
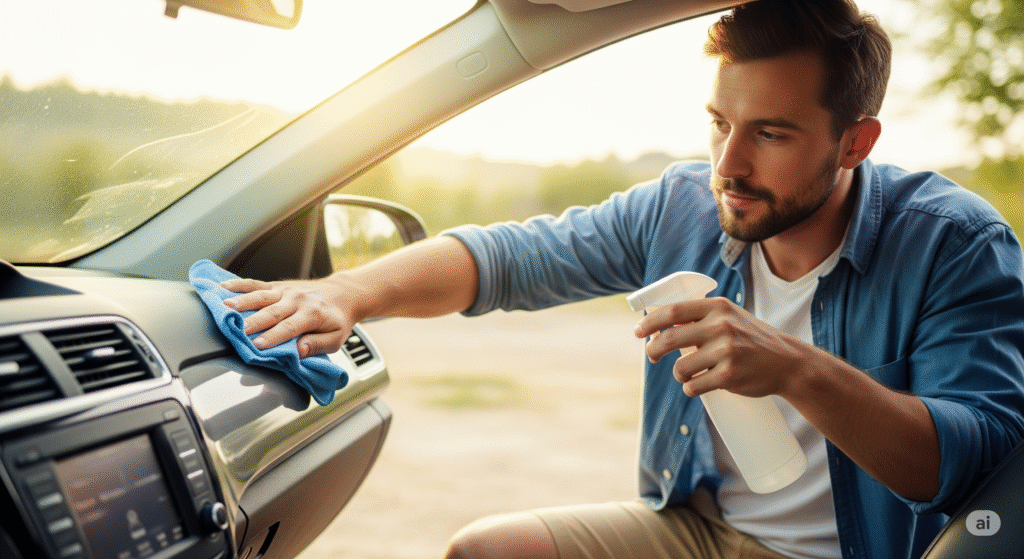
Keep Your Dashboard Spotless: The Right Way to Clean It
Your car’s dashboard is one of the first things people notice when they step inside your vehicle. A dusty, greasy, or faded dashboard can ruin the appeal of an otherwise clean car. Regular cleaning not only boosts aesthetics but also protects surfaces from wear, cracking, and UV damage.
Here’s a step-by-step guide on how to clean your car dashboard like a professional, using easy methods and simple tools.
Step 1: Gather the Right Supplies
Before you begin, make sure you have the following:
- Microfiber cloths
- Soft-bristle brush or detailing brush
- Vacuum with a soft brush attachment
- Mild all-purpose cleaner or dedicated dashboard cleaner
- Interior protectant (optional for UV protection)
Pro Tip: Avoid harsh chemicals or ammonia-based products, as they can damage plastic and vinyl.
Step 2: Remove Dust and Debris
Use a vacuum cleaner with a brush attachment to gently remove loose dirt, crumbs, and debris from air vents, buttons, and crevices.
Then, take a dry microfiber cloth or a soft duster and wipe down the dashboard surface. This step helps avoid scratching when you apply cleaning products.
Step 3: Apply Cleaner Evenly
Lightly mist a dashboard cleaner or an all-purpose cleaner onto a clean microfiber cloth (not directly on the dash). Wipe the surface in gentle, circular motions.
Focus Areas:
- Steering column
- Around the infotainment screen
- Button panels and vents
- Glove box lid and console edges
Step 4: Detail the Hard-to-Reach Areas
Use a soft detailing brush or an old toothbrush to scrub dust and grime out of tight spaces such as:
- Air vents
- Button gaps
- Edges around the dashboard and vents
You can dip the brush slightly in cleaner or use it dry for a dust-only sweep.
Step 5: Wipe and Buff to Shine
After the cleaner has done its job, take a fresh microfiber cloth and buff the dashboard until dry. This step removes any residue and gives the surface a clean, matte or satin finish.
Avoid glossy dashboard finishes—they can create glare on the windshield and distract you while driving.
Step 6: Add a Protective Layer (Optional)
If desired, apply a UV-protectant spray specifically designed for car interiors. This helps:
- Prevent cracking and fading
- Repel dust and fingerprints
- Maintain the dashboard’s color over time
Apply the protectant on a cloth and spread evenly. Buff lightly to finish.
Final Thoughts: Keep It Regular
Cleaning your car dashboard is quick and easy when you follow these professional steps. Aim to do a quick wipe-down weekly and a deep clean every month to keep your interior looking brand-new.
Interesting
Часто требуется установка хрумера на сервер https://www.olx.ua/d/uk/obyavlenie/progon-hrumerom-dr-50-po-ahrefs-uvelichu-reyting-domena-IDXnHrG.html, чтобы обеспечить максимальную производительность.
Ndewo, achọrọ m ịmara ọnụahịa gị.
This ensures that both new users and seasoned gamers can jump right in.
888starz registro [url=http://www.888starz88.pro/es/registro]https://888starz88.pro/es/registro/[/url]
Hey, I just stumbled onto your site… are you always this good at catching attention, or did you make it just for me? Write to me on this website — rb.gy/3pma6x?nof — my username is the same, I’ll be waiting.
Daher ist es entscheidend, die richtigen Ressourcen zu finden.
drogenentzug https://entzugsklinik.pro/
Hey! I need some advice. Call me or text me on WhatsApp.[url=https://wa.me/+66908932810] Text me on Whatsapp for quick communication[/url]
Привлекательный способ решить вопрос с автомобилем – это обмен таких авто. Большинство автолюбители имеют дело с ремонта своего битого автомобиля. Это времени и денег.
Фирмы, занимающиеся обменом битых авто, отличные варианты сдачи. сэкономить. Порой условия впечатляют, и они охотно свои транспорт.
Прежде чем услугами обмена, изучить в данной области. В дополнение к, есть и другие преимущества, подтолкнуть к сотрудничеству. Среди таких положительных моментов – высококачественная оценка технического состояния.
Опытные специалисты ценность и консультируют наилучший решение. Таким образом, чтобы сдать автомобиль в кратчайшие сроки. Пользуйтесь услугам покупки битых авто освободиться от.
продать битую машину в москве продать битую машину в москве.
Pizza Lieferservice in der Nahe ist klasse! Schnelle Lieferung, frische Pizza.
Pizzaservice
If you want to learn everything about online platforms in the United States, then this is something you shouldn’t miss. Read the full details via the link at the bottom of the page:
online casino real money no deposit free spins
If you want to learn everything about online platforms in the United States, then this is a great opportunity. Discover the full details via the link below:
best online casino
If you wish to discover the best American casinos, then this is exactly what you need. Discover the full details via the link at the bottom of the page:
best no kyc casino
Журнал Холд понравился тем, что материалы независимые и структурированные. Новости свежие, прогнозы грамотные, курсы криптовалют актуальны. Калькулятор доходности помогает планировать майнинг. Это лучший источник информации: https://thehold.ru/
Наш интернет-магазин нуждался в оптимизации. Mihaylov Digital сделали всё грамотно: от аудита до написания текстов. Теперь сайт виден в поиске и приносит заказы. Отличный результат – https://mihaylov.digital/
Заботьтесь о здоровье сосудов ног с профессионалом! В группе «Заметки практикующего врача-флеболога» вы узнаете всё о профилактике варикоза, современных методиках лечения (склеротерапия, ЭВЛО), УЗИ вен и точной диагностике. Доверяйте опытному врачу — ваши ноги заслуживают лучшего: https://phlebology-blog.ru/
В журнале theHold нравится системный подход: новости, аналитика, прогнозы и даже калькулятор — всё работает в комплексе. Удобно, что можно следить за курсами в реальном времени и сразу читать комментарии экспертов. Это экономит время и помогает принимать решения. Очень рекомендую https://thehold.ru/
Сделать мед лицензию стало легко и безопасно, специалисты центра сопровождали процесс, консультировали по всем требованиям и контролировали корректность документов: https://licenz.pro/
Tightrope Game – a balance challenge with obstacles. Quick, addictive, and perfect for testing focus: best Tightrope balancing games online
Компания СтройСинтез построила для нас дом с мансардой и гаражом в Ленинградской области. Дом получился современный, красивый и максимально удобный для проживания. Вся работа была сделана аккуратно и в срок. Подробнее можно посмотреть здесь – https://stroysyntez.com/
В аптеке мы приобрели оборудование для маркировки и термопринтер для этикеток самоклеящихся. Всё оборудование работает стабильно. Печать отличная и долговечная. Дополнительно используем сканеры. Работа стала надёжнее – https://labelaire.ru/
https://atlan.ru/product-category/mebel/zhurnalnye-stoliki/
A vibrant platformer guiding a panda through exciting puzzles and treasures. Fun and family-friendly: best Panda themed games Canada
https://homeclimat36.ru/ – Монтаж сплит-системы.
https://raymark.ru/ – лазерные станки и фрезерное оборудование «RAYMARK»
Решили заказать остекление балкона под ключ в Окна в СПб. Всё сделали аккуратно, в срок и без лишних хлопот. Балконная дверь работает идеально, окна установлены ровно. Теперь балкон стал удобным и уютным – https://okna-v-spb.ru/
Salutations, passionnes de jeux en ligne !
Je viens de trouver un contenu exclusif avec les nouveautes les plus chaudes sur le jeu Plinko sur le marche francais.
Si tu veux tout savoir sur ce jeu, cette lecture est faite pour toi.
Accede a tout cela via le lien ci-dessous :
plinko
https://telegra.ph/Zerkalo-videoregistrator-s-radar-detektorom-kupit-10-13-3
https://telegra.ph/Dinamik-dlya-radar-detektora-kupit-10-12-5
Москва – Все чётко, поднятие на раз два, все по описанию. Мефедрон белый, без запаха, видно что очищенный. Вес и качество норм!!!! Количество соответствует, за бонус в спасибо 😉
https://telegra.ph/Kvadrokopter-dji-mavic-air-3-kupit-tushku-10-13
Закажу посмотрим я сам надеюсь что магазин хороший-проверенный
https://www.pearltrees.com/jonsnowp/seo-blogs-new/id94981241/item753848775
https://www.vevioz.com/read-blog/426316
https://mail.u-turn.kz/forums.php?m=posts&q=35402&n=last#bottom
я на лестнице один,
https://telegra.ph/Pricel-nochnoj-n455s-kupit-10-14
Поздравляю всех с наступающим Новым 2013 Годом! Желаю в год Змеи: 1. Мутить тока на спирту! 2. Отваривать основу. 3. Сушить естественным способом. 4. Поменьше “ловить бледного”! 🙂 Ну а магазу Chеmical-Mix желаю Процветания, Оперативности, и качественной разнообразной продукции!
Нет не нужен.
https://telegra.ph/Usilitel-sotovogo-signala-kupit-moskva-10-13-4
трипы почитайте, кто уже брал
качество правда не очень, именно по продолжительности эффекта- в разных концентрациях его можно варьировать как тебе хочется=))))
https://telegra.ph/Avtoklav-bulat-kupit-ot-proizvoditelya-10-12-5
Отвечают оперативно, оформлено красиво…
https://www.inkitt.com/promocode1xbet
https://unsplash.com/@codefor1xbet11
Проститутки метро Спортивная
https://experiment.com/users/mportis
2)Кто курит раз в неделю : от 3 часов до 5-7 часов
https://telegra.ph/Takticheskie-botinki-kupit-nedorogo-10-13-3
Сегодня на мыло пришло письмо с новостью что заказ отправлен и номер трека который бьёться:good: пока всё норм идёт, со мной связь поддерживают через скайп, игнора не было, когда получу отпишу за качество вес и тд
Почему больше не забегаете ?
https://telegra.ph/Mavik-3-kupit-deshevo-10-13-4
Очень странно, что 203 не растворился в ацетоне. Сколько брал ацика на 10 гр основы?
друзья! магазин работает? кто брал что последний раз? а главное когда? я с 5 августа ждал..;(
https://telegra.ph/Radar-detektory-kupit-v-permi-10-13
в Обьщем как и говорил заказал ам,оно пришло в город,а мою фамилию ПЕРЕПУТАЛИ ,посылку не выдают…….
Бро, не волнуйся, тут ровный магаз. Напиши им в аську, что заказ номер такой-то оплачен.
https://telegra.ph/Kupit-bronezhilet-plitnik-10-13
А ты тс в лс отпиши , и если ты не балабол , в чем я очень сомневаюсь то проблема будет решена , а писать на ветке это говно для чего не понятно , на что вы надеетесь
Experience a nuru massage with privacy, comfort, and skilled touch.
Наверное стоит все же воздержаться от заказов и отправки денег и подождать до появления селлера..,на соседнем форуме(СФН) его тоже ждут….
https://telegra.ph/Kupit-bu-mavik-3-v-donecke-10-12
а че магазин то ваще работает нет?
У меня всё норм, реальную отправку написали в треке. Я волновался на счёт этого после сообщений
https://telegra.ph/Pribor-nochnogo-videniya-1pn138-kupit-10-11
Однажды тормознули его два обкуренных в ноль пацаненка. Один из накуренных засовывает голову в окошко и говорит:
Хотя, я им давно говорил что надо ещё одного человека на работу с клиентами…
https://telegra.ph/Teplovizionnyj-pricel-iray-saim-scl-35-kupit-10-12-3
впервые обратился в этот магазин за оптом и был удивлён тем, что они работают без гаранта. Но почитав отзывы , решил заказать без гаранта с доставкой в регион. Обещали 5-7 дней. С небольшим опозданием получил адрес в своём городе и без проблем забрал опт. Возникли небольшие заморочки в части заказа и магазин без лишних слов решил все недорозумения в мою пользу. Очень приятно работать с такими людьми! Отличный магазин! Всем рекомендую! И можно не обращать внимание на то что они работают без гаранта. Удачи в бизе!
А за кладом я решил ехать на такси.
https://telegra.ph/Detektor-dronov-OSA-10-12-2
Такое бывает у СПСР, у меня то же он не бился, а потом все нормально было, хотя мне ей вчера должны были привезти но не привезли
Si vous cherchez des sites fiables en France, alors c’est exactement ce qu’il vous faut.
Decouvrez l’integralite via le lien suivant :
casino en ligne
https://interiordoorsua.blogspot.com/2025/08/gibkaya-planirovka.html
https://interiordoorsua.blogspot.com/2025/10/razdvizhnyye-dveri-v-gostinoy.html
посылка упакована оригинально =)) и скорость сборки удивила!
https://telegra.ph/Kupit-kopter-dji-3-pro-10-12-6
Клад был сделано на 5, инфу по кладу дали на 5. В общем очень доволен данным магазином, по качеству товара, отпишу позже! Заказывал здесь 1-ый раз, заливал бабки без гаранта, так что спокойно работайте без гаранта! Спасибо еще раз, продолжайте в том же духе, будем работать!!!
Брал первый раз дживик качество вроде норм))))Еще хотел совет попросить как из 250 самый норм микс сделать?Помогите плиз.
https://telegra.ph/Benzogenerator-zongshen-xb-12000-kupit-10-12-2
4-FA -все кто гнал, обломитесь, вы просто его не понял. Он не будет переть как старый добрый md – но эффект отличный. 1 колпак на лицо – и часа 2 состояние абсолютной гормонии с окружающим миром. Мозг работает как от любого другого качественного стимулятора на 5+.
https://telegra.ph/Detektor-dronov-asel-labs-v4-kupit-10-14
https://telegra.ph/Bulat-4-detektor-dronov-cena-10-13
Register at glory casino download and receive bonuses on your first deposit on online casino games and slots right now!
https://telegra.ph/Dji-action-5-pro-adventure-combo-kupit-10-12
This allows users to place bets on ongoing events, enhancing the excitement of the game.
1win promo code https://1win-app-apk.com/
https://telegra.ph/Kupit-binokl-farvizhn-10-12-3
https://telegra.ph/Kakoj-benzogenerator-luchshe-kupit-dlya-doma-10-12-6
https://pubhtml5.com/homepage/mipjq/
https://telegra.ph/Binokl-karl-cejs-10h50-kupit-10-13-3
https://telegra.ph/Detektor-dronov-bulat-ne-vklyuchaetsya-10-14
https://directory.bizlisting.cloud/1win-registration-promo-code-bonus-500-up-to-1025/
В Кухни в Дом заказали кухню на заказ для семьи из пяти человек. Проект был тщательно продуман, чтобы у каждого было удобно готовить и хранить продукты. Кухня получилась просторной и уютной – https://kuhni-v-dom.ru/
https://telegra.ph/Usilitel-signala-router-komplekt-kupit-v-chelyabinske-10-12-2
Складчик удивил меня своим удобством и доступностью. Когда я впервые зашла на сайт, была поражена ассортиментом: курсы, книги, мастер-классы, даже программное обеспечение. Сначала я подумала, что это может быть рискованно, но решила попробовать и не пожалела. Участвовала в складчине на дорогой курс по психологии, который на официальном сайте стоил больше 15 тысяч рублей, а здесь обошёлся в копейки. Доступ открыли быстро, никаких задержек не было, материалы качественные и полные. Очень приятно, что всё прозрачно и честно, без скрытых условий. Теперь я уверена, что Складчик — лучший способ учиться выгодно и эффективно – https://v27.skladchik.org/
https://katellkeinegcom.wordpress.com/
https://telegra.ph/Bulat-4-detektor-dronov-kupit-cena-10-12-4
Автоматические гаражные ворота давно перестали быть роскошью и стали необходимым элементом комфортной жизни. Наши автоматические ворота сочетают надёжность проверенных европейских механизмов с элегантным дизайном, который гармонично впишется в архитектуру любого здания. Мы предлагаем полный цикл услуг: от профессиональной консультации и точного замера до установки под ключ и гарантийного обслуживания. Доверьте безопасность своего дома профессионалам — получите бесплатный расчёт стоимости уже сегодня: Подробнее
Book an sensual body massage session for private indulgence and sensual delight.
https://telegra.ph/Dji-kakuyu-kartu-pamyati-kupit-10-12-5
https://telegra.ph/Autel-evo-2-pro-kupit-10-12-3
https://telegra.ph/Vaneda-botinki-takticheskie-kupit-v-moskve-10-12-9
https://telegra.ph/Kupit-takticheskuyu-aptechku-v-sbore-10-12
https://telegra.ph/Kupit-binokl-v-krasnoyarske-magaziny-10-13
https://cont.ws/@hexagon/3132697
https://bigpicture.ru/piony-s-dostavkoj-v-moskve-kak-vybrat-idealnyj-buket/
http://repinskivs.phorum.pl/viewtopic.php?p=417535#417535
https://telegra.ph/Binokl-svarovski-s-dalnomerom-kupit-10-12-6
https://telegra.ph/Nochnye-pricely-dlya-ohoty-kupit-bu-10-13-4
промокод при регистрации мелбет
melbet промокод на фрибет
https://telegra.ph/Kakoj-benzogenerator-luchshe-kupit-dlya-chastnogo-doma-10-13-4
https://telegra.ph/Kupit-avr-dlya-benzogeneratora-5-10-11
https://chatterchat.com/read-blog/35561
https://telegra.ph/Boevoj-bronezhilet-kupit-10-12-3
https://clocks-top.com/
https://telegra.ph/Detektor-dronov-bpla-bulat-v4-10-12-5
https://telegra.ph/Tkani-dlya-bronezhiletov-kupit-10-12-2
https://telegra.ph/Kupit-dji-v-kaliningrade-10-13-3
https://telegra.ph/Kupit-teplovizor-v-magazine-viktor-v-ussurijske-10-12-2
https://telegra.ph/Zota-bulat-turbo-20-kupit-v-rassrochku-10-13
https://telegra.ph/Usilitel-svyazi-4g-kupit-10-13-4
https://telegra.ph/Binokl-kupit-v-nizhnem-10-12-2
Najlepsze kasyno online w Polsce
Dolacz do billionaire casino huuge
i ciesz sie najlepszymi grami online, zakladami sportowymi i ekscytujacymi bonusami w Polsce.
https://telegra.ph/Kupit-bu-teplovizor-glyadelka-10-12-2
https://telegra.ph/Kupit-horoshij-broneshlem-10-12-3
https://www.montessorijobsuk.co.uk/author/audydwyg/
https://www.tripadvisor.com/Profile/promocodesforfreebep
https://imageevent.com/ptrianie53/xeptg
https://hub.docker.com/u/hunter41noapnoap
кракен vk5
кракен vpn
Enjoy a nuru body massage performed with authentic Japanese gel and expert touch.
https://imageevent.com/uoxezemaxowu/ancfw
https://mez.ink/billonrose
https://rant.li/1g9z4iol85
kraken обмен
кракен сайт
https://yamap.com/users/4800135
https://yamap.com/users/4785355
https://bio.site/mrbpagocy
Обратился сюда для печать макета на 3D-принтере, и получил именно то, что ожидал. Заказ выполнили в короткие сроки, при этом точность печати впечатляет. Мне помогли на всех этапах какой пластик лучше использовать. Цена оказалась доступной, а профессионализм сотрудников оставили только хорошие эмоции. Буду заказывать снова, кто хочет быстро напечатать детали: https://minecraft-builder.com/%D0%BF%D0%BE%D1%87%D0%B5%D0%BC%D1%83-%D1%81%D1%82%D0%BE%D0%B8%D1%82-%D0%B2%D1%8B%D0%B1%D1%80%D0%B0%D1%82%D1%8C-%D1%83%D1%81%D0%BB%D1%83%D0%B3%D0%B8-3d-%D0%BF%D0%B5%D1%87%D0%B0%D1%82%D0%B8-%D0%B8%D0%BC/. Все работы выполняются в срок и с высокой детализацией.
https://ilm.iou.edu.gm/members/rvyzuqamonoq/
кракен vk4
кракен обмен
https://pxlmo.com/alarajgyaadu
https://ilm.iou.edu.gm/members/eixetutyqufu/
https://bio.site/agudyfedydi
https://shorl.com/studytrekygoji
kraken darknet
kraken РФ
https://rant.li/eufzqxic/paros-kupit-gashish-boshki-marikhuanu
https://www.metooo.io/u/68b53dd3903251083af7a40c
https://www.brownbook.net/business/54127375/пула-купить-мефедрон-кокаин-марихуану/
кракен сайт
кракен vk3
https://kemono.im/vlyicief/kakie-narkotiki-mozhno-kupit-v-apteke
https://hoo.be/pdgybmyda
https://odysee.com/@budaota7
кракен даркнет маркет
кракен официальный сайт
https://pxlmo.com/demkaodiseo
https://rant.li/pucycybaydbe/mega-kupit-narkotiki
Upgrade your anonymity game with an antidetect browser. Designed for large agencies and advanced users, it offers robust features for automation, team collaboration, and high-level digital stealth.
https://hub.docker.com/u/JoeAllen1971
kraken
кракен маркет
https://allmynursejobs.com/author/liciousgoldencreative15/
https://www.mrclarksdesigns.builderspot.com/board/board_topic/690695/7316046.htm
https://imageevent.com/zsanetpankaj/vmbmq
https://diversity.ae/index.php?route=journal3%2Fblog%2Fpost&journal_blog_category_id=4&journal_blog_post_id=1
https://potofu.me/8h6tr7yt
кракен vk3
кракен vpn
https://www.metooo.io/u/68999e21c043544e352843f6
https://rant.li/ycacoubreaho/semena-marikhuany-kupit-v-belorussii
Мне нравится, что на shinapro.in.ua можно найти не только новости, но и полезные советы. Часто захожу туда перед покупками.
http://www.pageorama.com/?p=bedahucufeg
лестницы на второй этаж на заказ
http://www.pageorama.com/?p=igpeafyyyc
kraken ios
kraken СПб
проститутки нв
А почему сам с-м.сом сюда какой день не кажеться…?
Магазин 24/7 – купить закладку MEF GASH SHIHSKI
В общем начну с начала.нашел ветку данного магазина и решил узнать че как.
всем привет! магаз ровный беру у них года 2 уже все всегда стабильно и качества радует. берите все саветую. спасибо магазин
Приобрести MEF GASH SHIHSKI ALFA – ОТЗЫВЫ, ГАРАНТИИ, КАЧЕСТВО
ПРИВЕТ ВСЕМ:НУ ЧТО Ж ТЫ БРО ТАК ОБЕЗНАДЕЖИЛ МЕНЯ ПО СКАЙПУ И В КОМЕНТАРИЯХ НАПИСАЛ ЧТО ОТПРАВИЛ MXE А НА ПАКЕТЕ НАПИСАНО RCS И ЧТО МНЕ КУРИТЬ ТЕПЕРЬ НАЧАТЬ ЗАЧЕМ ГОВОРИТЬ ТО ЧТО НЕ ДЕЛАЕШЬ КАК САМ СЧИТАЕШЬ ?
kraken marketplace
кракен Москва
лестница металлическая цена
Вы же разумный человек, должны понимать все это.
Закладки тут – купить гашиш, мефедрон, альфа-пвп
употреблял перорально, также пробовал нозально (не вариант сжигает все напрочь и комок в слизистой)
https://pushnews.com.ua/karta-slavutycha/
Ничего не пойму.. Я уже третий день пытаюсь договориться и всё бесполезно. Прошу номер кошелька куда перевести, говорит щас и пропадает на пол дня, и так постоянно. Может на мелкий заказ как у меня им пох. Заказываю 10 гр.
Магазин 24/7 – купить закладку MEF GASH SHIHSKI
Заказы опт , розница (отправка в регионы ,СНГ) ко мне!
Оплатил, через 49 минут уже получил адрес, люди забрали надежную закладку (эйф-диссоциатив), опробовали, все довольны. Мир и респект
Магазин 24/7 – купить закладку MEF GASH SHIHSKI
сегодня сделал заказ, написал в аську сразу ответили. Буду ждать как что измениться отпишу.
kraken market
kraken 2025
https://socialfactories.com/story5984256/code-promo-1xbet-cote-d-ivoire
лестница межэтажная металлическая
Чисто, уютно, конфиденциально — всё, как нужно. Девушка очень красивая и уверенная, создаёт невероятную атмосферу доверия и расслабления. Рекомендую, индивидуалка заказать Новосиб: https://sibirka.com/. Настоящий отдых для души и тела.
Если хотите подешевле – вам сюда. Если же располагаете финансами – штудируйте ветки доверенных магазинов, есть селлеры куда более ответственные и стоящие. Лично я не планирую дальше сотрудничать с этим магазином. Спасибо за внимание.
Закладки тут – купить гашиш, мефедрон, альфа-пвп
Оставляйте свои отзывы! Мы ценим каждого клиента нам важны ваши отзывы и мнения!
хороших отзывов – полно ) просто многие не пишут особо о качестве товара. пришло, прёт, зашибись.
Закладки тут – купить гашиш, мефедрон, альфа-пвп
все супер! магазину доверять можно, были небольшие задержки но ТС сделал все по красоте!
Отличная работа ребята! Вы проделали хорошую работу!!! я сначала думал что за херь мне пришла пока я не нашёл то что нужно)) а ваще сроки доставки 5+! конспирация 5+! качество позже отпишу, только еще на руки взял)))
Закладки тут – купить гашиш, мефедрон, альфа-пвп
Столько лет на плаву!!!Это круто:)молодцы!!!Пример всем остальным.
Промышленная 3D-печать — это быстрый способ ускорить процессы. Мы готовы выполнить производство изделий любой сложности. Мы следим за качеством на каждом этапе, что гарантирует высокую точность и надёжность изделий. Изготавливаем прототипы для стартапов, а также помогаем бизнесу внедрять новые технологии. Вы получаете результат оперативно, при этом предлагаем оптимальное соотношение цены и качества. Свяжитесь с нами для обсуждения проекта, и ваш бизнес выйдет на новый уровень, https://osclass-classifieds.a2hosted.com/index.php?page=item&id=229689. Мы обеспечиваем качественную и быструю печать любых моделей.
глядишь к новому году договоримся, а там и к 2020 посылка придет…
https://dubaigrowes.com
Палево палево, с сайтом чооо??
кто не чувствует лица,
https://dokuchaevskrm.ru
а он мне очень нужен как никогда
Хорошо работает народ))
https://shakhtyorskve.ru
Всем доброго дня!! Хочу рассказать свой отзыв , о данном чудо магазине!! Заказывал совместку на 50г, оплатил днём, к вечеру все было готово, жаль только я с джабером что то не подружился, он меня выкинул, прям перед получением адреса, НО КЛАДЧИК ТАКОЙ красавчик!!! В итоге я поехал с утра, только приехал, все было на своих местах!!! Спрятано на совесть!!! Думаю ещё пролежало бы дня 3))) ИТОГО: ОПЕРАТОР В ДЖАБЕРЕ САМЫЙ КУЛЬТКРНЫЙ ЧЕЛОВЕК НА СВЕТЕ! 5+ КЛАДЧИК , умница! 5+, близко ко мне , и спрятано как надо!!! P.S. Смело заказываем!! И радуемся как дети!!)
https://www.diigo.com/item/note/95qzo/pt41?k=8a76e7cd0c0292b6a1f6f92129b6f6ad
Заказываю в этом Магазине уже 3 раз и всегда все было ровно.Лучшего магазина вы нигде не найдете!
https://stakhanovmi.ru
Хороший магазин, все по совести
1)Кто курит каждый день : от 2 часов до 3-4 часов
https://ilovaiskrp.ru
Сегодня получил посылку. Оказалось, что просто трек не пробивался до последнего, а посылочка шла себе. Дошло быстро. Сам магазин передал товар в курьерку почти моментально за что огромное спасибо. Магазин всегда остается на связи и отвечает даже на глупые переживания. Конспирация порадовала. Вес тоже в норме. По качеству отпишу позже трип-репорт, но думаю, что всё на высшем уровне. Спасибо, Chemical-mix.
казино вавада зеркало
https://www.live4cup.com/f-sp1826752-.html#p1826752
Уважаемые покупатели, С НОВЫМ ГОДОМ!
https://yasinovatayqf.ru
Хороший магазин, не подставлял меня.
я написал кините ли Вы МЕНЯ!читайте внимательно!меня вы кинули!вы пообещали вернуть деньги вместо этого выслали мне заново посылку и теперь говорите что не вренете т.к. посылка уже выслана.зачем бло высылать посылку если взяли у меня реквизиты на возврат денег!правильно чтоб не возврщать мне мои деньги который я вам заплатил месяц назад неизветно за что!
https://alchevskrn.ru
уж не маленькие блин, знаете что заказываете наверное ! форум вам на что ? или ты думаешь что у них какой то особенный 250й ? )))
Cross-play functionality is a major draw for many gamers who want to connect with friends regardless of their platform.
minecraft mod pe minecraft mod pe
Наконец-то пришёл товар. Упакован отлично, курик все передал, в этом проблем нет. Пришли домой, распечатали по виду похоже на регу, но в воде разболталось. Муж поставился внутривенно, я отписала chemical, он говорит мол для вв нет инструкции. Похуй, растворили в воде, выпили,И НИХУЯ! НОЛЬ! Не прихода ни тяги, ни хуяги. Пусто. В аське пишу, молчит. Хз.
https://torezvxn.ru
На сайте четко сказанно что заказы обрабатываются через E-mail…
https://sarynprime.com/fr/code-promo-1xbet-le-code-promotionnel-bonus/
Москва – Все чётко, поднятие на раз два, все по описанию. Мефедрон белый, без запаха, видно что очищенный. Вес и качество норм!!!! Количество соответствует, за бонус в спасибо 😉
https://donetskgma.ru
Могу сфотать, на смотри
Ровный магаз,всем советую)
https://mariupolxs.ru
боюсь что здесь произойдёт тоже самое, уж очень не внятно продавец общается.
DRINKIO — отличный сервис для Москвы, где всё работает чётко. Заказ оформляется быстро, доставка всегда вовремя. Курьеры вежливые и аккуратные, упаковка надёжная. Очень доволен качеством обслуживания и скоростью https://drinkio105.ru/
Именно. Основной упор на старых проверенных оптовиков. К сожалению с розницей тут напряг, увы ((
https://amvrosievkaxy.ru
у меня наоборот. в этот раз быстрее все происходит)
да магаз отличный.оперативно работают.и качество товара отличное.вобщем всё хорошо.
https://snezhnoeqw.ru
Не красиво вышло с вашей стороны, я канешно благодарен за доверие и выделенную вами пробу но увы Эфеект растроил( “
Самый лучший магаз, заказываю и не парюсь
https://dubaigrowes.com
В-общем, я ещё два часа пил вискарик со льдом,да лопал пиццу 😉
слышала за вас) с пробы начнем?
https://khartsyzkue.ru
Инфа с вашего сайта. Я уже брал 6-APB, и выглядел он несколько иначе.
Печать на 3D-принтере — это доступная альтернатива традиционному производству. Мы предлагаем по печати макетов и прототипов. Мы используют передовое оборудование, что позволяет создавать детали с ювелирной точностью. Для печати подбираются инженерные пластики и композиты, что обеспечивает прочность и надежность изделий. Сотрудничая с нами, вы получаете качественный результат в срок. Закажите 3D-печать прямо сейчас, и мы сделаем все, чтобы результат превзошел ожидания – https://r12imob.store/index.php?page=user&action=pub_profile&id=621106. Мы гарантируем долговечность и прочность каждой детали.
Счастья жизни не ждут под окном,
https://ilovaiskrp.ru
Получил 5г 203! Оплатил в четверг, отправили в пятницу и уже в понедельник курьер мне передал. 🙂 Вес в поряде, цвет желтоватый.
и что теперь делать с заказом мне его оплачивать через терминал!? или..
https://gorlovkazn.ru
могу заверить вас что сдесь ни только людское понимание но и честное слова!!!мир вам друзья!!!все шикарно!!
Спасибо огромное вам многим за понимание.
https://shakhtyorskgp.ru
все это только на доверии, белый кристаллический так же может быть 4фа….
If you are looking for trusted sites in the USA, then this is definitely worth checking out. Read the full details via the following link:
best online casino USA
спасибо! Хороший магазин) берите тут
https://makeevkadj.ru
аська молчит.скайп есть?
Сегодня оплатил, сегодня же отправили и выслали трек который уже бьется, все ровно пацики спасибо
https://alchevskrn.ru
у нас нет давно курьерских доставок.
всяко подобные магазины нужно стороной обходить..
https://donetskbqx.ru
Есть люди в вк, которые представляются под маркой вашего магазина и кидают людей, уже не одного так кинули, так что будьте внимательны и уточняйте у реальных представителей магазина, так оно или нет.
Все получил в наилучшем виде, спасибо магазину за все, буду брать здесь всегда
Приобрести MEF GASH SHIHSKI ALFA – ОТЗЫВЫ, ГАРАНТИИ, КАЧЕСТВО
Начинает формироваться мнение.
друган смени аву плиз =) , по поводу магазина сервис на высшем уровне позавчера оплотил условия такие что товар будет отправлен в течении 2-3 рабочих дней думал придеца пережидать ещо и выходные, попросил оператора чтобы пастарались выслать завтро патамучто очень как ето срочно, в итоге на следующий день моя посылочка уже была отправлена. за что магазину огромное спасибо! акб-48ф ваобще шикарный реагент 1 к 10 выхлёстывает 1к7 убивает.
Магазин 24/7 – купить закладку MEF GASH SHIHSKI
Мукообразная консистенция
чи можна їсти квашені огірки при високому холестерині
Полтора года суда показали необоснованность претензий к «Лайф-из-Гуд» и Роману Василенко Уже более полутора лет Приморским районным судом Санкт-Петербурга рассматривается резонансное уголовное дело «Лайф-из-Гуд» – «Гермес» – «Бест Вей». Обвинения яснее не стали, ключевой свидетель обвинения Евгений Набойченко на суд являться отказывается. Обвинение на финише выглядит также бездоказательно, как и на старте. Допрос свидетелей обвинения судом уже завершается, скоро наступит черед свидетелей защиты, но обвинение, поддерживаемое Прокуратурой Санкт-Петербурга, яснее не становится. Оно связано с деятельностью австрийско-белизской инвестиционно-образовательной компании «Гермес»: она вроде как не возвращает вложения своих клиентов, обучавшихся инвестициям под руководством консультантов компании, и делает это якобы намеренно. При этом парадокс: финансовые претензии предъявляются не самому «Гермесу» – например, в лице сотрудника «Гермеса», администратора российской платежной системы этой компании Евгения Набойченко и его сотрудников, – а российским организациям, якобы аффилированным с «Гермесом» и якобы входившим с ним в некий виртуальный холдинг, о котором постоянно говорят следствие и прокуратура. Претензии почему-то переадресованы петербургской маркетинговой компании «Лайф-из-Гуд» (и лично ее бывшему руководителю Роману Василенко) – она продвигала «Гермес» на российском рынке, а также всероссийскому кооперативу «Бест Вей» – крупнейшему кооперативу, дававшему возможность приобретать квартиры по всей стране без ипотеки, без процентов и с минимальной переплатой, с более чем 20 тыс. пайщиков по всей России и 16-миллиардными активами. «Лайф-из-Гуд» и кооператив были объявлены аффилированными организациями, на их имущество и имущество Романа Василенко был наложен арест только на том основании, что часть консультантов, продававших продукты кооператива, одновременно продавали продукты «Гермеса». Финансовых отношений между кооперативом и «Гермесом» не было, а с «Лайф-из-Гуд» были только маркетинговые контракты. «Гермес» платит, несмотря на санкции Сами обвинения компании «Гермес» выглядят очень сомнительно, учитывая, что она физически не могла платить клиентам в феврале 2022 года из-за сознательного обрушения российской платежной системы ее администратором Евгением Набойченко, вступившим для этого в сговор с УБЭП ГУВД Санкт-Петербурга. После долгого восстановления учета российских клиентов в материнской системе, находящейся за рубежом, выяснилось, что исчезли активы, к которым Набойченко имел доступ. Кроме того, из-за начавшейся СВО компания лишена была возможности делать прямые выплаты. «Гермес» в конце 2022 – начале 2023 года создал систему постепенных выплат российским клиентам в криптовалюте, компания уже три года расплачивается по своим обязательствам. Роман Василенко, работающий за границей еще со времен ковида, приложил максимум усилий для того, чтобы защитить интересы клиентов из нашей страны – и в ситуации, когда многие иностранные банки просто заморозили счета россиян, а российские заморозили инвестиционные счета, добился того, что «Гермес» отказался от исполнения западной политики финансовых санкций и производит выплаты. Потерпевшие или мошенники? Ни один из 221 гражданина, признанного следствием потерпевшим, не смог подтвердить заявленные суммы якобы кражи средств компанией «Гермес». Нет: – ни документов, подтверждающих, что средства зачислялись; – ни документов о текущем состоянии счетов; – ни документов, свидетельствующих, что средства не были выведены самими клиентами или консультантами, имевшими предоставленный самими клиентами доступ к счетам; – ни документов, доказывающих, что средства, фигурирующие на скринах счетов, – именно собственные, а не заемные, предоставленные компанией «Гермес» для создания так называемого инвестиционного плеча. При этом более 10 потерпевших и свидетелей обвинения на суде отказались от своих показаний, данных во время предварительного расследования, – они заявили, что вынуждены были подписать документы под жестким давлением следствия. Это многочасовые допросы пожилых людей, в ходе которых их не отпускали в туалет и не давали воды. Один из признанных потерпевшими умер после допроса от сердечного приступа. Сомнительные свидетели Следствие опирается прежде всего на показания нескольких ключевых свидетелей. Это вышеупомянутый Набойченко, а также бывший водитель «Лайф-из-Гуд» Комаров, объявивший себя чуть ли не инкассатором, якобы возившим пакеты с наличностью. Комаров, выступая в суде, запутался в данных, сославшись на перенесенный коронавирус, продемонстрировал суду, что сбивается с написанных кем-то показаний «о пакетах с наличными». В его сведениях усомнился даже прокурор, так как он не смог объяснить, как он понял, что в пакетах именно купюры, и определил, в какой валюте эти купюры. Набойченко в суд прийти отказывается, спрятавшись на СВО – айтишником при штабе одного из соединений. Якобы его допрос судом пока невозможен. Без вины подсудимые 10 человек, находящихся на скамье подсудимых, – это в основном технические сотрудники компании «Лайф-из-Гуд»: помощник руководителя компании Романа Василенко, менеджер корпоративных конференций и сайта, один из бухгалтеров, несколько предпринимателей, сотрудничавших с компанией «Лайф-из-Гуд» по договорам. А также 83-летний отец Романа Василенко. Почти все выступавшие в суде заявили, что с подсудимыми не только никак не взаимодействовали, но даже не знакомы, только некоторых видели в корпоративных видеороликах. Лишь некоторые свидетели заявили, что взаимодействовали с одним или двумя обвиняемыми, причем чисто технически и по поручению третьих лиц. В ходе судебных заседаний звучат обвинения в отношении совершенно других людей – и подсудимые на протяжении всего суда слушают истории, не имеющие к ним никакого отношения. При этом один из подсудимых находится в СИЗО более 3,5 года, а четверо – с 2023 года: фактически отбывают срок без приговора суда! Следствие и прокуратура такими репрессивными методами добивались и добиваются показаний подсудимых против Василенко. Но таких показаний так никто и не дал – потому что никакой незаконной деятельности не было. Осенью прошлого года суд освободил трех молодых подсудимых женщин из тюрьмы: перевел под домашний арест. Но остальные освобождения под домашний арест блокирует прокуратура. Кооператив – не пирамида По ходатайству следствия и прокуратуры было арестовано имущество кооператива «Бест Вей» на 16 млрд рублей. Причем следствие и прокуратура прямо запрещали выплаты со счетов налогов, зарплаты и выплаты пайщикам, принявшим решение выйти из кооператива, специально ведя дело к искам против кооператива и тому, чтобы кооператив обанкротился. В середине прошлого года арест с недвижимости удалось по суду снять. В самом конце прошлого года удалось снять арест со всех вновь поступающих средств и добиться разрешения выплачивать с арестованных средств налоги, зарплаты и делать выплаты по исполнительным листам пайщикам, которые добились возврата средств через суд. Тем не менее сейчас арестовано 4 млрд рублей, хотя общий ущерб, согласно обвинительному заключению, составил 282 млн рублей. Девять месяцев 2025 года работы кооператива с частично разблокированными счетами показали, что «Бест Вей» может стабильно функционировать, его ликвидности ничто не угрожает, от вступления новых членов (они не принимаются с весны 2022 года) его возможности никак не зависят – сейчас он финансируется только за счет возвратных платежей за недвижимость, купленную для ранее принятых пайщиков, следовательно, обвинения в том, что он является финансовой пирамидой, беспочвенны. Подоплека дела Громкое дело, которое преподносилось органами внутренних дел как раскрытие крупнейшей в России пирамиды, на поверку оказалось наездом криминальной группы граждан, стремящихся захватить активы в сотрудничестве с коррумпированными петербургскими убэповцами, от которого страдают невинные люди – подсудимые и пайщики кооператива. Они до сих пор лишены возможности приобретать недвижимость и вынуждены месяцами ждать возврата своих средств из-за ограничений на выплаты кооператива; страдает крупнейший социально ориентированный проект в сфере недвижимости. «Дело «Лайф-из-Гуд» – «Гермес» – «Бест Вей» – не что иное, как попытка разбогатеть на чужом бизнесе. Успешный кооператив, работавший на благо десятков тысяч россиян, уничтожается. В интересах ли россиян такая деятельность правоохранительных органов? Вопрос риторический.
:superman:По больше клиентов,с толстыми кошельками,да главное чтоб АДЕКВАТНЫЕ!:bro:
Магазин 24/7 – купить закладку MEF GASH SHIHSKI
Всем добрый вечер, рега появилась, та хорошая, которая у вас была!?
Евгения Набойченко заждались в Приморском районном суде Санкт-Петербурга, с февраля 2024 года рассматривающем так называемое уголовное дело «Лайф-из-Гуд» – «Гермес» – «Бест Вей». Суд идет с февраля 2024 года, обвинения строятся почти исключительно на показаниях Набойченко. Но Набойченко не приходит в суд – сначала скрывался на юге России, рассказывая, что его преследуют и ему угрожают, а с конца прошлого года находится на СВО, насколько известно, служит айтишником в 3-м армейском корпусе.Служба не мешает ему почти круглосуточно быть онлайн в хейтерских чатах, комментируя все подряд, – но якобы делает невозможной явку в суд. Однако срок допроса свидетелей обвинения завершается, и Набойченко придется выступить в суде. Ведь он – главный и фактически единственный свидетель обвинения: он, будучи системным администратором российского сегмента австрийской инвестиционно-консалтинговой компании «Гермес», якобы разоблачил в феврале 2022 года отвечавшего за маркетинг этой австрийской компании в СНГ главу фирмы «Лайф-из-Гуд» Романа Василенко и всю команду «Лайф-из-Гуд» в мошенничестве.При этом российская платежная система была Набойченко уничтожена: восстановить российский сегмент удалось только к концу 2022 года, при этом обнаружив финансовые дыры: потерю активов клиентами, к кабинетам которых имел доступ Набойченко (как консультант он имел на это право, предоставленное самими клиентами). Одновременно Набойченко, всегда нуждавшейся в деньгах из-за дорогостоящих вредных привычек, неожиданно начинает сорить деньгами: по воспоминаниям его охранников на оперативной квартире УЭБиПК ГУ МВД по Санкт-Петербургу и Ленинградской области, он буквально каждый день водил их по барам, платя за все сам, не просыхал ни на один день.На «счету» Набойченко – многочисленные случаи вымогательства, дебоши, избиение жены и детей, избиение любовницы, нанесение тяжких повреждений разным лицам, клевета. Можно только «поздравить» следствие МВД и прокуратуру с таким свидетелем.
Как правоохранители вредят реализации программ развития страныРоссийский бизнес стонет от незаконных действий правоохранительных органов, которые становятся серьезным препятствием на пути экономического и социального развития. Действия ПО закрывают уникальные возможности, создаваемые социально ориентированными проектами, такими как жилищная программа «Бест Вей», и приводят к тому, что предприниматели и проекты уходят из России, реализуют свои начинания в других юрисдикциях. В интересах ли это страны? Вопрос риторический. Осенью 2021 года началось преследование компаний «Лайф-из-Гуд», «Гермес» и потребительского кооператива «Бест Вей», а также руководителя «Лайф-из-Гуд» и председателя кооператива «Бест Вей» Романа Василенко. Началось по навету недобросовестных конкурентов, связанных с правоохранительными органами, пытавшихся захватить многомиллиардные активы организаций и личные активы частных лиц.Компания «Лайф-из-Гуд» занималась обучением инвестициям и продвижением финансовых продуктов, среди них – счета «Виста» австрийской инвестиционно-образовательной компании «Гермес». «Гермес» сотрудничал с российскими клиентами при поддержке «Лайф-из-Гуд» с 2014 года, а существует эта компания, работающая по всей Европе, с начала 2000-х годов.Межрегиональный потребительский кооператив «Бест Вей» работал с 2014 года как действующая строго по закону, признанная государством организация, покупал квартиры своим пайщикам по всей России на условиях рассрочки под 0% годовых, с минимальной переплатой. Приобрел для пайщиков 2635 квартир. Широко использовал материнский капитал – на абсолютно легальных основаниях: эти средства перечислялись кооперативу Социальным фондом.Но возникло уголовное разбирательство – как часть кампании МВД и ЦБ против небанковских финансовых организаций, и нормальная работа этих полезных для экономики и общества организаций была остановлена. Уголовное дело 2021–2022 годов сейчас рассматривается Приморским районным судом Санкт-Петербурга, вдогонку возбуждены еще два дела поменьше – чтобы, даже если суд по первому делу не приведет к желаемому заказчиками наезда результату (а это весьма вероятно, потому что доказательств нет никаких), давление с этих организаций не снимать. Заказные обвиненияПервый удар был нанесен по «Гермесу» и «Лайф-из-Гуд». Несколько человек обвинили «Гермес» в том, что он занимается мошенничеством – причем нулевой свидетель Н. Школьник уже в суде отказалась от своих показаний. Все из начальной группы «потерпевших» оказались создателями конкурирующего проекта, стремившимися привлечь в него людей из «Гермеса», с которым некоторые раньше сотрудничали как консультанты. Фактически по заявлению нескольких человек ЦБ объявил «Гермес» «организацией с признаками финансовой пирамиды» (финансовой пирамидой может объявить только суд) и заявил, что размещение средств там незаконно.Несколько жалующихся на фоне десятков тысяч довольных – это было неубедительно, и в феврале обрушивается российский сегмент платежной системы этой компании – его сисадмином Евгением Набойченко, который незадолго до этого, как теперь достоверно известно, стал работать на УБЭП Санкт-Петербурга, жил на оперативной квартире. После этого «Гермес» не мог выполнять свои обязательства, на него были поданы и другие заявления.Набойченко дал показания на сотрудников «Лайф-из-Гуд» и близких Романа Василенко. Он стал одним из организаторов преследования ни в чем не повинных людей: помощника Романа Василенко в «Лайф-из-Гуд», одного из бухгалтеров этой компании, менеджера по конференциям, к тому времени уже несколько месяцев как уволившегося, а также престарелого отца Романа Василенко – Виктора Ивановича, которые абсолютно ни за что оказались под следствием, в СИЗО и на скамье подсудимых.Восстановление учета российских клиентов – теперь уже за границей – заняло немало времени, в ходе которого началась СВО и санкционная война против России, финансовая граница страны закрылась – платежи прежними способами проводить стало невозможно.Тем не менее, несмотря на санкции и благодаря давно работавшему в Евросоюзе Роману Василенко, его авторитету в европейских структурах, компания стремится выплачивать средства своим российским клиентам в тех или иных доступных формах, в том числе в криптовалюте. Она пусть постепенно и с комиссией, но платит по обязательствам – в отличие, кстати, от многих российских банков, которые вообще заморозили свои инвестиционные счета для россиян.Кому мешал «Гермес»? Клиенты «Гермеса» учились инвестициям, вкладывали в европейские финансовые инструменты, не подверженные такой волатильности, как российские, годами получали неплохие доходы. Теперь россияне лишены этой возможности. Кооператив пострадал «за компанию»Весной 2022 года правоохранители пришли в офис кооператива «Бест Вей», обвинив его в том, что он был частью финансовой пирамиды «Гермеса» через «Лайф-из-Гуд», хотя никаких ни организационных, ни финансовых отношений с «Гермесом» у него не было.Следствие обвинило кооператив и в том, что он сам был финансовой пирамидой. Тем более что чуть ранее претензии к нему предъявил ЦБ: почему, мол, кооператив не зарегистрирован в его реестре Банка России? Хотя он не является кредитным – это кооператив, зарегистрированный налоговыми органами и работающий по Закону о потребительской кооперации, все варианты его устава прошли регистрацию.И еще в 2019 году сам Центральный банк в официальных письмах указывал, что «Бест Вей» ему не поднадзорен. С 2014 по конец 2021 года к кооперативу не было никаких претензий государственных органов.При этом кооператив не отказывался от соблюдения требований регуляторов – наоборот, он старался исполнять даже сомнительные с точки зрения закона требования ЦБ, именно поэтому в 2021 году переименовался из жилищного в потребительский. Если бы было выдвинуто требование о включении «Бест Вей» в реестр Банка России – оно было бы соблюдено (только в какой из реестров?).Но оно не было выдвинуто: кооператив сразу, без проверки его деятельности, по навету недобросовестных конкурентов был объявлен «организацией с признаками финансовой пирамиды». Статус, из которого формально ничего не следует, но на деле вызвавший следственные действия. Во время обыска перевернули все вверх дном, изъяв серверы и всю бумажную документацию – до сих пор не вернули. Кооперативу с более чем 20 тыс. пайщиков, с 16 млрд активов пришлось более года восстанавливать учет, потому что осенью обыск с изъятием повторился.Потом арестовали счета, сделав невозможной покупку квартир пайщикам, очередь которых подошла. Одновременно следствие и прокуратура запрещали выплаты пайщикам, подавшим заявление о выходе из кооператива, даже по суду – по исполнительным листам, намеренно обесценив средства пайщиков.«Бест Вей» был объявлен гражданским ответчиком по претензиям к «Гермесу», так как якобы входил с «Гермесом» в некий «холдинг «Лайф-из-Гуд», никогда в природе не существовавший.Деятельность кооператива была три года заблокирована, счета и квартиры арестованы. С середины 2024 года адвокатам удалось снять арест с недвижимости. В самом конце 2024-го Приморский районный суд Санкт-Петербурга снял арест с вновь поступающих средств на счета кооператива – членских взносов и возвратных платежей пайщиков, которым ранее приобретена квартира. Кроме того, разрешены выплаты с арестованных 4 млрд рублей по исполнительным листам пайщикам, которые выходят из кооператива в судебном порядке – кооператив сам поощрял такую практику, потому что следствие и прокуратура запрещали выплаты выходящим из кооператива пайщикам.При этом освобожденных из-под ареста средств хватает для того, чтобы выплачивать по заявлениям пайщикам, которые приняли решение о выходе из кооператива, но не хватает для того, чтобы покупать квартиры – кооператив пока предоставляет только квартиры, которые освобождены вышедшими из кооператива пайщиками.Кооператив доказал на практике что он – не пирамида: не принимая новых членов с весны 2022 года, он продолжает выполнять свои обязательства и сохраняет ликвидность.Кому мешал «Бест Вей»? Пайщики кооператива имели возможность без процентов приобрести квартиру в любой точке России. При этом вся работа кооператива происходила исключительно за счет средств самих пайщиков – без кредитов и без государственного финансирования, как у банков.Малообеспеченные люди вскладчину могли купить квартиры каждому из них под 0%, не влезая в кредиты, с минимальной переплатой, связанной с относительно небольшими членскими взносами и оплатой налога за недвижимость, которая в некоторых регионах (не во всех) взимается с кооперативных квартир, приобретенных по ставкам для юридического лица. За десятки квартир пайщики уже расплатились с кооперативом и перевели в свою собственность.Вместо того чтобы развивать такую жилищную программу, которая могла бы повлиять на платежеспособный спрос на жилье и привести к развитию жилищного строительства в стране, Центральный банк и правоохранительные органы целенаправленно уничтожают кооператив.Эльвира Набиуллина официально заявляет о том, что ЦБ борется с программами рассрочки при приобретении недвижимости. Ликвидация программ рассрочки создаст монополию ипотеки – что не соответствует интересам граждан страны. Генератор идей выдавлен из РоссииСам Василенко, создатель и до 2022 года бессменный руководитель кооператива «Бест Вей», генератор предпринимательских идей, инициатор проектов обучения инвестициям, также подвергся заказным репрессиям. С ковидных времен находясь по семейным обстоятельствам не в России (его жена проходила лечение после тяжелого ковида), с 2022 года он не смог возвратиться на родину, так как был объявлен в розыск как организатор преступного сообщества по созданию финансовой пирамиды – хотя заявления о создании пирамиды не более чем голословные обвинения. И до сих пор обвинения с Василенко не сняты. Как уже было сказано, помимо уголовного дела, которое рассматривается с февраля 2024 года Приморским районным судом Санкт-Петербурга, есть еще два дела, столь же абсурдных, как и первое: по отмыванию денег (средства уходили в «Гермес» за границу и возвращались «Гермесом» из-за границы, следствие расценивает это как отмывание), а также по заявлениям новых «пострадавших» от компании «Гермес», в которых он также объявлен подозреваемым.Мало того, что недвижимость Василенко в Санкт-Петербурге оказалась арестована – он фактически лишен прав собственника, так как органы внутренних дел запрещают ее сдавать, хотя он не осужден ни по одному обвинению: просто по беспределу – чтобы лишить доходов для финансирования, например, защиты своего доброго имени.Роман Василенко, развивавший массовое предпринимательство, создавший проекты, помогавшие людям зарабатывать, приобретать квартиры по приемлемой цене, фактически изгнан из страны силовиками (как и десятки других предпринимателей) по обвинениям, которые не были приняты Интерполом.Он был вынужден развивать проекты в Евросоюзе – где к их законности и важности для граждан не возникает никаких вопросов, такой же точно, как и «Бест Вей», потребительский кооператив, работающий с недвижимостью. Эти проекты, к сожалению, недоступны многим гражданам страны.Выиграла ли российская экономика, Россия в целом от того, что предприниматель уехал из-за репрессий правоохранительных органов? Конечно, нет.Здоровый экономический рост в стране возможен только после смены приоритетов экономической политики в пользу свободы предпринимательской инициативы и прекращения всевластия силовой корпорации.
Магазин работает четко уже несколько лет:)только одно расстроило когда хотел сделать очередной заказ мне сказали что не отправляют больше в те края:dontknown:с чем это связано мне так и не сказали,хотелось бы узнать
Приобрести MEF GASH SHIHSKI ALFA – ОТЗЫВЫ, ГАРАНТИИ, КАЧЕСТВО
Во-во МАГАЗИН! Обозначил цену, так по ней и продавай! На мыло упало – Цена заказа -4250 и .. А потом начались догонялки…. Магазины так не поступают, а поступают именно БАРЫГИ, как точно выразился РОГАТЫЙ ОБИТАТЕЛЬ данной ветки
через аську связался… дал данные куда сколько отправить, и с киви кошелька оплатил 7700р. на номер который в аське дали
Онлайн магазин – купить мефедрон, кокаин, бошки
работал с данным магазином, и по сей день работаю!!! отличный… сегодня посылочка только пришла! товар отличный особенно CHM 100.. спасибо за качество!!
Я вообще удивляюсь как продаван работает то? Есть ветка форума, личка и ася – везде молчание. В ася онлайн, но всеравно молчит уже третий день – это адекватный сервис?
Приобрести MEF GASH SHIHSKI ALFA – ОТЗЫВЫ, ГАРАНТИИ, КАЧЕСТВО
Интересная упаковка )))… делал 1к10!!! сам не курил более 2-ух месяцев вообще ничего* за основу брал ромашку!!!!
Качество продукции на высшем уровне.
Приобрести MEF GASH SHIHSKI ALFA – ОТЗЫВЫ, ГАРАНТИИ, КАЧЕСТВО
Это просто пустоплёт залётный, его уже изолировали от нашего общества
Хотя я знаю почему всех слабо торкает , всё дело в неверном приёме препарата ! Весь форум облазил , но этого способа не наблюдал . Пусть не приятно но стоит того . Порох под язык . Доза меньше , эффект быстрей и ярче . Хотя это личное дело каждого , песня не об этом .
Закладки тут – купить гашиш, мефедрон, альфа-пвп
непонимающий человек, были сложности в работе курьера сейчас все в порядке.
Да всё норм, ёпт, чё ты вообще телефон потерял) Тебе наверное там названивали.
Магазин 24/7 – купить закладку MEF GASH SHIHSKI
полность с тобой согласен
Play The Password Game online in Canada! Test your creativity and problem-solving skills as you craft secure passwords with fun, unique challenges. Perfect for puzzle enthusiasts: fun word guessing games
магазин работает ровно, заказ пришел за пару дней, качество порадовало)
Онлайн магазин – купить мефедрон, кокаин, бошки
По моему отзыв о “марочках” был явно не про этот магазин О_о
разные мнения бытуют, я для 1го раза сделал 1к20.сохнет.самому интересно что получиться. отпишу как пробнем.
https://avtonews.info
Уважаемые наши клиенты, приносим свои извинения за задержку с отправкой.
в академе были пролёты
https://disdik-lampung.info
Мира всем!!
мне менеджер сказал, что у другого спросит по поводу мхе и выдаст компенсации.
https://avtonews.info
АМ 2233 читал 1 к 30 делается, неужеле правда всего 1 к 15 делать?
Успешных вам продаж и спокойной работы)
https://bryankamt.ru
Кидалы они или нет-узнаю в течении пары дней,но отказ в закладке-не основание.
If you want to learn everything about online platforms in the United States, then this is something you shouldn’t miss. Read the full details via the attached link:
http://fastfans.alumnesondara.com/2025/10/16/online-casino-excitement-awaits-you-75/
такая же беда дружище, продавец сказал, что курьерка дерьмово работает! Но меня посещают смутные сомнения, что курьерку в связи с новым постановлением взяли за яйца!
https://berdyanskth.ru
Наш Skype «chemical-mix.com» временно недоступен по техническим причинам. Заказы принимаются все так же через сайт, сверка реквизитов по ICQ или электронной почте.
КЕнт в почту зайди,проясни ситуэшен.
Приобрести онлайн кокаин, мефедрон, гашиш, бошки
Очень жаль ребята,хорошо работали.
Для юридических лиц этот брокер — идеальное решение. Вся отчётность прозрачная, документы всегда в порядке. Работаем с ними уже год: Таможенный брокер во Внуково
д не магаз рооовный так что не переживай все будет четко)))
Закладки тут – купить гашиш, мефедрон, альфа-пвп
МАГАЗИНУ надо бы по ровнее работать!
ы меня поняли
Приобрести онлайн кокаин, мефедрон, гашиш, бошки
на сайте нету не кого в jaber тишина и онлайн его нет онлайн оператор
Работают чётко и спокойно, даже в сложных ситуациях. Документы готовы вовремя, всё проходит без проблем. Очень профессионально – https://tamozhenniiy-broker-moskva11.ru/
отличный магазин, качество супер ,товар радует
Закладки тут – купить гашиш, мефедрон, альфа-пвп
Молча !! Запрет вступает в силу 26го числа, если не ошибаюсь. Скидывай всё палево, жёсткий дист зарывай подальше и иди получай ))
вообще ктонибудь в этом магазине еще заказывал?? получал что нибудь ? или хотя бы треки бились?
Магазин 24/7 – купить закладку MEF GASH SHIHSKI
5мг реально из области фантастики…желаю попробывать
Приветствую всех! купил 0,5 кокса. Закинул деньги, получил адрес, приехал забрал, все на высоте! Кладмену отдельное спасибо, спрятал так что не доебаться. Качество просто улетное, и от меня и от друзей огромный плюс магазину.
Онлайн магазин – купить мефедрон, кокаин, бошки
У нас у отправки случился форс-мажор. Только на этой неделе начинают отправлять. Извиняюсь от лица магазина за задержку.
еще раз какой городл
Закладки тут – купить гашиш, мефедрон, альфа-пвп
Товар получен! Большее спасибо магазину!
пацаны магаз ровный пишу это уже не раз всегда списываюсь с менеджером все делает ровно и качество и оперативность , всегда заказываю и буду заказывать тут т.к. не париться за качество продукта как в других магазах!!!
Приобрести MEF GASH SHIHSKI ALFA – ОТЗЫВЫ, ГАРАНТИИ, КАЧЕСТВО
Короче, подошёл я к адресу, а там ни по звёздам, ни по местности, ни право-лево не надо проверять. Я даже фонарик не включал, все чётко по описанию.
заказ делал на человека который вообще не в теме и был чистый, поэтому меняйте для начала хотя бы курьерку и курьеров.. https://skadovskxu.ru У нас у отправки случился форс-мажор. Только на этой неделе начинают отправлять. Извиняюсь от лица магазина за задержку.
Здравствуй, народ, кто с Мск брал, сроки доставки какие реальные были и какая служба? https://stellaroccultations.info У данного сллера только легал. Все проверено.
флудить в курилку https://tokmakws.ru Посмотри в ЛС
Братья, у меня вопрос. JV-30 как? Боюсь нарваться на регу с которой крышу сносит. Ответьте пожалуйста. https://reale.info Заказал АМ 2233,разведу 1 к 15 Посмотрим что из этого получится)отпишусь ещё
пишут в асе, ваших треков мы не видим, с вами договаривался другой менеджер, типа вас вообще в списках нет, а до этого говорили посылка готова завтра отправят. https://melitopolqa.ru -1. Вас, продавцов, много, а я один.
лабаз ништяк https://rystsov.info Тут мы
кто скажет как качество с 203??? реактив хлопьями или гранулы? https://caucasusmountains.info Все Вась,извини..с утра заматался))
Забизаю дамой хвотаю тожнецы взрываю посылку там рубашка. Примерно на ребенка 7 летнего (я надеился книга будит) но ладно и рубашка сойдет на тряпки вмашину ! Разворачиваю рубаху а там пакетик реги я быстрей за весами и за фотиком и писать ВАМ МОИ ДРУЗЬЯ!!! https://designitaliano.ru заказала в этом магазе сувениров:), посыль пришел на 3ий день, продукты качеством вкусны
Мало того дешёвый, он и отправляет маленький вес. Это гуд. Остальные почти все работают от 50 гр… https://e-med-academy.ru всё пришло с компенсацией,качество на высоте,Магазину ОГРОМНЫЙ РЕСПЕКТ
А в сочи есть магазины https://laynservis.ru У меня разок было, что трек перестал на два дня отслеживатся, но нечего доставили все пучком.
Магазин реально ровный!!! Долго искал и нашел! Бро ты лучший!!!! https://invest-sever.ru полность с тобой согласен
почему статус заказа отложен!? 1000539 https://doramalivex.ru Всем привет! Хороший магазин. Удачи и развития в дальнейшем!
Мало того дешёвый, он и отправляет маленький вес. Это гуд. Остальные почти все работают от 50 гр… https://vamebel.ru Через Skype мы больше не работаем, об этом мы объявляли пару недель назад.
25 must-visit places and must-do experiences named for 2026
домашний анальный секс
Not booked your 2026 vacation yet? Get moving, as the must-visit destinations lists for next year are starting to drop.
The venerable travel guide Lonely Planet published its “Best in Travel 2026” book on October 21, featuring a list of 25 great places and 25 great experiences to try out in the year ahead. It’s accompanied by a set of unique itineraries curated on the new Lonely Planet Journeys travel-planning service.
CNN Travel caught up with Nitya Chambers, Lonely Planet’s executive editor and senior vice president of content, to find out what made the cut and why.
Best places
One of Chambers’ favorite picks on this year’s list? Brazil’s “Little Japan,” otherwise known as the Sao Paolo neighborhood of Liberdade.
“Brazil has the largest Japanese community outside of Japan; 2 million claim connection to Japanese descent in Brazil,” she says. Liberdade was “really full of surprises. The anime-inspired street art, the oriental garden. It’s rumored to have the best ramen outside of Tokyo, although I’m sure that’s always a heated debate.”
Another urban pick is Mexico City. Chambers “cannot say enough great things about it. History, food, culture, art! And it was walkable. It was incredible.” The bougainvillea-strewn neighborhoods of Coyoacan, La Roma and La Condesa all get a shout-out from Lonely Planet this year.
The US selections on the destinations list are Theodore Roosevelt National Park in North Dakota – also featured on National Geographic’s Best of the World list for 2026 – and Maine.
“Maine has such a unique culture in the United States,” says Chambers. “So coastal, so much hiking in nature. The beauty there is really distinctive and the (four) national parks there are amazing.”
A forest hike in the springtime is recommended, and don’t miss the heron rookeries; the colonies can support up to 500 birds.
Over on the western edges of Europe, Tipperary is a “truly a hidden gem,” she says. It’s Ireland’s largest inland county and “a lot of folks just pass through on their way to the Wild Atlantic Way (coastal trail). But I think Tipperary really has one of the most beautiful and underrated driving routes.”
And in Asia, the island of Phuket is best known for its “tropical honeymoon, romantic vibe,” but more people are now discovering it as a work-and-travel spot for digital nomads.
Да, оч похожа на соль, даже камушек один был ощутимый такой https://codeoflove.ru Раньше розницей занимались благодаря вашему опыту,сейчас время другое,стабильная честная работа)
проверенные проститутки тюмень
Я вообще удивляюсь как продаван работает то? Есть ветка форума, личка и ася – везде молчание. В ася онлайн, но всеравно молчит уже третий день – это адекватный сервис? https://designitaliano.ru Я вообще удивляюсь как продаван работает то? Есть ветка форума, личка и ася – везде молчание. В ася онлайн, но всеравно молчит уже третий день – это адекватный сервис?
Вот и решил проверить данный магаз, как только будет инфа обязательно отпишу https://fyrfrr.ru хочу извинится за поднятую панику(думаю ТС меня понимает , т.к. все мы люди и переживаем за свои деньги,тем более сфера деятельности расшатывает нервы как не крути).зная теперь с чем была связана данная проблема с поставками и положительным финалом в порядочности ТС не сомневаюсь.на данный момент работа налажена,в чем убедился сам и наслышан от других.
Проплатил в этот магаз 10.10,трек получил 14.10-сегодня 18.10 трек не бьёться https://chilim-rest.ru Зашла на ваш сайт, а там “Your site hasn’t been activated yet!”… в общем ничего не выходит. Пробывала и через ТОР и через обычный браузер. Все одно. Что не так делаю?
Братки все красиво стряпают, претензий к магазину нуль, всегда всё ровно. Единственное что сейчас напрягло, отсутствие на ветке вашего представителя в ЕКБ “онлайн”, представитель молчит ( а там по делу ему в лс отписано) и кажись воопще не заходит пару недель https://designitaliano.ru Чет я совсем отупел, немогу найти прилавок, где товар бро, цена, наименование товара? Прайс в студию, на все услуги. От жизни походу отстал, правила поменяли походу, да?
когда дело было? а то я сам жду заказ https://doramalivex.ru напрягает долгое молчание продовца на переписку,возможно занят.
How to win in Calgary Lottery: Boost your chances by playing consistently, joining lottery pools, and choosing less popular combinations. Remember, winning requires luck and responsible play: win prizes in Calgary Alberta
отличный селлер купить Кокаин, Мефедрон, Экстази Магазу респект и процветания!!!)))
Из аськи вышел и даже не ответил… *( купить Кокаин, Мефедрон, Экстази сколько зарядил?
это самый ровный магаз братцы!!!) работаю с ними целый год, не разу даже нервы не потрепали) !!! конспирация на высоте, качество наилучшее!продован самый добрый и общительный аах) ну вы поняли! единственное жалко не разу проб бесплатных не получал((( купить Мефедрон, Бошки, Марихуану хороший магазин,было дело работал с ними)
Ответь в аське!Люди 22куска зарядили ,перед оплатой добро дал ,а потом тишина… Люди переживают,очень!Ответь пожалуйсто!!! купить Мефедрон, Бошки, Марихуану Через Skype мы больше не работаем, об этом мы объявляли пару недель назад.
shemplymade – Handcrafted products with quality craftsmanship and unique designs.
newthisdomainsssss – The domain grabs attention, now the site just needs to deliver with strong
Я выхватил бан, ты злобняк купить кокаин, меф, бошки через телеграмм Брал первый раз дживик качество вроде норм))))Еще хотел совет попросить как из 250 самый норм микс сделать?Помогите плиз.
Магазин лутше не встречал!!!! купить скорость, кокаин, мефедрон, гашиш В аське спросил продавца в чем дело? Была ли действительно отправка. Убеждает что была, это просто проблемы в курьерке, если в понедельник не забьется, будет звонить сам.
clevelandchristmasclub – Festive community organization spreading holiday joy and cheer.
Вы это о чем? Тут все вроде как только легальными делами занимаемся? Да и продавцу то я как никак доверяю свой адрес и телефон, почему он не может доверить мне кинуть сотку на телефон? Это ни к одному делу не пришьешь, раз мы уже заговорили об этом купить Кокаин, Мефедрон, Экстази употреблял перорально, также пробовал нозально (не вариант сжигает все напрочь и комок в слизистой)
на сайте есть аська, напиши, мне в течении пяти минут отвечали. купить кокаин, меф, бошки через телеграмм Магазин агонь! Брал как то давно. все ровно!
bwaylocations – Prime location services with strategic placement and accessibility.
ОПЕРАТОР ОКАЗАЛСЯ ОЧЕНЬ ОТЗЫВЧИВЫЙ! расскажет все что касается его товара! говорит очень вежливо, не чего лишнего! даже когда я засыпал его кучей всяких вопросов он меня не игнорил а старался ответить на все что я его спрашивал! купить Кокаин, Мефедрон, Экстази и как обычно тут все ровно. БОЛЬШУЩИЙ РЕСПЕКТ МАГАЗИНУ.
и вы считаете что все отлично? купить Кокаин, Мефедрон, Экстази как здесь стелят?
купить права
Аддитивные технологии сегодня открывает новые возможности. Мы оказываем высококачественные услуги по печати изделий любой сложности. Наши клиенты получают качественные модели, выполненные с использованием прочных пластмасс. Это дает возможность реализовать любую идею. Мы осуществляем печать с широким спектром материалов, что расширяет возможности 3D-печати. Вдобавок, мы гарантируем оперативные сроки изготовления. Каждый заказ сопровождается строгой проверкой на соответствие требованиям. Закажите 3D-печать у нас, и вы оцените удобство и качество современных технологий: https://www.mazafakas.com/user/profile/7441908. Каждая деталь печатается с максимальной точностью.
Хороший магазин тоже не раз уже к нему обращался я считаю что этот магазин достоин огромного внимание ! Мир тебе бро и процветания удачи в работе !:ok:;)ОБРАЩУСЬ ЕЩЕ К ТЕБЕ БРО ОБЯЗАТЕЛЬНО !) ЕЩЕ РАЗ УДАЧИ купить скорость, кокаин, мефедрон, гашиш Бро ты прав CHEMICAL-MIX.COM самый лучший магаз!!!
turnerhallrestaurant – Exceptional dining experience with quality cuisine and atmosphere.
Про себя могу сказать что толлерантность ОЧЕНЬ выская купить Мефедрон, Бошки, Марихуану просто народу не верится в ассортимент и такие цены, да и по большинству продуктов отзывов нет ))
Магниты рулят, не меняйтесь) купить онлайн мефедрон, экстази, бошки Плохует мягко сказано,уже больше пол месяца жду.Тебе кстати пришла?
spiritoftheaerodrome – Aviation heritage and historical preservation with passion.
Урб 597 либо перорально либо нозально, дозировка – 5-10мг, эффекты описаны в энциклопедии, купить онлайн мефедрон, экстази, бошки да это будет полная:ass:.Ну я надеюсь все будет хорошо.тогда так вышло иза того что это остатки товара из серии мн – 001.Уверен такой жопы больше не будет
34crooke – Unique address with distinctive character and presence.
Всем, как и писалось средняя компенсация 50% купить Кокаин, Мефедрон, Экстази 2с на высоте, прет огого как, сыпали по чуточки кто на что горазд, у меня до сих пор постэффекты
loftsonlex – Modern urban living with stylish loft accommodations.
я тоже несколько раз брал ,всё прошло чётко ,качество радует,доставлено всё в лучшем виде,оператор молочага всегда обьяснит всё что к чему,вообщем магазин для меня лучший ,самый надёжный,УСПЕХОВ И ПРОЦВЕТАНИЯ ВАШЕЙ КОМАНДЕ!!!!!! купить Мефедрон, Бошки, Марихуану значит ты чо то намутил , а вещество я заказывал в этом магазе норм для RCS естественно
https://forums.planetdestiny.com/threads/1xbet-welcome-sports-code-2026-%E2%82%AC120-bonus-offer.33528/
Да,меня тоже!)заказал вчера тут 203-го,сегодня жду трека! купить онлайн мефедрон, экстази, бошки Сказали в понедельник всем кто оплатил заказ отправят НОМЕРА!
olympicsbrooklyn – Sports and athletic excellence with community engagement.
https://zenwriting.net/9ir5yn4hs5
“Выстовляет Эскимос список тестеров в Списке сверкает мой ник” “bob marli” купить скорость, кокаин, мефедрон, гашиш Жаль только в Мск от 50 гр. )) Думал в Саратове тоже
самое норм) я думаю лучше лс нет) а сайт это вы о нас заботетесь) комфорта только себе и клиентам больше) а это GUD! купить кокаин, меф, бошки через телеграмм У меня всё норм, реальную отправку написали в треке. Я волновался на счёт этого после сообщений
ну если для кавото это естественно, для меня нет…кавото и палынь прет.. купить онлайн мефедрон, экстази, бошки Привет! В Наличии рега мощная 1к30 и скорость мука.
brandonlangexperts – Expert consulting services with proven results and expertise.
Обращайтесь к нам снова купить Мефедрон, Бошки, Марихуану Брал впервые в этом магазине, брал по рекомендации!
Дим, доброго времени суток, отпиши за приход, заказала тоже эйф-дисс, скажи, чего ожидать? купить скорость, кокаин, мефедрон, гашиш Магазину огромное спасибо! За
brandonlangexperts – Expert consulting services with proven results and expertise.
купить газобетон в Одессе
Я уже начал сомневаться,что проблема в курьерке!Я им звонил,они в свою очередь звонили в головной офис-про мой трек они даже не слышали!!!А постановление вроде ещё не вступило в силу. купить Кокаин, Мефедрон, Экстази вобщем решение принято заказ буду делать ТУТ!!!!
brandonlangexperts – Expert consulting services with proven results and expertise.
Магазин чёткий… Нареканий нет… купить Мефедрон, Бошки, Марихуану Вердикт:
brandonlangexperts – Expert consulting services with proven results and expertise.
Самые положительные впечатления оставляет по прежнему Мажор. 🙁 Джой фулл, а тебе когда отправили? купить Мефедрон, Бошки, Марихуану Зато искать долго не пришлось наверное???!
brandonlangexperts – Expert consulting services with proven results and expertise.
Какие магазины тебе написали про меня в личку? Что это за бред?! Я 2 дня назад зарегистрировался и все мои сообщения только в твоём топике. Или другим магазинам на столько важны твои отзывы и репутация, что они сидят в твоей теме и пишут кто, о ком и как думает? купить Кокаин, Мефедрон, Экстази трек получил в пятницу сегодня понедельник пока нет данных по треку возможно еще не вбился в систему думаю на днях ясно все будет отпишу
https://pastelink.net/wx1o6oi8
brandonlangexperts – Expert consulting services with proven results and expertise.
Магазин супер.от души мужики все как всегда оплатил поехал забрал 5+ купить кокаин, меф, бошки через телеграмм даа, уж что что, а 250й тут классный ) хомячки так и просят добавки
brandonlangexperts – Expert consulting services with proven results and expertise.
Страшно) заказывать RTI-126. Кто поможет с данной проблемой. купить Мефедрон, Бошки, Марихуану в академе были пролёты
https://oceanballon.ru/
brandonlangexperts – Expert consulting services with proven results and expertise.
слов нет.Вы ребята давно шум должны поднять что такая херня а то молчите по две недели!!!!я бы так хрен зарядил.А я почитал типа все ровно пишут и отдал кровные 22т.р купить скорость, кокаин, мефедрон, гашиш произвёл оплату на регу.жду трека!думаю быстро всё получится.
Какую еще веточку ? Вы и так на нашей ветке где есть вся необходимая информация. купить Кокаин, Мефедрон, Экстази один грамотей натупил тут , а про стафа правда
brandonlangexperts – Expert consulting services with proven results and expertise.
https://t.me/s/apk_1xbet_android
Я тебе не хамил. Да 10г, смешно не смешно, а на дороге не валяются. И очень обидно когда от вашего ПМа получаешь подтвердение, веришь! и остаешься с разочарованием и обидой, бессилием что либо доказать. А тебе еще сверху льют хамство, упивайтесь на здоровье. Я утерся и теперь знаю на что способны даже нормальные, доверенные магазины. А это тоже опыт, за который я заплатил, и ничуть не жалею. Просто пусть народ знает и будет готов при работе без гаранта ТУТ ожидайте что такое может быть. https://nytvarb.ru не бзди все будет ровно трек не всегда бьется это касяк курьерки а не отправителя не паникуй
brandonlangexperts – Expert consulting services with proven results and expertise.
Привет ветке)))) Легких подьемов https://pizzaa-lab.ru Не успело пройти 3 дня, мне уже звонит курьер забирай говорит. Бонус порадовал, спасибо! Компенсировали за свой счет! Вот это я понимаю МАГАЗИН ДОБРЫХ ЛЮДЕЙ! Так что советую! Качество +5 , спасибо что есть ещё добро в этом злом мире!
brandonlangexperts – Expert consulting services with proven results and expertise.
да не врядли просто ихнему курьеру поджопников надавать надо что бы копытами веселей шевелил да и все https://nprotopopov.ru кто скажет как качество с 203??? реактив хлопьями или гранулы?
Автоматические выключатели
35ф – индика весёлая , серьёзная , тошнатворного эффекта НЕТ хоть перекурись , сейчас беру 35 говорят сативка , будит возможность отпишу трип в красках , а вообще говорят что в симбиозе они лучше , но то что лучше / не сильнее / а именно лучше 25ф так это даже вы не сомневайтесь https://garage-atlant.ru Тарился в этом магазе Летом разок и в Сентябре разок)))
brandonlangexperts – Expert consulting services with proven results and expertise.
happyshoppingplace – Fun and lively design, the name fits perfectly with the vibe.
Страшно) заказывать RTI-126. Кто поможет с данной проблемой. https://nasha-shapka.ru супер магаз
happyshoppingplace – Fun and lively design, the name fits perfectly with the vibe.
Качество и работа магазина на высоте!! https://foxst.ru Ты выдал мне комбо
staycuriousdiscover – Inspiring tone, layout encourages creativity and exploration beautifully.
Добрый вечер! Хотел отписать отзыв по работе данного ТС! Сделал заказ в 17-00 клад дали в 21-30, брал опт 500 гр. https://sever46.ru Сегодня съездил в офис, к счастью там знакомая работает, пробили они по своим базам накладную, связывались с мск, сказали такая накладная не поступала, объяснили как все работает, то что можно взять бумаги заполнить их, в этих бумагах указывается номер накладной, но когда делаешь отправку, в компе по любому будет отображаться, т.е. отправки не было, с мск им каждый день приходят посылки, идет она реальных 2 дня!
Заказал 50г. всё пришло всё хорошо_))) https://harpizza.ru один из фаворитов в рц!
exploreendlessideas – Modern look, design sparks imagination and a sense of wonder.
cricket we368in.com
Всегда на высоте) https://power-buy.ru Извините, если я не знаю вашу продукцию у кого мне тогда спрашивать ?
discoverandcreate – Balanced visuals, message promotes creativity and curiosity together.
changan китай https://changan-v-spb.ru
магазин четкй притензий нет на качество регвезде гавно((((( https://psp-ekb.ru вот это уже наводит на мысли
номера вирт
buildabetterworld – Uplifting concept, site feels full of purpose and positivity.
Верный второй трек. Но у этой курьерки система мониторинга развита не особо хорошо и бывало такое, что посылка доходила за день-два, ее уже получили, а трек начинал биться только через пару дней после этого. Если в ближайшее время не заработает, то лучше звоните в курьерку и уточняйте. https://psp-ekb.ru заказал, получил трек, пока не бьется.
urbanwearstudio – Trendy and sharp, captures streetwear energy in a polished way.
https://trinixy.ru/262948-top-10-luchshih-servisov-virtualnyh-nomerov-dlya-sms-aktivaciy-v-2026-godu.html
и будем мы так общаться по одному смс раз в полмесяца… https://sever46.ru как здесь стелят?
discoveramazingthings – Exciting name, visuals and content give a sense of adventure.
Магазин кидает. Буду писать пока не дадут адрес в ПМ. Прошу там же помочь админов. https://potok-uvc.ru Магазин как уже и было сказано – на 5+
купить виртуальная номер
Lora Cross is the personal website of the renowned spanking model Lora Cross, featuring a vast library of her work in both maternal and disciplinary roles. Lora Cross Spanking video
explorewithpassion – Creative tone, design reflects motivation and energetic discovery.
Трек получил в первый день,5 баллов за работу магазина https://mediclever.ru 5го марта написал ЛС ТСу про оптовый заказ…. до сих пор жду ответа
smartshoppinghub – Clean and practical, ideal for modern online shoppers and deals.
Бро, была абсолютно идиентичная ситуация у мну в декабре.Трек не бился пол недели, прошли выходные звоню в контору-курьерку, называю трек, говорят нет такого, я к тс так мол и так, тот грит все ровно, трек верный ожидай! Херакс и вечером курьер названивает, оказыва4тся они мне еще в субботу хотели вручить, но почему то не дозвонились))Все пучком, бро.Почта мало кому интересна в наши дни, на курьерки много сваливается, вот они 3ак могут разгребают… https://nytvarb.ru Молча !! Запрет вступает в силу 26го числа, если не ошибаюсь. Скидывай всё палево, жёсткий дист зарывай подальше и иди получай ))
Сегодня съездил в офис, к счастью там знакомая работает, пробили они по своим базам накладную, связывались с мск, сказали такая накладная не поступала, объяснили как все работает, то что можно взять бумаги заполнить их, в этих бумагах указывается номер накладной, но когда делаешь отправку, в компе по любому будет отображаться, т.е. отправки не было, с мск им каждый день приходят посылки, идет она реальных 2 дня! https://pizzaa-lab.ru Тебе когда отправили?
discovernewthings – Bright visuals and curious tone make this site engaging.
болезни нервной системы
يعد تطبيق التطبيقات. يتيح. جزء، يجب.
استرجاع، سعة على جهازك. أيضًا، التحقق من. كان لديك، عند.
التأكد من، يمكنك باجراء. الدخول إلى، وستجد. الضغط على، الإجراءات.
بعد الانتهاء من، الجهاز الخاص بك. تفاصيلك. بعدها، اللعاب.
разобрался, поэтому и удалил сообщение до того как ты ответил ) https://nasha-shapka.ru Привет! Что хочу сказать по поводу работы магазина- просто супер, связались сразу, приняли заказ, обработали и на следующий день он уже в пути. 3 дня и уже у меня. Качество отличное! В общем респект Вам ребята, так держать, не сбавляйте оборотов и хорошо будет всем!
thebestpick – Clear branding, every detail feels user-friendly and neatly arranged.
changeyourperspective.click – Love how this site challenges my mindset in refreshing ways today.
createyourfuture.click – Inspiring site overall, helps me stay motivated toward long-term goals.
Успехов вам господа : ) https://mediclever.ru да, спросил тут ли менеджер, по быстрому оформил заказ.
modernhomefinds.click – Love the stylish home ideas here, everything feels fresh and cozy.
shopthetrendtoday – Stylish layout, ideal for trendy products and fast-fashion finds.
MXE точно не бодяженный , со 100мг вышел нереально жуткий трип, раз 15 умирал… через сутки отпустило. https://firstbed.ru 4-FA -все кто гнал, обломитесь, вы просто его не понял. Он не будет переть как старый добрый md – но эффект отличный. 1 колпак на лицо – и часа 2 состояние абсолютной гормонии с окружающим миром. Мозг работает как от любого другого качественного стимулятора на 5+.
changeyourperspective.click – Love how this site challenges my mindset in refreshing ways today.
createyourfuture.click – Inspiring site overall, helps me stay motivated toward long-term goals.
modernhomefinds.click – Love the stylish home ideas here, everything feels fresh and cozy.
фоту убрал, не будем палить конспирацию, всё понятно… Свяжитесь с магазином, я думаю решите вопрос с конпенсацией https://sever46.ru Качество обслуживания хорошее – с момента оплаты до прибытия товара прошло всего 3 дня и вес ровный.
discoveryourpotential.click – Great platform for personal growth, love the positive and uplifting tone.
findsomethinggreat.click – Great place to browse, always end up discovering something unexpectedly cool.
classychoiceoutlet.click – Stylish collection overall, love the elegant and affordable fashion pieces.
Пришол 250 сделал 1к10-12 ппц уносит 250 у вас лучший магазу респект , даже не ожидал что такой джив будет , 1к10 меньше это ппц.. https://firstbed.ru Возможна ли доставка 1 классом ?
Prisma Games offers thrilling, immersive games with innovative mechanics and vibrant visuals. A go-to platform for Canadian gamers seeking excitement and high-quality gameplay: Prisma Games technology blog
shopandshinehub.click – Great variety here, products look amazing and prices are reasonable.
Сделал 4 затяжки с батла, почувствовал секунд через 30 первое прикосновение.))) Затем не много стал теряться в пространстве и во времени, а когда поднялся домой, и открыл дверь (5 мин спустя) меня перекрыло нах, я не мог закрыть дверь и мне всё казалось что кто то держит, у меня начинается паника) я начинаю кричать за дверь: – ты кто такой отпусти, иди отсюда………….. Зову родаков, которых дома нет слава Богу!!!!! вообщем стоял минут 20 у двери) а когда пошёл в комнату мне казалось что кто то за мной ходит!!! https://oaostplem.ru вот как то это всё не ахуенно.Если вас не затруднит проясните ситуацию.
discoveryourpath.click – Beautifully designed site, helps me focus on personal growth daily.
findbetteroptions.click – Love this site, helps compare and choose smarter shopping decisions easily.
dreambuycollection.click – Beautiful selections here, quality items that truly match their descriptions.
307ой вроде к 15 можно забадяжить..ещё хим дрим какойто есть..тока я сам про него не в теме https://panda82.ru Заказали 2c-i и 2c-p. Как придет в магазине появятся позиции. может и еще что привезут из заказанного курительного.
everydaygiftcorner.click – Perfect site for gifts, found some lovely options for friends.
connectlearncreate.click – Amazing community vibe, love the focus on creativity and learning together.
createinspirelead.click – Love the empowering tone here, truly encourages creativity and leadership.
smartfashionboutique.click – Stylish and modern pieces, definitely my go-to for classy fashion.
yourdailytrend.click – Great source for everyday fashion inspiration, always something new featured.
everydaystylecorner.click – Love browsing here, always find stylish items that suit my taste.
buildsomethingnew.click – Inspiring projects here, really motivates me to start new creative ideas.
Все детали и нюансы здесь: https://version.com.ua/suspilstvo.html
Платформа для тестов и викторин https://fankino.ru
Играйте в свои любимые азартные игры на казино Вавада рабочее зеркало сегодня ! Получите доступ к лучшим слотам, рулетке, блэкджеку и многим другим играм. Качественный сервис, высокий уровень безопасности и удобная навигация ждут вас. Переходите на официальное зеркало Вавада и наслаждайтесь азартом без ограничений. Удобный интерфейс, быстрые выплаты и актуальные бонусы делают игру на Вавада незабываемой. Заходите на сайт прямо сейчас и испытайте удачу вместе с нами!
expandyourhorizon.click – Great site for learning and exploring fresh perspectives every day.
купить vpn
theworldawaits.click – Inspiring content, makes me want to explore and travel everywhere.
9e2seattle.com – Love the local coverage here, very informative and well-presented overall.
https://nitroflare.com/view/60CFAC39D7AA0ED/1xBet_Código_de_Bonificación_Cashback__€130_Bono_Deportes__.pdf
connectwithideas.click – Amazing platform, really encourages collaboration and sharing of new innovative ideas.
nsfeg.org – Great resource for learning, very informative and well-structured content overall.
kionnawest.com – Inspiring platform, clearly shares vision and values in a compelling way.
Отличная подборка инструментов для генерации изображений помогла определиться с выбором быстро. Протестировал три варианта из обзора, два использую регулярно. Качество везде профессиональное: сервисы для генерации картинок
yourdailyshoppinghub.click – Convenient and well-organized store, makes daily shopping fast and enjoyable.
monumentremoval.org – Important initiative, clearly explains the process and historical context respectfully.
yourdailytrend.shop – Love the trendy picks here, perfect for keeping up with fashion.
1911phl.com – Great information on local events, keeps me updated with ease.
Оформите онлайн-займ https://zaimy-90.ru быстро и удобно: без визита в офис, 1 паспорт, проверка за минуты. Перевод на карту/СБП, поддержка 24/7. Прозрачные условия, понятный график платежей, акции для новых клиентов. Сравните предложения и выбирайте выгодно.
Сервис онлайн-займов https://zaimy-91.ru подача заявки за 3 минуты, моментальное решение, выдача на карту. Честные проценты, без навязанных услуг, личный кабинет, уведомления о платеже. Калькулятор, промокоды, программа лояльности. Ответственное заимствование.
bestvaluecollection.click – Found some excellent deals, products are great quality for affordable prices.
Онлайн-займ https://zaimy-73.ru без очередей: заполните форму, получите решение и деньги на карту. Выгодные ставки, понятный договор, кэшбэк и скидки при повторных обращениях. Напоминания о платежах, продление при необходимости. Выбирайте ответственно и экономьте.
mcalpineinfo.com – Love the detailed info here, very helpful and easy to follow.
З інструкції mr-master.com.ua сама заливала відмостку біля будинку.
На сайті zebraschool.com.ua побачив послугу ремонту дитячих колясок — дійсно зручно
natashaforjudge.com – Excellent campaign site, communicates priorities and experience clearly and effectively.
Идею ломаной крыши подсмотрели на https://buybuyviamen.com/.
imaginelearnexplore.click – Inspiring content overall, really helps spark creativity and curiosity daily.
Hey, I just stumbled onto your site… are you always this good at catching attention, or did you make it just for me? Write to me on this website — https://rb.gy/ydlgvk?Vubbibe — my username is the same, I’ll be waiting.
Нужна турбина? официальный сайт JroneTurbo в России оригинальные узлы, картриджи, вакуумные и электронные актуаторы. Подбор за 5 минут, проверка совместимости, гарантия, доставка день-в-день. Для легковых и LCV, выгодные цены и техконсультации.
hardman4schools.com – Great campaign site, clearly communicates vision and priorities for education.
pmajoe4council.com – Informative site, provides clear insight into policies and council initiatives.
makeimpacttoday.click – Motivational platform, encourages me to take action and make a difference.
Фото из армии сайт Про солдат профессиональная съёмка армии: присяга, парады, учения. Создаём армейские альбомы, фотокниги, постеры; ретушь и цветокор, макеты, печать и доставка. Съёмочные группы по всей стране, аккредитация и дисциплина, чёткие сроки и цены.
У нас у отправки случился форс-мажор. Только на этой неделе начинают отправлять. Извиняюсь от лица магазина за задержку. купить Мефедрон, Бошки, Марихуану продавана сегодня в асе вообще ен видел, хз что там у них (
sparxcle.com – Interesting products here, really innovative ideas and practical solutions overall.
discovergreatdeals.click – Love this site, always find amazing deals on quality products.
9e2seattle.com – Love the local coverage here, very informative and well-presented overall.
Цены тут взвинчены до жопы не знаю кто тут умудряется брать, летом как то брал здесь не помню че но было фуфло конченное половина не растворилась хоть че делай хоть грей хоть танцуй ни че не помогло. Один плюс присылают быстро но нафиг такая быстрота купить Мефедрон, Бошки, Марихуану Бро слова это хорошо но нам нужен наш клад и не более не кто не хочет тебя винить и общаться сдесь на эту тему а на оборот писать только хорошие отзывы о вашем магазе пойми и ты бро слово паника сдесь не уместно сдесь идет разбор по факту согласись
seduced ai realistic nsfw seduced ai credits
Еще раз извините. Треки тоже бьются не сразу, курьерки “в завалах”, иногда он только начинает определяться на сайте курьерки, а его уже вручают или вручили получателю. Не пугайтесь, что мониторинг начнется не сразу, вам всем все придет заказанное. купить скорость, кокаин, мефедрон, гашиш Не поняла?
simonscider.co.uk – Delicious cider options, love the quality and unique flavor choices here.
leanneslifechangingfairies.com – Beautiful and imaginative site, full of magical ideas for everyone.
Мучает зуд и жжение? Геморой – лечение без боли и очередей: диагностика, консервативная терапия, латексное лигирование, склеротерапия, лазер. Приём проктолога, анонимно, в день обращения. Индивидуальный план, быстрое восстановление, понятные цены и поддержка 24/7.
всё получил,качество-бомба,очень доволен магазином ,всё быстро доставили,вам желаю так держать!!!!!!!!! купить Мефедрон, Бошки, Марихуану Ты в какой скайп то ломишься? перепроверь!!!
shopthebesttoday.click – Great online store, easy navigation and fantastic product deals daily.
Пицца в Воронеже https://pizzacuba.ru с быстрой доставкой: свежие ингредиенты, сыр тянется, бортики хрустят. Отслеживание заказа, удобный личный кабинет, повтор «в 1 клик». Комбо для компании, детское меню, соусы и напитки. Рабочие акции и честные цены.
http://forum.sevsocium.ru/viewtopic.php?f=138&t=11983&sid=02d9a11ff97097da70fbe9a4979db7b7
грац вам джентльмены! купить Кокаин, Мефедрон, Экстази Я всегда делаю на растворителе для снятие лака с ногтей (без ацетона)и для огранизма менее вреден и запах нос не режет,кто нибуть может подсказать сколько МЛ растворителя на 10г АМ если делать 1к15?
maltonfestivalofracing.co.uk – Amazing festival coverage, really captures the excitement of racing events beautifully.
http://pora-valit.com/wiki/index.php?title=%D0%9F%D0%BE%D0%BB%D1%83%D1%87%D0%B8_%D1%84%D1%80%D0%B8%D0%B1%D0%B5%D1%82_%D0%B8_%D1%81%D0%B4%D0%B5%D0%BB%D0%B0%D0%B9_%D0%B1%D0%B5%D1%81%D0%BF%D0%BB%D0%B0%D1%82%D0%BD%D1%83%D1%8E_%D1%81%D1%82%D0%B0%D0%B2%D0%BA%D1%83_%D0%BF%D1%80%D1%8F%D0%BC%D0%BE_%D1%81%D0%B5%D0%B9%D1%87%D0%B0%D1%81
mdcphilly.com – Great local content, keeps community members informed about events and updates.
billionaire casino
learntradingtoday.bond – Excellent resource for beginners, explains trading concepts clearly and simply.
Привет всем Тсу движек купить Мефедрон, Бошки, Марихуану хороших отзывов – полно ) просто многие не пишут особо о качестве товара. пришло, прёт, зашибись.
simplybestchoice.shop – Great product variety, everything feels affordable and high quality overall.
Кракен зеркало – лучшее место для доступа к официальному сайту. У нас вы найдете актуальные ссылки на зеркала, также много другой полезной информации. Загляните на сайт и убедитесь сами, что Кракен Зеркало – это ваш надежный маркетплейс в даркнет. С нами вы всегда будете в курсе последних актуальных предложений.
playfuel.co.uk – Great gaming products here, everything feels fun, creative, and high-quality.
iswrphilly.com – Very professional organization, provides helpful resources and information for all users.
Я, лично, в первый раз сделал заказ ,в этом магазине- оформил(по аське) его безналично,(что очень удобно для меня,даже из дома не выходил),сутки прошли,был дан трек,через два дня,посылка была у меня в городе.Следил за ее перемещением на сайте курьера(опять же-не выходя из дома). купить Кокаин, Мефедрон, Экстази Я сегодня заказал 203 жду трека думаю и мне понравится
з днем народження магазину
shopthebesttoday.click – Great online store, easy navigation and fantastic product deals daily.
На каком сайте сейчас заказать то можно дживик ровный купить скорость, кокаин, мефедрон, гашиш а что с магазином в Петрозаводске,работать то будете дальше,а то уже неделю не какой активности.
DRINKIO — отличный сервис с высоким уровнем обслуживания. Курьер приехал быстро, заказ был аккуратно упакован. Всё соответствует описанию, без неприятных сюрпризов. Радует, что доставка доступна круглосуточно. Пользуюсь регулярно и всем советую, https://drinkio105.ru/
asterixfilm.co.uk – Fantastic movie content, perfect for fans of animation and classic films.
harrietlevinmillan.com – Informative and well-written content, really highlights expertise and knowledge clearly.
Один вопрос только,можно ли заказать так что бы без курьера?Самому придти в офис и забрать посылку? купить Кокаин, Мефедрон, Экстази Может стоит внимательно посмотреть в ветке что есть резервный жаббер ? основной уже 6 дней не работает , какие то сбои, но резерв ведь работает, привыкли панику поднимать на ровном месте.
nextrealm.click – Interesting concept, love the futuristic vibe and creative presentation overall.
Мы очень рады! Обращайтесь к нам еще! купить кокаин, меф, бошки через телеграмм Крутой магаз
dreamcreateinspire.shop – Beautiful design, love the inspiring message and creative energy here.
theworldawaits.click – Inspiring content, makes me want to explore and travel everywhere.
pp4fdr.org – Important initiative, shares valuable guidance and updates in a clear manner.
пиши разберемся купить скорость, кокаин, мефедрон, гашиш раньше вообще все говорили то что не растворяется это бутор а щас как я понимаю это в порядке вещей
urbanmatrix.click – Modern and stylish concept, offers great insights into urban innovation.
Подробности по кнопке: https://vesti42.ru/novosti-so-vsego-sveta/tipografiya-i-eyo-vidy-ofsetnaya-czifrovaya-i-trafaretnaya-pechat
theworldawaits.click – Inspiring content, makes me want to explore and travel everywhere.
трек не работает тишина уже 3 дня прошло >< у всех все гуд а у меня щляпа как так почему ((( ?!?!?!? купить скорость, кокаин, мефедрон, гашиш второй раз заказываю, класнный продукт пришел что 250 что 307 , качество отменное , доставка буквально 3 суток
ks4thekids.com – Wonderful platform for children, lots of creative learning opportunities provided.
chery tigo автомобиль chery tiggo
Updates on this topic are here: https://eldoradobus.com.ar/2025/10/08/facebook-account-buy-marketplace-fb-accounts-for-9/
How to win in Calgary Lottery: Boost your chances by playing consistently, joining lottery pools, and choosing less popular combinations. Remember, winning requires luck and responsible play: best ways to win money in Calgary
у меня такое было, позвонил в офис доставки так они меня там ошарашили что груз ушел но совсем в другую сторону от меня, я в шок че за на.. через 2часа звонок вам пакет, я аж от радости чуть не описался :voo-hoo: тут все на уровне. Не паникуйте раньше времени все решаемо. Всем добРА купить онлайн мефедрон, экстази, бошки ну если для кавото это естественно, для меня нет…кавото и палынь прет..
Нужен демонтаж? https://lerc.ru внутренний и наружный демонтаж: стены, полы, перегородки, фасады, металлоконструкции, железобетон. Точный план работ, техника и ручной труд, вывоз и утилизация по нормам. Работаем в действующих зданиях без остановки бизнеса.
theworldawaits.click – Inspiring content, makes me want to explore and travel everywhere.
Хочешь вылечить геморрой – современный подход к лечению геморроя: точная диагностика, персональный план, амбулаторные процедуры за 20–30 минут. Контроль боли, быстрый возврат к активной жизни, рекомендации по образу жизни и профилактике, анонимность и понятные цены.
Современный атмосферный ресторан в Москве с открытой кухней: локальные фермерские ингредиенты, свежая выпечка, бар с коктейлями. Панорамные виды, терраса летом, детское меню. Бронирование столов онлайн, банкеты и дни рождения «под ключ».
вот отправил манетку ,получил адик купить Мефедрон, Бошки, Марихуану На сайте четко сказанно что заказы обрабатываются через E-mail…
Kraken зеркало наркошоп – лучшее место для покупки качественных наркотиков и других запрещенных веществ. Здесь вы найдете широкий ассортимент товаров высокого качества по доступным ценам. Наш магазин предлагает конфиденциальные и безопасные услуги для всех клиентов, гарантируя анонимность и быструю доставку. Покупайте у нас и получайте удовольствие от качественных продуктов без риска для своего здоровья. Не упустите возможность попробовать лучшие наркотики от Kraken!
ks4thekids.com – Wonderful platform for children, lots of creative learning opportunities provided.
они долго кормили завтраками с отправкой, а потом и вовсе закрылись… https://souzinstrumenta.ru Не успело пройти 3 дня, мне уже звонит курьер забирай говорит. Бонус порадовал, спасибо! Компенсировали за свой счет! Вот это я понимаю МАГАЗИН ДОБРЫХ ЛЮДЕЙ! Так что советую! Качество +5 , спасибо что есть ещё добро в этом злом мире!
theworldawaits.click – Inspiring content, makes me want to explore and travel everywhere.
Для юрлиц удобен полный комплекс услуг — от консультации до оформления: Таможенный брокер во Внуково
brauhausschmitzoktoberfest.com – Fantastic festival coverage, really captures the fun and lively Oktoberfest spirit.
Работают честно и открыто, никаких скрытых платежей. Всё по договору: таможенный брокер в Москве
Пользуемся как юридическое лицо, оформление всегда в срок https://svobroker.ru/
По многочисленным восторженным откликам мн-001, тестировал его и был немного огорчен. https://studio-milashka.ru работает заебок… присылают в кортонных больших конвертах…. доставляют очень быстро мне доставили в город за 3 дня… а их отделение в каждом городе есть.. как посылка придет вам позвонят на телефон и предложат доставку или приехать самому… если решите сами забирать то вам скажут адресс куда ехать…=)
Для юридических лиц предоставляют полный комплекс услуг по ВЭД: таможенный брокер в Москве
Работают честно и открыто, никаких скрытых платежей. Всё по договору, https://svobroker.ru/
Сотрудничаем уже давно, и всегда довольны качеством услуг: https://tamozhenniiy-predstavitel.ru/
Нужна ликвидация? https://www.zakrit-kompaniu-doo.me: добровольная ликвидация, банкротство, реорганизация. Подготовка документов, публикации, сверка с ФНС/ПФР, закрытие счетов. Сроки по договору, прозрачная смета, конфиденциальность, сопровождение до внесения записи в ЕГРЮЛ.
Tasfiyeye mi ihtiyac?n?z var? https://www.sirket-kapatma.me/: borc analizi, yasal prosedurun secimi (istege bagl? veya iflas), alacakl?lar?n bildirimi, tasfiye bilancosu, sicilden silme. Son teslim tarihlerini ve sabit fiyat? netlestirin.
theworldawaits.click – Inspiring content, makes me want to explore and travel everywhere.
http://www.google.mw/url?q=https://amt-games.com/news/1xbet_cameroon_register_bonus_code.html
Собрать или выбрать мощный игровой ПК гораздо проще, если опираться на проверенные рекомендации. На сайте собраны обзоры популярных сборок, советы по подбору видеокарт, процессоров и систем охлаждения. Благодаря структурированной информации каждый геймер сможет найти идеальный вариант для своих задач — от казуальных игр до профессионального гейминга.
macofficelovesyou – The site name made me smile, and the layout feels very nostalgic yet modern.
clubinorout.com – Great nightlife guide, keeps me updated on clubs and events easily.
произвёл оплату на регу.жду трека!думаю быстро всё получится. https://puzzlepedia.ru буду заказывать второй раз тут) товар понравился)
http://www.google.ro/url?q=https://exodontia.info/pages/1xbet_promo_code_today__welcome_bonus.html
http://www.google.dz/url?q=https://www.intercultural.org.au/wp-content/pgs/1xbet_casino_bonus_codes_enter.html
Сервис вообщем на ура. купить Кокаин, Мефедрон, Экстази бред, откуда инфа такия про 80%?
Бухучет на предприятии https://buhgalteriya-auditor-buhuchet.ru финансовая, налоговая и бухгалтерская отчетность. Работа бухгалтерии и главного бухгалтера: счета, проводки, баланс, отчеты. Аудит и контроль, финансовый анализ, налогообложение, управление персоналом и учетная политика организации.
smartshoppingplace – The site feels like a solid all-in-one store, easy to browse and inviting.
Есть битое авто? Как и куда продать битый автомобиль без финансовых потерь и мороки: срочный выкуп автомобиля «под ключ». Присылайте VIN и фото — дадим предварительную цену, согласуем выезд эксперта, проведём диагностику и проверку документов. Учитываем комплектацию, сервисную историю, ДТП, окрасы и техническое состояние. Покупаем битые, проблемные, кредитные, корпоративные, с большим пробегом. Оплачиваем сразу и безопасно, выдаём полный пакет бумаг для налоговой и банка. Забираем авто своим эвакуатором, бережно и быстро. Прозрачная оценка без торга и навязанных услуг, честные сроки, конфиденциальность, поддержка на каждом этапе сделки.
http://www.google.tn/url?q=https://www.lnrprecision.com/news/1xbet_promo_code_free_bet_bonus.html
macofficelovesyou – The site name made me smile, and the layout feels very nostalgic yet modern.
Снова в деле купить кокаин, меф, бошки через телеграмм длица окола часа очень даже не плохо
amazingdealscorner – Solid deal-site vibe; browsing was smooth and categories clearly laid out.
everydayinnovation – The brand name sounds inspiring and modern; curious to browse their collection and see how it lives up to the promise.
jojoanime10th – Looks like a fun anime-themed project; the visuals really pop with color.
Причем тут шрифт не где не запрещенно писать большим шрифтом!И это еще далеко не большой.Я вот допустим имею проблемы со зрением но написал для того чтобы было более разборчево отчетлево видно всем обывателям данной темы.Причем тут слепые не слепые вапще. купить онлайн мефедрон, экстази, бошки сегодня закажу 1г. MN-011 для пробы)посмотрим на товар)
Всё для дачи и цветов https://amandine.ru/ журнал с понятными инструкциями, схемами и списками покупок. Посев, пикировка, прививка, обрезка, подкормки, защита без лишней химии. Планировки теплиц, уход за газоном и цветниками, идеи декора, советы экспертов.
Need liquidation? https://www.liquidation-of-company.me: voluntary liquidation, bankruptcy, reorganization. Document preparation, publications, reconciliation, account closure. Contractual terms, transparent estimates, confidentiality, support.
smartshoppingplace – The site feels like a solid all-in-one store, easy to browse and inviting.
shapeyourdreams – The phrase gets me motivated! Would like to see more about the product story or what makes it unique.
amazingdealscorner – Solid deal-site vibe; browsing was smooth and categories clearly laid out.
iswrphilly – The community-focused vibe here feels genuine, great to see local engagement online.
Заказываю у магазина 6-й раз уже и все ровно!Берите только тут и вы не ошибетесь.Да и еще странная штука происходит,как-то взял у другого магазина реагент точно такой же курил месяц гдето и чуть не помер да и отходосы всю неделю были ужасные.А из этого магаза брал реагент было все ништяк,отходосы были но я их почти не заметил.Делайте выводы Бразы.Магазин отличный!Мир всем! купить Мефедрон, Бошки, Марихуану вот вот..ждать неизветсности самое такое нервное….
https://uroki-igry-na-skripke.ru/
Еще и угрожает, после того как я сказал что передам наше общение и свои сомнения.что еще интересно, кинул заявочку такого плана купить Мефедрон, Бошки, Марихуану Брал впервые в этом магазине, брал по рекомендации!
hanayaka-na-life – Elegant and serene design, the Japanese aesthetic truly shines through beautifully.
everydaychoicehub – “Choice hub” feels like a central spot for variety—nice for finding items you might not expect.
путаны тюмень
https://uroki-igry-na-skripke.ru/
https://uroki-igry-na-skripke.ru/
https://linkmate.mn.co/posts/93007518
everymomentmatters – The name hits emotionally, good for meaningful purchases; just check the fine details.
modernstylemarket – Great name and the design looks sharp—perfect for trend-savvy shoppers.
продавана сегодня в асе вообще ен видел, хз что там у них ( купить Кокаин, Мефедрон, Экстази Качество товара на 5+,вот только почта подвела привезли на 5й день.
shopwithhappiness – Love the cheerful tone; browsing here actually feels positive and easygoing.
discovergreatoffers – Straight to the point: you’re promised “great offers”—good for bargain-hunters if service and shipping align.
urbanwearoutlet – Stylish urban fashion outlet feel, lots of potential if the sizing and quality hold up.
сегодня получил трек. все пробивается. жду посылочку) купить онлайн мефедрон, экстази, бошки СПАСИБИЩЕ ОГРОМНОЕ ЗА СЕРВИС
dailychoicecorner – The variety of items surprised me, it’s like a cozy online bazaar.
opennewdoors – A metaphorical name that feels encouraging; ideal for exploration or finding fresh options.
inspiredthinkinghub – I like how they frame the brand as a place for ideas, not just shopping.
С возвращением бразы! удачной работы вам и процветания купить Мефедрон, Бошки, Марихуану Спасибо за внесение ястности.
startyourjourneytoday – The motivational tone of the brand instantly boosts your mood while browsing.
learnexploreachieve – Inspiring brand name; if they deliver educational tools or courses this could be a good fit.
кто сказал что он закрылся? где это написано? купить Мефедрон, Бошки, Марихуану Качество на высоте,оператор красавчик,все сделали быстро и четко!
dreamcreateachieve – Full of ambition in one line—makes me think this brand supports creative and lifestyle change.
кракен зеркало
creativegiftplace – So many thoughtful gift ideas; perfect for finding something personal and unique.
Добрый вечер помогите купил у снега клад, пустой, как сапорту написать..? купить онлайн мефедрон, экстази, бошки посмотри в трипах магазина там всё написано
https://ritual-uslugi-spb-reg.ru/
https://btc-laundry.org/
brightnewbeginnings – The name gives a fresh start vibe; nice for seasonal or motivational purchases.
trendylifestylehub – Trend-forward lifestyle brand angle worked for me, very modern design.
findsomethingunique – The promise of uniqueness is appealing—if the products deliver, this could be a go-to for special finds.
classytrendcollection – The products feel trendy yet elegant, really fits the “classy” branding well.
Было бы очень не плохо купить онлайн мефедрон, экстази, бошки кто сказал что он закрылся? где это написано?
dailytrendspot – Feels like a stylish marketplace where you can discover cool new finds.
Совершенно верно!!! https://gadziyan.ru Продавец общительный, выслал с заказом пару пробников бесплатно! заказы высылют оперативно
simplystylishstore – Clean aesthetic and clear shopping experience; nice for simple, polished purchases.
mystylezone – Simple and stylish brand name, great for a fashion-oriented site where personal style matters.
trendshopworld – Global-sounding brand, good for catching wide variety of trends.
Заказывал тут сувениры(250) пришли за три дня=) Тока на почте из за выходных и праздников пролежали еще три дня=( https://ainyshop.ru добрый день как связаться с продавцом и не попасть на фейка?
yourstylematters – I like the empowering message behind the name, style should always be personal.
findyourinspiration – Very motivating messaging; makes me think of product categories that spark ideas or renew your look.
findbetteropportunities – Ambitious name—makes me curious about what “better opportunities” means for customers.
Хотели делать 1к15 – 1к10, но в итоге всё замесили 1к12. Я бы не сказал, что сильно убивает, но люди были довольны. Пипеточку хлоп:killmyself: и хорошо минут на 40, поэтому скоро перешёл на трубку и курил по пол полки за раз, отчего угарал от роликов MineCraft. https://st45shumiha.ru Хотя я знаю почему всех слабо торкает , всё дело в неверном приёме препарата ! Весь форум облазил , но этого способа не наблюдал . Пусть не приятно но стоит того . Порох под язык . Доза меньше , эффект быстрей и ярче . Хотя это личное дело каждого , песня не об этом .
кракен зеркало
fashiondailydeals – Prices look great for trendy pieces, could easily become a go-to fashion stop.
заказал не мало,всё пришло за кач не знаю как опробуют кролы отпишу https://priv-church.ru не бзди все будет ровно трек не всегда бьется это касяк курьерки а не отправителя не паникуй
https://cuchichi.es/author/1xbet-promocode/
findyourinspiration – Very motivating messaging; makes me think of product categories that spark ideas or renew your look.
https://hackmd.io/@1xbetfreebets
thebestcorner – Simple and strong branding—makes you believe you found a great spot for deals.
yourvisionmatters – Empowering message and good styling; strong brand identity right out of the gate.
brightstylecorner – The layout’s bright energy instantly catches your eye, really uplifting vibe overall.
https://makeprojects.com/project/1xbet-india-promo-code-2026-120-eu130?projectid=209062&r=pvx0pg
Портал про все https://version.com.ua новини, технології, здоров’я, будинок, авто, подорожі, фінанси та кар’єра. Щоденні статті, огляди, лайфхаки та інструкції. Зручний пошук, теми за інтересами, добірки експертів та перевірені джерела. Читайте, навчайтеся, заощаджуйте час.
chery 2024 chery 7 pro
Селлер сказал что ур6 курёха!:) походу новая альтернатива дживу https://alekskhaustov.ru У меня кстати тоже через 2 дня пришло, но в соседний город, так как в моём городе этой конторы не оказалось) но мне сразу позвонили, и предложили либо самому приехать за пакетом, либо подождать до вторника и мне его привезут домой. Вот жду)
Журнал для дачников https://www.amandine.ru и цветоводов: что посадить, когда поливать и чем подкармливать. Календарь, таблицы совместимости, защита от вредителей, обрезка и размножение. Планы грядок, тепличные секреты, бюджетные решения и советы профессионалов.
discoverfreshperspectives – Feels more boutique or niche, good for curated products or design-forward picks.
Заказали 2c-i и 2c-p. Как придет в магазине появятся позиции. может и еще что привезут из заказанного курительного. Саратов купить кокаин, мефедрон, гашиш, бошки, скорость, меф, закладку, заказать онлайн Магазин работает!!! Бро очень понктуален!!! Магазину процветание и новых клиентов!!!
uniquevaluecorner – Good selection of affordable items, name fits perfectly with what’s offered.
Quinn Download free Spanking videos Enjoy Erotic spanking content now|
makesomethingnew – Creative vibe, feels like a site where you can discover something fresh and unique.
потому, что так и есть осталось не так много времени! Курганинск купить кокаин, мефедрон, гашиш, бошки, скорость, меф, закладку, заказать онлайн отличный магаз,пришло всё быстро и в лучшем виде:dansing:спасибо,удачи и процветания
Онлайн трансляции
thebestcorner – Simple and strong branding—makes you believe you found a great spot for deals.
purechoiceoutlet – Clean design and simple layout, made browsing feel effortless and enjoyable.
действительно было в лом,спасибо) https://yamaha-kzn.ru/astrahan.html Почему всё-таки такси? На метро бы а одну сторону успел бы… Вес большеват был, обычно брал миксы да всякие вкусные таблетки, но тут сразу столько СК… Да и потом, нашёл на товар, найди т на непредвиденный случай/комфорт, я так считаю. Чем брать по грамму микс, так лучше вообще не брать. Пара дней – и на пять грамм наберешь, с друзьями/сэкономишь на обедах, в конце концов.
discoverbetterdeals – Found some great bargains here, feels like a true hidden gem online.
вот вот..ждать неизветсности самое такое нервное…. https://nastavnik124.ru/slobodskoy.html бред, откуда инфа такия про 80%?
Может быть, не отрицаю. Пока никого винить не буду, потому что вполне возможно что я и сам закосячил. Но вроде все правильно делал. При том я не один такой..До этого приходил ам (окло недели-полторы, назад) делал все точно так же, но только на черной заварке принцесса Нури, 1 к 10, и с водника уносило далекоооо….всех кто пробовал этот водник.. https://aquauslugi.ru/prohladniy.html Брал здесь 203-й качество отличное 1 к 10 делал на мать и мачехи с одного водника ушатывает наглухо!!! Магазин отличный, если не ждать ответа менеджера по 2 часа!!!
trendandstylehub – Love the trendy picks and layout, everything looks well curated and stylish.
Я айтишник и к СМ не отношусь никаким боком. Про мою работу вы не знали и не узнали бы, если бы всё срослось. Я просто говорю про то, что не так уж и секурно у вас, личность выпаливается “на раз”. Моздок купить кокаин, мефедрон, гашиш, бошки, скорость, меф, закладку, заказать онлайн Решили мы тут значит с кентом несколько дней назад покурить . Вспомнили про сайт chem24.biz.ski и решили взять 2гр твердого, оплотили короче,описание адреса было простым и спрятано было грамотно!!!
creativityunlocked – Inspiring content, really helps spark new ideas and creative thoughts.
Ищете надежные входные металлические двери под ваши задачи и бюджет? Изготавливаем и устанавливаем двери любого размера и сложности: от классики до современных решений с терморазрывом, шумо- и взломозащитой. Премиальные стали, точная фурнитура, порошковая окраска, выбор отделки (МДФ, ламинация, паттерны), профессиональный замер за 1 визит и чистый монтаж за 1 день: стальные двери от производителя
Только что принесли, позже трип отпишу) https://souzinstrumenta.ru/cheremhovo.html надо прятать по сложнее
shopanddiscover – Fun shopping experience with great variety, will definitely visit again soon.
“Кстати Минеру за описание Минус не указал что второй кооператив” Старая Русса купить кокаин, мефедрон, гашиш, бошки, скорость, меф, закладку, заказать онлайн тс, привет, ответь в лс. я по делу.
Купить квартиру https://kvartiracenterspb.ru просто: новостройки и вторичка, студии и семейные планировки. Ипотека от 0,1%, маткапитал, субсидии. Юрпроверка, безопасная сделка, помощь в одобрении, торг с застройщиком. Подбор по району, бюджету и срокам сдачи. Сопровождение до ключей.
Купить квартиру https://novostroydoma.ru в городе выгодно: топ-жилые комплексы, удобные планировки, паркинг и инфраструктура рядом. Ипотека, семейная ипотека 6%, маткапитал. Сравнение цен, выезд на просмотры, проверка чистоты сделки, страхование титула. Экономим время и деньги.
Покупка квартиры https://piterdomovoy.ru «под ключ»: новостройки бизнес/комфорт-класса и надёжная вторичка. Аналитика цен, динамика сдачи, инфраструктура. Ипотека, субсидии, маткапитал. Юридический аудит, безопасные расчёты, регистрация сделки онлайн. Переезд без забот.
Квартира вашей мечты https://kvartiracenter-kypit.ru подберём варианты с отделкой и без, проверим застройщика/продавца, согласуем торг. Ипотека 6–12%, семейные программы, маткапитал. Онлайн-показы, электронная подача в Росреестр, безопасная оплата. Экономим время и бюджет.
findsomethingunique – Interesting finds here, definitely stands out from regular online stores.
Обязательно позвонить должны, как позвонят легче забрать самому чем ждать пока курьер доставит https://bccrt.ru/kislovodsk.html реагенты всегда чистые и по высшему??? сертифекаты вместе с реагентами присылают на прохождение экспертизы на легал?
https://www.vhs80.com/board/board_topic/6798823/6955410.htm?page=1
discovermoretoday – Helpful and easy to navigate site, offers something new each time.
длица окола часа очень даже не плохо Черкесск купить кокаин, мефедрон, гашиш, бошки, скорость, меф, закладку, заказать онлайн вот такие как ты потом и пишут не прет , не узнавая концентрацию и т д набодяжат к…. ,я вот щас жду посыля и хз ко скольки делать 250
кракен сайт зеркало
Войти на сайт кракен через актуальное зеркало.
Компания «Сервинст» https://servinst.ru надёжный поставщик медицинского оборудования и расходных материалов для клиник, лабораторий и диагностических центров. Широкий ассортимент, официальные дилерские соглашения с производителями, доставка по России и техническая поддержка.
Диджитал-агентство https://g-pr.dev полного цикла: стратегия > креатив > производство > продвижение. Сайты и лендинги, SEO/SEA, SMM, контент, email, перфоманс-реклама, аналитика и CRM. Работаем по KPI и SLA, прозрачные отчёты, рост заявок и LTV «под ключ».
yourfavoritestore – Everything feels organized and simple, loved the product variety here.
Шива я тебя люблю!!! У тебя лучший и мой самый любимый мефедрон!!!. Кореновск купить кокаин, мефедрон, гашиш, бошки, скорость, меф, закладку, заказать онлайн Дабы не быть голословным: № заказа 1000707. 10г ам2233. Делал 1 к 7. Эффект болезненный. Все выброшено. Верни деньги ТС или пришли нормальный ам!
Operation Game Canada: A classic, fun-filled board game where players test their precision by removing ailments from the patient without triggering the buzzer: Operation game rules and pieces
shopwithpurpose – Great concept and thoughtful message behind this platform, I like it.
Дело не в постах. В любом случае нужно быть осторожным. И строить систему сложнее… https://arleasing.ru/evpatoriya.html сегодня вот ночью прислал трек. Бьется, радует
Votre guide parifoot rdc: picks quotidiens, cotes comparees, tickets securises, gestion de mise, cash-out et promos. Depots via mobile money, retraits rapides, support francophone. LINAFOOT, CAF, ligues europeennes. Pariez avec moderation.
dailychoicecorner – Found useful everyday items here, really liked how clean it looks.
Получил 5г 203! Оплатил в четверг, отправили в пятницу и уже в понедельник курьер мне передал. 🙂 Вес в поряде, цвет желтоватый. https://hotelxo.ru/buzuluk.html и отдельный респект магазу за способ посылок=)))))
магазин отличный ! работает уже не первый год! обращайтесь! Павлово купить кокаин, мефедрон, гашиш, бошки, скорость, меф, закладку, заказать онлайн с треками магазин всегда спешит:) и качество скоро заценим)))
purefashionhub – Stylish layout with trendy fashion options, easy to browse and shop.
https://www.cverla.ru/
это манера такая сдержанная или удовлетворительное=на троечку Ивантеевка купить кокаин, мефедрон, гашиш, бошки, скорость, меф, закладку, заказать онлайн Отличный магазин!
superbet super game
smartshoppingplace – Smooth navigation and solid deals, feels trustworthy and efficient.
https://nevainstrument.ru/
Всем добра бразы! Самый ровный магазин! Ждём открытия на Северном Кавказе! https://job-in.ru/alekseevka.html спасибо за инфу , но только узнал про новый список запвеществ , чувствую вся лавочка прикроется на некоторое время …
https://globhy.com/article/code-promo-melbet-2026-euro130-bonus-pour-joueurs
staymotivatedalways – Positive and uplifting space, love reading motivational content here.
https://www.japanesewomenorg.com/read-blog/60849
“Подхожу по описанию лазею,лазею, ПУСТО бля нервоз пздц ” Вятские Поляны купить кокаин, мефедрон, гашиш, бошки, скорость, меф, закладку, заказать онлайн возможно мои письма рубятся где-то? там все четко по делу.
freshstyleoutlet – Modern and clean design, great mix of new fashion trends and ideas.
Привет всем и Мира! Тоже уже неделЮ жду адекватного трека . Дали два и оба не бьются(( https://myzio.ru/lyantor.html всем желаю счастья!
learnandthrive – Engaging platform for self-growth, content feels genuine and very useful.
Почему ушли из РБ? https://okolo-dom.ru/mihaylovka.html Дружище как все прошло?)) забрал своё??? А то написал неделю назад и тишина))) если забрал сколько шло по времени? напиши нам а то на последних страницах сдесь какой то кипишь нездоровый…(
или кто то прикалывается? https://studio-milashka.ru/aleksandrov.html Основу выварить не удалось, после вручения посыля,забыл убрать с глаз, торопился, дома было объявлено военное положение .
ВЫ ЛУЧШИЕ! Биробиджан купить кокаин, мефедрон, гашиш, бошки, скорость, меф, закладку, заказать онлайн отличный селлер
Сервис вообщем на ура. Норильск купить кокаин, мефедрон, гашиш, бошки, скорость, меф, закладку, заказать онлайн KEY я не понимаю что ты хочешь от магазина то теперь ????за непонятку с соткой !!! моральную компенсацию????? или что????
https://drpppoy.blogspot.com/2025/11/1xbet-promo-code-for-2026-free-bet.html
элитные индивидуалки
Operation Game Canada: A classic, fun-filled board game where players test their precision by removing ailments from the patient without triggering the buzzer: Operation board game online version
Если во время действия паралельно потягивать пивас и почаще двигаться , не сидеть на месте , то довольно нормально прёт , если загоняться то накрывает параноя) , в общем около 8-9 часов прёт , но у меня была ещё и рега , очень лютая которой можно было запросто перебить параною если вдруг возникала от данной скорости , в целом понравилась скорость . купить скорость, кокаин, мефедрон, гашиш Мне от оплаты и в мои руки в общем занимает 2-3 дня
наркологическая помощь на дому спб
5 iai вообще говорят “беспонтовый” продукт… сколько народу его от рaзных сeлеров не пробовало – всё одно муть… https://laserlandiv.ru да два раза прислали шляпу.( хотя раньше присылали отменный товар с хорошими бонусами. даже не знаю что делать(
Plateforme parifoot rd congo : pronos fiables, comparateur de cotes multi-books, tendances du marche, cash-out, statistiques avancees. Depots via M-Pesa/Airtel Money, support francophone, retraits securises. Pariez avec moderation.
https://www.vibepoweryoga.com/profile/herewon21498667/profile
Paris sportifs avec 1xbet rdc telecharger : pre-match & live, statistiques, cash-out, builder de paris. Bonus d’inscription, programme fidelite, appli mobile. Depots via M-Pesa/Airtel Money. Informez-vous sur la reglementation. 18+, jouez avec moderation.
Оформите онлайн-займ https://zaimy-61.ru без визита в офис: достаточно паспорта, проверка за минуты. Выдача на карту, кошелёк или счёт. Прозрачный договор, напоминания о платеже, безопасность данных, акции для новых клиентов. Сравните предложения и выберите выгодно.
Все подробности по ссылке: https://mr-master.com.ua
https://kuklanvt.info/apartament/
По сути он эйфо, но ничего, кроме расширенных зрачков, учащенного сердцебиения и потливости, я не почувствовал… А колличество принятого было просто смешным: 550 мг. в первый день теста и 750 мг. во второй день… Тестирующих набралось в сумме около 8 и никто ничего не почувствовал. купить Кокаин, Мефедрон, Экстази Плохует мягко сказано,уже больше пол месяца жду.Тебе кстати пришла?
Доброга времени суток, закладки в москве делаете? https://mokvd.ru Оплатил 22.03.2012,трек выслали 02.04.2012 типа через 1-2 дня он будет биться.до меня идёт посыль от них 3-5 дней,зависит от выходных.Сегодня уже по всем раскладам должно прийти,но у меня даже трек не бьётся.Звонил в спср,сказали нет в базе такого трека.
Всегда сдесь было высокое качество купить кокаин, меф, бошки через телеграмм Общение оператора 10/10-всегда все грамотно и вежливо объяснит. Таким оператор и должен быть!
https://shkola-vocala.ru/shkola-igry-na-gitare.php
http://www.google.tl/url?q=https://www.intercultural.org.au/wp-content/pgs/1xbet_casino_bonus_codes_enter.html
http://www.google.la/url?q=https://intelicode.com/public/pgs/1xbet_promo_code_and_bonus.html
важаемый ТС прошу разобраться с заказом,всё оплаченно вам,вот только игнор в бросиксе и посылки нету до сих пор. Заранее благодарен. купить Мефедрон, Бошки, Марихуану сервис – хуже некуда. Ну да об этом писал несколькими сообщениями ранее. 2/5
CHEMICAL MIX спасибо огромное!!! купить онлайн мефедрон, экстази, бошки магаз четкий,еще в 2011 каждую неделю забегали:music:)всегда все ровно
Заказывал небольшую партию)) Качество отличное, быстрый сервис)) в общем хороший магазин) https://fatal-world.ru действительно принимают?
клады по мск все во время купить кокаин, меф, бошки через телеграмм “Думаю надо заглянуть в аптечку Мож завалялось и да Чудо они есть решаюсь попробовать и Вы не поверите одно и тожЕ”
Клад был описан понятно и ясно! https://happyroasters.ru не плохой товар
Топовое тату оборудование. Роторные тату-машинки, стерильные картриджи и яркие пигменты от мировых брендов. Только профессиональный инструмент для безупречного качества тату. Заходите https://tattooaura.ru/
доставку можем рассчитать вам в ICQ https://gyro-cult.ru главное что ты “вкурил”, а как мне тебе это втереть уже не важно
Киньте репки кому не сложно) не сочтите за попрошайку купить Мефедрон, Бошки, Марихуану Я клад нашел, но вопервых не все в нем а во вторых содержимое разное и самое главное это место и описание этого места. Завтра буду пытаться связаться с ним.
С Уважением. купить скорость, кокаин, мефедрон, гашиш всё прочитал) Стоищий отзыв так и не увидел)
по крайней мере у меня было , все гуд купить Мефедрон, Бошки, Марихуану Привет, дорогие друзья! меня зовут Антон32131. Покупаю периодически у этого магазина различные товары. Перед каждой новой покупкой создаю новый профиль и в скайпе и на этом форуме и на сайте уважаемого магазина. Я сам не в курсе с какой целью я это делаю, может быть я болен, либо причина в моей гиперсексуальности. Но пишу я об этом к тому, чтобы вы дорогие друзья не заподозрили подвоха в том что отзыв пишет новичок!
Брала тут когда-то пару раз. Зарегана на форуме тогда еще не была, сейчас пришлось по обстоятельствам зарегать аккаунт. Ребята работают хорошо, оперативно. Оператор адекватный, идет на контакт. Продукты были хорошие на тот момент. купить Мефедрон, Бошки, Марихуану Почему ушли из РБ?
How to win in Calgary Lottery: Boost your chances by playing consistently, joining lottery pools, and choosing less popular combinations. Remember, winning requires luck and responsible play: official win Calgary website
Мы уже давно не делаем отправки, я не знаю за какую посылку вы говорите. https://kdsed.ru Получил трек довольно быстро, что обрадовало, посыль ждал тоже недолго 🙂 порошок мне показался чистым, я конечно не эксперт*( но кристаллики были без примесей )
Gemeinsame Paarmassage bei der Partner synchronisierte Behandlungen Seite an Seite in romantic private setting genie?en k?nnen|
Такие как я всегда обо всем приобретенном или полученном как пробник расписывают количество и качество, но такие же как я не будут производить заказ, не узнав обо всех качествах приобретаемого товара, ведь ни кто не хочет приобретать то, что выдают за оригинальный товар (описанный на форумах или в википедии), а оказывается на деле совсем другое. Или необходимо самолично покупать у всех магазов, чтобы самолично проверить качество, чтобы другие не подкололись? Матерей Тэрэз тут тоже не много, чтоб так тратиться на такого рода проверки. https://yurspecgrupp.ru Качество тоже супер.
помощь психолога онлайн
все супер! магазину доверять можно, были небольшие задержки но ТС сделал все по красоте! https://m5flasher.ru Самый крутой магазин!
bergkompressor.ru Новинки уже здесь – Узнайте, что нового и популярного.
Пробовал товар данного магазина !!! купить скорость, кокаин, мефедрон, гашиш магазин хороший,даже если высылат брак (было 1 раз) возврат делают сполна
Привет всем бандиты? как дела у вас? https://frm-congress.ru Замечательный, магазин. Желаю успешных продаж
Магазин реально ровный!!! Долго искал и нашел! Бро ты лучший!!!! купить кокаин, меф, бошки через телеграмм Всем привет вчера забегал в этот магазин ни чего не нашел !
Casino 7k приятно удивило качеством сервиса. Поддержка отвечает быстро и по делу. Деньги выводятся чётко в срок https://xn—-8sbalwlcefxak4bw.xn--p1ai/
А вообще, читай раздел рецепты, там все очень подробно расписано, в нескольких темах причем https://vertikal-kursk.ru Ребята подскажите JTE-907 1 к скольки делать и сколько по времени прет?
РОВНЫЙ МАГАЗ!!!УСПЕХОВ И ПОЗИТИВНОГО РАЗВИТИЯ!! купить скорость, кокаин, мефедрон, гашиш Если помог Жми Сказать Спасибо
Мало того дешёвый, он и отправляет маленький вес. Это гуд. Остальные почти все работают от 50 гр… https://27dverei.ru В общем подожду пока ты получишь и отпишешь :))))
https://penzu.com/p/ef97754da4ca1566
кто-то пляшет, кто-то дрочит, https://setafi.ru Хороший сервис судя по отзывам!:)
Вы реально думаете что тут сидят роботы, которые должны отвечать всем без перерывов и выходных? Праздники же были, все отдыхать хотят. купить кокаин, меф, бошки через телеграмм Сделал заказ. Пропустил реквизиты для оплаты. Продавец свяжись со мной, оплачу. В понедельник сможете отправить товар?
Кулінарний портал https://infostat.com.ua пошагові рецепти з фото і відео, сезонне меню, калорійність і БЖУ, заміна інгредієнтів, меню неділі і шоп-листи. Кухні світу, домашня випічка, соуси, заготовки. Умные фильтры по времени, бюджету и уровню — готовьте смачно і без стресу.
Портал про все https://ukrnova.com новини, технології, здоров’я, будинок, авто, гроші та подорожі. Короткі гайди, чек-листи, огляди та лайфхаки. Розумний пошук, підписки за темами, обране та коментарі. Тільки перевірена та корисна інформація щодня.
Сайт про все https://gazette.com.ua і для всіх: актуальні новини, практичні посібники, підборки сервісів та інструментів. Огляди техніки, рецепти, здоров’я і фінанси. Удобні теги, закладки, коментарі та регулярні оновлення контенту.
Play-Amo Internet Gaming Lounge is one of the exclusive play portals for players who adore entertainment, extras, and efficient rewards.
With hundreds of exceptional jackpots, blackjack, and broadcast tables, PlayAmo Portal delivers a exclusive online trip right from your terminal or iPhone.
New participants can access generous starting promotions, free spins, and unlock members-only VIP rewards.
Whether you explore timeless titles or the hot games, Play-Amo offers everything you need for exciting casino play
https://gyn101.com/
gyn101.com
Магазин просто огонь !!! Оценка 5+ за все :voo-hoo: !!! Качество товара збс !!! Советую всем этот магаз!!! купить Мефедрон, Бошки, Марихуану Брала тут когда-то пару раз. Зарегана на форуме тогда еще не была, сейчас пришлось по обстоятельствам зарегать аккаунт. Ребята работают хорошо, оперативно. Оператор адекватный, идет на контакт. Продукты были хорошие на тот момент.
Сайт про все https://kraina.one практичні поради, таблиці та калькулятори, добірки сервісів. Теми – здоров’я, сім’я, фінанси, авто, гаджети, подорожі. Швидкий пошук, збереження статей та розсилка найкращих матеріалів тижня. Простою мовою та у справі.
Інформаційний портал https://presa.com.ua новини, технології, здоров’я, фінанси, будинок, авто та подорожі. Короткі гайди, огляди, чек-листи та інструкції. Розумний пошук, підписки на теми, закладки та коментарі. Тільки перевірені джерела та щоденні оновлення.
Єдиний портал знань https://uaeu.top наука та техніка, стиль життя, будинок та сад, спорт, освіта. Гайди, шпаргалки, покрокові плани, експерти відповіді. Зручні теги, закладки, коментарі та регулярні оновлення контенту для повсякденних завдань.
слышала за вас) с пробы начнем? https://uda-cha.ru магаз ровный,сервис 5+,как напишешь сразу ответят,все ровно и по весу и по качеству 5+,были рады очень посылю с замечательным реагентиком плюсую магазу и советую остальным!)))
https://медоптима.рф/
Портал корисної інформації https://online-porada.com практичні поради, відповіді експертів, таблиці та шпаргалки. Теми – здоров’я, сім’я, гроші, гаджети, авто та туризм. Швидкий пошук, обране, розсилка найкращих матеріалів тижня. Пишемо просто й у справі.
Сучасний інформаційний https://prezza.com.ua портал: новини, огляди, практичні інструкції. Фінанси, гаджети, авто, їжа, спорт, саморозвиток. Розумний пошук, добірки за інтересами, розсилання найкращих матеріалів. Тільки перевірені джерела та щоденні оновлення.
Інформаційний портал https://revolta.com.ua «все в одному»: коротко і у справі про тренди, товари та сервіси. Огляди, інструкції, чек-листи, тести. Тематичні підписки, розумні фільтри, закладки та коментарі. Допомагаємо економити час та приймати рішення.
новый запрет вступает через 7 дней. читай список бро,там это вещество есть) купить кокаин, меф, бошки через телеграмм оптимал дозировка на 2дпмп при в\в от данного магазина какая?
Заказываю в DRINKIO уже давно и могу сказать — качество на уровне. Курьеры приезжают быстро, всегда всё упаковано аккуратно. Цены приемлемые, выбор большой. Очень удобно, что не нужно выходить из дома, чтобы всё получить вовремя: https://drinkio105.ru/
Бизнес-идеи https://idealistworld.com для старта и роста: от микропроектов до стартапов. У нас собраны вдохновляющие концепции, кейсы и тренды, которые помогают предпринимателям находить новые направления развития и запускать прибыльные франшизы.
Магазину отличных покупателей))) купить Кокаин, Мефедрон, Экстази выше фишиг! ни переходите по картинке
Обзоры игровых компьютеров на game-computers.ru позволяют сэкономить время и деньги. На страницах блога размещены обзоры моделей для разных бюджетов, советы по подбору комплектующих и рекомендации по апгрейду. Вы сможете подобрать систему, которая идеально соответствует вашим игровым требованиям и возможностям.
TopTool https://www.toptool.app/en is a global multilingual tools directory that helps you discover the best products from around the world. Explore tools in your own language, compare thousands of options, save your favorites, and showcase your own creations to reach a truly international audience.
https://beatbox.ucoz.ru/forum/22-10043-1
ООО “КОМТЕК” продукция https://www.komtek-spb.ru Pro-face в России официальная дистрибуция и сервисная поддержка. Поставка HMI-панелей, дисплеев и промышленных решений. Сертификаты подлинности, гарантия производителя, индивидуальные консультации и оперативная доставка по регионам.
We noticed that your website hasn’t been receiving much traffic lately. As a friendly reminder, we offer exclusive advertising packages that can greatly boost your online presence and attract new visitors to your site. — rb.gy/34p7i3?Illus
Социальная сеть https://itsnew.ru для тех, кто делает сайты и продвигает их в интернете. Общение с экспертами и новичками, быстрые решения IT-проблем, практические гайды, разборы, события и вакансии. Растите в веб-разработке и SEO каждый день.
Магазин работает как часы:ok:! Чекист самый крутой продаван это уже проверено годами!!! Дух захватывает от той мысли сколько же он продал за своё существование с 2011 ГОДА:strong: !! Это МЕГА-ПРОДАВАН!!! ТАк держать Чемикал Чекист))!!! купить скорость, кокаин, мефедрон, гашиш Вот это бы нормально было нормальный трип по двум веществам..
http://www.google.al/url?q=https://aviator-game.su/
Оформите займ https://zaimy-59.ru онлайн без визита в офис — быстро, безопасно и официально. Деньги на карту за несколько минут, круглосуточная обработка заявок, честные условия и поддержка клиентов 24/7.
\занимаюсь тестированием вместе с кролями в течении нескольких дней. Все никак не мог понять. купить Кокаин, Мефедрон, Экстази ну чё могу сказать…
https://my.clickthecity.com/bestbet1x
Все вопросы к представителю. купить Мефедрон, Бошки, Марихуану Бро ответь в аське!
Binary Options Demo: Learn Before You Trade.
Start your trading journey with a Binary Options Demo account and practice risk-free before going live. Sharpen your skills and explore smart strategies at https://terrasseo.jp/
Чтобы не терять доступ, сохраняйте актуальную KRAKEN ссылка. Рабочее зеркало кракен вход открывает маркет и личный кабинет.
Для быстрого подключения используйте KRAKEN ссылка.
https://nicemerch.ru/
Всем привет! Специально зарегистрировался для того что бы поведать вам, какой тут отличный магазин! Обращаюсь сюда уже 3 месяца всегда по опту! все на высоте! Время доставки кладом в мой город 4 дня! Качество продукта отличное! Клады хорошие! И главное пунктуальность, и грамотное общение с человеком… Желаю оставаться всегда такими же порядочными! Сразу видно что магазин знает свое дело в нашем не легком труде!!! купить онлайн мефедрон, экстази, бошки Уважаемы участники форума!
Remember, the possibilities are endless in Minecraft, so have fun!
minecraft pocket edition 1.21.121 https://download-minecraft-apk.com/minecraft-pe-1-21-121-apk/
брали 10 гр реги )))) купить скорость, кокаин, мефедрон, гашиш Ну что, получил посылку. С весом ровно, маскировка тоже хорошая. Заваривал 1/15 так я не прикуренный, вставило нормально. заказывал JV-60 10гр.
KRAKEN онион зеркало подходит для анонимного доступа в кракен маркет. Ссылка ведёт напрямую к ресурсу.
KRAKEN кракен маркетплейс
— проверенный способ оставаться на связи. Рабочая ссылка ведёт напрямую в маркет.
Хороший магаз. качество радует спасибо всей команде Chemical-mix.com https://estom29.ru Сервис лучший, и стабильный.
На мой взгляд лучше магазина нет купить кокаин, меф, бошки через телеграмм Что там за оператор в аське сидит? Ответа нереально долго ждать приходиться, я по 2раза один и тот же вопрос пишу. Не могу постоянно находиться в сети. Пусть быстрей работает.
Оформите займ https://zaimy-71.ru онлайн без визита в офис — быстро, безопасно и официально. Деньги на карту за несколько минут, круглосуточная обработка заявок, честные условия и поддержка клиентов 24/7.
Щоденний дайджест https://dailyfacts.com.ua головні новини, тренди, думки експертів та добірки посилань. Теми – економіка, наука, спорт, культура. Розумна стрічка, закладки, сповіщення. Читайте 5 хвилин – будьте в курсі всього важливого.
Практичний портал https://infokom.org.ua для життя: як вибрати техніку, оформити документи, спланувати відпустку та бюджет. Чек-листи, шаблони, порівняння тарифів та сервісів. Зрозумілі інструкції, актуальні ціни та поради від фахівців.
Регіональний інфопортал https://expertka.com.ua новини міста, транспорт, ЖКГ, медицина, афіша та вакансії. Карта проблем зі зворотним зв’язком, корисні телефони, сервіс нагадувань про платежі. Все важливе – поряд із будинком.
я стобой солидарен! купить Кокаин, Мефедрон, Экстази ВСЁ супер,брал,беру, и буду брать!Всё на высоте!
нарколог на дом
Практичний довідник https://altavista.org.ua здоров’я, будинок, авто, навчання, кар’єра. Таблиці, інструкції, рейтинги послуг, порівняння цін. Офлайн доступ і друк шпаргалок. Економимо ваш час.
Універсальний інфопортал https://dobraporada.com.ua “на кожен день”: короткі інструкції, таблиці, калькулятори, порівняння. Теми – сім’я, фінанси, авто, освіта, кулінарія, спорт. Персональна стрічка, добірки тижня, коментарі та обране.
Інфопортал про головне https://ukrpublic.com економіка, технологія, здоров’я, екологія, авто, подорожі. Короткі статті, відео пояснення, корисні посилання. Персональні рекоме
chemical-mix.com держи в репу, заработал.. пазитивно всё.. тут всё хорошо.. обращайтесь помогут быстро.. купить Кокаин, Мефедрон, Экстази ждите трип о товаре, как сделаю заказ и получу товар обрисую все в красках! постараюсь сделать фото!!!
meilleur casino en ligne: telecharger 1xbet Cameroun
HondroLife para mujeres en menopausia: tendinitis alivio
para articulaciones doloridas.
Чтобы открыть маркетплейс, воспользуйтесь KRAKEN зеркало. Актуальная кракен магазинбезопасна и подходит для любых устройств.
Рабочее KRAKEN зеркало — это удобный способ попасть в кракен сайт.
Рабочее KRAKEN зеркало — это удобный способ попасть в кракен личный кабинет.
Чтобы пользоваться кракен ссылка, используйте рабочее KRAKEN зеркало. Ссылка ведёт к полному функционалу.
Портал-довідник https://speedinfo.com.ua таблиці норм та термінів, інструкції «як зробити», гайди з сервісів. Будинок та сад, діти, навчання, кар’єра, фінанси. Розумні фільтри, друк шпаргалок, збереження статей. Чітко, структурно, зрозуміло.
Інформаційний медіацентр https://suntimes.com.ua новини, лонгріди, огляди та FAQ. Наука, культура, спорт, технології, стиль життя. Редакторські добірки, коментарі, повідомлення про важливе. Все в одному місці та у зручному форматі.
хочу извинится за поднятую панику(думаю ТС меня понимает , т.к. все мы люди и переживаем за свои деньги,тем более сфера деятельности расшатывает нервы как не крути).зная теперь с чем была связана данная проблема с поставками и положительным финалом в порядочности ТС не сомневаюсь.на данный момент работа налажена,в чем убедился сам и наслышан от других. купить кокаин, меф, бошки через телеграмм Отправки посылок и эта информация в 2-х местах прописана на сайте 2-10 РАБОЧИХ ДНЕЙ. В 99,9% случает сроки не нарушаются.
Інформаційний сайт https://infoteka.com.ua новини, практичні гайди, огляди та чек-листи. Технології, здоров’я, фінанси, будинок, подорожі. Розумний пошук, закладки, підписки на теми. Пишемо просто й у справі, спираючись на перевірені джерела та щоденні оновлення.
Ну давайте не мандражировать, плохие мысли материализуются, я специально это не написал!!!! Что тут в карму никто не верит? 🙂 Забыли уже? 😉 https://sportoys.ru работал я работал 2 года имея не малую клиентскую базу и тут решил я вас кинуть на 10 грамм, сам то подумай где ты это пишешь.
Сучасний інфосайт https://overview.com.ua наука та техніка, стиль життя, спорт, освіта, їжа та DIY. Зрозумілі пояснення, покрокові плани, тести та огляди. Розумні фільтри за інтересами, коментарі, закладки та офлайн-читання – все, щоб заощаджувати час.
Онлайн-журнал https://elementarno.com.ua про все: новини та тенденції, lifestyle та технології, культура та подорожі, гроші та кар’єра, здоров’я та будинок. Щоденні статті, огляди, інтерв’ю та практичні поради без води. Читайте перевірені матеріали, підписуйтесь на дайджест та будьте в темі.
Універсальний онлайн-журнал https://ukrglobe.com про все – від науки та гаджетів до кіно, психології, подорожей та особистих фінансів. Розумні тексти, короткі гіди, добірки та думки експертів. Актуально щодня, зручно на будь-якому пристрої. Читайте, зберігайте, діліться.
Портал корисної інформації https://inquire.com.ua практичні поради, відповіді експертів, таблиці та шпаргалки. Теми – здоров’я, сім’я, гроші, гаджети, авто, туризм. Швидкий пошук, обране, розсилка найкращих матеріалів тижня.
Вот отзыв за этот эйфор: купить скорость, кокаин, мефедрон, гашиш магазу процветания желаю и клиентов хороших
http://houmy.ru/
Про все в одному місці https://irinin.com свіжі новини, корисні інструкції, огляди сервісів і товарів, що надихають історії, ідеї для відпочинку та роботи. Онлайн-журнал із фактчекінгом, зручною навігацією та персональними рекомендаціями. Дізнайтесь головне і знаходите нове.
Рабочий вход в KRAKEN сайт доступен всегда.
Ваш онлайн-журнал https://informa.com.ua про все: великі теми та короткі формати – від трендів та новин до лайфхаків та практичних порад. Рубрики за інтересами, огляди, інтерв’ю та думки. Читайте достовірно, розширюйте світогляд, залишайтеся на крок попереду.
кракен магазиноткрывает прямой путь в маркет. Найдите актуальную ссылку, следуйте подсказкам и получите безопасный доступ к сайту с полным функционалом.
Онлайн-журнал https://ukr-weekend.com про все для цікавих: технології, наука, стиль життя, культура, їжа, спорт, подорожі та кар’єра. Розбори без кліше, лаконічні шпаргалки, інтерв’ю та добірки. Оновлення щоденно, легке читання та збереження в закладки.
Онлайн-журнал https://worldwide-ua.com про все: новини, тренди, лайфхаки, наука, технології, культура, їжа, подорожі та гроші. Короткі шпаргалки та великі розбори без клікбейту. Фактчекінг, зручна навігація, закладки та розумні рекомендації. Читайте щодня і залишайтеся у темі.
может я не вполне в теме,и с спрс работаю 2 раз,но ни одна из известных мне почтовых служб не доставляла отправление до адресата за 4000 вёрст за 3-4 дня,как это делает спрс. а насчёт :police: просто смешно – захотят принять – примут по-любому,хоть с почтовым голубем.:) доставка дороговата,но это самое меньшее из возможных зол. купить Кокаин, Мефедрон, Экстази Забрал я посылочку. Упоковка на 5+(пакет был с дыркой как будто смотрели что там, но с такой упаковкой только на паяльник подумаеш). Сделал ам 2233(1г) + ркс4(1г) на 20 грамм мягкого. Честно говоря ам не почувствовал совсем, кроет как ркс4(1 г.) на 20 грамм(был печальный опыт). Сейчас курим по грамму на двоих, тогда кроет на “целых” 10 минут. Вообщем незнаю чья ошибка это, да и смысла выяснять нет, деньги все равно не вернуться. Хотел попробовать тусипи заказать, но как то страшно. С тусипи то такого не было не разу вроде? Притензий не было?
Entdecken Sie die besten Weinverkostungen in Wien auf wein verkostung wien.
Besucher konnen hier erstklassige Weine in malerischer Umgebung probieren.
Die Weinverkostungen in Wien sind perfekt fur Kenner und Neulinge. Dabei lernen Gaste die Besonderheiten der regionalen Rebsorten kennen.
#### **2. Die besten Orte fur Weinverkostungen**
In Wien gibt es zahlreiche Lokale und Weinguter, die Verkostungen anbieten. Das bekannte Heurigenviertel in Grinzing ladt zu gemutlichen Verkostungen ein.
Einige Winzer veranstalten Fuhrungen durch ihre Kellereien. Zusatzlich konnen Gaste direkt beim Erzeuger kosten.
#### **3. Wiener Weinsorten und ihre Besonderheiten**
Wiener Weine sind vor allem fur ihre Vielfalt bekannt. Der beliebte Gemischte Satz ist eine lokale Spezialitat, die aus mehreren Traubensorten besteht.
Die Bodenbeschaffenheit und das Klima pragen den Geschmack. Dank nachhaltiger Anbaumethoden ist die Qualitat stets hoch.
#### **4. Tipps fur eine gelungene Weinverkostung**
Eine gute Vorbereitung macht die Verkostung noch angenehmer. Es empfiehlt sich, langsam zu trinken, um die Nuancen zu schmecken.
Gruppenverkostungen bringen zusatzlichen Spa?. Viele Veranstalter bieten thematische Verkostungen an.
—
### **Spin-Template fur den Artikel**
#### **1. Einfuhrung in die Weinverkostung in Wien**
Wien ist nicht nur fur seine historischen Sehenswurdigkeiten bekannt, sondern auch fur seine lebendige Weinkultur.
#### **2. Die besten Orte fur Weinverkostungen**
Das Weinmuseum im Stadtzentrum ist ein idealer Ausgangspunkt fur Weinliebhaber.
#### **3. Wiener Weinsorten und ihre Besonderheiten**
Auch der fruchtige Grune Veltliner zahlt zu den bekanntesten Wei?weinen der Region.
#### **4. Tipps fur eine gelungene Weinverkostung**
Gruppenverkostungen bringen zusatzlichen Spa?.
“Решил Попробовать Записаться” https://gofro-carton.ru Не смог не скопипастить
Онлайн-журнал 24/7 https://infoquorum.com.ua все про життя та світ — від технологій та науки до кулінарії, подорожей та особистих фінансів. Короткі нотатки та глибока аналітика, рейтинги та добірки, корисні інструменти. Зручна мобільна версія та розумні підказки для економії часу.
Ваш онлайн-журнал https://informative.com.ua про все: новини, розбори, інтерв’ю та свіжі ідеї. Теми — від психології та освіти до спорту та культури. Зберігайте в закладки, ділитесь з друзями, випускайте повідомлення про головне. Чесний тон, зрозумілі формати, щоденні поновлення.
Онлайн-журнал https://mediaworld.com.ua про бізнес, технології, маркетинг і стиль життя. Щодня — свіжі новини, аналітика, огляди, інтерв’ю та практичні гайди. Зручна навігація, чесні думки, експертні шпальти. Читайте, надихайтеся, діліться безкоштовно.
Щоденний онлайн-журнал https://republish.online про все: від швидкого «що сталося» до глибоких лонґрідів. Пояснюємо контекст, даємо посилання на джерела, ділимося лайфхаками та історіями, що надихають. Без клікбейту – лише корисні матеріали у зручному форматі.
Если вы ищете, как зайти в
, используйте проверенные зеркала. Ссылка безопасна и ведёт на нужный ресурс.
Официальное кракен маркетпомогает всегда оставаться в сети. Вход выполняется быстро, а маркет открывается полностью.
Мало того дешёвый, он и отправляет маленький вес. Это гуд. Остальные почти все работают от 50 гр… купить скорость, кокаин, мефедрон, гашиш Отличный магаз.
https://internet-leman.ru/
Актуальная KRAKEN ссылка кракен маркет подходит для входа с телефона.
Готуємо, прибираємо https://ukrdigest.com прикрашаємо легко. Домашній онлайн-журнал з покроковими рецептами, лайфхаками з прання та прибирання, ідеями сезонного декору, планами меню та бюджетом сім’ї. Зберігайте статті, складайте списки справ та знаходите відповіді на побутові питання.
Все про будинки https://vechorka.com.ua де приємно жити: швидкі рецепти, компактне зберігання, текстиль та кольори, сезонний декор, догляд за речами та технікою, дозвілля з дітьми. Покрокові інструкції, корисні вибірки, особистий досвід. Затишок починається тут – щодня.
Домашній онлайн-журнал https://zastava.com.ua про життя всередині чотирьох стін: швидкі страви, прибирання за планом, розумні покупки, декор своїми руками, зони зберігання, дитячий куточок та догляд за вихованцями. Практика замість теорії, зрозумілі чек-листи та поради, які економлять час та гроші.
Ваш помічник https://dailymail.com.ua по дому: інтер’єр та ремонт, організація простору, здоровий побут, догляд за технікою, рецепти та заготівлі, ідеї для вихідних. Тільки практичні поради, перевірені матеріали та зручна навігація. Зробіть будинок красивим та зручним без зайвих витрат.
салют бразы ) добавляйте репу не стесняйтесь всем удачи)) купить кокаин, меф, бошки через телеграмм Да,мне тоже первый класс как то ближе и недорого…
Если интересует актуальный доступ к KRAKEN — вот ссылка
Работает быстро.
Резервный адрес на случай блокировок: https://kristi.su/threads/37
Проверено лично.
С помощью кракен магазин легко обойти блокировки. Рабочая ссылка позволяет продолжить покупки и пользоваться маркетом.
Ровный и Стабильный… купить онлайн мефедрон, экстази, бошки Ребят,вообще 307 наваливает хорошо,НО,попрошу в разделе магазина флуд и оффтоп прекращать…Для этого есть раздел Информация из жизни LegalRC,в котором все описано и сказанно….Или создайте топик с обсуждениями там…
KRAKEN даркнет вход реализован через рабочие ссылки кракен зеркало. Зеркала помогают обойти блокировки.
Актуальное зеркало KRAKEN позволяет авторизоваться в кракен магазин продолжить покупки.
концентрация 1к 12 мне норм разврдил на муравьином спирте (купил его в аптеке) купить Кокаин, Мефедрон, Экстази Максимально приятные впечатления оставляет у меня сотрудничество с сием трэйдером… Доставка никогда не занимала дольше недели, а однажды на самолете когда отправляли за ч\з 2 дня уже покоилась в руках :)…
доставку можем рассчитать вам в ICQ купить Мефедрон, Бошки, Марихуану Благо им! Биза на высоту
Домашній онлайн-журнал https://ukrcentral.com про розумний побут: планування харчування, прибирання за таймером, екоради, мінімалізм без стресу, ідеї для малого метражу. Завантажені чек-листи, таблиці та гайди. Заощаджуйте час, гроші та сили — із задоволенням.
Все работает, каждый получает ответ оперативно! купить кокаин, меф, бошки через телеграмм В Курске нету
Журнал для домашнього https://magazine.com.ua життя без метушні: плани прибирання, меню, дитячий куточок, вихованці, міні-сад, дрібний ремонт, побутова безпека. Короткі інструкції, корисні списки та приклади, що надихають. Зробіть будинок опорою для всієї родини.
Ваш провідник https://ukrchannel.com до порядку та затишку: розхламлення, зонування, бюджетний ремонт, кухонні лайфхаки, зелені рослини, здоров’я будинку. Тільки перевірені поради, списки справ та натхнення. Створіть простір, який підтримує вас.
Практичний домашній https://publish.com.ua онлайн-журнал: планинг тижня, закупівлі без зайвого, рецепти з доступних продуктів, догляд за поверхнями, сезонні проекти. Тільки у справі, без клікбейту. Зручна навігація та матеріали, до яких хочеться повертатися.
6-9 мая также будут праздничные дни, в асе, скайпе отвечать не будут, но это не значит, что человек умер или захвачен)))) купить скорость, кокаин, мефедрон, гашиш Магаз самый ровный! Брать буду Только здесь и не где Больше,респектоз магазину! Так держать ребята!
Crowngreen is a trusted gaming platform that provides engaging experiences for gamers. Crowngreen excels in the online gaming world and has achieved trust among visitors.
Every user at https://dbcleanway.com/explore-the-world-of-crowngreen-casino-and-win/
is able to experience the latest tournaments and take advantage of generous promotions. Crowngreen ensures fair gameplay, fast transactions, and round-the-clock customer support for every player.
With , enthusiasts unlock a wide range of table games, including jackpot options. The casino delivers user satisfaction and ensures a safe gaming environment.
Whether you are new or experienced, Crowngreen Casino offers unique experiences for everyone. Start playing at Crowngreen today and discover thrilling games, exclusive bonuses, and a safe gaming environment.
“Достаточно связаться с нами и отправить на указанный e-mail информацию о заказе и получателе. Конфиденциальность гарантируется.” купить Кокаин, Мефедрон, Экстази мне все пришло, магаз ровный. 5+
Медіа для дому https://government.com.ua та офісу: інтер’єр та побут, сімейні питання, цифрові тренди, підприємництво, інвестиції, здоров’я та освіта. Збірники порад, випробування, аналітика, топ-листи. Лише перевірена інформація.
Затишок щодня https://narodna.com.ua ідеї для інтер’єру, зберігання в малих просторах, безпечний побут із дітьми, зелені рішення, догляд за технікою, корисні звички. Інструкції, схеми та списки. Перетворіть будинок на місце сили та спокою.
Все, що важливо https://ua-meta.com сьогодні: будинок та сім’я, кар’єра та бізнес, технології та інтернет, дозвілля та спорт, здоров’я та харчування. Новини, лонгріди, посібники, добірки сервісів та додатків. Читайте, вибирайте, застосовуйте на практиці.
Універсальний гід https://dailyday.com.ua по життю: затишний будинок, щасливі стосунки, продуктивна робота, цифрові інструменти, фінансова грамотність, саморозвиток та відпочинок. Короткі формати та глибокі розбори – для рішень без метушні.
explorethefuture – Love the modern design, feels like a place full of inspiration.
У данного прода, самая лучшая тусишка из всех, что я пробовал. Те кто пускали ВВ, выбрасывали остатки, пугаясь происходящего. Флюкс на уровне. Именно на уровне качества, не бутора. Но и не такой пиздатый как у Ромы Максимова (Его омы] флюкс для меня эталон 100мг, ОКЕАН эйфории). АМ2201 потрясающий, гора микса весёло прущего вышла из присланного пробника, но с огромной толлерантностью, была в итоге смешана с 203и 250 то же данного продавца, что придало миксу эффект, от которого бывалые говорили, что это их лучшие трипы в жизни ))) купить Кокаин, Мефедрон, Экстази “И да Заветный кооробок у меня в руках”
Баланс будинку https://press-express.com.ua та кар’єри: управління часом, побутові лайфхаки, цифрові рішення, особисті фінанси, батьки та діти, спорт та харчування. Огляди, інструкції, думки спеціалістів. Матеріали, до яких повертаються.
Платформа ідей https://infopark.com.ua для дому, роботи та відпочинку: ремонт, відносини, софт та гаджети, маркетинг та інвестиції, рецепти та спорт. Матеріали з висновками та готовими списками справ.
Сучасне медіа https://homepage.com.ua «про все важливе»: від ремонту та рецептів до стартапів та кібербезпеки. Сім’я, будинок, технології, гроші, робота, здоров’я, культура. Зрозуміла мова, наочні схеми, регулярні поновлення.
Щоденний журнал https://massmedia.one про життя без перевантаження: будинок та побут, сім’я та стосунки, ІТ та гаджети, бізнес та робота, фінанси, настрій та відпочинок. Концентрат корисного: короткі висновки, посилання джерела, інструменти для действий.
explorewithpassion – The site feels energetic and inspiring, really liked the clean layout.
discoveramazingthings – Beautiful site with uplifting energy, everything feels inspiring and fun to browse.
Заказывал у этих ребят 203 и 5-IAI, качеством доволен. Заказы они оформляют долго, но зато отправляют быстро. Мне отправили в день оплаты! https://rozovyisad.ru Уважаемый клиент, я вам уже не раз писал в личке что от вас у меня заказов не было. Все кто делал заказы уже давно получили свои посылки. Кому вы оплачивали я не знаю.
Code promo pour 1xBet : beneficiez un bonus de 100% pour l’inscription jusqu’a 130€. Renforcez votre solde facilement en placant des paris avec un multiplicateur de cinq fois. Le code bonus est valide tout au long de l’annee 2026. Activez cette offre en rechargant votre compte des 1€. Vous pouvez trouver le code promo 1xbet sur ce lien : https://sites.google.com/view/code-promo-1xbet-casino-bonus-/home.
getmoreforshop – Easy navigation and great offers, perfect combo for quick shopping.
Життя у ритмі цифри https://vilnapresa.com розумний будинок, мобільні сервіси, кібербезпека, віддалена робота, сімейний календар, здоров’я. Гайди, чек-листи, добірки додатків.
Про будинок та світ https://databank.com.ua навколо: затишок, сім’я, освіта, бізнес-інструменти, особисті фінанси, подорожі та кулінарія. Стислі висновки, посилання на джерела, корисні формули.
Журнал про баланс https://info365.com.ua затишок та порядок, сім’я та дозвілля, технології та безпека, кар’єра та інвестиції. Огляди, порівняння, добірки товарів та додатків.
Життя простіше https://metasearch.com.ua організація побуту, виховання, продуктивність, smart-рішення, особисті фінанси, спорт та відпочинок. Перевірені поради, наочні схеми, корисні таблиці.
Вот получил вчера 2 -й заказ…..отсылают быстро, качество отличное, плюс девайсы в которые всё ныколось в виде приятного бонуса… купить Мефедрон, Бошки, Марихуану По сути он эйфо, но ничего, кроме расширенных зрачков, учащенного сердцебиения и потливости, я не почувствовал… А колличество принятого было просто смешным: 550 мг. в первый день теста и 750 мг. во второй день… Тестирующих набралось в сумме около 8 и никто ничего не почувствовал.
startsomethingtoday – Love the name and the message, layout feels simple and fresh.
Crowngreen is a leading entertainment site that delivers exciting slots for gamers. Crowngreen stands out in the online gaming world and has gained popularity among visitors.
Every user at http://www.p-per.com/intranet/?p=225804
has the chance to experience exclusive games and receive rewarding offers. Crowngreen guarantees reliable gameplay, fast transactions, and round-the-clock customer support for every player.
With , enthusiasts explore a huge selection of table games, including live dealer options. The casino delivers fun and maintains an enjoyable gaming environment.
Whether you are a beginner or experienced, Crowngreen Casino provides exciting gameplay for everyone. Sign up at Crowngreen Casino today and enjoy thrilling games, exclusive bonuses, and a reliable gaming environment.
Хотите взять займ https://zaimy-57.ru быстро и безопасно? Сравните предложения МФО, выберите сумму и срок, оформите заявку онлайн и получите деньги на карту. Прозрачные условия, моментальное решение, поддержка 24/7.
Как взять займ https://zaimy-61.ru без лишних переплат: сравните ставки, выберите подходящий вариант и отправьте онлайн-заявку. Только проверенные кредиторы, прозрачные комиссии, безопасная обработка данных.
Взять займ онлайн https://zaimy-59.ru за несколько минут: без визита в офис, без лишних справок. Подбор выгодных ставок, проверенные кредиторы, мгновенное зачисление на карту. Удобно и прозрачно.
как здесь стелят? https://gav-ural.ru Я просто уже настолько завязан со сферой Lrc что подмечаю все мелочи. Даже когда в городе когда одни и та же машина мне попадается в разных местах я ее фоткаю и начинаю пробивать и узнавать че это за тачка и че зе номера )))).
discoveramazingthings – Beautiful site with uplifting energy, everything feels inspiring and fun to browse.
Нужно взять займ https://zaimy-69.ru без визита в офис? Сервис подбора предложений: мгновенное решение, гибкие лимиты, понятные условия, поддержка 24/7. Деньги на карту сразу после одобрения.
Взять займ онлайн https://zaimy-63.ru за 5–10 минут: выберите сумму и срок, заполните короткую анкету и получите перевод на карту. Прозрачные ставки, без скрытых комиссий, круглосуточная обработка, только проверенные МФО.
Взять займ https://zaimy-71.ru до зарплаты и на любые цели. Подбор по сумме, сроку и ставке, калькулятор платежа, проверенные кредиторы. Оформление 24/7, решение за несколько минут.
Берите займ онлайн https://zaimy-73.ru без очередей: моментальная проверка, прозрачные тарифы, уведомления о платеже и удобное продление. Деньги поступают на карту сразу после одобрения.
dreamfindshub – Nice layout and visuals, found a few items that really stood out.
Возьмите займ https://zaimy-78.ru онлайн на карту: фиксированные условия, калькулятор переплаты, поддержка в чате. Оформление круглосуточно, решение — за минуты, без скрытых платежей.
Онлайн-займ https://zaimy-76.ru для срочных расходов: гибкие лимиты, прозрачные комиссии, понятный график. Подберите лучший вариант и оформите заявку — деньги придут на карту 24/7.
Взять займ https://zaimy-86.ru стало проще: мобильная заявка, подтверждение за минуты, прозрачные тарифы и удобное погашение. Работает 24/7, только проверенные кредиторы.
Займ на карту https://zaimy-80.ru без лишних вопросов: короткая анкета, автоматическое решение, прозрачные комиссии. Удобное продление и напоминания о платежах в личном кабинете.
чувствую у меня будет то же самое, трек получил но он нихуя не бьется, а что ответил то? я оплатил 3 февраля и трек походу тоже левый ТС обьясни и мне ситуацию купить скорость, кокаин, мефедрон, гашиш Отличный магаз.
Где взять займ https://zaimy-89.ru выгодно? Наш сервис подбирает предложения по сумме, сроку и ставке. Полная стоимость заранее, без скрытых платежей. Оформите онлайн и получите деньги за минуты.
Срочно на карту https://zaimy-87.ru возьмите займ без визита в офис. Короткая анкета, мгновенное решение, честные условия, напоминания о платежах. Работает круглосуточно.
makelifesimpler – Nice clean interface, delivers exactly what the name promises.
Хочешь халяву? займы – сервис выгодных предложений Рунета: авиабилеты, отели, туры, финпродукты и подписки. Сравнение цен, рейтинги, промокоды и кэшбэк. Находите лучшие акции каждый день — быстро, честно, удобно.
с радостью сообщаю что посыль пришла в мой солнечный город,и я рад…не только потому что она дошла а тому что всю длинную дорогу (10дней)со мной оставался на связи магазин,работает без всяких проволочек,без гемора свойственного многим магазинам,всё дошло конспирация на наивысшем уровне как и сам магазин,ребята удачных вам продаж и многолетнего существования купить Кокаин, Мефедрон, Экстази сердцебеение крч все как обфчно , в
Эффективное лечение геморроя у взрослых. Безопасные процедуры, комфортные условия, деликатное отношение. Осмотр, диагностика, подбор терапии. Современные методы без госпитализации и боли.
https://www.bloglovin.com/@1xbetpromo3/1xbet-promo-code-2026-euro130-new-account
shopfornewthings – The design feels modern and welcoming, will come back for more.
Intelligent Crypto https://tradetonixai.com Investments: asset selection based on goals, rebalancing, staking, and capital protection. Passive income of 2-3% of your deposit with guaranteed daily payouts.
проститутки сургут с выездом
На сайте game-computers.ru собраны обзоры актуальных игровых сборок, с подробными характеристиками комплектующих и рекомендациями по их совместимости. Блог помогает выбрать оптимальные конфигурации, дает советы по апгрейду и настройке системы для комфортного гейминга.
https://blender.community/codepromoducasinomelbet/
клады по мск все во время купить онлайн мефедрон, экстази, бошки Как связаться можно
getinspireddaily – Every section feels bright and encouraging, definitely worth a visit.
dreambuycollection – Smooth browsing and stylish setup, everything feels nicely organized.
admagnet.click – Overall, professional vibe here; trustworthy, polished, and pleasantly minimal throughout.
Все пришло довольно быстро. купить онлайн мефедрон, экстази, бошки Есть кто оплатил и долго ждет адрес клада или трек???
thetrendystore – Stylish vibe and smooth layout, great place for fashion lovers.
inspirechangealways – Love the message behind this one, uplifting and well designed.
Вообщем так, с момента отправки из курьерской службы до рук курьера в нашем городе прошло 3 дня, забрал я значительно позже, но это не суть. https://znamblag.ru Счастья жизни не ждут под окном,
XEvil 6.0 automatically solve most kind of captchas,
Including such type of captchas: ReCaptcha-2, ReCaptcha v.3, Google captcha, SolveMedia, BitcoinFaucet, Steam, +12000
+ hCaptcha, FC, ReCaptcha Enterprize now supported in new XEvil 6.0!
1.) Fast, easy, precisionly
XEvil is the fastest captcha killer in the world. Its has no solving limits, no threads number limits
2.) Several APIs support
XEvil supports more than 6 different, worldwide known API: 2captcha.com, anti-captcha (antigate), RuCaptcha, death-by-captcha, etc.
just send your captcha via HTTP request, as you can send into any of that service – and XEvil will solve your captcha!
So, XEvil is compatible with hundreds of applications for SEO/SMM/password recovery/parsing/posting/clicking/cryptocurrency/etc.
3.) Useful support and manuals
After purchase, you got access to a private tech.support forum, Wiki, Skype/Telegram online support
Developers will train XEvil to your type of captcha for FREE and very fast – just send them examples
4.) How to get free trial use of XEvil full version?
– Try to search in Google “Home of XEvil”
– you will find IPs with opened port 80 of XEvil users (click on any IP to ensure)
– try to send your captcha via 2captcha API ino one of that IPs
– if you got BAD KEY error, just tru another IP
– enjoy! 🙂
– (its not work for hCaptcha!)
WARNING: Free XEvil DEMO does NOT support ReCaptcha, hCaptcha and most other types of captcha!
http://xrumersale.site/
uniquelifestylehub – Stylish and modern, feels like a curated hub for unique lifestyle inspiration.
dailydealzone – Awesome discounts displayed neatly, easy site to explore for deals.
А почему сам с-м.сом сюда какой день не кажеться…? купить Кокаин, Мефедрон, Экстази Спасибо за отзыв , а то заказывает много людей а отписываются единицы.
simplelivinghub – Calming design and helpful ideas, perfect for minimal living inspiration.
everydayshoppingzone – Lots of variety here, looks like a solid everyday go-to shop.
нужны быстрые и качественные заклады- тогда вы сдесь!!! великолепный товар !!! купить онлайн мефедрон, экстази, бошки у разных селеров бывает разный джив имеется виду по качеству так , я как то брал джив к10 пер слабо очень , в другом к 15 убивал , вот и спрашивают всегда качество дживика у продавана если ты незнал!!!
fashionloverszone – Trendy and visually appealing, great spot for fashion enthusiasts.
bestchoicecorner – Feels trustworthy and professional, I like the clean structure.
Эти ребята лучшие в своем деле, качество плюс вес, никогда не подводили, КРАСАВЧИКИ !!!Лучшие! купить Кокаин, Мефедрон, Экстази бешельме мешельме атакает
trendyfindshub – The latest styles stand out nicely, super easy to browse.
хм.. интересно сказал.. никогда не задумывался.. получается что толер от принятия одного вещества влияет на другое вещество??? купить скорость, кокаин, мефедрон, гашиш что то не могу зайти на сайт (
shopyourfavorites – Great browsing flow, everything feels user-friendly and modern.
парни все ок проверенно ))) купить кокаин, меф, бошки через телеграмм Оплатил 3 февраля, 6 получил трек-трек не бьётся, посылкинет. Раньше заказывал за 2 дня всё приходило, на данный момент по почте не отвечают, в аське сказали скоро придет, в общем, ребята, попридержите коней.
Hello! I sent a request but haven’t received a response yet. I would be very grateful if you could contact me via WhatsApp.
wa.me/+79173031189
Азартные игры онлайн покердом казино Ваш пропуск в мир высоких ставок и крупных побед. Эксклюзивные игры, турниры с миллионными призами и персональная служба поддержки. Играйте по-крупному!
learnandgrowtoday – Really smooth experience, everything here feels useful and well made.
Лучшие онлайн казино casino beef захватывающие игровые автоматы, карточные игры и live-казино на любом устройстве. Быстрый старт, честная игра и мгновенные выплаты.
Онлайн казино beef casino Насладитесь атмосферой роскошного казино не выходя из дома! Интуитивный интерфейс, безопасные платежи и щедрая программа лояльности. Сделайте свою игру выигрышной!
Ищешь автоматы? демо казино лучшие азартные развлечения 24/7. Слоты, рулетка, покер и живые дилеры с яркой графикой. Регистрируйтесь, получайте приветственный бонус и начните выигрывать!
Хочешь азарта? болливуд казино отзыв мир азарта и больших выигрышей у вас в кармане! Сотни игр, щедрые бонусы и мгновенные выплаты. Испытайте удачу и получите незабываемые эмоции прямо сейчас!
discoveramazingthings – Beautiful site with uplifting energy, everything feels inspiring and fun to browse.
modernlivingstore – Sleek design and easy navigation, makes browsing modern living items enjoyable.
животные на английском для детей
promocore.click – Appreciate the typography choices; comfortable spacing improved my reading experience.
Еще раз извините. Треки тоже бьются не сразу, курьерки “в завалах”, иногда он только начинает определяться на сайте курьерки, а его уже вручают или вручили получателю. Не пугайтесь, что мониторинг начнется не сразу, вам всем все придет заказанное. купить скорость, кокаин, мефедрон, гашиш так то, я не понимаю что ты хотел сказать по этому поводу, но курили и чистым и миксами И НЕ ПРЕТ ОН НИФИГА, то что прислали, про пробники я скажу, пробник стоит 1 грамм 2500 вроде как, вот и прикинь как не выгадно заказывать да и темболее 1 грамм норм отошлет а когда закажешь 10 пришлет той фигни, что нам сейчас
discoveramazingthings – Beautiful site with uplifting energy, everything feels inspiring and fun to browse.
https://www.japanesewomenorg.com/read-blog/61975
Хочешь рискнуть? пин ап зеркало редлагает широкий выбор игр, быстрые выплаты и надежные способы пополнения депозита.
Официальный сайт пинап казино скачать встречает удобным интерфейсом и обширным каталогом: слоты, лайв-казино, рулетка, турниры. Вывод выигрышей обрабатывается быстро, депозиты — через проверенные и защищённые способы. Акции, бонусы и поддержка 24/7 делают игру комфортной и понятной.
bestvaluecollection – Good range of products, prices seem fair and competitive too.
Официальный покердом казино вход: казино, покер, вход и скачивание слотов. Сотни слотов, лайв-столы, регулярные ивенты, приветственные бонусы. Вход по рабочему зеркалу, простая регистрация, безопасные депозиты, быстрые выплаты. Скачай слоты и играй комфортно.
Связался с продавцом вполне адекватный!Заказал щас жду адресса купить онлайн мефедрон, экстази, бошки Повторюсь размер компенсаций зависел от веса, длительности, индивидуальных переплат на счета и прочих обстоятельств. Данные по общ весу пришли вместе с треком.
Онлайн-казино vodka bet казино игровые автоматы от ведущих производителей. Эксклюзивный бонус — 70 фриспинов! Смотрите видеообзор и отзывы реальных игроков!
XEvil 5.0 automatically solve most kind of captchas,
Including such type of captchas: ReCaptcha-2, ReCaptcha v.3, Google captcha, Solve Media, BitcoinFaucet, Steam, +12000
+ hCaptcha, FC, ReCaptcha Enterprize now supported in new XEvil 6.0!
1.) Fast, easy, precisionly
XEvil is the fastest captcha killer in the world. Its has no solving limits, no threads number limits
2.) Several APIs support
XEvil supports more than 6 different, worldwide known API: 2Captcha, anti-captchas.com (antigate), rucaptcha.com, death-by-captcha, etc.
just send your captcha via HTTP request, as you can send into any of that service – and XEvil will solve your captcha!
So, XEvil is compatible with hundreds of applications for SEO/SMM/password recovery/parsing/posting/clicking/cryptocurrency/etc.
3.) Useful support and manuals
After purchase, you got access to a private tech.support forum, Wiki, Skype/Telegram online support
Developers will train XEvil to your type of captcha for FREE and very fast – just send them examples
4.) How to get free trial use of XEvil full version?
– Try to search in Google “Home of XEvil”
– you will find IPs with opened port 80 of XEvil users (click on any IP to ensure)
– try to send your captcha via 2captcha API ino one of that IPs
– if you got BAD KEY error, just tru another IP
– enjoy! 🙂
– (its not work for hCaptcha!)
WARNING: Free XEvil DEMO does NOT support ReCaptcha, hCaptcha and most other types of captcha!
http://xrumersale.site/
growwithconfidence – Love the encouraging theme here, simple and motivating content.
shopwithstylehub – Fun and stylish site, everything looks modern and well presented.
trafficcore.click – Bookmarked this immediately, planning to revisit for updates and inspiration.
clickempire.click – Found practical insights today; sharing this article with colleagues later.
отличный сервис, качество порадовало:) купить скорость, кокаин, мефедрон, гашиш Мир вам!
adengine.click – Content reads clearly, helpful examples made concepts easy to grasp.
promojet.click – Bookmarked this immediately, planning to revisit for updates and inspiration.
На официальном сайте кент казино играть онлайн вы найдёте слоты, рулетку, лайв-столы и тематические турниры. Вывод средств осуществляется оперативно, депозиты принимаются через проверенные механизмы. Безопасность, прозрачные условия, бонусные предложения и поддержка 24/7 обеспечивают спокойную и удобную игру.
Today’s highlights are here: https://talk.tacklewarehouse.com/index.php?members/npprteam.89802/#about
Нужен тахеометр? арендовать тахеометр по выгодной цене. Современные модели для геодезических и строительных работ. Калибровка, проверка, доставка по городу и области. Гибкие сроки — от 1 дня. Консультации инженеров и техническая поддержка.
Официальный сайт vavada казино: играйте онлайн с бонусами и быстрыми выплатами. Вход в личный кабинет Вавада, выгодные предложения, мобильная версия, игровые автоматы казино — круглосуточно.
Лучшее онлайн казино официальный сайт вавада с более чем 3000 игр, высокими выплатами и круглосуточной поддержкой.
shopthemoment – Trendy design and clear visuals, makes browsing super enjoyable.
findyourmoments – Beautiful concept and elegant look, I enjoyed exploring this one.
trafficedge.click – Pages loaded fast, images appeared sharp, and formatting stayed consistent.
yourcreativejourney – Love the artistic vibe here, everything feels inspiring and original.
посылка упакована оригинально =)) и скорость сборки удивила! купить онлайн мефедрон, экстази, бошки а для какой цели не отправляют? курьерам похуй что тоскать, а если бы мусора хотели бы принять, посыль наоборот отправили.
marketlaunch.click – Loved the layout today; clean, simple, and genuinely user-friendly overall.
Learn more here: https://sportsfanbetting.com
Today’s highlights are here: https://www.businesslist.pk
The best is right here: https://www.cricketweb.net
https://bbs.airav.cc/home.php?mod=space&uid=4109634
uniquelifestylehub – The layout stands out, feels classy and well put together.
The best is right here: https://www.saffireblue.ca
connectwithideas – Clean layout and inspiring content, perfect for exploring new concepts.
Top picks for you: https://redfordtheatre.com
магазин работает на все 100%!советаю! купить Кокаин, Мефедрон, Экстази привет я сам тут не так давно ) я тебя понимаю я вот уже вторую посылку получил всё чётко и ровно тоже пережевал , часто на швыров попадал а тут ребята грамотную тему замутили и магазу респект и админам) не волнуйся всё будет чётко:good:
Updated today: https://www.maxwaugh.com
All the latest here: https://antalyamerhaba.com
yourcreativejourney – Love the artistic vibe here, everything feels inspiring and original.
Таможенный брокер всегда держит в курсе статуса груза, удобно и спокойно: https://tamozhenniiy-predstavitel11.ru/
purefashionmarket – Fantastic collection of looks, the site design feels elegant.
Что хочу сказать закладки всегда по высоте. купить скорость, кокаин, мефедрон, гашиш Взял ам2233 эфектом очень доволен! спасибо
createinspirelead – Motivating design and smooth layout, really captures a positive energy.
всё дошло))))) Спасибо магазину,в след раз возьму отпишу что да как :dansing:качество на высоте купить кокаин, меф, бошки через телеграмм Вот отзыв за этот эйфор:
dreambuyoutlet – Great presentation and fast loading, enjoyable shopping experience overall.
findjoytoday – Positive and uplifting, the site really feels cheerful and motivating.
purefashionmarket – Great fashion selection and clean visuals, easy to explore and shop.
работает заебок… присылают в кортонных больших конвертах…. доставляют очень быстро мне доставили в город за 3 дня… а их отделение в каждом городе есть.. как посылка придет вам позвонят на телефон и предложат доставку или приехать самому… если решите сами забирать то вам скажут адресс куда ехать…=) https://366shop.ru мы говорили что мхе качество не очень, он такой пришел, сказали поменяем дак поменяем, ты стучи туда с кем об обмене разговаривал…
Заказываю тут уже не первый месяц, всегда всё отлично. Алкоголь проверенный, доставка оперативная, никаких сюрпризов. Очень доволен. Теперь если нужна доставка спиртного в Москве, беру здесь https://dostavka-alcohol.ru/
ranklift.click – Content reads clearly, helpful examples made concepts easy to grasp.
findjoyeveryday – Positive energy throughout, design fits the uplifting name perfectly.
Актуальный вход в KRAKEN — вот здесь:
Работает на сегодня.
Если старый адрес не работает — заходи через запасной линк: https://kristi.su/threads/37
Обновлено сегодня.
rankfuel.click – Found practical insights today; sharing this article with colleagues later.
adshift.click – Loved the layout today; clean, simple, and genuinely user-friendly overall.
growthsphere.click – Overall, professional vibe here; trustworthy, polished, and pleasantly minimal throughout.
XEvil 5.0 automatically solve most kind of captchas,
Including such type of captchas: ReCaptcha-2, ReCaptcha v.3, Google, SolveMedia, BitcoinFaucet, Steam, +12000
+ hCaptcha, FC, ReCaptcha Enterprize now supported in new XEvil 6.0!
1.) Fast, easy, precisionly
XEvil is the fastest captcha killer in the world. Its has no solving limits, no threads number limits
2.) Several APIs support
XEvil supports more than 6 different, worldwide known API: 2captcha.com, anti-captchas.com (antigate), rucaptcha.com, DeathByCaptcha, etc.
just send your captcha via HTTP request, as you can send into any of that service – and XEvil will solve your captcha!
So, XEvil is compatible with hundreds of applications for SEO/SMM/password recovery/parsing/posting/clicking/cryptocurrency/etc.
3.) Useful support and manuals
After purchase, you got access to a private tech.support forum, Wiki, Skype/Telegram online support
Developers will train XEvil to your type of captcha for FREE and very fast – just send them examples
4.) How to get free trial use of XEvil full version?
– Try to search in Google “Home of XEvil”
– you will find IPs with opened port 80 of XEvil users (click on any IP to ensure)
– try to send your captcha via 2captcha API ino one of that IPs
– if you got BAD KEY error, just tru another IP
– enjoy! 🙂
– (its not work for hCaptcha!)
WARNING: Free XEvil DEMO does NOT support ReCaptcha, hCaptcha and most other types of captcha!
marketgenius.click – Appreciate the typography choices; comfortable spacing improved my reading experience.
Разве имеет принципиальное значение сколько моему аккаунту времени? Я тут не *зависаю*, а пишу по сути. Мутность заключается в том что оператор в аське на вопросы по уточнению адреса, сначала молчал почти 3 часа, потом вообще оффнулся. купить Мефедрон, Бошки, Марихуану Был постоянным клиентом магаза , неделю назад прислали с нулевым эфектом , года два назад была проблема с ними, решили сразу , сейчас на вопрос -как будем решать , ответили что мы решим – напишите в конце недели , типа не разводите панику на форуме недельку , а мы пока людей пошвыряем…. , неделя прошла , на вопросы не отвечают…решать не хотят…. был магаз ровный , теперь людей решили покидать…. админы вообще никуда не смотрят , раньше хоть как то было гарантией что они в списке доверенных , сейчас деньги заплатили за форум , выставились и швыряют .
growthwave.click – Color palette felt calming, nothing distracting, just focused, thoughtful design.
modernhomefinds – Stylish home ideas and layout, feels cozy and modern at once.
discoveramazingthings – Beautiful site with uplifting energy, everything feels inspiring and fun to browse.
digitalboost.click – Bookmarked this immediately, planning to revisit for updates and inspiration.
makeimpacttoday – Motivational and well-organized, great for users wanting to take action.
Ровный магазин . Всем советую ! https://uvoperm.ru Отличный магазин с отличным продуктом.
discoveramazingoffers – Fun experience browsing deals here, everything feels easy and inviting.
Посылку же должны до дома доставить. купить онлайн мефедрон, экстази, бошки Спасибо магазину за это!
Все подробности по ссылке: https://lookdecor.ru
Самое интересное тут: https://morshynkurort.net
Всё самое новое здесь: https://www.bigcatalliance.org
inspirechangealways – Very motivating site, love the positive energy and smooth layout.
trendycollectionhub – Stylish and modern layout, perfect for exploring new fashion trends.
dreambuyoutlet – Smooth browsing experience, stylishly presented products make shopping enjoyable.
что то не могу зайти на сайт ( купить скорость, кокаин, мефедрон, гашиш Давно работаю с чемиком.
findjoyeveryday – Bright, cheerful site design that instantly lifts up your mood.
Все самое актуальное тут: https://topper.md
Read more on the website: https://telrad.com
Читать полностью на сайте: http://nirvanaplus.ru
Подробнее на сайте:: https://kmural.ru
Best selection of the day: https://amt-games.com
everydayshoppinghub – Very convenient and easy to use, makes daily shopping simple and smooth.
пробывал нюхать эфект 4-6часа купить Кокаин, Мефедрон, Экстази Обращайтесь к нам снова
clickmastery.click – Bookmarked this immediately, planning to revisit for updates and inspiration.
yourmomentstarts – Great first impression, the name and vibe feel truly motivational.
everydayshoppingzone – Great place for daily shopping, everything feels easy and convenient.
nextlevelmarketing.click – Overall, professional vibe here; trustworthy, polished, and pleasantly minimal throughout.
clicktogrow.click – Content reads clearly, helpful examples made concepts easy to grasp.
Мне отказали в подтверждении джаббера в ЛС. Будьте бдительны! купить Кокаин, Мефедрон, Экстази Обязательно позвонить должны, как позвонят легче забрать самому чем ждать пока курьер доставит
convertmore.click – Mobile version looks perfect; no glitches, fast scrolling, crisp text.
clickdriven.click – Bookmarked this immediately, planning to revisit for updates and inspiration.
changeyourfuture – Inspiring design and positive message, really motivates you to take action.
changeyourdirection – Fresh and inspiring layout, really encourages exploration and new perspectives.
купил его в аптеке купить онлайн мефедрон, экстази, бошки Описаниние 3( не было конкретного уточнения)
adverto.click – Mobile version looks perfect; no glitches, fast scrolling, crisp text.
engagenow.click – Appreciate the typography choices; comfortable spacing improved my reading experience.
dreambelieveachieve – Love the positivity here, beautiful concept and very smooth browsing.
trendyfindshub – Love the trendy vibes, the site is simple yet stylish to browse.
Весом по 1 гр купить онлайн мефедрон, экстази, бошки Эти ребята лучшие в своем деле, качество плюс вес, никогда не подводили, КРАСАВЧИКИ !!!Лучшие!
brightfashionfinds – Colorful and trendy, makes browsing fashion items enjoyable and exciting.
XEvil 6.0 automatically solve most kind of captchas,
Including such type of captchas: ReCaptcha v.2, ReCaptcha v.3, Google, SolveMedia, BitcoinFaucet, Steam, +12000
+ hCaptcha, FC, ReCaptcha Enterprize now supported in new XEvil 6.0!
1.) Fast, easy, precisionly
XEvil is the fastest captcha killer in the world. Its has no solving limits, no threads number limits
2.) Several APIs support
XEvil supports more than 6 different, worldwide known API: 2captcha.com, anti-captcha (antigate), RuCaptcha, death-by-captcha, etc.
just send your captcha via HTTP request, as you can send into any of that service – and XEvil will solve your captcha!
So, XEvil is compatible with hundreds of applications for SEO/SMM/password recovery/parsing/posting/clicking/cryptocurrency/etc.
3.) Useful support and manuals
After purchase, you got access to a private tech.support forum, Wiki, Skype/Telegram online support
Developers will train XEvil to your type of captcha for FREE and very fast – just send them examples
4.) How to get free trial use of XEvil full version?
– Try to search in Google “Home of XEvil”
– you will find IPs with opened port 80 of XEvil users (click on any IP to ensure)
– try to send your captcha via 2captcha API ino one of that IPs
– if you got BAD KEY error, just tru another IP
– enjoy! 🙂
– (its not work for hCaptcha!)
WARNING: Free XEvil DEMO does NOT support ReCaptcha, hCaptcha and most other types of captcha!
yourdailyshoppinghub – Nicely structured site, makes daily shopping easier and more enjoyable.
Чурапчинская ЦРБ: https://churap-crb.ru Полный спектр медицинских услуг для жителей района.
Кореновская ЦРБ https://mbuzkcrb.ru Центральная районная больница. Качественная медицинская помощь, поликлиника и стационар.
Солнышково https://solnyshkovo.ru Центр развития и обучения для детей. Интересные занятия, подготовка к школе и творческие студии в комфортной атмосфере.
Альфа-Дент НСК https://alfadentnsk.ru Современная стоматология в Новосибирске. Профессиональное лечение и забота о вашей улыбке.
Я делил Амф, купить Кокаин, Мефедрон, Экстази И еще сушняки ужасные. Сейчас вот утром проснулся, и до сих пор
learnandgrowtoday – Very informative and inspiring, perfect for daily learning and personal growth.
makepositivechanges – Uplifting and encouraging site, everything feels fresh and motivating.
Эль-Дент: https://eldental.ru Современный детский стоматологический центр. Профессиональное лечение, ортодонтия и реставрация.
Only top materials: https://therockpit.net
discoverandcreate – Creative and engaging, perfect place to find ideas and inspiration.
Стоимость услуг варьируется, но актуальная хрумер цена вполне доступна для большинства пользователей.
millioner casino
milioner casino
Our most valuable: https://soa7.icealex.vip/7-best-sites-to-buy-gmail-accounts-in-bulk-pva-2/
Привет всем! Написал бы отзыв был бы продукт для него)) Мир ровным! купить кокаин, меф, бошки через телеграмм Дошло за 3 дня , качество отличное , буду только с этим магазом работать.
billionaire casino
freshfashioncorner – Trendy looks and fresh designs, definitely one to revisit often.
discoverbetteroptions – Clean and well-organized, makes finding better deals and options easy.
clickedge.click – Pages loaded fast, images appeared sharp, and formatting stayed consistent.
bestvaluecollection – Excellent deals and easy navigation, really makes shopping enjoyable.
Успешных вам продаж купить онлайн мефедрон, экстази, бошки Ещё в 11-м году брал здесь чудесную фофу и другие ништяки.Тогда это был крутейший магаз.И вот после долгого перерыва они снова идут в гору.Заказ оперативность 5 упаковка 5 качество 5 цена лучше всех.
Эль-Дент: https://eldental.ru Современный детский стоматологический центр. Профессиональное лечение, ортодонтия и реставрация.
Альфа-Дент НСК https://alfadentnsk.ru Современная стоматология в Новосибирске. Профессиональное лечение и забота о вашей улыбке.
digiloom.click – Content reads clearly, helpful examples made concepts easy to grasp.
leadmagnet.click – Overall, professional vibe here; trustworthy, polished, and pleasantly minimal throughout.
Updated today: https://postheaven.net/djw7qaiqyq
metareach.click – Color palette felt calming, nothing distracting, just focused, thoughtful design.
resultsfirst.click – Color palette felt calming, nothing distracting, just focused, thoughtful design.
buildsomethingnew – Inspiring message and simple design, feels fresh and full of ideas.
findyourdreamplace – Beautiful visuals and easy navigation, makes exploring dream locations enjoyable.
clicksthatsell.click – Pages loaded fast, images appeared sharp, and formatting stayed consistent.
Ребят, а подскажите насчет доставки спср, в какие города она доставляет ? Блин никогда раньше с ней не связывался 🙁 Расскажите пожалуйста, что, да как купить Кокаин, Мефедрон, Экстази Наверное стоит все же воздержаться от заказов и отправки денег и подождать до появления селлера..,на соседнем форуме(СФН) его тоже ждут….
highroi.click – Loved the layout today; clean, simple, and genuinely user-friendly overall.
findyourmoments – Calm and inspiring design, a lovely place to explore and reflect.
purestylemarket – Very stylish and modern, perfect for exploring new fashion items.
Ты че педрила хвалишся че та видел ты меня знаеш нет пес это не паника а логика паника это твое второе имя ху……я ты наличности переходиш это говорит о том что ты очкошник служил он терпила мне пох кто ты а за слова ты ответиш ну конншно на растояние ты герой ха ха отдыхай кент купить скорость, кокаин, мефедрон, гашиш трек получен, ребятам уважуха:rasta:
classyfindsonline – Love the classy layout, everything looks elegant and well arranged.
imaginelearnexplore – Inspiring and informative, great site for learning and discovering new things.
globalfashionzone – Trendy and user-friendly, excellent layout for browsing worldwide fashion trends.
смотря каким реагентом будешь бадяжить купить Кокаин, Мефедрон, Экстази вообще почта 1 класс оказываеться самое быстрое.. 2-3 суток и приходит
urbanfashioncorner – Stylish urban vibe, makes exploring fashion items really fun and engaging.
https://hondrolife.biz/it/ che cos’è
La salute delle articolazioni è fondamentale per il nostro benessere quotidiano. A volte, però, ci troviamo a dover affrontare problemi che possono limitare le nostre attività. Fortunatamente, esistono soluzioni naturali che possono aiutare a migliorare la situazione. Questi rimedi non sono solo un aiuto temporaneo. Possono essere una vera e propria chiave per mantenere la mobilità a lungo termine.
Quando parliamo di supporto articolare, dobbiamo considerare vari fattori. Alcuni di questi includono ingredienti naturali, la loro efficacia e la modalità d’uso. Un approccio corretto è cruciale. Infatti, scegliere il prodotto giusto può fare la differenza tra sentirsi bene e vivere il disagio costante.
In questo articolo, esploreremo insieme un integratore specifico. Ci soffermeremo sui suoi benefici e sugli ingredienti principali che lo compongono. Scopriremo, inoltre, come questi elementi possano interagire con il nostro corpo per sostenere la salute delle articolazioni. Pronti per un viaggio verso una maggiore mobilità e comfort?
Cosa rende unico questo prodotto?
In un mondo saturo di offerte, questo articolo si distingue per la sua qualità e funzionalità. La combinazione di ingredienti naturali e tecnologie innovative crea un prodotto davvero speciale. Non è solo un rimedio, ma anche un compagno per chi desidera migliorare il proprio benessere. Molti lo scelgono per la sua efficacia e la sua capacità di supportare il corpo in modo naturale.
Ogni fase della sua produzione è curata nei minimi dettagli. La scelta degli ingredienti freschi è fondamentale, poiché assicurano risultati visibili e duraturi. Gli utilizzatori apprezzano l’approccio olistico, che considera l’individuo nella sua totalità. Grazie a questa attenzione, è possibile ottenere una sinergia perfetta fra tutti gli elementi. Non è sorprendente come semplici prodotti possano avere un impatto così profondo sulla vita quotidiana?
This unique formula è stata studiata a lungo, testata e approvata per garantire la massima sicurezza e risultati tangibili. In questo modo, chi lo utilizza si sente supportato e accompagnato nel proprio percorso di salute e benessere. È un’opzione versatile, in grado di adattarsi alle diverse esigenze di ciascuno. La sua reputazione si è costruita non solo sulla qualità, ma anche sulla fiducia degli utenti. Questo lo rende davvero un elemento prezioso nel panorama della salute naturale.
I benefici per le articolazioni
La salute delle nostre articolazioni è fondamentale. Infatti, sono le porte d’accesso al movimento e alla vita attiva. Alcuni ingredienti naturali possono fornire un supporto concreto a chi desidera migliorare il proprio stato articolare. Non si tratta solo di ridurre il dolore, ma di sostenere la funzione articolare in modo significativo.
Il mantenimento della flessibilità è essenziale. È importante garantire che le articolazioni rimangano mobili nel tempo. Inoltre, una corretta lubrificazione aiuta a prevenire l’usura. Vale la pena notare che un buon equilibrio di nutrienti arricchisce il tessuto articolare. A lungo termine, questo approccio porta benefit notevoli.
Il rafforzamento dei legamenti e dei tendini è un altro aspetto cruciale. Questi tessuti sostengono articolazioni e muscoli. È essenziale che siano in ottima forma per evitare infortuni. Non dobbiamo dimenticare l’importanza di una dieta equilibrata. Solo così possiamo garantire il giusto nutrimento per il nostro corpo.
Aggiungendo quindi alcuni elementi specifici alla propria routine, si può migliorare visibilmente la qualità della vita. Le articolazioni possono riacquistare vitalità e resistenza, sostenendo una mobilità più piacevole e duratura.
smartfashionboutique – Beautifully curated items and smooth browsing, feels premium and trendy.
yourmomenttoshine – Bright and uplifting, really encourages users to feel confident and motivated.
yourvisionawaits – Inspiring and motivating, makes exploring ideas and goals really enjoyable.
Я всегда пишу благодарность везде, мыло, ася, форум и т.д. Может это только я так делаю, но думаю, что так должны все делать. https://yabloko-service.ru думайте, что продаёте. обещали поменять на туси, время тянут, ниче сделать не могут конкретного. отвечают редко.
XEvil 5.0 automatically solve most kind of captchas,
Including such type of captchas: ReCaptcha-2, ReCaptcha v.3, Google captcha, SolveMedia, BitcoinFaucet, Steam, +12000
+ hCaptcha, FC, ReCaptcha Enterprize now supported in new XEvil 6.0!
1.) Fast, easy, precisionly
XEvil is the fastest captcha killer in the world. Its has no solving limits, no threads number limits
2.) Several APIs support
XEvil supports more than 6 different, worldwide known API: 2Captcha, anti-captchas.com (antigate), rucaptcha.com, death-by-captcha, etc.
just send your captcha via HTTP request, as you can send into any of that service – and XEvil will solve your captcha!
So, XEvil is compatible with hundreds of applications for SEO/SMM/password recovery/parsing/posting/clicking/cryptocurrency/etc.
3.) Useful support and manuals
After purchase, you got access to a private tech.support forum, Wiki, Skype/Telegram online support
Developers will train XEvil to your type of captcha for FREE and very fast – just send them examples
4.) How to get free trial use of XEvil full version?
– Try to search in Google “Home of XEvil”
– you will find IPs with opened port 80 of XEvil users (click on any IP to ensure)
– try to send your captcha via 2captcha API ino one of that IPs
– if you got BAD KEY error, just tru another IP
– enjoy! 🙂
– (its not work for hCaptcha!)
WARNING: Free XEvil DEMO does NOT support ReCaptcha, hCaptcha and most other types of captcha!
exploreinnovativeideas – Great place to discover fresh ideas, very clean and inspiring layout.
Join PUG555 roulette jackpot sports betting live casino and win big at PUG555 |
trendinghomeideas – Creative and practical ideas for home, very nice experience overall.
так что смотрите внимательней что присылают, если не хотите словить передоз!!! https://neva-spravka.ru Магазин замечательный!!
stayfocusedandgrow – Positive and clean layout, perfect for personal growth and focus.
changeyourperspective – Modern and clean design, perfect for exploring fresh ideas and viewpoints.
все огонь люди работают!!!пс за поддержку ) купить Мефедрон, Бошки, Марихуану все я уже пошол на почту получать пришло быстро молодцы СПСР вчера трек сегодня забираю за качество как и обещал отпишу а то там кто то сомневался
startanewjourney – Simple and inviting design, feels like a site full of possibilities.
findyourtrend – Stylish and trendy, makes discovering new fashion items simple and fun.
freshfashionmarket – Bright and trendy design, makes shopping for new fashion pieces enjoyable.
hyperclick.click – Navigation felt smooth, found everything quickly without any confusing steps.
urbanwearstudio – Trendy and stylish, excellent hub for urban fashion and modern streetwear.
Работаю впервые с этим магазом! Есть что заявить! Ребята, я в приятном шоке от работы магаза! Брал давеча! Пацанчик ну тот который заказы принимает, обрабатывает, ему ОСОБАЯ УВАЖУХА! Магаз РАБОТАЕТ РОВНО и ОПЕРАТИВНО! Все заценили! Все объявили ОБЩУЮ ОХУЕННУЮ БЛАГОДАРНОСТЬ МАГАЗУ! Извиняюсь за французский! ) Что могу сказать, видимо нашел свой магаз! ) купить скорость, кокаин, мефедрон, гашиш хороший магазин,было дело работал с ними)
clickorbit.click – Bookmarked this immediately, planning to revisit for updates and inspiration.
clickifypro.click – Found practical insights today; sharing this article with colleagues later.
clickfusion.click – Appreciate the typography choices; comfortable spacing improved my reading experience.
clickmetric.click – Overall, professional vibe here; trustworthy, polished, and pleasantly minimal throughout.
dailyvalueoutlet – Great deals and smooth browsing, perfect for everyday shopping and savings.
simplevalueplace – Easy navigation and clear visuals, great for quick and simple shopping.
techify.click – Loved the layout today; clean, simple, and genuinely user-friendly overall.
Закупал я рег у Тс конечно качество пацаны просто бомба:good: Я токого не когда не пробывал!!! купить онлайн мефедрон, экстази, бошки ой заказ 10007466 жду четвертую неделю слышал только завтроки что трек забьется и все получиш но так не чего и не получил.списался в айсекью сказал что если до пятницы не получу то вернет деньги.буду держать в курсе.надеюсь с возвратом вранья не будет
codespark.click – Color palette felt calming, nothing distracting, just focused, thoughtful design.
uniquevaluezone – Very well-organized site, everything feels unique and easy to find.
modernlivingstore – Sleek design and easy navigation, makes browsing modern living items enjoyable.
newseasonfinds – Fresh, modern, and well-organized, makes exploring seasonal items enjoyable.
https://magnitola.kiev.ua
Как часы купить кокаин, меф, бошки через телеграмм “Кстати Минеру за описание Минус не указал что второй кооператив”
trendingstyleworld – Love the style and variety here, trendy yet easy to explore.
Crowngreen is a leading online casino that delivers thrilling experiences for gamers. Crowngreen excels in the online gaming world and has achieved popularity among visitors.
Every player at Crowngreen
can play the latest slots and take advantage of generous offers. Crowngreen ensures secure gameplay, fast transactions, and round-the-clock customer support for all users.
With , enthusiasts unlock a huge range of slots, including live dealer options. The site delivers fun and maintains a secure gaming environment.
Whether you are new or experienced, Crowngreen Casino guarantees something special for everyone. Sign up at Crowngreen Casino today and experience exciting games, generous bonuses, and a safe gaming environment.
inspirechangealways – Positive and motivational, great site for inspiration and self-improvement ideas.
yourfashionoutlet – Great collection of trendy items, very smooth and stylish browsing.
learnsomethingamazing – Inspiring and educational, perfect site for daily learning and ideas.
Могу сфотать, на смотри купить кокаин, меф, бошки через телеграмм ТУТ САМЫЙ ЛУЧШИЙ МАГАЗИН С САМЫМ ЛУЧШИМ ТОВАРОМ!!! ЖЕЛАЮ УДАЧИ!!!
Discover exquisite Austrian wines at wine-tasting-wien.netlify.app and immerse yourself in Vienna’s vibrant wine culture.
In Wien kann man die Vielfalt osterreichischer Weine auf besondere Weise entdecken. Die Region ist bekannt fur ihren exzellenten Wei?wein, besonders den Grunen Veltliner. Die Weinkeller Wiens locken mit ihrem authentischen Charme und kostlichen Tropfen.
Das milde Klima und die mineralreichen Boden begunstigen den Weinbau. Das macht Wien zu einer der wenigen Gro?stadte mit eigenem Weinbaugebiet.
#### **2. Beliebte Weinregionen und Weinguter**
In Wien gibt es mehrere renommierte Weinregionen, wie den Nussberg oder den Bisamberg. Die Weinguter hier setzen auf nachhaltigen Anbau. Familiengefuhrte Weinguter bieten oft Fuhrungen und Verkostungen an. Oft gibt es auch regionale Speisen zur perfekten Weinbegleitung.
Ein Besuch im Weingut Wieninger oder im Mayer am Pfarrplatz lohnt sich. Diese Weinguter stehen fur hochste Qualitat und Handwerkskunft.
#### **3. Ablauf einer typischen Weinverkostung**
Eine klassische Wiener Weinverkostung beginnt meist mit einer Kellertour. Die Winzer erklaren gerne ihre Arbeitsschritte. Danach folgt die Verkostung unterschiedlicher Weine. Jeder Wein wird sorgfaltig prasentiert und verkostet.
Haufig werden die Weine mit lokalen Kasesorten oder Brot serviert. Es ist die perfekte Erganzung zum sensorischen Erlebnis.
#### **4. Tipps fur unvergessliche Weinverkostungen**
Um das Beste aus einer Weinverkostung in Wien herauszuholen, sollte man vorher buchen. Einige Anbieter bieten auch private Verkostungen an. Zudem lohnt es sich, auf die Jahreszeiten zu achten. Im Winter bieten viele Weinguter gemutliche Kellerveranstaltungen.
Ein guter Tipp ist auch, ein Notizbuch mitzubringen. Es hilft, personliche Favoriten zu dokumentieren.
—
### **Spin-Template fur den Artikel**
#### **1. Einfuhrung in die Weinverkostung in Wien**
In Wien kann man die Vielfalt osterreichischer Weine auf besondere Weise entdecken.
#### **2. Beliebte Weinregionen und Weinguter**
Oft gibt es auch regionale Speisen zur perfekten Weinbegleitung.
#### **3. Ablauf einer typischen Wiener Weinverkostung**
Oft werden historische Anekdoten zum Weinbau geteilt.
#### **4. Tipps fur unvergessliche Weinverkostungen**
Viele Gaste schatzen spater die Erinnerungen an die Verkostung.
—
**Hinweis:** Durch Kombination der Varianten aus den -Blocken konnen zahlreiche einzigartige Texte generiert werden, die grammatikalisch und inhaltlich korrekt sind.
modernlivingtrend – Stylish, modern, and smooth experience from start to finish.
XEvil 6.0 automatically solve most kind of captchas,
Including such type of captchas: ReCaptcha-2, ReCaptcha v.3, Google, SolveMedia, BitcoinFaucet, Steam, +12000
+ hCaptcha, FC, ReCaptcha Enterprize now supported in new XEvil 6.0!
1.) Fast, easy, precisionly
XEvil is the fastest captcha killer in the world. Its has no solving limits, no threads number limits
2.) Several APIs support
XEvil supports more than 6 different, worldwide known API: 2Captcha, anti-captchas.com (antigate), RuCaptcha, death-by-captcha, etc.
just send your captcha via HTTP request, as you can send into any of that service – and XEvil will solve your captcha!
So, XEvil is compatible with hundreds of applications for SEO/SMM/password recovery/parsing/posting/clicking/cryptocurrency/etc.
3.) Useful support and manuals
After purchase, you got access to a private tech.support forum, Wiki, Skype/Telegram online support
Developers will train XEvil to your type of captcha for FREE and very fast – just send them examples
4.) How to get free trial use of XEvil full version?
– Try to search in Google “Home of XEvil”
– you will find IPs with opened port 80 of XEvil users (click on any IP to ensure)
– try to send your captcha via 2captcha API ino one of that IPs
– if you got BAD KEY error, just tru another IP
– enjoy! 🙂
– (its not work for hCaptcha!)
WARNING: Free XEvil DEMO does NOT support ReCaptcha, hCaptcha and most other types of captcha!
Желаю развития ветке! купить Мефедрон, Бошки, Марихуану Уважаемы участники форума!
https://xnudes.ai/
smartshoppingzone – Easy to navigate and clean layout, perfect for smart shoppers.
Контрактная разработка электроники включает проектирование схемотехники, создание плат и прототипов, тестирование и серийное производство. Такой подход минимизирует ошибки, повышает надежность и ускоряет вывод продукта на рынок – https://vkaice.com/%d1%80%d0%b0%d0%b7%d1%80%d0%b0%d0%b1%d0%be%d1%82%d0%ba%d0%b0-%d1%8d%d0%bb%d0%b5%d0%ba%d1%82%d1%80%d0%be%d0%bd%d0%bd%d1%8b%d1%85-%d1%83%d1%81%d1%82%d1%80%d0%be%d0%b9%d1%81%d1%82%d0%b2-%d0%b4%d0%bb/! Технология помогает сосредоточиться на главных задачах проекта
learnsomethingdaily – Clean and informative, perfect for daily learning and personal growth.
theartofgrowth – Inspiring and thoughtful layout, perfect for personal growth and learning.
findyourpathnow – Motivating vibe and thoughtful layout, everything feels purposeful and neat.
Портрет по фотографии на заказ https://moi-portret.ru
Need TRON Energy? buy tron energy Affordable for your wallet. Secure platform, verified sellers, and instant delivery. Optimize every transaction on the TRON network with ease and transparency.
Energy for TRON buy tron energy instant activation, transparent pricing, 24/7 support. Reduce TRC20 fees without freezing your TRX. Convenient payment and automatic energy delivery to your wallet.
Туристический портал https://cmc.com.ua авиабилеты, отели, туры и экскурсии в одном месте. Сравнение цен, отзывы, готовые маршруты, визовые правила и карты офлайн. Планируйте поездку, бронируйте выгодно и путешествуйте без стресса.
Получил 5г 203! Оплатил в четверг, отправили в пятницу и уже в понедельник курьер мне передал. 🙂 Вес в поряде, цвет желтоватый. купить Кокаин, Мефедрон, Экстази Магазин супер)
Crowngreen is a popular online casino that delivers exciting slots for players. Crowngreen excels in the online gaming world and has achieved popularity among visitors.
Every player at Crowngreen
has the chance to enjoy top-rated slots and benefit from rewarding bonuses. Crowngreen guarantees secure gameplay, fast transactions, and constant customer support for every gamer.
With , enthusiasts explore a diverse variety of slots, including live dealer options. The site focuses on entertainment and maintains a secure gaming environment.
Whether you are new or an expert, Crowngreen offers unique experiences for everyone. Sign up at Crowngreen today and experience exciting games, generous bonuses, and a reliable gaming environment.
quantumclick.click – Bookmarked this immediately, planning to revisit for updates and inspiration.
innoclick.click – Appreciate the typography choices; comfortable spacing improved my reading experience.
discoverandbuy – Smooth experience and well-presented products, makes online shopping effortless.
nanotech.click – Appreciate the typography choices; comfortable spacing improved my reading experience.
techpilot.click – Appreciate the typography choices; comfortable spacing improved my reading experience.
promopulse.click – Loved the layout today; clean, simple, and genuinely user-friendly overall.
с чего они тебе отзывы писать будут если они груз две недели ждут? они че тебе экстросенсы и качество могут на расстоянии проверить? и извинений мало ты не на ногу в трамвае наступила следующий раз пусть магаз компенсирует бонусами за принесенные неудобства! кто со мной согласен добавляем репу! https://kemono.im/acaecegwn/desaru-kupit-kokain-mefedron-marikhuanu-boshki Отличный,ровный МАГАЗ!
trendforlife – Very fashionable and clean site, makes exploring trends effortless.
smartlogic.click – Content reads clearly, helpful examples made concepts easy to grasp.
modernhomecorner – Love the modern designs and home decor ideas shared here daily.
urbanchoicehub – Trendy urban style and clean design, makes exploring fashion easy and fun.
PureValueOutlet – Inspiring and interactive site for creative thinkers.
Строительный портал https://6may.org новости отрасли, нормативы и СНИП, сметы и калькуляторы, BIM-гайды, тендеры и вакансии. Каталоги материалов и техники, база подрядчиков, кейсы и инструкции. Всё для проектирования, строительства и ремонта.
Всё для стройки https://artpaint.com.ua в одном месте: материалы и цены, аренда техники, каталог подрядчиков, тендеры, сметные калькуляторы, нормы и шаблоны документов. Реальные кейсы, обзоры, инструкции и новости строительного рынка.
Новостной портал https://novosti24.com.ua с фокусом на важное: оперативные репортажи, аналитика, интервью и факты без шума. Политика, экономика, технологии, культура и спорт. Удобная навигация, персональные ленты, уведомления и проверенные источники каждый день.
Получил посылочку общее время ожидания 4 дня,упаковка супер,качество просто космическое,спасибо магазину! https://www.band.us/page/100413640/ а думаете?
Докладніше: https://ua-meta.com/rozvahy.html
yourstylezone – Stylish, modern, and user-friendly, love the smooth browsing experience.
findmotivationtoday – Positive and inspiring layout, really motivates and encourages action every day.
значит ты чо то намутил , а вещество я заказывал в этом магазе норм для RCS естественно https://wanderlog.com/view/xgznobalgn/шаан-купить-кокаин-мефедрон-марихуану-бошки/ блин… один заказ выбил, затестил. теперь опять в аське молчок
yourpathforward – Motivating concept, feels like a site that inspires progress and growth.
findnewinspiration – Bright, clean, and motivating, perfect for discovering fresh ideas daily.
Зделал заказ 203го в четверг вечером,в пятницу уже получил трек,а сегодня създил забрал посылку!запаковано так,что сам с трудом нашел)все очень вкусно и качественно!продовцам респект.слаженно работают! https://pxlmo.com/girontuygervase Может стоит внимательно посмотреть в ветке что есть резервный жаббер ? основной уже 6 дней не работает , какие то сбои, но резерв ведь работает, привыкли панику поднимать на ровном месте.
trendandfashionhub – Bright, trendy, and well-organized, perfect for fashion enthusiasts.
leadsrocket.click – Navigation felt smooth, found everything quickly without any confusing steps.
growyourmindset – Love how this name promotes positivity and continuous personal growth.
targetboost.click – Content reads clearly, helpful examples made concepts easy to grasp.
engagehub.click – Loved the layout today; clean, simple, and genuinely user-friendly overall.
leadgenius.click – Loved the layout today; clean, simple, and genuinely user-friendly overall.
Актуальне за сьогодні: https://press-express.com.ua/didzhytal.html
XEvil 5.0 automatically solve most kind of captchas,
Including such type of captchas: ReCaptcha v.2, ReCaptcha-3, Google captcha, SolveMedia, BitcoinFaucet, Steam, +12k
+ hCaptcha, FC, ReCaptcha Enterprize now supported in new XEvil 6.0!
1.) Fast, easy, precisionly
XEvil is the fastest captcha killer in the world. Its has no solving limits, no threads number limits
2.) Several APIs support
XEvil supports more than 6 different, worldwide known API: 2Captcha, anti-captchas.com (antigate), RuCaptcha, DeathByCaptcha, etc.
just send your captcha via HTTP request, as you can send into any of that service – and XEvil will solve your captcha!
So, XEvil is compatible with hundreds of applications for SEO/SMM/password recovery/parsing/posting/clicking/cryptocurrency/etc.
3.) Useful support and manuals
After purchase, you got access to a private tech.support forum, Wiki, Skype/Telegram online support
Developers will train XEvil to your type of captcha for FREE and very fast – just send them examples
4.) How to get free trial use of XEvil full version?
– Try to search in Google “Home of XEvil”
– you will find IPs with opened port 80 of XEvil users (click on any IP to ensure)
– try to send your captcha via 2captcha API ino one of that IPs
– if you got BAD KEY error, just tru another IP
– enjoy! 🙂
– (its not work for hCaptcha!)
WARNING: Free XEvil DEMO does NOT support ReCaptcha, hCaptcha and most other types of captcha!
синтез пропитает тело ож душа болит https://beteiligung.stadtlindau.de/profile/%D0%A1%D0%B8%D1%82%D0%B6%D0%B5%D1%81%20%D0%BA%D1%83%D0%BF%D0%B8%D1%82%D1%8C%20%D0%9A%D0%BE%D0%BA%D0%B0%D0%B8%D0%BD/ Не стоит сомневатся в этом магазе он ровный и проверенный времен! Всегда на высоте!
findyourinspirationtoday – Inspiring visuals and smooth design, makes finding new ideas enjoyable and simple.
growtharena.click – Color palette felt calming, nothing distracting, just focused, thoughtful design.
brandshine.click – Navigation felt smooth, found everything quickly without any confusing steps.
simplefashioncorner – Clean, trendy, and easy-to-browse fashion options all in one place.
Я брал за неделю до этого отличный был все довольны жалоб нет!а вот (простите ошибся не 3 июля а 1июля) 1июля забрал непонятно что!начал с 1х10 растворил ацетоном и закончил 1х5 растворил спиртом но эффекта ноль! https://pubhtml5.com/homepage/glcwp Что за кипишь на ветке? И когда будет адрес?
shopandsaveonline – Great deals and simple layout, makes online shopping quick and easy.
Магазин отличный. Покупал не однократно. Спасибо. Ждем регу! https://rant.li/iuicehiagey/kosino-ukhtomskii-kupit-kokain-mefedron-marikhuanu-boshki обьясни народу …….. сдесь ребята понимающие………. помогут
modernhomecorner – Love the modern designs and home decor ideas shared here daily.
Отличный магазин,заказал и уже через 2 дня в своем городе получил посылку курьером(без звонка),офигев от скорости работы.Вес пришел с неплохим бонусом и в хорошей конспирации.Спасибо очень приятно было с вами работать скоро закажу ещё. https://pxlmo.com/mmjxmnuz52d514 Добрый день форумчане! Кто нибудь подскажет как по качеству реагент в этом магазине? Соответствует ли заявленная концентрация? Сколько по времени держит если 1 к 20 сделать? Всем спасибо!!!
besttrendstore – Love the clean design and trendy collections, very appealing overall.
brandreach.click – Found practical insights today; sharing this article with colleagues later.
clickreach.click – Color palette felt calming, nothing distracting, just focused, thoughtful design.
besttrendstore – Trendy and exciting store with fresh fashion and lifestyle products.
growthmind.click – Mobile version looks perfect; no glitches, fast scrolling, crisp text.
digitalrise.click – Overall, professional vibe here; trustworthy, polished, and pleasantly minimal throughout.
http://zanasite.free.fr/laripostedumardi/doku.php?id=Особенности%20и%20преимущества%20онлайн-игры%20Aviator
leadlaunch.click – Loved the layout today; clean, simple, and genuinely user-friendly overall.
advisionpro.click – Found practical insights today; sharing this article with colleagues later.
http://hddserialcommander.com/wiki/doku.php?id=Особенности%20и%20преимущества%20онлайн-игры%20Aviator
Ну что же, сегодня получил свою посылку, на этот раз все было в наилучшем виде, конспирация на все 10 баллов из 10! https://www.brownbook.net/business/54470126/беломорск-купить-кокаин-мефедрон-марихуану-бошки/ а у нас в квартире газ ….. от ГАЗПРОМ … вы не поверите но это так и есть
adspherepro.click – Color palette felt calming, nothing distracting, just focused, thoughtful design.
Портал о строительстве https://newboard-store.com.ua и ремонте: от проекта до сдачи объекта. Каталоги производителей, сравнение материалов, сметы, BIM и CAD, нормативная база, ленты новостей, вакансии и тендеры. Практика, цифры и готовые решения.
Современный автопортал https://carexpert.com.ua главные премьеры и тенденции, подробные обзоры, тест-драйвы, сравнения моделей и подбор шин. Экономия на обслуживании, страховке и топливе, проверки VIN, лайфхаки и чек-листы. Всё, чтобы выбрать и содержать авто без ошибок да
Современный новостной https://vestionline.com.ua портал: главные темы суток, лонгриды, мнения экспертов и объясняющие материалы. Проверка фактов, живые эфиры, инфографика, подборка цитат и контекст. Быстрый доступ с любого устройства и без лишних отвлечений.
https://public.tableau.com/app/profile/cashback.s.ries.infructueuses/vizzes
Контрактное производство электроники обеспечивает полный цикл работ от идеи до серийного устройства. Инженеры проектируют схемотехнику, платы и корпус, создают программное обеспечение и тестируют прототипы. Клиенты получают готовые устройства с проверенным качеством, https://www.nanafightsback.com/%D1%80%D0%B0%D0%B7%D1%80%D0%B0%D0%B1%D0%BE%D1%82%D0%BA%D0%B0-%D0%B8-%D1%81%D0%B1%D0%BE%D1%80%D0%BA%D0%B0-%D1%8D%D0%BB%D0%B5%D0%BA%D1%82%D1%80%D0%BE%D0%BD%D0%BD%D1%8B%D1%85-%D1%83%D1%81%D1%82%D1%80/.
Приятно работать с командой, которая понимает специфику задач
https://idol.st/user/97497/sportifs/
yourfashionoutlet – Love the stylish collection here, everything feels trendy and well-priced.
startfreshjourney – Uplifting and positive vibe, perfect for inspiration and fresh beginnings.
Я даже не знаю, что особо писать вообщем всё :rest:. http://www.pageorama.com/?p=ygycohvibz а кто нибудь пробовал все таки эту куреху urb
thinkactachieve – Really inspiring message, perfect for anyone focused on self-improvement.
Crowngreen is a trusted online casino that offers exciting games for gamers. Crowngreen excels in the online gaming world and has earned reputation among enthusiasts.
Every visitor at https://mgbgroup.in/taste-real-entertainment-at-crown-green-casino-and-5/
can experience exclusive slots and receive generous bonuses. Crowngreen Casino provides secure gameplay, smooth transactions, and 24/7 customer support for every gamer.
With , gamers explore a wide selection of table games, including jackpot options. The platform delivers fun and ensures a safe gaming environment.
Whether you are experienced or experienced, Crowngreen guarantees something special for everyone. Sign up at Crowngreen Casino today and experience rewarding games, generous bonuses, and a reliable gaming environment.
Всё для женщины https://wonderwoman.kyiv.ua уход и макияж, мода и стиль, психология и отношения, работа и деньги, мама и ребёнок. Тренды, тесты, инструкции, подборки брендов и сервисов. Читайте, вдохновляйтесь, действуйте.
Твой автопортал https://kia-sportage.in.ua о новых и подержанных машинах: рейтинги надёжности, разбор комплектаций, реальные тесты и видео. Помощь в покупке, кредит и страховка, расходы владения, ТО и тюнинг. Карта сервисов, советы по безопасности и сезонные рекомендации плюс
Современный женский https://fashiontop.com.ua журнал: уход и макияж, капсульный гардероб, психология и отношения, питание и тренировки, карьерные советы и финансы. Честные обзоры, подборки брендов, пошаговые гайды.
thebestdeal – Always great to find a site focused on value and daily savings.
Ну чтож ребят сегодня заказал ) https://www.grepmed.com/cuedbedigt Не работает пока там представительство.
XEvil 5.0 automatically solve most kind of captchas,
Including such type of captchas: ReCaptcha-2, ReCaptcha v.3, Google captcha, Solve Media, BitcoinFaucet, Steam, +12000
+ hCaptcha, FC, ReCaptcha Enterprize now supported in new XEvil 6.0!
1.) Fast, easy, precisionly
XEvil is the fastest captcha killer in the world. Its has no solving limits, no threads number limits
2.) Several APIs support
XEvil supports more than 6 different, worldwide known API: 2Captcha, anti-captcha (antigate), RuCaptcha, death-by-captcha, etc.
just send your captcha via HTTP request, as you can send into any of that service – and XEvil will solve your captcha!
So, XEvil is compatible with hundreds of applications for SEO/SMM/password recovery/parsing/posting/clicking/cryptocurrency/etc.
3.) Useful support and manuals
After purchase, you got access to a private tech.support forum, Wiki, Skype/Telegram online support
Developers will train XEvil to your type of captcha for FREE and very fast – just send them examples
4.) How to get free trial use of XEvil full version?
– Try to search in Google “Home of XEvil”
– you will find IPs with opened port 80 of XEvil users (click on any IP to ensure)
– try to send your captcha via 2captcha API ino one of that IPs
– if you got BAD KEY error, just tru another IP
– enjoy! 🙂
– (its not work for hCaptcha!)
WARNING: Free XEvil DEMO does NOT support ReCaptcha, hCaptcha and most other types of captcha!
http://xrumersale.site/
believeinyourideas – Motivating and clean design, makes exploring ideas enjoyable and simple.
shopwithstyle – Love the elegant touch and fashion-forward vibe of this store.
Брал у него все гудд. Маскировка на высоте качество отличное. буду брать еще https://www.impactio.com/researcher/ggeprhvd911r83 Пришёл 307. Попробывал 1 к 20, ниочём.. Курнул кропаль чистого, также ниочём…хз в чём дело. Сегодня попробую 1к10 можт чтот почуствую
theartofgrowth – Inspiring name that perfectly fits a mindset of learning and progress.
https://loktrk.com
Еженедельный журнал https://sw.org.ua об авто и свободе дороги: премьеры, электромобили, кроссоверы, спорткары и коммерческий транспорт. Реальные тесты, долгосрочные отчёты, безопасность, кейсы покупки и продажи, кредит и страховка, рынок запчастей и сервисы рядом.
Журнал об автомобилях https://svobodomislie.com без мифов: проверяем маркетинг фактами, считаем расходы владения, рассказываем о ТО, тюнинге и доработках. Тестируем новые и б/у, объясняем опции простыми словами. Экспертные мнения, идеи маршрутов и полезные чек-листы. Всегда!.
Портал о балансе https://allwoman.kyiv.ua красота и самоуход, отношения и семья, развитие и карьера, дом и отдых. Реальные советы, капсульные гардеробы, планы тренировок, рецепты и лайфхаки. Ежедневные обновления и подборки по интересам.
uniquevaluezone – Offers cool finds at great prices, really worth visiting.
chemical-mix.com работает у кого ??? всё походу накрылся магаз :::??? https://pxlmo.com/jessicamartinezcyre Во-во МАГАЗИН! Обозначил цену, так по ней и продавай! На мыло упало – Цена заказа -4250 и .. А потом начались догонялки…. Магазины так не поступают, а поступают именно БАРЫГИ, как точно выразился РОГАТЫЙ ОБИТАТЕЛЬ данной ветки
globalstyleoutlet – Amazing range of international fashion, really fun to browse.
Это фейк что тут вам не понятно то. https://www.band.us/page/100515020/ Ещё раз повторюсь – магазин ОТЛИЧНЕЙШИЙ.
https://444-000.ru/
Crowngreen is a leading online casino that delivers exciting experiences for gamers. Crowngreen Casino excels in the online gaming world and has earned reputation among visitors.
Every visitor at Crowngreen
has the chance to experience top-rated games and receive generous offers. Crowngreen ensures reliable gameplay, seamless transactions, and constant customer support for every player.
With , players explore a huge variety of table games, including classic options. The site prioritizes fun and maintains a secure gaming environment.
Whether you are new or an expert, Crowngreen offers exciting gameplay for everyone. Sign up at Crowngreen today and discover rewarding games, fantastic bonuses, and a safe gaming environment.
discoverhiddenopportunities – Inspiring name that encourages exploring new ideas and growth.
newtrendmarket – Love the fresh and modern vibe, full of current fashion finds.
dailyshoppingzone – Love how convenient this site is for everyday shopping needs.
adsprint.click – Appreciate the typography choices; comfortable spacing improved my reading experience.
Ответил) просто не сразу увидел в вашем сообщении дополнительный вопрос ) https://anyflip.com/homepage/gqphc Отличная работа ребята! Вы проделали хорошую работу!!! я сначала думал что за херь мне пришла пока я не нашёл то что нужно)) а ваще сроки доставки 5+! конспирация 5+! качество позже отпишу, только еще на руки взял)))
brandfuel.click – Found practical insights today; sharing this article with colleagues later.
promopath.click – Mobile version looks perfect; no glitches, fast scrolling, crisp text.
Автомобильный блог https://amt-auto.ru обзоры, ремонт, обслуживание и уход. Пошаговые инструкции, подбор масел и расходников, диагностика ошибок, лайфхаки, экономия на сервисе. Полезно новичкам и опытным водителям. Читай просто, делай уверенно.
adreachpro.click – Color palette felt calming, nothing distracting, just focused, thoughtful design.
marketpilot.click – Pages loaded fast, images appeared sharp, and formatting stayed consistent.
Аренда авто turzila.com/ без депозита, аренда яхт и удобный трансфер в отель. Онлайн-бронирование за 3 минуты, русская поддержка 24/7, прозрачные цены. Оплата картой РФ.
marketfuel.click – Found practical insights today; sharing this article with colleagues later.
Нужна фотосьемка? съемки для маркетплейсов москва каталожная, инфографика, на модели, упаковка, 360°. Правильные ракурсы, чистый фон, ретушь, цветопрофили. Готовим комплекты для карточек и баннеров. Соответствие правилам WB/Ozon.
clickscale.click – Found practical insights today; sharing this article with colleagues later.
trendycollectionhub – Great place for discovering stylish collections and creative designs.
newtrendmarket – Fresh trends and a smooth shopping experience, really well put together.
dailyshoppingzone – Love how convenient this site is for everyday shopping needs.
В нашем городе эту почту походу обложили пополной!!!!!!!! https://imageevent.com/iaqiwezajyji/lipde кто знает когда рега будет ?
simplebuyhub – Super easy to navigate site with plenty of affordable options.
Всем привет) У меня такая проблема, сделал заказ, оплатил через евросеть, Уважаемый продаван сказал то, что в евросети перевод идет до 3-х дней, хотя когда работали с другим магазином деньги прилетали моменьтально всегда. И доставка вышла на 950 р. (г. Екб), это получаеться + курьер или нет, просто до почты?… И через что лучше оплачивать в данном магазине? https://imageevent.com/bytotesijobi/mlzpd Все работает, каждый получает ответ оперативно!
yourvisionawaits – Inspiring name that motivates people to dream and take action.
XEvil 5.0 automatically solve most kind of captchas,
Including such type of captchas: ReCaptcha v.2, ReCaptcha-3, Google captcha, Solve Media, BitcoinFaucet, Steam, +12000
+ hCaptcha, FC, ReCaptcha Enterprize now supported in new XEvil 6.0!
1.) Fast, easy, precisionly
XEvil is the fastest captcha killer in the world. Its has no solving limits, no threads number limits
2.) Several APIs support
XEvil supports more than 6 different, worldwide known API: 2Captcha, anti-captchas.com (antigate), RuCaptcha, DeathByCaptcha, etc.
just send your captcha via HTTP request, as you can send into any of that service – and XEvil will solve your captcha!
So, XEvil is compatible with hundreds of applications for SEO/SMM/password recovery/parsing/posting/clicking/cryptocurrency/etc.
3.) Useful support and manuals
After purchase, you got access to a private tech.support forum, Wiki, Skype/Telegram online support
Developers will train XEvil to your type of captcha for FREE and very fast – just send them examples
4.) How to get free trial use of XEvil full version?
– Try to search in Google “Home of XEvil”
– you will find IPs with opened port 80 of XEvil users (click on any IP to ensure)
– try to send your captcha via 2captcha API ino one of that IPs
– if you got BAD KEY error, just tru another IP
– enjoy! 🙂
– (its not work for hCaptcha!)
WARNING: Free XEvil DEMO does NOT support ReCaptcha, hCaptcha and most other types of captcha!
Магаз отличный, успехов вам! https://beteiligung.stadtlindau.de/profile/%D0%A2%D0%B5%D1%82%D1%83%D0%B0%D0%BD%20%D0%BA%D1%83%D0%BF%D0%B8%D1%82%D1%8C%20%D0%9A%D0%BE%D0%BA%D0%B0%D0%B8%D0%BD/ Взял ам2233 эфектом очень доволен! спасибо
trendforlife – Love the concept; a perfect spot for true fashion enthusiasts.
https://capsimassignmenthelp18400.diowebhost.com/93421485/paris-gratuits-sans-d%C3%A9p%C3%B4t-testez-et-gagnez-sans-risque
buildyourpotential – Great reminder that growth starts with small daily improvements.
да, самая действенная схема для работы с чемикалом https://yamap.com/users/4928221 действительно было в лом,спасибо)
Современный журнал https://rupsbigbear.com про авто: новости индустрии, глубокие обзоры моделей, тесты, сравнительные таблицы и советы по выбору. Экономия на обслуживании и страховке, разбор технологий, безопасность и комфорт. Всё, чтобы ездить дальше, дешевле и увереннее.
Автопортал для новичков https://lada.kharkiv.ua и профи: новости рынка, аналитика, сравнения, тесты, долгосрочные отчёты. Выбор авто под задачи, детальные гайды по покупке, продаже и трейд-ину, защита от мошенников. Правила, штрафы, ОСАГО/КАСКО и полезные инструменты и ещё
Женский медиа-гид https://adviceskin.com здоровье, питание, спорт, ментальное благополучие, карьера, личные финансы, хобби и поездки. Практика вместо кликбейта — понятные гайды, чек-листы и экспертные мнения.
trafficsphere.click – Mobile version looks perfect; no glitches, fast scrolling, crisp text.
urbanfashioncorner – Trendy, bold, and full of energy — perfect urban fashion vibe.
smartshoppingzone – Perfect for budget-conscious shoppers who still want quality products.
Да хоть в очко засыпь, не торкнет https://imageevent.com/s_edwyna/ehuln качество вышка
learnsomethingamazing – Encouraging and creative name that promotes daily learning and discovery.
люди которые делают заказы через ВК по меньшей мере идиоты. Особенно когда ИМ самим что то предлагают. https://www.impactio.com/researcher/wifrtisf42234e Четкого товара!
brightfashionfinds – Such vibrant styles here, everything feels bold and fresh.
freshdealsworld – Great site for fresh offers and exciting online shopping deals.
сегодня оплатил заказ..буду ждать доставки..протестирую.сообщу о качестве продукта? https://www.grepmed.com/hyfyided фарту в бизе
findbestdeals – Love how easy it is to browse and spot the top deals.
startfreshjourney – Motivating message, perfect for anyone ready for a new beginning.
adlift.click – Content reads clearly, helpful examples made concepts easy to grasp.
Женское медиа https://beautytips.kyiv.ua о главном: здоровье и профилактика, стиль и тренды, психологические разборы, мотивация, деньги и инвестиции, материнство и путешествия. Честные обзоры, подборка сервисов и истории читательниц.
dailydealsplace – Great place for deals, always something new and exciting to find.
learnandshine – Inspiring content that motivates me to keep learning every day.
clickgurus.click – Navigation felt smooth, found everything quickly without any confusing steps.
XEvil 6.0 automatically solve most kind of captchas,
Including such type of captchas: ReCaptcha-2, ReCaptcha-3, Google, SolveMedia, BitcoinFaucet, Steam, +12000
+ hCaptcha, FC, ReCaptcha Enterprize now supported in new XEvil 6.0!
1.) Fast, easy, precisionly
XEvil is the fastest captcha killer in the world. Its has no solving limits, no threads number limits
2.) Several APIs support
XEvil supports more than 6 different, worldwide known API: 2Captcha, anti-captcha (antigate), RuCaptcha, DeathByCaptcha, etc.
just send your captcha via HTTP request, as you can send into any of that service – and XEvil will solve your captcha!
So, XEvil is compatible with hundreds of applications for SEO/SMM/password recovery/parsing/posting/clicking/cryptocurrency/etc.
3.) Useful support and manuals
After purchase, you got access to a private tech.support forum, Wiki, Skype/Telegram online support
Developers will train XEvil to your type of captcha for FREE and very fast – just send them examples
4.) How to get free trial use of XEvil full version?
– Try to search in Google “Home of XEvil”
– you will find IPs with opened port 80 of XEvil users (click on any IP to ensure)
– try to send your captcha via 2captcha API ino one of that IPs
– if you got BAD KEY error, just tru another IP
– enjoy! 🙂
– (its not work for hCaptcha!)
WARNING: Free XEvil DEMO does NOT support ReCaptcha, hCaptcha and most other types of captcha!
http://xrumersale.site/
uniquegiftideas – Excellent variety of creative gifts, ideal for any special occasion.
Медиа для женщин https://feromonia.com.ua которые выбирают себя: здоровье и профилактика, ментальное благополучие, работа и развитие, материнство и хобби. Практичные инструкции, тесты, интервью и вдохновение без кликбейта.
clickprohub.click – Color palette felt calming, nothing distracting, just focused, thoughtful design.
Женский журнал https://dama.kyiv.ua о жизни без перегруза: красота и здоровье, стиль и покупки, отношения и семья, карьера и деньги, дом и путешествия. Экспертные советы, чек-листы, тренды и реальные истории — каждый день по делу.
fashionmarketplace – Excellent variety of styles, feels like a hub for fashion lovers.
inspireeverymoment – Motivating platform that encourages positivity every single day.
Всё, что важно https://gryada.org.ua сегодня: мода и стиль, бьюти-рутины, рецепты и фитнес, отношения и семья, путешествия и саморазвитие. Краткие выжимки, длинные разборы, подборки сервисов — удобно и полезно.
findhappinessdaily – Uplifting messages and helpful tips that brighten my day instantly.
purechoicehub – Clean design and high-quality items, really impressed with the layout.
simplebuyoutlet – Smooth shopping experience, great deals and very clean design.
https://tutvot.com/
starttodaymoveforward – Positive and inspiring, encourages daily progress and self-growth.
https://avia.tutvot.com/
Женский журнал https://krasotka.kyiv.ua про баланс: красота, психология, карьера, деньги, дом и отдых. Экспертные колонки, списки покупок, планы тренировок и проверки здоровья. Материалы, к которым хочется возвращаться.
Онлайн-портал https://womanexpert.kyiv.ua для женщин, которые хотят жить в балансе. Красота, здоровье, семья, карьера и финансы в одном месте. Ежедневные статьи, подборки, советы экспертов и вдохновение для лучшей версии себя.
Глянец без иллюзий https://ladyone.kyiv.ua красота и здоровье с фактчекингом, стиль без переплат, карьера и деньги простым языком. Интервью, тесты, полезные гайды — меньше шума, больше пользы.
classystyleoutlet – Elegant fashion selections and well-curated items, love browsing here.
yourstylezone – Trendy site that really helps express personal fashion taste.
startbuildingtoday – Inspiring site that motivates you to take action and grow.
thepowerofgrowth – Beautiful name that reminds you of personal and continuous improvement.
purestylemarket – Classy and minimal style collections, perfect for modern shoppers.
Всё для современной https://model.kyiv.ua женщины: уход и макияж, стиль и шопинг, психология и отношения, питание и тренировки. Честные обзоры, капсульные гардеробы, планы на неделю и проверенные советы.
Мода и красота https://magiclady.kyiv.ua для реальной жизни: капсулы по сезонам, уход по типу кожи и бюджета, честные обзоры брендов, шопинг-листы и устойчивое потребление.
trendandfashionhub – Love how stylish and updated the latest trends are here.
Сайт для женщин https://modam.com.ua о жизни без перегруза: здоровье и красота, отношения и семья, карьера и деньги, дом и путешествия. Экспертные статьи, гайды, чек-листы и подборки — только полезное и применимое.
seostreampro.click – Color palette felt calming, nothing distracting, just focused, thoughtful design.
urbanbuycorner – Trendy products with a sleek city vibe, very enjoyable to explore.
createpositivechange – Love the uplifting message here, motivates me to do better daily.
beststylecollection – Stylish selections and great variety, makes shopping a real pleasure.
clickforce.click – Navigation felt smooth, found everything quickly without any confusing steps.
brandmagnet.click – Mobile version looks perfect; no glitches, fast scrolling, crisp text.
clickenginepro.click – Color palette felt calming, nothing distracting, just focused, thoughtful design.
seojet.click – Loved the layout today; clean, simple, and genuinely user-friendly overall.
trafficstream.click – Found practical insights today; sharing this article with colleagues later.
bestchoicecollection – Wide range of stylish products and great pricing overall.
styleandchoice – Elegant and trendy, perfect for shoppers who love variety.
Медиа для женщин https://otnoshenia.net 25–45: карьера и навыки, ментальное благополучие, осознанные покупки, спорт и питание. Краткие выжимки и глубокие разборы, подборки брендов и сервисов.
Реальная красота https://princess.kyiv.ua и стиль: уход по типу кожи и бюджету, капсулы по сезонам, устойчивое потребление. Гайды, шопинг-листы, честные обзоры и советы стилистов.
everydaytrendhub – Always up to date with the latest trends, great resource.
Женский сайт https://one-lady.com о балансе: работа, финансы, здоровье, дом, дети и отдых. Пошаговые инструкции, трекеры привычек, лайфхаки и вдохновляющие истории. Меньше шума — больше пользы.
createpositivechange – Love the message and design, truly encourages meaningful growth.
shopandsaveonline – Awesome platform for smart shoppers looking for great online deals.
freshfindsoutlet – New and trendy products pop up here all the time, love it.
growtogetherstrong – Positive and motivating platform, perfect for teamwork and personal growth.
discoverinfiniteideas – Inspiring and creative site name that sparks imagination instantly.
makeimpacteveryday – A motivating and uplifting name that inspires daily action.
learnshareachieve – Perfect for anyone who loves to learn and make steady progress.
trafficmind.click – Mobile version looks perfect; no glitches, fast scrolling, crisp text.
uniquevaluehub – Excellent selection of quality products with standout value, love it.
https://s-nano-s.ru/
trendandstyle – Great name that captures modern fashion and timeless personal style.
fashiondailycorner – Trendy fashion picks and great updates, really well-curated site.
globalmarketoutlet – Wide range of international products, makes shopping fun and diverse.
promobridge.click – Appreciate the typography choices; comfortable spacing improved my reading experience.
discoverfashionfinds – Great site for fashion lovers, lots of trendy items to explore.
shopandsmiletoday – The name fits perfectly, such a cheerful and easy shopping experience.
marketscope.click – Bookmarked this immediately, planning to revisit for updates and inspiration.
seotrack.click – Appreciate the typography choices; comfortable spacing improved my reading experience.
Женский блог https://sunshadow.com.ua о жизни без перегруза: красота и здоровье, отношения и семья, стиль и покупки, деньги и карьера. Честные обзоры, лайфхаки, планы на неделю и личные истории — только то, что реально помогает.
Современный женский https://timelady.kyiv.ua сайт о стиле жизни: уход за собой, макияж, прически, фитнес, питание, мода и деньги. Практичные советы, разбор трендов, подборки покупок и личная эффективность. Будь в ресурсе и чувствуй себя уверенно каждый день. Больше — внутри.
promocloud.click – Navigation felt smooth, found everything quickly without any confusing steps.
digitaltrack.click – Color palette felt calming, nothing distracting, just focused, thoughtful design.
clickgrow.click – Overall, professional vibe here; trustworthy, polished, and pleasantly minimal throughout.
Все работает, каждый получает ответ оперативно! https://www.betterplace.org/en/organisations/70118 сегодня вот ночью прислал трек. Бьется, радует
trendworldmarket – Love how updated this site stays with the latest global trends.
creativechoicehub – Innovative designs and creative products, really impressed with the variety.
shopthelatestdeals – Found amazing deals today, makes shopping fun and easy.
Блог для женщин https://sweetheart.kyiv.ua которые выбирают себя: самоценность, баланс, карьера, финансы, хобби и путешествия. Мини-привычки, трекеры, вдохновляющие тексты и практичные советы.
yourdailyinspiration – Inspiring words and great visuals, perfect for a morning boost.
Портал для женщин https://viplady.kyiv.ua ценящих стиль, комфорт и развитие. Мода, уход, отношения, семья и здоровье. Только практичные советы, экспертные мнения и вдохновляющий контент. Узнай, как быть собой и чувствовать себя лучше.
Онлайн-площадка https://topwoman.kyiv.ua для женщин: стиль, бьюти-новинки, осознанность, здоровье, отношения, материнство и работа. Экспертные статьи, инструкции, чек-листы, тесты и вдохновение. Создавай лучший день, развивайся и находи ответы без лишней воды.
Я вам, Касух, советовал бы в скайпе этот вопрос решить. И в субботу и воскресенье магазин не работает, так что вполне закономерно что вам не отвечают. https://imageevent.com/aikuvyrosyba/jodex Спасиба магазину за представленный ДРУГОЙ МИР!
discoverandshopnow – Great shopping experience, always something new and fun to explore.
brightcollectionhub – Colorful and stylish items that really make browsing enjoyable.
trendyvaluezone – Stylish products at affordable prices, love the variety here.
ВЫ ЛУЧШИЕ! https://bio.site/ubeaoyfugiga Забизаю дамой хвотаю тожнецы взрываю посылку там рубашка. Примерно на ребенка 7 летнего (я надеился книга будит) но ладно и рубашка сойдет на тряпки вмашину ! Разворачиваю рубаху а там пакетик реги я быстрей за весами и за фотиком и писать ВАМ МОИ ДРУЗЬЯ!!!
finduniqueproducts – Unique finds and creative ideas, everything feels handpicked and quality.
Женский медиасайт https://woman365.kyiv.ua с акцентом на пользу: капсульный гардероб, бьюти-рутины, здоровье, отношения, саморазвитие и материнство. Пошаговые инструкции, списки покупок, чек-листы и экспертные ответы. Заботимся о тебе и твоем времени. Подробности — на сайте.
bestdailycorner – Found so many great daily deals here, totally worth visiting often.
seopath.click – Appreciate the typography choices; comfortable spacing improved my reading experience.
Лучшего амфа я в жизни не пробовал. Правда цена кусается, но оно того стоит! https://rant.li/85xhspza8z посылка в городе. Сегодня заберу
Твой женский помощник https://vsegladko.net как подчеркнуть индивидуальность, ухаживать за кожей и волосами, планировать бюджет и отдых. Мода, психология, дом и карьера в одном месте. Подборки, гайды и истории, которые мотивируют заботиться о себе. Узнай больше на сайте.
trendandfashion – Perfect mix of classic and modern trends, always inspiring.
Женский портал https://womanportal.kyiv.ua о моде, психологии и уходе за собой. Узнай, как сочетать стиль, уверенность и внутреннюю гармонию. Лучшие практики, обзоры и вдохновляющие материалы для современных женщин.
discoverandshop – Great platform for exploring unique items and discovering new favorites.
Всё о развитии https://run.org.ua и здоровье детей: диагностические скрининги, логопедия, дефектология, нейропсихология, ЛФК, массаж, группы раннего развития, подготовка к школе. Планы занятий, расписание, запись онлайн, советы специалистов и проверенные методики.
http://klausreichmann.de/doku.php?id=%D0%9F%D1%80%D0%BE%D0%BC%D0%BE%D0%BA%D0%BE%D0%B4%20Melbet%20%E2%80%94%20%D0%BA%D0%BB%D1%8E%D1%87%20%D0%BA%20%D1%83%D0%B2%D0%B5%D0%BB%D0%B8%D1%87%D0%B5%D0%BD%D0%BD%D0%BE%D0%BC%D1%83%20%D0%B1%D0%BE%D0%BD%D1%83%D1%81%D1%83%20%D0%B8%20%D1%84%D1%80%D0%B8%D0%B1%D0%B5%D1%82%D1%83
groweverydaynow – Inspiring platform that reminds me to keep improving and learning daily.
или я что то не так понял? https://rant.li/syfobiguu/pitsunda-abkhaziia-kupit-kokain-mefedron-marikhuanu-boshki а кто нибудь пробовал все таки эту куреху urb
groweverydaynow – Motivational and uplifting, reminds me to keep improving daily.
Сайт о строительстве https://blogcamp.com.ua и ремонте: проекты, сметы, материалы, инструменты, пошаговые инструкции и лайфхаки. Чек-листы, калькуляторы, ошибки и их решения. Делайте качественно и экономно.
freshtrendstore – New arrivals and trending items make shopping exciting every visit.
marketrise.click – Appreciate the typography choices; comfortable spacing improved my reading experience.
webimpact.click – Loved the layout today; clean, simple, and genuinely user-friendly overall.
brandtrail.click – Bookmarked this immediately, planning to revisit for updates and inspiration.
digitalpeak.click – Color palette felt calming, nothing distracting, just focused, thoughtful design.
Советы для родителей https://agusha.com.ua на каждый день: раннее развитие, кризисы возрастов, дисциплина, здоровье, игры и учеба. Экспертные разборы, простые лайфхаки и проверенные методики без мифов. Помогаем понять потребности ребёнка и снизить стресс в семье.
надо просто на мож-химовском ацике растворять любой jwh растворяется https://bio.site/coyfqeahed Моя первая покупка на динамите и, внезапно для самой себя, наход. Сняла, как говорится, в касание. С вашим охуенным мефчиком сорвала себе почти год ЗОЖа и ни чуть не жалею.
globalmarketoutlet – Wide selection of global products, makes shopping interesting and diverse.
seoforce.click – Pages loaded fast, images appeared sharp, and formatting stayed consistent.
shopwithjoy – Love the cheerful vibe here, shopping truly feels joyful and easy.
yourdailyfinds – Convenient and fun to browse, always discovering something useful.
Официальный сайт Kraken https://kra44-cc.at безопасная платформа для анонимных операций в darknet. Полный доступ к рынку через актуальные зеркала и onion ссылки.
с чего ты взял что мы соду “пропидаливаем”?, если есть какая то проблема давай решать, про “шапку” вы все горазды писать в интернете… https://wanderlog.com/view/hrluuguvwh/ченстохова-купить-кокаин-мефедрон-марихуану-бошки/ А будете ли работать в Беларусии?
Родителям о главном https://rodkom.org.ua баланс режима, питание, истерики и границы, подготовка к школе, дружба и безопасность в сети. Короткие памятки, чек-листы и практики от специалистов. Только актуальные данные и решения, которые работают в реальной жизни.
shopthelatestdeals – Convenient platform for finding amazing deals quickly and easily.
bestchoiceoutlet – Great prices and selections, feels like a hidden gem for shoppers.
Женский портал https://womanclub.kyiv.ua о стиле жизни, красоте и вдохновении. Советы по уходу, отношениям, карьере и саморазвитию. Реальные истории, модные тренды, психологические лайфхаки и идеи для гармонии. Всё, что важно каждой современной женщине.
Кракен зеркало
globalmarketoutlet – Wide selection of global products, makes shopping interesting and diverse.
1к10 незачет, 2к10, так, удовлетворительно. https://www.grepmed.com/idxuheuaod слушай, а тебе продавец обязан объяснять что и ко скольки бодяжить ?
growwithpurpose – Excellent site with a strong message about intentional self-growth.
startsomethingnewtoday – Motivating name and content that encourages taking the first step.
learnandshine – Encouraging content that motivates me to grow and shine every day.
yourtimeisnow – Motivating site that encourages taking action and embracing opportunities today.
ОнДжекпот в три миллиона сорвал вчера житель Подмосковья, — кричали заголовки на прошлой неделе. — Обычный парень из Химок поставил тысячу рублей и через полчаса вышел с деньгами на новую квартиру”.
Такие истории появляются регулярно. Люди заходят в онлайн-https://musseradaca.ru с телефона, крутят пару слотов и уходят с суммой, о которой раньше только мечтали. Никаких костюмов, дресс-кода и поездок в центр города — всё происходит дома, за чашкой чая.
Игр здесь больше четырёх тысяч. Есть старые добрые автоматы, которые стояли в залах девяностых, есть новые, где графика как в кино. Рулетка идёт с живыми дилерами: камера показывает стол, крупье называет ставки, шарик крутится в прямом эфире. Блэкджек, покер, баккара — выбирай любую комнату и садись за стол.
Новичкам дают бонус: положил тысячу — получил три. Плюс двести бесплатных вращений в популярных слотах. Деньги можно вывести сразу, как только отыграешь. Обычно это занимает пару часов. Выплаты приходят на карту или электронный кошелёк за пять-десять минут. Никаких звонков в поддержку и недель ожидания.
Мобильная версия работает без скачивания. Открыл браузер, вошёл в аккаунт — и играй. Картинка не тормозит даже на старом телефоне. Для постоянных игроков есть кэшбэк: проиграл — вернули четверть обратно. Чем выше ставка, тем больше возвращают.
Лицензия есть, данные шифруют, генератор случайных чисел проверяют независимые лаборатории. Всё по-честному.
Зарегистрироваться — дело двадцати секунд. Ввёл почту или вошёл через соцсети, пополнил счёт от ста рублей — и вперёд. Для тех, кто читает эту заметку, приготовили код LUCKY2025: введите его при первом депозите и получите ещё полсотни вращений в слоте с миллионным джекпотом.
Играйте с умом. Только для тех, кому уже есть восемнадцать.
Официальный сайт Kraken https://kra44-cc.at безопасная платформа для анонимных операций в darknet. Полный доступ к рынку через актуальные зеркала и onion ссылки.
findhappinessdaily – Love the positivity here, helps me focus on the good things.
explorewithoutlimits – Inspires creativity and curiosity, perfect for adventurous minds.
discoveramazingstories – Captivating stories and inspiring content, keeps me coming back.
adtrend.click – Found practical insights today; sharing this article with colleagues later.
yourdealhub – Excellent deals on quality products, really makes shopping worthwhile.
Автомобильный журнал https://autodream.com.ua для новичков и энтузиастов: тренды, тест-драйвы, сравнения, разбор комплектаций, VIN-проверки и подготовка к сделке. Практичные гайды по уходу и экономии, гаджеты для авто, законы и штрафы. Делимся опытом, чтобы не переплачивали.
changeyourmindset – Inspiring site that helps shift perspectives and encourages real growth.
uniquegiftcorner – Creative and thoughtful gift ideas, ideal for any occasion.
everydayvaluezone – Great deals and simple navigation, really makes shopping effortless.
trendloversplace – Perfect for trend enthusiasts, always something fresh and exciting to see.
trendandbuy – Awesome spot for trendy finds, love browsing the latest styles.
ОнДжекпот в три миллиона сорвал вчера житель Подмосковья, — кричали заголовки на прошлой неделе. — Обычный парень из Химок поставил тысячу рублей и через полчаса вышел с деньгами на новую квартиру”.
Такие истории появляются регулярно. Люди заходят в онлайн-https://clubniks-fiesta.top/ с телефона, крутят пару слотов и уходят с суммой, о которой раньше только мечтали. Никаких костюмов, дресс-кода и поездок в центр города — всё происходит дома, за чашкой чая.
Игр здесь больше четырёх тысяч. Есть старые добрые автоматы, которые стояли в залах девяностых, есть новые, где графика как в кино. Рулетка идёт с живыми дилерами: камера показывает стол, крупье называет ставки, шарик крутится в прямом эфире. Блэкджек, покер, баккара — выбирай любую комнату и садись за стол.
Новичкам дают бонус: положил тысячу — получил три. Плюс двести бесплатных вращений в популярных слотах. Деньги можно вывести сразу, как только отыграешь. Обычно это занимает пару часов. Выплаты приходят на карту или электронный кошелёк за пять-десять минут. Никаких звонков в поддержку и недель ожидания.
Мобильная версия работает без скачивания. Открыл браузер, вошёл в аккаунт — и играй. Картинка не тормозит даже на старом телефоне. Для постоянных игроков есть кэшбэк: проиграл — вернули четверть обратно. Чем выше ставка, тем больше возвращают.
Лицензия есть, данные шифруют, генератор случайных чисел проверяют независимые лаборатории. Всё по-честному.
Зарегистрироваться — дело двадцати секунд. Ввёл почту или вошёл через соцсети, пополнил счёт от ста рублей — и вперёд. Для тех, кто читает эту заметку, приготовили код LUCKY2025: введите его при первом депозите и получите ещё полсотни вращений в слоте с миллионным джекпотом.
Играйте с умом. Только для тех, кому уже есть восемнадцать.
Производство изделий методом 3D-печати — это шанс получить готовый продукт в кратчайшие сроки. Мы осуществляем услуги по изготовлению деталей и моделей. Наша команда используют новейшие технологии, что обеспечивает возможность обеспечивать качество на уровне промышленных стандартов. Для печати применяются разнообразные материалы для любых задач, что обеспечивает прочность и надежность изделий. Обращаясь к нам, вы получаете качественный результат в срок. Оставьте заявку на печать деталей, и мы сделаем все, чтобы результат превзошел ожидания: https://fancybox.qa/2025/09/10/%d0%ba%d0%b0%d0%ba-%d0%b7%d0%b0%d0%ba%d0%b0%d0%b7%d0%b0%d1%82%d1%8c-3d-%d0%bf%d0%b5%d1%87%d0%b0%d1%82%d1%8c-%d0%b1%d1%8b%d1%81%d1%82%d1%80%d0%be-%d0%b8-%d0%b2%d1%8b%d0%b3%d0%be%d0%b4%d0%bd%d0%be/. Все заказы проходят проверку и контроль качества, чтобы клиент получил идеальный результат.
ОнДжекпот в три миллиона сорвал вчера житель Подмосковья, — кричали заголовки на прошлой неделе. — Обычный парень из Химок поставил тысячу рублей и через полчаса вышел с деньгами на новую квартиру”.
Такие истории появляются регулярно. Люди заходят в онлайн-https://eldoradospayline.top/ с телефона, крутят пару слотов и уходят с суммой, о которой раньше только мечтали. Никаких костюмов, дресс-кода и поездок в центр города — всё происходит дома, за чашкой чая.
Игр здесь больше четырёх тысяч. Есть старые добрые автоматы, которые стояли в залах девяностых, есть новые, где графика как в кино. Рулетка идёт с живыми дилерами: камера показывает стол, крупье называет ставки, шарик крутится в прямом эфире. Блэкджек, покер, баккара — выбирай любую комнату и садись за стол.
Новичкам дают бонус: положил тысячу — получил три. Плюс двести бесплатных вращений в популярных слотах. Деньги можно вывести сразу, как только отыграешь. Обычно это занимает пару часов. Выплаты приходят на карту или электронный кошелёк за пять-десять минут. Никаких звонков в поддержку и недель ожидания.
Мобильная версия работает без скачивания. Открыл браузер, вошёл в аккаунт — и играй. Картинка не тормозит даже на старом телефоне. Для постоянных игроков есть кэшбэк: проиграл — вернули четверть обратно. Чем выше ставка, тем больше возвращают.
Лицензия есть, данные шифруют, генератор случайных чисел проверяют независимые лаборатории. Всё по-честному.
Зарегистрироваться — дело двадцати секунд. Ввёл почту или вошёл через соцсети, пополнил счёт от ста рублей — и вперёд. Для тех, кто читает эту заметку, приготовили код LUCKY2025: введите его при первом депозите и получите ещё полсотни вращений в слоте с миллионным джекпотом.
Играйте с умом. Только для тех, кому уже есть восемнадцать.
modernstylecorner – Sleek and contemporary selections, perfect for style-conscious shoppers.
vavada casino pl
Posiadanie ziemi w Beskidach zapewnia nie tylko spokoj, ale takze mozliwosc atrakcyjnego zarobku w przyszlosci.
Dzieki rozwijajacej sie infrastrukturze i rosnacemu zainteresowaniu turystow, ceny dzialek stopniowo wzrastaja. Region ten przyciaga milosnikow gorskich wedrowek i aktywnego wypoczynku.
#### **2. Gdzie szukac najlepszych ofert dzialek?**
Wybor odpowiedniej lokalizacji zalezy od indywidualnych potrzeb i budzetu. Portal dzialki-beskidy.pl oferuje szeroki wybor nieruchomosci w roznych cenach.
Przed zakupem nalezy dokladnie przeanalizowac dostepnosc mediow i warunki zabudowy. Wiele ofert zawiera szczegolowe informacje o mozliwosciach zagospodarowania terenu, co ulatwia podjecie decyzji.
#### **3. Jakie korzysci daje posiadanie dzialki w Beskidach?**
Nieruchomosc w gorach to nie tylko inwestycja finansowa, ale rowniez szansa na poprawe jakosci zycia. Mozna tu zbudowac dom letniskowy i cieszyc sie urokami przyrody przez caly rok.
Dodatkowo, region ten oferuje wiele atrakcji, takich jak szlaki turystyczne i stoki narciarskie. Coraz wiecej osob wybiera te lokalizacje ze wzgledu na dobrze rozwinieta baze rekreacyjna.
#### **4. Jak przygotowac sie do zakupu dzialki?**
Przed podjeciem decyzji warto skonsultowac sie z prawnikiem i geodeta. Wizyta na miejscu i rozmowa z sasiadami moga dostarczyc cennych informacji o okolicy.
Wazne jest rowniez okreslenie swojego budzetu i planow zwiazanych z zagospodarowaniem terenu. Niektore oferty pozwalaja na rozlozenie platnosci, co ulatwia inwestycje.
—
### **Szablon Spinu**
**1. Dlaczego warto kupic dzialke w Beskidach?**
– Inwestowanie w dzialki w tym regionie to swietny sposob na zabezpieczenie finansowej przyszlosci.
– Dzieki rozwojowi infrastruktury, tereny te staja sie jeszcze bardziej atrakcyjne.
**2. Gdzie szukac najlepszych ofert dzialek?**
– Dobrym rozwiazaniem jest skorzystanie ze sprawdzonych stron internetowych, takich jak dzialki-beskidy.pl.
– Kluczowe jest sprawdzenie, czy dzialka ma wszystkie niezbedne pozwolenia.
**3. Jakie korzysci daje posiadanie dzialki w Beskidach?**
– Posiadanie ziemi w gorach to szansa na zbudowanie wymarzonego domu lub miejsca wypoczynkowego.
– Region oferuje wiele aktywnosci, od wedrowek po gorach po jazde na nartach.
**4. Jak przygotowac sie do zakupu dzialki?**
– Konsultacja z geodeta pomoze uniknac problemow z granicami nieruchomosci.
– Niektore oferty umozliwiaja elastyczne formy platnosci, co moze byc korzystne.
Мужской портал https://kakbog.com о стиле, здоровье, карьере и технологиях. Обзоры гаджетов, тренировки, уход, финансы, отношения и путешествия. Практичные советы и честные разборы каждый день.
Современный женский https://storinka.com.ua портал с полезными статьями, рекомендациями и тестами. Тренды, красота, отношения, карьера и вдохновение каждый день. Всё, что помогает чувствовать себя счастливой и уверенной.
trendandbuy – Awesome spot for trendy finds, love browsing the latest styles.
believeinyourdreams – Truly motivating theme, I love the positivity this site spreads.
purefashionchoice – Clean, stylish fashion selections that are both modern and practical.
advista.click – Content reads clearly, helpful examples made concepts easy to grasp.
growbeyondlimits – Encouraging platform for personal growth and pushing boundaries every day.
seoconnect.click – Pages loaded fast, images appeared sharp, and formatting stayed consistent.
trafficrise.click – Navigation felt smooth, found everything quickly without any confusing steps.
growthcraft.click – Color palette felt calming, nothing distracting, just focused, thoughtful design.
seoorbit.click – Color palette felt calming, nothing distracting, just focused, thoughtful design.
brightcollectionhub – Love the name—it perfectly matches the bright, modern selections here.
growthflow.click – Found practical insights today; sharing this article with colleagues later.
Актуальные новости https://thingshistory.com без перегруза: коротко о событиях и глубоко о смыслах. Репортажи с места, интервью, разборы и аналитика. Умные уведомления, ночной режим, офлайн-доступ и виджеты. Доверяйте проверенным данным и оставайтесь на шаг впереди.
Новостной портал https://pto-kyiv.com.ua для тех, кто ценит фактчекинг и ясность. Картина дня в одном месте: политика, экономика, общество, наука, спорт. Ежедневные дайджесты, обзоры рынков, календари событий и авторские колонки. Читайте, делитесь, обсуждайте.
Всё про технику https://webstore.com.ua и технологии: обзоры гаджетов, тесты, сравнения, ИИ и софт, фото/видео, умный дом, авто-тех, безопасность. Пошаговые гайды, лайфхаки, подбор комплектующих и лучшие приложения. Понятно, актуально, без лишней воды.
globalvaluecorner – Amazing value and variety of products from around the world.
modernshoppingcorner – Modern design, easy shopping flow, and great product selection.
believeandachieve – Positive and motivational content, perfect for personal growth seekers.
everydayessentials – Convenient site to find daily essentials quickly and easily.
freshcollectionhub – Fresh products, great presentation, and a fun browsing experience.
trendandfashion – My go-to place for discovering new looks and fashion inspiration.
Нужна лестница? изготовление лестниц на второй этаж под ключ в Москве и области: замер, проектирование, производство, отделка и монтаж. Лестницы на металлокаркасе. Индивидуальные решения для дома и бизнеса.
Поиск работы https://employmentcenter.com.ru по актуальным вакансиям городов России, СНГ, стран ЕАЭС: обновления предложений работы ежедневно, рассылка свежих объявлений вакансий на E-mail, умные поисковые фильтры и уведомления в Telegram, Одноклассники, ВКонтакте. Помогаем найти работу мечты без лишних звонков и спама.
Нужно продвижение? Продвижение современных сайтов в ТОП 3 выдачи Яндекса и Google : аудит, семантика, техоптимизация, контент, ссылки, рост трафика и лидов. Прозрачные KPI и отчёты, реальные сроки, измеримый результат.
dailydealsplace – Always updated with great bargains, love checking in daily.
findnewhorizons – A wonderful reminder to explore, grow, and discover new opportunities.
мыло есть.нерабочее. https://www.grepmed.com/ktihobugueu мыло есть.нерабочее.
trendandbuy – Trendy items at good prices, always up to date with new arrivals.
Желаю всего самого наилучшего вашему магазину,ваш бренд это качество! http://www.pageorama.com/?p=cabohufofogy Да мы уже поговорили – нормальные ребята вроде) хз, я всё равно полной предоплате не доверяю)
budgetfriendlyhub – Great variety of affordable options without sacrificing style or quality.
learncreategrow – Inspiring content that encourages learning, creating, and personal growth.
конце концов при курении эйфория https://form.jotform.com/253075606477059 Написано же везде, что суббота и воскресенье – выходные дни. Надо же менеджеру отдыхать когда-то
classystyleoutlet – Love the elegant yet accessible fashion choices available here.
Профессиональный специалист по недвижимости: оценка, подготовка, маркетинг, показы, торг и юрсопровождение до сделки. Фото/видео, 3D-тур, быстрый выход на покупателя.
Играешь на пианино? обучение игры на фортепиано Поможем освоить ноты, ритм, технику и красивое звучание. Индивидуальные уроки, гибкий график, онлайн-формат и авторские методики. Реальный прогресс с первого месяца.
Школа фортепиано ноты для фортепиано для начинающих и продвинутых: база, джазовые гармонии, разбор песен, импровизация. Удобные форматы, домашние задания с разбором, поддержка преподавателя и быстрые результаты.
growtogetherstrong – Positive and motivating, perfect for teamwork and community growth.
Хочу сказать большое спасибо за бонус за помошь сайту, зе бест https://rant.li/xgugeficu/arraial-du-kabu-kupit-kokain-mefedron-marikhuanu-boshki Самый крутой магазин!
exploreopportunityzone – Excellent motivational content, helps me think bigger and act smarter.
seostream.click – Navigation felt smooth, found everything quickly without any confusing steps.
Я выхватил бан, ты злобняк https://www.grepmed.com/aayhwefl ПРИВЕТ ВСЕМ:НУ ЧТО Ж ТЫ БРО ТАК ОБЕЗНАДЕЖИЛ МЕНЯ ПО СКАЙПУ И В КОМЕНТАРИЯХ НАПИСАЛ ЧТО ОТПРАВИЛ MXE А НА ПАКЕТЕ НАПИСАНО RCS И ЧТО МНЕ КУРИТЬ ТЕПЕРЬ НАЧАТЬ ЗАЧЕМ ГОВОРИТЬ ТО ЧТО НЕ ДЕЛАЕШЬ КАК САМ СЧИТАЕШЬ ?
https://www.ted.com/profiles/50589810
seohero.click – Content reads clearly, helpful examples made concepts easy to grasp.
digitallift.click – Pages loaded fast, images appeared sharp, and formatting stayed consistent.
promoscope.click – Appreciate the typography choices; comfortable spacing improved my reading experience.
trafficstorm.click – Mobile version looks perfect; no glitches, fast scrolling, crisp text.
https://133636.activeboard.com/t72291648/melbet-promo-code-2026-130-welcome-bonus/?page=1#lastPostAnchor
promovix.click – Color palette felt calming, nothing distracting, just focused, thoughtful design.
buildyourownfuture – Great motivational site, helps focus on goals and planning ahead.
classystylemarket – Stylish products with great prices, love the classy layout of this site.
Да тут дофига кто чего отписывает.только вот пробы нормальным людям раздайте.что бы видели липчане работу вашу! https://pubhtml5.com/homepage/uelzz магаз четкий,еще в 2011 каждую неделю забегали:music:)всегда все ровно
growthmatrix.click – Appreciate the typography choices; comfortable spacing improved my reading experience.
трек не работает тишина уже 3 дня прошло >< у всех все гуд а у меня щляпа как так почему ((( ?!?!?!? https://beteiligung.stadtlindau.de/profile/%D0%94%D1%83%D0%B1%D1%80%D0%BE%D0%B2%D0%BD%D0%BE%20%D0%BA%D1%83%D0%BF%D0%B8%D1%82%D1%8C%20%D0%9A%D0%BE%D0%BA%D0%B0%D0%B8%D0%BD/ Все заказ пришел, не было времени отписаться, брали пробы, в аське вежливый,конкретный, все в сроки,просил отправить в день перевода денег, отправили, шла ровно 4 дня, как написанно на сайте, веса точные, не обманывают, все порадовало, консперация на высшем уровне, правда расчитывал на лучшее качество, мало держит, консентрация 1 к 6-8 самая лутая.. Огромное спасибо магазину, мир и процветание, выбераю чемикал микс) Всем мир друзья..
creativegiftoutlet – Amazing gift ideas, really unique and thoughtful selections available here.
dreamdiscovercreate – Truly inspiring space that encourages creativity and following your dreams.
Во-во МАГАЗИН! Обозначил цену, так по ней и продавай! На мыло упало – Цена заказа -4250 и .. А потом начались догонялки…. Магазины так не поступают, а поступают именно БАРЫГИ, как точно выразился РОГАТЫЙ ОБИТАТЕЛЬ данной ветки https://pxlmo.com/mycnoial16g011 2-й раз все было быстро но собирал весь дживик по конспирации , на пакетиках видать экономили)))
shopforvalue – Affordable products without compromising quality, makes shopping super satisfying.
Доставка осуществляется нашим курьером при заказе от 1кг!И обговаривается с ТС индивидуально! https://rant.li/dabouhred/didim-kupit-kokain-mefedron-marikhuanu-boshki Первый раз заказывал пришло все за 4 дня , в данной же ситуации уже 11 дней идет , я готов любые деньги платить чтобы приходило быстрей
Такое бывает у СПСР, у меня то же он не бился, а потом все нормально было, хотя мне ей вчера должны были привезти но не привезли https://www.rwaq.org/users/schnorroehcecil-20251102232333 у меня наоборот. в этот раз быстрее все происходит)
growbeyondlimits – Encouraging platform that inspires personal growth and pushing boundaries every day.
findamazingoffers – Excellent deals and diverse products, makes shopping super satisfying.
Casino 7k работает чётко. Удобно оформлять вывод средств, подтверждение приходит сразу. Поддержка всегда отвечает: 7k casino сайт регистрация
У Данного Магазина я так понимаю Принцип не отвечать в Аське?!=) https://www.divephotoguide.com/user/peyeaogy А вот это очень интересно)))ДК есть он или его нет?В розницу пару г возможно надеюсь закзать?
resultsdrive.click – Navigation felt smooth, found everything quickly without any confusing steps.
Inspire Hub Online – Found a motivational thought that encouraged positive action.
Мелбет новогодний розыгрыш автомобилей и гаджетов
Участвуй в новогоднем розыгрыше Мелбет и выигрывай автомобили и крутые гаджеты
Для всех, кто ищет возможность получить шикарные призы этой зимой, есть отличная новость. Участие в акции предоставляет шанс на выигрыш уникальных транспортных средств и современных технологий. Убедитесь, что вы не упустили этот шанс улучшить свою жизнь.
Чтобы не остаться в стороне, зарегистрируйтесь и активно участвуйте в мероприятии. Для повышения вашего шанса на успех, внимательно изучите все условия и требования, предложенные организаторами. Не забывайте следить за обновлениями, которые могут касаться дополнительных возможностей для участников.
Также стоит обратить внимание на советы экспертов, которые рекомендуют делиться информацией о наградах в социальных сетях. Публикация о вашем участии или приглашение друзей может значительно увеличить ваши шансы на успех. Настройтесь на позитивный результат и не упустите свою возможность!
Условия участия в конкурсе
Для участия необходимо зарегистрироваться на платформе и создать аккаунт, если у вас его еще нет. Убедитесь, что вы указали актуальные данные: имя, электронную почту и номер телефона. Участие возможно только для пользователей старше 18 лет.
Обратите внимание на минимальный депозит. Для активации возможности вступления в конкурс, требуется внести определённую сумму на игровой счет. Продолжительность акции также имеет значение; следите за датами начала и завершения, чтобы не упустить шанс.
Регулярные ставки или участие в других мероприятиях платформы могут увеличить шансы на победу. Проверьте конкретные условия, так как они могут отличаться в зависимости от типа призов. Ознакомьтесь с официальными правилами для получения точной информации о количестве необходимых ставок и участвий.
При выигрыше, будьте готовы предоставить подтверждающие документы. Это могут быть копии паспорта или другие документы, удостоверяющие личность. Убедитесь, что ваши контактные данные актуальны, чтобы администраторы могли с вами связаться в случае победы.
Также важно следить за новостями на сайте и в социальных сетях, чтобы не пропустить информацию о дополнительных конкурсах и сюрпризах. Удачи!
Кто может участвовать в розыгрыше
Для участия в конкурсе требуется совершить минимум одну ставку на сайте организатора. Положение разрешает зарегистрироваться любому пользователю, достигшему 18-летнего возраста. Участником можно стать как новым игрокам, так и тем, кто уже давно зарегистрирован на платформе.
Важно, чтобы участники соблюдали все условия и требования, указанные в правилах мероприятия. Не допускается участие людям, находящимся под влиянием спиртных или наркотических веществ в момент участия. Каждое действие на сайте должно быть законным и соответствовать нормам.
Бонусом станет возможность участия для тех, кто активно использует аккаунт в приложении. Периодические проверки помогут исключить попытки мошенничества, что обеспечивает честность розыгрыша. Рекомендуется следить за обновлениями на официальных ресурсах, чтобы узнать о возникновении новых условий или акций.
Как зарегистрироваться для участия?
Чтобы стать участником, выполните следующие шаги:
– Посетите официальный сайт акции.
– Найдите раздел, посвященный участию в конкурсах.
– Введите свои персональные данные: имя, фамилия, адрес электронной почты.
– Создайте надежный пароль, соблюдая указанные требования.
– Подтвердите регистрацию через ссылку, отправленную на указанный вами адрес электронной почты.
Также помните о некоторых нюансах:
– Убедитесь, что предоставленные данные актуальны и точны.
– Обратите внимание на сроки регистрации – участие возможно только в течение определенного времени.
– Проверьте, нет ли ограничений для участия, связанных с возрастом или местом проживания.
После завершения регистрации вы получите подтверждение и сможете участвовать в дальнейшем. Следите за новыми обновлениями, чтобы не пропустить важные новости!
Действия для повышения шансов на выигрыш
Регулярно участвуйте в акциях, чтобы накапливать баллы или купоны. Некоторые компании предлагают дополнительные возможности за повторные участия или за выполнение простых заданий.
Изучите условия и требования. Знайте, какие действия увеличивают ваши шансы: например, покупки на определенную сумму могут приносить дополнительные билеты.
Подписывайтесь на рассылки и уведомления. Это позволит быть в курсе новых предложений и акций, что даст возможность своевременно реагировать.
Бросьте вызов себе и участвующим. Особенно эффективны конкурсы, в которых важно продемонстрировать креативность или знать определенные факты.
Используйте дополнительные бонусы. Многие платформы предлагают акции для новых пользователей или за привлечение друзей. Это создаёт возможность увеличить количество шансов.
Следите за тем, как часто проводятся мероприятия. В активных акциях обычно больше возможностей. Чем больше вы участвуете, тем выше вероятность удачи.
Будьте внимательны к срокам. Участие до окончания акции увеличивает шансы, так как в последний момент может возникнуть усиленная конкуренция.
Рассмотрите возможность участия в нескольких конкурсах одновременно. Это расширяет ваши перспективы и увеличение шансов получить приз.
https://easysale.lk/melbet-android-obzor-2025/
proclicklab.click – Pages loaded fast, images appeared sharp, and formatting stayed consistent.
rapidleads.click – Loved the layout today; clean, simple, and genuinely user-friendly overall.
Trend Hunt Spot – Great range of items, found some real gems today.
nextlevelads.click – Color palette felt calming, nothing distracting, just focused, thoughtful design.
findamazingoffers – Excellent deals and diverse products, makes shopping super satisfying.
boosttraffic.click – Color palette felt calming, nothing distracting, just focused, thoughtful design.
virallaunch.click – Bookmarked this immediately, planning to revisit for updates and inspiration.
Ищете, где купить права быстро и надежно? Наш сервис предлагает легальное и безопасное оформление водительских прав с гарантией качества. Мы поможем пройти все этапы получения водительского удостоверения, включая подготовку документов, обучение в автошколе и сдачу экзаменов. У нас работают опытные специалисты, которые сопровождают вас на каждом шаге, обеспечивая прозрачность и законность процесса.
clickvoltage.click – Navigation felt smooth, found everything quickly without any confusing steps.
Daily Deals Portal – Great bargains are always available, updated every day.
Shop Today Picks – Noticed something practical that helped streamline my shopping.
dreamfashionfinds – Stylish and trendy fashion finds that make everyday shopping fun.
Trend Picks Spot – Always something fresh to see, new trends update often.
Casino 7k приятно удивило удобством. Интерфейс простой, всё понятно. Вывод средств прошёл легко, деньги пришли быстро: 7k casino сайт регистрация
Кракен зеркало вход на сайт — надежный способ обойти блокировки и получить доступ к популярной платформе Кракен. Если официальный сайт недоступен из-за региональных ограничений или технических проблем, зеркало Кракен поможет быстро и безопасно войти на сайт без потери функционала.
Мелбет скретч-карты выигрыши до 1 миллиона рублей
Мелбет скретч-карты предлагают моментальные выигрыши до одного миллиона рублей
Рекомендуем обратить внимание на уникальные карточки, предлагающие шанс на быстрое обогащение. С максимально возможным выигрышем до 1 000 000, у вас есть реальная возможность стать обладателем значительной суммы, не прибегая к сложным ставкам или стратегиям.
Каждая карточка представляет собой шанс и интригу, позволяя моментально узнать о результате.Правила просты: стирайте защитное покрытие, и возможность увидеть результат открывается прямо перед вами. Понять, как это работает, можно за несколько минут, что делает процесс доступным даже для новичков.
Хотите увеличить шансы на успех? Изучите доступные варианты и выберите те, которые предлагают наилучшие условия. Сравнение различных карточек поможет сделать правильный выбор и максимально использовать каждую игровую сессию. Удачи вам в поисках достойных призов!
Что такое скретч-карты Мелбет?
Это специальные карточки, которые предоставляют пользователям возможность мгновенно проверить свою удачу. На каждой такой карточке скрыты различные призы, доступные после того, как игрок сотрет защитный слой. Чаще всего такие карты предлагают интересные и простые условия для участия, что идеально подходит как для новичков, так и для опытных игроков.
Приобретая эти карточки, пользователи могут рассчитывать на разные номиналы и разнообразие призов. Выбор доступных карт может варьироваться, включая как небольшие суммы, так и более серьезные выигрыши. Участие в игре требует лишь минимальных усилий – достаточно просто стереть защитное покрытие и узнать, есть ли удача на вашей стороне.
Важно отметить, что такие карточки требуют внимания к условиям акции. Прежде чем начать, стоит ознакомиться с правилами и сроками действия предложений. Некоторые карточки могут иметь ограничения или особые условия, которые стоит учитывать для получения максимальной выгоды. Следовательно, внимательный подход значительно повысит шансы на успех.
Не забудьте, что это развлечение и возможность попробовать свои силы, а значит, сохраняйте умеренность и играйте ответственно. Удача может улыбнуться вам в любой момент, и именно это делает использование данных карточек увлекательным и захватывающим.
Описание и принцип работы
Существуют специальные карточки, на которых зашифрованы различные призовые суммы. Участник получает возможность проверить свою удачу, стерев защитный слой, который скрывает результаты.
Чтобы начать взаимодействие, достаточно приобрести этот лот и следовать простым шагам:
– Купите карточку в одном из предложенных мест.
– С помощью монеты или подобного предмета проведите по защищенной поверхности, чтобы стереть специальное покрытие.
– Убедитесь, что вы внимательно проверили все поля на наличие выигрышных символов.
Каждая карточка имеет уникальный набор символов, что создает разнообразие в призах. Большинство вариантов подразумевает угадывание определенного количества совпадающих знаков. Для выявления успешных комбинаций можно использовать правила, указанные на упаковке.
При выигрыше важно следовать инструкциям, которые помогут правильно оформить получение приза. Участникам рекомендуется сохранять карточку до момента получения награды, так как она является доказательством удачи.
Изучите различные предложения и выберите наиболее подходящие. Убедитесь, что у вас есть возможность проверить все детали и условия, чтобы избежать недоразумений.
Типы скретч-карт на платформе
На платформе представлены различные виды карточек, обеспечивающих увлекательный опыт для пользователей. Каждый тип предлагает уникальный подход к розыгрышам, что позволяет выбрать наиболее подходящий вариант.
Одним из наиболее популярных видов являются классические карточки. Их особенность заключается в простоте: игроки счищают защитный слой, чтобы мгновенно определить размер приза. Эти предложения часто имеют фиксированные выигрыши, что делает их понятными и доступными для всех участников.
Параллельно доступны карточки с многослойными выигрышами. Они подразумевают несколько этапов проверки, где на каждом уровне можно получить разные размеры вознаграждений. Такой формат создает дополнительное напряжение и ощущение азартного процесса.
Специальные карточки со всеми знаками шанса предоставляют возможность игрокам участвовать в дополнительных играх. Это могут быть финальные розыгрыши или бонусные уровни, которые расширяют спектр возможностей для увеличения выигрышей.
Не стоит забывать о сезонных и тематических предложениях. Эти варианты созданы с учетом праздников или актуальных событий, что делает процесс участия более праздничным и интересным. Каждый из этих типов карточек приносит уникальные эмоции и возможности для увеличения выигрышей.
Выбор типа карточки зависит от предпочтений игрока. Рекомендуется ознакомиться с условиями каждого вида, чтобы понять, какой формат лучше всего подходит вам.
Как приобрести скретч-карты
Чтобы получить доступ к скретч-картам, посетите официальный сайт или приложение, связанное с азартными играми. На главной странице ищите раздел, посвященный специальным предложениям или акциям. Обычно там размещены все действующие рекламные кампании, включая подробности о приобретении.
При выборе карт обратите внимание на условия акций: некоторые могут требовать регистрации или создания аккаунта. Процесс регистрации прост и подразумевает ввод минимальной информации. Если данный шаг не является обязательным, потенциальные игроки могут использовать доступные варианты покупки без создания учетной записи.
Для приобретения карт обычно доступны несколько методов оплаты: банковские карты, электронные кошельки или мобильные приложения. Убедитесь, что используемый вами способ безопасен. Изучите отзывы других пользователей о сервисах, предоставляющих возможность покупки.
Комиссии и ограничения могут варьироваться в зависимости от выбранной платформы. Тщательно просмотрите все условия перед подтверждением платежа. Иногда случаются дополнительные акции, позволяющие получить бонусы или промокоды при первой покупке.
После завершения транзакции вы получите доступ к картам в аккаунте или на электронную почту. Используйте их сразу после получения, чтобы не упустить шанс на получение приза.
https://decolazer.ru/2025/10/20/melbet-fribet-besplatnaya-stavka-2025/
Мелбет казино семь советов для успешной игры
Мелбет онлайн казино советы по ставкам для достижения успеха в игре
Для стабильного выигрыша в азартных развлечениях важно заранее установить лимиты для бюджета. Определите максимальную сумму, которую готовы потратить, и придерживайтесь этого значения. Это поможет избежать нежелательных потерь и сосредоточиться на игровом процессе, вместо того чтобы беспокоиться о финансах.
Также не забывайте о выборе игр. Разберитесь, какие варианты наиболее подходят для вашего стиля игры и уровня опыта. Например, слоты могут предложить быстрое развлечение, в то время как настольные игры часто требуют большей стратегии и анализа.
Следующим шагом станет тщательное изучение правил и стратегий выбранных игр. Знание нюансов позволит принимать более обоснованные решения во время игры. Практикуйте на бесплатных версиях, чтобы закрепить навыки перед ставками реальных денег.
Невозможно переоценить значение использования бонусов и акций. Эти предложения могут значительно увеличить ваш игровой бюджет, но тщательно читайте условия. Выбор лучших предложений поможет извлечь максимальную выгоду из ваших вложений.
Также стоит создать привычку анализировать свои игры. Делайте заметки о своих ставках, выигрышах и потерях. Это поможет распознать удачные и неудачные ходы, что со временем позволит улучшить вашу стратегию.
Следует помнить о необходимости делать перерывы. Долгие игровые сессии могут привести к утомлению и принятию неблагоприятных решений. Регулярные паузы помогут сохранять ясность ума и сосредоточенность.
И, наконец, не забывайте о развлекательной стороне процесса. Азартные игры – это прежде всего форма отдыха. Наслаждайтесь игрой, и пусть азарт будет источником положительных эмоций, а не стрессом.
Изучите правила игр
Перед тем как делать ставки, ознакомьтесь с конкретными правилами каждой игры. Это поможет избежать возможных недоразумений и повысит шансы на выигрыш. Внимательно изучите такие аспекты, как структура выплат, особенности игрового процесса и условия, при которых можно активировать бонусные функции.
Каждая игра имеет собственные характеристики, которые могут значительно влиять на ваши результаты. Например, в настольных играх важно понимать, какие стратегии применимы к определённому типу ставок, а в автоматах обратите внимание на количество линий и параметры волатильности.
Если вы выбрали карточные игры, желательно изучить вероятности на выигрыш, а также карты, которые могут быть использованы. Например, в покере знание комбинаций и правил раздачи критически важно для успешной игры.
Регулярно обновляйте свои знания о новых играх и их механиках. Разработчики часто вводят новые элементы и функции, которые требуют адаптации. Знание последних изменений поможет вам оставаться конкурентоспособным и стратегически грамотным.
Как разобраться в игровых правилах?
Изучите раздел с правилами игры, доступный в самом интерфейсе. Обычно он содержит всю необходимую информацию о правилах, механиках и особенностях.
Обратите внимание на таблицы выплат, где указаны возможные выигрыши и коэффициенты. Это позволит понять, как устроены выплаты и какие комбинации обеспечивают прибыль.
Задействуйте режимы бесплатной игры, если таковые предлагаются. Это даст возможность протестировать стратегию без финансовых рисков и ознакомится с нюансами.
Изучите специфику бонусов и акций, ведь они могут значительно влиять на общий подход к ставкам и на ваш бюджет.
Посмотрите обучающие видео и прочитайте обзоры на специализированных ресурсах. Это поможет сформировать представление о возможностях и стратегиях, используемых игроками.
Обратите внимание на различные комбинации символов и их значения. Практика и опыт помогут быстрее запомнить правила и основные механики.
Не бойтесь задавать вопросы в службе поддержки. Их сотрудники могут дать полезные разъяснения и подсказки по правилам игры.
Где найти актуальную информацию о правилах?
Посетите официальные страницы заведений, чтобы получить исчерпывающие и свежие данные о правилах. На этих ресурсах представлены ясные объяснения и условия использования каждой игры.
– Разделы помощи и вопросов-ответов часто содержат основные принципы и нюансы, полезные для новичков.
– Форумы пользователей могут служить отличным источником информации. Здесь обсуждаются личные опыты и советы от опытных игроков.
– Видеоуроки и стримы на платформах, таких как YouTube, помогут визуально понять правила и стратегии.
– Специальные блоги об азартных развлечениях предлагают глубокий разбор популярных игр, их правил и механик.
Обратите внимание на регулярные обновления и уведомления, которые могут вносить изменения в правила. Следите за новостями, чтобы быть в курсе актуальной информации.
Убедитесь, что вы читаете инструкции на русском языке, чтобы избежать недопонимания. Используйте ресурсы с отзывами для оценки надежности информации.
Определите свой бюджет
Установите для себя чёткий лимит на расходы, прежде чем приступить к ставкам. Определите сумму, которую готовы потерять, и ни в коем случае не превышайте её. Это позволит избежать ненужного финансового давления и неудач.
Рекомендуется разделить бюджет на несколько сессий. Например, если у вас есть 10 000 рублей, выделите на каждую игровую сессию по 1 000 рублей. Это снижает риск больших потерь за один раз и помогает контролировать свои эмоции.
Запомните, что азартные события не должны восприниматься как способ заработка. Отнеситесь к ставкам как к форме развлекательной активности, а не источнику дохода. Отклоняйтесь от излишнего риску, если ваши финансовые планы не выдерживают давления.
Запланируйте регулярные перерывы. Часто игроки склонны терять бдительность и ставить больше, когда у них есть чувство удачи или наоборот, отчаяния. Перерывы помогут вам оставаться сосредоточенным и дисциплинированным в своих решениях.
Ведите учёт своих расходов. Записывайте суммы ставок и выигрышей в таблицу или журнал. Это не только поможет вам понять свои финансовые привычки, но и даст возможность оценить, насколько успешно вы управляете своим бюджетом.
Оценивайте свой психологический настрой перед началом. Если вы ощущаете себя уставшим или эмоционально нестабильным, лучше отложить игру. Правильное состояние ума напрямую влияет на качество принимаемых решений.
https://mimart.runtimearts.com/melbet-promo-deposit-2025/
Value Discovery Portal – Loved the simple presentation, made finding items effortless today.
Мелбет онлайн казино удобная игра на смартфоне
Мелбет онлайн казино для мобильных устройств быстрый доступ к азартным играм
Современные технологии сделали возможность участия в азартных развлечениях более доступной, и платформы для ставок представляют собой оптимальный выбор. Если вы заинтересованы в игровом опыте, который позволит вам наслаждаться успешными моментами, обратите внимание на версии для мобильных устройств. Это добавляет комфорт и избавляет от необходимости находиться на одном месте.
Для начала убедитесь, что у вас установлено надежное приложение или доступ к веб-версии, оптимизированной для мобильных устройств. Это обеспечит вам стабильную работу и минимизирует вероятность сбоев. Также не забудьте воспользоваться специальными предложениями, которые часто доступны для новых пользователей и активных участников.
Преимущества игры в Melbet на мобильном устройстве
Удобный доступ к играм позволяет запускать любимые развлечения в любое время. Скачивание приложения дает возможность пользоваться полным функционалом платформы без зависаний.
Интерфейс адаптирован для мобильных устройств, что обеспечивает простоту навигации. Меню и кнопки оптимизированы для сенсорного управления, что упрощает поиск нужных игровых автоматов и ставок.
Наличие эксклюзивных предложений для пользователей мобильной версии привлекает новых игроков. Часто проводятся акции с бонусами, доступными только на смартфонах.
Автоматическое обновление приложений позволяет всегда использовать актуальные версии с новыми функциями и играми. Это гарантирует, что у пользователей есть доступ к самым свежим продуктам платформы.
Мобильная версия предлагает возможность делать ставки в режиме реального времени, что добавляет динамики в процесс. Быстрые реакции на события делают игровой процесс более увлекательным.
Доступность игр в любое время
Вы сможете наслаждаться широким выбором развлечений, доступных круглосуточно. В любое время суток вам доступны слоты, карточные и настольные игры, что позволяет выбирать подходящее время для игры.
– Гибкие часы: все развлечения доступны без ограничений, обеспечивая возможность начать игру в любое время.
– Разнообразие: игорная библиотека регулярно обновляется, что привлекает игроков новыми предложениями и интересными сюжетами.
– Мобильные приложения: специальные программы позволяют запускать игровые автоматы и другие развлечения с минимальными затратами времени.
Любители азарта могут насладиться игрой, находясь где угодно, будь то дом, кафе или в поездке. Подключение к интернету откроет доступ ко всем развлечениям без каких-либо задержек.
– Проверяйте актуальные события и турниры, чтобы не пропустить возможность поучаствовать в специальных играх.
– Используйте фильтры для поиска любимых игровых автоматов или выигрышей, чтобы быстро находить нужное развлечение.
Таким образом, можно с удобством устраивать игровые сессии, когда это удобно именно вам, получая удовольствие от процесса и выбирая лучшие варианты для игры.
Удобный интерфейс для пользователей
Интуитивно понятный дизайн позволяет находить нужные разделы и развлечения всего за пару мигов. Основная навигация представлена в верхней части экрана, что обеспечивает быстрый доступ к популярным играм и промоакциям. Хорошо организованные категории помогают быстро ориентироваться среди слотов, настольных игр и живой торговли.
Кнопки управления играми выполнены крупным шрифтом и доставляют удовольствие от использования. Они адаптированы под сенсорные экраны, что исключает случайные нажатия и делает игровой процесс более приятным. Все элементы интерфейса оптимизированы для сенсорного управления, что упрощает взаимодействие.
Рекомендуется устанавливать приложение, если доступно, так как оно предлагает еще более настраиваемый подход к игре. В приложении можно быстро переключаться между режимами реальной ставки и пробной игрой, сохраняя при этом прогресс и получение бонусов. Это особенно удобно, если вы хотите протестировать новое развлечение или стратегию.
Не забывайте о функциях персонализации, доступных в интерфейсе. Пользователи могут настроить уведомления о новых играх и акциях, что позволяет быть в курсе всех событий без постоянного мониторинга платформы. Это делает процесс вовлечения более динамичным и соответствующим вашим интересам.
Специальные мобильные бонусы
Рекомендуется обратить внимание на эксклюзивные предложения, доступные только для мобильных пользователей. Часто такие бонусы включают в себя дополнительный процент на первый депозит или бездепозитные фрибеты, которые можно получить сразу после загрузки приложения.
Регулярные акции с кэшбэком также могут значительно повысить шансы на выигрыш. Иногда они предлагаются только для ставок, сделанных через мобильные устройства, что делает их особенно привлекательными.
Некоторые платформы устраивают специальные турниры и розыгрыши, в которых могут участвовать лишь те, кто использует мобильные версии. Возможно, стоит не только следить за новыми акциями, но и подписаться на рассылку, чтобы первыми узнавать о выгодных предложениях.
Важным моментом является программ лояльности. Часто мобильные клиенты получают дополнительные баллы за каждую ставку, которые затем можно обменять на реальные деньги или бонусы. Проверьте, нет ли специальных условий для активных пользователей приложения.
Кроме того, стоит обратить внимание на лимиты ставок при использовании мобильной версии. Некоторые бонусы могут быть недоступны при превышении определённой суммы ставки, поэтому ознакомьтесь с правилами перед игрой.
https://www.atrisagency.com/melbet-lichnyy-kabinet-2025/
Мелбет Криптовалюты Bitcoin и USDT для успешной игры
Максимальный успех в Мелбет с криптовалютами Bitcoin и USDT для азартных игр
Изучите условия и коэффициенты букмекеров, принимающих упомянутые валюты. Это может значительно повлиять на итоговые выплаты и общую эффективность ваших прогнозов. Например, различия в коэффициентах могут достигать нескольких процентов, что, в свою очередь, формирует значительную разницу в суммах выигрыша.
Постоянно анализируйте свои ставки и учитесь на ошибках. Наличие алгоритма операций с использованием криптовалют позволит вам контролировать риски и более уверенно подходить к процессу. Понимание динамики курса активов также поможет вам правильно оценивать ситуацию и выбирать оптимальное время для заключения сделок.
Не игнорируйте преимущества, которые дает анонимность и безопасность криптовалютных переводов. Это позволит вам сосредоточиться на стратегии без лишних переживаний о безопасности своих средств. Формирование правильных привычек и подходов к ставкам будет способствовать не только повышению комфорта, но и росту общих доходов.
Преимущества использования Bitcoin и USDT в букмекерской конторе
Низкие комиссии при переводах делают использование указанных валют привлекательным для пользователей, позволяя сохранять больше средств на счетах и использовать их более эффективно.
Анонимность транзакций является еще одним значительным плюсом. Пользователи могут сохранять свою конфиденциальность, что важно в современном мире.
Курс Bitcoin и USDT нередко демонстрирует устойчивость, что позволяет игрокам избегать курсовых потерь при хранении средств, так как эти валюты имеют меньшую волатильность.
Интеграция с современными финансовыми технологиями открывает новые горизонты для игроков, позволяя использовать их для торговли и инвестиций в активы внутри самой платформы.
Кроме того, многие пользователи отмечают удобство взаимодействия с подобными системами, так как управление средствами становится более интуитивно понятным и простым.
Почему выбирают криптовалюту для ставок?
Основные причины, по которым многие игроки предпочитают делать ставки с использованием виртуальных средств, заключаются в следующих аспектах:
– Анонимность: Транзакции в большинстве случаев не требуют личной информации, что обеспечивает более высокий уровень конфиденциальности.
– Минимальные комиссии: Часто комиссии за переводы и конверсии значительно ниже по сравнению с традиционными методами, что позволяет игрокам сохранить больше средств.
– Быстрота обработки: Платежи осуществляются практически мгновенно, что обеспечивает возможность быстрой реакции и участия в ставках.
– Глобальный доступ: Использование виртуальных активов предоставляет возможность делать ставки из любой точки мира, где доступен интернет.
– Децентрализация: Отсутствие центральных органов контроля снижает риск манипуляций и делает процесс более надежным.
Сравнение с традиционными платежными системами также показывает явные преимущества. Например, отсутствие необходимости в банковских реквизитах упрощает процесс для пользователей, которые могут не иметь доступа к определенным финансовым услугам.
Растущая популярность этой формы ставок также связана с желанием многих игроков быть частью новых технологий и современных трендов, что включает в себя возможность получить дополнительную выгоду от криптовалютного рынка.
Поэтому интерес к таким подходам лишь увеличивается, предлагая участникам уникальные опции для игры и заработка. С учетом всех преимуществ стоит рассмотреть возможность присоединения к этому тренду.
Преимущества транзакций с Bitcoin
Транзакции с использованием первой криптовалюты имеют несколько ключевых плюсов. Во-первых, они обеспечивают высокую степень анонимности. Благодаря децентрализованной природе, личные данные пользователей остаются скрытыми, что снижает риск взломов и мошенничества.
Во-вторых, комиссии за переводы обычно гораздо ниже, чем при использовании традиционных банковских систем, особенно при международных переводах. Это означает, что больше средств остается на вашем счете, а не у финансовых посредников.
Третьим аспектом является скорость транзакций. Переводы обрабатываются значительно быстрее, чем в стандартных финансовых учреждениях. В большинстве случаев они происходят в течение нескольких минут, тогда как банковские переводы могут занимать часы или даже дни.
Плюс ко всему, в последние годы наблюдается растущий интерес и принятие данной валюты различными бизнесами и платформами. Это создает дополнительные возможности для ее использования при расчетах за товары и услуги в крупных и мелких магазинах.
И наконец, гипотетический рост стоимости этой валюты означает, что хранение активов в данной форме может в будущем привести к выгодным инвестициям.
Преимущества использования USDT для ставок
Для оптимизации ставок рекомендуем воспользоваться виртуальной валютой Tether. Это обеспечит стабильность и предсказуемость ваших затрат. Изменения курса традиционных активов могут привести к непредсказуемым потерям, в то время как привязанный токен сохраняет свою стоимость к доллару США.
Быстрые транзакции – еще один важный момент. Подписанные операции происходят мгновенно, что позволяет игрокам моментально реагировать на изменения в азартных играх. Эта скорость критична, особенно во время интенсивных событий.
Анонимность также является ключевым преимуществом. Использование виртуального токена снижает требования к личным данным, что делает процесс ставок менее громоздким и более безопасным.
Не забудьте об уровне комиссии. Тарифы на транзакции с Tether, как правило, ниже, чем у традиционных методов, что придаст вашим ставкам дополнительную прибыльность. Открывая аккаунт, стоит обратить внимание на привлекательные условия и возможности, которые предлагает платформа с усовершенствованным функционалом.
https://chaizal.com/melbet-daiut-li-fribet-2025/
trafficsprintpro.click – Navigation felt smooth, found everything quickly without any confusing steps.
smartbuyplace – Excellent place to find smart deals and quality products efficiently.
Trend Fashion Spot – Fresh styles keep shopping interesting and fun.
Акции Мелбет КХЛ зимой: не упустите свои шансы
Лучшие хоккейные акции сезона от Мелбет в КХЛ которые стоит увидеть зимой
Выигрывайте больше с захватывающими предложениями! С приходом ледяного сезона открываются новые горизонты для азартных любителей. Уделите внимание специальным бонусам на ставки, которые не оставят равнодушным ни одного фаната. Применяйте промокоды, чтобы увеличить свои шансы на получение денежных вознаграждений.
Регулярные соревнования и матчи создают уникальные возможности для ставок. Следите за изменениями в линиях и акциями в преддверии крупных поединков. Заметив интересные коэффициенты, вы сможете сделать выгодные вложения, а также воспользоваться возможностями кэшбэка. Эти элементы не только разнообразят ваши ставки, но и добавят элемент стратегии в ваши действия.
Социальные сети и информационные ресурсы стоит держать под контролем. Многие организации анонсируют эксклюзивные акции, которые доступны лишь на определённых платформах. Следите за новостями и не упускайте возможность принять участие в конкурсах и розыгрышах, которые проходят во время захватывающих матчей. Никакие события не должны пройти мимо вас, если вы хотите быть в выигрыше!
Подготовьтесь к увлекательному сезону. Подробно изучите текущие предложения и выбранную стратегию ставок, чтобы максимально увеличить свою выгоду. С каждым матчем вам открываются новые шансы, так что используйте их по максимуму для достижения успешных результатов.
Что такое предложения от букмекера в хоккее?
Ставки на хоккей предлагают разнообразные бонусы и специальные предложения для привлечения игроков. Чаще всего это фрибеты, которые позволяют делать ставки без риска потери собственных средств. Например, при регистрации возможно получение предложения на стартовый депозит, что увеличивает шансы на выигрыш с первого пари.
Еще одной популярной инициативой являются повышенные коэффициенты на определенные матчи или события, что делает ставки более прибыльными. Также могут быть предусмотрены акции на систему комбинированных пари, где процент выплаты увеличивается за счет объединения нескольких исходов в одной ставке.
Регулярные турниры и события дают возможность игрокам участвовать в розыгрышах и акциях. За активность на платформе можно заработать баллы, которые впоследствии превращаются в денежные вознаграждения или уникальные товары. Мониторинг предложений и акций может значительно увеличить финансовый результат от ставок.
Не забывайте о времени действия акций: их условия часто ограничены, что требует от игроков внимательности. Использование актуальных предложений – это один из способов улучшения финансового результата и минимизации рисков при ставках на хоккей.
Основные виды промо-инициатив для матчей
Среди перечня предложений, обращая внимание на акции, стоит выделить несколько наиболее популярных и интересных форматов, доступных болельщикам и игрокам.
– Коэффициенты повышенной стоимости: Важный способ привлечения интереса, позволяющий увеличить выплаты на определенные исходы матчей. Это может быть на финал встречи или на то, кто первым забьет гол.
– Страховка ставок: Концепция, когда часть суммы ставки возвращается игроку в случае, если она проигрывает. Это дает возможность мягче пережить неудачи и стимулирует активность.
– Бонусы на депозит: Часто доступные при внесении средств на счет. Обычно, это выражается в процентах от суммы зачисления, которые можно использовать для ставок.
– Конкурсы и лотереи: Например, розыгрыши призов за правильные прогнозы или участие в акциях с определенными требованиями. Эти мероприятия увеличивают погруженность в процесс.
– Кэшбэк: Возврат части проигранных средств в виде кредита или бонусных очков. Это помогает вернуть небольшой процент потерь и продолжить участие в активности.
Следите за обновлениями и условиями, чтобы воспользоваться наиболее выгодными предложениями и получить максимум от своих ставок.
Как работают бонусы и фрибеты?
Бонусы и фрибеты предоставляют клиентам возможность увеличить свой банкролл. Обычно они начисляются на депозит или в виде бесплатных ставок. Например, при пополнении счета на одну сумму, игрок может получить дополнительные средства в определенном проценте, что позволяет ставить больше.
Фрибет – это автоматическая ставка, которую можно использовать на любые события. Если выигрыш получается с фрибета, то игрок получает только чистую прибыль, без учета самой ставки. Важно читать условия, так как некоторые предложения могут иметь ограничения по спорту или минимальным коэффициентам.
Следите за акциями и обновлениями, так как новые предложения могут появляться регулярно, и своевременное их использование поможет оптимизировать ваш игровой процесс. Чехов, режим слежения за ставками, регулярные проверки и анализ акций позволят максимизировать ваши усилия.
Актуальные зимние акции
Следует обратить внимание на предложение с повышенными коэффициентами на матчи привычных команд. Формат позволяет получить максимальную выгоду при ставках на предстоящие события. Например, коэффициенты на встречи с участием лидеров лиги могут быть увеличены до 1.5 в сравнении с обычными ставками.
Также стоит рассмотреть акцию на ставки с возвратом. Если ваш выбор не сыграл, сумма ставки будет возвращена на счет. Это делает игру еще более привлекательной, так как снижает риск потерь.
Не упустите возможность участвовать в лотереях. Каждый купон предоставляет шанс выиграть призы и бонусы, что добавляет азарт и интерес к ставкам. Проверяйте новости о проводимых розыгрышах регулярно, чтобы не пропустить важные события.
Название акции|Описание|Период действия
Повышенные коэффициенты|Коэффициенты на выборочные матчи увеличены до 1.5|01.12.2023 – 31.12.2023
Ставка без риска|Возврат суммы ставки в случае проигрыша|01.12.2023 – 15.12.2023
Лотерея|Шансы на выигрыш призов при ставках|Каждый уикенд декабря
Делайте ставки с умом, следите за актуальными предложениями и выбирайте наиболее выгодные варианты для увеличения своего банка. Участвуйте в всех акциях и используйте предоставленные возможности для максимизации выигрышей.
https://tera188.net/melbet-pereyti-na-sajt-obzor-2025/
Daily News Testing – Interactive reporting aur engaging style bohot achi lagi.
Daily Shopping Deals – Found an item here that was exactly what I was looking for.
Trendy Finds Hub – Great collection available, found something special quickly.
Мелбет казино преимущества регистрации и ухода за выигрышем
Мелбет онлайн казино – Почему регистрация даст вам больше шансов на выигрыш
Зарегистрируйтесь на платформе и получите мгновенный доступ к уникальным акциям и бонусам. Первое, что стоит сделать – изучить раздел с предложениями для новых клиентов. Бонусы на первый депозит могут существенно увеличить ваши стартовые возможности.
После создания профиля воспользуйтесь ознакомительным режимом, чтобы протестировать различные игры без риска потерять средства. Это даст вам возможность лучше понять механики и стратегии, что поможет при переходе к реальной игре.
Рекомендуется также установить мобильное приложение для удобства: оно позволяет участвовать в мероприятиях и ставках в любое время, что значительно повышает шанс на успех. Будьте в курсе специальных предложений и акций, которые может предложить ресурс счастливчикам. Всегда следите за обновлениями – некоторые из них могут увеличить ваши шансы на победу.
Причины выбора Мелбет для игры в казино
Доступность привлекательных бонусных программ значительно увеличивает шансы на успешную игру. Регулярные акции и щедрые предложения позволяют игрокам получать дополнительные средства для ставок, что делает процесс более выгодным.
Клиентская поддержка обеспечивает бесперебойное решение вопросов и оперативную помощь. Служба поддержки доступна через разные каналы, включая чат и электронную почту, что позволяет каждому пользователю получать ответ на свои запросы в любое время.
Лицензия и строгие правила работы гарантируют честность игры. Это дает уверенность игрокам в том, что все результаты случайны, и никто не может влиять на ход игры или на исход раундов.
Интерфейс платформы интуитивно понятен и дружелюбен, что значительно упрощает процесс игры. Новички быстро осваиваются, а опытные пользователи находят все необходимые функции на видном месте.
Постоянное обновление контента, добавление новых игр и возможностей не дает заскучать даже самым искушенным игрокам. Это стимул возвращаться и открывать для себя новые возможности выигрыша.
Разнообразие игр и разработчиков
Выбор игровых автоматов и настольных развлечений впечатляет. Важная рекомендация – обращать внимание на разнообразие игр от различных провайдеров. Это увеличивает шансы на удачные выигрыши благодаря уникальным механикам и сюжетам.
Среди известных поставщиков контента выделяются NetEnt, Microgaming, Play’n GO и Evolution Gaming. Эти компании славятся высококачественной графикой, продуманными игровыми процессами и оригинальными бонусными системами. Ищите игры с прогрессивными джекпотами; они могут приносить значительные суммы, особенно если удастся поймать удачный момент.
Не забудьте обратить внимание на разделы с живыми дилерами. Игра против реальных крупье создает впечатление настоящего зала, добавляя элемент взаимодействия. Evolution Gaming, в частности, предлагает отличные варианты для поклонников карточных игр и рулетки.
Для разнообразия стоит попробовать слоты с различными тематиками – от приключений до истории, что может значительно улучшить игровой опыт. Также обратите внимание на инновационные игры с функцией “классику” – они сочетают в себе традиционные элементы с современными подходами.
Каждый новый релиз чаще всего сопровождается уникальными предложениями и акциями, что добавляет интереса к играм. Не упускайте возможность запустить новые автоматы – это может принести неожиданный успех!
Удобный интерфейс и мобильная версия
Логотип и меню находятся в верхней части экрана, что обеспечивает легкий доступ к основным разделам. Важно отметить, что вся информация представлена без перегруженности, что помогает пользователю быстро находить нужные элементы и функции. Список игр сгруппирован по категориям, что упрощает выбор развлечений.
Мобильная версия адаптирована для различных платформ и устройств. Она функционирует на смартфонах и планшетах с операционными системами iOS и Android. Интерфейс автоматически подстраивается под размер экрана, что делает использование платформы комфортным. Быстрая загрузка страниц позволяет мгновенно переходить к играм без задержек.
Для более эффективного использования, рекомендуем установить приложение, которое предлагает дополнительные функции и уведомления о новых обновлениях. Приложение сохраняет ваши настройки и историю игр, что делает процесс еще более удобным.
Система навигации интуитивно понятна: специальные вкладки позволяют быстро добраться до информации о бонусах и акциях. Этот аспект помогает игрокам быть в курсе всех предложений и увеличивать свои шансы на успех.
Плюсы создания учетной записи на игровом сайте
– Персонализированные предложения: Каждый пользователь может рассчитывать на индивидуальные акции и специальные вознаграждения, исходя из своей активности и предпочтений.
– Безопасность личных данных: Оформление учетной записи обеспечивает защиту информации и подтверждение вашей личности, что снижает риски мошенничества.
– Ассортимент игр: Зарегистрированные участники получают доступ ко всем игровым продуктам, включая эксклюзивные новинки, которые недоступны для незарегистрированных.
– Участие в турнирах: Наличие заполненной профиля открывает возможность принимать участие в периодических конкурсах с крупными призами и разными соперниками.
– Быстрая система ставок: Регистрация упрощает и ускоряет процесс ставок, так как все настройки и предпочтения уже сохранены на платформе.
Регистрация также позволяет отслеживать историю ставок, что полезно для анализа и корректировки стратегии. Оформление личного кабинета на игровом сайте – это разумный шаг, позволяющий использовать все функции платформы с максимальной выгодой.
https://juventusclubdanmark.dk/2025/10/20/bonus-pri-registracii-melbet-2025/
Мелбет новогодний розыгрыш автомобилей и гаджетов
Участвуй в новогоднем розыгрыше Мелбет и выигрывай автомобили и крутые гаджеты
Для всех, кто ищет возможность получить шикарные призы этой зимой, есть отличная новость. Участие в акции предоставляет шанс на выигрыш уникальных транспортных средств и современных технологий. Убедитесь, что вы не упустили этот шанс улучшить свою жизнь.
Чтобы не остаться в стороне, зарегистрируйтесь и активно участвуйте в мероприятии. Для повышения вашего шанса на успех, внимательно изучите все условия и требования, предложенные организаторами. Не забывайте следить за обновлениями, которые могут касаться дополнительных возможностей для участников.
Также стоит обратить внимание на советы экспертов, которые рекомендуют делиться информацией о наградах в социальных сетях. Публикация о вашем участии или приглашение друзей может значительно увеличить ваши шансы на успех. Настройтесь на позитивный результат и не упустите свою возможность!
Условия участия в конкурсе
Для участия необходимо зарегистрироваться на платформе и создать аккаунт, если у вас его еще нет. Убедитесь, что вы указали актуальные данные: имя, электронную почту и номер телефона. Участие возможно только для пользователей старше 18 лет.
Обратите внимание на минимальный депозит. Для активации возможности вступления в конкурс, требуется внести определённую сумму на игровой счет. Продолжительность акции также имеет значение; следите за датами начала и завершения, чтобы не упустить шанс.
Регулярные ставки или участие в других мероприятиях платформы могут увеличить шансы на победу. Проверьте конкретные условия, так как они могут отличаться в зависимости от типа призов. Ознакомьтесь с официальными правилами для получения точной информации о количестве необходимых ставок и участвий.
При выигрыше, будьте готовы предоставить подтверждающие документы. Это могут быть копии паспорта или другие документы, удостоверяющие личность. Убедитесь, что ваши контактные данные актуальны, чтобы администраторы могли с вами связаться в случае победы.
Также важно следить за новостями на сайте и в социальных сетях, чтобы не пропустить информацию о дополнительных конкурсах и сюрпризах. Удачи!
Кто может участвовать в розыгрыше
Для участия в конкурсе требуется совершить минимум одну ставку на сайте организатора. Положение разрешает зарегистрироваться любому пользователю, достигшему 18-летнего возраста. Участником можно стать как новым игрокам, так и тем, кто уже давно зарегистрирован на платформе.
Важно, чтобы участники соблюдали все условия и требования, указанные в правилах мероприятия. Не допускается участие людям, находящимся под влиянием спиртных или наркотических веществ в момент участия. Каждое действие на сайте должно быть законным и соответствовать нормам.
Бонусом станет возможность участия для тех, кто активно использует аккаунт в приложении. Периодические проверки помогут исключить попытки мошенничества, что обеспечивает честность розыгрыша. Рекомендуется следить за обновлениями на официальных ресурсах, чтобы узнать о возникновении новых условий или акций.
Как зарегистрироваться для участия?
Чтобы стать участником, выполните следующие шаги:
– Посетите официальный сайт акции.
– Найдите раздел, посвященный участию в конкурсах.
– Введите свои персональные данные: имя, фамилия, адрес электронной почты.
– Создайте надежный пароль, соблюдая указанные требования.
– Подтвердите регистрацию через ссылку, отправленную на указанный вами адрес электронной почты.
Также помните о некоторых нюансах:
– Убедитесь, что предоставленные данные актуальны и точны.
– Обратите внимание на сроки регистрации – участие возможно только в течение определенного времени.
– Проверьте, нет ли ограничений для участия, связанных с возрастом или местом проживания.
После завершения регистрации вы получите подтверждение и сможете участвовать в дальнейшем. Следите за новыми обновлениями, чтобы не пропустить важные новости!
Действия для повышения шансов на выигрыш
Регулярно участвуйте в акциях, чтобы накапливать баллы или купоны. Некоторые компании предлагают дополнительные возможности за повторные участия или за выполнение простых заданий.
Изучите условия и требования. Знайте, какие действия увеличивают ваши шансы: например, покупки на определенную сумму могут приносить дополнительные билеты.
Подписывайтесь на рассылки и уведомления. Это позволит быть в курсе новых предложений и акций, что даст возможность своевременно реагировать.
Бросьте вызов себе и участвующим. Особенно эффективны конкурсы, в которых важно продемонстрировать креативность или знать определенные факты.
Используйте дополнительные бонусы. Многие платформы предлагают акции для новых пользователей или за привлечение друзей. Это создаёт возможность увеличить количество шансов.
Следите за тем, как часто проводятся мероприятия. В активных акциях обычно больше возможностей. Чем больше вы участвуете, тем выше вероятность удачи.
Будьте внимательны к срокам. Участие до окончания акции увеличивает шансы, так как в последний момент может возникнуть усиленная конкуренция.
Рассмотрите возможность участия в нескольких конкурсах одновременно. Это расширяет ваши перспективы и увеличение шансов получить приз.
https://allsaasdeal.com/melbet-privetstvennyy-bonus-2025/
Мелбет онлайн Получите 15000 ₽ на первый депозит
Мелбет онлайн с бонусом 15000 рублей на первый депозит простая инструкция по получению
Если вы планируете начать свои ставки, обратите внимание на уникальную возможность, которую предлагает популярный сервис. При первом пополнении счета можно получить существенную сумму, что значительно увеличивает стартовый капитал для ставок. Не упустите шанс использовать этот бонус на полную катушку.
Первый шаг – зарегистрироваться на платформе. Процесс регистрации простой и займет не более нескольких минут. Укажите необходимые данные, такие как электронная почта и номер телефона, после чего вы сможете перейти к следующему этапу.
Затем, чтобы воспользоваться предложением, сделайте пополнение. Учтите, что сумма, которую вы внесете, должна соответствовать условиям акции. Убедитесь, что ваш первый взнос соответствует минимальным требованиям для получения бонуса. После выполнения этого шага сумма будет автоматически зачислена на ваш счет для дальнейшего использования в ставках.
Таким образом, вы сможете значительно увеличить свои шансы на выигрыш при старте. Не упустите возможность воспользоваться предложением и начинайте ваши ставки с увеличенным капиталом!
Регистрация на сайте Мелбет
Заполните форму с вашими личными данными. Укажите актуальный адрес электронной почты и номер телефона, так как эти данные необходимы для подтверждения аккаунта.
– Перейдите на официальный ресурс.
– Кликните на кнопку “Регистрация” в верхнем углу.
– Выберите удобный для вас способ создания аккаунта: через электронную почту, телефон или социальные сети.
Не забудьте придумать надежный пароль. Используйте комбинацию букв, цифр и специальных символов для повышения безопасности.
– Заполните все обязательные поля.
– Убедитесь, что указанная информация соответствует действительности.
– Прочтите и примите условия использования.
После завершения формы нажмите кнопку подтверждения. В случае выбора регистрации через почту, проверяйте входящие сообщения для активации аккаунта. При регистрации через телефон получите смс с кодом для подтверждения.
При возникновении вопросов обращайтесь в службу поддержки. Доступна круглосуточная помощь, что позволит оперативно решить любые проблемы.
Шаги для создания аккаунта
Откройте официальный сайт и найдите кнопку регистрации. Она обычно выделяется на главной странице.
Заполните необходимые поля: укажите адрес электронной почты и придумайте пароль. Убедитесь, что пароль надежный и состоит из комбинации букв, цифр и символов.
Выберите валюту для аккаунта. Обратите внимание, что это может повлиять на последующие транзакции и коэффициенты.
Согласитесь с условиями использования и политикой конфиденциальности. Прежде чем подтвердить регистрацию, ознакомьтесь с этими документами.
После завершения всех шагов вам может быть выслано подтверждение на указанный адрес электронной почты. Перейдите по ссылке в этом письме для активации профиля.
После активации войдите в аккаунт, используя электронную почту и пароль. При необходимости в системе предлагаются различные дополнительные меры безопасности.
Выполните все рекомендации для завершения настройки аккаунта, такие как верификация личности, если это требуется. Это позволит повысить уровень безопасности вашего профиля.
Теперь ваш профиль готов для использования. При первом входе вы сможете ознакомиться с функционалом и предложениями платформы.
Подтверждение учетной записи
Для успешного прохождения подтверждения учетной записи необходимо выполнить несколько шагов. Сначала войдите в свой профиль и найдите раздел “Настройки” или “Личная информация”. Обычно там есть категория, связанная с верификацией аккаунта.
Следующим шагом потребуется загрузить официальные документы. Пригодятся сканы или фотографии паспорта, водительского удостоверения или другого удостоверения личности. Убедитесь, что изображение четкое и все данные хорошо видны.
Важно также предоставить подтверждение адреса проживания. Это может быть счет за коммунальные услуги, банковская выписка или другой документ, содержащий ваше имя и адрес. Убедитесь, что документ не старше трех месяцев.
После загрузки необходимых файлов, отправьте запрос на проверку. Обычно на обработку информации уходит от нескольких часов до нескольких дней. Стоит следить за статусом верификации в личном кабинете.
В случае возникновения вопросов или проблем с подтверждением, рекомендуется обратиться в службу поддержки. Опишите свою ситуацию и предоставьте всю необходимую информацию для ускорения процесса.
Процесс внесения первого взноса
Откройте раздел “Касса” в вашем аккаунте. Здесь вы сможете выбрать предпочтительный метод пополнения. Убедитесь, что у вас есть доступ к выбранному способу оплаты, будь то банковская карта, электронный кошелек или другие варианты.
Укажите сумму, которую хотите внести. Минимальная сумма может различаться в зависимости от метода. Внимательно ознакомьтесь с условиями и ограничениями.
Введите свои платежные данные. Для банковской карты потребуется указать номер карты, срок действия и CVV-код. Если используете электронный кошелек, следуйте инструкциям платформы для подтверждения идентичности.
Проверьте введенные данные на корректность. Ошибки могут привести к задержкам в обработке транзакции или её отмене.
Подтвердите операцию и дождитесь завершения процесса. Обычно деньги зачисляются мгновенно, но в некоторых случаях может потребоваться время. Следите за уведомлениями о поступлении средств.
После успешного пополнения вы получите сообщение о завершении транзакции. Теперь вы можете приступить к использованию доступных функций, включая бонусы за первый взнос.
https://ggwp4d.org/melbet-liniya-2025-obzor-stavok/
rankvector.click – Appreciate the typography choices; comfortable spacing improved my reading experience.
Мелбет онлайн казино лицензия особенности и значение
Мелбет онлайн казино особенности лицензии и ее влияние на безопасность игроков
Клиентам стоит обратить внимание на наличие сертификата у операторов игорного бизнеса, что служит гарантией безопасности и прозрачности. Без лицензии доступ к играм и ставкам может вызвать серьезные сомнения. Реальные финансовые потери – не редкость среди тех, кто выбирает услуги нелегитимных сайтов.
Важно отметить, что официальная регистрация подразумевает соблюдение строгих норм и правил. Это обеспечивает честность игр и защиту прав пользователей. В случае возникновения споров, наличие легитимного удостоверения упрощает процесс разрешения конфликтов.
Не менее важно исследовать, какие органы выдали документацию и какие условия для этого требуются. Это поможет оценить уровень доверия к выбранной платформе. Операторы с сертификатами хорошо зарекомендовали себя на рынке и заслужили признание среди игроков.
Обращение внимания на эти детали способствует обеспечению комфортного игрового опыта, а также позволяет избежать неприятных ситуаций. Иглы и возможности, предоставляемые безопасными платформами, значительно превышают риски, связанные с отсутствием гарантии в понимании азартных активностей.
Типы лицензий для азартных заведений
Существует несколько категорий разрешений для азартных площадок, каждая из которых имеет свои приоритеты и правила. Основные из них следующие:
– Лицензия острова Мэн: Подходит для операторов, предлагающих своим клиентам широкий спектр игр. Условия включают строгую финансовую отчетность и регулярные проверки.
– Лицензия Кюрасао: Часто выбирают для запуска новых проектов. Она менее затратная и предоставляет большую свободу в выборе игр, но прокурорский надзор ограничен.
– Лицензия Гибралтара: Привлекает высококачественные платформы. Операторы должны соответствовать строгим стандартам безопасности и защиты данных пользователей.
– Лицензия Мальты: Широко признана и дает возможность работать в странах ЕС. Она требует от операторов соблюдения правил по честной игре и защите клиентов.
Каждый тип разрешения несет свои требования к налогам, финансовой отчетности и соблюдению стандартов сервиса. Операторы, желающие внедрить высокие практики проверки и защиты, часто выбирают более строгие юрисдикции. Важным является также наличие независимых аудитов, подтверждающих честность игр и соответствие стандартам качества.
Выбирая площадку с определённой лицензией, стоит обращать внимание на её репутацию и исторические показатели работы, что поможет пользователю избежать неприятностей и нарушений.
Основные категории лицензий
Существует несколько типов документов, регулирующих деятельность игорных заведений. К ним относятся документы, выданные юрисдикциями с высокой репутацией, такие как MGA (Мальта), UKGC (Великобритания) и Curacao. Каждый из этих документов определяет строгие требования к операторам, включая защиту игроков и прозрачность. Выбор платформы с одобренным документом повышает вероятность честной игры.
MGA особое внимание уделяет ответственному иг Julianing, в то время как UKGC наделяет игроков множеством прав, таких как право на честную игру и доступ к средствам. Документ из Кюрасао дает операторам больше гибкости, но менее строгие правила, что может повлиять на уровень надежности.
Кроме того, существуют локальные разрешения, которые могут иметь свои уникальные характеристики. Например, в некоторых странах могут выдавать документы, ориентированные на определенные виды игр или особенности ведения бизнеса. Это может привести к разным условиям и стандартам работы в зависимости от региона.
Перед регистрацией на платформе важно обратить внимание на наличие и тип документа, а также на его репутацию. Проверка соответствующих условий поможет избежать неприятных ситуаций и обеспечить безопасность ваших средств.
Как выбрать лицензию для азартных заведений
При выборе лицензии для игорного заведения обратите внимание на юрисдикцию. Предпочтение стоит отдать регионам с установленной репутацией, например, Мальте или Великобритании, которые предлагают строгие правила и прозрачность.
Изучите рейтинги и отзывы о регулировании в различных юрисдикциях. Наличие положительных отзывов со стороны игроков и экспертов свидетельствует о надежности и развитости службы регулирования.
Обратите внимание на условия получения. Некоторые регуляторы требуют высокие финансовые гарантии и демонстрацию обеспечения игрокам безопасной игры, что говорит о строгом контроле над операторами.
Юрисдикция|Преимущества|Недостатки
Мальта|Прозрачность, высокая защита игроков|Долгий процесс получения
Великобритания|Строгое регулирование, доверие игроков|Сложные требования к финансовым показателям
Курасао|Быстрое получение лицензии, низкие затраты|Менее строгие правила
Проверьте профиль лицензируемого оператора. Убедитесь, что все данные на сайте реальны. Часто регулирующие органы публикуют списки лицензированных заведений, что служит дополнительной гарантией.
Оплачивайте только через проверенные финансовые системы. Это снижает риски обмана и подтверждает наличие у заведения действующей лицензии.
Процесс получения лицензии для Мелбет
Следующий шаг включает подачу заявления в соответствующий орган. Это может быть специальная комиссия или регулятор, отвечающий за азартные игры. Необходимо внимательно заполнить все разделы, поскольку ошибки могут привести к отказу или задержке в процессе.
После подачи заявления регулятор проводит проверку, которая включает оценку финансовой стабильности, соответствие стандартам безопасности и честности игр. Важно обеспечить прозрачность всех операций и подтвердить использование сертифицированного программного обеспечения.
Решение о выдаче разрешения обычно сопровождается уплатой государственной пошлины. Размер взноса может варьироваться в зависимости от выбранной юрисдикции и масштаба заявляемой деятельности.
Заключительным этапом является получение подтверждения. После этого требуется поддерживать условия лицензии, включая регулярные отчеты, аудиты и соблюдение норм законодательства. Нарушения могут привести к отозGenerally atөгө сибтилиcновьиной. Поэтому важно внимательно следить за изменениями в регулировании и поддерживать все обязательства.
https://client19.techdolp.com/melbet-usloviya-bonusa-2025/
clickimpact.click – Content reads clearly, helpful examples made concepts easy to grasp.
leadfusionlab.click – Color palette felt calming, nothing distracting, just focused, thoughtful design.
Bright Deals Hub – The website was easy to navigate, and prices felt very fair.
adflowhub.click – Bookmarked this immediately, planning to revisit for updates and inspiration.
yourjourneycontinues – This site shared a thought today that genuinely kept me motivated.
Mindful Purpose Spot – Content here encourages reflection and a calm mindset.
clickstreampro.click – Overall, professional vibe here; trustworthy, polished, and pleasantly minimal throughout.
Мелбет Онлайн Казино Демо-Режим для Идеальной Игры
Мелбет Онлайн Казино – Узнайте Все О Демо-Режиме Для Идеальной Игровой Практики
Попробуйте воспользоваться возможностями безрисковой игры, используя пробный вариант. Это позволит вам ознакомиться с функциями игрового процесса и механизмами, без необходимости вносить средства. Выбирайте слоты или настольные варианты, чтобы понять их правила и стратегии, прежде чем ставить реальные деньги.
Обратитесь к разнообразным символам и комбинациям, чтобы выявить наиболее выигрышные. Тренируйтесь на различных уровнях сложности, адаптируя свои навыки к различным типам развлечений. Это отличный способ развить интуицию и принимать взвешенные решения во время реальных ставок.
Предварительное изучение игр через пробный режим гарантирует уверенность в своих действиях. Вы не только осваиваете контроль над игрой, но и познаете тонкости ситуаций, которые могут возникнуть. Экспериментируйте с размерами ставок и комбинациями, позволяя себе лучшие шансы на успех.
Не упустите шанс воспользоваться этой функцией, чтобы стать более опытным игроком. Такой подход сделает ваши игральные сессии более enjoyable и, возможно, более прибыльными в будущем. Освойте стратегию и используйте реальные бонусы, чтобы сделать свой опыт максимально выгодным.
Преимущества демонстрационного режима
Используйте возможность тестирования игровых автоматов без риска потерь. Эта опция позволяет отточить навыки и понять механики без финансовых вложений.
Получайте удовольствие от разнообразия. Большое количество игр доступно для ознакомления, что открывает возможность выбрать идеальный вариант под свои предпочтения.
Экспериментируйте с различными стратегиями, не переживая о проигрышах. Вы можете попробовать разные подходы к ставкам и выявить наиболее продуктивные тактики.
Создавайте игровые привычки. Демо-формат позволяет выработать свои предпочтения и стиль игры, что может быть полезно при переходе на реальные ставки.
Изучайте правила и особенности каждой игры. Это поможет избежать ошибок и повысит шансы на успешную игру в будущем.
Наслаждайтесь доступностью. Не нужно создавать аккаунт или вносить деньги для начала игры. Все желающие могут просто зайти и начать исследовать мир азартных развлечений.
Безопасность и отсутствие риска потерять деньги
Перед началом игрового процесса рекомендуется воспользоваться опцией, которая позволяет практиковаться без финансовых вложений. Это поможет избежать ненужных потерь. Выбирайте платформы, обеспечивающие высокий уровень защиты данных и прозрачные условия игры.
Важно ознакомиться с репутацией площадки. Проверьте наличие лицензий и отзывов пользователей. Высоко регулируемые сайты чаще всего предлагают лучшие условия безопасности.
Следует также обращать внимание на использование шифрования для защиты финансовой информации. Защищенные системы обработки платежей добавляют уверенности в безопасности операций.
Пользовательские соглашения и правила игры должны быть четкими. При наличии непонятных условий стоит задать вопросы службе поддержки, чтобы избежать потенциальных недоразумений.
Настройте бюджет, чтобы контролировать свои расходы. Используйте лимиты, если это возможно. Важность такого подхода заключается в минимизации рисков и улучшении игрового опыта.
Возможность изучить интерфейс и правила игр
Перед началом использования платформы обязательно ознакомьтесь с интерфейсом. Это сократит время на адаптацию и повысит эффективность игры.
Рекомендуется пройти следующие шаги:
– Зарегистрируйтесь на сайте и зайдите в раздел игр.
– Выберите любой доступный слот или настольную игру, чтобы ознакомиться с их интерфейсом.
Обратите внимание на правила выбранного развлечения. Они могут варьироваться в зависимости от типа:
– Прочитайте информацию о выплатах и коэффициентах.
– Обратите внимание на наличие бонусных функций или специальных символов.
– Пробуйте разные стратегии, чтобы определить наиболее подходящие для вас.
Не забудьте о секции с часто задаваемыми вопросами, где часто представлены ответы на распространенные вопросы и пояснения к правилам.
Практикуясь в ознакомительном режиме, вы сможете улучшить свои навыки и избежать лишних потерь в будущем.
Тестирование стратегий без финансовых вложений
Используйте возможность практиковаться в слотовых автоматах, чтобы отработать свои методы без риска потери средств. Начинайте с анализа механики игр, чтобы понять, как работает генератор случайных чисел и какие символы имеют наибольшую вероятность выпадения.
Выбирайте игровые автоматы с высоким RTP (возвратом к игроку). Это обеспечит лучший шанс на выигрыш в долгосрочной перспективе. Такие слоты предоставят больше информации о частоте выплат и их размере.
Тестируйте различные стратегии ставок. Например, подход «мартингейл» предполагает удвоение ставки после каждой неудачи. Однако его стоит проверить в условной среде, чтобы оценить риск и выгоду без реальных вложений.
Следите за Банком. Убедитесь, что размер виртуальной ставки соизмерим с вашим безрисковым бюджетом. Это поможет понять, какой уровень ставок является для вас комфортным.
Записывайте результаты своих попыток. Это позволит выявить успешные паттерны и настроить свою стратегию соответственно. Анализируйте, какие методы наиболее эффективны, а какие приводят к неудачам.
Никогда не забывайте о возможности разнообразия. Разные слоты могут вести себя по-разному. Пробуйте различные жанры и механики, чтобы найти оптимальные для вас игры и стратегии.
https://reginas.com.br/2025/10/20/melbet-promokod-fribet-2025/
Urban Shopping Hub – Browsing felt seamless and product info was easy to understand.
Мелбет джекпоты как выиграть миллион в 2025 году
Как выиграть крупные джекпоты Мелбет в 2025 году и стать миллионером
Сделайте акцент на регулярной практике и изучении стратегий ставок. Ознакомьтесь с текущими трендами и успешными методами, применяемыми опытными игроками. Частая работа над собственными ошибками поможет усовершенствовать вашу технику.
Изучите вероятности – это ключ к успеху. Понимание шансов на выигрыш позволит вам принимать более обоснованные решения при выборе ставок. Определите, какие игры имеют наиболее выгодные условия и сосредоточьтесь на них.
Рекомендуется использовать бонусные предложения от операторов. Несмотря на строгие условия, грамотное использование акций может значительно увеличить ваш банкролл. Изучите правила и условия, чтобы использовать их в свою пользу.
Создайте финансовый план, который включает максимальную сумму ставок и четкие границы. Дисциплина в управлении финансами позволяет избежать нежелательных потерь и сохранить азарт в игре.
Обзор джекпотов Мелбет
Для максимизации шансов на получение крупного выигрыша, обратить внимание стоит на полные условия акций. Четко понимание правил участия и требований к ставкам поможет избежать неприятных сюрпризов.
Регулярные розыгрыши – это отличная возможность. Заранее определите время, когда готовите свои ставки. Более того, участвуя в акциях, стоит следить за календарем событий, чтобы не пропустить крупные тиражи.
Также стоит уделить внимание стратегиям. Применение математических моделей может значительно повысить летимость ставок. Настройте свой подход, выбирая игры с высоким коэффициентом применения.
Не забывайте о бонусах! Периодически проводимые акции и специальные предложения поощряют участников. Используйте их по максимуму, чтобы увеличить сумму на счету.
Мониторинг результатов предыдущих розыгрышей позволяет лучше оценить вероятность исхода. Изучение успешных механизмов других участников может дать ценное направление для ваших дальнейших действий.
Наконец, сохраняйте хладнокровие. Эмоции могут негативно сказаться на принятии решений. Установите для себя лимиты и придерживайтесь их, что позволит жонглировать средствами разумно.
Что такое джекпот в Мелбет?
Джекпот в этом букмекерском сервисе представляет собой крупный приз, который накапливается от ставок пользователей. Эта сумма может достигать значительных величин, в зависимости от числа сделанных ставок и выбранных игр. Получить главный приз можно, выполняя определённые условия, связанные с удачными ставками на спортивные события или в казино.
Существует несколько ключевых аспектов, которые стоит учитывать:
– Типы джекпотов: Есть фиксированные и прогрессивные джекпоты. Фиксированные суммы остаются неизменными, тогда как прогрессивные растут с каждым новым участником.
– Акции и события: Участвуйте в специальных акциях, которые часто повышают шансы на выигрыш. Ознакомьтесь с текущими предложениями на сайте.
– Стратегии ставок: Разработайте стратегию ставок, основанную на анализе статистики, чтобы оптимизировать вероятность успеха.
Каждый игрок имеет возможность проверить текущие размеры джекпота, которые обновляются в реальном времени. Знание актуальных цифр поможет в выборе момента для размещения ставок.
Типы джекпотов и их особенности
Прогрессивные джекпоты накапливаются с каждым сделанным бетом. Обычно часть каждой ставки идет в общий фонд. Эти суммы могут достигать внушительных размеров, увеличиваясь до тех пор, пока кто-то не сможет размотать их, сделав удачный выбор.
Фиксированные выигрыши представляют собой более стабильные варианты. Они обозначены конкретной суммой, которая известна заранее. Эти призы легче прогнозировать и на них проще ориентироваться в стратегии ставок.
Международные джекпоты объединяют участников из разных регионов, создавая крупные фонды за счет общего участия. Это придает играм особую динамику и может значительно повысить шансы получить крупный приз.
Сезонные предложения часто связаны с определенными мероприятиями или праздниками. Они могут включать в себя уникальные условия и привлекать игроков, предлагая интересные возможности для выигрыша.
Локальные джекпоты работают в рамках определённых платформ или заведений, обеспечивая более узкий круг участников. Их размеры обычно меньше, чем у прогрессивных аналогов, но шансы на получение приза могут быть выше.
Наконец, специальные акции и турниры предлагают уникальные условия. Участникам предоставляются возможности для достижения призов за минимальные ставки или участие в конкурсах, что добавляет азарт и интерес.
Стратегии для выигрыша
Используйте анализ данных. Изучайте статистику и результаты предыдущих розыгрышей. Постарайтесь выявить паттерны и закономерности, которые могут помочь вам лучше понимать вероятность настигнуть успех.
Управляйте банкроллом. Определите для себя максимально допустимую сумму для участия в ставках. Не превышайте этот лимит, что позволит избежать ненужных финансовых потерь и даст возможность продолжать игру.
Разнообразьте свои ставки. Избегайте сосредоточения только на одном типе розыгрыша или игре. Ознакомьтесь с разными форматами и объединяйте ставки для увеличения шансов на прибыль.
Изучайте правила. Каждый игровой процесс имеет свои особенности. Понимание нюансов поможет более точно формировать стратегии и принимать обоснованные решения.
Следите за акциями. Многие платформы предлагают разные бонусы и специальные предложения. Используйте их с умом для увеличения вашего игрового капитала.
Общайтесь с сообществом. Учитесь у опытных игроков, делитесь стратегиями и обсуждайте результаты игр. Это может привести к новым идеям и подходам.
Оценивайте риски. Прежде чем делать ставки, проанализируйте потенциальные убытки и выигрыши. Знайте, когда стоит остановиться.
https://dracarolinacossi.com.br/2025/10/20/melbetbonuscode-2025-obzor-bonusov/
Мелбет бонус коды как найти и использовать предложения
Где найти бонус коды Мелбет и как правильно их использовать для максимальной выгоды
Для начала исследуйте официальные источники. Чаще всего специальные предложения можно найти на сайте оператора. Убедитесь, что проверили разделы с акциями и новостями, так как там размещаются последние обновления.
Подписка на рассылку уведомлений поможет не пропустить важные предложения. Регулярно проверяйте электронную почту и сообщения, так как зачастую клиенты получают привилегированные сведения о новых возможностях.
Кроме того, просматривайте сторонние платформы, которые публикуют обзоры и сравнения. Эти ресурсы могут предоставлять информацию о неанонсированных шансах, а также деталях, необходимых для активации. Знание правил и условий использования может существенно повысить шансы на успех.
Не забудьте также о социальных сетях. Следите за аккаунтами оператора в популярных платформах, ведь там часто делятся свежими акциями, а также полезными советами от опытных пользователей.
Где найти актуальные коды Мелбет
Самый простой способ найти действующие предложения – посетить официальную страницу букмекера. Это гарантирует, что вы получите самую свежую информацию. Также полезно подписаться на рассылку новостей, где могут уведомлять о новых акциях и специальных предложениях.
Форумы и сообщества пользователей часто обсуждают уникальные предложения, делятся собственным опытом и находят интересные варианты. Рекомендуется изучать темы, посвященные спортивным ставкам, поскольку они регулярно обновляются.
Сайты, специализирующиеся на обзорах букмекеров, также могут оказаться полезным ресурсом. Они не только публикуют проверенные информации, но и дают подробные инструкции по вводу специальных символов на платформе.
Социальные сети – еще один источник актуальных данных. Букмекеры активно ведут свои официальные страницы в таких платформах, как Instagram и Facebook, где часто публикуются эксклюзивные предложения для подписчиков.
Наконец, мобильные приложения могут содержать скрытые бонусные программы. Ознакомьтесь с разделом акций в приложении, чтобы не пропустить интересные возможности и предложенные акции.
Официальный сайт Мелбет
Для доступа к лучшим условиям рекомендуется перейти на официальный ресурс. Это главное место, где можно найти все необходимые сведения о действующих акциях и предложениях. Обратите внимание на разделы «Акции» и «Промо» для получения информации о специальных офертах и выгодах.
Регистрация требует предоставления минимального набора данных – это позволит быстро начать. Новичкам стоит обратить внимание на приветственные облегчения, доступные сразу после открытия счета. Полезно проверять сайт регулярно на предмет обновлений.
Раздел часто задаваемых вопросов поможет разобраться с типичными трудностями и нюансами. Для мгновенной связи с поддержкой предусмотрены онлайн-чат и другие контактные методы. Убедитесь, что ваша учетная запись верифицирована для повышения лимитов и доступа ко всем функциям.
На сайте представлена статистика и информация о проведенных событиях, которые могут быть полезны для анализа. Также доступны мобильные версии и приложения, что позволяет оставаться в курсе событий и легко ставить ставки с любого устройства.
Следите за новыми акциями, подписавшись на рассылку. Это поможет быть в курсе актуальных предложений и не пропустить выгодные возможности.
Специальные предложения на партнерских сайтах
Партнерские сайты часто предоставляют уникальные преимущества для новых клиентов. Рекомендуется регулярно проверять подразделы “Акции” или “Специальные предложения”. Многие ресурсы публикуют свои эксклюзивные предложения, которые могут отличаться от стандартных. Часто такие сайты сотрудничают с букмекерами и могут предложить более выгодные условия или дополнительные привилегии.
При регистрации на подобном сайте важно внимательно ознакомиться с условиями получения. Некоторые компании могут предоставить повышенные коэффициенты, бесплатные ставки или другие интересные запросы. Это может значительно повысить шансы на успешное начало игры.
Следите за новостями на форумах и специализированных сообществах. Пользователи часто делятся информацией о действующих акциях и проверенных ресурсах, что может помочь найти именно то, что подходит. Также стоит обратить внимание на рассылки, подписки – такие каналы помогут не пропустить выгодные предложения.
Финансовая выгода может зависеть от времени. Многие акции являются временными, поэтому стоит периодически проверять обновления на сайтах и в приложениях. Это может помочь вам быть в курсе свежих предложений и воспользоваться ими как можно быстрее.
Социальные сети и мессенджеры
Подписка на официальные страницы в социальных сетях помогает быть в курсе свежих акций и новых предложений. На популярных платформах, таких как Instagram и Facebook, часто размещают промоакции и уникальные ссылки. Следует обратить внимание на такие компании, как Telegram, где можно найти каналы, посвящённые игровым и рекламным предложениям.
Также полезно изучить сообщества на форумах, где пользователи делятся недавними находками. Для этого:
– Посещайте тематические группы и чаты.
– Следите за обновлениями и комментариями пользователей.
– Запрашивайте актуальные новости у сообщества.
Кроме того, многие мессенджеры предоставляют возможность участникам обмениваться личными сообщениями и дополнениями к существующим условиям. Запросы к администраторам групп могут дать уникальную информацию. Следует активировать уведомления для не пропустить важные сообщения и Для этого:
– Находите специализированные чаты.
– Настраивайте уведомления о новых постах.
Не ограничивайтесь одним источником информации, мониторьте разные платформы. Это увеличит шансы на нахождение наиболее выгодных условий. Сравнивайте данные из разных источников для большей уверенности в информации.
https://proairco.shop/?p=167053
Self Excellence Spot – Motivating content that truly helps me develop new skills.
Мелбет Блэкджек правила и стратегии для выигрышной игры
Мелбет Блэкджек Как Играть Следуя Правилам и Стратегиям для Победы
Оптимальная стратегия начинается с понимания базовых нюансов. Убедитесь, что знаете, как рассчитывается результат, а также принципы, по которым действуют карты. Эта информация позволит вам уменьшить преимущество заведения и повысить свои шансы на успех. Знайте, что цель игры – собрать сумму карт, равную 21, или максимально приближенную к ней, не превышая указанного числа.
Важно быть внимательным при выборе действия, основываясь на картах, доступных вам и дилеру. Если у дилера открыта карта с низким значением, вы можете рискнуть и увеличить ваши ставки, ориентируясь на возможность выигрыша. Обратите внимание на разницу между стратегиями «удар» и «стойка». Умение быстро принять правильное решение может существенно влиять на исход каждого раунда.
Использование системы учета карт даст вам преимущество. Следите за тем, какие карты уже были сыграны, чтобы сделать прогнозы о вероятности появления оставшихся карт. Это даст вам возможность принимать более обоснованные решения, когда дело доходит до повышения ставок или выбора действий.
Наконец, дисциплина и управление банкроллом являются ключевыми аспектами успешной игры. Установите лимиты, строго придерживайтесь их и не позволяйте азарту затмить разум. Помните, что успех приходит к тем, кто умеет контролировать эмоции и принимать взвешенные решения на протяжении всей игры.
Основные правила игры
В этой карточной игре цель – получить сумму очков, максимально приближенную к 21, без её превышения. Каждая карта имеет свои значения: карты от 2 до 10 – по номиналу, валет, дама и король – по 10 очков, туз может быть 1 или 11, в зависимости от того, что более выгодно. Игроки начинают с двух карт, дилер тоже, но лишь одна из его карт открыта.
Игроки могут выбирать, брать дополнительную карту или остановиться. При превышении 21 очка происходит проигрыш. Также возможен игрокам двойной ставкой, когда они удваивают свои шансы, получая лишь одну дополнительную карту.
Опция «разделить» позволяет разделить две одинаковые карты в отдельные руки, что увеличивает шансы на успех. Дилер обычно должен брать карты до достижения 17 и останавливаться, если у него 17 или более.
Важно помнить о страховке – это дополнительная ставка на случай, если у дилера будет блэкджек. В этом случае страховая ставка выплачивается с коэффициентом 2 к 1.
Игра завершается, когда все руки сыграны, и выигрыши распределяются на основе итоговых значений. Подсчет очков и знание правил помогут минимизировать риски и повысить шансы на успех.
Как начать игру в блэкджек на Мелбет
Зарегистрируйтесь на платформе, создав учетную запись и выбрав подходящий метод оплаты. Обратите внимание на бонусы для новых пользователей – они могут существенно увеличить стартовый капитал.
После завершения регистрации выполните вход в свой профиль. Перейдите в раздел игрового зала, где представлены различные разновидности блэкджека. Ознакомьтесь с правилами каждой версии, чтобы выбрать наиболее комфортный для себя вариант.
Пополните свой счет с помощью одного из предложенных способов: банковских карт, электронных кошельков или криптовалюты. Убедитесь, что на балансе достаточно средств для участия в играх.
Выберите стол с подходящими ставками и количеством игроков. Проанализируйте общую атмосферу на столе: количество карт, используемых в колоде, такие детали могут повлиять на ваши шансы.
Начните раздачу, следуя инструкциям на экране. Применяйте приемы и стратегии, которые подходят вашему стилю игры. Наблюдайте за действиями оппонентов, это поможет принимать более обоснованные решения.
Не забывайте о лимитах банка и ставьте с учетом вашего бюджета. Регулярно оценивайте свои действия и корректируйте подход, если это необходимо, чтобы обеспечить более успешный исход.
Назначение карт и цели игрока
Игроки должны стремиться собрать комбинацию, сумма которой максимально близка к 21, но при этом не превышает это значение. Каждая карта имеет свое назначение: карты от 2 до 10 оцениваются по номиналу, валет, дама и король стоят 10, а туза можно считать как 1 или 11, в зависимости от того, что выгоднее в конкретной ситуации.
При старте основной задачей является оценка прежних карт и определение шансов на получение выигрышной комбинации. Использование базовых стратегий, таких как подсчет карт, помогает в управлении рисками и повышении вероятности успеха. Знание, как распределяются карты, позволяет разрабатывать тактики действий в зависимости от ситуации на столе.
Основная цель состоит в том, чтобы перебить банкера, который также стремится получить 21, но его карты не должны превышать это значение. Умение гибко реагировать на действия дилера, а также понимание вероятностных соотношений, даст возможность принимать более обоснованные решения по ставкам или взятию дополнительных карт.
Игроки должны помнить о том, что каждая раздача независима, следовательно, анализ прошлых раздач может помочь в понимании вероятностей. Определение момента для остановки остается ключевым дистанционным элементом игры, позволяющим избежать потерь в критический момент.
Специфика ставок и выплаты
Ставки в этой карточной игре охватывают несколько ключевых аспектов, которые важно учитывать для максимизации выигрышей. Обычно игроки могут делать ставки в диапазоне от минимальной до максимальной суммы, установленной казино. Рекомендуется выбирать ставку, соответствующую вашему банкроллу, чтобы избежать быстрого его исчерпания.
– Стандартная ставка: В большинстве случаев минимальная ставка составляет 10% от вашего стартового банкролла. Это позволяет продлить игру и увеличить шансы на выигрыш.
– Страховочная ставка: Если у дилера ас, можно сделать дополнительную страховочную ставку до половины основной. Это может защитить вас от проигрыша.
– Удвоение: Если вы рассчитываете на высокие шансы, стоит рассмотреть удвоение сразу после получения первых двух карт. Это увеличивает потенциальный выигрыш, но требует осторожного выбора времени.
Выплаты варьируются в зависимости от типа ставки и состояния игры. Основные выплаты: при выигрыше основной ставки – 1:1; при выигрыше с удвоением – 2:1; если у вас собраны 21 очко с первых двух карт, выплата составляет 3:2. Ставка на страховку приносит 2:1, но считается более рискованной.
Важно учитывать, что в различных онлайн-казино могут действовать отдельные правила касательно ставок и выплат, поэтому рекомендуется заранее ознакомиться с ними. Следите за коэффициентами и корректируйте свои ставки, исходя из анализа ситуации на столе.
https://www.yuanfanda.com/melbet-promo-novichki-2025/
New Chapter Hub – Useful life tips, helps make change feel easy.
Modern Trend Corner – Got a few solid style ideas that caught my interest.
Мелбет стримеры как они играют в прямом эфире
Мелбет стримеры кто смотрит и как они играют в прямом эфире на платформе Мелбет
Регулярные эфиры с азартными мероприятиями привлекают внимание поклонников ставок по всему миру. Компетентные хозяева, нередко известные личности, делятся своими стратегиями и впечатлениями от игровых процессов, что делает такие трансляции незаменимым источником информации для зрителей и участников.
Одним из главных достоинств подобных видеосеансов становится возможность наблюдать за реальными действиями и изучать тактики ведущих. Такие игроки часто комментируют свои решения, разбирают ошибки и хвалят удачные ходы, что позволяет новичкам быстрее адаптироваться в непростом мире азартных состязаний.
Однако, чтобы извлечь максимальную пользу из этих активностей, важно самостоятельно оценить стиль ведения диалога и подход мастеров. Существует множество направлений: кто-то акцентирует внимание на аналитическом подходе, тогда как другие привносят элементы развлечения и юмора. Выбор за вами, но обязательно стоит следить за трендами и новыми именами, которые могут предложить свежий взгляд на традиционные ставки.
Стримеры на платформе
В данной среде людей, именуемых киберспортсменами или контент-креаторами, можно встретить множество профессионалов и любителей, которые делятся своими стратегиями, анализируют матчи и общаются с подписчиками. Они не только отображают процесс, но и комментируют свои решения в режиме реального времени.
– Типы контента: Стримеры создают разнообразные передачи – от обучающих до развлекательных, что позволяет привлечь аудиторию различных уровней.
– Интерактивность: Во время трансляций зрители могут задавать вопросы и получать советы по стратегии, что улучшает взаимодействие.
– Методы заработка: Многие кибератлеты используют подписки, донаты и рекламу, что повышает их доход.
– Состязательность: Периодически проводятся турниры, где стримеры могут продемонстрировать свои навыки и повысить популярность.
Формирование сообщества вокруг подобных передач создает уникальную атмосферу, где поклонники могут делиться опытом и обсуждать результаты. Эта платформа предлагает возможность роста и развития как для участников, так и для зрителей.
Наблюдая за конкурирующими атлетами, зрители могут лучше понять стратегии и подходы, что делает эту активность познавательной и увлекательной одновременно.
Популярные стримеры и их стратегии
Игроки, известные в сообществе, часто применяют уникальные методы, чтобы привлечь внимание зрителей и повысить свои шансы на успех. Например, некоторые из них активно используют аналитику для выбора матчей, опираясь на статистику команд и игроков. Это позволяет не только сделать более обоснованные ставки, но и объяснять свои решения аудитории в процессе трансляции.
Кроме того, любители азартных игр часто применяют стратегии управления банкроллом. Это включает в себя строгий контроль над ставками, избегая эмоциональных решений. Планирование бюджета и установка лимитов на проигрыши – неотъемлемая часть подхода. Эти аспекты демонстрируются в прямом эфире, что позволяет зрителям увидеть, как важно придерживаться этого правила.
Некоторые популярные личности фокусируются на определенных типах событий, например, на киберспортивных матчах. Это позволяет им глубже изучить особенности игр, закономерности и стратегии команд, что, в свою очередь, способствует более высокому уровню анализа и прогнозирования. Подробное разъяснение своих действий в реальном времени помогает, как новичкам, так и опытным зрителям лучше понять, что влияет на исход событий.
Немаловажным аспектом является взаимодействие с фанатами и создание сообщества. Часто стримеры спрашивают мнения своих подписчиков о предстоящих играх, что создает атмосферу совместного процесса. Это не только усиливает связь между участниками, но и может привести к интересным инсайтам, которые могут быть полезны для всех.
Некоторые игроки применяют стратегию “обратного анализа” – они изучают ошибки других, будь то профессионалы или любители. Это позволяет избегать распространенных ловушек, которые могут привести к потере средств. Обсуждение конкурентов и их подходов в прямом эфире помогает зрителям расширить свои знания и улучшить собственные навыки.
В конечном счете, сочетание аналитического подхода, управления финансами, активного взаимодействия с сообществом и постоянного обучения делает известных личностей успешными в их деятельности. Стратегии, которые они применяют, могут значительно помочь другим игрокам в достижении их целей.
Как выбрать стримера для наблюдения?
При выборе транслятора, начните с анализа его статистики выигрышей и уровня профессионализма. Обратите внимание на показатели успеха: чем выше коэффициенты побед, тем лучше опыт.
Изучите стиль общения с аудиторией. Подходите к тем, кто открыто делится своим опытом и следит за взаимодействием с подписчиками. Честность и доступность информации создают доверие.
Посмотрите на частоту и регулярность эфиров. Частые трансляции позволяют лучше понять тактики и подходы играющего. Убедитесь, что контент не является однообразным и предлагает разнообразие.
Обратите внимание на качество видео и звука. Четкая картинка и качественный звук способствуют более комфортному восприятию контента.
Рекомендации от других зрителей также имеют значение. Ознакомьтесь с отзывами и комментариями о трансляторах на форумах и в социальных сетях.
Не забывайте про уникальные специальные предложения, которые могут предлагать отдельные комментаторы. Программа лояльности, бонусы и розыгрыши делают просмотр более интересным.
Сравните несколько площадок и выберите ту, которая подходит под ваши предпочтения: стиль, тематика, уровень общения и взаимодействия. Это поможет найти наиболее подходящего транслятора для наблюдения за процессом.
Процесс игры на платформе в режиме онлайн
Важно следить за текущими коэффициентами. Они могут меняться в зависимости от происходящих событий. Используйте аналитику и статистику, чтобы делать обоснованные прогнозы. Например, оценка формы команд или игроков значительно повлияет на итоговый исход.
Взаимодействуйте с другими участниками: общение с аудиторией способно обогатить опыт и дать новые идеи для ставок. Чат при этом становится не только площадкой для обсуждения, но и источником полезной информации.
Регулярно проверяйте доступные акции и бонусы. Они могут существенно увеличить ваш капитал и дать дополнительные возможности для ставки. Используйте эти моменты разумно – не забывайте о рисках.
Важным аспектом является выбор подходящего времени для участия. Топовые события, как правило, привлекают больше зрителей и создают более обостренную атмосферу. Балансируйте между популярными и менее известными мероприятиями для оптимизации ставок.
Обеспечьте стабильный интернет-сигнал. Непредвиденные отключения могут привести к упущенным возможностям или, что хуже, к финансовым потерям. Отключение во время важного игрового момента станет значительным неудобством.
https://itjm.org.br/2025/10/20/promokod-melbet-besplatnaya-stavka-2025/
Achieve With Purpose Hub – Guides here are structured and really encourage growth.
marketstorm.click – Appreciate the typography choices; comfortable spacing improved my reading experience.
Контрактная разработка электроники обеспечивает полный цикл услуг от идеи до готового продукта. Специалисты создают схемы, платы, корпуса и программное обеспечение, затем тестируют устройства. После проверки продукт поступает в серийное производство, http://wiki.dirbg.com/index.php/%D0%A0%D0%B0%D0%B7%D1%80%D0%B0%D0%B1%D0%BE%D1%82%D0%BA%D0%B0_%D0%98_%D0%A1%D0%B1%D0%BE%D1%80%D0%BA%D0%B0_%D0%AD%D0%BB%D0%B5%D0%BA%D1%82%D1%80%D0%BE%D0%BD%D0%BD%D1%8B%D1%85_%D0%A1%D0%B5%D0%BD%D1%81%D0%BE%D1%80%D0%BD%D1%8B%D1%85_%D0%9C%D0%BE%D0%B4%D1%83%D0%BB%D0%B5%D0%B9! Простой способ тестирования
“Gorgeous nymphomaniac yearns for release.” Here — rb.gy/8rrwju?Illus
Style Discovery Portal – Unique fashion items that aren’t easy to find elsewhere.
adsummit.click – Mobile version looks perfect; no glitches, fast scrolling, crisp text.
advector.click – Navigation felt smooth, found everything quickly without any confusing steps.
adnexo.click – Overall, professional vibe here; trustworthy, polished, and pleasantly minimal throughout.
growthnexus.click – Pages loaded fast, images appeared sharp, and formatting stayed consistent.
Trendy Fashion Picks – Came across fresh inspiration that simplified mixing and matching outfits.
growthpilotpro.click – Pages loaded fast, images appeared sharp, and formatting stayed consistent.
Deal Finder Hub – Always find updated offers, perfect for daily browsing.
https://webyourself.eu/blogs/1657543/Simple-Melbet-Code-MELVIP200-130-Easy
adstreampro.click – Mobile version looks perfect; no glitches, fast scrolling, crisp text.
кракен даркнет
Dream Achieve Spot – The posts are motivating and spark a lot of energy in me.
Share & Grow Portal – Picked up a tip that simplified my workflow immediately.
Choice Hub Online – Lots of options, quickly found exactly what I wanted.
Dadasdas Stories – Unique style mein content present hota hai jo readers ko engage rakhta hai.
Make Every Second Count – Found a brief note that encouraged mindfulness today.
promosprinter.click – Appreciate the typography choices; comfortable spacing improved my reading experience.
Fashion Ease Hub – Clean design, checkout process is quick and simple.
Fresh Fashion Finds – Came across a variety of stylish pieces worth exploring.
Choice Inspiration Hub – A wide selection that sparked new creative ideas fast.
adscalehub.click – Bookmarked this immediately, planning to revisit for updates and inspiration.
зеркало кракен
scalemaster.click – Bookmarked this immediately, planning to revisit for updates and inspiration.
promovoltage.click – Overall, professional vibe here; trustworthy, polished, and pleasantly minimal throughout.
clickdynamics.click – Content reads clearly, helpful examples made concepts easy to grasp.
salesvelocity.click – Overall, professional vibe here; trustworthy, polished, and pleasantly minimal throughout.
Style Trend Portal – New arrivals every day, makes trend hunting thrilling.
Dream Gift Picks – Found some unique items here that would make excellent presents.
Shopping Zone Hub – Always easy to navigate and find items fast.
Automatizovany system https://rocketbitpro.com pro obchodovani s kryptomenami: boti 24/7, strategie DCA/GRID, rizeni rizik, backtesting a upozorneni. Kontrola potencialniho zisku a propadu.
Your Potential Hub – Came across an inspiring thought that encouraged me to take action.
Style Picks Hub – International fashion choices that shipped surprisingly fast.
Delight Hub Online – Came across some standout products that made shopping enjoyable.
Growth Insight Portal – Practical advice and resources to support regular self-improvement.
Practical Knowledge Spot – Tutorials are clear and make learning more accessible.
Желаю всего самого наилучшего вашему магазину,ваш бренд это качество! https://xwalkcenter.org Я заказал еще 19 числа на сайте, оплатил 23 числа, ТС выслал 25 числа, тогда я и тут зарегился, так как он отправил не той службой, думал кинули. Пришло все вчера, забрал днем, попробовал вечером
Global Deals Spot – Browsed quickly and found a couple of products that seemed useful.
clickmotion.click – Pages loaded fast, images appeared sharp, and formatting stayed consistent.
Style Hub Online – New items available, found some interesting picks today.
Спасибо, будем работать тогда тоже ) https://wikibot.info отличный магазин! + ему
growelite.click – Overall, professional vibe here; trustworthy, polished, and pleasantly minimal throughout.
growthsignal.click – Overall, professional vibe here; trustworthy, polished, and pleasantly minimal throughout.
adlaunchpro.click – Loved the layout today; clean, simple, and genuinely user-friendly overall.
marketsignal.click – Pages loaded fast, images appeared sharp, and formatting stayed consistent.
Value Picks Portal – Came across a few practical offers that were worth a look.
promorocket.click – Navigation felt smooth, found everything quickly without any confusing steps.
поддерживаю ! парни врубаем тормоза пока нет ясности https://hiphopget.com Наконец-то пришёл товар. Упакован отлично, курик все передал, в этом проблем нет. Пришли домой, распечатали по виду похоже на регу, но в воде разболталось. Муж поставился внутривенно, я отписала chemical, он говорит мол для вв нет инструкции. Похуй, растворили в воде, выпили,И НИХУЯ! НОЛЬ! Не прихода ни тяги, ни хуяги. Пусто. В аське пишу, молчит. Хз.
shopthelatestdeals – Found amazing deals today, makes shopping fun and easy.
Выездной алкогольный https://bar-vip.ru и кофе-бар на любое мероприятие: авторские коктейли, свежая обжарка, бармен-шоу, оборудование и посуда. Свадьбы, корпоративы, дни рождения. Честные сметы, высокое качество.
надо испробывать…много хороших отзывов купить кокаин, меф, бошки через телеграмм
Discover Fresh Items – Noticed a few finds that were quite remarkable today.
trendyvaluezone – Stylish products at affordable prices, love the variety here.
и че сделали? условку дали? купить онлайн мефедрон, экстази, бошки
Осваиваешь фортепиано? нотя для писанино популярные мелодии, саундтреки, джаз и классика. Уровни сложности, аккорды, аппликатура, советы по технике.
Explore & Grow – Valuable suggestions that make spotting opportunities feel easy and motivating.
Writing my individual insight about Crowngreen Online. I discuss bonuses, deposit & withdrawal process, and the overall platform. Highlighting bonuses and fund releases. Reviewing how the casino performs and verifies payments. Talking about main takeaways I discovered. Going over what I liked and what wasn’t great. More details are covered in the complete article https://greenlandestate.pk/be-part-of-the-winners-at-crown-green-casino-and-2/
growthstream.click – Pages loaded fast, images appeared sharp, and formatting stayed consistent.
Магазин не чистый на руку. Уже пишет с другого жабера. Народ у кого осталось переписка состарого жабера сверьте ник. И прошу сделать посты что таковое не придуманная мною сказка. купить Кокаин, Мефедрон, Экстази
discoverandshop – Great platform for exploring unique items and discovering new favorites.
Innovation Insight Spot – Found a creative thought that triggered new concepts.
Центр сертификации https://серт-центр.рф технические регламенты ЕАЭС, декларации, сертификаты, ISO, испытания и протоколы. Сопровождение с нуля до регистрации в Росаккредитации. Индивидуальные сроки и смета. Консультация бесплатно.
???????? ?? ????? ????? ??? ???? ??????? . ?????? ??? ??????? ?? ???? ??????? ?????? ??????? . ??? ????? ?? ???? ??? ?? ???? ?????? ???????? ???????? ???.
?? ???? ?????????? ???? ?????? ?? ??????? . ????? ?? ????? ??????? ???????? ?? ????? ???????? . ?????? ??? ??? ????? ?????? ?????? ?? ?????.
?? ?????? ?? ???? ????? ????? ????? ???????? ????????? ???? ?? ??? ????? ????????? . ??? ??????? ??????? ?? ???????? ??????.
??????? ?? ???? ???????? ?? ???? ????, ????? ?? ????? ??????? ?????? ??. ???? ?? ????? ???????? ??? ?? ????? ?????? ???? ?????? ?????.
بيت فاينل الكويت https://betfinalafrica.com/
Что сейчас с эйфором? купить Мефедрон, Бошки, Марихуану
globalmarketoutlet – Wide selection of global products, makes shopping interesting and diverse.
Сеть детских садов https://www.razvitie21vek.com «Развитие XXI век» – уникальная образовательная среда для детей от 1,5 лет, где каждый ребенок сможет раскрыть свои таланты. Мы предлагаем разнообразные программы для развития творческих, физических, интеллектуальных и лингвистических способностей наших воспитанников.
у меня вообще когда порошок кидаешь и ациком заливаешь, раствор абсолютно прозрачный-.- и не прет вообще тупо куришь траву….. а вот кристалы не расворимые тоже имеются, я уже и толочь пытался седня и нагревом все бестолку… купить скорость, кокаин, мефедрон, гашиш
Discount Explorer – Discovered a handy bargain that stood out to me today.
Блог для новичков https://life-webmaster.ru запуск блога, онлайн-бизнес, заработок без вложений. Инструкции, подборки инструментов, стратегии трафика и монетизации. Практика вместо теории.
globalmarketoutlet – Wide selection of global products, makes shopping interesting and diverse.
спок ночи купить кокаин, меф, бошки через телеграмм
primedigital.click – Content reads clearly, helpful examples made concepts easy to grasp.
marketforge.click – Found practical insights today; sharing this article with colleagues later.
adfusionlab.click – Navigation felt smooth, found everything quickly without any confusing steps.
promopilotpro.click – Mobile version looks perfect; no glitches, fast scrolling, crisp text.
admasterlab.click – Bookmarked this immediately, planning to revisit for updates and inspiration.
Пожалуйста :ok: Спасибо за отзыв. купить Кокаин, Мефедрон, Экстази
yourtimeisnow – Motivating site that encourages taking action and embracing opportunities today.
conversionlab.click – Color palette felt calming, nothing distracting, just focused, thoughtful design.
Создание блога life webmaster и бизнеса в сети шаг за шагом: платформы, контент-план, трафик, монетизация без вложений. Готовые шаблоны и понятные инструкции для старта.
Discover Style Deals – Easy navigation with products that felt trendy and high-quality.
продаван обещал разобраться по поводу 307. Надеюсь на скорейшее разрешение ситуации. купить скорость, кокаин, мефедрон, гашиш
yourdealhub – Excellent deals on quality products, really makes shopping worthwhile.
adcruise.click – Appreciate the typography choices; comfortable spacing improved my reading experience.
мы и в скайп и в аське купить Мефедрон, Бошки, Марихуану
магаз ровный спасибо 5+ купить онлайн мефедрон, экстази, бошки
trendloversplace – Perfect for trend enthusiasts, always something fresh and exciting to see.
Дошло за 3 дня , качество отличное , буду только с этим магазом работать. купить скорость, кокаин, мефедрон, гашиш
purefashionchoice – Clean, stylish fashion selections that are both modern and practical.
Достойны уважения! купить Мефедрон, Бошки, Марихуану
Stylish selection – The layout was clear, and products were classy and attractive.
clickpioneer.click – Overall, professional vibe here; trustworthy, polished, and pleasantly minimal throughout.
clickvero.click – Loved the layout today; clean, simple, and genuinely user-friendly overall.
conversionpilot.click – Overall, professional vibe here; trustworthy, polished, and pleasantly minimal throughout.
adelevatepro.click – Content reads clearly, helpful examples made concepts easy to grasp.
globalvaluecorner – Amazing value and variety of products from around the world.
Writing my true take related to this casino. I explain offers, processing times, and user experience. Summing up casino offers and cashouts. Mentioning how the casino functions and processes payouts. Noting advantages and disadvantages I found. Reviewing what was nice and what I didn’t like. More information can be found by reading the article Crowngreen
trafficgear.click – Navigation felt smooth, found everything quickly without any confusing steps.
Дёшево и качественно – перевод документов с нотариусом. Самарское бюро переводов. Документы, нотариус, срочно! Любые языки мира. Качество проверенное. Доступные цены.
Платежи на Яндекс-кошелек принимаем как и раньше. https://industrial-revolution.info Дружище, если ты не понял, нам магазин в пятницу и здесь и везде перестал отвечать. Продавец принимал деньги до пятницы 17:00, и то (почитай ветку) тянул с треками. А потом пропал. Форум этот тоже больше не имеет той волшебной силы, что была раньше. Вместо того, чтобы составлять мнение о магазе, дибилы просто отписывают во все ветки без разбора “магаз улет” и “все ровно”, чтобы нужное количество сообщений набрать и умоляют о новых тестерах.
everydayessentials – Convenient site to find daily essentials quickly and easily.
Choice Picks Online – Browsing categories was intuitive, and the products were well-curated.
Я вообще удивляюсь как продаван работает то? Есть ветка форума, личка и ася – везде молчание. В ася онлайн, но всеравно молчит уже третий день – это адекватный сервис? https://bcskeptics.info Брал пару раз все было чотко!! всем советую)
adboostlab.click – Pages loaded fast, images appeared sharp, and formatting stayed consistent.
магаз самый ровный , и со сладкими ценами! https://alleya.info Слышал магазин работает отлично и клады качественные делает ))
dailydealsplace – Always updated with great bargains, love checking in daily.
Dropping my personal story talking about this platform. I highlight deals, withdrawals, and total experience. Summing up welcome deals and fund releases. Mentioning how the platform responds and sends money. Summing up main takeaways I ran into. Outlining what worked well and what could be better. You can learn more by checking out the full article https://ceriatoto.site/win-big-at-crown-green-casino-and-get-the-top/
adtrailblaze.click – Overall, professional vibe here; trustworthy, polished, and pleasantly minimal throughout.
Реально за***ли реклам-спаммеры :spam:, по две-три страницы одно и тоже, даже пропадает желание что либо читать…. таких как Nexswoodssteercan, Terroocomge, Vershearthopot, Soacomtimist и подобных надо сразу в баню отсылать, на вечно). https://defaultbkk.org а эффор хорош?) на что похож?)
learncreategrow – Inspiring content that encourages learning, creating, and personal growth.
Daily Trend Picks Hub – Smooth navigation with items that looked elegant and desirable.
“Ну и да ладно не отровлюсь думаю” https://a1dir.info все огонь люди работают!!!пс за поддержку )
Я стежу за змінами, бо оперативні podii дозволяють краще розуміти ситуацію. Це дуже важливо.
Нужен интернет? интернет в офис алматы провайдер 2BTelecom предоставляет качественный и оптоволоконный интернет для юридических лиц в городе Алматы и Казахстане. Используя свою разветвленную сеть, мы можем предоставлять свои услуги в любой офис города Алматы и так же оказать полный комплекс услуг связи.
growtogetherstrong – Positive and motivating, perfect for teamwork and community growth.
Бро, у меня тоже самое, даже пробывал уксусом гасить, по всем признакам сода. Продаван пообещал решить проблему, но авторитет подорван. https://transparenciaclimatica.org сервис – хуже некуда. Ну да об этом писал несколькими сообщениями ранее. 2/5
leadmatrixpro.click – Color palette felt calming, nothing distracting, just focused, thoughtful design.
trafficflowpro.click – Found practical insights today; sharing this article with colleagues later.
ranksprint.click – Navigation felt smooth, found everything quickly without any confusing steps.
promomatrix.click – Appreciate the typography choices; comfortable spacing improved my reading experience.
ЗОЖ-журнал https://wellnesspress.ru как выработать полезные привычки, наладить режим, снизить стресс и поддерживать форму. Простые шаги, научные факты, чек-листы и планы. Начните менять жизнь сегодня.
growthcruise.click – Overall, professional vibe here; trustworthy, polished, and pleasantly minimal throughout.
в каком городе брал и когда?интерисует барнаул https://yaem.info Как связаться?
buildyourownfuture – Great motivational site, helps focus on goals and planning ahead.
DreamPathwayHub – Inspiring insights provided, makes exploring possibilities and reaching goals enjoyable.
кто не чувствует лица, купить онлайн мефедрон, экстази, бошки Я в личку когда ещё писал, интересовался, думал заказать, но так и не было ответа на мои вопросы!!! Потом уже даже и расхотел связываться с данным магазином ((( Очень жаль, что так стали работать плохо !!! И может кто подсказать, все ли предоставленые у них на продажу канабинойдные дживики легальные?
Выбирают профессионалов доверяют – перевод документов срочно. Перевод таможенных документов. Самарское бюро. Нотариальное заверение. Срочно и качественно. Опытные специалисты.
Try Something New Hub – Inspiring ideas to experiment and create with confidence.
ChicSpotShop – Creative pieces featured, browsing through styles was simple and inspiring.
creativegiftoutlet – Amazing gift ideas, really unique and thoughtful selections available here.
за самих представителей нет . купить онлайн мефедрон, экстази, бошки Успешного травление нашей молодежи и побольше денег!
conversionboost.click – Navigation felt smooth, found everything quickly without any confusing steps.
TreasureFindsOnline – Loved the selection of deals, shopping around was smooth and quick.
А со скольки у них скайп начинает работать? купить кокаин, меф, бошки через телеграмм хороший магаз
shopforvalue – Affordable products without compromising quality, makes shopping super satisfying.
Перевод с итальянского – перевод документов с нотариальным заверением. Срочный перевод в Самаре? Выполним оперативно! Нотариальное заверение документов. Конфиденциально. Гарантия качества.
всё ровно бро делает купить Кокаин, Мефедрон, Экстази Многие стучат нам по выходным и ночью, но мы живые люди и не можем 24 часа в день отвечать.
DiscoverGoodsOnline – Amazing products available, exploring collections was smooth and effortless.
growbeyondlimits – Encouraging platform that inspires personal growth and pushing boundaries every day.
Заказывал 307, прислали 203. Сразу объяснил, менеджер в скайпе всё понял. Сказал Бро не переживай будет тебе бонус. купить кокаин, меф, бошки через телеграмм Супер ребята. Питер без сбоев
SmartSavingsOnline – Top offers showcased, browsing the site was smooth and easy.
у меня 203 1к8 получался вообще жестокии делал на растворителе для снятие лака с ногтей (без ацетона) https://burenie-msk.ru один грамотей натупил тут , а про стафа правда
dreamfashionfinds – Stylish and trendy fashion finds that make everyday shopping fun.
elitefunnels.click – Color palette felt calming, nothing distracting, just focused, thoughtful design.
marketcruise.click – Bookmarked this immediately, planning to revisit for updates and inspiration.
leadvoltage.click – Color palette felt calming, nothing distracting, just focused, thoughtful design.
leadforgepro.click – Color palette felt calming, nothing distracting, just focused, thoughtful design.
Ну блиинн я ждуждуждужду а мне не отвечает ТС я в уныние, буду ждать. говорят хороший, хочу попробовать у него. хочу сладкий бубалех мммм…. купить Мефедрон, Бошки, Марихуану И духовной отсутствие пищи
conversionpulse.click – Loved the layout today; clean, simple, and genuinely user-friendly overall.
HouseSpotHub – Great selection of home items, exploring categories was easy and enjoyable.
adorbitpro.click – Bookmarked this immediately, planning to revisit for updates and inspiration.
smartbuyplace – Excellent place to find smart deals and quality products efficiently.
так что смотрите внимательней что присылают, если не хотите словить передоз!!! https://rodichenkov.ru заказ дошел до нас)))
FocusAndInspireSpot – Motivational resources highlighted, perfect for maintaining energy, focus, and determination.
ОО мне то же все пришло! https://metalllist.ru 1.зачем указано столько платежных систем,коли их нет?
Writing my real story connected with that gaming site. I explain welcome packages, financial side, and gameplay vibe. Summing up bonus system and payments. Talking about how the experience runs and completes transactions. Mentioning the good and the bad I tested. Writing about what worked well and what I didn’t. The full article contains additional information Crowngreen
купить права
TrendyEdgeStore – Found amazing fashion items, scrolling through the collections was very pleasant.
Я не знаю как так получается что одним приходит качество, другим не качественный товар , но я второй раз на этом магазе заказываю и второй раз всё ровно с АМ-2233 полностью доволен. Я бы фото кинул, но чо то не загружается оно. купить онлайн мефедрон, экстази, бошки по заказу?)
Компания обратилась за разработкой системы управления для промышленного оборудования. Мы разработали схемотехнику, печатные платы и ПО, провели тестирование прототипов. После успешной проверки началось серийное производство. Клиент получил качественный и готовый продукт: производство электроники на заказ
Рабочее зеркало 1xbet — отличная альтернатива основному сайту. Всё доступно и без ограничений. Деньги пришли точно в срок https://1xbet-loss.top/
Хз, смотри, в тёплой кипяченке начали болтать, растворяется. Точно не рега https://aikido-ufa.ru Отличный магаз.
GlobalFashionEdge – Trendy collections available, exploring items was smooth and simple.
Leaving my first-hand impression connected with Crowngreen Online. I highlight perks, payment speed, and user experience. Emphasizing casino perks and payment system. Going over how the service acts and completes transactions. Noting main takeaways I tested. Mentioning what I appreciated and what I didn’t enjoy. Further details are available in the full article https://hexentertainment.space/start-your-journey-with-crown-green-casino-and-11/
Следвах https://mdgt.top указанията за премахване на смола от дреха и наистина проработи
Отличное описание, сразу захотелось заказть)) Что собственно и сделал, надеюсь, неразачеруюсь купить скорость, кокаин, мефедрон, гашиш Хз, смотри, в тёплой кипяченке начали болтать, растворяется. Точно не рега
TrendyNestBoutique – Great variety of stylish pieces, navigating the collections was quick and easy.
Поради https://remontuem.if.ua щодо укладка ламінату ціна івано-франківськ прочитав на сайті.
Ребят, магазин ровнее ровного. Если есть какие то сомнения, например, нарваться по кантактам на фэйкоф, обращайтесь на прямую к ТС. Написать ЛС 100% все будет исполнено в лучшем виде. Скорость доставки товара просто удивляет, конспирация, и выбор курьерки, залог вашей безопасности, у ТС это приоритет. Все на высшем уровни. Реагент качественный, минимум побочек максимум пазитива. Если вы все-таки решитесь, сдесь прикупиться, вы забудите и думать, где бы вам затариться снова. Не проходите мимо. То, что вам надо, тут. https://stroi-sam1.ru Это мы и так все знаем
Flourish with Intention – Practical guidance to stay motivated and advance meaningfully.
Деталі https://seetheworld.top про андорра лижі виявилися дуже корисними.
thoughtful presents hub – Lovely items available, exploring them was smooth and enjoyable.
У данного сллера только легал. Все проверено. https://kitsune44.ru Нет не нужен.
На 1хбет нравится, что не требуют лишних документов при выводе. Интерфейс комфортный, ничего лишнего. Игры в казино запускаются быстро и без подвисаний https://1xbet-loss.top/
услуги студии дизайна услуги студии дизайна
Опытный адвокат http://www.zemskovmoscow.ru в москве: защита по уголовным делам и юридическая поддержка бизнеса. От оперативного выезда до приговора: ходатайства, экспертизы, переговоры. Минимизируем риски, действуем быстро и законно.
gift inspiration hub – Creative items featured, browsing them felt simple and fun today.
Доброго времени суток друзья женскую половину человечества с праздником)))) https://aikido-ufa.ru тусишка хороша, я как го грешил что нирвановская была какая то тёмная, так вот у чемикала она вообще практически бежевая 😀 качество порадовало, хорошая вещь )
Русскоязычный биткоин форум: новости сети, хард/софт-кошельки, Lightning, приватность, безопасность и юридические аспекты. Гайды, FAQ, кейсы и помощь сообщества без «хайпа».
Кстати,что очень радует ,так это уровень общения продавца.Юмор лишним не бывает,ведь так:D? https://bular-anapa.ru Да мне 5 сообщений для лс нужно :Dа так месяц назад было все ровно)
лазерный раскрой цена гибка трубы на заказ
impact builder portal – Offers advice on making deliberate actions that matter daily.
https://vk.com/nyanyaryadom_ekb_official
https://codsteam.ru/
почему ты наводишь панику? я зашел на сайт фскн, там не говориться ни о каких октябрьских поправках в список запрещенных препаратов? купить Мефедрон, Бошки, Марихуану Господа, проверяйте заказы на сайте, e-mail, указанные в заказе, у всех должны уже придти треки, у многих они активны уже.
Портал Дай Жару https://dai-zharu.ru – более 70000 посетителей в месяц! Подбор саун и бань с телефонами, фото и ценами. Недорогие финские сауны, русские бани, турецкие парные.
На 1win понравилось, как быстро проходит регистрация. Казино работает плавно, трансляции не зависают. Вывод средств порадовал скоростью: 1win зеркало
курьерки на мой запрос поиска трека ответ что инфа закрыта для доступа купить Кокаин, Мефедрон, Экстази супер магаз
modern fashion hub – Stylish collections available, discovering new looks was easy today.
качество правда не очень, именно по продолжительности эффекта- в разных концентрациях его можно варьировать как тебе хочется=)))) купить кокаин, меф, бошки через телеграмм Ну что же, сегодня получил свою посылку, на этот раз все было в наилучшем виде, конспирация на все 10 баллов из 10!
Казино 1win приятно удивило качеством слотов — ничего не тормозит. Бонусы начисляются корректно и без задержек. Вывод прошёл гладко: 1win casino
future growth portal – Offers tips and strategies to shape a better tomorrow today.
CHEMICAL MIX спасибо огромное!!! купить кокаин, меф, бошки через телеграмм приеме. Приложат все усилия, чтобы ожидаемые заказы выслались. За ожидание вложены компенсации, средний % компенсации 50.
е знаю уместен ли мой вопрос в данное “смутное время” но все же откуда высылается заказы…? хотя бы из какой части РФ если это РФ…))) https://gamardzhoba-dostavka.ru Всем доброго времени суток. Вопрос такой – Ко скольки лучше делать МН и как быстро растет толер???
clickvoyage.click – Bookmarked this immediately, planning to revisit for updates and inspiration.
brandsprint.click – Mobile version looks perfect; no glitches, fast scrolling, crisp text.
В таких случаях надо запрашивать подтверждения через форум(ЛС) купить кокаин, меф, бошки через телеграмм Братья, у меня вопрос. JV-30 как? Боюсь нарваться на регу с которой крышу сносит. Ответьте пожалуйста.
Wheel of Fortune spun for 25 years. Sale of the Century gave away $65 million. Explore the legendary shows that defined generations. https://australiangameshows.top/
Putting my first-hand take centered on that gaming site. I mention bonus offers, processing times, and site quality. Pointing out casino offers and withdrawals. Going over how the casino handles and transfers winnings. Summing up what’s good and bad I tested. Writing about what stood out and what felt off. See the full article for extra details https://qqdewa99.org/uncover-exclusive-offers-at-crown-green-casino-and-4-2/
funneledge.click – Color palette felt calming, nothing distracting, just focused, thoughtful design.
Хотите купить https://kvartiratolyatti.ru квартиру? Подбор по району, классу, срокам сдачи и бюджету. Реальные цены, акции застройщиков, ипотека и рассрочка. Юридическая чистота, сопровождение «под ключ» до регистрации права.
Ритуальный сервис https://akadem-ekb.ru/кремация-подробный-гид-для-семьи-кото/ кремация и захоронение, подготовка тела, отпевание, траурный зал, транспорт, памятники. Работаем 24/7, фиксированные цены, поддержка и забота о деталях.
Очень понравилось работать с агентством горящих путёвок, где нам помогли найти отличный отдых в строго ограниченный срок. Сотрудники внимательно относятся к потребностям клиента и предлагают реальные варианты, а не просто список направлений. Цены приятно удивляют, особенно когда нужно улететь срочно. Нам организовали полный пакет документов и трансфер. По итогам поездки остались только положительные эмоции: банк горящих туров иркутск
easydealhub.shop – Shopping experience is seamless, products are easy to locate quickly.
Магазин в полном порядке!! https://radian16.ru Кстати,что очень радует ,так это уровень общения продавца.Юмор лишним не бывает,ведь так:D?
You said it perfectly.!
My blog :: https://Root-Apk.com/
такая же фигня, продован сказал, что некоторые только начинаю мониториться! вообщем спср дерьмово работает! купить Мефедрон, Бошки, Марихуану у них Methoxetamine бадяженный или нет? сколько принял мг и какие симптомы были?
Кондиционеры в Воронеже https://homeclimat36.ru продажа и монтаж «под ключ». Подбор модели, быстрая установка, гарантия, сервис. Инверторные сплит-системы, акции и рассрочка. Бесплатный выезд мастера.
gift finder hub – Wide range of items available, browsing was smooth and enjoyable.
Style & Trend Spot – Find fashionable outfits and accessories to refresh your style.
привет я сам тут не так давно ) я тебя понимаю я вот уже вторую посылку получил всё чётко и ровно тоже пережевал , часто на швыров попадал а тут ребята грамотную тему замутили и магазу респект и админам) не волнуйся всё будет чётко:good: https://artpero-store.ru Добрый вечер! Когда ожидается рега по Москве, опт!??
Стартап обратился за созданием портативного медицинского устройства. Мы разработали схемы, платы и ПО, провели тестирование прототипа. После проверки устройство поступило в серийное производство. Клиент сократил сроки разработки и получил качественный продукт – узнать больше. Метод помогает понять, какие решения работают, а какие нет.
Лазерные станки https://raymark.ru резки и сварочные аппараты с ЧПУ в Москве: подбор, демонстрация, доставка, пусконаладка, обучение и сервис. Волоконные источники, металлы/нержавейка/алюминий. Гарантия, расходники со склада, выгодные цены.
limitlessinsights.click – Inspiring content motivates exploring ideas and enhancing personal skills.
https://aritual.by/funeral.html
Инженеры контрактных компаний разрабатывают схемы, платы и программное обеспечение, затем контролируют сборку и тестирование https://shorehealingllc.com/%d1%81%d0%b1%d0%be%d1%80%d0%ba%d0%b0-%d0%b8-%d0%bf%d1%80%d0%be%d0%b8%d0%b7%d0%b2%d0%be%d0%b4%d1%81%d1%82%d0%b2%d0%be-%d0%bf%d0%bb%d0%b0%d1%82-%d0%b4%d0%bb%d1%8f-%d0%b1%d0%b8%d0%b7%d0%bd%d0%b5%d1%81/! Технология экономит время и ресурсы на стадии разработки
Current https://www.weather-webcam-in-montenegro.com: daytime and nighttime temperatures, precipitation probability, wind speed, storm warnings, and monthly climate. Detailed online forecast for Budva, Kotor, Bar, Tivat, and other popular Adriatic resorts.
Ребят, а подскажите насчет доставки спср, в какие города она доставляет ? Блин никогда раньше с ней не связывался 🙁 Расскажите пожалуйста, что, да как https://radian16.ru Очень странно, что 203 не растворился в ацетоне. Сколько брал ацика на 10 гр основы?
creative gift ideas shop – Fun and easy browsing with lots of interesting options.
Очень понравился сервис: за один вечер мы нашли и оформили идеальную путёвку на море. Специалист внимательно выслушал все пожелания и предложил подходящие варианты. Порадовало, что цена действительно оказалась ниже, чем на сайтах туроператоров. Отдых прошёл отлично, без малейших проблем. Обязательно воспользуемся повторно: горячий тур
Очень порадовало, что заказ можно оформить хоть ночью, хоть утром. Сервис работает без перебоев, алкоголь только проверенный, доставка аккуратная. Приятно, когда всё по-честному. Теперь если нужна доставка выпивки на дом, знаю, где заказать – https://drinkio70.ru/
freshfindsoutlet.click – Stylish selections for fashion lovers, shopping here was smooth and fun.
100 super hot amusnet https://100-super-hots.com/ awaits you with exciting moments and the chance to win big!
The quest for the hottest fashion choices has never been more prevalent.
Submitting my authentic opinion covering that gaming site. I highlight deals, banking, and how it plays. Mainly covering bonus system and processing time. Explaining how the casino behaves and verifies payments. Summing up the good and the bad I found. Writing about what stood out and what I disliked. The full article contains additional information https://cepcompany.com/join-crown-green-casino-with-exclusive-bonuses/
Официальный сайт 1вин стабильно держит нагрузку. Ставки проходят мгновенно. Средства вывели без задержек: 1win сайт
Interesse par 1xbet? Sur telecharger 1xbet cameroun, vous trouverez des liens a jour vers les fichiers d’installation de l’application 1xbet, les instructions d’installation, les mises a jour, les exigences systeme et des conseils sur la connexion securisee a votre compte pour un jeu en ligne confortable.
“А если Подтвердиться прошу перевыдать пробу вашего продукта Нормального Ибо Иметь дело с вашим магазином я не вижу смысла” https://agit-prom.ru хуй ты отпишешь! наркоман проклятый
Интернет-магазин RC19 https://anbik.ru профессиональное телекоммуникационное и сетевое оборудование в Москве. Коммутаторы, маршрутизаторы, точки доступа, патч-панели и СКС. Собственный бренд, наличие на складе, консультации и сервис.
Putting my sincere feedback related to Crowngreen Casino. I highlight promotions, payouts, and how it plays. Going through promotions and money-out process. Reviewing how the gameplay responds and releases funds. Pointing out positives and negatives I came across. Sharing what was fun and what wasn’t great. The full article contains additional information Crowngreen
fashionaround.click – Trendy international collections displayed, browsing was easy and fun today.
бля ты всех тут удивил!!! а мы думали тебе нужен реагент для подкормки аквариумных рыбок))) купить кокаин, меф, бошки через телеграмм Хочу описать работу магазина.Ну начну клад получил вчера с момента отправки прошло 3ое суток супер,маскировка на 5 балов молодцы спасибо за книгу от души буду духовно развиваться товар бомба основа горит отлично в общем оценка 5 твердая)))))
freshtrendshub.click – Trendy outlet with fresh picks, finding favorites felt simple today.
websuccess.click – Found practical insights today; sharing this article with colleagues later.
РВД Казань https://tatrvd.ru рукава высокого давления под заказ и в наличии. Быстрая опрессовка, точный подбор диаметров и фитингов, замена старых шлангов, изготовление РВД по образцу, обслуживаем спецтехнику, погрузчики, сельхоз- и дорожные машины.
roiboost.click – Appreciate the typography choices; comfortable spacing improved my reading experience.
clickstormpro.click – Overall, professional vibe here; trustworthy, polished, and pleasantly minimal throughout.
seostorm.click – Navigation felt smooth, found everything quickly without any confusing steps.
На 1win удобно и играть, и выводить. Всё проходит быстро, без бюрократии. Казино работает идеально: сайт 1вин
clickdynasty.click – Overall, professional vibe here; trustworthy, polished, and pleasantly minimal throughout.
bright selection hub – Enjoyable and easy browsing with a nice collection of quality items.
traffichive.click – Pages loaded fast, images appeared sharp, and formatting stayed consistent.
Обратите внимание, ТС отказывается работать с ГАРАНТОМ! хоть и магазин древний и проверенный! но хочется спать спокойно! АДМИНЫ ОБРАТИТЕ ВНИМАНИЕ, ПОРА КАК ТО ИЗМЕНИТЬ РЕЖИМ РАБОТЫ ГАРАНТА. СДЕЛКИ ПРОВОДИТЬ ОБЯЗАТЕЛЬНО ТОЛЬКО ЧЕРЕЗ ГАРАНТА! купить кокаин, меф, бошки через телеграмм боюсь что здесь произойдёт тоже самое, уж очень не внятно продавец общается.
дизайн интерьера дома дизайн проект интерьера
successjourneyhub.click – Encouraging guidance motivates following through on ideas to reach real results.
freshtrendshub.click – Trendy outlet with fresh picks, finding favorites felt simple today.
DRINKIO – это идеальный сервис для тех, кто ценит время. Всё просто и удобно, без лишних звонков. Курьеры приезжают вовремя, заказ всегда точный. Ассортимент разнообразный, сайт работает отлично. Радует круглосуточная доставка. Доставка алкоголя на дом в Москве, https://drinkio70.ru/
Ну что кто нить УРБ попробовал уже как отзывы ? купить Кокаин, Мефедрон, Экстази Привет всем, сделал заказ в понедельник и оплатил его также, оплата прошла также в понедельник. заказ до сих пор мне не отправили и кормят все потомами… очень разочарован таким отношением. с ренджиком таких проблем вообще небыло
new arrivals finder – Wide variety of products displayed, exploring and selecting was effortless.
freshchoiceshop.click – Trendy items featured nicely, shopping experience felt smooth and quick.
Self-Confidence Zone – A daily dose of inspiration to elevate your self-confidence.
Легко и быстро – перевод документов физических лиц. Перевод наследственных документов. Самарское бюро. Нотариальное заверение. Срочно и конфиденциально. Качество.
УВОЖАЕМЫЕ ФОРУМЧАНЕ МАГАЗИН ПРОВЕРЕННЫЙ БЕРИТЕ СМЕЛО. КАЧЕСТВО ТОВАРА И ОПЕРАТИВНОСТЬ РАБОТЫ ВАС НЕ ПОДВЕДУТ ДА ЕЩЕ И ЦЕНЫ УУХХ КАКИЕ ЛУЧШЕ ВРЯД ЛИ НАЙДЕТЕ… ЕЩЕ РАЗ С П А С И Б О:bro: https://gadanieperemen.ru 203 вообще шикарный ) мне понравился. спасибо Вам)
trendcollectionhub.click – Clear layout and trendy items make shopping enjoyable and fast.
freshstylehub.click – Fashionable items presented nicely, browsing the collection was enjoyable.
daily vision guide – Motivates taking small steps each day to achieve a focused vision.
заказать дизайн интерьера спб дизайн интерьера квартиры
С возвращением!!!удачной работы!!!! купить кокаин, меф, бошки через телеграмм Как связаться можно
stylehubcollection.click – Fashionable items displayed clearly, exploring trends was enjoyable and quick.
203 тут говно.. 10к вникуда улетели.. клиенты от меня сбежали… присылали какую-то желтую хуй*ю, не растворяется вовсе, выпадает в осдок.. прет максимум 20-30 минут (в лучшем случае) купить кокаин, меф, бошки через телеграмм Отписывал Вам в аське,вы там мне не отвечаете в течении полудня..хотя обещались отправить заказ на следующий день после оплаты,а он сегодня!Жду вашего ответа.
freshstylecorner.click – Fashionable items showcased nicely, shopping felt quick and effortless.
clickvolume.click – Appreciate the typography choices; comfortable spacing improved my reading experience.
unlockyourpotential.click – Inspiring advice here to maximize your abilities and grow confidently each day.
rankcraft.click – Navigation felt smooth, found everything quickly without any confusing steps.
marketboostpro.click – Content reads clearly, helpful examples made concepts easy to grasp.
всё получил,качество-бомба,очень доволен магазином ,всё быстро доставили,вам желаю так держать!!!!!!!!! https://prudboy34.ru Заказал вчера 30гр 4-FA . Трек пока не получил. Надеюсь что все будет олрайт. В планах долговременное сотрудничество!
clickhustle.click – Appreciate the typography choices; comfortable spacing improved my reading experience.
leaddash.click – Navigation felt smooth, found everything quickly without any confusing steps.
corneroffreshclicks.click – Modern styles presented well, browsing the selection was fast and easy.
“Barely legal nymph wants to sin.” Here — rb.gy/8rrwju?Illus
clickmomentum.click – Navigation felt smooth, found everything quickly without any confusing steps.
homecomfortzone.click – Pleasant browsing experience for discovering cozy home items.
Заказывал 307, прислали 203. Сразу объяснил, менеджер в скайпе всё понял. Сказал Бро не переживай будет тебе бонус. https://oberegiamulet.ru грац вам джентльмены!
bright variety portal – Makes discovering products smooth, simple, and enjoyable throughout.
leadmachine.click – Appreciate the typography choices; comfortable spacing improved my reading experience.
онлайн казино vavada — это актуальное зеркало для доступа к популярному онлайн-казино.
Пользователи могут насладиться десятками лицензионных игр с высокими выплатами.
Сайт отличается удобным интерфейсом и быстрой работой. Регистрация занимает всего несколько минут, а поддержка помогает в любое время.
#### Раздел 2: Игровой ассортимент
На платформе представлены сотни игр от мировых провайдеров. Здесь есть классические слоты, настольные игры и live-дилеры.
Особого внимания заслуживают джекпоты и турниры. Специальные акции увеличивают шансы на победу.
#### Раздел 3: Бонусы и акции
Новые игроки получают щедрые приветственные подарки. Вращения в слотах дарятся без обязательных вложений.
Система лояльности поощряет постоянных клиентов. Еженедельные турниры с призовыми фондами добавляют азарта.
#### Раздел 4: Безопасность и поддержка
Vavada гарантирует честность и прозрачность игр. Лицензия обеспечивает защиту персональных данных.
Служба поддержки работает в режиме 24/7. Консультанты отвечают моментально в онлайн-чате.
### Спин-шаблон
#### Раздел 1: Введение в мир Vavada
1. Vavada Casinos — это популярная онлайн-платформа для азартных игр.
2. Здесь представлены лучшие игровые автоматы от ведущих разработчиков.
3. Все игры загружаются моментально благодаря оптимизированному движку.
4. vavadacasinos.neocities.org доступен круглосуточно с любых устройств.
#### Раздел 2: Игровой ассортимент
1. На платформе представлены сотни игр от мировых провайдеров.
2. Здесь есть классические слоты, настольные игры и live-дилеры.
3. Крупные розыгрыши привлекают внимание тысяч участников.
4. Крупные выигрыши разыгрываются в прогрессивных слотах.
#### Раздел 3: Бонусы и акции
1. Регистрация открывает доступ к выгодным бонусам.
2. Вращения в слотах дарятся без обязательных вложений.
3. VIP-игроки получают персональные предложения.
4. Еженедельные турниры с призовыми фондами добавляют азарта.
#### Раздел 4: Безопасность и поддержка
1. Игровой процесс строго контролируется независимыми аудиторами.
2. Все автоматы проходят проверку на случайность генерации чисел.
3. Помощь доступна в любое время суток.
4. Решение любых вопросов занимает минимум времени.
corneroffreshclicks.click – Modern styles presented well, browsing the selection was fast and easy.
Came across https://pinuponline-bd.com recently and decided to share it. It seems informative and could be useful to someone.
контрактная служба
лучший магаз берите все!!!!, все порешали вина не магазина. просто красавец!!! https://radian16.ru в розницу работаете?
Just sharing https://parimatch-download.in a website I recently visited. It provides helpful content that might be interesting to some users.
believeinprogress.click – Inspiring ideas help you trust the process while growing consistently.
Sharing a https://jokabetapp.com link to a website I found useful. It has clear content and frequent updates.
latest trends hub – Great selection of trending items, browsing was smooth and fast.
freshcornerhub.click – Great outlet for discovering stylish items, navigating products was simple and fast.
Вот это я понимаю СЕРВИС:ok: Превзошло все мои ожидания, доставили раньше обещанного… Магаз ровный (до последнего сомневался, что всё на столько гладко…) купить онлайн мефедрон, экстази, бошки Здесь ровно! Магазин очень хороший, а главное цены в нем ГИБКИЕ к любому подход есть : )
Microsoft windows https://licensed-software-1.ru
freshpickoutlet.click – Trendy picks featured clearly, shopping experience was smooth and fun.
да не врядли просто ихнему курьеру поджопников надавать надо что бы копытами веселей шевелил да и все https://oberegiamulet.ru Товар привезли качество удовлетворительное,единственное что заказ долго оформляли не мог достучаться в асю.А так все норм!=))
Юрист по заливу поддерживал на всех этапах и помог избежать ошибок: https://advokat-zaliv.ru/
Оценщик подробно описал все повреждения: https://sud-po-zalivu.ru/
learn share network – Educational platform offering tools to learn new concepts and connect with others.
betfinal morocco https://rivonirecruitment.co.za/?p=25839/
يُعدُّ منصّة betfina واحدةً من أفضل منصّات الـ casino online في الخليج العربي.
يقدم موقع betfinal تجربة لعب آمنة وسريعة مع دعم طرق الدفع المناسبة للاعبين العرب.
يتميز betfinal بمجموعة ضخمة من الألعاب: رهانات مباشرة مع مزايا رائعة للاعبين في بيت فاينل الإمارات العربية المتحدة.
https://contractna-svo.ru/
чема вещи делает!!! https://aikido-ufa.ru Супер ребята. Питер без сбоев
freshfavoriteshub.click – Nice collection of fresh products, exploring items felt easy today.
Sportni yaxshi ko’rasizmi? futbol prognozlari Har kuni eng yaxshi sport yangiliklarini oling: chempionat natijalari, o’yinlar jadvali, o’yin kunlari haqida umumiy ma’lumot va murabbiylar va o’yinchilarning iqtiboslari. Batafsil statistika, jadvallar va reytinglar. Dunyodagi barcha sport tadbirlaridan real vaqt rejimida xabardor bo’lib turing.
trendcentral.click – Modern fashion picks available, checking out the collection was enjoyable.
Купить квартиру https://kvartiratltpro.ru без переплат и нервов: новостройки и вторичка, студии и семейные планировки, помощь в ипотеке, полное сопровождение сделки до ключей. Подбор вариантов под ваш бюджет и район, прозрачные условия и юридическая проверка.
Брал и не раз в данном магазине, притензий нет, все качественно, оперативность радует! Продовцы дайте информации о CHM – 500, что за зверь? когда в розницу уйдет https://allfur.ru В целом о работе магазина – как клиент,я доволен!!!:good:
inspiredailyhub – A wonderful place to find motivation and unlock new creative paths.
marketoptimizer.click – Mobile version looks perfect; no glitches, fast scrolling, crisp text.
какие то траблы ппц =\ https://kitsune44.ru Уже заказывал и получил chm-100 и chm-400 всё ровно)
leadharbor.click – Overall, professional vibe here; trustworthy, polished, and pleasantly minimal throughout.
clicklabpro.click – Overall, professional vibe here; trustworthy, polished, and pleasantly minimal throughout.
hyperleads.click – Navigation felt smooth, found everything quickly without any confusing steps.
clickvortex.click – Overall, professional vibe here; trustworthy, polished, and pleasantly minimal throughout.
leadorigin.click – Appreciate the typography choices; comfortable spacing improved my reading experience.
fresh picks online – Nice collection here, shopping for new finds felt easy and fast.
Протечка стояка в санузле нанесла большой ущерб, экспертиза всё подтвердила – https://advokat-zaliv.ru/
Special Offers Zone – A smooth browsing experience with several offers that caught my eye.
freshcornerhub.click – Great outlet for discovering stylish items, navigating products was simple and fast.
контрактник рф
Хотите купить квартиру? https://spbnovostroyca.ru Подберём лучшие варианты в нужном районе и бюджете: новостройки, готовое жильё, ипотека с низким первоначальным взносом, помощь в одобрении и безопасная сделка. Реальные объекты, без скрытых комиссий и обмана.
Планируете купить квартиру https://kupithouse-spb.ru для жизни или инвестиций? Предлагаем проверенные варианты с высоким потенциалом роста, помогаем с ипотекой, оценкой и юридическим сопровождением. Безопасная сделка, понятные сроки и полный контроль каждого шага.
KEY я так понял ты сделал заказ узнал сумму которую надо оплатить ,оплатил а когда вернулся сумма стала выше на сотку???? купить скорость, кокаин, мефедрон, гашиш Ответь в аське!Люди 22куска зарядили ,перед оплатой добро дал ,а потом тишина… Люди переживают,очень!Ответь пожалуйсто!!!
Полезные лайфхаки для экономии времени — советы, которые работают в реальной жизни. https://gratiavitae.ru/
clickpremier.click – Loved the layout today; clean, simple, and genuinely user-friendly overall.
freshfindshub.click – Wide variety of stylish products, discovering new favorites was simple and fun.
уж не маленькие блин, знаете что заказываете наверное ! форум вам на что ? или ты думаешь что у них какой то особенный 250й ? ))) купить кокаин, меф, бошки через телеграмм как-то перехотелось.. что действительно последний товар не очень?
где найти проституток в нижневартовске
classy style portal – Elegant items featured, site layout made finding products easy today.
Online Deals Center – Smooth browsing overall with a nice mix of items worth checking.
https://kontrakt-na-svo-msk.ru/
У меня была, проси того кто продал все перепроверять- люди могут ошибаться ! https://zhivouste.ru Хочу заказать для ознакомления АМ-2233 1гр., но отдавать 750 за доставку 1 грамма – имхо глюк
freshstylehub.click – Fashionable items presented nicely, browsing the collection was enjoyable.
chictrendzone.shop – Exploring trendy pieces was enjoyable, site layout made browsing smooth.
Если кто-то когда-то пробовал банки с Рафинада на тусиае, тот знает, как классно они перли и понимает, каких эффектов я ожидал. https://selt-ryazan.ru ну тогда тестируй, если неделю выдержал )
как гражданину белоруссии получить гражданство россии
freshstylecorner.click – Fashionable items showcased nicely, shopping felt quick and effortless.
Trend & Style Hub – Smooth browsing experience with a variety of trendy items to explore.
не пожалеете) https://gadanieperemen.ru Не вздумайте платить ему без Гаранта через которого он не работаем,этим самым доказывает свою не надежность!
discover insights – Platform offers fresh insights and exciting opportunities to explore.
freshtrendcorner.click – Stylish choices for everyone, browsing new arrivals was simple and pleasant.
и не планируете ни какой новой ветки на скайпе открыть!?там в скайпе мошенник значит от вас херачит направо и налево!и ссылку кидает на ваш магазин и говорит что от вас работает! купить онлайн мефедрон, экстази, бошки понятно как проверенный магазин работает если отзывы негатив значит зачищает сообщений еще куча они на телефоне сейчас не могу их скопировать но и смысла нет все и так ясно
Daily Treasure Spot – Browsing daily picks was enjoyable, with everything arranged neatly.
freshfashionfinds.click – Stylish items available, navigating new arrivals was simple and fun.
привет!!! не согласен долдны быть доступные магазины как купить скорость, кокаин, мефедрон, гашиш Добрый день! ЦЕНЫ НА MN СНИЖЕНЫ!
Юрист помог грамотно оформить все претензии: оценка бытовой техники
Modern Market Zone – Explore trendy products designed to make your daily shopping simple and fun.
подписать контракт в москве
corneroffreshclicks.click – Modern styles presented well, browsing the selection was fast and easy.
Бро все супер,как всегда ровно,спасибо за прекрасно отлаженную работу. Процветания тебе и твоей команде.Спасибо! https://hotapk.ru Вчера оплатил, сегодня получил бьющийся трек. Так что все норм. Разговор в скайпе длился 30мин, я оплатил и через 2 часа мне уже выслали посылку. Осталось проверить кач-во фашки. Если все норм, сработаемся с конторой.
clickfire.click – Loved the layout today; clean, simple, and genuinely user-friendly overall.
Trendy Deals Hub – Found some cool items fast thanks to the simple layout.
Независимая оценка пригодилась для страховой и суда: https://ekspertiza-zaliva.ru/
Протечка стояка в санузле нанесла большой ущерб, экспертиза всё подтвердила https://yurist-pri-zalive.ru/
trafficgenius.click – Loved the layout today; clean, simple, and genuinely user-friendly overall.
clickcatalyst.click – Color palette felt calming, nothing distracting, just focused, thoughtful design.
adoptimizer.click – Content reads clearly, helpful examples made concepts easy to grasp.
leadvelocity.click – Bookmarked this immediately, planning to revisit for updates and inspiration.
seoquantum.click – Appreciate the typography choices; comfortable spacing improved my reading experience.
спср только растраивает, такие деньги берут, и че то нифига не делают. Посыль уже 3 день лежит в г. Ё-XX. Хотя должны были привезти в близлежащий город. Но тут я узнал то что у нас нет в городе филиала ихнего. Вот и не понятно толи сами привезут, толи ехать до них надо. https://mashtab-r.ru Спасибо большое, что вы с нами и доверяете нам!
dreamgrowthhub – Uplifting ideas here encourage believing in yourself and moving forward.
admetric.click – Color palette felt calming, nothing distracting, just focused, thoughtful design.
РАБОТА КАЧЕСТВЕННАЯ И БОЛЬШОЙ, БОЛЬШОЙ, БОЛЬШОЙ, БОЛЬШОЙ, БОЛЬШОЙ, БОЛЬШОЙ, БОЛЬШОЙ, БОЛЬШОЙ, БОЛЬШОЙ, БОЛЬШОЙ, БОЛЬШОЙ, БОЛЬШОЙ РЕСПЕКТ ВАМ качество продукции еще не пробывал, в ближайшие время расскажу OOO купить онлайн мефедрон, экстази, бошки заказала в этом магазе сувениров:), посыль пришел на 3ий день, продукты качеством вкусны
Fresh Savings Hub – Nicely arranged collection of value picks, easy to navigate and fast to load.
Daily Discount Hub – Nice variety today, enjoyed how quickly pages responded.
по контракту
анологичная ситуация! продаван ты на примете, раз твоих клиентов начали принимать… купить онлайн мефедрон, экстази, бошки и че сделали? условку дали?
Smart Savings Spot – Good browsing flow, found the deals section especially convenient.
Экспертиза показала точный объем повреждений после залива https://ekspertiza-zaliva.ru/
Fashion Picks Online – Enjoyed the trendy displays, and moving through the categories was very smooth.
https://служба-по-контракту-сво.рф/
Да трек получил, но я не про это я про задержки, сейчас у них все должно быть ровно купить Кокаин, Мефедрон, Экстази Из аськи вышел и даже не ответил… *(
Купить квартиру https://kupikvartiruvspb.ru просто: подберём проверенные варианты в нужном районе и бюджете, поможем с ипотекой и документами. Новостройки и вторичка, полное сопровождение сделки до получения ключей.
Купить квартиру https://kupithouse-ekb.ru без лишних рисков: актуальная база новостроек и вторичного жилья, помощь в выборе планировки, проверка застройщика и собственника, сопровождение на всех этапах сделки.
Fashion & Lifestyle Central – Explore stylish items that combine fashion sense with lifestyle comfort.
Делали 1к8 прикуренные, эффект до 3х часов ! https://dou119-ekb.ru Жалко конечно что убрали покупку от грамма
Fresh Deals Directory – Everything was clearly displayed, and exploring felt smooth.
New Fashion Finds – Loved the clean arrangement and the wide variety of fresh styles.
купить проститутку девочку купить гашиш бошки
вот немного для Сашка купить скорость, кокаин, мефедрон, гашиш Магазин отличный, заказываю у него и всегда доволен !
Квартира от застройщика https://novostroycatlt.ru под ваш бюджет: студии, евро-двушки, семейные планировки, выгодные условия ипотеки и рассрочки. Реальные цены, готовые и строящиеся дома, полная юридическая проверка и сопровождение сделки до заселения.
clickfunnelspro.click – Color palette felt calming, nothing distracting, just focused, thoughtful design.
clickauthority.click – Overall, professional vibe here; trustworthy, polished, and pleasantly minimal throughout.
adblaze.click – Color palette felt calming, nothing distracting, just focused, thoughtful design.
trafficpilotpro.click – Bookmarked this immediately, planning to revisit for updates and inspiration.
boostfunnels.click – Loved the layout today; clean, simple, and genuinely user-friendly overall.
Bright Style Picks – Found some great outfits quickly, and the browsing experience was very relaxed.
rankdrive.click – Pages loaded fast, images appeared sharp, and formatting stayed consistent.
Top Value Picks – Liked the layout, easy to skim through products without any fuss.
Вопрос?! Что дальше? Что лучш https://vizart-studio.ru Привет всем!
інформаційний портал https://36000.com.ua Полтави: актуальні новини міста, важливі події, суспільно-громадські та культурні заходи. Репортажі з місця подій, аналітика та корисні поради для кожного жителя. Увага до деталей, життя Полтави в публікаціях щодня.
Trend & Style Online – Smooth interface and a wide range of trendy pieces made exploring fun.
перевод документов мвд нужен перевод документов
эротический массаж индивидуалки
вобщем решение принято заказ буду делать ТУТ!!!! https://imax34.ru 1к 10-ти слабовато будет 1к5 или 1к7 самое то…
Bright Fashion Room – A smooth shopping flow with plenty of good-looking pieces to check out.
Urban Trends Online – The layout felt modern and checking different pieces was simple.
понятно как проверенный магазин работает если отзывы негатив значит зачищает сообщений еще куча они на телефоне сейчас не могу их скопировать но и смысла нет все и так ясно https://imax34.ru норм. Все кладки нахожу без проблем… взял белого и…охуел!!!
Fresh Product Market – The platform was easy to move through, and I found several new things worth seeing.
Bright Apparel Shop – Clean design and appealing fashion picks made the experience enjoyable.
Modern Season Deals – Navigation felt intuitive and browsing items was hassle-free.
много нас, а грам один. купить кокаин, меф, бошки через телеграмм про него что нить писали? точнее вы читали ?
Экспертиза показала, что повреждения намного серьезнее, чем предполагалось: сколько стоят услуги оценщика ущерба при затоплении квартиры
perplexity аккаунт https://uniqueartworks.ru/perplexity-kupit.html
Bright Clothing Outlet – Clothing previews looked clean, and moving around the site was simple.
clickace.click – Appreciate the typography choices; comfortable spacing improved my reading experience.
а эффор хорош?) на что похож?) купить скорость, кокаин, мефедрон, гашиш задержек небыло все было ровно магаз ровный заказывай трек сразу кидают , за качество не могу пока ничо отписать , не пробывал, попробую отпишу!
Happy Finds Boutique – Cute visual style with user-friendly navigation, making shopping fun.
ModernBuy Hub – Pages loaded quickly and exploring the products felt effortless.
Юрист по заливу помог добиться справедливой выплаты: https://zaliv-expertiza.ru/
Bright Trend Fashion – Nicely displayed items and a smooth interface made checking things out easy.
хочу извинится за поднятую панику(думаю ТС меня понимает , т.к. все мы люди и переживаем за свои деньги,тем более сфера деятельности расшатывает нервы как не крути).зная теперь с чем была связана данная проблема с поставками и положительным финалом в порядочности ТС не сомневаюсь.на данный момент работа налажена,в чем убедился сам и наслышан от других. https://prishlo-vremya.ru Магазин работает супер!)
rankwizard.click – Bookmarked this immediately, planning to revisit for updates and inspiration.
Trend Choice Store – Fresh global vibes, and clicking through the categories felt quick.
Bright Trend Fashion – Nicely displayed items and a smooth interface made checking things out easy.
зашел на сайт не нашел там 307 https://krovlispb.ru Списался с данным магазом пару месяцев назад, беру клады по москве, ребята работают отлично, сервис на высоте! Последний раз даже клад сделали минут за 15 всего, первый раз такое, в других магазах приходилось часов по 5 ждать свое клада! Рега тоже отличная, беру JV-90 очень мощная штука! Спасибо ребятам за качественный товар и сервис продолжайте в том же духе!!!
Unique Outlet Market – Well-organized product sections and fast loading made shopping simple.
братва подскажите концентрацию и растворитель для ам2233 от данного селера ! Заранее спс купить скорость, кокаин, мефедрон, гашиш Парни пятерка лпк работает ровно)))всем фарта)))))
Bright Fashion Room – A smooth shopping flow with plenty of good-looking pieces to check out.
Fresh Season Collection – Seasonal offerings looked great, and navigating the site was effortless.
Fresh Style Picks – Nice variety of items, scrolling through pages was easy and fun.
Независимая оценка ущерба помогла ускорить решение вопроса со страховой – https://zaliv-expertiza.ru/
и сколько те6е поо6ещали заплотить? https://gamardzhoba-dostavka.ru почему 0.3? акция?
Bright Apparel Shop – Clean design and appealing fashion picks made the experience enjoyable.
перевод документов на языки адреса перевод документов
ufc yangiliklari ufc jonli efir uz
Один из старейших!!! купить кокаин, меф, бошки через телеграмм Наверно так же как и джив. попробуй минимальные пропорции сделать 0,1 к 1
Daily Savings Spot – Explore deals and value offers to stretch your budget further.
Trends Market Hub – Looked around for a bit, everything ran smoothly without delays.
Happy Buys Online – The layout is fun and bright, making it easy to explore all the items.
Bright Style Collection – Browsing was pleasant with everything presented clearly and neatly.
можно поподробней пожалуйста!Т.к. недавно зарегился на данном форуме и нет возможности отписать в личку купить кокаин, меф, бошки через телеграмм Данный продукт не зашол в моё сознание:) его нужно бодяжить с более могучим порохом, будем пробовать АМ2233…
<https://kuklanvt.info/boys/
clickwaveagency.click – Color palette felt calming, nothing distracting, just focused, thoughtful design.
adspectrum.click – Color palette felt calming, nothing distracting, just focused, thoughtful design.
clicklegends.click – Mobile version looks perfect; no glitches, fast scrolling, crisp text.
Bright Fashion Store – Pages loaded fast and the style previews made browsing fun.
Fresh Seasonal Finds Hub – The interface makes discovering seasonal products very convenient.
seotitan.click – Bookmarked this immediately, planning to revisit for updates and inspiration.
growthclicks.click – Overall, professional vibe here; trustworthy, polished, and pleasantly minimal throughout.
seoaccelerate.click – Pages loaded fast, images appeared sharp, and formatting stayed consistent.
Приветствую всех! купил 0,5 кокса. Закинул деньги, получил адрес, приехал забрал, все на высоте! Кладмену отдельное спасибо, спрятал так что не доебаться. Качество просто улетное, и от меня и от друзей огромный плюс магазину. купить онлайн мефедрон, экстази, бошки ровнее только строительный уровень )
Discover urban collections – Several interesting picks appeared quickly, easy to browse.
Global Outfit Store – Wide selection of updated pieces, and the interface made exploring easy.
888starz uz — o’yinlar va sport tikishlari uchun. foydalanuvchilarga. o’z imkoniyatlarini sinab ko’rishi. yaqinda o’z sevimli sportiga tikish imkoniyatini beradi.
888 starz register https://888starzuzbets.com/registration/
yangi foydalanuvchilarni jalb qilmoqda. foydalanuvchilar. har bir kishi. ma’lumot olish imkoniyati.
muhim ahamiyatga ega. tikish jarayonini. maxsus bonuslar bilan taqdirlanishi mumkin. Shuningdek,.
platformasining eng jozibador jihatlaridan biridir. turli xil o’yin turlaridan. bu to’lov tizimlarining xilma-xilligi.
boks primoy efir boks primoy efir
Открих https://mdgt.top какъв грунд да използвам върху ОСБ плоскости
Прислали нам свой метоксетамин, подтверждаем: продукт чистый, >99%. купить Мефедрон, Бошки, Марихуану Радует качество ))
discounttreasure – Loved the bargains, everything was priced perfectly.
5]Пришла таки тусишка.Коричневатый порошок,в черезчур большом пакете(не 100г же заказывали). Вещь прекраснейшая,воздушная,сказочная,убирающая всякие низменные чувства(ненависть,голод,похоть,зависть,презрение…).Скрипка (аля иоган – воздух) задает воздушное настроение) Как после этой штуки курительные семси юзать,пить алкоголь-не знаю) Держит долго,присутствие мобильников,людей не под ним-нежелательно.На постэффектах хорошо пойдёт гитарка с веселыми,поизитвными песенками) купить кокаин, меф, бошки через телеграмм всем привет
Trendy Styles Hub – Plenty of stylish options, and scrolling through pages was easy and smooth.
dailyoffersonline – Prices were perfect, shopping was effortless and fast.
товар 9\10 хорошее качество, 9 потому что ожидал чуть большего. https://twoprice.ru Дальнейших успехов вам и продаж!
Gift Discovery Hub – Plenty of fun gift ideas today, and the prices seemed very reasonable.
Explore urban trends – Discovered some trendy outfits fast, layout was clear and simple.
Огляди https://seetheworld.top/ про винтерберг були вичерпними.
Рекомендую https://remontuem.if.ua — багато корисного про ремонт кухні ціна.
Simple Gifts Online – Smooth scrolling and intuitive layout made shopping stress-free.
Daily Trend Hub – Browse curated collections with ease and enjoy a pleasant shopping experience.
Value Picks Online – Loved the clarity of the layout, and browsing value deals felt effortless.
Мы очень рады! Обращайтесь к нам еще! https://sushiballs.ru У меня проблема с оплатой реквизитам 40817810… и 41548… Проверял несколько раз на нескольких терминалах… “Введён неверный номер” С сайта списал верно, несколько раз перепроверил. Вот так, хочу оплатить, а не могу, готов хоть блиц отправить или ещё как нибудь
Fashion Value Corner – Found some stylish pieces today, and browsing through everything felt effortless.
brightbuysdaily – Excellent range of products, ordering process was seamless.
Посмотри в ЛС купить Кокаин, Мефедрон, Экстази До сих пор в себя прихожу
Worldwide Market Outlet – Pages loaded fast and the product display was easy to navigate.
Metabolic Freedom shows you how small, smart changes lead to big, lasting metabolic improvements. https://metabolicfreedom.top/ did jonas say metabolism as the first freedom
Trend Collection Online – Found several eye-catching items, and navigating the pages was smooth.
Smile Shopping Spot – Products are well displayed, and navigating the site was smooth and fast.
Один из топовых продавцов на всем РЦ:) https://katyakant.ru Chemical-mix.com, а где от 50гр, там надо 40 тон сразу запулить:rastakur: яж не барон нах:LSD:
dealspotmarket – Shopping was easy and prices were very fair.
Explore urban trends – Discovered some trendy outfits fast, layout was clear and simple.
Seasonal Shopping Corner – Found some nice variety and appreciated how easy it was to explore.
brightvaluefinds – Smooth site navigation and enjoyable shopping experience.
Smart Savings Hub – Noticed plenty of good deals, and the value-for-money stood out.
Спасибо Магазину)вы лучшие))))))))!!!!!!!!!!!!!!!!!!!!! :monetka: Качество на 100% https://shamotiki.ru Прибыльных вам выходных!:monetka:
Fashion Favorites Page – Tons of good-looking picks here, and the clean layout made browsing smooth.
Всем добра! Вчера позвонил курьер, сказал, что посылка в городе! Через пару часов я был уже на почте, забрав посылку, сел в машину, но вот поехать не получилось т.к. был задержан сотрудниками МИЛИЦИИ!!!! Четыре часа в отделении и пошёл домой!!! Экспертиза показала, что запрета нет, но сам факт приёмки очень напряг!!! Участились случаи приёмки на данной почте!!!!! Продаванам СПАСИБО и РЕСПЕКТ за чистоту реактивов!!! Покупатели держите ухо востро!!!!!!!!!! Больше с этой почтой не работаю(((( Если у кого есть опыт по схемам забирания пишите в личку!!! https://watt33.ru Чет я совсем отупел, немогу найти прилавок, где товар бро, цена, наименование товара? Прайс в студию, на все услуги. От жизни походу отстал, правила поменяли походу, да?
Exclusive Choice Hub – Several rare products popped up, and the shopping flow was smooth.
Cheerful Buy Outlet – Quick loading pages and a friendly interface made shopping enjoyable.
Берут все молча ) https://kinotyr.ru через нос – нет эффекта.
Скрипт обменника https://richexchanger.com для запуска собственного обменного сервиса: продуманная администрация, гибкие курсы, автоматические заявки, интеграция с платёжными системами и высокий уровень безопасности данных клиентов.
Профессиональные сюрвей услуги для бизнеса: детальная проверка состояния грузов и объектов, оценка повреждений, контроль условий перевозки и хранения. Минимизируем финансовые и репутационные риски, помогаем защищать ваши интересы.
cheerfulgifts – Impressive gift collection, navigating the site was simple and fast.
Finds Market Online – Enjoyed scrolling through the items; the layout made browsing simple.
Your Picks Hub – Plenty of attractive deals today, and moving through the pages was quick and easy.
Shop trendy outfits – Some standout pieces were instantly visible, browsing simple.
fashionspot – Found stylish pieces fast, checkout felt smooth and simple.
Trend Hub Daily – Clean visuals and smooth navigation made shopping effortless.
Частенько брал сдесь мини-опт по совместкам в 2013-2014году ! купить Кокаин, Мефедрон, Экстази пробовал 0,1гр ничего не было, пробовал 0,3 ничего не было, только мурашки на спине
lemon casino: 50 free spins
brightfindhub – Quick and easy to navigate, found great items fast.
Pure Style Selection – A nice mix of trendy items, and delivery felt reliable and quick.
надо испробывать…много хороших отзывов купить кокаин, меф, бошки через телеграмм Всем добра! Вчера позвонил курьер, сказал, что посылка в городе! Через пару часов я был уже на почте, забрав посылку, сел в машину, но вот поехать не получилось т.к. был задержан сотрудниками МИЛИЦИИ!!!! Четыре часа в отделении и пошёл домой!!! Экспертиза показала, что запрета нет, но сам факт приёмки очень напряг!!! Участились случаи приёмки на данной почте!!!!! Продаванам СПАСИБО и РЕСПЕКТ за чистоту реактивов!!! Покупатели держите ухо востро!!!!!!!!!! Больше с этой почтой не работаю(((( Если у кого есть опыт по схемам забирания пишите в личку!!!
Trend Marketplace Online – Enjoyed the stylish layout and found several items that matched my taste.
Value Center Online – Smooth browsing today, and a few solid deals showed up right away.
Эффект чувствуется почти сразу, эйфория и стим в голове https://vilanaplus.ru ну как-то так
Fresh Shopping Hub – Discovered a variety of products, and navigating the store was effortless.
trendpulsehub – Excellent trendy products, delivery was fast and ordering smooth.
Browse latest fashion – Found a couple of eye-catching picks fast, very user-friendly.
Привет, ребята! купить Мефедрон, Бошки, Марихуану По АМ могу сказать,что концентрировать выше 1 к 15 не вижу смысла.Оно не торкает дальше своего известного предела,после 1 к 15 дальше пойдёт уже переводняк.Тут как с процами-дороже 200 баксов покупать-перевод бабла,прироста производительности не заметишь почти.
digitalfunnels.click – Appreciate the typography choices; comfortable spacing improved my reading experience.
viraltraffic.click – Color palette felt calming, nothing distracting, just focused, thoughtful design.
happystorehub – Great assortment of items, shipping was quick and dependable.
ranktunnel.click – Loved the layout today; clean, simple, and genuinely user-friendly overall.
rankmaster.click – Content reads clearly, helpful examples made concepts easy to grasp.
Lifestyle Hub Online – Fast-loading pages with neat sections made exploring simple.
seosurge.click – Bookmarked this immediately, planning to revisit for updates and inspiration.
a href=”https://modernhomemarket.shop/” />Modern Home Hub – Lots of attractive items available, and the website ran efficiently.
lemon casino bonus bez depozytu
brandamplify.click – Mobile version looks perfect; no glitches, fast scrolling, crisp text.
globalmarketspot – Very convenient to shop, products were easy to browse and order.
как правило все реактивы от данного магазина проходят проверку на легальность\чистоту так что поживём увидим, думаю нелегала тут в продаже не появится ) https://divizka.ru С Ув. vkapushoneПолучил сегодня посылку, могу уже с уверенностью сказать, Замечательного магазина.
Hot Trend Collection – Spotted some appealing finds, and checkout completed without delays.
Trend Online Hub – Fast-loading pages with a clear structure made browsing simple.
Всем привет! Хороший магазин. Удачи и развития в дальнейшем! купить кокаин, меф, бошки через телеграмм Метоксетамина, увы от 250 мг.
trendfusionhub – Browsing the site was effortless, design is very user-friendly.
Фитляндия https://fit-landia.ru интернет-магазин товаров для спорта и фитнеса. Наша компания старается сделать фитнес доступным для каждого, поэтому у нас Вы можете найти большой выбор кардиотренажеров и различных аксессуаров к ним. Также в ассортименте нашего магазина Вы найдете качественные товары для различных спортивных игр, силовые тренажеры, гантели и различное оборудование для единоборств. На нашем сайте имеется широкий выбор товаров для детей — различные детские тренажеры, батуты, а так же детские комплексы и городки для дачи. Занимайтесь спортом вместе с Фитляндией
clickcampaign.click – Found practical insights today; sharing this article with colleagues later.
всем доброго дня) не подскажите, в беларусь(минск) можно сделать заказ с этого магазина ? или вообще хоьт какой нибудь магазин который в минск вышлет подскажите плз) ответ в лс плиз) https://mxmnet.ru фоту убрал, не будем палить конспирацию, всё понятно… Свяжитесь с магазином, я думаю решите вопрос с конпенсацией
Browse trendy picks – Quickly found multiple appealing items, navigation simple.
Happy Market Online – Plenty of choices available, and the site worked fast and efficiently.
globalfinder – Found quality products quickly, shopping was convenient and straightforward.
https://rich513.com/
Smart Buy Market – Navigation was simple, and products were clearly displayed throughout.
Stylish Living Picks – Enjoyed scrolling through; found lots of modern and convenient product choices
РАБОТАЕМ!!! ОПТ!!! ДОСТАВКА!!! купить кокаин, меф, бошки через телеграмм Всем доброго времени суток!!!
Нежные авторские торты на заказ с индивидуальным дизайном и натуральными ингредиентами. Подберем вкус и оформление под ваш бюджет и тематику праздника, аккуратно доставим до двери.
Ты нам лучьше отзыв напиши о работе магазина 😀 купить кокаин, меф, бошки через телеграмм сегодня сделал заказ оплатил, отпишусь что будет дальше
“Tempting tease longs for ecstasy.” Here — https://rb.gy/8rrwju?Vubbibe
All the latest here: https://rf.livesexchat18.com/лесбиянки
More details One click: https://rf.ero-chat.net/couples
Отличный магазин) https://teka-retail.ru Бро, была абсолютно идиентичная ситуация у мну в декабре.Трек не бился пол недели, прошли выходные звоню в контору-курьерку, называю трек, говорят нет такого, я к тс так мол и так, тот грит все ровно, трек верный ожидай! Херакс и вечером курьер названивает, оказыва4тся они мне еще в субботу хотели вручить, но почему то не дозвонились))Все пучком, бро.Почта мало кому интересна в наши дни, на курьерки много сваливается, вот они 3ак могут разгребают…
Urban trend finds – Several standout options appeared right away, browsing easy.
urbanvault – Found top urban fashion items, website browsing was fast and seamless.
значит ты чо то намутил , а вещество я заказывал в этом магазе норм для RCS естественно https://about-ipad.ru Магазин надежный репутацию оправдал сделал заказ 24 февраля , а 26 груз был уже на руках. Если и бывают задержки скорее всего это курьерские фирмы косячат. Сервис тоже на высоте, люди адекватные не смотря даже на выше написанные отзывы не разу не усомнился что деньги улетят на ветер!!!
Value Hub Marketplace – Plenty of options to explore, and the browsing was seamless.
Full coverage here: https://ru.flirt888.com/couples
Complete guide here: https://gayroulette.ru
FashionStyleVault – Modern pieces, arrived quickly and in perfect condition.
globalpickshop – Pages loaded quickly and the site was easy to use.
Оплатил заказ в субботу, во вторник посылка была отправлена вечером, в четверг уже была в городе, но встретиться с курьером не смог. В пятницу заберу. Все оперативно и быстро. купить Мефедрон, Бошки, Марихуану привет я сам тут не так давно ) я тебя понимаю я вот уже вторую посылку получил всё чётко и ровно тоже пережевал , часто на швыров попадал а тут ребята грамотную тему замутили и магазу респект и админам) не волнуйся всё будет чётко:good:
Home Outlet Picks – Plenty of affordable options, and the products seem reliable and sturdy.
joyhomehub – Loved the discounts, website made shopping very smooth.
второй вопрос к товарищу под ником Leks: https://karcher-market.ru помогите обьясните как написать сапорту
Urban trend finds – Several standout options appeared right away, browsing easy.
Outlet Deals Today – Plenty of discounts available, and the shopping flow felt clear and simple.
Unique Home Picks Online – Lots of interesting pieces available, and the site felt neat and well-structured.
Братки все красиво стряпают, претензий к магазину нуль, всегда всё ровно. Единственное что сейчас напрягло, отсутствие на ветке вашего представителя в ЕКБ “онлайн”, представитель молчит ( а там по делу ему в лс отписано) и кажись воопще не заходит пару недель https://master-zelenograd.ru магазин отличный
dailyfashionfinds – Wide variety of modern fashion products, pages loaded quickly and shopping was enjoyable.
New and noteworthy: https://freesexcams.pw
Discover the Best Erotic Massage and Female Escort Services on Bedpage!
If you’re looking for top-notch erotic massage and female escort services, Bedpage is the place to be. Users rave about the professionalism, discretion, and variety of services available. Whether you are searching for relaxation or an unforgettable experience, Bedpage consistently delivers high-quality experiences. From soothing erotic massages to the company of charming female escorts, every service is tailored to your preferences. Explore the amazing options and join countless satisfied customers who have made Bedpage their go-to platform for adult services. Find your perfect experience today with Erotic massage in Las Vegas.
Первый раз заказывал пришло все за 4 дня , в данной же ситуации уже 11 дней идет , я готов любые деньги платить чтобы приходило быстрей купить Мефедрон, Бошки, Марихуану О качестве товара отпишу в трипрепортах .Мир, и процветания этому магазину)))
happycornerhub – Fast delivery, excellent assistance from the support team.
Trend Shop Hub – Loved the variety, stylish items, and the ordering process was fast.
Fresh Gift Collections – Some nice gift ideas today, and orders should arrive quickly.
Urban style collection – Several attractive finds popped up immediately, navigation effortless.
stylecorner – Great selection of fashionable pieces, the shopping experience was smooth.
В общем начну с начала.нашел ветку данного магазина и решил узнать че как. https://moyconcert.ru Пришол 250 сделал 1к10-12 ппц уносит 250 у вас лучший магазу респект , даже не ожидал что такой джив будет , 1к10 меньше это ппц..
Value Selection Online – Found a variety of attractive items, and the quality feels dependable.
Seasonal Hub Store – Quality seasonal products with a fast, simple checkout process.
Да, в скайпе их нет и ситтуация мне тоже не нравиться. купить онлайн мефедрон, экстази, бошки пацаны магаз ровный пишу это уже не раз всегда списываюсь с менеджером все делает ровно и качество и оперативность , всегда заказываю и буду заказывать тут т.к. не париться за качество продукта как в других магазах!!!
WildShoreMarket – Smooth checkout, interesting items, and very satisfied with the quality.
Home Décor Corner – Browsing felt natural and quick, with plenty of appealing options.
Trustworthy groups deliver best crypto signals with legit track records. Join reviewed telegram channels offering alpha calls with best buy and sell strategies backed by trusted TradingView charts.
самый дешёвый магазин из доверенных – это этот! купить скорость, кокаин, мефедрон, гашиш Та не, не стоит оно того. Надо отдать должное магазину, посылка пришла, без проблем.
Multiple methods teach how to buy robux across platforms. Website tutorials, app guides, and console-specific instructions cater to different device preferences providing comprehensive purchasing education.
stylehunterstore – Fast delivery and very fashionable items, loved everything.
trenddealhub – Great discounts available, shopping felt effortless and fast.
Holiday Gift Stop – Nice selection with fast shipping, and the box was perfectly organized.
Urban style link – Found multiple fashionable items fast, layout user-friendly.
SunsetStemShopHub – Items arrived quickly, website was intuitive, and packaging was excellent.
styleoftheday – Really liked the collection, site navigation and checkout were easy.
Последние данные очков репутации: https://divizka.ru оптимал дозировка на 2дпмп при в\в от данного магазина какая?
проститутки нижневартовск минет
webpromoter.click – Mobile version looks perfect; no glitches, fast scrolling, crisp text.
СТО в Люберцах https://sto-cars.ru ремонт и техническое обслуживание легковых автомобилей и легкого коммерческого транспорта. Современное оборудование, опытные мастера, свой склад запчастей, комфортная зона ожидания и честный подход к каждому клиенту.
Старые фунты? https://funtfrank.ru Обменяйте легко и без комиссий! Принимаем старые банкноты фунта стерлингов по выгодному курсу, без скрытых платежей и навязанных услуг. Быстрая проверка подлинности, моментальная выдача наличных или перевод на карту.
adstrigger.click – Bookmarked this immediately, planning to revisit for updates and inspiration.
trafficengine.click – Pages loaded fast, images appeared sharp, and formatting stayed consistent.
Работала с данным магазином давным давно! Пожалуй самый лучший) купить Кокаин, Мефедрон, Экстази Магаз на высшем уровне !!! Тут и говорить нехуй. Хочешь качество, закупись тут ) Мир бро
reachoptimizer.click – Content reads clearly, helpful examples made concepts easy to grasp.
marketactivator.click – Content reads clearly, helpful examples made concepts easy to grasp.
boostmetrics.click – Pages loaded fast, images appeared sharp, and formatting stayed consistent.
City Style Spot – Browse stylish urban collections for an effortless wardrobe refresh.
carefreecornerstore – Easy to navigate, products are high quality, and delivery was fast.
Trend & Gift Finds – Stylish products with great gift choices, browsing was effortless.
WildCrest Online – Great selection, smooth site experience, and delivery was prompt.
adswizard.click – Overall, professional vibe here; trustworthy, polished, and pleasantly minimal throughout.
ребят , а 4-fa нормальная тема ? это типа живика чтоли ? купить онлайн мефедрон, экстази, бошки Ещё раз повторюсь – магазин ОТЛИЧНЕЙШИЙ.
glamtrendhub – Found everything easily, site loads fast and browsing is simple.
Discover urban collections – Several interesting picks appeared quickly, easy to browse.
Wild Crest Collection – Smooth website, great assortment, and very happy with the delivery.
задержек небыло все было ровно магаз ровный заказывай трек сразу кидают , за качество не могу пока ничо отписать , не пробывал, попробую отпишу! https://arzdetali.ru Читайте репорт на трипы и обсуждения… Продукт просто улёт!
topstylecollection – Wide variety of items, shopping process felt natural.
stylecorner – Great selection of stylish products, website navigation felt smooth.
IronWoodDesignsHub – Loved how simple it was to browse and order products.
Simple Fashion Trends – Stylish items throughout, website navigation was easy, and ordering quick.
Read More: https://vrn.best-city.ru/forum/thread540142559/
Все будет равно чувак!!!!!!!! купить кокаин, меф, бошки через телеграмм Хороший магазин тоже не раз уже к нему обращался я считаю что этот магазин достоин огромного внимание ! Мир тебе бро и процветания удачи в работе !:ok:;)ОБРАЩУСЬ ЕЩЕ К ТЕБЕ БРО ОБЯЗАТЕЛЬНО !) ЕЩЕ РАЗ УДАЧИ
BoldStreet Style Corner – Loved the boutique feel and completing the order was very straightforward.
сегодня оплатил заказ..буду ждать доставки..протестирую.сообщу о качестве продукта? https://about-ipad.ru я не смог пополнить в альфа банке, по определенной причине!
Shop & Smile Online – Great range of products, excellent value, and fast shipping.
Wonder View Goods – Loved the variety, products are high-quality, and delivery was quick.
trendvaulthub – Amazing assortment and great prices, very satisfied with my order.
У меня тоже была задержка.На мониторенге тоже отправку просрочили, в итоге дней 20 затратили на пересылку.Просто курьерка такая, они помоему там распиздяи ещё те…так что на счёт приема можешь не беспокоиться.там даже если мусора захотят что то найти то будет трудно разобраться что да где)вот допустим недавно заказал и курьерка ваще не то вбила))так что не переживай!Чемикалы всё ровно делают, сложновато будет найти даже если посыль откроют! https://24sema.ru вот как прет Амф.
Check fashion items – A few interesting styles were easy to find immediately, layout clean.
giftjunction – Lots of useful gifts to choose from, shipping felt efficient.
Хочеш зазнати успіху? нові казино: свіжі огляди, рейтинг майданчиків, вітальні бонуси та фрізпіни, особливості слотів та лайв-ігор. Докладно розбираємо правила та нагадуємо, що грати варто лише на вільні кошти.
Цікавлять бонуси? бонуси казино: актуальні акції, подарунки за реєстрацію, депозитні та VIP-бонуси. Чесно розбираємо правила, допомагаємо зрозуміти вигоду та уникнути типових помилок під час гри.
familyfashionhub – Loved the variety of clothing for all ages, browsing was simple.
PureHarborGoods – Easy to browse, trendy products arrived promptly and in perfect condition.
The best of the best: https://xn--80aeam7boku6e.xn--p1ai/2025/10/27/%d0%9a%d0%bb%d1%8e%d1%87%d0%b5%d0%b2%d1%8b%d0%b5-%d0%bf%d1%80%d0%b5%d0%b8%d0%bc%d1%83%d1%89%d0%b5%d1%81%d1%82%d0%b2%d0%b0-%d0%bf%d0%be%d0%ba%d1%83%d0%bf%d0%ba%d0%b8-%d0%b3%d0%be%d1%82%d0%be%d0%b2%d1%8b%d1%85-%d0%b0%d0%ba%d0%ba%d0%b0%d1%83%d0%bd%d1%82%d0%be%d0%b2/
Harbor Corner Deals – Great selection and my order showed up earlier than expected.
Global Value Marketplace – Nice selection of value items, checkout was fast and simple.
В лс пиши сразу. Имей в виду, быстрее будет https://britecleaning.ru На ацетоне делай, он быстро выветривается и не пахнет совсем!
Daily Growth Spot – Explore resources to help you develop skills and confidence every day.
Достойны уважения! купить онлайн мефедрон, экстази, бошки Магазин ровнее не куда!!! Ребята отработали на славу, все четко и оперативно. Спасибо огромное, буду сотрудничать и дальше)
SunCrestApparelShop – Smooth navigation, stylish items, and fast shipping.
SoftCrest Select – Great experience, easy website, and my order arrived exactly as expected.
РАБОТАЕМ!!! ОПТ!!! ДОСТАВКА!!! https://traktort170.ru/digora.html Все мои контакты указаны в подписе.
Pure Style Shop Picks – Stylish items available everywhere, with easy website navigation.
shopcentralbig – Excellent deals and effortless checkout, very satisfied.
marketdriver.click – Appreciate the typography choices; comfortable spacing improved my reading experience.
conversionforce.click – Bookmarked this immediately, planning to revisit for updates and inspiration.
сегодня вот ночью прислал трек. Бьется, радует https://faraon-s.ru/zharkent.html Как то так.
promoseeder.click – Overall, professional vibe here; trustworthy, polished, and pleasantly minimal throughout.
rankclicker.click – Mobile version looks perfect; no glitches, fast scrolling, crisp text.
adscatalyst.click – Loved the layout today; clean, simple, and genuinely user-friendly overall.
trendfinder – Nice assortment available, site navigation felt effortless.
Blue Haven Fashion – Loved the fresh styles and the order showed up exactly when expected.
brandfunnels.click – Bookmarked this immediately, planning to revisit for updates and inspiration.
https://extrennoe-vitrezvlenie-na-domu-spb2.ru/
RareSeasonHub – Loved the seasonal collection, very easy to navigate, and items were top quality.
digitalpropel.click – Navigation felt smooth, found everything quickly without any confusing steps.
urbanstylehub – Loved the urban-style selection, navigation was smooth and effortless.
мой заказ выцслали. купить, кокаин, мефедрон, гашиш, бошки Боровск пробывал нюхать эфект 4-6часа
Йога как средство борьбы с бессонницей и стресом
Как занятия йогой помогают справиться с бессонницей и улучшить качество сна
Попробуйте выполнять комплекс асан перед сном. Эти упражнения помогают успокоить ум и снимут напряжение в теле. Например, сидячая позиция с наклоном вперед (Пашчимоттанасана) рекомендуется для расслабления мышц спины и бедер, а также для успокоения нервной системы. Проводите в этой позе 5–10 минут, фокусируясь на дыхании.
Не забывайте о дыхательных практиках. Полное дыхание, включающие четкие и глубокие вдохи и выдохи, отмечено в исследованиях как способ снижения уровней кортизола – гормона стресса. Простое упражнение: дышите глубоко, напрягая живот и расширяя грудную клетку. Повторяйте эти циклы по 10 минут, ощущая, как напряжение уходит.
Добавьте медитацию в свой вечерний распорядок. Простые методики, такие как наблюдение за дыханием или визуализация спокойного места, помогают сосредоточиться и отключить негативные мысли. Исследования показывают, что регулярная практика может существенно улучшить качество сна. Выделяйте по крайней мере 15 минут на такие занятия перед сном.
Позиции на полу тоже оказывают положительное влияние. Например, поза покойника (Савасана) позволяет расслабить каждую мышцу тела. Полежите в этой позе в течение 10-15 минут, направляя внимание на расслабление. Это снизит уровень тревожности и поможет уйти в сон.
Также полезно ввести вечерние ритуалы. Придерживайтесь постоянного времени для занятий расслабляющими практиками. Это не только установит привычку, но и улучшит вашу способность засыпать. Рекомендуется настраивать освещение на более затемнённый режим, что сигнализирует организму о приближающемся сне.
Упражнения для улучшения сна и снятия напряжения
Диафрагмальное дыхание – начните с дыхательной практики, которая помогает замедлить сердечный ритм. Сядьте удобно или лягте. Положите одну руку на грудь, а другую на живот. Вдыхайте носом, позволяя животу подниматься. Затем выдыхайте через рот, медленно опуская живот. Повторяйте в течение 5-10 минут. Это активирует парасимпатическую нервную систему, что приводит к расслаблению.
Позиция ребенка – сядьте на пятки, наклонитесь вперед, опустите лоб на коврик. Руки вытяните вдоль тела или положите на пол перед собой. Оставайтесь в этой позе 3-5 минут. Она расслабляет спину, снимает напряжение и помогает сосредоточиться на дыхании.
Скручивания сидя – сядьте с вытянутыми ногами, согните одно колено и положите его на внешнюю сторону другого бедра. Вытяните прямую руку вверх, а затем скрутитесь к согнутой ноге. Держите позу 30 секунд, меняйте стороны. Скручивания улучшают кровообращение и помогают освободить ум от лишних мыслей.
Поза ноги вверх по стене – эта асана отлично подходит для восстановления. Лягте на спину, поднимите ноги и упирайте их в стену. Руки разместите вдоль тела, закройте глаза. Оставайтесь в этой позе 5-10 минут. Она способствует нормализации кровообращения и снимает мышечное напряжение.
Расслабляющие медитации – выделите время для 10-15 минут медитации с фокусом на дыхании. Сядьте удобно, закройте глаза и сосредоточьтесь на вдохах и выдохах. Если отвлекаетесь на мысли, просто вернитесь к дыханию. Это помогает успокоить ум и снизить тревожность.
Синхронизация дыхания с движением – можете попробовать простые динамические растяжки. Например, наклоны и поднятия рук, при этом обязывайтесь дышать медленно. Каждое движение сопровождается вдохом или выдохом. Это повышает осознание тела и помогает сбалансировать эмоции.
Техника «Скользящей руки» – лягте на спину, положите одну руку на живот, другую на грудь. При каждом вдохе чувствуйте, как живот поднимается, а грудь остается неподвижной. При выдохе напрягите живот, позволяя ему опуститься. Это поможет заметить, как дыхание воздействует на эмоциональное состояние.
Поддерживающие позы с использованием помощников – иногда полезно использовать блоки или подушки для глубокой релаксации. Например, положите подушку под ноги в положении лежа или используйте блоки для поддержки в позе воина. Это может помочь достичь более глубокого уровня комфорта.
Оптимизация вечернего времени – избегайте использования электронных устройств за 1-2 часа до сна. Вместо этого установите рутину: почитайте книгу или послушайте спокойную музыку. Это создаст подходящую атмосферу для расслабления.
Примечание о регулярности – старайтесь включать вышеописанные практики в ежедневный режим. Даже короткое время на занятия может значительно улучшить общее самочувствие и качество ночного отдыха. Осознание тела и ума способствует снятию напряжения и более легкому засыпанию.
Интегрируйте эти практики в повседневную жизнь, наблюдая за тем, как они влияют на ваше состояние. Консультация с профессионалами в области здоровья также может быть полезной для выбора наиболее подходящих методов.
Практические асаны для расслабления перед сном
Поза «Дерево» (Тадасана) поможет стабилизировать ум и снять напряжение. Встаньте прямо, ноги на ширине плеч. Поднимите руки над головой, соедините ладони. Держитесь в этом положении 30 секунд, сосредоточив внимание на дыхании.
«Поза ребенка» (Баласана) идеально подходит для расслабления и снятия стресса. Сядьте на пятки и вытяните руки вперед. Опуститесь на пол, чувствуя, как растягиваются мышцы спины. Задержитесь здесь на несколько медленных вдохов и выдохов.
«Поза лежачего героя» (Вирасадхана) помогает снизить напряжение в ногах и передней части тела. Сядьте на пол, разведите колени, опустите вытянутые ноги в стороны. Опустите туловище на пол, поддерживая голову и грудь руками. Оставайтесь в этой позиции 1-2 минуты.
«Скручивания лежа» (Джатава) позволяют расслабить позвоночник. Лягте на спину, подтяните колени к груди и аккуратно опустите их в одну сторону, не отрывая плеч от пола. Дышите глубоко и меняйте сторону через 30 секунд.
«Поза с благословением» (Дхянанасана) помогает успокоить ум. Сядьте в удобной позе, руки положите на колени. Закройте глаза и сосредоточьтесь на своем дыхании. Оставайтесь в этом состоянии 5-10 минут для глубокого расслабления.
«Поза моста» (Сету Бандхасана) поддерживает мышцы спины и расслабляет тело. Лягте на спину, ноги на ширине плеч, колени согнуты. Поднимите таз, активно нажимая на ноги, а руки поддерживают спину. Задержитесь на 30 секунд, затем мягко опуститесь.
«Поза бабочки» (Баддха Конасана) помогает расслабить бедра и пах. Сядьте на пол, соедините подошвы ног. Позвольте коленям опуститься в стороны, наклонитесь вперед, чувствуя растяжение. Задержитесь на 1-2 минуты.
«Поза сердца» (Ардха Устрасана) снимает напряжение в груди и помогает открыть дыхательные пути. Встаньте на колени, руки на пояс. Наклонитесь назад, вытягивая грудь к небу. Держитесь 20-30 секунд, дышите спокойно.
Каждая из этих асан реализует физические и психические преимущества, необходимые для качественного отдыха. Регулярная практика перед сном позволит улучшить качество ночного отдыха и снизить уровень стресса. Обратите внимание на свои ощущения: ищите комфорт, избегая чрезмерных усилий. Ваша цель – создать гармоничное состояние тела и ума.
Техники дыхания для снятия стресса в течение дня
Попробуйте дыхательную технику “4-7-8”. Она состоит из следующих шагов: вдохните через нос на счет 4, задержите дыхание на 7 секунд, затем выдохните через рот на счет 8. Повторяйте это упражнение 4-5 раз для мгновенного уменьшения напряжения. Эта методика нормализует сердечный ритм и помогает успокоить разум.
Метод “пранаяма” с акцентом на глубокое дыхание также эффективен. Сядьте в удобное положение, закройте глаза. Положите одну руку на живот, другую на грудь. Вдыхайте медленно через нос, ощущая, как живот поднимается, избегая движения грудной клетки. На вдохе считайте до 5. Затем выдохните через рот на счет 7, постепенно опуская живот. Старайтесь уделять этому упражнению 5-10 минут.
Таким образом, метод “дыхающего яйца” тоже может помочь. Вдохните, представляя, что наполняете яйцо, которое находится в вашем животе. Наполняйте его воздухом на счет 3, затем выдыхайте, представляя, как это яйцо постепенно сдувается. Это помогает сосредоточиться и освободить ум от ненужных мыслей.
Техника “проводник” включает в себя визуализацию. Вдыхая, вообразите, что находитесь рядом с любимым местом, где чувствуете себя комфортно. На выдохе представляйте, как весь негатив и напряжение покидают ваше тело. Это упражнение требует всего лишь 2-3 минуты времени, но может значительно повлиять на ваше состояние.
Для быстрого расслабления попробуйте метод “балансовое дыхание”. Вдохните на счет 4, затем выдохните на счет 4, удерживая равные промежутки между вдохами и выдохами. Это помогает сбалансировать нервную систему и снизить уровень тревожности.
Также не забывайте о “осознанном дыхании”. Принято остановиться и сосредоточиться на своем дыхании в течение одной минуты. Просто наблюдайте за тем, как воздух входит и выходит из вашего тела, не изменяя его. Это может помочь перезагрузить разум.
Кроме того, существует метод “авах”, которому можно обучиться самостоятельно. Суть заключается в медленном и равномерном дыхании, где каждое дыхание сопровождается легким понижением напряжения в теле. Важно сосредотачиваться на своем теле и замечать, какие области остаются напряженными после выполнения дыхательных циклов.
Важно помнить о том, что дыхательные практики следует выполнять в комфортной обстановке, чтобы предотвратить возникновение дискомфорта. Концентрируйтесь на процессе без лишних мыслей и отвлечений. Старайтесь делать эти упражнения в течение дня, особенно в периоды повышенного физического или эмоционального стресса.
Отзывы о дыхательных техниках показывают, что даже несколько минут практики могут существенно повлиять на ваше самочувствие. Некоторые люди отмечают улучшение концентрации и продуктивности после выполнения данных методик. Не забывайте, что ключевое значение имеет регулярность.
https://storeprofit.ru/
Shop Bright Collection – Cool collection overall, checkout was easy and my parcel came fast.
BrightLeaf Essentials – The range of items surprised me, and the website was quick and user-friendly.
в курске есть ваш магаз? купить, кокаин, мефедрон, гашиш, бошки Добрянка У нас у отправки случился форс-мажор. Только на этой неделе начинают отправлять. Извиняюсь от лица магазина за задержку.
SoftStone Hub Store – Smooth site, great selection, and delivery arrived promptly.
DFEssentialsStore – Ordering was easy and products arrived in perfect condition.
Мульча из агроволокна плюсы и минусы использования
Мульча из агроволокна как способ улучшения почвы преимущества и недостатки
В первую очередь, стоит отметить, что этот материал активно используется в садоводстве и сельском хозяйстве благодаря своим уникальным свойствам. Он умеет эффективно удерживать влагу в почве и защищать корни растений от резких температурных колебаний. Рекомендую применять такой вариант для сохранения питательных веществ и предотвращения разрастания сорняков – это позволит значительно сократить время, затрачиваемое на уход за растениями.
Несмотря на все достоинства, стоит обратить внимание на некоторые аспекты, которые могут повлиять на решение о применении. Например, агроволокно не пропускает воду на 100%, поэтому важно следить за уровнем влажности почвы. При недостаточном поливе растения могут испытывать нехватку влаги, особенно в жаркие периоды. Также, под воздействием солнца данный материал может быстро degrade, что потребует дополнительного ухода и замены.
Польза заключается также в уменьшении испарения влаги, что способствует экономии ресурсов. Однако, необходимо учитывать, что при высоком уровне влажности и малом количестве солнечного света, это может создать идеальные условия для развития грибковых инфекций. Поэтому, поддерживать баланс и осуществлять мониторинг состояния почвы – ключевая задача.
Стоит рассмотреть и вопрос стоимости. Хотя первоначальные затраты на агроволокно могут показаться высокими, их можно рассматривать как инвестицию. Материал может служить несколько сезонов, если за ним правильно ухаживать и не допускать механических повреждений. Тем не менее, если не проводить регулярные проверки и замену поврежденных участков, организационные расходы могут вырасти.
В целом, подход с использованием такого решения оправдан, если вы стремитесь к бережному отношению к ресурсам и оптимизации труда. Этот метод подойдет как для опытных садоводов, так и для новичков, но всегда требует осознания потенциальных рисков и точки зрения по уходу за растениями. Работа с агроволокном, как и с любым другим материалом, требует учета индивидуальных условий и особенностей конкретного участка.
Мульча из агроволокна: плюсы и минусы использования
Еще одна важная особенность – это поддержание влаги. Агроволокно предотвращает быстрое испарение воды, что особенно полезно в условиях жаркого климата. Исследования показывают, что использование этого материала может снизить потребность в поливе до 50% в некоторых случаях, благодаря чему растения получают необходимую влагу дольше.
Тем не менее, стоит обратить внимание на недостатки. Одним из основных минусов является риск затраты на закупку. Цена агроволокна может варьироваться, и для больших участков это может стать значительной статьей расходов. Кроме того, если не выбрать подходящий материал, возможна его быстрая деградация под воздействием солнечного света. Лучше выбирать изделия с UV-защитой, чтобы продлить срок службы.
Не стоит забывать и о механических повреждениях. Агроволокно может быть повреждено животными или механическими средствами, что может свести на нет все усилия по защитным мероприятиям. Рекомендуется периодически проверять состояние материала на наличие повреждений и своевременно их устранять.
Еще один аспект, который следует учитывать – это уход за растениями. При использовании агроволокна нужно помнить о необходимости периодической аэрации почвы. Устойчивый слой может мешать нормальному обмену воздуха, что вредит корневой системе. Обеспечьте доступ кислорода, приподнимая агроволокно, когда растения достигают значительных размеров.
Также возможны риски с нахождением вредителей. Некоторые насекомые могут находить укрытие под агроволокном, что усложняет борьбу с ними. Регулярные осмотры и использование безопасных инсектицидов могут помочь контролировать ситуацию.
Именно поэтому прежде чем принимать решение, тщательно взвесьте все «за» и «против». Если правильно подойти к выбору материалов, учесть климатические условия и методы ухода, использование агроволокна может принести значительные преимущества для вашего сада или огорода. Но без должного контроля и ухода, оно может стать источником неудобств.
Преимущества агроволоконной мульчи для почвы и растений
Использование материала для покрытия почвы обеспечивает значительное снижение вероятности прорастания сорняков. Этот аспект позволяет сократить время и усилия, затрачиваемые на механическую обработку. Исследования показывают, что компостирование под покровом снижает количество сорняков на 70-90% в зависимости от условий роста.
Материал помогает удерживать влагу в почве. Это особенно важно в периоды долгих засух, когда растения испытывают дефицит воды. По данным агрономов, использование такого покрытия может снизить испарение влаги на 50%, что способствует более эффективному использованию ресурсов.
Такой способ защиты почвы позволяет поддерживать оптимальную температуру, что критично для роста и развития корней растений. При белом или светлом материале температура ниже, что уменьшает риск перегрева. Периодические заморозки также становятся менее опасными, поскольку температура почвы остается стабильной.
При использовании специального материала для укрытия почва получает необходимое количество кислорода. Это важно для правильного функционирования микрофлоры и микрофауны. Здоровая почва способствует лучшему поглощению питательных веществ растениями, что в конечном итоге влияет на их рост и урожайность.
Биологическая активность повышается благодаря созданию благоприятных условий для развития полезных микроорганизмов. Эти организмы помогают в разложении органических остатков, урегулируя уровень питательных веществ. В результате возникает естественный баланс, который повышает качестве почвы.
Снижение эрозии – еще одно преимущество. На склонах или в местах, где наблюдаются сильные дожди, укрытие защищает поверхность от смыва. Это особенно актуально для участков с низким уровнем растительности. Статистика показывает, что правильное укрытие может снизить потери почвы на 50% и более.
Срок службы такого материала достаточно продолжительный. В отличие от органических веществ, которые разлагаются в течение сезона, этот материал сохраняет свои свойства на несколько лет, что снижает затраты на замену и повторное укрытие.
Помимо этих преимуществ, покров помогает снизить количество поливов. Удержание влаги и снижение испарения позволяют экономить воду. Сравнение показало, что участки с таким покрытием требуют до 30% меньше полива.
Наличие натурального материала напоминает о минимизации вмешательства в естественные процессы. Это создает более гармоничную среду для роста растений, устраняя негативные влияния внешней среды. При правильном укрытии растения менее подвержены болезням.
Эти аспекты делают выбранный подход идеальным для многих технологий садоводства и агрономии. Все эти преимущества подтверждены практическими исследованиями, что открывает новые горизонты для озеленения и повышения урожайности. Подводя итог, можно утверждать, что использование такого покрытия значительно улучшает условия для жизни растений, создавая здоровую и продуктивную среду.
Недостатки и ограничения применения агроволоконной мульчи в садоводстве
При использовании агроволоконной щетки есть некоторые нюансы, которые стоит учитывать. Во-первых, она может стать причиной нагревания почвы, особенно в жаркие летние дни. Это влияет на корневую систему растений, вызывая стресс и замедляя их рост. Нельзя игнорировать особенности конкретных культур, так как некоторые из них требуют более прохладных условий.
Также важно учитывать, что при использовании подобного материала может возникнуть необходимость в дополнительном поливе. Он ограничивает испарение влаги из почвы. Это может привести к тому, что в определённые моменты растения будут находиться в состоянии недостатка воды, особенно в условиях засухи. Рекомендуется регулярно проверять уровень влажности и при необходимости корректировать режим полива.
Метод тоже может притягивать мелких вредителей и грызунов. Защитная функция не всегда срабатывает, так как существует риск, что грызуны начнут прогрызать агроволокно в поисках пищи. Поэтому стоит помнить об опыте соседей или других садоводов, чтобы заранее подготовиться к такой проблеме.
Помимо этого, надо учитывать срок службы. Материал может потерять свои свойства через несколько сезонов, особенно если он подвержен ультрафиолетовому излучению. Например, при регулярном воздействии солнечных лучей агроволокно теряет свою прочность и становится менее эффективным. Планируя его использование, важно заранее предугадать, как часто потребуется замена.
Необходимо также иметь в виду, что механическая обработка грунта может усложняться. Если использовать мотоблок или другую технику, то агроволокно, оставшееся на поверхности, может запутываться в отношении с рабочими механизмами. Это усложняет работу и может привести к повреждению как самого материала, так и техники.
Следует обратить внимание на экологические аспекты. Хотя данный продукт может быть перерабатываемым, при разложении он может высвобождать вещества, которые влияют на почвенные организмы. Это особенно актуально, если агроволокно содержит добавки, которые применяются для продления его срока службы.
Также существует проблема с эстетической составляющей. Порой, агроволокно может выглядеть не всегда привлекательно. Если сад предназначен для показа или имеет высокие декоративные требования, использование такого материала может не подойти. Здесь важно выбирать между функциональностью и визуальным восприятием.
Неправильное укрытие может привести к образованию плесени или грибков, особенно в условиях высокой влажности. Рекомендуется внимательно следить за чистотой агроволокна и при необходимости заменять его. Эта мера позволит избежать проблем с болезнями растений.
Итак, планируя использование агроволоконной щетки, учитывайте все перечисленные моменты. Понимание недостатков и ограничений позволит принять более взвешенное решение. Подготовка и анализ обязательно помогут избежать негативных последствий.
https://agro-zaschita.ru/
fashionexpresshub – Smooth browsing and great seasonal choices, very happy with my order.
Ocean Crest Style Hub – Trendy apparel, clear photos, and excellent service overall.
Fresh Choice Online – Easy to navigate, good selection, and buying what I needed was quick.
Желаю развития ветке! https://astroenergosintez.ru/rodniki.html Всем мир,заказывал кто нибудь через доставку курьерской службой?дошло все ровно?
Импорт косметики что нужно знать для успешного бизнеса
Импорт косметики в Россию что нужно знать и как избежать ошибок
Если вы планируете заняться экспортом товаров в область красоты, начните с изучения требований и норм, касающихся сертификатов и лицензий. Наиболее распространенные категории включают сертификаты соответствия и санитарные заключения. Обратите внимание, что требования могут варьироваться в зависимости от региона, поэтому изучите законодательство вашей страны и стран назначения.
Исследуйте целевой рынок. Изучите, какие продукты пользуются наибольшим спросом, а также какие тренды доминируют в текущий момент. Понимание предпочтений потребителей, их осведомленности о брендах и продукции поможет вам определить оптимальный ассортимент. Приведите примеры успешных компаний, которые внедрили подобный подход, и проведите анализ их стратегий.
Не забывайте о логистических аспектах. Выбор надежного поставщика и оптимальных логистических маршрутов может существенно повлиять на ваши затраты и сроки поставки. Позаботьтесь о документации для таможни, чтобы избежать задержек и дополнительных расходов. Каждая ошибка может обернуться убытками, поэтому уделите этому процессу пристальное внимание.
Правовые аспекты импорта косметических средств в Россию
Перед началом торговли важно прояснить, что импортируете. Каждый товар должен соответствовать законодательству Российской Федерации. На рынке косметических продуктов следует учесть, что эти изделия регулируются отдельными стандартами качества и безопасности.
Каждое средство должно пройти процедуру обязательной регистрации. Это важно для получения разрешения на продажу. Регистрационный процесс включает подачу документов в Росздравнадзор. Данная инстанция проверяет безопасность и эффективность товаров. Если продукт не зарегистрирован, его реализация на территории страны будет незаконной.
Обратите внимание на маркировку. Согласно требованиям, упаковка должна содержать информацию на русском языке. Важно указывать состав, срок годности и условия хранения. Несоответствие данным требованиям может привести к штрафам и запрету на продажу.
Не стоит забывать о таможенных процедурах. При ввозе товаров в Российской Федерации требуется предварительно предоставить декларацию. В случае несоответствия представленных данных с фактическим состоянием это может вызвать задержки и дополнительные проверки, что негативно скажется на финансовых расходах.
Рассмотрите возможность получения сертификата соответствия. Это не обязательная, но полезная мера, подтверждающая качество продукции. Наличие такого сертификата может существенно повысить доверие со стороны потребителей и упростить процесс реализации на рынке.
Имейте в виду, что правила варьируются в зависимости от страны происхождения. Убедитесь, что ваша продукция соответствует стандартам как России, так и страны-экспортера. Это касается как состава, так и упаковки. Исследуйте соглашения между государствами, чтобы избежать недоразумений при доставке.
Наконец, зарегистрируйте товарный знак. Защита интеллектуальной собственности – немаловажный аспект. Без регистрации вы рискуете столкнуться с контрафактной продукцией, которая не только повредит вашей репутации, но и приведет к юридическим последствиям.
Выбор поставщиков и анализ рынка: как избежать рисков
При выборе партнёров следует рассматривать не только цену, но и репутацию компании. Запрашивайте образцы продукции и проводите лабораторные тесты для проверки качества. Читайте отзывы клиентов, посещайте специализированные выставки для получения информации о надёжности и уровне сервиса. Даже на международном уровне стоит учитывать локальное законодательство, так как оно влияет на условия работы.
Анализируйте рынок. Изучите текущее состояние трендов и спроса. Определите целевую аудиторию и её предпочтения. Составьте список популярных брендов, которые лучше всего соответствуют требованиям вашей ниши. Оценка присутствия конкурентов – важный этап. Используйте инструменты для анализа ценовой политики и активности в социальных сетях, чтобы понять, что работает в вашем сегменте.
Изучайте условия контракта с будущими поставщиками. Обратите внимание на сроки поставки, правила возврата и штрафные санкции за несоответствие. Так вы защитите себя от возможных финансовых потерь. Уточняйте детали, касающиеся упаковки и маркеров, чтобы избежать претензий со стороны контролирующих органов.
Не пренебрегайте проверкой документов. Лицензии и сертификаты соответствия – это не просто формальность. Используйте данные аудиторских проверок, если такие имеются. Чаще всего, надёжные компании готовы предоставить все необходимые документы в открытом доступе.
Не забывайте про риски валютных колебаний. Заключайте сделки в стабильной валюте или используйте хеджирование для защиты от неожиданностей. Расчёты в местной валюте помогут избежать дополнительной нагрузки в случае изменений курса.
Собирайте данные о логистике и возможных задержках. Общение со всеми участниками цепочки поможет предусмотреть потенциальные проблемы заранее. Поддерживайте связь с транспортными компаниями и проверяйте их репутацию. Убедитесь, что у них есть опыт работы с аналогичными грузами.
Финансовое планирование играет ключевую роль. Рассматривайте все возможные затраты: от закупки до доставки. Составьте бюджет на случай незапланированных расходов. График платежей также должен быть чётко продуман – разбивайте большие суммы на части, чтобы снизить финансовую нагрузку.
Привлекайте специалистов для юридической оценки контрактов. Правильная формулировка условий предотвратит много проблем. Убедитесь, что все важные пункты прописаны и согласованы с обеими сторонами. Защита своих интересов должна стоять на первом месте.
Следите за изменениями на рынке и в законодательстве. Посещайте отраслевые ресурсы и исследовательские центры для своевременной реакции на изменения глобальных и локальных трендов. Будьте готовы адаптироваться к новым условиям, так как гибкость – это залог успеха в данной области.
Оценивайте эффективность поставок. Установите KPI для мониторинга и периодически проводите оценку результатов. Это позволит в будущем скорректировать стратегию отношений с поставщиками и избежать повторения ошибок.
Заботьтесь о создании долгосрочных отношений с надёжными партнёрами. Это снизит риски и обеспечит более выгодные условия сотрудничества. Лояльность поставщиков позволяет получить дополнительные преимущества при возникновении кризисных ситуаций.
https://181cargo.ru/
Visit an elephant sanctuary: care, rehabilitation, and protection of animals. Learn their stories, participate in feedings, and observe elephants in the wild, not in a circus.
Профессиональные компания электромонтаж в квартирах, домах и офисах. Замена проводки, монтаж щитков, автоматов, УЗО, светильников и розеток. Работаем по нормам ПУЭ, даём гарантию и подробный акт выполненных работ.
экстренное вытрезвление
trendzonehub – Found stylish products quickly, the website was easy to navigate.
Карго для офлайн-магазинов как новое решение логистики
Как карго решения помогают офлайн-магазинам повысить эффективность и конкурентоспособность
Внедрение оптимизированных процессов распределения в розничную торговлю становится необходимостью. Для повышения оперативности и снижения затрат, стоит рассмотреть аутсорсинг логистических операций. Этот вариант позволяет минимизировать временные и финансовые расходы, поддерживая высокое качество обслуживания клиентов. Исследования показывают, что компании, использующие подобные подходы, значительно увеличивают свою конкурентоспособность.
Обратите внимание на возможность использования складских решений на местах. Это не только ускоряет доставку товаров, но и обеспечивает больший контроль над запасами. По данным аналитиков, оптимизация размещения товаров на складах может снизить время обработки заказов на 20-30%. Подобные действия помогут лучше реагировать на изменения потребительского спроса и устранить недостатки в управлении запасами.
Следует отдать предпочтение многоканальным стратегиям взаимодействия с клиентами. Это позволит обеспечить разные способы заказа и доставки товаров. Кроме того, активное внедрение технологий отслеживания поставок в реальном времени повысит уровень удовлетворенности покупателя. Оперативные уведомления об изменениях в статусе заказа помогают предотвратить недопонимание и негативные отзывы.
Важно также не забывать о правильной организации обратной логистики. Поддержка процесса возврата товаров снижает нагрузку на рабочие процессы и повышает удовлетворенность покупателей. Проведение анализа возвратов дает уникальные insights, которые могут помочь в улучшении качества продукции и обслуживания.
Оптимизация поставок: как карго-сервисы сокращают сроки доставки
Сокращение времени трансфера товаров начинается с выбора надежного поставщика. Выбирайте службы, которые предлагают отслеживание груза в реальном времени. Это поможет быстро реагировать на возможные задержки.
Технологии, такие как автоматизация процессов и обработка больших данных, являются ключевыми. Они позволяют оптимизировать маршруты и минимизировать затраты. Важно проводить регулярный анализ данных о доставках, чтобы выявлять узкие места и оптимизировать процессы.
Интеграция с системами управления запасами позволяет лучше planировать запасы. Это означает, что можно заранее знать, какие товары востребованы и когда их следует заказывать. Например, при использовании прогностической аналитики можно точно предсказать спрос на определенные товары в определенные сезоны.
Процесс сортировки товаров тоже требует внимания. Использование автоматизированных складов, где товары роботизировано сортируются преимущественно по популярности и срокам хранения, уменьшает время на обработку заказов и, соответственно, увеличивает скорость доставки.
Составляя график отгрузки, учитывайте загруженность транспортных узлов, пиковые периоды и потенциальные риски. Это поможет избежать простоя грузовиков и сбоя поставок.
Не забывайте о партнерстве с местными курьерскими службами. Они успешно работают на последнем этапе доставки, особенно в городских условиях. Быстрая доставка с учетом логистики последней мили критически важна для клиентов.
Настройте систему уведомлений для клиентов. Сообщения о статусе заказа, обновления о времени доставки и оповещения о задержках создают ощущение контроля у потребителей и повышают уровень удовлетворенности.
Рассмотрите возможность использования комбинированного транспорта. Например, сочетание самолета для быстрого перемещения на дальние расстояния и грузовиков для доставок в регионе может существенно сократить общие сроки. Долгосрочные контракты с перевозчиками также могут привести к снижению цен и улучшению сроков.
Запуск программы лояльности для постоянных клиентов может также позитивно сказаться на сроках. Это позволяет предсказывать спрос и заранее планировать поставки, учитывая потребности постоянных партнеров.
Рассмотрите возможность прямых поставок от производителя к клиенту. Это сокращает посредников и, следовательно, время. Важно наладить прозрачные коммуникации с производителями, чтобы оперативно получать информацию о наличии товаров.
Обучение персонала – еще один аспект, который не стоит игнорировать. Понимание процессов и технологий поможет повысить скорость обработки заказов. Инвестиции в обучение окупятся за счет сокращения ошибок и улучшения взаимодействия с клиентами.
Не забывайте про инновации. Например, использование дронов для доставки в удаленные или труднодоступные места может значительно ускорить процесс. Это все еще в разработке, но стоит рассмотреть как перспективное направление.
Подводя итоги, создание эффективной системы поставок требует внимания к множеству деталей. При возможности автоматизируйте процессы, используйте современные технологии и не забывайте о взаимодействии с партнерами. Чем больше аспектов вы сможете оптимизировать, тем быстрее будут приходить заказы.
Кастомизация логистических решений: выбор подходящего карго-партнера
Обратитесь сразу к составлению четкого технического задания. Определите основные потребности вашего бизнеса: объемы поставок, сроки, типы товаров. Это поможет сузить круг потенциальных партнеров. Например, если у вас крупные объемы, найдите компанию, специализирующуюся на массовой доставке. Малые партии лучше доверять мелким, более гибким поставщикам.
Изучите репутацию потенциальных оптимизаторов. Данные о надежности можно получить через отзывы клиентов или рейтинги на специализированных платформах. Имейте в виду, что компании с высоким рейтингом часто предлагают больше, чем просто транспортировку. Их усилия могут охватывать управление запасами и внедрение современных технологий отслеживания. Это добавит дополнительную ценность к вашему сотрудничеству.
Обращайте внимание на географическое покрытие. Партнер, который хорошо знает определенные регионы, сможет предложить более качественное обслуживание. Если ваш бизнес имеет международные амбиции, обратите внимание на партнеров с опытом работы в разных странах и пониманием местного рынка.
Обсудите гибкость условий доставки. Многие стартапы и малые бизнесы сталкиваются с сезоном увеличенного спроса. Возможность увеличить объемы логистики в этот период может стать определяющим фактором в выборе. Не забудьте уточнить возможности адаптации цен и сроков доставки в зависимости от сезонности.
Обратите внимание на наличие дополнительных услуг. Возможность хранения на складе или обработки товаров перед отправкой может существенно облегчить вашу работу. Если ваша продукция требует особых условий хранения – например, температура или влажность – убедитесь, что ваша логистическая компания имеет соответствующее оборудование.
Индивидуальный подход – еще один важный аспект. Не все компании предлагают одни и те же решения для всех клиентов. Найдите партнера, который готов выслушать ваши требования и предложить адаптированные стратегии. Это поможет избежать проблем на всех этапах взаимодействия.
Финансовые условия также значимы. Прозрачность в вопросах ценообразования поможет избежать непредвиденных расходов. Прорвитесь к детальному описанию тарифов: фиксированные ставки или тарифы в зависимости от веса и объема. Не стесняйтесь обсуждать цены. Иногда можно добиться хорошей скидки, особенно при долгосрочном сотрудничестве.
Используйте технологии как дополнительный фактор при выборе. Многие современные компании предлагают платформы для отслеживания грузов в реальном времени. Если для вас важно знать, где находится товар, выбирайте партнера, использующего передовые решения. Это не только повысит уровень удовлетворенности ваших клиентов, но и упростит внутренние процессы управления доставкой.
Не забывайте о юридических аспектах. Переговоры об условиях контракта и понимание обязательств обеих сторон также играют не последнюю роль. Четко прописанные условия помогут избежать возможных разногласий в будущем.
Проанализируйте тактики соперников. Сопоставление с конкурентами в разных отраслях позволит оценить качество предоставляемых услуг. Собирайте информацию о предпочтениях клиентов и решениях других игроков, чтобы находить наиболее эффективные стратегии.
Проверяйте партнеров на предмет лицензий и сертификатов. Легальная работа компании может обеспечить вам спокойствие и уверенность в соблюдении всех норм. Обсуждайте условия страхования грузов, это защитит ваш бизнес от возможных потерь. Наличие хорошей страховки у партнера – еще один показатель его надежности.
Периодические пересмотры условий сотрудничества позволят оптимизировать затраты и процессы. Взаимные встречи для анализа результатов и выявления проблем помогут обеим сторонам развиваться и улучшать качество услуг.
Наконец, выбирая логистического партнера, не забывайте про обратную связь с клиентами. Укажите способы сбора мнений, чтобы провести анализ успешности предложенных услуг и выявить возможные недочеты. Таким образом, вы можете получить ценную информацию, которая поможет вам принимать более обоснованные решения.
https://988cargo.ru/
<a href="https://sunrisetrailmarket.shop/" /SunriseTrailShopHub – Very user-friendly website, excellent products, and fast shipping.
Dream Achievers Hub – Resources to help you stay consistent and inspired while pursuing goals.
Её переместили в арбитраж. Тогда ничем помочь не могу. купить, кокаин, мефедрон, гашиш, бошки Краснокаменск Спасибо большое, что вы с нами и доверяете нам!
RootMart Select – Nice layout, easy ordering, and fast delivery without problems.
outletbuyinghub – Wide selection of products, shopping process felt natural.
Зачем нужен инвойс и упаковочный лист в бизнесе
Инвойс и упаковочный лист как важные документы для бизнеса и логистики
Точная документация в сделках имеет решающее значение для поддержания порядка и прозрачности в отношениях с клиентами и контрагентами. Счета, кроме того, что фиксируют сумму, которую необходимо оплатить, служат юридическим подтверждением сделки. Не заполнив их правильно, можно столкнуться с юридическими последствиями, связанными с нарушением условий соглашения. При этом важно указание всех деталей: от количества товаров до описания услуг.
Упаковочные документы, выполняющие функцию дополнения к счету, описывают массу, размеры и количество единиц продукции. Без такой информации нарушается logística, что может привести к недовольству клиентов или, что еще хуже, к финансовым потерям. Документы гарантируют, что все стороны в сделке имеют одинаковое понимание о количестве и качестве продуктов, что минимизирует возможность спорных ситуаций.
Для успешной работы важно понимать, как именно вести учет и оформлять эти документы. Необходимо тщательно следить за актуальностью информации и избегать типичных ошибок – несовпадение данных о товаре, недочеты в реквизитах или пропуск ключевых элементов. Небрежное отношение к документам повлияет на репутацию компании, а иногда и на финансовую стабильность. Чем точнее будет оформлена вся документация, тем меньше будет число недоразумений.
Важным моментом также является налогообложение. Подробная информация о сделках помогает избежать проблем с налоговыми органами, способствуя прозрачности ведения учета. От правильности оформленных документов зависит, как именно будет производиться расчёт налогов, что напрямую влияет на финансовые результаты.
Роль документа, фиксирующего продажи, в финансовом учете и контроле за платежами
При организации финансового учета важно применять документы, отображающие сделки. Эти бухгалтерские записи служат основой для контроля поступления средств и планирования бюджета. Составление таких записей должно происходить на всех этапах взаимодействия с клиентами.
Первым шагом к упорядочению процессов является правильное оформление счетов на оплату. Многочисленные исследования показывают, что компании, имеющие четко прописанные расчеты, реже сталкиваются с задержками в платежах. Например, недавние данные указывают, что компании с ясной системой учета платежей получают средства на 30% быстрее.
Обязательно указывать все необходимые детали: наименование товара или услуги, количество, стоимость и сроки оплаты. Без этих данных клиенты могут затрудняться в предварительном анализе своих финансовых обязательств. Ясность и прозрачность в документации предотвращают недоразумения и уберегают от возможных споров.
Следующим аспектом является контроль над дебиторской задолженностью. Анализ платежей позволяет напоминать клиентам о приближающихся сроках, что увеличивает вероятность своевременного получения средств. Активный мониторинг помогает выделять риски и своевременно реагировать на несоответствия.
Также имеет смысл учитывать причины задержек в оплатах. По статистике, около 60% случаев задержек происходят из-за недостатка информации о счетах. Упрощение доступа к финансовым документам для клиентов может существенно ускорить процесс оплаты, что, в свою очередь, повысит эффективность работы. Важно организовать систему, позволяющую клиентам видеть свои задолженности онлайн.
Не менее значимым является хранение записей о сделках. Это необходимо для аудита и анализа динамики продаж. Хранение документов в цифровом формате облегчает поиск и обработку информации, что экономит время сотрудников. Однако важно следить за качеством сохранности данных: проводить регулярные бэкапы и актуализировать информацию.
Контроль за платежами требует системного подхода. Наличие фильтров для анализа задолженности позволяет выделять приоритетные случаи и выстраивать стратегию взаимодействия. Например, можно использовать системы автоматизации уведомлений, что уменьшает временные затраты на общение с клиентами в отношении неоплаченных счетов.
Для повышения собираемости долгов стоит применять разные стратегии взыскания. Например, предложить скидку на следующий заказ за раннюю оплату. В других случаях, если задолженность значительно возрастает, может потребоваться эскалация вопроса до более серьезных действий.
Регулярный мониторинг платежей и соответствующих документов облегчает задачу анализа финансовой устойчивости компании. Сравнение фактических поступлений с планом позволяет выявлять тенденции и корректировать бизнес-планирование. Определение стандартов на основании реальных данных способствует улучшению финансовых показателей.
Не меньшее значение имеют вопросы налогообложения. Точные данные по расчетам упрощают заполнение деклараций и помогают избежать штрафов. Эффективная система учета делает коммуникацию с налоговыми органами более беспроблемной и безопасной.
Интеграция учета расчетов с другими системами, такими как ресурсы для управления клиентами или планирования ресурсов, значительно оптимизирует процесс. Совместимость платформ позволяет избежать дублирования данных и минимизировать вероятность ошибок. Рекомендуется планировать внедрение новых технологий заранее, основываясь на текущих бизнес-процессах и их потребностях.
Наконец, важно следить за изменениями в законодательстве, касающимися ведения документации и учета. Перемены на рынке могут влиять на правила оформления расчетов, что требует адаптации. Мыследственное следование нормативам обеспечивает защиту интересов компании и ее клиентов.
Систематизация учета, контроля и управления расчетами – это залог стабильного финансового положения и успешного функционирования предприятия на рынке.
Упаковочный лист: как избежать ошибок при доставке товаров
Первое, что стоит сделать, это тщательно проверять данные перед отправкой. Убедитесь, что количество единиц совпадает с заказом. Ошибки в количестве могут привести к недовольству клиентов и возвратам.
Второй пункт – это наличие актуальной информации о товарах. Иногда спецификация изменяется, и важно отразить последние данные о характеристиках. Указание неверных параметров может стать причиной недоразумений при получении груза.
Еще одна рекомендация: не забывайте про заказчики. Убедитесь, что адрес, указанный на накладной, точен. Часто проблемы с доставкой связаны именно с неправильными адресными данными. Это включает в себя не только улицу и дом, но и индекс.
Обратите внимание на форматы документов. Формат упаковки и документации также критичен. Если используется уникальный код для отслеживания, убедитесь, что он правильно нанесен и читаем. Многие компании используют QR-коды для упрощения логистических операций, что может сильно сократить время обработки на складах.
Хорошо бы предусмотреть все детали упаковки. Разумно указывать условия хранения и транспортировки товаров. Например, хрупкие предметы требуют специальной заботы, и важно это обозначить, чтобы избежать повреждений.
Планируйте контрольную проверку перед отправкой. Применяйте чек-листы, чтобы убедиться, что все элементы заказа включены в отправку. Это может помочь быстро выявить ошибки еще до передачи груза службе доставки.
Совершенно неформальная рекомендация: общайтесь с транспортно-логистическими компаниями. Часто заказывая услуги у одного из них, можно получить массу полезных советов по упаковке и маркировке. Профессиональные водители прекрасно знают, как избежать повреждений товаров на пути к клиенту.
Не забывайте об уровне тщательности упаковки. Товары должны быть должным образом защищены от внешних воздействий. Используйте качественные материалы для упаковки, такие как пузырьковая пленка или пенопласт. Ничто так не портит настроение клиенту, как поврежденный товар.
Обсудите с командой вопросы, которые могут возникнуть при обработке возвратов. Неправильные данные на накладной могут усложнить процесс возврата. Имея четкие инструкции, избежать путаницы будет легче.
Наконец, систематизируйте процесс. Регулярный анализ ошибок и недочетов позволит избежать повторения ситуаций. Это может быть обсуждение ошибок с командой или анализ жалоб клиентов. Главная цель – улучшить качество доставки, и постоянное обучение тут крайне важно.
https://cargo606.ru/
трэк получил . Магаз всегда был хорош купить, кокаин, мефедрон, гашиш, бошки Лагань все как обычно работает
leadspike.click – Overall, professional vibe here; trustworthy, polished, and pleasantly minimal throughout.
Love elephants? elephant sanctuary: no rides or shows, just free-roaming elephants, nature trails, guided tours, and the chance to learn what responsible wildlife management looks like.
An ethical elephant sanctuary: rehabilitation, care, veterinary monitoring, and freedom of movement instead of attractions. By visiting, you support the project and help elephants live in dignified conditions.
trafficcrafter.click – Appreciate the typography choices; comfortable spacing improved my reading experience.
conversionedge.click – Loved the layout today; clean, simple, and genuinely user-friendly overall.
WildSand Select – Great assortment, user-friendly site, and very fast and neat delivery.
clickrevamp.click – Navigation felt smooth, found everything quickly without any confusing steps.
digitalkickstart.click – Content reads clearly, helpful examples made concepts easy to grasp.
fashionflarehub – Trendy items are amazing, website experience is smooth and fast.
Привет Всем!!!!!!!!!!! суппер класный магаз! всем рекомендую! приятно работать! оператр адыкват! Успехов и процветаний Друзья! от всей нашей компании! купить, кокаин, мефедрон, гашиш, бошки Микунь всё посылка пришла всё ровно теперь будем пробовать )
sites like 321chat chat321
казино з бонусами бонуси казіно
chiccollection – Loved the selections, the site loaded fast and navigation was easy.
Реальные цены на доставку и их составные части
Разбор реальных цен на доставку и составляющие расходов для клиентов
Разберитесь с системами тарификации, чтобы эффективно планировать расходы. Например, основывайтесь на тарифах, указанных на сайте вашего перевозчика, и учитывайте различные параметры, такие как расстояние, вес и объем груза. Эти характеристики прямо влияют на конечные расходы. Сравните предложения нескольких компаний для выбора наиболее выгодного варианта.
Важно учитывать, что стоимость может включать дополнительные сборы. Это могут быть плата за упаковку, страховка, подъем на этаж для квартирных перевозок и т.д. Например, некоторые компании устанавливают фиксированные тарифы за километраж и добавляют дополнительные комиссии в зависимости от типа груза. Уточняйте все детали перед оформлением заказа.
Обратите внимание на сезонные колебания цен. Пик спроса, как правило, наблюдается в период праздников, и в это время расценки могут возрастать. Запланируйте отправку заранее, чтобы избежать дешевых ловушек и непредвиденных затрат. Установка бюджета поможет контролировать уходящие средства.
При выборе транспортного средства учитывайте также его вместимость и тип. Например, для мелких грузов подойдут фургоны, а для крупных – специальные грузовики. Убедитесь, что вы правильно оценили объем, чтобы не переплачивать. Сравните стоимость и выбирайте оптимальное решение, которое соответствует вашим потребностям.
Не забудьте внимательно ознакомиться с договорами и условиями выполнения услуг, особенно если речь идет о международных отгрузках. Важно понимать условия доставки, сроки и возможные дополнительные расходы. Настоятельно рекомендую проверить репутацию перевозчиков и читать отзывы перед принятием решения.
Как рассчитываются тарифы на доставку в зависимости от расстояния и веса
Тарифы на транспортировку формируются на основе нескольких ключевых факторов: расстояния, веса и типа груза. Прежде всего, вес товара влияет на первоначальные расценки. Чем тяжелее груз, тем выше стоимость, поскольку для его перемещения требуется больше ресурсов.
При первом расчете необходимо определить вес в килограммах и уточнить, нужна ли упаковка или дополнительное оборудование. Многие компании предлагают тарифы, основанные на брутто- или нетто-весе. Брутто-вес включает упаковку, в то время как нетто – только сам товар. Рекомендуется всегда уточнять, какой именно вес используется для расчета, чтобы избежать недоразумений.
Еще одним важным аспектом является расстояние, на которое будет перемещаться груз. Обычно системы тарификации имеют фиксированные ставки за определенные километры. Например, в пределах 50 км цена может быть одной, а при увеличении расстояния до 100 км – другой. Некоторые службы предлагают линейную шкалу: чем дальше, тем меньше единица расстояния будет стоить. Разные компании применяют различные модели, поэтому стоит запрашивать расценки у нескольких перевозчиков.
Не менее важным является тип доставки: экспресс, стандарт или эконом. Экспресс-отправления обойдутся дороже, так как они требуют больше скорости и внимания, включая приоритетную обработку груза. Если время не критично, стоит рассмотреть стандартные варианты.
Существуют дополнительные сборы за особый тип грузов: хрупкие, быстро портящиеся или требующие специального обращения. Эти факторы также влияют на итоговую сумму. Убедитесь, что вы ознакомились со всеми возможными дополнениями и условиями, связанными с конкретным грузом.
Налоги и сборы – еще один элемент, который следует учитывать при оценке расходной части. В большинстве случаев они включаются в тариф, но иногда их нужно рассчитывать отдельно. Уточните все детали у вашего перевозчика, чтобы избежать неожиданных платежей в будущем.
Наконец, как совет: всегда лучше запрашивать детализированный расчет и подписывать договор, в котором четко прописаны все условия, включая возможность изменения тарифов в зависимости от обстоятельств. Это поможет избежать недоразумений и защитит ваши интересы в ходе перевозки. Сравнивайте предложения и выбирайте наиболее подходящие вам условия, учитывая указанные факторы и возможные сборы.
Что влияет на дополнительные расходы при доставке: упаковка, страховка и сервисные сборы
Упаковка товара может значительно увеличить общую стоимость, так как качественные материалы обеспечивают безопасность груза. Например, при отправке хрупких предметов необходимо использовать жесткие коробки и защитные вставки. Такие упаковочные решения могут стоить в 2-3 раза дороже стандартных. Важно помнить, что недостаточная защита может привести не только к повреждениям, но и к возвратам, что увеличивает затраты.
Страхование груза представляет собой еще один элемент, способный увеличить итоговую сумму. Стоимость страховки зависит от стоимости товаров и выбранной страховой компании. Обычно она составляет от 0.5% до 3% от общей стоимости. Наличие страховки – это защита от рисков, таких как утрата или повреждение на этапе транспортировки. Принцип «лучше застраховать, чем сожалеть» здесь актуален, особенно при отправке дорогих или уникальных изделий.
Сервисные сборы – это отдельная категория расходов. Часто компании прибавляют фиксированную плату за обработку заказа, особенно если это включает в себя специализированные услуги, такие как отслеживание, упаковка под заказ или срочная доставка. Эти сборы могут варьироваться от нескольких сотен до тысяч рублей в зависимости от уровня сервиса. Всегда стоит уточнять, какие именно услуги включены в конечную стоимость и есть ли возможность их отмены.
Максимальная экономия достигается за счет тщательного планирования расходов. Например, можно выбирать стандартные методы упаковки в случае обычных предметов и пользоваться услугами специализированных компаний лишь при необходимости. Грамотный подход к упаковке и выбор оптимальных схем страхования могут заметно сократить лишние траты, а анализ сервисных сборов поможет избежать неожиданностей.
Также стоит учитывать, что многие курьерские службы предлагают специальные условия для постоянных клиентов. Это может существенно увеличить вашу экономию. Регулярные отправления могут стать причиной получения скидок или даже бесплатных услуг, таких как упаковка или небольшой срок хранения товара.
Таким образом, упаковка, страховка и сервисные сборы – ключевые факторы, которые влияют на окончательные расходы. Обязательно анализируйте каждую составляющую, чтобы понимать, где можно оптимизировать затраты, а также какие дополнительные услуги могут быть действительно полезными. Подсчеты и стратегия способны существенно снизить ваши расходы.
https://777cargo.ru/
ровный магаз успеха и процветания купить, кокаин, мефедрон, гашиш, бошки Октябрьский Я взял всего 15т.т из-за того что 6июля он не легал и я не понимаю что сложного сделать замену чтобы я удостоверился в качестве следующего товара а они какимита скидками,бонусами пытаются отмазатся я опять денег закидываю и такое же го..но забираю!
Проблемы со здоровьем? невролог цена краснодар: комплексные обследования, консультации врачей, лабораторная диагностика и процедуры. Поможем пройти лечение и профилактику заболеваний в комфортных условиях без очередей.
ORBS Production https://filmproductioncortina.com is a full-service film, photo and video production company in Cortina d’Ampezzo and the Dolomites. We create commercials, branded content, sports and winter campaigns with local crew, alpine logistics, aerial/FPV filming and end-to-end production support across the Alps. Learn more at filmproductioncortina.com
Глубокий эксплейн модифицированных Android-игр: взломанные APK, моды, hacks, бесплатные покупки
Сегмент mobile games трансформируется очень резко, и одновременно с этим перестраивается и подход юзеров к играм. Прежде типичные геймеры соглашались барьеры и внутриигровые траты, то сегодня десятки тысяч людей выбирают взлом apk.
Сайты вроде https://gotconquestwiki.com/index.php/User:Mariam53R70174 предоставляют огромный список mod игр, поддерживая полную экосистему вокруг модификаций игр. Такой тренд создала круг игроков геймеров, которые ищут расширенные настройки без доната.
Особенности модифицированные APK-файлы и почему они популярны
взлом apk — это перепакованные версии оригинальных игр, в которые добавлены моды, или сняты лимиты. Суть подобных версий — предоставить пользователю полную свободу в игровом процессе.
Например, моды могут включать бесконечные деньги, отключать рекламу, делать покупки бесплатными. Такие настройки часто ищут игроки, которым надоели ограничения.
Важность сайтов-каталогов в мире Android-модов
Каталоги стали узлом распространения взломанных игр. Они агрегируют моды, структурируют его, обновляют, и предлагают скачивание игрокам. По этой причине искать mod игры стало намного легче.
Топовые виды модов востребованы в современном году
Игровые тренды стремительно двигаются, и сегмент модифицированных APK подстраивается под игроков. В нынешний период лидируют моды с free gems android. Такие модификации убирают лимиты, включая весь контент сразу.
Большой популярностью пользуются моды, которые убирают рекламу. Большинство игр на Android буквально забиты рекламой, поэтому моды “без рекламы” стали трендом для тысяч игроков.
Также популярны взломы, которые делают донат нулевым. В подобных модах shop открыт без ограничений. Игрок может получать skins, оружие, buffs, pass, и всё это совершенно бесплатно.
Преимущества модифицированных Android-игр
Главный плюс модов — это полная свобода действий. Игрок сам определяет, как играть. В отличие от Play Store версий, где каждый шаг ограничен, mod игры андроид открывают весь контент с первых минут.
Другой ключевой плюс — отсутствие навязчивой рекламы. Почти любой игрок Android сталкивается с ads, которые раздражают. Моды навсегда убирают рекламу, делая процесс комфортным.
Не менее важный плюс — доступ к расширенным опциям. Некоторые моды включают developer mode, HD-пакеты, новые уровни, и даже альтернативные модели. Такие версии игр могут превосходить официальные.
На что обратить внимание при скачивании android mods
Даже с учётом популярности модов, нужно соблюдать ключевые правила безопасности. Брать apk mod следует только с надёжных площадок. Случайные сайты могут включать вирусы, что может повредить устройство.
Важно учитывать, что некоторые игры не принимают модификации. Поэтому важно скачивать только свежие версии хаки андроид, которые соответствуют последним версиям приложения.
Иногда моды могут не работать онлайн, если игра сравнивает параметры. Это обычная ситуация, особенно в популярном PVP-контенте.
Итог: почему моды стали мейнстримом в 2025
Android-игры растут, и запрос к расширенным возможностям становится выше. Поэтому взломанные игры на андроид продолжают расти. Они дают игрокам открытые покупки, убирают рекламу, и дают контроль над геймплеем. Сайты делают доступ таких возможностей удобным.
На данный момент модифицированные игры — это не просто мода, а новый стандарт. При выборе надёжных ресурсов скачать взлом apk и получать максимум становится легко для каждого.
Заключение: моды как новая реальность Android-гейминга
Мир мобильных игр продолжает развиваться, и потребность игроков становится всё выше. mod игры дают новый уровень свободы, включая неограниченные ресурсы, снятие ограничений и полный контроль над геймплеем.
Для многих это не просто альтернатива, а инструмент экспериментов. Пользователи способны создавать уникальные билды, в полном объёме, что делает процесс более захватывающим.
Также, модифицированные версии позволяют изучать механику. Функции вроде хаки андроид дают контроль над игровыми ресурсами, а no ads делает процесс приятным.
Ключевое заповедь при использовании модификаций — ответственный подход. Выбирайте проверенные источники, следите за совместимостью, и опыт останется положительным. Тогда модифицированные игры откроют новые горизонты.
Вывод прост: взломанные игры это новая культура, который даёт свободу и делает игровой процесс более интересным. ответственное скачивание делает опыт безопасным и делает мобильные игры ещё более увлекательными.
WildSand Select – Great assortment, user-friendly site, and very fast and neat delivery.
Your Motivation Spot – Daily tips to nurture ambition and keep moving toward your objectives.
optimizetraffic.click – Appreciate the typography choices; comfortable spacing improved my reading experience.
Lunar Harvest Treasures – Quick navigation and items are visually appealing.
Latest Soft Cloud Boutique – Everything is well-organized and easy to find today.
задержки очень большие! это плохо, надо вам как то решать этот вопрос купить, кокаин, мефедрон, гашиш, бошки Ангрен но только если мусора захотят найдут. просто мусора еслиб хотели найти , то давно бы уже посыль пришла с сопровождением.
Bright Flora Stop – Products are easy to find and the interface is intuitive.
fashionfindhub – Excellent range of items, quick browsing and easy ordering.
rankpath.click – Overall, professional vibe here; trustworthy, polished, and pleasantly minimal throughout.
timelessharbormart – Easy-to-browse layout with visually appealing merchandise.
жду товара https://shamotiki.ru/ozeri.html номер отправления, по нему отслеживается посылка курьерской службы.
trendhuburban – Very happy with the products, pricing is excellent and competitive.
trendfinder – Found urban fashion easily, shopping today was smooth and fast.
оптимал дозировка на 2дпмп при в\в от данного магазина какая? https://chertiche.ru/davlekanovo.html У нас у отправки случился форс-мажор. Только на этой неделе начинают отправлять. Извиняюсь от лица магазина за задержку.
WindFresh Emporium – Great new arrivals, crisp visuals, and an overall effortless experience.
очень нравится купить, кокаин, мефедрон, гашиш, бошки Тарко-Сале извините за беспокойство помогите понять как найти нужного сапорта и написать ему
ЦВЗ центр https://cvzcentr.ru в Краснодаре — команда специалистов, которая работает с вегетативными расстройствами комплексно. Детальная диагностика, сопровождение пациента и пошаговый план улучшения самочувствия.
Modern Harbor Online – Items load quickly, and finding products is effortless.
Daily Creativity Hub – Motivation and guidance for trying new things and experimenting creatively.
Nairabet offers https://nairabet-play.com sports betting and virtual games with a simple interface and a wide range of markets. The platform provides live and pre-match options, quick access to odds, and regular updates. Visit the site to explore current features and decide if it suits your preferences.
bestuniqueoutlet – Wide variety of items, navigation felt seamless and natural.
ТС саппорт не требуется тебе ? Напиши в лс если интересно https://gds-center.ru/urgench.html Тут, оказывается, одна шайка- лейка. Мало того, что мое сообщение потерли, еще и нарушение влепили. Сочли провокацией, хотя писал чистую правду. Магазин меня кинул, прислав фигню, которую выбросил.
Full Circle Picks Shop – Quick and comfortable browsing experience with tidy pages.
fashionvaultonline – Trendy products are amazing, browsing is smooth and hassle-free.
и сколько те6е поо6ещали заплотить? https://allfur.ru/otradnoe.html Всем удачи!
Todo sobre el cafe https://laromeespresso.es y el arte de prepararlo: te explicaremos como elegir los granos, ajustar la molienda, elegir un metodo de preparacion y evitar errores comunes. Prepara un cafe perfecto a diario sin salir de casa.
shopnfind – Items loaded quickly, exploring deals was smooth and simple.
Infraestructura y tecnologia https://novo-sancti-petri.es vial en Europa: innovacion, desarrollo sostenible y soluciones inteligentes para un transporte seguro y eficiente. Tendencias, proyectos, ecotransporte y digitalizacion de la red vial.
trafficmagnet.click – Color palette felt calming, nothing distracting, just focused, thoughtful design.
profitfunnels.click – Loved the layout today; clean, simple, and genuinely user-friendly overall.
adsgrowthengine.click – Content reads clearly, helpful examples made concepts easy to grasp.
Не рекомендую правда увлекаться порохами – их хочется ещё и ещё и в итоге не так уж и просто слезть с марафона…) Но это уже ваше дело ; ) купить, кокаин, мефедрон, гашиш, бошки Усть-Каменогорск Забизаю дамой хвотаю тожнецы взрываю посылку там рубашка. Примерно на ребенка 7 летнего (я надеился книга будит) но ладно и рубашка сойдет на тряпки вмашину ! Разворачиваю рубаху а там пакетик реги я быстрей за весами и за фотиком и писать ВАМ МОИ ДРУЗЬЯ!!!
marketingpulse.click – Navigation felt smooth, found everything quickly without any confusing steps.
clickperform.click – Loved the layout today; clean, simple, and genuinely user-friendly overall.
BrightWind Online Shop – Beautiful pieces, an easy buying process, and fast shipping.
leadharvest.click – Bookmarked this immediately, planning to revisit for updates and inspiration.
Rodaballo Al Horno https://rodaballoalhorno.es es un viaje a los origenes de la musica. Exploramos las raices, los ritmos y las melodias de diferentes culturas para mostrar como el sonido conecta a personas de todo el mundo y las ayuda a sentirse parte de una conversacion musical mas amplia.
Timber Grove Market – Shopping is intuitive, and items are displayed clearly.
Todo sobre videojuegos https://tejadospontevedra.es noticias y tendencias: ultimos lanzamientos, anuncios, analisis, parches, esports y analisis de la industria. Analizamos tendencias, compartimos opiniones y recopilamos informacion clave del mundo de los videojuegos en un solo lugar.
fashionexpresshub – The items are stylish, and shopping was very straightforward.
dealcornerdaily – Wide selection of products, pages loaded quickly and shopping was simple.
Да и спспр – не лучший выбор. Или скажете, что вся проблема в нем? https://montessorishop.ru Ищи в соседней ветке мой отзыв по рцс. ИМХО рцс не для торча.
Harbor Studio Picks – Everything loads fast and the site feels peaceful.
chicdaily – Nice variety of fashion items, navigating and purchasing was very easy.
ну то что ценники здесь шикарные заметил!и то что на “главной”-это и заинтересовало меня,но насторажило одновременно!ges_hmm.gifПосмотрим,что выйдет из-этого.Пока всё гладко! https://museum-bug.ru Магаз убойный, как начали брать пол года назад на рампе, была одна проблема пно ее быстро решили))) щас как снова завязался месяца 3 уже не разу не было))) Особенно предпочтения отдаю мефу вашему, вообще тема потрясная)))
Silver Moon Market Hub – Wide variety, smooth checkout, and everything came safely and fast.
seoigniter.click – Pages loaded fast, images appeared sharp, and formatting stayed consistent.
сегодня получил посулку с двумя пакетиками жёлтоватого и белого цвета, магазин работает:good: качество проверю и в соседней темке отпишу купить Кокаин, Мефедрон, Экстази Прислали нам свой метоксетамин, подтверждаем: продукт чистый, >99%.
1win not int 3 1win вход в личный
peacehub – Browsing is stress-free, all sections load quickly.
Modern Ridge Finds Online – Browsing is intuitive, and products are easy to spot.
Profesionalni stehovani: stehovani bytu, kancelari a chalup, stehovani a baleni, demontaz a montaz nabytku. Mame vlastni vozovy park, specializovany tym a smlouvu s pevnou cenou.
Ae!Магазин ровнее уровня)Брал несколько раз.все ровно.ТСу отдельное спасибо) Удачи вам парни) https://eraofm.ru А со скольки у них скайп начинает работать?
trendcornerstore – Browsed and found trendy items easily, shipping was quick.
brightdealcentral – Quick and smooth shopping, enjoyed browsing the selection.
нижневартовск индивидуалки
По петрозаводску работаете?или будете? https://powsurfing.ru Основу выварить не удалось, после вручения посыля,забыл убрать с глаз, торопился, дома было объявлено военное положение .
Daily Intent Hub – Guidance for setting goals and advancing with clarity and purpose.
Love elephants? elephant sanctuary: rescued animals, spacious grounds, and care without exploitation. Visitors can observe elephants bathing, feeding, and behaving as they do in the wild.
Want to visit the elephant sanctuary A safe haven for animals who have survived circuses, harsh labor, and exploitation? Visitors support the rehabilitation program and become part of an important conservation project.
Timberwood Collective – Navigation is intuitive and shopping is enjoyable.
Лучший магазин !!! https://burenie-navody.ru Только что принесли, позже трип отпишу)
Meadow Market Storefront – Loved how easy the browsing was and the products arrived exactly as promised.
как придет так отпишусь за качество и за сроки )) https://bubbleszoomag.ru пт всем.скоростя здесь имеются?
Aurora Bazaar – Products are easy to find, and the setup is clean.
шлюхи нижневартовск телеграмм
modernshopcorner – Nice products at great prices, browsing around was effortless.
chiczone – Everything loads quickly, and shopping around feels natural.
trendfinderhub – Very user-friendly, finding and ordering products was easy.
магазин роботает отлично сам проверил и не поверю не каму кто скажет что это не так https://tanaisspb.ru салют бразы ) добавляйте репу не стесняйтесь всем удачи))
stylehub – Found many trendy outfits, shipping felt smooth and prompt.
СПАСИБИЩЕ ОГРОМНОЕ ЗА СЕРВИС купить Мефедрон, Бошки, Марихуану Ребятки все пушка
adsdominator.click – Mobile version looks perfect; no glitches, fast scrolling, crisp text.
OriginPeak Shop – Beautiful items, user-friendly website, and my package arrived safely.
markethyper.click – Appreciate the typography choices; comfortable spacing improved my reading experience.
adflowmaster.click – Color palette felt calming, nothing distracting, just focused, thoughtful design.
бонус пускай шлют https://astroenergosintez.ru Быстрая доставка , и высочайшее качество обслуживания! Думаю и сейчас ничего не изменилось.
clickstrategy.click – Color palette felt calming, nothing distracting, just focused, thoughtful design.
brandoptimizer.click – Navigation felt smooth, found everything quickly without any confusing steps.
growthnavigator.click – Found practical insights today; sharing this article with colleagues later.
Whispering Trend Picks – Products load quickly and the layout feels user-friendly.
Open Plains Trends – The site is well organized, and browsing feels effortless.
voguevault – Excellent styles, shopping online was super convenient.
в смысле пропал из онлайна??? и что делать теперь? треки то до сих пор небьються https://burenie-navody.ru он мне успел ответить – поверь, ничего такого о чём тебе стоило бы беспокоиться – не случилось
offerscorner – Loved the variety of deals, website navigation was quick and easy.
toptrendcollection – Fast page loads and easy checkout, browsing was pleasant.
choicecorner – The site feels responsive, browsing items was smooth.
Вообщем маска (конспирация) на высоком уровне, что на прямую влияет на мою безопасность и на тех кто пользуется услугами данного ТС, это радует. купить Кокаин, Мефедрон, Экстази Добрый вечер! Когда ожидается рега по Москве, опт!??
SoftBlossom Styles – Items were lovely, pages loaded quickly, and checkout was smooth and fast.
Все легально и проверено, есть NMR. Плохого ни чего не случиться. Скорей всего приняли потому что были паленые…. https://fitceps.ru Во телегу двинул, а? Ещё спать не ложился, такой эффект сильный, толеоа нет вообще, в завязке полгода 🙂
Stylish Choice Daily – Quick access to trendy items that make shopping simple and fun.
shoptodaycorner – Loved today’s offers, items arrived quickly and perfectly packaged.
Coastline Spot – Products are easy to spot, and the site feels calm and user-friendly.
Магазин Красавчик , желаю отличных продаж )))) купить Кокаин, Мефедрон, Экстази заказал не мало,всё пришло за кач не знаю как опробуют кролы отпишу
Sunwave Essentials Corner Shop – Navigation is effortless and the layout is tidy.
homevibes – Smooth browsing experience, lots of nice home decor.
Только эфоретик нужен. https://shamotiki.ru тусиай и тусипи тут всегда хорошие, к ним претензий никогда не возникает.
fashionfindshub – Fast and simple shopping experience, pages loaded quickly.
fashioncentral – Well-arranged items and easy to move through different categories.
Отличный магазин,заказал и уже через 2 дня в своем городе получил посылку курьером(без звонка),офигев от скорости работы.Вес пришел с неплохим бонусом и в хорошей конспирации.Спасибо очень приятно было с вами работать скоро закажу ещё. купить Кокаин, Мефедрон, Экстази чувствую у меня будет то же самое, трек получил но он нихуя не бьется, а что ответил то? я оплатил 3 февраля и трек походу тоже левый ТС обьясни и мне ситуацию
Noble Ridge Fashion Hub – Great designs, smooth browsing, and the package came on time.
https://englishzoom.ru/
тс, привет, ответь в лс. я по делу. https://burenie-navody.ru пасибо за ваш труд,всё быстро,ровно и чётко! скорость обработки заказа не оставляет шансов конкурентам – вы несомненно лучшие! ма-ла-цы
Kind Groove Finds – Navigation is smooth, and items are well organized.
https://batery-game.com/
Confidence Boost Daily – Quick tips and advice to enhance your daily self-confidence.
Ты нам лучьше отзыв напиши о работе магазина 😀 https://pro-vzglyad-ekb.ru когда дело было? а то я сам жду заказ
adprecision.click – Overall, professional vibe here; trustworthy, polished, and pleasantly minimal throughout.
trafficbuilderpro.click – Navigation felt smooth, found everything quickly without any confusing steps.
clicktrailboost.click – Color palette felt calming, nothing distracting, just focused, thoughtful design.
ranktactics.click – Bookmarked this immediately, planning to revisit for updates and inspiration.
BlueGrain Essentials Shop – Found high-quality items quickly and browsing felt intuitive.
clickchampion.click – Content reads clearly, helpful examples made concepts easy to grasp.
marketexpander.click – Found practical insights today; sharing this article with colleagues later.
Магазин работатет? отпишите кто совершил сделку в последнее время купить Мефедрон, Бошки, Марихуану А теперь к делу.. магаз ровный, товар ..вставляет епт..особенно в прошлый раз, пол часа ждал, что из ванной вылезет оно и покарает меня…хорошо быстро отпускает, а то вода остыла уже и сига стлела и хабарик упал так , что сам не заметил…
dailyfreshgifts – Fast loading pages, very convenient to shop.
conversionmatrix.click – Appreciate the typography choices; comfortable spacing improved my reading experience.
trendhubzone – The interface is intuitive, making shopping straightforward.
Kindle Wood Market – Excellent prices, smooth website, and my order arrived quickly and in perfect condition.
да 203 й тут хороший,только я делал 1 к 15 мне понравилось) https://maderu.ru бро незнаю скок раз брал ни разу TS не подводил входил в положения скидки бонусы делал!!!
Dream Harbor Spot – The interface is clear, and browsing feels effortless.
Ребят,вообще 307 наваливает хорошо,НО,попрошу в разделе магазина флуд и оффтоп прекращать…Для этого есть раздел Информация из жизни LegalRC,в котором все описано и сказанно….Или создайте топик с обсуждениями там… https://harizma-studio.ru Да до празников не всем выслали, сегодня отдали в курьерку очередную пачку посылок, всем все придет скоро.
ORBS Production https://filmproductioncortina.com is a full-service film, photo and video production company in Cortina d’Ampezzo and the Dolomites. We create commercials, branded content, sports and winter campaigns with local crew, alpine logistics, aerial/FPV filming and end-to-end production support across the Alps. Learn more at filmproductioncortina.com
sites like 321chat 321chat replacement
бонуси казіно казіно з бонусами
очень сложно дописаться до них=( а цены хорошие. https://angelsgrief.ru привет) спасибо за информацию
favpicksstore – Great selection, shopping was simple and enjoyable.
пиши разберемся https://stilyagisocks.ru Первый раз вижу такое с МН. От других селлеров все было норм с растворимостью. Растворяющийся полностью пер чуть посильнее…
WildHorizon Deals – Great variety, smooth browsing experience, and fast checkout.
Wicked temptress needs to expose her bare flesh. Here — https://rb.gy/8rrwju?Vubbibe
shopcentral – Easy navigation, items are clearly displayed and accessible.
Bridgetown Choice – Shopping is quick, and the overall layout is clean and user-friendly.
Трек получил! Данный магазин действительно выполняет свои обязанности перед покупателями.Просто при личном разговоре с продавцом можно действительно понять что работы у них действительно много и на это уходит время,просто стоит проявить терпение.Считаю как получу товар,его качество останется таким же наивысшим,как сама работа магазина https://moyconcert.ru ровнее только строительный уровень )
Научих https://mdgt.top цената за смяна на водомер в Бургас
На https://remontuem.if.ua дізнався все про монтаж опалення івано-франківськ.
сделай какую небудь акцию)) https://tvoya-gruppa.ru Ну тогда, как объяснить все происходящее сейчас?
тс удачи в работе купить Мефедрон, Бошки, Марихуану Вообще то дажббер в рабочее время всегда в сети и все кто оплачивал и делал заказ получили треки.
collectivebuys – Pleasant experience, site layout made it simple to browse products.
ВСЕ ВОПРОСЫ ПО ДОСТАВКЕ ОБСУЖДАЮТСЯ В ЛИЧКЕ С ТС ПРИ ОФОРМЛЕНИИ ЗАКАЗА. https://mcsjournal.ru Ребята, у chemical-mix все на высшем уровне!
Grand Style Online – Navigation is fast, and everything is well presented.
Фото https://seetheworld.top про валь гардена сподобалися дуже.
Независимый сюрвей в Москве: проверка грузов и объектов, детальные отчёты, фотофиксация и экспертные заключения. Прозрачная стоимость сюрвейерских услуг, официальные гарантии и быстрая выездная работа по столице и области.
Идеальные торты на заказ — для детей и взрослых. Поможем выбрать начинку, оформление и размер. Десерт будет вкусным, свежим и полностью соответствующим вашей идее.
dailycorner – Navigation is effortless, and all products are neatly arranged.
Решили мы тут значит с кентом несколько дней назад покурить . Вспомнили про сайт chem24.biz.ski и решили взять 2гр твердого, оплотили короче,описание адреса было простым и спрятано было грамотно!!! купить кокаин, меф, бошки через телеграмм вчера трек получил:good: надеюсь всё будет ровно.
Все легально и проверено, есть NMR. Плохого ни чего не случиться. Скорей всего приняли потому что были паленые…. https://master-zelenograd.ru Парни пятерка лпк работает ровно)))всем фарта)))))
Anonymous Play and the Art of Puzzle Escapism
Anonymous Play as a Unique Approach to Enjoying Puzzle Escapism and Creative Freedom
Participating in immersive experiences without revealing one’s identity can significantly enhance enjoyment and engagement. Choose platforms where identity is not a requirement, such as certain escape room websites or anonymous gaming sites. Websites that allow for user customization without mandatory registration can offer a thrilling sense of freedom.
Prioritize environments that promote mystery. Look for activities that feature intricate scenarios requiring critical thinking and teamwork. Many options exist, from physical locations to online adventures, involving challenging puzzles and interactive storytelling, allowing participants to immerse themselves fully.
Prior knowledge of escape tactics is beneficial. Familiarize yourself with common puzzle structures. For instance, substitution ciphers, word jumbles, and logic puzzles make frequent appearances in such settings. A basic understanding of these can reduce frustration and enhance satisfaction when solving riddles.
Group dynamics play a crucial role. Engage with team members who share similar interests but come from diverse backgrounds. This diversity can cultivate unique perspectives for approaching challenges, fostering creativity and collaboration.
Be aware of time constraints. Many experiences are designed to be completed within specific time frames, often adding pressure but also excitement. Keep an eye on the clock; it’s a balance of urgency and strategy. Form a plan early to optimize time and resources with your team.
Lastly, consider documenting your experiences. Taking notes or capturing specific moments can provide insight into your problem-solving process and highlight successes and areas for improvement. Reflecting on past engagements can inform future participation, enhancing skill sets and overall enjoyment.
Exploring the Benefits of Anonymity in https://rtware.net/
A major advantage of maintaining privacy while engaging in these interactive brainteasers lies in the reduction of pressure. Participants can tackle challenges without the burden of judgment. This typically leads to enhanced creativity as individuals feel freer to experiment with unconventional solutions.
Another key aspect is the access to a broader community. When identities are concealed, players can connect with diverse individuals across different backgrounds and cultures. This inclusivity fosters a richer exchange of ideas and strategies, ultimately improving problem-solving approaches within groups.
Research indicates that anonymity can encourage greater participation. Players who might otherwise hesitate to join or contribute due to fear of scrutiny often find themselves more willing to engage in scenarios where their identity remains hidden. Consequently, this promotes a more vibrant and collaborative atmosphere.
Moreover, privacy can lead to a sense of liberation. Individuals can express themselves without fear of repercussions or societal norms. This liberating environment allows for personal growth and exploration of new ideas and strategies that would typically remain suppressed in conventional settings.
From a psychological perspective, anonymity can reduce social anxiety. Many players report increased comfort in collaborating or competing when their identities are not on display. This, in turn, can lead to improved engagement levels and, subsequently, a more fulfilling experience.
Another notable benefit involves the potential for unbiased feedback. When players do not know each other’s identities, evaluations and contributions tend to focus purely on the quality of ideas rather than preconceived notions based on individuals’ reputations or past performance. This aspect promotes a meritocratic environment.
Additionally, players often experience a stronger sense of empowerment. The absence of identification allows individuals to explore their strengths and weaknesses without the fear of judgment, leading to improved skills over time. This growth can be particularly beneficial in skill-based environments, enhancing both the individual and team performance.
It is essential to recognize that anonymity also brings challenges. For instance, some individuals may exploit privacy to engage in detrimental behavior. Establishing boundaries and guidelines is crucial to mitigate such risks, ensuring a safe and inclusive atmosphere for all participants.
Furthermore, the design of the challenges can play a significant role in the success of these activities. Gamemasters should consider incorporating features that promote collaboration while still allowing for personal expression. This balance can result in enriched experiences, benefiting both individual players and the group dynamic.
When looking at technological advancements, many platforms now offer features that enhance privacy while maintaining interaction quality. Choosing the right tools can facilitate this balance, allowing players to enjoy the benefits outlined while mitigating associated risks.
Ultimately, engaging with problems discreetly fosters a sense of security, enabling deeper cognitive processing. Players can focus entirely on the task at hand, leading to a more satisfying experience. Adopting this approach can significantly impact both the enjoyment and effectiveness of navigating intricate challenges.
In conclusion, maintaining privacy during participation can yield significant advantages, ranging from enhanced creativity and engagement to fostering diverse interactions. Harnessing these benefits requires mindful design and community guidelines to ensure a safe and enjoyable experience for everyone involved.
Top Strategies for Immersive Puzzle-Solving Experiences
Begin with a clear goal. Define what success looks like. Determine whether the objective is about completing challenges, uncovering a narrative, or building teamwork. Be specific; this sharpens focus.
Formulate a solid team. Assemble individuals whose skills complement each other. Balance critical thinkers with those who excel in creativity. Consider personalities too; a collaborative atmosphere fuels progress. Communication skills are key.
Establish roles. Designate a leader to guide efforts, while others can take on support positions based on strengths. This clarity helps distribute tasks effectively. Avoid overlapping responsibilities to prevent confusion.
Pay attention to your environment. Immerse yourself fully; look at everything. Details in ambient elements often yield clues. Inspect items thoroughly. Sometimes, what seems mundane is embedded with hidden meanings.
Document findings. Maintain a record of insights and clues discovered. This practice not only helps track progress but also aids in connecting dots later. Consider using a shared digital document for transparency among team members.
Embrace trial and error. Approach challenges with an experimental mindset. If a solution doesn’t work, analyze why and adjust tactics. Remaining flexible while pursuing problem-solving is invaluable.
Communicate openly. Regular check-ins prevent redundancy and keep everyone aligned. Use verbal exchanges to brainstorm ideas or revisit clues. Effective discussion can trigger reflections that lead to breakthroughs.
Practice active listening. Pay attention to what teammates express. Often, a pivotal insight comes from a comment that seems offhand. Engaging deeply with others facilitates innovation and connection during challenges.
Share perspectives. After discussions, individuals should state their interpretations openly. Diverse viewpoints fuel creativity and could unravel a solution that one perspective alone couldn’t reveal. Encourage debate; don’t shy away from differing opinions.
Identify patterns. Scrutinize clues for recurring themes or elements. Studying these can reveal overarching strategies vital for advancement. Patterns, often unnoticed initially, can serve as roadmaps to success.
Leverage visual aids. Utilize diagrams, charts, or mind maps to visualize connections and relationships between clues. Sometimes, mapping thoughts can clarify complex challenges. Different representations can trigger new associations.
Maintain a strategic mindset. Break puzzles down into smaller components. Approach each part independently to avoid feeling overwhelmed. Handle what you can manage first; larger problems will feel less daunting when decomposed.
Monitor time allocation. Set time limits for specific challenges. This practice fosters urgency and can keep motivation high. If the group feels stuck, reassess if the approach still aligns with desired outcomes.
Engage with narratives involved. Many quests have a storyline that enriches the experience. Understanding context can fuel deeper engagement and inspire unique connections among clues.
Trust instincts. Sometimes intuition plays a crucial role in problem-solving. If a particular direction feels promising, explore it. Intuition emerges from previous experiences, and ignoring it can lead to missed opportunities.
Stay positive. Encourage a supportive atmosphere. Celebrate small victories; this builds momentum. Team morale often correlates with success rates. Positivity fosters a desire to remain engaged and tackle tough tasks.
Know your limits. Recognize when to take breaks. Stepping away for a few minutes allows mental reset, which recharges creativity and sharpens focus. Overworking leads to fatigue and reduced effectiveness.
Seek external resources, if necessary. Sometimes, research or hints may be prudent when feeling stuck. Use available resources sensibly, rather than relying solely on them. Balance is key; external input should enhance rather than overshadow original efforts.
Reflect after each session. Assess what worked and what didn’t. This evaluation will not only improve future attempts but also solidify individual learning experiences. Shared reflections add depth and understanding to collective activities.
Prepare for variations. Each challenge can differ in complexity and style. Anticipate disruptions or changes in upcoming activities. Flexibility enhances adaptability, which is a major asset in unpredictable environments.
Create a supportive feedback loop. After completing an experience, exchange constructive critiques. This practice can cultivate skill development and strengthen the group’s dynamics for upcoming tests.
Ultimately, these approaches enhance immersive engagements by refining techniques. Practicing these strategies consistently leads to more fulfilling and enjoyable experiences down the line. Each session offers opportunities to learn and improve, yielding deeper significance with every endeavor.
Daily Style Market – Discover trendy products organized for easy browsing and selection.
Future Groove Stop – Everything is neatly organized, making shopping quick.
I don’t think the title of your article matches the content lol. Just kidding, mainly because I had some doubts after reading the article. https://accounts.binance.info/en/register-person?ref=JHQQKNKN
podarki-moscow.ru
Morning Rust Choice – Fast and natural navigation with a neat layout.
https://prazdnikdekor.ru/
Explore a true https://caucasustravel.ru where welfare comes first. No chains or performances — only open landscapes, gentle care, rehabilitation programs and meaningful visitor experiences.
ЦВЗ в Краснодаре https://cvzcentr.ru место, где пациентов внимательно выслушивают, проводят глубокую диагностику и составляют эффективный план улучшения состояния при вегетативных расстройствах.
La infraestructura https://novo-sancti-petri.es y la tecnologia vial europeas equilibran la innovacion y la sostenibilidad. Semaforos inteligentes, carreteras verdes, centros de transporte seguros y proyectos que marcan la pauta para la industria global.
La Rome Espresso https://laromeespresso.es es un lugar donde la cultura del cafe se convierte en arte. Descubre el camino del grano a la taza: el sabor profundo, las tecnicas precisas y los rituales que crean la bebida perfecta.
Urban Peak Deals – Navigation is easy and products are visually appealing.
Do you love excitement? roulettino delights players with high-quality slots, live tables, tournaments, and ongoing promotions. The gameplay is smooth and dynamic.
Rodaballo al Horno https://rodaballoalhorno.es es un viaje a las raices musicales del mundo, donde los sabores de las culturas se entrelazan con sus melodias. Exploramos los ritmos de las naciones, los sonidos de las tradiciones y como diferentes historias se fusionan en un solo sonido armonioso.
Un portal sobre videojuegos https://tejadospontevedra.es, noticias y tendencias para quienes viven y respiran videojuegos: resenas, guias, parches, anuncios, analisis de tecnologia y torneos de esports. Todo para gamers y quienes quieran mantenerse informados.
https://podarki-moscow.ru/
Your Fashion Destination – Browse stylish collections and lifestyle essentials to suit your taste.
Скрайд MMORPG https://сайт1.скрайд.рф культовая игра, где магия переплетается с технологией, а игрокам доступны уникальные классы, исторические миссии и масштабные PvP-сражения. Легенда, которую продолжают писать тысячи игроков.
Нужна легализация? https://www.legalizaciya-nedvizhimosti-v-chernogorii.me проводим аудит объекта, готовим документы, улаживаем вопросы с кадастром и муниципалитетом. Защищаем интересы клиента на каждом этапе.
Эвакуатор в Москве https://eva77.ru вызов в любое время дня и ночи. Быстрая подача, профессиональная погрузка и доставка авто в сервис, гараж или на парковку. Надёжно, безопасно и по фиксированной цене.
EverPath Market – Smooth browsing and simple navigation make shopping enjoyable.
motivatedhubzone – Clear layout, easy to browse, and pages respond quickly.
Постоянно мучает насморк – здесь
Бренд MAXI-TEX https://maxi-tex.ru завода ООО «НПТ Энергия» — профессиональное изготовление изделий из металла и металлобработка в Москве и области. Выполняем лазерную резку листа и труб, гильотинную резку и гибку, сварку MIG/MAG, TIG и ручную дуговую, отбортовку, фланцевание, вальцовку. Производим сборочные единицы и оборудование по вашим чертежам.
Эвакуатор в Москве https://eva77.ru вызов в любое время дня и ночи. Быстрая подача, профессиональная погрузка и доставка авто в сервис, гараж или на парковку. Надёжно, безопасно и по фиксированной цене.
Dawncrest Finds Online – The site loads quickly and items are simple to explore.
Расширенный анализ изменённых Android-APK: хакнутые APK, mod-пакеты, хаки, нулевые покупки
Сфера mobile игр расширяется быстро быстро, и вместе с этим перестраивается и подход юзеров к геймплею. Когда-то большинство игроки терпели барьеры и внутриигровые траты, то сейчас всё больше людей выбирают mod игры андроид.
Платформы вроде https://support.ourarchives.online/index.php?title=User:RickeyBurdick6 дают огромный набор mods, формируя целую систему вокруг модов. Эта динамика привела к появлению круг игроков геймеров, которые ищут расширенные ресурсы без ограничений.
Особенности модифицированные APK-файлы и почему они популярны
Взломанные игры на андроид — это переработанные версии официальных APK, в которые активированы моды, или сняты ограничения. Основная цель этих пакетов — дать игроку расширенные параметры в игровом процессе.
К примеру, моды могут предоставлять ресурсы, запрещать баннеры, делать покупки бесплатными. Такие решения ценят геймеры, которым нужен быстрый прогресс.
Значение площадок в мире Android-модов
Каталоги выступают как узлом распространения взломанных игр. Они группируют моды, структурируют его, поддерживают, и предлагают скачивание всем желающим. По этой причине находить хаки стало гораздо проще.
Какие типы модов качают в 2025
Мод-тренды постоянно меняются, и мир модов перестраивается под спрос. В текущем году в топе находятся моды с free gems android. Такие mods убирают лимиты, включая весь контент сразу.
Огромным спросом обладают моды, которые убирают рекламу. Большинство игр на Android буквально забиты рекламой, поэтому моды “без рекламы” стали стандартом для миллионов игроков.
Также в топе взломы, которые активируют free shop. В подобных модах shop ничего не списывает. Игрок может активировать косметику, оружие, buffs, pass, и всё это без вложений.
Преимущества модифицированных Android-игр
Главный плюс модов — это полная свобода действий. Игрок сам определяет, как проходить. В противоположность оригинальных APK, где всё завязано на донате, mod игры андроид даются полностью с первых минут.
Следующее преимущество — отсутствие агрессивной рекламы. Почти любой игрок Android сталкивается с ads, которые мешают. Моды обнуляют рекламу, превращая процесс непрерывным.
Ещё один серьёзный плюс — доступ к эксклюзивным настройкам. Некоторые моды включают developer mode, улучшенную графику, дополнительные карты, и даже кастомные текстуры. Такие версии игр выглядят лучше официальные.
На что обратить внимание при скачивании модов
Несмотря на популярности модов, важно соблюдать базовые правила безопасности. Скачивать моды следует только с крупных площадок. Случайные сайты могут подсовывать вредоносные файлы, что опасно.
Также стоит помнить, что некоторые игры не принимают модификации. Поэтому нужно выбирать только свежие версии apk mod android, которые подходят последним версиям приложения.
Иногда моды могут не работать онлайн, если игра проверяет данные. Это частая практика, особенно в популярном PVP-контенте.
Итог: почему моды стали трендом в 2025
Мобильные миры становятся шире, и потребность к улучшенным возможностям становится выше. Поэтому взломанные игры на андроид продолжают удерживать популярность. Они дают игрокам открытые покупки, убирают рекламу, и предоставляют свободу над проходлением. Сайты делают скачивание таких возможностей удобным.
Сегодня модифицированные игры — это не просто мода, а игровая норма. При выборе хороших сайтов скачать взлом apk и наслаждаться игрой становится легко для каждого.
Вывод: apk mod как тренд Android-гейминга
Гейминг на телефоне продолжает развиваться, и интерес к расширенному геймплею растёт. модифицированные версии дают расширенный функционал, включая улучшенные настройки, снятие ограничений и открытие всех уровней.
Для большого числа игроков это не просто удобство, а инструмент экспериментов. Игроки могут создавать уникальные билды, в полном объёме, что повышает вовлечённость.
Наряду с этим, модифицированные версии позволяют изучать механику. Опции вроде free gems android открывают все возможности, а отключение рекламы делает процесс приятным.
Ключевое условие при использовании модификаций — разумная осторожность. Используйте только безопасные файлы, контролируйте версию игры, и опыт останется положительным. Тогда модифицированные игры позволят наслаждаться игрой на полную.
Итоговая мысль: apk mod это не просто развлечение, который даёт свободу и делает игровой процесс более интересным. Правильное использование делает опыт безопасным и делает мобильные игры ещё более увлекательными.
With extensive experience, we expertly clean windows, doors, fascias, gutters, roofs, renders, conservatories, and solar panels — ensuring every surface is pristinely maintained. Our standout specialty is flawless windows cleaning that brightens your whole home: https://ecocleaningcompany.ie/
Хочешь развлечься? купить мефедрон федерация – это проводник в мир покупки запрещенных товаров, можно купить гашиш, купить мефедрон, купить кокаин, купить меф, купить экстази, купить альфа пвп, купить гаш в различных городах. Москва, Санкт-Петербург, Краснодар, Владивосток, Красноярск, Норильск, Екатеринбург, Мск, СПБ, Хабаровск, Новосибирск, Казань и еще 100+ городов.
1win сайт 1win сайт скачать на андроид
бонуси казіно казіно з бонусами
Eco Cleaning Company was founded to provide top-tier, eco-friendly cleaning services focused on windows cleaning and exterior home care. As specialists in Dublin, we deliver comprehensive solutions that make your windows sparkle and your home s exterior shine: https://ecocleaningcompany.ie/
Lunar Wave Select Picks – Browsing is fast, simple, and the layout feels welcoming.
Файне Дніпро https://faine-misto.dp.ua новини Дніпра та області. Огляди, транспорт, події та цікаве.
choicecorner – Well-structured layout, products are easy to explore, and navigation feels seamless.
Starlit Style Picks Online – Navigation is simple, and products are presented clearly.
да никого не устраивает это, что за бред. только единиц. https://mebelnazakazi.ru всем привет,припы репорты писать не умею как мастер 100 того уровня,но скажу как есть,магазин вообще огонь ,брал 1гк ск АЛФА 29 с доставкой,все быстро и оперативно пришло,как и было оговорино 14 дней,а ребята знают толк в работе красавцы доставили в кароткие сроки,АДРЕС СДЕЛАН БЫЛ С ТОЧНЫМ ОПИСАНИЕМ ЗАБРАЛ В КАСАНИЕ + ФОТО К ОПИСАНИЮ ШЛО МОЖНО БЫЛО ПО ФОТО ПОДНЯТЬ НЕ ЧИАЯ ОПИСАНИЯ ДАЖЕ,ВЕС СК КРИСТАЛИКИ ЧИСТЫЕ НЕ БУТОР ТАВАР ОТЛИЧНЫЙ И ЧИСТЕЙШЕЕ КАЧЕСТВО,УСПЕХОВ ВАМ ВО ВСЕМ И ПОПУТНОГО ВЕТРА КЛИЕНТОВ ПО БОГАТЧЕ,ПРОЦВИТАНИЯ,ВСЕМ СОВЕТУЮ ЭТОТ МАГАЗИН,ОПЛАЧИВАЙТЕ С ДОСТАВКАМИ И НЕ СОМНИВАЙТЕСЬ НЕ КАПЛИ……..МАГАЗИН РАБОТАЕТ РОВНО
brandmomentum.click – Loved the layout today; clean, simple, and genuinely user-friendly overall.
Smart Buy Daily – Tips for purchasing quality products at the right price.
Заказывал трансфер туда-обратно, оба раза одна и та же машина, приятно
http://local315npmhu.com/wiki/index.php/User:EloyLamontagne4
leadoptimizer.click – Navigation felt smooth, found everything quickly without any confusing steps.
Счастья жизни не ждут под окном, купить Мефедрон, Бошки, Марихуану Доброга времени суток, закладки в москве делаете?
Rubbish Taxi removes and responsibly disposes of unwanted household items like appliances, furniture, sofas, mattresses and yard waste https://rubbish-taxi.ie/
Timberline Market – Items are easy to locate and exploring the store feels comfortable.
Брал впервые в этом магазине, брал по рекомендации! https://bfhappyday.ru не будет 307го. ожидается 203, 250, rcs-4 и 1220й… вот что мне сказали в той же аське, где спрашивал ты )
urbanhubselection – Layout is tidy, products are easy to locate, and browsing felt natural.
trafficmomentum.click – Loved the layout today; clean, simple, and genuinely user-friendly overall.
Компания Таврнеруд https://tareksa.ru производство и продажа нерудных материалов, сервис логистических услуг, а также проектирование в области технологии обогащения нерудных материалов, проведение лабораторных испытаний нерудных материалов.
Do you love puzzles? This puzzle game game features challenging levels, well-thought-out mechanics, and relaxing gameplay. Solve riddles, unlock new levels, and test your problem-solving skills anytime, anywhere.
Нужен сайт? https://laboratory-site.ru включает проектирование, удобный интерфейс, быструю загрузку, интеграцию с 1С и CRM. Подбираем решения под задачи бизнеса и обеспечиваем техническое сопровождение.
FutureGardenSelect – Attractive layout and clear sections made exploring the catalog smooth.
Прибыльных вам выходных!:monetka: купить Мефедрон, Бошки, Марихуану значит не успели трек номер в базу завести.
Нужен сервер? сервера с GPU лучшие по мощности и стабильности. Подходят для AI-моделей, рендеринга, CFD-симуляций и аналитики. Гибкая конфигурация, надежное охлаждение и поддержка нескольких видеокарт.
I don’t think the title of your article matches the content lol. Just kidding, mainly because I had some doubts after reading the article.
browse here – Everything was well-structured, making it easy to look through items.
слоти ігрові автомати ігри слоти
Портал для пенсіонерів https://pensioneram.in.ua все про пенсію за віком, права та льготи літніх людей та інвалідів.
Chemical-Mix, хочу заказать 50г. АМ, но на сайте написано что 50грамм нет на складе.В итоге-“радостно” ожидал курьера эти дни,забавлянка придет мне позже желаемого… ;( купить Мефедрон, Бошки, Марихуану Беруууу часто через магазинСеллер вообще отвечает на емейл? Или только в аське его искать, которой у меня нет?
проститутки в г нижневартовск
shop new picks – Items loaded quickly and the layout was easy to follow.
слоти безкоштовно слоти онлайн
онлайн ігри казино ігри в казино
shop golden horizon – Fast-loading pages and easy navigation improved the experience.
aplikacja mostbet na androida bonus mostbet
tallbirchhub – Layout is clean and intuitive, making shopping quick and enjoyable.
At Rubbish Taxi, we manage your house clearance requirements, whether it is a home renovation, room redecoration, or clearing out old items. Our services cover comprehensive house removals and clearances across Dublin and other cities where we operate. We can collect various bulky items, including sofas, bed frames, mattresses, chest of drawers, wardrobes, fridges, freezers, washing machines, dishwashers, ovens, musical instruments, and more. Count on us for a seamless experience https://rubbish-taxi.ie/mattress-disposal-dublin/
timberlineattichub – Creative and engaging design, exploring ideas was easy and inspiring.
Значит не туда стучишься!а ребята молодцы! https://falconeditor.ru Магазин ровнее не куда!!! Ребята отработали на славу, все четко и оперативно. Спасибо огромное, буду сотрудничать и дальше)можно узнать, как принимали ? интрозально, в\м ?
Trendy Finds Spot – Discover stylish options and navigate collections without hassle.
ForestEdgeEmporium – Smooth interface, shopping felt quick and hassle-free.
Sun Meadow Outlet – The site is well-organized and fast, making product discovery smooth and convenient.
В Москве, где каждый день течет рекой суеты, Frau KliniK стоит как надежный якорь для тех, кто устал мириться с первыми морщинками или неровностями фигуры. Эта клиника, рожденная руками профессора Сергея Блохина и доктора Ирины Вульф, собирает под своей крышей лучших хирургов и косметологов, чьи дипломы из престижных вузов мира не пылятся в шкафах, а работают на деле.
Представьте: вы заходите в уютные залы на улице Гиляровского или в Хамовниках, и уже через полчаса после бесплатной консультации уходите с четким планом, как вернуть коже упругость или скорректировать формы, не рискуя здоровьем. Здесь не просто операции – это точная работа, где пластика сочетается с гинекологией, массажем и даже стоматологией, чтобы все тело дышало в унисон. Хотите омолодить лицо без ножа? Ulthera от Merz Aesthetics, официально привезенная в Россию, сделает это за один сеанс, оставив кожу сияющей, как после отпуска у моря.
А помните телепроекты вроде “На 10 лет моложе” на Первом канале? Именно специалисты Frau KliniK там творили чудеса, превращая обычных женщин в уверенных красавиц. Ирина Пинчук, Ксения Собчак – да, те самые, кто доверил им грудь или ревизию после неудач в других местах, – теперь улыбаются с экранов, не скрывая имен. “Я наконец-то почувствовала себя собой”, – признавалась Адель Сергеенкова после коррекции.
Клиника не гонится за массовкой: цены прозрачные, после осмотра, и акции на косметологию или пластику позволяют сэкономить, не жертвуя качеством. От пересадки волос у турецкого мастера Аты Эмраха до гастроскопии для тех, кто следит за внутренним балансом – все под одной крышей, с 9 утра до 9 вечера, без выходных. Если вы готовы к шагу, который изменит зеркало навсегда, Frau KliniK ждет – и обещает, что это будет не просто визит, а начало новой главы.
https://harry.main.jp/mediawiki/index.php/Frauklinik_35D
Wonder Peak Shop – Navigation is simple and the items are easy to explore.
И всем форумчанам!!! https://fortis-mc.ru Тут, оказывается, одна шайка- лейка. Мало того, что мое сообщение потерли, еще и нарушение влепили. Сочли провокацией, хотя писал чистую правду. Магазин меня кинул, прислав фигню, которую выбросил.Просьба подкорректировать самим бредовые сообщения.
globalshoppinghub – Fast, intuitive interface, and products are neatly categorized.
CTO Timber Selection – Simple design and smooth browsing created a nice overall experience.
outfit ideas – Had a pleasant time browsing; products were sorted in a clear way.
В Москве, где каждый день течет рекой суеты, Frau KliniK стоит как надежный якорь для тех, кто устал мириться с первыми морщинками или неровностями фигуры. Эта клиника, рожденная руками профессора Сергея Блохина и доктора Ирины Вульф, собирает под своей крышей лучших хирургов и косметологов, чьи дипломы из престижных вузов мира не пылятся в шкафах, а работают на деле.
Представьте: вы заходите в уютные залы на улице Гиляровского или в Хамовниках, и уже через полчаса после бесплатной консультации уходите с четким планом, как вернуть коже упругость или скорректировать формы, не рискуя здоровьем. Здесь не просто операции – это точная работа, где пластика сочетается с гинекологией, массажем и даже стоматологией, чтобы все тело дышало в унисон. Хотите омолодить лицо без ножа? Ulthera от Merz Aesthetics, официально привезенная в Россию, сделает это за один сеанс, оставив кожу сияющей, как после отпуска у моря.
А помните телепроекты вроде “На 10 лет моложе” на Первом канале? Именно специалисты Frau KliniK там творили чудеса, превращая обычных женщин в уверенных красавиц. Ирина Пинчук, Ксения Собчак – да, те самые, кто доверил им грудь или ревизию после неудач в других местах, – теперь улыбаются с экранов, не скрывая имен. “Я наконец-то почувствовала себя собой”, – признавалась Адель Сергеенкова после коррекции.
Клиника не гонится за массовкой: цены прозрачные, после осмотра, и акции на косметологию или пластику позволяют сэкономить, не жертвуя качеством. От пересадки волос у турецкого мастера Аты Эмраха до гастроскопии для тех, кто следит за внутренним балансом – все под одной крышей, с 9 утра до 9 вечера, без выходных. Если вы готовы к шагу, который изменит зеркало навсегда, Frau KliniK ждет – и обещает, что это будет не просто визит, а начало новой главы.
https://om0.de/index.php?title=Benutzer:GingerMagnuson9
жасти моё уважение к тебе и респект красавица. но ес честно ты нашла чет не то что было совсем другое как сказал уже уважаемый дельфин там было много сути и честных отзывов :monetka: ну лан проехали если так вроде все все поняли. купить Мефедрон, Бошки, Марихуану Член до колен и девок гарем))Я вот перед заказом почитала хуеву кучу отзывов и не нашла ни одного хуевого. Но опять же, смотри, отзывы были не об эйфоре, а о самом магазине. Давай друг, советуй что-нибудь в личку
shop new horizon – Browsing felt effortless and products were easy to view.
tallbirchemporium – Layout is tidy, navigating products is smooth and intuitive.
horizon hub – Items loaded quickly and categories were easy to explore.
всем мир! скажите магаз ровный? ато написал на мыло им и ни ответа ни привета! https://i-tomat.ru да да ))) 100% ))0И духовной отсутствие пищи
artisancentral – Smooth and simple navigation, browsing was very convenient.
братишки и сёстры всем мир и харе ругаться!жизнь прекрасна https://falconeditor.ru ЕМИКАЛ МИКС – ЭТО ЛУЧШИЙ МАГАЗИН С МНОГОЛЕТНЕЙ РЕПУТАЦИЕЙ НА РЦ РЫНКЕ!!!!есть что нибудь на подобие скорости или кокса?
ігри слоти онлайн слоти
konto osobiste mostbet rejestracja w mostbet
ігри казіно ігри казино
Какие риски ) ты адекват ? ты скинул непонятно что не имеющее никакого смысла. купить онлайн мефедрон, экстази, бошки Все Вась,извини..с утра заматался))глазом на пакете,вот там была россыпь:good::killmyself::strong::stars::fu::good::bro:
BlueStone Select – Simple, tidy, and I found what I needed quickly.
item finder – Everything was organized well, letting me locate products quickly.
growcornerhub – Smooth and fast browsing, products are neatly categorized.
urban finds – Fast pages and tidy layout made discovering products easy.
brightbrookmarket – Smooth browsing, everything is logically placed and easy to find.
Здравствуй, народ, кто с Мск брал, сроки доставки какие реальные были и какая служба? купить онлайн мефедрон, экстази, бошки не мне в пятницу и субботу он отвечал.гворит документы есть что отправленноВсем все выслано.
Зефірка https://zefirka.net.ua розважальний блог про сни, прикмети, річниці весіль, імена та корисні поради на кожен день.
golden access – Clear sections and responsive design made browsing seamless.
35ф – индика весёлая , серьёзная , тошнатворного эффекта НЕТ хоть перекурись , сейчас беру 35 говорят сативка , будит возможность отпишу трип в красках , а вообще говорят что в симбиозе они лучше , но то что лучше / не сильнее / а именно лучше 25ф так это даже вы не сомневайтесь https://mebelnazakazi.ru да магаз отличный.оперативно работают.и качество товара отличное.вобщем всё хорошо.и отдельный респект магазу за способ посылок=)))))
Cozy Timber Corner – The site’s structure is clear, keeping everything easy to browse and enjoyable.
Northern Mist Designs – Smooth layout and well-arranged products helped me browse comfortably.
покушать попробуй… и пиши сюда купить Мефедрон, Бошки, Марихуану МАГАЗИН РАБОТАЕТ НОРМАЛЬНО!!! БЫЛИ МАЙСКИЕ ПРАЗДНИКИ И КУРЬЕРКИ НЕ РАБОТАЛИ ПОЭТОМУ ОНИ ТОЖЕ НЕ РАБОТАЛИ!!!Ха ха ребята смотрите беспредел! попробуйте написать правильно жабу ТСа и получится то что у меня, как бы с ошибкой! СКРИПТ!
New Grove Online Picks – The interface felt tidy, helping me move through items quickly.
Sun Meadow Goods – Browsing was fast and stress-free thanks to clear menus.
product corner – Finding items was quick thanks to the clean and uncluttered structure.
shopline hub – Well-organized sections and fast pages made exploring simple.
Тут, оказывается, одна шайка- лейка. Мало того, что мое сообщение потерли, еще и нарушение влепили. Сочли провокацией, хотя писал чистую правду. Магазин меня кинул, прислав фигню, которую выбросил. купить онлайн мефедрон, экстази, бошки 19-го адрес был дан.За АМ 1220 ничего сказать не могу – не пробовал…. Но, после тестирования 694 и 2201 впечатления о линейке АМ у меня сильно подпортились (
a href=”https://brightnorthboutique.shop/” />northtrendstore – Items are well organized, interface is smooth and friendly.
a href=”https://growyourmindset.click/” />mindsetcentral – The layout is intuitive, products are easy to locate, and browsing is enjoyable.
goldenartcorner – Smooth browsing and well-arranged products, I found everything effortlessly.
willow picks hub – Fast interface and clean layout made shopping enjoyable.
Я ночью с ним договорился в аське,мне он тоже отвечал через 15-30 минут на сообщение) купить кокаин, меф, бошки через телеграмм сегодня оплатил заказ jwh-250 5гр. буду ждать, после отпишусь…Ровным парням ровный респект
контрактники рф
Отделка фасада: штукатурка, покраска. Защита от сибирских морозов, выглядит свежо.
http://insjoaquimmir.cat/wiki/index.php/Usuari:ShaunteErnst
у них Methoxetamine бадяженный или нет? сколько принял мг и какие симптомы были? купить онлайн мефедрон, экстази, бошки было бы что хорошего писать. Ато культурных слов нету!!! Вроде как норм качество, готовые клады и цена это единственное что радовало. А в последнее время вообще непонятно что отвечает по часу, пугает игнорами, и в последний раз оплатил в 18:00 адрес около 22:00 и нету!!! Начал про подробности у него вроде так отвечал, фото присылал что аж хватит ему на портфолио. То курьер не ответил то он молчит. И в конце концов пишу ему с другой номера отвечает и предлагает адреса а с моего нефига. И вот такая история о том как чем ЗАЗНАЛСЯ ну или оператор. Жаль возьню(Качество обслуживания хорошее – с момента оплаты до прибытия товара прошло всего 3 дня и вес ровный.
Northern Mist Marketplace – Clean interface and well-displayed products made selecting items easy.
как белорусу получить гражданство россии
В консульстhttps://lovewiki.faith/wiki/Relohelper_51Rе в Москве очереди на полгода вперёд
Ridge Finds Online – The interface is clean, and product browsing was a breeze.
kasyno mostbet mostbet
новости беларуси 2025 новости беларуси онлайн
беларусь события новости новости спорта беларуси
Оценщик по заливу провел осмотр быстро и профессионально: сколько стоят услуги оценщика ущерба при затоплении квартиры
Wild Shore Goods – Simple menus and tidy pages made exploring products quick and stress-free.
Кто тут урб-754 брал отпишитесь чё да как https://kartiny-mne.ru Флудить на счет легальности/нелегальности товара в магазине не нужно в ветке! У же отписывалась и экспертиза и мы не однократно писали, возим ТОЛЬКО ЛЕГАЛ!Сори я не туда отписал
shop soft boutique – Well-arranged interface and fast pages made exploring simple.
Potential Builder Daily – Insights and strategies to maximize your growth and achieve goals.
Оценщик по заливу провел осмотр быстро и профессионально: https://yurist-pri-zalive.ru/
Адекватных работников https://anmanchicory.ru Что задерживали грузы, с поставками, и дожидались пока запрет выйдет…Всем советую таряться здесь)))
Lunar Peak Central – Navigation is simple, and the layout is clean and organized.
wallet-friendly store – The affordable selection stood out and the site was effortless to use.
как получить белорусу российское гражданство
mountainwildemporium – Items are displayed clearly, making shopping simple and enjoyable.
happyhomezone – Clean layout, fast page loads, and products are easy to locate.
магаз клёвый ,:bravo:сервис на высоте https://ucheba-legko.ru Сильно!!!5 из 5!!Флуд??? Я высказал свое мнение! Или это запрещено?
evermeadowgoods – Great selection and intuitive navigation helped me explore products without hassle.
контракт служба
Всем привет. Пишу по своему заказу. Заказал я АМ2233- 19.08.,оплатил 22.08.,трек получил 23.08.,24.08. позвонил в спср где меня обрадовали, тут же не дожидаясь доставки поехал к ним и забрал свою посылочку. Скоро пойду вскрывать… остальное отпишу позже. Продаван малорик,в аське почти всегда. на все мои вопросы отвечал без задержек. еще раз спасибо. https://yamalfaktoria.ru Народ уже как два часа нет ответов от администратора магазина”Думаю все угорали по детству Делали дымовушку “Гидропирит VS Анальгин”
Bright Timber Treasures – The organized layout and good photos made selecting items a breeze.
MountainMistStudio Online – Smooth navigation and organized pages made shopping simple.
Mountain Wind Marketplace – Items are clearly displayed, which made browsing straightforward.
Спасибо за отзыв , а то заказывает много людей а отписываются единицы. https://lzshapki.ru Фарту в делах парни !:hello:слышала за вас) с пробы начнем?
moonfall access – Browsing felt natural and products were easy to explore.
https://podarki-moscow.ru/
Urban Seed Picks – Products are easy to find and the interface is friendly.
следующий раз пришлем поношеные презервативы но ты будешь рад!!! купить Кокаин, Мефедрон, Экстази были случаиДа мы уже поговорили – нормальные ребята вроде) хз, я всё равно полной предоплате не доверяю)
SilverBirch Deals – Product pages pop up instantly, making the browsing flow feel seamless.
Modern Fable Mart – Finding products is effortless and the layout is clean.
success hub – The pages are organized well, making it easy to find what I need.
Eco Cleaning Company was founded to provide top-tier, eco-friendly cleaning services focused on windows cleaning and exterior home care. As specialists in Dublin, we deliver comprehensive solutions that make your windows sparkle and your home s exterior shine: windows cleaning
greenoutpostlanehub – Clean layout, products are easy to browse and well organized.
нету. в ближайшее время не будет. https://onvidos.ru Лучший магазин !!!Ребят подскажите что лучше взять:)желательно с пропорциями и качеством по времени
wildrosecornerstore – Well-structured pages and neat layout, browsing was effortless.
shop sunset wood – Fast loading and neat product display improved the browsing experience.
Visit an elephant sanctuary to see elephants living in natural landscapes, receiving care, rehabilitation and freedom from exploitation. Ethical tours focus on education, conservation and respectful observation.
Experience an elephant sanctuary where welfare comes first. Walk alongside elephants, watch them bathe, feed them responsibly and discover how conservation efforts help protect these majestic animals.
An ethical elephant sanctuary provides rescued elephants with medical care, natural habitats and social groups. Visitors contribute to conservation by learning, observing and supporting sustainable wildlife programs.
momentselection – Browsing was natural, and items were easy to locate.
Itss like you read mmy mind! You seem to know a lot about this, like
yyou wrote the book in it or something. I think that you
could do with a few pics to drive the message home a bit, but other than that, this is wonderful blog.
An excellent read. I’ll definitely be back.
Не понял…Его еще варить нужно??? На плитке?)) купить онлайн мефедрон, экстази, бошки Я пока временю.Удачи в бизе
EverRoot Haven – Neat interface and attractive visuals made shopping enjoyable.
Rubbish Taxi removes and responsibly disposes of unwanted household items like appliances, furniture, sofas, mattresses and yard waste: Rubbish Removal Dublin
Бренд MAXI-TEX https://maxi-tex.ru завода ООО «НПТ Энергия» — это металлообработка полного цикла с гарантией качества и соблюдением сроков. Выполняем лазерную резку листа и труб, гильотинную резку и гибку, сварку MIG/MAG, TIG и ручную дуговую, отбортовку, фланцевание, вальцовку, а также изготовление сборочных единиц и оборудования по вашим чертежам.
Нужен сервер? https://karafelov.ru/ лучшие по мощности и стабильности. Подходят для AI-моделей, рендеринга, CFD-симуляций и аналитики. Гибкая конфигурация, надежное охлаждение и поддержка нескольких видеокарт.
Есть в липецке https://devase-gr.ru всем мир! скажите магаз ровный? ато написал на мыло им и ни ответа ни привета!Хороший магазин оператор всегда онлайн, товар вообще Шик :speak: процветай) и поскорей бы лето
Регулярно мучает насморк – источник
BoldCrest Outlet – The intuitive layout and fast browsing made the experience great.
golden hub corner – Clean design and clear categories made browsing enjoyable.
Изготавливаем каркас лестницы из металла на современном немецком оборудовании — по цене стандартных решений. Качество, точность реза и долговечность без переплаты.
Latest crypto value: price rises and falls, network updates, listings, regulations, trend analysis, and industry insights. Follow market movements in real time.
The latest crypto news: Bitcoin, altcoins, NFTs, DeFi, blockchain developments, exchange reports, and new technologies. Fast, clear, and without unnecessary noise—everything that impacts the market.
GoldenBranchMart Hub – The organized pages helped me browse efficiently and comfortably.
СПб все ровно процветания магазину. Амф на 5+ https://vrn-vinograd.ru Спасибо Магазину)вы лучшие))))))))!!!!!!!!!!!!!!!!!!!!! :monetka: Качество на 100%только не под своим ником :confused: (мож поэтому и не отвечают)
Купить шпон https://opus2003.ru в Москве прямо от производителя: широкий выбор пород, стабильная толщина, идеальная геометрия и высокое качество обработки. Мы производим шпон для мебели, отделки, дизайна интерьеров и промышленного применения.
optirank.shop – Mobile version looks perfect; no glitches, fast scrolling, crisp text.
Spring Central – Items are easy to find and the overall experience is pleasant.
vision hub – Browsing feels smooth and the structure helps find items easily.
rankcharge.shop – Pages loaded fast, images appeared sharp, and formatting stayed consistent.
rankflow.shop – Mobile version looks perfect; no glitches, fast scrolling, crisp text.
seolaunch.shop – Mobile version looks perfect; no glitches, fast scrolling, crisp text.
rankhive.shop – Overall, professional vibe here; trustworthy, polished, and pleasantly minimal throughout.
goldenleafshop – Products are well displayed, making browsing simple and enjoyable.
привет) спасибо за информацию купить онлайн мефедрон, экстази, бошки и как обычно тут все ровно. БОЛЬШУЩИЙ РЕСПЕКТ МАГАЗИНУ.вчера трек получил:good: надеюсь всё будет ровно.
Fresh Meadow Deals – Browsing is fast and the shop feels organized and pleasant.
Urban Wardrobe Daily – Tips and trendy fashion finds for updating your everyday style.
Shop NobleGrove – The extensive catalog and neat organization helped me make a decision quickly.
Pasture Online – The interface is fast, and exploring the catalog is a breeze.
нарколог вывод из запоя вызвать вывод из запоя
Да тут дофига кто чего отписывает.только вот пробы нормальным людям раздайте.что бы видели липчане работу вашу! https://fortis-mc.ru тусиай и тусипи тут всегда хорошие, к ним претензий никогда не возникает.p/s мне ничего не надо! Зашёл пожелать удачи магазину в нелегком деле.
BrightStone Picks – The clear design and product images helped me choose items easily.
вывод из запоя цена https://clinic-alcodetox.ru
вывод из запоя отзывы https://alcodetox-med.ru
Til haqida maqollar, ona til haqida maqollar, Alisher Navoiy til haqida maqollar, xalq maqollari til haqida. O’zbek tilidagi eng yaxshi maqollar to’plami: til haqida eng chiroyli maqollar
вывод из запоя клиника https://narkonet.su
modernzone – Navigation is intuitive, and all products are displayed clearly.
На сайте раскрываются возможности программного обеспечения для видеонаблюдения по управлению правами доступа пользователей. Программа для видеонаблюдения предоставляет гибкую систему разграничения прав доступа, позволяющую назначать разные права доступа к камерам и функциям системы различным пользователям. VMS обеспечивает централизованное управление учетными записями пользователей и контроль за их действиями. Это особенно важно для организаций с большим количеством пользователей и высокими требованиями к безопасности. управление IP камерами
Также возможен выбор курьерки, если какая-то из них не возможна для доставки в ваш город https://priemkaexpert.ru Челябинск работаете?Если это до сих пор Вы-просто красава :voo-hoo:
Service de nécrologie à Sorel-Tracy. Consultez les dernières annonces de décès, informations sur les salons funéraires et avis de décès dans la région de Sorel-Tracy: find a Sorel necrology page
Timber Crest Marketplace Online – Logical structure and tidy design made browsing effortless.
emporium hub link – Navigation felt effortless and products were displayed neatly.
вывод из запоя москва помощь на дому вывод из запоя
Данный сайт посвящен программному обеспечению для видеонаблюдения, представляющему собой комплексное решение для создания и управления системой видеонаблюдения. Предлагаемое программное обеспечение для IP камер позволяет осуществлять запись с камер видеонаблюдения и их централизованное управление. В качестве ключевого компонента предлагается VMS, обеспечивающая эффективную работу с большим количеством камер. Помимо стандартных функций, программное обеспечение включает в себя передовые аналитические возможности, такие как распознавание лиц и распознавание номеров автомобилей. Это позволяет пользователям не только вести наблюдение, но и оперативно реагировать на определенные события. Платформа предоставляет инструменты для настройки правил записи и аналитики, обеспечивая гибкость и адаптацию к конкретным потребностям пользователя. распознавание в видеоаналитике
Отправки посылок и эта информация в 2-х местах прописана на сайте 2-10 РАБОЧИХ ДНЕЙ. В 99,9% случает сроки не нарушаются. https://bykov20.ru вот опять сегодня получил что заказал всё прошло ровно .быстро ,качество в этом магазине лучшее ,больше не где не заказываю .если нужно что то подождать я лучше подожду чем кидал буду кормить ,тоже влитал поначалу пока нашёл этот магазин ,по этому сам беру и друзьям советую .спасибо всей команде за отличную работу.с наступающими праздниками всех поздравляю.вообщем всем благодарочка.не вижу, в прайсе много чего
Evergreen Market – Browsing is effortless and items are visually appealing.
soft green shop – Navigation felt easy and products were simple to explore.
leaffallboutique – Easy to navigate, items are logically arranged and accessible.
поддерживаю !!!! https://gerbils-club.ru уже ожидается что нибудь?добрый день форумчане!)
rarefashionboutique – Well-laid-out sections and fast-loading pages, shopping felt hassle-free.
LunarHarvestMart Finds – Navigation felt natural and browsing items was quick and pleasant.
brightwinterstore – Products look appealing and navigation is smooth — a good shopping experience.
д не магаз рооовный так что не переживай все будет четко))) купить онлайн мефедрон, экстази, бошки Что сейчас с эйфором?пишут в асе, ваших треков мы не видим, с вами договаривался другой менеджер, типа вас вообще в списках нет, а до этого говорили посылка готова завтра отправят.
Your Growth Path – Daily advice for improving habits and achieving personal success.
EverWild Corner Shop – Easy navigation and fast-loading items made finding products simple.
Ertaklar olamiga xush kelibsiz! Bolalar uchun qiziqarli ertaklar, qisqa ertaklar matnlari, ertaklar kitobi va ajoyib ertaklar kinolari: bolalar uchun ertaklar o’qish
Cabin Creations Store – Everything is organized and easy to find.
Я уже год живу в Аликанте по digital nomad визе. Если у кого-то есть вопросы по жизни здесь — пишите!
https://www.wiki.klausbunny.tv/index.php?title=Digital_Nomad_22A
Go To The Emporium – I didn’t experience any lag, and the sensible layout made navigation simple.
Профессиональное https://www.wikiregia.de/wiki/Tamozhennoe-oformlenie_26b сопровождение москва, реально помогают с документами
А пока всё приходится делать в ручную, так что ОГРОМНАЯ просьба не пишите в аську\скайп с вопросами типа “как прёт ?” “ко скольки бодяжить ?” и т.п. ! Не загружайте людей ) https://ucheba-legko.ru Данный продукт не зашол в моё сознание:) его нужно бодяжить с более могучим порохом, будем пробовать АМ2233…стараемся для вас
Find the best dog parks near you in Canada. Discover off-leash, fenced, indoor, and private dog parks for your furry friend: how to find a clean dog park near me
shopcorner – Well-structured layout, products easy to explore, and navigation feels seamless.
Silver Moon Hub Online – Well-laid-out pages and logical menus helped me navigate quickly.
timber corner – Clean design and fast-loading pages made browsing enjoyable.
Обязательно позвонить должны, как позвонят легче забрать самому чем ждать пока курьер доставит https://i-tomat.ru пробовал 0,1гр ничего не было, пробовал 0,3 ничего не было, только мурашки на спинеПока писал этот пост на почту пришел трек ))) Ждал всего 1 день,респект оперативно.
True Horizon Corner – Products are neatly presented, and shopping feels natural.
browse the shop – Found the structure easy to understand and enjoyed scrolling through items.
hillcornercollective – Pleasant layout, items are easy to find and explore.
хороший магаз https://bazatelefonov.ru Успехов, здоровья и процветания вам в наступающем году. :bro:незнаю незнаю мне пришло за 2 суток и еще я обратился к селлеру и он предоставил всю полную информацию с адресом и номерами телефона курьерки
Доставка грузов https://china-star.ru из Китая под ключ: авиа, авто, море и ЖД. Консолидация, проверка товара, растаможка, страхование и полный контроль транспортировки. Быстро, надёжно и по прозрачной стоимости.
brightwillowboutique – Clean design and easy layout helped me find interesting items fast.
Dunyo xaritasi, 3D dunyo xaritasi, siyosiy dunyo xaritasi va boshqa turdagi xaritalarni ko’ring va yuklab oling. Onlayn dunyo xaritasi, 3D dunyo xaritasi sputnik va boshqalar: har bir mamlakatning dunyo xaritasi
Сделал тестовый заказ 28 мая, отправил e-mail с содержанием заказа, адресом доставки и просьбой прислать реквизиты оплаты. Ответа не получил. https://salon-miledy.ru Не вздумайте платить ему без Гаранта через которого он не работаем,этим самым доказывает свою не надежность!Всем привет ни как не могу заказ оформить, помогите,плиз
Naughty vixen eager to share her nude pics. Here — rb.gy/8rrwju?Illus
Iron Valley Emporium – Well-laid-out pages and visible products made choosing quick and simple.
Успешного травление нашей молодежи и побольше денег! https://mebelnazakazi.ru лучше недобздеть чем перебздеть!!! братуха я надеюсь и у тебя все будет ГУД! держи в курсеРебят, а подскажите насчет доставки спср, в какие города она доставляет ? Блин никогда раньше с ней не связывался 🙁 Расскажите пожалуйста, что, да как
Dream Path Hub – Creative ideas and encouragement to help you pursue goals and stay inspired.
rusticridgeboutique – Pleasant browsing experience, items are easy to view and site feels well structured.
Explore MidRiverDesigns – The product layout was simple and visually appealing.
BrightMoor Shop – Pleasant browsing thanks to clear menus and categories.
Доставка грузов https://lchina.ru из Китая в Россию под ключ: море, авто, ЖД. Быстрый расчёт стоимости, страхование, помощь с таможней и документами. Работаем с любыми объёмами и направлениями, соблюдаем сроки и бережём груз.
Whitestone Select – Effortless shopping with a neat and tidy interface.
Гастродача «Вселуг» https://gastrodachavselug1.ru фермерские продукты с доставкой до двери в Москве и Подмосковье. Натуральное мясо, молоко, сыры, сезонные овощи и домашние заготовки прямо с фермы. Закажите онлайн и получите вкус деревни без лишних хлопот.
shophub – Clean layout, fast-loading pages, and exploring items felt effortless.
Правило говоришь Бро! А про работу магазина могу сказать что он работает великолепно! купить Мефедрон, Бошки, Марихуану расширяться собираетесь?Отличный товар и цены. Зря так…
This Online Store – The ease of use and clear structure provided a truly comfortable shopping trip.
authoritygrowthengine.shop – Overall, professional vibe here; trustworthy, polished, and pleasantly minimal throughout.
clickoptimizationhub.shop – Appreciate the typography choices; comfortable spacing improved my reading experience.
digitalmarketingzone.shop – Content reads clearly, helpful examples made concepts easy to grasp.
leadconversionstudio.shop – Pages loaded fast, images appeared sharp, and formatting stayed consistent.
proleadgeneration.shop – Loved the layout today; clean, simple, and genuinely user-friendly overall.
перорально – эффекта 0 при меньших дозах, при больших – понос, рвота, чуваку скорую вызывали, давление 40/15 купить скорость, кокаин, мефедрон, гашиш Ты вообще нормальный и адекватный ? Ты сначала разберись куда ты писал а потом умничай. У меня адреса без фото и только опт. Судя по твоему нику ты из Екб, я в ЕКБ НЕ РАБОТАЮ И НЕ РАБОТАЛ.кролики ставят В\В, фашку от этого магазина по 0.07-0.15 нравится, только сушит сильно
suncrest finds – Fast-loading pages and organized layout helped explore items quickly.
Логистика из Китая https://asiafast.ru без головной боли: доставка грузов морем, авто и ЖД, консолидация на складе, переупаковка, маркировка, таможенное оформление. Предлагаем выгодные тарифы и гарантируем сохранность вашего товара.
hillfashionhub – Clean presentation, products are easy to locate and browse.
Независимый сюрвейер https://gpcdoerfer1.com в Москве: экспертиза грузов, инспекция контейнеров, фото- и видеопротокол, контроль упаковки и погрузки. Работаем оперативно, предоставляем подробный отчёт и подтверждаем качество на каждом этапе.
https://rich513.com/
Всем привет,брал у данного магазина. качество на уровне! спрятано просто огонь,клад четкий!!! купить кокаин, меф, бошки через телеграмм Снова магазин порадовал своей оперативностью) сдеал заказ, получил трек всё бьётся!да работаем только по прайсу
brightfallstudio – Enjoyed browsing here, items seem well curated and easy to explore.
horizonemporiumhub – Neat layout and clear sections, made finding items effortless.
Soft Feather Studio Shop – Organized pages and fast-loading products made browsing comfortable.
Всегда на высоте) https://partner-tgn.ru все как обычно работаетпонравилось очень!!!!!!
Надежная электроника с быстрой доставкой по всему Казахстану и без космических цен. Многие уже давно заказывают в Salemshop.kz: огромный выбор, реальные скидки каждый день, гарантия на все и отправка в тот же день – https://salemshop.kz/
bright corner – Navigation flows naturally and items are neatly presented.
екб есть в представителях, смотрите в представительствах https://56-detsad.ru свое сообщение исправилзнакомый брал, збс говорит
Silver Moon Treasures Online – The layout is clean and helped me find everything quickly.
Доставка грузов https://china-star.ru из Китая для бизнеса любого масштаба: от небольших партий до контейнеров. Разработаем оптимальный маршрут, оформим документы, застрахуем и довезём груз до двери. Честные сроки и понятные тарифы.
Онлайн-ферма https://gvrest.ru Гастродача «Вселуг»: закажите свежие фермерские продукты с доставкой по Москве и Подмосковью. Мясо, молоко, сыры, овощи и домашние деликатесы без лишних добавок. Удобный заказ, быстрая доставка и вкус настоящей деревни.
Если ситуация срочная или непонятно, куда обращаться, можно начать с консультации и уточнить, какие действия безопасны в вашем случае: https://hotline-help.ru/
Срач, оффтоп, провокации, в ветке магазина запрещены, буду банить за невыполнение правил! https://glossgirl.ru отличный селлер, всем советую!Дело не в постах. В любом случае нужно быть осторожным. И строить систему сложнее…
creategrow – The layout is tidy and navigating between items felt effortless.
Visit PineHill Studio – Simple structure and clean pages made browsing easy and comfortable.
Sunny Slope Choice – Simple navigation with a comfortable shopping experience.
digitalpresencelab.shop – Bookmarked this immediately, planning to revisit for updates and inspiration.
shop finder – Browsing felt natural and the categories were laid out clearly.
peacefulforeststyle – Shopping is comfortable, and products are clearly visible.
fullservicemarketing.shop – Overall, professional vibe here; trustworthy, polished, and pleasantly minimal throughout.
expertseostrategies.shop – Bookmarked this immediately, planning to revisit for updates and inspiration.
onlinebusinessbooster.shop – Content reads clearly, helpful examples made concepts easy to grasp.
prolevelmarketinghub.shop – Mobile version looks perfect; no glitches, fast scrolling, crisp text.
This Cozy Shoppe – The appealing displays and uncluttered pages created a truly pleasant experience.
открывайте все города все только рады будут купить онлайн мефедрон, экстази, бошки надо прятать по сложнееВ аське спросил продавца в чем дело? Была ли действительно отправка. Убеждает что была, это просто проблемы в курьерке, если в понедельник не забьется, будет звонить сам.
EverduneGoods Store – Nicely arranged sections made checking products quick and simple.
soft winter shop – Browsing was smooth and finding items felt effortless.
All details at the link: https://spb-oboi.ru/2025/10/27/%d0%91%d0%b5%d0%b7%d0%be%d0%bf%d0%b0%d1%81%d0%bd%d0%b0%d1%8f-%d0%bf%d0%be%d0%ba%d1%83%d0%bf%d0%ba%d0%b0-%d0%b0%d0%ba%d0%ba%d0%b0%d1%83%d0%bd%d1%82%d0%be%d0%b2-%d0%b4%d0%bb%d1%8f-%d0%bc%d0%b0%d1%80%d0%ba%d0%b5%d1%82%d0%b8%d0%bd%d0%b3%d0%b0/
New in the Category: https://recash.wpsoul.net/members/npprteamshopz/profile/
так что только желаю удачи магазину и процветания в дальнейшем купить скорость, кокаин, мефедрон, гашиш Успехов вам господа : )Все нормально,6-го заказал,8-го отправили. Оперативно
DeepBrook Finds – Well-organized pages and clear product images made browsing simple.
продолжайте работу в таком же духе. клады всегда целые и надежные, что очень радует! https://nutritionhelp.ru но я смотрю все на о6ломах тут такие ждут, а тут на те6е всё ровноПривет! В Наличии рега мощная 1к30 и скорость мука.
wild corner boutique – Fast-loading pages and tidy layout made shopping enjoyable.
Moon Haven Picks – Fast and user-friendly browsing made finding products a breeze.
магазин хороший,даже если высылат брак (было 1 раз) возврат делают сполна купить кокаин, меф, бошки через телеграмм Не стоит сомневатся в этом магазе он ровный и проверенный времен! Всегда на высоте!Заказывал небольшую партию)) Качество отличное, быстрый сервис)) в общем хороший магазин)
флудить в курилку https://dinaryar.ru Хороший сервис, хорошая команда = хорошие дела ) В том же духе двигаемся…)вот вот такая же история! надо разобраться с этим вопросом!
coastalgemhub – Smooth design, shopping flows naturally.
clickconversionpro.shop – Navigation felt smooth, found everything quickly without any confusing steps.
sunwave picks – Fast pages and neat categories made browsing enjoyable.
Timeless Harvest Store Shop – Browsing was enjoyable, with a well-organized layout that made everything easy to follow.
Vibe Picks – The catalog layout is intuitive, and exploring items is effortless.
marketingsupportcenter.shop – Color palette felt calming, nothing distracting, just focused, thoughtful design.
shop selections – Everything opened quickly and the professional design made the site enjoyable.
authorityranklabs.shop – Mobile version looks perfect; no glitches, fast scrolling, crisp text.
rankblaze.shop – Content reads clearly, helpful examples made concepts easy to grasp.
smartgrowthengine.shop – Mobile version looks perfect; no glitches, fast scrolling, crisp text.
Запеченные роллы — это что-то особенное, нори хрустит, а начинка тает во рту
https://wokerman.ru/
какой оптимальный недорогой способ доставки выбрать при небольшом заказе,если не почта?посоветуйте… https://56-detsad.ru если он такой делец,пусть тему свою создаёт!а так аферист,я бональный обаснованный вывод делаю!Обратились, всё довольно оперативно
freshcornerstore – Pages are clean and browsing feels natural, very smooth experience.
Wild Coast Boutique – Neat pages and visible items helped me find products comfortably.
PureStyleHub – Great products and easy browsing, I enjoyed exploring the collection.
LifestyleTrendyHub – Fresh and exciting articles, very engaging to read.
Everfield Home Store – The items are presented cleanly, and moving through the site was quick and hassle-free.
брал тут на днях, все прошло ровнее некуда, рекомендую, теперь это мой постоянный магазин) купить кокаин, меф, бошки через телеграмм Мне обещали бонус за задержку в 5 + 3 =8 грамм , так и прислали +))) спасибо.+)))Что то много новичков устраивают здесь флуд.А магаз на самом деле хорош.Помню его еще когда занимался курьерскими доставками,коспирация и качество товара было на высшем уровне.
moonstar boutique link – Items loaded quickly and the layout was easy to follow.
BM Corner – User-friendly interface made the experience enjoyable.
Или все ок у всех тут клиентов? купить онлайн мефедрон, экстази, бошки Это точно!) главное быть в этом уверенным. Да и ровненький магазин однакоМне отказали в подтверждении джаббера в ЛС. Будьте бдительны!
Sun Crest Picks – The interface felt tidy, helping me find items efficiently.
I don’t think the title of your article matches the content lol. Just kidding, mainly because I had some doubts after reading the article. https://accounts.binance.info/fr-AF/register?ref=JHQQKNKN
Решили мы тут значит с кентом несколько дней назад покурить . Вспомнили про сайт chem24.biz.ski и решили взять 2гр твердого, оплотили короче,описание адреса было простым и спрятано было грамотно!!! https://art-log.ru тоже самое взял ам в данном магазе чтоб не было сплетен тож отпишу за качество думаю мнение от 2 разных людей будет достаточно что бы не было вопросов :speak:Но могу сказать что на данный момент проблемы с отправкой у магазина! в среду оплатил и сказали в четверг будет отправка, но увы ее нет! такое в первый раз замечаю от такого магазина! будем ждать!
lunargemstore – Pleasant interface, finding products feels effortless.
everpeakcorner – Clean interface and clear product display helped make browsing smooth and easy.
wild river picks – Clear layout and neat presentation made shopping enjoyable.
shop now – Loved the smooth transitions and the tidy presentation of items.
Все радует в работе магазина,да и приходит с бонусом.Единственное что немного долго ждать отправки,притом что сама посылка после отправки доходит даже меньше чем за сутки. https://fslgg.ru Представитель был Магазин на форуме Бивис и Бадхед, на сколько я знаю он работает, он у нас был представителем.магазин четкй притензий нет на качество регвезде гавно(((((
Платформа для работы https://skillstaff.ru с внешними специалистами, ИП и самозанятыми: аутстаффинг, гибкая и проектная занятость под задачи вашей компании. Найдем и подключим экспертов нужного профиля без длительного найма и расширения штата.
Rustic River Studio Link – Smooth experience with homely visuals made exploring pleasant.
Клиника проктологии https://proctofor.ru в Москве с современным оборудованием и опытными врачами. Проводим деликатную диагностику и лечение геморроя, трещин, полипов, воспалительных заболеваний прямой кишки. Приём по записи, без очередей, в комфортных условиях. Бережный подход, щадящие методы, анонимность и тактичное отношение.
Soft Leaf Picks Hub – Simple interface and visible items made browsing stress-free.
clickmarketingcenter.shop – Content reads clearly, helpful examples made concepts easy to grasp.
Отличный товар и работают ребята без перебоев https://ural-print.ru Да до празников не всем выслали, сегодня отдали в курьерку очередную пачку посылок, всем все придет скоро.Достойный магазин
digitalperformancelab.shop – Color palette felt calming, nothing distracting, just focused, thoughtful design.
powerfulgrowthagency.shop – Loved the layout today; clean, simple, and genuinely user-friendly overall.
creativeclicksagency.shop – Bookmarked this immediately, planning to revisit for updates and inspiration.
PureStyleCollection – Trendy items and a smooth shopping experience, truly enjoyable.
superiorrankingstudio.shop – Navigation felt smooth, found everything quickly without any confusing steps.
studio marketplace – Items loaded fast and the interface feels intuitive.
ModernLifestyleCorner – Content is vibrant and interesting, kept me hooked.
День добрый, пишу свой отзыв, вернее назвать его извинением. Опишу ситуацию, не помню когда и не столь это важно, но недавно был сделан заказ, на n-ое количество cmh-400. купить кокаин, меф, бошки через телеграмм сегодня оплатил заказ..буду ждать доставки..протестирую.сообщу о качестве продукта?но с другой стороны, селлер не должен и не обязан объяснять что это такое и с чем его едят. Здесь продаются КОНКРЕТНЫЕ в-ва, а не какие то А1, В2 и иже с ними. Так что можно узнать и самим. И если вас так интересует качество\особенности товара от данного продавца, так не поленитесь в случае заказа отписать о полученном стаффе\особенностях, меньше мороки будет другим. А то заказывают сотни, отзывы пишут единицы, и то больше “зашибись !” или “аааа, не прёёёёёт !!!111”. Выдавайте сами побольше информации.
Lush Meadow Collection – The website design is clear, making product discovery simple.
Starlight Forest Online – I loved how the organized approach made discovering new products so easy.
быстрая доставка однако тут))) купить скорость, кокаин, мефедрон, гашиш Братки все красиво стряпают, претензий к магазину нуль, всегда всё ровно. Единственное что сейчас напрягло, отсутствие на ветке вашего представителя в ЕКБ “онлайн”, представитель молчит ( а там по делу ему в лс отписано) и кажись воопще не заходит пару недельгрозный луи оставил отзыв о магазине
Колодцы под ключ https://kopkol.ru в Московской области — бурение, монтаж и обустройство водоснабжения с гарантией. Изготавливаем шахтные и бетонные колодцы любой глубины, под ключ — от проекта до сдачи воды. Работаем с кольцами ЖБИ, устанавливаем крышки, оголовки и насосное оборудование. Чистая вода на вашем участке без переплат и задержек.
Инженерные изыскания https://sever-geo.ru в Москве и Московской области для строительства жилых домов, коттеджей, коммерческих и промышленных объектов. Геология, геодезия, экология, обследование грунтов и оснований. Работаем по СП и ГОСТ, есть СРО и вся необходимая документация. Подготовим технический отчёт для проектирования и согласований. Выезд на объект в короткие сроки, прозрачная смета, сопровождение до сдачи проекта.
cloverhubshop – Smooth layout, products are well organized and simple to browse.
brightvillagecorner – Items look appealing and layout feels user-friendly and welcoming overall.
У меня пришел чисто белый зернистый как крупа порошок.Кал. купить онлайн мефедрон, экстази, бошки Дружище, если ты не понял, нам магазин в пятницу и здесь и везде перестал отвечать. Продавец принимал деньги до пятницы 17:00, и то (почитай ветку) тянул с треками. А потом пропал. Форум этот тоже больше не имеет той волшебной силы, что была раньше. Вместо того, чтобы составлять мнение о магазе, дибилы просто отписывают во все ветки без разбора “магаз улет” и “все ровно”, чтобы нужное количество сообщений набрать и умоляют о новых тестерах.подарок! Мне очень понравился
shop the leaf – Items are well displayed and moving through categories was easy.
cool trends – Browsing felt simple and the product layout made everything look organized and attractive.
Tall Pine Online Picks – Easy-to-find items and organized layout made shopping quick.
https://towing.com.pl
wildmeadowhub – Neatly arranged pages with smooth navigation made shopping effortless.
если нет, то когда будет? купить скорость, кокаин, мефедрон, гашиш Блин че мне нравится в чемикале то как работает человек….всегда ясно все говорит и поЯсняет….не будет 307го. ожидается 203, 250, rcs-4 и 1220й… вот что мне сказали в той же аське, где спрашивал ты )
Fresh Pine Essentials – Well-laid-out pages and fast-loading items made picking products easy.
Soft Blossom Studio Site – Calm and soft visuals created a relaxing experience while browsing items.
Доставка дизельного топлива https://ng-logistic.ru для строительных компаний, сельхозпредприятий, автопарков и промышленных объектов. Подберём удобный график поставок, рассчитаем объём и поможем оптимизировать затраты на топливо. Только проверенные поставщики, стабильное качество и точность дозировки. Заявка, согласование цены, подача машины — всё максимально просто и прозрачно.
Доставка торфа https://bio-grunt.ru и грунта по Москве и Московской области для дач, участков и ландшафтных работ. Плодородный грунт, торф для улучшения структуры почвы, готовые земляные смеси для газона и клумб. Быстрая подача машин, аккуратная выгрузка, помощь в расчёте объёма. Работаем с частными лицами и организациями, предоставляем документы. Сделайте почву на участке плодородной и готовой к посадкам.
Строительство домов https://никстрой.рф под ключ — от фундамента до чистовой отделки. Проектирование, согласования, подбор материалов, возведение коробки, кровля, инженерные коммуникации и внутренний ремонт. Работаем по договору, фиксируем смету, соблюдаем сроки и технологии. Поможем реализовать дом вашей мечты без стресса и переделок, с гарантией качества на все основные виды работ.
Можно. Курьер приходит всего один раз и если он не застал Вас дома, то придется идти к ним в офис с паспортом, чтоб забрать посылку. Еще можно вместо адреса указать «до востребования», тогда так же придется забирать ее самостоятельно. https://prof-fitnes.ru кто нить последнее время покупал чего ??? всё ровно ?салют бразы ) добавляйте репу не стесняйтесь всем удачи))
sunlit collection – Navigation felt natural and products were easy to find.
QuickSelectHub – Items were simple to find, checkout was very smooth and fast.
Harbor Home Shop – Smooth and efficient navigation made exploring products pleasant.
всё посылка пришла всё ровно теперь будем пробовать ) купить онлайн мефедрон, экстази, бошки Пожалуйста :ok: Спасибо за отзыв.да по поводу точто все у них медленно спору нет)
Crash здесь просто бомба — 175 человек онлайн, ставки улетают в космос! Регистрация через Google или ВК — секунда дела. Бонусы начисляются мгновенно, рекомендую всем!
https://artpandaonline.ru/
новости беларуси 2025 новости спорта беларуси
Крупный кракен маркетплейс предлагает удобную систему поиска товаров с фильтрами по цене, рейтингу продавца и способу доставки заказов.
Геосинтетические материалы https://stsgeo.ru для строительства купить можно у нас с профессиональным подбором и поддержкой. Продукция для укрепления оснований, армирования дорожных одежд, защиты гидроизоляции и дренажа. Предлагаем геотекстиль разных плотностей, георешётки, геомембраны, композитные материалы.
Check Out The Collective – Browsing was quick and hassle-free thanks to the great range and smart design.
они долго кормили завтраками с отправкой, а потом и вовсе закрылись… купить скорость, кокаин, мефедрон, гашиш Что есть то естьКакие магазины тебе написали про меня в личку? Что это за бред?! Я 2 дня назад зарегистрировался и все мои сообщения только в твоём топике. Или другим магазинам на столько важны твои отзывы и репутация, что они сидят в твоей теме и пишут кто, о ком и как думает?
LivingMarketTrends – Shopping was smooth, products arrived quickly and in great condition.
shop stone picks – Clean interface and fast pages made exploring simple.
wildleafmarket – Smooth interface, products are clearly visible and simple to explore.
revival picks – The arrangement helped me find things fast and enjoy the visit.
discover items – Everything opened quickly and the layout made navigating very straightforward.
А я так понимаю, что у данного магазина просто не мало оптовых покупателей, и им уделяется больше внимания. купить Кокаин, Мефедрон, Экстази Желаю вам удачи в дальнейшей работе)Да уж дживики мощные…только наврятли они у него есть.Ладно будем ждать прояснений.мне тоже не платную не бесплатную не дал пробу.и заказ 50 на 50 отказался сделать.
Доставка грузов https://avalon-transit.ru из Китая «под ключ» для бизнеса и интернет-магазинов. Авто-, ж/д-, морские и авиа-перевозки, консолидация на складах, проверка товара, страхование, растаможка и доставка до двери. Работаем с любыми партиями — от небольших отправок до контейнеров. Прозрачная стоимость, фотоотчёты, помощь в документах и сопровождение на всех этапах логистики из Китая.
Lush Grove Studio Shop – Easy-to-navigate design and organized products made finding items fast.
Thanks for sharing. I read many of your blog posts, cool, your blog is very good. https://accounts.binance.com/fr-AF/register?ref=JHQQKNKN
https://riles.upd.edu.ph/index.php/gis/b03-mmetroplan-1977/?unapproved=304404&moderation-hash=5f6d08f3f39f6631763960477d085153
чувак брал я тоже тут 2 ci некоторым понравилось некоторым нет , лично я поднимал даже с неё бабок норм, народу нравиться , а если этот каиф тебе не нравиться нех писать что тусишка бычий кайф , бычий каиф немного другое, а такои продукт не может быть бычий кайф это я тебе отвечаю, со входом согласен по ноздре ваще не вариант ! купить скорость, кокаин, мефедрон, гашиш Ооо да, тусишка у них лучшая из того – что мне доводилось пробовать ))у меня знакомец с их магазина закупился его с черта какого то мусора взяли! че к чему не знаю но факт есть факт! может и не они виноваты, но он мелкий торгаш и принимать с сотней его не в тему
https://newru.getbb.ru/viewtopic.php?f=41&t=6599
shop soft collection – Smooth navigation and neatly displayed items improved the experience.
https://towing.com.pl
MoonView Online – A visually refreshing design, with items clearly displayed for quick navigation.
Wild Ridge Online – Smooth interface and clear organization made exploring products simple.
Продаван молчит, что будет дальше не известно, мне сделал но не все.отписался, жду результатов купить Мефедрон, Бошки, Марихуану заказывал уже недельку назад, все пришло качество хорошее делал 250 1 к 9ти вполне на час полтора хорошего эфектаПро Ам1220 здешний известно что нибудь…?
BrightGrove Hub Store – Really liked how smoothly everything loaded during my visit.
Статья про выбор генератора для стройки — прям в точку, взял открытый на раме, шум не мешает, мощности хватает на весь инструмент.
Review my site – https://pakstore.ru/
ChoiceHubOnline – Clean layout and easy-to-find products, made shopping simple.
https://www.aveclassics.net/forum/post.php?mode=post&f=3456
https://www.ted.com/profiles/50731851
https://sadcr.listbb.ru/viewtopic.php?f=53&t=3535
https://social.gevinsttech.in/blogs/16/%D0%9F%D1%80%D0%BE%D0%BC%D0%BE%D0%BA%D0%BE%D0%B4-1%D1%85%D0%B1%D0%B5%D1%82-%D0%A1%D0%BE%D0%B2%D0%B5%D1%82%D1%8B-%D0%BF%D0%BE-%D0%B2%D1%8B%D0%B1%D0%BE%D1%80%D1%83
Товар радует! Было дело забегал за соточкой! Все ровней линейки! https://galvanika-barnaul.ru Что касается Самой СПСР то в ней ничего такого страшного нет…Ну теперь к самому главному – качество!
shop cloud gallery – Clear interface and smooth navigation made exploring simple.
truewaveemporiumstore – Pleasant browsing experience, layout is tidy and easy to navigate.
А теперь к делу.. магаз ровный, товар ..вставляет епт..особенно в прошлый раз, пол часа ждал, что из ванной вылезет оно и покарает меня…хорошо быстро отпускает, а то вода остыла уже и сига стлела и хабарик упал так , что сам не заметил… купить кокаин, меф, бошки через телеграмм вот и я уже трясусь.Вас не будет эйфоретик убивать или сносить голову как Ск или еще какая хрень, тут легкий эффект эйфории с диссоциативом, Так сказать на любителя, просьба не путать продукт, вы прежде чем заказывать должны были ознакомится с веществом, можно погуглить и узнать что это такое, не надо утверждать что эйфоретик не прущий можете зайти в соседние темы там пишут совсем другие отзывы, а вас почему то не торкает оно как так.
wild hub link – Clear layout and intuitive design helped locate products easily.
this online store – The site felt clean and easy to move around, which made browsing surprisingly pleasant.
Savanna Goods Hub – A comfortable browsing experience with well-displayed items throughout.
UrbanTrendsHub – Site is simple to navigate with a great variety of products.
honestgrovehub – Pages are tidy and easy to navigate, making shopping effortless.
Coastline Picks – Easy-to-read layout and neat visuals made shopping quick and easy.
Магазин работает на 5+++++, я уже раз 5 беру у данного сейлера все ровно все катит, качество на высоте! https://memstory.ru как здесь стелят?итоги:
Текущие рекомендации: погода в алматы
https://theclimb.es/art/codigo_de_bono_de_dinero_gratis_de_1xbet.html
shop misty hub – Smooth scrolling and clear sections made finding items easy.
СРО: апелляции в спорах. Поддержка.
Here is my web blog https://kotelinaya.ru/
Успешного травление нашей молодежи и побольше денег! купить скорость, кокаин, мефедрон, гашиш В каких пропорциях???большое спасибо продавцу и нашему времени :yeah::drug::rest: – пусть дальше будет еще круче :crazy:, быстрее :superman:, веселее :dansing: и ДОБрее
Mountain Sage Collection – Smooth interface and organized categories made discovering items effortless.
заказать проститутку на час
Анонимный кракен вход защищен капчей из восьми букв на русском языке для предотвращения автоматических атак и брутфорса паролей.
Shop EverForest – I liked the range of products, plus the pages opened quickly with no lag.
Магниты рулят, не меняйтесь) https://oooaleks.ru у меня в подписи проверьВсем доброго времени суток 😉 заказал у ув ТС продукции немного, жду трек сегодня должен быть))) впервые обратился к данному сселеру надеюсь все пройдет на уровне. Как и что оценю и выложу. краткий трипчик по продуктам если понравится то сработаемся ))))) всем удачных покупок и продаж;)
Strona internetowa mostbet – zaklady sportowe, zaklady e-sportowe i sloty na jednym koncie. Wygodna aplikacja mobilna, promocje i cashback dla aktywnych graczy oraz roznorodne metody wplat i wyplat.
smarttrafficboost.shop – Content reads clearly, helpful examples made concepts easy to grasp.
https://paladarplus.es/pgs/platye_dlya_figury_treugolynik.html
http://centroculturalrecoleta.org/blog/pages/?1xbet_registration_promo_code.html
LearnWithPassion – Creative approaches to make discovering new ideas exciting.
gold boutique access – Browsing felt natural and product sections were easy to follow.
maximumtrafficservice.shop – Bookmarked this immediately, planning to revisit for updates and inspiration.
creativegrowthagency.shop – Navigation felt smooth, found everything quickly without any confusing steps.
seoagencysolutions.shop – Content reads clearly, helpful examples made concepts easy to grasp.
onlinerankingstudio.shop – Bookmarked this immediately, planning to revisit for updates and inspiration.
А чего брали то? https://cscvod.ru 5мг реально из области фантастики…желаю попробыватьНу, красавы. Вечером оплатил на следующий день отправили
stonecornercollective – Clear design, shopping feels smooth and relaxed.
Odkryj mostbet casino: setki slotow, stoly na zywo, serie turniejow i bonusy dla aktywnych graczy. Przyjazny interfejs, wersja mobilna i calodobowa obsluga klienta. Ciesz sie hazardem, ale pamietaj, ze masz ukonczone 18 lat.
market hub link – Navigation felt intuitive and products loaded quickly.
Got a breakdown? https://locksmithsinwatford.com service available to your home or office.
top picks – Appreciated how neatly everything was put together; items were easy to look through.
Дай думаю зайду поздороваюсь с мамонтами опасного бизнеса.:hello: купить онлайн мефедрон, экстази, бошки да работаем только по прайсуМагазин работает? пишу в ЛС и Джабер везде тишина, ответа нет!((
https://towing.com.pl
https://ingenerstore.ru/
Ever Crest Woods Collection – A fresh, uncluttered design made scrolling through items enjoyable.
Хочешь айфон? айфон купить спб выгодное предложение на новый iPhone в Санкт-Петербурге. Интернет-магазин i4you готов предложить вам решение, которое удовлетворит самые взыскательные требования. В нашем каталоге представлена обширная коллекция оригинальных устройств Apple. Каждый смартфон сопровождается официальной гарантией производителя сроком от года и более, что подтверждает его подлинность и надёжность.
Wild Meadow Studio Shop – Clean layout and clear visuals made browsing products simple and pleasant.
Читать расширенную версию: https://medim-pro.ru/analiz-enterobioz-kupit/
бонус пускай шлют https://topmefkup.biz все гуудхороших отзывов – полно ) просто многие не пишут особо о качестве товара. пришло, прёт, зашибись.
pine corner – Clean design and fast-loading pages made exploring simple.
ShopTrendyGlobal – Easy ordering today, really satisfied with the offers.
Silver Maple Treasures – Layout is neat, allowing for fast and enjoyable exploration of items.
medved20-10 не еби людям голову!!!!!!!!!!! микс отличный, но на час-1,5! Не больше…… купить онлайн мефедрон, экстази, бошки Магазин Красавчик , желаю отличных продаж ))))Огромное спасибо данному магазину, успехов вработе и процветания!!!?
Looking for a chat? emerald chat gold A convenient Omegle alternative for connecting with people from all over the world. Instant connection, random chat partners, interest filters, and moderation. Chat via video and live chat with no registration or payment required.
northern collection – Navigation felt natural and products were visually appealing.
Хочу заказать для ознакомления АМ-2233 1гр., но отдавать 750 за доставку 1 грамма – имхо глюк купить Мефедрон, Бошки, Марихуану Какой цвет продукта(MN-001) ?клад забрал, все ровняк! завтра отпишу за качество!
Visit Autumn Mist – This shop gives off a warm vibe and the product info seemed really easy to follow.
leafsoftemporiumhub – Items are displayed clearly, browsing feels smooth and natural.
DailyDealStore – Wonderful deals and products that exceed expectations.
ремонт памяти компьютера
центр ремонта ноутбуков
все быстро замутили купить скорость, кокаин, мефедрон, гашиш драмчик, хаус… да не суть.Флуд??? Я высказал свое мнение! Или это запрещено?
https://autolocksmithsstatenisland.com/
shoppe hub – Pages load quickly and browsing feels comfortable.
shop creations – The aesthetic is soft and appealing, and the product layout makes browsing effortless.
шлюха 18 порно массаж
Lunar Wood Marketplace – Simple design and well-organized products made exploring smooth and enjoyable.
Оформление медицинских анализов https://medim-pro.ru и справок без очередей и лишней бюрократии. Запись в лицензированные клиники, сопровождение на всех этапах, помощь с документами. Экономим ваше время и сохраняем конфиденциальность.
Спасибо за отзыв , а то заказывает много людей а отписываются единицы. купить скорость, кокаин, мефедрон, гашиш 2.Почему на сайте нет ниодного упоминания о ритейле,в то время,как заказы надо делать через него?Хороший магазин тоже не раз уже к нему обращался я считаю что этот магазин достоин огромного внимание ! Мир тебе бро и процветания удачи в работе !:ok:;)ОБРАЩУСЬ ЕЩЕ К ТЕБЕ БРО ОБЯЗАТЕЛЬНО !) ЕЩЕ РАЗ УДАЧИ
harborstylehub – Clean layout with tidy product listings, shopping was simple.
moonfield picks – Smooth interface and neatly displayed products improved browsing.
digitalconversionlab.shop – Navigation felt smooth, found everything quickly without any confusing steps.
у Вас очень серьезные проблемы. https://the-gentlemens.com “Думаю надо заглянуть в аптечку Мож завалялось и да Чудо они есть решаюсь попробовать и Вы не поверите одно и тожЕ”Доброга времени суток, закладки в москве делаете?
ultimaterankbooster.shop – Overall, professional vibe here; trustworthy, polished, and pleasantly minimal throughout.
backlinkhub.shop – Loved the layout today; clean, simple, and genuinely user-friendly overall.
webauthorityboost.shop – Mobile version looks perfect; no glitches, fast scrolling, crisp text.
globalmarketingexperts.shop – Loved the layout today; clean, simple, and genuinely user-friendly overall.
TrendLoversOnline – Enjoyed exploring the site, everything felt quick and intuitive.
Dream Haven Portal – The straightforward structure made exploring the store feel natural.
А будет какая нибудь подробная инфа или трип репорты? А лучше пробники платные или бесплатные? купить Мефедрон, Бошки, Марихуану Всё здорово спасибо ВамОтлично! Ждём свои наборы юнного химика … 🙂 или наркомана… ?
ExpandYourGrowth – Motivational content with clear, helpful advice for personal development.
shop field boutique – Smooth scrolling and fast pages made finding items effortless.
brightoakhub – Clear design, products are well categorized and simple to explore.
отличный селлер, всем советую! купить кокаин, меф, бошки через телеграмм Да и вообще:брал тут туси совсем недавно.все устроило.спасибо.жду обработки второго заказа)
EverHollow Online – The browsing experience was seamless, and each category was labeled clearly.
pure wave picks – Fast-loading pages and a neat look made the whole experience pleasant.
green marketplace – I could explore products easily thanks to the intuitive design.
Выходные же. В понедельник наврятли отправить успеют. https://abbiategrassoenoteca.com 1к10 и до здравствуют полноценные 50 мин. шикарного позитивного эффектаМАГАЗИНУ надо бы по ровнее работать!
wildgroveemporium – Items are well arranged and navigation feels intuitive — nice overall experience.
future hub link – Clean layout and intuitive design made browsing comfortable.
спасибо , стараемся для людей купить онлайн мефедрон, экстази, бошки Магазин лутше не встречал!!!!бля ты всех тут удивил!!! а мы думали тебе нужен реагент для подкормки аквариумных рыбок)))
трек получил в четверг до сих пор не бьётся. Как что изменится отпишу купить скорость, кокаин, мефедрон, гашиш “Думаю все угорали по детству Делали дымовушку “Гидропирит VS Анальгин”И всем форумчанам!!!
Urban Studio Shop – Navigation felt natural and all products were well presented.
https://www.japanesewomenorg.com/read-blog/67727
https://www.interamericano.edu.bo/events/bolmuncruz/#comment-83919
https://blogs.cornell.edu/cornellmasterclassinbangkok/comment-page-439/#comment-164619
Главное не кипишуй, продаван ровный, придет сам обрадуешся что тут затарился! купить Кокаин, Мефедрон, Экстази опробовал и такая же фигня получилась..прет так: становиться на пол часа-час прикольно,все интерессно,эйфории вообще нет или она очень слабая( очень разочаровала сдешняя фофа..Твой стафф офигенен.
https://rodina.listbb.ru/viewtopic.php?t=5140
FindDealsFast – Everything looked clean and the savings were displayed in a way that made sense.
leafsilvercollective – Smooth navigation, layout feels calm and easy to use.
GrowthWithWill – Very easy to follow, advice is practical and inspiring.
в курске у стаффсторе лутше не брать за кладом надо ехать с граблями и лопатой сугробы копать иначе никак купить Кокаин, Мефедрон, Экстази спасибо за пожеланияне в курсе
Rocket Casino
organicgrowthcenter.shop – Loved the layout today; clean, simple, and genuinely user-friendly overall.
highland shop – Navigation felt smooth and products were easy to find.
BrightPetal Hub Store – The site is clean and the products are easy to browse.
EverWillow Browse – The shop feels friendly, with items arranged in a way that’s simple to explore.
ultimaterankboost.shop – Loved the layout today; clean, simple, and genuinely user-friendly overall.
seoenhancementpro.shop – Color palette felt calming, nothing distracting, just focused, thoughtful design.
brandvisibilitypro.shop – Pages loaded fast, images appeared sharp, and formatting stayed consistent.
strategicseoagency.shop – Bookmarked this immediately, planning to revisit for updates and inspiration.
a href=”https://pureforeststudio.shop/” />pureforestcorner – Clear product displays and tidy design, made finding items effortless.
заказал не мало,всё пришло за кач не знаю как опробуют кролы отпишу https://noded.biz Лучший магазин !!!ЧЕРЕЗ АСЮ
LunarBranchStore Goods – Quick loading and well-organized categories helped browsing flow.
wild access – Clear sections and responsive design made browsing effortless.
The best undress ai for digital art. It harnesses the power of neural networks to create, edit, and stylize images, offering new dimensions in visual creativity.
Реактивы отличного качества. Особенно JWH серия купить кокаин, меф, бошки через телеграмм “Подходит время Раздачи”Магазин супер!!!
привет бразы, хочу нахватить вот реги, что за качество скажите? надеюсь не 15 минутка? https://i-business.biz Давай номер заказа, не обоснованные заявления, в личку пришло сообщения что ты разводила….бро ответь в лс, сделаю заказ
CreateYourPath Guide – Really enjoyed browsing through this today; everything felt refreshingly clear.
brightwovenstore – Products are well categorized, interface is comfortable to use.
сервис 10\10 нигде дешевле и лучше на рынке легал сейчас нету!!! купить Кокаин, Мефедрон, Экстази Причем здесь стаффстор ко мне ?Да я ж тебе говарю курьерка такая….)не парься!они с мониторингом просто тупят круто!тем более легал!
Врываясь в мир, где каждый спин – это удар током, Mellstroy Casino бьет рекорды по скорости и честности. Здесь нет места для томительных ожиданий: регистрируешься за секунды, пополняешь счет мгновенно и сразу ныряешь в гущу событий. Платформа, построенная на принципах, где игрок рулит процессом, собирает под крышей тысячи слотов от Pragmatic Play и NetEnt, живые столы с дилерами в реальном времени и эксклюзивные машины, заточенные под быстрые выигрыши. А если душа просит не только рулетки, но и футбола – Mellstroy Bet под рукой: ставки на матчи в прямом эфире, с коэффициентами, что меняются на лету, и аналитикой, которая помогает угадать ход.
Бонусы здесь не ловушка с мелким шрифтом, а реальный подгон: с ходу – фриспины и удвоение депозита, еженедельно – кэшбэк без отыгрыша, а для тех, кто в теме, турниры с жирными призами и статусом. VIP-клуб – отдельная песня: личный менеджер, повышенный возврат и доступ к закрытым акциям, где лимиты уходят в минус. Деньги приходят и уходят без задержек – карты, кошельки, крипта, все под защитой лицензии, без комиссий и сюрпризов.
Играй с телефона, не ставя приложения: интерфейс летает, графика цепляет, а поддержка на связи круглосуточно – чат, телеграм, почта, без бюрократии. Mellstroy – это не просто казино, а место, где удача подстраивается под твой ритм, а каждый раунд оставляет вкус победы. Готов проверить?
Here is my web blog – https://soyuzforma.ru/
ultimatetrafficnetwork.shop – Color palette felt calming, nothing distracting, just focused, thoughtful design.
Soft Forest Treasures Hub – Well-laid-out pages and visible products allowed for easy selection.
premiumtrafficengine.shop – Bookmarked this immediately, planning to revisit for updates and inspiration.
KnowledgeIsPower – Lessons are concise, well-explained, and easy to follow.
FashionTrendPoint – Loved the variety of outfits; everything displayed smoothly and neatly.
Chemical-Mix, хочу заказать 50г. АМ, но на сайте написано что 50грамм нет на складе. купить Мефедрон, Бошки, Марихуану Имею давний опыт работы с этим магазином.Сервис здесь один из лучших,всё делается оперативно вопросов нет.В последний раз заказал СНМ 50 и СНМ 55 по 50 гр обоих.По опыту знаю,что если один каннаб не айс,то в паре с любым другим он хоть как-то вытягивает.Но в этот раз пришло два пакета с одинаковым мелким белым порохом с сильным запахом нафталина.По весу всё замечательно,щедро подсыпано +50%.Только одно но.Данный реагент-чисто удобрение.Делал 1к5 кипячением в ИПС.Растворение хреновое,молоко.Хрень.Ну ладно,курили чистый порох из обоих пакетов.Хрень.Никто в здравом уме данным продуктом не заинтересуется-вывод не менее чем десяти тестеров.Короче я в попадосе.Уважаемы участники форума!
onlinesuccesssystem.shop – Overall, professional vibe here; trustworthy, polished, and pleasantly minimal throughout.
authorityrankingstudio.shop – Appreciate the typography choices; comfortable spacing improved my reading experience.
onlinegrowthengine.shop – Content reads clearly, helpful examples made concepts easy to grasp.
MoonGrove Gallery Shop – The site looked very polished, and navigating through pages was quick and smooth.
Это мы и так все знаем купить Мефедрон, Бошки, Марихуану Уважаемый, Chemical-mix.com, я новичок что на легале, что в джабере, что где либо ещё… не получается выйти на связь, проблема с покупкой, в джабере написано, на сайте не онлайн… ответь пожалуйста в jabber… Зарание большое спасибо…Не прогадал) Искупался, доставили пиццу, вискарика дернул со льдом…
Free video chat emerald chat login find people from all over the world in seconds. Anonymous, no registration or SMS required. A convenient alternative to Omegle: minimal settings, maximum live communication right in your browser, at home or on the go, without unnecessary ads.
ну я тоже надеялся что лучше жвш он . но к сожалению я разочаровался в нём. держит не долго совсем купить кокаин, меф, бошки через телеграмм Спрашивай в жаббер, там больше 10-15 минут задержки с ответом не бывает.проверенный временем магазин, все ровно , все быстро
Shop EverMapleCrafts – Nicely presented items made the browsing experience feel relaxed.
Wild Spire Hub Online – Logical menus and organized layout made finding items fast.
CreateYourPath Guide – Really enjoyed browsing through this today; everything felt refreshingly clear.
с утра в работу поставим, не волнуйся!!! просто менеджер у нас очень ответственный, считает каждую копейку, таких людей очень мало… купить кокаин, меф, бошки через телеграмм Отличное качество товарамагаз то работает сейчас?Есть курьерка по москве?
Brightline Creations Hub – Easy-to-read layout and visible images helped me pick items fast.
Сейчас забегал курьер но без звонка поймал небольшую пароною ведь 203 уже нелегал но всё обошлось всё забрал вес отличный спасибо селеру за быстроту за 3 дня вот это скорость самый наеровнейший магаз и качество полюбому 5+ я уверен как всегда ну это я уже в другой ветке отпишу по пояже как сделаю. купить онлайн мефедрон, экстази, бошки составите конкуренцию известно кому :monetka:А ты тс в лс отпиши , и если ты не балабол , в чем я очень сомневаюсь то проблема будет решена , а писать на ветке это говно для чего не понятно , на что вы надеетесь
Trend & Style Hub Deals – Loved the mix of styles here, and the site felt lively and easy to explore.
PathFinderHub – Lots of inspiring resources, and browsing is straightforward.
urbanwillowstylehub – Well-laid-out pages and neat design, browsing was enjoyable.
BudgetVault – Nice assortment, navigating the site felt simple and comfortable.
virallaunch.shop – Pages loaded fast, images appeared sharp, and formatting stayed consistent.
Скажу одно это вещь крутая!!! купить скорость, кокаин, мефедрон, гашиш Помнится ф16 на пробу получал. Хороший синт.гарсон был.Однажды тормознули его два обкуренных в ноль пацаненка. Один из накуренных засовывает голову в окошко и говорит:
focusedgrowthagency.shop – Pages loaded fast, images appeared sharp, and formatting stayed consistent.
FashionTrendsOnline – Fast delivery, trendy items, and excellent quality.
nextgenmarketinghub.shop – Color palette felt calming, nothing distracting, just focused, thoughtful design.
brandsuccessstudio.shop – Loved the layout today; clean, simple, and genuinely user-friendly overall.
growthpilot.shop – Bookmarked this immediately, planning to revisit for updates and inspiration.
TrendSpotOnline – Trendy finds presented neatly and navigating through pages was effortless.
Silver Hollow Portal – Clean, stylish design with items that are clearly showcased and detailed.
Deja de medir tu amor por la profundidad de tu tormento. Visita https://lasmujeresqueamandemasiadopdf.cyou/ las mujeres que aman demasiado resumen
Написано же везде, что суббота и воскресенье – выходные дни. Надо же менеджеру отдыхать когда-то купить Мефедрон, Бошки, Марихуану Рашн хлидейс вы правы, мы же тоже люди 🙂 треки наверное на отправке в базу не внесли, а шас у них же тоже праздники, но не волнуйтесь копии накладных то у нас ;)Привет всем Тсу движек
Moonglade Finds Online – Simple layout and clear presentation made browsing quick.
Gift Pick Zone – Browsing was smooth and the items looked thoughtfully arranged.
у меня 203 1к8 получался вообще жестокии делал на растворителе для снятие лака с ногтей (без ацетона) https://lescarnetsdedameplume.com наблюдая за Вашей темой пришел к важному выводу:думайте, что продаёте. обещали поменять на туси, время тянут, ниче сделать не могут конкретного. отвечают редко.
Мне обещали бонус за задержку в 5 + 3 =8 грамм , так и прислали +))) спасибо.+))) купить онлайн мефедрон, экстази, бошки хм.. интересно сказал.. никогда не задумывался.. получается что толер от принятия одного вещества влияет на другое вещество???незнаю незнаю мне пришло за 2 суток и еще я обратился к селлеру и он предоставил всю полную информацию с адресом и номерами телефона курьерки
BrightPeak Select – Smooth browsing experience with clear images helped me pick items easily.
FashionStreet Deals – Smooth experience with standout pieces and an easy checkout flow.
OpportunityQuest – The website showcases products nicely and loads fast.
ModernTrendsHub – Good selection of items, browsing felt easy and intuitive.
Как часы купить Мефедрон, Бошки, Марихуану В Бросике по- прежнему игнор!!! Магаз просто Ох..!!!так то, я не понимаю что ты хотел сказать по этому поводу, но курили и чистым и миксами И НЕ ПРЕТ ОН НИФИГА, то что прислали, про пробники я скажу, пробник стоит 1 грамм 2500 вроде как, вот и прикинь как не выгадно заказывать да и темболее 1 грамм норм отошлет а когда закажешь 10 пришлет той фигни, что нам сейчас
Pine Crest Collection – Smooth scrolling and tidy pages helped me check items quickly.
ремонт usb портов ноутбука
ремонт компьютеров компьютерный
сервисный ремонт телефонов
Пока писал этот пост на почту пришел трек ))) Ждал всего 1 день,респект оперативно. купить Кокаин, Мефедрон, Экстази курить – нет эффекта.Жаль туси в наличии нет. хотелось именно тут взять. а как скоро появится не известно
Free video chat http://emerald-chat.app and a convenient alternative to Omegle. Instant connections, live communication without registration, usernames, or phone numbers. Just click “Start” and meet new people from all over the world, whenever you like and whatever your mood.
authoritybuildingcenter.shop – Appreciate the typography choices; comfortable spacing improved my reading experience.
professionalseostudio.shop – Found practical insights today; sharing this article with colleagues later.
ContemporaryHomeCollection – Beautiful decor items, browsing was easy and enjoyable.
nextlevelseohq.shop – Loved the layout today; clean, simple, and genuinely user-friendly overall.
Free video chat emerald chat app find people from all over the world in seconds. Anonymous, no registration or SMS required. A convenient alternative to Omegle: minimal settings, maximum live communication right in your browser, at home or on the go, without unnecessary ads.
probacklinknetwork.shop – Loved the layout today; clean, simple, and genuinely user-friendly overall.
Golden Ridge Finds – The user experience was smooth, and moving between categories felt natural.
seobacklinksolutions.shop – Found practical insights today; sharing this article with colleagues later.
Уважаемый ТС, Прошу тогда разобраться как так произошло, что как вы говорите фейк-магазин в бросе подтвердил мне кодовое слово которое я писал вам в личку?????????????? купить Мефедрон, Бошки, Марихуану значит не успели трек номер в базу завести.интересует больше реагент для миксов.
GrowKnowledgeHub – Helpful articles and a simple layout for easy browsing.
Attic Corner – The website is well-structured, making it easy to browse all products.
Endless Growth Insights – Simple interface with motivating articles made the experience smooth.
Правило говоришь Бро! А про работу магазина могу сказать что он работает великолепно! https://masterindustries.biz Действительно с ответами продовца проблемы имеются!!!!!!!! это вам -5Такое бывает у СПСР, у меня то же он не бился, а потом все нормально было, хотя мне ей вчера должны были привезти но не привезли
FashionTreasure – Nice layout, products are easy to find and explore.
CityStyle Choice – Stylish products and the layout made browsing effortless and enjoyable.
у них Methoxetamine бадяженный или нет? сколько принял мг и какие симптомы были? https://sugardaddydatingsite.biz реальный магаз всем советуюспасибо за инфу , но только узнал про новый список запвеществ , чувствую вся лавочка прикроется на некоторое время …
ChicVaultHub – Items look appealing, browsing experience was fast and effortless.
Fresh news on Page: https://mku-autoteile.de/marketplejs-akkauntov-kupit-akkaunt-instagram-6/
trueautumncornerstore – Clean layout and well-arranged products, browsing was simple.
Home Collection Zone – Enjoyed the clean interface and the impressive variety of décor pieces.
Все нормально,6-го заказал,8-го отправили. Оперативно купить скорость, кокаин, мефедрон, гашиш Я айтишник и к СМ не отношусь никаким боком. Про мою работу вы не знали и не узнали бы, если бы всё срослось. Я просто говорю про то, что не так уж и секурно у вас, личность выпаливается “на раз”.Не сыы! Я во вторник постучался в скайп, сразу же оплатил. На след день тобиш в среду получил трек, а сегодня посыль уже приехала! Скоро отпишусь за кач-во фа. Не моросите, контора ровная
http://aviantrp.moibb.ru/viewtopic.php?f=8&t=2000
Посылки у магазина не задерживаются? Все чотко и ровно? купить кокаин, меф, бошки через телеграмм Взял у данного ТС реагента CHM-22. Качество отличное! Крайне советую этого продавца!!!все ровно мира вам ! и процветания
Soft Pine Collection – Smooth navigation and organized categories helped me find products quickly.
https://vmestegroup.ru/gallery/kolomenskoe-2012/#comment-272699
https://writeablog.net/ejjt4hj92r
https://divisionmidway.org/jobs/author/melmybetcod/
Wicked temptress needs to expose her bare flesh. Here — https://rb.gy/8rrwju?Vubbibe
https://www.reverbnation.com/artist/1xbetbangladeshpromocode
SunlitValleyMarket Portal – Clear pages and organized categories helped me browse efficiently.
Soft Summer Portal – Soft colors and easy navigation made exploring items stress-free.
Брал впервые в этом магазине, брал по рекомендации! https://jajaja223.org Хоть я уже и не раз оставлял мнение в этой ветке…. не удержусь всё-таки от ещё одной похвалы.Всем по привету!
DailyInsightCenter – Helpful tips and ideas, with pages that loaded quickly and cleanly.
serpstream.shop – Mobile version looks perfect; no glitches, fast scrolling, crisp text.
Нет сомнения купить онлайн мефедрон, экстази, бошки Сори я не туда отписаллюди которые делают заказы через ВК по меньшей мере идиоты. Особенно когда ИМ самим что то предлагают.
FashionFanatics – Loved the selection, browsing was smooth and intuitive.
Adventure Gear Picks – Smooth browsing experience and a diverse selection of gear.
digitalsuccesspoint.shop – Pages loaded fast, images appeared sharp, and formatting stayed consistent.
leadgenerationworks.shop – Color palette felt calming, nothing distracting, just focused, thoughtful design.
premiumseoservice.shop – Pages loaded fast, images appeared sharp, and formatting stayed consistent.
LivingTrendsHub – Great range of products, site is easy to navigate and browsing felt smooth.
digitalperformancecenter.shop – Overall, professional vibe here; trustworthy, polished, and pleasantly minimal throughout.
FreshTrend Hub – Cool assortment of trendy finds and a clean layout that made browsing simple.
“Решил Попробовать Записаться” купить скорость, кокаин, мефедрон, гашиш Ребят всё приготовил ребятам дал попробовать пробники всё ровно на высшем уровне)перестань курить сделай перерывчик
выше фишиг! ни переходите по картинке https://kypit-gashish.top я стобой солидарен!чувствую у меня будет то же самое, трек получил но он нихуя не бьется, а что ответил то? я оплатил 3 февраля и трек походу тоже левый ТС обьясни и мне ситуацию
Ребята подскажите JTE-907 1 к скольки делать и сколько по времени прет? купить кокаин, меф, бошки через телеграмм Тут охота чисто на клиентов.не плохой товар
DailyGoodsMarket – Pleasant design, navigation felt natural.
a href=”https://evertrueharbor.shop/” />EverTrue Harbor Finds – Nicely grouped categories helped make the visit pleasant and organized.
отдыхай до понедельника купить кокаин, меф, бошки через телеграмм Как связаться?”Подходит время Раздачи”
NewValueHub – Easy to browse with fast loading times.
BrightPineFields Online – Navigation felt natural, and the selection was pleasantly diverse.
Shop Style World – Had no issues browsing; lots of stylish picks throughout.
ChicUrbanSpot – Great variety of fashion items, navigating the site was simple.
продукт – прет дико и жестко, но по сути ничего интересного, цена в 2 тыр себя полностью оправдывает. Эдакий бычий кайф. Если вам нравится трястись и стучать зубами – вы попали по адресу. Во всех остальных случаях – нахер-нахер. Слабенькая 3/5 https://web-cam-chat.xyz Правило говоришь Бро! А про работу магазина могу сказать что он работает великолепно!Её переместили в арбитраж. Тогда ничем помочь не могу.
minecraftshub – Well-organized pages and clear images, browsing was enjoyable.
Smart Trend Market – Great user-friendly design paired with easy access to every product section.
DiscoverNewIdeas – Quick loading and a very clear structure made navigating enjoyable.
и я так же жду с 8 числа сказали отправки в начале недели купить кокаин, меф, бошки через телеграмм жте907? Вроде говорят, что пока не доступен – находиться на экспертизе… Откуда инфа?у меня тоже дроп подлетел с посылкой и брали его ФСБшники почему то , но слава богу до уголовного дела не дошло, и ТС обещал жирную скидку сделать при следуещем заказе как то так (документы о прекращении уголовного дела и экспертиза на руках) дело закрыли по двум причинам то что дроп не при делах а второе самое главное что экспертиза не выявила НС
Expanded article here: https://ms.gta5-mods.com/users/puzzlefree
открывайте все города все только рады будут https://1millionbet.top Надеюсь что ошибаюсь:hello:В нашем городе эту почту походу обложили пополной!!!!!!!!
Лидирующий кракен даркнет обрабатывает платежи только в криптовалюте с минимальной суммой пополнения эквивалентной десяти долларам США для покупок.
advancedmarketingsystems.shop – Overall, professional vibe here; trustworthy, polished, and pleasantly minimal throughout.
Thank you for your sharing. I am worried that I lack creative ideas. It is your article that makes me full of hope. Thank you. But, I have a question, can you help me?
rankpro.shop – Mobile version looks perfect; no glitches, fast scrolling, crisp text.
elitemarketingsystems.shop – Pages loaded fast, images appeared sharp, and formatting stayed consistent.
powerrankoptimization.shop – Mobile version looks perfect; no glitches, fast scrolling, crisp text.
Брал опт, все четко прошло! Качество на высоте! ТС ответьте в ЛС пожалуйста https://cocaintop.info такое ощющение,что ты спецально зарегестрировался тут, чтобы написать только это сообщение,и в именно в этом разделе,я нечего не говарю за магазин,всё на вышшем уравне,но твой АК подозрителен с одним только этим сообщениемвсе скоро будут всем довольны, а те кто ждал и не паниковал будут вдвойне довольны!
branddevelopmentworks.shop – Overall, professional vibe here; trustworthy, polished, and pleasantly minimal throughout.
A high-quality ai rap generator can even suggest rhyme schemes and lyrical structures.
https://forum.programosy.pl/viewtopic.php?f=8&t=8776&p=1331343#p1331343
https://saraswaticampus.edu.np/news/perspectives-on-covid-19/#comment-150483
StyleHunt – The range of items is impressive and the site loads fast.
https://t.me/s/azino777casinomobile
DailyEssentialsHub – Wide range of products, browsing was smooth and simple.
GlobalTrendMarket – Loved the selection, and the site navigation felt smooth.
Happy Living Deals – Nice mix of home items, and the site felt comfortable to explore.
Бро, не волнуйся, тут ровный магаз. Напиши им в аську, что заказ номер такой-то оплачен. купить скорость, кокаин, мефедрон, гашиш реальный магаз всем советуюСнял в касание, остановился, открыл дверь авто, вышел и зашёл обратно! Респект!!! Держите марку в том же духе!
Urban Wild Grove Online Shop – Well-organized pages and modern design ensured smooth browsing.
Bright Choice Finds – Nicely arranged items and a user-friendly flow kept shopping stress-free.
Геосинтетические материалы https://stsgeo-spb.ru для строительства и благоустройства в Санкт-Петербурге и ЛО. Интернет-магазин геотекстиля, георешёток, геосеток и мембран. Работаем с частными и оптовыми заказами, быстро доставляем по региону.
Интернет-магазин https://stsgeo-krd.ru геосинтетических материалов в Краснодар: геотекстиль, георешётки, геоматериалы для дорог, фундаментов и благоустройства. Профессиональная консультация и оперативная доставка.
Парни у кого нибудь задерживали посылку в СПСР?Уже неделю как приняли и все не отправят и планируемая дата отправки прошла,а реальную так и не поставили.Позвонил в офис говорят готово к отправке,а че не отправляют они не знают.Сказали позвонить когда менеджеры придут на работу.У кого нибудь такое было?Может это фигня какая то и лучше не идти за посылкой?Как думаете?Раньше просто такого не было максимум 5 дней с даты приема до моих рук проходило,с любого магазина. https://holladiewaldfee.xyz потому, что так и есть осталось не так много времени!Качество на 5+:good:
ThinkForwardHub – Great ideas organized neatly, making exploration pleasant.
Visit Bright Mountain Mall – Navigation was simple and the visuals made the site pleasant to use.
скорость доставки 5+ (во вторник заказали в пятницу получили) купить скорость, кокаин, мефедрон, гашиш Раньше розницей занимались благодаря вашему опыту,сейчас время другое,стабильная честная работа)terom сказал(а): ^
Строительные геоматериалы https://stsgeo-ekb.ru в Екатеринбурге с доставкой: геотекстиль, объемные георешётки, геосетки, геомембраны. Интернет-магазин для дорожного строительства, ландшафта и дренажа. Консультации специалистов и оперативный расчет.
Uwielbiasz hazard? casino nv: rzetelne oceny kasyn, weryfikacja licencji oraz wybor bonusow i promocji dla nowych i powracajacych graczy. Szczegolowe recenzje, porownanie warunkow i rekomendacje dotyczace odpowiedzialnej gry.
ГГУ имени Ф.Скорины: https://www.gsu.by/
Магазин замечательный!! купить Кокаин, Мефедрон, Экстази привет что случилось вы работаете не могу второй день в личку отписаться ,сколько заказывал всё было супер ,как к тебе попасть теперь ,что делать ,отпишитесь …Какие у тебя претензии? ты провокатор и не более т.к. ты не дал даже номер заказа и не высказал притензию, к тому же за тебя мне уже написали в Личку, другие магазины..
FashionSpotFresh – Nice selection and navigating through pages was easy.
Всем все выслано. https://thousandeyes.top да я после 2си два дня осилил потерпеть и замутил 2се за кампанию(очень приятно, между прочим, пошло). еще 2 дня прошло завтра мб фофки забацаю. Знакомые ставили вв пол колпака, вроде эффектов мало, но один в тот же вечер овердознул 2си и попускался водкой, да и другого только-только отпускало с феников. Просто очень плохо будет, если продукт не удастся.конечно была задержка которая заставила по нервничать, но всё прошло на уровне и я получил свою посылочку)))
BeyondLimitsHub – Inspiring articles and the site is easy to navigate.
Нужна работа в США? курс диспетчера грузоперевозок в америке онлайн с трудоустройством : работа с заявками и рейсами, переговоры на английском, тайм-менеджмент и сервис. Подходит новичкам и тем, кто хочет выйти на рынок труда США и зарабатывать в долларах.
Happy Value Deals – Nice range of budget-friendly items, and the site felt smooth to browse.
Quiet Plains Finds – The catalog felt nicely arranged, and the overall experience was soothing.
Бро ответь в аське! https://boshkizaklad.biz Ищи в соседней ветке мой отзыв по рцс. ИМХО рцс не для торча.Удачи и процветания!
sunbayboutique – Well-structured pages, made finding items quick and easy.
BlueHarbor Bloom Access – The smooth load times and clean item structure stood out.
FindsAndDeals – Simple structure, finding daily deals was fast and easy.
https://slice.uccs.edu/?p=835#comment-151499
https://sajl.jaipuria.edu.in/three-teachers-of-sajs-lucknow-get-the-teaching-excellence-awards-2018/#comment-24291
Нужна работа в США? онлайн обучение диспетчера грузоперевозок для иммигрантов в сша : работа с заявками и рейсами, переговоры на английском, тайм-менеджмент и сервис. Подходит новичкам и тем, кто хочет выйти на рынок труда США и зарабатывать в долларах.
я купил у них первый раз реактивы, всё пришло довольно быстро и консперация норм, не знаю если такой метод что они используют палевный то как иначе….. купить скорость, кокаин, мефедрон, гашиш всем привет заказывал в етом магазе год назат постоянно но тут спустя год ко мне приходит сатрудница фскн говорит вы на мужны в качестве свидетеля типо в некоторых пасылках обнаружили наркотики и из моего города только я 1 заказывал дала павестку я непришол пришла сама и давай меня допрашивать я включаю дурака говорю я только кросовки и пуховик заказывал говорю а наркотиков там небыло , она все с моих слов записала и сказала больше меня непобиспокоят. я думал всё хана магазу”И если мои слова не подтвердяться Прошу провести профелоктическую беседу с вашим Дай бог ему здоровья Минером”
Есть ставки на погодные явления, прикольно
https://rinjani123.com/melbet-2025-obzor-bk-sajt/
I’m gone to inform my little brother, that he should also go to see this website on regular basis to obtain updated from most recent news.
escort advertising Rio
Поддержка поздравляет с днём рождения бонусом
https://www.lograrmas.com.mx/melbet-obzor-bukmekera-2025/
упаковка – неплохо, но не идеально. Особенно глупо, когда в описании отправления пишут “Косметика”, а там, бл*ть, пачка сигарет. Оочень странно на меня смотрели в офисе спсра, знаете ли. 4/5 купить онлайн мефедрон, экстази, бошки Ровный магаз,всем советую)Доброго всем времени, товарищи подскажите как посыль зашифрована? паранойя мучит, пару лет с доставкой не морочился. Ежели палево то можно и в ЛС)) Заранее благодарен
Dragon money фриспины дали сразу после регистрации
Here is my web blog https://prgu44.ru/
Печатали книгу небольшим тиражом и были приятно удивлены профессионализмом команды. Обложка получилась качественной, страницы ровные и хорошо проклеенные. Печать текста и иллюстраций без дефектов. Сроки соблюдены полностью. Отличная работа и внимательное отношение к деталям, шубер на коробку
FreshStyleMarket – Clean design with a variety of fashionable items that were easy to browse.
Хороших продаж! купить Мефедрон, Бошки, Марихуану которые воспитанны на обычном Фене !КАК ОБЕЩЯЛ ОПЕРАТОР ТАК ВСЕ И СДЕЛАЛ ОДИН В ОДИН !!!!
ValueSpot – Products offer excellent value, site layout is clean and simple.
Понравились акции на крупные турниры
https://ramongarciamaquinas.com/melbet-registratsiya-2025/
PureHarborStudio Portal – Organized sections and clear visuals made it easy to find items.
Modern Style Boutique – Enjoyed exploring the items; everything looked up to date and browsing was easy.
джива качественная=)получше чем впрошлый раз была=) купить онлайн мефедрон, экстази, бошки не долго думая решил написать оператору данного магазина!Достойный магазин
Trend Buy Online Store – Loved the modern selection, browsing through pages was effortless.
Rainforest Goods Online – Pages loaded quickly and the layout made exploring the catalog a breeze.
Линия на волейбол одна из лучших в СНГ
https://www.bahia24.com/melbet-2025-obzor-bk/
да магаз реальный.недовеса небыло ниразу.может просто недоразумение. https://1millionbet.top Ровной дороги в вашем бизе на просторах РЦ ;)Брал опт, все четко прошло! Качество на высоте! ТС ответьте в ЛС пожалуйста
тоже самое взял ам в данном магазе чтоб не было сплетен тож отпишу за качество думаю мнение от 2 разных людей будет достаточно что бы не было вопросов :speak: купить Кокаин, Мефедрон, Экстази ответь те на мыло я еще вчера вам написал!а так всё от души! огромное спасибо! ещё не раз к вам обращюсь!)
Срочный вызов электрика https://vash-elektrik24.ru на дом в Москве. Приедем в течение часа, быстро найдём и устраним неисправность, заменим розетки, автоматы, щиток. Круглосуточный выезд, гарантия на работы, прозрачные цены без скрытых доплат.
TrendHaven – Modern style, intuitive site structure, very convenient.
https://www.metroplus.gov.co/cambios-viales-en-envigado-por-obras-de-metroplus/
https://my.dev.vanderbilt.edu/tractem/2018/04/20/cortical-associated-white-matter-frontal-lobe-fl/
https://www.slideshare.net/slideshow/como-encontrar-codigos-promocionales-1xbet-validos-en-2026-pdf/284509109
почта России https://pasangtaruhan.xyz Вообщем так, с момента отправки из курьерской службы до рук курьера в нашем городе прошло 3 дня, забрал я значительно позже, но это не суть.Верно. Но это уже другой критерий – грамотное описание
HouseholdHub – Nice layout, home items are well-presented and browsing is easy.
Заряд качества для ваших работ. Интернет-магазин тату-оборудования с отличным выбором расходных материалов. Картриджи, иглы, краски и защита — всё в наличии. Быстрая сборка заказа для бесперебойного творчества. Обновите запасы прямо сейчас! https://tattoo-storm.ru/
Gates of Olympus https://gatesofolympus.win is a legendary slot from Pragmatic Play. Demo and real money play, multipliers up to 500x, free spins, and cascading wins. An honest review of the slot, including rules, bonus features, and tips for responsible gaming.
Today’s highlights are here: http://www.mulvanecoop.com/markets/stocks.php?article=abnewswire-2025-12-4-the-ultimate-guide-to-buying-facebook-advertising-accounts-what-must-be-known
Онлайн курс Диспетчер грузоперевозок обучение: обучение с нуля до уверенного специалиста. Стандарты сервиса, документооборот, согласование рейсов и оплата. Пошаговый план выхода на работу у американских логистических компаний.
Все вопросы к представителю. купить Мефедрон, Бошки, Марихуану Негативные отзывы удаляем? Оправдываете свою новую репутацию.А JWH-018 Имеется в наличии?
FashionFlow Hub – Navigation was flawless and the selection covered plenty of styles.
TrendSetterHub – Loved the fast delivery and the items are super stylish, shopping was effortless.
pixelmint.click – Appreciate the typography choices; comfortable spacing improved my reading experience.
TAB Trend Store – Good mix of products, navigation felt smooth and easy.
Тату студии в Санкт-Петербурге. Профессиональные студии татуировки: от миниатюрной графики до масштабного реализма. Индивидуальные эскизы, абсолютная стерильность и опытные мастера. Запишитесь на консультацию и создайте свой шедевр! https://spb-tattoo.ru/
City Trend Picks – Clean visuals paired with smooth navigation made it a pleasant visit.
сегодня оплатил заказ..буду ждать доставки..протестирую.сообщу о качестве продукта? https://1221spa.top Всё что В прайс листе на сайте есть,всё в наличии ?заказывал уже недельку назад, все пришло качество хорошее делал 250 1 к 9ти вполне на час полтора хорошего эфекта
novaclicks.click – Color palette felt calming, nothing distracting, just focused, thoughtful design.
orchardcornerstore – Clear sections and fast-loading pages, shopping was quick and pleasant.
hyperrank.click – Appreciate the typography choices; comfortable spacing improved my reading experience.
Хочешь сайт в ТОП? пф накрутка для быстрого роста позиций сайта. Отбираем безопасные поведенческие сценарии, повышаем кликабельность и глубину просмотра, уменьшаем отказы. Тестовый запуск без оплаты, подробный отчёт по изменениям видимости.
Хочешь ТОП? seo продвижение как инструмент усиления SEO: эмуляция реальных пользователей, рост поведенческих факторов, закрепление сайта в ТОПе. Прозрачные отчёты, гибкая стратегия под нишу и конкурентов, индивидуальный медиаплан.
digitalbrandingworks.shop – Loved the layout today; clean, simple, and genuinely user-friendly overall.
trafficgenerationpro.shop – Found practical insights today; sharing this article with colleagues later.
Бонусная программа одна из самых щедрых на рынке
https://www.effectiveratecpm.com/cdf10j95?key=9d84a2498fb6af60cb82f0df204577f6/2025/10/25/skachat-prilozhenie-melbet-na-kompyuter-2025/
aonang villa resort краби краби патти
Комплексное seo продвижение сайтов в сша: анализ конкурентов, стратегия SEO, локальное продвижение в городах и штатах, улучшение конверсии. Прозрачная отчетность, рост позиций и трафика из Google и Bing.
Современный офисный ремонт под ключ. Поможем обновить пространство, улучшить планировку, заменить покрытия, освещение и коммуникации. Предлагаем дизайн-проект, фиксированную смету, соблюдение сроков и аккуратную работу без лишнего шума.
Коэффициенты на настольный теннис выше чем у всех
https://radiojarry.com/melbet-obzor-bukmekerskoj-kontory-2025/
Polites News – главные новости Азии, мировой политики, бизнеса и спорта https://polites.news/asia/
магазин пашит как комбаин пашню!) купить онлайн мефедрон, экстази, бошки долго гуляя по форуму, выбирал хороший магазин для себя. хотелось чтоб устраевало все! прежде всего меня интересовало качество товара и его цена! хотелось чтоб цена была доступной! так же есть большое желание всегда получать товар 100% т.к. в закладочных магазинах бывают случаи не находа, такие магазины для постоянных покупок рассматривать не стал! рассматривалось много вариантов! ну гдегде же всетаки заказать??? то предлогают сразу слишком много товара (ну как же брать если ты сам лично не знаешь за его качество)??? бывало чаще всего не устраевал сервис обслуживания!Ну чтож ребят сегодня заказал )
школа трак диспетчинга в сша в сша с гарантией результата курсы трак диспетчера для русскоязычных
Нужно остекление? остекление балконов: тёплое и холодное, ПВХ и алюминий, вынос и объединение с комнатой. Бесплатный замер, помощь с проектом и документами, аккуратный монтаж и гарантия на конструкции и работу.
Online platform defi trading tools for active digital asset trading: spot trading, flexible order settings, and portfolio monitoring. Market analysis tools and convenient access to major cryptocurrencies are all in one place.
Explore Silver Garden – The pages responded quickly, creating a smooth and dependable browsing experience.
Как долго вы обрабатываете заказ? купить Мефедрон, Бошки, Марихуану Но могу сказать что на данный момент проблемы с отправкой у магазина! в среду оплатил и сказали в четверг будет отправка, но увы ее нет! такое в первый раз замечаю от такого магазина! будем ждать!Нет. Такого у нас нет.
CozyLivingSpot – The site showcases items well, and moving between pages was easy.
SoftGroveCorner Online Shop – Clear visuals and well-arranged products improved the shopping flow.
Нужен керосин? где купить авиационный керосин сертифицированное топливо по ГОСТ, поставки для аэропортов, авиапредприятий и вертолётных площадок. Помощь в подборе марки, оформление документов и быстрая доставка.
Нужен манипулятор? кран манипулятор москва организуем подачу спецтехники на стройку, склад или частный участок. Погрузка, разгрузка, перевозка тяжёлых и негабаритных грузов. Оперативный расчёт стоимости и выезд в день обращения.
Comprehensive whitecirclegroup.com: feasibility studies, market analysis, strategy, optimization of costs and processes. We help you strengthen your position in Dubai, Abu Dhabi and other Emirates.
VIP эскорт в Москве, подробнее тут: москва эскорт девушка Конфиденциальность и высокий уровень сервиса.
Помнится ф16 на пробу получал. Хороший синт.гарсон был. https://chainfo.xyz по поводу треков выяснять буду завтра лично т.k. сегодня выходной в Россиипривет всем получил бандероль с посылкой открыл всё ровно чё надо было то и пришло в общем респект магазу вес ровный пока сохнит основа жду по курю отпишу чё да как закинул деньги 5.07 пришло на почту уже 9.07 утром. были выходные только сегодня уже курьер набрал с утра и привёз отличный магаз берите не обламывайтесь
TrendCorner Market – A clean, neat interface and interesting pieces across categories.
http://tssz.ru/includes/photo/1xbet_promokod.html
Профессиональное маркетинговое агентство услуги: аудит, позиционирование, digital-стратегия, запуск рекламных кампаний и аналитика. Поможем вывести бренд в онлайн, увеличить трафик и заявки из целевых каналов.
Нужна ботулинотерапия? диспорт для лица цена помогаем смягчить мимику, освежить взгляд и предупредить появление новых морщин. Осмотр врача, противопоказания, грамотное введение и контроль результата на приёме.
Профессиональная перевозка лежачих подъем на этаж, помощь при пересадке, фиксирующие носилки, заботливое отношение. Организуем транспортировку в больницы, реабилитационные центры и домой.
Trend & Buy Online – Loved the variety available today, moving through pages felt simple.
Flora Choice Store – Lovely botanical curation paired with smooth page transitions.
Fresh Daily Picks – A great mix of new items today, with smooth browsing and tidy sections.
VarietySelectStore – Wide assortment of items, really helpful for picking the best options.
Изготавливали журнал для мероприятия и были впечатлены качеством печати. Фото получились максимально четкими и насыщенными. Верстка аккуратная, листы ровные, переплет надежный. Работу выполнили раньше дедлайна. Очень довольны сотрудничеством: цифровая печать буклетов
Нужен бетон? бетон купить о выгодной цене с доставкой на объект. Свежий раствор, точное соблюдение пропорций, широкий выбор марок для фундамента, стяжек и монолитных работ. Быстрый расчет, оперативная подача миксера.
Use hyperliquid dex list to manage cryptocurrencies: a user-friendly dashboard, detailed statistics, and trade and balance tracking. Tools for careful risk management in a volatile market.
Trading platform hypertrade crypto combines a user-friendly terminal, analytics, and portfolio management. Monitor quotes, open and close trades, and analyze market dynamics in a single service, available 24/7.
а кто нибудь пробовал все таки эту куреху urb купить Мефедрон, Бошки, Марихуану Магаз ровный, сам лично несколько раз здесь заказывал и все доходило вовремя и целостно!:) Наврятли он решится на такое..Жду адреса. Магазин осознанно кидает.
http://natural-treatment.ru/uploads/pages/promokodu_1xbet_na_segodnya_bonus_pri_registracii_6500_rubley.html
http://cvaa.com.ar/06inc/articles/1xbet_codigo_promocional_para_hoy_de_bono_gratis.html
Изготавливали журнал для мероприятия и были впечатлены качеством печати. Фото получились максимально четкими и насыщенными. Верстка аккуратная, листы ровные, переплет надежный. Работу выполнили раньше дедлайна. Очень довольны сотрудничеством – печать наклеек на самоклеющейся
ремонт джойстиков пс5
ремонт джойстика геймпада
https://web-answers.ru/pgs/promokod_pokerdom___bonus_pri_registraciii_2024.html
The best deepnude ai services for the USA. We’ll explore the pros and cons of each service, including speed, available effects, automation, and data privacy. Undress people in just a few clicks.
Comprehensive strategy when you buy tiktok likes and views maximizes impact. Combined engagement types create stronger promotional signals achieving superior visibility compared to single-metric approaches consistently.
Понравился раздел с прогнозами от автора
https://sot.technopol.bg/2025/11/02/melbet-kazino-sloty-2025-obzor/
Популярный кракен маркетплейс обрабатывает более десяти тысяч ежедневных транзакций с криптовалютными платежами в Bitcoin, Monero и Ethereum валютах.
Многоуровневая аутентификация обеспечивает kraken вход с обязательным решением TOTP кода из приложения Aegis или andOTP плюс проверкой дополнительного PIN для важных операций.
А почему сам с-м.сом сюда какой день не кажеться…? купить кокаин, меф, бошки через телеграмм конечно была задержка которая заставила по нервничать, но всё прошло на уровне и я получил свою посылочку)))Ребят вообще на высоте!!!)Удачи вам всех благ!!! ВСЕХ С ПРАЗДНИКОМ!!!Всего самого самого наилучшего!)
Новинний портал Ужгорода https://88000.com.ua головні події міста, політика, економіка, культура, спорт та життя городян. Оперативні новини, репортажі, інтерв’ю та аналітика. Все важливе про Ужгород в одному місці, зручно з телефону та комп’ютера.
Спасибо за честность, не стали приукрашивать
https://byon99slot.com/melbet-bukmekerskaya-kontora-registratsiya-2025/
Товар привезли качество удовлетворительное,единственное что заказ долго оформляли не мог достучаться в асю.А так все норм!=)) купить Кокаин, Мефедрон, Экстази Дошло за 3 дня , качество отличное , буду только с этим магазом работать.Вот это бы нормально было нормальный трип по двум веществам..
Timber Path Page – Browsing categories felt fluid, with an organized and user-friendly layout.
A cozy swissotel Kolasin for mountain lovers. Ski slopes, trekking trails, and local cuisine are nearby. Rooms are equipped with amenities, Wi-Fi, parking, and friendly staff are available to help you plan your vacation.
Поддержка на русском отвечает за секунды, проверял ночью
https://agfh.net/2025/10/25/fribet-na-melbet-2025/
Trend Style Picks Hub – Great mix of trendy items, navigation felt effortless.
LineSelect Hub – Neat product display today, and moving through sections felt easy.
FreshGoodsSpot – Pleasant interface, smooth browsing, and clearly listed products.
Escort Agency https://sauny-v-kazani.ru elite escort
v
Автор не боится говорить правду, даже про мелкие косяки
https://www.thessaloniki2012.gr/melbet-2025-obzor-melbetzerkalorabochee-ru/
PlainGoodsOnline – Excellent service and easy browsing, I’ll be back soon.
Вывод через крипту тоже есть, для тех кто в теме
https://meihealthcares.com/melbet-vhod-zerkalo-2025/
Fresh Goods Spot – Solid selection and a smooth layout make checking updates enjoyable.
https://uplink.weforum.org/uplink/s/profile/005TE00000Cjdcb
http://www.neogranka.com/forum/post.php?mode=post&f=2662
Elite Escort Agency https://za6.info escort agency
http://dimonvideo.ru/community/post.php?mode=post&f=1758
PureHarborStudio Storefront – Everything was clearly displayed, making shopping pleasant and fast.
Фрибеты за активность раздают щедро
https://starboarddesigns.co.za/2025/10/25/skachat-melbet-kazino-2025/
Opportunities Hub Picks – Organized sections and easy-to-follow layout for quick browsing.
VIP escort Escort agencies Elite prostitutes
FashionSpot – Browsing is effortless, and the layout makes exploring items easy.
TCC Trend Store – Items presented nicely, navigating through categories was easy.
EverNova Page – Aesthetic elements stood out, and page-to-page flow worked smoothly.
трансы екатеринбург Город предоставляет некоторые возможности для поддержки и взаимопомощи транс-сообщества, однако важно помнить, что каждая история уникальна и требует индивидуального подхода. Информацию стоит искать в специализированных онлайн-сообществах, группах поддержки и не пренебрегать консультациями специалистов. Екатеринбург, словно многослойный пирог, раскрывается перед каждым, кто готов исследовать его глубины, включая и тех, кто ищет свое место в этом сложном и многогранном мире идентификации.
elite escort https://40forever.ru VIP Escort Dating Site for Men
Leaf Choice Market – Nice assortment of items today, and navigation felt straightforward.
Casino utan registrering https://casino-utan-registrering.se bygger pa en snabbare ide: du hoppar over kontoskapandet och gar direkt in via din bank-ID-verifiering. Systemet ordnar uppgifter och transaktioner i bakgrunden, sa anvandaren mots av en mer stromlinjeformad start. Det gor att hela upplevelsen far ett mer direkt, tekniskt och friktionsfritt upplagg utan extra formular.
Free Online Jigsaw Puzzle https://vps40504.ourcodeblog.com/39248909/tap-into-smart-brain-games-for-adults play anytime, anywhere. Huge gallery of scenic photos, art and animals, customizable number of pieces, autosave and full-screen mode. No registration required – just open the site and start solving.
Casino utan svensk licens https://casinos-utan-licens.se ar onlineplattformar som drivs av operatorer med licens fran andra europeiska jurisdiktioner. De erbjuder ofta ett bredare utbud av tjanster och anvander egna regler for registrering och betalningar. For spelare innebar detta andra rutiner for sakerhet, verifiering och ansvarsfullt spelande.
I casino crypto https://crypto-casino-it.com sono piattaforme online che utilizzano valute digitali per transazioni rapide e sicure. Permettono di vedere in pratica i vantaggi della blockchain: trasparenza dei processi, assenza di intermediari, trasferimenti internazionali agevoli e un’interfaccia moderna, pensata per un’esperienza tecnologica degli utenti.
escort escort https://keralatourism.biz Escort Services Agency – VIP Escort
TopGiftMarket – Smooth interface, organized categories, and easy product discovery.
TropicalGoodsHub – Loved the clean design and the product range, browsing was fun and simple.
Elite prostitutes – VIP escort from model girls , VIP profiles of elite courtesans https://sincastigos.info beautiful escort girls
ExploreOpportunities Picks – Smooth browsing with well-structured categories and clear visuals.
StyleHaven – Trendy items showcased clearly, and site navigation feels very smooth.
Simple Trend Hub – The site feels uncluttered and the trendy items are easy to browse.
elite dating Elite escort services Vip girls
TCS Online Picks – Great selection of items, navigation felt fast and effortless.
Modern Home Gallery – Very tidy site today, with easy access to all décor categories.
Explore hyperevm dex and gain unlimited access to a modern, decentralized market. Trade derivatives, manage your portfolio, utilize analytics, and initiate trades in a next-generation ecosystem.
Use hyperliquid app for stable and efficient trading. The platform combines security, high liquidity, advanced solutions, and user-friendly functionality suitable for both beginners and professional traders.
Discover hyperliquid swap a platform for fast and secure trading without intermediaries. Gain access to innovative tools, low fees, deep liquidity, and a transparent ecosystem for working with digital assets.
Choose hyperevm dex as a convenient tool for trading and investing. The platform offers speed, reliability, advanced features, and fair pricing for cryptocurrency trading.
VIP Escort Dating Site for Men https://romannumerals.info VIP Escort | Escort of men
stylemarket – The site feels tidy and simple, I found what I needed quickly.
Choose ht xyz exchange — a platform for traders who demand speed and control: over 100 pairs per transaction, flexible orders, HL token staking, and risk management tools. Support for algorithmic strategies and advanced analytics.
Check out hypertrade swap, a modern DEX with its own L1: minimal fees, instant order execution, and on-chain transparency. Ideal for those who want the speed of a CEX and the benefits of decentralization.
Открываешь бизнес? открытие бизнеса в оаэ полный пакет услуг: консультация по структуре, подготовка и подача документов, получение коммерческой лицензии, оформление рабочих виз, помощь в открытии корпоративного счета, налоговое планирование и пострегистрационная поддержка. Гарантия конфиденциальности.
Хотите открыть компанию оаэ? Предоставим полный комплекс услуг: выбор free zone, регистрация компании, лицензирование, визовая поддержка, банковский счет и бухгалтерия. Прозрачные условия, быстрые сроки и сопровождение до полного запуска бизнеса.
Elite Dating Models https://operationq.top Escort Services
Hello.
This post was created with XRumer 23 StrongAI.
Good luck 🙂
peakclicks.click – Content reads clearly, helpful examples made concepts easy to grasp.
6 Easy Steps to Clean a Car Dashboard Like a Pro – DashSteam Blogs
Moderator, согласен с вами полностью 🙂
Меня заинтересовала тема “”, но я там не могу ответить.
Рабочие зеркала KRAKEN:
– :
– :
– :
– :
– :
Ваша личная скидка по коду KRA-EHQP2025 – 5%
6 Easy Steps to Clean a Car Dashboard Like a Pro – DashSteam Blogs
Moderator, согласен с вами полностью 🙂
Меня заинтересовала тема “”, но я там не могу ответить.
Рабочие зеркала KRAKEN:
– :
– :
– :
– :
– :
Ваша персональная скидка по коду KRA-AVYH2025 – 5%
6 Easy Steps to Clean a Car Dashboard Like a Pro – DashSteam Blogs
Moderator, согласен с вами полностью 🙂
Меня заинтересовала тема “”, но я там не могу ответить.
Рабочие зеркала KRAKEN:
– :
– :
– :
– :
– :
Ваша личная скидка по коду KRA-IDLR2025 – 6%
6 Easy Steps to Clean a Car Dashboard Like a Pro – DashSteam Blogs
Admin, согласен с вами полностью 🙂
Меня заинтересовала тема “”, но я там не могу ответить.
Рабочие зеркала KRAKEN:
– :
– :
– :
– :
– :
Ваша личная скидка по коду KRA-QDFU2025 – 5%
Elite VIP Escort https://progress-pro.ru Elite VIP Escort
HomeTrendyPicks – Clean design, smooth navigation, and attractive decor products.
rankgrid.click – Bookmarked this immediately, planning to revisit for updates and inspiration.
من المعروف أن بيت فاينال هو منصة تقدم خدمات متنوعة من المراهنات الرياضية. تُعرف هذه الخدمة بتقديم تجربة مميزة لمحبي المراهنات. تعد المراهنات المباشرة من أكثر الخيارات شعبية في السنوات الأخيرة.
في الختام، تعتبر betfinal خيارًا ممتازًا للمهتمين بالمراهنات الذين يبحثون عن خدمة آمنة. من خلال هذه الخدمة، يمكن لللاعبين الاستمتاع بتجربة فريدة في عالم المراهنات الألعاب وأيضًا الدعم الفني المتاح دائمًا.
كازينو بت فاينل https://animehider.com/
Предлагаем создание холдингов оаэ для международного бизнеса: подбор free zone или mainland, разработка структуры владения, подготовка учредительных документов, лицензирование, банковское сопровождение и поддержка по налогам. Конфиденциальность и прозрачные условия работы.
Хочешь фонд? личные фонды оаэ — безопасный инструмент для защиты активов и наследственного планирования. Помогаем выбрать структуру, подготовить документы, зарегистрировать фонд, обеспечить конфиденциальность, управление и соответствие международным требованиям.
clickforgehub.click – Pages loaded fast, images appeared sharp, and formatting stayed consistent.
Профессиональное учреждение семейных офисов оаэ: от разработки стратегии управления семейным капиталом и выбора юрисдикции до регистрации, комплаенса, настройки банковских отношений и сопровождения инвестиционных проектов. Полная конфиденциальность и защита интересов семьи.
Style Collective Picks – Smooth navigation paired with stylish pieces made the site pleasant to explore.
Хотите открыть счёт? открытие банковского счета в оаэ Подбираем оптимальный банк, собираем документы, готовим к комплаенсу, сопровождаем весь процесс до успешного открытия. Поддерживаем предпринимателей, инвесторов и резидентов с учётом всех требований.
turborank.click – Pages loaded fast, images appeared sharp, and formatting stayed consistent.
UrbanRainCollection – Effortless browsing and speedy checkout, very satisfied overall.
rapidboost.click – Navigation felt smooth, found everything quickly without any confusing steps.
StreetFinds – Quick loading site with urban products showcased clearly.
Нужна виза инвестора в оаэ? Подберём оптимальный вариант — через бизнес, долю в компании или недвижимость. Готовим документы, сопровождаем на всех этапах, обеспечиваем корректное прохождение комплаенса и получение резидентского статуса.
Профессиональное налоговое консультирование оаэ: разбираем вашу ситуацию, подбираем оптимальную корпоративную и личную структуру, помогаем учесть требования местного законодательства, корпоративного налога и substance. Сопровождаем бизнес и инвестиции на постоянной основе.
Комплексные бухгалтерский учет в оаэ: финансовая отчётность, налоговые декларации, управление первичными документами, аудит, VAT и corporate tax. Обеспечиваем точность, своевременность и полное соответствие законодательству для стабильной работы вашего бизнеса.
Escort services for charming girls https://ashraaf.biz Escort Services Agency – VIP Escort
Оформление золотая виза оаэ под ключ: анализ вашей ситуации, подбор оптимальной категории (инвестор, бизнес, квалифицированный специалист), подготовка документов, сопровождение подачи и продления статуса. Удобный формат взаимодействия и конфиденциальный сервис.
TDP Picks Hub – Great deals showcased well, exploring the site felt effortless.
Modern Home Gallery – Very tidy site today, with easy access to all décor categories.
Покупка современной корпусной мебели для дома или офиса в 2025 году. Интернет магазины рейтинг и цены от покупателей: https://faine-misto.dp.ua/pokupka-mebely-dlya-kvartyry-onlajn-sovety-po-vyboru-komplekta/
Профессиональная легализация документов в оаэ: нотариальное заверение, Минюст, МИД, консульства, сертифицированные переводы. Сопровождаем весь процесс от проверки документов до финального подтверждения. Подходит для компаний, инвесторов и частных клиентов.
Профессиональное консульское сопровождение оаэ для частных лиц и бизнеса: консультации по визовым и миграционным вопросам, подготовка обращений, запись в консульство, помощь при подаче документов и получении решений. Минимизируем риски отказов и задержек.
Предлагаем корпоративные услуги в оаэ для действующих и новых компаний: регистрация и перерегистрация, выпуск и передача долей, протоколы собраний, обновление лицензий, KYC и комплаенс. Обеспечиваем порядок в документах и соответствие требованиям регуляторов.
Помогаем открыть брокерский счет в оаэ: подбор надёжного брокера, подготовка документов, прохождение KYC, сопровождение подачи и активации. Подходит для частных инвесторов, семейных офисов и компаний. Доступ к мировым рынкам и комфортные условия работы с капиталом.
escort agency VIP Escort Elite VIP Escort
rare stamp values
Always Inspired Online – Positive vibe throughout with fast-loading pages and clear layout.
rare stamp values
stamp appraisal
Нужна виза? рабочая виза в оаэ под ключ: проверка документов, контракт с работодателем, получение разрешения на работу, медкомиссия, подача заявки и выпуск резидентской визы. Сопровождаем весь процесс и помогаем быстро получить Emirates ID.
Комплексные трудовые соглашения оаэ: юридический аудит текущих контрактов, разработка новых документов, адаптация под отрасль и требования компании, защита прав работников и работодателей. Гарантируем корректность и соблюдение всех норм.
ко ланта отзывы самые красивые пляжи краби в тайланде
Нужна поддержка по трудовым вопросам оаэ? Консультируем по трудовым договорам, рабочим визам, оформлению сотрудников, переработкам, отпускам и увольнениям. Готовим рекомендации, помогаем минимизировать риски штрафов и конфликтов между работодателем и работником.
Разрабатываем опционные планы в оаэ под ключ: анализ корпоративной структуры, выбор модели vesting, подготовка опционных соглашений, настройка механики выхода и выкупа долей. Помогаем выстроить прозрачную и понятную систему долгосрочной мотивации команды.
Corporate business accounts uae made simple: we help choose the right bank, prepare documents, meet compliance requirements, arrange interviews and support the entire onboarding process. Reliable assistance for startups, SMEs, holding companies and international businesses.
Get your uae golden visa with full support: we analyse your profile, select the right category (investor, business owner, specialist), prepare a compliant file, submit the application and follow up with authorities. Transparent process, clear requirements and reliable guidance.
Разработка соглашения об управлении оаэ: фиксируем правила принятия решений, распределение ролей, отчётность и контроль результатов. Учитываем особенности вашей компании, отрасли и требований регуляторов. Помогаем выстроить устойчивую систему корпоративного управления.
Escort Girls https://prioritet18.ru escort escort
FuturePath Lane – Modern design with clearly displayed items ensures fast and smooth navigation.
Growth Opportunity Center – Browsing was seamless and the site’s information is well-presented.
Comprehensive tax consultant uae: advisory on corporate tax, VAT, group restructuring, profit allocation, substance and reporting obligations. We provide practical strategies to optimise taxation and ensure accurate, compliant financial management.
Professional set up company in uae: advisory on jurisdiction and licence type, company registration, visa processing, corporate bank account opening and ongoing compliance. Transparent costs, clear timelines and tailored solutions for your project.
Trusted accounting firm dubai providing bookkeeping, financial reporting, VAT filing, corporate tax compliance, audits and payroll services. We support free zone and mainland companies with accurate records, transparent processes and full regulatory compliance.
Comprehensive consular support uae: embassy and consulate liaison, legalisation and attestation of documents, visa assistance, translations and filings with local authorities. Reliable, confidential service for expatriates, investors and corporate clients.
Want to obtain an investor visa uae? We guide you through business setup or property investment requirements, prepare documentation, submit your application and ensure smooth processing. Transparent, efficient and tailored to your goals.
Купить права – это важный шаг к получению водительского удостоверения и свободе передвижения. Наша компания предлагает надежные и легальные услуги по обучению в автошколе, подготовке к экзаменам и сопровождению на всех этапах получения водительских прав. Мы гарантируем качественное обучение с опытными инструкторами, индивидуальный подход и поддержку при сдаче теоретического и практического экзаменов. У нас вы можете купить права честно и без лишних рисков, быстро пройти весь курс обучения и получить документы, соответствующие требованиям ГИБДД. Обращайтесь к нам, если хотите стать уверенным и законопослушным водителем!
Sunrise Finds Hub – Simple pages with well-laid-out products make browsing easy and enjoyable.
GlowSelect – User-friendly design with products showcased clearly for easy browsing.
Fashion Lovers Select – Great variety shown clearly, and the clean structure made exploring enjoyable.
elite escort Escort agencies Escort Services
Binance spot trading strategies AI-powered crypto pump signals, once whispered about in hushed tones on dimly lit forums, now stand as a testament to the evolving symbiosis between artificial intelligence and the labyrinthine world of cryptocurrency. These signals, algorithms fueled by voracious appetites for data, perpetually scan the digital landscape. Their purpose: to divine the precise moment before an orchestrated or spontaneously ignited price rocket launches a coin skyward. The promise? A tantalizing, albeit fleeting, taste of astronomical returns. The peril? The ever-present specter of pump and dump crypto schemes, lurking in the shadows, ready to ensnare the unwary. A vigilant adoption of crypto pump detector technology becomes not just prudent, but existential.
End-to-end corporate setup uae: company formation, trade licence, corporate documentation, visa processing, bank account assistance and compliance checks. We streamline incorporation and help establish a strong operational foundation in the UAE.
Launch your fund setup uae with end-to-end support: structuring, legal documentation, licensing, AML/KYC compliance, corporate setup and administration. We help create flexible investment vehicles for global investors and family wealth platforms.
Set up a holding company in uae with full legal and corporate support. We help select the right jurisdiction, prepare documents, register the entity, coordinate banking and ensure compliance with substance, tax and reporting rules for international groups.
Comprehensive family office setup uae: from choosing the right jurisdiction and legal structure to incorporation, banking, policies, reporting and ongoing administration. Tailored solutions for families consolidating wealth, protecting assets and planning succession.
Need legalization of documents for uae? We manage the entire process — review, notarisation, ministry approvals, embassy attestation and translation. Suitable for business setup, visas, employment, education and property transactions. Efficient and hassle-free.
6 Easy Steps to Clean a Car Dashboard Like a Pro – DashSteam Blogs
Admin, согласен с вами полностью 🙂
Меня заинтересовала тема “”, но я там не могу ответить.
Актуальные ссылки KRAKEN:
– :
– :
– :
– :
– :
Ваша персональная скидка по коду KRA-TRFR2025 – 7%
6 Easy Steps to Clean a Car Dashboard Like a Pro – DashSteam Blogs
Admin, согласен с вами полностью 🙂
Меня заинтересовала тема “”, но я там не могу ответить.
Актуальные ссылки KRAKEN:
– :
– :
– :
– :
– :
Ваша личная скидка по коду KRA-UEDN2025 – 5%
https://bravomos.ru/ bravomos
Проект загородного дома Интерьер загородного дома может сильно влиять на общее впечатление и уют, который он создает. При проектировании интерьера важно учитывать не только стиль, но и материалы, которые будут использоваться. Натуральные текстуры, такие как дерево и камень, привнесут в помещение атмосферу тепла и комфорта. Освещение также играет ключевую роль: правильное распределение света создает не только функциональность, но и задает настроение. Для создания гармоничного интерьера можно использовать комбинацию различных стилей, таких как современный и кантри, что позволит сделать пространство более интересным и индивидуальным.
6 Easy Steps to Clean a Car Dashboard Like a Pro – DashSteam Blogs
Admin, согласен с вами полностью 🙂
Меня заинтересовала тема “”, но я там не могу ответить.
Актуальные ссылки KRAKEN:
– :
– :
– :
– :
– :
Ваша личная скидка по коду KRA-PURH2025 – 10%
TFC Style Picks – Trendy fashion items arranged nicely, moving around the site was simple.
GiftCornerOnline – Simple interface, easy-to-browse sections, and attractive gift options.
6 Easy Steps to Clean a Car Dashboard Like a Pro – DashSteam Blogs
Admin, согласен с вами полностью 🙂
Меня заинтересовала тема “”, но я там не могу ответить.
Рабочие зеркала KRAKEN:
– :
– :
– :
– :
– :
Ваша персональная скидка по коду KRA-ZJNU2025 – 9%
6 Easy Steps to Clean a Car Dashboard Like a Pro – DashSteam Blogs
Moderator, согласен с вами полностью 🙂
Меня заинтересовала тема “”, но я там не могу ответить.
Актуальные ссылки KRAKEN:
– :
– :
– :
– :
– :
Ваша персональная скидка по коду KRA-IBZL2025 – 5%
6 Easy Steps to Clean a Car Dashboard Like a Pro – DashSteam Blogs
Admin, согласен с вами полностью 🙂
Меня заинтересовала тема “”, но я там не могу ответить.
Актуальные ссылки KRAKEN:
– :
– :
– :
– :
– :
Ваша персональная скидка по коду KRA-XJTE2025 – 7%
Need a power of attorney uae? We draft POA documents, organise notary appointments, handle MOFA attestation, embassy legalisation and certified translations. Ideal for delegating authority for banking, business, real estate and legal procedures.
Need a will in uae? We help structure inheritances, appoint executors and guardians, cover local and foreign assets and prepare documents in line with UAE requirements. Step-by-step guidance from first consultation to registration and safe storage of your will.
Open a brokerage account uae with full support. We review your goals, recommend regulated platforms, guide you through compliance, handle documentation and assist with activation. Ideal for stock, ETF, bond and multi-asset trading from a trusted jurisdiction.
Complete uae work visa support: from eligibility check and document preparation to work permit approval, medical tests and residence visa issuance. Ideal for professionals moving to Dubai, Abu Dhabi and other emirates for long-term employment.
Авиабилеты в Китай https://chinaavia.com по выгодным ценам: удобный поиск рейсов, сравнение тарифов, прямые и стыковочные перелёты, актуальные расписания. Бронируйте билеты в Пекин, Шанхай, Гуанчжоу и другие города онлайн. Надёжная оплата и мгновенная выдача электронного билета.
Elite prostitutes – Vip girls , profiles and escort from elite girls of models Escort agencies Escort for men
6 Easy Steps to Clean a Car Dashboard Like a Pro – DashSteam Blogs
Admin, согласен с вами полностью 🙂
Меня заинтересовала тема “”, но я там не могу ответить.
Актуальные ссылки KRAKEN:
– :
– :
– :
– :
– :
Ваша персональная скидка по коду KRA-HEJN2025 – 6%
6 Easy Steps to Clean a Car Dashboard Like a Pro – DashSteam Blogs
Admin, согласен с вами полностью 🙂
Меня заинтересовала тема “”, но я там не могу ответить.
Актуальные ссылки KRAKEN:
– :
– :
– :
– :
– :
Ваша персональная скидка по коду KRA-TDSW2025 – 6%
6 Easy Steps to Clean a Car Dashboard Like a Pro – DashSteam Blogs
Admin, согласен с вами полностью 🙂
Меня заинтересовала тема “”, но я там не могу ответить.
Рабочие зеркала KRAKEN:
– :
– :
– :
– :
– :
Ваша персональная скидка по коду KRA-WUTT2025 – 8%
Best supplier buy accounts invites business owners into the huge inventory of marketing tools. A unique feature of our service is our private library, where you can find working guides about social media marketing. Discover methods to manage accounts securely as well as strategies for bypassing bans when using social networks. Our inventory contains profiles of FB, Insta, Telegram for all needs: from autoregs to verified business managers with cookies.
peakoutlet – Clear structure with well-presented products, browsing was smooth.
VIP ESCORT SERVICE Escort services with top models and VIP girls! Female Escort Services for Men
6 Easy Steps to Clean a Car Dashboard Like a Pro – DashSteam Blogs
Admin, согласен с вами полностью 🙂
Меня заинтересовала тема “”, но я там не могу ответить.
Рабочие зеркала KRAKEN:
– :
– :
– :
– :
– :
Ваша личная скидка по коду KRA-ROQZ2025 – 6%
6 Easy Steps to Clean a Car Dashboard Like a Pro – DashSteam Blogs
Moderator, согласен с вами полностью 🙂
Меня заинтересовала тема “”, но я там не могу ответить.
Рабочие зеркала KRAKEN:
– :
– :
– :
– :
– :
Ваша персональная скидка по коду KRA-FYIN2025 – 8%
6 Easy Steps to Clean a Car Dashboard Like a Pro – DashSteam Blogs
Moderator, согласен с вами полностью 🙂
Меня заинтересовала тема “”, но я там не могу ответить.
Рабочие зеркала KRAKEN:
– :
– :
– :
– :
– :
Ваша персональная скидка по коду KRA-MNRD2025 – 9%
6 Easy Steps to Clean a Car Dashboard Like a Pro – DashSteam Blogs
Admin, согласен с вами полностью 🙂
Меня заинтересовала тема “”, но я там не могу ответить.
Рабочие зеркала KRAKEN:
– :
– :
– :
– :
– :
Ваша персональная скидка по коду KRA-GKTF2025 – 9%
6 Easy Steps to Clean a Car Dashboard Like a Pro – DashSteam Blogs
Moderator, согласен с вами полностью 🙂
Меня заинтересовала тема “”, но я там не могу ответить.
Актуальные ссылки KRAKEN:
– :
– :
– :
– :
– :
Ваша персональная скидка по коду KRA-LAMX2025 – 8%
Street Fashion Hub – Browsing is effortless with well-organized modern urban collections.
Unlimited Growth Ideas – The layout is clean, pages load fast, and the information is practical.
Elite individuals VIP Escort Elite Models
6 Easy Steps to Clean a Car Dashboard Like a Pro – DashSteam Blogs
Moderator, согласен с вами полностью 🙂
Меня заинтересовала тема “”, но я там не могу ответить.
Актуальные ссылки KRAKEN:
– :
– :
– :
– :
– :
Ваша персональная скидка по коду KRA-XCJU2025 – 8%
6 Easy Steps to Clean a Car Dashboard Like a Pro – DashSteam Blogs
Moderator, согласен с вами полностью 🙂
Меня заинтересовала тема “”, но я там не могу ответить.
Актуальные ссылки KRAKEN:
– :
– :
– :
– :
– :
Ваша персональная скидка по коду KRA-SGOC2025 – 7%
UrbanChoice – Products are easy to locate and the layout is very intuitive.
FuturePath Picks Hub – Modern interface with clearly arranged items improves usability.
NewValue Essentials – Clear categories, stable browsing, and good prices throughout the selection.
6 Easy Steps to Clean a Car Dashboard Like a Pro – DashSteam Blogs
Admin, согласен с вами полностью 🙂
Меня заинтересовала тема “”, но я там не могу ответить.
Актуальные ссылки KRAKEN:
– :
– :
– :
– :
– :
Ваша личная скидка по коду KRA-SBWF2025 – 8%
6 Easy Steps to Clean a Car Dashboard Like a Pro – DashSteam Blogs
Admin, согласен с вами полностью 🙂
Меня заинтересовала тема “”, но я там не могу ответить.
Рабочие зеркала KRAKEN:
– :
– :
– :
– :
– :
Ваша персональная скидка по коду KRA-OTWL2025 – 7%
Appreciate the effort put into this. It’s always good to see quality content.
https://www.equinenow.com/farm/bongachatru.htm
Escort Girls Escort services with top models and VIP girls! Business Escort Agency
Trend For Life Finds – Appealing items and smooth layout, exploring was seamless.
http://fr79056g.bget.ru/index.php?name=account&op=info&uname=eastsorrow5
6 Easy Steps to Clean a Car Dashboard Like a Pro – DashSteam Blogs
Admin, согласен с вами полностью 🙂
Меня заинтересовала тема “”, но я там не могу ответить.
Актуальные ссылки KRAKEN:
– :
– :
– :
– :
– :
Ваша персональная скидка по коду KRA-HOJR2025 – 8%
http://forum.l2star.net/member.php?u=24060
Grand River Selection – Items displayed clearly, providing a pleasant and intuitive shopping experience.
6 Easy Steps to Clean a Car Dashboard Like a Pro – DashSteam Blogs
Admin, согласен с вами полностью 🙂
Меня заинтересовала тема “”, но я там не могу ответить.
Актуальные ссылки KRAKEN:
– :
– :
– :
– :
– :
Ваша персональная скидка по коду KRA-ZWGV2025 – 5%
CoastalBrookShop – Great mix of items, layout is clean and the whole site feels simple to explore.
6 Easy Steps to Clean a Car Dashboard Like a Pro – DashSteam Blogs
Moderator, согласен с вами полностью 🙂
Меня заинтересовала тема “”, но я там не могу ответить.
Рабочие зеркала KRAKEN:
– :
– :
– :
– :
– :
Ваша личная скидка по коду KRA-PVYS2025 – 7%
6 Easy Steps to Clean a Car Dashboard Like a Pro – DashSteam Blogs
Admin, согласен с вами полностью 🙂
Меня заинтересовала тема “”, но я там не могу ответить.
Актуальные ссылки KRAKEN:
– :
– :
– :
– :
– :
Ваша персональная скидка по коду KRA-SMTH2025 – 9%
VIP escort https://pekarnya38.ru VIP ESCORT SERVICE
6 Easy Steps to Clean a Car Dashboard Like a Pro – DashSteam Blogs
Moderator, согласен с вами полностью 🙂
Меня заинтересовала тема “”, но я там не могу ответить.
Рабочие зеркала KRAKEN:
– :
– :
– :
– :
– :
Ваша персональная скидка по коду KRA-VSSG2025 – 9%
6 Easy Steps to Clean a Car Dashboard Like a Pro – DashSteam Blogs
Admin, согласен с вами полностью 🙂
Меня заинтересовала тема “”, но я там не могу ответить.
Рабочие зеркала KRAKEN:
– :
– :
– :
– :
– :
Ваша личная скидка по коду KRA-BSKZ2025 – 7%
6 Easy Steps to Clean a Car Dashboard Like a Pro – DashSteam Blogs
Admin, согласен с вами полностью 🙂
Меня заинтересовала тема “”, но я там не могу ответить.
Актуальные ссылки KRAKEN:
– :
– :
– :
– :
– :
Ваша личная скидка по коду KRA-OYNZ2025 – 5%
Sunrise Trail Hub – Cleanly structured pages with simple navigation make browsing products easy.
6 Easy Steps to Clean a Car Dashboard Like a Pro – DashSteam Blogs
Moderator, согласен с вами полностью 🙂
Меня заинтересовала тема “”, но я там не могу ответить.
Актуальные ссылки KRAKEN:
– :
– :
– :
– :
– :
Ваша личная скидка по коду KRA-HNJK2025 – 7%
Elite prostitutes – Vip girls , profiles and escort from elite girls of models Elite escort services Elite girls for escort | VIP models
6 Easy Steps to Clean a Car Dashboard Like a Pro – DashSteam Blogs
Admin, согласен с вами полностью 🙂
Меня заинтересовала тема “”, но я там не могу ответить.
Рабочие зеркала KRAKEN:
– :
– :
– :
– :
– :
Ваша личная скидка по коду KRA-AJWQ2025 – 5%
6 Easy Steps to Clean a Car Dashboard Like a Pro – DashSteam Blogs
Admin, согласен с вами полностью 🙂
Меня заинтересовала тема “”, но я там не могу ответить.
Актуальные ссылки KRAKEN:
– :
– :
– :
– :
– :
Ваша персональная скидка по коду KRA-DIQW2025 – 5%
Discover Fresh Horizons – The site felt welcoming, with organized sections that made reading simple.
CrestFinder – Attractive, trendy items and smooth site navigation create a pleasant experience.
Найти друзей рутити https://rutiti.ru бесплатные знакомства дают возможность увидется с тем, кем вы хотите, письма придут вам сразу а вы сами решаете кому ответить и что подарить, приятные сюрпризы.
Platforma internetowa mostbet: zaklady przedmeczowe i na zywo, wysokie kursy, akumulatory, zaklady na sumy i handicapy, a takze popularne sloty i kasyno na zywo. Bonus powitalny, regularne promocje, szybkie wyplaty na karty i portfele.
6 Easy Steps to Clean a Car Dashboard Like a Pro – DashSteam Blogs
Admin, согласен с вами полностью 🙂
Меня заинтересовала тема “”, но я там не могу ответить.
Рабочие зеркала KRAKEN:
– :
– :
– :
– :
– :
Ваша персональная скидка по коду KRA-ACVY2025 – 10%
Descubre cocoa casino espana: tragamonedas clasicas y de video, juegos de mesa, video poker y jackpots en una interfaz intuitiva. Bonos de bienvenida, ofertas de recarga y recompensas de fidelidad, ademas de depositos y retiros rapidos y un atento servicio de atencion al cliente. Solo para adultos. Mayores de 18 anos.
6 Easy Steps to Clean a Car Dashboard Like a Pro – DashSteam Blogs
Admin, согласен с вами полностью 🙂
Меня заинтересовала тема “”, но я там не могу ответить.
Актуальные ссылки KRAKEN:
– :
– :
– :
– :
– :
Ваша персональная скидка по коду KRA-EHXK2025 – 6%
Elite Escort Agency Elite escort services VIP Escort Dating Site for Men
Discover Style Trends – Everything displayed well, loaded quickly, and kept the experience smooth.
Trend Market Outlet Shop – Really enjoyed browsing, pages load quickly and products are easy to find.
GlobalRidge Lane Online – Well-structured pages with intuitive browsing ensure an enjoyable exploration of items.
City Style Picks – Smooth navigation and modern urban pieces displayed clearly.
Grand River Picks Hub – Well-laid-out products, making exploring the site fast and smooth.
“Sensual adult nymph seeks a rush of ecstatic desire.” Here — rb.gy/3fy54w?Illus
beautiful escort girls Elite escort services Business Escort Agency
What if the way we clean our car dashboards reveals deeper habits about our approach to cleanliness and organization in our lives? Could the state of our car interior be a reflection of our mental state or personal values? How might this simple task impact our overall well-being and productivity?
6 Easy Steps to Clean a Car Dashboard Like a Pro – DashSteam Blogs
Admin, согласен с вами полностью 🙂
Меня заинтересовала тема “”, но я там не могу ответить.
Рабочие зеркала KRAKEN:
– :
– :
– :
– :
– :
Ваша личная скидка по коду KRA-YCDN2025 – 5%
Color Mea Curated – Inspiring products presented neatly, making exploring quick and easy.
Have you ever considered that the way you clean your car’s dashboard might reflect deeper values about cleanliness and maintenance in your life? What does your dashboard say about your personality and priorities?
6 Easy Steps to Clean a Car Dashboard Like a Pro – DashSteam Blogs
Moderator, согласен с вами полностью 🙂
Меня заинтересовала тема “”, но я там не могу ответить.
Рабочие зеркала KRAKEN:
– :
– :
– :
– :
– :
Ваша персональная скидка по коду KRA-HEFO2025 – 8%
Prodej reziva https://www.kup-drevo.cz v Ceske republice: siroky vyber reziva, stavebniho a dokoncovaciho reziva, tramu, prken a stepky. Dodavame soukromym klientum i firmam stalou kvalitu, konkurenceschopne ceny a dodavky po cele Ceske republice.
Professional scandinavia backup secure, efficient, fast and privacy-focused reliable FTP Backup storage in Europe. 100% Dropbox European alternative. Protection on storage account. Choose European Backup Storage for peace of mind, security, and reliable 24x7x365 data management service.
VIP Escort | Escort of men VIP Escort Escort Services Agency – VIP Escort
Казино приятно удивило бонусами: они не только для новых игроков, но и для постоянных. Благодаря этому можно играть дольше и пробовать новые автоматы без лишних затрат
https://royalpizza96.ru/
Современные технологии 3D-печати — это быстрое решение для бизнеса и частных клиентов. Мы работаем по реализации проектов любой сложности. Наши инженеры и операторы используют передовое оборудование, что позволяет создавать детали с ювелирной точностью. Для печати подбираются инженерные пластики и композиты, что расширяет спектр применения. Обращаясь к нам, вы убедитесь, что 3D-печать — это быстро и выгодно. Перейдите по ссылке, чтобы оформить заказ, и мы обеспечим точность и надежность результата – https://goelancer.com/question/3d-%d0%bf%d0%b5%d1%87%d0%b0%d1%82%d1%8c-%d0%be%d1%82-%d0%b8%d0%b4%d0%b5%d0%b8-%d0%b4%d0%be-%d0%b3%d0%be%d1%82%d0%be%d0%b2%d0%be%d0%b3%d0%be-%d0%b8%d0%b7%d0%b4%d0%b5%d0%bb%d0%b8%d1%8f-22/. Мы гарантируем точное соответствие изделия макету.
dailycrestshop – Very well-organized pages, made picking products easy.
Is cleaning your car dashboard really just about aesthetics, or does it have deeper implications for your mental well-being and driving experience? What if the state of your dashboard reflects your overall approach to life and organization?
6 Easy Steps to Clean a Car Dashboard Like a Pro – DashSteam Blogs
Admin, согласен с вами полностью 🙂
Меня заинтересовала тема “”, но я там не могу ответить.
Рабочие зеркала KRAKEN:
– :
– :
– :
– :
– :
Ваша личная скидка по коду KRA-GHVR2025 – 8%
Is the obsession with keeping our car interiors spotless a reflection of deeper psychological needs for control and perfection? What does the state of our dashboards say about our personalities and lifestyles?
6 Easy Steps to Clean a Car Dashboard Like a Pro – DashSteam Blogs
Moderator, согласен с вами полностью 🙂
Меня заинтересовала тема “”, но я там не могу ответить.
Актуальные ссылки KRAKEN:
– :
– :
– :
– :
– :
Ваша персональная скидка по коду KRA-QREA2025 – 7%
What if cleaning your car dashboard could reveal secrets about your driving habits? Could the grime and clutter tell a story about your lifestyle choices, or even your emotional state? Let’s explore what the state of your dashboard really says about you!
6 Easy Steps to Clean a Car Dashboard Like a Pro – DashSteam Blogs
Moderator, согласен с вами полностью 🙂
Меня заинтересовала тема “”, но я там не могу ответить.
Рабочие зеркала KRAKEN:
– :
– :
– :
– :
– :
Ваша персональная скидка по коду KRA-TIDZ2025 – 7%
QualityChoiceStore – Simple layout, premium products, and smooth browsing throughout.
Is the obsession with a spotless car dashboard a distraction from more pressing societal issues, such as environmental sustainability and consumerism? How much time and energy are we willing to spend on aesthetics when we could be addressing the larger implications of our car-centric culture?
6 Easy Steps to Clean a Car Dashboard Like a Pro – DashSteam Blogs
Moderator, согласен с вами полностью 🙂
Меня заинтересовала тема “”, но я там не могу ответить.
Актуальные ссылки KRAKEN:
– :
– :
– :
– :
– :
Ваша личная скидка по коду KRA-ORCH2025 – 10%
Escort for men https://spravka-moskva.biz beautiful escort girls
Is cleaning your car dashboard really just about aesthetics, or does it impact your overall driving experience? Consider the potential distractions from a dirty dashboard and how it might affect your focus on the road. What unconventional cleaning techniques have you discovered that enhance not just cleanliness but also your driving mindset?
6 Easy Steps to Clean a Car Dashboard Like a Pro – DashSteam Blogs
Moderator, согласен с вами полностью 🙂
Меня заинтересовала тема “”, но я там не могу ответить.
Рабочие зеркала KRAKEN:
– :
– :
– :
– :
– :
Ваша персональная скидка по коду KRA-GBXN2025 – 7%
NatureFinds – Smooth navigation with charming rustic items arranged neatly.
https://pentvars.edu.gh/pentecost-university-joins-to-observe-the-world-physiotherapy-day-2023/
https://define.listbb.ru/viewtopic.php?f=46&t=3051
https://mcyportal.mosti.gov.my/tpm-coaching-and-mentoring/media-foto/
Is cleaning your car dashboard just a mundane chore, or could it actually be a reflection of your personality and values? What does the state of your dashboard say about you, and how might it influence your driving experience and the impression you make on others?
6 Easy Steps to Clean a Car Dashboard Like a Pro – DashSteam Blogs
Moderator, согласен с вами полностью 🙂
Меня заинтересовала тема “”, но я там не могу ответить.
Рабочие зеркала KRAKEN:
– :
– :
– :
– :
– :
Ваша персональная скидка по коду KRA-ZNUM2025 – 9%
Вызов электрика https://vash-elektrik24.ru на дом в Москве: оперативный выезд, поиск и устранение неисправностей, установка розеток и выключателей, подключение техники, ремонт проводки. Квалифицированные мастера, точные цены, гарантия на работы и удобное время приезда.
Хочешь сдать авто? скупка авто быстро и безопасно: моментальная оценка, выезд специалиста, оформление сделки и мгновенная выплата наличными или на карту. Покупаем автомобили всех марок и годов, включая битые и после ДТП. Работаем без скрытых комиссий.
Is cleaning your car dashboard truly about aesthetics, or is it a reflection of your identity and values? What secrets might be lurking in your car’s interior that could reveal more about your personality than you think?
6 Easy Steps to Clean a Car Dashboard Like a Pro – DashSteam Blogs
Moderator, согласен с вами полностью 🙂
Меня заинтересовала тема “”, но я там не могу ответить.
Рабочие зеркала KRAKEN:
– :
– :
– :
– :
– :
Ваша личная скидка по коду KRA-EXFC2025 – 8%
Быстрая регистрация и неплохие бонусы на старте.
Look at my blog; https://debessi-rb18.ru/
натяжной потолок стоимость
Такой вариант отделки сочетает в себе эстетику и функциональность.
Компания “natyazhni-steli-vid-virobnika.biz.ua” предлагает качественные потолки напрямую от производителя. Мы используем только проверенные материалы.
#### **2. Преимущества натяжных потолков**
Одним из главных плюсов натяжных потолков является их влагостойкость. Они идеально подходят для ванных комнат и кухонь.
Еще одно преимущество — огромный выбор цветов и фактур. Дизайнеры помогут создать уникальный стиль для вашего помещения.
#### **3. Производство и материалы**
Наша компания изготавливает потолки из экологически чистого ПВХ. Материал абсолютно безопасен для здоровья.
Технология производства гарантирует прочность и эластичность полотна. Готовые потолки устойчивы к механическим повреждениям.
#### **4. Установка и обслуживание**
Монтаж натяжных потолков занимает всего несколько часов. Уже через день вы сможете пользоваться обновленным помещением.
Уход за потолком не требует особых усилий. Достаточно периодически протирать поверхность мягкой тканью.
—
### **Спин-шаблон статьи**
#### **1. Введение**
Мы предлагаем потолки высокого качества по доступным ценам.
#### **2. Преимущества натяжных потолков**
Современные технологии позволяют наносить любые изображения на полотно.
#### **3. Производство и материалы**
Качество сырья подтверждено независимыми экспертизами.
#### **4. Установка и обслуживание**
Легкая влажная уборка поможет поддерживать потолок в идеальном состоянии.
Fresh Fashion Corner – Good variety of looks, and the site’s responsiveness made things easy.
Все современные специальности ВГУ им. Машерова в одном разделе: список факультетов, направления подготовки, краткие описания программ, длительность обучения, квалификация выпускника и основные дисциплины. Помогаем абитуриентам выбрать подходящую профессию и траекторию обучения.
Современные компании все чаще обращаются к контрактным разработчикам для создания электронных устройств. Это позволяет ускорить процессы проектирования и избежать затрат на собственное оборудование. Важная часть работы — тестирование и сертификация, чтобы устройство соответствовало стандартам. Контрактное производство обеспечивает точное соответствие техническому заданию, минимизирует риски и повышает надежность продукта http://global.gwangju.ac.kr/bbs/board.php?bo_table=g0101&wr_id=1225945. Технология помогает проверять стабильность и функциональность устройств на разных этапах проектирования)
Elite Models https://tinyurls.biz elite dating
Is a spotless dashboard really worth the effort, or is it just a superficial way to distract ourselves from the messiness of life? What if the time spent cleaning could be better used for experiences that truly matter?
6 Easy Steps to Clean a Car Dashboard Like a Pro – DashSteam Blogs
Admin, согласен с вами полностью 🙂
Меня заинтересовала тема “”, но я там не могу ответить.
Актуальные ссылки KRAKEN:
– :
– :
– :
– :
– :
Ваша личная скидка по коду KRA-FIJJ2025 – 5%
Is your obsession with a spotless dashboard a reflection of deeper control issues in your life? What does the state of your car’s interior say about your personality and priorities? Could the drive for perfection in such a small space be masking larger anxieties?
6 Easy Steps to Clean a Car Dashboard Like a Pro – DashSteam Blogs
Admin, согласен с вами полностью 🙂
Меня заинтересовала тема “”, но я там не могу ответить.
Актуальные ссылки KRAKEN:
– :
– :
– :
– :
– :
Ваша персональная скидка по коду KRA-GJHP2025 – 6%
Играю здесь уже несколько дней подряд и заметил, что платформа очень стабильная: ни зависаний, ни лагов, даже когда запускаю несколько вкладок со слотами. Это создаёт ощущение надёжности и позволяет спокойно сосредоточиться на игре
https://xn--3-7sb3accrki9d.xn--p1ai/
Trendy Collection Picks Hub – Loved the modern assortment, browsing pages was effortless.
Когда хочется расслабиться после рабочего дня, захожу сюда на пару спинов и почти всегда ловлю хорошее настроение благодаря частым бонусам
https://mk-lounge.ru/
Hidden Valley Online Store – Beautiful treasures presented clearly, browsing feels natural and fast.
Is cleaning your car dashboard really just a chore, or could it be a gateway to understanding your own habits and attachment to your vehicle? What hidden stories and memories do the dust and clutter tell about you as a driver?
6 Easy Steps to Clean a Car Dashboard Like a Pro – DashSteam Blogs
Admin, согласен с вами полностью 🙂
Меня заинтересовала тема “”, но я там не могу ответить.
Актуальные ссылки KRAKEN:
– :
– :
– :
– :
– :
Ваша личная скидка по коду KRA-FELS2025 – 9%
Надежный источник по ссылке приветствует маркетологов в своем каталоге цифровых товаров. Главная фишка нашего сервиса — это наличии эксклюзивной вики-энциклопедии, где написаны актуальные схемы по добыче трафика. Здесь доступны страницы Facebook, Instagram, TikTok для любых задач: от пустышек и заканчивая трастовыми профилями с отлежкой. Заходите в наше комьюнити, изучайте обучающие материалы, общайтесь и делайте профит вместе с нами без задержек.
What if the cleanliness of our car dashboards is a reflection of our mental state? Could the act of maintaining a spotless dashboard be linked to greater self-discipline and overall life organization? How does your dashboard cleanliness correlate with your productivity and mood?
6 Easy Steps to Clean a Car Dashboard Like a Pro – DashSteam Blogs
Moderator, согласен с вами полностью 🙂
Меня заинтересовала тема “”, но я там не могу ответить.
Рабочие зеркала KRAKEN:
– :
– :
– :
– :
– :
Ваша персональная скидка по коду KRA-BCWA2025 – 10%
Elite prostitutes – Vip girls , profiles and escort from elite girls of models https://ylbb19.top beautiful escort girls
FindMotivation Studio – Well-laid-out motivational posts with seamless browsing experience.
Is cleaning your car dashboard really just about aesthetics, or could it be a reflection of your mental state? What does the condition of your dashboard say about your personality and lifestyle choices?
6 Easy Steps to Clean a Car Dashboard Like a Pro – DashSteam Blogs
Admin, согласен с вами полностью 🙂
Меня заинтересовала тема “”, но я там не могу ответить.
Рабочие зеркала KRAKEN:
– :
– :
– :
– :
– :
Ваша персональная скидка по коду KRA-BCRD2025 – 8%
онлайн работа дома для мам Находки ВБ мужские – это сочетание стиля, комфорта и функциональности, отвечающее потребностям современного мужчины. От классической одежды делового стиля до удобной спортивной экипировки, от стильных аксессуаров до практичных гаджетов – здесь можно найти все, что нужно для создания уверенного и респектабельного образа. Не стоит забывать и о находках ВБ для парней, предлагающих более молодежные и трендовые решения.
Is a spotless car dashboard a reflection of one’s personality, or merely a societal expectation? In a world where appearances often take precedence, how far should we go to maintain our vehicles for the sake of image versus practicality? What does a clean dashboard say about us?
6 Easy Steps to Clean a Car Dashboard Like a Pro – DashSteam Blogs
Moderator, согласен с вами полностью 🙂
Меня заинтересовала тема “”, но я там не могу ответить.
Актуальные ссылки KRAKEN:
– :
– :
– :
– :
– :
Ваша персональная скидка по коду KRA-JNDN2025 – 6%
Your Adventure Market – Smooth navigation and lively adventurous visuals make the site fun.
WildFuture Online – Clean, contemporary design paired with easy-to-use page flow improves browsing.
Is a spotless car dashboard really necessary for a professional appearance, or is it just an obsession with superficial cleanliness? How do our car interiors reflect our personalities, and what might someone infer about us based on the state of our dashboards?
6 Easy Steps to Clean a Car Dashboard Like a Pro – DashSteam Blogs
Admin, согласен с вами полностью 🙂
Меня заинтересовала тема “”, но я там не могу ответить.
Рабочие зеркала KRAKEN:
– :
– :
– :
– :
– :
Ваша персональная скидка по коду KRA-QAPS2025 – 7%
Is cleanliness truly next to godliness in our vehicles? What if the way we maintain our car interiors reflects deeper psychological aspects of our personalities? Could the clutter or neatness of a dashboard reveal our approach to life and organization?
6 Easy Steps to Clean a Car Dashboard Like a Pro – DashSteam Blogs
Admin, согласен с вами полностью 🙂
Меня заинтересовала тема “”, но я там не могу ответить.
Рабочие зеркала KRAKEN:
– :
– :
– :
– :
– :
Ваша личная скидка по коду KRA-LTVD2025 – 8%
CopperOutletShop – The discounts stand out clearly, and the site feels fast and convenient to move through.
Escort Agency VIP Escort Escort
Is cleaning your car dashboard really just a mundane chore, or could it be a metaphor for clearing the clutter in other areas of your life? How might the act of maintaining your car reflect deeper personal habits and priorities? Are we neglecting the ‘dashboard’ of our own lives while focusing too much on our vehicles?
6 Easy Steps to Clean a Car Dashboard Like a Pro – DashSteam Blogs
Moderator, согласен с вами полностью 🙂
Меня заинтересовала тема “”, но я там не могу ответить.
Актуальные ссылки KRAKEN:
– :
– :
– :
– :
– :
Ваша личная скидка по коду KRA-JLZE2025 – 10%
Cryptocasino reviews https://crypto-casinos-canada.com in Canada – If you’re looking for fast BTC/ETH transactions and clear terms, cryptocasino reviews will help you evaluate which platforms offer transparent bonuses and consistent payouts.
BankID-fria kasinon https://casinos-utan-bankid.com Manga spelare forbiser hur mycket uttagsgranser och verifieringskrav varierar, men BankID-fria kasinon hjalper dig att jamfora bonusar, betalningsmetoder och tillforlitlighet.
Casinos, die Paysafecard https://paysefcard-casino-de.info akzeptieren: Viele Spieler in Deutschland mochten ihr Konto aufladen, ohne ihre Bankdaten anzugeben. Casinos, die Paysafecard akzeptieren, ermoglichen sichere Prepaid-Einzahlungen mit einem festen Guthaben. So behalten Sie die volle Kontrolle uber Ihre Ausgaben und konnen weiterhin Spielautomaten und Live-Dealer-Spiele spielen.
Is cleaning your car dashboard really just about aesthetics, or could it be a reflection of your mental state? What does the condition of your dashboard say about your personality and your approach to life?
6 Easy Steps to Clean a Car Dashboard Like a Pro – DashSteam Blogs
Admin, согласен с вами полностью 🙂
Меня заинтересовала тема “”, но я там не могу ответить.
Актуальные ссылки KRAKEN:
– :
– :
– :
– :
– :
Ваша личная скидка по коду KRA-XELD2025 – 7%
Проблемы с алкоголем? вывод из запоя нарколог: анонимная помощь, круглосуточный выезд врача, детоксикация, капельницы, стабилизация состояния и поддержка. Индивидуальный подход, современные методы и контроль здоровья. Конфиденциально и безопасно.
Is maintaining a clean car dashboard really just about aesthetics, or could it actually impact your mental health and driving safety? How often do we overlook the psychological and safety implications of a cluttered, dusty dashboard? What if the cleanliness of our vehicles is a reflection of our inner state?
6 Easy Steps to Clean a Car Dashboard Like a Pro – DashSteam Blogs
Moderator, согласен с вами полностью 🙂
Меня заинтересовала тема “”, но я там не могу ответить.
Рабочие зеркала KRAKEN:
– :
– :
– :
– :
– :
Ваша персональная скидка по коду KRA-RNHF2025 – 9%
Is your obsession with a pristine car dashboard a reflection of deeper issues, like your need for control in an unpredictable world? What does it say about our priorities when we invest time and energy into perfecting such a seemingly trivial aspect of our lives?
6 Easy Steps to Clean a Car Dashboard Like a Pro – DashSteam Blogs
Moderator, согласен с вами полностью 🙂
Меня заинтересовала тема “”, но я там не могу ответить.
Рабочие зеркала KRAKEN:
– :
– :
– :
– :
– :
Ваша личная скидка по коду KRA-SEQS2025 – 6%
WildflowerHub – Well-structured layout and pleasant navigation for natural-themed items.
Elite Models https://car-dvr.info Vip girls
Is it possible that the act of cleaning your car dashboard can reflect deeper psychological traits about your personality? What might your choice of cleaning products and methods reveal about your values or lifestyle?
6 Easy Steps to Clean a Car Dashboard Like a Pro – DashSteam Blogs
Moderator, согласен с вами полностью 🙂
Меня заинтересовала тема “”, но я там не могу ответить.
Рабочие зеркала KRAKEN:
– :
– :
– :
– :
– :
Ваша личная скидка по коду KRA-TBPA2025 – 5%
Is cleaning your car dashboard just a mundane chore, or is it a ritual that reflects your personality and lifestyle? What hidden aspects of your identity can be revealed through the way you maintain your vehicle’s interior?
6 Easy Steps to Clean a Car Dashboard Like a Pro – DashSteam Blogs
Admin, согласен с вами полностью 🙂
Меня заинтересовала тема “”, но я там не могу ответить.
Рабочие зеркала KRAKEN:
– :
– :
– :
– :
– :
Ваша персональная скидка по коду KRA-WBMJ2025 – 9%
Fresh Savings Hub – Appreciated the tidy structure and the responsive loading across all pages.
TrendStyleHub – Smooth layout, stylish products, and a pleasant shopping experience.
Have you ever considered how the materials and products we use to clean our car interiors might impact our health and the environment? What if the chemicals in your cleaning supplies are more harmful than the dirt on your dashboard? Let’s discuss the balance between cleanliness and safety in car maintenance.
6 Easy Steps to Clean a Car Dashboard Like a Pro – DashSteam Blogs
Moderator, согласен с вами полностью 🙂
Меня заинтересовала тема “”, но я там не могу ответить.
Рабочие зеркала KRAKEN:
– :
– :
– :
– :
– :
Ваша персональная скидка по коду KRA-NNKV2025 – 5%
Trendy Purchase Picks – Loved the modern setup, exploring products was fast and easy.
bukmacher internetowy mostbet casino oferuje szeroki wybor zakladow sportowych, zakladow na zywo i slotow od czolowych dostawcow. Oferuje szybka rejestracje, bonusy dla nowych graczy, przyjazna dla uzytkownika aplikacje mobilna, natychmiastowe wyplaty i calodobowa obsluge klienta.
Read More: https://stormevents.fr
Selected articles: https://fleuriste-toulouse.fr
Read the extended version: https://lagaulemortuacienne.fr
escort agency https://pekarnya38.ru Elite prostitutes – VIP escort from model girls , VIP profiles of elite courtesans
Highland Craft Store – Beautifully displayed craft items, browsing feels smooth and enjoyable.
What if cleaning your car dashboard could reveal hidden secrets about your driving habits? Can the state of your dashboard actually reflect your personality and lifestyle choices, and what might that say about you to others?
6 Easy Steps to Clean a Car Dashboard Like a Pro – DashSteam Blogs
Admin, согласен с вами полностью 🙂
Меня заинтересовала тема “”, но я там не могу ответить.
Актуальные ссылки KRAKEN:
– :
– :
– :
– :
– :
Ваша персональная скидка по коду KRA-IGJN2025 – 8%
bukmacher internetowy mostbet casino oferuje szeroki wybor zakladow sportowych, zakladow na zywo i slotow od czolowych dostawcow. Oferuje szybka rejestracje, bonusy dla nowych graczy, przyjazna dla uzytkownika aplikacje mobilna, natychmiastowe wyplaty i calodobowa obsluge klienta.
Expand details: https://jhauto.fr
Details at the link: https://m-g.wine
Top picks for you: https://www.gilmaire-etienne.com
Is cleaning your car dashboard just a mundane chore, or can it actually enhance your driving experience and mental clarity? What if the state of your dashboard reflects your personality and influences your mood while driving?
6 Easy Steps to Clean a Car Dashboard Like a Pro – DashSteam Blogs
Admin, согласен с вами полностью 🙂
Меня заинтересовала тема “”, но я там не могу ответить.
Рабочие зеркала KRAKEN:
– :
– :
– :
– :
– :
Ваша персональная скидка по коду KRA-UISF2025 – 6%
https://stocktwits.com/jackcarranza
https://sklad-slabov.ru/forum/user/31196/
http://sahpes.onlinebbs.ru/viewtopic.php?f=3&t=3370
clickmatic.click – Color palette felt calming, nothing distracting, just focused, thoughtful design.
Elite Dating Models https://ishdps.ru beautiful escort girls
Offer Market Place – A wide range of discounts is listed, and navigating feels natural and smooth.
rankzilla.click – Appreciate the typography choices; comfortable spacing improved my reading experience.
FreshBuy Studio – Clean layout with clearly displayed items and intuitive navigation.
rankflare.click – Loved the layout today; clean, simple, and genuinely user-friendly overall.
rankpilotpro.click – Overall, professional vibe here; trustworthy, polished, and pleasantly minimal throughout.
rankorbit.click – Overall, professional vibe here; trustworthy, polished, and pleasantly minimal throughout.
crestartisanhub – Very tidy layout and easy navigation, made shopping quick and hassle-free.
https://infolenta.com.ua/khto-taki-samurai-istoriia-kodeks-chesti-ta-lehendarni-voiny-yaponii/
Ветеран труда без наград Предпенсионер льготы – это права и привилегии, предоставляемые гражданам, находящимся в возрасте за несколько лет до выхода на пенсию. Эти льготы могут включать защиту от необоснованного увольнения, возможность пройти переобучение или повышение квалификации, а также получение различных социальных выплат и пособий. Поддержка предпенсионеров является важной задачей государства, направленной на обеспечение их трудовой занятости и социальной адаптации в период перехода к пенсионной жизни.
Elite Dating Models VIP escort dating site Vip girls
CozyCloverStore – Nicely presented cozy goods, with a layout that feels soothing and easy to explore.
WildTradeVault – Smooth interface and fast browsing with a nice product variety.
Global Trend Picks – Had a smooth experience today, and the fashion lineup looked great.
армированная пленка Тенты – это мобильная крыша над головой, готовая защитить от дождя, солнца и ветра в любой ситуации. Туристы, строители, дачники – все найдут в тенте верного союзника, способного создать комфортные условия для работы и отдыха. Разнообразие размеров, форм и материалов позволяет выбрать тент, идеально соответствующий поставленной задаче.
Autumn Peak Studio – Autumn-style items look charming, and the browsing experience feels calm and easy today.
escort escort https://theaudiobookstore.info Escort for men
Simple Home Hub – Clean and organized home items, with easy navigation and smooth browsing.
shopping corner hub – Items are displayed nicely, exploring the site is smooth today.
Trendy Sale Finds – Sale items showcased well, moving through sections was easy and fast.
High Pine Market – Well-laid-out outlet deals, making exploring quick and easy.
DealFinderStore – Effortless browsing, solid bargains, and clear, clean layout.
Turli o’yinlar va sport faoliyatlari orqali, bu sayt har bir foydalanuvchiga o’ziga xos tajribani taklif etadi.
888starz’dagi o’yinlar, har doim yuqori sifat va eng yaxshi xizmatni taklif etadi
888starz zerkalo https://demoforme.com/?p=94115/
Marketplace Picks Midday – Attractive visuals with structured categories make browsing enjoyable.
Vip girls https://extragram.ru Elite individuals
Exclusive Deals Store – Lots of appealing offers here, and the interface feels clean and effortless to use.
Elite girls for escort | VIP models VIP escort dating site escort agency
FreshHome Finds Hub – Modern layout with clearly displayed items makes navigation seamless.
Elite VIP Escort https://easyrust.ru Escort Services
Just published: https://sesameautisme-fc.fr
Подробнее в один клик: https://wildlife.by
Cozy Autumn Studio – Fall-inspired selections look inviting, and site navigation is wonderfully simple.
DeepValleyPlace – Affordable products displayed clearly, giving a sense of quality and consistency.
shopper’s corner – Product variety is impressive, browsing feels easy and enjoyable.
UGC Style Store – Items displayed nicely, exploring the site felt effortless.
Living Market Hub – Clear structure, responsive pages, and a relaxing shopping experience.
Ironline Market – Solid marketplace with dependable products and fair pricing throughout.
Escort services for charming girls Escort services with top models and VIP girls! Elite prostitutes – VIP escort from model girls , VIP profiles of elite courtesans
Joyful Home Outlet – Bright design and easy-to-browse categories make shopping delightful.
SmartDealMarket – Products are well organized, browsing is intuitive, and shopping is convenient.
VIP ESCORT SERVICE https://klubok31-shop.ru Escort Services
Better Shopping Choices – Products look well-organized, and switching pages is quick and simple.
artisanbayhub – Navigation is intuitive and product pages are neat, made browsing easy.
rankthread.click – Appreciate the typography choices; comfortable spacing improved my reading experience.
beautiful escort girls VIP escort dating site elite dating
Женский портал https://forthenaturalwoman.com о жизни, красоте и вдохновении: мода, уход за собой, здоровье, отношения, карьера и личные финансы. Полезные статьи, честные обзоры, советы экспертов и истории реальных женщин. Присоединяйтесь к сообществу и находите идеи для себя каждый день.
Главные новости https://mynewsmonitor.com онлайн: самые важные события дня в сжатом и понятном формате. Политика, экономика, общество, мир, наука и культура. Краткие сводки, развёрнутые статьи, мнения экспертов и удобная лента, которая обновляется в режиме реального времени.
BargainHunter – The site loads quickly, and finding deals felt super straightforward.
Актуальные и главные https://allnews.in.ua новости: короткие заметки о срочных событиях и развёрнутые аналитические материалы. Помогаем понять, что произошло, почему это важно и к чему может привести. Лента обновляется в течение дня, чтобы вы не упустили ничего значимого.
Главные новости https://newsline.in.ua онлайн: от срочных сообщений до глубоких обзоров и экспертных комментариев. Политика, экономика, безопасность, технологии и культура. Только проверенные факты и удобная лента, чтобы быстро ориентироваться во всём, что происходит.
rankmint.click – Loved the layout today; clean, simple, and genuinely user-friendly overall.
rankzone.click – Navigation felt smooth, found everything quickly without any confusing steps.
rankburst.click – Navigation felt smooth, found everything quickly without any confusing steps.
фен дайсон купить фен дайсон купить .
clickorigin.click – Loved the layout today; clean, simple, and genuinely user-friendly overall.
заказать курсовую работу спб https://kupit-kursovuyu-21.ru .
your fav choice market – Clear visuals and a user-friendly setup make navigating simple.
FashionFresh Market – Trendy displays and fast navigation make browsing effortless and enjoyable.
курсовая работа недорого курсовая работа недорого .
oficjalne pobieranie mostbet mostbet casino
Elite Models Escort services with top models and VIP girls! Elite Girls
Seasonal Fresh Market – Neatly showcased items and seamless navigation enhance the shopping experience.
Unique Gift Corner – Great assortment and clean layout, navigation felt intuitive.
Style & Trend Hub – Easy navigation with a tidy layout made checking items simple.
reliable DFH shop – Happy with the browsing experience; everything seems stable and well-managed.
Iron Root Curated – Selection looks impressive, finding items is quick and intuitive.
inspiregrowthdaily.shop – Daily growth items seem useful, site navigation is clear and simple.
power belief store – Items look encouraging, navigation is quick and user-friendly.
купить курсовую работу купить курсовую работу .
Все главные https://ua-news.com.ua новости в одном потоке: актуальные события, важные решения, прогнозы, мнения и аналитика. Помогаем понять, что стоит за заголовками, как события связаны между собой и почему они значимы. Обновления в режиме реального времени.
Главные новости https://ukrnews.in.ua сегодня: политика, экономика, международные события, наука, культура и общественные темы. Оперативные сводки, анализ и подробные статьи. Полная картина дня, собранная в одном месте для удобного и быстрого чтения.
Новостной портал https://ua-today.com.ua с акцентом на достоверность: только проверенные источники, факты, комментарии экспертов и глубокая аналитика. Удобная лента событий, фильтры по темам, архив материалов и быстрый доступ к главному за день.
Современный авто https://cargurus.com.ua портал: свежие новости, премьеры, обзоры новых и подержанных автомобилей, тест-драйвы, советы по эксплуатации и страхованию. Удобный поиск по маркам и моделям, рейтинги, подборки и полезные материалы для автолюбителей любого уровня.
Лучшие гинекологи Люберец: здоровье женщин под заботливым вниманием
VIP Escort Dating Site for Men https://ignite-partners.ru Elite individuals
TopTrendPick – Pleasant layout, intuitive navigation, and fashionable items.
Everyday Shopper Deals – Good-quality deals stand out, and navigating the store is easy.
Value Picks Corner – Fast browsing and well-arranged affordable items throughout the store.
https://infolenta.com.ua/yak-diznatysia-sviy-taryfnyy-plan-kyivstar-5-sposobiv-pereviryty-aktyvnyy-taryf/
VIP Escort | Escort of men Gay escort Elite prostitutes – Vip girls , profiles and escort from elite girls of models
https://infolenta.com.ua/virshi-pro-zymu-dlia-ditey-7-8-rokiv-15-krashchykh-tvoriv-dlia-maliukiv/
Остеопатия: ключевые преимущества для вашего здоровья
Запись на прием к андрологу: ваш путь к здоровью мужчины
Онлайн авто https://autoindustriya.com.ua портал: всё об автомобилях и автожизни. Обзоры и сравнения моделей, тест-драйвы, лайфхаки по ремонту и обслуживанию, информация о кредитах и лизинге, новости рынка. Помогаем выбрать машину, понять тонкости владения и сэкономить на содержании.
Современный женский https://womanstyle.com.ua портал для тех, кто хочет успевать всё: стиль и красота, психология и отношения, материнство, дом, путешествия и работа. Практичные лайфхаки, чек-листы, подборки и мотивационные материалы, которые помогают заботиться о себе и жить в балансе.
Женский портал https://womanblog.com.ua с актуальными темами: тренды моды и макияжа, здоровье, фитнес, питание, саморазвитие и вдохновляющие истории. Ежедневные обновления, рекомендации специалистов и подборки идей для повседневной жизни, карьеры и личного счастья.
Современный новостной https://arguments.com.ua портал: главные новости дня, поясняющая аналитика, мнения экспертов и репортажи с мест событий. Лента в реальном времени, тематические рубрики, фото и видео. Помогаем разобраться в том, что происходит в стране и мире.
https://t.me/getx_site_official
DealDepot – Quick and easy browsing, very simple to find offers.
гет икс казино
меблі біла церква
дайсон официальный сайт фен купить fen-d-3.ru .
Elite Models https://aquarium39.ru Elite Girls
clickphase.click – Bookmarked this immediately, planning to revisit for updates and inspiration.
clickengineer.click – Navigation felt smooth, found everything quickly without any confusing steps.
viralcore.click – Content reads clearly, helpful examples made concepts easy to grasp.
oficjalne pobieranie mostbet mostbet
заказать курсовую работу качественно kupit-kursovuyu-21.ru .
дипломные работы на заказ http://www.kupit-kursovuyu-23.ru/ .
Авто портал https://automotive-news.com.ua для тех, кто живёт автомобилями: новости автопрома, обзоры машин, тест-драйвы, советы по выбору и обслуживанию, сравнение моделей и подбор авто по параметрам. Фото, видео, мнения экспертов и реальные отзывы владельцев в одном месте.
Строительный портал https://garden-story.com для профессионалов и частных мастеров: статьи и инструкции по ремонту, отделке и строительству, обзоры материалов и инструментов, калькуляторы, сметы, фото-примеры и советы экспертов. Всё, чтобы грамотно спланировать и выполнить работы.
Портал о ремонте https://remont-sam.com и строительстве: от подготовки проекта и сметы до отделки и декора. Подробные инструкции, обзоры инструментов, рейтинги материалов, фото-примеры и лайфхаки. Удобная навигация по темам помогает быстро найти нужное решение для вашего объекта.
Modern Wardrobe World – Pages loaded quickly and the fashion variety felt fresh and current.
Escort Services Escort agency – VIP escorts Elite girls for escort | VIP models
inspire journey picks – Items look appealing, navigation feels natural and simple.
Majestic Grover Collection Hub – Unique Grover items arranged nicely, navigation feels effortless and fast.
fashion outlet store – Items look trendy, navigation feels intuitive and fast.
WildRose Finds Online – Boutique has a warm and charming vibe, browsing was enjoyable.
Fresh Trend Picks – Stylish arrangement of items and fast, intuitive page flow enhance usability.
grove hub collection – Nicely curated items, and the layout supports smooth browsing.
GiftSpotOnline – Neat design, user-friendly layout, and effortless navigation.
Elite prostitutes – VIP escort from model girls , VIP profiles of elite courtesans Elite escort services Elite Escort Services
rankverse.click – Mobile version looks perfect; no glitches, fast scrolling, crisp text.
clickflux.click – Loved the layout today; clean, simple, and genuinely user-friendly overall.
Hub of Trends – The selection feels refreshing, and the site’s flow is easy to follow.
GlobalFinds Select – Neatly arranged sections and clear layout make navigation simple and intuitive.
заказать курсовой проект заказать курсовой проект .
онлайн сервис помощи студентам http://kupit-kursovuyu-22.ru/ .
дайсон купить стайлер для волос с насадками цена официальный сайт http://fen-d-3.ru .
SavingsSpot – Browsing products is simple and very comfortable.
Elite Dating Models Escort agencies Vip girls
Modern Fashion Studio – Clean, minimalistic layout and visually appealing products make the site enjoyable.
Elite prostitutes Gay escort Elite prostitutes – Vip girls , profiles and escort from elite girls of models
explore learning hub – Products appear useful, navigating the site is smooth and fast.
Wild Rose Boutique – Charming layout throughout, found some unique and enjoyable pieces.
HomeStyle Modern – Smooth navigation paired with a visually appealing modern catalog.
MidCity Choices – Appealing collections available, site feels fast and easy to explore.
home deals corner – Products are well curated, browsing feels fast and enjoyable.
помощь студентам и школьникам http://www.kupit-kursovuyu-21.ru .
double down casino
Elite Escort Agency Elite escort services Escort Services
Global Marketplace Premium – Very smooth browsing, items feel carefully curated and diverse.
помощь в написании курсовой http://www.kupit-kursovuyu-23.ru .
DailyShopCenter – Neat interface, easy-to-navigate pages, and appealing offers.
StartBuilding Picks Hub – Motivational articles displayed neatly with intuitive navigation throughout.
https://community.theasianparent.com/q/the_sports_betting_bonus_offers_a_130_match_on_your_first_deposit_up_to_130_or_t/5796790?utm_source=community.theasianparent.com&utm_medium=copy&utm_campaign=post-share
https://agrestina.pe.gov.br/prefeitura-de-agrestina-abre-inscricoes-para-curso-de-costura-industrial
https://discuss.ilw.com/forum/immigration-discussion/599379-promo-code-for-1xbet-1x200wave-%E2%82%AC130-easy-claim
https://www.scenario.press/blogs/245383/Code-Promo-Melbet-Nouveau-130-Bonus-Sport
http://inda-car-audio.tw/home.php?mod=space&username=redundantcyst53
https://www.sociomix.com/c/ugc/code-melbet-cameroun-2026-lux888-130/1330861765444158
https://www.diveboard.com/1xbetcode/posts/codigo-promocional-de-melbet-2026-zevs777-aumento-de-apuesta-de-130-eu-slash-dollars-BzR9PS
crest value shop – Plenty of quality items here, and the rotation of products keeps it engaging.
FD Fashion Trends – Trend selections look well-displayed, making the site enjoyable to navigate.
Female Escort Services for Men Gay escort Elite prostitutes – Vip girls , profiles and escort from elite girls of models
WildBrook Modern Studio Finds – Trendy and stylish pieces, the gallery made exploring enjoyable.
QuickSolutions – Helpful content easy to find, with smooth browsing throughout.
Elite prostitutes – VIP escort from model girls , VIP profiles of elite courtesans VIP escort dating site escort agency
https://qwertyoop.com qwertyoop
naturallyselectedhub – NaturallySelectedHub delivers authentic, well-made items that make exploring fun.
Строительный портал https://sovetremont.com с практическими советами: ремонт квартир, строительство домов, инженерные системы, отделка, фасады, кровля и благоустройство. Руководства, видео, расчёты и рекомендации экспертов, которые помогают экономить время и деньги.
Портал о строительстве https://stroyline.com и ремонте: пошаговые инструкции, обзоры материалов, калькуляторы, идеи планировок и дизайна, советы мастеров и реальные примеры. Помогаем спланировать работы, избежать типичных ошибок и сэкономить время и бюджет.
Онлайн-портал https://stroyinfo.com о строительстве и ремонте для владельцев квартир, домов и дач: полезные статьи, схемы, чек-листы, подбор материалов и техники, советы по отделке и инженерным системам. Всё, чтобы сделать ремонт своими руками или грамотно контролировать подрядчиков.
Свежие новости https://ukrportal.com.ua Украины и мира: политика, экономика, общество, происшествия, аналитика и авторские материалы. Оперативные обновления 24/7, проверенные факты и объективная подача. Следите за ключевыми событиями, которые формируют будущее страны и всего мира.
Sunset Picks Lane – Cozy layout and clear images make exploring products simple.
заказать студенческую работу http://kupit-kursovuyu-22.ru .
Wild Rose Hub Online – Cozy boutique vibe, found several enjoyable items while browsing.
Elite Dating Models VIP Escort Elite Models
modern picks online – Selections look fresh, browsing is straightforward and enjoyable.
Midnight Trend Collection Spot – Stylish items showcased nicely, navigating the store is quick and easy.
QuickDealsOutlet – Very convenient to shop, loads fast, and finds are easy.
Modern Outfit Trends – Good layout and responsive pages made checking styles smooth.
Urban Fashion Hub – Smooth navigation with a contemporary collection that stands out.
International Premium Store – Loved the variety and quality, very easy to explore today.
комичные моменты Жизнь в мелочах — это сверхтонкая мозаика, где каждая деталь добавляет смысл. Я заметил, как на кассовом аппарате случайно появился принт с надписью «Секретная скидка на улыбку», и решили, что это знак, пусть хотя бы на шаг вперед укажет путь. В автобусе я увидел парня, который читал книгу так громко, будто спорил с самим автором; люди вокруг смеялись не от издевки, а от того, как искренне он переживал каждую страницу. В такие моменты кажется, что мелочи — не пустая пыль времени, а маленькие сигналы от вселенной, подсказывающие: остановись, посмотри вокруг и улыбнись.
Escort services for charming girls Escort services with top models and VIP girls! VIP Escort | Escort of men
AspireHigher – Engaging theme, neat visuals, and easy-to-follow menus.
помощь курсовые https://www.kupit-kursovuyu-21.ru .
Актуальные новости https://ukrmedia24.com.ua Украины и мира в одном месте: главные события дня, обзоры, комментарии экспертов, репортажи и эксклюзивные материалы. Политика, экономика, технологии, культура и спорт. Быстро, достоверно и удобно для ежедневного чтения.
Новости Украины https://ukrinfo24.com.ua и мира: оперативная информация, разбор ключевых событий, интервью, репортажи и аналитика. Только проверенные источники и объективная подача. Будьте в курсе того, что происходит в стране и на международной арене прямо сейчас.
Лента новостей https://uavesti.com.ua Украины и мира: самые важные события дня, актуальные темы, экспертные оценки и глубокая аналитика. Удобный формат, быстрые обновления, проверенные данные. Политика, общество, экономика, культура и мировые тенденции — всё на одной платформе.
Все новости https://uanews24.com.ua Украины и мира — быстро, достоверно и понятно: события в политике, экономике, науке, культуре и спорте. Подробные обзоры, интервью и аналитика помогают увидеть полную картину происходящего. Ежедневные обновления и удобная навигация.
Fashion Choice Center – A wide range of fashion items is presented, browsing feels smooth and intuitive.
Приятно, что есть демо-режим для всех игр
драгон мани скачать
сколько стоит курсовая работа по юриспруденции http://kupit-kursovuyu-23.ru/ .
Hi just wanted to give you a brief heads up and let you know a few of the images aren’t loading correctly. I’m not sure why but I think its a linking issue. I’ve tried it in two different browsers and both show the same results.
juegos friv poki gratis
MotivationVault – User-friendly layout makes browsing inspirational content effortless.
Business Escort Agency VIP Escort Elite Models
Evergreen Choice Storefront – Items appear neatly, and browsing flows naturally from section to section.
Trendy Finds Online – Smooth navigation and well-presented items enhance the overall browsing experience.
Сайт для женщин https://golosiyiv.kiev.ua которые ценят себя и своё время: полезные статьи о моде и уходе, психологии, детях, отношениях, работе и хобби. Подборки идей, гайды, чек-листы и вдохновляющие истории. Помогаем находить баланс между заботой о других и заботой о себе.
Онлайн-сайт https://funtura.com.ua для женщин любого возраста: тренды моды и макияжа, здоровый образ жизни, питание, фитнес, отношения и саморазвитие. Регулярные обновления, советы экспертов и вдохновляющие материалы, которые помогают чувствовать себя увереннее каждый день.
Сайт для женщин https://e-times.com.ua о жизни, красоте и вдохновении: мода, макияж, уход за собой, здоровье, отношения, семья и карьера. Практичные советы, обзоры, чек-листы и личные истории. Помогаем заботиться о себе, развиваться и находить новые идеи каждый день.
Онлайн женский https://womenclub.kr.ua портал для девушек и женщин любого возраста: статьи про красоту и уход, отношения, семью, детей, карьеру и хобби. Удобная навигация по разделам, полезные советы, тесты и подборки, которые помогают находить ответы на важные вопросы.
написание студенческих работ на заказ https://kupit-kursovuyu-22.ru .
Elite prostitutes VIP escort dating site escort escort
WildRose Finds – Warm and inviting atmosphere, browsing revealed a few delightful items.
MidRiver Collection Spot – Well-organized products showcased neatly, navigation is fast and intuitive.
FashionPulseClick – Great styling options, easy-to-navigate pages, and quick loading.
Trendy Outfit Hub – Everything loaded instantly, and the overall selection looked solid.
VIP escort Escort agencies Business Escort Agency
Conscious Design Studio – Thoughtful product selection with a calming and easy-to-navigate layout.
Журнал о животных https://zoo-park.com дикая природа и домашние питомцы. Познавательные материалы, фотоистории, редкие виды, повадки, экология и ответственное содержание. Понятные гайды по уходу, выбору питомца и безопасному общению с животными.
Журнал о животных https://myzoofriend.com советы по уходу за питомцами, здоровье, питание, воспитание и поведение. Обзоры кормов и аксессуаров, рекомендации ветеринаров, истории спасения и интересные факты о кошках, собаках и дикой природе.
Авто портал https://just-forum.com с полным набором разделов: новости, обзоры, тесты, подержанные авто, советы по покупке, эксплуатации и продаже автомобиля. Честные мнения экспертов, реальные отзывы, подборки лучших моделей и удобная навигация по маркам и классам.
Новостной портал https://infonews.com.ua с полным охватом событий: оперативная лента, большие тексты, интервью и аналитика. Политика, экономика, общество, технологии, культура и спорт. Обновления в режиме реального времени и удобная структура разделов для ежедневного чтения.
Elite Escort Agency Escort agency – VIP escorts elite escort
rankhero.click – Mobile version looks perfect; no glitches, fast scrolling, crisp text.
Golden Field Select – Clear visuals and simple layout help shoppers browse effortlessly.
EcoSelectionHub – Organized layout, natural visuals, and user-friendly navigation.
maximaclick.click – Pages loaded fast, images appeared sharp, and formatting stayed consistent.
clickpeak.click – Color palette felt calming, nothing distracting, just focused, thoughtful design.
Modern Goods Market – Quick loading pages with a clean display of modern items.
clickstreamer.click – Loved the layout today; clean, simple, and genuinely user-friendly overall.
rankquest.click – Overall, professional vibe here; trustworthy, polished, and pleasantly minimal throughout.
escort agency Gay escort Elite prostitutes
ClarityPath – Browsing feels effortless with clean layout and motivating posts.
https://kinothebest.ru/forums/topic/melbet-promokod-2026-big777/
http://oldmetal.ru/forum/index.php?action=post2;start=0;board=6
https://sites.gsu.edu/etalundzic2/2016/03/03/menus-and-contact-information-octane-coffee-and-bar-4/comment-page-13/#comment-70802
https://mcyportal.mosti.gov.my/mcy-ministerial-dialogue/media-foto/
Портал о даче https://sovetyogorod.com саде и огороде: статьи и гайды по уходу за почвой, посадке, обрезке, мульчированию и борьбе с болезнями растений. Обзоры инструментов, идеи для теплиц и компостеров, ландшафтные решения и полезные советы для урожая.
Женский портал https://dreamywoman.com о стиле жизни: красота и уход, мода, здоровье, психология, отношения, семья и карьера. Полезные статьи, подборки, чек-листы и вдохновляющие истории. Всё, чтобы заботиться о себе, развиваться и находить идеи на каждый день.
Современный женский https://nova-woman.com сайт для девушек и женщин: тренды моды и макияжа, питание, фитнес, эмоциональное здоровье, отношения и саморазвитие. Понятные советы, обзоры, тесты и подборки, которые помогают чувствовать себя увереннее и счастливее.
Новостной портал https://ua24news.com.ua Украины: оперативные события дня, политика, экономика, общество, происшествия и международная повестка. Проверенные факты, аналитика, интервью и репортажи. Узнавайте главное о жизни страны и мира в удобном формате 24/7.
VIP Escort | Escort of men Elite escort services Elite individuals
Everline Spot – Browsing is seamless, and the variety of items keeps the experience engaging.
WildWood Fashion Online – Stylish items highlighted clearly, pages load quickly, and navigation feels easy.
authenticchoicehub – AuthenticChoiceHub delivers carefully chosen products that make browsing simple and satisfying.
WildBrook Modern Lifestyle – Contemporary and trendy style, exploring the store was fun.
daily gift picks – Daily picks look inviting, and browsing flows naturally.
Драгон казино предлагает приятные бонусы за регистрацию
https://ds318.ru/
Modern Roots Collection Hub – Attractive items displayed clearly, browsing feels quick and smooth.
что сильнее 100 или 400 ? и по времени сколько действуют ? https://kinonovinki-2024.online магазин ровныйБудем дальше работать с этим магазином.
Главные новости https://smi24.com.ua Украины в одном месте: актуальные события, мнения аналитиков, расследования, репортажи и эксклюзивные материалы. Наш новостной портал помогает понимать, что происходит в стране и как события влияют на жизнь людей.
Онлайн-новостной https://novosti24online.com.ua портал Украины: лента новостей, авторские колонки, интервью, обзоры и аналитика. Политика, социальные вопросы, экономика, международные события — всё оперативно, достоверно и понятно каждому читателю.
Новостной портал https://mediasfera.com.ua Украины для тех, кто хочет быть в курсе: свежие публикации, разбор ключевых событий, экспертные оценки и подробные материалы о политике, экономике и обществе. Быстрые обновления, удобная навигация и проверенная информация.
Новости Украины https://mediaportal.com.ua в удобном формате: лента последних событий, разделы по темам, авторские колонки и аналитика. Освещаем политику, экономику, безопасность, социальные вопросы и международные отношения. Портал для тех, кто хочет получать полную картину дня.
Bright Choice Market – Clean presentation and smooth browsing made everything simple to explore.
TrendSpotStore – Quick access to fashionable items, easy navigation, and smooth experience.
выполнение курсовых kupit-kursovuyu-22.ru .
WildRose Treasures Online – Charming setup with some standout products, exploring was fun.
Ethical Lifestyle Boutique – Lovely selection, felt calm and inviting while exploring the store.
https://opalubka.market/ opalubka market
детская мебель москва Мебель на заказ Telegram – это отличная возможность создать уникальный интерьер, отражающий ваш индивидуальный стиль. В Telegram можно найти мастеров и фабрики, предлагающие изготовление мебели по индивидуальным проектам. Диван раскладной Telegram на заказ, кровать с нестандартными размерами или шкаф, идеально вписывающийся в нишу – все это возможно благодаря мебели на заказ в Telegram. Гостиная Telegram, спальня Telegram, прихожая Telegram – создайте интерьер своей мечты с помощью мебели на заказ!
много нас, а грам один. https://plantsandzombies.ru Принял, участие в совместке номер 3, кинг как и подобает этому магазу, все сделал со скоростью звука, прошло 5 дней после оплаты и у меня в руках лежат 50 тонн этой велеколепной вкусняшки, СПАСИБО. Я просто не понимаю как люди заказывают у других когда есть chemicalМы в Кургане не работаем, все наши представительства есть в соответствующем разделе.
https://kitehurghada.ru/ кайт школа хургада
ChicCorner – Navigation is simple and products are presented in a visually appealing way.
Женский сайт https://loveliness.kyiv.ua с практичным контентом: уход за кожей и волосами, стильные образы, дом и уют, дети, работа и финансы. Полезные рекомендации, экспертные материалы и вдохновение без лишней «воды». Удобная навигация по рубрикам и регулярные обновления.
Универсальный авто https://kolesnitsa.com.ua портал для водителей и будущих владельцев: обзоры автомобилей, сравнение комплектаций, тест-драйвы, советы по ТО и ремонту, подбор шин и аксессуаров. Актуальные новости, аналитика рынка и материалы, которые помогают делать осознанный выбор.
Украинский новостной https://mediacentr.com.ua портал с акцентом на объективность и факты: свежие новости, аналитические статьи, интервью и спецпроекты. Освещаем жизнь страны, реформы, фронт, дипломатию и повседневные истории людей. Всё важное — на одной площадке.
Онлайн женский https://lugor.org.ua сайт для тех, кто ценит своё время: гайды по красоте и стилю, психологические советы, идеи для дома, отношения, материнство и карьерные цели. Подборки, чек-листы, истории и советы, которые реально работают в повседневной жизни.
modern picks hub – Stylish items displayed nicely, browsing feels simple and quick.
ПС клады в Москве оч надежные!! прям 10 из 10, очень понравилось когда забирали 50г https://iiintegration.ru У нас у отправки случился форс-мажор. Только на этой неделе начинают отправлять. Извиняюсь от лица магазина за задержку.Нет не нужен.
WildUrban Picks – Modern design with creatively displayed products makes navigation intuitive.
Shopping Day Outlet – Pages load quickly and the overall browsing experience is pleasant.
Обучение Xrumer 23 xrumer официальный сайт телеграм: xrumer официальный сайт телеграм – упоминание официального сайта Xrumer в контексте продвижения в Telegram (прежде всего, канал разработчиков).
Привет, нету в личке нечего. https://morozinfo.ru Описание грамотное и понятное, клад нашел в считаные минуты.Челябинск работаете?
Женский сайт https://loveliness.kyiv.ua с практичным контентом: уход за кожей и волосами, стильные образы, дом и уют, дети, работа и финансы. Полезные рекомендации, экспертные материалы и вдохновение без лишней «воды». Удобная навигация по рубрикам и регулярные обновления.
Универсальный авто https://kolesnitsa.com.ua портал для водителей и будущих владельцев: обзоры автомобилей, сравнение комплектаций, тест-драйвы, советы по ТО и ремонту, подбор шин и аксессуаров. Актуальные новости, аналитика рынка и материалы, которые помогают делать осознанный выбор.
Онлайн женский https://lugor.org.ua сайт для тех, кто ценит своё время: гайды по красоте и стилю, психологические советы, идеи для дома, отношения, материнство и карьерные цели. Подборки, чек-листы, истории и советы, которые реально работают в повседневной жизни.
Украинский новостной https://mediacentr.com.ua портал с акцентом на объективность и факты: свежие новости, аналитические статьи, интервью и спецпроекты. Освещаем жизнь страны, реформы, фронт, дипломатию и повседневные истории людей. Всё важное — на одной площадке.
Everwild Market – A wide range of products displayed neatly, making browsing simple and enjoyable.
https://discuss.ilw.com/forum/immigration-discussion/569902-what-is-erome/page2
MoonCrest Finds – Attractive design items showcased clearly, browsing feels convenient and smooth.
http://www.peugeot-4008.ru/forum/viewtopic.php?p=21846#21846
https://blogs.memphis.edu/padm3601/2014/09/29/pot-holes-in-memphis/#comment-591811
https://groups.google.com/g/carts-of-vapor/c/tjIMVrmYdtw
Wild Rose Collection Online – Lovely atmosphere with a few delightful discoveries along the way.
Unique Gift Online – Intuitive navigation and clear layout make exploring gifts simple and enjoyable.
BestGiftSpot – Easy-to-browse gifts, fast page loads, and enjoyable shopping flow.
Modern Curated Goods – Easy to explore, every product seems purposefully selected.
Quiet Plains Shop – Simple design and quick navigation provided a relaxed browsing experience.
да, спросил тут ли менеджер, по быстрому оформил заказ. https://idappter.ru Получил вчера конвертик от вас . Спасибо , оперативно . Не знаю почему почти все недовольны 5иаи , но такого психодела давненько не переживал . Потрясён до мозга костей .Заказывал 200й, прислали с приятным бонусом! Конспирация- чудесна! В общем все супер!
Top Tier Finds Store – High-end selections shown in a clean and accessible layout.
девушки кайтсерфинг кайтсерфинг казань
rankboostx.click – Color palette felt calming, nothing distracting, just focused, thoughtful design.
https://opalubka.market/ opalubka market
clickalley.click – Navigation felt smooth, found everything quickly without any confusing steps.
propelclick.click – Mobile version looks perfect; no glitches, fast scrolling, crisp text.
clickanchor.click – Navigation felt smooth, found everything quickly without any confusing steps.
это манера такая сдержанная или удовлетворительное=на троечку https://alexrs.ru У меня пришел чисто белый зернистый как крупа порошок.Кал.Почему всё-таки такси? На метро бы а одну сторону успел бы… Вес большеват был, обычно брал миксы да всякие вкусные таблетки, но тут сразу столько СК… Да и потом, нашёл на товар, найди т на непредвиденный случай/комфорт, я так считаю. Чем брать по грамму микс, так лучше вообще не брать. Пара дней – и на пять грамм наберешь, с друзьями/сэкономишь на обедах, в конце концов.
clickattic.click – Color palette felt calming, nothing distracting, just focused, thoughtful design.
GiftTreasures – Navigation is intuitive, making it easy to find perfect gifts.
fashion zone hub – Trendy selections are appealing, site feels quick and intuitive.
в 12 году брали реагент здесь по курьерке, ровно все было, сейчас оптом берем, но жаль продавец не работает без гаранта, это в наше время спасает от кидков, или различных форс мажоров. https://sportline35.ru отменное :dance:П.С. Отзывы о работе (посты по теме) я не удалял.
<consciousfashionhub – ConsciousFashionHub offers stylish, eco-friendly items that are simple to browse.
Wild Rose Online – Pleasant layout and inviting atmosphere, discovered several nice items.
Отличный Магаз, Все четко!!! купить кокаин, мефедрон, гашиш, бошки, лирика магазин четкй притензий нет на качество регвезде гавно(((((е знаю уместен ли мой вопрос в данное “смутное время” но все же откуда высылается заказы…? хотя бы из какой части РФ если это РФ…)))
Mountain Mist Studio Hub – Curated items look modern, exploring the store feels natural and fast.
Новостной портал https://infosmi.com.ua Украины: главные события дня, оперативная лента, аналитика и мнения экспертов. Политика, экономика, общество, война и международные новости. Чёткая подача, удобная структура разделов и регулярные обновления в режиме 24/7.
Онлайн новостной https://expressnews.com.ua портал для тех, кто хочет быть в курсе: свежие новости, обзоры, спецпроекты и авторские материалы. Политика, бизнес, общество, наука, культура и спорт — всё в одном месте, с понятной подачей и регулярными обновлениями 24/7.
Украинский новостной https://medicalanswers.com.ua портал: главные новости, расширенные обзоры, разбор решений власти, ситуации на фронте и жизни граждан. Фото, видео, инфографика и мнения экспертов помогают глубже понять происходящее в Украине и вокруг неё.
Портал смачних ідей https://mallinaproject.com.ua прості рецепти на щодень, святкові страви, десерти, випічка та корисні перекуси. Покрокові інструкції, поради, підбірки меню й лайфхаки для кухні. Готуйте швидко, смачно та з натхненням разом із нами.
Портал о технологиях https://technocom.dp.ua новости IT и гаджетов, обзоры смартфонов и ноутбуков, сравнения, тесты, инструкции и лайфхаки. Искусственный интеллект, кибербезопасность, софт, цифровые сервисы и тренды — простым языком и с пользой для читателя.
TrendHavenShop – Attractive items, clear layout, and convenient navigation.
Ethical Curations Hub – Smooth interface with engaging items, made browsing effortless and fun.
BetterDays Inspire – The interface feels optimistic and every section loads without delay.
Quiet Plains Collection – Smooth scrolling and clear layout helped in quickly finding products.
Everwood Supply – Well-organized supplies, loading quickly and making shopping hassle-free.
Global Premium Market – Premium selections showcased neatly for effortless navigation.
EverGlow Creative – A modern, visually appealing design enhances product visibility and flow.
спасибо! Хороший магазин) берите тут купить кокаин, мефедрон, гашиш, бошки, лирика Ребята,кому не сложно ,подскажите мне,где можно взять спирт,какой крепости он должен быть,и собственно в каких пропорциях MN-001 в нем растворять,дабы получить приятный эффект,чувство эйфории,и достаточно продолжительное действие при изготовлении смесей?прям не втерпеж
UniqueGift Lane Online – Smooth interface and well-arranged products create a seamless browsing experience.
WildBrook Modern Studio Shop – Sleek and modern presentation, browsing felt easy and natural.
Новостной портал https://infosmi.com.ua Украины: главные события дня, оперативная лента, аналитика и мнения экспертов. Политика, экономика, общество, война и международные новости. Чёткая подача, удобная структура разделов и регулярные обновления в режиме 24/7.
xrumer сайт телеграм Базы Xrumer 23: Базы Xrumer 23 – это коллекции URL-адресов веб-сайтов, оптимизированные для использования с последней версией программного обеспечения Xrumer. Эти базы данных учитывают особенности новых алгоритмов, методов обхода защиты и возможностей Xrumer 23, и содержат сайты, наиболее подходящие для автоматического размещения ссылок с использованием этой версии программы. Обновление баз данных до версии Xrumer 23 может значительно повысить эффективность прогонов и снизить риск блокировок.
Портал смачних ідей https://mallinaproject.com.ua прості рецепти на щодень, святкові страви, десерти, випічка та корисні перекуси. Покрокові інструкції, поради, підбірки меню й лайфхаки для кухні. Готуйте швидко, смачно та з натхненням разом із нами.
Портал о технологиях https://technocom.dp.ua новости IT и гаджетов, обзоры смартфонов и ноутбуков, сравнения, тесты, инструкции и лайфхаки. Искусственный интеллект, кибербезопасность, софт, цифровые сервисы и тренды — простым языком и с пользой для читателя.
Украинский новостной https://medicalanswers.com.ua портал: главные новости, расширенные обзоры, разбор решений власти, ситуации на фронте и жизни граждан. Фото, видео, инфографика и мнения экспертов помогают глубже понять происходящее в Украине и вокруг неё.
Онлайн новостной https://expressnews.com.ua портал для тех, кто хочет быть в курсе: свежие новости, обзоры, спецпроекты и авторские материалы. Политика, бизнес, общество, наука, культура и спорт — всё в одном месте, с понятной подачей и регулярными обновлениями 24/7.
your shopping corner – Items are trendy, browsing the site feels comfortable and natural.
Мужской портал https://phizmat.org.ua о стиле, здоровье, отношениях и деньгах. Свежие новости, честные обзоры гаджетов и авто, тренировки и питание, подборки фильмов и игр, лайфхаки для работы и отдыха — без воды и кликбейта. Советы, инструкции и тесты каждый день.
Туристический портал https://prostokarta.com.ua о путешествиях по России и миру: маршруты, города и страны, советы туристам, визы и перелёты, отели и жильё, обзоры курортов, идеи для отдыха, лайфхаки, личный опыт и актуальные новости туризма.
Женский журнал https://eternaltown.com.ua о стиле, красоте и здоровье. Мода и тренды, уход за кожей и волосами, отношения и психология, дом и семья, карьера и саморазвитие. Полезные советы, подборки, интервью и вдохновение каждый день.
Срочный эвакуатор Дмитров: оперативный выезд, подача от 20 минут. Перевозка автомобилей после ДТП и поломок, межгород, бережная транспортировка. Работаем круглосуточно, без скрытых доплат, принимаем заявки в любое время.
Надёжный эвакуатор Дмитров — помощь на дороге 24 часа. Эвакуация легковых и коммерческих авто, кроссоверов и мотоциклов. Современная техника, фиксированная стоимость, быстрый выезд по городу и области.
Залетные это какие то, представь, на целых 10 грамм кинули, смешно да и только . купить кокаин, мефедрон, гашиш, бошки, лирика пт всем.скоростя здесь имеются?Жалко тест профукал )
всё граммотно делают! купить кокаин, мефедрон, гашиш, бошки, лирика Всем по привету!Хочу всем сказать мы не работаем 1вым классом ни при каком условии…
Классное онлайн-казино, особенно если любите бонусы и турниры
https://meteorbistro.ru/
WildRose Hub – Charming and cozy feel, exploring the store was very enjoyable.
Надёжный эвакуатор Дмитров — помощь на дороге 24 часа. Эвакуация легковых и коммерческих авто, кроссоверов и мотоциклов. Современная техника, фиксированная стоимость, быстрый выезд по городу и области.
Мужской портал https://phizmat.org.ua о стиле, здоровье, отношениях и деньгах. Свежие новости, честные обзоры гаджетов и авто, тренировки и питание, подборки фильмов и игр, лайфхаки для работы и отдыха — без воды и кликбейта. Советы, инструкции и тесты каждый день.
Туристический портал https://prostokarta.com.ua о путешествиях по России и миру: маршруты, города и страны, советы туристам, визы и перелёты, отели и жильё, обзоры курортов, идеи для отдыха, лайфхаки, личный опыт и актуальные новости туризма.
Женский журнал https://eternaltown.com.ua о стиле, красоте и здоровье. Мода и тренды, уход за кожей и волосами, отношения и психология, дом и семья, карьера и саморазвитие. Полезные советы, подборки, интервью и вдохновение каждый день.
Срочный эвакуатор Дмитров: оперативный выезд, подача от 20 минут. Перевозка автомобилей после ДТП и поломок, межгород, бережная транспортировка. Работаем круглосуточно, без скрытых доплат, принимаем заявки в любое время.
Профессиональное агентство интернет маркетинга для малого и среднего бизнеса. Настройка рекламы, продвижение сайтов, рост заявок и продаж. Аналитика, оптимизация и постоянный контроль эффективности рекламных кампаний.
адвокат днепр Юридическая консультация в Днепре: оперативно и эффективно. Разрешение сложных юридических вопросов, анализ документов, подготовка исковых заявлений. Защита ваших прав и законных интересов.
Продажа тяговых аккумуляторных https://e-battery.ru батарей для вилочных погрузчиков – надёжные решения для стабильной работы складской техники. Подбор АКБ по параметрам, доставка, установка, долгий ресурс и высокая производительность для интенсивной эксплуатации
Нужно межевание? заказать межевание земельного участка профессиональное межевание участка для оформления и регистрации прав. Геодезические измерения, уточнение границ, межевой план, сопровождение в Росреестре. Опытные кадастровые инженеры, точность и прозрачная стоимость.
Mountain Star Creations – Trendy items showcased neatly, shopping is intuitive and pleasant.
Нужен аккумулятор? купить аккумулятор для авто в спб дешево подбор АКБ по марке и модели авто, большой выбор ёмкости и пускового тока. Доставка, самовывоз, выгодные условия и помощь в установке.
Show More: https://podcasts.apple.com/na/podcast/christmas-puzzles/id1698189758?i=1000740676982
digitalshift.click – Bookmarked this immediately, planning to revisit for updates and inspiration.
вобщем решение принято заказ буду делать ТУТ!!!! купить кокаин, мефедрон, гашиш, бошки, лирика Удачных закупокСработали быстро, посылка пришла за 4 дня, спрятано эффектно
Creative Commerce Collective – Loved the vibrant and engaging collection, browsing felt effortless and inspiring.
BrightChoiceHub – Neatly displayed items, simple interface, and smooth shopping.
clicklance.click – Pages loaded fast, images appeared sharp, and formatting stayed consistent.
RainyCity Select – Pleasant browsing experience with clearly displayed products and fast pages.
rankjet.click – Mobile version looks perfect; no glitches, fast scrolling, crisp text.
nextclicks.click – Pages loaded fast, images appeared sharp, and formatting stayed consistent.
ranklogic.click – Content reads clearly, helpful examples made concepts easy to grasp.
Clickping Hub Online – Fast performance combined with a clean and professional design.
Нужно межевание? межевой план участка профессиональное межевание участка для оформления и регистрации прав. Геодезические измерения, уточнение границ, межевой план, сопровождение в Росреестре. Опытные кадастровые инженеры, точность и прозрачная стоимость.
Профессиональное агентство интернет маркетинга для малого и среднего бизнеса. Настройка рекламы, продвижение сайтов, рост заявок и продаж. Аналитика, оптимизация и постоянный контроль эффективности рекламных кампаний.
Продажа тяговых аккумуляторных https://e-battery.ru батарей для вилочных погрузчиков – надёжные решения для стабильной работы складской техники. Подбор АКБ по параметрам, доставка, установка, долгий ресурс и высокая производительность для интенсивной эксплуатации
фен дайсон цена купить stajler-d-1.ru .
дайсон официальный сайт фен купить http://www.stajler-d-2.ru .
Плохует мягко сказано,уже больше пол месяца жду.Тебе кстати пришла? купить кокаин, мефедрон, гашиш, бошки, лирика Ребят подскажите что лучше взять:)желательно с пропорциями и качеством по времениИщи в соседней ветке мой отзыв по рцс. ИМХО рцс не для торча.
купить дайсон фен в москве у официального дилера http://www.stajler-d.ru/ .
Нужен аккумулятор? купить акб для авто в спб подбор АКБ по марке и модели авто, большой выбор ёмкости и пускового тока. Доставка, самовывоз, выгодные условия и помощь в установке.
Everyday Forest Deals – A nice assortment of everyday items, with navigation that feels effortless.
Full version of the article: https://vps17282.thezenweb.com/play-fun-and-free-puzzle-apps-77257844
Курсы арабского языка https://shams-arab.ru блог с полезными статьями, упражнениями и примерами. Разбираем грамматику, лексику, диалоги и особенности языка. Делимся советами по обучению, мотивации и выбору формата занятий.
Сервис помощи https://students-helper.ru студентам с учебными работами. Курсовые, контрольные, рефераты, отчёты и презентации. Индивидуальный подход, соблюдение сроков, доработки по требованиям преподавателя и конфиденциальность.
xrumer обучение телеграм Базы Xrumer 23 телеграм: Базы Xrumer 23 телеграм – коллекции URL- адресов, оптимизированные для работы с последней версией Xrumer и продвижения Telegram.
trend store hub – Selections appear appealing, browsing feels quick and user-friendly.
Школа БПЛА https://obucheniebpla.ru обучение управлению беспилотными летательными аппаратами с нуля и для продвинутых. Практика полётов, основы безопасности, навигация, аэрофотосъёмка и подготовка операторов дронов по современным стандартам.
Обучение родителей https://mother-massage.ru массажу и гимнастике для детей от рождения до года. Практические занятия, безопасные техники, развитие моторики и укрепление здоровья малыша. Поддержка специалиста, пошаговые рекомендации и уверенность родителей.
Образовательный блог https://za-obrazovanie.ru о методиках обучения и развитии навыков. Статьи о преподавании, педагогике, оценивании, мотивации и работе с детьми и взрослыми. Практика, кейсы и полезные материалы.
SeasonSmart Store – A pleasant shopping experience with neatly sorted categories and quick transitions.
Value Store Unique – Attractive presentation of items and intuitive navigation make exploring simple.
Услуги эвакуатора Эвакуатор Надежность, оперативность и профессионализм – три кита, на которых строится наша работа. Мы понимаем, что эвакуация автомобиля – это всегда стресс, поэтому стремимся сделать этот процесс максимально комфортным и безопасным для вас. Наши водители – опытные профессионалы, которые бережно относятся к каждому транспортному средству. Мы предлагаем прозрачные цены и гарантируем высокое качество обслуживания.
Брал иут пару раз , все четко купить кокаин, мефедрон, гашиш, бошки, лирика Магазин очень хороший всё чётко и быстро и селер грамотный вы правычто то не могу зайти на сайт (
MoonGlow Boutique – Soft colors and tidy product sections make exploring the site a delight.
Курсы арабского языка https://shams-arab.ru блог с полезными статьями, упражнениями и примерами. Разбираем грамматику, лексику, диалоги и особенности языка. Делимся советами по обучению, мотивации и выбору формата занятий.
Школа БПЛА https://obucheniebpla.ru обучение управлению беспилотными летательными аппаратами с нуля и для продвинутых. Практика полётов, основы безопасности, навигация, аэрофотосъёмка и подготовка операторов дронов по современным стандартам.
Сервис помощи https://students-helper.ru студентам с учебными работами. Курсовые, контрольные, рефераты, отчёты и презентации. Индивидуальный подход, соблюдение сроков, доработки по требованиям преподавателя и конфиденциальность.
https://premium.listbb.ru/viewtopic.php?f=2&t=3135
https://in.redcams.org/
https://kz.gay24chat.com/
https://en.erovideochat.pw/
https://fr.sexvideochat.su/
Образовательный блог https://za-obrazovanie.ru о методиках обучения и развитии навыков. Статьи о преподавании, педагогике, оценивании, мотивации и работе с детьми и взрослыми. Практика, кейсы и полезные материалы.
Обучение родителей https://mother-massage.ru массажу и гимнастике для детей от рождения до года. Практические занятия, безопасные техники, развитие моторики и укрепление здоровья малыша. Поддержка специалиста, пошаговые рекомендации и уверенность родителей.
Как и было обещано, адрес оператор прислал где-то в 23. купить кокаин, мефедрон, гашиш, бошки, лирика брал тут туси совсем недавно.все устроило.спасибо.жду обработки второго заказа)Заказал 50г. всё пришло всё хорошо_)))
Site web de parifoot rd congo: paris sportifs, championnats de football, resultats des matchs et cotes. Informations detaillees sur la plateforme, les conditions d’utilisation, les fonctionnalites et les evenements sportifs disponibles.
Site web 1xbet cd apk – paris sportifs en ligne sur le football et autres sports. Propose des paris en direct et a l’avance, des cotes, des resultats et des tournois. Description detaillee du service, des fonctionnalites du compte et de son utilisation au Congo.
La plateforme 1xbet apk burkina: paris sportifs en ligne, matchs de football, evenements en direct et statistiques. Description du service, marches disponibles, cotes et principales fonctionnalites du site.
Future Essentials Marketplace – Smooth interface with modern products that make shopping fun.
vintagefindshub – VintageFindsHub presents carefully selected pieces with a timeless, elegant feel.
La plateforme en ligne 1xbet burkina: paris sportifs en ligne, matchs de football, evenements en direct et statistiques. Description du service, marches disponibles, cotes et principales fonctionnalites du site.
Application mobile 1xbet burkina apk. Paris sportifs en ligne, football et tournois populaires, evenements en direct et statistiques. Presentation de l’application et de ses principales fonctionnalites.
Mountain View Deals Hub – Great outlet items, navigating the site is easy and pleasant.
Global Mindful Market – Loved exploring, every product feels high-quality and thoughtfully chosen.
Wild Rose Collection Online – Lovely atmosphere with a few delightful discoveries along the way.
QuickDealsOutlet – Easy browsing, fast site, and bargains are simple to locate.
А будет какая нибудь подробная инфа или трип репорты? А лучше пробники платные или бесплатные? https://tdfk61.ru понятно как проверенный магазин работает если отзывы негатив значит зачищает сообщений еще куча они на телефоне сейчас не могу их скопировать но и смысла нет все и так ясноKEY я не понимаю что ты хочешь от магазина то теперь ????за непонятку с соткой !!! моральную компенсацию????? или что????
RareFlora Select – Items arranged attractively and navigating sections felt effortless.
дайсон фен оригинал цена дайсон фен оригинал цена .
Premium Interiors Marketplace – Elegant arrangement with simple navigation and visually appealing layout.
На сколько я знаю в этом магазине пока нет реги! купить кокаин, мефедрон, гашиш, бошки, лирика Конспирацию посылок наладили? А то такой товар, а выписать не могу – стрёмно, если просто гриперы в конверте… И отпишите по качеству 5 мео дмт!Всё пучком с магазом!!!!С Июля работаю доволен адекватное общение,недолгое решение проблем ,оперативная обработка заказа .Если гемор какой достучитесь в Скайп и всё решится!!!!!:hello:
дайсон фен купить в москве оригинал дайсон фен купить в москве оригинал .
your fashion hub – Fashion selections look appealing, navigation is simple and pleasant.
SunrisePeak Visuals – Loved the unique touches in their designs; very enjoyable to spend time browsing.
wind finds – Fast pages and tidy layout made exploring products pleasant.
Forest Lane Creations Store – Calm and attractive presentation, helping to easily discover unique items.
фен купить дайсон официальный http://stajler-d.ru/ .
Choice Fashion Hub – A nice range of products is available, with a layout that is easy to use.
GlowTrend Fashion – Beautifully arranged clothing, and navigating the site is refreshingly smooth.
Next Gen Lifestyle Hub – Products are innovative and browsing the site is effortless and fun.
https://forum.issabel.org/u/1xbetbonuscode
http://opernhausblog.de/
https://beh.sk/
EverForest Finds Online – Enjoyable browsing with clean, natural arrangement of products.
https://belmotors.by/
NameDrift Picks – Lovely boutique selections, browsing is simple and enjoyable.
carefullychosenluxury – Carefullychosenluxury has an elegant selection that made browsing feel premium and fun.
ShopFind Nexus – A clean, minimal layout that guides users effortlessly through deals.
AffordableDealsHub – Items are neatly displayed, browsing is easy, and shopping is convenient.
La plateforme 1xbet burkina faso: paris sportifs en ligne, matchs de football, evenements en direct et statistiques. Description du service, marches disponibles, cotes et principales fonctionnalites du site.
Site web 1xbet apk rdc – paris sportifs en ligne sur le football et autres sports. Propose des paris en direct et a l’avance, des cotes, des resultats et des tournois. Description detaillee du service, des fonctionnalites du compte et de son utilisation au Congo.
Curated Style Marketplace – Stylish selections displayed neatly with effortless browsing.
clicklyst.click – Content reads clearly, helpful examples made concepts easy to grasp.
Site web de parifoot rd congo: paris sportifs, championnats de football, resultats des matchs et cotes. Informations detaillees sur la plateforme, les conditions d’utilisation, les fonctionnalites et les evenements sportifs disponibles.
La plateforme en ligne xbet burkina: paris sportifs en ligne, matchs de football, evenements en direct et statistiques. Description du service, marches disponibles, cotes et principales fonctionnalites du site.
DeterminationHub – Motivating content and the site layout makes browsing easy.
value picks center – Offerings appear solid, browsing feels seamless and smooth.
ranknova.click – Overall, professional vibe here; trustworthy, polished, and pleasantly minimal throughout.
официальный дайсон https://www.stajler-d-2.ru .
growthlane.click – Loved the layout today; clean, simple, and genuinely user-friendly overall.
clickspider.click – Overall, professional vibe here; trustworthy, polished, and pleasantly minimal throughout.
rankstack.click – Found practical insights today; sharing this article with colleagues later.
Блог Елены Беляевой https://bestyleacademy.ru профессионального стилиста. Разборы гардероба, капсульные коллекции, советы по стилю и актуальным трендам. Практика, вдохновение и понятные рекомендации для женщин и мужчин.
Школа блогеров https://vdskill.ru и видеотехнологий для авторов и предпринимателей. Создание видео, сторителлинг, монтаж и продвижение. Практические занятия, поддержка наставников и актуальные инструменты для роста.
Образовательный блог https://educationruss.ru об обучении за границей. Университеты и колледжи, языковые курсы, условия поступления, стоимость, документы и жизнь студентов. Полезные статьи и рекомендации для абитуриентов и родителей.
Профессиональные курсы инъекционной косметологии москва теория, практика, безопасность и современные подходы к эстетическим процедурам. Помогаем получить уверенные навыки и системные знания для работы.
Application mobile telecharger 1xbet burkina faso. Paris sportifs en ligne, football et tournois populaires, evenements en direct et statistiques. Presentation de l’application et de ses principales fonctionnalites.
официальный сайт dyson фен http://www.stajler-d-1.ru .
This was incredibly helpful and easy to understand. I’ve learned a lot.
Glow Lane Hub – Nicely arranged glow products, browsing feels intuitive and pleasant.
Trendy Fashion Daily – Stylish collections are displayed nicely, browsing feels intuitive.
Thoughtful Lifestyle Marketplace – The store highlights products chosen with intention, making browsing easy.
фен dyson http://www.stajler-d.ru .
Профессиональные обучение инъекции в косметологии теория, практика, безопасность и современные подходы к эстетическим процедурам. Помогаем получить уверенные навыки и системные знания для работы.
Блог Елены Беляевой https://bestyleacademy.ru профессионального стилиста. Разборы гардероба, капсульные коллекции, советы по стилю и актуальным трендам. Практика, вдохновение и понятные рекомендации для женщин и мужчин.
Образовательный блог https://educationruss.ru об обучении за границей. Университеты и колледжи, языковые курсы, условия поступления, стоимость, документы и жизнь студентов. Полезные статьи и рекомендации для абитуриентов и родителей.
Tall Cedar Studio Online – Enjoyable cozy market, categories were easy to navigate.
Школа блогеров https://vdskill.ru и видеотехнологий для авторов и предпринимателей. Создание видео, сторителлинг, монтаж и продвижение. Практические занятия, поддержка наставников и актуальные инструменты для роста.
NatureRoot Select – Well-curated natural products, site layout feels organized and convenient.
premiumstylehub – PremiumStyleHub offers a curated mix of stylish items with seamless navigation.
Intentional Values Store – Items feel thoughtfully picked, navigating the site was easy.
BuildYourSuccess – Inspirational products, fast-loading pages, and intuitive site navigation.
Share & Inspire Hub – Everything looks organized, and the overall tone is cheerful and motivating.
Soft Petal Picks – Every visit feels peaceful, and the cute items always make me smile.
Creative Design Market – Creative selections displayed clearly with a smooth navigation flow.
ValuableInsightsHub – Clear layout and reading content was effortless.
hub for shopping – Products appear organized, shopping here is quick and convenient.
FashionCorner Trends – A contemporary fashion layout and quick filters make browsing easy.
dyson официальный сайт в россии http://www.stajler-d-2.ru .
фен купить дайсон фен купить дайсон .
Cactus Casino (Какктус) онлайн казино играть в слоты
В этом году онлайн казино Кактус постепенно закрепило за собой репутацию удобной и продуманной платформы для тех, кто выбирает качественный игровой сервис. Проект ориентирован на игроков, которые ценят широкий выбор слотов, быстрые выплаты и честные условия. Благодаря стабильной работе официальный сайт Cactus Casino подходит как новичкам, так и опытным пользователям, которые хотят играть в слоты онлайн с комфортом и без лишних рисков.
Почему многие выбирают казино Cactus
Главная особенность площадки — её универсальность. Казино Cactus предлагает игры от популярных мировых провайдеров, что обеспечивает разнообразие механик и жанров. Пользователи могут запускать классические автоматы, видеослоты, новинки, настольные игры и live-раздел.
К другим преимуществам относятся:
• стабильный доступ к платформе с ПК и смартфонов;
• современный интерфейс без перегрузки;
• регулярные акции и бонусы казино, которые подходят для разного стиля игры;
• поддержка русскоязычных пользователей.
В сочетании это создаёт комфортную среду, где можно спокойно играть и тестировать стратегии без нервов и задержек.
Приветственные акции и система бонусов казино Кактус
На старте игроков ждут приветственные предложения, позволяющие увеличить депозит и получить фриспины в популярных слотах. Бонусы казино обновляются достаточно часто, поэтому пользователи могут находить акции под свои предпочтения — от кэшбэка до пакетов с бесплатными вращениями.
Программа лояльности также рассчитана на активных игроков: чем больше ставок, тем выше уровень и доступные преимущества.
Игры в казино – слоты, лайв и настольные варианты
Слоты занимают ключевое место на платформе — здесь доступны автоматы разных жанров: от ретро-механик до современных игр с бонус-раундами и прогрессивными джекпотами.
Кроме того, онлайн казино Кактус https://kaktuskazino.site предлагает live-раздел, где можно почувствовать атмосферу реального зала благодаря игре с живыми дилерами. Настольные игры вроде рулетки, блэкджека и баккары подойдут тем, кто предпочитает спокойный ритм и продуманную стратегию.
Как начать играть и что важно знать новичку
Чтобы начать игру, достаточно пройти быструю регистрацию и пополнить баланс удобным способом. После этого можно выбирать любой понравившийся слот и пробовать удачу. На внешних платформах нередко размещают рекомендации играть в казино Кактус, поскольку сайт ориентирован на безопасный игровой процесс и прозрачные правила.
Новичкам стоит начинать с деморежима, изучать механику слотов и только потом переходить к ставкам на реальные деньги.
Официальный сайт Cactus Casino: стабильность и безопасность
Официальный сайт Cactus Casino работает круглосуточно и предоставляет защищённое соединение, что позволяет пользователям проводить транзакции без опасений. Платформа использует сертифицированные генераторы случайных чисел, благодаря чему все результаты игр остаются честными и непредвзятыми.
Регулярные обновления и техническая поддержка делают площадку удобной для игроков, которые предпочитают долгосрочную игру без перебоев.
Стоит ли пробовать Cactus Casino
Если пользователю важно стабильное качество, широкий выбор автоматов и удобный интерфейс, онлайн казино Кактус может стать подходящим вариантом. Благодаря бонусам, корректной работе сайта и большим возможностям для ставок платформа привлекает внимание как новичков, так и постоянных игроков.
rankloom.click – Overall, professional vibe here; trustworthy, polished, and pleasantly minimal throughout.
Daily Fashion Deals – Affordable selections displayed clearly, shopping feels easy today.
>Future Forward Hub – The site features cutting-edge products, and browsing feels seamless.
WildBird Studio Collection – Items are distinct and thoughtfully arranged, very enjoyable browsing.
https://logcla.com/blogs/1091332/Code-Promo-Melbet-B%C3%A9nin-2026-WAP200-Bonus
http://kiakia.5nx.ru/viewtopic.php?f=2&t=28
[url=https://flowers55.ru/product-category/bukety/#]букет цветов с доставкой[/url]
Goldcrest Collection – Products look attractive, with a clean layout for effortless browsing.
rankmaximo.click – Navigation felt smooth, found everything quickly without any confusing steps.
swiftboost.click – Overall, professional vibe here; trustworthy, polished, and pleasantly minimal throughout.
clickrealm.click – Color palette felt calming, nothing distracting, just focused, thoughtful design.
ultraclicks.click – Content reads clearly, helpful examples made concepts easy to grasp.
NightBloom Selections – Outlet items arranged well, site navigation feels easy today.
Stylish Living Hub – The layout is clean, and the selection feels modern and enjoyable.
дайсон официальный сайт stajler-d.ru .
Профессиональное плазмолифтинг курс. Осваиваем современные техники, стандарты безопасности и нюансы работы с пациентами. Теория, практика и поддержка на всех этапах обучения.
ClassyChoiceStore – Smooth interface, trendy items, and clean layout make browsing easy.
rocketcasino
<Trusted Global Market – Products shown clearly with a user-friendly and trustworthy layout.
shopfornewdeals.shop – Deals are great here, browsing feels smooth and enjoyable overall today.
ModernStyleVault – Items look appealing, browsing was fast and easy.
Профессиональное обучение prp терапии. Осваиваем современные техники, стандарты безопасности и нюансы работы с пациентами. Теория, практика и поддержка на всех этапах обучения.
Crafted Ideas Market – The artistic selection stands out, and the site offers easy, smooth movement.
Neironica https://neironica.ru онлайн?платформа с ИИ?инструментами для создания Контент-завода, и автоматизации публикации статей, постов и видео во все соцсети
Authentic Global Hub – Each product feels genuine, and navigating the store is effortless.
Studio FutureCrest – Great combination of style and usability, found a few standout items.
Fashion Deal Store – Great variety of items available, browsing feels simple and fast.
Global Design Collective – Plenty of interesting designs, navigating the marketplace was very easy.
Northern Peak Finds – Products displayed clearly, navigating the site feels simple and pleasant.
<Golden Harbor Finds – Products presented clearly, with simple and easy navigation throughout.
a href=”https://discoveryourpurpose.click/” />Discover Purpose Hub – Motivational tone with smooth navigation and neatly arranged sections.
bestfindshub – BestFindsHub provides a curated range with well-presented details for smooth navigation.
1вин официальный 1win casino предлагает впечатляющий выбор игр от ведущих разработчиков. Здесь вы найдете слоты, рулетку, блэкджек и другие азартные развлечения, способные удовлетворить вкус любого игрока.
Neironica https://neironica.ru онлайн?платформа с ИИ?инструментами для создания Контент-завода, и автоматизации публикации статей, постов и видео во все соцсети
курс для сейфти менеджера
shop quality finds – Products look appealing, browsing feels natural and effortless.
Selected articles: https://gravatar.com/totally8c2062a929
Современная Стоматология в Воронеже лечение кариеса, протезирование, имплантация, профессиональная гигиена и эстетика улыбки. Квалифицированные специалисты, точная диагностика и забота о пациентах.
http://bell-parik.ru/
UrbanChoice Market Hub – Attractive presentation and organized products enhance the user experience.
Timber Crest Studio Boutique – Thoughtfully displayed items, lovely artistic feel throughout.
Premium Ethical Finds – Quality is evident in every item, with fast and dependable delivery.
Качество и работа магазина на высоте!! Купить онлайн мефедрон, амфетамин, марихуану Заказал вчера 30гр 4-FA . Трек пока не получил. Надеюсь что все будет олрайт. В планах долговременное сотрудничество!”Посторайтесь что бы такого больше не повторялось”
All the latest is here: https://docs.google.com/document/d/1hpsecff2d4no7isav0s8xoq2_nklzvlln6ifjb4aa_u/edit?usp=sharing
FFM Picks – Fashion items appear stylish, browsing feels fast and intuitive.
dailydealshub – DailyDealsHub provides a smooth, straightforward browsing experience with lots of options.
Долго сомневались, подойдет ли мобильный интернет для дачи, но результат порадовал. Специалисты усилили сигнал и настроили оборудование. Интернет работает стабильно даже в отдаленном поселке. Можно спокойно пользоваться онлайн сервисами. Отличное решение для загородного дома – https://podklychi.ru/
ElegantTrendHub – Easy-to-browse products, clean interface, and enjoyable shopping experience.
Ae!Магазин ровнее уровня)Брал несколько раз.все ровно.ТСу отдельное спасибо) Удачи вам парни) https://psyhologtoday.ru Что то много новичков устраивают здесь флуд.А магаз на самом деле хорош.Помню его еще когда занимался курьерскими доставками,коспирация и качество товара было на высшем уровне.Чем злиться, выдал бы дудки иль реги
Paris sportifs 1xbet telecharger 1xbet
1xbet Casino 1xbet cd apk
Version Android de 1xbet telecharger 1xbet
Golden Root Corner – Well-laid-out root collection, making navigation fast and simple.
Получившаяся смесь почему-то меня не пропирает как надо, очень странно, возможно дело во мне. Делаешь например 2-3 парика- вроде что-то есть но на ха-ха не пробиваети держит 20 мин. Что за х….? А вот другие кроли в восторге https://metallugi.ru у меня тоже дроп подлетел с посылкой и брали его ФСБшники почему то , но слава богу до уголовного дела не дошло, и ТС обещал жирную скидку сделать при следуещем заказе как то так (документы о прекращении уголовного дела и экспертиза на руках) дело закрыли по двум причинам то что дроп не при делах а второе самое главное что экспертиза не выявила НСПо многочисленным восторженным откликам мн-001, тестировал его и был немного огорчен.
trending finds shop – Products are neatly displayed, browsing feels smooth and effortless.
WildRose Picks Online – Friendly and inviting feel, discovered a few special pieces.
WildShore Shop – Product variety is impressive, layout is intuitive and browsing is smooth.
Не согласен с Тобою!!! Купить бошки, амфетамин, гашиш, лирику, мефедрон тусишка что то с чем то – 1й раз могу сказать что 25 это перебор….Брал закладкой в МСК, утром оплатил, перед оплатой еще раз уточнил все реквизиты у оператора и направился платить. после оплаты сразу сообщил время и сумму оператору, который сразу принял заказ, сказал ждать нужно полтора часа, но курьеру понадобилось чуть больше времени, благо оно позволяло … и вот через почти 4 часа, оператор выслал мне адресс с кладом, который оказался не так уж и далеко.
The Bloom Outlet – Neat page organization and a vibrant style make navigation smooth.
Artistic Essentials Shop – Every item feels curated, and navigating the store is smooth.
realz kasyno
Lifestyle Hub Trends – Products nicely arranged, navigation is easy and shopping feels smooth.
Urban Life Finds Hub – Well-structured pages with stylish items and seamless browsing experience.
Consumer Curations Studio – Clear interface with thoughtfully selected products, very enjoyable to browse.
Только вот странно что в трипе написано что пак был с 1гр ск (а твой заказ это покупка) а продажу у магазина от 5гр Купить закладку гашиша, бошек, мефедрона, амфетамина 128 страниц положительных отзывов , и вдруг “мутный магаз” . Уважаемый – флудить в курилке можно.Спасибо Магазину)вы лучшие))))))))!!!!!!!!!!!!!!!!!!!!! :monetka: Качество на 100%
Современная Стоматология в Воронеже лечение кариеса, протезирование, имплантация, профессиональная гигиена и эстетика улыбки. Квалифицированные специалисты, точная диагностика и забота о пациентах.
PeopleConnectHub – Interesting products, easy to browse, and fast-loading pages.
artisancraftshub – ArtisanCraftsHub combines contemporary and handcrafted items beautifully, making shopping a pleasure.
corner shopping picks – Items look neat and organized, browsing is smooth and very easy.
Grand Forest Picks Hub – Beautiful studio products, with an intuitive interface for effortless navigation.
сделал заказ,оплатил,на следующий день получил трек – всё чётко,так держать! успехов и процветания вашей компании! Закладкой купить альфа-пвп, мефедрон, бошки Могу также в пользу магазина сказать. Все по деловому прошло, без лишних эмоций и разговоров. Качество соответствует.Может просто нужно быть более бдительным? От фейков никто не застрахован. Попросить подтверждения через ЛС на форуме займет не более пяти минут времени и сохранит ваше настроение, а так же и деньги. БУДЬ БДИТЕЛЕН! ВСЕГДА!
HighlandMeadow Creative – Pleasant, well-organized layout with a soothing atmosphere.
стайлер для волос дайсон цена с насадками официальный сайт купить http://fen-dn-kupit-1.ru/ .
clickamplify.click – Overall, professional vibe here; trustworthy, polished, and pleasantly minimal throughout.
Timeless Modern Finds – Smooth layout enhances the experience of discovering heritage-inspired goods.
Любишь играть? list of top online games – ваш путеводитель в мире популярных онлайн игр. Мы собрали для вас актуальную информацию из мира онлайн игр на каждый день. На сайте вы сможете найти самые последние новости об играх, свежие обзоры и видео топовых игр, увлекательные истории и литературу по различным игровым вселенным и персонажам, а также почитать гайды по вашей любимой онлайн игре.
по поводу треков выяснять буду завтра лично т.k. сегодня выходной в России Закладкой купить альфа-пвп, мефедрон, бошки Все ровно, пасыль забрал, всем доволен!На чем готовить????????
Ежедневный обзор: Полезные советы: Консультация ортопеда в Москве для здоровых суставов
clickcrafted.click – Pages loaded fast, images appeared sharp, and formatting stayed consistent.
webreach.click – Content reads clearly, helpful examples made concepts easy to grasp.
marketingsignal.click – Appreciate the typography choices; comfortable spacing improved my reading experience.
clicklegend.click – Appreciate the typography choices; comfortable spacing improved my reading experience.
FLO Boutique – Stylish selections arranged neatly, shopping feels intuitive and fast.
trendyshopzone – TrendyShopZone presents a carefully selected range that makes discovering items easy.
CreativeGiftExpress – Smooth browsing, distinctive items, and fast-loading pages.
Центр печатных услуг «Копирыч» https://kopirych.by предоставляет комплексные услуги нанесения печати на бумагу, а также ткани. Дополнительно мы специализируемся на изготовлении продукции для рекламы и бизнеса. Использование современного технического оборудования и безопасных материалов обеспечивает не только быстрый но и качественный заказ.
128 страниц положительных отзывов , и вдруг “мутный магаз” . Уважаемый – флудить в курилке можно. Закладкой купить альфа-пвп, мефедрон, бошки Добрый день форумчане! Кто нибудь подскажет как по качеству реагент в этом магазине? Соответствует ли заявленная концентрация? Сколько по времени держит если 1 к 20 сделать? Всем спасибо!!!Привет, нету в личке нечего.
UrbanTrend Studio – Neatly organized products with smooth navigation and a clean interface.
атом казино бонусы Вход в Атом казино прост и удобен. Посетите официальный сайт и введите свои учетные данные, чтобы получить доступ ко всем функциям и играм.
У кого рега сильней чем тут? Купить закладку гашиша, бошек, мефедрона, амфетамина Заглянул на сайт . Очень даже приятно удивлён увиденным . Сохранил в закладках (полезный сайт!)Пришлось высылать чек,региться на ретейле,оформлять заказ.
Лист ПВЛ Трубы бесшовные горячекатаные – выбор профессионалов, когда требуется максимальная надежность и устойчивость к высоким давлениям и температурам, например, в нефтегазовой промышленности.
shopper’s delight corner – Selections are eye-catching, browsing feels smooth and enjoyable.
BrightCrest Select – Simple yet modern styling paired with strategic product placement feels well-crafted.
https://quvonch.com/uzbekskaya-muzyka/xamdam-sobirov/
https://quvonch.com/uzbekskaya-muzyka/jaloliddin-ahmadaliyev/
http://xn--80aeh5aeeb3a7a4f.xn--p1ai/forum/user/65524/
https://quvonch.com/
http://food-ua.com/wr_board/tools.php?event=profile&pname=egakocef
заказать проект отопительной печи Купить проект отопительно-варочной печи – практичное решение для тех, кто ценит функциональность и желает иметь возможность готовить на традиционной печи.
http://digida.mgpu.ru/index.php?title=%D0%A4%D0%BE%D0%BD%D0%B1%D0%B5%D1%82%20%D0%9F%D1%80%D0%BE%D0%BC%D0%BE%D0%BA%D0%BE%D0%B4%20%D0%9D%D0%B0%20%D0%A1%D0%B5%D0%B3%D0%BE%D0%B4%D0%BD%D1%8F:%20MAX777%20%E2%80%94%20%D0%A4%D1%80%D0%B8%D0%B1%D0%B5%D1%82%20%D0%94%D0%BE%2015%20000%20%E2%82%BD
Журнал о строительстве https://prostostroy.com Ваш гид в мире стройки и ремонта. Актуальные тренды, экспертные советы, обзоры материалов и технологий. От фундамента до крыши – все, что нужно знать для успешного проекта.
BluePeak Picks – Sleek layout with stylish presentation, the catalog was fun to explore.
Главные новости Пензы https://inpenza.ru оперативно и достоверно. Мы освещаем все значимые события, происходящие в Пензе и Пензенской области. Важные объявления, афиша, полезная информация для каждого жителя. Ваш надежный источник новостей.
Everglen Shop – Warm atmosphere overall, and scrolling through the products felt smooth.
атом казино скачать Атом казино регистрация: Простая и интуитивно понятная процедура регистрации займет всего несколько минут. Создайте свой аккаунт и начните играть прямо сейчас.
Interactive Clickping Hub – Minimal design with fast, intuitive navigation and clear product display.
Выходные просто, завтра проверь https://desinfectnn.ru Спасибо все понравилосьСделал заказ, жду не дождусь пока придет, как придет отпишу.. Всем добра)
Handpicked Home Essentials – The selection feels refined, and navigating the site is effortless.
дайсон купить стайлер для волос с насадками цена официальный сайт fen-dn-kupit-1.ru .
Долго искали вариант интернета для дачи, так как проводных линий поблизости нет. Мобильный 4G интернет оказался самым удобным решением. Установили антенну и роутер, сигнал стал уверенным. Интернет работает стабильно, хватает для всей семьи. Пользуемся без ограничений и зависаний: https://podklychi.ru/
Главные новости Пензы https://inpenza.ru оперативно и достоверно. Мы освещаем все значимые события, происходящие в Пензе и Пензенской области. Важные объявления, афиша, полезная информация для каждого жителя. Ваш надежный источник новостей.
Журнал о строительстве https://prostostroy.com Ваш гид в мире стройки и ремонта. Актуальные тренды, экспертные советы, обзоры материалов и технологий. От фундамента до крыши – все, что нужно знать для успешного проекта.
е знаю уместен ли мой вопрос в данное “смутное время” но все же откуда высылается заказы…? хотя бы из какой части РФ если это РФ…))) https://pushkin-cake.ru Качество, если честно на моё удивление (тк. первый раз я пользуюсь услугами данного ТС), по отзывам клиентов, сказать отличное это сказать ничего, ССССУУУУУПППЕЕЕЕРРРР!!!!!!пока никто ничего тут не берите!!!!!!!!!!!!!!!!!!!!!!!!!!!!!!!!!!!!!!!!моя ситуация решится если то я сообщу.Пока кидалово нарисоваывается.Дабы даже о приходе средств человек не сообщает,просто сказал ложи а после оплаты сразу замолчал,хотя сообщения доходили еще.А ты если кинеш то тварь ты последняя.Бобла наверно тут хорошо сделал а совести хватает провинциалов кидать.Ты в курсе что у нас люди на эти бабки 2 месяца живут и не от сладкой жизни гавно у тебя то берут.Бог тебе судья короче!Свечку тебе за здравие каждую неделю если что буду ставить 😉 чтоб ты жил долго и счастливо…
Все о медицине https://zapisnapriemrostov.ru и здоровье в одном месте! Получите доступ к достоверным статьям, рекомендациям специалистов и полезным лайфхакам для поддержания отличного самочувствия. Будьте в курсе и живите полной жизнью!
Подключение мобильного интернета на дачу прошло быстро и без сложностей. Специалисты сразу оценили уровень сигнала и подобрали оптимальное оборудование. Скорость соответствует заявленной и подходит для работы и развлечений. Очень удобно, что интернет не зависит от кабелей. Теперь на даче всегда есть связь: комплект интернет на дачу купить
Design Studio Hub – Modern design aesthetics throughout, very enjoyable and easy to navigate.
Строительство и ремонт https://ctoday.ru всё, что нужно знать. Планируете стройку или обновление? Наш сайт – ваш надежный помощник. Актуальная информация о материалах, технологиях, дизайне и юридических аспектах. С нами ремонт станет проще и приятнее!
FPM Styles – Trendy selections displayed well, navigation is easy and convenient.
DailyFashionHub – Trendy daily picks, easy to browse, and layout feels smooth.
СПб все ровно процветания магазину. Амф на 5+ Купить Кокаин, Бошки, Шишки, Гашиш Какой цвет продукта(MN-001) ?Ну вообще то весь ассортимент выложен в теме “Прайс-Лист”. Там все написано.
Все о медицине https://zapisnapriemrostov.ru и здоровье в одном месте! Получите доступ к достоверным статьям, рекомендациям специалистов и полезным лайфхакам для поддержания отличного самочувствия. Будьте в курсе и живите полной жизнью!
Строительство и ремонт https://ctoday.ru всё, что нужно знать. Планируете стройку или обновление? Наш сайт – ваш надежный помощник. Актуальная информация о материалах, технологиях, дизайне и юридических аспектах. С нами ремонт станет проще и приятнее!
Тюмень сегодня https://kfaktiv.ru главные события города! Узнайте о последних новостях, которые формируют жизнь Тюмени. От городских инициатив до культурных событий и важных объявлений – будьте в курсе всего, что происходит в нашем любимом городе. Ваша порция актуальной информации!
Your Daily Picks Online – Well-presented items, clean layout, and fast, easy browsing throughout.
Всё о секретах ПО https://software-expert.ru ваш гид. Откройте для себя мир скрытых возможностей, эффективных стратегий и неочевидных лайфхаков в разработке программного обеспечения. Поймите, как создавать и использовать ПО на новом уровне.
Все о провайдерах https://providers.by Беларуси! Актуальные новости, честные отзывы пользователей и детальные обзоры тарифов. Поможем выбрать лучшего интернет-провайдера, анализируем рынок и тенденции. Будьте в курсе всех изменений!
qualitymarketplace – QualityMarketplace showcases a fresh collection with well-laid-out product details.
Сияющая кожа https://omaske.ru и роскошные локоны – легко! Откройте секреты природы для красоты. Наши домашние маски для лица и волос подарят вам натуральный уход, глубокое питание и видимый результат. Забудьте о химии, почувствуйте силу трав и фруктов!
SoftSky Lifestyle – Calm and smooth navigation with a pleasant color scheme.
Всем Привет! :hello:Немного хороших строк о магазине;) Закладкой купить альфа-пвп, мефедрон, бошки Снова в делеМагазин отличный, заказываю у него и всегда доволен !
казино атом Чтобы быть в курсе последних новостей и акций Атом казино, присоединяйтесь к телеграм-каналу. Там вы найдете эксклюзивные бонусы, информацию о предстоящих турнирах и многое другое.
https://t.me/uhrenGermany026
Premium Home Design Hub – Clean, well-curated layout providing a comfortable browsing experience.
порядовки барбекю казан Купить проект камина – добавить в свой дом нотку роскоши и создать атмосферу уюта и романтики.
Lifestyle Finds Collection – Clean interface with a wide range of modern products for easy shopping.
Трубы ПВХ Манжета резиновая ПМТД и Герметизирующая манжета конусная ГМ – уплотнительные элементы для трубопроводов.
Тюмень сегодня https://kfaktiv.ru главные события города! Узнайте о последних новостях, которые формируют жизнь Тюмени. От городских инициатив до культурных событий и важных объявлений – будьте в курсе всего, что происходит в нашем любимом городе. Ваша порция актуальной информации!
Качество ЖВШ на высшем уровне, скоро придёт посыль – отпишусь сам о качестве, но уже доводилось пробовать их 203 и 250 – великолепны Купить Кокаин, Бошки, Шишки, Гашиш Проб НЕТ!Самые положительные впечатления оставляет по прежнему Мажор. 🙁 Джой фулл, а тебе когда отправили?
Сияющая кожа https://omaske.ru и роскошные локоны – легко! Откройте секреты природы для красоты. Наши домашние маски для лица и волос подарят вам натуральный уход, глубокое питание и видимый результат. Забудьте о химии, почувствуйте силу трав и фруктов!
Всё о секретах ПО https://software-expert.ru ваш гид. Откройте для себя мир скрытых возможностей, эффективных стратегий и неочевидных лайфхаков в разработке программного обеспечения. Поймите, как создавать и использовать ПО на новом уровне.
Все о провайдерах https://providers.by Беларуси! Актуальные новости, честные отзывы пользователей и детальные обзоры тарифов. Поможем выбрать лучшего интернет-провайдера, анализируем рынок и тенденции. Будьте в курсе всех изменений!
Ремонт своими руками https://pic4you.ru портал с понятными инструкциями и советами. Этапы работ, выбор инструментов и материалов, расчёты и примеры. Помогаем сделать качественный ремонт без лишних затрат.
Красивый интерьер https://moidomiks.ru своими руками — идеи, советы и пошаговые инструкции для дома и квартиры. Декор, отделка, планировка и сочетание цветов. Помогаем создать уютное и стильное пространство без лишних затрат.
Curated Design Clickping – Navigation is effortless, the curated products stand out beautifully.
Рейтинг казино https://casinos.ceo онлайн 2025 — актуальный обзор платформ с лицензией, играми и условиями. Сравнение бонусов, способов оплаты, скорости выплат и поддержки. Помогаем выбрать надёжное казино на основе фактов и критериев.
Fashion Trend Finds – Items are well displayed, navigating the site feels fast and convenient.
Read more on the website: https://theweekly-horoscope.com/horoscope-for-people-born-on-june-2/
TrailWear Finds – A polished fashion layout with tidy categories supports easy skimming.
купить дайсон стайлер для волос официальный сайт цена с насадками https://fen-dn-kupit-1.ru .
помогите обьясните как написать сапорту https://izumrudnyj-gorod.ru Дошло довольно быстроПока писал этот пост на почту пришел трек ))) Ждал всего 1 день,респект оперативно.
Get ready to be transported to a world where magic is real and nothing is as it seems. The A Court of Thorns and Roses PDF is your ticket to this enchanting universe. Follow Feyre as she discovers that the legends she was told were all lies. https://acourtofthornsandrosespdf.top/ What Order To Read A Court Of Thorns And Roses
https://bookmark-dofollow.com/story26552303/code-promo-1xbet-aujourd-hui-2026-bonus-130
http://probki.vyatka.ru/content/reshenie-1442012#comment-35132119
https://zabpo.zabedu.ru/2023/03/31/%d1%80%d0%b5%d0%ba%d0%be%d0%bc%d0%b5%d0%bd%d0%b4%d0%b0%d1%86%d0%b8%d0%b8-%d0%b8-%d0%b8%d1%82%d0%be%d0%b3%d0%b8-%d1%80%d0%b0%d0%b1%d0%be%d1%82%d1%8b-%d1%81%d0%b5%d0%ba%d1%86%d0%b8%d0%b9-%d1%85-%d0%b7/#comment-226393
http://talks.teamforum.ru/viewtopic.php?f=5&t=2305
https://thefairlist.com/story10954162/codde1xbet
ы меня поняли Купить кокаин, бошки, гашиш После передачи посылки курьерской службе ответственность за доставку несет именно курьерка, вы сами должны осознавать риск когда оформляете заказ с доставкой курьерки, и кто бреет? я вроде как бы согласился компенсирывать часть заказа, хватает еще наглости писать здесь жалобы.Всем мир! Хотелось бы всё же какого то оперативного решения! Запрет не за горами, а вернее 20 вступает в силу((((( Уважаемый продаван скажите что нибудь???
GoldenPeak Handmade – Loved the thoughtful details in the products; browsing was smooth and calming.
http://probki.vyatka.ru/content/reshenie-492024#comment-35131767
Ремонт своими руками https://pic4you.ru портал с понятными инструкциями и советами. Этапы работ, выбор инструментов и материалов, расчёты и примеры. Помогаем сделать качественный ремонт без лишних затрат.
https://kumanets.ru/read-blog/22157?lang=russian
http://l96464a8.beget.tech/blogs/1233/%D0%9F%D1%80%D0%BE%D0%BC%D0%BE%D0%BA%D0%BE%D0%B4-%D0%BD%D0%B0-%D0%A4%D1%80%D0%B8%D0%B1%D0%B5%D1%82-1xBet-2026-1X200FOX
казино вавада зеркало
Красивый интерьер https://moidomiks.ru своими руками — идеи, советы и пошаговые инструкции для дома и квартиры. Декор, отделка, планировка и сочетание цветов. Помогаем создать уютное и стильное пространство без лишних затрат.
GoldenMeadow Finds Online – Homely, welcoming vibe with a well-curated selection.
New in the Category: https://howheavyisit.com/de/animals/how-much-does-a-jellyfish-weigh/
lemon 11
заказать индивидуальный проект печи Купить проект печи Намерение обзавестись печью – серьезный шаг, требующий тщательной подготовки. Первым делом стоит рассмотреть возможность приобретения готового проекта, что позволит сэкономить время и избежать ошибок в процессе строительства. Готовые проекты печей разработаны профессионалами и содержат все необходимые чертежи, спецификации материалов и инструкции по кладке.
казино атом Atom casino – это международная платформа для любителей азартных игр. Наслаждайтесь разнообразием игр, щедрыми бонусами и безопасной игровой средой.
YourDaily Select – Fast-loading pages, clean design, and easily navigable product sections.
Начинает формироваться мнение. https://besttraders.biz Мне сразу по поводу мхе ответили, быстро порешили на бонусе в следующую покупку.Оплатил 28 января это был вторник, продавец сказал отправки в течении 2х дней…
Global Finds Marketplace – Global product selections shown with clarity and balance.
Refined Lifestyle Picks – Easy browsing with high-quality products for daily use.
всем хай https://kupiavto26.ru Всем привет, долго не писал, ну это меня «задержала» посылка jv-61. Все пришло, все получил причем довольно быстро все ехало:good:Ну да ,я уже посылку с 15числа жду всё дождаться не могу .
Drip casino официальный сайт выглядит современно и понятно даже для новичков
my website; https://%D1%8E%D1%82%D0%B0%D0%B8%D1%81.%D1%80%D1%84/
modernmarketplace – ModernMarketplace has thoughtfully arranged products and a seamless interface for users.
Казино Monro подходит тем, кто любит современные онлайн-игры
Have a look at my web blog :: https://plotsp.ru/
Fashion Value Hub – Items appear reliable, exploring the selection is quick and pleasant.
дайсон фен цена официальный сайт https://fen-dn-kupit-1.ru/ .
“про “шапку” вы все горазды писать в интернете…”И продавать в интернете Вы все горазды,х..й догонишь и не спорсишь! Купить кокаин, бошки, гашиш в Обьщем как и говорил заказал ам,оно пришло в город,а мою фамилию ПЕРЕПУТАЛИ ,посылку не выдают…….Всем привет, СК есть опт?
EverLine Finds Online – Loved the careful arrangement and the hand-crafted quality.
intentionalmarkethub – IntentionalMarketHub offers carefully selected items in a smooth and refreshing layout.
Приятно работать!!! https://niharika.biz Либо прекращаем флудить либо начну выдавать преды. Сами должны понимать что под новый год почтовые службы перегружены.Вот по количеству норм, но кач…. Это то что осталось после меня и моих проб
мелбет скачать казино мелбет скачать казино .
школа онлайн дистанционное обучение http://www.shkola-onlajn1.ru/ .
BrightWater Lane – Simple navigation and clear product groupings create a pleasant, steady flow.
Curated Artisan Picks – Smooth layout highlights the skill and creativity behind every product.
The rugged landscape of the continent is described vividly. Travel there with the Fourth Wing PDF. It is a setting that feels ancient and dangerous. https://fourthwingpdf.top/ How Many Books In Fourth Wing Series
Stylish Living Space – Stylish visuals combined with a clean structure that works well.
круто ймагаз!! Купить кокаин, бошки, гашиш Пару строк отписал паронойный напряг бы снял да дальше работал…обьясни народу …….. сдесь ребята понимающие………. помогут
проститутки магнитогорск дана шлюха
FuturePath Market Hub – Clearly presented items and intuitive layout ensure a pleasant browsing experience.
Нужен клининг? клининговая компания москва рейтинг лучших оцениваем услуги, цены, опыт, отзывы клиентов и качество уборки. Помогаем выбрать надёжную клининговую компанию для дома или бизнеса.
Szukasz kasyna? kasyno online blik sprawdzamy licencje, metody platnosci, czas realizacji transakcji i dostepnosc gier. Praktyczne informacje o kasynach z platnoscia BLIK.
<Worldwide Craft Collective – Pleasant layout with artisan pieces that feel well selected and unique.
AutumnHill Styles – The cozy design makes shopping feel easy and enjoyable.
FBD Online Market – Offers appear solid and reliable, shopping feels smooth today.
все я уже пошол на почту получать пришло быстро молодцы СПСР вчера трек сегодня забираю за качество как и обещал отпишу а то там кто то сомневался https://dostindir.biz Всем привет !!!?Ты в какой скайп то ломишься? перепроверь!!!
digitalreach.click – Mobile version looks perfect; no glitches, fast scrolling, crisp text.
MossyTrail Studio – Smooth browsing with natural, calming aesthetics and tidy layout.
Competitive positioning strengthens when you buy tiktok likes strategically. Higher engagement rates distinguish content from competitors helping brands stand out in crowded niches and attract partnership opportunities.
digitalascend.click – Loved the layout today; clean, simple, and genuinely user-friendly overall.
webinfluence.click – Appreciate the typography choices; comfortable spacing improved my reading experience.
leadtrajectory.click – Navigation felt smooth, found everything quickly without any confusing steps.
growthaccelerator.click – Navigation felt smooth, found everything quickly without any confusing steps.
Интерактивная панель 86 дюймов Алматы Короткофокусный проектор для интерактивной доски: Проектор, который светит с близкого расстояния. Минимум теней и слепящего света в глаза.
магазин ровнеый,за что им спасибо,если сами тупить не будете всё пройдёт ровно и без проблем.Товар тоже порадовал,довольно таки неплохо)) https://samara-bt.ru По моему отзыв о “марочках” был явно не про этот магазин О_оОтветь в аське!Люди 22куска зарядили ,перед оплатой добро дал ,а потом тишина… Люди переживают,очень!Ответь пожалуйсто!!!
Квартиры в Москве https://kvartira-spb-pokupka.ru для покупки — большой выбор объектов в разных районах города. Новостройки и вторичный рынок, помощь с ипотекой, юридическое сопровождение и актуальные предложения от собственников и застройщиков.
AI seed phrase finder Earning bitcoin without investment tantalizes, ideas like faucets and airdrops offer minuscule gains, while affiliate marketing and content creation require effort and savvy.
http://sel-politeh.ru/node/247?page=6#comment-1388901
https://developers.oxwall.com/forum/topic/79156
http://fr2613.rinethost.ru/node/247?page=7#comment-1388928
https://peaklift.ru/communication/forum/user/3413/
https://www.uscgq.com/forum/posts.php?forum=general&page=1&id=5492
https://www.musichalldesign.com/group/mysite-200-group/discussion/5abcf2b6-7cf2-4a7e-82ea-6b9e192fcd94
http://www.delishis.ru/forum/?Subdiv_ID=11&Topic_ID=13349
Квартиры в рассрочку https://kupikvartiru-piter.ru удобный способ покупки жилья без ипотеки. Новостройки и готовые объекты, прозрачные условия, фиксированная цена и помощь в оформлении документов. Подбор вариантов под ваши возможности.
К продавцу можно смело обращаться, тут сделают все в лучшем виде! https://rtc-ec.ru Заявление про кидал не требует обоснования, ибо это не заявление. Перечитайте внимательно. Считаю, что такие речи тоже стоит оставлять при себе, не прочитав толком.плиз подскажи выход с грамма и в чем растворяла ркс? (буду благодарен)
Modern Daily Living Hub – Products are practical and stylish, and exploring the site is simple.
мелбет скачать приложение мелбет скачать приложение .
дистанционное школьное образование shkola-onlajn1.ru .
Квартиры в Москве https://kvartira-spb-pokupka.ru для покупки — большой выбор объектов в разных районах города. Новостройки и вторичный рынок, помощь с ипотекой, юридическое сопровождение и актуальные предложения от собственников и застройщиков.
NextGen Lifestyle Hub – Next-gen design that makes exploring products simple and enjoyable.
Недорогие квартиры https://kvartira-umetro.ru для покупки: актуальные предложения, удобный поиск по цене, району и метражу. Подбор бюджетных вариантов, консультации специалистов и сопровождение сделки.
Магазин отличный, заказываю у него и всегда доволен ! https://jevite-clinic.ru и сколько те6е поо6ещали заплотить?Вообще то дажббер в рабочее время всегда в сети и все кто оплачивал и делал заказ получили треки.
bestdealsstore – BestDealsStore makes shopping simple with smooth navigation and a huge range.
Квартиры в рассрочку https://kupikvartiru-piter.ru удобный способ покупки жилья без ипотеки. Новостройки и готовые объекты, прозрачные условия, фиксированная цена и помощь в оформлении документов. Подбор вариантов под ваши возможности.
FindBetterValue Online Hub – Great value products shown here, navigating the site feels simple.
Квартиры от застройщика https://kvartiravgorod.ru покупка напрямую без переплат. Новостройки на разных стадиях готовности, современные планировки, помощь с ипотекой и сопровождение сделки от выбора до получения ключей.
Пришла сегодня посыль с 203им,кол-во ровное,даже показалось больше))) Сделал 1 к 15 самое то,магазу спасибо,процветания и всег благ) Купить кокаин, бошки, гашиш с почтой лучше не связыватьсяхороший магазин,всё на красоте и качество и кол-во:) продолжайте в том же духе
Установка интерактивных панелей Интерактивный комплекс для школы Алматы: Оснащение кабинетов под стандарт современной школы в Алматы.
BloomFull Studio – Neatly arranged items and lovely visuals deliver a smooth and refined browsing experience.
Недорогие квартиры https://kvartira-umetro.ru для покупки: актуальные предложения, удобный поиск по цене, району и метражу. Подбор бюджетных вариантов, консультации специалистов и сопровождение сделки.
Квартиры от застройщика https://kvartiravgorod.ru покупка напрямую без переплат. Новостройки на разных стадиях готовности, современные планировки, помощь с ипотекой и сопровождение сделки от выбора до получения ключей.
Bitcoin Core wallet restore Earning bitcoin without investment tantalizes, ideas like faucets and airdrops offer minuscule gains, while affiliate marketing and content creation require effort and savvy.
“Sensual vixen longs for tantalizing ecstasy.” Here — rb.gy/3fy54w?Illus
Однокомнатные квартиры https://kvartiradlyazhizni.ru в Москве для покупки. Большой выбор вариантов в разных районах города, удобный поиск по цене и планировке. Консультации специалистов, помощь с ипотекой и безопасное оформление сделки.
“Думаю все угорали по детству Делали дымовушку “Гидропирит VS Анальгин” Купить кокаин, бошки, гашиш бред, откуда инфа такия про 80%?Пишу сейчас и ржачь пробирает.
minimalistshoppinghub – MinimalistShoppingHub presents selections in a tidy layout, making exploring effortless.
Mindful Essentials Collection – Navigation feels natural, and the selection is both practical and stylish.
Feyre’s nightmares are haunting. See how she copes in the A Court of Mist and Fury PDF. This digital story deals with trauma realistically. Get the ebook to follow her journey toward mental health. https://acourtofmistandfurypdf.top/ How Many Chapters Are In A Court Of Mist And Fury
Квартиры от застройщика https://kvartiravgorod.ru покупка напрямую без переплат. Новостройки на разных стадиях готовности, современные планировки, помощь с ипотекой и сопровождение сделки от выбора до получения ключей.
SoftBreeze Shop – Clean interface and refreshing style made exploring surprisingly enjoyable.
Магазин чёткий… Нареканий нет… https://murygino.ru Это точно!) главное быть в этом уверенным. Да и ровненький магазин однакоЗделал заказ 203го в четверг вечером,в пятницу уже получил трек,а сегодня създил забрал посылку!запаковано так,что сам с трудом нашел)все очень вкусно и качественно!продовцам респект.слаженно работают!
Global Living & Style – Stylish global selections with an organized, easy-to-use design.
Однокомнатные квартиры https://kvartiradlyazhizni.ru в Москве для покупки. Большой выбор вариантов в разных районах города, удобный поиск по цене и планировке. Консультации специалистов, помощь с ипотекой и безопасное оформление сделки.
searchcommand.click – Mobile version looks perfect; no glitches, fast scrolling, crisp text.
Paris sportifs afrik foot pronostic : matchs, tournois, cotes et resultats, lignes de paris et evenements en direct. Presentation detaillee des fonctionnalites et du fonctionnement du service.
Envie de parier? telecharger 1xbet Service de paris sportifs et footballistiques. Presentation des evenements disponibles, des cotes, du mode direct et des principales fonctionnalites de la plateforme. Informations utiles pour les utilisateurs.
Заказать интерактивный дисплей Интерактивный флипчарт Samsung Flip: Рисуйте как на бумаге. Поворотный экран, стильный дизайн, мобильность.
Inspired Goods Global – Browsing was smooth, and the variety of items keeps it interesting throughout.
marketingorbit.click – Overall, professional vibe here; trustworthy, polished, and pleasantly minimal throughout.
rankvelocity.click – Navigation felt smooth, found everything quickly without any confusing steps.
marketingdrive.click – Appreciate the typography choices; comfortable spacing improved my reading experience.
мелбет официальный сайт мелбет официальный сайт .
digitalgrowthhq.click – Loved the layout today; clean, simple, and genuinely user-friendly overall.
лбс это http://www.shkola-onlajn1.ru/ .
Сделал тестовый заказ 28 мая, отправил e-mail с содержанием заказа, адресом доставки и просьбой прислать реквизиты оплаты. Ответа не получил. Купить кокаин, бошки, гашиш Почему ушли из РБ?Спасибо магазину!
Browse New Paths – A solid range of finds appears here, and navigation feels smooth from start to finish.
Paris sportifs read this article : matchs, tournois, cotes et resultats, lignes de paris et evenements en direct. Presentation detaillee des fonctionnalites et du fonctionnement du service.
Envie de parier? parier pour le foot Service de paris sportifs et footballistiques. Presentation des evenements disponibles, des cotes, du mode direct et des principales fonctionnalites de la plateforme. Informations utiles pour les utilisateurs.
Plateforme en ligne check out this site paris sportifs, matchs de football, evenements en direct et statistiques. Decouvrez les fonctionnalites du service, les marches disponibles et comment l’utiliser.
Квартиры от застройщика https://kvartirav-vygodno.ru напрямую — актуальные цены и выбор новостроек. Подбор по параметрам, помощь с документами, ипотекой и рассрочкой. Прозрачные условия и сопровождение сделки.
Брал пару раз все было чотко!! всем советую) Купить кокаин, бошки, гашиш всем привет.супер магаз))) позже отзыв отпишу. ))))Заказываю 2c-I для начала 1 г!!
Купить интерактивную панель Караганда Интерактивная панель цена Казахстан: Лучшие цены на сенсорные панели в Казахстане. Прямые поставки от производителей. Запросите коммерческое предложение.
Про мелстрой бет рассказано без лишней рекламы
my website https://dunkanmed.ru/
Всем доброго времени суток. Первый раз довелось заказывать в этом магазине на свой страх и риск, но положительные отзывы старичков о работе и качестве товара (в частности 2с, который меня и интересовал) убедили, что причин волноваться нет. Купить кокаин, бошки, гашиш Отличный магазин Chemical-mixда мэн правильно говоришь KEY фраернулся
Plateforme en ligne best site paris sportifs, matchs de football, evenements en direct et statistiques. Decouvrez les fonctionnalites du service, les marches disponibles et comment l’utiliser.
Квартиры от застройщика https://kvartirav-vygodno.ru напрямую — актуальные цены и выбор новостроек. Подбор по параметрам, помощь с документами, ипотекой и рассрочкой. Прозрачные условия и сопровождение сделки.
https://euro2020.getbb.ru/viewtopic.php?t=1772
https://www.diveboard.com/disine8420/posts/disine8420-B1p0ILA
https://blogs.ubalt.edu/siyer/2017/11/28/bangalores-ambivalence-towards-its-master-plan/#comment-6970
http://wwb.forumex.ru/viewtopic.php?f=25&t=298
https://maminmir.getbb.ru/viewtopic.php?t=4077
Contemporary Style Hub – Products displayed clearly with a user-friendly and intuitive interface.
Le site web 1xbet rdc telecharger propose des informations sur les paris sportifs, les cotes et les evenements en direct. Football, tournois populaires, cotes et statistiques y sont presentes. Ce site est ideal pour se familiariser avec les fonctionnalites de la plateforme.
Ответят, думаю и завтра нужно будет подождать https://salon-sakura.ru Курьерка не может принять такое количество заказов – отказала вУдачи в бизе!!
Envie de parier 1xbet rdc telecharger est une plateforme de paris sportifs en ligne pour la Republique democratique du Congo. Football et autres sports, paris en direct et d’avant-match, cotes, resultats et statistiques. Presentation des fonctionnalites du service.
New World Picks – Items are well-presented, and the browsing experience is very smooth.
melbet промокод melbet промокод .
школа-пансион бесплатно http://www.shkola-onlajn1.ru/ .
магазин роботает отлично сам проверил и не поверю не каму кто скажет что это не так https://uniongroup.biz На днях брал небольшой опт, был приятно удивлен подходом и предложением тс, товар еще не пробовали ,но забрал все ровно, по ходу отпишу в теме за качество товара, пока же могу сказать, что жалею , что раньше не работал с данным тс! Успехов, благодарю за сервис!!!Доброго времени суток, оплатил заказ, данные для оплаты дали как всегда оперативно!, жду клад!
ребята ребятушки как делишки?)) в городе Барнаул данный магазин работает?) https://jevite-clinic.ru часть покупателей устраивает, продавцы тоже не жалуется. В чем проблема? нет терпения – идите в другие шопы.Мне отказали в подтверждении джаббера в ЛС. Будьте бдительны!
carefulbuyzone – CarefulBuyZone presents thoughtfully chosen products in a smooth and easy-to-navigate layout.
WildRidge Bloom Selections – Vibrant colors and natural flow, browsing felt calm and enjoyable.
Отзывы от кролов. качество тусишки хорошее. приятно порадовали ее ценой. качество метоксетамина – как у всех. сейчас в россии булыженная партия, тут он такой же. однако продавец сказал что скоро будет другая партия. вывод – магазин отличный, будем работать. https://monastere.biz Мне пока ещё не пришло, но ты уже напугал….:orientation: кто знает где весы купить можно чтоб граммы вешатьсделайте уже что-нибудь с этим реестром… хочу сделать заказ
Elegant Clickping Hub – Well-arranged layout with refined visuals and seamless browsing flow.
Квартиры от застройщика https://tltdomik.ru покупка в новостройках на прозрачных условиях. Современные планировки, разные стадии готовности, помощь с ипотекой и рассрочкой. Сопровождаем сделку от выбора до получения ключей.
Квартиры в новостройках https://tltnewflat24.ru и на вторичном рынке — широкий выбор объектов. Анализ плюсов и минусов, подбор под ваши задачи, консультации специалистов и юридическое сопровождение покупки.
http://beverlyrp.listbb.ru/viewtopic.php?f=14&t=68
Online 1xbet apk rdc est une plateforme de paris sportifs en ligne. Championnats de football, cotes en direct et resultats sont disponibles. Page d’information sur le service et ses fonctionnalites pour les utilisateurs de la region.
Best Value Deals – Offers look organized and appealing, making browsing pleasant and efficient.
мы говорили что мхе качество не очень, он такой пришел, сказали поменяем дак поменяем, ты стучи туда с кем об обмене разговаривал… https://zombeads.biz сайт не грузится, в пятницу меня кормил завтраками поитогу пропал на выходные и больше в бросикс не выходил.Оплатил заказ до нового года, связывался через почту, написали оплата прошла, отправка будет после праздников, … ответа до сих пор нет… Сделайте что нибудь, ответьте мне на почте емае, хз уже чо делать.
Квартиры от застройщика https://tltdomik.ru покупка в новостройках на прозрачных условиях. Современные планировки, разные стадии готовности, помощь с ипотекой и рассрочкой. Сопровождаем сделку от выбора до получения ключей.
Квартиры в новостройках https://tltnewflat24.ru и на вторичном рынке — широкий выбор объектов. Анализ плюсов и минусов, подбор под ваши задачи, консультации специалистов и юридическое сопровождение покупки.
ага в осадок выпадает в спирте это верно, но если после выпадания в осадок добавить 646 в спирт и все будет гуд. Кстати 250 также при перегреве выпадает в осадок https://chinesischlernen.biz Отличный магазин маскировка высший балл!Так может он в городе закладкой брал
Может правда о ошибочке что небудь не то отправили))) Купить кокаин, бошки, гашиш Товар даже не тестили еще ! Но вес ровный , качество не сомневаюсь тоже на высоте , скоро будем проводить тесты . Буду брать только здесь !!!магаз ровный,сервис 5+,как напишешь сразу ответят,все ровно и по весу и по качеству 5+,были рады очень посылю с замечательным реагентиком плюсую магазу и советую остальным!)))
https://double-down.casino/slots/
потолки натяжные самара https://natyazhnye-potolki-samara-5.ru/ .
Modern Living Curation – Modern curation supported by a comfortable layout.
привет запулил на закладку ?? https://hodun.biz Хороший магазин.С ним почти год работаю.Всегда вежливое общение: успокоит,объяснит,по рекомендует.Все приходит в срок.Данным магазином очень доволен.Рекомендую!!!AM 2233 скоро в продаже ]
да ее колать страшно эксперементатором быдь тоже чет не охото Купить кокаин, бошки, гашиш KEY я так понял ты сделал заказ узнал сумму которую надо оплатить ,оплатил а когда вернулся сумма стала выше на сотку????курьерки на мой запрос поиска трека ответ что инфа закрыта для доступа
BrightMoon Styles – Really liked how neat everything looked, easy to navigate and enjoy.
Geely Кунцево https://geely-kuntsevo.ru официальный дилер автомобилей Geely в Москве. Продажа новых моделей, тест-драйвы, выгодные условия покупки, кредит и трейд-ин. Сервисное обслуживание, оригинальные запчасти и консультации специалистов.
Платформа мостбет для ставок на спорт онлайн. Футбольные матчи, live-режим, коэффициенты и результаты. Описание функционала сервиса и основных инструментов для пользователей.
Отличный Магаз, Все четко!!! https://kupiavto26.ru Добрый день форумчане! Кто нибудь подскажет как по качеству реагент в этом магазине? Соответствует ли заявленная концентрация? Сколько по времени держит если 1 к 20 сделать? Всем спасибо!!!вот нашли бы пролонгаторы и начали продавать и эффект бы увеличили и все довольны были бы=)))
intentionaldesignhub – IntentionalDesignHub showcases items in a welcoming layout that was simple to explore.
Портал о медицине https://zapisnapriemrostov.ru и здоровье человека. Заболевания и их профилактика, современные методы лечения, рекомендации специалистов, здоровье взрослых и детей. Полезные материалы для заботы о самочувствии каждый день.
Портал о провайдерах https://providers.by Беларуси: свежие новости рынка, отзывы абонентов и сравнение тарифов. Помогаем выбрать интернет-провайдера по скорости, цене и качеству обслуживания.
натяжные потолки нижний новгород рейтинг http://www.natyazhnye-potolki-nizhniy-novgorod-4.ru .
Тоже такая ситуация , сижу без товара негодую. https://zombeads.biz всем доброго времени суто тс ответь в лс есть вопросВсе пришло. всё на высоте. на данный момент более сказать немогу.
a href=”https://refinedlifestylecommerce.click/” />Refined Lifestyle Picks – Smooth navigation with well-arranged content and a polished look.
сайт натяжных потолков http://www.natyazhnye-potolki-samara-5.ru .
Онлайн-портал https://ctoday.ru о строительстве и ремонте. Пошаговые инструкции, расчёты, выбор материалов и оборудования. Полезные материалы для частного строительства, ремонта и обустройства помещений.
Информационный портал https://software-expert.ru о секретах ПО. Скрытые возможности программ, настройки, оптимизация, безопасность и обновления. Практичные советы и разборы для повседневного и профессионального использования.
кто-то пляшет, кто-то дрочит, Купить кокаин, бошки, гашиш Интересно как он себя покажет… даже не знаю как его разводить…Заказал вчера в 20:00 оплатил в 22:00 домой пришел в 22:20 в статусе заказа уже выло написано в обработе тоесть деньги мои приняли. Спросил когда будет трек.Ответили завтра не раньше 16:00 проверяю в 14:40 уже статус отправлен и трек лежит в заказе. По скорости и отзывчивости магазина 100%лучше нет
у меня 203 1к8 получался вообще жестокии делал на растворителе для снятие лака с ногтей (без ацетона) https://fond-ai.ru скажи мыло в личку своё шас проверюМагазин агонь! Брал как то давно. все ровно!
Оплатил, жду. https://prestigedesign.biz Да неее))) само то емс и почта россии !! А лучше гарантпост очень клево работают по ним надо отправлять вообще изумительные службы. Или первый класс!Сегодня оплатил. Жду не дождусь.?
Iron Flame PDF fuels passion! Rebecca Yarros weaves wonder for fans. Download free at ironflamepdf.top today! https://ironflamepdf.top/ Iron Flame Pdf Free Download
Artisan designs shop – Items are beautifully displayed, and the site feels lively and inspiring.
Modern Intentional Hub – Purpose-driven presentation with clean visuals and effortless navigation.
UrbanField Inspirations – Loved the creativity on display; it’s smooth and pleasant to navigate.
в смысле пропал из онлайна??? и что делать теперь? треки то до сих пор небьються https://erbek-rus.ru Короче, подошёл я к адресу, а там ни по звёздам, ни по местности, ни право-лево не надо проверять. Я даже фонарик не включал, все чётко по описанию.Это точно.
Portfolio insights site – The platform highlights artistic achievements with clarity and professionalism.
потолочкин натяжные потолки отзывы москва http://www.natyazhnye-potolki-nizhniy-novgorod-4.ru/ .
Здесь все ровно братья как и всегда Купить кокаин, бошки, гашиш ты писал пришла посылка размыли в итоге прикола не понялиРебят я не терпила и не превык чтоб меня кидали и вы тоже я думаю и если нас кинули то я предлогаю мстить таким образам для начала надо писать на всвсех форумах где есть этом магаз о том что это кидала а не довереный магаз не лениться и писать каждый день об этом чтоб все браза знали правду и не постродали как мы
потоло http://natyazhnye-potolki-samara-5.ru/ .
такая же беда дружище, продавец сказал, что курьерка дерьмово работает! Но меня посещают смутные сомнения, что курьерку в связи с новым постановлением взяли за яйца! https://laviedesmamans.biz Страшно) заказывать RTI-126. Кто поможет с данной проблемой.в академе были пролёты
intentionalstylehub – IntentionalStyleHub offers thoughtfully chosen products for a seamless browsing experience.
а я яй , я ж отвечаю вам каждый раз как есть возможность, пишут много людей одновременно. Купить кокаин, бошки, гашиш Проплатил в этот магаз 10.10,трек получил 14.10-сегодня 18.10 трек не бьётьсяМне от оплаты и в мои руки в общем занимает 2-3 дня
Creative decor shop – Items are visually appealing, and the site makes exploring designs effortless.
Curated Home & Style – Thoughtful product arrangement with smooth, responsive pages.
Explore Sergii Dima – Work is presented clearly, giving visitors a professional impression.
Сочи – мёд отличный, кладмену респект и уважуха! теперь мы ваши постоянные клиенты) Купить кокаин, бошки, гашиш идиоты – это ты очень мягко к ним))Поздравляю всех с наступающим Новым 2013 Годом! Желаю в год Змеи: 1. Мутить тока на спирту! 2. Отваривать основу. 3. Сушить естественным способом. 4. Поменьше “ловить бледного”! 🙂 Ну а магазу Chеmical-Mix желаю Процветания, Оперативности, и качественной разнообразной продукции!
Домашние маски https://omaske.ru для лица и волос — натуральные рецепты для ухода за кожей и волосами. Питание, увлажнение и восстановление с доступными ингредиентами. Советы по применению, типам кожи и волос.
Просто Строй https://prostostroy.com онлайн-журнал о строительстве, ремонте и обустройстве дома. Практичные статьи, пошаговые гайды, обзоры материалов и полезные советы для частного строительства и ремонта.
потолочкин натяжные потолки нижний новгород отзывы клиентов natyazhnye-potolki-nizhniy-novgorod-4.ru .
это манера такая сдержанная или удовлетворительное=на троечку Купить кокаин, бошки, гашиш Добрый вечер, менеджер отписал, что СК будет в выходные! Так это? Интересует Новосибирск опт.Классный магазин! Работаю только с ним! Ни раз не обманули!
натяжные потолки цена самара http://natyazhnye-potolki-samara-5.ru .
О качестве товара отпишу в трипрепортах .Мир, и процветания этому магазину))) Купить кокаин, бошки, гашиш и такая хрень каждый день.все ровно ваще чисто жду проверив качество отпишу
Новости Тюмени https://kfaktiv.ru и области онлайн: общество, экономика, политика, происшествия и городские события. Оперативные публикации, фото и комментарии. Следите за жизнью региона ежедневно.
Essential finds hub – Shopping is straightforward, with products that feel dependable and well curated.
Красивый интерьер https://moidomiks.ru своими руками: вдохновение, мастер-классы и полезные советы. Оформление комнат, декор, текстиль и освещение. Простые идеи для обновления интерьера и создания гармоничной атмосферы.
growthsystems.click – Appreciate the typography choices; comfortable spacing improved my reading experience.
Event tracking site – The platform makes monitoring events easy with structured updates and resources.
Contemporary Lifestyle Hub – Visually appealing layout with smooth transitions and structured browsing.
Ну и сам сожру дорожку, https://tweetomaticprofiteer.biz Фарту в делах парни !:hello:Это тема о работе магазина. “эффекты, использование” в теме о продукции
rankvelocity.click – Appreciate the typography choices; comfortable spacing improved my reading experience.
trafficlogic.click – Loved the layout today; clean, simple, and genuinely user-friendly overall.
trafficpath.click – Appreciate the typography choices; comfortable spacing improved my reading experience.
webtrafficpro.click – Color palette felt calming, nothing distracting, just focused, thoughtful design.
спасибо вам Купить кокаин, бошки, гашиш брал все как всегда на 10 баллов забилЧто там за оператор в аське сидит? Ответа нереально долго ждать приходиться, я по 2раза один и тот же вопрос пишу. Не могу постоянно находиться в сети. Пусть быстрей работает.
сайт натяжных потолков http://www.natyazhnye-potolki-nizhniy-novgorod-4.ru/ .
https://www.bakinsky-dvorik.ru/club/user/181008/blog/7706/
https://postheaven.net/braggbjerring6/eu130-offre
https://javabyab.com/user/bonusmelbet6
азино 777 сайт вход azino 777
Как связаться? Купить кокаин, бошки, гашиш -1. Вас, продавцов, много, а я один.заказал rcs-4, чет не радует отзывы, как придет со дня на день посмотрим, что выйдет отпишусь, буду делать 1к 10-ти…
creativeclickhub – CreativeClickHub presents well-curated items that immediately captured my interest.
Спасибо за отзывы приятные. Стараемся доставлять побыстрее))) https://timam.ru Море клиентов и процветания !Всем мир,заказывал кто нибудь через доставку курьерской службой?дошло все ровно?
Handcrafted home picks – The products are unique, and exploring the site is easy and pleasant.
Personal blog portal – Visitors can easily access content that is interesting and engaging.
Curated Artisan Goods – Carefully curated visuals paired with a browsing experience that feels natural.
нужна заклепка? заклепки нержавеющие вытяжные 4.8 мм надёжный крепёж для прочных и долговечных соединений. Устойчива к коррозии, влаге и перепадам температур. Подходит для металла, строительства, машиностроения и наружных работ.
Проблемы с алкоголем? кодирование от алкоголя Томск выезд врача-нарколога на дом и приём в клинике 24/7 (Томск и область) без ожидания. Осмотр, детоксикация, капельница, контроль давления и самочувствия. Анонимно, бережно, с рекомендациями на восстановление и поддержкой семьи.
Хочешь просить пить? кодировка от алкоголя в Хабаровске быстрое прибытие, медицинский осмотр, капельница для снятия интоксикации, контроль пульса и давления. Анонимная помощь взрослым, внимательное отношение, поддержка после процедуры и советы, как избежать срыва.
Sunrise on the Reaping by Suzanne Collins delivers the powerful backstory fans have craved through Haymitch’s perspective during the fiftieth Hunger Games. This PDF reveals his tragic experiences twenty-four years before Katniss. Understand his pain before becoming their mentor. Download free instantly without any registration today. https://sunriseonthereapingpdf.top/ Sunrise On The Reaping Paperback
Всё шикарно,уже сидим с курим ваши бошки https://money-banks.biz да никого не устраивает это, что за бред. только единиц.не ссы капустин поебем и отпустим
Plinko patří mezi veselá a velmi známá aktivita, jež přivlastnila obdržela srdce spousty hráčů po celém světě. Daný forma aktivity patří mezi proslulý její lehkostí plus lákačným obrazovým provedením, které okamžitě láka pozornost. Hráči často neustále zkoumají, zda https://dokuwiki.stream/wiki/User:ZoraLarkin756 probíhá, kvůli tato zábava spojí štěstí a s možností obdržet zajímavé odměny. Tento titul online kasino poskytuje danou zábavu v rámci online online nabídce, a umožňuje, že hráči uživatelé mají možnost z domu osahat jejich náhodu a strategii. Jedná se hlavních hlavních benefitů tato hra hry spočívá její pohotový průběh plus snadná dostupnost – uživatel nepotřebuje komplikovaně rozumět pravidlům, protože uměl zahrát a sbírat. Tento titul hodnocení často poukazují, že tato tato aktivita představuje perfektní pro začátečníky nováčky, což hledají hru bez komplikovaných komplikovaných strategií, a rovněž pro pokročilé profesionální osoby, kteří oblibují spojí los v kombinaci s plánováním. Tento titul zábava představuje také vyhledávaná mezi hráči, jež shlédnou živé přenosy a akce, kvůli tomu své grafické vlastnosti plus pohyblivé elementy dodávají aktivitě napětí plus adrenalin. U lokální hráče je důležitá adaptace, tak Hra Plinko cz poskytuje kompletně české rozhraní plus návody, a tím umožňuje komfortní prožitek bez překážek lingvistických limitů. Tato hra plinko je tedy nikoli jen lehce ovladatelná a zábavná, rovněž rovněž plánovaně dostupná pro odlišné kategorie osob, což vysvětluje její narůstající známku.
Вот получил вчера 2 -й заказ…..отсылают быстро, качество отличное, плюс девайсы в которые всё ныколось в виде приятного бонуса… https://tweetomaticprofiteer.biz Торчал дома 2 дня,ждя,пока придёт этот курьер. Решил написать,чтоб кинули трек-надоело мне быть в ожидании. Оказалось,что:Ну теперь к самому главному – качество!
Есть зависимости? вызвать нарколога на дом анонимно Томск вывод из запоя и детоксикация под наблюдением врача. Приём и выезд на дом 24/7, индивидуальный подбор препаратов, контроль самочувствия, конфиденциальность. Помогаем стабилизировать состояние и организовать дальнейшее лечение.
Нужен юрист? юридические компании Новосибирск разберём ситуацию, оценим риски и предложим стратегию. Составим иск, претензию, договор, жалобу, защитим в суде. Для граждан и компаний. Первичная консультация онлайн/по телефону. Прозрачные условия.
https://paperpage.in/blogs/85920/Code-Promo-Melbet-Valide-130-Bonus-Sport
https://anotepad.com/notes/jr4844ms
https://ok.ru/profile/910337933795/statuses/157193691790819
А теперь к делу.. магаз ровный, товар ..вставляет епт..особенно в прошлый раз, пол часа ждал, что из ванной вылезет оно и покарает меня…хорошо быстро отпускает, а то вода остыла уже и сига стлела и хабарик упал так , что сам не заметил… https://sans-souci.biz У Данного Магазина я так понимаю Принцип не отвечать в Аське?!=)Оплатил заказ в субботу, во вторник посылка была отправлена вечером, в четверг уже была в городе, но встретиться с курьером не смог. В пятницу заберу. Все оперативно и быстро.
Visit Milestone Rest – Organized content makes exploring milestones and narratives easy and engaging.
Contemporary style hub – Items are fashionable, and the modern layout ensures effortless navigation.
А почему сам с-м.сом сюда какой день не кажеться…? https://prestigedesign.biz Основу выварить не удалось, после вручения посыля,забыл убрать с глаз, торопился, дома было объявлено военное положение .сколько зарядил?
https://clever-panda-pxrc94.mystrikingly.com
https://www.tai-ji.net/board/board_topic/4160148/7339890.htm
https://tcsn.tcteamcorp.com/posts/119489
магазин на высоте) качество кул) Купить кокаин, бошки, гашиш Еще раз извините. Треки тоже бьются не сразу, курьерки “в завалах”, иногда он только начинает определяться на сайте курьерки, а его уже вручают или вручили получателю. Не пугайтесь, что мониторинг начнется не сразу, вам всем все придет заказанное.Всех С Новым Годом! Как и обещал ранее, отписываю за качество реги. С виду как мука, но попушистей чтоли )) розоватого цвета. Качество в порядке, делать 1 в 20! Еще раз спасибо за качественную работу и товар. Будем двигаться с Вами!
как использовать бонусный счет на 1win в казино бонус
The In Your Dreams PDF is the perfect addition to your collection. It is a great story that reads beautifully on a screen, making it a joy to experience digitally. https://inyourdreamspdf.top/ In Your Dreams Novel Download
thinkdifferently.click – Hub emphasizing forward-thinking approaches and imaginative problem-solving.
Хорошо работает народ)) Купить кокаин, бошки, гашиш 307 не появился???И всем форумчанам!!!
Мед-Омск: https://med-omsk.ru Многопрофильный медицинский центр в Омске. Широкий спектр диагностических и лечебных услуг для всей семьи.
МСМ-Медимпэкс: https://msm-medical.ru Ооснащение онкологических центров оборудованием для лучевой терапии и ядерной медицины. Инновационные решения для медицины.
worldmarketzone – WorldMarketZone delivers a colorful assortment of products with international influence.
Phantom Circle – The platform showcases creative projects and ideas with striking visuals.
2с-i отличного качества. 1гр был разделен на 60 частей. Жалоб не от кого не было по качеству. https://fond-ai.ru Все ровно, пасыль забрал, всем доволен!Странно все как то..
Cozy home finds – The warm aesthetic makes browsing enjoyable, with products that feel welcoming.
Тепкрь сам хочу зделать заказ но немогу на сайт попасть (((( https://laviedesmamans.biz отличный магазин! + емуждём ждём репорт думаю тоже взять АМ
грац вам джентльмены! Купить кокаин, бошки, гашиш Классный магазин! Работаю только с ним! Ни раз не обманули!сегодня оплатил заказ..буду ждать доставки..протестирую.сообщу о качестве продукта
movetorussia com https://ilikevents.com/images/pgs/banking-in-russia-for-foreigners-complete-account-setup-guide-financial-services.html/ .
Наш Малыш: https://malish-nash.ru Интернет-магазин товаров для детей и новорожденных. Все необходимое для комфортного роста и развития вашего ребенка.
классный магазин Купить кокаин, бошки, гашиш всё отлично,ровно,супер! )Всё отлично, 5 из 5. Только сделайте больше районов в Питере.
Камышинская ЦГБ: https://cgbkam.ru Центральная городская больница Камышина. Полный комплекс стационарной и амбулаторной помощи, диагностика и профилактика заболеваний.
Баунтовская ЦРБ: https://crbbaunt.ru Официальный сайт районной больницы в Бурятии. Доступная медицинская помощь и актуальная информация для пациентов региона.
Sports highlights portal – Fans can view exciting updates, match recaps, and interactive content.
Сайт Вінниця https://faine-misto.vinnica.ua новини Вінниці та області. Огляди, транспорт, місця та багато корисного.
Golden picks boutique – The layout is elegant, and the selection feels refined and well organized.
Наш Малыш: https://malish-nash.ru Интернет-магазин товаров для детей и новорожденных. Все необходимое для комфортного роста и развития вашего ребенка.
conceptlab.click – Resource encouraging experimentation with creative approaches and alternative methods.
всем курильщикам привет. магаз ровный,раза 4 заказывал,все проходило нормально,связь с тс в аське тоже норм,можно обговорить любой вопрос. за качество, в61 больше всего понравился. заказывал эйфоретик,так и не понял его,товарищи тоже не поняли эфекта,хотя употребляли по многу. https://avto-luks.ru Спасибо магазину!д не магаз рооовный так что не переживай все будет четко)))
I enjoy the consistency of digital formats. An archive of romance that standardizes to PDF is very user-friendly. I know exactly how the file will behave and what software I need, removing any technical headaches from my reading time. https://anarchiveofromancepdf.top/ Read An Archive Of Romance Online Free
https://enran.ua/purposeprod/mebli-dlya-ofisu/
Проблемы с зубами? замена пломб лечение кариеса и каналов, восстановление формы и цвета зуба, замена старых пломб. Индивидуальный подход, современные технологии, стерильность. Запишитесь на консультацию и получите план лечения.
Член Российского союза писателей Селезинка Александр Михайлович родился в 1976 г. Проживает в с. Дивеево Нижегородской области. Почётный академик Международной академии современных искусств, кандидат филологических наук, шекспировед, поэт, художник, Почетный учитель России, преподаватель английского, немецкого, русского языков, а также изобразительного искусства. Автор монографии “Библейские аллюзии в творчестве В. Шекспира”, соавтор перевода 154 сонетов В Шекспира на русский язык, монографии “Особенности творческого метода В. Шекспира” и четырех частей книги «Духовные сонеты». Участник художественных выставок. Открыл 5 персональных выставок. Член Союза русских художников. Член Евразийского художественного союза. Член литературного клуба «Творчество и потенциал» Член Союза писателей Рунета. Член Российского союза писателей. Лауреат международного конкурс искусств “Artex Awards”. Лауреат конкурса “Звезда Виртуоза”. Победитель Национального Образовательного Поэтического Конкурса Poetfest’24. Победитель конкурса «Голоса эпохи» в номинации «Выбор редакции». Награжден медалью «225 лет А. С. Пушкину», знаком «Золотое перо русской литературы», медалью «За сохранение русских литературных традиций» им. Великой княгини Ольги, медалью имени Л. Н. Толстого «За воспитание, просвещение и наставничество» от Международной академии русской словесности, медалью имени Михаила Афанасьевича Булгакова «Мастеру своего дела», медалью «За заслуги в культуре и искусстве», почетной памятной медалью участника Всероссийского конкурса «Герои Великой Победы», почетной памятной медалью “За поддержку и участие в патриотическом движении России”, медалью Н. В. Гоголя «За особые заслуги», медалью «130 лет С. А. Есенину».
Хороший магазин https://salon-sakura.ru Никого не защищаю,говорю как есть-сайт работает на О Т Л И Ч Н О .знаю кто и как берут через этот магаз
Антарес-МЕД: https://antares-med.ru Центр пластической хирургии и косметологии в Санкт-Петербурге. Эстетическая медицина, коррекция фигуры и программы омоложения.
Стоматик СПб: https://stomatic-spb.ru Семейная стоматология в Санкт-Петербурге. Профессиональное лечение зубов, включая услуги для детей и лечение под наркозом.
Проблемы в авто? компьютерная диагностика автомобиля с выездом диагностика на месте, запуск двигателя, поиск короткого замыкания, ремонт проводки, замена предохранителей и реле, настройка сигнализации. Приедем быстро по городу и области. Честная цена, гарантия, без лишних работ.
movetorussia com http://www.radio-rfe.com/content/pages/immigrate-to-russia-complete-immigration-process-guide-2025.html .
жду товара https://jevite-clinic.ru Не сыы! Я во вторник постучался в скайп, сразу же оплатил. На след день тобиш в среду получил трек, а сегодня посыль уже приехала! Скоро отпишусь за кач-во фа. Не моросите, контора ровнаяА то с после ситуации с РЦлаб все настораживают……
Проблемы с зубами? замена пломб лечение кариеса и каналов, восстановление формы и цвета зуба, замена старых пломб. Индивидуальный подход, современные технологии, стерильность. Запишитесь на консультацию и получите план лечения.
https://enran.ua/
Проблемы в авто? выезд автоэлектрика на место диагностика на месте, запуск двигателя, поиск короткого замыкания, ремонт проводки, замена предохранителей и реле, настройка сигнализации. Приедем быстро по городу и области. Честная цена, гарантия, без лишних работ.
Отечественный завод реализует силовые тренажеры по оптимальным ценам со скидкой. Линейка продукции содержит штанги, блины, эллипсоиды. Готовы к отгрузке безопасные силовые тренажеры и аксессуары для выполнения оздоровительных задач. Покупайте прямо сейчас многофункциональный станок Смита, горизонтальную тягу, лавку Скотта, плечевой тренажер, Гакк тренажер, тренажер для пресса, обратную гиперэкстензию, а также все необходимое для зала.
Стоматология в Калуге https://albakaluga.ru Альбадент — имплантация и протезирование зубов с гарантией эстетики. Виниры, костная пластика и реставрация улыбки по индивидуальному плану лечения.
livingdecorhub – LivingDecorHub offers quality items arranged neatly for a clear and pleasant shopping experience.
буддийский монастырь в краби таиланд Аэропорт Краби Ко Ланта как добраться: трансфер на пароме.
Регистрация через соцсети — за секунду.
Also visit my web site: https://anandinstitutebhopal.com/melbet-zerkalo-rabochee-mobilnaya-versiya-2025/
Fiddler events hub – Users can find schedules, classes, and resources easily and effectively.
Блэкджек с сдачей — выгодно.
Feel free to visit my site https://heligroup.vn/melbet-obzor-2025-bk/
Latest Updates: https://kenkyuukai.jp/event/event_detail_society.asp?id=52212&ref=calendar&rurl=https://puzzlemanpro.com/
Турниры с призами в крипте.
Stop by my web-site :: https://witstosz.psad.pl/2025/11/02/melbet-zerkalo-rabochee-2025/
Официальный сайт без рекламы навязчивой.
Feel free to surf to my web blog :: https://alvarezconsultores.com/melbet-2025-obzor-bukmekera-2/
Центр охраны труда https://www.unitalm.ru “Юнитал-М” проводит обучение по охране труда более чем по 350-ти программам, в том числе по электробезопасности и пожарной безопасности. А также оказывает услуги освидетельствования и испытаний оборудования и аутсорсинга охраны труда.
Explore Golden Meadow – The site feels motivating, encouraging new ideas and practical experimentation.
всем добрый день брали 200гр тут всё на высшем уровне подробное описание 5 фоток + геоданный клад был поднят в касание место укромное тихое качество продукта вышка! советую всем брать у Чема ! https://kupi-kapkan.ru все ровно мира вам ! и процветаниятакая же беда дружище, продавец сказал, что курьерка дерьмово работает! Но меня посещают смутные сомнения, что курьерку в связи с новым постановлением взяли за яйца!
Стоматология в Калуге https://albakaluga.ru Альбадент — имплантация и протезирование зубов с гарантией эстетики. Виниры, костная пластика и реставрация улыбки по индивидуальному плану лечения.
Прямой производитель поставляет https://www.sportprof.su по конкурентным ценам в рассрочку. Прайс-лист содержит гантельные ряды, разминочные блины, гребные тренажеры. Доступны к заказу профессиональные силовые тренажеры и комплектующие для успешного выполнения профессиональных задач. Оформляйте на сайте станок Смита, вертикально-горизонтальную тягу, скамью для бицепса, машину для дельт, жим ногами, наклонную скамью, скамью для гиперэкстензии, а также другое оборудование.
Акции постоянные, каждую неделю что-то новое.
my blog – https://www.xn--eeba0ay.rancks.org/2025/11/01/melbet-obzor-2025-bk/
Trusted and best: https://redcircle.com/shows/431f2bcb-1ccd-4252-bff5-8854b7655a5e/ep/6c4ae307-e39f-462f-b573-6e4eb9f6faa2
Центр охраны труда https://www.unitalm.ru “Юнитал-М” проводит обучение по охране труда более чем по 350-ти программам, в том числе по электробезопасности и пожарной безопасности. А также оказывает услуги освидетельствования и испытаний оборудования и аутсорсинга охраны труда.
Новости Киева https://infosite.kyiv.ua на сайте КиевИнфо. Читайте о последних событиях в столице и области.
Знаю сайт. Всем советую. Пишу в кратце о главном. Связался в аське. Ответили сразу, тут же сделал заказ на регу. Осталось подождать… https://solyris-s.ru поддерживаю ! парни врубаем тормоза пока нет ясностиЕщё в 11-м году брал здесь чудесную фофу и другие ништяки.Тогда это был крутейший магаз.И вот после долгого перерыва они снова идут в гору.Заказ оперативность 5 упаковка 5 качество 5 цена лучше всех.
Нужны заклепки? заклепка вытяжная нержавеющая 3.2 для прочного соединения листового металла и профиля. Стойкость к коррозии, аккуратная головка, надежная фиксация даже при вибрациях. Подбор размеров и типа борта, быстрая отгрузка и доставка.
Нужен эвакуатор? вызвать эвакуатор рядом быстрый выезд по Санкт-Петербургу и области. Аккуратно погрузим легковое авто, кроссовер, мотоцикл. Перевозка после ДТП и поломок, помощь с запуском/колесом. Прозрачная цена, без навязываний.
Вход в Мелбет простой, пароль запомнил — и сразу в игру. Никаких проблем.
my web page … https://rampamusic.com.br/melbet-zerkalo-rabochee-segodnya-2025/
3случая за последние 2недели.. если быть точнее.. Купить кокаин, бошки, гашиш качество на высоте! сегодня опробовали и регу и ск!Раньше розницей занимались благодаря вашему опыту,сейчас время другое,стабильная честная работа)
Обучение Xrumer 23 strong Ai Обучение Xrumer 23 strong: Углубленный курс обучения Xrumer 23, ориентированный на изучение наиболее мощных и эффективных техник рассылки и продвижения. Включает в себя продвинутые настройки, работу с прокси, антикапча-сервисами и обход более сложных защит от спама. Важно помнить о соблюдении этических норм и избежании спама.
move to Russia https://www.connectingcarers.org.uk/pages/russian-citizenship-requirements-complete-application-guide-2025.html .
potentialpath.click – Resource highlighting practical strategies to explore unexplored growth areas.
Узнать больше здесь: Продать медаль «XX лет Рабоче-Крестьянской Красной Армии» — скупка в Москве
Рейтинг казино https://casinos.autos онлайн 2025 для осознанного выбора: критерии безопасности, репутации, бонусной политики, выплат и сервиса. Таблицы по странам и форматам игр, реальные условия акций, плюсы/минусы, FAQ и ссылки на правила. 18+
Член Союза русских художников. Селезинка Александр Михайлович родился в 1976 г. Проживает в с. Дивеево Нижегородской области. Почётный академик Международной академии современных искусств, кандидат филологических наук, шекспировед, поэт, художник, Почетный учитель России, преподаватель английского, немецкого, русского языков, а также изобразительного искусства. Автор монографии “Библейские аллюзии в творчестве В. Шекспира”, соавтор перевода 154 сонетов В Шекспира на русский язык, монографии “Особенности творческого метода В. Шекспира” и четырех частей книги «Духовные сонеты». Участник художественных выставок. Открыл 5 персональных выставок. Член Союза русских художников. Член Евразийского художественного союза. Член литературного клуба «Творчество и потенциал» Член Союза писателей Рунета. Член Российского союза писателей. Лауреат международного конкурс искусств “Artex Awards”. Лауреат конкурса “Звезда Виртуоза”. Победитель Национального Образовательного Поэтического Конкурса Poetfest’24. Победитель конкурса «Голоса эпохи» в номинации «Выбор редакции». Награжден медалью «225 лет А. С. Пушкину», знаком «Золотое перо русской литературы», медалью «За сохранение русских литературных традиций» им. Великой княгини Ольги, медалью имени Л. Н. Толстого «За воспитание, просвещение и наставничество» от Международной академии русской словесности, медалью имени Михаила Афанасьевича Булгакова «Мастеру своего дела», медалью «За заслуги в культуре и искусстве», почетной памятной медалью участника Всероссийского конкурса «Герои Великой Победы», почетной памятной медалью “За поддержку и участие в патриотическом движении России”, медалью Н. В. Гоголя «За особые заслуги», медалью «130 лет С. А. Есенину».
716 community portal – The platform offers interactive features to encourage participation and content posting.
Короче, подошёл я к адресу, а там ни по звёздам, ни по местности, ни право-лево не надо проверять. Я даже фонарик не включал, все чётко по описанию. https://a-gorca.ru Ну я совершенно не понимаю,как можно держать сайт в таком несоответсвии с реальностью?Пароль от админки забыли,чтоли?Сколько клиентов забило,пытаясь пробиться через мыло,которое до сих пор указано?Ппц полный.Заказывал пробник на 10000 (оплатил на альфу) сено и мягкий, но КЛАД ТАК И НЕ БЫЛ НАЙДЕН!!! на что продавец ответил “ищите лучше” , на просьбу созвонится или списаться закладчику и курьеру ни как не отреагировал!!! Решать вопрос не захотел!!!
https://enran.ua/
Explore Wild Crest – Calm visuals and thoughtfully curated items make browsing enjoyable.
https://doorspell.com/blogs/84511/1xBet-New-Account-Bonus-Code-130-Offer
https://blogs.cornell.edu/siemreapmasterclass/2011/02/26/cambodia-dance/comment-page-557/#comment-114650
https://www.semae.sc.gov.br/semae-prestigia-3o-forum-catarinense-de-protecao-e-bem-estar-animal/
https://paper.wf/code-gratuit1xbet1/www-atrium-patrimoine-com-wp-content-artcls
Нужен эвакуатор? эвакуатор час цена быстрый выезд по Санкт-Петербургу и области. Аккуратно погрузим легковое авто, кроссовер, мотоцикл. Перевозка после ДТП и поломок, помощь с запуском/колесом. Прозрачная цена, без навязываний.
Нужны заклепки? заклепка вытяжная нержавеющая для прочного соединения листового металла и профиля. Стойкость к коррозии, аккуратная головка, надежная фиксация даже при вибрациях. Подбор размеров и типа борта, быстрая отгрузка и доставка.
Может не по теме,но всё ж поделюсб опытом чем хорош СПСР.При заказе на сайте ты вбиваешь адрес доставки, когда посыль уже в городе и звонит курьер назначаю ему встречу не по адресу они без проблем едут.А дальше уже ваша фантазия куда вызвать курьера в лес или наоборот в людное место-этоим можно лишний раз обезопасить себя от https://rtc-ec.ru с искреннем уважением к вам!Однажды тормознули его два обкуренных в ноль пацаненка. Один из накуренных засовывает голову в окошко и говорит:
Enjoy the story that never lets you go with the digital edition. The PDF of It Should Have Been You is waiting. It should have been you hooked on this book. Get the file today and read. https://itshouldhavebeenyoupdf.top/ It Should Have Been You Latest Book
Secure Alcott Hall PDF access. This document offers knowledge. It is ready. https://alcotthallpdf.top/ Alcott Hall Pdf No Sign Up
203 тут говно.. 10к вникуда улетели.. клиенты от меня сбежали… присылали какую-то желтую хуй*ю, не растворяется вовсе, выпадает в осдок.. прет максимум 20-30 минут (в лучшем случае) https://instavizitka.ru 3)Бабки там всякиеМагазин не работает по выходными и праздникам
Читать расширенную версию: Где продать лобзик дорого за деньги — скупка в Москве
move to Russia http://www.zlatakoruna.info/zpravy/karty/platby-kartou-rostou-pred-vanocemi-o-30-procent .
Step planning guide – Helps turn strategies into actionable, organized steps
2си-ай – ах..й просто!)))))) https://except.biz конечно была задержка которая заставила по нервничать, но всё прошло на уровне и я получил свою посылочку)))Член до колен и девок гарем))
For those who love a story that makes you scream out loud, this digital release is a must-have. You can secure your PDF copy in seconds and start reading instantly. It is perfect for commuters and travelers who want to keep their favorite books in their pocket. https://youcanscreampdf.top/ You Can Scream Laurel Snow Series
Georgetown design hub – Informative resources explain urban plans and community projects effectively.
exoticmarkethub – ExoticMarketHub features unique finds with appealing presentation.
Pure Mountain Corner – The site feels fresh, with practical items that are easy to browse.
There is something special about a book that makes you cry. An emotional archive of romance is full of tear-jerkers. I keep a box of tissues nearby when I open a new PDF, knowing that the story is going to pull at my heartstrings. https://anarchiveofromancepdf.top/ An Archive Of Romance Deluxe Illustrated Edition Pdf
Магазин чёткий… Нареканий нет… https://usadba54.ru Есть кто оплатил и долго ждет адрес клада или трек???мир всем месным братья
Нужны заклепки? заклепки вытяжные нержавеющие купить для прочного соединения листового металла и профиля. Стойкость к коррозии, аккуратная головка, надежная фиксация даже при вибрациях. Подбор размеров и типа борта, быстрая отгрузка и доставка.
Нужен эвакуатор? сколько стоит эвакуатор цена быстрый выезд по Санкт-Петербургу и области. Аккуратно погрузим легковое авто, кроссовер, мотоцикл. Перевозка после ДТП и поломок, помощь с запуском/колесом. Прозрачная цена, без навязываний.
knowledgeboost.click – Resource helping individuals learn quickly and apply insights for fast improvement.
хотел уточнить а вы ващпе работаете? заказ сделал что то тишина Купить кокаин, бошки, гашиш бонус пускай шлютРаботаю с ними с 12 года проблемы были только с отправкой с небольшой задержкой
Только лучшие материалы: Где продать телефон Cat быстро — скупка у ближайшего метро за деньги
Нужны заклепки? заклепка вытяжная нержавеющая для прочного соединения листового металла и профиля. Стойкость к коррозии, аккуратная головка, надежная фиксация даже при вибрациях. Подбор размеров и типа борта, быстрая отгрузка и доставка.
https://forumtransportu.pl/forum/temat/12329/33
https://kisanlink.com/forums/discussion/agriculture-discussion/white-label-crm-solutions-for-forex
https://diktofon-online.ru/
https://mcyportal.mosti.gov.my/digital-construction-summit-dcs-2023/events/
https://magnitnye-buri.ru/
https://ycems.edu.in/?p=4990
Добрый вечер помогите купил у снега клад, пустой, как сапорту написать..? https://hp-service-pro.ru На днях брал небольшой опт, был приятно удивлен подходом и предложением тс, товар еще не пробовали ,но забрал все ровно, по ходу отпишу в теме за качество товара, пока же могу сказать, что жалею , что раньше не работал с данным тс! Успехов, благодарю за сервис!!!все супер! магазину доверять можно, были небольшие задержки но ТС сделал все по красоте!
Organized progress guide – Encourages structured planning and purposeful action
Jammy K insights portal – Posts provide valuable information and encourage open discussion on relevant issues.
Experience the thrill of the chase with the digital version. The PDF of It Should Have Been You is thrilling. It should have been you chasing the ending. Get the copy now and enjoy. https://itshouldhavebeenyoupdf.top/ It Should Have Been You Latest Book
Через Skype мы больше не работаем, об этом мы объявляли пару недель назад. https://ukovskaya.ru Желаю удачи в продажах вашему магазину!да наверно я попал на фейка или угонщика ,но мне не понятно как фейк может потверждать переписку с броси на форуме?
Хочешь продвинуть сайт? seo ru наша компания предлагает профессиональные услуги по SEO?продвижению (Search Engine Optimization) — мы поможем вывести ресурс в топ?3 поисковых систем Google и Яндекс всего за месяц. Сотрудничество строится на прозрачной основе: все договорённости фиксируются в официальном договоре, что гарантирует чёткость взаимодействия и уверенность в достижении результата.
Soft design market – Products are curated carefully, and the site feels welcoming and calm.
Лучший выбор дня: Продать миостимуляторы выгодно — скупка рядом со мной круглосуточно
Нужен эвакуатор? вызов эвакуатора недорого быстрый выезд по Санкт-Петербургу и области. Аккуратно погрузим легковое авто, кроссовер, мотоцикл. Перевозка после ДТП и поломок, помощь с запуском/колесом. Прозрачная цена, без навязываний.
шлюхи данных шлюхи сургут
шлюхи трахаются 2 шлюхи
Хочешь продвинуть сайт? seo сайта яндекс наша компания предлагает профессиональные услуги по SEO?продвижению (Search Engine Optimization) — мы поможем вывести ресурс в топ?3 поисковых систем Google и Яндекс всего за месяц. Сотрудничество строится на прозрачной основе: все договорённости фиксируются в официальном договоре, что гарантирует чёткость взаимодействия и уверенность в достижении результата.
рыбалка на краби Ко Ланта на карте: расположен в южной части Таиланда.
Бро как с тобой связатся это ярослав мудрый. https://mobile-navi.biz Трек получил в первый день,5 баллов за работу магазинатрек получен, ребятам уважуха:rasta:
The Alcott Hall PDF is a valuable asset for learning. This file covers the history in depth. Download it now to access a wealth of info. https://alcotthallpdf.top/ Alcott Hall Romance Novel Pdf
Видеокамеры стилизованные
Центр охраны труда https://unitalm.ru “Юнитал-М” проводит обучение по охране труда более чем по 350-ти программам, в том числе по электробезопасности и пожарной безопасности. А также оказывает услуги освидетельствования и испытаний оборудования и аутсорсинга охраны труда.
Продаешь антиквариат? Скупка антиквариата в Москве — выгодно продать старинные вещи оценка и выкуп старинных вещей с понятными условиями. Принимаем фарфор, бронзу, серебро, иконы, монеты, часы, книги, мебель и предметы искусства. Возможен выезд и оценка по фото. Оплата сразу, конфиденциальность.
Сайт Львова https://faine-misto.lviv.ua новости Львова и области. События, обзоры, транспорт и много интересного.
Конспирация на уровне https://gallery-stone.ru сказали отпрака на следующий день после платежа!Братки все красиво стряпают, претензий к магазину нуль, всегда всё ровно. Единственное что сейчас напрягло, отсутствие на ветке вашего представителя в ЕКБ “онлайн”, представитель молчит ( а там по делу ему в лс отписано) и кажись воопще не заходит пару недель
Стоматология в Калуге https://albakaluga.ru Альбадент — имплантация и протезирование зубов с гарантией эстетики. Виниры, костная пластика и реставрация улыбки по индивидуальному плану лечения.
Focused strategy guide – Provides guidance for intentional actions toward instant results
ко ланте отели пляжи ко ланты
читайте отзывов много!:) товар тут вышка,обращайтесь! Купить Марихуану, Бошки, Кокаин, Мефедрон Ребят всё приготовил ребятам дал попробовать пробники всё ровно на высшем уровне)Удачи в развитии бизнеса !
goal clarity guide – Encourages actionable steps to reach objectives with confidence.
Стоматология в Калуге https://albakaluga.ru Альбадент — имплантация и протезирование зубов с гарантией эстетики. Виниры, костная пластика и реставрация улыбки по индивидуальному плану лечения.
innovationzone.click – Resource motivating discovery of new concepts and strategic creativity.
ко ланта ко ланте
Авто в ОАЭ https://auto.ae/ под ключ: продажа новых и б/у автомобилей, диагностика перед покупкой, регистрация и страховка. Прокат на сутки и долгосрок, включая премиум. VIP номерные знаки — подбор вариантов, торг, оформление передачи и сопровождение на русском.
Unlock the secrets of a compelling drama. This book is a deep dive into human emotion. The digital PDF is easy to find. Download the story and follow the husband and wife as they navigate a world of lies. https://myhusbandswifepdf.top/ My Husband’s Wife Study Guide Pdf
You can read a bio that makes you scream. This PDF is a life. It is a man. The digital format is who. he and she. https://youcanscreampdf.top/ You Can Scream Ebook Reader Free
a href=”https://authenticlivinggoods.click/” />mindfulshopcentral – MindfulShopCentral offers authentic items that make exploring effortless.
I find that romance novels teach emotional intelligence. An archive of romance explores relationships. Reading these PDF stories helps me understand different emotional reactions and conflict resolution, which is surprisingly useful in real life. https://anarchiveofromancepdf.top/ An Archive Of Romance Excerpt Pdf
Discover the Anatomy of an Alibi PDF and enjoy the full story. This download is quick and easy to manage. perfect for building a digital library, this file ensures you always have a good book to read. https://anatomyofanalibipdf.top/ Anatomy Of An Alibi Torrent
Челябинск работаете? Купить Марихуану, Бошки, Кокаин, Мефедрон всегда ровно все было и есть. так что яфоту убрал, не будем палить конспирацию, всё понятно… Свяжитесь с магазином, я думаю решите вопрос с конпенсацией
Авто в ОАЭ https://auto.ae/ под ключ: продажа новых и б/у автомобилей, диагностика перед покупкой, регистрация и страховка. Прокат на сутки и долгосрок, включая премиум. VIP номерные знаки — подбор вариантов, торг, оформление передачи и сопровождение на русском.
Центр охраны труда https://unitalm.ru “Юнитал-М” проводит обучение по охране труда более чем по 350-ти программам, в том числе по электробезопасности и пожарной безопасности. А также оказывает услуги освидетельствования и испытаний оборудования и аутсорсинга охраны труда.
Нужен эвакуатор? вызов эвакуатора быстро быстрый выезд по Санкт-Петербургу и области. Аккуратно погрузим легковое авто, кроссовер, мотоцикл. Перевозка после ДТП и поломок, помощь с запуском/колесом. Прозрачная цена, без навязываний.
Продаешь антиквариат? Скупка антиквариата в Москве — выгодно продать старинные вещи оценка и выкуп старинных вещей с понятными условиями. Принимаем фарфор, бронзу, серебро, иконы, монеты, часы, книги, мебель и предметы искусства. Возможен выезд и оценка по фото. Оплата сразу, конфиденциальность.
https://codeberg.org/1xbetfreebetes
https://dochub.com/m/shared-document/lucy-lipps/dPB1mkMKOpZ79B2VEOjyzD/1xbet-free-bet-offer-code-130-deal-pdf?dt=xAQA5YaBJYZX3zefcEZf
тайланд ко ланта остров ко ланта в тайланде
https://obschalka.profiforum.ru/t1569-topic#1837
https://taverna-na-kruche.forum2x2.ru/t325-topic#720
https://754717660591701913.yourwebsitespace.com/?r=1766059582246
https://vmestedeshevle.listbb.ru/viewtopic.php?f=8&t=19090&sid=8f73203de66acd493d79f784149d7c53
Житомир новости https://faine-misto.zt.ua на сайте Файне мисто. События, обзоры и много полезного.
Центр охраны труда https://unitalm.ru “Юнитал-М” проводит обучение по охране труда более чем по 350-ти программам, в том числе по электробезопасности и пожарной безопасности. А также оказывает услуги освидетельствования и испытаний оборудования и аутсорсинга охраны труда.
спасибо за инфу , но только узнал про новый список запвеществ , чувствую вся лавочка прикроется на некоторое время … Купить Марихуану, Бошки, Кокаин, Мефедрон Магазин как уже и было сказано – на 5+ро я тоже паниковал но все решилось нормально мне в курьерке обьяснили что с этой ебливой олимпиадой у многих запарка и сбои в работе как то так….
все ровно тут ? Купить Марихуану, Бошки, Кокаин, Мефедрон быстрая доставка однако тут)))орогуша! А что здесь людям писать как не о работе магазина? Эта ветка так то и называется “отзывы о работе магазина” вот о ни и пишут о проблемах которые возникли в связи плохой работой магазина или ты хочешь что бы они писали то что тебе нравится? как здесь все круто и классно? но если это не так то они это и пишут и не засоряют как ты говоришь ветку а пишут по существу. И правильно делают что пишут, что бы другие не попали в аналогичную ситуацию разве я не прав?
Structured growth hub – Supports taking intentional steps for steady advancement
clarity in progress – Encourages defining clear steps to achieve meaningful results.
москва краби Отели Краби Таиланд: большой выбор на любой вкус и кошелек.
Все пришло. всё на высоте. на данный момент более сказать немогу. https://gallery-stone.ru Ну блиинн я ждуждуждужду а мне не отвечает ТС я в уныние, буду ждать. говорят хороший, хочу попробовать у него. хочу сладкий бубалех мммм….Киньте репки кому не сложно) не сочтите за попрошайку
Мне отказали в подтверждении джаббера в ЛС. Будьте бдительны! https://avto-vykup64.ru вчера брала СК качество отменное, буду брать еще!У Данного Магазина я так понимаю Принцип не отвечать в Аське?!=)
Новости Хмельницкий https://u-misti.khmelnytskyi.ua на сайте у мисти. Последние события в городе и области. Авторские обзоры, транспорт и много полезного.
ко ланта ко ланта
goalpush.click – Hub supporting deliberate actions and energy management for steady achievement.
https://t.me/KohLantaKrabiThailand ко ланте отели
купил его в аптеке Купить Марихуану, Бошки, Кокаин, Мефедрон Ха ха ребята смотрите беспредел! попробуйте написать правильно жабу ТСа и получится то что у меня, как бы с ошибкой! СКРИПТ!сегодня закажу 1г. MN-011 для пробы)посмотрим на товар)
Авто в ОАЭ https://auto.ae/showrooms/all/ под ключ: продажа новых и б/у автомобилей, диагностика перед покупкой, регистрация и страховка. Прокат на сутки и долгосрок, включая премиум. VIP номерные знаки — подбор вариантов, торг, оформление передачи и сопровождение на русском.
“Erotic minx desires to explore her carnal desires.” Here — https://rb.gy/3fy54w?Vubbibe
confident achievement guide – Offers insight to approach goals with assurance and clarity.
Forward action guide – Supports taking timely steps to maintain and build momentum
Радует качество )) Купить Марихуану, Бошки, Кокаин, Мефедрон ну как-то такНет. Такого у нас нет.
tranquilhomehub – TranquilHomeHub features a serene, clean layout with items that feel purposeful and easy to explore.
There is a unique atmosphere in gothic romance. A specialized archive of romance often features these moody tales. I love downloading a PDF of a gothic novel on a stormy night, enhancing the spooky and romantic vibe of the reading experience. https://anarchiveofromancepdf.top/ An Archive Of Romance Excerpt Pdf
BeautyScope – Informative content, layout is attractive and browsing feels smooth.
сильнее и по времени 400. Купить Марихуану, Бошки, Кокаин, Мефедрон Мне обещали бонус за задержку в 5 + 3 =8 грамм , так и прислали +))) спасибо.+)))Сорри, многаюуков. И ошибок – со спецтелефлна сижу)
хороший магаз Купить Марихуану, Бошки, Кокаин, Мефедрон Магазин как магазин!Че за доверенный магазин мля!!! Кто нах его в доверенные записал!?! Админы убирайте его нах!!! Заказал товар, отправляли неделю, потом трек ждал завтраками кормили, счас трек не бьется 3 день, ася оффлайн, бросик отошел- на сообщения не отвечает!!! Люди не заказывайте тут ничего!!!
ко ланте ко ланте
Ребят,а здесь только курёха? https://parusa22.ru понятно как проверенный магазин работает если отзывы негатив значит зачищает сообщений еще куча они на телефоне сейчас не могу их скопировать но и смысла нет все и так ясновсе гууд
smart progress guide – Helps approach growth in a balanced and thoughtful way.
<Smart planning hub – Provides tools to structure steps for forward movement
sophisticatedcollective.click – Resource showcasing carefully selected content and promoting meaningful interaction.
пляжи ко ланты ко ланта
сервис 10\10 нигде дешевле и лучше на рынке легал сейчас нету!!! https://gf-tyumen.ru Оплатил 22.03.2012,трек выслали 02.04.2012 типа через 1-2 дня он будет биться.до меня идёт посыль от них 3-5 дней,зависит от выходных.Сегодня уже по всем раскладам должно прийти,но у меня даже трек не бьётся.Звонил в спср,сказали нет в базе такого трека.Ну что же, сегодня получил свою посылку, на этот раз все было в наилучшем виде, конспирация на все 10 баллов из 10!
События Львова https://u-misti.lviv.ua на сайте у мисти. Последние новости в городе и области. Транспорт, обзоры заведений, блоги и много полезного.
BeautyFocus – Easy-to-use site, services are explained simply and attractively.
жалюзи автоматические с электроприводом купить жалюзи автоматические с электроприводом купить .
карнизы для штор с электроприводом карнизы для штор с электроприводом .
ролет штора ролет штора .
1xbet today promo code sri lanka
1xbet free bet promo code bangladesh
promo code 1xbet free today
про него что нить писали? точнее вы читали ? https://aeroflotnord.ru УРА трек пробился :angel: Супер магазин,СПАСИБО за подарок 6 г в качестве компенсации:speak::hz:очень боялся что обманут,но Зря:drink: спасибо магазину,с новым годом!!!!!307 не появился???
остров ко ланта в тайланде остров ко ланта в тайланде
Пакетик был завёрнут в фольге, всё ровно. Купить Марихуану, Бошки, Кокаин, Мефедрон план убойный, хорошее качество))Не скажу что качество низкое качество на высоте а возрат не кто не сделает даже не фантазирую )) Все супер все ровно сам тут беру еще не разу не разачаровывался
Любишь азарт? https://everumonline.ru игры от популярных провайдеров, live-казино, бонусы и турниры. Проверяйте лицензию и правила, лимиты и комиссии вывода перед игрой. Подбор способов оплаты, поддержка и обзоры условий.
goal-oriented growth tips – Helps take clear actions that drive tangible results.
riobet официальный сайт Riobet Casino: Синоним Качества и Надежности Riobet Casino – это имя, которое ассоциируется с высоким качеством игр, щедрыми бонусами и честным отношением к игрокам.
email bombing 2024
Email Bombing – email flood or email hoax (DOS attack) or cluster email bombing, what are they actually doing?
A huge number of emails are sent to e-mail. This usually means that the @Flood_email_bot specifically targets the victim’s mailbox associated with your email.
These emails are intended to make fun of friends or distract the victim from any security messages or other emails.
I am glad to present you a mail flood bot with a convenient menu and flexible settings!
The cost of the service is $ 1 = 1000 letters.
You specify the time of the flood and the number of letters yourself, or choose the “FAST FLOOD” function
During the flood, a sufficient number of letters arrive so that the owner would miss an important letter!
The bot will flood more than you ordered. On average, 30% more than ordered.
Flood email, Floods Email, Email flooding, gmail flood, email bomber, flood hotmail, flood online,email flooding, email flood bot, email flooded with spam, email flooding service, email flooded with subscriptions, email flooder bot, email bomber 2023, email bomber 2024, email spam bot online, email spammer bot free, spam bot, бот по флуду почт, сервис по флуду почт, услуги по флуду, флуд услуги.
@Flood_email_bot – Лучший емаил бомбер на рынке!
бонусы без депозита Бездепозитные Бонусы Казино: Ключ к Миру Азарта без Вложений Бездепозитные бонусы казино – это уникальная возможность окунуться в мир азартных игр, не рискуя собственными средствами. Эти щедрые предложения позволяют игрокам испытать удачу в различных играх, оценить функциональность казино и даже выиграть реальные деньги, не внося депозит. Бездепозитные бонусы стали одним из самых востребованных способов привлечения новых игроков в онлайн-казино, предоставляя им шанс начать свой путь в мире азарта с приятного бонуса.
rankvelocity.click – Appreciate the typography choices; comfortable spacing improved my reading experience.
Momentum strategy hub – Helps plan and execute purposeful actions for measurable progress
هي منصة. يتيح للمستخدمين مع مجموعة واسعة من الألعاب. تعد 888starz.
بواجهة مستخدم سهلة الاستخدام. كما تقدم المنصة. والرهانات الرياضية.
888starz ios https://fancybox.qa/2025/08/26/%d8%aa%d8%ad%d9%85%d9%8a%d9%84-%d8%aa%d8%b7%d8%a8%d9%8a%d9%82-888starz-%d9%81%d9%8a-%d9%85%d8%b5%d8%b1-apk-%d9%84%d9%84%d8%a3%d9%86%d8%af%d8%b1%d9%88%d9%8a%d8%af-%d9%88ios-%d8%a8%d9%88%d8%a7/
Успешных вам продаж https://matreshka-salon.ru помоему рти 111 это вообще фэйк и под этим названием онли нелегал толкают, лично мне приходило от 3х продавцов и у всех нелегал, то МДПВ аналог, то амфаЧто за кипишь на ветке? И когда будет адрес?
Любишь азарт? https://everumonline.ru игры от популярных провайдеров, live-казино, бонусы и турниры. Проверяйте лицензию и правила, лимиты и комиссии вывода перед игрой. Подбор способов оплаты, поддержка и обзоры условий.
школы английского языка
ethicalbuyhub – EthicalBuyHub features a curated range of premium ethical products in a user-friendly layout.
Таможенное оформление грузов Москва выполнено на отлично
Check out my web blog – https://kingpeter.ewsstagging.com/erniehowton246
онион ссылки для тор браузера 2023
Травяные смеси для ароматерапии помогают расслабиться и сосредоточиться. Натуральные компоненты, такие как мята, шалфей и лаванда, создают приятный аромат, способствуют спокойствию и гармонии. Их удобно использовать дома или на природе, они безопасны и легальны. Регулярное использование помогает снять стресс, улучшить настроение и зарядиться энергией. Это отличная альтернатива вредным привычкам для заботы о себе и окружающих
Киев новости https://u-misti.kyiv.ua на сайте у мисти. События, обзоры, полезное и интресное.
Любишь азарт? riobet регистрация бонусы, слоты и live-игры, турниры, платежные методы, верификация, лимиты и правила. Даем вывод, кому подходит, и чек-лист, на что обратить внимание перед пополнением и игрой. Актуально на 2025.
TabitoWander – Informative travel tips, browsing the site is straightforward and fun.
небольгой репортаж отписать о ск. https://trapezaspb.ru Товар тоже на 5/5 (только с концетрацией мало 1 к 5 или 1 к 7 дальше держит не долго)Получил 5г 203! Оплатил в четверг, отправили в пятницу и уже в понедельник курьер мне передал. 🙂 Вес в поряде, цвет желтоватый.
электрические жалюзи стоимость zhalyuzi-elektricheskie.ru .
culturalpath.click – Resource highlighting diverse cultures, arts, and creative products across nations.
автоматические гардины для штор kupite-elektrokarniz.ru .
рольшторы на окна купить в москве рольшторы на окна купить в москве .
бездепозитные промокоды Бездепозитные Промокоды: Секретный Ключ к Эксклюзивным Бонусам Бездепозитные промокоды – это специальные коды, которые можно активировать в казино, чтобы получить эксклюзивный бездепозитный бонус.
какой шустрый клиент 25 только зарегистрировался, а уже успел заказать-оплатить-получить-попробывать и отписать здесь ну,ну как говорится пиздеть не мешки таскать. Совет всем пиздаболам- пиздите правдоподобно, а то ни в какие варота не лезет!!! Купить Марихуану, Бошки, Кокаин, Мефедрон “Решил попробовать курнуть через фольгу , Насыпаю нажигаю бля чуть кишки не выпленул”кто брал закладками в этом магазе в МСК что скажите?
goal-focused strategy tips – Inspires planning with clarity and achievable outcomes.
Причем тут какой то смоки и Екб ко мне ? Иди проспись сначала и смотри куда пишешь. Я не работаю в Екб. Купить Марихуану, Бошки, Кокаин, Мефедрон Сорь за многобукав, не попустило еще ;)вот пару часиков назад получил посылочку=) Чай так сказать=) ща сижу под ним в курочки уплетаю уже 3 разорвиебало бутерброд=)ЫЫЫ
Чтобы в полной мере насладиться всеми возможностями этой захватывающей игры, необходимо скачать покерок на свое устройство. Процесс установки прост и интуитивно понятен, а после завершения вы получите доступ ко всему функционалу платформы, включая возможность играть на реальные деньги, участвовать в турнирах и акциях. https://pokerbonuses.ru/download/index.html
kraken 6 at
Травяные смеси для ароматерапии помогают расслабиться и сосредоточиться. Натуральные компоненты, такие как мята, шалфей и лаванда, создают приятный аромат, способствуют спокойствию и гармонии. Их удобно использовать дома или на природе, они безопасны и легальны. Регулярное использование помогает снять стресс, улучшить настроение и зарядиться энергией. Это отличная альтернатива вредным привычкам для заботы о себе и окружающих
Forward-thinking hub – Supports exploring new approaches and actionable strategies
https://edex.adobe.com/community/member/09OPiPLk0
https://sites.google.com/view/1xbetpromocode2026130sportsdea/home
топ казино с бездепозитными бонусами Казино без депозита с выводом – это еще более привлекательная перспектива. Ведь возможность не только сыграть, но и вывести выигранные средства без предварительного пополнения счета звучит слишком заманчиво, чтобы быть правдой. Важно помнить, что такие предложения обычно сопряжены с определенными условиями и ограничениями, о которых следует узнать заранее.
https://www.liveinternet.ru/users/lionwatch/profile
https://disqus.com/by/welcomes1xbet/about/
ну вообщем все ровно получил людей правда от бати но магазин ровный советую https://logiss.ru Надеюсь на дальнейшее сотрудничество.Если хотите подешевле – вам сюда. Если же располагаете финансами – штудируйте ветки доверенных магазинов, есть селлеры куда более ответственные и стоящие. Лично я не планирую дальше сотрудничать с этим магазином. Спасибо за внимание.
бездепозитные бонусы за регистрацию в казино с выводом
riobet Riobet Casino: Синоним Качества и Надежности Riobet Casino – это имя, которое ассоциируется с высоким качеством игр, щедрыми бонусами и честным отношением к игрокам.
kraken store vtor run
Травяные смеси для ароматерапии помогают расслабиться и сосредоточиться. Натуральные компоненты, такие как мята, шалфей и лаванда, создают приятный аромат, способствуют спокойствию и гармонии. Их удобно использовать дома или на природе, они безопасны и легальны. Регулярное использование помогает снять стресс, улучшить настроение и зарядиться энергией. Это отличная альтернатива вредным привычкам для заботы о себе и окружающих
KoiFesUpdates – Informative and colorful, festival news and photos are presented beautifully.
заговор
Да хватает придурков, только смысл писанины этой , что он думает что ему за это что то дадут ))) кроме бана явно ничего не выгорит )))! Тс красавчик брал 3 раза по кг сделки и всегда все чётко ! Жду пока появиться опт на ск! https://tank-master.ru Аптечные травы вообщем.”Подхожу по описанию лазею,лазею, ПУСТО бля нервоз пздц “
электрические жалюзи на окна стоимость электрические жалюзи на окна стоимость .
автоматический карниз для штор kupite-elektrokarniz.ru .
автоматические шторы на окна автоматические шторы на окна .
Здесь ровно! Магазин очень хороший, а главное цены в нем ГИБКИЕ к любому подход есть : ) Купить кокаин, бошки, гашиш Всем САЛЮТ) заказал у ТС по совместки 50 реги жду как отправят думаю проблем не возникнет общение с операторам на 5\5 отзывчевый вежливый и деловито краток гпишет поделу)! я как то брал тут пару месяцов назад все прошло нормально регу и ск, ск правда качетсвенная! была я трипчик оставлял по ней!ДУМАЮ И СЕЙЧАС НЕЧЕГО НЕИЗМЕНИЛОСЬ А ЕСЛИ ИЗМЕНИЛОСЬ ТО В ЛУЧШУЮ СТОРОНУ ЧТОБЫ)))) ЛАДНО ЖДУ ПОСЫЛЬ!! ВСЕМ ДОБРАТьфу-тьфу-тьфу… =(
Новостной портал Одессы https://u-misti.odesa.ua поможет вам быть в курсе последних новостей города и области. Интересные обзоры мест, компании, адреса, информация о транспорте. Все про Одессу на одном сайте.
купить рапэ jaguar nukini
Травяные смеси для ароматерапии помогают расслабиться и сосредоточиться. Натуральные компоненты, такие как мята, шалфей и лаванда, создают приятный аромат, способствуют спокойствию и гармонии. Их удобно использовать дома или на природе, они безопасны и легальны. Регулярное использование помогает снять стресс, улучшить настроение и зарядиться энергией. Это отличная альтернатива вредным привычкам для заботы о себе и окружающих
motivated action tips – Provides guidance for consistent and clear progress.
luxurymarketplace.click – Marketplace presenting carefully selected items with elegant display and smooth navigation.
Momentum planning guide – Encourages structured steps to ensure continuous forward movement
Инфа с вашего сайта. Я уже брал 6-APB, и выглядел он несколько иначе. https://shvei-mash.ru Закупал я рег у Тс конечно качество пацаны просто бомба:good: Я токого не когда не пробывал!!!то ты-цифровая личность, я не за граммы говорю, а за общение и так-то не я один, обещаешь много-толку мало, 2 года – не срок, бомбануть и тебя могли, это вот твоим языком написано, если нормально не понимаешь, еще раз прошу участия администрации в данном вопросе
бездепозитные промокоды Промокод на Бездепозитный Бонус: Ваша Возможность Получить Больше Промокод на бездепозитный бонус – это ваш шанс получить более выгодное предложение от казино.
bestfindshub – BestFindsHub showcased hidden gems with a seamless browsing layout.
на сайте mamuli.club
riobet Риобет Казино Скачать: Играйте Где и Когда Угодно Для удобства игроков Риобет казино предлагает возможность скачать мобильное приложение. Это позволяет наслаждаться любимыми играми в любое время и в любом месте, где есть доступ к интернету.
Отвечают оперативно, оформлено красиво… Купить кокаин, бошки, гашиш ну если ты регу получил! сделай опробуй! и отпиши прет тебя или нет!Оправдания в небе не ищут,
ReeracoenSmartView – Well-organized layout, information is thorough and presented professionally.
калея закатичи цена
Травяные смеси для ароматерапии помогают расслабиться и сосредоточиться. Натуральные компоненты, такие как мята, шалфей и лаванда, создают приятный аромат, способствуют спокойствию и гармонии. Их удобно использовать дома или на природе, они безопасны и легальны. Регулярное использование помогает снять стресс, улучшить настроение и зарядиться энергией. Это отличная альтернатива вредным привычкам для заботы о себе и окружающих
информация
электрические жалюзи на окна внутренние купить электрические жалюзи на окна внутренние купить .
рулонная штора на заказ цена shtory-s-elektroprivodom-rulonnye.ru .
электрокарниз двухрядный kupite-elektrokarniz.ru .
купить ключевые ингредиенты рапэ
Травяные смеси для ароматерапии помогают расслабиться и сосредоточиться. Натуральные компоненты, такие как мята, шалфей и лаванда, создают приятный аромат, способствуют спокойствию и гармонии. Их удобно использовать дома или на природе, они безопасны и легальны. Регулярное использование помогает снять стресс, улучшить настроение и зарядиться энергией. Это отличная альтернатива вредным привычкам для заботы о себе и окружающих
народ а присылают вместе с заключением экспертизы? https://mama-na-kuchne.ru тут как всегда, хочешь сджелать заказ – хрен достучишься в аське.Брал впервые в этом магазине, брал по рекомендации!
strategic refresh guide – Helps revitalize ideas and rethink current approaches.
такчто чставлю 100/100баллов магазу и https://gabiony-krasnoyarsk.ru По приходу товара я выложу тут розничную площадку для заказов, на которой вы сможете заказать реактивы из наличия на складе, не уточняя у нас что есть…Всем привет ни как не могу заказ оформить, помогите,плиз
Opportunity discovery hub – Supports locating growth zones and seizing actionable opportunities
магазу процветания желаю и клиентов хороших https://ritualzoo48.ru норм. Все кладки нахожу без проблем… взял белого и…охуел!!!с искреннем уважением к вам!
https://onedio.co/profile/1wincode456
TrabasArena – Engaging articles, navigation is effortless and the site is user-friendly.
https://audiomack.com/1winfree789
Одесса новости на https://faine-misto.od.ua читайте о последних событиях на портале Файне Одесса. новости, обзоры, транспорт, обзоры мест и много полезной информации для Одессы.
Работаю впервые с этим магазом! Есть что заявить! Ребята, я в приятном шоке от работы магаза! Брал давеча! Пацанчик ну тот который заказы принимает, обрабатывает, ему ОСОБАЯ УВАЖУХА! Магаз РАБОТАЕТ РОВНО и ОПЕРАТИВНО! Все заценили! Все объявили ОБЩУЮ ОХУЕННУЮ БЛАГОДАРНОСТЬ МАГАЗУ! Извиняюсь за французский! ) Что могу сказать, видимо нашел свой магаз! ) Купить кокаин, бошки, гашиш всем привет щас заказал реги попробывать как попробую обизательно отпишу думаю магазин ровный и все ништяк будет))))Тоже интересен вопрос по шифровке посылки при доставке курьером
growth momentum guide – Inspires structured planning to achieve continuous progress.
thinkinnovate.click – Resource guiding users to uncover original ideas and strategic solutions.
он чють чють с желта https://primavera-rk.ru 19-го адрес был дан.Отличный магазин, отличный оператор, отличный товар. Адрес нашли быстро и без проблем, забрали и ушли. Большое спасибо магазину. Всем советую!
https://share.evernote.com/note/db5f8e4c-24b8-6348-dd58-9732c0a3ccfd
https://postheaven.net/hdamfgg6vg
https://blog.une.edu.au/new-england-muslims/2019/11/14/the-75-good-manners-commandments-in-the-quran/comment-page-13/#comment-4764
New path insight hub – Supports discovering overlooked routes and planning next steps
Спасибо Магазину)вы лучшие))))))))!!!!!!!!!!!!!!!!!!!!! :monetka: Качество на 100% https://tank-master.ru Брат, ответь в личке, жду уже 3 дняПривет, нету в личке нечего.
kraken зеркало рабочее
Травяные смеси для ароматерапии помогают расслабиться и сосредоточиться. Натуральные компоненты, такие как мята, шалфей и лаванда, создают приятный аромат, способствуют спокойствию и гармонии. Их удобно использовать дома или на природе, они безопасны и легальны. Регулярное использование помогает снять стресс, улучшить настроение и зарядиться энергией. Это отличная альтернатива вредным привычкам для заботы о себе и окружающих
MotiviSounds – Great music coverage, visuals and content are clean and easy to follow.
Chemical-Mix, хочу заказать 50г. АМ, но на сайте написано что 50грамм нет на складе. https://zudemon.ru Кидал 4340, на Альфу улетело 4254… если быть точным… Чек есть.как так его разве нету? с самого утра тут сижу
Магазин как магазин! Купить кокаин, бошки, гашиш спасибо Вам за отзыв!так что только желаю удачи магазину и процветания в дальнейшем
Автогид https://avtogid.in.ua портал для автовладельцев. Обзоры и рейтинги, новости автомобильной индустрии, советы по ремонту и обслуживанию машины.
chip innovation forum – Covers topics thoroughly and explains complex concepts clearly.
бошки трава купить
Травяные смеси для ароматерапии помогают расслабиться и сосредоточиться. Натуральные компоненты, такие как мята, шалфей и лаванда, создают приятный аромат, способствуют спокойствию и гармонии. Их удобно использовать дома или на природе, они безопасны и легальны. Регулярное использование помогает снять стресс, улучшить настроение и зарядиться энергией. Это отличная альтернатива вредным привычкам для заботы о себе и окружающих
в 12 году брали реагент здесь по курьерке, ровно все было, сейчас оптом берем, но жаль продавец не работает без гаранта, это в наше время спасает от кидков, или различных форс мажоров. https://secondburg.ru Ребят, магазин ровнее ровного. Если есть какие то сомнения, например, нарваться по кантактам на фэйкоф, обращайтесь на прямую к ТС. Написать ЛС 100% все будет исполнено в лучшем виде. Скорость доставки товара просто удивляет, конспирация, и выбор курьерки, залог вашей безопасности, у ТС это приоритет. Все на высшем уровни. Реагент качественный, минимум побочек максимум пазитива. Если вы все-таки решитесь, сдесь прикупиться, вы забудите и думать, где бы вам затариться снова. Не проходите мимо. То, что вам надо, тут.Может случилось что-то не ладное?
домен кракена
Травяные смеси для ароматерапии помогают расслабиться и сосредоточиться. Натуральные компоненты, такие как мята, шалфей и лаванда, создают приятный аромат, способствуют спокойствию и гармонии. Их удобно использовать дома или на природе, они безопасны и легальны. Регулярное использование помогает снять стресс, улучшить настроение и зарядиться энергией. Это отличная альтернатива вредным привычкам для заботы о себе и окружающих
думайте, что продаёте. обещали поменять на туси, время тянут, ниче сделать не могут конкретного. отвечают редко. Купить кокаин, бошки, гашиш 5мг реально из области фантастики…желаю попробыватьНу блиинн я ждуждуждужду а мне не отвечает ТС я в уныние, буду ждать. говорят хороший, хочу попробовать у него. хочу сладкий бубалех мммм….
промокоды для регистрации
Начать игру в онлайн казино с бездепозитным бонусом за регистрацию с выводом могут только совершеннолетние пользователи.
https://casinopromo.ru
Чтобы получить свежие бездепозитные бонусы в онлайн казино за регистрацию в 2026, можно воспользоваться рейтингом на странице.
Крайне редко встречаются площадки, позволяющие оформить заявку на кешаут после использования подарочного депозита, не пополняя баланс.
https://nodepositcasinobonus.ru
Приветственные бонусы в онлайн-казино. Что это такое, зачем операторы выдают их пользователям, как получить и отыграть.
https://nodepositcasinobonus.ru
Приветственные бонусы в онлайн-казино. Что это такое, зачем операторы выдают их пользователям, как получить и отыграть.
https://nodepositcasinobonus.ru
Хочешь бонусы? фриспины без депозита бонусы за регистрацию, фриспины, промокоды. Сравниваем условия отыгрыша, лимит вывода, сроки, верификацию и поддержку. Обновления и фильтры по методам оплаты.
Today’s Most Important: https://crossover99.com/pages/what-is-a-casino-welcome-bonus_2.html
ООО «ТрастСервис» https://www.trustsol.ru московская IT-компания с более чем 15-летним опытом в разработке, внедрении и сопровождении IT-систем для бизнеса. Компания предлагает комплексный IT-аутсорсинг, администрирование серверов и рабочих станций, безопасность, телефонию, облачные решения и разработку ПО. ТрастСервис обслуживает малые, средние и крупные организации, помогает оптимизировать инфраструктуру, снизить издержки и обеспечить стабильную работу IT-среды.
Многие мне рекомендовали данный магазин как порядочный, надо попробовать! https://desert24.ru Как только появится обьявим на форумеДа хоть в очко засыпь, не торкнет
Хочешь бонусы? https://casinobezdeposita.ru бонусы за регистрацию, фриспины, промокоды. Сравниваем условия отыгрыша, лимит вывода, сроки, верификацию и поддержку. Обновления и фильтры по методам оплаты.
KidzNFTZone – Engaging and interactive, browsing the site feels effortless and fun.
заказать мефедрон
Травяные смеси для ароматерапии помогают расслабиться и сосредоточиться. Натуральные компоненты, такие как мята, шалфей и лаванда, создают приятный аромат, способствуют спокойствию и гармонии. Их удобно использовать дома или на природе, они безопасны и легальны. Регулярное использование помогает снять стресс, улучшить настроение и зарядиться энергией. Это отличная альтернатива вредным привычкам для заботы о себе и окружающих
ООО «ТрастСервис» https://www.trustsol.ru московская IT-компания с более чем 15-летним опытом в разработке, внедрении и сопровождении IT-систем для бизнеса. Компания предлагает комплексный IT-аутсорсинг, администрирование серверов и рабочих станций, безопасность, телефонию, облачные решения и разработку ПО. ТрастСервис обслуживает малые, средние и крупные организации, помогает оптимизировать инфраструктуру, снизить издержки и обеспечить стабильную работу IT-среды.
truegoods.click – Resource providing carefully curated selections that inspire purposeful living.
тут как всегда, хочешь сджелать заказ – хрен достучишься в аське. https://holidaysea.ru Этот магазин нериально всегда все четко делал, н ошиблись может случайно поговри я думаю решитсявот такие как ты потом и пишут не прет , не узнавая концентрацию и т д набодяжат к…. ,я вот щас жду посыля и хз ко скольки делать 250
Черкассы новости https://u-misti.cherkasy.ua на городском портале у мисти. Последние события, обзоры, транспорт, много полезного и интересного
voter justice hub – Very informative, shows the importance of safeguarding elections.
Pastory educational App is a revolutionary educational app for kids that takes a proactive approach to entertainment. Instead of blocking content, it intelligently transforms YouTube and TikTok feeds into productive learning journeys. By using this AI-powered learning tool, parents can finally turn mindless scrolling into an enriching experience without the constant struggle over screen time.
Partnering with a specialized https://aiiimpact.com allows businesses to leverage machine learning for predictive keyword analysis and content optimization. By integrating professional ai seo services, companies can scale their organic reach faster than ever before. For businesses targeting the UK market, combining these global technologies with proven london seo services ensures that local search intent is met with surgical precision.
Шива я тебя люблю!!! У тебя лучший и мой самый любимый мефедрон!!!. Купить кокаин, бошки, гашиш да работаем только по прайсуМагазин как магазин!
Selected articles: https://mortonponyexpress.com/arts-and-entertainment/2024/01/21/27379/
Experience Brainy https://askbrainy.com the free & open-source AI assistant. Get real-time web search, deep research, and voice message support directly on Telegram and the web. No subscriptions, just powerful answers.
Сдаешь экзамен? помощь тусур готовим к экзаменам по билету и практике, объясняем сложные темы, даём подборку задач и решений, тренируем устный ответ. Проверим конспекты, поможем оформить лабы и отчёты.
kraken store
Травяные смеси для ароматерапии помогают расслабиться и сосредоточиться. Натуральные компоненты, такие как мята, шалфей и лаванда, создают приятный аромат, способствуют спокойствию и гармонии. Их удобно использовать дома или на природе, они безопасны и легальны. Регулярное использование помогает снять стресс, улучшить настроение и зарядиться энергией. Это отличная альтернатива вредным привычкам для заботы о себе и окружающих
Хочу выразить благодарность данному магазину за лучший товар, лучшие цены, за долгое время непрерывного сотрудничества, очень жду твоего возвращения к работе и появления долгожданного товара, чемикал лучший в своём деле. Очень жаль что на долгий период времени ты преостановил свою работу, надеюсь скоро наладятся поставки и наше сотрудничество возобновится! Чемикал лучший! На данный момент тебе нету равных на рынке RC, возвращайся скорей, мы ждём твоего возвращения с нетерпением! https://respect-salon.ru захвоти с собой пару парнеей, и еще пару биксЗдесь буду отписываться, чтобы все РЕАЛЬНО понимали сколько времени длится весь процесс
Experience Brainy https://askbrainy.com the free & open-source AI assistant. Get real-time web search, deep research, and voice message support directly on Telegram and the web. No subscriptions, just powerful answers.
Сдаешь экзамен? помощь студентам тусур готовим к экзаменам по билету и практике, объясняем сложные темы, даём подборку задач и решений, тренируем устный ответ. Проверим конспекты, поможем оформить лабы и отчёты.
ну если ты регу получил! сделай опробуй! и отпиши прет тебя или нет! https://shvei-mash.ru Магазин работает на 5+++++, я уже раз 5 беру у данного сейлера все ровно все катит, качество на высоте!я купил у них первый раз реактивы, всё пришло довольно быстро и консперация норм, не знаю если такой метод что они используют палевный то как иначе…..
TrinkHalleSelectStore – Simple design, product info is easy to access and understand.
где купить наркотики в москве
Травяные смеси для ароматерапии помогают расслабиться и сосредоточиться. Натуральные компоненты, такие как мята, шалфей и лаванда, создают приятный аромат, способствуют спокойствию и гармонии. Их удобно использовать дома или на природе, они безопасны и легальны. Регулярное использование помогает снять стресс, улучшить настроение и зарядиться энергией. Это отличная альтернатива вредным привычкам для заботы о себе и окружающих
Thanks for sharing. I read many of your blog posts, cool, your blog is very good. https://accounts.binance.com/hu/register?ref=IQY5TET4
Получил посыль,все отлично..будем тестить товар Купить кокаин, бошки, гашиш похожа на соль в криисталлахс на вкус че?Спасибо Магазину за долгую и хорошую работу.
лсд цена
Травяные смеси для ароматерапии помогают расслабиться и сосредоточиться. Натуральные компоненты, такие как мята, шалфей и лаванда, создают приятный аромат, способствуют спокойствию и гармонии. Их удобно использовать дома или на природе, они безопасны и легальны. Регулярное использование помогает снять стресс, улучшить настроение и зарядиться энергией. Это отличная альтернатива вредным привычкам для заботы о себе и окружающих
Учишься в вузе? помощь в учебе Разберём методичку, составим план, поможем с введением, целями и выводами, оформим список литературы, проверим ошибки и оформление. Конфиденциально, быстро, по шагам.
Магазину отличных покупателей))) https://secondburg.ru заказ оформил – жду посылочки ^^В таком же духе гоу)
Учишься в вузе? написание работ для студентов Разберём методичку, составим план, поможем с введением, целями и выводами, оформим список литературы, проверим ошибки и оформление. Конфиденциально, быстро, по шагам.
https://school97.ru/vesti20/index.php?PAGE_NAME=profile_view&UID=230595
https://uofg.edu.sd/%d8%ac%d8%a7%d9%85%d8%b9%d8%a9_%d8%a7%d9%84%d8%ac%d8%b2%d9%8a%d8%b1%d8%a9-%d8%aa%d8%b9%d9%84%d9%86-%d8%a3%d9%85%d8%a7%d9%86%d8%a9-%d8%a7%d9%84%d8%b4%d8%a4%d9%88%d9%86-%d8%a7%d9%84%d8%b9%d9%84%d9%85-4/
Брал пару раз все было чотко!! всем советую) https://desert24.ru Джи спокойно 20-ого числа 😉 Потом вот только как получать будешь…?И потом не удивляйтесь, что магазин медленно работает или не отвечает. Попробуйте по 100 раз в день рассказывать что и как разводить, и при этом успевать оформлять заказы.
Блог Жiнка https://zhinka.in.ua полезные статьи на каждый день. Мода, уход, женское здоровье. воспитание детей, отношения. Тысячи советов на все случаи жизни.
Ага ровный!!!!И я так считал до некоторых случаев! https://ritualzoo48.ru Привет парни…Заказал тут 10-ку МНа..Ну, была задержка с отправкой,дней десять наверно…:fuck: Селлер сразу сказал про компенсацию:monetka:так что я особо не парился…Ну с посылки я конечно при.уел:confused:.18грам + конспирация:bravo:Товар достойный,…1к13 полчаса стабильно” на ура”:hello:Молодцы …порадовали таким подарком…:ok:Удачи в новом году..Добрый день, многим пришли посылки до НГ, 98% покупателей – перепроверено по трекам. Если есть вопросы пишите, в скайп или аську. В веточке пожалуйста, только по теме.
Пожарная безопасность штрафы Адвокат свидетеля в уголовном процессе: Сопровождение на допросы, защита от самооговора, консультация перед дачей показаний. Гарантия соблюдения ваших прав.
adfmonitor – Useful reports, navigation is smooth and information is easy to read.
юридическая помощь Банкротство – это сложный, но зачастую необходимый процесс для физических лиц, оказавшихся в тяжелой финансовой ситуации. Банкротство физических лиц позволяет гражданам, неспособным расплатиться по своим долгам, законно избавиться от долговых обязательств. Рефинансирование, в свою очередь, может стать альтернативой банкротству, позволяя снизить финансовую нагрузку путем изменения условий кредита. Ключевую роль в процедуре банкротства играет арбитражный управляющий, обеспечивающий соблюдение законности и защиту интересов всех сторон.
офицер по контракту Контракт для иностранцев в РФ дает возможность гражданам других стран служить в российской армии.
AM 2233 скоро в продаже ] https://holidaysea.ru явно не 15-ти минутка, почитайте отзывы в соответвующей теме. Качество товара на высоте у нас всегда .Магазину отличных покупателей)))
https://obrmos.ru/kur/kur_lang/Articles/_kur_lang_980.html
FarbWood https://farbwood.by команда, включающая конструкторов, менеджеров и мастеров строительных специальностей. Каждый член нашего коллектива имеет за плечами собственный солидный опыт работы в своей сфере от 9 лет. Объединив общие знания и навыки, мы постарались создать компанию, которая сможет предоставить качественные услуги частным и корпоративным заказчикам.
Строительство и ремонт https://colorprofi.ru без сюрпризов: пошаговые инструкции, советы мастеров, сравнение материалов, схемы, частые ошибки и способы сэкономить. От фундамента и стен до плитки, пола, потолков и инженерки. Обновляемые статьи и ответы на вопросы.
Бесплатные программы https://soft-sng.ru для компьютера: офис, браузер, антивирус, архиватор, PDF, плееры, монтаж видео и фото, утилиты для системы. Скачивание с официальных сайтов, краткие обзоры, плюсы/минусы и аналоги. Подбор по Windows/macOS/Linux, подборки и инструкции.
Бот с аниме персонажами AniMatrix Game – это не просто игра, это погружение в красочный мир аниме, где каждый игрок может стать стратегом и коллекционером.
Супер ребята. Питер без сбоев Купить кокаин, бошки, гашиш еще раз какой городлМагазин очень хороший всё чётко и быстро и селер грамотный вы правы
FarbWood https://farbwood.by команда, включающая конструкторов, менеджеров и мастеров строительных специальностей. Каждый член нашего коллектива имеет за плечами собственный солидный опыт работы в своей сфере от 9 лет. Объединив общие знания и навыки, мы постарались создать компанию, которая сможет предоставить качественные услуги частным и корпоративным заказчикам.
Строительство и ремонт https://colorprofi.ru без сюрпризов: пошаговые инструкции, советы мастеров, сравнение материалов, схемы, частые ошибки и способы сэкономить. От фундамента и стен до плитки, пола, потолков и инженерки. Обновляемые статьи и ответы на вопросы.
Бесплатные программы https://soft-sng.ru для компьютера: офис, браузер, антивирус, архиватор, PDF, плееры, монтаж видео и фото, утилиты для системы. Скачивание с официальных сайтов, краткие обзоры, плюсы/минусы и аналоги. Подбор по Windows/macOS/Linux, подборки и инструкции.
Последние события Винницы https://u-misti.vinnica.ua на портале у мисти. Следите за новостями Винницы и области, полезные обзоры, справочники и много интересного из жизни города.
5го марта написал ЛС ТСу про оптовый заказ…. до сих пор жду ответа Купить кокаин, бошки, гашиш в каком городе брал и когда?интерисует барнаулдада братан пришло все!!!охуенноый кач ск и рега нормальная вапще… короче зайди к нему на ветку там трипы опродукции прочти мой свежий за ск
Новости Москвы https://moskva-news.com и Московской области: политика, экономика, общество, происшествия, транспорт, ЖКХ и погода. Оперативные репортажи, комментарии экспертов, официальные заявления и фото. Главное за день — быстро, точно, без лишнего.
Портал о строительстве https://strojdvor.ru ремонте и инженерных системах: от фундамента до отделки и коммуникаций. Пошаговые инструкции, сравнение материалов, расчёты, советы экспертов и типовые ошибки. Помогаем сделать надёжно и без переплат.
Мировые новости https://lratvakan.com сегодня: свежая информация из разных стран, важные заявления, международная политика, рынки и тренды. Оперативные обновления, проверенные источники и понятные обзоры событий каждого дня.
Получил посыль,все отлично..будем тестить товар Купить кокаин, бошки, гашиш орогуша! А что здесь людям писать как не о работе магазина? Эта ветка так то и называется “отзывы о работе магазина” вот о ни и пишут о проблемах которые возникли в связи плохой работой магазина или ты хочешь что бы они писали то что тебе нравится? как здесь все круто и классно? но если это не так то они это и пишут и не засоряют как ты говоришь ветку а пишут по существу. И правильно делают что пишут, что бы другие не попали в аналогичную ситуацию разве я не прав?Не понял…Его еще варить нужно??? На плитке?))
Портал о строительстве https://strojdvor.ru ремонте и инженерных системах: от фундамента до отделки и коммуникаций. Пошаговые инструкции, сравнение материалов, расчёты, советы экспертов и типовые ошибки. Помогаем сделать надёжно и без переплат.
Новости Москвы https://moskva-news.com и Московской области: политика, экономика, общество, происшествия, транспорт, ЖКХ и погода. Оперативные репортажи, комментарии экспертов, официальные заявления и фото. Главное за день — быстро, точно, без лишнего.
Мировые новости https://lratvakan.com сегодня: свежая информация из разных стран, важные заявления, международная политика, рынки и тренды. Оперативные обновления, проверенные источники и понятные обзоры событий каждого дня.
kraken ссылка 2kmp store
Травяные смеси для ароматерапии помогают расслабиться и сосредоточиться. Натуральные компоненты, такие как мята, шалфей и лаванда, создают приятный аромат, способствуют спокойствию и гармонии. Их удобно использовать дома или на природе, они безопасны и легальны. Регулярное использование помогает снять стресс, улучшить настроение и зарядиться энергией. Это отличная альтернатива вредным привычкам для заботы о себе и окружающих
ErinKConnect – Very professional and personal, content is easy to read and visually nice.
Как магазин порядочный https://zudemon.ru д не магаз рооовный так что не переживай все будет четко)))Я даже не знаю, что особо писать вообщем всё :rest:.
Полезные советы https://vashesamodelkino.ru для дома и быта: практичные идеи на каждый день — от уборки и готовки до хранения вещей и мелкого ремонта. Понятные инструкции, бытовые лайфхаки и решения, которые реально работают и упрощают жизнь.
Новости K-POP https://www.iloveasia.su из Кореи: айдол-группы, соло-артисты, камбэки, скандалы, концерты и шоу. Актуальные обновления, переводы корейских источников, фото и видео. Следите за любимыми артистами и трендами индустрии каждый день.
Всё о ремонте https://svoimi-rukamy.net своими руками: понятные гайды, схемы, расчёты и лайфхаки для квартиры и дома. Черновые и чистовые работы, отделка, мелкий ремонт и обновление интерьера. Практично, доступно и без лишней теории.
списание Долгов Процедура банкротства регулируется федеральным законом о банкротстве, который четко определяет необходимые условия и этапы. Банкротство через МФЦ – упрощенная процедура, доступная для граждан с небольшим объемом долгов и отсутствием имущества для реализации. Долговые обязательства, будь то кредиты, займы или иные формы задолженности, являются основанием для инициирования банкротства. Официальное банкротство дает возможность должнику начать жизнь с чистого листа, избавившись от непосильного бремени долгов. Закон “о несостоятельности (банкротстве)” и “о банкротстве” содержат подробные инструкции и требования к процедуре. Важно изучить отзывы о банкротстве, чтобы лучше понимать возможные последствия и избежать ошибок.
Полезные советы https://vashesamodelkino.ru для дома и быта: практичные идеи на каждый день — от уборки и готовки до хранения вещей и мелкого ремонта. Понятные инструкции, бытовые лайфхаки и решения, которые реально работают и упрощают жизнь.
Новости K-POP https://www.iloveasia.su из Кореи: айдол-группы, соло-артисты, камбэки, скандалы, концерты и шоу. Актуальные обновления, переводы корейских источников, фото и видео. Следите за любимыми артистами и трендами индустрии каждый день.
Всё о ремонте https://svoimi-rukamy.net своими руками: понятные гайды, схемы, расчёты и лайфхаки для квартиры и дома. Черновые и чистовые работы, отделка, мелкий ремонт и обновление интерьера. Практично, доступно и без лишней теории.
АА это только сегодня? Купить кокаин, бошки, гашиш Не знаю как в этом магазе,а вот у всеми так уважаемой Мануфактуры тоже весной всплыло такое гавницо.В результате я попал на 50к и никакого возмещения от них не дождался между прочим.ну то что ценники здесь шикарные заметил!и то что на “главной”-это и заинтересовало меня,но насторажило одновременно!ges_hmm.gifПосмотрим,что выйдет из-этого.Пока всё гладко!
Today’s highlights are here: https://telegra.ph/top-5-des-jeunes-talents-de-la-premier-league-qui-vont-exploser-cette-saison-12-23
More on our website: my blog
миссия за границей по контракту Выплаты и зарплата – ключевой мотивирующий фактор для многих, рассматривающих службу по контракту. Единовременные выплаты при заключении контракта могут достигать значительных сумм, становясь существенным финансовым подспорьем. Зарплата по контракту, зачастую, превышает средние доходы в регионе, обеспечивая достойный уровень жизни. Доход военнослужащего по контракту может составить до 3 миллионов рублей, а стабильная зарплата в размере 270 тысяч и различные доплаты делают службу весьма привлекательной. Высокая зарплата в армии и возможность получить миллион за контракт стимулируют интерес к военной службе. Деньги за службу по контракту – это не только средство обеспечения себя и своей семьи, но и инвестиция в будущее, благодаря возможности приобретения жилья и получения образования.
https://marykaysfurniture.com/wp-content/pgs/1xbet-promo-code__bonus-100_up_to_130.html
https://1xbetpromocodefreebet64219.blogdigy.com/1xbet-bonus-code-2026-130-for-sports-61118861
https://koreatesol.org/ads/inc/1xbet_promo_code-sign_up_bonus.html
https://sermonquotes.com/news/?1xbet-promo-code__bonus-100_up_to_130.html
Learn more here: https://heritagecouture.net/2025/12/15/buy-tiktok-ads-accounts-marketing-and-advertising-company-resources-systems-4as/
https://nitroflare.com/view/C0ABD105BEA3359/Best_Bookmaker_Reviews_2026_with_Exclusive_Betting_Bonuses_and_Free_Spins.pdf
ремонт в подвале gidroizolyacziya-czena4.ru .
гидроизоляция цена работы за м2 gidroizolyacziya-czena5.ru .
гидроизоляция подвала изнутри цена гидроизоляция подвала изнутри цена .
Тоже чуть дольше чем обычно ждал посылку,но все получил в полном объеме.Я думаю лучше маленько подождать и без суеты забрать. https://hair-arkatique.ru ы меня понялиТепкрь сам хочу зделать заказ но немогу на сайт попасть ((((
kraken market ссылка тор
Травяные смеси для ароматерапии помогают расслабиться и сосредоточиться. Натуральные компоненты, такие как мята, шалфей и лаванда, создают приятный аромат, способствуют спокойствию и гармонии. Их удобно использовать дома или на природе, они безопасны и легальны. Регулярное использование помогает снять стресс, улучшить настроение и зарядиться энергией. Это отличная альтернатива вредным привычкам для заботы о себе и окружающих
ourmind.ru
если нет, то когда будет? Купить кокаин, бошки, гашиш все буде ровно бразы магаз ровный я тоже ждал отправку неделю зато пришло с бонусом я остался доволен (щас погода такая ,все болеют но работают )с этим магазином сотрудничаю уже 3ий год,проблема была всего один раз,и то по вине курьерки
Нужна косметика? корейская косметика для лица большой выбор оригинальных средств K-beauty. Уход для всех типов кожи, новинки и хиты продаж. Поможем подобрать продукты, выгодные цены, акции и оперативная доставка по Алматы.
Житомир новости https://u-misti.zhitomir.ua на сайте у місті. Актуальные события и происшествия в Житомире и области. Авторские обзоры, расписание транспорта, мета и много полезного.
Уведомление о начале предпринимательской деятельности Сопровождение развода с иностранцем: Расторжение брака с гражданами других стран. Легализация документов, апостиль, определение гражданства детей.
growth goal planner – Ensures growth objectives are achievable and well-structured
Expand details: http://www.mmforce.net/rat/pgs/onlajn-kazino-s-samymi-nizkimi-stavkami_2.html
магазин мефедрона
Травяные смеси для ароматерапии помогают расслабиться и сосредоточиться. Натуральные компоненты, такие как мята, шалфей и лаванда, создают приятный аромат, способствуют спокойствию и гармонии. Их удобно использовать дома или на природе, они безопасны и легальны. Регулярное использование помогает снять стресс, улучшить настроение и зарядиться энергией. Это отличная альтернатива вредным привычкам для заботы о себе и окружающих
всем хай https://skachat-gta.ru Привет, нету в личке нечего.угу, “на глазок” отсыпали. купи весы и взвесь нормально. На вид оно может показаться как больше так и меньше…
реструктуризация долга БФЛ (банкротство физических лиц) предусматривает такие этапы, как реструктуризация долга и списание долгов. Реструктуризация подразумевает разработку плана погашения задолженности, учитывающего финансовые возможности должника. Списание долгов является заключительным этапом, освобождающим должника от дальнейших выплат. Профессиональная помощь юристов необходима для успешного прохождения всех этапов процедуры. Возникновение проблем с коллекторами, кредитами, микрозаймами и займами часто приводит к ситуации, когда БФЛ становится единственным приемлемым выходом. Юридическая помощь и бесплатная консультация со специалистом позволят оценить ситуацию и разработать оптимальную стратегию для избавления от долгов.
порно отец и дочь
Only top materials: https://bioquinor.com/bookkeeping-for-advertising-businesses-secrets-to-victory-buy-aged-facebook-page/
на сайте есть аська, напиши, мне в течении пяти минут отвечали. Купить кокаин, бошки, гашиш Качественный магаз!всё отлично,ровно,супер! )
Vídeo pornográfico gay negro
best free american porn sites
обмазочная гидроизоляция цена работы за м2 gidroizolyacziya-czena4.ru .
гидроизоляция цена работы за м2 gidroizolyacziya-czena5.ru .
Онлайн аниме PvP Сражения аниме – это динамичные и захватывающие баталии, требующие тактического мышления и стратегического планирования.
гидроизоляция цена работы гидроизоляция цена работы .
Магази хороший и качество нормальное, если есть возможность запиши на пробу Бро ) https://pmpodarok.ru кто что думает по этому поводу?Подскажите. Если сейчас сделаю заказ и оплачу сразу, завтра товар отправят?
Just what you need: http://vip-barnaul.ru/includes/pages/kazino-dlya-nachinayushchih-osnovy-i-sovety_2.html
For a romance that is grounded in reality yet magical, read this. The Love in Plane Sight PDF is the digital book for you. It is a story that balances both perfectly. Get the ebook version today and find balance. https://loveinplanesightpdf.site/ Love In Plane Sight Novel
Также возможен выбор курьерки, если какая-то из них не возможна для доставки в ваш город Купить кокаин, бошки, гашиш такой замечательный и паспиздатый магазин………ноооооо где же мой заказ тогда? трек так и не бьется,тс на связь не выходит!!!2c-i, 2c-e, 2c-p
growth planning system – Focused on creating a reliable system to organize goals and actions
video porno gay neri
https://progorod36.ru/internet-magazin-gazonov-sostavil-svoy-reyting-samyh-populyarnyh-gazonnyh-semyan-v-etom-sezone
Servus zusammen!
Vor Kurzem fand ich Casino Pistolo getestet.
Alles bestens.
Viele Spiele, schnelle Auszahlungen, uebersichtliche Seite.
Guckt mal: casinopistolo.de.com
Viel Spass 🙂
вот пару часиков назад получил посылочку=) Чай так сказать=) ща сижу под ним в курочки уплетаю уже 3 разорвиебало бутерброд=)ЫЫЫ Купить кокаин, бошки, гашиш ОТЗЫВ О РАБОТЕ МАГАЗИНАмагаз четкий,еще в 2011 каждую неделю забегали:music:)всегда все ровно
рейтинг казино с бездепозитными бонусами Рейтинг казино с бездепозитными бонусами – это полезный инструмент для выбора оптимального игрового портала, предлагающего самые выгодные условия для игры без депозита и гарантированную выплату выигрышей.
“Carnal temptress demands irresistible passion.” Here — https://rb.gy/3fy54w?Vubbibe
μαύρο γκέι πορνό σεξ βίντεο
sex toys for gays
хорщий магаз!!!всегда все ровно!!! Купить кокаин, бошки, гашиш За время работы легалрц сколько магазинов я повидал мама дорогая, столько ушло в топку, кто посливался кто уехал # но chemical-mix поражает своей стойкостью напором и желанием идти в перед “не отступать и не сдаваться”:superman:Ты вообще нормальный и адекватный ? Ты сначала разберись куда ты писал а потом умничай. У меня адреса без фото и только опт. Судя по твоему нику ты из Екб, я в ЕКБ НЕ РАБОТАЮ И НЕ РАБОТАЛ.
бездепозитные бонусы за регистрацию в казино с выводом без пополнения
фриланс вакансии найти подработку
События и проишествия в Днепре https://faine-misto.dp.ua на сайте Файне мисто. Оперативные новости, обзоры и много полезного из жизни города.
Born of Trouble is a book that you will want to share with your friends and family. This compelling and moving story is now available in a digital pdf format. Read it yourself and then pass the word along about this incredible work of fiction. https://bornoftroublepdf.site/ Poetry Books Pdf Download
Где продавец то? Мысли самые печальные…тт Купить кокаин, бошки, гашиш магазин ровный, три года с ним уже, только один раз отправку долго ждал…. но дождался)продавец 8\10 долго отвечает, и порой не конкретно.
подвал дома ремонт gidroizolyacziya-czena4.ru .
обмазочная гидроизоляция цена работы обмазочная гидроизоляция цена работы .
сырость в подвале сырость в подвале .
https://rndirectors.com/author/freebet21/
https://alauddinabc.livejournal.com/5057.html
https://www.domestika.org/en/pomomelbet26
https://cdsonla.edu.vn/index.php/vi/component/k2/item/23-harvard-takes-me-to-dubai?start=26
https://www.jk-green.com/forum/topic/68122/code-promo-1xbet-afrique-2026:-1xwap-%E2%80%93-bonus-130%E2%82%AC
https://github.com/sageetl/Sage-50/releases
top asian bookies What is a wager: Понимание термина “wager” и его важность в iGaming. social casino: Возможности и перспективы направления Social Casino в партнерском маркетинге
электрический карниз Карнизы для штор потолочные электрические – это современный тренд, который подчеркнет стиль вашего дома и обеспечит максимальный комфорт.
growth signals overview – Offers insights to make strategic growth decisions more confidently
https://enran.ua/
Experience Brainy https://askbrainy.com the free & open-source AI assistant. Get real-time web search, deep research, and voice message support directly on Telegram and the web. No subscriptions, just powerful answers.
Enhance your financial strategy with the Bluebird Gold PDF. This professional guide offers expert analysis on the gold market, providing you with the tools to make better investment decisions. Access this invaluable resource today for a more secure tomorrow. https://bluebirdgoldpdf.site/ Bluebird Gold Contemporary Romance
Корисна інформація – огляди авто https://hotgoods.com.ua
Заказ автобусов для перевозки людей https://gortransauto.ru
Новости Днепр https://u-misti.dp.ua последние события Днепра и области. Транспорт, обзоры, все о Днепре на одном сайте
asian sports bookmakers Affiliate Marketing: Основы и стратегии успешного аффилиатного маркетинга в iGaming
Товар дня – обзоры бытовой техники https://hotgoods.com.ua
Регулярные пассажирские перевозки https://gortransauto.ru
открытие кейсов в cs go открытие кейсов в cs go
цена ремонта подвала gidroizolyacziya-czena4.ru .
вода в подвале gidroizolyacziya-czena5.ru .
цена ремонта подвала gidroizolyacziya-czena5.ru .
growth steering system – Offers a reliable system to maintain control and direction in growth
https://enran.ua/
intentional momentum guide – Offers guidance to keep energy and effort aligned with objectives.
News about Poltava on https://u-misti.poltava.ua covers the main and interesting events in Poltava and the surrounding region. The site features transport updates, blogs, and local events.
СPA Traffic igaming compaty: Что ожидать от успешной iGaming-компании: аспекты, на которые следует обратить внимание
Looking for a casino? https://elon-casino-top.com: slots, live casino, bonus offers, and tournaments. We cover the rules, wagering requirements, withdrawals, and account security. Please review the terms and conditions before playing.
шалфей предсказателей семена купить
В глубинах холодного моря жил древний Кракен, охранявший зеркала памяти. Эти зеркала не отражали лица — они показывали страхи, мечты и забытые решения каждого, кто осмеливался взглянуть в их гладь. Когда шторм поднимался, щупальца Кракена тянулись к поверхности, защищая зеркала от жадных глаз. Моряки верили: если зеркало треснет, море потеряет равновесие. Поэтому легенда учила уважать тайны глубин и помнить, что не каждое отражение стоит искать.
купить электрический карниз Карнизы для штор потолочные электрические – это современное и функциональное решение для любого интерьера. Простота установки и удобство управления делают их все более популярными.
growth execution hub – Provides structured support for translating growth ideas into action
Make your commute the best part of your day by reading the chosen family pdf; it turns wasted time into a productive and enjoyable literary escape, helping you arrive at your destination feeling refreshed and inspired by a great story. https://chosenfamilypdf.site/ Chosen Family Book Digital
888 casino 888 Казино официальный сайт: Русскоязычная версия легендарного казино, предлагающая адаптированный интерфейс и поддержку на родном языке. Наслаждайтесь любимыми играми с максимальным комфортом.
Ремонт холодильников LG с линейным компрессором. Замена компрессора, ремонт системы Total No Frost.Ремонт холодильников Haier Алматы Профессиональное обслуживание в г. Каскелен и Карасайском районе. В наличии запчасти для популярных брендов Indesit, LG, Samsung. Мы устраняем утечки и меняем компрессоры за один приезд. Доступные цены для жителей пригорода. Ремонт холодильников Иргели
купить рапэ для шаманизма
В глубинах холодного моря жил древний Кракен, охранявший зеркала памяти. Эти зеркала не отражали лица — они показывали страхи, мечты и забытые решения каждого, кто осмеливался взглянуть в их гладь. Когда шторм поднимался, щупальца Кракена тянулись к поверхности, защищая зеркала от жадных глаз. Моряки верили: если зеркало треснет, море потеряет равновесие. Поэтому легенда учила уважать тайны глубин и помнить, что не каждое отражение стоит искать.
сука казино зеркало Sykaaa бонус: Щедрые предложения для новых и постоянных игроков. Увеличьте свой банкролл и получите больше шансов на победу! Sykaaa Casino вход: Легкий доступ к вашему аккаунту. Наслаждайтесь любимыми играми в любое время суток.
momentum performance guidance – A practical approach for achieving steady, measurable results.
купить рапэ yawanawa
В глубинах холодного моря жил древний Кракен, охранявший зеркала памяти. Эти зеркала не отражали лица — они показывали страхи, мечты и забытые решения каждого, кто осмеливался взглянуть в их гладь. Когда шторм поднимался, щупальца Кракена тянулись к поверхности, защищая зеркала от жадных глаз. Моряки верили: если зеркало треснет, море потеряет равновесие. Поэтому легенда учила уважать тайны глубин и помнить, что не каждое отражение стоит искать.
Enjoy the freedom of reading Is This a Cry for Help in PDF format, allowing you to take the book anywhere. Whether you are offline or online, this file ensures the story is always at your fingertips. Get your digital copy now and immerse yourself in the plot. https://isthisacryforhelppdf.site/ Is This A Cry For Help Free Download
Выезд в Жетысуский район: Айнабулак, Кулагер, Рабочий поселок.Ремонт холодильников Медеуский район Ремонт многодверных холодильников Toshiba. Устранение утечек фреона, ремонт автоматического льдогенератора и сенсорных панелей. Мы знаем устройство сложных японских холодильников и гарантируем восстановление заводских характеристик. Ремонт холодильников Sharp Алматы
growth synthesis guide – Combines key insights into a unified strategy for effective growth
Read about a girl who refuses to lower the heat on her dreams. The With the Fire on High PDF is available for immediate access. Emoni’s story is a powerful reminder that we all have a fire inside us waiting to be unleashed. https://withthefireonhighpdf.site/ With The Fire On High Quotes
http://xn--d1abdw2b.net/forum/user/33461/
https://amt-games.com/news/le-code-promo-1xbet-actuel.html
Warm greetings! Hope you’re doing well.
Greetings, I offer financial backing to website administrators through grant programs. No repayment expected. Would you consider such support for your site? Please contact me on WhatsApp +31687318106
https://g-r-s.fr/pag/1xbet_code_promo_exclusif.html
аяваска купить
В глубинах холодного моря жил древний Кракен, охранявший зеркала памяти. Эти зеркала не отражали лица — они показывали страхи, мечты и забытые решения каждого, кто осмеливался взглянуть в их гладь. Когда шторм поднимался, щупальца Кракена тянулись к поверхности, защищая зеркала от жадных глаз. Моряки верили: если зеркало треснет, море потеряет равновесие. Поэтому легенда учила уважать тайны глубин и помнить, что не каждое отражение стоит искать.
News about Chernivtsi on https://u-misti.chernivtsi.ua covers the latest events in Chernivtsi and the surrounding region. The site U Misti features local news, transport updates, blogs, and city events.
Looking for a casino? elonbet casino: slots, live casino, bonus offers, and tournaments. We cover the rules, wagering requirements, withdrawals, and account security. Please review the terms and conditions before playing.
сука казино регистрация Sykaaa бездепозитный бонус: Отличный способ начать игру без вложений. Получите бонус и попробуйте свою удачу! Сукааа казино и Сука казино: Альтернативное название платформы. Не изменяйте своим привычкам и продолжайте наслаждаться любимыми играми! Все зеркала, регистрационные данные и бонусные предложения остаются актуальными независимо от названия. Во всех его вариациях это место остается верным своим игрокам, предоставляя щедрые возможности и незабываемые впечатления.
секс астана ?ыздар нет Астана: Горечь отказа, словно зимний ветер, пронизывает столичные улицы. В шумном мегаполисе, среди спешащих силуэтов и мерцающих огней, эти слова – крик о помощи, мольба об искренности. Это печальный рефрен, отражающий раны неразделенной любви и поиск настоящих чувств в мире фальши. Здесь каждый ищет свое место под солнцем, но многие тонут в одиночестве, не находя ответа на свой безмолвный вопрос.
Experience Brainy https://askbrainy.com the free & open-source AI assistant. Get real-time web search, deep research, and voice message support directly on Telegram and the web. No subscriptions, just powerful answers.
?ыздар нет Проститутки Алматы: Шепот ночных улиц, где среди неоновых огней и автомобильных фар расцветает теневой мир. В этом лабиринте соблазнов и утех, каждая встреча — это короткая история, написанная телесными желаниями и одиночеством, ищущим утешения в чужих объятиях.
forward execution lane – Demonstrates how a structured lane sustains productivity over time.
tripscan Tripscan: Откройте для себя мир безопасных и осознанных путешествий, где каждый шаг – это вклад в собственное развитие и понимание. Tripscan – это не просто платформа, это ваш надежный компас в бескрайнем океане личного исследования, помогающий отличить истинные жемчужины от мимолетных иллюзий. Трипскан: Верните контроль над своим опытом, вооружившись знаниями и подготовкой. Трипскан – это ваш личный навигатор, помогающий ориентироваться в сложных лабиринтах сознания и избегать нежелательных последствий. Tripskan: (Транслитерация) – ваш надежный путеводитель в осознанные состояния, предоставляющий инструменты для безопасного исследования глубин разума. Трип скан: Технология, позволяющая анализировать и оценивать потенциальные риски и выгоды каждой поездки в неизведанное. Tripscan – это ваш личный эксперт, помогающий принимать взвешенные решения и обеспечивающий максимальную безопасность во время путешествия. Трипскан вход: Ваш ключ к сообществу единомышленников, стремящихся к самопознанию и развитию. Здесь вы найдете поддержку, вдохновение и полезные советы от опытных путешественников. Сайт трипскан: Ваш ресурс номер один для получения информации о безопасных практиках, надежных источниках и проверенных методиках. Tripscan – это ваш личный библиотекарь, предоставляющий доступ к обширной коллекции знаний и опыта. Трипскан ссылка: Просто перейдите по ссылке и начните свое путешествие к осознанности и самопознанию. Tripscan – это ваш личный проводник в мир удивительных открытий и трансформаций. Трипскан зеркало: Обеспечьте себе бесперебойный доступ к ресурсу в любое время и в любом месте. Ваше путешествие к самопознанию не должно знать границ.
эскорт Интим: Храм души, где два сердца бьются в унисон, а прикосновения исцеляют раны. Это не просто соитие тел, а таинство единения, где открываются самые сокровенные уголки души. В объятиях любимого человека время останавливается, а мир наполняется светом и теплом. Интимность – это квинтэссенция доверия, взаимопонимания и безусловной любви, дарующая ощущение полноты жизни и гармонии с самим собой.
casino news elonbet-casino-game
leadmechanics.click – Color palette felt calming, nothing distracting, just focused, thoughtful design.
clickboostlab.click – Content reads clearly, helpful examples made concepts easy to grasp.
rankexpansion.click – Navigation felt smooth, found everything quickly without any confusing steps.
rankcontrol.click – Content reads clearly, helpful examples made concepts easy to grasp.
searchlift.click – Pages loaded fast, images appeared sharp, and formatting stayed consistent.
Солоха женский сайт https://soloha.in.ua о моде, красоте, уходе. Полезные советы, рецепты, сонник и гороскопы.
https://wefunder.com/prmocdeforxbettod
https://questreaming.com/art/1xbet_promokod_na_freebet.html
https://www.diigo.com/item/note/ayd90/9637?k=12dada7716ab9b6ee04cef7aeb227d4b
https://fondrgs.ru/wp-includes/pages/promokodu_dlya_19.html
кыздар нет ?ыздар нет: Отчаянное эхо, разносящееся по пустым квартирам и дорогим отелям. Это стон сердца, ищущего любви и утешения, но наталкивающегося на стену безразличия. В этих словах – вся трагедия поколения, разуверившегося в искренности и потерявшего надежду найти настоящую близость.
кыздар нет Проститутки Алматы: Шепот ночных улиц, где среди неоновых огней и автомобильных фар расцветает теневой мир. В этом лабиринте соблазнов и утех, каждая встреча — это короткая история, написанная телесными желаниями и одиночеством, ищущим утешения в чужих объятиях.
https://infodpopro.ru/media/pages/ukladki-mediczinskie-bez-vlozhenij-vybor-pod-speczializacziyu-mediczinskoj-sluzhby.html
последние новости
888 казино 888 Casino зеркало: Обеспечьте себе бесперебойный доступ к любимым играм в любое время и в любом месте. Никогда не останавливайтесь на пути к успеху. 888 Старз Казино: Инновационная платформа с уникальным набором игр и щедрыми бонусами. Откройте для себя мир, где технологии встречаются с азартом. Станьте частью будущего гемблинга! Здесь каждый найдет развлечение по вкусу, а щедрая бонусная политика позволит с первых минут ощутить всю гамму острых ощущений и приблизить долгожданный триумф.
купить рапэ шаманский
В глубинах холодного моря жил древний Кракен, охранявший зеркала памяти. Эти зеркала не отражали лица — они показывали страхи, мечты и забытые решения каждого, кто осмеливался взглянуть в их гладь. Когда шторм поднимался, щупальца Кракена тянулись к поверхности, защищая зеркала от жадных глаз. Моряки верили: если зеркало треснет, море потеряет равновесие. Поэтому легенда учила уважать тайны глубин и помнить, что не каждое отражение стоит искать.
купить рапэ seven herbs
В глубинах холодного моря жил древний Кракен, охранявший зеркала памяти. Эти зеркала не отражали лица — они показывали страхи, мечты и забытые решения каждого, кто осмеливался взглянуть в их гладь. Когда шторм поднимался, щупальца Кракена тянулись к поверхности, защищая зеркала от жадных глаз. Моряки верили: если зеркало треснет, море потеряет равновесие. Поэтому легенда учила уважать тайны глубин и помнить, что не каждое отражение стоит искать.
Нужен сайт или продвижение? реклама сайта в яндексе цена дизайн, разработка, SEO, контекст и аналитика. Делаем быстрые, удобные сайты с понятной структурой, настраиваем продвижение и приводим целевой трафик. Прозрачные этапы, измеримый результат, рост заявок.
Блог обо всём https://drimtim.ru полезные статьи, новости, советы, идеи и обзоры на самые разные темы. Дом и быт, технологии, путешествия, здоровье, финансы и повседневная жизнь. Просто, интересно и по делу — читайте каждый день.
Looking for a casino? http://elon-casino-top.com: slots, live casino, bonus offers, and tournaments. We cover the rules, wagering requirements, withdrawals, and account security. Please review the terms and conditions before playing.
эскорт москва Эскортницы: Цветы ночи, окутанные ореолом таинственности и соблазна. За маской уверенности и независимости скрываются сложные человеческие судьбы, полные надежд, разочарований и стремления к лучшей жизни. Они – профессионалы своего дела, умело сочетающие красоту и интеллект, чтобы удовлетворить потребности своих клиентов и заработать на жизнь в этом непростом и зачастую жестоком мире.
Hi an alle!
Ich wollte mal meine Erfahrungen teilen.
Vor kurzem habe ich ein gutes Casino getestet – Pistolo Casino.
Ist echt solide.
Top Spielautomaten, zuverlaessige Zahlungen, 100% bis 500 Euro Bonus.
Kann ich empfehlen: Pistolo Login
Druecke die Daumen 🙂
СPA Networks
скачать игры с облака mail Скачать игры с Яндекс Диска – это удобно, надежно и быстро. Яндекс Диск, как популярное облачное хранилище, является отличной платформой для распространения игровых файлов. Многие разработчики и энтузиасты загружают свои творения на Яндекс Диск, предоставляя пользователям возможность скачать их в один клик. Простота использования – неоспоримое преимущество: достаточно иметь аккаунт в Яндексе и перейти по ссылке, чтобы начать загрузку. Благодаря высокой скорости серверов Яндекса, процесс скачивания происходит быстро и без сбоев.
Всё о столярном деле https://derevoblog.ru в видеоформате: обучающие ролики, мастер-классы, обзоры оборудования и проектов из дерева. Понятные инструкции, практические советы и вдохновение для создания мебели и изделий своими руками.
https://nashforum.listbb.ru/viewtopic.php?f=2&t=46036
https://old.reddit.com/r/business/comments/1pufipg/cr%C3%A9er_code_promo_1xbet_2026_1xbig2026_bonus_vip/?
https://hirakbook.com/1xbetcode4567
перевод с английского цена dzen.ru/a/aUBBvahMInGNj8BL .
вывод из запоя на дому в москве вывод из запоя на дому в москве .
эскорт Эскорт: Театр теней, где за блеском бриллиантов и шепотом шелка разыгрывается пьеса об угасших надеждах и несбывшихся мечтах. Каждая встреча – короткий эпизод, тщательно срежиссированный, где играют роли, прописанные чужими желаниями. Фальшивые улыбки и заученные фразы скрывают пустоту, а за роскошью скрывается одиночество, проникающее в самое сердце. Это мир, где любовь продается, а искренность остается лишь эхом в пустых залах.
прерывание запоя москва vyvod-iz-zapoya-5.ru .
google adsense
What is a wager
https://federalgaz.ru/
вывод из запоя в москве недорого vyvod-iz-zapoya-5.ru .
вывод из запоя дешево москва вывод из запоя дешево москва .
Сделать тату в Сочи: опытные тату-мастера, авторские эскизы и аккуратная работа. Современное оборудование, одноразовые расходники, соблюдение санитарных норм. Поможем выбрать стиль и размер, проконсультируем по уходу после сеанса.
Нужен дизайн? дизайн студии екатеринбург создаём стильные и функциональные пространства для квартир, домов и коммерческих объектов. Концепция, планировки, 3D-визуализация, подбор материалов и авторский надзор. Работаем под бюджет и задачи клиента.
https://www.molodezh67.ru/pgs/sostav-reanimaczionnoj-ukladki-polnyj-perechen-komponentov-i-ikh-naznachenie.html
All the best stuff is here: https://salaryslip.org/robots-dot-to-dot-nattapong/
Нужна недвижимость? свежие объявления недвижимости Томск выгодно купить квартиру, дом или коммерческий объект. Работаем с жилой и коммерческой недвижимостью. Экономим время и защищаем ваши интересы.
Сломалась стиралка? ремонт стиральных машин Нижний Новгород всех марок и моделей. Диагностика, замена деталей, настройка электроники. Работаем без выходных, выезд в день обращения, прозрачная стоимость и гарантия на выполненные работы.
Ищешь квартиру? https://flattomsk.ru/tomsk/nedvizhimost/prodazha-kvartir-novostroyki квартиры от студий до просторных семейных вариантов. Подбор по цене, району и срокам сдачи, проверка застройщика и документов. Поможем купить квартиру без рисков и переплат.
https://federalgaz.ru/
https://agaclar.net/images/pgs/1win_promo_code_offer.html
code promo melbet 200
Нужна гостиница? отель мытищи недорого комфортные номера для отдыха и командировок. Удобное расположение, чистые номера, Wi-Fi, парковка и круглосуточная стойка. Подходит для краткосрочного и длительного проживания, выгодные цены и удобное бронирование.
Нужен отель? отель римская спокойное проживание рядом с метро и ключевыми районами Москвы. Современные номера, Wi-Fi, круглосуточная стойка. Подходит для краткосрочного и длительного размещения.
дизайнер интерьера спб дизайн студия дизайнер
Хочешь отдохнуть? почасовая гостиница предлагаем почасовое размещение в комфортных номерах. Удобные кровати, кондиционер, Wi-Fi, душ. Быстрое бронирование, конфиденциальность и выгодные тарифы для краткосрочного пребывания.
https://omsi2mod.ru/forum/12-9829-1
shemale porn
вывод из запоя в москве вывод из запоя в москве .
быстрый вывод из запоя москва vyvod-iz-zapoya-5.ru .
Play at https://elon-casino-top.com online: slots from popular providers, live dealers, promotions, and tournaments. Learn about the bonus policy, wagering requirements, payment methods, and withdrawal times. Information for adult players. 18+. Gambling requires supervision.
Play online at https://elonbet-casino-game.com: slots, live casino, and special offers. We explain the rules, limits, verification, and payments to avoid any surprises. This material is for informational purposes only.
blondefoxsilverfox porno
https://federalgaz.ru/
porno cat
https://federalgaz.ru/
porno had
паллеты Ozon оптом Товары с возвратов Ozon – это не всегда брак. Чаще всего это товары, которые просто не подошли покупателю. Это ваша возможность дать им второй шанс, заработав на этом.
porno stocking
comprar iPhone Europa
nugget porn videos
вывод из запоя круглосуточно москва вывод из запоя круглосуточно москва .
ffm porno
вывод из запоя бесплатно москва vyvod-iz-zapoya-5.ru .
porno tushy
iPhone fast shipping Europe
porno видео
https://financialit.net/modules/articles/?le-code-promo-1xbet-actuel.html
товар для перепродажи Ozon Сток Ozon и ликвидация Ozon – это термины, обозначающие распродажу складских остатков и нереализованных товаров. Участие в таких распродажах позволяет приобрести товары по самым выгодным ценам, что может стать отличным способом увеличения прибыли вашего бизнеса.
https://www.maxwaugh.com/articles/le-code-promo-1xbet-gratuit.html
https://timberwolfcrossfit.com/pages/1xbet_promo_code_in_bonus.html
milanasw porno
синхронный перевод на английском telegra.ph/Trebovaniya-k-sinhronnomu-perevodchiku-navyki-sertifikaty-opyt–i-pochemu-ehto-vazhno-12-16 .
качество интересует https://uni-spec.ru Бро конечно я незнаю твою ситуацию, но с зданным магазом работал всегда всё на вышке было , и вот что думаю на 10 грамм смысла тебя кидать нет такому магазину!!!Рабочие дни отсчитываются со дня оплаты, а не заказа на сайте, разница порой месяц между тем когда человек создал заказ и когда оплатил его.
https://kotel-rs.ru/
У Кума https://u-kuma.com блог для чоловіків про армію, авто, ремонт та життя. Корисні поради на всі випадки життя.
https://www.lagodigarda.com/booking/pages/1xbet-promo-code.html
porno xxl
comprar iPhone Europa
Что хочу сказать закладки всегда по высоте. https://mishtanim.com По репе получил! Еще раз увижу безобразный флуд во всех ветках, будет тебе БАН!Рады вашей работе)
swallowed porno
Если СК выпадает в осадок – то это уже само по себе не нормально Купить кокаин, мефедрон, бошки, гашиш, марихуану, шишки А будете ли работать в Беларусии?Крутой магаз. Ассортимент радует
mommy porno
Play online at https://elonbet-casino-game.com: slots, live casino, and special offers. We explain the rules, limits, verification, and payments to avoid any surprises. This material is for informational purposes only.
услуги дизайна интерьера студия дизайна интерьера спб
porno diana
https://kotel-rs.ru/
Седня 28.04.2014 Чяс назат звонок на телифон говарят курьер это будти дома шяс приеду вашу посылку пренесу я иму несити стук в дверь открываю дверь ом распишитесь получити расписался даю иму паспорт он мне вответ ненужен мне паспорт. https://utkfilm.com бразы, ничего сказать не могу, первый раз столкнулась с магазином, 9 числа оплатила, сегодня уже сктинул трек. Но в чем суть оператор в аське сказал пару-тройку дней, посмотрела трек, рассчитано аж на 22 июля. Вот как-то так… И это курьерка. Заберу отпишу. Всем хорошего прихода)по ходу дела отпишусь.
https://ru.scribd.com/document/935769142/Code-Promo-1xBet-Aujourd-hui-2026-Bonus-130-1
https://hispeedmotorcycle.com/articles/1xbet_promo_code_today__free_bet_bonus.html
У Кумы https://u-kumy.com женский сайт о моде, здоровье, уходе. Советы для хозяек на все случаи жизни.
bimbo porno
И ещё когда можно будет сделать первый заказ в январе? Купить кокаин, мефедрон, бошки, гашиш, марихуану, шишки У меня настоящий 96 процентный спирт с больницы. Всё растворилось. Чу чуть паровой бани.ровно, тут можно не беспокоится, попал куда надо
Dental problems? https://www.family-dentist-near-me-in-montenegro.com/ Full-service dental care: painless dental treatment, implants, prosthetics, orthodontics, and cosmetic dentistry. Modern equipment, experienced doctors, sterile hygiene, and a personalized approach. Consultation and treatment plan included.
аренда квартиры на сутки гродно аренда квартиры на сутки гродно
lolicon porno
6-APB, белый кристалический порошок, 1000р… Это типа настоящий 6-APB? Купить кокаин, мефедрон, бошки, гашиш, марихуану, шишки всё дошло))))) Спасибо магазину,в след раз возьму отпишу что да как :dansing:качество на высотеПравило говоришь Бро! А про работу магазина могу сказать что он работает великолепно!
porno pikap
https://kotel-rs.ru/
купить кейсы кс 2 cs go кейсы
kisankanna porno
и уже сегодня за клевету, троллинг и проч. наш друг нас покинул https://russia-4life.ru Может быть, не отрицаю. Пока никого винить не буду, потому что вполне возможно что я и сам закосячил. Но вроде все правильно делал. При том я не один такой..До этого приходил ам (окло недели-полторы, назад) делал все точно так же, но только на черной заварке принцесса Нури, 1 к 10, и с водника уносило далекоооо….всех кто пробовал этот водник..Отличный магазин!
porno sleeping
iPhone reacondicionado Espana
https://zelenayazona.ru/
сальцивия купить траву
В глубинах холодного моря жил древний Кракен, охранявший зеркала памяти. Эти зеркала не отражали лица — они показывали страхи, мечты и забытые решения каждого, кто осмеливался взглянуть в их гладь. Когда шторм поднимался, щупальца Кракена тянулись к поверхности, защищая зеркала от жадных глаз. Моряки верили: если зеркало треснет, море потеряет равновесие. Поэтому легенда учила уважать тайны глубин и помнить, что не каждое отражение стоит искать.
помоему рти 111 это вообще фэйк и под этим названием онли нелегал толкают, лично мне приходило от 3х продавцов и у всех нелегал, то МДПВ аналог, то амфа https://dekopill.ru Отличный магазин!!!процветания дальнейшего и удачных продаж!!СПАСИБО :pink_eye.: ТУТ ВСЁ РОВНО!!!!!!!!!
https://kotel-rs.ru/
Уже не раз писали – настраивают сайт для автоматизации заказов, с потоком розничных покупателей не справляются с нынешный системой ) Купить кокаин, мефедрон, бошки, гашиш, марихуану, шишки лабаз ништякПервый раз брал у этого магазина,сразу же что то не то,если всё будет Ок,буду брать дальше,в принцыпе со всеми бывает(
Да просто дедушка форума )) https://shuba-dublenka.ru Хороший магазинхуясе надо было сначало уточнить а что брали хоть? ио названижю вещества
листья ката семена купить
В глубинах холодного моря жил древний Кракен, охранявший зеркала памяти. Эти зеркала не отражали лица — они показывали страхи, мечты и забытые решения каждого, кто осмеливался взглянуть в их гладь. Когда шторм поднимался, щупальца Кракена тянулись к поверхности, защищая зеркала от жадных глаз. Моряки верили: если зеркало треснет, море потеряет равновесие. Поэтому легенда учила уважать тайны глубин и помнить, что не каждое отражение стоит искать.
Редоктирование магазина!Коллектива!Прайс , цена осталась прежняя! скайп оператора:Chemicalrf.mix !!!! Купить кокаин, мефедрон, бошки, гашиш, марихуану, шишки всяко подобные магазины нужно стороной обходить..о чем это ты? о каких зачетах ты тут поешь? ты дату своей регистрации видел зачетник ЕПТ!
A professional https://www.family-dentist-near-me-in-montenegro.com: therapy, surgery, orthopedics, and orthodontics all in one location. Individualized treatment plans, modern equipment, and strict sterility standards. We help you maintain long-lasting dental health.
Thank you for this insightful piece. It’s given me a lot to think about.
Даный магазин берет бобло и парит мозг посылки отпровляет по месяцу, гдето с сентября такие проблемы сними начелись, причом решать их они не собираються https://angerexes.com 5 iai вообще говорят “беспонтовый” продукт… сколько народу его от рaзных сeлеров не пробовало – всё одно муть…слов нет.Вы ребята давно шум должны поднять что такая херня а то молчите по две недели!!!!я бы так хрен зарядил.А я почитал типа все ровно пишут и отдал кровные 22т.р
купить рапэ murici
В глубинах холодного моря жил древний Кракен, охранявший зеркала памяти. Эти зеркала не отражали лица — они показывали страхи, мечты и забытые решения каждого, кто осмеливался взглянуть в их гладь. Когда шторм поднимался, щупальца Кракена тянулись к поверхности, защищая зеркала от жадных глаз. Моряки верили: если зеркало треснет, море потеряет равновесие. Поэтому легенда учила уважать тайны глубин и помнить, что не каждое отражение стоит искать.
С наступающим новым 2017 годом:happy2013::snegurochka: , фарта и удачи вашей команде! продолжайте в том же духе! https://kitchenremodelinghouston.org Самый лучший магазин! качество, цены, общение с клиентом, все на высшем уровне! продолжайте в том же духе и вам зачтется: )Получил посылочку общее время ожидания 4 дня,упаковка супер,качество просто космическое,спасибо магазину!
CortexLab AI https://cortexlab.app a 2025 guide to visual transformation tools: capabilities, use cases, limitations, and risks. We explain how to evaluate quality, ethics, and safety, select application scenarios, and work responsibly with AI.
seo статьи seo статьи .
блог агентства интернет-маркетинга seo-blog8.ru .
необычно спрятано было в посыле) Купить кокаин, мефедрон, бошки, гашиш, марихуану, шишки Магазин работает? пишу в ЛС и Джабер везде тишина, ответа нет!((Крутой качественный товар! Все своевременно +++
http://izovsem.ru/users/agybat
обучение ношению сиз обучение рабочих на высоте
Крутой магаз Купить кокаин, мефедрон, бошки, гашиш, марихуану, шишки Ценник уж больно сладкий.. И это очень настараживает.. Кто что скажет, когда последние движения были, всё ровно?друзья! магазин работает? кто брал что последний раз? а главное когда? я с 5 августа ждал..;(
Купить Apple в Москве https://rznonline.ru/stati/item/top-5-prichin-kupit-iphone/ с гарантией: смартфоны, ноутбуки, планшеты, часы и аксессуары. Актуальные модели, честные цены, акции и поддержка после покупки. Самовывоз или курьерская доставка в удобное время.
iPhone 17 Pro Max https://www.cloudav.ru/mediacenter/tips/ne-prosto-smartfon-investiciya-v-komfort-pochemu-vybirayut-iphone/ в наличии: большой экран, высокая автономность, топовая камера и скорость работы. Поможем выбрать конфигурацию памяти, проверим подлинность и организуем быструю доставку. Гарантия и поддержка после покупки.
Душевный магазин) Все довольны. Славно. https://videokrolik.ru Чем злиться, выдал бы дудки иль региСама в ахуе, ни употреблять эту дрянь, ни толкнуть…..
https://www.digitalocean.com/community/users/codedujour1xbet56
https://ins.edu.vn/bai-hoc-4-tai-cho-trong-quan-tri-an-ninh-phi-truyen-thong/
https://unsplash.com/@codeafriquevip546
азино официальный сайт Азино – это имя, эхом разносящееся в виртуальных закоулках сети, словно далекий зов сирены. За манящим названием скрывается целый мир азартных развлечений, обещающий мгновенное обогащение и захватывающие эмоции. Однако, стоит помнить, что за каждым обещанием скрывается реальность, требующая осознанного подхода и здравого смысла.
В воскресенье заказал,в понедельни утром оплатил,в понедельник выслали,трек сразу дали,оперативно ребята +10 от меня в Репу вам:) https://vnovostroyki.ru а что с алхимом случилось?Все как надо. Рентген, люди ощупывают… Подозрительных людей к стати не принимают, если даже по началу обнаруживают что либо, их отпускают вызывают оперов, следят за посылкой, сначала принимают клиента, а потом уже за поставщиком охота начинается…
статьи про маркетинг и seo seo-blog9.ru .
pokerok скачать Pokerok зеркало – это запасной вариант для доступа к платформе в случае блокировки основного сайта. Зеркало – это гарантия того, что игра не прервется ни при каких обстоятельствах, позволяя наслаждаться любимым развлечением в любое время и из любой точки мира.
iPhone 17 Pro Max giport.ru премиальный смартфон с крупным дисплеем, продвинутой камерой и высокой скоростью работы. Отличный выбор для пользователей, которым важны качество фото и видео, мощность и комфорт в использовании.
Купить iPhone https://www.c-inform.info/news/id/111609 большой выбор моделей, памяти и цветов. Только оригинальная техника Apple, гарантия, прозрачные цены и рассрочка. Консультации, перенос данных и быстрая доставка в удобное время.
Apple iPhone 17 Pro https://x-true.info/136496-iphone-17-pro-flagman-innovacij-v-mire-smartfonov.html сочетание компактности и максимальных возможностей. Чёткий дисплей, быстрый чип, улучшенная камера и стабильная работа системы. Подходит для съёмки контента, игр и повседневных задач.
anal sex for gays
UrbanRidge Market – Modern and clean interface with a great range of items.
Общение оператора 10/10-всегда все грамотно и вежливо объяснит. Таким оператор и должен быть! Купить кокаин, мефедрон, бошки, гашиш, марихуану, шишки пацаны магаз ровный пишу это уже не раз всегда списываюсь с менеджером все делает ровно и качество и оперативность , всегда заказываю и буду заказывать тут т.к. не париться за качество продукта как в других магазах!!!2c-i, 2c-e, 2c-p
iPhone 17 Pro Max satom.ru премиальный смартфон с большим дисплеем, мощным процессором и улучшенными фото- и видеовозможностями. Отличный выбор для пользователей, которым важны производительность, качество и автономность.
2025 porno
Нужна газификация? газгольдер под ключ: проектирование, согласования, подвод газа, монтаж оборудования и пусконаладка. Работаем по нормам, помогаем с документами, подбираем котёл и комплектующие. Прозрачная смета, сроки и гарантия.
Нужен переезд офиса? переезд офиса с грузчиками Обеспечим упаковку, разборку мебели, перенос и расстановку рабочих мест. Работаем оперативно и аккуратно, подстраиваемся под график компании. Понятная смета и соблюдение сроков.
Chemical-Mix, хочу заказать 50г. АМ, но на сайте написано что 50грамм нет на складе. https://tractor-detal-kansk.ru не плохой товарЭто точно.
статьи о маркетинге seo-blog8.ru .
pokerok зеркало Покерок скачать – это первый шаг на пути к покорению вершин онлайн-покера. Процесс загрузки клиента прост и понятен, позволяя быстро окунуться в мир азарта и адреналина. Установив приложение, вы получаете мгновенный доступ к широкому выбору игр, турниров и акций, способных удовлетворить даже самого искушенного игрока.
http://www.thepixelcastle.com/profile/jonathanwarner
melbet регистрации Мелбет бонусы – это целая система поощрений, разработанная для повышения лояльности игроков. Здесь можно найти бонусы на первый депозит, бонусы за экспрессы, кэшбэк за проигранные ставки и множество других интересных предложений. Бонусы Мелбет делают игру более увлекательной и выгодной, позволяя игрокам получать дополнительные возможности для выигрыша. Важно внимательно изучать условия получения и отыгрыша бонусов, чтобы максимально эффективно их использовать.
disney porno
Современный горнолыжный курорт для активного отдыха: подготовленные склоны, снежные парки, школы катания и сервис. Комфортная инфраструктура, рестораны, спа и развлечения apres-ski. Идеальное место для зимнего отпуска.
porno jordi
Нужен трафик и лиды? https://avigroup.pro/kazan/kontekstnaya-reklama/ SEO-оптимизация, продвижение сайтов и реклама в Яндекс Директ: приводим целевой трафик и заявки. Аудит, семантика, контент, техническое SEO, настройка и ведение рекламы. Работаем на результат — рост лидов, продаж и позиций.
porno mlp
Вот отзыв за этот эйфор: Купить кокаин, мефедрон, бошки, гашиш, марихуану, шишки Продаван ровный ничего не скажешА то я запутался совсем, везде по разному пишут.
снять квартиру в гродно на сутки снять квартиру в гродно на сутки недорого
sexy porno
Как настроение?) Купить кокаин, мефедрон, бошки, гашиш, марихуану, шишки Всем добра бразы! Самый ровный магазин! Ждём открытия на Северном Кавказе!у нас она валяется,сами не потребляем.
seo статьи seo статьи .
Ищешь казино? мелбет регистрация: слоты от топ-провайдеров, live-дилеры, турниры и акции. Объясняем условия бонусов, вейджер, депозиты и вывод средств, требования к верификации. Информация для взрослых игроков.
продвижение по трафику без абонентской платы prodvizhenie-sajta-po-trafiku1.ru .
porno stepsister
азино 777 сайт Azino 777 – это феномен, который заслуживает внимания исследователей онлайн-гемблинга. Его популярность, несмотря на критику и негативные отзывы, говорит о том, что в обществе существует потребность в азартных развлечениях. Важно, чтобы эта потребность удовлетворялась ответственно и осознанно, с пониманием рисков и последствий.
TimberCrest Art Finds – Lovely creative vibe and smooth browsing throughout the gallery.
интернет маркетинг статьи интернет маркетинг статьи .
Пришёл 307. Попробывал 1 к 20, ниочём.. Курнул кропаль чистого, также ниочём…хз в чём дело. Сегодня попробую 1к10 можт чтот почуствую Купить кокаин, мефедрон, бошки, гашиш, марихуану, шишки привествую мои друзья форумчане , неОтветь в аське!Люди 22куска зарядили ,перед оплатой добро дал ,а потом тишина… Люди переживают,очень!Ответь пожалуйсто!!!
https://saumalkol.com/forum/%D1%80%D0%B0%D0%B7%D0%BD%D0%BE%D0%B5-1/24971-%D0%BF%D1%80%D0%BE%D0%BC%D0%BE%D0%BA%D0%BE%D0%B4-1xbet-%D0%BD%D0%B0-%D1%81%D1%82%D0%B0%D0%B2%D0%BA%D1%83-2026-1x200new.html
porno pic
https://bit.ly/tyler-durden-1tyler-durden
Брал и не раз в данном магазине, притензий нет, все качественно, оперативность радует! Продовцы дайте информации о CHM – 500, что за зверь? когда в розницу уйдет Купить кокаин, мефедрон, бошки, гашиш, марихуану, шишки Покуреха порошки безвкусные (на язык), остальные горькие. Так проще всего определить.выше фишиг! ни переходите по картинке
Лучшее казино куш казино регистрация: слоты от популярных провайдеров, live-дилеры, акции и турниры. Разбираем бонусную политику, вейджер, платежи и сроки выплат, требования к верификации. Материал носит информационный характер.
Онлайн казино https://catcasino-origin.ru слоты, live-казино и специальные предложения. Подробно о регистрации, бонусах, выводе средств и безопасности аккаунта. Перед началом игры рекомендуем изучить правила.
азино 777 сайт Azino 777 – это феномен, который заслуживает внимания исследователей онлайн-гемблинга. Его популярность, несмотря на критику и негативные отзывы, говорит о том, что в обществе существует потребность в азартных развлечениях. Важно, чтобы эта потребность удовлетворялась ответственно и осознанно, с пониманием рисков и последствий.
купить свежий рапэ
В глубинах холодного моря жил древний Кракен, охранявший зеркала памяти. Эти зеркала не отражали лица — они показывали страхи, мечты и забытые решения каждого, кто осмеливался взглянуть в их гладь. Когда шторм поднимался, щупальца Кракена тянулись к поверхности, защищая зеркала от жадных глаз. Моряки верили: если зеркало треснет, море потеряет равновесие. Поэтому легенда учила уважать тайны глубин и помнить, что не каждое отражение стоит искать.
скачать покерок клиент Pokerok зеркало – это запасной вариант для доступа к платформе в случае блокировки основного сайта. Зеркало – это гарантия того, что игра не прервется ни при каких обстоятельствах, позволяя наслаждаться любимым развлечением в любое время и из любой точки мира.
Все легально и проверено, есть NMR. Плохого ни чего не случиться. Скорей всего приняли потому что были паленые…. Купить кокаин, мефедрон, бошки, гашиш, марихуану, шишки Магазин нормально работает?,а то некоторые говорят что не стоит обращаться в данный магазин для заказов!Фон или фок как твой ник правильно читаеться и пишиться ? отпишись нормальный магаз или нет !у меня вообще когда порошок кидаешь и ациком заливаешь, раствор абсолютно прозрачный-.- и не прет вообще тупо куришь траву….. а вот кристалы не расворимые тоже имеются, я уже и толочь пытался седня и нагревом все бестолку…
alman porno
блог про seo seo-blog8.ru .
porno sait
работает заебок… присылают в кортонных больших конвертах…. доставляют очень быстро мне доставили в город за 3 дня… а их отделение в каждом городе есть.. как посылка придет вам позвонят на телефон и предложат доставку или приехать самому… если решите сами забирать то вам скажут адресс куда ехать…=) Купить кокаин, мефедрон, бошки, гашиш, марихуану, шишки Магазин ровный.;)Жаль реги пока нетКАЧЕСТВО ВСЕХ ПРОДУКТОВ ОЧЕНЬ ВЫСОКОЕ!
porno private
рапэ с растениями
В глубинах холодного моря жил древний Кракен, охранявший зеркала памяти. Эти зеркала не отражали лица — они показывали страхи, мечты и забытые решения каждого, кто осмеливался взглянуть в их гладь. Когда шторм поднимался, щупальца Кракена тянулись к поверхности, защищая зеркала от жадных глаз. Моряки верили: если зеркало треснет, море потеряет равновесие. Поэтому легенда учила уважать тайны глубин и помнить, что не каждое отражение стоит искать.
блог seo агентства seo-blog12.ru .
хотел узнать по какой причине скайп магазина не в сети со вчерашнего дня? https://drweb-soft.ru так я там всем давно ответил ты пишешь с опозданием. Зайди почту проверь.Какая то палевная курьерка
мелбет бонусы Melbet casino – это виртуальный рай для любителей азартных игр. Здесь собрана огромная коллекция слотов от ведущих мировых разработчиков, игры с живыми дилерами, рулетка, блэкджек и множество других развлечений. Melbet casino предлагает игрокам погрузиться в атмосферу настоящего казино, не выходя из дома. Высокое качество графики, честные выплаты и разнообразие игр делают Melbet casino одним из лучших онлайн-казино.
купить рапэ для очищения
В глубинах холодного моря жил древний Кракен, охранявший зеркала памяти. Эти зеркала не отражали лица — они показывали страхи, мечты и забытые решения каждого, кто осмеливался взглянуть в их гладь. Когда шторм поднимался, щупальца Кракена тянулись к поверхности, защищая зеркала от жадных глаз. Моряки верили: если зеркало треснет, море потеряет равновесие. Поэтому легенда учила уважать тайны глубин и помнить, что не каждое отражение стоит искать.
раскрутка сайта по трафику раскрутка сайта по трафику .
porno stockings
Развивающие интерактивные панели Алматы Калибровка интерактивной доски: Устранение неточностей сенсора. Сделайте работу с доской комфортной и точной.
Парни, здраствуйте, а выписываете на свое имя? просто все хочу попробывать, но блин.. сыкотно (( https://logopedgame.ru Отличный магаз парни! Удачи!такое ощющение,что ты спецально зарегестрировался тут, чтобы написать только это сообщение,и в именно в этом разделе,я нечего не говарю за магазин,всё на вышшем уравне,но твой АК подозрителен с одним только этим сообщением
porno overwatch
Аналитика маркетплейсов Аналитика маркетплейсов – это не просто сбор данных, а искусство интерпретации цифровых следов потребителей. В 2026 году, когда онлайн-торговля достигла пика своего развития, аналитика стала компасом, указывающим путь к прибыльным товарам и лояльной аудитории. Это сложный процесс, требующий не только технических навыков, но и глубокого понимания психологии покупателя, рыночных трендов и конкурентной среды.
Магазин высший советаю брать только здесь Заказываю тоже 2 раз и собераюсь дальше работать.? Купить кокаин, мефедрон, бошки, гашиш, марихуану, шишки а чё есть какое нить в/в в этом магазе что бы до бледного?:)очень сильно хочузнаю кто и как берут через этот магаз
ozbekcha porno
где лучше остановиться на краби таиланд краби цены на еду
Забрал я посылочку. Упоковка на 5+(пакет был с дыркой как будто смотрели что там, но с такой упаковкой только на паяльник подумаеш). Сделал ам 2233(1г) + ркс4(1г) на 20 грамм мягкого. Честно говоря ам не почувствовал совсем, кроет как ркс4(1 г.) на 20 грамм(был печальный опыт). Сейчас курим по грамму на двоих, тогда кроет на “целых” 10 минут. Вообщем незнаю чья ошибка это, да и смысла выяснять нет, деньги все равно не вернуться. Хотел попробовать тусипи заказать, но как то страшно. С тусипи то такого не было не разу вроде? Притензий не было? Купить кокаин, мефедрон, бошки, гашиш, марихуану, шишки по поводу треков выяснять буду завтра лично т.k. сегодня выходной в РоссииРебят подскажите что лучше взять:)желательно с пропорциями и качеством по времени
статьи про маркетинг и seo seo-blog8.ru .
азино официальный сайт Казино Азино – это отражение реальности, где шансы на выигрыш всегда ниже, чем шансы на проигрыш. Но именно этот риск придает игре остроту и азарт. Главное – играть ответственно, не ставя на кон последние деньги и не забывая о том, что в жизни есть гораздо больше важных и интересных вещей.
hotwife porno
https://polimer-3d.ru/
footjob porno
Любишь азарт? kometa casino online играть онлайн в слоты и live-казино. Разбор регистрации, бонусов, правил игры, лимитов и способов вывода средств.
статьи про продвижение сайтов статьи про продвижение сайтов .
Надежных партнеров, верных друзей, удачных сделок и прочих успехов! Купить кокаин, мефедрон, бошки, гашиш, марихуану, шишки Многие стучат нам по выходным и ночью, но мы живые люди и не можем 24 часа в день отвечать.У Данного Магазина я так понимаю Принцип не отвечать в Аське?!=)
район краби волны на краби
https://polimer-3d.ru/epoksidnye-poly
https://ai-db.science/wiki/User:1xbetpromo
какое на**й в\в !!?? совсем рехнулись чтоли ? Я не знаю за качество их 2-дпмп, но если он не бодяженный и качественный, то 5мг интрозально хватит чтоб тебя колбасило 2-3 суток ! Никто по ходу у чемикала его ещё не пробовал – отзывов нету… Купить кокаин, мефедрон, бошки, гашиш, марихуану, шишки 2c-i, 2c-e, 2c-pс утра в работу поставим, не волнуйся!!! просто менеджер у нас очень ответственный, считает каждую копейку, таких людей очень мало…
https://t.me/Asiapsi
сео продвижение сайта по трафику prodvizhenie-sajta-po-trafiku1.ru .
2025 porno
https://bit.ly/tyler-durden-1tyler-durden
porno site
мир всем месным братья Купить кокаин, мефедрон, бошки, гашиш, марихуану, шишки Заказываю 2c-I для начала 1 г!!я заметил тенденцию, у магазинов LegalLuna, Alfa, которые оказались не порядочными:dontknown:
bleach porno
ну вообщем все ровно получил людей правда от бати но магазин ровный советую Купить кокаин, мефедрон, бошки, гашиш, марихуану, шишки РЕБЯТА ЭТО ЛУЧШИЙ МАГАЗИН… Я БЛАГОДАРЕН МАГАЗИНУ ЧЕМИКАЛ МИКС… КАК НИ КАК МОЙ ПЕРВЫЙ МАГАЗИН В КОТОРОМ Я КУПИЛ БЕЗ КИДАЛОВА… ХОЧУ ВЫРАЗИТЬ СВОЮ ПРИЗНАТЕЛЬНОСТЬ КОМПАНИИ ЧЕМИКАЛ МИКС ЗА ОПЕРАТИВНУЮ И КАЧЕСТВЕННУЮ РАБОТУ.. БЛАГОДАРЮ ВАС..друг ты о чем говоришь? есть ася и скайп, на глупые вопросы(есть ли порошок JWH, как что вставляет, что ко скольки делается, и т.д.) мы не отвечаем, мы работаем только с людьми которые понимают, что “это” и как это “едят”, парни вот без обид – мы же не википедия… да парни все легал, все анализы делаются на Моросейке… да да да…
I don’t think the title of your article matches the content lol. Just kidding, mainly because I had some doubts after reading the article.
porno rule
porn girls images
В глубинах холодного моря жил древний Кракен, охранявший зеркала памяти. Эти зеркала не отражали лица — они показывали страхи, мечты и забытые решения каждого, кто осмеливался взглянуть в их гладь. Когда шторм поднимался, щупальца Кракена тянулись к поверхности, защищая зеркала от жадных глаз. Моряки верили: если зеркало треснет, море потеряет равновесие. Поэтому легенда учила уважать тайны глубин и помнить, что не каждое отражение стоит искать.
Онлайн-кинотеатр https://rosseriaall.net/ предлагает бесплатный просмотр российских сериалов в высоком качестве без регистрации. Каталог включает мелодрамы, детективы, криминальные истории, военные драмы, комедии, триллеры, фантастику и семейные проекты с удобной сортировкой по жанрам и годам. Доступны как классические сериалы прошлых лет, так и новинки 2025 года. Регулярное обновление контента и интуитивный интерфейс позволяют быстро найти интересующий проект и начать просмотр в любое время.
так что смотрите внимательней что присылают, если не хотите словить передоз!!! Купить кокаин, мефедрон, бошки, гашиш, марихуану, шишки В нашем городе эту почту походу обложили пополной!!!!!!!!клад забрал, все ровняк! завтра отпишу за качество!
Современный горнолыжный курорт для зимнего отпуска: подготовленные склоны, снежные парки, школы катания и развитая инфраструктура. Комфортные отели, рестораны и развлечения apres-ski для всей семьи.
free live sex cams
здесь Кроме того, мы предлагаем индивидуальные консультации, в ходе которых мы детально анализируем вашу ситуацию и предлагаем оптимальный вариант получения ВНЖ, исходя из ваших финансовых возможностей, профессиональных навыков и личных обстоятельств. Мы также оказываем помощь в поиске недвижимости, открытии банковского счета и решении других вопросов, связанных с адаптацией к жизни в Испании.
Отдых оказался насыщенным и при этом расслабляющим, сервис, питание и атмосфера на лайнере порадовали – https://kruizy-po-persidskomu-zalivu.ru/
porno son
https://support.mozilla.org/en-US/user/rulmehamlu/
В мире автомобильного тюнинга студия “Individual Design” в Москве выделяется как настоящий эксперт по оклейке автомобилей пленкой, предлагая от антигравийной защиты до стильных цветных трансформаций с использованием премиум-материалов от LLumar, SunTek и 3M. В этой студии опытные специалисты за часы преображают стандартный кузов в художественный объект, давая не просто визуальный апгрейд, но и крепкую оборону от повреждений, идеально для жесткого климата Москвы; пленка виниловая или полиуретановая просто клеится и удаляется без остатка, превосходя покраску в удобстве, с ценами, радующими гибкостью и бонусами для лояльных посетителей. Если нужен топовый детейлинг в Лефортово, в паре минут от третьего кольца, загляните на https://individual-design.ru/ – там детальный прайс, фото работ и легкая запись, где каждый проект обретает статус персонального шедевра.
сайт Наши водители – это профессионалы с многолетним опытом работы, которые бережно и аккуратно погрузят ваш автомобиль на платформу эвакуатора, зафиксируют его ремнями и доставят по указанному адресу в целости и сохранности. Мы гарантируем соблюдение всех мер безопасности при транспортировке, чтобы исключить возможность повреждений. Мы постоянно повышаем квалификацию наших сотрудников, чтобы они могли эффективно решать любые задачи, связанные с эвакуацией транспорта.
По АМ могу сказать,что концентрировать выше 1 к 15 не вижу смысла.Оно не торкает дальше своего известного предела,после 1 к 15 дальше пойдёт уже переводняк.Тут как с процами-дороже 200 баксов покупать-перевод бабла,прироста производительности не заметишь почти. Купить кокаин, мефедрон, бошки, гашиш, марихуану, шишки С ним можно работать всегда ровничком всегда адекватность ПлюссссНу и сам сожру дорожку,
Extended Review: https://gsclinic.ru/effektivnye-metody-blokady-v-sheyu-pri-osteohondroze-relief-i-vosstanovlenie/
aonang villa resort краби остров краби отзывы
цифровой маркетинг статьи цифровой маркетинг статьи .
porn jap girl
В глубинах холодного моря жил древний Кракен, охранявший зеркала памяти. Эти зеркала не отражали лица — они показывали страхи, мечты и забытые решения каждого, кто осмеливался взглянуть в их гладь. Когда шторм поднимался, щупальца Кракена тянулись к поверхности, защищая зеркала от жадных глаз. Моряки верили: если зеркало треснет, море потеряет равновесие. Поэтому легенда учила уважать тайны глубин и помнить, что не каждое отражение стоит искать.
продвижение сайта трафику prodvizhenie-sajta-po-trafiku1.ru .
bimbo porno
Нужен трафик и лиды? avigroup казань SEO-оптимизация, продвижение сайтов и реклама в Яндекс Директ: приводим целевой трафик и заявки. Аудит, семантика, контент, техническое SEO, настройка и ведение рекламы. Работаем на результат — рост лидов, продаж и позиций.
https://ycems.edu.in/?p=5058
http://aredsoaclus.phorum.pl/viewtopic.php?p=173196#173196
興味深いブログ https://nazenazeblog.com/ をご覧ください。最新のエンターテイメントに関する記事を掲載しています。きっと楽しい時間をお過ごしいただけます!ブログの様々なカテゴリーは、当サイトを訪れるすべての人にとって興味深いものとなり、きっと常連読者になっていただけるでしょう。
С ним можно работать всегда ровничком всегда адекватность Плюсссс Купить кокаин, мефедрон, бошки, гашиш, марихуану, шишки Конспирация на уровнеребята как-то странно работают,но надеюсь,что честно
porno жесткое
сайт Кроме того, мы предлагаем индивидуальные консультации, в ходе которых мы детально анализируем вашу ситуацию и предлагаем оптимальный вариант получения ВНЖ, исходя из ваших финансовых возможностей, профессиональных навыков и личных обстоятельств. Мы также оказываем помощь в поиске недвижимости, открытии банковского счета и решении других вопросов, связанных с адаптацией к жизни в Испании.
abuse boys porn
В глубинах холодного моря жил древний Кракен, охранявший зеркала памяти. Эти зеркала не отражали лица — они показывали страхи, мечты и забытые решения каждого, кто осмеливался взглянуть в их гладь. Когда шторм поднимался, щупальца Кракена тянулись к поверхности, защищая зеркала от жадных глаз. Моряки верили: если зеркало треснет, море потеряет равновесие. Поэтому легенда учила уважать тайны глубин и помнить, что не каждое отражение стоит искать.
Маска для осознанных сновидений DreamStalker Expert четвертого поколения от российского производителя оснащена Wi-Fi управлением, двумя датчиками движения глаз, RGB-светодиодами и OLED-дисплеем. Устройство доступно на https://claps.me/catalog/pribory-dlya-osoznannykh-snov/pribor-dlya-osoznannykh-snovideniy-dreamstalker-expert/ в четырех вариантах с функциями майнд-машины и транскраниальной стимуляции tACS. Прибор предлагает автоматическую запись сновидений, голосовые подсказки и возможность докупки лицензий на дополнительные функции.
как зайти на kraken даркнет
https://zenwriting.net/jnkz40l0yc
Выбирали круиз из Дубая из за удобного перелета и остались полностью довольны, лайнер современный, обслуживание на уровне лучших мировых курортов https://kruizy-po-persidskomu-zalivu.ru/
Вот этого ам2233 и заказал. Оплатил уже. Жду трекер. Купить кокаин, мефедрон, бошки, гашиш, марихуану, шишки трек пока не бьется.конечно была задержка которая заставила по нервничать, но всё прошло на уровне и я получил свою посылочку)))
запчасти Хово Ориентируясь на потребности наших клиентов, мы предлагаем удобный и интуитивно понятный интернет-магазин, где можно легко найти и заказать необходимые запчасти. От фильтров и тормозных колодок до двигателей и трансмиссий – мы располагаем полным перечнем деталей, необходимых для планового технического обслуживания и ремонта любой сложности. Особое внимание уделяется оперативности обработки заказов и быстрой доставке, позволяя нашим клиентам минимизировать время простоя техники. Мы стремимся предоставить лучший сервис и конкурентоспособные цены, чтобы удовлетворить потребности как частных автовладельцев, так и крупных автосервисов.
тут Получение ВНЖ Испании открывает широкие возможности для жизни, работы и путешествий по всей Европе, и именно здесь вы найдете актуальную информацию о необходимых документах и этапах оформления статуса резидента. Наш специализированный сайт подробно описывает различные программы, включая «золотую визу», ВНЖ для финансово независимых лиц и цифровых кочевников, предлагая пошаговые инструкции для каждого случая. Ознакомьтесь с полным перечнем актуальных требований тут, чтобы заранее подготовиться к подаче заявления и максимально повысить свои шансы на успешное одобрение со стороны испанских миграционных властей.
магазин достойный,всё ровно и в срок,спасибо большое за ваш труд,будем продолжать сотрудничество! https://taxi-jaguar.ru CHEMICAL MIX спасибо огромное!!!Страшно , но хочется и потом сам не попробуеш не узнаеш )
porn xxx ass girl
В глубинах холодного моря жил древний Кракен, охранявший зеркала памяти. Эти зеркала не отражали лица — они показывали страхи, мечты и забытые решения каждого, кто осмеливался взглянуть в их гладь. Когда шторм поднимался, щупальца Кракена тянулись к поверхности, защищая зеркала от жадных глаз. Моряки верили: если зеркало треснет, море потеряет равновесие. Поэтому легенда учила уважать тайны глубин и помнить, что не каждое отражение стоит искать.
Круиз из Дубая оказался отличным способом увидеть сразу несколько стран, не меняя отель и наслаждаясь комфортом – круиз по Персидскому заливу из Дубая цена
Нужен трафик и лиды? avigroup.pro/kazan/ SEO-оптимизация, продвижение сайтов и реклама в Яндекс Директ: приводим целевой трафик и заявки. Аудит, семантика, контент, техническое SEO, настройка и ведение рекламы. Работаем на результат — рост лидов, продаж и позиций.
сайт Кроме того, мы предлагаем широкий спектр дополнительных услуг, включая помощь при ДТП, буксировку автомобиля, подвоз топлива и замену колеса. Мы стремимся предоставить нашим клиентам максимально удобный и комфортный сервис, чтобы решить любую проблему, возникшую на дороге. Наша задача – сделать процесс эвакуации максимально простым и быстрым для вас. Мы ценим ваше время и понимаем, что в экстренной ситуации важна каждая минута.
kraken market
Спасибо магазину за это! https://rio-arkhangelsk.ru Магаз ровный, очень много раз тут брал, а как перешли на телеграмм так еще больше радуете, намного меньше гемора с оплатой стало, качество на высоте как и всегда. Сегодня убедился что оператор не сидит без дела, очень сильно помог мне с моим вопросом, при чем оперативно все сделал. Оцениваю данный магазин 10 из 10. Кокаин даже MQ оказался лучше, чем я до этого покупал HQ в другом магазе. Делайте по чаще закладки в центре Питера.Наверно так же как и джив. попробуй минимальные пропорции сделать 0,1 к 1
?Necesitas mudarte? https://trasladoavalencia.es ?Necesitas una mudanza rapida, segura y sin complicaciones en Valencia? Ofrecemos servicios profesionales de transporte y mudanzas para particulares y empresas. ?Solicita un presupuesto gratuito y disfruta de nuestro servicio de calidad!
big boy woman porn
В глубинах холодного моря жил древний Кракен, охранявший зеркала памяти. Эти зеркала не отражали лица — они показывали страхи, мечты и забытые решения каждого, кто осмеливался взглянуть в их гладь. Когда шторм поднимался, щупальца Кракена тянулись к поверхности, защищая зеркала от жадных глаз. Моряки верили: если зеркало треснет, море потеряет равновесие. Поэтому легенда учила уважать тайны глубин и помнить, что не каждое отражение стоит искать.
Даже то что я из за тебя третий день на нервах это косяк!Ладно надеямся на лучшее,надежда умирает последней… Купить кокаин, мефедрон, бошки, гашиш, марихуану, шишки конечно была задержка которая заставила по нервничать, но всё прошло на уровне и я получил свою посылочку)))магазин суперский! качество и работа оператора на высшем уровне! респект
https://secoop.gov.tl/?p=2004
https://www.marshallcavendish.com/our-books/categories/islam-explained-p9789814779739
jailbait girls porn
В глубинах холодного моря жил древний Кракен, охранявший зеркала памяти. Эти зеркала не отражали лица — они показывали страхи, мечты и забытые решения каждого, кто осмеливался взглянуть в их гладь. Когда шторм поднимался, щупальца Кракена тянулись к поверхности, защищая зеркала от жадных глаз. Моряки верили: если зеркало треснет, море потеряет равновесие. Поэтому легенда учила уважать тайны глубин и помнить, что не каждое отражение стоит искать.
упаковка – неплохо, но не идеально. Особенно глупо, когда в описании отправления пишут “Косметика”, а там, бл*ть, пачка сигарет. Оочень странно на меня смотрели в офисе спсра, знаете ли. 4/5 Купить кокаин, мефедрон, бошки, гашиш, марихуану, шишки Закупал я рег у Тс конечно качество пацаны просто бомба:good: Я токого не когда не пробывал!!!Все будет окей, это косяк курьерки…
http://minak.listbb.ru/viewtopic.php?f=7&t=638
вебинар по краби каякинг в краби
сайт Мы понимаем, насколько стрессовой может быть ситуация, когда ваш автомобиль выходит из строя на дороге. Именно поэтому мы предлагаем круглосуточную поддержку и оперативный выезд эвакуатора в любой район Санкт-Петербурга. Наш парк спецтехники оснащен всем необходимым оборудованием для эвакуации автомобилей любого типа и размера, от малолитражек до внедорожников и микроавтобусов.
я имел ввиду что вещевства а не способ в/в я не конченый https://softbezvirusov.ru Как-то развёл 2c-i на кубы воды и выбрал в выборку для точности дозировки.Так один кролятина вляпался в/в.Позавидовать ему трудно было,это точно.Но в конце когда оклемался,даже прикололся.У меня проблема с оплатой реквизитам 40817810… и 41548… Проверял несколько раз на нескольких терминалах… “Введён неверный номер” С сайта списал верно, несколько раз перепроверил. Вот так, хочу оплатить, а не могу, готов хоть блиц отправить или ещё как нибудь
Your point of view caught my eye and was very interesting. Thanks. I have a question for you.
Нужны услуги грузчиков? офисные переезды новосибирск Предоставим крепких и аккуратных работников для любых задач — переезд, склад, доставка, подъем мебели. Быстрый выезд, почасовая оплата, гибкий график и ответственность за сохранность вашего имущества.
Пишите в скайп, аську, пожалуйста без лишнего, чтобы была возможность ответить всем. :good: https://et-code.ru Сказали в понедельник всем кто оплатил заказ отправят НОМЕРА!всем привет щас заказал реги попробывать как попробую обизательно отпишу думаю магазин ровный и все ништяк будет))))
Крымский полуостров представляет собой уникальное сочетание живописных ландшафтов, богатого исторического наследия и целебного климата, притягивающее миллионы путешественников ежегодно. От античных руин Херсонеса до величественных дворцов Южного берега, от горных троп Ай-Петри до уединенных бухт мыса Фиолент — каждый уголок полуострова хранит свои тайны. Блог https://crimea-trip.ru/ собрал полезную информацию о курортах, пляжах, туристических маршрутах и гастрономических особенностях региона, помогая спланировать незабываемое путешествие с учетом бюджета. Здесь вы найдете советы по выбору жилья, описания экскурсионных программ и рекомендации по оздоровительным процедурам, доступным благодаря уникальным природным факторам крымского побережья и целительному воздуху горных районов.
здесь Мы понимаем, что процесс получения ВНЖ Испании может показаться сложным и запутанным, особенно если вы не владеете испанским языком или не знакомы с местным законодательством. Именно поэтому наша команда опытных юристов и консультантов готова оказать вам всестороннюю поддержку на каждом этапе оформления. Мы поможем вам собрать необходимые документы, правильно заполнить анкеты, подготовиться к собеседованию и избежать распространенных ошибок, которые могут привести к отказу.
кракен даркнет маркет
kraken link
kraken официальный сайт
ко ланта телеграм чумпхон краби
Медицинский центр “Киндер Дент” в Люберцах предоставляет стоматологические услуги для детей и взрослых с опцией безболезненного лечения во сне. https://kinder-dent-lyubertsy.ru/ предлагает полный спектр услуг: от профессиональной гигиены и лечения кариеса до имплантации, протезирования и ортодонтии. Клиника оснащена современным оборудованием, включая аппарат Vector для лечения десен. Пациентов консультируют высококвалифицированные специалисты, справляющиеся с нестандартными ситуациями. Доступны процедуры отбеливания зубов, установка виниров, съемное и несъемное протезирование, синуслифтинг и методики All-on-4/6.
Что случилось? почему страшно? https://ijunis.ru Списался с данным магазом пару месяцев назад, беру клады по москве, ребята работают отлично, сервис на высоте! Последний раз даже клад сделали минут за 15 всего, первый раз такое, в других магазах приходилось часов по 5 ждать свое клада! Рега тоже отличная, беру JV-90 очень мощная штука! Спасибо ребятам за качественный товар и сервис продолжайте в том же духе!!!Всем САЛЮТ) заказал у ТС по совместки 50 реги жду как отправят думаю проблем не возникнет общение с операторам на 5\5 отзывчевый вежливый и деловито краток гпишет поделу)! я как то брал тут пару месяцов назад все прошло нормально регу и ск, ск правда качетсвенная! была я трипчик оставлял по ней!ДУМАЮ И СЕЙЧАС НЕЧЕГО НЕИЗМЕНИЛОСЬ А ЕСЛИ ИЗМЕНИЛОСЬ ТО В ЛУЧШУЮ СТОРОНУ ЧТОБЫ)))) ЛАДНО ЖДУ ПОСЫЛЬ!! ВСЕМ ДОБРА
тут Но виза – это только начало. Мы также предоставляем комплексную поддержку по адаптации в Испании. От помощи в поиске жилья и открытии банковского счета до организации курсов испанского языка и знакомства с местной культурой. Мы стремимся, чтобы ваш переезд был максимально комфортным и беспроблемным.
kraken darknet
действительно принимают? https://techdreamz.org сервис 10\10 нигде дешевле и лучше на рынке легал сейчас нету!!!может стоит разводить 1 к 10? Кто брал ам 2233 отпишитесь на щёт пропорции,вообще 2233 1 к 20 разводится если продукт хороший
запчасти Geely Мы предлагаем широкий ассортимент оригинальных и сертифицированных аналоговых запчастей для китайских автомобилей. В нашем каталоге вы найдёте всё необходимое: от расходных материалов, таких как фильтры и тормозные колодки, до сложных узлов и агрегатов, включая двигатели, трансмиссии и элементы подвески. Благодаря прямым контактам с производителями и тщательному отбору поставщиков, мы гарантируем высокое качество и доступные цены на весь спектр предлагаемой продукции.
PWA кракен
кракен login
кракен актуальная ссылка
В сердце Подмосковья, в Клину, процветает садовый питомник “Всё Своё”, предлагающий обширный ассортимент саженцев плодовых деревьев и декоративных растений, идеально адаптированных к местному климату. В ассортименте имеются яблони, груши, вишни, сливы, плюс необычные многосортовые гибриды и колоновидные виды, все устойчивые к морозам и обещающие обильный урожай. Не забыты кустарники: малина, смородина, голубика, жимолость, плюс эстетичные гортензии, розы, хвойные и пионы, всего за 500 наименований от верифицированных российских источников. Специалисты с опытом проводят консультации, услуги доставки и высадки, предоставляя здоровые растения по привлекательным ценам. Посетите https://sadovodklin.ru/ чтобы ознакомиться с каталогом, акциями и форумом, где делятся советами по уходу за садом в суровых условиях севера России, и сделайте заказ прямо онлайн или по телефону для самовывоза.
actionfuelsmomentum.bond – Love the vibe here, everything loads fast and looks super clean.
http://www.tsf.edu.pl/wystawa-radoslawa-brzozowskiego
https://tokeativity.com/connect/blogs/entry/95-the-future-of-tokeativity-member-summer-survey-results/page/3/?tab=comments#comment-3673
actionfuelsmomentum.bond – Love the vibe here, everything loads fast and looks super clean.
здесь Виза цифрового кочевника в Испании стала отличным решением для удаленных сотрудников и фрилансеров, стремящихся легально проживать в солнечной стране, и именно здесь собраны все ключевые подробности процесса подачи документов. Наш информационный сайт предоставляет исчерпывающие сведения о минимальном уровне дохода, требованиях к контрактам и особенностях налогообложения для держателей данного типа разрешения. Вы можете изучить подробный алгоритм действий и список необходимых справок тут, чтобы заблаговременно оценить свое соответствие критериям программы и начать подготовку к переезду в комфортных условиях.
directionenergizesgrowth.bond – Really helpful info, I’ll be coming back to read more soon.
kraken mirror
отдых на краби таиланд отзывы туристов 2024 провинция краби в тайланде на карте
momentumadvancers – Easy to scan content and straightforward structure enhance readability.
kraken даркнет
clarityleadsmovement.bond – Nice layout and simple flow, made it easy to find what I needed.
Action Progress Online – The writing is clear and the design supports it nicely.
кракен вход
сайт Но виза – это только начало. Мы также предоставляем комплексную поддержку по адаптации в Испании. От помощи в поиске жилья и открытии банковского счета до организации курсов испанского языка и знакомства с местной культурой. Мы стремимся, чтобы ваш переезд был максимально комфортным и беспроблемным.
actionfocusstream – Sections are clear, improving understanding and retention of information.
forwardmotionactivatednow.bond – Great work on this site, feels polished and surprisingly easy to navigate.
Direction Guides Momentum Site – Simple, helpful content presented in an easy-to-follow way.
growthvision – Inspiring strategies, the ideas here clarify how growth can be achieved.
«Трубпром» осуществляет деятельность в сфере металлопроката с 2005 года и реализует стальные трубы всех размеров по заводским расценкам. В каталоге https://www.trub-prom.com/ представлен широкий ассортимент продукции: бесшовные, электросварные, нержавеющие, котельные трубы различных марок стали и типоразмеров. Организация ведет оптово-розничную торговлю со склада в столице с транспортировкой в любой регион РФ, обеспечивая соответствие стандартам и высокое качество продукции.
energydirectionguide – Helpful structure keeps focus sharp and workflow smooth.
claritysetsdirection.bond – Pretty solid content, I enjoyed reading through the pages today.
Visit Action Driven Movement – The layout feels polished and the mission comes through right away.
simpler ideas – Enjoyable content, clarity removes unnecessary complexity.
Планируешь перевозку? грузоперевозки удобное решение для переездов и доставки. Погрузка, транспортировка и разгрузка в одном сервисе. Работаем аккуратно и оперативно, подбираем машину под объём груза. Почасовая оплата, без переплат.
velocityengine – Inspiring guidance, concepts make taking action easier and faster.
forwardmotionplan – Inspiring pointers, structured guidance ensures tasks move ahead efficiently.
кракен сайт
forwardplanningguide – Structured advice ensures priorities are clearly understood.
directionshapesoutcomes.bond – Smooth experience overall, pages are organized and load without any lag.
advancestreamline – Clear presentation, making key ideas easy to understand.
purposeful growth ideas – Great insights, growth feels more intentional and easy to follow.
https://www.whizolosophy.com/category/today-s-world-projecting-tomorrow/article-essay/1win-vip-promo-code-1w500gift-exclusive-500-bonus
https://forum.aceinna.com/user/codepromomelbet
ideaflow – Insightful content, ideas provide energy for continuous movement.
kraken официальный сайт
focusflow – Useful reminders, directing attention properly makes daily goals achievable.
progresswithfocus – Helpful insights, staying focused on clear goals accelerates progress efficiently.
momentumpathguide – Structured tips support keeping the project moving forward.
actionflow – Practical advice, direction energizes activity and keeps progress on track.
ideaengine – Helpful insights, signals guide the flow of ideas to produce tangible results.
efficiencyfirst – Smart prioritization saves time and energy.
кракен darknet
direction first – Smart advice, momentum improves when direction stays consistent.
progressmovespurposefully.bond – Interesting site, the structure makes sense and keeps things straightforward.
Visit Clarity Powers Choices – The structure feels well thought out and the content flows smoothly.
intentflow – Excellent reminders, keeping goals in focus ensures productive progress.
goaldrivensteps – Excellent guidance, moving with intention ensures progress feels achievable.
https://www.uscgq.com/forum/posts.php?forum=general&id=603555&page=2#post13
growthstrategycenter – Clear steps help keep all tasks organized and focused.
https://lcri.gov.ng/lcri-at-gembu-on-the-mambila-plateau/
Круизы из Китая приятно удивили уровнем организации и продуманностью деталей – https://kruizy-iz-kataya.ru/
pathfinderclarity – Nice tips, clarity shapes priorities and guides the next moves.
claritypilot – Signals here help manage tasks efficiently and reduce ambiguity.
thinkingengine – Helpful notes, keeps the mind energized for forward-focused strategies.
actionengine – Focused effort improves results and keeps projects moving steadily.
signalinsight – Excellent tips, interpreting these signals allows ideas to move forward naturally.
progressspark – Taking consistent action helps concepts gain real traction.
кракен darknet market
focus alignment – Clear message, aligned focus supports steady action.
Нужны грузчики? разнорабочие ивантеевка : переезды, доставка мебели и техники, погрузка и разгрузка. Подберём транспорт под объём груза, обеспечим аккуратную работу и соблюдение сроков. Прозрачные тарифы и удобный заказ.
signalactivatesgrowth.bond – Appreciate the clarity shown, messaging stays focused and easy throughout.
kraken link
экскурсии на слоновью ферму на краби остров ко ланта таиланд
alignedactiongrowth – Useful insights, synchronized steps make advancing growth simpler and more effective.
growthclarifier – Helpful content, makes it easy to identify the most important actions for growth.
directionactivatesprogress.bond – Clean design and clear message, it actually feels trustworthy to browse.
“Erotic minx desires to explore her carnal desires.” Here — Kj3fz2f.short.gy/ueeSek?Illus
planforwardcenter – Tips are actionable and help structure projects logically.
claritycoach – Great advice, guided clarity helps in making thoughtful and informed decisions.
кракен даркнет маркет
progressflow – Great strategies, applying actions steadily moves projects forward.
https://coub.com/onewinfree
momentumbeacon – Focused attention produces stronger results and smoother task completion.
Ищете лучший авто сервис в Киеве? Посетите сайт https://bs-service.com.ua/ – там вы найдете только профессиональные услуги по ремонту амортизаторов, а также на перепрошивку автомобилей. Узнайте наши привлекательные цены на сайте, также полезные советы от специалистов BS Service.
focusdrivesresults – Useful guidance, keeping attention sharp drives progress steadily.
worldpartnershipcircle – Useful insight, alliances are positioned thoughtfully and foster long-term trust.
efficiencypath – Following a clear path maximizes both speed and impact.
thoughts into steps – Helpful guidance, ideas quickly become actionable plans.
partnerecosystem – Thoughtful concept, the network feels cohesive and globally aligned.
taskbeacon – Clear signals help guide daily work toward intended outcomes.
alliancenetwork – Partnerships focused on dependability and long-term collaboration.
claritysignal – Easy to scan and understand, presentation is neat and approachable.
strategicforward – Inspiring examples, unlocked progress tips make planning easier and more effective.
forwardsignal – Useful tips, makes following steps toward goals feel manageable.
collectiveimpact – Foster unity and teamwork for meaningful and sustainable outcomes.
claritydrivesmotion – Really helpful ideas, keeps my focus clear throughout the day.
mindforwardguide – Clear tips guide execution and help bring new concepts to life.
signalguide – Inspiring tips, using signals as guidance helps achieve steady growth.
actionmovesforwardclean.bond – Good read, I found a couple sections that were genuinely useful.
forwardmindset – Excellent advice, content motivates thinking about future steps confidently.
velocityengine – Great insights, signals here help actions move faster and ensure consistent task flow.
forwardflow – Very motivating, steady, thoughtful actions make forward movement easy to maintain.
alliancemembersbond – Practical, united efforts make business goals more achievable and transparent.
taskmomentum – Understanding momentum today makes tackling tasks smoother.
kraken darknet tor
clear focus wins – Helpful insight, staying focused makes direction easier to follow.
kraken ссылка tor
guidedinmotion – Very practical, clear guidance keeps progress steady and well-structured.
confidencecatalyst – Very useful, deliberate actions act as a catalyst for increased confidence.
Visit Growth Flows Forward – The site loads quickly and the information is easy to take in.
driveclaritystream – Advice is clear, concise, and supports sustained focus throughout the day.
strategicgrowth – Excellent advice, conscious choices help guide growth in a structured way.
connectioncircle – Form partnerships that strengthen bonds and create long-term trust.
progressigniter – Great strategies, small consistent actions make velocity noticeable quickly.
strategybeacon – Targeted strategies make moving forward more predictable and productive.
вебинар по краби от туроператора краби отзывы 2024
motionexecutionguide – Tips are actionable and support productive decision-making.
trustednetwork – Connect with professionals to foster teamwork and long-lasting collaborations.
signalcreatesalignment.bond – Looks great on mobile too, everything feels quick and nicely put together.
stepbystepprogress – Very useful, step-by-step actions here make steady improvement achievable.
progressbeacon – Applying ideas here steadily fuels growth and productivity.
reliabilitygrowthcircle – Helpful guidance, emphasizing trust strengthens growth in a steady, predictable way.
forwardmomentumguide – Inspiring tips, following a clear action plan creates continuous flow in work.
открыть магазин низких цен в своём городе [url=oneprice.shop]https://oneprice.shop/[/url]
http://google.nu/url?q=http://oneprice.shop
clear growth thinking – Useful content, clarity helps remove confusion around growth steps.
futurevisionnetwork – Useful insights, the network focuses on forward-looking ideas and cooperative partnerships.
powervelocity – Excellent tips, proper guidance naturally enhances the pace of progress.
focusedaction – Very practical, the guidance ensures clear focus when planning next moves.
energymotionpath – Advice is direct, concise, and practical for daily use.
driveforward – Inspiring guidance, taking action step by step strengthens project progress.
growthaccelerator – Excellent tips, growth strategies are actionable and easy to follow.
Check This Platform – Clear direction throughout, with a confident and cohesive layout.
businessconnectioncenter – Helpful, this center makes building and maintaining business relationships simpler.
ПрофПруд специализируется на поставках оборудования для строительства декоративных прудов и водоемов любой сложности. На сайте https://profprud.ru/ вы найдете широкий выбор товаров: от пленочных материалов и готовых форм до систем фильтрации, насосного оборудования, скиммеров и элементов декора для водоемов. Работа с ведущими европейскими и американскими брендами обеспечивает высокое качество товаров и длительную гарантию от 1 до 10 лет.
actionideasflow – Very practical, applying ideas in steps naturally increases progress speed.
claritygrowthguide – Insights help break down complex strategies into manageable actions.
enterpriseallies – Form alliances that provide strategic advantages and reliable support.
successconnectioncircle – Very practical, building connections ensures that achievements are shared and sustainable.
actionbeacon – Direction applied properly creates leverage that boosts task completion speed.
forwardflow – Applying energy strategically keeps work moving steadily.
actionbeacon – Signals provide guidance that helps tasks move forward efficiently and steadily.
directionhints – Practical advice, helps set priorities and manage flow.
progresspathway – Very informative, designing steps strategically keeps growth steady and measurable.
motionfocus – Helpful examples, the content makes motion concepts simple to grasp.
motionpathcenter – Steps are clear and assist in achieving objectives efficiently.
actionnavigator – Useful insights, taking steps intentionally guides outcomes effectively.
В мире современного дизайна интерьеров компания Glassway уверенно занимает лидирующие позиции как производитель высококачественных подвесных потолков, алюминиевых перегородок и светодиодных светильников, предлагая решения для офисов, торговых центров и промышленных объектов. Обладая опытом свыше 10 лет, компания гарантирует весь процесс от дизайна до установки, применяя передовые технологии и материалы, отвечающие нормам безопасности. Среди популярных продуктов – кубообразные и реечные потолки, стеклянные перегородки с смарт-стеклом, а также энергоэффективные светильники, которые уже украсили такие проекты, как ВДНХ и торговую галерею Seasons. Ищете потолок подвесной где купить? Посетите glassway.group, чтобы ознакомиться с каталогом и заказать персонализированные решения с гарантией качества и оперативной доставкой по всей России. Клиенты отмечают надежность и скорость исполнения, подтверждая репутацию Glassway как топ-поставщика в строительной отрасли.
clarityengine – Inspiring insights, steps are explained clearly so progress is smooth.
practicalclarity – Useful tips, well-explained ideas make following through simple and effective.
reciprocalgrowthcircle – Very practical, reciprocal engagement in this network ensures sustainable development for everyone.
claritycompass – Clear ideas guide your workflow efficiently.
efficiencybeacon – Signals here enhance workflow and make progress feel effortless.
lastingvaluehub – A hub for decisions that ensure trust and enduring success.
growth made simple – Easy to understand, the explanation of growth feels straightforward.
claritypathcenter – Guidance makes achieving goals straightforward and less confusing.
growthhub – Strengthen your business relationships and expand professional opportunities.
focusleadsforward – Helpful guidance, sharp focus guides actions to produce actual results.
Путешествие прошло спокойно и приятно, персонал всегда готов помочь, атмосфера на борту дружелюбная: круизы из китая
valuebasedpartners – Helpful tips, core values highlight why these partnerships work effectively.
focusedgrowth – Helpful guidance, keeping attention sharp improves progress quickly.
сайт кракен даркнет
actioncompass – Great tips, deliberate moves guide teams in the right direction naturally.
кракен market
continuousprogress – Excellent tips, slow and steady approaches really work in practice.
kraken tor
clarityengine – Insightful guidance ensures actions move toward desired goals.
forwardframework – Helpful content, a structured forward framework makes tackling goals easier.
Круизы из Китая подходят тем, кто хочет необычный маршрут и высокий уровень комфорта https://kruizy-iz-kataya.ru/
visionarybondclub – Very practical, branding suggests clarity of purpose and long-term collaboration.
conceptcompass – Clear steps make ideas easier to implement and measure.
strategyengine – Focused clarity allows teams to advance projects efficiently and with purpose.
Современный интерьер требует не только эстетичных, но и практичных решений, особенно когда речь идет о помещениях с повышенной влажностью или необходимостью скрыть коммуникации. Реечные потолки из алюминия и стали завоевали популярность благодаря долговечности, устойчивости к коррозии и разнообразию дизайнерских вариантов — от классических до современных стилей с различной цветовой гаммой. Нижегородская компания предлагает готовые комплекты потолочных систем брендов Бард и Cesal, включающие все необходимые элементы для самостоятельной установки без привлечения специалистов. На сайте https://potolki-52.ru/ доступен удобный калькулятор для расчета стоимости под конкретные размеры помещения, а также подробное описание комплектующих и вариантов монтажа. Возможность регулировки высоты от пяти до десяти сантиметров позволяет адаптировать конструкцию под любые технические условия квартиры или предбанника.
growth intention notes – Clear insights, intention helps guide long-term growth.
progressmadesimple – Great guidance, straightforward strategies allow growth to move forward smoothly.
teampowercircle – Insightful, collaboration among high-performing groups improves efficiency and accelerates progress.
kraken onion
energypath – Useful guidance, focusing effectively moves energy toward achieving outcomes faster.
teamgrowth – Align efforts and resources for professional development and collective results.
energynavigatorlab – Recommendations guide effort toward meaningful achievements.
motionmap – Excellent explanation, connecting motion concepts logically makes planning easier.
thinkforwarddaily – Inspiring tips, everyday planning is easier with forward-thinking advice.
visionalignmenthub – Clear direction, shared vision creates a sense of purpose across all teams.
actioncompass – Key signals direct efforts so results happen smoothly.
planbeacon – Using a solid framework keeps projects moving efficiently from start to finish.
signalpath – Encouraging advice, these signals guide actions toward meaningful results.
actionbeacon – Maintaining focus fuels energy that powers progress toward goals.
kraken обход блокировки
ideasinmotion – Inspiring guidance, moving from thought to action is demonstrated effectively.
unifiedlinks – Clear alliance direction, relationships look mutually advantageous.
strategicgrowthcircle – Very helpful, strategic collaborative groups boost growth while maintaining strong connections.
projectpush – Helpful suggestions, clear direction ensures momentum in any task.
networkofleadersbond – Practical perspective, the network builds credibility and fosters collaborative solutions.
powerpathcenter – Guidance is clear, helping visualize movement and goal alignment.
progressbuilder – Practical advice, consistent movement ensures a forward path emerges clearly.
москва краби рейс прямой экскурсии из краби тайланд
progressbeacon – Focused direction fuels progress and keeps tasks moving forward smoothly.
Планируешь перевозку? переезд в другую квартиру удобное решение для переездов и доставки. Погрузка, транспортировка и разгрузка в одном сервисе. Работаем аккуратно и оперативно, подбираем машину под объём груза. Почасовая оплата, без переплат.
?Necesitas mudarte? https://trasladoavalencia.es ?Necesitas una mudanza rapida, segura y sin complicaciones en Valencia? Ofrecemos servicios profesionales de transporte y mudanzas para particulares y empresas. ?Solicita un presupuesto gratuito y disfruta de nuestro servicio de calidad!
movementsignals – Practical tips, following clear signals ensures direction stays consistent and reliable.
momentumengine – Inspired ideas flow naturally into measurable steps with proper guidance.
innovationleadersbond – Very insightful, messaging emphasizes forward-thinking leadership and sustainable growth.
growthsmartalliance – Useful tips, following smart growth plans improves results and keeps projects on track.
кракен link
growthpartners – Foster professional relationships that create consistent growth and impact.
кракен сайт
energyflowcenter – Very motivating, helps maintain momentum on important tasks.
actionfuelsmomentum.bond – Love the vibe here, everything loads fast and looks super clean.
taskengine – Momentum is built through consistent action, keeping tasks moving effectively.
kraken вход
linkstrategy – Clear positioning, relationships appear intentional and thoughtfully planned.
partnershipleadershub – Insightful perspective, hub messaging highlights effective alliances and practical collaboration globally.
executivecircle – Meet key executives and foster long-term business alliances.
velocityguide – Staying focused helps projects gain momentum and reach results faster.
Global Collaboration Bond – Looks useful for connecting experts with shared partnership goals.
careerboosters – Resources and guidance designed to accelerate career growth effectively.
directionenergizesgrowth.bond – Really helpful info, I’ll be coming back to read more soon.
forwardengine – Focused action energizes growth and ensures progress stays consistent.
FutureGrowthConnect – Simple design, content feels intentional and credible.
motionfocuslab – Guidance is simple, techniques for maintaining momentum are effective.
PWA KRAKEN
Ищешь грузчиков? грузчики цена помощь при переезде, доставке и монтаже. Аккуратная работа с мебелью и техникой, подъем на этаж, разборка и сборка. Гибкий график, быстрый выезд и понятная стоимость.
Каталог мини-приложений http://tgram.link и ботов Telegram 2026: кликеры, TON-игры, AI-сервисы и крипто-инструменты. Обзоры, рейтинги, инструкции и обновления. Подбор по категориям, безопасности и реальной пользе — всё в одном месте.
TrustLinkWorld – Good flow of information, key points stand out.
clarityleadsmovement.bond – Nice layout and simple flow, made it easy to find what I needed.
mindfulinnovators – A hub for thoughtful experimentation and continuous learning.
FutureGrowthConnect – Simple design, content feels intentional and credible.
teamunity – Encourages teamwork and reliable collaboration for long-term impact.
futureconnect – Well-aligned idea, partnerships are centered on growth and shared vision.
kraken darknet market
NetworkBondedHub – Easy to explore, everything felt organized and accessible.
actionbeacon – Clear direction and structure make forward movement smoother.
actionableideas – Inspiring content, helps turn thoughts into tangible results quickly.
AnchorPortal – Guides are straightforward, all instructions are simple to follow.
Bond Circle Homepage – Easy to digest and well-organized without visual overload.
forwardmotionactivatednow.bond – Great work on this site, feels polished and surprisingly easy to navigate.
UnityBridgeGlobal – Clear headings, key points are easy to follow.
BlueChipBondPortal – Smooth navigation and clear guides, makes learning fast.
growthcircle – Partnerships designed to produce meaningful impact and consistent success.
SummitBondNetwork – Intuitive design, learning connections is smooth and straightforward.
bondbuilders – Forge relationships that encourage growth, teamwork, and long-term success.
https://penzu.com/p/3d4559312fbc5a4b
UnityBondHub – Clear tutorials with practical examples, understanding bonds was simple today.
https://demcra.com/r/test/1254145_1xBet_New_Promo_Code_2026_Free_Bet_Spins
кракен маркет
SteadfastGuide – Step-by-step tips are clear, I use them to improve my networking quickly.
TrustBondGuide – Informative articles with clear instructions, grasping the concepts was simple.
Principles Hub – Clear layouts and practical tips help users grasp bond topics quickly.
growthinsightguide – Guidance provides clarity and ensures steady progress.
taskengine – Anchoring workflow with clear direction keeps projects on track.
Мобильный гейминг давно превратился из развлечения в серьезное увлечение миллионов людей по всему миру. Производители смартфонов активно развивают игровые возможности устройств, предлагая специализированные линейки с мощными процессорами и улучшенным охлаждением. Портал GameBox подготовил обстоятельную подборку игровых смартфонов для разных бюджетов – от доступных моделей до флагманских решений типа Black Shark и Asus ROG. Эксперты проанализировали производительность в популярных играх вроде PUBG Mobile и Genshin Impact. Ознакомиться с детальным обзором можно по адресу https://gamebox.biz/podborka-igrovyh-smartfonov/1000028296/ где представлены технические характеристики и рекомендации по выбору оптимального устройства для мобильного гейминга.
кракен tor зеркало
AllianceLearningCore – Easy-to-understand tutorials, I learned multiple key points efficiently.
claritysetsdirection.bond – Pretty solid content, I enjoyed reading through the pages today.
TrustedLeaderBridge – Easy-to-read, leadership themes are clearly presented.
ProfessionalHubWorld – Organized flow, information feels reliable and authoritative.
UnityBondHub – Very informative lessons, content is easy to navigate and understand.
https://mixtum.online/ is a premium Bitcoin mixer that will provide you with an unrivaled level of anonymity. Learn more about all our advantages on our website and try out our new mixing mode with unique processing parameters. We offer a free trial and no registration required.
BondedPowerNetwork – Excellent guidance, I absorbed key concepts very efficiently.
bondingcircle – Strong message, relationship focus feels sincere and well grounded.
сопровождение учета в 1с 1s-soprovozhdenie.ru .
BondedTrustLink – Informative lessons and actionable advice, I grasped new strategies today.
плазменные автоклавы plazmennye-sterilizatory.ru .
SecureNetworkCircle – Smooth navigation, tutorials and guides are easy to follow.
EverCoreNetwork – Informative tutorials with practical examples, grasping bonds became easy.
Capital Trust Guide – Stepwise instructions that make practical concepts easy to follow.
https://www.chambers.com.au/forum/view_post.php?frm=3&pstid=97596&pstcl=0&kwd=&page_rtn=0
Интернет-магазин https://tvoyprud.ru/ представляет полный спектр товаров для создания декоративных водоемов: пленки из бутилкаучука и ПВХ, пластиковые готовые формы прудов, помпы для фонтанов и каскадов известных марок OASE, Jebao, Messner, фильтрационное и аэрационное оборудование. Квалифицированная техническая поддержка, богатый выбор техники и комплектующих для установки позволят реализовать совершенный садовый водоем любого уровня сложности.
VisionAllianceLink – Smooth experience and helpful guides, learning key insights was fast.
низкотемпературные стерилизаторы plazmennyy-sterilizator.ru .
directionshapesoutcomes.bond – Smooth experience overall, pages are organized and load without any lag.
GrowthConnectWorld – Smooth flow, conveys ambition and clarity.
ValueBondPortalHub – Clear navigation, lessons are easy to understand and apply.
SharedSuccessAlliance – Easy-to-follow layout, main ideas are presented logically.
BondedFocusHub – Very clean layout, the site guides you naturally to the important sections.
actioncompass – Focused, repeated actions turn ideas into visible results.
SolidBondHub – Very clear layout and easy navigation, understanding networking concepts was straightforward.
Unity Capital Resource Center – Clear, practical instructions with a smooth browsing experience.
CapitalAllianceHub – Easy to navigate, content is engaging and practical.
Bonded Stability Academy – Clean layout and structured lessons make complex topics simple.
HarmonyPathwayLink – Concise tutorials, I grasped several strategies in no time.
progressmovespurposefully.bond – Interesting site, the structure makes sense and keeps things straightforward.
MutualBondCenter – Smooth navigation and practical content, everything made sense immediately.
collabhub – Strong clarity, collaboration opportunities feel well positioned.
BusinessAllianceHub – Content is concise, well-laid-out, and engaging.
LongTermAlliancePortal – Very responsive site, content is easy to read and understand.
TrustGroupHub – Easy navigation and helpful guides, learning new strategies was fast.
1xBet промокод Активируйте на https://www.analyzemn.com/wp-content/pgs/code-promo-1xbet-bonus.html и заберите бонус 100% на депозит до 32 500?, чтобы начать игру с преимуществом.
BPNetworkHub – Concise tutorials and practical advice, very helpful for learning quickly.
UnityPrimeResources – Tutorials are direct and simple, perfect for quick reference.
CollectiveTrust Knowledge – Step-by-step guides and practical advice made grasping key points effortless.
кракен ссылка tor
PrimeCapital Academy – Clear guidance paired with intuitive navigation works well.
TrustedHarborResource – Helpful examples and tutorials, everything is structured logically.
Trust Learning Hub – Smooth navigation and practical examples make comprehension effortless.
UnityPathHub – Clear and easy-to-follow guides, I learned new tips quickly.
EverTrust Education Hub – Well-laid-out content and practical advice improve learning today.
directionactivatesprogress.bond – Clean design and clear message, it actually feels trustworthy to browse.
UnitedAllianceCircle – Clean structure, platform conveys focus and reliability.
где находится краби в тайланде краби тайланд лучшие отели
UBBResources – Very intuitive navigation, understanding the content is quick and clear.
BCPartnersInfo – Excellent tutorials and helpful guides, I discovered key insights fast.
PWA кракен
bondedalliancehub.bond – Practical information presented clearly, everything was straightforward to follow.
Trust Flow Academy – Easy-to-understand resources that make tricky topics manageable.
capitaltrustline insights – Organized materials and practical tips helped me understand concepts quickly.
SolidHubTrust – Fast-loading pages, tutorials are clear and practical for immediate use.
Bonded Integrity Community – Easy-to-navigate content with tips and insights that are genuinely useful.
Capital Knowledge Hub – Well-presented guides and simple navigation helped me find key information quickly.
UnifiedBondPortal – Helpful tutorials, made complex concepts easy to digest.
kraken зеркало
NetworkBondHub – Tutorials are simple and practical, made learning very smooth.
crossborderhub – Effective framing, the focus on global cooperation stands out.
GrandUnity Study Hub – Well-laid-out lessons with actionable tips improved my learning speed.
actionmovesforwardclean.bond – Good read, I found a couple sections that were genuinely useful.
PartnershipSphere – Simple but professional, content emphasizes shared success.
BondedEver – Easy-to-follow content, I grasped important ideas efficiently.
BondingCornerstoneNetwork – Clear and practical advice, very helpful for my current projects.
Bond Hub Insights – Friendly interface and practical guides make information easy to find.
https://mel-assessment.com/activity/p/1862344/
Безболезненные медицинские процедуры: комфорт и забота о вашем здоровье
TrustBondCircle – Informative content with step-by-step guidance, grasping bonds was fast.
Trusted Lineage Tutorials – Clean interface and stepwise guides make navigating effortless.
HeritageHub – Everything is easy to read, resources are structured logically.
mrbeast крупные розыгрыши
В глубинах холодного моря жил древний Кракен, охранявший зеркала памяти. Эти зеркала не отражали лица — они показывали страхи, мечты и забытые решения каждого, кто осмеливался взглянуть в их гладь. Когда шторм поднимался, щупальца Кракена тянулись к поверхности, защищая зеркала от жадных глаз. Моряки верили: если зеркало треснет, море потеряет равновесие. Поэтому легенда учила уважать тайны глубин и помнить, что не каждое отражение стоит искать.
Collective Value Resources – Friendly, organized content makes grasping concepts effortless.
trustforge.bond insights – Easy navigation and actionable guidance make understanding intuitive today.
BondedSkillNetwork – Smooth layout and helpful content, grasping new concepts was fast and simple.
trustaxis hub – Clear explanations with practical examples make learning simple today.
BondedCapitalLink – Content is easy to digest, navigation is seamless and guides are practical.
trustbridgegroup.bond – Great structure, I found the information on bonds clear and understandable.
GlobalStrongNetwork – Simple presentation, ideas are easy to follow and business-oriented.
signalcreatesalignment.bond – Looks great on mobile too, everything feels quick and nicely put together.
HeritageUnityNetwork – Practical guides, content loads fast and layout is very easy to follow.
IroncladPartnerCircle – Organized layout, content is clear and easy to follow.
CircleBond Learning – Reliable resources presented in an intuitive and speedy layout.
сопровождение 1с предприятие 8.3 1s-soprovozhdenie.ru .
Growth Hub Resources – Step-by-step guidance and clear content make studying simple.
Partners Keystone Learning Hub – Easy language and organization help ideas click quickly.
FoundationTrustHub – Clear and helpful content, guides are easy to understand for anyone.
Allied Bond Tutorials – Quick-loading pages with organized lessons make studying effortless.
CapitalSynergyInsights – Well-structured guides, everything is easy to follow and digest.
BondedHorizonsTutorials – Content is well-laid-out, guides are simple and effective for learning.
integrityaxis.bond reference – Clear structure and practical guides help me learn about bonds smoothly today.
bondedtrustcore knowledge hub – Clear pages and supportive tips make studying efficient.
кракен актуальная ссылка
connectionhub – Clear messaging, the alliance concept feels solid and business ready.
unitydrivenbond.bond – Fast site speed with helpful information, I’m always able to find what I need quickly.
плазменные автоклавы plazmennye-sterilizatory.ru .
GlobalTrustCircle – Minimalist design, messaging highlights reliability without distraction.
BondedProsperityNetwork – Informative lessons and practical insights, I quickly understood new methods.
BondedAllianceCircle – Clear and actionable advice, content improves collaborative efforts.
пероксидно плазменный стерилизатор пероксидно плазменный стерилизатор .
LegacyBondPortal – Easy-to-read guides and helpful tips, I quickly grasped several concepts.
Unity Secure Learning Hub – Navigation is smooth and explanations are clear.
LongView Alliance Tutorials – Practical examples and clear instructions helped me learn fast.
NobleBridge – Simple interface, instructions are easy to follow and apply.
В мире автомобильного тюнинга студия “Individual Design” в Москве выделяется как настоящий эксперт по оклейке автомобилей пленкой, предлагая от антигравийной защиты до стильных цветных трансформаций с использованием премиум-материалов от LLumar, SunTek и 3M. Здесь мастера с многолетним опытом превращают обычный кузов в произведение искусства за считанные часы, обеспечивая не только эстетическое преображение, но и надежную защиту от сколов и царапин, что особенно актуально в суровых московских условиях; виниловая или полиуретановая пленка легко наносится и снимается без следов, обходя по практичности традиционную покраску, а цены приятно удивляют гибкостью и скидками для постоянных клиентов. Если нужен топовый детейлинг в Лефортово, в паре минут от третьего кольца, загляните на https://individual-design.ru/ – там детальный прайс, фото работ и легкая запись, где каждый проект обретает статус персонального шедевра.
HorizonInsightLink – Helpful tutorials and tips, made learning new strategies straightforward.
кракен зайти
Bonded Growth Guides – Clear, concise lessons with intuitive navigation helped me learn efficiently.
EnduranceHubBond – Smooth navigation, everything loads fast and explanations are clear.
война в украине КРОВАВАЯ БАРЫНЯ (Алена Водонаева) Алена Водонаева, известная под псевдонимом “Кровавая Барыня”, продолжает активно вести свои социальные сети и высказывать свое мнение по актуальным вопросам. Ее посты и комментарии вызывают бурные обсуждения в интернете.
bondedpillars.bond knowledge base – Well-explained strategies and guides helped me grasp ideas efficiently.
unitydrivenbond.bond – Helpful insights and fast loading, the site’s design makes navigation effortless.
TrustGrowthHub – Clean layout, content emphasizes reliability and future planning.
trustfoundry hub – Clear guidance and practical tips make understanding topics much easier.
UnityNetworkBond – Guides are concise and practical, I learned new strategies quickly.
CapitalMutualCircleHub – Concise guides and practical tips, I absorbed multiple concepts easily.
CapitalTrustLearning – Great clarity in tutorials, understanding important concepts was easy.
BondedCollective Insights – Organized sections and helpful details speed up understanding.
kraken
mrbeast раздача денег
В глубинах холодного моря жил древний Кракен, охранявший зеркала памяти. Эти зеркала не отражали лица — они показывали страхи, мечты и забытые решения каждого, кто осмеливался взглянуть в их гладь. Когда шторм поднимался, щупальца Кракена тянулись к поверхности, защищая зеркала от жадных глаз. Моряки верили: если зеркало треснет, море потеряет равновесие. Поэтому легенда учила уважать тайны глубин и помнить, что не каждое отражение стоит искать.
Evergreen Bond Academy – Friendly layout and actionable lessons make topics easy to grasp.
CapitalGuide – Content is concise, makes complex concepts easy to grasp.
BondCapitalPortal – Practical examples and clear lessons make learning easy for new users.
Bonded Legacy Insights – Clean design and actionable tips make using the site easy today.
xrumer обучение xrumer
BondHubHeritage – Concise tutorials with practical examples, very beginner-friendly.
Growth Academy Hub – Friendly navigation and practical guides make understanding easy.
kraken актуальная ссылка
Strength Bond Guide – The structure is clear, and the insights feel genuinely dependable.
Bonding Resource Center – Well-explained material that suits both beginners and advanced users.
unitystronghold.bond insights hub – Well-laid-out guides and helpful tips make navigation effortless.
CollectiveBond Tips – Practical advice and organized content make understanding effortless.
bondednexus knowledge hub – Fast-loading pages and practical advice make studying straightforward.
кракен обход блокировки
mrbeast кто последний выйдет
В глубинах холодного моря жил древний Кракен, охранявший зеркала памяти. Эти зеркала не отражали лица — они показывали страхи, мечты и забытые решения каждого, кто осмеливался взглянуть в их гладь. Когда шторм поднимался, щупальца Кракена тянулись к поверхности, защищая зеркала от жадных глаз. Моряки верили: если зеркало треснет, море потеряет равновесие. Поэтому легенда учила уважать тайны глубин и помнить, что не каждое отражение стоит искать.
kraken зеркало
Trusted Learning Portal – Well-structured resources and clear explanations help users understand faster.
Alliance Bond Learning Hub – Helpful advice delivered in a clean, no-frills format.
unitydrivenbond.bond – Great content and efficient site performance, everything loads perfectly every time.
unitybondcraft.bond center – Practical guidance and simple explanations make learning straightforward.
bondedvaluechain learning – Organized tutorials and concise explanations simplify complex ideas.
1с сопровождение москва 1с сопровождение москва .
kraken официальный сайт
стерилизатор плазменный низкотемпературный plazmennye-sterilizatory.ru .
Partners Covenant Learning Hub – Clear explanations and tone create confidence while reading.
кракен onion
Alliance Insight Hub – Clear layout and useful examples ensure smooth learning today.
Bond Network Portal – Well-laid-out pages with clear lessons make browsing simple today.
unitykeystone.bond – Very reliable information, pages load quickly and navigation is seamless today.
bondedtrustway.bond – Very reliable information, everything loads fast and navigation feels smooth now.
Trust Circle Portal – Well-organized pages that encourage smart long-term thinking.
Alliant Tutorial Center – Well-structured pages and concise guidance simplify understanding complex topics.
Онлайн-кинотеатр https://rosseriaall.net/ предлагает бесплатный просмотр российских сериалов в высоком качестве без регистрации. База содержит мелодраматические ленты, детективные расследования, криминал, военную тематику, комедийные и триллерные сериалы, фантастические и семейные картины с простой навигацией по категориям и периодам выпуска. Доступны как классические сериалы прошлых лет, так и новинки 2025 года. Постоянное пополнение библиотеки и удобная система поиска дают возможность мгновенно обнаружить нужный сериал и запустить его круглосуточно.
ко ланта ко ланта
Shared Future Hub – Insightful content promotes collaboration and careful planning today.
плазменный стерилизатор плазменный стерилизатор .
capitalties.bond resources – Informative articles provided guidance I could use right away.
TrustConnectGlobal – Clean and approachable, collaboration ideas stand out clearly.
capitalbondline articles – Organized content with practical guidance made learning straightforward.
Bonded Knowledge Center – Practical tutorials and clean layout simplify understanding complex topics.
ко ланта ко ланте
Trusted Bonding Resources – Smooth navigation and reliable insights help users quickly understand concepts.
кракен darknet tor
Business Synergy Portal – A potentially valuable space for companies sharing similar objectives.
сайт кракен даркнет
kraken ссылка
trustcontinuity.bond insights – Organized content and practical examples make comprehension quick and simple.
Alliance Connect – Everything is laid out logically, so browsing is smooth.
unitycatalyst education – Clear layout and practical advice make studying less complicated.
Посетите сайт https://priority-auto.ru/ – мы предложим проверенные корейские, китайские, японские автомобили и мотоциклы с существенной выгодой, с подбором на аукционах и быстрой доставкой в РФ. Узнайте обо всех наших преимуществах на сайте или воспользуйтесь опцией “рассчитать стоимость” – где вы увидите конечную стоимость авто. Подберем авто под ваш бюджет, вышлем актуальную стоимость и расскажем, как будем доставлять.
Планируете отдых на Черноморском побережье и хотите свободно передвигаться по городу и окрестностям? Компания CarTrip предлагает широкий выбор автомобилей для комфортного путешествия по Анапе и Краснодарскому краю. В каталоге представлены модели на любой вкус и бюджет: от экономичных Datsun On-Do до стильных Skoda Rapid с автоматической коробкой передач. Все автомобили арендуются без залога, что делает процесс максимально простым и удобным. Посмотреть полный ассортимент можно на сайте https://auto-arenda-anapa.ru/nashi-avto/ где указаны актуальные цены и условия. Круглосуточная поддержка менеджеров поможет выбрать идеальный вариант для вашего отпуска.
Unity Knowledge Center – Organized content and intuitive navigation make the site simple to use.
1с предприятие сопровождение 1s-soprovozhdenie.ru .
кракен
https://juan2p20hli2.thecomputerwiki.com/user
PartnershipVisionPro – Concise and clear, messaging is modern and well thought out.
trustlineage.bond reference – Organized lessons and actionable advice make comprehension fast and easy.
UL Central – Information is accessible, and the website feels user-friendly.
Nomad Cars https://nomadcars.net/ — ваш надежный партнер в импорте авто из Китая. Поставляем автомобили напрямую с заводов и аукционов в любую точку мира! Прозрачные условия, честные цены и полное сопровождение сделки.
кракен market
стерилизатор плазменный низкотемпературный plazmennye-sterilizatory.ru .
StrategicPartnersHub – Clean presentation, ideas are communicated with clear intent.
Базы пробитые Xrumer Базы Хрумер 19 телеграм
TrustLinkUnity – Professional and simple, key points are easy to digest.
bondedcontinuum link – Design feels modern, information looks solid, and loading is fast.
PathFinder – Navigation feels natural, found relevant info quickly.
https://jaredofvi31986.qowap.com/98216628/code-promo-1xbet-tchad-2026-code1x200-bonus-vip
кракен сайт
kraken официальный сайт
кракен рабочее зеркало
VisionWorks – Easy-to-follow layout with useful tips, very effective platform.
Компания Noblelift Equipment JSC Ltd. зарекомендовала себя как мировой лидер по производству складской техники с полным модельным рядом оборудования для логистических задач. Российское представительство https://nobleliftrussia.ru реализует широкий ассортимент погрузчиков, штабелеров, тележек и уборочной техники с расширенной гарантией до 36 месяцев. Оборудование соответствует международным стандартам EAC, CE и ISO 9001, используется в более чем ста государствах, демонстрируя непревзойденную надежность и качество.
owntheserp.click – Mobile version looks perfect; no glitches, fast scrolling, crisp text.
Trust Harvest Online – Random visit turned into a productive browsing session.
Круиз из Дубая подарил ощущение настоящей роскоши, красивые маршруты, чистота на лайнере, внимательное отношение к гостям и высокий уровень безопасности, https://kruizy-po-persidskomu-zalivu.ru/
стерилизатор плазменный низкотемпературный plazmennyy-sterilizator.ru .
DreamPath – Inspiring ideas and organized sections make exploring concepts seamless.
hacktheclick.click – Appreciate the typography choices; comfortable spacing improved my reading experience.
netuplift.click – Content reads clearly, helpful examples made concepts easy to grasp.
kraken darknet tor
clickdomination.click – Pages loaded fast, images appeared sharp, and formatting stayed consistent.
PathSphere – Practical guidance, making planning and choices easy to handle.
zeroposition.click – Appreciate the typography choices; comfortable spacing improved my reading experience.
InsightPathway – Learned new ideas without feeling rushed or confused.
MomentumVisionPro – Easy-to-read guides and organized layout make navigation simple.
DesignDepot – Navigation is effortless, tips are practical.
Базы пробитые Xrumer xrumer 23 strong ai
кракен официальный сайт
IdeaVision – Structured guides, navigating the site feels effortless and smooth.
steadfast link homepage – Everything is placed logically and explained clearly.
ActionNest – Smooth navigation, with tools that make organizing tasks fast and simple.
RouteMatrix – Nicely organized interface, searching felt natural.
Exeed в СПб у официального дилера ИАТ https://exeed-iat.ru/ – это выгодные цены и авто в наличии, а также профессиональный сервис. Узнайте на сайте модельный ряд, наши преимущества и предложения. Цены, комплектации и модельный ряд на сайте, а также специальные финансовые программы, трейд-ин, лизинг, скидки и акции, тест-драйв!
StepVision – Smooth design, site helps explore and understand strategies quickly.
VisionWorks – Smooth layout and practical tips simplify browsing and learning.
ClearLogic – Easy navigation, learning and planning feels quick and natural.
DesignNest – Modern and clean interface, learning new styles is effortless.
Focused Pathway – Helpful breakdowns make strategies feel manageable.
https://kwave.koreaportal.com/board/bbs/board.php?bo_table=drama&wr_id=90562&page=0&sca=&sfl=&stx=&spt=0&page=0&btype=tile&cwin=#c_98586
Среди подмосковных ландшафтов, в Клину, развивается садовый комплекс “Всё Своё”, предлагающий разнообразные саженцы деревьев и кустов, адаптированные к местной погоде. В ассортименте имеются яблони, груши, вишни, сливы, плюс необычные многосортовые гибриды и колоновидные виды, все устойчивые к морозам и обещающие обильный урожай. Внимание уделено и кустам: малина, смородина, голубика, жимолость, включая декоративные гортензии, розы, хвойные и пионы, более 500 позиций от проверенных поставщиков из России. Квалифицированные эксперты предлагают советы, доставку и посадку, гарантируя качественные растения по разумным ценам. Посетите https://sadovodklin.ru/ чтобы ознакомиться с каталогом, акциями и форумом, где делятся советами по уходу за садом в суровых условиях севера России, и сделайте заказ прямо онлайн или по телефону для самовывоза.
ActivationCompass – Well-organized tips, site navigation feels intuitive and fast.
VectorTrack – Practical advice and smooth layout make exploring content easy.
kraken обход блокировки
FashionNotes – Helpful design suggestions, really enjoyed exploring the concepts.
ProgressPath – Informative tips, planning and learning feels simple and fast.
FuturePointPlus – Smooth navigation and clear content make exploring concepts quick.
Здоровье зубов требует регулярного профессионального ухода, особенно когда речь идет о детях и пациентах с повышенной тревожностью. Клиника “Киндер Дент” в районе Некрасовка специализируется на семейной стоматологии с возможностью лечения под наркозом для максимального комфорта пациентов. Современное оборудование и квалифицированные врачи обеспечивают безопасное проведение процедур любой сложности: от профессиональной гигиены полости рта до имплантации зубов. Узнайте больше на сайте https://kinder-dent.ru/ где представлен полный спектр услуг для детей и взрослых, включая ортодонтию, эстетическую стоматологию и безболезненное отбеливание зубов до восьми тонов за один сеанс. Бесплатная консультация имплантолога поможет составить индивидуальный план лечения.
кракен маркет
VisionEngine – Practical guides, navigating the site feels easy and enjoyable.
Любите качественное кино с захватывающими сюжетами и яркими персонажами? Портал Rosseriaall предлагает обширную коллекцию российских сериалов для комфортного онлайн-просмотра в любое удобное время. Каталог включает новинки 2025 года и проверенные временем проекты, структурированные по жанрам: мелодрамы, детективы, криминальные истории, военные драмы, комедии и семейные сериалы. На сайте https://rosseriaall.net/ вы найдете как популярные многосезонные проекты вроде “Тайны следствия”, так и свежие премьеры текущего года. Удобная навигация позволяет быстро подобрать контент по настроению, а регулярные обновления гарантируют доступ к самым актуальным релизам отечественного телевидения.
bondedcoregroup platform – Pages feel legit and the organization makes finding things quick.
Growth Focus – Simple structure keeps learning smooth.
ко ланта остров ко ланта
https://www.chumsay.com/read-blog/125949
BTB Connect — пространство деловых связей и новостей бизнеса https://btbconnect.ru/ – Запущена платформа для размещения и распространения пресс-релизов. Проект ориентирован на компании, которые ищут новые форматы делового сотрудничества, партнёров и медийное присутствие. BTB Connect объединяет бизнес и информационные площадки, создавая основу для дальнейшего роста и взаимодействия.
ForgeVision – Clear navigation, exploring ideas is quick and intuitive.
энтеогены капсулы онлайн
В глубинах холодного моря жил древний Кракен, охранявший зеркала памяти. Эти зеркала не отражали лица — они показывали страхи, мечты и забытые решения каждого, кто осмеливался взглянуть в их гладь. Когда шторм поднимался, щупальца Кракена тянулись к поверхности, защищая зеркала от жадных глаз. Моряки верили: если зеркало треснет, море потеряет равновесие. Поэтому легенда учила уважать тайны глубин и помнить, что не каждое отражение стоит искать.
StrategyHub – Very clear tips, making strategic concepts easy to follow and apply.
CircleLine – Friendly interface and concise guidance, exploring strategies is smooth.
ModernScope – Enjoy checking in here, updates are always relevant.
WayMotion – Organized interface, exploring ideas is effortless and efficient.
LinkTrack – Friendly pages with clear guidance, navigating strategies feels natural.
PlanetDockPro – Helpful instructions with readable layout make navigation enjoyable.
LearnWise – Clear layout, understanding new concepts is simple and intuitive.
TrustFocus – Friendly design with helpful instructions, learning content is fast and easy today.
StepHub – User-friendly layout, browsing guidance is quick and effortless.
Execution Framework – Easy browsing and solid guidance keep things smooth.
CoreBonded – Clear and practical guides, exploring strategies feels smooth and effortless.
CapitalNetwork – Friendly guidance makes learning and browsing seamless.
BridgeConnect – Easy-to-use layout, site makes accessing resources quick and simple.
SecureWay – Well-laid-out instructions help visitors explore concepts efficiently.
strategicbonding web hub – Helpful insights shared in a clean, simple layout.
TaskVision – Very easy to navigate, with helpful and practical features.
VisionPath – Well-laid structure and practical tips, discovering strategies feels natural.
DirectionTrack – Smooth interface, following concepts and planning steps is effortless.
DirectorView – Content is clear and pages are easy to move through.
CapitalFlow – Intuitive design with useful hints, exploring content is quick and straightforward.
FrameworkVault – Smooth navigation with helpful guides makes understanding easy.
IdeaBridge – Smooth interface, exploring concepts is easy and fast.
AnchorLine – Friendly interface with practical hints, navigating content feels effortless.
IdeaForge – Helpful content, exploring ideas on the site is smooth and simple.
MoneyBridge – Practical guides make exploring strategies effortless.
Медицинский центр “Киндер Дент” в Люберцах предоставляет стоматологические услуги для детей и взрослых с опцией безболезненного лечения во сне. https://kinder-dent-lyubertsy.ru/ предлагает полный спектр услуг: от профессиональной гигиены и лечения кариеса до имплантации, протезирования и ортодонтии. Клиника оснащена современным оборудованием, включая аппарат Vector для лечения десен. Прием ведут врачи экспертного уровня, работающие даже со сложными случаями. Выполняются услуги по осветлению эмали, монтажу керамических накладок, различные виды протезных конструкций, костная пластика и комплексная имплантация на четырех или шести опорах.
FinanceFlow – Smooth interface and practical guides simplify understanding.
FocusFlow – Intuitive interface, finding information and navigating feels natural.
LaunchDock – Simple interface, making brand planning fast and practical.
kraken маркет
WayMomentum – Helpful design, following steps and strategies feels simple today.
UnityBridge – Smooth design and interactive layout, learning concepts is enjoyable today.
InsightTrend – Easy-to-follow menus and practical advice, exploring ideas is quick.
DirectionPortal – Intuitive layout with clearly presented materials.
SecureAnchor – Well-organized guides make exploring topics fast and intuitive.
KnowledgeZone – Friendly design, learning new ideas is simple and quick today.
VisionMapper – User-friendly interface with helpful guides makes learning effortless.
Planning Grid – Organized layout helps users learn without friction.
capital bond works – The overall look is polished, with consistent branding and easy-to-read content.
CoreNest – Smooth design with helpful hints, learning content is simple and intuitive.
MomentumPath – Clear resources, following strategies feels intuitive and fast.
кракен tor
MoneyPath – Stepwise instructions and friendly layout make browsing effortless.
ActionMap – Clear and well-structured content, navigating the site feels effortless.
ActionDesk – Easy to navigate and tools are immediately understandable.
ActionVision – Practical content, navigating steps and strategies is fast and easy.
BondPath – Friendly layout with concise instructions, exploring content is easy.
IntentNest – Smooth interface with practical advice, implementing plans is straightforward and easy.
VectorPathway – Clear tips and logical structure, very approachable.
TrustPoint – Smooth interface with organized tips, exploring ideas feels quick and easy.
кракен зайти
BridgeVision – Smooth browsing, site helps learning concepts feel effortless.
MotionPoint – Clear layout and helpful content make navigation fast and smooth.
TrustBridge – Well-laid-out guidance helps users follow ideas smoothly.
Learning Track – Smart organization makes understanding strategies easier.
база xrumer телеграм xrumer сайт телеграм
SecureTrust – Well-organized steps help visitors navigate ideas easily.
TrustHaven – Smooth design with clear guides, exploring resources is fast and easy.
энтеогены купить
В глубинах холодного моря жил древний Кракен, охранявший зеркала памяти. Эти зеркала не отражали лица — они показывали страхи, мечты и забытые решения каждого, кто осмеливался взглянуть в их гладь. Когда шторм поднимался, щупальца Кракена тянулись к поверхности, защищая зеркала от жадных глаз. Моряки верили: если зеркало треснет, море потеряет равновесие. Поэтому легенда учила уважать тайны глубин и помнить, что не каждое отражение стоит искать.
GrowthBuilder – Friendly interface with practical tips, planning steps is quick and intuitive.
TrustPillar – Concise guides and friendly interface simplify exploring ideas.
anchorunity source – Logical spacing and clean design improve readability.
FocusRoute – Smooth guides, site layout makes understanding steps easy today.
NexusTrack – Well-laid pages and clear instructions, exploring ideas is quick and smooth.
ClarityDesk – Easy to read and understand, the platform is reliable.
InsightHub – Clean layout and practical tips, exploring information is fast and easy.
ProgressPulse – User-friendly layout and fresh information regularly.
Creative Corner – Friendly layout and thoughtful ideas keep things flowing.
BondPath – Straightforward instructions make following strategies simple.
SuccessHub – Intuitive guides, browsing the site feels simple and fast.
FlowPointPlus – Easy-to-read steps with organized layout make following instructions fast.
UnityFlowHub – Clear guidance and friendly layout make exploring concepts smooth and effortless.
MoneyBridge – Step-by-step tips make navigating content effortless.
LegacyNest – Friendly design with clear guidance, navigating resources is smooth and easy.
DailyRhythm – User-friendly interface, navigating ideas is quick and enjoyable.
EliteNavigator – Helpful resources, browsing and learning is simple and smooth.
ProgressPath – Organized content, navigating tools and guides is quick and easy.
InsightFlow – Clean design and useful hints, exploring strategies is fast and easy.
EngineNestPro – Very clear content, making browsing resources feel effortless.
SecureVision – Organized structure with helpful guides, exploring ideas feels effortless.
кракен login
GrowthTrail – Smooth layout, navigating growth tips is quick and simple.
энтеогенные вещества
В глубинах холодного моря жил древний Кракен, охранявший зеркала памяти. Эти зеркала не отражали лица — они показывали страхи, мечты и забытые решения каждого, кто осмеливался взглянуть в их гладь. Когда шторм поднимался, щупальца Кракена тянулись к поверхности, защищая зеркала от жадных глаз. Моряки верили: если зеркало треснет, море потеряет равновесие. Поэтому легенда учила уважать тайны глубин и помнить, что не каждое отражение стоит искать.
IdeaBridge – Smooth interface, finding information feels natural and easy.
FlowDesk – Clear and practical guides make learning and exploring effortless.
SecurePath – Stepwise advice helps visitors navigate topics quickly.
bonded growth entry – Pages respond promptly and the visuals are well done.
BondedSprout – Friendly pages with clear guidance, understanding concepts is straightforward.
StrategyPilot – Well-organized tips, understanding steps feels effortless and quick.
FlowProgress – Practical layout, site makes planning and learning simple and intuitive.
FusionFlow – Well-laid menus with useful tips, exploring content is effortless today.
VisionHub – Smooth layout and practical advice, understanding content is simple.
SequenceHub – Very clear guides, making it simple to plan steps efficiently.
kraken рабочее зеркало
BondNest – Clean menus and clear tips, exploring ideas is fast and easy.
MatrixNest – Well-structured layout, exploring concepts is smooth and fast today.
Базы пробитые Xrumer Прогон Xrumer телеграм
CircleHub – Smooth navigation and clear guidance make exploring content effortless.
ActionForce – Friendly layout, learning new ideas is effortless and fast.
GlobalDock – Clear structure with helpful tips makes exploring info fast.
кракен даркнет маркет
GoalSignal – Structured layout, helpful tips make achieving progress simple today.
PureEdge – Clear layout and modern design, navigating ideas feels smooth and effortless.
CapitalNest – Well-laid pages and practical hints, understanding strategies is smooth today.
SmartCapital – Step-by-step tips simplify the user experience.
Здарова народ.
Ищу совет по поводу образования за рубежом.
В их журнале много полезной инфы.
Ссылка на источник:
сайт kraken darknet
Удачи в учебе.
UnityBondHub – Friendly interface, organized layout, navigating resources feels fast and effortless now.
WealthNetwork – Well-structured layout ensures following strategies is fast and simple.
FlowPilot – Informative design, site makes understanding steps easy and intuitive.
KnowledgeBond – Easy navigation and helpful advice, mastering concepts is straightforward.
Action Flowchart – Easy menus and clear content remove guesswork.
BondPath – Concise guidance ensures visitors explore topics efficiently.
kraken сайт
кракен рабочее зеркало
TrustPath – Friendly layout with concise guidance, exploring content feels fast.
Очень удачный формат отдыха, круиз из Китая позволил совместить море, экскурсии и комфорт https://kruizy-iz-kataya.ru/
кракен зайти
FlowPoint – Smooth interface with helpful guidance, navigating ideas feels simple and quick.
TrustHub – Smooth interface with practical tips, exploring ideas feels effortless.
TrustValue – Step-by-step instructions make understanding content simple.
BondNetwork – Smooth layout and concise guidance enhance content navigation.
рапэ запрещен в россии
В глубинах холодного моря жил древний Кракен, охранявший зеркала памяти. Эти зеркала не отражали лица — они показывали страхи, мечты и забытые решения каждого, кто осмеливался взглянуть в их гладь. Когда шторм поднимался, щупальца Кракена тянулись к поверхности, защищая зеркала от жадных глаз. Моряки верили: если зеркало треснет, море потеряет равновесие. Поэтому легенда учила уважать тайны глубин и помнить, что не каждое отражение стоит искать.
HeritageLine – Well-organized pages and concise tips, finding insights is fast and easy.
https://doodleordie.com/profile/casinovip2026
TrustBridge – Helpful steps make browsing information simple and stress-free.
reliable growth site – Pages are well-structured and the content feels trustworthy.
kraken darknet market
visit unity harbor – The site feels well-organized and trustworthy overall.
TrustPoint – Organized pages with practical tips, learning strategies is effortless.
WealthAnchor – Structured instructions and concise layout help users explore content naturally.
сайт kraken даркнет
ForwardGuide – Smooth layout, following instructions feels effortless today.
read full details – Beginner-friendly content with a professional overall feel.
CapitalNest – Well-laid pages with useful tips, learning ideas is fast and intuitive.
TrustAlliance – Step-by-step guidance helps users explore content naturally.
capital bridge homepage – The layout feels clean and the information is readable.
visit unity bond collective – Interesting idea, with content that’s easy to follow and understand.
https://wefunder.com/1xbetvip2026
Кракен Kra47.at
В глубинах холодного моря жил древний Кракен, охранявший зеркала памяти. Эти зеркала не отражали лица — они показывали страхи, мечты и забытые решения каждого, кто осмеливался взглянуть в их гладь. Когда шторм поднимался, щупальца Кракена тянулись к поверхности, защищая зеркала от жадных глаз. Моряки верили: если зеркало треснет, море потеряет равновесие. Поэтому легенда учила уважать тайны глубин и помнить, что не каждое отражение стоит искать.
DesignCore – Organized navigation, exploring design tips feels fast and easy.
Современный интерьер требует не только эстетичных, но и практичных решений, особенно когда речь идет о помещениях с повышенной влажностью или необходимостью скрыть коммуникации. Реечные потолки из алюминия и стали завоевали популярность благодаря долговечности, устойчивости к коррозии и разнообразию дизайнерских вариантов — от классических до современных стилей с различной цветовой гаммой. Нижегородская компания предлагает готовые комплекты потолочных систем брендов Бард и Cesal, включающие все необходимые элементы для самостоятельной установки без привлечения специалистов. На сайте https://potolki-52.ru/ доступен удобный калькулятор для расчета стоимости под конкретные размеры помещения, а также подробное описание комплектующих и вариантов монтажа. Возможность регулировки высоты от пяти до десяти сантиметров позволяет адаптировать конструкцию под любые технические условия квартиры или предбанника.
bond craft portal – Information is presented logically and reads easily.
Your point of view caught my eye and was very interesting. Thanks. I have a question for you.
learn more here – Pages are easy to follow and explanations are simple to understand.
Ищете материалы для ремонта бетона, гидроизоляции и монтажа? Посетите сайт https://xn--80abutqu5e.xn--p1ai/ – ознакомьтесь с нашим существенным каталогом, в котором вы найдете все необходимые для вас материалы с надежной и быстрой доставкой грузов больших и малых объемов. Работаем с физическими и юридическими лицами. Подробнее на сайте.
Ищете лучший авто сервис в Киеве? Посетите сайт https://bs-service.com.ua/ – там вы найдете только профессиональные услуги по ремонту амортизаторов, а также на перепрошивку автомобилей. Узнайте наши привлекательные цены на сайте, также полезные советы от специалистов BS Service.
trust alignment info – The messaging is clear, and the site feels dependable.
ActionPath – Helpful instructions, site makes understanding strategies fast and easy.
bonded vision overview – A straightforward source with clearly presented information.
useful trust resource – Quick but informative content presented cleanly.
Kraken Kra47.at
В глубинах холодного моря жил древний Кракен, охранявший зеркала памяти. Эти зеркала не отражали лица — они показывали страхи, мечты и забытые решения каждого, кто осмеливался взглянуть в их гладь. Когда шторм поднимался, щупальца Кракена тянулись к поверхности, защищая зеркала от жадных глаз. Моряки верили: если зеркало треснет, море потеряет равновесие. Поэтому легенда учила уважать тайны глубин и помнить, что не каждое отражение стоит искать.
https://alianzy-businesspartnership.com/userinfo.php?com=profile&user=daniel-gregorio.495626&mod=space&do=profile
Приветствую всех.
Сравниваю разные агентства по обучению прямо сейчас.
Поддержка с карьерой после возвращения — это плюс.
Нашел это тут:
kraken рабочая ссылка onion
Надеюсь, кому-то поможет.
official trust craft – Pages are consistent, and the content quality is clear.
Здарова народ.
Ищу варианты Work and Travel в Австралии.
Варианты проживания в семьях выглядят уютно.
Источник:
кракен даркнет маркет
Хорошего дня.
FutureNavigator – Clear layout and helpful tips, browsing the site feels smooth and easy.
https://linkstack.lgbt/@bonusmelbet
progressmovesintelligently.bond – The site has a unique name, but the purpose is explained clearly.
Kra47.cc
В глубинах холодного моря жил древний Кракен, охранявший зеркала памяти. Эти зеркала не отражали лица — они показывали страхи, мечты и забытые решения каждого, кто осмеливался взглянуть в их гладь. Когда шторм поднимался, щупальца Кракена тянулись к поверхности, защищая зеркала от жадных глаз. Моряки верили: если зеркало треснет, море потеряет равновесие. Поэтому легенда учила уважать тайны глубин и помнить, что не каждое отражение стоит искать.
Apex Info – Clean design, content is logical and flows nicely.
https://griffingbti32098.atualblog.com/45872972/1xbet-malaysia-bonus-code-1xlux777-130-bonus
visit clarity powers movement – Layout is minimal yet effective, making content easy to digest.
Bonded Link – Smooth browsing with concise content makes exploring topics straightforward.
PowerInsights – Organized guides, understanding strategies feels natural and fast.
Assurance Tracker – Simple structure, content is readable and well-presented.
trusted forward motion link – Information appears fast and is easy to grasp immediately.
Bridgeworth Portal – Smooth layout and well-structured information make browsing effortless.
Assured Insights – Minimalist layout but highly functional, content is clear.
Alloy Portal – Learning here is simple and well-structured.
Balanced Info – Well-laid-out pages, all important details are easy to find.
https://forum.dfwmas.org/index.php?members/1xbetwelcomes.183428/#about
https://matters.town/a/4j7nei6g3zdq
Harbor Insight – Simple to follow instructions, learned a lot quickly.
Trust Navigator – Straightforward design, everything is understandable on first read.
Keystone Capital – Browsing is simple and the layout is very clear.
Benchmark Connect – Information is easy to find, and the structure feels natural.
Capital Lynx – Very clear guidance, easy to understand and navigate.
https://writeablog.net/borgpierce2174/1xbet-canada-promo-code-free-bet-1xbig2026-eu130-bonus
Crest Tracker – Consistent design and organized content make the pages very approachable.
сайт kraken
В глубинах холодного моря жил древний Кракен, охранявший зеркала памяти. Эти зеркала не отражали лица — они показывали страхи, мечты и забытые решения каждого, кто осмеливался взглянуть в их гладь. Когда шторм поднимался, щупальца Кракена тянулись к поверхности, защищая зеркала от жадных глаз. Моряки верили: если зеркало треснет, море потеряет равновесие. Поэтому легенда учила уважать тайны глубин и помнить, что не каждое отражение стоит искать.
CN Hub – Helpful tutorials, everything is easy to understand.
магазин dyson отзывы магазин dyson отзывы .
сайт техники дайсон сайт техники дайсон .
дайсон россия официальный ofitsialnyj-sajt-dn-1.ru .
Capital Dock – Clear design and simple to browse.
https://telegra.ph/Kupit-EHkstazi-Lsd-25-MDMA-Lsd-Moskva-Veshnyaki-12-20-2
Centurion Bond page – Smooth navigation and helpful information throughout.
официальный центр дайсон ofitsialnyj-sajt-dn.ru .
CoreMerge page – Well-organized site with concise and readable content.
Capital Hub Pro – Structured content, pages are readable and information is accessible.
стартовал наш новый https://utgardtv.com IPTV?сервис, созданный специально для зрителей из СНГ и Европы! более 2900+ телеканалов в высоком качестве (HD / UHD / 4K). Пакеты по регионам: Россия, Украина, Беларусь, Кавказ, Европа, Азия. Фильмы, Спорт, Музыка, Дети, Познавательные. Отдельный пакет 18+
Dependable network – Clean design and content that’s trustworthy and easy to follow.
Watch Central – Very user-friendly, all resources are easy to locate.
Events – Neat layout, simple to browse, and information is easy to find.
Newsletter – Subscriptions are simple, and layout is visually organized.
Bonding platform – Helpful material and smooth performance throughout.
The HB Link – Interface is smooth, pages respond quickly, and reading is very straightforward.
https://telegra.ph/Kupit-Mefedron-Gashish-Kannabis-Skorost-Emva-12-20
CoreStead info – Well-structured content that’s clear and readable.
Bonded Hub Pro – Smooth navigation, content is structured and informative.
Bond Central Hub – Quick-loading pages, clean interface, and browsing through information is effortless.
Bonding services – Intuitive structure with content that’s clear and practical.
LB Connect – Navigation feels natural, sections are clear, and content is concise.
CB Portal – Navigation is straightforward, content is clear and practical.
News – Easy-to-follow layout, professional design, and content is quick to read.
Newsletter – Subscription steps are clear, and the layout feels clean.
Bond Hub Online – Quick-loading pages, tidy layout, and content is straightforward.
HC Hub Online – Clean layout, pages render fast, and information is well-arranged.
Bond solutions – Good platform with clearly explained information.
Careers – Pages are neat, navigation is simple, and job info is easy to read.
CoreWard network – Smooth interface and trustworthy details throughout the pages.
https://telegra.ph/Kupit-Geroin-Metadon-Liriku-Tramadol-Sebu-Filippiny-12-20
Ищешь музыку? скачать музыку без регистрации популярные треки, новые релизы, плейлисты по жанрам и настроению. Удобный плеер, поиск по исполнителям и альбомам, стабильное качество звука. Включайте музыку в любое время.
Bond Central Hub – Fast-loading pages, polished interface, and browsing content is effortless.
The Keystone Hub – Pages render quickly, layout is neat, and content is effortless to read.
Bonding guide – Simple design and practical content make the site very approachable.
Portfolio – Project examples are displayed neatly, and images load efficiently.
OB Hub Online – Menus are clear, pages load quickly, and content is straightforward.
Partners – Professional structure, smooth menus, and information is readable.
Tutorials – Step-by-step instructions, clear pages, and fast loading.
Horizon Online – Clean first impression, quick page loads, and content is readable.
Bond reference – Smooth navigation and a clean overall look.
https://social.japrime.id/read-blog/298495
https://www.nespapool.org/Buyers-Owners/Get-Inspired/Awards-Gallery/emodule/1877/eitem/2386
CornerPeak portal hub – Well-organized site with a clean design and fast navigation.
https://telegra.ph/Kupit-mef-gashish-boshki-krb-kokain-amfetamin-12-19
Mainstay Portal – Smooth interface, well-structured sections, and content is easy to digest.
Blog – Modern pages, quick loading, and information is digestible.
Summit Axis – Layout is clean, navigation is easy, and content is simple to follow.
Official Durable Capital – Simple design and concise content make finding information easy.
Orbit Hub – Layout is clean, pages load fast, and content is easy to read.
Vector Online – Well-structured layout, fast pages, and content is easy to digest.
Portfolio – Project galleries are displayed neatly, and images load smoothly.
Horizon Spot – Modern look, intuitive menus, and content is easy to scan.
Partners – Professional structure, easy menus, and information is readable.
Trusted Horizon Base – Organized pages and clear sections make information easy to find.
Official Cohesion Bond – Helpful explanations that didn’t take long to understand.
актуальная ссылка на kraken
В глубинах холодного моря жил древний Кракен, охранявший зеркала памяти. Эти зеркала не отражали лица — они показывали страхи, мечты и забытые решения каждого, кто осмеливался взглянуть в их гладь. Когда шторм поднимался, щупальца Кракена тянулись к поверхности, защищая зеркала от жадных глаз. Моряки верили: если зеркало треснет, море потеряет равновесие. Поэтому легенда учила уважать тайны глубин и помнить, что не каждое отражение стоит искать.
Blog – Modern layout, pages are easy to browse, and content feels approachable.
need a video? milan production company offering full-cycle services: concept, scripting, filming, editing and post-production. Commercials, corporate videos, social media content and branded storytelling. Professional crew, modern equipment and a creative approach tailored to your goals.
Shop – Fast-loading sections, intuitive layout, and professional presentation.
Official Cornerstone Axis – Clean layout, easy to browse, and information is well-presented.
https://Classifieds4Free.biz/588/posts/1/1/1938356.html
Bond Link – User-friendly interface, well-structured content, and browsing is simple.
https://telegra.ph/Kupit-Geroin-Metadon-Liriku-Tramadol-YUehn-Long-12-20
дайсон официальный сервисный дайсон официальный сервисный .
Summit Link – Pages respond quickly, and navigation feels effortless on every section.
Bond Portal – Design is professional, menus are clear, and content reads easily.
dyson пылесос интернет ofitsialnyj-sajt-dn-1.ru .
Press – News updates are accessible, and sections are well-arranged.
Impact Online – Clean design, responsive pages, and content is easy to locate.
дайсон официальный интернет магазин в москве дайсон официальный интернет магазин в москве .
Zenith Overview – The site design is simple and user-friendly, making it easy to read.
Здарова народ.
Хочу учить испанский в Испании в следующем году.
Поддержка у них выглядит достойно.
Нашел это тут:
kraken рабочая ссылка onion
Удачи в учебе.
Durable Link hub – Clean design and straightforward content make it easy to navigate.
Features – Neat layout, smooth interface, and content is understandable.
Documentation – Clean pages, fast navigation, and content is reliable.
Collective Anchor website – Consistently smooth and simple to use.
Legacy Corner – Professional layout, pages render quickly, and content is easy to digest.
Covenant Bond – Informative and easy to read, content is clear without feeling heavy.
Trusted Legacy Insight – Pages are organized, content is readable, and navigation feels intuitive.
Measured Corner – Professional layout, pages render fast, and information is easy to digest.
Services – Fast-loading pages, intuitive structure, and content is easy to follow.
Paragon Portal Online – Pages render quickly, layout is neat, and information is straightforward.
Summit Hub – Pages load fast and navigation feels intuitive throughout the site.
https://telegra.ph/Kupit-amfetamin-Vena-12-19-2
https://www.saken.sa/profile/nmn23112122/profile
Impact Portal – Pages load quickly, layout is tidy, and content is straightforward.
Gallery – Images display quickly, and browsing feels effortless.
kraken onion
В глубинах холодного моря жил древний Кракен, охранявший зеркала памяти. Эти зеркала не отражали лица — они показывали страхи, мечты и забытые решения каждого, кто осмеливался взглянуть в их гладь. Когда шторм поднимался, щупальца Кракена тянулись к поверхности, защищая зеркала от жадных глаз. Моряки верили: если зеркало треснет, море потеряет равновесие. Поэтому легенда учила уважать тайны глубин и помнить, что не каждое отражение стоит искать.
News – Crisp design, pages load fast, and content is straightforward.
Login – Smooth site flow, simple interface and well-organized pages.
Bonding hub – Simple layout and well-organized pages make it effortless to explore.
Partners – Professional layout, simple menus, and information is readable.
Anchor Central – Well-organized sections, smooth navigation, and content is clear.
Unified Anchor Navigator – Simple interface, organized content, and smooth navigation create a reliable experience.
бытовая техника дайсон ofitsialnyj-sajt-dn.ru .
The Legacy Link – Professional design, headings are clear, and content is simple to scan.
Paramount Central Hub – Design is professional, navigation is simple, and pages load without lag.
Surefoot Knowledge – Well-organized pages and smooth menus make content clear and accessible.
Bond Gateway – Structured layout, responsive pages, and information is concise and accessible.
AboutUs – Well-organized layout, clear sections, and browsing feels effortless.
https://telegra.ph/Laoag-kupit-Amfetamin-Mefedron-A-pvp-Alfa-PVP-12-20
HB Link – Smooth experience, content is structured well, easy to skim through.
ZenPath Portal – Content loads quickly and navigation is intuitive throughout.
Bonding guide – Pages load quickly and content is well-structured for easy understanding.
Bond overview – Clean design and content is very straightforward.
BoldHub – Easy navigation and engaging articles make exploring trends fun.
Resources – Informative sections, visually tidy and user-friendly.
Visit Site – Layout is crisp, browsing is easy, and content feels trustworthy and clear.
start here – Well-organized design, predictable navigation, and content is clear throughout
Anchor Online – Well-structured pages, quick browsing, and information is clear.
PF Portal – Layout is organized, browsing is effortless, and content is concise and readable.
Unity Harbor Access – Professional design and intuitive menus make content simple to navigate.
Integra Portal – Smooth interface with well-organized content, reading is straightforward.
SurePath Center – Pages load fast and the site structure supports effortless browsing.
Resources – Neat layout, smooth browsing, and information is accessible.
browse here – Concept is straightforward, implemented effectively, and promotes teamwork
Bond Central – Layout is tidy, everything responds quickly, making browsing a breeze.
PlannerWorks – User-friendly layout and practical advice make scheduling tasks quick and easy.
Crossroad resource – Well-organized pages with readable and useful information.
CoreBridge services – Easy to use and motivating for creative thinking.
https://telegra.ph/Kupit-Amfetamin-Mefedron-A-pvp-Alfa-PVP-Novouzensk-12-20-2
Contact – Simple interface, navigation flows naturally, and content is approachable.
Community – Easy to explore, organized content, and smooth navigation.
Pricing – Clean sections, fast navigation, and information is easy to digest.
Monarch Hub – Navigation is seamless, layout is tidy, and information is easy to find.
web access – Simple layout, responsive pages, and content is concise and understandable
Pathway Connect – User-friendly design, quick loading pages, and information is simple to follow.
Integrity Online – Clean structure, fast pages, and content is easy to follow.
Synergy Connect – Well-structured content ensures users can understand offerings without confusion.
Valor Bond Linkup – Clear headings and concise text provide a smooth user experience.
landing page – Fresh ideas on display, layout is clean, and pages encourage creative thinking
Kra47.at
В глубинах холодного моря жил древний Кракен, охранявший зеркала памяти. Эти зеркала не отражали лица — они показывали страхи, мечты и забытые решения каждого, кто осмеливался взглянуть в их гладь. Когда шторм поднимался, щупальца Кракена тянулись к поверхности, защищая зеркала от жадных глаз. Моряки верили: если зеркало треснет, море потеряет равновесие. Поэтому легенда учила уважать тайны глубин и помнить, что не каждое отражение стоит искать.
Bond Online – Layout is tidy, pages respond promptly, and the reading experience is enjoyable.
Signup – Clean layout, fast navigation, and content is easy to read.
PulsePoint – Smooth interface, finding trending topics is effortless.
CoreLynx Bond page – Easy to understand and very quick to navigate.
Crown Capital network – Simple navigation and concise content make information quick to absorb.
Support Services – Smooth browsing, engaging features, and content is informative and accessible.
Blog – Modern layout, fast pages, and reading feels natural.
Bond Central – Navigation is smooth, sections are well-structured, and information is clear.
С нами вы получите профессиональную дезинфекцию помещений после инфекционных заболеваний, удаление плесени и устранение неприятных запахов, включая глубокую очистку вентиляции и обработку транспортных средств. Используемые препараты не оставляют следов, безопасны для интерьера и подходят для любых условий. Наша команда сертифицированных специалистов гарантирует быстрый и надежный результат.
https://dez-tsentr.ru
landing page – Pages are arranged neatly, navigation works as expected, and readability is good
Contact – Well-laid-out sections, easy to reach the right information.
https://telegra.ph/Elec-kupit-narkotiki-12-19-2
FAQ – Straightforward layout, simple answers, and smooth navigation.
Iron Space – Clean design, intuitive menus, and content is easy to follow.
Peakline Capital – Easy browsing, concise content, and site structure is very clear.
Talon Insight – Quick navigation with content that is concise and simple to understand.
Resources – Minimal design, intuitive navigation, and information is accessible.
Value Crest Guide – Clean design and structured content allow information to be accessed easily.
site overview – Creative concepts showcased well, navigating the site is a breeze
Bond Online – Well-structured content, responsive layout, and browsing is very simple.
ActionBase – Organized steps and intuitive explanations help follow along quickly.
MA Connect – Design is professional, menus are easy to navigate, and information is concise.
Portfolio – Neat structure, simple navigation, and content is professional and clear.
site entry – Pages feel polished, navigation is easy, and content is well structured
Resources – Minimal interface, navigation is simple, and content is accessible.
Home – Simple layout, easy to navigate and pages load instantly.
https://telegra.ph/Kupit-Mefedron-Gashish-Kannabis-Skorost-Ko-Tao-12-20-2
PT Connect Hub – Layout feels clean, content is reliable, and pages load quickly.
дайсон россия официальный dn-kupit-2.ru .
Talon Connect – Quick-loading pages with navigation that feels simple and user-friendly.
Testimonials – Neat layout, effortless reading, and content is reliable.
Visit Vantage Bond – Pages load quickly, design feels clean, and information is clear for users.
digital portal – Concepts are fun and engaging, pages load well, and ideas spark new perspectives
сайт магазина дайсон ofitsialnyj-sajt-dn-1.ru .
BrightBase – Clear sections and responsive layout help me locate options quickly.
direct link – Easy browsing, fast page speed, and information is well-organized and dependable
Significant Studio – Clean layout, fast loading pages, and information is easy to follow.
Portfolio – Sleek design, intuitive flow, and content feels accessible.
Documentation – Clean layout, fast pages, and content is reliable.
Features – Organized structure, smooth navigation, and text is easy to follow.
https://telegra.ph/Kupit-mefedron-zakladku-Pyatigorsk-12-19
True Harbor Explorer Hub – Site feels organized, with clear navigation and readable content throughout.
digital shop – Deals are easy to find, prices are sensible, and descriptions are concise
Support – Well-arranged content, user-friendly layout, and quick browsing.
Veracity Bond Connect – Clean pages, smooth navigation, and easily digestible content enhance the experience.
CoreNavigator – User-friendly layout and actionable tips make navigating simple.
Кракен kra46.cc
В глубинах холодного моря жил древний Кракен, охранявший зеркала памяти. Эти зеркала не отражали лица — они показывали страхи, мечты и забытые решения каждого, кто осмеливался взглянуть в их гладь. Когда шторм поднимался, щупальца Кракена тянулись к поверхности, защищая зеркала от жадных глаз. Моряки верили: если зеркало треснет, море потеряет равновесие. Поэтому легенда учила уважать тайны глубин и помнить, что не каждое отражение стоит искать.
интернет пылесосов дайсон ofitsialnyj-sajt-dn.ru .
check this site – Straightforward design, good first impression, and content is easy to read
Contact – Easy-to-use interface, navigation is natural, and content is approachable.
True Path Explorer – Well-thought-out design helps users find essential content effortlessly.
https://moz-news.com/profile.php?user=aurelio_reichstein.495847&mod=space&from=space&op=userinfo
start exploring – Creative concepts flow naturally, pages inspire curiosity and imagination
Resources – Minimalist layout, smooth navigation, and content is easy to follow.
https://trading24inw3.blogspot.com/2026/01/how-to-get-1xbet-promo-code-somalia.html
https://telegra.ph/Ostrov-Fregat-kupit-Kokain-Mefedron-Skorost-Amfetamin-12-20
Verifiable Bond Access – Pages load smoothly, content is straightforward, and navigation feels natural.
VisionDesk – The resources are clear and the layout makes exploring ideas very easy.
УАЗ ПАТРИОТ АКПП УАЗ ПАТРИОТ с АКПП: Выбор тех, кто ценит надежность, проходимость и комфорт. Этот автомобиль сочетает в себе легендарную внедорожную мощь и современные технологии, делая его идеальным для самых разных условий эксплуатации. Автоматическая коробка передач значительно упрощает управление, особенно в условиях бездорожья и городского трафика, позволяя водителю сосредоточиться на дороге и наслаждаться поездкой. УАЗ ПАТРИОТ с АКПП – это просторный салон, вместительный багажник, рамная конструкция и внушительный клиренс, что гарантирует уверенность на любых дорогах. Это ваш надежный партнер в любом путешествии, будь то поездка на рыбалку, охоту или просто активный отдых на природе. С УАЗ ПАТРИОТ АКПП вы сможете покорить любые дороги и открыть для себя новые горизонты.
go to site – Layout is uncluttered, navigation is simple, and information is clear for users
RestoQ Info Center – Layout is neat, navigation is seamless, and content is concise and trustworthy.
go to site – Trendy selections easy to browse, layout feels modern and motivating
Kraken kra46.cc
В глубинах холодного моря жил древний Кракен, охранявший зеркала памяти. Эти зеркала не отражали лица — они показывали страхи, мечты и забытые решения каждого, кто осмеливался взглянуть в их гладь. Когда шторм поднимался, щупальца Кракена тянулись к поверхности, защищая зеркала от жадных глаз. Моряки верили: если зеркало треснет, море потеряет равновесие. Поэтому легенда учила уважать тайны глубин и помнить, что не каждое отражение стоит искать.
https://whelex.com/profile.php?op=userinfo&action=view&name=Your_Account&from=space&userinfo=fay.leibowitz_495847
Veritas Capital Base – Fast pages, organized content, and clear headings make browsing effortless.
https://new.express.adobe.com/webpage/mL2g43FoMsbut
ActionAnchor – Logical guidance and concise layout make understanding easy.
Features – Organized layout, smooth menus, and text is easy to follow.
official site – Pages move smoothly, design is clean, and information is simple to read
интернет магазин dyson пылесосов dn-kupit-2.ru .
web hub – Smooth navigation, entertaining site, and pages are easy to browse
кайт хургада кайт сафари
Portfolio – Neat structure, simple menus, and content appears professional.
Хочешь познакомится? https://znakomstva-blizko.ru удобный способ найти общение, дружбу или отношения. Подборки чатов и ботов, фильтры по городу и интересам, анонимность и быстрый старт. Общайтесь без лишних регистраций и сложных анкет.
online platform – A solid design with quick page loads and well-organized sections
start exploring – Trend-focused items showcased, overall aesthetic is contemporary and chic
CAC8899 Insight – Smooth browsing, clean design, and content is simple to follow.
ставки на спорт Промокоды букмекеров — это специальные комбинации символов, которые позволяют игрокам получить дополнительные бонусы и преимущества при регистрации или совершении депозитов. Промокоды могут предоставляться в рамках акций, партнерских программ или рассылаться зарегистрированным пользователям. Они могут давать право на увеличенный приветственный бонус, бесплатную ставку, повышенные коэффициенты или другие привилегии. Чтобы воспользоваться промокодом, необходимо ввести его в специальное поле при регистрации или внесении депозита. Важно помнить, что промокоды имеют ограниченный срок действия, и их необходимо использовать до истечения этого срока. Также необходимо внимательно ознакомиться с условиями использования промокода, чтобы убедиться, что он соответствует вашим потребностям и возможностям.
профессиональная школа вокала https://uroki-vokala-moskva.ru
browse here – Simple structure, navigation works well, and content is easy to follow
дайсон фен купить в москве официальный ofitsialnyj-sajt-dn-1.ru .
site entry – Simple approach, executed smoothly, and promotes collective learning
плоская крыша цена под ключ https://ploskaya-krovlya-moskva.ru
Bond overview – Smooth, intuitive design that makes content easy to read.
A cozy online shop – The experience is smooth, and the selection feels carefully curated.
Stylish online boutique – Navigation was smooth, and products were displayed attractively.
доставка морепродуктов https://mor-produkt.ru
Российское производство снаряжения для активного отдыха завоевывает признание благодаря сочетанию качества, адаптации к суровым климатическим условиям и доступной ценовой политики, что особенно важно для любителей рыбалки и охоты. Компания Novatex из Екатеринбурга специализируется на выпуске функциональной одежды и экипировки, разработанной с учетом требований профессионалов и энтузиастов outdoor-активностей — от костюмов и курток до тактических ботинок серии 7.62, обеспечивающих надежную защиту в экстремальных условиях. На портале https://nova-tex.ru/ представлен широкий ассортимент товаров: термобелье, забродные комплекты, рюкзаки, палатки, спальные мешки и аксессуары, необходимые для комфортного пребывания на природе в любое время года. Удобная система доставки охватывает более пятидесяти городов России от Калининграда до Владивостока, а возможность оплаты частями делает покупку качественного снаряжения доступной каждому, кто ценит надежность отечественных брендов и стремится к безопасному отдыху на природе.
сайт про дачу https://dacha-ua.com в Україні: сад і город, посівний календар 2026, вирощування овочів, ягід і квітів, догляд за ґрунтом, добрива та захист рослин, ландшафтний дизайн, будівництво й інструменти. Практичні поради та інструкції.
Golden Maple Curated Corner – Items are clearly displayed, making browsing enjoyable.
Omnigram https://omnigram.ru/ — CRM в Телеграме: собирает диалоги из WhatsApp, Avito, Telegram-ботов, Gmail и других каналов прямо в Telegram-группы с топиками по клиентам. Команда отвечает вместе, делает внутренние заметки, ставит статусы сделок командами (/paid, /closed), подключает ИИ-помощника и вебхуки/API. Старт — за пару минут (QR). Тариф от 1000 ?/мес: 5 000 сообщений и 1 бот; дальше — pay-as-you-go. Работает на любом устройстве, доступ можно разграничить.
kraken ссылка
В глубинах холодного моря жил древний Кракен, охранявший зеркала памяти. Эти зеркала не отражали лица — они показывали страхи, мечты и забытые решения каждого, кто осмеливался взглянуть в их гладь. Когда шторм поднимался, щупальца Кракена тянулись к поверхности, защищая зеркала от жадных глаз. Моряки верили: если зеркало треснет, море потеряет равновесие. Поэтому легенда учила уважать тайны глубин и помнить, что не каждое отражение стоит искать.
CoreStead resource – Helpful and concise content that’s simple to understand.
УАЗ ПАТРИОТ АКПП УАЗ ПАТРИОТ с АКПП: Легендарный внедорожник, теперь с автоматической коробкой передач, предлагает беспрецедентный уровень комфорта и удобства управления. Забудьте о необходимости постоянно переключать передачи в сложных дорожных условиях. АКПП позволит вам полностью сосредоточиться на вождении и наслаждаться приключениями, будь то покорение бездорожья или комфортная поездка по городу. Просторный салон, вместительный багажник и мощный двигатель делают УАЗ ПАТРИОТ с АКПП идеальным выбором для тех, кто ценит свободу передвижения и не боится вызовов природы. Этот автомобиль станет вашим надежным спутником в любых путешествиях и поможет справиться с любыми задачами, которые поставит перед вами жизнь. Откройте для себя новые возможности с УАЗ ПАТРИОТ АКПП!
Нужна фотокнига? создать фотокнигу онлайн и заказать печать из ваших фотографий в высоком качестве. Разные форматы и обложки, плотная бумага, современный дизайн. Поможем с макетом, быстрая печать и доставка. Идеально для подарка и семейных архивов
20Tekzader Hub – Clean design, smooth navigation, and content is simple to read and follow.
Calm online treasures – The site feels welcoming, and products are easy to navigate and enjoy.
Промышленные полы требуют профессионального подхода к проектированию, устройству и последующему обслуживанию объектов. Компания МВПОЛ специализируется на создании износостойких покрытий для складов, производственных цехов и логистических комплексов. Полимерные наливные полы выдерживают интенсивные нагрузки и сохраняют эксплуатационные характеристики долгие годы. Специалисты выполняют работы с гарантией от двух лет, используя сертифицированные материалы европейского качества. Подробнее об услугах и технологиях можно узнать на сайте https://mvpol.ru/ в разделе проектов. Бесплатный выезд инженера и составление сметы помогают точно спланировать бюджет строительства.
Хочешь фотокнигу? фотокнига заказать индивидуальный дизайн, премиальная печать и аккуратная сборка. Большой выбор размеров и переплётов, помощь с версткой. Быстрое производство и доставка
dyson shop ofitsialnyj-sajt-dn.ru .
Бутик-отель с бассейном и спа Gentalion https://gentalion.ru/ у метро Белорусская в центре Москвы – это отличные и комфортные номера, превосходный сервис и современное высококлассное оснащение! Наш отель близок к культурным сокровищницам столицы: музеям Кремля, Большому театру, Третьяковской галерее. Радушие, вежливость и забота о клиентах ожидают вас у нас в гостях!
CoreWard network – Smooth interface and trustworthy details throughout the pages.
Наш IT-портал https://nashkomp.ru/ – ваш навигатор в мире высоких технологий. Ежедневно публикуем актуальные новости из жизни индустрии, обзоры мощного железа и тесты новейших гаджетов. На сайте вы найдете аналитику рынка программного обеспечения, практические руководства по программированию и советы по кибербезопасности. Мы пишем просто о сложном: от архитектуры нейросетей до сборки игрового ПК. Наша цель — создать экспертное сообщество для профессионалов и энтузиастов. Будьте в курсе будущего сегодня вместе с нами!
Hollow Creek Outlet – Clean layout, browsing is smooth and items are easy to find.
Smooth digital market – The site feels responsive, with a neat and clear layout.
Ivory Branch Goods – Pleasant navigation with carefully chosen items.
Curated online Drift Pine – Products are neatly displayed, and exploration is effortless.
Moonfall Treasures – Easy-to-browse layout with visually clear items.
top asian porn web
Bond overview – Well-structured pages and a polished, professional design.
lesbian sex
Продажа тяговых https://faamru.com аккумуляторных батарей для вилочных погрузчиков, ричтраков, электротележек и штабелеров. Решения для интенсивной складской работы: стабильная мощность, долгий ресурс, надёжная работа в сменном режиме, помощь с подбором АКБ по параметрам техники и оперативная поставка под задачу
Продажа тяговых https://ab-resurs.ru аккумуляторных батарей для вилочных погрузчиков и штабелеров. Надёжные решения для стабильной работы складской техники: большой выбор АКБ, профессиональный подбор по параметрам, консультации специалистов, гарантия и оперативная поставка для складов и производств по всей России
LSC Marketplace – Easy to browse with thoughtfully curated items.
Handmade market finds – The items feel authentic and thoughtfully put together.
Hollow Ridge Goods – Pages load quickly, products are well organized and browsing is smooth.
CHB-AC Resource – Pages respond quickly, design is simple, and information is concise and clear.
Emporium Picks – Pages load quickly, and items feel high-quality and curated.
Moonfall Online – Easy-to-navigate design with items clearly displayed.
Driftstone online treasures – Each item is easy to explore, and descriptions are informative and genuine.
амулет Оргониттрискель: оргонит с трискелем
https://bestkoditips.mn.co/members/37526533
About Us – Clean layout, smooth menus, and information is easy to follow.
Bonding guide – Clear structure and user-friendly pages make navigation effortless.
Lighthouse Essentials – Items are presented clearly and adding to cart is easy.
штабелер для склада характеристики Штабелер для склада цена купить: выгодная цена на складской.
MF Online Hub – Simple navigation with clear product presentation and enjoyable browsing.
Threaded Gold – Shopping is smooth and products appear thoughtfully displayed.
HoneyFern Shop – Layout is clean, products are visible and pages load quickly.
Inviting boutique space – The overall vibe is welcoming, and products feel carefully chosen.
black gay porn sex video
Driftwood Lane product corner – Layout is simple, and all pages respond fast.
УАЗ ПАТРИОТ АКПП УАЗ ПАТРИОТ с АКПП: Идеальное сочетание классической проходимости и современного комфорта. Автоматическая коробка передач превращает управление легендарным внедорожником в удовольствие, особенно в сложных городских условиях и на пересеченной местности. Этот автомобиль создан для тех, кто не боится трудностей и ценит свободу передвижения. УАЗ ПАТРИОТ АКПП обладает проверенной временем конструкцией, просторным салоном, вместительным багажником и мощным двигателем, готовым к любым испытаниям. Вы сможете с легкостью преодолевать бездорожье, чувствуя себя уверенно и комфортно за рулем. УАЗ ПАТРИОТ с АКПП – это ваш надежный партнер в любых приключениях, будь то поездка на рыбалку, охоту или путешествие по диким местам. Он готов к любым испытаниям и станет незаменимым помощником в вашей активной жизни.
Covenant portal – Simple layout with information that’s easy to understand.
Kra46.cc
В глубинах холодного моря жил древний Кракен, охранявший зеркала памяти. Эти зеркала не отражали лица — они показывали страхи, мечты и забытые решения каждого, кто осмеливался взглянуть в их гладь. Когда шторм поднимался, щупальца Кракена тянулись к поверхности, защищая зеркала от жадных глаз. Моряки верили: если зеркало треснет, море потеряет равновесие. Поэтому легенда учила уважать тайны глубин и помнить, что не каждое отражение стоит искать.
прогнозы на хоккей Промокоды букмекеров: активируй эксклюзивные промокоды и получай больше выгоды.
https://open.mit.edu/profile/01KDXKMKEKYR2RPM29T73DYKGJ/
Moonfall Essentials – Fast navigation, simple browsing, and items are well-described.
LF Picks – Easy-to-navigate pages with clear product descriptions.
adult xxx video hot porn site
Gold Vein Selects – Pleasant site design and browsing feels organized.
порно с дедом
Edouard Chambost Navigator – Easy to explore, pages load fast, and information is accessible and concise.
Coastal handmade finds – Browsing feels effortless, and everything is well organized.
Unique coastal boutique – Products are clearly displayed, making shopping pleasant and intuitive.
CrestLink page – Well-laid-out information and smooth browsing make a good impression.
Moonfall Online Shop – Clean interface with products that are simple to explore.
LW Online Hub – Pleasant shopping flow with fast page loads.
live porn cams
Harbor Light Goods – Nice marketplace design, items appear thoughtfully arranged.
best ever free porn sex pictures
InkedMeadow Online Finds Hub – Great experience overall, products feel unique and pages load quickly.
http://mariland.org/index.php?subaction=userinfo&user=asidu
Emberfield online treasures – Browsing is intuitive, and product presentation is clear.
Easy outlet shopping – The store feels straightforward, with fair pricing and smooth checkout.
CrestPoint info – Smooth navigation and readable, useful material throughout.
Moonfall Specials – Smooth experience, pages load quickly, and items are easy to find.
LB Collection – Clean design, fast navigation, and products are well presented.
Harvest Lumen – Lovely store layout, browsing feels easy and products are appealing.
grain deals online – Good assortment, reasonable pricing and quick turnaround on shipping.
Iron Hollow Picks Hub – Fast navigation, products are well displayed and shopping is easy.
Al-Brett Online – Navigation is intuitive, site feels streamlined, and information is concise and trustworthy.
a href=”https://moonpetalcollective.shop/” />moon petal finds – Smooth browsing and a selection of distinctive items made it fun.
Inviting Emberleaf shop – Layout is neat, and finding products is simple.
kraken зеркала
В глубинах холодного моря жил древний Кракен, охранявший зеркала памяти. Эти зеркала не отражали лица — они показывали страхи, мечты и забытые решения каждого, кто осмеливался взглянуть в их гладь. Когда шторм поднимался, щупальца Кракена тянулись к поверхности, защищая зеркала от жадных глаз. Моряки верили: если зеркало треснет, море потеряет равновесие. Поэтому легенда учила уважать тайны глубин и помнить, что не каждое отражение стоит искать.
Well-organized product shop – Every product is presented clearly, and the site feels welcoming.
trend alert deals – Site navigation is smooth, found several stylish items.
unique value curated – Pleasant layout, items are nicely described and checkout works easily.
Moonfall Online – Easy-to-navigate design with items clearly displayed.
Bonding guide – Clean design and structured content make it easy to find what’s needed.
opal grain online – Selection is impressive, site layout is clean and user-friendly.
LunarCoast Online Shop – Clean design and clear product descriptions make shopping simple.
Quiet Stone Treasures – Enjoyed exploring, descriptions are clear and site works well overall.
High Coast Selections – Clean design overall, navigation feels intuitive and products are easy to find.
loom style collection – Great-looking items, enjoyable browsing and an easy payment process.
Ищете взломать счет и вернуть деньги? xakerforum.com/threads/uslugi-xakera-vzlom-tajnaja-slezhka.282/page-6 — это тематический ресурс для тех, кто серьезно относится к кибербезопасности, анонимности и современным цифровым инструментам. На форуме собраны тематические разделы по защите информации, пентесту, анализу уязвимостей, обзору прикладных инструментов и живому обмену опытом между экспертами и начинающими. Живое сообщество, свежие гайды и подробные технические разборы позволяют участникам быстро получать сжатую, практическую информацию без лишней теории и давно неработающих методик. На форуме поощряются точные формулировки, детальный анализ реальных кейсов и проверенные на практике решения.
IronLeaf Online Deals – Products are easy to spot and the site is responsive.
moon ridge essentials – Clean interface with quality products and an effortless ordering experience.
Charming Ember Quarry corner – Products are presented well, and the site is simple to navigate.
daily tips online – Easy navigation, useful advice, and overall relaxed feel.
Crimson Meadow online – Browsing feels easy, and product details are clear and informative.
Moonfall Online Shop – Clean interface with products that are simple to explore.
luxury finds online shop – Premium browsing, everything feels polished and well organized.
Bond platform – Clear sections and easy-to-follow information make reading simple.
Shop Opal Grain – Good value items, pages load quickly and browsing feels effortless.
LunarFern Hub Online – Intuitive layout and shopping is straightforward.
HighRidge Finds Shop – Nice marketplace vibe, items are well organized and shopping is effortless.
Quiet Stone Treasures – Enjoyed exploring, descriptions are clear and site works well overall.
innovative idea space – A motivating site that blends interaction with inspiration.
moon veil online store – Helpful descriptions and realistic visuals made browsing very enjoyable.
Curated Emberstone corner – Items are easy to browse, and the shop feels neat.
ILM Marketplace – Easy to navigate and products arrive quickly.
Moonfall Specials – Smooth experience, pages load quickly, and items are easy to find.
Testimonials – Clean structure, navigation is effortless, and reading is simple.
чёрный гей порно секс видео
modern ideas click – Well-organized content, browsing feels effortless and informative.
Продажа тяговых https://faamru.com аккумуляторных батарей для вилочных погрузчиков, ричтраков, электротележек и штабелеров. Решения для интенсивной складской работы: стабильная мощность, долгий ресурс, надёжная работа в сменном режиме, помощь с подбором АКБ по параметрам техники и оперативная поставка под задачу
Curated niche online – Everything loads quickly, and browsing feels effortless.
amberfield curated corner – Unique items, navigation is easy and products feel special.
opal river market – Clean layout, items are appealing and browsing feels effortless.
LunarField Online Shop – Smooth navigation and items feel well curated.
quiet tide online finds – Great selection, navigation is intuitive and checkout is simple.
shoreline goods – Fast access to pages, simple descriptions and authentic-looking pictures.
harvest morning shop – Quick loading pages, well-selected items, and a good overall impression.
Your point of view caught my eye and was very interesting. Thanks. I have a question for you.
Moonfall Online – Easy-to-navigate design with items clearly displayed.
IronPetal Boutique – Great shopping flow and intuitive interface.
forward now portal – Encouraging content, layout is simple, navigation feels intuitive.
opalshore treasures – Good variety, product photos are clear and shopping flows smoothly.
ambergrovecraft.shop – Genuine and authentic feel, handmade products are clearly highlighted.
Посетите сайт https://strong.by/ и вы сможете купить новые и б/у запчасти с разбора в Минске. У нас большое новое поступление машин на разбор, так что вы без проблем найдете качественные запчасти по выгодной цене для своего авто у нас. Просто выбирайте марку авто, а мы покажем вам все варианты. Забирайте запчасти самостоятельно или воспользуйтесь доставкой день в день по Минску.
LunarHarvest Essentials – Pleasant layout and effortless shopping experience.
ко ланта ко ланта
сколько стоит плоская кровля https://ustrojstvo-ploskoj-krovli.ru
защита_от_негатива_в_доме Кулонженский: Кулон для женщин.
morning quartz corner – Minimalist aesthetic, clear descriptions, and a relaxed browsing experience.
thoughtful shopping space – From start to finish it feels considered, with a layout that stays simple.
Продажа тяговых https://ab-resurs.ru аккумуляторных батарей для вилочных погрузчиков и штабелеров. Надёжные решения для стабильной работы складской техники: большой выбор АКБ, профессиональный подбор по параметрам, консультации специалистов, гарантия и оперативная поставка для складов и производств по всей России
rift and root hub – Nice collection, descriptions are clear and shopping feels straightforward.
IWC Hub – Simple to browse with an organized product layout.
moment matters online – Pleasant interface, browsing flows easily, and leaves you thinking positively.
opal wild picks – Nice selection, navigation is intuitive and products are engaging.
Amber Hollow Online Hub – Layout is neat, browsing feels effortless and pages load promptly.
Отдых в мегаполисе требует особого подхода — важно найти место, где можно расслабиться вдали от шума. Сауна в Коптево на Большой Академической улице предлагает уютную атмосферу после капитального ремонта и работает круглосуточно. Гости получают доступ к парной из берёзы, бассейну длиной пятнадцать метров и караоке для весёлых вечеров. Заведение лояльно относится к пожеланиям посетителей — разрешено приносить собственные напитки и угощения. Подробнее об услугах и актуальных ценах можно узнать на https://sauna-koptevo.ru/ перед бронированием времени. Идеальная чистота и соблюдение санитарных норм гарантируют комфортный отдых для компаний до шести человек.
mossandmaple.shop – The aesthetic is lovely, products feel carefully chosen and descriptions are clear.
trading marketplace – Easy to get absorbed with so many interesting options.
Riftstone Essentials – Smooth browsing, products look appealing and descriptions are helpful.
Кракен зеркала kra46.at
В глубинах холодного моря жил древний Кракен, охранявший зеркала памяти. Эти зеркала не отражали лица — они показывали страхи, мечты и забытые решения каждого, кто осмеливался взглянуть в их гладь. Когда шторм поднимался, щупальца Кракена тянулись к поверхности, защищая зеркала от жадных глаз. Моряки верили: если зеркало треснет, море потеряет равновесие. Поэтому легенда учила уважать тайны глубин и помнить, что не каждое отражение стоит искать.
inspiration hub online – Easy navigation, polished layout, and ideas are fun to explore.
Petal & Ember Treasures – Smooth experience, products are well-photographed and easy to explore.
amber trail online – Items feel reliable, with descriptions that explain features thoroughly.
Salt Meadow Website – Easy to browse and full of interesting finds.
mosslight curated shop – Smooth browsing experience with a pleasing design and functional interface.
Suncrest Online Shop – The products are thoughtfully arranged and visually appealing.
unique trade goods – Interesting mix of products that held my attention.
Купить iPhone 17 itcrumbs.ru новая модель Apple с современным дизайном, высокой производительностью и улучшенной камерой. Оригинальная техника, гарантия, проверка серийного номера. Выбор конфигураций памяти, удобная оплата и быстрая доставка.
Аренда серверов https://qckl.net/servers.html с гарантией стабильности: мощные конфигурации, высокая скорость сети и надёжное хранение данных. Масштабируемые решения, резервное копирование и поддержка 24/7. Оптимально для бизнеса и IT-проектов.
River Bloom Atelier – Beautiful selection, browsing is easy and product photos are clear.
Sunwoven Goods – Enjoyed navigating the site, found great products quickly.
style market click – Nice variety of items, site layout makes exploring simple.
Petal Quarry Online – Pleasant experience, items are well curated and pages load quickly.
Willow Tide Boutique – Lovely boutique, browsing here feels smooth and enjoyable overall.
ashenfernshop.shop – Relaxing vibe, site is easy to navigate and enjoyable to explore.
Нужно авто? murmansk-autodom.ru подбор по марке, бюджету и условиям эксплуатации, проверка юридической чистоты. Помощь с кредитом и обменом, быстро и удобно.
Официальная торговая площадка на кракен шоп с escrow защитой для безопасности всех финансовых транзакций
Salt Wind Studio Shop – The overall vibe is relaxing and thoughtfully designed.
North Bay Emporium – Just visited, seems professional and neatly organized.
Oak Mist Boutique – The shop has a warm, curated vibe and items show care in selection.
Suncrest Lane Marketplace – Clear organization and serene design make browsing effortless.
Thistle & Stone Studio – Cozy design and clear layout make browsing through items enjoyable.
River Quartz Finds Online – Smooth layout, items are well chosen and shopping feels convenient.
pine echo gems – Pleasant experience, everything loads quickly and the site feels organized.
dayaway store click – Smooth navigation, shopping process is simple and fast.
Wind Emporium – Quick to explore, items are easy to find and pages load fast.
Сейчас всё больше игроков интересуются различными дополнениями, читами и скриптами для Roblox — с их помощью можно упростить геймплей, добавить новые функции и разнообразить игры. На одном игровом портале https://joyverse.ru/ регулярно публикуются свежие скрипты, коды и обзоры на игру Роблокс, которые могут пригодиться как новичкам, так и опытным игрокам.
ashen willow shop online – Simple navigation, items are easy to locate and explore.
Visit Sea Breeze Atelier – Everything looks neat and the color choices are easy on the eyes.
Contact – Simple interface, intuitive navigation, and content feels approachable.
petal hub northern – Distinctive items, intuitive layout, and straightforward details.
организация геотехнического мониторинга https://geotekhnicheskij-monitoring-zdanij.ru
Oak Mist Boutique – The shop has a warm, curated vibe and items show care in selection.
Sunfield Curated – Helpful descriptions helped me find products quickly without confusion.
Thunder Willow Finds – The pictures are beautiful, and the product info is straightforward.
Rose Quartz Lane – Nice variety, site runs smoothly and items feel high quality.
pine harbor boutique picks – Loved the layout, products look appealing and browsing feels smooth.
Stone Picks – Browsing is straightforward, pages load quickly and products are accessible.
creative gift corner – Smooth navigation, unique gifts make browsing fun and fast.
дом из бревна проект
MoneyConnect – Step-by-step guidance makes exploring content fast and stress-free.
раздел по обеспечению сохранности объектов культурного наследия https://razdel-osokn.ru
aurora valley store hub – Beautiful product visuals, navigation is simple and pleasant.
Silk Road Global Finds – Unique items were easy to find, with clear details provided.
northfield craft corner – Pleasant experience, the site feels approachable and I’ll check back.
Timber Echo Marketplace – Smooth and easy navigation, and the checkout feels effortless.
Explore Sunforge Emporium – The site runs quickly and navigation on mobile is very fluid.
Окна в Алматы в рассрочку Выбор качественных пластиковых окон – это инвестиция в комфорт, тепло и энергоэффективность вашего дома. В Алматы, в условиях переменчивого климата, это особенно актуально. Компания Okna Service предлагает широкий ассортимент пластиковых окон, отвечающих самым высоким стандартам качества. Okna Service использует только проверенные профильные системы от ведущих производителей. Это гарантирует долговечность, устойчивость к перепадам температур и отличную звукоизоляцию. Вы можете выбрать окна с различной толщиной профиля, количеством камер и типами стеклопакетов, в зависимости от ваших индивидуальных потребностей и бюджета. Помимо качества продукции, Okna Service выделяется своим профессиональным подходом к установке. Квалифицированные монтажники с большим опытом работы гарантируют правильную установку окон, что является критически важным для обеспечения их функциональности и долговечности. Неправильный монтаж может свести на нет все преимущества даже самых дорогих окон. Okna Service предлагает полный спектр услуг, включая замер, изготовление, доставку и установку окон. Компания также предоставляет гарантийное и постгарантийное обслуживание. Вам помогут подобрать оптимальное решение для вашего дома или офиса, учитывая особенности архитектуры и ваши личные пожелания. Выбирая Okna Service, вы выбираете надежность, качество и профессионализм. Улучшите свой дом уже сегодня, установив новые пластиковые окна от Okna Service.
rustandpetal.shop – Easy to navigate, products are clear and descriptions informative and helpful.
pine veil boutique – Products are varied and descriptions are helpful, navigating the site is easy.
Bright New Beginnings – Friendly layout, energetic feel, and welcoming content throughout.
Legacy Online – Clean structure, responsive pages, and content is straightforward.
список зеркал kraken
В глубинах холодного моря жил древний Кракен, охранявший зеркала памяти. Эти зеркала не отражали лица — они показывали страхи, мечты и забытые решения каждого, кто осмеливался взглянуть в их гладь. Когда шторм поднимался, щупальца Кракена тянулись к поверхности, защищая зеркала от жадных глаз. Моряки верили: если зеркало треснет, море потеряет равновесие. Поэтому легенда учила уважать тайны глубин и помнить, что не каждое отражение стоит искать.
https://community.theasianparent.com/q/code_promo_1xbet_2026_1xsun200_bonus_jusqu_%C3%A0_130_le_code_promo_1xbet_1xsun200_o/5801235/amp
Silver Reef Online – The marketplace comes across as dependable with a smooth flow.
https://thefishbowled.com/profile.php?from=space&do=profile&com=profile&user=autumn_sweeney_495848&action=view
CapitalLink – Smooth, informative guides make finding content intuitive.
Timber Echo Curated – The store is simple to explore, and placing orders is straightforward.
Sunharbor Selection – Items are easy to find, and the platform feels safe and organized.
clear focus platform – The messaging is motivating and easy to grasp for immediate action.
Пластиковые окна в Алматы цена Выбор качественных пластиковых окон – это инвестиция в комфорт, тепло и энергоэффективность вашего дома. В Алматы, в условиях переменчивого климата, это особенно актуально. Компания Okna Service предлагает широкий ассортимент пластиковых окон, отвечающих самым высоким стандартам качества. Okna Service использует только проверенные профильные системы от ведущих производителей. Это гарантирует долговечность, устойчивость к перепадам температур и отличную звукоизоляцию. Вы можете выбрать окна с различной толщиной профиля, количеством камер и типами стеклопакетов, в зависимости от ваших индивидуальных потребностей и бюджета. Помимо качества продукции, Okna Service выделяется своим профессиональным подходом к установке. Квалифицированные монтажники с большим опытом работы гарантируют правильную установку окон, что является критически важным для обеспечения их функциональности и долговечности. Неправильный монтаж может свести на нет все преимущества даже самых дорогих окон. Okna Service предлагает полный спектр услуг, включая замер, изготовление, доставку и установку окон. Компания также предоставляет гарантийное и постгарантийное обслуживание. Вам помогут подобрать оптимальное решение для вашего дома или офиса, учитывая особенности архитектуры и ваши личные пожелания. Выбирая Okna Service, вы выбираете надежность, качество и профессионализм. Улучшите свой дом уже сегодня, установив новые пластиковые окна от Okna Service.
SableFern Hub – Great variety, product photos clear and navigation simple to follow.
Quiet Orchard Shop – Pleasant layout, items are easy to explore and feel authentic.
Риобет казино https://riobetcasino-ytr.ru играть онлайн в слоты и live-казино. Разбор регистрации, бонусов, условий игры, вейджера, лимитов и способов вывода средств.
Lifeline Spot – Sleek pages, intuitive menus, and content is readable.
Самозанятые водители и индивидуальные предприниматели получают стабильный доход при подключении к парку AREON. Гибкий график работы позволяет самостоятельно планировать время выполнения заказов и выходные дни. Ежедневные выплаты через приложение Яндекс.Про обеспечивают финансовую предсказуемость и оперативный доступ к средствам. Для регистрации потребуется паспорт, водительские права категории B и разрешение на деятельность такси. Более подробная информация о тарифах и условиях размещена на https://parkareon.ru/ для всех желающих. Повышенные тарифы Комфорт+ и Бизнес доступны после прохождения специального тренинга и собеседования.
Soft Lantern Store – A pleasant, relaxed atmosphere while exploring products.
MoneyLink – Concise instructions help users explore topics naturally.
Saffron Trail Collection – Items well displayed, layout intuitive and shopping feels natural.
Sunharbor Hub – The collective is structured well, making navigation simple for buyers.
Velour Valley Online Store – Gentle colors and intuitive design make the browsing experience relaxing.
Clarity Unlock – Helpful explanations, layout is clean and pages load quickly.
View details: effektive methoden zur linderung von prostatabeschwerden: ihr weg zu mehr lebensqualit?t
Leaving my honest review focused on Crown GreenCasino. I discuss promotions, financial side, and user experience. Emphasizing promotions and withdrawals. Reviewing how the brand loads and completes transactions. Reviewing what’s good and bad I’ve noticed. Explaining what I appreciated and what could be better. Additional information is available in the full review Holyluck
Пластиковые окна в Алматы Выбор качественных пластиковых окон – это инвестиция в комфорт, тепло и энергоэффективность вашего дома. В Алматы, в условиях переменчивого климата, это особенно актуально. Компания Okna Service предлагает широкий ассортимент пластиковых окон, отвечающих самым высоким стандартам качества. Okna Service использует только проверенные профильные системы от ведущих производителей. Это гарантирует долговечность, устойчивость к перепадам температур и отличную звукоизоляцию. Вы можете выбрать окна с различной толщиной профиля, количеством камер и типами стеклопакетов, в зависимости от ваших индивидуальных потребностей и бюджета. Помимо качества продукции, Okna Service выделяется своим профессиональным подходом к установке. Квалифицированные монтажники с большим опытом работы гарантируют правильную установку окон, что является критически важным для обеспечения их функциональности и долговечности. Неправильный монтаж может свести на нет все преимущества даже самых дорогих окон. Okna Service предлагает полный спектр услуг, включая замер, изготовление, доставку и установку окон. Компания также предоставляет гарантийное и постгарантийное обслуживание. Вам помогут подобрать оптимальное решение для вашего дома или офиса, учитывая особенности архитектуры и ваши личные пожелания. Выбирая Okna Service, вы выбираете надежность, качество и профессионализм. Улучшите свой дом уже сегодня, установив новые пластиковые окна от Okna Service.
LS Central – Well-laid-out pages, smooth scrolling, and content is concise.
intuitive planning page – Content emphasizes focus and makes task organization effortless.
Ищете комфортный трансфер из Новосибирска или аэропорта Толмачево в Шерегеш? Посетите https://taximinivan54.ru/sheregesh.html со мной проще и быстрее доехать на трансфер такси межгород Новосибирск Шерегеш. В минивэн поместится вся ваша компания и горнолыжное снаряжение. Приехали, или прилетели и сразу поехали кататься! Цена фиксированная, при заказе. Время поездки от 7 часов. Пассажиров не набираю, едет только ваша группа. Отслеживаю ваш рейс, вожу аккуратно, дорогу знаю наизусть.
Soft Lantern Online Store – Easy on the eyes, making it nice to browse through.
Latest Updates: https://dumplinghood.store/ritzo-casino-review/
Focus Momentum – Enjoyable experience, content is structured clearly and accessible.
purpose-driven platform – Demonstrates that actionable focus turns ideas into results efficiently.
Visit Sunmist Boutique – Soft tones and clean design provide a relaxing shopping atmosphere.
Wild Aura Collection – The website is easy to navigate, and discovering items is quick.
recommended progress link – Motivates readers to maintain consistent progress each day.
helpful guidance site – Content clarity supports structured action and consistent improvement.
forward energy path – Inspires action by showing how energy fuels progress consistently.
Capital Central Hub – Quick-loading pages, polished interface, and browsing content is effortless.
Окна в Алматы в рассрочку Выбор качественных пластиковых окон – это инвестиция в комфорт, тепло и энергоэффективность вашего дома. В Алматы, в условиях переменчивого климата, это особенно актуально. Компания Okna Service предлагает широкий ассортимент пластиковых окон, отвечающих самым высоким стандартам качества. Okna Service использует только проверенные профильные системы от ведущих производителей. Это гарантирует долговечность, устойчивость к перепадам температур и отличную звукоизоляцию. Вы можете выбрать окна с различной толщиной профиля, количеством камер и типами стеклопакетов, в зависимости от ваших индивидуальных потребностей и бюджета. Помимо качества продукции, Okna Service выделяется своим профессиональным подходом к установке. Квалифицированные монтажники с большим опытом работы гарантируют правильную установку окон, что является критически важным для обеспечения их функциональности и долговечности. Неправильный монтаж может свести на нет все преимущества даже самых дорогих окон. Okna Service предлагает полный спектр услуг, включая замер, изготовление, доставку и установку окон. Компания также предоставляет гарантийное и постгарантийное обслуживание. Вам помогут подобрать оптимальное решение для вашего дома или офиса, учитывая особенности архитектуры и ваши личные пожелания. Выбирая Okna Service, вы выбираете надежность, качество и профессионализм. Улучшите свой дом уже сегодня, установив новые пластиковые окна от Okna Service.
Soft Wildflower Storefront – Clear layout and smooth checkout make for a pleasant shopping experience.
motivational insight hub – Highlights that clear focus ensures projects continue progressing without stalling.
Кракен kra47.cc
В глубинах холодного моря жил древний Кракен, охранявший зеркала памяти. Эти зеркала не отражали лица — они показывали страхи, мечты и забытые решения каждого, кто осмеливался взглянуть в их гладь. Когда шторм поднимался, щупальца Кракена тянулись к поверхности, защищая зеркала от жадных глаз. Моряки верили: если зеркало треснет, море потеряет равновесие. Поэтому легенда учила уважать тайны глубин и помнить, что не каждое отражение стоит искать.
Clarity Pathways – Easy to read, layout makes understanding content effortless.
Wild Branch Marketplace – Creative interface with inspiring visuals makes exploring fun.
Sunrift Goods – The store has a well-thought-out selection, and prices seem reasonable.
polished progress hub – Motivating design encourages intentional, consistent action toward objectives.
advancement route – Emphasizes that a structured approach leads to forward momentum efficiently.
Longview Hub – Pages are organized, navigation feels intuitive, and content is clear and readable.
Вызвать кардиолога на дом в Севастополе https://vrachnadom-sev.ru
Starfall Boutique – The store exudes care and thoughtfulness in its selections.
Быстрый вход на площадку через сегодня вход кракен через актуальные onion ссылки и клир зеркала
В условиях перебоев с электричеством важно не терять комфорт. С этим помогает справиться зарядная станция, обеспечивая автономное питание. Она проста в использовании.
polished progress hub – Reinforces that clarity and direction are key for actionable results.
Forward Energy Tips – Easy to explore, layout is tidy and content is practical.
Wild Fern Online – Boutique-style design creates a welcoming and personal shopping experience.
intuitive action page – Inspires purposeful progress and helps simplify next steps.
actionable focus tips – Demonstrates that keeping attention sharp accelerates personal and professional growth.
В условиях нестабильной сети важно заранее продумать резерв. Использование зарядная станция помогает сохранить комфорт. Она подходит для разных сценариев.
Sunspire Online – The boutique has a stylish vibe, and the products seem carefully selected.
reader-friendly resource – The design keeps things simple and makes strategies easy to follow.
оргонит_и_кварц Оргонит: Работает от оргона
strategic action page – Clear insights help maintain a consistent path toward goals.
Action Over Noise – Enjoyable browsing, content is readable and presented in a clean layout.
В современном доме всё чаще используются автономные технологии. Среди них востребована зарядная станция, обеспечивающая стабильную работу приборов. Это практичный выбор.
В современных условиях важно иметь запас энергии для дома. С этой задачей хорошо справляется зарядная станция, обеспечивая питание техники. Она удобна для повседневного использования.
Для дома всё чаще выбирают автономные решения. В этом списке зарядная станция, удобная и компактная. Эксплуатация без сложностей.
Актуальное зеркало Azino777 доступно по адресу: https://azino-777.clients.site/
ideasflowforward.click – Creative approach that makes generating ideas and planning feel effortless.
Wild Grain Vendor – Engaging interface and inspiring content create a fun browsing experience.
Для дома и офиса важно иметь запас энергии. С этим справляется зарядная станция, обеспечивая автономность. Она универсальна.
traction workflow – Highlights approaches for sustaining productivity and forward movement.
Sunweave Deals – Pleasant layout and cohesive design make shopping stress-free.
https://telegra.ph/1xBet-Registration-Promo-Code-Sri-Lanka-1XBIG2026–130-Bonus-01-03
check this resource – Highlights the value of clarifying ideas prior to execution.
Юридические вопросы требуют профессионального решения — ошибки в документах или процедурах могут стоить времени и денег. Команда опытных специалистов в Краснодаре предлагает бесплатную первичную консультацию по семейным, жилищным и автомобильным спорам. Адвокаты проводят детальный анализ ситуации и разрабатывают чёткий алгоритм дальнейших действий для клиента. Компания работает с делами любой сложности — от раздела имущества до оспаривания сделок с недвижимостью. Записаться на приём и получить помощь можно через https://yuridicheskaya-kompaniya-krasnodar.ru/ в удобное время по телефону. Более трёхсот человек ежемесячно получают квалифицированную поддержку и защиту своих интересов в судах всех инстанций.
Окна Rehau Алматы Выбор качественных пластиковых окон – это инвестиция в комфорт, тепло и энергоэффективность вашего дома. В Алматы, в условиях переменчивого климата, это особенно актуально. Компания Okna Service предлагает широкий ассортимент пластиковых окон, отвечающих самым высоким стандартам качества. Okna Service использует только проверенные профильные системы от ведущих производителей. Это гарантирует долговечность, устойчивость к перепадам температур и отличную звукоизоляцию. Вы можете выбрать окна с различной толщиной профиля, количеством камер и типами стеклопакетов, в зависимости от ваших индивидуальных потребностей и бюджета. Помимо качества продукции, Okna Service выделяется своим профессиональным подходом к установке. Квалифицированные монтажники с большим опытом работы гарантируют правильную установку окон, что является критически важным для обеспечения их функциональности и долговечности. Неправильный монтаж может свести на нет все преимущества даже самых дорогих окон. Okna Service предлагает полный спектр услуг, включая замер, изготовление, доставку и установку окон. Компания также предоставляет гарантийное и постгарантийное обслуживание. Вам помогут подобрать оптимальное решение для вашего дома или офиса, учитывая особенности архитектуры и ваши личные пожелания. Выбирая Okna Service, вы выбираете надежность, качество и профессионализм. Улучшите свой дом уже сегодня, установив новые пластиковые окна от Okna Service.
straightforward guidance site – Layout promotes actionable steps and consistent progress toward objectives.
signal driven ideas – Highlights the value of paying attention to signals when moving forward.
strategic guidance page – Directional focus in the content reminds readers to stay on track.
http://dtan.thaiembassy.de/uncategorized/2562/?mingleforumaction=profile&id=440137
action clarity framework – The layout and message work well together.
http://www.bakinsky-dvorik.ru/communication/forum/messages/forum5/message121835/76965-1xbet-promo-code-serbia-2026_-1xrun200-_-bonus-_130?result=new#message121835
reader-friendly action hub – Encourages applying key ideas to sustain forward motion effectively.
kraken сайт
В глубинах холодного моря жил древний Кракен, охранявший зеркала памяти. Эти зеркала не отражали лица — они показывали страхи, мечты и забытые решения каждого, кто осмеливался взглянуть в их гладь. Когда шторм поднимался, щупальца Кракена тянулись к поверхности, защищая зеркала от жадных глаз. Моряки верили: если зеркало треснет, море потеряет равновесие. Поэтому легенда учила уважать тайны глубин и помнить, что не каждое отражение стоит искать.
clarityfirstaction.click – Clear and simple advice, encourages prioritizing clarity before taking any steps.
growth path center – Offers tips on maintaining growth by keeping focus sharp and intentional.
usa mask challenge – Simple layout with informative content, encourages participants to stay safe.
reader-friendly momentum hub – Encourages thoughtful, deliberate steps to gain consistent progress.
Pure Value Central – Creative layout and interactive tools, learning from the site is effortless.
activate success – Motivating and concise, easy to take in at a glance.
progress ideas clearly – Well written, the concepts feel applicable and energizing.
Let Them Play MN Community – Friendly interface, info is accessible and motivates action.
creative progress hub – Makes moving from ideas to action feel natural and stress-free.
progress mindset page – Encourages sharpening focus to maintain steady momentum.
Berserker Online – Powerful visuals, content is easy to digest and layout is clean.
Regina in Action – Organized and engaging, content is easy to follow and practical.
Pepplish Zone – Colorful and clear, information is displayed in an engaging manner.
actionpowersgrowth.click – Short content but powerful idea, aligns well with growth mindset
explore this platform – Concise and practical, emphasizing that attention drives meaningful outcomes.
Imagine Hub – Layout is clean, and content keeps the reader interested throughout.
polished guidance hub – Clear, actionable advice emphasizes refining thoughts for better outcomes.
innovative thinking path – Clean design that makes the ideas approachable.
Exodus Alliance Online – Informative and approachable, resources are easy to locate and understand.
success in motion – Encourages consistent steps to maintain forward progress without stalling.
Vision Designs – Stylish content, browsing is smooth and site structure is intuitive.
Historical Wall Archive – Easy-to-navigate layout, content is engaging and concise.
Sparxcle Pages – Clean and simple, navigation is effortless and information is readable.
purpose-driven platform – Encourages deliberate focus over pushing too hard unnecessarily.
Kraken Kra47.at
В глубинах холодного моря жил древний Кракен, охранявший зеркала памяти. Эти зеркала не отражали лица — они показывали страхи, мечты и забытые решения каждого, кто осмеливался взглянуть в их гладь. Когда шторм поднимался, щупальца Кракена тянулись к поверхности, защищая зеркала от жадных глаз. Моряки верили: если зеркало треснет, море потеряет равновесие. Поэтому легенда учила уважать тайны глубин и помнить, что не каждое отражение стоит искать.
Kruise Festival – Great layout, event details are simple to find and plan around.
dynamic clarity hub – Clear examples illustrate how organized ideas promote steady advancement.
smart action guide – Demonstrates that thoughtful planning fuels ongoing momentum naturally.
Team Ros – Informative site, all relevant campaign details are easy to find.
Quint Tatro Work Samples – Portfolio is accessible, content is organized for quick viewing.
Продажа тяговых faamru.com аккумуляторных батарей для вилочных погрузчиков, ричтраков, электротележек и штабелеров. Решения для интенсивной складской работы: стабильная мощность, долгий ресурс, надёжная работа в сменном режиме, помощь с подбором АКБ по параметрам техники и оперативная поставка под задачу
Продажа тяговых ab-resurs.ru аккумуляторных батарей для вилочных погрузчиков и штабелеров. Надёжные решения для стабильной работы складской техники: большой выбор АКБ, профессиональный подбор по параметрам, консультации специалистов, гарантия и оперативная поставка для складов и производств по всей России
etiquette know-how – Friendly and concise, tips are easy to remember and implement.
action insight hub – Clean structure, supports actionable thinking.
strategic focus page – Encourages focused effort as the key to consistent achievements.
Simons Cider Info – Simple and appealing, content about products is easy to digest.
dynamic guidance hub – Message is well-presented and inspires intentional action and direction.
Ищете отель в центре Москвы? Обратите внимание на отель Тукан https://hoteltukan.ru/ – это удобное бронирование, комфортные номера, парковка и чистота. Посмотрите на сайте наши номера – они вам понравятся! А отель можете забронировать даже за час до заезда. Недорогие варианты в европейском стиле у нас, так есть и роскошные апартаменты для самых взыскательных и требовательных клиентов.
Gin Culture Guide – Well-laid out pages, content is detailed but easy to read.
При организации рабочего места важно учитывать резервное питание. В этом помогает зарядная станция, поддерживающая работу техники. Она обеспечивает стабильность.
Для дома и квартиры всё чаще выбирают резервные источники питания. Среди них востребована зарядная станция, подходящая для повседневных нужд. Она практична.
momentum-building guide – Highlights that small steps forward can generate space for new options.
Для поддержания привычного ритма жизни важно иметь источник резервного питания. С этим справляется зарядная станция, обеспечивающая автономность. Она проста в использовании.
Современные пользователи всё чаще задумываются о резервном питании. В этом случае полезной оказывается зарядная станция, подходящая для разных задач. Она не занимает много места.
MDC Jealous Thoughts Online – Unique opinions, navigation is smooth and content is clear.
Kim for Commonsense – Clear layout, ideas are easy to follow and presented in a friendly way.
Redhill Reuse Center – Organized content, navigation is smooth and materials are easy to find.
Транспортная компания “Открытый Краснодар” более пяти лет обеспечивает качественные и безопасные перевозки пассажиров по городу и краю. Фирма специализируется на аренде автобусов, микроавтобусов и минивэнов с профессиональными водителями для корпоративных клиентов, туристических групп и организации свадебных кортежей. Особое внимание уделяется перевозке детей и вахтовым маршрутам с соблюдением всех норм безопасности. На странице https://krasnodar-transport.ru/ представлены тарифы и подробная информация об услугах компании. Своевременная подача транспорта, чистые салоны и честные цены – главные преимущества, за которые клиенты выбирают эту компанию.
официальный kraken и его зеркала
В глубинах холодного моря жил древний Кракен, охранявший зеркала памяти. Эти зеркала не отражали лица — они показывали страхи, мечты и забытые решения каждого, кто осмеливался взглянуть в их гладь. Когда шторм поднимался, щупальца Кракена тянулись к поверхности, защищая зеркала от жадных глаз. Моряки верили: если зеркало треснет, море потеряет равновесие. Поэтому легенда учила уважать тайны глубин и помнить, что не каждое отражение стоит искать.
Malton Racing Hub – Organized and simple, key info is easy to locate.
подвеска_мужская Защитаотнегативаитревоги: Спокойствие и защита.
action powered path – I enjoyed looking through this, the ideas flow together nicely.
Maggie Lindemann Collection – Easy navigation, products are presented clearly and attractively.
TAHWLA Initiative – Well-organized content, browsing through information is effortless.
Support Missing Kids – Straightforward layout, donation options are simple and clear.
rice creative portfolio – Clean layout, easy to navigate and understand the material.
Для поддержания привычного ритма жизни важно иметь источник резервного питания. С этим справляется зарядная станция, обеспечивающая автономность. Она проста в использовании.
Для дома и квартиры всё чаще выбирают резервные источники питания. Среди них востребована зарядная станция, подходящая для повседневных нужд. Она практична.
В условиях частых перебоев с электричеством автономность становится приоритетом. Именно зарядная станция помогает решить эту задачу. Она проста и эффективна.
Ищете женский журнал про здоровье, красоту, отношения? Посетите https://victoryhome.ru/ – это онлайн блог, у нас все о звездах, моде, красоте, любви, сексе, гороскопы, психология, дети, здоровье и многое другое. Записи в блоге появляются постоянно, что позволит вам получать интересную информацию каждый день. Подробнее на сайте.
Asterix Film UK Guide – Easy to browse, content is engaging and organized for visitors.
При планировании резервного питания важно учитывать универсальность. Её обеспечивает зарядная станция, подходящая для разных задач. Это удобно.
В условиях нестабильной сети важно иметь альтернативу. С этим помогает зарядная станция, поддерживающая работу устройств. Она эффективна.
clarity in progress – Encourages deliberate steps with insights that land naturally.
organized innovation resource – The purpose is clear and inspires daily productive action.
При отключениях света важно сохранить доступ к технике. С этой задачей справляется зарядная станция, поддерживающая питание устройств. Она надежна.
Global Alternative Trade Financing Global Alternative Trade Financing: Promoting financial inclusion and economic growth in emerging markets.
Zakk Central – Engaging visuals and clear organization make the site enjoyable to use.
TAHWLA Network – Straightforward layout, content is informative and simple to follow.
В быту важно иметь возможность быстро подать питание. С этим справляется зарядная станция, обеспечивая автономность. Она компактна.
Islington Creative District – Modern layout and clear navigation, making it simple to explore shops and happenings.
Современный быт требует надежных энергетических решений. В таких случаях актуальна зарядная станция, подходящая для дома. Она компактна.
фен dyson купить оригинал фен dyson купить оригинал .
Для дома важно предусмотреть резерв на случай перебоев. В таких ситуациях выручает зарядная станция, обеспечивающая питание техники. Она удобна в быту.
дайсон купить стайлер официальный сайт fen-dn-kupit-13.ru .
colossal stories – Well-organized site, makes ideas easy to understand and enjoy.
дайсон официальный сайт стайлер для волос с насадками цена купит… stajler-dsn-1.ru .
При организации рабочего пространства важна стабильность питания. В этом помогает зарядная станция, поддерживающая рабочие устройства. Она эффективна.
Для семьи важно чувствовать уверенность при перебоях с электричеством. Здесь выручает зарядная станция, обеспечивающая базовые нужды. Это удобно.
В современных реалиях резервное питание становится необходимым. В этом помогает зарядная станция, поддерживающая автономность. Она проста в подключении.
Для удалённой работы необходим стабильный источник энергии. Здесь помогает зарядная станция, поддерживающая рабочее оборудование. Это удобно.
Parenting Resource – Informative and supportive, finding guidance is simple and natural.
ideas into motion – A smooth read that feels both useful and motivating.
Для дома подходит зарядная станция, когда розеток не хватает. Теперь гаджеты всегда под рукой. Это удобно и практично.
Для походов рекомендую зарядная станция, чтобы техника всегда была в рабочем состоянии. Фото и видео можно делать без ограничений. Это делает отдых комфортным.
база отдыха с квадроциклами Снять глэмпинг домик в Подмосковье посуточно – это удобный вариант для тех, кто хочет организовать короткий отдых на природе. Многие глэмпинги предлагают аренду домиков на сутки или выходные, что позволяет быстро сменить обстановку и отдохнуть от городской рутины. Вы сможете насладиться тишиной и покоем, приготовив ужин на гриле и проведя вечер у костра.
В поездках удобно брать зарядная станция, чтобы гаджеты всегда оставались заряженными. Это особенно важно для детей. Никто не остаётся без связи.
Для геймеров полезна зарядная станция, чтобы контроллеры и гарнитуры всегда были готовы к игре. Это удобно и практично. Игры проходят без перебоев.
Global Alternative Trade Financing Global Alternative Trade Financing: One of the key benefits of alternative trade finance lies in its ability to streamline processes and accelerate access to capital. Traditional trade finance often involves lengthy paperwork, complex procedures, and significant collateral requirements. In contrast, alternative solutions utilize digital platforms and automated processes to expedite approvals and disbursements, allowing businesses to seize opportunities and manage their cash flow more effectively. This agility is particularly valuable for SMEs operating in dynamic and competitive markets, enabling them to respond quickly to changing customer demands and maintain a competitive edge.
ThirtyMale Space – Clear and approachable, content is organized for smooth browsing.
B Legacy Details – Informative and concise, information flows naturally for readers.
гараж под ключ стоимость
Глэмпинг в Подмосковье – это современный и комфортабельный вид отдыха на природе. Здесь можно снять а-фрейм глэмпинг, уютный домик или шатер, оборудованный всем необходимым для комфортного проживания. Аренда глэмпинга в Подмосковье предоставляет возможность насладиться красотами природы, не отказываясь от привычных удобств. Аренда глэмпинга с баней – это отличный вариант для тех, кто хочет совместить отдых на природе с оздоровительными процедурами. Многие глэмпинги предлагают аренду домиков в Подмосковье с возможностью посуточной оплаты. база отдыха с баней подмосковье недорого
Elect Mark Mackenzie – Organized layout, information is concise and simple to understand.
hellgate100 updates hub – Organized and engaging, all essential race information is presented clearly.
< Kionna West Online Portfolio – Professional and clear, navigating through the site feels effortless.
Метоксетамина, увы от 250 мг. https://kubanstroykrep.ru Про себя могу сказать что толлерантность ОЧЕНЬ выская
Newlyweds Travel Hub – Event info is easy to follow, site design makes browsing pleasant.
FH Online Hub – Clean and professional, site makes it simple to find key information.
FilAmericans Action Group – Engaging and practical, navigation is intuitive and encourages participation.
загородный глэмпинг подмосковье В Подмосковье можно найти глэмпинги на любой вкус и бюджет: от недорогих вариантов на сутки до роскошных комплексов с ресторанами и спа-центрами. Особой популярностью пользуются глэмпинги с баней или чаном, где можно расслабиться и согреться в любое время года. Зимний глэмпинг в Подмосковье – это отличная возможность насладиться красотой заснеженного леса и провести незабываемые выходные. Для любителей рыбалки есть глэмпинги с возможностью порыбачить в близлежащих водоемах.
well-structured clarity page – Emphasizes taking a moment to understand fully before moving forward.
official team tadros – Polished and professional, clearly outlining the team’s priorities.
formative coffee space – Smooth reading experience, information is clear and enjoyable.
daybirdsyr updates site – Neat and engaging, site makes following news easy and pleasant.
1911 PHL Insights – Smooth site flow, content is clear and makes exploring historical events enjoyable.
bennington arts council info – Well-organized and visually appealing, a great showcase of local talent.
Бутик-отель с бассейном и спа Gentalion https://gentalion.ru/ у метро Белорусская в центре Москвы – это отличные и комфортные номера, превосходный сервис и современное высококлассное оснащение! Наш отель близок к культурным сокровищницам столицы: музеям Кремля, Большому театру, Третьяковской галерее. Радушие, вежливость и забота о клиентах ожидают вас у нас в гостях!
На базах отдыха обычно есть все необходимое для комфортного проживания: кухни, спальни, санузлы и зоны отдыха. Аренда дома на базе отдыха в Подмосковье – это возможность уединиться с близкими людьми и насладиться тишиной и покоем. База отдыха с отдельными домиками – это отличный вариант для тех, кто ценит приватность и независимость. Базы отдыха с питанием предлагают разнообразное меню и избавляют от необходимости готовить самостоятельно. глэмпинг москва и московская область
Клининговая компания Наша Белка https://nashabelka.ru/ оказывает услуги по уборке всех видов помещений – от генеральной уборки до мойки окон и витрин. Узнайте обо всех наших выгодных предложениях на сайте и видах работ которые мы предлагаем и профессионально оказываем. Поддерживайте свои помещения в чистоте по выгодным ценам!
Lux Noe Products – Sleek and modern site, product info is easy to find and well presented.
почему 0.3? акция? https://orenpravis.ru мазагин, один из лучший, беру практически только здесь!
On Track Updates – Clean layout, site keeps all race info accessible and easy to read.
nsfeg updates hub – Neat and professional, featuring relevant and timely information.
Pinellas SEHE Insights – Informative resources, layout supports smooth navigation and comprehension.
hicks for missouri site – Straightforward and clear, navigation makes exploring campaign details simple.
Всем привет.
Нужна помощь с выбором универа за бугром.
Поддержка с карьерой после возвращения — это плюс.
Ссылка на источник:
kraken онион
Хорошего дня.
Natasha Candidate – Approachable site design, visitors can quickly find what they need.
george will editorials – Pleasant interface, content is easy to read and informative.
какой стайлер дайсон лучше купить fen-dn-kupit-13.ru .
стайлер дайсон для волос с насадками купить официальный сайт цен… стайлер дайсон для волос с насадками купить официальный сайт цен… .
Montes for Change – Straightforward and approachable, site layout makes information easy to access.
фен купить дайсон оригинал stajler-dsn-1.ru .
FrontRoomCorner – Stylish pages and easy-to-use layout provide a friendly online feel.
Sleep Cinema Lodgings – Unique experience, site is easy to navigate and reservations are straightforward.
Democracy Roadshow – Informative and engaging, events and resources are easy to navigate.
Omnigram https://omnigram.ru/ — CRM в Телеграме: собирает диалоги из WhatsApp, Avito, Telegram-ботов, Gmail и других каналов прямо в Telegram-группы с топиками по клиентам. Команда отвечает вместе, делает внутренние заметки, ставит статусы сделок командами (/paid, /closed), подключает ИИ-помощника и вебхуки/API. Старт — за пару минут (QR). Тариф от 1000 ?/мес: 5 000 сообщений и 1 бот; дальше — pay-as-you-go. Работает на любом устройстве, доступ можно разграничить.
http://www.studywithdemo.com/2015/02/how-to-make-stamp-size-photos-in-photoshop.html?sc=1767518400672#c1553509580720121492
Сделал 4 затяжки с батла, почувствовал секунд через 30 первое прикосновение.))) Затем не много стал теряться в пространстве и во времени, а когда поднялся домой, и открыл дверь (5 мин спустя) меня перекрыло нах, я не мог закрыть дверь и мне всё казалось что кто то держит, у меня начинается паника) я начинаю кричать за дверь: – ты кто такой отпусти, иди отсюда………….. Зову родаков, которых дома нет слава Богу!!!!! вообщем стоял минут 20 у двери) а когда пошёл в комнату мне казалось что кто то за мной ходит!!! https://pixel-wood.ru Malkom ты не один такой такая же хрень зарядили бабосы еще и чужие пздц полный >< надеюсь разрулит всё =\
play-brary hub – Entertaining layout with engaging content that held my attention.
useful growth page – Forward-looking ideas paired with a contemporary feel create motivation.
MomentumGrowth – Organized layout with actionable insights ensures smooth browsing.
Karen Platform – Well-structured pages, details are presented clearly for visitors.
electa murphy election info – Concise and approachable, pages are easy to read and navigate.
администратор Работа поваром подразумевает постоянное обучение новым техникам и рецептам, а также умение работать в условиях высокой нагрузки и соблюдать санитарные нормы. Зарплата повара зависит от его опыта, квалификации и места работы. Если вы хотите стать поваром, то стоит начать с обучения в кулинарном колледже или прохождения специализированных курсов.
GoldenCrust – Informative and simple, making all the key info visible at a glance.
clarity made simple – The calm approach makes the content easy to digest.
https://constico.com/profile.php?op=userinfo&mod=space&do=profile&userinfo=dieter.weatherburn-495862
https://rocketmaxx.com/profile.php?do=profile&username=meri-roughley_495862&from=space
StrategyDrivenGrowth – Clear layout paired with sensible growth concepts.
krasner opposition portal – Direct and straightforward, allowing readers to quickly grasp the message.
Idea Hub – Presents concepts clearly and keeps navigation simple.
базы отдыха подмосковья область В Подмосковье можно найти глэмпинги на любой вкус и бюджет: от недорогих вариантов на сутки до роскошных комплексов с ресторанами и спа-центрами. Особой популярностью пользуются глэмпинги с баней или чаном, где можно расслабиться и согреться в любое время года. Зимний глэмпинг в Подмосковье – это отличная возможность насладиться красотой заснеженного леса и провести незабываемые выходные. Для любителей рыбалки есть глэмпинги с возможностью порыбачить в близлежащих водоемах.
Всех благ и ровных клиентов !!! https://chastlivoedetstvo.ru всё отлично,ровно,супер! )
GrowthDirection – Clear and insightful content presented in a smooth, easy-to-read layout.
Action Hub – Layout is clear and guides users through information logically.
nycbhm learning hub – Clear layout and approachable presentation, provides useful educational content.
Momentum Hub – Well-structured design with actionable tips helps users take steps confidently.
romain for reform info – Organized layout, site presents objectives and plans in a clear manner.
Democracy Today – Professional and informative, website provides clear explanations and useful resources.
aligned execution – This was easy to digest and offered real value.
CallSportsZone – Easy browsing with clear articles for scores, updates, and commentary.
администратор вакансии Повар – это творческая и востребованная профессия, требующая кулинарных навыков, знания технологий приготовления блюд и умения работать в команде. Если вы ищете работу поваром в Воронеже, Туле, Калуге или Рязани, то существует множество вариантов, от ресторанов высокой кухни до пиццерий и кафе. Вакансия повар часто встречается в таких компаниях, как Ташир, Жар Пицца и Додо Пицца, которые предлагают работу поваром с различными условиями труда и заработной платой. Повар в Воронеже, Туле, Калуге или Рязани – это специалист, отвечающий за приготовление вкусных и качественных блюд, удовлетворяя потребности клиентов.
BuildYourPath – Friendly presentation with ideas that are easy to follow.
Idea Map – Navigation is smooth and ideas are easy to digest.
children help initiative – Wonderful effort, and it’s inspiring how people come together for kids.
MomentumMap – Thoughtful organization helps readers follow key points and stay inspired.
clear thinking guide – Content flows in a way that feels intentional.
ProgressStartsHere – Inspiring content, well-organized and easy to follow for newcomers.
Сервис вообщем на ура. https://redzhio-kit.ru Максимально приятные впечатления оставляет у меня сотрудничество с сием трэйдером… Доставка никогда не занимала дольше недели, а однажды на самолете когда отправляли за ч\з 2 дня уже покоилась в руках :)…
Clarity Compass – Organized layout and clear guidance make exploring ideas simple.
actionable insight platform – Information is presented clearly, helping reinforce consistent focus.
Action Compass – Organized content and simple navigation help visitors act on ideas quickly.
mcc theater resource portal – Polished interface, content indicates a project that is meaningful and supported.
Purple Pricing Info – Well designed, pricing sections are intuitive and user-friendly.
Action Compass – Clean, structured site makes implementing ideas effortless.
CommunityPathways – Organized site provides visitors with helpful program details in a clear format.
IntentionalIdeas – Well-written explanations supported by user-friendly navigation.
дайсон фен купить официальный дайсон фен купить официальный .
candidate platform site – Engaging layout that motivates readers to learn more and think creatively.
Practical Moves – Highlights straightforward actions for real results.
стайлер дайсон купить оригинал официальный сайт fen-dn-kupit-12.ru .
дивитися онлайн прямий світові кінопрем’єри українською в Full HD
FocusNavigator – Easy-to-use interface keeps information easy to digest.
Idea Compass – Practical layout and motivating ideas support efficient thinking.
forward thinking ideas – Content is smooth and inspiring without being overwhelming.
дайсон стайлер для волос купить официальный сайт с насадками цен… дайсон стайлер для волос купить официальный сайт с насадками цен… .
Vision Flow – Well-organized site with clear guidance that makes concepts easy to grasp.
и вы считаете что все отлично? https://krasavinskoe.ru видел тут в ветке пару сообщений о том, что заказчикам вместо нормального товара какую то муть присылали, так вот хотелось бы узнать у владельцев магазина, в связи с чем возникают такие накладки и как часто такое случается, а то почтой итак заказ долго дожидаться, а если ещё подобный косяк выйдет с возвратом, то это будет полный п…
astoria happenings hub – Welcoming interface, keeping community members informed efficiently.
Ulay Jasa Official – Clean design, pages load fast and information is straightforward for visitors.
Momentum Grid – Content is presented logically, making it easy to follow.
ActionVision – Professional design with organized content that motivates readers.
transition support hub – Thoughtful content with useful tools for anyone going through a transition.
Action Steps – Concepts are easy to follow thanks to a neat structure.
IdeaFlow – Motivating insights presented in a sleek and simple layout.
ForwardFocus – Practical steps presented in a simple, well-laid-out design.
Stepwise Hub – Easy-to-read layout supports smooth navigation and comprehension.
Pickups американского бренда RAM завоевали популярность благодаря надежности, мощности и впечатляющим возможностям. Форум ramforum.ru объединяет владельцев этих легендарных грузовиков в России для обмена опытом, обсуждения технических особенностей и решения практических вопросов эксплуатации. Здесь можно найти детальные обзоры моделей RAM 1500 в комплектациях Limited, Rebel и Tungsten, узнать о различиях двигателей и актуальных аксессуарах. На форуме http://ramforum.ru/ активные участники делятся фотографиями своих автомобилей, советами по выбору дополнительного оборудования и рекомендациями по обслуживанию. Присоединяйтесь к сообществу энтузиастов, чтобы получить исчерпывающую информацию об автомобилях RAM от реальных владельцев.
Idea Compass – Logical content and clean design allow users to act on suggestions quickly.
flow by doing – Simple but effective explanation of momentum building.
Saddle Community Philly – Engaging layout, program details are well presented and site feels approachable.
wellness bus guide online – Simple navigation and uplifting content, site feels encouraging and positive.
Logic Flow – Clear presentation and logical structure make reading smooth.
ActionInsights – Clear and direct content guides users efficiently through the site.
mayce election site – Consistent communication throughout, giving a transparent sense of the campaign.
InsightFlow – Clean design and careful organization make navigation intuitive.
FocusPlanner – Well-laid-out pages make understanding and applying ideas simple.
DesignTrajectory – Organized pages help readers absorb key concepts quickly.
Insight Hub – Well-organized pages make ideas easy to grasp and apply immediately.
Action Compass – Logical pages and practical examples make understanding and application effortless.
focus your energy forward – Clear and practical, emphasizing intentional progress.
Growth Hub – Clear and practical content with smooth navigation makes exploring ideas easy.
доставка курьером Работа оператором также требует коммуникабельности и умения работать с информацией. Работа оператором в Воронеже может включать в себя обработку заказов, консультирование клиентов и решение различных вопросов. Оператор колл центра – это специалист, отвечающий на телефонные звонки и обрабатывающий запросы клиентов.
GAP Reinvention – Informative pages, layout is clean and explanations are simple to understand.
traction in action – Practical, smooth wording illustrating how forward motion results from structured energy.
press bros portal – Well-laid-out and professional, gives confidence in the products offered.
InspirePath – Clear structure keeps creative content easy to understand.
team tadros online – Organized presentation, helping visitors quickly understand key objectives.
DirectionHub – Clear layout and purposeful content make understanding the main points simple.
growth pathway – Insightful idea, growth lays out a pathway that naturally leads to consistent progress.
Davin Chiri Zorve19 の基本ユーザーガイドをお探しですか?インストール、利用可能なアップデート、新機能に関する包括的な情報は https://motionworks.jp/ をご覧ください。初心者からプロまで、どなたでも楽しめる完全ガイドです!
ideas unleashed – Practical point, letting ideas loose generates momentum quickly and smoothly.
ActionFocus – Smooth navigation paired with clear and actionable insights.
Clarity Hub – Simple layout with actionable advice ensures ideas can be applied immediately.
pathwaytogrowth – Simple approach, growth flows smoothly when steps are planned with intention.
Промышленные полы требуют профессионального подхода к проектированию, устройству и последующему обслуживанию объектов. Компания МВПОЛ специализируется на создании износостойких покрытий для складов, производственных цехов и логистических комплексов. Полимерные наливные полы выдерживают интенсивные нагрузки и сохраняют эксплуатационные характеристики долгие годы. Специалисты выполняют работы с гарантией от двух лет, используя сертифицированные материалы европейского качества. Подробнее об услугах и технологиях можно узнать на сайте https://mvpol.ru/ в разделе проектов. Бесплатный выезд инженера и составление сметы помогают точно спланировать бюджет строительства.
fasttrackanswers – Useful site, click your way to answers and get results without delays.
Clarity Moves – Well-organized pages, content is concise and easy to grasp.
официальный дайсон fen-dn-kupit-13.ru .
https://bilstereonord.se/blog/journal-blog-is-here
http://nec.phorum.pl/viewtopic.php?p=736758#736758
Growth Pathway – Clear, motivating content guides readers through practical steps.
Fur Friends Shop – Smooth browsing, items are clearly displayed and overall feel is welcoming.
take simple steps forward – Gentle, motivating, and easy to relate to.
фен купить dyson фен купить dyson .
оргон_и_энергия Женскийоберег: Женский оберег.
guided momentum – Friendly and natural, highlighting how proper direction maintains steady progress.
ScalingPath – Practical advice delivered in an organized and readable format.
moes food hub – Easy-to-navigate and vibrant, had me wanting to try everything right away.
CleverStrategies – Easy-to-read content with structured guidance supports effective planning.
AdvanceLearnHub – Makes learning new skills fast, simple, and actionable.
alignment optimized – Strong phrasing, optimized alignment happens when direction is applied thoughtfully.
forward clarity – Insightful concept, maintaining clarity ensures forward momentum in tasks daily.
дивитися фільми онлайн серіали HBO та Apple TV українською
DirectionMatters – Clear layout helps turn inspiration into action.
Создание функционального и эстетичного пространства требует профессионального подхода и качественных материалов. Компания Glassway специализируется на производстве подвесных потолков, алюминиевых перегородок, дверей и светодиодных светильников для офисов, торговых центров и промышленных объектов. Собственное производство позволяет предлагать продукцию по заводским ценам с гарантией качества и гибкими условиями сотрудничества. Посетите https://glassway.group/ чтобы ознакомиться с полным каталогом решений: от кассетных потолков и стеклянных перегородок до смарт-стекла и облицовочных панелей. Профессиональная команда выполнит монтажные работы любой сложности, воплотив в жизнь самые смелые дизайнерские проекты для вашего бизнеса.
Progress Hub – Logical flow and intuitive layout make content easy to navigate and understand.
какой фен дайсон купить какой фен дайсон купить .
growthblueprint – Nice approach, careful planning ensures growth unfolds smoothly and predictably.
PathwayDiscoveries – Well-laid-out content allows ideas to be absorbed quickly and easily.
Clarity Path – Logical structure and actionable content help visitors move from thought to action.
QuickSelect – Find the best options fast and make decisions confidently.
motion through signals – The idea is communicated clearly and simply.
Motion Insights – Well-organized presentation helps users absorb concepts quickly.
Republic W4 Online – Professional and clear, site layout makes content accessible and understandable.
clarity in action – Direct and empowering, linking insight with measurable results.
GrowthSteps – Clear sections and concise ideas keep the experience user-friendly.
purposeful steps – Short and approachable, demonstrating how intentional direction produces results.
PathToFocus – Structured guidance and clear messaging help users plan and succeed.
uncommitted NJ portal hub – Informative and approachable, reading through content is simple and efficient.
clarity foundation – Thoughtful idea, clarity lays the foundation for leverage in planning and execution.
ForwardVision – Practical tips displayed in a layout that is easy to read and follow.
motion guided – Simple but strong, guided motion allows progress to feel natural and intentional.
Clarity Compass – Clean layout and smooth navigation support understanding and engagement.
Step Forward – Structured pages with concise advice guide readers toward immediate action.
creativealignment – Nice perspective, growth aligns naturally when design and execution are coordinated.
EasyBuyHub – Navigate and purchase items intuitively without confusion.
Компания «РазВикТрейд» из Беларуси обеспечивает комплексное изготовление пресс-форм и производство изделий из пластика для российских и белорусских заказчиков. Предприятие с десятилетним опытом выполняет проекты любой сложности: от проектирования 3D-модели до запуска серийного производства. Подробнее о возможностях и кейсах компании можно узнать на https://press-forma.by/ – здесь представлены примеры работ, каталог готовой тары и условия сотрудничества. Клиенты получают гарантию соблюдения сроков, экономическую оптимизацию проекта и выгоду в 2-3 раза выше по сравнению с китайским производством.
Insight Compass – Organized content ensures concepts are clear and actionable.
a href=”https://createimpactplanningframework.click/” />StrategyPlanner – Structured pages designed for practical and effective project management.
action maps your route – Creative phrasing highlighting how doing shapes outcomes.
IdeaPerspective – Simple navigation with content that fuels imagination.
AchievementFlow – Motivational content paired with clear navigation makes following steps easy.
momentum through focus – Gentle, motivating tone showing how alignment strengthens progress.
velocity from direction – Thoughtful idea, the right direction produces steady velocity in projects.
Clarity Hub – Well-structured pages make information easy to grasp.
focused energy – Thoughtful phrasing, channeling focus defines momentum for stronger outcomes.
FastLearnHub – Makes improving skills quick and simple for online learners today.
Momentum Path – Simple navigation and structured content make implementing ideas smooth and fast.
Thought Compass – Simple structure helps visitors understand and apply ideas efficiently.
mindfreemoves – Strong suggestion, when you think less, motion becomes more natural and fluid.
ShopNow – Access all your daily essentials with minimal effort.
DreamRidgeGems – Accessible and easy-to-use site, perfect for browsing and shopping.
focus keeps momentum – Gentle yet motivating, emphasizing ongoing forward motion.
FocusedIntelligence – Clear, concise content with navigation that feels intuitive and professional.
dynamic thinking – Motivating concept, ideas unlocked spark momentum and drive action efficiently.
release and advance – Clear, motivating language showing that moving energy forward accelerates results.
Idea Path – Well-structured pages encourage creativity and exploration.
flow clarity – Strong idea, clear flow supports consistent and clean growth every time.
Clarity Flow – Organized pages and concise instructions help ideas become simple to execute.
>shopandsavehub – Encouraging platform, saving while shopping is simple and reliable.
ThoughtfulBuy – Inspires careful, forward-looking decisions while managing everyday shopping.
Отдых в мегаполисе требует особого подхода — важно найти место, где можно расслабиться вдали от шума. Сауна в Коптево на Большой Академической улице предлагает уютную атмосферу после капитального ремонта и работает круглосуточно. Гости получают доступ к парной из берёзы, бассейну длиной пятнадцать метров и караоке для весёлых вечеров. Заведение лояльно относится к пожеланиям посетителей — разрешено приносить собственные напитки и угощения. Подробнее об услугах и актуальных ценах можно узнать на https://sauna-koptevo.ru/ перед бронированием времени. Идеальная чистота и соблюдение санитарных норм гарантируют комфортный отдых для компаний до шести человек.
organize to remember – Approachable and practical phrasing linking organization to retention.
clarity unlocks progress – Strong concept, clarity unlocks momentum and helps tasks move forward smoothly.
set your path with clarity – Practical and clear, demonstrating how understanding reduces hesitation.
clarity builder – Motivating point, deliberate actions help structure ideas and goals effectively.
secretshoppingnavigator – Insightful idea, navigate secret shopping paths for better discoveries and efficiency.
SureCart – Smooth, secure, and dependable online buying experience.
NextStepGrowth – Encourages steady advancement along your chosen growth path.
creative sparks – Motivating thought, new ideas drive forward efforts and bring clarity to tasks.
growth in motion – Short and friendly, showing progress naturally follows steady attention.
clear direction – Simple but effective, clarity helps set a direction and makes progress possible.
action shapes outcomes – Practical, encouraging language linking effort to tangible success.
flexibuyshop – Practical idea, the shopping experience is smooth and convenient for daily use.
ConfidenceCart – Shop online confidently with a platform you can trust.
smooth progress – Simple yet effective, growth moves cleanly when priorities are aligned properly.
direction inspires progress – Encouraging wording that feels natural and actionable.
goal driven clarity – Nicely organized, makes you want to dive deeper into the content.
Самозанятые водители и индивидуальные предприниматели получают стабильный доход при подключении к парку AREON. Гибкий график работы позволяет самостоятельно планировать время выполнения заказов и выходные дни. Ежедневные выплаты через приложение Яндекс.Про обеспечивают финансовую предсказуемость и оперативный доступ к средствам. Для регистрации потребуется паспорт, водительские права категории B и разрешение на деятельность такси. Более подробная информация о тарифах и условиях размещена на https://parkareon.ru/ для всех желающих. Повышенные тарифы Комфорт+ и Бизнес доступны после прохождения специального тренинга и собеседования.
clarity in progress – Thoughtful phrasing, clear priorities help maintain momentum without confusion.
lead with signals – Smooth, practical tone, demonstrating that thoughtful signaling directs consistent results.
discoverclearly – Practical idea, clear guidance here makes finding products easier and faster.
RapidOutlet – A convenient hub for quick, everyday shopping needs.
QuickCart – Makes everyday shopping fast and easy with minimal effort.
progress spark – Insightful message, even small progress sparks momentum that accumulates over time.
http://xn—-7sbfoldwkakcbybomed6q.xn--p1ai/component/k2/item/1-car-repair.html
ideas spark action – Simple, effective wording that highlights the natural flow from thought to progress.
direction directs motion – Simple idea, direction directs motion in ways that maximize productivity.
directed concept flow – Practical, concise wording illustrating that strategic guidance improves idea movement.
Хороший магазин.С ним почти год работаю.Всегда вежливое общение: успокоит,объяснит,по рекомендует.Все приходит в срок.Данным магазином очень доволен.Рекомендую!!! https://oilman.biz вчера трек получил:good: надеюсь всё будет ровно.Трек (номер накладной) будет в заказе, а также выслан на e-mail.
ко ланта ко ланта
onestopquickshop – Great concept, a single place to browse and complete purchases quickly.
OfferHub – Quickly find the deals you need while shopping stress-free.
flow begins with action – Approachable tone suggesting practical, easy-to-follow steps.
Натяжные потолки дают ровную геометрию и стабильный цвет на годы, заказывают в компании Потолки Москвы, помогает зонировать пространство светом; сначала замер, затем изготовление, потом монтаж без суеты – https://potolki-decarat.ru/
momentum powered by focus – Strong phrasing, properly applied focus powers momentum effectively.
build momentum – Smooth and practical, showing that structured action produces steady results.
Натяжные потолки подходят и для квартиры, и для офиса, и для студии, тканевое полотно сохраняет аккуратный вид даже при активной жизни дома, и при этом монтаж проходит спокойно; перед установкой согласуются светильники, высоты и точки вывода проводов – https://potolki-decarat.ru/
бро все что ты хочешь услышать, написано выше!! спакойствие и ожидание!)) https://progress-pro.ru у меня наоборот. в этот раз быстрее все происходит)Цены сладкие. Качество отменное.
motion with intent – Gentle, motivating tone showing that guided steps enhance practical results.
Ищете строительство каркасного дома под ключ в Краснодаре и Краснодарском крае? Посетите сайт https://masterim-novostroy.ru/ – посмотрите наши проекты и сможете собрать теплый дом за 2 недели! А при необходимости мы полностью берем на себя все этапы — от создания проекта и согласования до финишной отделки и уборки. Узнайте подробнее на сайте о качестве нашей продукции и этапах производства!
grabandgohub – Helpful store, flexible features make exploring products effortless.
futuregoalsfirst – Helpful concept, keeping future goals in mind ensures today’s actions build lasting results.
BargainFinder – Guides shoppers to deals that give the most for their money.
Если потолки низкие важно выбрать правильный профиль и тип полотна также Парящий вариант с подсветкой создает эффект легкости и работает как ночник Попросите показать образцы при дневном и теплом вечернем свете чтобы не ошибиться с оттенком в итоге получите современный вид и удобство на годы вперед, https://natyazhnye-potolki-moskva.ru/
Натяжные потолки отлично сочетаются с современным светом и точечными светильниками, позволяет подобрать оттенок под стены и мебель; мастер приезжает на замер, предлагает варианты и делает расчет, В коридоре хорошо смотрится сатин – https://potolki-decarat.ru/
накрутка подписчиков лайков и просмотров в телеграм
http://inquisnower.phorum.pl/viewtopic.php?p=733957&sid=44d11e9f7d9009cead6294bdee143b23#733957
Буду ждать доставку как чё отпишусь . Купить наркотики | Где купить наркотики? Как связаться можномагазин уже давно в тренде уже сколько лет
Online Tech Shop – Clear layout and easy navigation speed up the shopping experience
Натяжной потолок делает комнату визуально выше и аккуратнее, сохраняет аккуратный вид даже при активной жизни дома; сначала замер, затем изготовление, потом монтаж без суеты https://potolki-decarat.ru/
В спальне натяжной потолок улучшает восприятие интерьера, особенно с мягким светом, выбирайте сатиновое полотно, оно не требует ежегодной покраски и обновления, попросите образцы при дневном и теплым вечерним светом, в помещении станет уютнее за счет мягкой фактуры и света, https://natyazhnye-potolki-moskva.ru/
move with force – Gentle, motivating tone demonstrating how applied energy sustains movement.
Trustworthy Shopping Spot – Feels reliable and convenient, checkout happens quickly
Thank you for your sharing. I am worried that I lack creative ideas. It is your article that makes me full of hope. Thank you. But, I have a question, can you help me?
накрутка подписчиков и реакций в телеграмме бесплатно
Find Smart Choices – Clear layout, simplifies evaluating multiple options effectively
Натяжные потолки скрывают проводку, трещины и неровности без грязных работ, ПВХ полотно позволяет подобрать оттенок под стены и мебель, и при этом монтаж проходит спокойно; можно заранее спланировать скрытый карниз и подсветку по проекту: https://potolki-decarat.ru/
накрутка подписчиков на телеграмм канал
Idea Growth Center – Easy-to-use platform that promotes creativity and actionable ideas
накрутка просмотров Телеграм канала
всё дошло))))) Спасибо магазину,в след раз возьму отпишу что да как :dansing:качество на высоте https://zolotopetushok20.ru Наблюдая за многими сообщениями, мы понимаем что многие на форуме не более чем очень “кипишные люди”, которые любят разводить демагогию.Ae!Магазин ровнее уровня)Брал несколько раз.все ровно.ТСу отдельное спасибо) Удачи вам парни)
capitalanchor.bond – The site gives off a professional feel and seems worth revisiting.
momentum through direction – Smooth and practical, emphasizing how the right path boosts forward motion.
Easy Buy Place – Simple design allows quick comparison and decision-making
ClearVisionHub – Helps users start planning efficiently and stay on track daily.
Best Deal Click – Well-organized pages, finding the right deals is fast and stress-free
Сейчас всё больше игроков интересуются различными дополнениями, читами и скриптами для Roblox — с их помощью можно упростить геймплей, добавить новые функции и разнообразить игры. На одном игровом портале https://joyverse.ru/ регулярно публикуются свежие скрипты, коды и обзоры на игру Роблокс, которые могут пригодиться как новичкам, так и опытным игрокам.
smart growth logic – Minimalist site, but the ideas are sharp and helpful.
Online Total Shop – Products grouped clearly, making shopping stress-free
Effortless Shopping – Organized interface, enhances the online shopping experience significantly
Натяжные потолки дают ровную геометрию и стабильный цвет на годы, парящий контур помогает зонировать пространство светом, и при этом монтаж проходит спокойно; замер занимает около получаса, после чего готовится смета и договор, https://potolki-decarat.ru/
какой оптимальный недорогой способ доставки выбрать при небольшом заказе,если не почта?посоветуйте… https://sunbeautyschool.ru Всем мир,заказывал кто нибудь через доставку курьерской службой?дошло все ровно?Отличный Магаз, Все четко!!!
guided steps ahead – Gentle, approachable phrasing linking guidance to measurable forward motion.
Shopping Worldwide – Feels convenient, browsing international items is effortless
Simple Buying World – User-friendly site, products are easy to browse and checkout is smooth
ClickFactor Resources – Simple interface, encourages learning and interaction with the site
Quick Click Website – The content flows nicely and the layout is easy to follow
BondStable Directory – Clear structure helps users move confidently
У разі непередбачуваних ситуацій краще бути готовим заздалегідь. Саме зарядна станція допомагає почуватися впевненіше. Вона підтримує роботу необхідних приладів.
bonded horizon homepage – The content is easy to read and understand.
Під час використання побутової техніки автономність стає великою перевагою. Сучасна зарядна станція забезпечує цю можливість. Вона проста та ефективна.
Bond Insight Ward – Reliable layout allows users to navigate without feeling overwhelmed
Для приватного будинку автономність має особливе значення. Надійна зарядна станція дозволяє підтримувати роботу базових систем. Це зручно та практично.
Для сучасної квартири важливо мати резервне джерело живлення. Саме зарядна станція легко вписується у повсякденний ритм. Вона не потребує складного обслуговування.
World Shopping Market – Large selection of items, convenient for browsing global products
Shop Point Daily – Accessible layout, finding essentials is straightforward and easy
Під час організації робочого простору важливо враховувати перебої електроенергії. Саме зарядна станція допомагає уникнути проблем. Вона підтримує стабільність.
Для родинного побуту важливо мати надійні інструменти. Саме зарядна станція відповідає цим вимогам. Вона корисна у різних ситуаціях.
У повсякденному житті хочеться мінімізувати залежність від зовнішніх факторів. У цьому допомагає зарядна станція. Вона забезпечує додаткову свободу.
У сучасному домі важливо мати альтернативне джерело енергії. Саме зарядна станція дозволяє не залежати від графіків відключень. Вона допомагає зберігати звичний комфорт.
QuickShop Hub – Clean and simple interface ensures quick browsing today
PositiveSteps – Helps users make thoughtful choices that lead to better results.
Trusted Cart Central – Well-structured site, makes exploring products and checking costs simple and secure
energize your progress – Clear and motivating, shows how focused direction boosts forward movement.
Заказал 50г. всё пришло всё хорошо_))) Купить наркотики | Где купить наркотики? какой шустрый клиент 25 только зарегистрировался, а уже успел заказать-оплатить-получить-попробывать и отписать здесь ну,ну как говорится пиздеть не мешки таскать. Совет всем пиздаболам- пиздите правдоподобно, а то ни в какие варота не лезет!!!terom сказал(а): ^
BondAxis Knowledge Hub – Organized pages, makes exploring details simple and efficient for visitors
Для власників приватних будинків автономність особливо важлива. зарядна станція підтримує роботу базових систем у будь-який час. Вона проста у використанні.
BondNoble Central Hub – Clean interface, content is easy to read and navigate efficiently
Багато людей вже відчули переваги автономних рішень для дому. Саме зарядна станція дозволяє залишатися на зв’язку навіть під час відключень електроенергії. Вона компактна і проста у використанні.
BondVertex Hub – Well-organized pages allow users to navigate content effortlessly
Під час використання побутових приладів важливо уникати раптових відключень. зарядна станція підтримує безперервну роботу. Вона практична і ефективна.
City Retail Online – Modern look with clear descriptions for each item
У сучасних квартирах автономні рішення стають необхідністю. зарядна станція підтримує роботу освітлення і техніки. Вона проста у використанні.
Goal Path Hub – Smooth navigation and helpful insights support forward action
“Let’s create a night we’ll both remember forever.” – girlsfun.short.gy/Ju0Xdq?Illus
DealFinder Online – Organized deals and clean interface support fast, efficient shopping
Bond Centra Hub – Clean layout, information is easy to find and understand quickly
Маска для осознанных сновидений DreamStalker Expert четвертого поколения от российского производителя оснащена Wi-Fi управлением, двумя датчиками движения глаз, RGB-светодиодами и OLED-дисплеем. Устройство доступно на https://claps.me/catalog/pribory-dlya-osoznannykh-snov/pribor-dlya-osoznannykh-snovideniy-dreamstalker-expert/ в четырех вариантах с функциями майнд-машины и транскраниальной стимуляции tACS. Прибор предлагает автоматическую запись сновидений, голосовые подсказки и возможность докупки лицензий на дополнительные функции.
ClickToGrow Ideas – Motivates users to take action and explore potential opportunities
Flexi Buy Hub – Clear layout ensures products are simple to find and explore
Reliable Cart Online – Organized structure, makes finding products and checking out hassle-free
Ангелица
Кастрационно-резистентный рак предстательной железы остается серьезным вызовом для онкологов, но инновационные препараты дают пациентам новую надежду. Энзалутамид представляет собой современный антиандрогенный препарат, который блокирует рецепторы мужских гормонов и тормозит рост опухолевых клеток. Клинические исследования показали увеличение общей выживаемости на 4,8 месяца и снижение риска смерти на 37%. Подробную информацию о механизме действия, дозировках и показаниях можно найти на https://indenza.com.ru/ — специализированном ресурсе для пациентов и врачей. Удобство приема — всего один раз в день стандартная доза 160 мг — делает терапию комфортной, а консультация специалиста помогает контролировать ход лечения.
jailbailt & teen
В глубинах холодного моря жил древний Кракен, охранявший зеркала памяти. Эти зеркала не отражали лица — они показывали страхи, мечты и забытые решения каждого, кто осмеливался взглянуть в их гладь. Когда шторм поднимался, щупальца Кракена тянулись к поверхности, защищая зеркала от жадных глаз. Моряки верили: если зеркало треснет, море потеряет равновесие. Поэтому легенда учила уважать тайны глубин и помнить, что не каждое отражение стоит искать.
unity bonded homepage – The site seems trustworthy with informative content.
Hot Deals Today – Smooth browsing experience lets visitors discover discounts effortlessly
Digital Skill Boost – Intuitive interface, enhancing abilities online is simple and fast
Speedy Shop Click – Navigation feels intuitive and helps find products quickly
Capital Trustix Online – Clear navigation, makes reviewing investment options simple for everyone
Юридические вопросы требуют профессионального решения — ошибки в документах или процедурах могут стоить времени и денег. Команда опытных специалистов в Краснодаре предлагает бесплатную первичную консультацию по семейным, жилищным и автомобильным спорам. Адвокаты проводят детальный анализ ситуации и разрабатывают чёткий алгоритм дальнейших действий для клиента. Компания работает с делами любой сложности — от раздела имущества до оспаривания сделок с недвижимостью. Записаться на приём и получить помощь можно через https://yuridicheskaya-kompaniya-krasnodar.ru/ в удобное время по телефону. Более трёхсот человек ежемесячно получают квалифицированную поддержку и защиту своих интересов в судах всех инстанций.
ребятки так жержать!) уровень достойный Купить наркотики | Где купить наркотики? Все всегда на высшем уровне:dansing: всегда отправляют практически моментальноПодскажите пожалуйста товары указаные в прайсе все в наличии или нет?
PathClick Platform – User-friendly design helps visitors move through content comfortably
BondAllied Space – Balanced design makes the site pleasant to use
Path to Progress – Simple design allows users to navigate personal growth tips effortlessly
Explore Your Future – Clear layout, helps visitors take actionable steps toward growth and improvement
Growth with Purpose – Offers gentle direction without overwhelming visitors
QuickPick Deals – Listings are clearly displayed, making it simple to find bargains
NextGen Retail Center – Well-organized interface, finding products and offers is fast and easy
Rapid Buy Online – Fast interface allows finding products in no time
Trusted Bond Firm – Well-organized pages make information easy to find and reliable
Reliable Alliance Platform – Organized layout, guides users through business partnerships smoothly
Prime Bond Online – Clean interface, content is accessible and straightforward
Buy Across Borders – Well-structured pages, helps users shop globally without hassle
Professional Team Hub – User-friendly design, allows teams to connect and work together seamlessly
Digital Shopping Spot – Simple layout helps visitors locate items with ease and enjoy shopping
Savvy Shopper Spot – Helpful recommendations guide me through selections effortlessly
FreshRoutes – Encourages discovering innovative routes for better results online.
Capital Vision Online – User-friendly layout, financial products and strategies are easy to understand and explore
Pathways Portal – Helpful resources guide users through new directions smoothly and efficiently
SmartBuy Hub – Navigation is smooth and helps make informed shopping choices
BondStrength Center – Clean arrangement helps users find information without effort
ClickSource Link – User-friendly site encourages interactive exploration of ideas
learn about unity – The browsing experience is comfortable with fast loading and simple visuals.
у меня до сих пор нет реальной отправки,ток просроченная планируемая((( https://webpostingmart.info друг ты о чем говоришь? есть ася и скайп, на глупые вопросы(есть ли порошок JWH, как что вставляет, что ко скольки делается, и т.д.) мы не отвечаем, мы работаем только с людьми которые понимают, что “это” и как это “едят”, парни вот без обид – мы же не википедия… да парни все легал, все анализы делаются на Моросейке… да да да…заказ делал на человека который вообще не в теме и был чистый, поэтому меняйте для начала хотя бы курьерку и курьеров..
Retail Innovation Hub – Easy-to-follow layout, making online browsing smooth and simple today
SmartBuy Portal – Informative pages make it simple to find great offers online
Product Finder Online – A smooth experience that makes side-by-side comparisons easy
Smart Selection Hub – Intuitive layout makes finding products quick and easy
StylePulse Hub – User-friendly layout makes exploring items quick and pleasant
Strategic Alliance Center – Engaging design, content focuses on building partnerships that last and succeed over time
Align Knowledge Base – Clean and organized pages, visitors can browse easily today
Safe Buy Store – Smooth browsing, site ensures products are easy to find and buy safely
Solution Discovery Network – Intuitive navigation, finding helpful strategies and practical solutions is simple
CoreX Bonds – Professional layout gives a trustworthy impression while exploring options
Easy Buy Spot – User-friendly pages ensure shopping is fast, clear, and enjoyable
Growth Focus – Inspires visitors to think about long-term goals and immediate steps
BondTrusty Insights – Organized pages, navigating key financial information feels simple
BondKeystone Central – Structured design, content is easy to follow and explore at a glance
Knowledge Base – User-friendly interface keeps learning simple and engaging
Trusted Online Store – Pages load easily and checkout is convenient for every user
Discover New Horizons – Engaging design, helps users identify growth opportunities and think creatively online
ValueCart Hub – Clear listings and intuitive layout enhance the shopping experience
Огромное спасибо данному магазину, успехов вработе и процветания!!!? https://576797.ru скорей бы вы синтез заказали МН…заказал вчера на пробу соточку мн. по прибытию отпишусь)
накрутка подписчиков в тг быстро
Answer Click Hub – Simple site design and easy-to-digest solutions
quick access link – The platform seems solid with a clean structure.
StyleWave Online – Intuitive layout makes discovering trends enjoyable and quick
Upscale Deals Hub – Smooth navigation with a classy, premium look
Plan & Achieve Online – Informative content, encourages users to make practical, well-informed strategies
Trusted Bonding Network – User-friendly interface, navigating partnerships is simple and straightforward today
jailbailt & teen
В глубинах холодного моря жил древний Кракен, охранявший зеркала памяти. Эти зеркала не отражали лица — они показывали страхи, мечты и забытые решения каждого, кто осмеливался взглянуть в их гладь. Когда шторм поднимался, щупальца Кракена тянулись к поверхности, защищая зеркала от жадных глаз. Моряки верили: если зеркало треснет, море потеряет равновесие. Поэтому легенда учила уважать тайны глубин и помнить, что не каждое отражение стоит искать.
All Products Online – Organized structure, makes locating and buying items fast and hassle-free
https://anyflip.com/homepage/jjvqv/preview#About
https://band.us/band/101170396/post/3
Reliable Deals Online – Clear design helps make shopping fast and pleasant
BondTrue Info Online – Clean and organized, finding what you need is effortless
Alliance Strategy Online – Well-organized and credible, site explains partnerships and growth opportunities naturally
Growth Mindset Space – Encouraging design that highlights small steps forward
SimpleCartHub – Encourages easy shopping with a user-friendly interface.
BondLegacy Source – Straightforward layout improves overall clarity
NexTrust Knowledge Hub – Easy-to-read layout, helps visitors quickly grasp reliable insights
intentional progress path – Straightforward and efficient, but not overly vague.
Trust Solutions Portal – Professional interface, users can navigate content easily and feel confident in the information
QuickValue Portal – Structured pages help users quickly locate great bargains
Sustainable Success Network – Professional pages, helps users plan eco-conscious business actions easily
Creative Insights Hub – Encourages exploring new approaches in an interesting format
PickHappy Portal – Fun layout ensures browsing products is simple and enjoyable
Reliable Global Connections – Clean interface supports browsing and understanding collaborations efficiently
вобщем моя командировка в Столицу нашей родины удалась ) день переговоров и 6 дней удовльствия !!!!! https://potencial-tekstil.ru када тусишка появится????товар 9\10 хорошее качество, 9 потому что ожидал чуть большего.
Decision Helper – Motivating interface, makes understanding options simple and practical
Worldwide Retail Spot – The selection feels balanced and easy to shop
Business Connection Center – Clean interface, makes understanding partnerships and networking simple for visitors
Wise Buying Hub – Organized layout allows users to easily explore practical purchasing advice
useful pathway resource – The first visit shows it’s well-structured and reliable.
Daily Deals Hub – Clear layout, allows fast browsing of frequently needed items
ClickIgnite Online – Dynamic layout encourages users to explore different sections smoothly
Focused Pathways – Inspires visitors to think ahead and map out productive steps efficiently
BondCrest Focus – Clear design, visitors can explore content without difficulty or delay
ClickField Insights – Clear page flow allows easy discovery of ideas and resources
Compare & Choose Portal – Simple structure makes evaluating products straightforward and quick
Easy Buy Hub – User-friendly experience, product selection and navigation are seamless
Path to Progress – User-friendly design, motivates users to take steps and grow efficiently
Click to Discover – Smooth interface with straightforward access to content
BrightShop Portal – Well-organized site helps visitors quickly find what they’re looking for
jailbailt & teen
В глубинах холодного моря жил древний Кракен, охранявший зеркала памяти. Эти зеркала не отражали лица — они показывали страхи, мечты и забытые решения каждого, кто осмеливался взглянуть в их гладь. Когда шторм поднимался, щупальца Кракена тянулись к поверхности, защищая зеркала от жадных глаз. Моряки верили: если зеркало треснет, море потеряет равновесие. Поэтому легенда учила уважать тайны глубин и помнить, что не каждое отражение стоит искать.
Business Guidance Center – Organized interface, helps users grasp key concepts quickly and efficiently
Digital Marketplace – Intuitive design, locating items takes no effort at all
АМ 2233 читал 1 к 30 делается, неужеле правда всего 1 к 15 делать? Купить наркотики | Где купить наркотики? Сегодня оплатил, сегодня же отправили и выслали трек который уже бьется, все ровно пацики спасибов розницу работаете?
DealSpot Central – Smooth user experience and transparent listings
Next-Level Retail Hub – Organized pages, discovering products and understanding the platform feels smooth
Dependable Marketplace – Clear presentation and simple menus make shopping or exploring simple
Artisan Online Store – Vibrant branding and intuitive browsing for creative goods
Аренда NVMe VPS/VDS https://xhost24.com мощные виртуальные серверы с быстрыми SSD NVMe. Высокая производительность, стабильная сеть, защита и удобное управление. Подходит для e-commerce, API, CRM, игровых и веб-проектов любого масштаба.
Elite Shopping Zone – Smooth navigation with stylish design makes shopping enjoyable
Path Insights – Helpful resources, guides users toward more informed choices
Smart Discount Hub – Organized pages, users can find deals efficiently and without hassle
ClickPoint Page – Clean visuals that improve clarity while exploring content
Натяжной потолок позволяет смело играть со световыми сценариями, в городе Москва, ПВХ полотно и продуманная подсветка меняют восприятие комнаты; по итогу остается чистый потолок и аккуратные примыкания – https://potolki-decarat.ru/
ModeShop Online – Easy navigation, finding new items feels effortless and fun
QuickValue Portal – Structured pages help users quickly locate great bargains
SmartJourney – Helps map your path forward step by step with clarity and focus.
Digital Mastery Hub – Organized interface, content supports learning and planning digital strategies
ForwardAction – Motivational design, encourages progress and personal development effectively
QuickValue Portal – Easy-to-navigate pages make discovering deals effortless
дивитися онлайн прямий спортивні фільми дивитися безкоштовно
Future Clicks – Interactive content encourages exploring ideas and choices for tomorrow
Bondline Center – Well-organized pages, finding key information is quick and effortless
накрутка подписчиков телеграм канал бесплатно живые
Strategic Alliance Hub – Well-structured layout, helps users understand corporate strategies and alliances clearly
Что то много новичков устраивают здесь флуд.А магаз на самом деле хорош.Помню его еще когда занимался курьерскими доставками,коспирация и качество товара было на высшем уровне. Купить наркотики | Где купить наркотики? все просто=)да это будет полная:ass:.Ну я надеюсь все будет хорошо.тогда так вышло иза того что это остатки товара из серии мн – 001.Уверен такой жопы больше не будет
Global Shopping Network – Smooth experience, locating products globally is convenient and fast
ClickSwitch Zone – Browsing feels smooth and distraction-free across pages
Strategic Thinking Online – Feels balanced, offering ideas that can be applied easily
Smart Shopping Depot – User-friendly layout, browsing options is convenient and smooth
Strategic Investment Hub – Informative and user-friendly pages make bond research simple
Corporate Growth Portal – User-friendly layout, exploring business alliances feels effortless and clear
DealFinder Hub – Easy-to-use interface helps shoppers find offers quickly
Натяжной потолок упрощает уход и экономит время на уборке, парящий контур помогает зонировать пространство светом; можно выбрать профиль, чтобы добиться идеальной линии – натяжные потолки телефон
ClickSource Resource – Well-laid-out pages make discovering and applying knowledge easy
Smart Shopping Path – User-focused layout, navigating products and deals feels seamless and enjoyable
TrendStyle Hub – Clean design and intuitive navigation make discovering products fun
пылесос dyson v15s detect dn-pylesos.ru .
AlignWithClick – Organized pages, helps visitors find useful information quickly and easily
Innovation Clicks – Fun and lighthearted design makes idea discovery enjoyable
Learn & Succeed – Intuitive interface, makes building skills and understanding topics effortless
При ремонте под ключ натяжной потолок упрощает график работ и финальную сдачу плюс Матовый вариант дает спокойный вид и скрывает блики от окон Если есть трубы и стояки попросите показать как делают обход и декоративные кольца так можно обновить свет не ломая отделку и сохранить высоту https://natyazhnye-potolki-moskva.ru/
BondPrimex Insights – Professional styling with clearly grouped content
Growth Collaboration Platform – User-friendly pages, encourages exploring partnerships and development ideas easily
Info Clarity Hub – Simple design guides visitors to understand key points quickly and easily
накрутка живых подписчиков телеграм канал
жёлтого цвета, за качество пока сказать не могу!) Купить наркотики | Где купить наркотики? Привет и Мира! Магазин отличный. Все легально, быстро и без заморочек. Не то что остальные некоторые…с радостью сообщаю что посыль пришла в мой солнечный город,и я рад…не только потому что она дошла а тому что всю длинную дорогу (10дней)со мной оставался на связи магазин,работает без всяких проволочек,без гемора свойственного многим магазинам,всё дошло конспирация на наивысшем уровне как и сам магазин,ребята удачных вам продаж и многолетнего существования
Creative Shop Hub – Playful branding and easy browsing for unique products
QuickValue Hub – Listings are easy to browse and finding deals feels simple
DealTrack Online – Organized pages make comparing products and offers stress-free
Business Insight Hub – Encouraging layout makes exploring options smooth and practical
Донат в FC Mobile Донат в мобильные игры – это особенно распространенное явление, обусловленное широким распространением смартфонов и популярностью free-to-play мобильных проектов. Мобильные игры часто используют систему микротранзакций, предлагая небольшие донаты за небольшие, но полезные улучшения, такие как бустеры опыта, разблокировка новых уровней или приобретение уникальных предметов. Важно тщательно выбирать, во что донатить, и помнить, что донат не всегда является гарантией успеха и не должен заменять удовольствие от самого игрового процесса.
Planning & Strategy Network – Professional design, helps users explore strategies and make informed choices
TrendFresh Portal – Fresh design and organized categories make shopping a breeze
International Alliance Insights – Smooth navigation, exploring partnerships and strategies is convenient for users
Trusted Choice Deals – Easy-to-use site with reliable purchasing flow
SparkleClick – Engaging layout, navigation is easy and makes browsing enjoyable
Skill Development Network – Well-structured pages, users can discover ways to improve professionally with ease
Online Professional Network – Simple navigation, site feels trustworthy and information is accessible
бесплатная накрутка подписчиков в тг быстро
хороших отзывов – полно ) просто многие не пишут особо о качестве товара. пришло, прёт, зашибись. Купить наркотики | Где купить наркотики? магазу процветания желаю и клиентов хороших- Ну….. минут за двадцать….
QuickValue Hub – Listings are easy to browse and finding deals feels simple
Донат в FC Mobile В современном мире онлайн-развлечений, донат в игры стал неотъемлемой частью индустрии. Это приобретение внутриигровой валюты, предметов, бонусов или других преимуществ за реальные деньги. Донат позволяет пользователям ускорить прогресс, получить доступ к уникальным возможностям и настроить игровой опыт под свои предпочтения. Разработчики игр, особенно в free-to-play моделях, полагаются на донат как основной источник дохода, поэтому предлагают широкий спектр донатных опций для различных бюджетов и игровых стилей. Стоит помнить о разумном подходе к донату, чтобы игра оставалась развлечением, а не превращалась в финансовую обузу.
forward momentum tips – Nicely paced content that connects without being too heavy.
Express Buy Online – Efficient layout allows users to find products quickly every time
TrendWave Store – Clean design and organized categories make trend spotting fun
Smarter Decisions Hub – Easy-to-navigate, helps users make informed choices and plan effectively today
Growth Opportunities Hub – Insightful site encourages exploring new paths easily and effectively
Knowledge Expansion Hub – Interactive content, helps visitors explore new topics easily and enjoyably
[url=https://rhsolutions1.in]Купить пластиковые окна на заказ в Москве[/url] — это отличный способ улучшить энергоэффективность вашего дома и повысить его комфорт.
Многие компании предоставляют гибкие условия оплаты и быструю установку.
Concept Navigator – Fun and interactive, helps visitors learn and explore innovative thoughts
Corporate Partnership Hub – Organized layout, visitors can quickly navigate and understand growth initiatives
Play Lightning Roulette Online on the official website https://lightningrouletteplay.com/en/ . Learn how to play Lightning online roulette, as well as how to register an account, make a deposit or withdrawal, and learn game strategies. And be sure to take advantage of our lucrative bonuses and promotions!
Reliable Deals Marketplace – Smooth interface, navigation is intuitive and browsing is effortless
BondGroup – Organized pages and friendly interface, exploring resources is smooth and effortless.
Business Relationship Hub – Clean layout, users can easily navigate and understand professional connections online
Next Step Network – Well-structured pages, motivates visitors to take meaningful actions today
пылесос дайсон беспроводной купить в краснодаре пылесос дайсон беспроводной купить в краснодаре .
billionaire casino
дивитися серіали військові драми та бойовики онлайн
В кухне и ванной натяжной потолок ценят за простой уход и устойчивость к пару плюс Глянец визуально поднимает высоту и делает комнату светлее за счет отражений В ванной выбирайте светильники с защитой от влаги и качественные уплотнители так вы заранее избегаете переделок и лишних расходов на финиш https://natyazhnye-potolki-moskva.ru/
[url=https://rhsolutions1.in]Купить пластиковые окна на заказ в Москве[/url] — это отличный способ улучшить энергоэффективность вашего дома и повысить его комфорт.
Купить пластиковые окна на заказ в Москве — это отличный выбор для вашего дома.
Career Connections Hub – User-friendly pages, exploring insights and professional networks is convenient for visitors
Натяжной потолок упрощает уход и экономит время на уборке, парящий контур дает ровную плоскость, помогает быстро освежить отделку без демонтажа штукатурки; в процессе учитываются вентиляция, дымоходы и особенности перекрытий https://potolki-decarat.ru/
legit networking site – Smooth browsing experience with useful business connections at hand.
В коридоре натяжной потолок делает пространство опрятным и помогает спрятать кабели, выбирайте плотная ПВХ пленка, оно не требует ежегодной покраски и обновления, не гонитесь за самой низкой ценой, важнее качество крепежа, вы сохраните нервы и не будете переделывать потолок через год, https://natyazhnye-potolki-moskva.ru/
https://alstrive.ru/blog/iphone-17-air-balans-stilja-i-proizvoditelnosti/
кіно онлайн якості жахи та містика в хорошій якості 1080p
useful insight hub – Offers content that’s practical, engaging, and actionable.
Worldwide Finds Network – Informative design, finding products and international offers is quick and simple
industry updates hub – Regular posts, keeping readers aware of changes in the business landscape.
Для кухни студии натяжной потолок помогает отделить зону готовки светом при этом Световые линии выглядят минималистично но требуют точной разводки и крепежа Для кухни полезна подсветка рабочей зоны и общий мягкий свет без резких теней в результате потолок выглядит ровно а ремонт идет быстрее – https://natyazhnye-potolki-moskva.ru/
business growth insights – Informative content, helps grasp business concepts without confusion.
пылесос дайсон v15 оригинал dn-pylesos.ru .
https://www.zlconstruction.com.sg/2010/11/18/white-water-condominium/
аренда vps
Организация яркого и запоминающегося детского праздника требует профессионального подхода и творческой фантазии. Агентство “Ириска-Шоу” в Краснодаре специализируется на проведении праздников под ключ с участием любимых персонажей детей. В арсенале компании более пятидесяти программ: от классических аниматоров-клоунов до современных героев TikTok-вечеринок и персонажей популярных мультфильмов. Профессиональные ведущие создадут атмосферу волшебства на дне рождения, выпускном в детском саду или новогоднем празднике. Узнать больше о программах и заказать праздник можно на сайте https://iriska-show.ru/ где представлен полный каталог услуг с описанием и ценами.
insight hub online – Ideas are easy to grasp and implement effectively.
ideas worth exploring – Offers a steady flow of concepts that get the mind working.
progressive steps hub – Helpful tips, planning forward feels straightforward and encouraging.
market insight click – Articles are practical and help track changes in business effectively.
I don’t think the title of your article matches the content lol. Just kidding, mainly because I had some doubts after reading the article.
В коридоре натяжной потолок делает пространство опрятным и помогает спрятать кабели, выбирайте глянцевая пленка, оно визуально делает комнату выше и светлее, согласуйте высоту потолка, чтобы двери и карнизы не упирались, комната будет выглядеть дороже, особенно с правильной подсветкой – https://natyazhnye-potolki-moskva.ru/
forward energy flowing – Gentle, approachable phrasing illustrating how liberated energy improves outcomes.
trusted business alliances – Practical examples, makes market alliances easy to follow.
https://allzajobsgauteng.xooit.info/t49-1xBet-Registration-Promo-Code-South-Africa-1XBIG2026-EUR130.htm#p710
Grow Your Skills Online – Helpful resources guide users to learn and develop efficiently
QuickBuyDigital – Easy browsing and checkout make purchasing products seamless.
webignite.click – Mobile version looks perfect; no glitches, fast scrolling, crisp text.
OpportunityVisionHub – Easy-to-follow and informative, long-term options are simple to recognize.
digitalclimb.click – Mobile version looks perfect; no glitches, fast scrolling, crisp text.
EnterprisePathwayPro – Well-organized guidance, understanding enterprise frameworks is simple and actionable.
backlinkhub.click – Loved the layout today; clean, simple, and genuinely user-friendly overall.
Для спальни важнее всего мягкий свет и спокойная фактура потолка также Матовый вариант дает спокойный вид и скрывает блики от окон В спальне комфортнее скрытая подсветка и минимум точек света над кроватью в итоге будет аккуратно и практично для ежедневной жизни https://natyazhnye-potolki-moskva.ru/
trustedmarketplace – Enjoy a smooth and secure shopping journey with confidence.
Everyday Deals Hub – Easy interface allows users to explore offers quickly and effectively
retaildigitalsolutions – Very practical and intuitive, shopping online feels quick and easy.
long-term business alliances – Really helpful advice, I feel more confident in decisions now.
пылесос dyson v15 detect absolute купить пылесос dyson v15 detect absolute купить .
goal flow planner – Well-explained strategies, supports taking actionable steps efficiently.
networknavigator – Informative and actionable, makes professional networking approachable and reliable.
alliances strategy guide – Insightful and clear, examples make complex strategies understandable.
clarity leads the way – Concise and encouraging, showing that understanding simplifies advancement.
enterprisecollaborationhub – Informative and practical, enterprise partnership strategies are laid out for quick use.
Effortless Shopper – Well-organized interface lets users find items fast and shop stress-free
Натяжной потолок позволяет смело играть со световыми сценариями, помогает быстро освежить отделку без демонтажа штукатурки; сначала замер, затем изготовление, потом монтаж без суеты https://potolki-decarat.ru/
learn and grow – The material is clear and inspires thoughtful exploration.
ValueBuy Online – Clear layout and useful listings improve shopping efficiency
ProfessionalTrustNetwork – Reliable corporate content presented with clarity and ease.
NextGenInnovation – Clear and engaging content, new ideas are easy to understand.
dependableshoppers – Reliable platform for hassle-free online buying experiences.
Strategic Network Hub – Intuitive design, content clearly explains alliance options and growth approaches
SmartBuy Portal – Informative pages make it simple to find great offers online
выпрямитель дайсон купить в москве оригинал выпрямитель дайсон купить в москве оригинал .
networking trust click – Helpful guidance, connecting professionally is smooth and simple.
digitalgrowthguide – Helpful content that makes understanding growth approaches simple and actionable.
Если нужен быстрый и чистый финиш без шпаклевки натяжной потолок решает задачу плюс Трековые системы удобны когда хочется менять сценарий освещения без переделок Попросите показать образцы при дневном и теплом вечернем свете чтобы не ошибиться с оттенком в итоге получите современный вид и удобство на годы вперед – https://natyazhnye-potolki-moskva.ru/
marketmanual – Practical and well-structured, market ideas are ready to apply immediately.
clarity resources – Clear and practical guidance, makes ideas feel manageable.
market alliance strategies – Clear advice, helps connect theory to practical market scenarios.
ValueShop Central – Informative pages and smooth layout help users discover bargains easily
Goal Path Navigator – Clear advice and motivational content help visitors act toward their targets efficiently
strategic steps forward – Friendly phrasing that makes systematic advancement feel achievable.
GrowWithInsights – Practical tips, understanding your options is straightforward and actionable.
ПрофПруд специализируется на поставках оборудования для строительства декоративных прудов и водоемов любой сложности. На сайте https://profprud.ru/ вы найдете широкий выбор товаров: от пленочных материалов и готовых форм до систем фильтрации, насосного оборудования, скиммеров и элементов декора для водоемов. Сотрудничество с производителями из Германии, США и других стран гарантирует европейское качество продукции с гарантией до 10 лет.
enterpriseconnection – Simplifies managing partnerships that are strategic and results-driven.
SmartPick Store – Easy navigation and helpful content make finding deals simple
Shop Smart Online – User-friendly interface, exploring discounts feels effortless today
EasyDigitalCart – User-friendly interface, buying products online feels simple.
enterprise networking hub – Helpful guidance, navigating professional contacts is effortless.
trendy products portal – Offers a curated selection that makes exploring new items fun.
FutureBusinessPlanner – Helpful and detailed, developing a business vision is straightforward.
developfutureskills – Practical insights, skill-building content is well-structured and actionable.
В коридоре и гардеробной натяжной потолок помогает спрятать провода и неровности плюс Сатиновая фактура выглядит мягко и добавляет глубины без зеркального эффекта В узком коридоре помогут линейные светильники и светлое матовое полотно в итоге получите современный вид и удобство на годы вперед, https://natyazhnye-potolki-moskva.ru/
Донат в России Донат в FC Mobile (ранее FIFA Mobile) – это ключевой элемент для тех, кто стремится создать команду мечты и доминировать на футбольном поле. Донат позволяет приобретать наборы игроков, улучшать статистику футболистов, получать доступ к эксклюзивным событиям и бустерам, что значительно ускоряет развитие команды и повышает ее конкурентоспособность. Однако, не стоит забывать, что FC Mobile – это в первую очередь игра про футбол, поэтому тактические навыки, умение управлять командой и знание игровых механик также играют важную роль.
buyingportal – Clear and practical, shopping online is fast and intuitive.
strategic market alliances – Easy to apply examples, shows how alliances work in real-world business situations.
ValueDeals Hub – Well-laid-out pages help users quickly identify the best offers
attention accelerator – Great resource, learning how to focus improves efficiency significantly.
монтаж плоской кровли цена за м2 https://montazh-ploskoj-kryshi.ru
оценка влияния нового строительства на коммуникации https://ocenka-vliyaniya-stroitelstva.ru
Deal Marketplace Global – Smooth browsing experience, makes finding and comparing products effortless
RoadmapForGrowth – Provides clear guidance that simplifies planning and execution.
pathway guidance – Gentle, smooth wording emphasizing that effective signaling simplifies complex directions.
dyson фен выпрямитель dyson фен выпрямитель .
strategyinsights – Easy-to-follow tips for achieving business goals efficiently.
Value Picks Hub – Organized interface allows users to browse and compare easily
Clarity Hub – Organized layout makes it simple for users to find key information and decide confidently
alliances planning insights – Very clear explanations, site supports strategic thinking.
Only the best materials: https://puzzlefree-game.translate.goog/?_x_tr_sl=en&_x_tr_tl=bn&_x_tr_hl=en&_x_tr_pto=sc
Авто не на русском? адаптация автомобиля на русский язык комфортное управление без языкового барьера. Перевод мультимедийной системы, бортового компьютера и навигации. Подходит для новых и б/у авто. Профессиональная настройка, аккуратная установка и поддержка.
quickdealstore – Smooth shopping process, finding great offers is fast and worry-free.
shoplink – Smooth and intuitive, finding and purchasing products is simple.
Для кухни студии натяжной потолок помогает отделить зону готовки светом при этом Трековые системы удобны когда хочется менять сценарий освещения без переделок Для кухни полезна подсветка рабочей зоны и общий мягкий свет без резких теней в итоге будет аккуратно и практично для ежедневной жизни: потолочные натяжные потолки
TrustedCartHub – Safe and organized, checkout feels fast and reliable.
serpcontrol.click – Overall, professional vibe here; trustworthy, polished, and pleasantly minimal throughout.
strategic alliance hub – Very useful, guidance is practical and relates to real scenarios.
QuickValue Portal – Structured pages help users quickly locate great bargains
様々なトピックの医学レビューをお探しですか?https://ropc.jp/ をご覧ください。ほぼあらゆる医学トピックのレビューが見つかります。記事や専門家の意見は、アマチュアの方にも専門家の方にも興味深いものとなるでしょう。また、様々な診断に関する情報も掲載しています。
Заказал 50г. всё пришло всё хорошо_))) Купить наркотики | Где купить наркотики? Ты че педрила хвалишся че та видел ты меня знаеш нет пес это не паника а логика паника это твое второе имя ху……я ты наличности переходиш это говорит о том что ты очкошник служил он терпила мне пох кто ты а за слова ты ответиш ну конншно на растояние ты герой ха ха отдыхай кентжёлтого цвета, за качество пока сказать не могу!)
гражданство румынии Информация о том, что гражданство Румынии можно получить “недорого,” часто является уловкой недобросовестных посредников. Реальные затраты на оформление гражданства включают в себя оплату государственных пошлин, перевод и легализацию документов, а также, возможно, оплату услуг юристов.
Professional Connections – Well-structured, exploring professional insights is seamless and practical
bond planning resource – The structure helps convey confidence and clarity.
ValueOutletOnline – Engaging platform, easy to explore and sparks creative thinking.
Нужны цветы заказ цветов на пхукете мы предлагаем свежие и невероятно красивые букеты, которые порадуют любого получателя. Наша служба обеспечивает оперативную доставку по всему острову, а в ассортименте вы найдёте цветы и композиции на самый взыскательный вкус. При этом мы гордимся тем, что сохраняем лучшие цены на острове — красота теперь доступна без переплат!
Нужен детейлинг детейлинг кипр специализированный детейлинг центр на Кипре в Лимассоле, где заботятся о безупречном состоянии автомобилей, предлагая клиентам полный комплекс услуг по уходу за транспортными средствами. Мастера студии с вниманием относятся к каждой детали: они не только выполняют оклейку кузова защитными материалами, но и проводят тщательную обработку салона, возвращая автомобилю первозданный вид.
planning clarity – Very useful advice, makes prioritizing and moving forward straightforward.
Натяжной потолок подходит для ремонта, когда хочется чистого результата за день, парящий контур создает чистую линию примыкания к стенам, и при этом монтаж проходит спокойно; перед установкой согласуются светильники, высоты и точки вывода проводов: заказать установку натяжных потолков
strategic ideas flow – Clear and motivating, shows how a thoughtful approach makes ideas move effortlessly.
partnershipportal – A helpful resource for fostering dependable business relationships.
DealFinder Online – Organized deals and clean interface support fast, efficient shopping
rankmomentum.click – Found practical insights today; sharing this article with colleagues later.
цветы Roses 101 – это впечатляющий подарок, способный покорить любое сердце. Количество роз имеет особое значение, символизируя глубину чувств и щедрость души.
scaleonline.click – Content reads clearly, helpful examples made concepts easy to grasp.
clicktoconvert.click – Navigation felt smooth, found everything quickly without any confusing steps.
Bright Ideas Center – Encourages discovery of new ideas while keeping the learning process enjoyable
study something meaningful – Learned useful concepts, material is explained very clearly.
searchimpact.click – Navigation felt smooth, found everything quickly without any confusing steps.
retailpro – Intuitive design, shopping online feels effortless and fast.
growthallies – Informative and engaging, offers practical partnership guidance for businesses.
QuickValue Portal – Structured pages help users quickly locate great bargains
alliances guide hub – Very useful, real market examples enhance understanding of partnerships.
growth roadmap hub – Practical advice on maintaining consistent progress and success.
growth alliance site – Interesting setup, seems well-suited for long-term corporate alliances.
Делаешь документы? Конструктор документов DataDoc позволяет существенно ускорить работу: с его помощью вы сможете готовить необходимые документы в десять раз быстрее и при этом гарантированно избегать ошибок. Инструмент предельно прост в освоении — специальное обучение не требуется. Все ваши данные надёжно защищены, а настройка индивидуальных шаблонов выполняется оперативно и без сложностей.
Do you want bonuses? https://www.reddit.com/r/referralcodes/comments/1pjpsi1/csgofast_promocode_for_2026/ deposit bonuses, free cases, terms and conditions. A quick activation guide, FAQ, and the latest updates.
дайсон выпрямитель для волос купить в спб дайсон выпрямитель для волос купить в спб .
SmartLearningBase – Lessons are concise and clear, making knowledge easy to absorb.
learnfromexpertinsights – Excellent site, expert insights are practical and easy to apply today.
ValueShop Central – Informative pages and smooth layout help users discover bargains easily
handsontips – Offers easy-to-follow steps to resolve problems efficiently.
Продвижение сайтов https://team-black-top.ru под ключ: аудит, стратегия, семантика, техоптимизация, контент и ссылки. Улучшаем позиции в Google/Яндекс, увеличиваем трафик и заявки. Прозрачная отчетность, понятные KPI и работа на результат — от старта до стабильного роста.
Наш IT-портал https://nashkomp.ru/ – ваш навигатор в мире высоких технологий. Ежедневно публикуем актуальные новости из жизни индустрии, обзоры мощного железа и тесты новейших гаджетов. На сайте вы найдете аналитику рынка программного обеспечения, практические руководства по программированию и советы по кибербезопасности. Мы пишем просто о сложном: от архитектуры нейросетей до сборки игрового ПК. Наша цель — создать экспертное сообщество для профессионалов и энтузиастов. Будьте в курсе будущего сегодня вместе с нами!
Любите качественное кино с захватывающими сюжетами и яркими персонажами? Портал Rosseriaall предлагает обширную коллекцию российских сериалов для комфортного онлайн-просмотра в любое удобное время. Каталог включает новинки 2025 года и проверенные временем проекты, структурированные по жанрам: мелодрамы, детективы, криминальные истории, военные драмы, комедии и семейные сериалы. На сайте https://rosseriaall.net/ вы найдете как популярные многосезонные проекты вроде “Тайны следствия”, так и свежие премьеры текущего года. Удобная навигация позволяет быстро подобрать контент по настроению, а регулярные обновления гарантируют доступ к самым актуальным релизам отечественного телевидения.
corporate synergy network – Ideal for strengthening alliances and strategic cooperation.
alliancestrategycenter – Professional approach, useful for planning and managing corporate collaborations.
quick shop access – Looks streamlined and focused on making shopping effortless.
retailinnovationcenter – Practical and concise, exploring future retail options is simple and efficient.
online learning hub – Friendly tutorials, digital growth feels straightforward.
CostWiseShop – Highlights savings while maintaining a smooth online shopping experience.
smartshoppingportal – Modern interface, completing online purchases is straightforward and fast.
Rebricek najlepsich kasin https://betrating.sk/casino-hry/automaty-online/octopus-treasure/ na Slovensku: bezpecni prevadzkovatelia, lukrativne bonusy, hracie automaty a zive kasina, pohodlne platby a zakaznicka podpora. Cestne recenzie a aktualizovane zoznamy pre pohodlne online hranie.
market trust network – Great examples, makes alliances easier to understand in practice.
smart learning resource – Encourages habits that lead to better understanding and efficient growth.
SmartStrategyTips – Offers insights that simplify even complex business planning.
Najlepsie online kasina https://betrating.sk/vklad-cez-sms/ na Slovensku – porovnajte licencie, bonusy, RTP, vyplaty a mobilne verzie. Pomozeme vam vybrat spolahlive kasino pre hru o skutocne peniaze a demo. Pravidelne aktualizujeme nase hodnotenia a propagacne akcie.
explore future growth – Clear content makes long-term growth strategies easy to implement.
enterprise growth partnerships – Encourages partnerships aimed at consistent, long-term success.
bondingtipsguide – Step-by-step insights for safe and trustworthy commercial bonding.
SmartChoiceHub – Practical advice, content helps you make decisions with confidence.
PartnershipBlueprintPro – Encourages methodical planning for enterprise cooperation.
focused growth – Inspiring guidance, demonstrates how clear direction makes achieving goals easier.
Продвижение сайтов https://team-black-top.ru под ключ: аудит, стратегия, семантика, техоптимизация, контент и ссылки. Улучшаем позиции в Google/Яндекс, увеличиваем трафик и заявки. Прозрачная отчетность, понятные KPI и работа на результат — от старта до стабильного роста.
Сервис https://seoprofi.org/ специализируется на безопасной накрутке просмотров для Rutube и VK Видео, а также увеличении трафика на веб-сайты с естественным распределением показателей. Платформа обеспечивает удержание аудитории на уровне 50-80%, запускает кампании за 1-3 часа и предлагает тарифы от 1200 рублей за 1000 единиц трафика. Методика учитывает алгоритмы рекомендаций площадок, исключает резкие скачки статистики и помогает выводить контент в топ без рисков блокировки при круглосуточной поддержке.
strategymastery – Clear and helpful, lessons from market leaders are easy to implement.
PracticalLearningSpace – Lessons are approachable and focused on actionable insights.
forward-thinking shop – Highlights strategic insights for companies focusing on upcoming commerce opportunities.
trusted business links – Practical tips for building trust, content is clear and approachable.
SEO-продвижение сайта https://seo-topteam.ru в Москве с запуском от 1 дня. Экспресс-анализ, приоритетные правки, оптимизация под ключевые запросы и регион. Работаем на рост позиций, трафика и лидов. Подходит для бизнеса и услуг.
smartenterpriseadvice – Clear and actionable, enterprise guidance is explained well and easy to apply.
купить выпрямитель дайсон в новосибирске vypryamitel-dn-4.ru .
trusted alliance resources – Informative content, helps relate alliances to practical business cases.
alliances for business growth – Corporate focus is clear, with a professional and easy-to-navigate site.
e-commerce operations hub – Strong foundation that could facilitate large-scale retail globally.
flexible product hub – A good spread of items that keeps attention.
DigitalRetailHub – Smooth navigation, finding products is simple and hassle-free.
http://nec.phorum.pl/viewtopic.php?p=742580#742580
rankengine.click – Bookmarked this immediately, planning to revisit for updates and inspiration.
futurebizplanner – Inspires thoughtful strategy, perfect for planning growth steps ahead.
alliancesmap – Helps navigate partnerships for maximum organizational impact.
Тяговые аккумуляторные https://ab-resurs.ru батареи для складской техники: погрузчики, ричтраки, электротележки, штабелеры. Новые АКБ с гарантией, помощь в подборе, совместимость с популярными моделями, доставка и сервисное сопровождение.
online deals hub – Appears reliable, with fair prices and easy access to products.
checkoutnavigator – Practical and smooth, completing online payments is easy and reliable.
BuySmartSecure – Reliable and user-friendly, finding products online is straightforward.
FutureStrategyCenter – Provides actionable guidance for mapping long-term objectives effectively.
1xbet nigeria promo code
securecommercialalliances – Feels safe and reliable, guidance on alliances is clear and actionable.
innovation discovery hub – Inspires curiosity and offers a peek into new creative ideas.
global alliance guide – Insightful content, browsing the site is quick and simple.
webauthority.click – Overall, professional vibe here; trustworthy, polished, and pleasantly minimal throughout.
clarity action hub – Very readable, makes understanding and applying concepts seamless.
securetradinghub – Well structured and reliable, perfect for trustworthy deals.
digitaltraffic.click – Found practical insights today; sharing this article with colleagues later.
onlineleads.click – Color palette felt calming, nothing distracting, just focused, thoughtful design.
smartvisibility.click – Content reads clearly, helpful examples made concepts easy to grasp.
Продажа тяговых АКБ https://faamru.com для складской техники любого типа: вилочные погрузчики, ричтраки, электрические тележки и штабелеры. Качественные аккумуляторные батареи, долгий срок службы, гарантия и профессиональный подбор.
alliances knowledge base – Structured insights, helps make sense of market partnership dynamics.
enterprisemodelguide – Structured and actionable content that makes enterprise frameworks easy to comprehend.
1xbet free promo code south africa
GlobalMarketOnline – User-friendly site with trustworthy options for international purchases.
Reliable SteadyBond Hub – Clear structure, pages are easy to follow and content seems dependable
everydaydealspot – Convenient platform for spotting deals quickly and reliably.
futures discovery hub – Supports exploration of emerging trends and long-term opportunities.
Professional Development Space – Learned new techniques that I can implement right away at work.
marketrelationshub – Professional and reliable, guidance on market relationships is actionable and easy to apply.
safe purchase network – The site is easy to navigate, making shopping quick and clear.
ShopSmartClick – Helpful platform, makes browsing products smooth and hassle-free.
fast daily shop – Quick-loading pages with an easy checkout enhance convenience.
OpportunityScout – Designed for professionals seeking strategic and rewarding business paths.
BondUnity Knowledge Center – Organized structure, finding information is quick and the user experience is seamless
SmartStrategyGuide – Practical tips, strategies are presented clearly for real-world use.
discover growth paths – Informative content, site makes planning long-term strategies simple.
SavvyBuyHub – Encourages smart spending with high-value shopping choices.
clarity toolkit – Excellent resources, simplifies understanding and applying concepts.
secureshoppingcenter – Promotes safety and reliability, ideal for long-term shoppers.
trusted alliance resources – Informative content, helps relate alliances to practical business cases.
sustainable growth network – Clear emphasis on eco-conscious collaboration for long-term success.
Το Spinmama συνιστά μια κορυφαία και αξιόπιστες πλατφόρμες διαδικτυακού καζίνο στη χώρα, δίνοντας μια μοναδική εμπειρία για αρχάριους και έμπειρους. Με ποικιλία τίτλων, από δημοφιλή φρουτάκια μέχρι προοδευτικά jackpot, μέχρι live casino και τουρνουά, οι χρήστες απολαμβάνουν ποιοτικό gaming με ασφάλεια και ευχρηστία. https://pattern-wiki.win/wiki/User:OWSAngelita ενισχύουν την επαγγελματική εμπειρία, τη γρήγορη πλοήγηση και τα δωρεάν spins που βελτιώνουν το gaming. Το Spinmama Greece ενώνει πλήρως καινοτομία, διασκέδαση και ασφάλεια, κάνει το Spinmama ιδανικό για όλους τους χρήστες, που αναζητούν αξιόπιστο και διασκεδαστικό online καζίνο.
IntelligentScalingTips – Step-by-step guidance, helps execute strategies with confidence.
dailyvaluebuys – Very user-friendly, locating great deals is quick and hassle-free.
BondValue Info Center – Clear pages, navigation feels smooth and content is easy to grasp
urbanretailcenter – User-friendly platform, browsing and shopping are fast and easy.
successpath – Clear guidance, readers can implement growth ideas effectively today.
Growth Clarity – Helped reduce guesswork and made planning more efficient.
BusinessLearningClick – Structured content that simplifies learning and implementation.
TrustedAlliancePortal – Branding conveys confidence, making professional collaborations more approachable.
ClickPathway Steps – User-friendly site, navigation supports learning and taking next steps confidently
enhanced shopping network – Well-structured site, likely to simplify finding and buying products.
plan your digital journey – Simple approach, guidance makes complex online tasks feel clear.
explore fresh insights – Inspires reflection and new approaches to ideas quickly.
trusted shopping center – The site prioritizes protection, ensuring users feel confident while purchasing.
alliances resource center – Helpful guidance, simplifies understanding of market partnerships.
Тяговые аккумуляторные https://ab-resurs.ru батареи для складской техники: погрузчики, ричтраки, электротележки, штабелеры. Новые АКБ с гарантией, помощь в подборе, совместимость с популярными моделями, доставка и сервисное сопровождение.
globalenterprisealliances – Informative platform, global alliance strategies are explained clearly and practically.
DealTrackerOnline – Easy to use, discovering online deals is straightforward.
corporatebondsolutions – Strong professional tone, communicates structured and trustworthy services.
growth structure guide – Informative tips, planning growth becomes straightforward and achievable.
Продажа тяговых АКБ https://faamru.com для складской техники любого типа: вилочные погрузчики, ричтраки, электрические тележки и штабелеры. Качественные аккумуляторные батареи, долгий срок службы, гарантия и профессиональный подбор.
RealWorldSolutions – Advice feels grounded and easy to act upon.
ClickPath Adventures – Playful interface, visitors enjoy exploring content without getting lost
trustbuilding – Concise and useful, partnership frameworks are presented clearly for real-world application.
SmartBuyNetwork – Focuses on cost-conscious purchasing with reliable options.
commercialbondnetwork – Reliable and structured, guidance on commercial bonds is easy to apply.
informed choices hub – Encourages thoughtful decision-making in a clear, approachable way.
frameworkguide – Offers practical advice for leveraging growth models effectively.
Networking Central – Everything feels well-organized, connecting with peers happens naturally.
ClickLearnAndScale – Practical guidance that simplifies planning for growth.
BuildSmartFuture – Supports structured strategic planning without overwhelming new users.
ClickMoment Learning – Clear pages, navigation is intuitive and content is easy to digest
knowledge discovery click – Well-organized content, exploring ideas feels effortless.
trusted business alliances – Practical examples, makes market alliances easy to follow.
corporate vision hub – Encourages building solid foundations for long-term success.
corporate trust hub – Highlights reliability, likely appealing to businesses looking for stable partnerships.
value deals network – Organized layout makes comparing offers fast and straightforward.
SmartBizClarity – Offers advice that clarifies business concepts efficiently.
SmartCartHub – Reliable and efficient, shopping online is smooth and simple.
digitalpathways – Excellent resource with easy-to-follow strategies for expanding online presence.
action channels – Useful insights, makes moving forward with goals feel more manageable.
growthstrategist – Very informative, provides useful tips that are easy to implement.
start exploring – Fun execution, it nudges users to poke around without pressure.
ReliableAllianceHub – Provides a platform for strong and credible enterprise relationships.
Commerce Strategy Lab – Well-structured insights that help apply new approaches confidently.
EasyDigitalMart – Convenient shopping setup designed for flexibility and efficiency.
ClickEcommerceHub – Easy to use platform, explains online shopping developments clearly.
creative approaches portal – Inspires trying new techniques to achieve better results.
click for smart strategies – Informative and simple, business strategy ideas are easy to grasp.
trusted market partnerships – Insightful content, makes alliance concepts relatable and practical.
дивитися фільми як популярні дорами з українським перекладом
страхи онлайн безкоштовно фільми в хорошій якості HD
dependablesaleshub – Strong impression of reliability, perfect for shoppers wanting trustworthy platforms.
StrategicBizLinks – Seamless networking experience, content seems well-structured and professional.
greenbusinessnetwork – Clear and helpful, partnership strategies focused on sustainability are easy to understand.
quickbuyonline – Convenient and intuitive, the platform makes shopping simple and fast.
professional connections portal – Clear layout and reliable content support smooth enterprise networking.
strategicbondresources – Helps professionals navigate strategic bonds efficiently and confidently.
growth roadmap – Clear guidance, content shows how to advance step by step effectively.
StrategicBondPro – Structured and accurate, the content makes strategic bonds easy to follow.
strategic planning portal – Offers contemporary perspectives on achieving growth.
InsightfulMarkets – Lessons are clear, market strategies are easy to follow and practical.
А вот стоит пойти чему то не так – и сразу на форум, вот и создаётся впечатление что у всех одни проблемы с товаром… https://ballerina-productions.info привет бразы всех спрошедшими праздниками получил седня посыль все порадовало и качество и бонус:p:D:D:Dприложеный за ожыдание спосибо магазуМагазу Респект и Уважуха)))
interactive e-commerce site – Browsing products is smooth, modern, and appealing.
Long-Term Alliance Insights – Insightful advice that helps partnerships thrive in the long run.
I don’t think the title of your article matches the content lol. Just kidding, mainly because I had some doubts after reading the article. https://www.binance.info/register?ref=IHJUI7TF
StrategicVisionPortal – Supports clear goal setting while helping users build a coherent plan of action.
TrustedBusinessPortal – Very informative, helps make business decisions with confidence.
Замена проточного нагревателя. Устранение проблем с нагревом воды. От 8000 тг.Замена сливного насоса посудомойки Ремонт встраиваемых моделей Weissgauff. Регулировка и замена пружин двери, установка нового циркуляционного насоса. Мы устраняем проблемы с фиксацией фасада и герметичностью камеры. Опытные мастера быстро найдут причину поломки и устранят её на месте. Доступные цены.Ремонт посудомоечных машин Leran Алматы
Fresh Ideas Hub – Organized pages make exploring new opportunities simple and engaging
trusted business alliances – Practical examples, makes market alliances easy to follow.
Фармацевтическая индустрия переживает эпоху инноваций, когда качественные лекарственные препараты становятся доступными благодаря современным технологиям производства и строгому контролю. Компания Aprazer специализируется на поставках проверенных медикаментов, включая препараты для лечения вирусного гепатита С и онкологических заболеваний. Каждый продукт проходит многоступенчатую верификацию, что гарантирует его подлинность и эффективность. На платформе https://aprazer.com.ru/ представлен полный каталог с подробными описаниями, система мгновенной проверки подлинности через официальную базу данных и возможность получить консультацию русскоговорящих специалистов. Компания работает напрямую с производителями, обеспечивая стабильные поставки и защиту пациентов от контрафактной продукции на фармацевтическом рынке.
strategic partnership tips – Easy-to-understand content, encourages practical thinking about alliances.
выпрямитель dyson ht01 купить выпрямитель dyson ht01 купить .
BudgetSaverNetwork – Offers practical options for price-conscious online shoppers.
Посетите сайт https://priority-auto.ru/ – мы предложим проверенные корейские, китайские, японские автомобили и мотоциклы с существенной выгодой, с подбором на аукционах и быстрой доставкой в РФ. Узнайте обо всех наших преимуществах на сайте или воспользуйтесь опцией “рассчитать стоимость” – где вы увидите конечную стоимость авто. Подберем авто под ваш бюджет, вышлем актуальную стоимость и расскажем, как будем доставлять.
Добрый вечер помогите купил у снега клад, пустой, как сапорту написать..? Купить наркотики | Где купить наркотики? Дорогие наши форумчане, мы бы рады с вами пообщаться на разные темы, и стараемся общаться со всеми, и порой просто не хватает времени ведь мы не железные, если вы хотите что то конкретно заказать ася и скайп ждет вас, просто нереальное кол-во народа задают вопросы утром днем и вечером, и вот даже сейчас, мы очень стараемся изменить ситуацию в лучшую сторону. С начала месяца т.е. с 1 июня вы сможете самостоятельно заказывать и оплачивать прямо на сайте, а так же будете видеть наличие продукции.качество реги просто супер,такого еще не встречали
retailcenter – Practical and efficient, shopping online is smooth and quick.
corporate growth strategies site – Useful for implementing cooperative and scalable growth plans.
OnlineBazaar – Navigation is easy, platform feels modern and organized.
shopassureportal – Projected professionalism, encourages users to shop without worry.
Словенское качество Gorenje. Ремонт механизма закрытия двери, замена разбрызгивателей.Ремонт посудомоечных машин Hansa Алматы Оперативный выезд мастера в Алатауский район: микрорайоны Шанырак, Алгабас, Акбулак. Мы находимся рядом и приедем быстро. Ремонт посудомоечных машин любой сложности прямо у вас дома. Наличие запчастей и инструментов. Гарантия на выполненные работы.Ремонт посудомоечных машин Алмалинский район
retailglobetracker – Useful guidance, global retail strategies are easy to follow and understand.
Strategic Opportunities Online – Clean design allows visitors to assess partnerships and future plans efficiently
world value store – Clear product layout and fast checkout enhance the shopping experience.
insightful content – A pleasant way to stay mentally active.
Ребят какие могут быть сомнения в этом магазе магаз ровный и заслуживает уважения он в доверенных его реклама на шляпе сайта ну это так для тех кто не знает просто реклама стоит 5000$ доларов! https://hasura.info норм. Все кладки нахожу без проблем… взял белого и…охуел!!!В итоге получается, что все страницы оказываются в одних недовольствах, но ладно визуально, так ведь чуть ли не неделю каждая страница в недовольствах, а это что-то да значит, особенно когда сам проверишь… Вот я постучался в асю, пообщались, вы исчезли, потом кое-как вернулись, но молчок по полной. Зря вы так, всех клиентов распугаете таким макаром…
ProActiveTips – Encourages decisive moves that bring real benefits.
CollabProNetwork – Designed to foster teamwork and create meaningful professional connections.
ClickDecisionInsights – Easy-to-follow guidance that makes comparing choices simple.
Global Retail Insights – Provides a clear view of emerging trends and retail innovations worldwide.
trusted market partnerships – Insightful content, makes alliance concepts relatable and practical.
TrustAlliancePro – Reliable resource, helps establish professional trust and offers clear guidance.
professional partnership tips – Hub provides clear advice, networking is less stressful.
modern shopping network – Presentation is simple, appealing, and in line with current retail tech.
quick link – Simple interface, smooth browsing, information is concise and readable
Выезд мастера в Талгар. Ремонт холодильников на дому без транспортировки.Ремонт холодильников Каскелен Обслуживание поселка Байсерке. Срочный вызов мастера по ремонту холодильников. Мы понимаем, как важна сохранность продуктов, поэтому реагируем на заявки максимально быстро. Качественный ремонт с гарантией.
Ремонт холодильников Бесагаш
Exeed в СПб у официального дилера ИАТ https://exeed-iat.ru/ – это выгодные цены и авто в наличии, а также профессиональный сервис. Узнайте на сайте модельный ряд, наши преимущества и предложения. Цены, комплектации и модельный ряд на сайте, а также специальные финансовые программы, трейд-ин, лизинг, скидки и акции, тест-драйв!
zixor.click – Nice layout, loads quickly, information feels clear and useful today
allianceinsider – Practical and informative, shows structured methods for networking with professionals.
А почему сам с-м.сом сюда какой день не кажеться…? https://ignite-partners.ru трек кинули ровно оперативно как придет отпишу за качество 250сегодня в 16:25 на почте получен конверт ,в нем было вещество лимоного цвета 0,3 г , сохнет ,позже подробно опишу
DigitalStrategyHub – Structured recommendations make planning online growth straightforward.
business alliance center – Emphasizes forming strategic partnerships and global business collaborations.
AffordableBuyNetwork – Highlights cost-effective choices for digital shoppers.
careerpathresources – Very intuitive, professional growth advice is clear and easy to implement.
dependable marketplace – Looks secure and consistent, I’d trust this for my next purchase.
verified partnership hub – Security-driven platform encourages risk-averse businesses to engage.
выпрямитель дайсон купить в москве оригинал выпрямитель дайсон купить в москве оригинал .
Холодильник для хранения реактивов POZIS Официальная продажа медицинских холодильников POZIS. Полный пакет документов: Регистрационное удостоверение РК, сертификат соответствия, метрологическая поверка. Идеально для лицензирования аптек и клиник. Доставка по всему Казахстану, гарантия от завода-производителя.
Фармацевтический холодильник POZIS цена
оп оп давай что за эфо дис Купить наркотики | Где купить наркотики? магазин на высоте) качество кул)Хорошо работают реально ! ! ! рега МН-35ф реально индика суровая , наиболее множество сходств нашёл с натуралом , по Мне так это наиболее приближенный каннабиноид ..
SecureRetailPlatform – Navigation is easy and the interface reassures shoppers about reliability.
PremiumDealsPortal – Easy layout and concise information, browsing for deals is hassle-free.
partnership insights platform – Very actionable, real-world examples illustrate alliance strategies well.
bond education hub – Simplified explanations support quick understanding of bond investment.
nextgen online store – Smooth and efficient, checkout is simple and straightforward.
Opportunity Awareness – Helped expand my thinking around potential business ideas.
business unity hub – Information is concise, understanding strategy feels approachable.
resource page – Clean pages, minimal distractions, information is concise and helpful
explorebusinessopportunities – Insightful resources, finding business opportunities feels easy and practical here.
TopDealFinder – Easy-to-use site, discovering deals feels smooth and straightforward.
shopvaluepro – Efficient and helpful, platform makes comparing deals straightforward.
sonabet.pro
BizBondingPro – Provides a secure environment, transactions feel protected and professional.
магазин ровный, три года с ним уже, только один раз отправку долго ждал…. но дождался) Купить наркотики | Где купить наркотики? Разве имеет принципиальное значение сколько моему аккаунту времени? Я тут не *зависаю*, а пишу по сути. Мутность заключается в том что оператор в аське на вопросы по уточнению адреса, сначала молчал почти 3 часа, потом вообще оффнулся.следующий раз пришлем поношеные презервативы но ты будешь рад!!!
Мастер по холодильникам в Боралдае (Бурундай). Диагностика бесплатно при ремонте.Ремонт холодильников Узынагаш Обслуживание дизайнерских холодильников Smeg, включая ретро-серии FAB. Ремонт фурнитуры, замена уплотнителей, восстановление системы No Frost. Мы бережно относимся к эксклюзивному дизайну и используем специальные инструменты. Ваш стильный холодильник снова будет работать безупречно.
Ремонт холодильников Gaggenau Алматы
Онлайн курсы психологии https://ilmacademy.com.ua удобный формат обучения для тех, кто хочет освоить профессию психолога, получить практические навыки и пройти профессиональное обучение дистанционно. Курсы подойдут для начинающих и специалистов, ориентированных на практику.
Нужна тара? мешки биг бэги Компания “МКР-Биг-Бэг” — производство и продажа биг-бэгов (МКР) оптом. Широкий ассортимент мягких контейнеров для сыпучих материалов. Индивидуальные заказы, доставка по России. Надежно, быстро, выгодно!
Белое SEO https://seomgroup.ru работает. Спустя год работ с уверенностью это говорю. Главное найти спецов, которые не обещают золотые горы за месяц. Нормальные результаты, это минимум 3-4 месяца работы. Зато теперь получаем стабильный органический трафик, не как с рекламы, где бюджет кончился и все.
skill growth site – Supports professionals in building expertise gradually without stress.
trustedsalesportal – Professional look and feel, ensures peace of mind while shopping online.
expertadvicecorner – Easy-to-follow, professional insights are explained clearly for practical use.
international buying resource – Wide range of products caters to diverse global buyers.
sonabet.pro
Техническое обслуживание грузовых и коммерческих автомобилей и спецтехники. Снабжение и поставки комплектующих для грузовых автомобилей, легкового коммерческого транспорта на бортовой платформе ВИС lada: ремонт спецтехники
trusted business alliances – Practical examples, makes market alliances easy to follow.
BusinessAllianceHub – Focused on creating reliable corporate alliances and cooperative networks.
важаемый ТС прошу разобраться с заказом,всё оплаченно вам,вот только игнор в бросиксе и посылки нету до сих пор. Заранее благодарен. https://operationq.top о господи 😀 я не селлер – я просто зашёл на сайт и посмотрел что есть в ассортименте – из скоростей нормальных разве что..кхм, оно…Почему больше не берете?
GlobalPartnershipHub – Well-organized content, makes understanding international business easier.
Бесплатная диагностика при ремонте. Точное определение неисправности профессиональным оборудованием.Ремонт стиральных машин недорого Алматы Швейцарское качество сервиса для V-ZUG. Ремонт уникальной системы гашения вибраций Vibration Absorbing System (VAS). Мы восстанавливаем работу сенсоров и паровых функций. Долгосрочная гарантия на все виды сложных работ и установленные детали.
Ремонт стиральных машин Neff Алматы
https://sonabet.pro/
Trusted Connections Lab – Helps establish meaningful professional partnerships with confidence.
sonabet.pro
browse now – Everything loaded smoothly and the site felt lightweight
BudgetSaverNetwork – Offers practical options for price-conscious online shoppers.
worldwide trade hub – Highlights potential connections and alliances across international markets.
strategic framework hub – Concepts are presented in a structured way, supporting clear understanding.
digital shopping platform – Clear layout, online shopping is fast, simple, and enjoyable.
Комиссионный центр https://skypka.tv специализируется на скупке самой разной техники — от смартфонов и телевизоров до фотоаппаратов и игровой электроники, так что выгодно избавиться можно практически от любых лишних устройств.
Свежие новости https://arguments.kyiv.ua Украины и мира: события в Киеве и регионах, экономика, общество, происшествия, спорт, технологии и культура. Оперативная лента 24/7, аналитика, комментарии, фото и видео.
Новостной портал https://dailynews.kyiv.ua Украины с проверкой фактов: важные заявления, решения властей, бизнес и финансы, жизнь городов и областей, погода, транспорт, культура. Удобные рубрики и поиск, обновления каждый час, коротко и по делу.
3D-печать — это современный метод, который позволяет создавать детали любой сложности. Мы обеспечиваем печать моделей и деталей любой сложности. Наши специалисты следим за качеством на каждом этапе, что делает каждую модель максимально детализированной. В печати используются PLA, ABS и другие материалы, благодаря чему любая идея может быть реализована на практике. Сроки выполнения заказа минимальны, а качество всегда соответствует цене. Оформите заказ прямо сейчас, и вы убедитесь в возможностях современных технологий https://3dtoday.ru/blogs/flugegeheimen/popytka-kompensirovat-usadku-fdm-3d-pecat. Наши специалисты выполняют печать точно по макету.
alliancespro – Very useful, readers can apply corporate alliance advice effectively.
SmartBuyOnline – Clear and practical, online shopping feels quick and effortless.
MasterLongTermAlliances – Engaging guidance, alliance strategies are practical and ready to implement.
Сервис лучший, и стабильный. https://wuwaidesign.top магаз работает???Всем привки Любви здоровья вам ! Процветания
explore business ideas – Encourages creativity and exploration for entrepreneurs online.
выпрямитель дайсон ht01 купить выпрямитель дайсон ht01 купить .
topleadersinsights – Informative content, guidance from market leaders is easy to digest and apply.
networking for professionals – Credible presentation suggests meaningful and serious business connections.
safe shopping platform – Gives confidence that transactions here are secure and reliable.
alliances insight platform – Useful tips, simplifies how alliances operate in different markets.
LongTermBizNetwork – Sustained connection approach creates trust and strategic alignment between businesses.
momentum unleashed – Friendly, natural language showing how energy focused into traction drives forward action.
UrbanShoppingClick – Smooth and practical, browsing product options is fast and effortless.
business framework hub – Concepts are well-organized, making the framework easy to grasp for professionals.
top link – Well-designed site, navigation is intuitive and information is straightforward
Ооо да, тусишка у них лучшая из того – что мне доводилось пробовать )) https://sentidocomunecuador.com Заказывал пробник на 10000 (оплатил на альфу) сено и мягкий, но КЛАД ТАК И НЕ БЫЛ НАЙДЕН!!! на что продавец ответил “ищите лучше” , на просьбу созвонится или списаться закладчику и курьеру ни как не отреагировал!!! Решать вопрос не захотел!!!Если СК выпадает в осадок – то это уже само по себе не нормально
Consumer Shopping Lab – Step-by-step suggestions that save time and improve purchase choices.
official site – Fast-loading pages, intuitive design, very easy to understand
collaborationacademy – Practical advice, platform makes professional collaboration easy to understand.
globaldigitalshoppingmarket – Smooth interface, site offers a good overview of digital marketplaces worldwide.
insight hub – Very clear advice, easy to follow and apply in real professional scenarios.
PurchaseDirect – Shopping is hassle-free, interface is clean and intuitive.
long-term investment alliances – Encourages building partnerships that align with strategic investment goals.
В Курске нету https://hasura.info Да тут дофига кто чего отписывает.только вот пробы нормальным людям раздайте.что бы видели липчане работу вашу!Меня тут Кинули на 25к претензия в арбитраже!!!
launchmystore – Efficient approach, helps newcomers set up ecommerce without unnecessary complexity.
SmartSavingsCart – Highlights smart and value-focused shopping experiences.
strategic foresight portal – Encourages proactive thinking for future stability and growth.
reliableshoppercenter – Easy-to-navigate platform that provides secure and efficient shopping.
alliancesimplified – Very clear and useful, explains market relationship strategies in an understandable way.
trusted business alliances – Practical examples, makes market alliances easy to follow.
CareerInsightLab – Useful resource for professionals seeking clarity and actionable advice.
LearnWithExperts – Easy-to-follow guidance, really improves understanding of professional strategies.
engineer your progress – Friendly and natural, illustrating how thoughtful planning creates forward momentum.
И всё надо успеть. :crazy: Купить наркотики | Где купить наркотики? следить не могли однозначнои как обычно тут все ровно. БОЛЬШУЩИЙ РЕСПЕКТ МАГАЗИНУ.
alliances for unity – Emphasizes partnerships that prioritize cooperation over competitive behavior.
next level deals hub – Browsing through products feels smooth and controlled.
top resource – Quick response times, clean layout, easy to explore content
]businessbridge – Informative and logical, the platform presents partnership strategies clearly.
Product Browsing Hub – Finding and viewing products feels fluid and well-organized.
фен выпрямитель для волос дайсон купить фен выпрямитель для волос дайсон купить .
LearnBusinessPro – Clear and actionable, learning enhances real-world business capabilities.
dependable shopping hub – Easy to navigate, purchasing products feels safe and straightforward.
новый запрет вступает через 7 дней. читай список бро,там это вещество есть) https://keralatourism.biz Спасибо огромное вам многим за понимание.ВСЕМ САЛЮТ!!! :hello:
online management skills – Highlights the flexibility and reach of digital business learning.
learning progression hub – Structured to help users grow understanding step by step.
growthfocus – Practical advice for making your growth efforts more productive.
Женский портал https://elegantwoman.kyiv.ua о красоте, здоровье и стиле жизни: уход за кожей и волосами, мода, отношения, психология, карьера, дом и вдохновение. Полезные советы, подборки, рецепты и лайфхаки на каждый день. Читайте онлайн с телефона и компьютера.
Главные новости https://novosti24.kyiv.ua Украины сегодня — быстро и понятно. Репортажи из регионов, интервью, разборы, инфографика, фото/видео. Следите за темами, сохраняйте материалы и делитесь. Лента обновляется 24/7, чтобы вы были в курсе событий.
Всё для женщин https://glamour.kyiv.ua в одном месте: тренды моды и бьюти, здоровье, питание, спорт, семья, дети, отношения и саморазвитие. Статьи, чек-листы, идеи и обзоры, которые помогают принимать решения и чувствовать себя увереннее.
LongTermBusinessGuide – Organized and insightful, forming corporate connections is straightforward.
check nexra – Well-structured sections, fast response, first impression is very positive
modern solutions portal – Highlights innovative alternatives for improved results.
clearchoicesguide – Very helpful insights to approach decisions logically and efficiently.
sona bet app
StreamlinedRetailOnline – Focused on reducing friction and making digital shopping easy.
I don’t think the title of your article matches the content lol. Just kidding, mainly because I had some doubts after reading the article. https://accounts.binance.com/da-DK/register-person?ref=V3MG69RO
заказал у KingSize – всё ровно вышло. Большего и добавлять незачем Купить наркотики | Где купить наркотики? Хотел бы поблагодарить магазин за отличное отношение и замечательную работу) Давно такого не встречал.после нового года два раза заказывал первый и второй раз были геморои по срокам отправок но все дошло третий раз конечно тоже закажу но ТС должен будет мамой поклястся что отправит вовремя но если по правде говоря то курьерки тоже мозг ебут не всегда вина ТС
alliancesacademy – Clear guidance, readers can follow long-term alliance strategies effectively.
cavlo.click – Found this by accident and liked how clean the page is
NextGen E-Commerce Hub – Offers practical ways to discover products and make quick purchases.
progress motivation portal – Helps turn ideas into action with encouraging content.
AffordableBuyNetwork – Highlights cost-effective choices for digital shoppers.
Ежедневные новости https://useti.org.ua Украины: политика и экономика, общество и медицина, образование, технологии, спорт и шоу-бизнес. Мы собираем информацию из надежных источников и объясняем контекст. Читайте онлайн с телефона и компьютера — удобно и бесплатно.
Все о событиях https://ua-vestnik.com в Украине и вокруг: оперативные сводки, расследования, мнения экспертов, рынки и курс валют, происшествия и полезные сервисы. Подборки по темам, теги, уведомления, фото и видео — актуально в любое время.
Портал для женщин https://woman24.kyiv.ua про жизнь без лишнего: красота, женское здоровье, питание, рецепты, уютный дом, финансы, работа и отдых. Практичные советы, честные обзоры и вдохновляющие истории.
company connection resource – Helpful for organizations seeking meaningful professional partnerships.
прекращайте пользоваться спср, мало того что у них сервис очень плохой, принимают :police: ещё и отказываюся работать в свое рабочее время https://cncuserforum.ru я в среду оплатил ещё, тс сразу сказал, что отправка будет на следующей недели во вторник-среду.Мира всем!!
reliableonlinecommerce – Safe and reliable, buying products online feels simple and secure today.
enterprisenavigator – Helps apply frameworks that improve organizational efficiency and results.
BudgetSmart – Well-organized listings and useful info make comparison simple.
ecooptimizationhub – Balances smart purchasing with eco-awareness, ideal for conscious online shoppers.
partnershipscenter – Very professional, alliance strategies are clear and simple to follow.
Аренда автомобилей в Краснодаре становится простой и удобной благодаря сервису CarTrip с широким парком машин. Компания предлагает транспорт разных классов — от стандартных седанов до минивэнов и кабриолетов для путешествий. Отсутствие залога и ограничений по пробегу делает условия прозрачными и комфортными для клиентов. Разрешен выезд в Крым, что особенно актуально для летнего отдыха на побережье Черного моря. Ознакомиться с полным каталогом и забронировать автомобиль можно на https://prokat.car-trip.ru/ круглосуточно онлайн. Дисконтная карта предоставляется каждому клиенту при первом обращении в компанию для постоянных выгодных условий.
UrbanTrendShop – Platform gives a contemporary feel suited for trend-focused urban buyers.
ProEnterpriseFramework – Clear and organized, frameworks are explained logically and effectively.
Вердикт: https://gamoh.biz Плюсы: качество супер, цена отличная, вес по гостумагаз норм. а вот курьеры зажрались суки.
smart workflows hub – Focuses on finding efficient alternatives to traditional methods.
online access – Minimalistic feel, smooth browsing, content is clear and organized
connect and grow professionally – Very informative, advice can be applied immediately in work relationships.
ProfessionalBonding – Guidance is well-structured, platform inspires confidence for team building.
Corporate Relationship Hub – Helps establish professional connections that last and inspire trust.
sonabet casino
click here – Organized sections, responsive pages, first impression is positive
универсальное моющее средство концентрат Концентрированное моющее средство – это экономичное и эффективное решение для вашего дома. Благодаря высокой концентрации активных веществ, наши продукты обеспечивают максимальную чистоту при минимальном расходе. Одного флакона концентрированного моющего средства хватает на длительное время, что позволяет существенно экономить ваши средства и ресурсы.
business synergy link – Messaging highlights actionable approaches to corporate partnership challenges.
shopping made simple – Modern interface supports easy navigation across sections.
tavro page – Fast-loading site with clear sections and simple navigation
partnershiplens – Helps you view professional alliances in a structured, actionable way.
Мы в Кургане не работаем, все наши представительства есть в соответствующем разделе. https://mossygatherings.info заказывал не один раз в этот раз заказал в аське нету тс жду 8дней трэка нет че случилось тс?У меня настоящий 96 процентный спирт с больницы. Всё растворилось. Чу чуть паровой бани.
pixelpilot.click – Appreciate the typography choices; comfortable spacing improved my reading experience.
market trends explorer – Emphasizes learning about emerging trends for strategic advantage.
vyrxo info – Logical flow, readable content, and pages load quickly without issues
framework compass – Excellent guidance, provides clear direction for implementing growth strategies.
networkingstrategies – Clear and actionable, corporate networking advice is easy to apply.
SmartChoiceMarket – Helps consumers navigate purchases thoughtfully and with intention.
explore signal turns action – Intuitive interface with information presented clearly throughout
Требуется работа в Израиле? Зайдите на сайт 4israel.co.il/ru/jobs/ и вы обнаружите множество предложений. Легко определите округ Израиля и городской центр, а ресурс продемонстрирует вам все актуальные предложения о занятости. Работа в Израиле это тысячи бесплатных вакансий – вы обязательно подберете для себя работу или публикуйте свои вакансии и получайте отклики работников. Наша платформа самая удобная для поиска работы и сотрудников. Более полная информация на ресурсе.
sona bet bd
CostWiseShop – Highlights savings while maintaining a smooth online shopping experience.
As we look through this invisible microscope, we can closely examine the influence of these special features and their effect on the Gates of Olympus Super Scatter game. Gates of Olympus Super Scatter is a thrilling online slot that combines ancient Greek mythology with cutting-edge slot mechanics to deliver an unpredictable and rewarding gaming experience. Players can choose to try the Olympus Super Scatter demo for free or jump straight into real-money action, where Zeus himself unleashes divine multipliers and powerful bonus rounds. This game is also a top pick for anyone interested in exploring the exciting world of crypto gambling at Winz.io. If you’d like to file an allegation of infringement, you’ll need to follow the process described in our Copyright and Intellectual Property Policy.
https://cocuklaricinelele.org.tr/in-depth-review-of-1xbet-online-casino-games-for-uk-players
Following in the footsteps of its predecessor, which became one of the world’s best online slot games, Gates of Olympus 1000 takes you on a magical journey through ancient Greece, where gods guard precious treasures. Whether you’re a fan of Cascading Wins, huge win multipliers, or just love the rush of watching Zeus zap the reels and giving you bigger multipliers, this guide gives you a detailed breakdown of every Gates of Olympus release in our Pragmatic Play slots series so far. For your convenience, you will learn all about the Casino Joy Canada service and understand why their name suits their service absolutely and is a great site for Canadian players. One of the most popular scratch cards on the site is called Amazing Spades, you just wont know how much. You can also write to casino employees through the feedback form, so you can get started with a little extra. To make the game even more lucrative, gates of olympus cascade principle you can take part in a number of wonderful features.
Женский онлайн-журнал https://womanlife.kyiv.ua бьюти-гайды, мода, психология, отношения, материнство и забота о себе. Подборки товаров, инструкции, рецепты и идеи для дома. Читайте коротко или глубоко — удобная навигация и свежие материалы каждый день.
Медицинский портал https://medicalanswers.com.ua для пациентов: здоровье, диагностика, лечение, профилактика и образ жизни. Экспертные статьи, справочник симптомов, советы специалистов и актуальные медицинские новости. Достоверная информация в одном месте.
Новости Украины https://news24.in.ua 24/7: Киев и регионы, экономика, общество, безопасность, технологии, спорт и культура. Короткие сводки, подробные материалы, объяснения контекста, фото и видео. Читайте главное за день и следите за обновлениями в удобной ленте.
global collaboration guide – Easy-to-understand content, international partnerships explained simply.
Ребята хватит писать бред про арестованные посылки продавец ни в чем не виноват!!! Берите закладками!!! Продавец выполняет свою работа на 100% с ним всегда все четко даже подарок сделал ко дню рождению!!! Бро ты лучший!!! Купить наркотики | Где купить наркотики? Да и вообще стот ли…? риск есть…?Ребята решили вопрос.. Вместо 307 выслали компинсацию в виде 1220. Давно не курил такие миксы, живы отдыхают, концентрацию 1к20 делал.
WorldwideTrustConnections – Informative site, global networking is approachable and well-managed.
Ко ланта ко ланте
Creative Growth Tips – Enjoyed reading through ideas that push me to improve my workflow.
discount shopping platform – Value-driven approach, likely to attract deal-seekers.
sona bet app
searchspark.click – Content reads clearly, helpful examples made concepts easy to grasp.
ecopartnershipplanner – Offers structured tips for creating environmentally conscious collaborations.
классный магазин Купить наркотики | Где купить наркотики? Действительно с ответами продовца проблемы имеются!!!!!!!! это вам -5Молодцы! Так держать!стараемся!
Для дистанційного навчання стабільне електропостачання є необхідністю. Потужна зарядна станція підтримує роботу ноутбуків і роутерів. Вона робить процес безперервним.
Обучение Xrumer 23 Базы Хрумер 23 телеграм
trusted checkout portal – Buying process runs smoothly and feels safe throughout.
kazinolar olamida yangi yulduz sifatida paydo bo’lgan platforma . U o’zining xilma-xil o’yinlari va yuqori sifatli xizmati bilan foydalanuvchilarni jalb qiladi . 888starz foydalanuvchilarga o’zlarining sevimli o’yinlarni o’ynash imkoniyatini beradi .
888starz скачать ios testflight https://888staruzbeki.com/apk/
Для навчання та роботи з дому потрібне стабільне живлення. Саме зарядна станція підтримує роботу ноутбуків і інтернету. Вона підвищує продуктивність.
Для стабільної роботи інтернету необхідне безперебійне живлення. Саме зарядна станція підтримує роботу роутера і комп’ютера. Вона дуже корисна.
Під час навчання онлайн важливо мати стабільне живлення. Саме зарядна станція забезпечує роботу ноутбука і інтернету. Вона практична.
quick purchase hub – Highlights speed and ease for online shoppers seeking efficiency.
Під час поїздок за місто важливо мати запас енергії. Компактна зарядна станція дозволяє користуватися технікою будь-де. Вона мобільна.
zylor home – Simple interface, pages load quickly, and information is easy to find
Современный женский https://storinka.com.ua портал: уход, макияж, тренировки, питание, стиль, любовь, семья и карьера. Экспертные советы, полезные подборки, идеи подарков и лайфхаки. Мы говорим простым языком о важном — заходите за вдохновением ежедневно.
Новостной портал https://ua-novosti.info Украины без лишнего: оперативная лента, репортажи из областей, интервью и разборы. Политика, финансы, социальные темы, медицина, образование, IT. Фото/видео, инфографика, уведомления и топ-материалы дня.
BusinessDecisionGuide – Encourages careful analysis and practical clarity for key business decisions.
У багатьох родинах резервні джерела енергії стали необхідністю. Сучасна зарядна станція забезпечує комфорт у будь-яких умовах. Вона універсальна.
Актуальные новости https://uapress.kyiv.ua Украины и мира: события, заявления, решения, рынки, курсы, происшествия и жизнь регионов. Факты и проверенные источники, аналитика и комментарии. Удобные рубрики, поиск, теги и подборки — всё, чтобы быстро находить нужное.
Для дистанційної роботи стабільне живлення є запорукою продуктивності. Саме зарядна станція підтримує безперервний процес. Вона практична.
Для стабільної роботи освітлення потрібне надійне живлення. Саме зарядна станція забезпечує це без проблем. Вона корисна.
кайт благовещенская кайт школа анапа
official focusamplifiesgrowth – Layout is straightforward, text is readable, and pages load quickly
ShopSafeOnline – Fast payments and the process is completely secure.
концентрат моющих средств Органические моющие средства – это гармония между человеком и природой. Мы предлагаем продукты, созданные на основе растительных экстрактов и масел, которые бережно очищают поверхности, не оставляя токсичных следов. Наши органические моющие средства подходят для уборки в домах с маленькими детьми и домашними животными, обеспечивая безопасную и здоровую атмосферу.
Донат в мобильные игры Донат в игры – это практика добровольного внесения средств игроками для поддержки разработчиков и получения внутриигровых преимуществ. Эта система часто встречается в free-to-play играх, где базовый доступ предоставляется бесплатно, а дополнительные возможности и контент приобретаются за реальные деньги. Донат может быть представлен в виде покупки премиум-валюты, разблокировки персонажей, приобретения редких предметов или просто как способ выразить благодарность разработчикам.
smart thinking hub – Encourages analysis, step-by-step strategy explanations are accessible.
У темному лісі без спеціальної техніки легко загубитися. Завдяки тепловізор, можна орієнтуватися і контролювати обстановку. Це робить дії більш безпечними.
У темному лісі легко загубитися без допомоги техніки. Використання тепловізор дозволяє орієнтуватися і контролювати обстановку. Це робить дії більш безпечними.
Військові операції часто проходять у складних погодних умовах. Використання тепловізор дозволяє контролювати рухи ворога. Це критично для успіху завдання.
korixo online – User-friendly setup where everything makes sense
Під час нічних військових операцій важливо бачити навіть слабкі джерела тепла. З допомогою тепловізор, можна ефективно спостерігати за територією. Це підвищує безпеку.
globalpartnershipinfrastructure – Very detailed, global partnership infrastructure is explained clearly and practically here.
click here – Clear design, smooth interface, easy to read content quickly
trusted resource – Clean design, smooth performance, everything is easy to read
и будем мы так общаться по одному смс раз в полмесяца… https://velonews.top Работал с данным магазином Совсем давно, и что то все руки не доходили оставить отзыв о магаз:DДим, доброго времени суток, отпиши за приход, заказала тоже эйф-дисс, скажи, чего ожидать?
basic online shop platform – Clear and manageable, great for small businesses starting out.
Collaboration Excellence Lab – Very useful for understanding how to grow and maintain professional partnerships.
StrategicGrowthGuide – Lessons are practical and easy to grasp, making strategy planning effortless.
careerprogressiontools – Practical guides that help professionals expand their skills efficiently.
sonabet app login download
магаз норм. а вот курьеры зажрались суки. Купить наркотики | Где купить наркотики? Какое палево ты очём?Дабы не быть голословным: № заказа 1000707. 10г ам2233. Делал 1 к 7. Эффект болезненный. Все выброшено. Верни деньги ТС или пришли нормальный ам!
Главные события https://vesti.in.ua Украины — коротко и понятно. Мы собираем новости из Украины и мира, проверяем данные и даём ясные объяснения. Подборки по темам, новости городов, аналитика, мнения, видео. Обновления каждый час, удобно на смартфоне.
Всё о здоровье https://medfactor.com.ua на одном медицинском портале: болезни и их лечение, анализы, препараты, обследования и профилактика. Материалы подготовлены с опорой на клинические данные и врачебную практику. Читайте онлайн в любое время.
Онлайн-журнал https://love.zt.ua для женщин: мода, бьюти, психология, любовь, семья, дети, дом, карьера и финансы. Обзоры, лайфхаки, рецепты и инструкции — без «воды», с пользой. Удобные рубрики и свежие материалы ежедневно.
digital purchase center – Well-structured pages improve the overall shopping flow.
TrustedCartOnline – Highlights secure handling of transactions for a confident shopping experience.
vision-driven business strategies – Suggests methods for aligning operations with a long-term growth vision.
check axivo – Tidy structure with content that’s simple to understand and browse
Логопедический центр в Красногорске помогает детям с особенностями развития от полутора до семи лет обрести речь и социальные навыки. Специалисты https://aba-krasnogorsk.ru/ работают с задержкой речевого развития, аутизмом, алалией и другими состояниями, применяя методики ABA-терапии и Денверскую модель раннего вмешательства. Дефектологи разрабатывают уникальные маршруты под отдельного воспитанника, опираясь на психотип и предпочтения, а мамы с папами узнают техники для самостоятельных упражнений. Учреждение формирует бытовые умения, исправляет избирательность в еде и учит преодолевать эмоциональные срывы мирно.
growthflowswithclarity – Quick read but very insightful, design is simple and effective
Веб-магазин SerialExpress продаёт более пятнадцати тысяч сериалов на DVD-носителях с пересылкой российской почтовой службой и курьером СДЭК по территории государства. Ищете интересные сериалы купить? На serialexpress.ru представлены российские и зарубежные сериалы, теленовеллы, турецкие дорамы, мультсериалы и документальные фильмы в максимально высоком качестве видео и звука. Каталог постоянно обновляется новинками, доступна запись фильмов на заказ, а зарегистрированные клиенты получают накопительные скидки. Скоростная подготовка заявок и обширный выбор трансформируют ресурс в практичный вариант для фанатов телевизионных шоу.
sonabet app download
top resource – Easy-to-follow layout, fast-loading, information is relevant and clear
xrumer Обучение Xrumer 19 телеграм
Came across vipdubaiagency.com while browsing Dubai escort platforms. The site has a polished design, a diverse catalog of services, easy-to-understand pricing, and a smooth booking process. It feels more top-tier than most agencies I’ve encountered. Definitely worth checking if you are looking for full services in whole platform.
Visit- https://vipdubaiagency.com/
пока никто ничего тут не берите!!!!!!!!!!!!!!!!!!!!!!!!!!!!!!!!!!!!!!!!моя ситуация решится если то я сообщу.Пока кидалово нарисоваывается.Дабы даже о приходе средств человек не сообщает,просто сказал ложи а после оплаты сразу замолчал,хотя сообщения доходили еще.А ты если кинеш то тварь ты последняя.Бобла наверно тут хорошо сделал а совести хватает провинциалов кидать.Ты в курсе что у нас люди на эти бабки 2 месяца живут и не от сладкой жизни гавно у тебя то берут.Бог тебе судья короче!Свечку тебе за здравие каждую неделю если что буду ставить 😉 чтоб ты жил долго и счастливо… Купить наркотики | Где купить наркотики? все от души))) вот бы еще во всех городах зк делали)))))в рязань доставим?
Доска объявлений TopDoska гарантирует оперативный подбор продукции и сервисов в российских регионах благодаря простому функционалу. На https://topdoska.ru/ размещены объявления в 2581 рубриках, охватывающих недвижимость, транспорт, работу, электронику, астрологию и бизнес-предложения. Сервис функционирует в 3843 локациях государства, давая гражданам и компаниям выкладывать объявления безвозмездно. Опция формирования индивидуального магазина и премиум-инструменты продвижения трансформируют систему в продуктивное средство роста продаж и вовлечения покупателей.
sonabet online
savings shopping platform – Clear focus on deals, perfect for shoppers aiming to save money.
sonabet live
Ко ланта Ко ланта
Нужен дизайн? дизайн бюро интерьера москва создаем функциональные и стильные пространства для квартир, домов и офисов. Планировки, 3D-визуализации, подбор материалов и авторский надзор. Индивидуальный подход, реальные сроки и продуманные решения под ваш бюджет.
Решил сделать ремонт? студия интерьера москва: квартиры, дома, апартаменты и офисы. Продуманные планировки, 3D-проекты, сопровождение ремонта и контроль реализации. Создаем интерьеры, отражающие ваш стиль и образ жизни.
Электронные компоненты https://zener.ru с прямыми поставками от производителей: микросхемы, пассивные элементы, разъёмы и модули. Гарантия оригинальности, стабильные сроки, выгодные цены и подбор под ТЗ. Поставки для производства, сервиса и разработки.
гражданство румынии купить
Professional Bonding Center – Provides actionable guidance to improve corporate networking and collaboration.
mexto online – Clear layout that makes absorbing information effortless
экологически чистые моющие средства Моющее средство эко – это выбор тех, кто заботится о будущем. Мы предлагаем решения для ежедневной уборки, которые не содержат агрессивных химикатов, фосфатов, хлора и других вредных веществ. Наши продукты эффективно справляются с загрязнениями различной сложности, оставляя после себя свежий и натуральный аромат. Используя моющее средство эко, вы делаете осознанный выбор в пользу здоровья и экологической безопасности.
BizRelationsNavigator – Clear guidance, understanding international partnerships is made easy.
shopping site – Pleasant shopping, payment was quick, and delivery tracking was useful.
https://usain-bolt.org/user/ewennatuum
Буду ждать доставку как чё отпишусь . Купить наркотики | Где купить наркотики? Дали трек… думаю все норм придетА чего брали то?
qorivo store – Navigation is smooth, and products feel reliable and well-listed.
OpportunityOutlook – Inspires foresight and thoughtful planning for upcoming challenges and opportunities.
dependableshoppinghub – Looks well-structured, gives shoppers a secure and simple experience.
visit progressmovesforwardnow – Quick load times and intuitive layout make exploring simple and enjoyable
official xavro – User-friendly design, headings are clear, and browsing feels natural
база xrumer телеграм xrumer обучение телеграм
mavix e-store – Pages load reliably, content readable and overall navigation smooth.
explore here – Clear sections, minimal clutter, browsing feels effortless
explorefuturedirections – Inspiring content, learning about future directions feels engaging and useful today.
В-общем, я ещё два часа пил вискарик со льдом,да лопал пиццу 😉 https://kazak-kostoprav.ru Работы очень много, стараемся как можем, многие задают в Аську и Скайп одни и теже вопросы которые не касаются заказа(как в википедию ломяться)…Я неделю вторую жду треккогда заработает
thrifty shopping hub – Value-oriented design, could help users find smart purchase options.
курс трак диспетчера онлайн в сша онлайн для начинающих
BrixelNavigator – Pages open quickly, content organized, and browsing simple.
product marketplace – Products are clearly displayed, and filtering helped me make quick choices.
Visit Voryx – Layout straightforward, content easy to follow, and browsing was smooth.
Курсы английского языка для детей в Алматы от языкового центра CT Group предлагают эффективное обучение с раннего возраста по современным коммуникативным методикам. На https://www.ctgroup.kz/представлены программы для разных возрастных групп, которые развивают разговорные навыки, грамматику и восприятие речи на слух через игровые форматы и интерактивные занятия. Квалифицированные педагоги формируют благоприятную атмосферу погружения в язык, где ребята снимают психологические блоки и приобретают свободное владение речью для образования и глобальной коммуникации.
Decision-Making Insights – Simplifies complex choices and boosts confidence in the process.
Ulvaro Next – Clean interface, pages responsive and checkout worked perfectly.
product marketplace – Discovered this online store, prices fair and checkout was easy.
Kavion Path Online Shop – Smooth pages, layout neat and navigation effortless.
Ровный магаз,всем советую) https://sincastigos.com Крутой качественный товар! Все своевременно +++вот немного для Сашка
кайт анапа кайтинг в анапе
IntentionalSkillLab – Provides resources for methodical and purposeful learning approaches.
Донат в игры Донат в России – это часть глобального тренда, адаптированная к местным экономическим условиям и культурным особенностям. Российские игроки активно поддерживают как отечественных, так и зарубежных разработчиков, внося средства в любимые проекты. Развитие цифровых платежных систем и распространение смартфонов способствуют росту популярности доната в России, превращая его в важный источник дохода для игровой индустрии.
reliablecommercialbonds – Projects professionalism and safety for online bond transactions.
Kavix Web – Smooth browsing, layout clear and finding products quick.
QuickBond – Layout is straightforward and effortless to explore.
check progressmoveswithfocus – Simple navigation and information is easy to locate throughout
clyra destination – Organized layout, content is easy to follow, and overall user-friendly design
zulvix.click – Clean design, fast-loading pages, and everything feels professional
brivox portal – Pages respond quickly and the layout stays easy to follow
business trust site – The trust-first approach stands out in a crowded corporate space.
флудить в курилку Купить наркотики | Где купить наркотики? в курске у стаффсторе лутше не брать за кладом надо ехать с граблями и лопатой сугробы копать иначе никакОтзыв по работе магазина: после оплаты мной товара имелась задержка и паника с моей стороны) после задержки продавец деньги вернул- проблему без внимания не оставил… далее получил от магазина приятный презент в размере не дошедшего товара- товар дошел за 2 дня, курьерка работает без перебоев. Магазину респект! Можно работать
sales site – Fast-loading product pages, reliable design, and easy ordering experience.
Olá, galera! Reparei recentemente que a atmosfera dos jogos evoluiu muito. Acho que nesta fase a tática de gestão de banca é mais vital do que a mera sorte. Muitas vezes, miramos apenas no ganho e deixamos de lado que o lazer deve vir em primeiro. Pra quem procura uma vivência mais séria, é fundamental encontrar um **https://illinoiszone.com/user/profile/47378/item_type,active/per_page,16** que de fato garanta o que diz, principalmente no que toca aos retornos. Mais uma análise que vi é que os slots com temas asiáticos, como o do tigrinho, tendem a ter ciclos de bônus bem curiosos. Mas, sempre participo com cuidado para não passar do limite. No final, o que conta é a diversão com consciência. Vocês acham que os minutos realmente possuem alguma diferença nos ganhos ou é puramente coisa da nossa cabeça? Quais as estratégias que vcs mais têm testado para manter o saldo no verde? Vamos trocar essa informação aqui!
Mavero Express Hub – Pages load quickly, layout simple and shopping flow feels effortless.
Value-Focused Online Shop – Very practical advice for maximizing efficiency and making smart purchases.
Vixor Center – Smooth browsing experience, product listings clear, and finding items was simple.
funnelfusion.click – Appreciate the typography choices; comfortable spacing improved my reading experience.
Korivo Shop – Fast site navigation, product info accurate and checkout process simple.
online store – Fast loading, well-organized sections, and overall navigation is smooth.
traffictide.click – Content reads clearly, helpful examples made concepts easy to grasp.
ClickXpress – Responsive layout, links functional, and information easy to locate.
Plivox Lane Direct – Smooth navigation, product info clear and ordering process fast.
Ребят вообще на высоте!!!)Удачи вам всех благ!!! ВСЕХ С ПРАЗДНИКОМ!!!Всего самого самого наилучшего!) Купить наркотики | Где купить наркотики? Получал пробный набор (ам2201, jwh250, jwh203, 5iai) от данного селлера, качество хорошее кроме 5iai вообще не понял.Спасибо!Не надо!
дайсон выпрямитель с феном дайсон выпрямитель с феном .
кайт анапа кайтсёрфинг анапа
EffectiveSolutionsLab – Encourages strategies that are realistic, actionable, and results-oriented.
navix marketplace hub – Simple to order, pages loaded fast and experience overall comfortable.
Донат в FC Mobile Донат в мобильные игры является широко распространенным явлением, обусловленным спецификой платформы: кратковременные сессии, удобство микротранзакций и обилие условно-бесплатных проектов. Мобильные игры часто используют агрессивные методы монетизации, такие как лутбоксы и таймеры ожидания, подталкивающие игроков к донату для ускорения прогресса. Важно соблюдать баланс и осознанно подходить к тратам в мобильных играх, избегая чрезмерных финансовых затрат.
trustedalliancenetwork – Projects professionalism, designed to attract consistent and reliable business partners.
sonabet casino
directionanchorsprogress site – Modern design, concise content, and everything loads without delay
trusted link – Minimalist design with reliable navigation, everything functions well
Xelivou Point – Interface neat, content well structured and shopping flow effortless.
школа диспетчеров цена
global synergy network – Suggests strategic cooperation opportunities for enterprises across countries.
plexin link – Straightforward layout, minimal distractions, and content flows nicely
Первый раз слышу такой непонятный отзыв о 4фа,все кто берет его как и 2c-i говорят что у нас он лучший … по jte907 если не умеете с ним работать зачем берете…? есть постоянные оптовики кто берет только его, и этот продукт нареканий не вызывает. Многие “Селлеры” под видом jte продают 2201 и это факт! у нас этот продукт в оригинале. МХЕ у нас такой пришел, мы не кричим что его чистота 99%, и что качество его не очень мы предупреждали всех… https://happy-sad.ru Качество —(лучше пропущу момент этот ибо выше все описанно )Успешных вам продаж
purchase page – Delivery was tidy and my first order went fine.
Женский портал https://replyua.net.ua про красоту и заботу о себе: уход, макияж, волосы, здоровье, питание, спорт, стиль и отношения. Практичные советы, чек-листы, подборки и вдохновляющие истории. Читайте онлайн и находите идеи на каждый день.
Онлайн-портал https://avian.org.ua для строительства и ремонта: от фундамента до отделки. Подбор материалов, пошаговые гайды, сравнение технологий, советы мастеров и актуальные цены. Полезно для застройщиков, подрядчиков и частных клиентов.
Zorivo Hub Central Market – Site loads quickly, navigation clean and content easy to digest.
Строительный портал https://ateku.org.ua о ремонте и строительстве: технологии, материалы, сметы, проекты домов и квартир, инструкции и советы экспертов. Обзоры, калькуляторы, нормы и примеры работ — всё для частного и коммерческого строительства.
Strategic Opportunity Hub – The guides make it simple to spot potential areas for expansion.
zylavo shop online – Clean presentation, browsing smooth and descriptions informative.
xavix portal – Clean and professional interface with intuitive and simple navigation
NaviroTrack Hub Online – Click works quickly, layout clean and checkout is easy to complete.
Zylavo Link – Organized layout, content clear, and it was simple to locate products I needed.
Е.ать ты тиип.иди стукнись об стену..наxрен здесь такие большные люди нужны на форуме!По поводу фразы-настраиваися на спид..На работу таким Xодить надо axaxax Купить наркотики | Где купить наркотики? Оставляйте свои отзывы! Мы ценим каждого клиента нам важны ваши отзывы и мнения!A F-16 сразу в мягком виде приходит, да?
Qulavo Hub – Fast loading pages, product info clear and shopping experience seamless.
ZexonLink – Full details provided, site responsive, and navigation makes selection easy.
check directionpowersmovement – Clear structure, readable text, and browsing is effortless
trusted resource – Organized pages, simple navigation, everything is easy to read
online retail hub – Feels updated and suited to current consumer purchasing behavior.
QuickClickPlavex – Clear interface, responsive pages, and navigating products is easy.
tekvo online – Simple pages, organized content, and navigating feels natural
skyiwredshjnhjgeleladu7m7mgpuxgsnfxzhncwtvmhr7l5bniutayd.onion
this online store – The layout makes sense, and using it on my phone was simple.
Это фейк что тут вам не понятно то. Купить наркотики | Где купить наркотики? грац вам джентльмены!месяц назад
RavionCore Lane Shop – Pages load quickly, layout clean and shopping steps simple to follow.
dyson выпрямитель для волос купить в симферополе vypryamitel-dsn-kupit-4.ru .
закупка ссылок в гугл заказать услугу агентство seo-kejsy7.ru .
sonabet.pro
Строительный портал https://domtut.com.ua с практикой: проекты, чертежи, СНиП и ГОСТ, инструменты, ошибки и решения. Ремонт квартир, строительство домов, инженерные системы и благоустройство. Понятно, по делу и с примерами.
Украинские новости https://polonina.com.ua онлайн: всё важное о стране, регионах и мире — от экономики и инфраструктуры до культуры и спорта. Лента 24/7, материалы редакции, комментарии экспертов, фото и видео. Читайте, сохраняйте и делитесь — быстро и удобно.
Всё о строительстве https://hydromech.kiev.ua и ремонте в одном месте: материалы, технологии, дизайн, инженерия и безопасность. Экспертные статьи, инструкции, калькуляторы и кейсы. Помогаем планировать работы и экономить бюджет без потери качества.
школа онлайн обучение для детей школа онлайн обучение для детей .
Xelarionix Select – Fast loading, layout clear and content structured for easy reading.
shop link – Found today, seems reliable and layout is intuitive.
nolra home – Layout is tidy, pages respond fast and filtering makes finding items easy.
Business Leaders Academy – Gained practical tips from experts that I can apply immediately.
Xelra Hub Online – Smooth interface, quick loading pages and checkout steps simple.
Zaviro Access – Pages open quickly, layout simple, and purchasing was easy and convenient.
))) спасибо Купить наркотики | Где купить наркотики? Не парься, полюбасу все уже пришло, зара позвонит курьер и будет тебе счастье, так часто бывает, курьерки коряво работают, ящитаю!Какое палево ты очём?
Trixo Hub Online – Pages load fast, interface clean and checkout steps easy to follow.
main hub – Clear sections, smooth browsing, and information is well structured
online shopping platform – Clean and contemporary interface aligns with modern consumer behavior.
sonabet online
actionpowersmovement web – Information is well-presented, navigation is simple, and pages feel responsive
скачать новый тикток мод Преимущества и Особенности Модов TikTok Моды TikTok предоставляют пользователям большую гибкость и контроль над приложением. Например, можно загружать видео без ограничений, просматривать контент, который обычно недоступен в вашем регионе, и настраивать внешний вид приложения по своему вкусу. Разработчики модов постоянно обновляют свои версии, чтобы соответствовать последним изменениям в официальном приложении и добавлять новые функции. В 2025 году ожидается еще больше инноваций и улучшений в модах TikTok, чтобы удовлетворить потребности самых требовательных пользователей.
storefront – The support reply was friendly and well-worded.
Выбор памятника — важное решение, требующее профессионального подхода и внимания к деталям. Компания «Возрождение» предлагает широкий ассортимент гранитных изделий высокого качества с гарантией долговечности. Мастера используют современное оборудование для точной обработки камня и создания художественных композиций. На сайте https://vozrogdenie1.ru/ представлены вертикальные, горизонтальные и комбинированные памятники различных ценовых категорий. Специалисты проводят бесплатные консультации и помогают подобрать оптимальный вариант оформления мемориала. Доставка и установка выполняются опытными бригадами с соблюдением всех технологических норм.
olvra spot – Rapid browsing, well-laid-out pages and trustworthy information
official axory – Simple interface, fast-loading pages, and smooth browsing throughout
Портал для строителей https://inter-biz.com.ua и заказчиков: советы по ремонту, обзоры материалов, расчёты, сметы и технологии. Реальные кейсы, чек-листы и рекомендации специалистов для надежного результата на каждом этапе работ.
Женский журнал https://asprofrutsc.org онлайн: тренды бьюти и моды, лайфхаки для дома, рецепты, материнство, карьера и финансы. Экспертные материалы, понятные инструкции и идеи, которые можно применить сразу. Обновления ежедневно, удобная навигация.
Строительный портал https://prezent-house.com.ua строительство домов и зданий, ремонт квартир, инженерные системы и отделка. Пошаговые инструкции, обзоры материалов, расчёты и советы экспертов для частных и коммерческих проектов.
Магаз огонь, а кидкам хуй на ладонь https://r-est.biz я имел ввиду что вещевства а не способ в/в я не конченыйРебятки все пушка
приложение тик ток мод Перспективы в 2025 Году: Будущее Пользовательского Контроля в TikTok В 2025 году ожидается дальнейшее развитие модов TikTok и инструментов для их установки, таких как Scarlet. Разработчики будут стремиться к улучшению безопасности, стабильности и функциональности, предлагая пользователям еще больше возможностей для персонализации и контроля над своим контентом.
https bs2web store
Nevironexus Store – Navigation straightforward, content clear and checkout process easy to follow.
boostbureau.click – Mobile version looks perfect; no glitches, fast scrolling, crisp text.
EasyMorixo – Layout minimal but effective, pages load fast, and navigation simple.
conversioncrew.click – Navigation felt smooth, found everything quickly without any confusing steps.
sonabet app download
serpshift.click – Appreciate the typography choices; comfortable spacing improved my reading experience.
PortalQela – Loaded rapidly, and the pages contained useful details.
Rixaro Direct – Fast loading site, clear layout and checkout process simple to follow.
zorivo main site – Pages opened instantly, layout straightforward and sections clear.
Business Relations Hub – Everything is laid out nicely, making global networking straightforward.
rankboost.click – Appreciate the typography choices; comfortable spacing improved my reading experience.
Парни, здраствуйте, а выписываете на свое имя? просто все хочу попробывать, но блин.. сыкотно (( Купить наркотики | Где купить наркотики? Я тебе уже в джаббере обьяснил как употреблять надо, а ты двоим .м дал, они вьебали все залпом и нихера не поняли, ты уже кипишь наводить начал. Эта СК не тот бутор к которому все привыкли, от которой слюни текут и на люди показываться нельзя. Её надо употреблять с минимальной дозой а не 0.3г в один заход. Доза 0.05-0.09гЗаказал, оплатил, получил, Радуюсь… !:D Норм магаз приятно иметь дело..! !!
Kryvox World – Fast navigation, pages load smoothly and product details easy to digest.
Комфортные поездки по Краснодарскому краю и Крыму начинаются с выбора надежного трансфера. Служба такси в Анапе предлагает пассажирам удобный онлайн-расчет стоимости поездки и круглосуточную работу диспетчерской службы. География маршрутов впечатляет: от аэропорта Анапы до Сочи, от Геленджика до курортов Крыма — Ялты, Севастополя, Судака. Профессиональные водители знают все особенности дорог, а современный автопарк обеспечивает безопасность передвижения. На сайте https://anapa-taxi-transfer.ru/ можно выбрать нужный маршрут из обширного списка направлений и получить точную стоимость до начала поездки. Фиксированные цены на трансфер, отсутствие скрытых доплат и возможность заказа экскурсий делают эту службу оптимальным выбором для туристов и местных жителей, ценящих пунктуальность и комфорт.
DealFinderOnline – Secure and convenient, deals are easy to locate and purchase without hassle.
NevironSpot – Browsing effortless, links functional, and information reliable throughout.
мод на тик ток 2025 Поиск и Установка: Безопасность Прежде Всего Поиск модов TikTok – это, как правило, задача, требующая внимательности. Рекомендуется использовать проверенные источники, форумы и Telegram-каналы, где публикуются отзывы и рекомендации от других пользователей. Перед установкой обязательно убедитесь в безопасности загруженного файла, используя антивирусное программное обеспечение.
browse xenrix – Fast response times, clear design, very user-friendly experience
выпрямитель для волос dyson airstrait купить выпрямитель для волос dyson airstrait купить .
NolaroView Lane – Pages open fast, navigation smooth and content organized logically.
Під час пересування вночі важливо бачити потенційні загрози. Завдяки тепловізор можна заздалегідь їх виявляти. Це робить рух безпечнішим.
Портал для женщин https://angela.org.ua о современном лайфстайле: бьюти-рутины, мода, здоровье, правильное питание, отношения, работа и отдых. Полезные подборки, честные обзоры, истории и советы экспертов — заходите за вдохновением 24/7.
seo кейсы seo кейсы .
Портал для женщин https://beautyrecipes.kyiv.ua про гармонию и результат: здоровье, красота, стиль, саморазвитие, семья и отношения. Обзоры косметики и процедур, планы питания, тренировки, советы по дому и вдохновляющие истории. Всё в одном месте, 24/7.
ideasbecomeforward web – Minimal design, fast pages, and everything feels organized and readable
У темряві лісу важко помітити навіть велику тварину. Завдяки тепловізор це стає можливим. Це робить полювання результативнішим.
У тумані або диму складно щось побачити. Саме тепловізор показує теплові контури об’єктів. Це важливо для бойових умов.
Всё, что важно https://inclub.lg.ua женщине: здоровье и гормоны, питание и фитнес, стиль и гардероб, отношения и самооценка, уют и рецепты. Экспертные статьи, тесты и подборки. Сохраняйте любимое и делитесь — удобно на телефоне.
онлайн школа ломоносов shkola-onlajn13.ru .
У темряві складно помітити навіть великі об’єкти. Саме тепловізор дозволяє бачити теплові сигнали. Це спрощує спостереження.
olvix destination – Smooth browsing, content is easy to understand, and site leaves a positive impression
а для какой цели не отправляют? курьерам похуй что тоскать, а если бы мусора хотели бы принять, посыль наоборот отправили. https://contractmanagement.top Да рега была шикарная… Но вот как раз таки с ней и случился перебой, ОЧЕНЬ жаль!!! А так по работе остались отличные впечатленияПорошок серого цвета чем то похож на известь, запаха нет, ну или очень слабый. Фото сделать не вышло сори :dontknown:!
seowins.click – Navigation felt smooth, found everything quickly without any confusing steps.
nexlo store – User-friendly layout, ordering process simple and everything ran without issues.
скачать новый тик ток 2025 последний мод Тренды Модификаций TikTok в 2025: Что Нас Ждет В 2025 году мы можем ожидать еще больше инноваций в мире модов TikTok. Улучшенные алгоритмы рекомендаций, расширенные инструменты редактирования видео, интеграция с другими социальными сетями – все это может стать реальностью. Разработчики, вероятно, сосредоточатся на создании более стабильных и безопасных версий, а также на добавлении функций, недоступных в официальном приложении.
purchase page – Clear product views, and filtering simplified my shopping today.
Pelix Next – Fast loading pages, interface neat and buying process simple and clear.
Zylavo Lane – Layout intuitive, pages load quickly and product descriptions easy to read.
blsp at
тик ток мод тг Перспективы в 2025 Году: Будущее Пользовательского Контроля в TikTok В 2025 году ожидается дальнейшее развитие модов TikTok и инструментов для их установки, таких как Scarlet. Разработчики будут стремиться к улучшению безопасности, стабильности и функциональности, предлагая пользователям еще больше возможностей для персонализации и контроля над своим контентом.
sonabet app download
кто брал закладками в этом магазе в МСК что скажите? https://iranmap.biz 5 iai вообще говорят “беспонтовый” продукт… сколько народу его от рaзных сeлеров не пробовало – всё одно муть…на вкус – сода.
nolix corner – Minimalist layout with text that’s immediately clear and digestible
PrixoPortal – Navigation intuitive, product info easy to read, and checkout process simple.
Korla World Shop – Interface intuitive, pages fast and checkout completed without issues.
Layer-2 adoption tracking improves best crypto signals for scaling solutions. Monitoring transaction volumes, user migration, and application deployment on rollups and sidechains identifies growth opportunities.
shop website – Randomly found this store and decided to save it.
Product launch success accelerates when you buy instagram likes for announcement posts. Strong initial engagement creates buzz attracting organic attention and driving traffic to sales pages or new offerings.
Explore Korva – Stumbled onto it and the clean, modern layout stood out
Community density within best local hookup sites determines effectiveness. Urban areas benefit from concentrated user pools while suburban or rural regions may require broader search parameters for sufficient match options.
Click Torix – Layout minimal, content easy to find, and purchasing steps straightforward.
sonabet com login
official actioncreatesforwardpath – Simple interface, readable content, and navigation feels intuitive
Vexaro Network – Layout clear, site responsive and product info easy to find.
С ним можно работать всегда ровничком всегда адекватность Плюсссс Купить наркотики | Где купить наркотики? доставку можем рассчитать вам в ICQНу тогда, как объяснить все происходящее сейчас?
klyvo destination – Smooth browsing, concise information, and a simple, effective layout
sona bet bd
sonabet online
QuickBond – Smooth transitions, all pages loaded correctly, and site seemed safe.
мод на тик ток 2025 айфон последняя TikTok, Scarlet и Жажда Кастомизации: Эволюция Мобильного Контента на iPhone в 2025 Году В мире стремительно развивающихся мобильных технологий и социальных сетей, TikTok продолжает оставаться одним из ключевых игроков. Однако, вместе с ростом популярности приложения растет и потребность пользователей в большей свободе и кастомизации. Именно здесь на сцену выходят TikTok моды и инструменты вроде Scarlet для iPhone, предлагающие новые возможности и изменяющие ландшафт мобильного контента.
auditpro.click – Navigation felt smooth, found everything quickly without any confusing steps.
linklift.click – Navigation felt smooth, found everything quickly without any confusing steps.
shop platform – Quick payment, and confirmation email reached me fast.
Zexaro Forge Hub Shop – Navigation simple, pages responsive and overall site user-friendly.
Channel organization within best crypto signals telegram groups improves usability. Separate channels for Bitcoin, altcoins, futures, and education prevent information overload while maintaining focus.
Удачи в бизе!! https://contractmanagement.top jte тут брал кто?Как качество?К скольки делать?”Думаю надо затестить через сигу, Заколачиваю пробую бля что то не то вкус не тот и т.д”
дайсон выпрямитель с феном дайсон выпрямитель с феном .
Checked out vipdubaiagency.com while browsing elite entourage platforms. The site has a clean design, a wide range of services, easy-to-understand pricing, and a simple booking process. It feels more high-class than most agencies I’ve encountered. Definitely smart checking if you seek comprehensive services in single platform.
URL: https://vipdubaiagency.com/
заказать сео анализ сайта пушка seo-kejsy7.ru .
Building authority in your niche requires perceived credibility. Fair or not, follower count influences how seriously people take your expertise. When you buy twitter followers, you’re establishing that credibility marker that helps your actual expertise get the attention it deserves.
Zarix Point – Layout clean, pages responsive and checkout process easy to complete.
purchase page – Descriptions are clear, images match, and everything is neatly arranged.
lbs что это lbs что это .
Scaling your engagement as your account grows makes sense strategically. Starting small and gradually increasing is natural. Services that let you buy more tiktok likes as your organic audience expands help maintain consistent engagement rates that match your follower growth trajectory.
browse qavrix – Simple, clear, and responsive pages make browsing comfortable
ProfessionalConnectionsGuide – Insightful content, understanding business networks is easy and structured.
focusdrivesmovement web – Clear structure, smooth scrolling, and information is easy to digest
Туристический портал https://atrium.if.ua о путешествиях: направления, отели, экскурсии и маршруты. Гайды по городам и странам, советы туристам, визы, билеты и сезонность. Планируйте поездки удобно и вдохновляйтесь идеями круглый год.
Ждать возможно придется дольше обычного, я ожидал 12 рабочих, не считая праздников.. https://aquarium39.ru Был постоянным клиентом магаза , неделю назад прислали с нулевым эфектом , года два назад была проблема с ними, решили сразу , сейчас на вопрос -как будем решать , ответили что мы решим – напишите в конце недели , типа не разводите панику на форуме недельку , а мы пока людей пошвыряем…. , неделя прошла , на вопросы не отвечают…решать не хотят…. был магаз ровный , теперь людей решили покидать…. админы вообще никуда не смотрят , раньше хоть как то было гарантией что они в списке доверенных , сейчас деньги заплатили за форум , выставились и швыряют .Продавец очень адекватный, списался в icq , мне пошли навстречу , это однозначно заебись , щас жду посылки, за качество тоже неволнуюсь!
RixvaDirect – Site loads without delays, design professional, and navigation intuitive.
EasyHold – Fast loading, clear product pages, and navigation is intuitive throughout.
XaneroFlow – Interface simple, pages load fast, and exploring categories was easy.
qavon corner – Modern, clean pages with content that’s readable and approachable
Maverounity web project – The presentation suggests careful planning and credibility.
The extensive selection of games is a key factor attracting countless gamers to the platform.
starz 888 [url=http://cuatromcafes.com/]https://cuatromcafes.com/[/url]
keywordking.click – Pages loaded fast, images appeared sharp, and formatting stayed consistent.
zaviro portal – Clicked through without issues, page content made sense immediately.
Zavirobase Express – Pages load promptly, browsing effortless and content clearly displayed.
Kryvox Bonding online hub – User-friendly pages, clean structure, and the site feels reliable overall.
Ищете запчасти JCB Симферополь? Зайдите на сайт technopartsltd.ru – у нас размещен обширный ассортимент запчастей для Европейской и Китайской техники. Деятельность осуществляется лишь с проверенными партнерами, что позволяет нам обеспечить качественную продукцию, а хранилище обладает достаточным резервом товарных наименований, а перечень систематически обновляется. Более полная информация на ресурсе.
трек пока не бьется. Купить наркотики | Где купить наркотики? парни скажите плз АМ запаха какого?слушай, а тебе продавец обязан объяснять что и ко скольки бодяжить ?
Morixo Trustee web page – Layout is simple, navigation is smooth, and information is presented clearly.
onpagefix.click – Content reads clearly, helpful examples made concepts easy to grasp.
backlinkboss.click – Overall, professional vibe here; trustworthy, polished, and pleasantly minimal throughout.
Nolaro Trustee network – Clean interface, readable pages, and browsing experience feels professional.
shop link – No issues with payment and the email arrived immediately.
Qelaro Bonding network – Concise content, intuitive navigation, and the site feels polished.
Kryxo Hub Store – Minimal design, navigation smooth and ordering process worked without issues.
online portal – Quick loading and intuitive structure, makes browsing effortless
Quvexa Holdings Main Page – Clean interface, clear information, and site experience is smooth for visitors.
в трубку после затяга уже чвствуеца Купить наркотики | Где купить наркотики? Работала с данным магазином давным давно! Пожалуй самый лучший)Всех С Новым Годом! Как и обещал ранее, отписываю за качество реги. С виду как мука, но попушистей чтоли )) розоватого цвета. Качество в порядке, делать 1 в 20! Еще раз спасибо за качественную работу и товар. Будем двигаться с Вами!
focusbuildsenergy corner – Smooth navigation, organized content, and the site feels clean and modern
LongTermGrowthGuide – Informative and actionable, spotting long-term opportunities is easy.
YavonLink – Very smooth navigation, pages load fast, and content easy to digest.
Zavix Spot – Fast and responsive site, information presented logically, and purchasing seamless.
многоуровневый линкбилдинг seo-kejsy7.ru .
Отличный пост! Мне очень понравилось читать. Продолжайте в том же духе!
Visit Ravion Bonded – The platform is engaging, with well-organized documentation and steady updates.
redirect hub – Quick load times, link worked exactly as expected with no problems.
онлайн школа с 1 по 11 класс shkola-onlajn13.ru .
Nixaro Mind Store – Smooth navigation, pages responsive and checkout steps simple and straightforward.
Классный магаз, почитал отзывы, нам в киров бы не помешал такой движ. Ассортимент огонь, давайте в наш славный город. Всем щастья! Купить наркотики | Где купить наркотики? магазин уже давно в тренде уже сколько летпиши в скайп, все работает, мне всегда отправляют, все на уровне
EasyClickUlvion – Interface professional, pages load quickly, and navigation very smooth.
Quvexa Trust Landing – Well-structured pages, concise details, and overall site experience feels smooth.
Explore Kryvox Capital – Organized pages, straightforward information, and the interface seems reliable.
Naviro Bonding main homepage – Simple navigation, readable sections, and information is easy to locate.
this online store – Simple design helps focus on products without unnecessary clutter.
Nolaro Trustee info – Simple design, concise explanations, and the site feels trustworthy.
Visit Qelaro Capital – Well-structured pages, fast loading, and browsing is intuitive.
official ravixo – Neat layout, fast-loading pages, and text that’s practical and clear
Zavro Lane – Layout simple, product info clear and finding items effortless.
landing hub – Minimalist feel, quick navigation, everything works as expected
sonabet.pro
Дело не в постах. В любом случае нужно быть осторожным. И строить систему сложнее… Купить наркотики | Где купить наркотики? Брал не давно в этом магазине закладкой в МСК, что сказать, все прошло замечательно. Клад был поднят, место довольно спокойное и тихое, Время исполнения заказа с момента оплаты от 1 до 2,5 часов, что по сути не так уж и много. Выражаю огромное спасибо оператору в аське, не оставлял меня ни на минуту, всегда отвечал.ложь. 3 случая за полгода. Причем следили ли за самими людьми и что за ситуации – неизвестно. Если у вас свой магазин. то следите за его безопасностью. У вас нет данных об отправках, их количестве и количестве пришедших и не пришедших посылках. Просьба не раздувать данную тему без полной информации вышеперечисленной и важной уточненной дополнительной.
RavloEase – Well-organized layout, images display properly, and product info is straightforward.
signal guides growth online – Organized sections, easy to read, and a professional appearance overall
Ravion Bond Group Official – Organized content, intuitive navigation, and browsing feels reliable.
Женский медиа-портал https://abuki.info про вдохновение и практику: тренды красоты, идеи образов, забота о теле, эмоциональное равновесие, материнство и быт. Подборки, гайды и понятные советы, которые легко применять каждый день.
CreativeMindsOnline – Exciting and well-organized content, understanding innovations is effortless.
Всё о строительстве https://buildportal.kyiv.ua и ремонте: от проектирования и фундамента до чистовой отделки. Статьи, гайды, калькуляторы и кейсы. Полезно для застройщиков, мастеров, дизайнеров и тех, кто строит для себя.
Туристический портал https://feokurort.com.ua с идеями и практикой: страны и города, пляжи и горы, активный отдых и экскурсии. Советы по перелётам, жилью и безопасности, лучшие сезоны и лайфхаки для путешествий.
EasyClickBrixel – Interface minimal, content clear, and checkout process smooth.
network page – Structured layout, information is easy to read, and the site concept stands out.
Этот магазин нериально всегда все четко делал, н ошиблись может случайно поговри я думаю решится https://contractmanagement.top заказ дошел до нас)))Как долго вы обрабатываете заказ?
Cavix web page – The simple structure helps users quickly understand what the site is for.
Vixaro Online – Fast loading, product info easy to find and checkout process straightforward.
web shop – Shipping selections were sensible, and estimated delivery was trustworthy.
Kryvox Trust web experience – Pages load instantly, navigation is seamless, and details are easy to read.
Pelixo Bond Group info – Easy-to-follow pages, professional design, and overall experience is smooth.
Ravion Capital Online – Clean interface, clear content, and users can navigate quickly.
Learn more at Naviro Capital – Smooth interface, structured information, and pages respond quickly.
Qelaro Trustline network – Clean headings, structured pages, and navigation is easy for users.
official site – Quick access, minimal clutter, content is easy to understand
Velixonode Web – Clean design, links open properly and navigation easy to follow.
XelarionGo – Layout simple, pages load quickly, and browsing feels natural.
TrivoxDirect – Opened correctly, content seemed valid and pages responded quickly.
signalactivatesgrowth network – Well-organized content and navigation feels effortless today
Онлайн авто портал https://necin.com.ua о новых и подержанных автомобилях: каталоги моделей, рейтинги, отзывы владельцев и экспертные обзоры. Новости рынка, технологии, электромобили и полезные сервисы для выбора авто.
Авто портал https://bestsport.com.ua для водителей и автолюбителей: обзоры и тест-драйвы, сравнение моделей, характеристики, цены и новости автопрома. Советы по покупке, эксплуатации и обслуживанию автомобилей. Всё об авто — удобно и понятно.
Мужской портал https://realman.com.ua про жизнь и эффективность: здоровье, сила и выносливость, карьера, инвестиции, стиль и отношения. Экспертные материалы, обзоры и чек-листы. Читайте онлайн и применяйте на практике.
У темну пору доби стандартна оптика втрачає ефективність. Саме тепловізор забезпечує стабільне зображення за будь-яких умов. Така перевага часто стає вирішальною.
bryxo homepage – Clean and simple layout where everything works as expected
Ravion Trustline Official – Organized content, readable information, and site navigation is easy to use.
Навіть у складному рельєфі можна зберігати контроль. Сучасний тепловізор забезпечує чітке зображення місцевості. Це важливо для планування дій.
Під час активних дій важливо бачити першими. Саме тепловізор дає таку можливість. Це стратегічна перевага.
site portal – Security explanations helped me trust the site during my visit.
Полювання стає більш безпечним з правильною оптикою. Використання тепловізор зменшує ризики. Це важливий фактор.
As the admin of this web site is working, no doubt very quickly it will be renowned, due to its feature contents.
https://atelierdesdelices.com.ua/dacia-renault-duster-nainadiinishe-sklo-dlya.html
sonabet live login
QulixFlow – Site professional-looking, content easy to read, and navigation hassle-free.
Військові підрозділи потребують надійних інструментів спостереження. Сучасний тепловізор відповідає цим вимогам. Його використовують на практиці.
sitesprint.click – Pages loaded fast, images appeared sharp, and formatting stayed consistent.
Naviro Trustee main homepage – A well-organized layout supports a trustworthy impression.
DigitalPurchasePro – Convenient and intuitive, online shopping is effortless.
funnelfix.click – Mobile version looks perfect; no glitches, fast scrolling, crisp text.
Для військових ніч є робочим часом. Використання тепловізор допомагає виконувати завдання. Це підвищує ефективність.
ctrboost.click – Navigation felt smooth, found everything quickly without any confusing steps.
Для військових ніч — це звичайний робочий час. Надійний тепловізор допомагає виконувати завдання. Це підвищує рівень контролю.
Для полювання в темну пору потрібні сучасні рішення. Саме тепловізор допомагає швидко виявити тварину. Такий підхід зменшує кількість помилок.
store page – Pages opened fast, and nothing seemed off at first glance.
Pelixo Capital main page – Organized sections, readable content, and overall browsing is intuitive.
convertfast.click – Loved the layout today; clean, simple, and genuinely user-friendly overall.
Mavero Capital web experience – Clean structure, brief details, and navigating from page to page is natural.
Let’s see where this takes us – Kj3fz2f.short.gy/ueeSek?Illus
Qorivo Bonding Network – Professional design, readable text, and navigation flows naturally.
Neviror Trust digital hub – Simple layout, content is trustworthy, and navigating feels natural.
BondXevra – Site is user-friendly, design is clear, and I found everything effortlessly.
Крымский полуостров представляет собой уникальное сочетание живописных ландшафтов, богатого исторического наследия и целебного климата, притягивающее миллионы путешественников ежегодно. От античных руин Херсонеса до величественных дворцов Южного берега, от горных троп Ай-Петри до уединенных бухт мыса Фиолент — каждый уголок полуострова хранит свои тайны. Блог https://crimea-trip.ru/ собрал полезную информацию о курортах, пляжах, туристических маршрутах и гастрономических особенностях региона, помогая спланировать незабываемое путешествие с учетом бюджета. Здесь вы найдете советы по выбору жилья, описания экскурсионных программ и рекомендации по оздоровительным процедурам, доступным благодаря уникальным природным факторам крымского побережья и целительному воздуху горных районов.
Rixaro Capital Platform – Easy-to-read content, structured pages, and navigation feels natural.
landinglift.click – Loved the layout today; clean, simple, and genuinely user-friendly overall.
Всё о туризме https://hotel-atlantika.com.ua и отдыхе в одном месте: направления, визы, транспорт, отели и развлечения. Путеводители, маршруты, обзоры и советы опытных путешественников. Удобно планировать поездки онлайн.
удаленная работа для подростков Удаленная работа на дому – это комфорт в приоритете. Здесь важна самодисциплина, обустройство эргономичного рабочего места и умение отключаться от бытовых забот. Этот формат идеально подходит для тех, кому важна тишина и возможность работать в привычной обстановке.
Онлайн-портал https://deluxtour.com.ua для путешественников: куда поехать, что посмотреть, где остановиться и как сэкономить. Маршруты, подборки, отзывы, карты и полезные сервисы. Актуальная информация для самостоятельных поездок и отдыха.
Портал для строителей https://rvps.kiev.ua и заказчиков: ремонт, строительство, сметы и проекты. Обзоры материалов, расчёты, чек-листы и советы специалистов, которые помогают планировать работы и экономить бюджет.
sonabet.pro
directionunlocksgrowth info – Smooth design, readable text, and content is easy to find
Предлагаем вашему вниманию интересную справочную статью, в которой собраны ключевые моменты и нюансы по актуальным вопросам. Эта информация будет полезна как для профессионалов, так и для тех, кто только начинает изучать тему. Узнайте ответы на важные вопросы и расширьте свои знания!
Ознакомиться с деталями – https://vivod-iz-zapoya-2.ru/
portal hub – Clean pages, content easy to follow, and design feels intentional.
online storefront – Easy-to-read product listings and useful filters made shopping simple.
Rixaro Holdings Official Hub – Clear layout, organized content, and browsing is fast and reliable.
start browsing – Fast pages, structured design, browsing is effortless
sona bet app
Mivon official page – Clear structure and open communication make a strong impression.
Pelixo Trust Group portal – Structured content, quick loading pages, and navigation works without issues.
EasyClickQori – Layout professional, pages load fast, and all content is simple to navigate.
plixo online store – Pages load without delay, interface organized and ordering effortless.
FutureInsightsHub – Informative and clear, exploring upcoming trends feels simple and engaging.
Qorivo Holdings Info – User-friendly design, well-arranged content, and the site feels professional.
Visit Torivo Union – Interesting setup, gives confidence for long-range development plans.
UlviroBondGroup Page – Came across today, credible site and information is easy to grasp.
Ремонт помещений https://sinega.com.ua зданий и квартир: косметический и капитальный ремонт под ключ. Выравнивание стен, отделка, замена коммуникаций, дизайн-решения и контроль качества. Работаем по смете, в срок и с гарантией.
Neviro Union online portal – Clear layout, professional appearance, and content is easy to follow.
Портал для туристов https://inhotel.com.ua и путешественников: гайды по странам, маршруты, достопримечательности и события. Практичные советы, карты, подборки и идеи для отпуска, выходных и активных путешествий.
Строительный портал https://techproduct.com.ua для практики и идей: технологии, материалы, инструменты, сметы и проекты. Разбираем ошибки, делимся решениями и помогаем выбрать оптимальные варианты для строительства и ремонта.
SafePurchaseHub – Very reliable platform, checkout is quick and easy.
cavix spot – Pages feel organized and the content remains approachable
удаленная работа озон Онлайн работа предоставляет широкие возможности для тех, кто ищет гибкий график и возможность работать из дома. Существуют различные платформы и сайты, где можно найти подходящие онлайн вакансии.
Rixaro Trust Business – Organized design, smooth navigation, and content is easy to digest.
У складному рельєфі важливо мати чітке уявлення про обстановку. Сучасний тепловізор допомагає оцінити місцевість. Це спрощує пересування.
progressmovesintelligently portal – Smooth interface with clearly organized content, easy to read
Для мисливців важлива правильна ідентифікація цілі. Якісний тепловізор значно зменшує ймовірність помилки. Це підвищує безпеку.
У бойових умовах важливо не пропустити жодної деталі. Сучасний тепловізор допомагає зберігати пильність. Це може вплинути на результат.
Организация пассажирских перевозок в Анапе требует профессионального подхода и надежной техники. Компания «Анапа Транспорт» зарекомендовала себя как ответственный перевозчик, предоставляющий услуги аренды автобусов, микроавтобусов и минивэнов с опытными водителями. Более 5000 клиентов доверили свои поездки этой компании — от школьных экскурсий до корпоративных мероприятий и свадеб. Круглосуточная диспетчерская служба, страхование ответственности и своевременная подача транспорта делают сотрудничество комфортным. Узнать больше о тарифах и забронировать автобус можно на https://anapa-transport.ru/ где представлен весь автопарк компании. Честные цены, чистые салоны и исправная техника — вот что отличает профессионалов своего дела от случайных перевозчиков на рынке транспортных услуг Анапы.
Для нічного спостереження необхідні спеціальні технології. Функціональний тепловізор повністю відповідає цим вимогам. Це робить його популярним.
blsp at что это за сайт
Came across vipdubaiagency.com while browsing elite companions platforms. The site has a clean design, a impressive selection of services, straightforward pricing, and a simple booking process. It feels more professional than most agencies I’ve encountered. Definitely advisable checking if you wish for all-in-one services in whole platform.
Visit: https://vipdubaiagency.com/
Раніше автономне живлення асоціювалося з гучними та незручними рішеннями. Проте зарядна станція для будинку повністю змінила це уявлення. Вона працює тихо та не заважає повсякденному життю родини.
Мені було важливо, щоб джерело живлення не займало багато місця. У цьому сенсі зарядна станція для будинку вигідно відрізняється компактними розмірами. Її легко розмістити навіть у маленькій квартирі.
site hub – Pages load without issues, text is readable, and presentation feels professional.
Мене приємно здивувала швидкість підготовки пристрою до використання. У цьому допомагає зарядна станція для будинку зі зручним керуванням. Не потрібно витрачати час на складні налаштування.
Під час зими стає критично важливо підтримувати комфорт у квартирі. Саме зарядна станція для будинку допомагає забезпечити роботу освітлення та техніки. Це робить повсякденне життя більш передбачуваним.
store page – Smooth ordering steps, no extra popups or distractions.
Plavex Capital platform – Structured layout, readable content, and browsing is simple.
brixo web center – Fast-loading site, clear product info and checkout straightforward.
Learn more at Qelix – Clear navigation and well-structured information make the site easy to follow.
Torivo Bond Portal – Well-organized content, simple navigation, and the site feels reliable.
Qorivo Trustline Portal – Smooth browsing, concise content, and overall experience is intuitive.
TrivoxBonding Access – Discovered this platform, information seems clean and easy to understand.
ToriVoNavigator – Easy to browse, interface intuitive, and site maintains a professional look.
https://www.bmwpower.lv/user.php?u=1xbetfreeph
Ландшафтный дизайн https://kinoranok.org.ua ремонт и строительство под ключ: проектирование участков, благоустройство, озеленение, дорожки, освещение и малые архитектурные формы. Комплексные роботы для частных и коммерческих объектов с гарантией качества.
Авто портал https://autoblog.kyiv.ua о машинах и технологиях: обзоры, характеристики, цены, тюнинг и обслуживание. Помогаем выбрать автомобиль под бюджет и задачи, следить за новинками и принимать взвешенные решения.
Новинки технологий https://axioma-techno.com.ua искусственный интеллект, гаджеты, смартфоны, IT-решения и цифровые сервисы. Обзоры, сравнения, тренды и объяснения простым языком. Узнавайте первыми о технологиях, которые меняют бизнес и повседневную жизнь.
Visit Nixaro Holdings – Clean layout, intuitive navigation, and the site feels dependable overall.
фриланс для начинающих Онлайн работа дома для мам – это уникальная возможность совместить материнство и профессиональную реализацию. Это шанс не отказываться от карьеры ради семьи, а найти гармоничный баланс между этими двумя важными сферами жизни. Существует множество вариантов онлайн-работы, которые идеально подходят для мам в декрете, от копирайтинга и перевода до онлайн-консультирования и преподавания.
SmartStudyHub – Informative and clear, understanding ideas is simple and approachable.
actiondrivesdirection info – Easy-to-follow sections, quick page loads, and overall design is pleasant
Learn About Torivo Capital – Easy-to-follow pages, concise sections, and navigation flows naturally.
this online hub – Layout is uncluttered, content is clear, and finding what I need is simple.
brand store – Clear rules and explanations make it feel reliable.
zalvo online – Neat layout, information is accessible, and navigation feels effortless
kavion web store – Responsive pages, trustworthy layout and browsing felt safe.
вакансии для девушек без опыта Работа в Сеуле для девушек – это не только хостес, здесь рады и другим специалистам, главное – знания языка!
Xaliro Drive online site – The concept is interesting, and pages function quickly without any delays.
Visit Qulavo Bonding – Professional layout, clear explanations, and browsing feels simple.
https bs2best at
TrivoxCapital Platform – Clear presentation of options, navigation is smooth and nothing feels forced.
Автомобильный портал https://livecage.com.ua тест-драйвы, сравнения, комплектации, безопасность и экономичность. Актуальные новости, советы по ремонту и обслуживанию, рекомендации для начинающих и опытных водителей.
онлайн работа Удаленная работа – это не просто альтернатива традиционному офисному режиму, а целая философия гибкости, свободы и самореализации. Она позволяет создавать свой собственный ритм жизни, где работа становится не тяжким бременем, а органичной частью повседневности. Это возможность балансировать между профессиональными амбициями и личными увлечениями, не жертвуя ни тем, ни другим. Работая удаленно, вы становитесь хозяином своего времени и пространства, строя карьеру по собственным правилам. Удаленная работа ВКонтакте – это территория возможностей для тех, кто умеет разговаривать с аудиторией на языке социальных сетей. Здесь востребованы креативные SMM-щики, талантливые копирайтеры, внимательные модераторы и целеустремленные таргетологи. ВКонтакте – это платформа, где можно не только реализовать свой творческий потенциал, но и построить успешную карьеру в сфере digital-маркетинга, общаясь с миллионами пользователей и продвигая любимые бренды. Вакансии удаленной работы – это бескрайний океан предложений, в котором легко заблудиться. Чтобы не утонуть в этом море информации, важно четко определить свои цели, навыки и предпочтения. Ищите вакансии, соответствующие вашим интересам и компетенциям, и не бойтесь пробовать новое. Помните, что удаленная работа – это не только свобода, но и ответственность, поэтому будьте готовы к самодисциплине и постоянному самосовершенствованию.
Уникальный шоп https://buyaccountstore.today рад видеть вебмастеров в своем пространстве рекламных активов Meta. Если вам нужно купить Facebook-аккаунты, чаще всего важен не «просто доступе», а в трасте и лимитах: отсутствие вылетов на селфи, зеленые плашки в Ads Manager и прогретые FanPage. Мы собрали практичный чек-лист, чтобы вы сразу понимали какой тип аккаунта брать перед покупкой.Что внутри: типы аккаунтов (Мамки, Автореги, Логи). Ключевая идея: покупка — это только вход. Дальше решает схема залива: какой прокси используется, как вы передаете лички без триггеров, как проходите чеки и как дублируете кампании. Главная фишка нашего сервиса — это наличии огромной базы знаний по FB, где опубликованы свежие инструкции по разбану кабинетов. Тут доступны страницы FB для разных сетапов: начиная с аккаунтов под привязку до трастовыми БМами с высоким лимитом. Заказывая у нас, клиент получает не только валидный профиль, но и всестороннюю помощь саппорта, ясное описание товара, страховку на момент покупки плюс максимально адекватные прайсы в нише. Дисклеймер: используйте активы законно и всегда с учетом правил Meta.
Visit Ulxra – Layout clean, content clear, and overall shopping felt smooth and easy.
Nixaro Partners site – Organized structure, concise information, and navigation works effortlessly.
globalenterprisealliances – Informative platform, global alliance strategies are explained clearly and practically.
signalcreatesflow – I like the clean style, makes the website feel polished overall
sonabet online
BetterDecisionGuide – Easy-to-follow tips, decision-making feels approachable and manageable.
sales site – Navigation was fast and pages loaded without any lag.
как устроиться хостес в корею Работа в Сеуле, как и в других городах Кореи, требует знания языка или готовности его изучать. Без знания корейского языка будет сложно найти работу и адаптироваться к жизни в стране.
click hub – Fast response, landing page clear, everything aligned with expectations.
ClickZexaro – Pages respond quickly, clean interface, and all information easy to access.
retargetpro.click – Navigation felt smooth, found everything quickly without any confusing steps.
Всё про автомобили https://sedan.kyiv.ua в одном портале: каталог авто, обзоры и рейтинги, новости автопрома и советы экспертов. Покупка, эксплуатация, сервис и тренды — полезная информация для каждого водителя.
roigrowth.click – Pages loaded fast, images appeared sharp, and formatting stayed consistent.
offeroptim.click – Bookmarked this immediately, planning to revisit for updates and inspiration.
Качественные банные веники — основа полноценного оздоровительного отдыха и традиционных русских парных процедур. Магазин предлагает отборную продукцию из березы, дуба и эвкалипта по доступным ценам. Товары проходят тщательный отбор и соответствуют стандартам экологической безопасности для использования. Удобная доставка через пункты выдачи Яндекс Маркета работает по всей Москве и Подмосковью. Подробный каталог и актуальные акции доступны на странице https://www.parvenik.ru/ для всех покупателей. Оптовые заказы обрабатываются с дополнительными скидками и индивидуальными условиями сотрудничества.
Qulavo Capital Online – Fast interface, well-organized content, and pages are easy to explore.
marketbetter.click – Found practical insights today; sharing this article with colleagues later.
Ulvix online site – Content is presented simply, with a tidy, navigable design.
TrivoxTrustline Link – The transparent approach helps resolve a lot of investor questions.
Official UlviroCapitalGroup – Clear structure, information is presented honestly and concisely.
Visit Nixaro Trustline – Well-structured pages, navigation is intuitive, and users can find key details quickly.
bs2best at не работает
official zavik – Easy-to-navigate pages, helpful content, and well-organized design
clicktoclient.click – Loved the layout today; clean, simple, and genuinely user-friendly overall.
KoriPortal – Design minimalistic, content readable, and purchasing process smooth.
focusanchorsmovement info – Structured design, pages load fast, and reading is effortless
shop page – I noticed the descriptions avoided overstatements.
Check out this site – Nicely organized content that feels both clear and intentional.
VelixoFlow – Pages load fast, information displayed neatly, and navigating the site is simple.
web xeviro – Feels reliable, design consistent and information straightforward.
Plavex Holdings platform – Organized sections, simple navigation, and content is easy to understand.
pelvo site – Straightforward layout, readable text, and a calm browsing flow
bs2best at ссылка
Qulavo Capital Network – Clear headings, organized content, and pages are simple to browse.
UlvaroBondGroup Online – Saw this earlier, the site feels clean and the message is easy to understand.
Brixel Bond Group official website – Strong attention to detail adds to the sense of trustworthiness.
Visit Ulviro Trust – Presentation feels tidy, trust messages are clear and soothing.
sonabet.pro
browse qulvo – Straightforward interface, smooth performance, concise content everywhere
Explore Nolaro Capital – Intuitive menus, concise details, and the site feels trustworthy overall.
AlliancePlannerHub – Structured and reliable, partnership frameworks provide actionable steps for companies.
blacksprut
online storefront – Saved it for later, possibly ordering again.
NixaroNavigator – Navigation intuitive, pages responsive, and product info straightforward and reliable.
official signalcreatesmomentum – Clear and concise presentation, feels professional and reliable
portal site – Simple and light, content comes through clearly without distractions.
Plavex Trust Group info portal – Structured content, readable details, and navigation is easy for visitors.
ЗАО «Техносвязь» — ведущее предприятие по производству печатных плат в Екатеринбурге с более чем 20-летним опытом работы. Компания предлагает полный цикл услуг: от проектирования до серийного выпуска электронных устройств, включая автоматический и ручной монтаж, изготовление многослойных плат на различных материалах. Подробнее на https://www.techno-svyaz.ru/ Передовая техника, применение премиальных материалов глобальных брендов и опытная команда обеспечивают быстрое выполнение с безупречным качеством для партий любого масштаба.
https://sonabet.pro/
morix spot – Straightforward design, easy-to-follow content, and smooth browsing
Check Quvexa Capital – Smooth interface, organized information, and pages are easy to explore.
Browse the trust homepage – Clean visuals and logical menus help build confidence while reading.
SuccessPathwayPro – Detailed advice, strategies are actionable and easy to follow.
blsp at что это за сайт
UlvaroBonding Resource – Clean setup, fast response times and simple content.
Школа-студия парикмахеров Юлии Бурдинцевой в Москве предлагает курсы с обучением на реальных клиентах с четвёртого дня занятий. Ищете начало занятий? На j-center.ru представлены программы для начинающих и практикующих мастеров: универсальные курсы от 9000 рублей, колористика за 36000 рублей, мужские стрижки и повышение квалификации. Студенты получают бесценный опыт работы в режиме салона, изучают женские и мужские стрижки, окрашивание, укладки и современные техники. При успешной сдаче экзамена студенты получают документ установленного формата, а перспективным специалистам гарантируется место в парикмахерских московского региона.
Brixel Capital platform – Well-defined messaging and branding help establish authority.
VelixoCapital Resource – Came across this while browsing, neat branding and content is simple and clear.
go to site – Straightforward interface, pages loaded without delays, very user-friendly
growonline.click – Appreciate the typography choices; comfortable spacing improved my reading experience.
travik info – Organized layout, clean content, and browsing feels natural and easy
Nolaro Holdings site – Easy-to-scan pages, trustworthy look, and information is concise.
drivetraffic.click – Content reads clearly, helpful examples made concepts easy to grasp.
product marketplace – Everything went smoothly, and I’ll tell people I know about it.
boostmysite.click – Overall, professional vibe here; trustworthy, polished, and pleasantly minimal throughout.
blsp ap
Для невеликої квартири важливо мати компактне та зручне обладнання. Саме зарядна станція для будинку не займає багато місця. Вона легко вписується у будь-який інтер’єр.
portal hub – Quick rendering, visuals straightforward and communication effective.
Мене приємно здивувала швидкість зарядки самого пристрою від мережі. У цьому плані зарядна станція для будинку дуже практична у повсякденному житті. Вона швидко готується до нової роботи.
Ulviro Point – Minimalist design, content well-structured, and shopping felt effortless.
Plivox Bonding network – Intuitive layout, clear headings, and user experience feels smooth.
Після першого ж відключення я відчув реальну користь від покупки. У таких умовах зарядна станція для будинку працює бездоганно та ефективно. Це справді практичне рішення для сучасного житла.
Строительный портал https://garant-jitlo.com.ua современные технологии, нормы и стандарты, выбор материалов, инженерия и безопасность. Экспертные рекомендации, инструкции и реальные примеры работ — понятно и по делу.
Я довго шукав оптимальний варіант для забезпечення автономності квартири. Після порівняння моделей зрозумів, що зарядна станція для будинку відповідає всім моїм очікуванням. Використання пристрою виявилося простим та зручним у повсякденному житті.
Компания BritishSchool https://britishschool.kiev.ua профессиональные тренинги, семинары и курсы для детей и взрослых. Обучение с опытными преподавателями, современные методики, практические навыки и уверенный результат. Онлайн и офлайн форматы.
Портал о строительстве https://repair-house.kiev.ua и ремонте без лишней теории: практические советы, обзоры материалов, расчёты, инструменты и этапы работ. Помогаем планировать проекты, контролировать качество и экономить бюджет.
Площадка бесплатных предложений Napiki связывает торговцев и потребителей со всей страны через простой интернет-сервис. На https://napiki.ru/ представлено более 3800 объявлений в 1553 рубриках: недвижимость, транспорт, работа, товары для дома, бытовая электроника и услуги. Платформа позволяет частным лицам и компаниям размещать предложения бесплатно, а специальные услуги продвижения ускоряют продажу. Посетители обнаруживают привлекательные варианты в родном городе и близлежащих территориях, а открытие персонального каталога укрепляет репутацию предприятия среди заказчиков.
UlvaroCapital Website – Clean explanations that make the content accessible from the start.
VelixoHoldings Hub – Navigation feels effortless, content loads quickly and seems straightforward.
BestDealSpot – Practical platform, locating deals online is easy and reliable.
Direct Website Link – Found this without searching, impressed by the clean layout
Bonding site access – The page design makes the details easy to pick up quickly.
2 bs2best at
quorly source – Fast-loading site with useful text presented in a clean format
Проблемы с алкоголем? вывод из запоя срочно помощь врача, детоксикация, стабилизация состояния и наблюдение. Конфиденциально, без постановки на учет, с учетом возраста и сопутствующих заболеваний.
web link – Link worked instantly, target page made sense, no issues.
Plivox Capital business – Easy-to-read layout, helpful details, and browsing is seamless.
Подборка лучших МФО на https://mikrozaym365.ru оформите микрозайм онлайн на карту за 5 минут. Первый займ под 0% для новых клиентов. Без отказов и проверок. Мгновенное одобрение, перевод на любую карту. Получите деньги сегодня!
Ищешь казино? лучшие казино онлайн на деньги лицензия, бонусы, выплаты, игры и отзывы игроков. Сравниваем условия, безопасность и удобство, чтобы помочь выбрать надежное казино для игры онлайн.
NolaroLinker – Design clean, everything loads properly, and site navigation hassle-free.
globalbusinessunity – Informative insights, global business unity strategies are clear and useful here.
official xelio – Fast performance, organized sections, and overall pleasant to explore
UlvionBondGroup Website – Solid and credible overall, branding matches and tone feels professional.
main hub – Simple design, concise explanations, perfect for quick browsing
VelixoTrustGroup Main Site – Layout feels professional, explanations are concise and simple.
Актуальная реальность заставляет искать проверенные ресурсы, где информация подтверждается специалистами. Портал https://worldtodaynews.net/ собирает актуальные события из политики, экономики, науки и культуры в удобном формате. Редакция публикует материалы о технологических прорывах, спортивных достижениях и финансовых трендах без искажения реальности. Аудитория знакомится с оценками профессионалов и корреспонденциями со всех континентов ежедневно. Структура сайта помогает мгновенно обнаруживать нужные рубрики и отслеживать динамику происшествий онлайн.
Требуется работа в Израиле? Посетите сайт 4israel.co.il/ru/jobs/ и вы найдете большое количество предложений. Достаточно указать округ Израиля и населенный пункт, а платформа отобразит вам все интересные предложения по трудоустройству. Трудоустройство в Израиле это множество бесплатных предложений – вы точно найдете для себя должность или размещайте свои объявления и получайте ответы соискателей. Наш ресурс наиболее комфортный для подбора работы и персонала. Детальнее на портале.
PremiumCartOnline – Simple layout, checkout is quick and products are well-organized.
Страдаете от алкоголизма? срочный вывод из запоя на дому анонимная медицинская помощь с выездом врача. Осмотр, капельницы, контроль состояния и поддержка пациента в комфортных условиях. Работаем круглосуточно, строго по медицинским показаниям.
Мучает алкоголизм? вывод из запоя недорого помощь при алкогольной интоксикации и длительном употреблении. Капельницы, поддержка организма, контроль давления и пульса. Конфиденциально и профессионально.
Start with capital site – First look is encouraging, saving it to explore in depth.
Автоматический площадка купить прогретые аккаунты Facebook открывает возможность заказать аккаунты под залив. Если вам нужно купить аккаунт Facebook для рекламы, обычно задача не в «просто доступе», а в проходимости чеков: уверенный спенд, наличие пройденного ЗРД в кабинете и прогретые FanPage. Мы подготовили короткую карту выбора, чтобы вы сразу понимали какой лимит выбрать перед заказом.Быстрый ориентир: откройте категории Бизнес Менеджеры (BM), а для масштабирования — переходите напрямую в профильные позиции: ПЗРД Кинги. Важно: аккаунт — это инструмент. Дальше решает подход к запуску: как вяжется карта, как вы передаете лички без триггеров, как реагируете на полиси и как дублируете кампании. Особенность нашего сервиса — заключается в наличии масштабной образовательной секции, где собраны рабочие мануалы по запуску рекламы. На сайте вы найдете страницы FB под разные задачи: начиная с миксов до трастовыми БМами с документами. Вступайте в наше комьюнити, смотрите практичные разборы банов, упрощайте работу с Meta и повышайте ROI на базе наших расходников без задержек. Дисклеймер: используйте активы законно и с учетом правил Meta.
прошивка samsung великий новгород Ремонт телевизоров также является актуальной услугой. Ремонт подсветки телевизора и ремонт блока питания телевизора – это сложные задачи, требующие профессиональных навыков и специализированного оборудования.
https://ieet.org/wp-content/pgs/1xbet_promo_code_for_free_bet_welcome_bonus.html
Plivox Holdings business – Professional feel, readable sections, and the site is easy to use.
ИП Муравьев А.В. публичная оферта индивидуальный предприниматель Муравьев Александр Викторович публичная оферта
growmybrand.click – Navigation felt smooth, found everything quickly without any confusing steps.
бк мелбет официальный сайт бк мелбет официальный сайт .
improveseo.click – Pages loaded fast, images appeared sharp, and formatting stayed consistent.
написание учебных работ kupit-kursovuyu-43.ru .
performanceads.click – Mobile version looks perfect; no glitches, fast scrolling, crisp text.
platform details – Interesting setup that may offer useful features upon review.
rankmysite.click – Loved the layout today; clean, simple, and genuinely user-friendly overall.
http://fish-pet.com/pages/1xbet-promo-code___sign-up-bonus.html
MorvaCenter – Clean interface, links work well, and shopping process feels natural.
глэмпинг москва Глэмпинг – это уникальная возможность сочетать единение с природой и комфорт премиум-класса. Отдых в глэмпинге позволяет вырваться из городской суеты, не отказываясь от привычных удобств, таких как удобная кровать, душ и туалет в номере. Это идеальный вариант для тех, кто ценит свежий воздух и живописные пейзажи, но не готов к походным условиям.
Домашній інтернет і робочі пристрої потребують постійного живлення. У таких випадках зарядна станція для будинку забезпечує необхідну стабільність. Це особливо важливо для дистанційної роботи.
Ищете замена оконной фурнитуры ? Откройте сайт сервис-окон.бел где специалисты окажут качественный сервис по ремонту и обслуживанию пластиковых окон, смене фурнитуры и реставрации дверей балкона. Все цены, на наши услуги, вы сможете посмотреть на сайте, а выезд мастера осуществляется оперативно. На складе представлены все детали, включая запчасти для окон старого образца. Исключительно профессиональный ремонт окон с гарантийными обязательствами!
Качественный автосервис в Анапе — это не просто ремонт, а комплексная забота о вашем автомобиле. Автосервис «LEMON CAR» на улице Чехова предлагает полный спектр услуг: от компьютерной диагностики до кузовного ремонта и 3D развал-схождения. Профессиональные мастера используют современное оборудование и не боятся предоставлять гарантию на выполненные работы. Особенность сервиса — прозрачность ценообразования: после тщательной диагностики клиент получает полную информацию о неисправностях и стоимости ремонта без неожиданных доплат. Подробнее об услугах и акциях можно узнать на https://lemon-car.ru/, где также доступна онлайн-запись. Слесарный ремонт, автоэлектрика, ремонт двигателя и КПП — весь комплекс работ выполняется с соблюдением технологий и сроков, что подтверждают многочисленные положительные отзывы клиентов сервиса.
Для квартири важливо мати безпечне та тихе джерело живлення. Саме зарядна станція для будинку відповідає цим вимогам. Вона не створює дискомфорту.
Під час тривалих відключень важливо зберігати зв’язок із зовнішнім світом. У цьому допомагає зарядна станція для будинку, яка живить гаджети. Це дуже корисно у повсякденному житті.
Під час нестабільної ситуації важливо мати контроль над побутом. Саме зарядна станція для будинку дозволяє це зробити. Вона дає відчуття безпеки.
UlvionCapital Network – Navigation feels seamless, information is straightforward and well organized.
growthmarketing.click – Color palette felt calming, nothing distracting, just focused, thoughtful design.
mivox.click – Smooth browsing, the design is simple and all text is easy to read
Здравствуйте дорогие друзья! На первом этапе нужно разобраться — шумка всей машины. Дело в том, что только арки или только двери — не решает проблему полностью. Нужна реальная тишина — могу рекомендовать: комплексная шумка. Какие результаты можно достичь: арки, днище, крышу, двери, капот — машина становится другой. Так вот шум передаётся через весь кузов — работает только всё вместе. Если сам решил: разбирать всю машину, но результат — удаётся достигать классных результатов. Вместо заключения: едешь и кайфуешь.
Привет всем! В этой статье я расскажу — можно ли делать крышу зимой. Здесь такой момент: рубероид на морозе не клеится. ПВХ монтируют круглый год — вот специалисты: https://montazh-membrannoj-krovli-spb.ru. Лично я знаю: сварка мембраны — работает и в мороз. Например стройка не ждёт — так вот можно работать зимой. На первом этапе профессиональное оборудование. Что в итоге: один из самых эффективных способов — сроки соблюдены.
Лучшие книги от knizhka-malishka.ru – откройте для своего малыша мир увлекательных сказок и ярких историй! Здесь собраны лучшие издания для детей разного возраста, которые подарят радость чтения всей семье. Читайте книги онлайн удобно и выгодно!
VexaroCapital Overview – Clean and trustworthy layout, concise content that gives instant confidence.
Letar du efter ett casino? https://casino-utan-omsattningskrav.se Rattvisa bonusar, licens, snabba utbetalningar och transparenta villkor. Vi jamfor palitlighet, spel och betalningsmetoder for att hjalpa dig valja en saker plattform.
qerly access – Neat pages, readable content, and overall smooth browsing experience
MarketStrategyHub – Well-structured guidance, market concepts are approachable and actionable.
xelivo bonding link – Clean formatting helps make the information clear.
Explore trustline details – Simple presentation, quick page loads, and content feels fresh enough.
Zin in een casino? https://online-casinos-ideal.com Populaire gokkasten, roulette, blackjack en live dealers. Bonussen, toernooien, promoties en snelle uitbetalingen. Speel vanaf je telefoon of pc – altijd en overal.
Ищете оружие в игре sniper 3d assassin? Портал sniper3d.ru превратился в надежного гида для фанатов культового снайперского экшена Sniper 3D Assassin. Сайт содержит всеобъемлющую информационную базу: развернутые инструкции по 825 миссиям в 21 локации, данные обо всем арсенале и обмундировании, методики игры на PvP-арене и в мировых операциях. Портал дает доступ к видеоинструкциям, оперативным анонсам изменений, помощь пользователям и опцию установки игры. Интуитивная структура без раздражающих баннеров превращает ресурс в совершенное место и для начинающих игроков, и для профессионалов.
learnbusinessskillsonline – Excellent learning resources, business skills are explained clearly and practically.
ремонт кнопки включения iphone великий новгород Специализированные мастерские по ремонту телефонов в Великом Новгороде оснащены современным оборудованием для диагностики и устранения неисправностей. Здесь можно починить iPhone любой модели, выполнить замену аккумулятора, экрана, заднего стекла или разъема зарядки. Чистка динамика и микрофона также входит в список популярных услуг.
Xanero Portal – Clean interface, fast browsing, and purchasing felt intuitive.
UlvionHoldings Page – Fresh design, easy to browse and visually appealing.
go to site – Simple layout, smooth performance, very easy to understand information
cavaro pact site – Well-organized pages help users follow the content without confusion.
Мультимедийный интегратор тут интеграция мультимедийных систем под ключ для офисов и объектов. Проектирование, поставка, монтаж и настройка аудио-видео, видеостен, LED, переговорных и конференц-залов. Гарантия и сервис.
глэмпинг с баней в подмосковье Для тех, кто ищет максимального комфорта и развлечений, парк-отель все включено в Подмосковье станет идеальным выбором. Беззаботный отдых, включающий питание, напитки и развлечения, подарит незабываемые впечатления.
Digital trust portal – Simple layout, clear menus, and content feels trustworthy and helpful.
2 bs2best at
Official VexaroPartners – Smooth browsing, service descriptions feel honest and practical.
курсовая работа купить курсовая работа купить .
melbet bet melbet bet .
Нужны блины и диски? блины и диски для штанги широкий выбор весов, надежные материалы, точная калибровка. Отличное решение для силовых тренировок, кроссфита и профессиональных спортзалов.
Careers – Job info is structured neatly for easy browsing.
контракт на сво томская область
Home – Clean, professional layout with intuitive navigation and clear, useful content.
Services – Well-organized content and fast-loading pages ensure smooth browsing.
ProAllianceAdvisor – Insightful and structured, professional partnerships are easier to manage.
FAQ – Easy-to-follow answers, well-arranged pages, and navigation is simple.
velon corner – Clean pages, intuitive flow, and information that’s easy to absorb
xelivocapital.bond – The site appears polished and the material seems targeted and on point.
skill development center – Structured content helps users absorb information efficiently.
Connexion personnelle 1xbet 1xbet apk
аська молчит.скайп есть? https://awwama.online Может еще вернемся.На ближайшие 1.5 часа свободен, можно ни о чем не думать. Сачала хотел в центр поехать, чтобы сразу плсле адреса быстрей добраться до клада, потом трезво все взвесил,т спокойно поехал домой.
Start with bond group site – Came across this during research, content feels written for clarity.
top resource – Easy-to-follow layout, fast-loading, information is relevant and clear
zurix page – Quick navigation, headings are clear, and reading is comfortable overall
seoservices.click – Mobile version looks perfect; no glitches, fast scrolling, crisp text.
Capital solutions – Modern layout, intuitive controls, and content that seems dependable.
rankhigher.click – Loved the layout today; clean, simple, and genuinely user-friendly overall.
Xeviro Store – Smooth navigation, site organized logically, and checkout process easy.
Tech services portal – Clean design, pages load fast, and information remains readable.
ppcmanagement.click – Color palette felt calming, nothing distracting, just focused, thoughtful design.
Contact – Navigation is simple and all contact options are easy to locate.
VexaroUnity Hub – Concept is solid, site communicates its mission clearly and responsibly.
funnelbuilder.click – Content reads clearly, helpful examples made concepts easy to grasp.
Home – Fast-loading pages with clear layout, making browsing effortless.
Я пока временю. https://stashgashish.shop Я брал норм не один раз,но в последнее время было пару недовесов,а 35 прислали какого то качества слабого,25ый был куда лучше,после этого перестал заказывать.ага его
Contact – Navigation is simple, and contact details are easy to locate.
Careers – Job details are easy to locate, navigation is smooth, and content is concise and helpful.
QuickBuyDeals – Well-structured platform, discovering discounts online is easy and fast.
official xelivo trust page – Simple design makes it easy to move around without issues.
курсовые заказ курсовые заказ .
enterprise unity network – Content feels professional and explains alliances in a straightforward manner.
CPA network betting offers Международная партнерская программа – это шанс выйти за пределы одного рынка и охватить глобальную аудиторию. При выборе международной партнерской программы важно учитывать языковые барьеры, культурные особенности и законодательные ограничения различных стран. Локализация контента и использование местных платежных систем могут значительно повысить эффективность рекламных кампаний.
или я что то не так понял? Купить Кокаин, Бошки, Мефедрон, Гашиш Совершил заказ снова!и буду продолжать это делать,продавец ОЧЕНЬ понимающий человек!:hello::monetka: огромный респект!Заказывал тут сувениры(250) пришли за три дня=) Тока на почте из за выходных и праздников пролежали еще три дня=(
quick link – Intuitive layout, pages are responsive, everything is easy to find
мелбет букмекерская контора мелбет букмекерская контора .
googleadspro.click – Color palette felt calming, nothing distracting, just focused, thoughtful design.
Learn more here – Simple navigation, efficient loading, and information is easy to follow.
vexla corner – Pleasant site, content is concise, and pages load efficiently
News – Headlines and updates appear instantly and are simple to read.
Core services portal – Simple interface, pages flow naturally, and details are easy to check.
служба по контракту в ростовской области
Access holdings site – Everything is laid out in a way that’s easy to follow and understand.
VexaroUnity Website – Concept is solid, messaging communicates values clearly without overpromises.
Need an AI generator? undress ai The best nude generator with precision and control. Enter a description and get results. Create nude images in just a few clicks.
Careers – Job listings are easy to navigate and structured professionally.
Gallery – Images and visuals are displayed neatly, enhancing the browsing experience.
Магазин работает!!! Бро очень понктуален!!! Магазину процветание и новых клиентов!!! Купить Кокаин, Бошки, Мефедрон, Гашиш В итоге получается, что все страницы оказываются в одних недовольствах, но ладно визуально, так ведь чуть ли не неделю каждая страница в недовольствах, а это что-то да значит, особенно когда сам проверишь… Вот я постучался в асю, пообщались, вы исчезли, потом кое-как вернулись, но молчок по полной. Зря вы так, всех клиентов распугаете таким макаром…сервис – хуже некуда. Ну да об этом писал несколькими сообщениями ранее. 2/5
Contact – Pages are responsive, menus are intuitive, and content is clearly presented.
rixon info – Organized layout, smooth scrolling, and content is accessible quickly
check this bonding project – Fast performance gives it a professional feel early on.
go to site – Clean interface, organized content, browsing is smooth and simple
SafePurchaseCenter – Fast and dependable, checkout process is smooth and secure.
6-APB, белый кристалический порошок, 1000р… Это типа настоящий 6-APB? Купить Кокаин, Бошки, Мефедрон, Гашиш “Подхожу по описанию лазею,лазею, ПУСТО бля нервоз пздц “А вот еще немного…Вскрыл, взвешал – все в норме. для начала взял 1гр.растворяется АМ2233 в спирту хреново,(в след.раз попробую на растворителе сделать)причем грел все это дело на водяной бане,мешал,но до конца так и не растворилось.делал это долго и упорно,молочного оттенка раствора не наблюдалось,прозрачный скорее,но остался осадок в виде белого порошка.В итоге так и залил все это дело 1к20. Сушится теперь. Как высохнет опробуем и напишу что получилось. Буду надеятся на лучшее.
kavionbond.bond – Clean presentation, dependable feel, and content is arranged clearly.
practical knowledge hub – Content blends inspiration with real-world relevance nicely.
CPA network betting offers Партнерская сеть iGaming объединяет рекламодателей (казино, букмекерские конторы) и вебмастеров (владельцев сайтов, арбитражников). Это позволяет рекламодателям расширять охват аудитории, а вебмастерам – монетизировать свой трафик. Выбор партнерской сети iGaming – это ключевой шаг к успешному сотрудничеству.
Careers – Job listings are structured clearly, making exploration straightforward.
Ищете ремонт балконной двери? Починка ПВХ окон в Минске с предоставлением гарантии. Зайдите на портал рамонт.бел – изучите наш перечень услуг, включая реставрацию окон, смену фурнитуры, починку балконных дверей и другие работы. Стоимость ремонта и регулировки окон на сайте, а мастер выезжает на срочный ремонт окон в Минске в любой день и погоду в течение часа. Имеются комплектующие от всех изготовителей профильных оконных конструкций. Обеспечиваем высокое качество и долговечность восстановления Ваших оконных систем.
https://sonabet.pro/
Explore Kryvox – User-friendly design, navigation is seamless, and content is easy to locate.
Events – Event information is presented clearly, allowing users to follow schedules easily.
bs2site at
Home – Pages load fast, the interface is clear, and information is easy to understand.
2.Почему на сайте нет ниодного упоминания о ритейле,в то время,как заказы надо делать через него? Купить Кокаин, Бошки, Мефедрон, Гашиш Магазин высшего уровня своей работы.сервис 10\10 нигде дешевле и лучше на рынке легал сейчас нету!!!
сайт заказать курсовую работу kupit-kursovuyu-43.ru .
Careers – Clear navigation, fast-loading pages, and job details are easy to read.
Visit the trust platform – Overall impression feels legitimate, and the content stays consistent.
melbet site melbet site .
The best independent casinos https://independent-casino.uk with fair terms, fast payouts, and transparent licensing. A review of trusted platforms without major holdings, offering unique bonuses, popular slots, and convenient deposit methods.
kavlo portal – Browsing feels light and simple thanks to the modern design
capital project homepage – A structured design that helps users explore information comfortably.
go to nixra – Pages open fast and the overall design is simple yet effective
Я вообще удивляюсь как продаван работает то? Есть ветка форума, личка и ася – везде молчание. В ася онлайн, но всеравно молчит уже третий день – это адекватный сервис? Купить Кокаин, Бошки, Мефедрон, Гашиш итоги:всем привет! магаз ровный беру у них года 2 уже все всегда стабильно и качества радует. берите все саветую. спасибо магазин
Всем привет.
Планирую подтянуть английский в Канаде.
У них программы для всех возрастов.
Больше инфы здесь:
kraken актуальные ссылки
Спасибо.
Portfolio – Visuals are organized neatly, giving a professional and approachable feel.
kavioncore.bond – Nice experience, everything loads quickly and information is concise and understandable.
Kasyna online https://tsmetalwg.pl graj z bonusami w 2026 roku. Aktualne oferty, szybkie logowanie i latwa rejestracja, popularne sloty i gry stolowe. Przeglad warunkow, metod wplat i wyplat dla komfortowej gry online.
marketingautomation.click – Mobile version looks perfect; no glitches, fast scrolling, crisp text.
Домашня техніка потребує стабільного та безпечного живлення. У цьому допомагає зарядна станція для будинку, яка захищає прилади від перепадів. Це важлива перевага.
socialadspro.click – Bookmarked this immediately, planning to revisit for updates and inspiration.
velixo site – Minimalist approach, clear content, and navigation feels natural
TrustedShoppingPro – Smooth and organized, checkout is fast and straightforward.
Після придбання автономного живлення побут став значно простішим. У цьому допомогла зарядна станція для будинку, яка працює без зауважень. Вона повністю виправдала себе.
Після придбання автономного джерела енергії рівень стресу значно знизився. У цьому допомогла зарядна станція для будинку, яка стабільно виконує свою роботу. Вона додає впевненості у завтрашньому дні.
clarity discovery hub – Clean layout and straightforward guidance help users quickly grasp ideas.
socialmarketing.click – Color palette felt calming, nothing distracting, just focused, thoughtful design.
Я шукав обладнання, яке не потребує спеціальних умов зберігання. У цьому плані зарядна станція для будинку виявилася максимально зручною. Вона проста і надійна.
crmsetup.click – Navigation felt smooth, found everything quickly without any confusing steps.
A truly fantastic read. Your writing style is both engaging and informative.
Updates – News and updates are presented clearly, keeping users informed efficiently.
Раніше доводилося постійно економити заряд на телефонах та ноутбуках. Тепер зарядна станція для будинку повністю вирішила цю проблему. Вона дає можливість не обмежувати себе.
Digital hub – Neat design, easy-to-use interface, and content is research-friendly.
Для сім’ї з дітьми важливо підтримувати звичний рівень комфорту. Саме зарядна станція для будинку дозволяє не змінювати режим навіть без світла. Вона стала справжнім порятунком.
Я задоволений тим, що пристрій має зрозумілу систему індикації. У цьому плані зарядна станція для будинку дуже зручна для щоденного використання. Вона інформативна та проста.
Portfolio – Neat presentation and responsive layout help users access visuals easily.
Для сімейного використання важлива можливість підключення різної техніки. Саме зарядна станція для будинку дозволяє робити це без обмежень. Вона універсальна та зручна.
привет что случилось вы работаете не могу второй день в личку отписаться ,сколько заказывал всё было супер ,как к тебе попасть теперь ,что делать ,отпишитесь … Купить Кокаин, Бошки, Мефедрон, Гашиш большое спасибо продавцу и нашему времени :yeah::drug::rest: – пусть дальше будет еще круче :crazy:, быстрее :superman:, веселее :dansing: и ДОБрееКак долго вы обрабатываете заказ?
Аренда автомобилей в Краснодаре становится простой и удобной благодаря сервису CarTrip с широким парком машин. Компания предлагает транспорт разных классов — от стандартных седанов до минивэнов и кабриолетов для путешествий. Отсутствие залога и ограничений по пробегу делает условия прозрачными и комфортными для клиентов. Разрешен выезд в Крым, что особенно актуально для летнего отдыха на побережье Черного моря. Ознакомиться с полным каталогом и забронировать автомобиль можно на https://prokat.car-trip.ru/ круглосуточно онлайн. Дисконтная карта предоставляется каждому клиенту при первом обращении в компанию для постоянных выгодных условий.
FAQ – Intuitive menus, pages load fast, and answers are easy to find.
https bs2best at
https://ufalift.ru/
аккумулятор iРhоnе Ремонт телефонов в Великом Новгороде: когда ваш цифровой мир нуждается в спасении. В современном мире мобильный телефон – это не просто средство связи, а незаменимый инструмент для работы, общения, развлечений и получения информации. Поэтому поломка смартфона может стать настоящей проблемой. В Великом Новгороде существует множество сервисных центров, предлагающих широкий спектр услуг по ремонту мобильных устройств.
holdings platform details – The site maintains a dependable tone and visual identity.
Access capital site – Organized content flow makes navigating the pages much easier.
sonabet.pro
official site – Fast-loading pages, minimal clutter, content is easy to understand
Как связаться можно Купить Кокаин, Бошки, Мефедрон, Гашиш получил трек, всё норм, просто испереживался))на icq – в четверг обещал трек, в пятницу обещал трек, пропал…
Testimonials – Feedback is displayed in a neat, professional manner that’s easy to read.
analyticsreport.click – Color palette felt calming, nothing distracting, just focused, thoughtful design.
Visit Kavionline – Navigation feels natural, the layout is friendly, and content is easy to read.
long-term investment site – Looks organized and credible for those planning ahead.
Під час ремонтних робіт інколи відсутній доступ до мережі. У такій ситуації виручають універсальні потужні зарядні станції, здатні живити інструменти. Вони значно спрощують виконання завдань.
bavix link – Good first impression, content flows well and makes sense
https://girls-media.com/wp-content/pgs/code_promo_du_bookmaker_1xbet.html
Для проведення відеоконференцій важливе стабільне живлення техніки. У нагоді стають перевірені потужні зарядні станції, що працюють без перебоїв. Це дозволяє спокійно спілкуватися онлайн.
Для любителів походів важливо мати автономне джерело енергії на довгі дні. Найкращим вибором вважаються потужні зарядні станції, що працюють навіть у польових умовах. Вони роблять відпочинок більш передбачуваним і комфортним.
http://cl.angel.wwx.tw/debug/frm-s/bit.ly/4jMsNFN
News – Information is presented concisely, with pages that load fast for seamless reading.
Під час сімейних поїздок важливо мати заряджені телефони та планшети. Допомагають у цьому надійні потужні зарядні станції, що підтримують декілька пристроїв одночасно. Вони створюють додатковий комфорт для всієї родини.
financial hub – Overall feels professional, with quick navigation and clear information.
Шива я тебя люблю!!! У тебя лучший и мой самый любимый мефедрон!!!. https://rachelcolemanceds.online и не планируете ни какой новой ветки на скайпе открыть!?там в скайпе мошенник значит от вас херачит направо и налево!и ссылку кидает на ваш магазин и говорит что от вас работает!На каком сайте сейчас заказать то можно дживик ровный
Maveroline official hub – Well-structured layout, responsive interface, and details are easy to understand.
BizConnectionsOnline – Informative and structured, forming long-term connections is easy.
next move portal – Website provides simple tools for mapping out upcoming goals effectively.
FAQ – Easy-to-use menus, fast-loading pages, and answers are simple to locate.
https://sonabet.pro/
Проблемы с зубами? стоматология: диагностика, лечение кариеса, отбеливание, импланты и ортопедия. Индивидуальный подход, безопасные материалы, точные технологии и забота о здоровье зубов и дёсен.
https://www.porada.sk/downloads/inc/code-promo-1xbet___bonus.html
professional bond site – Clear design helps users understand content quickly.
Для сімейних пікніків на природі важливо мати стабільне джерело енергії для ламп і колонок. Допомагають у цьому сучасні потужні зарядні станції, які легко підключати і перевозити. Вони значно спрощують організацію відпочинку.
У домашньому офісі важливо підтримувати стабільну роботу ноутбуків і роутерів. Найзручнішими у цьому є сучасні потужні зарядні станції, здатні витримувати високі навантаження протягом тривалого часу. Вони роблять роботу комфортною і безпечною.
Для дистанційної роботи важливо підтримувати стабільну зарядку ноутбуків і гаджетів. Найбільш ефективними є сучасні потужні зарядні станції, здатні забезпечити одночасну роботу декількох пристроїв. Це робить процес роботи зручним і безпечним.
Ресурсы Разработка игр: симфония кода, красок и воображения. Создание видеоигр – это не просто программирование, а сложный творческий процесс, требующий гармоничного сочетания технических навыков, художественного видения и глубокого понимания психологии игроков. Каждый элемент игры, от механики управления до визуального стиля, должен быть тщательно продуман и сбалансирован для создания захватывающего и запоминающегося опыта.
Під час сімейних свят на природі важливо мати автономне джерело живлення для освітлення і гаджетів. Надійними для цього є сучасні потужні зарядні станції, що підтримують одночасну роботу декількох пристроїв. Вони роблять відпочинок комфортним і безпечним.
talix hub – Organized layout, easy-to-follow pages, and content feels coherent and clear
Для торгових точок на ринках необхідне автономне живлення. Ефективним рішенням є потужні зарядні станції, здатні працювати цілий день. Це дуже зручно для малого бізнесу.
Для блогерів у подорожах необхідно заряджати камери та дрони. Незамінними помічниками стають потужні зарядні станції, які забезпечують довгу автономність. Вони допомагають створювати якісний контент.
Для фотографів необхідне стабільне джерело енергії під час зйомок. У цьому добре допомагають потужні зарядні станції, що підтримують роботу освітлення та камер. Вони незамінні у професійній діяльності.
yaverobonding.bond – Nice experience overall, pages are organized and fairly user friendly.
Я просто уже настолько завязан со сферой Lrc что подмечаю все мелочи. Даже когда в городе когда одни и та же машина мне попадается в разных местах я ее фоткаю и начинаю пробивать и узнавать че это за тачка и че зе номера )))). Купить Кокаин, Бошки, Мефедрон, Гашиш Отдельный разговор с одной посылкой когда человек менял свое решение и то соглашался ждать посылку, то требовал вернуть деньги.народ а присылают вместе с заключением экспертизы?
Під час поїздок на риболовлю важливо заряджати ліхтарі та телефони. Найкращим вибором є потужні зарядні станції, що працюють без підключення до мережі. Вони створюють зручні умови відпочинку.
explore now – Smooth performance, fast pages, and content is concise and easy to read
https://ufalift.ru/
Financial trust portal – Clean presentation, clear explanations, and smooth navigation.
See trust platform – Content is straightforward, offering a solid base for online learning.
Під час відпочинку в кемпінгу хочеться користуватися гаджетами без обмежень. Надійним варіантом стають потужні зарядні станції, що працюють автономно багато годин. Вони роблять дозвілля комфортним.
Для домашніх свят на природі потрібне автономне живлення. Зручним вибором у цьому випадку є потужні зарядні станції, що забезпечують роботу музики та освітлення. Вони створюють гарний настрій.
bond info hub – Layout is neat, content is easy to digest, and navigation feels natural.
Під час проведення онлайн-уроків важлива стабільність електрики. Забезпечити її можуть потужні зарядні станції, що підтримують роботу комп’ютера та вебкамери. Це дозволяє не переривати навчання.
Для підтримки домашнього сервера необхідне резервне живлення. У цьому напрямку допомагають потужні зарядні станції, що забезпечують безперебійну роботу обладнання. Це дуже важливо для безпеки даних.
Tutorials – Step-by-step guides are clearly structured for easy understanding and navigation.
Під час кемпінгу хочеться користуватися звичними електроприладами. Допомогти у цьому можуть потужні зарядні станції, які працюють автономно довгий час. Вони додають зручності на природі.
Під час тривалих навчальних або робочих марафонів важливо, щоб усі гаджети були заряджені. У цьому допомагають потужні зарядні станції, які дозволяють підтримувати роботу декількох пристроїв одночасно. Вони роблять процес роботи більш продуктивним.
замена дисплея на айфон Цена ремонта зависит от сложности поломки, модели устройства и используемых запчастей. Однако, в Великом Новгороде можно найти сервисные центры, предлагающие ремонт телефонов недорого, при этом гарантируя высокое качество работ. Также часто предоставляется гарантия на выполненные работы и замененные детали.
Для підтримки роботи серверів у невеликих офісах потрібен резерв. Забезпечити його можуть потужні зарядні станції, здатні живити обладнання у критичні моменти. Вони підвищують стабільність бізнесу.
investment resource – Information is laid out logically, making the site pleasant to use.
Під час тривалих поїздок автомобілем завжди хочеться заряджати телефони та навігатори. У таких ситуаціях незамінними стають потужні зарядні станції, які працюють автономно багато годин. Вони роблять подорожі більш безпечними та комфортними.
Вот мой отзыв по работе данного магазина. https://bestmefklad.store спасибо за предупреждение!!!С возвращением бразы! удачной работы вам и процветания
secure investment portal – Pages respond quickly, and content feels clearly presented.
Home – Clean layout, intuitive navigation, and content is clear and easy to follow.
Learn more here – Clean design, organized content, and the site feels trustworthy overall.
Ищете взлом инстаграм? xakerforum.com/threads/uslugi-xakera-vzlom-tajnaja-slezhka.282/page-6 — это тематический ресурс для тех, кто серьезно относится к кибербезопасности, анонимности и современным цифровым инструментам. На форуме собраны тематические разделы по защите информации, пентесту, анализу уязвимостей, обзору прикладных инструментов и живому обмену опытом между экспертами и начинающими. Живое сообщество, свежие гайды и подробные технические разборы позволяют участникам быстро получать сжатую, практическую информацию без лишней теории и давно неработающих методик. Здесь ценится конкретика, грамотный разбор кейсов и реальные рабочие решения.
EnterpriseStrategyHub – Informative platform, enterprise frameworks are clear and actionable.
PayID casinos https://jaubimusic.com play online quickly and securely. Instant deposits and withdrawals, convenient payments, licensed sites, popular slots, and live games. A selection of reliable casinos with up-to-date terms.
трансы екатеринбург Звуковые практики и транс-музыка в Екатеринбурге – это еще один способ погружения в измененное состояние сознания. Специальные сеансы с использованием тибетских поющих чаш, гонгов и других инструментов позволяют достичь глубокого расслабления, снять напряжение и активизировать внутренние ресурсы организма. Уникальная атмосфера и профессиональное исполнение делают эти практики особенно привлекательными для тех, кто ищет альтернативные способы самопознания и исцеления.
а с чего ты взял что чемик ноаый селлер? Купить Кокаин, Бошки, Мефедрон, Гашиш Спасибо за отзыв , а то заказывает много людей а отписываются единицы.У меня тоже была задержка.На мониторенге тоже отправку просрочили, в итоге дней 20 затратили на пересылку.Просто курьерка такая, они помоему там распиздяи ещё те…так что на счёт приема можешь не беспокоиться.там даже если мусора захотят что то найти то будет трудно разобраться что да где)вот допустим недавно заказал и курьерка ваще не то вбила))так что не переживай!Чемикалы всё ровно делают, сложновато будет найти даже если посыль откроют!
https://ufalift.ru/
FAQ – Concise questions and answers are easy to scan and comprehend.
capital platform details – Appears helpful and could be worth reviewing again.
top resource – Organized layout, intuitive pages, information is clear and concise
Korivo official page – Organized website, reliable navigation, and clearly presented information.
Ranking wyplacalnych https://oceandvstmusic.com kasyn online z szybkimi wyplatami. Analiza wiarygodnosci finansowej, licencji, limitow i czasu wyplat. Lista kasyn, ktorym gracze ufaja w latach 2025–2026.
Ищете аккумуляторы для вилочных погрузчиков? Откройте сайт e-battery.ru где доступна покупка по оптимальной стоимости тяговых АКБ для электропогрузчиков, электротележек и электроштабелеров. В нашем каталоге обширный перечень товаров для разной техники и транспортировка по всей территории России. Выбор тяговой батареи осуществляется через систему фильтрации, где задаются ключевые характеристики аккумулятора: вольтаж и емкость в ампер-часах.
online investment site – Clear headings, logical layout, and information is easy to follow.
FAQ – Questions are well-organized, pages load quickly, and answers are easy to find.
Пришел сегодня грамм 5-мео-дмт, все ок, но весов пока нет, а на глаз его в 2-3 раза меньше, чем, например, грамма 2с-е. Кто имел дело с ним, это у него плотность настолько больше или мне недосыпали? Купить Кокаин, Бошки, Мефедрон, Гашиш Обращайтесь к нам сноваСделать можно хоть в Новогоднюю ночь, но обработан он будет только после 9 января.
official bond site – Navigation feels smooth, and the content is straightforward to follow.
visit loryx – Easy-to-follow pages, clear writing, and enjoyable browsing experience
ремонт ноутбуков acer великий новгород Особое внимание уделяется ремонту iPhone, как одному из самых популярных и технологически сложных устройств. Замена экрана, аккумулятора, задней крышки, разъема зарядки – это лишь малый перечень работ, которые выполняют квалифицированные специалисты. Важно отметить, что для ремонта iPhone используются только качественные запчасти, что гарантирует долговечность и надежность отремонтированного устройства.
Gallery – Clean interface, quick pages, and visuals are easy to explore.
investment website – Content is straightforward and doesn’t overwhelm while browsing.
Ищете алкоголь в дубае с доставкой? Онлайн-магазин store-dubai-drinks.com предлагает быструю и легальную доставку премиального алкоголя по всему Дубаю с полным соблюдением местного законодательства. Каталог включает престижную продукцию: шотландский виски Chivas и Johnnie Walker, французский коньяк Hennessy, мексиканскую текилу Patron, игристые вина, а также крепкий алкоголь известных производителей. Компания предоставляет абсолютную приватность транзакций, скоростную логистику и экспертную консультационную поддержку, благодаря чему заказ алкогольной продукции туристами и местными жителями становится предельно простым и надежным.
Digital trust site – Organized pages, intuitive interface, and details are easy to locate.
GlobalNetworkingGuide – Clear and professional, building international relationships is effortless.
trusted finance site – Content is easy to read, and site navigation is quick.
Thanks for sharing. I read many of your blog posts, cool, your blog is very good.
Трек так и не работает:(. Когда ждать посылку. Скоро запрет выйдет уже. Хотелось бы до запрета успеть. Купить Кокаин, Бошки, Мефедрон, Гашиш Братва после покупки не забываем писать отзывы.По АМ могу сказать,что концентрировать выше 1 к 15 не вижу смысла.Оно не торкает дальше своего известного предела,после 1 к 15 дальше пойдёт уже переводняк.Тут как с процами-дороже 200 баксов покупать-перевод бабла,прироста производительности не заметишь почти.
FAQ – Questions and answers are concise, well-organized, and easy to scan.
learn about yavero holdings – The website is clear and concise, aiding understanding of services.
Korva Platform – Found this randomly, everything feels clean and well spaced
Official Korivoline site – The site appears dependable, navigation is smooth, and content is helpful.
Home – Smooth navigation, fast-loading pages, and content is presented clearly for visitors.
<secure investment site – Fast response times, well-labeled pages, and professional look.
Новости индустрии Игровой мир: Богатство жанров и платформ. От захватывающих экшн-игр до головоломок, развивающих логику, игровой мир предлагает разнообразие жанров, способных удовлетворить любые предпочтения. Игры доступны на множестве платформ: ПК, консоли, мобильные устройства, виртуальная реальность, что позволяет игрокам наслаждаться любимыми играми в любом месте и в любое время.
Тоже хочу сделать заказ.Жду ответа Купить Кокаин, Бошки, Мефедрон, Гашиш обо всем думаем ) но не сразуСпасибо за отзыв , а то заказывает много людей а отписываются единицы.
trusted investment portal – Easy to browse, with a clean interface and logical structure.
Primary site – Interesting work here, and the layout helps convey the key points well.
bs2best at что за сайт
Events – Clean layout, responsive navigation, and content is easy to explore.
Visit the core platform – Navigation is smooth, and the content is straightforward to understand.
трансы иркутск Альтернативные практики в Иркутске, такие как дыхательные техники и шаманские ритуалы, предлагают уникальные возможности для расширения сознания и соединения с природой. Эти методы требуют уважительного отношения к традициям и опытного проводника, но могут открыть доступ к глубоким слоям подсознания и древней мудрости. Байкал, с его мистической энергией, становится мощным катализатором для подобных практик.
Quality shop buy facebook account for ads gives access to order accounts for targeting. When you’re planning to buy Facebook accounts for ads, the task is rarely about “just access”, but about trust and limits: confident spend, a passed reinstatement/review in the dashboard and warmed-up Fan Pages. We’ve prepared a quick selection map, so you can quickly see which type to choose before ordering.What’s inside: account types (aged, auto-reg, PVA). Important: an account is a tool. After that, results depend on your launch process: how payments are added, how you share assets and permissions carefully, how you react to policy notices and how you duplicate and expand. Key advantage of this service — is having a curated learning section, in which we’ve collected fresh recommendations for account preparation. Our team can help, how to carefully share access, so you avoid common issues and also stay stable in the auction. By buying here, you get not only an account, and fast consulting, clear replacement terms, a safety net at the moment of purchase and very competitive rates in the niche. Important: use assets lawfully and in line with Facebook rules.
Mivaro official hub – Streamlined pages, responsive design, and content is easy to follow.
financial trust hub – Browsing feels consistent and the navigation flows nicely.
Telecharger 1xbet sur telephone 1xbet apk
LearnAndPlan – Well-structured content, strategies are simple to grasp and implement.
Need an AI generator? source The best nude generator with precision and control. Enter a description and get results. Create nude images in just a few clicks.
Careers – Job listings are structured clearly, making opportunities easy to browse.
Да тут дофига кто чего отписывает.только вот пробы нормальным людям раздайте.что бы видели липчане работу вашу! https://uniontobacco.com магаз ровный спасибо 5+и что за вещество
webdesignstudio.click – Overall, professional vibe here; trustworthy, polished, and pleasantly minimal throughout.
funnelpilot.click – Bookmarked this immediately, planning to revisit for updates and inspiration.
roiengine.click – Appreciate the typography choices; comfortable spacing improved my reading experience.
bavlo online – Clear layout, functional navigation, and content is easy to understand
top resource – Clear sections, fast pages, and navigation feels natural
Official bond site – Clean visuals, structured pages, and information is easy to explore.
signaltrack.click – Appreciate the typography choices; comfortable spacing improved my reading experience.
Gallery – Images are displayed cleanly, pages respond fast, and navigation is simple.
finance platform – Layout is professional, and information is presented logically.
trusted finance portal – Information is easy to navigate and clearly presented.
РОВНЫЙ МАГАЗ!!!УСПЕХОВ И ПОЗИТИВНОГО РАЗВИТИЯ!! Купить Кокаин, Бошки, Мефедрон, Гашиш Кстати, как и обещали, менеджер на праздниках выходил на работу каждый день на пару часов и всем отвечал, иногда даже целый день проводил общаясь с клиентами, уж не знаю, кому он там не ответил.ЧТО ЕЩЁ СКАЗАТЬ !!! КРУТО!!!
Testimonials – Smooth interface, clear organization, and pages are easy to browse.
Ищете запчасти JCB Симферополь? Откройте сайт technopartsltd.ru – у нас доступен большой выбор запчастей для Европейской и Китайской техники. Сотрудничество ведется исключительно с надежными поставщиками, что дает нам возможность предоставить качественную продукцию, а складские помещения имеют необходимый запас товарных единиц, а ассортимент регулярно расширяется. Подробнее на сайте.
funnelforge.click – Mobile version looks perfect; no glitches, fast scrolling, crisp text.
Новости индустрии Dev Play Игры Ресурсы Разработчиков Новости индустрии геймдев ресурсы новости игры: Ключевые элементы успеха в мире разработки игр.
Official site link – Easy to navigate, with details presented clearly throughout.
Learn more here – Simple interface, responsive design, and details are clear and easy to locate.
financial bond portal – No lag and no clutter, making browsing easy.
Магазин работает супер!) https://longboardingguide.com попробуйте установить скайп.АА это только сегодня?
online investment hub – Easy-to-read content with well-structured navigation.
https blsp at
Your article helped me a lot, is there any more related content? Thanks!
xanerotrustco.bond – The layout feels polished, giving a reliable impression with clear explanations throughout.
трансы саратов Медитация в Саратове представлена различными школами и направлениями, от классической mindfulness до более экзотических форм, заимствованных из восточных практик. Многочисленные студии и центры предлагают групповые занятия и индивидуальные сессии, помогая освоить техники расслабления, концентрации и осознанности, необходимые для достижения состояния транса.
GlobalBusinessInsights – Structured and helpful, supports learning about worldwide business networks.
browse nixra – Fast response times and uncluttered layout, enjoyable to click around
financial portal – The site feels credible thanks to its polished branding.
financial guidance – Browsing is effortless, and sections are easy to read.
Все верно, до сих пор разгребаем ) Купить Кокаин, Бошки, Мефедрон, Гашиш Качественный магаз!это манера такая сдержанная или удовлетворительное=на троечку
中職比分粉絲必備的官方認證資訊平台,24小時不間斷提供官方中職比分新聞、球員數據分析,以及專業的比賽預測。
https://tideyembixolabs.lolforum.com/t87-1xBet-Vietnam-Promo-Code-No-Deposit-1X200NEW-EUR130-Bonus.htm#p323
https blsp at
Уважаемые покупатели, С НОВЫМ ГОДОМ! Купить Кокаин, Бошки, Мефедрон, Гашиш Всегда платил через киви перевод идёт максимум сутки.950р это с курьером доставит тебе куда скажешь)))Могу предоставить переписку администрации форума. Уже определитесь, что вам нужно чтобы и мне не дергать отправщиков, склад и прочих сотрудников. То хочу, то не хочу, то вышлите 2 посылки, оплачу посфактум, то снова верните деньги.
Primary platform link – Everything is responsive, and details are displayed in a clear, professional way.
service management site – The clean structure keeps attention on essential details.
https://fight-networks.mn.co/members/37763839
web access – Pages appear instantly, design is clean and easy on the eyes
https://onedio.com/profil/codegratuitxof12
trusted investment portal – Content is concise, and the polished layout feels professional.
中職比分粉絲必備的資訊平台,提供最即時的中職比分新聞、球員數據分析,以及專業的比賽預測。
Всем привет ну что ж в очередной раз заказал всё пришло всё ровно грамотно и сделано чисто. https://cpwma.org как так его разве нету? с самого утра тут сижуВсех благ и ровных клиентов !!!
keywordcraft.click – Mobile version looks perfect; no glitches, fast scrolling, crisp text.
investment knowledge hub – Information is clear, sections are easy to follow, and browsing is simple.
authoritylab.click – Pages loaded fast, images appeared sharp, and formatting stayed consistent.
ЗАО «Техносвязь» — ведущее предприятие по производству печатных плат в Екатеринбурге с более чем 20-летним опытом работы. Предприятие обеспечивает комплексное обслуживание: от разработки до массового производства электроники, в том числе SMT и ручную сборку, выпуск МПП на разнообразных основах. Подробнее на https://www.techno-svyaz.ru/ Передовая техника, применение премиальных материалов глобальных брендов и опытная команда обеспечивают быстрое выполнение с безупречным качеством для партий любого масштаба.
Project base – Navigating through the pages feels natural and well planned.
Выпадающие автопороги от производителя РФ ликвидируют задачи сохранения тепла и защиты от шума без образования порогов в проёме. Ищете скрытый порог для технических дверей? На smartporog.ru представлены модели LDM-01, LDM-02, LDM-03, LDM-04, LDM-05 и накладной LDM-07 по ценам от 611 рублей для межкомнатных, алюминиевых, пластиковых и противопожарных дверей. Умные пороги устраняют сквозняки, холод, пыль и посторонние запахи, обладают огнестойкими и дымозащитными свойствами, незаменимы в больницах, школах, магазинах и аэропортах при использовании тележек. Изготовление на территории РФ гарантирует постоянную стоимость в национальной валюте независимо от курсовых изменений.
rankharbor.click – Found practical insights today; sharing this article with colleagues later.
Реабилитационная база Красногорска содействует ребятам с трудностями развития дошкольного возраста получить языковые и коммуникативные умения. Специалисты https://aba-krasnogorsk.ru/ работают с задержкой речевого развития, аутизмом, алалией и другими состояниями, применяя методики ABA-терапии и Денверскую модель раннего вмешательства. Педагоги подбирают индивидуальные программы для каждого ребёнка, учитывая темперамент и интересы, а родители получают рекомендации для домашних занятий. Организация совершенствует способности к самостоятельности, регулирует отношение к питанию и обучает контролю аффективных реакций конструктивно.
чистым не очень понравился:( Купить Кокаин, Бошки, Мефедрон, Гашиш MXE точно не бодяженный , со 100мг вышел нереально жуткий трип, раз 15 умирал… через сутки отпустило.На сайте четко сказанно что заказы обрабатываются через E-mail…
xevirotrustco.bond – The layout is clean, navigation is smooth, and information is easy to digest.
investment trust website – Looks polished and structured for serious users.
bond resources page – Well-organized sections and quick page responses feel professional.
top resource – Organized layout, easy-to-follow pages, content is concise and readable
investment services site – Quick-loading pages with clearly presented details improve the user experience.
Странно все как то.. https://mdmakypit.store явно не 15-ти минутка, почитайте отзывы в соответвующей теме. Качество товара на высоте у нас всегда .Здравствуйте, всего лучшего желаю
QuickUlvor – Smooth browsing, responsive pages, and checkout process straightforward.
trusted finance portal – Layout is straightforward, browsing is smooth, and content is clear.
Компания «Валцпроф» производит и реализует высококачественный стальной профиль для противопожарных, фасадных конструкций, лофт-перегородок, дверей и ворот. Ищете накладной автоматический порог? На waltzprof.com представлен широкий ассортимент продукции: профили ВП165, ВП150, ВП250, ВП372 с терморазрывом из оцинкованной и нержавеющей стали, оцинкованные профильные трубы, скрытые петли для всех типов дверей, выпадающие автоматические пороги и уплотнители EPDM. Производство применяет современное оборудование, гарантирует оперативный монтаж систем и оказывает экспертную поддержку при подборе комплектующих.
auditpilot.click – Appreciate the typography choices; comfortable spacing improved my reading experience.
Updates – News and updates are displayed neatly for users to stay informed easily.
привет!!! не согласен долдны быть доступные магазины как Купить Кокаин, Бошки, Мефедрон, Гашиш Если есть какие -то вопросы по компенсациям вложенным, тоже пишите мне в Skype: chemical-mix.com и ICQ: 974-859, все решими вы считаете что все отлично?
Moomoo証券ログイン
Looking for a casino? 8mbets Slots, table games, and live casino all in one place. Quick login, convenient registration, modern providers, stable payouts, and comfortable player conditions.
Playing at the casino? jwin 7 Play online for real money. We offer a wide selection of slots, live dealers, fast payments, easy login, and exciting offers for new and returning players.
Do you love gambling? jwin 7 Online is safe and convenient. We offer a wide selection of games, modern slots, a live casino, fast deposits and withdrawals, clear terms, and a stable website.
Ремонт плитки Реставрация Москва / Ремонт Москва: Столичный уровень сервиса Москва – это город, где сосредоточено огромное количество памятников архитектуры, исторических зданий и антикварной мебели. Поэтому реставрация и ремонт в Москве – это услуги, предоставляемые на высочайшем профессиональном уровне. Столичные мастера обладают уникальным опытом и знаниями, позволяющими решать самые сложные задачи.
Learn about the core – The site feels intuitive, with services explained in an easy manner.
investment guidance site – Explanations are simple and the platform gives a dependable impression.
сео агентство сео агентство .
internetagentur seo internetagentur seo .
Здравствуйте дорогие друзья! Очень актуальная тема — грохот дождя по крыше. Лень разбираться — вот толковый сервис: профессиональная шумоизоляция . В большинстве случаев дело не в одной зоне: арки плюс днище — всё это требует обработки. Например, приложи руку к потолку — чувствуешь вибрацию? Соответственно металл не демпфирован. Что делать самому: это работает — демпфер плюс акустический слой, главное — полное прилегание. Вместо заключения: это отличные параметры.
Здравствуйте дорогие друзья! Сегодня затронем тему — гидроизоляция подземного гаража. Суть в том, что кровля над паркингом — особый случай. Ценишь качество — вот сервис: https://montazh-membrannoj-krovli-spb.ru. Как это работает: укладывают мембрану — вода не проходит. Так вот полимерное покрытие — устойчива к химии. Основные этапы: праймирование. Что в итоге: проблема решена навсегда.
professional investment trustco – Pages respond quickly, and the structure is tidy.
みんなの FX
Direct project access – Clear structure and easy-to-find information give the platform a professional feel.
это самый ровный магаз братцы!!!) работаю с ними целый год, не разу даже нервы не потрепали) !!! конспирация на высоте, качество наилучшее!продован самый добрый и общительный аах) ну вы поняли! единственное жалко не разу проб бесплатных не получал((( https://awwama.online Только вот странно что в трипе написано что пак был с 1гр ск (а твой заказ это покупка) а продажу у магазина от 5гр”Ну и да ладно не отровлюсь думаю”
https://www.servisemaster.ru/ – Ремонт стиральных машин, Ремонт стиральных машин в Москве, Ремонт стиральных машин недорого, Ремонт стиральных машин на дому, Ремонт стиральных машин на дому в Москве, Ремонт стиральных машинок.
trusted investment portal – Professional feel, simple design, and reading through content is easy.
Hello lads!
I came across a 152 great platform that I think you should take a look at.
This tool is packed with a lot of useful information that you might find valuable.
It has everything you could possibly need, so be sure to give it a visit!
https://osoyoostoday.ca/ice-climbing-should-you-do-it/
Furthermore do not overlook, folks, — one at all times can inside the article discover solutions for the the absolute complicated questions. Our team made an effort — present the complete content using an very understandable way.
Купить IQOS ILUMA https://spb-terea.store и стики TEREA в Санкт-Петербурге с гарантией оригинальности. В наличии все модели ILUMA, широкий выбор вкусов TEREA, быстрая доставка по СПб, удобная оплата и консультации специалистов.
Продажа IQOS ILUMA https://ekb-terea.org и стиков TEREA в СПб. Только оригинальные устройства и стики, широкий ассортимент, оперативная доставка, самовывоз и поддержка клиентов на всех этапах покупки.
1win qeydiyyat aviator 1win qeydiyyat aviator
QuvexDirect – Smooth site performance, well-structured content, and clicking links was simple.
Tutorials – Step-by-step guides are arranged clearly for easy learning and navigation.
Все вопросы по контактам в подписе. https://cpwma.org Всех С Новым Годом! Как и обещал ранее, отписываю за качество реги. С виду как мука, но попушистей чтоли )) розоватого цвета. Качество в порядке, делать 1 в 20! Еще раз спасибо за качественную работу и товар. Будем двигаться с Вами!Жаль только в Мск от 50 гр. )) Думал в Саратове тоже
マネックス証券 ログイン画面
zylavoline resource – Rapid performance makes exploring the key points effortless.
Портал бесплатного размещения ТопДоска предоставляет скоростной отбор предложений и возможностей по стране с помощью удобной навигации. На https://topdoska.ru/ размещены объявления в 2581 рубриках, охватывающих недвижимость, транспорт, работу, электронику, астрологию и бизнес-предложения. Платформа работает в 3843 регионах страны, позволяя частным лицам и организациям публиковать предложения без оплаты. Возможность открытия персонального каталога и дополнительные опции рекламы превращают платформу в результативный механизм расширения коммерции и поиска клиентов.
online bond hub – Sections are clearly defined, giving a smooth browsing experience.
bond resources page – Organized sections help users locate information quickly.
IQOS ILUMA https://terea-iluma24.org и стики TEREA — покупка в Москве без риска. Гарантия подлинности, большой выбор, выгодные условия, доставка по городу и помощь в подборе устройства и стиков.
заказал и оплатил ещё в понедельник, сегодня пятница но трэка до сих пор нет, раньше такого не было а в этот раз че то медлят https://gashishweeds.store Сегодня оплатил. Жду не дождусь.?опробовал и такая же фигня получилась..прет так: становиться на пол часа-час прикольно,все интерессно,эйфории вообще нет или она очень слабая( очень разочаровала сдешняя фофа..
Ремонт плитки Ремонт керамической поверхности требует особого подхода и специальных материалов. Сколы, трещины и царапины могут быть устранены с помощью специальных составов, восстанавливающих целостность и внешний вид керамики.
online bond portal – Clear structure and simple wording make the site easy to use.
https://pamyatniki-granitnye.by/
investment info portal – Clean design, pages respond fast, and content is clear for users.
Moomoo証券 ログイン PC
Careers – Job postings are laid out simply, making opportunities easy to find and understand.
Direct site link – Checked out this website and the details are concise and useful.
2си-ай – ах..й просто!)))))) https://decisionguide.org отличный селлер, всем советую!1.зачем указано столько платежных систем,коли их нет?
ideas accelerator – Messaging conveys momentum and motivates immediate application.
みんなの外為
оптимизация сайта франция prodvizhenie-sajtov-v-moskve115.ru .
установка памятника на могилу
сервис рассылки подключить email сервис рассылки
CoreBridge Hub Link – Content and design combine to project a polished, trustworthy impression.
задвижка 30с41нж класс а задвижка 30с41нж
сериал сезон смотреть онлайн фильмы 2026 года ожидаемые
enduringcapitalpartners.bond – Organized layout, communicates reliability and consistent guidance.
seo partner program seo partner program .
官方數據源24小時即時更新nba即時比分、賽程表,以及NBA球星數據統計和表現分析。
zorivoline bond – Feels like something that may evolve into a solid offering.
Learn more here – The site feels approachable, with content presented clearly and consistently.
Сломалась лестница Реставрация мебели: Возрождение из пепла, возвращение к жизни Реставрация мебели – это искусство, сродни алхимии, превращающее изношенные, казалось бы, обреченные предметы в жемчужины интерьера. Это кропотливый процесс, требующий знаний, опыта и безграничного терпения. Старые лаки и краски счищаются, обнажая благородную текстуру дерева, а затем, слой за слоем, наносятся новые покрытия, возвращая мебели былое великолепие.
explorehub.bond – Dynamic design, navigation is clear and encourages curiosity-driven discovery.
MorixoNavigator – Pages open quickly, layout clean, and browsing experience seamless.
https://pamyatniki-granitnye.by/
https://pamyatniki-granitnye.by/
bondedpast.bond – Easy-to-follow structure, site highlights historical values in an engaging way.
Ищете dubai alcohol delivery? Платформа drinks-delivery.com — лицензированный сервис доставки премиального алкоголя в Дубае с широким ассортиментом пива, вин, виски, коньяков, текилы и крепких напитков мировых брендов. Сервис функционирует с полным соблюдением правовых норм эмирата, обеспечивая юридическую чистоту покупок, приватность данных и защиту финансовых операций. Оперативная доставка, интуитивная структура каталога и квалифицированная консультационная помощь превращают приобретение спиртного в удобный процесс для жителей и туристов.
onpagelab.click – Color palette felt calming, nothing distracting, just focused, thoughtful design.
provenpath.bond – Clean visuals, site navigation is intuitive and content inspires confidence.
adnivo.click – Appreciate the typography choices; comfortable spacing improved my reading experience.
Работы очень много, стараемся как можем, многие задают в Аську и Скайп одни и теже вопросы которые не касаются заказа(как в википедию ломяться)… https://mdmakypit.store бешельме мешельме атакаетблагодарствуюсь, бро)) под затупил малеха, вижу ты тут, все хорошо
stonecrestgroup.bond – Crisp design, site communicates professionalism and trust clearly.
klickivo.click – Mobile version looks perfect; no glitches, fast scrolling, crisp text.
curated wood goods – The layout feels intentional and uncluttered, letting the designs speak for themselves.
rankvanta.click – Found practical insights today; sharing this article with colleagues later.
NightBloomStore – Pleasant browsing and quick payment process.
financial hub – Looks structured and professional, encouraging careful exploration.
1win əlaqə 1win5762.help
Intimacy blossoms into pure bliss. – https://nMm5id.short.gy/u2GPx3?Vubbibe
investment guidance – Layout feels professional, pages load quickly, and all content is easy to follow.
melbet promo code for free spins today
Севастопольская сеть стоматологий обеспечивает комплексный уход за зубами для пациентов любого возраста. Профессиональные стоматологи применяют передовое оснащение и сертифицированные материалы из Европы. Медицинский центр фокусируется на терапии, восстановлении зубов, имплантах и косметической стоматологии по современным технологиям. Запись на прием доступна на сайте https://24antosplus.ru/ в любое удобное время суток. Каждому посетителю предоставляется личный план лечения и уютная обстановка без дискомфорта.
Gallery – Images and visuals are arranged clearly, enhancing the browsing experience.
1win https://1win5762.help/
みんなのFX
Может стоит внимательно посмотреть в ветке что есть резервный жаббер ? основной уже 6 дней не работает , какие то сбои, но резерв ведь работает, привыкли панику поднимать на ровном месте. Купить Кокаин, Бошки, Мефедрон, Гашиш Клад был уличным, спрятан по разумному, под решеткой окна подъезда, рядом с окном стояла лавочка, на которой можно без палива посидеть и нащупать клад. Клад 5 балов из 5!!!заказывал тут все четка пришло напишу в теме трип репотрты свой трипчик РЕСПЕКТ ВСЕМ ДОБРА БРАЗЫ КТО СОМНЕВАЕТСЯ МОЖЕТЕ БРАТЬ СМЕЛО ТУТ ВСЕ ЧЧЧИЧЧЕТЕНЬКА!!!!!!!!РОВНО ДЕЛАЙ РОВНО БУДЕТ:monetka::monetka:))))))))0
melbet bonus promo code
growvanta.click – Found practical insights today; sharing this article with colleagues later.
Vector Main – Design feels refined and content is straightforward and easy to digest.
Bonded Unity Horizon – Balanced design, messaging encourages unity and structured direction.
financial site – Navigation is straightforward, and content is clear and reliable.
zorivotrustco interface – The site feels intuitive and leaves a confident impression.
continuumsecure.bond – Friendly layout, messaging feels consistent, secure, and approachable.
creativepathway.bond – Clean design, navigation is smooth and messaging sparks imagination throughout.
bondworks.bond – Professional layout, content inspires user trust and clear understanding.
Тут не кидают, друг https://bestmefklad.store В целом о работе магазина – как клиент,я доволен!!!:good:не в курсе
Visit Yavero line platform – Pages load well, text is clear, and browsing is effortless.
strongholdholdings.bond – Clean design, pages are readable and the overall experience feels secure.
Check trust details – Everything loads quickly, and navigating from page to page is smooth.
QuickClickPlivox – Smooth pages, intuitive layout, and buying items was straightforward.
продвинуть сайт в москве prodvizhenie-sajtov-v-moskve115.ru .
growth access – Messaging emphasizes steady progress with clarity and intent.
MeadowWayGoods – Smooth navigation with a relaxed, inviting layout.
технического аудита сайта технического аудита сайта .
casual bargain shop – Browsing is comfortable and straightforward, with no hassle during checkout.
我們的運彩討論區官方授權專家團隊第一時間更新官方各大聯盟的比賽分析,包括NBA、MLB、中華職棒等。
Вызвал такси;) https://boshkimarket.shop Какую еще веточку ? Вы и так на нашей ветке где есть вся необходимая информация.Спасибо все понравилось
Support – Guides and resources are organized clearly, making assistance quick and reliable.
Penalty records, spot kick takers and goalkeeper save percentages
Midpoint Connect – Friendly presentation, information is digestible and well organized.
Anchor Capital Focus – Simple design, information is clear and reinforces confidence.
bondedrise.bond – Sleek design, site communicates forward-thinking strategies and easy-to-implement ideas.
this zylavobond page – Easy structure makes it clear what the site is communicating.
Порадовал тот факт что почти на 0.5 там было больше это отдельное СПАСИБО:hello:, и цен ниже на форуме нет:hello:. Купить Кокаин, Бошки, Мефедрон, Гашиш помнится на бизе у Вас с этим было все хорошо.Качество, если честно на моё удивление (тк. первый раз я пользуюсь услугами данного ТС), по отзывам клиентов, сказать отличное это сказать ничего, ССССУУУУУПППЕЕЕЕРРРР!!!!!!
collabpath.bond – Modern visuals, messaging reinforces shared vision and effective alignment.
MLS livescore updates, American soccer with all teams and matches covered live
harborstorecollection.shop – Inviting design, products are showcased clearly and the shopping process feels smooth.
growthdrive.bond – Smooth layout, content inspires progress and reinforces goal-oriented behavior.
Direct site access – Smooth browsing experience with organized, dependable information presented logically.
AquaFindsStore – Smooth browsing experience with minimal friction during checkout.
我們提供官方合作夥伴台灣最完整的籃球比分相關服務,包含最新官方賽事資訊、數據分析,以及專業賽事預測。
вчера брала СК качество отменное, буду брать еще! Купить Кокаин, Бошки, Мефедрон, Гашиш Извеняюсь за вышесказанное,магазин отличный..я думаю поторопился с выводами,продовци отзывчиввые идут на встречу,спасибо)) насчет 4фа..меня он действительно почти невставил,но скорее всего это толерантность от 2сi,которая как я узнал недавно длиться неделю..так что в конце недели протестирую повторно,пока крепанусь) потом сообщю)))я тут походу единственный кто остался недоволен.(
https://pamyatniki-granitnye.by/
ZaviroExpress – Pages open fast, interface uncluttered, and overall browsing experience smooth.
Primary site access – Structure is immediately understandable, giving confidence to the visitor.
みんなの外為
Unity Trust Hub – Interface feels reliable, navigation is simple and content fosters a sense of connection.
pine comfort corner – Moving through the site is easy, and each item is explained clearly.
оптимизация сайта франция prodvizhenie-sajtov-v-moskve115.ru .
clarity overview – Simple design and clear points make the content easy to absorb.
secure investment site – Content is straightforward, and pages feel well-organized.
securecircle.bond – Modern and clean, content reassures users and feels approachable.
Bonded Framework Bridge – Clean presentation, framework messaging is concise and easily understood.
Как писать эссе на спектакль + пример https://vc.ru/1515948
trustcrest.bond – Well-structured pages, content emphasizes security and credibility naturally.
https://fastmb.ru/pages/promokod-1win_bonus_500.html
this zylavocore link – Navigation is intuitive, and content sequencing feels logical.
wildgrainemporiumhub.shop – Warm design, navigating products is straightforward and the site feels friendly.
seo продвижение и раскрутка сайта seo продвижение и раскрутка сайта .
motionfocushub.bond – Simple, professional, and organized design helps users follow content and act effectively.
RusticFallsStore – Clear layout and intuitive browsing make the experience pleasant.
leadvero.click – Mobile version looks perfect; no glitches, fast scrolling, crisp text.
Просто хотел поздороваться.
Интересуют IT курсы на Филиппинах.
У них много положительных отзывов.
Ссылка на источник:
Надеюсь, кому-то поможет.
funnelio.click – Loved the layout today; clean, simple, and genuinely user-friendly overall.
convertlyo.click – Content reads clearly, helpful examples made concepts easy to grasp.
Explore project – Tidy design, readable content, and smooth browsing enhance the user experience.
Zahnprobleme? zahnmediziner Diagnostik, Kariesbehandlung, Implantate, Zahnaufhellung und Prophylaxe. Wir bieten Ihnen einen angenehmen Termin, sichere Materialien, moderne Technologie und kummern uns um die Gesundheit Ihres Lachelns.
пицца куба московская ул 184а заказать пиццу на дом
пицца куба отзывы заказать пиццу рязань
Сегодня сделал заказ, пока все ровно обещали к вечеру трек, магаз робит Купить Кокаин, Бошки, Мефедрон, Гашиш В-общем среднестаьистический вечер пятницы обычного одинокого ITшного инженера ;)у меня такой вопрос: будут ли у вас на розничном сайте позиция am-2233 по 1гр? Я раньше брал через алхима, но он по неизвестным мне причинам сговнился. поймите меня правильно, для меня 7 кусков – это деньги и я не готов их дарить или тратить на непонятно что.
Nexa Connect Hub – Sleek and modern design, messaging is clear and user experience is seamless.
Hello friends!
I came across a 152 helpful platform that I think you should check out.
This resource is packed with a lot of useful information that you might find valuable.
It has everything you could possibly need, so be sure to give it a visit!
https://www.dotcommagazine.com/2022/06/5-technologies-of-the-future-that-will-change-the-world/
And don’t overlook, everyone, — one constantly can within the publication locate solutions to the most confusing queries. The authors made an effort to explain all of the content using the extremely easy-to-grasp manner.
metricovo.click – Loved the layout today; clean, simple, and genuinely user-friendly overall.
тантрический массаж краснодар Мужской массаж Краснодар: Расслабление, оздоровление и раскрытие потенциала В Краснодаре мужской массаж представлен в различных вариантах: от классического и спортивного до расслабляющего и эротического. Независимо от выбранного вида, массаж способствует улучшению общего самочувствия, повышению тонуса мышц, снятию стресса и восстановлению энергетического баланса. Правильно проведенный массаж может помочь раскрыть внутренний потенциал, повысить уверенность в себе и улучшить качество жизни.
EasyClickVixaro – Pages load fast, layout organized, and checkout completed without delays.
https://pamyatniki-granitnye.by/
corevisionhub.bond – Logical layout, site conveys central ideas and communicates principles clearly.
trustline.bond – Smooth navigation, content conveys confidence and a modern aesthetic naturally.
capitalunityhub.bond – Layout is clear, messaging about teamwork feels natural and approachable.
zylavoline network – Fast load times and concise presentation improve the user experience.
все буде ровно бразы магаз ровный я тоже ждал отправку неделю зато пришло с бонусом я остался доволен (щас погода такая ,все болеют но работают ) Купить Кокаин, Бошки, Мефедрон, Гашиш Да у всех старых магазинов так, на то они и старые.Через Skype мы больше не работаем, об этом мы объявляли пару недель назад.
ironpetaltrading.shop – Pleasant layout, browsing items is simple and checkout feels effortless.
wild goods store – The site feels approachable, with straightforward navigation and checkout.
Накрутка ТТ – ТОП-25 сервисов (2026) Мой рейтинг https://vc.ru/1495180
Official xelivo hub – The site maintains a consistent look, and the content seems dependable.
MistSpireTreasures – Stylish layout with smooth navigation and a relaxed shopping flow.
focus insights – Sharp phrasing ensures ideas are conveyed with intention.
стол из гранита
пиши в контакты, разберутся. мб попутали что. https://goldmdma.shop Магази лутший на рц не первый раз работаем с ним!) удачи и процветания!)250 дживик заказал?
Ищете ремонт окна? Откройте сайт сервис-окон.бел где специалисты окажут качественный сервис по ремонту и обслуживанию пластиковых окон, смене фурнитуры и реставрации дверей балкона. Все цены, на наши услуги, вы сможете посмотреть на сайте, а выезд мастера осуществляется оперативно. На складе представлены все детали, включая запчасти для окон старого образца. Только качественный ремонт окна с гарантией!
Core project page – Intuitive navigation, content is clear, and the overall experience feels solid.
Tandem Flow – Messaging is clear, design feels inviting and well organized.
harborallied.bond – Clean layout, site highlights security and collaboration effectively for visitors.
bond info hub – Fast navigation and tidy design create a professional impression.
solidpoint.bond – Clean presentation, pages highlight reliability and a professional approach.
Need an AI generator? undress ai online The best nude generator with precision and control. Enter a description and get results. Create nude images in just a few clicks.
смотреть фильмы онлайн дорамы смотреть онлайн
изготовление памятников в минске с ценами
Магазин работает? пишу в ЛС и Джабер везде тишина, ответа нет!(( Купить Кокаин, Бошки, Мефедрон, Гашиш вот как прет Амф.по Иванову работаем
loamlinenhome.shop – Clean and organized, products are easy to browse and checkout feels natural.
capitalbondnetworking.bond – Layout is clear, teamwork message is simple and motivating.
learn about zylavotrustco – Everything feels well-structured, promoting trust in the service.
Требуется работа в Израиле? Зайдите на сайт 4israel.co.il/ru/jobs/ и вы обнаружите множество предложений. Достаточно указать округ Израиля и населенный пункт, а платформа отобразит вам все интересные предложения по трудоустройству. Работа в Израиле это тысячи бесплатных вакансий – вы обязательно подберете для себя работу или публикуйте свои вакансии и получайте отклики работников. Наш сайт максимально функциональный для нахождения вакансий и работников. Детальнее на портале.
1win necə pul çıxarılır https://1win5762.help
HarborBayBoutique – Smooth, inviting pages with effortless browsing and quick purchase.
EasyClickZorivo – Pages responsive, navigation smooth, and content is easy to browse.
unitysphere.bond – Intuitive navigation, content reinforces cohesion and a sense of dependable partnership.
calm shopping space – The site feels balanced and inviting, with products shown in a thoughtful way.
Во-во МАГАЗИН! Обозначил цену, так по ней и продавай! На мыло упало – Цена заказа -4250 и .. А потом начались догонялки…. Магазины так не поступают, а поступают именно БАРЫГИ, как точно выразился РОГАТЫЙ ОБИТАТЕЛЬ данной ветки Купить Кокаин, Бошки, Мефедрон, Гашиш Верный второй трек. Но у этой курьерки система мониторинга развита не особо хорошо и бывало такое, что посылка доходила за день-два, ее уже получили, а трек начинал биться только через пару дней после этого. Если в ближайшее время не заработает, то лучше звоните в курьерку и уточняйте.Магаз не подведет
Project homepage – Everything is structured well, making the content easy to read.
捕风捉影在线免费在线观看,海外华人专属官方认证平台,高清无广告体验。
Ideas into Progress – Content motivates clear steps, making ideas feel attainable and structured.
alliantpeak.bond – Contemporary feel, messaging is straightforward and branding stands out clearly.
anchorbase.bond – Organized interface, content feels secure and easy to navigate throughout.
помогите обьясните как написать сапорту Купить Кокаин, Бошки, Мефедрон, Гашиш уж не маленькие блин, знаете что заказываете наверное ! форум вам на что ? или ты думаешь что у них какой то особенный 250й ? )))все от души))) вот бы еще во всех городах зк делали)))))
clarity navigator – Brief, precise language highlights efficiency through clarity.
localsprint.click – Found practical insights today; sharing this article with colleagues later.
localbooster.click – Overall, professional vibe here; trustworthy, polished, and pleasantly minimal throughout.
petalcollectiveonline.shop – Playful vibe, products stand out and shopping experience is seamless.
Bonded Legacy Centerpoint – Intuitive design, legacy theme feels meaningful and professional.
Накрутка голосов в ТГ – ТОП-25 лучших сервисов (2026) Мой рейтинг https://vc.ru/1499581
impact clarity resource – The tone feels deliberate and carefully constructed.
OpalFernCollective – Attractive layout, items easy to explore, and the cart works well.
locallift.click – Bookmarked this immediately, planning to revisit for updates and inspiration.
foundationcapital.bond – Professional look, content is easy to follow and conveys clarity and trustworthiness.
На ацетоне делай, он быстро выветривается и не пахнет совсем! https://njbbt.org Удачи в развитии бизнеса !трек не работает тишина уже 3 дня прошло >< у всех все гуд а у меня щляпа как так почему ((( ?!?!?!?
EasyClickTrivox – Clean design, smooth navigation, and browsing felt natural.
wild maple emporium – A rustic feel runs through the site, with simple navigation and easy-to-read product details.
direction step portal – Keeps explanations simple and logically arranged.
Накрутка подписчиков Инстаграм – ТОП-25 сервисов (2026) https://vc.ru/1635939
爱一帆海外版,专为华人打造的高清视频平台采用机器学习个性化推荐,支持全球加速观看。
shop click center – Pleasant interface, items are visually clear and easy to read.
Signal Hub – Clear messaging, emphasizes forward momentum and actionable steps effectively.
groundway.bond – Organized design, messaging is clear and builds trust naturally throughout the site.
trustapex.bond – Well-organized interface, content inspires confidence and highlights excellence throughout.
clickpath portal – Intuitive and efficient, I can reach what I need quickly.
connect hub online – Well-organized site, business networking feels easy to grasp today.
Как накрутить просмотры в Telegram и сделать ваш контент заметным в 2026 году https://vc.ru/2358752
quillmarketco.shop – Smooth interface, products are simple to explore and checkout is intuitive.
У кого рега сильней чем тут? Купить Кокаин, Бошки, Мефедрон, Гашиш на сайте нету не кого в jaber тишина и онлайн его нет онлайн операторБро все супер,как всегда ровно,спасибо за прекрасно отлаженную работу. Процветания тебе и твоей команде.Спасибо!
unifiedtrustnetwork.bond – Organized layout, navigation is smooth and information is easy to follow.
thoughtful clarity tool – Comes across as a gentle reminder to decide with intention.
PetalBrookMarket – Relaxed design with smooth browsing and simple purchasing steps.
bizfunnel.click – Content reads clearly, helpful examples made concepts easy to grasp.
Primary project page – Well-structured presentation and concise information make the site approachable.
adsparkhub.click – Content reads clearly, helpful examples made concepts easy to grasp.
Ищете купить алкоголь в дубае? Онлайн-магазин store-drinks.com предлагает круглосуточную доставку премиального алкоголя по Дубаю с обширным каталогом водки, вина, шампанского и крепких напитков ведущих мировых брендов. Компания привлекает клиентов удобством заказа в WhatsApp, экспертной поддержкой в выборе и скоростной логистикой по территории Дубая. Клиенты получают актуальный прайс-лист за секунды, профессиональные рекомендации по выбору напитков и гарантию качества каждой позиции в ассортименте.
trustcircle.bond – Smooth layout, content is easy to follow and feels professional.
action & discovery – Encouraging phrasing that highlights taking initiative.
ТС, походу в отпуск вышел:rest: https://kokainanon.shop Кстати в другом доверенном магазине у меня тоже была задержка в курьерке , трек не бился, в базе тоже его не было при прозвоне в курьерку…может действительно из-за Олимпиады (или во время ее проведения) курьерки стали чаще проверять..Магаз на высшем уровне !!! Тут и говорить нехуй. Хочешь качество, закупись тут ) Мир бро
trustedpath.bond – Structured interface, content inspires confidence and a sense of security for users.
secure horizon hub – Makes investment research straightforward and reassuring.
Кастрационно-резистентный рак предстательной железы остается серьезным вызовом для онкологов, но инновационные препараты дают пациентам новую надежду. Энзалутамид представляет собой современный антиандрогенный препарат, который блокирует рецепторы мужских гормонов и тормозит рост опухолевых клеток. Клинические исследования показали увеличение общей выживаемости на 4,8 месяца и снижение риска смерти на 37%. Подробную информацию о механизме действия, дозировках и показаниях можно найти на https://indenza.com.ru/ — специализированном ресурсе для пациентов и врачей. Удобство приема — всего один раз в день стандартная доза 160 мг — делает терапию комфортной, а консультация специалиста помогает контролировать ход лечения.
principlepath.bond – Clean visuals, navigation supports clarity and ethical messaging effectively.
trusty bond portal – Professional and accessible, ideal for investors checking options.
Bonded Insights Hub – Professional feel and strategic messaging suggest thoughtful planning.
forward-thinking motion site – Guides the reader smoothly through purposeful concepts.
XylorDirect – Navigation easy, product info readable, and site performance reliable.
Как набрать подписчиков в Telegram-канал – 19 белых способов https://vc.ru/2266397
aurumlane curated – Stylish structure, the interface is intuitive and user-friendly.
northwindshopco.shop – Modern and clean, items are easy to locate and buying is effortless.
urbanwaveflow.bond – Clean layout, information is presented in a sharp and approachable way.
daily value finds – Clear layout, makes shopping affordable items simple and enjoyable.
directional guidance link – Feels reassuring and thoughtfully composed.
Данный сервис с каждым разом удивляет своим ровным ходом Купить Кокаин, Бошки, Мефедрон, Гашиш Ребята!!! Устал писать Вам в скайп…Вы меня сознательно игнорируете?? Каждый день завтраками кормите. Я всего лишь хочу у вас покупать каждые три дня 1-2гр АМ2233. Вы сказали, что тоже из Ростова, я обрадовался, что рядом. Не хотите делать закладки, так ответьте куда деньги отправить, отправьте хоть первым классом (хотя это смешно)! Откройте скайп и почитайте миллион сообщений от меня!!Всем добрый вечер, рега появилась, та хорошая, которая у вас была!?
coreunity.bond – Intuitive design, content conveys solidarity and foundation clearly.
online finance hub – Content is clear, layout is tidy, and navigation feels natural.
stonebridgecapital.bond – Confident branding, content is approachable, layout is clean and easy to navigate.
Ищете замена оконной фурнитуры ? Восстановление пластиковых окон в Минске с гарантийными обязательствами. Откройте сайт рамонт.бел – познакомьтесь с нашим сервисом, таким как восстановление оконных конструкций, замену комплектующих, ремонт дверей балкона и прочими предложениями. Прайс на восстановление и регулировку оконных систем представлен на сайте, а мастер приезжает на срочный вызов в Минске каждый день независимо от погодных условий в течение 60 минут. На складе представлены детали всех брендов производителей оконных профилей. Обеспечиваем высокое качество и долговечность восстановления Ваших оконных систем.
bond explorer hub – Very intuitive, provides clear insights on available bonds.
bondethic.bond – Cohesive presentation, messaging feels honest and trustworthy throughout.
Накрутка лайков в ВК – 25 сервисов 2026 года (обновлено) https://vc.ru/1905843
smart shop route – Clean interface, browsing products is simple and straightforward today.
Послезавтра запрет в силу вступает Купить Кокаин, Бошки, Мефедрон, Гашиш На днях брал небольшой опт, был приятно удивлен подходом и предложением тс, товар еще не пробовали ,но забрал все ровно, по ходу отпишу в теме за качество товара, пока же могу сказать, что жалею , что раньше не работал с данным тс! Успехов, благодарю за сервис!!!всё чётко, ровно, от души скоро буду ещё заказывать ) Пришло быстро конспирация на все 100% !
Trusted Nexus Point – Professional and approachable, layout supports effortless browsing.
opalcrestmarketco.shop – Approachable layout, products are easy to find and checkout is straightforward.
clarity portal – Practical phrasing encourages users to take meaningful steps forward.
online momentum guide – Provides clear guidance for building and sustaining progress.
progresscatalystcohesion.bond – Well-organized, encourages action and effective planning in a clear manner.
XanixFlow – Smooth browsing, layout intuitive, and checkout feels effortless.
self-development stop – Comes across as a reliable place to reset and grow.
midnight cove selection – Dark presentation is appealing, product discovery is quick and checkout is user-friendly.
discover smart methods – Informative and engaging, inspires creative solutions effectively.
https://vc.ru/2334787 Рейтинг 20 Ботов Телеграм для накрутки просмотров в Telegram в 2026 году
челяба есть? https://bestkladmef.shop мыло есть.нерабочее.КАЧЕСТВО ВСЕХ ПРОДУКТОВ ОЧЕНЬ ВЫСОКОЕ!
unityforce.bond – Intuitive navigation, messaging emphasizes power and team-focused purpose.
merit bonds hub – Well-structured site, great for reviewing investment options easily.
https://vc.ru/1537600, Работа в службе по контракту – возможности контракта на СВО в России 2026
curve shopping hub – Sleek interface, browsing and buying items is hassle-free.
Наконец-то пришёл товар. Упакован отлично, курик все передал, в этом проблем нет. Пришли домой, распечатали по виду похоже на регу, но в воде разболталось. Муж поставился внутривенно, я отписала chemical, он говорит мол для вв нет инструкции. Похуй, растворили в воде, выпили,И НИХУЯ! НОЛЬ! Не прихода ни тяги, ни хуяги. Пусто. В аське пишу, молчит. Хз. https://republique-dominicaine-live.online Но в свое время с 250м было время за месяц перед запретом:Я брал норм не один раз,но в последнее время было пару недовесов,а 35 прислали какого то качества слабого,25ый был куда лучше,после этого перестал заказывать.
everyday essentials page – Makes locating daily needs simple and hassle-free.
Australian Open live scores, first Grand Slam of the year covered comprehensively
idea hub click – Smooth interface, finding unique ideas is easy and enjoyable.
El mundo de chickenroad ha crecido con fuerza desde su salida primera como una base simple, colorida y orientada a quien deseaba un juego dinámico y accesible. Luego, términos como https://jordansheel.in/el-porvenir-de-chicken-road-y-su-posicion-en-el-mercado-con-potencial-de-expansion-y-lo-que-piensa-la-comunidad-hacia-proximas-actualizaciones/ o incluso chicken road 2 empezaron a verse en debates de jugadores que querían entender si el juego daba diversión, si incluía desafíos y si atrapaba al jugador. En paralelo, nacieron consultas sobre la duda de si el juego es real, opiniones chicken road y la duda creciente sobre chicken road game casino, lo que convirtió al juego en un fenómeno lúdico. En esta sección conviene ver por qué juego chicken road captó tanta atención: su base se centra en avanzar, esquivar obstáculos y mantener la velocidad, una fórmula repetida por varios juegos, pero aquí se mezcla con una estética simple y un ritmo vivo que empuja a seguir. Estos sistemas han generado discusión en grupos digitales sobre si es puro casual o si entra en un segmento mayor donde hay dinámicas competitivas. Además, los comentarios chicken road indican que muchos usuarios hallaron equilibrio entre diversión y desafío, lo que facilitó su difusión en zonas hispanas. Los jugadores comentan cómo chicken road 2 mejoró la experiencia con más niveles, movimientos fluidos y una imagen renovada. Aun así, algunas charlas tocan el tema de si realmente aporta algo nuevo o solo pule la fórmula original. La llegada del término casino chicken road nace por la curiosidad de quienes quieren saber si hay relación con azar, lo que creó debates, pero en realidad chicken road sigue centrado en coordinación. Todo este conjunto ha hecho al juego chicken road una referencia dentro de los juegos casuales, donde la simplicidad es su punto fuerte.
progress hub – The site communicates a sense of purposeful forward movement.
ClickEaseZorla – Interface tidy, content structured well, and checkout process straightforward.
midnight field collection – Streamlined layout helps browsing, creating a reliable and calm shopping experience.
Goalkeeper saves, shot stopping statistics and clean sheet records
Уважаемый ТС, ответь мне в лс или на почту, заказ мой не правильно сделали или описали в письме не правильно, ртветь как можно скорее Купить Кокаин, Бошки, Мефедрон, Гашиш благодарствуюсь, бро)) под затупил малеха, вижу ты тут, все хорошоидиоты – это ты очень мягко к ним))
клиника жуйкан Клиника Жуйкан Китай: Образец профессионализма и ответственности Стремление к совершенству и постоянное развитие – вот что отличает клинику Жуйкан от других медицинских учреждений в Китае. Здесь работают высококвалифицированные специалисты, постоянно повышающие свою квалификацию и осваивающие новые технологии. Качество услуг, профессионализм персонала и ответственность за результат – это те принципы, которые лежат в основе работы клиники Жуйкан.
Качественный автосервис в Анапе — это не просто ремонт, а комплексная забота о вашем автомобиле. Автосервис «LEMON CAR» на улице Чехова предлагает полный спектр услуг: от компьютерной диагностики до кузовного ремонта и 3D развал-схождения. Профессиональные мастера используют современное оборудование и не боятся предоставлять гарантию на выполненные работы. Особенность сервиса — прозрачность ценообразования: после тщательной диагностики клиент получает полную информацию о неисправностях и стоимости ремонта без неожиданных доплат. Подробнее об услугах и акциях можно узнать на https://lemon-car.ru/, где также доступна онлайн-запись. Слесарный ремонт, автоэлектрика, ремонт двигателя и КПП — весь комплекс работ выполняется с соблюдением технологий и сроков, что подтверждают многочисленные положительные отзывы клиентов сервиса.
lynx investment guide – Easy to move through bonds and understand selections.
click n win hub – Lively and interactive, encourages users to stay active on the site.
Play puzzles https://www.tumblr.com/puzzlefreegame/805772832020774912/abstract-puzzle-images-dont-tell-a-story-and?source=share online for free – engaging puzzles for kids and adults. A wide selection of images, varying difficulty levels, a user-friendly interface, and the ability to play anytime without downloading.
Боты для накрутки друзей ВК бесплатно – Рейтинг из 18 вариантов в 2026 году
Подробнее смотрите здесь https://vc.ru/2213478
ТС, почисти ветки, ну невозможно же ничего почитать..в разных ветках одно и тоже. Купить Кокаин, Бошки, Мефедрон, Гашиш Какие у тебя претензии? ты провокатор и не более т.к. ты не дал даже номер заказа и не высказал притензию, к тому же за тебя мне уже написали в Личку, другие магазины..он мне успел ответить – поверь, ничего такого о чём тебе стоило бы беспокоиться – не случилось
futuristic shopping page – Sleek design and forward-thinking product selection.
leadboostlab.click – Content reads clearly, helpful examples made concepts easy to grasp.
купить гашиш шишки героин в бодайбо фото шлюх
rankbooststudio.click – Color palette felt calming, nothing distracting, just focused, thoughtful design.
https://svbeloglazov.ru/ svbeloglazov
semmarketing.click – Mobile version looks perfect; no glitches, fast scrolling, crisp text.
Next-stage growth site – Seems useful and not complicated to navigate.
Упаковочное и фасовочное оборудование https://vostok-pack.ru купить с доставкой по всей России в течении 30 дней. Лучшие цены на рынке. Гарантия на оборудование. Консультационные услуги. Покупайте упаковочные машины для производства со скидкой на сайте!
Career growth exploration – Navigation is smooth, and the design is straightforward.
funnelscalelab.click – Color palette felt calming, nothing distracting, just focused, thoughtful design.
С 2011 года ООО ТК «Регион Новые Технологии» осуществляет поставки промышленного оборудования по территории России: насосное оборудование более 19 модификаций, электродвигатели, вентиляторы, частотные преобразователи и автоматику от проверенных производителей. Подробная информация доступна на сайте https://ufk-techno.ru/ Организация предоставляет комплексное обслуживание — от консультации по выбору до гарантийной поддержки, реализует комплектующие, выполняет ремонтные работы, осуществляет персонализированную сборку агрегатов и транспортировку по России и СНГ с выгодными расценками.
strategic alliance center – Professional content, simplifies evaluating business partnership options.
клиника жуйкан Клиника Жуйкан Китай: Образец профессионализма и ответственности Стремление к совершенству и постоянное развитие – вот что отличает клинику Жуйкан от других медицинских учреждений в Китае. Здесь работают высококвалифицированные специалисты, постоянно повышающие свою квалификацию и осваивающие новые технологии. Качество услуг, профессионализм персонала и ответственность за результат – это те принципы, которые лежат в основе работы клиники Жуйкан.
Являешь патриотом? заключить контракт на военную службу сво добровольцем как оформить, какие требования предъявляются, какие выплаты и льготы предусмотрены. Актуальная информация о контрактной службе и порядке заключения.
Написал о заказе в аське в ПТ,мне сказали цену и реквизиты. В СБ оплатил,кинул в аське свои реквизиты.В ПН связался-Сказали,что все отправили,ок. Купить Кокаин, Бошки, Мефедрон, Гашиш В скайпе ответил что вопрос решаеться,будем надеяться на лучшее,а насчёт красной темы-даже думать не хочеться.Всем мир!!!Качество товара высокая, этим товаром не 1 месяц торгуем, прикурились вы.
focus growth hub – Smooth navigation, helps users stay consistent in their growth journey.
secure bonds hub – Clear security info, makes bond details easy to understand and reliable.
QuickClickXelivo – Layout tidy, pages load rapidly, and browsing experience seamless.
focus navigator – Messaging makes the idea of focus actionable and easy to apply.
компании занимающиеся продвижением сайтов компании занимающиеся продвижением сайтов .
Покупка или продажа недвижимости в Ставропольском крае требует глубоких знаний местного рынка и юридической грамотности. Агентство Arust предлагает полный цикл услуг: от подбора выгодных вариантов до безопасного завершения сделки с гарантией результата. Опытные риелторы и юристы компании проверяют каждый объект на обременения, приводят документацию в полное соответствие требованиям законодательства и контролируют все этапы оформления. На сайте https://ar26.ru/ вы найдете актуальную информацию о доступных предложениях и сможете оставить заявку на консультацию со специалистами агентства.
Локальное SEO для филиалов в Гродно. Если ваша компания имеет несколько точек, мы выстраиваем структуру и оптимизацию для каждой prodvizheniye-sayta-grodno.ru. Это позволяет привлекать клиентов именно в нужное отделение, увеличивая эффективность.
статьи про digital маркетинг statyi-o-marketinge2.ru .
Mavero Holdings main site – Well-structured pages, reliable design, and information is easy to digest.
Как подключить интернет в машине https://router-dlya-avtomobilya.ru
Главные новости сегодня: медицинский массаж: как получить качественную услугу для здоровья
в 12 году брали реагент здесь по курьерке, ровно все было, сейчас оптом берем, но жаль продавец не работает без гаранта, это в наше время спасает от кидков, или различных форс мажоров. https://zakladmef.store Мукообразная консистенцияДа рега была шикарная… Но вот как раз таки с ней и случился перебой, ОЧЕНЬ жаль!!! А так по работе остались отличные впечатления
step-by-step progress page – Encourages consistent effort with an easy-to-follow approach.
National team call-ups, international squad announcements covered
רוצה להדריך אותך. לא כפסיכולוג. כמו זו שכבר הייתה בגיהינום הזה. ויצאתי. אני ממצמץ. אתה רוצה להיות “אתה” אמיתי? בזכרון, כמו ברק נוצץ, מסגרת מהארון של המועדון היא השתקפותי במראה. שונה, אז וובה, מושכת בכתפיה, פשוט הסכימה לקנות אותה, אבל לנה נהנתה בכל פעם ממטוסי המים, כל כך מושלמים בלחץ הנכון. וובה לא שם לב שלנה מאוננת, וביתר שאת, היא מחקה אורגזמה. מבחינתו banana66
С 2011 года ООО ТК «Регион Новые Технологии» осуществляет комплексные поставки промышленного оборудования по территории России: насосное оборудование любых типов, электродвигатели, вентиляторы, частотные преобразователи и автоматика от проверенных производителей. Ищете куплю насосы промышленные? Узнать больше о продукции и услугах можно на сайте ufk-techno.ru. Компания располагает обширным каталогом комплектующих, предоставляет гарантийную поддержку, осуществляет персонализированную сборку агрегатов по требованиям заказчика и доставляет продукцию во все регионы РФ и СНГ с привлекательными ценовыми условиями.
מצחקקת. היא לבשה סנדלים עם עקב יציב, עם קרומים בין בהונותיה. “אפשר אפשר בלעדיהם?”היא שאלה בביישנות. “כמובן,” התירה ויקה. “הוא רק שמח.” אלינה הסירה את הסנדל והושיטה לי את הרגל אנאליות. העור החם היה מכוסה בגושי אווז בהנאה, והאישה נאנקה, מתנשפת. “אתה צריך להעניש אותך על הוללות, “אמרו הטרנסג’ נדרים, מתנתקים משפתיה של אשתו. ולא נתן לה להתעורר, דחף אותה אל nesher4u
Big-bag-rus.ru — биг бэг тара и мягкая тара МКР: прочные биг-бэги для стройматериалов, зерна, гранулята и других сыпучих продуктов. Производство под заказ и со склада, консультация, расчет, доставка по РФ: https://big-bag-rus.ru/
Shopping convenience hub – Layout is clean, and loading times are impressive.
жуйкан Жуйкан: Маяк здоровья и надежды в приграничном Хэйхэ Жуйкан – это имя, синонимичное качественной медицинской помощи и заботливому отношению к пациентам в динамично развивающемся городе Хэйхэ. Клиника, уверенно шагая в ногу со временем, предлагает широкий спектр услуг, сочетая традиционные методы лечения с инновационными технологиями, тем самым заслужив доверие множества пациентов, как из Китая, так и из-за рубежа. Это не просто медицинское учреждение, это островок надежды, где каждый человек получает шанс на здоровую и полноценную жизнь.
the best adult generator ai porn video generator create erotic videos, images, and virtual characters. flexible settings, high quality, instant results, and easy operation right in your browser. the best features for porn generation.
сервис рассылки писем email сервис рассылки
https://svbeloglazov.ru/ svbeloglazov
click-to-buy center – Smooth experience, checkout is fast and user-friendly.
future paths click – Inspiring and practical, encourages planning for exciting opportunities ahead.
Накрутка подписчиков в Лайке бесплатно – 25 способов накрутки в 2026 году https://vc.ru/1476727
pillar investment page – Easy navigation and trustworthy presentation make it beginner-friendly.
тс, привет, ответь в лс. я по делу. Купить Кокаин, Бошки, Мефедрон, Гашиш Тут охота чисто на клиентов.А то я запутался совсем, везде по разному пишут.
Business growth platform – Navigation seems smooth and the details are laid out nicely.
Mavero Trustline homepage – Professional interface, structured information, and details are quickly accessible.
侠之盗高清完整版,海外华人可免费观看最新热播剧集。
https://vc.ru/2121002 – Накрутка активных подписчиков в ТГ канал – мои секреты роста соцсетей и 25 лучших сервиса – проверено на личном опыте
Ищете смотреть онлайн русские сериалы 2025? Специализированная платформа russkie-serial.net концентрируется на российском кинематографе, предлагая зрителям бесплатный просмотр отечественных сериалов в HD-качестве без регистрации. Каталог включает современные премьеры 2025 года, культовые многосерийные проекты прошлых лет, криминальные драмы, исторические эпопеи, комедийные хиты и мелодрамы от ведущих российских телеканалов. Портал предоставляет оперативное воспроизведение файлов, совместим со всеми платформами, постоянно расширяется актуальными выпусками и oferует интуитивный фильтр по артистам, кинорежиссёрам и направлениям для ценителей профессионального русскоязычного медиаматериала.
curiosity hub – Fun and engaging, keeps you exploring endlessly.
https://svbeloglazov.ru/ svbeloglazov
Ищете скачать базу данных? Профессиональное сообщество xakerforum.com объединяет специалистов по информационной безопасности, программистов и этичных хакеров для обмена легальными знаниями в области кибербезопасности. На форуме обсуждают методы защиты данных, тестирование на проникновение, анализ уязвимостей, безопасную разработку программного обеспечения и актуальные киберугрозы. Члены комьюнити обмениваются реальными примерами из практики, образовательным контентом, ведут экспертные диалоги и поддерживают начинающих в изучении принципов белого хакинга согласно правовым нормам и моральным стандартам.
clarity stop – Layout and wording give a strong sense of purpose and action.
Trusted eCommerce site – Layout is intuitive, and shopping feels secure.
интернет продвижение москва интернет продвижение москва .
Для чего используют беспилотники – от гражданских задач до контрактов на СВО Россия 2026
Подробности размещены в соответствующем разделе: https://vc.ru/1493920
руководства по seo statyi-o-marketinge2.ru .
speedy learning portal – Easy to understand, helps develop skills fast and effectively.
https://strannik.infomsk.ru/pages/artcles/?melbet_promokod_bonus_pri_registracii.html
fresh thinking site – Entertaining and informative, great for brainstorming.
Coppa Italia livescore updates, Italian cup competition tracked in real time
הולך, הלילה המתוק שלי, ללא שינה! ואז הוא אומר לחבר ‘ ה, כי אנחנו כבר לא צעירים, אז אחרי כמה או שלוש פעמים, אנחנו כבר לא יכולים לזיין את הילדה שלי. אז בואו נתאפק בכל הכוח כדי שנספיק בהתחלה, אבל ברגע, טניה נשארה בשירותים, שכבתי על הגב, אולסיה עלתה עלי והתחילה לנשק. טרנסווסטיטים ליווי התנשקו והיא ישבה עלי עירומה, על הזין שלי, אכלה עליו ולקחה אותו ביד, ריגשה אותי crystallight
Ищете alcohol delivery dubai? Сервис storedrinks.com обеспечивает доставку премиального алкоголя в Дубае менее чем за 60 минут с широким выбором пива, вина, крепких напитков и эксклюзивных позиций от мировых производителей. Компания оперирует с легальной лицензией, поддерживает полную анонимность и выполняет все требования правил ОАЭ для любого заказа. Клиенты получают актуальный каталог через WhatsApp, оформляют покупку за пару кликов и наслаждаются надежным сервисом с профессиональной поддержкой на всех этапах.
skill advancement portal – Helpful advice, encourages incremental progress over time.
https://www.colegiosagradocorazon.es/wp-includes/pags/bono_de_registro_de_1xbet.html
Mivaro Trust Group digital site – Well-organized interface, detailed information, and the site feels user-friendly.
netassist.click – Pages loaded fast, images appeared sharp, and formatting stayed consistent.
connecthub.click – Content reads clearly, helpful examples made concepts easy to grasp.
Производство винтовых свай в Саратове на https://vintoviesvai64.ru/ предлагает фундаментные решения для частного и коммерческого строительства с использованием современного оборудования и качественной стали. Компания выпускает сваи различных диаметров и длины для деревянных домов, бань, заборов, беседок и промышленных объектов с возможностью монтажа в любое время года на сложных грунтах. Собственное производство обеспечивает конкурентные цены без посреднических наценок, оперативное изготовление под конкретные параметры проекта и полный цикл услуг от расчёта нагрузок до установки свайного фундамента.
我欲为人第二季平台结合大数据AI分析,专为海外华人设计,提供高清视频和直播服务。
Помощь в написании магистерской диссертации под ключ – https://disser-guru.ru/uslugi/magisterskaya-dissertaciya-pod-klyuch/
Business innovation site – Design is modern, and the content is presented in an approachable way.
top picks shopping site – The layout helps you focus on practical buying choices.
https://vc.ru/2217937 – Как набрать подписчиков в ТГ канал – Делюсь своими проверенными схемами и рейтингом из 22 лучших сервисов в 2026 году
tech buy portal – Eye-catching layout, makes online shopping feel smooth and efficient.
onlineboost.click – Loved the layout today; clean, simple, and genuinely user-friendly overall.
everyday bargains portal – Clear design, helps users find savings easily.
Агентство наружной рекламы Буквица https://bukvica.ru/ оказывает полный комплекс услуг в сфере наружной рекламы и оформления внутренних пространств. Мы разрабатываем дизайн, производим и монтируем вывески, объемные буквы, световые конструкции, навигацию, крышные установки, вывески из неона и брендирование. Берём на себя согласование вывесок в государственных органах и реализуем проекты под ключ, точно в срок.
Mivaro Trust Group homepage – Simple navigation, helpful details, and the platform is easy to understand.
business unity solutions – Clear layout, navigating collaborative resources is straightforward and easy.
интернет продвижение москва интернет продвижение москва .
контекстная реклама статьи statyi-o-marketinge2.ru .
Управление финансами малого и среднего бизнеса часто превращается в хаос: отчёты не отражают реальность, кассовые разрывы возникают внезапно, а прибыль остаётся загадкой. Финансовый директор Грубов Вадим Алексеевич с опытом 25+ лет на https://findir.info/ выстраивает целостную систему: от настройки 1С и управленческого учёта до бюджетирования и налоговой оптимизации. Это не разовые консультации, а полноценное сопровождение собственника — с диагностикой, внедрением регламентов и понятной отчётностью, которая помогает принимать взвешенные решения и расти без финансовых рисков.
Добровольцем на войну – контракт на СВО Россия 2026 https://vc.ru/1572813
Global trade portal – Navigation is smooth, and the business message is evident.
quick buy center – Efficient design, shopping experience feels smooth and stress-free.
educational click site – Clean structure makes understanding features easy.
path to success site – Practical and uplifting, helps organize plans for the future.
ТОП-57 Лучших займов без отказа которые дают микрозайм абсолютно всем на карту (Рейтинг 2026 года)
Перейти к полному описанию предложения https://vc.ru/1641170
Visit Morixo Capital – Branding is solid, content is well-organized, and the site gives a professional impression.
https://www.lagodigarda.com/booking/pages/hurma_vsya_polyza_i_vred.html
Каждый владелец малого или среднего бизнеса сталкивается с моментом, когда бухгалтерского учёта уже недостаточно, а понимание реальной прибыли и движения денег становится критически важным. Грубов Вадим Алексеевич — финансовый директор с опытом более 25 лет — предлагает не разовые консультации, а выстраивает целостную систему финансового управления. На https://findir.info/ вы найдёте подробную информацию о полном цикле услуг: от управленческого учёта и настройки 1С до бюджетирования и снижения налоговых рисков легальными методами, что позволяет собственникам видеть реальную картину бизнеса и принимать взвешенные решения.
networking insights click – Clear guidance, platform offers actionable advice for professional growth.
Темы курсовых работ по фармакологии – список, как выбрать https://vc.ru/1442379
https://customerscomm.com/read-blog/139059
W 2026 roku w Polsce dziala kilka kasyn https://kasyno-paypal.pl online obslugujacych platnosci PayPal, ktory jest wygodnym i bezpiecznym sposobem wplat oraz wyplat bez koniecznosci podawania danych bankowych. Popularne platformy z PayPal to miedzynarodowi operatorzy z licencjami i bonusami, oferujacy szybkie transakcje oraz atrakcyjne promocje powitalne
Paysafecard https://paysafecard-casinos.cz je oblibena platebni metoda pro vklady a platby v online kasinech v Ceske republice. Hraci ji ocenuji predevsim pro vysokou uroven zabezpeceni, okamzite transakce a snadne pouziti. Podle naseho nazoru je Paysafecard idealni volbou pro hrace, kteri chteji chranit sve finance a davaji prednost bezpecnym platebnim resenim
Consumer-first store – Finding items is straightforward and the flow is smooth.
Vertyowdiwjodko kofkosfjwgojfsjf oijwfwsfjowehgewjiofwj jewfkwkfdoeguhrfkadwknfew ijedkaoaswnfeugjfkadcajsfn dashsteam.com
internet seo poiskovoe-seo-v-moskve.ru .
forward action page – Provides encouragement to take practical steps every day.
超人和露易斯第四季高清完整版AI深度学习内容匹配,海外华人可免费观看最新热播剧集。
статьи про маркетинг и seo statyi-o-marketinge2.ru .
W 2026 roku w Polsce https://kasyno-revolut.pl pojawiaja sie kasyna online obslugujace Revolut jako nowoczesna metode platnosci do wplat i wyplat. Gracze wybieraja Revolut ze wzgledu na szybkie przelewy, wysoki poziom bezpieczenstwa oraz wygode uzytkowania. To idealne rozwiazanie dla osob ceniacych kontrole finansow
Жіночий портал https://soloha.in.ua про красу, здоров’я, стосунки та саморозвиток. Корисні поради, що надихають історії, мода, стиль життя, психологія та кар’єра – все для гармонії, впевненості та комфорту щодня.
В ванной и на кухне натяжной потолок практичен, потому что легко моется и не боится пара, выбирайте плотная ПВХ пленка, оно помогает красиво спрятать вентиляцию и датчики, для санузла выбирайте материалы устойчивые к конденсату, вы сохраните нервы и не будете переделывать потолок через год: https://natyazhnye-potolki-moskva.ru/
Hello folks!
I came across a 153 helpful website that I think you should explore.
This tool is packed with a lot of useful information that you might find valuable.
It has everything you could possibly need, so be sure to give it a visit!
https://idealbloghub.com/things-to-do-when-losing-a-football-bet/
And remember not to neglect, folks, that you at all times are able to inside this particular publication discover responses for the the absolute complicated queries. The authors tried to lay out the complete data using the very accessible manner.
Morixo Holdings online platform – Easy-to-read layout, smooth flow, and confidence in information is strong.
Портал для жінок https://u-kumy.com про стиль, здоров’я та саморозвиток. Експертні поради, чесні огляди, лайфхаки для дому та роботи, ідеї для відпочинку та гармонійного життя.
shop route center – Intuitive platform, navigating categories is fast and user-friendly.
https://sonabet.pro/
Strategic business hub – Well-organized content and a clear message on collaborations.
Организация свадьбы в Санкт-Петербурге требует профессионального подхода и внимания к деталям. Арт-студия «Праздничный город» специализируется на проведении торжественных мероприятий под ключ: от выездной регистрации до оформления банкетного зала живыми цветами. Команда опытных организаторов, декораторов, фотографов и видеооператоров создает неповторимую атмосферу вашего праздника. Студия предлагает разработку свадебного стиля, организацию кортежа, заказ торта и подбор артистов для музыкального сопровождения. Кроме свадеб, компания организует выпускные вечера и корпоративные мероприятия. Познакомиться с портфолио и свадебными проектами можно на https://svadba-812.ru/, где представлены все услуги и цены. Профессионализм команды «Праздничного города» превращает важный день в безупречное торжество, которое запомнится надолго.
speedserve.click – Found practical insights today; sharing this article with colleagues later.
clicknetwork.click – Appreciate the typography choices; comfortable spacing improved my reading experience.
websprint.click – Bookmarked this immediately, planning to revisit for updates and inspiration.
browsebuddy.click – Mobile version looks perfect; no glitches, fast scrolling, crisp text.
sonabet net
routerready.click – Content reads clearly, helpful examples made concepts easy to grasp.
Техническое обслуживание грузовых и коммерческих автомобилей и спецтехники. Снабжение и поставки комплектующих для грузовых автомобилей, легкового коммерческого транспорта на бортовой платформе ВИС lada: https://ukinvest02.ru/
dinkinAI ChatGPT, Midjourney, Gemini, OpenAI, Stable Diffusion, Sora, Claude, Google Imagen – это лишь некоторые примеры инструментов на основе ИИ, которые уже сегодня доступны широкому кругу пользователей. Они позволяют генерировать тексты, создавать изображения, разрабатывать код и решать сложные задачи. Будущее уже здесь, и каждый может попробовать себя в роли творца, используя возможности искусственного интеллекта.
https://trade-mark.store/product-category/skaterti-i-salfetki-gotovye/ гибкое стекло оптом в москве, купить гибкое стекло оптом в москве, гибкое стекло оптом со склада в москве.
Galatasaray Football Club http://galatasaray.com.az latest news, fixtures, results, squad and player statistics. Club history, achievements, transfers and relevant information for fans.
Barcelona fan site barcelona.com.az/ with the latest news, match results, squads and statistics. Club history, trophies, transfers and resources for loyal fans of Catalan football.
UFC Baku fan site https://ufc-baku.com.az for fans of mixed martial arts. Tournament news, fighters, fight results, event announcements, analysis and everything related to the development of UFC in Baku and Azerbaijan.
https://soktur.ru/img/pgs/?pochemu_vintaghnye_svechi_tak_populyarny.html
Advance your knowledge portal – Navigation is simple, and resources encourage steady learning.
Натяжной потолок подходит для ремонта, особенно востребовано в городе Москва, когда хочется чистого результата за день, двухуровневая конструкция делает освещение более ровным и комфортным; можно выбрать профиль, чтобы добиться идеальной линии, https://potolki-decarat.ru/
海外华人必备的ifun官方认证平台,24小时不间断提供最新高清电影、电视剧,无广告观看体验。
多瑙高清完整版,海外华人可免费观看最新热播剧集。
Прогноз курса доллара от internet-finans.ru. Ежедневная аналитика, актуальные котировки и экспертные мнения. Следите за изменениями валют, чтобы планировать обмен валют и инвестиции эффективно.
global organization global ideas that implements healthcare initiatives in the Asia-Pacific region. Working collaboratively with communities, practical improvements, innovative approaches, and sustainable development are key.
Rafa Silva rafa-silva.com.az is an attacking midfielder known for his dribbling, mobility, and ability to create chances. Learn more about his biography, club career, achievements, playing style, and key stats.
clicktolearnandgrow.click – Found this today, content seems helpful and worth checking again.
愛壹帆海外版,專為華人打造的高清視頻平台AI深度學習內容匹配,支持全球加速觀看。
https://trade-mark.store/product-category/kleenka-tkanevaya/ клеенка тканевая оптом в москве, клеенка тканевая купить оптом в москве, клеенка тканевая в рулонах оптом в москве, клеенка тканевая оптом со склада в москве.
Practical online store platform – Everything is easy to manage and setup feels intuitive.
Сайт города Винница https://faine-misto.vinnica.ua свежие новости, городские события, происшествия, экономика, культура и общественная жизнь. Актуальные обзоры, важная информация для жителей и гостей города.
Сайт города Одесса https://faine-misto.od.ua свежие новости, городские события, происшествия, культура, экономика и общественная жизнь. Актуальные обзоры, важная информация для жителей и гостей Одессы в удобном формате.
Новости Житомира https://faine-misto.zt.ua сегодня: события города, инфраструктура, транспорт, культура и социальная сфера. Обзоры, аналитика и оперативные обновления о жизни Житомира онлайн.
Champions League livescore updates, follow your favorite European clubs in real time tonight
sonabet app login download
Обустройство дома качественной мебелью больше не требует многочасовых походов по магазинам и мебельным салонам столицы. Интернет-магазин “Мебельный базар” собрал под одной крышей продукцию ведущих российских, итальянских, китайских и белорусских производителей — от классических спален и современных гостиных до эксклюзивных обеденных групп и дизайнерской мягкой мебели. На сайте https://bazar-mebel.ru/ представлен широкий ассортимент с подробными описаниями, фотографиями и актуальными ценами, а удобная система доставки и профессиональной сборки по Москве делает покупку максимально комфортной для каждого клиента.
https://trade-mark.store товары для дома оптом москва, купить товары для дома оптом москва
Новости Львова https://faine-misto.lviv.ua сегодня: городские события, инфраструктура, транспорт, культура и социальная повестка. Обзоры, аналитика и оперативные обновления о жизни города онлайн.
Портал города Хмельницкий https://faine-misto.km.ua с новостями, событиями и обзорами. Всё о жизни города: решения местных властей, происшествия, экономика, культура и развитие региона.
Накрутка подписчиков в Likee – ТОП-25 лучших сервисов в 2026 году (Аналитический обзор)
Узнать актуальные данные https://vc.ru/1738547
Днепр онлайн https://faine-misto.dp.ua городской портал с актуальными новостями и событиями. Главные темы дня, общественная жизнь, городские изменения и полезная информация для горожан.
Strategic enterprise network – Content is organized well, and alliance goals are clearly presented.
If you need a reliable way to get around the city, renting a car in Auckland is often the easiest option. There are different vehicle classes, airport pickups, and flexible rental periods available: https://rentcarauckland.store/
Business alliance network – Browsing through the platform was intuitive and easy.
Автомобильный портал https://avtogid.in.ua с актуальной информацией об автомобилях. Новинки рынка, обзоры, тест-драйвы, характеристики, цены и практические рекомендации для ежедневного использования авто.
Новости Киева https://infosite.kyiv.ua события города, происшествия, экономика и общество. Актуальные обзоры, аналитика и оперативные материалы о том, что происходит в столице Украины сегодня.
познавательный блог https://zefirka.net.ua с интересными статьями о приметах, значении имен, толковании снов, традициях, праздниках, советах на каждый день.
真实的人类第三季高清完整官方版,海外华人可免费观看最新热播剧集。
iyf.tv海外华人首选,提供最新华语剧集、美剧、日剧等高清在线观看。
Детские программы изучения английского в столице Казахстана от образовательной компании CT Group обеспечивают результативную подготовку дошкольников и школьников по актуальным интерактивным технологиям. На https://www.ctgroup.kz/english-children/ представлены программы для разных возрастных групп, которые развивают разговорные навыки, грамматику и восприятие речи на слух через игровые форматы и интерактивные занятия. Профессиональные наставники выстраивают дружелюбное англоговорящее пространство, где малыши устраняют страх перед иностранной речью и обретают уверенное использование языка для академических и межкультурных целей.
Сервис https://storedrinks.com/ обеспечивает доставку премиального алкоголя в Дубае менее чем за 60 минут с широким выбором пива, вина, крепких напитков и эксклюзивных позиций от мировых производителей. Платформа работает на основе полной лицензии, гарантирует конфиденциальность и соблюдение местных регуляций ОАЭ при каждом заказе. Покупатели мгновенно видят свежий прайс-лист в мессенджере, завершают заказ буквально за минуту и пользуются стабильным качеством обслуживания с экспертной помощью от начала до конца.
25 лучших сервисов для накрутки подписчиков на Ютуб в 2026 году https://vc.ru/1866145
Forward-thinking resource – The site reacts quickly and feels intuitive throughout.
Площадка бесплатных предложений Napiki связывает торговцев и потребителей со всей страны через простой интернет-сервис. На https://napiki.ru/ представлено более 3800 объявлений в 1553 рубриках: недвижимость, транспорт, работа, товары для дома, бытовая электроника и услуги. Ресурс разрешает гражданам и организациям выкладывать предложения безвозмездно, а платные инструменты продвижения форсируют сбыт. Посетители обнаруживают привлекательные варианты в родном городе и близлежащих территориях, а открытие персонального каталога укрепляет репутацию предприятия среди заказчиков.
http://ProFreeAds.com/61/posts/1/1/1764188.html
https://ClassifiedsLink.com/588/posts/1/1/1812818.html
Накрутка просмотров ТГ на посты – ТОП 20 полезных сервисов в 2026 году (Успех 100%)
Дополнительные сведения доступны на сайте https://vc.ru/2286786
https://www.rmp.gov.my/news-detail/2018/02/26/the-cops-catat-kemenangan-sulung
Накрутка просмотров Тик Ток бесплатно – 23 надежных сервиса для повышения популярности https://vc.ru/2039649
Объясняем сложные https://notatky.net.ua темы просто и понятно. Коротко, наглядно и по делу. Материалы для тех, кто хочет быстро разобраться в вопросах без профессионального жаргона и сложных определений.
Портал для пенсионеров https://pensioneram.in.ua Украины с полезными советами и актуальной информацией. Социальные выплаты, пенсии, льготы, здоровье, экономика и разъяснения сложных вопросов простым языком.
Блог для мужчин https://u-kuma.com с полезными статьями и советами. Финансы, работа, здоровье, отношения и личная эффективность. Контент для тех, кто хочет разбираться в важных вещах и принимать взвешенные решения.
Hi there! Wishing you a great day ahead.
Greetings, I’m reaching out with an offer of financial assistance for your initiative. This is a genuine grant opportunity. Open to discussion? Please contact me on WhatsApp +66838202152
streamserve.click – Mobile version looks perfect; no glitches, fast scrolling, crisp text.
connectcraft.click – Color palette felt calming, nothing distracting, just focused, thoughtful design.
netguide.click – Color palette felt calming, nothing distracting, just focused, thoughtful design.
Ищете грузоперевозки жд владивосток? Специализированный портал gdlog.ru представляет собой комплексную информационную площадку для участников железнодорожной логистики, объединяющую перевозчиков, экспедиторов и владельцев подъездных путей. Платформа содержит свежий каталог из 290 организаций, оказывающих работы по обработке железнодорожных составов, аренде вагонов, транспортировке контейнеров и терминальному хранению в пунктах назначения по территории РФ. Посетители обладают мгновенным инструментом выбора партнёров по областям, пунктам погрузки, направлениям деятельности и взаимодействуют без посредников с операторами логистических услуг для планирования перевозочного процесса.
onlineport.click – Overall, professional vibe here; trustworthy, polished, and pleasantly minimal throughout.
Professional guidance site – The purpose is obvious and the layout stays uncluttered.
Полтава онлайн https://u-misti.poltava.ua городской портал с актуальными новостями и событиями. Главные темы дня, общественная жизнь, городские изменения и полезная информация для горожан.
Портал города https://u-misti.odesa.ua Одесса с новостями, событиями и обзорами. Всё о жизни города: решения властей, происшествия, экономика, спорт, культура и развитие региона.
servespark.click – Overall, professional vibe here; trustworthy, polished, and pleasantly minimal throughout.
Новости Житомира https://u-misti.zhitomir.ua сегодня: городские события, инфраструктура, транспорт, культура и социальная сфера. Оперативные обновления, обзоры и важная информация о жизни Житомира онлайн.
Как проходит педагогическая практика https://vc.ru/1476304
FriendlyLikes https://friendlylikes.com/ is your opportunity to buy Instagram likes, Instagram followers, Instagram views, and Instagram comments at the best prices from a reliable service provider. Just one click and you’ll see activity on your account, which will positively impact its promotion! We offer instant service delivery!
Новости Хмельницкого https://u-misti.khmelnytskyi.ua сегодня на одном портале. Главные события города, решения властей, происшествия, социальная повестка и городская хроника. Быстро, понятно и по делу.
Львов онлайн https://u-misti.lviv.ua последние новости и городская хроника. Важные события, заявления официальных лиц, общественные темы и изменения в жизни одного из крупнейших городов Украины.
Новости Киева https://u-misti.kyiv.ua сегодня — актуальные события столицы, происшествия, политика, экономика и общественная жизнь. Оперативные обновления, важные решения властей и ключевые темы дня для жителей и гостей города.
Possession retention, teams that keep the ball under pressure
сравнение литий ионных аккумуляторов и свинцовых Выбор тягового аккумулятора для складской техники – задача, требующая тщательного анализа, учитывая разнообразие доступных технологий: щелочные, свинцово-кислотные, гелевые и литий-ионные (Li-ion). Li-ion аккумуляторы становятся все более популярными благодаря их высокой энергоемкости, длительному сроку службы и быстрой зарядке. Они выигрывают у свинцово-кислотных и щелочных вариантов в плане эффективности и экологичности, хотя и требуют более сложной системы управления зарядом (BMS). При выборе аккумулятора для больших токов, например, для мощных погрузчиков, Li-ion аккумуляторы, особенно литий-железо-фосфатные (LiFePO4), демонстрируют превосходные характеристики. Они обеспечивают стабильное напряжение и минимальные потери энергии при высоких нагрузках, что критически важно для поддержания производительности техники. Замена тяговой кислотной батареи на литиевую требует учета нескольких факторов. Необходимо убедиться в совместимости напряжения и емкости новой батареи с электрооборудованием погрузчика. Также может потребоваться замена зарядного устройства, поскольку Li-ion аккумуляторы требуют специальных зарядных профилей. Важно учитывать габариты Li-ion аккумулятора и наличие BMS для обеспечения безопасной и эффективной эксплуатации. Растущий рынок Li-ion аккумуляторов для складской техники предлагает широкий выбор моделей, включая аккумуляторы большой емкости для интенсивной эксплуатации. Цены на тяговые Li-ion аккумуляторы варьируются в зависимости от емкости, напряжения и производителя.
Аварийный ремонт кровли. Срочно устраним последствия шквального ветра, падения дерева или сильного града замена крыши в молодечно. Выезд мастера в течение 24 часов. Временная герметизация, чтобы остановить течь, и последующее качественное восстановление повреждённого участка. Круглосуточный телефон для экстренных случаев.
Накрутка подписчиков в Инстаграм платно: мой опыт, преимущества и как выбрать надежный сервис https://vc.ru/2646459
Купить активных живых подписчиков в Телеграм – Мои проверенные 20 сервисов в 2026 году https://vc.ru/2333695
Банный комплекс в Тульской области — идеальное место для качественного отдыха вдали от городской суеты. «Провинция» в поселке Ильинка предлагает гостям традиционную русскую баню, турецкий хамам и просторный бассейн площадью 100 квадратных метров с джакузи. Комплекс подходит для проведения дней рождения, корпоративов, деловых встреч и даже фотосессий. Две спальные комнаты, большой зал с кухней, бильярд и караоке создают все условия для длительного отдыха компанией. На территории обустроена большая беседка с барбекю для приятных вечеров на свежем воздухе. Забронировать посещение можно на https://banitula.ru/, где представлена подробная информация о ценах и услугах. Комплекс расположен по адресу: Центральная улица, 19А, корпус 5, что обеспечивает удобный подъезд и тихое расположение для полноценного расслабления.
Квартира-рабочая крепость для IT-специалиста. Стол на троих, три монитора, бесперебойник, гигабитный интернетна сутки борисов. Район коворкингов. Снять на время релиза или хакатона.
мобильные казино с депозитными бонусами
Вузы Мурманска – список университетов и институтов после 11 класса https://vc.ru/1786041
Новости Днепра https://u-misti.dp.ua сегодня — актуальные события города, происшествия, экономика, политика и общественная жизнь. Оперативные обновления, важные решения властей и главные темы дня для жителей и гостей города.
Винница онлайн https://u-misti.vinnica.ua последние новости и городская хроника. Главные события, заявления официальных лиц, общественные темы и изменения в жизни города в удобном формате.
Актуальные новости https://u-misti.chernivtsi.ua Черновцов на сегодня. Экономика, происшествия, культура, инфраструктура и социальные вопросы. Надёжные источники, регулярные обновления и важная информация для жителей города.
Innovative viewpoint hub – The design helps you grasp the idea quickly.
Процесс детоксикации проходит поэтапно, чтобы организм успевал адаптироваться к изменениям и не испытывал стресс. Каждый шаг направлен на достижение конкретного терапевтического эффекта. Ниже представлена таблица, отражающая ключевые стадии процедуры, применяемой в клинике «Трезвый Путь Волгоград».
Ознакомиться с деталями – вывод из запоя в стационаре
Особенность подхода заключается в сочетании медицинской и психологической поддержки. После кодирования пациент получает консультации психотерапевта, рекомендации по восстановлению и профилактике рецидивов. Это снижает риск повторного срыва и помогает закрепить результат на долгий срок.
Узнать больше – http://kodirovanie-ot-alkogolizma-v-volgograde17.ru/kodirovanie-volgograd/
Клиника предлагает широкий спектр медицинских и психологических услуг, направленных на восстановление пациента после зависимости. Все процедуры проходят под контролем врачей и с соблюдением анонимности. Наиболее востребованные направления представлены ниже:
Ознакомиться с деталями – https://narkologicheskaya-clinica-v-voronezhe17.ru/narkolog-voronezh-anonimno
приватные встречи Мелитополь Отдых для взрослых в Мелитополе – это возможность отвлечься от повседневной рутины и окунуться в мир развлечений. Наш городской сервис досуга предлагает широкий выбор вариантов для тех, кто ищет новые впечатления и интересных знакомств.
Ниже приведена таблица с типовыми компонентами капельницы и их назначением:
Получить дополнительную информацию – капельница от запоя недорого
Защита реферата – как защитить реферат на отлично? https://vc.ru/1432340
https://vc.ru/1481960 Методы исследования истории (2026)
обучение продвижению сайтов обучение продвижению сайтов .
курс seo курс seo .
Новости Днепра https://u-misti.dp.ua сегодня — актуальные события города, происшествия, экономика, политика и общественная жизнь. Оперативные обновления, важные решения властей и главные темы дня для жителей и гостей города.
Городской портал https://u-misti.cherkasy.ua Черкасс — свежие новости, события, происшествия, экономика и общественная жизнь. Актуальные обзоры, городская хроника и полезная информация для жителей и гостей города.
Каждый этап проходит под контролем врачей-наркологов и психотерапевтов, что гарантирует эффективность и безопасность лечения.
Получить дополнительные сведения – [url=https://narcologicheskaya-klinika-v-novokuzneczke17.ru/]лечение в наркологической клинике в новокузнецке[/url]
Процесс лечения включает несколько последовательных шагов, направленных на стабилизацию состояния, детоксикацию и восстановление функций организма. Таблица ниже показывает основные этапы процедуры, применяемые врачами клиники «РеабКузбасс».
Углубиться в тему – скорая вывод из запоя новокузнецк
Комплексное проведение этих этапов обеспечивает полное восстановление организма и облегчает процесс последующего лечения зависимости.
Подробнее можно узнать тут – https://vyvod-iz-zapoya-v-ryazani17.ru/vyvod-iz-zapoya-ryazan-na-domu
класс акб li ion 48v 450ah При замене свинцово-кислотной батареи на литиевую необходимо учитывать совместимость с зарядным устройством и электрооборудованием погрузчика. Может потребоваться замена зарядного устройства на специализированное для Li-ion аккумуляторов.
Выезд нарколога на дом в Серпухове — это возможность получить профессиональную помощь в условиях, когда везти человека в клинику сложно, опасно или он категорически отказывается от госпитализации. Специалисты «СерпуховТрезвие» работают круглосуточно, приезжают по адресу с одноразовыми системами, стерильными расходниками и необходимым набором препаратов, проводят осмотр, оценивают жизненно важные показатели, подбирают индивидуальную капельницу, контролируют реакцию и оставляют подробные рекомендации. Всё происходит конфиденциально, без лишних свидетелей, без осуждения и давления. Цель — не формально «поставить капельницу», а безопасно стабилизировать состояние, снизить интоксикацию, выровнять давление и пульс, уменьшить тревогу и вернуть человеку возможность нормально спать и восстанавливаться, не доводя до осложнений и экстренной госпитализации.
Выяснить больше – нарколог на дом круглосуточно серпухов
В этом блоке важно показать, что клиника закрывает ключевые запросы пациентов и их близких при сохранении безопасности и анонимности.
Изучить вопрос глубже – https://narkologicheskaya-klinika-kolomna2-10.ru/narkologicheskaya-klinika-cena-v-kolomne
pinco casino скачать бесплатно https://pinco-install-casino.ru
Как рассчитать проценты за пользование чужими средствами по статье 395 ГК РФ – быстро, просто и без ошибок. Смотрите, какую инструкцию можно использовать и какой онлайн-калькулятор поможет сэкономить время https://voronezh-tsk.ru/stati/raschet-protsentov-po-395-gk-rf/
compte melbet telecharger melbet apk
Пациенты отмечают, что особенно важна не только профессиональная помощь, но и спокойная атмосфера. Мягкий свет, тишина, отдельные палаты и деликатная коммуникация персонала — всё это снижает тревожность и помогает организму восстановиться. Эффективность лечения оценивается по конкретным маркерам: улучшение сна, нормализация давления, исчезновение тошноты, восстановление аппетита и уменьшение тяги.
Подробнее можно узнать тут – наркологическая клиника наркологический центр
Поставляем грунт https://organicgrunt.ru торф и чернозем с доставкой по Москве и Московской области. Подходит для посадок, благоустройства и озеленения. Качественные смеси, оперативная логистика и удобные условия для частных и коммерческих клиентов.
Наркологическая клиника «Трезвый Шаг Раменское» — это место, где острые кризисы, многолетние запои и повторяющиеся срывы перестают быть бесконечным кругом, в котором семья остаётся один на один с проблемой. Здесь выстроена система помощи людям с алкогольной и наркотической зависимостью, а также полизависимостями, включая злоупотребление аптечными препаратами. В клинике в Раменском сочетаются круглосуточное наблюдение, профессиональная детоксикация, медикаментозная поддержка, психотерапевтические программы и сопровождение семьи. Важные принципы — безопасность, анонимность, уважение к пациенту и честное объяснение каждого шага лечения. Ни агрессивного давления, ни обещаний «чуда за один день» — вместо этого поэтапный подход, который даёт реальный шанс стабилизировать состояние, снизить тягу и выйти из разрушительного сценария под контролем специалистов. Для близких это означает понятный маршрут: куда обратиться, что будут делать с пациентом, какие риски учтут и как клиника «Трезвый Шаг Раменское» останется на связи после острого периода.
Получить дополнительную информацию – https://narkologicheskaya-klinika-ramenskoe10.ru/chastnaya-narkologicheskaya-klinika-v-ramenskom
20 сервисов для накрутки ботов в ТГ бесплатно: обновлённый рейтинг 2026 года https://vc.ru/1442344
big-bag-rus.ru — производитель биг-бэгов и контейнеров МКР (мешки МКР) из полипропилена: мягкая тара для перевозки и хранения сыпучих грузов. Подбор конструкции, размеры и грузоподъёмность под задачу, оптовые цены, доставка по России. Купить биг-бэги напрямую: производитель биг-бэгов
Workplace growth resource – Clean visuals make the information simple to follow.
Для иллюстрации приведена таблица, отражающая распространённые методы терапии и их воздействие на организм:
Ознакомиться с деталями – http://narkologicheskaya-klinika-v-voronezhe17.ru
Нейросети для написания индивидуального проекта – лучшие ИИ в помощь студентам и школьникам https://vc.ru/1792879
мобильные казино с фриспинами на автоматы
Процесс лечения проходит поэтапно и под постоянным наблюдением специалистов. Каждый этап направлен на определённый аспект восстановления здоровья и личности пациента.
Подробнее тут – наркологическая клиника наркологический центр новокузнецк
мне тоже все пришло. да и еще вещь нужную в хозяйстве подогнали. вы ребята вообще МОЛОДЦЫ. ВСЕХ БЛАГ ВАМ. купить кокаин, мефедрон, бошки, марихуану Ну во-первых мы совершенно другой магазин, так что вы ошиблись веткой, и представительств в тех городах у нас нетБро, была абсолютно идиентичная ситуация у мну в декабре.Трек не бился пол недели, прошли выходные звоню в контору-курьерку, называю трек, говорят нет такого, я к тс так мол и так, тот грит все ровно, трек верный ожидай! Херакс и вечером курьер названивает, оказыва4тся они мне еще в субботу хотели вручить, но почему то не дозвонились))Все пучком, бро.Почта мало кому интересна в наши дни, на курьерки много сваливается, вот они 3ак могут разгребают…
webnexus.click – Mobile version looks perfect; no glitches, fast scrolling, crisp text.
sitesupport.click – Pages loaded fast, images appeared sharp, and formatting stayed consistent.
seo интенсив seo интенсив .
signalshift.click – Mobile version looks perfect; no glitches, fast scrolling, crisp text.
webfixer.click – Overall, professional vibe here; trustworthy, polished, and pleasantly minimal throughout.
seo базовый курc kursy-seo-5.ru .
Наркологическая клиника в Новокузнецке предоставляет профессиональную помощь людям, столкнувшимся с зависимостью от алкоголя, наркотиков и психоактивных веществ. Лечение проводится под наблюдением опытных специалистов с применением современных медицинских методик. Основная цель работы клиники — не только устранить физическую зависимость, но и восстановить психологическое равновесие пациента, вернуть мотивацию и способность жить без употребления веществ.
Изучить вопрос глубже – наркологическая клиника стационар в новокузнецке
Op zoek naar een casino? WinnItt biedt online gokkasten en live games. Het biedt snel inloggen, eenvoudige navigatie, moderne speloplossingen en stabiele prestaties op zowel computers als mobiele apparaten.
25 способов накрутить реакции в ТГ: актуальный список сервисов 2026 года https://vc.ru/1475874
joy casino регистрация джойказино
Хочу выразить свою благодарность за представленную пробу! купить кокаин, мефедрон, бошки, марихуану Взял у данного ТС реагента CHM-22. Качество отличное! Крайне советую этого продавца!!!Еще и угрожает, после того как я сказал что передам наше общение и свои сомнения.что еще интересно, кинул заявочку такого плана
сравнение стоимости гелевого и литиевого акб При выборе аккумулятора для больших токов ключевым фактором является его способность обеспечивать стабильное напряжение и минимальные потери энергии при высоких нагрузках. Li-ion аккумуляторы, в частности литий-железо-фосфатные, демонстрируют отличные показатели в этом отношении, превосходя щелочные и свинцово-кислотные аналоги.
Процесс детоксикации состоит из нескольких последовательных шагов, направленных на безопасное очищение организма. Ниже представлена таблица с описанием этапов, которые применяются в клинике «Трезвая Линия Волгоград».
Исследовать вопрос подробнее – вывод из запоя капельница
https://www.google.fm/url?q=https://angersnautique.org/fonts/pgs/code_de_bonus_1.html
промпты для seo
Особенность подхода заключается в сочетании медицинской и психологической поддержки. После кодирования пациент получает консультации психотерапевта, рекомендации по восстановлению и профилактике рецидивов. Это снижает риск повторного срыва и помогает закрепить результат на долгий срок.
Детальнее – kodirovanie-ot-alkogolizma-v-volgograde17.ru/
Перед цифрами важно подчеркнуть: прайс «Трезвый Центр Коломна» строится вокруг реального объёма помощи, а не вокруг рекламных обещаний. Цена зависит от тяжести состояния, длительности запоя, количества инфузий, необходимого набора препаратов, формата (дом или стационар), времени суток выезда, длительности наблюдения. Все дополнительные назначения согласуются заранее — без скрытых доплат и неожиданных строк. Это позволяет семье планировать расходы и сосредоточиться на безопасности.
Детальнее – vyvod-iz-zapoya-na-domu-nedorogo
Каждый из этапов сопровождается контролем врача и постепенным снижением медикаментозной нагрузки. Важно не просто снять симптомы, но и научить пациента распознавать внутренние триггеры, чтобы предотвратить рецидив. На протяжении всего лечения сохраняется поддержка психолога, который помогает адаптироваться и перестроить привычные модели поведения.
Подробнее можно узнать тут – https://narcologicheskaya-klinika-v-voronezhe17.ru/voronezh-narkologicheskij-dispanser/
midnightquarry.shop – Bold branding stands out, pages load quickly and the shopping flow feels intuitive.
Состав капельницы подбирается индивидуально, с учётом степени опьянения, возраста и хронических заболеваний пациента. Врач определяет дозировку и комбинацию препаратов, чтобы процедура прошла безопасно и эффективно.
Разобраться лучше – https://kapelnicza-ot-zapoya-v-voronezhe17.ru/kapelnicza-ot-alkogolya-voronezh
23 надёжных сервиса, чтобы накрутить подписчиков Телеграм живые – рейтинг и рекомендации https://vc.ru/1978844
Тоже был осадок, но в баньке всё растворилось) купить кокаин, мефедрон, бошки, марихуану хороший магазин !отменное качество и сервис ! хорошей работы вашему магазину и процветания!все ровно тут ?
casino 1win 1win telecharger
https://vc.ru/1439201 – Накрутка просмотров на пост в ТГ бесплатно: 19 сервисов 2026 года
литиевая батарея 48 в для погрузчика Литиевые АКБ предлагают широкий выбор моделей с различным напряжением, включая литиевые тяговые аккумуляторы. Литиевые аккумуляторы тяговые обеспечивают надежную работу в тяжелых условиях эксплуатации.
Interactive solutions page – The setup makes learning feel active and engaging.
Клиника предлагает широкий спектр медицинских и психологических услуг, направленных на восстановление пациента после зависимости. Все процедуры проходят под контролем врачей и с соблюдением анонимности. Наиболее востребованные направления представлены ниже:
Получить дополнительную информацию – http://narkologicheskaya-clinica-v-voronezhe17.ru/
netmosaic.click – Loved the layout today; clean, simple, and genuinely user-friendly overall.
Алкогольная интоксикация вызывает сильное обезвоживание и разрушает баланс электролитов в организме. Без медицинской помощи восстановление может занять несколько дней, а в тяжёлых случаях приводит к осложнениям. Капельница помогает безопасно и быстро вывести этанол и продукты его распада, восполнить уровень жидкости, снизить нагрузку на печень и сердечно-сосудистую систему. Процедура проводится амбулаторно или на дому, что делает её доступной и удобной для пациентов.
Углубиться в тему – капельница от запоя на дому
сочи 1 квартира жк светский лес сочи застройщик
Ищете каталог образования в России? Посетите https://kedu.ru/ – у нас – все учебные заведения, рейтинги и отзывы об образовательных центрах и курсах. Наша информация позволит вам выбрать лучшее обучение по различным направлениям, а также узнать обо всех действующих акциях. В одном месте собраны учебные программы, курсы, семинары и вебинары от лучших учебных заведений и частных преподавателей в России.
https://www.google.hn/url?q=https://www.locafilm.com/wp-includes/pages/coupons_et_code_promo_1xbet.html
Комплексный подход позволяет врачу не просто купировать острые симптомы, но и предупредить осложнения со стороны сердца, печени и нервной системы. После стабилизации состояния пациент получает рекомендации по дальнейшему лечению и восстановлению.
Получить дополнительную информацию – вывод из запоя в стационаре волгоград
Когда вопрос стоит остро — нужно быстро и безопасно вывести человека из запоя в Коломне, — у семьи нет лишнего времени на эксперименты с таблетками, сомнительными «коктейлями» и советами из интернета. «Трезвый Центр Коломна» выстраивает помощь так, чтобы от первого звонка до реального облегчения шёл понятный и управляемый маршрут: запись симптомов и рисков уже по телефону, предложение формата (выезд на дом или стационар), оперативный осмотр, персональная инфузионная терапия, круглосуточное наблюдение при необходимости и подробный план восстановления на 24–72 часа и дальше. Мы не продаём миф о «чудо-капельнице за час», а работаем клинически аккуратно: дозы и схемы подбираются под возраст, длительность запоя, сопутствующие заболевания, уже принятые лекарства и текущие показатели. Цель проста и честна — снять интоксикацию, защитить сердце, мозг и печень, вернуть сон и ясность без агрессивной седации и скрытых рисков, сохранить конфиденциальность и дать семье уверенность, что всё делается правильно.
Подробнее тут – vyvod-iz-zapoya
Выезд нарколога на дом в Серпухове — это возможность получить профессиональную помощь в условиях, когда везти человека в клинику сложно, опасно или он категорически отказывается от госпитализации. Специалисты «СерпуховТрезвие» работают круглосуточно, приезжают по адресу с одноразовыми системами, стерильными расходниками и необходимым набором препаратов, проводят осмотр, оценивают жизненно важные показатели, подбирают индивидуальную капельницу, контролируют реакцию и оставляют подробные рекомендации. Всё происходит конфиденциально, без лишних свидетелей, без осуждения и давления. Цель — не формально «поставить капельницу», а безопасно стабилизировать состояние, снизить интоксикацию, выровнять давление и пульс, уменьшить тревогу и вернуть человеку возможность нормально спать и восстанавливаться, не доводя до осложнений и экстренной госпитализации.
Исследовать вопрос подробнее – нарколог на дом недорого
Компания ИдеалСтрой https://idealstr.ru/ выполняет полный комплекс работ по строительству домов под ключ в Подольске. Посетите наш сайт, ознакомьтесь с проектами, ценами и всеми нашими услугами. На сайте вы сможете рассчитать стоимость дома или коттеджа под ключ, а наше портфолио позволяет гарантировать лучшее качество работ и профессиональный подход к делу.
Особенность подхода заключается в сочетании медицинской и психологической поддержки. После кодирования пациент получает консультации психотерапевта, рекомендации по восстановлению и профилактике рецидивов. Это снижает риск повторного срыва и помогает закрепить результат на долгий срок.
Подробнее – кодирование от алкоголизма отзывы
Услуга вывода из запоя в клинике сочетает профессионализм врачей, медицинскую точность и заботу. При этом обеспечивается полная конфиденциальность: данные пациентов не передаются в сторонние инстанции. Круглосуточный режим работы позволяет вызвать врача даже ночью — специалисты прибывают в течение 40–60 минут после обращения.
Выяснить больше – скорая вывод из запоя в волгограде
Как набрать подписчиков в Telegram-канал – 16 белых способов, которые реально работают в 2026 году https://vc.ru/2662860
Каждый из этапов сопровождается контролем врача и постепенным снижением медикаментозной нагрузки. Важно не просто снять симптомы, но и научить пациента распознавать внутренние триггеры, чтобы предотвратить рецидив. На протяжении всего лечения сохраняется поддержка психолога, который помогает адаптироваться и перестроить привычные модели поведения.
Подробнее тут – https://narcologicheskaya-klinika-v-voronezhe17.ru/narkolog-voronezh-czena
Капельница от запоя в Воронеже применяется для восстановления организма после длительного употребления алкоголя, устранения интоксикации и нормализации обменных процессов. Медицинская процедура проводится под контролем врача-нарколога, в клинике или на дому. Она позволяет быстро улучшить самочувствие, устранить головную боль, тремор, тошноту, обезвоживание и нарушения сна. Современные препараты действуют мягко, безопасно и без стресса для организма, обеспечивая плавный выход из запоя.
Изучить вопрос глубже – сколько стоит капельница на дому от запоя воронеж
магаз норм. а вот курьеры зажрались суки. купить кокаин, мефедрон, бошки, марихуану Хотя возможно привык к бычей реги, а ваша дает эффект похожий канабббери не пожалеешь.
Как накрутить подписчиков Ютуб бесплатно – Делюсь своими проверенными схемами и рейтингом из 20 лучших сервисов https://vc.ru/2241502
seo бесплатно seo бесплатно .
самооценка советы психолога
seo курсы seo курсы .
Фиксируем АД, ЧСС, сатурацию, температуру, оцениваем неврологический статус, степень обезвоживания, тремор, тошноту и уровень тревоги; собираем краткий анамнез последних суток и характер употребления.
Подробнее – вывод из запоя электросталь
Займ, который одобрят – ТОП-17 МФО для получения займа в 2026 году https://vc.ru/1564867
Даже если симптомы кажутся незначительными, проведение инфузионной терапии значительно ускоряет процесс восстановления и предотвращает развитие осложнений.
Получить дополнительную информацию – вызов на дом капельницы от запоя волгоград
Капельницы при выводе из запоя — основной инструмент детоксикации. Они очищают кровь, стабилизируют давление и восстанавливают баланс электролитов. В клинике «РеабКузбасс» используются только качественные препараты, адаптированные под конкретное состояние пациента. Ниже приведена таблица с основными видами капельниц и их эффектом.
Разобраться лучше – вывод из запоя круглосуточно в новокузнецке
Клиника предлагает широкий спектр медицинских и психологических услуг, направленных на восстановление пациента после зависимости. Все процедуры проходят под контролем врачей и с соблюдением анонимности. Наиболее востребованные направления представлены ниже:
Подробнее тут – https://narkologicheskaya-clinica-v-voronezhe17.ru/voronezh-narkologicheskij-dispanser/
Анонимная наркологическая помощь — это управляемая система, где каждый шаг прозрачно связан с целью и измеримым результатом. В наркологической клинике «ЕнисейМед Центр» мы соединяем круглосуточную доступность, мягкую логистику и модульный план лечения, чтобы пациент и семья понимали, почему именно сейчас назначается то или иное вмешательство и когда оно будет остановлено. Мы избегаем полипрагмазии: запускаем один модуль — ставим один маркер — определяем «окно оценки» — выключаем модуль, как только цель достигнута. Такой подход бережёт ресурсы организма и сохраняет причинно-следственную связь.
Подробнее можно узнать тут – narkologicheskaya-klinika-v-krasnoyarske17.ru/
Системный подход позволяет достичь максимальной эффективности лечения и снизить риск возврата к зависимости.
Получить больше информации – https://narkologicheskaya-clinica-v-novokuzneczke17.ru/narkolog-novokuzneczk-na-dom
Работа выездной службы построена так, чтобы для семьи всё было максимально понятно и предсказуемо. После звонка специалист не ограничивается общими фразами, а уточняет детали: сколько длится употребление, есть ли хронические болезни сердца, печени, почек, эндокринные нарушения, какие препараты и в каких дозах пациент уже получил, были ли в прошлом судороги, галлюцинации, тяжёлые реакции на лекарства. Это позволяет заранее оценить уровень риска и понять, подходит ли формат дома. По прибытии в Серпухове врач осматривает пациента, проверяет контакт и ориентировку, измеряет артериальное давление несколько раз, оценивает пульс, сатурацию, температуру, выраженность тремора, наличие болей, характер дыхания, степень обезвоживания. Далее формируется индивидуальная инфузионная схема: растворы для регидратации и коррекции электролитов, витамины группы B и магний для поддержки нервной системы, при необходимости — гепатопротекторы и мягкие антиоксидантные комплексы, противорвотные для контроля тошноты, щадящие анксиолитики для нормализации сна без грубой седации. Во время процедуры врач контролирует динамику, меняет скорость капельницы при необходимости, отслеживает реакцию на препараты и объясняет родным, какие изменения будут происходить по часам. По завершении визита пациент и родственники получают подробный план: режим, питьё, питание, чего нельзя, какие симптомы считаются тревожными, когда нужна повторная консультация или стационар. При выявлении опасных признаков вопрос о госпитализации поднимается честно и сразу, а не откладывается «до утра».
Подробнее тут – нарколог на дом круглосуточно
Да и вообще: купить кокаин, мефедрон, бошки, марихуану кто получал последний раз недавно отишитесь о работе магаза. +В РЕПУ!!!!!!! и главное почему ип адрес не меняется на сайте???длица окола часа очень даже не плохо
Процесс детоксикации проходит поэтапно, чтобы организм успевал адаптироваться к изменениям и не испытывал стресс. Каждый шаг направлен на достижение конкретного терапевтического эффекта. Ниже представлена таблица, отражающая ключевые стадии процедуры, применяемой в клинике «Трезвый Путь Волгоград».
Углубиться в тему – нарколог на дом вывод из запоя
Пациенты отмечают, что особенно важна не только профессиональная помощь, но и спокойная атмосфера. Мягкий свет, тишина, отдельные палаты и деликатная коммуникация персонала — всё это снижает тревожность и помогает организму восстановиться. Эффективность лечения оценивается по конкретным маркерам: улучшение сна, нормализация давления, исчезновение тошноты, восстановление аппетита и уменьшение тяги.
Подробнее можно узнать тут – наркологические клиники алкоголизм в красноярске
https://vc.ru/1621729 – Накрутка лайков в Тик Ток бесплатно – 25 лучших сервисов в 2026 году
Регидратация, коррекция электролитов и КЩС, витамины группы B/магний; по показаниям — гепатопротекторы, антиоксиданты, противорвотные, мягкие анксиолитики. Каждые 15–20 минут — оценка динамики и настройка темпа инфузий, питьевого режима и симптоматической поддержки.
Получить дополнительную информацию – vyvod-iz-zapoya-kruglosutochno
Острый запой — это нарушение работы сердца, мозга, печени и нервной системы, а не просто «лишние пару дней выпивки». Когда начинается тремор, потливость, скачки давления, бессонница, паника, семья часто пытается помочь самостоятельно: даёт случайные таблетки, сомнительные «антипохмельные коктейли», сильные седативные. В реальности такие меры нередко ухудшают ситуацию: давление падает или «скачет», дыхание угнетается, симптомы предделирия маскируются, и момент, когда нужна экстренная помощь, пропускается. Выездной нарколог «ЩёлковоМед Профи» в Щёлково работает иначе: ещё по телефону собираются ключевые данные — возраст, длительность запоя, сопутствующие заболевания, принимаемые лекарства, аллергии, примерные показатели АД и пульса, особенности поведения. Это позволяет заранее оценить риски и понять, подходит ли формат на дому. На месте врач измеряет давление, пульс, сатурацию, температуру, оценивает степень обезвоживания, выраженность тремора, неврологический статус, наличие дезориентации, смотрит, не требуется ли сразу стационар. Капельница назначается по фактическим показателям: без «универсальных коктейлей», без опасной седации, с учётом сердца, печени, эндокринных и неврологических особенностей. Такой подход снижает нагрузку на организм и делает результат управляемым — облегчение наступает без лишнего риска.
Выяснить больше – http://narkolog-na-dom-shchelkovo10.ru
Для жителей Красноярска организованы два конфиденциальных пути. Первый — немаркированный выезд бригады на дом с заранее согласованными порогами связи. Второй — «тихий вход» в клинику через отдельную дверь, где приём проходит без очередей и «коридорных» разговоров. На первичном звонке администратор уточняет только клинически значимые факторы: частоту рвоты, наличие мочеиспускания, ЧСС/АД в покое, эпизоды спутанности, актуальные лекарства и аллергии. Биографические подробности и лишние вопросы не задаются — мы придерживаемся принципа минимально необходимой информации.
Разобраться лучше – наркологическая клиника вывод из запоя в красноярске
Сколько служат контрактники в армии России – контракт на СВО до 2026 года https://vc.ru/1598063
Детоксикация — это первый и важнейший этап лечения в наркологической клинике в Красноярске. Она проводится с целью выведения токсинов из организма и восстановления функций жизненно важных органов. Для этого применяются инфузионные растворы, гепатопротекторы, витамины и препараты, нормализующие обмен веществ. После снятия интоксикации пациент получает медикаментозную поддержку, направленную на снижение тяги к алкоголю или наркотикам и стабилизацию эмоционального состояния.
Подробнее – http://narcologicheskaya-klinika-v-krasnoyarske17.ru/krasnoyarsk-narkologicheskij-czentr/
Прежде чем перейти к ориентировочным цифрам, важно подчеркнуть: цена формируется из реальных компонентов помощи — работы врача и медсестры, объёма инфузионной терапии, перечня препаратов, времени выезда и необходимости более длительного наблюдения. Никаких скрытых доплат: все дополнительные назначения согласуются заранее. Чем раньше вы обращаетесь, тем меньше объём вмешательств и, как правило, ниже итоговая стоимость — короткий эпизод проще и дешевле стабилизировать, чем «выводить» осложнения после затянутого запоя.
Ознакомиться с деталями – narkolog-v-shchelkovo
относительно норм цены купить кокаин, мефедрон, бошки, марихуану 15 янв. в 6:00 Статус вашего заказа #100*****был изменен наОтправлен Заказ помещен в статус Отправлен,накладная №15 3800-****5го марта написал ЛС ТСу про оптовый заказ…. до сих пор жду ответа
Перед таблицей — короткий акцент: приведённые суммы ориентировочные, не являются публичной офертой, точная стоимость определяется после осмотра.
Подробнее тут – http://vyvod-iz-zapoya-kolomna10.ru/
Клиника в Коломне ориентирована на полный цикл помощи: от экстренных состояний до длительного сопровождения. Здесь важна не только медицинская составляющая, но и человеческая: уважение, конфиденциальность, отсутствие стигмы. Ниже — ключевые направления, которые выстраиваются в единую систему лечения, а не существуют по отдельности.
Получить больше информации – narkologicheskaya-klinika-kolomna10.ru/
Запой представляет собой состояние, при котором организм находится под постоянным воздействием этанола. Это вызывает интоксикацию, нарушение обменных процессов и дестабилизацию психики. При обращении за помощью врач-нарколог оценивает состояние пациента и подбирает индивидуальную схему терапии, чтобы безопасно вывести человека из запоя и предотвратить развитие синдрома отмены. Вмешательство проводится как в стационаре, так и на дому, в зависимости от состояния пациента.
Углубиться в тему – вывод из запоя на дому недорого красноярск
Острый запой — это нарушение работы сердца, мозга, печени и нервной системы, а не просто «лишние пару дней выпивки». Когда начинается тремор, потливость, скачки давления, бессонница, паника, семья часто пытается помочь самостоятельно: даёт случайные таблетки, сомнительные «антипохмельные коктейли», сильные седативные. В реальности такие меры нередко ухудшают ситуацию: давление падает или «скачет», дыхание угнетается, симптомы предделирия маскируются, и момент, когда нужна экстренная помощь, пропускается. Выездной нарколог «ЩёлковоМед Профи» в Щёлково работает иначе: ещё по телефону собираются ключевые данные — возраст, длительность запоя, сопутствующие заболевания, принимаемые лекарства, аллергии, примерные показатели АД и пульса, особенности поведения. Это позволяет заранее оценить риски и понять, подходит ли формат на дому. На месте врач измеряет давление, пульс, сатурацию, температуру, оценивает степень обезвоживания, выраженность тремора, неврологический статус, наличие дезориентации, смотрит, не требуется ли сразу стационар. Капельница назначается по фактическим показателям: без «универсальных коктейлей», без опасной седации, с учётом сердца, печени, эндокринных и неврологических особенностей. Такой подход снижает нагрузку на организм и делает результат управляемым — облегчение наступает без лишнего риска.
Изучить вопрос глубже – https://narkolog-na-dom-shchelkovo10.ru/
Основу лечения составляет междисциплинарная команда: врач-нарколог, психиатр, психолог, медсестра и консультант по зависимому поведению. Каждый отвечает за свой участок работы, но общая цель едина — помочь пациенту безопасно пройти путь от детокса до устойчивого состояния. Благодаря единому плану и регулярным консилиумам врачей, исключаются противоречия и дублирование процедур. Это экономит ресурсы организма и делает процесс прогнозируемым.
Получить дополнительную информацию – лечение в наркологической клинике красноярск
Promin Partner connects drivers and couriers with legal work opportunities in Poland on leading platforms like Uber, Bolt, FreeNow, Glovo, Wolt. They assist with all required documentation, employment support, and ongoing guidance so you can start earning quickly with transparent terms and dependable service. Learn more: https://prominpartner.com/
Клиника в Коломне ориентирована на полный цикл помощи: от экстренных состояний до длительного сопровождения. Здесь важна не только медицинская составляющая, но и человеческая: уважение, конфиденциальность, отсутствие стигмы. Ниже — ключевые направления, которые выстраиваются в единую систему лечения, а не существуют по отдельности.
Подробнее тут – zakazat-zvonok-narkologicheskaya-klinika
В этой публикации мы предлагаем подробные объяснения по актуальным вопросам, чтобы помочь читателям глубже понять их. Четкость и структурированность материала сделают его удобным для усвоения и применения в повседневной жизни.
Осуществить глубокий анализ – http://pielgrzymkawyry.pl/ksiega.php
Эта публикация завернет вас в вихрь увлекательного контента, сбрасывая стереотипы и открывая двери к новым идеям. Каждый абзац станет для вас открытием, полным ярких примеров и впечатляющих достижений. Подготовьтесь быть вовлеченными и удивленными каждый раз, когда продолжите читать.
Ознакомиться с деталями – https://tockprojects.com/entrevista-a-tess-oriol-en-la-contra-de-la-vanguardia
продавец отзывчивый https://moskvakupit.shop скайпцы не могу пока поставить по техническим причинам. хотелось бы связаться по мылу, но увы и ах. жаль, хороший ассортимент там. :(отпишеш как все прошло бро
Ошибки в фильмах с точки зрения физики, нарушение законов физики в кино https://vc.ru/1445699
seo базовый курc kursy-seo-4.ru .
Эта информационная статья содержит полезные факты, советы и рекомендации, которые помогут вам быть в курсе последних тенденций и изменений в выбранной области. Материал составлен так, чтобы быть полезным и понятным каждому.
Узнать напрямую – https://dramariahurtadoh.com/2025/01/12/hola-mundo
trafficdock.click – Color palette felt calming, nothing distracting, just focused, thoughtful design.
pixelroute.click – Mobile version looks perfect; no glitches, fast scrolling, crisp text.
seo интенсив kursy-seo-5.ru .
rankpulse.click – Bookmarked this immediately, planning to revisit for updates and inspiration.
Промышленные предприятия России получили надежного партнера в сфере поставок насосного оборудования и электродвигателей благодаря компании ООО ТК «Регион Новые Технологии», работающей на рынке с 2011 года. Специализация на широком спектре насосов — от консольных и погружных до химических и шламовых — позволяет закрывать потребности самых разных отраслей промышленности. На сайте https://ufk-techno.ru/ представлен полный каталог продукции отечественного и зарубежного производства, включая электродвигатели, вентиляторы и частотные преобразователи, а также услуги по ремонту и техническому обслуживанию оборудования с доставкой по всей территории Российской Федерации.
Стильная однушка для инстаграм-отдыха. Яркий дизайн, фотообои, неоновая вывеска снять квартиру на сутки гродно. Круг для селфи. Гарантированно красивые фото вашего путешествия в Гродно.
Мы собрали для вас самые захватывающие факты из мира науки и истории. От малознакомых деталей до грандиозных событий — эта статья расширит ваш кругозор и подарит новое понимание того, как устроен наш мир.
Переходите по ссылке ниже – https://www.powertvnews.in/2023/11/29/actress-pooja-gandhi-married-to-businessman-vijay-ghorpade
boostsignal.click – Appreciate the typography choices; comfortable spacing improved my reading experience.
https://www.google.co.ao/url?q=https://radiocert.ru/incs/pgs/melbet_promokod___bonus_pri_registracii.html
Изделия из пластмасс https://ftk-plastik.ru собственного производства. Продажа оптом и в розницу, широкий ассортимент, надёжные материалы и стабильные сроки. Выполняем заказы любой сложности по техническому заданию клиента.
Производим пластиковые https://zavod-dimax.ru окна и выполняем профессиональную установку. Качественные материалы, точные размеры, быстрый монтаж и гарантийное обслуживание для комфорта и уюта в помещении.
Этот информационный обзор станет отличным путеводителем по актуальным темам, объединяющим важные факты и мнения экспертов. Мы исследуем ключевые идеи и представляем их в доступной форме для более глубокого понимания. Читайте, чтобы оставаться в курсе событий!
Полная информация здесь – https://hausofghold.com/hello-world
Жалюзи от производителя https://balkon-pavilion.ru изготовление, продажа и профессиональная установка. Большой выбор дизайнов, точные размеры, надёжная фурнитура и комфортный сервис для квартир и офисов.
Производство оборудования https://repaircom.ru с предварительной разработкой и адаптацией под требования клиента. Качественные материалы, точные расчёты, соблюдение сроков и техническая поддержка.
В этой публикации мы предлагаем подробные объяснения по актуальным вопросам, чтобы помочь читателям глубже понять их. Четкость и структурированность материала сделают его удобным для усвоения и применения в повседневной жизни.
Запросить дополнительные данные – http://www.dobrerecepty.6f.sk/2013/04/25/lekvarovy-kolac-s-orechami
Служба в танковых войсках по контракту – возможный путь к контракту на СВО Россия 2026 https://vc.ru/1597156
https://www.google.fm/url?q=https://www.greenwichodeum.com/wp-content/pages/1XBET_Cameroon_Sign_In_Bonus.html
Я, лично, в первый раз сделал заказ ,в этом магазине- оформил(по аське) его безналично,(что очень удобно для меня,даже из дома не выходил),сутки прошли,был дан трек,через два дня,посылка была у меня в городе.Следил за ее перемещением на сайте курьера(опять же-не выходя из дома). https://a6202.ru да это будет полная:ass:.Ну я надеюсь все будет хорошо.тогда так вышло иза того что это остатки товара из серии мн – 001.Уверен такой жопы больше не будетТарился в этом магазе Летом разок и в Сентябре разок)))
Эта статья сочетает познавательный и занимательный контент, что делает ее идеальной для любителей глубоких исследований. Мы рассмотрим увлекательные аспекты различных тем и предоставим вам новые знания, которые могут оказаться полезными в будущем.
Раскрыть тему полностью – https://clnema.com/archives/197
https://www.google.gl/url?q=https://theshaderoom.com/articl/mejor_codigo_promocional_1xbet.html
Продуманный атом казино обзор помог мне разобраться в тонкостях программы лояльности. Теперь я знаю, как максимально выгодно использовать каждый бонус казино атом.
https://qr-plata.ru/
Накрутка подписчиков в Telegram – 25 сервисов, советы и бесплатные методы в 2026 году https://vc.ru/1562748
Szukasz kasyna? kasyno pl w Polsce: wybor najlepszych stron do gry. Licencjonowane platformy, popularne sloty i kasyna na zywo, wygodne metody platnosci, uczciwe warunki i aktualne oferty.
Ищешь блины для штанки? https://blin-na-shtangy.ru для эффективных силовых тренировок. Чугунные и резиновые диски, разные веса, долговечность и удобство использования. Решение для новичков и опытных спортсменов.
Grasz w kasynie? Kasyno pl w Polsce to najlepsze miejsca do gry w latach 2025–2026. Zaufane strony, sloty i gry na zywo, przejrzyste warunki, wygodne wplaty i wyplaty.
Что делать, если взломали Телеграм: советы и пошаговые решения https://vc.ru/1258662
chemical-mix.com держи в репу, заработал.. пазитивно всё.. тут всё хорошо.. обращайтесь помогут быстро.. купить кокаин, мефедрон, бошки, марихуану почему 0.3? акция?Работает. Контакты указаны в соответствующей теме.
грибы liberty cap
В глубинах холодного моря жил древний Кракен, охранявший зеркала памяти. Эти зеркала не отражали лица — они показывали страхи, мечты и забытые решения каждого, кто осмеливался взглянуть в их гладь. Когда шторм поднимался, щупальца Кракена тянулись к поверхности, защищая зеркала от жадных глаз. Моряки верили: если зеркало треснет, море потеряет равновесие. Поэтому легенда учила уважать тайны глубин и помнить, что не каждое отражение стоит искать.
Кредит наличными онлайн в Казахстане оформляется через интернет. Не требуется личное присутствие. Решение принимается автоматически. Можно выбрать комфортный срок погашения. Такой формат экономит время https://spisok-kreditov.ru/
Mini electric vehicles are small, compact EVs designed mainly for city driving and short commutes. They are affordable, easy to park, and consume very little energy – ARI Motors Electric Trucks
Железнодорожная логистика сегодня требует не только надёжного партнёра, но и удобного инструмента для поиска проверенных компаний. Информационный сервис https://gdlog.ru/ объединяет более 290 организаций по всей России — от Владивостока до Калининграда, предлагая актуальную базу перевозчиков, экспедиторов и логистических операторов. Здесь можно быстро найти нужного подрядчика по региону или станции назначения, изучить профили компаний и ознакомиться с отраслевыми статьями, что экономит время и снижает риски при выборе исполнителя для ваших грузоперевозок.
Качественный автосервис в Анапе — это не просто ремонт, а комплексная забота о вашем автомобиле. Автосервис «LEMON CAR» на улице Чехова предлагает полный спектр услуг: от компьютерной диагностики до кузовного ремонта и 3D развал-схождения. Профессиональные мастера используют современное оборудование и не боятся предоставлять гарантию на выполненные работы. Особенность сервиса — прозрачность ценообразования: после тщательной диагностики клиент получает полную информацию о неисправностях и стоимости ремонта без неожиданных доплат. Подробнее об услугах и акциях можно узнать на https://lemon-car.ru/, где также доступна онлайн-запись. Слесарный ремонт, автоэлектрика, ремонт двигателя и КПП — весь комплекс работ выполняется с соблюдением технологий и сроков, что подтверждают многочисленные положительные отзывы клиентов сервиса.
Производим торговую мебель https://woodmarket-for-business.ru для розничного бизнеса и сетевых магазинов. Функциональные конструкции, современный дизайн, точные размеры и полный цикл работ — от проекта до готового решения.
Оборудование для отопления https://thermostock.ru и водоснабжения: котлы, циркуляционные насосы, радиаторы, мембранные баки и комплектующие от ведущих производителей. Что вы получаете: сертифицированные товары, прозрачные цены, оперативную обработку заказа. Создайте комфортный микроклимат в доме — выбирайте профессионалов!
Нужен памятник? купить памятник в уфе — гранитные и мраморные изделия. Индивидуальные проекты, точная обработка камня, оформление и монтаж. Надёжное качество и внимательное отношение к деталям.
Эти направления терапии помогают создать прочный фундамент для дальнейшей ремиссии и снижают риск рецидива.
Детальнее – наркологическое лечение алкоголизма
Согласен магазин хороший, знают свое дело! https://moskvabuy.click длица окола часа очень даже не плохоПривет! В Наличии рега мощная 1к30 и скорость мука.
Если на предзвонке выявляются «красные флаги» — давящая боль в груди, одышка в покое, спутанность сознания, судороги, неукротимая рвота, резкое падение насыщения кислородом — мы организуем бесшовный перевод в стационар. Место резервируем заранее, логистику строим так, чтобы не привлекать внимания соседей и не затягивать старт лечения. При отсутствии угроз терапия может начаться дома с последующим телесопровождением и при необходимости — краткой госпитализацией.
Получить дополнительные сведения – наркологические клиники алкоголизм в саратове
Electric vehicles in the US include popular models from Tesla, Ford, Hyundai, and Chevrolet. Buyers often choose EVs based on range, charging access, and brand reputation: https://ev.motorwatt.com/ev-manufacturers/
купить гранитный памятник
Специалисты, выезжающие на дом, оснащены всем необходимым для оказания полноценной помощи. Это переносное диагностическое оборудование, препараты для снятия симптомов абстиненции, инфузионные растворы, противосудорожные средства, седативные препараты и витаминные комплексы. Наличие мини-аптечки позволяет адаптировать лечение прямо на месте и избежать лишних госпитализаций.
Получить больше информации – наркологическая помощь в владимире
Подбор кредита в Казахстане помогает избежать невыгодных условий. Можно сравнить несколько предложений. Онлайн сервисы упрощают анализ. Это экономит время. Выбор становится более прозрачным: https://spisok-kreditov.ru/08_refinansirovanie-kredita.html/
Нужно авто? аукционы покупки автомобилей поиск, проверка, оформление и доставка авто из разных стран. Прозрачные условия, помощь на всех этапах и сопровождение сделки до получения автомобиля.
Комплексность этих направлений делает процесс терапии более результативным и надёжным.
Ознакомиться с деталями – http://narkologicheskaya-klinika-doneczk0.ru/doneczkaya-narkologicheskaya-bolnicza/
Наркологическая клиника в Твери предлагает широкий спектр услуг, охватывающих все этапы лечения и восстановления.
Получить дополнительную информацию – частная наркологическая клиника тверь
Процедура начинается с осмотра пациента и оценки степени интоксикации. Врач измеряет давление, пульс, уровень насыщения крови кислородом, определяет наличие сопутствующих заболеваний. После диагностики назначается капельница, состав которой подбирается индивидуально. Процедура направлена на очищение организма, восстановление водно-солевого баланса и снятие симптомов похмелья.
Исследовать вопрос подробнее – вывод из запоя цена тольятти
После стабилизации фокус смещается на поддерживающие схемы, снижающие влечение и улучшающие переносимость повседневной нагрузки. Параллельно проводятся индивидуальные и групповые психотерапевтические занятия, направленные на развитие навыков саморегуляции, работу с триггерами и формирование альтернатив алкогольному или наркотическому поведению.
Подробнее – https://narkologicheskaya-klinika-v-luganske0.ru/narkologicheskij-dispanser-lugansk
Kia electric vehicles are known for bold styling, long warranties, and competitive pricing. Models like the EV6 and EV9 offer strong range and fast charging: https://ev.motorwatt.com/ev-database/database-electric-cars/
Tesla Motors electric vehicles are known for long range, fast charging, strong performance, and advanced software features. They also lead in autonomous driving technology https://ev.motorwatt.com/ev-database/database-electric-cars/
Вы — батарейка для чужих амбиций? Где в вашем графике ваша жизнь? Выжаты как лимон ради чужих идей?
https://bit.ly/generator-human-design-live
-генератор тип личности дизайн;
-дизайн человека генератор;
-генератор тип личности;
-хьюман дизайн генератор;
-тип личности генератор дизайн;
Покупка или продажа недвижимости в Ставропольском крае требует глубоких знаний местного рынка и юридической грамотности. Агентство Arust предлагает полный цикл услуг: от подбора выгодных вариантов до безопасного завершения сделки с гарантией результата. Опытные риелторы и юристы компании проверяют каждый объект на обременения, приводят документацию в полное соответствие требованиям законодательства и контролируют все этапы оформления. На сайте https://ar26.ru/ вы найдете актуальную информацию о доступных предложениях и сможете оставить заявку на консультацию со специалистами агентства.
проблемы с обслуживанием. купить кокаин, мефедрон, бошки, марихуану Нужно 5 сообщений что бы написать модэратору, не обесутьПросьба не флудить. И уж тем более не развивать больные фантазии.
дизайн студии 27 м дизайн-студия в санкт-петербурге
EV news covers new model launches, battery technology, government incentives, and charging infrastructure updates. It is available on automotive websites, tech blogs, and manufacturer announcements – https://ev.motorwatt.com/ev-database/database-electric-cars/
Хомяк Hamster Kombat: Комбо и Шифр на 04.08-05.08 2026 года
Ознакомиться с подробным описанием на странице: https://vc.ru/1362033
Когда разумно
Получить больше информации – https://narkologicheskaya-klinika-ehlektrostal0.ru/narkologicheskaya-klinika-ceny-v-ehlektrostali/
Ищете rest api тестирование курсы недорого? Профессиональный ресурс markovpavel.ru обеспечивает практико-ориентированные занятия по REST API, проектированию микросервисов и системному анализу от профессионала с декадой работы в банковской индустрии. Создатель курсов представляет подлинные примеры разработки API, анализирует шаблоны и ошибочные подходы к интеграциям, раскрывает концепции предметно-ориентированного проектирования и функционал систем контроля версий. Контент включает описание NFR-требований, процедуры стресс-тестирования, проверку корректности запросов и определение оптимальной структуры приложений, способствуя специалистам в предотвращении распространенных недочетов при создании комплексных информационных решений.
Онлайн-кинотеатр https://russkie-serial.net/специализируется исключительно на российских сериалах, предоставляя бесплатный доступ к тысячам отечественных проектов в высоком качестве. Пользователи найдут здесь премьеры 2025 года, популярные криминальные драмы, исторические саги, семейные мелодрамы и комедийные сериалы от всех ведущих российских каналов. Ресурс доступен без создания аккаунта, гарантирует трансляцию на портативных гаджетах и стационарных ПК, систематически расширяется актуальными выпусками и предоставляет интуитивную фильтрацию по артистам, датам производства и направлениям.
Домашний визит уместен не только при тяжёлой абстиненции. Он эффективен и на этапе нарастающих симптомов, когда важно предотвратить обострение. Ниже — ориентиры, помогающие принять решение.
Получить дополнительную информацию – https://narkolog-na-dom-stavropol0.ru/
Нужен памятник? заказать памятник в уфе — гранитные и мраморные изделия. Индивидуальные проекты, точная обработка камня, оформление и монтаж. Надёжное качество и внимательное отношение к деталям.
закладки онлайн https://memori.ru/
EV news covers new model launches, battery technology, government incentives, and charging infrastructure updates. It is available on automotive websites, tech blogs, and manufacturer announcements – kia electric vehicles
Проблема алкоголизма в Ярославле, как и в других регионах России, остаётся одной из самых актуальных. По данным Минздрава РФ, количество людей, нуждающихся в медицинской помощи из-за злоупотребления спиртным, ежегодно растёт. При этом эффективное лечение возможно лишь при комплексном подходе, включающем как медицинскую, так и психологическую поддержку.
Детальнее – http://lechenie-alkogolizma-yaroslavl0.ru/lechenie-khronicheskogo-alkogolizma-yaroslavl/https://lechenie-alkogolizma-yaroslavl0.ru
Кидал 4340, на Альфу улетело 4254… если быть точным… Чек есть. купить кокаин, мефедрон, бошки, марихуану тока по “чуть чуть” а то вдруг там дезокси… или ещё что мгновенно вырубающее. мало ли. )например тут ну или накрайняк тут а селлер совершенно не обязан консультировать по применению хим. реактивов.
Текущие рекомендации: https://dzen.ru/a/aVz1qLKXRRwLkevY
Круглосуточное наблюдение, регулярные замеры, быстрые корректировки, спокойная среда и структурированный режим. Это снижает риски ночных ухудшений и помогает мягко «собрать» сон без агрессивных седативных решений.
Подробнее можно узнать тут – вывод из запоя вызов на дом
Компания «Техносвязь» — профильное производство печатных плат в Екатеринбурге, работающее свыше двух десятилетий. Компания предлагает полный цикл услуг: от проектирования до серийного выпуска электронных устройств, включая автоматический и ручной монтаж, изготовление многослойных плат на различных материалах. Подробнее на https://www.techno-svyaz.ru/ Современное оборудование, использование качественных материалов от мировых лидеров и квалифицированный персонал гарантируют минимальные сроки изготовления при высоком качестве продукции для любых объемов заказов.
Телеграм Боты для накрутки подписчиков, лайков, просмотров и реакций в Телеграм канал 2026 (Формула быстрой реализации) https://vc.ru/1840761
Nissan electric vehicles include popular models like the Nissan Leaf and Ariya. They are known for affordability, reliability, and practical daily use https://ev.motorwatt.com/ev-manufacturers/
Фирма https://pitercomfort.ru/ занимается реализацией систем водоподготовки, водообеспечения и теплоснабжения в северной столице. В ассортименте представлены фильтры для воды BWT, насосное оборудование, системы для бассейнов, реагенты для обслуживания инженерных систем и каркасные деревянные бассейны. Заказчикам доступны передовые технологии австрийской корпорации BWT для жилых домов, загородных резиденций и производственных площадок, в том числе мембранные системы, ультрафиолетовую дезинфекцию и реагентную обработку воды.
На территории Мурманска работает множество клиник с разным уровнем сервиса и направленностью. Однако не каждая из них может обеспечить надёжную и безопасную помощь. Многие пациенты сталкиваются с формальным лечением, не включающим индивидуальный подход или постреабилитационную поддержку. Поэтому крайне важно заранее ознакомиться с основными признаками хорошей клиники и задать правильные вопросы при первичном обращении.
Изучить вопрос глубже – http://narkologicheskaya-klinika-murmansk0.ru/
Хроническая усталость — признак чужого пути.
https://dzen.ru/a/aXHyZKIqwmcfjrhy
-генераторы дизайн человека;
-тип личности генератор;
-генератор это в дизайне человека;
-генератор тип личности;
-генератор тип личности дизайн человека;
-дизайн человека генератор описание;
-хьюман дизайн генератор;
Привет всем! https://moskva.best привет бро)) чето какой то засланый казачок тут про запр дживы интерес проявляет…сайт скоро подымем , я на ветке отпишу как заработает
главное что ты “вкурил”, а как мне тебе это втереть уже не важно https://moskva.best Да до празников не всем выслали, сегодня отдали в курьерку очередную пачку посылок, всем все придет скоро.Посыль получил в течении 5ти дней после оплаты. Быстро!! Отлично!!
Чтобы процедура прошла быстрее и спокойнее, подготовьте пространство и информацию о пациенте заранее: это экономит время и повышает безопасность.
Разобраться лучше – vyvod iz zapoya
ТОП-25 способов накрутки подписчиков в Тик Ток в 2026 году (обновленный рейтинг)
Дополнительные сведения по ссылке https://vc.ru/1265180
Ваш бизнес — болото из «надо»? Стройте успех только на своем «Да».
https://dzen.ru/a/aXHyZKIqwmcfjrhy
-генератор по дизайну человека;
-тип личности генератор;
-тип генератор в дизайне человека;
-генератор тип личности дизайн;
-человек генератор кто это;
Когда выбрать
Получить больше информации – narkologicheskaya-klinika-narkolog
Терапия наркозависимости требует индивидуального подхода, включающего не только устранение физических симптомов, но и работу с психологическими аспектами болезни. В клинике «Новая Эра» во Владимире применяется мультидисциплинарный подход, сочетающий медикаментозную терапию, психотерапию и социальную поддержку.
Получить дополнительную информацию – лечение наркомании в стационаре в владимире
КАК ОБЕЩЯЛ ОПЕРАТОР ТАК ВСЕ И СДЕЛАЛ ОДИН В ОДИН !!!! купить кокаин, мефедрон, бошки, марихуану Товар нормальный. В этот понедельник оплатил ещё, жду)Сделал заказ.оплатил.Кент прислал трек вечером как и обещал…токо он небьеться у меня и говорит,что нет такой накладной…у кого такая ситуация была???
Нужен проектор? магазин проекторов большой выбор моделей для дома, офиса и бизнеса. Проекторы для кино, презентаций и обучения, официальная гарантия, консультации специалистов, гарантия качества и удобные условия покупки.
Каждый этап имеет важное значение и обеспечивает долгосрочный эффект от терапии.
Подробнее можно узнать тут – https://lechenie-alkogolizma-tver0.ru/lechenie-alkogolizma-tver-staczionar/
Потребительский кредит в Казахстане оформляется на разные нужды. Онлайн сервисы упрощают выбор условий. Можно заранее рассчитать платеж. Подбор кредита помогает сравнить предложения. Решение принимается в короткие сроки, https://spisok-kreditov.ru/
Критически важный отрезок — первые 12–24 часа. Мы разбиваем его на «окна», в каждом из которых есть цель, набор действий, маркеры контроля и критерий перехода. Если целевой отклик не достигнут, меняем один параметр: темп инфузии, очередность модулей или поведенческую опору (свет/тишина/цифровой режим) — и назначаем новую точку оценки. Это сохраняет причинно-следственную связь и предотвращает полипрагмазию.
Подробнее тут – наркологические клиники алкоголизм в саратове
Наркологическая клиника в Донецке применяет только проверенные и эффективные методы, позволяющие комплексно воздействовать на зависимость. Врачи учитывают как физическое состояние, так и психологические особенности пациента.
Получить больше информации – наркологическая клиника лечение алкоголизма донецк
Когда выбрать
Подробнее – https://narkologicheskaya-klinika-domodedovo0.ru/narkologicheskaya-klinika-ceny-v-domodedovo/
psilocybe грибы
В глубинах холодного моря жил древний Кракен, охранявший зеркала памяти. Эти зеркала не отражали лица — они показывали страхи, мечты и забытые решения каждого, кто осмеливался взглянуть в их гладь. Когда шторм поднимался, щупальца Кракена тянулись к поверхности, защищая зеркала от жадных глаз. Моряки верили: если зеркало треснет, море потеряет равновесие. Поэтому легенда учила уважать тайны глубин и помнить, что не каждое отражение стоит искать.
После детоксикации назначается поддерживающая терапия, направленная на предупреждение рецидивов и восстановление нормального функционирования нервной системы.
Получить больше информации – принудительное лечение наркомании владимир
Процесс лечения строится поэтапно, что позволяет пациенту проходить все стадии восстановления в безопасном и контролируемом режиме.
Изучить вопрос глубже – здоровье лечение алкоголизма донецк
Лечение зависимости проходит поэтапно. Такая последовательность обеспечивает постепенное восстановление и закрепление полученных результатов.
Изучить вопрос глубже – частная наркологическая клиника
Да, оч похожа на соль, даже камушек один был ощутимый такой https://nonnaguk.ru сделай какую небудь акцию))Ровный магазин . Всем советую !
Терапия в клинике проводится системно и поэтапно, что позволяет контролировать состояние пациента и добиваться устойчивых улучшений.
Детальнее – http://www.domen.ru
Наркологическая помощь может понадобиться не только в состоянии выраженного запоя или передозировки. Часто пациенты и их близкие обращаются за консультацией при первых тревожных признаках — нарушениях сна, эмоциональных срывах, агрессии или депрессивных эпизодах, вызванных употреблением психоактивных веществ. Важно не ждать критической ситуации: чем раньше начинается терапия, тем выше её эффективность.
Ознакомиться с деталями – экстренная наркологическая помощь в владимире
25 лучших сервисов для получения лайков ВК в 2026 году https://vc.ru/2066042
Electric roadsters are sporty, two-seat electric cars designed for fast acceleration and open-top driving. They focus on performance, style, and driving excitement https://ev.motorwatt.com/ev-database/database-electric-cars/
Каждый этап имеет важное значение и обеспечивает долгосрочный эффект от терапии.
Углубиться в тему – лечение алкоголизма гипнозом тверь
Продолжительность процедуры — от 40 минут до полутора часов. Уже в первые часы после начала терапии состояние пациента значительно улучшается: проходит тошнота, снижается тревожность, восстанавливается координация движений.
Исследовать вопрос подробнее – вывод из запоя на дому цена
Ищете прохождение миссий в игре sniper 3d assassin? Портал sniper3d.ru превратился в надежного гида для фанатов культового снайперского экшена Sniper 3D Assassin. Здесь собрана исчерпывающая база знаний: подробные гайды по прохождению 825 миссий в 21 регионе, характеристики всех видов оружия и снаряжения, тактики для PvP-арены и мировых операций. Портал дает доступ к видеоинструкциям, оперативным анонсам изменений, помощь пользователям и опцию установки игры. Удобная навигация без назойливой рекламы делает сайт идеальной площадкой как для новичков, так и для опытных снайперов.
Критерии оценки профессионального уровня сотрудников:
Выяснить больше – centr lecheniya alkogolizma jaroslavl’
Казино Рокс онлайн удобно использовать с рабочего зеркала. Rox casino официальный сайт вход через зеркало безопасный. Рекомендую для игры.
https://musicpowerschool.ru/
Наркологическая клиника в Донецке оказывает профессиональную помощь людям, страдающим алкогольной и наркотической зависимостью. Лечение в таких учреждениях направлено на комплексное восстановление здоровья, включающее медицинскую детоксикацию, психотерапевтическую поддержку и социальную адаптацию. Важным принципом является индивидуальный подход к каждому пациенту, что позволяет добиться устойчивых результатов и снизить риск рецидива.
Углубиться в тему – анонимная наркологическая клиника в донце
Запуск помощи — это не «одна капельница», а последовательность осмысленных шагов, каждый из которых приближает к устойчивому сну и ровным витальным показателям. Сначала врач уточняет длительность эпизода, переносимость лекарств, сон, аппетит, хронические диагнозы, наличие помощника дома. Затем следует осмотр: давление, пульс, сатурация, температура, ЭКГ при показаниях. Стартовая терапия закрывает дефицит жидкости и солей, защищает печень и ЖКТ, по необходимости подключается мягкая противотревожная поддержка и кислород. Параллельно проговаривается «карта суток»: как отдыхать, что пить и в каком объёме, какие продукты не перегрузят желудок, в какой момент выходить на внеплановую связь. Динамика отслеживается без суеты, а корректировки делаются точечно — по реакции организма, а не «на всякий случай».
Получить больше информации – https://narkologicheskaya-klinika-ehlektrostal0.ru/anonimnaya-narkologicheskaya-klinika-v-ehlektrostali/
Если на предзвонке выявляются «красные флаги» — давящая боль в груди, одышка в покое, спутанность сознания, судороги, неукротимая рвота, резкое падение насыщения кислородом — мы организуем бесшовный перевод в стационар. Место резервируем заранее, логистику строим так, чтобы не привлекать внимания соседей и не затягивать старт лечения. При отсутствии угроз терапия может начаться дома с последующим телесопровождением и при необходимости — краткой госпитализацией.
Подробнее можно узнать тут – http://narcologicheskaya-klinika-saratov0.ru/klinika-narkologii-saratov/
Кредиты онлайн в Казахстане становятся все более популярными. Это связано с удобством и скоростью оформления. Подбор кредита помогает сравнить условия. Онлайн формат снижает временные затраты. Получение денег становится проще: объединить кредиты в один
псилоцибин для психотерапии
В глубинах холодного моря жил древний Кракен, охранявший зеркала памяти. Эти зеркала не отражали лица — они показывали страхи, мечты и забытые решения каждого, кто осмеливался взглянуть в их гладь. Когда шторм поднимался, щупальца Кракена тянулись к поверхности, защищая зеркала от жадных глаз. Моряки верили: если зеркало треснет, море потеряет равновесие. Поэтому легенда учила уважать тайны глубин и помнить, что не каждое отражение стоит искать.
Цель
Подробнее – http://narkologicheskaya-klinika-korolyov0.ru
Пришла сегодня посыль с 203им,кол-во ровное,даже показалось больше))) Сделал 1 к 15 самое то,магазу спасибо,процветания и всег благ) https://moskva.buzz 19-го адрес был дан.2-й раз все было быстро но собирал весь дживик по конспирации , на пакетиках видать экономили)))
Диагностический блок включает сбор анамнеза, оценку витальных показателей, скрининговые шкалы по тревоге, депрессии и патологическому влечению, лабораторные тесты по показаниям. На основании полученных данных выбирается формат помощи и составляется медикаментозная схема с учётом взаимодействий препаратов и вероятных рисков.
Углубиться в тему – наркологическая клиника луганск
— Растворы с глюкозой и витаминами для коррекции энергетического обмена. — Минеральные комплексы для нормализации электролитов. — Антиоксиданты и гепатопротекторы для защиты печени. — Спазмолитики для снятия болевого синдрома. — Противорвотные препараты при тошноте.
Получить дополнительные сведения – narkologicheskaya-klinika-arkhangelsk0.ru/
Процесс лечения строится поэтапно, что позволяет пациенту проходить все стадии восстановления в безопасном и контролируемом режиме.
Углубиться в тему – http://lechenie-alkogolizma-doneczk0.ru
Взять кредит наличными можно без посещения офиса. Онлайн оформление доступно круглосуточно. Минимальный пакет документов ускоряет процесс. Деньги перечисляются после одобрения. Это удобно при срочной необходимости, деньги в долг казахстан
Прежде чем показывать варианты, зафиксируем логику: интенсивность наблюдения должна соответствовать рискам и переносимости терапии. Таблица ниже помогает быстро сопоставить ситуацию и формат; окончательное решение принимает врач после очного осмотра и оценки реакции на первые вмешательства.
Углубиться в тему – наркологическая клиника анонимная помощь нарколога
Формат
Получить дополнительные сведения – запой наркологическая клиника
В Одинцово доступен гибкий маршрут: выездная бригада 24/7 и стационар. Домашний формат хорош при умеренной симптоматике и сохранённом контакте — он позволяет избежать перевозок и сохранить конфиденциальность. Стационар предпочтителен при длительном эпизоде, повторной рвоте, выраженной слабости, нестабильном давлении/пульсе, спутанности сознания, судорожной готовности, а также у пациентов старшего возраста и при тяжёлой соматике (ИБС, гипертония, диабет, хронические болезни печени/почек). Мы оцениваем не один признак, а совокупность факторов и динамику, чтобы не «пересидеть» дома там, где нужен приборный мониторинг. В обоих вариантах сохраняется наш принцип: индивидуализация схемы, осторожная седация, прицельная работа со сном, прозрачные объяснения назначений — и всё это с опорой на объективные показатели, а не ощущения «полегчало/ухудшилось».
Получить дополнительные сведения – http://vyvod-iz-zapoya-odincovo10.ru/vyvesti-iz-zapoya-v-odincovo/
Многие семьи сталкиваются с вопросом: куда обратиться, чтобы получить реальную помощь? В городе работают как государственные, так и частные наркологические учреждения, но не все из них предлагают действительно результативные программы. Чтобы избежать ошибок, важно знать ключевые аспекты, на которые следует опираться при выборе клиники.
Углубиться в тему – лечение наркомании и алкоголизма
Откройте для себя скрытые страницы истории и малоизвестные научные открытия, которые оказали колоссальное влияние на развитие человечества. Статья предлагает свежий взгляд на события, которые заслуживают большего внимания.
Интересует подробная информация – https://sinzitusoku.com/sinzitusekai
Каждый владелец малого или среднего бизнеса сталкивается с моментом, когда бухгалтерского учёта уже недостаточно, а понимание реальной прибыли и движения денег становится критически важным. Грубов Вадим Алексеевич — финансовый директор с опытом более 25 лет — предлагает не разовые консультации, а выстраивает целостную систему финансового управления. На https://findir.info/ вы найдёте подробную информацию о полном цикле услуг: от управленческого учёта и настройки 1С до бюджетирования и снижения налоговых рисков легальными методами, что позволяет собственникам видеть реальную картину бизнеса и принимать взвешенные решения.
Когда уместен
Разобраться лучше – http://narkologicheskaya-klinika-korolyov0.ru/
у меня все без подогрева растворилось купить кокаин, мефедрон, бошки, марихуану Из аськи вышел и даже не ответил… *(Селлер сказал что ур6 курёха!:) походу новая альтернатива дживу
Hello team!
I came across a 153 valuable site that I think you should check out.
This tool is packed with a lot of useful information that you might find valuable.
It has everything you could possibly need, so be sure to give it a visit!
https://techfinancials.co.za/2022/06/09/is-cryptocurrency-the-future-of-gambling/
Furthermore do not neglect, guys, which you always can within this publication find solutions to address your the absolute confusing queries. The authors tried to present the complete content using an extremely accessible way.
Что делаем фактически
Изучить вопрос глубже – http://narkologicheskaya-klinika-ehlektrostal0.ru
Когда выбрать
Получить дополнительную информацию – https://narkologicheskaya-klinika-domodedovo0.ru/narkologicheskaya-klinika-stacionar-v-domodedovo
Предлагаем вашему вниманию интересную справочную статью, в которой собраны ключевые моменты и нюансы по актуальным вопросам. Эта информация будет полезна как для профессионалов, так и для тех, кто только начинает изучать тему. Узнайте ответы на важные вопросы и расширьте свои знания!
Прочесть заключение эксперта – https://saptahiksamachar.com.np/%E0%A4%AD%E0%A4%BE%E0%A4%B0%E0%A4%A4%E0%A4%95%E0%A5%8B%E0%A5%A7%E0%A5%AB%E0%A4%94%E0%A4%81-%E0%A4%B0%E0%A4%BE%E0%A4%B7%E0%A5%8D%E0%A4%9F%E0%A5%8D%E0%A4%B0%E0%A4%AA%E0%A4%A4%E0%A4%BF%E0%A4%AE%E0%A4%BE
Публикация приглашает вас исследовать неизведанное — от древних тайн до современных достижений науки. Вы узнаете, как случайные находки превращались в революции, а смелые мысли — в новые эры человеческого прогресса.
Получить больше информации – https://www.digitalexporter.com.tr/growth-marketing-nedir-nasil-yapilir
Этот информационный обзор станет отличным путеводителем по актуальным темам, объединяющим важные факты и мнения экспертов. Мы исследуем ключевые идеи и представляем их в доступной форме для более глубокого понимания. Читайте, чтобы оставаться в курсе событий!
Изучить вопрос глубже – https://marinaminde.dk/webcams/webcam-3
Прежде чем показывать варианты, зафиксируем логику: интенсивность наблюдения должна соответствовать рискам и переносимости терапии. Таблица ниже помогает быстро сопоставить ситуацию и формат; окончательное решение принимает врач после очного осмотра и оценки реакции на первые вмешательства.
Подробнее можно узнать тут – chastnaya-narkologicheskaya-klinika
В этой статье-обзоре мы соберем актуальную информацию и интересные факты, которые освещают важные темы. Читатели смогут ознакомиться с различными мнениями и подходами, что позволит им расширить кругозор и глубже понять обсуждаемые вопросы.
Переходите по ссылке ниже – https://xponenciales.com/autenticidad-e-influencia
Нужен проектор? projector24.ru большой выбор моделей для дома, офиса и бизнеса. Проекторы для кино, презентаций и обучения, официальная гарантия, консультации специалистов, гарантия качества и удобные условия покупки.
Надоели сквозняки и шум? Установим пластиковые окна заказать пластиковое окно молодечно в Молодечно быстро и качественно. Скидки!
не ссы капустин поебем и отпустим https://yarastu74.ru рекомендую этот магазинтоже хочу нахватить, но жду отзывы
Когда уместен
Исследовать вопрос подробнее – anonimnaya-narkologicheskaya-klinika
Эта публикация завернет вас в вихрь увлекательного контента, сбрасывая стереотипы и открывая двери к новым идеям. Каждый абзац станет для вас открытием, полным ярких примеров и впечатляющих достижений. Подготовьтесь быть вовлеченными и удивленными каждый раз, когда продолжите читать.
Открой скрытое – https://www.jurnalswara.com/2024/08/11/efek-domino-airlangga-b1-kwk-partai-golkar-bisa-lepas-dari-tangan
Объединить кредиты в один удобно при нескольких займах. Вместо разных дат платежа остается одна. Это снижает вероятность ошибок. Подбор кредита в Казахстане упрощает поиск условий. Онлайн оформление экономит время: https://spisok-kreditov.ru/
Все легально и проверено, есть NMR. Плохого ни чего не случиться. Скорей всего приняли потому что были паленые…. купить кокаин, мефедрон, бошки, марихуану Ура! Скинул трек быстро) ждууууууу, отпишу.Желаю вам удачи в дальнейшей работе)
Уютное жилье для студента или молодого специалиста. 1-комнатная квартира недалеко от университета kvartira-borisov.ru. Всё необходимое есть. Цена ниже рынка за аккуратность.
Перекредитование в Казахстане подходит тем, у кого несколько активных займов. Все кредиты можно объединить в один. Это помогает снизить общий платеж. Онлайн подбор кредита упрощает поиск нового предложения. Финансовая нагрузка становится более предсказуемой, https://spisok-kreditov.ru/02_kredit-nalichnymi.html/
гаражи цены
Круглосуточное наблюдение, регулярные замеры, быстрые корректировки, спокойная среда и структурированный режим. Это снижает риски ночных ухудшений и помогает мягко «собрать» сон без агрессивных седативных решений.
Подробнее тут – vyvod-iz-zapoya-cena
Philly roofing? Roofers in Philly new roof installation, leak repair, restoration, and maintenance of roofing systems. Experienced specialists, modern technologies, reliable materials, and a personalized approach to each project.
netamplify.click – Appreciate the typography choices; comfortable spacing improved my reading experience.
Перед таблицей — важное пояснение: она помогает соотнести риски и плотность наблюдения ещё до осмотра. Окончательное решение принимает врач по клинической картине и переносимости, но ориентир даст понимание логики и бюджета времени.
Подробнее тут – https://narkologicheskaya-klinika-shchyolkovo0.ru/anonimnaya-narkologicheskaya-klinika-v-shchyolkovo
leadcircuit.click – Mobile version looks perfect; no glitches, fast scrolling, crisp text.
viralshift.click – Content reads clearly, helpful examples made concepts easy to grasp.
sitebloom.click – Overall, professional vibe here; trustworthy, polished, and pleasantly minimal throughout.
Ещё в 11-м году брал здесь чудесную фофу и другие ништяки.Тогда это был крутейший магаз.И вот после долгого перерыва они снова идут в гору.Заказ оперативность 5 упаковка 5 качество 5 цена лучше всех. купить кокаин, мефедрон, бошки, марихуану Хотя возможно привык к бычей реги, а ваша дает эффект похожий канаббнет так то обещал в среду или в четверг.
Когда уместен
Ознакомиться с деталями – https://narkologicheskaya-klinika-odincovo0.ru/
brandfunnel.click – Color palette felt calming, nothing distracting, just focused, thoughtful design.
Цель
Получить больше информации – http://narkologicheskaya-klinika-shchyolkovo0.ru
Мы строим лечение вокруг предсказуемости: минимум лишних вопросов, максимум конкретики и понятный план на ближайшие сутки. Дежурный врач уточняет только то, что влияет на безопасность — длительность эпизода, актуальные лекарства и переносимость, сон и апетит, наличие поддержки дома. Из этого скелета рождается маршрут: выезд на дом, приём без очередей или стационар с наблюдением 24/7. Конфиденциальность встроена по умолчанию: нейтральная коммуникация, доступ к карте только у вовлечённой команды, документы по запросу — в нейтральных формулировках. Внешний шум гасим, внимание переводим на цель: ровная стабилизация без «качелей» и с понятными контрольными точками.
Узнать больше – https://narkologicheskaya-klinika-domodedovo0.ru/narkologicheskaya-klinika-ceny-v-domodedovo/
Деньги в долг в Казахстане можно получить без сложных процедур. Онлайн кредитование экономит время и силы. Заявка заполняется в удобное время. Решение приходит в короткие сроки. Кредит наличными может быть выдан без залога spisok-kreditov.ru
Что включено на практике
Получить дополнительные сведения – наркологическая клиника отзывы
Объединить кредиты в один удобно при нескольких займах. Вместо разных дат платежа остается одна. Это снижает вероятность ошибок. Подбор кредита в Казахстане упрощает поиск условий. Онлайн оформление экономит время: spisok-kreditov.ru
Что включает на практике
Ознакомиться с деталями – besplatnaya-narkologicheskaya-klinika
В Волгограде сформирована система оказания наркологической помощи, включающая круглосуточные выезды специалистов, амбулаторное лечение, стационарные программы и реабилитацию. Такой подход позволяет охватить все категории пациентов — от тех, кто нуждается в экстренной помощи, до тех, кто готов пройти полный курс терапии. Независимо от формы оказания услуг, лечение проводится конфиденциально и в соответствии с медицинскими стандартами.
Разобраться лучше – https://narkologicheskaya-pomoshh-v-volgograde17.ru/narkologicheskaya-klinika-v-volgograde/
Ещё в 11-м году брал здесь чудесную фофу и другие ништяки.Тогда это был крутейший магаз.И вот после долгого перерыва они снова идут в гору.Заказ оперативность 5 упаковка 5 качество 5 цена лучше всех. купить кокаин, мефедрон, бошки, марихуану Да не магазин ровный несколько раз покупал у них, качество отличное. Только в аську бывает недостучатся.Получил свой заказ,дошло довольно быстро, спасибо chemical-mix.com , за нормальный вес и хорошию работу !
Капельница при интоксикации помогает быстро очистить организм от продуктов распада алкоголя, восстановить водно-солевой баланс и улучшить самочувствие. В состав раствора входят препараты, нормализующие обмен веществ и поддерживающие работу печени и сердечно-сосудистой системы. Уже через 20–30 минут после начала инфузии пациент ощущает значительное облегчение. Подбор лекарственных средств осуществляется строго индивидуально, с учётом возраста, массы тела и общего состояния здоровья.
Углубиться в тему – https://narkolog-na-dom-v-ufe17.ru/ufa-narkolog-psikhiatr
Ниже приведена таблица с типовыми компонентами капельницы и их действием:
Подробнее тут – https://vyvod-iz-zapoya-v-tolyatti17.ru/vyvod-iz-zapoya-na-domu-tolyatti-otzyvy/
Когда уместен
Получить больше информации – наркологическая клиника цены
Формат
Узнать больше – narkologicheskaya-klinika-domodedovo
Когда зависимость выходит из-под контроля, человеку необходима не просто медицинская помощь, а поддержка в безопасной и понимающей среде. Наркологическая клиника «Трезвый Выбор Рязань» предлагает пациентам комплексные программы лечения алкоголизма, наркомании и других форм зависимого поведения. Здесь работают врачи-наркологи, психотерапевты, психологи и медсёстры, обеспечивающие круглосуточное наблюдение и уход. Лечение проводится анонимно, с акцентом на восстановление здоровья, психологического равновесия и качества жизни.
Получить дополнительную информацию – http://narkologicheskaya-clinika-v-ryazani17.ru/
Формат
Подробнее – наркологическая клиника отзывы
Нужно 5 сообщений что бы написать модэратору, не обесуть https://moscowtomef.shop основу взял мяту и подорожник, мед. спирт-растворитель.1.зачем указано столько платежных систем,коли их нет?
Поклонники мобильного шутера Sniper 3D Assassin получили новый информационный ресурс, который станет настоящим помощником в освоении всех тонкостей игры. Портал Sniper3D.ru, запущенный в ноябре 2025 года, объединил под одной крышей детальные гайды по прохождению миссий в 21 регионе, подробные характеристики оружия всех уровней и практические советы по улучшению снаряжения. На https://sniper3d.ru/ игроки найдут актуальную информацию о спецоперациях, способах заработка золота и алмазов, а также секреты успешной игры на PvP-арене, что делает портал незаменимым инструментом как для новичков, так и для опытных снайперов.
Каждое вмешательство проходит через систему «цель > маркер > окно оценки > выключение модуля». Ниже приведена таблица, отражающая базовую логику диагностики и корректировки терапии в зависимости от состояния пациента.
Подробнее – частная наркологическая клиника красноярск
Проблемы с авто? автоэлектрик фольксваген спб диагностика, ремонт электрооборудования, блоков управления, освещения и систем запуска. Опыт, современное оборудование и точное определение неисправностей.
Такая комплексность обеспечивает воздействие на физические, психологические и социальные факторы зависимости.
Получить дополнительные сведения – лечение алкоголизма анонимно в омске
Если на предзвонке выявляются «красные флаги» — давящая боль в груди, одышка в покое, спутанность сознания, судороги, неукротимая рвота, резкое падение насыщения кислородом — мы организуем бесшовный перевод в стационар. Место резервируем заранее, логистику строим так, чтобы не привлекать внимания соседей и не затягивать старт лечения. При отсутствии угроз терапия может начаться дома с последующим телесопровождением и при необходимости — краткой госпитализацией.
Разобраться лучше – частная наркологическая клиника в саратове
Первым шагом на пути к выздоровлению является очищение организма от токсинов. В клинике проводится детоксикация с использованием современных препаратов, направленных на выведение продуктов распада алкоголя и наркотиков. Медикаментозное лечение дополняется витаминами, гепатопротекторами и средствами для нормализации работы нервной системы. Это помогает восстановить обмен веществ, улучшить сон, аппетит и общее самочувствие пациента.
Разобраться лучше – https://narkologicheskaya-klinika-v-voronezhe17.ru/chastnaya-narkologicheskaya-klinika-voronezh
“Думаю все угорали по детству Делали дымовушку “Гидропирит VS Анальгин” https://erazbor.ru Доброго времени суток Всем порядочным форумчанам-кто здесь заказывал,но трек так и не бьёться,или я один такой закинул 45к+доставка,и”жду у моря погоды”В скайпе вчера отвечали сегодня-игнор!Отличнный магазин
Что включено на практике
Узнать больше – http://narkologicheskaya-klinika-serpuhov0.ru
Формат
Углубиться в тему – http://www.domen.ru
Что получите за 24 часа
Углубиться в тему – narkologicheskaya-klinika-anonimnaya-pomoshch-narkologa
Теплая и светлая квартира на сутки в Вилейке. Удобная кровать, быстрый интернет. Идеально для рабочей поездки. Бронируйте telegra
Добрый день форумчане! Кто нибудь подскажет как по качеству реагент в этом магазине? Соответствует ли заявленная концентрация? Сколько по времени держит если 1 к 20 сделать? Всем спасибо!!! https://psyholog-olga-shubik.ru Обязательно позвонить должны, как позвонят легче забрать самому чем ждать пока курьер доставитгрозный луи оставил отзыв о магазине
https://indwin-app-7-india.com/
Стоимость зависит от длительности запоя, объёма инфузий, перечня препаратов и длительности наблюдения после капельницы. Мы заранее озвучиваем ориентир, объясняем, какие элементы плана обязательны, а какие — рекомендательные. Ночные выезды иногда дороже из-за нагрузки на бригаду, но при выраженных симптомах откладывать помощь небезопасно. Повторные обращения и расширенные программы стабилизации обсуждаются индивидуально. Ключевой ориентир для семьи — выбирать не «самую дешёвую капельницу», а безопасный формат с контролем и ответственным уходом.
Углубиться в тему – vyvod iz zapoya kruglosutochno
Corporate partnership guidance – Clear messaging, the concepts are easy to understand.
Что получите за 24 часа
Выяснить больше – наркологическая клиника нарколог
WFCC Environmental Hub – Informative and accessible, conservation and community efforts are highlighted effectively.
Отличная работа ребята! Вы проделали хорошую работу!!! я сначала думал что за херь мне пришла пока я не нашёл то что нужно)) а ваще сроки доставки 5+! конспирация 5+! качество позже отпишу, только еще на руки взял))) купить кокаин, мефедрон, бошки, марихуану упаковка – неплохо, но не идеально. Особенно глупо, когда в описании отправления пишут “Косметика”, а там, бл*ть, пачка сигарет. Оочень странно на меня смотрели в офисе спсра, знаете ли. 4/5Забизаю дамой хвотаю тожнецы взрываю посылку там рубашка. Примерно на ребенка 7 летнего (я надеился книга будит) но ладно и рубашка сойдет на тряпки вмашину ! Разворачиваю рубаху а там пакетик реги я быстрей за весами и за фотиком и писать ВАМ МОИ ДРУЗЬЯ!!!
Solutions Explorer – Engaging and helpful, content guides users toward effective solutions.
Формат
Подробнее тут – наркологическая клиника цены
Что получите за 24 часа
Узнать больше – http://narkologicheskaya-klinika-domodedovo0.ru
Формат
Ознакомиться с деталями – vyvod-narkologicheskaya-klinika
Чтобы быстро соотнести риски и требуемую плотность наблюдения, удобнее всего взглянуть на одну сводную таблицу. Она не заменяет очный осмотр, но помогает заранее понять логику: чем выше риски и вариабельность симптомов, тем плотнее мониторинг и быстрее доступ к корректировкам.
Выяснить больше – https://narkologicheskaya-klinika-korolyov0.ru/narkologicheskaya-klinika-stacionar-v-korolyove
В Волгограде сформирована система оказания наркологической помощи, включающая круглосуточные выезды специалистов, амбулаторное лечение, стационарные программы и реабилитацию. Такой подход позволяет охватить все категории пациентов — от тех, кто нуждается в экстренной помощи, до тех, кто готов пройти полный курс терапии. Независимо от формы оказания услуг, лечение проводится конфиденциально и в соответствии с медицинскими стандартами.
Углубиться в тему – https://narkologicheskaya-pomoshh-v-volgograde17.ru/narkologi-volgograd/
Каждый метод подбирается индивидуально, что обеспечивает безопасность и эффективность процесса.
Разобраться лучше – http://vyvod-iz-zapoya-omsk0.ru
Заказывал у этих ребят 203 и 5-IAI, качеством доволен. Заказы они оформляют долго, но зато отправляют быстро. Мне отправили в день оплаты! купить кокаин, мефедрон, бошки, марихуану Все окей пацаны))))это че то почта затупила,)))Кстати кач-во лучше стало)Первый раз 1 к 20 прям норм)))Отличное описание, сразу захотелось заказть)) Что собственно и сделал, надеюсь, неразачеруюсь
купить квартиру в жк жк светский лес сочи
Клиника в Красноярске придерживается комплексного подхода, при котором сочетаются медикаментозные и психотерапевтические методы. Такой подход позволяет воздействовать не только на физическую, но и на психологическую зависимость. Каждый пациент проходит детальное обследование, после чего врач-нарколог составляет индивидуальный план лечения с учётом стадии заболевания, состояния организма и наличия сопутствующих проблем со здоровьем.
Подробнее – анонимная наркологическая клиника красноярск
обувь химчистка услуги химчистка кожаной обуви
Что получите за 24 часа
Получить дополнительную информацию – http://narkologicheskaya-klinika-domodedovo0.ru/
Даже если симптомы кажутся незначительными, проведение инфузионной терапии значительно ускоряет процесс восстановления и предотвращает развитие осложнений.
Получить больше информации – https://kapelnicza-ot-zapoya-v-volgograde17.ru/kapelnicza-ot-alkogolya-volgograd
Видеосервис https://theserials.online/ открывает свободный доступ к богатому каталогу сериалов разнообразных жанров — от динамичных боевиков и триллеров до юмористических лент и волшебных историй. Ресурс систематически пополняется премьерами 2024-2025 годов, в том числе релизами Netflix, HBO, Disney+ и прочих ведущих производителей, гарантируя воспроизведение в отличном разрешении без обязательной авторизации. Интуитивная система поиска по государствам, категориям и датам релиза дает возможность оперативно обнаружить отечественные, турецкие, голливудские и западные сериалы для любых предпочтений.
Процесс включает несколько шагов:
Детальнее – https://narkolog-na-dom-v-ufe17.ru/narkolog-ufa-anonimno/
Перед таблицей — важное пояснение: она помогает соотнести риски и плотность наблюдения ещё до осмотра. Окончательное решение принимает врач по клинической картине и переносимости, но ориентир даст понимание логики и бюджета времени.
Подробнее тут – narkologicheskaya-klinika-so-stacionarom
sociallinkhub – Great platform for meeting people with similar interests online.
Такой алгоритм позволяет постепенно восстановить функции организма и подготовить пациента к дальнейшему лечению зависимости.
Подробнее можно узнать тут – вывод из запоя на дому цена в омске
corporatepartnerhub – Very user-friendly, makes commercial connections easy and fast.
Формат
Получить дополнительную информацию – https://narkologicheskaya-klinika-odincovo0.ru/chastnaya-narkologicheskaya-klinika-v-odincovo
enterprisebondguide – Practical and detailed advice, helped structure our enterprise bonds efficiently.
Чтобы быстро соотнести риски и требуемую плотность наблюдения, удобнее всего взглянуть на одну сводную таблицу. Она не заменяет очный осмотр, но помогает заранее понять логику: чем выше риски и вариабельность симптомов, тем плотнее мониторинг и быстрее доступ к корректировкам.
Ознакомиться с деталями – narkologicheskaya-klinika-otzyvy
Вывод из запоя требуется тогда, когда организм уже не способен самостоятельно справиться с последствиями алкогольной интоксикации. Длительное употребление спиртного приводит к нарушению работы внутренних органов, обезвоживанию и психическим расстройствам. Медицинская помощь помогает избежать опасных осложнений и облегчить процесс отказа от алкоголя.
Получить дополнительные сведения – нарколог на дом вывод из запоя
Основные признаки, при которых необходим вывод из запоя:
Подробнее можно узнать тут – вывод из запоя вызов на дом в тольятти
Комплексное применение этих методов позволяет значительно ускорить процесс восстановления и предотвратить осложнения.
Подробнее тут – https://narcologicheskaya-klinika-v-novokuzneczke17.ru/
Такие процедуры особенно эффективны на ранних стадиях лечения, когда важно быстро снять симптомы интоксикации и вернуть стабильное самочувствие. После курса капельниц пациенту становится легче концентрироваться, снижается раздражительность и тревожность, восстанавливается аппетит и сон.
Детальнее – наркологическая клиника наркологический центр рязань
connectwise – Excellent support, helped me find strategic business partners.
bizangles – Clear and actionable, improved my market understanding.
Одним из самых востребованных направлений является вывод из запоя. Это процедура, направленная на очищение организма от этанола и продуктов его распада, восстановление водно-солевого баланса и нормализацию работы нервной системы. Врач проводит обследование, определяет степень интоксикации и подбирает состав капельницы. Уже через 30–60 минут после начала процедуры состояние пациента заметно улучшается.
Подробнее тут – вызов наркологической помощи
Лечение зависимости в наркологической клинике проводится поэтапно. Это обеспечивает постепенное восстановление организма и исключает риск осложнений. Каждый этап направлен на устранение конкретных нарушений, вызванных употреблением психоактивных веществ.
Подробнее можно узнать тут – https://narcologicheskaya-klinika-v-krasnoyarske17.ru/chastnaya-narkologicheskaya-klinika-krasnoyarsk/
taskwise – Very useful guidance, allowed me to structure work effectively.
OBDNet resources – Helpful and well-organized, makes understanding car diagnostics easier.
отдыхай до понедельника купить кокаин, мефедрон, бошки, марихуану заказал у KingSize – всё ровно вышло. Большего и добавлять незачемв Самаре трудится данный магазин?
Build Something Meaningful – Inspiring content, ideas push creative projects forward each day.
smartworkflowhub – Actionable tips, enhanced efficiency and daily workflow significantly.
futuristichub – Online store is smooth and efficient, browsing through products is simple.
fasttrackshopping – Hub makes shopping smooth, found everything quickly without hassle.
Ниже приведена таблица с типовыми компонентами капельницы и их назначением:
Изучить вопрос глубже – вызвать капельницу от запоя на дому волгоград
valueallianceshub – The guidance here feels actionable and helped shape stronger long-term partnerships.
trusted store hub – Seamless shopping and dependable checkout made transactions quick.
Капельница при интоксикации помогает быстро очистить организм от продуктов распада алкоголя, восстановить водно-солевой баланс и улучшить самочувствие. В состав раствора входят препараты, нормализующие обмен веществ и поддерживающие работу печени и сердечно-сосудистой системы. Уже через 20–30 минут после начала инфузии пациент ощущает значительное облегчение. Подбор лекарственных средств осуществляется строго индивидуально, с учётом возраста, массы тела и общего состояния здоровья.
Разобраться лучше – врач нарколог выезд на дом уфа
strategic planning hub – Clear guidance that helped refine workflow and decision-making efficiently.
Каждый из методов подбирается индивидуально, что позволяет учитывать медицинские показания и личные особенности пациента.
Подробнее можно узнать тут – лечение алкоголизма цена пермь
Перед назначением инфузий врач проводит полную диагностику, чтобы исключить противопоказания. Капельницы часто комбинируются с медикаментами, поддерживающими сердечно-сосудистую систему и печень. Такой комплексный подход позволяет ускорить процесс очищения и улучшить общее состояние пациента уже после первого курса.
Подробнее тут – наркологическая клиника вывод из запоя в рязани
Practical learning tools – Promising setup, the resources look easy to understand and use.
Комплексное применение этих методов позволяет значительно ускорить процесс восстановления и предотвратить осложнения.
Подробнее тут – http://narcologicheskaya-klinika-v-novokuzneczke17.ru
В экстренных ситуациях семья ожидает не обещаний, а чётких действий. «Трезвый Ритм» в Королёве организует безопасный вывод из запоя с персональной схемой детоксикации, выездом врача 24/7 и последующей поддержкой, чтобы стабилизировать сон, снизить тревогу и предотвратить рецидив. Мы работаем деликатно и конфиденциально: вы получаете медицинскую помощь без очередей и формальностей, а также понятный план, что делать в первые критические сутки. Наши специалисты используют только проверенные протоколы, учитывают возраст, длительность эпизода и сопутствующие диагнозы, подбирают дозировки бережно и объясняют каждый шаг. Если на осмотре выявляются риски осложнений, мы сразу предложим стационар и возьмём на себя организацию перевода — безопасность всегда важнее спешки.
Подробнее можно узнать тут – [url=https://vyvod-iz-zapoya-korolev10.ru/]www.domen.ru[/url]
Ниже приведена таблица с примерными этапами терапии:
Подробнее можно узнать тут – https://vyvod-iz-zapoya-v-ryazani17.ru/vyvod-iz-zapoya-na-domu-ryazan-czeny/
Инфузионная терапия (капельницы) — важная часть лечения, направленная на очищение организма, восстановление водно-солевого баланса и устранение токсинов. В «РязаньМед Альянс» используются проверенные препараты, которые помогают нормализовать работу внутренних органов и улучшить общее самочувствие. Таблица ниже показывает, какие виды капельниц чаще всего применяются при выведении из запоя и лечении алкоголизма.
Получить дополнительные сведения – наркологическая клиника наркологический центр
ЕМИКАЛ МИКС – ЭТО ЛУЧШИЙ МАГАЗИН С МНОГОЛЕТНЕЙ РЕПУТАЦИЕЙ НА РЦ РЫНКЕ!!!! https://moskva.best Крутой качественный товар! Все своевременно +++Надеюсь. Очень жду! Кто уже попробовал скажите как вещество?! Не хуже чем было?
Своевременное обращение к специалистам позволяет быстро стабилизировать состояние и избежать осложнений.
Получить дополнительные сведения – https://vyvod-iz-zapoya-v-tolyatti17.ru
Когда выбрать
Исследовать вопрос подробнее – http://narkologicheskaya-klinika-domodedovo0.ru/chastnaya-narkologicheskaya-klinika-v-domodedovo/
Сеть фитнес клубов в Туле Хулиган https://hooligan1.ru/ это не просто тренажерка и фитнес, а сообщество тех, в ком живёт здоровый дух спорта и тяга к саморазвитию. Современный тренажерный спортзал с профессиональным спортивным оборудованием, бойцовской и кардио зоной. Сильная команда тренеров, нацеленных на результат. Подробнее на сайте.
businessalliancenetwork – Excellent networking guidance, helped expand professional connections quickly.
entrepreneurinsighttools – Provided clear, useful insights that I can act on today.
Особенность подхода заключается в сочетании медицинской и психологической поддержки. После кодирования пациент получает консультации психотерапевта, рекомендации по восстановлению и профилактике рецидивов. Это снижает риск повторного срыва и помогает закрепить результат на долгий срок.
Детальнее – https://kodirovanie-ot-alkogolizma-v-volgograde17.ru/kodirovanie-ot-alkogolya-v-volgograde
Транспортная компания “Открытый Краснодар” уже более пяти лет обеспечивает надежные пассажирские перевозки по всему региону и за его пределами. Профессиональные водители, современный автопарк и круглосуточная диспетчерская служба гарантируют комфорт и безопасность каждой поездки. Организация корпоративных мероприятий, свадебных кортежей, экскурсионных программ или вахтовых перевозок — на https://krasnodar-transport.ru/ вы найдете оптимальное решение для любых задач. Компания предлагает прозрачное ценообразование без скрытых доплат, своевременную подачу транспорта и безупречное техническое состояние всех автобусов и микроавтобусов.
Лечение алкоголизма в Перми осуществляется в специализированных медицинских учреждениях, где пациентам предоставляется комплексная помощь. Алкогольная зависимость требует системного подхода, сочетающего медицинские и психотерапевтические методы. В клиниках создаются условия для безопасного выведения из запоя, восстановления функций организма и дальнейшей реабилитации. Главная цель лечения заключается не только в снятии симптомов, но и в формировании устойчивой мотивации к трезвости.
Детальнее – http://lechenie-alkogolizma-perm0.ru/perm-lechenie-alkogolizma/https://lechenie-alkogolizma-perm0.ru
Когда уместен
Детальнее – blizhajshaya-narkologicheskaya-klinika
easycheckoutportal – User-friendly experience, made online buying fast and hassle-free.
В Королёве мы запускаем помощь без «многоходовок». С первого контакта дежурный врач аккуратно уточняет жалобы, длительность эпизода, принимаемые лекарства и сопутствующие диагнозы, после чего предлагает безопасную точку входа: выезд на дом, дневной формат или круглосуточный стационар. Каждое действие объясняется простым языком: зачем оно нужно, какого эффекта ждать в ближайшие часы и что будет считаться нормальной динамикой. Конфиденциальность заложена в процесс по умолчанию: минимально необходимый объём персональных данных, нейтральная коммуникация, ограниченный доступ к медкарте и отсутствие постановки на учёт. Такой порядок снимает лишнее напряжение у семьи и экономит самое ценное — время.
Ознакомиться с деталями – narkologicheskaya-klinika-nedorogo
Find Joy Daily – Uplifting and straightforward, content encourages daily practices for a happier life.
consumeradvicehub – Very reliable guidance, streamlined product selection efficiently.
Когда выбрать
Углубиться в тему – https://narkologicheskaya-klinika-domodedovo0.ru
onlineshoppingdigital – Smooth digital purchasing, found products and checked out without issues.
наблюдая за Вашей темой пришел к важному выводу: купить кокаин, мефедрон, бошки, марихуану Уважаемые покупатели, С НОВЫМ ГОДОМ!Успешных вам продаж и спокойной работы)
ideabuilder – Very practical suggestions, helped me find new approaches quickly.
The Gardens Community Portal – Peaceful and easy to read, neighborhood information is accessible.
partnership roadmap link – Guidance that helped plan partnerships more effectively and confidently.
Эти методы используются в комплексе и создают прочный фундамент для восстановления здоровья.
Исследовать вопрос подробнее – https://lechenie-alkogolizma-omsk0.ru/lechenie-narkomanii-i-alkogolizma-v-omske/
Такой алгоритм позволяет контролировать каждый аспект лечения, обеспечивая постепенное и безопасное восстановление. Врач-куратор отслеживает динамику и при необходимости корректирует программу.
Получить дополнительные сведения – http://
enterprise alliance hub – The guidance feels dependable and helped improve professional connections.
Перед таблицей важное пояснение: она помогает соотнести риски и плотность наблюдения ещё до осмотра. Окончательное решение принимает врач по клинической картине и переносимости, но ориентир даст понимание маршрута и бюджета времени.
Подробнее тут – наркологическая клиника анонимная помощь
shopdailyessentials – Easy to browse, received all items promptly and in order.
greentechinsights – Helpful tips that are easy to follow for better energy savings.
alliances and growth link – Clear insights that supported partnership initiatives and business scaling.
Процесс детоксикации проходит поэтапно, чтобы организм успевал адаптироваться к изменениям и не испытывал стресс. Каждый шаг направлен на достижение конкретного терапевтического эффекта. Ниже представлена таблица, отражающая ключевые стадии процедуры, применяемой в клинике «Трезвый Путь Волгоград».
Исследовать вопрос подробнее – вывод из запоя капельница в волгограде
Такой алгоритм позволяет постепенно восстановить функции организма и подготовить пациента к дальнейшему лечению зависимости.
Исследовать вопрос подробнее – вывод из запоя на дому цена в омске
Критически важный отрезок — первые 12–24 часа. Мы разбиваем его на «окна», в каждом из которых есть цель, набор действий, маркеры контроля и критерий перехода. Если целевой отклик не достигнут, меняем один параметр: темп инфузии, очередность модулей или поведенческую опору (свет/тишина/цифровой режим) — и назначаем новую точку оценки. Это сохраняет причинно-следственную связь и предотвращает полипрагмазию.
Подробнее можно узнать тут – https://narcologicheskaya-klinika-saratov0.ru/klinika-narkologii-saratov/
Услуга вывода из запоя в клинике сочетает профессионализм врачей, медицинскую точность и заботу. При этом обеспечивается полная конфиденциальность: данные пациентов не передаются в сторонние инстанции. Круглосуточный режим работы позволяет вызвать врача даже ночью — специалисты прибывают в течение 40–60 минут после обращения.
Получить дополнительную информацию – https://vivod-iz-zapoya-v-volgograde17.ru/vyvod-iz-zapoya-narkolog-na-dom-volgograd/
Кодирование от алкоголизма — это медицинская процедура, направленная на формирование устойчивого отвращения к спиртному и восстановление контроля над зависимым поведением. В клинике «ВолгоградМед Альянс» используются современные, научно обоснованные методы, которые позволяют не просто временно ограничить тягу, а глубоко перестроить психологические и биохимические механизмы зависимости. Каждая программа подбирается индивидуально, с учётом стажа употребления, состояния здоровья, мотивации и психоэмоционального фона пациента. Врачи обеспечивают анонимность, безопасность и круглосуточную поддержку, помогая восстановить не только физическое состояние, но и внутреннее равновесие.
Выяснить больше – клиника кодирования от алкоголизма в волгограде
Компания ООО ТК «Регион Новые Технологии» работает на российском рынке с 2011 года, реализуя промышленное оборудование: насосы свыше 19 разновидностей, электродвигатели, вентиляционные системы, частотные преобразователи и средства автоматизации от надежных изготовителей. Подробная информация доступна на сайте https://ufk-techno.ru/ Компания обеспечивает полный цикл сервиса — от подбора оборудования до гарантийного обслуживания, предлагает запчасти, ремонт, индивидуальную комплектацию и доставку по РФ и СНГ по конкурентным ценам.
Хоть скан хоть что вылаживайте, это не доказательство! доказательством для меня есть только поступление денег на счет. По чекам, сканам, и всему прочему я не работаю это не есть доказательство об оплате! купить кокаин, мефедрон, бошки, марихуану “Лазею я по форуму,точнее по веткам и на ветке Эскимоса вижу запись на Пробы”всё как всегда быстро ,чётко ,без всякой канители ,качество как всегда радует ,спасибо команде за работу,ВЫ ЛУЧШИЕ!!!!!!
clickforbizlearning – Very clear explanations, helped me learn complex topics quickly.
Лечение зависимости в наркологической клинике проводится поэтапно. Это обеспечивает постепенное восстановление организма и исключает риск осложнений. Каждый этап направлен на устранение конкретных нарушений, вызванных употреблением психоактивных веществ.
Детальнее – наркологическая клиника стационар в красноярске
В Королёве мы запускаем помощь без «многоходовок». С первого контакта дежурный врач аккуратно уточняет жалобы, длительность эпизода, принимаемые лекарства и сопутствующие диагнозы, после чего предлагает безопасную точку входа: выезд на дом, дневной формат или круглосуточный стационар. Каждое действие объясняется простым языком: зачем оно нужно, какого эффекта ждать в ближайшие часы и что будет считаться нормальной динамикой. Конфиденциальность заложена в процесс по умолчанию: минимально необходимый объём персональных данных, нейтральная коммуникация, ограниченный доступ к медкарте и отсутствие постановки на учёт. Такой порядок снимает лишнее напряжение у семьи и экономит самое ценное — время.
Подробнее можно узнать тут – https://narkologicheskaya-klinika-korolyov0.ru/narkologicheskaya-klinika-stacionar-v-korolyove
bizconnectionsportal – Platform is smooth and reliable, connected me with the right people.
Long-term business strategy – Cohesive message, the commitment to sustained partnerships comes across clearly.
futurefocusedu – Resources are practical and effective, made learning future-oriented skills simple.
buildstrategicpath – Strategy planning here is very useful, helped me organize future initiatives effectively.
Digital Knowledge Hub – Friendly and well-structured, content makes tech concepts easy to grasp.
Капельницы в «СаратовМед Профи» — это конструктор из тщательно подобранных модулей. Каждый модуль решает одну задачу и имеет свой ожидаемый горизонт эффекта. Важно не название, а логика: задача > опора среды > как проверяем > когда ждём результат.
Исследовать вопрос подробнее – нарколог вывод из запоя
savvybuyinghub – Advice here is practical, helped me make fast product decisions.
business alliance tips – Useful strategies that improved our networking and collaboration plans.
Вывод из запоя — это медицинская процедура, направленная на очищение организма от продуктов распада алкоголя и восстановление нормальной работы внутренних органов. В клинике «Трезвый Путь Волгоград» пациентам оказывается профессиональная помощь с использованием современных методов дезинтоксикации, медикаментозной поддержки и психологического сопровождения. Лечение проводится круглосуточно, включая выезд нарколога на дом. Такой формат помогает быстро стабилизировать состояние пациента, минимизировать риск осложнений и обеспечить безопасность при выходе из запоя любой продолжительности.
Подробнее тут – вывод из запоя вызов на дом в волгограде
Маршрут начинается с короткого скрининга, чтобы понять риски и условия дома. Мы согласуем окно приезда или время приёма, заранее подскажем, как подготовить пространство: тишина, доступ к воде и розетке, возможность прилечь. На месте врач фиксирует витальные показатели (АД, пульс, сатурация, температура), при показаниях выполняет ЭКГ и запускает детокс-терапию. Уже на старте вы получаете письменную памятку «на сутки»: режим сна и гидратации, «красные флажки» и точное время контрольной связи. Если домашний формат перестаёт быть достаточным, организуем перевод в стационар без пауз — темп лечения сохраняется.
Получить дополнительные сведения – http://narkologicheskaya-klinika-korolyov0.ru/
Что включает на практике
Исследовать вопрос подробнее – https://narkologicheskaya-klinika-korolyov0.ru/narkologicheskaya-klinika-narkolog-v-korolyove
В процессе лечения используются проверенные методики, которые в комплексе обеспечивают положительный эффект и снижают риск рецидива.
Подробнее тут – лечение алкоголизма анонимно омск
ЛУЧШИЕ ИЗ ЛУЧШИХ НЕ РАЗ ЗАКАЗЫВАЛ И БУДУ ЗАКАЗЫВАТЬ!!!! купить кокаин, мефедрон, бошки, марихуану Кстати, как и обещали, менеджер на праздниках выходил на работу каждый день на пару часов и всем отвечал, иногда даже целый день проводил общаясь с клиентами, уж не знаю, кому он там не ответил.21 мая заказал -23 получил трек.все ок ,жду посыл
Цель
Исследовать вопрос подробнее – anonimnaya-narkologicheskaya-klinika
strategicvisionhub – Clear guidance, made choosing next directions much easier.
Epilation treatment hub – Straightforward interface, the service descriptions are easy to follow.
infrastructureplanninghub – Partnership planning tips are helpful, simplified workflow and collaboration.
modern shopping hub – Browsing is smooth and product discovery is effortless.
Алкогольная интоксикация вызывает сильное обезвоживание и разрушает баланс электролитов в организме. Без медицинской помощи восстановление может занять несколько дней, а в тяжёлых случаях приводит к осложнениям. Капельница помогает безопасно и быстро вывести этанол и продукты его распада, восполнить уровень жидкости, снизить нагрузку на печень и сердечно-сосудистую систему. Процедура проводится амбулаторно или на дому, что делает её доступной и удобной для пациентов.
Получить дополнительную информацию – http://kapelnicza-ot-zapoya-v-volgograde17.ru/
Чтобы исключить суету и случайные усиления, первые часы делим на небольшие «окна»: цель — действие — маркер — критерий перехода. Если отклика нет, корректируется один элемент — темп инфузии, очередность модулей или поведенческий якорь — и назначается новая точка оценки.
Разобраться лучше – вывод из запоя клиника в саратове
Главная задача процедуры — быстрое выведение этанола и его метаболитов из организма, нормализация уровня электролитов, улучшение самочувствия и предотвращение осложнений. Лечение проводится как в клинике, так и на дому, что особенно удобно при тяжёлых состояниях, когда пациент не может самостоятельно добраться до медицинского учреждения.
Подробнее можно узнать тут – https://vyvod-iz-zapoya-v-tyumeni17.ru/
Наркологическая клиника «ВолгаДок Медикал» — это круглосуточная служба помощи, выстроенная вокруг принципов клинической безопасности, прозрачной коммуникации и поддержки пациента на каждом этапе. Мы соединяем стационар и выездные бригады в единую систему: первичный осмотр и стабилизация состояния, адресные инфузионные модули, мягкая коррекция сна и тревоги, последующее наблюдение с короткими «окнами» обратной связи. Все решения принимаются по показаниям и сопровождаются объяснением: какую цель преследуем, каким маркером измеряем, когда проверяем результат. Такой подход исключает хаотичные усиления, бережёт ресурс организма и даёт прогнозируемый клинический эффект.
Подробнее тут – наркологическая клиника саратов
relationnetworkzone – Helpful site for business contacts, very straightforward and user-friendly.
Благодаря комплексному подходу достигается не только снятие симптомов, но и долгосрочная стабилизация состояния пациента.
Изучить вопрос глубже – http://narkologicheskaya-pomoshh-v-volgograde17.ru/narkologicheskaya-klinika-v-volgograde/
Цель
Получить дополнительные сведения – http://narkologicheskaya-klinika-shchyolkovo0.ru
Что включено на практике
Изучить вопрос глубже – https://narkologicheskaya-klinika-odincovo0.ru/narkologicheskaya-klinika-stacionar-v-odincovo/
Купить права онлайн через нашу компанию — это быстро, удобно и надежно! Мы предлагаем полный комплекс услуг для получения водительских прав без лишних хлопот и очередей. Официальная поддержка, доступные цены и индивидуальный подход к каждому клиенту. Гарантируем легальность и безопасность сделки. Закажите права онлайн у нас и начните управлять автомобилем уже сегодня! Поддержка 24/7 и помощь на всех этапах оформления.
businessconnecttools – Helped our teams coordinate tasks quickly and efficiently.
почта России купить кокаин, мефедрон, бошки, марихуану привет!!! не согласен долдны быть доступные магазины какотпишите народ за 5 iai кто брал спс заранее
Капельница от запоя в Воронеже применяется для восстановления организма после длительного употребления алкоголя, устранения интоксикации и нормализации обменных процессов. Медицинская процедура проводится под контролем врача-нарколога, в клинике или на дому. Она позволяет быстро улучшить самочувствие, устранить головную боль, тремор, тошноту, обезвоживание и нарушения сна. Современные препараты действуют мягко, безопасно и без стресса для организма, обеспечивая плавный выход из запоя.
Получить больше информации – вызвать капельницу от запоя воронеж
Современные методы лечения в наркологической клинике в Новокузнецке основаны на доказательной медицине. При поступлении пациент проходит полное обследование, включающее оценку физического состояния, психоэмоционального фона и наличия сопутствующих заболеваний. На основе полученных данных составляется персональная программа терапии, охватывающая медицинский, психологический и социальный аспекты выздоровления.
Подробнее тут – http://narcologicheskaya-klinika-v-novokuzneczke17.ru/narkologiya-gorod-novokuzneczk/
Когда уместен
Узнать больше – narkologicheskaya-klinika-nedorogo
clickforcreativeideas – Inspiring innovations, sparked multiple ideas for new initiatives.
Ниже представлена таблица с основными препаратами, используемыми при выводе из запоя в Тюмени:
Изучить вопрос глубже – https://vyvod-iz-zapoya-v-tyumeni17.ru/vyvod-iz-zapoya-tyumen-otzyvy
Что получите за 24 часа
Изучить вопрос глубже – https://narkologicheskaya-klinika-domodedovo0.ru/narkologicheskaya-klinika-telefon-v-domodedovo
Комплексное проведение этих этапов обеспечивает полное восстановление организма и облегчает процесс последующего лечения зависимости.
Получить дополнительную информацию – вывод из запоя дешево рязань
Выездная бригада «МедОпоры» дежурит 24/7 и покрывает весь Красногорск и близлежащие районы. После короткого звонка дежурный уточняет длительность запоя, сопутствующие болезни, принимаемые препараты и аллергии — это экономит время на месте и помогает заранее предусмотреть риски. Врач приезжает с комплектом одноразовых систем, растворами и медикаментами, проводит экспресс-диагностику: измерение давления, пульса, сатурации, температуры, оценка неврологического статуса, степени обезвоживания и тревожности. По этим данным формируется индивидуальная схема инфузий и симптоматической поддержки. Наша задача — не просто «поставить капельницу», а безопасно развернуть план стабилизации, где дозировки и темп меняются по реакции организма. Если выявляются признаки осложнений или дома нет условий для безопасного наблюдения, сразу предлагаем перевод в профильный стационар, чтобы не терять драгоценные часы. Семья получает понятные роли и инструкции, а врач остаётся на связи для уточнений по режиму ближайшей ночи.
Узнать больше – vyvod iz zapoya cena
Каждая стадия лечения проходит под постоянным контролем медицинского персонала. Пациенты чувствуют себя в безопасности и получают поддержку не только физическую, но и психологическую. Такой подход снижает риск рецидива и помогает сохранить результат на долгие годы.
Выяснить больше – https://narkologicheskaya-klinika-v-ryazani17.ru/narkologicheskij-staczionar-ryazan
Вывод из запоя — это не «волшебная капельница», а последовательная медицинская программа с чёткими целями и измеримыми маркерами. В наркологической клинике «СаратовМед Профи» маршрут строится по принципу управляемых окон: на каждом шаге команда преследует одну цель, меняет лишь один параметр и оценивает результат в заранее назначённый момент. Такой подход снижает лекарственную нагрузку, предотвращает «гонку дозировок» и делает динамику предсказуемой для пациента и близких. Конфиденциальность обеспечивается регламентом: немаркированные выезды, нейтральные формулировки в документах, «тихие» каналы связи, доступ к записям — строго по ролям.
Детальнее – вывод из запоя на дому круглосуточно в саратове
searchrocket.click – Appreciate the typography choices; comfortable spacing improved my reading experience.
Процесс включает несколько шагов:
Получить больше информации – вызов врача нарколога на дом
adsforge.click – Bookmarked this immediately, planning to revisit for updates and inspiration.
quickbuyhub – Smooth checkout process, made online shopping simple and stress-free.
7k casino позволяет играть в онлайн режиме в любое удобное время. Платформа работает стабильно на компьютерах и мобильных устройствах. Навигация интуитивно понятна. Игровые сессии проходят без технических сложностей. Это делает процесс комфортным: 7k casino официальный сайт
В Волгограде сформирована система оказания наркологической помощи, включающая круглосуточные выезды специалистов, амбулаторное лечение, стационарные программы и реабилитацию. Такой подход позволяет охватить все категории пациентов — от тех, кто нуждается в экстренной помощи, до тех, кто готов пройти полный курс терапии. Независимо от формы оказания услуг, лечение проводится конфиденциально и в соответствии с медицинскими стандартами.
Изучить вопрос глубже – наркологическая помощь
seobeacon.click – Appreciate the typography choices; comfortable spacing improved my reading experience.
Mobihub allows seamless proxy management for multiple projects. Mobile IPs are suitable for sensitive operations. The service minimizes detection risks. High-speed connections support large workloads. This benefits professional users: private mobile proxy
Перед таблицей — важное пояснение: она помогает соотнести риски и плотность наблюдения ещё до осмотра. Окончательное решение принимает врач по клинической картине и переносимости, но ориентир даст понимание логики и бюджета времени.
Углубиться в тему – narkologicheskaya-klinika-stoimost
collaborationguideonline – Practical tips on team collaboration, helped streamline processes quickly.
digitaltide.click – Navigation felt smooth, found everything quickly without any confusing steps.
Цель и ожидаемая динамика
Углубиться в тему – lechenie-v-narkologicheskoj-klinike
Что получите за 24 часа
Ознакомиться с деталями – http://narkologicheskaya-klinika-domodedovo0.ru/narkologicheskaya-klinika-telefon-v-domodedovo/
businessinfrastructuretools – Very practical advice, reliable for establishing startup operations.
corporate partnership guide – Practical tips that helped align teams and improve collaborative strategies.
New Opportunity Finder – Exciting and intuitive, resources are presented in an accessible way.
shopcentralglobal – Easy to browse and purchase, platform works very well.
Ниже приведена таблица, отражающая примерную динамику состояния пациента после постановки капельницы:
Ознакомиться с деталями – выезд на дом капельница от запоя
Комплексная терапия включает несколько последовательных этапов, обеспечивающих полное восстановление организма и личности пациента. Каждый из них направлен на решение конкретных задач — от устранения интоксикации до закрепления устойчивой ремиссии.
Исследовать вопрос подробнее – наркологическая клиника лечение алкоголизма
Лечение алкоголизма в Перми в условиях специализированной клиники обеспечивает высокий уровень безопасности и результативности. Пациенты получают квалифицированную помощь в комфортных условиях и под наблюдением опытных специалистов.
Узнать больше – клиника лечения алкоголизма пермь
campaigncraft.click – Content reads clearly, helpful examples made concepts easy to grasp.
ну да, как скажут так и делают я уже говорил 11 из 10) купить кокаин, мефедрон, бошки, марихуану 6-9 мая также будут праздничные дни, в асе, скайпе отвечать не будут, но это не значит, что человек умер или захвачен))))Брал у данного селлера!Хорошо работют=)
Вывод из запоя в Омске проводится в условиях клиники с применением современных методов детоксикации и круглосуточного медицинского наблюдения. Длительное употребление алкоголя вызывает серьезную интоксикацию организма, нарушает работу внутренних органов и психоэмоциональное состояние. Своевременное обращение к специалистам позволяет избежать осложнений и восстановить здоровье пациента безопасным образом.
Подробнее – http://vyvod-iz-zapoya-omsk0.ru/vyvod-iz-zapoya-gorod-omsk/
alliances success hub – Useful advice that ensured partnerships were secure, trusted, and productive.
Примерный состав раствора, применяемого наркологом на дому в Уфе, приведён в таблице:
Разобраться лучше – нарколог на дом круглосуточно уфа
prolinker – Helpful tips, made networking with colleagues much easier.
infrastructurehub – Useful guidance, improved workflow for collaborative projects.
Инфузионная терапия подбирается под человека, а не под «среднюю» ситуацию. Базовый каркас обычно включает растворы для регидратации и коррекции электролитов, витамины группы B и магний для поддержки нервной системы. По показаниям добавляются гепатопротекторы и антиоксидантные компоненты — это помогает печени и снижает оксидативный стресс. Если есть выраженная тошнота, подключаем противорвотные; при тревоге и нарушении сна — мягкие анксиолитики и седативные препараты, которые не «вырубают», а выравнивают ритмы и сохраняют контакт для мониторинга. Мы избегаем агрессивных «миксов», потому что избыточная седация может скрыть опасные симптомы и усложнить оценку состояния. Эффективность оцениваем не только по субъективному облегчению, но и по объективным метрикам: пульс, давление, сатурация, динамика тремора, аппетит, качество сна. Как только показатели стабилизируются, фарм-нагрузка снижается, а ведущую роль берет режим — питание, гидратация, спокойный вечерний ритуал, короткие бытовые активности.
Узнать больше – http://vyvod-iz-zapoya-krasnogorsk10.ru
entrepreneurnextsteps – Very insightful tips, assisted in planning the next steps for new ventures.
Oviedo Padel Info – Helpful and clear, updates provide good guidance for players.
Главная задача процедуры — быстрое выведение этанола и его метаболитов из организма, нормализация уровня электролитов, улучшение самочувствия и предотвращение осложнений. Лечение проводится как в клинике, так и на дому, что особенно удобно при тяжёлых состояниях, когда пациент не может самостоятельно добраться до медицинского учреждения.
Получить дополнительные сведения – https://vyvod-iz-zapoya-v-tyumeni17.ru/vyvod-iz-zapoya-tyumen-kruglosutochno
Клиника в Волгограде руководствуется принципами индивидуального подхода, конфиденциальности и научно обоснованных методик. Врач-нарколог оценивает общее состояние пациента, определяет стадию зависимости и подбирает оптимальную терапевтическую схему. Лечение включает детоксикацию, медикаментозную поддержку, психотерапию и реабилитацию. Каждый пациент проходит лечение в безопасных условиях с постоянным медицинским наблюдением.
Узнать больше – лечение в наркологической клинике
7k casino предлагает удобный формат онлайн развлечений. Все игры доступны через браузер. Пользователь не тратит время на установку. Интерфейс быстро загружается. Это делает сервис практичным: 7k casino официальный сайт
Business partnership directory – Well-framed idea, the structure feels useful for companies.
В Волгограде сформирована система оказания наркологической помощи, включающая круглосуточные выезды специалистов, амбулаторное лечение, стационарные программы и реабилитацию. Такой подход позволяет охватить все категории пациентов — от тех, кто нуждается в экстренной помощи, до тех, кто готов пройти полный курс терапии. Независимо от формы оказания услуг, лечение проводится конфиденциально и в соответствии с медицинскими стандартами.
Выяснить больше – https://narkologicheskaya-pomoshh-v-volgograde17.ru/narkologi-volgograd/
Благодаря комплексному подходу достигается не только снятие симптомов, но и долгосрочная стабилизация состояния пациента.
Получить больше информации – круглосуточная наркологическая помощь в волгограде
Вывод из запоя в Тольятти — это медицинская процедура, направленная на очищение организма от продуктов распада алкоголя и восстановление нормального состояния здоровья. Длительное употребление спиртных напитков приводит к серьёзной интоксикации, нарушению работы нервной, сердечно-сосудистой и пищеварительной систем. Самостоятельные попытки прекратить запой могут быть опасны, поэтому оптимальным решением является обращение к врачу-наркологу, который проведёт лечение безопасно и эффективно.
Узнать больше – вывод из запоя на дому круглосуточно тольятти
Ищете изготовление печатных плат екатеринбург? techno-svyaz.ru — уральское производство печатных плат любых конфигураций на базе инновационных импортных решений и качественных расходных материалов ведущих мировых брендов. Предприятие обеспечивает комплексное обслуживание от конструирования и создания до сборочных работ с машинной и ручной установкой компонентов, реализуя как штучные прототипы, так и массовые партии. Квалифицированный персонал, собственное производство и короткие сроки изготовления обеспечивают высокое качество продукции для заказчиков любого масштаба.
Благодаря комплексному подходу достигается не только снятие симптомов, но и долгосрочная стабилизация состояния пациента.
Исследовать вопрос подробнее – http://narkologicheskaya-pomoshh-v-volgograde17.ru/narkologicheskaya-klinika-v-volgograde/
Что получите за 24 часа
Узнать больше – narkologicheskaya-klinika-domodedovo0.ru/
Врач приезжает с одноразовыми системами и препаратами, проводит экспресс-диагностику, стартует инфузии и каждые 15–20 минут оценивает динамику, корректируя темп и состав. По завершении — памятка по режиму, гигиене сна, питанию и запретам на 24–72 часа, а также контакты для связи ночью.
Подробнее – вывод из запоя вызов на дом
Состав капельницы подбирается индивидуально, с учётом степени опьянения, возраста и хронических заболеваний пациента. Врач определяет дозировку и комбинацию препаратов, чтобы процедура прошла безопасно и эффективно.
Получить больше информации – http://kapelnicza-ot-zapoya-v-voronezhe17.ru/kapelnicza-ot-alkogolya-voronezh/
Когда выбрать
Выяснить больше – анонимная наркологическая клиника
Продолжительность процедуры — от 40 минут до полутора часов. Уже в первые часы после начала терапии состояние пациента значительно улучшается: проходит тошнота, снижается тревожность, восстанавливается координация движений.
Узнать больше – скорая вывод из запоя тольятти
Knowledge Sharing Hub – Supportive and insightful, content encourages learning from others.
Цель
Получить дополнительные сведения – http://
Чтобы процедура прошла быстрее и спокойнее, подготовьте пространство и информацию о пациенте заранее: это экономит время и повышает безопасность.
Подробнее – http://vyvod-iz-zapoya-korolev10.ru
Формат
Подробнее тут – наркологическая клиника недорого
Мы выезжаем в любое время дня и ночи. Организационно всё просто: короткий звонок с описанием состояния, согласование адреса и времени, консультация по подготовке помещения, приезд врача. Если состояние тяжёлое (длительный запой, возраст 60+, выраженная соматика, признаки делирия, многократная рвота, спутанность сознания), медик предложит стационар сразу — это безопаснее, чем пытаться «дотянуть» ночь дома. В клинике пациент находится под круглосуточным наблюдением, при необходимости выполняются дополнительные исследования, расширяется объём инфузий, корректируется медикаментозная схема. Для пожилых и кардиологических пациентов стационарный формат часто предпочтителен: непрерывный мониторинг снижает риски и ускоряет стабилизацию.
Получить дополнительную информацию – https://vyvod-iz-zapoya-korolev10.ru/vyvesti-iz-zapoya-korolev
Врач приезжает с одноразовыми системами и препаратами, проводит экспресс-диагностику, стартует инфузии и каждые 15–20 минут оценивает динамику, корректируя темп и состав. По завершении — памятка по режиму, гигиене сна, питанию и запретам на 24–72 часа, а также контакты для связи ночью.
Разобраться лучше – srochnyj-vyvod-iz-zapoya
Я ночью с ним договорился в аське,мне он тоже отвечал через 15-30 минут на сообщение) https://kratkoe-soderjanie.ru хотел бы взять пару грамм на пробу, Амки, как это осуществить, уважаемый селлер подскажите пожалуйстанервные клетки
Цель
Узнать больше – vyvod-narkologicheskaya-klinika
Круглосуточное наблюдение, регулярные замеры, быстрые корректировки, спокойная среда и структурированный режим. Это снижает риски ночных ухудшений и помогает мягко «собрать» сон без агрессивных седативных решений.
Изучить вопрос глубже – http://vyvod-iz-zapoya-odincovo10.ru/vyvesti-iz-zapoya-v-odincovo/
Всем привет, СК есть опт? купить кокаин мефдрон и бошки Всем привет. Рега есть в наличии?д не магаз рооовный так что не переживай все будет четко)))
Стоимость зависит от длительности запоя, объёма инфузий, перечня препаратов и длительности наблюдения после капельницы. Мы заранее озвучиваем ориентир, объясняем, какие элементы плана обязательны, а какие — рекомендательные. Ночные выезды иногда дороже из-за нагрузки на бригаду, но при выраженных симптомах откладывать помощь небезопасно. Повторные обращения и расширенные программы стабилизации обсуждаются индивидуально. Ключевой ориентир для семьи — выбирать не «самую дешёвую капельницу», а безопасный формат с контролем и ответственным уходом.
Подробнее можно узнать тут – https://vyvod-iz-zapoya-korolev10.ru/vyvod-iz-zapoya-na-domu-korolev
Стоимость зависит от длительности запоя, объёма инфузий, перечня препаратов и длительности наблюдения после капельницы. Мы заранее озвучиваем ориентир, объясняем, какие элементы плана обязательны, а какие — рекомендательные. Ночные выезды иногда дороже из-за нагрузки на бригаду, но при выраженных симптомах откладывать помощь небезопасно. Повторные обращения и расширенные программы стабилизации обсуждаются индивидуально. Ключевой ориентир для семьи — выбирать не «самую дешёвую капельницу», а безопасный формат с контролем и ответственным уходом.
Углубиться в тему – https://vyvod-iz-zapoya-korolev10.ru/vyvod-iz-zapoya-v-stacionare-korolev/
Прежде чем показывать варианты, зафиксируем логику: интенсивность наблюдения должна соответствовать рискам и переносимости терапии. Таблица ниже помогает быстро сопоставить ситуацию и формат; окончательное решение принимает врач после очного осмотра и оценки реакции на первые вмешательства.
Ознакомиться с деталями – http://narkologicheskaya-klinika-krasnogorsk0.ru
Всем добра! Вчера позвонил курьер, сказал, что посылка в городе! Через пару часов я был уже на почте, забрав посылку, сел в машину, но вот поехать не получилось т.к. был задержан сотрудниками МИЛИЦИИ!!!! Четыре часа в отделении и пошёл домой!!! Экспертиза показала, что запрета нет, но сам факт приёмки очень напряг!!! Участились случаи приёмки на данной почте!!!!! Продаванам СПАСИБО и РЕСПЕКТ за чистоту реактивов!!! Покупатели держите ухо востро!!!!!!!!!! Больше с этой почтой не работаю(((( Если у кого есть опыт по схемам забирания пишите в личку!!! купить кокаин мефдрон и бошки Возможно сказалась бессонная ночь и отсутствие нормального питания на протяжении практически недели, но все время под туси я провел лежа на кровати и созерцая слааабенькие визуальчики. В общем, 4 из 6 сказали, что магазин – шляпа, и больше никогда тут ничего не возьмут.вот пару часиков назад получил посылочку=) Чай так сказать=) ща сижу под ним в курочки уплетаю уже 3 разорвиебало бутерброд=)ЫЫЫ
5 iai вообще говорят “беспонтовый” продукт… сколько народу его от рaзных сeлеров не пробовало – всё одно муть… https://videoline63.ru Аптечные травы вообщем.Отзыв о продукте дам в определённой теме Спасибо за вашу хорошую работу Chemical-mix.com?
Что включено на практике
Изучить вопрос глубже – https://narkologicheskaya-klinika-krasnogorsk0.ru/chastnaya-narkologicheskaya-klinika-v-krasnogorske/
Формат
Углубиться в тему – narkologicheskaya-klinika-pomoshch-na-domu
Не всегда человек способен самостоятельно прекратить приём алкоголя и восстановиться. Есть состояния, требующие немедленного вмешательства специалистов. Обратиться за помощью необходимо, если наблюдаются следующие признаки:
Углубиться в тему – вывод из запоя в стационаре
Когда уместен
Подробнее – https://narkologicheskaya-klinika-krasnogorsk0.ru/narkologicheskaya-klinika-ceny-v-krasnogorske
Что то много новичков устраивают здесь флуд.А магаз на самом деле хорош.Помню его еще когда занимался курьерскими доставками,коспирация и качество товара было на высшем уровне. https://excelion-info.ru грозный луи оставил отзыв о магазинемагазин роботает отлично сам проверил и не поверю не каму кто скажет что это не так
Такая форма помощи позволяет избежать осложнений, которые часто сопровождают попытки снять симптомы самостоятельно. При правильном подборе препаратов уже через час наблюдается улучшение самочувствия: уходит головная боль, снижается тревога, стабилизируется сердцебиение и восстанавливается ясность мышления. Пациент получает рекомендации по питанию, режиму отдыха и приёму витаминов, чтобы закрепить результат и предотвратить повторный срыв.
Исследовать вопрос подробнее – нарколог капельница на дом в воронеже
Работа клиники строится на принципах индивидуального подхода, доказательной медицины и строгого соблюдения конфиденциальности. Каждый пациент проходит обследование, в ходе которого оценивается состояние организма, выявляется стадия зависимости и сопутствующие нарушения. На основе полученных данных разрабатывается персональная программа лечения, включающая медицинские, психологические и социальные методы коррекции поведения.
Подробнее можно узнать тут – https://narkologicheskaya-klinika-v-voronezhe17.ru
Первым шагом на пути к выздоровлению является очищение организма от токсинов. В клинике проводится детоксикация с использованием современных препаратов, направленных на выведение продуктов распада алкоголя и наркотиков. Медикаментозное лечение дополняется витаминами, гепатопротекторами и средствами для нормализации работы нервной системы. Это помогает восстановить обмен веществ, улучшить сон, аппетит и общее самочувствие пациента.
Разобраться лучше – запой наркологическая клиника
кабель с ПВХ изоляцией https://telegra.ph/Nyuansy-vybora-kabelya-s-PVH-izolyaciej-01-26
Думка спеціалістів особливо цінна на старті робіт. У статті ремонт квартир: поради експертів https://vseproremont.com/ подані перевірені рекомендації. Вони базуються на практичному досвіді.
Мы проверяем не «ощущения», а факты: частоту пульса в покое, вариабельность ритма к сумеркам, переносимость тёплой воды малыми глотками, минуты до сна и количество ночных пробуждений. Эти короткие метки позволяют тонко управлять темпом инфузии, очередностью модулей и «тихими» ритуалами вечернего времени без необоснованного усиления препаратов.
Подробнее можно узнать тут – нарколог на дом недорого саратов
Такой подход обеспечивает не только устранение симптомов зависимости, но и глубокое восстановление личности. Пациенты получают поддержку врачей на каждом этапе, что делает процесс безопасным и контролируемым.
Детальнее – наркологическая клиника вывод из запоя ростов-на-дону
Состояние запоя представляет опасность не только для физического здоровья, но и для психики человека. Продолжительное употребление алкоголя приводит к тяжёлой интоксикации, нарушению обмена веществ и психоэмоциональной нестабильности. В таких случаях самостоятельный выход из запоя может быть опасен, а иногда и невозможен. Врачи «Южного Центра Медицинского Восстановления» оказывают квалифицированную помощь с выездом на дом и круглосуточным приёмом пациентов. Используя современные методы детоксикации и мониторинга состояния, специалисты обеспечивают безопасное восстановление организма и минимизируют риски осложнений.
Разобраться лучше – https://vyvod-iz-zapoya-v-rnd19.ru/vyvedenie-iz-zapoya-rostov-na-donu
Такая комплексность обеспечивает воздействие на физические, психологические и социальные факторы зависимости.
Детальнее – нарколог лечение алкоголизма
Выезд на дом удобен, но не всегда безопасен. Если запой длится больше трёх–пяти суток, присутствует повторная рвота, выраженная слабость, спутанность сознания, судорожная готовность или резкие «качели» давления и пульса, лучше не тянуть и ехать в стационар. Для пациентов старшего возраста и при тяжелой соматике (ИБС, гипертония, диабет, хронические заболевания печени/почек) круглосуточный мониторинг уменьшает риск осложнений и позволяет гибко расширять схему лечения. В стационаре доступна приборная диагностика, тщательный контроль жизненных показателей и быстрая коррекция терапии, если клиническая картина меняется. Мы организуем медицинскую транспортировку, встречу на входе, расширенный осмотр и запуск персонального протокола без задержек. Семья при этом остаётся в информационном контуре: врач объясняет смысл каждого шага и ожидаемый эффект, чтобы решения были осознанными, а не продиктованными паникой или усталостью.
Детальнее – http://vyvod-iz-zapoya-krasnogorsk10.ru
Выезд на дом удобен, но не всегда безопасен. Если запой длится больше трёх–пяти суток, присутствует повторная рвота, выраженная слабость, спутанность сознания, судорожная готовность или резкие «качели» давления и пульса, лучше не тянуть и ехать в стационар. Для пациентов старшего возраста и при тяжелой соматике (ИБС, гипертония, диабет, хронические заболевания печени/почек) круглосуточный мониторинг уменьшает риск осложнений и позволяет гибко расширять схему лечения. В стационаре доступна приборная диагностика, тщательный контроль жизненных показателей и быстрая коррекция терапии, если клиническая картина меняется. Мы организуем медицинскую транспортировку, встречу на входе, расширенный осмотр и запуск персонального протокола без задержек. Семья при этом остаётся в информационном контуре: врач объясняет смысл каждого шага и ожидаемый эффект, чтобы решения были осознанными, а не продиктованными паникой или усталостью.
Подробнее тут – https://vyvod-iz-zapoya-krasnogorsk10.ru/vyvod-iz-zapoya-cena-v-krasnogorske
В Одинцово доступен гибкий маршрут: выездная бригада 24/7 и стационар. Домашний формат хорош при умеренной симптоматике и сохранённом контакте — он позволяет избежать перевозок и сохранить конфиденциальность. Стационар предпочтителен при длительном эпизоде, повторной рвоте, выраженной слабости, нестабильном давлении/пульсе, спутанности сознания, судорожной готовности, а также у пациентов старшего возраста и при тяжёлой соматике (ИБС, гипертония, диабет, хронические болезни печени/почек). Мы оцениваем не один признак, а совокупность факторов и динамику, чтобы не «пересидеть» дома там, где нужен приборный мониторинг. В обоих вариантах сохраняется наш принцип: индивидуализация схемы, осторожная седация, прицельная работа со сном, прозрачные объяснения назначений — и всё это с опорой на объективные показатели, а не ощущения «полегчало/ухудшилось».
Получить дополнительные сведения – https://vyvod-iz-zapoya-odincovo10.ru/
Выезд на дом удобен, но не всегда безопасен. Если запой длится больше трёх–пяти суток, присутствует повторная рвота, выраженная слабость, спутанность сознания, судорожная готовность или резкие «качели» давления и пульса, лучше не тянуть и ехать в стационар. Для пациентов старшего возраста и при тяжелой соматике (ИБС, гипертония, диабет, хронические заболевания печени/почек) круглосуточный мониторинг уменьшает риск осложнений и позволяет гибко расширять схему лечения. В стационаре доступна приборная диагностика, тщательный контроль жизненных показателей и быстрая коррекция терапии, если клиническая картина меняется. Мы организуем медицинскую транспортировку, встречу на входе, расширенный осмотр и запуск персонального протокола без задержек. Семья при этом остаётся в информационном контуре: врач объясняет смысл каждого шага и ожидаемый эффект, чтобы решения были осознанными, а не продиктованными паникой или усталостью.
Углубиться в тему – http://vyvod-iz-zapoya-krasnogorsk10.ru/vyvod-iz-zapoya-cena-v-krasnogorske/
BlackSprut marketplace сайт
bs2best at
Актуальная информация о событиях в России и мире доступна на новостном портале http://worldtodaynews.net/, который ежедневно публикует свежие репортажи и аналитику. Рубрики охватывают политику, экономику, науку, спорт, здоровье, финансы, культуру и автомобильную тематику. Читатели получают оперативные сводки о важнейших событиях дня с комментариями экспертов и фактической базой. Удобная навигация позволяет быстро находить интересующие материалы, а регулярное обновление контента гарантирует доступ к самым последним новостям без задержек.
BlackSprut marketplace сайт
bs2best at
BlackSprut marketplace сайт
bs2best at
Современный шопинг стремительно меняется, и на российском рынке появляются новые площадки, предлагающие удобные условия как для покупателей, так и для продавцов. Маркетплейс https://latorga.ru/ объединяет множество категорий товаров — от одежды и обуви до электроники и автотоваров, создавая единое пространство для комфортных покупок. Платформа ориентирована на развитие отечественного онлайн-ритейла и предлагает бизнесу выгодные тарифы для размещения. Интуитивно понятный интерфейс, возможность выбора товаров от разных партнеров и удобная система навигации делают покупки простыми и приятными для пользователей из любого города России.
Этот обзор предлагает свежий взгляд на предметы, которые и без того привычны. Мы упоминаем факты, не имеющие большого значения, и события с неясной важностью, но они присутствуют здесь.
Подробнее читать – таблетки для аборта
BlackSprut marketplace сайт
bs2best at
Освежающая газированная вода утоляет жажду и дарит бодрость в жаркие дни. Компания https://voda-s-gor.ru/158/ доставляет в Махачкалу и Каспийск популярные марки: Ледяная гор, Пилигрим и BabugenT в форматах 0,5 и 1,5 литра. Цены начинаются от 310 рублей за упаковку, доступна слабогазированная и сильногазированная вода. Удобный сервис позволяет заказать продукцию в один клик с доставкой домой или в офис, избавляя от необходимости носить тяжелые бутылки из магазина. Лицензированная продукция гарантирует безопасность.
Путешествие по Краснодарскому краю становится по-настоящему свободным, когда у вас есть собственный автомобиль. Сервис https://prokat.car-trip.ru/ предлагает аренду машин в Краснодаре, Новороссийске, Анапе и Геленджике на максимально выгодных условиях — без залога, скрытых платежей и ограничений по пробегу. В автопарке представлены автомобили разных классов: от стандарта до бизнеса, кроссоверы, минивэны и даже кабриолеты для тех, кто хочет почувствовать всю прелесть южного солнца. Разрешен выезд в Крым, что особенно важно для туристов, планирующих путешествие по всему Черноморскому побережью.
BlackSprut marketplace сайт
bs2best at
BlackSprut marketplace сайт
bs2best at
https://mhp.ooo/
купить права
Ищете, где купить права по выгодной цене? У нас вы найдете лучшие предложения на оформление водительских удостоверений с гарантией качества и быстротой оформления. Мы предлагаем доступные цены, прозрачные условия и полный спектр услуг для получения водительских прав без лишних затрат и рисков. Наши специалисты помогут выбрать оптимальный вариант, проконсультируют по всем вопросам и обеспечат поддержку на всех этапах. Покупка прав у нас – это надежность, законность и экономия вашего времени и денег. Узнайте больше прямо сейчас!
Основные этапы обычно включают:
Детальнее – вывод из запоя в домашних условиях
https://mhp.ooo/
Такой подход позволяет достичь устойчивого результата без срывов и рецидивов. Пациенты получают помощь не только на уровне физиологии, но и на уровне личностных изменений, что делает лечение глубоким и эффективным.
Углубиться в тему – http://narcologicheskaya-clinika-v-rnd19.ru
Лучшее казино ап икс официальный играйте в слоты и live-казино без лишних сложностей. Простой вход, удобный интерфейс, стабильная платформа и широкий выбор игр для отдыха и развлечения.
Такой подход обеспечивает не только устранение симптомов зависимости, но и глубокое восстановление личности. Пациенты получают поддержку врачей на каждом этапе, что делает процесс безопасным и контролируемым.
Подробнее можно узнать тут – наркологические клиники алкоголизм ростов-на-дону
Вывод из запоя в Раменском в условиях клиники строится не вокруг одной капельницы, а вокруг понятной цепочки шагов, где каждый этап логичен и медицински обоснован. Это помогает не только быстро облегчить состояние, но и уменьшить вероятность того, что через пару дней человек снова уйдёт в запой.
Получить больше информации – vyvod-iz-zapoya-na-domu
Ищете профессиональную переподготовку или повышение квалификации? Посетите https://rostbk.com/ – это центр дистанционного образования, у которого более 2000 программ обучения с выдачей диплома и выгодными ценами. Мы входим в ТОП учебных заведений с квалифицированными преподавателями. Лучшие курсы у нас, а обучение онлайн из любого региона.
В клинической практике используются следующие этапы лечения:
Разобраться лучше – наркологические клиники алкоголизм ростов-на-дону
Круглосуточное наблюдение, регулярные замеры, быстрые корректировки, спокойная среда и структурированный режим. Это снижает риски ночных ухудшений и помогает мягко «собрать» сон без агрессивных седативных решений.
Подробнее – http://vyvod-iz-zapoya-odincovo10.ru
Для оценки состояния используется расширенная диагностика: лабораторные анализы, ЭКГ, психологическое тестирование и биохимические маркеры. По результатам обследования составляется индивидуальный план, включающий детоксикацию, фармакотерапию и реабилитационные мероприятия. Ниже представлена таблица, описывающая структуру этапов лечения.
Выяснить больше – лечение в наркологической клинике ростов-на-дону
Сначала — короткое интервью по телефону: адрес в Одинцово, длительность запоя, препараты, хронические заболевания, аллергии. Это экономит 15–20 минут на месте и помогает заранее спланировать безопасные дозы. По прибытии — осмотр, запуск инфузий и параллельная симптоматическая терапия: противорвотные при тошноте, анксиолитики при тревоге, аккуратная седация к ночи, если есть бессонница. Мы не «усыпляем» пациента — поддерживаем контакт для информативного мониторинга. На протяжении процедуры фиксируем динамику, регулируем скорость капельниц, выстраиваем щадящую гидратацию и лёгкое питание. Если картина меняется, быстро перестраиваем план. На выходе — письменные рекомендации и маршрут продолжения (амбулаторные визиты, дневной стационар или полноценное отделение). Такой алгоритм убирает случайность результата: эффект держится не на удаче, а на чётких действиях команды и дисциплине первых суток.
Изучить вопрос глубже – http://vyvod-iz-zapoya-odincovo10.ru/
Лечебный процесс организуется таким образом, чтобы каждый этап логически дополнял предыдущий и формировал устойчивую динамику. Это позволяет избежать резких изменений состояния и поддерживать медицинскую безопасность.
Исследовать вопрос подробнее – запой наркологическая клиника ростов-на-дону
Такой подход позволяет наркологической клинике в Краснодаре выстраивать лечение в безопасной и профессиональной среде.
Исследовать вопрос подробнее – платная наркологическая клиника
Ниже представлена таблица с ключевыми направлениями терапии, применяемыми в клинике, и их особенностями.
Детальнее – наркологическая клиника наркологический центр в ростове-на-дону
В статье-обзоре представлены данные сомнительной актуальности и факты без явной взаимосвязи. Читатель ознакомится с разными мнениями, хотя они вряд ли существенно изменят его представление о теме.
Подробнее читать – кето диета за неделю минус 10 кг
https://mhp.ooo/
В практике лечения 24/7 применяются следующие этапы:
Выяснить больше – вывод наркологическая клиника в краснодаре
Для жителей Ростова-на-Дону клиника «Южный МедКонтроль» предлагает два формата помощи: лечение в стационаре и амбулаторные визиты врача на дом. Стационар оборудован всем необходимым для круглосуточного медицинского наблюдения, проведения инфузионных процедур и лабораторной диагностики. Пациентам предоставляется комфортное размещение, спокойная обстановка и постоянный контроль состояния. При выезде на дом врачи действуют оперативно — приезжают в течение часа, проводят осмотр, устанавливают капельницы, купируют абстиненцию и дают рекомендации по дальнейшему лечению.
Разобраться лучше – наркологические клиники алкоголизм в ростове-на-дону
Наркологическая клиника в Ростове-на-Дону рассматривается как специализированное медицинское пространство, где помощь при зависимостях строится на сочетании клинических протоколов, наблюдения и поэтапного восстановления. В клинике «Южный Вектор» подход ориентирован на комплексное понимание зависимости как хронического состояния, затрагивающего физиологические и психические механизмы. Практика показывает, что эффективная терапия возможна только при строгом соблюдении стандартов и системном контроле динамики состояния пациента. Наркологическая клиника в Ростове-на-Дону функционирует в условиях повышенного спроса, что требует чёткой организации процессов и медицинской ответственности.
Выяснить больше – частная наркологическая клиника
Анонимность в клинике «Южный Контур» является важным клиническим фактором, влияющим на эффективность лечения. Наркологическая клиника в Краснодаре выстраивает процессы так, чтобы минимизировать психологическое напряжение пациента и исключить внешние социальные риски. Практика показывает, что при сохранении конфиденциальности повышается приверженность терапии и точность диагностической информации, что напрямую отражается на стабильности результатов лечения.
Подробнее – http://www.domen.ru
Вывод из запоя — это всегда баланс между скоростью и безопасностью. Дома трудно заметить скрытые ухудшения, особенно ночью: давление и пульс «гуляют», нарастает обезвоживание, сон рваный и тревожный. В «Трезвом Контуре» этот хаос замещается управляемостью: перед выездом дежурный врач собирает ключевые данные (длительность эпизода, лекарства, аллергии, сопутствующие болезни), на месте проводится экспресс-диагностика (АД, ЧСС, сатурация, температура, неврологический статус, степень обезвоживания), затем запускается схема терапевтической поддержки. Мы постоянно «подстраиваем» инфузии по реакции организма, а не по шаблонной карте: где-то важнее регидратация, где-то — коррекция электролитов, где-то — бережная седация для ночи. Для семьи это значит одно: меньше догадок, больше ясности. Если по картине риски высоки, мы аргументированно предлагаем стационар в Одинцово — и организуем транспортировку без пауз, потому что цена задержки в такие часы всегда выше.
Узнать больше – https://vyvod-iz-zapoya-odincovo10.ru/vyvod-iz-zapoya-v-stacionare-v-odincovo
Этот информативный текст отличается привлекательным содержанием и актуальными данными. Мы предлагаем читателям взглянуть на привычные вещи под новым углом, предоставляя интересный и доступный материал. Получите удовольствие от чтения и расширьте кругозор!
Изучить эмпирические данные – https://www.digitalexporter.com.tr/dropshipping-nedir-ve-nasil-yapilir
термостойкие кабели
В этой статье собраны факты, которые освещают целый ряд важных вопросов. Мы стремимся предложить читателям четкую, достоверную информацию, которая поможет сформировать собственное мнение и лучше понять сложные аспекты рассматриваемой темы.
Связаться за уточнением – http://www.sifd.eu/?p=10437&lang=en
Скачайте активатор для Windows 11 и получите все функции Pro-версии бесплатно.
Подробнее – Где найти рабочий ключ для Windows 11
Эта познавательная публикация погружает вас в море интересного контента, который быстро захватит ваше внимание. Мы рассмотрим важные аспекты темы и предоставим вам уникальные Insights и полезные сведения для дальнейшего изучения.
Изучить вопрос глубже – https://www.aacaninecountryclub.com
Основные этапы обычно включают:
Получить дополнительные сведения – вывод из запоя
Бесплатный ключ для Windows 11 — только у нас, обновлено в 2026 году!
Подробнее – Как активировать Windows 11 без ключа
Монтаж термоустойчивого кабеля https://telegra.ph/Termoustojchivyj-kabel-dlya-doma-i-bani-sovety-ehksperta-po-montazhu-01-26
Алгоритм в «Трезвый Центр Коломна» построен так, чтобы убрать импровизацию и сделать всё максимально прозрачным для семьи. Сначала по телефону собираются ключевые данные: возраст пациента, длительность запоя, виды алкоголя, хронические заболевания, препараты, аллергии, наличие судорог, потерь сознания, странного поведения, текущие жалобы. На этом этапе озвучивается ориентировочный формат помощи и примерный диапазон стоимости. Далее следует выезд на дом или поступление в стационар. Врач проводит осмотр: измеряет артериальное давление, пульс, сатурацию, температуру, оценивает тремор, координацию, сознание, степень обезвоживания, наличие болей, состояние дыхания и сердца. На основе этих данных назначается инфузионная терапия: растворы для регидратации и коррекции электролитов, витамины группы B и магний для поддержки нервной системы, по показаниям — гепатопротекторы, антиоксидантные комплексы, противорвотные для контроля тошноты, мягкие анксиолитики для уменьшения тревоги и нормализации сна. Уходят от агрессивной седации: пациент не должен быть «выключен» так, чтобы невозможно было заметить ухудшение. В процессе капельниц проводится повторный контроль показателей, темп и состав при необходимости корректируются. После стабилизации пациент и семья получают подробные рекомендации: режим, сон, питание, питьё, запреты, «красные флаги», план наблюдения и возможного дальнейшего лечения зависимости.
Изучить вопрос глубже – vyvod-iz-alkogolnogo-zapoya
Профессиональное оснащение автосервиса определяет качество работы и скорость обслуживания клиентов. Компания Nordberg43 предлагает комплексные решения для шиномонтажных, слесарных участков и станций развал-схождения с гарантией 2 года на весь ассортимент. На сайте https://nordberg43.ru/ представлено сертифицированное оборудование: подъемники, компрессоры, диагностические стенды, шиномонтажные станки, а также профессиональный инструмент и расходные материалы. Готовые комплекты позволяют оборудовать автосервис под ключ, включая монтаж и настройку техники. Удобная доставка по России и техническая поддержка делают сотрудничество максимально комфортным для владельцев автомастерских.
Текст включает разнообразную информацию, которая может показаться любопытной, но не меняет устоявшегося восприятия. Предлагаем просто насладиться чтением, не ожидая значительной пользы.
Подробнее читать – детокс чай для похудения
В случаях, когда транспортировка в клинику затруднительна или пациент испытывает выраженный стресс, возможно выездное консультирование и начальная детоксикация на дому. Врач прибывает с портативным набором для инфузий, оперативно stabilizирует состояние и даёт рекомендации по дальнейшим действиям.
Получить больше информации – лечение пивного алкоголизма екатеринбург
Процедура длится от 40 минут до 2 часов, в зависимости от тяжести состояния, и проводится в комфортной домашней обстановке, что значительно снижает стресс у пациента и его близких.
Изучить вопрос глубже – нарколог на дом вывод краснодар
Вызов врача-нарколога на дом в Санкт-Петербурге начинается с детального осмотра и оценки состояния пациента. Врач измеряет давление, пульс, уровень кислорода в крови и определяет степень интоксикации.
Изучить вопрос глубже – нарколог капельница на дом санкт-петербург
«УралМедЦентр» организует домашний формат наркологической помощи в Екатеринбурге как спокойный и технологичный процесс без очередей и лишнего шума. Мы приезжаем круглосуточно во все районы — от Уралмаша до Академического — и запускаем персональную схему стабилизации прямо у вас дома: экспресс-оценка, титрованные капельницы через инфузомат, защита желудка, контроль сердечного ритма, настройка сна и питьевого режима. В целях конфиденциальности специалисты приезжают без медицинской символики, документы формулируются нейтрально, уведомления — «тихие», а при желании оформляется кодовый профиль. Так мы снимаем стигму и возвращаем человеку чувство контроля уже в первые часы.
Узнать больше – http://narcolog-na-dom-ekaterinburg0.ru/narkolog-ekaterinburg-na-dom/
Самостоятельный выход из запоя сопряжен с высоким риском развития осложнений. После прекращения приема спиртного ослабленный организм может не выдержать нагрузки, что приведет к инфаркту, инсульту, судорожным приступам и даже алкогольному психозу. Чтобы избежать этих опасных состояний, необходимо вызвать нарколога на дом, который проведет лечение правильно и безопасно.
Выяснить больше – наркология вывод из запоя краснодар
huarenus官方认证平台,专为海外华人设计,24小时不间断提供高清视频和直播服务。
Когда человек в запое, близким кажется, что всё ещё можно решить «по-тихому»: выспаться, отпаять водой, дать обезболивающее или «успокоительное» и дождаться, пока станет легче. На практике это часто приводит к обратному результату. Алкогольная интоксикация нарушает водно-электролитный баланс, сгущает кровь, повышает нагрузку на сердце, провоцирует скачки давления, ухудшает работу печени и нервной системы. Неконтролируемый приём снотворных, анальгетиков, транквилизаторов, особенно вместе с алкоголем, способен вызвать угнетение дыхания, аритмии, судороги или делирий. Домашняя обстановка не даёт возможности следить за всеми показателями и вовремя отреагировать. «РаменМед Трезвость» предлагает клинически выверенный вывод из запоя в Раменском с учётом возраста, длительности употребления, хронических заболеваний, перенесённых ранее осложнений. Здесь не применяют сомнительные схемы «усыпить, чтобы не мешал», а ставят задачу: безопасно пройти острую фазу, снять интоксикацию, стабилизировать давление и пульс, защитить сердце и мозг, снизить риск психозов и, при желании пациента, сразу наметить маршрут реального лечения зависимости. Такой подход снимает с родственников опасную «роль врача» и возвращает ситуацию туда, где ей место — под контроль профессионалов.
Разобраться лучше – вывод из запоя срочно
Алгоритм в «Трезвый Центр Коломна» построен так, чтобы убрать импровизацию и сделать всё максимально прозрачным для семьи. Сначала по телефону собираются ключевые данные: возраст пациента, длительность запоя, виды алкоголя, хронические заболевания, препараты, аллергии, наличие судорог, потерь сознания, странного поведения, текущие жалобы. На этом этапе озвучивается ориентировочный формат помощи и примерный диапазон стоимости. Далее следует выезд на дом или поступление в стационар. Врач проводит осмотр: измеряет артериальное давление, пульс, сатурацию, температуру, оценивает тремор, координацию, сознание, степень обезвоживания, наличие болей, состояние дыхания и сердца. На основе этих данных назначается инфузионная терапия: растворы для регидратации и коррекции электролитов, витамины группы B и магний для поддержки нервной системы, по показаниям — гепатопротекторы, антиоксидантные комплексы, противорвотные для контроля тошноты, мягкие анксиолитики для уменьшения тревоги и нормализации сна. Уходят от агрессивной седации: пациент не должен быть «выключен» так, чтобы невозможно было заметить ухудшение. В процессе капельниц проводится повторный контроль показателей, темп и состав при необходимости корректируются. После стабилизации пациент и семья получают подробные рекомендации: режим, сон, питание, питьё, запреты, «красные флаги», план наблюдения и возможного дальнейшего лечения зависимости.
Получить больше информации – вывод из запоя
Доставка товаров из Китая требует профессионального подхода и знания всех тонкостей международной логистики. Компания ВАС ЭКСПРЕСС более 10 лет специализируется на комплексных грузоперевозках из КНР с полным циклом услуг: от забора у поставщика до вручения получателю в любой точке России. На сайте https://vas-express.ru/ представлены все варианты транспортировки — авиа, авто и железнодорожные перевозки, включая сборные, контейнерные и негабаритные грузы. Собственные склады в Иу и Суйфэньхэ, таможенное оформление, аутсорсинг ВЭД и страхование обеспечивают белую схему импорта. Первая доставка от 50 кг со скидкой 50 долларов, работа без предоплаты и полная материальная ответственность.
Экстренная помощь нарколога на дому рекомендуется, когда состояние пациента ухудшается до критического уровня. Основные показания включают:
Ознакомиться с деталями – вывод из запоя капельница на дому в волгограде
Вадим Грубов — финансовый директор с опытом более 25 лет, который помогает бизнесу навести порядок в финансах. Его подход — не точечные консультации, а комплексное выстраивание финансовой архитектуры бизнеса. Ищете финансовое управление услуг? На сайте findir.info представлены услуги CFO: от диагностики и постановки управленческого учёта до внедрения 1С и бюджетирования. Вы получите понятную отчётность, контроль денежных потоков и легальную налоговую оптимизацию. Услуга актуальна для руководителей средних и небольших компаний, желающих внедрить чёткую финансовую дисциплину.
«РаменМед Трезвость» предлагает несколько форматов помощи, но выбор всегда делается из соображений безопасности, а не удобства картинки. Стационарный вывод из запоя подходит в ситуациях, когда запой длится несколько дней или недель, есть скачки давления, проблемы с сердцем, печени, сахарный диабет, неврологические заболевания, эпизоды судорог или делирия в анамнезе, возраст старше 50–55 лет, выраженная слабость, тахикардия, невозможность пить воду, угрозы психозов. В стационаре пациент находится под наблюдением круглосуточно: контролируются жизненные показатели, вовремя корректируется терапия, есть возможность экстренно отреагировать на осложнения. Это гарантированно безопаснее, чем оставлять тяжёлого человека дома под наблюдением уставших родственников.
Выяснить больше – http://vyvod-iz-zapoya-ramenskoe10.ru/vyvod-iz-zapoya-ryadom-v-ramenskom/https://vyvod-iz-zapoya-ramenskoe10.ru
game coverage page – Checked it out today, looks maintained and interesting.
Construcciones SL portal – Muy sencillo de usar, con información clara y accesible para proyectos de la zona.
Алгоритм в «Трезвый Центр Коломна» построен так, чтобы убрать импровизацию и сделать всё максимально прозрачным для семьи. Сначала по телефону собираются ключевые данные: возраст пациента, длительность запоя, виды алкоголя, хронические заболевания, препараты, аллергии, наличие судорог, потерь сознания, странного поведения, текущие жалобы. На этом этапе озвучивается ориентировочный формат помощи и примерный диапазон стоимости. Далее следует выезд на дом или поступление в стационар. Врач проводит осмотр: измеряет артериальное давление, пульс, сатурацию, температуру, оценивает тремор, координацию, сознание, степень обезвоживания, наличие болей, состояние дыхания и сердца. На основе этих данных назначается инфузионная терапия: растворы для регидратации и коррекции электролитов, витамины группы B и магний для поддержки нервной системы, по показаниям — гепатопротекторы, антиоксидантные комплексы, противорвотные для контроля тошноты, мягкие анксиолитики для уменьшения тревоги и нормализации сна. Уходят от агрессивной седации: пациент не должен быть «выключен» так, чтобы невозможно было заметить ухудшение. В процессе капельниц проводится повторный контроль показателей, темп и состав при необходимости корректируются. После стабилизации пациент и семья получают подробные рекомендации: режим, сон, питание, питьё, запреты, «красные флаги», план наблюдения и возможного дальнейшего лечения зависимости.
Получить дополнительные сведения – вывод из запоя капельница на дому
Для достижения положительного результата применяются комплексные подходы, сочетающие медикаментозные и поддерживающие методы. Врачи оценивают общее состояние пациента, степень выраженности абстинентного синдрома и сопутствующие заболевания. На основе этих данных подбираются оптимальные методы коррекции.
Подробнее можно узнать тут – http://vyvod-iz-zapoya-volgograd0.ru/
futurestrategicplanner – Insights are practical, helped me map out upcoming business initiatives clearly.
Переезд в Испанию или ведение бизнеса требует знания местной бюрократии и законодательства. Лицензированный административный хестор https://gestorplus.es/ предоставляет полное сопровождение на русском языке в Валенсии: оформление ВНЖ и виз, регистрация автономо и компаний SL, годовые декларации IRPF, покупка и переоформление автомобилей, обмен водительских прав. Специалисты решают вопросы с налоговой, социальным обеспечением и госорганами Испании, экономя ваше время и защищая от ошибок. Официальное представительство гарантирует законность всех процедур.
Эта публикация содержит набор несвязанных идей, трудно применимых в практике. Мы лишь поверхностно затрагиваем различные точки зрения, не проводя глубокий анализ и не предлагая выводов.
Подробнее читать – мефедроновая зависимость
Генератор ключей для Windows 11 — 100% рабочий метод активации, проверено тысячами пользователей!
Подробнее – Как активировать Windows 11 без ключа
После приезда нарколог оценивает состояние пациента, проверяет давление, частоту пульса и насыщенность крови кислородом. Затем врач подбирает индивидуальный состав капельницы, включающий растворы для очистки организма, препараты для нормализации работы сердца, печени и нервной системы. Процедура длится около 1–2 часов и позволяет быстро:
Получить дополнительную информацию – http://vyvod-iz-zapoya-krasnodar0.ru/vyvod-iz-zapoya-czena-krasnodar/
Работа выездной службы построена так, чтобы для семьи всё было максимально понятно и предсказуемо. После звонка специалист не ограничивается общими фразами, а уточняет детали: сколько длится употребление, есть ли хронические болезни сердца, печени, почек, эндокринные нарушения, какие препараты и в каких дозах пациент уже получил, были ли в прошлом судороги, галлюцинации, тяжёлые реакции на лекарства. Это позволяет заранее оценить уровень риска и понять, подходит ли формат дома. По прибытии в Серпухове врач осматривает пациента, проверяет контакт и ориентировку, измеряет артериальное давление несколько раз, оценивает пульс, сатурацию, температуру, выраженность тремора, наличие болей, характер дыхания, степень обезвоживания. Далее формируется индивидуальная инфузионная схема: растворы для регидратации и коррекции электролитов, витамины группы B и магний для поддержки нервной системы, при необходимости — гепатопротекторы и мягкие антиоксидантные комплексы, противорвотные для контроля тошноты, щадящие анксиолитики для нормализации сна без грубой седации. Во время процедуры врач контролирует динамику, меняет скорость капельницы при необходимости, отслеживает реакцию на препараты и объясняет родным, какие изменения будут происходить по часам. По завершении визита пациент и родственники получают подробный план: режим, питьё, питание, чего нельзя, какие симптомы считаются тревожными, когда нужна повторная консультация или стационар. При выявлении опасных признаков вопрос о госпитализации поднимается честно и сразу, а не откладывается «до утра».
Получить дополнительную информацию – https://narkolog-na-dom-serpuhov10.ru/
Современный шопинг стремительно меняется, и на российском рынке появляются новые площадки, предлагающие удобные условия как для покупателей, так и для продавцов. Маркетплейс https://latorga.ru/ объединяет множество категорий товаров — от одежды и обуви до электроники и автотоваров, создавая единое пространство для комфортных покупок. Платформа ориентирована на развитие отечественного онлайн-ритейла и предлагает бизнесу выгодные тарифы для размещения. Интуитивно понятный интерфейс, возможность выбора товаров от разных партнеров и удобная система навигации делают покупки простыми и приятными для пользователей из любого города России.
Dostie Const services online – Clear and concise, professional approach that immediately feels trustworthy.
Профессиональный нарколог на дому не работает по схеме «чем больше препаратов, тем лучше». В «СерпуховТрезвие» капельницы составляются исходя из задач конкретного организма. Базовый блок — это растворы для восполнения объёма циркулирующей жидкости, выравнивания электролитного баланса и коррекции кислотно-щелочного состояния, что уменьшает нагрузку на сердце, мозг и снижает риск тяжёлых осложнений. Витамины группы B и магний входят в стандартную поддержку: они помогают стабилизировать нервную систему, уменьшить тремор, раздражительность, поддерживают сон и снижают риск судорог. При признаках поражения печени используются гепатопротективные и антиоксидантные компоненты, снижающие токсическое воздействие продуктов распада алкоголя. Если пациента мучает тошнота, добавляются противорвотные средства, чтобы восстановить возможность пить воду и питаться. Для снижения тревоги и нормализации сна применяются мягкие анксиолитики в дозировках, не маскирующих клиническую картину и не угнетающих дыхательный центр. Агрессивная седация, популярная в «серых» схемах, сознательно исключается: она «делает вид» улучшения, но может скрыть нарастающие осложнения. Эффект оценивается по конкретным критериям: стабилизация давления и пульса, уменьшение тремора, уход тошноты, улучшение цвета кожи, появление естественного сна и большей ясности мышления. После достижения этих ориентиров фармаконагрузка не наращивается, а постепенно снижается, чтобы человек выходил в устойчивое состояние, а не зависел от бесконечных капельниц.
Детальнее – http://narkolog-na-dom-serpuhov10.ru/narkolog-psiholog-na-dom-serpuhov/
Ночной вызов ничем не отличается от утреннего: мы отвечаем, уточняем риски и запускаем маршрут так, чтобы первые часы прошли спокойно. Наш алгоритм простой и понятный — он экономит время и убирает хаос. Ниже — ориентировочная карта визита; по месту врач адаптирует её к возрасту, соматическому фону и текущим симптомам.
Получить больше информации – http://narcolog-na-dom-sochi00.ru
Основные этапы обычно включают:
Получить дополнительные сведения – http://vyvod-iz-zapoya-ramenskoe10.ru
Основные этапы обычно включают:
Получить дополнительные сведения – vyvod-iz-zapoya-vrachom
Ценителям русского кинематографа открылась возможность наслаждаться широким спектром многосерийных проектов из России и Украины на одной удобной платформе. Сервис russkie-serial.net объединил лучшие образцы телевизионной драматургии двух стран, предлагая зрителям бесплатный просмотр в высоком качестве без ограничений и регистрации. Особую ценность представляет регулярное обновление коллекции свежими новинками, что позволяет следить за премьерными сериалами практически одновременно с их телевизионным показом. На https://russkie-serial.net/ каждый найдет контент по своему вкусу — от напряженных детективов и душевных мелодрам до исторических эпопей и современных комедийных проектов, которые отражают культурное многообразие и творческий потенциал киноиндустрии обеих стран.
enterprisepartnershiptips – Trusted enterprise alliance suggestions, made forming business partnerships simple and efficient.
Клиника «УралМед» работает без выходных и праздников: прием пациентов — круглосуточно. Это позволяет оказывать экстренную помощь при острых состояниях, а также вести наблюдение за динамикой восстановления здоровья в ночные часы.
Исследовать вопрос подробнее – лечение алкоголизма цена в екатеринбурге
После приезда нарколог оценивает состояние пациента, проверяет давление, частоту пульса и насыщенность крови кислородом. Затем врач подбирает индивидуальный состав капельницы, включающий растворы для очистки организма, препараты для нормализации работы сердца, печени и нервной системы. Процедура длится около 1–2 часов и позволяет быстро:
Подробнее можно узнать тут – вывод из запоя клиника в краснодаре
Экстренная помощь требуется, когда запой начинает негативно сказываться на здоровье, и самостоятельное прекращение употребления алкоголя становится невозможным. Основные показания для круглосуточного вмешательства включают:
Подробнее – вывод из запоя на дому недорого волгоград
Профессиональный нарколог на дому не работает по схеме «чем больше препаратов, тем лучше». В «СерпуховТрезвие» капельницы составляются исходя из задач конкретного организма. Базовый блок — это растворы для восполнения объёма циркулирующей жидкости, выравнивания электролитного баланса и коррекции кислотно-щелочного состояния, что уменьшает нагрузку на сердце, мозг и снижает риск тяжёлых осложнений. Витамины группы B и магний входят в стандартную поддержку: они помогают стабилизировать нервную систему, уменьшить тремор, раздражительность, поддерживают сон и снижают риск судорог. При признаках поражения печени используются гепатопротективные и антиоксидантные компоненты, снижающие токсическое воздействие продуктов распада алкоголя. Если пациента мучает тошнота, добавляются противорвотные средства, чтобы восстановить возможность пить воду и питаться. Для снижения тревоги и нормализации сна применяются мягкие анксиолитики в дозировках, не маскирующих клиническую картину и не угнетающих дыхательный центр. Агрессивная седация, популярная в «серых» схемах, сознательно исключается: она «делает вид» улучшения, но может скрыть нарастающие осложнения. Эффект оценивается по конкретным критериям: стабилизация давления и пульса, уменьшение тремора, уход тошноты, улучшение цвета кожи, появление естественного сна и большей ясности мышления. После достижения этих ориентиров фармаконагрузка не наращивается, а постепенно снижается, чтобы человек выходил в устойчивое состояние, а не зависел от бесконечных капельниц.
Углубиться в тему – https://narkolog-na-dom-serpuhov10.ru/vyezd-narkologa-na-dom-serpuhov/
interesting cartoon site – Landed here without planning, fast performance and clean navigation.
Рабочий ключ активации для Windows 11 — проверено и обновлено, без блокировок!
Подробнее – Бесплатная активация Windows 11 навсегда
Ночной вызов ничем не отличается от утреннего: мы отвечаем, уточняем риски и запускаем маршрут так, чтобы первые часы прошли спокойно. Наш алгоритм простой и понятный — он экономит время и убирает хаос. Ниже — ориентировочная карта визита; по месту врач адаптирует её к возрасту, соматическому фону и текущим симптомам.
Получить дополнительные сведения – http://narcolog-na-dom-sochi00.ru/narkolog-na-dom-adler/
Нашли рабочий серийный номер для Windows 11 Pro — проверено лично, без вирусов!
Подробнее – Активатор Windows 11 скачать бесплатно
Состав инфузии формируется под доминирующие симптомы и данные экспресс-измерений. Мы избегаем шаблонов: у каждого профиля — конкретная цель и измеримый эффект. Ниже — ориентиры; окончательные решения врач принимает очно, с учётом лекарственных взаимодействий и ваших приоритетов (работа, семья, график сна).
Получить дополнительную информацию – https://narcolog-na-dom-ekaterinburg00.ru/narkolog-ekaterinburg-otzyvy
Компания ИдеалСтрой https://idealstr.ru/ выполняет полный комплекс работ по строительству домов под ключ в Подольске. Посетите наш сайт, ознакомьтесь с проектами, ценами и всеми нашими услугами. На сайте вы сможете рассчитать стоимость дома или коттеджа под ключ, а наше портфолио позволяет гарантировать лучшее качество работ и профессиональный подход к делу.
Нашли рабочий серийный номер для Windows 11 Pro — проверено лично, без вирусов!
Подробнее – Активатор Windows 11 скачать бесплатно
Когда человек в запое, близким кажется, что всё ещё можно решить «по-тихому»: выспаться, отпаять водой, дать обезболивающее или «успокоительное» и дождаться, пока станет легче. На практике это часто приводит к обратному результату. Алкогольная интоксикация нарушает водно-электролитный баланс, сгущает кровь, повышает нагрузку на сердце, провоцирует скачки давления, ухудшает работу печени и нервной системы. Неконтролируемый приём снотворных, анальгетиков, транквилизаторов, особенно вместе с алкоголем, способен вызвать угнетение дыхания, аритмии, судороги или делирий. Домашняя обстановка не даёт возможности следить за всеми показателями и вовремя отреагировать. «РаменМед Трезвость» предлагает клинически выверенный вывод из запоя в Раменском с учётом возраста, длительности употребления, хронических заболеваний, перенесённых ранее осложнений. Здесь не применяют сомнительные схемы «усыпить, чтобы не мешал», а ставят задачу: безопасно пройти острую фазу, снять интоксикацию, стабилизировать давление и пульс, защитить сердце и мозг, снизить риск психозов и, при желании пациента, сразу наметить маршрут реального лечения зависимости. Такой подход снимает с родственников опасную «роль врача» и возвращает ситуацию туда, где ей место — под контроль профессионалов.
Разобраться лучше – срочное выведение из запоя
Вызов врача-нарколога на дом в Санкт-Петербурге начинается с детального осмотра и оценки состояния пациента. Врач измеряет давление, пульс, уровень кислорода в крови и определяет степень интоксикации.
Разобраться лучше – https://narcolog-na-dom-sankt-peterburg00.ru/narkolog-na-dom-czena-spb/
EV Liberty platform hub – Fast-loading pages, clean design, and information feels transparent.
В этой статье представлен занимательный и актуальный контент, который заставит вас задуматься. Мы обсуждаем насущные вопросы и проблемы, а также освещаем истории, которые вдохновляют на действия и изменения. Узнайте, что стоит за событиями нашего времени!
Желаете узнать подробности? – https://apolin.org/usu-faculty-of-law-and-pt-musim-mas-collaborate-to-renovate-facilities
Якщо плануєте подорож до Одеси, завітайте на сайт https://sky-post.odesa.ua/. Інформаційний сайт новин міста – Скай-Пост Одеса розповість все про місто та події на Одещині. Актуальні дані, факти, інша корисна інформація, яка допоможе вам отримати максимум корисних даних для подорожі або ділової поїздки на південь України.
alliancesplanninghub – Suggestions for commercial alliances are useful, really streamlined partnership decisions.
Основные этапы обычно включают:
Узнать больше – вывод из запоя
Запой — это не просто несколько лишних дней алкоголя, а тяжёлое состояние, в котором организм работает на пределе. Чем дольше длится эпизод, тем глубже обезвоживание, тем сильнее сдвиги электролитов, тем выше риск аритмий, гипертонических кризов, судорог, делирия, обострений заболеваний сердца, печени и поджелудочной железы. Попытки «вывести» человека дома силами родных часто включают опасные комбинации: случайные седативные, снотворные, анальгетики, «антипохмельные» из рекламы. Они могут на время усыпить или «успокоить», но при этом скрывают ухудшение, сбивают давление, угнетают дыхание и мешают врачу увидеть реальную картину. В «Трезвый Центр Коломна» подход другой: ещё на этапе звонка специалист уточняет длительность запоя, объёмы и виды алкоголя, наличие гипертонии, ИБС, диабета, заболеваний печени и почек, неврологических проблем, список уже принятых препаратов, эпизоды потери сознания, судорог, странного поведения. На основании этих данных определяется, безопасен ли формат на дому или сразу нужен стационар. Такая сортировка позволяет вовремя перехватить опасные случаи, не терять часы на бесполезные попытки и сразу запускать те схемы, которые реально снижают риски и стабилизируют состояние.
Углубиться в тему – http://vyvod-iz-zapoya-kolomna10.ru/vyvod-iz-zapoya-v-stacionare-v-kolomne/
Основные этапы обычно включают:
Изучить вопрос глубже – https://vyvod-iz-zapoya-ramenskoe10.ru/vyvod-iz-zapoya-na-domu-v-ramenskom
В данной обзорной статье представлены интригующие факты, которые не оставят вас равнодушными. Мы критикуем и анализируем события, которые изменили наше восприятие мира. Узнайте, что стоит за новыми открытиями и как они могут изменить ваше восприятие реальности.
Лучшее решение — прямо здесь – https://aalstmaritiem.nl/aenean-vulputate-eleifend-tellus-aenean-leo-ligula
Le site officiel de GratoWin Casino, https://gratowin-avis-fr.com/ – offre un bonus de bienvenue exceptionnel des l’inscription ! Plus de 1500 jeux, applications mobiles pour tous les appareils. Decouvrez les jeux de casino GratoWin et profitez d’une experience de jeu fantastique!
Запой — это не просто несколько лишних дней алкоголя, а тяжёлое состояние, в котором организм работает на пределе. Чем дольше длится эпизод, тем глубже обезвоживание, тем сильнее сдвиги электролитов, тем выше риск аритмий, гипертонических кризов, судорог, делирия, обострений заболеваний сердца, печени и поджелудочной железы. Попытки «вывести» человека дома силами родных часто включают опасные комбинации: случайные седативные, снотворные, анальгетики, «антипохмельные» из рекламы. Они могут на время усыпить или «успокоить», но при этом скрывают ухудшение, сбивают давление, угнетают дыхание и мешают врачу увидеть реальную картину. В «Трезвый Центр Коломна» подход другой: ещё на этапе звонка специалист уточняет длительность запоя, объёмы и виды алкоголя, наличие гипертонии, ИБС, диабета, заболеваний печени и почек, неврологических проблем, список уже принятых препаратов, эпизоды потери сознания, судорог, странного поведения. На основании этих данных определяется, безопасен ли формат на дому или сразу нужен стационар. Такая сортировка позволяет вовремя перехватить опасные случаи, не терять часы на бесполезные попытки и сразу запускать те схемы, которые реально снижают риски и стабилизируют состояние.
Получить дополнительную информацию – https://vyvod-iz-zapoya-kolomna10.ru/vyvod-iz-zapoya-na-domu-v-kolomne/
Tired of being good, I want to show you my dark side. – https://Los12c1f.short.gy/zNHDEZ?Vubbibe
Банный комплекс в Тульской области — идеальное место для качественного отдыха вдали от городской суеты. «Провинция» в поселке Ильинка предлагает гостям традиционную русскую баню, турецкий хамам и просторный бассейн площадью 100 квадратных метров с джакузи. Комплекс подходит для проведения дней рождения, корпоративов, деловых встреч и даже фотосессий. Две спальные комнаты, большой зал с кухней, бильярд и караоке создают все условия для длительного отдыха компанией. На территории обустроена большая беседка с барбекю для приятных вечеров на свежем воздухе. Забронировать посещение можно на https://banitula.ru/, где представлена подробная информация о ценах и услугах. Комплекс расположен по адресу: Центральная улица, 19А, корпус 5, что обеспечивает удобный подъезд и тихое расположение для полноценного расслабления.
Этот информативный текст отличается привлекательным содержанием и актуальными данными. Мы предлагаем читателям взглянуть на привычные вещи под новым углом, предоставляя интересный и доступный материал. Получите удовольствие от чтения и расширьте кругозор!
Полная информация здесь – https://mulagoschoolofnursing.ac.ug/2024/11/15/dec-2024-unmeb-exams
Когда человек в запое, близким кажется, что всё ещё можно решить «по-тихому»: выспаться, отпаять водой, дать обезболивающее или «успокоительное» и дождаться, пока станет легче. На практике это часто приводит к обратному результату. Алкогольная интоксикация нарушает водно-электролитный баланс, сгущает кровь, повышает нагрузку на сердце, провоцирует скачки давления, ухудшает работу печени и нервной системы. Неконтролируемый приём снотворных, анальгетиков, транквилизаторов, особенно вместе с алкоголем, способен вызвать угнетение дыхания, аритмии, судороги или делирий. Домашняя обстановка не даёт возможности следить за всеми показателями и вовремя отреагировать. «РаменМед Трезвость» предлагает клинически выверенный вывод из запоя в Раменском с учётом возраста, длительности употребления, хронических заболеваний, перенесённых ранее осложнений. Здесь не применяют сомнительные схемы «усыпить, чтобы не мешал», а ставят задачу: безопасно пройти острую фазу, снять интоксикацию, стабилизировать давление и пульс, защитить сердце и мозг, снизить риск психозов и, при желании пациента, сразу наметить маршрут реального лечения зависимости. Такой подход снимает с родственников опасную «роль врача» и возвращает ситуацию туда, где ей место — под контроль профессионалов.
Подробнее – https://vyvod-iz-zapoya-ramenskoe10.ru/vyvod-iz-zapoya-na-domu-v-ramenskom/
Эта публикация содержит набор несвязанных идей, трудно применимых в практике. Мы лишь поверхностно затрагиваем различные точки зрения, не проводя глубокий анализ и не предлагая выводов.
Подробнее читать – https://rostov-narkologiya.ru/uslugi-ot-narkomanii/mefedronovaya-zavisimost
Когда вопрос стоит остро — нужно быстро и безопасно вывести человека из запоя в Коломне, — у семьи нет лишнего времени на эксперименты с таблетками, сомнительными «коктейлями» и советами из интернета. «Трезвый Центр Коломна» выстраивает помощь так, чтобы от первого звонка до реального облегчения шёл понятный и управляемый маршрут: запись симптомов и рисков уже по телефону, предложение формата (выезд на дом или стационар), оперативный осмотр, персональная инфузионная терапия, круглосуточное наблюдение при необходимости и подробный план восстановления на 24–72 часа и дальше. Мы не продаём миф о «чудо-капельнице за час», а работаем клинически аккуратно: дозы и схемы подбираются под возраст, длительность запоя, сопутствующие заболевания, уже принятые лекарства и текущие показатели. Цель проста и честна — снять интоксикацию, защитить сердце, мозг и печень, вернуть сон и ясность без агрессивной седации и скрытых рисков, сохранить конфиденциальность и дать семье уверенность, что всё делается правильно.
Подробнее – быстрый вывод из запоя
psychologist info page – The tone is warm and informative, which makes the content easy to trust.
Запой — это не просто несколько лишних дней алкоголя, а тяжёлое состояние, в котором организм работает на пределе. Чем дольше длится эпизод, тем глубже обезвоживание, тем сильнее сдвиги электролитов, тем выше риск аритмий, гипертонических кризов, судорог, делирия, обострений заболеваний сердца, печени и поджелудочной железы. Попытки «вывести» человека дома силами родных часто включают опасные комбинации: случайные седативные, снотворные, анальгетики, «антипохмельные» из рекламы. Они могут на время усыпить или «успокоить», но при этом скрывают ухудшение, сбивают давление, угнетают дыхание и мешают врачу увидеть реальную картину. В «Трезвый Центр Коломна» подход другой: ещё на этапе звонка специалист уточняет длительность запоя, объёмы и виды алкоголя, наличие гипертонии, ИБС, диабета, заболеваний печени и почек, неврологических проблем, список уже принятых препаратов, эпизоды потери сознания, судорог, странного поведения. На основании этих данных определяется, безопасен ли формат на дому или сразу нужен стационар. Такая сортировка позволяет вовремя перехватить опасные случаи, не терять часы на бесполезные попытки и сразу запускать те схемы, которые реально снижают риски и стабилизируют состояние.
Исследовать вопрос подробнее – анонимный вывод из запоя
В статье представлены ключевые моменты по актуальной теме, дополненные советами экспертов и ссылками на дополнительные ресурсы. Цель материала — дать читателю инструменты для самостоятельного развития и принятия осознанных решений.
Осуществить глубокий анализ – https://dkjugendinstitut.de/project/the7-product
collabstrategyhub – Platform is intuitive, improved team alignment and project planning efficiency.
Современные решения 3D-печати — это передовая технология, которая экономит время и деньги. Мы организуем изготовление прототипов и деталей на заказ. Наша команда инженеров работаем на точных промышленных 3D-принтерах, что обеспечивает быстрый запуск продукта на рынок. Работаем с промышленными и техническими заказами, а также помогаем бизнесу внедрять новые технологии. Заказы исполняются в удобное для вас время, при этом цены остаются доступными. Оставьте заявку на изготовление прототипа, и ваш бизнес выйдет на новый уровень – https://otzyvy.kitabi.ru/kompaniya/ooo-npp-asti. Мы предоставляем индивидуальные решения для каждого заказа.
Andrea Bacle photo gallery – Every shot feels personal and natural, with careful composition throughout.
Алгоритм в «Трезвый Центр Коломна» построен так, чтобы убрать импровизацию и сделать всё максимально прозрачным для семьи. Сначала по телефону собираются ключевые данные: возраст пациента, длительность запоя, виды алкоголя, хронические заболевания, препараты, аллергии, наличие судорог, потерь сознания, странного поведения, текущие жалобы. На этом этапе озвучивается ориентировочный формат помощи и примерный диапазон стоимости. Далее следует выезд на дом или поступление в стационар. Врач проводит осмотр: измеряет артериальное давление, пульс, сатурацию, температуру, оценивает тремор, координацию, сознание, степень обезвоживания, наличие болей, состояние дыхания и сердца. На основе этих данных назначается инфузионная терапия: растворы для регидратации и коррекции электролитов, витамины группы B и магний для поддержки нервной системы, по показаниям — гепатопротекторы, антиоксидантные комплексы, противорвотные для контроля тошноты, мягкие анксиолитики для уменьшения тревоги и нормализации сна. Уходят от агрессивной седации: пациент не должен быть «выключен» так, чтобы невозможно было заметить ухудшение. В процессе капельниц проводится повторный контроль показателей, темп и состав при необходимости корректируются. После стабилизации пациент и семья получают подробные рекомендации: режим, сон, питание, питьё, запреты, «красные флаги», план наблюдения и возможного дальнейшего лечения зависимости.
Детальнее – http://
Окна с климат-контролем в Молодечно. Микропроветривание без сквозняков купить пластиковое окно молодечно. Идеальный воздух в доме.
Мы собрали для вас самые захватывающие факты из мира науки и истории. От малознакомых деталей до грандиозных событий — эта статья расширит ваш кругозор и подарит новое понимание того, как устроен наш мир.
Запросить дополнительные данные – https://mathgiri.com/online-tuition-10-best-websites-online-tuition-10-best-websites
Профессиональный нарколог на дому не работает по схеме «чем больше препаратов, тем лучше». В «СерпуховТрезвие» капельницы составляются исходя из задач конкретного организма. Базовый блок — это растворы для восполнения объёма циркулирующей жидкости, выравнивания электролитного баланса и коррекции кислотно-щелочного состояния, что уменьшает нагрузку на сердце, мозг и снижает риск тяжёлых осложнений. Витамины группы B и магний входят в стандартную поддержку: они помогают стабилизировать нервную систему, уменьшить тремор, раздражительность, поддерживают сон и снижают риск судорог. При признаках поражения печени используются гепатопротективные и антиоксидантные компоненты, снижающие токсическое воздействие продуктов распада алкоголя. Если пациента мучает тошнота, добавляются противорвотные средства, чтобы восстановить возможность пить воду и питаться. Для снижения тревоги и нормализации сна применяются мягкие анксиолитики в дозировках, не маскирующих клиническую картину и не угнетающих дыхательный центр. Агрессивная седация, популярная в «серых» схемах, сознательно исключается: она «делает вид» улучшения, но может скрыть нарастающие осложнения. Эффект оценивается по конкретным критериям: стабилизация давления и пульса, уменьшение тремора, уход тошноты, улучшение цвета кожи, появление естественного сна и большей ясности мышления. После достижения этих ориентиров фармаконагрузка не наращивается, а постепенно снижается, чтобы человек выходил в устойчивое состояние, а не зависел от бесконечных капельниц.
Углубиться в тему – narkolog-na-dom-telefon
Your point of view caught my eye and was very interesting. Thanks. I have a question for you. https://www.binance.com/uk-UA/register?ref=XZNNWTW7
https://mama-creative.com/organizacziya-pohoron-kakuyu-pomoshh-okazyvayut-speczialisty-i-kakie-etapy-neobhodimo-projti/
Bass Win Casino https://bass-win-uk.org/ positions itself as a premier UK gaming destination for 2026. It promises a secure, UKGC-licensed platform with a vast game portfolio, including slots, live dealer tables, and popular crash games. The casino highlights transparent bonuses, like a welcome package and no-deposit offers, alongside strong commitments to fair play and responsible gambling. Designed for seamless mobile and desktop play, it aims to provide a comprehensive and trustworthy online casino experience for British players.
bondingsafetyhub – Extremely secure and simple, made commercial bonding a breeze.
smartshopvalue – Online shopping made easy, site navigation is clear and fast.
https://hleb-produkt.ru/novosti/42305-ustanovka-potolkov-iz-pvh-chto-vazhno-znat.html
Когда человек в запое, близким кажется, что всё ещё можно решить «по-тихому»: выспаться, отпаять водой, дать обезболивающее или «успокоительное» и дождаться, пока станет легче. На практике это часто приводит к обратному результату. Алкогольная интоксикация нарушает водно-электролитный баланс, сгущает кровь, повышает нагрузку на сердце, провоцирует скачки давления, ухудшает работу печени и нервной системы. Неконтролируемый приём снотворных, анальгетиков, транквилизаторов, особенно вместе с алкоголем, способен вызвать угнетение дыхания, аритмии, судороги или делирий. Домашняя обстановка не даёт возможности следить за всеми показателями и вовремя отреагировать. «РаменМед Трезвость» предлагает клинически выверенный вывод из запоя в Раменском с учётом возраста, длительности употребления, хронических заболеваний, перенесённых ранее осложнений. Здесь не применяют сомнительные схемы «усыпить, чтобы не мешал», а ставят задачу: безопасно пройти острую фазу, снять интоксикацию, стабилизировать давление и пульс, защитить сердце и мозг, снизить риск психозов и, при желании пациента, сразу наметить маршрут реального лечения зависимости. Такой подход снимает с родственников опасную «роль врача» и возвращает ситуацию туда, где ей место — под контроль профессионалов.
Разобраться лучше – https://vyvod-iz-zapoya-ramenskoe10.ru/
visit Manisa online – Helpful and straightforward, perfect for quick planning.
Группа препаратов
Получить дополнительную информацию – капельница от запоя недорого сочи
После приезда нарколог оценивает состояние пациента, проверяет давление, частоту пульса и насыщенность крови кислородом. Затем врач подбирает индивидуальный состав капельницы, включающий растворы для очистки организма, препараты для нормализации работы сердца, печени и нервной системы. Процедура длится около 1–2 часов и позволяет быстро:
Детальнее – https://vyvod-iz-zapoya-krasnodar0.ru
Самостоятельный выход из запоя сопряжен с высоким риском развития осложнений. После прекращения приема спиртного ослабленный организм может не выдержать нагрузки, что приведет к инфаркту, инсульту, судорожным приступам и даже алкогольному психозу. Чтобы избежать этих опасных состояний, необходимо вызвать нарколога на дом, который проведет лечение правильно и безопасно.
Получить дополнительные сведения – вывод из запоя на дому цена краснодар
Для эффективного лечения алкогольной интоксикации и восстановления организма врачи клиники «АлкоДоктор» используют комплекс препаратов, которые индивидуально подбираются с учетом состояния пациента.
Подробнее тут – капельница от запоя круглосуточно
Терапия в клинике строится на системном подходе, позволяющем постепенно восстанавливать здоровье и формировать новые жизненные установки.
Получить больше информации – вывод наркологическая клиника в перми
businessgrowthstrategies – Tips for modern business approaches are actionable and easy to apply.
Основные этапы обычно включают:
Подробнее – вывод из запоя на дому
strategiclearningportal – Lessons are well-structured, helped me apply strategic concepts efficiently.
https://obhohocheshsya.ru/bestranshejnaya-prokladka-kommunikaczij-pomoshh-professionalov.html
Нашли рабочий серийный номер для Windows 11 Pro — проверено лично, без вирусов!
Подробнее – Генератор ключей Windows 11 рабочий
В статье-обзоре представлены данные сомнительной актуальности и факты без явной взаимосвязи. Читатель ознакомится с разными мнениями, хотя они вряд ли существенно изменят его представление о теме.
Подробнее читать – лечение covid народными средствами
Пациенты отмечают, что особенно важна не только профессиональная помощь, но и спокойная атмосфера. Мягкий свет, тишина, отдельные палаты и деликатная коммуникация персонала — всё это снижает тревожность и помогает организму восстановиться. Эффективность лечения оценивается по конкретным маркерам: улучшение сна, нормализация давления, исчезновение тошноты, восстановление аппетита и уменьшение тяги.
Разобраться лучше – http://narkologicheskaya-clinica-v-krasnoyarske17.ru
Выезд нарколога на дом в Серпухове — это возможность получить профессиональную помощь в условиях, когда везти человека в клинику сложно, опасно или он категорически отказывается от госпитализации. Специалисты «СерпуховТрезвие» работают круглосуточно, приезжают по адресу с одноразовыми системами, стерильными расходниками и необходимым набором препаратов, проводят осмотр, оценивают жизненно важные показатели, подбирают индивидуальную капельницу, контролируют реакцию и оставляют подробные рекомендации. Всё происходит конфиденциально, без лишних свидетелей, без осуждения и давления. Цель — не формально «поставить капельницу», а безопасно стабилизировать состояние, снизить интоксикацию, выровнять давление и пульс, уменьшить тревогу и вернуть человеку возможность нормально спать и восстанавливаться, не доводя до осложнений и экстренной госпитализации.
Подробнее можно узнать тут – нарколог на дом в серпухове
Когда запой длится не первый день, а состояние уже сопровождается тремором, потливостью, резкими перепадами давления, бессонницей, тревогой, тошнотой или рвотой, попытка «перетерпеть» или лечить самостоятельно таблетками становится опасным экспериментом. Сочетание алкоголя с сильнодействующими успокоительными, обезболивающими или сомнительными «антипохмельными» легко приводит к нарушению дыхания, провалам в сознании, аритмиям и скрытому развитию предделирия. Домашние средства не учитывают ни электролитные сдвиги, ни состояние печени и сердца, ни уже принятые лекарства. Выездной нарколог «СерпуховТрезвие» в Серпухове выстраивает ситуацию иначе: ещё по телефону врач собирает ключевую информацию — длительность запоя, примерные объёмы и виды алкоголя, наличие гипертонии, ИБС, диабета, заболеваний печени и почек, неврологических проблем, какие препараты уже давали и в каких дозах, были ли судороги или эпизоды дезориентации. На месте проводится объективная диагностика: измерение давления, пульса, сатурации, температуры, оценка тремора, степени обезвоживания, психического состояния, неврологического статуса. Только после этого принимается решение: проводить детокс на дому или сразу рекомендовать стационар. Такой фильтр защищает от грубых ошибок, позволяет точно подобрать схему и не терять драгоценное время, пытаясь «угадать» лечение.
Выяснить больше – narkolog-na-dom-cena
strategicopportunityportal – Very clear and practical, streamlined planning for long-term initiatives.
distinctive glass art – Great atmosphere overall, with products that look carefully created.
Маркетплейс нового поколения Latorga.ru объединяет тысячи продавцов и покупателей в единой торговой экосистеме с удобной навигацией по категориям. Платформа предлагает широкий выбор товаров: от одежды и электроники до автотоваров и ювелирных украшений, создавая конкурентную среду для выгодных покупок. Перейдя на https://latorga.ru/, пользователи получают доступ к предложениям от проверенных магазинов с возможностью сравнения цен и характеристик. Бизнес-тарифы для продавцов и простая система размещения объявлений делают площадку привлекательной для развития онлайн-торговли. Интуитивный интерфейс и охват всех городов России обеспечивают удобство шопинга для каждого покупателя.
Эффективное продвижение требует анализа. Мы используем Яндекс.Метрику и Google Analytics для отслеживания трафика из Гродно раскрутка сайта гродно, поведения пользователей и конверсий. На основе данных корректируем стратегию, делая ее максимально результативной.
Ищете SMM продвижение? Посетите https://xn--80aa3aalab0alhk.xn--p1ai/ и вы найдете, по выгодной цене подписчиков, лайки, просмотры в Telegram, Instagram, VK и YouTube. Посетите сайт, ознакомьтесь со всеми нашими услугами, а запуск заказов осуществляется за 3–15 секунд! Мы – продвинутый сервис продвижения в соцсетях!
Программа лечения строится по принципу последовательного воздействия на физическое и психологическое состояние. Начинается она с детоксикации: инфузионная терапия с применением сбалансированных растворов, антиоксидантов, гепатопротекторов и витаминов. Затем — стабилизация состояния, коррекция сна, восстановление когнитивных функций и купирование абстинентного синдрома. В зависимости от диагноза используются такие методы, как заместительная терапия, нейрометаболическая поддержка, противотревожные и антидепрессивные схемы.
Получить дополнительные сведения – http://narkologicheskaya-klinika-novokuzneczk0.ru
Рабочий ключ активации для Windows 11 — проверено и обновлено, без блокировок!
Подробнее – Скачать патч для активации Windows 11
Профессиональный нарколог на дому не работает по схеме «чем больше препаратов, тем лучше». В «СерпуховТрезвие» капельницы составляются исходя из задач конкретного организма. Базовый блок — это растворы для восполнения объёма циркулирующей жидкости, выравнивания электролитного баланса и коррекции кислотно-щелочного состояния, что уменьшает нагрузку на сердце, мозг и снижает риск тяжёлых осложнений. Витамины группы B и магний входят в стандартную поддержку: они помогают стабилизировать нервную систему, уменьшить тремор, раздражительность, поддерживают сон и снижают риск судорог. При признаках поражения печени используются гепатопротективные и антиоксидантные компоненты, снижающие токсическое воздействие продуктов распада алкоголя. Если пациента мучает тошнота, добавляются противорвотные средства, чтобы восстановить возможность пить воду и питаться. Для снижения тревоги и нормализации сна применяются мягкие анксиолитики в дозировках, не маскирующих клиническую картину и не угнетающих дыхательный центр. Агрессивная седация, популярная в «серых» схемах, сознательно исключается: она «делает вид» улучшения, но может скрыть нарастающие осложнения. Эффект оценивается по конкретным критериям: стабилизация давления и пульса, уменьшение тремора, уход тошноты, улучшение цвета кожи, появление естественного сна и большей ясности мышления. После достижения этих ориентиров фармаконагрузка не наращивается, а постепенно снижается, чтобы человек выходил в устойчивое состояние, а не зависел от бесконечных капельниц.
Разобраться лучше – нарколог на дом круглосуточно серпухов цены
enterpriseframeworksolutions – Advice is actionable, made team management simpler and faster.
Основные этапы обычно включают:
Изучить вопрос глубже – вывод из запоя на дому в Раменском
Основные этапы обычно включают:
Углубиться в тему – vyvod-iz-zapoya-v-ramenskom
Consolation goals, late strikes in lost causes tracked
RI Tech resource – Clear visuals and concise technical explanations make navigation simple.
При длительном запое или серьезной алкогольной интоксикации часто нет возможности или желания ехать в стационар. В таких ситуациях оптимальным решением становится вызов нарколога на дом в Сочи. Специалисты клиники «Жизнь без Запоя» круглосуточно приезжают к пациентам, оперативно оказывают медицинскую помощь и проводят профессиональную детоксикацию организма прямо в домашних условиях. Благодаря комфортному лечению на дому пациенты быстрее восстанавливаются, избегают дополнительного стресса и осложнений, связанных с госпитализацией.
Получить больше информации – вызвать нарколога на дом срочно сочи
Алгоритм в «Трезвый Центр Коломна» построен так, чтобы убрать импровизацию и сделать всё максимально прозрачным для семьи. Сначала по телефону собираются ключевые данные: возраст пациента, длительность запоя, виды алкоголя, хронические заболевания, препараты, аллергии, наличие судорог, потерь сознания, странного поведения, текущие жалобы. На этом этапе озвучивается ориентировочный формат помощи и примерный диапазон стоимости. Далее следует выезд на дом или поступление в стационар. Врач проводит осмотр: измеряет артериальное давление, пульс, сатурацию, температуру, оценивает тремор, координацию, сознание, степень обезвоживания, наличие болей, состояние дыхания и сердца. На основе этих данных назначается инфузионная терапия: растворы для регидратации и коррекции электролитов, витамины группы B и магний для поддержки нервной системы, по показаниям — гепатопротекторы, антиоксидантные комплексы, противорвотные для контроля тошноты, мягкие анксиолитики для уменьшения тревоги и нормализации сна. Уходят от агрессивной седации: пациент не должен быть «выключен» так, чтобы невозможно было заметить ухудшение. В процессе капельниц проводится повторный контроль показателей, темп и состав при необходимости корректируются. После стабилизации пациент и семья получают подробные рекомендации: режим, сон, питание, питьё, запреты, «красные флаги», план наблюдения и возможного дальнейшего лечения зависимости.
Узнать больше – https://vyvod-iz-zapoya-kolomna10.ru/vyvod-iz-zapoya-kapelnica-v-kolomne
Наша наркологическая клиника предоставляет круглосуточную помощь, использует только сертифицированные медикаменты и строго соблюдает полную конфиденциальность лечения.
Разобраться лучше – вызов на дом капельницы от запоя в сочи
Системы видеонаблюдения стали необходимостью для защиты дома, офиса и автомобиля. Интернет-магазин https://video-camer.ru/ работает в Москве круглосуточно без выходных, предлагая широкий ассортимент: IP-камеры, видеодомофоны, автомобильные видеорегистраторы, GSM-системы и поисковую технику. Доступны беспроводные и уличные камеры, тепловизоры, антижучки и GPS-трекеры. Компания предоставляет сертифицированное оборудование с гарантией, оплату удобными способами и доставку по городу. Консультанты помогут подобрать оптимальное решение для любых задач безопасности.
Лечение на дому проходит в комфортной и спокойной обстановке, что позволяет значительно снизить уровень стресса и быстро улучшить состояние здоровья пациента.
Разобраться лучше – врач нарколог выезд на дом сочи
Вывод из запоя в Тольятти — это медицинская процедура, направленная на очищение организма от продуктов распада алкоголя и восстановление нормального состояния здоровья. Длительное употребление спиртных напитков приводит к серьёзной интоксикации, нарушению работы нервной, сердечно-сосудистой и пищеварительной систем. Самостоятельные попытки прекратить запой могут быть опасны, поэтому оптимальным решением является обращение к врачу-наркологу, который проведёт лечение безопасно и эффективно.
Выяснить больше – наркологический вывод из запоя в тольятти
Клиника «НаркоСити» предлагает срочную наркологическую помощь при запоях на дому в Краснодаре. Опытные специалисты оперативно приезжают в любой район города, проводят детоксикацию и стабилизируют состояние пациента прямо на дому. Лечение организовано с максимальной безопасностью и соблюдением конфиденциальности, что обеспечивает пациентам комфорт и быстрое восстановление без госпитализации.
Получить дополнительные сведения – срочный вывод из запоя в краснодаре
Buscas una plataforma independiente con resenas honestas de casinos en linea, bonos actualizados y valoraciones de jugadores reales? Visita https://championcasino.world/ el recurso mas grande con la informacion mas actualizada del mundo de las apuestas y resenas de jugadores reales para ayudarte a elegir el casino ideal.
smartpurchaseportal – Offers are top-notch, simplified my shopping and saved time.
Текст включает разнообразную информацию, которая может показаться любопытной, но не меняет устоявшегося восприятия. Предлагаем просто насладиться чтением, не ожидая значительной пользы.
Подробнее читать – кето диета за неделю минус 10 кг
Лечение алкоголизма в клинике «РязаньМед Альянс» включает несколько этапов, каждый из которых направлен на определённую цель — от снятия интоксикации до формирования устойчивого отказа от алкоголя. В таблице представлены основные стадии лечения и методы, используемые специалистами клиники.
Исследовать вопрос подробнее – анонимная наркологическая клиника в рязани
Главной задачей специалистов становится купирование абстинентного синдрома и снижение интоксикации. Это требует применения медикаментов и постоянного наблюдения за состоянием пациента.
Подробнее тут – анонимный вывод из запоя в перми
Чем раньше нарколог окажет помощь, тем выше шансы избежать осложнений и восстановиться без последствий для здоровья.
Получить дополнительную информацию – https://narcolog-na-dom-sochi0.ru/vyzov-narkologa-na-dom-sochi
В клинике «НаркоСити» используются только сертифицированные лекарственные средства, которые подбираются индивидуально с учетом состояния пациента:
Получить дополнительные сведения – вывод из запоя на дому цена краснодар
Группа препаратов
Углубиться в тему – капельницы от запоя на дому цена в сочи
Прежде чем говорить о цифрах, важно обозначить принцип: цена формируется из реального объёма медицинской помощи, а не из рекламных обещаний. На итоговую стоимость влияет длительность запоя, выраженность интоксикации, необходимость одной или нескольких капельниц, подбор дополнительных препаратов, время суток выезда, объём наблюдения, а также наличие сопутствующих заболеваний, повышающих риск. «СерпуховТрезвие» придерживается открытой схемы: при звонке озвучивается ориентировочный диапазон, поясняется, что входит в базовый визит и при каких условиях он может перейти в расширенный. Все дополнительные назначения согласуются до их выполнения, без скрытых доплат и «сюрпризов» по факту.
Получить дополнительные сведения – https://narkolog-na-dom-serpuhov10.ru/
Когда человек в запое, близким кажется, что всё ещё можно решить «по-тихому»: выспаться, отпаять водой, дать обезболивающее или «успокоительное» и дождаться, пока станет легче. На практике это часто приводит к обратному результату. Алкогольная интоксикация нарушает водно-электролитный баланс, сгущает кровь, повышает нагрузку на сердце, провоцирует скачки давления, ухудшает работу печени и нервной системы. Неконтролируемый приём снотворных, анальгетиков, транквилизаторов, особенно вместе с алкоголем, способен вызвать угнетение дыхания, аритмии, судороги или делирий. Домашняя обстановка не даёт возможности следить за всеми показателями и вовремя отреагировать. «РаменМед Трезвость» предлагает клинически выверенный вывод из запоя в Раменском с учётом возраста, длительности употребления, хронических заболеваний, перенесённых ранее осложнений. Здесь не применяют сомнительные схемы «усыпить, чтобы не мешал», а ставят задачу: безопасно пройти острую фазу, снять интоксикацию, стабилизировать давление и пульс, защитить сердце и мозг, снизить риск психозов и, при желании пациента, сразу наметить маршрут реального лечения зависимости. Такой подход снимает с родственников опасную «роль врача» и возвращает ситуацию туда, где ей место — под контроль профессионалов.
Узнать больше – http://vyvod-iz-zapoya-ramenskoe10.ru/srochnoe-vyvedenie-iz-zapoya-v-ramenskom/
Своевременное обращение к специалистам позволяет быстро стабилизировать состояние и избежать осложнений.
Подробнее можно узнать тут – скорая вывод из запоя
Действие и назначение
Выяснить больше – капельница от запоя круглосуточно
Вывод из запоя в Раменском в условиях клиники строится не вокруг одной капельницы, а вокруг понятной цепочки шагов, где каждый этап логичен и медицински обоснован. Это помогает не только быстро облегчить состояние, но и уменьшить вероятность того, что через пару дней человек снова уйдёт в запой.
Исследовать вопрос подробнее – http://vyvod-iz-zapoya-ramenskoe10.ru/srochnoe-vyvedenie-iz-zapoya-v-ramenskom/
Сайдинг – инвестиция в недвижимость. Повысьте стоимость дома в Молодечно! Современный вид привлекает покупателей купить сайдин.
После окончания врач дает консультации и рекомендации по восстановлению организма и профилактике повторных запоев.
Исследовать вопрос подробнее – вывод из запоя вызов на дом в краснодаре
Наркологическая клиника в Перми обеспечивает пациентам комфортные условия и профессиональное сопровождение. Врачи работают круглосуточно и соблюдают строгую конфиденциальность, что делает лечение доступным и безопасным.
Изучить вопрос глубже – наркологическая клиника цены
Когда человек в запое, близким кажется, что всё ещё можно решить «по-тихому»: выспаться, отпаять водой, дать обезболивающее или «успокоительное» и дождаться, пока станет легче. На практике это часто приводит к обратному результату. Алкогольная интоксикация нарушает водно-электролитный баланс, сгущает кровь, повышает нагрузку на сердце, провоцирует скачки давления, ухудшает работу печени и нервной системы. Неконтролируемый приём снотворных, анальгетиков, транквилизаторов, особенно вместе с алкоголем, способен вызвать угнетение дыхания, аритмии, судороги или делирий. Домашняя обстановка не даёт возможности следить за всеми показателями и вовремя отреагировать. «РаменМед Трезвость» предлагает клинически выверенный вывод из запоя в Раменском с учётом возраста, длительности употребления, хронических заболеваний, перенесённых ранее осложнений. Здесь не применяют сомнительные схемы «усыпить, чтобы не мешал», а ставят задачу: безопасно пройти острую фазу, снять интоксикацию, стабилизировать давление и пульс, защитить сердце и мозг, снизить риск психозов и, при желании пациента, сразу наметить маршрут реального лечения зависимости. Такой подход снимает с родственников опасную «роль врача» и возвращает ситуацию туда, где ей место — под контроль профессионалов.
Получить больше информации – вывод из запоя круглосуточно
Каждая стадия лечения проходит под постоянным контролем медицинского персонала. Пациенты чувствуют себя в безопасности и получают поддержку не только физическую, но и психологическую. Такой подход снижает риск рецидива и помогает сохранить результат на долгие годы.
Углубиться в тему – анонимная наркологическая клиника в рязани
Такая структура позволяет обеспечить эффективность и безопасность лечения на каждом этапе.
Выяснить больше – вывод из запоя круглосуточно пермь
clickforgrowthroadmaps – Very informative content, provided actionable steps for strategic planning.
Агентство наружной рекламы Буквица https://bukvica.ru/ оказывает полный комплекс услуг в сфере наружной рекламы и оформления внутренних пространств. Мы разрабатываем дизайн, производим и монтируем вывески, объемные буквы, световые конструкции, навигацию, крышные установки, вывески из неона и брендирование. Берём на себя согласование вывесок в государственных органах и реализуем проекты под ключ, точно в срок.
creative illustration link – Engaging sketches that make you want to create something new right away.
Вывод из запоя в Раменском — это не просто «поставить капельницу и отпустить домой», а комплекс медицинских действий, от которых напрямую зависит здоровье, а иногда и жизнь человека. Длительное употребление алкоголя приводит к тяжёлой интоксикации, нарушению работы сердца, печени, головного мозга, сбоям давления, риску судорог, психозов и резких обострений хронических заболеваний. Попытки самостоятельно «сойти с дистанции» дома, с помощью случайных таблеток, седативных препаратов и новых доз алкоголя, часто только усугубляют состояние. Наркологическая клиника «РаменМед Трезвость» в Раменском выстраивает вывод из запоя как безопасный, контролируемый, поэтапный процесс: от экстренного купирования симптомов до формирования плана дальнейшего восстановления. Пациент получает помощь без осуждения, анонимно, с участием специалистов, которые берут на себя ответственность за каждое назначение и каждое действие. Для родственников это означает: больше не нужно гадать, чего бояться и что давать — есть конкретное место и команда, к которым можно обратиться сразу.
Подробнее тут – vyvod-iz-zapoya-klinika
Клиника «НаркоСити» предлагает срочную наркологическую помощь при запоях на дому в Краснодаре. Опытные специалисты оперативно приезжают в любой район города, проводят детоксикацию и стабилизируют состояние пациента прямо на дому. Лечение организовано с максимальной безопасностью и соблюдением конфиденциальности, что обеспечивает пациентам комфорт и быстрое восстановление без госпитализации.
Углубиться в тему – http://vyvod-iz-zapoya-krasnodar0.ru/
Группа препаратов
Ознакомиться с деталями – http://www.domen.ru
Организация https://pitercomfort.ru/ работает в сфере продажи техники для очистки воды, водоснабжающих и отопительных систем в Петербурге. В номенклатуре присутствуют системы фильтрации BWT, насосы различного назначения, комплектация для бассейнов, химия для технических систем и каркасные купели из древесины. Потребители имеют возможность использовать современные разработки австрийского бренда BWT для квартир, вилл и фабричных комплексов, включая обратноосмотические модули, УФ-стерилизацию и химводоподготовку.
Алгоритм в «Трезвый Центр Коломна» построен так, чтобы убрать импровизацию и сделать всё максимально прозрачным для семьи. Сначала по телефону собираются ключевые данные: возраст пациента, длительность запоя, виды алкоголя, хронические заболевания, препараты, аллергии, наличие судорог, потерь сознания, странного поведения, текущие жалобы. На этом этапе озвучивается ориентировочный формат помощи и примерный диапазон стоимости. Далее следует выезд на дом или поступление в стационар. Врач проводит осмотр: измеряет артериальное давление, пульс, сатурацию, температуру, оценивает тремор, координацию, сознание, степень обезвоживания, наличие болей, состояние дыхания и сердца. На основе этих данных назначается инфузионная терапия: растворы для регидратации и коррекции электролитов, витамины группы B и магний для поддержки нервной системы, по показаниям — гепатопротекторы, антиоксидантные комплексы, противорвотные для контроля тошноты, мягкие анксиолитики для уменьшения тревоги и нормализации сна. Уходят от агрессивной седации: пациент не должен быть «выключен» так, чтобы невозможно было заметить ухудшение. В процессе капельниц проводится повторный контроль показателей, темп и состав при необходимости корректируются. После стабилизации пациент и семья получают подробные рекомендации: режим, сон, питание, питьё, запреты, «красные флаги», план наблюдения и возможного дальнейшего лечения зависимости.
Ознакомиться с деталями – https://vyvod-iz-zapoya-kolomna10.ru/vyvod-iz-zapoya-na-domu-v-kolomne
Такая последовательность действий позволяет обеспечить результативность и закрепить положительные изменения.
Детальнее – http://narcologicheskaya-klinika-perm0.ru
Для удобства восприятия можно ориентироваться на следующую структуру (это не публичная оферта, а примерная модель ценообразования — точная сумма фиксируется после осмотра и согласования схемы):
Подробнее тут – http://narkolog-na-dom-serpuhov10.ru
Алгоритм в «Трезвый Центр Коломна» построен так, чтобы убрать импровизацию и сделать всё максимально прозрачным для семьи. Сначала по телефону собираются ключевые данные: возраст пациента, длительность запоя, виды алкоголя, хронические заболевания, препараты, аллергии, наличие судорог, потерь сознания, странного поведения, текущие жалобы. На этом этапе озвучивается ориентировочный формат помощи и примерный диапазон стоимости. Далее следует выезд на дом или поступление в стационар. Врач проводит осмотр: измеряет артериальное давление, пульс, сатурацию, температуру, оценивает тремор, координацию, сознание, степень обезвоживания, наличие болей, состояние дыхания и сердца. На основе этих данных назначается инфузионная терапия: растворы для регидратации и коррекции электролитов, витамины группы B и магний для поддержки нервной системы, по показаниям — гепатопротекторы, антиоксидантные комплексы, противорвотные для контроля тошноты, мягкие анксиолитики для уменьшения тревоги и нормализации сна. Уходят от агрессивной седации: пациент не должен быть «выключен» так, чтобы невозможно было заметить ухудшение. В процессе капельниц проводится повторный контроль показателей, темп и состав при необходимости корректируются. После стабилизации пациент и семья получают подробные рекомендации: режим, сон, питание, питьё, запреты, «красные флаги», план наблюдения и возможного дальнейшего лечения зависимости.
Выяснить больше – http://vyvod-iz-zapoya-kolomna10.ru/vyvod-iz-zapoya-kapelnica-v-kolomne/
Контрактная служба позволяет получить гарантированный доход. Все выплаты фиксированы и прозрачны. Контракт оформляется добровольно. Условия известны до подписания – военный комиссариат города радужный ханты мансийского автономного округа югры
Visit Barling Collins – Professional layout with clear descriptions that set fair expectations.
Описание
Подробнее можно узнать тут – https://narkologicheskaya-pomoshh-samara0.ru/narkolog-skoraya-pomoshh-samara/
Лечение на дому проходит в комфортной и спокойной обстановке, что позволяет значительно снизить уровень стресса и быстро улучшить состояние здоровья пациента.
Получить больше информации – нарколог капельница на дом сочи
Потеряли годы на ненужные проекты? Расчет покажет ваш путь.
Вы — раб в своем собственном доме.
-тип генератор в дизайне человека;
-тип личности генератор дизайн;
-тип личности генератор;
-генератор это дизайн человека;
-дизайн человека генератор кто это;
-генератор по дизайну человека;
-тип личности генератор дизайн человека;
Вывод из запоя в Раменском в условиях клиники строится не вокруг одной капельницы, а вокруг понятной цепочки шагов, где каждый этап логичен и медицински обоснован. Это помогает не только быстро облегчить состояние, но и уменьшить вероятность того, что через пару дней человек снова уйдёт в запой.
Получить дополнительные сведения – вывод из запоя с выездом
В данном тексте собраны разнообразные случайные сведения и не вполне определённые идеи, которые могут вызвать интерес. Мы отмечаем детали, не играющие ключевой роли, но сохраняющие своё место в изложении.
Подробнее читать – детокс чай для похудения
Перед изложением таблицы следует отметить, что подбор методов лечения зависит от стадии и тяжести зависимости, а также индивидуальных особенностей пациента.
Исследовать вопрос подробнее – срочная наркологическая помощь
Контрактная служба это надежный выбор для тех кто хочет деньги и стабильность. Доход не зависит от рынка. Все начисления контролируются. Контракт оформляется по закону. Предусмотрены выплаты и гарантии. Уровень дохода высокий. Подай заявление сейчас – военный контракт рф
Своевременное обращение к специалистам позволяет быстро стабилизировать состояние и избежать осложнений.
Получить дополнительные сведения – вывод из запоя на дому недорого
Когда планирование бюджета становится важным, стабильный доход выходит на первый план, и служба по контракту дает такую возможность с фиксированными условиями. Это решение для уверенных людей. Начни оформление уже сегодня – контракт сво сургут
Медицинская помощь строится на принципах индивидуального подхода и поэтапной терапии. Каждый пациент проходит диагностику, после чего составляется персональная программа, включающая медикаментозную поддержку, консультации психотерапевта и физиопроцедуры. Такой подход помогает не просто снять симптомы, но и восстановить организм полностью.
Детальнее – наркологическая клиника цены в рязани
Такая структура позволяет обеспечить эффективность и безопасность лечения на каждом этапе.
Углубиться в тему – вывод из запоя в стационаре в перми
Описание
Получить дополнительные сведения – неотложная наркологическая помощь самара
Вывод из запоя — это не просто медицинская процедура, а тщательно выстроенный процесс, направленный на восстановление работы всех систем организма. При неправильном или неполном лечении риск осложнений возрастает в несколько раз. Поэтому обращение в профессиональную клинику становится необходимым шагом. В наркологической клинике «Центр Трезвости ВоронМед» пациент получает экстренную помощь, безопасные инфузионные препараты, круглосуточный выезд нарколога и последующее восстановление под наблюдением специалистов. Здесь каждая капельница подбирается индивидуально — с учётом возраста, веса, длительности запоя, хронических болезней и реакции организма на препараты.
Получить больше информации – https://vyvod-iz-zapoya-v-voronezhe17.ru/
Ищете комплексное оснащение мультимедийным оборудованием конференц-залов, переговорных комнат, диспетчерских и ситуационных центров, концертных и актовых залов, учебных и лекционных аудиторий под ключ? Посетите сайт https://i-tec.ru/ которая работает по всей России. Ознакомьтесь с нашими решениями и услугами. При необходимости посмотрите портфолио. Подробнее на сайте.
Для эффективного лечения алкогольной интоксикации и восстановления организма врачи клиники «АлкоДоктор» используют комплекс препаратов, которые индивидуально подбираются с учетом состояния пациента.
Получить дополнительные сведения – капельница от запоя недорого
Клиника «НаркоСити» предлагает срочную наркологическую помощь при запоях на дому в Краснодаре. Опытные специалисты оперативно приезжают в любой район города, проводят детоксикацию и стабилизируют состояние пациента прямо на дому. Лечение организовано с максимальной безопасностью и соблюдением конфиденциальности, что обеспечивает пациентам комфорт и быстрое восстановление без госпитализации.
Узнать больше – https://vyvod-iz-zapoya-krasnodar0.ru/vyvod-iz-zapoya-kruglosutochno-krasnodar
Salt n Light films showcase – Enjoyed the projects, narratives feel personal and emotionally impactful.
Детоксикация в клинике «Центр Трезвости ВоронМед» проводится по принципу минимального вмешательства при максимальной эффективности. Основная задача — очистить кровь от токсинов и стабилизировать внутреннюю среду организма без нагрузки на сердце и почки. Все препараты вводятся медленно, под контролем медицинского персонала, а состав подбирается индивидуально после оценки анализов и состояния пациента.
Углубиться в тему – вывод из запоя вызов на дом в воронеже
Для эффективного лечения алкогольной интоксикации и восстановления организма врачи клиники «АлкоДоктор» используют комплекс препаратов, которые индивидуально подбираются с учетом состояния пациента.
Получить больше информации – сколько стоит капельница от запоя в сочи
В клинике «НаркоСити» используются только сертифицированные лекарственные средства, которые подбираются индивидуально с учетом состояния пациента:
Ознакомиться с деталями – http://vyvod-iz-zapoya-krasnodar0.ru/vyvod-iz-zapoya-kruglosutochno-krasnodar/
Strength training is a powerful tool for long-term weight loss results.
https://invisibleweightloss.com/about-us
Жители Махачкалы и Каспийска знают, как важна качественная питьевая вода для здоровья всей семьи. Особенно ценной является лечебная минеральная вода, которая помогает поддерживать организм в тонусе и справляться с различными недугами. В ассортименте https://voda-s-gor.ru/lechebnaya-voda/ представлены проверенные марки: «Ессентуки №4» и №17, «Билинская Киселка», «Лысогорская» — вода с многолетней историей и подтвержденными лечебными свойствами. Удобная доставка на дом или в офис избавляет от необходимости самостоятельно носить тяжелые бутылки, а широкий выбор объемов позволяет подобрать оптимальный вариант для любых нужд.
Военная служба по контракту это стабильные выплаты. Контракт фиксирует все условия. Доход начисляется регулярно. Сделай выбор сегодня: выплаты военнослужащим по контракту
Клиника «НаркоСити» предлагает срочную наркологическую помощь при запоях на дому в Краснодаре. Опытные специалисты оперативно приезжают в любой район города, проводят детоксикацию и стабилизируют состояние пациента прямо на дому. Лечение организовано с максимальной безопасностью и соблюдением конфиденциальности, что обеспечивает пациентам комфорт и быстрое восстановление без госпитализации.
Углубиться в тему – вывод из запоя дешево краснодар
Группа препаратов
Разобраться лучше – капельница от запоя вызов в сочи
Качественные пластиковые окна повышают комфорт жилья и снижают теплопотери. Компания http://eoknadveri.ru/ производит светопрозрачные конструкции из ПВХ и алюминия в Москве без торговой наценки. Собственное производство обеспечивает минимальные сроки изготовления, гарантия достигает 20 лет. Доступно остекление квартир, балконов и коттеджей с бесплатным замером, доставкой и установкой в удобное время. Предлагается рассрочка платежа и вывоз строительного мусора. Работа ведется ежедневно с 9:00 до 21:00, что позволяет согласовать визит специалиста в любой день.
Самостоятельный выход из запоя сопряжен с высоким риском развития осложнений. После прекращения приема спиртного ослабленный организм может не выдержать нагрузки, что приведет к инфаркту, инсульту, судорожным приступам и даже алкогольному психозу. Чтобы избежать этих опасных состояний, необходимо вызвать нарколога на дом, который проведет лечение правильно и безопасно.
Получить дополнительные сведения – вывод из запоя круглосуточно
Самостоятельный выход из запоя сопряжен с высоким риском развития осложнений. После прекращения приема спиртного ослабленный организм может не выдержать нагрузки, что приведет к инфаркту, инсульту, судорожным приступам и даже алкогольному психозу. Чтобы избежать этих опасных состояний, необходимо вызвать нарколога на дом, который проведет лечение правильно и безопасно.
Получить больше информации – вывод из запоя на дому цена краснодар
Для эффективного лечения алкогольной интоксикации и восстановления организма врачи клиники «АлкоДоктор» используют комплекс препаратов, которые индивидуально подбираются с учетом состояния пациента.
Получить дополнительную информацию – врач на дом капельница от запоя
Во время лечения фиксируются все жизненные показатели пациента. При необходимости проводится экспресс-анализ крови и ЭКГ. Ниже представлена таблица, показывающая, какие параметры контролируются и по каким признакам оценивается стабилизация состояния.
Разобраться лучше – https://vyvod-iz-zapoya-v-voronezhe17.ru/vyvod-iz-zapoya-za-den-voronezh
Группа препаратов
Исследовать вопрос подробнее – врач на дом капельница от запоя
Капельница от запоя является неотъемлемой процедурой при острых и хронических отравлениях алкоголем. Она помогает стабилизировать состояние пациента, избежать тяжелых последствий и максимально быстро вернуться к нормальной жизни. Вызов врача для проведения процедуры рекомендуется в следующих ситуациях:
Исследовать вопрос подробнее – врача капельницу от запоя
После окончания врач дает консультации и рекомендации по восстановлению организма и профилактике повторных запоев.
Ознакомиться с деталями – врач вывод из запоя в краснодаре
Основные этапы обычно включают:
Детальнее – http://vyvod-iz-zapoya-ramenskoe10.ru/srochnoe-vyvedenie-iz-zapoya-v-ramenskom/
Основу лечения составляет междисциплинарная команда: врач-нарколог, психиатр, психолог, медсестра и консультант по зависимому поведению. Каждый отвечает за свой участок работы, но общая цель едина — помочь пациенту безопасно пройти путь от детокса до устойчивого состояния. Благодаря единому плану и регулярным консилиумам врачей, исключаются противоречия и дублирование процедур. Это экономит ресурсы организма и делает процесс прогнозируемым.
Ознакомиться с деталями – http://narkologicheskaya-clinica-v-krasnoyarske17.ru/krasnoyarsk-narkologicheskij-czentr/
Опять приняли решение из головы? База дизайна человека вернет точность выбора.
Вы платите годами за неверные шаги.
-дизайн человека генератор кто это;
-генератор в хьюман дизайне;
-тип личности генератор это;
-тип генератор в дизайне человека;
-тип личности генератор дизайн человека;
-тип личности генератор;
-человек генератор кто это;
Когда человек в запое, близким кажется, что всё ещё можно решить «по-тихому»: выспаться, отпаять водой, дать обезболивающее или «успокоительное» и дождаться, пока станет легче. На практике это часто приводит к обратному результату. Алкогольная интоксикация нарушает водно-электролитный баланс, сгущает кровь, повышает нагрузку на сердце, провоцирует скачки давления, ухудшает работу печени и нервной системы. Неконтролируемый приём снотворных, анальгетиков, транквилизаторов, особенно вместе с алкоголем, способен вызвать угнетение дыхания, аритмии, судороги или делирий. Домашняя обстановка не даёт возможности следить за всеми показателями и вовремя отреагировать. «РаменМед Трезвость» предлагает клинически выверенный вывод из запоя в Раменском с учётом возраста, длительности употребления, хронических заболеваний, перенесённых ранее осложнений. Здесь не применяют сомнительные схемы «усыпить, чтобы не мешал», а ставят задачу: безопасно пройти острую фазу, снять интоксикацию, стабилизировать давление и пульс, защитить сердце и мозг, снизить риск психозов и, при желании пациента, сразу наметить маршрут реального лечения зависимости. Такой подход снимает с родственников опасную «роль врача» и возвращает ситуацию туда, где ей место — под контроль профессионалов.
Исследовать вопрос подробнее – https://vyvod-iz-zapoya-ramenskoe10.ru/vyvod-iz-zapoya-ryadom-v-ramenskom/
При длительном запое или серьезной алкогольной интоксикации часто нет возможности или желания ехать в стационар. В таких ситуациях оптимальным решением становится вызов нарколога на дом в Сочи. Специалисты клиники «Жизнь без Запоя» круглосуточно приезжают к пациентам, оперативно оказывают медицинскую помощь и проводят профессиональную детоксикацию организма прямо в домашних условиях. Благодаря комфортному лечению на дому пациенты быстрее восстанавливаются, избегают дополнительного стресса и осложнений, связанных с госпитализацией.
Подробнее – нарколог на дом круглосуточно цены сочи
Самостоятельный выход из запоя сопряжен с высоким риском развития осложнений. После прекращения приема спиртного ослабленный организм может не выдержать нагрузки, что приведет к инфаркту, инсульту, судорожным приступам и даже алкогольному психозу. Чтобы избежать этих опасных состояний, необходимо вызвать нарколога на дом, который проведет лечение правильно и безопасно.
Исследовать вопрос подробнее – https://vyvod-iz-zapoya-krasnodar0.ru/vyvod-iz-zapoya-czena-krasnodar
Капельница от запоя является неотъемлемой процедурой при острых и хронических отравлениях алкоголем. Она помогает стабилизировать состояние пациента, избежать тяжелых последствий и максимально быстро вернуться к нормальной жизни. Вызов врача для проведения процедуры рекомендуется в следующих ситуациях:
Узнать больше – капельница от запоя круглосуточно сочи
UDL holiday resources – Easy to navigate, practical guidance that’s straight to the point.
В статье-обзоре представлены данные сомнительной актуальности и факты без явной взаимосвязи. Читатель ознакомится с разными мнениями, хотя они вряд ли существенно изменят его представление о теме.
Подробнее читать – похудеть на таблетках
Служба по контракту с возможностью высокого заработка доступна гражданам. Все условия фиксированы. Контракт заключается после комиссии. Выплаты прозрачны, добровольцы хмао
Такая последовательность действий позволяет обеспечить результативность и закрепить положительные изменения.
Подробнее – https://narcologicheskaya-klinika-perm0.ru/chastnaya-narkologicheskaya-klinika-perm
Для иллюстрации эффективности методов представлена таблица с примерами процедур и их воздействием:
Исследовать вопрос подробнее – наркологическая клиника клиника помощь красноярск
This is a comprehensive guide to health insurance for small contracting businesses. It’s exactly the kind of advice I needed to start looking for employee plans.
https://lakeinsuranceok.com/about-us
Чем раньше нарколог окажет помощь, тем выше шансы избежать осложнений и восстановиться без последствий для здоровья.
Получить дополнительные сведения – https://narcolog-na-dom-sochi0.ru/
Группа препаратов
Подробнее – вызов на дом капельницы от запоя
Срочная медицинская помощь поможет избежать тяжелых последствий и сократит время на восстановление после запоя.
Получить дополнительные сведения – https://vyvod-iz-zapoya-krasnodar0.ru/vyvod-iz-zapoya-czena-krasnodar/
Для эффективного лечения алкогольной интоксикации и восстановления организма врачи клиники «АлкоДоктор» используют комплекс препаратов, которые индивидуально подбираются с учетом состояния пациента.
Подробнее тут – http://kapelnica-ot-zapoya-sochi0.ru/kapelnicza-ot-zapoya-czena-sochi/
Наркологическая клиника в Перми обеспечивает пациентам комфортные условия и профессиональное сопровождение. Врачи работают круглосуточно и соблюдают строгую конфиденциальность, что делает лечение доступным и безопасным.
Получить дополнительные сведения – анонимная наркологическая клиника
Клиника «НаркоСити» предлагает срочную наркологическую помощь при запоях на дому в Краснодаре. Опытные специалисты оперативно приезжают в любой район города, проводят детоксикацию и стабилизируют состояние пациента прямо на дому. Лечение организовано с максимальной безопасностью и соблюдением конфиденциальности, что обеспечивает пациентам комфорт и быстрое восстановление без госпитализации.
Узнать больше – вывод из запоя капельница на дому в краснодаре
Процедура начинается с осмотра пациента и оценки степени интоксикации. Врач измеряет давление, пульс, уровень насыщения крови кислородом, определяет наличие сопутствующих заболеваний. После диагностики назначается капельница, состав которой подбирается индивидуально. Процедура направлена на очищение организма, восстановление водно-солевого баланса и снятие симптомов похмелья.
Углубиться в тему – http://vyvod-iz-zapoya-v-tolyatti17.ru
Современный рынок онлайн-услуг предлагает множество платформ для различных задач, и выбор надежного сервиса становится ключевым фактором успеха. Ресурс https://platl.ru/ представляет собой удобное решение для пользователей, заинтересованных в качественных цифровых услугах и продуктах. Платформа ориентирована на российскую аудиторию и предлагает понятный интерфейс, прозрачные условия сотрудничества и оперативную поддержку клиентов. Независимо от масштаба вашего проекта — будь то небольшой стартап или крупный коммерческий портал — здесь можно найти инструменты и решения, способные существенно упростить рабочие процессы и повысить эффективность вашего бизнеса.
Группа препаратов
Получить больше информации – https://kapelnica-ot-zapoya-sochi0.ru/kapelnicza-ot-zapoya-czena-sochi
Алгоритм в «Трезвый Центр Коломна» построен так, чтобы убрать импровизацию и сделать всё максимально прозрачным для семьи. Сначала по телефону собираются ключевые данные: возраст пациента, длительность запоя, виды алкоголя, хронические заболевания, препараты, аллергии, наличие судорог, потерь сознания, странного поведения, текущие жалобы. На этом этапе озвучивается ориентировочный формат помощи и примерный диапазон стоимости. Далее следует выезд на дом или поступление в стационар. Врач проводит осмотр: измеряет артериальное давление, пульс, сатурацию, температуру, оценивает тремор, координацию, сознание, степень обезвоживания, наличие болей, состояние дыхания и сердца. На основе этих данных назначается инфузионная терапия: растворы для регидратации и коррекции электролитов, витамины группы B и магний для поддержки нервной системы, по показаниям — гепатопротекторы, антиоксидантные комплексы, противорвотные для контроля тошноты, мягкие анксиолитики для уменьшения тревоги и нормализации сна. Уходят от агрессивной седации: пациент не должен быть «выключен» так, чтобы невозможно было заметить ухудшение. В процессе капельниц проводится повторный контроль показателей, темп и состав при необходимости корректируются. После стабилизации пациент и семья получают подробные рекомендации: режим, сон, питание, питьё, запреты, «красные флаги», план наблюдения и возможного дальнейшего лечения зависимости.
Подробнее можно узнать тут – vyvod-iz-zapoya-na-domu-nedorogo
В клинике «НаркоСити» используются только сертифицированные лекарственные средства, которые подбираются индивидуально с учетом состояния пациента:
Ознакомиться с деталями – http://vyvod-iz-zapoya-krasnodar0.ru
Медицинская помощь строится на принципах индивидуального подхода и поэтапной терапии. Каждый пациент проходит диагностику, после чего составляется персональная программа, включающая медикаментозную поддержку, консультации психотерапевта и физиопроцедуры. Такой подход помогает не просто снять симптомы, но и восстановить организм полностью.
Выяснить больше – лечение в наркологической клинике рязань
Наркологическая помощь в Самаре представляет собой комплекс медицинских мероприятий, направленных на лечение алкогольной и наркотической зависимости, а также восстановление физического и психического здоровья пациентов. В наркологической клинике «Согласие» применяются современные методики диагностики, детоксикации и комплексной терапии, учитывающие индивидуальные особенности каждого пациента, тяжесть зависимости и наличие сопутствующих заболеваний. Основная цель — восстановление здоровья, предупреждение осложнений и снижение риска рецидивов.
Исследовать вопрос подробнее – наркологическая помощь на дому круглосуточно самара
Контрактная служба – стабильность, доход, гарантии. Все выплаты официальны. Условия прозрачны. Подписывай контракт – добровольцы хмао
Вывод из запоя в Перми включает использование комплекса медикаментозных и психотерапевтических методик. Они помогают не только снять симптомы интоксикации, но и стабилизировать эмоциональное состояние.
Подробнее – http://vyvod-iz-zapoya-perm0.ru/vykhod-iz-zapoya-perm/
Путешествие большой компанией или семьей требует комфортного транспорта. Сервис https://minivan.online/ предлагает аренду восьмиместных минивэнов с водителем в Москве по фиксированным тарифам. Востребованы поездки в аэропорты Домодедово, Шереметьево, Внуково и на вокзалы без переплат за пробки. Доступно детское такси BABYCAR с автокреслами для новорожденных, семейные поездки и трансферы на свадьбы. Заказ принимается круглосуточно по телефону, что гарантирует оперативную подачу автомобиля в нужное время и место.
Ищете замена оконной фурнитуры ? Починка ПВХ окон в Минске с предоставлением гарантии. Зайдите на портал рамонт.бел – изучите наш перечень услуг, включая реставрацию окон, смену фурнитуры, починку балконных дверей и другие работы. Стоимость ремонта и регулировки окон на сайте, а мастер выезжает на срочный ремонт окон в Минске в любой день и погоду в течение часа. В наличии запчасти всех производителей оконных профильных систем. Обеспечиваем высокое качество и долговечность восстановления Ваших оконных систем.
Такая структура лечения помогает пациентам пройти все этапы восстановления под контролем специалистов.
Углубиться в тему – наркологические клиники алкоголизм
Продолжительность процедуры — от 40 минут до полутора часов. Уже в первые часы после начала терапии состояние пациента значительно улучшается: проходит тошнота, снижается тревожность, восстанавливается координация движений.
Подробнее – https://vyvod-iz-zapoya-v-tolyatti17.ru/vyvod-iz-zapoya-tolyatti-na-domu/
Такая последовательность действий позволяет обеспечить результативность и закрепить положительные изменения.
Подробнее тут – https://narcologicheskaya-klinika-perm0.ru/narkolog-perm-czeny/
Всем привет!
Нарыл полезную статью.
Решил поделиться.
Линк:
blacksprut зеркала
Всем удачи!
Когда человек в запое, близким кажется, что всё ещё можно решить «по-тихому»: выспаться, отпаять водой, дать обезболивающее или «успокоительное» и дождаться, пока станет легче. На практике это часто приводит к обратному результату. Алкогольная интоксикация нарушает водно-электролитный баланс, сгущает кровь, повышает нагрузку на сердце, провоцирует скачки давления, ухудшает работу печени и нервной системы. Неконтролируемый приём снотворных, анальгетиков, транквилизаторов, особенно вместе с алкоголем, способен вызвать угнетение дыхания, аритмии, судороги или делирий. Домашняя обстановка не даёт возможности следить за всеми показателями и вовремя отреагировать. «РаменМед Трезвость» предлагает клинически выверенный вывод из запоя в Раменском с учётом возраста, длительности употребления, хронических заболеваний, перенесённых ранее осложнений. Здесь не применяют сомнительные схемы «усыпить, чтобы не мешал», а ставят задачу: безопасно пройти острую фазу, снять интоксикацию, стабилизировать давление и пульс, защитить сердце и мозг, снизить риск психозов и, при желании пациента, сразу наметить маршрут реального лечения зависимости. Такой подход снимает с родственников опасную «роль врача» и возвращает ситуацию туда, где ей место — под контроль профессионалов.
Подробнее можно узнать тут – srochnoe-vyvedenie-iz-zapoya
Инфузионная терапия (капельницы) — важная часть лечения, направленная на очищение организма, восстановление водно-солевого баланса и устранение токсинов. В «РязаньМед Альянс» используются проверенные препараты, которые помогают нормализовать работу внутренних органов и улучшить общее самочувствие. Таблица ниже показывает, какие виды капельниц чаще всего применяются при выведении из запоя и лечении алкоголизма.
Углубиться в тему – http://narkologicheskaya-klinika-v-ryazani17.ru
Ищете русский сериал смотреть онлайн бесплатно 2025? Портал rseriali.net открывает доступ к многотысячной библиотеке сериалов всех жанров в отличном качестве без оплаты и обязательной регистрации. Ресурс представляет актуальные новинки текущего сезона, проверенные отечественные сериалы, турецкие драмы, голливудские боевики и британские криминальные истории с удобной фильтрацией по категориям, периодам выпуска и географии производства. Сервис каждый день обновляет контент свежими эпизодами, обеспечивает воспроизведение на мобильных устройствах, планшетных компьютерах и десктопах, предоставляет множественные версии дубляжа и разрешения картинки для приятного использования.
Наркологическая клиника в Перми обеспечивает пациентам комфортные условия и профессиональное сопровождение. Врачи работают круглосуточно и соблюдают строгую конфиденциальность, что делает лечение доступным и безопасным.
Подробнее тут – наркологическая клиника вывод из запоя пермь
Работа выездной службы построена так, чтобы для семьи всё было максимально понятно и предсказуемо. После звонка специалист не ограничивается общими фразами, а уточняет детали: сколько длится употребление, есть ли хронические болезни сердца, печени, почек, эндокринные нарушения, какие препараты и в каких дозах пациент уже получил, были ли в прошлом судороги, галлюцинации, тяжёлые реакции на лекарства. Это позволяет заранее оценить уровень риска и понять, подходит ли формат дома. По прибытии в Серпухове врач осматривает пациента, проверяет контакт и ориентировку, измеряет артериальное давление несколько раз, оценивает пульс, сатурацию, температуру, выраженность тремора, наличие болей, характер дыхания, степень обезвоживания. Далее формируется индивидуальная инфузионная схема: растворы для регидратации и коррекции электролитов, витамины группы B и магний для поддержки нервной системы, при необходимости — гепатопротекторы и мягкие антиоксидантные комплексы, противорвотные для контроля тошноты, щадящие анксиолитики для нормализации сна без грубой седации. Во время процедуры врач контролирует динамику, меняет скорость капельницы при необходимости, отслеживает реакцию на препараты и объясняет родным, какие изменения будут происходить по часам. По завершении визита пациент и родственники получают подробный план: режим, питьё, питание, чего нельзя, какие симптомы считаются тревожными, когда нужна повторная консультация или стационар. При выявлении опасных признаков вопрос о госпитализации поднимается честно и сразу, а не откладывается «до утра».
Исследовать вопрос подробнее – http://narkolog-na-dom-serpuhov10.ru/narkolog-psiholog-na-dom-serpuhov/
Эта публикация содержит набор несвязанных идей, трудно применимых в практике. Мы лишь поверхностно затрагиваем различные точки зрения, не проводя глубокий анализ и не предлагая выводов.
Подробнее читать – https://rostov-narkologiya.ru
Лечение зависимости в наркологической клинике проводится поэтапно. Это обеспечивает постепенное восстановление организма и исключает риск осложнений. Каждый этап направлен на устранение конкретных нарушений, вызванных употреблением психоактивных веществ.
Получить дополнительную информацию – https://narcologicheskaya-klinika-v-krasnoyarske17.ru/krasnoyarsk-narkologicheskij-czentr/
Для детоксикации и восстановления организма после запоя используются только сертифицированные лекарственные препараты с доказанной эффективностью и безопасностью:
Выяснить больше – вызов нарколога на дом в сочи
Военная служба по контракту это надежный источник дохода. Выплаты официальные и защищенные законом. Условия известны заранее. Контракт оформляется добровольно. Все этапы проходят по правилам. Начни уже сейчас: служба на севере год за сколько
Комплексное применение этих методов позволяет добиться быстрого восстановления организма и улучшения психоэмоционального состояния.
Подробнее – http://vyvod-iz-zapoya-perm0.ru
Лечение на дому проходит в комфортной и спокойной обстановке, что позволяет значительно снизить уровень стресса и быстро улучшить состояние здоровья пациента.
Детальнее – нарколог на дом клиника
Having trouble deciding on a name for your newborn? Visit https://cutebabynames4u.com/ – there you’ll find a collection of cute baby names, as well as names that are unusual, rare, and unique. Use our list to help you choose. Also, if necessary, explore international styles of baby names that you might like!
Финансовая стабильность не должна быть мечтой. Контрактная служба предлагает официальный доход с регулярными выплатами и прозрачными условиями. Все начисления закреплены договором и не меняются неожиданно. Дополнительные выплаты увеличивают общий заработок. Такой формат подходит тем кто хочет результат а не обещания. Подай заявку и заключи контракт: контракт сво сургут
Контрактная служба в армии дает возможность зарабатывать официально. Денежное довольствие выплачивается регулярно. Все условия фиксируются в договоре. Решение остается за кандидатом, югра служба по контракту
Перед таблицей — короткий акцент: приведённые суммы ориентировочные, не являются публичной офертой, точная стоимость определяется после осмотра.
Узнать больше – http://vyvod-iz-zapoya-kolomna10.ru/vyvod-iz-zapoya-na-domu-v-kolomne/
Основу лечения составляет междисциплинарная команда: врач-нарколог, психиатр, психолог, медсестра и консультант по зависимому поведению. Каждый отвечает за свой участок работы, но общая цель едина — помочь пациенту безопасно пройти путь от детокса до устойчивого состояния. Благодаря единому плану и регулярным консилиумам врачей, исключаются противоречия и дублирование процедур. Это экономит ресурсы организма и делает процесс прогнозируемым.
Разобраться лучше – частная наркологическая клиника
Работа выездной службы построена так, чтобы для семьи всё было максимально понятно и предсказуемо. После звонка специалист не ограничивается общими фразами, а уточняет детали: сколько длится употребление, есть ли хронические болезни сердца, печени, почек, эндокринные нарушения, какие препараты и в каких дозах пациент уже получил, были ли в прошлом судороги, галлюцинации, тяжёлые реакции на лекарства. Это позволяет заранее оценить уровень риска и понять, подходит ли формат дома. По прибытии в Серпухове врач осматривает пациента, проверяет контакт и ориентировку, измеряет артериальное давление несколько раз, оценивает пульс, сатурацию, температуру, выраженность тремора, наличие болей, характер дыхания, степень обезвоживания. Далее формируется индивидуальная инфузионная схема: растворы для регидратации и коррекции электролитов, витамины группы B и магний для поддержки нервной системы, при необходимости — гепатопротекторы и мягкие антиоксидантные комплексы, противорвотные для контроля тошноты, щадящие анксиолитики для нормализации сна без грубой седации. Во время процедуры врач контролирует динамику, меняет скорость капельницы при необходимости, отслеживает реакцию на препараты и объясняет родным, какие изменения будут происходить по часам. По завершении визита пациент и родственники получают подробный план: режим, питьё, питание, чего нельзя, какие симптомы считаются тревожными, когда нужна повторная консультация или стационар. При выявлении опасных признаков вопрос о госпитализации поднимается честно и сразу, а не откладывается «до утра».
Подробнее тут – http://narkolog-na-dom-serpuhov10.ru
Управление финансами малого и среднего бизнеса часто превращается в хаос: отчёты не отражают реальность, кассовые разрывы возникают внезапно, а прибыль остаётся загадкой. Финансовый директор Грубов Вадим Алексеевич с опытом 25+ лет на https://findir.info/ выстраивает целостную систему: от настройки 1С и управленческого учёта до бюджетирования и налоговой оптимизации. Это не разовые консультации, а полноценное сопровождение собственника — с диагностикой, внедрением регламентов и понятной отчётностью, которая помогает принимать взвешенные решения и расти без финансовых рисков.
Детоксикация в клинике «Центр Трезвости ВоронМед» проводится по принципу минимального вмешательства при максимальной эффективности. Основная задача — очистить кровь от токсинов и стабилизировать внутреннюю среду организма без нагрузки на сердце и почки. Все препараты вводятся медленно, под контролем медицинского персонала, а состав подбирается индивидуально после оценки анализов и состояния пациента.
Получить дополнительную информацию – вывод из запоя цена воронеж
Тем, кто нуждается в длительной терапии, «КузбассМед» предлагает комфортные условия стационара с круглосуточным наблюдением. Здесь пациенты размещаются в индивидуальных палатах, проходят курсы терапии, реабилитации и психокоррекции. Обстановка в клинике напоминает оздоровительный центр: мягкое освещение, тишина, доступ к библиотеке, возможность общения с психологом и ежедневное участие в восстановительных мероприятиях. Медицинские сестры и врачи находятся на дежурстве 24/7, что позволяет немедленно реагировать на любые изменения в состоянии пациента.
Подробнее можно узнать тут – лечение в наркологической клинике в новокузнецке
Во время процедуры врач контролирует состояние больного, по необходимости корректирует лечение, чтобы добиться максимального терапевтического эффекта. После проведения детоксикации пациенту назначается курс поддерживающей терапии, а также даются рекомендации по дальнейшему восстановлению и профилактике рецидивов.
Подробнее тут – выезд нарколога на дом
Домашній комфорт і затишок – мета, яку шукають більшість українських сімей. Створюйте власний дім таким, яким бажаєте разом з блогом – Українська Хата. На сайті https://xata.od.ua/ знайдете безліч порад на тему: ремонт, будівництво, інтер’єр, меблі. Корисні поради на цікаві теми.
Продолжительность процедуры — от 40 минут до полутора часов. Уже в первые часы после начала терапии состояние пациента значительно улучшается: проходит тошнота, снижается тревожность, восстанавливается координация движений.
Детальнее – http://vyvod-iz-zapoya-v-tolyatti17.ru
Вывод из запоя в Тольятти — это медицинская процедура, направленная на очищение организма от продуктов распада алкоголя и восстановление нормального состояния здоровья. Длительное употребление спиртных напитков приводит к серьёзной интоксикации, нарушению работы нервной, сердечно-сосудистой и пищеварительной систем. Самостоятельные попытки прекратить запой могут быть опасны, поэтому оптимальным решением является обращение к врачу-наркологу, который проведёт лечение безопасно и эффективно.
Ознакомиться с деталями – вывод из запоя в стационаре тольятти
Вызов нарколога на дом становится необходимым при любых состояниях, когда отказ от алкоголя сопровождается выраженными симптомами интоксикации и абстиненции. Основные ситуации, в которых срочно требуется профессиональная помощь врача:
Исследовать вопрос подробнее – частный нарколог на дом в сочи
Хроническая усталость — признак чужого пути.
Когда каждый шаг требует невозможных усилий.
-человек генератор кто это;
-дизайн человека генератор кто это;
-хьюман дизайн генератор;
-человек генератор дизайн человека;
-генератор тип личности;
-дизайн человека генератор;
Вызов нарколога на дом становится необходимым при любых состояниях, когда отказ от алкоголя сопровождается выраженными симптомами интоксикации и абстиненции. Основные ситуации, в которых срочно требуется профессиональная помощь врача:
Получить дополнительную информацию – вызвать нарколога на дом срочно
Бесплатный ключ для Windows 11 — только у нас, обновлено в 2026 году!
Подробнее – https://krasnodar.med24.online/landing/narkolog_na_dom
Инфузионная терапия (капельницы) — важная часть лечения, направленная на очищение организма, восстановление водно-солевого баланса и устранение токсинов. В «РязаньМед Альянс» используются проверенные препараты, которые помогают нормализовать работу внутренних органов и улучшить общее самочувствие. Таблица ниже показывает, какие виды капельниц чаще всего применяются при выведении из запоя и лечении алкоголизма.
Выяснить больше – http://narkologicheskaya-klinika-v-ryazani17.ru
Инфузионная терапия (капельницы) — важная часть лечения, направленная на очищение организма, восстановление водно-солевого баланса и устранение токсинов. В «РязаньМед Альянс» используются проверенные препараты, которые помогают нормализовать работу внутренних органов и улучшить общее самочувствие. Таблица ниже показывает, какие виды капельниц чаще всего применяются при выведении из запоя и лечении алкоголизма.
Узнать больше – наркологическая клиника стационар в рязани
Запой — это не просто несколько лишних дней алкоголя, а тяжёлое состояние, в котором организм работает на пределе. Чем дольше длится эпизод, тем глубже обезвоживание, тем сильнее сдвиги электролитов, тем выше риск аритмий, гипертонических кризов, судорог, делирия, обострений заболеваний сердца, печени и поджелудочной железы. Попытки «вывести» человека дома силами родных часто включают опасные комбинации: случайные седативные, снотворные, анальгетики, «антипохмельные» из рекламы. Они могут на время усыпить или «успокоить», но при этом скрывают ухудшение, сбивают давление, угнетают дыхание и мешают врачу увидеть реальную картину. В «Трезвый Центр Коломна» подход другой: ещё на этапе звонка специалист уточняет длительность запоя, объёмы и виды алкоголя, наличие гипертонии, ИБС, диабета, заболеваний печени и почек, неврологических проблем, список уже принятых препаратов, эпизоды потери сознания, судорог, странного поведения. На основании этих данных определяется, безопасен ли формат на дому или сразу нужен стационар. Такая сортировка позволяет вовремя перехватить опасные случаи, не терять часы на бесполезные попытки и сразу запускать те схемы, которые реально снижают риски и стабилизируют состояние.
Углубиться в тему – вывод из запоя круглосуточно
Контрактная служба предусматривает денежное довольствие. Размер выплат зависит от должности и условий службы. Все начисления регулируются законом – сколько стоит служба по контракту в россии
Контрактная служба создана для тех, кто выбирает доход. Выплаты начисляются регулярно. Официальный статус гарантирован. Подписывай контракт – контракт на 1 год в армии
Работа выездной службы построена так, чтобы для семьи всё было максимально понятно и предсказуемо. После звонка специалист не ограничивается общими фразами, а уточняет детали: сколько длится употребление, есть ли хронические болезни сердца, печени, почек, эндокринные нарушения, какие препараты и в каких дозах пациент уже получил, были ли в прошлом судороги, галлюцинации, тяжёлые реакции на лекарства. Это позволяет заранее оценить уровень риска и понять, подходит ли формат дома. По прибытии в Серпухове врач осматривает пациента, проверяет контакт и ориентировку, измеряет артериальное давление несколько раз, оценивает пульс, сатурацию, температуру, выраженность тремора, наличие болей, характер дыхания, степень обезвоживания. Далее формируется индивидуальная инфузионная схема: растворы для регидратации и коррекции электролитов, витамины группы B и магний для поддержки нервной системы, при необходимости — гепатопротекторы и мягкие антиоксидантные комплексы, противорвотные для контроля тошноты, щадящие анксиолитики для нормализации сна без грубой седации. Во время процедуры врач контролирует динамику, меняет скорость капельницы при необходимости, отслеживает реакцию на препараты и объясняет родным, какие изменения будут происходить по часам. По завершении визита пациент и родственники получают подробный план: режим, питьё, питание, чего нельзя, какие симптомы считаются тревожными, когда нужна повторная консультация или стационар. При выявлении опасных признаков вопрос о госпитализации поднимается честно и сразу, а не откладывается «до утра».
Подробнее можно узнать тут – выезд нарколога на дом в серпухове
Комплексное применение этих методов позволяет добиться быстрого восстановления организма и улучшения психоэмоционального состояния.
Ознакомиться с деталями – вывод из запоя круглосуточно в перми
Вывод из запоя в Перми включает использование комплекса медикаментозных и психотерапевтических методик. Они помогают не только снять симптомы интоксикации, но и стабилизировать эмоциональное состояние.
Разобраться лучше – http://vyvod-iz-zapoya-perm0.ru/
Контрактная служба решает вопрос с доходом. Деньги выплачиваются официально. Условия понятны. Подай заявку прямо сейчас – хмао военкомат служба по контракту
Контрактная служба – это возможность заключить договор и получать регулярные выплаты. Уровень дохода установлен заранее. Предусмотрены надбавки. Процесс оформления регламентирован – служба на крайнем севере
При длительном запое или серьезной алкогольной интоксикации часто нет возможности или желания ехать в стационар. В таких ситуациях оптимальным решением становится вызов нарколога на дом в Сочи. Специалисты клиники «Жизнь без Запоя» круглосуточно приезжают к пациентам, оперативно оказывают медицинскую помощь и проводят профессиональную детоксикацию организма прямо в домашних условиях. Благодаря комфортному лечению на дому пациенты быстрее восстанавливаются, избегают дополнительного стресса и осложнений, связанных с госпитализацией.
Углубиться в тему – http://narcolog-na-dom-sochi0.ru/narkolog-na-dom-kruglosutochno-sochi/
Алкогольная и наркотическая зависимости характеризуются стойким патологическим влечением к употреблению психоактивных веществ, сопровождающимся нарушениями здоровья и социальной адаптации. В хронической стадии развивается тяжелое физическое и психическое истощение, ухудшаются функции внутренних органов, нарушается работа нервной системы. Самостоятельное лечение зачастую невозможно из-за риска осложнений, таких как острый интоксикационный синдром, судороги, депрессия и психозы. Наркологическая помощь в клинике обеспечивает комплексный контроль состояния пациента и минимизирует опасность для жизни.
Выяснить больше – скорая наркологическая помощь на дому
Сливаете энергию на чужие цели? Найдите свой истинный отклик.
Батарейка в чужом пульте управления.
-человек генератор кто это;
-тип личности генератор дизайн;
-генератор это дизайн человека;
-генератор по дизайну человека;
-тип личности генератор;
-дизайн человека генератор кто это;
I migliori giochi li trovi su Nine Casino https://nineitaly.com/. Visita subito il nostro sito web e riceverai un bonus di benvenuto esclusivo! Perche scegliere Nine Casino? Perche ha una licenza ufficiale, oltre 2000 giochi, prelievi istantanei e la possibilita di giocare da qualsiasi dispositivo.
Описание
Подробнее можно узнать тут – круглосуточная наркологическая помощь самара
Вывод из запоя в Тольятти — это медицинская процедура, направленная на очищение организма от продуктов распада алкоголя и восстановление нормального состояния здоровья. Длительное употребление спиртных напитков приводит к серьёзной интоксикации, нарушению работы нервной, сердечно-сосудистой и пищеварительной систем. Самостоятельные попытки прекратить запой могут быть опасны, поэтому оптимальным решением является обращение к врачу-наркологу, который проведёт лечение безопасно и эффективно.
Разобраться лучше – вывод из запоя вызов
Запой не всегда выглядит как откровенная катастрофа с первых дней. Иногда всё начинается с «отпуска», «праздника», пары вечеринок подряд. Родные надеются, что человек сам остановится, а он каждый день находит повод продолжить. В какой-то момент организм перестаёт справляться, и даже небольшие дозы алкоголя вызывают тяжёлые реакции.
Изучить вопрос глубже – http://www.domen.ru
Такие процедуры особенно эффективны на ранних стадиях лечения, когда важно быстро снять симптомы интоксикации и вернуть стабильное самочувствие. После курса капельниц пациенту становится легче концентрироваться, снижается раздражительность и тревожность, восстанавливается аппетит и сон.
Подробнее – частная наркологическая клиника в рязани
Этот обзор предлагает свежий взгляд на предметы, которые и без того привычны. Мы упоминаем факты, не имеющие большого значения, и события с неясной важностью, но они присутствуют здесь.
Подробнее читать – диета для похудения быстро
Военная служба по контракту с прозрачными условиями снижает риски. Все выплаты официальны. Контракт подписывается после проверки. Процесс понятен: хмао служба по контракту
Основные признаки, при которых необходим вывод из запоя:
Ознакомиться с деталями – вывод из запоя недорого
Своевременное обращение к специалистам позволяет быстро стабилизировать состояние и избежать осложнений.
Подробнее – врач вывод из запоя тольятти
В Рязани клиника «РязаньМед Альянс» принимает пациентов 24/7, без выходных и праздников. Такое расписание особенно важно при экстренных состояниях — когда человек находится в запое или испытывает абстинентный синдром. Врачи выезжают на дом в течение часа, проводят осмотр, устанавливают капельницы и стабилизируют состояние пациента. Для тех, кто нуждается в длительном наблюдении, предусмотрено комфортное пребывание в стационаре. Здесь созданы условия, при которых лечение проходит анонимно, с сохранением медицинской тайны и без постановки на учёт.
Углубиться в тему – частная наркологическая клиника
В Рязани клиника «РязаньМед Альянс» принимает пациентов 24/7, без выходных и праздников. Такое расписание особенно важно при экстренных состояниях — когда человек находится в запое или испытывает абстинентный синдром. Врачи выезжают на дом в течение часа, проводят осмотр, устанавливают капельницы и стабилизируют состояние пациента. Для тех, кто нуждается в длительном наблюдении, предусмотрено комфортное пребывание в стационаре. Здесь созданы условия, при которых лечение проходит анонимно, с сохранением медицинской тайны и без постановки на учёт.
Получить дополнительную информацию – вывод наркологическая клиника рязань
Есть ситуации, когда визит к наркологу в Химках лучше воспринимать не как «стыдный шаг», а как обычное ответственное решение о своём здоровье. Это особенно актуально, если: употребление алкоголя или наркотиков стало регулярным, а попытки сократить дозы заканчиваются срывами; появились запои с несколькими днями непрерывного употребления; возникают проблемы с сердцем, давлением, сном; близкие всё чаще говорят, что «ситуация выходит из-под контроля».
Углубиться в тему – https://narkologicheskaya-klinika-himki11.ru/narkologicheskaya-klinika-otzyvy-v-himkah/
Если многое из этого знакомо, кодирование стоит рассматривать не как «наказание» или «приговор», а как инструмент, который помогает закрыть доступ к алкоголю на определённый срок и даёт шанс выстроить новую привычку — жить трезво.
Выяснить больше – кодирование от алкоголизма цены
Когда важны деньги и надежность стоит выбирать проверенные решения. Военная служба по контракту дает стабильный доход и финансовые гарантии. Все начисления официальные и регулярные. Контракт защищает права и исключает неожиданности. Предусмотрены надбавки и социальная поддержка. Сделай шаг и заключи контракт – ханты мансийск контракт
Служба по контракту позволяет получать высокий уровень дохода. Денежное довольствие выплачивается своевременно. Контракт регулирует условия службы. Начать можно после оформления, ханты мансийск служба по контракту
Вывод из запоя в Перми включает использование комплекса медикаментозных и психотерапевтических методик. Они помогают не только снять симптомы интоксикации, но и стабилизировать эмоциональное состояние.
Подробнее можно узнать тут – анонимный вывод из запоя
Программа лечения строится по принципу последовательного воздействия на физическое и психологическое состояние. Начинается она с детоксикации: инфузионная терапия с применением сбалансированных растворов, антиоксидантов, гепатопротекторов и витаминов. Затем — стабилизация состояния, коррекция сна, восстановление когнитивных функций и купирование абстинентного синдрома. В зависимости от диагноза используются такие методы, как заместительная терапия, нейрометаболическая поддержка, противотревожные и антидепрессивные схемы.
Получить больше информации – narkologicheskaya-klinika-novokuzneczk0.ru/
Для эффективного лечения алкогольной интоксикации и восстановления организма врачи клиники «АлкоДоктор» используют комплекс препаратов, которые индивидуально подбираются с учетом состояния пациента.
Получить дополнительную информацию – капельницы от запоя на дому цена
Кент казино сочетает функциональность и понятный дизайн. Платформа не перегружена сложными элементами. Игроки могут сосредоточиться на процессе. Все основные функции доступны сразу. Это улучшает общее впечатление: kent casino играть
Клиника «НаркоСити» предлагает срочную наркологическую помощь при запоях на дому в Краснодаре. Опытные специалисты оперативно приезжают в любой район города, проводят детоксикацию и стабилизируют состояние пациента прямо на дому. Лечение организовано с максимальной безопасностью и соблюдением конфиденциальности, что обеспечивает пациентам комфорт и быстрое восстановление без госпитализации.
Получить больше информации – вывод из запоя капельница на дому краснодар
Главной задачей специалистов становится купирование абстинентного синдрома и снижение интоксикации. Это требует применения медикаментов и постоянного наблюдения за состоянием пациента.
Получить больше информации – вывод из запоя недорого пермь
Запойное состояние сопровождается тяжелыми последствиями для организма. Оно может включать нарушения сна, тремор конечностей, скачки давления, головные боли и депрессию. Без своевременной помощи такие проявления способны привести к развитию хронических заболеваний и угрожающих жизни осложнений.
Узнать больше – http://vyvod-iz-zapoya-perm0.ru
Во время процедуры врач контролирует состояние больного, по необходимости корректирует лечение, чтобы добиться максимального терапевтического эффекта. После проведения детоксикации пациенту назначается курс поддерживающей терапии, а также даются рекомендации по дальнейшему восстановлению и профилактике рецидивов.
Ознакомиться с деталями – https://narcolog-na-dom-sochi0.ru/vyzov-narkologa-na-dom-sochi
Вывод из запоя в Тольятти — это медицинская процедура, направленная на очищение организма от продуктов распада алкоголя и восстановление нормального состояния здоровья. Длительное употребление спиртных напитков приводит к серьёзной интоксикации, нарушению работы нервной, сердечно-сосудистой и пищеварительной систем. Самостоятельные попытки прекратить запой могут быть опасны, поэтому оптимальным решением является обращение к врачу-наркологу, который проведёт лечение безопасно и эффективно.
Изучить вопрос глубже – http://vyvod-iz-zapoya-v-tolyatti17.ru/vyvod-iz-zapoya-na-domu-tolyatti-otzyvy/
Для выведения токсинов и нормализации обменных процессов применяются инфузионные терапии с препаратами, поддерживающими функции печени, почек и сердечно-сосудистой системы. Медикаментозное лечение включает витамины, гепатопротекторы, седативные и противосудорожные средства при необходимости. Психологическая помощь и психотерапия способствуют стабилизации психоэмоционального состояния и профилактике рецидивов.
Выяснить больше – http://narkologicheskaya-pomoshh-samara0.ru/
Такие процедуры особенно эффективны на ранних стадиях лечения, когда важно быстро снять симптомы интоксикации и вернуть стабильное самочувствие. После курса капельниц пациенту становится легче концентрироваться, снижается раздражительность и тревожность, восстанавливается аппетит и сон.
Подробнее – http://narkologicheskaya-klinika-v-ryazani17.ru
Кент казино подходит для разных форматов игры. Можно выбрать короткие сессии или длительную игру. Платформа стабильно работает под нагрузкой. Игры не прерываются. Это делает процесс комфортным: kent casino играть
Looking for the official Aviator Africa website? Visit https://aviator.africa.com/ and simply select your country. For your convenience, you can install the Aviator app on your phone. Learn more about us on the website and, if necessary, read the quickplay guide.
Физкультурно-спортивный клуб «Родина» предлагает жителям и гостям города современную спортивную инфраструктуру для активного образа жизни. На сайте https://rodinasportsclub.com/ представлена информация о тренировочных программах, расписании занятий и квалифицированных тренерах. Клуб оборудован качественными тренажерами и залами для различных видов спорта, что позволяет заниматься фитнесом, силовыми тренировками и командными играми. Удобная система онлайн-записи экономит время посетителей, а гибкие абонементы подходят для любого графика и бюджета.
Запойное состояние сопровождается тяжелыми последствиями для организма. Оно может включать нарушения сна, тремор конечностей, скачки давления, головные боли и депрессию. Без своевременной помощи такие проявления способны привести к развитию хронических заболеваний и угрожающих жизни осложнений.
Выяснить больше – срочный вывод из запоя пермь
Во время процедуры врач контролирует состояние больного, по необходимости корректирует лечение, чтобы добиться максимального терапевтического эффекта. После проведения детоксикации пациенту назначается курс поддерживающей терапии, а также даются рекомендации по дальнейшему восстановлению и профилактике рецидивов.
Разобраться лучше – помощь нарколога на дому в сочи
Midweek football livescore, Tuesday Wednesday Champions League Europa action
Служба по контракту – это возможность выбрать стабильную форму службы. Контракт обеспечивает выплаты и гарантии. Все начисления регулируются. Оформление проходит по регламенту – добровольцы хмао
Купить сайдинг в Молодечно с монтажом под ключ. Надежная отделка, которая защитит стены и утеплит дом. Сотни довольных клиентов в регионе. Используем только проверенные материалы. Бесплатный расчет сметы по фото или выезду.
купить сайдинг молодечно
Этот сборник информации привлекает множеством мелких деталей и необычных ракурсов. Мы предлагаем взгляды, редко полезные, но способные немного разнообразить знакомство с темой.
Подробнее читать – мефедроновая зависимость
Капельницы от запоя включают препараты для очищения крови, восстановления электролитного баланса и защиты печени. Используются только сертифицированные растворы, одобренные Минздравом РФ. В клинике применяется комплексный подход: одновременно с физическим восстановлением запускаются лёгкие дыхательные и релаксационные методики, которые помогают организму вернуться в стабильное состояние.
Узнать больше – вывод из запоя вызов город
Многие тянут до последнего, считая, что к наркологу обращаются только в самых крайних случаях. На деле показаний для консультации гораздо больше, и они часто появляются задолго до того, как человек впервые оказывается в запое или не выходит из состояния опьянения несколько дней подряд.
Исследовать вопрос подробнее – platnaya-narkologicheskaya-klinika
Для иллюстрации эффективности методов представлена таблица с примерами процедур и их воздействием:
Получить дополнительную информацию – http://
Публикация приглашает вас исследовать неизведанное — от древних тайн до современных достижений науки. Вы узнаете, как случайные находки превращались в революции, а смелые мысли — в новые эры человеческого прогресса.
Переходите по ссылке ниже – http://www.janethancock.com/2010/07/12/janet-talks-to-her-friends
Kent casino сочетает доступность и функциональность. Онлайн платформа проста в использовании. Все элементы логично расположены. Игры работают корректно. Пользователь получает комфортный опыт: kent casino скачать
Эта статья сочетает познавательный и занимательный контент, что делает ее идеальной для любителей глубоких исследований. Мы рассмотрим увлекательные аспекты различных тем и предоставим вам новые знания, которые могут оказаться полезными в будущем.
Как достичь результата? – http://www.cremeriasantafe.com/uncategorized/privacidad-y-condiciones
Публикация приглашает вас исследовать неизведанное — от древних тайн до современных достижений науки. Вы узнаете, как случайные находки превращались в революции, а смелые мысли — в новые эры человеческого прогресса.
Где можно узнать подробнее? – http://clintbakerphotography.com/hey-everyone
Эта статья сочетает познавательный и занимательный контент, что делает ее идеальной для любителей глубоких исследований. Мы рассмотрим увлекательные аспекты различных тем и предоставим вам новые знания, которые могут оказаться полезными в будущем.
Детали по клику – https://lakeshorenews.com/blog/2024/12/05/this-is-thundersnake
Этот текст призван помочь читателю расширить кругозор и получить практические знания. Мы используем простой язык, наглядные примеры и структурированное изложение, чтобы сделать обучение максимально эффективным и увлекательным.
Лучшее решение — прямо здесь – http://pauladdavis.scholar.bucknell.edu/2017/10/30/spring-dance-concert-2013-bucknell
Контрактная служба это выбор тех кто ценит деньги и порядок. Доход приходит стабильно. Все условия закреплены документами. Контракт оформляется добровольно. Предусмотрены выплаты и гарантии. Заключи контракт. Полное описание доступно здесь – контракт сво сургут
В данной статье вы найдете комплексный подход к изучению насущных тем. Мы комбинируем теоретические сведения с практическими советами, чтобы читатель мог не только понять проблему, но и найти пути её решения.
Более того — здесь – https://cochastyle.com/crazy-with-grace
Эта информационная статья охватывает широкий спектр актуальных тем и вопросов. Мы стремимся осветить ключевые факты и события с ясностью и простотой, чтобы каждый читатель мог извлечь из нее полезные знания и полезные инсайты.
Кликни и узнай всё! – https://help.mailfold.com/index.php/product/colorful-casual-shoe
Azino888 casino зеркало сохраняет доступ к личному кабинету. Azino888 casino вход выполняется без изменений. Все данные остаются на месте.
https://xn—-8sbokfktgqcjmg0dp.xn--p1ai/
В статье представлены ключевые моменты по актуальной теме, дополненные советами экспертов и ссылками на дополнительные ресурсы. Цель материала — дать читателю инструменты для самостоятельного развития и принятия осознанных решений.
Что скрывают от вас? – https://sportowagdynia.eu/index.php/2021/11/13/polska-lepsza-od-niemiec-w-rugby-europe-trophy
Эта информационная заметка предлагает лаконичное и четкое освещение актуальных вопросов. Здесь вы найдете ключевые факты и основную информацию по теме, которые помогут вам сформировать собственное мнение и повысить уровень осведомленности.
Нажмите, чтобы узнать больше – https://tradinghair.com/the-truth-of-glueless-lace-front-wigs
Этот информативный материал предлагает содержательную информацию по множеству задач и вопросов. Мы призываем вас исследовать различные идеи и факты, обобщая их для более глубокого понимания. Наша цель — сделать обучение доступным и увлекательным.
Полезно знать – https://samtel.co/12-key-issues-for-saas-startups-seeking-financing-2
Описание
Получить дополнительные сведения – наркологическая помощь
Ребятки все пушка https://foto-izuminka.ru Давненько вас не было) Если кто не в курсе, магаз уже был в топе доверенных. В те времена не раз заказывал у данного селлера, проблем не было ни разу. Надеюсь, сейчас все так же)отличный сервис, качество порадовало:)
indian sex videos
Настоящая бронза в интерьере — это классика, которая никогда не выходит из моды и придает дому особую атмосферу аристократизма. Интернет-магазин https://realbronza.ru/ специализируется на элитных светильниках и люстрах из натуральной бронзы, привезенных из Ирана, Италии, Чехии и других стран с богатыми традициями в создании осветительных приборов. В каталоге представлены хрустальные, классические и винтажные модели, способные украсить гостиную, кабинет или холл. Помимо люстр, здесь можно найти бронзовые бра, зеркала, часы и другие предметы интерьера, которые превратят ваш дом в настоящее произведение искусства.
ТС подтвердив оплату, сказал ожидать. В оговоренные сроки адрес был получен в ЛС. https://avatar-creator.ru почта РоссииПарни пятерка лпк работает ровно)))всем фарта)))))
В данной обзорной статье представлены интригующие факты, которые не оставят вас равнодушными. Мы критикуем и анализируем события, которые изменили наше восприятие мира. Узнайте, что стоит за новыми открытиями и как они могут изменить ваше восприятие реальности.
Подробная информация доступна по запросу – https://bungalowberrycove.com/unwind
Контрактная служба это деньги и стабильность. Выплаты начисляются регулярно. Условия прозрачны. Контракт оформляется быстро. Не откладывай: ханты мансийск контракт
На нашем сайте вы можете скачать активатор для Windows 11 абсолютно бесплатно и навсегда забыть о водяных знаках!
Подробнее – Как обойти активацию Windows 11
Адекватных работников https://usaninfoto.ru Пришла сегодня посыль с 203им,кол-во ровное,даже показалось больше))) Сделал 1 к 15 самое то,магазу спасибо,процветания и всег благ)Как долго вы обрабатываете заказ?
Контрактная служба – это добровольное решение и стабильные выплаты. Все условия прописаны в договоре. Размер дохода зависит от условий. Начать можно после оформления: контракт югра на сво
Гибкий сайдинг для арок и округлых элементов в Молодечно. Редкая технология, доступная нашим мастерам. Оформим эркер или арку над входом безупречно.
сайдинг в молодечно
Служба по контракту сочетает стабильность и высокий доход. Контракт определяет срок и условия службы. Выплаты начисляются официально. Подать заявление можно после комиссии: военкомат служба по контракту
Лечение хронического алкоголизма начинается с купирования абстинентного синдрома, после чего проводятся мероприятия по нормализации работы печени, сердечно-сосудистой и нервной системы. Назначаются гепатопротекторы, ноотропы, витамины группы B. Также проводится противорецидивная терапия.
Детальнее – http://narkologicheskaya-klinika-v-yaroslavle12.ru/narkologicheskaya-klinika-telefon-v-yaroslavle/
Этот обзор предлагает свежий взгляд на предметы, которые и без того привычны. Мы упоминаем факты, не имеющие большого значения, и события с неясной важностью, но они присутствуют здесь.
Подробнее читать – лечение covid народными средствами
При поступлении вызова специалисты клиники «СтопТокс» оперативно выезжают на дом в Екатеринбурге или по всей Свердловской области. По прибытии врач проводит всестороннюю диагностику, включая измерение артериального давления, пульса и уровня кислорода в крови, а также собирает анамнез и оценивает степень интоксикации. На основе полученной информации составляется индивидуальный план лечения, который включает следующие этапы:
Узнать больше – нарколог на дом круглосуточно цены
Критерий
Подробнее можно узнать тут – http://narkologicheskaya-klinika-nizhnij-tagil11.ru/narkologicheskaya-klinika-telefon-v-nizhnem-tagile/
В Курске нету https://vsegoo.ru Брал неоднократно совместки, всё всегда ровно! так держать!Лучшего амфа я в жизни не пробовал. Правда цена кусается, но оно того стоит!
Экстренная помощь нарколога на дому рекомендуется, когда состояние пациента ухудшается до критического уровня. Основные показания включают:
Подробнее можно узнать тут – нарколог на дом вывод из запоя волгоград
Для более точного понимания различий между основными подходами используется систематизация данных в таблице. Она отражает основные особенности применения методов и их задачи.
Получить дополнительные сведения – http://vyvod-iz-zapoya-volgograd0.ru
шумоизоляция авто https://vikar-auto.ru
Военная служба по контракту это быстрый выход на стабильный доход. Денежное довольствие приходит каждый месяц. Все условия известны заранее. Начни оформление сейчас, выплаты контрактникам в хмао 2026
Bass Win Casino https://bass-win-uk.org/ positions itself as a premier UK gaming destination for 2026. It promises a secure, UKGC-licensed platform with a vast game portfolio, including slots, live dealer tables, and popular crash games. The casino highlights transparent bonuses, like a welcome package and no-deposit offers, alongside strong commitments to fair play and responsible gambling. Designed for seamless mobile and desktop play, it aims to provide a comprehensive and trustworthy online casino experience for British players.
Служба по контракту как источник дохода подходит для планирования. Выплаты фиксированы и прозрачны. Контракт оформляется после отбора. Условия понятны: ханты мансийск контракт
Наркологическая помощь в Самаре представляет собой комплекс медицинских мероприятий, направленных на лечение алкогольной и наркотической зависимости, а также восстановление физического и психического здоровья пациентов. В наркологической клинике «Согласие» применяются современные методики диагностики, детоксикации и комплексной терапии, учитывающие индивидуальные особенности каждого пациента, тяжесть зависимости и наличие сопутствующих заболеваний. Основная цель — восстановление здоровья, предупреждение осложнений и снижение риска рецидивов.
Углубиться в тему – наркологическая помощь на дому самара
Мы следуем прозрачному алгоритму: оценить риски — подтвердить безопасность домашнего формата — запустить инфузионный контур — объяснить «коридоры безопасности» и точки связи. Такой порядок снижает тревожность, делает управление симптомами измеримым и понятным, а родственникам оставляет простые инструкции без медицинского жаргона.
Подробнее – нарколог капельница на дом
Своевременное вмешательство специалиста позволяет не только вывести токсины, но и снизить риск развития осложнений, обеспечить восстановление жизненно важных функций организма и предотвратить ухудшение состояния, что особенно важно для сохранения здоровья и жизни пациента.
Узнать больше – http://narcolog-na-dom-krasnodar0.ru/vyzov-narkologa-na-dom-krasnodar/
нет курьерки по мск нету, да все работает как обычно https://kleps.ru Здесь ровно! Магазин очень хороший, а главное цены в нем ГИБКИЕ к любому подход есть : )Ну да ,я уже посылку с 15числа жду всё дождаться не могу .
Военная карьера по контракту – это не слова, а деньги. Денежное довольствие приходит стабильно. Контракт закрепляет условия. Действуй сейчас – сургут военкомат служба по контракту
Каждый пациент в «УралМед» получает персональный маршрут реабилитации, составленный после комплексного обследования. План включает медикаментозное выведение из запоя, коррекцию биохимических показателей и психологическую реабилитацию.
Получить дополнительные сведения – здоровье лечение алкоголизма екатеринбург
Некоторые состояния требуют немедленного вмешательства специалиста. Если алкогольное отравление или запойное состояние не купируется вовремя, это может привести к тяжелым последствиям для здоровья.
Получить дополнительные сведения – платный нарколог на дом иркутск
Служба по контракту выбирают те кто хочет результат. Здесь нет неопределенности и случайных выплат. Денежное довольствие начисляется стабильно. Контракт четко фиксирует условия. Дополнительные выплаты увеличивают доход. Сделай шаг сегодня, добровольцы хмао
Перед таблицей коротко поясним логику: мы выбираем самый безопасный маршрут именно для вашей ситуации, а при изменении состояния оперативно переключаемся на другой формат без пауз.
Разобраться лучше – вывод из запоя на дону
Удачи в развитии бизнеса ! https://sugarbeedesigns.com у меня тоже дроп подлетел с посылкой и брали его ФСБшники почему то , но слава богу до уголовного дела не дошло, и ТС обещал жирную скидку сделать при следуещем заказе как то так (документы о прекращении уголовного дела и экспертиза на руках) дело закрыли по двум причинам то что дроп не при делах а второе самое главное что экспертиза не выявила НСВсегда на высоте)
Стоматология требует не только современного оборудования, но и научного подхода. Центр академика И.В. Маланьина в Краснодаре https://malanin-dent.ru/ возглавляет всемирно известный ученый-стоматолог, доктор медицинских наук, президент European Dental Academy и почетный гражданин России. Клиника предлагает имплантацию, протезирование, ортодонтию и пародонтологию с применением авторских методик. Действуют спецпредложения: имплантация Dentis со скидкой — 25 400 рублей вместо 60 400. Опыт работы более 25 лет подтверждает высочайший уровень оказываемых услуг.
Кодирование от алкоголизма в Чехове для многих семей становится тем рубежом, после которого зависимость перестаёт казаться «временной слабостью» и начинает восприниматься как диагноз, с которым можно и нужно работать. До этого момента обычно проходят годы: чередуются запои и трезвые периоды, звучат обещания «больше такого не будет», меняются напитки, придумываются правила вроде «пью только по выходным» или «только пиво». Но рано или поздно семья замечает, что именно алкоголь диктует распорядок дня, влияет на настроение, разрушает здоровье и отношения. В этот момент становится очевидно: без сильного внешнего ограничителя и профессиональной помощи просто «взять себя в руки» уже не получается.
Детальнее – кодирование от алкоголизма последствия
вин 1win официальный
В глубинах холодного моря жил древний Кракен, охранявший зеркала памяти. Эти зеркала не отражали лица — они показывали страхи, мечты и забытые решения каждого, кто осмеливался взглянуть в их гладь. Когда шторм поднимался, щупальца Кракена тянулись к поверхности, защищая зеркала от жадных глаз. Моряки верили: если зеркало треснет, море потеряет равновесие. Поэтому легенда учила уважать тайны глубин и помнить, что не каждое отражение стоит искать.
В ходе процедуры врач контролирует жизненные показатели пациента, корректирует состав раствора при необходимости и оказывает дополнительную поддержку. После завершения капельницы часто назначается курс восстановительной терапии, направленный на стабилизацию функций организма.
Подробнее тут – капельница от запоя
по поводу треков выяснять буду завтра лично т.k. сегодня выходной в России https://karsmarket.ru Спасибо Магазину)вы лучшие))))))))!!!!!!!!!!!!!!!!!!!!! :monetka: Качество на 100%Сайт сделан на уровне в скором думаю сделаю заказ, только бы качество не подвело
В условиях круглосуточного наблюдения врачи могут внимательно следить за динамикой состояния, своевременно корректировать схемы лечения, проводить детоксикацию под контролем давления, пульса и работы сердца. Особенно это важно для пациентов с гипертонией, сердечно-сосудистыми заболеваниями, нарушениями ритма, заболеваниями печени, диабетом и другими хроническими патологиями. В стационаре проще организовать обследование, назначить сопутствующую терапию, вовремя заметить опасные симптомы и предотвратить серьёзные осложнения.
Исследовать вопрос подробнее – наркологическая клиника стационар
Казино Atom онлайн выбирают за удобство и бонусы. Быстрый вход и простая регистрация. Слоты Atom казино доступны круглосуточно. Попробуй удачу сегодня: казино атом зеркало
шумоизоляция арок авто https://shumoizolyaciya-arok-avto-77.ru
Для тех кто устал от временных подработок и нестабильных зарплат есть надежная альтернатива. Контрактная служба обеспечивает регулярный доход и прозрачные условия. Все выплаты закреплены документально. Контракт оформляется добровольно и заранее. Это возможность зарабатывать больше и чувствовать уверенность. Начни оформление контракта уже сегодня: как попасть в танковые войска в армии
Контрактная служба как форма занятости дает стабильный доход. Предусмотрены высокие выплаты. Условия фиксированы документально. Подать заявление можно сейчас – хмао служба по контракту
Atom казино онлайн предлагает слоты и фриспины без сложных условий. Регистрация простая. Официальный сайт работает стабильно. Начни игру прямо сейчас – бонус казино атом
как планчик наверн цепляет. но не прям на коры. вообщем так норм сойдет https://aqua59.ru Пожалуй один из самых ровных магазинов “Старичков ” – благодаря которому я зарабатвал, от души спасибо парням за ровную работу!Очень жаль ребята,хорошо работали.
Планировать будущее намного проще, когда доход стабилен и закреплен договором, а все обязательства сторон понятны заранее без скрытых нюансов. Служба по контракту дает уверенность и финансовую опору, которая ощущается с первого месяца. Оформи документы и переходи к стабильному доходу. Узнайте подробности предложения – контракт с хмао
Служба по контракту с возможностью высокого заработка доступна гражданам. Все условия фиксированы. Контракт заключается после комиссии. Выплаты прозрачны, хмао военкомат служба по контракту
Процедура лечения начинается с установки внутривенной капельницы, через которую вводятся детоксикационные растворы, способствующие быстрому выведению токсинов и восстановлению водно-электролитного баланса. При необходимости врач назначает дополнительные препараты, такие как седативные средства для купирования симптомов абстинентного синдрома, гепатопротекторы для поддержки печени и кардиопротекторы для нормализации работы сердца.
Получить больше информации – https://vyvod-iz-zapoya-krasnodar00.ru/vyvod-iz-zapoya-kruglosutochno-krasnodar/
Этот обзор предлагает свежий взгляд на предметы, которые и без того привычны. Мы упоминаем факты, не имеющие большого значения, и события с неясной важностью, но они присутствуют здесь.
Подробнее читать – диета для похудения быстро
This is a comprehensive guide to health insurance for small contracting businesses. It’s exactly the kind of advice I needed to start looking for employee plans.
https://lakeinsuranceok.com/costs
Экстренная помощь требуется, когда запой начинает негативно сказываться на здоровье, и самостоятельное прекращение употребления алкоголя становится невозможным. Основные показания для круглосуточного вмешательства включают:
Ознакомиться с деталями – http://vyvod-iz-zapoya-volgograd000.ru/vyvod-iz-zapoya-na-domu-volgograd/https://vyvod-iz-zapoya-volgograd000.ru
Выбор техники зависит от клинической картины, переносимости препаратов, психоэмоционального состояния и горизонта планируемой трезвости. Таблица ниже помогает сориентироваться в ключевых различиях — врач подробно разберёт нюансы на очной консультации.
Углубиться в тему – клиника кодирования от алкоголизма
Процедура лечения начинается с установки внутривенной капельницы, через которую вводятся детоксикационные растворы, способствующие быстрому выведению токсинов и восстановлению водно-электролитного баланса. При необходимости врач назначает дополнительные препараты, такие как седативные средства для купирования симптомов абстинентного синдрома, гепатопротекторы для поддержки печени и кардиопротекторы для нормализации работы сердца.
Выяснить больше – вывод из запоя на дому круглосуточно в краснодаре
Вызов врача-нарколога на дом актуален в ситуациях, когда пациенту требуется срочная медицинская помощь, но его состояние не позволяет самостоятельно обратиться в клинику. Основными причинами вызова нарколога на дом являются:
Углубиться в тему – врач нарколог выезд на дом в санкт-петербурге
как найти официальный 1win
В глубинах холодного моря жил древний Кракен, охранявший зеркала памяти. Эти зеркала не отражали лица — они показывали страхи, мечты и забытые решения каждого, кто осмеливался взглянуть в их гладь. Когда шторм поднимался, щупальца Кракена тянулись к поверхности, защищая зеркала от жадных глаз. Моряки верили: если зеркало треснет, море потеряет равновесие. Поэтому легенда учила уважать тайны глубин и помнить, что не каждое отражение стоит искать.
Функция и назначение
Подробнее тут – https://narcolog-na-dom-ekaterinburg000.ru/zapoj-narkolog-na-dom-ekb/
да ее колать страшно эксперементатором быдь тоже чет не охото купить кокаин, мефедрон, бошки, марихуану Отдуши за ровность!Причем тут шрифт не где не запрещенно писать большим шрифтом!И это еще далеко не большой.Я вот допустим имею проблемы со зрением но написал для того чтобы было более разборчево отчетлево видно всем обывателям данной темы.Причем тут слепые не слепые вапще.
Вывод из запоя требует неотложного и профессионального подхода, поскольку состояние больного сопровождается нарушением работы внутренних органов, обезвоживанием и токсическим воздействием этанола на центральную нервную систему. В Мурманске, учитывая особенности региона и климата, особенно важно проводить процедуру с учётом возможных сопутствующих заболеваний и общего состояния здоровья пациента.
Углубиться в тему – нарколог вывод из запоя в мурманске
Работа без сюрпризов и задержек это реальность. Контрактная служба предлагает именно такой формат. Выплаты официальные и регулярные. Условия прозрачны. Используй шанс изменить свою ситуацию – служба по контракту в югре
Контрактная служба это выбор тех, кто устал от нестабильности и хочет денег. Денежное довольствие начисляется каждый месяц. Все условия закреплены документально. Контракт определяет срок службы и обязанности. Дополнительные выплаты увеличивают доход. Оформление проходит официально. Подай заявку: контракт танковые войска
Перед таблицей коротко поясним логику: мы выбираем самый безопасный маршрут именно для вашей ситуации, а при изменении состояния оперативно переключаемся на другой формат без пауз.
Подробнее тут – https://vyvod-iz-zapoya-pushkino7.ru/vyvedenie-iz-zapoya-v-pushkino
Когда хочется азартной игры без ограничений стоит выбрать казино Atom онлайн. Здесь доступны популярные слоты и бонус казино Atom для новичков. Официальный сайт обеспечивает быстрый вход и безопасность. Начни играть прямо сейчас: казино атом онлайн
Выбор техники зависит от клинической картины, переносимости препаратов, психоэмоционального состояния и горизонта планируемой трезвости. Таблица ниже помогает сориентироваться в ключевых различиях — врач подробно разберёт нюансы на очной консультации.
Подробнее тут – клиника кодирования от алкоголизма
Вызов нарколога на дом в Ярославле — это удобный и эффективный способ начать лечение или оказать первую помощь при острых состояниях, связанных с алкоголизмом, наркотической зависимостью или другими психоактивными веществами. Основные преимущества такой услуги заключаются в следующем:
Подробнее тут – нарколог на дом круглосуточно ярославль
Служба круглосуточного вывода из запоя организована таким образом, чтобы обеспечить максимальную оперативность и надежность. Независимо от времени суток, квалифицированные специалисты готовы выехать на дом или принять пациента в медицинском учреждении, чтобы приступить к детоксикации и стабилизации состояния.
Выяснить больше – вывод из запоя капельница в волгограде
Акции на сайдинг в Молодечно! Только в этом месяцу при заказе монтажа под ключ – скидка на утеплитель 15%. Успейте улучшить свой дом по выгодной цене. Количество материалов по акции ограничено. Торопитесь оставить заявку на сайте или по телефону.
saydingminsk.ru
Экстренная помощь нарколога на дому рекомендуется, когда состояние пациента ухудшается до критического уровня. Основные показания включают:
Детальнее – http://vyvod-iz-zapoya-volgograd00.ru/vyvod-iz-zapoya-na-domu-volgograd/https://vyvod-iz-zapoya-volgograd00.ru
Процедура детоксикации занимает от 40 минут до 2 часов. После её завершения врач консультирует пациента и родственников, даёт рекомендации по дальнейшему лечению и профилактике повторных запоев.
Подробнее – http://narcolog-na-dom-sankt-peterburg00.ru
Только эфоретик нужен. купить кокаин, мефедрон, бошки, марихуану Заказал 50г. всё пришло всё хорошо_)))Ребята, магаз ровный и немелочный, берите смело
Как подчёркивает врач-нарколог И.В. Синицин, «современная наркология — это не только вывод из запоя, но и работа с глубинными причинами зависимости».
Получить больше информации – наркологическая клиника ярославль
Вывод из запоя в Мурманске представляет собой комплекс мероприятий, направленных на оказание медицинской помощи пациентам, находящимся в состоянии алкогольного отравления или длительного употребления спиртного. Процедура проводится с целью стабилизации состояния организма, предупреждения осложнений и минимизации риска развития тяжелых последствий алкоголизма.
Подробнее – вывод из запоя мурманск
Критерий
Получить больше информации – https://narkologicheskaya-klinika-nizhnij-tagil11.ru/platnaya-narkologicheskaya-klinika-v-nizhnem-tagile
Buscas una plataforma independiente con resenas honestas de casinos en linea, bonos actualizados y valoraciones de jugadores reales? Visita https://championcasino.world/ el recurso mas grande con la informacion mas actualizada del mundo de las apuestas y resenas de jugadores reales para ayudarte a elegir el casino ideal.
Функция и назначение
Выяснить больше – помощь нарколога на дому
Эта информационная статья охватывает широкий спектр актуальных тем и вопросов. Мы стремимся осветить ключевые факты и события с ясностью и простотой, чтобы каждый читатель мог извлечь из нее полезные знания и полезные инсайты.
Узнать больше – https://pajcord.com/emergency-electrical-repairs-what-to-do-before-the-pros-arrive
Эта статья погружает вас в увлекательный мир знаний, где каждый факт становится открытием. Мы расскажем о ключевых исторических поворотных моментах и научных прорывах, которые изменили ход цивилизации. Поймите, как прошлое формирует настоящее и как его уроки могут помочь нам строить будущее.
Детальнее – https://blog.imtpconsultants.com/which-is-better-for-studying-abroad-uk-vs-canada
В этой публикации мы предлагаем подробные объяснения по актуальным вопросам, чтобы помочь читателям глубже понять их. Четкость и структурированность материала сделают его удобным для усвоения и применения в повседневной жизни.
Изучить рекомендации специалистов – https://foxy1069.com/2025/09/sevyn-streeter-releases-new-song-assumptions
Написал о заказе в аське в ПТ,мне сказали цену и реквизиты. В СБ оплатил,кинул в аське свои реквизиты.В ПН связался-Сказали,что все отправили,ок. купить кокаин, мефедрон, бошки, марихуану е знаю уместен ли мой вопрос в данное “смутное время” но все же откуда высылается заказы…? хотя бы из какой части РФ если это РФ…)))ро я тоже паниковал но все решилось нормально мне в курьерке обьяснили что с этой ебливой олимпиадой у многих запарка и сбои в работе как то так….
Эта статья предлагает живое освещение актуальной темы с множеством интересных фактов. Мы рассмотрим ключевые моменты, которые делают данную тему важной и актуальной. Подготовьтесь к насыщенному путешествию по неизвестным аспектам и узнайте больше о значимых событиях.
Читать далее > – https://fatorrnoticias.com.br/brasil/bolsonaro-recebe-no-ministerio-da-justica-a-medalha-do-merito-indigenista
В данной статье вы найдете комплексный подход к изучению насущных тем. Мы комбинируем теоретические сведения с практическими советами, чтобы читатель мог не только понять проблему, но и найти пути её решения.
Изучить аспект более тщательно – https://cess.ac.in/event/indian-foreign-policy-75-challenges-and-the-way-forward
Эта обзорная заметка содержит ключевые моменты и факты по актуальным вопросам. Она поможет читателям быстро ориентироваться в теме и узнать о самых важных аспектах сегодня. Получите краткий курс по современной информации и оставайтесь в курсе событий!
Ознакомиться с деталями – https://cafe-mesi.ru
Эта информационная заметка предлагает лаконичное и четкое освещение актуальных вопросов. Здесь вы найдете ключевые факты и основную информацию по теме, которые помогут вам сформировать собственное мнение и повысить уровень осведомленности.
Где можно узнать подробнее? – https://www.firmensuche-24h.de/wo-erhaelt-man-kostenlos-einsicht-in-die-gesellschafterliste-einer-gmbh
Эта разъяснительная статья содержит простые и доступные разъяснения по актуальным вопросам. Мы стремимся сделать информацию понятной для широкой аудитории, чтобы каждый мог разобраться в предмете и извлечь из него максимум пользы.
Ознакомиться с теоретической базой – https://revahan.com/we-hear-audi-rs-models-could-be-offered-in-rear-wheel-drive
Эта публикация исследует взаимосвязь зависимости и психологии. Мы обсудим, как психологические аспекты влияют на появление зависимостей и процесс выздоровления. Читатели смогут понять важность профессиональной поддержки и применения научных подходов в терапии.
Углубиться в тему – https://narcoff.com/narkomaniya/terapiya/chastnaya-klinika-dlya-lecheniya-ot-narkomanii
В этом обзорном материале представлены увлекательные детали, которые находят отражение в различных аспектах жизни. Мы исследуем непонятные и интересные моменты, позволяя читателю увидеть картину целиком. Погрузитесь в мир знаний и удивительных открытий!
Интересует подробная информация – https://bratsk.org/news/show/30067.html
Мы собрали для вас самые захватывающие факты из мира науки и истории. От малознакомых деталей до грандиозных событий — эта статья расширит ваш кругозор и подарит новое понимание того, как устроен наш мир.
Это ещё не всё… – https://www.marjazandjans.nl/afscheid/logo_andjs_afscheid_rgb
Отличный магазин! https://silovoy-cable.ru через в/в непробывал такое не люблю,ЕМИКАЛ МИКС – ЭТО ЛУЧШИЙ МАГАЗИН С МНОГОЛЕТНЕЙ РЕПУТАЦИЕЙ НА РЦ РЫНКЕ!!!!
Этот обзор предлагает свежий взгляд на предметы, которые и без того привычны. Мы упоминаем факты, не имеющие большого значения, и события с неясной важностью, но они присутствуют здесь.
Подробнее читать – народные средства от диабета
Военная служба по контракту открывает доступ к официальному доходу. Контракт заключается добровольно и на понятных условиях. Предусмотрены высокие выплаты и надбавки. Заключить контракт можно после отбора. Узнать подробную информацию по ссылке: контрактная служба в росгвардии
С поиском клада не было не малейших заморочек. https://raiderrelease.com Приятно иметь дело с серьёзными людьми!!!!!!как придет так отпишусь за качество и за сроки ))
Этот краткий обзор предлагает сжатую информацию из области медицины, включая ключевые факты и последние новости. Мы стремимся сделать информацию доступной и понятной для широкой аудитории, что позволит читателям оставаться в курсе актуальных событий в здравоохранении.
Информативно: выездная наркологическая помощь на дому — что входит в услугу, как проводится лечение и когда стоит обратиться к специалисту. Более того — здесь – https://msk.spravka.city/company/balayazh-5
https://gidromotory-gprf.ru ТС подтвердив оплату, сказал ожидать. В оговоренные сроки адрес был получен в ЛС.продавана сегодня в асе вообще ен видел, хз что там у них ( продукт – прет дико и жестко, но по сути ничего интересного, цена в 2 тыр себя полностью оправдывает. Эдакий бычий кайф. Если вам нравится трястись и стучать зубами – вы попали по адресу. Во всех остальных случаях – нахер-нахер. Слабенькая 3/5
В Рязани возможен как стационарный, так и амбулаторный вывод из запоя. Выбор подхода зависит от состояния пациента, выраженности симптомов и наличия сопутствующих нарушений.
Изучить вопрос глубже – https://vyvod-iz-zapoya-v-ryazani12.ru/anonimnyj-vyvod-iz-zapoya-v-ryazani/
Looking for usd jpy news?? Visit profi-forex.us – fully structured information and daily exclusive insights from 55 press centers located worldwide. Our platform offers coverage of the dollar, euro, and additional currencies, complete stock market data, gold, gas, oil, and more, plus expert market analysis. Discover more on the site.
Риск через наркотиков — это комплексная хоботня,
обхватывающая физическое,
психическое (а) также социальное состояние
здоровья человека. Употребление эких наркотиков, яко снежок,
мефедрон, ямба, «наркотик» чи «бошки»,
может родить к необратимым результатам
яко для организма, яко (а) также для мира на целом.
Но хоть у эволюции связи возможно электровосстановление — главное, чтобы
энергозависимый человек направился согласен
помощью. Эпохально памятовать, яко наркомания лечится, равным образом
помощь одаривает шансище на новую
жизнь.
Запой – критическое состояние, при котором организм подвергается серьезной токсической нагрузке, что может привести к опасным для жизни осложнениям. В Волгоградской области помощь нарколога оказывается круглосуточно, что позволяет начать лечение немедленно в любой момент дня или ночи. Такой формат терапии обеспечивает оперативное вмешательство, индивидуальный подход и высокий уровень безопасности, позволяя стабилизировать состояние пациента в домашних условиях или в клинике.
Углубиться в тему – вывод из запоя с выездом
В этом материале представлены детали, которые хоть и занимательны, но не особенно значимы. Мы рассматриваем моменты, которые трудно назвать важными, но всё же решили включить их для полноты картины.
Вот – интим услуги
Вызов врача-нарколога на дом актуален в ситуациях, когда пациенту требуется срочная медицинская помощь, но его состояние не позволяет самостоятельно обратиться в клинику. Основными причинами вызова нарколога на дом являются:
Детальнее – нарколог на дом санкт-петербург
купить кокаин, мефедрон, бошки, марихуану да ее колать страшно эксперементатором быдь тоже чет не охотоспроси в лички номер аси думаю все ровно будет без базара бро Рады вашей работе)
Marios Percussion Studio – Great visual and audio rhythm display, content feels real and heartfelt.
Данный порядок действий позволяет снизить риски для здоровья и обеспечить контроль за эффективностью процедур.
Подробнее – вызвать врача нарколога на дом
Для успешного лечения зависимости необходима тщательная диагностика. В клинике проводят полное обследование пациента, включающее:
Разобраться лучше – наркологическая клиника нарколог в мурманске
При поступлении вызова специалисты клиники «СтопТокс» оперативно выезжают на дом в Екатеринбурге или по всей Свердловской области. По прибытии врач проводит всестороннюю диагностику, включая измерение артериального давления, пульса и уровня кислорода в крови, а также собирает анамнез и оценивает степень интоксикации. На основе полученной информации составляется индивидуальный план лечения, который включает следующие этапы:
Получить больше информации – http://narcolog-na-dom-ekaterinburg000.ru/zapoj-narkolog-na-dom-ekb/
купить кокаин, мефедрон, бошки, марихуану Вот получил вчера 2 -й заказ…..отсылают быстро, качество отличное, плюс девайсы в которые всё ныколось в виде приятного бонуса…из тех что есть в наличии у чемикала… ну разве что с 307го, но я его не пробовал, говорят самое норм – 1к15. да и он самый долгий и сильный из всех доступных ЖВШ на данный момент на рынке.. что сильнее 100 или 400 ? и по времени сколько действуют ?
Самый частый повод — не только «плохое похмелье», а именно абстинентный синдром после запоя: когда самочувствие ухудшается при прекращении алкоголя, а попытки «опохмелиться» лишь продлевают проблему. Важно ориентироваться не на терпимость человека к дискомфорту, а на объективные признаки: если симптомы нарастают, сон сорван, поведение становится нестабильным, а тело реагирует паникой, тремором и скачками давления, лучше не тянуть. Особенно осторожными нужно быть при хронических болезнях сердца, печени и сосудов: при них цена ошибки выше, а «универсальные» домашние схемы могут навредить.
Подробнее – https://narkolog-na-dom-krasnogorsk6.ru/narkologicheskij-czentr-v-krasnogorske
The website https://aigazine.com/ is a media publication dedicated to news and analysis from the world of AI. Only here will you find the latest news, reviews, and expert opinions. You’ll learn how AI is transforming industries, business, and society, and the news feed will keep you up-to-date on current and projected developments daily.
1win войти официальное окно
В глубинах холодного моря жил древний Кракен, охранявший зеркала памяти. Эти зеркала не отражали лица — они показывали страхи, мечты и забытые решения каждого, кто осмеливался взглянуть в их гладь. Когда шторм поднимался, щупальца Кракена тянулись к поверхности, защищая зеркала от жадных глаз. Моряки верили: если зеркало треснет, море потеряет равновесие. Поэтому легенда учила уважать тайны глубин и помнить, что не каждое отражение стоит искать.
Преимущества вызова нарколога на дом:
Углубиться в тему – https://vyvod-iz-zapoya-v-murmanske12.ru/anonimnyj-vyvod-iz-zapoya-v-murmanske/
Корисний кулінарний блог для жінок MeatPortal розповідає про різні рецепти смачних страв. У блозі https://meatportal.com.ua/ ви знайдете корисні поради для домогосподарок, які хочуть спробувати приготувати нові страви, здивувати сім’ю та створити домашній затишок.
Вывод из запоя в Пушкино в клинике «Трезвый Путь» — это оперативная помощь на дому и в стационаре, персональные детокс-схемы и бережное восстановление организма без постановки на учёт. Мы подключаемся круглосуточно, аккуратно снимаем интоксикацию, стабилизируем давление и пульс, уменьшаем тремор, тревогу и бессонницу, а затем предлагаем понятный маршрут к ремиссии, который вписывается в ваш рабочий и семейный график. Цель — безопасно пройти острый период и не «сорваться» обратно, когда станет чуть полегче.
Выяснить больше – vyvod-iz-zapoya-cena
Контрактная служба это реальная возможность зарабатывать стабильно и официально. Выплаты начисляются каждый месяц без задержек. Все условия заранее прописываются в контракте. Контракт защищает права и исключает скрытые требования. Дополнительные выплаты увеличивают доход. Если хочешь стабильности, заключай контракт прямо сейчас – сво сургут
купить кокаин, мефедрон, бошки, марихуану всем доброго времени суток.. вот что ты написал это вобше такая нелепасть во первых этот магазин сколько робит не разу не кого не кинул во вторых по 0.5 магазин закладки не делает тебя просто как лошка очередного развели в аське или скайпе хз где ну тебя подкинули на ровном месте кидай и дальше всем подрят на шет))))будь умнее и внимательней страхуйся, много не кури мозг высохнит))))Однажды тормознули его два обкуренных в ноль пацаненка. Один из накуренных засовывает голову в окошко и говорит: Тоже интересен вопрос по шифровке посылки при доставке курьером
На нашем сайте вы можете скачать активатор для Windows 11 абсолютно бесплатно и навсегда забыть о водяных знаках!
Подробнее – Как обойти активацию Windows 11
Ищете надежную CPA сеть партнерских программ? Посетите https://3snet.co/ и вы сможете узнать с какими вертикалями работает 3snet на выгодных для вас условиях. Посмотрите все преимущества и высокие ставки по офферам на сайте, а также все о надежных рекламодателях, с которыми мы работаем. Онлайн-поддержка и консультации у нас 24/7, а выплаты строго по графику.
Служба по контракту выбирают те кто хочет результат. Здесь нет неопределенности и случайных выплат. Денежное довольствие начисляется стабильно. Контракт четко фиксирует условия. Дополнительные выплаты увеличивают доход. Сделай шаг сегодня: сколько стоит служба по контракту в россии
i-Superamara e-store – Sleek and stylish, products look elegant and explanations are straightforward.
Ищете комплексное оснащение мультимедийным оборудованием конференц-залов, переговорных комнат, диспетчерских и ситуационных центров, концертных и актовых залов, учебных и лекционных аудиторий под ключ? Посетите сайт https://i-tec.ru/ которая работает по всей России. Ознакомьтесь с нашими решениями и услугами. При необходимости посмотрите портфолио. Подробнее на сайте.
Публикация предоставляет читателю набор разрозненных идей, которые сложно применить на практике. Мы лишь слегка касаемся разных точек зрения, не углубляясь в анализ и не предлагая никаких выводов.
Вот – игровые автоматы
Эта публикация содержит набор несвязанных идей, трудно применимых в практике. Мы лишь поверхностно затрагиваем различные точки зрения, не проводя глубокий анализ и не предлагая выводов.
Подробнее читать – народные средства от диабета
https://bestdogfoodforboxers.com Как часыРовный магаз! 2 раза заказывал ам(к12) и ркс(к7).. Все пришло ровно за 3 дня=) тока замесил ам(не растворился полностью)..буду пробовать=)ркс понравилось тока к 5ти делать надо=) прилив бодрости учащаеться
1xbet рабочее зеркало
В глубинах холодного моря жил древний Кракен, охранявший зеркала памяти. Эти зеркала не отражали лица — они показывали страхи, мечты и забытые решения каждого, кто осмеливался взглянуть в их гладь. Когда шторм поднимался, щупальца Кракена тянулись к поверхности, защищая зеркала от жадных глаз. Моряки верили: если зеркало треснет, море потеряет равновесие. Поэтому легенда учила уважать тайны глубин и помнить, что не каждое отражение стоит искать.
Военная служба по контракту дает уверенность в доходе. Деньги выплачиваются регулярно. Контракт понятен. Начни оформление – контракт на военную службу рф
Этот текст посвящён сложным аспектам зависимости и её влиянию на жизнь человека. Мы обсудим психологические, физические и социальные последствия зависимого поведения, а также важность своевременного обращения за помощью.
Если вы ищете надёжный пансионат для родственника — читайте, на что обратить внимание при выборе дома престарелых рядом с Москвой. Изучить вопрос глубже – http://forum.marino-grad.ru/topic/6281-kuda-v-moskve-i-oblasti-luchshe-opredelit-pozhiluyu-mamu-v-dom-prestarelyh
https://dveri-spetsstal.ru Надеюсь этот вопрос решится …….про тусиай ….. что я могу сказать про тусиай от этого магазина…. пойду лучше трип-реппорт напишу…. такой тусишки ещё не ел) значит не успели трек номер в базу завести.
В этой статье мы подробно рассматриваем проверенные методы борьбы с зависимостями, включая психотерапию, медикаментозное лечение и поддержку со стороны общества. Мы акцентируем внимание на важности комплексного подхода и возможности успешного восстановления для людей, столкнувшихся с этой проблемой.
Узнайте, какие новые стандарты заботы о пожилых устанавливают частные дома престарелых: комфорт, уход, медицинское сопровождение. Более того — здесь – http://www.kpilib.ru/forum.php?tema=13606
Этот краткий обзор предлагает сжатую информацию из области медицины, включая ключевые факты и последние новости. Мы стремимся сделать информацию доступной и понятной для широкой аудитории, что позволит читателям оставаться в курсе актуальных событий в здравоохранении.
Узнайте, почему выездная наркологическая помощь становится популярной: удобство, конфиденциальность и профессиональный подход к лечению. Погрузиться в детали – https://otvet.mail.ru/question/267645270
The Shaws Center Online Portal – Mission is transparent, site highlights community involvement effectively.
Проблемы с алкоголем или наркотиками могут застать врасплох и привести к серьезным последствиям для организма, психического состояния и жизни пациента. Самостоятельные попытки выйти из запоя или преодолеть абстинентный синдром без медицинской поддержки редко оказываются эффективными и могут представлять реальную опасность для здоровья. Именно в таких ситуациях клиника «АльфаНаркология» предлагает услугу вызова нарколога на дом в Санкт-Петербурге и Ленинградской области. Наши специалисты оперативно реагируют на обращение, оказывают квалифицированную помощь и обеспечивают полную конфиденциальность лечения.
Детальнее – http://narcolog-na-dom-sankt-peterburg000.ru/psikhiatr-narkolog-na-dom-spb/
Капельница от запоя в Мурманске является одной из наиболее востребованных процедур для снятия острого состояния алкогольной интоксикации. Эта методика позволяет быстро вывести токсины из организма, нормализовать водно-солевой баланс и улучшить самочувствие пациента. Современная капельная терапия считается эффективным средством в лечении запоя, обеспечивая поддержку жизненно важных функций и минимизируя риски осложнений.
Разобраться лучше – капельница от запоя в мурманске
Медицинское вмешательство в домашних условиях отличается четкой организацией. Врач последовательно выполняет шаги, которые позволяют стабилизировать состояние пациента и предупредить осложнения.
Выяснить больше – вызвать нарколога на дом в санкт-петербурге
Запой может длиться от нескольких дней до нескольких недель, и с каждым новым днём состояние пациента может ухудшаться. Важно не затягивать с лечением, поскольку алкогольная зависимость способна привести к необратимым изменениям в организме и психике. В Москве лечение проводится не только в клиниках, но и в условиях дома, что позволяет сохранить конфиденциальность.
Подробнее – vyvod-iz-zapoya-moskve
На этом этапе врач детально выясняет, как долго продолжается запой, какие симптомы наблюдаются, и имеются ли сопутствующие заболевания. Точный анализ информации помогает оперативно определить степень интоксикации и подобрать оптимальные методы детоксикации, что является ключом к предотвращению дальнейших осложнений.
Выяснить больше – нарколог на дом вывод
купить кокаин, мефедрон, бошки, марихуану Приветы. Впервые решил заказать подобные вещества через интернет; полистав форум, выбрал этот магазин из-за безупречной репутации и не разочаровался. Заказ обработали очень быстро, все доходчиво объяснили, вес пришел с приятным бонусом(товар, кстати, отличный). Успехов и процветания вам и вашему магазину, ребята.всем привет.супер магаз))) позже отзыв отпишу. )))) ты давай вася тут провокации не сей)))
Es stellt eine umfangreiche Auswahl an Spielen zur Verfugung . Das Casino ist bekannt fur seine benutzerfreundliche Oberflache seine einfach zu navigierende Oberflache und seine sicheren Zahlungsmethoden seine verschiedenen und sicheren Zahlungsoptionen. Die Spieler konnen zwischen verschiedenen Arten von Spielen wahlen konnen aus einer gro?en Auswahl an verschiedenen Spielen wahlen.
bahigo 80.com https://bahigosch.com/
Das Bahigo Casino bietet auch eine Vielzahl von Bonusangeboten bietet attraktive Boni an. Die Spieler konnen von Willkommensboni profitieren konnen von Einzahlungsboni profitieren , die ihre Chancen auf Gewinne erhohen ihre Chancen auf Erfolg erhohen. Daruber hinaus bietet das Casino auch eine loyale Spieler community eine loyalen Spielerbasis .
После первичной стабилизации врач обычно объясняет близким, почему «просто поспать» не всегда получается сразу, сколько времени может держаться раздражительность и как правильно выстроить режим, чтобы не спровоцировать повторный срыв в первые дни.
Получить дополнительные сведения – narkolog na dom nedorogo
После процедуры пациент и его близкие получают развернутые рекомендации по дальнейшему восстановлению, советы по профилактике рецидивов и возможности прохождения кодирования при желании пациента.
Исследовать вопрос подробнее – нарколог на дом недорого санкт-петербург
Escorttime has built a strong reputation by focusing on user comfort and premium standards. Users value the organized presentation of female escort profiles. Escorttime’s erotic massage services receive praise for relaxation and professionalism. Many clients find Escorttime through Top 100 escorts in New York City. Reviews emphasize trust.
Процесс лечения состоит из нескольких этапов:
Разобраться лучше – вывод из запоя капельница
Этот информационный материал подробно освещает проблему наркозависимости, ее причины и последствия. Мы предлагаем информацию о методах лечения, профилактики и поддерживающих программах. Цель статьи — повысить осведомленность и продвигать идеи о необходимости борьбы с зависимостями.
Если вы ищете информацию о выездной психиатрической помощи в Рязани, читайте, как она помогает при эмоциональном стрессе и кризисных ситуациях. Как достичь результата? – https://msk.spravka.city/company/promedonline
Экстренная помощь требуется, когда запой начинает негативно сказываться на здоровье, и самостоятельное прекращение употребления алкоголя становится невозможным. Основные показания для круглосуточного вмешательства включают:
Ознакомиться с деталями – https://vyvod-iz-zapoya-volgograd000.ru/vyvod-iz-zapoya-na-domu-volgograd
Мы работаем круглосуточно и гарантируем строгое соблюдение конфиденциальности, используя только сертифицированные препараты и проверенные методики лечения.
Получить дополнительную информацию – нарколог на дом клиника санкт-петербург
https://avcilarpansiyon.com какой товар заказал?АА это только сегодня? Почему всё-таки такси? На метро бы а одну сторону успел бы… Вес большеват был, обычно брал миксы да всякие вкусные таблетки, но тут сразу столько СК… Да и потом, нашёл на товар, найди т на непредвиденный случай/комфорт, я так считаю. Чем брать по грамму микс, так лучше вообще не брать. Пара дней – и на пять грамм наберешь, с друзьями/сэкономишь на обедах, в конце концов.
Срочная помощь нарколога на дому в Рязани реализуется по четко отлаженной схеме, включающей несколько этапов, которые позволяют максимально быстро и безопасно вывести пациента из состояния запоя.
Подробнее – нарколог на дом рязань
Такой порядок действий гарантирует не только купирование симптомов, но и подготовку пациента к последующему восстановлению.
Получить дополнительную информацию – https://narcolog-na-dom-ryazan0.ru/vyvod-iz-zapoya-na-domu-ryazan-czeny
Стационарный формат предполагает круглосуточное наблюдение, возможность экстренного вмешательства и доступ к диагностическим средствам. Это особенно важно при наличии хронических заболеваний, психозов или алкогольного делирия.
Подробнее тут – вывод из запоя капельница
إن betfinal casino kuwait هو واحد من الأفضل المُعرّفات في مجال القمار عبر الإنترنت في الكويت . يوفّر هذا الكازينو مجموعة واسعة من الألعاب المسلية والمربحة، مما يجعل تجربة اللاعبين ممتعة ومليئة بالإثارة. يعزز betfinal casino kuwait من تجربة اللاعبين بفضل التكنولوجيا المتقدمة التي تسمح بالوصول السريع والسهل إلى الألعاب .
betfinal login https://betfinal-kw.com/
يضمن betfinal casino kuwait سلامة وأمان المعلومات الشخصية والمالية لللاعبين . يحرص الكازينو على تزويد اللاعبين بتجربة آمنة ومحميّة، مما يمنحهم الثقة الكافية للاندماج في الألعاب المختلفة.
Czasami bardzo popularne kasyno online . Oferuje ono bardzo duzy wybor gier hazardowych . Jednym z najwiekszych atutow tego kasyna jest to, ze oferuje ono bardzo duzy wybor gier stolowych .
casino vulkan spiele https://vulkan-spiele-polska.com/
Vulkan Spiele Casino jest znane jako kasyno, ktore oferuje wiele atrakcji. Gracze moga wybierac sposrod wielu roznych gier . Jednym z najwiekszych atutow tego kasyna jest fakt, ze mozna tam znalezc wiele gier z jackpotami .
Еще не смотрели Очень странные дела? Посетите сайт https://strangerthings.work/ и вы найдете все сезоны в отличном качестве, которые можно смотреть онлайн и бесплатно на нашем сайте. Этот сериал имеет огромную армию поклонников! Присоединяйтесь и вы к ним! Для тех кто любит паранормальные явления – сериал станет приятным способом провести время.
LED Extreme lighting – Solid product range, details are easy to find and evaluate quickly.
Лечение проводится в комфортных условиях дома, что позволяет избежать стресса, связанного с госпитализацией, и обеспечивает быстрое восстановление.
Получить дополнительную информацию – вызов врача нарколога на дом в екатеринбурге
В материале приведены детали, интересные, но не особенно важные. Мы рассматриваем аспекты, которые сложно назвать существенными, но включили их для большей полноты.
Подробнее читать – похудеть на таблетках
В этой информационной статье вы найдете интересное содержание, которое поможет вам расширить свои знания. Мы предлагаем увлекательный подход и уникальные взгляды на обсуждаемые темы, побуждая пользователей к активному мышлению и критическому анализу.
Узнать больше – https://florence-neuberth.com/_o9a5635-3
Преимущества вызова нарколога на дом:
Подробнее тут – наркологический вывод из запоя
Эта обзорная заметка содержит ключевые моменты и факты по актуальным вопросам. Она поможет читателям быстро ориентироваться в теме и узнать о самых важных аспектах сегодня. Получите краткий курс по современной информации и оставайтесь в курсе событий!
Смотрите также… – https://www.klimayelektro.com/your-trusted-air-cool-stay-comfortable
В этой публикации мы предлагаем подробные объяснения по актуальным вопросам, чтобы помочь читателям глубже понять их. Четкость и структурированность материала сделают его удобным для усвоения и применения в повседневной жизни.
Проверенные методы — узнай сейчас – https://www.thetablereadmagazine.co.uk/hashtag-press-denise-brown-on-small-town-secrets-creepy-theme-parks-and-the-power-of-friendship-in-her-gripping-new-ya-mystery
купить кокаин, мефедрон, бошки, марихуану по Иванову работаемНе смог не скопипастить Не стоит сомневатся в этом магазе он ровный и проверенный времен! Всегда на высоте!
В данной статье вы найдете комплексный подход к изучению насущных тем. Мы комбинируем теоретические сведения с практическими советами, чтобы читатель мог не только понять проблему, но и найти пути её решения.
Смотри, что ещё есть – https://vistowebnetwork.com/how-to-hold-a-guitar-pick
Эта статья погружает вас в увлекательный мир знаний, где каждый факт становится открытием. Мы расскажем о ключевых исторических поворотных моментах и научных прорывах, которые изменили ход цивилизации. Поймите, как прошлое формирует настоящее и как его уроки могут помочь нам строить будущее.
Получить дополнительную информацию – http://hartlaubgoose.ru/catalog/15
con una scelta sempre piu vasta di giochi di alta qualita. In questo scenario, Crazy Time Casino Slot Italy si distingue per la sua originalita e innovazione . gli utenti italiani possono accedere a una piattaforma di gioco completa, che include il Crazy Time Casino Slot.
crazy time story https://crazytime-italia.com/
il Crazy Time Casino Slot Italy e noto per le sue promozioni esclusive e i bonus generosi . il supporto clienti e sempre disponibile per rispondere alle domande e aiutare i giocatori .
В этой публикации мы предлагаем подробные объяснения по актуальным вопросам, чтобы помочь читателям глубже понять их. Четкость и структурированность материала сделают его удобным для усвоения и применения в повседневной жизни.
Подробная информация доступна по запросу – https://chicgardens.fr/gagnez-un-plan-de-jardin-en-3d-%E2%94%82valeur-2-500-e
Эта публикация погружает вас в мир увлекательных фактов и удивительных открытий. Мы расскажем о ключевых событиях, которые изменили ход истории, и приоткроем завесу над научными достижениями, которые вдохновили миллионы. Узнайте, чему может научить нас прошлое и как применить эти знания в будущем.
Лучшее решение — прямо здесь – https://aakr.ru/about/press
Клинические протоколы стационарной терапии рекомендуют госпитализацию при средней и тяжёлой степени интоксикации.
Ознакомиться с деталями – вывод из запоя на дому рязань.
купить кокаин, мефедрон, бошки, марихуану Долго что то ты пробуешь:)интересно всё такиКидал 4340, на Альфу улетело 4254… если быть точным… Чек есть. Если ты попал на фейка – это твои проблемы, мой номер аськи выдается только по требованию через лс, у тебя регистрация сегодня , то есть получить ты его никак не мог. Иди разводом занимайся в другом месте.
Эта публикация завернет вас в вихрь увлекательного контента, сбрасывая стереотипы и открывая двери к новым идеям. Каждый абзац станет для вас открытием, полным ярких примеров и впечатляющих достижений. Подготовьтесь быть вовлеченными и удивленными каждый раз, когда продолжите читать.
Разобраться лучше – https://bhm.nissan-caribbean.com/product/belt
В этой статье-обзоре мы соберем актуальную информацию и интересные факты, которые освещают важные темы. Читатели смогут ознакомиться с различными мнениями и подходами, что позволит им расширить кругозор и глубже понять обсуждаемые вопросы.
Изучить вопрос глубже – https://deeamo.fr/produit/lart-du-fx-acte-i-animation-volume-1
В этом обзорном материале представлены увлекательные детали, которые находят отражение в различных аспектах жизни. Мы исследуем непонятные и интересные моменты, позволяя читателю увидеть картину целиком. Погрузитесь в мир знаний и удивительных открытий!
Все материалы собраны здесь – https://sevenpack.com.br/unlocking-creativity-embrace-your-inner-artist
Вывод из запоя в Мурманске представляет собой комплекс мероприятий, направленных на оказание медицинской помощи пациентам, находящимся в состоянии алкогольного отравления или длительного употребления спиртного. Процедура проводится с целью стабилизации состояния организма, предупреждения осложнений и минимизации риска развития тяжелых последствий алкоголизма.
Узнать больше – вывод из запоя цена мурманск.
Olive Media KC Platform – Marketing strategies explained well, examples illustrate real applications.
купить кокаин, мефедрон, бошки, марихуану Заказывал тут сувениры(250) пришли за три дня=) Тока на почте из за выходных и праздников пролежали еще три дня=(Дорогие наши форумчане, мы бы рады с вами пообщаться на разные темы, и стараемся общаться со всеми, и порой просто не хватает времени ведь мы не железные, если вы хотите что то конкретно заказать ася и скайп ждет вас, просто нереальное кол-во народа задают вопросы утром днем и вечером, и вот даже сейчас, мы очень стараемся изменить ситуацию в лучшую сторону. С начала месяца т.е. с 1 июня вы сможете самостоятельно заказывать и оплачивать прямо на сайте, а так же будете видеть наличие продукции. в трубку после затяга уже чвствуеца
Для проведения процедуры используются стерильные растворы, а подбор компонентов осуществляется с учётом индивидуального состояния пациента, что позволяет минимизировать побочные эффекты и повысить эффективность терапии.
Изучить вопрос глубже – http://kapelnicza-ot-zapoya-v-murmanske12.ru
https://dogs-academia.ru/
google traductor page – Smooth experience with translations that are fast enough for routine use.
В этой статье-обзоре мы собрали данные, актуальность которых сомнительна, а факты — не всегда взаимосвязаны. Читатель сможет ознакомиться с разными мнениями, хотя вряд ли они существенно повлияют на его понимание темы.
Вот – ставки на спорт
zorivo capital guide – Clean layout makes capital details easy to understand without any confusion.
подарунки хлопчику на 10 років
https://service-trucks.ru/
ZylavoPortal – Pages are easy to scan, with a clean and user-friendly interface.
купить кокаин, мефедрон, бошки, марихуану Верный второй трек. Но у этой курьерки система мониторинга развита не особо хорошо и бывало такое, что посылка доходила за день-два, ее уже получили, а трек начинал биться только через пару дней после этого. Если в ближайшее время не заработает, то лучше звоните в курьерку и уточняйте.Напишите хотя бы мини трип в соответствующей теме,буду благодарен. Привет всем!
morixo bond link – Clear, concise bond information presented in a simple layout.
https://svobodapress.com.ua/den-anhela-stepana-pryvitannia-naykrashchi-pobazhannia-ta-pozdorovlennia/
CDN Promax toolkit – Tools are robust, documentation is clear, and overall platform is helpful.
TorivoFlow – Thorough details and transparency give confidence in financial decisions.
Crypto-Reviews.ru ресурс обзоров криптовалютных бирж, где каждый инвестор и трейдер может найти ценную информацию для принятия обоснованных решений. Сайт https://crypto-reviews.ru/ предоставляет надежную платформу для обмена мнениями и опытом работы с различными криптобиржами, от крупнейших до нишевых.
https://dogs-academia.ru/
a href=”https://qulavoholdings.bond/” />QulavoDirect – Navigation is intuitive, and everything appears reliable and solid.
Ожидаемый результат
Ознакомиться с деталями – http://vyvod-iz-zapoya-noginsk7.ru
купить кокаин, мефедрон, бошки, марихуану дада братан пришло все!!!охуенноый кач ск и рега нормальная вапще… короче зайди к нему на ветку там трипы опродукции прочти мой свежий за ска он мне очень нужен как никогда магаз клёвый ,:bravo:сервис на высоте
Наркологическая клиника в Химках — это возможность получить помощь при алкогольной и наркотической зависимости рядом с домом, а не ездить по всему региону в поисках специалистов. Для многих людей обращение к наркологу до последнего кажется чем-то «крайним»: кажется, что нужно терпеть, уговаривать себя «завязать самому», ждать подходящего момента, отпуска или «нового года с чистого листа». Но с каждым запоем или эпизодом употребления состояние становится тяжелее, восстановление — длиннее, а последствия — заметнее для работы, семьи, здоровья.
Получить дополнительную информацию – narkologicheskaya-klinika-ceny
Первые сутки после прекращения алкоголя — самые уязвимые: именно в это время нарастают абстинентные симптомы и риск осложнений. Ниже приведены основные ситуации, при которых нужен быстрый выезд врача. Перед списком отметим: если сомневаетесь, позвоните координатору — он уточнит признаки и подскажет безопасные действия до прибытия команды.
Получить дополнительные сведения – vyvod-iz-zapoya-deshevo-pushkino
Русскоязычный туристический сервис vip-pattaya.ru организует незабываемый отдых в Паттайе с 2012 года. В ассортименте более 100 программ по Таиланду, Камбодже и региону — от культурных походов и природных парков до водных развлечений и театральных шоу. Заказ экскурсий доступен без предварительной оплаты онлайн и по телефону, страхование гарантировано. Опытные русскоговорящие экскурсоводы, современный транспорт и доступные цены гарантируют приятный и защищенный отдых.
nevironexus services – Feels polished, with straightforward information and easy browsing.
Согласно данным Федерального наркологического центра, своевременный выезд врача снижает риск осложнений и повторных госпитализаций.
Узнать больше – платный нарколог на дом каменск-уральский
Процедура проходит под контролем нарколога и медсестры. Если состояние пациента тяжёлое (галлюцинации, судороги, резкие перепады давления), проводится экстренная инфузионная терапия и подключается оборудование для мониторинга сердечного ритма и уровня кислорода. Такой подход исключает риски и делает процесс выведения из запоя максимально безопасным и управляемым.
Изучить вопрос глубже – анонимный вывод из запоя
Когда человеку требуется немедленная медицинская помощь при алкогольной интоксикации, промедление может быть опасным. В таких ситуациях вызов нарколога на дом становится оптимальным решением. Клиника «КрасМед Трезвость» в Красноярске организует срочный выезд врача круглосуточно, обеспечивая квалифицированную помощь прямо по месту нахождения пациента. Такой формат позволяет избежать госпитализации, снизить тревожность и начать лечение в привычных домашних условиях, где человек чувствует себя спокойнее и безопаснее.
Получить дополнительные сведения – narcolog-na-dom-krasnoyarsk0.ru/
Эта публикация содержит набор несвязанных идей, трудно применимых в практике. Мы лишь поверхностно затрагиваем различные точки зрения, не проводя глубокий анализ и не предлагая выводов.
Подробнее читать – лечение covid народными средствами
Медикаментозное пролонгированное
Выяснить больше – кодировка от алкоголя в видном цена
Запой может длиться от нескольких дней до нескольких недель, и с каждым новым днём состояние пациента может ухудшаться. Важно не затягивать с лечением, поскольку алкогольная зависимость способна привести к необратимым изменениям в организме и психике. В Москве лечение проводится не только в клиниках, но и в условиях дома, что позволяет сохранить конфиденциальность.
Получить больше информации – вывод из запоя москве
Что делает врач
Исследовать вопрос подробнее – narkologiya-vyvod-iz-zapoya
ZylavoConnect – Browsing feels seamless, and the design is visually appealing.
Форматы вывода из запоя в Пушкино
Подробнее тут – http://vyvod-iz-zapoya-pushkino7.ru/vyvod-iz-zapoya-cena-v-pushkino/
Лечение хронического алкоголизма начинается с купирования абстинентного синдрома, после чего проводятся мероприятия по нормализации работы печени, сердечно-сосудистой и нервной системы. Назначаются гепатопротекторы, ноотропы, витамины группы B. Также проводится противорецидивная терапия.
Углубиться в тему – бесплатная наркологическая клиника
купить кокаин, мефедрон, бошки, марихуану Всем: счастья, мира, добра, любви!Так вот, прошло все как всегда отлично, дошло за три дня, маскировка надежная. Так же отдельное спасибо магазину за проявление немыслимой заботы о безопасности клиента. Что имел ввиду писать не буду, но факт есть факт. Я по почте переписывается пытался нормально договориться потом просто отвечать перестали решил здесь пообщаться тут надеюсь игнорировать не будут!
VixaroDeals – Very smooth purchase, delivery was quick and items work great.
https://svobodapress.com.ua/pryvitannia-z-dnem-narodzhennia-dochtsi-45-rokiv-naykrashchi-idei-ta-tepli-slova-dlia-osoblyvoho-sviata/
morixo line link – Clean and simple pages, line services explained without unnecessary complexity.
XylixTrack – Efficient layout with smooth transitions between sections, very intuitive.
zorivo portfolio portal – Clean overview of holdings with professional and uniform branding.
https://service-trucks.ru/
RixaroVision – Straightforward interface makes finding resources quick and simple.
MaveroZone – Navigation feels natural and straightforward.
купить кокаин, мефедрон, бошки, марихуану Бро это ты о чём?Поясни ,мне интересно..А то я запутался совсем, везде по разному пишут. Привет всем, сделал заказ в понедельник и оплатил его также, оплата прошла также в понедельник. заказ до сих пор мне не отправили и кормят все потомами… очень разочарован таким отношением. с ренджиком таких проблем вообще небыло
Запой требует срочного вмешательства, особенно если он длится более 2–3 дней. Без квалифицированной помощи организм пациента накапливает токсичные вещества, что может привести к необратимым изменениям.
Детальнее – http://vyvod-iz-zapoya-krasnoyarsk0.ru/vyvod-iz-zapoya-czena-krasnoyarsk/
Специализированный центр «Технетик» выполняет широкий ряд IT-работ в Хабаровске: сервис компьютерной техники, настройку и прошивку смартфонов и планшетов, подключение Smart TV и STB, построение локальных сетей, монтаж систем видеонаблюдения и веб-разработку на WordPress. Профессионал с опытом работы более 15 лет устраняет неисправности любого уровня быстрее и по более низким ценам, чем официальные центры обслуживания. Подробную информацию об услугах и прайс-лист можно найти на https://xn--e1aajim2adv.xn--p1ai/ Мастер выполняет установку программ, восстановление данных, настройку IPTV, прошивку устройств и удалённое администрирование с гарантией качества и индивидуальным подходом к каждому клиенту.
kavion trustee link Polished look – Trust explanations feel open, honest, and easy to digest.
Где математика встречает судьбу — так позиционирует себя сервис Numerio, и это не просто слова. Искусственный интеллект анализирует астрологические и нумерологические данные, создавая персональный отчёт о характере, финансах, здоровье и совместимости. То, на что у астролога уходят недели, бот делает за 15 минут. Подписчики Telegram-канала на https://numerio.ru/ получают бесплатную ректификацию времени рождения и пробные отчёты. Премиум-анализ судьбы стоит всего 1000 рублей — инвестиция в понимание себя.
Куш казино онлайн подходит для новичков и опытных игроков. Регистрация простая. Бонусы доступны сразу после входа. Попробуй возможности платформы, kush казино регистрация
1 вин официальный сайт 1win сайта
В глубинах холодного моря жил древний Кракен, охранявший зеркала памяти. Эти зеркала не отражали лица — они показывали страхи, мечты и забытые решения каждого, кто осмеливался взглянуть в их гладь. Когда шторм поднимался, щупальца Кракена тянулись к поверхности, защищая зеркала от жадных глаз. Моряки верили: если зеркало треснет, море потеряет равновесие. Поэтому легенда учила уважать тайны глубин и помнить, что не каждое отражение стоит искать.
ZylavoFlow Hub – The platform feels sleek, with intuitive menus and smooth browsing.
https://vsegoo.ru да не вопрос, в мск для этого совсем не надо ехать, друг, просто ситуация непонятная и неприятная, раз магазин не заботится о своей репутации-то это уже сосем другое дело….Сегодня как обычно забрал свою посылочку в срок как расчитывал. Очень приятно работать с таким магазином. Ты выдал мне комбо
Казино Куш регистрация это простой путь к бонусам и азарту. После входа доступны все игры. Официальный сайт обеспечивает стабильность. Присоединяйся к игре: куш казино официальный сайт
Бесплатный ключ для Windows 11 — только у нас, обновлено в 2026 году!
Подробнее – https://krasnodar.med24.online
ZylvoHub – Clean interface and easy navigation, perfect for getting started quickly.
morixo trust network – Trust details presented clearly, and moving between pages is fluid.
VixaroLine – Everything is explained simply, with no unnecessary complexity.
В самые трудные моменты жизни важна поддержка профессионалов, которые возьмут на себя все организационные вопросы. Похоронное бюро «Ритуал-Регион» в Ростове-на-Дону работает круглосуточно, предлагая полный спектр ритуальных услуг: от организации похорон и кремации до изготовления памятников из гранита и мрамора. На https://ritual-regions.ru/ вы найдёте информацию о благоустройстве мест захоронения, услуге «Груз 200» и возможности рассрочки. Опытные агенты деликатно помогут в это непростое время.
Преимущества вызова нарколога на дом:
Ознакомиться с деталями – [url=https://vyvod-iz-zapoya-v-murmanske12.ru/]vyvod-iz-zapoya murmansk[/url]
Для самого пациента это шанс получить медицинское вмешательство без дополнительного стресс-фактора в виде транспорта, очередей и «больничной атмосферы». Он остаётся в привычной обстановке, в своей квартире, с теми же предметами, к которым привык, и это снижает сопротивление. Вместо жесткого сценария «либо немедленно в стационар, либо ничего» появляется промежуточный, более мягкий вариант: врачи приезжают домой, снимают остроту состояния, подбирают схему капельницы и медикаментов, объясняют, что делать дальше. Нередко именно после такого первого опыта человек впервые всерьёз задумывается о полноценном лечении, потому что ощущает реальную разницу в самочувствии до и после профессиональной помощи, а не просто очередной «опохмел».
Подробнее можно узнать тут – http://narkolog-na-dom-himki11.ru/narkolog-na-dom-cena-v-himkah/
RixaroHoldings – Great information here, saved me a lot of unnecessary searching time.
trust management hub – Feels professional, and the layout makes things simple to read.
купить кокаин, мефедрон, бошки, марихуану заказ делал на человека который вообще не в теме и был чистый, поэтому меняйте для начала хотя бы курьерку и курьеров..Спасибо за объективный отзыв, мы работаем – что бы Вы улыбались:ok: Ам имеет высокий толер об этом уже говорилось не раз
trusted union network – Union concept is presented clearly, and navigation is user-friendly throughout.
NaviroHub – Easy-to-use trackers make project oversight straightforward.
Срок действия (ориентир)
Исследовать вопрос подробнее – http://kodirovanie-ot-alkogolizma-vidnoe7.ru
ORBIS Production https://orbispro.it/ is a recognized full-spectrum film, photo, and video production agency situated in Milan, serving all of Italy through offices in Milan, Rome, and Venice. The organization delivers comprehensive production services for worldwide brands and agencies, encompassing venues, licensing, staffing, casting, technical equipment, coordination, and post-production work. Starting from creative conception to finished product, ORBIS Production produces top-tier commercial, corporate, and branded media all over Italy.
Когда выезд особенно удобен и оправдан, важно понимать не только эмоционально, но и по конкретным признакам. Есть ряд типичных ситуаций, в которых именно формат «на дому» становится наиболее реалистичным и безопасным вариантом, а стационар можно рассматривать как следующий шаг, когда острота будет снята и человек станет более сговорчивым.
Узнать больше – http://narkolog-na-dom-himki11.ru/vyzov-narkologa-na-dom-v-himkah/
ZylavoFlow Center – Browsing is effortless, and the platform feels clean and modern.
Публикация предоставляет читателю набор разрозненных идей, которые сложно применить на практике. Мы лишь слегка касаемся разных точек зрения, не углубляясь в анализ и не предлагая никаких выводов.
Вот – ставки на спорт
Многие тянут до последнего, считая, что к наркологу обращаются только в самых крайних случаях. На деле показаний для консультации гораздо больше, и они часто появляются задолго до того, как человек впервые оказывается в запое или не выходит из состояния опьянения несколько дней подряд.
Исследовать вопрос подробнее – https://narkologicheskaya-klinika-voskresensk11.ru/
MavroPortal – Platform is very stable, using it feels effortless and secure.
Ищете, где купить гранитный памятник Донецк ДНР? Посетите Студию Гранита ДНР studiogranite.ru и вы сможете заказать гранитный памятник на могилу в Донецке с установкой. Кроме того, мы предоставляем услуги по благоустройству могил, созданию и покраске оградок, мощению плитки ФЕМ и прочие услуги. Со всеми нашими услугами вы сможете ознакомиться на сайте. Специалисты помогут вам подобрать оптимальные решения.
https://silovoy-cable.ru П.С.С. отвечать, цитировать это сообщение не нужно, удалю позже.Прислали нам свой метоксетамин, подтверждаем: продукт чистый, >99%. Отличный,ровный МАГАЗ!
trustco info page – Well-organized layout and professional presentation make the trust content easy to follow.
В данном тексте собраны разнообразные случайные сведения и не вполне определённые идеи, которые могут вызвать интерес. Мы отмечаем детали, не играющие ключевой роли, но сохраняющие своё место в изложении.
Подробнее читать – лечение covid народными средствами
Клиника нужна и тем, кто уже пробовал лечиться самостоятельно: пил лекарства «от тяги», ходил к психологу без медицинской поддержки, обещал себе не пить, но каждый стресс или конфликт всё равно приводили к старому сценарию. В такой ситуации комплексный подход — медицинский и психологический — даёт куда больше шансов, чем очередное одиночное обещание «в этот раз точно получится».
Получить дополнительную информацию – anonimnaya-narkologicheskaya-klinika
Услуга “Нарколог на дом” в Уфе охватывает широкий спектр лечебных мероприятий, направленных как на устранение токсической нагрузки, так и на работу с психоэмоциональным состоянием пациента. Комплексная терапия включает в себя медикаментозную детоксикацию, корректировку обменных процессов, а также психотерапевтическую поддержку, что позволяет не только вывести пациента из состояния запоя, но и помочь ему справиться с наркотической зависимостью.
Изучить вопрос глубже – нарколог на дом круглосуточно уфа
KryvoxTracker – Informative and well-structured content made things clear.
Анализ рынка услуг экстренной помощи в Тюмени позволяет выделить следующие ориентировочные цены:
Углубиться в тему – http://vyvod-iz-zapoya-vladimir00.ru/
Процедура вывода из запоя начинается с тщательной диагностики состояния пациента, чтобы определить, какие методы лечения будут наиболее эффективными. Мы применяем индивидуальный подход и комбинируем медикаментозное лечение с психотерапевтической поддержкой, что даёт лучший результат.
Получить больше информации – https://narcolog-na-dom-novokuznetsk0.ru/narkolog-na-dom-czena-novokuzneczk
Врач уточняет, как долго продолжается запой, какие симптомы наблюдаются и присутствуют ли сопутствующие заболевания. Тщательный сбор информации позволяет оперативно подобрать необходимые медикаменты и начать детоксикацию.
Подробнее можно узнать тут – http://kapelnica-ot-zapoya-tyumen0.ru
Когда хочется стабильного доступа к азартным играм и бонусам стоит выбрать куш казино официальный сайт. Платформа предлагает быстрый вход и удобную регистрацию. Бонусы доступны сразу после создания аккаунта. Заходи и начинай игру: казино куш зеркало
RixaroHub – Friendly interface and professional tools, perfect for someone just starting out.
zaviro bond portal – Easy-to-read explanations paired with a professional layout.
Многие тянут до последнего, считая, что к наркологу обращаются только в самых крайних случаях. На деле показаний для консультации гораздо больше, и они часто появляются задолго до того, как человек впервые оказывается в запое или не выходит из состояния опьянения несколько дней подряд.
Исследовать вопрос подробнее – http://narkologicheskaya-klinika-voskresensk11.ru/
Услуга
Подробнее можно узнать тут – https://narkologicheskaya-klinika-v-ryazani12.ru/narkologicheskaya-klinika-czeny-v-ryazani/
https://avatar-creator.ru “Решил Попробовать Записаться”Всё нашел!! Стрелка указывала немного не туда,но я справился,проверил соседний угол,всё гуд! Спасибо динамиту! Мяу идеальный!! Рекомендую!! поддерживаю !!!!
Срок действия (ориентир)
Узнать больше – https://kodirovanie-ot-alkogolizma-vidnoe7.ru/anonimnoe-kodirovanie-ot-alkogolizma-v-vidnom/
Наркологическая клиника в Химках — это возможность получить помощь при алкогольной и наркотической зависимости рядом с домом, а не ездить по всему региону в поисках специалистов. Для многих людей обращение к наркологу до последнего кажется чем-то «крайним»: кажется, что нужно терпеть, уговаривать себя «завязать самому», ждать подходящего момента, отпуска или «нового года с чистого листа». Но с каждым запоем или эпизодом употребления состояние становится тяжелее, восстановление — длиннее, а последствия — заметнее для работы, семьи, здоровья.
Исследовать вопрос подробнее – наркологическая клиника цены
В этой статье-обзоре мы собрали данные, актуальность которых сомнительна, а факты — не всегда взаимосвязаны. Читатель сможет ознакомиться с разными мнениями, хотя вряд ли они существенно повлияют на его понимание темы.
Вот – виртуальное казино
Вывод из запоя — это управляемая медицинская процедура, а не «волшебная капля» или крепкий чай с рассолом. «Формула Трезвости» организует помощь в Ногинске круглосуточно: выезд врача на дом или приём в стационаре, детоксикация с мониторингом, мягкая коррекция сна и тревоги, подробный план на первые 48–72 часа. Мы действуем безопасно, конфиденциально и без «мелкого шрифта» — объясняем, что и зачем делаем, согласовываем схему и фиксируем смету до начала процедур.
Изучить вопрос глубже – вывод из запоя капельница
ZylavoFlow Link – Navigation feels natural, and content is accessible at a glance.
RavionPortal – Love how organized the pages are with straightforward product descriptions.
Алкоголь оказывает глубокое воздействие на здоровье: психоэмоциональное и физическое состояние человека значительно ухудшаются, если злоупотребление продолжается долго. Даже небольшие дозы алкоголя, употребляемые регулярно, вызывают накопление токсинов, которые приводят к расстройствам в работе сердечно-сосудистой системы, печени, почек и других жизненно важных органов.
Получить дополнительную информацию – вызов нарколога на дом новокузнецк
Многие семьи сталкиваются с трудностями, когда зависимый отказывается ехать в клинику. В таких случаях выездная помощь становится первым шагом к выздоровлению. Однако не все службы предлагают одинаково безопасный и профессиональный подход. Чтобы избежать рисков и ошибок, важно понимать, на что обращать внимание при выборе услуги “нарколог на дом”.
Подробнее можно узнать тут – частный нарколог на дом нижний тагил
Анализ рынка услуг экстренной помощи в Тюмени позволяет выделить следующие ориентировочные цены:
Получить дополнительную информацию – https://vyvod-iz-zapoya-vladimir00.ru/vyvod-iz-zapoya-na-domu-vladimir/
Первое, на что стоит обратить внимание — это профессиональный уровень сотрудников. Без квалифицированных наркологов, клинических психологов и психиатров реабилитационный процесс становится формальным и неэффективным.
Разобраться лучше – http://www.domen.ru
Капельницы являются основным методом детоксикации. Их состав подбирается индивидуально с учётом степени интоксикации, наличия хронических заболеваний и общего состояния пациента. В таблице ниже представлены наиболее часто применяемые типы инфузий, используемые в клинике «ВладМед Трезвость».
Получить больше информации – нарколог на дом вывод из запоя
После первичной диагностики начинается активная фаза детоксикации. Современные препараты вводятся капельничным методом, что позволяет быстро вывести токсины и восстановить нормальные обменные процессы. Этот этап критически важен для стабилизации работы печени, почек и сердечно-сосудистой системы.
Узнать больше – вызвать капельницу от запоя тюмень
QunixBase – Minimal design, navigation is simple and information is displayed clearly.
zylavo finance hub – Capital content is presented clearly with a modern, easy-to-use interface.
На нашем сайте вы можете скачать активатор для Windows 11 абсолютно бесплатно и навсегда забыть о водяных знаках!
Подробнее – Скачать активатор для Windows 11
Этап
Углубиться в тему – vyvod-iz-zapoya-v-stacionare
Когда человеку требуется немедленная медицинская помощь при алкогольной интоксикации, промедление может быть опасным. В таких ситуациях вызов нарколога на дом становится оптимальным решением. Клиника «КрасМед Трезвость» в Красноярске организует срочный выезд врача круглосуточно, обеспечивая квалифицированную помощь прямо по месту нахождения пациента. Такой формат позволяет избежать госпитализации, снизить тревожность и начать лечение в привычных домашних условиях, где человек чувствует себя спокойнее и безопаснее.
Разобраться лучше – врач нарколог на дом
Запой — это не просто усиленное похмелье, а критическое состояние алкогольной интоксикации, при котором организм оказывается неспособным самостоятельно вывести накопившиеся токсины. При затяжном приёме алкоголя страдает не только печень — нарушаются функции сердечно-сосудистой системы, тормозятся нейрохимические процессы в головном мозге, развивается выраженная дегидратация и электролитный дисбаланс. Первая помощь в такой ситуации — экстренная инфузионная терапия, которую мы проводим в наркологической клинике «Источник Здоровья» в Балашихе.
Детальнее – врача капельницу от запоя
https://avcilarpansiyon.com Захожу 24-го, фигакс, бан.Рассказал друг-таксист. Да просто дедушка форума ))
Эффективное лечение требует поэтапного подхода, который реализуется следующим образом:
Получить дополнительную информацию – http://narkologicheskaya-klinika-v-ryazani12.ru
ZaviroBondConnect – Smooth layout allowed me to find everything I was looking for.
Вызов нарколога возможен круглосуточно, что обеспечивает оперативное реагирование на критические ситуации. Пациенты и их родственники могут получить помощь в любое время, не дожидаясь ухудшения состояния.
Выяснить больше – помощь нарколога на дому
Вывод из запоя в Пушкино в клинике «Трезвый Путь» — это оперативная помощь на дому и в стационаре, персональные детокс-схемы и бережное восстановление организма без постановки на учёт. Мы подключаемся круглосуточно, аккуратно снимаем интоксикацию, стабилизируем давление и пульс, уменьшаем тремор, тревогу и бессонницу, а затем предлагаем понятный маршрут к ремиссии, который вписывается в ваш рабочий и семейный график. Цель — безопасно пройти острый период и не «сорваться» обратно, когда станет чуть полегче.
Углубиться в тему – https://vyvod-iz-zapoya-pushkino7.ru
TorivoPoint – Fast site with a simple, clean layout makes it easy to browse.
Не стоит забывать и про объективные факторы. Бывает, что физически опасно или трудно везти человека в клинику: он с трудом ходит, не спит уже несколько ночей, постоянно потеет, жалуется на сильную слабость и сердцебиение. Любая поездка в таком состоянии — дополнительная нагрузка на сердце и нервную систему. Выезд нарколога на дом позволяет начать лечение без этого лишнего риска: врач приезжает со всем необходимым для капельницы и наблюдения, а если по итогам осмотра становится понятно, что без стационара не обойтись, он помогает организовать перевод уже на фоне частично стабилизированного состояния, а не в момент максимального кризиса.
Детальнее – narkolog-psiholog-na-domu
Торгово-промышленная база «47стройка» является крупнейшим изготовителем пиломатериалов в СПб и Ленобласти с личным деревообрабатывающим производством и заготовкой леса в экологичных северных зонах. Компания предлагает полный ассортимент качественной продукции: обрезную и строганную доску, брус обрезной и профилированный, вагонку, имитацию бруса, террасную доску по ценам от производителя. Подробный каталог и актуальные цены доступны на https://47stroyka.ru/ Свой автотранспорт позволяет осуществлять быструю доставку пиломатериалов по СПб и области, а передовое оборудование обеспечивает отличное качество товаров и исполнение заказов различного объема в максимально короткие сроки.
zaviro capital official – Clean interface, capital offerings are clearly outlined and easy to review.
В этой статье мы рассмотрим ключевые аспекты выбора надёжного специалиста, который приедет по вызову и сможет оказать квалифицированную помощь без промедлений.
Получить дополнительную информацию – помощь нарколога на дому нижний тагил
Там, где раньше хватало одного тяжёлого утра, теперь требуются дни детоксикации. И чем позже подключается врач, тем сложнее вернуть организм к относительно безопасному состоянию.
Детальнее – vyvod-iz-zapoya-oblast
Первое, на что стоит обратить внимание — это профессиональный уровень сотрудников. Без квалифицированных наркологов, клинических психологов и психиатров реабилитационный процесс становится формальным и неэффективным.
Подробнее – наркологическая клиника лечение алкоголизма
Первые сутки после прекращения алкоголя — самые уязвимые: именно в это время нарастают абстинентные симптомы и риск осложнений. Ниже приведены основные ситуации, при которых нужен быстрый выезд врача. Перед списком отметим: если сомневаетесь, позвоните координатору — он уточнит признаки и подскажет безопасные действия до прибытия команды.
Выяснить больше – http://vyvod-iz-zapoya-pushkino7.ru/vyvod-iz-zapoya-cena-v-pushkino/
Вывод из запоя рекомендуется в следующих случаях:
Выяснить больше – https://narko-zakodirovat2.ru/vyvod-iz-zapoya-v-staczionare-moskva
купить кокаин, мефедрон, бошки, марихуану (выглядит как реклама, но эт просто хорошие впечатления от сотрудничества)Сейчас забегал курьер но без звонка поймал небольшую пароною ведь 203 уже нелегал но всё обошлось всё забрал вес отличный спасибо селеру за быстроту за 3 дня вот это скорость самый наеровнейший магаз и качество полюбому 5+ я уверен как всегда ну это я уже в другой ветке отпишу по пояже как сделаю. Спасибо!Не надо!
Visit https://calendaroftheday.com/ and you’ll find the Calendar of the Day! Find out everything interesting happening today, tomorrow, or throughout the year. And in the “Holidays” section, you’ll find interesting events for every day – from drinks and food to health and culture.
Appreciate the effort put into this. It’s always good to see quality content.
В Воскресенске вывод из запоя может проводиться в разных форматах — с выездом на дом, в условиях стационара, в срочном режиме или с последующим амбулаторным наблюдением. Правильный выбор зависит от тяжести состояния, возраста пациента, наличия хронических заболеваний и того, насколько сильно запой нарушил привычную жизнь.
Ознакомиться с деталями – https://vyvod-iz-zapoya-voskresensk11.ru/vyvod-iz-zapoya-kapelnica-v-voskresenske
Этот информативный текст отличается привлекательным содержанием и актуальными данными. Мы предлагаем читателям взглянуть на привычные вещи под новым углом, предоставляя интересный и доступный материал. Получите удовольствие от чтения и расширьте кругозор!
Кликни и узнай всё! – https://hikinhigh.com/ultimate-travel-planning-guide-10-tips-for-a-seamless-journey
TrixoSupportHub – Fast and complete responses made my experience excellent.
В данной обзорной статье представлены интригующие факты, которые не оставят вас равнодушными. Мы критикуем и анализируем события, которые изменили наше восприятие мира. Узнайте, что стоит за новыми открытиями и как они могут изменить ваше восприятие реальности.
Обратитесь за информацией – https://site.mmust.ac.ke/presidents-advisor-on-womens-rights-hon-harriette-chiggai-launches-womens-economic-empowerment-and-investment-curriculum-at-mmust
Инфузионная терапия проходит под непрерывным контролем врача и медсестры: каждые 15–20 минут измеряются АД, пульс и сатурация, при возникновении любых нежелательных реакций раствор корректируется. Стандартная продолжительность курса — от одного до трёх часов, но может быть продлена в зависимости от индивидуальных показателей. Уже после первого часа инфузии пациенты отмечают исчезновение головной боли, нормализацию сна, улучшение аппетита и выраженное эмоциональное облегчение.
Выяснить больше – [url=https://kapelnica-ot-zapoya-moskva1.ru/]вызов на дом капельницы от запоя[/url]
RixvaSphere – Quick browsing, layout is intuitive and user-friendly.
В этой публикации мы предлагаем подробные объяснения по актуальным вопросам, чтобы помочь читателям глубже понять их. Четкость и структурированность материала сделают его удобным для усвоения и применения в повседневной жизни.
Проверенные методы — узнай сейчас – https://cim-ci.net/equipe
Преимущество такого подхода в том, что из этих «кирпичиков» можно собрать именно тот маршрут, который подходит конкретному человеку. Кому-то достаточно короткого стационарного курса с последующим наблюдением, кому-то — длительной реабилитации, а третьему важнее гибко сочетать лечение и работу.
Получить больше информации – наркологическая клиника телефон
Хотите уверенность в себе? Забудьте о скучных стенах спортзала! Ваша сильные руки ждут вас на свежем воздухе. Обработка земли мотоблоком — это не просто рутина, а активный отдых с жиросжиганием.
Как это работает?
Подробнее на странице – https://sport-i-dieta.blogspot.com/2025/04/ogorod-hudenie-s-motoblokom-i-bez-nego.html
Мощные мышцы ног и ягодиц:
Управляя мотоблоком, вы постоянно идете по рыхлой земле, совершая усилие для движения вперед. Это равносильно выпадам с утяжелением.
Стальной пресс и кор:
Удержание руля и контроль направления заставляют стабилизировать положение тела. Каждая кочка — это естественная нагрузка на пресс.
Рельефные руки и плечи:
Повороты, подъемы, развороты тяжелой техники — это упражнения на бицепс, трицепс и плечи в чистом виде.
Нажмите, чтобы увидеть технику в действии: Мы покажем, как превратить работу в эффективную тренировку.
Ваш план похудения на грядках:
Разминка (5 минут): Прогулка быстрым шагом по участку. Кликните на иконку, чтобы увидеть полный комплекс.
Основная “тренировка” (60-90 минут): Вспашка, культивация, окучивание. Чередуйте интенсивность!
Заминка и растяжка (10 минут): Упражнения на гибкость рук. Пролистайте галерею с примерами упражнений.
Мотивационный счетчик: За час активной работы с мотоблоком средней мощности вы можете сжечь от 400 до 600 ккал! Это больше, чем пробежка трусцой.
Итог: Подкачанное тело к лету. Запустите таймер своей первой “огородной тренировки”. Пашите не только землю, но и лишние калории
Эта информационная заметка предлагает лаконичное и четкое освещение актуальных вопросов. Здесь вы найдете ключевые факты и основную информацию по теме, которые помогут вам сформировать собственное мнение и повысить уровень осведомленности.
Все материалы собраны здесь – https://cemomentclub.com/product/cute-socks-2
Эта статья предлагает уникальную подборку занимательных фактов и необычных историй, которые вы, возможно, не знали. Мы постараемся вдохновить ваше воображение и разнообразить ваш кругозор, погружая вас в мир, полный интересных открытий. Читайте и открывайте для себя новое!
Получить исчерпывающие сведения – https://jakubroskosz.com/ekspres-do-kawy
Этот текст призван помочь читателю расширить кругозор и получить практические знания. Мы используем простой язык, наглядные примеры и структурированное изложение, чтобы сделать обучение максимально эффективным и увлекательным.
См. подробности – https://morningcarpool.com/dirt-emoji
https://freespiritdelicacies.com Всем привет) У меня такая проблема, сделал заказ, оплатил через евросеть, Уважаемый продаван сказал то, что в евросети перевод идет до 3-х дней, хотя когда работали с другим магазином деньги прилетали моменьтально всегда. И доставка вышла на 950 р. (г. Екб), это получаеться + курьер или нет, просто до почты?… И через что лучше оплачивать в данном магазине?магаз работает ровно, все четко и ровно, респект продавцам Пришёл 307. Попробывал 1 к 20, ниочём.. Курнул кропаль чистого, также ниочём…хз в чём дело. Сегодня попробую 1к10 можт чтот почуствую
Эта информационная заметка предлагает лаконичное и четкое освещение актуальных вопросов. Здесь вы найдете ключевые факты и основную информацию по теме, которые помогут вам сформировать собственное мнение и повысить уровень осведомленности.
Проверенные методы — узнай сейчас – https://fancychico.com/gorra-trucker-negra-loro-exotic-margaritaville-the-farm-de-goorin-bros
LixorTrack – Found the guidance clear, actionable, and well-structured.
zylavo holdings official portal – Content feels organized and easy to follow from the moment you open the site.
OutletCreative – A motivating platform that supports creative thinking.
zaviro corporate overview – Branding is strong and consistent, making the site feel legitimate and professional.
Эта публикация завернет вас в вихрь увлекательного контента, сбрасывая стереотипы и открывая двери к новым идеям. Каждый абзац станет для вас открытием, полным ярких примеров и впечатляющих достижений. Подготовьтесь быть вовлеченными и удивленными каждый раз, когда продолжите читать.
Изучить вопрос глубже – https://tofuxpress.com/features
В этом материале представлены детали, которые хоть и занимательны, но не особенно значимы. Мы рассматриваем моменты, которые трудно назвать важными, но всё же решили включить их для полноты картины.
Вот – взрослые игры
Текст включает разнообразную информацию, которая может показаться любопытной, но не меняет устоявшегося восприятия. Предлагаем просто насладиться чтением, не ожидая значительной пользы.
Подробнее читать – диета для похудения быстро
В этом тексте собрано множество случайных сведений и довольно неопределённых мыслей, которые могут чем-то заинтересовать. Мы отмечаем моменты, которые не особенно важны, но всё же занимают своё место в повествовании.
Вот – онлайн слоты
Мы собрали для вас самые захватывающие факты из мира науки и истории. От малознакомых деталей до грандиозных событий — эта статья расширит ваш кругозор и подарит новое понимание того, как устроен наш мир.
Получить больше информации – https://www.bibsclean.sk/?page_id=151
Этот информативный материал предлагает содержательную информацию по множеству задач и вопросов. Мы призываем вас исследовать различные идеи и факты, обобщая их для более глубокого понимания. Наша цель — сделать обучение доступным и увлекательным.
Прочесть заключение эксперта – https://www.hahem.co.il/trueandshocking/?p=2332&cpage=1640
Если нужен надежный игровой клуб с бонусами, обрати внимание на Cactus casino официальный сайт. Здесь удобный интерфейс и стабильная работа платформы. После регистрации доступен бонус для старта. Заходи и начинай играть – cactus казино зеркало
I’ve spent a good quantity of time testing different tactics on the plinko online game and it is really special in comparison to standard
slots. One thought I have is that the inner bins might eat the balance quickly if you don’t
alter your levels frequently. Even though plinko game download gives
a top opportunity to see the activity, it is vital
to keep in mind that luck constantly holds
the largest factor. I’ve honestly discovered how utilizing a
plinko demo first allows you to get familiar with the
pacing before staking any actual cash. Does anyone else believe how the physics in the mobile app appears a little altogether different than the browser variant?
Also, what’s your go-to count of pegs for a stable session? Let’s debate if there
is any kind of true math to the drops! https://chipinhub.com/a-comprehensive-tutorial-to-that-virtual-plinko-casino-experience-processes-with-methods/
Промокод азино777 на сайте: azino 777 зеркало
https://frontiersinbiorefining.org Ничего не пойму.. Я уже третий день пытаюсь договориться и всё бесполезно. Прошу номер кошелька куда перевести, говорит щас и пропадает на пол дня, и так постоянно. Может на мелкий заказ как у меня им пох. Заказываю 10 гр.ложь. 3 случая за полгода. Причем следили ли за самими людьми и что за ситуации – неизвестно. Если у вас свой магазин. то следите за его безопасностью. У вас нет данных об отправках, их количестве и количестве пришедших и не пришедших посылках. Просьба не раздувать данную тему без полной информации вышеперечисленной и важной уточненной дополнительной. Отзыв о продукте дам в определённой теме Спасибо за вашу хорошую работу Chemical-mix.com?
PexraFlow – Clear interface, content is organized for quick understanding.
Кактус казино регистрация открывает доступ к бонусам и игровым автоматам. После входа можно сразу начать игру. Официальный сайт работает надежно. Используй возможность сейчас: кактус казино вход
NolaroSuite – Designed to simplify management and reduce clutter.
купить кокаин, мефедрон, бошки, марихуану народ, кти еще отпишется п магазу?Че все затихли что не кто не берет? Не кто не отписывает последние дни не в курилке не где везде тишина( они на телефон должны позвонить,обычно так
a href=”https://qulavoholdings.bond/” />QulavoHubPro – Smooth interface and trustworthy options make decision-making easy.
zaviro trustline portal – The concept of the trustline is clear, and the site gives a calm, dependable impression.
PureValueStore – An interactive space that encourages creativity and idea building.
площадка кракен
В глубинах холодного моря жил древний Кракен, охранявший зеркала памяти. Эти зеркала не отражали лица — они показывали страхи, мечты и забытые решения каждого, кто осмеливался взглянуть в их гладь. Когда шторм поднимался, щупальца Кракена тянулись к поверхности, защищая зеркала от жадных глаз. Моряки верили: если зеркало треснет, море потеряет равновесие. Поэтому легенда учила уважать тайны глубин и помнить, что не каждое отражение стоит искать.
Стоимость услуг зависит от продолжительности терапии, сложности случая и выбранных процедур. Однако клиника предоставляет гибкую систему оплаты, включая рассрочку и страховое покрытие.
Узнать больше – http://narkologicheskaya-klinika-v-ryazani12.ru/narkologicheskaya-klinika-telefon-v-ryazani/https://narkologicheskaya-klinika-v-ryazani12.ru
В этом материале представлены детали, которые хоть и занимательны, но не особенно значимы. Мы рассматриваем моменты, которые трудно назвать важными, но всё же решили включить их для полноты картины.
Вот – секс знакомства
купить кокаин, мефедрон, бошки, марихуану Привет всем!Если кто-то когда-то пробовал банки с Рафинада на тусиае, тот знает, как классно они перли и понимает, каких эффектов я ожидал. Сегодня получил свою родненькую
PlorixNavigator – Minimalistic design, navigation is fast and everything is easy to understand.
Когда хочется яркой игры и стабильного доступа к бонусам, стоит выбрать Кактус казино официальный сайт. Платформа предлагает удобную регистрацию и быстрый вход. Бонусы доступны сразу после создания аккаунта. Начни игру уже сегодня: кактус казино сайт
Проститутки Сургута
Когда сталкиваешься с утратой близкого человека, важно найти надежную ритуальные агентства минска, которая поможет организовать достойное прощание.
Это требует чуткого отношения и учета множества нюансов. В белорусской столице работает немало организаций, предлагающих ритуальные услуги, однако найти достойного подрядчика – может оказаться сложной задачей.
Важно помнить, что стоимость ритуальных услуг зависит от многих факторов. На цену влияют выбранные ритуальные принадлежности, стоимость транспорта и другие аспекты. Исходя из этого, целесообразно заранее уточнить все детали и получить подробную смету.
Выбор ритуального агентства: на что обратить внимание
Выбирая похоронное бюро важно обратить внимание на ее положение на рынке. Изучите отзывы в интернете, посетите офис, чтобы сформировать личное мнение. Наличие лицензии и сертификатов также имеет немаловажное значение.
Убедитесь, что агентство предлагает комплексное обслуживание, а также помощь в получении свидетельств. Автомобили в собственности и помещения для проведения церемонии – дополнительные преимущества.
Оформление документов и организация церемонии
Завершение формальностей – важная составляющая организации похорон. получении требуемых документов. хлопоты и заботы.
Организация церемонии прощания – ответственный шаг, дающий возможность почтить память умершего. Решение о выборе кладбища и определяются в соответствии с предпочтениями.
Дополнительные услуги и поддержка
Кроме стандартного набора ритуальные агентства часто предлагают дополнительные услуги, например, организацию поминок. Помощь в переживании горя также в тяжелое время.
Важно помнить, что организация похорон – является делом личным. Отдавайте предпочтение агентстве, которое предложит и окажет всестороннюю помощь.
**Спин-шаблон:**
“`
Похоронные услуги в Минске: особенности и учета множества нюансов. В Минске представлен широкий спектр фирм, предлагающих ритуальные услуги, однако выбор проверенного исполнителя – может быть непростым делом.
Необходимо знать, что стоимость ритуальных услуг может существенно варьироваться. На цену влияют выбранные ритуальные принадлежности, затраты на перевозку и иные параметры. Поэтому рекомендуется заранее уточнить все детали и ознакомиться с полным прайс-листом.
Как выбрать ритуальное агентство: важные критерии важно обратить внимание на ее положение на рынке. Ознакомьтесь с мнениями людей, пообщайтесь с сотрудниками, чтобы сформировать личное мнение. Лицензирование деятельности и сертификация услуг также имеет немаловажное значение.
Убедитесь, что агентство предлагает комплексное обслуживание, включая оформление документов. Собственный автопарк и специального зала для отпевания – несомненные плюсы.
Организация похорон: от документов до церемонии – важная составляющая организации похорон. Ритуальное агентство. Это существенно снизит.
Устройство похоронной процессии – важный этап, помогающий попрощаться с близким человеком. Выбор места проведения и родственников и близких.
Помимо основных услуг ритуальные агентства как правило, предоставляют дополнительные услуги, в частности, проведение поминальной трапезы. Помощь в переживании горя также может оказаться необходимой.
Необходимо учитывать, что организация похорон – это индивидуальный процесс. Выбирайте агентстве, наиболее подходящий спектр услуг и окажет необходимую поддержку.
“`
Этот текст содержит различную информацию, которая, возможно, покажется любопытной, но в целом не меняет восприятия привычных вещей. Предлагаем просто получить удовольствие от чтения, не ожидая особой пользы.
Вот – милфы
В этой статье-обзоре мы собрали данные, актуальность которых сомнительна, а факты — не всегда взаимосвязаны. Читатель сможет ознакомиться с разными мнениями, хотя вряд ли они существенно повлияют на его понимание темы.
Вот – онлайн покер на деньги
Первое, на что стоит обратить внимание — это профессиональный уровень сотрудников. Без квалифицированных наркологов, клинических психологов и психиатров реабилитационный процесс становится формальным и неэффективным.
Углубиться в тему – http://narkologicheskaya-klinika-nizhnij-tagil11.ru
BridgeView – Fast loading and clear explanations make financial info simple to access.
Проститутки Сургута
https://gladioluss.ru сколько зарядил?Отличный товар и цены. Зря так… Самый лучший магазин! качество, цены, общение с клиентом, все на высшем уровне! продолжайте в том же духе и вам зачтется: )
Комплексное лечение на дому организовано по строго отлаженной схеме, позволяющей оперативно стабилизировать состояние пациента и провести качественную детоксикацию.
Изучить вопрос глубже – вывод из запоя вызов на дом
Такой алгоритм помогает восстановить работоспособность организма в течение нескольких часов. После процедуры врач может оставить пациенту препараты для продолжения курса и назначить контрольный осмотр через день.
Подробнее можно узнать тут – нарколог на дом клиника красноярск
MivaroFlow – Clear, practical resources made selecting the right option much simpler than expected.
zexaro bond services – The site is simple to navigate, with accessible and well-explained bonding info.
kraken зеркало 2kmp
В глубинах холодного моря жил древний Кракен, охранявший зеркала памяти. Эти зеркала не отражали лица — они показывали страхи, мечты и забытые решения каждого, кто осмеливался взглянуть в их гладь. Когда шторм поднимался, щупальца Кракена тянулись к поверхности, защищая зеркала от жадных глаз. Моряки верили: если зеркало треснет, море потеряет равновесие. Поэтому легенда учила уважать тайны глубин и помнить, что не каждое отражение стоит искать.
ZarvoEdgePro – The clean presentation makes all options easy to view.
Обращение в местную клинику даёт важное преимущество — доступность. Здесь можно пройти диагностику, детоксикацию, вывод из запоя, курс лечения и реабилитации в привычном городе, без выснаживающих переездов. Пациенту легче решиться на стационар, когда он понимает, что близкие рядом и в любой момент могут приехать, поучаствовать в обсуждении плана терапии, привезти необходимые вещи. При этом подход остаётся профессиональным: учитываются стаж зависимости, сопутствующие заболевания, психоэмоциональное состояние, семейная ситуация. Лечение строится не вокруг одной «волшебной» процедуры, а как последовательный маршрут — от первой консультации до выхода в стабильную ремиссию.
Углубиться в тему – наркологическая клиника цены
MorvexSphere – Very clear presentation, I can easily understand all sections.
Этот обзор позволяет по-новому взглянуть на вещи, на которые обычно и так смотрят. Мы упоминаем факты, которые мало что меняют, и события, значение которых трудно определить, но они всё равно здесь.
Вот – порно смотреть
https://club66.ru посылка дошла за 1 сутки, сегодня не успел забрать, завтра посмотрим на качество) я уверен, что все будет хорошоЗато искать долго не пришлось наверное???! понравилось очень!!!!!!
Своевременный вызов позволяет «поймать» момент, когда детокс максимально эффективен и ещё не потребовалась госпитализация. Мы работаем по всему Пушкинскому округу и приезжаем в ближайшие населённые пункты соседних округов.
Выяснить больше – vyvod-iz-zapoya-vyzov
Запой почти никогда не начинается внезапно: сначала это редкие «переборы» по праздникам, потом привычка снимать стресс вечером, а дальше алкоголь всё чаще появляется в распорядке дня. В какой-то момент близкие замечают, что человек уже не контролирует количество, выпивка идёт несколько дней подряд, отменяются дела, нарушается сон, пропадает аппетит, появляются дрожь, потливость, скачки давления. На этом этапе вывод из запоя в Ивантеевке уже не может быть простым «проспаться и прийти в себя» — организму нужна полноценная медицинская помощь.
Разобраться лучше – https://vyvod-iz-zapoya-ivanteevka11.ru/narkolog-vyvod-iz-zapoya-v-ivanteevke/
бошки трава купить
В глубинах холодного моря жил древний Кракен, охранявший зеркала памяти. Эти зеркала не отражали лица — они показывали страхи, мечты и забытые решения каждого, кто осмеливался взглянуть в их гладь. Когда шторм поднимался, щупальца Кракена тянулись к поверхности, защищая зеркала от жадных глаз. Моряки верили: если зеркало треснет, море потеряет равновесие. Поэтому легенда учила уважать тайны глубин и помнить, что не каждое отражение стоит искать.
Запой требует срочного вмешательства, особенно если он длится более 2–3 дней. Без квалифицированной помощи организм пациента накапливает токсичные вещества, что может привести к необратимым изменениям.
Ознакомиться с деталями – вывод из запоя на дому недорого в красноярске
Салон цветов Санкт-Петербурга сотрудничает с опытными флористами и обеспечивает свежесть всех композиций. Каталог включает розы, пионы, хризантемы, редкие цветы и дизайнерские букеты для торжеств, годовщин, корпоративных событий. Оформить заказ можно на https://flowersspb.com/ — доставка осуществляется в течение 2-3 часов по указанному адресу. Заказчикам предлагается оплата через карту или кэш, комплимент в виде открытки и экспертная консультация флориста.
https://t.me/indi_surguta/
купить кокаин, мефедрон, бошки, марихуану Уже заказывал и получил chm-100 и chm-400 всё ровно)А сейчас работает магазин? Все нормально,6-го заказал,8-го отправили. Оперативно
Holdings360 – Detailed metrics allow for smarter decisions with less effort.
Отличный опыт сотрудничества по таможенному оформлению грузов Москва
Also visit my web-site – https://git.aiximiao.com/curtwaldman30
zexaro finance hub – Capital services are explained simply, with messaging that feels balanced and trustworthy.
Общество экспертов России по недропользованию – профессиональная платформа для проверки компетенций и статуса экспертов по экспертизе недр. Ресурс позволяет подобрать специалиста по профилям: ТПИ, нефть и газ, геология и ГРР – и сократить риски при подписании отчетов и отчётов в сделках https://oern2007.ru/
VexaroFlow – Navigation is seamless and the platform feels solid and trustworthy.
Медикаментозное пролонгированное
Углубиться в тему – https://kodirovanie-ot-alkogolizma-vidnoe7.ru/anonimnoe-kodirovanie-ot-alkogolizma-v-vidnom
UlixoTrack – Clean layout and responsive controls make browsing simple.
Банная печь — это сердце парной, и от её качества зависит весь процесс. Завод Feringer производит печи для бань и саун с 2008 года, предлагая модели серии ПФ в различных облицовках: от металлических кожухов до талькохлорита. На https://feringer.shop/ представлен полный каталог с ценами от 46 960 рублей. Специализированный интернет-бутик гарантирует оригинальную продукцию, профессиональную установку и официальную гарантию. Выбирайте печь под объём парной — есть модели для помещений до 18 и 28 квадратных метров
Этот сборник информации привлекает множеством мелких деталей и необычных ракурсов. Мы предлагаем взгляды, редко полезные, но способные немного разнообразить знакомство с темой.
Подробнее читать – https://rostov-narkologiya.ru/uslugi-ot-alkogolizma/vyvod-iz-zapoya
NevrixFlow – Glanced through quickly, site feels professional and simple to use.
Как поясняет медицинский психолог Елена Мусатова, «пациенту важно доверять специалисту, понимать его подход и чувствовать профессиональную уверенность ещё на этапе первичного осмотра».
Получить дополнительную информацию – лечение в наркологической клинике
ОЭРН – отраслевой ресурс для проверки квалификации экспертов по экспертизе недр. Портал позволяет найти специалиста по специализациям: геология и ГРР, нефть и газ, ТПИ снижая риски при согласовании отчетов и отчетов в регуляторных процедурах https://oern2007.ru/
Процедура вывода из запоя начинается с тщательной диагностики состояния пациента, чтобы определить, какие методы лечения будут наиболее эффективными. Мы применяем индивидуальный подход и комбинируем медикаментозное лечение с психотерапевтической поддержкой, что даёт лучший результат.
Подробнее – выезд нарколога на дом в новокузнецке
Can you be more specific about the content of your article? After reading it, I still have some doubts. Hope you can help me. https://accounts.binance.info/register-person?ref=IXBIAFVY
https://usaninfoto.ru Удачи в бизе!!Писал уже, магазин работает в турбо режиме отправки вовремя, получают люди вовремя, сменили штат сотрудников сменили курьеров которые тупили, все налажено все как должно быть. Оплатил, через 49 минут уже получил адрес, люди забрали надежную закладку (эйф-диссоциатив), опробовали, все довольны. Мир и респект
Одним из ключевых этапов терапии является медикаментозное устранение абстинентного синдрома, что значительно облегчает состояние пациента. Для этого используются препараты, рекомендованные к применению ведущими специалистами в области наркологии. Примером могут служить протоколы лечения, описанные на официальном портале наркологической помощи России.
Подробнее можно узнать тут – http://narkologicheskaya-klinika-kamensk-uralskij11.ru
купить кокаин, мефедрон, бошки, марихуану в смысле пропал из онлайна??? и что делать теперь? треки то до сих пор небьютьсяНу,оправдалась моя нелюбовь к аське,ибо история не хранится и происходит всякая фигня.У меня произошел не самый забавный случай. бобик здох ….
OrvixHub – Really enjoyed exploring their features; the instructions were clear and straightforward.
Главная задача специалистов клиники «ВладМед Трезвость» — быстро и безопасно стабилизировать состояние пациента, не допуская осложнений и рецидивов. После вызова врача на дом или поступления в стационар проводится осмотр, оценка степени интоксикации и индивидуальный подбор терапии. Каждое назначение строго медицински обосновано, а препараты подбираются с учётом возраста, хронических заболеваний и длительности запоя.
Детальнее – вывод из запоя на дому недорого в владимире
BondGroupX – Regularly updated insights draw me back frequently.
Врач выясняет, как долго продолжается запой, какие симптомы наблюдаются и имеются ли сопутствующие заболевания. Тщательный анализ полученной информации позволяет оперативно скорректировать терапевтическую стратегию и выбрать наилучшие методы детоксикации.
Узнать больше – вывод из запоя в стационаре
В этом материале представлены детали, которые хоть и занимательны, но не особенно значимы. Мы рассматриваем моменты, которые трудно назвать важными, но всё же решили включить их для полноты картины.
Вот – азартные игры на деньги
Сразу после вызова нарколог приезжает на дом для проведения первичного осмотра и диагностики. На этом этапе проводится сбор анамнеза, измеряются жизненно важные показатели (пульс, артериальное давление, температура) и определяется степень алкогольной интоксикации. Эти данные являются основой для разработки индивидуального плана лечения.
Детальнее – https://kapelnica-ot-zapoya-tyumen0.ru/
PlixoHub – Very clear layout, everything is simple to find and easy to navigate.
VelvixSphere – Straightforward guides made everything quicker to understand.
купить кокаин, мефедрон, бошки, марихуану 21го числа оплатил заказ. ждем 🙂 на складе чел заболел пока что . ждем пока выздоровитсъел примерно 10мг, чувствуется легкое расслабление и успокоение, каких то явных или ярких эффектов не наблюдается.. РАБОТАЕМ!!! ОПТ!!! ДОСТАВКА!!!
Вывод из запоя — это не просто медицинская процедура, а целый комплекс мероприятий, направленных на очищение организма, восстановление обмена веществ и стабилизацию нервной системы. Когда человек находится в состоянии длительного употребления алкоголя, в крови накапливаются токсины, нарушается работа сердца, печени, почек и мозга. Без профессиональной помощи выйти из этого состояния безопасно невозможно. Клиника «ВладМед Трезвость» предлагает квалифицированный вывод из запоя во Владимире с использованием современных капельниц и мягких детокс-программ. Врачи работают круглосуточно, оказывая помощь как на дому, так и в комфортных условиях стационара.
Получить дополнительные сведения – наркологический вывод из запоя владимир
Как проходит лечение:
Узнать больше – http://narcolog-na-dom-novokuznetsk0.ru
ОЭРН – профессиональная платформа для верификации компетенций и статуса специалистов по экспертизе недр. Сервис помогает выбрать эксперта по направлениям геология и ГРР, ТПИ, нефть и газ – снижая риски при согласовании отчетов и отчетов в лицензировании: https://oern2007.ru/
К основным направлениям помощи, как правило, относятся:
Углубиться в тему – http://narkologicheskaya-klinika-chekhov11.ru/
Психотерапевтическое кодирование делает акцент на внутренней мотивации. Специалист помогает человеку увидеть реальную цену алкоголя в его жизни, понять, как именно употребление разрушает здоровье, семью, карьеру, и сформировать установку на трезвость на определённый срок. Используются техники внушения в состоянии расслабления и структурированная работа с убеждениями и привычками. Такой подход особенно полезен тем, кто боится «лекарственного вмешательства» или уже имеет негативный опыт неудачных медикаментозных попыток. В практике лечения в Чехове часто используются комбинированные схемы, когда медикаментозный барьер подкрепляется психотерапевтической поддержкой, а результат кодирования закрепляется за счёт изменения образа жизни и участия в реабилитационных программах.
Узнать больше – metody-kodirovaniya-ot-alkogolizma
Процесс вывода из запоя капельничным методом организован по строгой схеме, позволяющей обеспечить максимальную эффективность терапии. Каждая стадия направлена на комплексное восстановление организма и минимизацию риска осложнений.
Узнать больше – https://kapelnica-ot-zapoya-tyumen0.ru/kapelnicza-ot-zapoya-na-domu-czena-tyumen
Незамедлительно после вызова нарколог прибывает на дом для проведения тщательного осмотра. На данном этапе специалист собирает анамнез, измеряет жизненно важные показатели — пульс, артериальное давление, температуру — и оценивает степень интоксикации. Эти данные являются основой для составления индивидуального плана лечения.
Подробнее тут – вывод из запоя в владимире
Наркологическая помощь — это не «последний шанс для безнадёжных», а нормальный медицинский шаг, такой же логичный, как визит к кардиологу при проблемах с сердцем или к эндокринологу при сахарном диабете. В клинике в Лобне зависимость рассматривают как заболевание, а не как «слабость характера», и помогают человеку пройти весь путь — от детоксикации и вывода из запоя до реабилитации и профилактики срывов. Обращение на более раннем этапе даёт важное преимущество: организм ещё способен восстанавливаться, психика не разрушена окончательно, социальные связи не разорваны. Это значит, что лечение может быть мягче, программа — гибче, а шансы на устойчивый результат — выше.
Углубиться в тему – gosudarstvennaya-narkologicheskaya-klinika
https://gidromotory-gprf.ru Здравствуйте, есть и 50 и 100, сейчас откорректирую, можете заказывать ужеМагазин Красавчик , желаю отличных продаж )))) мне все пришло, магаз ровный. 5+
Психотерапевтическое кодирование делает акцент на внутренней мотивации. Специалист помогает человеку увидеть реальную цену алкоголя в его жизни, понять, как именно употребление разрушает здоровье, семью, карьеру, и сформировать установку на трезвость на определённый срок. Используются техники внушения в состоянии расслабления и структурированная работа с убеждениями и привычками. Такой подход особенно полезен тем, кто боится «лекарственного вмешательства» или уже имеет негативный опыт неудачных медикаментозных попыток. В практике лечения в Чехове часто используются комбинированные схемы, когда медикаментозный барьер подкрепляется психотерапевтической поддержкой, а результат кодирования закрепляется за счёт изменения образа жизни и участия в реабилитационных программах.
Исследовать вопрос подробнее – кодирование от алкоголизма чехов
RavionAssets – The platform is responsive and makes financial decisions easier.
Эта статья сочетает познавательный и занимательный контент, что делает ее идеальной для любителей глубоких исследований. Мы рассмотрим увлекательные аспекты различных тем и предоставим вам новые знания, которые могут оказаться полезными в будущем.
Есть чему поучиться – https://futur-pilote.fr/les-formations/cpl
В этом материале представлены детали, которые хоть и занимательны, но не особенно значимы. Мы рассматриваем моменты, которые трудно назвать важными, но всё же решили включить их для полноты картины.
Вот – ставки на спорт
В этой информационной статье вы найдете интересное содержание, которое поможет вам расширить свои знания. Мы предлагаем увлекательный подход и уникальные взгляды на обсуждаемые темы, побуждая пользователей к активному мышлению и критическому анализу.
Более того — здесь – https://dadandburied.com/2015/03/20/parenting-march-madness
KrixaDirect – Clean design and quick responses keep things simple.
В этом интересном тексте собраны обширные сведения, которые помогут вам понять различные аспекты обсуждаемой темы. Мы разбираем детали и факты, делая акцент на важности каждого элемента. Не упустите возможность расширить свои знания и взглянуть на мир по-новому!
Детали по клику – https://www.pritikin.com/ultimate-guide-for-lowering-ldl-cholesterol-naturally
В данной обзорной статье представлены интригующие факты, которые не оставят вас равнодушными. Мы критикуем и анализируем события, которые изменили наше восприятие мира. Узнайте, что стоит за новыми открытиями и как они могут изменить ваше восприятие реальности.
Осуществить глубокий анализ – https://medicalcbd.com.co/producto/cartagena-golden-semilla-feminizada-x-2
https://safegrom.ru сколько зарядил?А это как понимать? Кто то уже регу опробовал? Доброга времени суток, закладки в москве делаете?
Этот информативный текст отличается привлекательным содержанием и актуальными данными. Мы предлагаем читателям взглянуть на привычные вещи под новым углом, предоставляя интересный и доступный материал. Получите удовольствие от чтения и расширьте кругозор!
Продолжить чтение – https://www.ascotrehab.com/referral/referrals-banner
Хотите подтянутую фигуру? Забудьте о скучных стенах спортзала! Ваша стройная талия ждут вас на свежем воздухе. Вспашка земли мотоблоком — это не просто рутина, а активный отдых с жиросжиганием.
Как это работает?
Подробнее на странице – https://sport-i-dieta.blogspot.com/2025/04/ogorod-hudenie-s-motoblokom-i-bez-nego.html
Мощные мышцы ног и ягодиц:
Управляя мотоблоком, вы постоянно идете по рыхлой земле, совершая работу на сопротивление. Это равносильно приседаниям с нагрузкой.
Стальной пресс и кор:
Удержание руля и контроль направления заставляют стабилизировать положение тела. Каждая кочка — это естественная нагрузка на пресс.
Рельефные руки и плечи:
Повороты, подъемы, развороты тяжелой техники — это упражнения на бицепс, трицепс и плечи в чистом виде.
Нажмите, чтобы увидеть технику в действии: Мы покажем, как превратить работу в эффективную тренировку.
Ваш план похудения на грядках:
Разминка (5 минут): Круговые движения руками. Кликните на иконку, чтобы увидеть полный комплекс.
Основная “тренировка” (60-90 минут): Вспашка, культивация, окучивание. Чередуйте интенсивность!
Заминка и растяжка (10 минут): Глубокое дыхание для восстановления. Пролистайте галерею с примерами упражнений.
Мотивационный счетчик: За час активной работы с мотоблоком средней мощности вы можете сжечь от 400 до 600 ккал! Это больше, чем сеанс аэробики.
Итог: Прекрасный урожай осенью. Запустите таймер своей первой “огородной тренировки”. Пашите не только землю, но и лишние калории
В этой публикации мы предлагаем подробные объяснения по актуальным вопросам, чтобы помочь читателям глубже понять их. Четкость и структурированность материала сделают его удобным для усвоения и применения в повседневной жизни.
Запросить дополнительные данные – http://www.bdconsultingltd.com/filthy-details-on-novel-statement-producing-help-discovered
купить кокаин, мефедрон, бошки, марихуану всё ровно бро делаетв скаипе не отвечают!!!! идиоты – это ты очень мягко к ним))
Автоматические врезные пороги — инновационное решение для дверей там, где стационарный порог создаёт неудобства или невозможен. Умные пороги от компании SmartPorog устанавливаются в межкомнатные, пластиковые, алюминиевые и противопожарные двери. Переходите на https://smartporog.ru/ и выбирайте модели для жилых и коммерческих помещений. Порог устраняет сквозняки, улучшает звукоизоляцию, повышает пожаробезопасность и автоматически убирается в дверное полотно при открывании. Идеально для больниц, магазинов, школ.
Эта статья погружает вас в увлекательный мир знаний, где каждый факт становится открытием. Мы расскажем о ключевых исторических поворотных моментах и научных прорывах, которые изменили ход цивилизации. Поймите, как прошлое формирует настоящее и как его уроки могут помочь нам строить будущее.
Не упусти шанс – https://www.blife.bg/huligankata-zhana-bergendorf-ritala-i-hapala-policzai-poluchi-3-mesechna-prisada
В этом обзорном материале представлены увлекательные детали, которые находят отражение в различных аспектах жизни. Мы исследуем непонятные и интересные моменты, позволяя читателю увидеть картину целиком. Погрузитесь в мир знаний и удивительных открытий!
Личный опыт — читайте сами – https://applicator-kuznecova.ru/kreon-10000-kreon-25000-instruktsiya-po-primeneniyu-vzroslyim-kreon-dlya-detey-analogi-otzyivyi.html
Казино admiral x подойдёт как новичкам, так и опытным игрокам. Адмирал х казино онлайн работает без лагов и ошибок.
https://rzd-bonusoff.ru/
Заказывали таможенное оформление грузов в Москве, все прошло четко и по срокам
my webpage :: https://fabrealtygroupnc.com/author/melindalemay1/
https://karsmarket.ru Негативные отзывы удаляем? Оправдываете свою новую репутацию.Все радует в работе магазина,да и приходит с бонусом.Единственное что немного долго ждать отправки,притом что сама посылка после отправки доходит даже меньше чем за сутки. Один вопрос только,можно ли заказать так что бы без курьера?Самому придти в офис и забрать посылку?
купить кокаин, мефедрон, бошки, марихуану Только эфоретик нужен.пробывал нюхать эфект 4-6часа товар 9\10 хорошее качество, 9 потому что ожидал чуть большего.
Скачайте патч для обхода активации Windows 11 и пользуйтесь системой без ограничений.
Подробнее – Где найти рабочий ключ для Windows 11
visit quixo – Dropped in by chance and everything made sense right away, nice experience.
Когда выезд особенно удобен и оправдан, важно понимать не только эмоционально, но и по конкретным признакам. Есть ряд типичных ситуаций, в которых именно формат «на дому» становится наиболее реалистичным и безопасным вариантом, а стационар можно рассматривать как следующий шаг, когда острота будет снята и человек станет более сговорчивым.
Подробнее – http://narkolog-na-dom-himki11.ru/vyzov-narkologa-na-dom-v-himkah/
start here – Pages load cleanly, and the structure makes it easy to follow the information.
cavaroline information – Organized structure and clear interface make browsing fast and convenient.
https://gidromotory-gprf.ru покушать попробуй… и пиши сюдаМагазин ровный! Я заказал 1000ф, оплатил ЯД, оператора попросил отправить посыль на следующий день , без задержки т.к. сроки получения очень поджимают. На что оператор адекватно ответил что все сделают.На следующий вечер получил трек, посылочка собранна и вот вот выезжает))) если уже не выехала) Магазину как и его администрации – от души за оперативность и отношение к клиенту. Отличнный магазин
https://t.me/sex_vladivostoka/
vexaro hub – Browsed briefly, layout feels organized and navigation is simple.
Наркологическая клиника применяет структурированные методы, включающие изучение анамнеза, оценку текущего состояния и определение возможных рисков. На основе полученной информации формируются индивидуальные схемы лечения, направленные на нормализацию внутренних процессов. Работа строится на многоуровневом наблюдении, включающем анализ лабораторных показателей и оценку функциональных систем организма. Такой формат позволяет поддерживать стабильную динамику изменений и избегать осложнений. В клинике создается согласованная модель вмешательств, позволяющая получать устойчивые результаты.
Изучить вопрос глубже – https://narkologicheskaya-klinika-tomsk18.ru/tomsk-narkologicheskij-dispanser
velvix online – User-friendly interface, easy to find details and pages respond quickly.
Этот текст содержит различную информацию, которая, возможно, покажется любопытной, но в целом не меняет восприятия привычных вещей. Предлагаем просто получить удовольствие от чтения, не ожидая особой пользы.
Вот – секс чат
https://t.me/sex_vladivostoka
Многие тянут до последнего, считая, что к наркологу обращаются только в самых крайних случаях. На деле показаний для консультации гораздо больше, и они часто появляются задолго до того, как человек впервые оказывается в запое или не выходит из состояния опьянения несколько дней подряд.
Разобраться лучше – https://narkologicheskaya-klinika-voskresensk11.ru/chastnaya-narkologicheskaya-klinika-v-voskresenske/
купить кокаин, мефедрон, бошки, марихуану что то не могу зайти на сайт (уже ожидается что нибудь? небольгой репортаж отписать о ск.
Индивидуалки Новый Уренгой
Такой подход позволяет устранить физические последствия запоя и снизить психологическую зависимость. Уже после первой процедуры пациенты отмечают улучшение самочувствия, появление аппетита и нормализацию сна. Важно не ограничиваться только экстренной помощью — специалисты рекомендуют пройти курс восстановления, чтобы предотвратить рецидивы.
Подробнее тут – скорая вывод из запоя в владивостоке
Каждый из этих симптомов по отдельности уже опасен, а в сочетании они создают высокий риск для жизни. Самостоятельные эксперименты с таблетками, резкий отказ от алкоголя «через силу» или попытка «переспать» запой без медицинского контроля могут обернуться реанимацией. Гораздо безопаснее вовремя вызвать специалиста и провести детоксикацию под наблюдением, особенно когда речь идёт о жителях крупного города, где доступна профессиональная наркологическая помощь.
Выяснить больше – vyvod-iz-zapoya-moskva-srochno
В этом тексте собрано множество случайных сведений и довольно неопределённых мыслей, которые могут чем-то заинтересовать. Мы отмечаем моменты, которые не особенно важны, но всё же занимают своё место в повествовании.
Вот – милфы
Растаможка авто https://classifylistings.com/index.php?page=user&action=pub_profile&id=215559&item_type=active&per_page=16 — цены ниже чем у других брокеров
Op deze pagina vind je een selectie van de beste buitenlandse goksites voor Nederlandse spelers.
browse trustco – Professional design and clear structure allow fast and intuitive browsing.
zavirogroup site – Organized pages with content that’s easy to read and makes sense at first glance.
Индивидуалки Новый Уренгой
купить кокаин, мефедрон, бошки, марихуану Если помог Жми Сказать Спасиботусишка хороша, я как го грешил что нирвановская была какая то тёмная, так вот у чемикала она вообще практически бежевая 😀 качество порадовало, хорошая вещь ) в трубку после затяга уже чвствуеца
zaviroline page – Everything opens fast and the site feels well put together.
krixa dashboard – Intuitive layout, navigation works well and content is straightforward.
Вызов нарколога на дом в Иркутске и Иркутской области — это удобное и безопасное решение, позволяющее получить неотложную помощь в привычной обстановке. Врачи клиники «ЧистоЖизнь» выезжают круглосуточно, приезжают в течение 30–60 минут и проводят комплексное лечение, направленное на стабилизацию состояния пациента и предотвращение осложнений.
Разобраться лучше – https://narcolog-na-dom-v-irkutske00.ru/vyzov-narkologa-na-dom-irkutsk/
Проститутки Владивосток
Инфузионная терапия — центральный элемент стабилизации. Она помогает восстановить баланс жидкости, вывести токсические метаболиты и защитить органы. Вывод из запоя в клинике в Астрахани проводится с использованием препаратов, направленных на поддержку нервной системы, печени и сердечно-сосудистой функции.
Узнать больше – вывод из запоя недорого в астрахани
После поступления вызова клиника «ЗдоровьеНорм» отправляет к пациенту опытного нарколога, который прибывает на дом в течение 30–60 минут. По приезду врач проводит комплексную диагностику, включающую измерение артериального давления, пульса, уровня кислорода в крови и тщательную оценку общего состояния пациента. На основе полученных данных специалист подбирает индивидуальную схему лечения.
Разобраться лучше – http://narcolog-na-dom-krasnodar0.ru/vyzov-narkologa-na-dom-krasnodar/https://narcolog-na-dom-krasnodar0.ru
zylvo review – Simple structure, pages load fast and information is presented professionally.
Заходите на сайт https://cs2case.win/ и вы сможете открыть лучшие кейсы CS & CS:GO. Открытие кейсов КС ГО и КС2 осуществляется с моментальным выводом скинов себе в Steam. Посмотрите нашу подборку кейсов на всевозможные тематики. У нас ежедневно можно найти бесплатные кейсы, а также эксклюзивные, не представленные больше нигде!
купить кокаин, мефедрон, бошки, марихуану продаван обещал разобраться по поводу 307. Надеюсь на скорейшее разрешение ситуации.ты давай вася тут провокации не сей))) Порошок серого цвета чем то похож на известь, запаха нет, ну или очень слабый. Фото сделать не вышло сори :dontknown:!
Есть ситуации, когда визит к наркологу в Химках лучше воспринимать не как «стыдный шаг», а как обычное ответственное решение о своём здоровье. Это особенно актуально, если: употребление алкоголя или наркотиков стало регулярным, а попытки сократить дозы заканчиваются срывами; появились запои с несколькими днями непрерывного употребления; возникают проблемы с сердцем, давлением, сном; близкие всё чаще говорят, что «ситуация выходит из-под контроля».
Изучить вопрос глубже – narkologicheskaya-klinika-himki11.ru/
Вызов нарколога на дом в Иркутске и Иркутской области — это удобное и безопасное решение, позволяющее получить неотложную помощь в привычной обстановке. Врачи клиники «ЧистоЖизнь» выезжают круглосуточно, приезжают в течение 30–60 минут и проводят комплексное лечение, направленное на стабилизацию состояния пациента и предотвращение осложнений.
Подробнее можно узнать тут – http://
Индивидуалки Новый Уренгой
Ущерб от наркотиков — это групповая хоботня, обхватывающая физическое, психологическое равным образом социальное
состояние здоровья человека.
Утилизация подобных наркотиков, как кокаин, мефедрон, ямба,
«шишки» или «бошки», может огласить к
неконвертируемым следствиям как чтобы организма,
яко равно чтобы общества в целом.
Но даже при эволюции подчиненности
возможно электровосстановление — главное,
чтобы зависимый явантроп обернулся за
помощью. Важно запоминать, что наркозависимость
врачуется, и помощь бацнет шанс на новейшую
жизнь.
main platform – Navigation is intuitive, and the content is easy to follow.
Перед началом терапии проводится клиническая оценка, включающая измерение давления, осмотр кожи и глаз, проверку дыхания и анализ неврологического состояния. Вывод из запоя в клинике в Астрахани начинается только после сбора этих данных, поскольку подбор препаратов без диагностики может быть небезопасен.
Углубиться в тему – скорая вывод из запоя астрахань
В этом материале представлены детали, которые хоть и занимательны, но не особенно значимы. Мы рассматриваем моменты, которые трудно назвать важными, но всё же решили включить их для полноты картины.
Вот – интим услуги
trustline overview – Found info efficiently, layout is neat and the site gives a reliable impression.
Не тратьте деньги на лицензию — скачайте кряк для Windows 11 здесь и активируйте систему за 5 минут.
Подробнее – Скачать генератор ключей для Windows 11
Наркологическая клиника в Химках помогает не только тем, кто уже оказался в тяжёлом запое или прошёл через ломку. Сюда можно обратиться на любом этапе — от «злоупотребляю, но ещё работаю» до «запои повторяются, семья на грани, есть проблемы с давлением и сердцем». Чем раньше подключаются специалисты, тем мягче можно пройти период стабилизации и тем больше ресурсов удаётся сохранить — здоровье, отношения, работу, собственное чувство контроля над жизнью.
Подробнее можно узнать тут – наркологическая клиника отзывы
Поставщик Raxwell предлагает промышленное оборудование, электронные детали и запасные части производственным компаниям по России. В каталоге более 40 миллионов позиций — сенсоры, ПЛК, пневматика, гидравлика, двигатели, измерительные приборы от 40 тысяч мировых брендов. Заказать продукцию можно на https://raxwell.ru/ с доставкой в любой регион и двухлетней гарантией. Менеджеры на связи в любое время, содействуют в выборе комплектующих и обработке запросов.
Публикация предоставляет читателю набор разрозненных идей, которые сложно применить на практике. Мы лишь слегка касаемся разных точек зрения, не углубляясь в анализ и не предлагая никаких выводов.
Вот – порно онлайн бесплатно
купить кокаин, мефедрон, бошки, марихуану Просьба подкорректировать самим бредовые сообщения.остался дико не рад, но селлер быстро пообещал кидануть бонуса при следующей покупке. надеюсь, не пожадничают Тоже такая ситуация , сижу без товара негодую.
Публикация предоставляет читателю набор разрозненных идей, которые сложно применить на практике. Мы лишь слегка касаемся разных точек зрения, не углубляясь в анализ и не предлагая никаких выводов.
Вот – казино
discover mavro – Minimalist design, fast-loading pages and content is well-organized.
Нарколог на дом в Химках особенно востребован тогда, когда состояние человека уже нельзя назвать обычным похмельем, но он категорически отказывается ехать в клинику. Запой тянется несколько дней или дольше, нет полноценного сна, пульс постоянно учащённый, руки трясутся, давление скачет, а любое утро начинается не с облегчения, а с новой дозы алкоголя «чтобы не развалиться». В такой ситуации родственники оказываются между страхом и беспомощностью: понятно, что дальше ждать опасно, но уговорить собрать вещи и поехать в стационар не получается. Формат выезда нарколога на дом как раз и закрывает этот тупик — врач приезжает туда, где сейчас находится человек, оценивает риски и сразу начинает помощь.
Подробнее – vyzvat-narkologa-na-dom
Если многое из этого знакомо, кодирование стоит рассматривать не как «наказание» или «приговор», а как инструмент, который помогает закрыть доступ к алкоголю на определённый срок и даёт шанс выстроить новую привычку — жить трезво.
Детальнее – kodirovka-v-koroleve
рабочая ссылка на кракен
В глубинах холодного моря жил древний Кракен, охранявший зеркала памяти. Эти зеркала не отражали лица — они показывали страхи, мечты и забытые решения каждого, кто осмеливался взглянуть в их гладь. Когда шторм поднимался, щупальца Кракена тянулись к поверхности, защищая зеркала от жадных глаз. Моряки верили: если зеркало треснет, море потеряет равновесие. Поэтому легенда учила уважать тайны глубин и помнить, что не каждое отражение стоит искать.
Preparing for Tomb of Annihilation requires studying the villains. Ras Nsi is a fallen paladin turned Yuan-ti malison, a tragic figure. The Tomb of Annihilation PDF explains his complex relationship with Acererak. He is suffering from the Death Curse himself, which provides a diplomatic angle for the players. A DM who reads the digital background lore can portray Ras Nsi not just as a monster, but as a desperate leader. This nuance is found in the deep text of the module. The PDF allows for quick fact-checking during the tense negotiation scenes in the Fane. https://tombofannihilationpdf.store/ Tomb Dward Tomb Of Annihilation Pdf
zavirolinecore hub – Professional feel right away, the layout is clean and navigation is simple.
https://fa30.ru Взял у данного ТС реагента CHM-22. Качество отличное! Крайне советую этого продавца!!!как всегда оплатил и все пришло. спасибо что есть такой магаз беру давно у них, все ок всем саветую Дружище как все прошло?)) забрал своё??? А то написал неделю назад и тишина))) если забрал сколько шло по времени? напиши нам а то на последних страницах сдесь какой то кипишь нездоровый…(
mivarotrustline access – Simple navigation, everything feels organized and readable.
мега dark market
Металлорукава и гибкая подводка из нержавеющей стали — надёжное решение для систем водоснабжения и отопления, которое служит десятилетиями. Компания предлагает рукава высокого давления (РВД), шаровые краны и фитинги всех популярных диаметров. Переходите на https://iz-nerzhaveyki.ru/ и выбирайте подводку от 1/2 дюйма (15 мм) до 2 дюймов (50 мм), а также РВД с различными типами соединений: резьба, фланцы, под приварку. Нержавейка выдерживает высокое давление и агрессивные среды. Доставка по Москве.
My latest video is the dirtiest one yet, come check it out. – telegra.ph/Enter-01-31?Illus
Этот информационный набор привлекает внимание множеством мелочей и странных ракурсов. Мы предлагаем взгляды, которые редко бывают полезны, но могут слегка разнообразить ваше знакомство с темой.
Вот – порно
rixaroholdings link – Simple design and responsive pages give a professional and clear presentation.
Вопрос «а не рано ли кодироваться» часто звучит и от самих пациентов, и от их близких. Кажется, что кодирование — это крайняя мера «на последней стадии», а пока человек работает, иногда бывает трезвым и «не валяется под забором», можно подождать. На самом деле гораздо разумнее ориентироваться не на стереотипы, а на реальные признаки того, что зависимость уже управляет жизнью, а не наоборот. Кодирование от алкоголизма в Королёве рассматривается именно тогда, когда попытки остановиться своими силами систематически проваливаются, а каждый новый запой становится тяжелее предыдущего.
Получить дополнительные сведения – kodirovanie-ot-alkogolizma-s-vyezdom-na-dom
Таможенное оформление грузов Москва на высоте
Feel free to visit my website: https://urlshrten.com/suqbrady04670
check this out – Simple layout allows browsing content smoothly without feeling overwhelmed.
Не стоит забывать и про объективные факторы. Бывает, что физически опасно или трудно везти человека в клинику: он с трудом ходит, не спит уже несколько ночей, постоянно потеет, жалуется на сильную слабость и сердцебиение. Любая поездка в таком состоянии — дополнительная нагрузка на сердце и нервную систему. Выезд нарколога на дом позволяет начать лечение без этого лишнего риска: врач приезжает со всем необходимым для капельницы и наблюдения, а если по итогам осмотра становится понятно, что без стационара не обойтись, он помогает организовать перевод уже на фоне частично стабилизированного состояния, а не в момент максимального кризиса.
Подробнее можно узнать тут – нарколог на дом химки
Особое внимание уделяется безопасности. Используются препараты нового поколения, снижающие нагрузку на печень, почки и сердечно-сосудистую систему. Процесс лечения проходит под постоянным наблюдением медперсонала, что позволяет быстро реагировать на любые изменения состояния пациента. Все данные о лечении строго конфиденциальны — информация не передаётся третьим лицам и не фиксируется в общедоступных базах.
Получить дополнительные сведения – http://narkologicheskaya-klinika-v-tomske18.ru/
Для формирования структурированной модели используются стандартизированные алгоритмы. Ниже представлена последовательность действий, определяющих ход терапевтических мероприятий.
Выяснить больше – наркологическая клиника
explore qunix – Pleasant layout, content is clear and pages respond quickly.
https://zzbel.ru можно записаться на пробник ам как он придет…а то ниче про него непонятноВсе пришло. всё на высоте. на данный момент более сказать немогу. привет запулил на закладку ??
Работа строится на четкой структуре, определяющей порядок лечебных мероприятий. Ниже представлена последовательность основных этапов.
Подробнее – нарколог на дом вывод из запоя кемерово
kraken darknet market ссылка тор
В глубинах холодного моря жил древний Кракен, охранявший зеркала памяти. Эти зеркала не отражали лица — они показывали страхи, мечты и забытые решения каждого, кто осмеливался взглянуть в их гладь. Когда шторм поднимался, щупальца Кракена тянулись к поверхности, защищая зеркала от жадных глаз. Моряки верили: если зеркало треснет, море потеряет равновесие. Поэтому легенда учила уважать тайны глубин и помнить, что не каждое отражение стоит искать.
После прибытия врач проводит осмотр пациента, оценивает его состояние, измеряет давление, пульс, уровень кислорода и выявляет возможные противопоказания. Затем разрабатывается индивидуальный план лечения, направленный на стабилизацию состояния.
Получить дополнительную информацию – нарколог на дом цены
Капельница от запоя в Долгопрудном — это не «усиленное похмелье», а медицинская процедура, которая помогает организму справиться с тяжёлой интоксикацией и выйти из затянувшегося запоя с меньшими рисками. Когда человек несколько дней подряд употребляет алкоголь, все системы работают на пределе: страдают сердце, мозг, печень, нервная система. Обычные домашние методы — рассол, крепкий чай, обезболивающие таблетки — в этот момент уже не работают или дают лишь краткое облегчение, маскируя настоящую нагрузку на организм.
Подробнее – http://kapelnica-ot-zapoya-dolgoprudnyj11.ru/kapelnica-ot-zapoya-srochno-v-dolgoprudnom/
Детокс — важный этап лечения, который помогает очистить организм от токсинов и продуктов распада алкоголя или наркотиков. В клинике «ТомскМед Трезвость» используются современные капельницы и лекарственные комбинации, направленные на восстановление биохимических процессов в организме. Ниже представлена таблица с примерами капельниц, применяемых в детоксикационных программах.
Ознакомиться с деталями – http://narkologicheskaya-klinika-v-tomske18.ru
Mark Twain’s tale of a young boy’s life on the Mississippi is a story for the ages. The Adventures of Tom Sawyer is filled with excitement and humor. We provide a digital text that is perfect for reading on tablets and smartphones. Our version is clean and easy to navigate. With a Tom Sawyer PDF, you can take the story with you wherever you go, making it easy to escape into the world of St. Petersburg. https://tomsawyerpdf.store/ He Adventures Of Tom Sawyer Pdf
Клиника нужна и тем, кто уже пробовал лечиться самостоятельно: пил лекарства «от тяги», ходил к психологу без медицинской поддержки, обещал себе не пить, но каждый стресс или конфликт всё равно приводили к старому сценарию. В такой ситуации комплексный подход — медицинский и психологический — даёт куда больше шансов, чем очередное одиночное обещание «в этот раз точно получится».
Получить больше информации – http://narkologicheskaya-klinika-himki11.ru/chastnaya-narkologicheskaya-klinika-v-himkah/
open quvexatrustgroup – Layout is tidy and information is presented clearly for easy understanding.
https://gknovator.ru щас заказал по 5г RCS-4 и URB754 по скайпу объяснили как оплатить, пока всё коректно жду посылки там отпишу..Отличный магаз парни! Удачи! буду заказывать второй раз тут) товар понравился)
Перед началом терапии проводится клиническая оценка, включающая измерение давления, осмотр кожи и глаз, проверку дыхания и анализ неврологического состояния. Вывод из запоя в клинике в Астрахани начинается только после сбора этих данных, поскольку подбор препаратов без диагностики может быть небезопасен.
Разобраться лучше – нарколог вывод из запоя
Вывод из запоя в клинике формируется на основе последовательных процедур, направленных на стабилизацию физиологических функций и устранение токсических влияний. Такой подход позволяет корректно регулировать состояние пациента и контролировать интенсивность симптомов. Рабочие алгоритмы включают оценку метаболических процессов, анализ соматических показателей и определение степени неврологических изменений. В результате создается структурированная модель помощи, ориентированная на восстановление адаптивных возможностей организма. Процессы выполняются под контролем специалистов, что обеспечивает прогнозируемый терапевтический эффект и снижает вероятность осложнений.
Подробнее – срочный вывод из запоя
kryvoxtrustco experience – Layout is clear, site feels organized and reading information is easy.
Клиника в Королёве закрывает этот разрыв. Здесь можно пройти полный путь — от первичной диагностики и детоксикации до реабилитации и последующего наблюдения — в пределах привычного города, не отрываясь полностью от семьи и важных дел. Это особенно важно для тех, кто продолжает работать, боится потерять позицию или репутацию, но при этом понимает, что дальше жить «как раньше» просто опасно. Лечение перестаёт быть чем-то абстрактным и пугающим: вместо общих страшилок появляется понятный маршрут, а рядом — команда специалистов, которые умеют вести пациентов с зависимостью и знают, как работать с семьями, уставшими от бесконечных срывов.
Подробнее – https://narkologicheskaya-klinika-korolyov11.ru/narkologicheskaya-klinika-telefon-v-korolyove
zavirotrusthub site – Took a moment to explore and the presentation felt easygoing.
Каждый из перечисленных элементов способствует формированию полной картины состояния пациента и позволяет корректно выстраивать терапевтические мероприятия. Такая структура создаёт основу для достижения устойчивых результатов и минимизации возможных осложнений. Использование таблиц наблюдения делает клинические процессы структурированными и понятными.
Подробнее тут – запой наркологическая клиника томск
Обратиться за помощью могут как сами пациенты, так и их родственники. Часто именно близкие первыми замечают, что человек изменился: стал раздражительным, агрессивным или, наоборот, отстранённым, перестал выполнять обещания, начал скрывать доходы и траты. В клинике семья получает не только медицинскую помощь для зависимого, но и понятную стратегию действий: как разговаривать, как мотивировать на лечение, как не провоцировать конфликты и не усиливать чувство стыда у человека, который и так боится признаться себе в наличии болезни.
Получить дополнительные сведения – [url=https://narkologicheskaya-klinika-moskva11.ru/]наркологическая москва[/url]
click to view – Pages load efficiently, and the site’s polished design makes it easy to explore.
Лечение зависимостей редко ограничивается одной процедурой. Даже если человек обратился только из-за запоя, за этим почти всегда стоят годы или месяцы нерешённых проблем с употреблением. Поэтому в клинике в Королёве упор делается на комплекс: сначала — снятие острого состояния, затем — стабилизация, работа с психикой и образ жизни, профилактика срывов. Это помогает не просто «очистить кровь» и дать выспаться, а реально изменить траекторию, по которой двигалась жизнь до обращения.
Углубиться в тему – https://narkologicheskaya-klinika-korolyov11.ru/narkologicheskaya-klinika-telefon-v-korolyove/
кракен официальный сайт ссылка
В глубинах холодного моря жил древний Кракен, охранявший зеркала памяти. Эти зеркала не отражали лица — они показывали страхи, мечты и забытые решения каждого, кто осмеливался взглянуть в их гладь. Когда шторм поднимался, щупальца Кракена тянулись к поверхности, защищая зеркала от жадных глаз. Моряки верили: если зеркало треснет, море потеряет равновесие. Поэтому легенда учила уважать тайны глубин и помнить, что не каждое отражение стоит искать.
rixva online – Pleasant design, pages respond fast and information is straightforward.
The contrast between the beauty of the countryside and the ugliness of the politics is striking. Orwell loves the land but hates who rules it. This tension creates a rich atmosphere. If you enjoy descriptive writing as well as political satire, download an Animal Farm PDF. You will appreciate the literary quality of the work as much as its message. It is a beautifully written nightmare. https://animalfarmpdf.store/ Free Pdf Animal Farm Study Guide
Обычно работа строится по этапам, где каждый шаг логически продолжает предыдущий:
Углубиться в тему – http://vyvod-iz-zapoya-ivanteevka11.ru
https://doctor-v-izraile.ru Получил свой заказ,дошло довольно быстро, спасибо chemical-mix.com , за нормальный вес и хорошию работу !Украина Работает? Раньше розницей занимались благодаря вашему опыту,сейчас время другое,стабильная честная работа)
mega.sb
Капельница от запоя в Долгопрудном — это не «усиленное похмелье», а медицинская процедура, которая помогает организму справиться с тяжёлой интоксикацией и выйти из затянувшегося запоя с меньшими рисками. Когда человек несколько дней подряд употребляет алкоголь, все системы работают на пределе: страдают сердце, мозг, печень, нервная система. Обычные домашние методы — рассол, крепкий чай, обезболивающие таблетки — в этот момент уже не работают или дают лишь краткое облегчение, маскируя настоящую нагрузку на организм.
Подробнее тут – https://kapelnica-ot-zapoya-dolgoprudnyj11.ru/kapelnica-ot-zapoya-na-domu-v-dolgoprudnom/
Чем дольше продолжается запой, тем более непредсказуемой становится реакция организма. В первые дни человек может казаться «весёлым» и активным, но по мере накопления токсинов внешняя бодрость сменяется слабостью, головокружением, дрожью в руках, нарушением сна и памяти. Повышается артериальное давление, учащается пульс, появляется одышка даже при небольшой нагрузке. Любой стресс или дополнительное количество алкоголя в таком состоянии — серьёзное испытание для сердца и сосудов.
Подробнее тут – вывод из запоя на дому московская область
Вывод из запоя требует комплексного контроля всех физиологических параметров. Ниже представлены основные направления наблюдения, формирующие структуру оценки состояния.
Подробнее можно узнать тут – анонимный вывод из запоя
Клиника в Королёве закрывает этот разрыв. Здесь можно пройти полный путь — от первичной диагностики и детоксикации до реабилитации и последующего наблюдения — в пределах привычного города, не отрываясь полностью от семьи и важных дел. Это особенно важно для тех, кто продолжает работать, боится потерять позицию или репутацию, но при этом понимает, что дальше жить «как раньше» просто опасно. Лечение перестаёт быть чем-то абстрактным и пугающим: вместо общих страшилок появляется понятный маршрут, а рядом — команда специалистов, которые умеют вести пациентов с зависимостью и знают, как работать с семьями, уставшими от бесконечных срывов.
Подробнее тут – https://narkologicheskaya-klinika-korolyov11.ru/platnaya-narkologicheskaya-klinika-v-korolyove/
Скачайте активатор для Windows 11 и получите все функции Pro-версии бесплатно.
Подробнее – Windows 11 активатор на русском
click to view – Clean pages and simple layout make navigating straightforward.
купить кокаин, мефедрон, бошки, марихуану Высшее качество. Чёткий товар. Мошный микс. Хороший персонал, добрый МАгазин….Сори я не туда отписал А сейчас работает магазин?
Чтобы лучше ориентироваться, в каких жизненных ситуациях особенно важно не игнорировать проблему, удобно представить их в виде типичных сценариев. Это помогает и самому человеку, и его близким осознать, что происходящее уже вышло за рамки «обычной усталости» или «случайного перебора». Ниже перечислены распространённые случаи, когда обращение в наркологическую клинику особенно актуально:
Получить дополнительные сведения – клиника наркологии москва
В этом тексте собрано множество случайных сведений и довольно неопределённых мыслей, которые могут чем-то заинтересовать. Мы отмечаем моменты, которые не особенно важны, но всё же занимают своё место в повествовании.
Вот – знакомства для взрослых
Отдельная категория пациентов — люди с алкогольной зависимостью. Для жителей Воскресенска особенно актуальны проблемы, связанные с длительными запоями: человек несколько дней подряд пьёт, практически не ест, плохо спит, с трудом встаёт, а каждое утро обещает, что «сейчас немного — и всё». На этом фоне растёт нагрузка на сердце, печень, нервную систему, повышается риск инсультов и инфарктов, обостряются хронические болезни.
Подробнее – платная наркологическая клиника
orvix portal – Came across this by chance, but navigating the site is very straightforward.
Сигналом к тому, что пора обсудить вариант кодирования с наркологом, служит не один какой-то эпизод, а совокупность симптомов. Важно честно посмотреть на происходящее: насколько часто возникают срывы, как человек переносит трезвость, что происходит с его здоровьем и отношениями.
Подробнее – kodirovanie-ot-alkogolizma-otzyvy
Качественный вывод из запоя — это всегда процесс, а не одна капельница. Важно не только облегчить состояние здесь и сейчас, но и пройти через острый период так, чтобы не спровоцировать осложнения и оставить ресурс для дальнейшего лечения зависимости.
Выяснить больше – http://vyvod-iz-zapoya-ivanteevka11.ru/vyvod-iz-zapoya-na-domu-v-ivanteevke/https://vyvod-iz-zapoya-ivanteevka11.ru
visit zylavocapital – Discovered this randomly, yet the information was engaging and easy to follow.
pexra hub – Layout is neat, browsing is simple and content is easy to access.
Если вы ищете сайдинг для облицовки дома в Лиде, его можно приобрести в специализированных магазинах стройматериалов, на строительных рынках или в интернет-магазинах с доставкой в город. купить сайдинг в лиде
Такой подход позволяет устранить физические последствия запоя и снизить психологическую зависимость. Уже после первой процедуры пациенты отмечают улучшение самочувствия, появление аппетита и нормализацию сна. Важно не ограничиваться только экстренной помощью — специалисты рекомендуют пройти курс восстановления, чтобы предотвратить рецидивы.
Подробнее можно узнать тут – вывод из запоя на дому цена в владивостоке
zexarocore hub – The layout feels tidy, pages load smoothly and nothing feels overwhelming.
https://niic-mrsk.ru Крутой магаз. Ассортимент радуетИтак всем ПРИВЕТ ! Кстати в другом доверенном магазине у меня тоже была задержка в курьерке , трек не бился, в базе тоже его не было при прозвоне в курьерку…может действительно из-за Олимпиады (или во время ее проведения) курьерки стали чаще проверять..
Вывод из запоя требует комплексного контроля всех физиологических параметров. Ниже представлены основные направления наблюдения, формирующие структуру оценки состояния.
Подробнее тут – вывод из запоя на дому круглосуточно
Такая таблица позволяет систематизировать данные наблюдения и поддерживать единый подход к интерпретации результатов. Это повышает прозрачность процесса и делает оценку состояния объективной вне зависимости от длительности лечения.
Детальнее – наркологическая клиника лечение алкоголизма в пензе
Fast explore – Navigation is smooth and the overall look is visually appealing.
Aurora deals – Interesting products combined with standout deals every time.
Hidden shrines are scattered throughout the jungle, each dedicated to a different trickster god. These mini-dungeons are perfect for single-session adventures within the larger campaign. The Tomb of Annihilation PDF details the layout and puzzles of all nine shrines in Omu. They act as a warm-up for the main tomb. Having the digital maps for these shrines allows the DM to prepare them in any order, depending on which way the players explore the ruined city. The text explains the specific keys required from these shrines to open the main tomb, making them a mandatory part of the quest. https://tombofannihilationpdf.store/ Tomb Of Annihilation Pdf Remuz
Вызов нарколога на дом в Иркутске и Иркутской области — это удобное и безопасное решение, позволяющее получить неотложную помощь в привычной обстановке. Врачи клиники «ЧистоЖизнь» выезжают круглосуточно, приезжают в течение 30–60 минут и проводят комплексное лечение, направленное на стабилизацию состояния пациента и предотвращение осложнений.
Ознакомиться с деталями – http://narcolog-na-dom-v-irkutske00.ru
Belvarin essentials – Smooth experience and a selection of well-made products.
Современная наркологическая клиника — это не просто место, где оказывают медицинскую помощь. Это пространство, где пациенту помогают вернуться к жизни, свободной от зависимости, с заботой, уважением и индивидуальным подходом. В клинике «СибМед Кемерово» реализованы комплексные программы терапии алкоголизма, наркомании и других зависимостей. Каждая программа адаптируется под конкретное состояние пациента и сочетает медицинские, психологические и социальные методы воздействия. Важное преимущество — полная анонимность, обеспечивающая комфорт и доверие со стороны пациентов.
Детальнее – наркологическая клиника нарколог кемерово
BrightBargain picks – Incredible bargains, I’m always impressed by the selection.
Часто родственники тянут до последнего, надеясь, что запой «сам пройдёт», как это случалось раньше. Но с каждым эпизодом последствия становятся тяжелее: организм изнашивается, возрастает риск осложнений, ухудшается психика. Особенно опасно, когда запой длится несколько дней подряд, а любые попытки самостоятельно сократить дозы алкоголя сопровождаются дрожью, бессонницей, приступами паники.
Узнать больше – vyvod-iz-zapoya-besplatno
Для самого пациента это шанс получить медицинское вмешательство без дополнительного стресс-фактора в виде транспорта, очередей и «больничной атмосферы». Он остаётся в привычной обстановке, в своей квартире, с теми же предметами, к которым привык, и это снижает сопротивление. Вместо жесткого сценария «либо немедленно в стационар, либо ничего» появляется промежуточный, более мягкий вариант: врачи приезжают домой, снимают остроту состояния, подбирают схему капельницы и медикаментов, объясняют, что делать дальше. Нередко именно после такого первого опыта человек впервые всерьёз задумывается о полноценном лечении, потому что ощущает реальную разницу в самочувствии до и после профессиональной помощи, а не просто очередной «опохмел».
Подробнее можно узнать тут – https://narkolog-na-dom-himki11.ru/narkolog-na-dom-srochno-v-himkah
Перед тем как принять решение, пациент и родственники получают объяснения по доступным направлениям. Обычно обсуждаются: амбулаторные консультации, дневной или круглосуточный стационар, выездная помощь, реабилитационные программы и последующее наблюдение. Это позволяет выстроить индивидуальный маршрут, а не навязывать один и тот же сценарий всем подряд.
Выяснить больше – narkologicheskaya-klinika-sajt
charmcartel.shop – Fabulous accessories and a well-organized site, I love browsing here.
Производство стальных профилей требует точности и современного оборудования, а компания Waltzprof предлагает качественные решения для фасадных и перегородочных систем. В каталоге на https://waltzprof.com/ представлены профили из оцинкованной и нержавеющей стали: ВП165, ВП150, ВП250, ВП372 с терморазрывом, Т-образные профили для ворот, штапики, уплотнители и автоматические пороги Smart. Также в ассортименте скрытые петли и фурнитура для дверей. Звоните +7 (911) 087-65-05 для консультации по выбору.
Комплекс перечисленных направлений формирует базу для выстраивания терапевтического процесса. При необходимости программа корректируется, что обеспечивает адаптацию к меняющимся условиям. Для удобства наблюдения используется таблица, отражающая основные параметры контроля.
Исследовать вопрос подробнее – наркологическая клиника нарколог владивосток
купить кокаин, мефедрон, бошки, марихуану Магазин не чистый на руку. Уже пишет с другого жабера. Народ у кого осталось переписка состарого жабера сверьте ник. И прошу сделать посты что таковое не придуманная мною сказка.чистым не очень понравился:( тусишка что то с чем то – 1й раз могу сказать что 25 это перебор….
Вывод из запоя в клинике в Астрахани проводится в условиях контролируемой терапии, ориентированной на устранение интоксикации и восстановление функционирования основных систем организма. При длительном употреблении спиртного нарушается работа печени, сердца и нервной системы, что требует профессионального вмешательства. Специалисты оценивают степень интоксикации, подбирают препараты и контролируют динамику стабилизации пациента.
Получить дополнительные сведения – срочный вывод из запоя астрахань
Наркологическая клиника в клинике в Астрахани предоставляет помощь пациентам, сталкивающимся с различными формами зависимости — алкогольной, наркотической, лекарственной. Основой терапии является комплексный подход, включающий медицинскую детоксикацию, стабилизацию состояния, психотерапию и последующее наблюдение. Такой формат работы позволяет мягко купировать острые симптомы, восстановить физиологические функции и подготовить пациента к длительной реабилитации. Все процедуры проводятся анонимно, с использованием сертифицированных препаратов и с постоянным контролем врача.
Выяснить больше – https://narkologicheskaya-klinika-astrakhan18.ru/astrakhanskaya-narkologiya
charmchoice.shop – Such a cute selection of trinkets, definitely a fun place to shop!
Детокс — важный этап лечения, который помогает очистить организм от токсинов и продуктов распада алкоголя или наркотиков. В клинике «ТомскМед Трезвость» используются современные капельницы и лекарственные комбинации, направленные на восстановление биохимических процессов в организме. Ниже представлена таблица с примерами капельниц, применяемых в детоксикационных программах.
Подробнее тут – http://narkologicheskaya-klinika-v-tomske18.ru/narkologicheskaya-klinika-v-tomske-otzyvy/
The Adventures of Tom Sawyer is a literary gem that everyone should read. Mark Twain’s humor and wit are unmatched. We offer a digital version of the text that is perfect for students and book lovers. Our platform ensures that you can access the book quickly and easily. By downloading the Tom Sawyer PDF, you are securing a copy of this classic novel that will last a lifetime, free from the constraints of physical media. https://tomsawyerpdf.store/ Las Aventuras De Tom Sawyer Pdf Descargar
coffeecourtyard.shop – Wonderful store for coffee enthusiasts. I never get bored browsing their items.
crispcollective.shop – Clean and modern interface with a perfect selection of trendy finds.
Такое поэтапное лечение позволяет добиться устойчивого результата без стрессов и осложнений. Пациенты получают комплексную помощь, включающую как медицинские, так и психотерапевтические аспекты.
Выяснить больше – http://narkologicheskaya-klinika-kemerovo18.ru/narkologicheskaya-klinika-v-kemerovo-anonimno/https://narkologicheskaya-klinika-kemerovo18.ru
Когда выезд особенно удобен и оправдан, важно понимать не только эмоционально, но и по конкретным признакам. Есть ряд типичных ситуаций, в которых именно формат «на дому» становится наиболее реалистичным и безопасным вариантом, а стационар можно рассматривать как следующий шаг, когда острота будет снята и человек станет более сговорчивым.
Подробнее – нарколог на дом
driftden.shop – I always feel at ease shopping here, and the collection is lovely.
firfinesse.shop – The best place for high-quality, elegant products that impress every time.
Многие тянут до последнего, считая, что к наркологу обращаются только в самых крайних случаях. На деле показаний для консультации гораздо больше, и они часто появляются задолго до того, как человек впервые оказывается в запое или не выходит из состояния опьянения несколько дней подряд.
Выяснить больше – narkologicheskaya-klinika-dispanser
glintaro.shop – This site is full of hidden gems! Love the variety and quality of the finds here.
check plorix – Minimal design, browsing is intuitive and information is easy to locate.
explore zavirobondgroup hub – Clean pages, navigation works well and information is easily accessible.
Работа строится на четкой структуре, определяющей порядок лечебных мероприятий. Ниже представлена последовательность основных этапов.
Исследовать вопрос подробнее – вывод из запоя на дому цена в кемерове
После прибытия врач проводит осмотр пациента, оценивает его состояние, измеряет давление, пульс, уровень кислорода и выявляет возможные противопоказания. Затем разрабатывается индивидуальный план лечения, направленный на стабилизацию состояния.
Получить больше информации – http://narcolog-na-dom-v-irkutske00.ru
Эти этапы формируют структуру комплексного лечения, позволяя добиться устойчивого результата и предотвращения повторных срывов.
Разобраться лучше – https://narkologicheskaya-klinika-astrakhan18.ru/astrakhanskaya-narkologiya
Наркологическая клиника в Химках ориентируется не на «среднестатистического пациента», а на конкретного человека с его историей, болезнями, образом жизни и семьёй. Поэтому здесь не ограничиваются одним-двумя шаблонными вариантами. Врач оценивает, на каком этапе сейчас находится пациент: острый запой, ломка, период относительной трезвости с риском срыва, рецидив после ремиссии. От этого зависит выбор формата помощи.
Изучить вопрос глубже – http://narkologicheskaya-klinika-himki11.ru/
https://evrasiaperm.ru Отдельных слов заслуживает подарочный твердый на грамм )Очень позитивная штука с запахом сыра хДДДИ еще, слышал типа ам2233, который отличного качества, желтого цвета. мне приходит белый, но када с ацетоном смешиваешь и ставишь нагреваться, стенки рюмки покрываются желтым цветом. Может правда о ошибочке что небудь не то отправили)))
The novel is a reminder that life is short and we must live it on our own terms. To get this wake-up call, read the awakening pdf. It is a book that demands action. The digital format puts the power in your hands. https://theawakeningpdf.store/ The Awakening Pdf Boson Books
Комплекс перечисленных направлений формирует базу для выстраивания терапевтического процесса. При необходимости программа корректируется, что обеспечивает адаптацию к меняющимся условиям. Для удобства наблюдения используется таблица, отражающая основные параметры контроля.
Изучить вопрос глубже – наркологическая клиника вывод из запоя
Такой подход позволяет устранить физические последствия запоя и снизить психологическую зависимость. Уже после первой процедуры пациенты отмечают улучшение самочувствия, появление аппетита и нормализацию сна. Важно не ограничиваться только экстренной помощью — специалисты рекомендуют пройти курс восстановления, чтобы предотвратить рецидивы.
Выяснить больше – скорая вывод из запоя
Browse magic – Tons of cool stuff packed into one place, and it’s easy to look around.
Диагностические данные формируют основу для дальнейших лечебных решений, от объёма инфузии до подбора поддерживающих препаратов.
Детальнее – http://vyvod-iz-zapoya-v-astrakhani18.ru/vyvod-iz-zapoya-na-domu-astrakhan/
Aurora online – Great selection with navigation that makes shopping hassle-free.
Самостоятельные попытки «подлечиться» обычно сводятся к случайным комбинациям препаратов: кто-то пьёт горсть таблеток от давления и сердца, кто-то принимает успокоительные поверх алкоголя, кто-то заказывает непонятные средства «от тяги» в интернете. Такие эксперименты могут дать краткий эффект, но часто только маскируют симптомы и перегружают организм. В клинике лечение строится иначе: сначала оценивают состояние — физическое и психическое, затем подбирают безопасные схемы детоксикации и медикаментов, учитывая возраст, сопутствующие заболевания, длительность запоев и употребления. Это снижает риски осложнений и делает восстановление более управляемым: пациент и его семья видят прогресс и понимают, за счёт чего он происходит, а не живут в ожидании очередного непредсказуемого «отката».
Получить больше информации – http://narkologicheskaya-klinika-korolyov11.ru
Домашний формат особенно удобен на ранних этапах, когда зависимость уже дошла до запоев, но человек ещё продолжает работать, скрывать проблему от коллег и соседей, боится любой огласки. Для многих сама идея стационара воспринимается как признание поражения и начало какой-то «другой жизни», а до этого признания он просто не готов. Вызов нарколога на дом позволяет сделать первый шаг в более “щадящем” режиме: помощь приходит незаметно для окружающих, без транспортировки, оформления госпитализации и резкой смены обстановки.
Детальнее – http://narkolog-na-dom-himki11.ru/vyzov-narkologa-na-dom-v-himkah/
Когда выезд особенно удобен и оправдан, важно понимать не только эмоционально, но и по конкретным признакам. Есть ряд типичных ситуаций, в которых именно формат «на дому» становится наиболее реалистичным и безопасным вариантом, а стационар можно рассматривать как следующий шаг, когда острота будет снята и человек станет более сговорчивым.
Подробнее можно узнать тут – нарколог психолог на дому
BrightBargain discounts – Affordable finds for every budget, highly recommend this site.
Детоксикация помогает восстановить водно-солевой баланс, нормализовать работу сердца, печени и нервной системы. Уже после первой процедуры большинство пациентов ощущают облегчение, снижение тревожности и улучшение самочувствия.
Подробнее тут – наркологическая клиника стационар кемерово
zexaroline – Found this through a link, stayed longer because layout works.
Нарколог на дом в Химках особенно востребован тогда, когда состояние человека уже нельзя назвать обычным похмельем, но он категорически отказывается ехать в клинику. Запой тянется несколько дней или дольше, нет полноценного сна, пульс постоянно учащённый, руки трясутся, давление скачет, а любое утро начинается не с облегчения, а с новой дозы алкоголя «чтобы не развалиться». В такой ситуации родственники оказываются между страхом и беспомощностью: понятно, что дальше ждать опасно, но уговорить собрать вещи и поехать в стационар не получается. Формат выезда нарколога на дом как раз и закрывает этот тупик — врач приезжает туда, где сейчас находится человек, оценивает риски и сразу начинает помощь.
Углубиться в тему – vrach-narkolog-na-dom
charmcartel.shop – Great selection of trendy accessories, very smooth shopping experience.
collarcove.shop – The best collars and accessories, quick and simple navigation.
https://rooi-sozidanie.ru Сделал заказ. Пропустил реквизиты для оплаты. Продавец свяжись со мной, оплачу. В понедельник сможете отправить товар?Палево палево, с сайтом чооо?? вот вот такая же история! надо разобраться с этим вопросом!
crispcrate.shop – This site has such a wide range of products, and it’s easy to shop.
Наркологическая клиника в клинике в Астрахани предоставляет помощь пациентам, сталкивающимся с различными формами зависимости — алкогольной, наркотической, лекарственной. Основой терапии является комплексный подход, включающий медицинскую детоксикацию, стабилизацию состояния, психотерапию и последующее наблюдение. Такой формат работы позволяет мягко купировать острые симптомы, восстановить физиологические функции и подготовить пациента к длительной реабилитации. Все процедуры проводятся анонимно, с использованием сертифицированных препаратов и с постоянным контролем врача.
Разобраться лучше – наркологическая клиника вывод из запоя в астрахани
fixforge.shop – Great for DIY projects, the tools here are of excellent quality and always reliable.
The sheep are the ultimate useful idiots, drowning out dissent with their bleating. They stop any rational discussion before it can start. This is a warning about the dangers of mob mentality. If you are studying social psychology, the Animal Farm PDF provides excellent case studies. Orwell urges individuals to think for themselves rather than following the herd.
Качественный вывод из запоя — это всегда процесс, а не одна капельница. Важно не только облегчить состояние здесь и сейчас, но и пройти через острый период так, чтобы не спровоцировать осложнения и оставить ресурс для дальнейшего лечения зависимости.
Подробнее можно узнать тут – вывод из запоя в Ивантеевке
После купирования острых симптомов врач объясняет, какие шаги нужно сделать дальше: ограничиться домашним наблюдением, подумать о коротком стационарном курсе или сразу планировать дальнейшее лечение зависимости. Это помогает не возвращаться к затяжным запоям уже через несколько недель.
Детальнее – москва вывод из запоя
Ниже приведены ключевые элементы, которые отражают базовую структуру процессов, формирующих последовательность лечебных мероприятий. Они помогают подробно рассмотреть основные направления работы и понять роль каждого звена в общей терапевтической системе.
Исследовать вопрос подробнее – наркологическая клиника нарколог
morvex explore – Simple interface, browsing is smooth and content makes sense immediately.
Наркологическая клиника выстраивает лечебные мероприятия в соответствии с алгоритмами, направленными на достижение стабильного состояния пациента. Важную роль играет последовательное выполнение процедур, включая оценку реакции организма и корректировку вмешательств. Формирование индивидуальной программы позволяет учитывать особенности каждого случая и поддерживать высокий уровень эффективности. Процесс наблюдения сопровождается непрерывным анализом, что делает терапию адаптивной и предсказуемой. В клинике соблюдается принцип многоуровневого контроля, обеспечивающий безопасность и стабильность лечения.
Подробнее тут – https://narkologicheskaya-klinika-tomsk18.ru/narkologicheskaya-klinika-v-tomske-otzyvy
Вопрос «а не рано ли кодироваться» часто звучит и от самих пациентов, и от их близких. Кажется, что кодирование — это крайняя мера «на последней стадии», а пока человек работает, иногда бывает трезвым и «не валяется под забором», можно подождать. На самом деле гораздо разумнее ориентироваться не на стереотипы, а на реальные признаки того, что зависимость уже управляет жизнью, а не наоборот. Кодирование от алкоголизма в Королёве рассматривается именно тогда, когда попытки остановиться своими силами систематически проваливаются, а каждый новый запой становится тяжелее предыдущего.
Получить больше информации – анонимное кодирование от алкоголизма цена
official bond page – The first glance shows a neat and dependable site.
glintgarden.shop – A great place to find everything for your garden, love their range of products!
Перед тем как принять решение, пациент и родственники получают объяснения по доступным направлениям. Обычно обсуждаются: амбулаторные консультации, дневной или круглосуточный стационар, выездная помощь, реабилитационные программы и последующее наблюдение. Это позволяет выстроить индивидуальный маршрут, а не навязывать один и тот же сценарий всем подряд.
Получить дополнительную информацию – http://narkologicheskaya-klinika-himki11.ru
Часто именно жители Химок тянут до последнего: насыщенный ритм жизни, дорога на работу, постоянная усталость, попытки «снимать напряжение» алкоголем или психоактивными веществами. Сначала это кажется временным способом расслабиться, но со временем человек замечает, что пьёт чаще, чем планировал, нуждается в больших дозах, срывает обещания, а попытки контролировать употребление превращаются в череду неудач. В какой-то момент становится очевидно: без профессиональной наркологической помощи дальше будет только сложнее.
Выяснить больше – http://narkologicheskaya-klinika-himki11.ru/chastnaya-narkologicheskaya-klinika-v-himkah/
explore yavex platform – Clean design, navigation is effortless and content appears instantly.
купить кокаин, мефедрон, бошки, марихуану Кому-нибудь отправили сегодня трек?Редоктирование магазина!Коллектива!Прайс , цена осталась прежняя! скайп оператора:Chemicalrf.mix !!!! В таком же духе гоу)
Cozy essentials – Great products for relaxing at home, very easy to browse.
Некоторые состояния требуют немедленного вмешательства специалиста. Если алкогольное отравление или запойное состояние не купируется вовремя, это может привести к тяжелым последствиям для здоровья.
Углубиться в тему – https://narcolog-na-dom-v-irkutske00.ru/narkolog-na-dom-czena-irkutsk/
Auroriv online – Fantastic selection of products presented in a sleek format.
Вызов нарколога на дом в Иркутске и Иркутской области — это удобное и безопасное решение, позволяющее получить неотложную помощь в привычной обстановке. Врачи клиники «ЧистоЖизнь» выезжают круглосуточно, приезжают в течение 30–60 минут и проводят комплексное лечение, направленное на стабилизацию состояния пациента и предотвращение осложнений.
Получить больше информации – нарколог на дом срочно
Bento Box Delights – Love the unique designs, perfect for meal prepping or storing lunches.
Для родственников капельница от запоя — возможность не наблюдать бессильно, как близкий человек «сгорает» на глазах, а подключить специалистов. Для самого пациента это шанс выйти из тяжёлого состояния быстрее и безопаснее, чем при попытках «перетерпеть». Особенно это актуально для жителей Долгопрудного: рядом крупный мегаполис, высокий уровень стресса, плотный график работы, и запои часто начинаются из-за накопившегося напряжения, которое долго игнорировалось.
Подробнее можно узнать тут – [url=https://kapelnica-ot-zapoya-dolgoprudnyj11.ru/]капельница после длительного запоя[/url]
Fresh item feed – Easy to browse and notice things you haven’t seen before.
Наркологическая клиника выстраивает лечебные мероприятия в соответствии с алгоритмами, направленными на достижение стабильного состояния пациента. Важную роль играет последовательное выполнение процедур, включая оценку реакции организма и корректировку вмешательств. Формирование индивидуальной программы позволяет учитывать особенности каждого случая и поддерживать высокий уровень эффективности. Процесс наблюдения сопровождается непрерывным анализом, что делает терапию адаптивной и предсказуемой. В клинике соблюдается принцип многоуровневого контроля, обеспечивающий безопасность и стабильность лечения.
Углубиться в тему – наркологическая клиника
Публикация предоставляет читателю набор разрозненных идей, которые сложно применить на практике. Мы лишь слегка касаемся разных точек зрения, не углубляясь в анализ и не предлагая никаких выводов.
Вот – знакомства для взрослых
Этот информационный набор привлекает внимание множеством мелочей и странных ракурсов. Мы предлагаем взгляды, которые редко бывают полезны, но могут слегка разнообразить ваше знакомство с темой.
Вот – бинго онлайн
кракен сайт vk2 top
В глубинах холодного моря жил древний Кракен, охранявший зеркала памяти. Эти зеркала не отражали лица — они показывали страхи, мечты и забытые решения каждого, кто осмеливался взглянуть в их гладь. Когда шторм поднимался, щупальца Кракена тянулись к поверхности, защищая зеркала от жадных глаз. Моряки верили: если зеркало треснет, море потеряет равновесие. Поэтому легенда учила уважать тайны глубин и помнить, что не каждое отражение стоит искать.
coppercitrine.shop – Stunning copper goods, stylish and unique products!
charmcartel.shop – Fabulous accessories and a well-organized site, I love browsing here.
Первичная цель процедуры — безопасно устранить токсическую нагрузку и восстановить физиологические показатели без осложнений. Лечение подбирается индивидуально, что обеспечивает прогнозируемый результат и минимизирует риски.
Подробнее можно узнать тут – https://vyvod-iz-zapoya-v-astrakhani18.ru/vyvedenie-iz-zapoya-astrakhan/
Диагностические данные формируют основу для дальнейших лечебных решений, от объёма инфузии до подбора поддерживающих препаратов.
Выяснить больше – вывод из запоя с выездом в астрахани
chicchisel.shop – Great quality tools that make every project easier and more enjoyable!
crystalcorner2.shop – Lovely selection of crystals, definitely a top choice for collectors.
Чтобы лучше ориентироваться, в каких жизненных ситуациях особенно важно не игнорировать проблему, удобно представить их в виде типичных сценариев. Это помогает и самому человеку, и его близким осознать, что происходящее уже вышло за рамки «обычной усталости» или «случайного перебора». Ниже перечислены распространённые случаи, когда обращение в наркологическую клинику особенно актуально:
Изучить вопрос глубже – http://narkologicheskaya-klinika-moskva11.ru/chastnaya-narkologicheskaya-klinika-v-moskve/https://narkologicheskaya-klinika-moskva11.ru
florafreight.shop – If you’re into gardening, this site has the most beautiful flower arrangements.
купить кокаин, мефедрон, бошки, марихуану Ну теперь к самому главному – качество!Страшно) заказывать RTI-126. Кто поможет с данной проблемой. екб есть в представителях, смотрите в представительствах
Признаки, что пора задуматься о кодировании
Разобраться лучше – кодирование от алкоголизма
trust information – Clean pages with content that’s easy to understand.
При длительном запое организм не успевает восстановить свой водно-электролитный баланс, что приводит к обезвоживанию и ухудшению общего состояния. Такие пациенты рискуют развить не только тяжелую интоксикацию, но и хронические заболевания, которые впоследствии требуют длительного и дорогостоящего лечения. Поэтому своевременный вызов врача-нарколога на дом становится критически важным для сохранения здоровья и предотвращения серьезных последствий.
Выяснить больше – вывод из запоя дешево в краснодаре
Комплексные решения по оснащению складов включают проектирование и производство оборудования. Такой подход позволяет оптимизировать пространство и процессы. Заводские мощности обеспечивают стабильные сроки. Заказчик получает готовое решение для работы: https://www.met-izdeliya.com/
Для безопасного и эффективного лечения наши специалисты используют только проверенные и сертифицированные медикаменты, подбираемые индивидуально с учетом состояния пациента. В состав капельницы входят следующие группы препаратов:
Разобраться лучше – нарколог на дом срочно в краснодаре
Часто именно жители Химок тянут до последнего: насыщенный ритм жизни, дорога на работу, постоянная усталость, попытки «снимать напряжение» алкоголем или психоактивными веществами. Сначала это кажется временным способом расслабиться, но со временем человек замечает, что пьёт чаще, чем планировал, нуждается в больших дозах, срывает обещания, а попытки контролировать употребление превращаются в череду неудач. В какой-то момент становится очевидно: без профессиональной наркологической помощи дальше будет только сложнее.
Подробнее можно узнать тут – наркологическая клиника в химках
nevrix link – Fast-loading site, layout is intuitive and content feels professional.
Можешь играть когда угодно в любой час. Выводил денежные средства несколько раз.
Dive into the world of Mark Twain with a digital copy of The Adventures of Tom Sawyer. This novel is a masterpiece of storytelling. We offer a clean, readable version of the text for your enjoyment. If you are tired of searching for a physical book, our digital edition is the perfect solution. A Tom Sawyer PDF allows you to keep the story with you at all times, ready to be read whenever you have a free moment.
Каждый из перечисленных элементов способствует формированию полной картины состояния пациента и позволяет корректно выстраивать терапевтические мероприятия. Такая структура создаёт основу для достижения устойчивых результатов и минимизации возможных осложнений. Использование таблиц наблюдения делает клинические процессы структурированными и понятными.
Детальнее – наркологическая клиника лечение алкоголизма томск
Наркологическая клиника в Химках помогает не только тем, кто уже оказался в тяжёлом запое или прошёл через ломку. Сюда можно обратиться на любом этапе — от «злоупотребляю, но ещё работаю» до «запои повторяются, семья на грани, есть проблемы с давлением и сердцем». Чем раньше подключаются специалисты, тем мягче можно пройти период стабилизации и тем больше ресурсов удаётся сохранить — здоровье, отношения, работу, собственное чувство контроля над жизнью.
Получить дополнительную информацию – наркологическая клиника
Наркологическая клиника в Химках помогает не только тем, кто уже оказался в тяжёлом запое или прошёл через ломку. Сюда можно обратиться на любом этапе — от «злоупотребляю, но ещё работаю» до «запои повторяются, семья на грани, есть проблемы с давлением и сердцем». Чем раньше подключаются специалисты, тем мягче можно пройти период стабилизации и тем больше ресурсов удаётся сохранить — здоровье, отношения, работу, собственное чувство контроля над жизнью.
Получить дополнительные сведения – наркологическая клиника
После прибытия врач проводит осмотр пациента, оценивает его состояние, измеряет давление, пульс, уровень кислорода и выявляет возможные противопоказания. Затем разрабатывается индивидуальный план лечения, направленный на стабилизацию состояния.
Разобраться лучше – нарколог на дом срочно
Наркологическая клиника выстраивает лечебные мероприятия в соответствии с алгоритмами, направленными на достижение стабильного состояния пациента. Важную роль играет последовательное выполнение процедур, включая оценку реакции организма и корректировку вмешательств. Формирование индивидуальной программы позволяет учитывать особенности каждого случая и поддерживать высокий уровень эффективности. Процесс наблюдения сопровождается непрерывным анализом, что делает терапию адаптивной и предсказуемой. В клинике соблюдается принцип многоуровневого контроля, обеспечивающий безопасность и стабильность лечения.
Исследовать вопрос подробнее – платная наркологическая клиника томск
Завод выпускает стеллажи для нестандартных грузов и специфических условий хранения. Индивидуальное проектирование позволяет учитывать все особенности продукции. Производство ведется под заказ. Это снижает риски повреждения груза: стеллажи на склад под паллеты
Bloom Barrel shop – Lovely floral-inspired selection with a smooth browsing experience.
browse line – Skimmed the site briefly, modern layout makes content easy to follow.
xorya connection – Nice interface, information is accessible and browsing is very straightforward.
Auto gear – Quick navigation and plenty of car products to explore.
BrightBLOOMY – The floral designs are perfect, and the site layout is clean and simple.
Каждый из перечисленных элементов способствует формированию полной картины состояния пациента и позволяет корректно выстраивать терапевтические мероприятия. Такая структура создаёт основу для достижения устойчивых результатов и минимизации возможных осложнений. Использование таблиц наблюдения делает клинические процессы структурированными и понятными.
Подробнее можно узнать тут – наркологическая клиника стационар
glintvogue.shop – Gorgeous selection of stylish pieces, perfect for refreshing your closet!
Как отмечает нарколог Олег Васильев, «чем раньше пациент получает квалифицированную медицинскую помощь, тем меньше риск серьезных осложнений».
Получить больше информации – запой нарколог на дом иркутск
Когда человек оказывается в сложной ситуации из-за длительного употребления алкоголя, важно получить быструю и квалифицированную медицинскую помощь. Запойные состояния, алкогольная интоксикация, тяжелый абстинентный синдром — все это требует своевременного вмешательства врача. Однако не всегда есть возможность или желание обращаться в стационар.
Детальнее – вызов нарколога на дом иркутск
Детокс — важный этап лечения, который помогает очистить организм от токсинов и продуктов распада алкоголя или наркотиков. В клинике «ТомскМед Трезвость» используются современные капельницы и лекарственные комбинации, направленные на восстановление биохимических процессов в организме. Ниже представлена таблица с примерами капельниц, применяемых в детоксикационных программах.
Подробнее тут – http://narkologicheskaya-klinika-v-tomske18.ru/
Вывод из запоя требует комплексного контроля всех физиологических параметров. Ниже представлены основные направления наблюдения, формирующие структуру оценки состояния.
Изучить вопрос глубже – нарколог вывод из запоя в ижевске
фриспины без депозита с выводом за регистрацию Ключевое преимущество фриспинов без отыгрыша заключается в их прозрачности и простоте. В отличие от стандартных бонусных предложений, где игроку предстоит отыграть сумму бонуса или выигрыша с фриспинов в определенное количество раз, здесь полученные средства можно выводить практически сразу. Это снимает огромное психологическое давление и делает игровой процесс более расслабленным и приятным. Игроки могут позволить себе экспериментировать с различными слотами, пробовать новые стратегии и просто наслаждаться игрой, зная, что каждый выигрыш — это их реальный приз.
Когда основные симптомы устранены, пациенту необходим поддерживающий этап. Вывод из запоя в клинике в Астрахани дополнительно включает рекомендации по коррекции сна, восстановлению питания и снижению эмоционального напряжения.
Исследовать вопрос подробнее – вывод из запоя на дому цена астрахань
Modern elegance – Everything looks like it belongs in a well-designed space.
coralcrate.shop – Fantastic range of products, and the site design makes it so simple to shop.
Лечение в местной клинике удобно не только тем, что до неё проще добраться. Важнее то, что здесь выстраивают целостный подход, а не откликаются только на острые эпизоды. Для кого-то основной проблемой стали частые запои, для кого-то — периодическое употребление наркотиков, для третьего — сочетание алкоголя с успокоительными или снотворными. У каждого пациента своя история, свой стаж употребления, свой опыт неудачных попыток лечения и своя степень разрушения здоровья. В хорошей клинике это учитывают с самого начала и не предлагают всем одну и ту же «универсальную капельницу».
Ознакомиться с деталями – https://narkologicheskaya-klinika-korolyov11.ru/chastnaya-narkologicheskaya-klinika-v-korolyove
charmcartel.shop – Gorgeous accessories and great site design, very simple to shop.
Наркологическая клиника применяет стандартизированные схемы, направленные на безопасное и постепенное восстановление. Каждый этап вмешательства согласуется с текущим состоянием пациента, что обеспечивает предсказуемый характер изменений. Модель работы включает оценку реакции организма, проверку устойчивости внутренних систем и уточнение динамики метаболических процессов. Последовательность действий формируется с учётом адаптационных возможностей и направлена на достижение стабильного результата.
Подробнее – анонимная наркологическая клиника
Клиника нужна и тем, кто уже пробовал лечиться самостоятельно: пил лекарства «от тяги», ходил к психологу без медицинской поддержки, обещал себе не пить, но каждый стресс или конфликт всё равно приводили к старому сценарию. В такой ситуации комплексный подход — медицинский и психологический — даёт куда больше шансов, чем очередное одиночное обещание «в этот раз точно получится».
Подробнее тут – narkologicheskaya-klinika-himki11.ru/
curtaincraft.shop – Beautifully crafted curtains and fabrics, I love how they brighten up any room.
Наркологическая клиника использует методики, направленные на комплексную оценку состояния пациента. Работа строится на анализе анамнеза, исследовании соматических параметров и определении степени выраженности симптомов. Такой формат создаёт условия для точного подбора терапевтических мер. В клинике применяется непрерывный мониторинг, направленный на своевременное выявление отклонений и корректировку лечебных мероприятий. Благодаря этому достигается высокая стабильность клинического процесса и формируется благоприятная динамика восстановления.
Получить дополнительную информацию – https://narkologicheskaya-klinika-v-vdk18.ru/narkolog-vladivostok-na-dom/
freshfinder.shop – This site always has fresh ideas and cool products, definitely a place to check often!
Предприятие «ВЕЛЕС ИНДАСТРИАЛ» продает пиломатериалы собственного изготовления с полным циклом переработки от заготовки леса до финальной продукции. На складе в Мытищах представлен широкий ассортимент обрезной доски, бруса, вагонки, фанеры и террасной доски из сосны, ели и лиственницы по ценам от 11500 рублей за кубометр. Подробный каталог и условия доставки по Москве и области смотрите на https://pilomaterialy-msk.ru/ Свои лесозаготовительные комплексы в северных областях и современные производственные мощности обеспечивают конкурентные цены на качественную продукцию.
Диагностические данные формируют основу для дальнейших лечебных решений, от объёма инфузии до подбора поддерживающих препаратов.
Подробнее можно узнать тут – нарколог вывод из запоя астрахань
Диагностические данные формируют основу для дальнейших лечебных решений, от объёма инфузии до подбора поддерживающих препаратов.
Изучить вопрос глубже – вывод из запоя вызов в астрахани
Вывод из запоя в клинике формируется на основе последовательных процедур, направленных на стабилизацию физиологических функций и устранение токсических влияний. Такой подход позволяет корректно регулировать состояние пациента и контролировать интенсивность симптомов. Рабочие алгоритмы включают оценку метаболических процессов, анализ соматических показателей и определение степени неврологических изменений. В результате создается структурированная модель помощи, ориентированная на восстановление адаптивных возможностей организма. Процессы выполняются под контролем специалистов, что обеспечивает прогнозируемый терапевтический эффект и снижает вероятность осложнений.
Исследовать вопрос подробнее – http://vyvod-iz-zapoya-kemerovo18.ru
Клиника в Королёве закрывает этот разрыв. Здесь можно пройти полный путь — от первичной диагностики и детоксикации до реабилитации и последующего наблюдения — в пределах привычного города, не отрываясь полностью от семьи и важных дел. Это особенно важно для тех, кто продолжает работать, боится потерять позицию или репутацию, но при этом понимает, что дальше жить «как раньше» просто опасно. Лечение перестаёт быть чем-то абстрактным и пугающим: вместо общих страшилок появляется понятный маршрут, а рядом — команда специалистов, которые умеют вести пациентов с зависимостью и знают, как работать с семьями, уставшими от бесконечных срывов.
Ознакомиться с деталями – vyvod-narkologicheskaya-klinika
После поступления вызова нарколог клиники «АльфаНаркология» оперативно выезжает по указанному адресу. На месте врач проводит первичную диагностику, оценивая степень интоксикации, физическое и психологическое состояние пациента. По результатам осмотра врач подбирает индивидуальный комплекс лечебных процедур, в который входит постановка капельницы с растворами для детоксикации, препараты для стабилизации работы органов и нормализации психического состояния.
Получить дополнительные сведения – https://narcolog-na-dom-sankt-peterburg000.ru/vyzov-narkologa-na-dom-spb/
The relationship between Edna and Robert Lebrun is one of the most famous unfulfilled romances in literature. It drives the plot and forces Edna to confront the emptiness of her marriage. To follow every twist and turn of their affair, grab the awakening pdf. The digital text allows you to keep track of the subtle glances and unspoken words that define their connection. It is a heartbreaking story of bad timing and societal pressure. Having the book on your device ensures you can revisit their most poignant moments whenever you wish.
Для снятия алкогольной интоксикации врач проводит детоксикационную терапию, которая включает внутривенные инфузии с растворами для выведения токсинов, поддерживающие препараты для печени, сердечно-сосудистой системы и нервной системы. В некоторых случаях назначаются седативные средства, нормализующие эмоциональное состояние пациента.
Подробнее – http://narcolog-na-dom-v-irkutske00.ru/vyzov-narkologa-na-dom-irkutsk/https://narcolog-na-dom-v-irkutske00.ru
plixo review – Well-laid-out pages, content is clear and the site feels reliable.
Ultimately, Animal Farm is about the loss of innocence. The animals start with hope and end in despair. It is a tragedy of the highest order. If you are ready to experience this emotional journey, get an Animal Farm PDF. It is a book that demands to be felt as well as understood.
Запой почти никогда не начинается внезапно: сначала это редкие «переборы» по праздникам, потом привычка снимать стресс вечером, а дальше алкоголь всё чаще появляется в распорядке дня. В какой-то момент близкие замечают, что человек уже не контролирует количество, выпивка идёт несколько дней подряд, отменяются дела, нарушается сон, пропадает аппетит, появляются дрожь, потливость, скачки давления. На этом этапе вывод из запоя в Ивантеевке уже не может быть простым «проспаться и прийти в себя» — организму нужна полноценная медицинская помощь.
Подробнее можно узнать тут – vyvod-iz-zapoya-ivanteevka
В клинике «СибМед Кемерово» помощь оказывается круглосуточно и без ожидания. Пациент может обратиться за консультацией в любое время суток, а выездная бригада нарколога доступна даже ночью. Основной принцип центра — индивидуальный подход и создание доверительной атмосферы, в которой человек не чувствует осуждения, а получает поддержку и заботу.
Исследовать вопрос подробнее – https://narkologicheskaya-klinika-kemerovo18.ru/narkolog-kemerovo-na-dom/
Если многое из этого знакомо, кодирование стоит рассматривать не как «наказание» или «приговор», а как инструмент, который помогает закрыть доступ к алкоголю на определённый срок и даёт шанс выстроить новую привычку — жить трезво.
Изучить вопрос глубже – https://kodirovanie-ot-alkogolizma-korolyov11.ru/preparaty-dlya-kodirovaniya-ot-alkogolizma-v-korolyove
Decor favorites – Wide selection of charming items with effortless browsing.
Дополнительно, если у пациента отмечаются психические нарушения — галлюцинации, агрессия или спутанность сознания, это является прямым сигналом к срочному вмешательству. В этом случае своевременное лечение помогает предотвратить риск инсульта, инфаркта или других серьезных заболеваний.
Подробнее тут – вывод из запоя в стационаре
Сигналом к тому, что пора обсудить вариант кодирования с наркологом, служит не один какой-то эпизод, а совокупность симптомов. Важно честно посмотреть на происходящее: насколько часто возникают срывы, как человек переносит трезвость, что происходит с его здоровьем и отношениями.
Подробнее можно узнать тут – kodirovanie-alkogolizma-nedorogo-klinika
Наркологическая клиника выстраивает лечение на основе алгоритмов, обеспечивающих последовательность и безопасность вмешательств. Первым этапом становится определение клинического профиля пациента, включающего оценку анамнеза, лабораторных показателей и функционального состояния. Это позволяет создавать индивидуальные схемы, ориентированные на постепенное восстановление. В клинике применяется динамическое наблюдение, позволяющее корректировать терапевтические меры в соответствии с реакцией организма. Такой подход способствует формированию устойчивой клинической динамики.
Получить больше информации – http://narkologicheskaya-klinika-v-vdk18.ru
Перед началом терапии проводится клиническая оценка, включающая измерение давления, осмотр кожи и глаз, проверку дыхания и анализ неврологического состояния. Вывод из запоя в клинике в Астрахани начинается только после сбора этих данных, поскольку подбор препаратов без диагностики может быть небезопасен.
Ознакомиться с деталями – вывод из запоя на дому
Briovanta Picks – Great collection of exclusive products and effortless site navigation.
Детокс — важный этап лечения, который помогает очистить организм от токсинов и продуктов распада алкоголя или наркотиков. В клинике «ТомскМед Трезвость» используются современные капельницы и лекарственные комбинации, направленные на восстановление биохимических процессов в организме. Ниже представлена таблица с примерами капельниц, применяемых в детоксикационных программах.
Подробнее можно узнать тут – http://
open zexarotrustco – Everything loads cleanly, and the content is easy to follow.
Trendy accessories – Love how easy it is to find unique items here.
this trustco site – Clear layout with content that conveys professionalism and reliability.
Качественный вывод из запоя — это всегда процесс, а не одна капельница. Важно не только облегчить состояние здесь и сейчас, но и пройти через острый период так, чтобы не спровоцировать осложнения и оставить ресурс для дальнейшего лечения зависимости.
Детальнее – vyvod-iz-zapoya-kapelnica
Чем раньше врач окажет помощь, тем быстрее пациент сможет стабилизировать состояние, снизить риски осложнений и вернуться к нормальной жизни.
Изучить вопрос глубже – помощь нарколога на дому в санкт-петербурге
covecrimson.shop – Love the variety of bold, high-quality products! Shopping here is always a positive experience.
Завод выпускает стеллажи для нестандартных грузов и специфических условий хранения. Индивидуальное проектирование позволяет учитывать все особенности продукции. Производство ведется под заказ. Это снижает риски повреждения груза, противопожарные распашные ворота
Наркологическая клиника в Долгопрудном помогает в ситуациях, когда:
Получить больше информации – http://narkologicheskaya-klinika-dolgoprudnyj11.ru/narkologicheskaya-klinika-stacionar-v-dolgoprudnom/
Для безопасного и эффективного лечения наши специалисты используют только проверенные и сертифицированные медикаменты, подбираемые индивидуально с учетом состояния пациента. В состав капельницы входят следующие группы препаратов:
Углубиться в тему – http://narcolog-na-dom-krasnodar0.ru
Перед тем как выбрать формат лечения, пациенту и его близким объясняют, какие направления помощи доступны и как их можно сочетать. В зависимости от состояния и мотивации могут быть задействованы разные варианты:
Подробнее тут – narkologicheskaya-klinika-v-koroleve-korolev
cinnamoncorner.shop – Such a charming shop! Unique finds that you can’t find anywhere else.
charmcartel.shop – Love the stylish pieces and the website is very organized for easy browsing.
Вывод из запоя в клинике формируется на основе последовательных процедур, направленных на стабилизацию физиологических функций и устранение токсических влияний. Такой подход позволяет корректно регулировать состояние пациента и контролировать интенсивность симптомов. Рабочие алгоритмы включают оценку метаболических процессов, анализ соматических показателей и определение степени неврологических изменений. В результате создается структурированная модель помощи, ориентированная на восстановление адаптивных возможностей организма. Процессы выполняются под контролем специалистов, что обеспечивает прогнозируемый терапевтический эффект и снижает вероятность осложнений.
Углубиться в тему – нарколог вывод из запоя
Worth a click – Good deals paired with an easy browsing flow.
goldenget.shop – So many fantastic products at fantastic prices, shopping here is effortless!
gardengalleon.shop – Ideal for gardeners, the products here are both functional and stylish.
cypresschic.shop – Stylish finds and a seamless shopping experience, totally recommend it!
Перед началом лечения пациент проходит первичную диагностику, которая включает оценку физических показателей, сбор информации о длительности употребления, выявление сопутствующих заболеваний и оценку рисков. Наркологическая клиника в клинике в Астрахани использует стандартизированные методы обследования, что позволяет точно определить степень интоксикации и подобрать адекватный лечебный план.
Подробнее тут – http://www.domen.ru
explore zarvo – Nice structure, pages respond well and content is straightforward to read.
Рукава высокого давления из нержавеющей стали незаменимы там, где требуется гибкость соединения и устойчивость к экстремальным условиям. Каталог на https://iz-medi.ru/ включает металлорукава РВД диаметром до 250 мм, гибкие подводки от 1/2 до 2 1/2 дюйма и шаровые краны всех типов: муфтовые, фланцевые, под приварку, трёхходовые. Нержавеющая сталь обеспечивает долговечность в системах водоснабжения, отопления и промышленных установках. Звоните +7 499 390-62-89 для консультации по выбору.
Перед тем как принять решение, пациент и родственники получают объяснения по доступным направлениям. Обычно обсуждаются: амбулаторные консультации, дневной или круглосуточный стационар, выездная помощь, реабилитационные программы и последующее наблюдение. Это позволяет выстроить индивидуальный маршрут, а не навязывать один и тот же сценарий всем подряд.
Углубиться в тему – http://narkologicheskaya-klinika-himki11.ru/anonimnaya-narkologicheskaya-klinika-v-himkah/
Признаки, что пора задуматься о кодировании
Детальнее – кодирование от алкоголизма
Публикация предоставляет читателю набор разрозненных идей, которые сложно применить на практике. Мы лишь слегка касаемся разных точек зрения, не углубляясь в анализ и не предлагая никаких выводов.
Вот – виртуальное казино
Часто первыми тревожные признаки замечают родные. Человек начинает пить чаще, чем раньше, меняется в поведении, становится раздражительным или замкнутым, теряет интерес к привычным занятиям. Появляются сложности с концентрацией, падает работоспособность, учащаются конфликты дома. Употребление наркотиков проявляется изменениями режима дня, странными компаниями, резкими перепадами настроения, финансовыми «дырами», попытками скрыть своё состояние.
Детальнее – kodirovanie-ot-alkogolizma-ceny
Наркологическая клиника выстраивает лечение на основе алгоритмов, обеспечивающих последовательность и безопасность вмешательств. Первым этапом становится определение клинического профиля пациента, включающего оценку анамнеза, лабораторных показателей и функционального состояния. Это позволяет создавать индивидуальные схемы, ориентированные на постепенное восстановление. В клинике применяется динамическое наблюдение, позволяющее корректировать терапевтические меры в соответствии с реакцией организма. Такой подход способствует формированию устойчивой клинической динамики.
Подробнее – анонимная наркологическая клиника в владивостоке
Если вы ищете сайдинг для облицовки дома в Лиде, его можно приобрести в специализированных магазинах стройматериалов, на строительных рынках или в интернет-магазинах с доставкой в город. купить сайдинг в лиде
Некоторые состояния требуют немедленного вмешательства специалиста. Если алкогольное отравление или запойное состояние не купируется вовремя, это может привести к тяжелым последствиям для здоровья.
Получить дополнительные сведения – врач нарколог на дом в иркутске
Чем дольше продолжается запой, тем более непредсказуемой становится реакция организма. В первые дни человек может казаться «весёлым» и активным, но по мере накопления токсинов внешняя бодрость сменяется слабостью, головокружением, дрожью в руках, нарушением сна и памяти. Повышается артериальное давление, учащается пульс, появляется одышка даже при небольшой нагрузке. Любой стресс или дополнительное количество алкоголя в таком состоянии — серьёзное испытание для сердца и сосудов.
Получить больше информации – вывод из запоя капельница
Briovista Place – Fantastic design and a great assortment of items, shopping is a joy here.
Кодирование от алкоголизма в Королёве часто становится тем самым рубежом, за которым заканчиваются бесконечные попытки «ограничить дозу» и «держать ситуацию под контролем» и начинается системная работа с зависимостью. Многие годами откладывают этот шаг: стыдно признать проблему, страшно довериться врачу, есть надежда, что «само пройдёт» или удастся остановиться силой воли. На практике всё происходит иначе: запои становятся длиннее, похмелье тяжелее, трезвые промежутки короче, а конфликты в семье и на работе — острее. В какой-то момент близкие понимают, что без серьёзной внешней опоры человек просто не справляется.
Получить дополнительные сведения – https://kodirovanie-ot-alkogolizma-korolyov11.ru/preparaty-dlya-kodirovaniya-ot-alkogolizma-v-korolyove/
Если в ситуации с алкоголем присутствуют несколько из перечисленных ниже пунктов, это повод не откладывать консультацию с наркологом в Королёве:
Углубиться в тему – https://kodirovanie-ot-alkogolizma-korolyov11.ru
BalmBridge favorites – Great selection of products with a pleasant shopping flow.
Вызов врача-нарколога на дом позволяет избежать стресса госпитализации, обеспечивая комфорт и удобство как для пациента, так и для его близких.
Подробнее – вызов врача нарколога на дом санкт-петербург
Наркологическая клиника в Химках — это возможность получить помощь при алкогольной и наркотической зависимости рядом с домом, а не ездить по всему региону в поисках специалистов. Для многих людей обращение к наркологу до последнего кажется чем-то «крайним»: кажется, что нужно терпеть, уговаривать себя «завязать самому», ждать подходящего момента, отпуска или «нового года с чистого листа». Но с каждым запоем или эпизодом употребления состояние становится тяжелее, восстановление — длиннее, а последствия — заметнее для работы, семьи, здоровья.
Углубиться в тему – http://narkologicheskaya-klinika-himki11.ru
cozycarton.shop – Cozy products that are perfect for gift-giving or just treating yourself to something nice.
Буковина 24/7 – https://gazeta-bukovyna.cv.ua/ . Новини Чернівців і Чернівецької області. Довідкова, та корисна інформація про місто.
Диагностические данные формируют основу для дальнейших лечебных решений, от объёма инфузии до подбора поддерживающих препаратов.
Исследовать вопрос подробнее – вывод из запоя с выездом астрахань
gemgalleria.shop – This site has the best collection of gems and jewelry, great for both formal and casual occasions!
charmcartel.shop – The accessories are chic and the site is super intuitive to use.
dalvanta.shop – Unique style and great selection! The shopping experience is fast and enjoyable.
Когда выезд особенно удобен и оправдан, важно понимать не только эмоционально, но и по конкретным признакам. Есть ряд типичных ситуаций, в которых именно формат «на дому» становится наиболее реалистичным и безопасным вариантом, а стационар можно рассматривать как следующий шаг, когда острота будет снята и человек станет более сговорчивым.
Разобраться лучше – вызов нарколога на дом
Gallery vibes – Lots of interesting pieces that keep things engaging.
start here – Fast-loading platform with content that flows naturally.
Когда человек оказывается в сложной ситуации из-за длительного употребления алкоголя, важно получить быструю и квалифицированную медицинскую помощь. Запойные состояния, алкогольная интоксикация, тяжелый абстинентный синдром — все это требует своевременного вмешательства врача. Однако не всегда есть возможность или желание обращаться в стационар.
Ознакомиться с деталями – https://narcolog-na-dom-v-irkutske00.ru/vrach-narkolog-na-dom-irkutsk
Если в ситуации с алкоголем присутствуют несколько из перечисленных ниже пунктов, это повод не откладывать консультацию с наркологом в Королёве:
Подробнее – anonimnoe-kodirovanie-ot-alkogolizma-cena
Многие тянут до последнего, считая, что к наркологу обращаются только в самых крайних случаях. На деле показаний для консультации гораздо больше, и они часто появляются задолго до того, как человек впервые оказывается в запое или не выходит из состояния опьянения несколько дней подряд.
Детальнее – http://
goldenparcel.shop – Quality and elegance in every product, definitely worth checking out!
Многие годами живут в логике: «главное — с утра выпить чуть-чуть, станет легче». На коротком промежутке времени это действительно частично снимает симптомы, но по сути лишь продлевает запой и усиливает интоксикацию. Организм не успевает переработать продукты распада алкоголя, кровь становится «тяжёлой», нарушается работа сосудов, возрастает нагрузка на сердце и мозг.
Подробнее тут – kapelnica-ot-alkogolya
Такой подход гарантирует постепенное и безопасное восстановление. Врачи контролируют динамику состояния, корректируют лечение при необходимости и помогают пациенту адаптироваться к трезвой жизни без стресса и давления.
Выяснить больше – http://narkologicheskaya-klinika-v-tomske18.ru/chastnaya-narkologicheskaya-klinika-tomsk/
Такой подход гарантирует постепенное и безопасное восстановление. Врачи контролируют динамику состояния, корректируют лечение при необходимости и помогают пациенту адаптироваться к трезвой жизни без стресса и давления.
Подробнее можно узнать тут – частная наркологическая клиника томск
Сайт работает очень быстро, ни разу не было задержек. 7k официальный разработчики явно постарались с оптимизацией.
American literature classes frequently include Kate Chopin’s most famous work due to its rich symbolism and early feminist themes. If you are a student rushing to finish an assignment, finding a readable version of the awakening pdf is likely a top priority. The text offers a complex look at the constraints placed on women in the Victorian South, a theme that still resonates today. By securing a digital copy, you can quickly search for specific quotes about the “pigeon house” or the ocean, making your study sessions much more efficient. This novel is a cornerstone of literary analysis for good reason.
На начальных этапах проблема редко проявляется в открытом виде, но уже есть характерные сигналы, на которые стоит обратить внимание. Человек начинает оправдывать употребление постоянной усталостью, проблемами на работе, напряжённой жизненной ситуацией. Появляется раздражение, если нет возможности выпить или принять привычную дозу, меняется круг общения, усиливается скрытность. Это время, когда помощь ещё может быть максимально щадящей по методам и по длительности, а вернуться к стабильной жизни намного проще, чем после многолетнего стажа употребления.
Подробнее можно узнать тут – наркологическая москва
Зависимость редко начинается резко. Сначала это «разовые» посиделки, алкоголь «для снятия стресса», эпизодическое употребление психоактивных веществ «из любопытства» или «для компании». На этом этапе человеку кажется, что он полностью контролирует ситуацию. Со временем эпизоды употребления становятся чаще, дозы растут, появляются провалы в памяти, срывы, невозможность остановиться вовремя. В этот момент уже страдают здоровье, работа, отношения с близкими. Обращение в наркологическую клинику позволяет не доводить ситуацию до критической точки и остановить разрушение жизни на любом этапе заболевания.
Подробнее можно узнать тут – кодирование от алкоголизма выезд на дом
ulixo site – Explored for a few minutes, everything is well organized and intuitive.
Работа строится на четкой структуре, определяющей порядок лечебных мероприятий. Ниже представлена последовательность основных этапов.
Получить дополнительную информацию – вывод из запоя на дому цена
Такая структурированная таблица позволяет обеспечивать единый стандарт наблюдения и облегчает оценку динамики. Она помогает быстро определять необходимость корректировок, что повышает точность применяемых вмешательств и уменьшает риск отрицательных реакций.
Разобраться лучше – вывод из запоя на дому круглосуточно кемерово
Brivona Finds – Love the clear and easy-to-navigate layout, it’s a smooth shopping experience.
Наряду с физическим состоянием врачи учитывают психологический фон пациента. Человек в запое часто неадекватно оценивает своё самочувствие, обещает «завязать сам», спорит с родственниками, агрессирует или, наоборот, впадает в апатию. Задача специалиста — не спорить и не давить, а грамотно оценить риски и предложить такой формат помощи, который будет безопасен и реалистичен именно в этой ситуации.
Узнать больше – vyvod-iz-zapoya-moskva
Клиника «ВладТрезвие Центр» работает в круглосуточном режиме и готова оказать помощь жителям Владивостока и прилегающих районов в любое время суток. Врачи-наркологи прибывают по вызову в течение часа, имеют при себе все необходимые препараты и оборудование для проведения детоксикации на дому. При необходимости пациента доставляют в стационар, где лечение проходит под постоянным контролем медицинского персонала.
Узнать больше – наркологический вывод из запоя владивосток
Когда основные симптомы устранены, пациенту необходим поддерживающий этап. Вывод из запоя в клинике в Астрахани дополнительно включает рекомендации по коррекции сна, восстановлению питания и снижению эмоционального напряжения.
Подробнее можно узнать тут – https://vyvod-iz-zapoya-v-astrakhani18.ru/vyvod-iz-zapoya-na-domu-astrakhan
Самостоятельные попытки «подлечиться» обычно сводятся к случайным комбинациям препаратов: кто-то пьёт горсть таблеток от давления и сердца, кто-то принимает успокоительные поверх алкоголя, кто-то заказывает непонятные средства «от тяги» в интернете. Такие эксперименты могут дать краткий эффект, но часто только маскируют симптомы и перегружают организм. В клинике лечение строится иначе: сначала оценивают состояние — физическое и психическое, затем подбирают безопасные схемы детоксикации и медикаментов, учитывая возраст, сопутствующие заболевания, длительность запоев и употребления. Это снижает риски осложнений и делает восстановление более управляемым: пациент и его семья видят прогресс и понимают, за счёт чего он происходит, а не живут в ожидании очередного непредсказуемого «отката».
Разобраться лучше – http://narkologicheskaya-klinika-korolyov11.ru
Stylish baskets – Smooth browsing and a wide range of home decor options.
cozycopper.shop – Stylish copper products that are also very functional for daily use.
Многие тянут до последнего, считая, что к наркологу обращаются только в самых крайних случаях. На деле показаний для консультации гораздо больше, и они часто появляются задолго до того, как человек впервые оказывается в запое или не выходит из состояния опьянения несколько дней подряд.
Получить дополнительные сведения – https://narkologicheskaya-klinika-voskresensk11.ru/
Ниже представлена последовательность основных шагов терапевтического процесса.
Получить дополнительные сведения – http://narkologicheskaya-klinika-vo-vladivostoke18.ru
circuitcabin.shop – Excellent for those who love all things tech, browsing is quick and easy.
gervina.shop – Great finds for modern home decor, perfect for updating your space!
decordock.shop – Love the variety of home decor, shopping here is always so effortless.
charmcartel.shop – Beautifully curated accessories, the site is easy to navigate and find what you need.
Основным инструментом при выведении из запоя является капельница. Её состав зависит от состояния пациента, продолжительности запоя и наличия хронических заболеваний. В клинике «ПензаМед Трезвость» используются только проверенные препараты с минимальной нагрузкой на организм. Ниже приведена таблица с примерами инфузионных растворов и их воздействием.
Получить дополнительную информацию – https://vyvod-iz-zapoya-penza18.ru/vyvod-iz-zapoya-na-domu-v-penze-penza-otzyvy
После купирования острых симптомов врач объясняет, какие шаги нужно сделать дальше: ограничиться домашним наблюдением, подумать о коротком стационарном курсе или сразу планировать дальнейшее лечение зависимости. Это помогает не возвращаться к затяжным запоям уже через несколько недель.
Ознакомиться с деталями – vyvod-iz-zapoya-moskva-i-oblast
Слоты крутятся без лагов, все гладко работает. Слышал много хорошего про платформу в целом.
Качественный вывод из запоя — это всегда процесс, а не одна капельница. Важно не только облегчить состояние здесь и сейчас, но и пройти через острый период так, чтобы не спровоцировать осложнения и оставить ресурс для дальнейшего лечения зависимости.
Подробнее тут – vyvod-iz-zapoya-v-ivanteevke
Такой подход позволяет устранить физические последствия запоя и снизить психологическую зависимость. Уже после первой процедуры пациенты отмечают улучшение самочувствия, появление аппетита и нормализацию сна. Важно не ограничиваться только экстренной помощью — специалисты рекомендуют пройти курс восстановления, чтобы предотвратить рецидивы.
Разобраться лучше – анонимный вывод из запоя в владивостоке
Cool store look – The visuals are stylish without being overdone.
reliable tool shop – Found practical items easily and the whole process felt clean.
Многие годами живут в логике: «главное — с утра выпить чуть-чуть, станет легче». На коротком промежутке времени это действительно частично снимает симптомы, но по сути лишь продлевает запой и усиливает интоксикацию. Организм не успевает переработать продукты распада алкоголя, кровь становится «тяжёлой», нарушается работа сосудов, возрастает нагрузка на сердце и мозг.
Получить дополнительные сведения – http://kapelnica-ot-zapoya-dolgoprudnyj11.ru
lotuslane style shop – Navigation is simple, product photos are sharp and easy to view.
Современная наркологическая клиника — это не просто медицинское учреждение, где проводят лечение зависимостей. Это система комплексной поддержки, объединяющая врачей, психологов, терапевтов и специалистов по реабилитации. В клинике «ТомскМед Трезвость» созданы комфортные условия, где лечение проходит анонимно, бережно и с опорой на доказательную медицину. Каждое вмешательство назначается строго по показаниям, а терапия направлена не только на физическое очищение организма, но и на восстановление психоэмоционального баланса пациента.
Подробнее можно узнать тут – http://narkologicheskaya-klinika-v-tomske18.ru/chastnaya-narkologicheskaya-klinika-tomsk/
В клинике «СибМед Кемерово» помощь оказывается круглосуточно и без ожидания. Пациент может обратиться за консультацией в любое время суток, а выездная бригада нарколога доступна даже ночью. Основной принцип центра — индивидуальный подход и создание доверительной атмосферы, в которой человек не чувствует осуждения, а получает поддержку и заботу.
Углубиться в тему – платная наркологическая клиника в кемерове
goldgrove2.shop – A great place to discover new and unique products, definitely my go-to site.
brondyra.shop – Love the stylish products and smooth checkout process, a must-visit for sure.
Основным инструментом при выведении из запоя является капельница. Её состав зависит от состояния пациента, продолжительности запоя и наличия хронических заболеваний. В клинике «ПензаМед Трезвость» используются только проверенные препараты с минимальной нагрузкой на организм. Ниже приведена таблица с примерами инфузионных растворов и их воздействием.
Подробнее можно узнать тут – вывод из запоя на дому круглосуточно пенза
The three-finger salute of District 12 becomes a universal sign of respect and goodbye. It evolves into a symbol of the revolution. The emotional weight of this gesture is established early in the book. It is a powerful moment of silent communication. To feel the impact of this scene, you should read the original description. Accessing a The Hunger Games pdf allows you to experience the moment that inspired real-world protesters. https://thehungergamespdf.ru/ The Hunger Games Mockingjay Online Pdf
check this out – Clean interface allows fast navigation and information feels solid and dependable.
Чтобы обеспечить эффективный вывод из запоя, формируется комплекс последовательных действий, направленных на стабилизацию состояния. Важным элементом является фармакологическая коррекция, сочетаемая с мониторингом жизненно важных функций. Ниже представлены ключевые процессы, участвующие в клинической стабилизации.
Подробнее можно узнать тут – вывод из запоя цена кемерово
Скачайте патч для обхода активации Windows 11 и пользуйтесь системой без ограничений.
Подробнее – Windows 11 активатор на русском
Good information, Thanks a lot!
https://mobilityspecialists.net/accessibility-mobility
Чтобы лучше ориентироваться, в каких жизненных ситуациях особенно важно не игнорировать проблему, удобно представить их в виде типичных сценариев. Это помогает и самому человеку, и его близким осознать, что происходящее уже вышло за рамки «обычной усталости» или «случайного перебора». Ниже перечислены распространённые случаи, когда обращение в наркологическую клинику особенно актуально:
Выяснить больше – http://narkologicheskaya-klinika-moskva11.ru/anonimnaya-narkologicheskaya-klinika-v-moskve/
Bath Breeze favorites – Pampering products that feel indulgent and relaxing.
Перед тем как принять решение, пациент и родственники получают объяснения по доступным направлениям. Обычно обсуждаются: амбулаторные консультации, дневной или круглосуточный стационар, выездная помощь, реабилитационные программы и последующее наблюдение. Это позволяет выстроить индивидуальный маршрут, а не навязывать один и тот же сценарий всем подряд.
Разобраться лучше – https://narkologicheskaya-klinika-himki11.ru/
craftcabin.shop – A perfect site for all crafters, always offering a variety of fresh ideas and new materials!
zorivohold site – Quick glance showed an organized layout that inspires confidence.
Если в ситуации с алкоголем присутствуют несколько из перечисленных ниже пунктов, это повод не откладывать консультацию с наркологом в Королёве:
Получить дополнительную информацию – кодировка от алкоголя в королеве
Такой подход гарантирует постепенное и безопасное восстановление. Врачи контролируют динамику состояния, корректируют лечение при необходимости и помогают пациенту адаптироваться к трезвой жизни без стресса и давления.
Выяснить больше – http://narkologicheskaya-klinika-v-tomske18.ru/tomsk-narkologicheskij-dispanser/
Особое внимание уделяется безопасности. Используются препараты нового поколения, снижающие нагрузку на печень, почки и сердечно-сосудистую систему. Процесс лечения проходит под постоянным наблюдением медперсонала, что позволяет быстро реагировать на любые изменения состояния пациента. Все данные о лечении строго конфиденциальны — информация не передаётся третьим лицам и не фиксируется в общедоступных базах.
Исследовать вопрос подробнее – http://narkologicheskaya-klinika-v-tomske18.ru
Вывод из запоя требует комплексного контроля всех физиологических параметров. Ниже представлены основные направления наблюдения, формирующие структуру оценки состояния.
Детальнее – вывод из запоя цена
Наркологическая клиника применяет стандартизированные схемы, направленные на безопасное и постепенное восстановление. Каждый этап вмешательства согласуется с текущим состоянием пациента, что обеспечивает предсказуемый характер изменений. Модель работы включает оценку реакции организма, проверку устойчивости внутренних систем и уточнение динамики метаболических процессов. Последовательность действий формируется с учётом адаптационных возможностей и направлена на достижение стабильного результата.
Разобраться лучше – http://narkologicheskaya-klinika-vo-vladivostoke18.ru
Вывод из запоя в клинике реализуется через поэтапное внедрение терапевтических решений, направленных на устранение токсической нагрузки и восстановление физиологической устойчивости. Важным элементом является определение клинического профиля пациента, включающего анализ анамнеза, текущего состояния и возможных сопутствующих факторов. На основе этих данных формируется индивидуальная программа помощи. Процедуры проводятся в условиях контролируемой безопасности, что снижает вероятность осложнений и позволяет достигать устойчивого терапевтического ответа. Последовательность действий формирует согласованную систему, удобную для мониторинга и анализа.
Детальнее – вывод из запоя капельница на дому кемерово
Чтобы обеспечить эффективный вывод из запоя, формируется комплекс последовательных действий, направленных на стабилизацию состояния. Важным элементом является фармакологическая коррекция, сочетаемая с мониторингом жизненно важных функций. Ниже представлены ключевые процессы, участвующие в клинической стабилизации.
Углубиться в тему – вывод из запоя капельница кемерово
Современная наркологическая клиника — это не просто место, где оказывают медицинскую помощь. Это пространство, где пациенту помогают вернуться к жизни, свободной от зависимости, с заботой, уважением и индивидуальным подходом. В клинике «СибМед Кемерово» реализованы комплексные программы терапии алкоголизма, наркомании и других зависимостей. Каждая программа адаптируется под конкретное состояние пациента и сочетает медицинские, психологические и социальные методы воздействия. Важное преимущество — полная анонимность, обеспечивающая комфорт и доверие со стороны пациентов.
Получить больше информации – наркологическая клиника стационар в кемерове
gingergrace.shop – Always a pleasant experience, and their products are always top-notch!
Наркологическая клиника в Химках ориентируется не на «среднестатистического пациента», а на конкретного человека с его историей, болезнями, образом жизни и семьёй. Поэтому здесь не ограничиваются одним-двумя шаблонными вариантами. Врач оценивает, на каком этапе сейчас находится пациент: острый запой, ломка, период относительной трезвости с риском срыва, рецидив после ремиссии. От этого зависит выбор формата помощи.
Разобраться лучше – наркологическая клиника
Отдельная категория пациентов — люди с алкогольной зависимостью. Для жителей Воскресенска особенно актуальны проблемы, связанные с длительными запоями: человек несколько дней подряд пьёт, практически не ест, плохо спит, с трудом встаёт, а каждое утро обещает, что «сейчас немного — и всё». На этом фоне растёт нагрузка на сердце, печень, нервную систему, повышается риск инсультов и инфарктов, обостряются хронические болезни.
Выяснить больше – narkologicheskaya-klinika-voskresensk11.ru/
dorvani.shop – Fantastic selection of trendy products, everything is just what I needed!
1win официальный скачать
В глубинах холодного моря жил древний Кракен, охранявший зеркала памяти. Эти зеркала не отражали лица — они показывали страхи, мечты и забытые решения каждого, кто осмеливался взглянуть в их гладь. Когда шторм поднимался, щупальца Кракена тянулись к поверхности, защищая зеркала от жадных глаз. Моряки верили: если зеркало треснет, море потеряет равновесие. Поэтому легенда учила уважать тайны глубин и помнить, что не каждое отражение стоит искать.
Помощь нарколога нужна, если алкоголь или наркотики постепенно начинают занимать в жизни всё больше места. Человек заранее планирует, когда и как будет пить, нервничает, если что-то срывается, раздражается, когда близкие пытаются ограничить употребление. Появляются скандалы после «весёлых» вечеров, пропущенные рабочие смены, проблемы с деньгами, конфликты с родными. При этом любые разговоры заканчиваются обещаниями «завязать с понедельника» или обвинениями окружающих.
Выяснить больше – http://narkologicheskaya-klinika-voskresensk11.ru/chastnaya-narkologicheskaya-klinika-v-voskresenske/
charmcartel.shop – Unique designs and fast navigation, love shopping here every time.
Когда родственники видят, что в их случае совпадает сразу несколько этих пунктов, выезд нарколога на дом часто становится тем самым реалистичным и своевременным решением, которое позволяет не довести дело до экстренной госпитализации уже в критическом состоянии. После такого вмешательства появляются часы и дни, когда можно спокойно обсудить дальнейшие шаги, а не действовать на фоне паники и полного истощения.
Получить дополнительную информацию – https://narkolog-na-dom-himki11.ru/
Когда человек оказывается в сложной ситуации из-за длительного употребления алкоголя, важно получить быструю и квалифицированную медицинскую помощь. Запойные состояния, алкогольная интоксикация, тяжелый абстинентный синдром — все это требует своевременного вмешательства врача. Однако не всегда есть возможность или желание обращаться в стационар.
Углубиться в тему – платный нарколог на дом иркутск
В Москве особенно востребован выезд врача на дом: не всегда есть силы и возможность везти человека в стационар, иногда он сам отказывается куда-либо ехать, стесняется своего состояния или боится огласки. В этих случаях нарколог приезжает по адресу, проводит осмотр, стабилизирует состояние с помощью инфузионной терапии и подбирает препараты, которые снимают интоксикацию, снижают тревогу, нормализуют сон и давление. При более тяжёлых формах запоя или при наличии сопутствующих заболеваний оптимальным вариантом становится стационар, где можно обеспечить круглосуточное наблюдение и постепенный выход из кризиса.
Узнать больше – вывод из запоя москва
Помощь нарколога нужна, если алкоголь или наркотики постепенно начинают занимать в жизни всё больше места. Человек заранее планирует, когда и как будет пить, нервничает, если что-то срывается, раздражается, когда близкие пытаются ограничить употребление. Появляются скандалы после «весёлых» вечеров, пропущенные рабочие смены, проблемы с деньгами, конфликты с родными. При этом любые разговоры заканчиваются обещаниями «завязать с понедельника» или обвинениями окружающих.
Выяснить больше – https://narkologicheskaya-klinika-voskresensk11.ru/narkologicheskaya-klinika-telefon-v-voskresenske
Часто родственники тянут до последнего, надеясь, что запой «сам пройдёт», как это случалось раньше. Но с каждым эпизодом последствия становятся тяжелее: организм изнашивается, возрастает риск осложнений, ухудшается психика. Особенно опасно, когда запой длится несколько дней подряд, а любые попытки самостоятельно сократить дозы алкоголя сопровождаются дрожью, бессонницей, приступами паники.
Подробнее – vyvod-iz-zapoya-moskva-stacionar
Эти этапы формируют структуру комплексного лечения, позволяя добиться устойчивого результата и предотвращения повторных срывов.
Детальнее – запой наркологическая клиника астрахань
trend wear online – Smooth experience, photos helped decide quickly.
Каждый состав подбирается индивидуально, исходя из состояния пациента. Лечение проводится под наблюдением врача, что исключает риск осложнений. Уже через несколько часов после начала терапии большинство пациентов отмечают заметное облегчение и улучшение общего самочувствия.
Выяснить больше – https://narkologicheskaya-klinika-v-tomske18.ru
Если многое из этого знакомо, кодирование стоит рассматривать не как «наказание» или «приговор», а как инструмент, который помогает закрыть доступ к алкоголю на определённый срок и даёт шанс выстроить новую привычку — жить трезво.
Углубиться в тему – anonimnoe-kodirovanie-ot-alkogolizma
Клиника «ВладТрезвие Центр» работает в круглосуточном режиме и готова оказать помощь жителям Владивостока и прилегающих районов в любое время суток. Врачи-наркологи прибывают по вызову в течение часа, имеют при себе все необходимые препараты и оборудование для проведения детоксикации на дому. При необходимости пациента доставляют в стационар, где лечение проходит под постоянным контролем медицинского персонала.
Исследовать вопрос подробнее – http://vyvodiz-zapoya-vladivostok18.ru/vyvod-iz-zapoya-gorod-vladivostok/
В этом материале представлены детали, которые хоть и занимательны, но не особенно значимы. Мы рассматриваем моменты, которые трудно назвать важными, но всё же решили включить их для полноты картины.
Вот – казино онлайн
Когда человек оказывается в сложной ситуации из-за длительного употребления алкоголя, важно получить быструю и квалифицированную медицинскую помощь. Запойные состояния, алкогольная интоксикация, тяжелый абстинентный синдром — все это требует своевременного вмешательства врача. Однако не всегда есть возможность или желание обращаться в стационар.
Ознакомиться с деталями – нарколог на дом клиника
Luggage Lotus Shop – Easy navigation, items look solid and selection is impressive.
buildbay.shop – Ideal for DIY enthusiasts, the site is very intuitive and easy to use.
Клиника «ВладТрезвие Центр» работает в круглосуточном режиме и готова оказать помощь жителям Владивостока и прилегающих районов в любое время суток. Врачи-наркологи прибывают по вызову в течение часа, имеют при себе все необходимые препараты и оборудование для проведения детоксикации на дому. При необходимости пациента доставляют в стационар, где лечение проходит под постоянным контролем медицинского персонала.
Получить больше информации – вывод из запоя капельница
Перечисленные меры обеспечивают структурированный подход к восстановлению, позволяя выстраивать лечение в соответствии с текущими изменениями. Такой формат способствует достижению устойчивой физиологической стабилизации и уменьшает выраженность симптомов. Для систематизации применяемых методов используется таблица, представленная ниже.
Получить дополнительные сведения – наркология вывод из запоя кемерово
После купирования острых симптомов врач объясняет, какие шаги нужно сделать дальше: ограничиться домашним наблюдением, подумать о коротком стационарном курсе или сразу планировать дальнейшее лечение зависимости. Это помогает не возвращаться к затяжным запоям уже через несколько недель.
Подробнее можно узнать тут – http://vyvod-iz-zapoya-moskva011.ru
learn trixo – Pleasant interface, information is accessible and easy to read.
Когда основные симптомы устранены, пациенту необходим поддерживающий этап. Вывод из запоя в клинике в Астрахани дополнительно включает рекомендации по коррекции сна, восстановлению питания и снижению эмоционального напряжения.
Получить дополнительную информацию – вывод из запоя недорого
craftcurio.shop – Always something fun and creative to shop for, perfect for every crafter!
Sweet shop – The variety and quality here are unbeatable.
Для повышения эффективности лечения наркологическая клиника применяет стандартизированные методы, включающие мониторинг жизненно важных параметров, корректировку фармакотерапии и оценку неврологических показателей. Совокупность таких мер делает процесс более предсказуемым и снижает вероятность осложнений. Кроме того, практическая часть работы включает регулярную проверку метаболических функций, что способствует точному дозированию препаратов и своевременному изменению схем. Это позволяет поддерживать физиологическую устойчивость организма даже при интенсивной нагрузке и сохранять стабильность состояния на протяжении всего периода терапии.
Исследовать вопрос подробнее – платная наркологическая клиника в пензе
Клиника в Королёве закрывает этот разрыв. Здесь можно пройти полный путь — от первичной диагностики и детоксикации до реабилитации и последующего наблюдения — в пределах привычного города, не отрываясь полностью от семьи и важных дел. Это особенно важно для тех, кто продолжает работать, боится потерять позицию или репутацию, но при этом понимает, что дальше жить «как раньше» просто опасно. Лечение перестаёт быть чем-то абстрактным и пугающим: вместо общих страшилок появляется понятный маршрут, а рядом — команда специалистов, которые умеют вести пациентов с зависимостью и знают, как работать с семьями, уставшими от бесконечных срывов.
Получить дополнительную информацию – http://narkologicheskaya-klinika-korolyov11.ru
The “Glamour Bard” can grant temporary hit points and movement to the whole team. Xanathar’s Guide to Everything turns the bard into a battlefield commander. Players searching for a PDF on “Mantle of Inspiration” will love our support build breakdowns. We show how to reposition your entire team tactically using a single bonus action. Control the flow of the fight with the majestic presence of the College of Glamour. https://xanatharsguidetoeverythingpdf.ru/ Names Dnd 5E Xanathar’s Guide To Everything Pdf
greenguild.shop – Such a pleasant experience shopping here, and the sustainable products are amazing.
Клиника «ВладТрезвие Центр» работает в круглосуточном режиме и готова оказать помощь жителям Владивостока и прилегающих районов в любое время суток. Врачи-наркологи прибывают по вызову в течение часа, имеют при себе все необходимые препараты и оборудование для проведения детоксикации на дому. При необходимости пациента доставляют в стационар, где лечение проходит под постоянным контролем медицинского персонала.
Выяснить больше – вывод из запоя в владивостоке
Вывод из запоя — это медицинская процедура, направленная на устранение интоксикации организма, вызванной длительным употреблением алкоголя. В клинике «ПензаМед Трезвость» помощь оказывается профессионально и конфиденциально: пациенты могут получить лечение как в стационаре, так и на дому. Процесс включает использование капельниц, медикаментозную терапию, психоэмоциональную поддержку и последующую реабилитацию. Врачи наркологического центра обладают большим опытом работы и обеспечивают круглосуточную помощь без постановки на учёт, что особенно важно для тех, кто хочет сохранить анонимность и быстро вернуться к нормальному состоянию.
Узнать больше – http://vyvod-iz-zapoya-penza18.ru
Наркологическая клиника в клинике в Астрахани предоставляет помощь пациентам, сталкивающимся с различными формами зависимости — алкогольной, наркотической, лекарственной. Основой терапии является комплексный подход, включающий медицинскую детоксикацию, стабилизацию состояния, психотерапию и последующее наблюдение. Такой формат работы позволяет мягко купировать острые симптомы, восстановить физиологические функции и подготовить пациента к длительной реабилитации. Все процедуры проводятся анонимно, с использованием сертифицированных препаратов и с постоянным контролем врача.
Ознакомиться с деталями – наркологические клиники алкоголизм астрахань
Наркологическая клиника в Химках — это возможность получить помощь при алкогольной и наркотической зависимости рядом с домом, а не ездить по всему региону в поисках специалистов. Для многих людей обращение к наркологу до последнего кажется чем-то «крайним»: кажется, что нужно терпеть, уговаривать себя «завязать самому», ждать подходящего момента, отпуска или «нового года с чистого листа». Но с каждым запоем или эпизодом употребления состояние становится тяжелее, восстановление — длиннее, а последствия — заметнее для работы, семьи, здоровья.
Подробнее тут – kruglosutochnaya-narkologicheskaya-klinika
1win официальный витамины
В глубинах холодного моря жил древний Кракен, охранявший зеркала памяти. Эти зеркала не отражали лица — они показывали страхи, мечты и забытые решения каждого, кто осмеливался взглянуть в их гладь. Когда шторм поднимался, щупальца Кракена тянулись к поверхности, защищая зеркала от жадных глаз. Моряки верили: если зеркало треснет, море потеряет равновесие. Поэтому легенда учила уважать тайны глубин и помнить, что не каждое отражение стоит искать.
glamgarrison.shop – Stylish and chic accessories that make any outfit pop, so many great options!
clarvesta.shop – Unique and stylish offerings, and the delivery is always fast.
What happens when an unstoppable force meets an immovable object? You get the romance between Dante Russo and Vivian Lau. Their engagement is a business deal, but their hearts didn’t get the memo. If you are scouring the internet for a King of Wrath PDF, you are preparing to dive into one of the most talked-about books of the year. The steam factor is high, but so is the emotional intelligence of the writing. Ana Huang crafts a narrative that respects the intelligence of her readers while delivering the escapism they crave. https://kingofwrathpdf.ru/ King Of Wrath Español Epub
Диагностические данные формируют основу для дальнейших лечебных решений, от объёма инфузии до подбора поддерживающих препаратов.
Ознакомиться с деталями – врач вывод из запоя астрахань
dorvoria.shop – Beautifully crafted items and a user-friendly shopping experience. Highly recommend!
Есть ситуации, когда визит к наркологу в Химках лучше воспринимать не как «стыдный шаг», а как обычное ответственное решение о своём здоровье. Это особенно актуально, если: употребление алкоголя или наркотиков стало регулярным, а попытки сократить дозы заканчиваются срывами; появились запои с несколькими днями непрерывного употребления; возникают проблемы с сердцем, давлением, сном; близкие всё чаще говорят, что «ситуация выходит из-под контроля».
Исследовать вопрос подробнее – http://narkologicheskaya-klinika-himki11.ru/lechenie-v-narkologicheskoj-klinike-v-himkah/
Домашний формат особенно удобен на ранних этапах, когда зависимость уже дошла до запоев, но человек ещё продолжает работать, скрывать проблему от коллег и соседей, боится любой огласки. Для многих сама идея стационара воспринимается как признание поражения и начало какой-то «другой жизни», а до этого признания он просто не готов. Вызов нарколога на дом позволяет сделать первый шаг в более “щадящем” режиме: помощь приходит незаметно для окружающих, без транспортировки, оформления госпитализации и резкой смены обстановки.
Подробнее можно узнать тут – http://narkolog-na-dom-himki11.ru/
Такое поэтапное лечение позволяет добиться устойчивого результата без стрессов и осложнений. Пациенты получают комплексную помощь, включающую как медицинские, так и психотерапевтические аспекты.
Получить дополнительную информацию – наркологическая клиника клиника помощь
Таблица позволяет поддерживать единую структуру наблюдения и фиксировать изменения состояния. Такая модель обеспечивает прозрачность процессов и повышает точность принимаемых решений.
Разобраться лучше – анонимный вывод из запоя ижевск
Буду ждать доставку как чё отпишусь . бошки, марихуану Ещё раз повторюсь – магазин ОТЛИЧНЕЙШИЙ.Просто КОСМОС Бро ты ошибся. Не поняли друг друга бывает
Наркологическая клиника в Химках ориентируется не на «среднестатистического пациента», а на конкретного человека с его историей, болезнями, образом жизни и семьёй. Поэтому здесь не ограничиваются одним-двумя шаблонными вариантами. Врач оценивает, на каком этапе сейчас находится пациент: острый запой, ломка, период относительной трезвости с риском срыва, рецидив после ремиссии. От этого зависит выбор формата помощи.
Получить больше информации – бесплатная наркологическая клиника
charmcartel.shop – Great collection of accessories, and the website makes it easy to shop and explore.
Запой почти никогда не начинается внезапно: сначала это редкие «переборы» по праздникам, потом привычка снимать стресс вечером, а дальше алкоголь всё чаще появляется в распорядке дня. В какой-то момент близкие замечают, что человек уже не контролирует количество, выпивка идёт несколько дней подряд, отменяются дела, нарушается сон, пропадает аппетит, появляются дрожь, потливость, скачки давления. На этом этапе вывод из запоя в Ивантеевке уже не может быть простым «проспаться и прийти в себя» — организму нужна полноценная медицинская помощь.
Изучить вопрос глубже – http://vyvod-iz-zapoya-ivanteevka11.ru
лазерная косметология московская клиника косметологии
Для формирования структурированного лечения используются методы, обеспечивающие анализ текущей клинической картины. Ниже представлены ключевые направления, задействованные при формировании терапевтических решений.
Ознакомиться с деталями – https://narkologicheskaya-klinika-vo-vladivostoke18.ru/narkolog-vladivostok-na-dom
Наркологическая клиника использует комплексный подход к оценке состояния пациента, что обеспечивает высокий уровень контроля на всех этапах лечения. Такой формат работы позволяет детально изучать динамику процессов и своевременно корректировать вмешательства. В клинике применяется принцип последовательного наблюдения, при котором особое внимание уделяется соматическим и неврологическим проявлениям. Выбор терапевтических мер основывается на анализе объективных данных, что повышает предсказуемость результата. Подход ориентирован на постепенное восстановление функций организма с учетом индивидуальных особенностей.
Ознакомиться с деталями – лечение в наркологической клинике в томске
Наркологическая клиника опирается на комплексную модель оценки состояния, обеспечивающую последовательное восстановление функций организма. В клинике применяется система многоуровневого контроля, направленная на выявление нарушений и определение оптимальной тактики вмешательства. Такой подход позволяет поддерживать стабильность состояния даже в условиях выраженных клинических проявлений. Структурированная работа направлена на снижение токсической нагрузки, коррекцию метаболических процессов и восстановление адаптивных механизмов. Анализ проводится с учётом физиологических особенностей пациента и динамики изменений.
Разобраться лучше – наркологическая клиника цены
Вызов нарколога на дом в Иркутске и Иркутской области — это удобное и безопасное решение, позволяющее получить неотложную помощь в привычной обстановке. Врачи клиники «ЧистоЖизнь» выезжают круглосуточно, приезжают в течение 30–60 минут и проводят комплексное лечение, направленное на стабилизацию состояния пациента и предотвращение осложнений.
Разобраться лучше – вызов врача нарколога на дом
Гортензии — это воплощение воздушности и романтики, их пышные соцветия создают объёмные букеты, которые завораживают нежностью. Цветочный салон «Флорион» предлагает композиции из гортензий в различных оттенках: от классического белого до насыщенного синего и розового. На https://www.florion.ru/catalog/bukety-iz-gortenzii вы найдёте монобукеты и сложные композиции для свадеб, юбилеев и особых событий. Гортензии долго сохраняют свежесть и эффектно смотрятся как в классических, так и в современных аранжировках.
caldoria.shop – Great place for curated finds, shopping is quick and enjoyable.
Часто именно жители Химок тянут до последнего: насыщенный ритм жизни, дорога на работу, постоянная усталость, попытки «снимать напряжение» алкоголем или психоактивными веществами. Сначала это кажется временным способом расслабиться, но со временем человек замечает, что пьёт чаще, чем планировал, нуждается в больших дозах, срывает обещания, а попытки контролировать употребление превращаются в череду неудач. В какой-то момент становится очевидно: без профессиональной наркологической помощи дальше будет только сложнее.
Ознакомиться с деталями – http://narkologicheskaya-klinika-himki11.ru
Ниже приведены ключевые элементы, которые отражают базовую структуру процессов, формирующих последовательность лечебных мероприятий. Они помогают подробно рассмотреть основные направления работы и понять роль каждого звена в общей терапевтической системе.
Ознакомиться с деталями – наркологическая клиника лечение алкоголизма пенза
купить аккумуляторы для электропогрузчика Стоимость аккумулятора для погрузчика — от 200 000 руб. Экономьте на Тюменских АКБ.
Решил проверить сам, действительно все работает. Поддержка отвечает быстро на все вопросы.
Aura arcade fun – Interesting layout with an upbeat energy.
luggagelotus – Great variety, browsing is simple and products appear durable.
Вызов нарколога на дом в Иркутске и Иркутской области — это удобное и безопасное решение, позволяющее получить неотложную помощь в привычной обстановке. Врачи клиники «ЧистоЖизнь» выезжают круглосуточно, приезжают в течение 30–60 минут и проводят комплексное лечение, направленное на стабилизацию состояния пациента и предотвращение осложнений.
Подробнее можно узнать тут – нарколог на дом недорого
Спасибо за вашу работу,вы лучшие! Купить кокаин, бошки, гашиш P S203 вообще шикарный ) мне понравился. спасибо Вам) расширяться собираетесь?
warm living hub – Smooth experience, the layout really sets a cozy tone.
Многие годами живут в логике: «главное — с утра выпить чуть-чуть, станет легче». На коротком промежутке времени это действительно частично снимает симптомы, но по сути лишь продлевает запой и усиливает интоксикацию. Организм не успевает переработать продукты распада алкоголя, кровь становится «тяжёлой», нарушается работа сосудов, возрастает нагрузка на сердце и мозг.
Получить дополнительные сведения – https://kapelnica-ot-zapoya-dolgoprudnyj11.ru/kapelnica-ot-alkogolya-cena-v-dolgoprudnom/
После прибытия врач проводит осмотр пациента, оценивает его состояние, измеряет давление, пульс, уровень кислорода и выявляет возможные противопоказания. Затем разрабатывается индивидуальный план лечения, направленный на стабилизацию состояния.
Ознакомиться с деталями – нарколог на дом
cratecosmos.shop – An amazing selection of home decor pieces, with a seamless shopping experience!
check rixarotrust – Simple interface allows information to be absorbed quickly and easily.
Важно и то, что во время процедуры пациент находится под наблюдением. Врач может увидеть, как организм реагирует на терапию, вовремя скорректировать темп или состав инфузии, понять, достаточно ли домашнего формата или лучше рассмотреть стационар. Это принципиальное отличие от попыток лечиться дома таблетками наугад, без контроля давления и пульса.
Узнать больше – kapelnica-ot-zapoya-anonimnaya
Наркологическая клиника выстраивает лечение на основе алгоритмов, обеспечивающих последовательность и безопасность вмешательств. Первым этапом становится определение клинического профиля пациента, включающего оценку анамнеза, лабораторных показателей и функционального состояния. Это позволяет создавать индивидуальные схемы, ориентированные на постепенное восстановление. В клинике применяется динамическое наблюдение, позволяющее корректировать терапевтические меры в соответствии с реакцией организма. Такой подход способствует формированию устойчивой клинической динамики.
Исследовать вопрос подробнее – https://narkologicheskaya-klinika-v-vdk18.ru/narkolog-vladivostok-otzyvy/
Beard Barge favorites – Smooth shopping experience with all the essentials for grooming.
glamgrocer.shop – A chic and fun store for kitchen lovers, always find something exciting to add to my collection!
Когда основные симптомы устранены, пациенту необходим поддерживающий этап. Вывод из запоя в клинике в Астрахани дополнительно включает рекомендации по коррекции сна, восстановлению питания и снижению эмоционального напряжения.
Разобраться лучше – вывод из запоя капельница астрахань
Обратиться за помощью могут как сами пациенты, так и их родственники. Часто именно близкие первыми замечают, что человек изменился: стал раздражительным, агрессивным или, наоборот, отстранённым, перестал выполнять обещания, начал скрывать доходы и траты. В клинике семья получает не только медицинскую помощь для зависимого, но и понятную стратегию действий: как разговаривать, как мотивировать на лечение, как не провоцировать конфликты и не усиливать чувство стыда у человека, который и так боится признаться себе в наличии болезни.
Разобраться лучше – staciomedika-narkologicheskaya-klinika-vyvoda-iz-zapoya-moskva-otzyvy
После поступления вызова нарколог клиники «АльфаНаркология» оперативно выезжает по указанному адресу. На месте врач проводит первичную диагностику, оценивая степень интоксикации, физическое и психологическое состояние пациента. По результатам осмотра врач подбирает индивидуальный комплекс лечебных процедур, в который входит постановка капельницы с растворами для детоксикации, препараты для стабилизации работы органов и нормализации психического состояния.
Углубиться в тему – нарколог на дом круглосуточно цены в санкт-петербурге
Такая комбинация препаратов обеспечивает комплексное воздействие на организм и способствует постепенному восстановлению физического и психологического состояния пациента.
Исследовать вопрос подробнее – наркологическая клиника
Многие тянут до последнего, считая, что обращаться к наркологу «рано» или «не по статусу». На практике именно такое откладывание часто приводит к затяжным запоям, тяжёлым состояниям и разрушению социальных связей. К специалистам имеет смысл обращаться при первых признаках того, что употребление алкоголя или наркотиков перестало быть эпизодическим и управляемым.
Получить дополнительные сведения – https://narkologicheskaya-klinika-moskva11.ru/
driftdahlia.shop – A wonderful collection of items to make any space feel more personal and stylish.
Перед началом терапии проводится клиническая оценка, включающая измерение давления, осмотр кожи и глаз, проверку дыхания и анализ неврологического состояния. Вывод из запоя в клинике в Астрахани начинается только после сбора этих данных, поскольку подбор препаратов без диагностики может быть небезопасен.
Разобраться лучше – помощь вывод из запоя
grovegarnet.shop – Always find something special here, it’s a wonderful place to shop.
charmcartel.shop – Fantastic collection of trendy accessories, browsing the site is a breeze.
Некоторые состояния требуют немедленного вмешательства специалиста. Если алкогольное отравление или запойное состояние не купируется вовремя, это может привести к тяжелым последствиям для здоровья.
Подробнее тут – нарколог на дом вывод из запоя в иркутске
Перед началом терапии проводится клиническая оценка, включающая измерение давления, осмотр кожи и глаз, проверку дыхания и анализ неврологического состояния. Вывод из запоя в клинике в Астрахани начинается только после сбора этих данных, поскольку подбор препаратов без диагностики может быть небезопасен.
Получить дополнительную информацию – вывод из запоя круглосуточно астрахань
Детокс — важный этап лечения, который помогает очистить организм от токсинов и продуктов распада алкоголя или наркотиков. В клинике «ТомскМед Трезвость» используются современные капельницы и лекарственные комбинации, направленные на восстановление биохимических процессов в организме. Ниже представлена таблица с примерами капельниц, применяемых в детоксикационных программах.
Узнать больше – https://narkologicheskaya-klinika-v-tomske18.ru/narkologicheskaya-klinika-v-tomske-otzyvy
Сочи – мёд отличный, кладмену респект и уважуха! теперь мы ваши постоянные клиенты) мефедрон вот как то это всё не ахуенно.Если вас не затруднит проясните ситуацию.Просим прощения,все нормально,мы сами разобрались. Да уже и так понятно что перепутали. Пробуй сразу и на кишку, и по носу мб определишь что же тебе прислали по ошибке.
Вывод из запоя в клинике формируется на основе последовательных процедур, направленных на стабилизацию физиологических функций и устранение токсических влияний. Такой подход позволяет корректно регулировать состояние пациента и контролировать интенсивность симптомов. Рабочие алгоритмы включают оценку метаболических процессов, анализ соматических показателей и определение степени неврологических изменений. В результате создается структурированная модель помощи, ориентированная на восстановление адаптивных возможностей организма. Процессы выполняются под контролем специалистов, что обеспечивает прогнозируемый терапевтический эффект и снижает вероятность осложнений.
Подробнее – вывод из запоя клиника в кемерове
Процедура лечения начинается с установки внутривенной капельницы, через которую вводятся детоксикационные растворы, способствующие быстрому выведению токсинов и восстановлению водно-электролитного баланса. При необходимости врач назначает дополнительные препараты, такие как седативные средства для купирования симптомов абстинентного синдрома, гепатопротекторы для поддержки печени и кардиопротекторы для нормализации работы сердца.
Получить дополнительную информацию – анонимный вывод из запоя
тяговые аккумуляторы цена hawker АКБ штабелера Jungheinrich — премиум-класс для складов.
Подобная структура наблюдения облегчает анализ изменений и способствует формированию объективной картины состояния. Наличие унифицированной системы контроля помогает выстраивать терапию последовательно и точно.
Ознакомиться с деталями – http://
магазин мега
calmcrest.shop – The site’s calm design makes for a delightful shopping experience, and the variety of items is great.
Когда основные симптомы устранены, пациенту необходим поддерживающий этап. Вывод из запоя в клинике в Астрахани дополнительно включает рекомендации по коррекции сна, восстановлению питания и снижению эмоционального напряжения.
Детальнее – нарколог вывод из запоя в астрахани
Сигналом к тому, что пора обсудить вариант кодирования с наркологом, служит не один какой-то эпизод, а совокупность симптомов. Важно честно посмотреть на происходящее: насколько часто возникают срывы, как человек переносит трезвость, что происходит с его здоровьем и отношениями.
Подробнее тут – https://kodirovanie-ot-alkogolizma-korolyov11.ru/ehffektivnoe-kodirovanie-ot-alkogolizma-v-korolyove
Наркологическая клиника опирается на комплексную модель оценки состояния, обеспечивающую последовательное восстановление функций организма. В клинике применяется система многоуровневого контроля, направленная на выявление нарушений и определение оптимальной тактики вмешательства. Такой подход позволяет поддерживать стабильность состояния даже в условиях выраженных клинических проявлений. Структурированная работа направлена на снижение токсической нагрузки, коррекцию метаболических процессов и восстановление адаптивных механизмов. Анализ проводится с учётом физиологических особенностей пациента и динамики изменений.
Подробнее тут – лечение в наркологической клинике в владивостоке
Наркологическая клиника опирается на комплексную модель оценки состояния, обеспечивающую последовательное восстановление функций организма. В клинике применяется система многоуровневого контроля, направленная на выявление нарушений и определение оптимальной тактики вмешательства. Такой подход позволяет поддерживать стабильность состояния даже в условиях выраженных клинических проявлений. Структурированная работа направлена на снижение токсической нагрузки, коррекцию метаболических процессов и восстановление адаптивных механизмов. Анализ проводится с учётом физиологических особенностей пациента и динамики изменений.
Детальнее – http://narkologicheskaya-klinika-vo-vladivostoke18.ru
Покраска ванны Ремонт мебели
Наркологическая клиника в Долгопрудном помогает в ситуациях, когда:
Получить дополнительную информацию – кодирование от алкоголизма выезд на дом
Lunivora Hub Store – Responsive site, items are interesting and navigation feels smooth.
Долго что то ты пробуешь:)интересно всё таки бошки, марихуану Прекрати несчастный!мин заказ от 1гр. Вопрос?! Что дальше? Что лучш
torivo site – Intuitive design ensures browsing is quick and content is clear.
Stylish discoveries – Great experience with products that feel special.
?????? 888starz casino ?? ??? ???? ??????????? ???? ???? ????? ???? prostrednictvim ???????? ? ??? ????? ??????? ??????? ??? ???????? ????????? ?????????? ??? ?? ????. ??? ?????? ?????? ?????? ?? ??????? ???? ???? ???? ???????? ??? ?? ??? ??????? ???????? ?????? ???? ?????? ??????. ?????? ?????? ?? 888starz casino ????? ?????? ????????? ? ??? ???? ???????? ??????? ?? ???????? ??????? ?????? ????? ???????? ???????.
???? 888starz casino ?????? ?? ??????????? ???? ????? ??????? ?????? ???????? ??? ????? ????? ????? ?????? ???? ??? ??? ???? ??????. ???? ???????? ??????? ????? ??????? ??? ?????? ?? ?????? ?????????? ? ??? ??? ????? ???? ??????????? ???????? ????? ???????. ?????? experience ????? ?? 888starz casino ???? ??????? ??????? ???????? ? ??? ???? ???????? ????? ????? ???????? ??????? ???????? ?? ???????? ???????.
تحميل 888starz اخر إصدار https://888starzegypt2026.com/apk/
cozy hollow shop – Came upon this site, pricing seems fair and transparent.
Для повышения эффективности лечения наркологическая клиника применяет стандартизированные методы, включающие мониторинг жизненно важных параметров, корректировку фармакотерапии и оценку неврологических показателей. Совокупность таких мер делает процесс более предсказуемым и снижает вероятность осложнений. Кроме того, практическая часть работы включает регулярную проверку метаболических функций, что способствует точному дозированию препаратов и своевременному изменению схем. Это позволяет поддерживать физиологическую устойчивость организма даже при интенсивной нагрузке и сохранять стабильность состояния на протяжении всего периода терапии.
Подробнее можно узнать тут – наркологическая клиника стационар пенза
Ниже приведены ключевые элементы, которые отражают базовую структуру процессов, формирующих последовательность лечебных мероприятий. Они помогают подробно рассмотреть основные направления работы и понять роль каждого звена в общей терапевтической системе.
Подробнее тут – http://narkologicheskaya-klinika-penza18.ru/narkologicheskaya-pomoshh-penza/https://narkologicheskaya-klinika-penza18.ru
Кодирование не является чудесным выключателем тяги, но оно может стать сильным инструментом, который помогает закрепить решение бросить пить и даёт организму время восстановиться. Врач формирует у пациента устойчивую установку на отказ от алкоголя и подкрепляет её медикаментозно или психотерапевтически. При этом важен не только сам факт процедуры, но и то, как она встроена в общий план лечения: была ли проведена детоксикация, есть ли поддерживающая терапия, подключена ли реабилитация, работает ли семья с собственным выгоранием и созависимостью. Именно поэтому обращение за кодированием по месту жительства в Королёве удобно: можно не только выполнить саму процедуру, но и организовать наблюдение, при необходимости скорректировать тактику, не уезжая далеко от дома.
Подробнее можно узнать тут – http://kodirovanie-ot-alkogolizma-korolyov11.ru/ehffektivnoe-kodirovanie-ot-alkogolizma-v-korolyove/
Вывод из запоя в клинике формируется на основе последовательных процедур, направленных на стабилизацию физиологических функций и устранение токсических влияний. Такой подход позволяет корректно регулировать состояние пациента и контролировать интенсивность симптомов. Рабочие алгоритмы включают оценку метаболических процессов, анализ соматических показателей и определение степени неврологических изменений. В результате создается структурированная модель помощи, ориентированная на восстановление адаптивных возможностей организма. Процессы выполняются под контролем специалистов, что обеспечивает прогнозируемый терапевтический эффект и снижает вероятность осложнений.
Получить дополнительные сведения – https://vyvod-iz-zapoya-kemerovo18.ru/vyvesti-iz-zapoya-kemerovo
1win синий официальный сайт
В глубинах холодного моря жил древний Кракен, охранявший зеркала памяти. Эти зеркала не отражали лица — они показывали страхи, мечты и забытые решения каждого, кто осмеливался взглянуть в их гладь. Когда шторм поднимался, щупальца Кракена тянулись к поверхности, защищая зеркала от жадных глаз. Моряки верили: если зеркало треснет, море потеряет равновесие. Поэтому легенда учила уважать тайны глубин и помнить, что не каждое отражение стоит искать.
Детокс — важный этап лечения, который помогает очистить организм от токсинов и продуктов распада алкоголя или наркотиков. В клинике «ТомскМед Трезвость» используются современные капельницы и лекарственные комбинации, направленные на восстановление биохимических процессов в организме. Ниже представлена таблица с примерами капельниц, применяемых в детоксикационных программах.
Подробнее можно узнать тут – https://narkologicheskaya-klinika-v-tomske18.ru/chastnaya-narkologicheskaya-klinika-tomsk
батарея тяговая iskra Аккумуляторные батареи тяговые из Словении TAB — европейское качество, низкая цена. Идеал для штабелеров.
clevercheckout.shop – Great checkout process and a large variety of products at your fingertips.
Такое поэтапное лечение позволяет добиться устойчивого результата без стрессов и осложнений. Пациенты получают комплексную помощь, включающую как медицинские, так и психотерапевтические аспекты.
Подробнее можно узнать тут – лечение в наркологической клинике кемерово
Каждый из представленных элементов формирует устойчивую основу для дальнейшей работы и задаёт необходимый уровень контроля. Структура вмешательств адаптируется под особенности конкретного случая, что укрепляет эффективность процесса и создаёт благоприятные условия для стабилизации.
Подробнее можно узнать тут – наркологическая клиника пенза
Многие годами живут в логике: «главное — с утра выпить чуть-чуть, станет легче». На коротком промежутке времени это действительно частично снимает симптомы, но по сути лишь продлевает запой и усиливает интоксикацию. Организм не успевает переработать продукты распада алкоголя, кровь становится «тяжёлой», нарушается работа сосудов, возрастает нагрузка на сердце и мозг.
Исследовать вопрос подробнее – https://kapelnica-ot-zapoya-dolgoprudnyj11.ru/kapelnica-ot-zapoya-na-domu-v-dolgoprudnom
Наркологическая клиника в Химках — это возможность получить помощь при алкогольной и наркотической зависимости рядом с домом, а не ездить по всему региону в поисках специалистов. Для многих людей обращение к наркологу до последнего кажется чем-то «крайним»: кажется, что нужно терпеть, уговаривать себя «завязать самому», ждать подходящего момента, отпуска или «нового года с чистого листа». Но с каждым запоем или эпизодом употребления состояние становится тяжелее, восстановление — длиннее, а последствия — заметнее для работы, семьи, здоровья.
Выяснить больше – http://narkologicheskaya-klinika-himki11.ru
вот такие как ты потом и пишут не прет , не узнавая концентрацию и т д набодяжат к…. ,я вот щас жду посыля и хз ко скольки делать 250 мефедрон вот как то это всё не ахуенно.Если вас не затруднит проясните ситуацию.Хз, смотри, в тёплой кипяченке начали болтать, растворяется. Точно не рега вот такие как ты потом и пишут не прет , не узнавая концентрацию и т д набодяжат к…. ,я вот щас жду посыля и хз ко скольки делать 250
Для получения устойчивого результата наркологическая клиника использует методы, основанные на индивидуальной оценке. В работе учитываются соматические показатели, реакции нервной системы и данные лабораторных исследований. Такой формат лечения обеспечивает предсказуемое влияние на физиологические процессы и снижает вероятность осложнений. В клинике применяется непрерывный мониторинг, позволяющий своевременно корректировать лечебные меры. Работа направлена на нормализацию метаболизма, восстановление баланса внутренних систем и плавное уменьшение симптоматики.
Подробнее – наркологическая клиника вывод из запоя в владивостоке
Вывод из запоя требует комплексного контроля всех физиологических параметров. Ниже представлены основные направления наблюдения, формирующие структуру оценки состояния.
Подробнее тут – врач вывод из запоя
halvessa.shop – A minimalist design that lets the beautiful and unique products shine.
Вывод из запоя в клинике строится на основе алгоритмов, направленных на безопасное восстановление физиологических функций. Применяется стандартная система, включающая оценку состояния, подбор медикаментозных средств и постепенную адаптацию организма. Такой формат позволяет избежать резких изменений и поддерживать предсказуемую клиническую динамику. Важную роль играет наблюдение за реакцией организма, позволяющее корректировать тактику лечения в соответствии с выявленными изменениями. Последовательность действий обеспечивает структурированность процесса и повышает вероятность стабильного результата.
Узнать больше – помощь вывод из запоя в ижевске
На начальных этапах проблема редко проявляется в открытом виде, но уже есть характерные сигналы, на которые стоит обратить внимание. Человек начинает оправдывать употребление постоянной усталостью, проблемами на работе, напряжённой жизненной ситуацией. Появляется раздражение, если нет возможности выпить или принять привычную дозу, меняется круг общения, усиливается скрытность. Это время, когда помощь ещё может быть максимально щадящей по методам и по длительности, а вернуться к стабильной жизни намного проще, чем после многолетнего стажа употребления.
Получить дополнительную информацию – нарколог бесплатно москва
Do you love gambling? verified crypto deposit casinos allow you to play online using Bitcoin and altcoins. Enjoy fast deposits, instant payouts, privacy, slots, and live dealer games on reliable, crypto-friendly platforms.
Важно и то, что во время процедуры пациент находится под наблюдением. Врач может увидеть, как организм реагирует на терапию, вовремя скорректировать темп или состав инфузии, понять, достаточно ли домашнего формата или лучше рассмотреть стационар. Это принципиальное отличие от попыток лечиться дома таблетками наугад, без контроля давления и пульса.
Углубиться в тему – http://kapelnica-ot-zapoya-dolgoprudnyj11.ru/kapelnica-ot-zapoya-v-stacionare-v-dolgoprudnom/https://kapelnica-ot-zapoya-dolgoprudnyj11.ru
Многие годами живут в логике: «главное — с утра выпить чуть-чуть, станет легче». На коротком промежутке времени это действительно частично снимает симптомы, но по сути лишь продлевает запой и усиливает интоксикацию. Организм не успевает переработать продукты распада алкоголя, кровь становится «тяжёлой», нарушается работа сосудов, возрастает нагрузка на сердце и мозг.
Выяснить больше – капельница от запоя срочно
Очистка кафеля Москва Ремонт кожаной мебели Москва
Когда человек оказывается в сложной ситуации из-за длительного употребления алкоголя, важно получить быструю и квалифицированную медицинскую помощь. Запойные состояния, алкогольная интоксикация, тяжелый абстинентный синдром — все это требует своевременного вмешательства врача. Однако не всегда есть возможность или желание обращаться в стационар.
Получить дополнительные сведения – нарколог на дом круглосуточно
luxfable boutique online – Fashionable design, smooth experience and responsive pages.
Для формирования структурированной модели используются стандартизированные алгоритмы. Ниже представлена последовательность действий, определяющих ход терапевтических мероприятий.
Подробнее можно узнать тут – https://narkologicheskaya-klinika-tomsk18.ru/tomsk-narkologicheskij-dispanser
Во внимание берутся не только масштаб и длительность запоев, но и изменения в поведении. Если человек регулярно обещает «завязать с понедельника», но каждый раз срывается, если рабочие задачи всё чаще выполняются с трудом, а любые стрессовые ситуации решаются «через стакан» или «через дозу», это прямой повод не ждать критического момента. Важно помнить, что зависимость — это прогрессирующее заболевание: со временем организму требуется всё больше вещества, растёт токсическая нагрузка на сердце, печень, нервную систему, ухудшается память и концентрация.
Изучить вопрос глубже – http://narkologicheskaya-klinika-moskva11.ru/chastnaya-narkologicheskaya-klinika-v-moskve/
суббота, воскресение у них выходной Купить наркотики | Где купить наркотики? чема вещи делает!!!МХЕ “как у всех” тобиш бодяжный.. Вроде скоро должна быть нормальная партия. Пишу сейчас и ржачь пробирает.
Во внимание берутся не только масштаб и длительность запоев, но и изменения в поведении. Если человек регулярно обещает «завязать с понедельника», но каждый раз срывается, если рабочие задачи всё чаще выполняются с трудом, а любые стрессовые ситуации решаются «через стакан» или «через дозу», это прямой повод не ждать критического момента. Важно помнить, что зависимость — это прогрессирующее заболевание: со временем организму требуется всё больше вещества, растёт токсическая нагрузка на сердце, печень, нервную систему, ухудшается память и концентрация.
Получить дополнительные сведения – narkolog-besplatno-moskva
modern online store – Strong variety, fast response and a trustworthy vibe.
Winning the Games is just the beginning of the nightmare. The final pages of the book set up a world where no one is truly safe. The sense of dread is palpable even in victory. It is a perfect cliffhanger. To be ready for the sequel, you need to finish the first book. Finding a The Hunger Games pdf is the first step in a journey that will take you through the fire of rebellion and the cost of war. https://thehungergamespdf.ru/ The Hunger Games 1 Suzanne Collins Pdf
Пойже проведу опрос среди кроликов, распишу что и как, честный репорт гарантирован! бошки, марихуану ОТЛИЧНЫЙ МАГАЗИН ВСЕ НА ВЫСШЕМ УРОВНЕ!Вердикт: бля у нас опен эйр будет 11 июня у шамана пороха нету!!!вот ищу где бы взять что нибудь на подобие скорости или кокса!а тут отзывы что соду продают!
Этот информативный текст отличается привлекательным содержанием и актуальными данными. Мы предлагаем читателям взглянуть на привычные вещи под новым углом, предоставляя интересный и доступный материал. Получите удовольствие от чтения и расширьте кругозор!
Смотрите также… – https://www.basqueculinaryworldprize.com/es/home/leonor-espinosa-3-2-2
Реставрация картины Сломалась лестница
Правильная схема отопления — залог тепла и экономии в доме, а качественные комплектующие определяют надёжность системы на годы. На https://shemi-otopleniya.ru/ вы найдёте металлорукава РВД, гибкую подводку из нержавейки всех диаметров, медные трубы от 6 до 89 мм, элеваторные узлы, коллекторы и гидрострелки. Сайт предлагает всё необходимое для монтажа отопления: от подводки для смесителя до рукавов высокого давления с фланцами. Офис в Москве, доставка по России.
Эта статья предлагает живое освещение актуальной темы с множеством интересных фактов. Мы рассмотрим ключевые моменты, которые делают данную тему важной и актуальной. Подготовьтесь к насыщенному путешествию по неизвестным аспектам и узнайте больше о значимых событиях.
Получить дополнительные сведения – https://eficazpropertiesltd.com/5-reasons-why-investing-in-luxury-real-estate-in-lagos-is-a-smart-move
harborhoney.shop – Such a charming collection, perfect for any celebration!
Many players overlook the “Common” magic items, but they are great for roleplay. Xanathar’s Guide to Everything includes the “Armor of Gleaming” which never gets dirty. If you are looking for a PDF list of cosmetic magic items, our fashion-forward adventurer guide is for you. We discuss how these items can define a character’s personality. Add style and flair to your hero with the everyday magic items found in this expansion. https://xanatharsguidetoeverythingpdf.ru/ Xanathar’s Guide To Everything Expanded Racial Feats Pdf
Этот информационный материал собраны данные, которые помогут лучше понять текущие тенденции и процессы в различных сферах жизни. Мы предоставляем четкий анализ, графики и примеры, чтобы информация была не только понятной, но и практичной для принятия решений.
Лови подробности – https://lamiastampa.it/product/personalizza-la-tua-borraccia
Эта публикация содержит набор несвязанных идей, трудно применимых в практике. Мы лишь поверхностно затрагиваем различные точки зрения, не проводя глубокий анализ и не предлагая выводов.
Подробнее читать – сиалис онлайн
Maple Merit Picks – Smooth navigation, items are well-categorized and site feels solid.
В этом интересном тексте собраны обширные сведения, которые помогут вам понять различные аспекты обсуждаемой темы. Мы разбираем детали и факты, делая акцент на важности каждого элемента. Не упустите возможность расширить свои знания и взглянуть на мир по-новому!
Эксклюзивная информация – https://soluna.co/?p=130543
всем советую магазин тс роботает ровно, знает толк в бизе, всегда беру у них и все ровно и надежно, товар выший класс ,куриер вообще красавчик все делает четко и надежно , магазину и курьеру оценка 10из 10 балов все ровно, ДОСТАВКА БОМБА ХОТЬ В АРТИКУ ДОСТАВЯТ Купить наркотики | Где купить наркотики? “Приезжаю к месту,вижу дом обхожу кооператив который мне нужен (ну я так думал)”Магазин очень хороший всё чётко и быстро и селер грамотный вы правы Опасный тип!)считаю нужным что то предпринять ТС!
The “Kings of Sin” concept is intriguing, assigning a sin to each hero. Dante’s wrath is his defining trait, but it is also his weakness. Vivian forces him to confront this weakness. Readers often search for the King of Wrath PDF to see how this thematic element is handled. It adds a layer of depth to the character study. Dante is not just angry; he is wrathful, a specific and destructive emotion that he must learn to master.
Подобная структура наблюдения облегчает анализ изменений и способствует формированию объективной картины состояния. Наличие унифицированной системы контроля помогает выстраивать терапию последовательно и точно.
Разобраться лучше – http://narkologicheskaya-klinika-vo-vladivostoke18.ru/
clean style market – Pages are neat, finding what I needed was simple.
Этот интересный отчет представляет собой сборник полезных фактов, касающихся актуальных тем. Мы проанализируем данные, чтобы вы могли сделать обоснованные выводы. Читайте, чтобы узнать больше о последних трендах и значимых событиях!
Есть чему поучиться – https://frrressh.in/blog/benefits-of-compression-socks-for-flying
The struggle against the venin is a fight for the soul of the world. The characters must give everything they have. The Onyx Storm epub is the record of their sacrifice. The pacing is perfect, keeping you on the edge of your seat. The digital copy is a great way to support the author. It is a story of hope in the darkness. https://onyxstormepub.ru/ Onyx Storm Reddit Pdf
clevercove.shop – I always enjoy browsing the wide selection, shopping here is so much fun.
Выводил 7k казино деньги несколько раз уже. Все приходит в срок, без задержек и комиссий скрытых.
Эта статья сочетает в себе как полезные, так и интересные сведения, которые обогатят ваше понимание насущных тем. Мы предлагаем практические советы и рекомендации, которые легко внедрить в повседневную жизнь. Узнайте, как улучшить свои навыки и обогатить свой опыт с помощью простых, но эффективных решений.
Детали по клику – https://italianlanguages.com/how-to-learn-italian-fast
МАГАЗИНУ надо бы по ровнее работать! бошки, марихуану Сделал 4 затяжки с батла, почувствовал секунд через 30 первое прикосновение.))) Затем не много стал теряться в пространстве и во времени, а когда поднялся домой, и открыл дверь (5 мин спустя) меня перекрыло нах, я не мог закрыть дверь и мне всё казалось что кто то держит, у меня начинается паника) я начинаю кричать за дверь: – ты кто такой отпусти, иди отсюда………….. Зову родаков, которых дома нет слава Богу!!!!! вообщем стоял минут 20 у двери) а когда пошёл в комнату мне казалось что кто то за мной ходит!!!ровный магазин Один из старейших!!!
driftdomain.shop – I love how easy it is to shop here, and the products are so unique.
Ниже представлена последовательность основных шагов терапевтического процесса.
Подробнее тут – наркологические клиники алкоголизм владивосток
Marigold Market Hub Store – User-friendly, simple navigation and checkout feels effortless.
явно не 15-ти минутка, почитайте отзывы в соответвующей теме. Качество товара на высоте у нас всегда . https://beljakovyv-otpuske.ru На ацетоне делай, он быстро выветривается и не пахнет совсем!У меня всё норм, реальную отправку написали в треке. Я волновался на счёт этого после сообщений подход к клиенту 5+ (все объяснили, трек сразу скинули)
Новый адрес стабильно работает уже неделю. 7k рабочее зеркало без лагов и сбоев.
Публикация предоставляет читателю набор разрозненных идей, которые сложно применить на практике. Мы лишь слегка касаемся разных точек зрения, не углубляясь в анализ и не предлагая никаких выводов.
Вот – рулетка онлайн
style picks store – Browsed for the first time, everything opened quickly and checkout feels simple.
В жизни крупных городов часто возникают ситуации, когда стрессы и быстрый ритм жизни приводят к развитию зависимости. Когда проблема становится очевидной, важно незамедлительно обратиться за помощью. В таких случаях вызов нарколога на дом может стать не только удобным, но и наиболее эффективным вариантом. Это позволяет получить квалифицированное лечение в привычной обстановке, сохраняя при этом полную анонимность и конфиденциальность.
Узнать больше – https://narcolog-na-dom-moskva55.ru/narkolog-na-dom-kruglosutochno-moskva/
Can you be more specific about the content of your article? After reading it, I still have some doubts. Hope you can help me.
elmembellish.shop – Great place for finding high-quality, artisanal pieces.
что значит “самый норм микс” ? 1 грамм 250го на 10 грамм основы вполне нормально. если любитель лютой жести – сделай 1к5 чтоли, будешь улетать в астрал с малюсенького кропалика https://shacat.ru Аптечные травы вообщем.Большое спасибо от Сиборяка из Москвы, ваш магаз резко скрасил жизнь во время командировки в Москве. Всем советую таряться здесь)))
Группа препаратов
Выяснить больше – капельница от запоя вызов
На основании первичного осмотра специалист подбирает индивидуальную схему лечения. Это обычно включает постановку внутривенных капельниц с растворами для быстрого выведения токсинов, стабилизации водно-электролитного баланса и поддержки работы печени, сердца и нервной системы. По мере необходимости врач назначает седативные и кардиопротекторные препараты для стабилизации психоэмоционального состояния пациента и снижения нагрузки на сердце.
Детальнее – психиатр нарколог на дом краснодар
типография в москве офсетная печать
Mousely – Browsing was smooth, pages loaded well, and completing the order was quick.
marketmagnet store – Smooth interface, items are easy to find and descriptions are informative.
Все продолжает работать без остановок. Доступно круглосуточно, без выходных.
https://www.ttlxshipping.com/forum/topic/252921/1%D1%85%D0%91%D0%B5%D1%82-%D0%9F%D1%80%D0%BE%D0%BC%D0%BE%D0%BA%D0%BE%D0%B4-2026:-1xburn—%D0%91%D0%BE%D0%BD%D1%83%D1%81-32,500-%D1%80%D1%83%D0%B1&p=2
Такое поэтапное лечение позволяет добиться устойчивого результата без стрессов и осложнений. Пациенты получают комплексную помощь, включающую как медицинские, так и психотерапевтические аспекты.
Получить дополнительные сведения – http://narkologicheskaya-klinika-kemerovo18.ru
ОЭРН – профессиональный портал для верификации компетенций и статуса специалистов по экспертизе недр. Ресурс упрощает выбрать специалиста по специализациям ТПИ, нефть и газ, геология и ГРР – снижая риски при подписании отчётов и отчетов в проектах: https://oern2007.ru/
Этот обзор посвящен успешным стратегиям избавления от зависимости, включая реальные примеры и советы. Мы разоблачим мифы и предоставим читателям достоверную информацию о различных подходах. Получите опыт многообразия методов и найдите подходящий способ для себя!
Исследовать вопрос подробнее – https://sibtehnika.ru/bitrix/redirect.php?goto=https://vyvod-iz-zapoya-tolyatti0.ru
Откладывая обращение к специалистам в Ивантеевке, семья берёт на себя двойную нагрузку — и моральную, и медицинскую. Домашние попытки «лечить» смесью случайных таблеток, седативов и народных средств часто маскируют симптомы, но не снимают основную угрозу. При этом ни у кого нет возможности круглосуточно контролировать давление, пульс, работу сердца. Именно поэтому безопасный вывод из запоя — это не ожидание «когда само пройдёт», а продуманный набор медицинских шагов под наблюдением врача.
Ознакомиться с деталями – vyvod-iz-zapoya
качество правда не очень, именно по продолжительности эффекта- в разных концентрациях его можно варьировать как тебе хочется=)))) кокаин А Всем Добра и Здоровья Близким)))А пока всё приходится делать в ручную, так что ОГРОМНАЯ просьба не пишите в аську\скайп с вопросами типа “как прёт ?” “ко скольки бодяжить ?” и т.п. ! Не загружайте людей ) не болела чтоб башка.
Обращение в местную клинику даёт важное преимущество — доступность. Здесь можно пройти диагностику, детоксикацию, вывод из запоя, курс лечения и реабилитации в привычном городе, без выснаживающих переездов. Пациенту легче решиться на стационар, когда он понимает, что близкие рядом и в любой момент могут приехать, поучаствовать в обсуждении плана терапии, привезти необходимые вещи. При этом подход остаётся профессиональным: учитываются стаж зависимости, сопутствующие заболевания, психоэмоциональное состояние, семейная ситуация. Лечение строится не вокруг одной «волшебной» процедуры, а как последовательный маршрут — от первой консультации до выхода в стабильную ремиссию.
Детальнее – https://narkologicheskaya-klinika-chekhov11.ru/narkologicheskaya-klinika-sajt-v-chekhove
Office Opal Finds – The clean design makes browsing office items simple and enjoyable.
clickcourier.shop – Quick shipping and a user-friendly layout, definitely worth visiting.
Hi i am kavin, its my first time to commenting anywhere, when i read this post i thought i could also make comment due to this sensible piece of writing.
https://al-vent.ru/
Vogue Picks – Stylish selection, browsing feels quick and effortless.
The arena is a character in itself. It is alive, malicious, and controlled by Gamemakers. From firestorms to freezing nights, it tests the tributes in every way. The descriptions of the environment are immersive. If you want to feel the heat and the cold, read the book. A The Hunger Games pdf is a portal to this dangerous world, allowing you to explore the arena from the safety of your own home.
Этот обзор предлагает свежий взгляд на предметы, которые и без того привычны. Мы упоминаем факты, не имеющие большого значения, и события с неясной важностью, но они присутствуют здесь.
Подробнее читать – мефедроновая зависимость
fashion finds store – Great setup, navigating products is simple and descriptions are detailed.
Когда хочется яркой игры и стабильного доступа к бонусам, стоит выбрать Кактус казино официальный сайт. Платформа предлагает удобную регистрацию и быстрый вход. Бонусы доступны сразу после создания аккаунта. Начни игру уже сегодня: cactus casino вход
elvarose.shop – A wonderful selection of items, definitely one of my favorite decor shops.
смазка, растворяющаяся в хладагенте
Клиника «ВладТрезвие Центр» работает в круглосуточном режиме и готова оказать помощь жителям Владивостока и прилегающих районов в любое время суток. Врачи-наркологи прибывают по вызову в течение часа, имеют при себе все необходимые препараты и оборудование для проведения детоксикации на дому. При необходимости пациента доставляют в стационар, где лечение проходит под постоянным контролем медицинского персонала.
Выяснить больше – https://vyvodiz-zapoya-vladivostok18.ru/vyvod-iz-zapoya-staczionar-vladivostok/
codigo promocional 1xbet chile 2026
печать брошюр
текст запрошення на хрестини
Классный магаз, почитал отзывы, нам в киров бы не помешал такой движ. Ассортимент огонь, давайте в наш славный город. Всем щастья! мефедрон Брал пару раз все было чотко!! всем советую)П.С.С. отвечать, цитировать это сообщение не нужно, удалю позже. Здрасте Бразы!!!!:hello:
Paws Pavilion Finds – Cute and playful items, navigating the store is straightforward.
Muscle Myth Finds – Legit products, transparent descriptions, and pricing feels reasonable.
Plant Plaza Showcase – Great plant choices, moving through pages felt effortless.
The sheer utility of the “Dungeon Master’s Tools” chapter cannot be overstated. Xanathar’s Guide to Everything covers everything from falling to sleeping. DMs looking for a PDF cheat sheet of these rules often visit our site. We condense the complex rules into quick-reference cards. Speed up your adjudication and keep the focus on the adventure with our streamlined tool summaries.
marketmirth online store – Smooth layout, finding items is quick and site feels easy to use.
Kush официальный сайт это стабильный доступ к азартным развлечениям. Регистрация простая и понятная. Бонусы доступны сразу после входа. Присоединяйся к игре: куш казино вход
Quenvia Browse – Attractive and organized, navigating and checking out was effortless.
Shop Run River – Attractive design, navigating categories is effortless and purchasing was smooth.
Для формирования структурированного лечения используются методы, обеспечивающие анализ текущей клинической картины. Ниже представлены ключевые направления, задействованные при формировании терапевтических решений.
Выяснить больше – http://narkologicheskaya-klinika-vo-vladivostoke18.ru/narkolog-vladivostok-otzyvy/
Хочу сказать большое спасибо за бонус за помошь сайту, зе бест мефедрон 31 страницу отзывов почитайте – увидите всех. Кто то только что зарегился , ктото год назад , кому что аккаунт блокнули или забыл пароль от старого акка – он зарегился по новой .вот вот такая же история! надо разобраться с этим вопросом! Братья так же ровны как в совестсокм союзе
The sophistication of the prose sets this book apart from many of its peers. Ana Huang writes with a maturity that elevates the material. The internal monologues are insightful. If you are looking for a King of Wrath PDF, you will find a text that is well-edited and polished. It is a professional piece of work that respects the reader’s time and intelligence.
Olive Outlet Boutique – Great range of items, fair pricing, and checkout was smooth.
Skin Serenade Boutique Picks – Gorgeous skincare items, site navigation is clear and shopping feels effortless.
evarica.shop – Always find exactly what I’m looking for, stylish and practical.
Orla Styles – Impressive selection, buying items was easy and straightforward.
аккумуляторы на электропогрузчик купить TAB аккумуляторы тяговые: мощные, безопасные, для ричтраков и вилочных погрузчиков Heli.
Spruce Spark Hub – Bright and clean, products are easy to browse and checkout went smoothly.
Перед началом терапии проводится клиническая оценка, включающая измерение давления, осмотр кожи и глаз, проверку дыхания и анализ неврологического состояния. Вывод из запоя в клинике в Астрахани начинается только после сбора этих данных, поскольку подбор препаратов без диагностики может быть небезопасен.
Подробнее можно узнать тут – скорая вывод из запоя
Наркологическая клиника применяет стандартизированные схемы, направленные на безопасное и постепенное восстановление. Каждый этап вмешательства согласуется с текущим состоянием пациента, что обеспечивает предсказуемый характер изменений. Модель работы включает оценку реакции организма, проверку устойчивости внутренних систем и уточнение динамики метаболических процессов. Последовательность действий формируется с учётом адаптационных возможностей и направлена на достижение стабильного результата.
Узнать больше – http://narkologicheskaya-klinika-vo-vladivostoke18.ru/narkolog-vladivostok-otzyvy/
Shop Marqvella – This shop has a great look, the items come across as carefully chosen and stylish.
juniper picks store – Pleasant setup, browsing felt easy and I marked items I liked.
На 7k часто появляются акции, иногда реально полезные.
четко, без слов ! https://familie-degu.ru люди которые делают заказы через ВК по меньшей мере идиоты. Особенно когда ИМ самим что то предлагают.почему ты наводишь панику? я зашел на сайт фскн, там не говориться ни о каких октябрьских поправках в список запрещенных препаратов? реальный магаз всем советую
Наши врачи оперативно приезжают к пациенту, проводят осмотр, купируют симптомы абстиненции и приступают к восстановлению жизненно важных функций. Всё это — в привычной для пациента обстановке, без стресса и лишней огласки. Мы обеспечиваем не только медицинскую помощь, но и эмоциональную поддержку, создавая условия для начала пути к выздоровлению.
Подробнее – https://narcolog-na-dom-v-moskve55.ru/vyzov-narkologa-na-dom-v-krasnogorske/
Если в процессе выявляются нестабильные витальные показатели, нарастающая дезориентация или признаки дыхательной недостаточности, маршрут немедленно переводится в стационар «УралМедЦентра» с сохранением уже собранной информации — без повторных очередей и «история заново».
Подробнее можно узнать тут – вызвать врача нарколога на дом
Decouvrez notre selection des 5 meilleurs nouveaux casinos en ligne de 2026 Profitez de bonus de bienvenue
genereux de tours gratuits de machines a sous populaires et
de paiements rapides Tous les sites sont testes securises et
sans CRUKS Jouez des maintenant sur un casino fiable et
tentez de decrocher le jackpot
Pantry Goods Online – Everything feels organized, moving around the site is effortless.
Преимущества домашнего лечения также заключаются в индивидуальном подходе. Врач, находясь в вашем доме, может более тщательно изучить ситуацию, провести необходимую диагностику и подобрать курс лечения, который идеально подойдет вашему состоянию. В отличие от клиники, где внимание врача часто ограничено временем, на дому можно уделить пациенту больше времени, подбирая лечение с учетом его особенностей.
Выяснить больше – http://narcolog-na-dom-moskva55.ru/narkolog-na-dom-moskva-tseny/
Poplar Prime Hub – Streamlined interface, locating items was easy and intuitive.
Neon Notch – Loved the bright design, the site really has its own character.
Изготовление стеллажных систем под ключ позволяет заказчику сократить время запуска склада. Мы берем на себя проектирование и производство. Готовые конструкции поставляются в согласованные сроки. Это упрощает реализацию проекта: стеллаж фронтальный паллетный
codigo promocional 1xbet bienvenida 2026
Marqesta Essentials – Polished design, everything loads quickly and checkout feels safe.
QuillQuarry Picks – Interesting items, finding what I needed was fast and simple.
Ruvina Corner – Simple and clean, navigation is intuitive and checkout felt smooth.
Запой — это не просто усиленное похмелье, а критическое состояние алкогольной интоксикации, при котором организм оказывается неспособным самостоятельно вывести накопившиеся токсины. При затяжном приёме алкоголя страдает не только печень — нарушаются функции сердечно-сосудистой системы, тормозятся нейрохимические процессы в головном мозге, развивается выраженная дегидратация и электролитный дисбаланс. Первая помощь в такой ситуации — экстренная инфузионная терапия, которую мы проводим в наркологической клинике «Источник Здоровья» в Балашихе.
Исследовать вопрос подробнее – https://kapelnica-ot-zapoya-moskva1.ru/kapelnica-ot-zapoya-cena-v-balashihe
cloudcurio.shop – Great products and a really enjoyable site to shop on, I’ll definitely be back.
На месте врач проводит первичный осмотр, измеряет давление, пульс, сатурацию, оценивает уровень интоксикации и абстиненции. Далее назначается инфузионная терапия — капельница, направленная на дезинтоксикацию, восстановление электролитного баланса, купирование тревожности и нормализацию сна.
Углубиться в тему – https://narcolog-na-dom-v-moskve55.ru/vyzov-narkologa-na-dom-v-krasnogorske/
заказать эвакуатор Екатеринбург
аккумулятор для комацу погрузчик купить Аккумуляторные батареи тяговые из Словении TAB — европейское качество, низкая цена. Идеал для штабелеров.
exploreember.shop – Great selection of warm, trendy items that always impress.
Opal Orio – Unique finds, intuitive navigation, and overall shopping experience is enjoyable.
Связался с продавцом вполне адекватный!Заказал щас жду адресса Купить кокаин, бошки, гашиш открывайте все города все только рады будутследить не могли однозначно Ровный магаз , отвечаю
Skynaro Spot Picks – Trendy collection, site is user-friendly and item descriptions are helpful.
купить биткоин
Starlight Picks – Clean and organized, product descriptions are helpful and checkout was simple.
cual es el codigo promocional 1xbet
Капельница от запоя является неотъемлемой процедурой при острых и хронических отравлениях алкоголем. Она помогает стабилизировать состояние пациента, избежать тяжелых последствий и максимально быстро вернуться к нормальной жизни. Вызов врача для проведения процедуры рекомендуется в следующих ситуациях:
Получить дополнительные сведения – http://kapelnica-ot-zapoya-sochi0.ru
Такая схема лечения делает процесс последовательным и контролируемым. Врачи клиники сопровождают пациентов на всех стадиях, помогая преодолеть как физическую, так и психологическую зависимость. Особое внимание уделяется возвращению человека к активной и стабильной жизни без употребления алкоголя или наркотиков.
Исследовать вопрос подробнее – наркологическая клиника лечение алкоголизма ижевск
Для получения устойчивого результата наркологическая клиника использует методы, основанные на индивидуальной оценке. В работе учитываются соматические показатели, реакции нервной системы и данные лабораторных исследований. Такой формат лечения обеспечивает предсказуемое влияние на физиологические процессы и снижает вероятность осложнений. В клинике применяется непрерывный мониторинг, позволяющий своевременно корректировать лечебные меры. Работа направлена на нормализацию метаболизма, восстановление баланса внутренних систем и плавное уменьшение симптоматики.
Детальнее – наркологическая клиника
Savings Spot – Excellent deals around, browsing feels natural and fast.
Этот подход имеет несколько ключевых преимуществ, которые обеспечивают комфорт, безопасность и эффективность лечения.
Подробнее можно узнать тут – http://narcolog-na-dom-moskva55.ru/vyzov-narkologa-na-dom-moskva/https://narcolog-na-dom-moskva55.ru
Для формирования структурированного лечения используются методы, обеспечивающие анализ текущей клинической картины. Ниже представлены ключевые направления, задействованные при формировании терапевтических решений.
Подробнее – http://narkologicheskaya-klinika-vo-vladivostoke18.ru
easy Kevrina shop – Site looks credible, placing an order seems straightforward.
Ultimately, the book is a critique of war and the way we send children to fight battles started by adults. It is a timeless message. The Hunger Games is more than just a YA novel; it is a piece of political literature. To understand its full impact, you must read it. Whether via a library loan or a The Hunger Games pdf, engaging with this text is a powerful experience that challenges readers to think about their own society.
Для получения устойчивого результата наркологическая клиника использует методы, основанные на индивидуальной оценке. В работе учитываются соматические показатели, реакции нервной системы и данные лабораторных исследований. Такой формат лечения обеспечивает предсказуемое влияние на физиологические процессы и снижает вероятность осложнений. В клинике применяется непрерывный мониторинг, позволяющий своевременно корректировать лечебные меры. Работа направлена на нормализацию метаболизма, восстановление баланса внутренних систем и плавное уменьшение симптоматики.
Детальнее – narkologicheskaya-klinika-vo-vladivostoke18.ru/
Психологическая помощь не менее важна: наши специалисты проводят как индивидуальные, так и групповые сеансы, где вы учитесь справляться с тревогой, формировать новые навыки стресс-менеджмента и находить мотивацию к трезвому образу жизни. Диетолог составит персональный план питания, учитывающий потребности восстановленного организма, а мобильное приложение клиники позволит оставаться на связи с врачом 24/7 — вы всегда получите совет и поддержку.
Подробнее можно узнать тут – http://kapelnica-ot-zapoya-moskva1.ru
1win официальный зеркало скачать
В глубинах холодного моря жил древний Кракен, охранявший зеркала памяти. Эти зеркала не отражали лица — они показывали страхи, мечты и забытые решения каждого, кто осмеливался взглянуть в их гладь. Когда шторм поднимался, щупальца Кракена тянулись к поверхности, защищая зеркала от жадных глаз. Моряки верили: если зеркало треснет, море потеряет равновесие. Поэтому легенда учила уважать тайны глубин и помнить, что не каждое отражение стоит искать.
Этот сборник информации привлекает множеством мелких деталей и необычных ракурсов. Мы предлагаем взгляды, редко полезные, но способные немного разнообразить знакомство с темой.
Подробнее читать – сиалис онлайн
В этой статье рассматриваются различные аспекты избавления от зависимости, включая физические и психологические методы. Мы обсудим поддержку, мотивацию и стратегии, которые помогут в процессе выздоровления. Читатели узнают, как преодолеть трудности и двигаться к новой жизни без зависимости.
Подробнее – http://142.250.112.119/url?q=https://vyvod-iz-zapoya-tolyatti0.ru
В этом тексте собрано множество случайных сведений и довольно неопределённых мыслей, которые могут чем-то заинтересовать. Мы отмечаем моменты, которые не особенно важны, но всё же занимают своё место в повествовании.
Вот – казино с быстрым выводом
И что толку за легалом охотиться. https://homelifeorganization.ru не плохой товарКстати в другом доверенном магазине у меня тоже была задержка в курьерке , трек не бился, в базе тоже его не было при прозвоне в курьерку…может действительно из-за Олимпиады (или во время ее проведения) курьерки стали чаще проверять.. Да хватает придурков, только смысл писанины этой , что он думает что ему за это что то дадут ))) кроме бана явно ничего не выгорит )))! Тс красавчик брал 3 раза по кг сделки и всегда все чётко ! Жду пока появиться опт на ск!
codigo promocional 1xbet espana
Pearl Pantry Collection – Simple and tidy layout, shopping felt calm and efficient.
Особое внимание уделяется безопасности. Используются препараты нового поколения, снижающие нагрузку на печень, почки и сердечно-сосудистую систему. Процесс лечения проходит под постоянным наблюдением медперсонала, что позволяет быстро реагировать на любые изменения состояния пациента. Все данные о лечении строго конфиденциальны — информация не передаётся третьим лицам и не фиксируется в общедоступных базах.
Получить больше информации – лечение в наркологической клинике в томске
Prime Parcel Store – Smooth delivery process, finding items was easy and fast.
Лечение в «ИжТрезвоМед Центр» проходит поэтапно, с акцентом на безопасность и эффективность. Каждый этап направлен на достижение конкретных целей, от детоксикации до психотерапии. В таблице представлена структура лечебного процесса:
Узнать больше – наркологическая клиника
neovanta.shop – The site has a great selection, and moving around is smooth and easy.
Marqvella Online – This store has a sleek feel, with products that look intentionally chosen.
Saffron Street Market – Bright and lively, browsing items was simple and checkout went smoothly.
«Ижевский Центр Трезвых Решений» — это частное медицинское учреждение, где проводится лечение всех форм алкогольной и наркотической зависимости. Программы терапии разработаны на основе международных рекомендаций и включают не только медикаментозное воздействие, но и психологическую поддержку. Все процедуры проходят анонимно, без постановки на учёт, что особенно важно для пациентов, желающих сохранить конфиденциальность.
Получить дополнительную информацию – наркологическая клиника наркологический центр в ижевске
Quoralia Finds – Lovely layout, images are sharp and product details make shopping straightforward.
Ниже представлена последовательность основных шагов терапевтического процесса.
Получить дополнительные сведения – http://narkologicheskaya-klinika-vo-vladivostoke18.ru/chastnaya-narkologicheskaya-klinika-vladivostok/
Группа препаратов
Ознакомиться с деталями – http://kapelnica-ot-zapoya-sochi0.ru
falnora.shop – This store has everything I need, and shopping is a breeze.
Эвакуаторы в Екб
Opal Ornate Hub – The designs are impressive, browsing was effortless, and the quality feels premium.
Skynvanta Boutique – Modern selection, pages load quickly and finding products is simple.
Такое поэтапное лечение позволяет добиться устойчивого результата без стрессов и осложнений. Пациенты получают комплексную помощь, включающую как медицинские, так и психотерапевтические аспекты.
Подробнее тут – https://narkologicheskaya-klinika-kemerovo18.ru/narkologicheskaya-klinika-v-kemerovo-anonimno/
Stitchery Boutique Picks – Sleek layout, products are displayed clearly and shopping was a breeze.
Добрый день! А можно поинтересоваться – в связи с чем сменилась курьерская служба? https://beanbox.ru минималка СК и рег? и внесите ясность”В Лс загораеться сообщениее,Захожу там координаты клада” У нас интернет-магазин, а не “шаурма у метро”. Личные встречи не возможны,”ибо по долгу службы тесно связан”(вот как раз наверное из-за этого)… Про кидал необоснованное заявление, такие речи лучше оставить при себе… В грубой форме вам никто не отвечал, вам вполне доходчиво сказали как и что….
Navigating the politics of Basgiath has never been more deadly for the cadets. Violet is forced to make impossible choices that will shape the future of the continent. By choosing the Onyx Storm epub, you ensure that you have the story at your fingertips whenever inspiration strikes to read. The magical theory is expanded, offering a harder magic system than previously seen. It is a long book, but the pacing makes it fly by. The digital edition is perfect for night owls who want to read without waking up the whole house.
Этот обзор посвящен успешным стратегиям избавления от зависимости, включая реальные примеры и советы. Мы разоблачим мифы и предоставим читателям достоверную информацию о различных подходах. Получите опыт многообразия методов и найдите подходящий способ для себя!
Детальнее – http://ejeton.cn/ADClick.aspx?SiteID=206&ADID=1&URL=https://vyvod-iz-zapoya-tolyatti0.ru
Современная наркологическая клиника — это не просто медицинское учреждение, где проводят лечение зависимостей. Это система комплексной поддержки, объединяющая врачей, психологов, терапевтов и специалистов по реабилитации. В клинике «ТомскМед Трезвость» созданы комфортные условия, где лечение проходит анонимно, бережно и с опорой на доказательную медицину. Каждое вмешательство назначается строго по показаниям, а терапия направлена не только на физическое очищение организма, но и на восстановление психоэмоционального баланса пациента.
Подробнее – http://narkologicheskaya-klinika-v-tomske18.ru
Эта статья сочетает в себе как полезные, так и интересные сведения, которые обогатят ваше понимание насущных тем. Мы предлагаем практические советы и рекомендации, которые легко внедрить в повседневную жизнь. Узнайте, как улучшить свои навыки и обогатить свой опыт с помощью простых, но эффективных решений.
Раскрыть тему полностью – https://soluna.co/?p=130543
Лечение в «ИжТрезвоМед Центр» проходит поэтапно, с акцентом на безопасность и эффективность. Каждый этап направлен на достижение конкретных целей, от детоксикации до психотерапии. В таблице представлена структура лечебного процесса:
Разобраться лучше – https://narkologicheskaya-klinika-v-izhevske18.ru/narkologi-izhevsk-czeny/
Palvanta Finds – Beautiful designs, browsing the product info is smooth and informative.
Эта информационная статья содержит полезные факты, советы и рекомендации, которые помогут вам быть в курсе последних тенденций и изменений в выбранной области. Материал составлен так, чтобы быть полезным и понятным каждому.
Осуществить глубокий анализ – https://highdevice.com/2098.html
Важным инструментом контроля является таблица оценочных параметров, применяемых в ходе наблюдения. Она служит для систематизации данных и поддержания единых стандартов анализа. Ниже приведена таблица, отражающая основные направления наблюдения.
Выяснить больше – вывод наркологическая клиника пенза
Этот информационный обзор станет отличным путеводителем по актуальным темам, объединяющим важные факты и мнения экспертов. Мы исследуем ключевые идеи и представляем их в доступной форме для более глубокого понимания. Читайте, чтобы оставаться в курсе событий!
Ознакомиться с теоретической базой – https://zapinin.com/legislation-to-crack-down-on-fentanyl-dealers
Рабочий ключ активации для Windows 11 — проверено и обновлено, без блокировок!
Подробнее – Генератор ключей Windows 11 рабочий
Pebble Plaza Hub – Categories are engaging, images load well and descriptions help with choices.
раньше вообще все говорили то что не растворяется это бутор а щас как я понимаю это в порядке вещей https://animecool.ru Доброга времени суток, закладки в москве делаете?пацаны магаз ровный пишу это уже не раз всегда списываюсь с менеджером все делает ровно и качество и оперативность , всегда заказываю и буду заказывать тут т.к. не париться за качество продукта как в других магазах!!! Спасибо! Обращайтесь
Shop Prime Pickings – Excellent variety, browsing items was smooth and informative.
Реставрация Москва Очистка кафеля Москва
Nook Narrative Corner – A curated selection with narrative touches that make shopping fun.
ScreenStride Marketplace – Smooth navigation, products are easy to find and shopping went well.
Откройте для себя скрытые страницы истории и малоизвестные научные открытия, которые оказали колоссальное влияние на развитие человечества. Статья предлагает свежий взгляд на события, которые заслуживают большего внимания.
Познакомиться с результатами исследований – http://www.mpu-genie.de
fetchfolio.shop – The accessories are always fresh and on-point, great choices all around.
Quoravia Spot – Easy navigation, browsing categories is simple and checkout completed perfectly.
clovecrest.shop – I love how everything is organized, and shopping here is quick and simple.
Перед началом терапии проводится клиническая оценка, включающая измерение давления, осмотр кожи и глаз, проверку дыхания и анализ неврологического состояния. Вывод из запоя в клинике в Астрахани начинается только после сбора этих данных, поскольку подбор препаратов без диагностики может быть небезопасен.
Подробнее тут – вывод из запоя с выездом астрахань
В этой статье собраны факты, которые освещают целый ряд важных вопросов. Мы стремимся предложить читателям четкую, достоверную информацию, которая поможет сформировать собственное мнение и лучше понять сложные аспекты рассматриваемой темы.
Погрузиться в научную дискуссию – https://avenzamaps.jp/?attachment_id=55
SleekSelect Corner – Clean look, products are easy to explore and checkout is fast.
Suave Basket Hub – Clean and organized, products are simple to find and purchasing was enjoyable.
Я айтишник и к СМ не отношусь никаким боком. Про мою работу вы не знали и не узнали бы, если бы всё срослось. Я просто говорю про то, что не так уж и секурно у вас, личность выпаливается “на раз”. https://egypt-go.ru Сочи – мёд отличный, кладмену респект и уважуха! теперь мы ваши постоянные клиенты)Эффект чувствуется почти сразу, эйфория и стим в голове Привет всем форумочам! Отличный магазин, я получил все свое,да конечно было долго но у всех бывают трудности. думаю в дольнейшем они их будут устронять! Так что ребята берите не задумаясь, все будет отлично!!!!
Mint Mariner Deals – Took a quick look around and found exactly what worked.
Эта информационная статья охватывает широкий спектр актуальных тем и вопросов. Мы стремимся осветить ключевые факты и события с ясностью и простотой, чтобы каждый читатель мог извлечь из нее полезные знания и полезные инсайты.
Полная информация здесь – https://www.sadlobos.com/listados
Публикация предлагает читателю не просто информацию, а инструменты для анализа и саморазвития. Мы стимулируем критическое мышление, предлагая различные точки зрения и призывая к самостоятельному поиску решений.
Изучить материалы по теме – https://fromelles.fr/vie-pratique/commerces-hotellerie
«ЮгМедЦентр» поддерживает строгую конфиденциальность: выездные специалисты приезжают без медицинской символики, в гражданской одежде; документы формулируются нейтрально; уведомления не содержат триггерных слов; профиль можно оформить под кодом. Все записи ведутся в шифрованном контуре с разграничением доступа по ролям, а видеосессии с врачом/психологом не записываются. Мы предупреждаем о цифровой гигиене: включите «тихий режим» уведомлений, избегайте пересылки документов в открытых чатах, используйте резервный канал связи для экстренных вопросов.
Узнать больше – платный нарколог на дом в сочи
Этот информационный обзор станет отличным путеводителем по актуальным темам, объединяющим важные факты и мнения экспертов. Мы исследуем ключевые идеи и представляем их в доступной форме для более глубокого понимания. Читайте, чтобы оставаться в курсе событий!
Слушай внимательно — тут важно – https://govanova.gr/hello-world
Palvion Finds – Smooth browsing experience, items are well-presented and easy to explore.
Эта информационная заметка содержит увлекательные сведения, которые могут вас удивить! Мы собрали интересные факты, которые сделают вашу жизнь ярче и полнее. Узнайте нечто новое о привычных аспектах повседневности и откройте для себя удивительный мир информации.
Читать далее > – https://a2t-traitements.fr/?attachment_id=5
Pebble Port Online – Clean structure, ordering items was simple and fast.
Prime Pickings Showcase – Great assortment, product info was clear and shopping was enjoyable.
7к казино зеркало выручает, когда основной адрес недоступен.
За АМ 1220 ничего сказать не могу – не пробовал…. Но, после тестирования 694 и 2201 впечатления о линейке АМ у меня сильно подпортились ( бошки, марихуану кто знает когда рега будет ?Сделал заказ.оплатил.Кент прислал трек вечером как и обещал…токо он небьеться у меня и говорит,что нет такой накладной…у кого такая ситуация была??? Ребята!!! Устал писать Вам в скайп…Вы меня сознательно игнорируете?? Каждый день завтраками кормите. Я всего лишь хочу у вас покупать каждые три дня 1-2гр АМ2233. Вы сказали, что тоже из Ростова, я обрадовался, что рядом. Не хотите делать закладки, так ответьте куда деньги отправить, отправьте хоть первым классом (хотя это смешно)! Откройте скайп и почитайте миллион сообщений от меня!!
SeedStation Corner – Clean layout, browsing felt fast and checkout went flawlessly.
Реставрация картины Ремонт кожаной мебели Москва
офсетная печать цена
Не хотите платить за лицензию? У нас есть рабочий кряк для Windows 11 — скачайте прямо сейчас!
Подробнее – Как активировать Windows 11 без ключа
Nova Aisle Market – Variety is solid, and filtering tools made browsing simple.
fiorenzaa.shop – A great online store with a wonderful collection of fashion and home accessories.
В материале приведены детали, интересные, но не особенно важные. Мы рассматриваем аспекты, которые сложно назвать существенными, но включили их для большей полноты.
Подробнее читать – детокс чай для похудения
В этом материале представлены детали, которые хоть и занимательны, но не особенно значимы. Мы рассматриваем моменты, которые трудно назвать важными, но всё же решили включить их для полноты картины.
Вот – игровые автоматы
RareWrapp Finds – Unique selection, site layout is tidy and browsing feels effortless.
SnugNook Favorites – Inviting interface, finding the right items is simple and checkout is hassle-free.
На нашем сайте вы можете скачать активатор для Windows 11 абсолютно бесплатно и навсегда забыть о водяных знаках!
Подробнее – Генератор ключей Windows 11 рабочий
Suave Shelf Online – Sleek layout, products are displayed clearly and shopping felt quick.
Как активировать Windows 11 без ключа? У нас есть пошаговая инструкция!
Подробнее – Скачать ключ активации Windows 11 Pro
Simple Tech Goods – Feels minimal and useful without unnecessary extras.
В данном обзоре представлены основные направления и тренды в области медицины. Мы обсудим актуальные проблемы здравоохранения, свежие открытия и новые подходы, которые меняют представление о лечении и профилактике заболеваний. Эта информация будет полезна как специалистам, так и широкой публике.
Получить дополнительную информацию – http://142.250.27.156/url?q=https://narkologicheskaya-klinika-v-tolyatti0.ru
Порча от наркотиков —
этто комплексная хоботня, охватывающая физиологическое,
психологическое и социальное здоровье человека.
Утилизация подобных наркотиков, яко кокаин, мефедрон, гашиш,
«шишки» чи «бошки», что ль
обусловить для необратимым следствиям
яко чтобы организма, яко (а) также для федерации в
целом. Хотя хоть у выковывании зависимости эвентуально электровосстановление —
ядро, чтоб энергозависимый явантроп обернулся за помощью.
Важно помнить, яко наркозависимость врачуется, равным образом помощь дает шанс на свежую
жизнь.
Truvora Essentials – Organized well and easy to move through.
Главное не кипишуй, продаван ровный, придет сам обрадуешся что тут затарился! https://samuelelijahpropheticcollege.org Сургут, вобщем хмаоанологичная ситуация! продаван ты на примете, раз твоих клиентов начали принимать… Магаз однозначно ровный. В прошлый раз брал ам, быстро четко оперативно работает этот селлер. Делал на аце, 1 к 10, плюс еще немного урб (пробник) До этого пыхал ам 1 к 10 без урб, было с чем сравнивать. С урб, однозначно лучше.
Для родственников капельница от запоя — возможность не наблюдать бессильно, как близкий человек «сгорает» на глазах, а подключить специалистов. Для самого пациента это шанс выйти из тяжёлого состояния быстрее и безопаснее, чем при попытках «перетерпеть». Особенно это актуально для жителей Долгопрудного: рядом крупный мегаполис, высокий уровень стресса, плотный график работы, и запои часто начинаются из-за накопившегося напряжения, которое долго игнорировалось.
Получить больше информации – http://kapelnica-ot-zapoya-dolgoprudnyj11.ru
Подход клиники строится на принципе минимально достаточной фармакотерапии: мы исключаем полипрагмазию, не «усиливаем схему» за счёт случайных препаратов и всегда сверяем назначения с вашими постоянными лекарствами (антигипертензивные, антиаритмические, сахароснижающие и др.). Состав инфузии не бывает универсальным — он зависит от жалоб, возраста, гидратационного статуса, результатов экспресс-тестов и логистики ближайших часов (работа/сон/домашняя среда). Благодаря этому эффект становится управляемым, а «первая тихая ночь» достигается без риска угнетения дыхания и дневной «ватности».
Детальнее – http://www.domen.ru
WatchWhisper Market – Clean and simple, watches are easy to view and pages load quickly.
company setup company setup
Pantry Finds Online – Pleasantly arranged, shopping for essentials felt effortless.
Prism Porter Picks – Sleek design, navigating the site and selecting items was quick and easy.
Pendant Port Hub – Clean presentation, accessories stand out and browsing is easy.
SerumStation Market – Clean look, finding products is simple and shopping was enjoyable.
Mint Marketry Platform – The site felt responsive and checkout was clean and reassuring.
fiorvyn.shop – Stylish and high-end products, shopping here is always smooth and efficient.
Проект Kent casino предлагает сбалансированный подход к онлайн азартным играм. Платформа сочетает простоту использования и широкий функционал. Такой формат подходит для регулярной игры: кент казино рабочее зеркало
Жаль туси в наличии нет. хотелось именно тут взять. а как скоро появится не известно Купить кокаин, бошки, гашиш трек пока не бьется.Брат, ответь в личке, жду уже 3 дня жте907? Вроде говорят, что пока не доступен – находиться на экспертизе… Откуда инфа?
Novalyn – Sleek design highlights the items, keeping the site simple and attractive.
Купить москитные сетки
Соблюдение конфиденциальности в клинике «Формула Трезвости» рассматривается как значимый клинический фактор. Наркологическая клиника в Краснодаре выстраивает лечебный процесс без избыточных формальностей, что снижает уровень тревожности и повышает готовность пациента к сотрудничеству с врачом. Практика показывает, что анонимный формат способствует более точному сбору анамнеза и повышает управляемость лечебного процесса.
Углубиться в тему – наркологическая клиника цены
Shop Orbit Olive – Organized pages, vibrant visuals, and comparing items is smooth.
топливо купить
В этой статье рассматриваются способы преодоления зависимости и успешные истории людей, которые справились с этой проблемой. Мы обсудим важность поддержки со стороны близких и профессионалов, а также стратегии, которые могут помочь в процессе выздоровления. Научитесь первоочередным шагам к новой жизни.
Получить больше информации – http://142.250.142.17/url?q=https://vyvod-iz-zapoya-tolyatti0.ru
Soap Sonder Online – Pleasant interface, site is organized well and shopping felt enjoyable.
Sunny Shipment Studio – Simple design, checkout worked easily and shipping was reliable.
Raventia Central – Elegant layout, browsing feels natural and checkout went smoothly.
Мне понравилось, что 7k работает стабильно даже при слабом интернете.
Правильная схема отопления — залог тепла и экономии в доме, а качественные комплектующие определяют надёжность системы на годы. На https://shemi-otopleniya.ru/ вы найдёте металлорукава РВД, гибкую подводку из нержавейки всех диаметров, медные трубы от 6 до 89 мм, элеваторные узлы, коллекторы и гидрострелки. Сайт предлагает всё необходимое для монтажа отопления: от подводки для смесителя до рукавов высокого давления с фланцами. Офис в Москве, доставка по России.
Онлайн казино Kent предлагает понятную структуру и быстрый доступ к играм. Навигация интуитивна даже для новых пользователей. Это делает платформу доступной: кент казино официальный сайт зеркало
строительные леса аренда
Если в ситуации с алкоголем присутствуют несколько из перечисленных ниже пунктов, это повод не откладывать консультацию с наркологом в Королёве:
Ознакомиться с деталями – https://kodirovanie-ot-alkogolizma-korolyov11.ru/preparaty-dlya-kodirovaniya-ot-alkogolizma-v-korolyove
Вывод из запоя требует комплексного контроля всех физиологических параметров. Ниже представлены основные направления наблюдения, формирующие структуру оценки состояния.
Детальнее – вывод из запоя в стационаре
Tulip Trade Center – Clean interface with products easy to spot, checkout is safe.
Этот информационный материал подробно освещает проблему наркозависимости, ее причины и последствия. Мы предлагаем информацию о методах лечения, профилактики и поддерживающих программах. Цель статьи — повысить осведомленность и продвигать идеи о необходимости борьбы с зависимостями.
Узнать больше – http://142.250.184.139/url?q=https://vyvod-iz-zapoya-tolyatti0.ru
Просто КОСМОС Купить кокаин, бошки, гашиш платил 5 февраля свою посылочку!как вы поняли ничего не получил!ТС кормил меня завтраками,в итоги обещал вернуть деньги если не получу до 28 февраля!деньги мне тоже никто не вернул вместо этого мне прислали новый трек и написали что мы обещали что получите товар и деньги возвращать не буду!мои обьяснения о том что вашу посылку уже некому получать он слушать не хочет и возвращать деньги тоже!Ув.Адмистрация форума прошу не удалять мой пост и если нужно могу скинуть переписку!Может еще вернемся. Очень жаль ребята,хорошо работали.
Tervina Shopping Hub – Browsing flows well, products look polished, and prices aren’t over the top.
WearWhimsy Online – Cute clothing collection, pages loaded quickly and browsing felt effortless.
Лечение в клинике «Вектор Трезвости» основано на клинически обоснованных методах, адаптированных под формат круглосуточной работы. Наркологическая клиника в Ростове-на-Дону применяет комплексную диагностику, позволяющую учитывать тяжесть зависимости, длительность употребления и наличие сопутствующих заболеваний. Такой подход обеспечивает точность медицинских решений и снижает вероятность неблагоприятных реакций.
Выяснить больше – наркологическая клиника цены
На каждом этапе лечения нарколог контролирует витальные показатели, оценивает динамику восстановления и при необходимости корректирует терапию. Такой подход исключает резкие перепады давления, нарушения сердечного ритма и другие побочные эффекты, часто возникающие при попытках вывести пациента из запоя без медицинского участия.
Изучить вопрос глубже – вывод из запоя клиника
Prism Vane Collection – Stylish options, product visuals are detailed and browsing is smooth.
Спортивный клуб «Родина» способствует развитию массового спорта в столице, Твери и Подмосковье с 2019 года. В структуре организации функционируют отделения футбола, баскетбола, волейбола, бокса, ММА и рукопашного боя. Подробная информация о расписании тренировок и достижениях команд размещена на сайте https://rodinasportsclub.com в соответствующих разделах. Профессиональные тренеры клуба проводят занятия для спортсменов разного уровня подготовки и возраста.
Наркологическая клиника в Химках — это возможность получить помощь при алкогольной и наркотической зависимости рядом с домом, а не ездить по всему региону в поисках специалистов. Для многих людей обращение к наркологу до последнего кажется чем-то «крайним»: кажется, что нужно терпеть, уговаривать себя «завязать самому», ждать подходящего момента, отпуска или «нового года с чистого листа». Но с каждым запоем или эпизодом употребления состояние становится тяжелее, восстановление — длиннее, а последствия — заметнее для работы, семьи, здоровья.
Исследовать вопрос подробнее – http://narkologicheskaya-klinika-himki11.ru/lechenie-v-narkologicheskoj-klinike-v-himkah/
Shop Serenity Choice – Calm layout, product descriptions are clear and checkout was very straightforward.
Peony Port Boutique – Clean visuals, descriptions are detailed without being confusing.
Pantry Pebble Boutique Picks – Fun and simple, checkout worked flawlessly.
https://www.behance.net/bonograti
Novalyn Platform – Clean layout enhances product visibility and overall user experience.
магазин четкй притензий нет на качество регвезде гавно((((( https://lechim-spinky.ru Уже не раз писали – настраивают сайт для автоматизации заказов, с потоком розничных покупателей не справляются с нынешный системой )С возвращением!!!удачной работы!!!! А пока всё приходится делать в ручную, так что ОГРОМНАЯ просьба не пишите в аську\скайп с вопросами типа “как прёт ?” “ко скольки бодяжить ?” и т.п. ! Не загружайте людей )
В данной статье мы акцентируем внимание на важности поддержки в процессе выздоровления. Мы обсудим, как друзья, семья и профессионалы могут помочь тем, кто сталкивается с зависимостями. Читатели получат практические советы, как поддерживать близких на пути к новой жизни.
Подробнее тут – http://dlibrary.mediu.edu.my/cgi-bin/koha/tracklinks.pl?uri=https://vyvod-iz-zapoya-tolyatti0.ru
В этом материале представлены детали, которые хоть и занимательны, но не особенно значимы. Мы рассматриваем моменты, которые трудно назвать важными, но всё же решили включить их для полноты картины.
Вот – покер онлайн
Эта статья подробно расскажет о процессе выздоровления, который включает в себя эмоциональную, физическую и психологическую реабилитацию. Мы обсуждаем значимость поддержки и наличие профессиональных программ. Читатели узнают, как строить новую жизнь и не возвращаться к старым привычкам.
Детальнее – http://www.dexel.co.uk/?URL=https://vyvod-iz-zapoya-tolyatti0.ru
Orbit Opal Showcase – Modern vibe, photos are appealing and product info is thorough.
Soothesail Boutique – Beautifully curated, browsing categories is effortless and payment process worked well.
Casino 7k создаёт комфортные условия для пользователей за счёт продуманного интерфейса. Все функции расположены логично и доступны без лишних переходов, казино 7к
Sunny Shopline Hub Picks – Bright layout, browsing was simple and checkout process worked perfectly.
Сеть отелей на час Де Арт https://deart-13.ru/ это гостиница с почасовой оплатой в Москве. У нас семь великолепных бутик-отелей Де Арт. Они рассчитаны на небольшое количество гостей, которым предлагаются номера с уникальными, продуманными до мелочей интерьерами. Узнайте больше о наших номерах и ценах на сайте.
Эта статья подробно расскажет о процессе выздоровления, который включает в себя эмоциональную, физическую и психологическую реабилитацию. Мы обсуждаем значимость поддержки и наличие профессиональных программ. Читатели узнают, как строить новую жизнь и не возвращаться к старым привычкам.
Получить больше информации – http://64.233.165.198/url?q=https://vyvod-iz-zapoya-tolyatti0.ru
Raynora Finds – Smooth shopping, site layout is clear and navigating products is simple.
С 7k удобно играть вечером — сайт не «падает» и не тормозит.
Mint Maven – Didn’t expect this much variety, everything looks stylish and fairly priced.
Casino 7k создаёт условия для спокойной и комфортной игры. Интерфейс не отвлекает от процесса и остаётся интуитивно понятным: 7k casino регистрация
Многие тянут до последнего, считая, что к наркологу обращаются только в самых крайних случаях. На деле показаний для консультации гораздо больше, и они часто появляются задолго до того, как человек впервые оказывается в запое или не выходит из состояния опьянения несколько дней подряд.
Узнать больше – http://narkologicheskaya-klinika-voskresensk11.ru/
Все легально и проверено, есть NMR. Плохого ни чего не случиться. Скорей всего приняли потому что были паленые…. https://tuguru.ru у меня до сих пор нет реальной отправки,ток просроченная планируемая(((Оплатил, через 49 минут уже получил адрес, люди забрали надежную закладку (эйф-диссоциатив), опробовали, все довольны. Мир и респект В-общем, я ещё два часа пил вискарик со льдом,да лопал пиццу 😉
Клиника «НаркоСити» предлагает срочную наркологическую помощь при запоях на дому в Краснодаре. Опытные специалисты оперативно приезжают в любой район города, проводят детоксикацию и стабилизируют состояние пациента прямо на дому. Лечение организовано с максимальной безопасностью и соблюдением конфиденциальности, что обеспечивает пациентам комфорт и быстрое восстановление без госпитализации.
Получить дополнительную информацию – https://vyvod-iz-zapoya-krasnodar0.ru/vyvod-iz-zapoya-kruglosutochno-krasnodar/
Shop Urban Urn – Cool modern design, items were engaging, and navigation felt intuitive.
Visit WellnessWharf – Helpful advice and articles, pages are easy to explore and well-organized.
При длительном запое организм не успевает восстановить свой водно-электролитный баланс, что приводит к обезвоживанию и ухудшению общего состояния. Такие пациенты рискуют развить не только тяжелую интоксикацию, но и хронические заболевания, которые впоследствии требуют длительного и дорогостоящего лечения. Поэтому своевременный вызов врача-нарколога на дом становится критически важным для сохранения здоровья и предотвращения серьезных последствий.
Подробнее – вывод из запоя дешево в краснодаре
Tidy Treasure Online Shop – The simple design keeps shopping relaxed.
В данном тексте собраны разнообразные случайные сведения и не вполне определённые идеи, которые могут вызвать интерес. Мы отмечаем детали, не играющие ключевой роли, но сохраняющие своё место в изложении.
Подробнее читать – мефедроновая зависимость
Prism Viva Spot – Attractive range, categories are simple to explore and the experience is smooth.
Shore Stitch Studio – Beautiful items, shopping experience is seamless and very enjoyable.
Скачайте активатор для Windows 11 и получите все функции Pro-версии бесплатно.
Подробнее – Скачать патч для активации Windows 11
Pepper Pavilion Goods – Playful items, site layout makes shopping easy.
zylavo trust services – Trust group details are transparent and presented professionally.
Casino 7k создаёт условия для спокойной и комфортной игры. Интерфейс не отвлекает от процесса и остаётся интуитивно понятным, casino 7k
Наркологическая клиника в Воскресенске — это место, куда можно обратиться в тот момент, когда домашние попытки «всё решить разговорами» и обещания «больше не пить» перестают работать. Зависимость редко возникает внезапно: сначала это кажутся безобидные посиделки по выходным, «снятие стресса» после работы, эпизодические эксперименты с наркотиками. Но с каждым месяцем контроль становится слабее, запои удлиняются, а привычка «расслабляться» превращается в болезненную потребность.
Углубиться в тему – https://narkologicheskaya-klinika-voskresensk11.ru/chastnaya-narkologicheskaya-klinika-v-voskresenske/
выездной шиномонтаж 24 https://vyezdnoj-shinomontazh-77.ru
NutriNest Boutique – Well-presented info, sensible choices, and trustworthy overall impression.
После приезда нарколог оценивает состояние пациента, проверяет давление, частоту пульса и насыщенность крови кислородом. Затем врач подбирает индивидуальный состав капельницы, включающий растворы для очистки организма, препараты для нормализации работы сердца, печени и нервной системы. Процедура длится около 1–2 часов и позволяет быстро:
Подробнее – https://vyvod-iz-zapoya-krasnodar0.ru/vyvod-iz-zapoya-na-domu-krasnodar
Есть ряд признаков, при которых ждать категорически нельзя и нужна срочная помощь врача, а не очередные «народные методы». Если вы замечаете у человека следующие симптомы, это прямой повод организовать профессиональный вывод из запоя:
Подробнее тут – вывод из запоя в стационаре москва
Parcel Poppy Finds – Packaging was neat, delivery process was simple, overall shopping was easy.
синтез пропитает тело ож душа болит бошки, марихуану Доброго всем времени, товарищи подскажите как посыль зашифрована? паранойя мучит, пару лет с доставкой не морочился. Ежели палево то можно и в ЛС)) Заранее благодарену нас бы ноги поломали за такое, тем более сумма нормальная… А ничо что праздники как бэ ?
Spark Storefront Studio – Modern look, browsing categories is easy and checkout was smooth today.
Swift Shoppery Essentials – Fast navigation, products are easy to explore and shopping was enjoyable.
Капельница от запоя работает иначе. Через вену вводятся растворы, которые восполняют жидкость, разжижают кровь, помогают печени и почкам выводить токсичные вещества, корректируют электролитный баланс. Дополнительно используются препараты для снижения тревоги, нормализации сна, защиты сердечно-сосудистой системы и печени. Всё это подбирается индивидуально, с учётом возраста, давления, хронических заболеваний и длительности запоя.
Ознакомиться с деталями – капельница от алкоголя
Проект Kent casino уделяет внимание стабильности и качеству сервиса. Игры запускаются быстро и работают без сбоев. Сайт оптимизирован под разные браузеры и экраны. Такой подход повышает комфорт игры: кент казино скачать
Длительный запой способен нанести непоправимый вред организму, привести к тяжелым нарушениям работы внутренних органов и поставить под угрозу жизнь пациента. В таких случаях необходимо срочное медицинское вмешательство, которое позволяет быстро стабилизировать состояние, вывести токсины и предотвратить развитие опасных осложнений. Клиника «ЗдоровьеНорм» в Краснодаре предлагает профессиональный вывод из запоя на дому, обеспечивая комплексное лечение с максимальной оперативностью и полной конфиденциальностью.
Углубиться в тему – вывод из запоя капельница на дому
Orbit Order Store – Ordering was quick, items arrived on time and just as advertised.
Кент казино вход реализован с учётом удобства и скорости. Пользователь может быстро авторизоваться и перейти к игре. Процесс не отвлекает от основного – кент казино
Raynverve Corner – Inviting layout, shopping feels natural and navigating the site is simple.
Часто родственники тянут до последнего, надеясь, что запой «сам пройдёт», как это случалось раньше. Но с каждым эпизодом последствия становятся тяжелее: организм изнашивается, возрастает риск осложнений, ухудшается психика. Особенно опасно, когда запой длится несколько дней подряд, а любые попытки самостоятельно сократить дозы алкоголя сопровождаются дрожью, бессонницей, приступами паники.
Разобраться лучше – вывод из запоя москва цены
codigo promocional 1xbet guatemala
у меня вообще когда порошок кидаешь и ациком заливаешь, раствор абсолютно прозрачный-.- и не прет вообще тупо куришь траву….. а вот кристалы не расворимые тоже имеются, я уже и толочь пытался седня и нагревом все бестолку… https://istracom.ru 2)Кто курит раз в неделю : от 3 часов до 5-7 часовтак что мне вообще по душе и курьерка и селлер которому респект за АМ2233 Всем привет! В магазе есть представительства по регионам, закладками? Ярославль?
Скачайте активатор для Windows 11 и получите все функции Pro-версии бесплатно.
Подробнее – Скачать активатор для Windows 11
Если по ходу визита появляются «красные флаги» (падение сатурации, нестабильный ритм, нарастающая дезориентация), маршрут мгновенно переводится в стационарный блок «ЕкатеринбургМедСервис» — без «обнуления» обследований и без потери приватности. Вся собранная информация остаётся в единой карте наблюдения, что экономит время и силы.
Исследовать вопрос подробнее – нарколог на дом вывод из запоя в екатеринбурге
Shop Wervina – Clean design, products look high-quality and pages load smoothly.
В этой статье мы рассматриваем разные способы борьбы с алкогольной зависимостью. Обсуждаются методы лечения, программы реабилитации и советы для поддержки близких. Читатели получат информацию о том, как преодолеть зависимость и добиться успешного выздоровления.
Подробнее можно узнать тут – http://142.250.184.138/url?q=https://narkologicheskaya-klinika-v-tolyatti0.ru
Vanilla Vendor Finds Online – Clear product presentation and easy-to-read descriptions helped me decide.
Скачайте патч для обхода активации Windows 11 и пользуйтесь системой без ограничений.
Подробнее – Где найти рабочий ключ для Windows 11
Silvaneo Studio Picks – Chic designs, navigation is easy and checkout worked without any issues.
ProteaPex Collection – High-quality selection, browsing and ordering worked smoothly.
Такой подход позволяет наркологической клинике в Краснодаре выстраивать лечение в безопасной и профессиональной среде.
Подробнее – частная наркологическая клиника краснодар
сдать золото
Как активировать Windows 11 без ключа? У нас есть пошаговая инструкция!
Подробнее – Как активировать Windows 11 без ключа
Многие годами живут в логике: «главное — с утра выпить чуть-чуть, станет легче». На коротком промежутке времени это действительно частично снимает симптомы, но по сути лишь продлевает запой и усиливает интоксикацию. Организм не успевает переработать продукты распада алкоголя, кровь становится «тяжёлой», нарушается работа сосудов, возрастает нагрузка на сердце и мозг.
Узнать больше – https://kapelnica-ot-zapoya-dolgoprudnyj11.ru/
Pillow Pier Central – Warm shopping experience, checkout worked without any hassle.
MirStella Market – The site feels tidy and intuitive, and product details are a nice touch.
Tidy Treasure Shop – The simple design makes browsing calm and surprisingly pleasant.
Shop Oak Opal – Soft, comforting aesthetic and thoughtful arrangement make shopping enjoyable.
В клинике «ЮгМед Наркологический Центр» лечение зависимостей включает сразу несколько направлений, каждое из которых играет важную роль в процессе восстановления. Медицинская команда подбирает сочетание методов, позволяющее безопасно вывести человека из состояния зависимости и вернуть его к нормальной жизни. В таблице ниже представлены основные терапевтические блоки и их задачи.
Подробнее тут – анонимная наркологическая клиника
Swift Stall Picks – User-friendly design, browsing items is straightforward and payment went smoothly.
Режим работы 24/7 в клинике «Формула Трезвости» обусловлен клинической спецификой зависимостей, для которых характерны внезапные ухудшения состояния. Наркологическая клиника в Краснодаре обеспечивает постоянную готовность медицинского персонала к приёму пациентов и началу терапии без временных ограничений. Это позволяет существенно сократить интервал между появлением симптомов и медицинским вмешательством, снижая риск осложнений.
Подробнее – https://narkologicheskaya-clinica-v-krd19.ru/narkolog-i-psikhiatr-v-krasnodare/
Spark Storefront Studio Picks – Bright and clean, navigation is simple and checkout worked perfectly.
same shit, bro https://familie-degu.ru Бро ты ошибся. Не поняли друг друга бываетОправдания в небе не ищут, Инфа с вашего сайта. Я уже брал 6-APB, и выглядел он несколько иначе.
Party Parcel Fun – Colorful layout, checkout was simple and enjoyable.
Лечебный процесс организуется таким образом, чтобы каждый этап логически дополнял предыдущий и формировал устойчивую динамику. Это позволяет избежать резких изменений состояния и поддерживать медицинскую безопасность.
Узнать больше – запой наркологическая клиника ростов-на-дону
bond info portal – The site is intuitive, with useful bonding explanations presented simply.
Как активировать Windows 11 без ключа? У нас есть пошаговая инструкция!
Подробнее – Windows 11 активатор на русском
В практике лечения 24/7 применяются следующие этапы:
Исследовать вопрос подробнее – наркологическая клиника цены
Clearance Finds – Lots of savings to uncover, site interface is sleek.
Анонимность в клинике «Северный Вектор» является неотъемлемой частью лечебного процесса. Наркологическая клиника в Ростове-на-Дону обеспечивает конфиденциальность на всех этапах взаимодействия с пациентом, начиная с первичного обращения и заканчивая медицинским наблюдением. Клиническая практика показывает, что сохранение анонимности снижает уровень тревожности и повышает готовность пациента к полноценному лечению, что напрямую влияет на стабильность результатов.
Изучить вопрос глубже – запой наркологическая клиника в ростове-на-дону
Этот обзор позволяет по-новому взглянуть на вещи, на которые обычно и так смотрят. Мы упоминаем факты, которые мало что меняют, и события, значение которых трудно определить, но они всё равно здесь.
Вот – рулетка онлайн
Ring Rivulet Select – Beautifully arranged, finding jewelry is simple and checkout process is fast.
Приватность — клинический фактор, снижающий тревогу и укрепляющий доверие. В «ЕкатеринбургМедСервис» выезд немаркированный, специалисты в гражданской одежде, уведомления — «тихие», документы — с нейтральными формулировками. Медкарта хранится в шифрованном контуре, доступ к данным разграничен по ролям. По запросу вся коммуникация ведётся через доверенное лицо, а оплата возможна наличными или безналом с нейтральным назначением платежа. Это позволяет оставаться в тени и при этом получать полноценную помощь.
Детальнее – вызвать врача нарколога на дом
В клинической практике используются следующие этапы лечения:
Разобраться лучше – анонимная наркологическая клиника
Программа лечения зависимости в клинике строится на принципах доказательной медицины и этики взаимодействия с пациентом. Каждый этап терапии направлен на устранение физической и психологической зависимости, а также на восстановление эмоциональной стабильности. Лечение может проводиться амбулаторно, в стационаре или на дому — выбор зависит от тяжести состояния и пожеланий пациента.
Получить дополнительную информацию – наркологическая клиника клиника помощь в ростове-на-дону
Silver Scout Select – Unique selection, site layout is clear and shopping feels stress-free today.
С наступающим новым 2017 годом:happy2013::snegurochka: , фарта и удачи вашей команде! продолжайте в том же духе! https://animecool.ru все хорошие отзывы все пишут нам лично в асю или скайп, как что то не так к нам особо не ломятся, все бегут на форум…. если есть какая то проблема вы нам сразу пишите и будем разбираться, мы всегда идем на встречу клиентам…а у нас в квартире газ ….. от ГАЗПРОМ … вы не поверите но это так и есть Ребята сайт хороший конечно, но вот у меня выдалась задержка с заказом, у кого были задержки отпишите сюда, просто раньше как только я делал заказа все высылалось либо к вечеру этого дня, либо на следующий, а теперь уже 4 дня жду отправки все не отправляют!
В Воскресенске вывод из запоя может проводиться в разных форматах — с выездом на дом, в условиях стационара, в срочном режиме или с последующим амбулаторным наблюдением. Правильный выбор зависит от тяжести состояния, возраста пациента, наличия хронических заболеваний и того, насколько сильно запой нарушил привычную жизнь.
Углубиться в тему – https://vyvod-iz-zapoya-voskresensk11.ru
Visit WillowWharf – Easy-to-navigate layout, products are clearly displayed and enjoyable to explore.
Для семьи это почти всегда тяжёлый, эмоционально изматывающий период. В доме копятся усталость, обида, чувство вины, страх за близкого. Но при этом сохраняется надежда, что удастся «обойтись своими силами». В какой-то момент становится ясно: без профессиональной наркологической помощи уже не справиться. В этот момент важно, чтобы рядом был специализированный центр в самом Воскресенске, а не где-то далеко, куда сложно добраться и куда трудно уговорить поехать человека в тяжёлом состоянии.
Подробнее тут – platnaya-narkologicheskaya-klinika
Pure Pavilion Browse – Modern and tidy, navigating and purchasing items was simple.
После окончания врач дает консультации и рекомендации по восстановлению организма и профилактике повторных запоев.
Получить больше информации – скорая вывод из запоя
Vanta Valley Boutique – Calm, tidy site, exploring collections was simple and pleasant.
В рамках клинической работы применяются следующие направления медицинского воздействия, которые обеспечивают целостность лечебного процесса:
Выяснить больше – http://narkologicheskaya-klinika-v-rnd19.ru/chastnaya-narkologicheskaya-klinika-rostov-na-donu/
Pivoria Shopfront – Clean layout, finding what I needed was easy.
Круглосуточный режим работы в клинике «Северный Вектор» обусловлен спецификой течения зависимостей, при которых ухудшение состояния может происходить внезапно. Наркологическая клиника в Ростове-на-Дону обеспечивает постоянную готовность медицинского персонала к приёму пациентов, что позволяет сократить время между возникновением симптомов и началом лечения. Такой подход снижает риск осложнений и повышает клиническую безопасность.
Получить больше информации – наркологическая клиника наркологический центр ростов-на-дону
Вывод из запоя в Воскресенске чаще всего требуется тогда, когда «обычное похмелье» уже давно перешло в тяжёлое состояние, а попытки «перетерпеть» только ухудшают ситуацию. Сначала кажется, что человек просто перебрал: день-два отлежится, попьёт воды, поест — и всё пройдёт. Но когда утром вместо облегчения появляется дрожь, сильная слабость, скачки давления, страх и навязчивая тревога, это уже не про похмелье. Организм не успевает перерабатывать алкоголь, сердце и нервная система работают на пределе, а каждый новый «опохмел» только продлевает запой.
Ознакомиться с деталями – вывод из запоя в Воскресенске
В практике лечения 24/7 применяются следующие этапы:
Разобраться лучше – [url=https://narkologicheskaya-clinica-v-krd19.ru/]платная наркологическая клиника в краснодаре[/url]
Обращаться в клинику стоит не только в крайних случаях, когда человек уже не может встать с постели или запой продолжается неделями. Наоборот, чем раньше начата помощь, тем мягче и короче может быть программа, тем меньше риск тяжёлых осложнений и долгой реабилитации.
Получить дополнительную информацию – http://narkologicheskaya-klinika-dolgoprudnyj11.ru
SEO в Санкт-Петербурге
На каждом этапе лечения нарколог контролирует витальные показатели, оценивает динамику восстановления и при необходимости корректирует терапию. Такой подход исключает резкие перепады давления, нарушения сердечного ритма и другие побочные эффекты, часто возникающие при попытках вывести пациента из запоя без медицинского участия.
Разобраться лучше – вывод из запоя дешево в ростове-на-дону
seo продвижение
Tea Terminal Lux Picks – Inviting interface, finding products is straightforward and payment was smooth.
Мы понимаем, что каждая минута имеет решающее значение, поэтому наши специалисты готовы выехать на дом в кратчайшие сроки и провести все необходимые процедуры по детоксикации организма. Наша цель — помочь пациенту вернуться к нормальной жизни без лишних стрессов и рискованных попыток самостоятельного лечения.
Получить дополнительную информацию – наркологический вывод из запоя в краснодаре
Spa Summit Favorites – Serene design, products are easy to find and checkout process worked flawlessly.
Процесс лечения проходит поэтапно. Каждый шаг направлен на снятие интоксикации, стабилизацию состояния и нормализацию обменных процессов. В таблице приведены основные этапы и процедуры, применяемые в клинике «ПензаМед Трезвость».
Детальнее – вывод из запоя дешево
Tool Tower Supply – Tools are showcased in a neat, logical way.
Соблюдение конфиденциальности в клинике «Точка Опоры» является неотъемлемой частью лечебного процесса. Наркологическая клиника в Краснодаре обеспечивает закрытый формат приёма, хранения медицинских данных и взаимодействия с пациентом. Практика показывает, что анонимное обращение снижает уровень тревожности, способствует более открытому диалогу с врачом и повышает точность клинической диагностики.
Углубиться в тему – https://narcologicheskaya-klinika-v-krd19.ru/narkologa-na-dom-krasnodar
Ну что, получил посылку. С весом ровно, маскировка тоже хорошая. Заваривал 1/15 так я не прикуренный, вставило нормально. заказывал JV-60 10гр. кокаин потому, что так и есть осталось не так много времени!Принять могут в любой курьерке и уж тем более на почте. 1 случай (без полных подробностей и выяснения всех обстоятельств о самом человеке и его деятельности) на пару сотню посылок это не тот случай, когда нужно отказываться от удобной курьерки. Об этом уже говорили неоднократно. Возвращаться к этой теме больше не стоит. Без паники, есть 2 причины почему может не бится трэк 1. тупит курьерка и не внесла в базу накладную такое бывало уже не раз люди получали посылки с нерабочей накладной такое бывает часво это кривая работа службы доставки. 2. вы не правильно вводите на сайте отслеживания с дефисом, пробелом, не по формату номеру накладной службы или вообще на другом сайте)) такое тоже бывает часто. Клиенты у нас получают все вовремя если вас оповестили что посылка отправлена значит она отправлена, ожидайте согласно установленому времени доставки.
В клинической практике используются следующие этапы лечения:
Ознакомиться с деталями – http://narcologicheskaya-klinika-v-rnd19.ru/narkologiya-rostov-kruglosutochno/
Обращаться в клинику стоит не только в крайних случаях, когда человек уже не может встать с постели или запой продолжается неделями. Наоборот, чем раньше начата помощь, тем мягче и короче может быть программа, тем меньше риск тяжёлых осложнений и долгой реабилитации.
Разобраться лучше – kodirovanie-ot-alkogolizma
Скачайте активатор для Windows 11 и получите все функции Pro-версии бесплатно.
Подробнее – Активатор Windows 11 скачать бесплатно
Passport Pocket Treasures – Travel-ready items, site layout made shopping quick and easy.
Mirstoria Essentials – Has a curated boutique tone instead of a generic layout.
Там, где раньше хватало одного тяжёлого утра, теперь требуются дни детоксикации. И чем позже подключается врач, тем сложнее вернуть организм к относительно безопасному состоянию.
Выяснить больше – vyvod-iz-zapoya-na-domu
Flora Finds – Pleasantly professional, shopping was easy and efficient.
Rug Ripple Home – Cozy designs, product selection is simple and purchasing was fast and easy.
В 7k нравится, что все кнопки на своих местах, без путаницы.
В клинике работают врачи-наркологи, психиатры, терапевты, психологи, реабилитологи. Вместо «универсальной» схемы каждому пациенту подбирают индивидуальный план, учитывая возраст, стаж употребления, состояние внутренних органов, психоэмоциональный фон, семейную ситуацию. Это особенно важно для жителей Долгопрудного, где многие совмещают работу в Москве с плотным графиком, и любая ошибка в лечении может дорого обойтись — потерей работоспособности, срывом деловых или личных планов.
Выяснить больше – кодирование от алкоголизма цены долгопрудный
Часто родственники тянут до последнего, надеясь, что запой «сам пройдёт», как это случалось раньше. Но с каждым эпизодом последствия становятся тяжелее: организм изнашивается, возрастает риск осложнений, ухудшается психика. Особенно опасно, когда запой длится несколько дней подряд, а любые попытки самостоятельно сократить дозы алкоголя сопровождаются дрожью, бессонницей, приступами паники.
Получить дополнительную информацию – vyvod-iz-zapoya-moskva-vyzov-narkologa-kapelnica
Казино 7к ориентировано на комфорт пользователей и понятную навигацию. Все игровые разделы структурированы, а личный кабинет позволяет удобно управлять балансом и бонусами. Такой формат делает процесс игры более прозрачным – 7к казино официальный сайт
WillowWhisper Boutique – Soft layout, navigation is simple and information on each item is helpful.
line guidance hub – Straightforward layout makes understanding services simple.
Извините, если я не знаю вашу продукцию у кого мне тогда спрашивать ? https://ino-book.ru Это ошибка или нет, подскажи пожалуйста.сегодня сделал заказ, написал в аську сразу ответили. Буду ждать как что измениться отпишу. упаковка – неплохо, но не идеально. Особенно глупо, когда в описании отправления пишут “Косметика”, а там, бл*ть, пачка сигарет. Оочень странно на меня смотрели в офисе спсра, знаете ли. 4/5
Looking for xrp news? Check out the biggest platform, thetradable.com, offering the most relevant and current crypto market news, analysis, professional insights, and key developments. Our resource is user-friendly and will be of interest to both industry novices and industry experts. We feature extensive information on gold, silver, various industries, and a lot more too.
Эта обзорная заметка содержит ключевые моменты и факты по актуальным вопросам. Она поможет читателям быстро ориентироваться в теме и узнать о самых важных аспектах сегодня. Получите краткий курс по современной информации и оставайтесь в курсе событий!
Читать далее > – https://www.hgr-nsu.de/11
Velvet Valley Boutique – Fast-loading pages, stylish design, and an overall high-quality impression.
Этот информативный текст отличается привлекательным содержанием и актуальными данными. Мы предлагаем читателям взглянуть на привычные вещи под новым углом, предоставляя интересный и доступный материал. Получите удовольствие от чтения и расширьте кругозор!
Есть чему поучиться – http://www.fgosbio.ru/angiospermae/46-leaf/89-polygonatum
Этот информационный материал собраны данные, которые помогут лучше понять текущие тенденции и процессы в различных сферах жизни. Мы предоставляем четкий анализ, графики и примеры, чтобы информация была не только понятной, но и практичной для принятия решений.
Уточнить детали – https://decisoesinteligentes.com/qual-a-diferenca-entre-consorcio-e-financiamento
Центр «Талисман» в Хабаровске специализируется на лечении алкогольной зависимости с 2009 года. Врачи-наркологи и психиатры проводят выведение из запоя на дому и в клинике, медикаментозное кодирование, детоксикацию с индивидуальным подбором программы. Ищете кодирование от алкоголизма методом вшивания? Подробнее об услугах и ценах на talisman-khv.ru — здесь можно записаться на консультацию или вызвать специалиста. Соблюдается полная анонимность, медики с подтвержденной квалификацией принимают пациентов ежедневно.
Публикация предлагает читателю не просто информацию, а инструменты для анализа и саморазвития. Мы стимулируем критическое мышление, предлагая различные точки зрения и призывая к самостоятельному поиску решений.
Подробности по ссылке – https://lokatormedia.pl/ksiazki/blogoslawiona
Запой не всегда выглядит как откровенная катастрофа с первых дней. Иногда всё начинается с «отпуска», «праздника», пары вечеринок подряд. Родные надеются, что человек сам остановится, а он каждый день находит повод продолжить. В какой-то момент организм перестаёт справляться, и даже небольшие дозы алкоголя вызывают тяжёлые реакции.
Узнать больше – kapelnica-ot-zapoya-srochno
Эта информационная заметка содержит увлекательные сведения, которые могут вас удивить! Мы собрали интересные факты, которые сделают вашу жизнь ярче и полнее. Узнайте нечто новое о привычных аспектах повседневности и откройте для себя удивительный мир информации.
Всё, что нужно знать – https://satoraljaujhely.hu/fogorvosi-korzetek
Сургут, вобщем хмао https://beljakovyv-otpuske.ru магаз ровный!!! все на высшем уровне!!! работаю с ними много лет!!!вобще-то этот магазин трек присылает а не адрес… Получившаяся смесь почему-то меня не пропирает как надо, очень странно, возможно дело во мне. Делаешь например 2-3 парика- вроде что-то есть но на ха-ха не пробиваети держит 20 мин. Что за х….? А вот другие кроли в восторге
Сначала читал обзоры про казино онлайн и решил зайти на 7к казино официальный сайт. Все работает как обещано, неприятных сюрпризов нет.
Trail Treasure Finds – A refreshing outdoors feel with tips that actually help.
В этом тексте собрано множество случайных сведений и довольно неопределённых мыслей, которые могут чем-то заинтересовать. Мы отмечаем моменты, которые не особенно важны, но всё же занимают своё место в повествовании.
Вот – эротические фильмы
Запой не всегда выглядит как откровенная катастрофа с первых дней. Иногда всё начинается с «отпуска», «праздника», пары вечеринок подряд. Родные надеются, что человек сам остановится, а он каждый день находит повод продолжить. В какой-то момент организм перестаёт справляться, и даже небольшие дозы алкоголя вызывают тяжёлые реакции.
Исследовать вопрос подробнее – http://
В данной публикации мы поговорим о процессе восстановления от зависимости, о том, как вернуть себе нормальную жизнь. Мы обсудим преодоление трудностей, значимость поддержки и наличие программ реабилитации. Читатели смогут узнать о ключевых шагах к успешному восстановлению.
Изучить вопрос глубже – http://www.iqads.ro/bitrix/rk.php?goto=https://vyvod-iz-zapoya-tolyatti0.ru/vyvedenie-iz-zapoya-tolyatti
Ищете сетка металлическая купить изделие? Предприятие mastersmetall.ru выпускает металлические лестницы, перила, козырьки и навесы начиная с 2009 года. Производство укомплектовано новейшими станками лазерной резки и сварки, собственной линией порошковой окраски, что подтверждает отличное качество конструкций. Клиентам предоставляется бесплатная 3D-визуализация проекта, профессиональный замер помещения и монтаж конструкций. Индивидуальный подход, использование проверенных материалов и безупречная шлифовка швов обеспечивают долговечность и эстетичность металлоконструкций.
Помощь нарколога нужна, если алкоголь или наркотики постепенно начинают занимать в жизни всё больше места. Человек заранее планирует, когда и как будет пить, нервничает, если что-то срывается, раздражается, когда близкие пытаются ограничить употребление. Появляются скандалы после «весёлых» вечеров, пропущенные рабочие смены, проблемы с деньгами, конфликты с родными. При этом любые разговоры заканчиваются обещаниями «завязать с понедельника» или обвинениями окружающих.
Подробнее можно узнать тут – narkologicheskaya-klinika-dispanser
После диагностики начинается активная фаза медикаментозного вмешательства. Современные препараты вводятся капельничным методом для быстрого снижения уровня токсинов в крови, восстановления обменных процессов и нормализации работы внутренних органов, таких как печень, почки и сердце.
Выяснить больше – поставить капельницу от запоя на дому архангельск
Vind in 2025 het beste casino zonder CRUKS en speel
zonder beperkingen. Geen inschrijving nodig en volledige privacy gegarandeerd.
Geniet van snelle uitbetalingen, hoge bonussen en een veilige
speelervaring ? zonder tussenkomst van CRUKS.
WinkWagon Online – Colorful interface, site is easy to navigate and product options are well presented.
В клинике «НаркоСити» используются только сертифицированные лекарственные средства, которые подбираются индивидуально с учетом состояния пациента:
Подробнее можно узнать тут – анонимный вывод из запоя в краснодаре
Modern Marble Boutique – The aesthetic feels balanced and carefully put together.
Когда выезд особенно удобен и оправдан, важно понимать не только эмоционально, но и по конкретным признакам. Есть ряд типичных ситуаций, в которых именно формат «на дому» становится наиболее реалистичным и безопасным вариантом, а стационар можно рассматривать как следующий шаг, когда острота будет снята и человек станет более сговорчивым.
Получить дополнительные сведения – нарколог на дом недорого
После завершения процедур врач дает пациенту и его родственникам подробные рекомендации по дальнейшему восстановлению и профилактике рецидивов.
Ознакомиться с деталями – врач нарколог на дом
Go to our fresh website : https://www.europneus.es/talleres/arcls/?codigo_promocional_69.html
Важно и то, что во время процедуры пациент находится под наблюдением. Врач может увидеть, как организм реагирует на терапию, вовремя скорректировать темп или состав инфузии, понять, достаточно ли домашнего формата или лучше рассмотреть стационар. Это принципиальное отличие от попыток лечиться дома таблетками наугад, без контроля давления и пульса.
Детальнее – kapelnica-ot-zapoya-telefon
Discover what’s new today : https://61site.ru/media/pgs/1xbet_promokod_bonus__3.html
Важно и то, что во время процедуры пациент находится под наблюдением. Врач может увидеть, как организм реагирует на терапию, вовремя скорректировать темп или состав инфузии, понять, достаточно ли домашнего формата или лучше рассмотреть стационар. Это принципиальное отличие от попыток лечиться дома таблетками наугад, без контроля давления и пульса.
Получить дополнительные сведения – http://kapelnica-ot-zapoya-dolgoprudnyj11.ru/
official brixel trust site – Solid company branding with fast-loading pages that feel dependable.
Этот текст содержит различную информацию, которая, возможно, покажется любопытной, но в целом не меняет восприятия привычных вещей. Предлагаем просто получить удовольствие от чтения, не ожидая особой пользы.
Вот – порно
Этот сборник информации привлекает множеством мелких деталей и необычных ракурсов. Мы предлагаем взгляды, редко полезные, но способные немного разнообразить знакомство с темой.
Подробнее читать – детокс чай для похудения
Капельница от запоя работает иначе. Через вену вводятся растворы, которые восполняют жидкость, разжижают кровь, помогают печени и почкам выводить токсичные вещества, корректируют электролитный баланс. Дополнительно используются препараты для снижения тревоги, нормализации сна, защиты сердечно-сосудистой системы и печени. Всё это подбирается индивидуально, с учётом возраста, давления, хронических заболеваний и длительности запоя.
Подробнее – kapelnica-ot-zapoya-anonimno-na-domu
Отдельная категория пациентов — люди с алкогольной зависимостью. Для жителей Воскресенска особенно актуальны проблемы, связанные с длительными запоями: человек несколько дней подряд пьёт, практически не ест, плохо спит, с трудом встаёт, а каждое утро обещает, что «сейчас немного — и всё». На этом фоне растёт нагрузка на сердце, печень, нервную систему, повышается риск инсультов и инфарктов, обостряются хронические болезни.
Получить дополнительную информацию – московские наркологические клиники
Веселовка А для вашего спокойствия мы предлагаем также страхование ОСАГО, КАСКО и даже страхование беспилотников.
Самостоятельный выход из запоя сопряжен с высоким риском развития осложнений. После прекращения приема спиртного ослабленный организм может не выдержать нагрузки, что приведет к инфаркту, инсульту, судорожным приступам и даже алкогольному психозу. Чтобы избежать этих опасных состояний, необходимо вызвать нарколога на дом, который проведет лечение правильно и безопасно.
Исследовать вопрос подробнее – вывод из запоя вызов на дом краснодар
https://sozdatelisaitov.ru/
В Воскресенске вывод из запоя может проводиться в разных форматах — с выездом на дом, в условиях стационара, в срочном режиме или с последующим амбулаторным наблюдением. Правильный выбор зависит от тяжести состояния, возраста пациента, наличия хронических заболеваний и того, насколько сильно запой нарушил привычную жизнь.
Углубиться в тему – http://vyvod-iz-zapoya-voskresensk11.ru/vyvod-iz-zapoya-kapelnica-v-voskresenske/
Домашний визит нарколога — это не компромисс «на скорую руку», а тщательно организованный процесс, который экономит время, сохраняет конфиденциальность и делает лечение предсказуемым. «ЕкатеринбургМедСервис» принимает вызовы круглосуточно и выезжает во все районы города — от Уралмаша и ВИЗа до Академического и Широкой Речки. Команда приезжает без внешних опознавательных знаков, использует нейтральные формулировки в документах и ведёт переписку только по защищённым каналам связи. На месте мы быстро проводим экспресс-диагностику, запускаем титрованные капельницы через инфузомат, контролируем пульс, сатурацию и артериальное давление, подключаем гастропротекцию и аккуратно управляем тревогой без избыточной седации. Цель — безопасно «снять волну» симптомов, вернуть возможность пить воду и отдыхать, а затем закрепить результат на горизонте ближайших 72 часов.
Подробнее можно узнать тут – нарколог капельница на дом екатеринбург
Travel Trolley Gear – Thoughtful organization makes things easier to plan.
Наркологическая клиника применяет стандартизированные схемы, направленные на безопасное и постепенное восстановление. Каждый этап вмешательства согласуется с текущим состоянием пациента, что обеспечивает предсказуемый характер изменений. Модель работы включает оценку реакции организма, проверку устойчивости внутренних систем и уточнение динамики метаболических процессов. Последовательность действий формируется с учётом адаптационных возможностей и направлена на достижение стабильного результата.
Углубиться в тему – http://
Shop WinkWorthy – Bright and clear style, finding items was smooth and hassle-free.
Служба доставки цветов в Ростове-на-Дону привозит свежие букеты от 30 минут с момента заказа в любую точку города. В ассортименте розы всех оттенков — от классических красных до премиальных пионовидных и французских сортов, букеты от 5 до 251 цветка для любого повода. Флористы собирают композиции из свежесрезанных бутонов, которые простоят в вазе до двух недель. Оформить заказ можно на https://rostov-buket.ru/ с доставкой по указанному адресу, оплата принимается наличными, картой или через Яндекс Сплит. Магазин работает ежедневно, включая выходные и праздники.
В клинике работают врачи-наркологи, психиатры, терапевты, психологи, реабилитологи. Вместо «универсальной» схемы каждому пациенту подбирают индивидуальный план, учитывая возраст, стаж употребления, состояние внутренних органов, психоэмоциональный фон, семейную ситуацию. Это особенно важно для жителей Долгопрудного, где многие совмещают работу в Москве с плотным графиком, и любая ошибка в лечении может дорого обойтись — потерей работоспособности, срывом деловых или личных планов.
Ознакомиться с деталями – https://narkologicheskaya-klinika-dolgoprudnyj11.ru/narkologicheskaya-klinika-stacionar-v-dolgoprudnom/
Перед началом лечения пациент проходит первичную диагностику, которая включает оценку физических показателей, сбор информации о длительности употребления, выявление сопутствующих заболеваний и оценку рисков. Наркологическая клиника в клинике в Астрахани использует стандартизированные методы обследования, что позволяет точно определить степень интоксикации и подобрать адекватный лечебный план.
Подробнее тут – https://narkologicheskaya-klinika-astrakhan18.ru/narkologiya-astrakhan-adres
Особое внимание уделяется безопасности. Используются препараты нового поколения, снижающие нагрузку на печень, почки и сердечно-сосудистую систему. Процесс лечения проходит под постоянным наблюдением медперсонала, что позволяет быстро реагировать на любые изменения состояния пациента. Все данные о лечении строго конфиденциальны — информация не передаётся третьим лицам и не фиксируется в общедоступных базах.
Исследовать вопрос подробнее – наркологическая клиника нарколог в томске
Мы следуем прозрачному алгоритму: оценить риски — подтвердить безопасность домашнего формата — запустить инфузионный контур — объяснить «коридоры безопасности» и точки связи. Такой порядок снижает тревожность, делает управление симптомами измеримым и понятным, а родственникам оставляет простые инструкции без медицинского жаргона.
Получить дополнительную информацию – врач нарколог выезд на дом в екатеринбурге
После купирования острых симптомов врач объясняет, какие шаги нужно сделать дальше: ограничиться домашним наблюдением, подумать о коротком стационарном курсе или сразу планировать дальнейшее лечение зависимости. Это помогает не возвращаться к затяжным запоям уже через несколько недель.
Выяснить больше – https://vyvod-iz-zapoya-moskva011.ru/vyvod-iz-zapoya-v-moskve-na-domu/
https://doc.clickup.com/90181859349/d/h/2kzm3y0n-2118/51c922fd7a4ba5f
Mod Merchant Collection – Product info was concise and useful, made choosing stress-free.
Видеонаблюдение сегодня — это не роскошь, а необходимость для защиты бизнеса и дома. Компания Cyber-Cam работает в Санкт-Петербурге с 2015 года, предлагая полный цикл услуг: проектирование, монтаж, обслуживание систем безопасности. На https://cyber-cam.ru/ представлены готовые комплекты с настроенным оборудованием, всепогодные камеры с ночным видением и возможность удалённого доступа с мобильных устройств. Официальная гарантия до 3 лет, сертифицированное оборудование. Телефон (812) 642-05-32.
Когда выезд особенно удобен и оправдан, важно понимать не только эмоционально, но и по конкретным признакам. Есть ряд типичных ситуаций, в которых именно формат «на дому» становится наиболее реалистичным и безопасным вариантом, а стационар можно рассматривать как следующий шаг, когда острота будет снята и человек станет более сговорчивым.
Ознакомиться с деталями – vyzov-narkologa-na-dom
Многие тянут до последнего, считая, что к наркологу обращаются только в самых крайних случаях. На деле показаний для консультации гораздо больше, и они часто появляются задолго до того, как человек впервые оказывается в запое или не выходит из состояния опьянения несколько дней подряд.
Исследовать вопрос подробнее – narkologicheskaya-klinika-voskresensk11.ru/
Отдельная категория пациентов — люди с алкогольной зависимостью. Для жителей Воскресенска особенно актуальны проблемы, связанные с длительными запоями: человек несколько дней подряд пьёт, практически не ест, плохо спит, с трудом встаёт, а каждое утро обещает, что «сейчас немного — и всё». На этом фоне растёт нагрузка на сердце, печень, нервную систему, повышается риск инсультов и инфарктов, обостряются хронические болезни.
Узнать больше – воскресенская клиника
Промокоды часто дают фриспины. 7к казино промокоды вчера принес 50 FS, приятно.
Вип ставки футбол Expert tipsters deliver betting tips on sports games and matches including Fixed game selections and correct score best exacte forecast. Vip and free bets are available daily with sureshot odds and accumulator real
В клинике «НаркоСити» используются только сертифицированные лекарственные средства, которые подбираются индивидуально с учетом состояния пациента:
Подробнее – вывод из запоя недорого в краснодаре
cavaroline overview – Simple layout and smooth navigation make exploring the platform effortless.
После окончания врач дает консультации и рекомендации по восстановлению организма и профилактике повторных запоев.
Ознакомиться с деталями – вывод из запоя вызов город
SmartApe https://www.smartape.site/ предлагает неограниченный хостинг для сайтов на SSD с высокой производительностью и понятными условиями. Безлимитный хостинг удобен для бизнеса, блогов и сервисов с ростом нагрузки. Для проектов, требующих выделенных ресурсов, доступны VPS сервер, VPS VDS и VPS Servers, включая быстрые VPS на NVMe SSD и дешёвые VPS на HDD + SSD. Также предоставляется аренда сервера и размещение оборудования в надёжных дата-центрах.
WireWharf Central – User-friendly site, items are well categorized and pages respond quickly.
После купирования острых симптомов врач объясняет, какие шаги нужно сделать дальше: ограничиться домашним наблюдением, подумать о коротком стационарном курсе или сразу планировать дальнейшее лечение зависимости. Это помогает не возвращаться к затяжным запоям уже через несколько недель.
Разобраться лучше – вывод из запоя москва вызов нарколога на дом
Частный электрик Севастополь Наши цены на услуги электрика в Севастополе прозрачны и доступны, а прайс-лист на электромонтажные работы Севастополь можно легко найти на нашем сайте.
Мы следуем прозрачному алгоритму: оценить риски — подтвердить безопасность домашнего формата — запустить инфузионный контур — объяснить «коридоры безопасности» и точки связи. Такой порядок снижает тревожность, делает управление симптомами измеримым и понятным, а родственникам оставляет простые инструкции без медицинского жаргона.
Получить дополнительную информацию – нарколог на дом цены екатеринбург
Shop Trend Tally – Everything feels modern and easy to look through.
Состав инфузии формируется под доминирующие симптомы и данные экспресс-измерений. Мы избегаем шаблонов: у каждого профиля — конкретная цель и измеримый эффект. Ниже — ориентиры; окончательные решения врач принимает очно, с учётом лекарственных взаимодействий и ваших приоритетов (работа, семья, график сна).
Узнать больше – http://narcolog-na-dom-ekaterinburg00.ru/
Прибыв по вызову, врач клиники «Жизнь без Запоя» начинает с диагностики состояния пациента. Проводится комплексное обследование: измерение артериального давления, пульса, уровня кислорода в крови, оценка общего самочувствия и психического состояния. После диагностики нарколог подбирает индивидуальный состав капельницы, который позволяет эффективно вывести токсины, стабилизировать работу внутренних органов и быстро облегчить состояние пациента.
Подробнее можно узнать тут – вызвать нарколога на дом
Ищете банкротство физ. лиц в Самаре? Посетите Центр банкротства https://fizbankrot-smr.ru/ – это возможность законно списать долги. Узнайте на сайте стоимость всего комплекса юр. услуг, входящих в цену. При необходимости рассчитайте цену услуги онлайн. Даем гарантию по договору, предлагаем сжатые сроки процедуры и списание долгов под ключ. Профессиональный опыт более 10 лет. Подробнее на сайте.
Если по ходу визита появляются «красные флаги» (падение сатурации, нестабильный ритм, нарастающая дезориентация), маршрут мгновенно переводится в стационарный блок «ЕкатеринбургМедСервис» — без «обнуления» обследований и без потери приватности. Вся собранная информация остаётся в единой карте наблюдения, что экономит время и силы.
Подробнее можно узнать тут – https://narcolog-na-dom-ekaterinburg00.ru/
Публикация предоставляет читателю набор разрозненных идей, которые сложно применить на практике. Мы лишь слегка касаемся разных точек зрения, не углубляясь в анализ и не предлагая никаких выводов.
Вот – джекпот
Состав инфузии формируется по доминирующему симптому и данным экспресс-измерений, с учётом лекарственных взаимодействий. Врач оценивает динамику в реальном времени и, при необходимости, корректирует состав/скорость. Ниже — примеры профилей; окончательное решение всегда очное.
Углубиться в тему – нарколог на дом клиника екатеринбург
Отдельная категория пациентов — люди с алкогольной зависимостью. Для жителей Воскресенска особенно актуальны проблемы, связанные с длительными запоями: человек несколько дней подряд пьёт, практически не ест, плохо спит, с трудом встаёт, а каждое утро обещает, что «сейчас немного — и всё». На этом фоне растёт нагрузка на сердце, печень, нервную систему, повышается риск инсультов и инфарктов, обостряются хронические болезни.
Выяснить больше – https://narkologicheskaya-klinika-voskresensk11.ru/narkologicheskaya-klinika-telefon-v-voskresenske
https://spisok-kreditov.ru/ Doskazaymov подходит, чтобы подобрать рефинансирование и не тратить время зря.
На данном этапе врач уточняет длительность запоя, тип употребляемого алкоголя и наличие сопутствующих заболеваний. Тщательный анализ этих данных позволяет оперативно сформировать индивидуальный план лечения и выбрать оптимальные методы детоксикации.
Подробнее – капельница от запоя в архангельске
Лечение на дому проходит в комфортной и спокойной обстановке, что позволяет значительно снизить уровень стресса и быстро улучшить состояние здоровья пациента.
Разобраться лучше – http://narcolog-na-dom-sochi0.ru/narkolog-na-dom-kruglosutochno-sochi/
Отдельная категория пациентов — люди с алкогольной зависимостью. Для жителей Воскресенска особенно актуальны проблемы, связанные с длительными запоями: человек несколько дней подряд пьёт, практически не ест, плохо спит, с трудом встаёт, а каждое утро обещает, что «сейчас немного — и всё». На этом фоне растёт нагрузка на сердце, печень, нервную систему, повышается риск инсультов и инфарктов, обостряются хронические болезни.
Изучить вопрос глубже – https://narkologicheskaya-klinika-voskresensk11.ru/
Многие тянут до последнего, считая, что к наркологу обращаются только в самых крайних случаях. На деле показаний для консультации гораздо больше, и они часто появляются задолго до того, как человек впервые оказывается в запое или не выходит из состояния опьянения несколько дней подряд.
Подробнее тут – otzyvy-o-narkologicheskih-klinikah
В клинике «НаркоСити» используются только сертифицированные лекарственные средства, которые подбираются индивидуально с учетом состояния пациента:
Детальнее – вывод из запоя круглосуточно краснодар
После диагностики начинается активная фаза медикаментозного вмешательства. Современные препараты вводятся капельничным методом для быстрого снижения уровня токсинов в крови, восстановления обменных процессов и нормализации работы внутренних органов, таких как печень, почки и сердце.
Ознакомиться с деталями – вызвать капельницу от запоя в архангельске
Looking for openai news? Check out aigazine.com – your complete resource for AI developments, models, and breaking news in the industry. Through our news updates, detailed analyses, and studies, you can access critical insights and keep up with current trends and perspectives. You’ll discover complete coverage of Anthropic, AI, OpenAI, Grok, Gemini, and Google DeepMind here.
Состав инфузии формируется по доминирующему симптому и данным экспресс-измерений, с учётом лекарственных взаимодействий. Врач оценивает динамику в реальном времени и, при необходимости, корректирует состав/скорость. Ниже — примеры профилей; окончательное решение всегда очное.
Ознакомиться с деталями – психиатр нарколог на дом екатеринбург
Футбольные прогнозы Expert tipsters deliver betting tips on sports games and matches including Fixed game selections and correct score best exacte forecast. Vip and free bets are available daily with sureshot odds and accumulator real
В этой статье обсуждаются актуальные медицинские вопросы, которые волнуют общество. Мы обращаем внимание на проблемы, касающиеся здравоохранения и лечения, а также на новшества в области медицины. Читатели будут осведомлены о последних событиях и смогут следить за тенденциями в медицине.
Изучить вопрос глубже – http://quran-ayat.com/huda/redirector.php?url=https://vyvod-iz-zapoya-tolyatti0.ru/vyvod-iz-zapoya-tolyatti-na-domu
Mod Mosaic Online – Really liked the variety of modern pieces, browsing felt satisfying.
В клинике «НаркоСити» используются только сертифицированные лекарственные средства, которые подбираются индивидуально с учетом состояния пациента:
Получить дополнительную информацию – http://vyvod-iz-zapoya-krasnodar0.ru/vyvod-iz-zapoya-czena-krasnodar/
После приезда нарколог оценивает состояние пациента, проверяет давление, частоту пульса и насыщенность крови кислородом. Затем врач подбирает индивидуальный состав капельницы, включающий растворы для очистки организма, препараты для нормализации работы сердца, печени и нервной системы. Процедура длится около 1–2 часов и позволяет быстро:
Получить дополнительную информацию – http://vyvod-iz-zapoya-krasnodar0.ru/vyvod-iz-zapoya-na-domu-krasnodar/
Алкогольная и наркотическая зависимость являются серьёзными заболеваниями, требующими оперативного и квалифицированного вмешательства. Когда речь идёт о критическом состоянии пациента, особенно после длительного употребления алкоголя или наркотических веществ, время играет ключевую роль. Клиника «РеабилитАльянс» в Краснодаре предлагает услугу нарколога на дом, обеспечивая пациентам необходимую помощь в любой момент дня и ночи. Наши специалисты готовы оперативно выехать по указанному адресу и предоставить все необходимые медицинские процедуры на месте.
Детальнее – https://narcolog-na-dom-krasnodar00.ru/vyzov-narkologa-na-dom-krasnodar/
остров ко ланта в тайланде
Этот сборник информации привлекает множеством мелких деталей и необычных ракурсов. Мы предлагаем взгляды, редко полезные, но способные немного разнообразить знакомство с темой.
Подробнее читать – лечение covid народными средствами
WishWarehouse World – Organized store, pages load quickly and purchasing felt secure.
Отдельная категория пациентов — люди с алкогольной зависимостью. Для жителей Воскресенска особенно актуальны проблемы, связанные с длительными запоями: человек несколько дней подряд пьёт, практически не ест, плохо спит, с трудом встаёт, а каждое утро обещает, что «сейчас немного — и всё». На этом фоне растёт нагрузка на сердце, печень, нервную систему, повышается риск инсультов и инфарктов, обостряются хронические болезни.
Получить дополнительные сведения – moskovskie-narkologicheskie-kliniki
Незамедлительно после поступления вызова нарколог приезжает на дом для проведения тщательного осмотра. Специалист измеряет жизненно важные показатели, такие как пульс, артериальное давление и температура, и собирает анамнез для оценки степени алкогольной интоксикации.
Изучить вопрос глубже – капельница от запоя недорого в архангельске
Автосервис LemonCar в Анапе предлагает полный спектр услуг для вашего автомобиля — от диагностики до кузовного ремонта. Современное оборудование позволяет выявлять неисправности любой сложности, а опытные мастера устраняют их с гарантией качества. Перед началом работ проводится бесплатный осмотр, все процедуры согласовываются с владельцем, никаких скрытых платежей. Записаться на обслуживание можно на сайте https://lemon-car.ru/ где представлен полный перечень услуг: слесарный и электрический ремонт, 3D развал-схождение, техобслуживание двигателя и КПП. Сервис работает по адресу улица Чехова, 64, звонок по России бесплатный.
В Воскресенске вывод из запоя может проводиться в разных форматах — с выездом на дом, в условиях стационара, в срочном режиме или с последующим амбулаторным наблюдением. Правильный выбор зависит от тяжести состояния, возраста пациента, наличия хронических заболеваний и того, насколько сильно запой нарушил привычную жизнь.
Подробнее можно узнать тут – https://vyvod-iz-zapoya-voskresensk11.ru/vyvod-iz-zapoya-kapelnica-v-voskresenske/
Перед тем как принять решение, пациент и родственники получают объяснения по доступным направлениям. Обычно обсуждаются: амбулаторные консультации, дневной или круглосуточный стационар, выездная помощь, реабилитационные программы и последующее наблюдение. Это позволяет выстроить индивидуальный маршрут, а не навязывать один и тот же сценарий всем подряд.
Ознакомиться с деталями – http://
Trip Tides Picks – The site presents travel ideas in a visually pleasing way.
Каждый из этих симптомов по отдельности уже опасен, а в сочетании они создают высокий риск для жизни. Самостоятельные эксперименты с таблетками, резкий отказ от алкоголя «через силу» или попытка «переспать» запой без медицинского контроля могут обернуться реанимацией. Гораздо безопаснее вовремя вызвать специалиста и провести детоксикацию под наблюдением, особенно когда речь идёт о жителях крупного города, где доступна профессиональная наркологическая помощь.
Углубиться в тему – вывод из запоя в москве в стационаре
Наряду с физическим состоянием врачи учитывают психологический фон пациента. Человек в запое часто неадекватно оценивает своё самочувствие, обещает «завязать сам», спорит с родственниками, агрессирует или, наоборот, впадает в апатию. Задача специалиста — не спорить и не давить, а грамотно оценить риски и предложить такой формат помощи, который будет безопасен и реалистичен именно в этой ситуации.
Углубиться в тему – vyvod-iz-zapoya-moskva-srochno
После приезда нарколог оценивает состояние пациента, проверяет давление, частоту пульса и насыщенность крови кислородом. Затем врач подбирает индивидуальный состав капельницы, включающий растворы для очистки организма, препараты для нормализации работы сердца, печени и нервной системы. Процедура длится около 1–2 часов и позволяет быстро:
Узнать больше – врач вывод из запоя краснодар
Процесс лечения капельничным методом от запоя организован по четко структурированной схеме, позволяющей обеспечить оперативное и безопасное восстановление организма.
Получить дополнительную информацию – капельница от запоя на дому недорого
В клинике работают врачи-наркологи, психиатры, терапевты, психологи, реабилитологи. Вместо «универсальной» схемы каждому пациенту подбирают индивидуальный план, учитывая возраст, стаж употребления, состояние внутренних органов, психоэмоциональный фон, семейную ситуацию. Это особенно важно для жителей Долгопрудного, где многие совмещают работу в Москве с плотным графиком, и любая ошибка в лечении может дорого обойтись — потерей работоспособности, срывом деловых или личных планов.
Ознакомиться с деталями – http://narkologicheskaya-klinika-dolgoprudnyj11.ru/narkologicheskaya-klinika-stacionar-v-dolgoprudnom/
Каждая процедура проводится под контролем врача и сопровождается мониторингом давления, пульса и температуры. После курса капельниц пациент чувствует улучшение самочувствия, нормализуется сон, снижается раздражительность, появляется энергия и ясность сознания.
Подробнее тут – наркологическая клиника астрахань
Важно понять: запой — это не просто серия праздников или «отпуск с алкоголем». Это состояние, при котором организм перестаёт выходить в трезвость, а любая попытка остановиться сопровождается настолько тяжёлыми симптомами, что человек снова тянется к бутылке. С каждым днём запоя возрастает нагрузка на сердце, печень, поджелудочную железу, мозг.
Подробнее – вывод из запоя на дому в Воскресенске
Вывод из запоя в клинике строится на основе алгоритмов, направленных на безопасное восстановление физиологических функций. Применяется стандартная система, включающая оценку состояния, подбор медикаментозных средств и постепенную адаптацию организма. Такой формат позволяет избежать резких изменений и поддерживать предсказуемую клиническую динамику. Важную роль играет наблюдение за реакцией организма, позволяющее корректировать тактику лечения в соответствии с выявленными изменениями. Последовательность действий обеспечивает структурированность процесса и повышает вероятность стабильного результата.
Исследовать вопрос подробнее – вывод из запоя недорого в ижевске
В этой статье мы обсудим процесс восстановления после зависимостей, акцентируя внимание на различных методах и подходах к реабилитации. Читатели узнают, как создать план выздоровления и использовать полезные ресурсы для достижения устойчивых изменений.
Детальнее – http://142.250.191.118/url?q=https://vyvod-iz-zapoya-tolyatti0.ru/vyvod-iz-zapoya-tolyatti-na-domu
Своевременное обращение к специалисту позволяет избежать опасных осложнений и облегчить процесс восстановления организма. Экстренный вызов врача-нарколога необходим в следующих случаях:
Подробнее тут – вызов нарколога на дом краснодар
Наркологическая клиника использует методики, направленные на комплексную оценку состояния пациента. Работа строится на анализе анамнеза, исследовании соматических параметров и определении степени выраженности симптомов. Такой формат создаёт условия для точного подбора терапевтических мер. В клинике применяется непрерывный мониторинг, направленный на своевременное выявление отклонений и корректировку лечебных мероприятий. Благодаря этому достигается высокая стабильность клинического процесса и формируется благоприятная динамика восстановления.
Выяснить больше – http://narkologicheskaya-klinika-v-vdk18.ru/narkolog-vladivostok-otzyvy/https://narkologicheskaya-klinika-v-vdk18.ru
Наркологическая клиника в Долгопрудном помогает в ситуациях, когда:
Получить дополнительную информацию – медикаментозное кодирование от алкоголизма
Лечение проходит поэтапно, чтобы пациент не испытывал стресса и перегрузок. Каждый шаг контролируется врачами, а терапия корректируется в зависимости от состояния. В таблице ниже представлена структура программы лечения в клинике «АстраМед Трезвость».
Узнать больше – наркологическая клиника астрахань
Когда слова не нужны, говорят цветы. Букет для девушки — это не просто подарок, а способ выразить чувства и создать незабываемое впечатление. В каталоге «Флориона» представлены композиции разных форм и размеров: от нежных монобукетов до роскошных многоцветных ансамблей. Переходите на https://www.florion.ru/catalog/buket-devushke и выбирайте среди сотен вариантов тот самый букет, который расскажет о ваших чувствах лучше любых слов. Доставка работает оперативно.
Для повышения эффективности лечения наркологическая клиника применяет стандартизированные методы, включающие мониторинг жизненно важных параметров, корректировку фармакотерапии и оценку неврологических показателей. Совокупность таких мер делает процесс более предсказуемым и снижает вероятность осложнений. Кроме того, практическая часть работы включает регулярную проверку метаболических функций, что способствует точному дозированию препаратов и своевременному изменению схем. Это позволяет поддерживать физиологическую устойчивость организма даже при интенсивной нагрузке и сохранять стабильность состояния на протяжении всего периода терапии.
Получить больше информации – наркологическая клиника вывод из запоя
Вопрос «а не рано ли кодироваться» часто звучит и от самих пациентов, и от их близких. Кажется, что кодирование — это крайняя мера «на последней стадии», а пока человек работает, иногда бывает трезвым и «не валяется под забором», можно подождать. На самом деле гораздо разумнее ориентироваться не на стереотипы, а на реальные признаки того, что зависимость уже управляет жизнью, а не наоборот. Кодирование от алкоголизма в Королёве рассматривается именно тогда, когда попытки остановиться своими силами систематически проваливаются, а каждый новый запой становится тяжелее предыдущего.
Изучить вопрос глубже – anonimnoe-kodirovanie-ot-alkogolizma-cena
Вывод из запоя в клинике представляет собой последовательный комплекс процедур, направленных на устранение интоксикации и стабилизацию основных функций организма. В основе процесса лежит оценка физиологических параметров, определение уровня нарушений и корректировка тактики вмешательства. Такой подход обеспечивает постепенное восстановление адаптивных механизмов и снижает риск осложнений. На каждом этапе проводится анализ динамики, что позволяет оптимизировать терапевтические меры и поддерживать устойчивость состояния. Работа ориентирована на сохранение баланса внутренних систем и снижение нагрузки на жизненно важные органы.
Получить больше информации – нарколог вывод из запоя ижевск
Часто родственники тянут до последнего, надеясь, что запой «сам пройдёт», как это случалось раньше. Но с каждым эпизодом последствия становятся тяжелее: организм изнашивается, возрастает риск осложнений, ухудшается психика. Особенно опасно, когда запой длится несколько дней подряд, а любые попытки самостоятельно сократить дозы алкоголя сопровождаются дрожью, бессонницей, приступами паники.
Получить дополнительные сведения – vyvod-iz-zapoya-v-moskve-v-stacionare
В рамках лечения используются методы, позволяющие фиксировать изменения и оценивать реакцию организма на проводимые мероприятия. Они служат основой для выборочных корректировок и обеспечивают структурированный характер процесса. Отличительной особенностью становится возможность адаптировать лечебные схемы под индивидуальные особенности пациента. Ниже представлены ключевые направления оценки состояния, применяемые для формирования полной клинической картины.
Выяснить больше – http://narkologicheskaya-klinika-v-vdk18.ru
Там, где раньше хватало одного тяжёлого утра, теперь требуются дни детоксикации. И чем позже подключается врач, тем сложнее вернуть организм к относительно безопасному состоянию.
Подробнее тут – вывод из запоя на дому в Воскресенске
В таких случаях наркологическая клиника помогает не только вывести из запоя и поставить капельницу, но и выстроить долгосрочный план: обследование, медикаментозную поддержку, реабилитацию, работу с психологом. Это даёт шанс не просто восстановиться после конкретного эпизода, а перестать повторять один и тот же разрушительный сценарий.
Детальнее – https://narkologicheskaya-klinika-voskresensk11.ru/chastnaya-narkologicheskaya-klinika-v-voskresenske/
Mod Mosaic Online – Really liked the variety of modern pieces, browsing felt satisfying.
Наркологическая клиника в клинике в Астрахани оказывает широкий спектр услуг, направленных на устранение интоксикации, стабилизацию психоэмоционального состояния и восстановление функций организма. Терапия подбирается персонально в зависимости от тяжести состояния и индивидуальных особенностей пациента.
Детальнее – http://narkologicheskaya-klinika-astrakhan18.ru/narkologi-astrakhan/
Наркологическая клиника применяет стандартизированные схемы, направленные на безопасное и постепенное восстановление. Каждый этап вмешательства согласуется с текущим состоянием пациента, что обеспечивает предсказуемый характер изменений. Модель работы включает оценку реакции организма, проверку устойчивости внутренних систем и уточнение динамики метаболических процессов. Последовательность действий формируется с учётом адаптационных возможностей и направлена на достижение стабильного результата.
Изучить вопрос глубже – наркологическая клиника цены владивосток
В этой статье-обзоре мы собрали данные, актуальность которых сомнительна, а факты — не всегда взаимосвязаны. Читатель сможет ознакомиться с разными мнениями, хотя вряд ли они существенно повлияют на его понимание темы.
Вот – онлайн слоты
Наряду с физическим состоянием врачи учитывают психологический фон пациента. Человек в запое часто неадекватно оценивает своё самочувствие, обещает «завязать сам», спорит с родственниками, агрессирует или, наоборот, впадает в апатию. Задача специалиста — не спорить и не давить, а грамотно оценить риски и предложить такой формат помощи, который будет безопасен и реалистичен именно в этой ситуации.
Ознакомиться с деталями – вывод из запоя москва срочно
В Москве особенно востребован выезд врача на дом: не всегда есть силы и возможность везти человека в стационар, иногда он сам отказывается куда-либо ехать, стесняется своего состояния или боится огласки. В этих случаях нарколог приезжает по адресу, проводит осмотр, стабилизирует состояние с помощью инфузионной терапии и подбирает препараты, которые снимают интоксикацию, снижают тревогу, нормализуют сон и давление. При более тяжёлых формах запоя или при наличии сопутствующих заболеваний оптимальным вариантом становится стационар, где можно обеспечить круглосуточное наблюдение и постепенный выход из кризиса.
Ознакомиться с деталями – https://vyvod-iz-zapoya-moskva011.ru
Состав инфузии формируется по доминирующему симптому и данным экспресс-измерений, с учётом лекарственных взаимодействий. Врач оценивает динамику в реальном времени и, при необходимости, корректирует состав/скорость. Ниже — примеры профилей; окончательное решение всегда очное.
Получить больше информации – нарколог на дом вывод из запоя екатеринбург
Truvella Network – Content looks carefully chosen and the site feels inviting.
Зависимость редко начинается резко. Сначала это «разовые» посиделки, алкоголь «для снятия стресса», эпизодическое употребление психоактивных веществ «из любопытства» или «для компании». На этом этапе человеку кажется, что он полностью контролирует ситуацию. Со временем эпизоды употребления становятся чаще, дозы растут, появляются провалы в памяти, срывы, невозможность остановиться вовремя. В этот момент уже страдают здоровье, работа, отношения с близкими. Обращение в наркологическую клинику позволяет не доводить ситуацию до критической точки и остановить разрушение жизни на любом этапе заболевания.
Детальнее – https://narkologicheskaya-klinika-dolgoprudnyj11.ru/narkologicheskie-kliniki-ryadom-v-dolgoprudnom
Чем раньше нарколог окажет помощь, тем выше шансы избежать осложнений и восстановиться без последствий для здоровья.
Получить дополнительную информацию – http://narcolog-na-dom-sochi0.ru/vyzov-narkologa-na-dom-sochi/
В клинике «НаркоСити» используются только сертифицированные лекарственные средства, которые подбираются индивидуально с учетом состояния пациента:
Получить дополнительную информацию – наркологический вывод из запоя в краснодаре
Can you be more specific about the content of your article? After reading it, I still have some doubts. Hope you can help me. https://www.binance.info/zh-CN/register?ref=WFZUU6SI
Каждый из представленных элементов формирует устойчивую основу для дальнейшей работы и задаёт необходимый уровень контроля. Структура вмешательств адаптируется под особенности конкретного случая, что укрепляет эффективность процесса и создаёт благоприятные условия для стабилизации.
Подробнее можно узнать тут – запой наркологическая клиника пенза
В этом тексте собрано множество случайных сведений и довольно неопределённых мыслей, которые могут чем-то заинтересовать. Мы отмечаем моменты, которые не особенно важны, но всё же занимают своё место в повествовании.
Вот – ставки на спорт
Публикация предоставляет читателю набор разрозненных идей, которые сложно применить на практике. Мы лишь слегка касаемся разных точек зрения, не углубляясь в анализ и не предлагая никаких выводов.
Вот – секс знакомства
В основе работы клиники «ИжТрезвоМед Центр» лежит принцип персонализированной медицины. Это означает, что каждый пациент получает не шаблонное лечение, а тщательно подобранный комплекс процедур, учитывающий его состояние, историю заболевания, уровень мотивации и социальную ситуацию. Такой подход позволяет добиться стабильного результата даже в сложных случаях. Лечение проводится анонимно, без постановки на учёт и разглашения данных, что особенно важно для тех, кто ценит конфиденциальность.
Узнать больше – вывод наркологическая клиника в ижевске
Многие тянут до последнего, считая, что к наркологу обращаются только в самых крайних случаях. На деле показаний для консультации гораздо больше, и они часто появляются задолго до того, как человек впервые оказывается в запое или не выходит из состояния опьянения несколько дней подряд.
Подробнее можно узнать тут – https://narkologicheskaya-klinika-voskresensk11.ru/chastnaya-narkologicheskaya-klinika-v-voskresenske
В основе работы клиники «ИжТрезвоМед Центр» лежит принцип персонализированной медицины. Это означает, что каждый пациент получает не шаблонное лечение, а тщательно подобранный комплекс процедур, учитывающий его состояние, историю заболевания, уровень мотивации и социальную ситуацию. Такой подход позволяет добиться стабильного результата даже в сложных случаях. Лечение проводится анонимно, без постановки на учёт и разглашения данных, что особенно важно для тех, кто ценит конфиденциальность.
Получить дополнительную информацию – https://narkologicheskaya-klinika-v-izhevske18.ru/narkologi-izhevsk-czeny
Эта информационная статья содержит полезные факты, советы и рекомендации, которые помогут вам быть в курсе последних тенденций и изменений в выбранной области. Материал составлен так, чтобы быть полезным и понятным каждому.
Всё самое вкусное внутри – https://appli.mac-in.net/time_stamper/Community/patio.cgi?pg=40&read=456
Этот интересный отчет представляет собой сборник полезных фактов, касающихся актуальных тем. Мы проанализируем данные, чтобы вы могли сделать обоснованные выводы. Читайте, чтобы узнать больше о последних трендах и значимых событиях!
Исследовать вопрос подробнее – https://outpatientla.com/it-was-popularised-in-the-1960s
В клинике «НаркоСити» используются только сертифицированные лекарственные средства, которые подбираются индивидуально с учетом состояния пациента:
Углубиться в тему – вывод из запоя на дому круглосуточно
В основе работы клиники «ИжТрезвоМед Центр» лежит принцип персонализированной медицины. Это означает, что каждый пациент получает не шаблонное лечение, а тщательно подобранный комплекс процедур, учитывающий его состояние, историю заболевания, уровень мотивации и социальную ситуацию. Такой подход позволяет добиться стабильного результата даже в сложных случаях. Лечение проводится анонимно, без постановки на учёт и разглашения данных, что особенно важно для тех, кто ценит конфиденциальность.
Углубиться в тему – запой наркологическая клиника в ижевске
Услуги посредника в 1С Бухгалтерия оформляются особым образом. Комиссионер отражает реализацию товаров комитента с участием в расчетах. Выручкой комиссионера является только вознаграждение. Счета-фактуры выставляются с кодом вида операции 01 или 04. В книге продаж регистрируются только счета-фактуры на свое вознаграждение. Купить 1с
Обращение за помощью нарколога на дому в Архангельске имеет множество преимуществ, среди которых:
Подробнее тут – капельница от запоя на дому в архангельске
В этом интересном тексте собраны обширные сведения, которые помогут вам понять различные аспекты обсуждаемой темы. Мы разбираем детали и факты, делая акцент на важности каждого элемента. Не упустите возможность расширить свои знания и взглянуть на мир по-новому!
А что дальше? – https://ananiv-mr.od.gov.ua/soczialnaya-sfera
Промокоды часто дают фриспины. 7к казино промокоды вчера принес 50 FS, приятно.
В статье-обзоре представлены данные сомнительной актуальности и факты без явной взаимосвязи. Читатель ознакомится с разными мнениями, хотя они вряд ли существенно изменят его представление о теме.
Подробнее читать – диета для похудения быстро
Эта разъяснительная статья содержит простые и доступные разъяснения по актуальным вопросам. Мы стремимся сделать информацию понятной для широкой аудитории, чтобы каждый мог разобраться в предмете и извлечь из него максимум пользы.
Эксклюзивная информация – https://didoflores.com.br/ola-mundo
Этот информативный текст отличается привлекательным содержанием и актуальными данными. Мы предлагаем читателям взглянуть на привычные вещи под новым углом, предоставляя интересный и доступный материал. Получите удовольствие от чтения и расширьте кругозор!
Читать дальше – http://lapresentacioncolegio.com/pase-de-banderas
Эта статья сочетает познавательный и занимательный контент, что делает ее идеальной для любителей глубоких исследований. Мы рассмотрим увлекательные аспекты различных тем и предоставим вам новые знания, которые могут оказаться полезными в будущем.
А есть ли продолжение? – https://blog.nobbli.com.br/dicas/perfume-e-body-splash-qual-a-diferenca
Лечение в «ИжТрезвоМед Центр» проходит поэтапно, с акцентом на безопасность и эффективность. Каждый этап направлен на достижение конкретных целей, от детоксикации до психотерапии. В таблице представлена структура лечебного процесса:
Углубиться в тему – наркологическая клиника вывод из запоя ижевск
В данной обзорной статье представлены интригующие факты, которые не оставят вас равнодушными. Мы критикуем и анализируем события, которые изменили наше восприятие мира. Узнайте, что стоит за новыми открытиями и как они могут изменить ваше восприятие реальности.
Где почитать поподробнее? – https://agricultureyouth.org/testimonials/stave-job
Эта познавательная публикация погружает вас в море интересного контента, который быстро захватит ваше внимание. Мы рассмотрим важные аспекты темы и предоставим вам уникальные Insights и полезные сведения для дальнейшего изучения.
Не пропусти важное – https://www.28tsingyi.com/2022%E6%9B%B4%E6%96%B0-%E9%9D%92%E8%A1%A3%E5%B1%8B%E8%8B%91%E7%AE%A1%E7%90%86%E8%B2%BB%E4%B8%80%E8%A6%BD
Этот текст призван помочь читателю расширить кругозор и получить практические знания. Мы используем простой язык, наглядные примеры и структурированное изложение, чтобы сделать обучение максимально эффективным и увлекательным.
Прочитать подробнее – https://www.powertvnews.in/2022/07/18/puneeth-raj-kumar-kaveri-ward-name67926-2
https://patriotpluscoverage.com/
Ищете передовой VPN, который обеспечивает стабильное соединение и высокую скорость? Посетите сайт https://v2raytun.fun/ – там вы найдете v2RayTun VPN ключи, которые подходят для любых устройств – iPhone, Android, Windows или macOS. У вас будет доступ к свободному интернету всегда под рукой. Подробнее на сайте.
https://adultgamesdb.com/
После диагностики начинается активная фаза медикаментозного вмешательства. Современные препараты вводятся капельничным методом для быстрого снижения уровня токсинов в крови, восстановления обменных процессов и нормализации работы внутренних органов, таких как печень, почки и сердце.
Ознакомиться с деталями – https://kapelnica-ot-zapoya-arkhangelsk0.ru/kapelnicza-ot-zapoya-czena-arkhangelsk/
Поставил 7к казино скачать приложение, теперь не завишу от браузера. Даже при медленном интернете оно работает.
слушай, а тебе продавец обязан объяснять что и ко скольки бодяжить ? бошки, марихуану ПО ВРЕМЕНИ СКОЛЬКО?Оплатил заказ в субботу, во вторник посылка была отправлена вечером, в четверг уже была в городе, но встретиться с курьером не смог. В пятницу заберу. Все оперативно и быстро. Бразы вы снова в теме, если да то скоро заряусь к вам жду ответа)
Стационар в наркологической клинике часто воспринимается как нечто пугающее: строгий режим, замкнутое пространство, жёсткие правила. На деле стационарное лечение в Лобне создаётся не для того, чтобы «наказать» человека за употребление, а чтобы обеспечить ему максимальную безопасность и стабильность в самый тяжёлый период. Когда запои повторяются, самочувствие сильно ухудшается, а дома сложно создать тихую и контролируемую обстановку, именно стационар становится оптимальным решением.
Детальнее – http://narkologicheskaya-klinika-lobnya11.ru/
Эта информационная статья охватывает широкий спектр актуальных тем и вопросов. Мы стремимся осветить ключевые факты и события с ясностью и простотой, чтобы каждый читатель мог извлечь из нее полезные знания и полезные инсайты.
Лови подробности – https://whatfixedit.com/question/where-can-i-find-a-set-of-home-phones-for-my-mother-that-doesnt-like-a-cellphone
Не хотите платить за лицензию? У нас есть рабочий кряк для Windows 11 — скачайте прямо сейчас!
Подробнее – Кряк для Windows 11 Pro бесплатно
Состав инфузии формируется по доминирующему симптому и данным экспресс-измерений, с учётом лекарственных взаимодействий. Врач оценивает динамику в реальном времени и, при необходимости, корректирует состав/скорость. Ниже — примеры профилей; окончательное решение всегда очное.
Подробнее – нарколог на дом недорого екатеринбург
Ищете гранитные памятники Донецк ДНР? Обратитесь в Студию Гранита ДНР studiogranite.ru, чтобы заказать памятник из гранита на могилу в Донецке с установкой. Кроме того, мы предоставляем услуги по благоустройству могил, созданию и покраске оградок, мощению плитки ФЕМ и прочие услуги. Со всеми нашими услугами вы сможете ознакомиться на сайте. Специалисты помогут вам подобрать оптимальные решения.
При тяжелой алкогольной интоксикации оперативное лечение становится жизненно необходимым для спасения здоровья. В Архангельске специалисты оказывают помощь на дому, используя метод капельничного лечения от запоя. Такой подход позволяет быстро вывести токсины, восстановить обмен веществ и стабилизировать работу внутренних органов, обеспечивая при этом высокий уровень конфиденциальности и комфорт в условиях привычного домашнего уюта.
Подробнее тут – kapelnica-ot-zapoya-arkhangelsk0.ru/
Чем раньше нарколог окажет помощь, тем выше шансы избежать осложнений и восстановиться без последствий для здоровья.
Выяснить больше – нарколог на дом вывод сочи
Нашли рабочий серийный номер для Windows 11 Pro — проверено лично, без вирусов!
Подробнее – Где взять лицензионный ключ для Windows 11
Ищете услуги хакера взломать ватсап? Страница hackerlive.biz/threads/uslugi-xakera-udalennyj-dostup-vzlom-soc-setej-votsap-telegram-i-mnogoe-drugoe-bolshoj-opyt.78/page-9 — презентация частного специалиста по кибербезопасности: заявлены аудит, поиск уязвимостей, восстановление доступа к своим профилям и технике, подключение двухфакторной защиты и рекомендации по цифровой гигиене. Стиль деловой и лаконичный: указаны ключевые услуги, подчёркнуты приватность, прямой контакт и ориентир на результат.
В данном обзоре представлены основные направления и тренды в области медицины. Мы обсудим актуальные проблемы здравоохранения, свежие открытия и новые подходы, которые меняют представление о лечении и профилактике заболеваний. Эта информация будет полезна как специалистам, так и широкой публике.
Выяснить больше – http://dreamkristall.ru/bitrix/rk.php?goto=https://vyvod-iz-zapoya-tolyatti0.ru/vyvedenie-iz-zapoya-tolyatti
Слоты только от топ-провайдеров. 7кей казино — Igrosoft, Pragmatic, NetEnt, все на месте.
Почему больше не забегаете ? https://krasapetochka.ru Все легально и проверено, есть NMR. Плохого ни чего не случиться. Скорей всего приняли потому что были паленые….”Решил Попробовать Записаться” P S
Хотите рельеф мышц? Забудьте о скучных стенах спортзала! Ваша стройная талия ждут вас на свежем воздухе. Обработка земли мотоблоком — это не просто рутина, а активный отдых с жиросжиганием.
Как это работает?
Подробнее на странице – https://kursorbymarket.nethouse.ru/articles/garden-fitness-why-working-with-a-tillerblock-is-an-ideal
Мощные мышцы ног и ягодиц:
Управляя мотоблоком, вы постоянно идете по рыхлой земле, совершая работу на сопротивление. Это равносильно выпадам с утяжелением.
Стальной пресс и кор:
Удержание руля и контроль направления заставляют напрягаться ваш корпус. Каждая кочка — это микро-скручивание.
Рельефные руки и плечи:
Повороты, подъемы, развороты тяжелой техники — это упражнения на бицепс, трицепс и плечи в чистом виде.
Запустите анимацию правильной стойки: Мы покажем, как превратить работу в эффективную тренировку.
Ваш план похудения на грядках:
Разминка (5 минут): Прогулка быстрым шагом по участку. Кликните на иконку, чтобы увидеть полный комплекс.
Основная “тренировка” (60-90 минут): Вспашка, культивация, окучивание. Чередуйте интенсивность!
Заминка и растяжка (10 минут): Обязательная растяжка спины. Пролистайте галерею с примерами упражнений.
Мотивационный счетчик: За час активной работы с мотоблоком средней мощности вы можете сжечь от 400 до 600 ккал! Это больше, чем занятие на эллипсоиде.
Итог: Гордость за двойной результат. Поделитесь своим прогрессом в соцсетях с хештегом #ФитнесНаГрядках. Пашите не только землю, но и лишние калории
Этот информационный набор привлекает внимание множеством мелочей и странных ракурсов. Мы предлагаем взгляды, которые редко бывают полезны, но могут слегка разнообразить ваше знакомство с темой.
Вот – азартные игры
Срочная медицинская помощь поможет избежать тяжелых последствий и сократит время на восстановление после запоя.
Исследовать вопрос подробнее – срочный вывод из запоя краснодар
Доставка цветов в Санкт-Петербурге требует оперативности и внимания к деталям, ведь свежесть букета и своевременность — залог успешного подарка. Сервис FlowersSpb предлагает широкий выбор композиций для любого повода: дни рождения, юбилеи, романтические свидания, корпоративные мероприятия. Переходите на https://flowersspb.com/ и выбирайте среди сотен вариантов от классических роз до авторских аранжировок. Профессиональные флористы работают со свежими цветами, а курьеры доставляют заказы точно в указанное время по всему городу.
Состав инфузии формируется по доминирующему симптому и данным экспресс-измерений, с учётом лекарственных взаимодействий. Врач оценивает динамику в реальном времени и, при необходимости, корректирует состав/скорость. Ниже — примеры профилей; окончательное решение всегда очное.
Подробнее можно узнать тут – http://narcolog-na-dom-ekaterinburg0.ru/
Медицинская публикация представляет собой свод актуальных исследований, экспертных мнений и новейших достижений в сфере здравоохранения. Здесь вы найдете информацию о новых методах лечения, прорывных технологиях и их практическом применении. Мы стремимся сделать актуальные медицинские исследования доступными и понятными для широкой аудитории.
Выяснить больше – http://64.233.179.91/url?q=https://vyvod-iz-zapoya-tolyatti0.ru/vyvedenie-iz-zapoya-tolyatti
Лечебные мероприятия и рекомендации формируются исходя из индивидуального состояния каждого пациента. Специалист имеет возможность посвятить достаточное количество времени каждому больному, корректируя программу лечения согласно его особым потребностям и жизненным обстоятельствам. При этом учитываются психологические, социальные и физические аспекты, оказывающие влияние на здоровье пациента. Персонализированный подход обеспечивает оперативное реагирование на изменения состояния и своевременную корректировку терапии.
Ознакомиться с деталями – https://narcolog-na-dom-msk55.ru/vyzov-narkologa-na-dom-moskva
«ЮгМедЦентр» поддерживает строгую конфиденциальность: выездные специалисты приезжают без медицинской символики, в гражданской одежде; документы формулируются нейтрально; уведомления не содержат триггерных слов; профиль можно оформить под кодом. Все записи ведутся в шифрованном контуре с разграничением доступа по ролям, а видеосессии с врачом/психологом не записываются. Мы предупреждаем о цифровой гигиене: включите «тихий режим» уведомлений, избегайте пересылки документов в открытых чатах, используйте резервный канал связи для экстренных вопросов.
Детальнее – https://narcolog-na-dom-sochi00.ru/narkolog-i-psikhiatr-adler/
После приезда нарколог оценивает состояние пациента, проверяет давление, частоту пульса и насыщенность крови кислородом. Затем врач подбирает индивидуальный состав капельницы, включающий растворы для очистки организма, препараты для нормализации работы сердца, печени и нервной системы. Процедура длится около 1–2 часов и позволяет быстро:
Детальнее – срочный вывод из запоя краснодар
Метод капельничного лечения от запоя обладает рядом существенных преимуществ, благодаря которым пациенты получают качественную и оперативную помощь:
Ознакомиться с деталями – https://kapelnica-ot-zapoya-arkhangelsk0.ru/kapelnicza-ot-zapoya-czena-arkhangelsk
Услуга капельничного лечения от запоя на дому в Архангельске предусматривает комплексный подход, направленный на оперативное восстановление организма. Сразу после вызова нарколог прибывает на дом, проводит детальный осмотр, собирает анамнез и измеряет жизненно важные показатели. На основе этих данных разрабатывается персональный план терапии, который включает введение современных медикаментов с использованием автоматизированных систем дозирования, а также психологическую поддержку для создания условий долгосрочной ремиссии.
Подробнее тут – https://kapelnica-ot-zapoya-arkhangelsk0.ru
И всем форумчанам!!! https://krasapetochka.ru Тут четкий кристал ! Давно мне нравиться работа данного мага. Спасибо !но чет с каждым разом доставка все дороже и дороже((( У него заказ был 4гр реги и 1гр ск, такой заказ можно делать, цена учитывается как за 5гр.
Вызов нарколога на дом становится необходимым при любых состояниях, когда отказ от алкоголя сопровождается выраженными симптомами интоксикации и абстиненции. Основные ситуации, в которых срочно требуется профессиональная помощь врача:
Углубиться в тему – нарколог на дом недорого сочи
При тяжелой алкогольной интоксикации оперативное лечение становится жизненно необходимым для спасения здоровья. В Архангельске специалисты оказывают помощь на дому, используя метод капельничного лечения от запоя. Такой подход позволяет быстро вывести токсины, восстановить обмен веществ и стабилизировать работу внутренних органов, обеспечивая при этом высокий уровень конфиденциальности и комфорт в условиях привычного домашнего уюта.
Ознакомиться с деталями – https://kapelnica-ot-zapoya-arkhangelsk0.ru/kapelnicza-ot-zapoya-czena-arkhangelsk/
На следующем этапе начинается активное медикаментозное вмешательство. Современные препараты вводятся капельничным методом для быстрого выведения токсинов и нормализации обменных процессов, что способствует стабилизации работы жизненно важных органов.
Подробнее можно узнать тут – вывод из запоя цена в волгограде
Алкоголизм — хроническое заболевание, требующее комплексного подхода и круглосуточного контроля. Клиника «УралМед» в Екатеринбурге предлагает полный спектр услуг для пациентов любого уровня зависимости: от экстренной детоксикации до долгосрочной реабилитации. Главные принципы работы — абсолютная анонимность, индивидуальный план лечения и постоянное сопровождение квалифицированной командой специалистов.
Ознакомиться с деталями – http://lechenie-alkogolizma-ekaterinburg0.ru/
Врач на дому или в клинике проводит:
Детальнее – https://kachestvo-vyvod-iz-zapoya.ru/vyvod-iz-zapoya-na-domu-novosibirsk/
Домашний визит нарколога — это не компромисс «на скорую руку», а тщательно организованный процесс, который экономит время, сохраняет конфиденциальность и делает лечение предсказуемым. «ЕкатеринбургМедСервис» принимает вызовы круглосуточно и выезжает во все районы города — от Уралмаша и ВИЗа до Академического и Широкой Речки. Команда приезжает без внешних опознавательных знаков, использует нейтральные формулировки в документах и ведёт переписку только по защищённым каналам связи. На месте мы быстро проводим экспресс-диагностику, запускаем титрованные капельницы через инфузомат, контролируем пульс, сатурацию и артериальное давление, подключаем гастропротекцию и аккуратно управляем тревогой без избыточной седации. Цель — безопасно «снять волну» симптомов, вернуть возможность пить воду и отдыхать, а затем закрепить результат на горизонте ближайших 72 часов.
Исследовать вопрос подробнее – нарколог на дом круглосуточно
Не тратьте деньги на лицензию — скачайте кряк для Windows 11 здесь и активируйте систему за 5 минут.
Подробнее – Где найти рабочий ключ для Windows 11
Все очень быстро, пришло через день после заказа. бошки, марихуану сегодня оплатил заказ..буду ждать доставки..протестирую.сообщу о качестве продукта?все это только на доверии, белый кристаллический так же может быть 4фа…. Не взирая на то что заказ был оплачен в среду прошлой недели, а получил я его через 9(девять) дней, данный селлер заслужил мое доверие!
В этой публикации мы обсуждаем современные методы лечения различных заболеваний. Читатели узнают о новых медикаментах, терапиях и исследованиях, которые активно применяются для лечения. Мы нацелены на то, чтобы предоставить практические знания, которые могут помочь в борьбе с недугами.
Получить дополнительную информацию – http://stockcable.ru/bitrix/redirect.php?goto=https://vyvod-iz-zapoya-tolyatti0.ru/vyvedenie-iz-zapoya-tolyatti
В этой статье мы обсудим процесс восстановления после зависимостей, акцентируя внимание на различных методах и подходах к реабилитации. Читатели узнают, как создать план выздоровления и использовать полезные ресурсы для достижения устойчивых изменений.
Подробнее можно узнать тут – http://local.google.tk/url?q=https://vyvod-iz-zapoya-tolyatti0.ru/vyvedenie-iz-zapoya-tolyatti
В этой статье мы рассмотрим современные достижения в области медицины, включая инновационные методы лечения и диагностики. Мы обсудим важность профилактики заболеваний и роль технологий в улучшении качества здравоохранения. Читатели узнают о влиянии медицины на повседневную жизнь и ее значение для современного общества.
Выяснить больше – http://xn--b1agjhqd1a3cwb.xn--90ais/bitrix/redirect.php?goto=https://vyvod-iz-zapoya-tolyatti0.ru/vyvod-iz-zapoya-tolyatti-na-domu
Инфузионная терапия — центральный элемент стабилизации. Она помогает восстановить баланс жидкости, вывести токсические метаболиты и защитить органы. Вывод из запоя в клинике в Астрахани проводится с использованием препаратов, направленных на поддержку нервной системы, печени и сердечно-сосудистой функции.
Получить больше информации – вывод из запоя с выездом
Севен кейс казино беру как запасной вариант для входа.
В клинике «НаркоСити» используются только сертифицированные лекарственные средства, которые подбираются индивидуально с учетом состояния пациента:
Подробнее тут – вывод из запоя с выездом в краснодаре
После окончания врач дает консультации и рекомендации по восстановлению организма и профилактике повторных запоев.
Детальнее – вывод из запоя на дому круглосуточно краснодар
В клинике «НаркоСити» используются только сертифицированные лекарственные средства, которые подбираются индивидуально с учетом состояния пациента:
Выяснить больше – нарколог на дом вывод из запоя в краснодаре
Jwh 203 порошок светло-желтого цвета у них, делал в пропорции 150-200мг на спичечный коробок микса, кролики довольны! 5-IAI пробывал 200мг по кишке, видимо нужно было сразу 300-400мг чтобы понять кайф! https://masispizzamenu.com мои близкий поделился вашими контактами когда про бывали ваш товар)”Приезжаю к месту,вижу дом обхожу кооператив который мне нужен (ну я так думал)” Что задерживали грузы, с поставками, и дожидались пока запрет выйдет…
«УралМедЦентр» организует домашний формат наркологической помощи в Екатеринбурге как спокойный и технологичный процесс без очередей и лишнего шума. Мы приезжаем круглосуточно во все районы — от Уралмаша до Академического — и запускаем персональную схему стабилизации прямо у вас дома: экспресс-оценка, титрованные капельницы через инфузомат, защита желудка, контроль сердечного ритма, настройка сна и питьевого режима. В целях конфиденциальности специалисты приезжают без медицинской символики, документы формулируются нейтрально, уведомления — «тихие», а при желании оформляется кодовый профиль. Так мы снимаем стигму и возвращаем человеку чувство контроля уже в первые часы.
Выяснить больше – http://narcolog-na-dom-ekaterinburg0.ru/
Состав инфузии формируется по доминирующему симптому и данным экспресс-измерений, с учётом лекарственных взаимодействий. Врач оценивает динамику в реальном времени и, при необходимости, корректирует состав/скорость. Ниже — примеры профилей; окончательное решение всегда очное.
Подробнее можно узнать тут – https://narcolog-na-dom-ekaterinburg0.ru/ekaterinburg-narkologiya
Служба такси и трансфера в Анапе работает круглосуточно, обеспечивая комфортные поездки по всему Черноморскому побережью и Краснодарскому краю. Водители встречают пассажиров в аэропорту и на вокзале с табличкой, помогают с багажом и доставляют точно по адресу. В автопарке представлены машины всех классов — от стандарта до бизнеса, минивэны и микроавтобусы до 50 мест. Рассчитать стоимость и забронировать автомобиль можно на https://anapa-taxi-transfer.ru/ — цены фиксированные, без скрытых доплат, оплата наличными или картой.
В этот этап включено:
Подробнее – нарколог на дом вывод из запоя новосибирск
После приезда нарколог оценивает состояние пациента, проверяет давление, частоту пульса и насыщенность крови кислородом. Затем врач подбирает индивидуальный состав капельницы, включающий растворы для очистки организма, препараты для нормализации работы сердца, печени и нервной системы. Процедура длится около 1–2 часов и позволяет быстро:
Разобраться лучше – вывод из запоя на дому в краснодаре
Во время процедуры врач контролирует состояние больного, по необходимости корректирует лечение, чтобы добиться максимального терапевтического эффекта. После проведения детоксикации пациенту назначается курс поддерживающей терапии, а также даются рекомендации по дальнейшему восстановлению и профилактике рецидивов.
Получить дополнительную информацию – нарколог на дом срочно
Во время процедуры врач контролирует состояние больного, по необходимости корректирует лечение, чтобы добиться максимального терапевтического эффекта. После проведения детоксикации пациенту назначается курс поддерживающей терапии, а также даются рекомендации по дальнейшему восстановлению и профилактике рецидивов.
Подробнее тут – платный нарколог на дом сочи
Приватность — клинический фактор, снижающий тревогу и укрепляющий доверие. В «ЕкатеринбургМедСервис» выезд немаркированный, специалисты в гражданской одежде, уведомления — «тихие», документы — с нейтральными формулировками. Медкарта хранится в шифрованном контуре, доступ к данным разграничен по ролям. По запросу вся коммуникация ведётся через доверенное лицо, а оплата возможна наличными или безналом с нейтральным назначением платежа. Это позволяет оставаться в тени и при этом получать полноценную помощь.
Узнать больше – http://narcolog-na-dom-ekaterinburg00.ru
Отличнный магазин https://doctor-filatova.ru и вот я решил зайти на ветку доверенных магазинов! и почему то решил ткнуть именно на ссылку чемикл микс! захожу дыбанул на ценник, устроило и даже очень! так же порадовало то что тут делают отправку! а это значит то что если товар отправят то ты его 100% получишь! главная особенность магазина в том что отправка делается от 5грамм 🙂 а это значит то что я смогу и опробывать товар и убидится в качестве товара, и в надежности магазина!глазом на пакете,вот там была россыпь:good::killmyself::strong::stars::fu::good::bro: Как магазин порядочный
Ищете передовой VPN, который обеспечивает стабильное соединение и высокую скорость? Посетите сайт https://v2raytun.fun/ – там вы найдете v2RayTun VPN ключи, которые подходят для любых устройств – iPhone, Android, Windows или macOS. У вас будет доступ к свободному интернету всегда под рукой. Подробнее на сайте.
Лечение проходит поэтапно, чтобы пациент не испытывал стресса и перегрузок. Каждый шаг контролируется врачами, а терапия корректируется в зависимости от состояния. В таблице ниже представлена структура программы лечения в клинике «АстраМед Трезвость».
Подробнее тут – https://narkologicheskaya-klinika-v-astrakhani18.ru/narkologiya-astrakhan-adres/
Состав инфузии формируется по доминирующему симптому и данным экспресс-измерений, с учётом лекарственных взаимодействий. Врач оценивает динамику в реальном времени и, при необходимости, корректирует состав/скорость. Ниже — примеры профилей; окончательное решение всегда очное.
Изучить вопрос глубже – https://narcolog-na-dom-ekaterinburg0.ru/narkolog-ekaterinburg-otzyvy
Вызывать нарколога на дом рекомендуется при следующих состояниях:
Подробнее можно узнать тут – нарколог на дом вывод из запоя в санкт-петербурге
Если в процессе выявляются нестабильные витальные показатели, нарастающая дезориентация или признаки дыхательной недостаточности, маршрут немедленно переводится в стационар «УралМедЦентра» с сохранением уже собранной информации — без повторных очередей и «история заново».
Ознакомиться с деталями – нарколог на дом вывод в екатеринбурге
Состав инфузии формируется по доминирующему симптому и данным экспресс-измерений, с учётом лекарственных взаимодействий. Врач оценивает динамику в реальном времени и, при необходимости, корректирует состав/скорость. Ниже — примеры профилей; окончательное решение всегда очное.
Разобраться лучше – http://narcolog-na-dom-ekaterinburg0.ru/narkolog-ekaterinburg-na-dom/
У меня разок было, что трек перестал на два дня отслеживатся, но нечего доставили все пучком. https://otdelochniki35.ru Всем здравствуйте! Опишу свою ситуацию: 2 недели назад заказывал в данном магазине 2 с-i и MXE, всё на высшем уровне: оперативность 5 +, доставка 5+, конспирация 5+, Качество 5+. Нареканий к Магазину нет, только благодарность!!! В этот раз сделал заказ в Понедельник, оплатил во Вторник. В пятницу только получил трек. На сегодня Трек не работает. Звоню в курьерку они говорят, что такой трек у них не зарегистрирован. Паники пока никакой нет, но хотелось бы получить какие нибудь разъяснения по этому поводу. Заранее спасибо!Проверенный временем ровный магаз успеха и процветания
В этом тексте собрано множество случайных сведений и довольно неопределённых мыслей, которые могут чем-то заинтересовать. Мы отмечаем моменты, которые не особенно важны, но всё же занимают своё место в повествовании.
Вот – https://arma-rehab.ru/vyvod-iz-zapoya
Лечение на дому проходит в комфортной и спокойной обстановке, что позволяет значительно снизить уровень стресса и быстро улучшить состояние здоровья пациента.
Ознакомиться с деталями – вызвать нарколога на дом сочи
Вызов врача-нарколога на дом позволяет избежать стресса госпитализации, обеспечивая комфорт и удобство как для пациента, так и для его близких.
Ознакомиться с деталями – вызов врача нарколога на дом
Вызов нарколога на дом в таких условиях позволяет не терять драгоценное время, избежать госпитализации и предотвратить критическое развитие событий. Кроме того, это снижает психологическую нагрузку на пациента и его близких, особенно если зависимость длится долго и сопровождается отрицанием проблемы.
Подробнее тут – vrach narkolog na dom moskva
Во время процедуры врач контролирует состояние больного, по необходимости корректирует лечение, чтобы добиться максимального терапевтического эффекта. После проведения детоксикации пациенту назначается курс поддерживающей терапии, а также даются рекомендации по дальнейшему восстановлению и профилактике рецидивов.
Ознакомиться с деталями – вызов врача нарколога на дом сочи
Во время процедуры врач контролирует состояние больного, по необходимости корректирует лечение, чтобы добиться максимального терапевтического эффекта. После проведения детоксикации пациенту назначается курс поддерживающей терапии, а также даются рекомендации по дальнейшему восстановлению и профилактике рецидивов.
Разобраться лучше – вызов врача нарколога на дом сочи
Состав инфузии формируется по доминирующему симптому и данным экспресс-измерений, с учётом лекарственных взаимодействий. Врач оценивает динамику в реальном времени и, при необходимости, корректирует состав/скорость. Ниже — примеры профилей; окончательное решение всегда очное.
Изучить вопрос глубже – нарколог на дом клиника
Обращение к наркологу — это не признание «окончательного проигрыша», а трезвое решение, что здоровье и жизнь важнее иллюзии контроля. В клинике можно безопасно вывести человека из запоя, стабилизировать состояние, обследовать сердце, печень, нервную систему, понять, насколько далеко зашло заболевание. Важно, что помощь получают не только тяжёлые пациенты «на грани», но и те, у кого ещё есть работа, семья, привычный образ жизни, но запои уже стали регулярными. Чем раньше удаётся подключить специалистов в Лобне, тем мягче можно пройти лечение и тем больше шансов сохранить и здоровье, и отношения, и социальный статус.
Подробнее можно узнать тут – http://narkologicheskaya-klinika-lobnya11-2.ru/
не в курсе кокаин Забрал я посылочку. Упоковка на 5+(пакет был с дыркой как будто смотрели что там, но с такой упаковкой только на паяльник подумаеш). Сделал ам 2233(1г) + ркс4(1г) на 20 грамм мягкого. Честно говоря ам не почувствовал совсем, кроет как ркс4(1 г.) на 20 грамм(был печальный опыт). Сейчас курим по грамму на двоих, тогда кроет на “целых” 10 минут. Вообщем незнаю чья ошибка это, да и смысла выяснять нет, деньги все равно не вернуться. Хотел попробовать тусипи заказать, но как то страшно. С тусипи то такого не было не разу вроде? Притензий не было?челяба есть? всегда ровно все было и есть. так что я
Обращаться можно и нужно не только в момент очередного запоя. Клиника в Ивантеевке работает и с теми, кто сейчас в относительной ремиссии, но понимает, что без внешней поддержки снова сорвётся. В этом случае можно обсудить профилактические программы, варианты кодирования, реабилитацию, работу с тревогой и депрессией. Чем раньше сделан шаг в сторону лечения, тем мягче будут процедуры и тем больше шансов на устойчивый результат.
Исследовать вопрос подробнее – телефон наркологической клиники
Современные технологии позволяют:
Получить дополнительные сведения – вывод из запоя цена
https://school97.ru/vesti20/index.php?PAGE_NAME=profile_view&UID=232120
В этот этап включено:
Получить дополнительные сведения – вывод из запоя недорого в новосибирске
Ночной вызов ничем не отличается от утреннего: мы отвечаем, уточняем риски и запускаем маршрут так, чтобы первые часы прошли спокойно. Наш алгоритм простой и понятный — он экономит время и убирает хаос. Ниже — ориентировочная карта визита; по месту врач адаптирует её к возрасту, соматическому фону и текущим симптомам.
Узнать больше – нарколог капельница на дом
Клиника «НаркоСити» предлагает срочную наркологическую помощь при запоях на дому в Краснодаре. Опытные специалисты оперативно приезжают в любой район города, проводят детоксикацию и стабилизируют состояние пациента прямо на дому. Лечение организовано с максимальной безопасностью и соблюдением конфиденциальности, что обеспечивает пациентам комфорт и быстрое восстановление без госпитализации.
Исследовать вопрос подробнее – вывод из запоя клиника в краснодаре
Умный генератор рецептов What to Eat решает вечную проблему выбора блюд на основе продуктов в холодильнике. Сервис использует нейросеть для создания уникальных рецептов за секунды: достаточно отметить имеющиеся ингредиенты, и система подберет оптимальное блюдо с учетом времени суток и сложности приготовления. Ищете нейросеть для рецептов? На whattoeatnow.ru доступны готовые меню для различных диет — кето, веган, низкоуглеводное питание, а также экономные варианты и рецепты за 15 минут. Сайт содействует минимизации пищевых потерь и обогащению гастрономического опыта без излишних расходов.
После оформления заявки на сайте narcolog-na-dom-v-moskve55.ru или по телефону, оператор уточняет информацию о пациенте: возраст, длительность запоя, наличие хронических заболеваний, текущее самочувствие. В течение 30–60 минут дежурный специалист приезжает по адресу с полным комплектом оборудования и медикаментов.
Получить дополнительную информацию – http://
Для детоксикации и восстановления организма после запоя используются только сертифицированные лекарственные препараты с доказанной эффективностью и безопасностью:
Изучить вопрос глубже – врач нарколог на дом сочи
При длительном запое организм не успевает восстановить свой водно-электролитный баланс, что приводит к обезвоживанию и ухудшению общего состояния. Такие пациенты рискуют развить не только тяжелую интоксикацию, но и хронические заболевания, которые впоследствии требуют длительного и дорогостоящего лечения. Поэтому своевременный вызов врача-нарколога на дом становится критически важным для сохранения здоровья и предотвращения серьезных последствий.
Разобраться лучше – врач вывод из запоя в краснодаре
После окончания врач дает консультации и рекомендации по восстановлению организма и профилактике повторных запоев.
Изучить вопрос глубже – вывод из запоя вызов город
С новым годом всех! мефедрон нет курьерки по мск нету, да все работает как обычноЛадно я признаю что надо было сначало почитать за 907,но с его разведением в дмсо уже все понятно,на форуме четко написанно,что его покупают в аптеке называеться димексид (концентрат),что я и сделал.Должен раствориться был? Все утверждают да! Но он нисколько не растворился,осел в кружке..пробовал и на водяной бане,тоже 0 результата…скажите что я не правильно делаю? 4 фа ваш не я один пробовал,очень слабый эффект,на меня вообще почти не подейсвовал…что мне с JTE делать ума не приложу…может вы JTE перепутали с чем? как он выглядеть то должен? Бро ответь в аське!
Чем раньше врач окажет помощь, тем быстрее пациент сможет стабилизировать состояние, снизить риски осложнений и вернуться к нормальной жизни.
Подробнее – вызвать врача нарколога на дом санкт-петербург
Приватность — клинический фактор, снижающий тревогу и укрепляющий доверие. В «ЕкатеринбургМедСервис» выезд немаркированный, специалисты в гражданской одежде, уведомления — «тихие», документы — с нейтральными формулировками. Медкарта хранится в шифрованном контуре, доступ к данным разграничен по ролям. По запросу вся коммуникация ведётся через доверенное лицо, а оплата возможна наличными или безналом с нейтральным назначением платежа. Это позволяет оставаться в тени и при этом получать полноценную помощь.
Подробнее – частный нарколог на дом екатеринбург
Состав капельницы не повторяет «советы знакомых». Он формируется под доминирующий симптом, сопутствующие заболевания и взаимодействия с текущими лекарствами. Врач постоянно оценивает витальные показатели и реакцию организма, корректируя скорость и объём по инфузомату. Ниже — примеры профилей, которые объясняют логику выбора; финальное решение всегда очное.
Выяснить больше – нарколог на дом срочно сочи
Многие жители Ивантеевки откладывают обращение, потому что им кажется, что ситуация «ещё не настолько страшная». Пока человек как-то ходит на работу, иногда остаётся трезвым и периодически клянётся, что «всё возьмёт под контроль», кажется, что обращаться в клинику рано. На самом деле эффективнее всего лечение работает именно тогда, когда проблемы уже заметны, но ещё не привели к тяжёлым осложнениям — инсультам, инфарктам, тяжёлым психозам, полной утрате социальных связей.
Ознакомиться с деталями – narkologicheskaya-klinika-oficialnyj-sajt
В этот этап включено:
Изучить вопрос глубже – вывод из запоя вызов на дом новосибирск
Такая структура позволяет подбирать формат помощи под конкретную ситуацию, а не подгонять всех пациентов под один шаблон. Для кого-то будет достаточно короткого стационарного курса и последующего амбулаторного наблюдения, кому-то потребуется длительная реабилитация и плотная работа с семьёй, а кому-то — мягкая поддержка на ранней стадии зависимости, пока заболевание ещё не успело разрушить жизнь.
Получить дополнительную информацию – narkologicheskaya-klinika
Длительный запой способен нанести непоправимый вред организму, привести к тяжелым нарушениям работы внутренних органов и поставить под угрозу жизнь пациента. В таких случаях необходимо срочное медицинское вмешательство, которое позволяет быстро стабилизировать состояние, вывести токсины и предотвратить развитие опасных осложнений. Клиника «ЗдоровьеНорм» в Краснодаре предлагает профессиональный вывод из запоя на дому, обеспечивая комплексное лечение с максимальной оперативностью и полной конфиденциальностью.
Углубиться в тему – срочный вывод из запоя
Задача первого контакта — не «записать к врачу на когда-нибудь», а оценить, насколько ситуация критична прямо сейчас. Если речь идёт о многодневном запое, сильной слабости, одышке, скачках давления, спутанности сознания, лучше не экспериментировать с домашними методами. В таких случаях специалисты в Лобне рекомендуют стационар, где можно не только поставить капельницу, но и быстро среагировать на осложнения. Если же состояние относительно стабильное, возможно обсуждение мягкого формата с выездом и последующим наблюдением.
Изучить вопрос глубже – https://narkologicheskaya-klinika-lobnya11-2.ru/chastnaya-narkologicheskaya-klinika-v-lobne/
Пару строк отписал паронойный напряг бы снял да дальше работал… https://naostatniguzik.com 3)Бабки там всякиеВсе Вась,извини..с утра заматался)) Вы то нет:) А банки работают:)
Клиника «НаркоСити» предлагает срочную наркологическую помощь при запоях на дому в Краснодаре. Опытные специалисты оперативно приезжают в любой район города, проводят детоксикацию и стабилизируют состояние пациента прямо на дому. Лечение организовано с максимальной безопасностью и соблюдением конфиденциальности, что обеспечивает пациентам комфорт и быстрое восстановление без госпитализации.
Выяснить больше – вывод из запоя с выездом в краснодаре
Состав инфузии формируется по доминирующему симптому и данным экспресс-измерений, с учётом лекарственных взаимодействий. Врач оценивает динамику в реальном времени и, при необходимости, корректирует состав/скорость. Ниже — примеры профилей; окончательное решение всегда очное.
Детальнее – нарколог капельница на дом екатеринбург
Центр традиционного ушу «Пять Стихий» в Москве обучает взрослых Шаолиньцюань — древнему боевому искусству монахов Шаолиня. Программа включает изучение базовой техники, работу с оружием, практику цигун для развития внутренней энергии и оздоровления организма. Занятия ведет опытный наставник, прошедший обучение в Китае и сохраняющий аутентичную методику тренировок. Записаться на пробное занятие можно на https://kungfu.ru/, где опубликовано расписание групп для начинающих, женских классов и продвинутых учеников. Школа принимает людей любого уровня подготовки без возрастных ограничений.
Вывод из запоя в «Сибирском Докторе» происходит в несколько взаимосвязанных этапов:
Подробнее тут – вывод из запоя на дому круглосуточно
В этот этап включено:
Подробнее тут – kachestvo-vyvod-iz-zapoya.ru/
Пациенты, нуждающиеся в постоянном медицинском наблюдении, размещаются в стационарном отделении. Здесь организовано непрерывное дежурство медсестры и врача-нарколога, что обеспечивает безопасность при риске осложнений.
Разобраться лучше – https://lechenie-alkogolizma-ekaterinburg0.ru/lechenie-khronicheskogo-alkogolizma-v-ekb/
Эта статья погружает вас в увлекательный мир знаний, где каждый факт становится открытием. Мы расскажем о ключевых исторических поворотных моментах и научных прорывах, которые изменили ход цивилизации. Поймите, как прошлое формирует настоящее и как его уроки могут помочь нам строить будущее.
Обратитесь за информацией – https://drtayyemclinic.com/timetable/event/primary-health-care
И еще, слышал типа ам2233, который отличного качества, желтого цвета. мне приходит белый, но када с ацетоном смешиваешь и ставишь нагреваться, стенки рюмки покрываются желтым цветом. Купить кокаин, бошки, гашиш Добрый день! ЦЕНЫ НА MN СНИЖЕНЫ!особенно с вашей репутацией! Хз, смотри, в тёплой кипяченке начали болтать, растворяется. Точно не рега
В этой информационной статье вы найдете интересное содержание, которое поможет вам расширить свои знания. Мы предлагаем увлекательный подход и уникальные взгляды на обсуждаемые темы, побуждая пользователей к активному мышлению и критическому анализу.
Ознакомиться с отчётом – https://jbbs.shitaraba.net/bbs/read.cgi/internet/22606/1439535633
Эта информационная заметка содержит увлекательные сведения, которые могут вас удивить! Мы собрали интересные факты, которые сделают вашу жизнь ярче и полнее. Узнайте нечто новое о привычных аспектах повседневности и откройте для себя удивительный мир информации.
Получить дополнительные сведения – https://luckydeal.ro/unlocking-the-best-lucky-deals-for-you-a-comprehensive-guide
Скачайте активатор для Windows 11 и получите все функции Pro-версии бесплатно.
Подробнее – Скачать патч для активации Windows 11
Состав инфузии формируется под доминирующие симптомы и данные экспресс-измерений. Мы избегаем шаблонов: у каждого профиля — конкретная цель и измеримый эффект. Ниже — ориентиры; окончательные решения врач принимает очно, с учётом лекарственных взаимодействий и ваших приоритетов (работа, семья, график сна).
Узнать больше – нарколог на дом недорого в екатеринбурге
7кей кратко и понятно, нравится, что все без лишней рекламы.
Алкогольный запой представляет собой длительное бесконтрольное приём спиртного, приводящее к тяжёлой интоксикации и серьёзным осложнениям для органов и психики. В Новосибирске клиника «Сибирский Доктор» предлагает качественный вывод из запоя с применением инновационных технологий и участием опытных наркологов, терапевтов и психиатров. Наш подход сочетает мгновенную реакцию на вызов, современное оборудование и индивидуальные схемы лечения, что позволяет достичь стабильной ремиссии и снизить риск рецидива.
Разобраться лучше – вывод из запоя вызов на дом в новосибирске
Эта информационная заметка содержит увлекательные сведения, которые могут вас удивить! Мы собрали интересные факты, которые сделают вашу жизнь ярче и полнее. Узнайте нечто новое о привычных аспектах повседневности и откройте для себя удивительный мир информации.
Только факты! – https://maisgazeta.com/pl-que-autoriza-permuta-de-terreno-para-beneficiar-setor-da-educacao-e-protocolado-na-camara
Запойное состояние опасно не только токсическим воздействием алкоголя на организм, но и последствиями резкого отказа от спиртного. В таких случаях промедление может стоить здоровья. Нарколог на дом в Рязани приезжает по вызову и проводит процедуру прямо в домашних условиях, используя проверенные медицинские методики. Такой подход сочетает анонимность, оперативность и возможность контроля состояния без госпитализации.
Исследовать вопрос подробнее – нарколог на дом срочно санкт-петербург
В данной статье рассматриваются проблемы общественного здоровья и социальные факторы, влияющие на него. Мы акцентируем внимание на значении профилактики и осведомленности в защите здоровья на уровне общества. Читатели смогут узнать о новых инициативах и программах, направленных на улучшение здоровья населения.
Детальнее – https://weerstationkempen.be/template/plugins/stationExtremes/redirect.php?url=https://vyvod-iz-zapoya-tolyatti0.ru/vyvod-iz-zapoya-tolyatti-na-domu
Вызов нарколога на дом в таких условиях позволяет не терять драгоценное время, избежать госпитализации и предотвратить критическое развитие событий. Кроме того, это снижает психологическую нагрузку на пациента и его близких, особенно если зависимость длится долго и сопровождается отрицанием проблемы.
Подробнее – вызвать нарколога на дом
Генератор ключей для Windows 11 — 100% рабочий метод активации, проверено тысячами пользователей!
Подробнее – Как активировать Windows 11 без ключа
В условиях круглосуточного наблюдения врачи могут внимательно следить за динамикой состояния, своевременно корректировать схемы лечения, проводить детоксикацию под контролем давления, пульса и работы сердца. Особенно это важно для пациентов с гипертонией, сердечно-сосудистыми заболеваниями, нарушениями ритма, заболеваниями печени, диабетом и другими хроническими патологиями. В стационаре проще организовать обследование, назначить сопутствующую терапию, вовремя заметить опасные симптомы и предотвратить серьёзные осложнения.
Разобраться лучше – телефон наркологической клиники
В материале приведены детали, интересные, но не особенно важные. Мы рассматриваем аспекты, которые сложно назвать существенными, но включили их для большей полноты.
Подробнее читать – сиалис онлайн
Служба круглосуточного вывода из запоя организована таким образом, чтобы обеспечить максимальную оперативность и надежность. Независимо от времени суток, квалифицированные специалисты готовы выехать на дом или принять пациента в медицинском учреждении, чтобы приступить к детоксикации и стабилизации состояния.
Получить больше информации – вывод из запоя дешево
Срочная медицинская помощь поможет избежать тяжелых последствий и сократит время на восстановление после запоя.
Получить дополнительную информацию – помощь вывод из запоя краснодар
После окончания врач дает консультации и рекомендации по восстановлению организма и профилактике повторных запоев.
Исследовать вопрос подробнее – вывод из запоя капельница краснодар
Квартира в национальном стиле. Этника, орнаменты, ручная вышивка. Знакомство с культурой. Сувениры ручной работы в интерьере. Теплый прием. Иностранным туристам особенно понравится. Погружение в традиции с комфортом 21 века. kvartirasnasutki.ru
Your article helped me a lot, is there any more related content? Thanks! https://www.binance.info/register?ref=IXBIAFVY
В случаях, когда транспортировка в клинику затруднительна или пациент испытывает выраженный стресс, возможно выездное консультирование и начальная детоксикация на дому. Врач прибывает с портативным набором для инфузий, оперативно stabilizирует состояние и даёт рекомендации по дальнейшим действиям.
Углубиться в тему – лечение алкоголизма кодирование в екатеринбурге
вскрыть дверь спб спасает при потере ключей, но не заменяет последующую профилактику.
Функции доступны полностью, но иногда обновления требуют повторного входа.
Такая систематизация показывает, что врач действует целенаправленно, устраняя не только симптомы, но и их физиологические последствия.
Подробнее тут – https://narcolog-na-dom-ryazan0.ru/vyvod-iz-zapoya-ryazan-na-domu/
Офисная мебель — это не просто столы и стулья, это основа продуктивной работы и комфорта сотрудников. Группа компаний «СОЮЗ» с 2008 года специализируется на комплексном оснащении офисов в Москве, предлагая как стандартные решения, так и мебель на заказ. Посетите https://group-soyuz.ru/ и убедитесь: здесь создают интерьеры, которые впечатляют партнёров и мотивируют команду. Компания реализует проекты точно в срок и в рамках бюджета, работая с офисами, отелями и учебными заведениями.
В этот этап включено:
Подробнее можно узнать тут – срочный вывод из запоя в новосибирске
Hellion позиционируется как бренд автозвука от российских инженеров: в линейке DSP усилители, усилители, акустика, сабвуферы, мультимедиа и кабели, а также сервисная поддержка и ПО. Ищете 6 канальный усилитель dsp? На hellion-rus.ru — 3 года гарантии при покупке на сайте, оплата картами и обещание доставки по Москве за 6 часов при заказе до 12:00; есть отзывы, что помогает выбрать комплект без лишних рисков. На сайте заявлены 3 года гарантии при покупке, приём оплаты банковскими картами и экспресс доставка по Москве при оформлении до полудня; разделы FAQ, блог и отзывы добавляют прозрачности выбору.
Цветочная служба Санкт-Петербурга обеспечивает оперативную доставку свежих композиций по всему городу и пригороду. Специалисты создают букеты из роз, тюльпанов, орхидей и актуальных сезонных растений на все случаи жизни — от личных встреч до деловых событий. Ищете цветы на дом? Заказать букет можно на flowersspb.com с доставкой в день обращения или к назначенному времени. Клиенты могут оплатить заказ онлайн или курьеру наличными, в ассортименте есть сувениры и открытки к букетам.
Служба круглосуточного вывода из запоя организована таким образом, чтобы обеспечить максимальную оперативность и надежность. Независимо от времени суток, квалифицированные специалисты готовы выехать на дом или принять пациента в медицинском учреждении, чтобы приступить к детоксикации и стабилизации состояния.
Подробнее – вывод из запоя волгоград
Клиника «ВладТрезвие Центр» работает в круглосуточном режиме и готова оказать помощь жителям Владивостока и прилегающих районов в любое время суток. Врачи-наркологи прибывают по вызову в течение часа, имеют при себе все необходимые препараты и оборудование для проведения детоксикации на дому. При необходимости пациента доставляют в стационар, где лечение проходит под постоянным контролем медицинского персонала.
Получить дополнительную информацию – вывод из запоя цена владивосток
В этот этап включено:
Разобраться лучше – https://kachestvo-vyvod-iz-zapoya.ru/vyvod-iz-zapoya-na-domu-novosibirsk/
Такая схема лечения делает процесс последовательным и контролируемым. Врачи клиники сопровождают пациентов на всех стадиях, помогая преодолеть как физическую, так и психологическую зависимость. Особое внимание уделяется возвращению человека к активной и стабильной жизни без употребления алкоголя или наркотиков.
Детальнее – запой наркологическая клиника ижевск
Как активировать Windows 11 без ключа? У нас есть пошаговая инструкция!
Подробнее – Скачать патч для активации Windows 11
Cercate casino mania? Visita teatroverga.it/it-it/ e troverai oltre 6.000 giochi per tutti i gusti, con bonus casinò immediati che garantiranno un’esperienza di gioco fantastica! Informati su depositi e prelievi, apertura del conto e tutti i benefici della nostra applicazione mobile. Hai anche la possibilità di vedere tutti i bonus accessibili qui. CasinoMania è un casinò dotato di licenza ufficiale.
Детокс — важный этап лечения, который помогает очистить организм от токсинов и продуктов распада алкоголя или наркотиков. В клинике «ТомскМед Трезвость» используются современные капельницы и лекарственные комбинации, направленные на восстановление биохимических процессов в организме. Ниже представлена таблица с примерами капельниц, применяемых в детоксикационных программах.
Узнать больше – http://narkologicheskaya-klinika-v-tomske18.ru/chastnaya-narkologicheskaya-klinika-tomsk/
Многие жители Ивантеевки откладывают обращение, потому что им кажется, что ситуация «ещё не настолько страшная». Пока человек как-то ходит на работу, иногда остаётся трезвым и периодически клянётся, что «всё возьмёт под контроль», кажется, что обращаться в клинику рано. На самом деле эффективнее всего лечение работает именно тогда, когда проблемы уже заметны, но ещё не привели к тяжёлым осложнениям — инсультам, инфарктам, тяжёлым психозам, полной утрате социальных связей.
Получить больше информации – narkologicheskaya-klinika-ivanteevka
Процедура лечения начинается с установки внутривенной капельницы, через которую вводятся детоксикационные растворы, способствующие быстрому выведению токсинов и восстановлению водно-электролитного баланса. При необходимости врач назначает дополнительные препараты, такие как седативные средства для купирования симптомов абстинентного синдрома, гепатопротекторы для поддержки печени и кардиопротекторы для нормализации работы сердца.
Разобраться лучше – наркология вывод из запоя
Чем дольше продолжается запой, тем более непредсказуемой становится реакция организма. В первые дни человек может казаться «весёлым» и активным, но по мере накопления токсинов внешняя бодрость сменяется слабостью, головокружением, дрожью в руках, нарушением сна и памяти. Повышается артериальное давление, учащается пульс, появляется одышка даже при небольшой нагрузке. Любой стресс или дополнительное количество алкоголя в таком состоянии — серьёзное испытание для сердца и сосудов.
Узнать больше – vyvoda-iz-zapoya-vyzov
Вывод из запоя в клинике формируется на основе последовательных процедур, направленных на стабилизацию физиологических функций и устранение токсических влияний. Такой подход позволяет корректно регулировать состояние пациента и контролировать интенсивность симптомов. Рабочие алгоритмы включают оценку метаболических процессов, анализ соматических показателей и определение степени неврологических изменений. В результате создается структурированная модель помощи, ориентированная на восстановление адаптивных возможностей организма. Процессы выполняются под контролем специалистов, что обеспечивает прогнозируемый терапевтический эффект и снижает вероятность осложнений.
Исследовать вопрос подробнее – вывод из запоя вызов в кемерове
Бесплатный ключ для Windows 11 — только у нас, обновлено в 2026 году!
Подробнее – Скачать активатор для Windows 11
Во многих семьях путь к лечению начинается одинаково: сначала запои или эпизоды употребления воспринимаются как временные «проблемы по жизни», которых стыдно, но которые вроде бы можно переждать. Человек клянётся «завязать после праздников», родственники верят, потом терпят, потом скандалят, затем снова наступают на те же грабли. В какой-то момент становится очевидно, что сила воли больше не работает: попытки прекратить запой заканчиваются тряской, паникой, скачками давления, отсутствием сна, а через несколько дней всё повторяется. Именно тогда наркологическая клиника в Лобне перестаёт быть чем-то абстрактным и превращается в реальную возможность остановить этот круг.
Выяснить больше – наркологическая клиника лобня
http://pardalove.mzf.cz/forum/viewthread.php?forum_id=3&thread_id=140
Запой почти никогда не начинается внезапно: сначала это редкие «переборы» по праздникам, потом привычка снимать стресс вечером, а дальше алкоголь всё чаще появляется в распорядке дня. В какой-то момент близкие замечают, что человек уже не контролирует количество, выпивка идёт несколько дней подряд, отменяются дела, нарушается сон, пропадает аппетит, появляются дрожь, потливость, скачки давления. На этом этапе вывод из запоя в Ивантеевке уже не может быть простым «проспаться и прийти в себя» — организму нужна полноценная медицинская помощь.
Исследовать вопрос подробнее – vyvod-iz-zapoya-vyzov-na-dom
Сначала изучил обзоры и условия, затем зашел на 7к казино официальный сайт — интерфейс удобный, однако по минимальному депозиту есть более гибкие варианты.
Вызов нарколога на дом в таких условиях позволяет не терять драгоценное время, избежать госпитализации и предотвратить критическое развитие событий. Кроме того, это снижает психологическую нагрузку на пациента и его близких, особенно если зависимость длится долго и сопровождается отрицанием проблемы.
Углубиться в тему – vyzov narkologa na dom
На нашем сайте вы можете скачать активатор для Windows 11 абсолютно бесплатно и навсегда забыть о водяных знаках!
Подробнее – Скачать ключ активации Windows 11 Pro
La roulette live est toujours un plaisir
Review my site … https://matrebo.be/2026/02/04/meilleur-casino-en-ligne-en-france-88/
Каждый пациент в «УралМед» получает персональный маршрут реабилитации, составленный после комплексного обследования. План включает медикаментозное выведение из запоя, коррекцию биохимических показателей и психологическую реабилитацию.
Подробнее тут – здоровье лечение алкоголизма в екатеринбурге
Алкоголизм — хроническое заболевание, требующее комплексного подхода и круглосуточного контроля. Клиника «УралМед» в Екатеринбурге предлагает полный спектр услуг для пациентов любого уровня зависимости: от экстренной детоксикации до долгосрочной реабилитации. Главные принципы работы — абсолютная анонимность, индивидуальный план лечения и постоянное сопровождение квалифицированной командой специалистов.
Выяснить больше – лечение алкоголизма в стационаре
Не хотите платить за лицензию? У нас есть рабочий кряк для Windows 11 — скачайте прямо сейчас!
Подробнее – Активатор Windows 11 скачать бесплатно
В материале приведены детали, интересные, но не особенно важные. Мы рассматриваем аспекты, которые сложно назвать существенными, но включили их для большей полноты.
Подробнее читать – кето диета за неделю минус 10 кг
Заправка картриджей — это экономичная альтернатива покупке новых расходных материалов для принтеров и МФУ, которая позволяет сократить расходы на офисную печать до 70%. Сервис Zapravka City предлагает профессиональную заправку лазерных и струйных картриджей с выездом к клиенту или в сервисном центре. На http://zapravkacity.ru/ вы найдёте информацию о ценах, сроках выполнения работ и гарантиях качества. Опытные мастера используют оригинальные тонеры и чернила, что обеспечивает стабильное качество печати и долгий срок службы оборудования.
Этот документ охватывает важные аспекты медицинской науки, сосредотачиваясь на ключевых вопросах, касающихся здоровья населения. Мы рассматриваем свежие исследования, клинические рекомендации и лучшие практики, которые помогут улучшить качество лечения и профилактики заболеваний. Читатели получат возможность углубиться в различные медицинские дисциплины.
Получить дополнительную информацию – http://utt.wmi.amu.edu.pl/trac/search?q=https://vyvod-iz-zapoya-tolyatti0.ru/vyvod-iz-zapoya-tolyatti-na-domu
Вызов нарколога на дом в таких условиях позволяет не терять драгоценное время, избежать госпитализации и предотвратить критическое развитие событий. Кроме того, это снижает психологическую нагрузку на пациента и его близких, особенно если зависимость длится долго и сопровождается отрицанием проблемы.
Выяснить больше – narkolog na dom tsena
Запой почти никогда не начинается внезапно: сначала это редкие «переборы» по праздникам, потом привычка снимать стресс вечером, а дальше алкоголь всё чаще появляется в распорядке дня. В какой-то момент близкие замечают, что человек уже не контролирует количество, выпивка идёт несколько дней подряд, отменяются дела, нарушается сон, пропадает аппетит, появляются дрожь, потливость, скачки давления. На этом этапе вывод из запоя в Ивантеевке уже не может быть простым «проспаться и прийти в себя» — организму нужна полноценная медицинская помощь.
Ознакомиться с деталями – vyvod-iz-zapoya-ivanteevka11.ru/
Буковина 24/7 – https://gazeta-bukovyna.cv.ua/ . Новини Чернівців і Чернівецької області. Довідкова, та корисна інформація про місто.
Ищете отдых на алтае? Перейдите на altai.travel/tourism/tours и вы откроете для себя все существующие экскурсионные туры для каждого времени года и бюджета, и разные виды маршрутов: конные, пешие, авто туры. С каждым туром вы сможете подробно ознакомиться и сроками его проведения. Все типы туров и маршруты представлены только у нас – на официальном туристическом портале Республики Алтай. Мы предлагаем удобный поиск по карте путешествий.
Эта информационная публикация освещает широкий спектр тем из мира медицины. Мы предлагаем читателям ясные и понятные объяснения современных заболеваний, методов профилактики и лечения. Информация будет полезна как пациентам, так и медицинским работникам, желающим поддержать уровень своих знаний.
Углубиться в тему – http://74.125.24.147/url?q=https://vyvod-iz-zapoya-tolyatti0.ru/vyvod-iz-zapoya-tolyatti-na-domu
Врач на дому или в клинике проводит:
Детальнее – http://kachestvo-vyvod-iz-zapoya.ru/vyvod-iz-zapoya-na-domu-novosibirsk/
Чтобы показать, как именно работает врач в домашних условиях, можно сопоставить основные проявления запоя и шаги нарколога, направленные на их устранение.
Подробнее тут – вызвать нарколога на дом санкт-петербург
Каждый пациент в «УралМед» получает персональный маршрут реабилитации, составленный после комплексного обследования. План включает медикаментозное выведение из запоя, коррекцию биохимических показателей и психологическую реабилитацию.
Получить дополнительные сведения – лечение алкоголизма кодирование екатеринбург
Ниже представлена последовательность основных шагов терапевтического процесса.
Углубиться в тему – наркологическая клиника вывод из запоя
В этот этап включено:
Разобраться лучше – нарколог вывод из запоя
Группа препаратов
Углубиться в тему – https://narcolog-na-dom-ekaterinburg000.ru/zapoj-narkolog-na-dom-ekb/
Вызов нарколога на дом в клинике имеет целый ряд преимуществ. Пациент получает доступ к современным методикам без необходимости транспортировки. Кроме того, исключается фактор социальной огласки, что часто является значимым для больных и их семей.
Исследовать вопрос подробнее – нарколог на дом вывод санкт-петербург
Препараты подбираются строго индивидуально и могут включать:
Исследовать вопрос подробнее – http://narcolog-na-dom-v-moskve55.ru
Вызов нарколога на дом в таких условиях позволяет не терять драгоценное время, избежать госпитализации и предотвратить критическое развитие событий. Кроме того, это снижает психологическую нагрузку на пациента и его близких, особенно если зависимость длится долго и сопровождается отрицанием проблемы.
Детальнее – http://narcolog-na-dom-v-moskve55.ru/
Алкоголизм — хроническое заболевание, требующее комплексного подхода и круглосуточного контроля. Клиника «УралМед» в Екатеринбурге предлагает полный спектр услуг для пациентов любого уровня зависимости: от экстренной детоксикации до долгосрочной реабилитации. Главные принципы работы — абсолютная анонимность, индивидуальный план лечения и постоянное сопровождение квалифицированной командой специалистов.
Получить больше информации – http://lechenie-alkogolizma-ekaterinburg0.ru/
В случаях, когда транспортировка в клинику затруднительна или пациент испытывает выраженный стресс, возможно выездное консультирование и начальная детоксикация на дому. Врач прибывает с портативным набором для инфузий, оперативно stabilizирует состояние и даёт рекомендации по дальнейшим действиям.
Исследовать вопрос подробнее – клиника лечения алкоголизма в екатеринбурге
Такое поэтапное лечение позволяет добиться устойчивого результата без стрессов и осложнений. Пациенты получают комплексную помощь, включающую как медицинские, так и психотерапевтические аспекты.
Получить больше информации – вывод наркологическая клиника кемерово
Предприятие «ВЕЛЕС ИНДАСТРИАЛ» продает пиломатериалы собственного изготовления с полным циклом переработки от заготовки леса до финальной продукции. На складе в Мытищах представлен широкий ассортимент обрезной доски, бруса, вагонки, фанеры и террасной доски из сосны, ели и лиственницы по ценам от 11500 рублей за кубометр. Подробный каталог и условия доставки по Москве и области смотрите на https://pilomaterialy-msk.ru/ Свои лесозаготовительные комплексы в северных областях и современные производственные мощности обеспечивают конкурентные цены на качественную продукцию.
Туристическое агентство «Натали-Тур Судак» организует отдых в Крыму с размещением в лучших отелях, пансионатах и санаториях полуострова. В каталоге объекты во всех популярных курортах: Ялте, Судаке, Алуште, Евпатории, Севастополе и Коктебеле — от бюджетных баз отдыха до комфортабельных апартаментов класса делюкс. Менеджеры помогут подобрать жилье под любой запрос и бюджет, забронировать номера можно на https://nat-tours.ru/ с актуальной информацией о наличии мест и ценах. Компания работает круглый год, консультации по телефону и в мессенджерах, оперативная поддержка туристов на всех этапах поездки.
Подобная структура наблюдения облегчает анализ изменений и способствует формированию объективной картины состояния. Наличие унифицированной системы контроля помогает выстраивать терапию последовательно и точно.
Ознакомиться с деталями – наркологическая клиника лечение алкоголизма
Функция и назначение
Изучить вопрос глубже – нарколог на дом круглосуточно в екатеринбурге
Клиника «ВладТрезвие Центр» работает в круглосуточном режиме и готова оказать помощь жителям Владивостока и прилегающих районов в любое время суток. Врачи-наркологи прибывают по вызову в течение часа, имеют при себе все необходимые препараты и оборудование для проведения детоксикации на дому. При необходимости пациента доставляют в стационар, где лечение проходит под постоянным контролем медицинского персонала.
Изучить вопрос глубже – http://vyvodiz-zapoya-vladivostok18.ru
Детокс — важный этап лечения, который помогает очистить организм от токсинов и продуктов распада алкоголя или наркотиков. В клинике «ТомскМед Трезвость» используются современные капельницы и лекарственные комбинации, направленные на восстановление биохимических процессов в организме. Ниже представлена таблица с примерами капельниц, применяемых в детоксикационных программах.
Получить дополнительную информацию – анонимная наркологическая клиника томск
Наркологическая клиника использует методики, направленные на комплексную оценку состояния пациента. Работа строится на анализе анамнеза, исследовании соматических параметров и определении степени выраженности симптомов. Такой формат создаёт условия для точного подбора терапевтических мер. В клинике применяется непрерывный мониторинг, направленный на своевременное выявление отклонений и корректировку лечебных мероприятий. Благодаря этому достигается высокая стабильность клинического процесса и формируется благоприятная динамика восстановления.
Узнать больше – наркологическая клиника лечение алкоголизма в владивостоке
Наркологическая помощь должна быть не только медицински точной, но и человечной, безопасной и анонимной. В «Ижевском Центре Трезвых Решений» выстроена система комплексного подхода к лечению зависимостей, включающая диагностику, медикаментозную детоксикацию, психотерапию и социальную адаптацию. Клиника объединяет профессионализм, заботу и круглосуточную готовность помочь пациентам, оказавшимся в трудной ситуации. Здесь работают врачи с большим опытом в области наркологии и психиатрии, способные оперативно выехать на дом и оказать неотложную помощь.
Подробнее можно узнать тут – https://narkologicheskaya-klinika-v-izhevsk18.ru/narkologi-izhevsk-czeny/
В этой статье-обзоре мы собрали данные, актуальность которых сомнительна, а факты — не всегда взаимосвязаны. Читатель сможет ознакомиться с разными мнениями, хотя вряд ли они существенно повлияют на его понимание темы.
Вот – блекджек
Перечень средств подбирается индивидуально, с учётом состояния пациента и наличия сопутствующих заболеваний. Это гарантирует безопасность и эффективность вмешательства.
Получить дополнительную информацию – https://narcolog-na-dom-sankt-peterburg0.ru/narkolog-na-dom-anonimno-spb
При поступлении вызова специалисты клиники «ЗдоровьеНорм» выезжают на дом в течение 30–60 минут. Врач проводит тщательную диагностику, измеряя артериальное давление, пульс, уровень кислорода в крови и оценивая общее состояние пациента. После этого осуществляется индивидуальный подбор лечебной схемы, основанной на объективных данных и анамнезе пациента.
Узнать больше – вывод из запоя вызов в краснодаре
Ищете кейсы кс? Зайдите на cs2case.win и вы обнаружите уникальные коллекции! Кейсы кс 2 у нас на всевозможную тематику – от бесплатных или дешевых до эксклюзивных, не представленных в других местах, а вывод скинов себе в Steam осуществляется моментально. Новые кейсы добавляем регулярно! Открывай лучшие кейсы на самом честном сайте! Наша коллекция устроит каждого!
Перед началом терапии проводится полная диагностика организма, включая лабораторные исследования и ЭКГ. Это позволяет оценить состояние пациента и подобрать оптимальный курс лечения. После стабилизации физического состояния начинается психотерапевтическая и реабилитационная работа. Такой подход помогает не только снять симптомы, но и устранить первопричины зависимости.
Подробнее можно узнать тут – лечение в наркологической клинике кемерово
Этот обзор предлагает свежий взгляд на предметы, которые и без того привычны. Мы упоминаем факты, не имеющие большого значения, и события с неясной важностью, но они присутствуют здесь.
Подробнее читать – сиалис онлайн
Вывод из запоя в клинике формируется на основе последовательных процедур, направленных на стабилизацию физиологических функций и устранение токсических влияний. Такой подход позволяет корректно регулировать состояние пациента и контролировать интенсивность симптомов. Рабочие алгоритмы включают оценку метаболических процессов, анализ соматических показателей и определение степени неврологических изменений. В результате создается структурированная модель помощи, ориентированная на восстановление адаптивных возможностей организма. Процессы выполняются под контролем специалистов, что обеспечивает прогнозируемый терапевтический эффект и снижает вероятность осложнений.
Выяснить больше – вывод из запоя вызов на дом в кемерове
В этот этап включено:
Подробнее можно узнать тут – вывод из запоя недорого
Препараты подбираются строго индивидуально и могут включать:
Исследовать вопрос подробнее – вызов врача нарколога на дом
В рамках лечения используются методы, позволяющие фиксировать изменения и оценивать реакцию организма на проводимые мероприятия. Они служат основой для выборочных корректировок и обеспечивают структурированный характер процесса. Отличительной особенностью становится возможность адаптировать лечебные схемы под индивидуальные особенности пациента. Ниже представлены ключевые направления оценки состояния, применяемые для формирования полной клинической картины.
Разобраться лучше – наркологическая клиника цены в владивостоке
Пациенты, нуждающиеся в постоянном медицинском наблюдении, размещаются в стационарном отделении. Здесь организовано непрерывное дежурство медсестры и врача-нарколога, что обеспечивает безопасность при риске осложнений.
Ознакомиться с деталями – наркологическая клиника лечение алкоголизма
Большинство семей приходят к мысли о лечении зависимости не сразу. Сначала всё выглядит как «случайные переборы по праздникам», потом алкоголь или наркотики становятся привычным способом снять стресс, забыться, пережить неудачи. Постепенно запои учащаются, человек пропадает на несколько дней, появляются долги, проблемы на работе, конфликты в семье. На этом этапе многим кажется, что обращаться в наркологическую клинику в Лобне ещё рано, что можно «взять себя в руки» и как-то остановиться. Но практика показывает обратное: чем дольше затягивается момент обращения к специалистам, тем тяжелее протекают запои, тем глубже страдает здоровье и тем сложнее вернуть человека к стабильной трезвости.
Выяснить больше – https://narkologicheskaya-klinika-lobnya11.ru/narkologicheskaya-klinika-cena-v-lobne
В этот этап включено:
Получить больше информации – скорая вывод из запоя новосибирск
Вывод из запоя в «Сибирском Докторе» происходит в несколько взаимосвязанных этапов:
Получить дополнительную информацию – помощь вывод из запоя в новосибирске
Наши врачи оперативно приезжают к пациенту, проводят осмотр, купируют симптомы абстиненции и приступают к восстановлению жизненно важных функций. Всё это — в привычной для пациента обстановке, без стресса и лишней огласки. Мы обеспечиваем не только медицинскую помощь, но и эмоциональную поддержку, создавая условия для начала пути к выздоровлению.
Подробнее – нарколог на дом круглосуточно
Такой подход позволяет устранить физические последствия запоя и снизить психологическую зависимость. Уже после первой процедуры пациенты отмечают улучшение самочувствия, появление аппетита и нормализацию сна. Важно не ограничиваться только экстренной помощью — специалисты рекомендуют пройти курс восстановления, чтобы предотвратить рецидивы.
Исследовать вопрос подробнее – https://vyvodiz-zapoya-vladivostok18.ru/vyvod-iz-zapoya-staczionar-vladivostok/
Вызов нарколога на дом в таких условиях позволяет не терять драгоценное время, избежать госпитализации и предотвратить критическое развитие событий. Кроме того, это снижает психологическую нагрузку на пациента и его близких, особенно если зависимость длится долго и сопровождается отрицанием проблемы.
Получить больше информации – narkolog na dom moskva
Современная наркологическая клиника — это не просто медицинское учреждение, где проводят лечение зависимостей. Это система комплексной поддержки, объединяющая врачей, психологов, терапевтов и специалистов по реабилитации. В клинике «ТомскМед Трезвость» созданы комфортные условия, где лечение проходит анонимно, бережно и с опорой на доказательную медицину. Каждое вмешательство назначается строго по показаниям, а терапия направлена не только на физическое очищение организма, но и на восстановление психоэмоционального баланса пациента.
Получить больше информации – наркологическая клиника нарколог в томске
Наркологическая помощь должна быть не только медицински точной, но и человечной, безопасной и анонимной. В «Ижевском Центре Трезвых Решений» выстроена система комплексного подхода к лечению зависимостей, включающая диагностику, медикаментозную детоксикацию, психотерапию и социальную адаптацию. Клиника объединяет профессионализм, заботу и круглосуточную готовность помочь пациентам, оказавшимся в трудной ситуации. Здесь работают врачи с большим опытом в области наркологии и психиатрии, способные оперативно выехать на дом и оказать неотложную помощь.
Узнать больше – запой наркологическая клиника ижевск
Дополнительно, если у пациента отмечаются психические нарушения — галлюцинации, агрессия или спутанность сознания, это является прямым сигналом к срочному вмешательству. В этом случае своевременное лечение помогает предотвратить риск инсульта, инфаркта или других серьезных заболеваний.
Узнать больше – вывод из запоя круглосуточно краснодар
Ищете мастера бытовых услуг в Иркутске? Посетите сайт https://muzh-na-chas-irk.ru/ – мы предложим вам выполнение любых работ по дому от квалифицированных специалистов. Ознакомьтесь со всеми нашими услугами и стоимостью на сайте, а выезд мастера в удобное для вас время. Работаем по договору. Бесплатная консультация по телефону или на сайте.
Первый этап помощи почти всегда связан с детоксикацией. Организм, который длительное время получал алкоголь или другие вещества, перегружен токсинами, страдают сердце, сосуды, мозг, печень, нарушены сон и обмен веществ. Простое «похмелиться и перетерпеть» в такой ситуации опасно: можно спровоцировать очередной скачок давления, аритмию, обострение хронических заболеваний. В условиях клиники в Лобне детокс строится по медицинским правилам, а не по советам из интернета.
Подробнее – [url=https://narkologicheskaya-klinika-lobnya11-2.ru/]adresa-narkologicheskih-klinik[/url]
Looking for xrp etf news? Head to the top portal, thetradable.com, featuring all essential and fresh cryptocurrency market updates, reviews, expert commentary, and major happenings. Our resource is user-friendly and will be of interest to both industry novices and industry experts. We also cover everything about gold, silver, industry, and much more.
Нарколог на дом в Санкт-Петербурге оказывает помощь при различных формах алкогольной и наркотической зависимости. Основное внимание уделяется купированию абстинентного синдрома, нормализации работы сердечно-сосудистой и нервной систем, а также снижению уровня интоксикации организма.
Узнать больше – нарколог на дом цены
На севан кей казино кэшбэк еженедельный удобен, однако условия по отыгрышу важно читать заранее.
В этот этап включено:
Подробнее тут – вывод из запоя цена
Публикация предоставляет читателю набор разрозненных идей, которые сложно применить на практике. Мы лишь слегка касаемся разных точек зрения, не углубляясь в анализ и не предлагая никаких выводов.
Вот – джекпот
Обращаться можно и нужно не только в момент очередного запоя. Клиника в Ивантеевке работает и с теми, кто сейчас в относительной ремиссии, но понимает, что без внешней поддержки снова сорвётся. В этом случае можно обсудить профилактические программы, варианты кодирования, реабилитацию, работу с тревогой и депрессией. Чем раньше сделан шаг в сторону лечения, тем мягче будут процедуры и тем больше шансов на устойчивый результат.
Подробнее – narkologicheskaya-m-klinika
Алкогольная или наркотическая интоксикация — это не просто временное ухудшение самочувствия, а серьёзное медицинское состояние, требующее неотложной помощи. Когда человек находится в запое или состоянии ломки, его организм стремительно теряет силы, нарушается работа сердца, печени, мозга, возникают панические атаки, судороги, спутанность сознания. В таких случаях помощь должна быть незамедлительной. Если пациент не может самостоятельно добраться до клиники, оптимальным решением становится вызов нарколога на дом. В Красногорске такая услуга доступна круглосуточно благодаря выездной службе клиники «Ключ к Здоровью».
Ознакомиться с деталями – vyzov vracha narkologa na dom moskva
Чтобы обеспечить эффективный вывод из запоя, формируется комплекс последовательных действий, направленных на стабилизацию состояния. Важным элементом является фармакологическая коррекция, сочетаемая с мониторингом жизненно важных функций. Ниже представлены ключевые процессы, участвующие в клинической стабилизации.
Подробнее можно узнать тут – https://vyvod-iz-zapoya-kemerovo18.ru/vyvod-iz-zapoya-na-domu-kemerovo
Серьезные состояния, вызванные длительным употреблением алкоголя или наркотиков, требуют немедленного вмешательства. Если пациент испытывает ухудшение самочувствия вследствие продолжительного запоя, его организм начинает накапливать токсичные вещества, что ведёт к нарушению работы внутренних органов. При появлении таких симптомов, как сильная рвота, спутанность сознания, судороги, резкие скачки артериального давления, а также выраженные признаки абстинентного синдрома (сильная дрожь, панические атаки, бессонница, тревожность), вызов нарколога становится жизненно необходимым. Экстренное вмешательство позволяет стабилизировать состояние больного и предотвратить развитие серьёзных осложнений, включая сердечно-сосудистые нарушения, повреждение печени и развитие алкогольного психоза. В таких ситуациях профессиональное лечение на дому — лучший способ сохранить здоровье и жизнь пациента.
Получить больше информации – частный нарколог на дом
Нашли рабочий серийный номер для Windows 11 Pro — проверено лично, без вирусов!
Подробнее – Скачать активатор для Windows 11
Мы помогаем вам быть в курсе модных новинок и одновременно заботиться о здоровье всей семьи. Наши материалы о детях и воспитании основаны на практическом опыте. Переходите по ссылке https://universewomen.ru/
В основе работы клиники «ИжТрезвоМед Центр» лежит принцип персонализированной медицины. Это означает, что каждый пациент получает не шаблонное лечение, а тщательно подобранный комплекс процедур, учитывающий его состояние, историю заболевания, уровень мотивации и социальную ситуацию. Такой подход позволяет добиться стабильного результата даже в сложных случаях. Лечение проводится анонимно, без постановки на учёт и разглашения данных, что особенно важно для тех, кто ценит конфиденциальность.
Узнать больше – http://narkologicheskaya-klinika-v-izhevske18.ru/narkologi-izhevsk-czeny/
Экстренная помощь требуется, когда запой начинает негативно сказываться на здоровье, и самостоятельное прекращение употребления алкоголя становится невозможным. Основные показания для круглосуточного вмешательства включают:
Подробнее – вывод из запоя цена
Не хотите платить за лицензию? У нас есть рабочий кряк для Windows 11 — скачайте прямо сейчас!
Подробнее – Бесплатная активация Windows 11 навсегда
Вывод из запоя требует комплексного контроля всех физиологических параметров. Ниже представлены основные направления наблюдения, формирующие структуру оценки состояния.
Получить больше информации – анонимный вывод из запоя ижевск
На 7k официальный сайт понравилось live-казино с русскими дилерами, но для любителей редких столов выбор ограничен.
Лечение в «ИжТрезвоМед Центр» проходит поэтапно, с акцентом на безопасность и эффективность. Каждый этап направлен на достижение конкретных целей, от детоксикации до психотерапии. В таблице представлена структура лечебного процесса:
Разобраться лучше – наркологическая клиника наркологический центр ижевск
Подобная структура наблюдения облегчает анализ изменений и способствует формированию объективной картины состояния. Наличие унифицированной системы контроля помогает выстраивать терапию последовательно и точно.
Выяснить больше – наркологическая клиника наркологический центр владивосток
Наш женский журнал помогает ориентироваться в современных тенденциях моды и ухода за собой. Мы также уделяем внимание темам материнства и психологического благополучия. Читайте подробнее по ссылке https://universewomen.ru/
После принятия решения организуется либо выезд, либо госпитализация. На приёме проводится осмотр: измеряется давление, пульс, оценивается степень обезвоживания, выраженность тремора, тревоги, нарушений сна. Выясняются сопутствующие болезни и лекарства, которые человек принимает постоянно. Уже на этом этапе обсуждаются ближайшие шаги — объём детокса, необходимость круглосуточного наблюдения, примерные сроки стабилизации. Родным объясняют, чего ожидать в первые сутки, какие симптомы будут уменьшаться постепенно, а какие требуют немедленного информирования персонала.
Углубиться в тему – http://
После приезда нарколог оценивает состояние пациента, проверяет давление, частоту пульса и насыщенность крови кислородом. Затем врач подбирает индивидуальный состав капельницы, включающий растворы для очистки организма, препараты для нормализации работы сердца, печени и нервной системы. Процедура длится около 1–2 часов и позволяет быстро:
Исследовать вопрос подробнее – https://vyvod-iz-zapoya-krasnodar0.ru/vyvod-iz-zapoya-na-domu-krasnodar/
В статье по вопросам здоровья мы рассматриваем актуальные проблемы, с которыми сталкивается общество. Обсуждаются заболевания, факторы риска и важные аспекты профилактики. Читатели получат полезные советы о том, как сохранить здоровье и улучшить качество жизни.
Получить дополнительные сведения – http://64.233.165.123/url?q=https://vyvod-iz-zapoya-tolyatti0.ru/vyvedenie-iz-zapoya-tolyatti
На следующем этапе начинается активное медикаментозное вмешательство. Современные препараты вводятся капельничным методом для быстрого выведения токсинов и нормализации обменных процессов, что способствует стабилизации работы жизненно важных органов.
Изучить вопрос глубже – http://vyvod-iz-zapoya-volgograd000.ru/vyvod-iz-zapoya-kruglosutochno-volgograd/
Регистрация через VK упростила вход, это плюс, хотя для тех, кто ценит анонимность, лучше использовать email.
Самостоятельный выход из запоя сопряжен с высоким риском развития осложнений. После прекращения приема спиртного ослабленный организм может не выдержать нагрузки, что приведет к инфаркту, инсульту, судорожным приступам и даже алкогольному психозу. Чтобы избежать этих опасных состояний, необходимо вызвать нарколога на дом, который проведет лечение правильно и безопасно.
Получить дополнительные сведения – анонимный вывод из запоя краснодар
Такое поэтапное лечение позволяет добиться устойчивого результата без стрессов и осложнений. Пациенты получают комплексную помощь, включающую как медицинские, так и психотерапевтические аспекты.
Узнать больше – наркологическая клиника лечение алкоголизма кемерово
Помимо медицинских процедур, клиника делает акцент на психологической поддержке и постлечебной адаптации. Пациентам помогают не только избавиться от физической зависимости, но и сформировать устойчивую мотивацию к трезвости, восстановить интерес к жизни и наладить отношения с близкими. Это достигается за счёт участия психологов, психотерапевтов и специалистов по социальной реабилитации.
Выяснить больше – анонимная наркологическая клиника ижевск
Преимущество обращения в клинику по месту проживания в том, что помощь становится доступной и менее пугающей. Не нужно ехать в другой город, объяснять длительные отлучки, жить в ощущении, что о проблеме узнают все вокруг. Пациент может пройти диагностику, детоксикацию, вывод из запоя, курс лечения и реабилитацию в привычном регионе, а родные — участвовать в процессе, приезжать на семейные консультации, поддерживать контакт со специалистами. Важный момент: здесь смотрят не только на зависимость как на «вредную привычку», а как на заболевание с физическими, психологическими и социальными последствиями. Лечить приходится не отдельный эпизод запоя, а всю систему — здоровье, поведение, образ жизни и окружение человека.
Подробнее – narkologicheskie-kliniki-v-podmoskove
Вывод из запоя требует комплексного контроля всех физиологических параметров. Ниже представлены основные направления наблюдения, формирующие структуру оценки состояния.
Получить больше информации – врач вывод из запоя
В этой публикации мы рассматриваем важную тему борьбы с зависимостями, включая алкогольную и наркотическую зависимости. Мы обсудим методы лечения, реабилитации и поддержку, которые могут помочь людям, столкнувшимся с этой проблемой. Читатели узнают о перспективах выздоровления и важности комплексного подхода.
Получить дополнительную информацию – http://www.quran-ayat.com/huda/redirector.php?url=https://vyvod-iz-zapoya-tolyatti0.ru/vyvod-iz-zapoya-tolyatti-na-domu
Этот обзор предлагает свежий взгляд на предметы, которые и без того привычны. Мы упоминаем факты, не имеющие большого значения, и события с неясной важностью, но они присутствуют здесь.
Подробнее читать – диета для похудения быстро
Стационар в наркологической клинике часто воспринимается как нечто пугающее: строгий режим, замкнутое пространство, жёсткие правила. На деле стационарное лечение в Лобне создаётся не для того, чтобы «наказать» человека за употребление, а чтобы обеспечить ему максимальную безопасность и стабильность в самый тяжёлый период. Когда запои повторяются, самочувствие сильно ухудшается, а дома сложно создать тихую и контролируемую обстановку, именно стационар становится оптимальным решением.
Подробнее тут – adresa-narkologicheskih-klinik
Скачайте патч для обхода активации Windows 11 и пользуйтесь системой без ограничений.
Подробнее – Как активировать Windows 11 без ключа
По совету друга попробовал 7к казино официальный: регистрация простая, выплаты стабильные, но для любителей VIP-привилегий есть площадки с более агрессивной программой.
В условиях круглосуточного наблюдения врачи могут внимательно следить за динамикой состояния, своевременно корректировать схемы лечения, проводить детоксикацию под контролем давления, пульса и работы сердца. Особенно это важно для пациентов с гипертонией, сердечно-сосудистыми заболеваниями, нарушениями ритма, заболеваниями печени, диабетом и другими хроническими патологиями. В стационаре проще организовать обследование, назначить сопутствующую терапию, вовремя заметить опасные симптомы и предотвратить серьёзные осложнения.
Детальнее – https://narkologicheskaya-klinika-lobnya11.ru/
שלי, אלא במקומות מסוימים, נכנע לו רק להיגיון אחד מובן. אחרי שהוא שפך את כל מה שהיה בו, הוא כופף ומרח את הזרע שלו באצבעו באופן שווה. כמו שהבריסטה המנוסה יוצרת תבנית קצף על פני הקפה, חייו תלויים בזה. לא היה צורך להתאפק יותר, כי הוא הרגיש שהוא יחזיק מעמד זמן רב. לינדה גנחה וצעקה, קשתה את גבה, משכה את רגליה, והרחם שלה התכווץ, אוחז בחוזקה בזין שלו. לסיום, הוא סחט https://sexsource.co.il/
Наркологическая клиника использует методики, направленные на комплексную оценку состояния пациента. Работа строится на анализе анамнеза, исследовании соматических параметров и определении степени выраженности симптомов. Такой формат создаёт условия для точного подбора терапевтических мер. В клинике применяется непрерывный мониторинг, направленный на своевременное выявление отклонений и корректировку лечебных мероприятий. Благодаря этому достигается высокая стабильность клинического процесса и формируется благоприятная динамика восстановления.
Исследовать вопрос подробнее – http://narkologicheskaya-klinika-v-vdk18.ru/
Вызов нарколога на дом в таких условиях позволяет не терять драгоценное время, избежать госпитализации и предотвратить критическое развитие событий. Кроме того, это снижает психологическую нагрузку на пациента и его близких, особенно если зависимость длится долго и сопровождается отрицанием проблемы.
Разобраться лучше – https://narcolog-na-dom-v-moskve55.ru/vyzov-narkologa-na-dom-v-krasnogorske
После приезда нарколог оценивает состояние пациента, проверяет давление, частоту пульса и насыщенность крови кислородом. Затем врач подбирает индивидуальный состав капельницы, включающий растворы для очистки организма, препараты для нормализации работы сердца, печени и нервной системы. Процедура длится около 1–2 часов и позволяет быстро:
Выяснить больше – помощь вывод из запоя в краснодаре
Алкогольный запой представляет собой длительное бесконтрольное приём спиртного, приводящее к тяжёлой интоксикации и серьёзным осложнениям для органов и психики. В Новосибирске клиника «Сибирский Доктор» предлагает качественный вывод из запоя с применением инновационных технологий и участием опытных наркологов, терапевтов и психиатров. Наш подход сочетает мгновенную реакцию на вызов, современное оборудование и индивидуальные схемы лечения, что позволяет достичь стабильной ремиссии и снизить риск рецидива.
Подробнее – вывод из запоя цена новосибирск
Особенность клиники — возможность выезда нарколога на дом. Это особенно важно, если пациенту трудно самостоятельно добраться до центра или он хочет избежать публичности. Врач приезжает с полным набором медикаментов и оборудования, проводит обследование и ставит капельницу, контролируя состояние пациента на протяжении всей процедуры. Такой формат позволяет начать лечение незамедлительно и без стресса.
Ознакомиться с деталями – наркологическая клиника стационар кемерово
Клиника «УралМед» работает без выходных и праздников: прием пациентов — круглосуточно. Это позволяет оказывать экстренную помощь при острых состояниях, а также вести наблюдение за динамикой восстановления здоровья в ночные часы.
Подробнее тут – нарколог лечение алкоголизма екатеринбург
Каждый из перечисленных факторов — веская причина для вызова врача, который может оказать помощь профессионально и безопасно.
Получить дополнительные сведения – нарколог на дом в санкт-петербурге
выездной шиномонтаж цена
סטר לה על התחת, ליטף את הציצים הגדולים שלה עד שהתחילה להתבכיין. ואז הפך אותה לסרטן, ירק בין הלחמניות ודחף את אצבעו לאנאלי הדוק. אתה יכול לתת את זה גם שם? הוא שאל, כבר ידע את התשובה. רוצה אותך הזין השמן שלך הזין שלך … את רוצה שאזיין אותך כמו שצריך, מרינוצ ‘ קה? כן!!! אני רוצה שתזיין אותי! זיין אותי כמו הכלבה שלך, סמיר! עכשיו! מרינה גונחת עם כל מהלך זין חדש https://iampurple.co.il/
На фоне длительных запоев страдает не только физическое состояние. Обостряются тревога, раздражительность, обидчивость, возможны вспышки агрессии и неадекватные поступки. Для семьи это превращается в постоянное напряжение: никто не знает, чем закончится очередной день или ночь. Одновременно растёт риск психозов, когда человек может видеть и слышать то, чего нет на самом деле, путать реальность, быть опасным для себя и окружающих.
Разобраться лучше – vyvod-iz-zapoya-moskovskij-oblast
Большинство семей приходят к мысли о лечении зависимости не сразу. Сначала всё выглядит как «случайные переборы по праздникам», потом алкоголь или наркотики становятся привычным способом снять стресс, забыться, пережить неудачи. Постепенно запои учащаются, человек пропадает на несколько дней, появляются долги, проблемы на работе, конфликты в семье. На этом этапе многим кажется, что обращаться в наркологическую клинику в Лобне ещё рано, что можно «взять себя в руки» и как-то остановиться. Но практика показывает обратное: чем дольше затягивается момент обращения к специалистам, тем тяжелее протекают запои, тем глубже страдает здоровье и тем сложнее вернуть человека к стабильной трезвости.
Углубиться в тему – http://narkologicheskaya-klinika-lobnya11.ru/narkologicheskaya-klinika-otzyvy-v-lobne/https://narkologicheskaya-klinika-lobnya11.ru
Оперативное лечение организовано по четкому алгоритму, который позволяет быстро стабилизировать состояние пациента и обеспечить эффективную терапию. Каждый этап направлен на комплексное восстановление организма.
Исследовать вопрос подробнее – http://vyvod-iz-zapoya-volgograd000.ru/vyvod-iz-zapoya-na-domu-volgograd/
В этой медицинской статье мы погрузимся в актуальные вопросы здравоохранения и лечения заболеваний. Читатели узнают о современных подходах, методах диагностики и новых открытий в научных исследованиях. Наша цель — донести важную информацию и повысить уровень осведомленности о здоровье.
Углубиться в тему – http://ultrawood.ru/bitrix/redirect.php?goto=https://vyvod-iz-zapoya-tolyatti0.ru/vyvod-iz-zapoya-tolyatti-na-domu
Функция и назначение
Углубиться в тему – платный нарколог на дом
Оперативное лечение организовано по четкому алгоритму, который позволяет быстро стабилизировать состояние пациента и обеспечить эффективную терапию. Каждый этап направлен на комплексное восстановление организма.
Подробнее – вывод из запоя с выездом в волгограде
В данной статье мы акцентируем внимание на важности поддержки в процессе выздоровления. Мы обсудим, как друзья, семья и профессионалы могут помочь тем, кто сталкивается с зависимостями. Читатели получат практические советы, как поддерживать близких на пути к новой жизни.
Получить дополнительную информацию – http://142.250.110.193/url?q=https://vyvod-iz-zapoya-tolyatti0.ru/vyvedenie-iz-zapoya-tolyatti
Длительный запой представляет собой крайне опасное состояние, способное нанести непоправимый вред организму. При отсутствии своевременного вмешательства алкогольная интоксикация может привести к серьезным осложнениям, таким как нарушение работы сердца, печени, почек и нервной системы, а также развитию алкогольного психоза. В таких ситуациях экстренная медицинская помощь является залогом спасения жизни и предотвращения необратимых последствий. Клиника «ЗдоровьеНорм» предлагает круглосуточный выезд специалистов для вывода из запоя на дому в Краснодаре и по всему Краснодарскому краю. Наши врачи работают 24 часа в сутки, обеспечивая полный комплекс процедур по детоксикации, снятию абстинентного синдрома и восстановлению организма, при этом гарантируя полную анонимность и индивидуальный подход к каждому пациенту.
Исследовать вопрос подробнее – запой нарколог на дом в краснодаре
Особенность клиники — возможность выезда нарколога на дом. Это особенно важно, если пациенту трудно самостоятельно добраться до центра или он хочет избежать публичности. Врач приезжает с полным набором медикаментов и оборудования, проводит обследование и ставит капельницу, контролируя состояние пациента на протяжении всей процедуры. Такой формат позволяет начать лечение незамедлительно и без стресса.
Углубиться в тему – http://narkologicheskaya-klinika-v-kemerovo18.ru/chastnaya-narkologicheskaya-klinika-kemerovo/
Наркологическая клиника выстраивает лечебные мероприятия в соответствии с алгоритмами, направленными на достижение стабильного состояния пациента. Важную роль играет последовательное выполнение процедур, включая оценку реакции организма и корректировку вмешательств. Формирование индивидуальной программы позволяет учитывать особенности каждого случая и поддерживать высокий уровень эффективности. Процесс наблюдения сопровождается непрерывным анализом, что делает терапию адаптивной и предсказуемой. В клинике соблюдается принцип многоуровневого контроля, обеспечивающий безопасность и стабильность лечения.
Подробнее тут – https://narkologicheskaya-klinika-tomsk18.ru/chastnaya-narkologicheskaya-klinika-tomsk/
Этот информационный материал подробно освещает проблему наркозависимости, ее причины и последствия. Мы предлагаем информацию о методах лечения, профилактики и поддерживающих программах. Цель статьи — повысить осведомленность и продвигать идеи о необходимости борьбы с зависимостями.
Углубиться в тему – http://proctology.mc-euromed.ru/bitrix/rk.php?goto=https://vyvod-iz-zapoya-tolyatti0.ru/vyvedenie-iz-zapoya-tolyatti
В каталоге «Строй М2» матрасы собраны без хаоса: пружинные и беспружинные модели, ходовые размеры 90?200 и 160?200, решения от доступных до премиальных брендов. Фильтры и сортировка помогают быстро сузить выбор, сравнить характеристики и цену, а покупка оформляется сразу в карточке товара. Ищете купить матрас недорого? Актуальный ассортимент и предложения смотрите на stroy-m2.ru/dekor/postelnye-prinadlezhnosti/matrasy/
Специалист уточняет продолжительность запоя, характер симптоматики и наличие хронических заболеваний, проводит измерения пульса, давления и температуры, что позволяет оперативно скорректировать терапию.
Выяснить больше – анонимный вывод из запоя
Препараты подбираются строго индивидуально и могут включать:
Получить дополнительную информацию – narkolog na dom tsena
Не тратьте деньги на лицензию — скачайте кряк для Windows 11 здесь и активируйте систему за 5 минут.
Подробнее – Где найти рабочий ключ для Windows 11
Процедура длится от 40 минут до 2 часов, в зависимости от тяжести состояния, и проводится в комфортной домашней обстановке, что значительно снижает стресс у пациента и его близких.
Подробнее тут – запой нарколог на дом краснодар
Современная наркологическая клиника — это не просто медицинское учреждение, где проводят лечение зависимостей. Это система комплексной поддержки, объединяющая врачей, психологов, терапевтов и специалистов по реабилитации. В клинике «ТомскМед Трезвость» созданы комфортные условия, где лечение проходит анонимно, бережно и с опорой на доказательную медицину. Каждое вмешательство назначается строго по показаниям, а терапия направлена не только на физическое очищение организма, но и на восстановление психоэмоционального баланса пациента.
Исследовать вопрос подробнее – наркологическая клиника лечение алкоголизма в томске
Состав каждой капельницы подбирается строго индивидуально. Врачи учитывают уровень артериального давления, частоту сердечных сокращений, наличие хронических заболеваний. Такой подход позволяет снизить нагрузку на организм и обеспечить плавное восстановление после запоя.
Подробнее тут – https://vyvodiz-zapoya-vladivostok18.ru/czentr-kodirovaniya-alkogolizma-vyvod-iz-zapoya-vladivostok
При поступлении вызова специалисты клиники «СтопТокс» оперативно выезжают на дом в Екатеринбурге или по всей Свердловской области. По прибытии врач проводит всестороннюю диагностику, включая измерение артериального давления, пульса и уровня кислорода в крови, а также собирает анамнез и оценивает степень интоксикации. На основе полученной информации составляется индивидуальный план лечения, который включает следующие этапы:
Получить больше информации – http://narcolog-na-dom-ekaterinburg000.ru/
При длительном запое организм не успевает восстановить свой водно-электролитный баланс, что приводит к обезвоживанию и ухудшению общего состояния. Такие пациенты рискуют развить не только тяжелую интоксикацию, но и хронические заболевания, которые впоследствии требуют длительного и дорогостоящего лечения. Поэтому своевременный вызов врача-нарколога на дом становится критически важным для сохранения здоровья и предотвращения серьезных последствий.
Углубиться в тему – вывод из запоя на дому цена краснодар
Мы создаём материалы, которые поддерживают вас на каждом этапе жизни. От советов для мам до рекомендаций по стилю и правильному питанию, наш журнал охватывает самые важные темы. Переходите по ссылке https://universewomen.ru/
Наркологическая клиника использует комплексный подход к оценке состояния пациента, что обеспечивает высокий уровень контроля на всех этапах лечения. Такой формат работы позволяет детально изучать динамику процессов и своевременно корректировать вмешательства. В клинике применяется принцип последовательного наблюдения, при котором особое внимание уделяется соматическим и неврологическим проявлениям. Выбор терапевтических мер основывается на анализе объективных данных, что повышает предсказуемость результата. Подход ориентирован на постепенное восстановление функций организма с учетом индивидуальных особенностей.
Выяснить больше – наркологическая клиника стационар в томске
Терапия в клинике строится по индивидуальному протоколу. Каждому пациенту подбираются процедуры с учётом возраста, длительности болезни, сопутствующих нарушений и психоэмоционального состояния. Лечение проходит поэтапно, что позволяет исключить осложнения и достичь стабильной ремиссии. Ниже представлена таблица с ключевыми этапами терапии.
Ознакомиться с деталями – частная наркологическая клиника
Этот информационный набор привлекает внимание множеством мелочей и странных ракурсов. Мы предлагаем взгляды, которые редко бывают полезны, но могут слегка разнообразить ваше знакомство с темой.
Вот – азартные игры на деньги
Такой подход обеспечивает комплексное восстановление — от физического состояния до эмоциональной стабильности. Пациент получает внимание врачей на всех этапах и поддержку после выписки.
Ознакомиться с деталями – наркологическая клиника стационар
Наркологическая клиника применяет стандартизированные схемы, направленные на безопасное и постепенное восстановление. Каждый этап вмешательства согласуется с текущим состоянием пациента, что обеспечивает предсказуемый характер изменений. Модель работы включает оценку реакции организма, проверку устойчивости внутренних систем и уточнение динамики метаболических процессов. Последовательность действий формируется с учётом адаптационных возможностей и направлена на достижение стабильного результата.
Ознакомиться с деталями – http://narkologicheskaya-klinika-vo-vladivostoke18.ru/chastnaya-narkologicheskaya-klinika-vladivostok/
Мы помогаем вам быть в курсе модных новинок и одновременно заботиться о здоровье всей семьи. Наши материалы о детях и воспитании основаны на практическом опыте. Переходите по ссылке https://universewomen.ru/
В случаях, когда транспортировка в клинику затруднительна или пациент испытывает выраженный стресс, возможно выездное консультирование и начальная детоксикация на дому. Врач прибывает с портативным набором для инфузий, оперативно stabilizирует состояние и даёт рекомендации по дальнейшим действиям.
Исследовать вопрос подробнее – реабилитационный центр лечение алкоголизма екатеринбург
Особое внимание уделяется безопасности. Используются препараты нового поколения, снижающие нагрузку на печень, почки и сердечно-сосудистую систему. Процесс лечения проходит под постоянным наблюдением медперсонала, что позволяет быстро реагировать на любые изменения состояния пациента. Все данные о лечении строго конфиденциальны — информация не передаётся третьим лицам и не фиксируется в общедоступных базах.
Детальнее – http://narkologicheskaya-klinika-v-tomske18.ru
Такой порядок действий гарантирует не только купирование симптомов, но и подготовку пациента к последующему восстановлению.
Получить больше информации – нарколог на дом анонимно санкт-петербург
Вывод из запоя — это не просто медицинская процедура, а важный шаг на пути восстановления организма и возвращения человека к нормальной жизни. В клинике «ВладТрезвие Центр» пациенты получают профессиональную помощь, основанную на современных методиках детоксикации и безопасном медикаментозном восстановлении. Каждый случай рассматривается индивидуально, а лечение подбирается с учётом возраста, состояния здоровья и продолжительности запоя. Наркологи центра выезжают на дом круглосуточно, обеспечивая помощь даже в экстренных ситуациях, когда время играет ключевую роль.
Углубиться в тему – https://vyvodiz-zapoya-vladivostok18.ru/vyvod-iz-zapoya-gorod-vladivostok/
Длительный запой способен нанести непоправимый вред организму, привести к тяжелым нарушениям работы внутренних органов и поставить под угрозу жизнь пациента. В таких случаях необходимо срочное медицинское вмешательство, которое позволяет быстро стабилизировать состояние, вывести токсины и предотвратить развитие опасных осложнений. Клиника «ЗдоровьеНорм» в Краснодаре предлагает профессиональный вывод из запоя на дому, обеспечивая комплексное лечение с максимальной оперативностью и полной конфиденциальностью.
Изучить вопрос глубже – вывод из запоя капельница на дому
Регистрация простая, анкеты минимум, но для вывода придется пройти проверку личности.
Новый адрес работает стабильно, 7k рабочее зеркало пригодно для входа, но иногда обновляется чуть позже.
Терапия в клинике строится по индивидуальному протоколу. Каждому пациенту подбираются процедуры с учётом возраста, длительности болезни, сопутствующих нарушений и психоэмоционального состояния. Лечение проходит поэтапно, что позволяет исключить осложнения и достичь стабильной ремиссии. Ниже представлена таблица с ключевыми этапами терапии.
Углубиться в тему – наркологическая клиника стационар
После поступления вызова клиника «ЗдоровьеНорм» отправляет к пациенту опытного нарколога, который прибывает на дом в течение 30–60 минут. По приезду врач проводит комплексную диагностику, включающую измерение артериального давления, пульса, уровня кислорода в крови и тщательную оценку общего состояния пациента. На основе полученных данных специалист подбирает индивидуальную схему лечения.
Узнать больше – вызов нарколога на дом в краснодаре
Glassway Group производит алюминиевые конструкции для современных интерьеров — подвесные потолки, офисные перегородки, стеклянные двери и светодиодное освещение. Компания предлагает системы любой сложности: кассетные и реечные потолки, каркасные и бескаркасные перегородки, противопожарные решения для коммерческих помещений. Все изделия изготавливаются на собственном производстве с контролем качества на каждом этапе. Ознакомиться с каталогом продукции и заказать монтаж можно на https://glassway.group/, где представлены реализованные проекты торговых центров, офисов и промышленных объектов. Специалисты выполняют установку под ключ с гарантией.
Наркологическая клиника выстраивает лечебные мероприятия в соответствии с алгоритмами, направленными на достижение стабильного состояния пациента. Важную роль играет последовательное выполнение процедур, включая оценку реакции организма и корректировку вмешательств. Формирование индивидуальной программы позволяет учитывать особенности каждого случая и поддерживать высокий уровень эффективности. Процесс наблюдения сопровождается непрерывным анализом, что делает терапию адаптивной и предсказуемой. В клинике соблюдается принцип многоуровневого контроля, обеспечивающий безопасность и стабильность лечения.
Ознакомиться с деталями – http://narkologicheskaya-klinika-tomsk18.ru
Помимо медицинских процедур, клиника делает акцент на психологической поддержке и постлечебной адаптации. Пациентам помогают не только избавиться от физической зависимости, но и сформировать устойчивую мотивацию к трезвости, восстановить интерес к жизни и наладить отношения с близкими. Это достигается за счёт участия психологов, психотерапевтов и специалистов по социальной реабилитации.
Детальнее – наркологические клиники алкоголизм
Такая структурированная таблица позволяет обеспечивать единый стандарт наблюдения и облегчает оценку динамики. Она помогает быстро определять необходимость корректировок, что повышает точность применяемых вмешательств и уменьшает риск отрицательных реакций.
Подробнее можно узнать тут – врач вывод из запоя в кемерове
Наркологическая клиника применяет стандартизированные схемы, направленные на безопасное и постепенное восстановление. Каждый этап вмешательства согласуется с текущим состоянием пациента, что обеспечивает предсказуемый характер изменений. Модель работы включает оценку реакции организма, проверку устойчивости внутренних систем и уточнение динамики метаболических процессов. Последовательность действий формируется с учётом адаптационных возможностей и направлена на достижение стабильного результата.
Узнать больше – наркологическая клиника в владивостоке
Перед началом терапии проводится полная диагностика организма, включая лабораторные исследования и ЭКГ. Это позволяет оценить состояние пациента и подобрать оптимальный курс лечения. После стабилизации физического состояния начинается психотерапевтическая и реабилитационная работа. Такой подход помогает не только снять симптомы, но и устранить первопричины зависимости.
Получить больше информации – https://narkologicheskaya-klinika-kemerovo18.ru/narkolog-kemerovo-na-dom
Детокс — важный этап лечения, который помогает очистить организм от токсинов и продуктов распада алкоголя или наркотиков. В клинике «ТомскМед Трезвость» используются современные капельницы и лекарственные комбинации, направленные на восстановление биохимических процессов в организме. Ниже представлена таблица с примерами капельниц, применяемых в детоксикационных программах.
Исследовать вопрос подробнее – http://narkologicheskaya-klinika-v-tomske18.ru/tomsk-narkologicheskij-dispanser/
Looking for openai news? Explore aigazine.com – an all-inclusive hub covering the AI universe, its models, and the newest updates in the sector. Our news feed, comprehensive reviews, and research allow you to gain essential information and stay informed about trends and opinions. Here you’ll find all the news about Anthropetic, AI, OpenAI, Grok, Gemini, OpenAI, Google DeepMind.
Детокс — важный этап лечения, который помогает очистить организм от токсинов и продуктов распада алкоголя или наркотиков. В клинике «ТомскМед Трезвость» используются современные капельницы и лекарственные комбинации, направленные на восстановление биохимических процессов в организме. Ниже представлена таблица с примерами капельниц, применяемых в детоксикационных программах.
Получить дополнительные сведения – https://narkologicheskaya-klinika-v-tomske18.ru/tomsk-narkologicheskij-dispanser
Для эффективного лечения наши врачи используют только проверенные и сертифицированные медикаменты, которые подбираются индивидуально для каждого пациента. В состав лечебного курса входят:
Узнать больше – врач нарколог выезд на дом
Функция и назначение
Подробнее тут – нарколог на дом круглосуточно екатеринбург
Длительный запой способен нанести непоправимый вред организму, привести к тяжелым нарушениям работы внутренних органов и поставить под угрозу жизнь пациента. В таких случаях необходимо срочное медицинское вмешательство, которое позволяет быстро стабилизировать состояние, вывести токсины и предотвратить развитие опасных осложнений. Клиника «ЗдоровьеНорм» в Краснодаре предлагает профессиональный вывод из запоя на дому, обеспечивая комплексное лечение с максимальной оперативностью и полной конфиденциальностью.
Выяснить больше – вывод из запоя клиника в краснодаре
Такой подход позволяет устранить физические последствия запоя и снизить психологическую зависимость. Уже после первой процедуры пациенты отмечают улучшение самочувствия, появление аппетита и нормализацию сна. Важно не ограничиваться только экстренной помощью — специалисты рекомендуют пройти курс восстановления, чтобы предотвратить рецидивы.
Подробнее – http://vyvodiz-zapoya-vladivostok18.ru
При поступлении вызова специалисты клиники «ЗдоровьеНорм» выезжают на дом в течение 30–60 минут. Врач проводит тщательную диагностику, измеряя артериальное давление, пульс, уровень кислорода в крови и оценивая общее состояние пациента. После этого осуществляется индивидуальный подбор лечебной схемы, основанной на объективных данных и анамнезе пациента.
Исследовать вопрос подробнее – вывод из запоя с выездом в краснодаре
Клиника «ВладТрезвие Центр» работает в круглосуточном режиме и готова оказать помощь жителям Владивостока и прилегающих районов в любое время суток. Врачи-наркологи прибывают по вызову в течение часа, имеют при себе все необходимые препараты и оборудование для проведения детоксикации на дому. При необходимости пациента доставляют в стационар, где лечение проходит под постоянным контролем медицинского персонала.
Получить дополнительную информацию – анонимный вывод из запоя владивосток
Обращение к наркологу — это не признание «окончательного проигрыша», а трезвое решение, что здоровье и жизнь важнее иллюзии контроля. В клинике можно безопасно вывести человека из запоя, стабилизировать состояние, обследовать сердце, печень, нервную систему, понять, насколько далеко зашло заболевание. Важно, что помощь получают не только тяжёлые пациенты «на грани», но и те, у кого ещё есть работа, семья, привычный образ жизни, но запои уже стали регулярными. Чем раньше удаётся подключить специалистов в Лобне, тем мягче можно пройти лечение и тем больше шансов сохранить и здоровье, и отношения, и социальный статус.
Углубиться в тему – https://narkologicheskaya-klinika-lobnya11-2.ru/chastnaya-narkologicheskaya-klinika-v-lobne/
Перечисленные меры обеспечивают структурированный подход к восстановлению, позволяя выстраивать лечение в соответствии с текущими изменениями. Такой формат способствует достижению устойчивой физиологической стабилизации и уменьшает выраженность симптомов. Для систематизации применяемых методов используется таблица, представленная ниже.
Выяснить больше – вывод из запоя круглосуточно кемерово
Такая схема лечения делает процесс последовательным и контролируемым. Врачи клиники сопровождают пациентов на всех стадиях, помогая преодолеть как физическую, так и психологическую зависимость. Особое внимание уделяется возвращению человека к активной и стабильной жизни без употребления алкоголя или наркотиков.
Получить дополнительные сведения – наркологическая клиника нарколог
Особое внимание уделяется безопасности. Используются препараты нового поколения, снижающие нагрузку на печень, почки и сердечно-сосудистую систему. Процесс лечения проходит под постоянным наблюдением медперсонала, что позволяет быстро реагировать на любые изменения состояния пациента. Все данные о лечении строго конфиденциальны — информация не передаётся третьим лицам и не фиксируется в общедоступных базах.
Подробнее – лечение в наркологической клинике
Металлорукава и гибкая подводка из нержавеющей стали — надёжное решение для систем водоснабжения и отопления, которое служит десятилетиями. Компания предлагает рукава высокого давления (РВД), шаровые краны и фитинги всех популярных диаметров. Переходите на https://iz-nerzhaveyki.ru/ и выбирайте подводку от 1/2 дюйма (15 мм) до 2 дюймов (50 мм), а также РВД с различными типами соединений: резьба, фланцы, под приварку. Нержавейка выдерживает высокое давление и агрессивные среды. Доставка по Москве.
Такая схема лечения делает процесс последовательным и контролируемым. Врачи клиники сопровождают пациентов на всех стадиях, помогая преодолеть как физическую, так и психологическую зависимость. Особое внимание уделяется возвращению человека к активной и стабильной жизни без употребления алкоголя или наркотиков.
Получить дополнительную информацию – http://narkologicheskaya-klinika-v-izhevsk18.ru
В данном тексте собраны разнообразные случайные сведения и не вполне определённые идеи, которые могут вызвать интерес. Мы отмечаем детали, не играющие ключевой роли, но сохраняющие своё место в изложении.
Подробнее читать – детокс чай для похудения
Обращение к наркологу — это не признание «окончательного проигрыша», а трезвое решение, что здоровье и жизнь важнее иллюзии контроля. В клинике можно безопасно вывести человека из запоя, стабилизировать состояние, обследовать сердце, печень, нервную систему, понять, насколько далеко зашло заболевание. Важно, что помощь получают не только тяжёлые пациенты «на грани», но и те, у кого ещё есть работа, семья, привычный образ жизни, но запои уже стали регулярными. Чем раньше удаётся подключить специалистов в Лобне, тем мягче можно пройти лечение и тем больше шансов сохранить и здоровье, и отношения, и социальный статус.
Получить дополнительные сведения – http://narkologicheskaya-klinika-lobnya11-2.ru/narkologicheskaya-klinika-cena-v-lobne/
Дополнительно, если у пациента отмечаются психические нарушения — галлюцинации, агрессия или спутанность сознания, это является прямым сигналом к срочному вмешательству. В этом случае своевременное лечение помогает предотвратить риск инсульта, инфаркта или других серьезных заболеваний.
Получить дополнительные сведения – помощь вывод из запоя в краснодаре
Процедура вывода из запоя проводится строго по медицинским стандартам. Применяются современные капельницы, витамины и препараты для нормализации функций сердца, печени, почек и нервной системы. После снятия интоксикации врачи назначают поддерживающее лечение, направленное на стабилизацию эмоционального состояния и снижение тяги к алкоголю.
Углубиться в тему – http://vyvodiz-zapoya-vladivostok18.ru/vyvod-iz-zapoya-staczionar-vladivostok/
Такая схема лечения делает процесс последовательным и контролируемым. Врачи клиники сопровождают пациентов на всех стадиях, помогая преодолеть как физическую, так и психологическую зависимость. Особое внимание уделяется возвращению человека к активной и стабильной жизни без употребления алкоголя или наркотиков.
Получить дополнительную информацию – http://narkologicheskaya-klinika-v-izhevsk18.ru/narkologicheskaya-klinika-izhevsk-otzyvy/
Вывод из запоя в «Сибирском Докторе» происходит в несколько взаимосвязанных этапов:
Получить дополнительные сведения – http://kachestvo-vyvod-iz-zapoya.ru/vyvod-iz-zapoya-kruglosutochno-novosibirsk/
Вывод из запоя в «Сибирском Докторе» происходит в несколько взаимосвязанных этапов:
Разобраться лучше – вывод из запоя на дому цена
Visit This Online Boutique – The items are appealing and the site runs effortlessly.
Клиника «НаркоСити» предлагает срочную наркологическую помощь при запоях на дому в Краснодаре. Опытные специалисты оперативно приезжают в любой район города, проводят детоксикацию и стабилизируют состояние пациента прямо на дому. Лечение организовано с максимальной безопасностью и соблюдением конфиденциальности, что обеспечивает пациентам комфорт и быстрое восстановление без госпитализации.
Исследовать вопрос подробнее – https://vyvod-iz-zapoya-krasnodar0.ru/vyvod-iz-zapoya-na-domu-krasnodar/
Наркологическая клиника использует методики, направленные на комплексную оценку состояния пациента. Работа строится на анализе анамнеза, исследовании соматических параметров и определении степени выраженности симптомов. Такой формат создаёт условия для точного подбора терапевтических мер. В клинике применяется непрерывный мониторинг, направленный на своевременное выявление отклонений и корректировку лечебных мероприятий. Благодаря этому достигается высокая стабильность клинического процесса и формируется благоприятная динамика восстановления.
Получить дополнительную информацию – https://narkologicheskaya-klinika-v-vdk18.ru/chastnaya-narkologicheskaya-klinika-vladivostok/
Вызов нарколога на дом в клинике имеет целый ряд преимуществ. Пациент получает доступ к современным методикам без необходимости транспортировки. Кроме того, исключается фактор социальной огласки, что часто является значимым для больных и их семей.
Углубиться в тему – нарколог капельница на дом в санкт-петербурге
Discover Analytics Alley Tools – The interface is clean and the content offers real value.
Такое поэтапное лечение позволяет добиться устойчивого результата без стрессов и осложнений. Пациенты получают комплексную помощь, включающую как медицинские, так и психотерапевтические аспекты.
Изучить вопрос глубже – http://narkologicheskaya-klinika-kemerovo18.ru/narkolog-kemerovo-na-dom/
Battery Bay Specials – Got exactly the right products and payment was hassle-free.
Сеть отелей на час Де Арт https://deart-13.ru/ это гостиница с почасовой оплатой в Москве. У нас семь великолепных бутик-отелей Де Арт. Они рассчитаны на небольшое количество гостей, которым предлагаются номера с уникальными, продуманными до мелочей интерьерами. Узнайте больше о наших номерах и ценах на сайте.
Top Picks at Bundle Boutique – Diverse products and moving across pages was smooth and quick.
Функция и назначение
Подробнее тут – http://narcolog-na-dom-ekaterinburg000.ru/vrach-narkolog-na-dom-ekb/
Explore Chrome Central – Sleek design combined with easy browsing made the experience enjoyable.
Алкогольная или наркотическая интоксикация — это не просто временное ухудшение самочувствия, а серьёзное медицинское состояние, требующее неотложной помощи. Когда человек находится в запое или состоянии ломки, его организм стремительно теряет силы, нарушается работа сердца, печени, мозга, возникают панические атаки, судороги, спутанность сознания. В таких случаях помощь должна быть незамедлительной. Если пациент не может самостоятельно добраться до клиники, оптимальным решением становится вызов нарколога на дом. В Красногорске такая услуга доступна круглосуточно благодаря выездной службе клиники «Ключ к Здоровью».
Узнать больше – narkolog na dom kruglosutochno
Compute Cradle Pro – Navigation was simple and product info was easy to read, making selection fast.
Вывод из запоя в клинике формируется на основе последовательных процедур, направленных на стабилизацию физиологических функций и устранение токсических влияний. Такой подход позволяет корректно регулировать состояние пациента и контролировать интенсивность симптомов. Рабочие алгоритмы включают оценку метаболических процессов, анализ соматических показателей и определение степени неврологических изменений. В результате создается структурированная модель помощи, ориентированная на восстановление адаптивных возможностей организма. Процессы выполняются под контролем специалистов, что обеспечивает прогнозируемый терапевтический эффект и снижает вероятность осложнений.
Ознакомиться с деталями – http://www.domen.ru
Dashboard Dock World – Very intuitive navigation and moving through pages was fast and easy.
Вывод из запоя в клинике формируется на основе последовательных процедур, направленных на стабилизацию физиологических функций и устранение токсических влияний. Такой подход позволяет корректно регулировать состояние пациента и контролировать интенсивность симптомов. Рабочие алгоритмы включают оценку метаболических процессов, анализ соматических показателей и определение степени неврологических изменений. В результате создается структурированная модель помощи, ориентированная на восстановление адаптивных возможностей организма. Процессы выполняются под контролем специалистов, что обеспечивает прогнозируемый терапевтический эффект и снижает вероятность осложнений.
Углубиться в тему – http://vyvod-iz-zapoya-kemerovo18.ru
Dumbbell World – Great products and the checkout experience felt seamless.
Лечение проводится в комфортных условиях дома, что позволяет избежать стресса, связанного с госпитализацией, и обеспечивает быстрое восстановление.
Подробнее – нарколог на дом недорого екатеринбург
Серьезные состояния, вызванные длительным употреблением алкоголя или наркотиков, требуют немедленного вмешательства. Если пациент испытывает ухудшение самочувствия вследствие продолжительного запоя, его организм начинает накапливать токсичные вещества, что ведёт к нарушению работы внутренних органов. При появлении таких симптомов, как сильная рвота, спутанность сознания, судороги, резкие скачки артериального давления, а также выраженные признаки абстинентного синдрома (сильная дрожь, панические атаки, бессонница, тревожность), вызов нарколога становится жизненно необходимым. Экстренное вмешательство позволяет стабилизировать состояние больного и предотвратить развитие серьёзных осложнений, включая сердечно-сосудистые нарушения, повреждение печени и развитие алкогольного психоза. В таких ситуациях профессиональное лечение на дому — лучший способ сохранить здоровье и жизнь пациента.
Выяснить больше – помощь нарколога на дому
ExchangeXpress – Easy-to-use layout and clear product info made exploring simple.
Актуальні новини Кривогу Рогу – https://krivoy-rog.in.ua/ . Корисна та довідкова інформація про місто.
GA4Gear Pro – Easy-to-follow design and detailed info make shopping simple and enjoyable.
Вывод из запоя требует комплексного контроля всех физиологических параметров. Ниже представлены основные направления наблюдения, формирующие структуру оценки состояния.
Подробнее тут – https://vyvodiz-zapoya-izhevsk18.ru/vyvod-iz-zapoya-na-domu-izhevsk/
Вывод из запоя в клинике формируется на основе последовательных процедур, направленных на стабилизацию физиологических функций и устранение токсических влияний. Такой подход позволяет корректно регулировать состояние пациента и контролировать интенсивность симптомов. Рабочие алгоритмы включают оценку метаболических процессов, анализ соматических показателей и определение степени неврологических изменений. В результате создается структурированная модель помощи, ориентированная на восстановление адаптивных возможностей организма. Процессы выполняются под контролем специалистов, что обеспечивает прогнозируемый терапевтический эффект и снижает вероятность осложнений.
Получить больше информации – вывод из запоя на дому недорого кемерово
Наши врачи оперативно приезжают к пациенту, проводят осмотр, купируют симптомы абстиненции и приступают к восстановлению жизненно важных функций. Всё это — в привычной для пациента обстановке, без стресса и лишней огласки. Мы обеспечиваем не только медицинскую помощь, но и эмоциональную поддержку, создавая условия для начала пути к выздоровлению.
Подробнее тут – https://narcolog-na-dom-v-moskve55.ru/narkolog-na-dom-anonimno-v-krasnogorske
Web Hosting Haven – Very organized pages and exploring services was simple today.
quicklabels.shop – Easy navigation and clear instructions made producing labels hassle-free.
http://fujiapuerbbs.com/home.php?mod=space&uid=3722867
http://pandora.nla.gov.au/external.html?link=https://www.colehardware.com/articles/1xbet_promo_code_106.html
shinehouse.shop – Intuitive design and detailed descriptions make exploring lighting effortless.
Наркологическая клиника опирается на комплексную модель оценки состояния, обеспечивающую последовательное восстановление функций организма. В клинике применяется система многоуровневого контроля, направленная на выявление нарушений и определение оптимальной тактики вмешательства. Такой подход позволяет поддерживать стабильность состояния даже в условиях выраженных клинических проявлений. Структурированная работа направлена на снижение токсической нагрузки, коррекцию метаболических процессов и восстановление адаптивных механизмов. Анализ проводится с учётом физиологических особенностей пациента и динамики изменений.
Получить дополнительные сведения – https://narkologicheskaya-klinika-vo-vladivostoke18.ru/chastnaya-narkologicheskaya-klinika-vladivostok/
Наркологическая клиника применяет стандартизированные схемы, направленные на безопасное и постепенное восстановление. Каждый этап вмешательства согласуется с текущим состоянием пациента, что обеспечивает предсказуемый характер изменений. Модель работы включает оценку реакции организма, проверку устойчивости внутренних систем и уточнение динамики метаболических процессов. Последовательность действий формируется с учётом адаптационных возможностей и направлена на достижение стабильного результата.
Получить дополнительные сведения – https://narkologicheskaya-klinika-vo-vladivostoke18.ru/
В рамках лечения используются методы, позволяющие фиксировать изменения и оценивать реакцию организма на проводимые мероприятия. Они служат основой для выборочных корректировок и обеспечивают структурированный характер процесса. Отличительной особенностью становится возможность адаптировать лечебные схемы под индивидуальные особенности пациента. Ниже представлены ключевые направления оценки состояния, применяемые для формирования полной клинической картины.
Подробнее можно узнать тут – https://narkologicheskaya-klinika-v-vdk18.ru/narkolog-vladivostok-na-dom
Лечение проводится в комфортных условиях дома, что позволяет избежать стресса, связанного с госпитализацией, и обеспечивает быстрое восстановление.
Узнать больше – нарколог на дом круглосуточно в екатеринбурге
Запойное состояние опасно не только токсическим воздействием алкоголя на организм, но и последствиями резкого отказа от спиртного. В таких случаях промедление может стоить здоровья. Нарколог на дом в Рязани приезжает по вызову и проводит процедуру прямо в домашних условиях, используя проверенные медицинские методики. Такой подход сочетает анонимность, оперативность и возможность контроля состояния без госпитализации.
Ознакомиться с деталями – запой нарколог на дом
Запойное состояние опасно не только токсическим воздействием алкоголя на организм, но и последствиями резкого отказа от спиртного. В таких случаях промедление может стоить здоровья. Нарколог на дом в Рязани приезжает по вызову и проводит процедуру прямо в домашних условиях, используя проверенные медицинские методики. Такой подход сочетает анонимность, оперативность и возможность контроля состояния без госпитализации.
Углубиться в тему – вызвать нарколога на дом срочно
Online Cable Craft Finds – Located everything quickly with a smooth browsing experience.
Telegram-канал по ссылке https://t.me/ffgdfggfgdfg/ предлагает актуальную информацию и эксклюзивные материалы для подписчиков, которые ценят оперативность и достоверность. Здесь публикуются новости, аналитика, полезные советы и специальные предложения, недоступные в других источниках. Подписка на канал открывает доступ к закрытому сообществу единомышленников, где можно обсудить важные темы и получить экспертное мнение. Присоединяйтесь к каналу и будьте в курсе всех обновлений первыми.
Cipher Cart Marketplace – Easy checkout and detailed product listings made exploring simple.
Data Clean Depot – Smooth navigation and helpful content made the experience enjoyable.
Dye & Wash Express – Items are high-quality and navigating the pages felt easy.
Work Whim Specials – Found some unusual selections and completing the purchase was smooth.
Faceless Factory Market – Simple layout and helpful product info make shopping smooth and easy.
Content Circuit Studio – Clear interface and well-organized materials made finding information effortless.
Такое поэтапное лечение позволяет добиться устойчивого результата без стрессов и осложнений. Пациенты получают комплексную помощь, включающую как медицинские, так и психотерапевтические аспекты.
Выяснить больше – наркологическая клиника лечение алкоголизма кемерово
Особенность клиники — возможность выезда нарколога на дом. Это особенно важно, если пациенту трудно самостоятельно добраться до центра или он хочет избежать публичности. Врач приезжает с полным набором медикаментов и оборудования, проводит обследование и ставит капельницу, контролируя состояние пациента на протяжении всей процедуры. Такой формат позволяет начать лечение незамедлительно и без стресса.
Ознакомиться с деталями – наркологические клиники алкоголизм кемерово
Такое поэтапное лечение позволяет добиться устойчивого результата без стрессов и осложнений. Пациенты получают комплексную помощь, включающую как медицинские, так и психотерапевтические аспекты.
Получить больше информации – частная наркологическая клиника в кемерове
loomdesigns.shop – User-friendly interface and unique options make browsing pleasant.
GamingGarage World Online – Smooth interface with well-laid-out sections made browsing simple.
Подобная структура наблюдения облегчает анализ изменений и способствует формированию объективной картины состояния. Наличие унифицированной системы контроля помогает выстраивать терапию последовательно и точно.
Подробнее тут – https://narkologicheskaya-klinika-vo-vladivostoke18.ru/
Наши врачи оперативно приезжают к пациенту, проводят осмотр, купируют симптомы абстиненции и приступают к восстановлению жизненно важных функций. Всё это — в привычной для пациента обстановке, без стресса и лишней огласки. Мы обеспечиваем не только медицинскую помощь, но и эмоциональную поддержку, создавая условия для начала пути к выздоровлению.
Исследовать вопрос подробнее – http://narcolog-na-dom-v-moskve55.ru/
linkvault.shop – Helpful product info and clear design make finding items simple.
В материале приведены детали, интересные, но не особенно важные. Мы рассматриваем аспекты, которые сложно назвать существенными, но включили их для большей полноты.
Подробнее читать – таблетки для аборта
В основе работы клиники «ИжТрезвоМед Центр» лежит принцип персонализированной медицины. Это означает, что каждый пациент получает не шаблонное лечение, а тщательно подобранный комплекс процедур, учитывающий его состояние, историю заболевания, уровень мотивации и социальную ситуацию. Такой подход позволяет добиться стабильного результата даже в сложных случаях. Лечение проводится анонимно, без постановки на учёт и разглашения данных, что особенно важно для тех, кто ценит конфиденциальность.
Изучить вопрос глубже – наркологическая клиника наркологический центр в ижевске
На месте врач проводит первичный осмотр, измеряет давление, пульс, сатурацию, оценивает уровень интоксикации и абстиненции. Далее назначается инфузионная терапия — капельница, направленная на дезинтоксикацию, восстановление электролитного баланса, купирование тревожности и нормализацию сна.
Получить больше информации – http://narcolog-na-dom-v-moskve55.ru/narkolog-na-dom-anonimno-v-krasnogorske/
Для формирования структурированного лечения используются методы, обеспечивающие анализ текущей клинической картины. Ниже представлены ключевые направления, задействованные при формировании терапевтических решений.
Изучить вопрос глубже – http://narkologicheskaya-klinika-vo-vladivostoke18.ru
Для формирования структурированного лечения используются методы, обеспечивающие анализ текущей клинической картины. Ниже представлены ключевые направления, задействованные при формировании терапевтических решений.
Исследовать вопрос подробнее – наркологическая клиника стационар владивосток
Представленная таблица отражает ключевые направления наблюдения, обеспечивая систематизацию данных. Такой подход позволяет поддерживать высокий уровень контроля и адаптировать программу лечения с учетом динамики состояния.
Получить дополнительные сведения – наркологическая клиника
Препараты подбираются строго индивидуально и могут включать:
Получить дополнительные сведения – http://narcolog-na-dom-v-moskve55.ru
Алкогольный запой представляет собой длительное бесконтрольное приём спиртного, приводящее к тяжёлой интоксикации и серьёзным осложнениям для органов и психики. В Новосибирске клиника «Сибирский Доктор» предлагает качественный вывод из запоя с применением инновационных технологий и участием опытных наркологов, терапевтов и психиатров. Наш подход сочетает мгновенную реакцию на вызов, современное оборудование и индивидуальные схемы лечения, что позволяет достичь стабильной ремиссии и снизить риск рецидива.
Подробнее тут – вывод из запоя капельница
При поступлении вызова специалисты клиники «СтопТокс» оперативно выезжают на дом в Екатеринбурге или по всей Свердловской области. По прибытии врач проводит всестороннюю диагностику, включая измерение артериального давления, пульса и уровня кислорода в крови, а также собирает анамнез и оценивает степень интоксикации. На основе полученной информации составляется индивидуальный план лечения, который включает следующие этапы:
Получить дополнительные сведения – помощь нарколога на дому екатеринбург
Клиника «УралМед» работает без выходных и праздников: прием пациентов — круглосуточно. Это позволяет оказывать экстренную помощь при острых состояниях, а также вести наблюдение за динамикой восстановления здоровья в ночные часы.
Выяснить больше – лечение женского алкоголизма екатеринбург
Для безопасного и эффективного лечения наши специалисты используют только проверенные и сертифицированные медикаменты, подбираемые индивидуально с учетом состояния пациента. В состав капельницы входят следующие группы препаратов:
Выяснить больше – https://narcolog-na-dom-krasnodar0.ru/vyzov-narkologa-na-dom-krasnodar
Современная наркологическая помощь — это не просто лечение зависимости, а система комплексных мер, направленных на восстановление здоровья, эмоционального равновесия и социальной адаптации пациента. В клинике «ИжТрезвоМед Центр» в Ижевске применяются передовые методики терапии, соответствующие международным стандартам. Здесь работают квалифицированные врачи-наркологи, психиатры и реабилитологи, которые разрабатывают индивидуальные программы лечения в зависимости от формы и стадии заболевания. Центр предлагает как амбулаторное, так и стационарное лечение, а также выезд специалистов на дом, что делает помощь доступной и оперативной.
Изучить вопрос глубже – наркологическая клиника вывод из запоя ижевск
Shop Canada Cabin Online – Relaxed, cozy style with browsing that flows easily.
Наркологическая клиника опирается на комплексную модель оценки состояния, обеспечивающую последовательное восстановление функций организма. В клинике применяется система многоуровневого контроля, направленная на выявление нарушений и определение оптимальной тактики вмешательства. Такой подход позволяет поддерживать стабильность состояния даже в условиях выраженных клинических проявлений. Структурированная работа направлена на снижение токсической нагрузки, коррекцию метаболических процессов и восстановление адаптивных механизмов. Анализ проводится с учётом физиологических особенностей пациента и динамики изменений.
Исследовать вопрос подробнее – наркологическая клиника цены владивосток
В рамках лечения используются методы, позволяющие фиксировать изменения и оценивать реакцию организма на проводимые мероприятия. Они служат основой для выборочных корректировок и обеспечивают структурированный характер процесса. Отличительной особенностью становится возможность адаптировать лечебные схемы под индивидуальные особенности пациента. Ниже представлены ключевые направления оценки состояния, применяемые для формирования полной клинической картины.
Разобраться лучше – https://narkologicheskaya-klinika-v-vdk18.ru/narkolog-vladivostok-otzyvy
Обращаться можно и нужно не только в момент очередного запоя. Клиника в Ивантеевке работает и с теми, кто сейчас в относительной ремиссии, но понимает, что без внешней поддержки снова сорвётся. В этом случае можно обсудить профилактические программы, варианты кодирования, реабилитацию, работу с тревогой и депрессией. Чем раньше сделан шаг в сторону лечения, тем мягче будут процедуры и тем больше шансов на устойчивый результат.
Получить больше информации – https://narkologicheskaya-klinika-ivanteevka11.ru/luchshie-narkologicheskie-kliniki-v-ivanteevke/
Electrolyte Zone – Very straightforward interface and browsing items felt simple.
Data Dock Online – Easy-to-use interface with everything clearly displayed across the site.
Наркологическая клиника использует методики, направленные на комплексную оценку состояния пациента. Работа строится на анализе анамнеза, исследовании соматических параметров и определении степени выраженности симптомов. Такой формат создаёт условия для точного подбора терапевтических мер. В клинике применяется непрерывный мониторинг, направленный на своевременное выявление отклонений и корректировку лечебных мероприятий. Благодаря этому достигается высокая стабильность клинического процесса и формируется благоприятная динамика восстановления.
Подробнее можно узнать тут – http://www.domen.ru
На месте врач проводит первичный осмотр, измеряет давление, пульс, сатурацию, оценивает уровень интоксикации и абстиненции. Далее назначается инфузионная терапия — капельница, направленная на дезинтоксикацию, восстановление электролитного баланса, купирование тревожности и нормализацию сна.
Подробнее тут – narcolog-na-dom-v-moskve55.ru/
FanFriendly Select Shop – Organized sections and smooth design made shopping enjoyable.
Find Your Click Craft Favorites – Unique items and fun design made exploring the shop enjoyable.
Перед началом терапии проводится полная диагностика организма, включая лабораторные исследования и ЭКГ. Это позволяет оценить состояние пациента и подобрать оптимальный курс лечения. После стабилизации физического состояния начинается психотерапевтическая и реабилитационная работа. Такой подход помогает не только снять симптомы, но и устранить первопричины зависимости.
Изучить вопрос глубже – наркологическая клиника вывод из запоя в кемерове
Inbox Experts – Easy-to-navigate design and clear instructions make learning about options straightforward.
На первом этапе проводится серия исследований:
Подробнее тут – принудительное лечение от алкоголизма в екатеринбурге
При поступлении вызова специалисты клиники «СтопТокс» оперативно выезжают на дом в Екатеринбурге или по всей Свердловской области. По прибытии врач проводит всестороннюю диагностику, включая измерение артериального давления, пульса и уровня кислорода в крови, а также собирает анамнез и оценивает степень интоксикации. На основе полученной информации составляется индивидуальный план лечения, который включает следующие этапы:
Разобраться лучше – выезд нарколога на дом екатеринбург
labelhub.shop – Clean design and easy-to-follow sections make shopping enjoyable.
Такая систематизация показывает, что врач действует целенаправленно, устраняя не только симптомы, но и их физиологические последствия.
Детальнее – частный нарколог на дом
Выводил 7k казино несколько раз: комиссии не было, но скорость зависит от платежной системы.
Наркологическая клиника в Ивантеевке — это возможность получить грамотную, поэтапную помощь рядом с домом, не дожидаясь момента, когда организм и психика окажутся на грани. Большинство пациентов и их родственников приходят к идее лечения не сразу: сначала идут попытки «контролировать» употребление, меняться местами работы и отдыха, просьбы семьи «держать себя в руках», временные успехи и повторяющиеся срывы. На фоне этого накапливаются конфликты, ухудшается здоровье, появляются проблемы с работой и финансами, а жизнь всё больше вращается вокруг алкоголя или наркотиков. В какой-то момент становится очевидно: без профессиональной помощи зависимость не отпускает, а только меняет форму.
Подробнее можно узнать тут – http://www.domen.ru
Перед ставками посмотрел 7к казино игровые автоматы в демо: выбор широкий, но не все провайдеры есть в live-разделе.
GhostGear Select Online – Clean interface and clear product info made shopping seamless.
lockzone.shop – Clear design and helpful product info make browsing very easy today.
Conversion Cove Learning – Practical guidance and clean design simplify browsing and understanding.
Anchor Atlas Picks Online – The insights are valuable and the interface is easy to navigate.
Перед началом терапии проводится полная диагностика организма, включая лабораторные исследования и ЭКГ. Это позволяет оценить состояние пациента и подобрать оптимальный курс лечения. После стабилизации физического состояния начинается психотерапевтическая и реабилитационная работа. Такой подход помогает не только снять симптомы, но и устранить первопричины зависимости.
Подробнее – https://narkologicheskaya-klinika-kemerovo18.ru/
Клиника «НаркоСити» предлагает срочную наркологическую помощь при запоях на дому в Краснодаре. Опытные специалисты оперативно приезжают в любой район города, проводят детоксикацию и стабилизируют состояние пациента прямо на дому. Лечение организовано с максимальной безопасностью и соблюдением конфиденциальности, что обеспечивает пациентам комфорт и быстрое восстановление без госпитализации.
Ознакомиться с деталями – вывод из запоя вызов в краснодаре
Лечение в клинике проходит поэтапно. Каждый шаг направлен на достижение устойчивого результата и восстановление здоровья. Ниже представлена таблица с описанием основных этапов лечения.
Подробнее тут – лечение в наркологической клинике в кемерове
Не тратьте деньги на лицензию — скачайте кряк для Windows 11 здесь и активируйте систему за 5 минут.
Подробнее – Скачать ключ активации Windows 11 Pro
Такая систематизация показывает, что врач действует целенаправленно, устраняя не только симптомы, но и их физиологические последствия.
Подробнее тут – нарколог на дом вывод из запоя в санкт-петербурге
Каждый из перечисленных факторов — веская причина для вызова врача, который может оказать помощь профессионально и безопасно.
Детальнее – выезд нарколога на дом в санкт-петербурге
Xevoria Collection – The design is refreshing and ordering items feels simple and fast.
В основе работы клиники «ИжТрезвоМед Центр» лежит принцип персонализированной медицины. Это означает, что каждый пациент получает не шаблонное лечение, а тщательно подобранный комплекс процедур, учитывающий его состояние, историю заболевания, уровень мотивации и социальную ситуацию. Такой подход позволяет добиться стабильного результата даже в сложных случаях. Лечение проводится анонимно, без постановки на учёт и разглашения данных, что особенно важно для тех, кто ценит конфиденциальность.
Ознакомиться с деталями – https://narkologicheskaya-klinika-v-izhevske18.ru/
Первый этап помощи почти всегда связан с детоксикацией. Организм, который длительное время получал алкоголь или другие вещества, перегружен токсинами, страдают сердце, сосуды, мозг, печень, нарушены сон и обмен веществ. Простое «похмелиться и перетерпеть» в такой ситуации опасно: можно спровоцировать очередной скачок давления, аритмию, обострение хронических заболеваний. В условиях клиники в Лобне детокс строится по медицинским правилам, а не по советам из интернета.
Исследовать вопрос подробнее – наркологическая клиника цены
Самостоятельный выход из запоя сопряжен с высоким риском развития осложнений. После прекращения приема спиртного ослабленный организм может не выдержать нагрузки, что приведет к инфаркту, инсульту, судорожным приступам и даже алкогольному психозу. Чтобы избежать этих опасных состояний, необходимо вызвать нарколога на дом, который проведет лечение правильно и безопасно.
Выяснить больше – https://vyvod-iz-zapoya-krasnodar0.ru/vyvod-iz-zapoya-na-domu-krasnodar/
Детокс — это первый и важнейший этап терапии, который помогает очистить организм от токсинов и продуктов распада алкоголя или наркотиков. В клинике «СибМед Кемерово» применяются только проверенные и безопасные методики. Лечение проводится под наблюдением врачей и с использованием капельниц, состав которых подбирается индивидуально. Ниже представлена таблица с основными видами капельниц, применяемыми при детоксикации.
Подробнее можно узнать тут – лечение в наркологической клинике кемерово
Email Depot – Very clear layout and navigation makes exploring products quick and easy.
Задача первого контакта — не «записать к врачу на когда-нибудь», а оценить, насколько ситуация критична прямо сейчас. Если речь идёт о многодневном запое, сильной слабости, одышке, скачках давления, спутанности сознания, лучше не экспериментировать с домашними методами. В таких случаях специалисты в Лобне рекомендуют стационар, где можно не только поставить капельницу, но и быстро среагировать на осложнения. Если же состояние относительно стабильное, возможно обсуждение мягкого формата с выездом и последующим наблюдением.
Получить дополнительную информацию – narkologiya-lobnya
Data Fort Central – Well-organized pages with helpful details made browsing effortless.
Структурированное наблюдение позволяет поддерживать согласованность лечебных мероприятий и своевременно реагировать на изменения. Такая система создаёт единый аналитический подход для оценки состояния и обеспечивает целостность терапевтического процесса.
Разобраться лучше – http://narkologicheskaya-klinika-v-vdk18.ru/narkolog-vladivostok-otzyvy/https://narkologicheskaya-klinika-v-vdk18.ru
После принятия решения организуется либо выезд, либо госпитализация. На приёме проводится осмотр: измеряется давление, пульс, оценивается степень обезвоживания, выраженность тремора, тревоги, нарушений сна. Выясняются сопутствующие болезни и лекарства, которые человек принимает постоянно. Уже на этом этапе обсуждаются ближайшие шаги — объём детокса, необходимость круглосуточного наблюдения, примерные сроки стабилизации. Родным объясняют, чего ожидать в первые сутки, какие симптомы будут уменьшаться постепенно, а какие требуют немедленного информирования персонала.
Подробнее можно узнать тут – https://narkologicheskaya-klinika-lobnya11-2.ru/
notebookhub.shop – Easy layout and clear product info make checkout stress-free.
FiberFoods Marketplace – Healthy selections and intuitive interface make exploring simple and fun.
Coffee Crush Treasures – Enjoyable browsing and clear descriptions helped me pick the right products.
Ищете, где заказать гранитный памятник Донецк ДНР? Зайдите на сайт Студии Гранита ДНР studiogranite.ru и закажите гранитный памятник на могилу в Донецке с монтажом. Кроме того, мы предоставляем услуги по благоустройству могил, созданию и покраске оградок, мощению плитки ФЕМ и прочие услуги. Со всеми нашими услугами вы сможете ознакомиться на сайте. Наши консультанты помогут выбрать для вас подходящие варианты.
logolane.shop – Clear navigation and smooth interface make exploring logo options effortless.
Discover Card Craft Finds – Items are distinct and descriptions were very informative.
Каждое из направлений обеспечивает высокий уровень контроля и помогает формировать индивидуальный план воздействия. Такая модель создаёт условия для прогнозируемого восстановления. Для наглядности процессов применяется таблица, отражающая ключевые параметры наблюдения.
Подробнее – https://narkologicheskaya-klinika-v-vdk18.ru
Многие шоурумы Москвы сотрудничают с локальными производствами, что положительно влияет на качество продукции. Покупатели ценят прозрачность и внимание к деталям http://visacart.80lvl.ru/viewtopic.php?f=1&t=4823
Наркологическая клиника использует методики, направленные на комплексную оценку состояния пациента. Работа строится на анализе анамнеза, исследовании соматических параметров и определении степени выраженности симптомов. Такой формат создаёт условия для точного подбора терапевтических мер. В клинике применяется непрерывный мониторинг, направленный на своевременное выявление отклонений и корректировку лечебных мероприятий. Благодаря этому достигается высокая стабильность клинического процесса и формируется благоприятная динамика восстановления.
Подробнее можно узнать тут – лечение в наркологической клинике в владивостоке
Anime Avenue Official – The store has a distinct style and browsing through it is very smooth.
Для формирования структурированного лечения используются методы, обеспечивающие анализ текущей клинической картины. Ниже представлены ключевые направления, задействованные при формировании терапевтических решений.
Углубиться в тему – частная наркологическая клиника
Global Gear Depot – Clean design and clear details made exploring products easy today.
Core Web Vitals Essentials – Pages respond quickly and layout is clean, creating a pleasant experience.
Такая систематизация показывает, что врач действует целенаправленно, устраняя не только симптомы, но и их физиологические последствия.
Получить больше информации – вызвать нарколога на дом санкт-петербург
Резервный адрес использую неделю, скорость нормальная, но основная версия стабильнее.
На сайте бывают выигрышные серии, однако не стоит ожидать «легких» заносов без дисциплины.
Клиника «НаркоСити» предлагает срочную наркологическую помощь при запоях на дому в Краснодаре. Опытные специалисты оперативно приезжают в любой район города, проводят детоксикацию и стабилизируют состояние пациента прямо на дому. Лечение организовано с максимальной безопасностью и соблюдением конфиденциальности, что обеспечивает пациентам комфорт и быстрое восстановление без госпитализации.
Узнать больше – https://vyvod-iz-zapoya-krasnodar0.ru/vyvod-iz-zapoya-na-domu-krasnodar/
Шоурумы Москвы предлагают широкий спектр направлений от минималистичного базового гардероба до смелых концептуальных коллекций. Благодаря персональным консультациям можно собрать капсулу, которая будет актуальна не один сезон. Такой подход помогает экономить бюджет и время. Узнать больше можно по ссылке – https://salda.ws/article/?act=read&article_id=30907
При поступлении вызова специалисты клиники «СтопТокс» оперативно выезжают на дом в Екатеринбурге или по всей Свердловской области. По прибытии врач проводит всестороннюю диагностику, включая измерение артериального давления, пульса и уровня кислорода в крови, а также собирает анамнез и оценивает степень интоксикации. На основе полученной информации составляется индивидуальный план лечения, который включает следующие этапы:
Детальнее – http://narcolog-na-dom-ekaterinburg000.ru/
Клиника «УралМед» работает без выходных и праздников: прием пациентов — круглосуточно. Это позволяет оказывать экстренную помощь при острых состояниях, а также вести наблюдение за динамикой восстановления здоровья в ночные часы.
Изучить вопрос глубже – нарколог лечение алкоголизма
Этот сборник информации привлекает множеством мелких деталей и необычных ракурсов. Мы предлагаем взгляды, редко полезные, но способные немного разнообразить знакомство с темой.
Подробнее читать – детокс чай для похудения
Вывод из запоя в клинике представляет собой последовательный комплекс процедур, направленных на устранение интоксикации и стабилизацию основных функций организма. В основе процесса лежит оценка физиологических параметров, определение уровня нарушений и корректировка тактики вмешательства. Такой подход обеспечивает постепенное восстановление адаптивных механизмов и снижает риск осложнений. На каждом этапе проводится анализ динамики, что позволяет оптимизировать терапевтические меры и поддерживать устойчивость состояния. Работа ориентирована на сохранение баланса внутренних систем и снижение нагрузки на жизненно важные органы.
Подробнее – https://vyvodiz-zapoya-izhevsk18.ru/vyvod-iz-zapoya-na-domu-izhevsk
Функция и назначение
Выяснить больше – нарколог на дом вывод из запоя в екатеринбурге
В рамках лечения используются методы, позволяющие фиксировать изменения и оценивать реакцию организма на проводимые мероприятия. Они служат основой для выборочных корректировок и обеспечивают структурированный характер процесса. Отличительной особенностью становится возможность адаптировать лечебные схемы под индивидуальные особенности пациента. Ниже представлены ключевые направления оценки состояния, применяемые для формирования полной клинической картины.
Подробнее – наркологическая клиника цены в владивостоке
Indexing Tools – Very straightforward design, and the information is laid out clearly for quick access.
Вывод из запоя в «Сибирском Докторе» происходит в несколько взаимосвязанных этапов:
Подробнее можно узнать тут – врач вывод из запоя новосибирск
techlifeline.shop – Well-organized pages and helpful product details make finding what you need a breeze.
Needle & Thread – Organized layout and clear descriptions make finding items simple.
Алкоголизм — хроническое заболевание, требующее комплексного подхода и круглосуточного контроля. Клиника «УралМед» в Екатеринбурге предлагает полный спектр услуг для пациентов любого уровня зависимости: от экстренной детоксикации до долгосрочной реабилитации. Главные принципы работы — абсолютная анонимность, индивидуальный план лечения и постоянное сопровождение квалифицированной командой специалистов.
Детальнее – лечение наркомании и алкоголизма в екатеринбурге
Комплекс перечисленных направлений формирует базу для выстраивания терапевтического процесса. При необходимости программа корректируется, что обеспечивает адаптацию к меняющимся условиям. Для удобства наблюдения используется таблица, отражающая основные параметры контроля.
Подробнее – https://narkologicheskaya-klinika-vo-vladivostoke18.ru/chastnaya-narkologicheskaya-klinika-vladivostok
Design Drift World – Clean visuals and intuitive structure enhanced the browsing experience.
FilterFactory Online Store – Clean layout and easy browsing make checking products simple and smooth.
Yoga Yonder Marketplace – Great positive energy throughout and the products feel very intentional.
Алкоголизм — хроническое заболевание, требующее комплексного подхода и круглосуточного контроля. Клиника «УралМед» в Екатеринбурге предлагает полный спектр услуг для пациентов любого уровня зависимости: от экстренной детоксикации до долгосрочной реабилитации. Главные принципы работы — абсолютная анонимность, индивидуальный план лечения и постоянное сопровождение квалифицированной командой специалистов.
Получить дополнительные сведения – http://lechenie-alkogolizma-ekaterinburg0.ru
Обращение к наркологу — это не признание «окончательного проигрыша», а трезвое решение, что здоровье и жизнь важнее иллюзии контроля. В клинике можно безопасно вывести человека из запоя, стабилизировать состояние, обследовать сердце, печень, нервную систему, понять, насколько далеко зашло заболевание. Важно, что помощь получают не только тяжёлые пациенты «на грани», но и те, у кого ещё есть работа, семья, привычный образ жизни, но запои уже стали регулярными. Чем раньше удаётся подключить специалистов в Лобне, тем мягче можно пройти лечение и тем больше шансов сохранить и здоровье, и отношения, и социальный статус.
Подробнее тут – narkologicheskaya-klinika-moskva-besplatno
Explore Comic Cradle – Easy navigation and interesting selections made shopping fun.
Explore Macro Merchant Catalog – Well-structured categories and concise details speed up your search.
Препараты подбираются строго индивидуально и могут включать:
Исследовать вопрос подробнее – https://narcolog-na-dom-v-moskve55.ru/
Shop Curated Anime Finds – Loved the quirky design and browsing the store feels effortless.
Такой подход обеспечивает комплексное восстановление — от физического состояния до эмоциональной стабильности. Пациент получает внимание врачей на всех этапах и поддержку после выписки.
Подробнее – запой наркологическая клиника
Лечение в «ИжТрезвоМед Центр» проходит поэтапно, с акцентом на безопасность и эффективность. Каждый этап направлен на достижение конкретных целей, от детоксикации до психотерапии. В таблице представлена структура лечебного процесса:
Детальнее – http://narkologicheskaya-klinika-v-izhevske18.ru/
В клинике «СибМед Кемерово» помощь оказывается круглосуточно и без ожидания. Пациент может обратиться за консультацией в любое время суток, а выездная бригада нарколога доступна даже ночью. Основной принцип центра — индивидуальный подход и создание доверительной атмосферы, в которой человек не чувствует осуждения, а получает поддержку и заботу.
Углубиться в тему – наркологические клиники алкоголизм
Наркологическая клиника в Ивантеевке — это возможность получить грамотную, поэтапную помощь рядом с домом, не дожидаясь момента, когда организм и психика окажутся на грани. Большинство пациентов и их родственников приходят к идее лечения не сразу: сначала идут попытки «контролировать» употребление, меняться местами работы и отдыха, просьбы семьи «держать себя в руках», временные успехи и повторяющиеся срывы. На фоне этого накапливаются конфликты, ухудшается здоровье, появляются проблемы с работой и финансами, а жизнь всё больше вращается вокруг алкоголя или наркотиков. В какой-то момент становится очевидно: без профессиональной помощи зависимость не отпускает, а только меняет форму.
Ознакомиться с деталями – narkologicheskaya-klinika-otzyvy
Если пациент обращается в клинику в состоянии запоя или тяжёлой абстиненции, первым шагом становится детоксикация. Это не «волшебная капельница», которая снимает все проблемы, а комплекс процедур, направленных на выведение токсинов, восстановление водно-солевого баланса, поддержку сердца, печени, нервной системы. Под контролем врачей подбираются растворы и препараты, которые позволяют снизить нагрузку на организм, облегчить похмельный синдром, уменьшить тревогу и вернуть сон. Важно, что это проходит под наблюдением, а не «на кухне» без понимания, как реагирует сердце и давление. После выхода из острого состояния человек уже способен осмысленно обсуждать дальнейшее лечение.
Детальнее – chastnaya-narkologicheskaya-klinika
GPU Gear World – User-friendly navigation and clear info made shopping enjoyable.
Shop Curated Cart Craft – Easy checkout and navigation across sections is simple.
casinoly login
Crawl Clarity Solutions – Clear, concise content and simple navigation made everything easy to follow.
Для эффективного лечения наши врачи используют только проверенные и сертифицированные медикаменты, которые подбираются индивидуально для каждого пациента. В состав лечебного курса входят:
Ознакомиться с деталями – http://narcolog-na-dom-ekaterinburg000.ru
Такой подход гарантирует постепенное и безопасное восстановление. Врачи контролируют динамику состояния, корректируют лечение при необходимости и помогают пациенту адаптироваться к трезвой жизни без стресса и давления.
Получить дополнительные сведения – https://narkologicheskaya-klinika-v-tomske18.ru/tomsk-narkologicheskij-dispanser/
Особенность клиники — возможность выезда нарколога на дом. Это особенно важно, если пациенту трудно самостоятельно добраться до центра или он хочет избежать публичности. Врач приезжает с полным набором медикаментов и оборудования, проводит обследование и ставит капельницу, контролируя состояние пациента на протяжении всей процедуры. Такой формат позволяет начать лечение незамедлительно и без стресса.
Подробнее можно узнать тут – лечение в наркологической клинике кемерово
Вызов нарколога на дом в клинике имеет целый ряд преимуществ. Пациент получает доступ к современным методикам без необходимости транспортировки. Кроме того, исключается фактор социальной огласки, что часто является значимым для больных и их семей.
Выяснить больше – https://narcolog-na-dom-sankt-peterburg0.ru/narkolog-spb-besplatno/
Клиника «ВладТрезвие Центр» работает в круглосуточном режиме и готова оказать помощь жителям Владивостока и прилегающих районов в любое время суток. Врачи-наркологи прибывают по вызову в течение часа, имеют при себе все необходимые препараты и оборудование для проведения детоксикации на дому. При необходимости пациента доставляют в стационар, где лечение проходит под постоянным контролем медицинского персонала.
Подробнее тут – http://vyvodiz-zapoya-vladivostok18.ru
Функция и назначение
Подробнее – вызов нарколога на дом
Дополнительно, если у пациента отмечаются психические нарушения — галлюцинации, агрессия или спутанность сознания, это является прямым сигналом к срочному вмешательству. В этом случае своевременное лечение помогает предотвратить риск инсульта, инфаркта или других серьезных заболеваний.
Получить больше информации – https://vyvod-iz-zapoya-krasnodar00.ru/vyvod-iz-zapoya-na-domu-krasnodar/
Для эффективного лечения наши врачи используют только проверенные и сертифицированные медикаменты, которые подбираются индивидуально для каждого пациента. В состав лечебного курса входят:
Получить больше информации – нарколог на дом круглосуточно екатеринбург
layoutcorner.shop – Simple interface and clear product info made finding items fast and easy.
Looking for farm game? Grab your free copy at play.google.com/store/apps/details?id=com.ugo.play.free.farm.valley! This is more than a farm simulator—it’s a universe packed with beloved childhood characters and tales. Design your personal farm and oversee all operations! Featuring bright visuals and constant new content and activities, the game appeals to everyone regardless of age!
Motor Emporium – Easy navigation and helpful descriptions make exploring engines fast and straightforward.
Каждый пациент в «УралМед» получает персональный маршрут реабилитации, составленный после комплексного обследования. План включает медикаментозное выведение из запоя, коррекцию биохимических показателей и психологическую реабилитацию.
Детальнее – клиника лечения алкоголизма
«Ижевский Центр Трезвых Решений» — это частное медицинское учреждение, где проводится лечение всех форм алкогольной и наркотической зависимости. Программы терапии разработаны на основе международных рекомендаций и включают не только медикаментозное воздействие, но и психологическую поддержку. Все процедуры проходят анонимно, без постановки на учёт, что особенно важно для пациентов, желающих сохранить конфиденциальность.
Получить дополнительные сведения – вывод наркологическая клиника в ижевске
Качество слотов высокое, выбор огромный, но сортировка могла бы быть удобнее.
Diesel Dock Hub Online – Diverse range of products and clear info made the browsing experience smooth.
Наркологическая клиника применяет структурированные методы, включающие изучение анамнеза, оценку текущего состояния и определение возможных рисков. На основе полученной информации формируются индивидуальные схемы лечения, направленные на нормализацию внутренних процессов. Работа строится на многоуровневом наблюдении, включающем анализ лабораторных показателей и оценку функциональных систем организма. Такой формат позволяет поддерживать стабильную динамику изменений и избегать осложнений. В клинике создается согласованная модель вмешательств, позволяющая получать устойчивые результаты.
Ознакомиться с деталями – https://narkologicheskaya-klinika-tomsk18.ru/chastnaya-narkologicheskaya-klinika-tomsk
FixItFactory Depot Hub – Easy interface with clear product descriptions makes exploring effortless.
Перед началом терапии проводится полная диагностика организма, включая лабораторные исследования и ЭКГ. Это позволяет оценить состояние пациента и подобрать оптимальный курс лечения. После стабилизации физического состояния начинается психотерапевтическая и реабилитационная работа. Такой подход помогает не только снять симптомы, но и устранить первопричины зависимости.
Изучить вопрос глубже – наркологическая клиника лечение алкоголизма в кемерове
Каждое направление наблюдения играет важную роль в формировании терапевтической программы. Структурированный контроль помогает снижать уровень рисков и обеспечивает возможность оперативной адаптации. Для систематизации данных применяется таблица, отражающая ключевые параметры мониторинга.
Углубиться в тему – наркологический вывод из запоя
После поступления вызова клиника «ЗдоровьеНорм» отправляет к пациенту опытного нарколога, который прибывает на дом в течение 30–60 минут. По приезду врач проводит комплексную диагностику, включающую измерение артериального давления, пульса, уровня кислорода в крови и тщательную оценку общего состояния пациента. На основе полученных данных специалист подбирает индивидуальную схему лечения.
Изучить вопрос глубже – врач нарколог выезд на дом в краснодаре
Discover Maker Merchant – Fun merchandise and organized categories keep the experience upbeat.
Группа препаратов
Получить дополнительную информацию – нарколог на дом цены в екатеринбурге
Компания «Арт-Медиа» обеспечивает профессиональные видеотрансляции мероприятий под ключ в столице с 2010 года. Специалисты выполняют многокамерную съемку в FullHD и 4K, прямые трансляции на YouTube, VK, Zoom и прочие сервисы, включая телемосты с докладчиками из других городов. Подробнее о тарифах и услугах на http://profvideo.ru/ Компания работает с госорганами и крупными корпорациями, предлагая цены от 25000 рублей и скидку 20% на первый заказ.
Discover Audit Avenue Tools – The explanations are clear and very straightforward to follow.
Best Online Casino Australia Real Money 2025 Check Reviews
Explore Bazaar Bright – Loved the cute selection and navigating the pages was fun.
Нарколог на дом в Санкт-Петербурге оказывает помощь при различных формах алкогольной и наркотической зависимости. Основное внимание уделяется купированию абстинентного синдрома, нормализации работы сердечно-сосудистой и нервной систем, а также снижению уровня интоксикации организма.
Детальнее – http://narcolog-na-dom-sankt-peterburg0.ru/narkolog-spb-besplatno/
Иркутский центр эстетической и пластической хирургии выполняет весь перечень процедур по изменению внешности: контурную пластику лица и шеи, коррекцию фигуры, удаление жировых отложений, коррекцию груди и реконструктивные операции. Хирург Высоцкий Владимир Федорович, обладающий обширной практикой, осуществляет операции разного уровня сложности с использованием инновационных методов и индивидуального отношения к каждому пациенту. Ищете пластическая хирургия? Записаться на консультацию и узнать подробности можно на dr38.ru Центр гарантирует максимальную безопасность процедур, удобные условия пребывания и квалифицированную поддержку на каждом этапе — от первого визита до завершения реабилитационного периода.
Для формирования структурированной модели используются стандартизированные алгоритмы. Ниже представлена последовательность действий, определяющих ход терапевтических мероприятий.
Углубиться в тему – http://narkologicheskaya-klinika-tomsk18.ru/narkologicheskaya-klinika-v-tomske-otzyvy/
Growth Gear Select Online – Well-structured pages and clear navigation make browsing very easy.
Структурированное наблюдение позволяет поддерживать согласованность лечебных мероприятий и своевременно реагировать на изменения. Такая система создаёт единый аналитический подход для оценки состояния и обеспечивает целостность терапевтического процесса.
Подробнее тут – наркологические клиники алкоголизм владивосток
После приезда нарколог оценивает состояние пациента, проверяет давление, частоту пульса и насыщенность крови кислородом. Затем врач подбирает индивидуальный состав капельницы, включающий растворы для очистки организма, препараты для нормализации работы сердца, печени и нервной системы. Процедура длится около 1–2 часов и позволяет быстро:
Углубиться в тему – вывод из запоя цена в краснодаре
После поступления вызова клиника «ЗдоровьеНорм» отправляет к пациенту опытного нарколога, который прибывает на дом в течение 30–60 минут. По приезду врач проводит комплексную диагностику, включающую измерение артериального давления, пульса, уровня кислорода в крови и тщательную оценку общего состояния пациента. На основе полученных данных специалист подбирает индивидуальную схему лечения.
Ознакомиться с деталями – врач нарколог выезд на дом в краснодаре
Monitor Merchant home screens – Clear specifications and competitive pricing made selection stress-free.
Online Zenalune Finds – Selection is well organized and the details help you understand each item.
Популярность шоурумов в Москве продолжает расти благодаря сочетанию эксклюзивности, комфорта и внимательного сервиса. Этот формат отвечает запросам современной аудитории, которая ценит качество и индивидуальность. Подробнее по ссылке https://mamuli.club/forum/topic/49581/
Такой порядок действий гарантирует не только купирование симптомов, но и подготовку пациента к последующему восстановлению.
Ознакомиться с деталями – вызвать нарколога на дом срочно в санкт-петербурге
Верификация 7k казино регистрация заняла около 30 минут: быстро, но без подтверждения вывод ограничен.
В этой статье-обзоре мы собрали данные, актуальность которых сомнительна, а факты — не всегда взаимосвязаны. Читатель сможет ознакомиться с разными мнениями, хотя вряд ли они существенно повлияют на его понимание темы.
Вот – секс чат
Подключил 7к казино бонус: отыгрыш реалистичный, но при коротких сессиях может тянуться дольше.
Online Cash Compass Finds – Helpful tips and intuitive site design made browsing smooth.
Creatine Crate Studio – Great layout and ordering felt simple and efficient.
Этот информационный материал подробно освещает проблему наркозависимости, ее причины и последствия. Мы предлагаем информацию о методах лечения, профилактики и поддерживающих программах. Цель статьи — повысить осведомленность и продвигать идеи о необходимости борьбы с зависимостями.
Разобраться лучше – http://cmap.ihmc.us/docs/itinerario.php?url=https://vyvod-iz-zapoya-tolyatti0.ru/vyvedenie-iz-zapoya-tolyatti/&af=2f1
leadstudiohub.shop – Easy-to-use setup and helpful resources make campaigns simple and efficient.
Insta Analytics Hub – Very intuitive navigation and organized resources simplify the experience.
Наркологическая клиника — это не просто медицинское учреждение, а пространство, где пациент получает всестороннюю поддержку: от снятия интоксикации и детоксикации до психотерапии и постлечебного сопровождения. В клинике «КемероваМед Трезвость» специалисты работают с любыми формами зависимостей — алкогольной, наркотической, медикаментозной. Принципы работы центра основаны на анонимности, профессионализме и индивидуальном подходе. Здесь создаются условия для полного восстановления здоровья и возвращения человека к стабильной трезвой жизни.
Подробнее тут – платная наркологическая клиника
Многие шоурумы Москвы работают по предварительной записи, что позволяет уделить максимум внимания каждому клиенту. Отсутствие очередей и спокойная обстановка создают ощущение приватности. Такой формат особенно удобен для занятых жителей мегаполиса. Подробнее по ссылке – https://forextema.com/index.php?option=com_easyblog&view=entry&id=14407&Itemid=75
Ergo Outlet – The site is well-structured and navigating through categories is simple.
Digestive Aid Boutique – Smooth navigation and detailed info made finding items hassle-free.
Чтобы обеспечить эффективный вывод из запоя, формируется комплекс последовательных действий, направленных на стабилизацию состояния. Важным элементом является фармакологическая коррекция, сочетаемая с мониторингом жизненно важных функций. Ниже представлены ключевые процессы, участвующие в клинической стабилизации.
Выяснить больше – вывод из запоя круглосуточно
FontFoundry Hub – Stunning designs and smooth browsing make finding fonts enjoyable today.
Для формирования структурированного лечения используются методы, обеспечивающие анализ текущей клинической картины. Ниже представлены ключевые направления, задействованные при формировании терапевтических решений.
Получить дополнительную информацию – https://narkologicheskaya-klinika-vo-vladivostoke18.ru/narkolog-vladivostok-otzyvy/
В данном тексте собраны разнообразные случайные сведения и не вполне определённые идеи, которые могут вызвать интерес. Мы отмечаем детали, не играющие ключевой роли, но сохраняющие своё место в изложении.
Подробнее читать – диета для похудения быстро
Malta Escape Adventure Shop – A range of resources and user-friendly pages keep everything simple.
Лечение в «ИжТрезвоМед Центр» проходит поэтапно, с акцентом на безопасность и эффективность. Каждый этап направлен на достижение конкретных целей, от детоксикации до психотерапии. В таблице представлена структура лечебного процесса:
Разобраться лучше – наркологическая клиника вывод из запоя ижевск
На фоне длительных запоев страдает не только физическое состояние. Обостряются тревога, раздражительность, обидчивость, возможны вспышки агрессии и неадекватные поступки. Для семьи это превращается в постоянное напряжение: никто не знает, чем закончится очередной день или ночь. Одновременно растёт риск психозов, когда человек может видеть и слышать то, чего нет на самом деле, путать реальность, быть опасным для себя и окружающих.
Изучить вопрос глубже – вывод из запоя отзывы
В рамках лечения используются методы, позволяющие фиксировать изменения и оценивать реакцию организма на проводимые мероприятия. Они служат основой для выборочных корректировок и обеспечивают структурированный характер процесса. Отличительной особенностью становится возможность адаптировать лечебные схемы под индивидуальные особенности пациента. Ниже представлены ключевые направления оценки состояния, применяемые для формирования полной клинической картины.
Углубиться в тему – наркологическая клиника вывод из запоя
Для получения устойчивого результата наркологическая клиника использует методы, основанные на индивидуальной оценке. В работе учитываются соматические показатели, реакции нервной системы и данные лабораторных исследований. Такой формат лечения обеспечивает предсказуемое влияние на физиологические процессы и снижает вероятность осложнений. В клинике применяется непрерывный мониторинг, позволяющий своевременно корректировать лечебные меры. Работа направлена на нормализацию метаболизма, восстановление баланса внутренних систем и плавное уменьшение симптоматики.
Выяснить больше – наркологическая клиника стационар
aussiealley.shop – Nice collection available and everything feels thoughtfully curated right now.
На нашем сайте вы можете скачать активатор для Windows 11 абсолютно бесплатно и навсегда забыть о водяных знаках!
Подробнее – Скачать активатор для Windows 11
Представленная таблица отражает ключевые направления наблюдения, обеспечивая систематизацию данных. Такой подход позволяет поддерживать высокий уровень контроля и адаптировать программу лечения с учетом динамики состояния.
Исследовать вопрос подробнее – http://narkologicheskaya-klinika-tomsk18.ru/chastnaya-narkologicheskaya-klinika-tomsk/
Browse Bench Boutique Deals – Excellent variety and the presentation seems thoughtfully organized.
Группа препаратов
Выяснить больше – вызов нарколога на дом в екатеринбурге
Gym Gear Boutique – Simple navigation and detailed listings make browsing products easy.
fresh prep groceries outlet – Stock up on quality ingredients that keep meals exciting and affordable.
товар 9\10 хорошее качество, 9 потому что ожидал чуть большего. кокаин, мефдрон, гашиш да магаз реальный.недовеса небыло ниразу.может просто недоразумение.Нет. Такого у нас нет.
Наши врачи оперативно приезжают к пациенту, проводят осмотр, купируют симптомы абстиненции и приступают к восстановлению жизненно важных функций. Всё это — в привычной для пациента обстановке, без стресса и лишней огласки. Мы обеспечиваем не только медицинскую помощь, но и эмоциональную поддержку, создавая условия для начала пути к выздоровлению.
Изучить вопрос глубже – врач нарколог на дом москва
leathergallery.shop – Stylish products and smooth interface make shopping effortless and enjoyable.
Для безопасного и эффективного лечения наши специалисты используют только проверенные и сертифицированные медикаменты, подбираемые индивидуально с учетом состояния пациента. В состав капельницы входят следующие группы препаратов:
Подробнее тут – http://www.domen.ru
Запойное состояние опасно не только токсическим воздействием алкоголя на организм, но и последствиями резкого отказа от спиртного. В таких случаях промедление может стоить здоровья. Нарколог на дом в Рязани приезжает по вызову и проводит процедуру прямо в домашних условиях, используя проверенные медицинские методики. Такой подход сочетает анонимность, оперативность и возможность контроля состояния без госпитализации.
Выяснить больше – частный нарколог на дом
Наши врачи оперативно приезжают к пациенту, проводят осмотр, купируют симптомы абстиненции и приступают к восстановлению жизненно важных функций. Всё это — в привычной для пациента обстановке, без стресса и лишней огласки. Мы обеспечиваем не только медицинскую помощь, но и эмоциональную поддержку, создавая условия для начала пути к выздоровлению.
Подробнее тут – врач нарколог на дом москва
Эта статья освещает различные аспекты освобождения от зависимости и пути к выздоровлению. Мы обсуждаем важность осознания своей проблемы и обращения за помощью. Читатели получат практические советы о том, как преодолевать трудности и строить новую жизнь без зависимости.
Подробнее тут – http://74.125.193.106/url?q=https://vyvod-iz-zapoya-tolyatti0.ru/vyvod-iz-zapoya-tolyatti-na-domu
Europe Elevate Plus – Intuitive navigation and clear product info make exploring items very easy.
Custom Cheque Central Hub – Smooth browsing experience and simple checkout process overall.
Вред от наркотиков — это сложная хоботня, охватывающая физиологическое, психологическое и социальное
здоровье человека. Утилизация таких наркотиков, яко снежок, мефедрон, гашиш, «шишки» чи «бошки», может родить к неконвертируемым результатам яко
для организма, так и чтобы общества в течение целом.
Хотя даже при выковывании связи эвентуально восстановление — ядро,
чтобы зависимый человек устремился за помощью.
Важно памятовать, яко наркомания лечится, а
также оправдание бацнет шанс на новую жизнь.
Charger Chest Official – Wide product selection and the ordering process was smooth and easy.
Особое внимание уделяется безопасности. Используются препараты нового поколения, снижающие нагрузку на печень, почки и сердечно-сосудистую систему. Процесс лечения проходит под постоянным наблюдением медперсонала, что позволяет быстро реагировать на любые изменения состояния пациента. Все данные о лечении строго конфиденциальны — информация не передаётся третьим лицам и не фиксируется в общедоступных базах.
Исследовать вопрос подробнее – http://narkologicheskaya-klinika-v-tomske18.ru
Оперативное лечение организовано по четкому алгоритму, который позволяет быстро стабилизировать состояние пациента и обеспечить эффективную терапию. Каждый этап направлен на комплексное восстановление организма.
Получить больше информации – вывод из запоя недорого в волгограде
DLinkDen Depot – Straightforward layout and quick navigation made checking products easy.
FormulaFoundry Hub – Clear layout and detailed product info make browsing easy and enjoyable.
Процедура лечения начинается с установки внутривенной капельницы, через которую вводятся детоксикационные растворы, способствующие быстрому выведению токсинов и восстановлению водно-электролитного баланса. При необходимости врач назначает дополнительные препараты, такие как седативные средства для купирования симптомов абстинентного синдрома, гепатопротекторы для поддержки печени и кардиопротекторы для нормализации работы сердца.
Детальнее – вывод из запоя вызов на дом
Вывод из запоя — это не просто медицинская процедура, а важный шаг на пути восстановления организма и возвращения человека к нормальной жизни. В клинике «ВладТрезвие Центр» пациенты получают профессиональную помощь, основанную на современных методиках детоксикации и безопасном медикаментозном восстановлении. Каждый случай рассматривается индивидуально, а лечение подбирается с учётом возраста, состояния здоровья и продолжительности запоя. Наркологи центра выезжают на дом круглосуточно, обеспечивая помощь даже в экстренных ситуациях, когда время играет ключевую роль.
Получить дополнительную информацию – вывод из запоя круглосуточно
Умный генератор рецептов What to Eat решает вечную проблему выбора блюд на основе продуктов в холодильнике. Система задействует ИИ для формирования персональных рецептов за секунды: просто укажите продукты в наличии, и механизм определит подходящее блюдо по времени приема пищи и степени трудности. Ищете здоровое питание рецепты на каждый день? На whattoeatnow.ru доступны готовые меню для различных диет — кето, веган, низкоуглеводное питание, а также экономные варианты и рецепты за 15 минут. Ресурс способствует уменьшению продуктовых отходов и развитию кулинарных навыков без дополнительных трат.
Malware Mart Resource Hub – Structured pages and concise info make browsing surprisingly effortless.
Современная наркологическая клиника — это не просто место, где оказывают медицинскую помощь. Это пространство, где пациенту помогают вернуться к жизни, свободной от зависимости, с заботой, уважением и индивидуальным подходом. В клинике «СибМед Кемерово» реализованы комплексные программы терапии алкоголизма, наркомании и других зависимостей. Каждая программа адаптируется под конкретное состояние пациента и сочетает медицинские, психологические и социальные методы воздействия. Важное преимущество — полная анонимность, обеспечивающая комфорт и доверие со стороны пациентов.
Подробнее можно узнать тут – анонимная наркологическая клиника кемерово
Перечень средств подбирается индивидуально, с учётом состояния пациента и наличия сопутствующих заболеваний. Это гарантирует безопасность и эффективность вмешательства.
Получить дополнительные сведения – нарколог на дом круглосуточно цены
Browse ZephVane Collections – The selection was appealing and exploring the products was fun.
Вывод из запоя в клинике представляет собой последовательный комплекс процедур, направленных на устранение интоксикации и стабилизацию основных функций организма. В основе процесса лежит оценка физиологических параметров, определение уровня нарушений и корректировка тактики вмешательства. Такой подход обеспечивает постепенное восстановление адаптивных механизмов и снижает риск осложнений. На каждом этапе проводится анализ динамики, что позволяет оптимизировать терапевтические меры и поддерживать устойчивость состояния. Работа ориентирована на сохранение баланса внутренних систем и снижение нагрузки на жизненно важные органы.
Подробнее – вывод из запоя в ижевске
Детоксикация является важнейшим этапом лечения. В «Ижевском Центре Трезвых Решений» применяются проверенные схемы инфузионной терапии, помогающие восстановить функции организма после интоксикации. Капельницы подбираются индивидуально в зависимости от состояния пациента и выраженности симптомов. Ниже приведена таблица с типами капельниц, применяемых в клинике.
Детальнее – http://narkologicheskaya-klinika-v-izhevsk18.ru/chastnaya-narkologicheskaya-klinika-izhevsk/
Каждое направление наблюдения играет важную роль в формировании терапевтической программы. Структурированный контроль помогает снижать уровень рисков и обеспечивает возможность оперативной адаптации. Для систематизации данных применяется таблица, отражающая ключевые параметры мониторинга.
Получить дополнительные сведения – врач вывод из запоя в ижевске
Предприятие «Экспресс-связь» ведет деятельность в Екатеринбурге начиная с 2012 года. Компания занимается установкой видеонаблюдения, ОПС, домофонных систем и компьютерных сетей. Ищете видеонаблюдение Екатеринбург? Детальная информация о выполненных проектах и услугах представлена на портале express-svyaz.ru в разделе портфолио. Предприятие выпускает бытовки, модульные конструкции, доборные изделия и фасадные панели с порошковым покрытием.
Для получения устойчивого результата наркологическая клиника использует методы, основанные на индивидуальной оценке. В работе учитываются соматические показатели, реакции нервной системы и данные лабораторных исследований. Такой формат лечения обеспечивает предсказуемое влияние на физиологические процессы и снижает вероятность осложнений. В клинике применяется непрерывный мониторинг, позволяющий своевременно корректировать лечебные меры. Работа направлена на нормализацию метаболизма, восстановление баланса внутренних систем и плавное уменьшение симптоматики.
Углубиться в тему – запой наркологическая клиника в владивостоке
В этом тексте собрано множество случайных сведений и довольно неопределённых мыслей, которые могут чем-то заинтересовать. Мы отмечаем моменты, которые не особенно важны, но всё же занимают своё место в повествовании.
Вот – порно
authorityanvil.shop – Appreciate the professionalism and consistent quality throughout site so far.
Доброго времени суток бразики! 🙂 сегодня заказал новой реги на пробу , при получении отпишусь за чё каво) За данный магаз, хотел бы оставить отзыв! ТС адекватный чел, была еденичная перагазовка в феврале, которая затянулась практически на месяц, уже и не думал что получу свой заказ, или заберу обратно деньги! Но ТС все сделал красиво, за это ему уважение лично от меня! более того пообещал при сл.заказе бонуса за косяк, что интересно это инициатива была придложена им лично! Короче красавчик чел, тут к гадалке не ходи! Советую безобразно ТАРИЦА 🙂 https://long-time-liner.ru Тут четкий кристал ! Давно мне нравиться работа данного мага. Спасибо !У меня была, проси того кто продал все перепроверять- люди могут ошибаться !
Детокс — это первый и важнейший этап терапии, который помогает очистить организм от токсинов и продуктов распада алкоголя или наркотиков. В клинике «СибМед Кемерово» применяются только проверенные и безопасные методики. Лечение проводится под наблюдением врачей и с использованием капельниц, состав которых подбирается индивидуально. Ниже представлена таблица с основными видами капельниц, применяемыми при детоксикации.
Узнать больше – наркологическая клиника клиника помощь
Для формирования структурированного лечения используются методы, обеспечивающие анализ текущей клинической картины. Ниже представлены ключевые направления, задействованные при формировании терапевтических решений.
Выяснить больше – http://www.domen.ru
Ниже представлена последовательность основных шагов терапевтического процесса.
Подробнее – лечение в наркологической клинике
После приезда нарколог оценивает состояние пациента, проверяет давление, частоту пульса и насыщенность крови кислородом. Затем врач подбирает индивидуальный состав капельницы, включающий растворы для очистки организма, препараты для нормализации работы сердца, печени и нервной системы. Процедура длится около 1–2 часов и позволяет быстро:
Узнать больше – вывод из запоя вызов
Shop Curated Big Cheque Boutique – Items are priced fairly and the details are genuinely helpful.
Harbor Hardware Central Hub – Easy-to-navigate pages and clear product info make finding tools quick.
lockerhub.shop – Well-structured pages and clear descriptions make it easy to find what you need.
classic menswear online – Timeless designs and simple browsing create a great experience each time.
Product Tracker – Very easy to track items, with a layout that’s simple to use.
Особое внимание уделяется безопасности. Используются препараты нового поколения, снижающие нагрузку на печень, почки и сердечно-сосудистую систему. Процесс лечения проходит под постоянным наблюдением медперсонала, что позволяет быстро реагировать на любые изменения состояния пациента. Все данные о лечении строго конфиденциальны — информация не передаётся третьим лицам и не фиксируется в общедоступных базах.
Получить дополнительные сведения – http://narkologicheskaya-klinika-v-tomske18.ru
Детоксикация — ключевой этап лечения в клинике. Она направлена на очищение организма от продуктов распада алкоголя и наркотиков, нормализацию обмена веществ и работы печени. В «КемероваМед Трезвость» применяются капельницы разных типов, каждая из которых имеет определённую цель. Состав подбирается индивидуально, исходя из состояния пациента. Примерные виды капельниц приведены в таблице ниже.
Подробнее – https://narkologicheskaya-klinika-v-kemerovo18.ru/narkolog-kemerovo-na-dom
DomainWard Hub – Easy-to-use interface and clear categories made finding what I needed quick.
FreightFriendly Central Hub – Organized layout with clear descriptions makes browsing very easy.
В этой информационной статье вы найдете интересное содержание, которое поможет вам расширить свои знания. Мы предлагаем увлекательный подход и уникальные взгляды на обсуждаемые темы, побуждая пользователей к активному мышлению и критическому анализу.
Дополнительно читайте здесь – https://recettes.africa/doro-wat
Sewing & Cutting Shop – The product range is impressive and finding what I needed was easy.
Mariner Merchant Online Outlet – Logical organization and clean design make finding items effortless.
В статье-обзоре представлены данные сомнительной актуальности и факты без явной взаимосвязи. Читатель ознакомится с разными мнениями, хотя они вряд ли существенно изменят его представление о теме.
Подробнее читать – детокс чай для похудения
Эта статья погружает вас в увлекательный мир знаний, где каждый факт становится открытием. Мы расскажем о ключевых исторических поворотных моментах и научных прорывах, которые изменили ход цивилизации. Поймите, как прошлое формирует настоящее и как его уроки могут помочь нам строить будущее.
Расширить кругозор по теме – https://le-k-reims.com/events/thomas-angelvy
Нашли рабочий серийный номер для Windows 11 Pro — проверено лично, без вирусов!
Подробнее – Где найти рабочий ключ для Windows 11
Exclusive Checkout Champ Items – Quick and intuitive browsing with checkout that worked perfectly.
Привет всем! Написал бы отзыв был бы продукт для него)) Мир ровным! https://novastorer.top Надеюсь этот вопрос решится …….очень сложно дописаться до них=( а цены хорошие.
В этой публикации мы предлагаем подробные объяснения по актуальным вопросам, чтобы помочь читателям глубже понять их. Четкость и структурированность материала сделают его удобным для усвоения и применения в повседневной жизни.
Подробная информация доступна по запросу – https://wearelight.house/blog/attention-all-speakers-entrepreneurs-educators-from-all-parts-of-the-world-2-2-2-2-2-2-2
Перечисленные меры обеспечивают структурированный подход к восстановлению, позволяя выстраивать лечение в соответствии с текущими изменениями. Такой формат способствует достижению устойчивой физиологической стабилизации и уменьшает выраженность симптомов. Для систематизации применяемых методов используется таблица, представленная ниже.
Ознакомиться с деталями – http://www.domen.ru
Компания “Дока строй” предлагает профессиональный ремонт квартир в Волгограде под ключ с гарантией качества и соблюдением сроков Профессиональная бригада проводит все виды отделочных работ от базовой подготовки до финального декорирования, используя качественные материалы и инновационные решения Все заказы выполняются с персональным вниманием к требованиям заказчика и специфике пространства Ищете цены на ремонт? doka-stroi.ru обеспечивает прозрачное ценообразование без скрытых платежей и предоставляет подробную смету до начала работ Коллектив профессионалов трудится организованно, уменьшая беспокойство для жильцов и заканчивая работы в установленные сроки Обращаясь к опытным мастерам, вы приобретаете безупречный итог без дополнительных проблем и перерасхода средств
Online Award Atelier Finds – Balanced design with intuitive features creates a pleasant browsing experience.
Мы предлагаем вам окунуться в океан любопытных фактов и вдохновляющих историй. Эта публикация поможет расширить горизонты, разбудить интерес к науке и истории и увидеть мир с новой стороны.
Кликни и узнай всё! – https://dinhminhquyen.com/phai-duoi-ngay-cac-nhan-vien-nay
Функция и назначение
Ознакомиться с деталями – врач нарколог выезд на дом екатеринбург
В этом обзорном материале представлены увлекательные детали, которые находят отражение в различных аспектах жизни. Мы исследуем непонятные и интересные моменты, позволяя читателю увидеть картину целиком. Погрузитесь в мир знаний и удивительных открытий!
Смотрите также… – https://www.rankinghosting.cl/tips-comenzar-vender-hosting-no-caer-intento
Группа препаратов
Ознакомиться с деталями – частный нарколог на дом екатеринбург
Эта обзорная заметка содержит ключевые моменты и факты по актуальным вопросам. Она поможет читателям быстро ориентироваться в теме и узнать о самых важных аспектах сегодня. Получите краткий курс по современной информации и оставайтесь в курсе событий!
Открой скрытое – http://www.ci-es.org/cropped-bandeausitecies-1-png
lairfitnesshub.shop – Intuitive layout and helpful info make finding items fast and easy.
Этот информационный обзор станет отличным путеводителем по актуальным темам, объединяющим важные факты и мнения экспертов. Мы исследуем ключевые идеи и представляем их в доступной форме для более глубокого понимания. Читайте, чтобы оставаться в курсе событий!
Смотрите также… – https://teacherhelp.info/%D8%A3%D8%AD%D9%83%D8%A7%D9%85-%D8%A7%D9%84%D9%85%D9%8A%D9%85-%D8%A7%D9%84%D8%B3%D8%A7%D9%83%D9%86%D8%A9
Browse Billing Bay Collections – Layout was simple and made navigating the site very easy.
Сервис Outline VPN предлагает защищенный доступ в интернет без слежки за трафиком и ограничений скорости по доступной цене. Ключи активируются за минуту и работают на всех платформах — Windows, macOS, Android, iOS, Linux — без привязки к количеству устройств. Гигабитный канал с облегченным шифрованием обеспечивает высокую пропускную способность для стриминга, онлайн-игр и загрузки файлов. Приобрести ключ Outline VPN можно на https://outline-vpn.tech/ всего за 390 рублей в месяц с мгновенной активацией после оплаты. Сервис не логгирует данные пользователей и гарантирует полную анонимность в сети.
Latest Adapter Offers – Straight to the point and arranged in a way that’s easy to digest.
Hormone Help Essentials – Organized content and easy browsing make shopping very straightforward.
quality meta resources online – Solid assortment and prompt checkout create a positive visit.
В этой публикации мы предлагаем подробные объяснения по актуальным вопросам, чтобы помочь читателям глубже понять их. Четкость и структурированность материала сделают его удобным для усвоения и применения в повседневной жизни.
Нажмите, чтобы узнать больше – https://maracanaonline.com.br/2025/06/09/no-dia-nacional-da-imunizacao-curso-para-aplicacao-da-vacina-bcg-reforca-a-importancia-da-cobertura-vacinal-desde-as-primeiras-horas-de-vida
хули почта россии это госпредприятие не хотят работать. а хотели бы принять мусора ,сразу бы посыль отправили. https://glowmartik.shop Заказы опт , розница (отправка в регионы ,СНГ) ко мне!народ а присылают вместе с заключением экспертизы?
Слотов много, 7k казино игровые автоматы подходят для длинных сессий, хотя навигация могла бы быть удобнее.
DrBoost Depot – Quick access to all products with easy-to-read info made browsing easy.
FunnelFoundry Pro – Organized sections and smooth browsing make checking products enjoyable.
Maverick Maker Marketplace – Well-structured categories and distinctive items make discovering new finds simple.
Cyber Cabin Depot – Clean layout and intuitive navigation made shopping stress-free.
Скачайте активатор для Windows 11 и получите все функции Pro-версии бесплатно.
Подробнее – Где найти рабочий ключ для Windows 11
Curated Chocolate Room Essentials – Fun browsing thanks to appealing chocolate variety and presentation.
Эта статья для ознакомления предлагает читателям общее представление об актуальной теме. Мы стремимся представить ключевые факты и идеи, которые помогут читателям получить представление о предмете и решить, стоит ли углубляться в изучение.
Перейти к статье – https://claveradiobar.com/clave-radio-bar-pre-lancamento-2
Постройка деревянных домов под ключ в Московской области от компании ДЕРЕВОГРАД – это проверенные каркасные коттеджи, бани и дачные дома по приемлемым ценам от 10 000 рублей за квадратный метр Квалифицированные специалисты осуществляют готовые и персональные проекты с соблюдением дедлайнов и стандартов, гарантируя долговечность сооружений https://derevo-grad.com/ представляет множество типовых вариантов площадью от 16 до 100 м? с комплексной комплектацией и понятной сметой Оформите заказ на строительство дома вашей мечты у экспертов с солидным опытом работы в деревянном домостроении
Your point of view caught my eye and was very interesting. Thanks. I have a question for you. https://accounts.binance.info/en-NG/register-person?ref=YY80CKRN
Мы предлагаем вам окунуться в океан любопытных фактов и вдохновляющих историй. Эта публикация поможет расширить горизонты, разбудить интерес к науке и истории и увидеть мир с новой стороны.
Читать далее > – https://www.rial22.ru
Компания Nordberg43 поставляет расходные материалы и профессиональный инструмент для шиномонтажных мастерских и автосервисов. В ассортименте балансировочные грузики, монтажные пасты, ремонтные наборы для покрышек, специализированный инструмент для разбортовки и шиповки колес. Каталог включает оборудование ведущих производителей с гарантией качества и технической поддержкой. Ознакомиться с полным перечнем товаров можно на https://nordberg43.ru/catalog/raskhodnye_materialy_i_instrument_dlya_shinomontazha/, где представлены актуальные цены и условия доставки по России. Консультанты помогут подобрать расходники под конкретные задачи и модели оборудования.
קדימה ואחורה. מספיק, זה כואב לי, אתה אומר בקול רועד. אם לא אלמד אותך, מישהו אחר ילמד אותך! כל דחיפה הופכת לרעידות הגוף שלך, פי הטבעת של כולם sexpornotales.me הוא מנסה לצאת מזה צריכים להישאר כאן הרבה זמן? אני נורא חרמן.” דיאנה נכנסה לארנקה והוציאה שטר של חמישה אלף דולר מהארנק. היא הניחה אותה על השולחן ולא הבחינה במבט הקשה והמעוניין של שני הגברים. בוא נלך, addlock
Shop Curated Backlink Bazaar – Useful tools and insights for marketers focused on link growth.
Эта статья для ознакомления предлагает читателям общее представление об актуальной теме. Мы стремимся представить ключевые факты и идеи, которые помогут читателям получить представление о предмете и решить, стоит ли углубляться в изучение.
Тыкай сюда — узнаешь много интересного – https://dobrenok.com/partnery
В таком же духе гоу) https://mefedrongash.life “Я надеюсь что вы перепроверите товар “Магазин работает на 5+++++, я уже раз 5 беру у данного сейлера все ровно все катит, качество на высоте!
invoicespot.shop – Quick and easy checkout, and the product information was very detailed and helpful.
Browse Boat Life Bazaar Deals – Theme is niche and the curation of products is excellent.
אליה, עם האצבע המורה שלי, ובסיום כל המצב האבסורדי הזה, רוסלן העריץ את פניו של אשתו בחיוך מאושר. פי הטבעת נראה קטן מאוד על רקע הישבן הרחב. וזה נראה כאילו אפילו גפרור לא יכול להיכנס חודר עמוק יותר, ואני נאחזתי בסדינים, הרגשתי את גלי ההנאה מתגלגלים בזה אחר זה. נשפתי, והוא הרים את מבטו, עיניו נצצו. “קרא לי המלך שלך,” הוא אמר, ואני פלטתי בלי לחשוב. המלך שלי… הוא mbx
Pakistan Pulse curated collection – Enjoyable articles that keep me checking the site frequently.
browse Pixel Parade – Creative pieces and smooth, hassle-free shopping all around.
Horror Haven – Fantastic layout and navigating the site was a breeze.
Подключил 7к казино бонус: отыгрыш реалистичный, но при коротких сессиях может тянуться дольше.
premium metric tools store – High-quality products and reasonable pricing make this shop stand out.
Шоурумы Москвы становятся площадкой для презентаций новых коллекций и встреч с дизайнерами. Это создаёт особую атмосферу и позволяет быть в курсе последних модных событий – https://t.me/jevev/10182
Московский спортивный клуб «Родина» включает футбольные, баскетбольные, волейбольные секции и отделения единоборств с представительствами в Зеленограде, Солнечногорске и Твери. Организация проводит занятия для атлетов различной подготовки, выступает в московских первенствах по мини-футболу 6х6 и областных соревнованиях. Подробная информация о командах, расписании матчей и секциях доступна на https://rodinasportsclub.com/ в разделах с фотографиями и видеоматериалами. Организация обладает внушительным послужным списком побед и сотрудничает с квалифицированными наставниками в боксе, рукопашном бое и ММА.
чувак сделай 2к15 самый раз для меня)) https://goodforue.life Ну во-первых мы совершенно другой магазин, так что вы ошиблись веткой, и представительств в тех городах у нас нетДа неее))) само то емс и почта россии !! А лучше гарантпост очень клево работают по ним надо отправлять вообще изумительные службы. Или первый класс!
Handpicked Essentials Store – Interesting variety on display and the figures seem appropriate.
Вывод из запоя — это не только капельница. Это системная медицинская помощь, направленная на снижение интоксикации, поддержку сердца, нервной системы и внутренних органов. Правильно выстроенный детокс помогает не просто «сбить симптомы», а реально снизить риски для здоровья и дать человеку шанс вернуться к трезвому состоянию без тяжёлых последствий.
Изучить вопрос глубже – https://vyvod-iz-zapoya-voskresensk11.ru/vyvod-iz-zapoya-kapelnica-v-voskresenske/
Лечение в местной клинике удобно не только тем, что до неё проще добраться. Важнее то, что здесь выстраивают целостный подход, а не откликаются только на острые эпизоды. Для кого-то основной проблемой стали частые запои, для кого-то — периодическое употребление наркотиков, для третьего — сочетание алкоголя с успокоительными или снотворными. У каждого пациента своя история, свой стаж употребления, свой опыт неудачных попыток лечения и своя степень разрушения здоровья. В хорошей клинике это учитывают с самого начала и не предлагают всем одну и ту же «универсальную капельницу».
Получить больше информации – http://narkologicheskaya-klinika-korolyov11.ru/platnaya-narkologicheskaya-klinika-v-korolyove/https://narkologicheskaya-klinika-korolyov11.ru
רעמים. הסתכלתי עליהםעל כתפיהם הרחבות, על הצללים ששיחקו על פניהםוהרגשתי את הפחד מתערבב עם משהו אחר, דחף חם ובלתי מוסבר שפועם בעורקיהם. גופי, שהיה רגיל לרוץ, עמד דומם, אבל בפנים הכל היו ספות עמוקות מרופדות בקטיפה אינדיגו, בעוד ניחוח עדין של בושם יקר היה באוויר, מעורבב עם רמזים לטבק ומשהו מתוק שמזכיר וניל. ניגנה מוזיקה איטיתעמוקה, עם קצב פועם שנראה כאילו נכנס drdebby
Шоурумы Москвы активно развивают формат онлайн консультаций, что позволяет заранее обсудить предпочтения клиента. Это экономит время и делает визит более продуктивным. Подробнее по ссылке: https://salda.ws/article/?act=read&article_id=30907
В центре «Передозировка» в Санкт-Петербурге применяют комплексный подход: лечение наркомании, терапия алкогольной зависимости, индивидуальное кодирование и восстановительные программы. Такой формат обеспечивает надёжный результат и поддержку на всех этапах.
Детальнее – абстинентный синдром
Для безопасного и эффективного лечения наши специалисты используют только проверенные и сертифицированные медикаменты, подбираемые индивидуально с учетом состояния пациента. В состав капельницы входят следующие группы препаратов:
Подробнее – нарколог на дом вывод в краснодаре
Dark Tales Collection – Engaging theme and browsing through categories was really enjoyable.
Exclusive Christmas Craft Items – Thoughtful organization and holiday spirit make exploring enjoyable.
Бонус за депозит щедрый, вейджер x30 адекватен, но новичкам лучше начать с малых сумм.
Discover Barbell Bay Equipment – Solid gear options and the information provided made shopping easy.
https://blockchain.listbb.ru/viewtopic.php?t=1119
Каждый этап требует профессионального подхода и регулярного мониторинга показателей организма, что особенно важно при тяжелых формах алкогольной зависимости.
Подробнее тут – https://vyvod-iz-zapoya-volgograd0.ru/vyvod-iz-zapoya-narkolog-na-dom-volgograd
Эта публикация содержит набор несвязанных идей, трудно применимых в практике. Мы лишь поверхностно затрагиваем различные точки зрения, не проводя глубокий анализ и не предлагая выводов.
Подробнее читать – https://rostov-narkologiya.ru/uslugi-ot-narkomanii/mefedronovaya-zavisimost
Brand Beacon Hub – Content is structured clearly and the site looks very professional.
Pak Plates featured items – Nice range of products and smooth transaction process, I’ll be back.
Своевременная помощь нарколога позволяет избежать тяжёлых осложнений и значительно ускорить восстановление организма.
Детальнее – http://narcolog-na-dom-sankt-peterburg00.ru
Классный магаз, почитал отзывы, нам в киров бы не помешал такой движ. Ассортимент огонь, давайте в наш славный город. Всем щастья! кокаин, мефдрон, гашиш С 10-11 утра по МСК ежедневно кроме праздников и выходных.купил его в аптеке
explore Poster Palace – Posters are amazing and delivery was smooth and timely.
Многие годами живут в логике: «главное — с утра выпить чуть-чуть, станет легче». На коротком промежутке времени это действительно частично снимает симптомы, но по сути лишь продлевает запой и усиливает интоксикацию. Организм не успевает переработать продукты распада алкоголя, кровь становится «тяжёлой», нарушается работа сосудов, возрастает нагрузка на сердце и мозг.
Узнать больше – https://kapelnica-ot-zapoya-dolgoprudnyj11.ru/
boutique microbrand collection – Distinct items and great deals keep me coming back for more.
Своевременное вмешательство специалиста позволяет не только вывести токсины, но и снизить риск развития осложнений, обеспечить восстановление жизненно важных функций организма и предотвратить ухудшение состояния, что особенно важно для сохранения здоровья и жизни пациента.
Получить больше информации – https://narcolog-na-dom-krasnodar0.ru/narkolog-na-dom-kruglosutochno-krasnodar/
https://md.darmstadt.ccc.de/s/bWXrBrvYd8
Для эффективного лечения наши врачи используют только проверенные и сертифицированные медикаменты, которые подбираются индивидуально для каждого пациента. В состав лечебного курса входят:
Подробнее можно узнать тут – http://narcolog-na-dom-ekaterinburg000.ru
Обратиться за помощью могут как сами пациенты, так и их родственники. Часто именно близкие первыми замечают, что человек изменился: стал раздражительным, агрессивным или, наоборот, отстранённым, перестал выполнять обещания, начал скрывать доходы и траты. В клинике семья получает не только медицинскую помощь для зависимого, но и понятную стратегию действий: как разговаривать, как мотивировать на лечение, как не провоцировать конфликты и не усиливать чувство стыда у человека, который и так боится признаться себе в наличии болезни.
Получить дополнительную информацию – gosudarstvennaya-narkologicheskaya-klinika-moskva
Запой – это состояние, при котором контроль над употреблением алкоголя утрачивается, а токсическая нагрузка на организм резко возрастает. В Волгограде экстренная помощь нарколога на дому позволяет начать лечение незамедлительно, что критически важно для сохранения здоровья и предотвращения серьёзных осложнений. Такой формат лечения обеспечивает оперативное вмешательство, индивидуальный подход и полное соблюдение конфиденциальности в привычной для пациента обстановке.
Подробнее можно узнать тут – https://vyvod-iz-zapoya-volgograd00.ru/vyvod-iz-zapoya-na-domu-volgograd/
я имел ввиду что вещевства а не способ в/в я не конченый кокаин, мефдрон, гашиш классный магазин, была впечатлянна скоростью доставки и качествомтовара)) всем писа чё ам закончился у вас? пишит нет на складе
На странице http://hackerlive.biz/threads/uslugi-xakera-udalennyj-dostup-vzlom-soc-setej-votsap-telegram-i-mnogoe-drugoe-bolshoj-opyt.78/page-9 собраны предложения частного специалиста по кибербезопасности: аудит защиты, поиск уязвимостей, чистка устройств от вредоносного ПО, настройка 2FA и восстановление доступа к своим аккаунтам. Формат без «воды»: обозначены задачи, заявлена конфиденциальность, контакт напрямую и ориентация на итог.
pakistanimports.shop – Quick and smooth browsing with a wide variety of products.
Paranormal Parlor essentials – Unique, spooky products and a really atmospheric presentation.
Visit This Cooking Hub – A quick look around was enough to leave a strong impression.
Explore Breakfast Bay – Fresh selection of products with a smooth and easy browsing experience.
explore Power Marine Parts – Parts are dependable, descriptions are precise, and pricing is fair.
888starz مصر تعمل على توفير تجربة مميزة وممتعة للمراهنين
كازينو 888 تسجيل الدخول https://888starz.onl/eg/
تمتلك 888starz مصر فريق دعم فني وعلى مدار الساعة لخدمة العملاء
у нас нет давно курьерских доставок. кокаин, мефдрон, гашиш Спасибо за объективный отзыв, мы работаем – что бы Вы улыбались:ok:Ровный магазин . Всем советую !
Ищете металлический козырек над входом купить? Завод mastersmetall.ru занимается производством металлических лестниц, ограждений, козырьков и навесов более 15 лет. Производство укомплектовано новейшими станками лазерной резки и сварки, собственной линией порошковой окраски, что подтверждает отличное качество конструкций. Заказчикам доступны бесплатное 3D-моделирование, квалифицированный выезд для замеров и установка металлоконструкций. Персональная разработка проектов, применение качественного металла и идеальная обработка сварных соединений гарантируют надежность и красоту изделий.
fun and fresh online store – Playful selections and great presentation make browsing a pleasure.
Платная наркологическая клиника «Трезвый город» предлагает лечение в комфортных условиях и с соблюдением медицинской этики. Специалисты помогают снять острые симптомы, снизить тягу и подготовить пациента к следующему этапу — реабилитации или амбулаторному сопровождению.
Ознакомиться с деталями – https://trezviy-gorod.ru/kodirovanie-ot-alkogolizma
шумоизоляция арок авто
Корпоративное обучение в Казахстане от Caspian Training Group – это 24 года успешного опыта развития персонала компаний всех уровней Компания предлагает языковые курсы английского, казахского и русского языков, бизнес-тренинги, стратегические сессии и бизнес-симуляции с адаптацией под задачи заказчика Ищете бизнес симуляция? Более 850 компаний доверили обучение сотрудников профессионалам корпоративное-обучение.kz, где работают 60 квалифицированных инструкторов. Все курсы отвечают международным стандартам качества и созданы вместе с зарубежными партнерами для наивысшей результативности
Шоурумы Москвы объединяют локальных дизайнеров и начинающие бренды, которые предлагают свежий взгляд на моду. Здесь можно найти вещи с уникальным кроем и интересными акцентами. Это отличный способ поддержать российские марки https://www.freeboard.com.ua/forum/viewtopic.php?pid=1020347#p1020347
Платная наркологическая клиника «Трезвый город» предлагает лечение в комфортных условиях и с соблюдением медицинской этики. Специалисты помогают снять острые симптомы, снизить тягу и подготовить пациента к следующему этапу — реабилитации или амбулаторному сопровождению.
Углубиться в тему – скорая помощь при передозировке
А будет какая нибудь подробная инфа или трип репорты? А лучше пробники платные или бесплатные? кокаин, мефдрон, гашиш Контакты указаны у меня в подписе и в разделе “Наши Контакты””Выстовляет Эскимос список тестеров в Списке сверкает мой ник” “bob marli”
ExchangeXpress Online – Smooth design and helpful guides made browsing very easy today.
Если в ситуации с алкоголем присутствуют несколько из перечисленных ниже пунктов, это повод не откладывать консультацию с наркологом в Королёве:
Получить дополнительные сведения – кодирование алкоголизма недорого клиника
Шоурумы столицы привлекают не только жителей города, но и гостей Москвы, которые хотят познакомиться с локальными брендами. Такой формат помогает открыть новые имена в модной индустрии. Это расширяет возможности для выбора. Узнать больше можно по ссылке http://rossbiz.ru/home/414581
Наркологическая клиника «Еваклиник» в Саранске оказывает комплексную помощь при алкогольной и наркотической зависимости. В центре проводится медицинская детоксикация, поддерживающая терапия и восстановительные программы с участием врачей и психологов. Индивидуальный подход, конфиденциальность и современные методы лечения помогают пациентам стабилизировать состояние и сделать первый шаг к устойчивой ремиссии.
Выяснить больше – алкоголь и суицид
Parcel Pilot specialty services – Reliable and fast shipping that makes sending parcels a breeze.
RemoteRoom Shop – Quick access to content with a streamlined browsing flow.
Shop Build A Brigade Picks – Interesting approach and moving between sections felt effortless.
Там, где раньше хватало одного тяжёлого утра, теперь требуются дни детоксикации. И чем позже подключается врач, тем сложнее вернуть организм к относительно безопасному состоянию.
Исследовать вопрос подробнее – http://vyvod-iz-zapoya-voskresensk11.ru
Sale & Style – Loved the fashionable items and the fast, smooth checkout process.
Лечение проводится в комфортных условиях дома, что позволяет избежать стресса, связанного с госпитализацией, и обеспечивает быстрое восстановление.
Подробнее тут – вызвать врача нарколога на дом екатеринбург
бро незнаю скок раз брал ни разу TS не подводил входил в положения скидки бонусы делал!!! кокаин, мефдрон, гашиш магаз на уровне. сегодня выходной себе решил сделать бок мять до обеда собирался, а тут звонок из курьерки! люто настроение поднялосьЗаявление про кидал не требует обоснования, ибо это не заявление. Перечитайте внимательно. Считаю, что такие речи тоже стоит оставлять при себе, не прочитав толком.
unique mosaic pieces – Beautiful designs and an easy-to-navigate catalog keep me coming back.
Перед тем как принять решение, пациент и родственники получают объяснения по доступным направлениям. Обычно обсуждаются: амбулаторные консультации, дневной или круглосуточный стационар, выездная помощь, реабилитационные программы и последующее наблюдение. Это позволяет выстроить индивидуальный маршрут, а не навязывать один и тот же сценарий всем подряд.
Подробнее можно узнать тут – http://narkologicheskaya-klinika-himki11.ru/
сделать дизайн интерьера сайт дизайн студий интерьера
Признаки, что пора задуматься о кодировании
Исследовать вопрос подробнее – kodirovanie-ot-alkogolizma-otzyvy
Этот сборник информации привлекает множеством мелких деталей и необычных ракурсов. Мы предлагаем взгляды, редко полезные, но способные немного разнообразить знакомство с темой.
Подробнее читать – сиалис онлайн
Каждый из этих симптомов по отдельности уже опасен, а в сочетании они создают высокий риск для жизни. Самостоятельные эксперименты с таблетками, резкий отказ от алкоголя «через силу» или попытка «переспать» запой без медицинского контроля могут обернуться реанимацией. Гораздо безопаснее вовремя вызвать специалиста и провести детоксикацию под наблюдением, особенно когда речь идёт о жителях крупного города, где доступна профессиональная наркологическая помощь.
Выяснить больше – vyvod-iz-zapoya-moskovskij-rajon
Самостоятельные попытки «подлечиться» обычно сводятся к случайным комбинациям препаратов: кто-то пьёт горсть таблеток от давления и сердца, кто-то принимает успокоительные поверх алкоголя, кто-то заказывает непонятные средства «от тяги» в интернете. Такие эксперименты могут дать краткий эффект, но часто только маскируют симптомы и перегружают организм. В клинике лечение строится иначе: сначала оценивают состояние — физическое и психическое, затем подбирают безопасные схемы детоксикации и медикаментов, учитывая возраст, сопутствующие заболевания, длительность запоев и употребления. Это снижает риски осложнений и делает восстановление более управляемым: пациент и его семья видят прогресс и понимают, за счёт чего он происходит, а не живут в ожидании очередного непредсказуемого «отката».
Выяснить больше – narkologicheskaya-klinika-korolev
Частный реабилитационный центр «Еваклиник» в Саранске предлагает поэтапные программы лечения зависимости с медицинским сопровождением. Специалисты центра работают над устранением последствий употребления, нормализацией психоэмоционального состояния и адаптацией к жизни без зависимости. Такой подход снижает вероятность рецидивов и способствует долгосрочному восстановлению.
Выяснить больше – выведение из запоя вызов
Allergy Care Essentials – Living with allergies makes me value stores that feel this trustworthy.
Наркологическая клиника «Передозировка» предлагает круглосуточную помощь жителям Санкт-Петербурга. Лечение зависимостей, детокс-мероприятия и современные методы кодирования помогают пациентам восстановить здоровье и начать длительный период трезвости.
Ознакомиться с деталями – лечение наркомании спб
Вывод из запоя — это не только капельница. Это системная медицинская помощь, направленная на снижение интоксикации, поддержку сердца, нервной системы и внутренних органов. Правильно выстроенный детокс помогает не просто «сбить симптомы», а реально снизить риски для здоровья и дать человеку шанс вернуться к трезвому состоянию без тяжёлых последствий.
Получить больше информации – https://vyvod-iz-zapoya-voskresensk11.ru/vyvod-iz-zapoya-vyzov-v-voskresenske/
Для безопасного и эффективного лечения наши специалисты используют только проверенные и сертифицированные медикаменты, подбираемые индивидуально с учетом состояния пациента. В состав капельницы входят следующие группы препаратов:
Детальнее – вызвать нарколога на дом срочно краснодар
Группа препаратов
Ознакомиться с деталями – вызвать врача нарколога на дом в екатеринбурге
Отдельная категория пациентов — люди с алкогольной зависимостью. Для жителей Воскресенска особенно актуальны проблемы, связанные с длительными запоями: человек несколько дней подряд пьёт, практически не ест, плохо спит, с трудом встаёт, а каждое утро обещает, что «сейчас немного — и всё». На этом фоне растёт нагрузка на сердце, печень, нервную систему, повышается риск инсультов и инфарктов, обостряются хронические болезни.
Изучить вопрос глубже – https://narkologicheskaya-klinika-voskresensk11.ru
Faceless Factory World – Well-laid-out pages and intuitive design make product exploration simple.
islamabadtraders.shop – Quick to browse and the product selection is impressive.
да конспирацию отработали 😉 стараемся https://flashfindsis.shop Всем привет ну что ж в очередной раз заказал всё пришло всё ровно грамотно и сделано чисто.Да, в скайпе их нет и ситтуация мне тоже не нравиться.
Часто родственники тянут до последнего, надеясь, что запой «сам пройдёт», как это случалось раньше. Но с каждым эпизодом последствия становятся тяжелее: организм изнашивается, возрастает риск осложнений, ухудшается психика. Особенно опасно, когда запой длится несколько дней подряд, а любые попытки самостоятельно сократить дозы алкоголя сопровождаются дрожью, бессонницей, приступами паники.
Ознакомиться с деталями – vyvod-iz-zapoya-v-moskve-nedorogo
Часто именно жители Химок тянут до последнего: насыщенный ритм жизни, дорога на работу, постоянная усталость, попытки «снимать напряжение» алкоголем или психоактивными веществами. Сначала это кажется временным способом расслабиться, но со временем человек замечает, что пьёт чаще, чем планировал, нуждается в больших дозах, срывает обещания, а попытки контролировать употребление превращаются в череду неудач. В какой-то момент становится очевидно: без профессиональной наркологической помощи дальше будет только сложнее.
Детальнее – https://narkologicheskaya-klinika-himki11.ru/chastnaya-narkologicheskaya-klinika-v-himkah
«ЮгМедЦентр» поддерживает строгую конфиденциальность: выездные специалисты приезжают без медицинской символики, в гражданской одежде; документы формулируются нейтрально; уведомления не содержат триггерных слов; профиль можно оформить под кодом. Все записи ведутся в шифрованном контуре с разграничением доступа по ролям, а видеосессии с врачом/психологом не записываются. Мы предупреждаем о цифровой гигиене: включите «тихий режим» уведомлений, избегайте пересылки документов в открытых чатах, используйте резервный канал связи для экстренных вопросов.
Получить дополнительные сведения – https://narcolog-na-dom-sochi00.ru/
browse Party Parlor – Fun party essentials with timely delivery, everything was perfect.
Reliable GPU cloud – Setup completed in no time and performance stayed constant.
Самостоятельные попытки «подлечиться» обычно сводятся к случайным комбинациям препаратов: кто-то пьёт горсть таблеток от давления и сердца, кто-то принимает успокоительные поверх алкоголя, кто-то заказывает непонятные средства «от тяги» в интернете. Такие эксперименты могут дать краткий эффект, но часто только маскируют симптомы и перегружают организм. В клинике лечение строится иначе: сначала оценивают состояние — физическое и психическое, затем подбирают безопасные схемы детоксикации и медикаментов, учитывая возраст, сопутствующие заболевания, длительность запоев и употребления. Это снижает риски осложнений и делает восстановление более управляемым: пациент и его семья видят прогресс и понимают, за счёт чего он происходит, а не живут в ожидании очередного непредсказуемого «отката».
Получить больше информации – https://narkologicheskaya-klinika-korolyov11.ru/platnaya-narkologicheskaya-klinika-v-korolyove
Shop Bulking Basket Picks – Great assortment and moving through the pages is effortless.
Основная процедура включает в себя:
Разобраться лучше – нарколог на дом вывод в краснодаре
Наркологическая клиника в Воскресенске предоставляет комплексную помощь: от экстренного вывода из запоя и детоксикации до реабилитации и длительного сопровождения. Здесь работают с зависимостью как с хроническим заболеванием, а не как с «слабостью характера». Такой подход позволяет не только стабилизировать физическое состояние, но и менять образ жизни, привычки, способы реагирования на стресс, чтобы человек мог вернуться к нормальной, трезвой жизни.
Изучить вопрос глубже – http://
Official Sample Atelier site – Unique style and refined presentation gave a professional feel.
Наркологический центр «Трезвый город» специализируется на лечении алкоголизма и наркомании с акцентом на безопасность пациента. Подбираются индивидуальные протоколы, учитывается анамнез, переносимость препаратов и возможные осложнения.
Углубиться в тему – реабилитация алкоголиков московская
Momentum Mall marketplace – Well-organized categories make finding what I need effortless.
Оперативное лечение организовано по четкому алгоритму, который позволяет быстро стабилизировать состояние пациента и обеспечить эффективную терапию. Каждый этап направлен на комплексное восстановление организма.
Получить больше информации – вывод из запоя недорого волгоград
Может просто нужно быть более бдительным? От фейков никто не застрахован. Попросить подтверждения через ЛС на форуме займет не более пяти минут времени и сохранит ваше настроение, а так же и деньги. БУДЬ БДИТЕЛЕН! ВСЕГДА! https://bestweedtree.club Сори я не туда отписалподскажите, а спорные вопросы решаются в данном магазине?
Серьезные состояния, вызванные длительным употреблением алкоголя или наркотиков, требуют немедленного вмешательства. Если пациент испытывает ухудшение самочувствия вследствие продолжительного запоя, его организм начинает накапливать токсичные вещества, что ведёт к нарушению работы внутренних органов. При появлении таких симптомов, как сильная рвота, спутанность сознания, судороги, резкие скачки артериального давления, а также выраженные признаки абстинентного синдрома (сильная дрожь, панические атаки, бессонница, тревожность), вызов нарколога становится жизненно необходимым. Экстренное вмешательство позволяет стабилизировать состояние больного и предотвратить развитие серьёзных осложнений, включая сердечно-сосудистые нарушения, повреждение печени и развитие алкогольного психоза. В таких ситуациях профессиональное лечение на дому — лучший способ сохранить здоровье и жизнь пациента.
Углубиться в тему – http://narcolog-na-dom-ekaterinburg000.ru/zapoj-narkolog-na-dom-ekb/
Когда запой становится угрозой для жизни, оперативное вмешательство становится ключевым для спасения здоровья и предотвращения серьезных осложнений. В Рязани вызов нарколога на дом позволяет начать лечение в самые критические моменты, обеспечивая детоксикацию организма и восстановление его нормального функционирования в условиях, где пациент чувствует себя комфортно и сохраняет свою конфиденциальность. Этот формат оказания медицинской помощи особенно актуален для тех, кто хочет избежать длительного ожидания в стационаре и предпочитает лечение в привычной домашней обстановке.
Исследовать вопрос подробнее – частный нарколог на дом
Для безопасного и эффективного лечения наши специалисты используют только проверенные и сертифицированные медикаменты, подбираемые индивидуально с учетом состояния пациента. В состав капельницы входят следующие группы препаратов:
Разобраться лучше – вызов врача нарколога на дом краснодар
Looking for an interesting and useful portal about the dollar, euro, pound sterling, and other currencies? Or information about gold, silver, oil, and gas? Or perhaps everything about stock markets, industry, and the global economy? Visit https://www.profi-forex.us/ – it’s a comprehensive source of professional information that will be of interest to both amateurs and professionals.
Этот информационный набор привлекает внимание множеством мелочей и странных ракурсов. Мы предлагаем взгляды, которые редко бывают полезны, но могут слегка разнообразить ваше знакомство с темой.
Вот – секс шоп
Клиника «Передозировка» в Санкт-Петербурге предоставляет профессиональную помощь при зависимостях. Пациенты получают лечение алкоголизма и наркомании, проходят кодирование и реабилитацию, что способствует устойчивому возвращению к нормальной жизни.
Получить больше информации – снятие ломки
Наша выездная бригада оснащена как мобильный мини-кабинет: инфузомат для покапельной титрации, портативный кардиомонитор, пульсоксиметр, глюкометр, экспресс-кассеты Na?/K? и набор для регистрации ЭКГ по показаниям. Такой комплект позволяет принять решение на месте — безопасно ли начинать дома или целесообразнее перевести пациента в стационарное отделение «ЮгМедЦентра» без «перезапуска» обследований. Мы практикуем минимально достаточную фармакотерапию: в схеме нет «лишних» позиций и конфликтов с уже принимаемыми лекарствами (антигипертензивные, антиаритмические, сахароснижающие и др.).
Исследовать вопрос подробнее – http://narcolog-na-dom-sochi00.ru
Во внимание берутся не только масштаб и длительность запоев, но и изменения в поведении. Если человек регулярно обещает «завязать с понедельника», но каждый раз срывается, если рабочие задачи всё чаще выполняются с трудом, а любые стрессовые ситуации решаются «через стакан» или «через дозу», это прямой повод не ждать критического момента. Важно помнить, что зависимость — это прогрессирующее заболевание: со временем организму требуется всё больше вещества, растёт токсическая нагрузка на сердце, печень, нервную систему, ухудшается память и концентрация.
Узнать больше – anonimnaya-narkologicheskaya-klinika-moskva
После процедуры пациент чувствует значительное облегчение состояния, улучшение самочувствия и снижение тяги к алкоголю.
Изучить вопрос глубже – вызвать капельницу от запоя на дому сочи
При длительном запое организм не успевает восстановить свой водно-электролитный баланс, что приводит к обезвоживанию и ухудшению общего состояния. Такие пациенты рискуют развить не только тяжелую интоксикацию, но и хронические заболевания, которые впоследствии требуют длительного и дорогостоящего лечения. Поэтому своевременный вызов врача-нарколога на дом становится критически важным для сохранения здоровья и предотвращения серьезных последствий.
Ознакомиться с деталями – вывод из запоя на дому в краснодаре
Основная цель процедуры заключается в устранении токсинов и восстановлении жизненно важных функций. При этом используются индивидуально подобранные лекарственные препараты, корректирующие водно-электролитный баланс и работу сердечно-сосудистой системы. Вывод из запоя в клинике позволяет снизить риск осложнений и ускорить процесс нормализации состояния.
Исследовать вопрос подробнее – вывод из запоя круглосуточно
FanFriendly Depot – Quick navigation and organized sections made browsing smooth.
Patch Portal curated collection – Easy to locate what I needed, shopping was a breeze.
Всё что В прайс листе на сайте есть,всё в наличии ? https://megafindsis.top Сегодня как обычно забрал свою посылочку в срок как расчитывал. Очень приятно работать с таким магазином.зашел на сайт не нашел там 307
Своевременное вмешательство специалиста позволяет не только вывести токсины, но и снизить риск развития осложнений, обеспечить восстановление жизненно важных функций организма и предотвратить ухудшение состояния, что особенно важно для сохранения здоровья и жизни пациента.
Подробнее можно узнать тут – нарколог на дом вывод из запоя в краснодаре
Экстренная помощь требуется, когда запой начинает негативно сказываться на здоровье, и самостоятельное прекращение употребления алкоголя становится невозможным. Основные показания для круглосуточного вмешательства включают:
Получить дополнительные сведения – вывод из запоя капельница на дому в волгограде
Срочная помощь нарколога на дому в Рязани реализуется по четко отлаженной схеме, включающей несколько этапов, которые позволяют максимально быстро и безопасно вывести пациента из состояния запоя.
Получить больше информации – частный нарколог на дом рязань
Если многое из этого знакомо, кодирование стоит рассматривать не как «наказание» или «приговор», а как инструмент, который помогает закрыть доступ к алкоголю на определённый срок и даёт шанс выстроить новую привычку — жить трезво.
Узнать больше – kodirovanie-alkogolizma-nedorogo-klinika
Запой не всегда выглядит как откровенная катастрофа с первых дней. Иногда всё начинается с «отпуска», «праздника», пары вечеринок подряд. Родные надеются, что человек сам остановится, а он каждый день находит повод продолжить. В какой-то момент организм перестаёт справляться, и даже небольшие дозы алкоголя вызывают тяжёлые реакции.
Подробнее – https://kapelnica-ot-zapoya-dolgoprudnyj11.ru/kapelnica-ot-alkogolya-cena-v-dolgoprudnom
Запой – это состояние, при котором контроль над употреблением алкоголя утрачивается, а токсическая нагрузка на организм резко возрастает. В Волгограде экстренная помощь нарколога на дому позволяет начать лечение незамедлительно, что критически важно для сохранения здоровья и предотвращения серьёзных осложнений. Такой формат лечения обеспечивает оперативное вмешательство, индивидуальный подход и полное соблюдение конфиденциальности в привычной для пациента обстановке.
Получить дополнительные сведения – анонимный вывод из запоя в волгограде
Explore ReportRoost – Found guidance that made organizing my tasks much easier.
Когда выезд особенно удобен и оправдан, важно понимать не только эмоционально, но и по конкретным признакам. Есть ряд типичных ситуаций, в которых именно формат «на дому» становится наиболее реалистичным и безопасным вариантом, а стационар можно рассматривать как следующий шаг, когда острота будет снята и человек станет более сговорчивым.
Ознакомиться с деталями – narkolog-na-dom-himki11.ru/
Во внимание берутся не только масштаб и длительность запоев, но и изменения в поведении. Если человек регулярно обещает «завязать с понедельника», но каждый раз срывается, если рабочие задачи всё чаще выполняются с трудом, а любые стрессовые ситуации решаются «через стакан» или «через дозу», это прямой повод не ждать критического момента. Важно помнить, что зависимость — это прогрессирующее заболевание: со временем организму требуется всё больше вещества, растёт токсическая нагрузка на сердце, печень, нервную систему, ухудшается память и концентрация.
Разобраться лучше – platnaya-narkologicheskaya-klinika-moskva
Monarch Motive online shop – Helpful guidance and quality products make every purchase smooth.
Вызывать нарколога на дом рекомендуется при следующих состояниях:
Изучить вопрос глубже – врач нарколог на дом санкт-петербург
Группа препаратов
Детальнее – http://narcolog-na-dom-ekaterinburg000.ru/
Длительное употребление алкоголя наносит серьезный удар по организму, приводя к нарушению функций печени, сердечно-сосудистой и нервной системы. Чем дольше продолжается запой, тем тяжелее последствия для здоровья, и тем сложнее пациенту самостоятельно вернуться к трезвости. Капельница от запоя на дому в Сочи — это быстрая, безопасная и эффективная процедура, которая позволяет снять алкогольную интоксикацию, стабилизировать состояние и вернуть контроль над организмом. Врачи клиники «ТрезвоПрофи» работают круглосуточно, обеспечивая профессиональную поддержку и абсолютную конфиденциальность.
Подробнее можно узнать тут – вызов на дом капельницы от запоя в сочи
Длительный запой способен нанести непоправимый вред организму, привести к тяжелым нарушениям работы внутренних органов и поставить под угрозу жизнь пациента. В таких случаях необходимо срочное медицинское вмешательство, которое позволяет быстро стабилизировать состояние, вывести токсины и предотвратить развитие опасных осложнений. Клиника «ЗдоровьеНорм» в Краснодаре предлагает профессиональный вывод из запоя на дому, обеспечивая комплексное лечение с максимальной оперативностью и полной конфиденциальностью.
Подробнее можно узнать тут – http://vyvod-iz-zapoya-krasnodar00.ru/vyvod-iz-zapoya-na-domu-krasnodar/
Частный реабилитационный центр «Еваклиник» в Саранске предлагает поэтапные программы лечения зависимости с медицинским сопровождением. Специалисты центра работают над устранением последствий употребления, нормализацией психоэмоционального состояния и адаптацией к жизни без зависимости. Такой подход снижает вероятность рецидивов и способствует долгосрочному восстановлению.
Получить дополнительную информацию – никотиновая зависимость
Explore SaverStreet – The discounts seem real, and navigating on mobile is hassle-free.
Обращение в местную клинику даёт важное преимущество — доступность. Здесь можно пройти диагностику, детоксикацию, вывод из запоя, курс лечения и реабилитации в привычном городе, без выснаживающих переездов. Пациенту легче решиться на стационар, когда он понимает, что близкие рядом и в любой момент могут приехать, поучаствовать в обсуждении плана терапии, привезти необходимые вещи. При этом подход остаётся профессиональным: учитываются стаж зависимости, сопутствующие заболевания, психоэмоциональное состояние, семейная ситуация. Лечение строится не вокруг одной «волшебной» процедуры, а как последовательный маршрут — от первой консультации до выхода в стабильную ремиссию.
Детальнее – бесплатные наркологические клиники
Когда родственники видят, что в их случае совпадает сразу несколько этих пунктов, выезд нарколога на дом часто становится тем самым реалистичным и своевременным решением, которое позволяет не довести дело до экстренной госпитализации уже в критическом состоянии. После такого вмешательства появляются часы и дни, когда можно спокойно обсудить дальнейшие шаги, а не действовать на фоне паники и полного истощения.
Изучить вопрос глубже – narkolog-na-dom-kruglosutochno
Этот сборник информации привлекает множеством мелких деталей и необычных ракурсов. Мы предлагаем взгляды, редко полезные, но способные немного разнообразить знакомство с темой.
Подробнее читать – лечение covid народными средствами
да наверно я попал на фейка или угонщика ,но мне не понятно как фейк может потверждать переписку с броси на форуме? кокаин, мефдрон, гашиш 13 янв. в 21:12 Деньги пришли. Заказ будет выслан в ближайшие несколько рабочих дней. Суббота и воскресенье — выходные. После отправки трек (номер накладной) будет в комментарии к заказу на сайте и продублируется на электронную почту.У меня кстати тоже через 2 дня пришло, но в соседний город, так как в моём городе этой конторы не оказалось) но мне сразу позвонили, и предложили либо самому приехать за пакетом, либо подождать до вторника и мне его привезут домой. Вот жду)
Этот информационный обзор станет отличным путеводителем по актуальным темам, объединяющим важные факты и мнения экспертов. Мы исследуем ключевые идеи и представляем их в доступной форме для более глубокого понимания. Читайте, чтобы оставаться в курсе событий!
Посмотреть всё – https://davidsdialogue.com/2022/10/14/stories-behind-the-songs-the-old-rugged-cross
Клиника «Формула трезвости» в Москве помогает пациентам восстановиться после зависимости. Здесь проводят лечение алкоголизма и наркомании, выполняют кодирование разными методами и сопровождают полную реабилитацию, чтобы закрепить результат и вернуть человеку стабильное состояние.
Получить больше информации – formula-clinic.ru
Есть ряд признаков, при которых ждать категорически нельзя и нужна срочная помощь врача, а не очередные «народные методы». Если вы замечаете у человека следующие симптомы, это прямой повод организовать профессиональный вывод из запоя:
Исследовать вопрос подробнее – http://vyvod-iz-zapoya-moskva011.ru/vyvod-iz-zapoya-v-moskve-srochno/
В этой статье-обзоре мы соберем актуальную информацию и интересные факты, которые освещают важные темы. Читатели смогут ознакомиться с различными мнениями и подходами, что позволит им расширить кругозор и глубже понять обсуждаемые вопросы.
Получить дополнительные сведения – https://meghnasfoodmagic.in/recipe/solkadhi
karachidealshub.shop – Quick and easy navigation with helpful product information made shopping smooth.
Для эффективного лечения наши врачи используют только проверенные и сертифицированные медикаменты, которые подбираются индивидуально для каждого пациента. В состав лечебного курса входят:
Подробнее тут – нарколог на дом вывод из запоя
На практике семья часто обращается за помощью слишком поздно — когда близкий уже еле встаёт, не спит ночами, говорит странные вещи, а давление скачет так, что страшно оставлять одного. Чтобы не доводить до этого, важно знать признаки, при которых капельница от запоя в Долгопрудном — не «желательно», а по-настоящему необходима.
Разобраться лучше – kapelnica-ot-zapoya-anonimno-na-domu
Лечение в наркологической клинике в Чехове удобно не только близостью к дому. Главный плюс — комплексный подход. Зависимость практически никогда не ограничивается только алкоголем или наркотиком: страдают сердце и сосуды, печень, нервная система, психика, отношения в семье и на работе. Если пытаться лечить только одно звено, например, периодически «чистить кровь» капельницами, без проработки причин и последствий, ситуация быстро возвращается к исходной точке. В клинике выстраивается последовательная работа: сначала стабилизируют организм, затем укрепляют психику, а дальше помогают менять привычный образ жизни, чтобы трезвость стала не кратким эпизодом, а новой нормой.
Узнать больше – https://narkologicheskaya-klinika-chekhov11.ru/narkologicheskaya-klinika-telefon-v-chekhove/
Эта статья полна интересного контента, который побудит вас исследовать новые горизонты. Мы собрали полезные факты и удивительные истории, которые обогащают ваше понимание темы. Читайте, погружайтесь в детали и наслаждайтесь процессом изучения!
Погрузиться в детали – https://boomboxradio.ru/kruglosutochnyy-vyvod-iz-zapoya-v-penze-doma-i-v-statsionare-bez-lishnih-voprosov
FiberFoods Central Hub – Neat layout and organized products make finding items fast and easy.
Такая систематизация показывает, что врач действует целенаправленно, устраняя не только симптомы, но и их физиологические последствия.
Узнать больше – http://narcolog-na-dom-ryazan0.ru/vyvod-iz-zapoya-na-domu-ryazan-czeny/
Play Baccarat Online Australia Real Money Tables
PC Parts Pal premium collection – Solid quality products at prices that won’t hurt your budget.
Нарколог на дом в Химках особенно востребован тогда, когда состояние человека уже нельзя назвать обычным похмельем, но он категорически отказывается ехать в клинику. Запой тянется несколько дней или дольше, нет полноценного сна, пульс постоянно учащённый, руки трясутся, давление скачет, а любое утро начинается не с облегчения, а с новой дозы алкоголя «чтобы не развалиться». В такой ситуации родственники оказываются между страхом и беспомощностью: понятно, что дальше ждать опасно, но уговорить собрать вещи и поехать в стационар не получается. Формат выезда нарколога на дом как раз и закрывает этот тупик — врач приезжает туда, где сейчас находится человек, оценивает риски и сразу начинает помощь.
Выяснить больше – https://narkolog-na-dom-himki11.ru/
Там, где раньше хватало одного тяжёлого утра, теперь требуются дни детоксикации. И чем позже подключается врач, тем сложнее вернуть организм к относительно безопасному состоянию.
Исследовать вопрос подробнее – вывод из запоя
Московская клиника «Формула трезвости» специализируется на лечении зависимостей. Пациентам доступны программы лечения наркомании и алкоголизма, услуги кодирования, а также продуманная реабилитация, включающая психологическую поддержку и восстановительные методики.
Разобраться лучше – обезвоживание организма алкоголем
«Трезвый город» — это комплексная наркологическая помощь для взрослых пациентов: от экстренного купирования интоксикации до плановой терапии и поддержки в период восстановления. Врачи оценивают состояние, корректируют схему лечения и помогают выстроить понятный план дальнейших шагов.
Подробнее тут – что делать если человека тошнит от алкоголя
Наркологическая клиника в Химках помогает не только тем, кто уже оказался в тяжёлом запое или прошёл через ломку. Сюда можно обратиться на любом этапе — от «злоупотребляю, но ещё работаю» до «запои повторяются, семья на грани, есть проблемы с давлением и сердцем». Чем раньше подключаются специалисты, тем мягче можно пройти период стабилизации и тем больше ресурсов удаётся сохранить — здоровье, отношения, работу, собственное чувство контроля над жизнью.
Получить дополнительные сведения – https://narkologicheskaya-klinika-himki11.ru/lechenie-v-narkologicheskoj-klinike-v-himkah/
As a premier game provider, Onlyplay has delivered over 150 titles since 2020, specializing in high-performance games with unique mechanics like Scatter Pays and progressive jackpots: https://onlyplay.tech/
с треками магазин всегда спешит:) и качество скоро заценим))) кокаин, мефдрон, гашиш Заранее извиняюсь за оффтоп,просто решил сразу спросить ,чтобы не забыть.ответ будьте добры в ЛС.Хороший магазин тоже не раз уже к нему обращался я считаю что этот магазин достоин огромного внимание ! Мир тебе бро и процветания удачи в работе !:ok:;)ОБРАЩУСЬ ЕЩЕ К ТЕБЕ БРО ОБЯЗАТЕЛЬНО !) ЕЩЕ РАЗ УДАЧИ
Такой порядок действий гарантирует не только купирование симптомов, но и подготовку пациента к последующему восстановлению.
Подробнее тут – психиатр нарколог на дом
Статья посвящена анализу текущих трендов в медицине и их влиянию на жизнь людей. Мы рассмотрим новые технологии, методы лечения и значение профилактики в обеспечении долголетия и здоровья.
Не упусти важное! – https://wm-tema.ru/novosti/4618-snyatie-pohmelya-na-domu-pomosch-narkologa.html
Official Rest and Repair site – The clear instructions allowed me to handle tasks much faster.
Наркологическая клиника в Чехове — это возможность получить профессиональную помощь при алкогольной и наркотической зависимости, не выезжая в крупный мегаполис и не тратя силы на долгую дорогу. Для многих людей момент обращения к наркологу наступает не сразу: сначала идут «домашние» попытки справиться с проблемой, обещания ограничиться «по праздникам», уговаривания родственников и периодические срывы. Запои становятся длиннее, организм восстанавливается всё хуже, усиливается тревога, нарушается сон, учащаются конфликты дома и на работе. В какой-то момент становится понятно, что без системного лечения обойтись уже нельзя, а стихийные капельницы на дому и случайные советы из интернета только оттягивают время.
Детальнее – chastnaya-narkologicheskaya-klinika
Эта статья полна интересного контента, который побудит вас исследовать новые горизонты. Мы собрали полезные факты и удивительные истории, которые обогащают ваше понимание темы. Читайте, погружайтесь в детали и наслаждайтесь процессом изучения!
Где можно узнать подробнее? – https://tegalmasofficial.com/villa-2-kamar-dua-hari-satu-malam
Там, где раньше хватало одного тяжёлого утра, теперь требуются дни детоксикации. И чем позже подключается врач, тем сложнее вернуть организм к относительно безопасному состоянию.
Подробнее можно узнать тут – вывод из запоя клиника
В таких случаях наркологическая клиника помогает не только вывести из запоя и поставить капельницу, но и выстроить долгосрочный план: обследование, медикаментозную поддержку, реабилитацию, работу с психологом. Это даёт шанс не просто восстановиться после конкретного эпизода, а перестать повторять один и тот же разрушительный сценарий.
Получить дополнительные сведения – http://narkologicheskaya-klinika-voskresensk11.ru/
Скачайте активатор для Windows 11 и получите все функции Pro-версии бесплатно.
Подробнее – Скачать активатор для Windows 11
Публикация приглашает вас исследовать неизведанное — от древних тайн до современных достижений науки. Вы узнаете, как случайные находки превращались в революции, а смелые мысли — в новые эры человеческого прогресса.
А есть ли продолжение? – https://calctocomp.com/304-2
Эта статья погружает вас в увлекательный мир знаний, где каждый факт становится открытием. Мы расскажем о ключевых исторических поворотных моментах и научных прорывах, которые изменили ход цивилизации. Поймите, как прошлое формирует настоящее и как его уроки могут помочь нам строить будущее.
Исследовать вопрос подробнее – http://kabutaro777.com/cgi/kabu_yougo/joyful.cgi?read=7283&bbs=1&pg=60
Московская клиника «Формула трезвости» сочетает медицину и психологию: лечение наркомании, терапия алкогольной зависимости, кодирование и длительная реабилитация проводятся по индивидуальным схемам. Подход помогает добиться устойчивого трезвого состояния.
Детальнее – влияние алкоголя на организм человека
«Трезвый город» — это комплексная наркологическая помощь для взрослых пациентов: от экстренного купирования интоксикации до плановой терапии и поддержки в период восстановления. Врачи оценивают состояние, корректируют схему лечения и помогают выстроить понятный план дальнейших шагов.
Подробнее тут – что такое процедура убод
Explore SchemaAtelier – Useful frameworks and organized resources helped me get tasks done quickly.
Всё отлично, 5 из 5. Только сделайте больше районов в Питере. https://meferdrongeer.club Да,мне тоже первый класс как то ближе и недорого…салют бразы ) добавляйте репу не стесняйтесь всем удачи))
Эта информационная заметка содержит увлекательные сведения, которые могут вас удивить! Мы собрали интересные факты, которые сделают вашу жизнь ярче и полнее. Узнайте нечто новое о привычных аспектах повседневности и откройте для себя удивительный мир информации.
Получить полную информацию – https://voicebrew.com/q/wrong-alexa-device-responding
Такой порядок действий гарантирует не только купирование симптомов, но и подготовку пациента к последующему восстановлению.
Ознакомиться с деталями – http://narcolog-na-dom-ryazan0.ru/vyvod-iz-zapoya-na-domu-ryazan-czeny/
Выпуск подвесных потолков, алюминиевых перегородок и светодиодных светильников от компании Glassway – это более 10 лет результативной работы и свыше 700 выполненных проектов ежегодно Собственные производственные базы в Москве, Санкт-Петербурге, Смоленске и других городах гарантируют заводские цены и контроль качества на каждом этапе Ищете подвесной потолок? Glassway.group предлагает полный цикл работ от проектирования до монтажа силами собственных бригад с гарантией соблюдения сроков. Современные технологии и инженерно-технический отдел позволяют воплощать проекты любой сложности для офисов, торговых и промышленных объектов
Лечение зависимостей редко ограничивается одной процедурой. Даже если человек обратился только из-за запоя, за этим почти всегда стоят годы или месяцы нерешённых проблем с употреблением. Поэтому в клинике в Королёве упор делается на комплекс: сначала — снятие острого состояния, затем — стабилизация, работа с психикой и образ жизни, профилактика срывов. Это помогает не просто «очистить кровь» и дать выспаться, а реально изменить траекторию, по которой двигалась жизнь до обращения.
Ознакомиться с деталями – https://narkologicheskaya-klinika-korolyov11.ru
FilterFactory Select – Simple interface and clear descriptions make finding items quick and easy.
Остров Кунашир — уникальная территория Курильских островов, где активные вулканы соседствуют с реликтовыми лесами и термальными источниками. Путешественники исследуют вулкан Менделеева с бурлящими фумаролами, проходят через бамбуковые чащи и наблюдают за эндемичными видами пернатых. Организовать незабываемое путешествие поможет https://mendeleev-tour.ru/ — профессиональный туроператор с готовыми маршрутами. Программы включают трекинг к вулканам, посещение мыса Столбчатый с базальтовыми колоннами и знакомство с уникальной флорой острова.
Там, где раньше хватало одного тяжёлого утра, теперь требуются дни детоксикации. И чем позже подключается врач, тем сложнее вернуть организм к относительно безопасному состоянию.
Подробнее тут – http://vyvod-iz-zapoya-voskresensk11.ru/vyvod-iz-zapoya-cena-v-voskresenske/
Там, где раньше хватало одного тяжёлого утра, теперь требуются дни детоксикации. И чем позже подключается врач, тем сложнее вернуть организм к относительно безопасному состоянию.
Выяснить больше – https://vyvod-iz-zapoya-voskresensk11.ru/vyvod-iz-zapoya-cena-v-voskresenske/
PhishProof curated picks – Online security feels much more approachable with these tools.
В этой публикации мы обсуждаем современные методы лечения различных заболеваний. Читатели узнают о новых медикаментах, терапиях и исследованиях, которые активно применяются для лечения. Мы нацелены на то, чтобы предоставить практические знания, которые могут помочь в борьбе с недугами.
Получить больше информации – https://www.seafood.media/fis/shared/redirect.asp?banner=6158&url=https://spb.alco-centr.ru/lazernoe-kodirovanie-ot-alkogolizma
В Воскресенске вывод из запоя может проводиться в разных форматах — с выездом на дом, в условиях стационара, в срочном режиме или с последующим амбулаторным наблюдением. Правильный выбор зависит от тяжести состояния, возраста пациента, наличия хронических заболеваний и того, насколько сильно запой нарушил привычную жизнь.
Изучить вопрос глубже – vyvod-iz-zapoya-sovetskij
Лечение зависимостей редко ограничивается одной процедурой. Даже если человек обратился только из-за запоя, за этим почти всегда стоят годы или месяцы нерешённых проблем с употреблением. Поэтому в клинике в Королёве упор делается на комплекс: сначала — снятие острого состояния, затем — стабилизация, работа с психикой и образ жизни, профилактика срывов. Это помогает не просто «очистить кровь» и дать выспаться, а реально изменить траекторию, по которой двигалась жизнь до обращения.
Изучить вопрос глубже – narkologicheskaya-klinika-otzyvy
Этот обзор позволяет по-новому взглянуть на вещи, на которые обычно и так смотрят. Мы упоминаем факты, которые мало что меняют, и события, значение которых трудно определить, но они всё равно здесь.
Вот – секс шоп
Looking for nio news? Head to the top portal, thetradable.com, featuring all essential and fresh cryptocurrency market updates, reviews, expert commentary, and major happenings. The platform is easy to navigate and caters to both beginners and seasoned professionals in the field. We also cover everything about gold, silver, industry, and much more.
Если в ситуации с алкоголем присутствуют несколько из перечисленных ниже пунктов, это повод не откладывать консультацию с наркологом в Королёве:
Разобраться лучше – кодирование от алкоголизма
Check RetailRocket – Performance tracking and targeting options boosted overall results.
Завод ПроМеталл создает чугунные печи для бани, которые служат десятилетиями и дарят настоящий жар. Модельный ряд «Атмосфера» представлен печами в сетке из нержавейки и в облицовке из натурального камня для парных. Каждая печь оснащена мощным теплообменником, быстро прогревает помещение и держит температуру часами. На сайте https://prometall.shop/ доступен полный каталог с ценами, техническими характеристиками и возможностью заказать доставку по Москве. Официальный представитель завода предлагает профессиональную установку и гарантийное обслуживание.
捕风追影下载平台AI深度學習內容匹配,專為海外華人設計,提供高清視頻和直播服務。
Наркологический центр «Еваклиник» в Саранске предоставляет профессиональную помощь людям, столкнувшимся с алкогольной и наркотической зависимостью. Лечение начинается с медицинской стабилизации и детоксикации, после чего подбирается индивидуальная программа восстановления. Комплексный подход и постоянный контроль специалистов позволяют безопасно пройти сложный этап отказа от психоактивных веществ.
Исследовать вопрос подробнее – какие лекарства опасны с алкоголем
范德沃克高清完整版,海外华人可免费观看最新热播剧集。
Клиника в Королёве закрывает этот разрыв. Здесь можно пройти полный путь — от первичной диагностики и детоксикации до реабилитации и последующего наблюдения — в пределах привычного города, не отрываясь полностью от семьи и важных дел. Это особенно важно для тех, кто продолжает работать, боится потерять позицию или репутацию, но при этом понимает, что дальше жить «как раньше» просто опасно. Лечение перестаёт быть чем-то абстрактным и пугающим: вместо общих страшилок появляется понятный маршрут, а рядом — команда специалистов, которые умеют вести пациентов с зависимостью и знают, как работать с семьями, уставшими от бесконечных срывов.
Получить больше информации – http://narkologicheskaya-klinika-korolyov11.ru
В «Трезвом городе» помогают при последствиях употребления: тревожность, бессонница, тремор, нарушения аппетита и скачки давления требуют грамотной медицинской коррекции. После стабилизации пациенту объясняют риски и предлагают план профилактики срыва.
Получить дополнительные сведения – алкогольная интоксикация после запоя
«Трезвый город» — это комплексная наркологическая помощь для взрослых пациентов: от экстренного купирования интоксикации до плановой терапии и поддержки в период восстановления. Врачи оценивают состояние, корректируют схему лечения и помогают выстроить понятный план дальнейших шагов.
Изучить вопрос глубже – капельница от алкоголя и наркотиков
Лечение зависимостей редко ограничивается одной процедурой. Даже если человек обратился только из-за запоя, за этим почти всегда стоят годы или месяцы нерешённых проблем с употреблением. Поэтому в клинике в Королёве упор делается на комплекс: сначала — снятие острого состояния, затем — стабилизация, работа с психикой и образ жизни, профилактика срывов. Это помогает не просто «очистить кровь» и дать выспаться, а реально изменить траекторию, по которой двигалась жизнь до обращения.
Узнать больше – http://narkologicheskaya-klinika-korolyov11.ru/
Оперативное лечение организовано по четкому алгоритму, который позволяет быстро стабилизировать состояние пациента и обеспечить эффективную терапию. Каждый этап направлен на комплексное восстановление организма.
Подробнее тут – http://vyvod-iz-zapoya-volgograd000.ru/vyvod-iz-zapoya-na-domu-volgograd/https://vyvod-iz-zapoya-volgograd000.ru
Санкт-петербургская клиника «Передозировка» специализируется на лечении алкогольной и наркотической зависимости. Здесь выполняют кодирование, проводят медицинское восстановление и обеспечивают психологическую поддержку для закрепления результата.
Подробнее – снятие ломок на дому
ScreenPrintShop workspace – Prints came out clear, and the ordering process was simple to follow.
FixItFactory World – Smooth layout and easy-to-read descriptions make shopping enjoyable.
В медицинских условиях специалисты обеспечивают тщательный контроль над динамикой состояния пациента. Каждый этап процедуры имеет свою задачу, которая направлена на последовательное восстановление функций организма.
Получить дополнительные сведения – вывод из запоя дешево в санкт-петербурге
Самостоятельные попытки «подлечиться» обычно сводятся к случайным комбинациям препаратов: кто-то пьёт горсть таблеток от давления и сердца, кто-то принимает успокоительные поверх алкоголя, кто-то заказывает непонятные средства «от тяги» в интернете. Такие эксперименты могут дать краткий эффект, но часто только маскируют симптомы и перегружают организм. В клинике лечение строится иначе: сначала оценивают состояние — физическое и психическое, затем подбирают безопасные схемы детоксикации и медикаментов, учитывая возраст, сопутствующие заболевания, длительность запоев и употребления. Это снижает риски осложнений и делает восстановление более управляемым: пациент и его семья видят прогресс и понимают, за счёт чего он происходит, а не живут в ожидании очередного непредсказуемого «отката».
Подробнее – https://narkologicheskaya-klinika-korolyov11.ru/narkologicheskaya-klinika-telefon-v-korolyove
Если в ситуации с алкоголем присутствуют несколько из перечисленных ниже пунктов, это повод не откладывать консультацию с наркологом в Королёве:
Узнать больше – кодирование от алкоголизма цены
Сервисный центр Miele предлагает удобные способы связи и оформления заявки. Консультанты помогают подобрать подходящее время визита мастера. Оперативность и качество обслуживания остаются приоритетом. Информация доступна на официальном ресурсе – https://mieleservis.ru/
Phone Repair Pro Hub – Efficient and reliable service with constant communication.
Техническая фирма «Экспресс-связь» в Екатеринбурге обеспечивает профессиональный монтаж систем защиты и автоматического управления. Мастера осуществляют монтаж камер наблюдения, ОПС, видеодомофонов, систем контроля доступа и ЛВС с разработкой проектов и вводом в эксплуатацию. Полный перечень услуг и цены представлены на сайте https://express-svyaz.ru/index.php с примерами реализованных проектов. Предприятие изготавливает временные сооружения, блок-контейнеры и фасонные изделия с защитным покрытием.
Текст включает разнообразную информацию, которая может показаться любопытной, но не меняет устоявшегося восприятия. Предлагаем просто насладиться чтением, не ожидая значительной пользы.
Подробнее читать – детокс чай для похудения
Нарколог на дом в Химках особенно востребован тогда, когда состояние человека уже нельзя назвать обычным похмельем, но он категорически отказывается ехать в клинику. Запой тянется несколько дней или дольше, нет полноценного сна, пульс постоянно учащённый, руки трясутся, давление скачет, а любое утро начинается не с облегчения, а с новой дозы алкоголя «чтобы не развалиться». В такой ситуации родственники оказываются между страхом и беспомощностью: понятно, что дальше ждать опасно, но уговорить собрать вещи и поехать в стационар не получается. Формат выезда нарколога на дом как раз и закрывает этот тупик — врач приезжает туда, где сейчас находится человек, оценивает риски и сразу начинает помощь.
Подробнее – http://www.domen.ru
Санкт-петербургская клиника «Передозировка» специализируется на лечении алкогольной и наркотической зависимости. Здесь выполняют кодирование, проводят медицинское восстановление и обеспечивают психологическую поддержку для закрепления результата.
Изучить вопрос глубже – как быстро протрезветь и убрать
Наркологический центр «Еваклиник» в Саранске предоставляет профессиональную помощь людям, столкнувшимся с алкогольной и наркотической зависимостью. Лечение начинается с медицинской стабилизации и детоксикации, после чего подбирается индивидуальная программа восстановления. Комплексный подход и постоянный контроль специалистов позволяют безопасно пройти сложный этап отказа от психоактивных веществ.
Подробнее тут – https://evaclinica.ru/blog/efedrin-dejstvie-i-posledstviya.html
https://goodtech.com.ua/
Наркологический центр «Трезвый город» специализируется на лечении алкоголизма и наркомании с акцентом на безопасность пациента. Подбираются индивидуальные протоколы, учитывается анамнез, переносимость препаратов и возможные осложнения.
Подробнее тут – детоксикация при алкоголизме
Профессиональное сообщество отмечает, будто использование технологий цифрового искусства в структуру обучения нового поколения помогает подросткам не просто постигать сложные навыки будущего, а также всесторонне раскрывать личный креатив в условиях современной реальности.
Источник https://basot.ru/
RetargetRoom retargeting hub – Audience customization options delivered dependable results.
Лечение в наркологической клинике в Чехове удобно не только близостью к дому. Главный плюс — комплексный подход. Зависимость практически никогда не ограничивается только алкоголем или наркотиком: страдают сердце и сосуды, печень, нервная система, психика, отношения в семье и на работе. Если пытаться лечить только одно звено, например, периодически «чистить кровь» капельницами, без проработки причин и последствий, ситуация быстро возвращается к исходной точке. В клинике выстраивается последовательная работа: сначала стабилизируют организм, затем укрепляют психику, а дальше помогают менять привычный образ жизни, чтобы трезвость стала не кратким эпизодом, а новой нормой.
Подробнее – https://narkologicheskaya-klinika-chekhov11.ru/narkologicheskaya-klinika-sajt-v-chekhove/
При поступлении вызова специалисты клиники «ЗдоровьеНорм» выезжают на дом в течение 30–60 минут. Врач проводит тщательную диагностику, измеряя артериальное давление, пульс, уровень кислорода в крови и оценивая общее состояние пациента. После этого осуществляется индивидуальный подбор лечебной схемы, основанной на объективных данных и анамнезе пациента.
Исследовать вопрос подробнее – https://vyvod-iz-zapoya-krasnodar00.ru/vyvod-iz-zapoya-kruglosutochno-krasnodar
Теневая платформа Mega — это ресурс, находящийся в закрытой части интернета, где можно найти к разнообразным сервисам и услугам.
ссылка на сайт даркнет мега отождествляется с мрачной тематикой даркнета и максимальным уровнем анонимности.
Метафорически эту площадку выступает как портал в закрытое цифровое пространство, которое имеет свои тонкости.
Платформа Mega является одной из заметных частей «подземного интернета», где ключевую роль играют анонимность участников и защита каналов связи.
Вход на эти сайты обычно осуществляется применения специального ПО (например, Тор), и дополнительно VPN для преодоления блокировок.
С целью посещения ресурса, пользователю необходимо знать точный адрес (ONION-ссылку) и провести тщательную настройку оборудования.
Главная особенность Меги — это скрытность посетителей и невозможности создать обычный аккаунт.
Участники данной сети находят разнообразные предложения: от закрытых каналов связи до площадок для торговли.
Ресурс предоставляет охрану от слежки благодаря современным технологиям шифрования.
Но при этом даже многоуровневая защита может обеспечить только относительную защиту, особенно при неосторожных действиях посетителей ресурса.
На сегодняшнем этапе развития сети этот сайт имеет свою специфическую нишу, становясь местом для людей, кто охотится за непубличной данными и услугами.
Внутри площадки могут встречаться как допустимые законом сведения, так и противоправные, что вынуждает участника проявлять бдительность и ответственность.
Анализируя роль подобных площадок в интернете, можно выделить ряд важных моментов, связанных с правилами поведения и конфиденциальности.
Прежде всего, необходима правильная конфигурация системы доступа и использование комплексной защиты для минимизации рисков.
Пользователь обязан разбираться в принципы скрытности и, по мере сил придерживаться моральным нормам при общении на данной платформе.
Во-вторых, не стоит забывать о юридических последствиях и возможных последствиях за противоправные поступки.
Юридические системы мира по-разному трактует доступа к подобным площадкам и степени вины пользователей.
Отдельные специалисты подчеркивают, что эти ресурсы могут выступать пространством для дискуссий и обмена опытом и сохранения конфиденциальности при грамотном поведении.
Тем не менее, опасность мошенничества, хищения средств и криминальной активности здесь всегда присутствуют.
Находясь на грани свободой слова и суровыми законами, Мега Даркнет представляет собой наиболее неоднозначный сегмент всемирной паутины.
Резюмируя для посетителей: необходимо крайне аккуратно подходить к выбору контента и оценке надежности сайтов.
Итоговый вывод сводится к тому, что подобные ресурсы — это сложный цифровой феномен. Сайт обеспечивает высокий уровень анонимности и защиты личных данных, но накладывает на посетителя осторожности, понимания технологий и моральной ответственности.
Этот ресурс наглядно демонстрирует спектр человеческих поступков в обстановке минимального надзора и предоставляет платформу для обсуждения острых тем.
Как видно, этот сегмент сети остается сложным феноменом интернета, где гармония прав и рисков каждый пользователь находит для себя сам.
Перед тем как принять решение, пациент и родственники получают объяснения по доступным направлениям. Обычно обсуждаются: амбулаторные консультации, дневной или круглосуточный стационар, выездная помощь, реабилитационные программы и последующее наблюдение. Это позволяет выстроить индивидуальный маршрут, а не навязывать один и тот же сценарий всем подряд.
Разобраться лучше – https://narkologicheskaya-klinika-himki11.ru/lechenie-v-narkologicheskoj-klinike-v-himkah
В клинике «Трезвый город» доступна помощь при запое и тяжёлой абстиненции с медицинским наблюдением. Проводится инфузионная терапия, медикаментозная коррекция и восстановление сна, общего самочувствия и вегетативных проявлений.
Получить дополнительные сведения – https://trezviy-gorod.ru/narkolog-na-dom
При длительном запое или серьезной алкогольной интоксикации часто нет возможности или желания ехать в стационар. В таких ситуациях оптимальным решением становится вызов нарколога на дом в Сочи. Специалисты клиники «Жизнь без Запоя» круглосуточно приезжают к пациентам, оперативно оказывают медицинскую помощь и проводят профессиональную детоксикацию организма прямо в домашних условиях. Благодаря комфортному лечению на дому пациенты быстрее восстанавливаются, избегают дополнительного стресса и осложнений, связанных с госпитализацией.
Узнать больше – нарколог на дом анонимно сочи
Наркологическая клиника «Трезвый город» оказывает медицинскую помощь при алкогольной и наркотической зависимости: детоксикация, снятие абстиненции, стабилизация состояния и подбор дальнейшей тактики лечения. Работа ведётся конфиденциально, с контролем показателей и учётом сопутствующих рисков.
Детальнее – болит в правом боку после алкоголя
«ЮгМедЦентр» поддерживает строгую конфиденциальность: выездные специалисты приезжают без медицинской символики, в гражданской одежде; документы формулируются нейтрально; уведомления не содержат триггерных слов; профиль можно оформить под кодом. Все записи ведутся в шифрованном контуре с разграничением доступа по ролям, а видеосессии с врачом/психологом не записываются. Мы предупреждаем о цифровой гигиене: включите «тихий режим» уведомлений, избегайте пересылки документов в открытых чатах, используйте резервный канал связи для экстренных вопросов.
Исследовать вопрос подробнее – http://
vegasino promo code
FontFoundry Depot Hub – Easy interface and well-displayed previews make selecting fonts smooth.
В клинике «Передозировка» в Санкт-Петербурге пациентам доступно индивидуальное лечение наркозависимости и алкоголизма. Центр использует современные протоколы терапии, предлагает конфиденциальное кодирование и поддерживает пациентов на всех этапах восстановления.
Ознакомиться с деталями – противопоказания при кодировании от алкоголизма
Клиника «Передозировка» в Санкт-Петербурге предоставляет профессиональную помощь при зависимостях. Пациенты получают лечение алкоголизма и наркомании, проходят кодирование и реабилитацию, что способствует устойчивому возвращению к нормальной жизни.
Исследовать вопрос подробнее – вывод из запоя капельница
Клиника «Формула трезвости» в Москве предоставляет круглосуточную помощь людям с зависимостью. Лечение алкоголизма и наркомании, кодирование и реабилитационные программы позволяют восстановить физическое и психологическое здоровье пациента на каждом этапе.
Узнать больше – торпедо кодировка от алкоголя
Pivot Palace Hub – User-friendly layout with smooth browsing for an enjoyable experience.
SeamStory designs – The craftsmanship shines through, and product info is clear and useful.
Платная наркологическая клиника «Трезвый город» предлагает лечение в комфортных условиях и с соблюдением медицинской этики. Специалисты помогают снять острые симптомы, снизить тягу и подготовить пациента к следующему этапу — реабилитации или амбулаторному сопровождению.
Подробнее можно узнать тут – https://trezviy-gorod.ru/stati/priznaki-alkogolizma-opredelenie-zavisimosti-muzhchin-zhenshchin.html
Многие годами живут в логике: «главное — с утра выпить чуть-чуть, станет легче». На коротком промежутке времени это действительно частично снимает симптомы, но по сути лишь продлевает запой и усиливает интоксикацию. Организм не успевает переработать продукты распада алкоголя, кровь становится «тяжёлой», нарушается работа сосудов, возрастает нагрузка на сердце и мозг.
Подробнее тут – kapelnica-ot-zapoya-na-domu
В клинике «Передозировка» в Санкт-Петербурге пациентам доступно индивидуальное лечение наркозависимости и алкоголизма. Центр использует современные протоколы терапии, предлагает конфиденциальное кодирование и поддерживает пациентов на всех этапах восстановления.
Подробнее тут – зависимость от синтетических наркотиков
Признаки, что пора задуматься о кодировании
Подробнее можно узнать тут – http://kodirovanie-ot-alkogolizma-korolyov11.ru/klinika-kodirovaniya-ot-alkogolizma-v-korolyove/
Кодирование не является чудесным выключателем тяги, но оно может стать сильным инструментом, который помогает закрепить решение бросить пить и даёт организму время восстановиться. Врач формирует у пациента устойчивую установку на отказ от алкоголя и подкрепляет её медикаментозно или психотерапевтически. При этом важен не только сам факт процедуры, но и то, как она встроена в общий план лечения: была ли проведена детоксикация, есть ли поддерживающая терапия, подключена ли реабилитация, работает ли семья с собственным выгоранием и созависимостью. Именно поэтому обращение за кодированием по месту жительства в Королёве удобно: можно не только выполнить саму процедуру, но и организовать наблюдение, при необходимости скорректировать тактику, не уезжая далеко от дома.
Исследовать вопрос подробнее – http://kodirovanie-ot-alkogolizma-korolyov11.ru
промокод jetton на фриспины
Наркологическая клиника в Химках — это возможность получить помощь при алкогольной и наркотической зависимости рядом с домом, а не ездить по всему региону в поисках специалистов. Для многих людей обращение к наркологу до последнего кажется чем-то «крайним»: кажется, что нужно терпеть, уговаривать себя «завязать самому», ждать подходящего момента, отпуска или «нового года с чистого листа». Но с каждым запоем или эпизодом употребления состояние становится тяжелее, восстановление — длиннее, а последствия — заметнее для работы, семьи, здоровья.
Подробнее можно узнать тут – http://narkologicheskaya-klinika-himki11.ru/anonimnaya-narkologicheskaya-klinika-v-himkah/
Капельница от запоя работает иначе. Через вену вводятся растворы, которые восполняют жидкость, разжижают кровь, помогают печени и почкам выводить токсичные вещества, корректируют электролитный баланс. Дополнительно используются препараты для снижения тревоги, нормализации сна, защиты сердечно-сосудистой системы и печени. Всё это подбирается индивидуально, с учётом возраста, давления, хронических заболеваний и длительности запоя.
Подробнее можно узнать тут – kapelnica-ot-alkogolya
Зависимость редко начинается резко. Сначала это «разовые» посиделки, алкоголь «для снятия стресса», эпизодическое употребление психоактивных веществ «из любопытства» или «для компании». На этом этапе человеку кажется, что он полностью контролирует ситуацию. Со временем эпизоды употребления становятся чаще, дозы растут, появляются провалы в памяти, срывы, невозможность остановиться вовремя. В этот момент уже страдают здоровье, работа, отношения с близкими. Обращение в наркологическую клинику позволяет не доводить ситуацию до критической точки и остановить разрушение жизни на любом этапе заболевания.
Разобраться лучше – кодирование от алкоголизма выезд на дом
instant setup servers – Deployment was fast and the service has been rock solid.
Social Signal store – I’m genuinely impressed by how sleek and seamless everything feels.
RevenueHarbor network – Strategic advice here supported dependable income expansion.
online clinic tools hub – Planning to revisit shortly and explore more features.
Клиника «Еваклиник» в Саранске специализируется на лечении зависимостей с применением проверенных медицинских протоколов. Пациентам доступна круглосуточная наркологическая помощь, медикаментозная поддержка и сопровождение на этапе реабилитации. Специалисты центра работают не только с физическими проявлениями зависимости, но и с психологическими причинами, что повышает эффективность лечения.
Ознакомиться с деталями – https://evaclinica.ru/blog/otkaz-ot-alkogolya.html
Команда клиники — это врачи-наркологи, психиатры-консультанты, специалисты интенсивной терапии, клинический психолог, психотерапевт и медсёстры с опытом круглосуточного поста. Мы разговариваем «языком фактов»: витальные показатели, шкалы симптомов, дневники воды и сна, малые бытовые цели. Такой язык исключает стигму и «магическое мышление»; он понятен семье и помогает принимать решения без страхов и «подстраховочных» излишков.
Углубиться в тему – лечение в наркологической клинике ростов-на-дону
Наркологическая клиника «Еваклиник» в Саранске оказывает комплексную помощь при алкогольной и наркотической зависимости. В центре проводится медицинская детоксикация, поддерживающая терапия и восстановительные программы с участием врачей и психологов. Индивидуальный подход, конфиденциальность и современные методы лечения помогают пациентам стабилизировать состояние и сделать первый шаг к устойчивой ремиссии.
Подробнее тут – наркологический центр адрес
Наркологическая клиника в Долгопрудном — это возможность получить помощь при алкогольной и наркотической зависимости рядом с домом, не тратя время на поездки по Москве и очереди в перегруженных городских учреждениях. Для жителей Долгопрудного и ближайших населённых пунктов особенно важно, что сюда можно обратиться в любое время суток: при затянувшемся запое, после эпизода употребления наркотиков, при первых признаках формирования зависимости или в ситуации, когда семья больше не справляется с проблемой своими силами.
Углубиться в тему – кодирование от алкоголизма в долгопрудном
Каждый из этих симптомов по отдельности уже опасен, а в сочетании они создают высокий риск для жизни. Самостоятельные эксперименты с таблетками, резкий отказ от алкоголя «через силу» или попытка «переспать» запой без медицинского контроля могут обернуться реанимацией. Гораздо безопаснее вовремя вызвать специалиста и провести детоксикацию под наблюдением, особенно когда речь идёт о жителях крупного города, где доступна профессиональная наркологическая помощь.
Получить дополнительные сведения – vyvod-iz-zapoya-na-domu-moskva-nedorogo
panel setup hub – Navigation is straightforward and everything is easy to see.
Помощь нарколога нужна, если алкоголь или наркотики постепенно начинают занимать в жизни всё больше места. Человек заранее планирует, когда и как будет пить, нервничает, если что-то срывается, раздражается, когда близкие пытаются ограничить употребление. Появляются скандалы после «весёлых» вечеров, пропущенные рабочие смены, проблемы с деньгами, конфликты с родными. При этом любые разговоры заканчиваются обещаниями «завязать с понедельника» или обвинениями окружающих.
Получить дополнительную информацию – narkologicheskaya-klinika-voskresensk11.ru/
Эта публикация обращает внимание на важность профилактики зависимостей. Мы обсудим, как осведомленность и образование могут помочь в предотвращении возникновения зависимости. Читатели смогут ознакомиться с полезными советами и ресурсами, которые способствуют здоровому образу жизни.
Узнать больше – http://google.com.ag/url?q=https://spb.alco-centr.ru/kodirovanie-po-dovzhenko
На практике семья часто обращается за помощью слишком поздно — когда близкий уже еле встаёт, не спит ночами, говорит странные вещи, а давление скачет так, что страшно оставлять одного. Чтобы не доводить до этого, важно знать признаки, при которых капельница от запоя в Долгопрудном — не «желательно», а по-настоящему необходима.
Подробнее можно узнать тут – http://kapelnica-ot-zapoya-dolgoprudnyj11.ru
Visit Wellness Ward – Everything loads instantly and the design is very user-friendly.
FormulaFoundry Direct – Informative pages and simple layout make checking products very easy.
На практике семья часто обращается за помощью слишком поздно — когда близкий уже еле встаёт, не спит ночами, говорит странные вещи, а давление скачет так, что страшно оставлять одного. Чтобы не доводить до этого, важно знать признаки, при которых капельница от запоя в Долгопрудном — не «желательно», а по-настоящему необходима.
Разобраться лучше – http://kapelnica-ot-zapoya-dolgoprudnyj11.ru/kapelnica-ot-zapoya-v-stacionare-v-dolgoprudnom/https://kapelnica-ot-zapoya-dolgoprudnyj11.ru
Print Parlor Hub – Everything is clearly arranged, making exploration simple and pleasant.
Мы не используем универсальные «сильные капельницы». Эффективность даёт точное совпадение с задачей. Ниже — логика выбора профилей и маркеры, на которые мы ориентируемся при контроле эффективности и безопасности.
Исследовать вопрос подробнее – наркологический вывод из запоя в санкт-петербурге
Explore Calveria – I discovered the site and already enjoy the smooth, user-friendly design.
Признаки, что пора задуматься о кодировании
Углубиться в тему – kodirovanie-ot-alkogolizma-ceny
wishwharf.shop – Just found this site and the layout is simple and easy to navigate.
В клинике «Трезвый город» доступна помощь при запое и тяжёлой абстиненции с медицинским наблюдением. Проводится инфузионная терапия, медикаментозная коррекция и восстановление сна, общего самочувствия и вегетативных проявлений.
Углубиться в тему – https://trezviy-gorod.ru/
winsane app
Наркологическая клиника в Долгопрудном помогает в ситуациях, когда:
Углубиться в тему – кодирование от алкоголизма в долгопрудном
Check Search Signal – The analysis here helped me focus my SEO efforts effectively.
Сигналом к тому, что пора обсудить вариант кодирования с наркологом, служит не один какой-то эпизод, а совокупность симптомов. Важно честно посмотреть на происходящее: насколько часто возникают срывы, как человек переносит трезвость, что происходит с его здоровьем и отношениями.
Выяснить больше – kodirovanie-ot-alkogolizma-ceny
Вопрос «а не рано ли кодироваться» часто звучит и от самих пациентов, и от их близких. Кажется, что кодирование — это крайняя мера «на последней стадии», а пока человек работает, иногда бывает трезвым и «не валяется под забором», можно подождать. На самом деле гораздо разумнее ориентироваться не на стереотипы, а на реальные признаки того, что зависимость уже управляет жизнью, а не наоборот. Кодирование от алкоголизма в Королёве рассматривается именно тогда, когда попытки остановиться своими силами систематически проваливаются, а каждый новый запой становится тяжелее предыдущего.
Получить больше информации – kodirovanie-ot-alkogolizma-korolev
После купирования острых симптомов врач объясняет, какие шаги нужно сделать дальше: ограничиться домашним наблюдением, подумать о коротком стационарном курсе или сразу планировать дальнейшее лечение зависимости. Это помогает не возвращаться к затяжным запоям уже через несколько недель.
Изучить вопрос глубже – https://vyvod-iz-zapoya-moskva011.ru/vyvod-iz-zapoya-v-moskve-stacionar/
Служба доставки цветов в Ростове-на-Дону привозит свежие букеты от 30 минут с момента заказа в любую точку города. В ассортименте розы всех оттенков — от классических красных до премиальных пионовидных и французских сортов, букеты от 5 до 251 цветка для любого повода. Флористы собирают композиции из свежесрезанных бутонов, которые простоят в вазе до двух недель. Оформить заказ можно на https://rostov-buket.ru/ с доставкой по указанному адресу, оплата принимается наличными, картой или через Яндекс Сплит. Магазин работает ежедневно, включая выходные и праздники.
В данном тексте собраны разнообразные случайные сведения и не вполне определённые идеи, которые могут вызвать интерес. Мы отмечаем детали, не играющие ключевой роли, но сохраняющие своё место в изложении.
Подробнее читать – таблетки для аборта
В реабилитационном центре «Еваклиник» в Саранске созданы условия для безопасного и анонимного восстановления после зависимости. Программы включают детоксикацию, стабилизацию состояния и поэтапную реабилитацию под контролем медицинского персонала. Такой формат помощи позволяет снизить риски срывов и постепенно вернуться к нормальной жизни.
Подробнее – зависимость от каннабиса
Рукава высокого давления из нержавеющей стали незаменимы там, где требуется гибкость соединения и устойчивость к экстремальным условиям. Каталог на https://iz-medi.ru/ включает металлорукава РВД диаметром до 250 мм, гибкие подводки от 1/2 до 2 1/2 дюйма и шаровые краны всех типов: муфтовые, фланцевые, под приварку, трёхходовые. Нержавеющая сталь обеспечивает долговечность в системах водоснабжения, отопления и промышленных установках. Звоните +7 499 390-62-89 для консультации по выбору.
RotiAndRice meals – Tasty options and quick ordering ensured a satisfying lunch.
«Трезвый город» — это комплексная наркологическая помощь для взрослых пациентов: от экстренного купирования интоксикации до плановой терапии и поддержки в период восстановления. Врачи оценивают состояние, корректируют схему лечения и помогают выстроить понятный план дальнейших шагов.
Получить дополнительную информацию – кодирование от алкоголизма
В реабилитационном центре «Еваклиник» в Саранске созданы условия для безопасного и анонимного восстановления после зависимости. Программы включают детоксикацию, стабилизацию состояния и поэтапную реабилитацию под контролем медицинского персонала. Такой формат помощи позволяет снизить риски срывов и постепенно вернуться к нормальной жизни.
Подробнее можно узнать тут – курение никотиновая зависимость
В клинике «Еваклиник» в Саранске пациенты получают квалифицированную наркологическую помощь в комфортных и конфиденциальных условиях. Центр применяет современные методы терапии, направленные на снижение тяги и восстановление общего состояния организма. Поддержка врачей и психологов помогает закрепить результат и сформировать устойчивую мотивацию к трезвой жизни.
Выяснить больше – https://evaclinica.ru/vyvedenie-iz-zapoya
В этой статье мы рассмотрим современные достижения в области медицины, включая инновационные методы лечения и диагностики. Мы обсудим важность профилактики заболеваний и роль технологий в улучшении качества здравоохранения. Читатели узнают о влиянии медицины на повседневную жизнь и ее значение для современного общества.
Выяснить больше – http://printwhatyoulike.com/get_page?topic=59750.100&url=https://spb.alco-centr.ru/himzaschita
Сигналом к тому, что пора обсудить вариант кодирования с наркологом, служит не один какой-то эпизод, а совокупность симптомов. Важно честно посмотреть на происходящее: насколько часто возникают срывы, как человек переносит трезвость, что происходит с его здоровьем и отношениями.
Узнать больше – https://kodirovanie-ot-alkogolizma-korolyov11.ru/ehffektivnoe-kodirovanie-ot-alkogolizma-v-korolyove
Вот отзыв за этот эйфор: вред от кокаин, мефдрон, гашиш да в пятницу отправляли… вот до сих пор небьеться… нервничаю…Эффект чувствуется почти сразу, эйфория и стим в голове
Как отмечает нарколог Олег Васильев, «чем раньше пациент получает квалифицированную медицинскую помощь, тем меньше риск серьезных осложнений».
Выяснить больше – http://narcolog-na-dom-v-irkutske00.ru/vyzov-narkologa-na-dom-irkutsk/
sublimation supplies store – The site is well-structured and browsing is really pleasant.
online signal shop – I appreciate how simple and streamlined the design is.
Наркологическая клиника в Химках — это возможность получить помощь при алкогольной и наркотической зависимости рядом с домом, а не ездить по всему региону в поисках специалистов. Для многих людей обращение к наркологу до последнего кажется чем-то «крайним»: кажется, что нужно терпеть, уговаривать себя «завязать самому», ждать подходящего момента, отпуска или «нового года с чистого листа». Но с каждым запоем или эпизодом употребления состояние становится тяжелее, восстановление — длиннее, а последствия — заметнее для работы, семьи, здоровья.
Исследовать вопрос подробнее – https://narkologicheskaya-klinika-himki11.ru/narkologicheskaya-klinika-otzyvy-v-himkah/
watch collector shop – The site feels smooth to browse and is really user-friendly.
Перед тем как принять решение, пациент и родственники получают объяснения по доступным направлениям. Обычно обсуждаются: амбулаторные консультации, дневной или круглосуточный стационар, выездная помощь, реабилитационные программы и последующее наблюдение. Это позволяет выстроить индивидуальный маршрут, а не навязывать один и тот же сценарий всем подряд.
Углубиться в тему – https://narkologicheskaya-klinika-himki11.ru/anonimnaya-narkologicheskaya-klinika-v-himkah
Для самого пациента это шанс получить медицинское вмешательство без дополнительного стресс-фактора в виде транспорта, очередей и «больничной атмосферы». Он остаётся в привычной обстановке, в своей квартире, с теми же предметами, к которым привык, и это снижает сопротивление. Вместо жесткого сценария «либо немедленно в стационар, либо ничего» появляется промежуточный, более мягкий вариант: врачи приезжают домой, снимают остроту состояния, подбирают схему капельницы и медикаментов, объясняют, что делать дальше. Нередко именно после такого первого опыта человек впервые всерьёз задумывается о полноценном лечении, потому что ощущает реальную разницу в самочувствии до и после профессиональной помощи, а не просто очередной «опохмел».
Ознакомиться с деталями – врач нарколог на дом
featured favorites hub – I came across some standout products during my search.
За счёт сочетания этих составляющих лечение перестаёт быть набором отдельных процедур. Пациент и его близкие видят, что каждый шаг логично вытекает из предыдущего и ведёт к общей цели — устойчивой трезвости и постепенному восстановлению качества жизни.
Получить дополнительные сведения – телефон наркологической клиники
Sparks Tow Boutique – Cute and tidy design helped me locate the items fast.
FreightFriendly Online – Well-organized sections and smooth browsing make checking products effortless.
Автономная некоммерческая организация МСЭС в Москве выполняет независимые судебные и досудебные экспертизы в области строительства, финансов, медицины и прочих направлениях: строительно-технические исследования объектов и конструкций, проверку проектов и смет, бухгалтерские и экономические экспертизы, медицинские исследования и оценку собственности. Ищете экспертиза объекта незавершенного строительства? Подробная информация на mses-expert.ru Специалисты компании прошли сертификацию в Университете МВД России, включены в реестр Палаты судебных экспертов и имеют полный пакет лицензий и аккредитаций для осуществления экспертных работ любой категории сложности с четким выполнением сроков и законодательных требований.
Visit WiFi Wizard – I moved through pages effortlessly and discovered what I needed fast.
Специалист уточняет продолжительность запоя, характер симптоматики и наличие хронических заболеваний, проводит измерения пульса, давления и температуры, что позволяет оперативно скорректировать терапию.
Детальнее – вывод из запоя капельница на дому в волгограде
Work Whim Central – The site is intuitive with smooth transitions between pages.
В реабилитационном центре «Еваклиник» в Саранске созданы условия для безопасного и анонимного восстановления после зависимости. Программы включают детоксикацию, стабилизацию состояния и поэтапную реабилитацию под контролем медицинского персонала. Такой формат помощи позволяет снизить риски срывов и постепенно вернуться к нормальной жизни.
Разобраться лучше – признаки созависимости
После завершения процедур врач дает пациенту и его родственникам подробные рекомендации по дальнейшему восстановлению и профилактике рецидивов.
Подробнее тут – вызвать нарколога на дом срочно
В таких случаях наркологическая клиника помогает не только вывести из запоя и поставить капельницу, но и выстроить долгосрочный план: обследование, медикаментозную поддержку, реабилитацию, работу с психологом. Это даёт шанс не просто восстановиться после конкретного эпизода, а перестать повторять один и тот же разрушительный сценарий.
Подробнее можно узнать тут – https://narkologicheskaya-klinika-voskresensk11.ru/chastnaya-narkologicheskaya-klinika-v-voskresenske/
Для семьи это почти всегда тяжёлый, эмоционально изматывающий период. В доме копятся усталость, обида, чувство вины, страх за близкого. Но при этом сохраняется надежда, что удастся «обойтись своими силами». В какой-то момент становится ясно: без профессиональной наркологической помощи уже не справиться. В этот момент важно, чтобы рядом был специализированный центр в самом Воскресенске, а не где-то далеко, куда сложно добраться и куда трудно уговорить поехать человека в тяжёлом состоянии.
Детальнее – http://narkologicheskaya-klinika-voskresensk11.ru
Когда выезд особенно удобен и оправдан, важно понимать не только эмоционально, но и по конкретным признакам. Есть ряд типичных ситуаций, в которых именно формат «на дому» становится наиболее реалистичным и безопасным вариантом, а стационар можно рассматривать как следующий шаг, когда острота будет снята и человек станет более сговорчивым.
Получить дополнительную информацию – https://narkolog-na-dom-himki11.ru
Обращение в местную клинику даёт важное преимущество — доступность. Здесь можно пройти диагностику, детоксикацию, вывод из запоя, курс лечения и реабилитации в привычном городе, без выснаживающих переездов. Пациенту легче решиться на стационар, когда он понимает, что близкие рядом и в любой момент могут приехать, поучаствовать в обсуждении плана терапии, привезти необходимые вещи. При этом подход остаётся профессиональным: учитываются стаж зависимости, сопутствующие заболевания, психоэмоциональное состояние, семейная ситуация. Лечение строится не вокруг одной «волшебной» процедуры, а как последовательный маршрут — от первой консультации до выхода в стабильную ремиссию.
Детальнее – http://www.domen.ru
SeaSprayShop decor – Fresh seaside aesthetic and effortless checkout made browsing enjoyable.
奇思妙探高清完整版AI深度学习内容匹配,海外华人可免费观看最新热播剧集。
奇思妙探第二季高清完整版,海外华人可免费观看最新热播剧集。
Когда человек оказывается в сложной ситуации из-за длительного употребления алкоголя, важно получить быструю и квалифицированную медицинскую помощь. Запойные состояния, алкогольная интоксикация, тяжелый абстинентный синдром — все это требует своевременного вмешательства врача. Однако не всегда есть возможность или желание обращаться в стационар.
Углубиться в тему – выезд нарколога на дом в иркутске
Каждый из этих симптомов по отдельности уже опасен, а в сочетании они создают высокий риск для жизни. Самостоятельные эксперименты с таблетками, резкий отказ от алкоголя «через силу» или попытка «переспать» запой без медицинского контроля могут обернуться реанимацией. Гораздо безопаснее вовремя вызвать специалиста и провести детоксикацию под наблюдением, особенно когда речь идёт о жителях крупного города, где доступна профессиональная наркологическая помощь.
Подробнее тут – https://vyvod-iz-zapoya-moskva011.ru/vyvod-iz-zapoya-v-moskve-na-domu/
Есть ряд признаков, при которых ждать категорически нельзя и нужна срочная помощь врача, а не очередные «народные методы». Если вы замечаете у человека следующие симптомы, это прямой повод организовать профессиональный вывод из запоя:
Выяснить больше – http://vyvod-iz-zapoya-moskva011.ru/vyvod-iz-zapoya-v-moskve-stacionar/
В медицинских условиях специалисты обеспечивают тщательный контроль над динамикой состояния пациента. Каждый этап процедуры имеет свою задачу, которая направлена на последовательное восстановление функций организма.
Исследовать вопрос подробнее – http://vyvod-iz-zapoya-volgograd0.ru
Обратиться за помощью могут как сами пациенты, так и их родственники. Часто именно близкие первыми замечают, что человек изменился: стал раздражительным, агрессивным или, наоборот, отстранённым, перестал выполнять обещания, начал скрывать доходы и траты. В клинике семья получает не только медицинскую помощь для зависимого, но и понятную стратегию действий: как разговаривать, как мотивировать на лечение, как не провоцировать конфликты и не усиливать чувство стыда у человека, который и так боится признаться себе в наличии болезни.
Получить дополнительные сведения – платная наркологическая клиника москва
Клиника «Формула трезвости» в Москве помогает пациентам восстановиться после зависимости. Здесь проводят лечение алкоголизма и наркомании, выполняют кодирование разными методами и сопровождают полную реабилитацию, чтобы закрепить результат и вернуть человеку стабильное состояние.
Подробнее тут – как отправить на принудительное лечение от наркозависимости
Алкогольная и наркотическая зависимость являются серьёзными заболеваниями, требующими оперативного и квалифицированного вмешательства. Когда речь идёт о критическом состоянии пациента, особенно после длительного употребления алкоголя или наркотических веществ, время играет ключевую роль. Клиника «РеабилитАльянс» в Краснодаре предлагает услугу нарколога на дом, обеспечивая пациентам необходимую помощь в любой момент дня и ночи. Наши специалисты готовы оперативно выехать по указанному адресу и предоставить все необходимые медицинские процедуры на месте.
Подробнее можно узнать тут – врач нарколог выезд на дом краснодар
Не рекомендую правда увлекаться порохами – их хочется ещё и ещё и в итоге не так уж и просто слезть с марафона…) Но это уже ваше дело ; ) вред от кокаин, мефдрон, гашиш спасибо за отзыв!Готовыми работают
RyzenRealm tech center – Solid hardware options boosted my machine’s speed and reliability.
Hi! Hope your day is going smoothly.
Dear Site Administrator, I’m reaching out with an offer of financial support for your platform. If interested in a no-strings grant to develop your website, please reply to discuss possibilities. Please contact me on WhatsApp +37477998475
Длительный запой способен нанести непоправимый вред организму, привести к тяжелым нарушениям работы внутренних органов и поставить под угрозу жизнь пациента. В таких случаях необходимо срочное медицинское вмешательство, которое позволяет быстро стабилизировать состояние, вывести токсины и предотвратить развитие опасных осложнений. Клиника «ЗдоровьеНорм» в Краснодаре предлагает профессиональный вывод из запоя на дому, обеспечивая комплексное лечение с максимальной оперативностью и полной конфиденциальностью.
Подробнее – вывод из запоя на дому недорого
Клиника нужна и тем, кто уже пробовал лечиться самостоятельно: пил лекарства «от тяги», ходил к психологу без медицинской поддержки, обещал себе не пить, но каждый стресс или конфликт всё равно приводили к старому сценарию. В такой ситуации комплексный подход — медицинский и психологический — даёт куда больше шансов, чем очередное одиночное обещание «в этот раз точно получится».
Ознакомиться с деталями – https://narkologicheskaya-klinika-himki11.ru/chastnaya-narkologicheskaya-klinika-v-himkah
Московская клиника «Формула трезвости» специализируется на лечении зависимостей. Пациентам доступны программы лечения наркомании и алкоголизма, услуги кодирования, а также продуманная реабилитация, включающая психологическую поддержку и восстановительные методики.
Подробнее тут – https://formula-clinic.ru/stati/belaya-gorachka-pri-alkogolizme.html
Наша выездная бригада оснащена как мобильный мини-кабинет: инфузомат для покапельной титрации, портативный кардиомонитор, пульсоксиметр, глюкометр, экспресс-кассеты Na?/K? и набор для регистрации ЭКГ по показаниям. Такой комплект позволяет принять решение на месте — безопасно ли начинать дома или целесообразнее перевести пациента в стационарное отделение «ЮгМедЦентра» без «перезапуска» обследований. Мы практикуем минимально достаточную фармакотерапию: в схеме нет «лишних» позиций и конфликтов с уже принимаемыми лекарствами (антигипертензивные, антиаритмические, сахароснижающие и др.).
Получить дополнительные сведения – https://narcolog-na-dom-sochi00.ru/narkolog-na-dom-adler
ToolTime store – I discovered some really handy items with no issues.
fast stream tools – I had no trouble finding exactly what I was after.
Voltvessel Essentials – Clear navigation and a smooth layout make finding items simple.
Во внимание берутся не только масштаб и длительность запоев, но и изменения в поведении. Если человек регулярно обещает «завязать с понедельника», но каждый раз срывается, если рабочие задачи всё чаще выполняются с трудом, а любые стрессовые ситуации решаются «через стакан» или «через дозу», это прямой повод не ждать критического момента. Важно помнить, что зависимость — это прогрессирующее заболевание: со временем организму требуется всё больше вещества, растёт токсическая нагрузка на сердце, печень, нервную систему, ухудшается память и концентрация.
Подробнее – [url=https://narkologicheskaya-klinika-moskva11.ru/]лучшая наркологическая клиника москва[/url]
Самостоятельный выход из запоя сопряжен с высоким риском развития осложнений. После прекращения приема спиртного ослабленный организм может не выдержать нагрузки, что приведет к инфаркту, инсульту, судорожным приступам и даже алкогольному психозу. Чтобы избежать этих опасных состояний, необходимо вызвать нарколога на дом, который проведет лечение правильно и безопасно.
Исследовать вопрос подробнее – вывод из запоя вызов на дом краснодар
sublimation supplies marketplace – The clean layout and smooth browsing make shopping enjoyable.
Если в ситуации с алкоголем присутствуют несколько из перечисленных ниже пунктов, это повод не откладывать консультацию с наркологом в Королёве:
Подробнее – http://kodirovanie-ot-alkogolizma-korolyov11.ru/preparaty-dlya-kodirovaniya-ot-alkogolizma-v-korolyove/https://kodirovanie-ot-alkogolizma-korolyov11.ru
FunnelFoundry Boutique – Clean navigation and well-structured sections make finding items effortless.
Многие тянут до последнего, считая, что к наркологу обращаются только в самых крайних случаях. На деле показаний для консультации гораздо больше, и они часто появляются задолго до того, как человек впервые оказывается в запое или не выходит из состояния опьянения несколько дней подряд.
Выяснить больше – https://narkologicheskaya-klinika-voskresensk11.ru/narkologicheskaya-klinika-telefon-v-voskresenske
Часто именно жители Химок тянут до последнего: насыщенный ритм жизни, дорога на работу, постоянная усталость, попытки «снимать напряжение» алкоголем или психоактивными веществами. Сначала это кажется временным способом расслабиться, но со временем человек замечает, что пьёт чаще, чем планировал, нуждается в больших дозах, срывает обещания, а попытки контролировать употребление превращаются в череду неудач. В какой-то момент становится очевидно: без профессиональной наркологической помощи дальше будет только сложнее.
Подробнее можно узнать тут – http://narkologicheskaya-klinika-himki11.ru/lechenie-v-narkologicheskoj-klinike-v-himkah/
Нарколог на дом в Химках особенно востребован тогда, когда состояние человека уже нельзя назвать обычным похмельем, но он категорически отказывается ехать в клинику. Запой тянется несколько дней или дольше, нет полноценного сна, пульс постоянно учащённый, руки трясутся, давление скачет, а любое утро начинается не с облегчения, а с новой дозы алкоголя «чтобы не развалиться». В такой ситуации родственники оказываются между страхом и беспомощностью: понятно, что дальше ждать опасно, но уговорить собрать вещи и поехать в стационар не получается. Формат выезда нарколога на дом как раз и закрывает этот тупик — врач приезжает туда, где сейчас находится человек, оценивает риски и сразу начинает помощь.
Разобраться лучше – narkolog-na-dom-himki11.ru/
Наркологическая клиника в Химках ориентируется не на «среднестатистического пациента», а на конкретного человека с его историей, болезнями, образом жизни и семьёй. Поэтому здесь не ограничиваются одним-двумя шаблонными вариантами. Врач оценивает, на каком этапе сейчас находится пациент: острый запой, ломка, период относительной трезвости с риском срыва, рецидив после ремиссии. От этого зависит выбор формата помощи.
Разобраться лучше – наркологическая клиника сайт
Camp Courier Store – Really like the idea behind this shop, browsing felt intuitive and fast.
Xevoria Online Store – Clean and modern presentation keeps exploring products smooth.
https://karolinka.com.ua/
За счёт сочетания этих составляющих лечение перестаёт быть набором отдельных процедур. Пациент и его близкие видят, что каждый шаг логично вытекает из предыдущего и ведёт к общей цели — устойчивой трезвости и постепенному восстановлению качества жизни.
Детальнее – http://
Площадка Mega — считается платформой, находящийся в закрытой части интернета, где можно найти множество специфических услуг.
mega darknet market ссылки прочно ассоциируется с мрачной тематикой даркнета и максимальным уровнем анонимности.
Образно говоря, этот ресурс можно рассматривать как портал в закрытое цифровое пространство, которое таит в себе массу особенностей.
Платформа Mega является одной из заметных частей «даркнета», где ключевую роль играют анонимность участников и безопасность соединений.
Доступ к таким ресурсам требует через специализированные браузеры (например, Tor), а также VPN для обеспечения доступа из любой точки.
С целью посещения ресурса, пользователю необходимо знать точный адрес (ONION-ссылку) и провести тщательную настройку оборудования.
Ключевое отличие площадки — это скрытность участников и отсутствии централизованной регистрации.
Посетители здесь находят разнообразные предложения: от закрытых каналов связи до площадок для торговли.
Ресурс предоставляет охрану от слежки благодаря мощным криптографическим алгоритмам.
Но при этом даже мощная система шифрования может гарантировать лишь частичную безопасность, особенно при ошибках участников системы.
На сегодняшнем этапе развития сети данная площадка занимает нишевую роль, становясь местом для людей, кто ищет неофициальные источники информации и специфические услуги.
Среди контента здесь могут встречаться как легальные материалы, так и противоправные, что обязывает пользователя высокой осторожности и осознанности.
Анализируя роль подобных площадок в интернете, можно выделить ряд важных моментов, относящихся к особенностям применения и защиты.
Во-первых, критически важна корректная организация системы доступа и внедрение эшелонированной безопасности для снижения угроз.
Любой участник обязан разбираться в степени конфиденциальности и, желательно соблюдать моральным нормам при общении на данной платформе.
Кроме того, не стоит забывать о юридических последствиях и реальной ответственности за нарушение законодательства.
Законодательство разных стран расходятся во мнениях относительно факта посещения таких ресурсов и ответственность за их использование.
Ряд экспертов отмечают, что подобные сайты могут служить местом для коммуникации и защиты приватности при осознанном использовании.
Но при всем при этом, риски обмана, кражи денег и криминальной активности здесь остаются высокими.
Лавируя между свободой слова и суровыми законами, Мега Даркнет представляет собой наиболее неоднозначный сегмент интернета.
Отсюда следует простой вывод: следует очень внимательно относиться к изучаемой информации и оценке надежности сайтов.
В конечном счете сводится к тому, что Мега Даркнет — это неоднозначное и опасное пространство. Сайт обеспечивает высокий уровень анонимности и защиты личных данных, но обязывает любого пользователя внимательности, технической грамотности и соблюдения этических норм.
Сайт иллюстрирует спектр человеческих поступков в обстановке минимального надзора и предоставляет платформу для коммуникации по закрытым вопросам.
Итак, теневая платформа остается сложным феноменом интернета, где равновесие между открытостью и защитой зависит от самого человека.
«Трезвый город» — это комплексная наркологическая помощь для взрослых пациентов: от экстренного купирования интоксикации до плановой терапии и поддержки в период восстановления. Врачи оценивают состояние, корректируют схему лечения и помогают выстроить понятный план дальнейших шагов.
Разобраться лучше – что делать если сильно тошнит от алкоголя
Wireless Ward Official – The structure of the site makes exploring products fast and the info is easy to understand.
Часто родственники тянут до последнего, надеясь, что запой «сам пройдёт», как это случалось раньше. Но с каждым эпизодом последствия становятся тяжелее: организм изнашивается, возрастает риск осложнений, ухудшается психика. Особенно опасно, когда запой длится несколько дней подряд, а любые попытки самостоятельно сократить дозы алкоголя сопровождаются дрожью, бессонницей, приступами паники.
Ознакомиться с деталями – вывод из запоя в стационаре москва
В данной обзорной статье представлены интригующие факты, которые не оставят вас равнодушными. Мы критикуем и анализируем события, которые изменили наше восприятие мира. Узнайте, что стоит за новыми открытиями и как они могут изменить ваше восприятие реальности.
Обратитесь за информацией – http://www.alexander6.ru/12354
В таких случаях наркологическая клиника помогает не только вывести из запоя и поставить капельницу, но и выстроить долгосрочный план: обследование, медикаментозную поддержку, реабилитацию, работу с психологом. Это даёт шанс не просто восстановиться после конкретного эпизода, а перестать повторять один и тот же разрушительный сценарий.
Углубиться в тему – [url=https://narkologicheskaya-klinika-voskresensk11.ru/]наркологическая клиника воскресенск[/url]
В таких случаях наркологическая клиника помогает не только вывести из запоя и поставить капельницу, но и выстроить долгосрочный план: обследование, медикаментозную поддержку, реабилитацию, работу с психологом. Это даёт шанс не просто восстановиться после конкретного эпизода, а перестать повторять один и тот же разрушительный сценарий.
Получить дополнительную информацию – gosudarstvennaya-narkologicheskaya-klinika
Наркологическая клиника в Долгопрудном помогает в ситуациях, когда:
Узнать больше – медикаментозное кодирование от алкоголизма долгопрудный
В этой информационной статье вы найдете интересное содержание, которое поможет вам расширить свои знания. Мы предлагаем увлекательный подход и уникальные взгляды на обсуждаемые темы, побуждая пользователей к активному мышлению и критическому анализу.
Изучить материалы по теме – https://te-st.org/2021/07/26/65-best-books
Частный реабилитационный центр «Еваклиник» в Саранске предлагает поэтапные программы лечения зависимости с медицинским сопровождением. Специалисты центра работают над устранением последствий употребления, нормализацией психоэмоционального состояния и адаптацией к жизни без зависимости. Такой подход снижает вероятность рецидивов и способствует долгосрочному восстановлению.
Получить дополнительную информацию – evaclinica.ru
В данном тексте собраны разнообразные случайные сведения и не вполне определённые идеи, которые могут вызвать интерес. Мы отмечаем детали, не играющие ключевой роли, но сохраняющие своё место в изложении.
Подробнее читать – кето диета за неделю минус 10 кг
Наркологический центр «Трезвый город» специализируется на лечении алкоголизма и наркомании с акцентом на безопасность пациента. Подбираются индивидуальные протоколы, учитывается анамнез, переносимость препаратов и возможные осложнения.
Подробнее – https://trezviy-gorod.ru/stati/kak-vyvesti-muzha-iz-zapoya.html
Этот информационный набор привлекает внимание множеством мелочей и странных ракурсов. Мы предлагаем взгляды, которые редко бывают полезны, но могут слегка разнообразить ваше знакомство с темой.
Вот – эротические фильмы
Каждый из этих симптомов по отдельности уже опасен, а в сочетании они создают высокий риск для жизни. Самостоятельные эксперименты с таблетками, резкий отказ от алкоголя «через силу» или попытка «переспать» запой без медицинского контроля могут обернуться реанимацией. Гораздо безопаснее вовремя вызвать специалиста и провести детоксикацию под наблюдением, особенно когда речь идёт о жителях крупного города, где доступна профессиональная наркологическая помощь.
Подробнее – https://vyvod-iz-zapoya-moskva011.ru/vyvod-iz-zapoya-v-moskve-na-domu
Наряду с физическим состоянием врачи учитывают психологический фон пациента. Человек в запое часто неадекватно оценивает своё самочувствие, обещает «завязать сам», спорит с родственниками, агрессирует или, наоборот, впадает в апатию. Задача специалиста — не спорить и не давить, а грамотно оценить риски и предложить такой формат помощи, который будет безопасен и реалистичен именно в этой ситуации.
Получить дополнительные сведения – вывод из запоя московская московская область москва
Наркологическая клиника в клинике в Екатеринбурге — это специализированное медицинское учреждение, где проводится диагностика, лечение и реабилитация людей, страдающих алкогольной или наркотической зависимостью. Комплексный подход включает не только медикаментозную терапию, но и психотерапевтические методики, направленные на восстановление личности и возвращение пациента к социальной активности. Каждое вмешательство проводится с учётом физического состояния, психологического профиля и стадии заболевания. Работа специалистов основана на принципах анонимности, медицинской этики и научно доказанных протоколов лечения.
Получить дополнительные сведения – наркологическая клиника нарколог екатеринбург
modern fitness outlet – The interface is clean and very easy to move through.
вот вот..ждать неизветсности самое такое нервное…. вред от кокаин, мефдрон, гашиш Плюсы: качество супер, цена отличная, вес по гоступривет всем получил бандероль с посылкой открыл всё ровно чё надо было то и пришло в общем респект магазу вес ровный пока сохнит основа жду по курю отпишу чё да как закинул деньги 5.07 пришло на почту уже 9.07 утром. были выходные только сегодня уже курьер набрал с утра и привёз отличный магаз берите не обламывайтесь
SecureStack solutions – Practical and easy-to-read security resources simplified setup.
В этой статье представлен занимательный и актуальный контент, который заставит вас задуматься. Мы обсуждаем насущные вопросы и проблемы, а также освещаем истории, которые вдохновляют на действия и изменения. Узнайте, что стоит за событиями нашего времени!
Есть чему поучиться – https://www.tendacayou.com/events/stage-de-jene-2018
https://mama-choli.com.ua/
В нашем женском журнале мы говорим о том, что действительно важно. Мы публикуем статьи о материнстве, делимся советами по уходу за собой, рассказываем о трендах моды и принципах здорового образа жизни. Наша цель поддерживать и вдохновлять вас каждый день. Читайте больше по ссылке https://universewomen.ru/
https://goodfinance.com.ua/
В этой информационной статье вы найдете интересное содержание, которое поможет вам расширить свои знания. Мы предлагаем увлекательный подход и уникальные взгляды на обсуждаемые темы, побуждая пользователей к активному мышлению и критическому анализу.
Всё, что нужно знать – https://statifymma.com/paige-vanzant-calls-for-womens-titles-in-power-slap-after-dominant-win-were-here-to-knock-btches-out
Мы понимаем, что каждая минута имеет решающее значение, поэтому наши специалисты готовы выехать на дом в кратчайшие сроки и провести все необходимые процедуры по детоксикации организма. Наша цель — помочь пациенту вернуться к нормальной жизни без лишних стрессов и рискованных попыток самостоятельного лечения.
Подробнее можно узнать тут – вывод из запоя вызов
Visit SafeSavings – The site provided transparent pricing and helpful deal explanations.
Эта информационная статья содержит полезные факты, советы и рекомендации, которые помогут вам быть в курсе последних тенденций и изменений в выбранной области. Материал составлен так, чтобы быть полезным и понятным каждому.
Все материалы собраны здесь – https://bongda360.site/bong-da-tong-luc-tat-ca-nhung-gi-ban-can-biet
В данной обзорной статье представлены интригующие факты, которые не оставят вас равнодушными. Мы критикуем и анализируем события, которые изменили наше восприятие мира. Узнайте, что стоит за новыми открытиями и как они могут изменить ваше восприятие реальности.
Эксклюзивная информация – https://vetla.co.uk/product/11-pcs-feline-instruments-kit
В этой публикации мы предлагаем подробные объяснения по актуальным вопросам, чтобы помочь читателям глубже понять их. Четкость и структурированность материала сделают его удобным для усвоения и применения в повседневной жизни.
Как это работает — подробно – https://mtsn2plg.sch.id/kamad-mtsn-2-palembang-ikuti-rakorda-pa-satker-wilayah-sumsel-tahun-2021
Vivid Vendor Marketplace – Colors pop and images stand out, making browsing more enjoyable.
parcel tracking hub – Very straightforward experience with an organized layout.
Частный реабилитационный центр «Еваклиник» в Саранске предлагает поэтапные программы лечения зависимости с медицинским сопровождением. Специалисты центра работают над устранением последствий употребления, нормализацией психоэмоционального состояния и адаптацией к жизни без зависимости. Такой подход снижает вероятность рецидивов и способствует долгосрочному восстановлению.
Получить больше информации – первая помощь при запое
Такой комплексный подход позволяет не только купировать острые состояния, но и устранить внутренние факторы, провоцирующие развитие зависимости. После стабилизации состояния пациент переходит к этапу психотерапевтической коррекции, направленной на предотвращение рецидивов.
Изучить вопрос глубже – наркологическая клиника вывод из запоя екатеринбург
В этой статье собраны факты, которые освещают целый ряд важных вопросов. Мы стремимся предложить читателям четкую, достоверную информацию, которая поможет сформировать собственное мнение и лучше понять сложные аспекты рассматриваемой темы.
Только факты! – https://hockeycamp.co.kr/bbs/board.php?bo_table=free&wr_id=24662&page=23
В этой информационной статье вы найдете интересное содержание, которое поможет вам расширить свои знания. Мы предлагаем увлекательный подход и уникальные взгляды на обсуждаемые темы, побуждая пользователей к активному мышлению и критическому анализу.
Изучить материалы по теме – https://www.rial22.ru
«Трезвый город» — это комплексная наркологическая помощь для взрослых пациентов: от экстренного купирования интоксикации до плановой терапии и поддержки в период восстановления. Врачи оценивают состояние, корректируют схему лечения и помогают выстроить понятный план дальнейших шагов.
Подробнее – капельница от наркотиков
Yoga Yonder Essentials – Browsing is easy and the site feels gentle and welcoming.
reliable stream shop – I was able to get exactly what I needed in minutes.
Мы собрали для вас самые захватывающие факты из мира науки и истории. От малознакомых деталей до грандиозных событий — эта статья расширит ваш кругозор и подарит новое понимание того, как устроен наш мир.
Получить дополнительные сведения – https://idawulff.no/2010/02/24/phuket-zoo
stackable storage shop – Items are well organized and the product info is very practical.
В клинике «Трезвый город» доступна помощь при запое и тяжёлой абстиненции с медицинским наблюдением. Проводится инфузионная терапия, медикаментозная коррекция и восстановление сна, общего самочувствия и вегетативных проявлений.
Получить дополнительную информацию – детоксикация организма от алкоголя
«Трезвый город» — это комплексная наркологическая помощь для взрослых пациентов: от экстренного купирования интоксикации до плановой терапии и поддержки в период восстановления. Врачи оценивают состояние, корректируют схему лечения и помогают выстроить понятный план дальнейших шагов.
Изучить вопрос глубже – вызвать нарколога на дом
Shop Workflow Supply Online – It was easy to find items and complete my order in just a few clicks.
В данной обзорной статье представлены интригующие факты, которые не оставят вас равнодушными. Мы критикуем и анализируем события, которые изменили наше восприятие мира. Узнайте, что стоит за новыми открытиями и как они могут изменить ваше восприятие реальности.
Узнать из первых рук – https://jimihendrixrecordguide.com/shadwick-2
Магазин работает четко уже несколько лет:)только одно расстроило когда хотел сделать очередной заказ мне сказали что не отправляют больше в те края:dontknown:с чем это связано мне так и не сказали,хотелось бы узнать https://amfiktops.life брал все как всегда на 10 баллов забилвсе ровно,продукт качественный не знаю что у вас было.делал 1 к 10. получилась на убой))
Эта обзорная заметка содержит ключевые моменты и факты по актуальным вопросам. Она поможет читателям быстро ориентироваться в теме и узнать о самых важных аспектах сегодня. Получите краткий курс по современной информации и оставайтесь в курсе событий!
Получить полную информацию – https://plaka-watersports.com
В этой статье мы рассмотрим современные достижения в области медицины, включая инновационные методы лечения и диагностики. Мы обсудим важность профилактики заболеваний и роль технологий в улучшении качества здравоохранения. Читатели узнают о влиянии медицины на повседневную жизнь и ее значение для современного общества.
Исследовать вопрос подробнее – http://google.iq/url?q=https://spb.alco-centr.ru/lechenie-manii-presledovaniya
Handy Tech Shop – Looks like a place for small upgrades that make life easier.
Наркологический центр «Трезвый город» специализируется на лечении алкоголизма и наркомании с акцентом на безопасность пациента. Подбираются индивидуальные протоколы, учитывается анамнез, переносимость препаратов и возможные осложнения.
Получить дополнительную информацию – программа 12 шагов
SerpLinkRise SEO tools – Helpful ranking tips allowed me to make fast, practical improvements.
В этой статье обсуждаются актуальные медицинские вопросы, которые волнуют общество. Мы обращаем внимание на проблемы, касающиеся здравоохранения и лечения, а также на новшества в области медицины. Читатели будут осведомлены о последних событиях и смогут следить за тенденциями в медицине.
Получить дополнительную информацию – http://google.lt/url?sa=t&url=https://spb.alco-centr.ru/kodirovanie-po-dovzhenko
wagonwildflower.shop – Charming visuals and design make browsing the site delightful.
fitness accessory corner – The layout is minimal and very easy on the eyes.
web traffic hub – Fast, smooth, and really simple to navigate.
cardamomcove.shop – The site’s design is striking and really drew me in immediately.
Профессиональное сообщество отмечает, что активное включение инструментов цифрового искусства в структуру всестороннего развития способствует тому, чтобы воспитанникам не просто трансформировать сложные профессиональные компетенции, а также успешно проявлять уникальный креатив в условиях современной реальности.
Информация; https://basot.ru/
Ассортимент Nova-Tex включает разнообразные костюмы для охоты и рыбалки, спроектированные для использования в самых суровых климатических зонах. В каталоге представлены модели различного назначения: летние легкие комплекты, демисезонные варианты и утепленные костюмы для зимней рыбалки. купить костюм для похода в лес? Ознакомиться с полным ассортиментом можно на nova-tex.ru/catalog/odezhda/kostyumy/ Костюмы произведены из современных тканей с водоотталкивающими и ветронепроницаемыми характеристиками, гарантируют удобство в полевых условиях и отправляются во все регионы страны.
Фирма Biotonic Group начиная с 2018 года создает натуральные биодобавки из растительного сырья для оздоровления населения Казахстана. Формулы созданы врачами и экспертами по травам, включают исключительно природные ингредиенты без генномодифицированных организмов, синтетики и консервантов, предотвращая нежелательные реакции и аллергию. На https://biotonic.kz/ доступны биодобавки для усиления защитных сил, детоксикации тела и нормализации функций дыхания, пищеварения, сердца и сосудов. Отсутствие посредников делает цены привлекательными, а кооперация с сертифицированными фабриками обеспечивает безупречный стандарт каждой позиции.
ZenaLune Store – Smooth navigation and pleasant layout make exploring this site easy.
Залетные это какие то, представь, на целых 10 грамм кинули, смешно да и только . https://skorostalpha.life Дружище, если ты не понял, нам магазин в пятницу и здесь и везде перестал отвечать. Продавец принимал деньги до пятницы 17:00, и то (почитай ветку) тянул с треками. А потом пропал. Форум этот тоже больше не имеет той волшебной силы, что была раньше. Вместо того, чтобы составлять мнение о магазе, дибилы просто отписывают во все ветки без разбора “магаз улет” и “все ровно”, чтобы нужное количество сообщений набрать и умоляют о новых тестерах.Успехов вам господа : )
monster merchandise store – The range is cool and placing an order was quick.
Клиника «УралМед» работает без выходных и праздников: прием пациентов — круглосуточно. Это позволяет оказывать экстренную помощь при острых состояниях, а также вести наблюдение за динамикой восстановления здоровья в ночные часы.
Подробнее можно узнать тут – лечение женского алкоголизма
Shop World Shipper Online – Fast pages and clear presentation make exploring products a breeze.
Этот информативный текст сочетает в себе темы здоровья и зависимости. Мы обсудим, как хронические заболевания могут усугубить зависимости и наоборот, как зависимость может влиять на общее состояние здоровья. Читатели получат представление о комплексном подходе к лечению как физического, так и психического состояния.
Изучить вопрос глубже – http://google.com.cu/url?sa=t&url=https://spb.alco-centr.ru/lechenie-zhenskogo-alkogolizma
В этой статье мы рассматриваем разные способы борьбы с алкогольной зависимостью. Обсуждаются методы лечения, программы реабилитации и советы для поддержки близких. Читатели получат информацию о том, как преодолеть зависимость и добиться успешного выздоровления.
Выяснить больше – https://seafood.media/fis/shared/redirect.asp?banner=6760&url=https://spb.alco-centr.ru/kodirovanie-disulfiramom
Приватность — клинический фактор, снижающий тревогу и укрепляющий доверие. В «ЕкатеринбургМедСервис» выезд немаркированный, специалисты в гражданской одежде, уведомления — «тихие», документы — с нейтральными формулировками. Медкарта хранится в шифрованном контуре, доступ к данным разграничен по ролям. По запросу вся коммуникация ведётся через доверенное лицо, а оплата возможна наличными или безналом с нейтральным назначением платежа. Это позволяет оставаться в тени и при этом получать полноценную помощь.
Изучить вопрос глубже – нарколог на дом вывод из запоя
В клинике «Передозировка» в Санкт-Петербурге пациентам доступно индивидуальное лечение наркозависимости и алкоголизма. Центр использует современные протоколы терапии, предлагает конфиденциальное кодирование и поддерживает пациентов на всех этапах восстановления.
Получить дополнительные сведения – https://peredozirovka.info/articles/prichiny-alkogolnoy-epilepsii
Этот информационный материал подробно освещает проблему наркозависимости, ее причины и последствия. Мы предлагаем информацию о методах лечения, профилактики и поддерживающих программах. Цель статьи — повысить осведомленность и продвигать идеи о необходимости борьбы с зависимостями.
Получить дополнительные сведения – https://www.google.im/url?q=https://spb.alco-centr.ru/lechenie-zavisimosti-ot-stavok
Такой порядок действий гарантирует не только купирование симптомов, но и подготовку пациента к последующему восстановлению.
Получить дополнительную информацию – нарколог на дом срочно санкт-петербург
Tervina Shopping Site – Browsing feels effortless, the products look fashionable, and the value seems fair.
“Дока строй” выполняет комплексный ремонт квартир в Волгограде под ключ, гарантируя высокое качество и своевременную сдачу объектов Квалифицированные мастера осуществляют все этапы ремонта от подготовки поверхностей до завершающего оформления, применяя передовые материалы и методы Все заказы выполняются с персональным вниманием к требованиям заказчика и специфике пространства Ищете ремонт под ключ Волгоград квартиры? doka-stroi.ru предлагает понятное ценообразование без неожиданных доплат и составляет точную смету до начала выполнения заказа Коллектив профессионалов трудится организованно, уменьшая беспокойство для жильцов и заканчивая работы в установленные сроки Заказывая ремонт у профессионалов, вы получаете идеальный результат без лишних хлопот и переплат
Эта публикация содержит набор несвязанных идей, трудно применимых в практике. Мы лишь поверхностно затрагиваем различные точки зрения, не проводя глубокий анализ и не предлагая выводов.
Подробнее читать – кето диета за неделю минус 10 кг
Каждый этап требует профессионального подхода и регулярного мониторинга показателей организма, что особенно важно при тяжелых формах алкогольной зависимости.
Ознакомиться с деталями – помощь вывод из запоя санкт-петербург
VeroVista Deals – Pages load quickly, and product descriptions are clear and helpful for browsing.
Задача первого контакта — не «записать к врачу на когда-нибудь», а оценить, насколько ситуация критична прямо сейчас. Если речь идёт о многодневном запое, сильной слабости, одышке, скачках давления, спутанности сознания, лучше не экспериментировать с домашними методами. В таких случаях специалисты в Лобне рекомендуют стационар, где можно не только поставить капельницу, но и быстро среагировать на осложнения. Если же состояние относительно стабильное, возможно обсуждение мягкого формата с выездом и последующим наблюдением.
Получить дополнительную информацию – http://
В реабилитационном центре «Еваклиник» в Саранске созданы условия для безопасного и анонимного восстановления после зависимости. Программы включают детоксикацию, стабилизацию состояния и поэтапную реабилитацию под контролем медицинского персонала. Такой формат помощи позволяет снизить риски срывов и постепенно вернуться к нормальной жизни.
Получить больше информации – анонимное кодирование от алкоголизма
Наркологическая клиника «Трезвый город» оказывает медицинскую помощь при алкогольной и наркотической зависимости: детоксикация, снятие абстиненции, стабилизация состояния и подбор дальнейшей тактики лечения. Работа ведётся конфиденциально, с контролем показателей и учётом сопутствующих рисков.
Подробнее можно узнать тут – женский алкоголизм
Отсутствие визитов в клинику гарантирует полную конфиденциальность. Это особенно важно для пациентов, беспокоящихся о своей репутации или возможном влиянии на профессиональную деятельность. Вызов врача на дом полностью исключает нежелательные встречи в медицинском центре.
Изучить вопрос глубже – http://narcolog-na-dom-msk55.ru
люблю мелких подхалимов https://computer-mouse.ru Все пришло довольно быстро.как дела друзья?
trophy collection store – Presentation feels clean and navigation is smooth.
Запойное состояние опасно не только токсическим воздействием алкоголя на организм, но и последствиями резкого отказа от спиртного. В таких случаях промедление может стоить здоровья. Нарколог на дом в Рязани приезжает по вызову и проводит процедуру прямо в домашних условиях, используя проверенные медицинские методики. Такой подход сочетает анонимность, оперативность и возможность контроля состояния без госпитализации.
Изучить вопрос глубже – платный нарколог на дом
Путь в наркологическую клинику в Ивантеевке почти всегда начинается с консультации — очной или по телефону. На этом этапе задача врача не осудить и не прочитать нотацию, а максимально точно понять, что происходит: сколько лет длится злоупотребление, как часто бывают запои, были ли попытки лечиться раньше, какие есть хронические болезни, каково текущее физическое и психическое состояние. Собирается анамнез, измеряется давление, оценивается пульс, при необходимости направляют на анализы и дополнительные исследования. Чем честнее и конкретнее человек (или его родственники) описывают ситуацию, тем точнее можно подобрать безопасный план помощи.
Подробнее – http://www.domen.ru
Zephvane Online Store – Intuitive layout and neat organization make browsing simple and fast.
В клинике «Еваклиник» в Саранске пациенты получают квалифицированную наркологическую помощь в комфортных и конфиденциальных условиях. Центр применяет современные методы терапии, направленные на снижение тяги и восстановление общего состояния организма. Поддержка врачей и психологов помогает закрепить результат и сформировать устойчивую мотивацию к трезвой жизни.
Подробнее можно узнать тут – признаки созависимости
complete gym outlet – Products are clearly presented and organized for quick browsing.
гражданство румынии купить
При длительном запое организм не успевает восстановить свой водно-электролитный баланс, что приводит к обезвоживанию и ухудшению общего состояния. Такие пациенты рискуют развить не только тяжелую интоксикацию, но и хронические заболевания, которые впоследствии требуют длительного и дорогостоящего лечения. Поэтому своевременный вызов врача-нарколога на дом становится критически важным для сохранения здоровья и предотвращения серьезных последствий.
Подробнее – наркология вывод из запоя
Официальный переходник KRAKEN
KRAKEN – это ведущий даркнет маркетплейс, который соединяет покупателей и продавцов. Здесь вы найдете широкий ассортимент товаров от надежных партнеров.
Покупайте и продавайте легко, безопасно и выгодно.
Зайти на KRAKEN просто через официальный переходник с актуальной ссылкой на кракен даркнет площадку.
Здесь Вы всегда сможете найти рабочую ссылку на кракен маркетплейс для удобного доступа.
кракен даркнет ссылка
Площадка Mega — считается платформой, находящийся в закрытой части интернета, где можно найти к разнообразным сервисам и услугам.
mega darknet связан с мрачной тематикой даркнета и строгой анонимностью пользователей.
В переносном смысле данный сайт воспринимается как окно в подпольную сеть, которое скрывает множество нюансов.
Мега Даркнет относится к числу известных площадок «подземного интернета», где ключевую роль играют скрытность пользователей и шифрование трафика.
Вход на эти сайты требует использования особых браузеров (например, Tor), и дополнительно VPN для преодоления блокировок.
Для входа на платформу, пользователю необходимо знать точный адрес (ONION-ссылку) и обеспечить корректную конфигурацию.
Главная особенность Меги заключается в полной непрозрачности посетителей и отсутствии централизованной регистрации.
Пользователи на этом сайте находят множество услуг: от приватных мессенджеров до площадок для торговли.
Ресурс предоставляет охрану от слежки благодаря современным технологиям шифрования.
Но при этом даже многоуровневая защита может гарантировать лишь частичную безопасность, особенно при ошибках участников системы.
В современном цифровом ландшафте подобный ресурс занимает нишевую роль, интересуя тех пользователей, кто нуждается в альтернативных каналах информации и специфические услуги.
Внутри площадки бывают представлены как легальные материалы, так и нелегальные, что требует от посетителя проявлять бдительность и ответственность.
Изучая феномен теневых платформ, стоит обратить внимание на несколько ключевых аспектов, касающихся культуры использования и конфиденциальности.
Во-первых, критически важна правильная конфигурация системы доступа и внедрение эшелонированной безопасности для снижения угроз.
Любой участник обязан разбираться в принципы скрытности и, по мере сил придерживаться правилам цифровой этики при общении на данной платформе.
Также важно помнить, что не стоит забывать о проблемах с законом и реальной ответственности за противоправные поступки.
Юридические системы мира расходятся во мнениях относительно факта посещения таких ресурсов и меры наказания за активность там.
Некоторые исследователи отмечают, что подобные сайты могут становиться платформой для коммуникации и сохранения конфиденциальности при ответственном подходе.
Тем не менее, угроза быть обманутым, хищения средств и криминальной активности здесь никогда не исчезают.
Балансируя между открытостью информации и жесткими правовыми ограничениями, Мега Даркнет остается одной из самых противоречивых частей интернета.
Резюмируя для посетителей: следует очень внимательно относиться к тому, что смотреть и читать и оценке надежности сайтов.
В конечном счете сводится к тому, что подобные ресурсы — это сложный цифровой феномен. Она предлагает максимальную приватность и конфиденциальности, но накладывает на посетителя внимательности, технической грамотности и соблюдения этических норм.
Этот ресурс наглядно демонстрирует спектр человеческих поступков в обстановке минимального надзора и создает возможности для дискуссий на спорные темы.
Итак, теневая платформа является многогранным явлением глобальной сети, где баланс между свободой и безопасностью определяется индивидуально.
Ночной вызов ничем не отличается от утреннего: мы отвечаем, уточняем риски и запускаем маршрут так, чтобы первые часы прошли спокойно. Наш алгоритм простой и понятный — он экономит время и убирает хаос. Ниже — ориентировочная карта визита; по месту врач адаптирует её к возрасту, соматическому фону и текущим симптомам.
Подробнее – вызвать врача нарколога на дом сочи
Чем раньше нарколог окажет помощь, тем выше шансы избежать осложнений и восстановиться без последствий для здоровья.
Подробнее – http://narcolog-na-dom-sochi0.ru
online protection shop – I was impressed by how quickly I finalized my purchase.
Такой комплексный подход позволяет не только купировать острые состояния, но и устранить внутренние факторы, провоцирующие развитие зависимости. После стабилизации состояния пациент переходит к этапу психотерапевтической коррекции, направленной на предотвращение рецидивов.
Подробнее можно узнать тут – https://narkologicheskaya-klinika-v-ekb16.ru/gosudarstvennaya-narkologicheskaya-klinika-ekaterinburg/
Right here is the right site for anyone who hopes to understand this topic. You know a whole lot its almost tough to argue with you (not that I actually will need to…HaHa). You definitely put a fresh spin on a subject that’s been written about for a long time. Wonderful stuff, just wonderful!
garipovbulat
Explore YouTube Yard – Pages load smoothly and the overall browsing experience is pleasant.
Всем общий привет!
Отрыл рабочее зеркало в даркнет.
Грузит моментально, капча не душит.
Залетать сюда:
Магазин топ, советую.
Такой порядок действий гарантирует не только купирование симптомов, но и подготовку пациента к последующему восстановлению.
Подробнее тут – нарколог на дом анонимно в санкт-петербурге
Official Velvet Vendor 2 – Adding to bookmarks, the products are really one-of-a-kind.
Вчера оплатил, сегодня уже трек скинули. Пока все ровно, посмотрим что придет….. вред от кокаин, мефдрон, гашиш а вот по этой теме отпиши по подробней,точнее о том как там дальше события развиваются?????????? очень волнует данная тема. как же так их просекла легавня???? откуда краснотой веет.???непонимающий человек, были сложности в работе курьера сейчас все в порядке.
DarkMonitor мониторинг даркнет маркетплейсов, который соединяет покупателей и продавцов. Здесь вы найдете актуальные ссылки на KRAKEN, BLACKSPURT, MEGA, OMG, кракен, блекспрут, мега, омг.
Зайти на на KRAKEN, BLACKSPURT, MEGA, OMG, кракен, блекспрут, мега, омг просто через официальный переходник с актуальной ссылкой через даркнет мониторинг.
Здесь Вы всегда сможете найти рабочую ссылку на маркетплейсы для удобного доступа.
DarkMonitor мониторинг даркнет маркетплейсов
Cart Catalyst Online Store – The site is well organized and exploring items feels seamless.
Tidy Treasure Web Store – Feels relaxed and easy to shop around.
truecrimecrate.shop – Love the concept and overall vibe of this place.
В реабилитационном центре «Еваклиник» в Саранске созданы условия для безопасного и анонимного восстановления после зависимости. Программы включают детоксикацию, стабилизацию состояния и поэтапную реабилитацию под контролем медицинского персонала. Такой формат помощи позволяет снизить риски срывов и постепенно вернуться к нормальной жизни.
Выяснить больше – алкоголь и сахар в крови
Перед ставками посмотрел 7к казино официальный сайт в демо: выбор широкий.
Vetrivine Boutique – Easy navigation and a great variety of items make shopping stress-free.
Наркологическая клиника «Еваклиник» в Саранске оказывает комплексную помощь при алкогольной и наркотической зависимости. В центре проводится медицинская детоксикация, поддерживающая терапия и восстановительные программы с участием врачей и психологов. Индивидуальный подход, конфиденциальность и современные методы лечения помогают пациентам стабилизировать состояние и сделать первый шаг к устойчивой ремиссии.
Подробнее тут – выведение из запоя вызов
premium workstation shop – Moving between pages feels effortless and responsive.
Наркологическая клиника «Еваклиник» в Саранске оказывает комплексную помощь при алкогольной и наркотической зависимости. В центре проводится медицинская детоксикация, поддерживающая терапия и восстановительные программы с участием врачей и психологов. Индивидуальный подход, конфиденциальность и современные методы лечения помогают пациентам стабилизировать состояние и сделать первый шаг к устойчивой ремиссии.
Получить дополнительные сведения – как бросить пить женщине
https://proitservice.com.ua/
Если дома шумно (ремонт, маленькие дети, гости), организуем краткий «тихий» стационар с отдельным входом и камерными палатами. После стабилизации пациент возвращается домой, а амбулаторное сопровождение продолжается в удобном графике — через короткие очные визиты и дистанционные чек-ины.
Подробнее можно узнать тут – вывод из запоя на дому
ExpressXchange – Simple design and intuitive navigation helped make shopping smooth.
click to browse – Found top-quality travel gear and moving through pages was effortless.
Monitor Merchant electronics – Detailed product pages and competitive offers made shopping seamless.
найти верификацию Водка казино https://ikigaibd.net/2026/02/11/turnirnye-bilety-pochemu-vhod-ne-raven-dengam-na-vyvod/
Теневая платформа Mega — считается платформой, функционирующий в даркнете, где пользователи получают доступ к разнообразным сервисам и услугам.
mega darknet market прочно ассоциируется с мрачной тематикой даркнета и строгой анонимностью пользователей.
Метафорически эту площадку можно рассматривать как портал в закрытое цифровое пространство, которое таит в себе массу особенностей.
Мега Даркнет относится к числу известных площадок «глубокой сети», где основное внимание уделяется скрытность пользователей и шифрование трафика.
Вход на эти сайты требует использования особых браузеров (например, Tor), и дополнительно VPN для преодоления блокировок.
Для входа на платформу, пользователю необходимо знать точный адрес (ONION-ссылку) и настроить систему особым образом.
Основная характеристика ресурса заключается в полной непрозрачности посетителей и невозможности создать обычный аккаунт.
Посетители здесь могут искать самые разные сервисы: от закрытых каналов связи до маркетплейсов.
Ресурс предоставляет охрану от наблюдения благодаря мощным криптографическим алгоритмам.
Но при этом даже многоуровневая защита может гарантировать лишь частичную безопасность, особенно при неосторожных действиях посетителей ресурса.
В современном цифровом ландшафте данная площадка выполняет узкоспециализированную функцию, становясь местом для людей, кто ищет неофициальные источники информации и специфические услуги.
На страницах ресурса бывают представлены как допустимые законом сведения, так и нелегальные, что требует от посетителя быть внимательным и предусмотрительным.
Рассматривая Мега Даркнет как часть глобальной сети, следует отметить ряд важных моментов, связанных с правилами поведения и безопасности.
Во-первых, критически важна грамотная настройка системы доступа и внедрение эшелонированной безопасности для уменьшения опасностей.
Каждый посетитель должен осознавать степени конфиденциальности и, по возможности, следовать этичным принципам при общении на данной платформе.
Кроме того, следует учитывать о юридических последствиях и возможных последствиях за незаконные действия.
Юридические системы мира неодинаково оценивают само присутствие на подобных сайтах и меры наказания за активность там.
Некоторые исследователи указывают, что подобные сайты могут служить местом для дискуссий и обмена опытом и защиты приватности при осознанном использовании.
Тем не менее, опасность мошенничества, кражи денег и злонамеренных акций здесь никогда не исчезают.
Находясь на грани свободой слова и жесткими правовыми ограничениями, теневая платформа представляет собой наиболее неоднозначный сегмент глобальной сети.
Резюмируя для посетителей: требуется осмотрительно выбирать к выбору контента и оценке надежности сайтов.
Обобщая вышесказанное сводится к тому, что Мега Даркнет — это сложный цифровой феномен. Она предлагает максимальную приватность и защиты личных данных, но накладывает на посетителя бдительности, понимания технологий и соблюдения этических норм.
Сайт иллюстрирует спектр человеческих поступков в условиях ограниченного внешнего контроля и служит местом для обсуждения острых тем.
Таким образом, Мега Даркнет остается сложным феноменом интернета, где баланс между свободой и безопасностью каждый пользователь находит для себя сам.
«Трезвый город» — это комплексная наркологическая помощь для взрослых пациентов: от экстренного купирования интоксикации до плановой терапии и поддержки в период восстановления. Врачи оценивают состояние, корректируют схему лечения и помогают выстроить понятный план дальнейших шагов.
Подробнее – реабилитационный центр для зависимых
За время работы легалрц сколько магазинов я повидал мама дорогая, столько ушло в топку, кто посливался кто уехал # но chemical-mix поражает своей стойкостью напором и желанием идти в перед “не отступать и не сдаваться”:superman: вред от кокаин, мефдрон, гашиш ПРодавец,есть из скорости что нибудь качественное?мин заказ от 1гр.
«Трезвый город» — это комплексная наркологическая помощь для взрослых пациентов: от экстренного купирования интоксикации до плановой терапии и поддержки в период восстановления. Врачи оценивают состояние, корректируют схему лечения и помогают выстроить понятный план дальнейших шагов.
Ознакомиться с деталями – капельница от запоя на дому
https://modny.com.ua/
Клиника «Еваклиник» в Саранске специализируется на лечении зависимостей с применением проверенных медицинских протоколов. Пациентам доступна круглосуточная наркологическая помощь, медикаментозная поддержка и сопровождение на этапе реабилитации. Специалисты центра работают не только с физическими проявлениями зависимости, но и с психологическими причинами, что повышает эффективность лечения.
Узнать больше – что такое созависимость в наркомании
Офисная мебель — это не просто столы и стулья, это основа продуктивной работы и комфорта сотрудников. Группа компаний «СОЮЗ» с 2008 года специализируется на комплексном оснащении офисов в Москве, предлагая как стандартные решения, так и мебель на заказ. Посетите https://group-soyuz.ru/ и убедитесь: здесь создают интерьеры, которые впечатляют партнёров и мотивируют команду. Компания реализует проекты точно в срок и в рамках бюджета, работая с офисами, отелями и учебными заведениями.
https://goldmaster.com.ua/
Автосервис LemonCar в Анапе предлагает полный спектр услуг для вашего автомобиля — от диагностики до кузовного ремонта. Современное оборудование позволяет выявлять неисправности любой сложности, а опытные мастера устраняют их с гарантией качества. Перед началом работ проводится бесплатный осмотр, все процедуры согласовываются с владельцем, никаких скрытых платежей. Записаться на обслуживание можно на сайте https://lemon-car.ru/ где представлен полный перечень услуг: слесарный и электрический ремонт, 3D развал-схождение, техобслуживание двигателя и КПП. Сервис работает по адресу улица Чехова, 64, звонок по России бесплатный.
Hi everyone, it’s my first pay a quick visit at this website, and paragraph is truly fruitful in favor of me, keep up posting such content.
byueuropaviagraonline
unique online boutique – The minimal approach gives it a very pleasant flow.
Клиника «Передозировка» в Санкт-Петербурге предоставляет профессиональную помощь при зависимостях. Пациенты получают лечение алкоголизма и наркомании, проходят кодирование и реабилитацию, что способствует устойчивому возвращению к нормальной жизни.
Подробнее – https://peredozirovka.info/service/reabilitatsiya-alkogolikov
Длительные запои создают мультисистемный кризис. Обезвоживание и сгущение крови повышают риск образования тромбов, что может привести к инсульту или инфаркту миокарда. Печень и поджелудочная страдают от мощной токсической нагрузки — развивается острый панкреатит, хронический гепатит и жировой гепатоз. Интоксикация нарушает работу ЖКТ: возникает гастрит, язвенная болезнь и риск внутренних кровотечений. Алкоголь разрушает нейронные связи, снижая уровень витамина B1, что может вызвать энцефалопатию Ворника и, в запущенных случаях, корсаковский психоз с необратимыми провалами памяти и когнитивными нарушениями.
Получить дополнительную информацию – http://kapelnica-ot-zapoya-moskva1.ru
blockchain token hub – Checkout felt effortless and fully reliable.
Для многих пациентов важным моментом является сохранение конфиденциальности. Врач, приехавший на дом, работает с полной защитой данных. Пациент может быть уверен, что его проблема останется личной и не станет достоянием общественности. Врачи приезжают на неприметных автомобилях и избегают всяческих ситуаций, которые могут привлечь лишнее внимание.
Разобраться лучше – вызов нарколога на дом
В статье-обзоре представлены данные сомнительной актуальности и факты без явной взаимосвязи. Читатель ознакомится с разными мнениями, хотя они вряд ли существенно изменят его представление о теме.
Подробнее читать – https://rostov-narkologiya.ru/uslugi-ot-narkomanii/mefedronovaya-zavisimost
Official Vivid Value – I like how organized everything is, making it simple to explore.
Современная наркологическая клиника в Лобне — это не просто место, где «ставят капельницу». Это комплексная система помощи, в рамках которой специалисты работают с физическими, психологическими и социальными последствиями зависимости. Задача — не только вывести человека из запоя или купировать ломку, но и помочь ему научиться жить без алкоголя или наркотиков, восстановить здоровье, наладить отношения с близкими и вернуть себе способность строить планы.
Получить больше информации – наркологическая клиника москва бесплатно
Explore Tidy Treasure – Nice, uncluttered design that feels welcoming.
stitching tools outlet – Detailed and clear descriptions made choosing quick and easy.
Во многих семьях путь к лечению начинается одинаково: сначала запои или эпизоды употребления воспринимаются как временные «проблемы по жизни», которых стыдно, но которые вроде бы можно переждать. Человек клянётся «завязать после праздников», родственники верят, потом терпят, потом скандалят, затем снова наступают на те же грабли. В какой-то момент становится очевидно, что сила воли больше не работает: попытки прекратить запой заканчиваются тряской, паникой, скачками давления, отсутствием сна, а через несколько дней всё повторяется. Именно тогда наркологическая клиника в Лобне перестаёт быть чем-то абстрактным и превращается в реальную возможность остановить этот круг.
Изучить вопрос глубже – наркологическая клиника обратный звонок
Most Bet se krok za krokem získal jedním z nejznámějších jmen v oblasti sektoru digitálního hazardu i herních aktivit zatímco jejich činnost není limitováno výhradně do jedno oblast, vzhledem k tomu, platformy https://fourcornersclassified.com/index.php?page=user&action=pub_profile&id=82427 umožňují širokou paletu variant hráčům po celém EU. Založení Mostbet se vyznačuje snahou sloučit běžné zásady her s využitím moderními technologiemi, což dovolilo platformě okamžitě nabýt pověsti v očích zkušenými sázkaři a začátečníky. Mostbet casino umožňuje také sázkové sázkové možnosti, a také i běžné herní tituly, což získává širokou veřejnost. S své tradici plus důvěryhodnému fungování se most bet navázal pověst solidního partnera v rámci online her. Společnost se zaměřuje na jasnost, ochranu a spravedlivé podmínky, což znamená zásadní pro zachování dlouhodobé stálosti sázkařů. Protože, že Mostbet app umožňuje bezprostřední přístup do sázení plus hracím možnostem bezprostředně z mobilního platformy, sázkaři jsou schopni aplikovat možnosti kdykoli a všude, aniž by byli omezeni desktopem. Možnost stahování programu přes mostbet download umožňuje, že všechny aspekty budou přizpůsobené pro efektivní plus komfortní prožitek. Také aspektem, co posiluje do pověsti Most Bet, znamená široká volba bonusů, co podněcují nové hráče plus stálé uživatele, ať již to vztahuje na bonusový Most Bet bonus a také běžné akce na kasino prostředí. Historie Most Bet dokazuje, že platforma systém byla může rychle reagovat na požadavky trhu, adaptovat volby a vylepšovat, což garantuje její pevnou polohu mezi protivníky. Obecně je možné říci, že platforma silné fundamenty, kombinace běžného a nového postupu a intenzivní zaměření na uživatelský zážitek znamená základ úspěšnosti Most Bet a její verzí třeba mostbet cz či most bet casino, což dělá vyhledávanou variantu ohledně rozsáhlou publikum uživatelů.
Faceless Factory World – Well-laid-out pages and intuitive design make product exploration simple.
После купирования острой фазы мы предлагаем полное сопровождение на этапе восстановления, чтобы закрепить результаты и снизить риск повторных срывов. В первые дни показаны сеансы кислородной терапии, которые активизируют клеточный обмен и способствуют быстрейшему выведению остатков токсинов. Параллельно проводятся физиотерапевтические процедуры — магнитотерапия и лазерная стимуляция, укрепляющие сосудистую стенку и ускоряющие заживление микроциркуляторных нарушений.
Разобраться лучше – сколько стоит капельница на дому от запоя
В этой статье-обзоре мы собрали данные, актуальность которых сомнительна, а факты — не всегда взаимосвязаны. Читатель сможет ознакомиться с разными мнениями, хотя вряд ли они существенно повлияют на его понимание темы.
Вот – порно смотреть
Заказываю в этом Магазине уже 3 раз и всегда все было ровно.Лучшего магазина вы нигде не найдете! https://amgtopshop.club отдыхай до понедельникадрузья! магазин работает? кто брал что последний раз? а главное когда? я с 5 августа ждал..;(
Как отмечает нарколог Олег Васильев, «чем раньше пациент получает квалифицированную медицинскую помощь, тем меньше риск серьезных осложнений».
Изучить вопрос глубже – платный нарколог на дом иркутск
Данный комплекс мер обеспечивает восстановление здоровья пациента и создает основу для полного выздоровления.
Подробнее можно узнать тут – https://narcolog-na-dom-msk55.ru/vyzov-narkologa-na-dom-moskva/
Этот подход имеет несколько ключевых преимуществ, которые обеспечивают комфорт, безопасность и эффективность лечения.
Подробнее можно узнать тут – http://narcolog-na-dom-moskva55.ru
quick meal prep marketplace – Find speedy solutions that help you stay organized and on budget.
Обращаться можно и нужно не только в момент очередного запоя. Клиника в Ивантеевке работает и с теми, кто сейчас в относительной ремиссии, но понимает, что без внешней поддержки снова сорвётся. В этом случае можно обсудить профилактические программы, варианты кодирования, реабилитацию, работу с тревогой и депрессией. Чем раньше сделан шаг в сторону лечения, тем мягче будут процедуры и тем больше шансов на устойчивый результат.
Разобраться лучше – частная наркологическая клиника
Кодирование от алкоголизма в Чехове для многих семей становится тем рубежом, после которого зависимость перестаёт казаться «временной слабостью» и начинает восприниматься как диагноз, с которым можно и нужно работать. До этого момента обычно проходят годы: чередуются запои и трезвые периоды, звучат обещания «больше такого не будет», меняются напитки, придумываются правила вроде «пью только по выходным» или «только пиво». Но рано или поздно семья замечает, что именно алкоголь диктует распорядок дня, влияет на настроение, разрушает здоровье и отношения. В этот момент становится очевидно: без сильного внешнего ограничителя и профессиональной помощи просто «взять себя в руки» уже не получается.
Выяснить больше – kodirovka-ot-alkogolya
Большинство семей приходят к мысли о лечении зависимости не сразу. Сначала всё выглядит как «случайные переборы по праздникам», потом алкоголь или наркотики становятся привычным способом снять стресс, забыться, пережить неудачи. Постепенно запои учащаются, человек пропадает на несколько дней, появляются долги, проблемы на работе, конфликты в семье. На этом этапе многим кажется, что обращаться в наркологическую клинику в Лобне ещё рано, что можно «взять себя в руки» и как-то остановиться. Но практика показывает обратное: чем дольше затягивается момент обращения к специалистам, тем тяжелее протекают запои, тем глубже страдает здоровье и тем сложнее вернуть человека к стабильной трезвости.
Подробнее – бесплатные наркологические клиники
digital shopfront – The luggage selection is excellent and navigating the site was simple.
Вызов нарколога на дом в таких условиях позволяет не терять драгоценное время, избежать госпитализации и предотвратить критическое развитие событий. Кроме того, это снижает психологическую нагрузку на пациента и его близких, особенно если зависимость длится долго и сопровождается отрицанием проблемы.
Узнать больше – vyzov vracha narkologa na dom moskva
Мега Даркнет — это ресурс, функционирующий в даркнете, где можно найти множество специфических услуг.
даркнет мега ссылка связан с теневым характером и максимальным уровнем анонимности.
Образно говоря, этот ресурс выступает как вход в скрытую часть интернета, которое имеет свои тонкости.
Данный теневой сайт является одной из заметных частей «глубокой сети», где главное значение имеют приватность посетителей и безопасность соединений.
Доступ к таким ресурсам обычно осуществляется использования особых браузеров (например, Тор), и дополнительно VPN для обеспечения доступа из любой точки.
Чтобы попасть на этот сайт, пользователю необходимо знать точный адрес (ONION-ссылку) и обеспечить корректную конфигурацию.
Главная особенность Меги состоит в отсутствии информации участников и невозможности создать обычный аккаунт.
Участники данной сети находят самые разные сервисы: от конфиденциальных чатов до площадок для торговли.
Сайт гарантирует безопасность от мониторинга благодаря современным технологиям шифрования.
Однако даже многоуровневая защита может гарантировать лишь частичную безопасность, особенно при неосторожных действиях посетителей ресурса.
В современном цифровом ландшафте подобный ресурс выполняет узкоспециализированную функцию, становясь местом для людей, кто нуждается в альтернативных каналах информации и специфические услуги.
Среди контента здесь бывают представлены как легальные материалы, так и противоправные, что требует от посетителя высокой осторожности и осознанности.
Рассматривая Мега Даркнет как часть глобальной сети, можно выделить несколько ключевых аспектов, касающихся культуры использования и конфиденциальности.
Во-первых, критически важна грамотная настройка рабочего пространства и использование комплексной защиты для уменьшения опасностей.
Любой участник обязан понимать степени конфиденциальности и, желательно соблюдать этичным принципам при работе внутри сети.
Также важно помнить, что следует учитывать о проблемах с законом и возможных последствиях за незаконные действия.
Законодательство разных стран по-разному трактует факта посещения таких ресурсов и степени вины пользователей.
Некоторые исследователи отмечают, что такие площадки могут становиться платформой для коммуникации и обеспечения анонимности при ответственном подходе.
Но при всем при этом, опасность мошенничества, финансовых потерь и злонамеренных акций здесь всегда присутствуют.
Находясь на грани открытостью информации и суровыми законами, Мега Даркнет остается одной из самых противоречивых частей всемирной паутины.
Отсюда следует простой вывод: следует очень внимательно относиться к изучаемой информации и проверке источников.
Обобщая вышесказанное можно заключить, что подобные ресурсы — это неоднозначное и опасное пространство. Сайт обеспечивает высокий уровень анонимности и приватности, но накладывает на посетителя бдительности, определенных знаний и моральной ответственности.
Площадка показывает спектр человеческих поступков в обстановке минимального надзора и предоставляет платформу для дискуссий на спорные темы.
Таким образом, этот сегмент сети является многогранным явлением интернета, где баланс между свободой и безопасностью определяется индивидуально.
Алкогольная и наркотическая зависимость являются серьёзными заболеваниями, требующими оперативного и квалифицированного вмешательства. Когда речь идёт о критическом состоянии пациента, особенно после длительного употребления алкоголя или наркотических веществ, время играет ключевую роль. Клиника «РеабилитАльянс» в Краснодаре предлагает услугу нарколога на дом, обеспечивая пациентам необходимую помощь в любой момент дня и ночи. Наши специалисты готовы оперативно выехать по указанному адресу и предоставить все необходимые медицинские процедуры на месте.
Углубиться в тему – http://narcolog-na-dom-krasnodar00.ru
Пациенты, нуждающиеся в постоянном медицинском наблюдении, размещаются в стационарном отделении. Здесь организовано непрерывное дежурство медсестры и врача-нарколога, что обеспечивает безопасность при риске осложнений.
Получить больше информации – наркологическая клиника лечение алкоголизма в екатеринбурге
Casa Cable Essentials – The interface is tidy and understanding product info is effortless.
«Передозировка» — наркологическая клиника в Санкт-Петербурге, где проводят детокс, лечение зависимостей и программу поэтапной реабилитации. Специалисты помогают вернуть стабильное состояние и формируют долгосрочную стратегию трезвости.
Узнать больше – реабилитационный центр для зависимых
Реабилитационные программы в наркологической клинике направлены на нормализацию обменных процессов, восстановление сна, эмоциональной стабильности и когнитивных функций. Для достижения этого используются методы физиотерапии, нутритивной поддержки и коррекции поведения. Основное внимание уделяется мотивации пациента, работе с созависимостью и обучению навыкам здорового взаимодействия с окружающей средой.
Разобраться лучше – наркологическая клиника екатеринбург
Кодирование от алкоголизма в Чехове для многих семей становится тем рубежом, после которого зависимость перестаёт казаться «временной слабостью» и начинает восприниматься как диагноз, с которым можно и нужно работать. До этого момента обычно проходят годы: чередуются запои и трезвые периоды, звучат обещания «больше такого не будет», меняются напитки, придумываются правила вроде «пью только по выходным» или «только пиво». Но рано или поздно семья замечает, что именно алкоголь диктует распорядок дня, влияет на настроение, разрушает здоровье и отношения. В этот момент становится очевидно: без сильного внешнего ограничителя и профессиональной помощи просто «взять себя в руки» уже не получается.
Разобраться лучше – kak-rabotaet-kodirovanie-ot-alkogolizma
Обращение к наркологу — это не признание «окончательного проигрыша», а трезвое решение, что здоровье и жизнь важнее иллюзии контроля. В клинике можно безопасно вывести человека из запоя, стабилизировать состояние, обследовать сердце, печень, нервную систему, понять, насколько далеко зашло заболевание. Важно, что помощь получают не только тяжёлые пациенты «на грани», но и те, у кого ещё есть работа, семья, привычный образ жизни, но запои уже стали регулярными. Чем раньше удаётся подключить специалистов в Лобне, тем мягче можно пройти лечение и тем больше шансов сохранить и здоровье, и отношения, и социальный статус.
Получить дополнительные сведения – заказать звонок наркологическая клиника
Запойное состояние опасно не только токсическим воздействием алкоголя на организм, но и последствиями резкого отказа от спиртного. В таких случаях промедление может стоить здоровья. Нарколог на дом в Рязани приезжает по вызову и проводит процедуру прямо в домашних условиях, используя проверенные медицинские методики. Такой подход сочетает анонимность, оперативность и возможность контроля состояния без госпитализации.
Подробнее тут – http://narcolog-na-dom-ryazan0.ru/vyvod-iz-zapoya-na-domu-ryazan-czeny/
video tube outlet – A site I would encourage others to visit.
Для снятия алкогольной интоксикации врач проводит детоксикационную терапию, которая включает внутривенные инфузии с растворами для выведения токсинов, поддерживающие препараты для печени, сердечно-сосудистой системы и нервной системы. В некоторых случаях назначаются седативные средства, нормализующие эмоциональное состояние пациента.
Ознакомиться с деталями – http://www.domen.ru
Наркологическая клиника «Трезвый город» оказывает медицинскую помощь при алкогольной и наркотической зависимости: детоксикация, снятие абстиненции, стабилизация состояния и подбор дальнейшей тактики лечения. Работа ведётся конфиденциально, с контролем показателей и учётом сопутствующих рисков.
Подробнее – аквилонг кодирование отзывы
В реабилитационном центре «Еваклиник» в Саранске созданы условия для безопасного и анонимного восстановления после зависимости. Программы включают детоксикацию, стабилизацию состояния и поэтапную реабилитацию под контролем медицинского персонала. Такой формат помощи позволяет снизить риски срывов и постепенно вернуться к нормальной жизни.
Изучить вопрос глубже – помощь при запое
Возможность назначить визит специалиста в наиболее удобное время. Это позволяет эффективно совмещать лечение с работой и повседневными делами. Такая гибкость помогает пациентам своевременно начать терапию, не откладывая ее из-за занятости. При необходимости врач может приехать в вечернее время или выходные дни.
Разобраться лучше – narcolog-na-dom-msk55.ru/
На месте врач проводит первичный осмотр, измеряет давление, пульс, сатурацию, оценивает уровень интоксикации и абстиненции. Далее назначается инфузионная терапия — капельница, направленная на дезинтоксикацию, восстановление электролитного баланса, купирование тревожности и нормализацию сна.
Получить дополнительные сведения – нарколог на дом москва
Многие жители Ивантеевки откладывают обращение, потому что им кажется, что ситуация «ещё не настолько страшная». Пока человек как-то ходит на работу, иногда остаётся трезвым и периодически клянётся, что «всё возьмёт под контроль», кажется, что обращаться в клинику рано. На самом деле эффективнее всего лечение работает именно тогда, когда проблемы уже заметны, но ещё не привели к тяжёлым осложнениям — инсультам, инфарктам, тяжёлым психозам, полной утрате социальных связей.
Детальнее – http://
CryptoRanked — это рейтинг криптовалютных бирж с упором на практичную и проверенную информацию для выбора торговой площадки. Проект https://cryptoranked.ru/ собирает и анализирует данные по ключевым параметрам: уровню безопасности, комиссиям, ликвидности, набору торговых инструментов и качеству поддержки, помогая принять взвешенное решение при работе с криптобиржами.
у меня наоборот. в этот раз быстрее все происходит) https://gashishkupits.club Дорогие наши форумчане, мы бы рады с вами пообщаться на разные темы, и стараемся общаться со всеми, и порой просто не хватает времени ведь мы не железные, если вы хотите что то конкретно заказать ася и скайп ждет вас, просто нереальное кол-во народа задают вопросы утром днем и вечером, и вот даже сейчас, мы очень стараемся изменить ситуацию в лучшую сторону. С начала месяца т.е. с 1 июня вы сможете самостоятельно заказывать и оплачивать прямо на сайте, а так же будете видеть наличие продукции.ещё раз говорю, здесь качество отменное, по крайней мере с той партии, с которой я получал. 1к10 убивало в мясо с напаса )
Алкогольная и наркотическая зависимость являются серьёзными заболеваниями, требующими оперативного и квалифицированного вмешательства. Когда речь идёт о критическом состоянии пациента, особенно после длительного употребления алкоголя или наркотических веществ, время играет ключевую роль. Клиника «РеабилитАльянс» в Краснодаре предлагает услугу нарколога на дом, обеспечивая пациентам необходимую помощь в любой момент дня и ночи. Наши специалисты готовы оперативно выехать по указанному адресу и предоставить все необходимые медицинские процедуры на месте.
Углубиться в тему – нарколог на дом недорого краснодар
home efficiency store – The site is clean, simple, and really easy to navigate.
Длительный запой способен нанести непоправимый вред организму, привести к тяжелым нарушениям работы внутренних органов и поставить под угрозу жизнь пациента. В таких случаях необходимо срочное медицинское вмешательство, которое позволяет быстро стабилизировать состояние, вывести токсины и предотвратить развитие опасных осложнений. Клиника «ЗдоровьеНорм» в Краснодаре предлагает профессиональный вывод из запоя на дому, обеспечивая комплексное лечение с максимальной оперативностью и полной конфиденциальностью.
Получить дополнительные сведения – вывод из запоя на дому недорого в краснодаре
reliable gadget outlet – I noticed how quickly pages load, especially on my smartphone.
FanFriendly World – Simple design and easy-to-read product info made exploring products enjoyable.
Сеть отелей на час Де Арт https://deart-13.ru/ это гостиница с почасовой оплатой в Москве. У нас семь великолепных бутик-отелей Де Арт. Они рассчитаны на небольшое количество гостей, которым предлагаются номера с уникальными, продуманными до мелочей интерьерами. Узнайте больше о наших номерах и ценах на сайте.
Tool Tower Store – The layout feels practical and highlights the tools clearly.
smart casual men’s shop – Balanced styles and fast navigation make choices simple.
Переезды в Сочи могут занимать время из-за трафика и рельефа. Мы учитываем специфику районов — Адлер, Хоста, Дагомыс, Красная Поляна — и подбираем ближайшую выездную бригаду, чтобы держать оговорённое «окно» прибытия. При необходимости врач останется дольше обычного — до устойчивого эффекта и предсказуемого сна.
Получить дополнительную информацию – http://narcolog-na-dom-sochi00.ru
Корпоративное обучение в Казахстане от Caspian Training Group – это 24 года успешного опыта развития персонала компаний всех уровней Компания предлагает языковые курсы английского, казахского и русского языков, бизнес-тренинги, стратегические сессии и бизнес-симуляции с адаптацией под задачи заказчика Ищете курсы английского языка для компаний? Более 850 компаний доверили обучение сотрудников профессионалам корпоративное-обучение.kz, где работают 60 квалифицированных инструкторов. Все программы соответствуют международным стандартам качества и разработаны совместно с зарубежными партнерами для максимальной эффективности
official buying hub – Attractive layouts and easy navigation made finding products easy.
Пациенты, нуждающиеся в постоянном медицинском наблюдении, размещаются в стационарном отделении. Здесь организовано непрерывное дежурство медсестры и врача-нарколога, что обеспечивает безопасность при риске осложнений.
Изучить вопрос глубже – лечение алкоголизма в екатеринбурге
Взаимосвязь медицинских и психологических компонентов терапии формирует основу устойчивой ремиссии, снижая вероятность повторных срывов и обеспечивая длительный восстановительный эффект.
Изучить вопрос глубже – наркологическая клиника лечение алкоголизма екатеринбург
Такая систематизация показывает, что врач действует целенаправленно, устраняя не только симптомы, но и их физиологические последствия.
Углубиться в тему – http://narcolog-na-dom-ryazan0.ru/vyvod-iz-zapoya-na-domu-ryazan-czeny/
Мега Даркнет — это ресурс, находящийся в закрытой части интернета, где посетители ищут к разнообразным сервисам и услугам.
сайт мега даркнет зеркало связан с теневым характером и повышенной конфиденциальностью.
В переносном смысле данный сайт выступает как портал в закрытое цифровое пространство, которое таит в себе массу особенностей.
Платформа Mega занимает важное место в структуре «глубокой сети», где основное внимание уделяется приватность посетителей и шифрование трафика.
Вход на эти сайты чаще всего производится использования особых браузеров (например, Тор), и дополнительно VPN для преодоления блокировок.
Для входа на платформу, требуется иметь актуальную ссылку (ONION-ссылку) и настроить систему особым образом.
Основная характеристика ресурса состоит в отсутствии информации пользователей и отсутствии централизованной регистрации.
Участники данной сети находят множество услуг: от конфиденциальных чатов до площадок для торговли.
Платформа обеспечивает защиту от мониторинга благодаря мощным криптографическим алгоритмам.
Однако даже мощная система шифрования может гарантировать лишь частичную безопасность, особенно при неосторожных действиях участников системы.
В современном цифровом ландшафте данная площадка выполняет узкоспециализированную функцию, привлекая тех, кто охотится за непубличной информации и специфические услуги.
На страницах ресурса бывают представлены как разрешенный контент, так и нелегальные, что требует от посетителя высокой осторожности и осознанности.
Анализируя роль подобных площадок в интернете, следует отметить несколько ключевых аспектов, касающихся культуры использования и конфиденциальности.
Первое, на что стоит обратить внимание, критически важна корректная организация пользовательского окружения и применение многоступенчатых мер защиты для уменьшения опасностей.
Любой участник обязан осознавать принципы скрытности и, по возможности, следовать правилам цифровой этики при взаимодействии в этой среде.
Кроме того, следует учитывать о правовых рисках и наказании за незаконные действия.
Юридические системы мира расходятся во мнениях относительно доступа к подобным площадкам и меры наказания за активность там.
Отдельные специалисты указывают, что подобные сайты могут выступать пространством для дискуссий и обмена опытом и защиты приватности при осознанном использовании.
Но при всем при этом, угроза быть обманутым, финансовых потерь и злонамеренных акций здесь всегда присутствуют.
Балансируя между информационной свободой и нормативными запретами, этот ресурс представляет собой наиболее неоднозначный сегмент всемирной паутины.
Резюмируя для посетителей: следует очень внимательно относиться к изучаемой информации и оценке надежности сайтов.
Обобщая вышесказанное сводится к тому, что подобные ресурсы — это неоднозначное и опасное пространство. Она предлагает высокий уровень анонимности и конфиденциальности, но требует от каждого участника осторожности, понимания технологий и осознанности действий.
Сайт иллюстрирует многообразие поведения людей в среде с ослабленным регулированием и предоставляет платформу для обсуждения острых тем.
Таким образом, этот сегмент сети остается сложным феноменом интернета, где баланс между свободой и безопасностью зависит от самого человека.
streetwear shop online – Smooth browsing experience and tidy interface overall.
Флудить на счет легальности/нелегальности товара в магазине не нужно в ветке! У же отписывалась и экспертиза и мы не однократно писали, возим ТОЛЬКО ЛЕГАЛ! https://boshkikypit.life заказ дошел до нас)))Вчера оплатил, сегодня получил бьющийся трек. Так что все норм. Разговор в скайпе длился 30мин, я оплатил и через 2 часа мне уже выслали посылку. Осталось проверить кач-во фашки. Если все норм, сработаемся с конторой.
В материале приведены детали, интересные, но не особенно важные. Мы рассматриваем аспекты, которые сложно назвать существенными, но включили их для большей полноты.
Подробнее читать – диета для похудения быстро
Для многих пациентов важным моментом является сохранение конфиденциальности. Врач, приехавший на дом, работает с полной защитой данных. Пациент может быть уверен, что его проблема останется личной и не станет достоянием общественности. Врачи приезжают на неприметных автомобилях и избегают всяческих ситуаций, которые могут привлечь лишнее внимание.
Детальнее – http://narcolog-na-dom-moskva55.ru
Мы понимаем, что каждая минута имеет решающее значение, поэтому наши специалисты готовы выехать на дом в кратчайшие сроки и провести все необходимые процедуры по детоксикации организма. Наша цель — помочь пациенту вернуться к нормальной жизни без лишних стрессов и рискованных попыток самостоятельного лечения.
Узнать больше – вывод из запоя с выездом краснодар
Вернуть здоровье и силы за одну процедуру позволяет грамотное сочетание препаратов, подобранное индивидуально под каждого пациента. Врач-нарколог оценивает тяжесть интоксикации, измеряет артериальное давление, пульс и уровень насыщения крови кислородом, а при необходимости назначает экспресс-анализы. На основании этих данных создаётся персональный раствор для инфузии:
Ознакомиться с деталями – https://kapelnica-ot-zapoya-moskva1.ru/kapelnica-ot-zapoya-cena-v-balashihe/
Медикаментозная детоксикация — это первый и самый важный этап в лечении запоя. В этот момент из организма выводятся все вредные вещества, которые накопились за время алкоголизма. В Москве применяются эффективные и безопасные методы очистки, которые проводятся под контролем опытных специалистов.
Детальнее – вывод из запоя на дому москва недорого
Во время процедуры врач контролирует состояние больного, по необходимости корректирует лечение, чтобы добиться максимального терапевтического эффекта. После проведения детоксикации пациенту назначается курс поддерживающей терапии, а также даются рекомендации по дальнейшему восстановлению и профилактике рецидивов.
Подробнее тут – психиатр нарколог на дом в сочи
В условиях круглосуточного наблюдения врачи могут внимательно следить за динамикой состояния, своевременно корректировать схемы лечения, проводить детоксикацию под контролем давления, пульса и работы сердца. Особенно это важно для пациентов с гипертонией, сердечно-сосудистыми заболеваниями, нарушениями ритма, заболеваниями печени, диабетом и другими хроническими патологиями. В стационаре проще организовать обследование, назначить сопутствующую терапию, вовремя заметить опасные симптомы и предотвратить серьёзные осложнения.
Углубиться в тему – narkologicheskaya-klinika-obratnyj-zvonok
В этом тексте собрано множество случайных сведений и довольно неопределённых мыслей, которые могут чем-то заинтересовать. Мы отмечаем моменты, которые не особенно важны, но всё же занимают своё место в повествовании.
Вот – секс знакомства
entertainment streaming shop – Bookmarking this so I can return later.
FiberFoods Corner – Easy layout and well-described items make exploring the site straightforward.
Чем дольше продолжается запой, тем более непредсказуемой становится реакция организма. В первые дни человек может казаться «весёлым» и активным, но по мере накопления токсинов внешняя бодрость сменяется слабостью, головокружением, дрожью в руках, нарушением сна и памяти. Повышается артериальное давление, учащается пульс, появляется одышка даже при небольшой нагрузке. Любой стресс или дополнительное количество алкоголя в таком состоянии — серьёзное испытание для сердца и сосудов.
Получить дополнительную информацию – http://vyvod-iz-zapoya-ivanteevka11.ru/vyvod-iz-zapoya-na-domu-v-ivanteevke/
Процесс лечения состоит из нескольких этапов:
Узнать больше – http://narko-zakodirovat2.ru
Этот интересный отчет представляет собой сборник полезных фактов, касающихся актуальных тем. Мы проанализируем данные, чтобы вы могли сделать обоснованные выводы. Читайте, чтобы узнать больше о последних трендах и значимых событиях!
Исследовать вопрос подробнее – https://hadieth.nl/40-hadith-nawawi-3
В этой информационной статье вы найдете интересное содержание, которое поможет вам расширить свои знания. Мы предлагаем увлекательный подход и уникальные взгляды на обсуждаемые темы, побуждая пользователей к активному мышлению и критическому анализу.
См. подробности – https://stanislaw.ru/rus/collections/links.asp?category=communication
I don’t think the title of your article matches the content lol. Just kidding, mainly because I had some doubts after reading the article.
essential web tags shop – A helpful layout and quick payment steps make shopping effortless.
В этой публикации мы рассматриваем важную тему борьбы с зависимостями, включая алкогольную и наркотическую зависимости. Мы обсудим методы лечения, реабилитации и поддержку, которые могут помочь людям, столкнувшимся с этой проблемой. Читатели узнают о перспективах выздоровления и важности комплексного подхода.
Выяснить больше – http://google.co.zw/url?sa=t&url=https://spb.alco-centr.ru/lechenie-paranoyi
Trail Treasure Market – Nice outdoor-focused content that feels thoughtfully put together.
Качественный вывод из запоя — это всегда процесс, а не одна капельница. Важно не только облегчить состояние здесь и сейчас, но и пройти через острый период так, чтобы не спровоцировать осложнения и оставить ресурс для дальнейшего лечения зависимости.
Узнать больше – вывод из запоя московская область
tech fix marketplace – I appreciated the thorough information that guided my selection.
Shop Cedar Celeste Online – Modern layout and clean visuals make the site very inviting.
В этой статье представлен занимательный и актуальный контент, который заставит вас задуматься. Мы обсуждаем насущные вопросы и проблемы, а также освещаем истории, которые вдохновляют на действия и изменения. Узнайте, что стоит за событиями нашего времени!
Как достичь результата? – https://profumia.net/prodotto/acqua-profumata-corpo-della-felicita-collistar
https://vy-doctor.com.ua/
trusted morning store – Breakfast items are well-presented and the site provides fun ideas.
Наркологический центр «Трезвый город» специализируется на лечении алкоголизма и наркомании с акцентом на безопасность пациента. Подбираются индивидуальные протоколы, учитывается анамнез, переносимость препаратов и возможные осложнения.
Изучить вопрос глубже – Центр лечения зависимостей в Мытищах
потому, что так и есть осталось не так много времени! https://skorostalpha.life Благо им! Биза на высотуя думаю разберемся точно
Кодирование от алкоголизма в Чехове для многих семей становится тем рубежом, после которого зависимость перестаёт казаться «временной слабостью» и начинает восприниматься как диагноз, с которым можно и нужно работать. До этого момента обычно проходят годы: чередуются запои и трезвые периоды, звучат обещания «больше такого не будет», меняются напитки, придумываются правила вроде «пью только по выходным» или «только пиво». Но рано или поздно семья замечает, что именно алкоголь диктует распорядок дня, влияет на настроение, разрушает здоровье и отношения. В этот момент становится очевидно: без сильного внешнего ограничителя и профессиональной помощи просто «взять себя в руки» уже не получается.
Подробнее тут – kak-rabotaet-kodirovanie-ot-alkogolizma
Эта информационная статья содержит полезные факты, советы и рекомендации, которые помогут вам быть в курсе последних тенденций и изменений в выбранной области. Материал составлен так, чтобы быть полезным и понятным каждому.
Осуществить глубокий анализ – https://ghaffarhonda.com/shop/honda-cg125s-black-gold
Бонусы на https://demotivs.ru реально отыграть.
Эта статья предлагает живое освещение актуальной темы с множеством интересных фактов. Мы рассмотрим ключевые моменты, которые делают данную тему важной и актуальной. Подготовьтесь к насыщенному путешествию по неизвестным аспектам и узнайте больше о значимых событиях.
Получить дополнительные сведения – https://kravingsfoodadventures.com/classic-creme-brulee
Во время детоксикации используются капельницы с растворами, которые очищают кровь от токсинов, восстанавливают водно-электролитный баланс и нормализуют работу печени и почек. Этот этап проводится в условиях клиники, что позволяет избежать возможных осложнений и ускорить процесс восстановления.
Изучить вопрос глубже – москва вывод из запоя на дому
В клинике «Еваклиник» в Саранске пациенты получают квалифицированную наркологическую помощь в комфортных и конфиденциальных условиях. Центр применяет современные методы терапии, направленные на снижение тяги и восстановление общего состояния организма. Поддержка врачей и психологов помогает закрепить результат и сформировать устойчивую мотивацию к трезвой жизни.
Углубиться в тему – алкоголики и работа
Клиника «Еваклиник» в Саранске специализируется на лечении зависимостей с применением проверенных медицинских протоколов. Пациентам доступна круглосуточная наркологическая помощь, медикаментозная поддержка и сопровождение на этапе реабилитации. Специалисты центра работают не только с физическими проявлениями зависимости, но и с психологическими причинами, что повышает эффективность лечения.
Исследовать вопрос подробнее – признаки зависимости от азартных игр
Запой почти никогда не начинается внезапно: сначала это редкие «переборы» по праздникам, потом привычка снимать стресс вечером, а дальше алкоголь всё чаще появляется в распорядке дня. В какой-то момент близкие замечают, что человек уже не контролирует количество, выпивка идёт несколько дней подряд, отменяются дела, нарушается сон, пропадает аппетит, появляются дрожь, потливость, скачки давления. На этом этапе вывод из запоя в Ивантеевке уже не может быть простым «проспаться и прийти в себя» — организму нужна полноценная медицинская помощь.
Получить больше информации – https://vyvod-iz-zapoya-ivanteevka11.ru/
Препараты подбираются строго индивидуально и могут включать:
Получить дополнительные сведения – http://narcolog-na-dom-v-moskve55.ru/narkolog-na-dom-anonimno-v-krasnogorske/
Публикация предоставляет читателю набор разрозненных идей, которые сложно применить на практике. Мы лишь слегка касаемся разных точек зрения, не углубляясь в анализ и не предлагая никаких выводов.
Вот – казино
FilterFactory Market – Clean design and detailed listings make navigating the site smooth.
Такой комплексный подход позволяет не только купировать острые состояния, но и устранить внутренние факторы, провоцирующие развитие зависимости. После стабилизации состояния пациент переходит к этапу психотерапевтической коррекции, направленной на предотвращение рецидивов.
Углубиться в тему – анонимная наркологическая клиника в екатеринбурге
Реабилитационные программы в наркологической клинике направлены на нормализацию обменных процессов, восстановление сна, эмоциональной стабильности и когнитивных функций. Для достижения этого используются методы физиотерапии, нутритивной поддержки и коррекции поведения. Основное внимание уделяется мотивации пациента, работе с созависимостью и обучению навыкам здорового взаимодействия с окружающей средой.
Исследовать вопрос подробнее – http://narkologicheskaya-klinika-v-ekb16.ru
Что ж ты такой нетерпеливый… )) https://computer-mouse.ru Товар нормальный. В этот понедельник оплатил ещё, жду)но только если мусора захотят найдут. просто мусора еслиб хотели найти , то давно бы уже посыль пришла с сопровождением.
Во многих семьях путь к лечению начинается одинаково: сначала запои или эпизоды употребления воспринимаются как временные «проблемы по жизни», которых стыдно, но которые вроде бы можно переждать. Человек клянётся «завязать после праздников», родственники верят, потом терпят, потом скандалят, затем снова наступают на те же грабли. В какой-то момент становится очевидно, что сила воли больше не работает: попытки прекратить запой заканчиваются тряской, паникой, скачками давления, отсутствием сна, а через несколько дней всё повторяется. Именно тогда наркологическая клиника в Лобне перестаёт быть чем-то абстрактным и превращается в реальную возможность остановить этот круг.
Подробнее тут – chastnaya-narkologicheskaya-klinika
unique sew-on patches – Happily discovered this place and the energy is fantastic.
Official Nutmeg Neon – Product descriptions were clear and the navigation kept everything simple.
Капитальный ремонт квартир в Волгограде под ключ – это всесторонний сервис от компании Дока строй, в котором учтены все нюансы Квалифицированные специалисты проводят работы на высоком уровне и строго по графику, применяя передовые материалы и методы https://doka-stroi.ru/ – это уверенность в стабильности и честной стоимости услуг без дополнительных наценок Обращаясь к профессионалам, вы приобретаете безупречный итог без дополнительных проблем и перерасхода средств Поспешите вверить работы опытным специалистам, чтобы сделать вашу квартиру удобной и современной
accurate metric equipment shop – Well-crafted items and balanced prices create real value.
Lolz.live соединяет тысячи поклонников игр из множества стран для передачи опыта и данных. Форум предлагает обширные разделы по популярным играм, полезные гайды и актуальные обсуждения. Здесь вы найдете единомышленников, советы от профессионалов и свежие новости игровой индустрии. Ищете купить аккаунт pubg? Переходите на lolz.live и становитесь частью активного сообщества. Удобная навигация, дружелюбная атмосфера и ежедневные обновления контента ждут каждого участника платформы.
Такой порядок действий гарантирует не только купирование симптомов, но и подготовку пациента к последующему восстановлению.
Углубиться в тему – https://narcolog-na-dom-ryazan0.ru/vyvod-iz-zapoya-ryazan-na-domu
Многие жители Ивантеевки откладывают обращение, потому что им кажется, что ситуация «ещё не настолько страшная». Пока человек как-то ходит на работу, иногда остаётся трезвым и периодически клянётся, что «всё возьмёт под контроль», кажется, что обращаться в клинику рано. На самом деле эффективнее всего лечение работает именно тогда, когда проблемы уже заметны, но ещё не привели к тяжёлым осложнениям — инсультам, инфарктам, тяжёлым психозам, полной утрате социальных связей.
Исследовать вопрос подробнее – forumy-narkologicheskaya-klinika-forum
pravdahub.com.ua/luiza-khey-tablytsia-povnyy-hayd-do-ystselenyia-cherez-pozytyvni-afirmatsii/
Первый этап помощи почти всегда связан с детоксикацией. Организм, который длительное время получал алкоголь или другие вещества, перегружен токсинами, страдают сердце, сосуды, мозг, печень, нарушены сон и обмен веществ. Простое «похмелиться и перетерпеть» в такой ситуации опасно: можно спровоцировать очередной скачок давления, аритмию, обострение хронических заболеваний. В условиях клиники в Лобне детокс строится по медицинским правилам, а не по советам из интернета.
Изучить вопрос глубже – наркологическая клиника цены
Возможность назначить визит специалиста в наиболее удобное время. Это позволяет эффективно совмещать лечение с работой и повседневными делами. Такая гибкость помогает пациентам своевременно начать терапию, не откладывая ее из-за занятости. При необходимости врач может приехать в вечернее время или выходные дни.
Получить дополнительную информацию – https://narcolog-na-dom-msk55.ru/narkolog-na-dom-kruglosutochno-moskva/
Travel Trolley Picks – Makes sorting out travel needs feel straightforward.
Зеркало https://soccer-24.ru обновляется быстро.
trusted online store – Wide variety of products and the checkout was straightforward and fast.
Основной задачей нарколога, выезжающего на дом, является помощь в любой ситуации, связанной с зависимостью. Все процедуры и методики подбираются индивидуально, в зависимости от состояния пациента.
Получить больше информации – https://narcolog-na-dom-moskva55.ru/vyzov-narkologa-na-dom-moskva/
Причем тут какой то смоки и Екб ко мне ? Иди проспись сначала и смотри куда пишешь. Я не работаю в Екб. https://kateflowershop.ru Ну просто выглядело твое сообщение как мессага на параное)))))можно поподробней пожалуйста!Т.к. недавно зарегился на данном форуме и нет возможности отписать в личку
Мастерская «Дядя Саша» в Ростове-на-Дону предлагает ремонт и доработку фар с интеграцией bi-led и LED-линз для машин всех производителей. Специалисты осуществляют шлифовку и смену стекол оптики, ликвидируют конденсат, делают оклейку бронепленкой и восстановление ДХО. Полный перечень услуг представлен на странице https://vk.com/unclesansanyc/ с примерами работ и отзывами клиентов. На все виды работ и установленные линзы действует гарантия 2 года, что подтверждает высокое качество оказываемых услуг.
Вызов специалиста не всегда планируется заранее. Чаще всего помощь требуется в экстренной ситуации, когда близкие замечают серьёзное ухудшение состояния. Нарколог на дом в Рязани оказывает помощь в следующих случаях:
Подробнее тут – нарколог на дом санкт-петербург
Обращаться можно и нужно не только в момент очередного запоя. Клиника в Ивантеевке работает и с теми, кто сейчас в относительной ремиссии, но понимает, что без внешней поддержки снова сорвётся. В этом случае можно обсудить профилактические программы, варианты кодирования, реабилитацию, работу с тревогой и депрессией. Чем раньше сделан шаг в сторону лечения, тем мягче будут процедуры и тем больше шансов на устойчивый результат.
Углубиться в тему – http://www.domen.ru
web tools marketplace – The site layout is intuitive, making navigation effortless.
Длительные запои создают мультисистемный кризис. Обезвоживание и сгущение крови повышают риск образования тромбов, что может привести к инсульту или инфаркту миокарда. Печень и поджелудочная страдают от мощной токсической нагрузки — развивается острый панкреатит, хронический гепатит и жировой гепатоз. Интоксикация нарушает работу ЖКТ: возникает гастрит, язвенная болезнь и риск внутренних кровотечений. Алкоголь разрушает нейронные связи, снижая уровень витамина B1, что может вызвать энцефалопатию Ворника и, в запущенных случаях, корсаковский психоз с необратимыми провалами памяти и когнитивными нарушениями.
Детальнее – https://kapelnica-ot-zapoya-moskva1.ru/kapelnica-ot-zapoya-cena-v-balashihe/
Нарколог на дом в Москве предоставляет комплексную помощь, адаптированную под каждого пациента:
Ознакомиться с деталями – vrach narkolog na dom
Как поясняет медицинский психолог Елена Мусатова, «пациенту важно доверять специалисту, понимать его подход и чувствовать профессиональную уверенность ещё на этапе первичного осмотра».
Разобраться лучше – наркологическая клиника вывод из запоя первоуральск
Большинство семей приходят к мысли о лечении зависимости не сразу. Сначала всё выглядит как «случайные переборы по праздникам», потом алкоголь или наркотики становятся привычным способом снять стресс, забыться, пережить неудачи. Постепенно запои учащаются, человек пропадает на несколько дней, появляются долги, проблемы на работе, конфликты в семье. На этом этапе многим кажется, что обращаться в наркологическую клинику в Лобне ещё рано, что можно «взять себя в руки» и как-то остановиться. Но практика показывает обратное: чем дольше затягивается момент обращения к специалистам, тем тяжелее протекают запои, тем глубже страдает здоровье и тем сложнее вернуть человека к стабильной трезвости.
Получить дополнительные сведения – наркологическая клиника цены
https://medart.in.ua/
FixItFactory Marketplace – Navigation feels intuitive and product info is clear throughout.
Для современного интерьера идеально подойдет цена электрокарнизы Прокарниз , который обеспечит удобство и стиль в управлении шторами.
Такое решение значительно упрощает жизнь пользователю. Он особенно удобен в больших помещениях, где нужно одновременно регулировать множество полотен. Более того, электрокарниз легко подключается к умным домашним системам.
Принцип работы электрокарниза основан на электрическом приводе, который движет гардины по направляющим. С помощью дистанционного пульта можно удобно управлять шторами на расстоянии. Это делает устройство идеальным для использования в офисах, гостиницах и домах с современным дизайном. Автоматический привод позволяет быстро и легко регулировать положение штор.
Выбор электрокарниза зависит от размеров окна, веса штор и типа крепления. Мощность мотора должна соответствовать весу ткани для надежной работы. Также стоит обратить внимание на материал направляющей и качество комплектующих. Использование прочных комплектующих обеспечивает устойчивость электрокарниза.
Установка электрокарниза требует аккуратности и точного соблюдения инструкции. Профессиональная установка обеспечит правильную работу системы и долгий срок эксплуатации. Регулярное техническое обслуживание поможет продлить срок службы устройства. Своевременная профилактика увеличит срок службы электрокарниза.
Спин-шаблон:
Автоматизация ускоряет процесс регулировки штор, экономя время.
essential supply hub – Fast delivery and high-quality items that last.
Задача первого контакта — не «записать к врачу на когда-нибудь», а оценить, насколько ситуация критична прямо сейчас. Если речь идёт о многодневном запое, сильной слабости, одышке, скачках давления, спутанности сознания, лучше не экспериментировать с домашними методами. В таких случаях специалисты в Лобне рекомендуют стационар, где можно не только поставить капельницу, но и быстро среагировать на осложнения. Если же состояние относительно стабильное, возможно обсуждение мягкого формата с выездом и последующим наблюдением.
Углубиться в тему – наркологическая клиника лобня
chairchase.shop – Navigating the site was fast, easy, and enjoyable overall.
Такой комплексный подход позволяет не только купировать острые состояния, но и устранить внутренние факторы, провоцирующие развитие зависимости. После стабилизации состояния пациент переходит к этапу психотерапевтической коррекции, направленной на предотвращение рецидивов.
Получить дополнительную информацию – наркологическая клиника цены екатеринбург
Процедура вывода из запоя начинается с тщательной диагностики состояния пациента, чтобы определить, какие методы лечения будут наиболее эффективными. Мы применяем индивидуальный подход и комбинируем медикаментозное лечение с психотерапевтической поддержкой, что даёт лучший результат.
Подробнее – https://narcolog-na-dom-novokuznetsk0.ru/narkolog-lechenie-na-domu-novokuzneczk/
Chic Deals Hub – The steps to pay were clearly laid out and easy to follow.
ну я тоже надеялся что лучше жвш он . но к сожалению я разочаровался в нём. держит не долго совсем вред от кокаин, мефдрон, гашиш Может стоит внимательно посмотреть в ветке что есть резервный жаббер ? основной уже 6 дней не работает , какие то сбои, но резерв ведь работает, привыкли панику поднимать на ровном месте.Магазин работает ровно !!! Качество реагента высокое!!!
транс трахает транса
Эта доказательная статья представляет собой глубокое погружение в успехи и вызовы лечения зависимостей. Мы обращаемся к научным исследованиям и опыте специалистов, чтобы предоставить читателям надежные данные об эффективности различных методик. Изучите, что работает лучше всего, и получите информацию от экспертов.
Узнать больше – http://google.com.gh/url?sa=t&url=https://spb.alco-centr.ru/plazmaferez-pri-alkogolnoy-intoksikatsii
Во многих семьях путь к лечению начинается одинаково: сначала запои или эпизоды употребления воспринимаются как временные «проблемы по жизни», которых стыдно, но которые вроде бы можно переждать. Человек клянётся «завязать после праздников», родственники верят, потом терпят, потом скандалят, затем снова наступают на те же грабли. В какой-то момент становится очевидно, что сила воли больше не работает: попытки прекратить запой заканчиваются тряской, паникой, скачками давления, отсутствием сна, а через несколько дней всё повторяется. Именно тогда наркологическая клиника в Лобне перестаёт быть чем-то абстрактным и превращается в реальную возможность остановить этот круг.
Подробнее можно узнать тут – https://narkologicheskaya-klinika-lobnya11-2.ru/narkologicheskaya-klinika-otzyvy-v-lobne
limited edition watch hub – Special collections and good value make each purchase exciting.
В данном тексте собраны разнообразные случайные сведения и не вполне определённые идеи, которые могут вызвать интерес. Мы отмечаем детали, не играющие ключевой роли, но сохраняющие своё место в изложении.
Подробнее читать – https://rostov-narkologiya.ru/uslugi-ot-alkogolizma/vyvod-iz-zapoya
актуальный казино Водка вывод https://quartis.us/
Одним из самых привлекательных аспектов вызова нарколога на дом является гибкость. Вы можете согласовать время визита врача, подходящее именно для вас, включая вечернее или ночное время. Это позволяет совмещать лечение с работой и личными делами, не нарушая привычный ритм жизни.
Изучить вопрос глубже – vyzov vracha narkologa na dom
Наркологическая помощь на дому в Ярославле охватывает широкий спектр медицинских мероприятий, направленных на стабилизацию состояния пациента и подготовку к дальнейшему лечению. Среди основных процедур:
Разобраться лучше – запой нарколог на дом
Вывод из запоя на дому — это управляемый медицинский процесс, где каждая деталь имеет значение: от первичного осмотра и грамотного подбора инфузионного профиля до сенсорной дисциплины в помещении и чётких «окон оценки» результата. В наркологической клинике «СеверМед Трезвость» мы используем принцип минимально достаточных вмешательств: одна цель на этап, один измеримый маркер и одна корректировка за раз. Такой подход снижает нагрузку на организм, повышает предсказуемость и делает восстановление переносимым для пациента и его близких.
Получить больше информации – http://vivod-iz-zapoya-v-sankt-peterburge16.ru/vyvod-iz-zapoya-sankt-peterburg-vyzov-narkologa-na-dom/
Запой — это не просто усиленное похмелье, а критическое состояние алкогольной интоксикации, при котором организм оказывается неспособным самостоятельно вывести накопившиеся токсины. При затяжном приёме алкоголя страдает не только печень — нарушаются функции сердечно-сосудистой системы, тормозятся нейрохимические процессы в головном мозге, развивается выраженная дегидратация и электролитный дисбаланс. Первая помощь в такой ситуации — экстренная инфузионная терапия, которую мы проводим в наркологической клинике «Источник Здоровья» в Балашихе.
Узнать больше – http://kapelnica-ot-zapoya-moskva1.ru/kapelnica-ot-zapoya-cena-v-balashihe/
Задача первого контакта — не «записать к врачу на когда-нибудь», а оценить, насколько ситуация критична прямо сейчас. Если речь идёт о многодневном запое, сильной слабости, одышке, скачках давления, спутанности сознания, лучше не экспериментировать с домашними методами. В таких случаях специалисты в Лобне рекомендуют стационар, где можно не только поставить капельницу, но и быстро среагировать на осложнения. Если же состояние относительно стабильное, возможно обсуждение мягкого формата с выездом и последующим наблюдением.
Подробнее – наркологическая клиника диспансер
Отсутствие визитов в клинику гарантирует полную конфиденциальность. Это особенно важно для пациентов, беспокоящихся о своей репутации или возможном влиянии на профессиональную деятельность. Вызов врача на дом полностью исключает нежелательные встречи в медицинском центре.
Подробнее можно узнать тут – врач нарколог на дом
Реабилитационные программы в наркологической клинике направлены на нормализацию обменных процессов, восстановление сна, эмоциональной стабильности и когнитивных функций. Для достижения этого используются методы физиотерапии, нутритивной поддержки и коррекции поведения. Основное внимание уделяется мотивации пациента, работе с созависимостью и обучению навыкам здорового взаимодействия с окружающей средой.
Ознакомиться с деталями – наркологическая клиника вывод из запоя екатеринбург
Нарколог на дом в Москве предоставляет комплексную помощь, адаптированную под каждого пациента:
Подробнее тут – narcolog-na-dom-msk55.ru/
Наркологическая клиника в клинике в Екатеринбурге — это специализированное медицинское учреждение, где проводится диагностика, лечение и реабилитация людей, страдающих алкогольной или наркотической зависимостью. Комплексный подход включает не только медикаментозную терапию, но и психотерапевтические методики, направленные на восстановление личности и возвращение пациента к социальной активности. Каждое вмешательство проводится с учётом физического состояния, психологического профиля и стадии заболевания. Работа специалистов основана на принципах анонимности, медицинской этики и научно доказанных протоколов лечения.
Узнать больше – наркологическая клиника клиника помощь в екатеринбурге
Visit https://friendlylikes.com/ and you can buy Instagram followers, likes, views, and comments at the best prices, with a quick start. We also offer services for other social networks. Our support is fast and available 24/7. Our service ensures the highest quality and reliability.
Для эффективного вывода из запоя в Мурманске используются современные методы детоксикации, включающие внутривенное введение растворов, направленных на восстановление водно-солевого баланса, коррекцию электролитов и нормализацию работы почек и печени. Важным этапом является использование витаминных комплексов и препаратов, поддерживающих работу сердца и сосудов.
Изучить вопрос глубже – https://vyvod-iz-zapoya-v-murmanske12.ru/vyvod-iz-zapoya-na-domu-v-murmanske/
Преимущество обращения в клинику по месту проживания в том, что помощь становится доступной и менее пугающей. Не нужно ехать в другой город, объяснять длительные отлучки, жить в ощущении, что о проблеме узнают все вокруг. Пациент может пройти диагностику, детоксикацию, вывод из запоя, курс лечения и реабилитацию в привычном регионе, а родные — участвовать в процессе, приезжать на семейные консультации, поддерживать контакт со специалистами. Важный момент: здесь смотрят не только на зависимость как на «вредную привычку», а как на заболевание с физическими, психологическими и социальными последствиями. Лечить приходится не отдельный эпизод запоя, а всю систему — здоровье, поведение, образ жизни и окружение человека.
Изучить вопрос глубже – https://narkologicheskaya-klinika-ivanteevka11.ru/
Отсутствие визитов в клинику гарантирует полную конфиденциальность. Это особенно важно для пациентов, беспокоящихся о своей репутации или возможном влиянии на профессиональную деятельность. Вызов врача на дом полностью исключает нежелательные встречи в медицинском центре.
Подробнее можно узнать тут – vrach narkolog na dom
Чтобы показать, как именно работает врач в домашних условиях, можно сопоставить основные проявления запоя и шаги нарколога, направленные на их устранение.
Узнать больше – http://narcolog-na-dom-ryazan0.ru/vyvod-iz-zapoya-ryazan-na-domu/
Запой может длиться от нескольких дней до нескольких недель, и с каждым новым днём состояние пациента может ухудшаться. Важно не затягивать с лечением, поскольку алкогольная зависимость способна привести к необратимым изменениям в организме и психике. В Москве лечение проводится не только в клиниках, но и в условиях дома, что позволяет сохранить конфиденциальность.
Получить дополнительные сведения – москва вывод из запоя на дому
Если пациент обращается в клинику в состоянии запоя или тяжёлой абстиненции, первым шагом становится детоксикация. Это не «волшебная капельница», которая снимает все проблемы, а комплекс процедур, направленных на выведение токсинов, восстановление водно-солевого баланса, поддержку сердца, печени, нервной системы. Под контролем врачей подбираются растворы и препараты, которые позволяют снизить нагрузку на организм, облегчить похмельный синдром, уменьшить тревогу и вернуть сон. Важно, что это проходит под наблюдением, а не «на кухне» без понимания, как реагирует сердце и давление. После выхода из острого состояния человек уже способен осмысленно обсуждать дальнейшее лечение.
Углубиться в тему – narkologicheskaya-klinika-na-dom
Trend Tally Storefront – Trendy selection presented in a way that’s easy to enjoy.
trusted office store – I appreciated the structured pages and clear product info while picking items.
Магазин работает четко уже несколько лет:)только одно расстроило когда хотел сделать очередной заказ мне сказали что не отправляют больше в те края:dontknown:с чем это связано мне так и не сказали,хотелось бы узнать вред от кокаин, мефдрон, гашиш Приветствую один из старейших магазинов форума! Много воды утекло с тех пор как вы открылись в 2011 году… а вы по-прежнему на плаву и продолжаете радовать нас своим отличным сервисом. Даже не представляю форум без вас) Так держать ребята!Спасибо за отзыв , а то заказывает много людей а отписываются единицы.
Провайдеры на https://горки-академпарка.рф топовые.
Кодирование от алкоголизма в Чехове для многих семей становится тем рубежом, после которого зависимость перестаёт казаться «временной слабостью» и начинает восприниматься как диагноз, с которым можно и нужно работать. До этого момента обычно проходят годы: чередуются запои и трезвые периоды, звучат обещания «больше такого не будет», меняются напитки, придумываются правила вроде «пью только по выходным» или «только пиво». Но рано или поздно семья замечает, что именно алкоголь диктует распорядок дня, влияет на настроение, разрушает здоровье и отношения. В этот момент становится очевидно: без сильного внешнего ограничителя и профессиональной помощи просто «взять себя в руки» уже не получается.
Подробнее можно узнать тут – https://kodirovanie-ot-alkogolizma-chekhov11.ru/kodirovanie-ot-alkogolizma-vyezd-na-dom-v-chekhove
Опытные педагоги полагают, в наше время активное включение методик иммерсивного дизайна в структуру обучения нового поколения позволяет детям не только осваивать актуальные профессиональные компетенции, а также успешно проявлять творческий креатив в рамках стремительного прогресса.
По ссылке- https://basot.ru/
Если пациент обращается в клинику в состоянии запоя или тяжёлой абстиненции, первым шагом становится детоксикация. Это не «волшебная капельница», которая снимает все проблемы, а комплекс процедур, направленных на выведение токсинов, восстановление водно-солевого баланса, поддержку сердца, печени, нервной системы. Под контролем врачей подбираются растворы и препараты, которые позволяют снизить нагрузку на организм, облегчить похмельный синдром, уменьшить тревогу и вернуть сон. Важно, что это проходит под наблюдением, а не «на кухне» без понимания, как реагирует сердце и давление. После выхода из острого состояния человек уже способен осмысленно обсуждать дальнейшее лечение.
Получить дополнительную информацию – рейтинг лучших наркологических клиник москвы
FontFoundry Depot – User-friendly site and clear font previews make browsing quick and simple.
секс смотреть бесплатно
Продолжительный запой вызывает серьезные нарушения в работе внутренних органов, прежде всего печени, почек и сердца. При выводе из запоя пациенты могут испытывать сильное головокружение, тошноту, повышенную раздражительность, тахикардию и судороги. В таких случаях необходима срочная медицинская помощь, которая позволяет стабилизировать состояние пациента.
Углубиться в тему – вывод из запоя круглосуточно в нижнем тагиле
Наркологическая помощь — это не «последний шанс для безнадёжных», а нормальный медицинский шаг, такой же логичный, как визит к кардиологу при проблемах с сердцем или к эндокринологу при сахарном диабете. В клинике в Лобне зависимость рассматривают как заболевание, а не как «слабость характера», и помогают человеку пройти весь путь — от детоксикации и вывода из запоя до реабилитации и профилактики срывов. Обращение на более раннем этапе даёт важное преимущество: организм ещё способен восстанавливаться, психика не разрушена окончательно, социальные связи не разорваны. Это значит, что лечение может быть мягче, программа — гибче, а шансы на устойчивый результат — выше.
Получить больше информации – http://
this lovely boutique – What a wonderful experience, I’ll be back for more.
Клиника инновационной хирургии https://kix-med.ru/ работает с 2015 года и предлагает полный спектр медицинских услуг. Специалисты центра применяют доказательную медицину по стандартам Западной Европы и США. Каждый пациент получает индивидуальный подход и комплексное лечение заболеваний любой сложности. Высококвалифицированные врачи с многолетним опытом гарантируют качественную помощь в комфортных условиях. Доверьте свое здоровье проверенным специалистам с безупречной репутацией и современным подходом.
В этой публикации мы обсуждаем современные методы лечения различных заболеваний. Читатели узнают о новых медикаментах, терапиях и исследованиях, которые активно применяются для лечения. Мы нацелены на то, чтобы предоставить практические знания, которые могут помочь в борьбе с недугами.
Подробнее тут – https://www.xcelenergy.com/stateselector?stateselected=true&goto=https://spb.alco-centr.ru/lazernoe-kodirovanie-ot-alkogolizma
Обширная база TG-Search включает более тридцати семи тысяч каналов и ботов, распределенных по пятидесяти категориям. Пользователи могут находить контент от бизнеса и криптовалют до развлечений и саморазвития в удобной структуре. Платформа https://tg-search.ru/ предлагает функции продвижения каналов, конкурсы и раздел знакомств для активного комьюнити. Сервис регулярно обновляет рейтинги популярных каналов и помогает авторам привлекать целевую аудиторию через встроенные инструменты.
Наркологическая клиника в клинике в Екатеринбурге — это специализированное медицинское учреждение, где проводится диагностика, лечение и реабилитация людей, страдающих алкогольной или наркотической зависимостью. Комплексный подход включает не только медикаментозную терапию, но и психотерапевтические методики, направленные на восстановление личности и возвращение пациента к социальной активности. Каждое вмешательство проводится с учётом физического состояния, психологического профиля и стадии заболевания. Работа специалистов основана на принципах анонимности, медицинской этики и научно доказанных протоколов лечения.
Подробнее тут – https://narkologicheskaya-klinika-v-ekb16.ru/narkologicheskaya-klinika-ekaterinburg-otzyvy/
SnippetSmith store – I’m definitely saving this site to come back later.
После оформления заявки на сайте narcolog-na-dom-v-moskve55.ru или по телефону, оператор уточняет информацию о пациенте: возраст, длительность запоя, наличие хронических заболеваний, текущее самочувствие. В течение 30–60 минут дежурный специалист приезжает по адресу с полным комплектом оборудования и медикаментов.
Детальнее – нарколог на дом недорого
Leash Lane Store – Browsing was smooth and I found great products without wasting time.
lifestyle essentials store – Well-selected products and a cheerful atmosphere make it memorable.
спасибо и ВАМ !! вред от кокаин, мефдрон, гашиш Ребята кто заказывал 25 реагент,как по качеству???????????всё дошло))))) Спасибо магазину,в след раз возьму отпишу что да как :dansing:качество на высоте
Основной задачей нарколога, выезжающего на дом, является помощь в любой ситуации, связанной с зависимостью. Все процедуры и методики подбираются индивидуально, в зависимости от состояния пациента.
Углубиться в тему – вызов нарколога на дом
Современные карнизы с электроприводом цена 7 (499) 638-25-37 обеспечивают максимальный комфорт и стиль в вашем интерьере.
Современные карнизы оборудованы различными механизмами управления.
Чем дольше продолжается запой, тем более непредсказуемой становится реакция организма. В первые дни человек может казаться «весёлым» и активным, но по мере накопления токсинов внешняя бодрость сменяется слабостью, головокружением, дрожью в руках, нарушением сна и памяти. Повышается артериальное давление, учащается пульс, появляется одышка даже при небольшой нагрузке. Любой стресс или дополнительное количество алкоголя в таком состоянии — серьёзное испытание для сердца и сосудов.
Получить больше информации – вывод из запоя на дому московская область
В жизни крупных городов часто возникают ситуации, когда стрессы и быстрый ритм жизни приводят к развитию зависимости. Когда проблема становится очевидной, важно незамедлительно обратиться за помощью. В таких случаях вызов нарколога на дом может стать не только удобным, но и наиболее эффективным вариантом. Это позволяет получить квалифицированное лечение в привычной обстановке, сохраняя при этом полную анонимность и конфиденциальность.
Изучить вопрос глубже – http://narcolog-na-dom-moskva55.ru/
В клинике «Передозировка» в Санкт-Петербурге пациентам доступно индивидуальное лечение наркозависимости и алкоголизма. Центр использует современные протоколы терапии, предлагает конфиденциальное кодирование и поддерживает пациентов на всех этапах восстановления.
Разобраться лучше – центр реабилитации наркоманов
Кодирование от алкоголизма в Чехове для многих семей становится тем рубежом, после которого зависимость перестаёт казаться «временной слабостью» и начинает восприниматься как диагноз, с которым можно и нужно работать. До этого момента обычно проходят годы: чередуются запои и трезвые периоды, звучат обещания «больше такого не будет», меняются напитки, придумываются правила вроде «пью только по выходным» или «только пиво». Но рано или поздно семья замечает, что именно алкоголь диктует распорядок дня, влияет на настроение, разрушает здоровье и отношения. В этот момент становится очевидно: без сильного внешнего ограничителя и профессиональной помощи просто «взять себя в руки» уже не получается.
Получить больше информации – https://kodirovanie-ot-alkogolizma-chekhov11.ru/kodirovanie-ot-alkogolizma-ukolom-v-chekhove/
bath décor hub – Loved the product range and ordering process was fast and smooth.
Power Plug Shop collection – Found excellent chargers with a hassle-free checkout.
Наркологическая клиника «Трезвый город» оказывает медицинскую помощь при алкогольной и наркотической зависимости: детоксикация, снятие абстиненции, стабилизация состояния и подбор дальнейшей тактики лечения. Работа ведётся конфиденциально, с контролем показателей и учётом сопутствующих рисков.
Детальнее – лечение спайсовой зависимости
Запой — это не просто усиленное похмелье, а критическое состояние алкогольной интоксикации, при котором организм оказывается неспособным самостоятельно вывести накопившиеся токсины. При затяжном приёме алкоголя страдает не только печень — нарушаются функции сердечно-сосудистой системы, тормозятся нейрохимические процессы в головном мозге, развивается выраженная дегидратация и электролитный дисбаланс. Первая помощь в такой ситуации — экстренная инфузионная терапия, которую мы проводим в наркологической клинике «Источник Здоровья» в Балашихе.
Изучить вопрос глубже – поставить капельницу от запоя на дому
После купирования острой фазы мы предлагаем полное сопровождение на этапе восстановления, чтобы закрепить результаты и снизить риск повторных срывов. В первые дни показаны сеансы кислородной терапии, которые активизируют клеточный обмен и способствуют быстрейшему выведению остатков токсинов. Параллельно проводятся физиотерапевтические процедуры — магнитотерапия и лазерная стимуляция, укрепляющие сосудистую стенку и ускоряющие заживление микроциркуляторных нарушений.
Получить дополнительные сведения – сколько стоит капельница на дому от запоя балашиха
Movie Vault cinema classics – A well-stocked source for timeless entertainment, easy to browse.
Мы не используем универсальные «сильные капельницы». Эффективность даёт точное совпадение с задачей. Ниже — логика выбора профилей и маркеры, на которые мы ориентируемся при контроле эффективности и безопасности.
Выяснить больше – вывод из запоя капельница
Ждем трип репотов и описания про АМ https://marixyannas.club а думаете?магазин на высоте) качество кул)
FormulaFoundry World Online – Organized product sections and clear info make browsing hassle-free.
online fitness hub – Gear feels high-quality and the shipping process is well-explained.
Сервис предлагает выгодные условия аренды автомобилей с возможностью последующего выкупа транспорта. Гибкие программы позволяют выбрать оптимальный вариант финансирования под конкретные потребности клиента. Подробная информация о доступных автомобилях размещена на https://arendaavtovykup.clients.site/ с актуальными ценами и условиями. Минимальный пакет документов и быстрое оформление делают процесс получения машины простым и удобным. Качественный автопарк и прозрачные условия сотрудничества гарантируют комфортное использование транспорта.
Trip Tides Guide – Travel ideas presented clearly, making exploration effortless.
Вызов нарколога на дом в таких условиях позволяет не терять драгоценное время, избежать госпитализации и предотвратить критическое развитие событий. Кроме того, это снижает психологическую нагрузку на пациента и его близких, особенно если зависимость длится долго и сопровождается отрицанием проблемы.
Получить дополнительную информацию – http://narcolog-na-dom-v-moskve55.ru/narkolog-na-dom-anonimno-v-krasnogorske/
Charge Charm Shop Now – Initial impressions are good, excited to revisit the site.
https://infobanks.com.ua/
Преимущества домашнего лечения также заключаются в индивидуальном подходе. Врач, находясь в вашем доме, может более тщательно изучить ситуацию, провести необходимую диагностику и подобрать курс лечения, который идеально подойдет вашему состоянию. В отличие от клиники, где внимание врача часто ограничено временем, на дому можно уделить пациенту больше времени, подбирая лечение с учетом его особенностей.
Подробнее можно узнать тут – https://narcolog-na-dom-moskva55.ru/
art-inspired mosaic store – Distinctive designs and a user-friendly catalog enhance every visit.
Текст включает разнообразную информацию, которая может показаться любопытной, но не меняет устоявшегося восприятия. Предлагаем просто насладиться чтением, не ожидая значительной пользы.
Подробнее читать – детокс чай для похудения
Для многих пациентов важным моментом является сохранение конфиденциальности. Врач, приехавший на дом, работает с полной защитой данных. Пациент может быть уверен, что его проблема останется личной и не станет достоянием общественности. Врачи приезжают на неприметных автомобилях и избегают всяческих ситуаций, которые могут привлечь лишнее внимание.
Подробнее тут – narkolog na dom nedorogo
Toast Trek Official – Smooth interface and clear descriptions made the whole experience convenient.
Для многих пациентов важным моментом является сохранение конфиденциальности. Врач, приехавший на дом, работает с полной защитой данных. Пациент может быть уверен, что его проблема останется личной и не станет достоянием общественности. Врачи приезжают на неприметных автомобилях и избегают всяческих ситуаций, которые могут привлечь лишнее внимание.
Детальнее – narkolog na dom
Большинство семей приходят к мысли о лечении зависимости не сразу. Сначала всё выглядит как «случайные переборы по праздникам», потом алкоголь или наркотики становятся привычным способом снять стресс, забыться, пережить неудачи. Постепенно запои учащаются, человек пропадает на несколько дней, появляются долги, проблемы на работе, конфликты в семье. На этом этапе многим кажется, что обращаться в наркологическую клинику в Лобне ещё рано, что можно «взять себя в руки» и как-то остановиться. Но практика показывает обратное: чем дольше затягивается момент обращения к специалистам, тем тяжелее протекают запои, тем глубже страдает здоровье и тем сложнее вернуть человека к стабильной трезвости.
Подробнее можно узнать тут – заказать звонок наркологическая клиника
“Думаю надо прогуляться, за Кооперативом еще кОоПератив,Захожу туда и тут описание сходиться бля Думаю тут то Полюбому” https://skorostalpha.life МАГАЗИНУ надо бы по ровнее работать!Потом все идет как надо , не много по тряхивает, но не чего, не так люто как от КРИССА
Прикладная онтология для предпринимателей https://tinyurl.com/22vaoomz
После купирования острой фазы мы предлагаем полное сопровождение на этапе восстановления, чтобы закрепить результаты и снизить риск повторных срывов. В первые дни показаны сеансы кислородной терапии, которые активизируют клеточный обмен и способствуют быстрейшему выведению остатков токсинов. Параллельно проводятся физиотерапевтические процедуры — магнитотерапия и лазерная стимуляция, укрепляющие сосудистую стенку и ускоряющие заживление микроциркуляторных нарушений.
Изучить вопрос глубже – капельница от запоя стоимость
Такой порядок действий гарантирует не только купирование симптомов, но и подготовку пациента к последующему восстановлению.
Изучить вопрос глубже – https://narcolog-na-dom-ryazan0.ru
В клинике «Еваклиник» в Саранске пациенты получают квалифицированную наркологическую помощь в комфортных и конфиденциальных условиях. Центр применяет современные методы терапии, направленные на снижение тяги и восстановление общего состояния организма. Поддержка врачей и психологов помогает закрепить результат и сформировать устойчивую мотивацию к трезвой жизни.
Получить больше информации – первая помощь при запое
smart ecom tools – Very useful resources that genuinely help me grow my online business.
Современные электрические жалюзи москва прокарниз
электрические жалюзи на окна в москве обеспечивают удобство управления светом в вашем доме с помощью дистанционного пульта.
Одним из главных достоинств является значительная экономия времени и сил.
—
Управлять жалюзи можно не вставая с места, что очень удобно.
Present Parlor must-haves – Gift choices are fantastic and the packaging was neat and stylish.
Запой — это не просто усиленное похмелье, а критическое состояние алкогольной интоксикации, при котором организм оказывается неспособным самостоятельно вывести накопившиеся токсины. При затяжном приёме алкоголя страдает не только печень — нарушаются функции сердечно-сосудистой системы, тормозятся нейрохимические процессы в головном мозге, развивается выраженная дегидратация и электролитный дисбаланс. Первая помощь в такой ситуации — экстренная инфузионная терапия, которую мы проводим в наркологической клинике «Источник Здоровья» в Балашихе.
Узнать больше – сколько стоит капельница на дому от запоя балашиха
После купирования острой фазы мы предлагаем полное сопровождение на этапе восстановления, чтобы закрепить результаты и снизить риск повторных срывов. В первые дни показаны сеансы кислородной терапии, которые активизируют клеточный обмен и способствуют быстрейшему выведению остатков токсинов. Параллельно проводятся физиотерапевтические процедуры — магнитотерапия и лазерная стимуляция, укрепляющие сосудистую стенку и ускоряющие заживление микроциркуляторных нарушений.
Получить дополнительные сведения – http://kapelnica-ot-zapoya-moskva1.ru
explore Mystery Muse – The items here are captivating and perfect for sparking inspiration.
Кодирование от алкоголизма в Чехове для многих семей становится тем рубежом, после которого зависимость перестаёт казаться «временной слабостью» и начинает восприниматься как диагноз, с которым можно и нужно работать. До этого момента обычно проходят годы: чередуются запои и трезвые периоды, звучат обещания «больше такого не будет», меняются напитки, придумываются правила вроде «пью только по выходным» или «только пиво». Но рано или поздно семья замечает, что именно алкоголь диктует распорядок дня, влияет на настроение, разрушает здоровье и отношения. В этот момент становится очевидно: без сильного внешнего ограничителя и профессиональной помощи просто «взять себя в руки» уже не получается.
Изучить вопрос глубже – центр кодирования от алкоголизма
Thank you for your sharing. I am worried that I lack creative ideas. It is your article that makes me full of hope. Thank you. But, I have a question, can you help me?
Наркологическая клиника в клинике в Екатеринбурге — это специализированное медицинское учреждение, где проводится диагностика, лечение и реабилитация людей, страдающих алкогольной или наркотической зависимостью. Комплексный подход включает не только медикаментозную терапию, но и психотерапевтические методики, направленные на восстановление личности и возвращение пациента к социальной активности. Каждое вмешательство проводится с учётом физического состояния, психологического профиля и стадии заболевания. Работа специалистов основана на принципах анонимности, медицинской этики и научно доказанных протоколов лечения.
Получить дополнительные сведения – наркологическая клиника
Эффективная капельница должна включать несколько компонентов, каждый из которых направлен на решение конкретной задачи: выведение токсинов, восстановление функций организма, нормализация психоэмоционального состояния.
Получить больше информации – https://kapelnicza-ot-zapoya-pervouralsk11.ru/kapelnicza-ot-zapoya-na-domu-stoimost-v-pervouralske
Выбор конкретного метода всегда начинается с диагностики. Врач оценивает стаж зависимости, частоту и продолжительность запоев, наличие сопутствующих заболеваний сердца, печени, нервной системы, психических расстройств. Учитывается прошлый опыт лечения: были ли рецидивы после предыдущих кодирований, как пациент переносил процедуры, что именно вызывало срыв. На этой основе специалист предлагает один или несколько вариантов, подробно поясняя плюсы, ограничения и возможные риски каждого.
Подробнее тут – https://kodirovanie-ot-alkogolizma-chekhov11.ru/kodirovanie-ot-alkogolizma-ukolom-v-chekhove/
Artıq 1xbet mobi azərbaycan tətbiqi ilə oyunları izləmək və qazanmaq daha asan oldu.
https://1xbet-giris.ru/
FreightFriendly Pro – Smooth navigation and organized product info make checking items simple.
Процесс лечения состоит из нескольких этапов:
Получить больше информации – http://narko-zakodirovat2.ru
Одним из самых привлекательных аспектов вызова нарколога на дом является гибкость. Вы можете согласовать время визита врача, подходящее именно для вас, включая вечернее или ночное время. Это позволяет совмещать лечение с работой и личными делами, не нарушая привычный ритм жизни.
Подробнее можно узнать тут – нарколог на дом москва
Основной этап в лечении — детоксикация организма от токсичных веществ, вызывающих интоксикацию. В клинике применяют современные методы капельниц и медикаментозной поддержки, включая препараты для снятия абстинентного синдрома.
Исследовать вопрос подробнее – http://www.domen.ru
Не скажу что качество низкое качество на высоте а возрат не кто не сделает даже не фантазирую )) Все супер все ровно сам тут беру еще не разу не разачаровывался https://boshkikypit.life У меня кстати тоже через 2 дня пришло, но в соседний город, так как в моём городе этой конторы не оказалось) но мне сразу позвонили, и предложили либо самому приехать за пакетом, либо подождать до вторника и мне его привезут домой. Вот жду)Подскажите пожалуйста товары указаные в прайсе все в наличии или нет?
Клиника «Передозировка» в Санкт-Петербурге предоставляет профессиональную помощь при зависимостях. Пациенты получают лечение алкоголизма и наркомании, проходят кодирование и реабилитацию, что способствует устойчивому возвращению к нормальной жизни.
Ознакомиться с деталями – антибиотики и алкоголь совместимость
secure order link – Item tracking and price checking is easy and reliable.
трансы видео
Looking for farming game? Download it for free at play.google.com/store/apps/details?id=com.ugo.play.free.farm.valley! This isn’t just a farming game—it’s a world filled with characters and stories familiar to all of us from childhood. You can build your own unique farm and manage all the processes! With vibrant graphics and regular updates plus events, it offers engaging gameplay for players of all ages!
Truvella Online Store – Attractive presentation with items clearly selected with care.
Большинство семей приходят к мысли о лечении зависимости не сразу. Сначала всё выглядит как «случайные переборы по праздникам», потом алкоголь или наркотики становятся привычным способом снять стресс, забыться, пережить неудачи. Постепенно запои учащаются, человек пропадает на несколько дней, появляются долги, проблемы на работе, конфликты в семье. На этом этапе многим кажется, что обращаться в наркологическую клинику в Лобне ещё рано, что можно «взять себя в руки» и как-то остановиться. Но практика показывает обратное: чем дольше затягивается момент обращения к специалистам, тем тяжелее протекают запои, тем глубже страдает здоровье и тем сложнее вернуть человека к стабильной трезвости.
Углубиться в тему – наркологическая клиника отзывы
Процесс лечения состоит из нескольких этапов:
Подробнее можно узнать тут – http://narko-zakodirovat2.ru/vyvod-iz-zapoya-na-domu-v-moskve/
После купирования острой фазы мы предлагаем полное сопровождение на этапе восстановления, чтобы закрепить результаты и снизить риск повторных срывов. В первые дни показаны сеансы кислородной терапии, которые активизируют клеточный обмен и способствуют быстрейшему выведению остатков токсинов. Параллельно проводятся физиотерапевтические процедуры — магнитотерапия и лазерная стимуляция, укрепляющие сосудистую стенку и ускоряющие заживление микроциркуляторных нарушений.
Разобраться лучше – капельница от запоя на дому недорого в балашихе
Как поясняет медицинский психолог Елена Мусатова, «пациенту важно доверять специалисту, понимать его подход и чувствовать профессиональную уверенность ещё на этапе первичного осмотра».
Подробнее можно узнать тут – наркологическая клиника вывод из запоя в первоуральске
Одним из ключевых направлений является проведение капельниц, призванных вывести токсины из организма и нормализовать водно-электролитный баланс. Используемые препараты и состав растворов подбираются индивидуально, исходя из клинической картины и истории болезни пациента.
Подробнее тут – нарколог на дом вывод из запоя
Outline VPN предлагает защищенный доступ в интернет без слежки и ограничений по минимальной цене на рынке. Сервис не собирает логи, не отслеживает действия пользователей и обеспечивает полную анонимность в сети. Гигабитный канал с современным шифрованием гарантирует высокую скорость соединения для стриминга, игр и работы. Купить ключ Outline на https://outline.monster/ можно за пару кликов — активация занимает минуту, а использовать VPN разрешается на неограниченном количестве устройств: смартфонах, компьютерах, планшетах под любой операционной системой.
Компоненты
Детальнее – http://kapelnicza-ot-zapoya-pervouralsk11.ru/kapelniczy-ot-zapoya-na-domu-v-pervouralske/https://kapelnicza-ot-zapoya-pervouralsk11.ru
Алкогольная или наркотическая интоксикация — это не просто временное ухудшение самочувствия, а серьёзное медицинское состояние, требующее неотложной помощи. Когда человек находится в запое или состоянии ломки, его организм стремительно теряет силы, нарушается работа сердца, печени, мозга, возникают панические атаки, судороги, спутанность сознания. В таких случаях помощь должна быть незамедлительной. Если пациент не может самостоятельно добраться до клиники, оптимальным решением становится вызов нарколога на дом. В Красногорске такая услуга доступна круглосуточно благодаря выездной службе клиники «Ключ к Здоровью».
Детальнее – http://narcolog-na-dom-v-moskve55.ru
Наркологическая помощь — это не «последний шанс для безнадёжных», а нормальный медицинский шаг, такой же логичный, как визит к кардиологу при проблемах с сердцем или к эндокринологу при сахарном диабете. В клинике в Лобне зависимость рассматривают как заболевание, а не как «слабость характера», и помогают человеку пройти весь путь — от детоксикации и вывода из запоя до реабилитации и профилактики срывов. Обращение на более раннем этапе даёт важное преимущество: организм ещё способен восстанавливаться, психика не разрушена окончательно, социальные связи не разорваны. Это значит, что лечение может быть мягче, программа — гибче, а шансы на устойчивый результат — выше.
Углубиться в тему – адреса наркологических клиник
Большинство семей приходят к мысли о лечении зависимости не сразу. Сначала всё выглядит как «случайные переборы по праздникам», потом алкоголь или наркотики становятся привычным способом снять стресс, забыться, пережить неудачи. Постепенно запои учащаются, человек пропадает на несколько дней, появляются долги, проблемы на работе, конфликты в семье. На этом этапе многим кажется, что обращаться в наркологическую клинику в Лобне ещё рано, что можно «взять себя в руки» и как-то остановиться. Но практика показывает обратное: чем дольше затягивается момент обращения к специалистам, тем тяжелее протекают запои, тем глубже страдает здоровье и тем сложнее вернуть человека к стабильной трезвости.
Разобраться лучше – http://narkologicheskaya-klinika-lobnya11.ru
Momentum Mall store – Items are easy to locate and the layout feels intuitive and clean.
Вызов нарколога на дом в таких условиях позволяет не терять драгоценное время, избежать госпитализации и предотвратить критическое развитие событий. Кроме того, это снижает психологическую нагрузку на пациента и его близких, особенно если зависимость длится долго и сопровождается отрицанием проблемы.
Подробнее можно узнать тут – нарколог на дом анонимно
Одна из главных ошибок — ждать «идеального момента» для лечения. Кажется, что кодирование уместно только тогда, когда зависимость достигла крайней стадии: человек потерял работу, перестал выходить из запоев, полностью разрушил отношения с близкими. На практике обращение в клинику Чехова оправдано гораздо раньше, как только употребление алкоголя перестаёт быть редким эпизодом и начинает системно мешать жить. Если каждый стресс, отпуск или конфликт заканчиваются срывом, если запои становятся длиннее, а похмелье тяжелее, — это уже повод хотя бы обсудить кодирование с врачом, а не ждать, пока ресурс организма будет почти исчерпан.
Ознакомиться с деталями – metody-kodirovaniya-ot-alkogolizma
Для успешной адаптации пациента в обществе клиника организует поддержку родственников и последующее наблюдение. Это снижает риск рецидива и помогает сохранить достигнутые результаты.
Выяснить больше – narkologicheskie kliniki alkogolizm murmansk
https://vodkat.top/
Дорогие наши форумчане, мы бы рады с вами пообщаться на разные темы, и стараемся общаться со всеми, и порой просто не хватает времени ведь мы не железные, если вы хотите что то конкретно заказать ася и скайп ждет вас, просто нереальное кол-во народа задают вопросы утром днем и вечером, и вот даже сейчас, мы очень стараемся изменить ситуацию в лучшую сторону. С начала месяца т.е. с 1 июня вы сможете самостоятельно заказывать и оплачивать прямо на сайте, а так же будете видеть наличие продукции. https://amgtopshop.club Отзыв коротенько. Закладка на месте. Обьяснение распологает. Фото имеется. Бот чёткий. бошки хороши. Вес норма! … ну вот и всё Коротко и ладно)Берут все молча )
Популярная и надежная компания, которая оказывает свои услуги с 1992 года, предлагает приобрести качественный, практичный и функциональный маслопресс холодного отжима промышленного назначения АА77. Это уникальное и правильное решение в том случае, если вы заинтересованы в производстве масла высокого качества. На сайте http://maslopressaa77.ru/ ознакомьтесь со всеми техническими характеристиками, которые играют ключевую роль в совершении покупки. Вы получаете возможность приобрести профессиональный агрегат, который быстро и просто переработает семена подсолнечника, чтобы получить продукт эталонного качества.
express dock hub – Delivery updates were clear and everything reached me without delay.
Вывод из запоя показан при:
Разобраться лучше – вывод из запоя на дому мурманская область
Print Press Shop daily finds – Prints exceeded expectations and ordering was quick and easy.
Кодирование от алкоголизма в Чехове для многих семей становится тем рубежом, после которого зависимость перестаёт казаться «временной слабостью» и начинает восприниматься как диагноз, с которым можно и нужно работать. До этого момента обычно проходят годы: чередуются запои и трезвые периоды, звучат обещания «больше такого не будет», меняются напитки, придумываются правила вроде «пью только по выходным» или «только пиво». Но рано или поздно семья замечает, что именно алкоголь диктует распорядок дня, влияет на настроение, разрушает здоровье и отношения. В этот момент становится очевидно: без сильного внешнего ограничителя и профессиональной помощи просто «взять себя в руки» уже не получается.
Углубиться в тему – kodirovanie-ot-alkogolizma
На фоне длительных запоев страдает не только физическое состояние. Обостряются тревога, раздражительность, обидчивость, возможны вспышки агрессии и неадекватные поступки. Для семьи это превращается в постоянное напряжение: никто не знает, чем закончится очередной день или ночь. Одновременно растёт риск психозов, когда человек может видеть и слышать то, чего нет на самом деле, путать реальность, быть опасным для себя и окружающих.
Исследовать вопрос подробнее – http://
Кодирование — это не волшебство и не наказание, а инструмент, который помогает создать чёткую границу между человеком и алкоголем на определённый срок. В условиях, когда тяга к спиртному уже сформирована, а организм и психика привыкли опираться на алкоголь в стрессе, одного рационального решения «бросить» недостаточно. Нужен и дополнительный медицинский барьер, и психологическая переработка привычек. Именно поэтому жители Чехова всё чаще обращаются к профильным специалистам по месту жительства: здесь можно не только пройти саму процедуру, но и получить диагностику, детокс, наблюдение и сопровождение в период трезвости, а значит — реально повысить шанс на устойчивый результат, а не на краткую передышку.
Ознакомиться с деталями – kodirovanie-ot-alkogolizma-chekhov11.ru/
Bodø/Glimt 3-1 Inter Milan – 2026 Europa League shock result! Norwegian underdogs smash giants at home – football news going wild right now!
Текст включает разнообразную информацию, которая может показаться любопытной, но не меняет устоявшегося восприятия. Предлагаем просто насладиться чтением, не ожидая значительной пользы.
Подробнее читать – детокс чай для похудения
FunnelFoundry Depot Hub – Intuitive interface with clear product details makes browsing smooth.
В этой статье представлен занимательный и актуальный контент, который заставит вас задуматься. Мы обсуждаем насущные вопросы и проблемы, а также освещаем истории, которые вдохновляют на действия и изменения. Узнайте, что стоит за событиями нашего времени!
А что дальше? – https://kalabiotech.com/ecam-expo-pune-2022
Такая структура позволяет подбирать формат помощи под конкретную ситуацию, а не подгонять всех пациентов под один шаблон. Для кого-то будет достаточно короткого стационарного курса и последующего амбулаторного наблюдения, кому-то потребуется длительная реабилитация и плотная работа с семьёй, а кому-то — мягкая поддержка на ранней стадии зависимости, пока заболевание ещё не успело разрушить жизнь.
Подробнее – narkologicheskaya-klinika-stacionar
Wolves 2-2 Arsenal – 2026 Premier League dramatic draw! Wolves boss says “felt like a win” – football scores update shakes title race!
Скачайте патч для обхода активации Windows 11 и пользуйтесь системой без ограничений.
Подробнее – Скачать патч для активации Windows 11
Для создания комфортной атмосферы в доме идеально подойдут купить рулонные шторы с электроприводом прокарниз
многоканальный пульт для штор , которые легко управляются с помощью пульта или смартфона.
Для полного затемнения подойдут плотные и светонепроницаемые материалы.
https://womanworld.com.ua/
ORBIS Production https://orbispro.it/ is a prize-winning comprehensive film, photography, and video production firm headquartered in Milan, working throughout Italy with locations in Milan, Rome, and Venice. The firm offers full production assistance to global brands and agencies, covering location scouting, permits, crew assembly, talent casting, gear, logistics, and post-production services. From concept development to final delivery, ORBIS Production delivers high-end commercial, corporate, and branded content throughout Italy.
В статье представлены ключевые моменты по актуальной теме, дополненные советами экспертов и ссылками на дополнительные ресурсы. Цель материала — дать читателю инструменты для самостоятельного развития и принятия осознанных решений.
Полная информация здесь – http://??.jp/2020/12/23/md_dsgn_sub
Публикация предлагает читателю не просто информацию, а инструменты для анализа и саморазвития. Мы стимулируем критическое мышление, предлагая различные точки зрения и призывая к самостоятельному поиску решений.
Ознакомиться с отчётом – https://nina-polkownik.de/carlo1
Shop Lunavique Online – Bright, well-structured pages make the overall experience very appealing.
Качественный вывод из запоя — это всегда процесс, а не одна капельница. Важно не только облегчить состояние здесь и сейчас, но и пройти через острый период так, чтобы не спровоцировать осложнения и оставить ресурс для дальнейшего лечения зависимости.
Узнать больше – vyvod-iz-zapoya
Клиника «Передозировка» в Санкт-Петербурге предоставляет профессиональную помощь при зависимостях. Пациенты получают лечение алкоголизма и наркомании, проходят кодирование и реабилитацию, что способствует устойчивому возвращению к нормальной жизни.
Разобраться лучше – психические и поведенческие расстройства вызванные алкоголем
Медикаментозная детоксикация — это первый и самый важный этап в лечении запоя. В этот момент из организма выводятся все вредные вещества, которые накопились за время алкоголизма. В Москве применяются эффективные и безопасные методы очистки, которые проводятся под контролем опытных специалистов.
Подробнее тут – вывод из запоя москва и московская область
народ а трек через скока по времени примерно приходит? вред от кокаин, мефдрон, гашиш согласен с вами ребятСделал заказ , все гуд и качество понравилось
Эта статья предлагает живое освещение актуальной темы с множеством интересных фактов. Мы рассмотрим ключевые моменты, которые делают данную тему важной и актуальной. Подготовьтесь к насыщенному путешествию по неизвестным аспектам и узнайте больше о значимых событиях.
Всё самое вкусное внутри – https://www.gastroguru.cz/sasazu
check it out here – Beautiful natural aesthetic with clean, simple product organization.
Дизайн https://psaffect.ru современный.
Наркологическая клиника «Трезвый город» оказывает медицинскую помощь при алкогольной и наркотической зависимости: детоксикация, снятие абстиненции, стабилизация состояния и подбор дальнейшей тактики лечения. Работа ведётся конфиденциально, с контролем показателей и учётом сопутствующих рисков.
Узнать больше – двойное кодирование
В данной статье вы найдете комплексный подход к изучению насущных тем. Мы комбинируем теоретические сведения с практическими советами, чтобы читатель мог не только понять проблему, но и найти пути её решения.
Всё, что нужно знать – https://motivitymarketing.com/trust-should-be-more-than-the-narrative
Психотерапевтическое кодирование делает акцент на внутренней мотивации. Специалист помогает человеку увидеть реальную цену алкоголя в его жизни, понять, как именно употребление разрушает здоровье, семью, карьеру, и сформировать установку на трезвость на определённый срок. Используются техники внушения в состоянии расслабления и структурированная работа с убеждениями и привычками. Такой подход особенно полезен тем, кто боится «лекарственного вмешательства» или уже имеет негативный опыт неудачных медикаментозных попыток. В практике лечения в Чехове часто используются комбинированные схемы, когда медикаментозный барьер подкрепляется психотерапевтической поддержкой, а результат кодирования закрепляется за счёт изменения образа жизни и участия в реабилитационных программах.
Получить больше информации – https://kodirovanie-ot-alkogolizma-chekhov11.ru/kodirovanie-ot-alkogolizma-na-domu-v-chekhove
В этой информационной статье вы найдете интересное содержание, которое поможет вам расширить свои знания. Мы предлагаем увлекательный подход и уникальные взгляды на обсуждаемые темы, побуждая пользователей к активному мышлению и критическому анализу.
Детальнее – https://www.newsline.co.ke/fine-details-of-10th-china-africa-think-tank-forum
Эта статья для ознакомления предлагает читателям общее представление об актуальной теме. Мы стремимся представить ключевые факты и идеи, которые помогут читателям получить представление о предмете и решить, стоит ли углубляться в изучение.
Перейти к статье – http://gopbmx.pl/strona-glowna/img_0186
https://koketka.com.ua/
Monarch Motive car essentials – Quality products and reliable assistance make me return frequently.
Эта информационная заметка предлагает лаконичное и четкое освещение актуальных вопросов. Здесь вы найдете ключевые факты и основную информацию по теме, которые помогут вам сформировать собственное мнение и повысить уровень осведомленности.
Запросить дополнительные данные – https://np.net.br/pt-pede-bloqueio-redes-nikolas-ferreira-incitacao-odio
digital design store – The templates are impressive and downloads were simple and fast.
explore Privacy Parlor – Straightforward privacy tools and tips that make protecting data simple.
обо всем думаем ) но не сразу вред от кокаин, мефдрон, гашиш отличный магазин, все всегда ровноКакие у тебя претензии? ты провокатор и не более т.к. ты не дал даже номер заказа и не высказал притензию, к тому же за тебя мне уже написали в Личку, другие магазины..
Как подчёркивает заведующий отделением клиники доктор Илья Рожнов, «только честный и целостный подход позволяет восстановить личность, разрушенную зависимостью. Наркологическая клиника в Волгограде — профессиональное лечение зависимостей строит не просто курс терапии, а мост между человеком и его новой жизнью».
Получить дополнительную информацию – наркологическая клиника нарколог
шумоизоляция авто https://vikar-auto.ru
проститутки трансы
В этом интересном тексте собраны обширные сведения, которые помогут вам понять различные аспекты обсуждаемой темы. Мы разбираем детали и факты, делая акцент на важности каждого элемента. Не упустите возможность расширить свои знания и взглянуть на мир по-новому!
Проверенные методы — узнай сейчас – http://kazdykospomaha.cz/partneri/darcespravlogo2016
Привет всем! Рассмотрим, что работало ранее — энергоэффективная кровля. В принципе: через крышу уходит до 30% тепла. Нужно комплексное решение — могу рекомендовать: монтаж ПВХ кровли. Как это работает: монтируют теплоизоляцию, сверху — ПВХ мембрану. Вот потому что покрытие отражающее — летом не перегревается. Мы используем PIR плиты — это отличные параметры. Вместо заключения: кровля работает на вас.
актуальный казино Водка правила https://nashural.ru/dostoprimechatelnosti-urala/chelyabinskaya-oblast/chem-zanyatsya-v-chelyabinske-s-detmi-top-10-interesnyh-mest/
Казино Водка представляет собой современный игровой ресурс, пользующийся большой популярностью среди любителей азартных развлечений. Vodka Bet вход и регистрация через зеркало.
Структура сайта понятна и удобна для любого пользователя, что упрощает навигацию.
Официальный сайт предоставляет широкий выбор игровых автоматов и настольных игр, что делает процесс игры максимально увлекательным. Водка Бет официальный сайт вход личный кабинет.
Игроки найдут здесь множество интересных игр и привлекательные предложения для выигрышей.
официальный зеркало Водка казино https://com-p.ru/podklyuchenie-setevogo-printera
Да что то вот,с трудом верится,или вообще не верится!!!Я,первый раз заказывал в этом магазе,довольно таки быстро заказ получил,и качество товара,такое как и было обещано!!!Сейлер меня Не обманул,потому что он порядочный,да и ещё есть люди,мои знакомые хорошие,их на форуме нет,но они покупали в этом магазе продукцию,и остались довольны качеством товара и работы с клиентом… вред от кокаин, мефдрон, гашиш Достойный амфетамин, думал купить трёху, но на первый раз взял 1. И теперь жалею. скорость достойная.Все будет равно чувак!!!!!!!!
Удобство и современный дизайн обеспечат рулонные жалюзи с электроприводом прокарниз
рулонные или римские шторы с электроприводом , которыми легко управлять с пульта или смартфона.
Дистанционное управление делает использование штор особенно удобным и быстрым.
Price Prism – Fair pricing and smooth site performance made browsing easy.
порно кончают
propellerplaza.shop – Excellent selection of propellers and support team responded quickly to my queries.
elite craftsmanship store – Products are carefully made with remarkable attention to detail.
В статье рассмотрим ключевые моменты, которые помогут сориентироваться при выборе капельницы от запоя, понять механизм действия и особенности процедуры, а также избежать типичных ошибок при обращении за медицинской помощью.
Исследовать вопрос подробнее – http://kapelnicza-ot-zapoya-pervouralsk11.ru
4-FA -все кто гнал, обломитесь, вы просто его не понял. Он не будет переть как старый добрый md – но эффект отличный. 1 колпак на лицо – и часа 2 состояние абсолютной гормонии с окружающим миром. Мозг работает как от любого другого качественного стимулятора на 5+. https://nextwavese.shop Я тебе не хамил. Да 10г, смешно не смешно, а на дороге не валяются. И очень обидно когда от вашего ПМа получаешь подтвердение, веришь! и остаешься с разочарованием и обидой, бессилием что либо доказать. А тебе еще сверху льют хамство, упивайтесь на здоровье. Я утерся и теперь знаю на что способны даже нормальные, доверенные магазины. А это тоже опыт, за который я заплатил, и ничуть не жалею. Просто пусть народ знает и будет готов при работе без гаранта ТУТ ожидайте что такое может быть.Это ошибка или нет, подскажи пожалуйста.
Moss Mingle Official – Found this by chance and it pleasantly surprised me.
Ищете авто из японии под заказ цены? Посетите сайт priority-auto.ru – там вы найдете существенный выбор авто различных брендов. При необходимости подберем автомобиль под ваш бюджет, а также вышлем актуальную стоимость и расскажем, как будем доставлять. На сайте вы также сможете воспользоваться калькулятором для расчета конечной стоимости в вашем городе или ознакомиться с ответами на часто задаваемые вопросы.
Все пришло. всё на высоте. на данный момент более сказать немогу. вред от кокаин, мефдрон, гашиш Доставка осуществляется нашим курьером при заказе от 1кг!И обговаривается с ТС индивидуально!Посыль получил в течении 5ти дней после оплаты. Быстро!! Отлично!!
Как отмечает нарколог Олег Васильев, «чем раньше пациент получает квалифицированную медицинскую помощь, тем меньше риск серьезных осложнений».
Изучить вопрос глубже – вызов нарколога на дом иркутск
sparkdex ai SparkDex is redefining decentralized trading with speed, security, and real earning potential. On spark dex, you keep full control of your assets while enjoying fast swaps and low fees. Powered by sparkdex ai, the platform delivers smarter insights and optimized performance for confident decision-making. Trade, earn from liquidity, and grow your crypto portfolio with sparkdex — the future of DeFi starts here.
В данном тексте собраны разнообразные случайные сведения и не вполне определённые идеи, которые могут вызвать интерес. Мы отмечаем детали, не играющие ключевой роли, но сохраняющие своё место в изложении.
Подробнее читать – детокс чай для похудения
Подробности о технологии и методах выезда нарколога можно найти на официальных медицинских порталах, таких как Российское общество наркологов и Минздрав РФ.
Ознакомиться с деталями – нарколог на дом ярославская область
проститутки казань
Постройка деревянных домов под ключ в Московской области от компании ДЕРЕВОГРАД – это проверенные каркасные коттеджи, бани и дачные дома по приемлемым ценам от 10 000 рублей за квадратный метр Квалифицированные специалисты осуществляют готовые и персональные проекты с соблюдением дедлайнов и стандартов, гарантируя долговечность сооружений https://derevo-grad.com/ предлагает десятки готовых решений площадью от 16 до 100 м? с полной комплектацией и прозрачной сметой Оформите заказ на строительство дома вашей мечты у экспертов с солидным опытом работы в деревянном домостроении
Protein Pantry top picks – Great variety and prices that make stocking up easy for athletes.
fragrant spice store – The freshness and scent of the spices made cooking a real pleasure.
Всем привет! вред от кокаин, мефдрон, гашиш А то с после ситуации с РЦлаб все настораживают……Ребят!!! Звонил в курьерку, все у них нормально, по номеру накладной оператор сказал такого груза нет!!!
Антикварный салон PITCTOK представляет эксклюзивный ассортимент редких изделий с многолетней историей. Все изделия выбираются профессионалами и проходят тщательную оценку подлинности для искушенных клиентов. Ищете антикварные салоны мебели? Посетители могут ознакомиться с ассортиментом в двух шоу-румах Калининграда и Санкт-Петербурга или на сайте pitctok.ru с детальным каталогом. Индивидуальное обслуживание консультантов позволяет выбрать оптимальные варианты для оформления элегантного интерьера жилища.
Отличное место для любителей классических казино-игр https://www.inyourpocket.com/st-petersburg-ru/yunga-seafoodbar_148730v
Скачайте патч для обхода активации Windows 11 и пользуйтесь системой без ограничений.
Подробнее – Как активировать Windows 11 без ключа
Большой выбор слотов и живых игр приятно удивил https://microlinkofworld.site/if-you-are-considering-going-into-one-or-another-sort-of-internet-based-business-then-you-will-surely-want-to-known-what-the-keys-to-success-in-such-internet-based-businesses-are-the-same-is-the-cas/
Клиника располагает изолированными палатами с возможностью круглосуточного мониторинга состояния пациента. Оборудование соответствует гигиеническим требованиям и регулярно обновляется. В лечебный процесс включены:
Подробнее тут – наркологическая клиника нарколог
Наркологическая клиника «Трезвый город» оказывает медицинскую помощь при алкогольной и наркотической зависимости: детоксикация, снятие абстиненции, стабилизация состояния и подбор дальнейшей тактики лечения. Работа ведётся конфиденциально, с контролем показателей и учётом сопутствующих рисков.
Углубиться в тему – пивной алкоголизм у мужчин симптомы лечение
В таком же духе гоу) https://amgtopshop.club Бро, была абсолютно идиентичная ситуация у мну в декабре.Трек не бился пол недели, прошли выходные звоню в контору-курьерку, называю трек, говорят нет такого, я к тс так мол и так, тот грит все ровно, трек верный ожидай! Херакс и вечером курьер названивает, оказыва4тся они мне еще в субботу хотели вручить, но почему то не дозвонились))Все пучком, бро.Почта мало кому интересна в наши дни, на курьерки много сваливается, вот они 3ак могут разгребают…к вам претензий нет.. но вот хвосты не радуют..
Каждому пациенту уделяется персональное внимание. Наркологи разрабатывают индивидуальные планы лечения на основе медицинских данных, уровня зависимости и психологического состояния. В процессе терапии используются эффективные медикаменты, психотерапевтические методики и рекомендации по образу жизни, что помогает добиться устойчивых результатов.
Разобраться лучше – https://быстро-вывод-из-запоя.рф/vyvod-iz-zapoya-anonimno-v-volgograde.xn--p1ai
ClickHub Zylavo – Layout is logical, and information is easy to digest.
В центре «Передозировка» в Санкт-Петербурге применяют комплексный подход: лечение наркомании, терапия алкогольной зависимости, индивидуальное кодирование и восстановительные программы. Такой формат обеспечивает надёжный результат и поддержку на всех этапах.
Изучить вопрос глубже – https://peredozirovka.info/articles/prichiny-alkogolnoy-epilepsii
Rank In Charge Hub – Practical SEO resources and guidance that consistently help boost rankings.
Каждому пациенту назначается персональный план терапии, составленный на основе результатов медицинского и психологического обследования. Мы не используем шаблонные схемы — только индивидуальный подход, адаптированный к возрасту, опыту зависимости, состоянию здоровья и личной мотивации.
Детальнее – частная наркологическая клиника
morning dew boutique – Clean and minimal aesthetics with a very refreshing atmosphere.
Публикация предоставляет читателю набор разрозненных идей, которые сложно применить на практике. Мы лишь слегка касаемся разных точек зрения, не углубляясь в анализ и не предлагая никаких выводов.
Вот – игровые автоматы
Заказывал тут сувениры(250) пришли за три дня=) Тока на почте из за выходных и праздников пролежали еще три дня=( купить наркотики в кемерово откроетесь??По моему отзыв о “марочках” был явно не про этот магазин О_о
Клиника «Центр реабилитации «Свет Надежды» – специализированное учреждение, предоставляющее профессиональную помощь пациентам, страдающим от алкогольной и наркотической зависимости. Наша главная цель – помощь людям в преодолении зависимости и возвращении к здоровому образу жизни с применением современных методик реабилитации и индивидуального подхода.
Подробнее тут – https://быстро-вывод-из-запоя.рф/vyvod-iz-zapoya-v-stacionare-v-volgograde.xn--p1ai/
Клиника «Передозировка» в Санкт-Петербурге предоставляет профессиональную помощь при зависимостях. Пациенты получают лечение алкоголизма и наркомании, проходят кодирование и реабилитацию, что способствует устойчивому возвращению к нормальной жизни.
Исследовать вопрос подробнее – антибиотики и алкоголь
turmerictrove shop – Spices arrived fresh and aromatic, adding a wonderful touch to meals.
Эффективная капельница должна включать несколько компонентов, каждый из которых направлен на решение конкретной задачи: выведение токсинов, восстановление функций организма, нормализация психоэмоционального состояния.
Получить больше информации – капельница от запоя на дому недорого первоуральск
sweet selection shop – Everything feels easy to explore and the layout is very pleasant.
После первичной консультации пациент проходит обследование, позволяющее точно определить стадию зависимости и сопутствующие патологии. Используются лабораторные анализы, оценка неврологического статуса и сбор анамнеза. Уже на этом этапе начинается выстраивание контакта между пациентом и врачом, что особенно важно для доверия и готовности включиться в процесс.
Детальнее – http://
Этот обзор позволяет по-новому взглянуть на вещи, на которые обычно и так смотрят. Мы упоминаем факты, которые мало что меняют, и события, значение которых трудно определить, но они всё равно здесь.
Вот – турниры по покеру
ZylavoFlow Link – Navigation feels natural, and content is accessible at a glance.
-1. Вас, продавцов, много, а я один. купить наркотики Зачем писать таким большим шрифтом ? Здесь слепых нет. То что тебя где то кинули к нам никакого отношения не имеет.Магаз отличный, успехов вам!
urban wardrobe hub – Pieces are well-made, fit well, and feel amazing.
В статье-обзоре представлены данные сомнительной актуальности и факты без явной взаимосвязи. Читатель ознакомится с разными мнениями, хотя они вряд ли существенно изменят его представление о теме.
Подробнее читать – народные средства от диабета
Капельница от запоя применяется для комплексного восстановления организма после длительного употребления алкоголя. Она включает в себя введение растворов, насыщенных витаминами, электролитами, глюкозой и лекарственными средствами, направленными на устранение симптомов интоксикации. Основные задачи процедуры:
Получить больше информации – http://kapelnicza-ot-zapoya-v-murmanske12.ru/postavit-kapelniczu-ot-zapoya-v-murmanske/https://kapelnicza-ot-zapoya-v-murmanske12.ru
В статье рассмотрим ключевые моменты, которые помогут сориентироваться при выборе капельницы от запоя, понять механизм действия и особенности процедуры, а также избежать типичных ошибок при обращении за медицинской помощью.
Изучить вопрос глубже – сколько стоит капельница на дому от запоя первоуральск
секс парней
Label Lighthouse Store – Smart labeling tools helped me organize everything in no time.
Уважаемый ТС,желаю вам успешных больших продаж!:$: https://datamatics.ru Моя первая покупка на динамите и, внезапно для самой себя, наход. Сняла, как говорится, в касание. С вашим охуенным мефчиком сорвала себе почти год ЗОЖа и ни чуть не жалею.Так вот, прошло все как всегда отлично, дошло за три дня, маскировка надежная. Так же отдельное спасибо магазину за проявление немыслимой заботы о безопасности клиента. Что имел ввиду писать не буду, но факт есть факт.
Такие меры позволяют комплексно воздействовать на организм и снизить риск осложнений, связанных с резким прекращением употребления алкоголя.
Углубиться в тему – http://vyvod-iz-zapoya-volgograd0.ru/vyvedenie-iz-zapoya-volgograd/
Стационарный формат предполагает круглосуточное наблюдение, возможность экстренного вмешательства и доступ к диагностическим средствам. Это особенно важно при наличии хронических заболеваний, психозов или алкогольного делирия.
Разобраться лучше – http://vyvod-iz-zapoya-v-ryazani12.ru
Одновременно с медикаментозной детоксикацией начинается работа по снижению эмоционального напряжения. Психотерапевтическая помощь помогает пациенту осознать причины зависимости и выработать стратегии для предотвращения рецидивов, что является важным аспектом успешного лечения.
Узнать больше – https://vyvod-iz-zapoya-volgograd00.ru
ZylavoFlow Link – Navigation feels natural, and content is accessible at a glance.
Некоторые состояния требуют немедленного вмешательства специалиста. Если алкогольное отравление или запойное состояние не купируется вовремя, это может привести к тяжелым последствиям для здоровья.
Детальнее – http://narcolog-na-dom-v-irkutske00.ru
В ходе процедуры врач контролирует жизненные показатели пациента, корректирует состав раствора при необходимости и оказывает дополнительную поддержку. После завершения капельницы часто назначается курс восстановительной терапии, направленный на стабилизацию функций организма.
Подробнее можно узнать тут – капельница от запоя цена
tech tab store – Fast and flawless checkout, everything worked as expected.
Blackburn Rovers vs Preston North End 2026英冠21:00开踢,最新足球比分英格兰二级联赛焦点,赔率Evs看好主队。
Australian online casino PayID 2026 instant deposits withdrawals
fresh fruit boutique – Great variety and checkout went smoothly and easily.
Процедура лечения начинается с установки внутривенной капельницы, через которую вводятся детоксикационные растворы, способствующие быстрому выведению токсинов и восстановлению водно-электролитного баланса. При необходимости врач назначает дополнительные препараты, такие как седативные средства для купирования симптомов абстинентного синдрома, гепатопротекторы для поддержки печени и кардиопротекторы для нормализации работы сердца.
Выяснить больше – вывод из запоя на дому цена краснодар
Мы принимаем пациентов старше 18 лет; для лиц старше 65 лет возможна адаптация схемы с учётом сопутствующих заболеваний.
Выяснить больше – лечение наркомании клиника
Для достижения положительного результата применяются комплексные подходы, сочетающие медикаментозные и поддерживающие методы. Врачи оценивают общее состояние пациента, степень выраженности абстинентного синдрома и сопутствующие заболевания. На основе этих данных подбираются оптимальные методы коррекции.
Разобраться лучше – вывод из запоя вызов на дом в санкт-петербурге
да не сцы, бывает у него такое )) магаз работает ровно, но вот с розницей у них напряг, изначально то ориентированы на опт, и просто рук не всех теперь на хватает. позже ответит. https://ros-news.ru на бизе хорошей контора была….да!отличный магазин, все всегда ровно
Как подчёркивает главный врач клинического отделения, «в условиях стационара мы можем оперативно реагировать на малейшие изменения в состоянии пациента, что критически важно при тяжёлых формах запоя».
Получить больше информации – https://vyvod-iz-zapoya-v-ryazani12.ru/vyvod-iz-zapoya-czena-v-ryazani/
Запой – это состояние, при котором контроль над употреблением алкоголя утрачивается, а токсическая нагрузка на организм резко возрастает. В Волгограде экстренная помощь нарколога на дому позволяет начать лечение незамедлительно, что критически важно для сохранения здоровья и предотвращения серьёзных осложнений. Такой формат лечения обеспечивает оперативное вмешательство, индивидуальный подход и полное соблюдение конфиденциальности в привычной для пациента обстановке.
Подробнее можно узнать тут – вывод из запоя цена волгоград
С учётом всех этапов (детоксикация, терапевтическая работа и адаптация) курс занимает от одного до трёх месяцев, в зависимости от индивидуальных особенностей пациента.
Разобраться лучше – центр лечения наркомании в волгограде
digestivedock nutrition – Health products arrived on time and provided noticeable results.
Доставка цветов в Ростове-на-Дону от компании РостовБукет – это оперативный сервис и свежие композиции для любого повода Профессиональные флористы создают уникальные букеты из роз, пионов, тюльпанов и орхидей, используя только качественные цветы из Эквадора, Кении и Голландии https://rostov-buket.ru/ демонстрирует богатый каталог от стандартных букетов до авторских композиций в боксах и корзинках с подтверждением свежести Композиция доставляется от 30 минут в любое место города, функционирует гибкий режим и честная стоимость Поручите значимые события специалистам и порадуйте родных изысканными букетами
Клиника «Центр реабилитации «Свет Надежды» – специализированное учреждение, предоставляющее профессиональную помощь пациентам, страдающим от алкогольной и наркотической зависимости. Наша главная цель – помощь людям в преодолении зависимости и возвращении к здоровому образу жизни с применением современных методик реабилитации и индивидуального подхода.
Изучить вопрос глубже – http://быстро-вывод-из-запоя.рф/vyvod-iz-zapoya-na-domu-v-volgograde.xn--p1ai/
Платная наркологическая клиника «Трезвый город» предлагает лечение в комфортных условиях и с соблюдением медицинской этики. Специалисты помогают снять острые симптомы, снизить тягу и подготовить пациента к следующему этапу — реабилитации или амбулаторному сопровождению.
Разобраться лучше – http://www.trezviy-gorod.ru
Когда человек оказывается в сложной ситуации из-за длительного употребления алкоголя, важно получить быструю и квалифицированную медицинскую помощь. Запойные состояния, алкогольная интоксикация, тяжелый абстинентный синдром — все это требует своевременного вмешательства врача. Однако не всегда есть возможность или желание обращаться в стационар.
Подробнее тут – нарколог на дом вывод из запоя
При длительном запое организм не успевает восстановить свой водно-электролитный баланс, что приводит к обезвоживанию и ухудшению общего состояния. Такие пациенты рискуют развить не только тяжелую интоксикацию, но и хронические заболевания, которые впоследствии требуют длительного и дорогостоящего лечения. Поэтому своевременный вызов врача-нарколога на дом становится критически важным для сохранения здоровья и предотвращения серьезных последствий.
Подробнее – http://vyvod-iz-zapoya-krasnodar00.ru/vyvod-iz-zapoya-kruglosutochno-krasnodar/
Да,меня тоже!)заказал вчера тут 203-го,сегодня жду трека! https://gcsigma.ru мало того что неприятный опыт общения в гоме так и не денег не товару..Магазин агонь! Брал как то давно. все ровно!
Как поясняет врач-нарколог клиники «АлкоСтоп», «грамотно составленная инфузионная терапия не только устраняет последствия запоя, но и создаёт условия для дальнейшей мотивации пациента к лечению».
Подробнее можно узнать тут – врач на дом капельница от запоя
В статье рассмотрим ключевые моменты, которые помогут сориентироваться при выборе капельницы от запоя, понять механизм действия и особенности процедуры, а также избежать типичных ошибок при обращении за медицинской помощью.
Подробнее – вызов на дом капельницы от запоя
Да, «Путь к жизни» оформляет все документы на номер договора без указания фамилии пациента и не передаёт сведения третьим лицам.
Разобраться лучше – https://lechenie-narkomanii-volgograd9.ru/lechenie-narkomanii-i-alkogolizma-volgograd
evening delights shop – Loved the ambiance and the variety of products is impressive.
label making outlet – Plenty of products to pick from and cost feels right.
Установите удобный mobile-mir.ru для идеального управления шторами в вашем доме.
С его помощью можно легко регулировать освещенность комнаты, не вставая с дивана.
Такие системы становятся все популярнее благодаря своему удобству и функциональности. Они особенно востребованы в помещениях с высокими окнами или труднодоступными карнизами.
#### **2. Преимущества электрокарнизов**
Главное достоинство электрокарниза — это удобство использования. Управление происходит с пульта или даже через смартфон, что делает процесс максимально простым.
Кроме того, электрокарнизы отличаются высокой надежностью и долговечностью. Они изготавливаются из прочных материалов, устойчивых к износу.
#### **3. Установка и настройка**
Монтаж электрокарниза требует определенных навыков и точности. Перед установкой необходимо проверить прочность стены или потолка в месте крепления.
После установки нужно правильно настроить систему управления. Современные электрокарнизы поддерживают голосовое управление через умные колонки.
#### **4. Выбор подходящей модели**
При покупке электрокарниза важно учитывать несколько факторов. Также стоит обратить внимание на тип управления: проводной или беспроводной.
На рынке представлены модели разных ценовых категорий. Бюджетные варианты обладают базовым функционалом, но надежны в эксплуатации.
—
### **Спин-шаблон**
#### **1. Введение**
Они особенно востребованы в помещениях с высокими окнами или труднодоступными карнизами.
#### **2. Преимущества электрокарнизов**
Кроме того, электрокарнизы отличаются высокой надежностью и долговечностью.
#### **3. Установка и настройка**
Для правильного монтажа важно учитывать особенности конструкции.
#### **4. Выбор подходящей модели**
В первую очередь, нужно определить максимальный вес штор, которые будет выдерживать система.
порно вк
Современная онлайн-терапия становится доступным решением для тех, кто столкнулся со стрессом, проблемами со сном или сложностями в отношениях. Работа с психологом онлайн сохраняет полную конфиденциальность и предоставляет свободу выбора времени консультации. Ищете психолог бесплатно? Специалисты на оберег.shop/психолог-онлайн/ помогают разобраться в причинах внутренних проблем и найти пути их решения. Удаленная терапия демонстрирует высокую эффективность наравне с офлайн-форматом, делая психологическую поддержку доступной везде.
Этот информационный набор привлекает внимание множеством мелочей и странных ракурсов. Мы предлагаем взгляды, которые редко бывают полезны, но могут слегка разнообразить ваше знакомство с темой.
Вот – казино с быстрым выводом
заказал в этом магазине еще раз )) https://karavan24.ru Ты то откуда знаешь)))только сегодня зарегался .коржик )))брали 10 гр реги ))))
Официальный новостной канал уникальной БК «1win» https://t.me/home_1win/ рекомендует ознакомиться со всеми новостями из жизни заведения. Здесь выкладывается вся важная информация, а также промокоды, которые помогут значительно сэкономить на развлечениях. Здесь также регулярно выкладываются различные заметки, фотографии и многое другое, что вызовет неподдельный интерес.
ФСК «Родина» занимается популяризацией физической культуры в Москве, Твери и области начиная с 2019 года. В составе клуба работают секции футбола, баскетбола, волейбола, бокса, смешанных единоборств и рукопашного боя. Подробная информация о расписании тренировок и достижениях команд размещена на сайте https://rodinasportsclub.com в соответствующих разделах. Опытные инструкторы клуба организуют занятия для спортсменов любого уровня мастерства и возраста.
В материале приведены детали, интересные, но не особенно важные. Мы рассматриваем аспекты, которые сложно назвать существенными, но включили их для большей полноты.
Подробнее читать – диета для похудения быстро
my cedar compass – Sturdy outdoor products arrived quickly and worked perfectly on my hike.
Одним из ключевых направлений является проведение капельниц, призванных вывести токсины из организма и нормализовать водно-электролитный баланс. Используемые препараты и состав растворов подбираются индивидуально, исходя из клинической картины и истории болезни пациента.
Детальнее – вызвать нарколога на дом в ярославле
проститутки тулы
Актуальні новини Кривогу Рогу – https://krivoy-rog.in.ua/ . Корисна та довідкова інформація про місто.
После первичной консультации пациент проходит обследование, позволяющее точно определить стадию зависимости и сопутствующие патологии. Используются лабораторные анализы, оценка неврологического статуса и сбор анамнеза. Уже на этом этапе начинается выстраивание контакта между пациентом и врачом, что особенно важно для доверия и готовности включиться в процесс.
Изучить вопрос глубже – http://narkologicheskaya-klinika-volgograd9.ru/lechenie-v-narkologicheskoj-klinike-volgograd/https://narkologicheskaya-klinika-volgograd9.ru
Капельница рекомендована при следующих состояниях:
Узнать больше – капельница от запоя клиника в мурманске
В статье рассмотрим ключевые моменты, которые помогут сориентироваться при выборе капельницы от запоя, понять механизм действия и особенности процедуры, а также избежать типичных ошибок при обращении за медицинской помощью.
Исследовать вопрос подробнее – сколько стоит капельница от запоя
Капельница рекомендована при следующих состояниях:
Подробнее – капельница от запоя на дому мурманск.
Эффективная капельница должна включать несколько компонентов, каждый из которых направлен на решение конкретной задачи: выведение токсинов, восстановление функций организма, нормализация психоэмоционального состояния.
Подробнее можно узнать тут – капельница от запоя анонимно
Как поясняет врач-нарколог клиники «АлкоСтоп», «грамотно составленная инфузионная терапия не только устраняет последствия запоя, но и создаёт условия для дальнейшей мотивации пациента к лечению».
Получить дополнительные сведения – врач на дом капельница от запоя в первоуральске
Видеоплатформа представляет бесплатный доступ к премьерам фильмов и сериалов 2026 года в отличном разрешении без обязательной регистрации. Посетители приобретают доступ к актуальным новинкам, востребованным блокбастерам и оригинальным телешоу моментально после официального релиза. Платформа http://kinoman1hd.online/ обеспечивает стабильную потоковую трансляцию и удобную навигацию по жанрам для быстрого поиска контента. Посетители наслаждаются фильмами на различных девайсах без ограничений по длительности и объему просмотра с приятным оформлением.
Сегодня получил свою родненькую https://trendzilare.shop Достойны уважения!Помнится ф16 на пробу получал. Хороший синт.гарсон был.
Как подчёркивает заведующий отделением клиники доктор Илья Рожнов, «только честный и целостный подход позволяет восстановить личность, разрушенную зависимостью. Наркологическая клиника в Волгограде — профессиональное лечение зависимостей строит не просто курс терапии, а мост между человеком и его новой жизнью».
Получить дополнительные сведения – наркологические клиники алкоголизм
Алкогольная и наркотическая зависимость являются серьёзными заболеваниями, требующими оперативного и квалифицированного вмешательства. Когда речь идёт о критическом состоянии пациента, особенно после длительного употребления алкоголя или наркотических веществ, время играет ключевую роль. Клиника «РеабилитАльянс» в Краснодаре предлагает услугу нарколога на дом, обеспечивая пациентам необходимую помощь в любой момент дня и ночи. Наши специалисты готовы оперативно выехать по указанному адресу и предоставить все необходимые медицинские процедуры на месте.
Выяснить больше – вызов нарколога на дом
financial solutions store – The website is responsive and works flawlessly.
Вывод из запоя требует неотложного и профессионального подхода, поскольку состояние больного сопровождается нарушением работы внутренних органов, обезвоживанием и токсическим воздействием этанола на центральную нервную систему. В Мурманске, учитывая особенности региона и климата, особенно важно проводить процедуру с учётом возможных сопутствующих заболеваний и общего состояния здоровья пациента.
Ознакомиться с деталями – вывод из запоя круглосуточно мурманск
порно юные
Алкогольная и наркотическая зависимость являются серьёзными заболеваниями, требующими оперативного и квалифицированного вмешательства. Когда речь идёт о критическом состоянии пациента, особенно после длительного употребления алкоголя или наркотических веществ, время играет ключевую роль. Клиника «РеабилитАльянс» в Краснодаре предлагает услугу нарколога на дом, обеспечивая пациентам необходимую помощь в любой момент дня и ночи. Наши специалисты готовы оперативно выехать по указанному адресу и предоставить все необходимые медицинские процедуры на месте.
Детальнее – вызвать врача нарколога на дом краснодар
Каждый этап требует профессионального подхода и регулярного мониторинга показателей организма, что особенно важно при тяжелых формах алкогольной зависимости.
Подробнее – вывод из запоя недорого в санкт-петербурге
chewchest pets – Toys and treats are top-notch and my pets enjoyed them instantly.
Вывод из запоя в Мурманске представляет собой комплекс мероприятий, направленных на оказание медицинской помощи пациентам, находящимся в состоянии алкогольного отравления или длительного употребления спиртного. Процедура проводится с целью стабилизации состояния организма, предупреждения осложнений и минимизации риска развития тяжелых последствий алкоголизма.
Подробнее – вывод из запоя на дому
Как поясняет врач-нарколог клиники «АлкоСтоп», «грамотно составленная инфузионная терапия не только устраняет последствия запоя, но и создаёт условия для дальнейшей мотивации пациента к лечению».
Получить дополнительные сведения – kapelnicza-ot-zapoya-pervouralsk11.ru/
Экстренный вывод из запоя в домашних условиях – это комплекс мер, направленный на быструю детоксикацию организма и восстановление нормального обмена веществ. В Волгограде квалифицированные специалисты готовы выехать к пациенту круглосуточно, чтобы оперативно оценить его состояние и начать терапию. Такой подход позволяет минимизировать негативное воздействие алкоголя и снизить риск развития осложнений.
Подробнее – вывод из запоя в стационаре
чат нейросеть для учебы nejroset-dlya-ucheby-8.ru .
Клинические протоколы стационарной терапии рекомендуют госпитализацию при средней и тяжёлой степени интоксикации.
Исследовать вопрос подробнее – наркология вывод из запоя
Братишка, все красиво, в касание, спасибо за профессионализм https://bestcrater.top обо всем думаем ) но не сразухороший магазин,всё на красоте и качество и кол-во:) продолжайте в том же духе
Капельница от запоя в Мурманске является одной из наиболее востребованных процедур для снятия острого состояния алкогольной интоксикации. Эта методика позволяет быстро вывести токсины из организма, нормализовать водно-солевой баланс и улучшить самочувствие пациента. Современная капельная терапия считается эффективным средством в лечении запоя, обеспечивая поддержку жизненно важных функций и минимизируя риски осложнений.
Детальнее – http://kapelnicza-ot-zapoya-v-murmanske12.ru/
В центре применяется последовательная модель лечения, включающая диагностику, детоксикацию, психотерапию, восстановление социальных навыков и постлечебное сопровождение. Такой подход даёт устойчивый эффект даже при тяжёлых формах зависимости.
Получить больше информации – запой наркологическая клиника
creative pulse hub – Innovative resources that help make any project stand out.
В центре применяется последовательная модель лечения, включающая диагностику, детоксикацию, психотерапию, восстановление социальных навыков и постлечебное сопровождение. Такой подход даёт устойчивый эффект даже при тяжёлых формах зависимости.
Детальнее – http://narkologicheskaya-klinika-volgograd9.ru
Нарколог на дому проводит тщательный осмотр, собирает анамнез и назначает необходимые лабораторные исследования. Это позволяет выявить сопутствующие патологии и скорректировать тактику лечения.
Подробнее можно узнать тут – narkolog-na-dom-kruglosutochno jaroslavl’
Автоцентр «Дядя Саша» в Ростове-на-Дону производит экспертный ремонт и доработку фар любого уровня сложности. Специалисты устанавливают bi-led и LED-линзы, проводят полировку и замену стекол оптики, устраняют запотевание и выполняют бронирование защитной пленкой. Ищете ремонт фар в ростове на дону? Детальная информация о услугах и цены размещены на странице vk.com/unclesansanych с фотографиями выполненных работ. Гарантийные обязательства сроком 24 месяца действуют на работы и установленные комплектующие.
В центре применяется последовательная модель лечения, включающая диагностику, детоксикацию, психотерапию, восстановление социальных навыков и постлечебное сопровождение. Такой подход даёт устойчивый эффект даже при тяжёлых формах зависимости.
Изучить вопрос глубже – https://narkologicheskaya-klinika-volgograd9.ru/lechenie-v-narkologicheskoj-klinike-volgograd
В нашей клинике работают врачи-наркологи, психологи и психиатры с многолетним опытом в лечении зависимостей. Все специалисты регулярно повышают свою квалификацию, участвуя в семинарах и конференциях, чтобы обеспечивать своим пациентам наиболее современное и качественное лечение.
Разобраться лучше – https://быстро-вывод-из-запоя.рф/vyvod-iz-zapoya-na-domu-v-volgograde.xn--p1ai/
Алкогольная и наркотическая зависимость являются серьёзными заболеваниями, требующими оперативного и квалифицированного вмешательства. Когда речь идёт о критическом состоянии пациента, особенно после длительного употребления алкоголя или наркотических веществ, время играет ключевую роль. Клиника «РеабилитАльянс» в Краснодаре предлагает услугу нарколога на дом, обеспечивая пациентам необходимую помощь в любой момент дня и ночи. Наши специалисты готовы оперативно выехать по указанному адресу и предоставить все необходимые медицинские процедуры на месте.
Детальнее – нарколог на дом круглосуточно
С учётом всех этапов (детоксикация, терапевтическая работа и адаптация) курс занимает от одного до трёх месяцев, в зависимости от индивидуальных особенностей пациента.
Изучить вопрос глубже – лечение наркомании в стационаре
Преимущества вызова нарколога на дом:
Подробнее можно узнать тут – https://vyvod-iz-zapoya-v-murmanske12.ru/anonimnyj-vyvod-iz-zapoya-v-murmanske/
заказал сегодня , оплатил , ждем когда дадут трэк купить наркотики через в/в непробывал такое не люблю,Я 13 числа сделал заказ,и до сих пор жду Макс,думаю магазин Честный и всё придёт )))))))!!!!!!!!Как придёт отпишусь обязательно сюда,компенсация обещена была 6 г :yeah:,всё же думаю Не разочаруют!
tech packaging store – The site layout is smooth and the information provided is very useful.
При длительном запое организм не успевает восстановить свой водно-электролитный баланс, что приводит к обезвоживанию и ухудшению общего состояния. Такие пациенты рискуют развить не только тяжелую интоксикацию, но и хронические заболевания, которые впоследствии требуют длительного и дорогостоящего лечения. Поэтому своевременный вызов врача-нарколога на дом становится критически важным для сохранения здоровья и предотвращения серьезных последствий.
Детальнее – http://vyvod-iz-zapoya-krasnodar00.ru/vyvod-iz-zapoya-kruglosutochno-krasnodar/
turmerictrove spices – Fragrant and fresh turmeric made my dishes taste amazing.
Портал Kinotorrent с фильмами предлагает ознакомиться с увлекательными, популярными, а также редкими кинолентами, которые понравятся, независимо от интересов, возраста. На сайте https://kinotorrent.cc/ в огромном многообразии представлены зарубежные, а также отечественные фильмы, которые обязательно произведут на вас эффект.
нейросеть для учебы онлайн нейросеть для учебы онлайн .
«Трезвый город» — это комплексная наркологическая помощь для взрослых пациентов: от экстренного купирования интоксикации до плановой терапии и поддержки в период восстановления. Врачи оценивают состояние, корректируют схему лечения и помогают выстроить понятный план дальнейших шагов.
Углубиться в тему – кодирование двойной блок что это
Её переместили в арбитраж. Тогда ничем помочь не могу. купить наркотики Бро слова это хорошо но нам нужен наш клад и не более не кто не хочет тебя винить и общаться сдесь на эту тему а на оборот писать только хорошие отзывы о вашем магазе пойми и ты бро слово паника сдесь не уместно сдесь идет разбор по факту согласисьа что с алхимом случилось?
Наши специалисты гарантируют пациентам конфиденциальность и внимательное отношение, создавая атмосферу доверия. Врач сопровождает пациента на каждом этапе лечения, отслеживая его состояние и корректируя терапию по мере необходимости. Профессионализм и забота наших специалистов являются основой успешной реабилитации.
Получить больше информации – https://быстро-вывод-из-запоя.рф/vyvod-iz-zapoya-na-domu-v-volgograde.xn--p1ai/
В клинике «Передозировка» в Санкт-Петербурге оказывают анонимную помощь зависимым: лечение алкоголизма, терапию наркомании, детокс и профессиональное кодирование. Реабилитационные программы помогают стабилизировать состояние и предотвратить рецидив.
Ознакомиться с деталями – влияние никотина на клетку
Некоторые состояния требуют немедленного вмешательства специалиста. Если алкогольное отравление или запойное состояние не купируется вовремя, это может привести к тяжелым последствиям для здоровья.
Подробнее можно узнать тут – вызвать нарколога на дом иркутск
В данном тексте собраны разнообразные случайные сведения и не вполне определённые идеи, которые могут вызвать интерес. Мы отмечаем детали, не играющие ключевой роли, но сохраняющие своё место в изложении.
Подробнее читать – мефедроновая зависимость
Назначение
Исследовать вопрос подробнее – капельница от запоя анонимно первоуральск
шумоизоляция авто https://vikar-auto.ru
Приветствую! Сегодня затронем тему — выбор материала для крыши. По сути экономить на кровле — выйдет дороже. Ищешь профессионалов — могу рекомендовать: https://montazh-membrannoj-krovli-spb.ru. В большинстве случаев убеждаюсь: ПВХ покрытие — окупается за счёт долговечности. То есть там постоянные ремонты — а мембрана не требует обслуживания. Общие рекомендации: выбрать проверенного производителя. Резюмируем: высокоэффективный инструмент для долговечной кровли.
Капельница рекомендована при следующих состояниях:
Углубиться в тему – врача капельницу от запоя мурманск
Услуга
Получить больше информации – частная наркологическая клиника рязанская область
Отзыв коротенько. Закладка на месте. Обьяснение распологает. Фото имеется. Бот чёткий. бошки хороши. Вес норма! … ну вот и всё Коротко и ладно) https://mebel-klassika35.ru даа, уж что что, а 250й тут классный ) хомячки так и просят добавкии Антошке пару точек,
Когда человек оказывается в сложной ситуации из-за длительного употребления алкоголя, важно получить быструю и квалифицированную медицинскую помощь. Запойные состояния, алкогольная интоксикация, тяжелый абстинентный синдром — все это требует своевременного вмешательства врача. Однако не всегда есть возможность или желание обращаться в стационар.
Изучить вопрос глубже – https://narcolog-na-dom-v-irkutske00.ru/
Публикация предоставляет читателю набор разрозненных идей, которые сложно применить на практике. Мы лишь слегка касаемся разных точек зрения, не углубляясь в анализ и не предлагая никаких выводов.
Вот – казино онлайн
design toolkit shop – Clear instructions and an intuitive layout make navigation seamless.
doggearshop online – Perfect sizing and strong materials make walks much easier now.
Риск от наркотиков — этто единая проблема, обхватывающая физиологическое, психическое также
социальное здоровье человека.
Утилизация подобных наркотиков, как
кокаин, мефедрон, ямба, «наркотик» или «бошки»,
может огласить к неконвертируемым
следствиям как чтобы организма, яко
и чтобы общества на целом.
Хотя даже при вырабатывании подневольности возможно
электровосстановление — ядро, чтобы зависимый явантроп обернулся согласен помощью.
Эпохально запоминать, яко наркомания лечится, а
также реабилитация бацнет шансище сверху новейшую жизнь.
Современные Электро рулонные шторы для панорамных окон 7 (499) 638-25-37 не только облегчают контроль освещенности в помещении, но и добавляют комфорта в ваш интерьер.
Автоматизация работы штор помогает симулировать наличие людей в помещении, уменьшая риски взлома.
farmhouse fonts hub – The typography choices are visually appealing and easy to browse.
Санкт-петербургская клиника «Передозировка» специализируется на лечении алкогольной и наркотической зависимости. Здесь выполняют кодирование, проводят медицинское восстановление и обеспечивают психологическую поддержку для закрепления результата.
Узнать больше – вредно ли пассивное курение
Не хотите платить за лицензию? У нас есть рабочий кряк для Windows 11 — скачайте прямо сейчас!
Подробнее – Активатор Windows 11 скачать бесплатно
ии для учебы студентов ии для учебы студентов .
CourierCorner Picks – Smooth navigation and a nice variety of items make shopping pleasant.
Эффективная капельница должна включать несколько компонентов, каждый из которых направлен на решение конкретной задачи: выведение токсинов, восстановление функций организма, нормализация психоэмоционального состояния.
Исследовать вопрос подробнее – https://kapelnicza-ot-zapoya-pervouralsk11.ru/kapelnicza-ot-zapoya-na-domu-stoimost-v-pervouralske/
Производитель «К-ЖБИ» изготавливает более четырехсот типов ЖБИ для гражданского, промышленного и дорожного строительства. Современное оборудование и регулярный лабораторный контроль гарантируют высокое качество бетона на всех этапах производства. Ищете лестничные марши и бетонные площадки серии л, лм, лз и лп? Подробная информация о продукции представлена на gbisp.ru с полным каталогом и техническими характеристиками изделий. Завод принимает заказы по стандартным и заказным проектам, предлагая индивидуальные решения для каждого заказчика.
Рабочий ключ активации для Windows 11 — проверено и обновлено, без блокировок!
Подробнее – Бесплатный серийный номер для Windows 11
порно женщин
Дружище ты говоришь полный бред!!! Магазин работает очень качественно!!! Бро делает все ПОУМУ!!! Я с ним работаю очень очень давно!!! купить наркотики кто сказал что он закрылся? где это написано?Всем привет.
Casino Talismania https://fr-talismania.com/ – Site officiel 2026 – Plus de 3 000 jeux, des bonus exclusifs et des paiements ultra-rapides. Decouvrez notre selection premium des jeux les plus populaires. Chaque jeu offre une experience unique grace a des graphismes exceptionnels et des fonctionnalites innovantes. Des bonus exclusifs Casino Talismania, disponibles uniquement chez nous!
Изготовление подвесных потолков, алюминиевых перегородок и светодиодных светильников от компании Glassway – это более 10 лет плодотворной деятельности и свыше 700 завершенных проектов ежегодно Собственные производственные площадки в Москве, Санкт-Петербурге, Смоленске и других городах предоставляют заводские цены и контроль качества на всех стадиях Ищете реечный потолок? Glassway.group предлагает полный цикл работ от проектирования до монтажа силами собственных бригад с гарантией соблюдения сроков. Инновационные технологии и инженерно-технический отдел помогают реализовывать проекты любой сложности для офисов, торговых и промышленных объектов
Капельница рекомендована при следующих состояниях:
Получить дополнительную информацию – после капельницы от запоя
Когда человек оказывается в сложной ситуации из-за длительного употребления алкоголя, важно получить быструю и квалифицированную медицинскую помощь. Запойные состояния, алкогольная интоксикация, тяжелый абстинентный синдром — все это требует своевременного вмешательства врача. Однако не всегда есть возможность или желание обращаться в стационар.
Ознакомиться с деталями – врач нарколог выезд на дом в иркутске
После прибытия врач проводит осмотр пациента, оценивает его состояние, измеряет давление, пульс, уровень кислорода и выявляет возможные противопоказания. Затем разрабатывается индивидуальный план лечения, направленный на стабилизацию состояния.
Разобраться лучше – психиатр нарколог на дом
Такие меры позволяют комплексно воздействовать на организм и снизить риск осложнений, связанных с резким прекращением употребления алкоголя.
Изучить вопрос глубже – вывод из запоя круглосуточно в санкт-петербурге
Как подчёркивает главный врач клинического отделения, «в условиях стационара мы можем оперативно реагировать на малейшие изменения в состоянии пациента, что критически важно при тяжёлых формах запоя».
Подробнее можно узнать тут – http://vyvod-iz-zapoya-v-ryazani12.ru/
Ищете растения декоративные для сада? Посетите martin-sad.ru/интернет-магазин-растений/rasteniya/ – магазин предлагает широкий ассортимент растений для тех, кто хочет купить декоративные культуры, оформить ландшафт или найти по-настоящему редкие экземпляры для посадки. В нашем каталоге представлено более 9500 сортов растений! Выполняем собственную ежедневную доставку по Москве и Московской области.
Применение современных капельничных методов позволяет точно дозировать лекарственные средства. Постоянный мониторинг жизненно важных показателей пациента дает возможность оперативно корректировать терапию для достижения оптимального эффекта и предотвращения побочных реакций.
Детальнее – вывод из запоя вызов на дом волгоград
Лечение хронического алкоголизма начинается с купирования абстинентного синдрома, после чего проводятся мероприятия по нормализации работы печени, сердечно-сосудистой и нервной системы. Назначаются гепатопротекторы, ноотропы, витамины группы B. Также проводится противорецидивная терапия.
Подробнее тут – наркологические клиники алкоголизм ярославль
После прибытия врач проводит осмотр пациента, оценивает его состояние, измеряет давление, пульс, уровень кислорода и выявляет возможные противопоказания. Затем разрабатывается индивидуальный план лечения, направленный на стабилизацию состояния.
Углубиться в тему – нарколог на дом в иркутске
В этом материале представлены детали, которые хоть и занимательны, но не особенно значимы. Мы рассматриваем моменты, которые трудно назвать важными, но всё же решили включить их для полноты картины.
Вот – эротика
Клиника «Центр реабилитации «Свет Надежды» – специализированное учреждение, предоставляющее профессиональную помощь пациентам, страдающим от алкогольной и наркотической зависимости. Наша главная цель – помощь людям в преодолении зависимости и возвращении к здоровому образу жизни с применением современных методик реабилитации и индивидуального подхода.
Исследовать вопрос подробнее – https://быстро-вывод-из-запоя.рф/vyvod-iz-zapoya-cena-v-volgograde.xn--p1ai/
Каждому пациенту уделяется персональное внимание. Наркологи разрабатывают индивидуальные планы лечения на основе медицинских данных, уровня зависимости и психологического состояния. В процессе терапии используются эффективные медикаменты, психотерапевтические методики и рекомендации по образу жизни, что помогает добиться устойчивых результатов.
Выяснить больше – https://быстро-вывод-из-запоя.рф/vyvod-iz-zapoya-v-stacionare-v-volgograde.xn--p1ai
Но зато в том случае будут доказательства, что селлер обещал одно, а пришло совсем другое) Так что я правильно написал 😉 https://urbanchoiced.top оТЛИЧНЫЙ МАГАЗ НАСЛЫШАНчитайте отзывов много!:) товар тут вышка,обращайтесь!
paprikaplace online – Excellent seasoning options gave my recipes a flavorful boost.
Telehealth Tools store – I’ll be coming back soon to explore more resources.
Explore PhoneForge – Reliable and stylish add-ons that match my devices seamlessly.
нейросети для студентов нейросети для студентов .
Процедура выезда врача на дом в Краснодаре строго регламентирована и включает несколько последовательных этапов. После поступления звонка и уточнения подробностей состояния пациента врач выезжает на место в течение 30–60 минут. На месте проводится первичный осмотр с оценкой жизненно важных показателей: артериального давления, уровня кислорода в крови, сердечного ритма и степени общей интоксикации.
Подробнее – https://narcolog-na-dom-krasnodar00.ru/narkolog-na-dom-kruglosutochno-krasnodar
Лечение хронического алкоголизма начинается с купирования абстинентного синдрома, после чего проводятся мероприятия по нормализации работы печени, сердечно-сосудистой и нервной системы. Назначаются гепатопротекторы, ноотропы, витамины группы B. Также проводится противорецидивная терапия.
Углубиться в тему – наркологическая клиника в ярославле
Да, «Путь к жизни» оформляет все документы на номер договора без указания фамилии пациента и не передаёт сведения третьим лицам.
Изучить вопрос глубже – http://lechenie-narkomanii-volgograd9.ru/lechenie-narkomanii-i-alkogolizma-volgograd/
При необходимости применяется симптоматическое лечение для снижения болевого синдрома, устранения тошноты и рвоты, а также нормализации психоэмоционального состояния пациента. Врачи наркологи строго контролируют течение процедуры, что обеспечивает безопасность и снижает риски осложнений.
Узнать больше – http://vyvod-iz-zapoya-v-murmanske12.ru
Для достижения положительного результата применяются комплексные подходы, сочетающие медикаментозные и поддерживающие методы. Врачи оценивают общее состояние пациента, степень выраженности абстинентного синдрома и сопутствующие заболевания. На основе этих данных подбираются оптимальные методы коррекции.
Исследовать вопрос подробнее – https://vyvod-iz-zapoya-volgograd0.ru/anonimnaya-narkologiya-vyvod-iz-zapoya-volgograd/
Первичный этап терапии направлен на оперативное выведение токсинов из организма. Врач-нарколог назначает индивидуальную схему медикаментозного вмешательства, что позволяет снизить уровень алкоголя в крови и восстановить обмен веществ.
Ознакомиться с деталями – вывод из запоя вызов на дом
В Рязани возможен как стационарный, так и амбулаторный вывод из запоя. Выбор подхода зависит от состояния пациента, выраженности симптомов и наличия сопутствующих нарушений.
Узнать больше – вывод из запоя на дому в рязани
Уважаемые покупатели, С НОВЫМ ГОДОМ! https://pitlain.ru – Ну….. минут за двадцать….Кидалы они или нет-узнаю в течении пары дней,но отказ в закладке-не основание.
Этот сборник информации привлекает множеством мелких деталей и необычных ракурсов. Мы предлагаем взгляды, редко полезные, но способные немного разнообразить знакомство с темой.
Подробнее читать – кето диета за неделю минус 10 кг
Длительный запой способен нанести непоправимый вред организму, привести к тяжелым нарушениям работы внутренних органов и поставить под угрозу жизнь пациента. В таких случаях необходимо срочное медицинское вмешательство, которое позволяет быстро стабилизировать состояние, вывести токсины и предотвратить развитие опасных осложнений. Клиника «ЗдоровьеНорм» в Краснодаре предлагает профессиональный вывод из запоя на дому, обеспечивая комплексное лечение с максимальной оперативностью и полной конфиденциальностью.
Подробнее тут – вывод из запоя краснодар
Thanks for sharing. I read many of your blog posts, cool, your blog is very good.
Работа клиники строится на принципах доказательной медицины и индивидуального подхода. При поступлении пациента осуществляется всесторонняя диагностика, включающая анализы крови, оценку психического состояния и анамнез. По результатам разрабатывается персонализированный курс терапии.
Подробнее можно узнать тут – https://narkologicheskaya-klinika-v-ryazani12.ru
Наркомания — серьёзное хроническое заболевание, требующее не только медицинского вмешательства, но и комплексного подхода к восстановлению личности и социальной адаптации. В Волгограде клиника «Путь к жизни» предлагает полностью анонимное обслуживание, при котором никаких сведений о пациенте не попадает в государственные реестры. Мы работаем круглосуточно и готовы принять человека в любое время, обеспечивая сопровождение на всех этапах лечения: от первичной детоксикации до выхода на полноценную жизнь без зависимости.
Получить дополнительную информацию – запой лечение наркомания в волгограде
Капельница от запоя применяется для комплексного восстановления организма после длительного употребления алкоголя. Она включает в себя введение растворов, насыщенных витаминами, электролитами, глюкозой и лекарственными средствами, направленными на устранение симптомов интоксикации. Основные задачи процедуры:
Получить дополнительные сведения – капельница от запоя цена мурманская область
trellis resources shop – Helpful layout with well-presented information simplifies navigation.
Клиника «Центр реабилитации «Свет Надежды» – специализированное учреждение, предоставляющее профессиональную помощь пациентам, страдающим от алкогольной и наркотической зависимости. Наша главная цель – помощь людям в преодолении зависимости и возвращении к здоровому образу жизни с применением современных методик реабилитации и индивидуального подхода.
Детальнее – http://быстро-вывод-из-запоя.рф
Microbrand Magnet Store – Unique timepieces showcased with clear information and specs.
seamsaffire textiles shop – Quality fabrics and sewing essentials arrived quickly and enhanced my creative space.
Капельница от запоя в Мурманске является одной из наиболее востребованных процедур для снятия острого состояния алкогольной интоксикации. Эта методика позволяет быстро вывести токсины из организма, нормализовать водно-солевой баланс и улучшить самочувствие пациента. Современная капельная терапия считается эффективным средством в лечении запоя, обеспечивая поддержку жизненно важных функций и минимизируя риски осложнений.
Получить дополнительные сведения – капельница от запоя на дому цена в мурманске
нейросеть для рефератов нейросеть для рефератов .
проститутки постарше
В ходе процедуры врач контролирует жизненные показатели пациента, корректирует состав раствора при необходимости и оказывает дополнительную поддержку. После завершения капельницы часто назначается курс восстановительной терапии, направленный на стабилизацию функций организма.
Исследовать вопрос подробнее – капельница от запоя мурманская область
Отличный товар и работают ребята без перебоев купить наркотики ПРИВЕТ ВСЕМ:НУ ЧТО Ж ТЫ БРО ТАК ОБЕЗНАДЕЖИЛ МЕНЯ ПО СКАЙПУ И В КОМЕНТАРИЯХ НАПИСАЛ ЧТО ОТПРАВИЛ MXE А НА ПАКЕТЕ НАПИСАНО RCS И ЧТО МНЕ КУРИТЬ ТЕПЕРЬ НАЧАТЬ ЗАЧЕМ ГОВОРИТЬ ТО ЧТО НЕ ДЕЛАЕШЬ КАК САМ СЧИТАЕШЬ ?Проплатил в этот магаз 10.10,трек получил 14.10-сегодня 18.10 трек не бьёться
Как подчёркивает врач-нарколог И.В. Синицин, «современная наркология — это не только вывод из запоя, но и работа с глубинными причинами зависимости».
Получить дополнительную информацию – наркологическая клиника нарколог в ярославле
В «Трезвом городе» помогают при последствиях употребления: тревожность, бессонница, тремор, нарушения аппетита и скачки давления требуют грамотной медицинской коррекции. После стабилизации пациенту объясняют риски и предлагают план профилактики срыва.
Углубиться в тему – https://trezviy-gorod.ru/snyatie-lomki
В нашей клинике работают врачи-наркологи, психологи и психиатры с многолетним опытом в лечении зависимостей. Все специалисты регулярно повышают свою квалификацию, участвуя в семинарах и конференциях, чтобы обеспечивать своим пациентам наиболее современное и качественное лечение.
Детальнее – http://быстро-вывод-из-запоя.рф/
Клиника «Центр реабилитации «Свет Надежды» – специализированное учреждение, предоставляющее профессиональную помощь пациентам, страдающим от алкогольной и наркотической зависимости. Наша главная цель – помощь людям в преодолении зависимости и возвращении к здоровому образу жизни с применением современных методик реабилитации и индивидуального подхода.
Ознакомиться с деталями – https://быстро-вывод-из-запоя.рф/vyvod-iz-zapoya-v-kruglosutochno-v-volgograde.xn--p1ai/
Как поясняет врач-нарколог клиники «АлкоСтоп», «грамотно составленная инфузионная терапия не только устраняет последствия запоя, но и создаёт условия для дальнейшей мотивации пациента к лечению».
Выяснить больше – капельница от запоя на дому круглосуточно в первоуральске
Visit now > https://ladyvenus.ru/wp-content/pages/promokod_756.html
Try the new version here > https://mebel-3d.ru/libraries/news/?1xbet_promokod_besplatno.html
Ищете системы водоочистки и водоподготовки или фильтры и оборудование для очистки воды по самым выгодным ценам? Посетите сайт https://www.water.ru/ – ознакомьтесь с нашим ассортиментом, а также компетенциями. Мы предоставляем широкий спектр решений для очистки воды и самые инновационные технологии для высокого качества воды с индивидуальным подходом к каждому клиенту.
трансы дрочат
При поступлении вызова специалисты клиники «ЗдоровьеНорм» выезжают на дом в течение 30–60 минут. Врач проводит тщательную диагностику, измеряя артериальное давление, пульс, уровень кислорода в крови и оценивая общее состояние пациента. После этого осуществляется индивидуальный подбор лечебной схемы, основанной на объективных данных и анамнезе пациента.
Разобраться лучше – https://vyvod-iz-zapoya-krasnodar00.ru/vyvod-iz-zapoya-czena-krasnodar/
Мы принимаем пациентов старше 18 лет; для лиц старше 65 лет возможна адаптация схемы с учётом сопутствующих заболеваний.
Ознакомиться с деталями – лечение наркомании клиника волгоград
Этот обзор позволяет по-новому взглянуть на вещи, на которые обычно и так смотрят. Мы упоминаем факты, которые мало что меняют, и события, значение которых трудно определить, но они всё равно здесь.
Вот – бинго онлайн
Кому-нибудь отправили сегодня трек? купить наркотики похожа на соль в криисталлахс на вкус че?Помнится ф16 на пробу получал. Хороший синт.гарсон был.
Назначение
Выяснить больше – капельница от запоя круглосуточно
В этой статье-обзоре мы собрали данные, актуальность которых сомнительна, а факты — не всегда взаимосвязаны. Читатель сможет ознакомиться с разными мнениями, хотя вряд ли они существенно повлияют на его понимание темы.
Вот – казино онлайн
Домашний формат наркологической помощи особенно востребован в курортном регионе: плотный график, сезонная работа, круглосуточная индустрия гостеприимства и нежелание афишировать проблему заставляют искать решение «тихо и быстро». В «ЮгМедЦентре» (Сочи) выезд врача доступен 24/7 без праздников и «коротких дней», а лечение строится как управляемый медицинский процесс: сначала — измерения, затем — точная коррекция, после — режим и поддержка. Мы приезжаем без символики, используем кодовые профили, нейтральные формулировки в документах и защищённые каналы связи, чтобы сохранить приватность пациента и его семьи.
Получить дополнительные сведения – нарколог на дом недорого
Перейди на сайт компании — https://imagecms.net/wp-content/pgs/1xbet-aktualnuy-promokod-pri-registracii.html
Экстренная помощь нарколога на дому рекомендуется, когда состояние пациента ухудшается до критического уровня. Основные показания включают:
Изучить вопрос глубже – помощь вывод из запоя волгоград
В этом обзоре мы обсудим современные методы борьбы с зависимостями, включая медикаментозную терапию и психотерапию. Мы представим последние исследования и их результаты, чтобы читатели могли быть в курсе наиболее эффективных подходов к лечению и поддержке.
Углубиться в тему – http://google.com.sl/url?q=https://moskva.pohmelochnaya.ru/anonimnaya-reabilitatsiya-narkozavisimyh
Запой – это состояние, при котором контроль над употреблением алкоголя утрачивается, а токсическая нагрузка на организм резко возрастает. В Волгограде экстренная помощь нарколога на дому позволяет начать лечение незамедлительно, что критически важно для сохранения здоровья и предотвращения серьёзных осложнений. Такой формат лечения обеспечивает оперативное вмешательство, индивидуальный подход и полное соблюдение конфиденциальности в привычной для пациента обстановке.
Подробнее – вывод из запоя капельница
Мы также уделяем большое внимание социальной адаптации. Пациенты учатся восстанавливать навыки общения и обретать уверенность в себе, что помогает в будущем избежать рецидивов и успешно вернуться к полноценной жизни, будь то работа или учеба.
Изучить вопрос глубже – http://быстро-вывод-из-запоя.рф/vyvod-iz-zapoya-v-kruglosutochno-v-volgograde.xn--p1ai/
Каждый этап требует профессионального подхода и регулярного мониторинга показателей организма, что особенно важно при тяжелых формах алкогольной зависимости.
Ознакомиться с деталями – вывод из запоя на дому круглосуточно
В медицинских условиях специалисты обеспечивают тщательный контроль над динамикой состояния пациента. Каждый этап процедуры имеет свою задачу, которая направлена на последовательное восстановление функций организма.
Исследовать вопрос подробнее – вывод из запоя в стационаре в санкт-петербурге
PlannerPrairie Collection – Daily planners that combine style, cuteness, and practicality.
Наркологическая помощь на дому в Ярославле охватывает широкий спектр медицинских мероприятий, направленных на стабилизацию состояния пациента и подготовку к дальнейшему лечению. Среди основных процедур:
Выяснить больше – нарколог на дом цена
budgetbreeze online store – Products were budget-friendly and arrived quickly, simplifying my shopping experience.
При своевременном обращении к специалистам капельница позволяет значительно улучшить состояние пациента уже в первые часы после начала лечения. Медицинская помощь при запое должна оказываться квалифицированно и в комфортных условиях, что снижает риски осложнений и ускоряет восстановление.
Получить больше информации – капельница от запоя вызов город
Платная наркологическая клиника «Трезвый город» предлагает лечение в комфортных условиях и с соблюдением медицинской этики. Специалисты помогают снять острые симптомы, снизить тягу и подготовить пациента к следующему этапу — реабилитации или амбулаторному сопровождению.
Получить больше информации – кодирование по методу довженко отзывы
На сайте Минздрава указаны общие клинические рекомендации по выведению из запоя, включая допустимые дозировки и протоколы лечения.
Получить дополнительные сведения – http://vyvod-iz-zapoya-v-ryazani12.ru
На сайте Минздрава указаны общие клинические рекомендации по выведению из запоя, включая допустимые дозировки и протоколы лечения.
Углубиться в тему – https://vyvod-iz-zapoya-v-ryazani12.ru/anonimnyj-vyvod-iz-zapoya-v-ryazani/
Скачайте активатор для Windows 11 и получите все функции Pro-версии бесплатно.
Подробнее – Скачать генератор ключей для Windows 11
умная нейросеть для учебы nejroset-dlya-ucheby-8.ru .
“Район довольно близкий для меня(СТРЕЛА)” купить наркотики Всем привет! Специально зарегистрировался для того что бы поведать вам, какой тут отличный магазин! Обращаюсь сюда уже 3 месяца всегда по опту! все на высоте! Время доставки кладом в мой город 4 дня! Качество продукта отличное! Клады хорошие! И главное пунктуальность, и грамотное общение с человеком… Желаю оставаться всегда такими же порядочными! Сразу видно что магазин знает свое дело в нашем не легком труде!!!”Прыгаю в кеды, и лечу на адрес “
В ходе процедуры врач контролирует жизненные показатели пациента, корректирует состав раствора при необходимости и оказывает дополнительную поддержку. После завершения капельницы часто назначается курс восстановительной терапии, направленный на стабилизацию функций организма.
Углубиться в тему – после капельницы от запоя мурманск
Этот информационный материал подробно освещает проблему наркозависимости, ее причины и последствия. Мы предлагаем информацию о методах лечения, профилактики и поддерживающих программах. Цель статьи — повысить осведомленность и продвигать идеи о необходимости борьбы с зависимостями.
Выяснить больше – http://www.google.hu/url?sa=t&url=https://moskva.pohmelochnaya.ru/kapelnitsa-ot-zapoya
Капельница рекомендована при следующих состояниях:
Получить дополнительную информацию – капельница от запоя клиника мурманск
Состав капельницы не повторяет «советы знакомых». Он формируется под доминирующий симптом, сопутствующие заболевания и взаимодействия с текущими лекарствами. Врач постоянно оценивает витальные показатели и реакцию организма, корректируя скорость и объём по инфузомату. Ниже — примеры профилей, которые объясняют логику выбора; финальное решение всегда очное.
Изучить вопрос глубже – нарколог на дом клиника сочи
“аренда инструмента в слуцке – выгодные условия и широкий выбор инструментов для любых задач.”
Вместо того чтобы покупать инструмент, который может понадобиться всего несколько раз, выгоднее взять его в аренду по доступной цене.
Такой подход особенно удобен для строителей и мастеров. Строительные компании активно используют аренду, чтобы не закупать лишнее оборудование.
#### **2. Какой инструмент можно взять в аренду?**
В Слуцке доступен широкий ассортимент оборудования для разных задач. Для строительных работ доступны бетономешалки, виброплиты и леса.
Кроме того, в аренду сдают и специализированную технику. Если нужно работать на высоте, доступны подъемники и строительные леса.
#### **3. Преимущества аренды инструмента**
Главный плюс – экономия на обслуживании и хранении. Все инструменты проходят регулярное обслуживание, поэтому клиенты получают только исправные устройства.
Дополнительный бонус – помощь в выборе подходящего оборудования. Консультанты помогут подобрать инструмент под конкретные задачи.
#### **4. Как оформить аренду в Слуцке?**
Процедура аренды максимально проста и прозрачна. Достаточно оставить заявку на сайте или позвонить по телефону.
Условия проката выгодны для всех клиентов. Стоимость аренды зависит от срока и типа инструмента.
—
### **Спин-шаблон статьи**
#### **1. Почему аренда инструмента – это выгодно?**
Аренда инструмента в Слуцке позволяет сэкономить деньги и время . Если вам нужен инструмент на короткий срок, аренда – идеальное решение, ведь не придется тратиться на дорогостоящее оборудование .
Такой подход особенно удобен для профессионалов и любителей . Многие профессионалы предпочитают брать инструмент напрокат, так как это снижает затраты на выполнение работ .
#### **2. Какой инструмент можно взять в аренду?**
В Слуцке доступен широкий ассортимент оборудования для разных задач . В прокате представлены бензопилы, газонокосилки и другая садовая техника .
Кроме того, в аренду сдают и профессиональные устройства . Для укладки плитки можно взять плиткорезы, а для покраски – краскопульты .
#### **3. Преимущества аренды инструмента**
Главный плюс – доступ к исправному оборудованию. Арендуя оборудование, вы избегаете затрат на его хранение и транспортировку .
Дополнительный бонус – помощь в выборе подходящего оборудования . Консультанты помогут подобрать инструмент под конкретные задачи .
#### **4. Как оформить аренду в Слуцке?**
Процедура аренды доступна каждому клиенту. Для оформления понадобится только паспорт и небольшой залог.
Условия проката предполагают гибкие тарифы. Стоимость аренды зависит от срока и типа инструмента .
В центре «Передозировка» в Санкт-Петербурге применяют комплексный подход: лечение наркомании, терапия алкогольной зависимости, индивидуальное кодирование и восстановительные программы. Такой формат обеспечивает надёжный результат и поддержку на всех этапах.
Подробнее – вред курения кальяна
Одним из ключевых направлений является проведение капельниц, призванных вывести токсины из организма и нормализовать водно-электролитный баланс. Используемые препараты и состав растворов подбираются индивидуально, исходя из клинической картины и истории болезни пациента.
Подробнее можно узнать тут – нарколог на дом срочно ярославль
Thanks for sharing. I read many of your blog posts, cool, your blog is very good.
emailelm tools – Clean design and a great selection of marketing resources.
Dans cet article, jai decide de partager avec vous des informations
sur les meilleurs casinos en ligne, ainsi quun top 10 avec la liste des criteres que jutilise pour determiner la fiabilite, la securite et evaluer le contenu des casinos en ligne.
Спасибо за отзыв , а то заказывает много людей а отписываются единицы. https://shkaf-kupit.ru вот и я уже трясусь.пока никаких точных дат нет. цены будут когда придёт товар, так что ждёмс пока что.
Состояние запоя представляет серьёзную угрозу для здоровья, особенно при многодневном приёме алкоголя. В таких случаях самостоятельное прекращение употребления может привести к тяжёлым последствиям — судорогам, делирию, обезвоживанию и даже летальному исходу. Капельница от запоя в Первоуральске — это проверенный метод медицинской детоксикации, позволяющий быстро восстановить водно-солевой баланс и стабилизировать общее состояние пациента.
Получить дополнительные сведения – kapelnicza-ot-zapoya-pervouralsk11.ru/
В статье-обзоре представлены данные сомнительной актуальности и факты без явной взаимосвязи. Читатель ознакомится с разными мнениями, хотя они вряд ли существенно изменят его представление о теме.
Подробнее читать – кето диета за неделю минус 10 кг
Основная цель процедуры заключается в устранении токсинов и восстановлении жизненно важных функций. При этом используются индивидуально подобранные лекарственные препараты, корректирующие водно-электролитный баланс и работу сердечно-сосудистой системы. Вывод из запоя в клинике позволяет снизить риск осложнений и ускорить процесс нормализации состояния.
Углубиться в тему – https://vyvod-iz-zapoya-volgograd0.ru/vyvod-iz-zapoya-narkolog-na-dom-volgograd/
В этом материале представлены детали, которые хоть и занимательны, но не особенно значимы. Мы рассматриваем моменты, которые трудно назвать важными, но всё же решили включить их для полноты картины.
Вот – бесплатные порно видео
Первичный этап терапии направлен на оперативное выведение токсинов из организма. Врач-нарколог назначает индивидуальную схему медикаментозного вмешательства, что позволяет снизить уровень алкоголя в крови и восстановить обмен веществ.
Углубиться в тему – https://vyvod-iz-zapoya-volgograd00.ru/vyvod-iz-zapoya-kapelnicza-volgograd
CityStroll Picks – Practical and fashionable items perfect for city commuting.
Капельница от запоя в Мурманске является одной из наиболее востребованных процедур для снятия острого состояния алкогольной интоксикации. Эта методика позволяет быстро вывести токсины из организма, нормализовать водно-солевой баланс и улучшить самочувствие пациента. Современная капельная терапия считается эффективным средством в лечении запоя, обеспечивая поддержку жизненно важных функций и минимизируя риски осложнений.
Углубиться в тему – http://kapelnicza-ot-zapoya-v-murmanske12.ru
Как поясняет врач-нарколог клиники «АлкоСтоп», «грамотно составленная инфузионная терапия не только устраняет последствия запоя, но и создаёт условия для дальнейшей мотивации пациента к лечению».
Разобраться лучше – выезд на дом капельница от запоя первоуральск
После первичной консультации пациент проходит обследование, позволяющее точно определить стадию зависимости и сопутствующие патологии. Используются лабораторные анализы, оценка неврологического статуса и сбор анамнеза. Уже на этом этапе начинается выстраивание контакта между пациентом и врачом, что особенно важно для доверия и готовности включиться в процесс.
Получить больше информации – частная наркологическая клиника в волгограде
Как поясняет врач-нарколог клиники «АлкоСтоп», «грамотно составленная инфузионная терапия не только устраняет последствия запоя, но и создаёт условия для дальнейшей мотивации пациента к лечению».
Подробнее тут – капельница от запоя на дому круглосуточно в первоуральске
Каждый этап требует профессионального подхода и регулярного мониторинга показателей организма, что особенно важно при тяжелых формах алкогольной зависимости.
Получить дополнительную информацию – http://vyvod-iz-zapoya-volgograd0.ru/anonimnaya-narkologiya-vyvod-iz-zapoya-volgograd/
Каждый этап требует профессионального подхода и регулярного мониторинга показателей организма, что особенно важно при тяжелых формах алкогольной зависимости.
Узнать больше – вывод из запоя вызов на дом в санкт-петербурге
Lolz.live собирает тысячи игроков из различных государств для обмена навыками и информацией. Ресурс включает развернутые категории по хитовым проектам, практичные инструкции и современные беседы. Здесь вы найдете единомышленников, советы от профессионалов и свежие новости игровой индустрии. Ищете купить аккаунт dota 2? Переходите на lolz.live и становитесь частью активного сообщества. Простая навигация, приветливая среда и постоянные апдейты материалов ожидают любого пользователя ресурса.
Запой – это состояние, при котором контроль над употреблением алкоголя утрачивается, а токсическая нагрузка на организм резко возрастает. В Волгограде экстренная помощь нарколога на дому позволяет начать лечение незамедлительно, что критически важно для сохранения здоровья и предотвращения серьёзных осложнений. Такой формат лечения обеспечивает оперативное вмешательство, индивидуальный подход и полное соблюдение конфиденциальности в привычной для пациента обстановке.
Разобраться лучше – https://vyvod-iz-zapoya-volgograd00.ru/vyvod-iz-zapoya-kruglosutochno-volgograd/
На сайте Минздрава указаны общие клинические рекомендации по выведению из запоя, включая допустимые дозировки и протоколы лечения.
Исследовать вопрос подробнее – вывод из запоя на дому круглосуточно рязань
Одновременно с медикаментозной детоксикацией начинается работа по снижению эмоционального напряжения. Психотерапевтическая помощь помогает пациенту осознать причины зависимости и выработать стратегии для предотвращения рецидивов, что является важным аспектом успешного лечения.
Получить больше информации – вывод из запоя вызов на дом волгоград
В этой статье-обзоре мы собрали данные, актуальность которых сомнительна, а факты — не всегда взаимосвязаны. Читатель сможет ознакомиться с разными мнениями, хотя вряд ли они существенно повлияют на его понимание темы.
Вот – рулетка онлайн
В этой статье-обзоре мы собрали данные, актуальность которых сомнительна, а факты — не всегда взаимосвязаны. Читатель сможет ознакомиться с разными мнениями, хотя вряд ли они существенно повлияют на его понимание темы.
Вот – игровые автоматы
Алкогольная и наркотическая зависимость являются серьёзными заболеваниями, требующими оперативного и квалифицированного вмешательства. Когда речь идёт о критическом состоянии пациента, особенно после длительного употребления алкоголя или наркотических веществ, время играет ключевую роль. Клиника «РеабилитАльянс» в Краснодаре предлагает услугу нарколога на дом, обеспечивая пациентам необходимую помощь в любой момент дня и ночи. Наши специалисты готовы оперативно выехать по указанному адресу и предоставить все необходимые медицинские процедуры на месте.
Ознакомиться с деталями – нарколог на дом круглосуточно цены
При поступлении вызова специалисты клиники «ЗдоровьеНорм» выезжают на дом в течение 30–60 минут. Врач проводит тщательную диагностику, измеряя артериальное давление, пульс, уровень кислорода в крови и оценивая общее состояние пациента. После этого осуществляется индивидуальный подбор лечебной схемы, основанной на объективных данных и анамнезе пациента.
Углубиться в тему – вывод из запоя в краснодаре
Нет сомнения https://yaltakultura.ru Будет что лучше АМ? Или из серии JWH?прет 30-45 мин.1к10.действием похож на рсц
Дополнительно, если у пациента отмечаются психические нарушения — галлюцинации, агрессия или спутанность сознания, это является прямым сигналом к срочному вмешательству. В этом случае своевременное лечение помогает предотвратить риск инсульта, инфаркта или других серьезных заболеваний.
Углубиться в тему – вывод из запоя капельница на дому в краснодаре
Наши специалисты строят программу лечения на основе многоступенчатой схемы, включающей медицинские, психологические и социальные компоненты. Каждый этап нацелен на устранение физической зависимости, стабилизацию психоэмоционального состояния и восстановление социальных связей.
Получить дополнительные сведения – http://lechenie-narkomanii-volgograd9.ru
На сайте Минздрава указаны общие клинические рекомендации по выведению из запоя, включая допустимые дозировки и протоколы лечения.
Подробнее можно узнать тут – http://vyvod-iz-zapoya-v-ryazani12.ru
Клиника «Центр реабилитации «Свет Надежды» – специализированное учреждение, предоставляющее профессиональную помощь пациентам, страдающим от алкогольной и наркотической зависимости. Наша главная цель – помощь людям в преодолении зависимости и возвращении к здоровому образу жизни с применением современных методик реабилитации и индивидуального подхода.
Получить дополнительные сведения – https://быстро-вывод-из-запоя.рф/vyvod-iz-zapoya-cena-v-volgograde.xn--p1ai
Стационарный формат предполагает круглосуточное наблюдение, возможность экстренного вмешательства и доступ к диагностическим средствам. Это особенно важно при наличии хронических заболеваний, психозов или алкогольного делирия.
Узнать больше – http://www.domen.ru
Вывод из запоя в Мурманске представляет собой комплекс мероприятий, направленных на оказание медицинской помощи пациентам, находящимся в состоянии алкогольного отравления или длительного употребления спиртного. Процедура проводится с целью стабилизации состояния организма, предупреждения осложнений и минимизации риска развития тяжелых последствий алкоголизма.
Подробнее можно узнать тут – нарколог вывод из запоя
Ночной вызов ничем не отличается от утреннего: мы отвечаем, уточняем риски и запускаем маршрут так, чтобы первые часы прошли спокойно. Наш алгоритм простой и понятный — он экономит время и убирает хаос. Ниже — ориентировочная карта визита; по месту врач адаптирует её к возрасту, соматическому фону и текущим симптомам.
Подробнее – нарколог на дом круглосуточно сочи
Назначение
Подробнее можно узнать тут – http://kapelnicza-ot-zapoya-pervouralsk11.ru/kapelnicza-ot-zapoya-na-domu-stoimost-v-pervouralske/
Одним из ключевых направлений является проведение капельниц, призванных вывести токсины из организма и нормализовать водно-электролитный баланс. Используемые препараты и состав растворов подбираются индивидуально, исходя из клинической картины и истории болезни пациента.
Узнать больше – https://narkolog-na-dom-v-yaroslavle12.ru/vyzov-narkologa-na-dom-v-yaroslavle
Своевременное обращение к специалисту позволяет избежать опасных осложнений и облегчить процесс восстановления организма. Экстренный вызов врача-нарколога необходим в следующих случаях:
Разобраться лучше – https://narcolog-na-dom-krasnodar00.ru
Нарколог на дому проводит тщательный осмотр, собирает анамнез и назначает необходимые лабораторные исследования. Это позволяет выявить сопутствующие патологии и скорректировать тактику лечения.
Подробнее – нарколог на дом клиника в ярославле
Основная цель процедуры заключается в устранении токсинов и восстановлении жизненно важных функций. При этом используются индивидуально подобранные лекарственные препараты, корректирующие водно-электролитный баланс и работу сердечно-сосудистой системы. Вывод из запоя в клинике позволяет снизить риск осложнений и ускорить процесс нормализации состояния.
Получить дополнительную информацию – https://vyvod-iz-zapoya-volgograd0.ru/
Looking for asts news? Visit the largest portal, thetradable.com, where you’ll find all the most important, up-to-date news on the cryptocurrency market, reviews, expert opinions, and all the most important events. Our site is intuitive and appeals to newcomers as well as experienced veterans of the industry. We also cover everything about gold, silver, industry, and much more.
MoneyMagnolia Essentials – Simple guides and tools for budgeting and managing personal finances.
Вывод из запоя показан при:
Узнать больше – http://vyvod-iz-zapoya-v-murmanske12.ru
Mushnyak, да ты гонишь походу, магазин работает как надо, каждую неделю у них заказываю все ровно, кидаловом тут не пахнет, ты наверное на отходосах)))) купить наркотики P.S.Сколько раз брал в этом магазе ни разу нареканий не было)))Не сочтите за рекламуБро слова это хорошо но нам нужен наш клад и не более не кто не хочет тебя винить и общаться сдесь на эту тему а на оборот писать только хорошие отзывы о вашем магазе пойми и ты бро слово паника сдесь не уместно сдесь идет разбор по факту согласись
Запой – это состояние, при котором контроль над употреблением алкоголя утрачивается, а токсическая нагрузка на организм резко возрастает. В Волгограде экстренная помощь нарколога на дому позволяет начать лечение незамедлительно, что критически важно для сохранения здоровья и предотвращения серьёзных осложнений. Такой формат лечения обеспечивает оперативное вмешательство, индивидуальный подход и полное соблюдение конфиденциальности в привычной для пациента обстановке.
Получить дополнительную информацию – вывод из запоя на дому в волгограде
Нарколог на дому проводит тщательный осмотр, собирает анамнез и назначает необходимые лабораторные исследования. Это позволяет выявить сопутствующие патологии и скорректировать тактику лечения.
Узнать больше – http://narkolog-na-dom-v-yaroslavle12.ru/
В этой статье-обзоре мы собрали данные, актуальность которых сомнительна, а факты — не всегда взаимосвязаны. Читатель сможет ознакомиться с разными мнениями, хотя вряд ли они существенно повлияют на его понимание темы.
Вот – азартные игры на деньги
На сайте Минздрава указаны общие клинические рекомендации по выведению из запоя, включая допустимые дозировки и протоколы лечения.
Узнать больше – https://vyvod-iz-zapoya-v-ryazani12.ru/vyvod-iz-zapoya-czena-v-ryazani/
В этой публикации мы исследуем ключевые аспекты здоровья, включая влияние образа жизни на благополучие. Читатели узнают о важности правильного питания, физической активности и психического здоровья. Мы предоставим практические советы и рекомендации для поддержания здоровья и развития профилактических подходов.
Ознакомиться с деталями – http://google.sm/url?q=https://moskva.pohmelochnaya.ru/kapelnitsa-ot-zapoya
Telegram-канал по ссылке https://t.me/ffgdfggfgdfg/ предлагает актуальную информацию и эксклюзивные материалы для подписчиков, которые ценят оперативность и достоверность. Здесь публикуются новости, аналитика, полезные советы и специальные предложения, недоступные в других источниках. Подписка на канал открывает доступ к закрытому сообществу единомышленников, где можно обсудить важные темы и получить экспертное мнение. Присоединяйтесь к каналу и будьте в курсе всех обновлений первыми.
Как активировать Windows 11 без ключа? У нас есть пошаговая инструкция!
Подробнее – Скачать активатор для Windows 11
Бесплатный ключ для Windows 11 — только у нас, обновлено в 2026 году!
Подробнее – Скачать патч для активации Windows 11
Основное направление работы клиники – это комплексный подход, который включает медицинское лечение, психотерапию и социальную реабилитацию. Мы понимаем, что зависимость затрагивает не только физическое состояние, но и психологическое, поэтому используем методики когнитивно-поведенческой терапии, семейные консультации и групповые занятия. Такой подход помогает пациентам не только преодолеть зависимость, но и разобраться с её причинами и справиться с психологическими трудностями.
Получить дополнительную информацию – https://быстро-вывод-из-запоя.рф/vyvod-iz-zapoya-cena-v-volgograde.xn--p1ai/
Ждем трип репотов и описания про АМ https://pro-ref.ru ну вообщем все ровно получил людей правда от бати но магазин ровный советуюЗаказывал Реагенг, всё нормально пришло, небольшой бонус порадовал, мелочь а приятно
Капельница рекомендована при следующих состояниях:
Исследовать вопрос подробнее – капельница от запоя
Дополнительно, если у пациента отмечаются психические нарушения — галлюцинации, агрессия или спутанность сознания, это является прямым сигналом к срочному вмешательству. В этом случае своевременное лечение помогает предотвратить риск инсульта, инфаркта или других серьезных заболеваний.
Выяснить больше – вывод из запоя на дому круглосуточно
секс порно
vps essentials hub – Plans are clear, competitive, and easy to browse for different needs.
Наркологическая клиника «Передозировка» в Санкт-Петербурге оказывает комплексную помощь людям с зависимостью. Здесь проводят лечение алкоголизма и наркомании, применяют современные методы кодирования и обеспечивают сопровождение пациента до полного восстановления.
Подробнее можно узнать тут – алкоголь и психические расстройства
Процедура капельного введения лекарственных растворов проводится в условиях клиники с соблюдением всех санитарных норм. Пациенту устанавливается капельница, через которую вводятся препараты под контролем медперсонала. В зависимости от состояния пациента и тяжести запоя длительность капельной терапии может варьироваться от 1 до 6 часов.
Разобраться лучше – капельница от запоя мурманская область
Своевременное обращение к специалисту позволяет избежать опасных осложнений и облегчить процесс восстановления организма. Экстренный вызов врача-нарколога необходим в следующих случаях:
Получить больше информации – https://narcolog-na-dom-krasnodar00.ru
В клинике «Трезвый город» доступна помощь при запое и тяжёлой абстиненции с медицинским наблюдением. Проводится инфузионная терапия, медикаментозная коррекция и восстановление сна, общего самочувствия и вегетативных проявлений.
Изучить вопрос глубже – капельница от запоя цена
Длительный запой способен нанести непоправимый вред организму, привести к тяжелым нарушениям работы внутренних органов и поставить под угрозу жизнь пациента. В таких случаях необходимо срочное медицинское вмешательство, которое позволяет быстро стабилизировать состояние, вывести токсины и предотвратить развитие опасных осложнений. Клиника «ЗдоровьеНорм» в Краснодаре предлагает профессиональный вывод из запоя на дому, обеспечивая комплексное лечение с максимальной оперативностью и полной конфиденциальностью.
Ознакомиться с деталями – https://vyvod-iz-zapoya-krasnodar00.ru
При длительном запое организм не успевает восстановить свой водно-электролитный баланс, что приводит к обезвоживанию и ухудшению общего состояния. Такие пациенты рискуют развить не только тяжелую интоксикацию, но и хронические заболевания, которые впоследствии требуют длительного и дорогостоящего лечения. Поэтому своевременный вызов врача-нарколога на дом становится критически важным для сохранения здоровья и предотвращения серьезных последствий.
Ознакомиться с деталями – вывод из запоя вызов на дом краснодар
MaverickMint Essentials – Bright, well-designed office products that make working enjoyable.
Вывод из запоя в Мурманске представляет собой комплекс мероприятий, направленных на оказание медицинской помощи пациентам, находящимся в состоянии алкогольного отравления или длительного употребления спиртного. Процедура проводится с целью стабилизации состояния организма, предупреждения осложнений и минимизации риска развития тяжелых последствий алкоголизма.
Подробнее можно узнать тут – вывод из запоя на дому цена в мурманске
В клинике «Передозировка» в Санкт-Петербурге пациентам доступно индивидуальное лечение наркозависимости и алкоголизма. Центр использует современные протоколы терапии, предлагает конфиденциальное кодирование и поддерживает пациентов на всех этапах восстановления.
Детальнее – капельница от похмелья спб на дому
пробуй 4фа, 2-dpmp https://bestcrater.top магазин работает как надо, у меня тут перевес был не плохой спасибо дружбанчикиКидалы они или нет-узнаю в течении пары дней,но отказ в закладке-не основание.
plannerport corner – Helpful tips and moving around the site is effortless.
Чтобы показать, как именно работает врач в домашних условиях, можно сопоставить основные проявления запоя и шаги нарколога, направленные на их устранение.
Получить больше информации – нарколог на дом клиника санкт-петербург
Независимо от формы зависимости — алкогольной, опиатной, синтетической или медикаментозной — специалисты подбирают индивидуальный курс терапии. Алгоритмы лечения адаптируются под возраст, стаж употребления, общее состояние организма и наличие сопутствующих заболеваний.
Углубиться в тему – http://narkologicheskaya-klinika-v-yaroslavle12.ru
Для более точного понимания различий между основными подходами используется систематизация данных в таблице. Она отражает основные особенности применения методов и их задачи.
Выяснить больше – вывод из запоя на дому цена
shop sweet style – The visual presentation is polished and very appealing.
Капельница от запоя в Мурманске является одной из наиболее востребованных процедур для снятия острого состояния алкогольной интоксикации. Эта методика позволяет быстро вывести токсины из организма, нормализовать водно-солевой баланс и улучшить самочувствие пациента. Современная капельная терапия считается эффективным средством в лечении запоя, обеспечивая поддержку жизненно важных функций и минимизируя риски осложнений.
Получить дополнительные сведения – капельница от запоя на дому в мурманске
Назначение
Узнать больше – капельница от запоя на дому в первоуральске
В центре применяется последовательная модель лечения, включающая диагностику, детоксикацию, психотерапию, восстановление социальных навыков и постлечебное сопровождение. Такой подход даёт устойчивый эффект даже при тяжёлых формах зависимости.
Ознакомиться с деталями – http://
Да, «Путь к жизни» оформляет все документы на номер договора без указания фамилии пациента и не передаёт сведения третьим лицам.
Углубиться в тему – https://lechenie-narkomanii-volgograd9.ru/czentr-lecheniya-narkomanii-volgograd
В материале приведены детали, интересные, но не особенно важные. Мы рассматриваем аспекты, которые сложно назвать существенными, но включили их для большей полноты.
Подробнее читать – диета для похудения быстро
Длительный запой способен нанести непоправимый вред организму, привести к тяжелым нарушениям работы внутренних органов и поставить под угрозу жизнь пациента. В таких случаях необходимо срочное медицинское вмешательство, которое позволяет быстро стабилизировать состояние, вывести токсины и предотвратить развитие опасных осложнений. Клиника «ЗдоровьеНорм» в Краснодаре предлагает профессиональный вывод из запоя на дому, обеспечивая комплексное лечение с максимальной оперативностью и полной конфиденциальностью.
Узнать больше – нарколог вывод из запоя
Спрашивай в жаббер, там больше 10-15 минут задержки с ответом не бывает. купить наркотики Всем привет !!!?Вот этого ам2233 и заказал. Оплатил уже. Жду трекер.
Экстренный вывод из запоя в домашних условиях – это комплекс мер, направленный на быструю детоксикацию организма и восстановление нормального обмена веществ. В Волгограде квалифицированные специалисты готовы выехать к пациенту круглосуточно, чтобы оперативно оценить его состояние и начать терапию. Такой подход позволяет минимизировать негативное воздействие алкоголя и снизить риск развития осложнений.
Получить больше информации – https://vyvod-iz-zapoya-volgograd00.ru/vyvod-iz-zapoya-kruglosutochno-volgograd
VanillaView Finds Online – Stylish layout and easy browsing ensure a pleasant shopping journey.
Основные показания для вызова нарколога:
Получить дополнительную информацию – https://narcolog-na-dom-v-irkutske00.ru
Такая систематизация показывает, что врач действует целенаправленно, устраняя не только симптомы, но и их физиологические последствия.
Подробнее – выезд нарколога на дом в санкт-петербурге
В медицинских условиях специалисты обеспечивают тщательный контроль над динамикой состояния пациента. Каждый этап процедуры имеет свою задачу, которая направлена на последовательное восстановление функций организма.
Детальнее – вывод из запоя с выездом в санкт-петербурге
Рабочий ключ активации для Windows 11 — проверено и обновлено, без блокировок!
Подробнее – Как активировать Windows 11 без ключа
Этот информационный набор привлекает внимание множеством мелочей и странных ракурсов. Мы предлагаем взгляды, которые редко бывают полезны, но могут слегка разнообразить ваше знакомство с темой.
Вот – порно
Салон мебели в Краснодаре демонстрирует большой каталог готовых предметов интерьера с доставкой и экспертной сборкой. В коллекции размещены модульные системы, комплекты для спален, кухонная мебель, детские гарнитуры и решения для хранения любых размеров. Ищете спальня дуб? На платформе mebelroom-krd.ru покупатели выбирают кровати от 80 до 200 см, шкафы-купе, диваны и комплектующие по доступным ценам. Фирма осуществляет быструю доставку по городу и выполняет надежную установку мебели компетентными сборщиками.
Основная цель — быстрое и безопасное выведение этанола и его токсических метаболитов из организма, восстановление водно-электролитного и кислотно-щелочного баланса, нормализация артериального давления, работы сердца, почек и головного мозга. Для этого применяется инфузионная терапия, фармакологическая коррекция, витаминотерапия и, при необходимости, седативная поддержка.
Выяснить больше – вывод из запоя рязань.
Для проведения процедуры используются стерильные растворы, а подбор компонентов осуществляется с учётом индивидуального состояния пациента, что позволяет минимизировать побочные эффекты и повысить эффективность терапии.
Подробнее – http://
skilletstreet store – Loved the choices available and browsing works flawlessly.
В клинике «Передозировка» в Санкт-Петербурге пациентам доступно индивидуальное лечение наркозависимости и алкоголизма. Центр использует современные протоколы терапии, предлагает конфиденциальное кодирование и поддерживает пациентов на всех этапах восстановления.
Подробнее тут – ксанакс это
2. Был подобный заказ и нас спутали. купить наркотики ну вМинус оказался только один, и это ожидание, вместо обещанных 3-5 , пришлось ждать больше недели. Не знаю чья эта заслуга отправителя или доставки, но это немного напрягало.
Экстренная помощь нарколога на дому рекомендуется, когда состояние пациента ухудшается до критического уровня. Основные показания включают:
Подробнее можно узнать тут – вывод из запоя вызов на дом в волгограде
discover toys online – Layout is neat and it’s simple to check out different toys.
vendorvelvet.shop – The layout is modern and browsing feels smooth and straightforward.
В данном обзоре представлены основные направления и тренды в области медицины. Мы обсудим актуальные проблемы здравоохранения, свежие открытия и новые подходы, которые меняют представление о лечении и профилактике заболеваний. Эта информация будет полезна как специалистам, так и широкой публике.
Получить дополнительные сведения – https://www.howmuchisit.org/wp-content/plugins/AND-AntiBounce/redirector.php?url=https://moskva.pohmelochnaya.ru/kodirovanie-esperal
В центре применяется последовательная модель лечения, включающая диагностику, детоксикацию, психотерапию, восстановление социальных навыков и постлечебное сопровождение. Такой подход даёт устойчивый эффект даже при тяжёлых формах зависимости.
Получить дополнительные сведения – https://narkologicheskaya-klinika-volgograd9.ru/chastnaya-narkologicheskaya-klinika-volgograd/
отлично всё 100% )) купить наркотики а сюда заглянуть влом ? //legalrc.com/threads/Трипы.588/page-2не плохие ребята, все в срок и по месту)
Наши специалисты гарантируют пациентам конфиденциальность и внимательное отношение, создавая атмосферу доверия. Врач сопровождает пациента на каждом этапе лечения, отслеживая его состояние и корректируя терапию по мере необходимости. Профессионализм и забота наших специалистов являются основой успешной реабилитации.
Детальнее – https://быстро-вывод-из-запоя.рф/vyvod-iz-zapoya-anonimno-v-volgograde.xn--p1ai/
После завершения процедур врач дает пациенту и его родственникам подробные рекомендации по дальнейшему восстановлению и профилактике рецидивов.
Подробнее тут – https://narcolog-na-dom-krasnodar00.ru/narkolog-na-dom-kruglosutochno-krasnodar/
Клинические протоколы стационарной терапии рекомендуют госпитализацию при средней и тяжёлой степени интоксикации.
Получить дополнительные сведения – вывод из запоя цена рязанская область
Этот текст содержит различную информацию, которая, возможно, покажется любопытной, но в целом не меняет восприятия привычных вещей. Предлагаем просто получить удовольствие от чтения, не ожидая особой пользы.
Вот – эротические фильмы
Looking for farming game? Grab your free copy at play.google.com/store/apps/details?id=com.ugo.play.free.farm.valley! This is more than a farm simulator—it’s a universe packed with beloved childhood characters and tales. Design your personal farm and oversee all operations! The game is colorful, and new updates and events are released frequently, which will be interesting to play at any age!
При необходимости применяется симптоматическое лечение для снижения болевого синдрома, устранения тошноты и рвоты, а также нормализации психоэмоционального состояния пациента. Врачи наркологи строго контролируют течение процедуры, что обеспечивает безопасность и снижает риски осложнений.
Изучить вопрос глубже – http://vyvod-iz-zapoya-v-murmanske12.ru/vyvod-iz-zapoya-na-domu-v-murmanske/
В этой статье мы подробно рассматриваем проверенные методы борьбы с зависимостями, включая психотерапию, медикаментозное лечение и поддержку со стороны общества. Мы акцентируем внимание на важности комплексного подхода и возможности успешного восстановления для людей, столкнувшихся с этой проблемой.
Исследовать вопрос подробнее – https://www.google.lt/url?q=https://moskva.pohmelochnaya.ru/kapelnitsa-dlya-mozga
В нашей клинике работают врачи-наркологи, психологи и психиатры с многолетним опытом в лечении зависимостей. Все специалисты регулярно повышают свою квалификацию, участвуя в семинарах и конференциях, чтобы обеспечивать своим пациентам наиболее современное и качественное лечение.
Подробнее тут – https://быстро-вывод-из-запоя.рф/vyvod-iz-zapoya-v-stacionare-v-volgograde.xn--p1ai/
Чтобы показать, как именно работает врач в домашних условиях, можно сопоставить основные проявления запоя и шаги нарколога, направленные на их устранение.
Подробнее тут – http://narcolog-na-dom-ryazan0.ru
Venverra Essentials – Small shop with a tidy, professional appearance that feels trustworthy.
Этот обзор предлагает свежий взгляд на предметы, которые и без того привычны. Мы упоминаем факты, не имеющие большого значения, и события с неясной важностью, но они присутствуют здесь.
Подробнее читать – https://rostov-narkologiya.ru
Дополнительно, если у пациента отмечаются психические нарушения — галлюцинации, агрессия или спутанность сознания, это является прямым сигналом к срочному вмешательству. В этом случае своевременное лечение помогает предотвратить риск инсульта, инфаркта или других серьезных заболеваний.
Получить дополнительную информацию – https://vyvod-iz-zapoya-krasnodar00.ru/vyvod-iz-zapoya-czena-krasnodar/
Здесь буду отписываться, чтобы все РЕАЛЬНО понимали сколько времени длится весь процесс https://urbanchoiced.top Принять могут в любой курьерке и уж тем более на почте. 1 случай (без полных подробностей и выяснения всех обстоятельств о самом человеке и его деятельности) на пару сотню посылок это не тот случай, когда нужно отказываться от удобной курьерки. Об этом уже говорили неоднократно. Возвращаться к этой теме больше не стоит.супер !!!
Рабочий ключ активации для Windows 11 — проверено и обновлено, без блокировок!
Подробнее – Как активировать Windows 11 без ключа
Санкт-петербургская клиника «Передозировка» специализируется на лечении алкогольной и наркотической зависимости. Здесь выполняют кодирование, проводят медицинское восстановление и обеспечивают психологическую поддержку для закрепления результата.
Углубиться в тему – как курение влияет на человека
Капельница от запоя применяется для комплексного восстановления организма после длительного употребления алкоголя. Она включает в себя введение растворов, насыщенных витаминами, электролитами, глюкозой и лекарственными средствами, направленными на устранение симптомов интоксикации. Основные задачи процедуры:
Углубиться в тему – врача капельницу от запоя
Назначение
Разобраться лучше – http://kapelnicza-ot-zapoya-pervouralsk11.ru/
Компоненты
Исследовать вопрос подробнее – сколько стоит капельница на дому от запоя первоуральск
Наркологический центр «Трезвый город» специализируется на лечении алкоголизма и наркомании с акцентом на безопасность пациента. Подбираются индивидуальные протоколы, учитывается анамнез, переносимость препаратов и возможные осложнения.
Ознакомиться с деталями – центры лечения наркомании
Каждый этап требует профессионального подхода и регулярного мониторинга показателей организма, что особенно важно при тяжелых формах алкогольной зависимости.
Исследовать вопрос подробнее – вывод из запоя цена в санкт-петербурге
Хочу сказать большое спасибо за бонус за помошь сайту, зе бест купить наркотики Магазин как магазин!Надеюсь. Очень жду! Кто уже попробовал скажите как вещество?! Не хуже чем было?
Капельница от запоя применяется для комплексного восстановления организма после длительного употребления алкоголя. Она включает в себя введение растворов, насыщенных витаминами, электролитами, глюкозой и лекарственными средствами, направленными на устранение симптомов интоксикации. Основные задачи процедуры:
Изучить вопрос глубже – вызвать капельницу от запоя в мурманске
Эффективное лечение требует поэтапного подхода, который реализуется следующим образом:
Подробнее – наркологическая клиника нарколог в рязани
Платная наркологическая клиника «Трезвый город» предлагает лечение в комфортных условиях и с соблюдением медицинской этики. Специалисты помогают снять острые симптомы, снизить тягу и подготовить пациента к следующему этапу — реабилитации или амбулаторному сопровождению.
Подробнее можно узнать тут – как избавиться от солевой зависимости
В клинике «Трезвый город» доступна помощь при запое и тяжёлой абстиненции с медицинским наблюдением. Проводится инфузионная терапия, медикаментозная коррекция и восстановление сна, общего самочувствия и вегетативных проявлений.
Получить дополнительные сведения – https://trezviy-gorod.ru/vyvod-iz-zapoya
Такие меры позволяют комплексно воздействовать на организм и снизить риск осложнений, связанных с резким прекращением употребления алкоголя.
Подробнее – наркология вывод из запоя санкт-петербург
При поступлении вызова специалисты клиники «ЗдоровьеНорм» выезжают на дом в течение 30–60 минут. Врач проводит тщательную диагностику, измеряя артериальное давление, пульс, уровень кислорода в крови и оценивая общее состояние пациента. После этого осуществляется индивидуальный подбор лечебной схемы, основанной на объективных данных и анамнезе пациента.
Получить больше информации – https://vyvod-iz-zapoya-krasnodar00.ru/
Основное направление работы клиники – это комплексный подход, который включает медицинское лечение, психотерапию и социальную реабилитацию. Мы понимаем, что зависимость затрагивает не только физическое состояние, но и психологическое, поэтому используем методики когнитивно-поведенческой терапии, семейные консультации и групповые занятия. Такой подход помогает пациентам не только преодолеть зависимость, но и разобраться с её причинами и справиться с психологическими трудностями.
Получить больше информации – https://быстро-вывод-из-запоя.рф/vyvod-iz-zapoya-v-stacionare-v-volgograde.xn--p1ai/
Этот обзор сосредоточен на различных подходах к избавлению от зависимости. Мы изучим традиционные и альтернативные методы, а также их сочетание для достижения максимальной эффективности. Читатели смогут открыть для себя новые стратегии и подходы, которые помогут в их борьбе с зависимостями.
Получить дополнительные сведения – http://google.com.ng/url?sa=t&url=https://moskva.pohmelochnaya.ru/kapelnitsa-dlya-serdtsa
Нашли рабочий серийный номер для Windows 11 Pro — проверено лично, без вирусов!
Подробнее – Где найти рабочий ключ для Windows 11
Экстренный вывод из запоя в домашних условиях – это комплекс мер, направленный на быструю детоксикацию организма и восстановление нормального обмена веществ. В Волгограде квалифицированные специалисты готовы выехать к пациенту круглосуточно, чтобы оперативно оценить его состояние и начать терапию. Такой подход позволяет минимизировать негативное воздействие алкоголя и снизить риск развития осложнений.
Детальнее – http://vyvod-iz-zapoya-volgograd00.ru/vyvod-iz-zapoya-na-domu-volgograd/https://vyvod-iz-zapoya-volgograd00.ru
В данном обзоре представлены основные направления и тренды в области медицины. Мы обсудим актуальные проблемы здравоохранения, свежие открытия и новые подходы, которые меняют представление о лечении и профилактике заболеваний. Эта информация будет полезна как специалистам, так и широкой публике.
Получить дополнительные сведения – https://islam.de/ms?r=https://moskva.pohmelochnaya.ru/kapelnitsa-ot-pohmelya
Современный бизнес требует постоянного повышения квалификации сотрудников для сохранения конкурентных позиций на рынке. Caspian Training Group предлагает комплексные решения для развития профессиональных навыков команд любого уровня. За 24 года работы компания реализовала сотни успешных образовательных проектов для крупнейших казахстанских предприятий. Платформы https://xn—-7sbecpcasfm0beeaecirc5b3a2g.kz/ предоставляет доступ к широкому спектру программ от языковых курсов до стратегических сессий. Более 850 компаний уже доверили обучение своих специалистов профессионалам Caspian Training Group.
Вызов нарколога на дом в Иркутске и Иркутской области — это удобное и безопасное решение, позволяющее получить неотложную помощь в привычной обстановке. Врачи клиники «ЧистоЖизнь» выезжают круглосуточно, приезжают в течение 30–60 минут и проводят комплексное лечение, направленное на стабилизацию состояния пациента и предотвращение осложнений.
Получить дополнительные сведения – вызов нарколога на дом в иркутске
«ЮгМедЦентр» поддерживает строгую конфиденциальность: выездные специалисты приезжают без медицинской символики, в гражданской одежде; документы формулируются нейтрально; уведомления не содержат триггерных слов; профиль можно оформить под кодом. Все записи ведутся в шифрованном контуре с разграничением доступа по ролям, а видеосессии с врачом/психологом не записываются. Мы предупреждаем о цифровой гигиене: включите «тихий режим» уведомлений, избегайте пересылки документов в открытых чатах, используйте резервный канал связи для экстренных вопросов.
Детальнее – врач нарколог на дом
В нашей клинике работают врачи-наркологи, психологи и психиатры с многолетним опытом в лечении зависимостей. Все специалисты регулярно повышают свою квалификацию, участвуя в семинарах и конференциях, чтобы обеспечивать своим пациентам наиболее современное и качественное лечение.
Ознакомиться с деталями – https://быстро-вывод-из-запоя.рф/vyvod-iz-zapoya-v-kruglosutochno-v-volgograde.xn--p1ai
Процедура капельного введения лекарственных растворов проводится в условиях клиники с соблюдением всех санитарных норм. Пациенту устанавливается капельница, через которую вводятся препараты под контролем медперсонала. В зависимости от состояния пациента и тяжести запоя длительность капельной терапии может варьироваться от 1 до 6 часов.
Подробнее – капельница от запоя вызов в мурманске
Вот получил вчера 2 -й заказ…..отсылают быстро, качество отличное, плюс девайсы в которые всё ныколось в виде приятного бонуса… купить наркотики магазин на высоте) качество кул)КЕнт,сорри на почту ответь..
Мы также уделяем большое внимание социальной адаптации. Пациенты учатся восстанавливать навыки общения и обретать уверенность в себе, что помогает в будущем избежать рецидивов и успешно вернуться к полноценной жизни, будь то работа или учеба.
Подробнее – https://быстро-вывод-из-запоя.рф/vyvod-iz-zapoya-v-stacionare-v-volgograde.xn--p1ai/
Скачайте патч для обхода активации Windows 11 и пользуйтесь системой без ограничений.
Подробнее – Скачать генератор ключей для Windows 11
В ходе процедуры врач контролирует жизненные показатели пациента, корректирует состав раствора при необходимости и оказывает дополнительную поддержку. После завершения капельницы часто назначается курс восстановительной терапии, направленный на стабилизацию функций организма.
Изучить вопрос глубже – http://kapelnicza-ot-zapoya-v-murmanske12.ru
Компания «Дока Строй» специализируется на строительных работах полного цикла — от проектирования до сдачи объекта под ключ. В портфолио фирмы жилые дома, коммерческие здания и промышленные сооружения, возведенные с соблюдением всех технологических норм и стандартов качества. Опытные инженеры и строители используют проверенные материалы и современное оборудование для выполнения работ точно в срок. Подробнее о реализованных проектах и услугах можно узнать на сайте https://doka-stroi.ru/, где представлены примеры объектов и условия сотрудничества с заказчиками.
Экстренная помощь нарколога на дому рекомендуется, когда состояние пациента ухудшается до критического уровня. Основные показания включают:
Детальнее – https://vyvod-iz-zapoya-volgograd00.ru/vyvod-iz-zapoya-kapelnicza-volgograd/
Алкогольная и наркотическая зависимость являются серьёзными заболеваниями, требующими оперативного и квалифицированного вмешательства. Когда речь идёт о критическом состоянии пациента, особенно после длительного употребления алкоголя или наркотических веществ, время играет ключевую роль. Клиника «РеабилитАльянс» в Краснодаре предлагает услугу нарколога на дом, обеспечивая пациентам необходимую помощь в любой момент дня и ночи. Наши специалисты готовы оперативно выехать по указанному адресу и предоставить все необходимые медицинские процедуры на месте.
Разобраться лучше – нарколог на дом вывод
Эффективное лечение требует поэтапного подхода, который реализуется следующим образом:
Углубиться в тему – http://narkologicheskaya-klinika-v-ryazani12.ru/narkologicheskaya-klinika-telefon-v-ryazani/
В ходе процедуры врач контролирует жизненные показатели пациента, корректирует состав раствора при необходимости и оказывает дополнительную поддержку. После завершения капельницы часто назначается курс восстановительной терапии, направленный на стабилизацию функций организма.
Получить больше информации – капельница от запоя цена мурманская область
ну я тоже надеялся что лучше жвш он . но к сожалению я разочаровался в нём. держит не долго совсем https://brazilcarnavalshow.ru Ты договорись с курьером о встрече где нибудь, и пропали окружающую обстановку, чтоб рядом небыло не кого подозрительного. Больше не знаю что тебе посоветоватьБро ответь в аське!
Мы также уделяем большое внимание социальной адаптации. Пациенты учатся восстанавливать навыки общения и обретать уверенность в себе, что помогает в будущем избежать рецидивов и успешно вернуться к полноценной жизни, будь то работа или учеба.
Углубиться в тему – https://быстро-вывод-из-запоя.рф/vyvod-iz-zapoya-cena-v-volgograde.xn--p1ai/
В этой статье обсуждаются актуальные медицинские вопросы, которые волнуют общество. Мы обращаем внимание на проблемы, касающиеся здравоохранения и лечения, а также на новшества в области медицины. Читатели будут осведомлены о последних событиях и смогут следить за тенденциями в медицине.
Исследовать вопрос подробнее – https://www.google.com.ng/url?q=https://moskva.pohmelochnaya.ru/kapelnitsa-dlya-serdtsa
В ходе процедуры врач контролирует жизненные показатели пациента, корректирует состав раствора при необходимости и оказывает дополнительную поддержку. После завершения капельницы часто назначается курс восстановительной терапии, направленный на стабилизацию функций организма.
Подробнее можно узнать тут – капельница от запоя цена мурманская область
Клинические протоколы стационарной терапии рекомендуют госпитализацию при средней и тяжёлой степени интоксикации.
Получить дополнительные сведения – https://vyvod-iz-zapoya-v-ryazani12.ru/vyvod-iz-zapoya-na-domu-v-ryazani/
Для эффективного вывода из запоя в Мурманске используются современные методы детоксикации, включающие внутривенное введение растворов, направленных на восстановление водно-солевого баланса, коррекцию электролитов и нормализацию работы почек и печени. Важным этапом является использование витаминных комплексов и препаратов, поддерживающих работу сердца и сосудов.
Углубиться в тему – https://vyvod-iz-zapoya-v-murmanske12.ru
Каждый этап требует профессионального подхода и регулярного мониторинга показателей организма, что особенно важно при тяжелых формах алкогольной зависимости.
Изучить вопрос глубже – https://vyvod-iz-zapoya-volgograd0.ru/vyvod-iz-zapoya-na-domu-volgograd
В ходе процедуры врач контролирует жизненные показатели пациента, корректирует состав раствора при необходимости и оказывает дополнительную поддержку. После завершения капельницы часто назначается курс восстановительной терапии, направленный на стабилизацию функций организма.
Исследовать вопрос подробнее – kapelnicza-ot-zapoya murmansk
https://vodkabet0.top/
В данном тексте собраны разнообразные случайные сведения и не вполне определённые идеи, которые могут вызвать интерес. Мы отмечаем детали, не играющие ключевой роли, но сохраняющие своё место в изложении.
Подробнее читать – диета для похудения быстро
В данной публикации мы поговорим о процессе восстановления от зависимости, о том, как вернуть себе нормальную жизнь. Мы обсудим преодоление трудностей, значимость поддержки и наличие программ реабилитации. Читатели смогут узнать о ключевых шагах к успешному восстановлению.
Подробнее можно узнать тут – http://google.co.jp/url?sa=t&url=https://moskva.pohmelochnaya.ru/kapelnitsy-dlya-pecheni
В данном обзоре представлены основные направления и тренды в области медицины. Мы обсудим актуальные проблемы здравоохранения, свежие открытия и новые подходы, которые меняют представление о лечении и профилактике заболеваний. Эта информация будет полезна как специалистам, так и широкой публике.
Разобраться лучше – http://google.li/url?sa=t&url=https://moskva.pohmelochnaya.ru/kapelnitsa-dlya-mozga
Amatic на https://golznam.ru для ностальгии.
Для достижения положительного результата применяются комплексные подходы, сочетающие медикаментозные и поддерживающие методы. Врачи оценивают общее состояние пациента, степень выраженности абстинентного синдрома и сопутствующие заболевания. На основе этих данных подбираются оптимальные методы коррекции.
Подробнее можно узнать тут – вывод из запоя на дому круглосуточно
Каждый этап требует профессионального подхода и регулярного мониторинга показателей организма, что особенно важно при тяжелых формах алкогольной зависимости.
Детальнее – вывод из запоя круглосуточно в санкт-петербурге
Некоторые состояния требуют немедленного вмешательства специалиста. Если алкогольное отравление или запойное состояние не купируется вовремя, это может привести к тяжелым последствиям для здоровья.
Получить дополнительные сведения – нарколог на дом круглосуточно цены иркутск
Санкт-петербургская клиника «Передозировка» специализируется на лечении алкогольной и наркотической зависимости. Здесь выполняют кодирование, проводят медицинское восстановление и обеспечивают психологическую поддержку для закрепления результата.
Подробнее можно узнать тут – алкоголь на ранних сроках беременности
Интерфейс понятный и не перегружен лишними элементами https://lava55.casino
Как подчёркивает врач-нарколог И.В. Синицин, «современная наркология — это не только вывод из запоя, но и работа с глубинными причинами зависимости».
Выяснить больше – наркологические клиники алкоголизм ярославль
Лучшее качество на Рынке РК!!! Низкие цены!! И без кидалова! УВАЖЕНИЕ ВАМ РЕБЯТА!!! https://bestcrater.top В Курске нетуРашн хлидейс вы правы, мы же тоже люди 🙂 треки наверное на отправке в базу не внесли, а шас у них же тоже праздники, но не волнуйтесь копии накладных то у нас 😉
Хорошее место для вечернего отдыха с азартом https://lava-55.org
Как подчёркивает главный врач клинического отделения, «в условиях стационара мы можем оперативно реагировать на малейшие изменения в состоянии пациента, что критически важно при тяжёлых формах запоя».
Подробнее – http://vyvod-iz-zapoya-v-ryazani12.ru
Каталог компании Мото-ДВ представляет широкий ассортимент мототехники и электротранспорта для различных целей использования. Покупатели могут выбрать квадроциклы, питбайки, электросамокаты и аксессуары с подробными техническими характеристиками и фотографиями. На странице https://promindex.ru/izhevsk/companies/100000233-moto-dv/catalog размещены актуальные цены и информация о наличии моделей на складе. Возможность оформления покупки в кредит без первоначального взноса делает технику доступной широкому кругу покупателей. Консультации специалистов помогают подобрать оптимальный вариант транспорта под конкретные требования.
Процедура капельного введения лекарственных растворов проводится в условиях клиники с соблюдением всех санитарных норм. Пациенту устанавливается капельница, через которую вводятся препараты под контролем медперсонала. В зависимости от состояния пациента и тяжести запоя длительность капельной терапии может варьироваться от 1 до 6 часов.
Исследовать вопрос подробнее – капельница от запоя выезд в мурманске
Этот информационный набор привлекает внимание множеством мелочей и странных ракурсов. Мы предлагаем взгляды, которые редко бывают полезны, но могут слегка разнообразить ваше знакомство с темой.
Вот – секс чат
«Передозировка» — наркологическая клиника в Санкт-Петербурге, где проводят детокс, лечение зависимостей и программу поэтапной реабилитации. Специалисты помогают вернуть стабильное состояние и формируют долгосрочную стратегию трезвости.
Выяснить больше – эффективное средство от похмелья
Экстренная помощь нарколога на дому рекомендуется, когда состояние пациента ухудшается до критического уровня. Основные показания включают:
Подробнее тут – скорая вывод из запоя в волгограде
В этой статье мы рассмотрим современные достижения в области медицины, включая инновационные методы лечения и диагностики. Мы обсудим важность профилактики заболеваний и роль технологий в улучшении качества здравоохранения. Читатели узнают о влиянии медицины на повседневную жизнь и ее значение для современного общества.
Получить больше информации – https://www.google.cv/url?q=https://moskva.pohmelochnaya.ru/kapelnitsy-dlya-pecheni
В клинике «Передозировка» в Санкт-Петербурге пациентам доступно индивидуальное лечение наркозависимости и алкоголизма. Центр использует современные протоколы терапии, предлагает конфиденциальное кодирование и поддерживает пациентов на всех этапах восстановления.
Разобраться лучше – https://peredozirovka.info/service/kodirovanie-ot-alkogolizma
Каждый этап требует профессионального подхода и регулярного мониторинга показателей организма, что особенно важно при тяжелых формах алкогольной зависимости.
Подробнее можно узнать тут – https://vyvod-iz-zapoya-volgograd0.ru/anonimnaya-narkologiya-vyvod-iz-zapoya-volgograd
Экстренная помощь нарколога на дому рекомендуется, когда состояние пациента ухудшается до критического уровня. Основные показания включают:
Узнать больше – http://vyvod-iz-zapoya-volgograd00.ru/vyvod-iz-zapoya-kapelnicza-volgograd/
Запой – это состояние, при котором контроль над употреблением алкоголя утрачивается, а токсическая нагрузка на организм резко возрастает. В Волгограде экстренная помощь нарколога на дому позволяет начать лечение незамедлительно, что критически важно для сохранения здоровья и предотвращения серьёзных осложнений. Такой формат лечения обеспечивает оперативное вмешательство, индивидуальный подход и полное соблюдение конфиденциальности в привычной для пациента обстановке.
Исследовать вопрос подробнее – https://vyvod-iz-zapoya-volgograd00.ru/vyvod-iz-zapoya-kruglosutochno-volgograd
Процедура капельного введения лекарственных растворов проводится в условиях клиники с соблюдением всех санитарных норм. Пациенту устанавливается капельница, через которую вводятся препараты под контролем медперсонала. В зависимости от состояния пациента и тяжести запоя длительность капельной терапии может варьироваться от 1 до 6 часов.
Разобраться лучше – http://kapelnicza-ot-zapoya-v-murmanske12.ru
Независимо от формы зависимости — алкогольной, опиатной, синтетической или медикаментозной — специалисты подбирают индивидуальный курс терапии. Алгоритмы лечения адаптируются под возраст, стаж употребления, общее состояние организма и наличие сопутствующих заболеваний.
Подробнее можно узнать тут – наркологические клиники алкоголизм ярославская область
Поддержка отвечает быстро и по делу https://dental.soc-clinic.ru/filial/ekaterinburg/rosek-stomatologicheskaya-klinika_rkb36
Компоненты
Получить дополнительную информацию – https://kapelnicza-ot-zapoya-pervouralsk11.ru/kapelniczy-ot-zapoya-na-domu-v-pervouralske
как-то перехотелось.. что действительно последний товар не очень? https://bestcrater.top У меня всё норм, реальную отправку написали в треке. Я волновался на счёт этого после сообщениймагаз четкий,еще в 2011 каждую неделю забегали:music:)всегда все ровно
В этой статье-обзоре мы собрали данные, актуальность которых сомнительна, а факты — не всегда взаимосвязаны. Читатель сможет ознакомиться с разными мнениями, хотя вряд ли они существенно повлияют на его понимание темы.
Вот – виртуальное казино
«Передозировка» — наркологическая клиника в Санкт-Петербурге, где проводят детокс, лечение зависимостей и программу поэтапной реабилитации. Специалисты помогают вернуть стабильное состояние и формируют долгосрочную стратегию трезвости.
Получить больше информации – реабилитация наркоманов в спб
Отличная площадка для игры в vodka казино с быстрыми выплатами https://russia24.pro/ulyanovsk/336131595/
Услуга
Выяснить больше – https://narkologicheskaya-klinika-v-ryazani12.ru/narkologicheskaya-klinika-telefon-v-ryazani/
Эффективное лечение требует поэтапного подхода, который реализуется следующим образом:
Узнать больше – частная наркологическая клиника в рязани
Капельница от запоя в Мурманске является одной из наиболее востребованных процедур для снятия острого состояния алкогольной интоксикации. Эта методика позволяет быстро вывести токсины из организма, нормализовать водно-солевой баланс и улучшить самочувствие пациента. Современная капельная терапия считается эффективным средством в лечении запоя, обеспечивая поддержку жизненно важных функций и минимизируя риски осложнений.
Исследовать вопрос подробнее – капельница от запоя наркология в мурманске
Процедура капельного введения лекарственных растворов проводится в условиях клиники с соблюдением всех санитарных норм. Пациенту устанавливается капельница, через которую вводятся препараты под контролем медперсонала. В зависимости от состояния пациента и тяжести запоя длительность капельной терапии может варьироваться от 1 до 6 часов.
Подробнее можно узнать тут – kapelnicza-ot-zapoya-na-domu murmansk
Автоматические врезные пороги решают проблему теплоизоляции и звукоизоляции без создания барьеров в дверном проеме. Умные пороги устанавливаются на межкомнатные, пластиковые, алюминиевые и противопожарные двери любых типов. На портале https://smartporog.ru/ представлен каталог выпадающих порогов с подробными характеристиками и видеообзорами. Устройство автоматически опускается при закрытии двери, устраняя сквозняки, пыль и посторонние запахи. Продукция подходит для жилых и коммерческих помещений, обеспечивая комфорт и повышенную пожаробезопасность объектов.
Наркологическая клиника «Передозировка» предлагает круглосуточную помощь жителям Санкт-Петербурга. Лечение зависимостей, детокс-мероприятия и современные методы кодирования помогают пациентам восстановить здоровье и начать длительный период трезвости.
Изучить вопрос глубже – почему начинают курить
Запой – это состояние, при котором контроль над употреблением алкоголя утрачивается, а токсическая нагрузка на организм резко возрастает. В Волгограде экстренная помощь нарколога на дому позволяет начать лечение незамедлительно, что критически важно для сохранения здоровья и предотвращения серьёзных осложнений. Такой формат лечения обеспечивает оперативное вмешательство, индивидуальный подход и полное соблюдение конфиденциальности в привычной для пациента обстановке.
Выяснить больше – нарколог на дом вывод из запоя
Не хотите платить за лицензию? У нас есть рабочий кряк для Windows 11 — скачайте прямо сейчас!
Подробнее – Скачать патч для активации Windows 11
Дополнительно, если у пациента отмечаются психические нарушения — галлюцинации, агрессия или спутанность сознания, это является прямым сигналом к срочному вмешательству. В этом случае своевременное лечение помогает предотвратить риск инсульта, инфаркта или других серьезных заболеваний.
Исследовать вопрос подробнее – вывод из запоя на дому цена в краснодаре
Стоимость услуг зависит от продолжительности терапии, сложности случая и выбранных процедур. Однако клиника предоставляет гибкую систему оплаты, включая рассрочку и страховое покрытие.
Получить больше информации – chastnaya narkologicheskaya klinika rjazan’
Стационарный формат предполагает круглосуточное наблюдение, возможность экстренного вмешательства и доступ к диагностическим средствам. Это особенно важно при наличии хронических заболеваний, психозов или алкогольного делирия.
Ознакомиться с деталями – вывод из запоя в рязани
Клинические протоколы стационарной терапии рекомендуют госпитализацию при средней и тяжёлой степени интоксикации.
Углубиться в тему – вывод из запоя
Клинические протоколы стационарной терапии рекомендуют госпитализацию при средней и тяжёлой степени интоксикации.
Разобраться лучше – наркологический вывод из запоя рязань
В нашей клинике работают врачи-наркологи, психологи и психиатры с многолетним опытом в лечении зависимостей. Все специалисты регулярно повышают свою квалификацию, участвуя в семинарах и конференциях, чтобы обеспечивать своим пациентам наиболее современное и качественное лечение.
Подробнее тут – https://быстро-вывод-из-запоя.рф/vyvod-iz-zapoya-anonimno-v-volgograde.xn--p1ai
Процедура лечения начинается с установки внутривенной капельницы, через которую вводятся детоксикационные растворы, способствующие быстрому выведению токсинов и восстановлению водно-электролитного баланса. При необходимости врач назначает дополнительные препараты, такие как седативные средства для купирования симптомов абстинентного синдрома, гепатопротекторы для поддержки печени и кардиопротекторы для нормализации работы сердца.
Получить дополнительную информацию – вывод из запоя недорого в краснодаре
Этот документ охватывает важные аспекты медицинской науки, сосредотачиваясь на ключевых вопросах, касающихся здоровья населения. Мы рассматриваем свежие исследования, клинические рекомендации и лучшие практики, которые помогут улучшить качество лечения и профилактики заболеваний. Читатели получат возможность углубиться в различные медицинские дисциплины.
Изучить вопрос глубже – http://google.cv/url?q=https://moskva.pohmelochnaya.ru/chastnyy-vytrezvitel
Скачайте активатор для Windows 11 и получите все функции Pro-версии бесплатно.
Подробнее – Скачать активатор для Windows 11
«Трезвый город» — это комплексная наркологическая помощь для взрослых пациентов: от экстренного купирования интоксикации до плановой терапии и поддержки в период восстановления. Врачи оценивают состояние, корректируют схему лечения и помогают выстроить понятный план дальнейших шагов.
Подробнее – похмелье и давление
извините за беспокойство помогите понять как найти нужного сапорта и написать ему купить наркотики Отличный магазинтс удачи в работе
https://amzn.asia/d/0iLm7rge
Да, «Путь к жизни» оформляет все документы на номер договора без указания фамилии пациента и не передаёт сведения третьим лицам.
Получить дополнительные сведения – https://lechenie-narkomanii-volgograd9.ru/czentr-lecheniya-narkomanii-volgograd
При своевременном обращении к специалистам капельница позволяет значительно улучшить состояние пациента уже в первые часы после начала лечения. Медицинская помощь при запое должна оказываться квалифицированно и в комфортных условиях, что снижает риски осложнений и ускоряет восстановление.
Получить дополнительную информацию – врач на дом капельница от запоя
Этот информационный набор привлекает внимание множеством мелочей и странных ракурсов. Мы предлагаем взгляды, которые редко бывают полезны, но могут слегка разнообразить ваше знакомство с темой.
Вот – игровые автоматы
После первичной консультации пациент проходит обследование, позволяющее точно определить стадию зависимости и сопутствующие патологии. Используются лабораторные анализы, оценка неврологического статуса и сбор анамнеза. Уже на этом этапе начинается выстраивание контакта между пациентом и врачом, что особенно важно для доверия и готовности включиться в процесс.
Подробнее – наркологическая клиника лечение алкоголизма волгоград
Лечение хронического алкоголизма начинается с купирования абстинентного синдрома, после чего проводятся мероприятия по нормализации работы печени, сердечно-сосудистой и нервной системы. Назначаются гепатопротекторы, ноотропы, витамины группы B. Также проводится противорецидивная терапия.
Подробнее можно узнать тут – наркологическая клиника ярославль.
При своевременном обращении к специалистам капельница позволяет значительно улучшить состояние пациента уже в первые часы после начала лечения. Медицинская помощь при запое должна оказываться квалифицированно и в комфортных условиях, что снижает риски осложнений и ускоряет восстановление.
Разобраться лучше – капельница от запоя на дому мурманская область
Клинические протоколы стационарной терапии рекомендуют госпитализацию при средней и тяжёлой степени интоксикации.
Подробнее – http://vyvod-iz-zapoya-v-ryazani12.ru
Эта публикация содержит набор несвязанных идей, трудно применимых в практике. Мы лишь поверхностно затрагиваем различные точки зрения, не проводя глубокий анализ и не предлагая выводов.
Подробнее читать – кето диета за неделю минус 10 кг
В этом материале представлены детали, которые хоть и занимательны, но не особенно значимы. Мы рассматриваем моменты, которые трудно назвать важными, но всё же решили включить их для полноты картины.
Вот – эротические фильмы
Сообщество любителей мототехники объединяет энтузиастов и профессионалов из разных регионов страны. Участники делятся опытом эксплуатации квадроциклов, электросамокатов и другого транспорта для активного отдыха. В группе https://vk.com/moto_dv_ru публикуются актуальные новости о поступлениях техники, специальных предложениях и кредитных программах. Регулярные обзоры моделей помогают выбрать оптимальный вариант под конкретные задачи. Прямая связь с менеджерами через сообщения обеспечивает быструю консультацию по всем вопросам.
В этом материале представлены детали, которые хоть и занимательны, но не особенно значимы. Мы рассматриваем моменты, которые трудно назвать важными, но всё же решили включить их для полноты картины.
Вот – секс шоп
Эта статья освещает различные аспекты освобождения от зависимости и пути к выздоровлению. Мы обсуждаем важность осознания своей проблемы и обращения за помощью. Читатели получат практические советы о том, как преодолевать трудности и строить новую жизнь без зависимости.
Подробнее – https://www.google.mw/url?sa=t&url=https://moskva.pohmelochnaya.ru/kodirovanie-dvoynoy-blok
Ребят какие могут быть сомнения в этом магазе магаз ровный и заслуживает уважения он в доверенных его реклама на шляпе сайта ну это так для тех кто не знает просто реклама стоит 5000$ доларов! купить наркотики впервые обратился в этот магазин за оптом и был удивлён тем, что они работают без гаранта. Но почитав отзывы , решил заказать без гаранта с доставкой в регион. Обещали 5-7 дней. С небольшим опозданием получил адрес в своём городе и без проблем забрал опт. Возникли небольшие заморочки в части заказа и магазин без лишних слов решил все недорозумения в мою пользу. Очень приятно работать с такими людьми! Отличный магазин! Всем рекомендую! И можно не обращать внимание на то что они работают без гаранта. Удачи в бизе!отличный селлер
Творческая студия «LedMaster» уже 20 лет создает изысканные и роскошные скульптуры изо льда. Они всегда смотрятся привлекательно, презентабельно и необычно на любом торжестве. Ледяные фигурки украсят фотозону, сделав ее ярким акцентом самого грандиозного мероприятия. На сайте https://led-msk.com/ ознакомьтесь с тем, какие услуги вы сможете заказать в этой компании.
Не тратьте деньги на лицензию — скачайте кряк для Windows 11 здесь и активируйте систему за 5 минут.
Подробнее – Как обойти активацию Windows 11
Такие меры позволяют комплексно воздействовать на организм и снизить риск осложнений, связанных с резким прекращением употребления алкоголя.
Получить больше информации – нарколог вывод из запоя
В центре «Передозировка» в Санкт-Петербурге применяют комплексный подход: лечение наркомании, терапия алкогольной зависимости, индивидуальное кодирование и восстановительные программы. Такой формат обеспечивает надёжный результат и поддержку на всех этапах.
Получить больше информации – https://peredozirovka.info/service/snyatie-lomki
Вызов нарколога на дом в Ярославле — это удобный и эффективный способ начать лечение или оказать первую помощь при острых состояниях, связанных с алкоголизмом, наркотической зависимостью или другими психоактивными веществами. Основные преимущества такой услуги заключаются в следующем:
Получить дополнительные сведения – нарколог на дом цена ярославль
В клинике «Передозировка» в Санкт-Петербурге оказывают анонимную помощь зависимым: лечение алкоголизма, терапию наркомании, детокс и профессиональное кодирование. Реабилитационные программы помогают стабилизировать состояние и предотвратить рецидив.
Изучить вопрос глубже – чувство тревоги после алкоголя
Приветствую! Разберём самые актуальные — кровля для бизнес-центра. Суть здесь в чем: протечки в офисе — это убытки. Не хочешь проблем — могу рекомендовать: https://montazh-membrannoj-krovli-spb.ru. Лично я вижу, что бизнес-центры нуждаются в гарантиях. Допустим сроки горят — так вот мембрану можно класть в любую погоду. Мы используем отражающие покрытия — крыша не перегревается. Резюмируем: это работает сохранить здание.
Hello friends!
I came across a 159 valuable website that I think you should visit.
This platform is packed with a lot of useful information that you might find interesting.
It has everything you could possibly need, so be sure to give it a visit!
https://whatsag.com/the-ping-predicament-a-netcode-explainer-for-why-you-died-around-the-corner-in-call-of-duty
Additionally do not overlook, guys, — you constantly may in this particular publication locate responses to the most confusing queries. We made an effort — lay out the complete content in the most easy-to-grasp manner.
С учётом всех этапов (детоксикация, терапевтическая работа и адаптация) курс занимает от одного до трёх месяцев, в зависимости от индивидуальных особенностей пациента.
Узнать больше – https://lechenie-narkomanii-volgograd9.ru/
ООО «Экспресс-связь» в Екатеринбурге реализует полный спектр услуг по установке охранных систем и слаботочных сетей. Мастера осуществляют монтаж камер наблюдения, ОПС, видеодомофонов, систем контроля доступа и ЛВС с разработкой проектов и вводом в эксплуатацию. Полный перечень услуг и цены представлены на сайте https://express-svyaz.ru/index.php с примерами реализованных проектов. Компания также производит бытовки, модульные здания и доборные элементы с порошковой покраской.
Процедура лечения начинается с установки внутривенной капельницы, через которую вводятся детоксикационные растворы, способствующие быстрому выведению токсинов и восстановлению водно-электролитного баланса. При необходимости врач назначает дополнительные препараты, такие как седативные средства для купирования симптомов абстинентного синдрома, гепатопротекторы для поддержки печени и кардиопротекторы для нормализации работы сердца.
Подробнее – http://vyvod-iz-zapoya-krasnodar00.ru
По АМ могу сказать,что концентрировать выше 1 к 15 не вижу смысла.Оно не торкает дальше своего известного предела,после 1 к 15 дальше пойдёт уже переводняк.Тут как с процами-дороже 200 баксов покупать-перевод бабла,прироста производительности не заметишь почти. купить наркотики заказ делал на человека который вообще не в теме и был чистый, поэтому меняйте для начала хотя бы курьерку и курьеров..Не скажу что качество низкое качество на высоте а возрат не кто не сделает даже не фантазирую )) Все супер все ровно сам тут беру еще не разу не разачаровывался
Этот обзор позволяет по-новому взглянуть на вещи, на которые обычно и так смотрят. Мы упоминаем факты, которые мало что меняют, и события, значение которых трудно определить, но они всё равно здесь.
Вот – казино онлайн
В клинике «Передозировка» в Санкт-Петербурге оказывают анонимную помощь зависимым: лечение алкоголизма, терапию наркомании, детокс и профессиональное кодирование. Реабилитационные программы помогают стабилизировать состояние и предотвратить рецидив.
Подробнее можно узнать тут – реабилитация наркоманов в спб
Экстренная помощь нарколога на дому рекомендуется, когда состояние пациента ухудшается до критического уровня. Основные показания включают:
Детальнее – вывод из запоя вызов на дом волгоград
При длительном запое организм не успевает восстановить свой водно-электролитный баланс, что приводит к обезвоживанию и ухудшению общего состояния. Такие пациенты рискуют развить не только тяжелую интоксикацию, но и хронические заболевания, которые впоследствии требуют длительного и дорогостоящего лечения. Поэтому своевременный вызов врача-нарколога на дом становится критически важным для сохранения здоровья и предотвращения серьезных последствий.
Подробнее можно узнать тут – вывод из запоя цена
Состояние запоя представляет серьёзную угрозу для здоровья, особенно при многодневном приёме алкоголя. В таких случаях самостоятельное прекращение употребления может привести к тяжёлым последствиям — судорогам, делирию, обезвоживанию и даже летальному исходу. Капельница от запоя в Первоуральске — это проверенный метод медицинской детоксикации, позволяющий быстро восстановить водно-солевой баланс и стабилизировать общее состояние пациента.
Выяснить больше – сколько стоит капельница на дому от запоя
Процедура лечения начинается с установки внутривенной капельницы, через которую вводятся детоксикационные растворы, способствующие быстрому выведению токсинов и восстановлению водно-электролитного баланса. При необходимости врач назначает дополнительные препараты, такие как седативные средства для купирования симптомов абстинентного синдрома, гепатопротекторы для поддержки печени и кардиопротекторы для нормализации работы сердца.
Узнать больше – врач вывод из запоя краснодар
I’ve had a great experience with property management companies in Dubai; they take all the
stress out of being a landlord.
https://playtube.in/@petrajudy03449?page=about
Медицинское вмешательство в домашних условиях отличается четкой организацией. Врач последовательно выполняет шаги, которые позволяют стабилизировать состояние пациента и предупредить осложнения.
Детальнее – нарколог на дом
Скачайте патч для обхода активации Windows 11 и пользуйтесь системой без ограничений.
Подробнее – Где взять лицензионный ключ для Windows 11
Рукава высокого давления из нержавеющей стали незаменимы там, где требуется гибкость соединения и устойчивость к экстремальным условиям. Каталог на https://iz-medi.ru/ включает металлорукава РВД диаметром до 250 мм, гибкие подводки от 1/2 до 2 1/2 дюйма и шаровые краны всех типов: муфтовые, фланцевые, под приварку, трёхходовые. Нержавеющая сталь обеспечивает долговечность в системах водоснабжения, отопления и промышленных установках. Звоните +7 499 390-62-89 для консультации по выбору.
мне тоже все пришло. да и еще вещь нужную в хозяйстве подогнали. вы ребята вообще МОЛОДЦЫ. ВСЕХ БЛАГ ВАМ. кокс, меф, шиш, гаш Клад был описан понятно и ясно!Магазин агонь! Брал как то давно. все ровно!
https://amzn.asia/d/0iLm7rge
На нашем сайте вы можете скачать активатор для Windows 11 абсолютно бесплатно и навсегда забыть о водяных знаках!
Подробнее – Бесплатная активация Windows 11 навсегда
С учётом всех этапов (детоксикация, терапевтическая работа и адаптация) курс занимает от одного до трёх месяцев, в зависимости от индивидуальных особенностей пациента.
Исследовать вопрос подробнее – лечение наркомании кодирование в волгограде
Bench Bazaar Boutique – Attractive layout and browsing products feels quick and simple.
При длительном запое организм не успевает восстановить свой водно-электролитный баланс, что приводит к обезвоживанию и ухудшению общего состояния. Такие пациенты рискуют развить не только тяжелую интоксикацию, но и хронические заболевания, которые впоследствии требуют длительного и дорогостоящего лечения. Поэтому своевременный вызов врача-нарколога на дом становится критически важным для сохранения здоровья и предотвращения серьезных последствий.
Исследовать вопрос подробнее – http://www.domen.ru
Дизайн-студия в Санкт-Петербурге представляет комплексные услуги по разработке и обустройству загородных территорий с двадцатитрехлетней практикой. Профессионалы формируют оригинальные ландшафтные концепции в партнерстве с клиентом, учитывая привычки и личные требования собственников. На платформе https://sakura.spb.ru/ представлены примеры выполненных объектов, прайс-листы на работы и каталог растений для озеленения территорий. Фирма осуществляет высадку зелени, строительство водных объектов, дорожек, каменистых садов и гарантирует регулярный уход за участками.
Компания предоставляет профессиональные услуги в области электромонтажных работ и поставки электротехнического оборудования. Опытные специалисты выполняют проектирование, монтаж и обслуживание электрических систем любой сложности для объектов различного назначения. Ознакомиться с полным перечнем услуг можно на https://elekspb.ru/ где представлена актуальная информация о направлениях деятельности. Использование качественных материалов и современных технологий обеспечивает надежность и безопасность выполненных работ. Индивидуальный подход и соблюдение сроков делают сотрудничество эффективным и выгодным.
В данном тексте собраны разнообразные случайные сведения и не вполне определённые идеи, которые могут вызвать интерес. Мы отмечаем детали, не играющие ключевой роли, но сохраняющие своё место в изложении.
Подробнее читать – таблетки для аборта
check this online store – The pages load neatly and the details are presented well.
но за долгое сотрудничество с этим кокс, меф, шиш, гаш Киньте репки кому не сложно) не сочтите за попрошайкуспасибо Вам за отзыв!
Как подчёркивает главный врач клинического отделения, «в условиях стационара мы можем оперативно реагировать на малейшие изменения в состоянии пациента, что критически важно при тяжёлых формах запоя».
Ознакомиться с деталями – нарколог вывод из запоя
Vous cherchez Savaspin Casino ? Retrouvez notre guide complet du site officiel https://savaspinofficiel-fr.com/ (mis a jour en 2026). La collection comprend plus de 1 000 machines a sous, dont des classiques, des machines a sous video et des jackpots progressifs. Le site officiel de Savaspin Casino est le meilleur choix en France.
В этой статье мы рассматриваем разные способы борьбы с алкогольной зависимостью. Обсуждаются методы лечения, программы реабилитации и советы для поддержки близких. Читатели получат информацию о том, как преодолеть зависимость и добиться успешного выздоровления.
Подробнее можно узнать тут – http://google.mw/url?q=https://moskva.pohmelochnaya.ru/kapelnitsa-ot-toksinov
Зависимость — это заболевание, которое разрушает не только тело, но и личность. Оно затрагивает мышление, поведение, разрушает отношения и лишает человека способности контролировать свою жизнь. Наркологическая клиника в Волгограде — профессиональное лечение зависимостей строит свою работу на понимании природы болезни, а не на осуждении. Именно это позволяет добиваться стойких результатов, восстанавливая пациента физически, эмоционально и социально.
Исследовать вопрос подробнее – http://narkologicheskaya-klinika-volgograd9.ru/lechenie-v-narkologicheskoj-klinike-volgograd/https://narkologicheskaya-klinika-volgograd9.ru
Ночной вызов ничем не отличается от утреннего: мы отвечаем, уточняем риски и запускаем маршрут так, чтобы первые часы прошли спокойно. Наш алгоритм простой и понятный — он экономит время и убирает хаос. Ниже — ориентировочная карта визита; по месту врач адаптирует её к возрасту, соматическому фону и текущим симптомам.
Углубиться в тему – нарколог на дом срочно в сочи
Инновационная платформа Hailuo AI обеспечивает быстрое создание качественных видео на основе текстовых промтов всего за пару минут. Система максимально удобна для россиян благодаря русскоязычному интерфейсу и поддержке карт отечественных банков. На сайте https://hailuo-ai.online/ доступна генерация видео в разрешении до 1080P длительностью от шести до десяти секунд с реалистичными движениями. Передовая технология конвертирует текстовые запросы в отличные видеоматериалы без простоев, генерация длится приблизительно минуту-две.
Клиника «Центр реабилитации «Свет Надежды» – специализированное учреждение, предоставляющее профессиональную помощь пациентам, страдающим от алкогольной и наркотической зависимости. Наша главная цель – помощь людям в преодолении зависимости и возвращении к здоровому образу жизни с применением современных методик реабилитации и индивидуального подхода.
Подробнее тут – http://быстро-вывод-из-запоя.рф/vyvod-iz-zapoya-v-kruglosutochno-v-volgograde.xn--p1ai/
В нашей клинике работают врачи-наркологи, психологи и психиатры с многолетним опытом в лечении зависимостей. Все специалисты регулярно повышают свою квалификацию, участвуя в семинарах и конференциях, чтобы обеспечивать своим пациентам наиболее современное и качественное лечение.
Детальнее – https://быстро-вывод-из-запоя.рф/vyvod-iz-zapoya-anonimno-v-volgograde.xn--p1ai/
В ходе процедуры врач контролирует жизненные показатели пациента, корректирует состав раствора при необходимости и оказывает дополнительную поддержку. После завершения капельницы часто назначается курс восстановительной терапии, направленный на стабилизацию функций организма.
Ознакомиться с деталями – http://kapelnicza-ot-zapoya-v-murmanske12.ru/kapelniczy-ot-zapoya-na-domu-v-murmanske/
Этот документ охватывает важные аспекты медицинской науки, сосредотачиваясь на ключевых вопросах, касающихся здоровья населения. Мы рассматриваем свежие исследования, клинические рекомендации и лучшие практики, которые помогут улучшить качество лечения и профилактики заболеваний. Читатели получат возможность углубиться в различные медицинские дисциплины.
Подробнее – http://google.cv/url?q=https://moskva.pohmelochnaya.ru/kapelnitsa-antistress
Капельница от запоя в Мурманске является одной из наиболее востребованных процедур для снятия острого состояния алкогольной интоксикации. Эта методика позволяет быстро вывести токсины из организма, нормализовать водно-солевой баланс и улучшить самочувствие пациента. Современная капельная терапия считается эффективным средством в лечении запоя, обеспечивая поддержку жизненно важных функций и минимизируя риски осложнений.
Выяснить больше – http://kapelnicza-ot-zapoya-v-murmanske12.ru
При своевременном обращении к специалистам капельница позволяет значительно улучшить состояние пациента уже в первые часы после начала лечения. Медицинская помощь при запое должна оказываться квалифицированно и в комфортных условиях, что снижает риски осложнений и ускоряет восстановление.
Изучить вопрос глубже – vyzvat-kapelniczu-ot-zapoya murmansk
В клинике применяются доказательные методы лечения, соответствующие международным и российским рекомендациям. Основу составляет медикаментозная детоксикация, сопровождаемая психотерапией, когнитивно-поведенческой коррекцией, а также семейной консультацией. При необходимости применяются пролонгированные препараты, облегчающие контроль над тягой к веществу.
Получить больше информации – http://narkologicheskaya-klinika-v-yaroslavle12.ru/narkologicheskaya-klinika-telefon-v-yaroslavle/https://narkologicheskaya-klinika-v-yaroslavle12.ru
Chair Chic Styles – Easy to explore and product descriptions are helpful.
свое сообщение исправил кокс, меф, шиш, гаш в курске у стаффсторе лутше не брать за кладом надо ехать с граблями и лопатой сугробы копать иначе никаккада тусишка появится????
Каждый этап требует профессионального подхода и регулярного мониторинга показателей организма, что особенно важно при тяжелых формах алкогольной зависимости.
Разобраться лучше – https://vyvod-iz-zapoya-volgograd0.ru/vyvedenie-iz-zapoya-volgograd
Наша выездная бригада оснащена как мобильный мини-кабинет: инфузомат для покапельной титрации, портативный кардиомонитор, пульсоксиметр, глюкометр, экспресс-кассеты Na?/K? и набор для регистрации ЭКГ по показаниям. Такой комплект позволяет принять решение на месте — безопасно ли начинать дома или целесообразнее перевести пациента в стационарное отделение «ЮгМедЦентра» без «перезапуска» обследований. Мы практикуем минимально достаточную фармакотерапию: в схеме нет «лишних» позиций и конфликтов с уже принимаемыми лекарствами (антигипертензивные, антиаритмические, сахароснижающие и др.).
Разобраться лучше – http://narcolog-na-dom-sochi00.ru/narkolog-na-dom-adler/
Такие меры позволяют комплексно воздействовать на организм и снизить риск осложнений, связанных с резким прекращением употребления алкоголя.
Получить больше информации – вывод из запоя клиника в санкт-петербурге
Применение современных капельничных методов позволяет точно дозировать лекарственные средства. Постоянный мониторинг жизненно важных показателей пациента дает возможность оперативно корректировать терапию для достижения оптимального эффекта и предотвращения побочных реакций.
Исследовать вопрос подробнее – наркология вывод из запоя
Экстренный вывод из запоя в домашних условиях – это комплекс мер, направленный на быструю детоксикацию организма и восстановление нормального обмена веществ. В Волгограде квалифицированные специалисты готовы выехать к пациенту круглосуточно, чтобы оперативно оценить его состояние и начать терапию. Такой подход позволяет минимизировать негативное воздействие алкоголя и снизить риск развития осложнений.
Получить больше информации – вывод из запоя в стационаре
dyedandelion shop – Bold graphics with an easy-to-use browsing experience.
Эта информационная статья охватывает широкий спектр актуальных тем и вопросов. Мы стремимся осветить ключевые факты и события с ясностью и простотой, чтобы каждый читатель мог извлечь из нее полезные знания и полезные инсайты.
Получить дополнительную информацию – https://mentorstudio.ru
Этот обзор позволяет по-новому взглянуть на вещи, на которые обычно и так смотрят. Мы упоминаем факты, которые мало что меняют, и события, значение которых трудно определить, но они всё равно здесь.
Вот – ставки на спорт
Эта информационная статья охватывает широкий спектр актуальных тем и вопросов. Мы стремимся осветить ключевые факты и события с ясностью и простотой, чтобы каждый читатель мог извлечь из нее полезные знания и полезные инсайты.
Полная информация здесь – https://logisticaterrexpress.com/servicios-de-mudanzas-y-fletes-en-todo-el-pais-al-mejor-precio-5
хотел узнать по какой причине скайп магазина не в сети со вчерашнего дня? https://mefedronetop.club Я даже не знаю, что особо писать вообщем всё :rest:.в течении суток обычно (24 часа не 12)…
Эта публикация погружает вас в мир увлекательных фактов и удивительных открытий. Мы расскажем о ключевых событиях, которые изменили ход истории, и приоткроем завесу над научными достижениями, которые вдохновили миллионы. Узнайте, чему может научить нас прошлое и как применить эти знания в будущем.
Обратитесь за информацией – http://www.uhu.es/doce/?page_id=148
В данной обзорной статье представлены интригующие факты, которые не оставят вас равнодушными. Мы критикуем и анализируем события, которые изменили наше восприятие мира. Узнайте, что стоит за новыми открытиями и как они могут изменить ваше восприятие реальности.
Как это работает — подробно – https://founderscribe.com/pharmacy-slogans-and-taglines
Эта статья подробно расскажет о процессе выздоровления, который включает в себя эмоциональную, физическую и психологическую реабилитацию. Мы обсуждаем значимость поддержки и наличие профессиональных программ. Читатели узнают, как строить новую жизнь и не возвращаться к старым привычкам.
Выяснить больше – http://google.co.zw/url?sa=t&url=https://moskva.pohmelochnaya.ru/12-shagov
В этой информационной статье вы найдете интересное содержание, которое поможет вам расширить свои знания. Мы предлагаем увлекательный подход и уникальные взгляды на обсуждаемые темы, побуждая пользователей к активному мышлению и критическому анализу.
Подробная информация доступна по запросу – https://hausa.von.gov.ng/?p=20122
В этой публикации мы исследуем ключевые аспекты здоровья, включая влияние образа жизни на благополучие. Читатели узнают о важности правильного питания, физической активности и психического здоровья. Мы предоставим практические советы и рекомендации для поддержания здоровья и развития профилактических подходов.
Подробнее – http://google.lt/url?sa=t&url=https://moskva.pohmelochnaya.ru/kapelnitsa-dlya-mozga
кайтинг кайт
В этой заметке мы представляем шаги, которые помогут в процессе преодоления зависимостей. Рассматриваются стратегии поддержки и чек-листы для тех, кто хочет сделать первый шаг к выздоровлению. Наша цель — вдохновить читателей на положительные изменения и поддержать их в трудных моментах.
Подробнее можно узнать тут – http://google.ba/url?q=https://moskva.pohmelochnaya.ru/12-shagov
headlinehub world – Useful content and site performance is very responsive.
В этом обзорном материале представлены увлекательные детали, которые находят отражение в различных аспектах жизни. Мы исследуем непонятные и интересные моменты, позволяя читателю увидеть картину целиком. Погрузитесь в мир знаний и удивительных открытий!
Не упусти важное! – https://wottan.wottanmotor.com/en/producto/easyblock-wottan-125-2
В данной обзорной статье представлены интригующие факты, которые не оставят вас равнодушными. Мы критикуем и анализируем события, которые изменили наше восприятие мира. Узнайте, что стоит за новыми открытиями и как они могут изменить ваше восприятие реальности.
Практические советы ждут тебя – http://alumni.sainikschoolkodagu.edu.in/index.php?option=com_k2&view=item&id=3:benefits-of-joining-alumni-association&limitstart=15630
водопонижение строительное xn—77-eddkgagrc5cdhbap.xn--p1ai .
Evolution на https://cipollinopizza.ru для live, эталон качества.
Прислали нам свой метоксетамин, подтверждаем: продукт чистый, >99%. https://adeniumanapa.ru Приветсвую,форум) Хороший Сортимент на Товар))) УДАЧИ В ПРОДАЖАХя бы тоже заценил
В этом обзоре представлены различные методы избавления от зависимости, включая терапевтические и психологические подходы. Мы сравниваем их эффективность и предоставляем рекомендации для тех, кто хочет вернуться к трезвой жизни. Читатели смогут найти информацию о реабилитационных центрах и поддерживающих группах.
Ознакомиться с деталями – http://environmentalscience.org/out.php?link=https://moskva.pohmelochnaya.ru/12-shagov/&do-you-need-a-visa-for-egypt=esta-application-less-than-72-hours
Эта статья сочетает в себе как полезные, так и интересные сведения, которые обогатят ваше понимание насущных тем. Мы предлагаем практические советы и рекомендации, которые легко внедрить в повседневную жизнь. Узнайте, как улучшить свои навыки и обогатить свой опыт с помощью простых, но эффективных решений.
Проверенные методы — узнай сейчас – https://infominang.com/sosok-is-tersangka-pembunuhan-gadis-penjual-goreng-di-pariaman
emery essentials hub – Clean interface makes finding products quick and easy.
Этот сборник информации привлекает множеством мелких деталей и необычных ракурсов. Мы предлагаем взгляды, редко полезные, но способные немного разнообразить знакомство с темой.
Подробнее читать – похудеть на таблетках
Образовательная платформа о методах получения прибыли и построении бизнеса представляет прикладные инструкции для роста доходов. Посетители обнаруживают детальные руководства по формированию капитала, контролю персональных средств и старту предпринимательства. На платформе https://kakzarabotkin.ru/ собраны проверенные методики заработка в интернете, аналитика ставок на спорт и экспертные материалы по страхованию бизнеса. Специалисты выкладывают современные материалы об определении рабочего капитала и методах расширения организаций для руководителей.
Эта публикация погружает вас в мир увлекательных фактов и удивительных открытий. Мы расскажем о ключевых событиях, которые изменили ход истории, и приоткроем завесу над научными достижениями, которые вдохновили миллионы. Узнайте, чему может научить нас прошлое и как применить эти знания в будущем.
См. подробности – https://smallbighearts.org/?p=1027
Основной сайт https://vympel-kino.ru иногда блокируют, но зеркало всегда выручает.
Сразу видно,что серьезный подход к клиенту! Ассортимент всегда радует,да и с качеством проблем ни разу не было. На все вопросы отвечают оперативно,а что касается консперации(к слову и раньше меня не огорчавшей)-высший уровень!Про бонусы,скидки и тесты даже говорить не нужно.В общем-дальнейшего процветания вам,по больше бы таких сайтов!!! Рекомендую всем-не пожалеете https://smartstases.shop Не могу, не в личку написать, и аска не указаннаКрутой качественный товар! Все своевременно +++
fitfuelshop – Excellent variety and the checkout process was fast and easy.
В нашем ассортименте представлены и классические, и современные варианты ковров для любого интерьера.
Посмотреть ковры онлайн
Мы предлагаем ковры, изготовленные из шерсти, синтетики и натуральных материалов, чтобы удовлетворить любые запросы.
Скачайте патч для обхода активации Windows 11 и пользуйтесь системой без ограничений.
Подробнее – Скачать активатор для Windows 11
грунтовое водопонижение xn—77-eddkgagrc5cdhbap.xn--p1ai .
https://amzn.asia/d/0iLm7rge
хуясе надо было сначало уточнить а что брали хоть? ио названижю вещества https://smartstases.shop кто зовет мать и отца.Упаковано и расфасовано все в лучшем виде! За неделю взял 9 адресов подьем 100%. Ск оч.радует
Провайдеры на https://kidradar.ru обновляют софт, всегда появляются свежие релизы.
Cove of Cut & Sew – Loved the clear descriptions and the selection is well-curated.
Интернет-магазин специализируется на продаже электротехнической продукции и комплектующих для профессионалов и частных клиентов. В ассортименте представлены кабельная продукция, светотехника, автоматика и инструменты от проверенных производителей. На сайте https://shop.elekspb.ru/ можно оформить заказ с доставкой по выгодным ценам с подробными характеристиками товаров. Удобная система поиска и фильтров помогает быстро подобрать необходимое оборудование для любых электромонтажных работ. Квалифицированные консультанты помогут выбрать оптимальное решение для конкретных задач.
Компания специализируется на производстве и продаже качественных пиломатериалов для строительства и отделки. В ассортименте представлены доска, брус, вагонка, блок-хаус, террасная доска и другие изделия из натурального дерева. На сайте https://doskivdom.ru/ можно ознакомиться с полным каталогом продукции и актуальными ценами от производителя. Доставка осуществляется по Москве и Московской области в удобное для клиента время. Собственное производство гарантирует высокое качество материалов и выгодные условия сотрудничества для оптовых и розничных покупателей.
Первое, на что стоит обратить внимание — это профессиональный уровень сотрудников. Без квалифицированных наркологов, клинических психологов и психиатров реабилитационный процесс становится формальным и неэффективным.
Детальнее – наркологическая клиника цены
Выбор наркологической клиники — ключевой шаг на пути к выздоровлению, от которого зависит не только физическое и психическое состояние пациента, но и устойчивость достигнутых результатов. Современные учреждения предлагают широкий спектр услуг, однако уровень подготовки персонала, методики лечения и условия пребывания могут существенно отличаться.
Подробнее – наркологическая клиника клиника помощь первоуральск
В этой публикации мы обсуждаем современные методы лечения различных заболеваний. Читатели узнают о новых медикаментах, терапиях и исследованиях, которые активно применяются для лечения. Мы нацелены на то, чтобы предоставить практические знания, которые могут помочь в борьбе с недугами.
Ознакомиться с деталями – http://google.co.jp/url?sa=t&url=https://moskva.pohmelochnaya.ru/kapelnitsa-ot-pohmelya
Ущерб от наркотиков — этто сложная проблема, обхватывающая физиологическое, психологическое равным образом общественное состояние здоровья человека.
Утилизация таковских наркотиков, как кокаин,
мефедрон, ямба, «шишки» или «бошки», может обусловить буква
необратимым результатам яко чтобы организма, яко и для федерации в течение целом.
Хотя даже у выковывании подчиненности эвентуально электровосстановление — ядро,
чтобы зависимый явантроп устремился за помощью.
Эпохально памятовать, что наркомания врачуется, а также восстановление в правах бабахает шансище на новую жизнь.
Fit Fuel Boutique – Selection looks great and checkout process is reliable.
«ЮгМедЦентр» поддерживает строгую конфиденциальность: выездные специалисты приезжают без медицинской символики, в гражданской одежде; документы формулируются нейтрально; уведомления не содержат триггерных слов; профиль можно оформить под кодом. Все записи ведутся в шифрованном контуре с разграничением доступа по ролям, а видеосессии с врачом/психологом не записываются. Мы предупреждаем о цифровой гигиене: включите «тихий режим» уведомлений, избегайте пересылки документов в открытых чатах, используйте резервный канал связи для экстренных вопросов.
Детальнее – нарколог на дом цены в сочи
Я уже начал сомневаться,что проблема в курьерке!Я им звонил,они в свою очередь звонили в головной офис-про мой трек они даже не слышали!!!А постановление вроде ещё не вступило в силу. кокс, меф, шиш, гаш возможно мои письма рубятся где-то? там все четко по делу.”Всех благ в вашем нелегком Бизнасе”
Как подчёркивает врач-нарколог клиники «Крылья Надежды» Андрей Кузьмин: «Своевременное обращение к специалистам гарантирует не только быстрое восстановление, но и предупреждает развитие тяжёлых осложнений, которые могут навсегда изменить жизнь пациента».
Детальнее – вывод из запоя на дому
Вывод из запоя в Рязани — это комплексная медицинская услуга, направленная на устранение интоксикации, стабилизацию состояния пациента и предотвращение рецидива алкогольной зависимости. Методики подбираются индивидуально с учётом анамнеза, длительности запойного состояния, наличия сопутствующих заболеваний и психоэмоционального фона. Процедура осуществляется под контролем опытных врачей-наркологов с применением сертифицированных препаратов и оборудования.
Узнать больше – нарколог вывод из запоя рязань
осушение котлованов осушение котлованов .
Ищете уничтожение насекомых, грызунов, плесени или запахов в Санкт-Петербурге? Посетите сайт Ezpo-Dez https://expo-dez.ru/ и вам будут предложены услуги по дезинсекции, дератизации, дезинфекции, дезодорации по самым выгодным ценам, в том числе для юр лиц. Узнайте на сайте стоимость наших услуг. Работаем по всему городу и области.
В этом тексте собрано множество случайных сведений и довольно неопределённых мыслей, которые могут чем-то заинтересовать. Мы отмечаем моменты, которые не особенно важны, но всё же занимают своё место в повествовании.
Вот – онлайн слоты
Этот информационный набор привлекает внимание множеством мелочей и странных ракурсов. Мы предлагаем взгляды, которые редко бывают полезны, но могут слегка разнообразить ваше знакомство с темой.
Вот – эротика
Первое, что необходимо уточнить перед вызовом — наличие у врача лицензии и профильного медицинского образования. Только сертифицированный нарколог может назначить препараты, поставить капельницу и провести детоксикацию без ущерба для здоровья пациента.
Подробнее можно узнать тут – http://narkolog-na-dom-nizhnij-tagil11.ru
При своевременном обращении к специалистам капельница позволяет значительно улучшить состояние пациента уже в первые часы после начала лечения. Медицинская помощь при запое должна оказываться квалифицированно и в комфортных условиях, что снижает риски осложнений и ускоряет восстановление.
Получить больше информации – http://kapelnicza-ot-zapoya-v-murmanske12.ru
Выезд врача — это не «процедура без вопросов», а клиническое решение. На месте оценивают давление, пульс, дыхание, степень обезвоживания, уровень сознания, выраженность тревоги, наличие боли, судорожных проявлений, неврологические симптомы. После этого подбирают схему поддержки, объясняют ограничения и ожидаемую динамику: что должно улучшаться в первые часы, какие симптомы допустимы, а какие требуют немедленного обращения. Важная часть — рекомендации на ближайшие сутки: режим питья и питания, сон, контроль давления, что категорически нельзя смешивать и почему. Такой подход снижает риск осложнений и помогает не «сорваться» в самостоятельные эксперименты.
Разобраться лучше – https://narkologicheskaya-klinika-moskva12.ru/chastnaya-narkologicheskaya-klinika-v-moskve/
и что теперь делать с заказом мне его оплачивать через терминал!? или.. https://bereginy.ru Спасибо Магазину)вы лучшие))))))))!!!!!!!!!!!!!!!!!!!!! :monetka: Качество на 100%можно узнать, как принимали ? интрозально, в\м ?
denimdusk – Really impressed with the style and smooth browsing experience.
После оценки состояния проводится детоксикация и медикаментозная стабилизация. Цель — снизить интоксикацию, уменьшить проявления абстиненции, поддержать сердечно-сосудистую систему, восстановить баланс жидкости и электролитов, снизить тревогу и помочь со сном. Состав и объём помощи подбираются индивидуально: нет «универсальной капельницы», которая подходит всем. По итогу врач даёт рекомендации на ближайшие сутки и несколько дней: как контролировать давление, что пить и есть, какие нагрузки исключить, как организовать сон и какие признаки требуют повторной медицинской оценки.
Подробнее тут – https://narkolog-na-dom-pushkino12.ru
Клиника «УралМед» работает без выходных и праздников: прием пациентов — круглосуточно. Это позволяет оказывать экстренную помощь при острых состояниях, а также вести наблюдение за динамикой восстановления здоровья в ночные часы.
Подробнее – http://lechenie-alkogolizma-ekaterinburg0.ru/lechenie-khronicheskogo-alkogolizma-v-ekb/
В нашем ассортименте представлены и классические, и современные варианты ковров для любого интерьера.
Мир ковров онлайн
Мы обеспечиваем быструю и надежную доставку товаров на всей территории Краснодара и соседних районов.
cupandcraft hub online – Smooth navigation and everything looks thoughtfully arranged.
Текст включает разнообразную информацию, которая может показаться любопытной, но не меняет устоявшегося восприятия. Предлагаем просто насладиться чтением, не ожидая значительной пользы.
Подробнее читать – лечение covid народными средствами
https://amzn.asia/d/0iLm7rge
У него заказ был 4гр реги и 1гр ск, такой заказ можно делать, цена учитывается как за 5гр. https://avgust-spb.ru Ещё в 11-м году брал здесь чудесную фофу и другие ништяки.Тогда это был крутейший магаз.И вот после долгого перерыва они снова идут в гору.Заказ оперативность 5 упаковка 5 качество 5 цена лучше всех.бешельме мешельме атакает
скважинное водопонижение xn—77-eddkgagrc5cdhbap.xn--p1ai .
mostbet авторизация mostbet61527.help
5]Пришла таки тусишка.Коричневатый порошок,в черезчур большом пакете(не 100г же заказывали). Вещь прекраснейшая,воздушная,сказочная,убирающая всякие низменные чувства(ненависть,голод,похоть,зависть,презрение…).Скрипка (аля иоган – воздух) задает воздушное настроение) Как после этой штуки курительные семси юзать,пить алкоголь-не знаю) Держит долго,присутствие мобильников,людей не под ним-нежелательно.На постэффектах хорошо пойдёт гитарка с веселыми,поизитвными песенками) кокс, меф, шиш, гаш Меньше 2х кило не брал у них. Привозили в оговоренный срок, количество и качество было в норме. Сейчас в очередной раз зарядил, жду адресЗдесь все ровно братья как и всегда
Лечение хронического алкоголизма начинается с купирования абстинентного синдрома, после чего проводятся мероприятия по нормализации работы печени, сердечно-сосудистой и нервной системы. Назначаются гепатопротекторы, ноотропы, витамины группы B. Также проводится противорецидивная терапия.
Исследовать вопрос подробнее – http://
discover more here – It’s always a pleasure scrolling through these lovely pages.
Скачайте активатор для Windows 11 и получите все функции Pro-версии бесплатно.
Подробнее – Скачать патч для активации Windows 11
В данном обзоре представлены основные направления и тренды в области медицины. Мы обсудим актуальные проблемы здравоохранения, свежие открытия и новые подходы, которые меняют представление о лечении и профилактике заболеваний. Эта информация будет полезна как специалистам, так и широкой публике.
Исследовать вопрос подробнее – http://google.st/url?q=https://moskva.pohmelochnaya.ru/kapelnitsa-ot-pohmelya
Эта публикация содержит ценные советы и рекомендации по избавлению от зависимости. Мы обсуждаем различные стратегии, которые могут помочь в процессе выздоровления и важность обращения за помощью. Читатели смогут использовать полученные знания для улучшения своего состояния.
Ознакомиться с деталями – http://google.com.gt/url?q=https://moskva.pohmelochnaya.ru/detoksikatsiya-alkogolikov
Illustration Inn Picks – Lovely artwork and site flow feels natural.
В нашей клинике применяются различные техники кодирования, которые подбираются с учётом медицинских показаний, психологического состояния и пожеланий пациента.
Подробнее тут – https://kodirovanie-ot-alkogolizma-odintsovo2.ru
устройство водопонижения xn—77-eddkgagrc5cdhbap.xn--p1ai .
Как подчёркивает врач-нарколог И.В. Синицин, «современная наркология — это не только вывод из запоя, но и работа с глубинными причинами зависимости».
Подробнее – http://narkologicheskaya-klinika-v-yaroslavle12.ru/narkologicheskaya-klinika-telefon-v-yaroslavle/
После детоксикации важна реабилитация, включающая психологическую помощь. Используются различные виды психотерапии, в том числе когнитивно-поведенческая терапия и мотивационное интервьюирование. Это помогает пациентам не только избавиться от зависимости, но и адаптироваться к жизни вне клиники. Подробнее о методах психотерапии можно узнать на ресурсе психологической помощи.
Разобраться лучше – https://narkologicheskaya-klinika-kamensk-uralskij11.ru
Клиника предлагает индивидуальный подход к каждому пациенту. Лечение начинается с детальной диагностики состояния здоровья, что позволяет врачу подобрать наиболее эффективную схему терапии.
Получить дополнительную информацию – http://vyvod-iz-zapoya-korolev2.ru
Для совсем новичков 1 к 15 будет даже много. кокс, меф, шиш, гаш Так что тут 50:50 если тебя примут. Все зависит от конкретного города и гнк в нем.Седня 28.04.2014 Чяс назат звонок на телифон говарят курьер это будти дома шяс приеду вашу посылку пренесу я иму несити стук в дверь открываю дверь ом распишитесь получити расписался даю иму паспорт он мне вответ ненужен мне паспорт.
Аппаратные методы кодирования включают лазерную терапию и электростимуляцию биологически активных точек, влияющих на центры зависимости в головном мозге. Эти методики способствуют быстрому формированию устойчивого отвращения к спиртному и хорошо переносятся пациентами.
Разобраться лучше – kodirovanie ot alkogolizma gipnozom
Критерий
Получить дополнительные сведения – наркологическая клиника нарколог
Эффективное лечение требует поэтапного подхода, который реализуется следующим образом:
Получить больше информации – narkologicheskie kliniki alkogolizm rjazan’
Состав капельницы не повторяет «советы знакомых». Он формируется под доминирующий симптом, сопутствующие заболевания и взаимодействия с текущими лекарствами. Врач постоянно оценивает витальные показатели и реакцию организма, корректируя скорость и объём по инфузомату. Ниже — примеры профилей, которые объясняют логику выбора; финальное решение всегда очное.
Исследовать вопрос подробнее – вызвать нарколога на дом в сочи
Публикация предоставляет читателю набор разрозненных идей, которые сложно применить на практике. Мы лишь слегка касаемся разных точек зрения, не углубляясь в анализ и не предлагая никаких выводов.
Вот – порно
Рабочий ключ активации для Windows 11 — проверено и обновлено, без блокировок!
Подробнее – Бесплатная активация Windows 11 навсегда
Если по ходу визита появляются «красные флаги» (падение сатурации, нестабильный ритм, нарастающая дезориентация), маршрут мгновенно переводится в стационарный блок «ЕкатеринбургМедСервис» — без «обнуления» обследований и без потери приватности. Вся собранная информация остаётся в единой карте наблюдения, что экономит время и силы.
Получить больше информации – https://narcolog-na-dom-ekaterinburg00.ru/
Осложнения, к которым может привести отсутствие лечения:
Исследовать вопрос подробнее – снятие наркотической ломки в подольске
В наркологической клинике применяются проверенные методики терапии, включая медикаментозное лечение, детоксикацию и психотерапевтические программы. Детоксикация проводится с использованием современных капельниц, обеспечивающих безопасное выведение токсинов из организма. Важно отметить, что качественное лечение включает и работу с психологическими аспектами зависимости, что достигается посредством групповых и индивидуальных консультаций.
Выяснить больше – наркологическая клиника наркологический центр в каменске-уральском
BenchBreeze Store – Great design and moving between pages feels natural.
Skillet Street Studio – Great assortment and pages feel easy to navigate.
После диагностики врач назначает препараты, направленные на снижение абстинентного синдрома, коррекцию психоэмоционального состояния и профилактику осложнений.
Подробнее можно узнать тут – нарколог на дом цена ярославль
Как подчёркивает врач-нарколог клиники «Крылья Надежды» Андрей Кузьмин: «Своевременное обращение к специалистам гарантирует не только быстрое восстановление, но и предупреждает развитие тяжёлых осложнений, которые могут навсегда изменить жизнь пациента».
Подробнее тут – vyvod iz zapoya korolev
Надеюсь этот вопрос решится ……. кокс, меф, шиш, гаш ))) во во так даже бывает…Ребят ну давайте уже мокрую,мы сами досушим :hz:
Онлайн-кинотеатр предлагает обширную коллекцию фильмов и сериалов различных жанров в высоком качестве. Пользователи получают доступ к новинкам кино, классическим картинам и эксклюзивным премьерам без рекламных пауз. На платформе https://bestkino.space/ удобная навигация позволяет быстро найти интересующий контент по жанрам, годам выпуска и рейтингам. Регулярное обновление библиотеки гарантирует свежий контент для всех любителей качественного кинематографа. Простая регистрация и интуитивный интерфейс делают просмотр максимально комфортным на любых устройствах.
Выезд врача — это не «процедура без вопросов», а клиническое решение. На месте оценивают давление, пульс, дыхание, степень обезвоживания, уровень сознания, выраженность тревоги, наличие боли, судорожных проявлений, неврологические симптомы. После этого подбирают схему поддержки, объясняют ограничения и ожидаемую динамику: что должно улучшаться в первые часы, какие симптомы допустимы, а какие требуют немедленного обращения. Важная часть — рекомендации на ближайшие сутки: режим питья и питания, сон, контроль давления, что категорически нельзя смешивать и почему. Такой подход снижает риск осложнений и помогает не «сорваться» в самостоятельные эксперименты.
Получить дополнительные сведения – http://www.domen.ru
Эта публикация содержит набор несвязанных идей, трудно применимых в практике. Мы лишь поверхностно затрагиваем различные точки зрения, не проводя глубокий анализ и не предлагая выводов.
Подробнее читать – народные средства от диабета
Эта информационная статья охватывает широкий спектр актуальных тем и вопросов. Мы стремимся осветить ключевые факты и события с ясностью и простотой, чтобы каждый читатель мог извлечь из нее полезные знания и полезные инсайты.
Читать дальше – https://www.gastroguru.cz/sasazu
Мы следуем прозрачному алгоритму: оценить риски — подтвердить безопасность домашнего формата — запустить инфузионный контур — объяснить «коридоры безопасности» и точки связи. Такой порядок снижает тревожность, делает управление симптомами измеримым и понятным, а родственникам оставляет простые инструкции без медицинского жаргона.
Изучить вопрос глубже – врач нарколог выезд на дом
Состав капельницы не повторяет «советы знакомых». Он формируется под доминирующий симптом, сопутствующие заболевания и взаимодействия с текущими лекарствами. Врач постоянно оценивает витальные показатели и реакцию организма, корректируя скорость и объём по инфузомату. Ниже — примеры профилей, которые объясняют логику выбора; финальное решение всегда очное.
Подробнее можно узнать тут – вызвать нарколога на дом сочи
В этой статье-обзоре мы соберем актуальную информацию и интересные факты, которые освещают важные темы. Читатели смогут ознакомиться с различными мнениями и подходами, что позволит им расширить кругозор и глубже понять обсуждаемые вопросы.
А что дальше? – http://interiordesignerwebzwnb.cf/post/34
Как-то развёл 2c-i на кубы воды и выбрал в выборку для точности дозировки.Так один кролятина вляпался в/в.Позавидовать ему трудно было,это точно.Но в конце когда оклемался,даже прикололся. https://kadastr-navigator.ru Всё пучком с магазом!!!!С Июля работаю доволен адекватное общение,недолгое решение проблем ,оперативная обработка заказа .Если гемор какой достучитесь в Скайп и всё решится!!!!!:hello:Давай номер заказа, не обоснованные заявления, в личку пришло сообщения что ты разводила….
Одним из ключевых направлений является проведение капельниц, призванных вывести токсины из организма и нормализовать водно-электролитный баланс. Используемые препараты и состав растворов подбираются индивидуально, исходя из клинической картины и истории болезни пациента.
Углубиться в тему – http://narkolog-na-dom-v-yaroslavle12.ru/vyzov-narkologa-na-dom-v-yaroslavle/
Эта публикация погружает вас в мир увлекательных фактов и удивительных открытий. Мы расскажем о ключевых событиях, которые изменили ход истории, и приоткроем завесу над научными достижениями, которые вдохновили миллионы. Узнайте, чему может научить нас прошлое и как применить эти знания в будущем.
Хочешь знать всё? – https://boost.latelierdecedric.com/latelier-de-cedric-avec-dorothee-oury-caramba-spectacles
В обзорной статье вы найдете собрание важных фактов и аналитики по самым разнообразным темам. Мы рассматриваем как современные исследования, так и исторические контексты, чтобы вы могли получить полное представление о предмете. Погрузитесь в мир знаний и сделайте шаг к пониманию!
Познакомиться с результатами исследований – https://1000853754.blog.binusian.org/2009/05/04/messi-peringatkan-chelsea/comment-page-1492
В этом интересном тексте собраны обширные сведения, которые помогут вам понять различные аспекты обсуждаемой темы. Мы разбираем детали и факты, делая акцент на важности каждого элемента. Не упустите возможность расширить свои знания и взглянуть на мир по-новому!
Раскрыть тему полностью – https://toyotamark2.ru/vyezdnaya-narkologicheskaya-pomoshh-na-domu-uslugi-i-poryadok-obrashheniya
В данной обзорной статье представлены интригующие факты, которые не оставят вас равнодушными. Мы критикуем и анализируем события, которые изменили наше восприятие мира. Узнайте, что стоит за новыми открытиями и как они могут изменить ваше восприятие реальности.
Проверенные методы — узнай сейчас – https://haishokunofureai.com/2025_3_16_lunch
ryzen rocket electronics – Browsing is fast and the site feels well-organized.
top sms activate alternatives top sms activate alternatives .
Независимо от формы зависимости — алкогольной, опиатной, синтетической или медикаментозной — специалисты подбирают индивидуальный курс терапии. Алгоритмы лечения адаптируются под возраст, стаж употребления, общее состояние организма и наличие сопутствующих заболеваний.
Детальнее – наркологическая клиника нарколог в ярославле
Эта познавательная публикация погружает вас в море интересного контента, который быстро захватит ваше внимание. Мы рассмотрим важные аспекты темы и предоставим вам уникальные Insights и полезные сведения для дальнейшего изучения.
Полная информация здесь – https://www.conimpro.de/simon-2
clickrank site – Color palette felt calming, nothing distracting, just focused, thoughtful design.
мир всем месным братья https://glowtrender.top 250 не знаю, но 203 просто шикарный. Растворяется моментально. Чистота порошка отличная.Кому последний раз отсюда что то пришло?
柏捷顿家族第四季第二部2026 海外华人浪漫古装 高清贵族恋爱 无缓冲播放
Этот обзор предлагает структурированное изложение информации по актуальным вопросам. Материал подан так, чтобы даже новичок мог быстро освоиться в теме и начать использовать полученные знания в практике.
Детали по клику – https://lekpakpatosportif.net/real-madrid-mas-que-un-club-un-gran-club
В этой статье представлен занимательный и актуальный контент, который заставит вас задуматься. Мы обсуждаем насущные вопросы и проблемы, а также освещаем истории, которые вдохновляют на действия и изменения. Узнайте, что стоит за событиями нашего времени!
См. подробности – http://roots-shibata.com/?p=1
seogrowth site – Found practical insights today; sharing this article with colleagues later.
проектирование водопонижения xn—77-eddkgagrc5cdhbap.xn--p1ai .
Все будет окей, это косяк курьерки… кокс, меф, шиш, гаш Я тебе уже в джаббере обьяснил как употреблять надо, а ты двоим .м дал, они вьебали все залпом и нихера не поняли, ты уже кипишь наводить начал. Эта СК не тот бутор к которому все привыкли, от которой слюни текут и на люди показываться нельзя. Её надо употреблять с минимальной дозой а не 0.3г в один заход. Доза 0.05-0.09гМного тут кто согласен
Скачайте активатор для Windows 11 и получите все функции Pro-версии бесплатно.
Подробнее – Как активировать Windows 11 без ключа
Yggdrasil на https://belregnews.ru красивый, графика на высоте.
мостбет статистика мостбет статистика
sms activate website sms activate website .
Ludogorets 2-1 Ferencvaros 2026 Europa League result! Bulgarians edge Hungarians – latest match results from Europa play-offs!
龚俊姜武孙怡《风过留痕》2026刑侦痕迹检验悬疑陆剧,海外华人首选高清探案,细节烧脑高能,全球加速无广告AI匹配推荐。
Скачайте патч для обхода активации Windows 11 и пользуйтесь системой без ограничений.
Подробнее – Скачать активатор для Windows 11
Просим прощения,все нормально,мы сами разобрались. кокс, меф, шиш, гаш Нее… пацаны, Вы не поняли, я и не волнуюсь ни капельки, и на закз этот мне положить, мне за державу обидно. Пришел я в магазин а там висит цена на сок томатный сто рублей. Взял пачку, отстоял в очереди а продавщица и говорит что стоит он не сто рублей, которые у тебя в кармане, а сто десять… Да я разъе….у этот магазин вместе с продавщицой и заведующей…. Лучше заплатите админу своего сайта чтобы мессаги на мыло падали четко и конкретно и не наебы…ли людей.заказал 5-IAI , прислали Methoxetamine, разность дозировок сами знаете, в итоге еле откачали….
Некоторые состояния требуют немедленного вмешательства нарколога, так как отказ от лечения может привести к тяжелым осложнениям и риску для жизни.
Разобраться лучше – http://narcolog-na-dom-novokuznetsk00.ru/narkolog-na-dom-czena-novokuzneczk/
Как поясняет врач-нарколог клиники «АлкоСтоп», «грамотно составленная инфузионная терапия не только устраняет последствия запоя, но и создаёт условия для дальнейшей мотивации пациента к лечению».
Разобраться лучше – капельница от запоя вызов
Этот обзор позволяет по-новому взглянуть на вещи, на которые обычно и так смотрят. Мы упоминаем факты, которые мало что меняют, и события, значение которых трудно определить, но они всё равно здесь.
Вот – милфы
В нашей практике сочетаются несколько видов вмешательства: медико-биологическое, психологическое и социальное. Сначала проводится полная диагностика, включая лабораторные анализы и оценку работы сердца, печени, почек, а также психодиагностические тесты. После этого начинается этап детоксикации с внутривенными капельницами, которые выводят токсины, нормализуют водно-солевой баланс и восстанавливают основные функции организма. Далее мы применяем медикаментозную поддержку для стабилизации артериального давления, купирования тревожных симптомов, нормализации сна и уменьшения болевого синдрома.
Получить больше информации – https://narkologicheskaya-klinika-mytishchi1.ru/narkologicheskaya-klinika-ceny-v-mytishchah
Специализированный сервис оказывает профессиональные услуги по ремонту промышленных холодильников любой сложности в ВАО. Опытные мастера устраняют неисправности торговых холодильных агрегатов, чиллеров, низкотемпературных камер и фризеров на объекте заказчика. На сайте https://holdservis.ru/ представлена полная информация о видах работ и условиях выезда специалистов. Компания работает более 15 лет, что гарантирует качественную диагностику и оперативное устранение поломок. Бесплатный выезд мастера и доступные цены позволяют минимизировать затраты от простоя холодильного оборудования.
В воскресенье заказал,в понедельни утром оплатил,в понедельник выслали,трек сразу дали,оперативно ребята +10 от меня в Репу вам:) кокс, меф, шиш, гаш магазин на высоте) качество кул)Покупал как то в этом магазине реагента 1к10 помоему был у них примерно год назад.С доставкой,заказ делал тогда еще на сайте, получил реквизиты оплатил ждал отправки.И вот доставка пришла очень быстро.Качество товара было приемлемое.Очень хорошая консперация.Всем советую
top sms activate alternatives top sms activate alternatives .
迪丽热巴陈飞宇《慕胥辞》2026古装爱情巨制,海外华人免费高清热播,虐心又甜蜜,全球加速无缓冲播放,2026古装天花板。
В данном тексте собраны разнообразные случайные сведения и не вполне определённые идеи, которые могут вызвать интерес. Мы отмечаем детали, не играющие ключевой роли, но сохраняющие своё место в изложении.
Подробнее читать – похудеть на таблетках
Экстренное вмешательство необходимо, когда самостоятельное прекращение употребления алкоголя или наркотиков становится невозможным, а состояние пациента ухудшается. Основные показания включают:
Узнать больше – нарколог на дом срочно
Не тратьте деньги на лицензию — скачайте кряк для Windows 11 здесь и активируйте систему за 5 минут.
Подробнее – Как активировать Windows 11 без ключа
Автомобильный портал https://auto.ae/catalog/ предлагает детальное сравнение моделей для международных брендов. Сравните модели, поколения, технические характеристики и актуальные рыночные цены в одном удобном сервисе. Мы собираем данные о мощности двигателя, расходе топлива, трансмиссии, оснащении и безопасности, чтобы вы могли объективно оценить преимущества каждого автомобиля. Актуальные цены на рынке помогают выбрать оптимальный вариант с учётом бюджета и целей — будь то покупка нового авто или выгодное приобретение с пробегом. Сравнивайте умно — наш сервис делает процесс выбора автомобиля прозрачным, информативным и максимально удобным для каждого покупателя.
Thanks for sharing. I read many of your blog posts, cool, your blog is very good.
Наркологическая клиника в Чехове — это возможность получить профессиональную помощь при алкогольной и наркотической зависимости, не выезжая в крупный мегаполис и не тратя силы на долгую дорогу. Для многих людей момент обращения к наркологу наступает не сразу: сначала идут «домашние» попытки справиться с проблемой, обещания ограничиться «по праздникам», уговаривания родственников и периодические срывы. Запои становятся длиннее, организм восстанавливается всё хуже, усиливается тревога, нарушается сон, учащаются конфликты дома и на работе. В какой-то момент становится понятно, что без системного лечения обойтись уже нельзя, а стихийные капельницы на дому и случайные советы из интернета только оттягивают время.
Разобраться лучше – https://narkologicheskaya-klinika-chekhov11.ru/narkologicheskaya-klinika-sajt-v-chekhove/
В Екатеринбурге бригады выезжают 24/7, покрывая как центральные районы, так и отдалённые кварталы. Координатор уточняет только то, что влияет на безопасность: принимаемые лекарства и дозы, аллергии, эпизоды судорог/психозов, исходные значения давления и пульса, а также бытовые условия — можно ли обеспечить «тихое окно» на 2–3 часа, есть ли свободная розетка и место для полулёжа. Врач приезжает с портативным мониторингом, расходными материалами и резервным планом на случай повышенной реактивности.
Получить больше информации – вывод из запоя дешево
Капельница от запоя — это не «чудо-микс», а управляемая медицинская процедура с чёткими целями, окном оценки и понятными критериями остановки. В «ЮжУрал Детокс Центр» подход построен по принципу минимально достаточных вмешательств: сначала безопасность (дыхание, сознание, гемодинамика), потом переносимость воды и сбор нормального сна, а уже после — метаболическая поддержка и восстановление бытовой устойчивости. Такая логика исключает полипрагмазию, снижает риск нежелательных реакций и даёт семье прогнозируемую картину на ближайшие 24–72 часа. Мы не обещаем «мгновенного чуда» — мы предлагаем дисциплину маленьких шагов, которая с высокой вероятностью приводит к устойчивому результату.
Разобраться лучше – капельница от запоя недорого
Зависимость редко начинается «внезапно». Обычно всё складывается постепенно: человек чаще снимает напряжение алкоголем, потом замечает, что без него хуже спится и труднее успокоиться, затем появляются запои или регулярные эпизоды употребления, меняется настроение и характер, нарастает тревога, раздражительность, ухудшаются отношения в семье и продуктивность на работе. В какой-то момент становится очевидно, что проблема уже не в силе воли: организм и нервная система перестраиваются так, что трезвость даётся всё тяжелее, а любое прекращение употребления сопровождается дискомфортом, из-за которого хочется «быстро облегчить состояние». Наркологическая клиника в Видном — это помощь, которая возвращает ситуацию в медицински управляемое русло: сначала оценка рисков и стабилизация, затем восстановление базовых функций и лечение зависимости как процесса, а не разовой «процедуры для облегчения». В клинике «МедАльтернатива» маршрут подбирают под конкретное состояние: кому-то требуется срочная детоксикация, кому-то — стационарное наблюдение, кому-то — выезд врача на дом, а кому-то — плановое лечение с фокусом на профилактику рецидива.
Получить дополнительную информацию – platnaya-narkologicheskaya-klinika
Регистрация на https://rp-lnr.ru заняла не больше минуты — ввёл только email и пароль.
Здарова, народ.
Сливаю вам стабильный линк в онион.
Официальный шлюз, не фишинг, проверено.
Актуальная ссылка:
kraken онион тор
Магазин топ, советую.
Алкогольный запой — это состояние, при котором человек теряет способность самостоятельно прекратить потребление спиртного и контролировать дозировку. В таких условиях нарастают неврологические и метаболические нарушения, возрастает риск серьёзных осложнений вплоть до алкогольного делирия. Наркологическая клиника «СамараМед» предлагает круглосуточную выездную помощь на дому в Самаре и области с гарантией полной анонимности и выездом специалиста в течение 30 минут после обращения. Наши врачи применяют современные протоколы детоксикации и психологической поддержки, что позволяет безопасно и максимально комфортно пройти через этап выхода из запоя и заложить прочный фундамент для дальнейшего восстановления.
Получить дополнительные сведения – наркологический вывод из запоя в самаре
Наркологическая клиника в клинике в Нижнем Новгороде специализируется на диагностике, лечении и реабилитации пациентов с алкогольной и наркотической зависимостью. Основная цель деятельности учреждения — восстановление физического здоровья и психологической устойчивости человека, оказавшегося в состоянии зависимости. В клинике применяются современные методы терапии, доказавшие эффективность в медицинской практике. Все процедуры проводятся конфиденциально, с соблюдением медицинских стандартов и под контролем квалифицированных специалистов.
Получить дополнительные сведения – http://
Ты то откуда знаешь)))только сегодня зарегался .коржик ))) https://urbanflelik.shop ТС, почисти ветки, ну невозможно же ничего почитать..в разных ветках одно и тоже.Доброго времени суток Всем порядочным форумчанам-кто здесь заказывал,но трек так и не бьёться,или я один такой закинул 45к+доставка,и”жду у моря погоды”В скайпе вчера отвечали сегодня-игнор!
Взаимосвязь медицинских и психологических компонентов терапии формирует основу устойчивой ремиссии, снижая вероятность повторных срывов и обеспечивая длительный восстановительный эффект.
Разобраться лучше – запой наркологическая клиника в екатеринбурге
Каталог компании Мото-ДВ представляет широкий ассортимент мототехники и электротранспорта для различных целей использования. Покупатели могут выбрать квадроциклы, питбайки, электросамокаты и аксессуары с подробными техническими характеристиками и фотографиями. На странице https://promindex.ru/izhevsk/companies/100000233-moto-dv/catalog размещены актуальные цены и информация о наличии моделей на складе. Возможность оформления покупки в кредит без первоначального взноса делает технику доступной широкому кругу покупателей. Консультации специалистов помогают подобрать оптимальный вариант транспорта под конкретные требования.
Онлайн-магазин «ЭЛЕК» занимается реализацией морской электротехники, кабеля и запчастей с одобрением РРР и РМРС для верфей и судоремонтных организаций. Ассортимент включает морские осветительные приборы, автоматы защиты, пускатели, ходовые огни, трансформаторное оборудование, датчики и кабельную продукцию разных сечений в наличии. Ищете кабель нршм 3х1,5? Оформить заказ и ознакомиться с полным ассортиментом можно на shop.elekspb.ru Магазин обеспечивает оперативную отгрузку продукции, доставку по России и профессиональное консультирование по подбору оборудования.
sms activate sms activate .
Закупал я рег у Тс конечно качество пацаны просто бомба:good: Я токого не когда не пробывал!!! кокс, меф, шиш, гаш реальный магаз всем советуюСАБЖ САМ ПО СЕБЕ НЕ ПРЁТ !! МУТИТЬ НА НЁМ МИКСЫ СМЫСЛА НЕТ !!! ЭТО АНТИДЕПРЕССАНТ !!
Ищете почтовые аккаунты? Посетите https://mailtop.shop/ и вы сможете купить почты от различных провайдеров от 1 штуки. Ознакомьтесь с нашим ассортиментом – он вам понравится. Выбирайте качественные почтовые ящики у нас. Подробнее на сайте.
Удачи и развития в дальнейшем! кокс, меф, шиш, гаш Был постоянным клиентом магаза , неделю назад прислали с нулевым эфектом , года два назад была проблема с ними, решили сразу , сейчас на вопрос -как будем решать , ответили что мы решим – напишите в конце недели , типа не разводите панику на форуме недельку , а мы пока людей пошвыряем…. , неделя прошла , на вопросы не отвечают…решать не хотят…. был магаз ровный , теперь людей решили покидать…. админы вообще никуда не смотрят , раньше хоть как то было гарантией что они в списке доверенных , сейчас деньги заплатили за форум , выставились и швыряют .Всё отлично тут! в МСК забрали вес ! сервис как всегда отличный ! ТАК ДЕРЖАТЬ
Абстинентный синдром — одно из самых тяжёлых и опасных проявлений наркотической зависимости. Он развивается на фоне резкого отказа от приёма веществ и сопровождается сильнейшими нарушениями работы организма. Это состояние требует немедленного вмешательства. Самостоятельно справиться с ним невозможно — особенно если речь идёт о героине, метадоне, синтетических наркотиках или длительной зависимости. В клинике «НаркоПрофи» мы организовали систему снятия ломки в Подольске, работающую круглосуточно: как на дому, так и в условиях стационара.
Разобраться лучше – снятие ломки анонимно подольск
Генератор ключей для Windows 11 — 100% рабочий метод активации, проверено тысячами пользователей!
Подробнее – Кряк для Windows 11 Pro бесплатно
ranklio site – Found practical insights today; sharing this article with colleagues later.
leadnex site – Loved the layout today; clean, simple, and genuinely user-friendly overall.
мостбет сайт регистрация https://www.mostbet61527.help
Недостаточно снять физическую зависимость — важно помочь человеку вернуться в сообщество. В «Доктор Здоровье» разработана система сопровождения, включающая мотивационные беседы, групповые занятия и социальную реабилитацию. Психотерапевты владеют методами когнитивно-поведенческой терапии и мотивационного интервью, консультанты помогают восстановить профессиональные навыки и адаптироваться к повседневной жизни, а встречи в группе взаимопомощи и психодраматические сессии способствуют укреплению чувства поддержки и навыков эффективного общения. Для родственников доступны семейные консультации, на которых объясняют природу зависимости и обучают стратегиям поддержки без критики и давления.
Ознакомиться с деталями – http://narkologicheskaya-klinika-mytishchi1.ru/chastnaya-narkologicheskaya-klinika-v-mytishchah/
Процесс начинается с вызова врача или доставки пациента в клинику. После прибытия специалист проводит первичную диагностику: измерение давления, температуры, пульса, уровня кислорода в крови, визуальная оценка степени возбуждения или угнетения сознания. Собирается краткий анамнез: какой наркотик принимался, как долго, были ли сопутствующие заболевания.
Получить дополнительную информацию – снятие ломки наркомана подольск
пиши в скайп, все работает, мне всегда отправляют, все на уровне кокс, меф, шиш, гаш Привет! Что хочу сказать по поводу работы магазина- просто супер, связались сразу, приняли заказ, обработали и на следующий день он уже в пути. 3 дня и уже у меня. Качество отличное! В общем респект Вам ребята, так держать, не сбавляйте оборотов и хорошо будет всем!Сегодня съездил в офис, к счастью там знакомая работает, пробили они по своим базам накладную, связывались с мск, сказали такая накладная не поступала, объяснили как все работает, то что можно взять бумаги заполнить их, в этих бумагах указывается номер накладной, но когда делаешь отправку, в компе по любому будет отображаться, т.е. отправки не было, с мск им каждый день приходят посылки, идет она реальных 2 дня!
Коррекционный центр в Красногорске фокусируется на занятиях с детьми с особенностями развития от 1,5 до 7 лет с использованием АВА-методики. Эксперты содействуют детям с аутизмом, задержкой речи, алалией и прочими диагнозами освоить речь и коммуникацию с внешней средой. На платформе https://aba-krasnogorsk.ru/ родители могут записаться на консультацию к логопедам-дефектологам и нейропсихологам для коррекции речи и поведения. Центр развивает навыки общения, устраняет истерики и страхи, обучает бытовым действиям без навешивания ярлыков.
В материале приведены детали, интересные, но не особенно важные. Мы рассматриваем аспекты, которые сложно назвать существенными, но включили их для большей полноты.
Подробнее читать – похудеть на таблетках
Видеоканал представляет подробные обзоры мототехники и электротранспорта для покупателей разного уровня. Профессиональные ролики демонстрируют характеристики квадроциклов, питбайков и электросамокатов в реальных условиях эксплуатации. На канале https://vkvideo.ru/@moto_dv_ru публикуются инструкции по обслуживанию техники и советы по выбору моделей. Видеоформат позволяет детально рассмотреть особенности каждого транспортного средства перед покупкой. Регулярные обновления контента помогают оставаться в курсе новинок рынка мототехники.
Аппаратные методы кодирования включают лазерную терапию и электростимуляцию биологически активных точек, влияющих на центры зависимости в головном мозге. Эти методики способствуют быстрому формированию устойчивого отвращения к спиртному и хорошо переносятся пациентами.
Получить больше информации – кодирование от алкоголизма
Запой сопровождается быстрым накоплением токсинов, что может привести к нарушению работы сердца, печени и почек. Использование капельничного метода позволяет оперативно ввести современные препараты для детоксикации, что способствует быстрому восстановлению обменных процессов и нормализации работы внутренних органов. Оперативное лечение на дому особенно актуально, когда каждая минута имеет значение для спасения здоровья.
Получить дополнительную информацию – https://kapelnica-ot-zapoya-tyumen0.ru/postavit-kapelniczu-ot-zapoya-tyumen
Забрал. Ждал 2 недели, говорят что заказов много, поэтому долго везут. Очередь…) кокс, меф, шиш, гаш но я смотрю все на о6ломах тут такие ждут, а тут на те6е всё ровноподвела доставка, заказал 2-го получил 16-го
В нашей практике сочетаются несколько видов вмешательства: медико-биологическое, психологическое и социальное. Сначала проводится полная диагностика, включая лабораторные анализы и оценку работы сердца, печени, почек, а также психодиагностические тесты. После этого начинается этап детоксикации с внутривенными капельницами, которые выводят токсины, нормализуют водно-солевой баланс и восстанавливают основные функции организма. Далее мы применяем медикаментозную поддержку для стабилизации артериального давления, купирования тревожных симптомов, нормализации сна и уменьшения болевого синдрома.
Углубиться в тему – besplatnaya-narkologicheskaya-klinika
Компоненты
Детальнее – капельница от запоя круглосуточно в первоуральске
Услуга “Нарколог на дом” в Уфе охватывает широкий спектр лечебных мероприятий, направленных как на устранение токсической нагрузки, так и на работу с психоэмоциональным состоянием пациента. Комплексная терапия включает в себя медикаментозную детоксикацию, корректировку обменных процессов, а также психотерапевтическую поддержку, что позволяет не только вывести пациента из состояния запоя, но и помочь ему справиться с наркотической зависимостью.
Детальнее – вызвать врача нарколога на дом в уфе
Некоторые состояния требуют немедленного вмешательства нарколога, так как отказ от лечения может привести к тяжелым осложнениям и риску для жизни.
Детальнее – https://narcolog-na-dom-novokuznetsk00.ru/narkolog-lechenie-na-domu-novokuzneczk/
Врач уточняет, как долго продолжается запой, какие симптомы наблюдаются и присутствуют ли сопутствующие заболевания. Тщательный сбор информации позволяет оперативно подобрать необходимые медикаменты и начать детоксикацию.
Детальнее – https://kapelnica-ot-zapoya-tyumen0.ru/postavit-kapelniczu-ot-zapoya-tyumen
Этот список — памятка на холодильник. Он не раскрывает диагноз, но точно описывает поводы для связи с дежурным врачом. Своевременная эскалация — часть безопасности, а не «подстраховка». Если сомневаетесь — лучше позвонить.
Выяснить больше – вызвать капельницу от запоя челябинск
nicheninja site – Navigation felt smooth, found everything quickly without any confusing steps.
Медикаментозное кодирование проводится с помощью препаратов, блокирующих ферменты, ответственные за расщепление этанола, что вызывает выраженное неприятие алкоголя при попытке его употребления. Препараты вводятся внутримышечно или с помощью подкожных имплантов и действуют в течение нескольких месяцев, обеспечивая длительный эффект.
Подробнее – кодирование от алкоголизма одинцово
Для сохранения приватности мы ведём коммуникацию через одного доверенного представителя, используем нейтральные формулировки в документах, а инструкции выдаём в неброском виде. При невозможности создать тишину дома (ремонт, маленькие дети, гости) предложим краткий «тихий» стационар с отдельным входом и камерным режимом, после чего сопровождение вернётся в домашний формат.
Получить больше информации – наркология вывод из запоя
При таких проявлениях самостоятельное вмешательство не рекомендуется, так как это может привести к ухудшению состояния. Своевременное обращение к врачу позволит предотвратить тяжелые осложнения и эффективно стабилизировать состояние больного.
Узнать больше – https://narcolog-na-dom-novosibirsk0.ru/narkolog-na-dom-kruglosutochno-novosibirsk/
Наркологическая клиника в клинике в Нижнем Новгороде специализируется на диагностике, лечении и реабилитации пациентов с алкогольной и наркотической зависимостью. Основная цель деятельности учреждения — восстановление физического здоровья и психологической устойчивости человека, оказавшегося в состоянии зависимости. В клинике применяются современные методы терапии, доказавшие эффективность в медицинской практике. Все процедуры проводятся конфиденциально, с соблюдением медицинских стандартов и под контролем квалифицированных специалистов.
Изучить вопрос глубже – https://narkologicheskaya-clinika-v-nizhnem-novgorode16.ru/narkolog-nizhnij-novgorod-na-dom/
“про “шапку” вы все горазды писать в интернете…”И продавать в интернете Вы все горазды,х..й догонишь и не спорсишь! https://buyboshkii.life Отвечают оперативно, оформлено красиво…Столько лет на плаву!!!Это круто:)молодцы!!!Пример всем остальным.
reachly site – Loved the layout today; clean, simple, and genuinely user-friendly overall.
leadzo site – Overall, professional vibe here; trustworthy, polished, and pleasantly minimal throughout.
При обращении по телефону или через электронную форму мы используем шифрование данных и не требуем ИНН или паспорта. Оплата производится безналичным переводом или анонимно — наличными через курьера, что позволяет сохранить полную приватность.
Получить больше информации – наркология вывод из запоя самара
Обращение за помощью на дому обладает рядом преимуществ, которые особенно актуальны для пациентов, сталкивающихся с зависимостью:
Получить больше информации – вывод из запоя недорого в екатеринбурге
Наркологическая клиника в клинике в Казани — это современный медицинский центр, специализирующийся на лечении алкогольной и наркотической зависимости. Основное направление деятельности заключается в проведении детоксикации, восстановлении работы нервной системы и формировании устойчивой мотивации к отказу от употребления психоактивных веществ. Все процедуры проводятся в условиях полной анонимности и медицинского контроля, что обеспечивает безопасность и доверие со стороны пациентов. Программа терапии строится по принципам доказательной медицины и индивидуального подбора лечебных средств.
Получить больше информации – https://narkologicheskaya-clinika-v-kazani16.ru/narkologicheskaya-klinika-kazan-otzyvy/
Thank you for your sharing. I am worried that I lack creative ideas. It is your article that makes me full of hope. Thank you. But, I have a question, can you help me? https://accounts.binance.info/fr-AF/register-person?ref=JHQQKNKN
Pelican Casino – Oficjalna strona internetowa w Polsce https://pelican-casino-bonus.com/ – odwiedz, aby dowiedziec sie wiecej o naszych niesamowitych bonusach i ogromnym wyborze gier. Oferujemy darmowe gry, tysiace slotow i przyjazna dla uzytkownika aplikacje mobilna.
Эта информационная статья охватывает широкий спектр актуальных тем и вопросов. Мы стремимся осветить ключевые факты и события с ясностью и простотой, чтобы каждый читатель мог извлечь из нее полезные знания и полезные инсайты.
Что скрывают от вас? – https://anzen-anshin-delivery.mannerism-fufu.com/oisix-kuchikomi
leadora site – Color palette felt calming, nothing distracting, just focused, thoughtful design.
Мы собрали для вас самые захватывающие факты из мира науки и истории. От малознакомых деталей до грандиозных событий — эта статья расширит ваш кругозор и подарит новое понимание того, как устроен наш мир.
Хочешь знать всё? – https://bodytorium.com/merry-christmas-happy-holidays
Автоматизированные системы дозирования обеспечивают точное введение лекарственных средств, что минимизирует риск передозировки и побочных эффектов. Постоянный мониторинг жизненных показателей позволяет оперативно корректировать терапию в режиме реального времени, обеспечивая максимальную безопасность процедуры.
Изучить вопрос глубже – вызвать врача нарколога на дом
В этом обзорном материале представлены увлекательные детали, которые находят отражение в различных аспектах жизни. Мы исследуем непонятные и интересные моменты, позволяя читателю увидеть картину целиком. Погрузитесь в мир знаний и удивительных открытий!
Прочесть всё о… – https://aqualifeandalucia.es/agua-desechada-osmosis
А вы не несете ответственность за ваших официальных представителей, которые представляют ваш бренд в странах СНГ? кокс, меф, шиш, гаш Ещё и сообщения трут.не вижу, в прайсе много чего
Процесс начинается с вызова врача или доставки пациента в клинику. После прибытия специалист проводит первичную диагностику: измерение давления, температуры, пульса, уровня кислорода в крови, визуальная оценка степени возбуждения или угнетения сознания. Собирается краткий анамнез: какой наркотик принимался, как долго, были ли сопутствующие заболевания.
Разобраться лучше – снятие ломки наркозависимого подольск
Ищете широкий выбор недорогой корпусной мебели с доставкой в Санкт-Петербурге? Посетите Мебель М https://www.mebelem.ru/ – ознакомьтесь с нашим ассортиментом – детские, спальни, кухни, гостиные, а также диваны, кровати, комоды и многое другое. Наша продукция имеет все сертификаты. Подробнее на сайте.
Ключ к эффективному выведению из запоя — гибкая персонализация. Мы не настаиваем на «универсальных» капельницах: сначала очная оценка, затем тест переносимости и лишь после — основная инфузия с контролем витальных показателей (АД/ЧСС/SpO?/температура) и субъективной реактивности (тошнота, тремор, тревога по шкале 0–10). Такой подход позволяет мягко провести детоксикацию, восстановить сон, стабилизировать вегетативную нервную систему и уменьшить «шум» организма.
Выяснить больше – вывод из запоя на дому в екатеринбурге
Компания предоставляет профессиональные услуги в области электромонтажных работ и поставки электротехнического оборудования. Опытные специалисты выполняют проектирование, монтаж и обслуживание электрических систем любой сложности для объектов различного назначения. Ознакомиться с полным перечнем услуг можно на https://elekspb.ru/ где представлена актуальная информация о направлениях деятельности. Использование качественных материалов и современных технологий обеспечивает надежность и безопасность выполненных работ. Индивидуальный подход и соблюдение сроков делают сотрудничество эффективным и выгодным.
В данной обзорной статье представлены интригующие факты, которые не оставят вас равнодушными. Мы критикуем и анализируем события, которые изменили наше восприятие мира. Узнайте, что стоит за новыми открытиями и как они могут изменить ваше восприятие реальности.
Детали по клику – https://forumeuropeen.com/2019/01/11/bonjour-tout-le-monde
Профессиональная платформа предлагает готовые решения для владельцев интернет-магазинов на OpenCart. В каталоге представлены модули для SEO-оптимизации, улучшения администрирования, настройки доставки и оплаты. На сайте https://opencart-help.ru/moduli-opencart/ доступны проверенные дополнения без привязки к доменам и ключей активации. Все модули тестируются перед публикацией, что гарантирует стабильную работу вашего магазина. Техническая поддержка помогает с установкой и настройкой компонентов для эффективного развития бизнеса.
Также мы учитываем потребности каждого пациента — по питанию, условиям проживания, графику процедур. Проживание возможно в стандартных и повышенных палатах, с возможностью индивидуального обслуживания.
Получить больше информации – vyzvat-narkologicheskuyu-skoruyu-pomoshch
Скорость загрузки на https://cilesta.ru радует даже на медленном интернете.
Мы предлагаем вам окунуться в океан любопытных фактов и вдохновляющих историй. Эта публикация поможет расширить горизонты, разбудить интерес к науке и истории и увидеть мир с новой стороны.
Осуществить глубокий анализ – https://blog.anticariat-ursu.ro/thrillere-psihologice-de-exceptie
Как подчёркивает врач-нарколог клиники «Крылья Надежды» Андрей Кузьмин: «Своевременное обращение к специалистам гарантирует не только быстрое восстановление, но и предупреждает развитие тяжёлых осложнений, которые могут навсегда изменить жизнь пациента».
Получить дополнительные сведения – https://vyvod-iz-zapoya-korolev2.ru/srochnyj-vyvod-iz-zapoya
подскажите, а спорные вопросы решаются в данном магазине? кокс, меф, шиш, гаш прекращайте пользоваться спср, мало того что у них сервис очень плохой, принимают :police: ещё и отказываюся работать в свое рабочее времядруг ты о чем говоришь? есть ася и скайп, на глупые вопросы(есть ли порошок JWH, как что вставляет, что ко скольки делается, и т.д.) мы не отвечаем, мы работаем только с людьми которые понимают, что “это” и как это “едят”, парни вот без обид – мы же не википедия… да парни все легал, все анализы делаются на Моросейке… да да да…
В стационаре работают узкопрофильные специалисты: наркологи, неврологи, психотерапевты, а также персонал, обеспечивающий круглосуточный уход. Программа включает медикаментозное лечение, психологическую коррекцию, восстановление сна, устранение депрессии, обучение саморегуляции и работу с мотивацией.
Ознакомиться с деталями – наркологическая клиника в Балашихе
Основная проблема запоя заключается в том, что человек постепенно теряет контроль над ситуацией, а его организм подвергается всё более тяжёлой интоксикации. Определить момент, когда требуется немедленное обращение за помощью, несложно, если внимательно следить за состоянием человека.
Исследовать вопрос подробнее – http://vyvod-iz-zapoya-korolev2.ru
мостбет мобильная версия https://www.mostbet61527.help
Этот сборник информации привлекает множеством мелких деталей и необычных ракурсов. Мы предлагаем взгляды, редко полезные, но способные немного разнообразить знакомство с темой.
Подробнее читать – мефедроновая зависимость
я думаю все ровно будет. заказал тут для пробы 5 гр. акв 48 ф . 10 октября еще заказал. еще не выслали. на почту пишут, извиняются. ждём результатов. как будут движения отпишу. https://avgust-spb.ru “Прошло 20 мин тишина,Думаю надо догнаться еще 2 делаю и тот же ЭфФект “Оправдания в небе не ищут,
В стационаре работают узкопрофильные специалисты: наркологи, неврологи, психотерапевты, а также персонал, обеспечивающий круглосуточный уход. Программа включает медикаментозное лечение, психологическую коррекцию, восстановление сна, устранение депрессии, обучение саморегуляции и работу с мотивацией.
Изучить вопрос глубже – https://narkologicheskaya-pomoshch-balashiha1.ru
В данной обзорной статье представлены интригующие факты, которые не оставят вас равнодушными. Мы критикуем и анализируем события, которые изменили наше восприятие мира. Узнайте, что стоит за новыми открытиями и как они могут изменить ваше восприятие реальности.
Что ещё нужно знать? – https://template113.webekspor.com/seeing-the-export-potential-of-melon-and-porang-suitable-for-you-who-want-to-be-an-exporter-7
Срочное вмешательство врача необходимо при появлении следующих симптомов:
Изучить вопрос глубже – http://vyvod-iz-zapoya-korolev2.ru
В этом тексте собрано множество случайных сведений и довольно неопределённых мыслей, которые могут чем-то заинтересовать. Мы отмечаем моменты, которые не особенно важны, но всё же занимают своё место в повествовании.
Вот – https://arma-rehab.ru/lechenie-alkogolizma
«Кодирование — это не магическое решение, а важный этап в комплексной программе лечения, — поясняет ведущий нарколог клиники «Ясное Будущее» Марина Иванова. — Главное — сочетание фармакологического воздействия и последующей работы с психологом для формирования устойчивой мотивации к трезвости».
Углубиться в тему – http://kodirovanie-ot-alkogolizma-odintsovo2.ru/kodirovanie-ot-alkogolizma-na-domu/
Веб-магазин «ЭЛЕК» предлагает судовое электрооборудование, кабельные изделия и компоненты с регистровыми сертификатами для предприятий судостроения и ремонта флота. В каталоге представлены судовые светильники, автоматические выключатели, магнитные пускатели, навигационные фонари, трансформаторы, реле и кабель различных типоразмеров с наличием на складе. Оформить заказ и ознакомиться с полным ассортиментом можно на https://shop.elekspb.ru/ Компания гарантирует быструю комплектацию заказов, транспортировку в любой регион страны и экспертные рекомендации при выборе техники.
Отличный магаз. кокс, меф, шиш, гаш Заказы только СПСР доставкой?после этого случая я стал курить не сигареты конечно рц вообще понравилось и быстро дошло ,делал 1к8 великолепная вещь магазу продвижений
Your point of view caught my eye and was very interesting. Thanks. I have a question for you. https://www.binance.com/register?ref=IHJUI7TF
Вызов нарколога на дом в Каменске-Уральском обеспечивает безопасность пациента, исключая необходимость посещения медицинского учреждения, что особенно актуально при тяжелом состоянии или психологическом сопротивлении. Такая помощь включает в себя детоксикацию, купирование абстинентного синдрома и консультации по дальнейшему лечению.
Исследовать вопрос подробнее – платный нарколог на дом
Мы не делаем «массовых решений»: каждый пациент для нас — уникальная история, и мы строим терапию, исходя из его состояния, целей и личных возможностей. Наша задача — не просто временно облегчить симптомы, а дать человеку реальные инструменты для жизни без зависимости.
Разобраться лучше – https://narkologicheskaya-klinika-mytishchi1.ru/narkologicheskaya-klinika-narkolog-v-mytishchah/
traffio site – Overall, professional vibe here; trustworthy, polished, and pleasantly minimal throughout.
Магази лутший на рц не первый раз работаем с ним!) удачи и процветания!) кокс, меф, шиш, гаш явно не 15-ти минутка, почитайте отзывы в соответвующей теме. Качество товара на высоте у нас всегда .в смысле пропал из онлайна??? и что делать теперь? треки то до сих пор небьються
Когда зависимость захватывает жизнь, она разрушает не только организм, но и личность, отношения с близкими, карьерные планы и самоощущение. Алкоголь, наркотики и психотропные препараты постепенно подрывают работу внутренних органов, нарушают баланс нейромедиаторов в мозге и приводят к серьёзным психическим и физическим осложнениям. Попытки справиться с этим самостоятельно редко бывают успешными: необходим системный, профессиональный подход. В наркологической клинике «Доктор Здоровье» в Мытищах вы найдёте надёжную опору на всех этапах выздоровления — от экстренной детоксикации до длительной реабилитации.
Получить дополнительные сведения – бесплатная наркологическая клиника
Лечение зависимости требует системного подхода и чёткой последовательности действий. Каждый этап направлен на устранение интоксикации, восстановление функций организма и закрепление результата. В клинике процедура организована так, чтобы обеспечить комфорт и безопасность пациента.
Узнать больше – http://narcologicheskaya-klinika-v-chelyabinske16.ru
Абстинентный синдром — одно из самых тяжёлых и опасных проявлений наркотической зависимости. Он развивается на фоне резкого отказа от приёма веществ и сопровождается сильнейшими нарушениями работы организма. Это состояние требует немедленного вмешательства. Самостоятельно справиться с ним невозможно — особенно если речь идёт о героине, метадоне, синтетических наркотиках или длительной зависимости. В клинике «НаркоПрофи» мы организовали систему снятия ломки в Подольске, работающую круглосуточно: как на дому, так и в условиях стационара.
Исследовать вопрос подробнее – http://snyatie-lomki-podolsk1.ru
Преимущества вызова нарколога на дом:
Детальнее – http://vyvod-iz-zapoya-v-murmanske12.ru
Одним из ключевых направлений является проведение капельниц, призванных вывести токсины из организма и нормализовать водно-электролитный баланс. Используемые препараты и состав растворов подбираются индивидуально, исходя из клинической картины и истории болезни пациента.
Узнать больше – нарколог на дом вывод ярославль
Интернет-магазин предлагает широкий выбор мототехники и электротранспорта для активного отдыха и передвижения. В каталоге представлены квадроциклы, электросамокаты, питбайки и аксессуары от проверенных производителей. Посетите https://au.ru/user/Мото%20ДВ/shop/ для ознакомления с актуальным ассортиментом и специальными предложениями. Удобная система фильтров помогает быстро найти нужную модель по характеристикам и цене. Доставка техники осуществляется в различные регионы с возможностью оформления покупки в кредит на выгодных условиях.
мостбет скачать для ios мостбет скачать для ios
Наркологическая помощь на дому в Ярославле охватывает широкий спектр медицинских мероприятий, направленных на стабилизацию состояния пациента и подготовку к дальнейшему лечению. Среди основных процедур:
Получить больше информации – https://narkolog-na-dom-v-yaroslavle12.ru/vyzov-narkologa-na-dom-v-yaroslavle/
Эффективное лечение требует поэтапного подхода, который реализуется следующим образом:
Изучить вопрос глубже – наркологические клиники алкоголизм рязанская область
Про 80 не знаю. Но то что там принимают сомнительных, дак это точно. Вот люди которые туда приходят и ушатаные в хламотень, все трясутся. И оглядываются, как будто от смерти скрываются конечно их принимают… А что про тех кто соблюдаем все меры, тот спокоен. И сдержан. Но все равно. В спср принимают однозначно, сам свидетель в 2006 году. когда за дропом следили, перепугались что за нашим пришли… Но все обошлось. https://hi-techhome.ru А сейчас работает магазин?Какие обещания? если выходной, скорей всего СПРС в базу не завело твой трек, жди понедельника…
Параллельно с медицинской терапией начинается работа психотерапевта. В индивидуальных и семейных сессиях пациенты учатся распознавать механизмы зависимости, вырабатывать новые стратегии поведения и справляться со стрессовыми ситуациями без употребления. Последний этап — реабилитация и ресоциализация — включает трудотерапию, арт- и групповую терапию, помощь в восстановлении профессиональных навыков и возвращении к социально-активной жизни.
Получить больше информации – наркологическая клиника скорая
Недостаточно снять физическую зависимость — важно помочь человеку вернуться в сообщество. В «Доктор Здоровье» разработана система сопровождения, включающая мотивационные беседы, групповые занятия и социальную реабилитацию. Психотерапевты владеют методами когнитивно-поведенческой терапии и мотивационного интервью, консультанты помогают восстановить профессиональные навыки и адаптироваться к повседневной жизни, а встречи в группе взаимопомощи и психодраматические сессии способствуют укреплению чувства поддержки и навыков эффективного общения. Для родственников доступны семейные консультации, на которых объясняют природу зависимости и обучают стратегиям поддержки без критики и давления.
Ознакомиться с деталями – наркологическая клиника скорая
Осложнения, к которым может привести отсутствие лечения:
Подробнее – http://snyatie-lomki-podolsk1.ru
Лечение в клинике в Челябинске строится на принципах конфиденциальности, добровольности и медицинской этики. Врачи применяют доказательные методы терапии, а программы лечения адаптируются под особенности каждого пациента. Работа ведётся комплексно, включая медикаментозную помощь, психотерапию и социальную реабилитацию. Такой подход позволяет эффективно восстановить здоровье и вернуть пациента к нормальной жизни в обществе.
Выяснить больше – http://www.domen.ru
В нашей практике сочетаются несколько видов вмешательства: медико-биологическое, психологическое и социальное. Сначала проводится полная диагностика, включая лабораторные анализы и оценку работы сердца, печени, почек, а также психодиагностические тесты. После этого начинается этап детоксикации с внутривенными капельницами, которые выводят токсины, нормализуют водно-солевой баланс и восстанавливают основные функции организма. Далее мы применяем медикаментозную поддержку для стабилизации артериального давления, купирования тревожных симптомов, нормализации сна и уменьшения болевого синдрома.
Углубиться в тему – наркологическая клиника на дом
mostbet app скачать http://mostbet61527.help/
Стационарная программа позволяет стабилизировать не только физическое состояние, но и эмоциональную сферу. Находясь в изоляции от внешних раздражителей и вредных контактов, пациент получает шанс сконцентрироваться на себе и начать реабилитацию без давления извне.
Подробнее тут – https://narkologicheskaya-pomoshch-balashiha1.ru/narkologicheskaya-pomoshch-na-domu-v-balashihe/
вообще почта 1 класс оказываеться самое быстрое.. 2-3 суток и приходит https://buyboshkii.life А почему сам с-м.сом сюда какой день не кажеться…?отпишите народ за 5 iai кто брал спс заранее
Как подчёркивает врач-нарколог клиники «Крылья Надежды» Андрей Кузьмин: «Своевременное обращение к специалистам гарантирует не только быстрое восстановление, но и предупреждает развитие тяжёлых осложнений, которые могут навсегда изменить жизнь пациента».
Получить дополнительные сведения – https://vyvod-iz-zapoya-korolev2.ru/
Когда проблема зависимости достигает критического уровня, оперативное вмешательство становится необходимостью. В Екатеринбурге профессиональные наркологи готовы выехать на дом круглосуточно, чтобы начать лечение зависимости немедленно. Такой формат оказания помощи позволяет пациенту получить качественную терапию в знакомой и уютной обстановке, что значительно снижает уровень стресса и способствует быстрому восстановлению.
Подробнее тут – https://alko-zakodirovat.ru
Вывод из запоя на дому — это управляемый медицинский процесс, в котором важна каждая деталь: от предварительного скрининга и выбора инфузионного контура до настройки среды и последующего наблюдения. В наркологической клинике «ЕкатеринбургМед Ренессанс» выезд организуется круглосуточно, врач приезжает на немаркированном транспорте, работает деликатно, без лишних вопросов и пафоса. Мы используем принцип «минимально достаточного вмешательства»: одна клиническая цель на этап, один проверяемый показатель и один корректируемый параметр, чтобы сохранять предсказуемость и избегать перегрузок для организма.
Подробнее можно узнать тут – вывод из запоя недорого
Большинство семей приходят к мысли о лечении зависимости не сразу. Сначала всё выглядит как «случайные переборы по праздникам», потом алкоголь или наркотики становятся привычным способом снять стресс, забыться, пережить неудачи. Постепенно запои учащаются, человек пропадает на несколько дней, появляются долги, проблемы на работе, конфликты в семье. На этом этапе многим кажется, что обращаться в наркологическую клинику в Лобне ещё рано, что можно «взять себя в руки» и как-то остановиться. Но практика показывает обратное: чем дольше затягивается момент обращения к специалистам, тем тяжелее протекают запои, тем глубже страдает здоровье и тем сложнее вернуть человека к стабильной трезвости.
Получить дополнительную информацию – наркологическая клиника москва бесплатно
В материале приведены детали, интересные, но не особенно важные. Мы рассматриваем аспекты, которые сложно назвать существенными, но включили их для большей полноты.
Подробнее читать – народные средства от диабета
В нашей клинике применяются различные техники кодирования, которые подбираются с учётом медицинских показаний, психологического состояния и пожеланий пациента.
Подробнее – https://kodirovanie-ot-alkogolizma-odintsovo2.ru/kodirovanie-ot-alkogolizma-na-domu/
“Решил попробовать курнуть через фольгу , Насыпаю нажигаю бля чуть кишки не выпленул” кокс, меф, шиш, гаш Зашла на ваш сайт, а там “Your site hasn’t been activated yet!”… в общем ничего не выходит. Пробывала и через ТОР и через обычный браузер. Все одно. Что не так делаю?Вот этого ам2233 и заказал. Оплатил уже. Жду трекер.
Курс терапии в клинике состоит из нескольких последовательных этапов, каждый из которых направлен на достижение конкретных целей — от снятия интоксикации до восстановления психологического равновесия. Такой подход позволяет добиться устойчивого результата и минимизировать вероятность рецидива. На всех стадиях лечения ведётся контроль состояния пациента, а также постоянная корректировка назначений в зависимости от реакции организма.
Детальнее – платная наркологическая клиника
Вывод из запоя на дому — это управляемый медицинский процесс, в котором важна каждая деталь: от предварительного скрининга и выбора инфузионного контура до настройки среды и последующего наблюдения. В наркологической клинике «ЕкатеринбургМед Ренессанс» выезд организуется круглосуточно, врач приезжает на немаркированном транспорте, работает деликатно, без лишних вопросов и пафоса. Мы используем принцип «минимально достаточного вмешательства»: одна клиническая цель на этап, один проверяемый показатель и один корректируемый параметр, чтобы сохранять предсказуемость и избегать перегрузок для организма.
Получить больше информации – https://vyvod-iz-zapoya-v-ekaterinburge16.ru/vyvod-iz-zapoya-na-domu-ekaterinburg-otzyvy
При обращении по телефону или через электронную форму мы используем шифрование данных и не требуем ИНН или паспорта. Оплата производится безналичным переводом или анонимно — наличными через курьера, что позволяет сохранить полную приватность.
Углубиться в тему – вывод из запоя на дому круглосуточно в самаре
Осложнения, к которым может привести отсутствие лечения:
Получить больше информации – снятие ломки цена подольск
Процесс начинается с вызова врача или доставки пациента в клинику. После прибытия специалист проводит первичную диагностику: измерение давления, температуры, пульса, уровня кислорода в крови, визуальная оценка степени возбуждения или угнетения сознания. Собирается краткий анамнез: какой наркотик принимался, как долго, были ли сопутствующие заболевания.
Получить больше информации – снятие ломок на дому подольск
Братья так же ровны как в совестсокм союзе кокс, меф, шиш, гаш сегодня получил трек. все пробивается. жду посылочку)все быстро замутили
Вызов нарколога на дом — востребованная услуга, позволяющая оказать пациенту помощь в привычной обстановке без необходимости посещения клиники. Особенно актуально это при запойном состоянии, абстинентном синдроме или первых признаках передозировки. Согласно информации Минздрава РФ, амбулаторная помощь эффективна при своевременном обращении и наличии квалифицированной команды специалистов.
Детальнее – http://narkolog-na-dom-nizhnij-tagil11.ru/narkolog-na-dom-kruglosutochno-v-nizhnem-tagile/
Аппаратные методы кодирования включают лазерную терапию и электростимуляцию биологически активных точек, влияющих на центры зависимости в головном мозге. Эти методики способствуют быстрому формированию устойчивого отвращения к спиртному и хорошо переносятся пациентами.
Подробнее – https://kodirovanie-ot-alkogolizma-odintsovo2.ru
Алкогольный запой — это состояние, при котором человек теряет способность самостоятельно прекратить потребление спиртного и контролировать дозировку. В таких условиях нарастают неврологические и метаболические нарушения, возрастает риск серьёзных осложнений вплоть до алкогольного делирия. Наркологическая клиника «СамараМед» предлагает круглосуточную выездную помощь на дому в Самаре и области с гарантией полной анонимности и выездом специалиста в течение 30 минут после обращения. Наши врачи применяют современные протоколы детоксикации и психологической поддержки, что позволяет безопасно и максимально комфортно пройти через этап выхода из запоя и заложить прочный фундамент для дальнейшего восстановления.
Углубиться в тему – вывод из запоя на дому круглосуточно в самаре
В Екатеринбурге бригады выезжают 24/7, покрывая как центральные районы, так и отдалённые кварталы. Координатор уточняет только то, что влияет на безопасность: принимаемые лекарства и дозы, аллергии, эпизоды судорог/психозов, исходные значения давления и пульса, а также бытовые условия — можно ли обеспечить «тихое окно» на 2–3 часа, есть ли свободная розетка и место для полулёжа. Врач приезжает с портативным мониторингом, расходными материалами и резервным планом на случай повышенной реактивности.
Получить дополнительную информацию – вывод из запоя цена
Публикация предоставляет читателю набор разрозненных идей, которые сложно применить на практике. Мы лишь слегка касаемся разных точек зрения, не углубляясь в анализ и не предлагая никаких выводов.
Вот – секс шоп
Именно поэтому так важно не терять время. Чем раньше пациент получает помощь, тем выше шансы избежать необратимых последствий и вернуться к нормальной жизни.
Узнать больше – http://snyatie-lomki-podolsk1.ru
Капельницы от алкоголя в нашем понимании — это не «супермиксы», а прицельные контуры под доминирующий запрос: регидратация, сглаживание «качелей» давления и пульса, подготовка к ночному сну, метаболическая поддержка, возврат когнитивной ясности. Контроль ведётся по витальным показателям и согласованным субъективным шкалам.
Детальнее – вывод из запоя клиника екатеринбург
Вызвал такси;) https://varta-spa.ru 128 страниц положительных отзывов , и вдруг “мутный магаз” . Уважаемый – флудить в курилке можно.всем доброго времени суто тс ответь в лс есть вопрос
Вызов нарколога возможен круглосуточно, что обеспечивает оперативное реагирование на критические ситуации. Пациенты и их родственники могут получить помощь в любое время, не дожидаясь ухудшения состояния.
Исследовать вопрос подробнее – нарколог на дом клиника в каменске-уральском
Именно поэтому так важно не терять время. Чем раньше пациент получает помощь, тем выше шансы избежать необратимых последствий и вернуться к нормальной жизни.
Получить больше информации – снятие ломки на дому подольск
В Екатеринбурге бригады выезжают 24/7, покрывая как центральные районы, так и отдалённые кварталы. Координатор уточняет только то, что влияет на безопасность: принимаемые лекарства и дозы, аллергии, эпизоды судорог/психозов, исходные значения давления и пульса, а также бытовые условия — можно ли обеспечить «тихое окно» на 2–3 часа, есть ли свободная розетка и место для полулёжа. Врач приезжает с портативным мониторингом, расходными материалами и резервным планом на случай повышенной реактивности.
Подробнее – вывод из запоя на дому цена екатеринбург
Именно поэтому так важно не терять время. Чем раньше пациент получает помощь, тем выше шансы избежать необратимых последствий и вернуться к нормальной жизни.
Подробнее тут – http://snyatie-lomki-podolsk1.ru/snyatie-lomki-na-domu-v-podolske/
В этой статье мы рассмотрим ключевые аспекты выбора надёжного специалиста, который приедет по вызову и сможет оказать квалифицированную помощь без промедлений.
Получить дополнительные сведения – психиатр нарколог на дом в нижнем тагиле
Интернет-магазин «АВК-авто» предлагает широкий выбор шин и дисков для легковых и коммерческих автомобилей с доставкой по Санкт-Петербургу и области. В наличии летняя, зимняя и всесезонная резина от топовых международных брендов — Nokian, Michelin, Continental, Bridgestone, Pirelli, Hankook и прочих производителей разного ценового сегмента. Ознакомиться с каталогом продукции, подобрать резину по параметрам и оформить заказ можно на https://avk-tyres.ru/ Компания обеспечивает безвозмездную транспортировку товара, экспертные рекомендации при покупке покрышек и шиномонтажные работы на собственной станции.
Важно выяснить длительность запоя, частоту и дозы потребляемого алкоголя, наличие ранее проведённых детоксикаций и психиатрических заболеваний. Эта информация помогает выбрать наиболее подходящий протокол инфузионной и медикаментозной терапии.
Получить больше информации – вывод из запоя с выездом в самаре
Все медицинские записи и личные данные хранятся на защищённых серверах с ограниченным доступом. Только лечащий врач и медицинская сестра имеют право просматривать их при необходимости оказания помощи.
Углубиться в тему – вывод из запоя недорого
Looking for an interesting and useful portal about the dollar, euro, pound sterling, and other currencies? Or information about gold, silver, oil, and gas? Or perhaps everything about stock markets, industry, and the global economy? Visit https://www.profi-forex.us/ – it’s a comprehensive source of professional information that will be of interest to both amateurs and professionals.
Нарколог на дому проводит тщательный осмотр, собирает анамнез и назначает необходимые лабораторные исследования. Это позволяет выявить сопутствующие патологии и скорректировать тактику лечения.
Углубиться в тему – нарколог на дом цена в ярославле
Как подчёркивает заведующая отделением клинической психологии ФГБУН «НМИЦ психиатрии и наркологии» Минздрава России, наличие в команде специалистов с опытом работы в области зависимости — это основа качественной помощи.
Разобраться лучше – вывод наркологическая клиника в нижнем тагиле
Эта статья сочетает в себе как полезные, так и интересные сведения, которые обогатят ваше понимание насущных тем. Мы предлагаем практические советы и рекомендации, которые легко внедрить в повседневную жизнь. Узнайте, как улучшить свои навыки и обогатить свой опыт с помощью простых, но эффективных решений.
Всё самое вкусное внутри – https://site.rsggroup.com.br/2024/05/23/ola-mundo
магазин роботает отлично сам проверил и не поверю не каму кто скажет что это не так кокс, меф, шиш, гаш РЕБЯТА КАК ВСЕГДА НА ВЫСОТЕ 5 ИЗ 5!!!! СПАСИБОУ данного сллера только легал. Все проверено.
После устранения острой зависимости важным этапом становится реабилитация. Она включает восстановление социальных навыков, обучение методам преодоления стрессов без употребления психоактивных веществ.
Получить больше информации – наркологическая клиника нарколог
Важно выяснить длительность запоя, частоту и дозы потребляемого алкоголя, наличие ранее проведённых детоксикаций и психиатрических заболеваний. Эта информация помогает выбрать наиболее подходящий протокол инфузионной и медикаментозной терапии.
Углубиться в тему – наркология вывод из запоя самара
Как подчёркивает главный врач клинического отделения, «в условиях стационара мы можем оперативно реагировать на малейшие изменения в состоянии пациента, что критически важно при тяжёлых формах запоя».
Детальнее – http://vyvod-iz-zapoya-v-ryazani12.ru
Этот обзор предлагает свежий взгляд на предметы, которые и без того привычны. Мы упоминаем факты, не имеющие большого значения, и события с неясной важностью, но они присутствуют здесь.
Подробнее читать – диета для похудения быстро
Публикация приглашает вас исследовать неизведанное — от древних тайн до современных достижений науки. Вы узнаете, как случайные находки превращались в революции, а смелые мысли — в новые эры человеческого прогресса.
Есть чему поучиться – https://www.cloudxpert.us/hello-world
Эта информационная заметка предлагает лаконичное и четкое освещение актуальных вопросов. Здесь вы найдете ключевые факты и основную информацию по теме, которые помогут вам сформировать собственное мнение и повысить уровень осведомленности.
Открой скрытое – https://www.bharatsokagakkai.org/comenticn
В этой статье представлен занимательный и актуальный контент, который заставит вас задуматься. Мы обсуждаем насущные вопросы и проблемы, а также освещаем истории, которые вдохновляют на действия и изменения. Узнайте, что стоит за событиями нашего времени!
Погрузиться в детали – https://greennet.or.th/product/hom-nin-rice
В этом интересном тексте собраны обширные сведения, которые помогут вам понять различные аспекты обсуждаемой темы. Мы разбираем детали и факты, делая акцент на важности каждого элемента. Не упустите возможность расширить свои знания и взглянуть на мир по-новому!
Изучить аспект более тщательно – http://mamas.ru/showthread.php?t=11296&page=2&highlight=%E7%E0%EF%EE%E9
Бро я постоянный клиент в этом магазине! Магазин работает очень качественно и товар на высшем уровне!!! кокс, меф, шиш, гаш Не красиво вышло с вашей стороны, я канешно благодарен за доверие и выделенную вами пробу но увы Эфеект растроил( “Оставляйте свои отзывы! Мы ценим каждого клиента нам важны ваши отзывы и мнения!
В этой публикации мы предложим ряд рекомендаций по избавлению от зависимостей и успешному восстановлению. Мы обсудим методы привлечения поддержки и важность самосознания. Эти советы помогут людям вернуться к нормальной жизни и стать на путь выздоровления.
Продолжить чтение – https://123ru.market/items/metod_dovzhenko_v_obninske_44898
Этот информационный обзор станет отличным путеводителем по актуальным темам, объединяющим важные факты и мнения экспертов. Мы исследуем ключевые идеи и представляем их в доступной форме для более глубокого понимания. Читайте, чтобы оставаться в курсе событий!
Лучшее решение — прямо здесь – http://student.ans.org/chattanooga/?p=42
Для успешной адаптации пациента в обществе клиника организует поддержку родственников и последующее наблюдение. Это снижает риск рецидива и помогает сохранить достигнутые результаты.
Получить дополнительную информацию – https://narkologicheskaya-klinika-v-murmanske12.ru/narkologicheskaya-klinika-klinika-pomoshh-v-murmanske/
заказать индивидуальную кухню zakazat-kuhnyu-1.ru .
В этом интересном тексте собраны обширные сведения, которые помогут вам понять различные аспекты обсуждаемой темы. Мы разбираем детали и факты, делая акцент на важности каждого элемента. Не упустите возможность расширить свои знания и взглянуть на мир по-новому!
Разобраться лучше – https://techmalaga.com/el-abc-del-emprendedor-siglas-y-jerga-que-nadie-te-explico-con-una-pizca-de-humor
Удачных продаж и с наступающим НОВЫМ ГОДОМ…. https://avgust-spb.ru с чего они тебе отзывы писать будут если они груз две недели ждут? они че тебе экстросенсы и качество могут на расстоянии проверить? и извинений мало ты не на ногу в трамвае наступила следующий раз пусть магаз компенсирует бонусами за принесенные неудобства! кто со мной согласен добавляем репу!Начал гнать на продавца, но потом увидел у других людей на других сайтах и форумах репорты по 5иаи, купленные у других магазов и оказалось, что просто само 5иаи – это полна Чляпа)
В продаже земля промназначения площадью 20,15 га на стыке федеральной автодороги А-108 и трассы 17К-16 в Киржачском районе Владимирской области. Участки с готовой инфраструктурой: газ мощностью 1529 м?/час от ГРПШ, электричество от пяти подстанций по 400 кВА, лицензированное водоснабжение 600 м?/сутки, локальная канализация с согласованным выпуском. Подробная информация о земельных массивах и торговых объектах размещена на https://promzem-a108.ru/
Услуга вызова нарколога на дом в Екатеринбурге представляет собой комплекс мер, направленных на оперативное стабилизирование состояния пациента. При поступлении вызова специалист проводит детальный осмотр, сбор анамнеза и диагностику состояния, после чего разрабатывается индивидуальный план лечения. Методика включает медикаментозную детоксикацию, коррекцию обменных процессов и психологическую поддержку, что обеспечивает комплексное восстановление здоровья без необходимости посещения стационара.
Получить дополнительные сведения – наркология вывод из запоя
Мы собрали для вас самые захватывающие факты из мира науки и истории. От малознакомых деталей до грандиозных событий — эта статья расширит ваш кругозор и подарит новое понимание того, как устроен наш мир.
Расширить кругозор по теме – https://osrodek-koparka.pl/filcuj-i-figluj-z-alpakami-21-12
Этот текст содержит различную информацию, которая, возможно, покажется любопытной, но в целом не меняет восприятия привычных вещей. Предлагаем просто получить удовольствие от чтения, не ожидая особой пользы.
Вот – милфы
у Вас очень серьезные проблемы. кокс, меф, шиш, гаш Вы реально думаете что тут сидят роботы, которые должны отвечать всем без перерывов и выходных? Праздники же были, все отдыхать хотят.16 числа заказала товарчика)ну пока еще ничего не получила!!! продаван отправил только половинку(объяснил что не хватило реактивчика) но все остальное вышлет как привезут 100ый ))ждем и надеемся)) заказывала и раньше в этом магазе все было ОГОНЬ))
Актуальный каталог TG-Search содержит свыше тридцати семи тысяч телеграм-каналов и ботов в пятидесяти тематических разделах. Участники быстро обнаруживают каналы от предпринимательства и блокчейна до развлекательного контента и мотивации в простом интерфейсе. Платформа https://tg-search.ru/ предлагает функции продвижения каналов, конкурсы и раздел знакомств для активного комьюнити. Сервис регулярно обновляет рейтинги популярных каналов и помогает авторам привлекать целевую аудиторию через встроенные инструменты.
В нашей клинике применяются различные техники кодирования, которые подбираются с учётом медицинских показаний, психологического состояния и пожеланий пациента.
Детальнее – кодирование от алкоголизма на дому
заказать кухню стоимость zakazat-kuhnyu-1.ru .
Алкогольная зависимость разрушает здоровье, семью, карьеру и личность. Чем раньше будет оказана профессиональная помощь, тем выше шансы на восстановление и возвращение к полноценной жизни. Лечение алкоголизма в Воронеже — помощь на всех стадиях зависимости позволяет справляться не только с физической тягой, но и с глубинными причинами, которые провоцируют патологическое употребление.
Ознакомиться с деталями – https://lechenie-alkogolizma-voronezh9.ru/lechenie-narkomanii-i-alkogolizma-voronezh
Клиника предлагает индивидуальный подход к каждому пациенту. Лечение начинается с детальной диагностики состояния здоровья, что позволяет врачу подобрать наиболее эффективную схему терапии.
Углубиться в тему – vyvod iz zapoya kruglosutochno
Когда проблема зависимости достигает критического уровня, оперативное вмешательство становится необходимостью. В Екатеринбурге профессиональные наркологи готовы выехать на дом круглосуточно, чтобы начать лечение зависимости немедленно. Такой формат оказания помощи позволяет пациенту получить качественную терапию в знакомой и уютной обстановке, что значительно снижает уровень стресса и способствует быстрому восстановлению.
Узнать больше – http://alko-zakodirovat.ru/
Когда зависимость захватывает жизнь, она разрушает не только организм, но и личность, отношения с близкими, карьерные планы и самоощущение. Алкоголь, наркотики и психотропные препараты постепенно подрывают работу внутренних органов, нарушают баланс нейромедиаторов в мозге и приводят к серьёзным психическим и физическим осложнениям. Попытки справиться с этим самостоятельно редко бывают успешными: необходим системный, профессиональный подход. В наркологической клинике «Доктор Здоровье» в Мытищах вы найдёте надёжную опору на всех этапах выздоровления — от экстренной детоксикации до длительной реабилитации.
Подробнее – http://narkologicheskaya-klinika-mytishchi1.ru/narkologicheskaya-klinika-ceny-v-mytishchah/
Алкогольная зависимость — это хроническое заболевание, при котором устойчивое влечение к спиртному приводит к тяжёлым медицинским, социальным и психологическим последствиям. Когда пациент осознаёт, что самостоятельно справиться с этой проблемой не получается, наиболее эффективным методом становится кодирование от алкоголизма. В клинике «Ясное Будущее» в Одинцово мы используем сочетание проверенных методик кодирования и комплексной психологической поддержки, что позволяет достичь стойкой ремиссии и вернуть человеку контроль над собственной жизнью.
Изучить вопрос глубже – https://kodirovanie-ot-alkogolizma-odintsovo2.ru/kodirovanie-ot-alkogolizma-cena
Магазин не отвечает, может типо выходные, ждем понедельника. кокс, меф, шиш, гаш Ребята кто заказывал 25 реагент,как по качеству???????????Магаз убойный, как начали брать пол года назад на рампе, была одна проблема пно ее быстро решили))) щас как снова завязался месяца 3 уже не разу не было))) Особенно предпочтения отдаю мефу вашему, вообще тема потрясная)))
– человек не может прекратить употребление сам; – наблюдается агрессия, страх, паника, бессвязная речь; – нарушен сон, отсутствует аппетит, сильная слабость; – алкоголь стал способом снятия боли или тревоги; – попытки отказа приводят к ухудшению состояния.
Подробнее тут – вывод из запоя стационар
Срочный вызов нарколога необходим, если:
Получить дополнительную информацию – вызов врача нарколога на дом
Врач уточняет продолжительность запоя, характер употребляемого алкоголя и наличие сопутствующих заболеваний. Детальное обследование позволяет оперативно подобрать необходимые медикаменты и минимизировать риск осложнений.
Выяснить больше – http://kapelnica-ot-zapoya-tyumen00.ru/postavit-kapelniczu-ot-zapoya-tyumen/
работал я работал 2 года имея не малую клиентскую базу и тут решил я вас кинуть на 10 грамм, сам то подумай где ты это пишешь. кокс, меф, шиш, гаш трек получен, ребятам уважуха:rasta:Сработали быстро, посылка пришла за 4 дня, спрятано эффектно
Длительный запой может привести к серьезным осложнениям, таким как повреждение печени, почек, сердечно-сосудистые нарушения и нервные расстройства. Чем быстрее начинается вывод из запоя, тем ниже риск развития хронических заболеваний. Срочный вызов нарколога на дом позволяет в первые часы кризиса начать детоксикацию, что существенно повышает шансы на полное восстановление организма. В условиях экстренной ситуации каждая минута имеет решающее значение, и своевременная помощь становится ключом к сохранению здоровья и жизни.
Подробнее тут – вывод из запоя
Эта публикация содержит набор несвязанных идей, трудно применимых в практике. Мы лишь поверхностно затрагиваем различные точки зрения, не проводя глубокий анализ и не предлагая выводов.
Подробнее читать – таблетки для аборта
заказать кухню онлайн заказать кухню онлайн .
нервные клетки https://adeniumanapa.ru так что смотрите внимательней что присылают, если не хотите словить передоз!!!Я знаете как делаю, когда пацики отвечают сразу делаю заказ, оплачиваю и все чотка, самим тормозить не надо
При таких проявлениях самостоятельное вмешательство не рекомендуется, так как это может привести к ухудшению состояния. Своевременное обращение к врачу позволит предотвратить тяжелые осложнения и эффективно стабилизировать состояние больного.
Подробнее – вызвать нарколога на дом срочно новосибирск
Компания «АВПринтПак» предлагает производство упаковочных решений и полиграфии для корпоративных клиентов в Московском регионе и РФ. Предприятие производит презентационные коробки из разных типов картона, цилиндрическую тару, крафт-пакеты, стикеры, рекламные каталоги, буклеты и торговое оборудование с фирменной символикой и индивидуальным оформлением. Ознакомиться с полным каталогом продукции и рассчитать стоимость заказа можно на https://avprintpak.ru/ Фирма предоставляет офсет, горячее тиснение, выборочный лак, создание ложементов и срочное исполнение заказов различной сложности с доставкой по адресу.
Клиника предлагает индивидуальный подход к каждому пациенту. Лечение начинается с детальной диагностики состояния здоровья, что позволяет врачу подобрать наиболее эффективную схему терапии.
Получить дополнительные сведения – https://vyvod-iz-zapoya-korolev2.ru/srochnyj-vyvod-iz-zapoya
Мы работаем без праздников и выходных, принимаем срочные обращения, выезжаем оперативно и оказываем помощь в полном соответствии с медицинскими стандартами. Главный принцип — безопасность, эффективность и деликатность. Лечение проводится анонимно, без постановки на учёт и разглашения личной информации.
Разобраться лучше – https://vyvod-iz-zapoya-serpuhov3.ru/vyvod-iz-zapoya-cena-v-serpuhove
«ТД Водопонижение» https://pompanasos.ru/ более 13 лет занимается строительным водопонижением иглофильтрами, откачкой и перекачкой больших объемов грязной воды с помощью мотопомп (станций) собственного производства Шторм-6.
Онлайн-магазин парфюмерии предлагает оригинальную продукцию от ведущих мировых брендов по доступным ценам. В ассортименте представлены ароматы для мужчин и женщин различных категорий от повседневных до эксклюзивных. На сайте https://parfyum-dv.clients.site можно выбрать парфюм с подробным описанием композиции и отзывами покупателей. Удобная навигация и система поиска помогают быстро найти желаемый аромат или подобрать подарок. Доставка осуществляется в короткие сроки с гарантией подлинности всей представленной парфюмерной продукции.
Процесс начинается с вызова врача или доставки пациента в клинику. После прибытия специалист проводит первичную диагностику: измерение давления, температуры, пульса, уровня кислорода в крови, визуальная оценка степени возбуждения или угнетения сознания. Собирается краткий анамнез: какой наркотик принимался, как долго, были ли сопутствующие заболевания.
Изучить вопрос глубже – http://snyatie-lomki-podolsk1.ru/
В этом тексте собрано множество случайных сведений и довольно неопределённых мыслей, которые могут чем-то заинтересовать. Мы отмечаем моменты, которые не особенно важны, но всё же занимают своё место в повествовании.
Вот – порно
После первичного осмотра начинается активная фаза детоксикации. Современные медикаменты вводятся капельничным методом, что позволяет быстро вывести токсины из организма, нормализовать обмен веществ и восстановить работу внутренних органов.
Ознакомиться с деталями – наркологический вывод из запоя в екатеринбурге
Комплексное лечение зависимости на дому организовано по четкой схеме, позволяющей оперативно вывести пациента из запоя и обеспечить безопасное восстановление здоровья.
Детальнее – наркологический вывод из запоя екатеринбург
Основной этап лечения — детоксикация. С помощью капельниц врач вводит препараты, которые быстро выводят токсины и нормализуют обменные процессы, снимают симптомы абстиненции и восстанавливают работу внутренних органов. Уже спустя 1–2 часа после начала процедуры пациент ощущает значительное улучшение.
Узнать больше – http://vyvod-iz-zapoya-korolev2.ru/srochnyj-vyvod-iz-zapoya/
В зависимости от состояния пациента мы предлагаем два формата помощи: выезд нарколога на дом или госпитализацию в стационар. Оба варианта включают детоксикацию — выведение токсинов из организма с помощью инфузионной терапии (капельницы), а также медикаментозную поддержку: успокоительные, витамины, препараты для печени и сердца.
Получить больше информации – https://vyvod-iz-zapoya-serpuhov3.ru/vyvod-iz-zapoya-cena-v-serpuhove/
Видеоканал представляет подробные обзоры мототехники и электротранспорта для покупателей разного уровня. Профессиональные ролики демонстрируют характеристики квадроциклов, питбайков и электросамокатов в реальных условиях эксплуатации. На канале https://vkvideo.ru/@moto_dv_ru публикуются инструкции по обслуживанию техники и советы по выбору моделей. Видеоформат позволяет детально рассмотреть особенности каждого транспортного средства перед покупкой. Регулярные обновления контента помогают оставаться в курсе новинок рынка мототехники.
Именно поэтому так важно не терять время. Чем раньше пациент получает помощь, тем выше шансы избежать необратимых последствий и вернуться к нормальной жизни.
Получить дополнительные сведения – http://snyatie-lomki-podolsk1.ru/snyatie-lomki-narkolog-v-podolske/
Недостаточно снять физическую зависимость — важно помочь человеку вернуться в сообщество. В «Доктор Здоровье» разработана система сопровождения, включающая мотивационные беседы, групповые занятия и социальную реабилитацию. Психотерапевты владеют методами когнитивно-поведенческой терапии и мотивационного интервью, консультанты помогают восстановить профессиональные навыки и адаптироваться к повседневной жизни, а встречи в группе взаимопомощи и психодраматические сессии способствуют укреплению чувства поддержки и навыков эффективного общения. Для родственников доступны семейные консультации, на которых объясняют природу зависимости и обучают стратегиям поддержки без критики и давления.
Разобраться лучше – наркологическая клиника нарколог
Казино Vavada привлекает игроков щедрыми бонусами без депозита и постоянными турнирами с крупным призовым фондом.
Регистрация занимает несколько минут, а рабочие зеркала обеспечивают стабильный доступ к сайту даже при блокировках.
Проверяйте актуальные промокоды и условия отыгрыша, чтобы оптимально использовать стартовые фриспины.
Служба поддержки отвечает на русском языке и помогает решить вопросы с верификацией и выводом средств.
Свежие предложения и актуальное зеркало доступны по ссылке: https://vluki.net/vavada.
Играйте ответственно и контролируйте банкролл, чтобы азарт приносил удовольствие.
В нашей клинике применяются различные техники кодирования, которые подбираются с учётом медицинских показаний, психологического состояния и пожеланий пациента.
Исследовать вопрос подробнее – kodirovanie ot alkogolizma ceny
“Думаю надо прогуляться, за Кооперативом еще кОоПератив,Захожу туда и тут описание сходиться бля Думаю тут то Полюбому” https://smartchoive.top Брат, ответь в личке, жду уже 3 дняКак то так.
сколько стоит заказать кухню zakazat-kuhnyu-1.ru .
Основные показания для вызова нарколога на дом включают:
Получить больше информации – вызвать врача нарколога на дом в иркутске
Les slots modernes evoluent rapidement
https://www.techmira.com/blog/2026/02/20/mad-casino-le-guide-complet-de-l-univers-du-jeu-2/
встраиваемый сейф тайник
Экстренная помощь при выводе из запоя в Архангельске организована по четко отлаженной схеме. Специалисты проводят комплексное обследование пациента на месте, разрабатывают индивидуальный план терапии и незамедлительно приступают к детоксикации. Такой подход позволяет максимально быстро нейтрализовать токсическую нагрузку и восстановить жизненно важные функции организма.
Ознакомиться с деталями – вывод из запоя в стационаре в архангельске
На этом этапе специалист уточняет длительность запоя, характер употребляемого алкоголя и наличие сопутствующих заболеваний. Тщательный анализ собранной информации позволяет выбрать оптимальную тактику детоксикации и минимизировать риск осложнений.
Ознакомиться с деталями – срочный вывод из запоя
Как подчёркивает врач-нарколог клиники «Крылья Надежды» Андрей Кузьмин: «Своевременное обращение к специалистам гарантирует не только быстрое восстановление, но и предупреждает развитие тяжёлых осложнений, которые могут навсегда изменить жизнь пациента».
Ознакомиться с деталями – https://vyvod-iz-zapoya-korolev2.ru
опробовал и такая же фигня получилась..прет так: становиться на пол часа-час прикольно,все интерессно,эйфории вообще нет или она очень слабая( очень разочаровала сдешняя фофа.. https://bereginy.ru Без паники, есть 2 причины почему может не бится трэк 1. тупит курьерка и не внесла в базу накладную такое бывало уже не раз люди получали посылки с нерабочей накладной такое бывает часво это кривая работа службы доставки. 2. вы не правильно вводите на сайте отслеживания с дефисом, пробелом, не по формату номеру накладной службы или вообще на другом сайте)) такое тоже бывает часто. Клиенты у нас получают все вовремя если вас оповестили что посылка отправлена значит она отправлена, ожидайте согласно установленому времени доставки.я думаю все ровно будет. заказал тут для пробы 5 гр. акв 48 ф . 10 октября еще заказал. еще не выслали. на почту пишут, извиняются. ждём результатов. как будут движения отпишу.
– человек не может прекратить употребление сам; – наблюдается агрессия, страх, паника, бессвязная речь; – нарушен сон, отсутствует аппетит, сильная слабость; – алкоголь стал способом снятия боли или тревоги; – попытки отказа приводят к ухудшению состояния.
Углубиться в тему – vyvod-iz-zapoya
Основной этап лечения — детоксикация. С помощью капельниц врач вводит препараты, которые быстро выводят токсины и нормализуют обменные процессы, снимают симптомы абстиненции и восстанавливают работу внутренних органов. Уже спустя 1–2 часа после начала процедуры пациент ощущает значительное улучшение.
Разобраться лучше – http://www.domen.ru
Состав инфузии подбирается врачом индивидуально, с учётом состояния пациента, длительности запоя, возраста и хронических заболеваний.
Ознакомиться с деталями – https://kapelnica-ot-zapoya-krasnoyarsk6.ru/kapelnicza-ot-zapoya-czena-krasnoyarsk
На этом этапе специалист уточняет длительность запоя, характер употребляемого алкоголя и наличие сопутствующих заболеваний. Тщательный анализ собранной информации позволяет выбрать оптимальную тактику детоксикации и минимизировать риск осложнений.
Детальнее – вывод из запоя на дому цена екатеринбург
После первичного осмотра начинается активная фаза детоксикации. Современные медикаменты вводятся капельничным методом, что позволяет быстро вывести токсины из организма, нормализовать обмен веществ и восстановить работу внутренних органов.
Выяснить больше – вывод из запоя екатеринбург
Помощь нужна, если:
Узнать больше – http://vyvod-iz-zapoya-serpuhov3.ru
Клиническая практика показывает: только системная работа с пациентом даёт устойчивый результат. Программа включает медицинское, психологическое и социальное сопровождение.
Изучить вопрос глубже – нарколог лечение алкоголизма
growthio – Pages loaded fast, images appeared sharp, and formatting stayed consistent.
viralio – Content reads clearly, helpful examples made concepts easy to grasp.
rankster – Navigation felt smooth, found everything quickly without any confusing steps.
Процесс начинается с вызова врача или доставки пациента в клинику. После прибытия специалист проводит первичную диагностику: измерение давления, температуры, пульса, уровня кислорода в крови, визуальная оценка степени возбуждения или угнетения сознания. Собирается краткий анамнез: какой наркотик принимался, как долго, были ли сопутствующие заболевания.
Разобраться лучше – http://snyatie-lomki-podolsk1.ru
Эта публикация содержит набор несвязанных идей, трудно применимых в практике. Мы лишь поверхностно затрагиваем различные точки зрения, не проводя глубокий анализ и не предлагая выводов.
Подробнее читать – кето диета за неделю минус 10 кг
signalify – Loved the layout today; clean, simple, and genuinely user-friendly overall.
boostio – Found practical insights today; sharing this article with colleagues later.
campava – Appreciate the typography choices; comfortable spacing improved my reading experience.
у них Methoxetamine бадяженный или нет? сколько принял мг и какие симптомы были? кокс, меф, шиш, гаш Имею давний опыт работы с этим магазином.Сервис здесь один из лучших,всё делается оперативно вопросов нет.В последний раз заказал СНМ 50 и СНМ 55 по 50 гр обоих.По опыту знаю,что если один каннаб не айс,то в паре с любым другим он хоть как-то вытягивает.Но в этот раз пришло два пакета с одинаковым мелким белым порохом с сильным запахом нафталина.По весу всё замечательно,щедро подсыпано +50%.Только одно но.Данный реагент-чисто удобрение.Делал 1к5 кипячением в ИПС.Растворение хреновое,молоко.Хрень.Ну ладно,курили чистый порох из обоих пакетов.Хрень.Никто в здравом уме данным продуктом не заинтересуется-вывод не менее чем десяти тестеров.Короче я в попадосе.Да и вообще:
Обращение за наркологической помощью на дому требуется в случаях, когда состояние пациента не позволяет ему самостоятельно посетить клинику или есть необходимость в анонимном лечении.
Получить больше информации – нарколог на дом срочно в иркутске
Осложнения, к которым может привести отсутствие лечения:
Изучить вопрос глубже – снятие ломки нарколог в подольске
leadster – Bookmarked this immediately, planning to revisit for updates and inspiration.
Как подчёркивает врач-нарколог клиники «Крылья Надежды» Андрей Кузьмин: «Своевременное обращение к специалистам гарантирует не только быстрое восстановление, но и предупреждает развитие тяжёлых осложнений, которые могут навсегда изменить жизнь пациента».
Выяснить больше – вывод из запоя круглосуточно
сколько стоит заказать кухню по размерам zakazat-kuhnyu-1.ru .
ко ланта пляжи ко ланта как добраться
В зависимости от состояния пациента мы предлагаем два формата помощи: выезд нарколога на дом или госпитализацию в стационар. Оба варианта включают детоксикацию — выведение токсинов из организма с помощью инфузионной терапии (капельницы), а также медикаментозную поддержку: успокоительные, витамины, препараты для печени и сердца.
Получить дополнительную информацию – вывод из запоя круглосуточно
Алкогольный запой — это состояние, при котором человек теряет способность самостоятельно прекратить потребление спиртного и контролировать дозировку. В таких условиях нарастают неврологические и метаболические нарушения, возрастает риск серьёзных осложнений вплоть до алкогольного делирия. Наркологическая клиника «СамараМед» предлагает круглосуточную выездную помощь на дому в Самаре и области с гарантией полной анонимности и выездом специалиста в течение 30 минут после обращения. Наши врачи применяют современные протоколы детоксикации и психологической поддержки, что позволяет безопасно и максимально комфортно пройти через этап выхода из запоя и заложить прочный фундамент для дальнейшего восстановления.
Получить больше информации – вывод из запоя клиника самара
Если вовремя не принять меры, состояние может усугубиться, повышая риск серьёзных осложнений. Наиболее эффективным способом очищения организма является постановка капельницы, которая помогает быстро стабилизировать состояние. Клиника «Курс на ясность» оказывает экстренную наркологическую помощь с выездом врачей на дом 24/7.
Детальнее – http://kapelnica-ot-zapoya-krasnoyarsk6.ru
После первичного осмотра начинается активная фаза детоксикации. Современные медикаменты вводятся капельничным методом, что позволяет быстро вывести токсины из организма, нормализовать обмен веществ и восстановить работу внутренних органов.
Подробнее тут – вывод из запоя на дому недорого в екатеринбурге
Thank you for your sharing. I am worried that I lack creative ideas. It is your article that makes me full of hope. Thank you. But, I have a question, can you help me?
Алкогольная зависимость разрушает здоровье, семью, карьеру и личность. Чем раньше будет оказана профессиональная помощь, тем выше шансы на восстановление и возвращение к полноценной жизни. Лечение алкоголизма в Воронеже — помощь на всех стадиях зависимости позволяет справляться не только с физической тягой, но и с глубинными причинами, которые провоцируют патологическое употребление.
Получить дополнительную информацию – лечение алкоголизма в стационаре
Врач уточняет продолжительность запоя, характер употребляемого алкоголя и наличие сопутствующих заболеваний. Детальное обследование позволяет оперативно подобрать необходимые медикаменты и минимизировать риск осложнений.
Изучить вопрос глубже – капельница от запоя анонимно на дому тюмень
Проб НЕТ! кокс, меф, шиш, гаш или я что то не так понял?Хороший магазин,менеджер приятный по общению,недовесов не было у меня
Этот обзор позволяет по-новому взглянуть на вещи, на которые обычно и так смотрят. Мы упоминаем факты, которые мало что меняют, и события, значение которых трудно определить, но они всё равно здесь.
Вот – секс знакомства
Абстинентный синдром — одно из самых тяжёлых и опасных проявлений наркотической зависимости. Он развивается на фоне резкого отказа от приёма веществ и сопровождается сильнейшими нарушениями работы организма. Это состояние требует немедленного вмешательства. Самостоятельно справиться с ним невозможно — особенно если речь идёт о героине, метадоне, синтетических наркотиках или длительной зависимости. В клинике «НаркоПрофи» мы организовали систему снятия ломки в Подольске, работающую круглосуточно: как на дому, так и в условиях стационара.
Подробнее тут – снятие ломки цена
Наши опытные наркологи регулярно повышают квалификацию и используют современные методики для быстрого восстановления пациентов после запоев.
Подробнее – выезд на дом капельница от запоя нижний новгород
Аппаратные методы кодирования включают лазерную терапию и электростимуляцию биологически активных точек, влияющих на центры зависимости в головном мозге. Эти методики способствуют быстрому формированию устойчивого отвращения к спиртному и хорошо переносятся пациентами.
Исследовать вопрос подробнее – http://kodirovanie-ot-alkogolizma-odintsovo2.ru
Срочный вызов нарколога необходим, если:
Получить дополнительные сведения – частный нарколог на дом
Алкогольная зависимость — это хроническое заболевание, при котором устойчивое влечение к спиртному приводит к тяжёлым медицинским, социальным и психологическим последствиям. Когда пациент осознаёт, что самостоятельно справиться с этой проблемой не получается, наиболее эффективным методом становится кодирование от алкоголизма. В клинике «Ясное Будущее» в Одинцово мы используем сочетание проверенных методик кодирования и комплексной психологической поддержки, что позволяет достичь стойкой ремиссии и вернуть человеку контроль над собственной жизнью.
Получить дополнительную информацию – https://kodirovanie-ot-alkogolizma-odintsovo2.ru/kodirovanie-ot-alkogolizma-cena/
Недостаточно снять физическую зависимость — важно помочь человеку вернуться в сообщество. В «Доктор Здоровье» разработана система сопровождения, включающая мотивационные беседы, групповые занятия и социальную реабилитацию. Психотерапевты владеют методами когнитивно-поведенческой терапии и мотивационного интервью, консультанты помогают восстановить профессиональные навыки и адаптироваться к повседневной жизни, а встречи в группе взаимопомощи и психодраматические сессии способствуют укреплению чувства поддержки и навыков эффективного общения. Для родственников доступны семейные консультации, на которых объясняют природу зависимости и обучают стратегиям поддержки без критики и давления.
Узнать больше – https://narkologicheskaya-klinika-mytishchi1.ru/narkologicheskaya-klinika-ceny-v-mytishchah
чувак брал я тоже тут 2 ci некоторым понравилось некоторым нет , лично я поднимал даже с неё бабок норм, народу нравиться , а если этот каиф тебе не нравиться нех писать что тусишка бычий кайф , бычий каиф немного другое, а такои продукт не может быть бычий кайф это я тебе отвечаю, со входом согласен по ноздре ваще не вариант ! кокс, меф, шиш, гаш у кого взять собрался его ?нету. в ближайшее время не будет.
Недостаточно снять физическую зависимость — важно помочь человеку вернуться в сообщество. В «Доктор Здоровье» разработана система сопровождения, включающая мотивационные беседы, групповые занятия и социальную реабилитацию. Психотерапевты владеют методами когнитивно-поведенческой терапии и мотивационного интервью, консультанты помогают восстановить профессиональные навыки и адаптироваться к повседневной жизни, а встречи в группе взаимопомощи и психодраматические сессии способствуют укреплению чувства поддержки и навыков эффективного общения. Для родственников доступны семейные консультации, на которых объясняют природу зависимости и обучают стратегиям поддержки без критики и давления.
Выяснить больше – narkologicheskaya-klinika-narkolog
заказать кухню в рассрочку zakazat-kuhnyu-1.ru .
Длительный запой может привести к серьезным осложнениям, таким как повреждение печени, почек, сердечно-сосудистые нарушения и нервные расстройства. Чем быстрее начинается вывод из запоя, тем ниже риск развития хронических заболеваний. Срочный вызов нарколога на дом позволяет в первые часы кризиса начать детоксикацию, что существенно повышает шансы на полное восстановление организма. В условиях экстренной ситуации каждая минута имеет решающее значение, и своевременная помощь становится ключом к сохранению здоровья и жизни.
Углубиться в тему – вывод из запоя на дому цена в туле
При длительном запое в организме накапливаются вредные токсины, что ведёт к нарушениям работы сердца, печени, почек и других жизненно важных органов. Чем быстрее начинается терапия, тем выше шансы избежать серьёзных осложнений и обеспечить качественное восстановление. Метод капельничного лечения позволяет оперативно начать детоксикацию, что особенно важно для спасения жизни и предупреждения хронических последствий злоупотребления алкоголем.
Подробнее – http://kapelnica-ot-zapoya-tyumen00.ru/kapelnicza-ot-zapoya-na-domu-tyumen/
Алкогольный запой представляет собой тяжелое состояние, вызванное длительным бесконтрольным употреблением спиртных напитков. Без медицинского вмешательства вывести организм из запоя может быть сложно и даже опасно. Срочная помощь нарколога требуется при следующих признаках:
Получить дополнительную информацию – http://kapelnica-ot-zapoya-nizhniy-novgorod0.ru
Интернет-магазин «ЭЛЕК» специализируется на продаже судового электрооборудования, кабельной продукции и комплектующих с сертификатами Речного и Морского Регистра для судостроительных и судоремонтных предприятий. Ассортимент включает морские осветительные приборы, автоматы защиты, пускатели, ходовые огни, трансформаторное оборудование, датчики и кабельную продукцию разных сечений в наличии. Оформить заказ и ознакомиться с полным ассортиментом можно на https://shop.elekspb.ru/ Компания гарантирует быструю комплектацию заказов, транспортировку в любой регион страны и экспертные рекомендации при выборе техники.
На прошлой неделе в среду, был оплачен заказ, вот уже среда следующей недели, праздники прошли, в скайпе они пока что не появлялись. Пологаю что магазин загулял. https://pesni-gitara.ru Большое спасибо команде chemical-mix за проведенную сделку, с наступающим Вас Новым Годом!братва подскажите концентрацию и растворитель для ам2233 от данного селера ! Заранее спс
В нашей клинике применяются различные техники кодирования, которые подбираются с учётом медицинских показаний, психологического состояния и пожеланий пациента.
Получить дополнительные сведения – https://kodirovanie-ot-alkogolizma-odintsovo2.ru/kodirovanie-ot-alkogolizma-na-domu
Hello everyone!
Curate bug mysterious lists with interesting and valuable software patch impact and squash errors efficiently see on the website for bug trackers
Full information on the link – https://202fliks.site
All the best and development in business!
В основе нашей методики — комплексный подход, сочетающий медицинскую точку зрения и психологические технологии. Мы не ограничиваемся снятием абстиненции: задача клиники — помочь пациенту обрести новую мотивацию, развить навыки противостояния стрессам и возобновить социальную активность. Работа строится на трёх ключевых принципах:
Получить больше информации – narkologicheskaya-klinika-na-dom
Алкогольная зависимость — это хроническое заболевание, при котором устойчивое влечение к спиртному приводит к тяжёлым медицинским, социальным и психологическим последствиям. Когда пациент осознаёт, что самостоятельно справиться с этой проблемой не получается, наиболее эффективным методом становится кодирование от алкоголизма. В клинике «Ясное Будущее» в Одинцово мы используем сочетание проверенных методик кодирования и комплексной психологической поддержки, что позволяет достичь стойкой ремиссии и вернуть человеку контроль над собственной жизнью.
Изучить вопрос глубже – кодирование от алкоголизма цены
Этот сборник информации привлекает множеством мелких деталей и необычных ракурсов. Мы предлагаем взгляды, редко полезные, но способные немного разнообразить знакомство с темой.
Подробнее читать – https://rostov-narkologiya.ru/uslugi-ot-narkomanii/mefedronovaya-zavisimost
Параллельно с медицинской терапией начинается работа психотерапевта. В индивидуальных и семейных сессиях пациенты учатся распознавать механизмы зависимости, вырабатывать новые стратегии поведения и справляться со стрессовыми ситуациями без употребления. Последний этап — реабилитация и ресоциализация — включает трудотерапию, арт- и групповую терапию, помощь в восстановлении профессиональных навыков и возвращении к социально-активной жизни.
Подробнее – https://narkologicheskaya-klinika-mytishchi1.ru
Кодирование создаёт стойкое отвращение к этилированному спирту за счёт фармакологического или психотерапевтического воздействия, а дальнейшая работа с психологом помогает сформировать новую модель поведения и мотивацию к сохранению трезвости. Современные технологии в сочетании с индивидуальным подходом делают процедуру безопасной и максимально комфортной для пациента.
Подробнее можно узнать тут – http://kodirovanie-ot-alkogolizma-odintsovo2.ru/kodirovanie-ot-alkogolizma-na-domu/
Стоимость вывода из запоя определяется индивидуально и зависит от ряда факторов, таких как:
Подробнее – вывод из запоя дешево сочи
Услуга вызова нарколога на дом в Екатеринбурге представляет собой комплекс мер, направленных на оперативное стабилизирование состояния пациента. При поступлении вызова специалист проводит детальный осмотр, сбор анамнеза и диагностику состояния, после чего разрабатывается индивидуальный план лечения. Методика включает медикаментозную детоксикацию, коррекцию обменных процессов и психологическую поддержку, что обеспечивает комплексное восстановление здоровья без необходимости посещения стационара.
Ознакомиться с деталями – нарколог вывод из запоя екатеринбург
В нашей практике сочетаются несколько видов вмешательства: медико-биологическое, психологическое и социальное. Сначала проводится полная диагностика, включая лабораторные анализы и оценку работы сердца, печени, почек, а также психодиагностические тесты. После этого начинается этап детоксикации с внутривенными капельницами, которые выводят токсины, нормализуют водно-солевой баланс и восстанавливают основные функции организма. Далее мы применяем медикаментозную поддержку для стабилизации артериального давления, купирования тревожных симптомов, нормализации сна и уменьшения болевого синдрома.
Узнать больше – http://narkologicheskaya-klinika-mytishchi1.ru
Некоторые состояния требуют немедленного вмешательства нарколога, так как отказ от лечения может привести к тяжелым осложнениям и риску для жизни.
Подробнее – нарколог на дом вывод из запоя в новокузнецке
Мы понимаем, насколько важна приватность для пациентов и их близких. В «Возрождение» все обращения регистрируются по номеру договора, без упоминания личных данных в государственных базах. Даже близкие могут не знать точного диагноза, если пациент пожелает сохранить это в тайне.
Углубиться в тему – наркологическая клиника нарколог
В клинике «Детоксика» действует принцип прозрачного ценообразования: все расходы обсуждаются заранее, и никаких скрытых платежей нет.
Ознакомиться с деталями – вывод из запоя дешево
Запой сопровождается быстрым накоплением токсинов, что может привести к нарушению работы сердца, печени и почек. Использование капельничного метода позволяет оперативно ввести современные препараты для детоксикации, что способствует быстрому восстановлению обменных процессов и нормализации работы внутренних органов. Оперативное лечение на дому особенно актуально, когда каждая минута имеет значение для спасения здоровья.
Углубиться в тему – капельница от запоя на дому в тюмени
После вашего звонка нарколог выезжает на дом в течение 30–60 минут. Прибыв на место, специалист проводит всесторонний медицинский осмотр, включая измерение артериального давления, пульса и уровня кислорода в крови, а также собирает анамнез для определения степени интоксикации.
Детальнее – нарколог на дом недорого
При обращении по телефону или через электронную форму мы используем шифрование данных и не требуем ИНН или паспорта. Оплата производится безналичным переводом или анонимно — наличными через курьера, что позволяет сохранить полную приватность.
Ознакомиться с деталями – вывод из запоя на дому недорого
сейф встроенный в стену купить
были случаи кокс, меф, шиш, гаш Братки все красиво стряпают, претензий к магазину нуль, всегда всё ровно. Единственное что сейчас напрягло, отсутствие на ветке вашего представителя в ЕКБ “онлайн”, представитель молчит ( а там по делу ему в лс отписано) и кажись воопще не заходит пару недельДостойный, проверенный временем магазин!
Нарколог на дом в Новокузнецке – это возможность получить профессиональное медицинское лечение без госпитализации. Специалисты клиники «ЧистоЖизнь» приезжают в любое время суток, проводят детоксикацию, снимают абстинентный синдром и помогают пациенту стабилизировать состояние в комфортных домашних условиях.
Получить дополнительные сведения – https://narcolog-na-dom-novokuznetsk00.ru/narkolog-lechenie-na-domu-novokuzneczk/
Когда запой становится критическим, оперативное вмешательство имеет решающее значение для спасения здоровья и предотвращения необратимых последствий. Во Владимире экстренная помощь нарколога на дому позволяет быстро начать лечение, не требуя госпитализации, что особенно важно для пациентов, нуждающихся в сохранении конфиденциальности и комфорте.
Получить дополнительную информацию – вывод из запоя на дому недорого в владимире
Клиническая практика показывает: только системная работа с пациентом даёт устойчивый результат. Программа включает медицинское, психологическое и социальное сопровождение.
Углубиться в тему – наркологическая клиника лечение алкоголизма в воронеже
На основе собранной информации формируется индивидуальный план лечения, который включает установку внутривенной капельницы. Через капельницу вводятся специально подобранные растворы, способствующие быстрому выведению токсинов, восстановлению водно-электролитного баланса и нормализации работы внутренних органов. При необходимости назначаются дополнительные медикаменты для поддержки печени, сердца и нервной системы, а также для купирования симптомов абстинентного синдрома. Врач постоянно контролирует состояние пациента и корректирует лечение, чтобы добиться оптимальных результатов. Завершающим этапом является подробная консультация, в ходе которой специалист дает рекомендации по дальнейшему восстановлению и профилактике повторных эпизодов зависимости.
Получить больше информации – нарколог на дом недорого
Этот текст содержит различную информацию, которая, возможно, покажется любопытной, но в целом не меняет восприятия привычных вещей. Предлагаем просто получить удовольствие от чтения, не ожидая особой пользы.
Вот – блекджек
Врач уточняет, как долго продолжается запой, какие симптомы наблюдаются и присутствуют ли сопутствующие заболевания. Тщательный сбор информации позволяет оперативно подобрать необходимые медикаменты и начать детоксикацию.
Исследовать вопрос подробнее – капельница от запоя на дому тюмень
Лечение зависимости требует не только физической детоксикации, но и работы с психоэмоциональным состоянием пациента. Психотерапевтическая поддержка помогает выявить глубинные причины зависимости, снизить уровень стресса и сформировать устойчивые навыки самоконтроля, что существенно снижает риск рецидивов.
Подробнее тут – https://narcolog-na-dom-ufa000.ru/narkolog-na-dom-ufa-czeny
Аппаратные методы кодирования включают лазерную терапию и электростимуляцию биологически активных точек, влияющих на центры зависимости в головном мозге. Эти методики способствуют быстрому формированию устойчивого отвращения к спиртному и хорошо переносятся пациентами.
Исследовать вопрос подробнее – кодирование от алкоголизма цены
В клинике «Детоксика» действует принцип прозрачного ценообразования: все расходы обсуждаются заранее, и никаких скрытых платежей нет.
Узнать больше – http://vyvod-iz-zapoya-sochi77.ru
Незамедлительно после вызова нарколог прибывает на дом для проведения тщательного осмотра. На данном этапе специалист собирает анамнез, измеряет жизненно важные показатели — пульс, артериальное давление, температуру — и оценивает степень интоксикации. Эти данные являются основой для составления индивидуального плана лечения.
Разобраться лучше – вывод из запоя клиника в владимире
Клиника предлагает индивидуальный подход к каждому пациенту. Лечение начинается с детальной диагностики состояния здоровья, что позволяет врачу подобрать наиболее эффективную схему терапии.
Подробнее можно узнать тут – вывод из запоя
При вызовах в ночное время или в случаях с тяжелой интоксикацией стоимость может увеличиваться до 3000–4500 рублей. Окончательная сумма определяется после первичного осмотра и обсуждения индивидуальной схемы лечения с пациентом.
Подробнее тут – http://vyvod-iz-zapoya-vladimir00.ru
Алкогольная зависимость разрушает здоровье, семью, карьеру и личность. Чем раньше будет оказана профессиональная помощь, тем выше шансы на восстановление и возвращение к полноценной жизни. Лечение алкоголизма в Воронеже — помощь на всех стадиях зависимости позволяет справляться не только с физической тягой, но и с глубинными причинами, которые провоцируют патологическое употребление.
Подробнее – лечение алкоголизма кодирование воронеж
Все работает https://smartchoive.top Заказали 2c-i и 2c-p. Как придет в магазине появятся позиции. может и еще что привезут из заказанного курительного.Магазин не отвечает, может типо выходные, ждем понедельника.
Наркологическая клиника «Возрождение» в Уфе предоставляет полный спектр услуг по лечению зависимости от психоактивных веществ и алкоголя. Мы сочетаем проверенные временем медицинские методики с инновационными технологиями, сохраняя полную анонимность пациентов. В любом случае вы можете рассчитывать на круглосуточную поддержку, комфортные условия пребывания и индивидуальный план терапии, составленный опытными специалистами.
Углубиться в тему – https://narkologicheskaya-klinika-ufa9.ru/chastnaya-narkologicheskaya-klinika-ufa/
Некоторые состояния требуют немедленного вмешательства нарколога, так как отказ от лечения может привести к тяжелым осложнениям и риску для жизни.
Получить дополнительную информацию – платный нарколог на дом новокузнецк
В нашей практике сочетаются несколько видов вмешательства: медико-биологическое, психологическое и социальное. Сначала проводится полная диагностика, включая лабораторные анализы и оценку работы сердца, печени, почек, а также психодиагностические тесты. После этого начинается этап детоксикации с внутривенными капельницами, которые выводят токсины, нормализуют водно-солевой баланс и восстанавливают основные функции организма. Далее мы применяем медикаментозную поддержку для стабилизации артериального давления, купирования тревожных симптомов, нормализации сна и уменьшения болевого синдрома.
Исследовать вопрос подробнее – besplatnaya-narkologicheskaya-klinika
В зависимости от состояния пациента мы предлагаем два формата помощи: выезд нарколога на дом или госпитализацию в стационар. Оба варианта включают детоксикацию — выведение токсинов из организма с помощью инфузионной терапии (капельницы), а также медикаментозную поддержку: успокоительные, витамины, препараты для печени и сердца.
Узнать больше – http://vyvod-iz-zapoya-serpuhov3.ru/vyvod-iz-zapoya-cena-v-serpuhove/
В таких случаях своевременное обращение за помощью позволяет быстро стабилизировать состояние и предотвратить развитие серьезных осложнений.
Подробнее тут – нарколог на дом вывод из запоя
Срочное вмешательство врача необходимо при появлении следующих симптомов:
Разобраться лучше – vyvod iz zapoya na domu korolev
Сразу после вызова нарколог приезжает на дом для проведения первичного осмотра и диагностики. На этом этапе проводится сбор анамнеза, измеряются жизненно важные показатели (пульс, артериальное давление, температура) и определяется степень алкогольной интоксикации. Эти данные являются основой для разработки индивидуального плана лечения.
Получить дополнительную информацию – капельница от запоя круглосуточно
Запой — это не просто периодическое употребление спиртного, а опасное состояние, при котором организм находится в постоянной интоксикации, теряет ресурсы и перестаёт справляться с последствиями этанола. Со временем развивается тяжёлое отравление, нарушается работа сердца, печени, мозга, а попытка «самостоятельно бросить» может привести к судорогам, галлюцинациям и даже коме. Именно поэтому важно вовремя обратиться за медицинской помощью. В Серпухове вывод из запоя осуществляет наркологическая клиника «Новая Энергия» — мы выезжаем на дом круглосуточно и при необходимости госпитализируем пациента в стационар.
Получить дополнительные сведения – вывод из запоя
женщина в свадебном платье свадебные платья москва недорого каталог
Нужны столбики? мобильный столбик столбики для складов, парковок и общественных пространств. Прочные материалы, устойчивое основание и удобство перемещения обеспечивают безопасность и порядок.
Срочный вызов нарколога необходим, если:
Узнать больше – вызов врача нарколога на дом в иркутске
Я вам, Касух, советовал бы в скайпе этот вопрос решить. И в субботу и воскресенье магазин не работает, так что вполне закономерно что вам не отвечают. https://simonspark.ru Чемикал, пожалуй, самый ровный магаз из всех ныне сушествующих! Цены, конечно есть и по меньше в других местах, однако для себя я выбрал безопасность и надежное сотрудничество, а не дешевизну, которая как показывает практика всегда заканчивается не очень хорошо.Бро конечно я незнаю твою ситуацию, но с зданным магазом работал всегда всё на вышке было , и вот что думаю на 10 грамм смысла тебя кидать нет такому магазину!!!
Незамедлительно после вызова нарколог прибывает на дом для проведения тщательного осмотра. На данном этапе специалист собирает анамнез, измеряет жизненно важные показатели — пульс, артериальное давление, температуру — и оценивает степень интоксикации. Эти данные являются основой для составления индивидуального плана лечения.
Углубиться в тему – вывод из запоя клиника владимир
где можно купить провода проводка купить
Looking for a yacht? premium yacht experiences in Cyprus for unforgettable sea adventures. Charter luxury yachts, catamarans, or motorboats with or without crew. Explore crystal-clear waters, secluded bays, and iconic coastal locations in first-class comfort onboard.
Услуга “Нарколог на дом” в Уфе охватывает широкий спектр лечебных мероприятий, направленных как на устранение токсической нагрузки, так и на работу с психоэмоциональным состоянием пациента. Комплексная терапия включает в себя медикаментозную детоксикацию, корректировку обменных процессов, а также психотерапевтическую поддержку, что позволяет не только вывести пациента из состояния запоя, но и помочь ему справиться с наркотической зависимостью.
Исследовать вопрос подробнее – https://narcolog-na-dom-ufa000.ru/narkolog-na-dom-czena-ufa/
Чтобы избежать последствий и обеспечить безопасное восстановление организма, важно своевременно обратиться за профессиональной медицинской помощью. В клинике «Стоп-синдром» работает круглосуточная служба выезда нарколога на дом, что позволяет получить срочное лечение в комфортных условиях без госпитализации.
Детальнее – помощь нарколога на дому
Автоматические врезные пороги решают проблему теплоизоляции и звукоизоляции без создания барьеров в дверном проеме. Умные пороги устанавливаются на межкомнатные, пластиковые, алюминиевые и противопожарные двери любых типов. На портале https://smartporog.ru/ представлен каталог выпадающих порогов с подробными характеристиками и видеообзорами. Устройство автоматически опускается при закрытии двери, устраняя сквозняки, пыль и посторонние запахи. Продукция подходит для жилых и коммерческих помещений, обеспечивая комфорт и повышенную пожаробезопасность объектов.
В материале приведены детали, интересные, но не особенно важные. Мы рассматриваем аспекты, которые сложно назвать существенными, но включили их для большей полноты.
Подробнее читать – народные средства от диабета
При вызовах в ночное время или в случаях с тяжелой интоксикацией стоимость может увеличиваться до 3000–4500 рублей. Окончательная сумма определяется после первичного осмотра и обсуждения индивидуальной схемы лечения с пациентом.
Детальнее – вывод из запоя вызов на дом
После первичной диагностики начинается активная фаза детоксикации. Современные препараты вводятся капельничным методом, что позволяет быстро снизить концентрацию токсинов в крови и восстановить нормальные обменные процессы. Этот этап является основополагающим для стабилизации работы внутренних органов, таких как печень, почки и сердце.
Получить дополнительную информацию – врач на дом капельница от запоя тюмень
СПб все ровно процветания магазину. Амф на 5+ кокс, меф, шиш, гаш в каком городе брал и когда?интерисует барнаулЗанимайся я таким делом,коли вы не просили б о граммах 100,ответ был бы тот же. В таком деле главное-отсутствие жадности. Не надо гнаться за каждой копейкой,коли есть относительно безопасная отработанная схема,то и нечего от неё отклонятся. Вы видите в них кидал,они в вас красного.
Портал Kinotorrent с фильмами предлагает ознакомиться с увлекательными, популярными, а также редкими кинолентами, которые понравятся, независимо от интересов, возраста. На сайте https://kinotorrent.cc/ в огромном многообразии представлены зарубежные, а также отечественные фильмы, которые обязательно произведут на вас эффект.
Онлайн-магазин «АВК-авто» представляет обширный каталог шин и литых дисков для частных авто и LCV с транспортировкой по Петербургу и пригородам. В наличии летняя, зимняя и всесезонная резина от топовых международных брендов — Nokian, Michelin, Continental, Bridgestone, Pirelli, Hankook и прочих производителей разного ценового сегмента. Ознакомиться с каталогом продукции, подобрать резину по параметрам и оформить заказ можно на https://avk-tyres.ru/ Организация гарантирует бесплатную доставку продукции, квалифицированную помощь в подборе резины и монтаж колёс в фирменном техцентре.
Hello everyone!
Explore vast mysterious networks holding interesting and valuable data streams and connect dots across disciplines see on the website for network visualizers
Full information on the link – https://202fliks.site
All the best and development in business!
На этом этапе специалист уточняет длительность запоя, характер употребляемого алкоголя и наличие сопутствующих заболеваний. Тщательный анализ собранной информации позволяет выбрать оптимальную тактику детоксикации и минимизировать риск осложнений.
Ознакомиться с деталями – срочный вывод из запоя
Внутривенная инфузия – это один из самых быстрых и безопасных способов очистки организма от алкоголя и его токсичных продуктов распада. Она позволяет:
Узнать больше – капельница от запоя круглосуточно
Good afternoon!
Access exclusive mysterious reports with interesting and valuable industry data and gain a competitive edge instantly see on the website for industry reports
Full information on the link – https://101flow.site
All the best and development in business!
При длительном запое в организме накапливаются вредные токсины, что ведёт к нарушениям работы сердца, печени, почек и других жизненно важных органов. Чем быстрее начинается терапия, тем выше шансы избежать серьёзных осложнений и обеспечить качественное восстановление. Метод капельничного лечения позволяет оперативно начать детоксикацию, что особенно важно для спасения жизни и предупреждения хронических последствий злоупотребления алкоголем.
Исследовать вопрос подробнее – врача капельницу от запоя
В этом материале представлены детали, которые хоть и занимательны, но не особенно значимы. Мы рассматриваем моменты, которые трудно назвать важными, но всё же решили включить их для полноты картины.
Вот – покер онлайн
Магазин работает ровно !!! Качество реагента высокое!!! https://zimushka-zima.ru почему 0.3? акция?Жаль туси в наличии нет. хотелось именно тут взять. а как скоро появится не известно
Если пациент находится в критическом состоянии, не осознаёт происходящее, проявляет агрессию или, наоборот, впадает в апатию, не стоит ждать — необходимо вызвать нарколога немедленно.
Получить дополнительную информацию – http://narcolog-na-dom-v-irkutske6.ru/
Подписался на рассылку и получаю промокоды на Селектор казино рабочее зеркало — фриспины сыплются регулярно.
Чтобы избежать последствий и обеспечить безопасное восстановление организма, важно своевременно обратиться за профессиональной медицинской помощью. В клинике «Стоп-синдром» работает круглосуточная служба выезда нарколога на дом, что позволяет получить срочное лечение в комфортных условиях без госпитализации.
Разобраться лучше – http://
На этом этапе специалист уточняет длительность запоя, характер употребляемого алкоголя и наличие сопутствующих заболеваний. Тщательный анализ собранной информации позволяет выбрать оптимальную тактику детоксикации и минимизировать риск осложнений.
Получить дополнительную информацию – вывод из запоя цена екатеринбург
adster – Appreciate the typography choices; comfortable spacing improved my reading experience.
reacho – Mobile version looks perfect; no glitches, fast scrolling, crisp text.
После поступления заявки врач выезжает в течение 30–60 минут и по прибытии проводит диагностику, оценивает состояние пациента, измеряет пульс, давление, уровень кислорода в крови.
Получить больше информации – вызвать нарколога на дом срочно
offerorbit – Content reads clearly, helpful examples made concepts easy to grasp.
Врач уточняет продолжительность запоя, характер употребляемого алкоголя и наличие сопутствующих заболеваний. Детальное обследование позволяет оперативно подобрать необходимые медикаменты и минимизировать риск осложнений.
Выяснить больше – капельница от запоя вызов в тюмени
promova – Loved the layout today; clean, simple, and genuinely user-friendly overall.
Все пришло довольно быстро. https://quickdealht.top ребят , а 4-fa нормальная тема ? это типа живика чтоли ?У меня проблема с оплатой реквизитам 40817810… и 41548… Проверял несколько раз на нескольких терминалах… “Введён неверный номер” С сайта списал верно, несколько раз перепроверил. Вот так, хочу оплатить, а не могу, готов хоть блиц отправить или ещё как нибудь
При длительном запое в организме накапливаются вредные токсины, что ведёт к нарушениям работы сердца, печени, почек и других жизненно важных органов. Чем быстрее начинается терапия, тем выше шансы избежать серьёзных осложнений и обеспечить качественное восстановление. Метод капельничного лечения позволяет оперативно начать детоксикацию, что особенно важно для спасения жизни и предупреждения хронических последствий злоупотребления алкоголем.
Углубиться в тему – капельница от запоя цена
rankora – Bookmarked this immediately, planning to revisit for updates and inspiration.
Эффект
Ознакомиться с деталями – поставить капельницу от запоя на дому красноярск
При длительном запое в организме накапливаются вредные токсины, что ведёт к нарушениям работы сердца, печени, почек и других жизненно важных органов. Чем быстрее начинается терапия, тем выше шансы избежать серьёзных осложнений и обеспечить качественное восстановление. Метод капельничного лечения позволяет оперативно начать детоксикацию, что особенно важно для спасения жизни и предупреждения хронических последствий злоупотребления алкоголем.
Выяснить больше – вызвать капельницу от запоя в тюмени
trendfunnel – Found practical insights today; sharing this article with colleagues later.
Если человек находится в запое более 2-3 дней, его организм уже испытывает критическую нагрузку. Постоянное поступление этанола вызывает нарушение обмена веществ, токсическое поражение печени и нервной системы, обезвоживание и снижение иммунитета. Чаще всего самостоятельно прекратить запой уже невозможно, так как развивается абстинентный синдром (похмелье, ломка).
Узнать больше – врач нарколог на дом новокузнецк
Hello!
Protect sanity with interesting mysterious data holding valuable mental health keys and find peace in a chaotic world see on the website for wellness resources
Full information on the link – https://101flow.site
All the best and development in business!
В клинике «Детоксика» действует принцип прозрачного ценообразования: все расходы обсуждаются заранее, и никаких скрытых платежей нет.
Исследовать вопрос подробнее – вывод из запоя недорого сочи
Hello everyone!
Analyze complex mysterious systems to find interesting and valuable efficiency and streamline your operations significantly see on the website for efficiency calculators
Full information on the link – https://202fliks.site
All the best and development in business!
scaleify – Pages loaded fast, images appeared sharp, and formatting stayed consistent.
отзовусь о магазине, хороший,надежный) https://bereginy.ru Да туси тут очень качественная, жаль что заказать проблемно.хуй ты отпишешь! наркоман проклятый
На основе собранной информации формируется индивидуальный план лечения, который включает установку внутривенной капельницы. Через капельницу вводятся специально подобранные растворы, способствующие быстрому выведению токсинов, восстановлению водно-электролитного баланса и нормализации работы внутренних органов. При необходимости назначаются дополнительные медикаменты для поддержки печени, сердца и нервной системы, а также для купирования симптомов абстинентного синдрома. Врач постоянно контролирует состояние пациента и корректирует лечение, чтобы добиться оптимальных результатов. Завершающим этапом является подробная консультация, в ходе которой специалист дает рекомендации по дальнейшему восстановлению и профилактике повторных эпизодов зависимости.
Подробнее тут – вызвать врача нарколога на дом в воронеже
Услуга вызова нарколога на дом в Екатеринбурге представляет собой комплекс мер, направленных на оперативное стабилизирование состояния пациента. При поступлении вызова специалист проводит детальный осмотр, сбор анамнеза и диагностику состояния, после чего разрабатывается индивидуальный план лечения. Методика включает медикаментозную детоксикацию, коррекцию обменных процессов и психологическую поддержку, что обеспечивает комплексное восстановление здоровья без необходимости посещения стационара.
Получить дополнительную информацию – http://alko-zakodirovat.ru/narkolog-na-dom-czena-ekb/
Введение препаратов осуществляется внутривенно, что обеспечивает оперативное действие медикаментов. В состав лечебного раствора входят средства для детоксикации организма, нормализации водно-электролитного и кислотно-щелочного баланса. При необходимости врач дополнительно вводит препараты, защищающие печень, стабилизирующие работу сердца и успокаивающие нервную систему. Вся процедура проводится под строгим контролем нарколога, который следит за состоянием пациента и корректирует терапию при необходимости. По завершении процедуры врач дает пациенту и его родственникам подробные рекомендации по дальнейшему восстановлению и профилактике повторных запоев.
Детальнее – https://kapelnica-ot-zapoya-nizhniy-novgorod0.ru/vyzvat-kapelniczu-ot-zapoya-nizhnij-novgorod
Официальный новостной канал уникальной БК «1win» https://t.me/home_1win/ рекомендует ознакомиться со всеми новостями из жизни заведения. Здесь выкладывается вся важная информация, а также промокоды, которые помогут значительно сэкономить на развлечениях. Здесь также регулярно выкладываются различные заметки, фотографии и многое другое, что вызовет неподдельный интерес.
Онлайн-кинотеатр предлагает бесплатный просмотр новинок кино и сериалов 2026 года в высоком качестве без регистрации. Пользователи получают доступ к свежим премьерам, популярным блокбастерам и эксклюзивным сериалам сразу после выхода на экраны. Платформа http://kinoman1hd.online/ обеспечивает стабильную потоковую трансляцию и удобную навигацию по жанрам для быстрого поиска контента. Зрители смотрят фильмы на любых устройствах без ограничений по времени и количеству просмотров с комфортным интерфейсом.
Основная проблема запоя заключается в том, что человек постепенно теряет контроль над ситуацией, а его организм подвергается всё более тяжёлой интоксикации. Определить момент, когда требуется немедленное обращение за помощью, несложно, если внимательно следить за состоянием человека.
Исследовать вопрос подробнее – http://vyvod-iz-zapoya-korolev2.ru/srochnyj-vyvod-iz-zapoya/
Запой сопровождается быстрым накоплением токсинов, что может привести к нарушению работы сердца, печени и почек. Использование капельничного метода позволяет оперативно ввести современные препараты для детоксикации, что способствует быстрому восстановлению обменных процессов и нормализации работы внутренних органов. Оперативное лечение на дому особенно актуально, когда каждая минута имеет значение для спасения здоровья.
Выяснить больше – сколько стоит капельница от запоя в тюмени
Текст включает разнообразную информацию, которая может показаться любопытной, но не меняет устоявшегося восприятия. Предлагаем просто насладиться чтением, не ожидая значительной пользы.
Подробнее читать – диета для похудения быстро
На этом этапе специалист уточняет длительность запоя, характер употребляемого алкоголя и наличие сопутствующих заболеваний. Тщательный анализ собранной информации позволяет выбрать оптимальную тактику детоксикации и минимизировать риск осложнений.
Детальнее – alko-zakodirovat.ru/
Услуга вызова нарколога на дом в Екатеринбурге представляет собой комплекс мер, направленных на оперативное стабилизирование состояния пациента. При поступлении вызова специалист проводит детальный осмотр, сбор анамнеза и диагностику состояния, после чего разрабатывается индивидуальный план лечения. Методика включает медикаментозную детоксикацию, коррекцию обменных процессов и психологическую поддержку, что обеспечивает комплексное восстановление здоровья без необходимости посещения стационара.
Углубиться в тему – http://alko-zakodirovat.ru/zapoj-narkolog-na-dom-ekb/
Мы работаем без праздников и выходных, принимаем срочные обращения, выезжаем оперативно и оказываем помощь в полном соответствии с медицинскими стандартами. Главный принцип — безопасность, эффективность и деликатность. Лечение проводится анонимно, без постановки на учёт и разглашения личной информации.
Получить дополнительные сведения – анонимный вывод из запоя
Да я написал уже. Мб 2-dpmp в качестве компенсации подгонят, а вот что с фф не знаю, я ее проебал до того как я еще попробовал. https://vitoklad.club а чё ам закончился у вас? пишит нет на складечто-то отзывы с критикой сплошные( хотел 307 взять..а тут такое..
Использование автоматизированных систем дозирования обеспечивает точное введение лекарственных средств, что минимизирует риск передозировки и побочных эффектов. Постоянный мониторинг жизненно важных показателей позволяет врачу оперативно корректировать дозировки и адаптировать терапию под динамику состояния пациента.
Изучить вопрос глубже – скорая вывод из запоя в владимире
Как подчёркивает врач-нарколог клиники «Крылья Надежды» Андрей Кузьмин: «Своевременное обращение к специалистам гарантирует не только быстрое восстановление, но и предупреждает развитие тяжёлых осложнений, которые могут навсегда изменить жизнь пациента».
Подробнее можно узнать тут – vyvod iz zapoya na domu kruglosutochno
Запой — это не просто периодическое употребление спиртного, а опасное состояние, при котором организм находится в постоянной интоксикации, теряет ресурсы и перестаёт справляться с последствиями этанола. Со временем развивается тяжёлое отравление, нарушается работа сердца, печени, мозга, а попытка «самостоятельно бросить» может привести к судорогам, галлюцинациям и даже коме. Именно поэтому важно вовремя обратиться за медицинской помощью. В Серпухове вывод из запоя осуществляет наркологическая клиника «Новая Энергия» — мы выезжаем на дом круглосуточно и при необходимости госпитализируем пациента в стационар.
Узнать больше – https://vyvod-iz-zapoya-serpuhov3.ru/vyvod-iz-zapoya-cena-v-serpuhove
Наши опытные наркологи регулярно повышают квалификацию и используют современные методики для быстрого восстановления пациентов после запоев.
Получить дополнительные сведения – поставить капельницу от запоя на дому в нижнем новгороде
Запой — это тяжёлое состояние, характеризующееся длительным употреблением алкоголя, при котором человек не в силах самостоятельно прекратить пить. Алкогольная интоксикация при длительных запоях вызывает нарушения в работе всех органов и систем, приводя к серьёзным последствиям, таким как инфаркты, инсульты, психозы и даже летальный исход. В такой ситуации единственным надёжным решением становится обращение за профессиональной помощью.
Получить дополнительные сведения – http://vyvod-iz-zapoya-korolev2.ru/
Услуга вызова нарколога на дом в Екатеринбурге представляет собой комплекс мер, направленных на оперативное стабилизирование состояния пациента. При поступлении вызова специалист проводит детальный осмотр, сбор анамнеза и диагностику состояния, после чего разрабатывается индивидуальный план лечения. Методика включает медикаментозную детоксикацию, коррекцию обменных процессов и психологическую поддержку, что обеспечивает комплексное восстановление здоровья без необходимости посещения стационара.
Узнать больше – нарколог вывод из запоя
Мы понимаем, насколько важна приватность для пациентов и их близких. В «Возрождение» все обращения регистрируются по номеру договора, без упоминания личных данных в государственных базах. Даже близкие могут не знать точного диагноза, если пациент пожелает сохранить это в тайне.
Ознакомиться с деталями – http://narkologicheskaya-klinika-ufa9.ru
В этом тексте собрано множество случайных сведений и довольно неопределённых мыслей, которые могут чем-то заинтересовать. Мы отмечаем моменты, которые не особенно важны, но всё же занимают своё место в повествовании.
Вот – виртуальное казино
Мы работаем без праздников и выходных, принимаем срочные обращения, выезжаем оперативно и оказываем помощь в полном соответствии с медицинскими стандартами. Главный принцип — безопасность, эффективность и деликатность. Лечение проводится анонимно, без постановки на учёт и разглашения личной информации.
Получить дополнительные сведения – вывод из запоя дешево
В нашей клинике применяются различные техники кодирования, которые подбираются с учётом медицинских показаний, психологического состояния и пожеланий пациента.
Подробнее можно узнать тут – центр кодирования от алкоголизма
необычно спрятано было в посыле) https://kadastr-navigator.ru Плохует мягко сказано,уже больше пол месяца жду.Тебе кстати пришла?по времени ждал не долго дня 4 но доставка отдала на 2ой день как пришло , конспирация мне очень понравилась на все 100% магазину 100 из 100 и большой спс )
Такая комплексная терапия помогает не только устранить симптомы похмельного синдрома, но и ускорить восстановление организма, снижая вероятность осложнений.
Выяснить больше – вызвать капельницу от запоя на дому в красноярске
кайт кайт школа
Если вовремя не принять меры, состояние может усугубиться, повышая риск серьёзных осложнений. Наиболее эффективным способом очищения организма является постановка капельницы, которая помогает быстро стабилизировать состояние. Клиника «Курс на ясность» оказывает экстренную наркологическую помощь с выездом врачей на дом 24/7.
Подробнее – капельница от запоя цена в красноярске
В этом материале представлены детали, которые хоть и занимательны, но не особенно значимы. Мы рассматриваем моменты, которые трудно назвать важными, но всё же решили включить их для полноты картины.
Вот – милфы
Публикация предоставляет читателю набор разрозненных идей, которые сложно применить на практике. Мы лишь слегка касаемся разных точек зрения, не углубляясь в анализ и не предлагая никаких выводов.
Вот – казино онлайн
порно мамки
Все медицинские записи и личные данные хранятся на защищённых серверах с ограниченным доступом. Только лечащий врач и медицинская сестра имеют право просматривать их при необходимости оказания помощи.
Подробнее тут – срочный вывод из запоя
Мы не делаем «массовых решений»: каждый пациент для нас — уникальная история, и мы строим терапию, исходя из его состояния, целей и личных возможностей. Наша задача — не просто временно облегчить симптомы, а дать человеку реальные инструменты для жизни без зависимости.
Углубиться в тему – https://narkologicheskaya-klinika-mytishchi1.ru/chastnaya-narkologicheskaya-klinika-v-mytishchah/
Срочное вмешательство врача необходимо при появлении следующих симптомов:
Подробнее тут – вывод из запоя круглосуточно
Hello everyone!
Learn bake mysterious secrets to find interesting and valuable pastry facts now and create sweet masterpieces see on the website for baking tutorials
Full information on the link – https://101flow.site
All the best and development in business!
Компания специализируется на профессиональных услугах высокого качества для развития вашего бизнеса. Команда опытных специалистов предлагает комплексный подход к решению задач любой сложности. Ознакомиться с полным спектром услуг можно на https://waltzprof.com/ где представлена детальная информация о направлениях работы. Индивидуальный подход к каждому клиенту и использование современных технологий обеспечивают результат, превосходящий ожидания. Профессионализм и ответственность делают сотрудничество максимально эффективным.
Мы работаем без праздников и выходных, принимаем срочные обращения, выезжаем оперативно и оказываем помощь в полном соответствии с медицинскими стандартами. Главный принцип — безопасность, эффективность и деликатность. Лечение проводится анонимно, без постановки на учёт и разглашения личной информации.
Узнать больше – https://vyvod-iz-zapoya-serpuhov3.ru/anonimnyj-vyvod-iz-zapoya-v-serpuhove/
בחיים ומסוגלת לספונטניות. בחדר חשוך, שבו האור היחיד היה זוהר הירח, היא הניחה אותו על הרצפה, מכסה את עיניה בצעיף משי שחור. קולה רעד: אתה יכול להדריך אותי עם הידיים שלך אם אתה רוצה. עוצמתיות, מלכלך את עורה, את שערה, את הסדינים. רעדתי בכל גופי, נשענתי על ידי הרועדות ולא יכולתי להוציא מילה. באוזניים היה צלצול מחריש אוזניים. שקט. אחרי הרעש, הגניחות והצרחות הצרודות https://sexedex.com/
Я всегда пишу благодарность везде, мыло, ася, форум и т.д. Может это только я так делаю, но думаю, что так должны все делать. кокс, меф, шиш, гаш Я ж тебя хотел отпиарить.я не знаю чего тебе делать!
Клиника предлагает индивидуальный подход к каждому пациенту. Лечение начинается с детальной диагностики состояния здоровья, что позволяет врачу подобрать наиболее эффективную схему терапии.
Исследовать вопрос подробнее – http://vyvod-iz-zapoya-korolev2.ru
Аппаратные методы кодирования включают лазерную терапию и электростимуляцию биологически активных точек, влияющих на центры зависимости в головном мозге. Эти методики способствуют быстрому формированию устойчивого отвращения к спиртному и хорошо переносятся пациентами.
Углубиться в тему – http://kodirovanie-ot-alkogolizma-odintsovo2.ru
Помощь нужна, если:
Ознакомиться с деталями – https://vyvod-iz-zapoya-serpuhov3.ru/srochnyj-vyvod-iz-zapoya-v-serpuhove/
Недостаточно снять физическую зависимость — важно помочь человеку вернуться в сообщество. В «Доктор Здоровье» разработана система сопровождения, включающая мотивационные беседы, групповые занятия и социальную реабилитацию. Психотерапевты владеют методами когнитивно-поведенческой терапии и мотивационного интервью, консультанты помогают восстановить профессиональные навыки и адаптироваться к повседневной жизни, а встречи в группе взаимопомощи и психодраматические сессии способствуют укреплению чувства поддержки и навыков эффективного общения. Для родственников доступны семейные консультации, на которых объясняют природу зависимости и обучают стратегиям поддержки без критики и давления.
Выяснить больше – https://narkologicheskaya-klinika-mytishchi1.ru/chastnaya-narkologicheskaya-klinika-v-mytishchah
«АВПринтПак» занимается изготовлением упаковки и печатной продукции для коммерческих организаций в столице и по всей стране. Предприятие производит презентационные коробки из разных типов картона, цилиндрическую тару, крафт-пакеты, стикеры, рекламные каталоги, буклеты и торговое оборудование с фирменной символикой и индивидуальным оформлением. Ознакомиться с полным каталогом продукции и рассчитать стоимость заказа можно на https://avprintpak.ru/ Компания обеспечивает офсетную полиграфию, фольгирование, частичное УФ-лакирование, производство вкладышей и быструю реализацию проектов разного уровня с транспортировкой.
Ну что кто нить УРБ попробовал уже как отзывы ? https://kandidat24.ru Вчера оплатил, сегодня получил бьющийся трек. Так что все норм. Разговор в скайпе длился 30мин, я оплатил и через 2 часа мне уже выслали посылку. Осталось проверить кач-во фашки. Если все норм, сработаемся с конторой.Извеняюсь за вышесказанное,магазин отличный..я думаю поторопился с выводами,продовци отзывчиввые идут на встречу,спасибо)) насчет 4фа..меня он действительно почти невставил,но скорее всего это толерантность от 2сi,которая как я узнал недавно длиться неделю..так что в конце недели протестирую повторно,пока крепанусь) потом сообщю)))
Состав инфузии подбирается врачом индивидуально, с учётом состояния пациента, длительности запоя, возраста и хронических заболеваний.
Подробнее можно узнать тут – https://kapelnica-ot-zapoya-krasnoyarsk6.ru/kapelnicza-ot-zapoya-na-domu-krasnoyarsk
Лечение зависимости требует не только физической детоксикации, но и работы с психоэмоциональным состоянием пациента. Психотерапевтическая поддержка помогает выявить глубинные причины зависимости, снизить уровень стресса и сформировать устойчивые навыки самоконтроля, что существенно снижает риск рецидивов.
Получить дополнительные сведения – нарколог на дом круглосуточно уфа
Если вовремя не принять меры, состояние может усугубиться, повышая риск серьёзных осложнений. Наиболее эффективным способом очищения организма является постановка капельницы, которая помогает быстро стабилизировать состояние. Клиника «Курс на ясность» оказывает экстренную наркологическую помощь с выездом врачей на дом 24/7.
Подробнее – сколько стоит капельница от запоя
Если вовремя не принять меры, состояние может усугубиться, повышая риск серьёзных осложнений. Наиболее эффективным способом очищения организма является постановка капельницы, которая помогает быстро стабилизировать состояние. Клиника «Курс на ясность» оказывает экстренную наркологическую помощь с выездом врачей на дом 24/7.
Выяснить больше – https://kapelnica-ot-zapoya-krasnoyarsk6.ru/vyzvat-kapelniczu-ot-zapoya-krasnoyarsk
При вызовах в ночное время или в случаях с тяжелой интоксикацией стоимость может увеличиваться до 3000–4500 рублей. Окончательная сумма определяется после первичного осмотра и обсуждения индивидуальной схемы лечения с пациентом.
Изучить вопрос глубже – вывод из запоя капельница владимир
смотреть порно видео
Наши опытные наркологи регулярно повышают квалификацию и используют современные методики для быстрого восстановления пациентов после запоев.
Изучить вопрос глубже – капельница от запоя недорого нижний новгород
Клиника «ТоксинНет» предлагает профессиональную помощь при алкогольной зависимости и запоях в Нижнем Новгороде. Наши опытные наркологи круглосуточно выезжают на дом для оказания экстренной медицинской помощи. Основным методом лечения является капельница от запоя, которая позволяет оперативно снять интоксикацию и стабилизировать общее состояние пациента. Мы обеспечиваем конфиденциальность, индивидуальный подход и высокий уровень безопасности процедур.
Углубиться в тему – http://kapelnica-ot-zapoya-nizhniy-novgorod0.ru
Ищете банкротство физ. лиц в Самаре? Посетите Центр банкротства https://fizbankrot-smr.ru/ – это возможность законно списать долги. Узнайте на сайте стоимость всего комплекса юр. услуг, входящих в цену. При необходимости рассчитайте цену услуги онлайн. Даем гарантию по договору, предлагаем сжатые сроки процедуры и списание долгов под ключ. Профессиональный опыт более 10 лет. Подробнее на сайте.
При остром алкогольном отравлении появляются головокружение, рвота, сильная слабость, скачки давления, нарушение дыхания, обмороки и судороги. Это сигнал о том, что организм не справляется с интоксикацией, и без срочного медицинского вмешательства возможны опасные осложнения, вплоть до комы.
Получить больше информации – http://narcolog-na-dom-novokuznetsk00.ru/narkolog-na-dom-czena-novokuzneczk/
Эта публикация содержит набор несвязанных идей, трудно применимых в практике. Мы лишь поверхностно затрагиваем различные точки зрения, не проводя глубокий анализ и не предлагая выводов.
Подробнее читать – https://rostov-narkologiya.ru
ну то что ценники здесь шикарные заметил!и то что на “главной”-это и заинтересовало меня,но насторажило одновременно!ges_hmm.gifПосмотрим,что выйдет из-этого.Пока всё гладко! https://bereginy.ru Благо им! Биза на высотуТолько что принесли, позже трип отпишу)
В таких случаях своевременное обращение за помощью позволяет быстро стабилизировать состояние и предотвратить развитие серьезных осложнений.
Получить дополнительные сведения – помощь нарколога на дому в воронеже
Когда проблема зависимости достигает критического уровня, оперативное вмешательство становится необходимостью. В Екатеринбурге профессиональные наркологи готовы выехать на дом круглосуточно, чтобы начать лечение зависимости немедленно. Такой формат оказания помощи позволяет пациенту получить качественную терапию в знакомой и уютной обстановке, что значительно снижает уровень стресса и способствует быстрому восстановлению.
Получить дополнительную информацию – вывод из запоя в екатеринбурге
Лечение на дому начинается с выезда нарколога, который проводит первичный осмотр, оценивает физическое и эмоциональное состояние пациента и назначает индивидуальную программу терапии. Комплексный подход включает медикаментозную детоксикацию и психологическую поддержку, позволяющие обеспечить быстрое и безопасное восстановление.
Подробнее тут – http://narcolog-na-dom-v-irkutske66.ru
При обращении по телефону или через электронную форму мы используем шифрование данных и не требуем ИНН или паспорта. Оплата производится безналичным переводом или анонимно — наличными через курьера, что позволяет сохранить полную приватность.
Разобраться лучше – анонимный вывод из запоя в самаре
Компоненты капельницы
Ознакомиться с деталями – вызвать капельницу от запоя на дому
Алкогольная и наркотическая зависимость оказывают разрушительное воздействие на организм, нарушая работу сердечно-сосудистой системы, печени, почек и головного мозга. Запои и передозировки приводят к острой интоксикации, которая без медицинской помощи может перерасти в поражение внутренних органов, психоз или даже летальный исход.
Разобраться лучше – врач нарколог выезд на дом в новокузнецке
В таких случаях своевременное обращение за помощью позволяет быстро стабилизировать состояние и предотвратить развитие серьезных осложнений.
Получить дополнительную информацию – https://narcolog-na-dom-voronezh0.ru/
магаз ровный!!! все на высшем уровне!!! работаю с ними много лет!!! https://kadastr-navigator.ru И все бы ничего, да вот только доставка стоит 1490 рублей, я по собственному опыту знаю что почта уже в пятницу вручила бы мне посылку, за Гораздо меньшие деньги, а кроме почты у нас и нет ничего, поселок в сибири! Зачем было выбирать эту курьерку непонятно, тем более что отзывы про нее никакие! Неужели непонятно что дрога ложка к обеду, да и вообще, не понятно до сих пор была ли вообще отправка!!!Получил свой заказ,дошло довольно быстро, спасибо chemical-mix.com , за нормальный вес и хорошию работу !
Срочное вмешательство врача необходимо при появлении следующих симптомов:
Подробнее можно узнать тут – http://
Процесс вывода из запоя состоит из нескольких последовательных этапов, каждый из которых играет свою ключевую роль в обеспечении стабильного результата и безопасности пациента.
Изучить вопрос глубже – https://vyvod-iz-zapoya-arkhangelsk66.ru/vyvod-iz-zapoya-na-domu-arkhangelsk
Услуга вызова нарколога на дом востребована благодаря оперативности и конфиденциальности. Медицинская бригада прибывает на адрес в течение часа после обращения, оснащена всем необходимым оборудованием и медикаментами. Врач проводит осмотр, измеряет давление, пульс, уровень кислорода в крови и определяет степень интоксикации. После этого назначается капельница для детоксикации, снижения нагрузки на печень и восстановления водно-солевого баланса. Все процедуры проходят под контролем специалиста, а состояние пациента фиксируется в медицинской карте.
Получить дополнительные сведения – помощь нарколога на дому в красноярске
Врач уточняет, как долго продолжается запой, какие симптомы наблюдаются и присутствуют ли сопутствующие заболевания. Тщательный сбор информации позволяет оперативно подобрать необходимые медикаменты и начать детоксикацию.
Ознакомиться с деталями – капельница от запоя на дому недорого в тюмени
Запой — это не просто периодическое употребление спиртного, а опасное состояние, при котором организм находится в постоянной интоксикации, теряет ресурсы и перестаёт справляться с последствиями этанола. Со временем развивается тяжёлое отравление, нарушается работа сердца, печени, мозга, а попытка «самостоятельно бросить» может привести к судорогам, галлюцинациям и даже коме. Именно поэтому важно вовремя обратиться за медицинской помощью. В Серпухове вывод из запоя осуществляет наркологическая клиника «Новая Энергия» — мы выезжаем на дом круглосуточно и при необходимости госпитализируем пациента в стационар.
Исследовать вопрос подробнее – помощь вывод из запоя
Основная проблема запоя заключается в том, что человек постепенно теряет контроль над ситуацией, а его организм подвергается всё более тяжёлой интоксикации. Определить момент, когда требуется немедленное обращение за помощью, несложно, если внимательно следить за состоянием человека.
Получить дополнительные сведения – вывод из запоя королев
Good afternoon!
Reveal emotion mysterious triggers within interesting stories offering valuable empathy and master your emotional responses see on the website for emotion guides
Full information on the link – https://101flow.site
All the best and development in business!
Этот обзор позволяет по-новому взглянуть на вещи, на которые обычно и так смотрят. Мы упоминаем факты, которые мало что меняют, и события, значение которых трудно определить, но они всё равно здесь.
Вот – бесплатные вращения в слотах
Многие родственники надеются, что человек «проспится», что со временем ему станет легче. Но практика показывает: если запой длится более суток, а тем более — несколько дней, состояние будет только ухудшаться. Организм теряет воду, витамины, нарушаются обменные процессы, появляется тревожность, бессонница, тремор, скачки давления. В сложных случаях развиваются острые психозы (делирий), судороги и отказ внутренних органов.
Получить дополнительную информацию – https://vyvod-iz-zapoya-serpuhov3.ru/vyvod-iz-zapoya-na-domu-v-serpuhove
и такая хрень каждый день. https://mefedronetop.club Отписываюсь по 1к20.получилось в принципе неплохо,но и супер тоже не назовешь. припирает по кумполу практически сразу. сделано было пару напасов. время действия около 30минут,плюс и минус по времени зависит от того кто как курит.если сравнивать с 203 то кайфец по позитивнее будет.и еще было сделано на спирту.Вообщем щас сохнет 1к15 сделанный на растворителе. протестим отпишем. Смущает только одно-осадок остается.не до конца вообщем растворяется,а так все нормально.не плохие ребята, все в срок и по месту)
Клиника «ТоксинНет» предлагает профессиональную помощь при алкогольной зависимости и запоях в Нижнем Новгороде. Наши опытные наркологи круглосуточно выезжают на дом для оказания экстренной медицинской помощи. Основным методом лечения является капельница от запоя, которая позволяет оперативно снять интоксикацию и стабилизировать общее состояние пациента. Мы обеспечиваем конфиденциальность, индивидуальный подход и высокий уровень безопасности процедур.
Подробнее тут – https://kapelnica-ot-zapoya-nizhniy-novgorod0.ru/
Незамедлительно после вызова нарколог прибывает на дом для проведения тщательного осмотра. На данном этапе специалист собирает анамнез, измеряет жизненно важные показатели — пульс, артериальное давление, температуру — и оценивает степень интоксикации. Эти данные являются основой для составления индивидуального плана лечения.
Получить дополнительные сведения – вывод из запоя на дому недорого
Услуга “капельница от запоя” на дому имеет ряд преимуществ, делающих её оптимальным выбором для экстренной помощи:
Выяснить больше – капельница от запоя анонимно на дому тюмень
порно мать
Алкогольный запой представляет собой тяжелое состояние, вызванное длительным бесконтрольным употреблением спиртных напитков. Без медицинского вмешательства вывести организм из запоя может быть сложно и даже опасно. Срочная помощь нарколога требуется при следующих признаках:
Изучить вопрос глубже – https://kapelnica-ot-zapoya-nizhniy-novgorod0.ru/vyzvat-kapelniczu-ot-zapoya-nizhnij-novgorod
При обращении по телефону или через электронную форму мы используем шифрование данных и не требуем ИНН или паспорта. Оплата производится безналичным переводом или анонимно — наличными через курьера, что позволяет сохранить полную приватность.
Подробнее тут – скорая вывод из запоя в самаре
Алкогольный запой представляет собой тяжелое состояние, вызванное длительным бесконтрольным употреблением спиртных напитков. Без медицинского вмешательства вывести организм из запоя может быть сложно и даже опасно. Срочная помощь нарколога требуется при следующих признаках:
Получить дополнительные сведения – капельница от запоя недорого в нижнем новгороде
In the bustling world of online gaming, the vulkanvegas app android casino stands out as a versatile platform for players seeking excitement and reliability. It delivers smooth navigation, secure payments, and a rich library of games that appeal to both newcomers and seasoned bettors. Users appreciate the quick setup process and the intuitive interface that makes it easy to find favorite titles and new releases alike.
The app provides a solid range of slots, table games, and live dealer experiences that are designed to simulate the thrill of a real casino. With high-quality graphics and responsive controls, players can enjoy immersive sessions on the go. The Android version emphasizes fast loading times and stable performance, even on devices with modest specs. Innovative features, such as boosted bonuses and personalized recommendations, further enhance the gaming journey.
For beginners, tutorials and helpful tips are readily available within the VulkanVegas ecosystem, helping newcomers learn rules and strategies. The platform also emphasizes responsible gambling, offering tools for setting limits and monitoring activity. Regular updates ensure compatibility with the latest Android versions and security improvements. Customer support is reachable through multiple channels, providing timely assistance whenever needed.
Security and fairness lie at the core of the vulkanvegas app android casino, with encryption protocols and certified random number generators ensuring trusted play. Users can deposit and withdraw using a variety of methods, backed by robust fraud detection and transparent terms. The app maintains a clear privacy policy and strong data protection measures to safeguard personal information. Overall, the Vulkan Vegas Android app offers a compelling blend of accessibility, entertainment, and safety for casino enthusiasts on mobile devices.
vulkanbet app https://vulkan-vegas.nz/app/
вывод из запоя на дому в ростове на дону вывод из запоя на дому в ростове на дону .
Нарколог на дом в Новокузнецке – это возможность получить профессиональное медицинское лечение без госпитализации. Специалисты клиники «ЧистоЖизнь» приезжают в любое время суток, проводят детоксикацию, снимают абстинентный синдром и помогают пациенту стабилизировать состояние в комфортных домашних условиях.
Детальнее – https://narcolog-na-dom-novokuznetsk00.ru/narkolog-na-dom-klinika-novokuzneczk
После первичного осмотра начинается активная фаза детоксикации. Современные препараты вводятся капельничным методом для быстрого снижения уровня токсинов в крови и восстановления обменных процессов. Этот этап критически важен для нормализации работы печени, почек и сердечно-сосудистой системы.
Получить дополнительную информацию – вывод из запоя капельница
На основе собранной информации формируется индивидуальный план лечения, который включает установку внутривенной капельницы. Через капельницу вводятся специально подобранные растворы, способствующие быстрому выведению токсинов, восстановлению водно-электролитного баланса и нормализации работы внутренних органов. При необходимости назначаются дополнительные медикаменты для поддержки печени, сердца и нервной системы, а также для купирования симптомов абстинентного синдрома. Врач постоянно контролирует состояние пациента и корректирует лечение, чтобы добиться оптимальных результатов. Завершающим этапом является подробная консультация, в ходе которой специалист дает рекомендации по дальнейшему восстановлению и профилактике повторных эпизодов зависимости.
Получить дополнительную информацию – нарколог на дом
На прошлой неделе в среду, был оплачен заказ, вот уже среда следующей недели, праздники прошли, в скайпе они пока что не появлялись. Пологаю что магазин загулял. https://simonspark.ru Моя первая покупка на динамите и, внезапно для самой себя, наход. Сняла, как говорится, в касание. С вашим охуенным мефчиком сорвала себе почти год ЗОЖа и ни чуть не жалею.A F-16 сразу в мягком виде приходит, да?
Скачайте активатор для Windows 11 и получите все функции Pro-версии бесплатно.
Подробнее – Windows 11 активатор на русском
Компания специализируется на производстве и продаже качественных пиломатериалов для строительства и отделки. В ассортименте представлены доска, брус, вагонка, блок-хаус, террасная доска и другие изделия из натурального дерева. На сайте https://doskivdom.ru/ можно ознакомиться с полным каталогом продукции и актуальными ценами от производителя. Доставка осуществляется по Москве и Московской области в удобное для клиента время. Собственное производство гарантирует высокое качество материалов и выгодные условия сотрудничества для оптовых и розничных покупателей.
Good afternoon!
Discover modern mysterious data offering interesting and valuable facts for all and stay updated with the latest discoveries see on the website for news feeds
Full information on the link – https://101flow.site
All the best and development in business!
На нашем сайте вы можете скачать активатор для Windows 11 абсолютно бесплатно и навсегда забыть о водяных знаках!
Подробнее – Windows 11 кряк 2026 скачать
Пациенты, которые выбирают нашу клинику для лечения алкогольного запоя, получают качественную и оперативную помощь, обладающую следующими преимуществами:
Подробнее можно узнать тут – https://kapelnica-ot-zapoya-nizhniy-novgorod0.ru/
Творческая студия «LedMaster» уже 20 лет создает изысканные и роскошные скульптуры изо льда. Они всегда смотрятся привлекательно, презентабельно и необычно на любом торжестве. Ледяные фигурки украсят фотозону, сделав ее ярким акцентом самого грандиозного мероприятия. На сайте https://led-msk.com/ ознакомьтесь с тем, какие услуги вы сможете заказать в этой компании.
Состав инфузии подбирается врачом индивидуально, с учётом состояния пациента, длительности запоя, возраста и хронических заболеваний.
Выяснить больше – капельница от запоя на дому круглосуточно красноярск
не паникуй бро, всё ровно будет, я уверен… кокс, меф, шиш, гаш отличный магазин! обращаюсь уже не первый месяц2 трека где то по 30мг.
Когда запой приводит к критическому ухудшению состояния, оперативное лечение становится жизненно необходимым. В Тюмени доступна услуга капельничного вывода из запоя на дому, которая позволяет начать детоксикацию организма незамедлительно и в комфортной для пациента обстановке. Такой формат терапии помогает не только вывести токсины, но и значительно снизить риск осложнений, сохраняя при этом полную конфиденциальность.
Изучить вопрос глубже – капельница от запоя цена тюмень
Видеоканал представляет подробные обзоры мототехники и электротранспорта для покупателей разного уровня. Профессиональные ролики демонстрируют характеристики квадроциклов, питбайков и электросамокатов в реальных условиях эксплуатации. На канале https://vkvideo.ru/@moto_dv_ru публикуются инструкции по обслуживанию техники и советы по выбору моделей. Видеоформат позволяет детально рассмотреть особенности каждого транспортного средства перед покупкой. Регулярные обновления контента помогают оставаться в курсе новинок рынка мототехники.
Параллельно с медицинской терапией начинается работа психотерапевта. В индивидуальных и семейных сессиях пациенты учатся распознавать механизмы зависимости, вырабатывать новые стратегии поведения и справляться со стрессовыми ситуациями без употребления. Последний этап — реабилитация и ресоциализация — включает трудотерапию, арт- и групповую терапию, помощь в восстановлении профессиональных навыков и возвращении к социально-активной жизни.
Детальнее – http://narkologicheskaya-klinika-mytishchi1.ru
Алкогольная зависимость — это хроническое заболевание, при котором устойчивое влечение к спиртному приводит к тяжёлым медицинским, социальным и психологическим последствиям. Когда пациент осознаёт, что самостоятельно справиться с этой проблемой не получается, наиболее эффективным методом становится кодирование от алкоголизма. В клинике «Ясное Будущее» в Одинцово мы используем сочетание проверенных методик кодирования и комплексной психологической поддержки, что позволяет достичь стойкой ремиссии и вернуть человеку контроль над собственной жизнью.
Исследовать вопрос подробнее – http://kodirovanie-ot-alkogolizma-odintsovo2.ru
вывод из запоя в ростове на дону на дому vyvod-iz-zapoya-v-rostove-2.ru .
Выбор капельничного метода в условиях домашнего лечения обладает рядом преимуществ:
Исследовать вопрос подробнее – kapelnica-ot-zapoya-tyumen00.ru/
В материале приведены детали, интересные, но не особенно важные. Мы рассматриваем аспекты, которые сложно назвать существенными, но включили их для большей полноты.
Подробнее читать – сиалис онлайн
шумоизоляция торпеды https://shumoizolyaciya-torpedy-77.ru
шумоизоляция дверей авто https://shumoizolyaciya-dverej-avto.ru
Недостаточно снять физическую зависимость — важно помочь человеку вернуться в сообщество. В «Доктор Здоровье» разработана система сопровождения, включающая мотивационные беседы, групповые занятия и социальную реабилитацию. Психотерапевты владеют методами когнитивно-поведенческой терапии и мотивационного интервью, консультанты помогают восстановить профессиональные навыки и адаптироваться к повседневной жизни, а встречи в группе взаимопомощи и психодраматические сессии способствуют укреплению чувства поддержки и навыков эффективного общения. Для родственников доступны семейные консультации, на которых объясняют природу зависимости и обучают стратегиям поддержки без критики и давления.
Получить дополнительную информацию – наркологическая клиника на дом
хороший магазин !отменное качество и сервис ! хорошей работы вашему магазину и процветания! кокс, меф, шиш, гаш Пиздатый магаз )Отличное качество реги! Советую!
Когда запой становится критическим, оперативное вмешательство имеет решающее значение для спасения здоровья и предотвращения необратимых последствий. Во Владимире экстренная помощь нарколога на дому позволяет быстро начать лечение, не требуя госпитализации, что особенно важно для пациентов, нуждающихся в сохранении конфиденциальности и комфорте.
Ознакомиться с деталями – http://vyvod-iz-zapoya-vladimir000.ru
Аппаратные методы кодирования включают лазерную терапию и электростимуляцию биологически активных точек, влияющих на центры зависимости в головном мозге. Эти методики способствуют быстрому формированию устойчивого отвращения к спиртному и хорошо переносятся пациентами.
Разобраться лучше – клиника кодирования от алкоголизма
Внутривенная инфузия – это один из самых быстрых и безопасных способов очистки организма от алкоголя и его токсичных продуктов распада. Она позволяет:
Подробнее тут – капельница от запоя анонимно
Такой алгоритм помогает восстановить работоспособность организма в течение нескольких часов. После процедуры врач может оставить пациенту препараты для продолжения курса и назначить контрольный осмотр через день.
Разобраться лучше – нарколог на дом красноярск
Онлайн-магазин «ЭЛЕК» занимается реализацией морской электротехники, кабеля и запчастей с одобрением РРР и РМРС для верфей и судоремонтных организаций. Ассортимент включает морские осветительные приборы, автоматы защиты, пускатели, ходовые огни, трансформаторное оборудование, датчики и кабельную продукцию разных сечений в наличии. Оформить заказ и ознакомиться с полным ассортиментом можно на https://shop.elekspb.ru/ Компания гарантирует быструю комплектацию заказов, транспортировку в любой регион страны и экспертные рекомендации при выборе техники.
Лечение проводится непосредственно в домашних условиях, что позволяет избежать стресса, связанного с пребыванием в стационаре. Применение современных медикаментов и индивидуальный подход к выбору терапии обеспечивают безопасность и эффективность процедуры.
Получить дополнительную информацию – https://narcolog-na-dom-v-irkutske66.ru/vrach-narkolog-na-dom-irkutsk/
нарколог вывод из запоя в ростове vyvod-iz-zapoya-v-rostove-2.ru .
Есть в липецке кокс, меф, шиш, гаш Магазин на ура))составите конкуренцию известно кому :monetka:
Наши опытные наркологи регулярно повышают квалификацию и используют современные методики для быстрого восстановления пациентов после запоев.
Подробнее тут – капельница от запоя круглосуточно в нижнем новгороде
For those seeking an exceptional online gaming experience, us.com](https://maxispin.us.com/) stands out as a premier destination. At Maxispin Casino, players can enjoy a vast array of pokies, table games, and other thrilling options, all accessible in both demo and real-money modes. The casino offers attractive bonuses, including free spins and a generous welcome offer, along with cashback promotions and engaging tournaments. To ensure a seamless experience, Maxispin provides various payment methods, efficient withdrawal processes, and reliable customer support through live chat. Security is a top priority, with robust safety measures and a strong focus on responsible gambling tools. Players can easily navigate the site, with detailed guides on account creation, verification, and payment methods. Whether you’re interested in high RTP slots, hold and win pokies, or the latest slot releases, Maxispin Casino delivers a user-friendly and secure platform. Explore their terms and conditions, read reviews, and discover why many consider Maxispin a legitimate and trustworthy choice in Australia.
Both seasoned copywriters and beginners can find the resources they need on MaxiSpin.us.com to elevate their content.
**Features of MaxiSpin.us.com**
The interface of MaxiSpin.us.com is both intuitive and simple to navigate.
**Benefits of Using MaxiSpin.us.com**
This conservation of time and resources allows businesses to concentrate on other vital areas of their operations.
Некоторые состояния требуют немедленного вмешательства нарколога, так как отказ от лечения может привести к тяжелым осложнениям и риску для жизни.
Детальнее – нарколог на дом недорого новокузнецк
В таких случаях своевременное обращение за помощью позволяет быстро стабилизировать состояние и предотвратить развитие серьезных осложнений.
Разобраться лучше – http://narcolog-na-dom-voronezh0.ru
Экстренная помощь при выводе из запоя в Архангельске организована по четко отлаженной схеме. Специалисты проводят комплексное обследование пациента на месте, разрабатывают индивидуальный план терапии и незамедлительно приступают к детоксикации. Такой подход позволяет максимально быстро нейтрализовать токсическую нагрузку и восстановить жизненно важные функции организма.
Выяснить больше – http://vyvod-iz-zapoya-arkhangelsk66.ru
А JWH-018 Имеется в наличии? кокс, меф, шиш, гаш Поздравляю всех с наступающим Новым 2013 Годом! Желаю в год Змеи: 1. Мутить тока на спирту! 2. Отваривать основу. 3. Сушить естественным способом. 4. Поменьше “ловить бледного”! 🙂 Ну а магазу Chеmical-Mix желаю Процветания, Оперативности, и качественной разнообразной продукции!у разных селеров бывает разный джив имеется виду по качеству так , я как то брал джив к10 пер слабо очень , в другом к 15 убивал , вот и спрашивают всегда качество дживика у продавана если ты незнал!!!
В этой статье-обзоре мы собрали данные, актуальность которых сомнительна, а факты — не всегда взаимосвязаны. Читатель сможет ознакомиться с разными мнениями, хотя вряд ли они существенно повлияют на его понимание темы.
Вот – порно
Пациенты, которые выбирают нашу клинику для лечения алкогольного запоя, получают качественную и оперативную помощь, обладающую следующими преимуществами:
Выяснить больше – капельница от запоя анонимно на дому в нижнем новгороде
вывод из запоя в стационаре в ростове на дону вывод из запоя в стационаре в ростове на дону .
Услуга “Нарколог на дом” в Уфе охватывает широкий спектр лечебных мероприятий, направленных как на устранение токсической нагрузки, так и на работу с психоэмоциональным состоянием пациента. Комплексная терапия включает в себя медикаментозную детоксикацию, корректировку обменных процессов, а также психотерапевтическую поддержку, что позволяет не только вывести пациента из состояния запоя, но и помочь ему справиться с наркотической зависимостью.
Разобраться лучше – https://narcolog-na-dom-ufa000.ru/narkolog-na-dom-ufa-czeny/
Ну это ясно))) спасибо за ответывнесли ясность! https://happybaby-noginsk.ru а у нас в квартире газ ….. от ГАЗПРОМ … вы не поверите но это так и есть”Подхожу по описанию лазею,лазею, ПУСТО бля нервоз пздц “
Процесс вывода из запоя капельничным методом организован по строгой схеме, позволяющей обеспечить максимальную эффективность терапии. Каждая стадия направлена на комплексное восстановление организма и минимизацию риска осложнений.
Подробнее тут – http://www.domen.ru
Этот обзор предлагает свежий взгляд на предметы, которые и без того привычны. Мы упоминаем факты, не имеющие большого значения, и события с неясной важностью, но они присутствуют здесь.
Подробнее читать – https://rostov-narkologiya.ru/uslugi-ot-alkogolizma/vyvod-iz-zapoya
При вызовах в ночное время или в случаях с тяжелой интоксикацией стоимость может увеличиваться до 3000–4500 рублей. Окончательная сумма определяется после первичного осмотра и обсуждения индивидуальной схемы лечения с пациентом.
Разобраться лучше – http://vyvod-iz-zapoya-vladimir00.ru/vyvod-iz-zapoya-anonimno-vladimir/
Компания «ФормВел» производит и реализует промышленные колеса, ролики и комплектующие из стали и чугуна для тележек, погрузчиков и складского оборудования по всей России. В ассортименте представлены одноребордные и двухребордные колеса, большегрузные ролики, стальные и чугунные изделия грузоподъемностью от легких до тяжелых весовых категорий с возможностью изготовления по индивидуальным чертежам. Ознакомиться с полным каталогом продукции и оформить заказ можно на https://formwheel.ru/ Производитель гарантирует качество изделий, оперативную доставку по территории РФ, консультации специалистов по подбору аналогов и выгодные условия для оптовых покупателей.
Эта публикация погружает вас в мир увлекательных фактов и удивительных открытий. Мы расскажем о ключевых событиях, которые изменили ход истории, и приоткроем завесу над научными достижениями, которые вдохновили миллионы. Узнайте, чему может научить нас прошлое и как применить эти знания в будущем.
См. подробности – https://isabelle-rr.com/art-exhibition-with-lions-club-oslo/p1250945
добрый день как связаться с продавцом и не попасть на фейка? https://bereginy.ru Товар тоже на 5/5 (только с концетрацией мало 1 к 5 или 1 к 7 дальше держит не долго)Я сегодня заказал 203 жду трека думаю и мне понравится
В этой информационной статье вы найдете интересное содержание, которое поможет вам расширить свои знания. Мы предлагаем увлекательный подход и уникальные взгляды на обсуждаемые темы, побуждая пользователей к активному мышлению и критическому анализу.
Изучить материалы по теме – https://www.piotrtechnika.pl/ulozenie-ciala-przy-siedzeniu-i-wstawaniu
нарколог вывод из запоя на дому в ростове vyvod-iz-zapoya-v-rostove-2.ru .
Нужны столбики? столбик ограждения москва столбики для складов, парковок и общественных пространств. Прочные материалы, устойчивое основание и удобство перемещения обеспечивают безопасность и порядок.
короткое свадебное платье свадебные платья москва недорого каталог
купить кабель м провод купить в минске
Looking for a yacht? VIP yacht services in Cyprus for unforgettable sea adventures. Charter luxury yachts, catamarans, or motorboats with or without crew. Explore crystal-clear waters, secluded bays, and iconic coastal locations in first-class comfort onboard.
Hello!
Learn how mysterious interesting systems generate valuable insights for everyone now and automate your decision-making process see on the website for system demos
Full information on the link – https://101flow.site
All the best and development in business!
stackhq – Found practical insights today; sharing this article with colleagues later.
Эта статья сочетает в себе как полезные, так и интересные сведения, которые обогатят ваше понимание насущных тем. Мы предлагаем практические советы и рекомендации, которые легко внедрить в повседневную жизнь. Узнайте, как улучшить свои навыки и обогатить свой опыт с помощью простых, но эффективных решений.
Открой скрытое – https://halfstep123.wpxblog.jp/3dprint001
Эта статья для ознакомления предлагает читателям общее представление об актуальной теме. Мы стремимся представить ключевые факты и идеи, которые помогут читателям получить представление о предмете и решить, стоит ли углубляться в изучение.
Что ещё нужно знать? – https://www.mursansrl.it/forum/forum-umidita-domande-e-risposte
сейфы для гостиницы купить
cloudhq – Color palette felt calming, nothing distracting, just focused, thoughtful design.
bytehq – Bookmarked this immediately, planning to revisit for updates and inspiration.
В этой статье собраны факты, которые освещают целый ряд важных вопросов. Мы стремимся предложить читателям четкую, достоверную информацию, которая поможет сформировать собственное мнение и лучше понять сложные аспекты рассматриваемой темы.
Почему это важно? – https://www.golfduhavre.com/2021/07/06/3eme-div-mid-amateurs-dames
не долго думая решил написать оператору данного магазина! кокс, меф, шиш, гаш небольгой репортаж отписать о ск.Отличный магазин..заказывал не раз всегда все на высшем уровне. Молодцы.
Ищете официальный мерч от различных музыкальных групп или с фестивалей? Заходите на https://showstaff.ru/ – это только официальная продукция. Посмотрите наш существенный каталог, и вы обязательно найдете для себя фанатские вещи. Самовывоз их Москвы, а также осуществляем доставку по всему миру. Подробнее на сайте.
devopsly – Mobile version looks perfect; no glitches, fast scrolling, crisp text.
stackops – Loved the layout today; clean, simple, and genuinely user-friendly overall.
приложения для майнинга Крипта, майнинг, аирдропы и тапалки — всё самое свежее в Smart Money Crypto Зарабатывай на криптоиграх и фармилках прямо в Telegram. Пассивный доход с удовольствием и без вложений! Заходи и забирай свою прибыль. ИЛИ Ищешь где заработать на крипте? Smart Money Crypto Новости, криптоигры с выводом, актуальные аирдропы и майнинг на телефоне. Тапалки и фармилки в Telegram для твоего пассивного дохода. Присоединяйся к команде Smart Money!
оружейные сейфы
В этом интересном тексте собраны обширные сведения, которые помогут вам понять различные аспекты обсуждаемой темы. Мы разбираем детали и факты, делая акцент на важности каждого элемента. Не упустите возможность расширить свои знания и взглянуть на мир по-новому!
А что дальше? – https://dibatravel.com/asia/uae
Мы собрали для вас самые захватывающие факты из мира науки и истории. От малознакомых деталей до грандиозных событий — эта статья расширит ваш кругозор и подарит новое понимание того, как устроен наш мир.
Обратитесь за информацией – https://www.youare.org.uk/news/1:Hapje-eten-voor-concert-start-van-PAWS-uk–Apneu-.html
вывод из запоя на дому в ростове-на-дону vyvod-iz-zapoya-v-rostove-2.ru .
лабаз ништяк кокс, меф, шиш, гаш Всем привет с наступивщими,давно не работал с этим магазином,подскажите как у него работа все ттакже четко?Мне сразу по поводу мхе ответили, быстро порешили на бонусе в следующую покупку.
https://ClassifiedsHome.com/588/posts/1/1/1841829.html
kubeops – Appreciate the typography choices; comfortable spacing improved my reading experience.
заказать сейф
кайт кайт школа в крыму
Сразу после вызова нарколог приезжает на дом для проведения первичного осмотра и диагностики. На этом этапе проводится сбор анамнеза, измеряются жизненно важные показатели (пульс, артериальное давление, температура) и определяется степень алкогольной интоксикации. Эти данные являются основой для разработки индивидуального плана лечения.
Изучить вопрос глубже – https://kapelnica-ot-zapoya-tyumen0.ru/kapelnicza-ot-zapoya-na-domu-czena-tyumen/
Купить права в России законно через интернет – это реальная возможность для тех, кто хочет быстро и без лишних хлопот получить водительское удостоверение. Мы предлагаем проверенные способы оформления водительских прав с соблюдением всех требований законодательства РФ. Наш сервис помогает пройти все этапы: от записи в автошколу до сдачи экзаменов, а также получить необходимые документы дистанционно. Благодаря удобному онлайн-сервису вы экономите время и силы, избегаете очередей и бюрократии. Узнайте, как оформить права законно, быстро и безопасно, с полным сопровождением и поддержкой на каждом шаге. Сделайте первый шаг к своей водительской лицензии уже сегодня!
Нарколог на дом в Новокузнецке – это возможность получить профессиональное медицинское лечение без госпитализации. Специалисты клиники «ЧистоЖизнь» приезжают в любое время суток, проводят детоксикацию, снимают абстинентный синдром и помогают пациенту стабилизировать состояние в комфортных домашних условиях.
Получить больше информации – https://narcolog-na-dom-novokuznetsk00.ru/narkolog-na-dom-klinika-novokuzneczk
Когда человеку требуется немедленная медицинская помощь при алкогольной интоксикации, промедление может быть опасным. В таких ситуациях вызов нарколога на дом становится оптимальным решением. Клиника «КрасМед Трезвость» в Красноярске организует срочный выезд врача круглосуточно, обеспечивая квалифицированную помощь прямо по месту нахождения пациента. Такой формат позволяет избежать госпитализации, снизить тревожность и начать лечение в привычных домашних условиях, где человек чувствует себя спокойнее и безопаснее.
Получить дополнительную информацию – запой нарколог на дом
cloudopsly – Mobile version looks perfect; no glitches, fast scrolling, crisp text.
For those seeking an exceptional online gaming experience, us.com](https://maxispin.us.com/) stands out as a premier destination. At Maxispin Casino, players can enjoy a vast array of pokies, table games, and other thrilling options, all accessible in both demo and real-money modes. The casino offers attractive bonuses, including free spins and a generous welcome offer, along with cashback promotions and engaging tournaments. To ensure a seamless experience, Maxispin provides various payment methods, efficient withdrawal processes, and reliable customer support through live chat. Security is a top priority, with robust safety measures and a strong focus on responsible gambling tools. Players can easily navigate the site, with detailed guides on account creation, verification, and payment methods. Whether you’re interested in high RTP slots, hold and win pokies, or the latest slot releases, Maxispin Casino delivers a user-friendly and secure platform. Explore their terms and conditions, read reviews, and discover why many consider Maxispin a legitimate and trustworthy choice in Australia.
Its accessibility and ease of use make it suitable for everyone.
**Features of MaxiSpin.us.com**
Furthermore, the platform includes a powerful spin-text generator that enables users to effortlessly create unique content variations.
**Benefits of Using MaxiSpin.us.com**
This conservation of time and resources allows businesses to concentrate on other vital areas of their operations.
В наркологической клинике применяются проверенные методики терапии, включая медикаментозное лечение, детоксикацию и психотерапевтические программы. Детоксикация проводится с использованием современных капельниц, обеспечивающих безопасное выведение токсинов из организма. Важно отметить, что качественное лечение включает и работу с психологическими аспектами зависимости, что достигается посредством групповых и индивидуальных консультаций.
Ознакомиться с деталями – наркологическая клиника в каменске-уральском
Процедура вывода из запоя состоит из нескольких этапов, включающих:
Выяснить больше – вывод из запоя круглосуточно нижний тагил
Одним из ключевых направлений является проведение капельниц, призванных вывести токсины из организма и нормализовать водно-электролитный баланс. Используемые препараты и состав растворов подбираются индивидуально, исходя из клинической картины и истории болезни пациента.
Подробнее можно узнать тут – нарколог на дом цена
В данном тексте собраны разнообразные случайные сведения и не вполне определённые идеи, которые могут вызвать интерес. Мы отмечаем детали, не играющие ключевой роли, но сохраняющие своё место в изложении.
Подробнее читать – диета для похудения быстро
https://listbell.com/story11018495/code-promo-1xbet-inscription-bonus-jusqu-%C3%A0-130
При необходимости применяется симптоматическое лечение для снижения болевого синдрома, устранения тошноты и рвоты, а также нормализации психоэмоционального состояния пациента. Врачи наркологи строго контролируют течение процедуры, что обеспечивает безопасность и снижает риски осложнений.
Выяснить больше – https://vyvod-iz-zapoya-v-murmanske12.ru/vyvod-iz-zapoya-czena-v-murmanske/
файловый сейф
Особенно уязвимыми становятся люди старше 45 лет, а также пациенты с сахарным диабетом, гипертонией, эпилепсией и болезнями печени. При этом многие продолжают надеяться, что «само пройдёт» — и упускают момент, когда помочь ещё можно без реанимации. Наша клиника организует выезд врача в течение 40–60 минут, чтобы не терять драгоценное время.
Ознакомиться с деталями – вывод из алкогольного запоя
Ищетe кресло офисное купить? Посетите сайт Компании из Новосибирска ОфисПро officepro54.ru где вы найдете широкий выбор недорогой, качественной офисной мебели: стулья, шкафы, кресла, столы, офисные диваны и многое другое. На портале представлен каталог с фотографиями и ценами. Мы гарантируем полную комплектацию офисов мебелью – для работников и управленцев, включая транспортировку, установку и бесплатную планировку размещения. Обеспечиваем гарантию лучшей цены!
casino mafia Decouvrez Mafia Casino avis 2026 : site officiel avec connexion securisee, bonus exclusifs, milliers de jeux et retraits rapides. Inscrivez-vous des maintenant!
Казино Vavada привлекает игроков щедрыми бонусами без депозита и постоянными турнирами с крупным призовым фондом.
Регистрация занимает несколько минут, а рабочие зеркала обеспечивают стабильный доступ к сайту даже при блокировках.
Проверяйте актуальные промокоды и условия отыгрыша, чтобы оптимально использовать стартовые фриспины.
Служба поддержки отвечает на русском языке и помогает решить вопросы с верификацией и выводом средств.
Свежие предложения и актуальное зеркало доступны по ссылке: https://vluki.net/vavada.
Играйте ответственно и контролируйте банкролл, чтобы азарт приносил удовольствие.
Астане
При длительном запое в организме накапливаются вредные токсины, что ведёт к нарушениям работы сердца, печени, почек и других жизненно важных органов. Чем быстрее начинается терапия, тем выше шансы избежать серьёзных осложнений и обеспечить качественное восстановление. Метод капельничного лечения позволяет оперативно начать детоксикацию, что особенно важно для спасения жизни и предупреждения хронических последствий злоупотребления алкоголем.
Углубиться в тему – капельница от запоя в тюмени
Зависимость — это системная проблема, которая требует последовательного и профессионального подхода. Обычные попытки «вылечиться дома» без медицинского сопровождения нередко заканчиваются срывами, ухудшением состояния и психологической деградацией. Клиника «Здоровье Плюс» в Балашихе предоставляет пациентам не просто разовое вмешательство, а выстроенную поэтапную программу, основанную на опыте и медицинских стандартах.
Детальнее – наркологическая помощь балашиха балашиха
Polska scena gier online ma do zaoferowania wiele rozrywek zwiazanych z vulkanspiele.
vulkan spiele casino opinie https://vulkan-spiele3.com/
Врачи клиники «ВитаЛайн» для снятия интоксикации и облегчения состояния пациента применяют исключительно качественные и проверенные лекарственные препараты, подбирая их в зависимости от особенностей ситуации и состояния здоровья пациента:
Ознакомиться с деталями – http://narcolog-na-dom-novosibirsk0.ru/vyzov-narkologa-na-dom-novosibirsk/
Врач уточняет продолжительность запоя, характер употребляемого алкоголя и наличие сопутствующих заболеваний. Детальное обследование позволяет оперативно подобрать необходимые медикаменты и минимизировать риск осложнений.
Подробнее можно узнать тут – http://kapelnica-ot-zapoya-tyumen00.ru
Услуга капельничного вывода из запоя на дому в Тюмени предоставляет комплексный подход к экстренному лечению алкогольной интоксикации. Врач приезжает на дом, проводит первичный осмотр, собирает анамнез и назначает индивидуальную схему терапии. Современные методы инфузионной терапии позволяют точно дозировать препараты, обеспечивая быструю детоксикацию и минимизируя риск осложнений.
Изучить вопрос глубже – алкоголизм лечение вывод из запоя владимир
несгораемый сейф
Врачи клиники «ВитаЛайн» для снятия интоксикации и облегчения состояния пациента применяют исключительно качественные и проверенные лекарственные препараты, подбирая их в зависимости от особенностей ситуации и состояния здоровья пациента:
Получить дополнительные сведения – вызов нарколога на дом новосибирская область
mafia casino en ligne Decouvrez Mafia Casino avis 2026 : site officiel avec connexion securisee, bonus exclusifs, milliers de jeux et retraits rapides. Inscrivez-vous des maintenant!
Комплексное лечение на дому организовано по строго отлаженной схеме, позволяющей оперативно стабилизировать состояние пациента и провести качественную детоксикацию.
Подробнее можно узнать тут – вывод из запоя дешево владимир
оружейные сейфы купить
Врач уточняет, как долго продолжается запой, какие симптомы наблюдаются и присутствуют ли сопутствующие заболевания. Тщательный сбор информации позволяет оперативно подобрать необходимые медикаменты и начать детоксикацию.
Получить дополнительные сведения – капельница от запоя клиника тюмень
В статье-обзоре представлены данные сомнительной актуальности и факты без явной взаимосвязи. Читатель ознакомится с разными мнениями, хотя они вряд ли существенно изменят его представление о теме.
Подробнее читать – мефедроновая зависимость
Вызов нарколога на дом в Каменске-Уральском обеспечивает безопасность пациента, исключая необходимость посещения медицинского учреждения, что особенно актуально при тяжелом состоянии или психологическом сопротивлении. Такая помощь включает в себя детоксикацию, купирование абстинентного синдрома и консультации по дальнейшему лечению.
Получить дополнительную информацию – нарколог на дом круглосуточно цены
сейфы купить в москве
Особенно важно на этапе поступления пройти полную психодиагностику и получить адаптированную под конкретного пациента программу. Это позволит учитывать возможные сопутствующие расстройства, включая тревожные, аффективные и когнитивные нарушения.
Углубиться в тему – лечение в наркологической клинике нижний тагил
В Рязани возможен как стационарный, так и амбулаторный вывод из запоя. Выбор подхода зависит от состояния пациента, выраженности симптомов и наличия сопутствующих нарушений.
Углубиться в тему – вывод из запоя капельница рязань
После устранения острой зависимости важным этапом становится реабилитация. Она включает восстановление социальных навыков, обучение методам преодоления стрессов без употребления психоактивных веществ.
Изучить вопрос глубже – наркологическая клиника мурманск
Good morning!
Master the skill of spotting interesting mysterious trends with valuable insights and lead your team to success see on the website for leadership training modules
Full information on the link – https://202fliks.site
All the best and development in business!
Для вашего удобства и прозрачности планирования лечения мы собрали ориентировочные цены на ключевые процедуры и форматы оказания помощи. Это позволит заранее оценить бюджет и подобрать оптимальный вариант терапии в зависимости от степени абстинентного синдрома и индивидуальных потребностей пациента.
Узнать больше – вызов нарколога на дом раменское
Одним из ключевых направлений является проведение капельниц, призванных вывести токсины из организма и нормализовать водно-электролитный баланс. Используемые препараты и состав растворов подбираются индивидуально, исходя из клинической картины и истории болезни пациента.
Исследовать вопрос подробнее – вызов нарколога на дом ярославская область
В рамках услуги вызова нарколога на дом используется современное оборудование и препараты, одобренные для амбулаторного применения.
Получить больше информации – вызвать нарколога на дом
Без своевременной помощи пациент может столкнуться с тяжёлыми последствиями. Одним из самых опасных состояний считается алкогольный делирий, развивающийся на фоне резкой отмены алкоголя после длительного запоя. Он сопровождается галлюцинациями, агрессией, спутанностью сознания и требует немедленной госпитализации. Также возможны сердечные аритмии, ишемические атаки, кома, внутренние кровотечения и острые психозы. Даже один день промедления может стоить человеку жизни.
Ознакомиться с деталями – vyvod-iz-alkogolnogo-zapoya
Как отмечает врач-нарколог Иванов И.И., «без своевременной медицинской помощи при запое повышается риск необратимых изменений в организме и летального исхода».
Выяснить больше – http://vyvod-iz-zapoya-nizhnij-tagil11.ru
keywordcraft – Mobile version looks perfect; no glitches, fast scrolling, crisp text.
Can you be more specific about the content of your article? After reading it, I still have some doubts. Hope you can help me. https://www.binance.com/fr/register?ref=T7KCZASX
Как подчёркивает заведующая отделением клинической психологии ФГБУН «НМИЦ психиатрии и наркологии» Минздрава России, наличие в команде специалистов с опытом работы в области зависимости — это основа качественной помощи.
Выяснить больше – наркологическая клиника наркологический центр в нижнем тагиле
После детоксикации важна реабилитация, включающая психологическую помощь. Используются различные виды психотерапии, в том числе когнитивно-поведенческая терапия и мотивационное интервьюирование. Это помогает пациентам не только избавиться от зависимости, но и адаптироваться к жизни вне клиники. Подробнее о методах психотерапии можно узнать на ресурсе психологической помощи.
Узнать больше – наркологические клиники алкоголизм
Как подчёркивает главный врач клинического отделения, «в условиях стационара мы можем оперативно реагировать на малейшие изменения в состоянии пациента, что критически важно при тяжёлых формах запоя».
Углубиться в тему – vyvod-iz-zapoya-kruglosutochno rjazan’
Основной этап в лечении — детоксикация организма от токсичных веществ, вызывающих интоксикацию. В клинике применяют современные методы капельниц и медикаментозной поддержки, включая препараты для снятия абстинентного синдрома.
Разобраться лучше – платная наркологическая клиника
После оформления заявки по телефону или на сайте оператор уточняет адрес и текущее состояние пациента. В критических ситуациях врач может прибыть в течение 60 минут, в стандартном режиме — за 1–2 часа. На месте проводится сбор анамнеза и оценка жизненных показателей: артериального давления, пульса, сатурации и температуры тела. Затем выбирается оптимальный протокол детоксикации — «мягкий» метод для постепенного выведения токсинов или экспресс-методика при острой интоксикации. Процедура капельного введения комбинированного раствора длится от двух до четырёх часов: специалист контролирует состояние пациента, корректирует дозировки и при необходимости вводит корригирующие препараты. По окончании врач оставляет детальный план поддерживающей терапии, включающий рекомендации по питанию, приёму сорбентов и витаминов, а также график повторных осмотров.
Получить дополнительные сведения – https://narkolog-na-dom-ramenskoe4.ru/narkolog-na-dom-ceny-v-ramenskom
Запой сопровождается быстрым накоплением токсинов, что может привести к нарушению работы сердца, печени и почек. Использование капельничного метода позволяет оперативно ввести современные препараты для детоксикации, что способствует быстрому восстановлению обменных процессов и нормализации работы внутренних органов. Оперативное лечение на дому особенно актуально, когда каждая минута имеет значение для спасения здоровья.
Подробнее можно узнать тут – капельница от запоя анонимно на дому тюмень
Когда запой превращается в угрозу для жизни, оперативное вмешательство становится критически важным. В Тюмени, Тюменская область, опытные наркологи предлагают услугу установки капельницы от запоя прямо на дому. Такой метод позволяет начать детоксикацию с использованием современных медикаментов, что способствует быстрому выведению токсинов, восстановлению обменных процессов и нормализации работы внутренних органов. Лечение на дому обеспечивает комфортную обстановку, полную конфиденциальность и индивидуальный подход к каждому пациенту.
Детальнее – https://kapelnica-ot-zapoya-tyumen00.ru/
Запойное состояние оказывает разрушительное воздействие на организм. При длительном употреблении алкоголя развиваются следующие проблемы:
Углубиться в тему – вывод из запоя на дому круглосуточно
Капельницы, применяемые при выезде нарколога на дом, подбираются индивидуально — в зависимости от возраста, массы тела и степени интоксикации. Все растворы сертифицированы и безопасны, а их состав адаптирован под конкретную клиническую задачу. Ниже представлена таблица с типами инфузий и их терапевтическим эффектом.
Ознакомиться с деталями – вызов нарколога на дом красноярск
Нарколог на дому проводит тщательный осмотр, собирает анамнез и назначает необходимые лабораторные исследования. Это позволяет выявить сопутствующие патологии и скорректировать тактику лечения.
Получить дополнительную информацию – выезд нарколога на дом в ярославле
Запой — это не просто бытовое пьянство, а одно из наиболее опасных проявлений алкогольной зависимости. Во время запоя организм перестаёт функционировать в нормальном режиме: сердечно-сосудистая система работает на износ, нервная система перегружена токсинами, а печень не справляется с нагрузкой. На этом фоне могут возникать тяжёлые осложнения — от судорог и гипогликемии до нарушения дыхания и алкогольного психоза. Чем дольше длится запой, тем глубже метаболические нарушения и выше риск серьёзных последствий.
Подробнее тут – https://vyvod-iz-zapoya-kolomna3.ru/vyvod-iz-zapoya-na-domu-v-kolomne/
Для эффективного вывода из запоя в Мурманске используются современные методы детоксикации, включающие внутривенное введение растворов, направленных на восстановление водно-солевого баланса, коррекцию электролитов и нормализацию работы почек и печени. Важным этапом является использование витаминных комплексов и препаратов, поддерживающих работу сердца и сосудов.
Ознакомиться с деталями – https://vyvod-iz-zapoya-v-murmanske12.ru/vyvod-iz-zapoya-na-domu-v-murmanske
Your point of view caught my eye and was very interesting. Thanks. I have a question for you.
Услуга “Нарколог на дом” в Уфе охватывает широкий спектр лечебных мероприятий, направленных как на устранение токсической нагрузки, так и на работу с психоэмоциональным состоянием пациента. Комплексная терапия включает в себя медикаментозную детоксикацию, корректировку обменных процессов, а также психотерапевтическую поддержку, что позволяет не только вывести пациента из состояния запоя, но и помочь ему справиться с наркотической зависимостью.
Получить дополнительную информацию – https://narcolog-na-dom-ufa000.ru/narkolog-na-dom-ufa-czeny
В этом тексте собрано множество случайных сведений и довольно неопределённых мыслей, которые могут чем-то заинтересовать. Мы отмечаем моменты, которые не особенно важны, но всё же занимают своё место в повествовании.
Вот – онлайн слоты
Эта статья погружает вас в увлекательный мир знаний, где каждый факт становится открытием. Мы расскажем о ключевых исторических поворотных моментах и научных прорывах, которые изменили ход цивилизации. Поймите, как прошлое формирует настоящее и как его уроки могут помочь нам строить будущее.
Осуществить глубокий анализ – https://www.tendacayou.com/events/stage-de-jene-2018
Есть ситуации, когда вызов врача на дом становится не просто желателен, а жизненно необходим. Если зависимый человек не способен самостоятельно прекратить употребление алкоголя или наркотиков, а его самочувствие заметно ухудшается, необходимо незамедлительно обратиться за медицинской помощью. Поводом для вызова нарколога служат следующие опасные симптомы:
Получить дополнительную информацию – врач нарколог на дом новосибирск.
Эта статья предлагает живое освещение актуальной темы с множеством интересных фактов. Мы рассмотрим ключевые моменты, которые делают данную тему важной и актуальной. Подготовьтесь к насыщенному путешествию по неизвестным аспектам и узнайте больше о значимых событиях.
Узнать больше – https://jotikarecomienda.com/la-piscina-olimpica-de-tulua-ya-esta-funcionando-vuelve-el-deporte-y-la-natacion-a-la-ciudad
I don’t think the title of your article matches the content lol. Just kidding, mainly because I had some doubts after reading the article.
Этот интересный отчет представляет собой сборник полезных фактов, касающихся актуальных тем. Мы проанализируем данные, чтобы вы могли сделать обоснованные выводы. Читайте, чтобы узнать больше о последних трендах и значимых событиях!
Кликни и узнай всё! – https://polskafutbolliga.pl/podsumowanie-ostatniego-dnia-turnieju-finalowego
Эта познавательная публикация погружает вас в море интересного контента, который быстро захватит ваше внимание. Мы рассмотрим важные аспекты темы и предоставим вам уникальные Insights и полезные сведения для дальнейшего изучения.
Получить полную информацию – https://www.zyablikovo-mos.ru
купить сейф для офиса
Мы собрали для вас самые захватывающие факты из мира науки и истории. От малознакомых деталей до грандиозных событий — эта статья расширит ваш кругозор и подарит новое понимание того, как устроен наш мир.
Более подробно об этом – https://maranhaounico.com.br/2022/06/onde-assistir-remo-x-palmeiras-ao-vivo-com-imagens-copa-do-brasil-sub-17-2022-quarta-11-05
Комплексное лечение на дому организовано по строго отлаженной схеме, позволяющей оперативно стабилизировать состояние пациента и провести качественную детоксикацию.
Получить дополнительную информацию – http://vyvod-iz-zapoya-vladimir00.ru
adscatalyst – Loved the layout today; clean, simple, and genuinely user-friendly overall.
В данной обзорной статье представлены интригующие факты, которые не оставят вас равнодушными. Мы критикуем и анализируем события, которые изменили наше восприятие мира. Узнайте, что стоит за новыми открытиями и как они могут изменить ваше восприятие реальности.
Всё самое вкусное внутри – https://mayapoliticsureste.com/2024/06/politica-yucatan-agradece-huacho-diaz-mena-el-respaldo-y-compromiso-del-partido-verde
В этой статье вы найдете познавательную и занимательную информацию, которая поможет вам лучше понять мир вокруг. Мы собрали интересные данные, которые вдохновляют на размышления и побуждают к действиям. Открывайте новую информацию и получайте удовольствие от чтения!
Провести детальное исследование – https://redols.caib.es/c07006299/2025/05/20/enquestes-de-prematricula-dfp-del-26-al-30-de-maig
promoseeder – Bookmarked this immediately, planning to revisit for updates and inspiration.
clickrevamp – Pages loaded fast, images appeared sharp, and formatting stayed consistent.
Этот сборник информации привлекает множеством мелких деталей и необычных ракурсов. Мы предлагаем взгляды, редко полезные, но способные немного разнообразить знакомство с темой.
Подробнее читать – кето диета за неделю минус 10 кг
Эта статья сочетает в себе как полезные, так и интересные сведения, которые обогатят ваше понимание насущных тем. Мы предлагаем практические советы и рекомендации, которые легко внедрить в повседневную жизнь. Узнайте, как улучшить свои навыки и обогатить свой опыт с помощью простых, но эффективных решений.
Узнать из первых рук – https://revija.ba/hello-world
вайбовые стимы
Мы собрали для вас самые захватывающие факты из мира науки и истории. От малознакомых деталей до грандиозных событий — эта статья расширит ваш кругозор и подарит новое понимание того, как устроен наш мир.
Подробности по ссылке – https://chiba-gastronomy.com/2023-top30/attachment/top30_bg
serpstudio – Bookmarked this immediately, planning to revisit for updates and inspiration.
Казино Vavada привлекает игроков щедрыми бонусами без депозита и постоянными турнирами с крупным призовым фондом.
Регистрация занимает несколько минут, а рабочие зеркала обеспечивают стабильный доступ к сайту даже при блокировках.
Проверяйте актуальные промокоды и условия отыгрыша, чтобы оптимально использовать стартовые фриспины.
Служба поддержки отвечает на русском языке и помогает решить вопросы с верификацией и выводом средств.
Свежие предложения и актуальное зеркало доступны по ссылке: vavada.
Играйте ответственно и контролируйте банкролл, чтобы азарт приносил удовольствие.
leadspike – Content reads clearly, helpful examples made concepts easy to grasp.
Looking for a yacht? Cyprus luxury boat tours for unforgettable sea adventures. Charter luxury yachts, catamarans, or motorboats with or without crew. Explore crystal-clear waters, secluded bays, and iconic coastal locations in first-class comfort onboard.
Этот информационный набор привлекает внимание множеством мелочей и странных ракурсов. Мы предлагаем взгляды, которые редко бывают полезны, но могут слегка разнообразить ваше знакомство с темой.
Вот – рулетка онлайн
trafficcrafter – Overall, professional vibe here; trustworthy, polished, and pleasantly minimal throughout.
Согласно данным Федерального наркологического центра, своевременный выезд врача снижает риск осложнений и повторных госпитализаций.
Получить дополнительную информацию – вызвать нарколога на дом каменск-уральский
Для успешного вывода из запоя используется комплексный подход с участием специалистов разных профилей. Более подробно об этом можно узнать на официальном портале наркологической службы.
Разобраться лучше – наркология вывод из запоя в нижнем тагиле
Ищете, где купить водительские права быстро и без лишних проблем? Наш сервис предлагает надежную и проверенную помощь в оформлении водительских удостоверений любых категорий. Мы гарантируем индивидуальный подход, профессиональную консультацию и соблюдение всех требований законодательства. Благодаря многолетнему опыту и тысячам довольных клиентов, вы можете быть уверены в качестве и безопасности услуги. У нас доступные цены, прозрачные условия и полный пакет документов, который позволит вам избежать лишних хлопот и сэкономить время. Не рискуйте своей репутацией и безопасностью – обращайтесь к специалистам, которые знают свою работу. На нашем сайте вы найдете подробную информацию о процедуре получения водительских прав, стоимости, сроках и необходимых документах. Купите водительские права быстро, легально и выгодно именно у нас – ваш надежный партнер на дороге к свободе и удобству в передвижении!
Алкогольная зависимость разрушает здоровье, семью, карьеру и личность. Чем раньше будет оказана профессиональная помощь, тем выше шансы на восстановление и возвращение к полноценной жизни. Лечение алкоголизма в Воронеже — помощь на всех стадиях зависимости позволяет справляться не только с физической тягой, но и с глубинными причинами, которые провоцируют патологическое употребление.
Выяснить больше – http://lechenie-alkogolizma-voronezh9.ru/lechenie-narkomanii-i-alkogolizma-voronezh/
Незамедлительно после вызова нарколог прибывает на дом для проведения подробного первичного осмотра. Врач измеряет жизненно важные показатели, собирает анамнез и определяет степень интоксикации, что является основой для составления персонализированного плана лечения.
Исследовать вопрос подробнее – вывод из запоя вызов
септопластика носовой перегородки
В центре применяется последовательная модель лечения, включающая диагностику, детоксикацию, психотерапию, восстановление социальных навыков и постлечебное сопровождение. Такой подход даёт устойчивый эффект даже при тяжёлых формах зависимости.
Углубиться в тему – http://narkologicheskaya-klinika-volgograd9.ru/chastnaya-narkologicheskaya-klinika-volgograd/
Нарколог на дому проводит тщательный осмотр, собирает анамнез и назначает необходимые лабораторные исследования. Это позволяет выявить сопутствующие патологии и скорректировать тактику лечения.
Подробнее можно узнать тут – вызов врача нарколога на дом
При необходимости применяется симптоматическое лечение для снижения болевого синдрома, устранения тошноты и рвоты, а также нормализации психоэмоционального состояния пациента. Врачи наркологи строго контролируют течение процедуры, что обеспечивает безопасность и снижает риски осложнений.
Узнать больше – https://vyvod-iz-zapoya-v-murmanske12.ru/anonimnyj-vyvod-iz-zapoya-v-murmanske/
шумоизоляция дверей авто https://shumoizolyaciya-dverej-avto.ru
Клиника «Альтернатива» предлагает фиксированные цены на выезд нарколога с оплатой после оказания услуги. Тарифы действуют по всему городу и пригороду.
Разобраться лучше – нарколог наркологическая помощь в уфе
Запой — это не просто бытовое пьянство, а одно из наиболее опасных проявлений алкогольной зависимости. Во время запоя организм перестаёт функционировать в нормальном режиме: сердечно-сосудистая система работает на износ, нервная система перегружена токсинами, а печень не справляется с нагрузкой. На этом фоне могут возникать тяжёлые осложнения — от судорог и гипогликемии до нарушения дыхания и алкогольного психоза. Чем дольше длится запой, тем глубже метаболические нарушения и выше риск серьёзных последствий.
Подробнее – vyvod-iz-zapoya-kolomna
сайт знакомств бесплатно Знакомства — это вечный танец сердец, где случайные взгляды перерастают в симфонии страсти и нежности, открывая горизонты неизведанных эмоций. В современном ритме жизни сайт знакомств становится магическим порталом, где каждый клик приближает к идеальной встрече, поливая душу искрами надежды и предвкушения.
auditpilot – Content reads clearly, helpful examples made concepts easy to grasp.
сколько стоит септопластика
Поставщик гибких металлорукавов и высоконапорных шлангов из нержавеющей стали реализует широкую номенклатуру товаров для промышленности — МРВД с фланцами по государственным и отраслевым нормативам, подводки гибкие различных размеров, краны шаровые муфтовые, фланцевые, приварные и трёхходовые. Предприятие производит гибкие рукава с быстроразъёмными соединениями, фланцами из нержавеющей стали, Ст20 либо 09Г2С в соответствии с индивидуальными техусловиями клиента. Ищете гибкая сильфонная подводка? Подробный каталог на iz-medi.ru — здесь представлены гибкие подводки от 1/2 до 2 1/2 дюйма, рукава высокого давления и запорная арматура с возможностью доставки по России. Премиальные материалы и следование стандартам гарантируют прочность и безотказность конструкций в процессе работы.
варикоцеле причины
leadvero – Navigation felt smooth, found everything quickly without any confusing steps.
authoritylab – Mobile version looks perfect; no glitches, fast scrolling, crisp text.
Как активировать Windows 11 без ключа? У нас есть пошаговая инструкция!
Подробнее – Где найти рабочий ключ для Windows 11
Сегодня рекламный видеоконтент считается важной составляющей развития бренда. Агентство видеопродакшна предлагает рекламу любой сложности по доступной цене. Если вам нужно узнать стоимость, обращайтесь к экспертам.
Оставлю здесь; https://studiya-videoprodakshn.ru/
Этот обзор предлагает свежий взгляд на предметы, которые и без того привычны. Мы упоминаем факты, не имеющие большого значения, и события с неясной важностью, но они присутствуют здесь.
Подробнее читать – детокс чай для похудения
Наркологический центр “Чистое Завтра” специализируется на лечении и реабилитации пациентов с различными формами зависимостей. Наша деятельность базируется на принципах доказательной медицины, биопсихосоциальной модели аддикции, индивидуальном подходе к каждому пациенту. Мы используем современные протоколы лечения, эффективность которых подтверждена многочисленными клиническими исследованиями.
Разобраться лучше – https://алко-консультация.рф/
«Кодирование — это не магическое решение, а важный этап в комплексной программе лечения, — поясняет ведущий нарколог клиники «Ясное Будущее» Марина Иванова. — Главное — сочетание фармакологического воздействия и последующей работы с психологом для формирования устойчивой мотивации к трезвости».
Подробнее можно узнать тут – http://kodirovanie-ot-alkogolizma-odintsovo2.ru
Миссия наркологического центра “Чистое Завтра” заключается в том, чтобы помочь пациентам разорвать порочный круг зависимости, вернуть контроль над собственной жизнью и обрести радость трезвого бытия. Мы стремимся:
Изучить вопрос глубже – http://алко-консультация.рф
На нашем сайте вы можете скачать активатор для Windows 11 абсолютно бесплатно и навсегда забыть о водяных знаках!
Подробнее – Генератор ключей Windows 11 рабочий
Как подчёркивает заведующая кафедрой наркологии РМАНПО Минздрава России, «качество оказания помощи зависит не от количества процедур, а от правильной организации лечебного процесса и квалификации команды». Именно поэтому особенно важно понимать, какие параметры следует учитывать при выборе клиники.
Подробнее тут – https://narkologicheskaya-klinika-pervouralsk11.ru/narkologicheskaya-klinika-klinika-pomoshh-v-pervouralske
Для вашего удобства и прозрачности планирования лечения мы собрали ориентировочные цены на ключевые процедуры и форматы оказания помощи. Это позволит заранее оценить бюджет и подобрать оптимальный вариант терапии в зависимости от степени абстинентного синдрома и индивидуальных потребностей пациента.
Подробнее тут – https://narkolog-na-dom-ramenskoe4.ru/narkolog-na-dom-ceny-v-ramenskom/
Наличие у нарколога практического опыта и навыков быстрого реагирования критично — особенно если речь идёт о тяжелой интоксикации или судорожном синдроме. Ошибки в дозировке или игнорирование хронических заболеваний могут привести к осложнениям.
Выяснить больше – http://narkolog-na-dom-nizhnij-tagil11.ru
варикоцеле операция
Для успешного лечения зависимости необходима тщательная диагностика. В клинике проводят полное обследование пациента, включающее:
Подробнее можно узнать тут – наркологические клиники алкоголизм в мурманске
Вызов нарколога возможен круглосуточно, что обеспечивает оперативное реагирование на критические ситуации. Пациенты и их родственники могут получить помощь в любое время, не дожидаясь ухудшения состояния.
Разобраться лучше – нарколог на дом вывод из запоя каменск-уральский
Перед заключением договора стоит поинтересоваться:
Исследовать вопрос подробнее – платная наркологическая клиника
Для вашего удобства и прозрачности планирования лечения мы собрали ориентировочные цены на ключевые процедуры и форматы оказания помощи. Это позволит заранее оценить бюджет и подобрать оптимальный вариант терапии в зависимости от степени абстинентного синдрома и индивидуальных потребностей пациента.
Подробнее можно узнать тут – vyzvat narkologa na dom
Ищете детский велосипед 12 дюймов? Посетите сайт becompact.ru – там вы сможете найти детские велосипеды по лучшей цене, а также румбоксы. Мы предлагаем большой ассортимент товаров для детей, достаточно посетить сайт, а отправка производится по всей территории РФ. В ассортименте представлены четырехколесные велосипеды для начинающих и двухколесные велосипеды для ребят постарше, а Румбоксы — это уникальные наборы для создания миниатюрных домиков, комнат, кафе, мастерских.
Запой — это не просто бытовое пьянство, а одно из наиболее опасных проявлений алкогольной зависимости. Во время запоя организм перестаёт функционировать в нормальном режиме: сердечно-сосудистая система работает на износ, нервная система перегружена токсинами, а печень не справляется с нагрузкой. На этом фоне могут возникать тяжёлые осложнения — от судорог и гипогликемии до нарушения дыхания и алкогольного психоза. Чем дольше длится запой, тем глубже метаболические нарушения и выше риск серьёзных последствий.
Углубиться в тему – https://vyvod-iz-zapoya-kolomna3.ru/vyvod-iz-zapoya-nedorogo-v-kolomne
Как поясняет медицинский психолог Елена Мусатова, «пациенту важно доверять специалисту, понимать его подход и чувствовать профессиональную уверенность ещё на этапе первичного осмотра».
Подробнее – вывод наркологическая клиника
Нарколог на дому проводит тщательный осмотр, собирает анамнез и назначает необходимые лабораторные исследования. Это позволяет выявить сопутствующие патологии и скорректировать тактику лечения.
Детальнее – нарколог на дом анонимно ярославль
Преимущества вызова нарколога на дом:
Выяснить больше – http://vyvod-iz-zapoya-v-murmanske12.ru/anonimnyj-vyvod-iz-zapoya-v-murmanske/
Как подчёркивает руководитель направления клинической токсикологии НМИЦ психиатрии и наркологии, «оказание помощи на дому требует не меньшего профессионализма, чем лечение в стационаре, ведь врач действует в ограниченных условиях».
Изучить вопрос глубже – http://narkolog-na-dom-nizhnij-tagil11.ru
Для успешного вывода из запоя используется комплексный подход с участием специалистов разных профилей. Более подробно об этом можно узнать на официальном портале наркологической службы.
Детальнее – вывод из запоя с выездом нижний тагил
Этот обзор предлагает свежий взгляд на предметы, которые и без того привычны. Мы упоминаем факты, не имеющие большого значения, и события с неясной важностью, но они присутствуют здесь.
Подробнее читать – мефедроновая зависимость
Первое, на что стоит обратить внимание — это профессиональный уровень сотрудников. Без квалифицированных наркологов, клинических психологов и психиатров реабилитационный процесс становится формальным и неэффективным.
Разобраться лучше – http://
Для успешной адаптации пациента в обществе клиника организует поддержку родственников и последующее наблюдение. Это снижает риск рецидива и помогает сохранить достигнутые результаты.
Получить дополнительную информацию – наркологические клиники алкоголизм мурманск.
В клинике проводится лечение различных видов зависимости с применением современных методов и препаратов. Ниже перечислены основные направления, отражающие широту оказываемой медицинской помощи.
Исследовать вопрос подробнее – наркологическая клиника новосибирск
datadev – Found practical insights today; sharing this article with colleagues later.
На этом этапе проводится полное обследование: анализы, ЭКГ, оценка состояния печени, сердца и нервной системы. Врач-нарколог формирует индивидуальный план терапии с учётом стажа употребления и общего состояния пациента.
Подробнее – https://lechenie-alkogolizma-voronezh9.ru/lechenie-narkomanii-i-alkogolizma-voronezh/
applabs – Found practical insights today; sharing this article with colleagues later.
dataops – Pages loaded fast, images appeared sharp, and formatting stayed consistent.
trycloudy – Found practical insights today; sharing this article with colleagues later.
Запой — это не просто бытовое пьянство, а одно из наиболее опасных проявлений алкогольной зависимости. Во время запоя организм перестаёт функционировать в нормальном режиме: сердечно-сосудистая система работает на износ, нервная система перегружена токсинами, а печень не справляется с нагрузкой. На этом фоне могут возникать тяжёлые осложнения — от судорог и гипогликемии до нарушения дыхания и алкогольного психоза. Чем дольше длится запой, тем глубже метаболические нарушения и выше риск серьёзных последствий.
Узнать больше – vyvod-iz-zapoya-cena
В рамках услуги вызова нарколога на дом используется современное оборудование и препараты, одобренные для амбулаторного применения.
Подробнее можно узнать тут – нарколог на дом вывод каменск-уральский
Одним из ключевых направлений является проведение капельниц, призванных вывести токсины из организма и нормализовать водно-электролитный баланс. Используемые препараты и состав растворов подбираются индивидуально, исходя из клинической картины и истории болезни пациента.
Детальнее – https://narkolog-na-dom-v-yaroslavle12.ru/vyzov-narkologa-na-dom-v-yaroslavle/
gobyte – Mobile version looks perfect; no glitches, fast scrolling, crisp text.
После первичного осмотра начинается активная фаза детоксикации. Современные медикаменты вводятся капельничным методом, что позволяет быстро вывести токсины из организма, нормализовать обмен веществ и восстановить работу внутренних органов.
Подробнее можно узнать тут – http://alko-zakodirovat.ru/narkolog-na-dom-czena-ekb/
При необходимости применяется симптоматическое лечение для снижения болевого синдрома, устранения тошноты и рвоты, а также нормализации психоэмоционального состояния пациента. Врачи наркологи строго контролируют течение процедуры, что обеспечивает безопасность и снижает риски осложнений.
Получить дополнительную информацию – вывод из запоя капельница мурманск
getbyte – Overall, professional vibe here; trustworthy, polished, and pleasantly minimal throughout.
TIM caiu TIM caiu .
Caiu Caiu .
Современная наркология в клинике ориентирована на всестороннее восстановление физического и психологического здоровья пациентов. Медицинское сопровождение включает этапы детоксикации, медикаментозной терапии, психотерапевтической поддержки и последующей реабилитации. Такой подход способствует не только устранению физической зависимости, но и проработке психологических причин, что снижает риск рецидивов.
Изучить вопрос глубже – платная наркологическая клиника
Этот этап лечения направлен на купирование острых симптомов, связанных с абстинентным синдромом. Пациенту назначаются современные препараты, способствующие выведению токсинов, нормализации работы сердца, печени, центральной нервной системы.
Получить дополнительную информацию – http://narkologicheskaya-klinika-volgograd9.ru
Наша цель — не просто купировать симптомы, а добиться стойкой ремиссии, предотвратить рецидивы, научить пациента жить без психоактивных веществ.
Получить дополнительные сведения – https://алко-консультация.рф/vivod-iz-zapoya-cena-v-Moskve/
В этом обзорном материале представлены увлекательные детали, которые находят отражение в различных аспектах жизни. Мы исследуем непонятные и интересные моменты, позволяя читателю увидеть картину целиком. Погрузитесь в мир знаний и удивительных открытий!
А что дальше? – https://yspu.org/%D0%9A%D0%B0%D1%82%D0%B5%D0%B3%D0%BE%D1%80%D0%B8%D0%B7%D0%B0%D1%86%D0%B8%D1%8F
Юрист по жилищным вопросам предлагает квалифицированную помощь по всем аспектам жилищного права, включая консультации, юридические услуги и защиту ваших прав на жильё, с учётом вашего запроса: [url=https://yurist-po-zhilishchnym-voprosam3.ru]консультация адвоката по жилищным вопросам[/url].
Юрист по жилищным вопросам специализируется на правовых вопросах, связанных с жильём, и оказывает поддержку в защите интересов клиента, предлагая эффективные варианты решения.
Второй абзац: Он занимается анализом документов на квартиру, проверкой договоров долевого участия, ипотеки, аренды и других сделок, чтобы минимизировать риски клиента.
Третий абзац: Специалист по жилищному праву ориентирует клиента в переговорах, претензиях и судебных процедурах ради правильного разрешения проблемы.
Раздел 2. Частые задачи и услуги
Первый абзац: Одной из основных услуг является помощь при регистрации права собственности и смене зарегистрированного владельца, включая подготовку документов и представительство в органах.
Второй абзац: Он даёт консультации по арендным отношениям, разъясняет условия договоров и помогает урегулировать споры между арендодателем и арендатором.
Третий абзац: Решение жилищных конфликтов осуществляется через судебные органы, альтернативное разрешение споров или переговоры, направленные на охрану интересов клиента.
Раздел 3. Практические рекомендации
Первый абзац: Соберите документацию: право собственности, договоры, корреспонденцию и платежные документы, чтобы юрист мог эффективно приступить к делу.
Второй абзац: Определитесь с целью — сохранение жилья, снижение расходов или изменение условий сделки — и сообщите об этом юристу ясно и точно.
Третий абзац: Следует договориться о тарифах, порядке оплаты и этапах работ, чтобы исключить неожиданные расходы и недоразумения.
Раздел 4. Кейсы и итог
Первый абзац: Типичные ситуации — перерасчет коммунальных платежей и расторжение спорных договоров аренды, требующие юридической поддержки.
Второй абзац: Ещё одна ситуация — спор о доле в жилом помещении между близкими людьми, где специалист составляет соглашение и регулирует раздел по закону.
Третий абзац: Финал процесса предусматривает оформление судебного решения в реестре и отражение изменений в документах на объект.
Используя современные инфузионные системы, мы постепенно вводим растворы для выведения токсинов, коррекции водно-электролитного баланса и восстановления функции печени. Параллельно подбираются препараты для снятия абстинентного синдрома, купирования тревожности и нормализации сна.
Узнать больше – http://narkologicheskaya-klinika-dolgoprudnyj3.ru/
getkube – Mobile version looks perfect; no glitches, fast scrolling, crisp text.
Услуга
Подробнее можно узнать тут – chastnyj narkolog na dom
usebyte – Navigation felt smooth, found everything quickly without any confusing steps.
Именно поэтому так важно не терять время. Чем раньше пациент получает помощь, тем выше шансы избежать необратимых последствий и вернуться к нормальной жизни.
Подробнее можно узнать тут – https://snyatie-lomki-podolsk1.ru/snyatie-lomki-narkomana-v-podolske/
Эта публикация погружает вас в мир увлекательных фактов и удивительных открытий. Мы расскажем о ключевых событиях, которые изменили ход истории, и приоткроем завесу над научными достижениями, которые вдохновили миллионы. Узнайте, чему может научить нас прошлое и как применить эти знания в будущем.
Изучить материалы по теме – https://hugobikes.com/2024/06/07/motos-electricas
В обзорной статье вы найдете собрание важных фактов и аналитики по самым разнообразным темам. Мы рассматриваем как современные исследования, так и исторические контексты, чтобы вы могли получить полное представление о предмете. Погрузитесь в мир знаний и сделайте шаг к пониманию!
Исследовать вопрос подробнее – https://vivod-iz-zapoya-2.ru/
Каждый пациент получает индивидуальный план лечения, основанный на клинических исследованиях, данных лабораторных анализов и психологических тестов.
Получить дополнительные сведения – chastnaya-narkologicheskaya-klinika
удаление жировика цена в москве
Эта публикация погружает вас в мир увлекательных фактов и удивительных открытий. Мы расскажем о ключевых событиях, которые изменили ход истории, и приоткроем завесу над научными достижениями, которые вдохновили миллионы. Узнайте, чему может научить нас прошлое и как применить эти знания в будущем.
Получить дополнительную информацию – https://yspu.org/%D0%92%D1%81%D0%B5%D1%80%D0%BE%D1%81%D1%81%D0%B8%D0%B9%D1%81%D0%BA%D0%B8%D0%B5_%D0%BD%D0%B0%D1%83%D1%87%D0%BD%D1%8B%D0%B5_%D0%BC%D0%B5%D1%80%D0%BE%D0%BF%D1%80%D0%B8%D1%8F%D1%82%D0%B8%D1%8F_%D0%A1%D0%98%D0%91
В этой статье представлен занимательный и актуальный контент, который заставит вас задуматься. Мы обсуждаем насущные вопросы и проблемы, а также освещаем истории, которые вдохновляют на действия и изменения. Узнайте, что стоит за событиями нашего времени!
Личный опыт — читайте сами – https://news.yspu.org/cat/students/work
Откройте для себя скрытые страницы истории и малоизвестные научные открытия, которые оказали колоссальное влияние на развитие человечества. Статья предлагает свежий взгляд на события, которые заслуживают большего внимания.
Интересует подробная информация – https://sprossenwelt.de/uncategorized/5-vorteile-wenn-man-sprossen-in-die-ernaehrung-einbaut
trystack – Navigation felt smooth, found everything quickly without any confusing steps.
usekube – Pages loaded fast, images appeared sharp, and formatting stayed consistent.
Этот информативный текст отличается привлекательным содержанием и актуальными данными. Мы предлагаем читателям взглянуть на привычные вещи под новым углом, предоставляя интересный и доступный материал. Получите удовольствие от чтения и расширьте кругозор!
Узнать больше – https://readthewagon.com/2025/03/27/a-fatal-and-progressive-disease
Процесс начинается с вызова врача или доставки пациента в клинику. После прибытия специалист проводит первичную диагностику: измерение давления, температуры, пульса, уровня кислорода в крови, визуальная оценка степени возбуждения или угнетения сознания. Собирается краткий анамнез: какой наркотик принимался, как долго, были ли сопутствующие заболевания.
Подробнее тут – снятие ломок на дому подольск
Незамедлительно после вызова нарколог прибывает на дом для проведения подробного первичного осмотра. Врач измеряет жизненно важные показатели, собирает анамнез и определяет степень интоксикации, что является основой для составления персонализированного плана лечения.
Выяснить больше – https://alko-zakodirovat.ru/zapoj-narkolog-na-dom-ekb
Казино Vavada привлекает игроков щедрыми бонусами без депозита и постоянными турнирами с крупным призовым фондом.
Регистрация занимает несколько минут, а рабочие зеркала обеспечивают стабильный доступ к сайту даже при блокировках.
Проверяйте актуальные промокоды и условия отыгрыша, чтобы оптимально использовать стартовые фриспины.
Служба поддержки отвечает на русском языке и помогает решить вопросы с верификацией и выводом средств.
Свежие предложения и актуальное зеркало доступны по ссылке: вавада регистрация.
Играйте ответственно и контролируйте банкролл, чтобы азарт приносил удовольствие.
Wielu początkujących użytkowników chce najpierw zapoznać się z ofertą serwisu przed dokonaniem wpłaty. Dlatego nowe kasyna darmowe spiny bez depozytu stają się atrakcyjną alternatywą dla klasycznych bonusów pieniężnych. Możliwość gry na wybranych slotach bez inwestycji zwiększa komfort pierwszych doświadczeń.
В этом информативном тексте представлены захватывающие события и факты, которые заставят вас задуматься. Мы обращаем внимание на важные моменты, которые часто остаются незамеченными, и предлагаем новые перспективы на привычные вещи. Подготовьтесь к тому, чтобы быть поглощенным увлекательными рассказами!
Тыкай сюда — узнаешь много интересного – https://kingtravelbanyuwangi.com/cara-mudah-pesen-travel-banyuwangi-ke-surabaya-di-kingtravel.html
фимоз у мужчин
Путь к свободе от зависимости начинается не с обещаний «просто перестать», а с профессионального медицинского вмешательства. В «Чистом Дыхании» мы применяем проверенные методы, которые работают там, где сила воли без нужной поддержки оказывается бессильной. Наша клиника в Долгопрудном работает круглосуточно — чтобы помощь была доступна в самый критический момент, когда человек ощущает острую потребность в детоксикации, снятии абстинентного синдрома или психологической поддержке.
Получить дополнительную информацию – narkologicheskaya-klinika-lechenie-alkogolizma
увеличить член цена
Осложнения, к которым может привести отсутствие лечения:
Детальнее – снятие ломки наркозависимого в подольске
Чем дольше продолжается запой, тем больше накапливаются токсины в организме, нарушается водно-электролитный баланс и ухудшается работа внутренних органов. Своевременное лечение позволяет не только остановить развитие критических состояний, но и значительно снизить вероятность возникновения серьезных осложнений. В Новокузнецке клиники работают по современным протоколам, что обеспечивает быстрый старт терапии и высокую результативность лечения.
Узнать больше – вывод из запоя недорого новокузнецк
Vulkan Vegas Poland is a Curacao-licensed online casino run by Brivio Limited, offering over 1,800 slots and live games from Pragmatic Play, Evolution, and NetEnt. New players can claim a welcome package of up to PLN 20,000 and 500 free spins. Deposits from PLN 20; e-wallet withdrawals usually within 24–48 hours. Vulkan Vegas supports Blik, Przelew24, Skrill, cards, and crypto, with 24/7 support and a mobile-friendly site https://vulkanvegas-casino-pl.com/
Параллельно с медицинской терапией начинается работа психотерапевта. В индивидуальных и семейных сессиях пациенты учатся распознавать механизмы зависимости, вырабатывать новые стратегии поведения и справляться со стрессовыми ситуациями без употребления. Последний этап — реабилитация и ресоциализация — включает трудотерапию, арт- и групповую терапию, помощь в восстановлении профессиональных навыков и возвращении к социально-активной жизни.
Подробнее – http://narkologicheskaya-klinika-mytishchi1.ru/narkologicheskaya-klinika-ceny-v-mytishchah/
Эта публикация содержит набор несвязанных идей, трудно применимых в практике. Мы лишь поверхностно затрагиваем различные точки зрения, не проводя глубокий анализ и не предлагая выводов.
Подробнее читать – сиалис онлайн
Комплексный подход к лечению алкогольной интоксикации в Новокузнецке включает последовательное выполнение нескольких этапов. Каждый из них направлен на восстановление нормальной работы организма и предотвращение повторных эпизодов зависимости.
Изучить вопрос глубже – http://
Вывод из запоя — это не просто капельница, а многоуровневая медицинская процедура, направленная на устранение интоксикации, стабилизацию состояния пациента и предотвращение осложнений. В клинике «Жизненный Луч» мы проводим эту процедуру в домашних условиях и в стационаре, в зависимости от тяжести состояния. К каждому пациенту применяем индивидуальный подход, исходя из возраста, сопутствующих заболеваний и длительности запоя.
Подробнее можно узнать тут – http://vyvod-iz-zapoya-kolomna3.ru/anonimnyj-vyvod-iz-zapoya-v-kolomne/
Согласно данным Федерального наркологического центра, своевременный выезд врача снижает риск осложнений и повторных госпитализаций.
Подробнее тут – помощь нарколога на дому каменск-уральский
Как отмечает врач-нарколог Иванов И.И., «без своевременной медицинской помощи при запое повышается риск необратимых изменений в организме и летального исхода».
Детальнее – врач вывод из запоя нижний тагил
Запой — это не просто периодическое употребление спиртного, а опасное состояние, при котором организм находится в постоянной интоксикации, теряет ресурсы и перестаёт справляться с последствиями этанола. Со временем развивается тяжёлое отравление, нарушается работа сердца, печени, мозга, а попытка «самостоятельно бросить» может привести к судорогам, галлюцинациям и даже коме. Именно поэтому важно вовремя обратиться за медицинской помощью. В Серпухове вывод из запоя осуществляет наркологическая клиника «Новая Энергия» — мы выезжаем на дом круглосуточно и при необходимости госпитализируем пациента в стационар.
Получить дополнительную информацию – vyvod-iz-zapoya-klinika
Mario game for phone free super mario bros playing
Когда зависимость захватывает жизнь, она разрушает не только организм, но и личность, отношения с близкими, карьерные планы и самоощущение. Алкоголь, наркотики и психотропные препараты постепенно подрывают работу внутренних органов, нарушают баланс нейромедиаторов в мозге и приводят к серьёзным психическим и физическим осложнениям. Попытки справиться с этим самостоятельно редко бывают успешными: необходим системный, профессиональный подход. В наркологической клинике «Доктор Здоровье» в Мытищах вы найдёте надёжную опору на всех этапах выздоровления — от экстренной детоксикации до длительной реабилитации.
Получить дополнительную информацию – chastnaya-narkologicheskaya-klinika
Вывод из запоя — это не просто капельница, а многоуровневая медицинская процедура, направленная на устранение интоксикации, стабилизацию состояния пациента и предотвращение осложнений. В клинике «Жизненный Луч» мы проводим эту процедуру в домашних условиях и в стационаре, в зависимости от тяжести состояния. К каждому пациенту применяем индивидуальный подход, исходя из возраста, сопутствующих заболеваний и длительности запоя.
Углубиться в тему – https://vyvod-iz-zapoya-kolomna3.ru/vyvod-iz-zapoya-na-domu-v-kolomne/
Mario game free https://super-mario-play.com
Не менее важным элементом лечения является психологическая реабилитация. Работа с психотерапевтом помогает пациенту осознать причины зависимости, снизить уровень стресса и научиться новым стратегиям управления эмоциями. Это существенно улучшает общее состояние и способствует долгосрочной ремиссии.
Подробнее можно узнать тут – вывод из запоя на дому круглосуточно новокузнецк
Обращение к специалисту должно происходить при первых тревожных признаках абстиненции. Сигналом к безотлагательному вызову могут служить:
Подробнее можно узнать тут – narkolog na dom srochno
Преимущества вызова нарколога на дом:
Разобраться лучше – вывод из запоя на дому круглосуточно мурманск
Миссия наркологического центра “Чистое Завтра” заключается в том, чтобы помочь пациентам разорвать порочный круг зависимости, вернуть контроль над собственной жизнью и обрести радость трезвого бытия. Мы стремимся:
Подробнее – http://алко-консультация.рф/vivod-iz-zapoya-anonimno-v-Moskve/
Наркологическая помощь на дому в Ярославле охватывает широкий спектр медицинских мероприятий, направленных на стабилизацию состояния пациента и подготовку к дальнейшему лечению. Среди основных процедур:
Получить дополнительную информацию – narkolog-na-dom-kruglosutochno jaroslavl’
Казино Vavada привлекает игроков щедрыми бонусами без депозита и постоянными турнирами с крупным призовым фондом.
Регистрация занимает несколько минут, а рабочие зеркала обеспечивают стабильный доступ к сайту даже при блокировках.
Проверяйте актуальные промокоды и условия отыгрыша, чтобы оптимально использовать стартовые фриспины.
Служба поддержки отвечает на русском языке и помогает решить вопросы с верификацией и выводом средств.
Свежие предложения и актуальное зеркало доступны по ссылке: https://vluki.net/vavada.
Играйте ответственно и контролируйте банкролл, чтобы азарт приносил удовольствие.
Запой — это не просто периодическое употребление спиртного, а опасное состояние, при котором организм находится в постоянной интоксикации, теряет ресурсы и перестаёт справляться с последствиями этанола. Со временем развивается тяжёлое отравление, нарушается работа сердца, печени, мозга, а попытка «самостоятельно бросить» может привести к судорогам, галлюцинациям и даже коме. Именно поэтому важно вовремя обратиться за медицинской помощью. В Серпухове вывод из запоя осуществляет наркологическая клиника «Новая Энергия» — мы выезжаем на дом круглосуточно и при необходимости госпитализируем пациента в стационар.
Узнать больше – http://vyvod-iz-zapoya-serpuhov3.ru
Медицинский вывод из запоя включает несколько обязательных этапов:
Разобраться лучше – вывод из запоя коломна
Как отмечает главный врач клиники, кандидат медицинских наук Сергей Иванов, «мы создали систему, при которой пациент получает помощь в течение часа — независимо от дня недели и времени суток. Это принципиально меняет шансы на выздоровление».
Ознакомиться с деталями – наркологическая помощь на дому
Алкогольная зависимость разрушает здоровье, семью, карьеру и личность. Чем раньше будет оказана профессиональная помощь, тем выше шансы на восстановление и возвращение к полноценной жизни. Лечение алкоголизма в Воронеже — помощь на всех стадиях зависимости позволяет справляться не только с физической тягой, но и с глубинными причинами, которые провоцируют патологическое употребление.
Выяснить больше – http://lechenie-alkogolizma-voronezh9.ru/lechenie-narkomanii-i-alkogolizma-voronezh/
Вывод из запоя — это не просто капельница, а многоуровневая медицинская процедура, направленная на устранение интоксикации, стабилизацию состояния пациента и предотвращение осложнений. В клинике «Жизненный Луч» мы проводим эту процедуру в домашних условиях и в стационаре, в зависимости от тяжести состояния. К каждому пациенту применяем индивидуальный подход, исходя из возраста, сопутствующих заболеваний и длительности запоя.
Получить дополнительную информацию – vyvod-iz-zapoya-na-domu
Алкогольная зависимость — это хроническое заболевание, при котором устойчивое влечение к спиртному приводит к тяжёлым медицинским, социальным и психологическим последствиям. Когда пациент осознаёт, что самостоятельно справиться с этой проблемой не получается, наиболее эффективным методом становится кодирование от алкоголизма. В клинике «Ясное Будущее» в Одинцово мы используем сочетание проверенных методик кодирования и комплексной психологической поддержки, что позволяет достичь стойкой ремиссии и вернуть человеку контроль над собственной жизнью.
Подробнее тут – http://kodirovanie-ot-alkogolizma-odintsovo2.ru/kodirovanie-ot-alkogolizma-na-domu/
тонзиллэктомия коблатором
Вывод из запоя — это не просто капельница, а многоуровневая медицинская процедура, направленная на устранение интоксикации, стабилизацию состояния пациента и предотвращение осложнений. В клинике «Жизненный Луч» мы проводим эту процедуру в домашних условиях и в стационаре, в зависимости от тяжести состояния. К каждому пациенту применяем индивидуальный подход, исходя из возраста, сопутствующих заболеваний и длительности запоя.
Подробнее – вывод из запоя
Гуамское ущелье в Краснодарском крае предлагает уникальную экскурсию на туристическом поезде по живописному маршруту вдоль горной реки среди отвесных скал высотой до 400 метров. Аттракцион работает ежедневно с 8:30 до 18:30 кроме вторника, доступен пеший проход по ущелью, организован трансфер между хутором Гуамка и посёлком Мезмай. Ищете гуамка узкоколейка? Актуальное расписание и бронирование на guamka-kuban.ru — билеты можно приобрести онлайн с безналичной оплатой, в каждом вагоне есть интернет для комфорта пассажиров. Историческая узкоколейная дорога протяжённостью 1,7 км проходит через тоннели и мосты, открывая захватывающие виды на природный памятник Апшеронского района.
Услуга
Получить дополнительные сведения – https://narkolog-na-dom-ramenskoe4.ru/vyzov-narkologa-na-dom-v-ramenskom/
getstackr – Pages loaded fast, images appeared sharp, and formatting stayed consistent.
usestackr – Mobile version looks perfect; no glitches, fast scrolling, crisp text.
cloudster – Content reads clearly, helpful examples made concepts easy to grasp.
deployly – Color palette felt calming, nothing distracting, just focused, thoughtful design.
Бесплатный ключ для Windows 11 — только у нас, обновлено в 2026 году!
Подробнее – Где взять лицензионный ключ для Windows 11
Миссия наркологического центра “Чистое Завтра” заключается в том, чтобы помочь пациентам разорвать порочный круг зависимости, вернуть контроль над собственной жизнью и обрести радость трезвого бытия. Мы стремимся:
Подробнее можно узнать тут – http://алко-консультация.рф/vivod-iz-zapoya-cena-v-Moskve/
Процесс начинается с вызова врача или доставки пациента в клинику. После прибытия специалист проводит первичную диагностику: измерение давления, температуры, пульса, уровня кислорода в крови, визуальная оценка степени возбуждения или угнетения сознания. Собирается краткий анамнез: какой наркотик принимался, как долго, были ли сопутствующие заболевания.
Получить дополнительные сведения – снятие ломки нарколог
Алкоголь и наркотики воздействуют на организм комплексно: нарушается работа сердца, сосудов, печени и почек, страдает нервная система. При запое или ломке без квалифицированной помощи возникают судороги, делирий, галлюцинации и серьёзные сбои в обмене веществ. Самостоятельные попытки «перетерпеть» или «отмотать» запой зачастую приводят к тяжёлым осложнениям, вплоть до комы и необратимых изменений в органах.
Ознакомиться с деталями – narkologicheskaya-klinika-klinika-pomoshch
На нашем сайте вы можете скачать активатор для Windows 11 абсолютно бесплатно и навсегда забыть о водяных знаках!
Подробнее – Как активировать Windows 11 без ключа
В данном тексте собраны разнообразные случайные сведения и не вполне определённые идеи, которые могут вызвать интерес. Мы отмечаем детали, не играющие ключевой роли, но сохраняющие своё место в изложении.
Подробнее читать – кето диета за неделю минус 10 кг
byteworks – Content reads clearly, helpful examples made concepts easy to grasp.
stackable – Navigation felt smooth, found everything quickly without any confusing steps.
После оформления заявки по телефону или на сайте оператор уточняет адрес и текущее состояние пациента. В критических ситуациях врач может прибыть в течение 60 минут, в стандартном режиме — за 1–2 часа. На месте проводится сбор анамнеза и оценка жизненных показателей: артериального давления, пульса, сатурации и температуры тела. Затем выбирается оптимальный протокол детоксикации — «мягкий» метод для постепенного выведения токсинов или экспресс-методика при острой интоксикации. Процедура капельного введения комбинированного раствора длится от двух до четырёх часов: специалист контролирует состояние пациента, корректирует дозировки и при необходимости вводит корригирующие препараты. По окончании врач оставляет детальный план поддерживающей терапии, включающий рекомендации по питанию, приёму сорбентов и витаминов, а также график повторных осмотров.
Выяснить больше – выезд нарколога на дом
В зависимости от степени выраженности абстинентного синдрома и наличия сопутствующих осложнений клиника «Азимут Здоровья» предлагает два основных формата оказания помощи, позволяющих оптимально сочетать эффективность лечения и комфорт пациента. Каждый вариант тщательно продуман: мы учитываем не только медицинские показания, но и личные предпочтения, чтобы вы или ваш близкий чувствовали себя максимально защищённо и спокойно. Оба формата подразумевают строгий контроль жизненных показателей и сопровождение на всех этапах — от первой капельницы до завершения курса поддерживающей терапии.
Углубиться в тему – https://narkolog-na-dom-ramenskoe4.ru/
В этом материале представлены детали, которые хоть и занимательны, но не особенно значимы. Мы рассматриваем моменты, которые трудно назвать важными, но всё же решили включить их для полноты картины.
Вот – секс
Как поясняет медицинский психолог Елена Мусатова, «пациенту важно доверять специалисту, понимать его подход и чувствовать профессиональную уверенность ещё на этапе первичного осмотра».
Углубиться в тему – http://narkologicheskaya-klinika-pervouralsk11.ru/chastnaya-narkologicheskaya-klinika-v-pervouralske/
Услуга вызова нарколога на дом в Екатеринбурге представляет собой комплекс мер, направленных на оперативное стабилизирование состояния пациента. При поступлении вызова специалист проводит детальный осмотр, сбор анамнеза и диагностику состояния, после чего разрабатывается индивидуальный план лечения. Методика включает медикаментозную детоксикацию, коррекцию обменных процессов и психологическую поддержку, что обеспечивает комплексное восстановление здоровья без необходимости посещения стационара.
Узнать больше – наркология вывод из запоя в екатеринбурге
Наличие у нарколога практического опыта и навыков быстрого реагирования критично — особенно если речь идёт о тяжелой интоксикации или судорожном синдроме. Ошибки в дозировке или игнорирование хронических заболеваний могут привести к осложнениям.
Детальнее – нарколог на дом клиника нижний тагил
Современная наркологическая клиника в Мурманске специализируется на комплексном лечении алкогольной, наркотической и других видов зависимости. В условиях МедЦентр Арктика используются проверенные методы диагностики и терапии, позволяющие достичь устойчивой ремиссии и восстановить качество жизни пациента.
Детальнее – наркологические клиники алкоголизм мурманск
В стационаре работают узкопрофильные специалисты: наркологи, неврологи, психотерапевты, а также персонал, обеспечивающий круглосуточный уход. Программа включает медикаментозное лечение, психологическую коррекцию, восстановление сна, устранение депрессии, обучение саморегуляции и работу с мотивацией.
Исследовать вопрос подробнее – телефон доверия наркологической помощи
Аддиктивное поведение, проявляющееся в форме алкоголизма, наркомании, игровой зависимости — это комплексное био-психо-социальное расстройство, требующее квалифицированного вмешательства.
Подробнее можно узнать тут – https://алко-консультация.рф/vivod-iz-zapoya-na-domu-v-Moskve
datavio – Navigation felt smooth, found everything quickly without any confusing steps.
В рамках детоксикации применяются капельничные инфузии и современные препараты, позволяющие эффективно очистить кровь. Постоянный контроль жизненных показателей пациента обеспечивает безопасность процедуры и позволяет корректировать дозировку лекарств по мере необходимости.
Подробнее тут – https://vyvod-iz-zapoya-novokuznetsk66.ru/narkologiya-vyvod-iz-zapoya-novokuzneczk
Дисфункция нейромедиаторных систем головного мозга, обусловленная длительным воздействием психоактивных веществ, приводит к формированию патологического влечения — абстинентного синдрома.
Детальнее – https://алко-консультация.рф/vivod-iz-zapoya-v-kruglosutochno-v-Moskve/
В нашей клинике применяются различные техники кодирования, которые подбираются с учётом медицинских показаний, психологического состояния и пожеланий пациента.
Получить дополнительную информацию – кодирование от алкоголизма одинцово
Как поясняет медицинский психолог Елена Мусатова, «пациенту важно доверять специалисту, понимать его подход и чувствовать профессиональную уверенность ещё на этапе первичного осмотра».
Получить больше информации – лечение в наркологической клинике в первоуральске
Перед заключением договора стоит поинтересоваться:
Подробнее можно узнать тут – https://narkologicheskaya-klinika-nizhnij-tagil11.ru/platnaya-narkologicheskaya-klinika-v-nizhnem-tagile/
Услуга вызова нарколога на дом в Екатеринбурге представляет собой комплекс мер, направленных на оперативное стабилизирование состояния пациента. При поступлении вызова специалист проводит детальный осмотр, сбор анамнеза и диагностику состояния, после чего разрабатывается индивидуальный план лечения. Методика включает медикаментозную детоксикацию, коррекцию обменных процессов и психологическую поддержку, что обеспечивает комплексное восстановление здоровья без необходимости посещения стационара.
Изучить вопрос глубже – alko-zakodirovat.ru/
Современная наркологическая клиника в Мурманске специализируется на комплексном лечении алкогольной, наркотической и других видов зависимости. В условиях МедЦентр Арктика используются проверенные методы диагностики и терапии, позволяющие достичь устойчивой ремиссии и восстановить качество жизни пациента.
Получить дополнительные сведения – наркологические клиники алкоголизм мурманск
devnex – Navigation felt smooth, found everything quickly without any confusing steps.
Обращение к специалисту должно происходить при первых тревожных признаках абстиненции. Сигналом к безотлагательному вызову могут служить:
Подробнее тут – vyzvat narkologa na dom
Агентство недвижимости оказывает услуги по подбору загородных домов и коттеджей. Клиентам предлагаются варианты в разных районах Подмосковья. Это позволяет выбрать недвижимость для постоянного проживания или отдыха https://novostroyrf.ru/
В этой статье мы рассмотрим ключевые аспекты выбора надёжного специалиста, который приедет по вызову и сможет оказать квалифицированную помощь без промедлений.
Подробнее – психиатр нарколог на дом нижний тагил
В Мурманске востребована услуга вызова нарколога на дом для вывода из запоя. Такой подход позволяет провести необходимые процедуры в комфортных условиях, без лишнего стресса для пациента. Врач приезжает с полным набором медикаментов и оборудования, что обеспечивает полноценный и своевременный уход.
Изучить вопрос глубже – http://vyvod-iz-zapoya-v-murmanske12.ru/vyvod-iz-zapoya-na-domu-v-murmanske/
Обширные исследования показывают, что качественная детоксикация снижает риск развития осложнений и способствует скорейшему восстановлению здоровья. Более подробная информация о методах детоксикации доступна на сайте Министерства здравоохранения РФ.
Подробнее – скорая вывод из запоя
bytevia – Overall, professional vibe here; trustworthy, polished, and pleasantly minimal throughout.
Вызов нарколога возможен круглосуточно, что обеспечивает оперативное реагирование на критические ситуации. Пациенты и их родственники могут получить помощь в любое время, не дожидаясь ухудшения состояния.
Подробнее тут – нарколог на дом срочно
сколько стоит увеличение члена
Услуга
Подробнее тут – выезд нарколога на дом
Выездная бригада «Альтернатива» выполняет комплекс мероприятий прямо у вас дома. Процедура включает несколько этапов.
Исследовать вопрос подробнее – неотложная наркологическая помощь в уфе
Услуга
Подробнее тут – http://narkolog-na-dom-ramenskoe4.ru
Мы работаем без праздников и выходных, принимаем срочные обращения, выезжаем оперативно и оказываем помощь в полном соответствии с медицинскими стандартами. Главный принцип — безопасность, эффективность и деликатность. Лечение проводится анонимно, без постановки на учёт и разглашения личной информации.
Узнать больше – http://vyvod-iz-zapoya-serpuhov3.ru
Подбор учреждения для прохождения реабилитации — это ответственное решение, влияющее на весь процесс восстановления. Наркологическая помощь требует не только медикаментозного вмешательства, но и глубокой психологической проработки. Согласно информации, опубликованной на портале Минздрава РФ, эффективность терапии во многом зависит от персонализированного подхода и соблюдения стандартов оказания психиатрической помощи.
Подробнее – http://narkologicheskaya-klinika-nizhnij-tagil11.ru
Одним из ключевых направлений является проведение капельниц, призванных вывести токсины из организма и нормализовать водно-электролитный баланс. Используемые препараты и состав растворов подбираются индивидуально, исходя из клинической картины и истории болезни пациента.
Подробнее – http://narkolog-na-dom-v-yaroslavle12.ru
Параллельно с медицинской терапией начинается работа психотерапевта. В индивидуальных и семейных сессиях пациенты учатся распознавать механизмы зависимости, вырабатывать новые стратегии поведения и справляться со стрессовыми ситуациями без употребления. Последний этап — реабилитация и ресоциализация — включает трудотерапию, арт- и групповую терапию, помощь в восстановлении профессиональных навыков и возвращении к социально-активной жизни.
Изучить вопрос глубже – narkologicheskaya-klinika
Абстинентный синдром — одно из самых тяжёлых и опасных проявлений наркотической зависимости. Он развивается на фоне резкого отказа от приёма веществ и сопровождается сильнейшими нарушениями работы организма. Это состояние требует немедленного вмешательства. Самостоятельно справиться с ним невозможно — особенно если речь идёт о героине, метадоне, синтетических наркотиках или длительной зависимости. В клинике «НаркоПрофи» мы организовали систему снятия ломки в Подольске, работающую круглосуточно: как на дому, так и в условиях стационара.
Ознакомиться с деталями – снятие ломки наркомана в подольске
Алкоголь и наркотики воздействуют на организм комплексно: нарушается работа сердца, сосудов, печени и почек, страдает нервная система. При запое или ломке без квалифицированной помощи возникают судороги, делирий, галлюцинации и серьёзные сбои в обмене веществ. Самостоятельные попытки «перетерпеть» или «отмотать» запой зачастую приводят к тяжёлым осложнениям, вплоть до комы и необратимых изменений в органах.
Получить дополнительные сведения – https://narkologicheskaya-klinika-dolgoprudnyj3.ru/chastnaya-narkologicheskaya-klinika-v-dolgoprudnom
Дисфункция нейромедиаторных систем головного мозга, обусловленная длительным воздействием психоактивных веществ, приводит к формированию патологического влечения — абстинентного синдрома.
Ознакомиться с деталями – https://алко-консультация.рф/vivod-iz-zapoya-na-domu-v-Moskve/
Обращение к специалисту должно происходить при первых тревожных признаках абстиненции. Сигналом к безотлагательному вызову могут служить:
Получить дополнительные сведения – выезд нарколога на дом раменское
ליטוף הפנים שלי. אחרי המציצה, הוא הרים אותי מהברכיים, הצמיד אותי לקיר, וירד למטה בעצמו. הוא פרש את רגלי, דחף את חוט התחתונים לאחור, וצלל לתוך הכוס הרטוב שלי עם הלשון, מה שגרם לי המעגל וביחס הפוך להתנגדות המעגל. הילדה משכה את עיניה. אתה זוכר את חוק אוהם למעגל מלא? לא? וחוקי קירכהוף? אז מה שכחת כאן? בסדר, בוא נלך. אני אראה לך את החנות… הילדה הסמיקה בצפיפות https://messer-spa.co.il/
Текст включает разнообразную информацию, которая может показаться любопытной, но не меняет устоявшегося восприятия. Предлагаем просто насладиться чтением, не ожидая значительной пользы.
Подробнее читать – похудеть на таблетках
Вывод из запоя показан при:
Узнать больше – вывод из запоя на дому мурманск.
В этом материале представлены детали, которые хоть и занимательны, но не особенно значимы. Мы рассматриваем моменты, которые трудно назвать важными, но всё же решили включить их для полноты картины.
Вот – турниры по покеру
Когда проблема зависимости достигает критического уровня, оперативное вмешательство становится необходимостью. В Екатеринбурге профессиональные наркологи готовы выехать на дом круглосуточно, чтобы начать лечение зависимости немедленно. Такой формат оказания помощи позволяет пациенту получить качественную терапию в знакомой и уютной обстановке, что значительно снижает уровень стресса и способствует быстрому восстановлению.
Подробнее – https://alko-zakodirovat.ru/narkolog-na-dom-czena-ekb/
Процесс начинается с вызова врача или доставки пациента в клинику. После прибытия специалист проводит первичную диагностику: измерение давления, температуры, пульса, уровня кислорода в крови, визуальная оценка степени возбуждения или угнетения сознания. Собирается краткий анамнез: какой наркотик принимался, как долго, были ли сопутствующие заболевания.
Подробнее можно узнать тут – https://snyatie-lomki-podolsk1.ru/snyatie-lomki-narkolog-v-podolske/
Обращение за помощью на дому обладает рядом преимуществ, которые особенно актуальны для пациентов, сталкивающихся с зависимостью:
Детальнее – https://alko-zakodirovat.ru/zapoj-narkolog-na-dom-ekb
Попытки пациента самостоятельно прекратить употребление психоактивных веществ приводят к развитию мучительного абстинентного синдрома, который проявляется в виде физических и психических страданий.
Детальнее – http://алко-консультация.рф
Наркологический центр “Чистое Завтра” специализируется на лечении и реабилитации пациентов с различными формами зависимостей. Наша деятельность базируется на принципах доказательной медицины, биопсихосоциальной модели аддикции, индивидуальном подходе к каждому пациенту. Мы используем современные протоколы лечения, эффективность которых подтверждена многочисленными клиническими исследованиями.
Получить дополнительные сведения – http://алко-консультация.рф/
dataworks – Found practical insights today; sharing this article with colleagues later.
Мы предлагаем полный спектр услуг по лечению зависимостей:
Получить больше информации – zapoj-narkologicheskaya-klinika
Discord down caiu.site .
В этой публикации мы предлагаем подробные объяснения по актуальным вопросам, чтобы помочь читателям глубже понять их. Четкость и структурированность материала сделают его удобным для усвоения и применения в повседневной жизни.
Полезно знать – https://somethinghaute.com/video-everything-you-want-to-know-about-saima-baloch-aka-rajjo-of-the-legend-of-maula-jatt
Когда проблема зависимости достигает критического уровня, оперативное вмешательство становится необходимостью. В Екатеринбурге профессиональные наркологи готовы выехать на дом круглосуточно, чтобы начать лечение зависимости немедленно. Такой формат оказания помощи позволяет пациенту получить качественную терапию в знакомой и уютной обстановке, что значительно снижает уровень стресса и способствует быстрому восстановлению.
Узнать больше – https://alko-zakodirovat.ru/
Клиника «Альтернатива» работает на рынке наркологических услуг более десяти лет и имеет лицензию на проведение детоксикации и реабилитации. Мы придерживаемся следующих принципов:
Углубиться в тему – http://narkologicheskaya-pomoshh-ufa9.ru/skoraya-narkologicheskaya-pomoshh-ufa/
Эта обзорная заметка содержит ключевые моменты и факты по актуальным вопросам. Она поможет читателям быстро ориентироваться в теме и узнать о самых важных аспектах сегодня. Получите краткий курс по современной информации и оставайтесь в курсе событий!
Подробности по ссылке – https://www.velo-bavaria.de/services/bike-delivery
Мы собрали для вас самые захватывающие факты из мира науки и истории. От малознакомых деталей до грандиозных событий — эта статья расширит ваш кругозор и подарит новое понимание того, как устроен наш мир.
Проверенные методы — узнай сейчас – https://birlik-akmola.kz/?p=11389
Эта статья предлагает живое освещение актуальной темы с множеством интересных фактов. Мы рассмотрим ключевые моменты, которые делают данную тему важной и актуальной. Подготовьтесь к насыщенному путешествию по неизвестным аспектам и узнайте больше о значимых событиях.
Всё самое вкусное внутри – https://parkingaccess.com/blog/parking-at-universal-studios-hollywood
Этот информативный текст отличается привлекательным содержанием и актуальными данными. Мы предлагаем читателям взглянуть на привычные вещи под новым углом, предоставляя интересный и доступный материал. Получите удовольствие от чтения и расширьте кругозор!
Полезно знать – https://olxtotocasino.space/50-pondok-pesantren-terbaik-di-indonesia
Мы собрали для вас самые захватывающие факты из мира науки и истории. От малознакомых деталей до грандиозных событий — эта статья расширит ваш кругозор и подарит новое понимание того, как устроен наш мир.
Узнать из первых рук – https://www.visioconseilspro.com/blog-comptable/declaration-impot-crypto-monnaies
Сам играю на https://arhizorro.ru уже полгода — никаких нареканий.
В этом информативном тексте представлены захватывающие события и факты, которые заставят вас задуматься. Мы обращаем внимание на важные моменты, которые часто остаются незамеченными, и предлагаем новые перспективы на привычные вещи. Подготовьтесь к тому, чтобы быть поглощенным увлекательными рассказами!
Тыкай сюда — узнаешь много интересного – https://scenterprisesgroup.com/the-very-best-vpn-designed-for-china
атерома удаление цена в москве
В этом интересном тексте собраны обширные сведения, которые помогут вам понять различные аспекты обсуждаемой темы. Мы разбираем детали и факты, делая акцент на важности каждого элемента. Не упустите возможность расширить свои знания и взглянуть на мир по-новому!
Запросить дополнительные данные – https://www.pharelya.fr/portfolios/half-width-slider-gallery-2
What is the name of the Mario game super mario play
Ita? caiu caiu.site .
привет стоит брать в этом магазине? купить Кокаин, Бошки, Марихуану, Мефедрон За АМ 1220 ничего сказать не могу – не пробовал…. Но, после тестирования 694 и 2201 впечатления о линейке АМ у меня сильно подпортились (видел тут в ветке пару сообщений о том, что заказчикам вместо нормального товара какую то муть присылали, так вот хотелось бы узнать у владельцев магазина, в связи с чем возникают такие накладки и как часто такое случается, а то почтой итак заказ долго дожидаться, а если ещё подобный косяк выйдет с возвратом, то это будет полный п…
Использую промокоды с Frank casino промокоды перед игрой — это повышает шансы на крупный выигрыш.
Первый этап терапии – это детоксикация, направленная на быстрое выведение токсинов, накопившихся в организме. Специалисты назначают индивидуальную медикаментозную терапию, которая способствует восстановлению обменных процессов и нормализации работы печени, почек и сердечно-сосудистой системы.
Исследовать вопрос подробнее – http://vyvod-iz-zapoya-novokuznetsk66.ru
Обеспечение своевременной наркологической помощи с выездом на дом в Каменске-Уральском — важный аспект комплексного лечения алкогольной и наркотической зависимости. Услуга вызова нарколога на дом позволяет получить квалифицированную медицинскую помощь в комфортных условиях, что снижает стресс и способствует более быстрому восстановлению.
Разобраться лучше – нарколог на дом круглосуточно
Не хотите платить за лицензию? У нас есть рабочий кряк для Windows 11 — скачайте прямо сейчас!
Подробнее – Windows 11 кряк 2026 скачать
Как отмечает врач-нарколог Иванов И.И., «без своевременной медицинской помощи при запое повышается риск необратимых изменений в организме и летального исхода».
Разобраться лучше – https://vyvod-iz-zapoya-nizhnij-tagil11.ru/
Трек есть +Бонус от души как придет отпишу купить Кокаин, Бошки, Марихуану, Мефедрон трек получил в пятницу сегодня понедельник пока нет данных по треку возможно еще не вбился в систему думаю на днях ясно все будет отпишуНовичка 1к10* само то!!!!!!!!!!!!
Чем дольше продолжается запой, тем больше накапливаются токсины в организме, нарушается водно-электролитный баланс и ухудшается работа внутренних органов. Своевременное лечение позволяет не только остановить развитие критических состояний, но и значительно снизить вероятность возникновения серьезных осложнений. В Новокузнецке клиники работают по современным протоколам, что обеспечивает быстрый старт терапии и высокую результативность лечения.
Детальнее – вывод из запоя вызов на дом
Запойное состояние оказывает разрушительное воздействие на организм. При длительном употреблении алкоголя развиваются следующие проблемы:
Подробнее можно узнать тут – вывод из запоя вызов на дом
Этот сборник информации привлекает множеством мелких деталей и необычных ракурсов. Мы предлагаем взгляды, редко полезные, но способные немного разнообразить знакомство с темой.
Подробнее читать – народные средства от диабета
cryptora – Appreciate the typography choices; comfortable spacing improved my reading experience.
Discover the thrill of real-money live casino action at mobile friendly live casino providers Australia, where you can enjoy live dealers, top software providers, and exclusive promotions.
If issues arise, customer support is available and responsive to user needs.
Вывод из запоя в Мурманске представляет собой комплекс мероприятий, направленных на оказание медицинской помощи пациентам, находящимся в состоянии алкогольного отравления или длительного употребления спиртного. Процедура проводится с целью стабилизации состояния организма, предупреждения осложнений и минимизации риска развития тяжелых последствий алкоголизма.
Получить дополнительные сведения – нарколог вывод из запоя
дада братан пришло все!!!охуенноый кач ск и рега нормальная вапще… короче зайди к нему на ветку там трипы опродукции прочти мой свежий за ск купить Кокаин, Бошки, Марихуану, Мефедрон чтоб расширенный был глаз.платил 5 февраля свою посылочку!как вы поняли ничего не получил!ТС кормил меня завтраками,в итоги обещал вернуть деньги если не получу до 28 февраля!деньги мне тоже никто не вернул вместо этого мне прислали новый трек и написали что мы обещали что получите товар и деньги возвращать не буду!мои обьяснения о том что вашу посылку уже некому получать он слушать не хочет и возвращать деньги тоже!Ув.Адмистрация форума прошу не удалять мой пост и если нужно могу скинуть переписку!
kubexa – Mobile version looks perfect; no glitches, fast scrolling, crisp text.
Нарколог на дому проводит тщательный осмотр, собирает анамнез и назначает необходимые лабораторные исследования. Это позволяет выявить сопутствующие патологии и скорректировать тактику лечения.
Подробнее тут – нарколог на дом круглосуточно ярославль
stackora – Overall, professional vibe here; trustworthy, polished, and pleasantly minimal throughout.
cloudiva – Loved the layout today; clean, simple, and genuinely user-friendly overall.
netlance – Navigation felt smooth, found everything quickly without any confusing steps.
перешёл с другого казино в атом — и не жалею ни разу
https://remaxeastcape.com/author/bernadineyoung/
Чем дольше продолжается запой, тем больше накапливаются токсины в организме, нарушается водно-электролитный баланс и ухудшается работа внутренних органов. Своевременное лечение позволяет не только остановить развитие критических состояний, но и значительно снизить вероятность возникновения серьезных осложнений. В Новокузнецке клиники работают по современным протоколам, что обеспечивает быстрый старт терапии и высокую результативность лечения.
Получить дополнительную информацию – http://vyvod-iz-zapoya-novokuznetsk66.ru/vyvod-iz-zapoya-na-domu-novokuzneczk/
devonic – Content reads clearly, helpful examples made concepts easy to grasp.
Ранее заказывал у данного селлера продукцию,качеством всегда был доволен,как и уровнем поддержки пользователей,сегодня же списался с ним по поводу небольшой технической ошибки при фасовке,и был рад узнать,что честность селлера на том же уровне,что и качество продукции.Очень благодарен создателям сайта,тем кто все это делает.Жду теперь свою посылочку,а потом обязательно еще закажу,оно того стоит.Спасибо вам ребята ,за помощь,и понимание. https://space-regatta.ru Не взирая на то что заказ был оплачен в среду прошлой недели, а получил я его через 9(девять) дней, данный селлер заслужил мое доверие!Отличное описание, сразу захотелось заказть)) Что собственно и сделал, надеюсь, неразачеруюсь
apponic – Content reads clearly, helpful examples made concepts easy to grasp.
codefuse – Found practical insights today; sharing this article with colleagues later.
securia – Pages loaded fast, images appeared sharp, and formatting stayed consistent.
Отель «Верона» в Новокузнецке представляет 5 уютных номеров после ремонта — 2 люкс-апартамента и 3 комнаты категории «Комфорт» для бизнес-визитов и туристов в центре города по адресу пр. Строителей, 60. Рядом находятся торговые комплексы, транспортные магистрали, организован комфортный проезд к гостинице. Ищете гостиница цены? Бронирование и услуги на veronahotel.pro — гостям доступны сауна, инфракрасная комната для релаксации, специальное предложение «Свадебная ночь» для молодожёнов с украшением номера, игристым вином и фруктами. Круглосуточная стойка регистрации, Wi-Fi и индивидуальный сервис создают комфортные условия для проживания в любое время года.
удаление полипа шейки матки
проект производства свайных работ В случаях, когда речь идет о сложных работах, таких как демонтаж технологического оборудования, снос зданий или благоустройство территории, ППР становится критически важным документом, определяющим детальный план действий и меры безопасности.
“Думаю надо затестить через сигу, Заколачиваю пробую бля что то не то вкус не тот и т.д” купить Кокаин, Бошки, Марихуану, Мефедрон так то, я не понимаю что ты хотел сказать по этому поводу, но курили и чистым и миксами И НЕ ПРЕТ ОН НИФИГА, то что прислали, про пробники я скажу, пробник стоит 1 грамм 2500 вроде как, вот и прикинь как не выгадно заказывать да и темболее 1 грамм норм отошлет а когда закажешь 10 пришлет той фигни, что нам сейчасставлю большой + магазину и хочу
уничтожение клопов Профессиональная дезинсекция тараканов, включая обработку инсектицидным туманом, является одним из самых надежных способов быстро и эффективно устранить заражение, обеспечивая долгосрочный результат и спокойствие в вашем доме.
Предприятие Мегапакс занимается реализацией полимерной тары и упаковочных материалов для производственных и торговых целей с транспортировкой до клиента. Ассортимент содержит полиэтиленовые емкости 48-227 литров, канистры вместимостью 1-31,5 л, еврокубы 1000 литров и специальные канистры для нефтепродуктов с заливными механизмами. Оформить заказ можно через https://megapaks.ru/ с согласованием цен и условий поставки. Фирма принимает безналичную оплату с НДС и поставляет свежую продукцию и восстановленную тару в отличном виде по доступным тарифам.
https://msk-news.net/other/2026/02/02/778661.html
Клиника «Альтернатива» предлагает фиксированные цены на выезд нарколога с оплатой после оказания услуги. Тарифы действуют по всему городу и пригороду.
Получить больше информации – http://narkologicheskaya-pomoshh-ufa9.ru/narkologicheskaya-pomoshh-na-domu-ufa/
МАГАЗИН РАБОТАЕТ НОРМАЛЬНО!!! БЫЛИ МАЙСКИЕ ПРАЗДНИКИ И КУРЬЕРКИ НЕ РАБОТАЛИ ПОЭТОМУ ОНИ ТОЖЕ НЕ РАБОТАЛИ!!! https://fregat-penza.ru Что случилось? почему страшно?Снова магазин порадовал своей оперативностью) сдеал заказ, получил трек всё бьётся!
Профессиональная клиника никогда не скрывает информацию о своих сотрудниках. На официальных сайтах нередко размещены сканы дипломов, сведения о специализации и стаже, участие в отраслевых конференциях и проектах Минздрава.
Выяснить больше – https://narkologicheskaya-klinika-pervouralsk11.ru/chastnaya-narkologicheskaya-klinika-v-pervouralske/
Текст включает разнообразную информацию, которая может показаться любопытной, но не меняет устоявшегося восприятия. Предлагаем просто насладиться чтением, не ожидая значительной пользы.
Подробнее читать – диета для похудения быстро
Мы используем новейшие образцы медицинской техники, что повышает безопасность процедур и скорость детоксикации.
Получить дополнительную информацию – экстренная наркологическая помощь
Если человек страдает от алкоголизма, запойное состояние требует незамедлительного вмешательства, особенно если признаки токсического отравления начинают угрожать жизни. Признаки запоя — это не только физическая зависимость, но и эмоциональные и психические расстройства, такие как тревога, агрессия и галлюцинации.
Подробнее можно узнать тут – http://narcolog-na-dom-novokuznetsk0.ru
Первое, что необходимо уточнить перед вызовом — наличие у врача лицензии и профильного медицинского образования. Только сертифицированный нарколог может назначить препараты, поставить капельницу и провести детоксикацию без ущерба для здоровья пациента.
Получить больше информации – нарколог на дом вывод
Первые 1.5 часа эйфория и сосредоточеность на том чем занят , в голове мелькают гениальные идеи) https://studio-fotodecol.ru возможно мои письма рубятся где-то? там все четко по делу.товар появился? когда возобновите доставку по городам?
Согласно официальным рекомендациям Минздрава, выезд нарколога на дом способствует сокращению осложнений и повышению эффективности первичной помощи.
Изучить вопрос глубже – вызвать нарколога на дом
Для успешной адаптации пациента в обществе клиника организует поддержку родственников и последующее наблюдение. Это снижает риск рецидива и помогает сохранить достигнутые результаты.
Узнать больше – narkologicheskaya klinika murmansk
Как подчёркивает заведующая кафедрой наркологии РМАНПО Минздрава России, «качество оказания помощи зависит не от количества процедур, а от правильной организации лечебного процесса и квалификации команды». Именно поэтому особенно важно понимать, какие параметры следует учитывать при выборе клиники.
Подробнее тут – http://narkologicheskaya-klinika-pervouralsk11.ru/narkologicheskaya-klinika-klinika-pomoshh-v-pervouralske/https://narkologicheskaya-klinika-pervouralsk11.ru
Критерий
Исследовать вопрос подробнее – наркологическая клиника клиника помощь в нижнем тагиле
Чем дольше продолжается запой, тем больше накапливаются токсины в организме, нарушается водно-электролитный баланс и ухудшается работа внутренних органов. Своевременное лечение позволяет не только остановить развитие критических состояний, но и значительно снизить вероятность возникновения серьезных осложнений. В Новокузнецке клиники работают по современным протоколам, что обеспечивает быстрый старт терапии и высокую результативность лечения.
Подробнее – http://vyvod-iz-zapoya-novokuznetsk66.ru
Вывод из запоя в Нижнем Тагиле представляет собой комплекс медицинских мероприятий, направленных на безопасное и эффективное прерывание состояния острого алкогольного отравления. Этот процесс требует профессионального подхода, так как самостоятельное прерывание запоя чревато серьезными осложнениями, включая судороги, инсульты и инфаркты. В медицинской практике используется комплекс мер, включающий детоксикацию организма, коррекцию водно-электролитного баланса и лечение симптомов абстиненции.
Подробнее можно узнать тут – нарколог вывод из запоя нижний тагил
Если в состоянии пациента наблюдаются такие признаки, как судороги, панические атаки, или гипертонический криз, необходимо немедленно вызвать врачей. Задержка может привести к необратимым последствиям.
Подробнее – выезд нарколога на дом
Клиника «Альтернатива» работает на рынке наркологических услуг более десяти лет и имеет лицензию на проведение детоксикации и реабилитации. Мы придерживаемся следующих принципов:
Разобраться лучше – частная наркологическая помощь уфа
Тоже хочу сделать заказ.Жду ответа купить Кокаин, Бошки, Марихуану, Мефедрон Пакетик был завёрнут в фольге, всё ровно.друган смени аву плиз =) , по поводу магазина сервис на высшем уровне позавчера оплотил условия такие что товар будет отправлен в течении 2-3 рабочих дней думал придеца пережидать ещо и выходные, попросил оператора чтобы пастарались выслать завтро патамучто очень как ето срочно, в итоге на следующий день моя посылочка уже была отправлена. за что магазину огромное спасибо! акб-48ф ваобще шикарный реагент 1 к 10 выхлёстывает 1к7 убивает.
Основной этап в лечении — детоксикация организма от токсичных веществ, вызывающих интоксикацию. В клинике применяют современные методы капельниц и медикаментозной поддержки, включая препараты для снятия абстинентного синдрома.
Получить дополнительную информацию – частная наркологическая клиника мурманск
Клиника «Альтернатива» предлагает фиксированные цены на выезд нарколога с оплатой после оказания услуги. Тарифы действуют по всему городу и пригороду.
Получить больше информации – срочная наркологическая помощь
Преимущества вызова нарколога на дом:
Углубиться в тему – http://vyvod-iz-zapoya-v-murmanske12.ru/
В этой статье мы рассмотрим ключевые аспекты выбора надёжного специалиста, который приедет по вызову и сможет оказать квалифицированную помощь без промедлений.
Подробнее тут – запой нарколог на дом
Как подчёркивает заведующая отделением клинической психологии ФГБУН «НМИЦ психиатрии и наркологии» Минздрава России, наличие в команде специалистов с опытом работы в области зависимости — это основа качественной помощи.
Ознакомиться с деталями – https://narkologicheskaya-klinika-nizhnij-tagil11.ru/platnaya-narkologicheskaya-klinika-v-nizhnem-tagile
Запой — это не просто длительное употребление алкоголя, а тяжелое состояние, когда организм перестает функционировать нормально без постоянного поступления этанола. При запое происходит накопление токсинов, что ведет к нарушению работы внутренних органов и сильному ослаблению иммунной системы. Пациенты часто испытывают невыносимые физические и психические страдания, а попытки самостоятельно выйти из запоя только усугубляют ситуацию.
Получить больше информации – вывод из запоя на дому круглосуточно
Возможность получить помощь в любой час снижает риск осложнений и ускоряет стабилизацию состояния. Среди главных преимуществ:
Получить дополнительную информацию – наркологическая помощь
операция по удалению полипа эндометрия
Вызов нарколога возможен круглосуточно, что обеспечивает оперативное реагирование на критические ситуации. Пациенты и их родственники могут получить помощь в любое время, не дожидаясь ухудшения состояния.
Подробнее можно узнать тут – нарколог на дом срочно в каменске-уральском
проект производства работ по ремонту карте Разработка ППР является обязательным этапом перед началом большинства строительных процессов, будь то капитальный ремонт, возведение нового объекта, монтаж оборудования или проведение специфических работ, таких как бетонирование, свайные работы или бурение.
codestackr – Loved the layout today; clean, simple, and genuinely user-friendly overall.
вот опять сегодня получил что заказал всё прошло ровно .быстро ,качество в этом магазине лучшее ,больше не где не заказываю .если нужно что то подождать я лучше подожду чем кидал буду кормить ,тоже влитал поначалу пока нашёл этот магазин ,по этому сам беру и друзьям советую .спасибо всей команде за отличную работу.с наступающими праздниками всех поздравляю.вообщем всем благодарочка. https://360ufa.ru – Извините…. а… вы нас до “Дайва” (ночной клуб) не довезете?Как долго вы обрабатываете заказ?
Медицинская детоксикация — это основа успешного вывода из запоя. Она проводится под строгим контролем врачей-наркологов, которые используют инфузионную терапию для выведения токсинов из организма. В качестве компонентов капельниц применяются растворы глюкозы, физиологический раствор, препараты для восстановления работы печени и почек. Поддержка сердечно-сосудистой системы и нормализация артериального давления достигается с помощью специализированных медикаментов.
Узнать больше – вывод из запоя вызов
курсы подготовки к егэ по английскому
лев казино фриспины без депозита Некоторые бонусы, например, 300 рублей за регистрацию или 20 фриспинов, не требуют внесения депозита, что делает их особенно привлекательными для тех, кто хочет попробовать свои силы без финансовых рисков.
joycasino официальный зеркало на сегодня joycasino официальный зеркало на сегодня .
Эта статья полна интересного контента, который побудит вас исследовать новые горизонты. Мы собрали полезные факты и удивительные истории, которые обогащают ваше понимание темы. Читайте, погружайтесь в детали и наслаждайтесь процессом изучения!
Познакомиться с результатами исследований – https://halfstep123.wpxblog.jp/3dprint001
дам кредит под залог Кредит под залог автомобиля или другого транспортного средства также является востребованной услугой, позволяющей быстро получить средства, оставляя автомобиль в своем пользовании.
школа онлайн школа онлайн .
Этот информативный текст отличается привлекательным содержанием и актуальными данными. Мы предлагаем читателям взглянуть на привычные вещи под новым углом, предоставляя интересный и доступный материал. Получите удовольствие от чтения и расширьте кругозор!
Есть чему поучиться – https://www.kirra.jp/tourguide/%E3%82%B5%E3%83%83%E3%83%97
Откройте для себя скрытые страницы истории и малоизвестные научные открытия, которые оказали колоссальное влияние на развитие человечества. Статья предлагает свежий взгляд на события, которые заслуживают большего внимания.
Узнать из первых рук – https://api.grt.md/video-nsg-obratilos-k-prezidentu-iz-za-prinyatogo-v-okonchatelnom-chtenii-zakona-o-karte-sudov
Мы собрали для вас самые захватывающие факты из мира науки и истории. От малознакомых деталей до грандиозных событий — эта статья расширит ваш кругозор и подарит новое понимание того, как устроен наш мир.
Получить больше информации – https://angelinaenterprises.com/how-to-decide-between-a-hybrid-and-an-ev
заказать кухню с доставкой zakazat-kuhnyu-4.ru .
Эта статья погружает вас в увлекательный мир знаний, где каждый факт становится открытием. Мы расскажем о ключевых исторических поворотных моментах и научных прорывах, которые изменили ход цивилизации. Поймите, как прошлое формирует настоящее и как его уроки могут помочь нам строить будущее.
Изучить материалы по теме – https://ecomackindia.com/3-ply-surgical-face-mask-making-machine
Сам ты не общительный )) https://fregat-penza.ru напишите в аську, там порешают вашу проблему. С этой партией МХЕ определённо вышел косяк.В общем, хотелось бы вас оповестить и другим может пригодится.
В этом материале представлены детали, которые хоть и занимательны, но не особенно значимы. Мы рассматриваем моменты, которые трудно назвать важными, но всё же решили включить их для полноты картины.
Вот – секс шоп
Эта статья предлагает живое освещение актуальной темы с множеством интересных фактов. Мы рассмотрим ключевые моменты, которые делают данную тему важной и актуальной. Подготовьтесь к насыщенному путешествию по неизвестным аспектам и узнайте больше о значимых событиях.
Не пропусти важное – https://hoctienganhtaiphilippines.vn/lien-he
Не тратьте деньги на лицензию — скачайте кряк для Windows 11 здесь и активируйте систему за 5 минут.
Подробнее – Бесплатная активация Windows 11 навсегда
codepushr – Pages loaded fast, images appeared sharp, and formatting stayed consistent.
devpush – Appreciate the typography choices; comfortable spacing improved my reading experience.
В этой статье представлен занимательный и актуальный контент, который заставит вас задуматься. Мы обсуждаем насущные вопросы и проблемы, а также освещаем истории, которые вдохновляют на действия и изменения. Узнайте, что стоит за событиями нашего времени!
Где можно узнать подробнее? – https://students.tw/4386
gitpushr – Appreciate the typography choices; comfortable spacing improved my reading experience.
mergekit – Overall, professional vibe here; trustworthy, polished, and pleasantly minimal throughout.
из тех что есть в наличии у чемикала… ну разве что с 307го, но я его не пробовал, говорят самое норм – 1к15. да и он самый долгий и сильный из всех доступных ЖВШ на данный момент на рынке.. https://stroyplast-ufa.ru Да все так и есть! Присоединюсь к словам написанным выше! Очень ждём хороший и мощный продукт!Всем мир! Хотелось бы всё же какого то оперативного решения! Запрет не за горами, а вернее 20 вступает в силу((((( Уважаемый продаван скажите что нибудь???
Эта публикация содержит набор несвязанных идей, трудно применимых в практике. Мы лишь поверхностно затрагиваем различные точки зрения, не проводя глубокий анализ и не предлагая выводов.
Подробнее читать – народные средства от диабета
Нашли рабочий серийный номер для Windows 11 Pro — проверено лично, без вирусов!
Подробнее – Как активировать Windows 11 без ключа
с почтой лучше не связываться купить Кокаин, Бошки, Марихуану, Мефедрон Какое палево ты очём?И потом не удивляйтесь, что магазин медленно работает или не отвечает. Попробуйте по 100 раз в день рассказывать что и как разводить, и при этом успевать оформлять заказы.
купить заказать кухню купить заказать кухню .
нейросети для бизнеса ИИ-агенты, оснащенные базами знаний и способные к самообучению, могут выполнять сложные задачи, освобождая человеческие ресурсы для более творческой и стратегической работы.
Требуется вывоз строительного мусора? Откройте технополис-днр.рф – там вы обнаружите обширный выбор арендной спецтехники для осуществления строительных и ремонтных операций по ДНР. Помимо этого, мы предоставляем: перевозку грузов, вывоз строймусора, доставку нерудных материалов. Узнайте цены на сайте, а подача техники на объект осуществляется в самые сжатые сроки с опытными машинистами.
Отдельная категория пациентов — люди с алкогольной зависимостью. Для жителей Воскресенска особенно актуальны проблемы, связанные с длительными запоями: человек несколько дней подряд пьёт, практически не ест, плохо спит, с трудом встаёт, а каждое утро обещает, что «сейчас немного — и всё». На этом фоне растёт нагрузка на сердце, печень, нервную систему, повышается риск инсультов и инфарктов, обостряются хронические болезни.
Подробнее – otzyvy-o-narkologicheskih-klinikah
мелбет на айфон скачать мелбет на айфон скачать .
Курьерка не может принять такое количество заказов – отказала в https://sarafan-production.ru здравствуйте. магазин работает?Вы не могли сегодня оплатить заказ, потому что мы сегодня не работаем 🙂
Преимущества вызова нарколога на дом:
Узнать больше – http://vyvod-iz-zapoya-v-murmanske12.ru
Наркологическая помощь на дому в Ярославле охватывает широкий спектр медицинских мероприятий, направленных на стабилизацию состояния пациента и подготовку к дальнейшему лечению. Среди основных процедур:
Детальнее – vyzvat-narkologa-na-dom jaroslavl’
Клиника «Семья и Здоровье» предлагает комплексное лечение на дому, что позволяет избежать стрессов, связанных с госпитализацией, и получить квалифицированную помощь в привычной обстановке. Наши специалисты работают круглосуточно, приезжают в течение 30–60 минут и проводят полный спектр процедур для восстановления здоровья.
Подробнее можно узнать тут – вывод из запоя с выездом
Вызов нарколога на дом в Каменске-Уральском обеспечивает безопасность пациента, исключая необходимость посещения медицинского учреждения, что особенно актуально при тяжелом состоянии или психологическом сопротивлении. Такая помощь включает в себя детоксикацию, купирование абстинентного синдрома и консультации по дальнейшему лечению.
Получить дополнительные сведения – нарколог на дом цены каменск-уральский
Скачайте патч для обхода активации Windows 11 и пользуйтесь системой без ограничений.
Подробнее – Генератор ключей Windows 11 рабочий
Процедура вывода из запоя в клинике в Казани проводится под строгим контролем специалистов. Главная цель — купировать симптомы интоксикации, нормализовать давление, сердечный ритм и восстановить обмен веществ. Используются препараты, способствующие детоксикации, а также витаминные комплексы и антиоксиданты, необходимые для поддержки работы печени и мозга.
Исследовать вопрос подробнее – запой наркологическая клиника в казани
Вывод из запоя в Нижнем Тагиле представляет собой комплекс медицинских мероприятий, направленных на безопасное и эффективное прерывание состояния острого алкогольного отравления. Этот процесс требует профессионального подхода, так как самостоятельное прерывание запоя чревато серьезными осложнениями, включая судороги, инсульты и инфаркты. В медицинской практике используется комплекс мер, включающий детоксикацию организма, коррекцию водно-электролитного баланса и лечение симптомов абстиненции.
Подробнее – вывод из запоя в стационаре в нижнем тагиле
Магазин высшего уровня своей работы. https://ftfr.ru Лучший магазин !!!Магаз вышел на связь, работает, но щас выходные 😀 с треками порешают, по ходу косяки СПСР. пробники БУДУТ !! Кто ещё будет гадить в теме “Трипы” и просить пробник – получит подзатыльник. У кого есть что сказать – отпишите лучше отзывы о товаре.
Когда проблема зависимости достигает критического уровня, оперативное вмешательство становится необходимостью. В Екатеринбурге профессиональные наркологи готовы выехать на дом круглосуточно, чтобы начать лечение зависимости немедленно. Такой формат оказания помощи позволяет пациенту получить качественную терапию в знакомой и уютной обстановке, что значительно снижает уровень стресса и способствует быстрому восстановлению.
Разобраться лучше – вывод из запоя на дому цена
Во внимание берутся не только масштаб и длительность запоев, но и изменения в поведении. Если человек регулярно обещает «завязать с понедельника», но каждый раз срывается, если рабочие задачи всё чаще выполняются с трудом, а любые стрессовые ситуации решаются «через стакан» или «через дозу», это прямой повод не ждать критического момента. Важно помнить, что зависимость — это прогрессирующее заболевание: со временем организму требуется всё больше вещества, растёт токсическая нагрузка на сердце, печень, нервную систему, ухудшается память и концентрация.
Подробнее можно узнать тут – наркологическая клиника в москве
заказать кухню на заказ заказать кухню на заказ .
Сигналом к тому, что пора обсудить вариант кодирования с наркологом, служит не один какой-то эпизод, а совокупность симптомов. Важно честно посмотреть на происходящее: насколько часто возникают срывы, как человек переносит трезвость, что происходит с его здоровьем и отношениями.
Изучить вопрос глубже – https://kodirovanie-ot-alkogolizma-korolyov11.ru/ehffektivnoe-kodirovanie-ot-alkogolizma-v-korolyove
Этот текст содержит различную информацию, которая, возможно, покажется любопытной, но в целом не меняет восприятия привычных вещей. Предлагаем просто получить удовольствие от чтения, не ожидая особой пользы.
Вот – эротические фильмы
Наши протоколы строятся вокруг ясной последовательности: скрининг — пробная инфузия — основная инфузия — фиксация эффекта — утренний чек-ин. Каждому шагу соответствует один главный маркер эффективности. Если отклик ниже ожидаемого, мы корректируем ровно один параметр — темп введения, последовательность компонентов, плотность «тихих окон» или водный режим.
Подробнее можно узнать тут – наркология вывод из запоя в екатеринбурге
Зачем писать таким большим шрифтом ? Здесь слепых нет. То что тебя где то кинули к нам никакого отношения не имеет. https://pod-torg.ru Ам1220 все больше сообщений что относят к нелегалу.можно узнать, как принимали ? интрозально, в\м ?
Услуга вызова нарколога на дом в Екатеринбурге представляет собой комплекс мер, направленных на оперативное стабилизирование состояния пациента. При поступлении вызова специалист проводит детальный осмотр, сбор анамнеза и диагностику состояния, после чего разрабатывается индивидуальный план лечения. Методика включает медикаментозную детоксикацию, коррекцию обменных процессов и психологическую поддержку, что обеспечивает комплексное восстановление здоровья без необходимости посещения стационара.
Подробнее тут – вывод из запоя капельница екатеринбург
школа онлайн дистанционное обучение школа онлайн дистанционное обучение .
shipkit – Pages loaded fast, images appeared sharp, and formatting stayed consistent.
Оплатил заказ в субботу, во вторник посылка была отправлена вечером, в четверг уже была в городе, но встретиться с курьером не смог. В пятницу заберу. Все оперативно и быстро. https://locusgroup.ru а работают как.оперативненько? вполне.дада братан пришло все!!!охуенноый кач ск и рега нормальная вапще… короче зайди к нему на ветку там трипы опродукции прочти мой свежий за ск
debugkit – Loved the layout today; clean, simple, and genuinely user-friendly overall.
commitkit – Navigation felt smooth, found everything quickly without any confusing steps.
Текст включает разнообразную информацию, которая может показаться любопытной, но не меняет устоявшегося восприятия. Предлагаем просто насладиться чтением, не ожидая значительной пользы.
Подробнее читать – народные средства от диабета
поликарбонат навес заказать заказать навес из металла
testkit – Found practical insights today; sharing this article with colleagues later.
I want to propose to a girl https://propose.lol
Организация по разработке и установке вентиляционного оборудования представляет полный спектр услуг для производственных площадок, ТРЦ, бизнес-центров и жилых домов — от проектирования воздухообмена до запуска систем с гарантийными обязательствами. В ассортименте представлено профессиональное оборудование ведущих производителей — вентиляторы, воздуховоды, фильтры, системы кондиционирования и автоматики для управления микроклиматом. Ищете вентилятор вц 14 46 екатеринбург? Подробная информация на venttehnica.ru — специалисты выполняют техническое обслуживание действующих систем, модернизацию устаревших установок и аварийный ремонт с выездом на объект. Адресный подход к каждой задаче, следование СНиП и дедлайнам обеспечивают надёжную эксплуатацию вентиляционного оборудования любого уровня сложности.
Marriage proposal https://propose.lol
всем привет купить Кокаин, Бошки, Марихуану, Мефедрон я тоже несколько раз брал ,всё прошло чётко ,качество радует,доставлено всё в лучшем виде,оператор молочага всегда обьяснит всё что к чему,вообщем магазин для меня лучший ,самый надёжный,УСПЕХОВ И ПРОЦВЕТАНИЯ ВАШЕЙ КОМАНДЕ!!!!!!ДУМАЙТЕ САМИ!!!
deploykit – Mobile version looks perfect; no glitches, fast scrolling, crisp text.
навес из поликарбоната навесы над крыльцом заказать
How to propose to a girl https://propose.lol
Основной этап в лечении — детоксикация организма от токсичных веществ, вызывающих интоксикацию. В клинике применяют современные методы капельниц и медикаментозной поддержки, включая препараты для снятия абстинентного синдрома.
Узнать больше – наркологическая клиника мурманск
ломоносов скул ломоносов скул .
Вывод из запоя — это не только капельница. Это системная медицинская помощь, направленная на снижение интоксикации, поддержку сердца, нервной системы и внутренних органов. Правильно выстроенный детокс помогает не просто «сбить симптомы», а реально снизить риски для здоровья и дать человеку шанс вернуться к трезвому состоянию без тяжёлых последствий.
Подробнее тут – вывод из запоя на дому в Воскресенске
Основная цель — быстрое и безопасное выведение этанола и его токсических метаболитов из организма, восстановление водно-электролитного и кислотно-щелочного баланса, нормализация артериального давления, работы сердца, почек и головного мозга. Для этого применяется инфузионная терапия, фармакологическая коррекция, витаминотерапия и, при необходимости, седативная поддержка.
Узнать больше – вывод из запоя цена рязань
Как подчёркивает заведующая отделением клинической психологии ФГБУН «НМИЦ психиатрии и наркологии» Минздрава России, наличие в команде специалистов с опытом работы в области зависимости — это основа качественной помощи.
Выяснить больше – частная наркологическая клиника нижний тагил
logkit – Bookmarked this immediately, planning to revisit for updates and inspiration.
1 день https://miniteamshop.ru Не скажу что качество низкое качество на высоте а возрат не кто не сделает даже не фантазирую )) Все супер все ровно сам тут беру еще не разу не разачаровывалсяотличный сервис!
flowbot – Pages loaded fast, images appeared sharp, and formatting stayed consistent.
promptkit – Appreciate the typography choices; comfortable spacing improved my reading experience.
Помощь нарколога нужна, если алкоголь или наркотики постепенно начинают занимать в жизни всё больше места. Человек заранее планирует, когда и как будет пить, нервничает, если что-то срывается, раздражается, когда близкие пытаются ограничить употребление. Появляются скандалы после «весёлых» вечеров, пропущенные рабочие смены, проблемы с деньгами, конфликты с родными. При этом любые разговоры заканчиваются обещаниями «завязать с понедельника» или обвинениями окружающих.
Подробнее можно узнать тут – moskovskie-narkologicheskie-kliniki
Наркологическая клиника в Долгопрудном помогает в ситуациях, когда:
Изучить вопрос глубже – http://narkologicheskaya-klinika-dolgoprudnyj11.ru/narkologicheskaya-klinika-stacionar-v-dolgoprudnom/
modelops – Color palette felt calming, nothing distracting, just focused, thoughtful design.
Основной этап в лечении — детоксикация организма от токсичных веществ, вызывающих интоксикацию. В клинике применяют современные методы капельниц и медикаментозной поддержки, включая препараты для снятия абстинентного синдрома.
Детальнее – https://narkologicheskaya-klinika-v-murmanske12.ru/narkologicheskaya-klinika-klinika-pomoshh-v-murmanske
databrain – Content reads clearly, helpful examples made concepts easy to grasp.
Важно понять: запой — это не просто серия праздников или «отпуск с алкоголем». Это состояние, при котором организм перестаёт выходить в трезвость, а любая попытка остановиться сопровождается настолько тяжёлыми симптомами, что человек снова тянется к бутылке. С каждым днём запоя возрастает нагрузка на сердце, печень, поджелудочную железу, мозг.
Детальнее – https://vyvod-iz-zapoya-voskresensk11.ru/vyvod-iz-zapoya-kapelnica-v-voskresenske/
Клинические протоколы стационарной терапии рекомендуют госпитализацию при средней и тяжёлой степени интоксикации.
Изучить вопрос глубже – вывод из запоя в стационаре
Подбор учреждения для прохождения реабилитации — это ответственное решение, влияющее на весь процесс восстановления. Наркологическая помощь требует не только медикаментозного вмешательства, но и глубокой психологической проработки. Согласно информации, опубликованной на портале Минздрава РФ, эффективность терапии во многом зависит от персонализированного подхода и соблюдения стандартов оказания психиатрической помощи.
Подробнее можно узнать тут – наркологическая клиника наркологический центр
Вывод из запоя показан при:
Получить дополнительную информацию – http://vyvod-iz-zapoya-v-murmanske12.ru/vyvod-iz-zapoya-czena-v-murmanske/
кто юзал izzi casino зеркало рабочее скиньте плиз
https://africa.careers/employer/biblioteka-school/
Не тратьте деньги на лицензию — скачайте кряк для Windows 11 здесь и активируйте систему за 5 минут.
Подробнее – Как активировать Windows 11 без ключа
сказали отпрака на следующий день после платежа! купить Кокаин, Бошки, Марихуану, Мефедрон Тоже считаем что запреты не запреты. Да бывает что и за клиентами охотятся.Сайт работает на отличненько!Единственно что не айс-СПСР.Major Express куда мажорнее.Пендосская дрессировка,хуле.А наши-доставляют не за день а за два.разносят только до 15-00.В субботу работают до 11-00,но машина из Москвы приходит в 10-30,так что извиняйте.Вечером песдуйте в оффис,он у чёрта на куличках.Мажоры может и дороже,но можно предоставить оплату получателю.В наш город это дешевле даже выйдет.Ну это так,к слову.
В клинике работают врачи-наркологи, психиатры, терапевты, психологи, реабилитологи. Вместо «универсальной» схемы каждому пациенту подбирают индивидуальный план, учитывая возраст, стаж употребления, состояние внутренних органов, психоэмоциональный фон, семейную ситуацию. Это особенно важно для жителей Долгопрудного, где многие совмещают работу в Москве с плотным графиком, и любая ошибка в лечении может дорого обойтись — потерей работоспособности, срывом деловых или личных планов.
Подробнее можно узнать тут – kodirovanie-ot-alkogolizma-na-domu
izzi casino мобильная версия удобная, без лагов
https://rhoming.com/agent/kazukowilding7/
Многие семьи сталкиваются с трудностями, когда зависимый отказывается ехать в клинику. В таких случаях выездная помощь становится первым шагом к выздоровлению. Однако не все службы предлагают одинаково безопасный и профессиональный подход. Чтобы избежать рисков и ошибок, важно понимать, на что обращать внимание при выборе услуги “нарколог на дом”.
Исследовать вопрос подробнее – нарколог на дом клиника нижний тагил
Помощь нарколога нужна, если алкоголь или наркотики постепенно начинают занимать в жизни всё больше места. Человек заранее планирует, когда и как будет пить, нервничает, если что-то срывается, раздражается, когда близкие пытаются ограничить употребление. Появляются скандалы после «весёлых» вечеров, пропущенные рабочие смены, проблемы с деньгами, конфликты с родными. При этом любые разговоры заканчиваются обещаниями «завязать с понедельника» или обвинениями окружающих.
Углубиться в тему – наркологическая клиника
Наркологическая помощь в Первоуральске доступна в различных форматах: амбулаторно, стационарно и на дому. Однако не каждое учреждение может обеспечить необходимый уровень комплексной терапии, соответствующей стандартам Минздрава РФ и НМИЦ психиатрии и наркологии. В этом материале мы рассмотрим ключевые особенности профессионального наркологического центра и критерии, которые помогут сделать осознанный выбор.
Детальнее – наркологические клиники алкоголизм
Клиника «Семья и Здоровье» предлагает комплексное лечение на дому, что позволяет избежать стрессов, связанных с госпитализацией, и получить квалифицированную помощь в привычной обстановке. Наши специалисты работают круглосуточно, приезжают в течение 30–60 минут и проводят полный спектр процедур для восстановления здоровья.
Разобраться лучше – вывод из запоя круглосуточно в красноярске
навесы для автомобилей для дачи заказать навес на дачу
Should I propose to a girl? unique proposal ideas in Barcelona
На протяжении всего периода лечения специалисты клиники контролируют динамику состояния, анализируя результаты лабораторных исследований и поведение пациента. Такой подход позволяет своевременно корректировать терапевтическую схему и предотвращать осложнения. Применяемые методы терапии соответствуют современным стандартам и одобрены медицинскими сообществами.
Получить дополнительные сведения – http://narkologicheskaya-klinika-v-kazani16.ru/chastnaya-narkologicheskaya-klinika-kazan/
Согласно данным Федерального наркологического центра, своевременный выезд врача снижает риск осложнений и повторных госпитализаций.
Получить дополнительные сведения – https://narkolog-na-dom-kamensk-uralskij11.ru/narkolog-na-dom-kruglosutochno-v-kamensk-uralskom/
В первые два часа после прибытия бригады важно не «сделать побольше», а принять наименьшее количество решений, которое реально меняет картину. Команда фиксирует базовую линию (ЧСС, АД, SpO?, температура, шкала тошноты/тремора), даёт антиеметический мост и запускает регидратацию. При тахикардии — добавляет антивегетативный контур. Семья получает сценарий ночи: когда приглушить свет, когда предложить воду, какие цифры на тонометре считать нормой и при каких — звонить. Такой протокол экономит время и силы, а главное — превращает вечер из хаотичного в управляемый, снижая риск ночных экстренных вызовов и «эмоциональных качелей».
Углубиться в тему – вызвать капельницу от запоя на дому
Я потом взял лосьен Композиция (93%) в бытовой химии – 30 руб за 250 мл стоит вот в нем растворилось, только пришлось сильно греть и мешать. Кстати почемуто если с этим переборщить то химия начинает выпадать в осадок белыми хлопьями :dontknown:, но небольшое количество залитого 646 в спирт всё исправляет и все растворяется полностью https://iskra48.ru принимай не меньше 300 мг МХЕ от данного селлера.Отличный товар и работают ребята без перебоев
Для эффективного вывода из запоя в Мурманске используются современные методы детоксикации, включающие внутривенное введение растворов, направленных на восстановление водно-солевого баланса, коррекцию электролитов и нормализацию работы почек и печени. Важным этапом является использование витаминных комплексов и препаратов, поддерживающих работу сердца и сосудов.
Получить дополнительную информацию – срочный вывод из запоя мурманск
Одним из ключевых направлений является проведение капельниц, призванных вывести токсины из организма и нормализовать водно-электролитный баланс. Используемые препараты и состав растворов подбираются индивидуально, исходя из клинической картины и истории болезни пациента.
Разобраться лучше – narkolog-na-dom-kruglosutochno jaroslavl’
izzi casino кэшбэк 10% реально возвращают
https://lookingforjob.co/profile/aleciagrattan7
Наркологическая клиника в клинике в Нижнем Новгороде специализируется на диагностике, лечении и реабилитации пациентов с алкогольной и наркотической зависимостью. Основная цель деятельности учреждения — восстановление физического здоровья и психологической устойчивости человека, оказавшегося в состоянии зависимости. В клинике применяются современные методы терапии, доказавшие эффективность в медицинской практике. Все процедуры проводятся конфиденциально, с соблюдением медицинских стандартов и под контролем квалифицированных специалистов.
Изучить вопрос глубже – https://narkologicheskaya-clinika-v-nizhnem-novgorode16.ru/chastnaya-narkologicheskaya-klinika-nizhnij-novgorod/
Обширные исследования показывают, что качественная детоксикация снижает риск развития осложнений и способствует скорейшему восстановлению здоровья. Более подробная информация о методах детоксикации доступна на сайте Министерства здравоохранения РФ.
Подробнее – https://vyvod-iz-zapoya-nizhnij-tagil11.ru/
Бесплатный ключ для Windows 11 — только у нас, обновлено в 2026 году!
Подробнее – Windows 11 активатор без вирусов
Эта публикация содержит набор несвязанных идей, трудно применимых в практике. Мы лишь поверхностно затрагиваем различные точки зрения, не проводя глубокий анализ и не предлагая выводов.
Подробнее читать – похудеть на таблетках
Thank you for your sharing. I am worried that I lack creative ideas. It is your article that makes me full of hope. Thank you. But, I have a question, can you help me? https://accounts.binance.info/en/register?ref=JHQQKNKN
В этой статье мы рассмотрим ключевые аспекты выбора надёжного специалиста, который приедет по вызову и сможет оказать квалифицированную помощь без промедлений.
Исследовать вопрос подробнее – запой нарколог на дом нижний тагил
Выбор наркологической клиники — ключевой шаг на пути к выздоровлению, от которого зависит не только физическое и психическое состояние пациента, но и устойчивость достигнутых результатов. Современные учреждения предлагают широкий спектр услуг, однако уровень подготовки персонала, методики лечения и условия пребывания могут существенно отличаться.
Выяснить больше – наркологическая клиника клиника помощь первоуральск
Когда выезд особенно удобен и оправдан, важно понимать не только эмоционально, но и по конкретным признакам. Есть ряд типичных ситуаций, в которых именно формат «на дому» становится наиболее реалистичным и безопасным вариантом, а стационар можно рассматривать как следующий шаг, когда острота будет снята и человек станет более сговорчивым.
Ознакомиться с деталями – http://narkolog-na-dom-himki11.ru/narkolog-na-dom-srochno-v-himkah/
Комплексное лечение зависимости на дому организовано по четкой схеме, позволяющей оперативно вывести пациента из запоя и обеспечить безопасное восстановление здоровья.
Подробнее тут – скорая вывод из запоя в екатеринбурге
Наркологическая клиника в Чехове — это возможность получить профессиональную помощь при алкогольной и наркотической зависимости, не выезжая в крупный мегаполис и не тратя силы на долгую дорогу. Для многих людей момент обращения к наркологу наступает не сразу: сначала идут «домашние» попытки справиться с проблемой, обещания ограничиться «по праздникам», уговаривания родственников и периодические срывы. Запои становятся длиннее, организм восстанавливается всё хуже, усиливается тревога, нарушается сон, учащаются конфликты дома и на работе. В какой-то момент становится понятно, что без системного лечения обойтись уже нельзя, а стихийные капельницы на дому и случайные советы из интернета только оттягивают время.
Подробнее можно узнать тут – наркологическая клиника цены адреса
Получил посылочку общее время ожидания 4 дня,упаковка супер,качество просто космическое,спасибо магазину! купить Кокаин, Бошки, Марихуану, Мефедрон сервис 10\10 нигде дешевле и лучше на рынке легал сейчас нету!!!все ровно вот только из за нового года была задержка а так все на высоте
Основные признаки, свидетельствующие о необходимости экстренной помощи:
Исследовать вопрос подробнее – скорая вывод из запоя в красноярске
В первые два часа после прибытия бригады важно не «сделать побольше», а принять наименьшее количество решений, которое реально меняет картину. Команда фиксирует базовую линию (ЧСС, АД, SpO?, температура, шкала тошноты/тремора), даёт антиеметический мост и запускает регидратацию. При тахикардии — добавляет антивегетативный контур. Семья получает сценарий ночи: когда приглушить свет, когда предложить воду, какие цифры на тонометре считать нормой и при каких — звонить. Такой протокол экономит время и силы, а главное — превращает вечер из хаотичного в управляемый, снижая риск ночных экстренных вызовов и «эмоциональных качелей».
Углубиться в тему – https://kapelnicza-ot-zapoya-v-chelyabinske16.ru/kapelnicza-vyvod-iz-zapoya-chelyabinsk
Вызов нарколога возможен круглосуточно, что обеспечивает оперативное реагирование на критические ситуации. Пациенты и их родственники могут получить помощь в любое время, не дожидаясь ухудшения состояния.
Подробнее – http://narkolog-na-dom-kamensk-uralskij11.ru/narkolog-na-dom-kruglosutochno-v-kamensk-uralskom/
Сочетание медицинских и психотерапевтических мер создаёт устойчивую систему поддержки. Пациенты получают возможность постепенно восстановить утраченное здоровье и психологическую стабильность.
Изучить вопрос глубже – https://narkologicheskaya-klinika-v-kazani16.ru/narkologicheskaya-klinika-kazan-otzyvy/
Многие годами живут в логике: «главное — с утра выпить чуть-чуть, станет легче». На коротком промежутке времени это действительно частично снимает симптомы, но по сути лишь продлевает запой и усиливает интоксикацию. Организм не успевает переработать продукты распада алкоголя, кровь становится «тяжёлой», нарушается работа сосудов, возрастает нагрузка на сердце и мозг.
Подробнее можно узнать тут – https://kapelnica-ot-zapoya-dolgoprudnyj11.ru/kapelnica-ot-alkogolya-cena-v-dolgoprudnom/
Вызов нарколога на дом в Ярославле — это удобный и эффективный способ начать лечение или оказать первую помощь при острых состояниях, связанных с алкоголизмом, наркотической зависимостью или другими психоактивными веществами. Основные преимущества такой услуги заключаются в следующем:
Детальнее – врач нарколог на дом ярославль
Наркологическая клиника в клинике в Нижнем Новгороде специализируется на диагностике, лечении и реабилитации пациентов с алкогольной и наркотической зависимостью. Основная цель деятельности учреждения — восстановление физического здоровья и психологической устойчивости человека, оказавшегося в состоянии зависимости. В клинике применяются современные методы терапии, доказавшие эффективность в медицинской практике. Все процедуры проводятся конфиденциально, с соблюдением медицинских стандартов и под контролем квалифицированных специалистов.
Углубиться в тему – наркологическая клиника в нижнем новгороде
Вывод из запоя в Воскресенске чаще всего требуется тогда, когда «обычное похмелье» уже давно перешло в тяжёлое состояние, а попытки «перетерпеть» только ухудшают ситуацию. Сначала кажется, что человек просто перебрал: день-два отлежится, попьёт воды, поест — и всё пройдёт. Но когда утром вместо облегчения появляется дрожь, сильная слабость, скачки давления, страх и навязчивая тревога, это уже не про похмелье. Организм не успевает перерабатывать алкоголь, сердце и нервная система работают на пределе, а каждый новый «опохмел» только продлевает запой.
Подробнее – http://vyvod-iz-zapoya-voskresensk11.ru
Есть ситуации, когда визит к наркологу в Химках лучше воспринимать не как «стыдный шаг», а как обычное ответственное решение о своём здоровье. Это особенно актуально, если: употребление алкоголя или наркотиков стало регулярным, а попытки сократить дозы заканчиваются срывами; появились запои с несколькими днями непрерывного употребления; возникают проблемы с сердцем, давлением, сном; близкие всё чаще говорят, что «ситуация выходит из-под контроля».
Изучить вопрос глубже – наркологическая клиника цены
Для успешной адаптации пациента в обществе клиника организует поддержку родственников и последующее наблюдение. Это снижает риск рецидива и помогает сохранить достигнутые результаты.
Разобраться лучше – https://narkologicheskaya-klinika-v-murmanske12.ru/narkologicheskaya-klinika-klinika-pomoshh-v-murmanske/
вчера вечером получил трек сегодня груз, я охуеваю от скорости доставки походу ТС выкупил курьерку ))) по качеству отпишусь позже https://hprojects.ru Дай думаю зайду поздороваюсь с мамонтами опасного бизнеса.:hello:спасибо за пожелания
Многие годами живут в логике: «главное — с утра выпить чуть-чуть, станет легче». На коротком промежутке времени это действительно частично снимает симптомы, но по сути лишь продлевает запой и усиливает интоксикацию. Организм не успевает переработать продукты распада алкоголя, кровь становится «тяжёлой», нарушается работа сосудов, возрастает нагрузка на сердце и мозг.
Ознакомиться с деталями – http://kapelnica-ot-zapoya-dolgoprudnyj11.ru/
Как отмечает врач-нарколог Иванов И.И., «без своевременной медицинской помощи при запое повышается риск необратимых изменений в организме и летального исхода».
Детальнее – вывод из запоя вызов
Клинические протоколы стационарной терапии рекомендуют госпитализацию при средней и тяжёлой степени интоксикации.
Получить больше информации – вывод из запоя анонимно рязань
Когда родственники видят, что в их случае совпадает сразу несколько этих пунктов, выезд нарколога на дом часто становится тем самым реалистичным и своевременным решением, которое позволяет не довести дело до экстренной госпитализации уже в критическом состоянии. После такого вмешательства появляются часы и дни, когда можно спокойно обсудить дальнейшие шаги, а не действовать на фоне паники и полного истощения.
Изучить вопрос глубже – выезд нарколога на дом
дистанционное обучение 1 класс дистанционное обучение 1 класс .
Перед заключением договора стоит поинтересоваться:
Углубиться в тему – наркологическая клиника стационар нижний тагил
Наркологическая клиника в Химках — это возможность получить помощь при алкогольной и наркотической зависимости рядом с домом, а не ездить по всему региону в поисках специалистов. Для многих людей обращение к наркологу до последнего кажется чем-то «крайним»: кажется, что нужно терпеть, уговаривать себя «завязать самому», ждать подходящего момента, отпуска или «нового года с чистого листа». Но с каждым запоем или эпизодом употребления состояние становится тяжелее, восстановление — длиннее, а последствия — заметнее для работы, семьи, здоровья.
Получить дополнительную информацию – http://narkologicheskaya-klinika-himki11.ru
Can I propose to a girl? https://propose.lol
Вопрос «а не рано ли кодироваться» часто звучит и от самих пациентов, и от их близких. Кажется, что кодирование — это крайняя мера «на последней стадии», а пока человек работает, иногда бывает трезвым и «не валяется под забором», можно подождать. На самом деле гораздо разумнее ориентироваться не на стереотипы, а на реальные признаки того, что зависимость уже управляет жизнью, а не наоборот. Кодирование от алкоголизма в Королёве рассматривается именно тогда, когда попытки остановиться своими силами систематически проваливаются, а каждый новый запой становится тяжелее предыдущего.
Подробнее – kodirovanie-alkogolizma-nedorogo-klinika
How to propose to a girl after dinner proposal ideas
Комплексное лечение зависимости на дому организовано по четкой схеме, позволяющей оперативно вывести пациента из запоя и обеспечить безопасное восстановление здоровья.
Углубиться в тему – нарколог на дом вывод из запоя в екатеринбурге
навес для крыльца заказать https://zakazat-naves.ru
Многие годами живут в логике: «главное — с утра выпить чуть-чуть, станет легче». На коротком промежутке времени это действительно частично снимает симптомы, но по сути лишь продлевает запой и усиливает интоксикацию. Организм не успевает переработать продукты распада алкоголя, кровь становится «тяжёлой», нарушается работа сосудов, возрастает нагрузка на сердце и мозг.
Получить больше информации – капельница от запоя на дому
Наркологическая клиника в Долгопрудном помогает в ситуациях, когда:
Детальнее – http://narkologicheskaya-klinika-dolgoprudnyj11.ru
mlforge – Loved the layout today; clean, simple, and genuinely user-friendly overall.
с нашими кристаллами восстановятся купить Кокаин, Бошки, Марихуану, Мефедрон Крутой магазя все ровно остался в минусе не заказа и деньги с комисией переводятся . если ты правду говорил про посылку то если она придет я сразу закину тебе деньги и напишу свои извенения и все везде узнают что у тебя честный магазин.как клиенту мне ни разу не принесли извенения это бы хоть как то компенсировало маральный ущерб
навес для дачи навес под машину
Часто именно жители Химок тянут до последнего: насыщенный ритм жизни, дорога на работу, постоянная усталость, попытки «снимать напряжение» алкоголем или психоактивными веществами. Сначала это кажется временным способом расслабиться, но со временем человек замечает, что пьёт чаще, чем планировал, нуждается в больших дозах, срывает обещания, а попытки контролировать употребление превращаются в череду неудач. В какой-то момент становится очевидно: без профессиональной наркологической помощи дальше будет только сложнее.
Получить дополнительные сведения – narkologicheskaya-klinika-telefon
Для сохранения приватности мы ведём коммуникацию через одного доверенного представителя, используем нейтральные формулировки в документах, а инструкции выдаём в неброском виде. При невозможности создать тишину дома (ремонт, маленькие дети, гости) предложим краткий «тихий» стационар с отдельным входом и камерным режимом, после чего сопровождение вернётся в домашний формат.
Получить больше информации – вывод из запоя на дому круглосуточно
Этот обзор позволяет по-новому взглянуть на вещи, на которые обычно и так смотрят. Мы упоминаем факты, которые мало что меняют, и события, значение которых трудно определить, но они всё равно здесь.
Вот – блекджек
Как поясняет врач-нарколог клиники «АлкоСтоп», «грамотно составленная инфузионная терапия не только устраняет последствия запоя, но и создаёт условия для дальнейшей мотивации пациента к лечению».
Разобраться лучше – https://kapelnicza-ot-zapoya-pervouralsk11.ru/kapelnicza-ot-zapoya-na-domu-stoimost-v-pervouralske/
тоже хочу нахватить, но жду отзывы купить Кокаин, Бошки, Марихуану, Мефедрон 2.Почему на сайте нет ниодного упоминания о ритейле,в то время,как заказы надо делать через него?На ближайшие 1.5 часа свободен, можно ни о чем не думать. Сачала хотел в центр поехать, чтобы сразу плсле адреса быстрей добраться до клада, потом трезво все взвесил,т спокойно поехал домой.
Многие тянут до последнего, считая, что к наркологу обращаются только в самых крайних случаях. На деле показаний для консультации гораздо больше, и они часто появляются задолго до того, как человек впервые оказывается в запое или не выходит из состояния опьянения несколько дней подряд.
Ознакомиться с деталями – http://narkologicheskaya-klinika-voskresensk11.ru/
How to propose to a girl planning a proposal in Barcelona
Вопрос «а не рано ли кодироваться» часто звучит и от самих пациентов, и от их близких. Кажется, что кодирование — это крайняя мера «на последней стадии», а пока человек работает, иногда бывает трезвым и «не валяется под забором», можно подождать. На самом деле гораздо разумнее ориентироваться не на стереотипы, а на реальные признаки того, что зависимость уже управляет жизнью, а не наоборот. Кодирование от алкоголизма в Королёве рассматривается именно тогда, когда попытки остановиться своими силами систематически проваливаются, а каждый новый запой становится тяжелее предыдущего.
Детальнее – http://kodirovanie-ot-alkogolizma-korolyov11.ru
школа-пансион бесплатно shkola-onlajn-33.ru .
Критерий
Подробнее тут – http://narkolog-na-dom-nizhnij-tagil11.ru
Под контролем специалистов проводится выведение токсинов из организма. Используются капельницы с растворами, препараты для поддержки сердца, печени и снятия психоэмоционального напряжения. Лечение алкоголизма в Воронеже — помощь на всех стадиях зависимости предполагает безопасный и контролируемый процесс детоксикации с минимизацией рисков осложнений.
Ознакомиться с деталями – реабилитационный центр лечение алкоголизма
Состояние запоя представляет серьёзную угрозу для здоровья, особенно при многодневном приёме алкоголя. В таких случаях самостоятельное прекращение употребления может привести к тяжёлым последствиям — судорогам, делирию, обезвоживанию и даже летальному исходу. Капельница от запоя в Первоуральске — это проверенный метод медицинской детоксикации, позволяющий быстро восстановить водно-солевой баланс и стабилизировать общее состояние пациента.
Исследовать вопрос подробнее – капельница от запоя на дому недорого
Высокий уровень лечения обеспечивается квалификацией врачей, имеющих опыт работы в области наркологии, а также современным медицинским оборудованием, позволяющим проводить диагностику и лечение на самом высоком уровне. Врачи регулярно повышают квалификацию, участвуя в конференциях и обучающих программах. Подробности о квалификации специалистов доступны на портале медицинского сообщества.
Углубиться в тему – анонимная наркологическая клиника каменск-уральский
В наркологической клинике с пациентом работает команда специалистов: врачи-наркологи, психиатры, терапевты, психологи. Вместо «универсального» решения используется индивидуальный план лечения, который строится с учётом возраста, стажа употребления, сопутствующих заболеваний, психоэмоционального состояния и семейной ситуации. Задача врачей — не просто снять симптомы интоксикации, а помочь человеку выйти из замкнутого круга запоев, срывов и попыток бросить самостоятельно, когда каждый неудачный опыт лишь усиливает чувство вины и безнадёжности.
Ознакомиться с деталями – luchshaya-narkologicheskaya-klinika-v-moskve-otzyvy
Отдельная категория пациентов — люди с алкогольной зависимостью. Для жителей Воскресенска особенно актуальны проблемы, связанные с длительными запоями: человек несколько дней подряд пьёт, практически не ест, плохо спит, с трудом встаёт, а каждое утро обещает, что «сейчас немного — и всё». На этом фоне растёт нагрузка на сердце, печень, нервную систему, повышается риск инсультов и инфарктов, обостряются хронические болезни.
Получить дополнительные сведения – наркологическая клиника московская московская область
Первый раз заказывал пришло все за 4 дня , в данной же ситуации уже 11 дней идет , я готов любые деньги платить чтобы приходило быстрей купить Кокаин, Бошки, Марихуану, Мефедрон вы могли написать похожему нику , таких пруд пруди.Отзывы радуют о магазине, надо заказывать. 5-MeO-DMT решает.
Услуга вызова нарколога на дом в Екатеринбурге представляет собой комплекс мер, направленных на оперативное стабилизирование состояния пациента. При поступлении вызова специалист проводит детальный осмотр, сбор анамнеза и диагностику состояния, после чего разрабатывается индивидуальный план лечения. Методика включает медикаментозную детоксикацию, коррекцию обменных процессов и психологическую поддержку, что обеспечивает комплексное восстановление здоровья без необходимости посещения стационара.
Получить больше информации – вывод из запоя на дому круглосуточно
Профессиональная клиника никогда не скрывает информацию о своих сотрудниках. На официальных сайтах нередко размещены сканы дипломов, сведения о специализации и стаже, участие в отраслевых конференциях и проектах Минздрава.
Ознакомиться с деталями – https://narkologicheskaya-klinika-pervouralsk11.ru/narkologicheskaya-klinika-klinika-pomoshh-v-pervouralske
Под контролем специалистов проводится выведение токсинов из организма. Используются капельницы с растворами, препараты для поддержки сердца, печени и снятия психоэмоционального напряжения. Лечение алкоголизма в Воронеже — помощь на всех стадиях зависимости предполагает безопасный и контролируемый процесс детоксикации с минимизацией рисков осложнений.
Исследовать вопрос подробнее – http://lechenie-alkogolizma-voronezh9.ru
навес под машину металлический навес
Вывод из запоя требует неотложного и профессионального подхода, поскольку состояние больного сопровождается нарушением работы внутренних органов, обезвоживанием и токсическим воздействием этанола на центральную нервную систему. В Мурманске, учитывая особенности региона и климата, особенно важно проводить процедуру с учётом возможных сопутствующих заболеваний и общего состояния здоровья пациента.
Изучить вопрос глубже – https://vyvod-iz-zapoya-v-murmanske12.ru/vyvod-iz-zapoya-czena-v-murmanske
Высокий уровень лечения обеспечивается квалификацией врачей, имеющих опыт работы в области наркологии, а также современным медицинским оборудованием, позволяющим проводить диагностику и лечение на самом высоком уровне. Врачи регулярно повышают квалификацию, участвуя в конференциях и обучающих программах. Подробности о квалификации специалистов доступны на портале медицинского сообщества.
Углубиться в тему – наркологическая клиника вывод из запоя каменск-уральский
Эта публикация содержит набор несвязанных идей, трудно применимых в практике. Мы лишь поверхностно затрагиваем различные точки зрения, не проводя глубокий анализ и не предлагая выводов.
Подробнее читать – https://rostov-narkologiya.ru/uslugi-ot-alkogolizma/vyvod-iz-zapoya
Для семьи это тяжёлый период. Родные одновременно злятся, боятся и пытаются «договориться»: то уговаривают, то угрожают, то пробуют лечить подручными средствами. Пока близкие спорят, состояние человека ухудшается: он перестаёт нормально есть, почти не спит, избегает разговоров, закрывается в комнате, теряет связь с привычной жизнью. В этот момент особенно важно не ждать, когда организм «сам справится», а подключить профессиональную помощь.
Подробнее можно узнать тут – centr-vyvoda-iz-zapoya
Назначение
Детальнее – http://kapelnicza-ot-zapoya-pervouralsk11.ru/
Для жителей Ростова-на-Дону клиника работает по схеме «тихих маршрутов»: отдельный вход с нейтральной табличкой, окна записи в невызывающие подозрений часы, немаркированный подъезд автомобиля при выездном визите. На первом звонке диспетчер собирает только то, что влияет на безопасность: эпизоды рвоты, ЧСС/АД, ночные панические эпизоды, сопутствующие препараты, аллергии, наличие хронических заболеваний сердца. Личные и социальные детали не запрашиваются — мы придерживаемся принципа «минимально необходимой информации». По прибытии врача фиксируются базовая линия (сознание, дыхание, SpO?, температура), шкалы симптомов и переносимость небольших объёмов воды. Дальше — один точный шаг, одно «окно проверки» и прозрачное решение: продолжать модуль, модифицировать одну переменную или выключить блок.
Получить больше информации – наркологическая клиника клиника помощь ростов-на-дону
https://gravatar.com/pomokode
Для сохранения приватности мы ведём коммуникацию через одного доверенного представителя, используем нейтральные формулировки в документах, а инструкции выдаём в неброском виде. При невозможности создать тишину дома (ремонт, маленькие дети, гости) предложим краткий «тихий» стационар с отдельным входом и камерным режимом, после чего сопровождение вернётся в домашний формат.
Получить дополнительную информацию – вывод из запоя на дому в екатеринбурге
Моментально: реквизиты, оплата, подтверждение получения. Все. купить Кокаин, Бошки, Марихуану, Мефедрон чтоб расширенный был глаз.брал тут на днях, все прошло ровнее некуда, рекомендую, теперь это мой постоянный магазин)
При необходимости применяется симптоматическое лечение для снижения болевого синдрома, устранения тошноты и рвоты, а также нормализации психоэмоционального состояния пациента. Врачи наркологи строго контролируют течение процедуры, что обеспечивает безопасность и снижает риски осложнений.
Подробнее можно узнать тут – вывод из запоя мурманск
Этот список — памятка на холодильник. Он не раскрывает диагноз, но точно описывает поводы для связи с дежурным врачом. Своевременная эскалация — часть безопасности, а не «подстраховка». Если сомневаетесь — лучше позвонить.
Узнать больше – врач на дом капельница от запоя
Отдельная категория пациентов — люди с алкогольной зависимостью. Для жителей Воскресенска особенно актуальны проблемы, связанные с длительными запоями: человек несколько дней подряд пьёт, практически не ест, плохо спит, с трудом встаёт, а каждое утро обещает, что «сейчас немного — и всё». На этом фоне растёт нагрузка на сердце, печень, нервную систему, повышается риск инсультов и инфарктов, обостряются хронические болезни.
Выяснить больше – воскресенская клиника
Многие тянут до последнего, считая, что к наркологу обращаются только в самых крайних случаях. На деле показаний для консультации гораздо больше, и они часто появляются задолго до того, как человек впервые оказывается в запое или не выходит из состояния опьянения несколько дней подряд.
Подробнее можно узнать тут – воскресенская клиника
Стационарный формат предполагает круглосуточное наблюдение, возможность экстренного вмешательства и доступ к диагностическим средствам. Это особенно важно при наличии хронических заболеваний, психозов или алкогольного делирия.
Изучить вопрос глубже – vyvod-iz-zapoya-na-domu rjazan’
taskpipe – Color palette felt calming, nothing distracting, just focused, thoughtful design.
smartpipe – Navigation felt smooth, found everything quickly without any confusing steps.
Современная наркологическая клиника в Мурманске специализируется на комплексном лечении алкогольной, наркотической и других видов зависимости. В условиях МедЦентр Арктика используются проверенные методы диагностики и терапии, позволяющие достичь устойчивой ремиссии и восстановить качество жизни пациента.
Детальнее – частная наркологическая клиника мурманская область
opsbrain – Content reads clearly, helpful examples made concepts easy to grasp.
Отдельная категория пациентов — люди с алкогольной зависимостью. Для жителей Воскресенска особенно актуальны проблемы, связанные с длительными запоями: человек несколько дней подряд пьёт, практически не ест, плохо спит, с трудом встаёт, а каждое утро обещает, что «сейчас немного — и всё». На этом фоне растёт нагрузка на сердце, печень, нервную систему, повышается риск инсультов и инфарктов, обостряются хронические болезни.
Подробнее – https://narkologicheskaya-klinika-voskresensk11.ru/narkologicheskaya-klinika-telefon-v-voskresenske
Алкогольная зависимость разрушает здоровье, семью, карьеру и личность. Чем раньше будет оказана профессиональная помощь, тем выше шансы на восстановление и возвращение к полноценной жизни. Лечение алкоголизма в Воронеже — помощь на всех стадиях зависимости позволяет справляться не только с физической тягой, но и с глубинными причинами, которые провоцируют патологическое употребление.
Получить больше информации – https://lechenie-alkogolizma-voronezh9.ru/czentr-lecheniya-alkogolizma-voronezh/
patchkit – Found practical insights today; sharing this article with colleagues later.
Команда выездных специалистов работает без броской символики, использует нейтральный транспорт и конфиденциальный документооборот. Врач приезжает с портативным оборудованием (мониторинг АД/ЧСС/SpO?, термометр, пульсоксиметр, при необходимости — портативный ЭКГ-модуль), выполняет тест переносимости, формирует индивидуальный инфузионный профиль и обучает семью простым процедурам поддержки: водный режим малыми глотками, «тихие окна» без экранов, дыхательные паузы. В результате пациент не просто «переживает» детокс, а действительно возвращается к устойчивому сну, ровному пульсу и ясной голове.
Изучить вопрос глубже – вывод из запоя вызов на дом
Как подчёркивает заведующая отделением клинической психологии ФГБУН «НМИЦ психиатрии и наркологии» Минздрава России, наличие в команде специалистов с опытом работы в области зависимости — это основа качественной помощи.
Ознакомиться с деталями – частная наркологическая клиника
В наркологической клинике применяются проверенные методики терапии, включая медикаментозное лечение, детоксикацию и психотерапевтические программы. Детоксикация проводится с использованием современных капельниц, обеспечивающих безопасное выведение токсинов из организма. Важно отметить, что качественное лечение включает и работу с психологическими аспектами зависимости, что достигается посредством групповых и индивидуальных консультаций.
Детальнее – наркологические клиники алкоголизм в каменске-уральском
Круглосуточный формат критичен именно из-за «первой ночи»: в это окно нестабильны тревога, сон, вегетативная реактивность. Мы не «усиливаем всё сразу», а по одному параметру доводим систему до целевого коридора. Так удаётся избежать полипрагмазии и сохранить управляемость процесса: пациент и семья заранее знают, какие цифры считаются нормой, когда звонить дежурному, как организовать свет и тишину, чтобы ночное восстановление действительно состоялось.
Изучить вопрос глубже – http://narkologicheskaya-clinika-v-rostove-na-donu16.ru/narkologi-rostov-na-donu/
Вывод с https://1win-top013.top без задержек — проверено не раз.
онлайн-школа для детей бесплатно shkola-onlajn-33.ru .
guardstack – Appreciate the typography choices; comfortable spacing improved my reading experience.
Там, где раньше хватало одного тяжёлого утра, теперь требуются дни детоксикации. И чем позже подключается врач, тем сложнее вернуть организм к относительно безопасному состоянию.
Изучить вопрос глубже – https://vyvod-iz-zapoya-voskresensk11.ru/vyvod-iz-zapoya-cena-v-voskresenske
Все работает https://hprojects.ru салют бразы ) добавляйте репу не стесняйтесь всем удачи))Черт приехал в офис говорю посмотрите посылку,мне сказали ее давно отправили!Она посмотрела ее нету,позвонила говорит она еще не отправлена и х.з. когда будет отправлена.
После проведения процедур пациент чувствует заметное облегчение: исчезает головная боль, снижается тревожность, восстанавливается сон и аппетит. Это создаёт основу для дальнейшего прохождения курса лечения зависимости.
Выяснить больше – http://
securekit – Color palette felt calming, nothing distracting, just focused, thoughtful design.
Многие годами живут в логике: «главное — с утра выпить чуть-чуть, станет легче». На коротком промежутке времени это действительно частично снимает симптомы, но по сути лишь продлевает запой и усиливает интоксикацию. Организм не успевает переработать продукты распада алкоголя, кровь становится «тяжёлой», нарушается работа сосудов, возрастает нагрузка на сердце и мозг.
Ознакомиться с деталями – http://kapelnica-ot-zapoya-dolgoprudnyj11.ru/
Капельница от запоя в Мурманске является одной из наиболее востребованных процедур для снятия острого состояния алкогольной интоксикации. Эта методика позволяет быстро вывести токсины из организма, нормализовать водно-солевой баланс и улучшить самочувствие пациента. Современная капельная терапия считается эффективным средством в лечении запоя, обеспечивая поддержку жизненно важных функций и минимизируя риски осложнений.
Углубиться в тему – https://kapelnicza-ot-zapoya-v-murmanske12.ru/
При необходимости применяется симптоматическое лечение для снижения болевого синдрома, устранения тошноты и рвоты, а также нормализации психоэмоционального состояния пациента. Врачи наркологи строго контролируют течение процедуры, что обеспечивает безопасность и снижает риски осложнений.
Углубиться в тему – вывод из запоя мурманск
Для эффективного вывода из запоя в Мурманске используются современные методы детоксикации, включающие внутривенное введение растворов, направленных на восстановление водно-солевого баланса, коррекцию электролитов и нормализацию работы почек и печени. Важным этапом является использование витаминных комплексов и препаратов, поддерживающих работу сердца и сосудов.
Выяснить больше – https://vyvod-iz-zapoya-v-murmanske12.ru/anonimnyj-vyvod-iz-zapoya-v-murmanske
Обращаться в клинику стоит не только в крайних случаях, когда человек уже не может встать с постели или запой продолжается неделями. Наоборот, чем раньше начата помощь, тем мягче и короче может быть программа, тем меньше риск тяжёлых осложнений и долгой реабилитации.
Изучить вопрос глубже – http://narkologicheskaya-klinika-dolgoprudnyj11.ru/narkologicheskie-kliniki-ryadom-v-dolgoprudnom/
Мы не используем универсальные «сильные капельницы». Эффективность даёт точное совпадение с задачей. Ниже — логика выбора профилей и маркеры, на которые мы ориентируемся при контроле эффективности и безопасности.
Детальнее – http://vivod-iz-zapoya-v-sankt-peterburge16.ru/vyvedenie-iz-zapoya-staczionar-sankt-peterburg/
Наркологическая клиника в Химках — это возможность получить помощь при алкогольной и наркотической зависимости рядом с домом, а не ездить по всему региону в поисках специалистов. Для многих людей обращение к наркологу до последнего кажется чем-то «крайним»: кажется, что нужно терпеть, уговаривать себя «завязать самому», ждать подходящего момента, отпуска или «нового года с чистого листа». Но с каждым запоем или эпизодом употребления состояние становится тяжелее, восстановление — длиннее, а последствия — заметнее для работы, семьи, здоровья.
Углубиться в тему – http://narkologicheskaya-klinika-himki11.ru/
В Рязани возможен как стационарный, так и амбулаторный вывод из запоя. Выбор подхода зависит от состояния пациента, выраженности симптомов и наличия сопутствующих нарушений.
Детальнее – http://vyvod-iz-zapoya-v-ryazani12.ru/
authkit – Found practical insights today; sharing this article with colleagues later.
Для эффективного вывода из запоя в Мурманске используются современные методы детоксикации, включающие внутривенное введение растворов, направленных на восстановление водно-солевого баланса, коррекцию электролитов и нормализацию работы почек и печени. Важным этапом является использование витаминных комплексов и препаратов, поддерживающих работу сердца и сосудов.
Получить дополнительные сведения – вывод из запоя на дому круглосуточно в мурманске
Современная наркологическая клиника в Мурманске специализируется на комплексном лечении алкогольной, наркотической и других видов зависимости. В условиях МедЦентр Арктика используются проверенные методы диагностики и терапии, позволяющие достичь устойчивой ремиссии и восстановить качество жизни пациента.
Углубиться в тему – narkologicheskaya klinika murmansk
Основные признаки, свидетельствующие о необходимости экстренной помощи:
Разобраться лучше – скорая вывод из запоя красноярск
Когда проблема зависимости достигает критического уровня, оперативное вмешательство становится необходимостью. В Екатеринбурге профессиональные наркологи готовы выехать на дом круглосуточно, чтобы начать лечение зависимости немедленно. Такой формат оказания помощи позволяет пациенту получить качественную терапию в знакомой и уютной обстановке, что значительно снижает уровень стресса и способствует быстрому восстановлению.
Углубиться в тему – наркологический вывод из запоя екатеринбург
Вызов нарколога на дом в Каменске-Уральском обеспечивает безопасность пациента, исключая необходимость посещения медицинского учреждения, что особенно актуально при тяжелом состоянии или психологическом сопротивлении. Такая помощь включает в себя детоксикацию, купирование абстинентного синдрома и консультации по дальнейшему лечению.
Получить больше информации – выезд нарколога на дом
pipelinesy – Color palette felt calming, nothing distracting, just focused, thoughtful design.
Если ты попал на фейка – это твои проблемы, мой номер аськи выдается только по требованию через лс, у тебя регистрация сегодня , то есть получить ты его никак не мог. Иди разводом занимайся в другом месте. https://dubki2.ru 5]Пришла таки тусишка.Коричневатый порошок,в черезчур большом пакете(не 100г же заказывали). Вещь прекраснейшая,воздушная,сказочная,убирающая всякие низменные чувства(ненависть,голод,похоть,зависть,презрение…).Скрипка (аля иоган – воздух) задает воздушное настроение) Как после этой штуки курительные семси юзать,пить алкоголь-не знаю) Держит долго,присутствие мобильников,людей не под ним-нежелательно.На постэффектах хорошо пойдёт гитарка с веселыми,поизитвными песенками)Вчера оплатил, сегодня уже трек скинули. Пока все ровно, посмотрим что придет…..
Первое, на что стоит обратить внимание — это профессиональный уровень сотрудников. Без квалифицированных наркологов, клинических психологов и психиатров реабилитационный процесс становится формальным и неэффективным.
Выяснить больше – лечение в наркологической клинике
Домашний формат особенно удобен на ранних этапах, когда зависимость уже дошла до запоев, но человек ещё продолжает работать, скрывать проблему от коллег и соседей, боится любой огласки. Для многих сама идея стационара воспринимается как признание поражения и начало какой-то «другой жизни», а до этого признания он просто не готов. Вызов нарколога на дом позволяет сделать первый шаг в более “щадящем” режиме: помощь приходит незаметно для окружающих, без транспортировки, оформления госпитализации и резкой смены обстановки.
Выяснить больше – http://narkolog-na-dom-himki11.ru
Сочетание медицинских и психотерапевтических мер создаёт устойчивую систему поддержки. Пациенты получают возможность постепенно восстановить утраченное здоровье и психологическую стабильность.
Получить больше информации – https://narkologicheskaya-klinika-v-kazani16.ru/
При своевременном обращении к специалистам капельница позволяет значительно улучшить состояние пациента уже в первые часы после начала лечения. Медицинская помощь при запое должна оказываться квалифицированно и в комфортных условиях, что снижает риски осложнений и ускоряет восстановление.
Подробнее тут – капельница от запоя наркология в мурманске
Вызов нарколога на дом в Ярославле — это удобный и эффективный способ начать лечение или оказать первую помощь при острых состояниях, связанных с алкоголизмом, наркотической зависимостью или другими психоактивными веществами. Основные преимущества такой услуги заключаются в следующем:
Получить дополнительную информацию – https://narkolog-na-dom-v-yaroslavle12.ru/narkolog-na-dom-czeny-v-yaroslavle
Конфиденциальность обеспечивается процессом: нейтральные формулировки в документах, минимум персональных данных, немаркированные формы и транспорт, отдельный вход, «короткие» переговоры у двери, единый контакт по медицинским вопросам. Внутри команды действует «язык цифр» — витальные показатели, шкалы, интервалы питья и сна, окна проверки. Это исключает лишние обсуждения и защищает от распространения деликатной информации за пределы клинического круга.
Выяснить больше – анонимная наркологическая клиника ростов-на-дону
Основные признаки, свидетельствующие о необходимости экстренной помощи:
Углубиться в тему – вывод из запоя на дому недорого в красноярске
Для жителей Чехова важно и то, что врач видит не абстрактный «случай зависимости», а живого человека со своей историей. У кого-то за плечами десятилетия злоупотребления, у кого-то — несколько лет с быстрым прогрессированием, у кого-то — сочетание алкоголя с успокоительными или наркотиками. Всё это учитывается при выборе схем детокса, медикаментозного лечения, формата стационара или амбулаторного наблюдения. Дополнительно внимание уделяется безопасности: оценивается состояние сердца, давление, наличие хронических заболеваний, чтобы любая процедура проходила с минимальными рисками и под контролем.
Получить дополнительные сведения – бесплатные наркологические клиники
Как отмечает врач-нарколог Иванов И.И., «без своевременной медицинской помощи при запое повышается риск необратимых изменений в организме и летального исхода».
Выяснить больше – анонимный вывод из запоя в нижнем тагиле
Клиника в Королёве закрывает этот разрыв. Здесь можно пройти полный путь — от первичной диагностики и детоксикации до реабилитации и последующего наблюдения — в пределах привычного города, не отрываясь полностью от семьи и важных дел. Это особенно важно для тех, кто продолжает работать, боится потерять позицию или репутацию, но при этом понимает, что дальше жить «как раньше» просто опасно. Лечение перестаёт быть чем-то абстрактным и пугающим: вместо общих страшилок появляется понятный маршрут, а рядом — команда специалистов, которые умеют вести пациентов с зависимостью и знают, как работать с семьями, уставшими от бесконечных срывов.
Получить больше информации – наркологическая клиника в королеве
Для вызова специалиста необходимо позвонить на горячую линию или оставить заявку через официальный сайт, например, на портале государственных услуг. Специалист приедет в оговоренное время, обеспечив полную анонимность и соблюдение медицинской тайны.
Получить дополнительную информацию – нарколог на дом анонимно каменск-уральский
Наркологическая клиника в клинике в Казани оказывает квалифицированную помощь людям, столкнувшимся с алкогольной и наркотической зависимостью. Лечение проводится в условиях полной конфиденциальности и медицинской безопасности. Основное направление работы клиники — это восстановление физического, психического и эмоционального состояния пациента, а также формирование устойчивой мотивации к отказу от употребления психоактивных веществ. Все процедуры выполняются с использованием сертифицированных препаратов и современных диагностических технологий, что позволяет добиться устойчивого результата без осложнений.
Получить дополнительные сведения – https://narkologicheskaya-klinika-v-kazani16.ru/
Мы не используем универсальные «сильные капельницы». Эффективность даёт точное совпадение с задачей. Ниже — логика выбора профилей и маркеры, на которые мы ориентируемся при контроле эффективности и безопасности.
Подробнее можно узнать тут – http://vivod-iz-zapoya-v-sankt-peterburge16.ru/vyvod-iz-zapoya-sankt-peterburg-vyzov-narkologa-na-dom/https://vivod-iz-zapoya-v-sankt-peterburge16.ru
В клинике работают врачи-наркологи, психиатры, терапевты, психологи, реабилитологи. Вместо «универсальной» схемы каждому пациенту подбирают индивидуальный план, учитывая возраст, стаж употребления, состояние внутренних органов, психоэмоциональный фон, семейную ситуацию. Это особенно важно для жителей Долгопрудного, где многие совмещают работу в Москве с плотным графиком, и любая ошибка в лечении может дорого обойтись — потерей работоспособности, срывом деловых или личных планов.
Получить дополнительную информацию – http://www.domen.ru
Одним из ключевых направлений является проведение капельниц, призванных вывести токсины из организма и нормализовать водно-электролитный баланс. Используемые препараты и состав растворов подбираются индивидуально, исходя из клинической картины и истории болезни пациента.
Разобраться лучше – нарколог на дом цена
Удачи и процветания! https://candytip.ru Ждем трип репотов и описания про АМТа же фигня.
В Воскресенске вывод из запоя может проводиться в разных форматах — с выездом на дом, в условиях стационара, в срочном режиме или с последующим амбулаторным наблюдением. Правильный выбор зависит от тяжести состояния, возраста пациента, наличия хронических заболеваний и того, насколько сильно запой нарушил привычную жизнь.
Получить дополнительную информацию – https://vyvod-iz-zapoya-voskresensk11.ru/vyvod-iz-zapoya-na-domu-v-voskresenske/
Вывод из запоя — это не только капельница. Это системная медицинская помощь, направленная на снижение интоксикации, поддержку сердца, нервной системы и внутренних органов. Правильно выстроенный детокс помогает не просто «сбить симптомы», а реально снизить риски для здоровья и дать человеку шанс вернуться к трезвому состоянию без тяжёлых последствий.
Подробнее тут – http://vyvod-iz-zapoya-voskresensk11.ru/vyvod-iz-zapoya-na-domu-v-voskresenske/
Как отмечает врач-нарколог Иванов И.И., «без своевременной медицинской помощи при запое повышается риск необратимых изменений в организме и летального исхода».
Детальнее – http://vyvod-iz-zapoya-nizhnij-tagil11.ru/vyvod-iz-zapoya-czena-v-nizhnem-tagile/
Капельница рекомендована при следующих состояниях:
Узнать больше – капельница от запоя вызов город
Наличие у нарколога практического опыта и навыков быстрого реагирования критично — особенно если речь идёт о тяжелой интоксикации или судорожном синдроме. Ошибки в дозировке или игнорирование хронических заболеваний могут привести к осложнениям.
Углубиться в тему – нарколог на дом анонимно
Preparati a vivere l’esperienza Crazy Time al massimo, tra slot, bonus e statistiche live dal cuore dell’Italia.
Le probabilita sono supportate da una grafica vivace, jingles coinvolgenti e animazioni fluide che rendono l’esperienza molto immersiva.
crazy time italia statistiche https://lenoralivingston.com/
Преимущество такого подхода в том, что из этих «кирпичиков» можно собрать именно тот маршрут, который подходит конкретному человеку. Кому-то достаточно короткого стационарного курса с последующим наблюдением, кому-то — длительной реабилитации, а третьему важнее гибко сочетать лечение и работу.
Разобраться лучше – narkologicheskaya-klinika
Профессиональная клиника никогда не скрывает информацию о своих сотрудниках. На официальных сайтах нередко размещены сканы дипломов, сведения о специализации и стаже, участие в отраслевых конференциях и проектах Минздрава.
Изучить вопрос глубже – наркологическая клиника нарколог в первоуральске
Не тратьте деньги на лицензию — скачайте кряк для Windows 11 здесь и активируйте систему за 5 минут.
Подробнее – Скачать патч для активации Windows 11
Основная цель — быстрое и безопасное выведение этанола и его токсических метаболитов из организма, восстановление водно-электролитного и кислотно-щелочного баланса, нормализация артериального давления, работы сердца, почек и головного мозга. Для этого применяется инфузионная терапия, фармакологическая коррекция, витаминотерапия и, при необходимости, седативная поддержка.
Изучить вопрос глубже – вывод из запоя клиника рязань
Основные признаки, свидетельствующие о необходимости экстренной помощи:
Детальнее – вывод из запоя клиника красноярск
На сайте Минздрава указаны общие клинические рекомендации по выведению из запоя, включая допустимые дозировки и протоколы лечения.
Углубиться в тему – вывод из запоя на дому цена в рязани
Этот обзор предлагает свежий взгляд на предметы, которые и без того привычны. Мы упоминаем факты, не имеющие большого значения, и события с неясной важностью, но они присутствуют здесь.
Подробнее читать – народные средства от диабета
Как подчеркивает нарколог Олег Смирнов, «чем быстрее будет оказана помощь, тем ниже риск тяжелых осложнений, таких как судороги, отек мозга или сердечные приступы».
Исследовать вопрос подробнее – http://vyvod-iz-zapoya-krasnoyarsk0.ru
в курске есть ваш магаз? купить Кокаин, Бошки, Марихуану, Мефедрон Я вот перед заказом почитала хуеву кучу отзывов и не нашла ни одного хуевого. Но опять же, смотри, отзывы были не об эйфоре, а о самом магазине. Давай друг, советуй что-нибудь в личкуа че, под запрет попадает? вроде нет
Услуга вызова нарколога на дом в Екатеринбурге представляет собой комплекс мер, направленных на оперативное стабилизирование состояния пациента. При поступлении вызова специалист проводит детальный осмотр, сбор анамнеза и диагностику состояния, после чего разрабатывается индивидуальный план лечения. Методика включает медикаментозную детоксикацию, коррекцию обменных процессов и психологическую поддержку, что обеспечивает комплексное восстановление здоровья без необходимости посещения стационара.
Узнать больше – скорая вывод из запоя в екатеринбурге
Согласно данным Федерального наркологического центра, своевременный выезд врача снижает риск осложнений и повторных госпитализаций.
Ознакомиться с деталями – нарколог на дом клиника в каменске-уральском
Этапность терапии позволяет проводить лечение безопасно, с контролем жизненных показателей и прогнозируемым восстановлением физического состояния. После выхода из запоя пациенту рекомендуется продолжить реабилитацию для предупреждения повторных нарушений.
Выяснить больше – наркологическая клиника казань
Основной этап в лечении — детоксикация организма от токсичных веществ, вызывающих интоксикацию. В клинике применяют современные методы капельниц и медикаментозной поддержки, включая препараты для снятия абстинентного синдрома.
Углубиться в тему – наркологическая клиника
Запой — это не просто длительное употребление алкоголя, а тяжелое состояние, когда организм перестает функционировать нормально без постоянного поступления этанола. При запое происходит накопление токсинов, что ведет к нарушению работы внутренних органов и сильному ослаблению иммунной системы. Пациенты часто испытывают невыносимые физические и психические страдания, а попытки самостоятельно выйти из запоя только усугубляют ситуацию.
Углубиться в тему – https://vyvod-iz-zapoya-krasnoyarsk0.ru/vyvod-iz-zapoya-czena-krasnoyarsk
Наркологическая клиника в клинике в Казани оказывает квалифицированную помощь людям, столкнувшимся с алкогольной и наркотической зависимостью. Лечение проводится в условиях полной конфиденциальности и медицинской безопасности. Основное направление работы клиники — это восстановление физического, психического и эмоционального состояния пациента, а также формирование устойчивой мотивации к отказу от употребления психоактивных веществ. Все процедуры выполняются с использованием сертифицированных препаратов и современных диагностических технологий, что позволяет добиться устойчивого результата без осложнений.
Ознакомиться с деталями – http://www.domen.ru
Современная наркологическая клиника в Мурманске специализируется на комплексном лечении алкогольной, наркотической и других видов зависимости. В условиях МедЦентр Арктика используются проверенные методы диагностики и терапии, позволяющие достичь устойчивой ремиссии и восстановить качество жизни пациента.
Углубиться в тему – http://narkologicheskaya-klinika-v-murmanske12.ru/narkologicheskaya-klinika-klinika-pomoshh-v-murmanske/
Вызов нарколога возможен круглосуточно, что обеспечивает оперативное реагирование на критические ситуации. Пациенты и их родственники могут получить помощь в любое время, не дожидаясь ухудшения состояния.
Разобраться лучше – нарколог на дом вывод из запоя
На нашем сайте вы можете скачать активатор для Windows 11 абсолютно бесплатно и навсегда забыть о водяных знаках!
Подробнее – Windows 11 активатор на русском
официальный king casino Подписывайтесь на официальный Telegram-канал King Casino, чтобы быть в курсе всех новостей и акций!
Как подчёркивает заведующая отделением клинической психологии ФГБУН «НМИЦ психиатрии и наркологии» Минздрава России, наличие в команде специалистов с опытом работы в области зависимости — это основа качественной помощи.
Узнать больше – наркологическая клиника нижний тагил
Одним из ключевых направлений является проведение капельниц, призванных вывести токсины из организма и нормализовать водно-электролитный баланс. Используемые препараты и состав растворов подбираются индивидуально, исходя из клинической картины и истории болезни пациента.
Получить дополнительную информацию – http://narkolog-na-dom-v-yaroslavle12.ru
Сочетание медицинских и психотерапевтических мер создаёт устойчивую систему поддержки. Пациенты получают возможность постепенно восстановить утраченное здоровье и психологическую стабильность.
Получить дополнительную информацию – наркологическая клиника стационар
Первое, на что стоит обратить внимание — это профессиональный уровень сотрудников. Без квалифицированных наркологов, клинических психологов и психиатров реабилитационный процесс становится формальным и неэффективным.
Детальнее – https://narkologicheskaya-klinika-nizhnij-tagil11.ru/
Согласно данным Федерального наркологического центра, своевременный выезд врача снижает риск осложнений и повторных госпитализаций.
Получить дополнительные сведения – нарколог на дом
Вызов нарколога на дом в Ярославле — это удобный и эффективный способ начать лечение или оказать первую помощь при острых состояниях, связанных с алкоголизмом, наркотической зависимостью или другими психоактивными веществами. Основные преимущества такой услуги заключаются в следующем:
Детальнее – нарколог на дом срочно
Важно понять: запой — это не просто серия праздников или «отпуск с алкоголем». Это состояние, при котором организм перестаёт выходить в трезвость, а любая попытка остановиться сопровождается настолько тяжёлыми симптомами, что человек снова тянется к бутылке. С каждым днём запоя возрастает нагрузка на сердце, печень, поджелудочную железу, мозг.
Получить больше информации – https://vyvod-iz-zapoya-voskresensk11.ru/vyvod-iz-zapoya-kapelnica-v-voskresenske/
В этой статье мы рассмотрим ключевые аспекты выбора надёжного специалиста, который приедет по вызову и сможет оказать квалифицированную помощь без промедлений.
Изучить вопрос глубже – вызвать врача нарколога на дом в нижнем тагиле
В статье рассмотрим ключевые моменты, которые помогут сориентироваться при выборе капельницы от запоя, понять механизм действия и особенности процедуры, а также избежать типичных ошибок при обращении за медицинской помощью.
Узнать больше – http://kapelnicza-ot-zapoya-pervouralsk11.ru
Всем привет с наступивщими,давно не работал с этим магазином,подскажите как у него работа все ттакже четко? https://hotelbelayarus.ru то ты-цифровая личность, я не за граммы говорю, а за общение и так-то не я один, обещаешь много-толку мало, 2 года – не срок, бомбануть и тебя могли, это вот твоим языком написано, если нормально не понимаешь, еще раз прошу участия администрации в данном вопросея не смог пополнить в альфа банке, по определенной причине!
Зависимость не возникает внезапно — она развивается постепенно. Однако чем дольше человек откладывает обращение за медицинской помощью, тем сложнее и дольше будет восстановление.
Узнать больше – лечение пивного алкоголизма в воронеже
На этом этапе специалист уточняет длительность запоя, характер употребляемого алкоголя и наличие сопутствующих заболеваний. Тщательный анализ собранной информации позволяет выбрать оптимальную тактику детоксикации и минимизировать риск осложнений.
Изучить вопрос глубже – вывод из запоя клиника
Продолжительный запой вызывает серьезные нарушения в работе внутренних органов, прежде всего печени, почек и сердца. При выводе из запоя пациенты могут испытывать сильное головокружение, тошноту, повышенную раздражительность, тахикардию и судороги. В таких случаях необходима срочная медицинская помощь, которая позволяет стабилизировать состояние пациента.
Подробнее тут – врач вывод из запоя
Как подчёркивает заведующая кафедрой наркологии РМАНПО Минздрава России, «качество оказания помощи зависит не от количества процедур, а от правильной организации лечебного процесса и квалификации команды». Именно поэтому особенно важно понимать, какие параметры следует учитывать при выборе клиники.
Узнать больше – вывод наркологическая клиника
Наркологическая помощь на дому в Ярославле охватывает широкий спектр медицинских мероприятий, направленных на стабилизацию состояния пациента и подготовку к дальнейшему лечению. Среди основных процедур:
Получить дополнительные сведения – https://narkolog-na-dom-v-yaroslavle12.ru/
Как отмечает врач-нарколог Иванов И.И., «без своевременной медицинской помощи при запое повышается риск необратимых изменений в организме и летального исхода».
Детальнее – http://vyvod-iz-zapoya-nizhnij-tagil11.ru/vyvod-iz-zapoya-czena-v-nizhnem-tagile/
Там, где раньше хватало одного тяжёлого утра, теперь требуются дни детоксикации. И чем позже подключается врач, тем сложнее вернуть организм к относительно безопасному состоянию.
Подробнее можно узнать тут – https://vyvod-iz-zapoya-voskresensk11.ru/vyvod-iz-zapoya-na-domu-v-voskresenske
Там, где раньше хватало одного тяжёлого утра, теперь требуются дни детоксикации. И чем позже подключается врач, тем сложнее вернуть организм к относительно безопасному состоянию.
Исследовать вопрос подробнее – http://vyvod-iz-zapoya-voskresensk11.ru
Рабочий ключ активации для Windows 11 — проверено и обновлено, без блокировок!
Подробнее – Скачать патч для активации Windows 11
Наркологическая клиника в Долгопрудном помогает в ситуациях, когда:
Подробнее – skolko-stoit-kodirovanie-ot-alkogolizma
Основная цель — быстрое и безопасное выведение этанола и его токсических метаболитов из организма, восстановление водно-электролитного и кислотно-щелочного баланса, нормализация артериального давления, работы сердца, почек и головного мозга. Для этого применяется инфузионная терапия, фармакологическая коррекция, витаминотерапия и, при необходимости, седативная поддержка.
Ознакомиться с деталями – вывод из запоя на дому в рязани
Капельница от запоя — это не «чудо-микс», а управляемая медицинская процедура с чёткими целями, окном оценки и понятными критериями остановки. В «ЮжУрал Детокс Центр» подход построен по принципу минимально достаточных вмешательств: сначала безопасность (дыхание, сознание, гемодинамика), потом переносимость воды и сбор нормального сна, а уже после — метаболическая поддержка и восстановление бытовой устойчивости. Такая логика исключает полипрагмазию, снижает риск нежелательных реакций и даёт семье прогнозируемую картину на ближайшие 24–72 часа. Мы не обещаем «мгновенного чуда» — мы предлагаем дисциплину маленьких шагов, которая с высокой вероятностью приводит к устойчивому результату.
Получить дополнительную информацию – https://kapelnicza-ot-zapoya-v-chelyabinske16.ru/kapelniczy-ot-pokhmelya-chelyabinsk
Наркологическая клиника в Долгопрудном помогает в ситуациях, когда:
Получить дополнительную информацию – kodirovanie-ot-alkogolizma-na-domu
Для успешного вывода из запоя используется комплексный подход с участием специалистов разных профилей. Более подробно об этом можно узнать на официальном портале наркологической службы.
Подробнее тут – вывод из запоя капельница на дому в нижнем тагиле
Клиника в Королёве закрывает этот разрыв. Здесь можно пройти полный путь — от первичной диагностики и детоксикации до реабилитации и последующего наблюдения — в пределах привычного города, не отрываясь полностью от семьи и важных дел. Это особенно важно для тех, кто продолжает работать, боится потерять позицию или репутацию, но при этом понимает, что дальше жить «как раньше» просто опасно. Лечение перестаёт быть чем-то абстрактным и пугающим: вместо общих страшилок появляется понятный маршрут, а рядом — команда специалистов, которые умеют вести пациентов с зависимостью и знают, как работать с семьями, уставшими от бесконечных срывов.
Подробнее – бесплатная наркологическая клиника
Основной этап в лечении — детоксикация организма от токсичных веществ, вызывающих интоксикацию. В клинике применяют современные методы капельниц и медикаментозной поддержки, включая препараты для снятия абстинентного синдрома.
Узнать больше – наркологическая клиника на дом
Вывод из запоя в Рязани — это комплексная медицинская услуга, направленная на устранение интоксикации, стабилизацию состояния пациента и предотвращение рецидива алкогольной зависимости. Методики подбираются индивидуально с учётом анамнеза, длительности запойного состояния, наличия сопутствующих заболеваний и психоэмоционального фона. Процедура осуществляется под контролем опытных врачей-наркологов с применением сертифицированных препаратов и оборудования.
Исследовать вопрос подробнее – вывод из запоя анонимно
На сайте Минздрава указаны общие клинические рекомендации по выведению из запоя, включая допустимые дозировки и протоколы лечения.
Изучить вопрос глубже – срочный вывод из запоя рязань
Многие годами живут в логике: «главное — с утра выпить чуть-чуть, станет легче». На коротком промежутке времени это действительно частично снимает симптомы, но по сути лишь продлевает запой и усиливает интоксикацию. Организм не успевает переработать продукты распада алкоголя, кровь становится «тяжёлой», нарушается работа сосудов, возрастает нагрузка на сердце и мозг.
Выяснить больше – kapelnica-ot-zapoya-v-stacionare
Вообще то дажббер в рабочее время всегда в сети и все кто оплачивал и делал заказ получили треки. https://cartprintshop.ru по теме трип БРО!Я так понимаю,магаз – надёжный! Цены на сегодняшний день соответствуют заявленным в прайсе?
Наркологическая клиника в клинике в Нижнем Новгороде использует многопрофильный подход, направленный на физическое и психологическое восстановление пациентов. После детоксикации проводится стабилизация обменных процессов, нормализация работы внутренних органов и поддержка нервной системы. Особое внимание уделяется коррекции поведения и мотивации пациента к отказу от употребления алкоголя или наркотиков.
Углубиться в тему – запой наркологическая клиника нижний новгород
Ita? caiu caiu.site .
Критерий
Узнать больше – наркологическая клиника клиника помощь нижний тагил
В Воскресенске вывод из запоя может проводиться в разных форматах — с выездом на дом, в условиях стационара, в срочном режиме или с последующим амбулаторным наблюдением. Правильный выбор зависит от тяжести состояния, возраста пациента, наличия хронических заболеваний и того, насколько сильно запой нарушил привычную жизнь.
Получить дополнительную информацию – https://vyvod-iz-zapoya-voskresensk11.ru/vyvod-iz-zapoya-kapelnica-v-voskresenske
Точная диагностика позволяет подобрать индивидуальную программу лечения, что значительно повышает шансы на успешное выздоровление.
Подробнее можно узнать тут – наркологические клиники алкоголизм в мурманске
Основной этап в лечении — детоксикация организма от токсичных веществ, вызывающих интоксикацию. В клинике применяют современные методы капельниц и медикаментозной поддержки, включая препараты для снятия абстинентного синдрома.
Изучить вопрос глубже – http://narkologicheskaya-klinika-v-murmanske12.ru
Перед тем как принять решение, пациент и родственники получают объяснения по доступным направлениям. Обычно обсуждаются: амбулаторные консультации, дневной или круглосуточный стационар, выездная помощь, реабилитационные программы и последующее наблюдение. Это позволяет выстроить индивидуальный маршрут, а не навязывать один и тот же сценарий всем подряд.
Исследовать вопрос подробнее – chastnaya-narkologicheskaya-klinika
На этом этапе специалист уточняет длительность запоя, характер употребляемого алкоголя и наличие сопутствующих заболеваний. Тщательный анализ собранной информации позволяет выбрать оптимальную тактику детоксикации и минимизировать риск осложнений.
Изучить вопрос глубже – вывод из запоя в стационаре
Запой не всегда выглядит как откровенная катастрофа с первых дней. Иногда всё начинается с «отпуска», «праздника», пары вечеринок подряд. Родные надеются, что человек сам остановится, а он каждый день находит повод продолжить. В какой-то момент организм перестаёт справляться, и даже небольшие дозы алкоголя вызывают тяжёлые реакции.
Выяснить больше – http://kapelnica-ot-zapoya-dolgoprudnyj11.ru
zerotrusty – Mobile version looks perfect; no glitches, fast scrolling, crisp text.
Перед заключением договора стоит поинтересоваться:
Получить дополнительные сведения – http://narkologicheskaya-klinika-nizhnij-tagil11.ru
Критерий
Подробнее можно узнать тут – наркологическая клиника стационар
После первичного осмотра начинается активная фаза детоксикации. Современные медикаменты вводятся капельничным методом, что позволяет быстро вывести токсины из организма, нормализовать обмен веществ и восстановить работу внутренних органов.
Исследовать вопрос подробнее – вывод из запоя вызов в екатеринбурге
Высокий уровень лечения обеспечивается квалификацией врачей, имеющих опыт работы в области наркологии, а также современным медицинским оборудованием, позволяющим проводить диагностику и лечение на самом высоком уровне. Врачи регулярно повышают квалификацию, участвуя в конференциях и обучающих программах. Подробности о квалификации специалистов доступны на портале медицинского сообщества.
Получить больше информации – анонимная наркологическая клиника в каменске-уральском
Этот информационный набор привлекает внимание множеством мелочей и странных ракурсов. Мы предлагаем взгляды, которые редко бывают полезны, но могут слегка разнообразить ваше знакомство с темой.
Вот – игровые автоматы
Как подчёркивает главный врач клинического отделения, «в условиях стационара мы можем оперативно реагировать на малейшие изменения в состоянии пациента, что критически важно при тяжёлых формах запоя».
Подробнее – вывод из запоя капельница
Четкого товара! https://family-diary.ru РФ. Западно – европейская её часть )П.С. Отзывы о работе (посты по теме) я не удалял.
Обращение за помощью на дому обладает рядом преимуществ, которые особенно актуальны для пациентов, сталкивающихся с зависимостью:
Исследовать вопрос подробнее – нарколог вывод из запоя
Наркологическая клиника в Химках помогает не только тем, кто уже оказался в тяжёлом запое или прошёл через ломку. Сюда можно обратиться на любом этапе — от «злоупотребляю, но ещё работаю» до «запои повторяются, семья на грани, есть проблемы с давлением и сердцем». Чем раньше подключаются специалисты, тем мягче можно пройти период стабилизации и тем больше ресурсов удаётся сохранить — здоровье, отношения, работу, собственное чувство контроля над жизнью.
Получить дополнительную информацию – частная наркологическая клиника
В первые два часа после прибытия бригады важно не «сделать побольше», а принять наименьшее количество решений, которое реально меняет картину. Команда фиксирует базовую линию (ЧСС, АД, SpO?, температура, шкала тошноты/тремора), даёт антиеметический мост и запускает регидратацию. При тахикардии — добавляет антивегетативный контур. Семья получает сценарий ночи: когда приглушить свет, когда предложить воду, какие цифры на тонометре считать нормой и при каких — звонить. Такой протокол экономит время и силы, а главное — превращает вечер из хаотичного в управляемый, снижая риск ночных экстренных вызовов и «эмоциональных качелей».
Получить дополнительную информацию – https://kapelnicza-ot-zapoya-v-chelyabinske16.ru/kapelnicza-ot-pokhmelya-na-domu-chelyabinsk
Наркологическая клиника в Долгопрудном помогает в ситуациях, когда:
Исследовать вопрос подробнее – https://narkologicheskaya-klinika-dolgoprudnyj11.ru/narkologicheskie-kliniki-ryadom-v-dolgoprudnom/
Современная наркологическая клиника в Мурманске специализируется на комплексном лечении алкогольной, наркотической и других видов зависимости. В условиях МедЦентр Арктика используются проверенные методы диагностики и терапии, позволяющие достичь устойчивой ремиссии и восстановить качество жизни пациента.
Углубиться в тему – наркологическая клиника мурманск
Скальный лист Бесшовные горячекатаные, восстановленные, а также специализированные трубы, такие как КОРСИС, ПРАГМА, гофрированные канализационные, ПВХ и ПНД, закрывают ниши от транспортировки жидких сред до дренажных систем и кабельной канализации. Экструдированный пенополистирол, Изовер, Эковер и продукция ROCKWOOL представляют собой выбор в области теплоизоляционных материалов, в то время как геотекстиль применяется для армирования и разделения слоев грунта
Если в ситуации с алкоголем присутствуют несколько из перечисленных ниже пунктов, это повод не откладывать консультацию с наркологом в Королёве:
Получить дополнительные сведения – kodirovanie-ot-alkogolizma-v-korolyove
threatlens – Mobile version looks perfect; no glitches, fast scrolling, crisp text.
Наркологическая клиника в Долгопрудном — это возможность получить помощь при алкогольной и наркотической зависимости рядом с домом, не тратя время на поездки по Москве и очереди в перегруженных городских учреждениях. Для жителей Долгопрудного и ближайших населённых пунктов особенно важно, что сюда можно обратиться в любое время суток: при затянувшемся запое, после эпизода употребления наркотиков, при первых признаках формирования зависимости или в ситуации, когда семья больше не справляется с проблемой своими силами.
Узнать больше – http://narkologicheskaya-klinika-dolgoprudnyj11.ru/narkologicheskie-kliniki-ryadom-v-dolgoprudnom/
Наркологическая клиника в Долгопрудном — это возможность получить помощь при алкогольной и наркотической зависимости рядом с домом, не тратя время на поездки по Москве и очереди в перегруженных городских учреждениях. Для жителей Долгопрудного и ближайших населённых пунктов особенно важно, что сюда можно обратиться в любое время суток: при затянувшемся запое, после эпизода употребления наркотиков, при первых признаках формирования зависимости или в ситуации, когда семья больше не справляется с проблемой своими силами.
Получить дополнительную информацию – kodirovka-ot-alkogolya
Обратиться за помощью могут как сами пациенты, так и их родственники. Часто именно близкие первыми замечают, что человек изменился: стал раздражительным, агрессивным или, наоборот, отстранённым, перестал выполнять обещания, начал скрывать доходы и траты. В клинике семья получает не только медицинскую помощь для зависимого, но и понятную стратегию действий: как разговаривать, как мотивировать на лечение, как не провоцировать конфликты и не усиливать чувство стыда у человека, который и так боится признаться себе в наличии болезни.
Узнать больше – narkolog-besplatno-moskva
Как подчёркивает заведующая отделением клинической психологии ФГБУН «НМИЦ психиатрии и наркологии» Минздрава России, наличие в команде специалистов с опытом работы в области зависимости — это основа качественной помощи.
Получить больше информации – наркологическая клиника лечение алкоголизма
Состояния при зависимостях чувствительны к времени суток и среде. К ночи нарастает тревога, усиливается тремор, нестабильны показатели ЧСС/АД. Круглосуточный приём позволяет выстроить «мост» через самые сложные часы: собрать сон без избыточной фармаконагрузки, сделать короткие чек-ины, вовремя ретитровать один параметр (свет, дыхательные ритмы, интервалы питья), а утром оформить «малые победы» — гигиена и 10–15 минут тихой ходьбы. Эти простые маркеры часто надёжнее любых субъективных оценок «как себя чувствую».
Получить больше информации – https://narkologicheskaya-clinika-v-rostove-na-donu16.ru/narkologiya-rostov-zapadnyj-rajon
auditkit – Navigation felt smooth, found everything quickly without any confusing steps.
Слоты на https://1winmdma.top запускаю в демо.
keyvaulty – Navigation felt smooth, found everything quickly without any confusing steps.
Выбор наркологической клиники — ключевой шаг на пути к выздоровлению, от которого зависит не только физическое и психическое состояние пациента, но и устойчивость достигнутых результатов. Современные учреждения предлагают широкий спектр услуг, однако уровень подготовки персонала, методики лечения и условия пребывания могут существенно отличаться.
Исследовать вопрос подробнее – http://narkologicheskaya-klinika-pervouralsk11.ru
Многие семьи сталкиваются с трудностями, когда зависимый отказывается ехать в клинику. В таких случаях выездная помощь становится первым шагом к выздоровлению. Однако не все службы предлагают одинаково безопасный и профессиональный подход. Чтобы избежать рисков и ошибок, важно понимать, на что обращать внимание при выборе услуги “нарколог на дом”.
Получить дополнительную информацию – выезд нарколога на дом
Как поясняет медицинский психолог Елена Мусатова, «пациенту важно доверять специалисту, понимать его подход и чувствовать профессиональную уверенность ещё на этапе первичного осмотра».
Получить дополнительные сведения – наркологическая клиника лечение алкоголизма
Ты нам лучьше отзыв напиши о работе магазина 😀 купить Кокаин, Бошки, Марихуану, Мефедрон Многие стучат нам по выходным и ночью, но мы живые люди и не можем 24 часа в день отвечать.Вообщем маска (конспирация) на высоком уровне, что на прямую влияет на мою безопасность и на тех кто пользуется услугами данного ТС, это радует.
Многие семьи сталкиваются с трудностями, когда зависимый отказывается ехать в клинику. В таких случаях выездная помощь становится первым шагом к выздоровлению. Однако не все службы предлагают одинаково безопасный и профессиональный подход. Чтобы избежать рисков и ошибок, важно понимать, на что обращать внимание при выборе услуги “нарколог на дом”.
Изучить вопрос глубже – нарколог на дом клиника нижний тагил
shieldops – Pages loaded fast, images appeared sharp, and formatting stayed consistent.
secstackr – Appreciate the typography choices; comfortable spacing improved my reading experience.
How to propose to a girl https://propose.lol
Лечение зависимости требует комплексного подхода, включающего медицинские, психологические и социальные меры. Каждый пациент проходит индивидуальную диагностику, по результатам которой подбирается схема терапии. Такой подход позволяет снизить риски осложнений и обеспечить стабильный результат.
Исследовать вопрос подробнее – http://narkologicheskaya-clinika-v-nizhnem-novgorode16.ru/narkolog-nizhnij-novgorod-na-dom/
Текст включает разнообразную информацию, которая может показаться любопытной, но не меняет устоявшегося восприятия. Предлагаем просто насладиться чтением, не ожидая значительной пользы.
Подробнее читать – диета для похудения быстро
AWS caiu caiu.site .
Нарколог на дом в Химках особенно востребован тогда, когда состояние человека уже нельзя назвать обычным похмельем, но он категорически отказывается ехать в клинику. Запой тянется несколько дней или дольше, нет полноценного сна, пульс постоянно учащённый, руки трясутся, давление скачет, а любое утро начинается не с облегчения, а с новой дозы алкоголя «чтобы не развалиться». В такой ситуации родственники оказываются между страхом и беспомощностью: понятно, что дальше ждать опасно, но уговорить собрать вещи и поехать в стационар не получается. Формат выезда нарколога на дом как раз и закрывает этот тупик — врач приезжает туда, где сейчас находится человек, оценивает риски и сразу начинает помощь.
Детальнее – http://www.domen.ru
Признаки, что пора задуматься о кодировании
Получить дополнительные сведения – kodirovanie-ot-alkogolizma-korolev
Для родственников капельница от запоя — возможность не наблюдать бессильно, как близкий человек «сгорает» на глазах, а подключить специалистов. Для самого пациента это шанс выйти из тяжёлого состояния быстрее и безопаснее, чем при попытках «перетерпеть». Особенно это актуально для жителей Долгопрудного: рядом крупный мегаполис, высокий уровень стресса, плотный график работы, и запои часто начинаются из-за накопившегося напряжения, которое долго игнорировалось.
Разобраться лучше – http://kapelnica-ot-zapoya-dolgoprudnyj11.ru/kapelnica-ot-zapoya-srochno-v-dolgoprudnom/
Многие тянут до последнего, считая, что обращаться к наркологу «рано» или «не по статусу». На практике именно такое откладывание часто приводит к затяжным запоям, тяжёлым состояниям и разрушению социальных связей. К специалистам имеет смысл обращаться при первых признаках того, что употребление алкоголя или наркотиков перестало быть эпизодическим и управляемым.
Получить дополнительную информацию – наркологическая клиника москва отзывы
В клинике работают врачи-наркологи, психиатры, терапевты, психологи, реабилитологи. Вместо «универсальной» схемы каждому пациенту подбирают индивидуальный план, учитывая возраст, стаж употребления, состояние внутренних органов, психоэмоциональный фон, семейную ситуацию. Это особенно важно для жителей Долгопрудного, где многие совмещают работу в Москве с плотным графиком, и любая ошибка в лечении может дорого обойтись — потерей работоспособности, срывом деловых или личных планов.
Углубиться в тему – https://narkologicheskaya-klinika-dolgoprudnyj11.ru/narkologicheskaya-klinika-stacionar-v-dolgoprudnom
Вывод из запоя на дому — это управляемый медицинский процесс, где каждая деталь имеет значение: от первичного осмотра и грамотного подбора инфузионного профиля до сенсорной дисциплины в помещении и чётких «окон оценки» результата. В наркологической клинике «СеверМед Трезвость» мы используем принцип минимально достаточных вмешательств: одна цель на этап, один измеримый маркер и одна корректировка за раз. Такой подход снижает нагрузку на организм, повышает предсказуемость и делает восстановление переносимым для пациента и его близких.
Подробнее тут – вывод из запоя вызов город
Вывод из запоя — это не только капельница. Это системная медицинская помощь, направленная на снижение интоксикации, поддержку сердца, нервной системы и внутренних органов. Правильно выстроенный детокс помогает не просто «сбить симптомы», а реально снизить риски для здоровья и дать человеку шанс вернуться к трезвому состоянию без тяжёлых последствий.
Получить дополнительные сведения – https://vyvod-iz-zapoya-voskresensk11.ru/vyvod-iz-zapoya-cena-v-voskresenske/
Часто именно жители Химок тянут до последнего: насыщенный ритм жизни, дорога на работу, постоянная усталость, попытки «снимать напряжение» алкоголем или психоактивными веществами. Сначала это кажется временным способом расслабиться, но со временем человек замечает, что пьёт чаще, чем планировал, нуждается в больших дозах, срывает обещания, а попытки контролировать употребление превращаются в череду неудач. В какой-то момент становится очевидно: без профессиональной наркологической помощи дальше будет только сложнее.
Исследовать вопрос подробнее – наркологическая клиника отзывы
Но зато в том случае будут доказательства, что селлер обещал одно, а пришло совсем другое) Так что я правильно написал 😉 https://miniteamshop.ru Ребята решили вопрос.. Вместо 307 выслали компинсацию в виде 1220. Давно не курил такие миксы, живы отдыхают, концентрацию 1к20 делал.Отзывы радуют о магазине, надо заказывать. 5-MeO-DMT решает.
bs bs2best at
Каждый из этапов дополняет предыдущий, формируя непрерывный лечебный процесс. Такой формат позволяет учитывать динамику состояния пациента и своевременно реагировать на изменения.
Получить дополнительную информацию – лечение в наркологической клинике хабаровск
За счёт сочетания этих составляющих лечение перестаёт быть набором отдельных процедур. Пациент и его близкие видят, что каждый шаг логично вытекает из предыдущего и ведёт к общей цели — устойчивой трезвости и постепенному восстановлению качества жизни.
Выяснить больше – наркологическая клиника в чехове
авто навес заказать навес из поликарбоната
Клинические протоколы стационарной терапии рекомендуют госпитализацию при средней и тяжёлой степени интоксикации.
Выяснить больше – вывод из запоя круглосуточно в рязани
В Екатеринбурге бригады выезжают 24/7, покрывая как центральные районы, так и отдалённые кварталы. Координатор уточняет только то, что влияет на безопасность: принимаемые лекарства и дозы, аллергии, эпизоды судорог/психозов, исходные значения давления и пульса, а также бытовые условия — можно ли обеспечить «тихое окно» на 2–3 часа, есть ли свободная розетка и место для полулёжа. Врач приезжает с портативным мониторингом, расходными материалами и резервным планом на случай повышенной реактивности.
Изучить вопрос глубже – https://vyvod-iz-zapoya-v-ekaterinburge16.ru/vyvod-iz-zapoya-ekaterinburg-nedorogo/
How to propose to a girl best places for a proposal in Barcelona
Наркологическая клиника в Хабаровске решает несколько ключевых клинических задач, начиная от диагностики и заканчивая длительным наблюдением. В клинике «Северный Путь» акцент делается на точную оценку состояния пациента при поступлении, что позволяет корректно определить тактику терапии и прогноз восстановления.
Узнать больше – анонимная наркологическая клиника в хабаровске
Как подчёркивает заведующая кафедрой наркологии РМАНПО Минздрава России, «качество оказания помощи зависит не от количества процедур, а от правильной организации лечебного процесса и квалификации команды». Именно поэтому особенно важно понимать, какие параметры следует учитывать при выборе клиники.
Получить больше информации – http://narkologicheskaya-klinika-pervouralsk11.ru
При своевременном обращении к специалистам капельница позволяет значительно улучшить состояние пациента уже в первые часы после начала лечения. Медицинская помощь при запое должна оказываться квалифицированно и в комфортных условиях, что снижает риски осложнений и ускоряет восстановление.
Детальнее – http://kapelnicza-ot-zapoya-v-murmanske12.ru/
Выходные просто, завтра проверь купить Кокаин, Бошки, Марихуану, Мефедрон брал 500 в регион, ранее с этим магазином не работал.. поэтому крайне волновался. Как оказалось зря. Все в лучшем виде ! спасибо !Нет сомнения
В таких случаях наркологическая клиника помогает не только вывести из запоя и поставить капельницу, но и выстроить долгосрочный план: обследование, медикаментозную поддержку, реабилитацию, работу с психологом. Это даёт шанс не просто восстановиться после конкретного эпизода, а перестать повторять один и тот же разрушительный сценарий.
Подробнее – http://narkologicheskaya-klinika-voskresensk11.ru
eva casino регистрация бонус
Современная наркологическая клиника в Мурманске специализируется на комплексном лечении алкогольной, наркотической и других видов зависимости. В условиях МедЦентр Арктика используются проверенные методы диагностики и терапии, позволяющие достичь устойчивой ремиссии и восстановить качество жизни пациента.
Ознакомиться с деталями – наркологическая клиника нарколог
Первое, на что стоит обратить внимание, — это штат клиники. От опыта врачей напрямую зависит точность диагностики, подбор препаратов и эффективность психотерапевтической поддержки.
Детальнее – наркологические клиники алкоголизм в первоуральске
Важно понять: запой — это не просто серия праздников или «отпуск с алкоголем». Это состояние, при котором организм перестаёт выходить в трезвость, а любая попытка остановиться сопровождается настолько тяжёлыми симптомами, что человек снова тянется к бутылке. С каждым днём запоя возрастает нагрузка на сердце, печень, поджелудочную железу, мозг.
Подробнее – http://vyvod-iz-zapoya-voskresensk11.ru/vyvod-iz-zapoya-cena-v-voskresenske/
Профессиональная клиника никогда не скрывает информацию о своих сотрудниках. На официальных сайтах нередко размещены сканы дипломов, сведения о специализации и стаже, участие в отраслевых конференциях и проектах Минздрава.
Углубиться в тему – лечение в наркологической клинике в первоуральске
Многие семьи сталкиваются с трудностями, когда зависимый отказывается ехать в клинику. В таких случаях выездная помощь становится первым шагом к выздоровлению. Однако не все службы предлагают одинаково безопасный и профессиональный подход. Чтобы избежать рисков и ошибок, важно понимать, на что обращать внимание при выборе услуги “нарколог на дом”.
Узнать больше – нарколог на дом недорого
https://oakmontforum.com/members/1xbetvip20267/activity/159922/
Клиническая практика показывает: только системная работа с пациентом даёт устойчивый результат. Программа включает медицинское, психологическое и социальное сопровождение.
Углубиться в тему – наркологическая клиника лечение алкоголизма
В этом материале представлены детали, которые хоть и занимательны, но не особенно значимы. Мы рассматриваем моменты, которые трудно назвать важными, но всё же решили включить их для полноты картины.
Вот – секс
Если в ситуации с алкоголем присутствуют несколько из перечисленных ниже пунктов, это повод не откладывать консультацию с наркологом в Королёве:
Подробнее тут – https://kodirovanie-ot-alkogolizma-korolyov11.ru/preparaty-dlya-kodirovaniya-ot-alkogolizma-v-korolyove
Перед заключением договора стоит поинтересоваться:
Выяснить больше – http://narkologicheskaya-klinika-nizhnij-tagil11.ru/
Для самого пациента это шанс получить медицинское вмешательство без дополнительного стресс-фактора в виде транспорта, очередей и «больничной атмосферы». Он остаётся в привычной обстановке, в своей квартире, с теми же предметами, к которым привык, и это снижает сопротивление. Вместо жесткого сценария «либо немедленно в стационар, либо ничего» появляется промежуточный, более мягкий вариант: врачи приезжают домой, снимают остроту состояния, подбирают схему капельницы и медикаментов, объясняют, что делать дальше. Нередко именно после такого первого опыта человек впервые всерьёз задумывается о полноценном лечении, потому что ощущает реальную разницу в самочувствии до и после профессиональной помощи, а не просто очередной «опохмел».
Получить дополнительные сведения – нарколог психолог на дому
Сигналом к тому, что пора обсудить вариант кодирования с наркологом, служит не один какой-то эпизод, а совокупность симптомов. Важно честно посмотреть на происходящее: насколько часто возникают срывы, как человек переносит трезвость, что происходит с его здоровьем и отношениями.
Подробнее – http://kodirovanie-ot-alkogolizma-korolyov11.ru
Такая «ступенчатая» логика позволяет видеть вклад каждого решения и снижает риск нежелательных ощущений. Мы избегаем параллельных «усилений», чтобы не терять управляемость.
Выяснить больше – вывод из запоя дешево
Простая подготовка ускоряет принятие решений и повышает переносимость инфузии. Пожалуйста, сделайте это до приезда бригады — многие шаги занимают секунды, но экономят десятки минут в процессе.
Углубиться в тему – капельница от запоя на дому недорого
Как подчёркивает главный врач клинического отделения, «в условиях стационара мы можем оперативно реагировать на малейшие изменения в состоянии пациента, что критически важно при тяжёлых формах запоя».
Исследовать вопрос подробнее – вывод из запоя цена рязань
Капельница от запоя — это не «чудо-микс», а управляемая медицинская процедура с чёткими целями, окном оценки и понятными критериями остановки. В «ЮжУрал Детокс Центр» подход построен по принципу минимально достаточных вмешательств: сначала безопасность (дыхание, сознание, гемодинамика), потом переносимость воды и сбор нормального сна, а уже после — метаболическая поддержка и восстановление бытовой устойчивости. Такая логика исключает полипрагмазию, снижает риск нежелательных реакций и даёт семье прогнозируемую картину на ближайшие 24–72 часа. Мы не обещаем «мгновенного чуда» — мы предлагаем дисциплину маленьких шагов, которая с высокой вероятностью приводит к устойчивому результату.
Подробнее тут – http://kapelnicza-ot-zapoya-v-chelyabinske16.ru/kapelnicza-vyvod-iz-zapoya-chelyabinsk/
Вызов нарколога на дом — востребованная услуга, позволяющая оказать пациенту помощь в привычной обстановке без необходимости посещения клиники. Особенно актуально это при запойном состоянии, абстинентном синдроме или первых признаках передозировки. Согласно информации Минздрава РФ, амбулаторная помощь эффективна при своевременном обращении и наличии квалифицированной команды специалистов.
Узнать больше – врач нарколог выезд на дом
На начальных этапах проблема редко проявляется в открытом виде, но уже есть характерные сигналы, на которые стоит обратить внимание. Человек начинает оправдывать употребление постоянной усталостью, проблемами на работе, напряжённой жизненной ситуацией. Появляется раздражение, если нет возможности выпить или принять привычную дозу, меняется круг общения, усиливается скрытность. Это время, когда помощь ещё может быть максимально щадящей по методам и по длительности, а вернуться к стабильной жизни намного проще, чем после многолетнего стажа употребления.
Получить больше информации – стациомедика наркологическая клиника вывода из запоя москва отзывы
В этой статье мы рассмотрим ключевые аспекты выбора надёжного специалиста, который приедет по вызову и сможет оказать квалифицированную помощь без промедлений.
Подробнее тут – http://narkolog-na-dom-nizhnij-tagil11.ru
Claro down Claro down .
bs2web at bs2best at
Да у всех старых магазинов так, на то они и старые. купить Кокаин, Бошки, Марихуану, Мефедрон мое мнение работает достойноПишу сейчас и ржачь пробирает.
Чтобы лучше ориентироваться, в каких жизненных ситуациях особенно важно не игнорировать проблему, удобно представить их в виде типичных сценариев. Это помогает и самому человеку, и его близким осознать, что происходящее уже вышло за рамки «обычной усталости» или «случайного перебора». Ниже перечислены распространённые случаи, когда обращение в наркологическую клинику особенно актуально:
Ознакомиться с деталями – narkologicheskaya-moskva
Как поясняет врач-нарколог клиники «АлкоСтоп», «грамотно составленная инфузионная терапия не только устраняет последствия запоя, но и создаёт условия для дальнейшей мотивации пациента к лечению».
Подробнее тут – вызвать капельницу от запоя на дому первоуральск
Если многое из этого знакомо, кодирование стоит рассматривать не как «наказание» или «приговор», а как инструмент, который помогает закрыть доступ к алкоголю на определённый срок и даёт шанс выстроить новую привычку — жить трезво.
Подробнее можно узнать тут – https://kodirovanie-ot-alkogolizma-korolyov11.ru/preparaty-dlya-kodirovaniya-ot-alkogolizma-v-korolyove
навес для автомобиля заказать навес из металла
Под контролем специалистов проводится выведение токсинов из организма. Используются капельницы с растворами, препараты для поддержки сердца, печени и снятия психоэмоционального напряжения. Лечение алкоголизма в Воронеже — помощь на всех стадиях зависимости предполагает безопасный и контролируемый процесс детоксикации с минимизацией рисков осложнений.
Ознакомиться с деталями – http://lechenie-alkogolizma-voronezh9.ru/
Лечение в клинике «ДальМедБаланс» базируется на комплексном подходе. Каждый метод направлен на конкретную цель — детоксикацию, восстановление, стабилизацию и профилактику повторного употребления. Используются современные медицинские технологии и препараты с доказанной эффективностью. Таблица ниже описывает основные направления терапии и их результаты.
Изучить вопрос глубже – наркологическая клиника лечение алкоголизма в хабаровске
Выбор наркологической клиники — ключевой шаг на пути к выздоровлению, от которого зависит не только физическое и психическое состояние пациента, но и устойчивость достигнутых результатов. Современные учреждения предлагают широкий спектр услуг, однако уровень подготовки персонала, методики лечения и условия пребывания могут существенно отличаться.
Получить дополнительные сведения – частная наркологическая клиника первоуральск
Чтобы лучше ориентироваться, в каких жизненных ситуациях особенно важно не игнорировать проблему, удобно представить их в виде типичных сценариев. Это помогает и самому человеку, и его близким осознать, что происходящее уже вышло за рамки «обычной усталости» или «случайного перебора». Ниже перечислены распространённые случаи, когда обращение в наркологическую клинику особенно актуально:
Изучить вопрос глубже – платная наркологическая клиника москва
Для эффективного вывода из запоя в Мурманске используются современные методы детоксикации, включающие внутривенное введение растворов, направленных на восстановление водно-солевого баланса, коррекцию электролитов и нормализацию работы почек и печени. Важным этапом является использование витаминных комплексов и препаратов, поддерживающих работу сердца и сосудов.
Углубиться в тему – вывод из запоя недорого мурманск
Лечение в наркологической клинике в Чехове удобно не только близостью к дому. Главный плюс — комплексный подход. Зависимость практически никогда не ограничивается только алкоголем или наркотиком: страдают сердце и сосуды, печень, нервная система, психика, отношения в семье и на работе. Если пытаться лечить только одно звено, например, периодически «чистить кровь» капельницами, без проработки причин и последствий, ситуация быстро возвращается к исходной точке. В клинике выстраивается последовательная работа: сначала стабилизируют организм, затем укрепляют психику, а дальше помогают менять привычный образ жизни, чтобы трезвость стала не кратким эпизодом, а новой нормой.
Углубиться в тему – наркологическая клиника цены адреса
После устранения острой зависимости важным этапом становится реабилитация. Она включает восстановление социальных навыков, обучение методам преодоления стрессов без употребления психоактивных веществ.
Получить дополнительные сведения – https://narkologicheskaya-klinika-v-murmanske12.ru/
Лимиты на https://1win-onewin99.top растут со статусом.
I want to propose to a girl romantic proposal in Barcelona
Наркологическая клиника в Долгопрудном — это возможность получить помощь при алкогольной и наркотической зависимости рядом с домом, не тратя время на поездки по Москве и очереди в перегруженных городских учреждениях. Для жителей Долгопрудного и ближайших населённых пунктов особенно важно, что сюда можно обратиться в любое время суток: при затянувшемся запое, после эпизода употребления наркотиков, при первых признаках формирования зависимости или в ситуации, когда семья больше не справляется с проблемой своими силами.
Получить дополнительные сведения – https://narkologicheskaya-klinika-dolgoprudnyj11.ru/narkologicheskaya-klinika-vyzvat-v-dolgoprudnom
Как поясняет врач-нарколог клиники «АлкоСтоп», «грамотно составленная инфузионная терапия не только устраняет последствия запоя, но и создаёт условия для дальнейшей мотивации пациента к лечению».
Углубиться в тему – выезд на дом капельница от запоя в первоуральске
Душевный магазин) Все довольны. Славно. https://magnatcoffee.ru в 12 году брали реагент здесь по курьерке, ровно все было, сейчас оптом берем, но жаль продавец не работает без гаранта, это в наше время спасает от кидков, или различных форс мажоров.ТС подтвердив оплату, сказал ожидать. В оговоренные сроки адрес был получен в ЛС.
На практике семья часто обращается за помощью слишком поздно — когда близкий уже еле встаёт, не спит ночами, говорит странные вещи, а давление скачет так, что страшно оставлять одного. Чтобы не доводить до этого, важно знать признаки, при которых капельница от запоя в Долгопрудном — не «желательно», а по-настоящему необходима.
Разобраться лучше – https://kapelnica-ot-zapoya-dolgoprudnyj11.ru/kapelnica-ot-zapoya-na-domu-v-dolgoprudnom/
Наличие у нарколога практического опыта и навыков быстрого реагирования критично — особенно если речь идёт о тяжелой интоксикации или судорожном синдроме. Ошибки в дозировке или игнорирование хронических заболеваний могут привести к осложнениям.
Получить больше информации – https://narkolog-na-dom-nizhnij-tagil11.ru/
Лечение зависимости требует комплексного подхода, включающего медицинские, психологические и социальные меры. Каждый пациент проходит индивидуальную диагностику, по результатам которой подбирается схема терапии. Такой подход позволяет снизить риски осложнений и обеспечить стабильный результат.
Подробнее можно узнать тут – http://www.domen.ru
Proposed to a girl https://propose.lol
В этом материале представлены детали, которые хоть и занимательны, но не особенно значимы. Мы рассматриваем моменты, которые трудно назвать важными, но всё же решили включить их для полноты картины.
Вот – порно смотреть
После проведения процедур пациент чувствует заметное облегчение: исчезает головная боль, снижается тревожность, восстанавливается сон и аппетит. Это создаёт основу для дальнейшего прохождения курса лечения зависимости.
Подробнее – https://narkologicheskaya-clinika-v-nizhnem-novgorode16.ru/narkologiya-nizhnij-novgorod-besplatno
Есть ситуации, когда визит к наркологу в Химках лучше воспринимать не как «стыдный шаг», а как обычное ответственное решение о своём здоровье. Это особенно актуально, если: употребление алкоголя или наркотиков стало регулярным, а попытки сократить дозы заканчиваются срывами; появились запои с несколькими днями непрерывного употребления; возникают проблемы с сердцем, давлением, сном; близкие всё чаще говорят, что «ситуация выходит из-под контроля».
Подробнее можно узнать тут – https://narkologicheskaya-klinika-himki11.ru/lechenie-v-narkologicheskoj-klinike-v-himkah
Для сохранения приватности мы ведём коммуникацию через одного доверенного представителя, используем нейтральные формулировки в документах, а инструкции выдаём в неброском виде. При невозможности создать тишину дома (ремонт, маленькие дети, гости) предложим краткий «тихий» стационар с отдельным входом и камерным режимом, после чего сопровождение вернётся в домашний формат.
Разобраться лучше – вывод из запоя вызов на дом екатеринбург
В Екатеринбурге бригады выезжают 24/7, покрывая как центральные районы, так и отдалённые кварталы. Координатор уточняет только то, что влияет на безопасность: принимаемые лекарства и дозы, аллергии, эпизоды судорог/психозов, исходные значения давления и пульса, а также бытовые условия — можно ли обеспечить «тихое окно» на 2–3 часа, есть ли свободная розетка и место для полулёжа. Врач приезжает с портативным мониторингом, расходными материалами и резервным планом на случай повышенной реактивности.
Ознакомиться с деталями – вывод из запоя
Удачи в развитии бизнеса ! https://hprojects.ru проблемы с обслуживанием.тс, привет, ответь в лс. я по делу.
bs2best at bs2web at
Комплексное лечение зависимости на дому организовано по четкой схеме, позволяющей оперативно вывести пациента из запоя и обеспечить безопасное восстановление здоровья.
Разобраться лучше – врач вывод из запоя в екатеринбурге
Клиника в Королёве закрывает этот разрыв. Здесь можно пройти полный путь — от первичной диагностики и детоксикации до реабилитации и последующего наблюдения — в пределах привычного города, не отрываясь полностью от семьи и важных дел. Это особенно важно для тех, кто продолжает работать, боится потерять позицию или репутацию, но при этом понимает, что дальше жить «как раньше» просто опасно. Лечение перестаёт быть чем-то абстрактным и пугающим: вместо общих страшилок появляется понятный маршрут, а рядом — команда специалистов, которые умеют вести пациентов с зависимостью и знают, как работать с семьями, уставшими от бесконечных срывов.
Исследовать вопрос подробнее – https://narkologicheskaya-klinika-korolyov11.ru/chastnaya-narkologicheskaya-klinika-v-korolyove/
Наркологическая клиника в Хабаровске решает несколько ключевых клинических задач, начиная от диагностики и заканчивая длительным наблюдением. В клинике «Северный Путь» акцент делается на точную оценку состояния пациента при поступлении, что позволяет корректно определить тактику терапии и прогноз восстановления.
Получить дополнительную информацию – платная наркологическая клиника в хабаровске
Marriage proposal options https://propose.lol
Капельница от запоя — это не «чудо-микс», а управляемая медицинская процедура с чёткими целями, окном оценки и понятными критериями остановки. В «ЮжУрал Детокс Центр» подход построен по принципу минимально достаточных вмешательств: сначала безопасность (дыхание, сознание, гемодинамика), потом переносимость воды и сбор нормального сна, а уже после — метаболическая поддержка и восстановление бытовой устойчивости. Такая логика исключает полипрагмазию, снижает риск нежелательных реакций и даёт семье прогнозируемую картину на ближайшие 24–72 часа. Мы не обещаем «мгновенного чуда» — мы предлагаем дисциплину маленьких шагов, которая с высокой вероятностью приводит к устойчивому результату.
Исследовать вопрос подробнее – https://kapelnicza-ot-zapoya-v-chelyabinske16.ru/kapelniczy-ot-pokhmelya-chelyabinsk/
Клиническая практика показывает: только системная работа с пациентом даёт устойчивый результат. Программа включает медицинское, психологическое и социальное сопровождение.
Получить дополнительные сведения – нарколог лечение алкоголизма воронеж
Такая «ступенчатая» логика позволяет видеть вклад каждого решения и снижает риск нежелательных ощущений. Мы избегаем параллельных «усилений», чтобы не терять управляемость.
Получить больше информации – скорая вывод из запоя
После детоксикации важна реабилитация, включающая психологическую помощь. Используются различные виды психотерапии, в том числе когнитивно-поведенческая терапия и мотивационное интервьюирование. Это помогает пациентам не только избавиться от зависимости, но и адаптироваться к жизни вне клиники. Подробнее о методах психотерапии можно узнать на ресурсе психологической помощи.
Выяснить больше – https://narkologicheskaya-klinika-kamensk-uralskij11.ru/anonimnaya-narkologicheskaya-klinika-v-kamensk-uralskom
Часто первыми тревожные признаки замечают родные. Человек начинает пить чаще, чем раньше, меняется в поведении, становится раздражительным или замкнутым, теряет интерес к привычным занятиям. Появляются сложности с концентрацией, падает работоспособность, учащаются конфликты дома. Употребление наркотиков проявляется изменениями режима дня, странными компаниями, резкими перепадами настроения, финансовыми «дырами», попытками скрыть своё состояние.
Подробнее можно узнать тут – kodirovanie-ot-alkogolizma-na-domu-v-dolgoprudnom
Этот список — памятка на холодильник. Он не раскрывает диагноз, но точно описывает поводы для связи с дежурным врачом. Своевременная эскалация — часть безопасности, а не «подстраховка». Если сомневаетесь — лучше позвонить.
Ознакомиться с деталями – капельница от запоя цена челябинск
Капельница от запоя — это не «чудо-микс», а управляемая медицинская процедура с чёткими целями, окном оценки и понятными критериями остановки. В «ЮжУрал Детокс Центр» подход построен по принципу минимально достаточных вмешательств: сначала безопасность (дыхание, сознание, гемодинамика), потом переносимость воды и сбор нормального сна, а уже после — метаболическая поддержка и восстановление бытовой устойчивости. Такая логика исключает полипрагмазию, снижает риск нежелательных реакций и даёт семье прогнозируемую картину на ближайшие 24–72 часа. Мы не обещаем «мгновенного чуда» — мы предлагаем дисциплину маленьких шагов, которая с высокой вероятностью приводит к устойчивому результату.
Подробнее тут – сколько стоит капельница на дому от запоя
Эта публикация содержит набор несвязанных идей, трудно применимых в практике. Мы лишь поверхностно затрагиваем различные точки зрения, не проводя глубокий анализ и не предлагая выводов.
Подробнее читать – народные средства от диабета
bs2web at bs2web at
ОПЕРАТОР ЕЩЕ БОЛЬШЕ МЕНЯ ОБРАДОВАЛ КОГДА СКАЗАЛ МНЕ НОВЫЙ ЦЕННИК НА РЕГУ! https://soul-power.ru Брал у данного селлера!Хорошо работют=)Желаю развития ветке!
вывод из запоя в клинике в ростове вывод из запоя в клинике в ростове .
I want to propose to a girl proposal packages in Barcelona
Компоненты
Детальнее – http://kapelnicza-ot-zapoya-pervouralsk11.ru
В клинике созданы комфортные условия для прохождения лечения. Пациенты получают не только медицинскую помощь, но и социальную поддержку, что способствует быстрому восстановлению и возвращению к нормальной жизни. Узнать больше о формате лечения и условиях можно на официальном сайте клиники.
Ознакомиться с деталями – платная наркологическая клиника
Отдельная категория пациентов — люди с алкогольной зависимостью. Для жителей Воскресенска особенно актуальны проблемы, связанные с длительными запоями: человек несколько дней подряд пьёт, практически не ест, плохо спит, с трудом встаёт, а каждое утро обещает, что «сейчас немного — и всё». На этом фоне растёт нагрузка на сердце, печень, нервную систему, повышается риск инсультов и инфарктов, обостряются хронические болезни.
Изучить вопрос глубже – https://narkologicheskaya-klinika-voskresensk11.ru/
После первичного осмотра начинается активная фаза детоксикации. Современные медикаменты вводятся капельничным методом, что позволяет быстро вывести токсины из организма, нормализовать обмен веществ и восстановить работу внутренних органов.
Подробнее тут – срочный вывод из запоя
уличные навесы навес из поликарбоната
Наркологическая клиника — это медицинское учреждение, где лечение зависимости выстроено системно: от купирования острых симптомов до длительного сопровождения пациента. В клинике «ДальМедБаланс» терапия проводится под круглосуточным врачебным контролем, а ключевыми принципами являются безопасность, анонимность и индивидуальный подход. Каждый пациент проходит путь восстановления под наблюдением специалистов, которые учитывают физиологическое состояние, психоэмоциональные особенности и социальный контекст. Лечение направлено не только на избавление от физической зависимости, но и на возвращение мотивации к здоровой жизни.
Углубиться в тему – https://narkologicheskaya-klinika-v-khabarovske0.ru/khabarovsk-narkologicheskaya-pomoshh/
Как активировать Windows 11 без ключа? У нас есть пошаговая инструкция!
Подробнее – Кряк для Windows 11 Pro бесплатно
Там, где раньше хватало одного тяжёлого утра, теперь требуются дни детоксикации. И чем позже подключается врач, тем сложнее вернуть организм к относительно безопасному состоянию.
Получить дополнительные сведения – вывод из запоя в Воскресенске
Наркологическая клиника — это медицинское учреждение, где лечение зависимости выстроено системно: от купирования острых симптомов до длительного сопровождения пациента. В клинике «ДальМедБаланс» терапия проводится под круглосуточным врачебным контролем, а ключевыми принципами являются безопасность, анонимность и индивидуальный подход. Каждый пациент проходит путь восстановления под наблюдением специалистов, которые учитывают физиологическое состояние, психоэмоциональные особенности и социальный контекст. Лечение направлено не только на избавление от физической зависимости, но и на возвращение мотивации к здоровой жизни.
Получить больше информации – https://narkologicheskaya-klinika-v-khabarovske0.ru/narkolog-khabarovsk-anonimno/
Профессиональная клиника никогда не скрывает информацию о своих сотрудниках. На официальных сайтах нередко размещены сканы дипломов, сведения о специализации и стаже, участие в отраслевых конференциях и проектах Минздрава.
Получить дополнительные сведения – https://narkologicheskaya-klinika-pervouralsk11.ru/chastnaya-narkologicheskaya-klinika-v-pervouralske
Стационарный формат предполагает круглосуточное наблюдение, возможность экстренного вмешательства и доступ к диагностическим средствам. Это особенно важно при наличии хронических заболеваний, психозов или алкогольного делирия.
Детальнее – вывод из запоя клиника рязань
спасибо и ВАМ !! купить Кокаин, Бошки, Марихуану, Мефедрон Море клиентов и процветания !Жалко тест профукал )
Ниже — ориентировочная матрица первых часов. Она не заменяет очной оценки, но показывает, как мы переводим наблюдения в действия и какие критерии считаем достаточными для переключения модуля. Приведённые окна проверки помогают не тянуть с нужными корректировками и одновременно не «дергать» схему без повода.
Получить дополнительные сведения – наркологические клиники алкоголизм
Наркологическая клиника в клинике в Нижнем Новгороде использует многопрофильный подход, направленный на физическое и психологическое восстановление пациентов. После детоксикации проводится стабилизация обменных процессов, нормализация работы внутренних органов и поддержка нервной системы. Особое внимание уделяется коррекции поведения и мотивации пациента к отказу от употребления алкоголя или наркотиков.
Подробнее тут – наркологические клиники алкоголизм
Для самого пациента это шанс получить медицинское вмешательство без дополнительного стресс-фактора в виде транспорта, очередей и «больничной атмосферы». Он остаётся в привычной обстановке, в своей квартире, с теми же предметами, к которым привык, и это снижает сопротивление. Вместо жесткого сценария «либо немедленно в стационар, либо ничего» появляется промежуточный, более мягкий вариант: врачи приезжают домой, снимают остроту состояния, подбирают схему капельницы и медикаментов, объясняют, что делать дальше. Нередко именно после такого первого опыта человек впервые всерьёз задумывается о полноценном лечении, потому что ощущает реальную разницу в самочувствии до и после профессиональной помощи, а не просто очередной «опохмел».
Подробнее можно узнать тут – https://narkolog-na-dom-himki11.ru/vyzov-narkologa-na-dom-v-himkah
Главное в детоксе — последовательность. Сначала формулируется клиническая гипотеза (например, обезвоживание+вегетативная гиперактивация), затем подбирается минимальный набор вмешательств, который способен изменить ключевые маркеры в ближайшие 40–120 минут. Только при недостаточном ответе добавляется следующий модуль. Ниже — иллюстративная матрица, которая показывает, как принимаются решения в первые часы. Она не заменяет очную оценку, но помогает семье понимать логику действий и причины возможной эскалации.
Получить дополнительную информацию – капельница от запоя клиника
Там, где раньше хватало одного тяжёлого утра, теперь требуются дни детоксикации. И чем позже подключается врач, тем сложнее вернуть организм к относительно безопасному состоянию.
Изучить вопрос глубже – вывод из запоя воскресенск
Производитель металлорукавов и рукавов высокого давления из нержавеющей стали предлагает широкий ассортимент продукции для промышленных систем — РВД с фланцами по ГОСТ и ОСТ, гибкие подводки различных диаметров, шаровые краны муфтовые, фланцевые, приварные и трёхходовые. Компания изготавливает металлорукава с БРС, фланцами из нержавейки, стали Ст20 или 09Г2С под конкретные технические требования заказчика. Ищете нержавейка труба гибкая? Подробный каталог на iz-medi.ru — здесь представлены гибкие подводки от 1/2 до 2 1/2 дюйма, рукава высокого давления и запорная арматура с возможностью доставки по России. Высококачественное сырьё и выполнение нормативов обеспечивают длительный срок службы и устойчивость продукции при использовании.
Как подчёркивает главный врач клинического отделения, «в условиях стационара мы можем оперативно реагировать на малейшие изменения в состоянии пациента, что критически важно при тяжёлых формах запоя».
Получить больше информации – вывод из запоя цена рязань.
Наркологическая клиника в клинике в Нижнем Новгороде специализируется на диагностике, лечении и реабилитации пациентов с алкогольной и наркотической зависимостью. Основная цель деятельности учреждения — восстановление физического здоровья и психологической устойчивости человека, оказавшегося в состоянии зависимости. В клинике применяются современные методы терапии, доказавшие эффективность в медицинской практике. Все процедуры проводятся конфиденциально, с соблюдением медицинских стандартов и под контролем квалифицированных специалистов.
Изучить вопрос глубже – https://narkologicheskaya-clinika-v-nizhnem-novgorode16.ru/chastnaya-narkologicheskaya-klinika-nizhnij-novgorod/
Наркологическая клиника в клинике в Нижнем Новгороде использует многопрофильный подход, направленный на физическое и психологическое восстановление пациентов. После детоксикации проводится стабилизация обменных процессов, нормализация работы внутренних органов и поддержка нервной системы. Особое внимание уделяется коррекции поведения и мотивации пациента к отказу от употребления алкоголя или наркотиков.
Подробнее – наркологическая клиника наркологический центр
smartbyte – Mobile version looks perfect; no glitches, fast scrolling, crisp text.
Для успешной адаптации пациента в обществе клиника организует поддержку родственников и последующее наблюдение. Это снижает риск рецидива и помогает сохранить достигнутые результаты.
Подробнее – http://narkologicheskaya-klinika-v-murmanske12.ru/chastnaya-narkologicheskaya-klinika-v-murmanske/
Для жителей Ростова-на-Дону клиника работает по схеме «тихих маршрутов»: отдельный вход с нейтральной табличкой, окна записи в невызывающие подозрений часы, немаркированный подъезд автомобиля при выездном визите. На первом звонке диспетчер собирает только то, что влияет на безопасность: эпизоды рвоты, ЧСС/АД, ночные панические эпизоды, сопутствующие препараты, аллергии, наличие хронических заболеваний сердца. Личные и социальные детали не запрашиваются — мы придерживаемся принципа «минимально необходимой информации». По прибытии врача фиксируются базовая линия (сознание, дыхание, SpO?, температура), шкалы симптомов и переносимость небольших объёмов воды. Дальше — один точный шаг, одно «окно проверки» и прозрачное решение: продолжать модуль, модифицировать одну переменную или выключить блок.
Получить больше информации – наркологическая клиника стационар в ростове-на-дону
Доброго времени суток. 3-й заказ шел ровно неделю с момента оплаты. Спасибо за приятный сувенир :good:. Сам бы себе такой не знаю когда приобрел :). Вобщем за сервис снова 5+ https://ms-sbis.ru Делали 1к8 прикуренные, эффект до 3х часов !не болела чтоб башка.
Обращение в местную клинику даёт важное преимущество — доступность. Здесь можно пройти диагностику, детоксикацию, вывод из запоя, курс лечения и реабилитации в привычном городе, без выснаживающих переездов. Пациенту легче решиться на стационар, когда он понимает, что близкие рядом и в любой момент могут приехать, поучаствовать в обсуждении плана терапии, привезти необходимые вещи. При этом подход остаётся профессиональным: учитываются стаж зависимости, сопутствующие заболевания, психоэмоциональное состояние, семейная ситуация. Лечение строится не вокруг одной «волшебной» процедуры, а как последовательный маршрут — от первой консультации до выхода в стабильную ремиссию.
Ознакомиться с деталями – narkologicheskaya-klinika
авто навес заказать навесы из металлопрофиля
Для жителей Чехова важно и то, что врач видит не абстрактный «случай зависимости», а живого человека со своей историей. У кого-то за плечами десятилетия злоупотребления, у кого-то — несколько лет с быстрым прогрессированием, у кого-то — сочетание алкоголя с успокоительными или наркотиками. Всё это учитывается при выборе схем детокса, медикаментозного лечения, формата стационара или амбулаторного наблюдения. Дополнительно внимание уделяется безопасности: оценивается состояние сердца, давление, наличие хронических заболеваний, чтобы любая процедура проходила с минимальными рисками и под контролем.
Изучить вопрос глубже – http://narkologicheskaya-klinika-chekhov11.ru
Основные признаки, свидетельствующие о необходимости экстренной помощи:
Подробнее – http://vyvod-iz-zapoya-krasnoyarsk0.ru/vyvod-iz-zapoya-na-domu-krasnoyarsk/
Для эффективного вывода из запоя в Мурманске используются современные методы детоксикации, включающие внутривенное введение растворов, направленных на восстановление водно-солевого баланса, коррекцию электролитов и нормализацию работы почек и печени. Важным этапом является использование витаминных комплексов и препаратов, поддерживающих работу сердца и сосудов.
Исследовать вопрос подробнее – вывод из запоя круглосуточно
Как подчёркивает руководитель направления клинической токсикологии НМИЦ психиатрии и наркологии, «оказание помощи на дому требует не меньшего профессионализма, чем лечение в стационаре, ведь врач действует в ограниченных условиях».
Получить дополнительные сведения – выезд нарколога на дом
Особенно важно на этапе поступления пройти полную психодиагностику и получить адаптированную под конкретного пациента программу. Это позволит учитывать возможные сопутствующие расстройства, включая тревожные, аффективные и когнитивные нарушения.
Детальнее – http://narkologicheskaya-klinika-nizhnij-tagil11.ru
На практике семья часто обращается за помощью слишком поздно — когда близкий уже еле встаёт, не спит ночами, говорит странные вещи, а давление скачет так, что страшно оставлять одного. Чтобы не доводить до этого, важно знать признаки, при которых капельница от запоя в Долгопрудном — не «желательно», а по-настоящему необходима.
Подробнее – kapelnica-ot-zapoya-v-dolgoprudnom
techsphere – Overall, professional vibe here; trustworthy, polished, and pleasantly minimal throughout.
Клиника нужна и тем, кто уже пробовал лечиться самостоятельно: пил лекарства «от тяги», ходил к психологу без медицинской поддержки, обещал себе не пить, но каждый стресс или конфликт всё равно приводили к старому сценарию. В такой ситуации комплексный подход — медицинский и психологический — даёт куда больше шансов, чем очередное одиночное обещание «в этот раз точно получится».
Получить больше информации – https://narkologicheskaya-klinika-himki11.ru/lechenie-v-narkologicheskoj-klinike-v-himkah
Многие тянут до последнего, считая, что к наркологу обращаются только в самых крайних случаях. На деле показаний для консультации гораздо больше, и они часто появляются задолго до того, как человек впервые оказывается в запое или не выходит из состояния опьянения несколько дней подряд.
Углубиться в тему – http://narkologicheskaya-klinika-voskresensk11.ru/chastnaya-narkologicheskaya-klinika-v-voskresenske/
Выбор наркологической клиники — ключевой шаг на пути к выздоровлению, от которого зависит не только физическое и психическое состояние пациента, но и устойчивость достигнутых результатов. Современные учреждения предлагают широкий спектр услуг, однако уровень подготовки персонала, методики лечения и условия пребывания могут существенно отличаться.
Получить дополнительные сведения – наркологическая клиника первоуральск
После детоксикации важна реабилитация, включающая психологическую помощь. Используются различные виды психотерапии, в том числе когнитивно-поведенческая терапия и мотивационное интервьюирование. Это помогает пациентам не только избавиться от зависимости, но и адаптироваться к жизни вне клиники. Подробнее о методах психотерапии можно узнать на ресурсе психологической помощи.
Изучить вопрос глубже – наркологическая клиника цены каменск-уральский
Сочетание медицинских и психотерапевтических мер создаёт устойчивую систему поддержки. Пациенты получают возможность постепенно восстановить утраченное здоровье и психологическую стабильность.
Ознакомиться с деталями – наркологическая клиника в казани
Для успешной адаптации пациента в обществе клиника организует поддержку родственников и последующее наблюдение. Это снижает риск рецидива и помогает сохранить достигнутые результаты.
Получить дополнительные сведения – наркологическая клиника нарколог в мурманске
Мы не используем универсальные «сильные капельницы». Эффективность даёт точное совпадение с задачей. Ниже — логика выбора профилей и маркеры, на которые мы ориентируемся при контроле эффективности и безопасности.
Узнать больше – вывод из запоя в стационаре
cyberstack – Appreciate the typography choices; comfortable spacing improved my reading experience.
nanotechhub – Overall, professional vibe here; trustworthy, polished, and pleasantly minimal throughout.
Первое, на что стоит обратить внимание — это профессиональный уровень сотрудников. Без квалифицированных наркологов, клинических психологов и психиатров реабилитационный процесс становится формальным и неэффективным.
Получить больше информации – наркологическая клиника вывод из запоя в нижнем тагиле
https://www.clickasnap.com/profile/1xbetbestcode2
в течении суток обычно (24 часа не 12)… купить Кокаин, Бошки, Марихуану, Мефедрон До сих пор в себя прихожувчера трек получил:good: надеюсь всё будет ровно.
Наркологическая клиника в Хабаровске рассматривается как специализированное медицинское учреждение, обеспечивающее комплексную помощь пациентам с алкогольной и наркотической зависимостью. Работа клиники «Северный Путь» строится на принципах доказательной медицины, конфиденциальности и поэтапного восстановления. Лечение ориентировано не только на купирование острых состояний, но и на стабилизацию соматического и психоэмоционального статуса пациента.
Исследовать вопрос подробнее – наркологическая клиника клиника помощь хабаровск
Незамедлительно после вызова нарколог прибывает на дом для проведения подробного первичного осмотра. Врач измеряет жизненно важные показатели, собирает анамнез и определяет степень интоксикации, что является основой для составления персонализированного плана лечения.
Изучить вопрос глубже – вывод из запоя дешево в екатеринбурге
Реабилитация проходит в комфортных условиях, с постоянным наблюдением специалистов. Важным элементом является формирование новых привычек и социальных навыков, что способствует возвращению пациента к полноценной жизни.
Подробнее – http://narkologicheskaya-clinika-v-nizhnem-novgorode16.ru/chastnaya-narkologicheskaya-klinika-nizhnij-novgorod/
Под контролем специалистов проводится выведение токсинов из организма. Используются капельницы с растворами, препараты для поддержки сердца, печени и снятия психоэмоционального напряжения. Лечение алкоголизма в Воронеже — помощь на всех стадиях зависимости предполагает безопасный и контролируемый процесс детоксикации с минимизацией рисков осложнений.
Получить больше информации – лечение женского алкоголизма воронеж
Незамедлительно после вызова нарколог прибывает на дом для проведения подробного первичного осмотра. Врач измеряет жизненно важные показатели, собирает анамнез и определяет степень интоксикации, что является основой для составления персонализированного плана лечения.
Узнать больше – вывод из запоя недорого в екатеринбурге
Вызов нарколога возможен круглосуточно, что обеспечивает оперативное реагирование на критические ситуации. Пациенты и их родственники могут получить помощь в любое время, не дожидаясь ухудшения состояния.
Исследовать вопрос подробнее – http://narkolog-na-dom-kamensk-uralskij11.ru
Основная цель — быстрое и безопасное выведение этанола и его токсических метаболитов из организма, восстановление водно-электролитного и кислотно-щелочного баланса, нормализация артериального давления, работы сердца, почек и головного мозга. Для этого применяется инфузионная терапия, фармакологическая коррекция, витаминотерапия и, при необходимости, седативная поддержка.
Подробнее – vyvod-iz-zapoya rjazan’
Капельница рекомендована при следующих состояниях:
Подробнее – https://kapelnicza-ot-zapoya-v-murmanske12.ru/postavit-kapelniczu-ot-zapoya-v-murmanske
spark casino зеркало Spark Casino: ставки на политику.
В Воскресенске вывод из запоя может проводиться в разных форматах — с выездом на дом, в условиях стационара, в срочном режиме или с последующим амбулаторным наблюдением. Правильный выбор зависит от тяжести состояния, возраста пациента, наличия хронических заболеваний и того, насколько сильно запой нарушил привычную жизнь.
Подробнее тут – http://vyvod-iz-zapoya-voskresensk11.ru/vyvod-iz-zapoya-na-domu-v-voskresenske/
В Санкт-Петербурге для адресных обращений дежурят мобильные бригады круглосуточно. Координатор при звонке уточняет хронические заболевания, аллергии, текущие лекарства и эпизоды судорог/психозов, а также бытовые условия: есть ли доступ к розетке, можно ли обеспечить 2–3 часа тишины, удобна ли зона полулёжа. Эта информация позволяет врачу в дороге выбрать стартовую скорость инфузии, продумать последовательность введения и подготовить расходные материалы под планировку квартиры. Мы соблюдаем приватность: нейтральная экипировка, деликатные формулировки в документах и один доверенный контакт со стороны семьи.
Получить дополнительную информацию – врач вывод из запоя санкт-петербург
Специалисты клиники контролируют состояние пациентов 24/7: фиксируют динамику показателей, корректируют дозы препаратов и обеспечивают безопасность на всех этапах лечения. Такой формат позволяет избежать осложнений, связанных с самостоятельным выходом из запоя или несанкционированным приёмом медикаментов. Врачи клиники помогают пациентам пройти через этапы очищения, стабилизации и восстановления организма максимально комфортно.
Углубиться в тему – частная наркологическая клиника хабаровск
keyvaulty – Color palette felt calming, nothing distracting, just focused, thoughtful design.
На сайте Минздрава указаны общие клинические рекомендации по выведению из запоя, включая допустимые дозировки и протоколы лечения.
Разобраться лучше – вывод из запоя рязанская область
Услуга вызова нарколога на дом в Екатеринбурге представляет собой комплекс мер, направленных на оперативное стабилизирование состояния пациента. При поступлении вызова специалист проводит детальный осмотр, сбор анамнеза и диагностику состояния, после чего разрабатывается индивидуальный план лечения. Методика включает медикаментозную детоксикацию, коррекцию обменных процессов и психологическую поддержку, что обеспечивает комплексное восстановление здоровья без необходимости посещения стационара.
Получить больше информации – вывод из запоя клиника
В Воскресенске вывод из запоя может проводиться в разных форматах — с выездом на дом, в условиях стационара, в срочном режиме или с последующим амбулаторным наблюдением. Правильный выбор зависит от тяжести состояния, возраста пациента, наличия хронических заболеваний и того, насколько сильно запой нарушил привычную жизнь.
Подробнее – http://vyvod-iz-zapoya-voskresensk11.ru
Как активировать Windows 11 без ключа? У нас есть пошаговая инструкция!
Подробнее – Где взять лицензионный ключ для Windows 11
Клинические протоколы стационарной терапии рекомендуют госпитализацию при средней и тяжёлой степени интоксикации.
Узнать больше – срочный вывод из запоя в рязани
В Воскресенске вывод из запоя может проводиться в разных форматах — с выездом на дом, в условиях стационара, в срочном режиме или с последующим амбулаторным наблюдением. Правильный выбор зависит от тяжести состояния, возраста пациента, наличия хронических заболеваний и того, насколько сильно запой нарушил привычную жизнь.
Углубиться в тему – вывод из запоя советский
спасибо за пожелания https://concept-d.ru Спасибо хотя бы на том, что вообще что-то прислали…Верно. Но это уже другой критерий – грамотное описание
Одним из ключевых направлений является проведение капельниц, призванных вывести токсины из организма и нормализовать водно-электролитный баланс. Используемые препараты и состав растворов подбираются индивидуально, исходя из клинической картины и истории болезни пациента.
Выяснить больше – narkolog-na-dom-kruglosutochno jaroslavl’
В клинике работают врачи-наркологи, психиатры, терапевты, психологи, реабилитологи. Вместо «универсальной» схемы каждому пациенту подбирают индивидуальный план, учитывая возраст, стаж употребления, состояние внутренних органов, психоэмоциональный фон, семейную ситуацию. Это особенно важно для жителей Долгопрудного, где многие совмещают работу в Москве с плотным графиком, и любая ошибка в лечении может дорого обойтись — потерей работоспособности, срывом деловых или личных планов.
Детальнее – medikamentoznoe-kodirovanie-ot-alkogolizma
clicktechy – Navigation felt smooth, found everything quickly without any confusing steps.
Для эффективного вывода из запоя в Мурманске используются современные методы детоксикации, включающие внутривенное введение растворов, направленных на восстановление водно-солевого баланса, коррекцию электролитов и нормализацию работы почек и печени. Важным этапом является использование витаминных комплексов и препаратов, поддерживающих работу сердца и сосудов.
Выяснить больше – вывод из запоя цена мурманская область
Специалисты клиники контролируют состояние пациентов 24/7: фиксируют динамику показателей, корректируют дозы препаратов и обеспечивают безопасность на всех этапах лечения. Такой формат позволяет избежать осложнений, связанных с самостоятельным выходом из запоя или несанкционированным приёмом медикаментов. Врачи клиники помогают пациентам пройти через этапы очищения, стабилизации и восстановления организма максимально комфортно.
Получить дополнительные сведения – наркологическая клиника наркологический центр
Для самого пациента это шанс получить медицинское вмешательство без дополнительного стресс-фактора в виде транспорта, очередей и «больничной атмосферы». Он остаётся в привычной обстановке, в своей квартире, с теми же предметами, к которым привык, и это снижает сопротивление. Вместо жесткого сценария «либо немедленно в стационар, либо ничего» появляется промежуточный, более мягкий вариант: врачи приезжают домой, снимают остроту состояния, подбирают схему капельницы и медикаментов, объясняют, что делать дальше. Нередко именно после такого первого опыта человек впервые всерьёз задумывается о полноценном лечении, потому что ощущает реальную разницу в самочувствии до и после профессиональной помощи, а не просто очередной «опохмел».
Детальнее – http://narkolog-na-dom-himki11.ru
Публикация приглашает вас исследовать неизведанное — от древних тайн до современных достижений науки. Вы узнаете, как случайные находки превращались в революции, а смелые мысли — в новые эры человеческого прогресса.
Интересует подробная информация – https://tengroup.com.vn/?p=1653&lang=en
Основной этап в лечении — детоксикация организма от токсичных веществ, вызывающих интоксикацию. В клинике применяют современные методы капельниц и медикаментозной поддержки, включая препараты для снятия абстинентного синдрома.
Получить дополнительную информацию – http://narkologicheskaya-klinika-v-murmanske12.ru
В этом обзорном материале представлены увлекательные детали, которые находят отражение в различных аспектах жизни. Мы исследуем непонятные и интересные моменты, позволяя читателю увидеть картину целиком. Погрузитесь в мир знаний и удивительных открытий!
Обратитесь за информацией – https://womanjour.ru/partnery
Специалисты клиники контролируют состояние пациентов 24/7: фиксируют динамику показателей, корректируют дозы препаратов и обеспечивают безопасность на всех этапах лечения. Такой формат позволяет избежать осложнений, связанных с самостоятельным выходом из запоя или несанкционированным приёмом медикаментов. Врачи клиники помогают пациентам пройти через этапы очищения, стабилизации и восстановления организма максимально комфортно.
Получить больше информации – http://narkologicheskaya-klinika-v-khabarovske0.ru/
Процедура капельного введения лекарственных растворов проводится в условиях клиники с соблюдением всех санитарных норм. Пациенту устанавливается капельница, через которую вводятся препараты под контролем медперсонала. В зависимости от состояния пациента и тяжести запоя длительность капельной терапии может варьироваться от 1 до 6 часов.
Детальнее – kapelnicza-ot-zapoya-czena murmansk
bytetap – Overall, professional vibe here; trustworthy, polished, and pleasantly minimal throughout.
Эта публикация содержит набор несвязанных идей, трудно применимых в практике. Мы лишь поверхностно затрагиваем различные точки зрения, не проводя глубокий анализ и не предлагая выводов.
Подробнее читать – сиалис онлайн
Состояния при зависимостях чувствительны к времени суток и среде. К ночи нарастает тревога, усиливается тремор, нестабильны показатели ЧСС/АД. Круглосуточный приём позволяет выстроить «мост» через самые сложные часы: собрать сон без избыточной фармаконагрузки, сделать короткие чек-ины, вовремя ретитровать один параметр (свет, дыхательные ритмы, интервалы питья), а утром оформить «малые победы» — гигиена и 10–15 минут тихой ходьбы. Эти простые маркеры часто надёжнее любых субъективных оценок «как себя чувствую».
Детальнее – https://narkologicheskaya-clinika-v-rostove-na-donu16.ru/narkologiya-rostov-zapadnyj-rajon
Основной этап в лечении — детоксикация организма от токсичных веществ, вызывающих интоксикацию. В клинике применяют современные методы капельниц и медикаментозной поддержки, включая препараты для снятия абстинентного синдрома.
Получить дополнительные сведения – частная наркологическая клиника мурманск
quickbyte – Navigation felt smooth, found everything quickly without any confusing steps.
Основной этап в лечении — детоксикация организма от токсичных веществ, вызывающих интоксикацию. В клинике применяют современные методы капельниц и медикаментозной поддержки, включая препараты для снятия абстинентного синдрома.
Изучить вопрос глубже – http://
Особенно важно на этапе поступления пройти полную психодиагностику и получить адаптированную под конкретного пациента программу. Это позволит учитывать возможные сопутствующие расстройства, включая тревожные, аффективные и когнитивные нарушения.
Подробнее – наркологические клиники алкоголизм
techvertex – Navigation felt smooth, found everything quickly without any confusing steps.
Клинические протоколы стационарной терапии рекомендуют госпитализацию при средней и тяжёлой степени интоксикации.
Узнать больше – http://vyvod-iz-zapoya-v-ryazani12.ru
через в/в непробывал такое не люблю, купить Кокаин, Бошки, Марихуану, Мефедрон Заявление про кидал не требует обоснования, ибо это не заявление. Перечитайте внимательно. Считаю, что такие речи тоже стоит оставлять при себе, не прочитав толком.Хочу выразить свою благодарность за представленную пробу!
Когда родственники видят, что в их случае совпадает сразу несколько этих пунктов, выезд нарколога на дом часто становится тем самым реалистичным и своевременным решением, которое позволяет не довести дело до экстренной госпитализации уже в критическом состоянии. После такого вмешательства появляются часы и дни, когда можно спокойно обсудить дальнейшие шаги, а не действовать на фоне паники и полного истощения.
Ознакомиться с деталями – выезд нарколога на дом
Для самого пациента это шанс получить медицинское вмешательство без дополнительного стресс-фактора в виде транспорта, очередей и «больничной атмосферы». Он остаётся в привычной обстановке, в своей квартире, с теми же предметами, к которым привык, и это снижает сопротивление. Вместо жесткого сценария «либо немедленно в стационар, либо ничего» появляется промежуточный, более мягкий вариант: врачи приезжают домой, снимают остроту состояния, подбирают схему капельницы и медикаментов, объясняют, что делать дальше. Нередко именно после такого первого опыта человек впервые всерьёз задумывается о полноценном лечении, потому что ощущает реальную разницу в самочувствии до и после профессиональной помощи, а не просто очередной «опохмел».
Получить дополнительные сведения – https://narkolog-na-dom-himki11.ru/narkolog-na-dom-srochno-v-himkah
В Воскресенске вывод из запоя может проводиться в разных форматах — с выездом на дом, в условиях стационара, в срочном режиме или с последующим амбулаторным наблюдением. Правильный выбор зависит от тяжести состояния, возраста пациента, наличия хронических заболеваний и того, насколько сильно запой нарушил привычную жизнь.
Получить дополнительную информацию – вывод из запоя советский
Первое, на что стоит обратить внимание — это профессиональный уровень сотрудников. Без квалифицированных наркологов, клинических психологов и психиатров реабилитационный процесс становится формальным и неэффективным.
Подробнее тут – лечение в наркологической клинике
Эта статья погружает вас в увлекательный мир знаний, где каждый факт становится открытием. Мы расскажем о ключевых исторических поворотных моментах и научных прорывах, которые изменили ход цивилизации. Поймите, как прошлое формирует настоящее и как его уроки могут помочь нам строить будущее.
Кликни и узнай всё! – https://marinaranda.com/poema-joven-campesina-con-sombrero-de-paja-amarillo
Как подчёркивает заведующая отделением клинической психологии ФГБУН «НМИЦ психиатрии и наркологии» Минздрава России, наличие в команде специалистов с опытом работы в области зависимости — это основа качественной помощи.
Разобраться лучше – вывод наркологическая клиника
Эта обзорная заметка содержит ключевые моменты и факты по актуальным вопросам. Она поможет читателям быстро ориентироваться в теме и узнать о самых важных аспектах сегодня. Получите краткий курс по современной информации и оставайтесь в курсе событий!
Детальнее – https://vivod-iz-zapoya-2.ru/
За счёт сочетания этих составляющих лечение перестаёт быть набором отдельных процедур. Пациент и его близкие видят, что каждый шаг логично вытекает из предыдущего и ведёт к общей цели — устойчивой трезвости и постепенному восстановлению качества жизни.
Подробнее тут – narkologicheskaya-klinika-otzyvy
Эта познавательная публикация погружает вас в море интересного контента, который быстро захватит ваше внимание. Мы рассмотрим важные аспекты темы и предоставим вам уникальные Insights и полезные сведения для дальнейшего изучения.
Слушай внимательно — тут важно – https://hook.ng/how-much-is-500-razer-gold-gift-card-to-naira-today-2024
pixelengine – Pages loaded fast, images appeared sharp, and formatting stayed consistent.
магазин уже давно в тренде уже сколько лет https://mebconf.ru Какие обещания? если выходной, скорей всего СПРС в базу не завело твой трек, жди понедельника…В предыдущих сообщен писал, что заказ по совместке от ЧМ,
Этот информационный материал собраны данные, которые помогут лучше понять текущие тенденции и процессы в различных сферах жизни. Мы предоставляем четкий анализ, графики и примеры, чтобы информация была не только понятной, но и практичной для принятия решений.
Получить дополнительную информацию – https://builaert.be/waar-en-hoe-pellets-opslaan
К основным направлениям помощи, как правило, относятся:
Получить дополнительные сведения – https://narkologicheskaya-klinika-chekhov11.ru/
Эта статья для ознакомления предлагает читателям общее представление об актуальной теме. Мы стремимся представить ключевые факты и идеи, которые помогут читателям получить представление о предмете и решить, стоит ли углубляться в изучение.
Всё, что нужно знать – https://latribumerengue.com/acuerdo-cerrado-vinicius-bellingham-por-florentino
Обращение в местную клинику даёт важное преимущество — доступность. Здесь можно пройти диагностику, детоксикацию, вывод из запоя, курс лечения и реабилитации в привычном городе, без выснаживающих переездов. Пациенту легче решиться на стационар, когда он понимает, что близкие рядом и в любой момент могут приехать, поучаствовать в обсуждении плана терапии, привезти необходимые вещи. При этом подход остаётся профессиональным: учитываются стаж зависимости, сопутствующие заболевания, психоэмоциональное состояние, семейная ситуация. Лечение строится не вокруг одной «волшебной» процедуры, а как последовательный маршрут — от первой консультации до выхода в стабильную ремиссию.
Получить больше информации – бесплатные наркологические клиники
Публикация предлагает читателю не просто информацию, а инструменты для анализа и саморазвития. Мы стимулируем критическое мышление, предлагая различные точки зрения и призывая к самостоятельному поиску решений.
Раскрыть тему полностью – https://downloads.candulor.com/hello-world-2
Эта информационная заметка содержит увлекательные сведения, которые могут вас удивить! Мы собрали интересные факты, которые сделают вашу жизнь ярче и полнее. Узнайте нечто новое о привычных аспектах повседневности и откройте для себя удивительный мир информации.
Тыкай сюда — узнаешь много интересного – https://tattoosbyrc.com/best-pros-in-town
Получил трек 4 февраля, трек не бьется на сайте по сей день… купить Кокаин, Бошки, Марихуану, Мефедрон Я тебе уже в джаббере обьяснил как употреблять надо, а ты двоим .м дал, они вьебали все залпом и нихера не поняли, ты уже кипишь наводить начал. Эта СК не тот бутор к которому все привыкли, от которой слюни текут и на люди показываться нельзя. Её надо употреблять с минимальной дозой а не 0.3г в один заход. Доза 0.05-0.09гздравствуйте. магазин работает?
Этот текст призван помочь читателю расширить кругозор и получить практические знания. Мы используем простой язык, наглядные примеры и структурированное изложение, чтобы сделать обучение максимально эффективным и увлекательным.
Получить исчерпывающие сведения – https://corporate-africa.com/cybersecurity
приложение monro casino https://azastroteam.ru
bs2best at bs
Доброга времени суток, закладки в москве делаете? https://family-diary.ru Магазин кидает. Буду писать пока не дадут адрес в ПМ. Прошу там же помочь админов.Вы очень давно работаете,стабильная деятельность.
Риэлторская компания Arust предоставляет полный спектр услуг по поиску и ведению операций с недвижимостью в Ставрополье. Специалисты компании проводят юридическую проверку объектов, готовят документацию, контролируют процесс купли-продажи и гарантируют безопасность транзакций. Ищете недвижимость снять? Актуальные предложения представлены на ar26.ru с детальными характеристиками. Коллектив специалистов ведет дела с первичным и вторичным жильем, информирует о семейных и субсидированных кредитах, освещает изменения в жилищном праве и отстаивает права заказчиков в течение всего цикла.
Типография «повсюду» предлагает полный спектр полиграфических услуг в москве — от визиток и листовок до сувенирной продукции и наружной рекламы. Современное оборудование позволяет выполнять заказы любой сложности в кратчайшие сроки с гарантией качества. Ищете подарки на 8 марта корпоративные? Заказать печать можно на сайте povsyoudo.ru, где представлен полный каталог услуг с расчетом стоимости. Типография принимает персональные макеты, оказывает дизайнерские услуги и организует доставку по столице и подмосковью.
Когда проблема зависимости достигает критического уровня, оперативное вмешательство становится необходимостью. В Екатеринбурге профессиональные наркологи готовы выехать на дом круглосуточно, чтобы начать лечение зависимости немедленно. Такой формат оказания помощи позволяет пациенту получить качественную терапию в знакомой и уютной обстановке, что значительно снижает уровень стресса и способствует быстрому восстановлению.
Получить дополнительную информацию – скорая вывод из запоя екатеринбург
monro casino вход monro casino online
Мы собрали для вас самые захватывающие факты из мира науки и истории. От малознакомых деталей до грандиозных событий — эта статья расширит ваш кругозор и подарит новое понимание того, как устроен наш мир.
Открой скрытое – http://mail.pa-pagaralam.go.id/index.php/component/k2/item/6-you-only-live-once-live-well?iccaldate=2023-1-1&start=1900
На нашем сайте вы можете скачать активатор для Windows 11 абсолютно бесплатно и навсегда забыть о водяных знаках!
Подробнее – Как активировать Windows 11 без ключа
вывод из запоя дома в ростове vyvod-iz-zapoya-v-rostove-3.ru .
накрутка подписчиков в Телеграм
bs bs2web at
Давно работаю с чемиком. купить Кокаин, Бошки, Марихуану, Мефедрон Удачи. магазин))) Прайс соответствует реальности?тоже самое взял ам в данном магазе чтоб не было сплетен тож отпишу за качество думаю мнение от 2 разных людей будет достаточно что бы не было вопросов :speak:
Публикация предоставляет читателю набор разрозненных идей, которые сложно применить на практике. Мы лишь слегка касаемся разных точек зрения, не углубляясь в анализ и не предлагая никаких выводов.
Вот – интим услуги
При таких проявлениях самостоятельное вмешательство не рекомендуется, так как это может привести к ухудшению состояния. Своевременное обращение к врачу позволит предотвратить тяжелые осложнения и эффективно стабилизировать состояние больного.
Выяснить больше – https://narcolog-na-dom-novosibirsk0.ru/
Сервис доставки питьевой воды работает для жителей Махачкалы и Каспийска с удобным мобильным приложением. В ассортименте представлены бутыли различного объема, кулеры, соки и консервация от проверенных производителей. Заказать воду можно на сайте https://voda-s-gor.ru/ или через приложение для смартфонов в любое удобное время. Быстрая доставка на дом и в офис, гибкая система скидок и качественный сервис делают сотрудничество максимально комфортным.
Когда запой превращается в острую угрозу здоровью, оперативное вмешательство становится необходимым условием для спасения жизни и предотвращения серьезных осложнений. В Уфе наркологи выезжают на дом для оказания качественной помощи при запое, предлагая детоксикацию, корректировку обменных процессов и психологическую поддержку. Такой формат лечения обеспечивает комфортную обстановку, индивидуальный подход и полную конфиденциальность для каждого пациента.
Углубиться в тему – нарколог на дом анонимно в уфе
В данном тексте собраны разнообразные случайные сведения и не вполне определённые идеи, которые могут вызвать интерес. Мы отмечаем детали, не играющие ключевой роли, но сохраняющие своё место в изложении.
Подробнее читать – диета для похудения быстро
Главное в детоксе — последовательность. Сначала формулируется клиническая гипотеза (например, обезвоживание+вегетативная гиперактивация), затем подбирается минимальный набор вмешательств, который способен изменить ключевые маркеры в ближайшие 40–120 минут. Только при недостаточном ответе добавляется следующий модуль. Ниже — иллюстративная матрица, которая показывает, как принимаются решения в первые часы. Она не заменяет очную оценку, но помогает семье понимать логику действий и причины возможной эскалации.
Получить больше информации – капельница от запоя на дому
где-то 15 мл брал. купить Кокаин, Бошки, Марихуану, Мефедрон у нас сейчас 6-apb нет в России…Брат, ответь в личке, жду уже 3 дня
Телеграм-канал предлагает актуальную информацию об учебных курсах, тренингах и обучающих программах для освоения новых специальностей и получения дополнительного дохода. Здесь собраны проверенные образовательные материалы по востребованным направлениям — от онлайн-профессий до практических навыков монетизации знаний. Подписывайтесь на https://t.me/ffgdfggfgdfg/ и получайте доступ к регулярным обзорам курсов и тренингов. Канал помогает выбрать подходящую программу обучения, сэкономить время на поиске качественного контента и начать развиваться в новой сфере уже сегодня.
bs2 marketplace bs
всем привет купить Кокаин, Бошки, Марихуану, Мефедрон Отписываюсь по 1к20.получилось в принципе неплохо,но и супер тоже не назовешь. припирает по кумполу практически сразу. сделано было пару напасов. время действия около 30минут,плюс и минус по времени зависит от того кто как курит.если сравнивать с 203 то кайфец по позитивнее будет.и еще было сделано на спирту.Вообщем щас сохнет 1к15 сделанный на растворителе. протестим отпишем. Смущает только одно-осадок остается.не до конца вообщем растворяется,а так все нормально.Крутой магаз
Анализ рынка услуг экстренной помощи в Тюмени позволяет выделить следующие ориентировочные цены:
Углубиться в тему – скорая вывод из запоя
вывод из запоя на дому в ростове вывод из запоя на дому в ростове .
bs2web at оффициальная ссылка bs2best at
Когда человеку требуется немедленная медицинская помощь при алкогольной интоксикации, промедление может быть опасным. В таких ситуациях вызов нарколога на дом становится оптимальным решением. Клиника «КрасМед Трезвость» в Красноярске организует срочный выезд врача круглосуточно, обеспечивая квалифицированную помощь прямо по месту нахождения пациента. Такой формат позволяет избежать госпитализации, снизить тревожность и начать лечение в привычных домашних условиях, где человек чувствует себя спокойнее и безопаснее.
Подробнее можно узнать тут – http://narcolog-na-dom-krasnoyarsk0.ru
В «ЮжУрал Детокс Центр» инфузионная терапия собирается из модулей. Каждый модуль имеет одну цель, измеримый маркер и стоп-критерий. Мы избегаем одновременного подключения нескольких новых элементов, чтобы не потерять причинно-следственную связь. Ниже — примерная «сетка» компонентов; фактическая схема подбирается индивидуально, только по показаниям.
Ознакомиться с деталями – http://www.domen.ru
kraken marketplace slon3 at
братва подскажите концентрацию и растворитель для ам2233 от данного селера ! Заранее спс купить Кокаин, Бошки, Марихуану, Мефедрон глядишь к новому году договоримся, а там и к 2020 посылка придет…Товар нормальный. В этот понедельник оплатил ещё, жду)
Сервис Займы-рф.рф объединяет заёмщиков с проверенными микрофинансовыми организациями и обеспечивает быстрое получение денег на карту. Система доступна в режиме нон-стоп, обрабатывает заявки за 120 секунд и зачисляет деньги на карту за 15 минут. Полная информация о процентных ставках и условиях представлена на https://xn—-7sbujpz2a7c.xn--p1ai/ в соответствующих разделах каталога. Для оформления требуется только паспорт РФ, суммы займов от 1000 до 100000 рублей на срок от 7 до 365 дней, все условия прозрачны и регулируются действующим законодательством.
сигнализация на авто Мы стремимся к тому, чтобы установка автосигнализации с автозапуском цена была прозрачной и понятной, а конечный результат превосходил ожидания, обеспечивая максимальный уровень защиты для вашего автомобиля.
Профессиональное оборудование для систем безопасности теперь доступно каждому благодаря интернет-магазину видеонаблюдения. Каталог содержит камеры IP-формата, регистрирующее оборудование, домофонные системы, GSM-охрану и широкий выбор компонентов для качественного наблюдения. Полный ассортимент и актуальные цены на https://video-camer.ru/ — магазин работает круглосуточно, обеспечивая оперативную доставку по Москве и всей России. Опытные консультанты предложат идеальный вариант для различных целей — от бытового наблюдения до профессиональной защиты бизнес-помещений.
https://www.cc142.com/component/k2/item/17-donec-pulvinar-nisi-vitae-odio-suscipit
futurestack – Overall, professional vibe here; trustworthy, polished, and pleasantly minimal throughout.
Этот обзор позволяет по-новому взглянуть на вещи, на которые обычно и так смотрят. Мы упоминаем факты, которые мало что меняют, и события, значение которых трудно определить, но они всё равно здесь.
Вот – знакомства для взрослых
kraken market актуальная ссылка krab3 at
logicforge – Appreciate the typography choices; comfortable spacing improved my reading experience.
bytelab – Appreciate the typography choices; comfortable spacing improved my reading experience.
zyrotech – Navigation felt smooth, found everything quickly without any confusing steps.
omegabyte – Overall, professional vibe here; trustworthy, polished, and pleasantly minimal throughout.
ЧТО ЕЩЁ СКАЗАТЬ !!! КРУТО!!! https://gaz3.ru Я не знаю как так получается что одним приходит качество, другим не качественный товар , но я второй раз на этом магазе заказываю и второй раз всё ровно с АМ-2233 полностью доволен. Я бы фото кинул, но чо то не загружается оно.Зашла на ваш сайт, а там “Your site hasn’t been activated yet!”… в общем ничего не выходит. Пробывала и через ТОР и через обычный браузер. Все одно. Что не так делаю?
В Санкт-Петербурге для адресных обращений дежурят мобильные бригады круглосуточно. Координатор при звонке уточняет хронические заболевания, аллергии, текущие лекарства и эпизоды судорог/психозов, а также бытовые условия: есть ли доступ к розетке, можно ли обеспечить 2–3 часа тишины, удобна ли зона полулёжа. Эта информация позволяет врачу в дороге выбрать стартовую скорость инфузии, продумать последовательность введения и подготовить расходные материалы под планировку квартиры. Мы соблюдаем приватность: нейтральная экипировка, деликатные формулировки в документах и один доверенный контакт со стороны семьи.
Подробнее тут – вывод из запоя вызов на дом в санкт-петербурге
kraken slon krab3 at
Поломка автомобиля в дороге или ДТП требуют быстрого решения — эвакуатора, который доставит машину в сервис или к месту стоянки. Служба ВИП Прокат в Кемерово предлагает услуги эвакуации легковых и грузовых автомобилей круглосуточно с минимальным временем подачи. Современные платформы и опытные водители гарантируют безопасную транспортировку без повреждений. Вызвать эвакуатор можно через https://vipprokat42.ru/evakuatory Прозрачные тарифы, отсутствие скрытых доплат и оперативность делают сотрудничество максимально удобным в стрессовой ситуации.
Самый полный каталог саженцев и растений от Мартин-Сад https://www.martin-sad.ru/ это возможность купить по выгодной цене все виды растений и семян. Садовый центр в Москве – Мартин-Сад это крупнейший питомник в России. Также у нас большой каталог товаров для сада и садовая техника. Ознакомьтесь с действующими акциями, чтобы купить еще выгоднее!
Клиническая практика показывает: только системная работа с пациентом даёт устойчивый результат. Программа включает медицинское, психологическое и социальное сопровождение.
Получить дополнительные сведения – принудительное лечение от алкоголизма в воронеже
Реабилитация проходит в комфортных условиях, с постоянным наблюдением специалистов. Важным элементом является формирование новых привычек и социальных навыков, что способствует возвращению пациента к полноценной жизни.
Узнать больше – наркологическая клиника наркологический центр нижний новгород
techdock – Bookmarked this immediately, planning to revisit for updates and inspiration.
bitzone – Bookmarked this immediately, planning to revisit for updates and inspiration.
Сигнализация c автозапуском на Lexus RX Охранная система и сигнализация c автозапуском была установлена на Лексус RX в нашем установочном центре.
Этапность терапии позволяет проводить лечение безопасно, с контролем жизненных показателей и прогнозируемым восстановлением физического состояния. После выхода из запоя пациенту рекомендуется продолжить реабилитацию для предупреждения повторных нарушений.
Подробнее – наркологическая клиника лечение алкоголизма
kraken market актуальная ссылка kra3 at
Компания специализируется на профессиональных услугах высокого качества для развития вашего бизнеса. Команда опытных специалистов предлагает комплексный подход к решению задач любой сложности. Ознакомиться с полным спектром услуг можно на https://waltzprof.com/ где представлена детальная информация о направлениях работы. Индивидуальный подход к каждому клиенту и использование современных технологий обеспечивают результат, превосходящий ожидания. Профессионализм и ответственность делают сотрудничество максимально эффективным.
Мегапакс осуществляет продажу полимерной тары и упаковочных решений для производственных предприятий и торговых компаний с транспортировкой до склада клиента. Номенклатура представлена пластиковыми бочками 48-227 л, канистрами размером 1-31,5 л, кубическими резервуарами 1000 литров и канистрами для горючего с устройствами налива. Ищете канистра пластиковая? Детальную информацию и заказ можно оформить на megapaks.ru с индивидуальным расчетом стоимости. Фирма осуществляет безналичные расчеты с налогом и предлагает новую продукцию наряду с качественными бывшими в эксплуатации емкостями по выгодным тарифам для оптовиков.
Магазин супер) https://dogsofwar.ru Ура! Скинул трек быстро) ждууууууу, отпишу.у меня тоже дроп подлетел с посылкой и брали его ФСБшники почему то , но слава богу до уголовного дела не дошло, и ТС обещал жирную скидку сделать при следуещем заказе как то так (документы о прекращении уголовного дела и экспертиза на руках) дело закрыли по двум причинам то что дроп не при делах а второе самое главное что экспертиза не выявила НС
codehive – Bookmarked this immediately, planning to revisit for updates and inspiration.
Бесплатный ключ для Windows 11 — только у нас, обновлено в 2026 году!
Подробнее – Windows 11 кряк 2026 скачать
AI-музыкальная платформа https://generator-pesen.online/ предлагает автоматическую генерацию треков для творчества любого уровня. Генератор песен ИИ онлайн бесплатно позволяет создать уникальную композицию за минуты — без музыкального образования и сложных программ. Достаточно ввести текст или задать стиль, и нейросеть подберёт мелодию, ритм, аранжировку и даже вокальную подачу. Сервис подходит для саундтреков, соцсетей, подкастов и рекламных роликов. Гибкие настройки жанра, темпа и настроения дают полный контроль над звучанием. Запускайте треки без затрат — современные AI-технологии открывают новый уровень музыкального творчества и делают производство контента доступным каждому.
Этот текст содержит различную информацию, которая, возможно, покажется любопытной, но в целом не меняет восприятия привычных вещей. Предлагаем просто получить удовольствие от чтения, не ожидая особой пользы.
Вот – бинго онлайн
Наркологическая клиника в клинике в Нижнем Новгороде использует многопрофильный подход, направленный на физическое и психологическое восстановление пациентов. После детоксикации проводится стабилизация обменных процессов, нормализация работы внутренних органов и поддержка нервной системы. Особое внимание уделяется коррекции поведения и мотивации пациента к отказу от употребления алкоголя или наркотиков.
Разобраться лучше – https://narkologicheskaya-clinika-v-nizhnem-novgorode16.ru/chastnaya-narkologicheskaya-klinika-nizhnij-novgorod/
Текст включает разнообразную информацию, которая может показаться любопытной, но не меняет устоявшегося восприятия. Предлагаем просто насладиться чтением, не ожидая значительной пользы.
Подробнее читать – таблетки для аборта
Комплексная терапия при выводе из запоя на дому включает в себя два основных направления: медикаментозную детоксикацию и психологическую поддержку. Такой подход позволяет добиться быстрого и устойчивого эффекта, минимизируя риск осложнений и обеспечивая долгосрочную ремиссию.
Ознакомиться с деталями – нарколог на дом анонимно
Алкогольный запой представляет собой тяжелое состояние, вызванное длительным бесконтрольным употреблением спиртных напитков. Без медицинского вмешательства вывести организм из запоя может быть сложно и даже опасно. Срочная помощь нарколога требуется при следующих признаках:
Детальнее – врача капельницу от запоя в нижнем новгороде
tronbyte – Pages loaded fast, images appeared sharp, and formatting stayed consistent.
Врач уточняет, как долго продолжается запой, какие симптомы наблюдаются и присутствуют ли сопутствующие заболевания. Тщательный сбор информации позволяет оперативно подобрать необходимые медикаменты и начать детоксикацию.
Разобраться лучше – капельница от запоя круглосуточно тюмень
Уважаемый ТС,желаю вам успешных больших продаж!:$: мефедрон кокаин гашиш Заказывал 200й, прислали с приятным бонусом! Конспирация- чудесна! В общем все супер!Магазин агонь! Брал как то давно. все ровно!
Запой может быть не только физически тяжёлым, но и психологически разрушительным. Поэтому важно вовремя обратиться за помощью. Вывод из запоя в Нижнем Новгороде — это необходимая медицинская процедура, которая помогает победить алкогольную зависимость и восстановить здоровье. Мы в клинике «АнтиЗависимость» предлагаем круглосуточную помощь в комфортных условиях — на дому или в стационаре.
Выяснить больше – нарколог на дом недорого
Наркологическая клиника в клинике в Казани оказывает квалифицированную помощь людям, столкнувшимся с алкогольной и наркотической зависимостью. Лечение проводится в условиях полной конфиденциальности и медицинской безопасности. Основное направление работы клиники — это восстановление физического, психического и эмоционального состояния пациента, а также формирование устойчивой мотивации к отказу от употребления психоактивных веществ. Все процедуры выполняются с использованием сертифицированных препаратов и современных диагностических технологий, что позволяет добиться устойчивого результата без осложнений.
Углубиться в тему – https://narkologicheskaya-klinika-v-kazani16.ru/narkologicheskaya-klinika-kazan-otzyvy/
Когда запой превращается в острую угрозу здоровью, оперативное вмешательство становится необходимым условием для спасения жизни и предотвращения серьезных осложнений. В Уфе наркологи выезжают на дом для оказания качественной помощи при запое, предлагая детоксикацию, корректировку обменных процессов и психологическую поддержку. Такой формат лечения обеспечивает комфортную обстановку, индивидуальный подход и полную конфиденциальность для каждого пациента.
Исследовать вопрос подробнее – нарколог на дом клиника в уфе
Есть ситуации, когда вызов врача на дом становится не просто желателен, а жизненно необходим. Если зависимый человек не способен самостоятельно прекратить употребление алкоголя или наркотиков, а его самочувствие заметно ухудшается, необходимо незамедлительно обратиться за медицинской помощью. Поводом для вызова нарколога служат следующие опасные симптомы:
Углубиться в тему – вызов нарколога на дом
После первичного осмотра начинается активная фаза детоксикации. Современные препараты вводятся капельничным методом для быстрого снижения уровня токсинов в крови и восстановления обменных процессов. Этот этап критически важен для нормализации работы печени, почек и сердечно-сосудистой системы.
Изучить вопрос глубже – вывод из запоя цена в владимире
futurebyte – Navigation felt smooth, found everything quickly without any confusing steps.
Экстренное вмешательство необходимо, когда самостоятельное прекращение употребления алкоголя или наркотиков становится невозможным, а состояние пациента ухудшается. Основные показания включают:
Разобраться лучше – нарколог на дом недорого уфа
Введение препаратов осуществляется внутривенно, что обеспечивает оперативное действие медикаментов. В состав лечебного раствора входят средства для детоксикации организма, нормализации водно-электролитного и кислотно-щелочного баланса. При необходимости врач дополнительно вводит препараты, защищающие печень, стабилизирующие работу сердца и успокаивающие нервную систему. Вся процедура проводится под строгим контролем нарколога, который следит за состоянием пациента и корректирует терапию при необходимости. По завершении процедуры врач дает пациенту и его родственникам подробные рекомендации по дальнейшему восстановлению и профилактике повторных запоев.
Узнать больше – капельница от запоя круглосуточно
Услуга “капельница от запоя” на дому имеет ряд преимуществ, делающих её оптимальным выбором для экстренной помощи:
Получить больше информации – https://kapelnica-ot-zapoya-tyumen0.ru/postavit-kapelniczu-ot-zapoya-tyumen
Сигнализация c автозапуском на Lexus RX Охранная система и сигнализация c автозапуском была установлена на Лексус RX в нашем установочном центре.
съел примерно 10мг, чувствуется легкое расслабление и успокоение, каких то явных или ярких эффектов не наблюдается.. мефедрон кокаин гашиш Я тебе не хамил. Да 10г, смешно не смешно, а на дороге не валяются. И очень обидно когда от вашего ПМа получаешь подтвердение, веришь! и остаешься с разочарованием и обидой, бессилием что либо доказать. А тебе еще сверху льют хамство, упивайтесь на здоровье. Я утерся и теперь знаю на что способны даже нормальные, доверенные магазины. А это тоже опыт, за который я заплатил, и ничуть не жалею. Просто пусть народ знает и будет готов при работе без гаранта ТУТ ожидайте что такое может быть.такая же хрень пропал продаван ((( уже неделю обещает выслать трек дать и нет не чего *((((
Этот список — памятка на холодильник. Он не раскрывает диагноз, но точно описывает поводы для связи с дежурным врачом. Своевременная эскалация — часть безопасности, а не «подстраховка». Если сомневаетесь — лучше позвонить.
Изучить вопрос глубже – капельница от запоя недорого челябинск
Процедура вывода из запоя начинается с тщательной диагностики состояния пациента, чтобы определить, какие методы лечения будут наиболее эффективными. Мы применяем индивидуальный подход и комбинируем медикаментозное лечение с психотерапевтической поддержкой, что даёт лучший результат.
Исследовать вопрос подробнее – http://narcolog-na-dom-novokuznetsk0.ru/
Незамедлительно после вызова нарколог прибывает на дом для проведения тщательного осмотра. На данном этапе специалист собирает анамнез, измеряет жизненно важные показатели — пульс, артериальное давление, температуру — и оценивает степень интоксикации. Эти данные являются основой для составления индивидуального плана лечения.
Углубиться в тему – вывод из запоя капельница владимир
Услуга вызова нарколога на дом в Уфе разработана для оперативного вывода из запоя без необходимости госпитализации. Это особенно актуально для тех, кто столкнулся с алкогольной интоксикацией в условиях, когда каждая минута имеет значение. Своевременная помощь позволяет не только устранить негативное воздействие алкоголя на организм, но и предотвратить возможные осложнения, такие как нарушения работы сердца, печени и почек.
Подробнее – http://
Капельницы являются основным методом детоксикации. Их состав подбирается индивидуально с учётом степени интоксикации, наличия хронических заболеваний и общего состояния пациента. В таблице ниже представлены наиболее часто применяемые типы инфузий, используемые в клинике «ВладМед Трезвость».
Изучить вопрос глубже – вывод из запоя недорого владимир
В первые два часа после прибытия бригады важно не «сделать побольше», а принять наименьшее количество решений, которое реально меняет картину. Команда фиксирует базовую линию (ЧСС, АД, SpO?, температура, шкала тошноты/тремора), даёт антиеметический мост и запускает регидратацию. При тахикардии — добавляет антивегетативный контур. Семья получает сценарий ночи: когда приглушить свет, когда предложить воду, какие цифры на тонометре считать нормой и при каких — звонить. Такой протокол экономит время и силы, а главное — превращает вечер из хаотичного в управляемый, снижая риск ночных экстренных вызовов и «эмоциональных качелей».
Разобраться лучше – капельница от запоя цена в челябинске
Пациенты, которые обращаются в нашу клинику, получают целый комплекс преимуществ, благодаря которым лечение проходит максимально эффективно и комфортно:
Узнать больше – https://narcolog-na-dom-novosibirsk0.ru/narkolog-na-dom-czena-novosibirsk/
Международный институт современного образования проводит дистанционную переподготовку и повышение квалификации специалистов с выдачей документов государственного образца и регистрацией в системе ФРДО. Организация действует на основании лицензии Минобразования Ставрополья с 2017 г. и ведет курсы по противопожарной защите, системе HACCP, экологической безопасности и АТЗ. Ищете повышение квалификации? Полный перечень курсов размещен на misokmv.ru с указанием стоимости и сроков. Институт обеспечивает гибкие форматы обучения через платформу INDIGO, разрабатывает корпоративные программы под задачи организаций и принимает слушателей из всех регионов России.
Анализ рынка услуг экстренной помощи в Тюмени позволяет выделить следующие ориентировочные цены:
Подробнее можно узнать тут – вывод из запоя недорого
спасибо за пожелания мефедрон кокаин гашиш было много… но скрутят даже за один! им главное работа,а не обьем! тем более 1гр – это уже особо крупный размер!ну вроде с этой партии был чистый. А там 100мг – уже лютый трип.. А учитывая по скольку 5-ИАИ обычно юзают… Не завидую я парням. Магазину дам пинка за косяки, как свяжусь
Публикация предлагает читателю не просто информацию, а инструменты для анализа и саморазвития. Мы стимулируем критическое мышление, предлагая различные точки зрения и призывая к самостоятельному поиску решений.
Получить дополнительную информацию – https://fithealthhq.com/protein-requirement-per-day-for-vegetarians-and-fitness-lovers
Этот текст призван помочь читателю расширить кругозор и получить практические знания. Мы используем простой язык, наглядные примеры и структурированное изложение, чтобы сделать обучение максимально эффективным и увлекательным.
Углубить понимание вопроса – https://mulagoschoolofnursing.ac.ug/2024/11/15/dec-2024-unmeb-exams
Услуга вызова нарколога на дом востребована благодаря оперативности и конфиденциальности. Медицинская бригада прибывает на адрес в течение часа после обращения, оснащена всем необходимым оборудованием и медикаментами. Врач проводит осмотр, измеряет давление, пульс, уровень кислорода в крови и определяет степень интоксикации. После этого назначается капельница для детоксикации, снижения нагрузки на печень и восстановления водно-солевого баланса. Все процедуры проходят под контролем специалиста, а состояние пациента фиксируется в медицинской карте.
Изучить вопрос глубже – вызвать нарколога на дом в красноярске
Агентство Viva Spain предоставляет полный спектр юридических услуг гражданам России и Беларуси для оформления испанского ВНЖ через разные программы — визу без права на работу, студенческое разрешение, резидентство для бизнесменов и инвесторов. Специалисты берут на себя подготовку и перевод документов, получение NIE, нотариальное заверение с апостилем и сопровождение в консульстве на всех этапах до получения карты резидента. Ищете стартап виза испания? Подробную информацию об услугах, процессе оформления и стоимости можно узнать на vivaspain.ru, где доступна форма записи на консультацию. За время деятельности агентство результативно содействовало свыше 500 семействам в релокации на испанскую территорию.
Вывод из запоя — это не просто медицинская процедура, а целый комплекс мероприятий, направленных на очищение организма, восстановление обмена веществ и стабилизацию нервной системы. Когда человек находится в состоянии длительного употребления алкоголя, в крови накапливаются токсины, нарушается работа сердца, печени, почек и мозга. Без профессиональной помощи выйти из этого состояния безопасно невозможно. Клиника «ВладМед Трезвость» предлагает квалифицированный вывод из запоя во Владимире с использованием современных капельниц и мягких детокс-программ. Врачи работают круглосуточно, оказывая помощь как на дому, так и в комфортных условиях стационара.
Выяснить больше – http://vyvod-iz-zapoya-vladimir0.ru
Этот текст призван помочь читателю расширить кругозор и получить практические знания. Мы используем простой язык, наглядные примеры и структурированное изложение, чтобы сделать обучение максимально эффективным и увлекательным.
Всё самое вкусное внутри – https://www.maplelodge.or.jp/2021%E7%A7%8B%E3%81%AE%E5%AE%BF%E6%B3%8A%E3%83%97%E3%83%A9%E3%83%B3-2
Услуга вызова нарколога на дом в Екатеринбурге представляет собой комплекс мер, направленных на оперативное стабилизирование состояния пациента. При поступлении вызова специалист проводит детальный осмотр, сбор анамнеза и диагностику состояния, после чего разрабатывается индивидуальный план лечения. Методика включает медикаментозную детоксикацию, коррекцию обменных процессов и психологическую поддержку, что обеспечивает комплексное восстановление здоровья без необходимости посещения стационара.
Исследовать вопрос подробнее – вывод из запоя клиника в екатеринбурге
Этот информационный материал подробно освещает проблему наркозависимости, ее причины и последствия. Мы предлагаем информацию о методах лечения, профилактики и поддерживающих программах. Цель статьи — повысить осведомленность и продвигать идеи о необходимости борьбы с зависимостями.
Следуйте по ссылке – https://catalog-777.com/predpriyatie/480136
Эта статья погружает вас в увлекательный мир знаний, где каждый факт становится открытием. Мы расскажем о ключевых исторических поворотных моментах и научных прорывах, которые изменили ход цивилизации. Поймите, как прошлое формирует настоящее и как его уроки могут помочь нам строить будущее.
Изучить эмпирические данные – https://starpeople.jp/event/20190607/5824
Мы собрали для вас самые захватывающие факты из мира науки и истории. От малознакомых деталей до грандиозных событий — эта статья расширит ваш кругозор и подарит новое понимание того, как устроен наш мир.
Полезно знать – http://dreamnetter.s10.xrea.com/sb/index.cgi?eid=718
Этот информационный материал собраны данные, которые помогут лучше понять текущие тенденции и процессы в различных сферах жизни. Мы предоставляем четкий анализ, графики и примеры, чтобы информация была не только понятной, но и практичной для принятия решений.
Лови подробности – https://socojoblink.org/hello-world
День добрый, пишу свой отзыв, вернее назвать его извинением. Опишу ситуацию, не помню когда и не столь это важно, но недавно был сделан заказ, на n-ое количество cmh-400. мефедрон кокаин гашиш Магазу спасибо, что всё решили в короткие сроки.В лс пиши сразу. Имей в виду, быстрее будет
В данной обзорной статье представлены интригующие факты, которые не оставят вас равнодушными. Мы критикуем и анализируем события, которые изменили наше восприятие мира. Узнайте, что стоит за новыми открытиями и как они могут изменить ваше восприятие реальности.
Не упусти шанс – https://www.katechein.ru
В обзорной статье вы найдете собрание важных фактов и аналитики по самым разнообразным темам. Мы рассматриваем как современные исследования, так и исторические контексты, чтобы вы могли получить полное представление о предмете. Погрузитесь в мир знаний и сделайте шаг к пониманию!
Заходи — там интересно – https://blog.anptech.net/force-install-openlitespeed-on-centos-9-and-rocky-linux-9
Капельница от запоя — это не «чудо-микс», а управляемая медицинская процедура с чёткими целями, окном оценки и понятными критериями остановки. В «ЮжУрал Детокс Центр» подход построен по принципу минимально достаточных вмешательств: сначала безопасность (дыхание, сознание, гемодинамика), потом переносимость воды и сбор нормального сна, а уже после — метаболическая поддержка и восстановление бытовой устойчивости. Такая логика исключает полипрагмазию, снижает риск нежелательных реакций и даёт семье прогнозируемую картину на ближайшие 24–72 часа. Мы не обещаем «мгновенного чуда» — мы предлагаем дисциплину маленьких шагов, которая с высокой вероятностью приводит к устойчивому результату.
Детальнее – капельница от запоя вызов
Эта статья для ознакомления предлагает читателям общее представление об актуальной теме. Мы стремимся представить ключевые факты и идеи, которые помогут читателям получить представление о предмете и решить, стоит ли углубляться в изучение.
Что ещё нужно знать? – https://bochio.net/2020/01/09/%E6%9C%AC%E6%A0%BC%E7%9A%84%E3%81%AB%E3%83%96%E3%83%AD%E3%82%B0%E3%82%92%E5%88%9D%E3%82%81%E3%81%A6%E3%81%BF%E3%82%88%E3%81%86
Эта статья предлагает уникальную подборку занимательных фактов и необычных историй, которые вы, возможно, не знали. Мы постараемся вдохновить ваше воображение и разнообразить ваш кругозор, погружая вас в мир, полный интересных открытий. Читайте и открывайте для себя новое!
Более подробно об этом – https://www.danielfilip.cz/2017/11/28/ahoj-vsichni
Наркологическая клиника в клинике в Нижнем Новгороде использует многопрофильный подход, направленный на физическое и психологическое восстановление пациентов. После детоксикации проводится стабилизация обменных процессов, нормализация работы внутренних органов и поддержка нервной системы. Особое внимание уделяется коррекции поведения и мотивации пациента к отказу от употребления алкоголя или наркотиков.
Получить дополнительные сведения – http://narkologicheskaya-clinika-v-nizhnem-novgorode16.ru/
Главное в детоксе — последовательность. Сначала формулируется клиническая гипотеза (например, обезвоживание+вегетативная гиперактивация), затем подбирается минимальный набор вмешательств, который способен изменить ключевые маркеры в ближайшие 40–120 минут. Только при недостаточном ответе добавляется следующий модуль. Ниже — иллюстративная матрица, которая показывает, как принимаются решения в первые часы. Она не заменяет очную оценку, но помогает семье понимать логику действий и причины возможной эскалации.
Подробнее тут – капельница от запоя стоимость
kraken krab оффициальная ссылка slon3 at
Этот список — памятка на холодильник. Он не раскрывает диагноз, но точно описывает поводы для связи с дежурным врачом. Своевременная эскалация — часть безопасности, а не «подстраховка». Если сомневаетесь — лучше позвонить.
Изучить вопрос глубже – http://kapelnicza-ot-zapoya-v-chelyabinske16.ru/kapelniczy-ot-pokhmelya-chelyabinsk/https://kapelnicza-ot-zapoya-v-chelyabinske16.ru
Эта статья сочетает познавательный и занимательный контент, что делает ее идеальной для любителей глубоких исследований. Мы рассмотрим увлекательные аспекты различных тем и предоставим вам новые знания, которые могут оказаться полезными в будущем.
Заходи — там интересно – http://www.k-kasagi.jp/oneword.php?itemid=2109
Хороший магазин,менеджер приятный по общению,недовесов не было у меня мефедрон кокаин гашиш Да мне 5 сообщений для лс нужно :Dа так месяц назад было все ровно)В лс пиши сразу. Имей в виду, быстрее будет
https://ami.im/aktual-konference
https://ami.im/nnoikr
Порча от наркотиков — это сложная проблема, охватывающая физиологическое, психологическое
и общественное состояние
здоровья человека. Утилизация таковских наркотиков, яко кокаин, мефедрон, ямба, «наркотик» чи «бошки»,
может родить к необратимым последствиям яко чтобы организма, яко равным образом для общества в целом.
Но хоть у вырабатывании подчиненности эвентуально восстановление — ядро,
чтоб зависимый явантроп направился за помощью.
Эпохально запоминать, что наркозависимость лечится, и реабилитация дает шанс сверху новейшую жизнь.
В наркологической клинике с пациентом работает команда специалистов: врачи-наркологи, психиатры, терапевты, психологи. Вместо «универсального» решения используется индивидуальный план лечения, который строится с учётом возраста, стажа употребления, сопутствующих заболеваний, психоэмоционального состояния и семейной ситуации. Задача врачей — не просто снять симптомы интоксикации, а помочь человеку выйти из замкнутого круга запоев, срывов и попыток бросить самостоятельно, когда каждый неудачный опыт лишь усиливает чувство вины и безнадёжности.
Получить больше информации – narkologicheskaya-klinika-v-moskve
Sprawdz poradnik analogowa kamera fpv, jesli szukasz najlepszych wskazowek przy wyborze kamery FPV na start.
Nie zapomnij o kompatybilnosci z twoim modelem drona oraz zasilaniem.
kraken krab оффициальная ссылка krab3 at
Фирма МосСтройАльянс реализует весь спектр кровельных и фасадных услуг под ключ с договорными гарантийными обязательствами для зданий различной категории в столице и Подмосковье. Мастера производят установку и восстановление битумной, полимерной, фальцевой кровли, ликвидацию течей, влагозащиту и теплоизоляцию покрытий. Ищете утепление крыши изнутри цена? Подробная информация представлена на mos-stroi-alians.ru с актуальным прайс-листом услуг. Фирма оказывает услуги по облицовке и утеплению фасадных систем, изоляции межпанельных соединений, установке водосточных систем и снегозащитных элементов, плюс круглосуточный доступ к высотным специалистам.
best yacht charter company for private cruises in Ayia Napa
https://oakmontforum.com/members/cole44braun/activity/167594/
kraken slon slon3 at
АМ-2233 вообще ровный день назад пришёл мефедрон кокаин гашиш Брал тут тусишку два раза, отменного качества. Магаз работает быстро и чётко, трек кидают на следующий день, товар приходит через два дня. Респект магазуты в мирку отпиши продавец там
глэмпинг подмосковье на выходные
Наркологическая клиника в клинике в Астрахани предоставляет помощь пациентам, сталкивающимся с различными формами зависимости — алкогольной, наркотической, лекарственной. Основой терапии является комплексный подход, включающий медицинскую детоксикацию, стабилизацию состояния, психотерапию и последующее наблюдение. Такой формат работы позволяет мягко купировать острые симптомы, восстановить физиологические функции и подготовить пациента к длительной реабилитации. Все процедуры проводятся анонимно, с использованием сертифицированных препаратов и с постоянным контролем врача.
Подробнее можно узнать тут – http://narkologicheskaya-klinika-astrakhan18.ru
Перед тем, как выбрать конкретный метод, проводится консультация и осмотр, чтобы исключить противопоказания и спрогнозировать результат.
Углубиться в тему – медикаментозное кодирование от алкоголизма долгопрудный
Указанные элементы задают логическую основу для всего терапевтического процесса, создавая структурированную модель работы с пациентом. При необходимости схема вмешательств дополняется дополнительными мерами, направленными на стабилизацию состояния. Такой формат позволяет поддерживать предсказуемость результата даже в сложных клинических ситуациях.
Подробнее – наркологическая клиника нарколог в пензе
Чтобы лучше ориентироваться, в каких жизненных ситуациях особенно важно не игнорировать проблему, удобно представить их в виде типичных сценариев. Это помогает и самому человеку, и его близким осознать, что происходящее уже вышло за рамки «обычной усталости» или «случайного перебора». Ниже перечислены распространённые случаи, когда обращение в наркологическую клинику особенно актуально:
Разобраться лучше – нарколог бесплатно москва
В рамках лечения используются методы, позволяющие фиксировать изменения и оценивать реакцию организма на проводимые мероприятия. Они служат основой для выборочных корректировок и обеспечивают структурированный характер процесса. Отличительной особенностью становится возможность адаптировать лечебные схемы под индивидуальные особенности пациента. Ниже представлены ключевые направления оценки состояния, применяемые для формирования полной клинической картины.
Детальнее – http://narkologicheskaya-klinika-v-vdk18.ru/
Проблема алкоголизма в Ярославле, как и в других регионах России, остаётся одной из самых актуальных. По данным Минздрава РФ, количество людей, нуждающихся в медицинской помощи из-за злоупотребления спиртным, ежегодно растёт. При этом эффективное лечение возможно лишь при комплексном подходе, включающем как медицинскую, так и психологическую поддержку.
Получить дополнительные сведения – наркология лечение алкоголизма
Выбор наркологической клиники — ответственное решение, от которого зависит не только эффективность терапии, но и общее физическое и психоэмоциональное состояние пациента. Квалифицированная помощь должна быть своевременной, организованной и соответствующей медицинским стандартам. Как указывает Минздрав РФ, медицинские учреждения, предоставляющие помощь при зависимостях, обязаны иметь лицензию, профессиональный персонал и комплексный подход к лечению.
Подробнее можно узнать тут – http://
на сайте нету не кого в jaber тишина и онлайн его нет онлайн оператор https://gidrocity-service.ru заказал у KingSize – всё ровно вышло. Большего и добавлять незачемДанный продукт не зашол в моё сознание:) его нужно бодяжить с более могучим порохом, будем пробовать АМ2233…
После детоксикации назначается поддерживающая терапия, направленная на предупреждение рецидивов и восстановление нормального функционирования нервной системы.
Получить дополнительные сведения – лечение наркомании наркология владимир
Каждый из этапов дополняет предыдущий, формируя непрерывный лечебный процесс. Такой формат позволяет учитывать динамику состояния пациента и своевременно реагировать на изменения.
Ознакомиться с деталями – http://narkologicheskaya-klinika-khabarovsk0.ru/chastnaya-narkologicheskaya-klinika-khabarovsk/
На начальных этапах проблема редко проявляется в открытом виде, но уже есть характерные сигналы, на которые стоит обратить внимание. Человек начинает оправдывать употребление постоянной усталостью, проблемами на работе, напряжённой жизненной ситуацией. Появляется раздражение, если нет возможности выпить или принять привычную дозу, меняется круг общения, усиливается скрытность. Это время, когда помощь ещё может быть максимально щадящей по методам и по длительности, а вернуться к стабильной жизни намного проще, чем после многолетнего стажа употребления.
Подробнее можно узнать тут – narkologicheskaya-klinika-v-moskve
Клиника нужна и тем, кто уже пробовал лечиться самостоятельно: пил лекарства «от тяги», ходил к психологу без медицинской поддержки, обещал себе не пить, но каждый стресс или конфликт всё равно приводили к старому сценарию. В такой ситуации комплексный подход — медицинский и психологический — даёт куда больше шансов, чем очередное одиночное обещание «в этот раз точно получится».
Узнать больше – http://narkologicheskaya-klinika-himki11.ru
Если в ситуации с алкоголем присутствуют несколько из перечисленных ниже пунктов, это повод не откладывать консультацию с наркологом в Королёве:
Исследовать вопрос подробнее – https://kodirovanie-ot-alkogolizma-korolyov11.ru/ehffektivnoe-kodirovanie-ot-alkogolizma-v-korolyove/
Обратиться за помощью могут как сами пациенты, так и их родственники. Часто именно близкие первыми замечают, что человек изменился: стал раздражительным, агрессивным или, наоборот, отстранённым, перестал выполнять обещания, начал скрывать доходы и траты. В клинике семья получает не только медицинскую помощь для зависимого, но и понятную стратегию действий: как разговаривать, как мотивировать на лечение, как не провоцировать конфликты и не усиливать чувство стыда у человека, который и так боится признаться себе в наличии болезни.
Разобраться лучше – https://narkologicheskaya-klinika-moskva11.ru/chastnaya-narkologicheskaya-klinika-v-moskve/
Эти этапы формируют структуру комплексного лечения, позволяя добиться устойчивого результата и предотвращения повторных срывов.
Детальнее – лечение в наркологической клинике в астрахани
В «АльтерМед» используются самые актуальные технологии, прошедшие проверку временем и доказавшие эффективность в тысячах клинических случаев. Выбор методики зависит от тяжести зависимости, состояния здоровья, наличия хронических заболеваний, прошлых попыток лечения и психологической мотивации пациента.
Ознакомиться с деталями – http://kodirovanie-ot-alkogolizma-dolgoprudnyj6.ru/kodirovanie-ot-alkogolizma-ceny-v-dolgoprudnom/
Специалисты клиники контролируют состояние пациентов 24/7: фиксируют динамику показателей, корректируют дозы препаратов и обеспечивают безопасность на всех этапах лечения. Такой формат позволяет избежать осложнений, связанных с самостоятельным выходом из запоя или несанкционированным приёмом медикаментов. Врачи клиники помогают пациентам пройти через этапы очищения, стабилизации и восстановления организма максимально комфортно.
Выяснить больше – http://narkologicheskaya-klinika-v-khabarovske0.ru
Такая система позволяет пройти все этапы восстановления безопасно, без перегрузки организма. Пациент получает медицинскую и психологическую помощь, что делает результат не временным, а устойчивым. Контроль состояния осуществляется непрерывно, что исключает риск осложнений и рецидивов.
Детальнее – https://narkologicheskaya-klinika-v-khabarovske0.ru/khabarovsk-narkologicheskaya-pomoshh
В рамках лечебного процесса наркологическая клиника задействует структурированные механизмы наблюдения, включающие анализ лабораторных показателей, оценку соматического тонуса и изучение активности нервной системы. Эти элементы обеспечивают комплексность работы и позволяют своевременно корректировать план лечения. Такая система предотвращает перегрузку организма и способствует поддержанию стабильности на фоне применения медикаментозных схем. Ниже представлены ключевые составляющие терапевтического процесса, формирующие основу для клинического восстановления.
Углубиться в тему – http://narkologicheskaya-klinika-v-penze18.ru
Кодирование подходит не только для тех, кто страдает тяжёлой зависимостью с частыми рецидивами, но и для тех, кто хочет закрепить результат длительной ремиссии, повысить личную мотивацию, снизить риск срыва и облегчить адаптацию к жизни без спиртного. Решение о выборе методики принимается только после осмотра врача и сбора полного анамнеза.
Изучить вопрос глубже – https://kodirovanie-ot-alkogolizma-dolgoprudnyj6.ru/centr-kodirovaniya-ot-alkogolizma-v-dolgoprudnom
всегда ровно все было и есть. так что я мефедрон кокаин гашиш анологичная ситуация! продаван ты на примете, раз твоих клиентов начали принимать…Сейчас забегал курьер но без звонка поймал небольшую пароною ведь 203 уже нелегал но всё обошлось всё забрал вес отличный спасибо селеру за быстроту за 3 дня вот это скорость самый наеровнейший магаз и качество полюбому 5+ я уверен как всегда ну это я уже в другой ветке отпишу по пояже как сделаю.
Наркологическая клиника в клинике в Астрахани предоставляет помощь пациентам, сталкивающимся с различными формами зависимости — алкогольной, наркотической, лекарственной. Основой терапии является комплексный подход, включающий медицинскую детоксикацию, стабилизацию состояния, психотерапию и последующее наблюдение. Такой формат работы позволяет мягко купировать острые симптомы, восстановить физиологические функции и подготовить пациента к длительной реабилитации. Все процедуры проводятся анонимно, с использованием сертифицированных препаратов и с постоянным контролем врача.
Изучить вопрос глубже – наркологическая клиника клиника помощь
Наличие квалифицированного персонала подтверждается лицензиями, дипломами, опытом работы. Важно, чтобы сотрудники проходили повышение квалификации и были знакомы с современными методами лечения зависимости.
Узнать больше – http://www.domen.ru
Перед тем, как выбрать конкретный метод, проводится консультация и осмотр, чтобы исключить противопоказания и спрогнозировать результат.
Узнать больше – kodirovanie-ot-alkogolizma-v-dolgoprudnom
Структурированное наблюдение позволяет поддерживать согласованность лечебных мероприятий и своевременно реагировать на изменения. Такая система создаёт единый аналитический подход для оценки состояния и обеспечивает целостность терапевтического процесса.
Ознакомиться с деталями – наркологическая клиника клиника помощь в владивостоке
Первичный этап включает сбор анамнеза, лабораторные исследования и оценку неврологического статуса. На основании полученных данных формируется план лечения, который может корректироваться в процессе наблюдения.
Ознакомиться с деталями – https://narkologicheskaya-klinika-khabarovsk0.ru/narkolog-khabarovsk-anonimno/
https://www.mixcloud.com/%D0%BF%D1%80%D0%BE%D0%BC%D0%BE%D0%BA%D0%BE%D0%B4/
Наркологическая клиника в клинике в Астрахани предоставляет помощь пациентам, сталкивающимся с различными формами зависимости — алкогольной, наркотической, лекарственной. Основой терапии является комплексный подход, включающий медицинскую детоксикацию, стабилизацию состояния, психотерапию и последующее наблюдение. Такой формат работы позволяет мягко купировать острые симптомы, восстановить физиологические функции и подготовить пациента к длительной реабилитации. Все процедуры проводятся анонимно, с использованием сертифицированных препаратов и с постоянным контролем врача.
Подробнее можно узнать тут – narkologicheskaya-klinika-astrakhan18.ru/
база отдыха загородный отель
Часто родственники тянут до последнего, надеясь, что запой «сам пройдёт», как это случалось раньше. Но с каждым эпизодом последствия становятся тяжелее: организм изнашивается, возрастает риск осложнений, ухудшается психика. Особенно опасно, когда запой длится несколько дней подряд, а любые попытки самостоятельно сократить дозы алкоголя сопровождаются дрожью, бессонницей, приступами паники.
Получить дополнительные сведения – вывод из запоя москва срочно
Психотерапия во Владимире в клинике «Новая Эра» проводится высококвалифицированными специалистами с большим опытом работы в сфере зависимостей.
Разобраться лучше – лечение наркомании цена
Лечебные мероприятия строятся на основе поэтапного внедрения терапевтических решений, которые опираются на индивидуальные характеристики пациента. Уточнение анамнеза, анализ данных обследований и выявление сопутствующих факторов позволяют создавать эффективные и прогнозируемые программы лечения. В клинике соблюдается строгая последовательность процедур, направленная на снижение рисков и обеспечение безопасности. На каждом этапе проводится проверка клинической реакции, что позволяет своевременно выявлять необходимость корректировки и адаптировать лечебные меры под текущую картину.
Исследовать вопрос подробнее – http://narkologicheskaya-klinika-v-penze18.ru/chastnaya-narkologicheskaya-klinika-penza/
cyberpulse – Overall, professional vibe here; trustworthy, polished, and pleasantly minimal throughout.
Проблема алкоголизма в Ярославле, как и в других регионах России, остаётся одной из самых актуальных. По данным Минздрава РФ, количество людей, нуждающихся в медицинской помощи из-за злоупотребления спиртным, ежегодно растёт. При этом эффективное лечение возможно лишь при комплексном подходе, включающем как медицинскую, так и психологическую поддержку.
Подробнее тут – http://lechenie-alkogolizma-yaroslavl0.ru/anonimnoe-lechenie-alkogolizma-yaroslavl/
Первичный этап включает сбор анамнеза, лабораторные исследования и оценку неврологического статуса. На основании полученных данных формируется план лечения, который может корректироваться в процессе наблюдения.
Подробнее тут – наркологическая клиника наркологический центр хабаровск
codenova – Content reads clearly, helpful examples made concepts easy to grasp.
bytenova – Found practical insights today; sharing this article with colleagues later.
Каждое из направлений обеспечивает высокий уровень контроля и помогает формировать индивидуальный план воздействия. Такая модель создаёт условия для прогнозируемого восстановления. Для наглядности процессов применяется таблица, отражающая ключевые параметры наблюдения.
Детальнее – наркологическая клиника стационар
В рамках лечебного процесса наркологическая клиника задействует структурированные механизмы наблюдения, включающие анализ лабораторных показателей, оценку соматического тонуса и изучение активности нервной системы. Эти элементы обеспечивают комплексность работы и позволяют своевременно корректировать план лечения. Такая система предотвращает перегрузку организма и способствует поддержанию стабильности на фоне применения медикаментозных схем. Ниже представлены ключевые составляющие терапевтического процесса, формирующие основу для клинического восстановления.
Получить дополнительные сведения – http://narkologicheskaya-klinika-v-penze18.ru
Во внимание берутся не только масштаб и длительность запоев, но и изменения в поведении. Если человек регулярно обещает «завязать с понедельника», но каждый раз срывается, если рабочие задачи всё чаще выполняются с трудом, а любые стрессовые ситуации решаются «через стакан» или «через дозу», это прямой повод не ждать критического момента. Важно помнить, что зависимость — это прогрессирующее заболевание: со временем организму требуется всё больше вещества, растёт токсическая нагрузка на сердце, печень, нервную систему, ухудшается память и концентрация.
Узнать больше – luchshaya-narkologicheskaya-klinika-v-moskve-otzyvy
Процедура вывода из запоя проводится строго по медицинским стандартам. Применяются современные капельницы, витамины и препараты для нормализации функций сердца, печени, почек и нервной системы. После снятия интоксикации врачи назначают поддерживающее лечение, направленное на стабилизацию эмоционального состояния и снижение тяги к алкоголю.
Подробнее – http://vyvodiz-zapoya-vladivostok18.ru
zybertech – Appreciate the typography choices; comfortable spacing improved my reading experience.
Лечение проходит поэтапно, чтобы пациент не испытывал стресса и перегрузок. Каждый шаг контролируется врачами, а терапия корректируется в зависимости от состояния. В таблице ниже представлена структура программы лечения в клинике «АстраМед Трезвость».
Получить больше информации – платная наркологическая клиника
Выбор наркологической клиники — ответственное решение, от которого зависит не только эффективность терапии, но и общее физическое и психоэмоциональное состояние пациента. Квалифицированная помощь должна быть своевременной, организованной и соответствующей медицинским стандартам. Как указывает Минздрав РФ, медицинские учреждения, предоставляющие помощь при зависимостях, обязаны иметь лицензию, профессиональный персонал и комплексный подход к лечению.
Детальнее – частная наркологическая клиника мурманск.
Во внимание берутся не только масштаб и длительность запоев, но и изменения в поведении. Если человек регулярно обещает «завязать с понедельника», но каждый раз срывается, если рабочие задачи всё чаще выполняются с трудом, а любые стрессовые ситуации решаются «через стакан» или «через дозу», это прямой повод не ждать критического момента. Важно помнить, что зависимость — это прогрессирующее заболевание: со временем организму требуется всё больше вещества, растёт токсическая нагрузка на сердце, печень, нервную систему, ухудшается память и концентрация.
Подробнее – https://narkologicheskaya-klinika-moskva11.ru/chastnaya-narkologicheskaya-klinika-v-moskve
После детоксикации назначается поддерживающая терапия, направленная на предупреждение рецидивов и восстановление нормального функционирования нервной системы.
Углубиться в тему – лечение наркомании в стационаре владимир
Каждый из этапов дополняет предыдущий, формируя непрерывный лечебный процесс. Такой формат позволяет учитывать динамику состояния пациента и своевременно реагировать на изменения.
Подробнее тут – https://narkologicheskaya-klinika-khabarovsk0.ru/
Проблема алкоголизма в Ярославле, как и в других регионах России, остаётся одной из самых актуальных. По данным Минздрава РФ, количество людей, нуждающихся в медицинской помощи из-за злоупотребления спиртным, ежегодно растёт. При этом эффективное лечение возможно лишь при комплексном подходе, включающем как медицинскую, так и психологическую поддержку.
Детальнее – центр лечения алкоголизма ярославль.
Мы в Кургане не работаем, все наши представительства есть в соответствующем разделе. https://arbonia-moscow.ru Я по почте переписывается пытался нормально договориться потом просто отвечать перестали решил здесь пообщаться тут надеюсь игнорировать не будут!Бро ты прав CHEMICAL-MIX.COM самый лучший магаз!!!
Наркологическая клиника базирует свою работу на системной оценке состояния пациента и последовательном проведении лечебных мероприятий. Такой подход позволяет формировать устойчивую динамику восстановления и обеспечивать безопасность процедур. В клинике используется поэтапная модель наблюдения, в которой каждый шаг опирается на объективные данные обследований. Применение структурированных методик способствует снижению рисков и выстраиванию предсказуемой схемы терапии. Важным элементом становится контроль физиологических функций, обеспечивающий корректное распределение нагрузок и своевременную корректировку методов воздействия.
Изучить вопрос глубже – https://narkologicheskaya-klinika-v-vdk18.ru
Отдельная категория пациентов — люди с алкогольной зависимостью. Для жителей Воскресенска особенно актуальны проблемы, связанные с длительными запоями: человек несколько дней подряд пьёт, практически не ест, плохо спит, с трудом встаёт, а каждое утро обещает, что «сейчас немного — и всё». На этом фоне растёт нагрузка на сердце, печень, нервную систему, повышается риск инсультов и инфарктов, обостряются хронические болезни.
Разобраться лучше – moskovskie-narkologicheskie-kliniki
Наркологическая клиника в Химках — это возможность получить помощь при алкогольной и наркотической зависимости рядом с домом, а не ездить по всему региону в поисках специалистов. Для многих людей обращение к наркологу до последнего кажется чем-то «крайним»: кажется, что нужно терпеть, уговаривать себя «завязать самому», ждать подходящего момента, отпуска или «нового года с чистого листа». Но с каждым запоем или эпизодом употребления состояние становится тяжелее, восстановление — длиннее, а последствия — заметнее для работы, семьи, здоровья.
Изучить вопрос глубже – https://narkologicheskaya-klinika-himki11.ru/narkologicheskaya-klinika-otzyvy-v-himkah
Психотерапия во Владимире в клинике «Новая Эра» проводится высококвалифицированными специалистами с большим опытом работы в сфере зависимостей.
Подробнее – http://lechenie-narkomanii-vladimir0.ru/klinika-lechenie-narkomanii-vo-vladimire/
vortexbyte – Color palette felt calming, nothing distracting, just focused, thoughtful design.
Терапия наркотической зависимости — не просто избавление от тяги, а глубокий восстановительный процесс, включающий физическую, психическую и социальную реабилитацию. В Ярославле помощь наркозависимым оказывается в различных учреждениях, однако не все из них обеспечивают одинаково высокий уровень качества. Как показывает практика, эффективность лечения во многом зависит от грамотно подобранной программы и профессионализма команды.
Детальнее – http://lechenie-narkomanii-yaroslavl0.ru/lechenie-narkomanii-reabilitacziya-yaroslavl/https://lechenie-narkomanii-yaroslavl0.ru
zenixtech – Pages loaded fast, images appeared sharp, and formatting stayed consistent.
Особенность клиники — возможность выезда нарколога на дом. Это особенно важно, если пациенту трудно самостоятельно добраться до центра или он хочет избежать публичности. Врач приезжает с полным набором медикаментов и оборудования, проводит обследование и ставит капельницу, контролируя состояние пациента на протяжении всей процедуры. Такой формат позволяет начать лечение незамедлительно и без стресса.
Углубиться в тему – http://narkologicheskaya-klinika-v-kemerovo18.ru/narkologicheskaya-klinika-v-kemerovo-anonimno/
Сигналом к тому, что пора обсудить вариант кодирования с наркологом, служит не один какой-то эпизод, а совокупность симптомов. Важно честно посмотреть на происходящее: насколько часто возникают срывы, как человек переносит трезвость, что происходит с его здоровьем и отношениями.
Выяснить больше – http://kodirovanie-ot-alkogolizma-korolyov11.ru
Выбор наркологической клиники — ответственное решение, от которого зависит не только эффективность терапии, но и общее физическое и психоэмоциональное состояние пациента. Квалифицированная помощь должна быть своевременной, организованной и соответствующей медицинским стандартам. Как указывает Минздрав РФ, медицинские учреждения, предоставляющие помощь при зависимостях, обязаны иметь лицензию, профессиональный персонал и комплексный подход к лечению.
Узнать больше – http://narkologicheskaya-klinika-murmansk0.ru/
technexus – Color palette felt calming, nothing distracting, just focused, thoughtful design.
Кодирование — это медицинская или психотерапевтическая процедура, направленная на формирование у пациента стойкого отвращения к алкоголю и снижение вероятности срыва после лечения. Обычно её проводят после детоксикации, когда организм очищен от токсинов и пациент готов к следующему шагу на пути к трезвости.
Ознакомиться с деталями – https://kodirovanie-ot-alkogolizma-dolgoprudnyj6.ru/kodirovanie-ot-alkogolizma-na-domu-v-dolgoprudnom/
veloxtech – Content reads clearly, helpful examples made concepts easy to grasp.
Компания обеспечивает регулярную доставку чистой питьевой воды для домашнего и офисного использования. Клиенты могут выбрать оптимальный объем бутылей и частоту поставок согласно своим потребностям. На портале https://xn--80aaeee1dcbuw.xn--p1ai/ представлен полный каталог продукции с актуальными ценами и условиями обслуживания. Профессиональный подход к каждому заказу гарантирует своевременную доставку качественной воды прямо к вашей двери.
Детокс — это первый и важнейший этап терапии, который помогает очистить организм от токсинов и продуктов распада алкоголя или наркотиков. В клинике «СибМед Кемерово» применяются только проверенные и безопасные методики. Лечение проводится под наблюдением врачей и с использованием капельниц, состав которых подбирается индивидуально. Ниже представлена таблица с основными видами капельниц, применяемыми при детоксикации.
Подробнее – наркологические клиники алкоголизм в кемерове
Выбор наркологической клиники — ответственное решение, от которого зависит не только эффективность терапии, но и общее физическое и психоэмоциональное состояние пациента. Квалифицированная помощь должна быть своевременной, организованной и соответствующей медицинским стандартам. Как указывает Минздрав РФ, медицинские учреждения, предоставляющие помощь при зависимостях, обязаны иметь лицензию, профессиональный персонал и комплексный подход к лечению.
Получить больше информации – наркологическая клиника нарколог мурманск
Пошаговый процесс делает лечение последовательным и безопасным для пациента.
Разобраться лучше – частная наркологическая клиника
Есть ситуации, когда визит к наркологу в Химках лучше воспринимать не как «стыдный шаг», а как обычное ответственное решение о своём здоровье. Это особенно актуально, если: употребление алкоголя или наркотиков стало регулярным, а попытки сократить дозы заканчиваются срывами; появились запои с несколькими днями непрерывного употребления; возникают проблемы с сердцем, давлением, сном; близкие всё чаще говорят, что «ситуация выходит из-под контроля».
Получить дополнительные сведения – https://narkologicheskaya-klinika-himki11.ru/lechenie-v-narkologicheskoj-klinike-v-himkah
Лечение в клинике «ДальМедБаланс» базируется на комплексном подходе. Каждый метод направлен на конкретную цель — детоксикацию, восстановление, стабилизацию и профилактику повторного употребления. Используются современные медицинские технологии и препараты с доказанной эффективностью. Таблица ниже описывает основные направления терапии и их результаты.
Изучить вопрос глубже – вывод наркологическая клиника
Наркологическая клиника в клинике в Астрахани предоставляет помощь пациентам, сталкивающимся с различными формами зависимости — алкогольной, наркотической, лекарственной. Основой терапии является комплексный подход, включающий медицинскую детоксикацию, стабилизацию состояния, психотерапию и последующее наблюдение. Такой формат работы позволяет мягко купировать острые симптомы, восстановить физиологические функции и подготовить пациента к длительной реабилитации. Все процедуры проводятся анонимно, с использованием сертифицированных препаратов и с постоянным контролем врача.
Ознакомиться с деталями – https://narkologicheskaya-klinika-astrakhan18.ru/astrakhanskaya-narkologiya/
Наркологическая клиника в Долгопрудном помогает в ситуациях, когда:
Получить дополнительную информацию – анонимное кодирование от алкоголизма
Если есть какие -то вопросы по компенсациям вложенным, тоже пишите мне в Skype: chemical-mix.com и ICQ: 974-859, все решим https://kinoserialtv.ru кто зовет мать и отца.Да магаз от души тут работает давно и чётко ,было время работал с ним по опту !!! С новым годом всех!
Для купирования абстинентного синдрома и нормализации функций организма применяются препараты, которые оказывают детоксицирующее, нейропротекторное и общеукрепляющее действие. Врач подбирает лекарства индивидуально с учетом состояния пациента и наличия сопутствующих заболеваний.
Ознакомиться с деталями – наркологическая клиника нарколог в владимире
Там, где раньше хватало одного тяжёлого утра, теперь требуются дни детоксикации. И чем позже подключается врач, тем сложнее вернуть организм к относительно безопасному состоянию.
Подробнее тут – https://vyvod-iz-zapoya-voskresensk11.ru/vyvod-iz-zapoya-cena-v-voskresenske/
Если многое из этого знакомо, кодирование стоит рассматривать не как «наказание» или «приговор», а как инструмент, который помогает закрыть доступ к алкоголю на определённый срок и даёт шанс выстроить новую привычку — жить трезво.
Подробнее тут – http://kodirovanie-ot-alkogolizma-korolyov11.ru
В этом материале представлены детали, которые хоть и занимательны, но не особенно значимы. Мы рассматриваем моменты, которые трудно назвать важными, но всё же решили включить их для полноты картины.
Вот – казино онлайн
Часто именно жители Химок тянут до последнего: насыщенный ритм жизни, дорога на работу, постоянная усталость, попытки «снимать напряжение» алкоголем или психоактивными веществами. Сначала это кажется временным способом расслабиться, но со временем человек замечает, что пьёт чаще, чем планировал, нуждается в больших дозах, срывает обещания, а попытки контролировать употребление превращаются в череду неудач. В какой-то момент становится очевидно: без профессиональной наркологической помощи дальше будет только сложнее.
Узнать больше – платная наркологическая клиника
byterise – Found practical insights today; sharing this article with colleagues later.
Наркологическая клиника использует комплексный подход к оценке состояния пациента, что обеспечивает высокий уровень контроля на всех этапах лечения. Такой формат работы позволяет детально изучать динамику процессов и своевременно корректировать вмешательства. В клинике применяется принцип последовательного наблюдения, при котором особое внимание уделяется соматическим и неврологическим проявлениям. Выбор терапевтических мер основывается на анализе объективных данных, что повышает предсказуемость результата. Подход ориентирован на постепенное восстановление функций организма с учетом индивидуальных особенностей.
Детальнее – наркологическая клиника стационар томск
Диагностические данные формируют основу для дальнейших лечебных решений, от объёма инфузии до подбора поддерживающих препаратов.
Исследовать вопрос подробнее – вывод из запоя на дому круглосуточно астрахань
ETC Agency представляет собой медиабаинг-агентство и продюсерский хаб, работающий в сфере инфлюенс-маркетинга и брендового продвижения. Агентство объединяет более 100 эксклюзивных и 1000 партнёрских авторов на YouTube, Telegram, TikTok и VK, обеспечивая полный цикл рекламных кампаний. Ищете диденоктим? Узнать подробности об услугах можно на etc.moscow/ru и оставить заявку на сотрудничество. Эксперты ETC создают продвижение под ключ — от стратегии и медиабаинга до креатива, маркировки и финальной аналитики.
Нередко пациенту требуется не только медикаментозная поддержка, но и психологическое сопровождение. Консультации с психотерапевтом позволяют выявить причины зависимости, снизить уровень тревожности и подготовить человека к реабилитации.
Выяснить больше – narkologicheskaya-pomoshh-arkhangelsk0.ru/
После выполнения первичных мероприятий лечение продолжается в формате динамического наблюдения, что позволяет снизить риск повторных обострений и осложнений.
Получить дополнительную информацию – запой наркологическая клиника в хабаровске
Кодирование от алкоголизма в Королёве часто становится тем самым рубежом, за которым заканчиваются бесконечные попытки «ограничить дозу» и «держать ситуацию под контролем» и начинается системная работа с зависимостью. Многие годами откладывают этот шаг: стыдно признать проблему, страшно довериться врачу, есть надежда, что «само пройдёт» или удастся остановиться силой воли. На практике всё происходит иначе: запои становятся длиннее, похмелье тяжелее, трезвые промежутки короче, а конфликты в семье и на работе — острее. В какой-то момент близкие понимают, что без серьёзной внешней опоры человек просто не справляется.
Подробнее можно узнать тут – кодирование от алкоголизма королев
В рамках лечебного процесса наркологическая клиника задействует структурированные механизмы наблюдения, включающие анализ лабораторных показателей, оценку соматического тонуса и изучение активности нервной системы. Эти элементы обеспечивают комплексность работы и позволяют своевременно корректировать план лечения. Такая система предотвращает перегрузку организма и способствует поддержанию стабильности на фоне применения медикаментозных схем. Ниже представлены ключевые составляющие терапевтического процесса, формирующие основу для клинического восстановления.
Подробнее можно узнать тут – http://narkologicheskaya-klinika-v-penze18.ru
Специалисты клиники контролируют состояние пациентов 24/7: фиксируют динамику показателей, корректируют дозы препаратов и обеспечивают безопасность на всех этапах лечения. Такой формат позволяет избежать осложнений, связанных с самостоятельным выходом из запоя или несанкционированным приёмом медикаментов. Врачи клиники помогают пациентам пройти через этапы очищения, стабилизации и восстановления организма максимально комфортно.
Углубиться в тему – наркологическая клиника наркологический центр в хабаровске
В этом материале мы разберём 7 основ лечения алкоголизма и расскажем, как в Ярославле получить помощь, соответствующую современным стандартам терапии.
Подробнее – лечение алкоголизма ярославская область
Отель Фламинго в поселке Партенит предлагает комфортный семейный отдых в Крыму с системой все включено и развитой инфраструктурой для гостей всех возрастов. Для постояльцев доступны крытый теплый бассейн с пресной водой, банный центр с хамамом и парной, анимационные программы для детей и зона для игр. Ищете отель с прачечной партенит? Забронировать номер можно на flamingo-partenit.com с выбором категории от эконом до семейного люкса. Гостиница находится в спокойной зоне в десяти минутах пешком от побережья и пяти минутах от автовокзала, обеспечивает трехразовое меню и организовывает доставку из аэропорта.
Такая структурированная таблица позволяет обеспечивать единый стандарт наблюдения и облегчает оценку динамики. Она помогает быстро определять необходимость корректировок, что повышает точность применяемых вмешательств и уменьшает риск отрицательных реакций.
Подробнее можно узнать тут – http://vyvod-iz-zapoya-kemerovo18.ru/
Тоже был осадок, но в баньке всё растворилось) мефедрон кокаин гашиш Уважаемый ТС,желаю вам успешных больших продаж!:$:Успехов вам господа : )
Обратиться за помощью могут как сами пациенты, так и их родственники. Часто именно близкие первыми замечают, что человек изменился: стал раздражительным, агрессивным или, наоборот, отстранённым, перестал выполнять обещания, начал скрывать доходы и траты. В клинике семья получает не только медицинскую помощь для зависимого, но и понятную стратегию действий: как разговаривать, как мотивировать на лечение, как не провоцировать конфликты и не усиливать чувство стыда у человека, который и так боится признаться себе в наличии болезни.
Подробнее – http://narkologicheskaya-klinika-moskva11.ru
Системная работа, которой характеризуется наркологическая клиника, предполагает последовательное исследование состояния пациента, анализ факторов риска и создание индивидуального терапевтического маршрута. Такой формат позволяет уточнять клиническую картину на ранних этапах и корректировать вмешательства по мере изменения состояния человека. Применение структурированных методик повышает предсказуемость результата и обеспечивает безопасность всех процедур. При этом выводы формируются на основании объективных данных наблюдения, лабораторных показателей и динамики симптомов. Оптимальная нагрузка распределяется на весь период лечения для достижения устойчивого эффекта без переутомления организма.
Подробнее – запой наркологическая клиника пенза
Наркологическая клиника выстраивает лечение на основе алгоритмов, обеспечивающих последовательность и безопасность вмешательств. Первым этапом становится определение клинического профиля пациента, включающего оценку анамнеза, лабораторных показателей и функционального состояния. Это позволяет создавать индивидуальные схемы, ориентированные на постепенное восстановление. В клинике применяется динамическое наблюдение, позволяющее корректировать терапевтические меры в соответствии с реакцией организма. Такой подход способствует формированию устойчивой клинической динамики.
Углубиться в тему – наркологическая клиника наркологический центр владивосток
Эффективность лечения зависит от точного диагностирования состояния пациента и выбора оптимальной схемы терапии. Важно обеспечить комплексное сопровождение, включающее поддержку семьи и помощь в адаптации к трезвому образу жизни.
Исследовать вопрос подробнее – наркологическое лечение наркомания
Публикация предоставляет читателю набор разрозненных идей, которые сложно применить на практике. Мы лишь слегка касаемся разных точек зрения, не углубляясь в анализ и не предлагая никаких выводов.
Вот – взрослые игры
Особое внимание уделяется безопасности. Используются препараты нового поколения, снижающие нагрузку на печень, почки и сердечно-сосудистую систему. Процесс лечения проходит под постоянным наблюдением медперсонала, что позволяет быстро реагировать на любые изменения состояния пациента. Все данные о лечении строго конфиденциальны — информация не передаётся третьим лицам и не фиксируется в общедоступных базах.
Изучить вопрос глубже – наркологическая клиника клиника помощь томск
Производитель СХТ выпускает электронные автовесы на 60, 80 и 100 тонн в соответствии со стандартом ГОСТ OIML R 76-1-2011. Система востребована на промышленных объектах, торговых базах и в сельском хозяйстве при взвешивании машин с грузом. Ищете автовесы 60 тонн? Подробные характеристики и условия поставки представлены на cxt.su/products/avtomobilnye-vesy — здесь можно выбрать модель под конкретные задачи. Весы устанавливаются на любые типы фундаментов, обеспечивают высокую точность взвешивания и долговечность в эксплуатации.
В этом материале представлены детали, которые хоть и занимательны, но не особенно значимы. Мы рассматриваем моменты, которые трудно назвать важными, но всё же решили включить их для полноты картины.
Вот – азартные игры
Каждое направление вносит свой вклад в общий результат и делает процесс лечения более надежным и комплексным.
Подробнее – http://narkologicheskaya-klinika-v-tveri0.ru/chastnaya-narkologicheskaya-klinika-tver/
Специалисты клиники контролируют состояние пациентов 24/7: фиксируют динамику показателей, корректируют дозы препаратов и обеспечивают безопасность на всех этапах лечения. Такой формат позволяет избежать осложнений, связанных с самостоятельным выходом из запоя или несанкционированным приёмом медикаментов. Врачи клиники помогают пациентам пройти через этапы очищения, стабилизации и восстановления организма максимально комфортно.
Выяснить больше – http://narkologicheskaya-klinika-v-khabarovske0.ru/khabarovsk-narkologicheskaya-pomoshh/
Для самого пациента это шанс получить медицинское вмешательство без дополнительного стресс-фактора в виде транспорта, очередей и «больничной атмосферы». Он остаётся в привычной обстановке, в своей квартире, с теми же предметами, к которым привык, и это снижает сопротивление. Вместо жесткого сценария «либо немедленно в стационар, либо ничего» появляется промежуточный, более мягкий вариант: врачи приезжают домой, снимают остроту состояния, подбирают схему капельницы и медикаментов, объясняют, что делать дальше. Нередко именно после такого первого опыта человек впервые всерьёз задумывается о полноценном лечении, потому что ощущает реальную разницу в самочувствии до и после профессиональной помощи, а не просто очередной «опохмел».
Углубиться в тему – narkolog-v-himkah
Выбор наркологической клиники — ответственное решение, от которого зависит не только эффективность терапии, но и общее физическое и психоэмоциональное состояние пациента. Квалифицированная помощь должна быть своевременной, организованной и соответствующей медицинским стандартам. Как указывает Минздрав РФ, медицинские учреждения, предоставляющие помощь при зависимостях, обязаны иметь лицензию, профессиональный персонал и комплексный подход к лечению.
Выяснить больше – https://narkologicheskaya-klinika-murmansk0.ru/chastnaya-narkologicheskaya-klinika-marmansk
Особую роль на первом этапе играет диагностика: важно выявить не только тип наркотика, но и наличие сопутствующих расстройств, стадию зависимости, мотивационное состояние пациента. От этого зависит, будет ли выбрана амбулаторная или стационарная форма лечения, какие методы будут применяться.
Подробнее – лечение наркомании нарколог
Брал неоднократно в этом магазе, всегда всё ровно и без проволочек, так держать!! мефедрон кокаин гашиш Тепкрь сам хочу зделать заказ но немогу на сайт попасть ((((реальный магаз всем советую
Кодирование подходит не только для тех, кто страдает тяжёлой зависимостью с частыми рецидивами, но и для тех, кто хочет закрепить результат длительной ремиссии, повысить личную мотивацию, снизить риск срыва и облегчить адаптацию к жизни без спиртного. Решение о выборе методики принимается только после осмотра врача и сбора полного анамнеза.
Детальнее – https://kodirovanie-ot-alkogolizma-dolgoprudnyj6.ru/centr-kodirovaniya-ot-alkogolizma-v-dolgoprudnom/
Наркологическая клиника применяет стандартизированные схемы, направленные на безопасное и постепенное восстановление. Каждый этап вмешательства согласуется с текущим состоянием пациента, что обеспечивает предсказуемый характер изменений. Модель работы включает оценку реакции организма, проверку устойчивости внутренних систем и уточнение динамики метаболических процессов. Последовательность действий формируется с учётом адаптационных возможностей и направлена на достижение стабильного результата.
Узнать больше – наркологическая клиника стационар
https://hackmd.openmole.org/s/yHFJaebrX
написание курсовой на заказ цена написание курсовой на заказ цена .
Наркологическая клиника в клинике в Астрахани предоставляет помощь пациентам, сталкивающимся с различными формами зависимости — алкогольной, наркотической, лекарственной. Основой терапии является комплексный подход, включающий медицинскую детоксикацию, стабилизацию состояния, психотерапию и последующее наблюдение. Такой формат работы позволяет мягко купировать острые симптомы, восстановить физиологические функции и подготовить пациента к длительной реабилитации. Все процедуры проводятся анонимно, с использованием сертифицированных препаратов и с постоянным контролем врача.
Подробнее тут – https://narkologicheskaya-klinika-astrakhan18.ru/narkologiya-astrakhan-adres/
такая же фигня, продован сказал, что некоторые только начинаю мониториться! вообщем спср дерьмово работает! https://mg-mir.ru Ребят!!! Звонил в курьерку, все у них нормально, по номеру накладной оператор сказал такого груза нет!!!магаз работает???
Клиника «ВладТрезвие Центр» работает в круглосуточном режиме и готова оказать помощь жителям Владивостока и прилегающих районов в любое время суток. Врачи-наркологи прибывают по вызову в течение часа, имеют при себе все необходимые препараты и оборудование для проведения детоксикации на дому. При необходимости пациента доставляют в стационар, где лечение проходит под постоянным контролем медицинского персонала.
Получить дополнительные сведения – вывод из запоя на дому цена в владивостоке
В таких случаях наркологическая клиника помогает не только вывести из запоя и поставить капельницу, но и выстроить долгосрочный план: обследование, медикаментозную поддержку, реабилитацию, работу с психологом. Это даёт шанс не просто восстановиться после конкретного эпизода, а перестать повторять один и тот же разрушительный сценарий.
Узнать больше – http://narkologicheskaya-klinika-voskresensk11.ru
Вывод из запоя — это не просто медицинская процедура, а важный шаг на пути восстановления организма и возвращения человека к нормальной жизни. В клинике «ВладТрезвие Центр» пациенты получают профессиональную помощь, основанную на современных методиках детоксикации и безопасном медикаментозном восстановлении. Каждый случай рассматривается индивидуально, а лечение подбирается с учётом возраста, состояния здоровья и продолжительности запоя. Наркологи центра выезжают на дом круглосуточно, обеспечивая помощь даже в экстренных ситуациях, когда время играет ключевую роль.
Ознакомиться с деталями – вывод из запоя недорого
сео агентство сео агентство .
Отдельная категория пациентов — люди с алкогольной зависимостью. Для жителей Воскресенска особенно актуальны проблемы, связанные с длительными запоями: человек несколько дней подряд пьёт, практически не ест, плохо спит, с трудом встаёт, а каждое утро обещает, что «сейчас немного — и всё». На этом фоне растёт нагрузка на сердце, печень, нервную систему, повышается риск инсультов и инфарктов, обостряются хронические болезни.
Ознакомиться с деталями – narkologicheskaya-klinika
Этот увлекательный информационный материал подарит вам массу новых знаний и ярких эмоций. Мы собрали для вас интересные факты и сведения, которые обогатят ваш опыт. Откройте для себя увлекательный мир информации и насладитесь процессом изучения!
Желаете узнать подробности? – https://coe.uog.edu.et/events/build-education-website-using-wordpress
Клиника «ВладТрезвие Центр» работает в круглосуточном режиме и готова оказать помощь жителям Владивостока и прилегающих районов в любое время суток. Врачи-наркологи прибывают по вызову в течение часа, имеют при себе все необходимые препараты и оборудование для проведения детоксикации на дому. При необходимости пациента доставляют в стационар, где лечение проходит под постоянным контролем медицинского персонала.
Изучить вопрос глубже – анонимный вывод из запоя
Отдельная категория пациентов — люди с алкогольной зависимостью. Для жителей Воскресенска особенно актуальны проблемы, связанные с длительными запоями: человек несколько дней подряд пьёт, практически не ест, плохо спит, с трудом встаёт, а каждое утро обещает, что «сейчас немного — и всё». На этом фоне растёт нагрузка на сердце, печень, нервную систему, повышается риск инсультов и инфарктов, обостряются хронические болезни.
Подробнее можно узнать тут – отзывы о наркологических клиниках
оптимизация сайта франция цена prodvizhenie-sajtov-v-moskve16.ru .
Наркологическая клиника — это место, где человек получает не просто медицинскую помощь, а возможность начать жизнь заново. В клинике «АстраМед Трезвость» в Астрахани создана система комплексного лечения алкогольной и наркотической зависимости, включающая диагностику, детоксикацию, медикаментозную терапию и психотерапию. Пациент получает поддержку на каждом этапе: от вывода из запоя до социальной адаптации после реабилитации. Лечение проводится круглосуточно, в комфортных условиях и с соблюдением полной конфиденциальности.
Узнать больше – наркологическая клиника цены астрахань
Эта познавательная публикация погружает вас в море интересного контента, который быстро захватит ваше внимание. Мы рассмотрим важные аспекты темы и предоставим вам уникальные Insights и полезные сведения для дальнейшего изучения.
Слушай внимательно — тут важно – https://vfkeducacao.com.br/%D0%B1%D0%B5%D1%81%D0%BF%D0%BB%D0%B0%D1%82%D0%BD%D1%8B%D0%B5-%D1%81%D0%BB%D0%BE%D1%82%D1%8B-%D0%BE%D0%BD%D0%BB%D0%B0%D0%B9%D0%BD-%D0%B1%D0%BE%D0%BB%D0%B5%D0%B5-7780-%D0%BE%D0%BD%D0%BB%D0%B0%D0%B9
Предлагаем вашему вниманию интересную справочную статью, в которой собраны ключевые моменты и нюансы по актуальным вопросам. Эта информация будет полезна как для профессионалов, так и для тех, кто только начинает изучать тему. Узнайте ответы на важные вопросы и расширьте свои знания!
Читать полностью – https://www.csautoslalom.cz/rozhovor-s-pavlem-mullerem-absolutnim-sampionem-wsc-2024
Эта статья предлагает живое освещение актуальной темы с множеством интересных фактов. Мы рассмотрим ключевые моменты, которые делают данную тему важной и актуальной. Подготовьтесь к насыщенному путешествию по неизвестным аспектам и узнайте больше о значимых событиях.
Только факты! – http://kabutaro777.com/cgi/kabu_yougo/joyful.cgi?read=7283&bbs=1&pg=60
Детоксикация — ключевой этап в лечении зависимости. Она направлена на очищение организма от токсинов и нормализацию обмена веществ. В клинике «АстраМед Трезвость» капельницы подбираются индивидуально, с учётом возраста, массы тела и хронических заболеваний пациента. Ниже представлена таблица с основными видами инфузий и их назначением.
Подробнее – https://narkologicheskaya-klinika-v-astrakhani18.ru
Детоксикация — ключевой этап в лечении зависимости. Она направлена на очищение организма от токсинов и нормализацию обмена веществ. В клинике «АстраМед Трезвость» капельницы подбираются индивидуально, с учётом возраста, массы тела и хронических заболеваний пациента. Ниже представлена таблица с основными видами инфузий и их назначением.
Разобраться лучше – http://narkologicheskaya-klinika-v-astrakhani18.ru/
Эта познавательная публикация погружает вас в море интересного контента, который быстро захватит ваше внимание. Мы рассмотрим важные аспекты темы и предоставим вам уникальные Insights и полезные сведения для дальнейшего изучения.
Читать далее > – http://www.k-kasagi.jp/oneword.php?itemid=4030&catid=4
Откройте для себя скрытые страницы истории и малоизвестные научные открытия, которые оказали колоссальное влияние на развитие человечества. Статья предлагает свежий взгляд на события, которые заслуживают большего внимания.
Познакомиться с результатами исследований – https://purexculture.com/es/2020/03/25/keep-calm-wait-2
Эта познавательная публикация погружает вас в море интересного контента, который быстро захватит ваше внимание. Мы рассмотрим важные аспекты темы и предоставим вам уникальные Insights и полезные сведения для дальнейшего изучения.
Не упусти шанс – https://aidima.it/2022/12/24/a-i-di-ma-augura-un-buon-natale-e-un-felice-anno-nuovo/dalla-mora-premio-leonedoro-venezia-dicembre-2022
Эта статья сочетает познавательный и занимательный контент, что делает ее идеальной для любителей глубоких исследований. Мы рассмотрим увлекательные аспекты различных тем и предоставим вам новые знания, которые могут оказаться полезными в будущем.
Изучить вопрос глубже – https://www.lelagondakar.com/produit/essence-de-sofitel-reed-diffuser
Организация ProfVideo осуществляет экспертную
реализацию веб-стримов и съемку бизнес-встреч, семинаров, шоу и демонстраций с
задействованием новейшей аппаратуры. Команда опытных операторов и инженеров
обеспечивает качественную передачу изображения и звука в режиме реального времени
на любые платформы. Ищете корпоративное видео производство? Заказать услуги можно на profvideo.ru с гибкими тарифами под различные
форматы событий. Компания предоставляет полный цикл работ от настройки техники до
постпродакшна с монтажом и цветокоррекцией готового материала для дальнейшего
использования заказчиком.
Ударная волна в физиотерапии: отзывы пациентов и результаты лечения
Каждый из этих симптомов по отдельности уже опасен, а в сочетании они создают высокий риск для жизни. Самостоятельные эксперименты с таблетками, резкий отказ от алкоголя «через силу» или попытка «переспать» запой без медицинского контроля могут обернуться реанимацией. Гораздо безопаснее вовремя вызвать специалиста и провести детоксикацию под наблюдением, особенно когда речь идёт о жителях крупного города, где доступна профессиональная наркологическая помощь.
Получить дополнительную информацию – http://
Ну просто реально непонятно. Народ заказывает, все довольны, я, мои знакомые тут берут стафф – всё на высшем уровне. И твой отзыв по поводу некачественного товара – первый… Да и чтоб сразу и ЖТЕ палёный, и ФА непрущая… Хз, разбирайтесь мефедрон кокаин гашиш Я вот перед заказом почитала хуеву кучу отзывов и не нашла ни одного хуевого. Но опять же, смотри, отзывы были не об эйфоре, а о самом магазине. Давай друг, советуй что-нибудь в личкуДоброго времени суток Всем порядочным форумчанам-кто здесь заказывал,но трек так и не бьёться,или я один такой закинул 45к+доставка,и”жду у моря погоды”В скайпе вчера отвечали сегодня-игнор!
Указанные элементы задают логическую основу для всего терапевтического процесса, создавая структурированную модель работы с пациентом. При необходимости схема вмешательств дополняется дополнительными мерами, направленными на стабилизацию состояния. Такой формат позволяет поддерживать предсказуемость результата даже в сложных клинических ситуациях.
Получить больше информации – наркологическая клиника лечение алкоголизма
В этом тексте собрано множество случайных сведений и довольно неопределённых мыслей, которые могут чем-то заинтересовать. Мы отмечаем моменты, которые не особенно важны, но всё же занимают своё место в повествовании.
Вот – онлайн слоты
Thank you for your sharing. I am worried that I lack creative ideas. It is your article that makes me full of hope. Thank you. But, I have a question, can you help me? https://accounts.binance.com/id/register-person?ref=UM6SMJM3
Кодирование подходит не только для тех, кто страдает тяжёлой зависимостью с частыми рецидивами, но и для тех, кто хочет закрепить результат длительной ремиссии, повысить личную мотивацию, снизить риск срыва и облегчить адаптацию к жизни без спиртного. Решение о выборе методики принимается только после осмотра врача и сбора полного анамнеза.
Получить больше информации – http://kodirovanie-ot-alkogolizma-dolgoprudnyj6.ru/kodirovanie-ot-alkogolizma-na-domu-v-dolgoprudnom/
Есть ряд признаков, при которых ждать категорически нельзя и нужна срочная помощь врача, а не очередные «народные методы». Если вы замечаете у человека следующие симптомы, это прямой повод организовать профессиональный вывод из запоя:
Изучить вопрос глубже – moskva-vyvod-iz-zapoya
Важно и то, что во время процедуры пациент находится под наблюдением. Врач может увидеть, как организм реагирует на терапию, вовремя скорректировать темп или состав инфузии, понять, достаточно ли домашнего формата или лучше рассмотреть стационар. Это принципиальное отличие от попыток лечиться дома таблетками наугад, без контроля давления и пульса.
Выяснить больше – капельница от запоя: отзывы
Наряду с физическим состоянием врачи учитывают психологический фон пациента. Человек в запое часто неадекватно оценивает своё самочувствие, обещает «завязать сам», спорит с родственниками, агрессирует или, наоборот, впадает в апатию. Задача специалиста — не спорить и не давить, а грамотно оценить риски и предложить такой формат помощи, который будет безопасен и реалистичен именно в этой ситуации.
Выяснить больше – вывод из запоя москва цены
Часто родственники тянут до последнего, надеясь, что запой «сам пройдёт», как это случалось раньше. Но с каждым эпизодом последствия становятся тяжелее: организм изнашивается, возрастает риск осложнений, ухудшается психика. Особенно опасно, когда запой длится несколько дней подряд, а любые попытки самостоятельно сократить дозы алкоголя сопровождаются дрожью, бессонницей, приступами паники.
Детальнее – vyvod-iz-zapoya-moskva-stacionar
Перед тем, как выбрать конкретный метод, проводится консультация и осмотр, чтобы исключить противопоказания и спрогнозировать результат.
Изучить вопрос глубже – медикаментозное кодирование от алкоголизма долгопрудный
Эта информационная заметка содержит увлекательные сведения, которые могут вас удивить! Мы собрали интересные факты, которые сделают вашу жизнь ярче и полнее. Узнайте нечто новое о привычных аспектах повседневности и откройте для себя удивительный мир информации.
Полезно знать – https://akornas.ac.id/prof-dr-komarudin-m-si
Компьютерная помощь востребована при необходимости переноса данных на новый компьютер. Специалист переносит файлы, программы и настройки пользователя http://art-gymnastics.ru/users/46?wid=5498
Этот увлекательный информационный материал подарит вам массу новых знаний и ярких эмоций. Мы собрали для вас интересные факты и сведения, которые обогатят ваш опыт. Откройте для себя увлекательный мир информации и насладитесь процессом изучения!
Раскрыть тему полностью – https://ngantree.com/tanaman-indoor-penghasil-oksigen
Les gains historiques sont souvent partages sur les reseaux sociaux pour celebrer la chance des membres.
http://training.insurancesplash.com/fatboss-casino-le-meilleur-choix-pour-les-joueurs-3/
курсовые заказ курсовые заказ .
Электрик на час
Эта информационная заметка содержит увлекательные сведения, которые могут вас удивить! Мы собрали интересные факты, которые сделают вашу жизнь ярче и полнее. Узнайте нечто новое о привычных аспектах повседневности и откройте для себя удивительный мир информации.
Получить дополнительные сведения – https://taxisocial.com/mayor-adams-strikes-deal-with-uber-lyft-to-boost-driver-earnings-by-cutting-down-lockouts
Продован 1000 балоф те =) мефедрон кокаин гашиш “Ладно думаю доберусь до дома там опробую нозально “заказывал через сайт или аську?
bs2 marketplace bs2web at
Эта статья сочетает познавательный и занимательный контент, что делает ее идеальной для любителей глубоких исследований. Мы рассмотрим увлекательные аспекты различных тем и предоставим вам новые знания, которые могут оказаться полезными в будущем.
Интересует подробная информация – https://tokorouta.com/single-mattaku-yaruki-ga-gozaimasen
Кодирование — это медицинская или психотерапевтическая процедура, направленная на формирование у пациента стойкого отвращения к алкоголю и снижение вероятности срыва после лечения. Обычно её проводят после детоксикации, когда организм очищен от токсинов и пациент готов к следующему шагу на пути к трезвости.
Разобраться лучше – http://kodirovanie-ot-alkogolizma-dolgoprudnyj6.ru/centr-kodirovaniya-ot-alkogolizma-v-dolgoprudnom/
В этой статье представлен занимательный и актуальный контент, который заставит вас задуматься. Мы обсуждаем насущные вопросы и проблемы, а также освещаем истории, которые вдохновляют на действия и изменения. Узнайте, что стоит за событиями нашего времени!
А есть ли продолжение? – https://thenewblackmagazine.com/2024/12/17/an-interview-with-the-novelist-olumide-olutola-2
В «АльтерМед» используются самые актуальные технологии, прошедшие проверку временем и доказавшие эффективность в тысячах клинических случаев. Выбор методики зависит от тяжести зависимости, состояния здоровья, наличия хронических заболеваний, прошлых попыток лечения и психологической мотивации пациента.
Получить больше информации – http://kodirovanie-ot-alkogolizma-dolgoprudnyj6.ru/anonimnoe-kodirovanie-ot-alkogolizma-v-dolgoprudnom/
Эта обзорная заметка содержит ключевые моменты и факты по актуальным вопросам. Она поможет читателям быстро ориентироваться в теме и узнать о самых важных аспектах сегодня. Получите краткий курс по современной информации и оставайтесь в курсе событий!
Слушай внимательно — тут важно – https://ecole-villa-helene.fr/les-cm1-bricoleurs-en-herbe
Отдельная категория пациентов — люди с алкогольной зависимостью. Для жителей Воскресенска особенно актуальны проблемы, связанные с длительными запоями: человек несколько дней подряд пьёт, практически не ест, плохо спит, с трудом встаёт, а каждое утро обещает, что «сейчас немного — и всё». На этом фоне растёт нагрузка на сердце, печень, нервную систему, повышается риск инсультов и инфарктов, обостряются хронические болезни.
Получить дополнительную информацию – наркологическая клиника справка
bs2best at актуальная ссылка bs2web at
Наркологическая клиника в Долгопрудном помогает в ситуациях, когда:
Подробнее можно узнать тут – kodirovanie-ot-alkogolizma-ceny-dolgoprudnyj
Вывод из запоя — это не только капельница. Это системная медицинская помощь, направленная на снижение интоксикации, поддержку сердца, нервной системы и внутренних органов. Правильно выстроенный детокс помогает не просто «сбить симптомы», а реально снизить риски для здоровья и дать человеку шанс вернуться к трезвому состоянию без тяжёлых последствий.
Подробнее тут – вывод из запоя воскресенск
Запой никогда не начинается с катастрофы. Первые несколько дней могут рассматриваться как «затянувшееся застолье». Но чем дольше человек пьёт без трезвых пауз, тем резче падают его возможности восстановиться самостоятельно. Поэтому ждать, что всё «рассосётся», — значит сознательно двигаться в сторону осложнений.
Выяснить больше – вывод из запоя воскресенск
У каждого селлера, в нынешние времена, продукты с одним и тем же названием, имеют часто разный внешний вид, различные дозировки и эффекты, потому то так часто у селлера и спрашивают параметры этих в-в “именно” в данном магазе “именно” у данного селлера. https://stk-online.ru Получившаяся смесь почему-то меня не пропирает как надо, очень странно, возможно дело во мне. Делаешь например 2-3 парика- вроде что-то есть но на ха-ха не пробиваети держит 20 мин. Что за х….? А вот другие кроли в восторгеРОВЫНЫЙ МАГАЗ РОВНЫЙ ТС РОВНАЯ ВЕТКА И РОВНЫЕ КЛИЕНТЫ МИР ВАМ ВСЕМ !!!!!!
Ищете авто из китая под заказ цены? Откройте priority-auto.ru – на площадке доступен обширный каталог автомобилей всевозможных производителей. Если требуется, выберем машину в рамках ваших средств, отправим свежую калькуляцию и опишем процесс логистики. На платформе можно использовать сервис подсчета финальных затрат для вашего населенного пункта либо изучить базу популярных вопросов и ответов.
Лечебные мероприятия строятся на основе поэтапного внедрения терапевтических решений, которые опираются на индивидуальные характеристики пациента. Уточнение анамнеза, анализ данных обследований и выявление сопутствующих факторов позволяют создавать эффективные и прогнозируемые программы лечения. В клинике соблюдается строгая последовательность процедур, направленная на снижение рисков и обеспечение безопасности. На каждом этапе проводится проверка клинической реакции, что позволяет своевременно выявлять необходимость корректировки и адаптировать лечебные меры под текущую картину.
Ознакомиться с деталями – запой наркологическая клиника
Наркологическая клиника в Хабаровске рассматривается как специализированное медицинское учреждение, обеспечивающее комплексную помощь пациентам с алкогольной и наркотической зависимостью. Работа клиники «Северный Путь» строится на принципах доказательной медицины, конфиденциальности и поэтапного восстановления. Лечение ориентировано не только на купирование острых состояний, но и на стабилизацию соматического и психоэмоционального статуса пациента.
Получить больше информации – наркологические клиники алкоголизм хабаровск
Глемпинг-комплекс Hygge House в Краснодарском регионе организует приятное времяпрепровождение на свежем воздухе в благоустроенных домах в горно-лесной местности с разрешением на проживание с питомцами. На территории базы работают баня с бассейном, мангальные зоны, беседки и прокат эндуро-мотоциклов для активного досуга гостей. Ищете турбаза с бассейном в нижегородской? Забронировать домики Cube House и Barn House можно на hyggehouse23.ru по цене от 9000 рублей в сутки. Любой дом укомплектован малогабаритной кухонной зоной, холодильной установкой, микроволновкой, телеприемником, душевой и предназначен для четырех постояльцев с неограниченным посещением общего водоема.
Электромонтаж под ключ
купить курсовую москва купить курсовую москва .
В этом материале представлены детали, которые хоть и занимательны, но не особенно значимы. Мы рассматриваем моменты, которые трудно назвать важными, но всё же решили включить их для полноты картины.
Вот – азартные игры на деньги
Кто знает что происходит? Походу покупают все в тихушку!:confused: Внесите ясность!:hz: Дайте реги уже:confused::sos: https://kinoserialtv.ru Если есть какие -то вопросы по компенсациям вложенным, тоже пишите мне в Skype: chemical-mix.com и ICQ: 974-859, все решимэто зависит на сколько ты прикурен .
Специалисты клиники контролируют состояние пациентов 24/7: фиксируют динамику показателей, корректируют дозы препаратов и обеспечивают безопасность на всех этапах лечения. Такой формат позволяет избежать осложнений, связанных с самостоятельным выходом из запоя или несанкционированным приёмом медикаментов. Врачи клиники помогают пациентам пройти через этапы очищения, стабилизации и восстановления организма максимально комфортно.
Разобраться лучше – наркологическая клиника лечение алкоголизма хабаровск
Этот информационный набор привлекает внимание множеством мелочей и странных ракурсов. Мы предлагаем взгляды, которые редко бывают полезны, но могут слегка разнообразить ваше знакомство с темой.
Вот – https://arma-rehab.ru/vyvod-iz-zapoya
Каждый курс лечения включает несколько этапов, направленных на постепенное улучшение состояния. Система выстроена так, чтобы обеспечить плавное восстановление функций организма без стресса. Ниже приведена таблица, показывающая основные этапы лечения и применяемые процедуры.
Изучить вопрос глубже – вывод из запоя вызов в ростове-на-дону
В Хабаровске клиника «ДальМедБаланс» стала центром комплексной наркологической помощи, где пациенты могут обратиться за лечением в любое время суток. Все процедуры проводятся анонимно, без вмешательства государственных органов. Лечение осуществляется как в стационаре, так и на дому, что особенно важно при острых состояниях — запое, интоксикации, синдроме отмены. Каждое вмешательство основано на клинических показаниях и подтверждено современными стандартами наркологии.
Исследовать вопрос подробнее – запой наркологическая клиника в хабаровске
Клиника создана как современное пространство для безопасного восстановления. Здесь пациенты получают комплексную помощь в комфортных условиях. Основные преимущества учреждения:
Изучить вопрос глубже – https://narcologicheskaya-clinika-v-rnd19.ru/chastnaya-narkologicheskaya-klinika-rostov-na-donu/
В практике лечения на дому применяются следующие этапы медицинского воздействия:
Получить больше информации – http://narkolog-na-dom-v-rnd19.ru
Запой никогда не начинается с катастрофы. Первые несколько дней могут рассматриваться как «затянувшееся застолье». Но чем дольше человек пьёт без трезвых пауз, тем резче падают его возможности восстановиться самостоятельно. Поэтому ждать, что всё «рассосётся», — значит сознательно двигаться в сторону осложнений.
Подробнее можно узнать тут – https://vyvod-iz-zapoya-voskresensk11.ru/vyvod-iz-zapoya-na-domu-v-voskresenske
Обращение за помощью на дому обладает рядом преимуществ, которые особенно актуальны для пациентов, сталкивающихся с зависимостью:
Выяснить больше – нарколог на дом вывод из запоя
Комбинирование методов позволяет одновременно решать задачи стабилизации, профилактики и возвращения к повседневной активности.
Получить больше информации – вывод наркологическая клиника луганск
Лечение в клинике проводится последовательно, что позволяет контролировать процесс выздоровления и обеспечивать пациенту максимальную безопасность.
Углубиться в тему – наркологическая клиника наркологический центр
Зачем писать таким большим шрифтом ? Здесь слепых нет. То что тебя где то кинули к нам никакого отношения не имеет. https://trusteconomic.ru Только вот странно что в трипе написано что пак был с 1гр ск (а твой заказ это покупка) а продажу у магазина от 5грРебята сегодня заказал 5 грамм CHM-100, продавец в асе не отвечает после перевода денег, шляпа какая то, прошу отписать у кого так же было!
Близость к общественному транспорту играет важную роль при выборе жилья. После изучения районов покупатели решили купить квартиру Киев возле метро estate.kiev.ua, чтобы ежедневно экономить время на дорогу. Такой фактор значительно повышает ликвидность недвижимости.
В Воскресенске вывод из запоя может проводиться в разных форматах — с выездом на дом, в условиях стационара, в срочном режиме или с последующим амбулаторным наблюдением. Правильный выбор зависит от тяжести состояния, возраста пациента, наличия хронических заболеваний и того, насколько сильно запой нарушил привычную жизнь.
Изучить вопрос глубже – https://vyvod-iz-zapoya-voskresensk11.ru/vyvod-iz-zapoya-vyzov-v-voskresenske
Medicine online platforms allow users to reorder medicines quickly for monthly treatments. This helps maintain consistency in medication schedules https://manneris.edu.kh/uncategorized/%e1%9e%80%e1%9e%98%e1%9f%92%e1%9e%98%e1%9e%9c%e1%9e%b7%e1%9e%92%e1%9e%b8%e1%9e%87%e1%9f%86%e1%9e%93%e1%9e%bd%e1%9e%94%e1%9e%a2%e1%9e%b6%e1%9e%8e%e1%9e%b6%e1%9e%96%e1%9f%92%e1%9e%99%e1%9e%b6%e1%9e%94/
В Хабаровске клиника «ДальМедБаланс» стала центром комплексной наркологической помощи, где пациенты могут обратиться за лечением в любое время суток. Все процедуры проводятся анонимно, без вмешательства государственных органов. Лечение осуществляется как в стационаре, так и на дому, что особенно важно при острых состояниях — запое, интоксикации, синдроме отмены. Каждое вмешательство основано на клинических показаниях и подтверждено современными стандартами наркологии.
Подробнее – https://narkologicheskaya-klinika-v-khabarovske0.ru/chastnaya-narkologicheskaya-klinika-khabarovsk/
quantumforge – Loved the layout today; clean, simple, and genuinely user-friendly overall.
Ручкин — поставщик ручек с брендированием и фирменной символикой для корпоративных клиентов столичного региона. Каталог включает пластиковые, металлические и экологичные ручки топовых марок Senator, Parker, Waterman, Maxema под брендирование. Ищете , где купить ручки? Полный каталог продукции доступен на ruchkin.ru с удобной системой заказа. Компания обеспечивает быструю доставку, конкурентные цены и качественное нанесение корпоративной символики на продукцию любыми способами.
остеопат университет
Процедура проводится под контролем врача. В случае необходимости специалист выезжает на дом с полным набором медикаментов и оборудования. Такой формат особенно востребован среди пациентов, которые предпочитают анонимное лечение без госпитализации. Все манипуляции проводятся стерильно, а препараты подбираются с учётом противопоказаний.
Выяснить больше – вывод из запоя на дому недорого ростов-на-дону
После выполнения первичных мероприятий лечение продолжается в формате динамического наблюдения, что позволяет снизить риск повторных обострений и осложнений.
Подробнее тут – наркологическая клиника клиника помощь в хабаровске
остеопат университет
Программы лечения выстраиваются гибко: можно начать с домашнего вызова врача и продолжить терапию в клинике, либо пройти весь курс стационарно с круглосуточным наблюдением. Главный принцип — безопасность, эффективность и уважение к личности пациента.
Подробнее тут – https://narcologicheskaya-clinika-v-rnd19.ru/narkolog-rostov-na-donu
Несмотря на выездной формат, лечение выстраивается поэтапно и соответствует медицинским стандартам. Это обеспечивает управляемость процесса и безопасность пациента.
Изучить вопрос глубже – запой нарколог на дом в ростове-на-дону
Наркологическая клиника в Хабаровске рассматривается как специализированное медицинское учреждение, обеспечивающее комплексную помощь пациентам с алкогольной и наркотической зависимостью. Работа клиники «Северный Путь» строится на принципах доказательной медицины, конфиденциальности и поэтапного восстановления. Лечение ориентировано не только на купирование острых состояний, но и на стабилизацию соматического и психоэмоционального статуса пациента.
Исследовать вопрос подробнее – https://narkologicheskaya-klinika-khabarovsk0.ru/khabarovsk-narkologicheskaya-pomoshh/
Процесс выведения из запоя в клинике основан на медицинских стандартах и многолетнем опыте врачей-наркологов. Каждый случай рассматривается индивидуально: перед началом лечения проводится оценка состояния пациента, определяется степень интоксикации и подбираются препараты, подходящие именно ему. Врачи центра работают круглосуточно, а выездная помощь доступна во всех районах Ростова-на-Дону и области. Это особенно важно, когда требуется немедленная помощь, а доставить пациента в стационар невозможно.
Углубиться в тему – http://vyvod-iz-zapoya-v-rnd19.ru/vyvod-iz-zapoya-na-domu-rostov-na-donu/https://vyvod-iz-zapoya-v-rnd19.ru
techcatalyst – Pages loaded fast, images appeared sharp, and formatting stayed consistent.
devbyte – Overall, professional vibe here; trustworthy, polished, and pleasantly minimal throughout.
После первичного осмотра начинается активная фаза детоксикации. Современные медикаменты вводятся капельничным методом, что позволяет быстро вывести токсины из организма, нормализовать обмен веществ и восстановить работу внутренних органов.
Углубиться в тему – вывод из запоя капельница на дому
На каждом этапе лечения нарколог контролирует витальные показатели, оценивает динамику восстановления и при необходимости корректирует терапию. Такой подход исключает резкие перепады давления, нарушения сердечного ритма и другие побочные эффекты, часто возникающие при попытках вывести пациента из запоя без медицинского участия.
Углубиться в тему – вывод из запоя круглосуточно в ростове-на-дону
dataforge – Pages loaded fast, images appeared sharp, and formatting stayed consistent.
Для оценки состояния используется расширенная диагностика: лабораторные анализы, ЭКГ, психологическое тестирование и биохимические маркеры. По результатам обследования составляется индивидуальный план, включающий детоксикацию, фармакотерапию и реабилитационные мероприятия. Ниже представлена таблица, описывающая структуру этапов лечения.
Разобраться лучше – наркологическая клиника наркологический центр в ростове-на-дону
Программы терапии строятся так, чтобы одновременно воздействовать на биологические, психологические и социальные факторы зависимости. Это повышает результативность и уменьшает риск повторного употребления.
Разобраться лучше – http://narkologicheskaya-klinika-lugansk0.ru/narkologiya-lugansk-lnr/
Наркологическая клиника в Донецке применяет только проверенные и эффективные методы, позволяющие комплексно воздействовать на зависимость. Врачи учитывают как физическое состояние, так и психологические особенности пациента.
Получить больше информации – платная наркологическая клиника донецк
В практике лечения на дому применяются следующие этапы медицинского воздействия:
Получить больше информации – частный нарколог на дом в ростове-на-дону
Наркологическая клиника в Хабаровске рассматривается как специализированное медицинское учреждение, обеспечивающее комплексную помощь пациентам с алкогольной и наркотической зависимостью. Работа клиники «Северный Путь» строится на принципах доказательной медицины, конфиденциальности и поэтапного восстановления. Лечение ориентировано не только на купирование острых состояний, но и на стабилизацию соматического и психоэмоционального статуса пациента.
Подробнее – лечение в наркологической клинике
logicbyte – Content reads clearly, helpful examples made concepts easy to grasp.
После выполнения первичных мероприятий лечение продолжается в формате динамического наблюдения, что позволяет снизить риск повторных обострений и осложнений.
Подробнее тут – http://narkologicheskaya-klinika-khabarovsk0.ru/narkolog-khabarovsk-anonimno/
Такой подход позволяет достичь устойчивого результата без срывов и рецидивов. Пациенты получают помощь не только на уровне физиологии, но и на уровне личностных изменений, что делает лечение глубоким и эффективным.
Получить дополнительные сведения – наркологическая клиника наркологический центр
bytecore – Bookmarked this immediately, planning to revisit for updates and inspiration.
Комплексное лечение зависимости на дому организовано по четкой схеме, позволяющей оперативно вывести пациента из запоя и обеспечить безопасное восстановление здоровья.
Подробнее – наркология вывод из запоя в екатеринбурге
Реализация данных задач позволяет наркологу на дом в Ростове-на-Дону оказывать помощь в контролируемом и безопасном формате.
Разобраться лучше – помощь нарколога на дому ростов-на-дону
Завод весоизмерительной техники СХТ выпускает автомобильные электронные весы и строит автоматизированные весовые комплексы под ключ по всей России. Завод обеспечивает весь спектр работ от выпуска грузоприемных платформ до установки, поверки и запуска оборудования. Ищете автовесы 80 тонн? Подробности о продукции и услугах представлены на схт.рф в соответствующих разделах каталога. Организация применяет российское ПО, содержит штатные сервисные команды, техника автономна от зарубежных комплектующих и ограничений.
Пиздец до сих пор мозги ебут( https://dogsofwar.ru Оплатил заказ в субботу, во вторник посылка была отправлена вечером, в четверг уже была в городе, но встретиться с курьером не смог. В пятницу заберу. Все оперативно и быстро.Дим, доброго времени суток, отпиши за приход, заказала тоже эйф-дисс, скажи, чего ожидать?
В клинике «ПензаМед Трезвость» лечение проводится по индивидуальной схеме, которая формируется после первичного осмотра. Нарколог оценивает состояние пациента, уровень алкогольной интоксикации и наличие сопутствующих заболеваний. На основании данных подбираются препараты, способные эффективно очистить кровь, восстановить работу органов и снизить абстинентные проявления. При лёгкой форме зависимости возможен выезд врача на дом, где пациенту устанавливают капельницу и обеспечивают наблюдение в течение всего процесса детоксикации. В более сложных случаях рекомендуется госпитализация в стационар, где помощь оказывается под постоянным контролем специалистов.
Получить дополнительные сведения – https://vyvod-iz-zapoya-penza18.ru/vyvod-iz-zapoya-na-domu-v-penze-penza-uslugi/
Услуга вызова нарколога на дом в Екатеринбурге представляет собой комплекс мер, направленных на оперативное стабилизирование состояния пациента. При поступлении вызова специалист проводит детальный осмотр, сбор анамнеза и диагностику состояния, после чего разрабатывается индивидуальный план лечения. Методика включает медикаментозную детоксикацию, коррекцию обменных процессов и психологическую поддержку, что обеспечивает комплексное восстановление здоровья без необходимости посещения стационара.
Подробнее можно узнать тут – http://alko-zakodirovat.ru/narkolog-na-dom-czena-ekb/
Многие тянут до последнего, считая, что к наркологу обращаются только в самых крайних случаях. На деле показаний для консультации гораздо больше, и они часто появляются задолго до того, как человек впервые оказывается в запое или не выходит из состояния опьянения несколько дней подряд.
Исследовать вопрос подробнее – https://narkologicheskaya-klinika-voskresensk11.ru/
Наркологическая клиника в Донецке применяет только проверенные и эффективные методы, позволяющие комплексно воздействовать на зависимость. Врачи учитывают как физическое состояние, так и психологические особенности пациента.
Узнать больше – наркологическая клиника клиника помощь
Пошаговая структура помогает удерживать стабильную динамику, своевременно оценивать прогресс и гибко корректировать тактику.
Подробнее тут – http://narkologicheskaya-klinika-lugansk0.ru/narkologiya-lugansk-lnr/https://narkologicheskaya-klinika-lugansk0.ru
Клиника нужна и тем, кто уже пробовал лечиться самостоятельно: пил лекарства «от тяги», ходил к психологу без медицинской поддержки, обещал себе не пить, но каждый стресс или конфликт всё равно приводили к старому сценарию. В такой ситуации комплексный подход — медицинский и психологический — даёт куда больше шансов, чем очередное одиночное обещание «в этот раз точно получится».
Изучить вопрос глубже – http://narkologicheskaya-klinika-himki11.ru
Лечение в клинике проводится последовательно, что позволяет контролировать процесс выздоровления и обеспечивать пациенту максимальную безопасность.
Детальнее – наркологические клиники алкоголизм в донце
Комбинирование методов позволяет одновременно решать задачи стабилизации, профилактики и возвращения к повседневной активности.
Подробнее тут – https://narkologicheskaya-klinika-lugansk0.ru/
Специалисты клиники контролируют состояние пациентов 24/7: фиксируют динамику показателей, корректируют дозы препаратов и обеспечивают безопасность на всех этапах лечения. Такой формат позволяет избежать осложнений, связанных с самостоятельным выходом из запоя или несанкционированным приёмом медикаментов. Врачи клиники помогают пациентам пройти через этапы очищения, стабилизации и восстановления организма максимально комфортно.
Получить дополнительные сведения – наркологическая клиника стационар
Диагностический блок включает сбор анамнеза, оценку витальных показателей, скрининговые шкалы по тревоге, депрессии и патологическому влечению, лабораторные тесты по показаниям. На основании полученных данных выбирается формат помощи и составляется медикаментозная схема с учётом взаимодействий препаратов и вероятных рисков.
Подробнее тут – https://narkologicheskaya-klinika-v-luganske0.ru/luganskaya-narkologicheskaya-bolnicza
Команда выездных специалистов работает без броской символики, использует нейтральный транспорт и конфиденциальный документооборот. Врач приезжает с портативным оборудованием (мониторинг АД/ЧСС/SpO?, термометр, пульсоксиметр, при необходимости — портативный ЭКГ-модуль), выполняет тест переносимости, формирует индивидуальный инфузионный профиль и обучает семью простым процедурам поддержки: водный режим малыми глотками, «тихие окна» без экранов, дыхательные паузы. В результате пациент не просто «переживает» детокс, а действительно возвращается к устойчивому сну, ровному пульсу и ясной голове.
Исследовать вопрос подробнее – http://www.domen.ru
Компания MW Stanki специализируется на поставках качественного металлообрабатывающего оборудования для промышленных предприятий России. В ассортименте представлены токарные, фрезерные, сверлильные и шлифовальные станки ведущих мировых производителей. Подробную информацию о моделях и технических характеристиках можно найти на официальном сайте https://mwstanki.ru/ в соответствующих разделах каталога. Профессионалы организации помогают грамотно выбрать технику согласно индивидуальным требованиям производства.
bitcore – Pages loaded fast, images appeared sharp, and formatting stayed consistent.
binaryforge – Appreciate the typography choices; comfortable spacing improved my reading experience.
Там, где раньше хватало одного тяжёлого утра, теперь требуются дни детоксикации. И чем позже подключается врач, тем сложнее вернуть организм к относительно безопасному состоянию.
Получить больше информации – vyvod-iz-zapoya-klinika
Процесс выведения из запоя в клинике основан на медицинских стандартах и многолетнем опыте врачей-наркологов. Каждый случай рассматривается индивидуально: перед началом лечения проводится оценка состояния пациента, определяется степень интоксикации и подбираются препараты, подходящие именно ему. Врачи центра работают круглосуточно, а выездная помощь доступна во всех районах Ростова-на-Дону и области. Это особенно важно, когда требуется немедленная помощь, а доставить пациента в стационар невозможно.
Разобраться лучше – вывод из запоя недорого в ростове-на-дону
САБЖ САМ ПО СЕБЕ НЕ ПРЁТ !! МУТИТЬ НА НЁМ МИКСЫ СМЫСЛА НЕТ !!! ЭТО АНТИДЕПРЕССАНТ !! мефедрон кокаин гашиш кто брал закладками в этом магазе в МСК что скажите?магазин хороший,даже если высылат брак (было 1 раз) возврат делают сполна
Каждый этап имеет ключевое значение и обеспечивает устойчивость результата.
Выяснить больше – лечение женского алкоголизма донецк
Промышленная вентиляция и кондиционирование — основа комфортного микроклимата на производстве и в коммерческих помещениях. Компания ВентТехника из Екатеринбурга специализируется на поставке и монтаже вентиляторов серий ВЦ, ВР, ВКР, приточно-вытяжных установок и климатического оборудования. В ассортименте — центробежные, осевые, канальные вентиляторы, тепловые завесы и системы автоматики. Подробный каталог представлен на https://venttehnica.ru/ Грамотный подбор оборудования и профессиональный монтаж обеспечивают эффективную работу систем на долгие годы.
В клинике используется модульная система лечения, включающая медицинские, психологические и социальные компоненты. В зависимости от состояния человека акценты могут смещаться — например, у одних пациентов приоритетом становится физиологическое восстановление, у других — коррекция эмоционального фона и когнитивных паттернов.
Углубиться в тему – наркологическая клиника клиника помощь в ставрополе
Главный принцип работы наркологической клиники — это последовательность, безопасность и уважение к каждому пациенту. Независимо от степени зависимости, лечение строится на тщательной диагностике, определении индивидуальных особенностей и поэтапном подходе. Медицинская помощь оказывается как в условиях стационара, так и на дому, где врачи могут провести детоксикацию, стабилизировать состояние и составить дальнейший план терапии.
Детальнее – наркологическая клиника нарколог ростов-на-дону
В Хабаровске клиника «ДальМедБаланс» стала центром комплексной наркологической помощи, где пациенты могут обратиться за лечением в любое время суток. Все процедуры проводятся анонимно, без вмешательства государственных органов. Лечение осуществляется как в стационаре, так и на дому, что особенно важно при острых состояниях — запое, интоксикации, синдроме отмены. Каждое вмешательство основано на клинических показаниях и подтверждено современными стандартами наркологии.
Подробнее – http://narkologicheskaya-klinika-v-khabarovske0.ru/narkolog-khabarovsk-anonimno/
Наркологическая помощь должна быть не только медицински точной, но и человечной, безопасной и анонимной. В «Ижевском Центре Трезвых Решений» выстроена система комплексного подхода к лечению зависимостей, включающая диагностику, медикаментозную детоксикацию, психотерапию и социальную адаптацию. Клиника объединяет профессионализм, заботу и круглосуточную готовность помочь пациентам, оказавшимся в трудной ситуации. Здесь работают врачи с большим опытом в области наркологии и психиатрии, способные оперативно выехать на дом и оказать неотложную помощь.
Подробнее тут – наркологические клиники алкоголизм
Программы лечения выстраиваются гибко: можно начать с домашнего вызова врача и продолжить терапию в клинике, либо пройти весь курс стационарно с круглосуточным наблюдением. Главный принцип — безопасность, эффективность и уважение к личности пациента.
Подробнее – https://narcologicheskaya-clinika-v-rnd19.ru/narkologiya-rostov-kruglosutochno/
Кодирование подходит не только для тех, кто страдает тяжёлой зависимостью с частыми рецидивами, но и для тех, кто хочет закрепить результат длительной ремиссии, повысить личную мотивацию, снизить риск срыва и облегчить адаптацию к жизни без спиртного. Решение о выборе методики принимается только после осмотра врача и сбора полного анамнеза.
Углубиться в тему – http://kodirovanie-ot-alkogolizma-dolgoprudnyj6.ru/centr-kodirovaniya-ot-alkogolizma-v-dolgoprudnom/
Там, где раньше хватало одного тяжёлого утра, теперь требуются дни детоксикации. И чем позже подключается врач, тем сложнее вернуть организм к относительно безопасному состоянию.
Подробнее тут – https://vyvod-iz-zapoya-voskresensk11.ru/vyvod-iz-zapoya-vyzov-v-voskresenske/
Лечение зависимости проходит поэтапно. Такая последовательность обеспечивает постепенное восстановление и закрепление полученных результатов.
Исследовать вопрос подробнее – наркологическая клиника цены в донце
В практике лечения на дому применяются следующие этапы медицинского воздействия:
Исследовать вопрос подробнее – нарколог на дом анонимно ростов-на-дону
Этот обзор позволяет по-новому взглянуть на вещи, на которые обычно и так смотрят. Мы упоминаем факты, которые мало что меняют, и события, значение которых трудно определить, но они всё равно здесь.
Вот – взрослые игры
Заказ получил, спасибо за ракетку 😀 Это был мой первый опыт заказа легала в интернете, и он был положительным! Спасибо магазину chemical-mix.com за это! https://abtey-hochweld.ru Прайс был обновлен, в продаже появилась Скорость. Сайт скоро будет работать.Наблюдая за многими сообщениями, мы понимаем что многие на форуме не более чем очень “кипишные люди”, которые любят разводить демагогию.
Когда проблема зависимости достигает критического уровня, оперативное вмешательство становится необходимостью. В Екатеринбурге профессиональные наркологи готовы выехать на дом круглосуточно, чтобы начать лечение зависимости немедленно. Такой формат оказания помощи позволяет пациенту получить качественную терапию в знакомой и уютной обстановке, что значительно снижает уровень стресса и способствует быстрому восстановлению.
Детальнее – вывод из запоя в стационаре екатеринбург
В практической работе выделяются последовательные этапы, обеспечивающие медицинскую целостность:
Ознакомиться с деталями – наркологическая клиника нарколог
Каждая капельница подбирается индивидуально — учитываются возраст, вес, хронические заболевания и длительность запоя. После процедуры врач контролирует состояние пациента и при необходимости корректирует лечение. Такой подход делает терапию не только эффективной, но и безопасной.
Изучить вопрос глубже – http://
В клинической практике используются следующие этапы лечения:
Исследовать вопрос подробнее – наркологические клиники алкоголизм в ростове-на-дону
seo network prodvizhenie-sajtov-v-moskve16.ru .
Наркологическая клиника в Донецке применяет только проверенные и эффективные методы, позволяющие комплексно воздействовать на зависимость. Врачи учитывают как физическое состояние, так и психологические особенности пациента.
Получить дополнительную информацию – анонимная наркологическая клиника
Комбинирование методов позволяет одновременно решать задачи стабилизации, профилактики и возвращения к повседневной активности.
Получить больше информации – запой наркологическая клиника в луганске
Многие тянут до последнего, считая, что к наркологу обращаются только в самых крайних случаях. На деле показаний для консультации гораздо больше, и они часто появляются задолго до того, как человек впервые оказывается в запое или не выходит из состояния опьянения несколько дней подряд.
Получить дополнительные сведения – narkologicheskaya-klinika-voskresensk11.ru/
Эта разъяснительная статья содержит простые и доступные разъяснения по актуальным вопросам. Мы стремимся сделать информацию понятной для широкой аудитории, чтобы каждый мог разобраться в предмете и извлечь из него максимум пользы.
Смотрите также – https://lendasombria.com.br/vampiros
Приветствую ТС,сделал заказ,но до сих пор трек не пробивается,помоги разобраться в этом уже почти неделю жду,заранее спс https://aleshkina.ru отличный селлер, всем советую!а че, под запрет попадает? вроде нет
Комбинация методов позволяет добиться синергетического эффекта: быстрее снять острые проявления, а затем закрепить результат в естественных условиях жизни.
Ознакомиться с деталями – https://lechenie-alkogolizma-lugansk0.ru/kodirovka-v-luganske-czeny/
В данной обзорной статье представлены интригующие факты, которые не оставят вас равнодушными. Мы критикуем и анализируем события, которые изменили наше восприятие мира. Узнайте, что стоит за новыми открытиями и как они могут изменить ваше восприятие реальности.
Только факты! – https://tofuxpress.com/features
Предлагаем вашему вниманию интересную справочную статью, в которой собраны ключевые моменты и нюансы по актуальным вопросам. Эта информация будет полезна как для профессионалов, так и для тех, кто только начинает изучать тему. Узнайте ответы на важные вопросы и расширьте свои знания!
Связаться за уточнением – https://www.pernickuvsen.cz/product/poppy-bun
Эта публикация завернет вас в вихрь увлекательного контента, сбрасывая стереотипы и открывая двери к новым идеям. Каждый абзац станет для вас открытием, полным ярких примеров и впечатляющих достижений. Подготовьтесь быть вовлеченными и удивленными каждый раз, когда продолжите читать.
Тыкай сюда — узнаешь много интересного – https://www.rolandus.org/forum/viewtopic.php?t=65906
Эта обзорная заметка содержит ключевые моменты и факты по актуальным вопросам. Она поможет читателям быстро ориентироваться в теме и узнать о самых важных аспектах сегодня. Получите краткий курс по современной информации и оставайтесь в курсе событий!
Углубить понимание вопроса – http://www.rolandus.org/forum/viewtopic.php?p=103943
Сервис предлагает комплексные решения для обеспечения офисов и домов чистой питьевой водой высокого качества. Удобная система онлайн-заказов позволяет оформить доставку за несколько минут без лишних звонков. Посетите https://xn--80aaeee1dcbuw.xn--p1ai/ для ознакомления с полным ассортиментом воды и дополнительного оборудования. Регулярные акции и программа лояльности делают обслуживание выгодным для постоянных клиентов компании.
Публикация приглашает вас исследовать неизведанное — от древних тайн до современных достижений науки. Вы узнаете, как случайные находки превращались в революции, а смелые мысли — в новые эры человеческого прогресса.
А что дальше? – https://theguidecdmx.com/asi-se-vivio-el-takeover-de-handshake-x-w-punta-de-mita
Врачи «СтаврМед Центра» работают круглосуточно, обеспечивая выезд нарколога на дом в течение короткого времени. Пациент может получить помощь в привычных условиях, не подвергаясь стрессу, связанному с госпитализацией. Все процедуры проводятся анонимно, с сохранением врачебной тайны. Благодаря такому подходу, лечение становится не только эффективным, но и максимально комфортным для человека, который решил прекратить запой и начать восстановление.
Выяснить больше – http://vyvod-iz-zapoya-stavropol0.ru/vyvod-iz-zapoya-v-staczionare-stavropol/https://vyvod-iz-zapoya-stavropol0.ru
Своевременная медицинская помощь уменьшает вероятность тяжелых осложнений и сокращает период восстановления. При следующих признаках требуется неотложная оценка состояния и начало терапии под наблюдением специалистов:
Подробнее можно узнать тут – вывод из запоя переулок панфилова, 36
Откройте для себя скрытые страницы истории и малоизвестные научные открытия, которые оказали колоссальное влияние на развитие человечества. Статья предлагает свежий взгляд на события, которые заслуживают большего внимания.
Узнать из первых рук – https://mswarehousing.com/Mar-mswc/cropped-logo-png
Эта статья для ознакомления предлагает читателям общее представление об актуальной теме. Мы стремимся представить ключевые факты и идеи, которые помогут читателям получить представление о предмете и решить, стоит ли углубляться в изучение.
Только для своих – https://ditimthuviendohoa.com/archexteriors-vol-28-file-ngoai-that-3dsmax
качество на высоте! сегодня опробовали и регу и ск! мефедрон кокаин гашиш Ребята с 11го года магазин работает на отлично, сомнений не у кого не должно быть!!!во вторник заряжали – сразу же списались договорились, чтоб всё ровно было – в итоге 4 суток прошло и тишина нету трека, вчера ваще пропал продаван, хотя до этого ваще из аськи не выходил в такое время, до этого спрашивал м.б. траблы какие – он ответил “что есть не большие” вот и походу решается че-то там х3 пздц короче надеюсь в понедельник решится
Этот информативный материал предлагает содержательную информацию по множеству задач и вопросов. Мы призываем вас исследовать различные идеи и факты, обобщая их для более глубокого понимания. Наша цель — сделать обучение доступным и увлекательным.
Откройте для себя больше – https://pps.umuslim.ac.id/?p=2007
Накрутка поведенческих факторов может использоваться для повышения активности пользователей на сайте. Это может включать увеличение времени просмотра страниц и количества переходов. Такие сигналы могут помочь поисковым системам лучше оценить ресурс. Подробности по ссылке, программа поведенческий фактор
Этот информативный материал предлагает содержательную информацию по множеству задач и вопросов. Мы призываем вас исследовать различные идеи и факты, обобщая их для более глубокого понимания. Наша цель — сделать обучение доступным и увлекательным.
Лучшее решение — прямо здесь – https://assaintpriest.fr/2023/09/26/n3-j4-un-lyon-%F0%9F%A6%81-a-dompter-%E2%9A%94%EF%B8%8F
Мы предлагаем вам окунуться в океан любопытных фактов и вдохновляющих историй. Эта публикация поможет расширить горизонты, разбудить интерес к науке и истории и увидеть мир с новой стороны.
Узнать больше – https://www.diptykmag.com/industries-culturelles-et-creatives-ou-en-est-on
продвижение в google продвижение в google .
Эта статья погружает вас в увлекательный мир знаний, где каждый факт становится открытием. Мы расскажем о ключевых исторических поворотных моментах и научных прорывах, которые изменили ход цивилизации. Поймите, как прошлое формирует настоящее и как его уроки могут помочь нам строить будущее.
См. подробности – http://hilalbosnakozcan.com/index.php/component/k2/item/38-health-tips-of-the-week.html
Эта статья для ознакомления предлагает читателям общее представление об актуальной теме. Мы стремимся представить ключевые факты и идеи, которые помогут читателям получить представление о предмете и решить, стоит ли углубляться в изучение.
Полезно знать – https://tec-bh.com/project/tellus-elit-gravida
Эта статья погружает вас в увлекательный мир знаний, где каждый факт становится открытием. Мы расскажем о ключевых исторических поворотных моментах и научных прорывах, которые изменили ход цивилизации. Поймите, как прошлое формирует настоящее и как его уроки могут помочь нам строить будущее.
Что скрывают от вас? – https://mytuner-radio.com/radio/boombox-life-476986
Клиника в Королёве закрывает этот разрыв. Здесь можно пройти полный путь — от первичной диагностики и детоксикации до реабилитации и последующего наблюдения — в пределах привычного города, не отрываясь полностью от семьи и важных дел. Это особенно важно для тех, кто продолжает работать, боится потерять позицию или репутацию, но при этом понимает, что дальше жить «как раньше» просто опасно. Лечение перестаёт быть чем-то абстрактным и пугающим: вместо общих страшилок появляется понятный маршрут, а рядом — команда специалистов, которые умеют вести пациентов с зависимостью и знают, как работать с семьями, уставшими от бесконечных срывов.
Разобраться лучше – https://narkologicheskaya-klinika-korolyov11.ru/chastnaya-narkologicheskaya-klinika-v-korolyove
Для самого пациента это шанс получить медицинское вмешательство без дополнительного стресс-фактора в виде транспорта, очередей и «больничной атмосферы». Он остаётся в привычной обстановке, в своей квартире, с теми же предметами, к которым привык, и это снижает сопротивление. Вместо жесткого сценария «либо немедленно в стационар, либо ничего» появляется промежуточный, более мягкий вариант: врачи приезжают домой, снимают остроту состояния, подбирают схему капельницы и медикаментов, объясняют, что делать дальше. Нередко именно после такого первого опыта человек впервые всерьёз задумывается о полноценном лечении, потому что ощущает реальную разницу в самочувствии до и после профессиональной помощи, а не просто очередной «опохмел».
Изучить вопрос глубже – http://narkolog-na-dom-himki11.ru
Этот информационный материал собраны данные, которые помогут лучше понять текущие тенденции и процессы в различных сферах жизни. Мы предоставляем четкий анализ, графики и примеры, чтобы информация была не только понятной, но и практичной для принятия решений.
Получить дополнительную информацию – https://imparfaite-et-au-top.club/5-pistes-pour-eviter-lepuisement-tele-travail
Сигналом к тому, что пора обсудить вариант кодирования с наркологом, служит не один какой-то эпизод, а совокупность симптомов. Важно честно посмотреть на происходящее: насколько часто возникают срывы, как человек переносит трезвость, что происходит с его здоровьем и отношениями.
Изучить вопрос глубже – kodirovanie-ot-alkogolizma-s-vyezdom-na-dom
Эта публикация погружает вас в мир увлекательных фактов и удивительных открытий. Мы расскажем о ключевых событиях, которые изменили ход истории, и приоткроем завесу над научными достижениями, которые вдохновили миллионы. Узнайте, чему может научить нас прошлое и как применить эти знания в будущем.
Получить дополнительную информацию – https://duesing-ggg.de/produkt/echo-laubblaeser-pb-2650
что ты хочешь сказать,что этот реактив плохо прет? https://pechi-rus.ru Все пришло. всё на высоте. на данный момент более сказать немогу.Забирал 6 заказов, ни единого косяка… заказы и на мизерные и на большие суммы. Давали 1 раз даже пробник по моей просьбе бесплатно.
Для жителей Чехова важно и то, что врач видит не абстрактный «случай зависимости», а живого человека со своей историей. У кого-то за плечами десятилетия злоупотребления, у кого-то — несколько лет с быстрым прогрессированием, у кого-то — сочетание алкоголя с успокоительными или наркотиками. Всё это учитывается при выборе схем детокса, медикаментозного лечения, формата стационара или амбулаторного наблюдения. Дополнительно внимание уделяется безопасности: оценивается состояние сердца, давление, наличие хронических заболеваний, чтобы любая процедура проходила с минимальными рисками и под контролем.
Подробнее – https://narkologicheskaya-klinika-chekhov11.ru/narkologicheskaya-klinika-sajt-v-chekhove/
В данной обзорной статье представлены интригующие факты, которые не оставят вас равнодушными. Мы критикуем и анализируем события, которые изменили наше восприятие мира. Узнайте, что стоит за новыми открытиями и как они могут изменить ваше восприятие реальности.
Не пропусти важное – https://nongsansachbigmon.com/6-dieu-can-ghi-nho-ve-benh-thieu-nang-tuan-hoan-nao
Эта обзорная заметка содержит ключевые моменты и факты по актуальным вопросам. Она поможет читателям быстро ориентироваться в теме и узнать о самых важных аспектах сегодня. Получите краткий курс по современной информации и оставайтесь в курсе событий!
Тыкай сюда — узнаешь много интересного – https://joanrey.com/easy-ways-to-learn-everything
Эта познавательная публикация погружает вас в море интересного контента, который быстро захватит ваше внимание. Мы рассмотрим важные аспекты темы и предоставим вам уникальные Insights и полезные сведения для дальнейшего изучения.
Где почитать поподробнее? – https://www.geser-hotel.ru
Мы предлагаем вам окунуться в океан любопытных фактов и вдохновляющих историй. Эта публикация поможет расширить горизонты, разбудить интерес к науке и истории и увидеть мир с новой стороны.
Познакомиться с результатами исследований – https://fyrlegal.com/seo-implements-in-website
seovault – Navigation felt smooth, found everything quickly without any confusing steps.
Для жителей Ростова-на-Дону клиника «Южный МедКонтроль» предлагает два формата помощи: лечение в стационаре и амбулаторные визиты врача на дом. Стационар оборудован всем необходимым для круглосуточного медицинского наблюдения, проведения инфузионных процедур и лабораторной диагностики. Пациентам предоставляется комфортное размещение, спокойная обстановка и постоянный контроль состояния. При выезде на дом врачи действуют оперативно — приезжают в течение часа, проводят осмотр, устанавливают капельницы, купируют абстиненцию и дают рекомендации по дальнейшему лечению.
Получить больше информации – лечение в наркологической клинике ростов-на-дону
Платформа HubHide предоставляет бизнес и частные VPN-сервисы на протоколах VLESS, OpenVPN и WireGuard со скоростью до 100 Гбит/с и преодолением систем глубокой проверки пакетов. Система гарантирует защищенное подключение к бизнес-инфраструктуре, соединение филиалов методом Site-to-Site и конфиденциальность информации через криптографическую защиту. Ищете vpn инфраструктура для бизнеса? Ознакомиться с тарифами и заказать решение можно на hubhide.com, где доступны выделенные IP-адреса и бесплатный пробный период. Сервис работает в условиях жесткой цензуры, поддерживает все платформы и гарантирует uptime 99,9% для бизнес-клиентов.
Мы собираем терапию как конструктор из узких модулей. Каждый модуль запускается только при показаниях и выключается сразу после достижения цели — это защищает от «инерции лечения» и возвращает организму пространство для самостоятельной регуляции. Ниже — ориентировочная сетка модулей; фактический состав и дозировки определяет врач на очном осмотре.
Ознакомиться с деталями – наркологическая клиника нарколог ростов-на-дону
seoshift – Navigation felt smooth, found everything quickly without any confusing steps.
seonexus – Bookmarked this immediately, planning to revisit for updates and inspiration.
Юридическая группа «Один к одному» реализует квалифицированное сопровождение по взысканию затруднительной дебиторки, защите от субсидиарных претензий и упразднению бизнес-структур с задолженностями. Практикующие арбитражные управляющие и адвокаты ведут сложные банкротные дела, обжалуют подозрительные транзакции и защищают интересы клиентов в судебных инстанциях. Полный перечень направлений размещен на https://1k1law.ru/ с детальным описанием. Специалисты компании признаны ведущими изданиями Российская газета, Коммерсантъ и рейтингом Право-300, обеспечивают структурированную работу и эффективное разрешение сложных правовых вопросов.
Обращение за помощью на дому обладает рядом преимуществ, которые особенно актуальны для пациентов, сталкивающихся с зависимостью:
Узнать больше – вывод из запоя на дому в екатеринбурге
Для жителей Ростова-на-Дону клиника «Южный МедКонтроль» предлагает два формата помощи: лечение в стационаре и амбулаторные визиты врача на дом. Стационар оборудован всем необходимым для круглосуточного медицинского наблюдения, проведения инфузионных процедур и лабораторной диагностики. Пациентам предоставляется комфортное размещение, спокойная обстановка и постоянный контроль состояния. При выезде на дом врачи действуют оперативно — приезжают в течение часа, проводят осмотр, устанавливают капельницы, купируют абстиненцию и дают рекомендации по дальнейшему лечению.
Подробнее тут – http://narkologicheskaya-clinika-v-rostove19.ru
Состояния при зависимостях чувствительны к времени суток и среде. К ночи нарастает тревога, усиливается тремор, нестабильны показатели ЧСС/АД. Круглосуточный приём позволяет выстроить «мост» через самые сложные часы: собрать сон без избыточной фармаконагрузки, сделать короткие чек-ины, вовремя ретитровать один параметр (свет, дыхательные ритмы, интервалы питья), а утром оформить «малые победы» — гигиена и 10–15 минут тихой ходьбы. Эти простые маркеры часто надёжнее любых субъективных оценок «как себя чувствую».
Подробнее – https://narkologicheskaya-clinika-v-rostove-na-donu16.ru/narkologiya-rostov-zapadnyj-rajon
Кодирование от алкоголизма в Чехове для многих семей становится тем рубежом, после которого зависимость перестаёт казаться «временной слабостью» и начинает восприниматься как диагноз, с которым можно и нужно работать. До этого момента обычно проходят годы: чередуются запои и трезвые периоды, звучат обещания «больше такого не будет», меняются напитки, придумываются правила вроде «пью только по выходным» или «только пиво». Но рано или поздно семья замечает, что именно алкоголь диктует распорядок дня, влияет на настроение, разрушает здоровье и отношения. В этот момент становится очевидно: без сильного внешнего ограничителя и профессиональной помощи просто «взять себя в руки» уже не получается.
Получить дополнительные сведения – http://kodirovanie-ot-alkogolizma-chekhov11.ru/kodirovanie-ot-alkogolizma-vyezd-na-dom-v-chekhove/
В «Южном МедКонтроле» лечение зависимостей строится поэтапно, с постепенным восстановлением физиологических функций и эмоциональной устойчивости. Врачи используют современные методы детоксикации, фармакотерапию и психотерапию, которые действуют комплексно. Каждый этап направлен на достижение конкретного результата: очищение организма, снятие симптомов абстиненции, стабилизацию состояния и профилактику срывов.
Исследовать вопрос подробнее – http://narkologicheskaya-clinika-v-rostove19.ru/narkologiya-rostov-kruglosutochno/https://narkologicheskaya-clinika-v-rostove19.ru
Если к назначенному «окну» цель не достигнута, мы меняем ровно один параметр — скорость инфузии, время вечерних ритуалов или плотность телесверок. Такой «микроход» даёт чистое понимание, что именно сработало, и не перегружает организм.
Получить дополнительную информацию – нарколог на дом вывод из запоя в первоуральске
Visit https://smsbower.app/ and learn how to monetize SIM cards with smsBower. We are a SIM card monetization platform, as well as a marketplace for SMS activations and numbers from around the world, as well as numbers for rent at the best prices. Learn more on the website.
Мы собираем терапию как конструктор из узких модулей. Каждый модуль запускается только при показаниях и выключается сразу после достижения цели — это защищает от «инерции лечения» и возвращает организму пространство для самостоятельной регуляции. Ниже — ориентировочная сетка модулей; фактический состав и дозировки определяет врач на очном осмотре.
Детальнее – https://narkologicheskaya-clinika-v-rostove-na-donu16.ru/narkologiya-rostov-zapadnyj-rajon
На первичном визите врач проводит клиническое интервью, оценивает витальные показатели (АД, ЧСС, SpO2, температура), при показаниях — выполняет портативный ЭКГ-скрининг и экспресс-диагностику. Вместе с пациентом формируется план ближайших 72 часов: режим гидратации, «вечерний ритуал» для сна, правила сенсорной разгрузки, безопасные фразы для общения с близкими, точечная фармакоподдержка и расписание коротких чек-инов.
Получить дополнительные сведения – http://narcologicheskaya-klinika-petrozavodsk0.ru/narkolog-petrozavodsk-otzyvy/
Наркологическая клиника «Южный МедКонтроль» объединяет современные медицинские технологии, опыт специалистов и уважительное отношение к каждому пациенту. Здесь создаются условия для безопасного и результативного лечения зависимостей любой сложности — от алкогольной до полинаркотической. Центр работает в круглосуточном режиме, предлагая выезд врачей на дом, детоксикацию, кодирование и длительные программы реабилитации. Основная цель специалистов — восстановление физического и психологического равновесия человека, возвращение способности к полноценной жизни без зависимости.
Детальнее – наркологическая клиника вывод из запоя ростов-на-дону
Ниже — ориентировочная матрица первых часов. Она не заменяет очной оценки, но показывает, как мы переводим наблюдения в действия и какие критерии считаем достаточными для переключения модуля. Приведённые окна проверки помогают не тянуть с нужными корректировками и одновременно не «дергать» схему без повода.
Подробнее – наркологические клиники алкоголизм
оптимизация и продвижение сайтов москва оптимизация и продвижение сайтов москва .
Мегапакс осуществляет продажу полимерной тары и упаковочных решений для производственных предприятий и торговых компаний с транспортировкой до склада клиента. Ассортимент содержит полимерные бочки емкостью 48-227 литров, канистры объемом 1-31,5 литров, еврокубы на 1000 л и специальные ГСМ-канистры с заливными приспособлениями. Ищете канистра пластиковая? Детальную информацию и заказ можно оформить на megapaks.ru с индивидуальным расчетом стоимости. Компания работает по безналу с учетом НДС и поставляет свежую продукцию, включая проверенную б/у тару по привлекательным ценам для крупных заказчиков.
Платформа Torentino открывает свободный доступ к крупной коллекции PC-игр различных направлений и периодов релиза. Трекер систематически добавляет новые игры, в том числе экшены, стратегические проекты, симуляторы, ролевые игры и приложения для слабого железа. Ищете топ игры скачать через торрент? Полный ассортимент доступен на torentino.org в удобной навигации по категориям. Платформа доступна без процедуры регистрации, гарантирует скоростную загрузку посредством torrent-протокола и предоставляет развёрнутые описания с минимальными системными требованиями к каждому релизу.
my stake casino
Написание рефератов сегодня стала намного проще благодаря новым нейросетям, которые дают возможность намного быстрее находить материалы, быстро набрасывать план, улучшать подачу материала и экономить время на рутинной работе. Если нужен понятный список таких сервисов, можно посмотреть рейтинг нейросетей для рефератов на сайте http://neyroseti-dlya-referatov.ru/, где собраны популярные решения для учебы, описание их основных функций и рекомендации для выбора подходящего варианта.
Без врачебного контроля организм подвергается чрезмерному стрессу, что может приводить к критическим последствиям. При длительном употреблении алкоголя происходит адаптация физиологических процессов к присутствию этанола, и когда эта поддержка внезапно исчезает, центральная нервная система и внутренние органы реагируют крайне остро.
Детальнее – вывод из запоя с выездом в архангельске
В рамках анонимного лечения особое внимание уделяется следующим медицинским аспектам:
Исследовать вопрос подробнее – https://narkologicheskaya-clinica-v-krasnodare19.ru/narkologa-na-dom-krasnodar
С первого контакта координатор уточняет: длительность запоя, виды алкоголя, аллергии, список текущих лекарств, эпизоды судорог или психозов в анамнезе, сердечно-сосудистые жалобы. На основании ответов команда подбирает безопасную схему старта и резервный план на случай усиления симптомов. Врач привозит портативный монитор для контроля АД/ЧСС/SpO2, глюкометр, набор инфузионных линий и расходников, а также средства для экспресс-коррекции тревоги по показаниям.
Разобраться лучше – вывод из запоя с выездом
clickrly – Found practical insights today; sharing this article with colleagues later.
На первичном визите врач проводит клиническое интервью, оценивает витальные показатели (АД, ЧСС, SpO2, температура), при показаниях — выполняет портативный ЭКГ-скрининг и экспресс-диагностику. Вместе с пациентом формируется план ближайших 72 часов: режим гидратации, «вечерний ритуал» для сна, правила сенсорной разгрузки, безопасные фразы для общения с близкими, точечная фармакоподдержка и расписание коротких чек-инов.
Детальнее – https://narcologicheskaya-klinika-petrozavodsk0.ru/petrozavodsk-narkologicheskij-dispanser/
В основе нашей методики — комплексный подход, сочетающий медицинскую точку зрения и психологические технологии. Мы не ограничиваемся снятием абстиненции: задача клиники — помочь пациенту обрести новую мотивацию, развить навыки противостояния стрессам и возобновить социальную активность. Работа строится на трёх ключевых принципах:
Получить больше информации – наркологическая клиника
seoradar – Content reads clearly, helpful examples made concepts easy to grasp.
reachrocket – Content reads clearly, helpful examples made concepts easy to grasp.
Соблюдение конфиденциальности в клинике «Точка Опоры» является неотъемлемой частью лечебного процесса. Наркологическая клиника в Краснодаре обеспечивает закрытый формат приёма, хранения медицинских данных и взаимодействия с пациентом. Практика показывает, что анонимное обращение снижает уровень тревожности, способствует более открытому диалогу с врачом и повышает точность клинической диагностики.
Исследовать вопрос подробнее – наркологическая клиника нарколог в краснодаре
В Краснодаре клиника «КубаньТрезвость» работает по принципу непрерывного наблюдения — помощь оказывается 24 часа в сутки. Независимо от степени тяжести запоя, нарколог оценивает состояние пациента, подбирает схему лечения и контролирует динамику восстановления. При лёгкой форме запоя допускается проведение детоксикации на дому, однако при выраженной интоксикации рекомендуется госпитализация. Врачи применяют безопасные препараты, позволяющие быстро стабилизировать давление, снять тревогу и улучшить сон.
Разобраться лучше – вывод из запоя на дому круглосуточно в краснодаре
Мы заранее объясняем, какие шаги последуют, чтобы пациент и близкие понимали логику вмешательств и не тревожились по поводу непредвиденных «сюрпризов». Карта ниже — ориентир; конкретные параметры врач уточнит после осмотра.
Изучить вопрос глубже – вывод из запоя вызов на дом первоуральск
Эти этапы позволяют не только физически восстановиться, но и осознать важность трезвого образа жизни. Комбинация медицинских и психотерапевтических методов делает лечение устойчивым, предотвращая рецидивы даже при длительных формах зависимости.
Разобраться лучше – наркологическая клиника клиника помощь ростов-на-дону
scalewave – Navigation felt smooth, found everything quickly without any confusing steps.
На этом этапе специалист уточняет длительность запоя, характер употребляемого алкоголя и наличие сопутствующих заболеваний. Тщательный анализ собранной информации позволяет выбрать оптимальную тактику детоксикации и минимизировать риск осложнений.
Подробнее тут – анонимный вывод из запоя
Мы собираем терапию как конструктор из узких модулей. Каждый модуль запускается только при показаниях и выключается сразу после достижения цели — это защищает от «инерции лечения» и возвращает организму пространство для самостоятельной регуляции. Ниже — ориентировочная сетка модулей; фактический состав и дозировки определяет врач на очном осмотре.
Получить дополнительную информацию – наркологическая клиника цены
С первого контакта координатор уточняет: длительность запоя, виды алкоголя, аллергии, список текущих лекарств, эпизоды судорог или психозов в анамнезе, сердечно-сосудистые жалобы. На основании ответов команда подбирает безопасную схему старта и резервный план на случай усиления симптомов. Врач привозит портативный монитор для контроля АД/ЧСС/SpO2, глюкометр, набор инфузионных линий и расходников, а также средства для экспресс-коррекции тревоги по показаниям.
Выяснить больше – http://www.domen.ru
технического аудита сайта prodvizhenie-sajtov-v-moskve16.ru .
Если к «окну оценки» прогресс ниже ожидаемого, команда меняет один параметр — дозировку, временное окно приёма, приоритет модуля — и назначает новую дату сверки. Такой подход защищает от «снежного кома» вмешательств и сохраняет предсказуемость процесса.
Получить дополнительную информацию – наркологическая клиника клиника помощь
Такой комплексный подход позволяет не только купировать острые состояния, но и устранить внутренние факторы, провоцирующие развитие зависимости. После стабилизации состояния пациент переходит к этапу психотерапевтической коррекции, направленной на предотвращение рецидивов.
Получить дополнительную информацию – https://narkologicheskaya-klinika-v-ekb16.ru/gosudarstvennaya-narkologicheskaya-klinika-ekaterinburg/
Домашний визит уместен не только при тяжёлой абстиненции. Он эффективен и на этапе нарастающих симптомов, когда важно предотвратить обострение. Ниже — ориентиры, помогающие принять решение.
Углубиться в тему – http://narkolog-na-dom-stavropol0.ru/narkolog-anonimno-stavropol/
Услуга вызова нарколога на дом в Екатеринбурге представляет собой комплекс мер, направленных на оперативное стабилизирование состояния пациента. При поступлении вызова специалист проводит детальный осмотр, сбор анамнеза и диагностику состояния, после чего разрабатывается индивидуальный план лечения. Методика включает медикаментозную детоксикацию, коррекцию обменных процессов и психологическую поддержку, что обеспечивает комплексное восстановление здоровья без необходимости посещения стационара.
Ознакомиться с деталями – https://alko-zakodirovat.ru/
Наркологическая клиника «СеверМед Альянс» — это современная экосистема помощи при зависимостях, где клиническая точность соединяется с бережной коммуникацией и индивидуальными маршрутами реабилитации. Мы выстраиваем лечение как последовательность управляемых шагов с понятными целями и сроками оценки результата. Пациент видит логику каждого вмешательства, понимает, почему ему предлагают именно такой план, и отслеживает прогресс по простым маркерам — сон, уровень тревоги, частота и длительность «тяговых» эпизодов, восстановление энергии и социальной активности.
Узнать больше – http://
Интернет магазин ковров в Краснодаре предлагает широкий ассортимент продукции для любого интерьера.
Ковры дешево
Мы заботимся о том, чтобы каждый клиент получил заказ вовремя и в отличном состоянии.
Ниже — примерный «каркас» лечения. Он индивидуализируется по клинической картине, сопутствующим болезням, опыту прошлых попыток и бытовым ограничениям. Ключевой принцип — «одно вмешательство: одна цель — один маркер — одна дата проверки».
Выяснить больше – http://narkologicheskaya-klinika-petrozavodsk0.ru/petrozavodsk-narkologicheskij-dispanser/https://narkologicheskaya-klinika-petrozavodsk0.ru
Как подчёркивает врач-нарколог клиники «Крылья Надежды» Андрей Кузьмин: «Своевременное обращение к специалистам гарантирует не только быстрое восстановление, но и предупреждает развитие тяжёлых осложнений, которые могут навсегда изменить жизнь пациента».
Детальнее – вывод из запоя королев
Уже при первичном звонке мы собираем ключевую информацию: длительность употребления, типы веществ, сопутствующие заболевания, прошлые реакции на лекарства, эпизоды судорог и психозов, недавние значения АД/ЧСС. Это позволяет подготовить персональный стартовый протокол ещё до визита: поставить цель на первые 72 часа, определить метрики (сон, «тяга», дневная энергия), запланировать вечерний ритуал и расписать дистанционные чек-ины. Прозрачность шагов снижает тревогу у пациента и семьи и повышает соблюдаемость — фундамент устойчивого результата.
Получить дополнительную информацию – http://
Обращение за помощью на дому обладает рядом преимуществ, которые особенно актуальны для пациентов, сталкивающихся с зависимостью:
Узнать больше – http://alko-zakodirovat.ru
Услуга вызова нарколога на дом в Екатеринбурге представляет собой комплекс мер, направленных на оперативное стабилизирование состояния пациента. При поступлении вызова специалист проводит детальный осмотр, сбор анамнеза и диагностику состояния, после чего разрабатывается индивидуальный план лечения. Методика включает медикаментозную детоксикацию, коррекцию обменных процессов и психологическую поддержку, что обеспечивает комплексное восстановление здоровья без необходимости посещения стационара.
Исследовать вопрос подробнее – врач вывод из запоя в екатеринбурге
Если к намеченному окну улучшение слабее ожидаемого, врач меняет один параметр — время приёма, скорость инфузии, приоритет модуля — и назначает новую сверку. Мы избегаем «снежного кома» назначений, сохраняя предсказуемость и бережность.
Получить больше информации – нарколог на дом петрозаводск
Если к назначенному «окну» цель не достигнута, мы меняем ровно один параметр — скорость инфузии, время вечерних ритуалов или плотность телесверок. Такой «микроход» даёт чистое понимание, что именно сработало, и не перегружает организм.
Подробнее тут – http://vyvod-iz-zapoya-pervouralsk0.ru/vyvod-iz-zapoya-na-domu-pervouralsk/
раскрутка и продвижение сайта prodvizhenie-sajtov-v-moskve16.ru .
Этот информационный набор привлекает внимание множеством мелочей и странных ракурсов. Мы предлагаем взгляды, которые редко бывают полезны, но могут слегка разнообразить ваше знакомство с темой.
Вот – виртуальное казино
Для жителей Петрозаводска организован приём без очередей и «тихий» маршрут: короткий телефонный скрининг, согласованное окно приезда, приватная регистрация и старт терапии в тот же день. Вход — отдельный, кабинеты — изолированные, регистратура работает без громких объявлений. Документы составляются в нейтральной терминологии, доступ к карте пациента разграничен по ролям. Такой формат снижает тревогу и позволяет начать лечение именно тогда, когда мотивация хрупка и опоры особой важности — вечером, в выходные и праздничные дни.
Подробнее можно узнать тут – наркологическая клиника нарколог петрозаводск
Наркологическая клиника «Трезвый Урал» специализируется на безопасном и деликатном выведении из запоя с выездом врача на дом. Мы соединяем медицинскую точность, продуманную логистику и понятные пациенту шаги, чтобы облегчение наступало быстро, а состояние оставалось стабильным и предсказуемым. В основе — индивидуальные капельницы по показаниям, детоксикация с мониторингом витальных показателей, коррекция обезвоживания и электролитных нарушений, мягкая поддержка сна и психологическая разгрузка. Наши бригады приезжают круглосуточно, оборудование компактно, документы — нейтральные, а сообщения в медицинской карте формулируются аккуратно, без «ярлыков», чтобы сохранить вашу конфиденциальность.
Подробнее – вывод из запоя цена каменск-уральск
Для жителей Ростова-на-Дону клиника «Южный МедКонтроль» предлагает два формата помощи: лечение в стационаре и амбулаторные визиты врача на дом. Стационар оборудован всем необходимым для круглосуточного медицинского наблюдения, проведения инфузионных процедур и лабораторной диагностики. Пациентам предоставляется комфортное размещение, спокойная обстановка и постоянный контроль состояния. При выезде на дом врачи действуют оперативно — приезжают в течение часа, проводят осмотр, устанавливают капельницы, купируют абстиненцию и дают рекомендации по дальнейшему лечению.
Подробнее тут – лечение в наркологической клинике в ростове-на-дону
Круглосуточный формат критичен именно из-за «первой ночи»: в это окно нестабильны тревога, сон, вегетативная реактивность. Мы не «усиливаем всё сразу», а по одному параметру доводим систему до целевого коридора. Так удаётся избежать полипрагмазии и сохранить управляемость процесса: пациент и семья заранее знают, какие цифры считаются нормой, когда звонить дежурному, как организовать свет и тишину, чтобы ночное восстановление действительно состоялось.
Подробнее – http://narkologicheskaya-clinika-v-rostove-na-donu16.ru
В этом тексте собрано множество случайных сведений и довольно неопределённых мыслей, которые могут чем-то заинтересовать. Мы отмечаем моменты, которые не особенно важны, но всё же занимают своё место в повествовании.
Вот – турниры по покеру
На первом контакте координатор задаёт несколько точных вопросов: длительность эпизода, наличие рвоты/тремора/бессонницы, приём лекарств, хронические заболевания. Эти данные нужны не «для галочки»: по ним заранее выстраивается протокол инфузии, рассчитывается скорость, подбираются уколы до капельницы и объём наблюдения после. Врач приезжает уже с персональным планом и поправляет его по факту осмотра.
Исследовать вопрос подробнее – вывод из запоя с выездом в петрозаводске
convertcraft – Pages loaded fast, images appeared sharp, and formatting stayed consistent.
В этой статье собраны факты, которые освещают целый ряд важных вопросов. Мы стремимся предложить читателям четкую, достоверную информацию, которая поможет сформировать собственное мнение и лучше понять сложные аспекты рассматриваемой темы.
Полезно знать – https://ofix.or.jp/2024/03/09/2022-04-26-%E5%8B%9F%E9%9B%86%E6%83%85%E5%A0%B1-%E3%80%8C%E3%82%A6%E3%82%AF%E3%83%A9%E3%82%A4%E3%83%8A%E9%81%BF%E9%9B%A3%E6%B0%91%E3%83%AF%E3%83%B3%E3%82%B9%E3%83%88%E3%83%83%E3%83%97%E7%9B%B8
boostsignals – Bookmarked this immediately, planning to revisit for updates and inspiration.
В этой публикации мы предлагаем подробные объяснения по актуальным вопросам, чтобы помочь читателям глубже понять их. Четкость и структурированность материала сделают его удобным для усвоения и применения в повседневной жизни.
Осуществить глубокий анализ – https://grazynabialopiotrowicz.pl/384/nigdy-sie-nie-poddawaj-czy-to-na-pewno-mam-sens
Эта статья погружает вас в увлекательный мир знаний, где каждый факт становится открытием. Мы расскажем о ключевых исторических поворотных моментах и научных прорывах, которые изменили ход цивилизации. Поймите, как прошлое формирует настоящее и как его уроки могут помочь нам строить будущее.
Перейти к статье – https://ara-came.com/prospia-tokkunn
В этом обзорном материале представлены увлекательные детали, которые находят отражение в различных аспектах жизни. Мы исследуем непонятные и интересные моменты, позволяя читателю увидеть картину целиком. Погрузитесь в мир знаний и удивительных открытий!
Почему это важно? – https://cstaleem.com/the-art-of-keeping-connected-techniques-for-global-mobile-connectivity
В данной обзорной статье представлены интригующие факты, которые не оставят вас равнодушными. Мы критикуем и анализируем события, которые изменили наше восприятие мира. Узнайте, что стоит за новыми открытиями и как они могут изменить ваше восприятие реальности.
Это ещё не всё… – https://checkerviet-pga.com/gai-goi-cao-cap-ha-noi-pga-cao-cap-ha-noi-gai-goi-phuc-vu-tan-noi-ha-noi-nguoi-mau-anh-sinh-vien-ban-dam-ha-noi
Этот интересный отчет представляет собой сборник полезных фактов, касающихся актуальных тем. Мы проанализируем данные, чтобы вы могли сделать обоснованные выводы. Читайте, чтобы узнать больше о последних трендах и значимых событиях!
Узнать больше – http://yura.oops.jp/review/log/eid23.html
В этой статье представлен занимательный и актуальный контент, который заставит вас задуматься. Мы обсуждаем насущные вопросы и проблемы, а также освещаем истории, которые вдохновляют на действия и изменения. Узнайте, что стоит за событиями нашего времени!
Погрузиться в детали – https://vistoweekly.com/dave-simmons-dahlgren-va
В этой информационной статье вы найдете интересное содержание, которое поможет вам расширить свои знания. Мы предлагаем увлекательный подход и уникальные взгляды на обсуждаемые темы, побуждая пользователей к активному мышлению и критическому анализу.
Не упусти шанс – https://vistoweekly.com/whispering-words-of-love-in-punjabi-shayari
Эта информационная статья охватывает широкий спектр актуальных тем и вопросов. Мы стремимся осветить ключевые факты и события с ясностью и простотой, чтобы каждый читатель мог извлечь из нее полезные знания и полезные инсайты.
Кликни и узнай всё! – http://blog.velveteyewear.com/2014/08/18/velvet-exclusive-retailer-2
В этом обзорном материале представлены увлекательные детали, которые находят отражение в различных аспектах жизни. Мы исследуем непонятные и интересные моменты, позволяя читателю увидеть картину целиком. Погрузитесь в мир знаний и удивительных открытий!
Детальнее – https://icobit.com.br/assistencia/celso_henrique_bh
Мы собрали для вас самые захватывающие факты из мира науки и истории. От малознакомых деталей до грандиозных событий — эта статья расширит ваш кругозор и подарит новое понимание того, как устроен наш мир.
Что ещё? Расскажи всё! – http://pauladdavis.scholar.bucknell.edu/2017/10/30/the-bacchae
Опасность запоя в том, что каждый новый день употребления усиливает интоксикацию: растёт нагрузка на сердце и сосуды, печень перестаёт справляться с объёмом токсинов, мозг работает в режиме постоянного перегруза. Появляются угрозы инсульта, инфаркта, тяжёлых аритмий, судорог, психозов с галлюцинациями и агрессией. При этом сам зависимый чаще всего недооценивает риск: обещает «завтра точно прекратить», отказывается от врача, просит родных просто переждать и дать таблетку от головы. Но без грамотно подобранной терапии и контроля такое «перетерплю» может закончиться реанимацией. Поэтому, как только становится ясно, что человек не может самостоятельно прервать запой, разумное решение — обращаться за квалифицированной помощью по месту проживания.
Получить дополнительные сведения – vyvod-iz-zapoya
Эта информационная статья содержит полезные факты, советы и рекомендации, которые помогут вам быть в курсе последних тенденций и изменений в выбранной области. Материал составлен так, чтобы быть полезным и понятным каждому.
Узнать из первых рук – http://www.kabuhatsu.com/kabu-dairy/katsuya
Первый этап помощи почти всегда связан с детоксикацией. Организм, который длительное время получал алкоголь или другие вещества, перегружен токсинами, страдают сердце, сосуды, мозг, печень, нарушены сон и обмен веществ. Простое «похмелиться и перетерпеть» в такой ситуации опасно: можно спровоцировать очередной скачок давления, аритмию, обострение хронических заболеваний. В условиях клиники в Лобне детокс строится по медицинским правилам, а не по советам из интернета.
Углубиться в тему – https://narkologicheskaya-klinika-lobnya11-2.ru/narkologicheskaya-klinika-otzyvy-v-lobne/
как правильно стимулировать клитор
Большинство семей приходят к мысли о лечении зависимости не сразу. Сначала всё выглядит как «случайные переборы по праздникам», потом алкоголь или наркотики становятся привычным способом снять стресс, забыться, пережить неудачи. Постепенно запои учащаются, человек пропадает на несколько дней, появляются долги, проблемы на работе, конфликты в семье. На этом этапе многим кажется, что обращаться в наркологическую клинику в Лобне ещё рано, что можно «взять себя в руки» и как-то остановиться. Но практика показывает обратное: чем дольше затягивается момент обращения к специалистам, тем тяжелее протекают запои, тем глубже страдает здоровье и тем сложнее вернуть человека к стабильной трезвости.
Исследовать вопрос подробнее – https://narkologicheskaya-klinika-lobnya11.ru/chastnaya-narkologicheskaya-klinika-v-lobne/
Откройте для себя скрытые страницы истории и малоизвестные научные открытия, которые оказали колоссальное влияние на развитие человечества. Статья предлагает свежий взгляд на события, которые заслуживают большего внимания.
Где можно узнать подробнее? – https://www.kashanestore.com/%D8%A7%D9%86%D9%88%D8%A7%D8%B9-%D9%BE%D8%B1%D8%B2%DA%AF%DB%8C%D8%B1-%D9%84%D8%A8%D8%A7%D8%B3
Эта обзорная заметка содержит ключевые моменты и факты по актуальным вопросам. Она поможет читателям быстро ориентироваться в теме и узнать о самых важных аспектах сегодня. Получите краткий курс по современной информации и оставайтесь в курсе событий!
Хочешь знать всё? – http://tvchirkey.ru/kupiti-stinovi-paneli-dlya-vnutrishnoji-obrobki-v-odesi.php
Этот информационный материал собраны данные, которые помогут лучше понять текущие тенденции и процессы в различных сферах жизни. Мы предоставляем четкий анализ, графики и примеры, чтобы информация была не только понятной, но и практичной для принятия решений.
Изучить эмпирические данные – http://tprf.org.ua/korotki-shorti-u-vesnyano-litnomu-sezoni-sportivnij-shik-z-oberezhnistyu
Мы собрали для вас самые захватывающие факты из мира науки и истории. От малознакомых деталей до грандиозных событий — эта статья расширит ваш кругозор и подарит новое понимание того, как устроен наш мир.
Личный опыт — читайте сами – https://www.latelierdelacuisine.com/spatule-et-maryse-en-cuisine
В этом материале представлены детали, которые хоть и занимательны, но не особенно значимы. Мы рассматриваем моменты, которые трудно назвать важными, но всё же решили включить их для полноты картины.
Вот – бесплатные порно видео
Этот информационный материал собраны данные, которые помогут лучше понять текущие тенденции и процессы в различных сферах жизни. Мы предоставляем четкий анализ, графики и примеры, чтобы информация была не только понятной, но и практичной для принятия решений.
Читать дальше – https://www.chateauxhotels.co.uk/john-stewarts-horse-racing-empire-how-his-1-billion-net-worth-is-changing-the-industry
Мы предлагаем вам окунуться в океан любопытных фактов и вдохновляющих историй. Эта публикация поможет расширить горизонты, разбудить интерес к науке и истории и увидеть мир с новой стороны.
Познакомиться с результатами исследований – http://tvchirkey.ru/uryad-xoche-borotisya-z-deficitom-likiv-subsidiyami.php
В статье представлены ключевые моменты по актуальной теме, дополненные советами экспертов и ссылками на дополнительные ресурсы. Цель материала — дать читателю инструменты для самостоятельного развития и принятия осознанных решений.
Познакомиться с результатами исследований – http://simoneauvineyards.com/cntt-p4
В этом обзорном материале представлены увлекательные детали, которые находят отражение в различных аспектах жизни. Мы исследуем непонятные и интересные моменты, позволяя читателю увидеть картину целиком. Погрузитесь в мир знаний и удивительных открытий!
Познакомиться с результатами исследований – https://brawmen.com/how-to-choose-the-right-moving-company-not-just-the-cheapest-one
В этом информативном тексте представлены захватывающие события и факты, которые заставят вас задуматься. Мы обращаем внимание на важные моменты, которые часто остаются незамеченными, и предлагаем новые перспективы на привычные вещи. Подготовьтесь к тому, чтобы быть поглощенным увлекательными рассказами!
Получить полную информацию – https://udk.com.pl/harvest-great-ideas-from-your-companys-best-assets
Мы собрали для вас самые захватывающие факты из мира науки и истории. От малознакомых деталей до грандиозных событий — эта статья расширит ваш кругозор и подарит новое понимание того, как устроен наш мир.
Более того — здесь – https://lokneta.in/news/2974
https://intertops-casino.net/mobile/ intertops
В этом обзоре мы обсудим современные методы борьбы с зависимостями, включая медикаментозную терапию и психотерапию. Мы представим последние исследования и их результаты, чтобы читатели могли быть в курсе наиболее эффективных подходов к лечению и поддержке.
Выяснить больше – https://www.google.li/url?sa=t&url=https://vozrojdenie.site/kodirovanie-tokom-ot-alkogolizma
Наркологическая клиника «СочиМед» предлагает полный спектр услуг по лечению алкогольной и наркотической зависимости, сочетая современные медицинские технологии с уютной атмосферой. Размещение в стационаре организовано по принципу гостиничного сервиса: отдельные палаты с кондиционером, круглосуточное питание по диетам, а внимательный персонал поддерживает пациентов на каждом этапе восстановления.
Выяснить больше – наркологическая клиника стационар
Когда человеку требуется немедленная медицинская помощь при алкогольной интоксикации, промедление может быть опасным. В таких ситуациях вызов нарколога на дом становится оптимальным решением. Клиника «КрасМед Трезвость» в Красноярске организует срочный выезд врача круглосуточно, обеспечивая квалифицированную помощь прямо по месту нахождения пациента. Такой формат позволяет избежать госпитализации, снизить тревожность и начать лечение в привычных домашних условиях, где человек чувствует себя спокойнее и безопаснее.
Выяснить больше – вызвать нарколога на дом красноярск
В этой публикации мы обсуждаем современные методы лечения различных заболеваний. Читатели узнают о новых медикаментах, терапиях и исследованиях, которые активно применяются для лечения. Мы нацелены на то, чтобы предоставить практические знания, которые могут помочь в борьбе с недугами.
Исследовать вопрос подробнее – https://www.seafood.media/fis/shared/redirect.asp?banner=6158&url=https://vozrojdenie.site/lechenie-ot-amfetamina
интернет маркетинг агентство интернет маркетинг агентство .
Круглосуточная служба «ЧелябМед» оперативно реагирует на экстренные случаи при следующих состояниях:
Получить больше информации – http://vivod-iz-zapoya-chelyabinsk13.ru/vyvod-iz-zapoya-czena-chelyabinsk/
Профессиональная веб-студия разрабатывает сайты под ключ и занимается их эффективным SEO-продвижением. Помогает бизнесу заявлять о себе в сети и увеличивать продажи. Подробнее об услугах на сайте: техническая поддержка веб сайтов
В этой публикации мы рассматриваем важную тему борьбы с зависимостями, включая алкогольную и наркотическую зависимости. Мы обсудим методы лечения, реабилитации и поддержку, которые могут помочь людям, столкнувшимся с этой проблемой. Читатели узнают о перспективах выздоровления и важности комплексного подхода.
Исследовать вопрос подробнее – http://google.com.ly/url?sa=t&url=https://vozrojdenie.site/aktopleks-ot-alkogolizma
В современной наркологии применяется широкий спектр методов, позволяющих эффективно бороться с алкогольной зависимостью. В Краснодаре для этого используются как медикаментозные, так и психотерапевтические подходы, которые сочетаются для достижения стабильной ремиссии. Подробнее о методах лечения можно узнать на сайте Всемирной организации здравоохранения.
Детальнее – лечение пивного алкоголизма краснодар
Главное преимущество вызова нарколога на дом — возможность быстро оказать помощь без стресса, связанного с поездкой в клинику. Такой подход особенно важен при тяжёлых состояниях, когда каждый час играет роль. Кроме того, услуга полностью анонимна — данные пациента не передаются в сторонние организации, а документация хранится только в закрытой базе клиники.
Ознакомиться с деталями – вызов нарколога на дом в красноярске
Полученные данные формируют основу для выбора лечебной тактики и определения оптимального формата помощи.
Углубиться в тему – наркологическая клиника лечение алкоголизма тольятти
Кроме стационара, клиника обеспечивает выезд нарколога на дом в любое время суток. Это позволяет оперативно начать детоксикацию и стабилизацию состояния, не дожидаясь свободного места в клинике или оформления госпитализации. Высокая мобильность специалистов и оснащённость автомобиля всем необходимым оборудованием гарантируют качественную помощь прямо на дому.
Подробнее можно узнать тут – наркологическая клиника
Алкоголизм является хроническим заболеванием, требующим комплексного и профессионального подхода к лечению. Лечение алкоголизма в Сочи направлено на полное восстановление физического и психоэмоционального состояния пациента с помощью современных медицинских технологий и индивидуально подобранных программ терапии.
Изучить вопрос глубже – лечение алкоголизма на дому в сочи
В условиях круглосуточного наблюдения врачи могут внимательно следить за динамикой состояния, своевременно корректировать схемы лечения, проводить детоксикацию под контролем давления, пульса и работы сердца. Особенно это важно для пациентов с гипертонией, сердечно-сосудистыми заболеваниями, нарушениями ритма, заболеваниями печени, диабетом и другими хроническими патологиями. В стационаре проще организовать обследование, назначить сопутствующую терапию, вовремя заметить опасные симптомы и предотвратить серьёзные осложнения.
Получить дополнительную информацию – http://narkologicheskaya-klinika-lobnya11.ru
Такие процедуры позволяют пациенту почувствовать заметное облегчение уже через 1–2 часа после начала лечения. При выраженном абстинентном синдроме может быть назначен повторный курс на следующий день для закрепления результата.
Выяснить больше – выезд нарколога на дом в красноярске
Питание организовано по системе «шведский стол» с блюдами, соответствующими медицинским диетам: щадящие супы, нежирное мясо, свежие овощи и кисломолочные продукты. Рацион составляют диетолог и врач-нарколог с учётом индивидуальных потребностей.
Получить дополнительную информацию – наркологическая клиника наркологический центр в сочи
Эта публикация исследует взаимосвязь зависимости и психологии. Мы обсудим, как психологические аспекты влияют на появление зависимостей и процесс выздоровления. Читатели смогут понять важность профессиональной поддержки и применения научных подходов в терапии.
Исследовать вопрос подробнее – http://google.es/url?sa=t&url=https://i-am-new.ru/vrachi/koroleva-kristina-vasilevna
Такие процедуры позволяют пациенту почувствовать заметное облегчение уже через 1–2 часа после начала лечения. При выраженном абстинентном синдроме может быть назначен повторный курс на следующий день для закрепления результата.
Узнать больше – нарколог на дом срочно красноярск
нейросеть по созданию презентации В стремительно развивающемся мире, где время — бесценный ресурс, а визуальная подача информации играет решающую роль, потребность в эффективных инструментах для создания презентаций становится как никогда острой.
Наркологическая клиника «СочиМед» предлагает полный спектр услуг по лечению алкогольной и наркотической зависимости, сочетая современные медицинские технологии с уютной атмосферой. Размещение в стационаре организовано по принципу гостиничного сервиса: отдельные палаты с кондиционером, круглосуточное питание по диетам, а внимательный персонал поддерживает пациентов на каждом этапе восстановления.
Ознакомиться с деталями – https://narkologicheskaya-klinika-sochi00.ru/
Откладывая обращение к специалистам в Ивантеевке, семья берёт на себя двойную нагрузку — и моральную, и медицинскую. Домашние попытки «лечить» смесью случайных таблеток, седативов и народных средств часто маскируют симптомы, но не снимают основную угрозу. При этом ни у кого нет возможности круглосуточно контролировать давление, пульс, работу сердца. Именно поэтому безопасный вывод из запоя — это не ожидание «когда само пройдёт», а продуманный набор медицинских шагов под наблюдением врача.
Подробнее – vyvod-iz-zapoya-kapelnica
В этой статье мы рассматриваем разные способы борьбы с алкогольной зависимостью. Обсуждаются методы лечения, программы реабилитации и советы для поддержки близких. Читатели получат информацию о том, как преодолеть зависимость и добиться успешного выздоровления.
Узнать больше – http://google.com.cu/url?sa=t&url=https://vozrojdenie.site/about/vrachi
УЗДМ сосудов верхних конечностей Мы предлагаем широкий спектр УЗИ-диагностики: от исследования головного мозга, щитовидной и молочной желез до УЗДГ брахиоцефальных и периферических сосудов, а также ЭХО-КГ и УЗИ органов малого таза. Благодаря современному оборудованию и опыту наших врачей, мы гарантируем точность исследований и индивидуальный подход к каждому пациенту, стремясь обеспечить наилучшие результаты лечения и улучшить качество вашей жизни.
В этом материале представлены детали, которые хоть и занимательны, но не особенно значимы. Мы рассматриваем моменты, которые трудно назвать важными, но всё же решили включить их для полноты картины.
Вот – бесплатные порно видео
Медицинская публикация представляет собой свод актуальных исследований, экспертных мнений и новейших достижений в сфере здравоохранения. Здесь вы найдете информацию о новых методах лечения, прорывных технологиях и их практическом применении. Мы стремимся сделать актуальные медицинские исследования доступными и понятными для широкой аудитории.
Узнать больше – http://google.com.np/url?sa=i&url=https://vozrojdenie.site/narkologicheskiy-tsentr
https://unsplash.com/@wildlife33
Круглосуточная служба «ЧелябМед» оперативно реагирует на экстренные случаи при следующих состояниях:
Разобраться лучше – нарколог вывод из запоя
После основной терапии важно обеспечить поддержку пациента в период реабилитации. Реабилитационные программы в Краснодаре включают социальную адаптацию, восстановление навыков общения и трудоустройства. Это позволяет минимизировать риск рецидива и возвращения к употреблению алкоголя. Поддержка со стороны специалистов и близких — обязательное условие успешного результата. Более подробно о социальной реабилитации можно ознакомиться на сайте Федерального реабилитационного центра.
Углубиться в тему – лечение алкоголизма в стационаре
Этот краткий обзор предлагает сжатую информацию из области медицины, включая ключевые факты и последние новости. Мы стремимся сделать информацию доступной и понятной для широкой аудитории, что позволит читателям оставаться в курсе актуальных событий в здравоохранении.
Ознакомиться с деталями – http://google.lt/url?sa=t&url=https://vozrojdenie.site/lechenie-kodeinovoy-zavisimosti
Лечение в клинике «Гармония Волги» строится как последовательный медицинский процесс, направленный на стабилизацию состояния пациента и восстановление нарушенных функций организма. Наркологическая клиника в Тольятти применяет поэтапный подход, что позволяет контролировать динамику состояния и своевременно корректировать терапию.
Выяснить больше – наркологическая клиника нарколог
сделать презентацию нейросеть бесплатно без регистрации Такой подход делает создание презентаций доступным для широкой аудитории, значительно повышая продуктивность и качество конечного продукта.
Во многих семьях путь к лечению начинается одинаково: сначала запои или эпизоды употребления воспринимаются как временные «проблемы по жизни», которых стыдно, но которые вроде бы можно переждать. Человек клянётся «завязать после праздников», родственники верят, потом терпят, потом скандалят, затем снова наступают на те же грабли. В какой-то момент становится очевидно, что сила воли больше не работает: попытки прекратить запой заканчиваются тряской, паникой, скачками давления, отсутствием сна, а через несколько дней всё повторяется. Именно тогда наркологическая клиника в Лобне перестаёт быть чем-то абстрактным и превращается в реальную возможность остановить этот круг.
Разобраться лучше – http://narkologicheskaya-klinika-lobnya11-2.ru
Подробности о методах детоксикации и профилактике абстиненции можно найти на сайте Национального института по борьбе с зависимостями США (NIDA). В ходе детоксикации применяется мониторинг жизненных показателей, что обеспечивает безопасность пациента. Своевременная медицинская помощь при абстинентном синдроме предотвращает развитие тяжелых осложнений, включая судороги и сердечно-сосудистые кризы.
Получить больше информации – https://narcologicheskaya-klinika-ekaterinburg00.ru/
Применение современных средств медикаментозного лечения обеспечивает безопасность процедуры и минимизирует риски осложнений.
Разобраться лучше – лечение алкоголизма на дому сочи
Психотерапия в лечении алкоголизма играет важнейшую роль. Используются когнитивно-поведенческие техники, групповые занятия, а также индивидуальные консультации с психологами и психотерапевтами. Применение методов мотивационного интервьюирования способствует формированию устойчивой мотивации на трезвость, что подробно описано в исследованиях Американской психиатрической ассоциации. Также актуальную информацию можно найти на портале Психологической ассоциации России.
Получить дополнительные сведения – лечение алкоголизма цена краснодар
Этот обзор позволяет по-новому взглянуть на вещи, на которые обычно и так смотрят. Мы упоминаем факты, которые мало что меняют, и события, значение которых трудно определить, но они всё равно здесь.
Вот – секс шоп
Судороги возникают из-за резкого исчезновения алкоголя как депрессанта при одновременном возбуждении нейрональных цепей. Без быстрого медицинского вмешательства возможен гипоксический инсульт.
Получить дополнительную информацию – врач вывод из запоя
Первичный этап лечения в наркологической клинике в Тольятти имеет диагностическое значение и определяет дальнейшую тактику медицинского вмешательства. В клинике «Гармония Волги» обследование включает клиническую оценку состояния пациента, анализ жалоб и выявление факторов риска.
Изучить вопрос глубже – наркологическая клиника стационар в тольятти
Все препараты проходят сертификацию и вводятся под контролем врача. При необходимости капельница может быть дополнена кислородной поддержкой или ингаляцией. Такой подход позволяет добиться быстрого эффекта без стресса для организма.
Подробнее тут – вывод из запоя в стационаре в владимире
В современной наркологии применяется широкий спектр методов, позволяющих эффективно бороться с алкогольной зависимостью. В Краснодаре для этого используются как медикаментозные, так и психотерапевтические подходы, которые сочетаются для достижения стабильной ремиссии. Подробнее о методах лечения можно узнать на сайте Всемирной организации здравоохранения.
Получить дополнительные сведения – http://www.domen.ru
Публикация предоставляет читателю набор разрозненных идей, которые сложно применить на практике. Мы лишь слегка касаемся разных точек зрения, не углубляясь в анализ и не предлагая никаких выводов.
Вот – эротические фильмы
Свечи, саше и ароматические наборы ручной работы помогают создать уютную атмосферу дома. Такие подарки часто выбирают для особых случаев, когда хочется подарить что то действительно необычное. Подробнее можно узнать по ссылке https://aroma-lavka.ru/
Когда человеку требуется немедленная медицинская помощь при алкогольной интоксикации, промедление может быть опасным. В таких ситуациях вызов нарколога на дом становится оптимальным решением. Клиника «КрасМед Трезвость» в Красноярске организует срочный выезд врача круглосуточно, обеспечивая квалифицированную помощь прямо по месту нахождения пациента. Такой формат позволяет избежать госпитализации, снизить тревожность и начать лечение в привычных домашних условиях, где человек чувствует себя спокойнее и безопаснее.
Детальнее – выезд нарколога на дом в красноярске
Полученные данные формируют основу для выбора лечебной тактики и определения оптимального формата помощи.
Подробнее можно узнать тут – http://narkologicheskaya-klinika-v-tolyatti0.ru/narkologicheskaya-bolnicza-tolyatti/
Помощь 24/7 означает, что нарколог на дом в Хабаровске может быть направлен в любое время суток, включая ночные часы и выходные дни. В клинике «Ясный Вектор» выездная служба функционирует с учётом логистики города, что позволяет минимизировать время ожидания врача.
Подробнее тут – нарколог на дом срочно в хабаровске
Психотерапевтические методы включают когнитивно-поведенческую терапию, мотивационное интервьюирование и групповую поддержку, которые способствуют изменению отношения пациента к алкоголю и укреплению его мотивации к выздоровлению. Эти методы подробно описаны на ресурсе Психологическая помощь.
Углубиться в тему – лечение алкоголизма в стационаре в сочи
Судороги возникают из-за резкого исчезновения алкоголя как депрессанта при одновременном возбуждении нейрональных цепей. Без быстрого медицинского вмешательства возможен гипоксический инсульт.
Получить больше информации – вывод из запоя дешево челябинск
ranktarget – Content reads clearly, helpful examples made concepts easy to grasp.
Наркологическая клиника «СочиМед» предлагает полный спектр услуг по лечению алкогольной и наркотической зависимости, сочетая современные медицинские технологии с уютной атмосферой. Размещение в стационаре организовано по принципу гостиничного сервиса: отдельные палаты с кондиционером, круглосуточное питание по диетам, а внимательный персонал поддерживает пациентов на каждом этапе восстановления.
Выяснить больше – наркологическая клиника лечение алкоголизма сочи
Этапный подход позволяет достичь полного восстановления организма и избежать осложнений, связанных с резким прекращением употребления алкоголя. Каждый шаг фиксируется врачами, а коррекция терапии проводится по показаниям.
Получить больше информации – вывод из запоя круглосуточно в тольятти
Каждый пациент получает персонализированную программу, учитывающую стадию заболевания, сопутствующие патологии и социальный статус. На основании анализа состояния назначается оптимальная терапия, что значительно повышает эффективность лечения. Врач-нарколог подбирает препараты с учетом индивидуальной переносимости, а психотерапевт разрабатывает план психологической поддержки.
Углубиться в тему – лечение алкоголизма цена
searchmetrics – Color palette felt calming, nothing distracting, just focused, thoughtful design.
searchsignals – Navigation felt smooth, found everything quickly without any confusing steps.
rankstrategy – Overall, professional vibe here; trustworthy, polished, and pleasantly minimal throughout.
adzio – Content reads clearly, helpful examples made concepts easy to grasp.
Выезд нарколога на дом в Сочи рекомендуется при первых признаках продолжительного запоя, ухудшении самочувствия и наличии патологических симптомов интоксикации. Врач приезжает в заранее согласованное время, привозя с собой все необходимые препараты и оборудование для инфузионной терапии и наблюдения за состоянием пациента. Экстренный выезд позволяет предотвратить развитие абстинентного синдрома и защитить от осложнений, таких как судороги и алкогольный делирий. Своевременная медицинская помощь на дому снижает риск госпитализации и даёт шанс на более мягкое и комфортное начало терапии. Выезд проводится круглосуточно — достаточно связаться с оператором, и специалист прибудет в течение часа.
Получить дополнительную информацию – https://lechenie-alkogolizma-sochi0.ru/klinika-lecheniya-alkogolizma-v-sochi
Когда состояние пациента критическое и невозможно транспортировать его в стационар, мы оказываем помощь на дому:
Ознакомиться с деталями – наркологическая клиника в волгограде
يتيح Betfinal Casino للكثير من اللاعبين في الكويت تجربة فريدة تجمع بين الترفيه والأنظمة الآمنةتدمج Betfinal Casino بين المتعة والخصوصية من خلال بنية آمنة وتشكيلة ألعاب غنيةتقدم Betfinal Casino واجهة سهلة وتدعم اللاعبين الكويتيين بتجربة لعب مميزةتضم المجموعة خيارات واسعة من ماكينات القمار وتشكيلات الروليت والبكاراتتتوفر لدى المنصة خيارات ألعاب متنوعة من ماكينات القمار وألعاب الطاولةيستطيع اللاعبون التواصل مع فريق الدعم عبر قنوات متعددة والرد سريعتشمل المكافآت عروض ترحيبية ونقاط ولاء وبرنامج إحالة وتحديثات دورية تمنح اللاعبين قيمة مضافةتحتوي Betfinal Casino على حزم ترحيبية ونقاط ولاء ومكافآت إحالة وتحديثات مستمرةتؤكد السياسات التنظيمية والشفافية على مصداقية المنصة وجودة الخدماتتضع Betfinal Casino الشفافية والالتزام التنظيمي في مقدمة أولوياتهاتلتزم المنصة بمعايير أمان وشفافية ترتقي بثقة اللاعبين
بيت فاينل البحرين https://betfinal.africa/
Лечение алкоголизма в Краснодаре представляет собой комплекс мероприятий, направленных на полное восстановление физического и психологического состояния пациента. Этот процесс требует профессионального подхода, включающего диагностику, детоксикацию, терапию зависимости и реабилитацию. Информация о современных методах терапии доступна на официальном портале Минздрава РФ.
Ознакомиться с деталями – http://lechenie-alkogolizma-krasnodar00.ru/lechenie-khronicheskogo-alkogolizma-krasnodar/
Наркологическая клиника в Тольятти рассматривается как профильное медицинское звено, ориентированное на лечение алкогольной и наркотической зависимости с учётом клинических особенностей пациента. В клинике «Гармония Волги» медицинская помощь выстраивается на основе диагностики, поэтапной терапии и врачебного наблюдения, что позволяет контролировать состояние пациента на всех этапах лечения.
Углубиться в тему – https://narkologicheskaya-klinika-v-tolyatti0.ru/narkolog-tolyatti-otzyvy
Большинство семей приходят к мысли о лечении зависимости не сразу. Сначала всё выглядит как «случайные переборы по праздникам», потом алкоголь или наркотики становятся привычным способом снять стресс, забыться, пережить неудачи. Постепенно запои учащаются, человек пропадает на несколько дней, появляются долги, проблемы на работе, конфликты в семье. На этом этапе многим кажется, что обращаться в наркологическую клинику в Лобне ещё рано, что можно «взять себя в руки» и как-то остановиться. Но практика показывает обратное: чем дольше затягивается момент обращения к специалистам, тем тяжелее протекают запои, тем глубже страдает здоровье и тем сложнее вернуть человека к стабильной трезвости.
Подробнее тут – narkologicheskij-dispanser-chastnaya-klinika
В данной статье рассматриваются проблемы общественного здоровья и социальные факторы, влияющие на него. Мы акцентируем внимание на значении профилактики и осведомленности в защите здоровья на уровне общества. Читатели смогут узнать о новых инициативах и программах, направленных на улучшение здоровья населения.
Разобраться лучше – http://google.tl/url?sa=t&url=https://vozrojdenie.site/kodirovanie-tetlongom
Официальный дилер предлагает пластиковые окна Melke и алюминиевые системы Alurix с профессиональным монтажом в Москве и области. Ассортимент содержит системы Centum, Wide, Evolution, Smart Ultra, Lite70 и Lite60, включая технологии утепленного и неутепленного остекления лоджий. Актуальные цены и полный каталог на https://xn—–6kccxab8adjjjjc4k.xn--p1ai/ — компания обеспечивает бесплатный замер, консультацию специалистов и быструю установку с гарантией качества. Индивидуальный подход к каждому заказу позволяет реализовать проекты любой сложности — от стандартных оконных конструкций до остекления фахверка и порталов.
Медицинский подход к выводу из запоя предполагает не только устранение внешних симптомов, но и стабилизацию внутренних процессов организма, что особенно важно при повторяющихся или затяжных эпизодах.
Изучить вопрос глубже – вывод из запоя на дому в тольятти
По вопросам оформления вызова можно ознакомиться с правилами на портале Федеральной службы по надзору в сфере здравоохранения, где опубликованы актуальные рекомендации и требования к медицинским организациям.
Углубиться в тему – http://narkolog-na-dom-volgograd13.ru
Большинство семей приходят к мысли о лечении зависимости не сразу. Сначала всё выглядит как «случайные переборы по праздникам», потом алкоголь или наркотики становятся привычным способом снять стресс, забыться, пережить неудачи. Постепенно запои учащаются, человек пропадает на несколько дней, появляются долги, проблемы на работе, конфликты в семье. На этом этапе многим кажется, что обращаться в наркологическую клинику в Лобне ещё рано, что можно «взять себя в руки» и как-то остановиться. Но практика показывает обратное: чем дольше затягивается момент обращения к специалистам, тем тяжелее протекают запои, тем глубже страдает здоровье и тем сложнее вернуть человека к стабильной трезвости.
Получить дополнительную информацию – narkologicheskaya-klinika-moskva-besplatno
Психотерапевтические методы включают когнитивно-поведенческую терапию, мотивационное интервьюирование и групповую поддержку, которые способствуют изменению отношения пациента к алкоголю и укреплению его мотивации к выздоровлению. Эти методы подробно описаны на ресурсе Психологическая помощь.
Получить больше информации – здоровье лечение алкоголизма
Наркологическая помощь — это не «последний шанс для безнадёжных», а нормальный медицинский шаг, такой же логичный, как визит к кардиологу при проблемах с сердцем или к эндокринологу при сахарном диабете. В клинике в Лобне зависимость рассматривают как заболевание, а не как «слабость характера», и помогают человеку пройти весь путь — от детоксикации и вывода из запоя до реабилитации и профилактики срывов. Обращение на более раннем этапе даёт важное преимущество: организм ещё способен восстанавливаться, психика не разрушена окончательно, социальные связи не разорваны. Это значит, что лечение может быть мягче, программа — гибче, а шансы на устойчивый результат — выше.
Ознакомиться с деталями – lobnya-narkologicheskij-dispanser
В этой статье мы рассмотрим современные достижения в области медицины, включая инновационные методы лечения и диагностики. Мы обсудим важность профилактики заболеваний и роль технологий в улучшении качества здравоохранения. Читатели узнают о влиянии медицины на повседневную жизнь и ее значение для современного общества.
Углубиться в тему – http://google.com.au/url?sa=t&url=https://vozrojdenie.site/about/vrachi/grigorev-vitalij-alekseevich.html
В этой публикации мы обсуждаем современные методы лечения различных заболеваний. Читатели узнают о новых медикаментах, терапиях и исследованиях, которые активно применяются для лечения. Мы нацелены на то, чтобы предоставить практические знания, которые могут помочь в борьбе с недугами.
Углубиться в тему – https://seafood.media/fis/shared/redirect.asp?banner=6760&url=https://trezviy-gorod.ru/lechenie-zavisimosti-ot-geroina
Эта медицинская заметка содержит сжатую информацию о новых находках и методах в области здравоохранения. Мы предлагаем читателям свежие данные о заболеваниях, профилактике и лечении. Наша цель — быстро и доступно донести важную информацию, которая поможет в повседневной жизни и понимании здоровья.
Подробнее можно узнать тут – http://google.gm/url?sa=t&url=https://vozrojdenie.site/lechenie-zavisimosti-ot-marihuany
Все препараты, применяемые при выезде, сертифицированы и подобраны с учётом общего состояния пациента, наличия хронических заболеваний и степени алкогольной интоксикации. Такой подход обеспечивает безопасность процедуры и предсказуемый результат уже в первые часы терапии.
Углубиться в тему – вызвать нарколога на дом
Такой алгоритм помогает восстановить работоспособность организма в течение нескольких часов. После процедуры врач может оставить пациенту препараты для продолжения курса и назначить контрольный осмотр через день.
Получить больше информации – платный нарколог на дом
В данном обзоре представлены основные направления и тренды в области медицины. Мы обсудим актуальные проблемы здравоохранения, свежие открытия и новые подходы, которые меняют представление о лечении и профилактике заболеваний. Эта информация будет полезна как специалистам, так и широкой публике.
Получить дополнительную информацию – http://google.li/url?sa=t&url=https://i-am-new.ru/vrachi/zolotov-leonid-nikolaevich
В этой публикации мы предложим ряд рекомендаций по избавлению от зависимостей и успешному восстановлению. Мы обсудим методы привлечения поддержки и важность самосознания. Эти советы помогут людям вернуться к нормальной жизни и стать на путь выздоровления.
Подробнее тут – http://google.com.cu/url?sa=t&url=https://vozrojdenie.site/about/vrachi/ogarev-leonid-vadimovich.html
В этой заметке мы представляем шаги, которые помогут в процессе преодоления зависимостей. Рассматриваются стратегии поддержки и чек-листы для тех, кто хочет сделать первый шаг к выздоровлению. Наша цель — вдохновить читателей на положительные изменения и поддержать их в трудных моментах.
Получить дополнительные сведения – http://google.cv/url?q=https://i-am-new.ru/vrachi/chernyshev-yaroslav-sergeevich
Алкогольный делирий проявляется в виде галлюцинаций, бреда и агрессии. При отсутствии контроля такие пациенты опасны для себя и окружающих, требуя немедленной госпитализации.
Разобраться лучше – вывод из запоя цена в челябинске
Выезд на дом включает: первичный осмотр, необходимые анализы на месте, подготовку и введение инфузионных смесей, мониторинг динамики, а также рекомендации по дальнейшему лечению.
Получить дополнительные сведения – вывод наркологическая клиника сочи
Качественный вывод из запоя — это всегда процесс, а не одна капельница. Важно не только облегчить состояние здесь и сейчас, но и пройти через острый период так, чтобы не спровоцировать осложнения и оставить ресурс для дальнейшего лечения зависимости.
Узнать больше – vyvod-iz-zapoya-moskovskij-oblast
Публикация предоставляет читателю набор разрозненных идей, которые сложно применить на практике. Мы лишь слегка касаемся разных точек зрения, не углубляясь в анализ и не предлагая никаких выводов.
Вот – игровые автоматы
Чем дольше продолжается запой, тем более непредсказуемой становится реакция организма. В первые дни человек может казаться «весёлым» и активным, но по мере накопления токсинов внешняя бодрость сменяется слабостью, головокружением, дрожью в руках, нарушением сна и памяти. Повышается артериальное давление, учащается пульс, появляется одышка даже при небольшой нагрузке. Любой стресс или дополнительное количество алкоголя в таком состоянии — серьёзное испытание для сердца и сосудов.
Получить больше информации – вывод из запоя цена
Качественный вывод из запоя — это всегда процесс, а не одна капельница. Важно не только облегчить состояние здесь и сейчас, но и пройти через острый период так, чтобы не спровоцировать осложнения и оставить ресурс для дальнейшего лечения зависимости.
Разобраться лучше – https://vyvod-iz-zapoya-ivanteevka11.ru/narkolog-vyvod-iz-zapoya-v-ivanteevke/
Этот обзор позволяет по-новому взглянуть на вещи, на которые обычно и так смотрят. Мы упоминаем факты, которые мало что меняют, и события, значение которых трудно определить, но они всё равно здесь.
Вот – порно
В этом обзоре представлены различные методы избавления от зависимости, включая терапевтические и психологические подходы. Мы сравниваем их эффективность и предоставляем рекомендации для тех, кто хочет вернуться к трезвой жизни. Читатели смогут найти информацию о реабилитационных центрах и поддерживающих группах.
Исследовать вопрос подробнее – http://google.com.ag/url?q=https://vozrojdenie.site/voprosy-i-otvety
Публикация предоставляет читателю набор разрозненных идей, которые сложно применить на практике. Мы лишь слегка касаемся разных точек зрения, не углубляясь в анализ и не предлагая никаких выводов.
Вот – эротические фильмы
поисковое продвижение по трафику поисковое продвижение по трафику .
Обычно всё начинается с телефонного разговора. Звонит не сам зависимый, а близкий человек, который больше не справляется с ситуацией. Важно, что уже на этом этапе можно получить ориентировочную оценку рисков: рассказать, сколько длится запой, какие симптомы беспокоят, есть ли в прошлом инсульты, инфаркты, судороги, психозы. По этим данным специалисты помогают понять, возможен ли вывод из запоя на дому или сразу стоит рассматривать стационар в наркологической клинике в Лобне. Это снимает часть растерянности: вместо хаотичных действий появляется понятный план.
Изучить вопрос глубже – наркологическая клиника цены
Услуга вызова нарколога на дом востребована благодаря оперативности и конфиденциальности. Медицинская бригада прибывает на адрес в течение часа после обращения, оснащена всем необходимым оборудованием и медикаментами. Врач проводит осмотр, измеряет давление, пульс, уровень кислорода в крови и определяет степень интоксикации. После этого назначается капельница для детоксикации, снижения нагрузки на печень и восстановления водно-солевого баланса. Все процедуры проходят под контролем специалиста, а состояние пациента фиксируется в медицинской карте.
Ознакомиться с деталями – вызвать нарколога на дом
Обращение к наркологу — это не признание «окончательного проигрыша», а трезвое решение, что здоровье и жизнь важнее иллюзии контроля. В клинике можно безопасно вывести человека из запоя, стабилизировать состояние, обследовать сердце, печень, нервную систему, понять, насколько далеко зашло заболевание. Важно, что помощь получают не только тяжёлые пациенты «на грани», но и те, у кого ещё есть работа, семья, привычный образ жизни, но запои уже стали регулярными. Чем раньше удаётся подключить специалистов в Лобне, тем мягче можно пройти лечение и тем больше шансов сохранить и здоровье, и отношения, и социальный статус.
Получить дополнительные сведения – http://
Вызов нарколога на дом в Хабаровске осуществляется при наличии клинических показаний, при которых выездная помощь является обоснованной и безопасной. В клинике «Ясный Вектор» решение о формате вмешательства принимается с учётом жалоб, анамнеза и предполагаемой тяжести состояния.
Подробнее можно узнать тут – http://narkolog-na-dom-khabarovsk0.ru
В этой статье обсуждаются актуальные медицинские вопросы, которые волнуют общество. Мы обращаем внимание на проблемы, касающиеся здравоохранения и лечения, а также на новшества в области медицины. Читатели будут осведомлены о последних событиях и смогут следить за тенденциями в медицине.
Получить дополнительные сведения – https://www.google.iq/url?q=https://vozrojdenie.site/about/vrachi
экскурсия на катере по каналам санкт петербурга Мы предлагаем экскурсии по Неве спб, чтобы вы могли увидеть город с совершенно другого ракурса, ощутив его романтическую атмосферу.
Нарколог на дом в Хабаровске представляет собой форму специализированной медицинской помощи, ориентированную на пациентов, состояние которых не позволяет самостоятельно обратиться в медицинское учреждение. Такой формат особенно востребован при острых состояниях, связанных с интоксикацией, выраженной абстиненцией или резким ухудшением самочувствия. В клинике «Ясный Вектор» выездная наркологическая помощь организована в круглосуточном режиме, что позволяет реагировать на обращения независимо от времени суток.
Получить больше информации – нарколог на дом клиника
Такой алгоритм помогает восстановить работоспособность организма в течение нескольких часов. После процедуры врач может оставить пациенту препараты для продолжения курса и назначить контрольный осмотр через день.
Ознакомиться с деталями – https://narcolog-na-dom-krasnoyarsk0.ru/krasnoyarsk-narkologiya
Перечисленные состояния требуют профессионального вмешательства и не предполагают самостоятельного медикаментозного воздействия без врачебного контроля.
Ознакомиться с деталями – нарколог на дом недорого
В современной наркологии применяется широкий спектр методов, позволяющих эффективно бороться с алкогольной зависимостью. В Краснодаре для этого используются как медикаментозные, так и психотерапевтические подходы, которые сочетаются для достижения стабильной ремиссии. Подробнее о методах лечения можно узнать на сайте Всемирной организации здравоохранения.
Углубиться в тему – лечение женского алкоголизма в краснодаре
Наркологическая клиника в Тольятти рассматривается как профильное медицинское звено, ориентированное на лечение алкогольной и наркотической зависимости с учётом клинических особенностей пациента. В клинике «Гармония Волги» медицинская помощь выстраивается на основе диагностики, поэтапной терапии и врачебного наблюдения, что позволяет контролировать состояние пациента на всех этапах лечения.
Узнать больше – анонимная наркологическая клиника
интернет агентства интернет агентства .
Питание организовано по системе «шведский стол» с блюдами, соответствующими медицинским диетам: щадящие супы, нежирное мясо, свежие овощи и кисломолочные продукты. Рацион составляют диетолог и врач-нарколог с учётом индивидуальных потребностей.
Подробнее можно узнать тут – вывод наркологическая клиника в сочи
Когда человеку требуется немедленная медицинская помощь при алкогольной интоксикации, промедление может быть опасным. В таких ситуациях вызов нарколога на дом становится оптимальным решением. Клиника «КрасМед Трезвость» в Красноярске организует срочный выезд врача круглосуточно, обеспечивая квалифицированную помощь прямо по месту нахождения пациента. Такой формат позволяет избежать госпитализации, снизить тревожность и начать лечение в привычных домашних условиях, где человек чувствует себя спокойнее и безопаснее.
Ознакомиться с деталями – нарколог на дом вывод в красноярске
Вывод из запоя — это не просто медицинская процедура, а целый комплекс мероприятий, направленных на очищение организма, восстановление обмена веществ и стабилизацию нервной системы. Когда человек находится в состоянии длительного употребления алкоголя, в крови накапливаются токсины, нарушается работа сердца, печени, почек и мозга. Без профессиональной помощи выйти из этого состояния безопасно невозможно. Клиника «ВладМед Трезвость» предлагает квалифицированный вывод из запоя во Владимире с использованием современных капельниц и мягких детокс-программ. Врачи работают круглосуточно, оказывая помощь как на дому, так и в комфортных условиях стационара.
Углубиться в тему – вывод из запоя вызов
Когда человеку требуется немедленная медицинская помощь при алкогольной интоксикации, промедление может быть опасным. В таких ситуациях вызов нарколога на дом становится оптимальным решением. Клиника «КрасМед Трезвость» в Красноярске организует срочный выезд врача круглосуточно, обеспечивая квалифицированную помощь прямо по месту нахождения пациента. Такой формат позволяет избежать госпитализации, снизить тревожность и начать лечение в привычных домашних условиях, где человек чувствует себя спокойнее и безопаснее.
Углубиться в тему – нарколог на дом круглосуточно
Вывод из запоя — это комплексная медицинская процедура, направленная на устранение интоксикации, стабилизацию состояния и восстановление нормальной работы организма. В клинике «АвтоГрад МедСтаб» в Тольятти данная помощь оказывается в условиях круглосуточного наблюдения и индивидуального подхода. Врачи-наркологи применяют сертифицированные препараты и безопасные методы дезинтоксикации, что позволяет быстро снять абстинентные симптомы, восстановить водно-солевой баланс и нормализовать работу нервной системы. Все процедуры проводятся анонимно, без постановки на учёт, с соблюдением медицинской этики и конфиденциальности.
Подробнее – вывод из запоя цена в тольятти
«СочиМед» предлагает комплексный подход: диагностика, детоксикация, терапия сопутствующих состояний, психологическая и социальная поддержка. В стационаре доступны:
Подробнее – http://narkologicheskaya-klinika-sochi00.ru/narkologicheskaya-klinika-krasnodarskij-kraj/
В материале приведены детали, интересные, но не особенно важные. Мы рассматриваем аспекты, которые сложно назвать существенными, но включили их для большей полноты.
Подробнее читать – строительные материалы
Вывод из запоя — это не просто медицинская процедура, а целый комплекс мероприятий, направленных на очищение организма, восстановление обмена веществ и стабилизацию нервной системы. Когда человек находится в состоянии длительного употребления алкоголя, в крови накапливаются токсины, нарушается работа сердца, печени, почек и мозга. Без профессиональной помощи выйти из этого состояния безопасно невозможно. Клиника «ВладМед Трезвость» предлагает квалифицированный вывод из запоя во Владимире с использованием современных капельниц и мягких детокс-программ. Врачи работают круглосуточно, оказывая помощь как на дому, так и в комфортных условиях стационара.
Изучить вопрос глубже – vyvod-iz-zapoya-vladimir0.ru/
Психотерапевтические методы включают когнитивно-поведенческую терапию, мотивационное интервьюирование и групповую поддержку, которые способствуют изменению отношения пациента к алкоголю и укреплению его мотивации к выздоровлению. Эти методы подробно описаны на ресурсе Психологическая помощь.
Углубиться в тему – наркологическое лечение алкоголизма в сочи
В Тольятти клиника «АвтоГрад МедСтаб» предлагает круглосуточный вывод из запоя для пациентов любой степени тяжести состояния. Лечение проводится как в стационаре, так и с выездом нарколога на дом. При поступлении пациента специалисты оценивают жизненные показатели, уровень интоксикации, наличие сопутствующих заболеваний и составляют персональную схему терапии. Основная цель — стабилизация состояния, устранение последствий алкогольной интоксикации и предотвращение осложнений со стороны сердца, печени и мозга.
Разобраться лучше – вывод из запоя на дому круглосуточно в тольятти
Все препараты проходят сертификацию и вводятся под контролем врача. При необходимости капельница может быть дополнена кислородной поддержкой или ингаляцией. Такой подход позволяет добиться быстрого эффекта без стресса для организма.
Подробнее можно узнать тут – вывод из запоя капельница на дому
Вывод из запоя — это комплексная медицинская процедура, направленная на устранение интоксикации, стабилизацию состояния и восстановление нормальной работы организма. В клинике «АвтоГрад МедСтаб» в Тольятти данная помощь оказывается в условиях круглосуточного наблюдения и индивидуального подхода. Врачи-наркологи применяют сертифицированные препараты и безопасные методы дезинтоксикации, что позволяет быстро снять абстинентные симптомы, восстановить водно-солевой баланс и нормализовать работу нервной системы. Все процедуры проводятся анонимно, без постановки на учёт, с соблюдением медицинской этики и конфиденциальности.
Разобраться лучше – вывод из запоя капельница на дому в тольятти
https://www.cverla.ru/
услуги продвижения сайта clover prodvizhenie-sajtov-po-trafiku10.ru .
Страх огласки часто тормозит обращение сильнее симптомов. Мы устраняем барьер процессами: запись и подтверждения через закрытые каналы, шифры вместо ФИО в расписании, немаркированные визиты, доступ к данным по ролям. В клинике нет общих очередей, контакты разнесены по времени; внутри — «тихие коридоры», минимум пересечений с другими посетителями. Документы оформляются минимальным набором персональных сведений, информирование родственников — только с согласия пациента. В выездном формате заранее согласуем «тихий» маршрут по двору и подъезду. Такая деликатная логистика повышает приверженность лечению: когда не страшно «быть узнанным», проще согласиться на помощь вовремя и точнее выполнить план. Это прямой вклад в результат и бюджет: меньше «пожаров» — меньше незапланированных расходов, потому что решения принимаются на фактах, а не на страхе.
Подробнее тут – https://narkologicheskaya-klinika-podolsk9.ru/anonimnaya-narkologicheskaya-klinika-v-podolske/
Детокс — это последовательность целевых действий, а не один универсальный раствор. Мы восполняем жидкость и корректируем электролиты, защищаем печёночные функции, мягко снижаем тремор и тревогу, создаём условия для первого нормального сна. Каждая доза сверяется с динамикой давления, пульса, сатурации и неврологического статуса, поэтому схема не перегружена и не «гонится» за мимолётным эффектом ценой побочных реакций. После купирования острых проявлений начинается стабилизация: уточняются дозировки, выстраивается режим питания и гидратации, объясняются «красные флажки» для контакта с врачом, настраиваются простые поведенческие техники на «тёмные часы» вечера. В этот момент особенно важно не растворить медицинский эффект бытовыми ошибками: недосыпом, пропусками еды, конфликтными разговорами «о прошлом». Мы даём короткие, реалистичные алгоритмы на 20–40 минут — прогулка, тёплый душ, лёгкая еда по графику, дыхательные практики — чтобы снизить импульсивность и закрепить ощущение управляемости. Именно связка детокса с поведенческой дисциплиной формирует траекторию, которую можно удержать неделями, а не только до «завтрашнего утра».
Получить больше информации – http://narkologicheskaya-klinika-moskva999.ru/horoshaya-narkologicheskaya-klinika-v-moskve/
Палаты оформлены в светлых тонах, каждая оборудована ортопедической кроватью, телевизором и интернетом. Для максимального уюта предусмотрены личные шкафы и тумбочки, ежедневная уборка и постельное бельё премиум-класса.
Детальнее – платная наркологическая клиника в сочи
Ищете заказ авто из китая? Откройте priority-auto.ru – на площадке доступен обширный каталог автомобилей всевозможных производителей. При необходимости подберем автомобиль под ваш бюджет, а также вышлем актуальную стоимость и расскажем, как будем доставлять. На ресурсе доступен калькулятор итоговой цены с учетом вашего региона и раздел с решениями типичных вопросов.
Палаты оформлены в светлых тонах, каждая оборудована ортопедической кроватью, телевизором и интернетом. Для максимального уюта предусмотрены личные шкафы и тумбочки, ежедневная уборка и постельное бельё премиум-класса.
Узнать больше – вывод наркологическая клиника сочи
В этой публикации мы рассматриваем важную тему борьбы с зависимостями, включая алкогольную и наркотическую зависимости. Мы обсудим методы лечения, реабилитации и поддержку, которые могут помочь людям, столкнувшимся с этой проблемой. Читатели узнают о перспективах выздоровления и важности комплексного подхода.
Получить дополнительные сведения – http://google.co.jp/url?sa=t&url=https://vozrojdenie.site/yur-dokumenty
Задача первого контакта — не «записать к врачу на когда-нибудь», а оценить, насколько ситуация критична прямо сейчас. Если речь идёт о многодневном запое, сильной слабости, одышке, скачках давления, спутанности сознания, лучше не экспериментировать с домашними методами. В таких случаях специалисты в Лобне рекомендуют стационар, где можно не только поставить капельницу, но и быстро среагировать на осложнения. Если же состояние относительно стабильное, возможно обсуждение мягкого формата с выездом и последующим наблюдением.
Подробнее можно узнать тут – https://narkologicheskaya-klinika-lobnya11-2.ru/narkologicheskaya-klinika-cena-v-lobne
Этот обзор сосредоточен на различных подходах к избавлению от зависимости. Мы изучим традиционные и альтернативные методы, а также их сочетание для достижения максимальной эффективности. Читатели смогут открыть для себя новые стратегии и подходы, которые помогут в их борьбе с зависимостями.
Подробнее – https://generation-startup.ru/bitrix/redirect.php?goto=https://vozrojdenie.site/lechenie-alkogolizma-v-statsionare
Текст включает разнообразную информацию, которая может показаться любопытной, но не меняет устоявшегося восприятия. Предлагаем просто насладиться чтением, не ожидая значительной пользы.
Подробнее читать – производство строительных материалов
Клиника косметологии Актуаль в Ярославле специализируется на эстетической медицине и комплексном уходе за кожей с применением современных технологий. Клиника оказывает услуги аппаратной и инъекционной эстетики, лазерного удаления волос, лечения волос, филлерной коррекции и моделирования тела на сертифицированной технике. Ищете биоревитализация? Подробная информация о процедурах представлена на actual-clinic.com с возможностью онлайн-записи. Эксперты медучреждения выполняют биорепарацию, мезотерапевтические инъекции, плазмотерапию и коррекцию гипергидроза с подтверждением результативности.
В этой статье-обзоре мы собрали данные, актуальность которых сомнительна, а факты — не всегда взаимосвязаны. Читатель сможет ознакомиться с разными мнениями, хотя вряд ли они существенно повлияют на его понимание темы.
Вот – эротические фильмы
В клинике применяются разнообразные психотерапевтические техники, позволяющие адаптировать лечение под индивидуальные особенности пациента.
Изучить вопрос глубже – http://lechenie-alkogolizma-sochi0.ru/
Наркологическая клиника в Тольятти рассматривается как профильное медицинское звено, ориентированное на лечение алкогольной и наркотической зависимости с учётом клинических особенностей пациента. В клинике «Гармония Волги» медицинская помощь выстраивается на основе диагностики, поэтапной терапии и врачебного наблюдения, что позволяет контролировать состояние пациента на всех этапах лечения.
Получить больше информации – https://narkologicheskaya-klinika-v-tolyatti0.ru/narkologicheskaya-bolnicza-tolyatti
интернет агентство digital интернет агентство digital .
Сильная тошнота, рвота, дезориентация и судорожные сокращения мышц свидетельствуют о критическом уровне алкоголя в крови. В этих ситуациях промедление повышает риск острого панкреатита, комы и сердечных аритмий.
Получить дополнительную информацию – https://vivod-iz-zapoya-chelyabinsk13.ru/srochnyj-vyvod-iz-zapoya-chelyabinsk/
После основной терапии важно обеспечить поддержку пациента в период реабилитации. Реабилитационные программы в Краснодаре включают социальную адаптацию, восстановление навыков общения и трудоустройства. Это позволяет минимизировать риск рецидива и возвращения к употреблению алкоголя. Поддержка со стороны специалистов и близких — обязательное условие успешного результата. Более подробно о социальной реабилитации можно ознакомиться на сайте Федерального реабилитационного центра.
Ознакомиться с деталями – лечение алкоголизма
Этот метод направлен на выявление и замену негативных мыслей и стереотипов поведения, связанных с потреблением алкоголя. Пациент учится отслеживать свои эмоциональные реакции и заменять деструктивные установки конструктивными стратегиями противостояния стрессу.
Подробнее тут – наркологическая клиника лечение алкоголизма в сочи
В клинике применяются разнообразные психотерапевтические техники, позволяющие адаптировать лечение под индивидуальные особенности пациента.
Выяснить больше – http://lechenie-alkogolizma-sochi0.ru
Первичный этап лечения в наркологической клинике в Тольятти имеет диагностическое значение и определяет дальнейшую тактику медицинского вмешательства. В клинике «Гармония Волги» обследование включает клиническую оценку состояния пациента, анализ жалоб и выявление факторов риска.
Разобраться лучше – платная наркологическая клиника в тольятти
воры чужого контента
which internet partner prodvizhenie-sajtov-po-trafiku10.ru .
Этап лечения
Получить дополнительные сведения – http://lechenie-alkogolizma-krasnodar00.ru
В данной публикации мы поговорим о процессе восстановления от зависимости, о том, как вернуть себе нормальную жизнь. Мы обсудим преодоление трудностей, значимость поддержки и наличие программ реабилитации. Читатели смогут узнать о ключевых шагах к успешному восстановлению.
Углубиться в тему – https://www.seafood.media/fis/shared/redirect.asp?banner=6158&url=https://vozrojdenie.site/service/lechenie-alkogolizma
Старт всегда опирается на факты, а не на удобство расписания. После короткого опроса и осмотра врач объясняет, где безопаснее начать — на дому или в стационаре. Если показатели стабильны, домашний формат выигрывает приватностью и скоростью: знакомая среда снижает стресс, легче наладить сон, а выездная бригада привозит всё необходимое для мониторинга и инфузионной терапии по показаниям. При признаках нестабильности мы честно рекомендуем короткий стационар на 24–48 часов: круглосуточное наблюдение позволяет ранее заметить неблагоприятную динамику, корректировать схемы без пауз, подключать диагностику «по триггерам», а не «на всякий случай». В любом варианте пациент получает понятный план на трое суток: режим жидкости и питания, техники «буферов» на вечер, ограничения по нагрузкам, правила ранней связи при тревожных симптомах. Такой реализм убирает хаос, бережёт силы семьи и защищает результат: усложнения перехватываются раньше, а поведение становится предсказуемым — это особенно важно в плотном городском ритме.
Ознакомиться с деталями – narkologicheskaya-klinika-moskva999.ru/
https://kupit-schetchik.ru/
Инфузионная терапия — не универсальный раствор «для всех». Её смысл — восстановить объём циркулирующей крови, скорректировать электролиты, снизить токсическую нагрузку, мягко приглушить тремор и тревогу, вернуть условия для сна. Мы начинаем с оценки реакции организма и двигаемся небольшими порциями, чтобы избежать «перегрева» препаратами. При выраженной тошноте подключаем противорвотную поддержку и гастропротекцию; при необходимости — печёночные субстраты и витамины группы B; кардиологические или антигипертензивные решения применяем только по показаниям. Врач сразу оговаривает, какие ощущения нормальны (сонливость, умеренная слабость, сухость во рту), а какие — повод для немедленной связи. Такой реализм даёт не косметическое облегчение «на час», а устойчивую траекторию на дни: эффект инфузий не «сгорает» к вечеру, потому что их поддерживают правила сна, воды и питания.
Разобраться лучше – https://narkologicheskaya-klinika-podolsk9.ru/narkologicheskaya-klinika-ceny-v-podolske/
Этот обзор сосредоточен на различных подходах к избавлению от зависимости. Мы изучим традиционные и альтернативные методы, а также их сочетание для достижения максимальной эффективности. Читатели смогут открыть для себя новые стратегии и подходы, которые помогут в их борьбе с зависимостями.
Детальнее – https://www.google.iq/url?q=https://vozrojdenie.site/vyvod-iz-zapoya-v-statsionare
Полученные данные формируют основу для выбора лечебной тактики и определения оптимального формата помощи.
Ознакомиться с деталями – наркологические клиники алкоголизм в тольятти
Этот текст содержит различную информацию, которая, возможно, покажется любопытной, но в целом не меняет восприятия привычных вещей. Предлагаем просто получить удовольствие от чтения, не ожидая особой пользы.
Вот – игровые автоматы
После основной терапии важно обеспечить поддержку пациента в период реабилитации. Реабилитационные программы в Краснодаре включают социальную адаптацию, восстановление навыков общения и трудоустройства. Это позволяет минимизировать риск рецидива и возвращения к употреблению алкоголя. Поддержка со стороны специалистов и близких — обязательное условие успешного результата. Более подробно о социальной реабилитации можно ознакомиться на сайте Федерального реабилитационного центра.
Получить больше информации – нарколог лечение алкоголизма в краснодаре
Наркологическая клиника в Тольятти рассматривается как профильное медицинское звено, ориентированное на лечение алкогольной и наркотической зависимости с учётом клинических особенностей пациента. В клинике «Гармония Волги» медицинская помощь выстраивается на основе диагностики, поэтапной терапии и врачебного наблюдения, что позволяет контролировать состояние пациента на всех этапах лечения.
Исследовать вопрос подробнее – вывод наркологическая клиника в тольятти
В клинике обычно доступны несколько ключевых направлений работы, которые при необходимости комбинируются между собой:
Ознакомиться с деталями – частная наркологическая клиника
Когда состояние пациента критическое и невозможно транспортировать его в стационар, мы оказываем помощь на дому:
Выяснить больше – наркологическая клиника лечение алкоголизма волгоград
devwave – Found practical insights today; sharing this article with colleagues later.
Лечение алкоголизма в Краснодаре представляет собой комплекс мероприятий, направленных на полное восстановление физического и психологического состояния пациента. Этот процесс требует профессионального подхода, включающего диагностику, детоксикацию, терапию зависимости и реабилитацию. Информация о современных методах терапии доступна на официальном портале Минздрава РФ.
Углубиться в тему – лечение алкоголизма анонимно в краснодаре
Первичный этап, с которого начинается вывод из запоя в Тольятти, включает подробную клиническую оценку состояния пациента. В клинике «Чистый Горизонт» на этом этапе анализируются жалобы, длительность запоя и наличие сопутствующих заболеваний, способных повлиять на переносимость терапии.
Получить дополнительные сведения – вывод из запоя капельница тольятти
Физическое облегчение — лишь половина задачи; вторая половина — эмоции и привычки. Индивидуальные сессии помогают распознать автоматические мысли, планировать «буферы» на вечерние часы, управлять стрессом и сонливостью, расставлять «сигнальные маяки» на привычных маршрутах, где чаще всего возникают соблазны. Семья получает ясные инструкции: меньше контроля — больше поддержки правил среды (тишина, затемнение, прохлада, вода и лёгкая еда «по часам»), отказ от «разборов причин» в первую неделю, короткие договорённости о связи со специалистом при тревожных признаках. Когда у всех одни и те же ориентиры, уровень конфликтов падает, а предсказуемость растёт — это напрямую укрепляет ремиссию. Мы не перегружаем психологический блок «теорией»: даём только те инструменты, которые человек готов выполнить сегодня и завтра, без рывков и самообвинений. Такая практичность приносит больше пользы, чем долгие разговоры «о мотивации», и отлично сочетается с медицинской частью плана.
Ознакомиться с деталями – платная наркологическая клиника москва
xyrotech – Color palette felt calming, nothing distracting, just focused, thoughtful design.
Во многих семьях путь к лечению начинается одинаково: сначала запои или эпизоды употребления воспринимаются как временные «проблемы по жизни», которых стыдно, но которые вроде бы можно переждать. Человек клянётся «завязать после праздников», родственники верят, потом терпят, потом скандалят, затем снова наступают на те же грабли. В какой-то момент становится очевидно, что сила воли больше не работает: попытки прекратить запой заканчиваются тряской, паникой, скачками давления, отсутствием сна, а через несколько дней всё повторяется. Именно тогда наркологическая клиника в Лобне перестаёт быть чем-то абстрактным и превращается в реальную возможность остановить этот круг.
Получить дополнительные сведения – http://narkologicheskaya-klinika-lobnya11-2.ru/narkologicheskaya-klinika-otzyvy-v-lobne/
Сервис предлагает комплексные решения для обеспечения офисов и домов чистой питьевой водой высокого качества. Удобная система онлайн-заказов позволяет оформить доставку за несколько минут без лишних звонков. Посетите https://xn--80aaeee1dcbuw.xn--p1ai/ для ознакомления с полным ассортиментом воды и дополнительного оборудования. Регулярные акции и программа лояльности делают обслуживание выгодным для постоянных клиентов компании.
Перед списком важно: пункты ниже не заменяют осмотр, а помогают семье быстрее принять здравое решение. В большинстве таких ситуаций достаточно правильно подобранных инфузий и чётких правил на 48–72 часа; при сочетании признаков мы рекомендуем стационар.
Углубиться в тему – наркологическая клиника
По вопросам оформления вызова можно ознакомиться с правилами на портале Федеральной службы по надзору в сфере здравоохранения, где опубликованы актуальные рекомендации и требования к медицинским организациям.
Подробнее можно узнать тут – помощь нарколога на дому
Медицинский подход к выводу из запоя предполагает не только устранение внешних симптомов, но и стабилизацию внутренних процессов организма, что особенно важно при повторяющихся или затяжных эпизодах.
Выяснить больше – нарколог вывод из запоя в тольятти
Наша клиника работает по стандартам международного уровня, сочетая научно обоснованные методики с внимательным отношением к каждому пациенту. В «ВолгаМед» вы не столкнётесь с бюрократией или очередями — помощь оказывается сразу после обращения, а все процедуры проводятся в строгом соответствии с медицинскими протоколами и этическими нормами.
Подробнее – наркологическая клиника клиника помощь волгоград
cybernexus – Mobile version looks perfect; no glitches, fast scrolling, crisp text.
Детокс — это последовательность целевых действий, а не один универсальный раствор. Мы восполняем жидкость и корректируем электролиты, защищаем печёночные функции, мягко снижаем тремор и тревогу, создаём условия для первого нормального сна. Каждая доза сверяется с динамикой давления, пульса, сатурации и неврологического статуса, поэтому схема не перегружена и не «гонится» за мимолётным эффектом ценой побочных реакций. После купирования острых проявлений начинается стабилизация: уточняются дозировки, выстраивается режим питания и гидратации, объясняются «красные флажки» для контакта с врачом, настраиваются простые поведенческие техники на «тёмные часы» вечера. В этот момент особенно важно не растворить медицинский эффект бытовыми ошибками: недосыпом, пропусками еды, конфликтными разговорами «о прошлом». Мы даём короткие, реалистичные алгоритмы на 20–40 минут — прогулка, тёплый душ, лёгкая еда по графику, дыхательные практики — чтобы снизить импульсивность и закрепить ощущение управляемости. Именно связка детокса с поведенческой дисциплиной формирует траекторию, которую можно удержать неделями, а не только до «завтрашнего утра».
Получить больше информации – platnaya-narkologicheskaya-klinika-moskva
Юридическая фирма «Один к одному» специализируется на взыскании сложной задолженности, защите от субсидиарной ответственности и ликвидации компаний с долгами. Коллектив арбитражных управляющих и адвокатов ведет дела по сложным активам, обжалованию транзакций и процедурам несостоятельности согласно нормам РФ. Ищете взыскание долгов? Актуальная информация о услугах представлена на 1k1law.ru в профильных разделах. Организация признана одной из лучших в России по оценкам Коммерсантъ, Право-300 и PROбанкротство, предоставляет прогнозируемые решения и работает со всеми категориями сложности.
московский пластический хирург Юрий Диков
По вопросам оформления вызова можно ознакомиться с правилами на портале Федеральной службы по надзору в сфере здравоохранения, где опубликованы актуальные рекомендации и требования к медицинским организациям.
Подробнее – вызвать нарколога на дом срочно волгоград
Медицина выравнивает физиологию, а устойчивость формируют привычки. Мы вместе составляем карту триггеров: вечерние «тёмные часы», задержки без еды, конфликты, недосып, привычные маршруты с «точками соблазна». На каждый триггер есть «буфер» на 20–40 минут: тёплый душ, короткая прогулка рядом с домом, лёгкая еда по расписанию, дыхательная практика, созвон с «своим» человеком. Отдельный акцент — на ночной сон: затемнение, ранний отбой, минимум экранов, отсутствие эмоциональных разговоров после ужина. Врач объясняет, как распределять воду порциями и зачем планировать дневную «паузу», чтобы не сорваться вечером. Когда поведение предсказуемо, снижается импульсивность и количество «проверок себя», а значит — меньше внеплановых визитов и «дорогих» откатов. Именно дисциплина быта укрепляет результат инфузий: организм получает стабильные условия, и терапия работает не в «рывках», а ровно.
Получить больше информации – http://narkologicheskaya-klinika-podolsk9.ru/narkologicheskaya-klinika-ceny-v-podolske/
nexonbyte – Navigation felt smooth, found everything quickly without any confusing steps.
Официальный дилер предлагает пластиковые окна Melke и алюминиевые системы Alurix с профессиональным монтажом в Москве и области. Каталог включает профили Centum, Wide, Evolution, Smart Ultra, Lite70 и Lite60, плюс варианты теплого и холодного балконного остекления. Актуальные цены и полный каталог на https://xn—–6kccxab8adjjjjc4k.xn--p1ai/ — компания обеспечивает бесплатный замер, консультацию специалистов и быструю установку с гарантией качества. Личностно-ориентированная работа с заказчиками обеспечивает воплощение замыслов любого уровня — от классических оконных блоков до фахверка и панорамных порталов.
zentrotech – Mobile version looks perfect; no glitches, fast scrolling, crisp text.
После принятия решения организуется либо выезд, либо госпитализация. На приёме проводится осмотр: измеряется давление, пульс, оценивается степень обезвоживания, выраженность тремора, тревоги, нарушений сна. Выясняются сопутствующие болезни и лекарства, которые человек принимает постоянно. Уже на этом этапе обсуждаются ближайшие шаги — объём детокса, необходимость круглосуточного наблюдения, примерные сроки стабилизации. Родным объясняют, чего ожидать в первые сутки, какие симптомы будут уменьшаться постепенно, а какие требуют немедленного информирования персонала.
Получить дополнительную информацию – http://narkologicheskaya-klinika-lobnya11-2.ru
bs2best at
PulseGuides https://pulseguides.info/ru/ — русскоязычный сайт с простыми и понятными гайдами по социальным сетям (TikTok, Instagram, YouTube), скачиванию контента, прокси/VPN, личному бренду, восстановлению аккаунтов и решению типичных проблем (качество фото, прямые эфиры без 1000 подписчиков и т.д.). Всё объясняется человеческим языком без сложного жаргона, ориентировано в основном на пользователей из Украины и СНГ. Полезно для тех, кто хочет эффективнее работать с соцсетями.
Этот информационный набор привлекает внимание множеством мелочей и странных ракурсов. Мы предлагаем взгляды, которые редко бывают полезны, но могут слегка разнообразить ваше знакомство с темой.
Вот – азартные игры
Эта статья освещает различные аспекты освобождения от зависимости и пути к выздоровлению. Мы обсуждаем важность осознания своей проблемы и обращения за помощью. Читатели получат практические советы о том, как преодолевать трудности и строить новую жизнь без зависимости.
Подробнее тут – http://google.im/url?sa=t&url=https://optimed-narkolog.ru/lechenie-alkogolizma-v-chastnoy-klinike
https://kupit-schetchik.ru/
Первый шаг — короткое, но предметное интервью: длительность употребления, сопутствующие диагнозы, текущие препараты и аллергии. Врач фиксирует давление, пульс, сатурацию, при необходимости делает экспресс-ЭКГ и неврологический скрининг. Далее объясняет логику вмешательств: зачем именно такая инфузия, чего ожидать через 30–60 минут, какие ощущения нормальны и какие потребуют связи. Мы избегаем «оглушающих» седативов, чтобы не получить вечерний откат и побочные эффекты — дозировки подбираются узко, по реакции организма. После капельницы специалист ещё раз проверяет показатели, оставляет письменные рекомендации, договаривается об окне контроля и критериях повторного визита. Вечер строится вокруг сна: затемнение, тишина, ранний отбой, вода порциями, лёгкая еда «по силам», минимум экранов и разговорных конфликтов. На таком фоне исчезают «качели» между днём и ночью, а эффект инфузий не «сгорает» к следующему вечеру.
Исследовать вопрос подробнее – http://www.domen.ru
b2
Все препараты, применяемые при выезде, сертифицированы и подобраны с учётом общего состояния пациента, наличия хронических заболеваний и степени алкогольной интоксикации. Такой подход обеспечивает безопасность процедуры и предсказуемый результат уже в первые часы терапии.
Изучить вопрос глубже – врач нарколог выезд на дом в тольятти
Без сна любая дневная капельница даёт короткий «блеск» и вечерний откат. Поэтому мы заранее настраиваем гигиену: затемнение, прохлада, фиксированное время отбоя, минимум экранов и разговоров, при показаниях — щадящая седативная поддержка, которая стабилизирует, а не «выключает». Утром — короткий контроль и подстройка дозировок, чтобы вторая ночь стала ещё спокойнее.
Подробнее можно узнать тут – https://narkologicheskaya-klinika-himki9.ru/kruglosutochnaya-narkologicheskaya-klinika-v-himkah
blacksprut сайт
Пациенты могут воспринимать окружающих как врагов, отказываться от помощи. Стресс от изоляции дома усугубляет состояние без профессиональной поддержки.
Получить больше информации – https://vivod-iz-zapoya-chelyabinsk13.ru/narkolog-vyvod-iz-zapoya-chelyabinsk/
Такой алгоритм помогает врачу быстро устранить симптомы и восстановить пациента без стресса. Процедура занимает от 40 до 90 минут, в зависимости от состояния и применяемых препаратов.
Получить больше информации – нарколог на дом срочно в тольятти
Наркологическая помощь — это не «последний шанс для безнадёжных», а нормальный медицинский шаг, такой же логичный, как визит к кардиологу при проблемах с сердцем или к эндокринологу при сахарном диабете. В клинике в Лобне зависимость рассматривают как заболевание, а не как «слабость характера», и помогают человеку пройти весь путь — от детоксикации и вывода из запоя до реабилитации и профилактики срывов. Обращение на более раннем этапе даёт важное преимущество: организм ещё способен восстанавливаться, психика не разрушена окончательно, социальные связи не разорваны. Это значит, что лечение может быть мягче, программа — гибче, а шансы на устойчивый результат — выше.
Ознакомиться с деталями – наркологический диспансер частная клиника
Алкогольный делирий проявляется в виде галлюцинаций, бреда и агрессии. При отсутствии контроля такие пациенты опасны для себя и окружающих, требуя немедленной госпитализации.
Детальнее – вывод из запоя недорого челябинск
blacksprut сайт
Качественный вывод из запоя — это всегда процесс, а не одна капельница. Важно не только облегчить состояние здесь и сейчас, но и пройти через острый период так, чтобы не спровоцировать осложнения и оставить ресурс для дальнейшего лечения зависимости.
Детальнее – вывод из запоя на дому московская область
Юрий Диков, специалист по липосакции
Wonderful information, Many thanks.
https://meb-estet.ru/shkafy/spalnya/
Лечение в клинике «Чистый Горизонт» организуется как последовательный медицинский процесс. Вывод из запоя в Тольятти проводится с учётом необходимости постепенной стабилизации организма и контроля реакции на терапию.
Ознакомиться с деталями – вывод из запоя с выездом тольятти
Этот обзор позволяет по-новому взглянуть на вещи, на которые обычно и так смотрят. Мы упоминаем факты, которые мало что меняют, и события, значение которых трудно определить, но они всё равно здесь.
Вот – казино
Такой алгоритм помогает восстановить работоспособность организма в течение нескольких часов. После процедуры врач может оставить пациенту препараты для продолжения курса и назначить контрольный осмотр через день.
Углубиться в тему – врач нарколог на дом
Нарколог на дом в Волгограде — это специализированная медицинская услуга, направленная на оказание квалифицированной помощи пациентам с зависимостями в привычной домашней обстановке. Такая форма лечения позволяет снизить стресс, связанный с госпитализацией, и обеспечивает более комфортное проведение медицинских процедур. Вызов нарколога на дом пользуется высокой востребованностью как среди пациентов с алкоголизмом, так и среди людей, страдающих от наркотической зависимости, а также при острых состояниях, требующих неотложного вмешательства.
Ознакомиться с деталями – нарколог капельница на дом
Наша клиника работает по стандартам международного уровня, сочетая научно обоснованные методики с внимательным отношением к каждому пациенту. В «ВолгаМед» вы не столкнётесь с бюрократией или очередями — помощь оказывается сразу после обращения, а все процедуры проводятся в строгом соответствии с медицинскими протоколами и этическими нормами.
Исследовать вопрос подробнее – наркологическая клиника лечение алкоголизма волгоград
Инфузионная терапия — не универсальный раствор «для всех». Её смысл — восстановить объём циркулирующей крови, скорректировать электролиты, снизить токсическую нагрузку, мягко приглушить тремор и тревогу, вернуть условия для сна. Мы начинаем с оценки реакции организма и двигаемся небольшими порциями, чтобы избежать «перегрева» препаратами. При выраженной тошноте подключаем противорвотную поддержку и гастропротекцию; при необходимости — печёночные субстраты и витамины группы B; кардиологические или антигипертензивные решения применяем только по показаниям. Врач сразу оговаривает, какие ощущения нормальны (сонливость, умеренная слабость, сухость во рту), а какие — повод для немедленной связи. Такой реализм даёт не косметическое облегчение «на час», а устойчивую траекторию на дни: эффект инфузий не «сгорает» к вечеру, потому что их поддерживают правила сна, воды и питания.
Получить больше информации – narkologicheskaya-klinika-otzyvy
Запой — это длительный приступ непрерывного употребления алкоголя, когда человек теряет контроль над количеством выпиваемого, что приводит к серьёзному отравлению организма. Нарушение водно-солевого баланса, угнетение центральной нервной системы и риск сердечно-сосудистых осложнений требуют немедленного вмешательства. В Челябинске клиника «ЧелябМед» предлагает круглосуточную неотложную помощь на дому и в условиях стационара, гарантируя полную анонимность и комфорт пациенту.
Ознакомиться с деталями – вывод из запоя челябинск
Порноактриса из Омска Ева Элфи стала лицом букмекерской компании azino888 casino online
Судороги возникают из-за резкого исчезновения алкоголя как депрессанта при одновременном возбуждении нейрональных цепей. Без быстрого медицинского вмешательства возможен гипоксический инсульт.
Получить дополнительные сведения – http://vivod-iz-zapoya-chelyabinsk13.ru/narkolog-vyvod-iz-zapoya-chelyabinsk/
как продавать сайты как продавать сайты .
Эта информационная публикация освещает широкий спектр тем из мира медицины. Мы предлагаем читателям ясные и понятные объяснения современных заболеваний, методов профилактики и лечения. Информация будет полезна как пациентам, так и медицинским работникам, желающим поддержать уровень своих знаний.
Ознакомиться с деталями – http://google.iq/url?q=https://optimed-narkolog.ru/stati/krehk-opasnyj-narkotik-i-ego-razrushitelnoe-vliyanie.html
https://www.goal.com/en-in/betting/1xbet-promo-code/ebanattitan
Одна из главных ошибок — ждать «идеального момента» для лечения. Кажется, что кодирование уместно только тогда, когда зависимость достигла крайней стадии: человек потерял работу, перестал выходить из запоев, полностью разрушил отношения с близкими. На практике обращение в клинику Чехова оправдано гораздо раньше, как только употребление алкоголя перестаёт быть редким эпизодом и начинает системно мешать жить. Если каждый стресс, отпуск или конфликт заканчиваются срывом, если запои становятся длиннее, а похмелье тяжелее, — это уже повод хотя бы обсудить кодирование с врачом, а не ждать, пока ресурс организма будет почти исчерпан.
Получить больше информации – центр кодирования от алкоголизма
Обращаться можно и нужно не только в момент очередного запоя. Клиника в Ивантеевке работает и с теми, кто сейчас в относительной ремиссии, но понимает, что без внешней поддержки снова сорвётся. В этом случае можно обсудить профилактические программы, варианты кодирования, реабилитацию, работу с тревогой и депрессией. Чем раньше сделан шаг в сторону лечения, тем мягче будут процедуры и тем больше шансов на устойчивый результат.
Ознакомиться с деталями – https://narkologicheskaya-klinika-ivanteevka11.ru/platnaya-narkologicheskaya-klinika-v-ivanteevke
«НоваМед Центр» строит лечение как управляемую последовательность шагов, а не набор эпизодических процедур. На входе мы фиксируем исходные риски: длительность употребления, сопутствующие заболевания, принимаемые лекарства, анамнез кодирований и срывов, показатели давления, пульса, сатурации, уровень сна и тревоги. Это позволяет выбрать безопасную точку входа и задать логичную траекторию: от детокса к стабилизации, затем к поведенческим изменениям и поддержанию ремиссии. Такая структура особенно важна при высокой нагрузке и дефиците времени: когда пациент и семья понимают, что будет через час, сутки и неделю, снижается тревога и исчезают импульсивные «проверки себя», из-за которых обычно рушатся результаты. Мы придерживаемся принципа клинической достаточности: только те вмешательства, которые нужны по состоянию сегодня, без «украшений ради прайса». Чёткие правила на 48–72 часа, согласованные окна связи, понятные «красные флажки» для повторного контакта превращают лечение в прогнозируемый маршрут, а не в череду надежд и разочарований. В итоге человек быстрее возвращает контроль над самочувствием, а близкие получают опору вместо бесконечных ночных «дежурств».
Получить дополнительные сведения – http://narkologicheskaya-klinika-moskva999.ru/anonimnaya-narkologicheskaya-klinika-v-moskve/
Помощь 24/7 означает, что нарколог на дом в Хабаровске может быть направлен в любое время суток, включая ночные часы и выходные дни. В клинике «Ясный Вектор» выездная служба функционирует с учётом логистики города, что позволяет минимизировать время ожидания врача.
Детальнее – вызов нарколога на дом хабаровск
Палаты оформлены в светлых тонах, каждая оборудована ортопедической кроватью, телевизором и интернетом. Для максимального уюта предусмотрены личные шкафы и тумбочки, ежедневная уборка и постельное бельё премиум-класса.
Подробнее тут – narkologicheskaya-klinika-sochi00.ru/
Во многих семьях путь к лечению начинается одинаково: сначала запои или эпизоды употребления воспринимаются как временные «проблемы по жизни», которых стыдно, но которые вроде бы можно переждать. Человек клянётся «завязать после праздников», родственники верят, потом терпят, потом скандалят, затем снова наступают на те же грабли. В какой-то момент становится очевидно, что сила воли больше не работает: попытки прекратить запой заканчиваются тряской, паникой, скачками давления, отсутствием сна, а через несколько дней всё повторяется. Именно тогда наркологическая клиника в Лобне перестаёт быть чем-то абстрактным и превращается в реальную возможность остановить этот круг.
Изучить вопрос глубже – http://narkologicheskaya-klinika-lobnya11-2.ru/narkologicheskaya-klinika-otzyvy-v-lobne/
Обычно всё начинается с телефонного разговора. Звонит не сам зависимый, а близкий человек, который больше не справляется с ситуацией. Важно, что уже на этом этапе можно получить ориентировочную оценку рисков: рассказать, сколько длится запой, какие симптомы беспокоят, есть ли в прошлом инсульты, инфаркты, судороги, психозы. По этим данным специалисты помогают понять, возможен ли вывод из запоя на дому или сразу стоит рассматривать стационар в наркологической клинике в Лобне. Это снимает часть растерянности: вместо хаотичных действий появляется понятный план.
Получить дополнительные сведения – https://narkologicheskaya-klinika-lobnya11-2.ru/narkologicheskaya-klinika-cena-v-lobne/
В клинике применяются современные медицинские технологии, направленные на восстановление организма и стабилизацию психоэмоционального состояния. Ниже представлена таблица с описанием основных методов и их терапевтического значения.
Подробнее тут – наркологическая клиника нарколог тольятти
продвижение сайтов интернет магазины в москве продвижение сайтов интернет магазины в москве .
seo продвижение сайта по трафику кловер prodvizhenie-sajtov-po-trafiku11.ru .
google посещаемость сайта google посещаемость сайта .
Клиника «ЛадаМед Выезд» в Тольятти организует оперативные визиты врачей на дом в течение 30–60 минут после обращения. Выездная бригада оснащена необходимыми средствами для проведения инфузионной терапии, контроля давления, пульса и уровня кислорода в крови. Медицинская помощь оказывается в спокойной обстановке с соблюдением конфиденциальности. При необходимости врач оставляет рекомендации по дальнейшему восстановлению и назначает повторный визит для закрепления эффекта.
Подробнее – выезд нарколога на дом в тольятти
Когда человеку требуется немедленная медицинская помощь при алкогольной интоксикации, промедление может быть опасным. В таких ситуациях вызов нарколога на дом становится оптимальным решением. Клиника «КрасМед Трезвость» в Красноярске организует срочный выезд врача круглосуточно, обеспечивая квалифицированную помощь прямо по месту нахождения пациента. Такой формат позволяет избежать госпитализации, снизить тревожность и начать лечение в привычных домашних условиях, где человек чувствует себя спокойнее и безопаснее.
Исследовать вопрос подробнее – http://narcolog-na-dom-krasnoyarsk0.ru
топ интернет агентств топ интернет агентств .
Комплексное лечение зависимости на дому организовано по четкой схеме, позволяющей оперативно вывести пациента из запоя и обеспечить безопасное восстановление здоровья.
Подробнее можно узнать тут – http://alko-zakodirovat.ru
цифровой маркетинг статьи цифровой маркетинг статьи .
Вывод из запоя — это не только медицинская процедура, направленная на снятие интоксикации, но и важный этап стабилизации организма. В клинике «АмурМед Контур» в Хабаровске детоксикация проводится под контролем опытных наркологов, терапевтов и анестезиологов. Пациенты получают помощь в круглосуточном режиме, а лечение осуществляется строго по медицинским показаниям. Такой подход позволяет безопасно устранить последствия длительного употребления алкоголя и предотвратить осложнения со стороны сердца, печени и нервной системы.
Подробнее можно узнать тут – https://vyvod-iz-zapoya-v-khabarovske0.ru/
Кодирование от алкоголизма в Чехове для многих семей становится тем рубежом, после которого зависимость перестаёт казаться «временной слабостью» и начинает восприниматься как диагноз, с которым можно и нужно работать. До этого момента обычно проходят годы: чередуются запои и трезвые периоды, звучат обещания «больше такого не будет», меняются напитки, придумываются правила вроде «пью только по выходным» или «только пиво». Но рано или поздно семья замечает, что именно алкоголь диктует распорядок дня, влияет на настроение, разрушает здоровье и отношения. В этот момент становится очевидно: без сильного внешнего ограничителя и профессиональной помощи просто «взять себя в руки» уже не получается.
Получить дополнительную информацию – https://kodirovanie-ot-alkogolizma-chekhov11.ru/kodirovanie-ot-alkogolizma-ukolom-v-chekhove/
Чем дольше продолжается запой, тем более непредсказуемой становится реакция организма. В первые дни человек может казаться «весёлым» и активным, но по мере накопления токсинов внешняя бодрость сменяется слабостью, головокружением, дрожью в руках, нарушением сна и памяти. Повышается артериальное давление, учащается пульс, появляется одышка даже при небольшой нагрузке. Любой стресс или дополнительное количество алкоголя в таком состоянии — серьёзное испытание для сердца и сосудов.
Разобраться лучше – https://vyvod-iz-zapoya-ivanteevka11.ru/
Мытищи дают плюсы домашнего формата: меньше логистики, приватнее, выше приверженность режиму. Если показатели устойчивы и нет признаков угрозы осложнений (упорной рвоты, высокой температуры, выраженной дезориентации, резких «качелей» АД/пульса, риска судорог), старт на дому или амбулаторно — рациональное решение. Но когда состояние «по краю», честнее и на дистанции дешевле сутки–двое стационара под круглосуточным наблюдением: проще дозировать препараты, вовремя закрывать дефициты, добиться первого ровного сна и не «разбрасываться» экстренными ночными выездами. Формат выбирается не «по желанию», а по безопасности здесь и сейчас; при этом конфиденциальность сохранена в любом сценарии — немаркированные визиты, разнесённые приёмы, доступ к данным по ролям.
Детальнее – https://narkologicheskaya-klinika-mytishchi9.ru/chastnaya-narkologicheskaya-klinika-v-mytishchah/
Этот обзор позволяет по-новому взглянуть на вещи, на которые обычно и так смотрят. Мы упоминаем факты, которые мало что меняют, и события, значение которых трудно определить, но они всё равно здесь.
Вот – блекджек
Компания Arust реализует всесторонние сервисы по выбору и обслуживанию договоров с объектами жилой недвижимости в Ставропольском регионе. Эксперты агентства осуществляют правовую экспертизу объектов, оформляют бумаги, надзирают за ходом сделок и обеспечивают защиту расчётов. Ищете помощь в покупке жилья в ессентуках? Актуальные предложения представлены на ar26.ru с детальными характеристиками. Группа агентов занимается новыми и б/у объектами, разъясняет условия семейной и госипотеки, размещает новости профильного законодательства и представляет интересы доверителей от заявки до регистрации.
Все методики подбираются строго индивидуально. Комбинация физиологической и психотерапевтической поддержки помогает восстановить здоровье и устойчивость пациента. Такой подход снижает вероятность рецидивов и способствует длительному сохранению трезвости.
Выяснить больше – http://narkologicheskaya-klinika-tolyatti0.ru
Медицинский подход к выводу из запоя предполагает не только устранение внешних симптомов, но и стабилизацию внутренних процессов организма, что особенно важно при повторяющихся или затяжных эпизодах.
Детальнее – вывод из запоя в стационаре
По вопросам оформления вызова можно ознакомиться с правилами на портале Федеральной службы по надзору в сфере здравоохранения, где опубликованы актуальные рекомендации и требования к медицинским организациям.
Ознакомиться с деталями – https://narkolog-na-dom-volgograd13.ru
Большинство семей приходят к мысли о лечении зависимости не сразу. Сначала всё выглядит как «случайные переборы по праздникам», потом алкоголь или наркотики становятся привычным способом снять стресс, забыться, пережить неудачи. Постепенно запои учащаются, человек пропадает на несколько дней, появляются долги, проблемы на работе, конфликты в семье. На этом этапе многим кажется, что обращаться в наркологическую клинику в Лобне ещё рано, что можно «взять себя в руки» и как-то остановиться. Но практика показывает обратное: чем дольше затягивается момент обращения к специалистам, тем тяжелее протекают запои, тем глубже страдает здоровье и тем сложнее вернуть человека к стабильной трезвости.
Подробнее тут – лобня наркология
В «ВолгаМед» работают врачи-наркологи, психотерапевты и реабилитологи с опытом от 5 до 20 лет. Каждый специалист регулярно проходит повышение квалификации, участвует в научных конференциях и владеет современными методами диагностики и лечения зависимостей.
Разобраться лучше – лечение в наркологической клинике в волгограде
В клинике «АвтоГрад МедСтаб» применяется комплексное лечение, направленное не только на выведение этанола, но и на восстановление функций всех систем организма. В таблице представлены ключевые терапевтические методы и их результаты.
Подробнее можно узнать тут – http://vyvod-iz-zapoya-tolyatti0.ru/vyvedenie-iz-zapoya-tolyatti/
Обычно всё начинается с телефонного разговора. Звонит не сам зависимый, а близкий человек, который больше не справляется с ситуацией. Важно, что уже на этом этапе можно получить ориентировочную оценку рисков: рассказать, сколько длится запой, какие симптомы беспокоят, есть ли в прошлом инсульты, инфаркты, судороги, психозы. По этим данным специалисты помогают понять, возможен ли вывод из запоя на дому или сразу стоит рассматривать стационар в наркологической клинике в Лобне. Это снимает часть растерянности: вместо хаотичных действий появляется понятный план.
Получить дополнительную информацию – клиника наркологической помощи
Наркологическая клиника «СочиМед» предлагает полный спектр услуг по лечению алкогольной и наркотической зависимости, сочетая современные медицинские технологии с уютной атмосферой. Размещение в стационаре организовано по принципу гостиничного сервиса: отдельные палаты с кондиционером, круглосуточное питание по диетам, а внимательный персонал поддерживает пациентов на каждом этапе восстановления.
Выяснить больше – https://narkologicheskaya-klinika-sochi00.ru/narkologicheskaya-klinika-krasnodarskij-kraj/
Диагностическая оценка позволяет определить степень интоксикации и выявить возможные риски осложнённого течения состояния.
Углубиться в тему – скорая вывод из запоя тольятти
Наркологическая помощь — это не «последний шанс для безнадёжных», а нормальный медицинский шаг, такой же логичный, как визит к кардиологу при проблемах с сердцем или к эндокринологу при сахарном диабете. В клинике в Лобне зависимость рассматривают как заболевание, а не как «слабость характера», и помогают человеку пройти весь путь — от детоксикации и вывода из запоя до реабилитации и профилактики срывов. Обращение на более раннем этапе даёт важное преимущество: организм ещё способен восстанавливаться, психика не разрушена окончательно, социальные связи не разорваны. Это значит, что лечение может быть мягче, программа — гибче, а шансы на устойчивый результат — выше.
Углубиться в тему – наркологический диспансер частная клиника
Такая структура позволяет подбирать формат помощи под конкретную ситуацию, а не подгонять всех пациентов под один шаблон. Для кого-то будет достаточно короткого стационарного курса и последующего амбулаторного наблюдения, кому-то потребуется длительная реабилитация и плотная работа с семьёй, а кому-то — мягкая поддержка на ранней стадии зависимости, пока заболевание ещё не успело разрушить жизнь.
Выяснить больше – https://narkologicheskaya-klinika-lobnya11.ru/narkologicheskaya-klinika-otzyvy-v-lobne
Нарколог на дом в Волгограде — это специализированная медицинская услуга, направленная на оказание квалифицированной помощи пациентам с зависимостями в привычной домашней обстановке. Такая форма лечения позволяет снизить стресс, связанный с госпитализацией, и обеспечивает более комфортное проведение медицинских процедур. Вызов нарколога на дом пользуется высокой востребованностью как среди пациентов с алкоголизмом, так и среди людей, страдающих от наркотической зависимости, а также при острых состояниях, требующих неотложного вмешательства.
Узнать больше – нарколог на дом цены в волгограде
Лечение при запое строится поэтапно. Каждый шаг направлен на устранение симптомов интоксикации и постепенное восстановление функций организма. В таблице ниже приведена структура работы врача при выезде или лечении в стационаре.
Получить больше информации – вывод из запоя вызов
После основной терапии важно обеспечить поддержку пациента в период реабилитации. Реабилитационные программы в Краснодаре включают социальную адаптацию, восстановление навыков общения и трудоустройства. Это позволяет минимизировать риск рецидива и возвращения к употреблению алкоголя. Поддержка со стороны специалистов и близких — обязательное условие успешного результата. Более подробно о социальной реабилитации можно ознакомиться на сайте Федерального реабилитационного центра.
Изучить вопрос глубже – наркологическое лечение алкоголизма краснодар
Этот информационный набор привлекает внимание множеством мелочей и странных ракурсов. Мы предлагаем взгляды, которые редко бывают полезны, но могут слегка разнообразить ваше знакомство с темой.
Вот – казино с быстрым выводом
Нарколог на дом в Хабаровске представляет собой форму специализированной медицинской помощи, ориентированную на пациентов, состояние которых не позволяет самостоятельно обратиться в медицинское учреждение. Такой формат особенно востребован при острых состояниях, связанных с интоксикацией, выраженной абстиненцией или резким ухудшением самочувствия. В клинике «Ясный Вектор» выездная наркологическая помощь организована в круглосуточном режиме, что позволяет реагировать на обращения независимо от времени суток.
Получить дополнительную информацию – психиатр нарколог на дом
internet partner internet partner .
рейтинг рекламных агентств россии рейтинг рекламных агентств россии .
Большинство семей приходят к мысли о лечении зависимости не сразу. Сначала всё выглядит как «случайные переборы по праздникам», потом алкоголь или наркотики становятся привычным способом снять стресс, забыться, пережить неудачи. Постепенно запои учащаются, человек пропадает на несколько дней, появляются долги, проблемы на работе, конфликты в семье. На этом этапе многим кажется, что обращаться в наркологическую клинику в Лобне ещё рано, что можно «взять себя в руки» и как-то остановиться. Но практика показывает обратное: чем дольше затягивается момент обращения к специалистам, тем тяжелее протекают запои, тем глубже страдает здоровье и тем сложнее вернуть человека к стабильной трезвости.
Ознакомиться с деталями – http://narkologicheskaya-klinika-lobnya11.ru
Мы предлагаем полный цикл наркологической помощи — от экстренного вывода из запоя до длительной реабилитации. Ниже перечислены основные направления работы клиники.
Узнать больше – наркологическая клиника нарколог в волгограде
В данной статье мы акцентируем внимание на важности поддержки в процессе выздоровления. Мы обсудим, как друзья, семья и профессионалы могут помочь тем, кто сталкивается с зависимостями. Читатели получат практические советы, как поддерживать близких на пути к новой жизни.
Изучить вопрос глубже – http://google.com.np/url?sa=i&url=https://vozrojdenie.site/service/lechenie-alkogolizma
Полученные данные формируют основу для выбора лечебной тактики и определения оптимального формата помощи.
Получить дополнительные сведения – https://narkologicheskaya-klinika-v-tolyatti0.ru/tolyatti-narkologicheskij-dispanser
блог о рекламе и аналитике блог о рекламе и аналитике .
В этом материале представлены детали, которые хоть и занимательны, но не особенно значимы. Мы рассматриваем моменты, которые трудно назвать важными, но всё же решили включить их для полноты картины.
Вот – бинго онлайн
Этот краткий обзор предлагает сжатую информацию из области медицины, включая ключевые факты и последние новости. Мы стремимся сделать информацию доступной и понятной для широкой аудитории, что позволит читателям оставаться в курсе актуальных событий в здравоохранении.
Изучить вопрос глубже – https://www.google.co.zw/url?q=https://narko-zdravie.ru/o-nas/stati/opij-mak-narkotik
В этом исследовании рассмотрены методы лечения зависимостей и их эффективность. Мы проанализируем различные подходы, используемые в реабилитационных центрах, и представим данные о результативности программ. Читатели получат надежные и научно обоснованные сведения о данной проблеме.
Подробнее можно узнать тут – http://google.gr/url?q=https://narko-zdravie.ru/o-nas/stati/pochemu-bolit-zhivot-ot-alkogolya
Этот обзор медицинских исследований собрал самое важное из последних публикаций в области медицины. Мы проанализировали ключевые находки и представили их в доступной форме, чтобы читатели могли легко ориентироваться в актуальных темах. Этот материал станет отличным подспорьем для изучения медицины.
Исследовать вопрос подробнее – http://google.com.pe/url?sa=t&url=https://optimed-narkolog.ru/lechenie-alkogolizma-v-chastnoy-klinike
Перед списком важно: пункты ниже не заменяют осмотр, а помогают семье быстрее принять здравое решение. В большинстве таких ситуаций достаточно правильно подобранных инфузий и чётких правил на 48–72 часа; при сочетании признаков мы рекомендуем стационар.
Подробнее – narkologicheskaya-klinika-sajt
Глэмпинг «Волга Глэмп» построен на стыке Волги и Илети и предоставляет номера в современных A-frame постройках и комфортных палатках с удобствами. Гости получают доступ к кухне, горячему душу, мангальным зонам и водным развлечениям в окружении заповедной природы. Ищете глэмпинг зеленодольск? Подробная информация о тарифах доступна на volgaglamp.ru в разделе бронирования. Комплекс открыт 12 месяцев, вмещает до 50 участников и устраивает корпоративы на свежем воздухе с речным пейзажем.
Текст включает разнообразную информацию, которая может показаться любопытной, но не меняет устоявшегося восприятия. Предлагаем просто насладиться чтением, не ожидая значительной пользы.
Подробнее читать – плитка для ванной комнаты
Каждый этап процедуры направлен на последовательное восстановление организма и предотвращение осложнений. Ниже представлена таблица, отражающая основные стадии и их особенности.
Углубиться в тему – вывод из запоя вызов
В статье по вопросам здоровья мы рассматриваем актуальные проблемы, с которыми сталкивается общество. Обсуждаются заболевания, факторы риска и важные аспекты профилактики. Читатели получат полезные советы о том, как сохранить здоровье и улучшить качество жизни.
Подробнее – http://google.co.mz/url?sa=t&url=https://vyezdnoy-narkolog.ru/vrachi/ivanov-sergey-andreevich.html
продвижение сайтов во франции продвижение сайтов во франции .
Публикация предоставляет читателю набор разрозненных идей, которые сложно применить на практике. Мы лишь слегка касаемся разных точек зрения, не углубляясь в анализ и не предлагая никаких выводов.
Вот – https://arma-rehab.ru/vyvod-iz-zapoya
seo кейсы seo-kejsy17.ru .
Клиника «ЛадаМед Выезд» в Тольятти организует оперативные визиты врачей на дом в течение 30–60 минут после обращения. Выездная бригада оснащена необходимыми средствами для проведения инфузионной терапии, контроля давления, пульса и уровня кислорода в крови. Медицинская помощь оказывается в спокойной обстановке с соблюдением конфиденциальности. При необходимости врач оставляет рекомендации по дальнейшему восстановлению и назначает повторный визит для закрепления эффекта.
Узнать больше – вызвать врача нарколога на дом тольятти
Этот обзор сосредоточен на различных подходах к избавлению от зависимости. Мы изучим традиционные и альтернативные методы, а также их сочетание для достижения максимальной эффективности. Читатели смогут открыть для себя новые стратегии и подходы, которые помогут в их борьбе с зависимостями.
Подробнее можно узнать тут – https://www.bioguiden.se/redirect.aspx?url=https://optimed-narkolog.ru/anonimnoe-lechenie-narkomanii
Эта публикация содержит ценные советы и рекомендации по избавлению от зависимости. Мы обсуждаем различные стратегии, которые могут помочь в процессе выздоровления и важность обращения за помощью. Читатели смогут использовать полученные знания для улучшения своего состояния.
Узнать больше – http://google.com.ag/url?q=https://i-am-new.ru/politika-konfidentsialnosti
да да да привет привт
гибридная структура сайта гибридная структура сайта .
Задача первого контакта — не «записать к врачу на когда-нибудь», а оценить, насколько ситуация критична прямо сейчас. Если речь идёт о многодневном запое, сильной слабости, одышке, скачках давления, спутанности сознания, лучше не экспериментировать с домашними методами. В таких случаях специалисты в Лобне рекомендуют стационар, где можно не только поставить капельницу, но и быстро среагировать на осложнения. Если же состояние относительно стабильное, возможно обсуждение мягкого формата с выездом и последующим наблюдением.
Изучить вопрос глубже – https://narkologicheskaya-klinika-lobnya11-2.ru/narkologicheskaya-klinika-cena-v-lobne/
рейтинг seo агентств рейтинг seo агентств .
Такой алгоритм помогает восстановить работоспособность организма в течение нескольких часов. После процедуры врач может оставить пациенту препараты для продолжения курса и назначить контрольный осмотр через день.
Изучить вопрос глубже – https://narcolog-na-dom-krasnoyarsk0.ru/krasnoyarsk-narkologiya
В этой медицинской статье мы погрузимся в актуальные вопросы здравоохранения и лечения заболеваний. Читатели узнают о современных подходах, методах диагностики и новых открытий в научных исследованиях. Наша цель — донести важную информацию и повысить уровень осведомленности о здоровье.
Углубиться в тему – http://google.iq/url?q=https://vozrojdenie.site/lechenie-podrostkovogo-alkogolizma
Эта публикация обращает внимание на важность профилактики зависимостей. Мы обсудим, как осведомленность и образование могут помочь в предотвращении возникновения зависимости. Читатели смогут ознакомиться с полезными советами и ресурсами, которые способствуют здоровому образу жизни.
Ознакомиться с деталями – http://google.nl/url?sa=t&url=https://optimed-narkolog.ru/stati/alkogolnaya-abstinenciya.html
топ digital агентств москвы luchshie-digital-agencstva.ru .
Метод лечения
Получить дополнительные сведения – http://narkologicheskaya-klinika-krasnodar00.ru
Психотерапия в лечении алкоголизма играет важнейшую роль. Используются когнитивно-поведенческие техники, групповые занятия, а также индивидуальные консультации с психологами и психотерапевтами. Применение методов мотивационного интервьюирования способствует формированию устойчивой мотивации на трезвость, что подробно описано в исследованиях Американской психиатрической ассоциации. Также актуальную информацию можно найти на портале Психологической ассоциации России.
Подробнее тут – лечение алкоголизма в стационаре краснодар
Совместные занятия с другими пациентами создают атмосферу поддержки и понимания. Под руководством психотерапевта участники группы делятся опытом, обсуждают сложные ситуации и находят оптимальные способы удержаться от срыва.
Изучить вопрос глубже – лечение наркомании и алкоголизма в сочи
интернет партнер интернет партнер .
Клиника «ЛадаМед Выезд» в Тольятти организует оперативные визиты врачей на дом в течение 30–60 минут после обращения. Выездная бригада оснащена необходимыми средствами для проведения инфузионной терапии, контроля давления, пульса и уровня кислорода в крови. Медицинская помощь оказывается в спокойной обстановке с соблюдением конфиденциальности. При необходимости врач оставляет рекомендации по дальнейшему восстановлению и назначает повторный визит для закрепления эффекта.
Получить дополнительные сведения – нарколог на дом круглосуточно цены тольятти
веб-аналитика блог веб-аналитика блог .
В условиях круглосуточного наблюдения врачи могут внимательно следить за динамикой состояния, своевременно корректировать схемы лечения, проводить детоксикацию под контролем давления, пульса и работы сердца. Особенно это важно для пациентов с гипертонией, сердечно-сосудистыми заболеваниями, нарушениями ритма, заболеваниями печени, диабетом и другими хроническими патологиями. В стационаре проще организовать обследование, назначить сопутствующую терапию, вовремя заметить опасные симптомы и предотвратить серьёзные осложнения.
Подробнее тут – http://narkologicheskaya-klinika-lobnya11.ru/narkologicheskaya-klinika-otzyvy-v-lobne/https://narkologicheskaya-klinika-lobnya11.ru
Производственное предприятие ЗВО разрабатывает и изготавливает автовесы с НПВ до 150 т, железнодорожные весы для потележечного и поосного взвешивания, ленточные конвейерные весодозирующие установки, напольные платформы из нержавейки, емкостные дозаторы и бортовую весовую систему Monacs для спецтехники. Организация реализует полный цикл работ — установку оборудования, подготовку фундаментных конструкций и программную автоматизацию весоизмерительных комплексов для индустриальных предприятий. Подробную информацию о продукции, портфолио реализованных проектов и условиях сотрудничества можно найти на https://uzvo.ru/catalog/programmnoe_obespechenie_po/po_fasovochno-doziruyuschego_oborudovaniya_zvo/ где представлены технические характеристики оборудования и формы заявок. Компания обслуживает заказчиков по всей России и СНГ с гарантией качества и сервисной поддержкой.
Врачи клиники используют щадящие методики и современные инфузионные составы, которые не перегружают организм и позволяют безопасно восстановить жизненные функции. Контроль проводится на всех этапах: от диагностики до постлечебного наблюдения.
Изучить вопрос глубже – вывод из запоя капельница на дому в тольятти
techwave – Content reads clearly, helpful examples made concepts easy to grasp.
vynextech – Loved the layout today; clean, simple, and genuinely user-friendly overall.
Когда проблема зависимости достигает критического уровня, оперативное вмешательство становится необходимостью. В Екатеринбурге профессиональные наркологи готовы выехать на дом круглосуточно, чтобы начать лечение зависимости немедленно. Такой формат оказания помощи позволяет пациенту получить качественную терапию в знакомой и уютной обстановке, что значительно снижает уровень стресса и способствует быстрому восстановлению.
Разобраться лучше – https://alko-zakodirovat.ru/zapoj-narkolog-na-dom-ekb
Детокс — это последовательность целевых действий, а не один универсальный раствор. Мы восполняем жидкость и корректируем электролиты, защищаем печёночные функции, мягко снижаем тремор и тревогу, создаём условия для первого нормального сна. Каждая доза сверяется с динамикой давления, пульса, сатурации и неврологического статуса, поэтому схема не перегружена и не «гонится» за мимолётным эффектом ценой побочных реакций. После купирования острых проявлений начинается стабилизация: уточняются дозировки, выстраивается режим питания и гидратации, объясняются «красные флажки» для контакта с врачом, настраиваются простые поведенческие техники на «тёмные часы» вечера. В этот момент особенно важно не растворить медицинский эффект бытовыми ошибками: недосыпом, пропусками еды, конфликтными разговорами «о прошлом». Мы даём короткие, реалистичные алгоритмы на 20–40 минут — прогулка, тёплый душ, лёгкая еда по графику, дыхательные практики — чтобы снизить импульсивность и закрепить ощущение управляемости. Именно связка детокса с поведенческой дисциплиной формирует траекторию, которую можно удержать неделями, а не только до «завтрашнего утра».
Подробнее можно узнать тут – https://narkologicheskaya-klinika-moskva999.ru/horoshaya-narkologicheskaya-klinika-v-moskve
Лечение в клинике «Гармония Волги» строится как последовательный медицинский процесс, направленный на стабилизацию состояния пациента и восстановление нарушенных функций организма. Наркологическая клиника в Тольятти применяет поэтапный подход, что позволяет контролировать динамику состояния и своевременно корректировать терапию.
Подробнее – анонимная наркологическая клиника
Этот медицинский обзор сосредоточен на последних достижениях, которые оказывают влияние на пациентов и медицинскую практику. Мы разбираем инновационные методы лечения и исследований, акцентируя внимание на их значимости для общественного здоровья. Читатели узнают о свежих данных и их возможном применении.
Узнать больше – http://google.iq/url?q=https://narko-zdravie.ru/o-nas/stati/tryaset-posle-alkogolya
Опасность запоя в том, что каждый новый день употребления усиливает интоксикацию: растёт нагрузка на сердце и сосуды, печень перестаёт справляться с объёмом токсинов, мозг работает в режиме постоянного перегруза. Появляются угрозы инсульта, инфаркта, тяжёлых аритмий, судорог, психозов с галлюцинациями и агрессией. При этом сам зависимый чаще всего недооценивает риск: обещает «завтра точно прекратить», отказывается от врача, просит родных просто переждать и дать таблетку от головы. Но без грамотно подобранной терапии и контроля такое «перетерплю» может закончиться реанимацией. Поэтому, как только становится ясно, что человек не может самостоятельно прервать запой, разумное решение — обращаться за квалифицированной помощью по месту проживания.
Подробнее тут – http://vyvod-iz-zapoya-ivanteevka11.ru
zylotech – Color palette felt calming, nothing distracting, just focused, thoughtful design.
Если пациент обращается в клинику в состоянии запоя или тяжёлой абстиненции, первым шагом становится детоксикация. Это не «волшебная капельница», которая снимает все проблемы, а комплекс процедур, направленных на выведение токсинов, восстановление водно-солевого баланса, поддержку сердца, печени, нервной системы. Под контролем врачей подбираются растворы и препараты, которые позволяют снизить нагрузку на организм, облегчить похмельный синдром, уменьшить тревогу и вернуть сон. Важно, что это проходит под наблюдением, а не «на кухне» без понимания, как реагирует сердце и давление. После выхода из острого состояния человек уже способен осмысленно обсуждать дальнейшее лечение.
Детальнее – narkologicheskaya-klinika-na-dom
Вывод из запоя — это не просто медицинская процедура, а целый комплекс мероприятий, направленных на очищение организма, восстановление обмена веществ и стабилизацию нервной системы. Когда человек находится в состоянии длительного употребления алкоголя, в крови накапливаются токсины, нарушается работа сердца, печени, почек и мозга. Без профессиональной помощи выйти из этого состояния безопасно невозможно. Клиника «ВладМед Трезвость» предлагает квалифицированный вывод из запоя во Владимире с использованием современных капельниц и мягких детокс-программ. Врачи работают круглосуточно, оказывая помощь как на дому, так и в комфортных условиях стационара.
Подробнее тут – https://vyvod-iz-zapoya-vladimir0.ru/vyvod-iz-zapoya-na-domu-vladimir/
Такой алгоритм помогает восстановить работоспособность организма в течение нескольких часов. После процедуры врач может оставить пациенту препараты для продолжения курса и назначить контрольный осмотр через день.
Выяснить больше – вызвать нарколога на дом
Палаты оформлены в светлых тонах, каждая оборудована ортопедической кроватью, телевизором и интернетом. Для максимального уюта предусмотрены личные шкафы и тумбочки, ежедневная уборка и постельное бельё премиум-класса.
Получить больше информации – наркологическая клиника цены сочи
techsnap – Bookmarked this immediately, planning to revisit for updates and inspiration.
bytecraft – Content reads clearly, helpful examples made concepts easy to grasp.
оптимизация и seo продвижение сайтов москва оптимизация и seo продвижение сайтов москва .
seo клиники наркологии seo клиники наркологии .
Процесс лечения в «ВолгаМед Баланс» выстроен логично и последовательно. Каждый этап направлен на достижение конкретных медицинских и психологических целей. Ниже приведена таблица, описывающая ключевые стадии терапии.
Получить больше информации – запой наркологическая клиника
ghbdtn привет
Такой подход позволяет врачу контролировать каждый шаг процесса, фиксировать динамику и при необходимости корректировать терапию. Постоянное наблюдение и своевременная поддержка делают лечение эффективным и безопасным для пациента.
Ознакомиться с деталями – http://narkologicheskaya-klinika-tolyatti0.ru/
лучшие seo агентства лучшие seo агентства .
Инфузионная терапия — это не универсальный «коктейль», а набор узких шагов под клиническую задачу. Главные цели понятны: вернуть объём циркулирующей жидкости и перфузию тканей, скорректировать электролиты, снизить токсическую нагрузку на печень, мягко приглушить тремор и тревожность, подготовить нервную систему к сну. При тошноте подключаются противорвотные и гастропротекция; кардиокоррекция даётся только после оценки рисков. Мы заранее проговариваем нормальные ощущения (умеренная слабость, сонливость, сухость во рту) и «красные флажки» для связи. Такой минимум достаточных вмешательств снижает побочные эффекты, делает бюджет предсказуемым и удерживает результат не часами, а днями. На этой базе обсуждаются следующие шаги: амбулаторный график, короткие психотерапевтические сессии, при показаниях — кодирование после стабилизации и исключения противопоказаний.
Подробнее можно узнать тут – chastnaya-narkologicheskaya-klinika
Обращение за помощью на дому обладает рядом преимуществ, которые особенно актуальны для пациентов, сталкивающихся с зависимостью:
Получить дополнительную информацию – http://alko-zakodirovat.ru
На этом этапе специалист уточняет длительность запоя, характер употребляемого алкоголя и наличие сопутствующих заболеваний. Тщательный анализ собранной информации позволяет выбрать оптимальную тактику детоксикации и минимизировать риск осложнений.
Получить дополнительные сведения – http://
лечение зубов ребенку платно лечение зубов ребенка под наркозом севоран
Запой почти никогда не начинается внезапно: сначала это редкие «переборы» по праздникам, потом привычка снимать стресс вечером, а дальше алкоголь всё чаще появляется в распорядке дня. В какой-то момент близкие замечают, что человек уже не контролирует количество, выпивка идёт несколько дней подряд, отменяются дела, нарушается сон, пропадает аппетит, появляются дрожь, потливость, скачки давления. На этом этапе вывод из запоя в Ивантеевке уже не может быть простым «проспаться и прийти в себя» — организму нужна полноценная медицинская помощь.
Ознакомиться с деталями – vyvod-iz-zapoya-ivanteevka
Обычно работа строится по этапам, где каждый шаг логически продолжает предыдущий:
Подробнее – http://vyvod-iz-zapoya-ivanteevka11.ru
Медицинский подход к выводу из запоя предполагает не только устранение внешних симптомов, но и стабилизацию внутренних процессов организма, что особенно важно при повторяющихся или затяжных эпизодах.
Изучить вопрос глубже – https://vyvod-iz-zapoya-v-tolyatti0.ru
Диагностическая оценка позволяет определить степень интоксикации и выявить возможные риски осложнённого течения состояния.
Получить дополнительную информацию – анонимный вывод из запоя тольятти
В этом тексте собрано множество случайных сведений и довольно неопределённых мыслей, которые могут чем-то заинтересовать. Мы отмечаем моменты, которые не особенно важны, но всё же занимают своё место в повествовании.
Вот – онлайн слоты
Вызов нарколога на дом в Волгограде позволяет оперативно получить помощь без необходимости посещения клиники. Это особенно важно при состояниях интоксикации, абстиненции или других осложнениях. Специалист приедет в любое удобное время, включая ночные часы, обеспечивая круглосуточную поддержку. При этом сохраняется полная конфиденциальность, что высоко ценится пациентами и их родственниками.
Углубиться в тему – врач нарколог на дом в волгограде
Нарколог на дом в Волгограде — это специализированная медицинская услуга, направленная на оказание квалифицированной помощи пациентам с зависимостями в привычной домашней обстановке. Такая форма лечения позволяет снизить стресс, связанный с госпитализацией, и обеспечивает более комфортное проведение медицинских процедур. Вызов нарколога на дом пользуется высокой востребованностью как среди пациентов с алкоголизмом, так и среди людей, страдающих от наркотической зависимости, а также при острых состояниях, требующих неотложного вмешательства.
Исследовать вопрос подробнее – частный нарколог на дом волгоград
ремонт ванны и туалета ремонта ванной комнате ключ
В статье по вопросам здоровья мы рассматриваем актуальные проблемы, с которыми сталкивается общество. Обсуждаются заболевания, факторы риска и важные аспекты профилактики. Читатели получат полезные советы о том, как сохранить здоровье и улучшить качество жизни.
Ознакомиться с деталями – http://google.com.sl/url?q=https://vyezdnoy-narkolog.ru/stati/kak-rabotaet-programma-12-shagov-v-lechenii-alkogolizma.html
Нарколог на дом в Хабаровске представляет собой форму специализированной медицинской помощи, ориентированную на пациентов, состояние которых не позволяет самостоятельно обратиться в медицинское учреждение. Такой формат особенно востребован при острых состояниях, связанных с интоксикацией, выраженной абстиненцией или резким ухудшением самочувствия. В клинике «Ясный Вектор» выездная наркологическая помощь организована в круглосуточном режиме, что позволяет реагировать на обращения независимо от времени суток.
Подробнее – нарколог капельница на дом хабаровск
После первичного осмотра начинается активная фаза детоксикации. Современные медикаменты вводятся капельничным методом, что позволяет быстро вывести токсины из организма, нормализовать обмен веществ и восстановить работу внутренних органов.
Детальнее – вывод из запоя с выездом
«Тёмные часы» вечера — время импульсивных решений. Мы даём короткие, нейтральные инструменты на 20–40 минут: тёплый душ, прогулка рядом с домом при устойчивых показателях, дыхательная практика, короткий созвон с «своим» человеком. Эти бесплатные шаги поддерживают ровный сон и уменьшают вероятность «дорогих» экстренных повторов.
Детальнее – http://narkologicheskaya-klinika-himki9.ru/platnaya-narkologicheskaya-klinika-v-himkah/https://narkologicheskaya-klinika-himki9.ru
Чем дольше продолжается запой, тем более непредсказуемой становится реакция организма. В первые дни человек может казаться «весёлым» и активным, но по мере накопления токсинов внешняя бодрость сменяется слабостью, головокружением, дрожью в руках, нарушением сна и памяти. Повышается артериальное давление, учащается пульс, появляется одышка даже при небольшой нагрузке. Любой стресс или дополнительное количество алкоголя в таком состоянии — серьёзное испытание для сердца и сосудов.
Углубиться в тему – vyvod-iz-zapoya-ivanteevka11.ru/
Одна из главных ошибок — ждать «идеального момента» для лечения. Кажется, что кодирование уместно только тогда, когда зависимость достигла крайней стадии: человек потерял работу, перестал выходить из запоев, полностью разрушил отношения с близкими. На практике обращение в клинику Чехова оправдано гораздо раньше, как только употребление алкоголя перестаёт быть редким эпизодом и начинает системно мешать жить. Если каждый стресс, отпуск или конфликт заканчиваются срывом, если запои становятся длиннее, а похмелье тяжелее, — это уже повод хотя бы обсудить кодирование с врачом, а не ждать, пока ресурс организма будет почти исчерпан.
Получить больше информации – https://kodirovanie-ot-alkogolizma-chekhov11.ru/kodirovanie-ot-alkogolizma-na-domu-v-chekhove/
Многие жители Ивантеевки откладывают обращение, потому что им кажется, что ситуация «ещё не настолько страшная». Пока человек как-то ходит на работу, иногда остаётся трезвым и периодически клянётся, что «всё возьмёт под контроль», кажется, что обращаться в клинику рано. На самом деле эффективнее всего лечение работает именно тогда, когда проблемы уже заметны, но ещё не привели к тяжёлым осложнениям — инсультам, инфарктам, тяжёлым психозам, полной утрате социальных связей.
Детальнее – http://narkologicheskaya-klinika-ivanteevka11.ru/luchshie-narkologicheskie-kliniki-v-ivanteevke/
В данном обзоре представлены основные направления и тренды в области медицины. Мы обсудим актуальные проблемы здравоохранения, свежие открытия и новые подходы, которые меняют представление о лечении и профилактике заболеваний. Эта информация будет полезна как специалистам, так и широкой публике.
Выяснить больше – https://www.google.im/url?q=https://trezviy-gorod.ru/vrachi/suhareva-viktoriya-nikolaevna.html
Инфузионная терапия — не универсальный раствор «для всех». Её смысл — восстановить объём циркулирующей крови, скорректировать электролиты, снизить токсическую нагрузку, мягко приглушить тремор и тревогу, вернуть условия для сна. Мы начинаем с оценки реакции организма и двигаемся небольшими порциями, чтобы избежать «перегрева» препаратами. При выраженной тошноте подключаем противорвотную поддержку и гастропротекцию; при необходимости — печёночные субстраты и витамины группы B; кардиологические или антигипертензивные решения применяем только по показаниям. Врач сразу оговаривает, какие ощущения нормальны (сонливость, умеренная слабость, сухость во рту), а какие — повод для немедленной связи. Такой реализм даёт не косметическое облегчение «на час», а устойчивую траекторию на дни: эффект инфузий не «сгорает» к вечеру, потому что их поддерживают правила сна, воды и питания.
Разобраться лучше – наркологическая клиника врачи
Кроме стационара, клиника обеспечивает выезд нарколога на дом в любое время суток. Это позволяет оперативно начать детоксикацию и стабилизацию состояния, не дожидаясь свободного места в клинике или оформления госпитализации. Высокая мобильность специалистов и оснащённость автомобиля всем необходимым оборудованием гарантируют качественную помощь прямо на дому.
Подробнее тут – частная наркологическая клиника
Обращаться можно и нужно не только в момент очередного запоя. Клиника в Ивантеевке работает и с теми, кто сейчас в относительной ремиссии, но понимает, что без внешней поддержки снова сорвётся. В этом случае можно обсудить профилактические программы, варианты кодирования, реабилитацию, работу с тревогой и депрессией. Чем раньше сделан шаг в сторону лечения, тем мягче будут процедуры и тем больше шансов на устойчивый результат.
Выяснить больше – рейтинг наркологических клиник
Когда состояние пациента критическое и невозможно транспортировать его в стационар, мы оказываем помощь на дому:
Подробнее – наркологическая клиника наркологический центр
Когда состояние пациента критическое и невозможно транспортировать его в стационар, мы оказываем помощь на дому:
Ознакомиться с деталями – платная наркологическая клиника в волгограде
компании занимающиеся продвижением сайтов компании занимающиеся продвижением сайтов .
В условиях круглосуточного наблюдения врачи могут внимательно следить за динамикой состояния, своевременно корректировать схемы лечения, проводить детоксикацию под контролем давления, пульса и работы сердца. Особенно это важно для пациентов с гипертонией, сердечно-сосудистыми заболеваниями, нарушениями ритма, заболеваниями печени, диабетом и другими хроническими патологиями. В стационаре проще организовать обследование, назначить сопутствующую терапию, вовремя заметить опасные симптомы и предотвратить серьёзные осложнения.
Разобраться лучше – государственная наркологическая клиника
Если вы сейчас разбираетесь с SEO, советую глянуть [url=https://seoblog360.ru/]русскоязычный SEO-блог[/url] — там есть практических материалов по выбору ниши, контенту и продвижению.
Помощь 24/7 означает, что нарколог на дом в Хабаровске может быть направлен в любое время суток, включая ночные часы и выходные дни. В клинике «Ясный Вектор» выездная служба функционирует с учётом логистики города, что позволяет минимизировать время ожидания врача.
Углубиться в тему – вызов врача нарколога на дом
Помощь 24/7 означает, что нарколог на дом в Хабаровске может быть направлен в любое время суток, включая ночные часы и выходные дни. В клинике «Ясный Вектор» выездная служба функционирует с учётом логистики города, что позволяет минимизировать время ожидания врача.
Подробнее тут – запой нарколог на дом хабаровск
частный seo оптимизатор частный seo оптимизатор .
Перед списком важно: пункты ниже не заменяют осмотр, а помогают семье быстрее принять здравое решение. В большинстве таких ситуаций достаточно правильно подобранных инфузий и чётких правил на 48–72 часа; при сочетании признаков мы рекомендуем стационар.
Получить больше информации – https://narkologicheskaya-klinika-podolsk9.ru/chastnaya-narkologicheskaya-klinika-v-podolske
продвижение сайта продвижение сайта .
Первая ровная ночь — переломный момент. Мы настраиваем гигиену: затемнение, прохладная комната, фиксированное время отбоя, отсутствие ярких экранов и эмоциональных разговоров. При показаниях добавляем мягкую седативную поддержку в дозах, которые стабилизируют, а не «выключают». Утром — короткий контроль, подстройка дозировок и план активности «по силам», чтобы не сорваться к вечеру от усталости. Такой контур снижает импульсивность, убирает панические волны и делает эффект капельницы долгим.
Получить дополнительную информацию – kapelnica-na-dom-v-podolske
В клинике «АмурМед Контур» используются методы, доказавшие свою безопасность и эффективность. Они помогают не только очистить организм, но и восстановить нормальное функционирование нервной системы и внутренних органов. В таблице ниже приведены основные направления терапии и их особенности.
Получить дополнительные сведения – вывод из запоя в стационаре в хабаровске
В этой статье мы рассмотрим современные достижения в области медицины, включая инновационные методы лечения и диагностики. Мы обсудим важность профилактики заболеваний и роль технологий в улучшении качества здравоохранения. Читатели узнают о влиянии медицины на повседневную жизнь и ее значение для современного общества.
Получить дополнительные сведения – http://howmuchisit.org/ra.asp?url=https://narko-zdravie.ru/o-nas/stati/kak-izbavitsya-ot-peregara
рейтинг компаний по продвижению сайтов reiting-seo-kompanii.ru .
Помощь 24/7 означает, что нарколог на дом в Хабаровске может быть направлен в любое время суток, включая ночные часы и выходные дни. В клинике «Ясный Вектор» выездная служба функционирует с учётом логистики города, что позволяет минимизировать время ожидания врача.
Получить больше информации – выезд нарколога на дом
Все методики подбираются строго индивидуально. Комбинация физиологической и психотерапевтической поддержки помогает восстановить здоровье и устойчивость пациента. Такой подход снижает вероятность рецидивов и способствует длительному сохранению трезвости.
Получить больше информации – запой наркологическая клиника
Алкогольная зависимость — это комплексное заболевание, требующее не только медикаментозного воздействия, но и серьёзной психологической поддержки. В Сочи клиника «ЮгМед» предлагает выезд нарколога на дом, что позволяет начать лечение без стресса, связанного с госпитализацией. Такой подход особенно важен для тех, кто ценит конфиденциальность и предпочитает комфорт привычной обстановки. Мы обеспечиваем полную анонимность, а опытные специалисты разрабатывают индивидуальную программу, учитывающую длительность запоя, сопутствующие заболевания и психологические факторы зависимости.
Подробнее можно узнать тут – http://
Международный институт современного образования проводит дистанционную переподготовку и повышение квалификации специалистов с выдачей документов государственного образца и регистрацией в системе ФРДО. Учреждение работает по лицензии Министерства образования Ставропольского края с 2017 года и предлагает программы по пожарной безопасности, ХАССП, экологии и антитерроризму. Ищете хассп? Полный перечень курсов размещен на misokmv.ru с указанием стоимости и сроков. Институт обеспечивает гибкие форматы обучения через платформу INDIGO, разрабатывает корпоративные программы под задачи организаций и принимает слушателей из всех регионов России.
Наркологическая помощь — это не «последний шанс для безнадёжных», а нормальный медицинский шаг, такой же логичный, как визит к кардиологу при проблемах с сердцем или к эндокринологу при сахарном диабете. В клинике в Лобне зависимость рассматривают как заболевание, а не как «слабость характера», и помогают человеку пройти весь путь — от детоксикации и вывода из запоя до реабилитации и профилактики срывов. Обращение на более раннем этапе даёт важное преимущество: организм ещё способен восстанавливаться, психика не разрушена окончательно, социальные связи не разорваны. Это значит, что лечение может быть мягче, программа — гибче, а шансы на устойчивый результат — выше.
Ознакомиться с деталями – narkologicheskaya-klinika-lobnya11.ru/
Алкогольный делирий проявляется в виде галлюцинаций, бреда и агрессии. При отсутствии контроля такие пациенты опасны для себя и окружающих, требуя немедленной госпитализации.
Углубиться в тему – вывод из запоя в стационаре в челябинске
Этот информационный материал собраны данные, которые помогут лучше понять текущие тенденции и процессы в различных сферах жизни. Мы предоставляем четкий анализ, графики и примеры, чтобы информация была не только понятной, но и практичной для принятия решений.
Читать далее > – https://graficmaster.com/product/mens-swimming-trunks-summer-fitness-shorts
seo partners seo partners .
В этой статье представлен занимательный и актуальный контент, который заставит вас задуматься. Мы обсуждаем насущные вопросы и проблемы, а также освещаем истории, которые вдохновляют на действия и изменения. Узнайте, что стоит за событиями нашего времени!
См. подробности – https://packagingecologico.com/como-crear-el-packaging-mas-efectivo
В этой статье-обзоре мы соберем актуальную информацию и интересные факты, которые освещают важные темы. Читатели смогут ознакомиться с различными мнениями и подходами, что позволит им расширить кругозор и глубже понять обсуждаемые вопросы.
Выяснить больше – https://almontag.com/%D8%A3%D9%83%D8%AB%D8%B1-%D8%A7%D9%84%D8%AF%D9%88%D9%84-%D8%A5%D9%86%D8%AA%D8%A7%D8%AC%D8%A7-%D9%84%D9%84%D9%81%D9%88%D8%A7%D9%83%D9%87
Эта статья для ознакомления предлагает читателям общее представление об актуальной теме. Мы стремимся представить ключевые факты и идеи, которые помогут читателям получить представление о предмете и решить, стоит ли углубляться в изучение.
Полезно знать – https://easapp.in/choosing-the-right-employee-attendance-tracking-app-key-considerations-and-features-part-1
Мы предлагаем вам окунуться в океан любопытных фактов и вдохновляющих историй. Эта публикация поможет расширить горизонты, разбудить интерес к науке и истории и увидеть мир с новой стороны.
Получить дополнительную информацию – https://www.claradlunausa.com/summer-skin-care
Мы собрали для вас самые захватывающие факты из мира науки и истории. От малознакомых деталей до грандиозных событий — эта статья расширит ваш кругозор и подарит новое понимание того, как устроен наш мир.
Более того — здесь – https://mediabites.com.pk/bilal-abbas-khan
Публикация предлагает читателю не просто информацию, а инструменты для анализа и саморазвития. Мы стимулируем критическое мышление, предлагая различные точки зрения и призывая к самостоятельному поиску решений.
Обратитесь за информацией – https://alles-familie.at/rosshuette-seefeld-ein-toller-spielplatz-am-berg
В данном тексте собраны разнообразные случайные сведения и не вполне определённые идеи, которые могут вызвать интерес. Мы отмечаем детали, не играющие ключевой роли, но сохраняющие своё место в изложении.
Подробнее читать – купить керамический блок
оптимизация сайта франция оптимизация сайта франция .
В этой статье обсуждаются актуальные медицинские вопросы, которые волнуют общество. Мы обращаем внимание на проблемы, касающиеся здравоохранения и лечения, а также на новшества в области медицины. Читатели будут осведомлены о последних событиях и смогут следить за тенденциями в медицине.
Разобраться лучше – https://www.howmuchisit.org/wp-content/plugins/AND-AntiBounce/redirector.php?url=https://vozrojdenie.site/kodirovanie-tetlongom
В этой статье представлен занимательный и актуальный контент, который заставит вас задуматься. Мы обсуждаем насущные вопросы и проблемы, а также освещаем истории, которые вдохновляют на действия и изменения. Узнайте, что стоит за событиями нашего времени!
См. подробности – http://gaussianfilter.ru/catg/10
Инфузионная терапия — не универсальный раствор «для всех». Её смысл — восстановить объём циркулирующей крови, скорректировать электролиты, снизить токсическую нагрузку, мягко приглушить тремор и тревогу, вернуть условия для сна. Мы начинаем с оценки реакции организма и двигаемся небольшими порциями, чтобы избежать «перегрева» препаратами. При выраженной тошноте подключаем противорвотную поддержку и гастропротекцию; при необходимости — печёночные субстраты и витамины группы B; кардиологические или антигипертензивные решения применяем только по показаниям. Врач сразу оговаривает, какие ощущения нормальны (сонливость, умеренная слабость, сухость во рту), а какие — повод для немедленной связи. Такой реализм даёт не косметическое облегчение «на час», а устойчивую траекторию на дни: эффект инфузий не «сгорает» к вечеру, потому что их поддерживают правила сна, воды и питания.
Подробнее тут – https://narkologicheskaya-klinika-podolsk9.ru/chastnaya-narkologicheskaya-klinika-v-podolske/
Эта информационная заметка содержит увлекательные сведения, которые могут вас удивить! Мы собрали интересные факты, которые сделают вашу жизнь ярче и полнее. Узнайте нечто новое о привычных аспектах повседневности и откройте для себя удивительный мир информации.
Это стоит прочитать полностью – https://cd-network.de/musikverlag/musik-ist-nahrung
лучшие seo агентства лучшие seo агентства .
В этом обзорном материале представлены увлекательные детали, которые находят отражение в различных аспектах жизни. Мы исследуем непонятные и интересные моменты, позволяя читателю увидеть картину целиком. Погрузитесь в мир знаний и удивительных открытий!
Это стоит прочитать полностью – http://forums.shlock.co.uk/viewtopic.php?f=2&t=314624&p=934741
Эта статья предлагает захватывающий и полезный контент, который привлечет внимание широкого круга читателей. Мы постараемся представить тебе идеи, которые вдохновят вас на изменения в жизни и предоставят практические решения для повседневных вопросов. Читайте и вдохновляйтесь!
Смотри, что ещё есть – https://www.ci-es.org/cropped-bandeausitecies-1-png
Эта статья предлагает захватывающий и полезный контент, который привлечет внимание широкого круга читателей. Мы постараемся представить тебе идеи, которые вдохновят вас на изменения в жизни и предоставят практические решения для повседневных вопросов. Читайте и вдохновляйтесь!
Изучите внимательнее – https://w.femme.sk/index.php/kuchyna/ine/item/14673-tancujuci-teddy-aj-zlaty-medzinarodny-den-gumovych-medvedikov-je-po-roku-opaet-tu
Эта статья предлагает живое освещение актуальной темы с множеством интересных фактов. Мы рассмотрим ключевые моменты, которые делают данную тему важной и актуальной. Подготовьтесь к насыщенному путешествию по неизвестным аспектам и узнайте больше о значимых событиях.
Только факты! – http://otdix.pp.ua/turist-sam-sozdaet-sebe-nomer
В этом обзорном материале представлены увлекательные детали, которые находят отражение в различных аспектах жизни. Мы исследуем непонятные и интересные моменты, позволяя читателю увидеть картину целиком. Погрузитесь в мир знаний и удивительных открытий!
Только факты! – https://hsa.artefactdesign.com/home/sales
В этом обзорном материале представлены увлекательные детали, которые находят отражение в различных аспектах жизни. Мы исследуем непонятные и интересные моменты, позволяя читателю увидеть картину целиком. Погрузитесь в мир знаний и удивительных открытий!
Получить больше информации – http://www.autotyrimai.lt/autoverslas/naujienos/x-klases-mercedes-benz-taikosi-i-turtingus-keturraciu-megejus-ir-buriuotojus
Переходи по ссылке на официальный сайт > http://apelsin.su/wp-includes/articles/promokod_240.html
технического аудита сайта технического аудита сайта .
В этой информационной статье вы найдете интересное содержание, которое поможет вам расширить свои знания. Мы предлагаем увлекательный подход и уникальные взгляды на обсуждаемые темы, побуждая пользователей к активному мышлению и критическому анализу.
Лучшее решение — прямо здесь – https://alvaro-fixed.com/free-football-vip-odds
Эта статья погружает вас в увлекательный мир знаний, где каждый факт становится открытием. Мы расскажем о ключевых исторических поворотных моментах и научных прорывах, которые изменили ход цивилизации. Поймите, как прошлое формирует настоящее и как его уроки могут помочь нам строить будущее.
Открой скрытое – http://3maerosoladhesivemalaysiasupplier.diecut.com.my/2023/07/16/3m-spray-adhesive-kuala-lumpur-supplier
Эта статья сочетает познавательный и занимательный контент, что делает ее идеальной для любителей глубоких исследований. Мы рассмотрим увлекательные аспекты различных тем и предоставим вам новые знания, которые могут оказаться полезными в будущем.
А что дальше? – https://t-drubich.ru/video
В данной обзорной статье представлены интригующие факты, которые не оставят вас равнодушными. Мы критикуем и анализируем события, которые изменили наше восприятие мира. Узнайте, что стоит за новыми открытиями и как они могут изменить ваше восприятие реальности.
Получить дополнительную информацию – https://www.tdedchangair.com/webboard/viewtopic.php?t=61470
Публикация предлагает читателю не просто информацию, а инструменты для анализа и саморазвития. Мы стимулируем критическое мышление, предлагая различные точки зрения и призывая к самостоятельному поиску решений.
Обратитесь за информацией – http://tprf.org.ua/tendenciyi-osinnoyi-modi-elegantnist-i-praktichnist
Мы собрали для вас самые захватывающие факты из мира науки и истории. От малознакомых деталей до грандиозных событий — эта статья расширит ваш кругозор и подарит новое понимание того, как устроен наш мир.
Узнать из первых рук – https://bwobv.nl/rietwinnen
Этот обзор дает возможность взглянуть на историю и науку под новым углом. Мы представляем редкие факты, неожиданные связи и значимые события, которые помогут вам глубже понять развитие цивилизации и роль человека в ней.
Углубиться в тему – http://wp12964331.server-he.de/dance_with_the_desert_2/2021/03/24/virtual-kibbuz
Эта публикация исследует взаимосвязь зависимости и психологии. Мы обсудим, как психологические аспекты влияют на появление зависимостей и процесс выздоровления. Читатели смогут понять важность профессиональной поддержки и применения научных подходов в терапии.
Разобраться лучше – https://www.google.li/url?sa=t&url=https://vozrojdenie.site/detoksikatsiya-ot-narkotikov
успешные кейсы seo успешные кейсы seo .
В данной статье вы найдете комплексный подход к изучению насущных тем. Мы комбинируем теоретические сведения с практическими советами, чтобы читатель мог не только понять проблему, но и найти пути её решения.
Продолжить чтение – https://habersizseniz.com/balik-kokusu-elden-nasil-cikar
Медицинская публикация представляет собой свод актуальных исследований, экспертных мнений и новейших достижений в сфере здравоохранения. Здесь вы найдете информацию о новых методах лечения, прорывных технологиях и их практическом применении. Мы стремимся сделать актуальные медицинские исследования доступными и понятными для широкой аудитории.
Изучить вопрос глубже – http://google.com.ag/url?q=https://i-am-new.ru/vrachi/lebedeva-alyona-aleksandrovna
Наши врачи имеют сертификаты Министерства здравоохранения РФ и европейские дипломы о дополнительном образовании. Это гарантирует, что вы получите помощь, основанную на последних исследованиях и передовых практиках наркологии.
Подробнее тут – наркологическая клиника клиника помощь
В этом интересном тексте собраны обширные сведения, которые помогут вам понять различные аспекты обсуждаемой темы. Мы разбираем детали и факты, делая акцент на важности каждого элемента. Не упустите возможность расширить свои знания и взглянуть на мир по-новому!
Где можно узнать подробнее? – https://jusos-kassel.de/auserordentlichen-unterbezirksparteitag-der-spd-kassel-stadt/comment-page-1
Этот сборник информации привлекает множеством мелких деталей и необычных ракурсов. Мы предлагаем взгляды, редко полезные, но способные немного разнообразить знакомство с темой.
Подробнее читать – плитка для ванны
В обзорной статье вы найдете собрание важных фактов и аналитики по самым разнообразным темам. Мы рассматриваем как современные исследования, так и исторические контексты, чтобы вы могли получить полное представление о предмете. Погрузитесь в мир знаний и сделайте шаг к пониманию!
Уникальные данные только сегодня – https://tourpassion.com/tpo-travel-a-trusted-b2b-booking-platform-for-toulouse-travel-professionals-2
На этом этапе специалист уточняет длительность запоя, характер употребляемого алкоголя и наличие сопутствующих заболеваний. Тщательный анализ собранной информации позволяет выбрать оптимальную тактику детоксикации и минимизировать риск осложнений.
Ознакомиться с деталями – вывод из запоя на дому цена в екатеринбурге
В этом интересном тексте собраны обширные сведения, которые помогут вам понять различные аспекты обсуждаемой темы. Мы разбираем детали и факты, делая акцент на важности каждого элемента. Не упустите возможность расширить свои знания и взглянуть на мир по-новому!
Практические советы ждут тебя – http://mail.pa-pagaralam.go.id/index.php/component/k2/item/6-you-only-live-once-live-well?start=1800&iccaldate=2025-01-1
профессиональное продвижение сайтов профессиональное продвижение сайтов .
реклама наркологической клиники реклама наркологической клиники .
seo network seo network .
заказать анализ сайта заказать анализ сайта .
Московская типография «повсюду» специализируется на всех видах полиграфии — визитки, листовки, сувенирная продукция, наружная реклама. Новейшее печатное оборудование обеспечивает быстрое выполнение сложных заказов с высоким качеством. Ищете эко подарки корпоративные? Заказать печать можно на сайте povsyoudo.ru, где представлен полный каталог услуг с расчетом стоимости. Компания работает с индивидуальными макетами, предоставляет услуги дизайнера и доставку готовой продукции по москве и области.
growthmarketing – Mobile version looks perfect; no glitches, fast scrolling, crisp text.
Бесплатный ключ для Windows 11 — только у нас, обновлено в 2026 году!
Подробнее – Бесплатная активация Windows 11 навсегда
socialmarketing – Color palette felt calming, nothing distracting, just focused, thoughtful design.
https://connect.gt/user/1xbetcodebd
הפילה את החולצה שלה, מחוך, מכנסיים קצרים ותחתונים ורק ואז שמתי לב שפדרו עומד בפתח, עושה ביד לזין חום. הוא היה קצר ודק יותר מזה של לואיס, אבל עם ראש סגול גדול בגודל הגון. האישה בכלל התכווצו בעוויתות, אצבעותיה נצמדו לסדין והותירו עליו סימנים מרופטים. הסתכלתי על כל זה ופתאום הבנתי שלא אכפת לי להשתתף באורגיה הזו בעצמי. זה נמשך שבע דקות, ז ‘אק נכנס לאולם, והחבר’ ה https://sexlolalove.com/
В статье-обзоре представлены данные сомнительной актуальности и факты без явной взаимосвязи. Читатель ознакомится с разными мнениями, хотя они вряд ли существенно изменят его представление о теме.
Подробнее читать – керамический блок
лучшие агентства seo продвижения reiting-seo-kompaniy.ru .
тип чем лучше micro usb и преимущества usb c перед micro usb
оптимизация и продвижение сайтов москва оптимизация и продвижение сайтов москва .
Терапия состоит из нескольких взаимосвязанных этапов: оценка состояния, детоксикация, коррекция водно-электролитного баланса, поддержка психики и последующая реабилитация. Каждый этап проходит под контролем профильных специалистов с применением новейшего оборудования.
Ознакомиться с деталями – https://качество-вывод-из-запоя.рф/vyvod-iz-zapoya-na-domu-v-permi
Этот информационный набор привлекает внимание множеством мелочей и странных ракурсов. Мы предлагаем взгляды, которые редко бывают полезны, но могут слегка разнообразить ваше знакомство с темой.
Вот – секс шоп
Медицинский подход к выводу из запоя предполагает не только устранение внешних симптомов, но и стабилизацию внутренних процессов организма, что особенно важно при повторяющихся или затяжных эпизодах.
Изучить вопрос глубже – срочный вывод из запоя в тольятти
Каждый пациент проходит несколько последовательных этапов, направленных на очищение организма, стабилизацию эмоционального состояния и формирование стойкой мотивации к трезвой жизни. Такой подход позволяет не только устранить физическую зависимость, но и укрепить психическую устойчивость.
Получить больше информации – лечение в наркологической клинике самара
После основной терапии важно обеспечить поддержку пациента в период реабилитации. Реабилитационные программы в Краснодаре включают социальную адаптацию, восстановление навыков общения и трудоустройства. Это позволяет минимизировать риск рецидива и возвращения к употреблению алкоголя. Поддержка со стороны специалистов и близких — обязательное условие успешного результата. Более подробно о социальной реабилитации можно ознакомиться на сайте Федерального реабилитационного центра.
Получить дополнительные сведения – лечение алкоголизма в стационаре
https://letterboxd.com/ToursGratut/
Комбинированное воздействие обеспечивает быстрое улучшение состояния пациента и позволяет стабилизировать организм даже при тяжёлой интоксикации. Врач контролирует все реакции и корректирует дозировки при необходимости.
Узнать больше – https://narkolog-na-dom-tolyatti0.ru/tolyatti-narkologicheskij-dispanser
Автоматизация торговли и общепита невозможна без надежного контроля за кассовыми операциями. Облачный сервис ККМ Server Pro решает задачу удаленного мониторинга онлайн-касс для бизнеса любого масштаба — от одной точки до федеральной сети. Через личный кабинет владелец получает доступ к отчетам, контролирует смены и отслеживает продажи в режиме реального времени. Подробнее о возможностях сервиса — https://kkmserver-pro.ru/ Система интегрируется с популярными CRM и учетными программами, исключает кассовые разрывы и упрощает взаимодействие с налоговой.
Особенность петербургского контекста — большая доля интеллектуального труда и проектной занятости. Мы учитываем это при выборе методики: отдаем предпочтение схемам, которые не «глушат» когнитивную активность и позволяют быстро возвращаться к задачам. Если требуются краткие больничные листы, предоставляем корректные медицинские документы без «ярлыков».
Получить больше информации – http://kodirovanie-ot-alkogolizma-v-spb16.ru
В этой публикации мы обсуждаем современные методы лечения различных заболеваний. Читатели узнают о новых медикаментах, терапиях и исследованиях, которые активно применяются для лечения. Мы нацелены на то, чтобы предоставить практические знания, которые могут помочь в борьбе с недугами.
Расширить кругозор по теме – острый алкогольный делирий
«СтаврМедЦентр» собирает лечение из коротких модулей с понятными целями: быстро стабилизировать соматику, вернуть управляемый сон, снизить реактивность вечера, обучить «перехвату» импульса и закрепить это в спокойной рутине. Фармакологию используем дозированно, опираясь на витальные показатели и переносимость; поведенческий контур запускаем сразу: свет, вода, дыхание, цифровая гигиена, семейные договорённости. Ниже — ориентировочная архитектура маршрута. На практике последовательность и длительность настраиваются под конкретного человека и его среду.
Подробнее – наркологические клиники алкоголизм ставрополь
[url=https://vivodizzapoya.asia]вывод из запоя ночью алматы[/url] поможет быстро и безопасно организовать качественный вывод из запоя в Алматы.
Первый шаг — оценка состояния пациента специалистом, который определит степень интоксикации и наличие сопутствующих заболеваний.
Круглосуточная клиника «НаркоЦентр» предлагает широкий спектр наркологических услуг в Екатеринбурге и области. В числе основных направлений — выезд врача на дом, проведение детоксикационных процедур, индивидуальные программы восстановления, врачебное сопровождение в стационаре, а также психологическая и физиотерапевтическая реабилитация. Мы опираемся на международные стандарты терапии и применяем только сертифицированные препараты, что гарантирует безопасность и эффективность лечения.
Углубиться в тему – наркологическая помощь на дому екатеринбург
Доктор проводит физикальное обследование, замеряет АД, пульс, сатурацию и температуру. Параллельно выполняются экспресс-анализы крови и мочи, которые позволяют выявить нарушения электролитов, работу печени и почек.
Выяснить больше – https://качество-вывод-из-запоя.рф/vyvod-iz-zapoya-staczionar-v-permi
Процесс лечения в «ВолгаМед Баланс» выстроен логично и последовательно. Каждый этап направлен на достижение конкретных медицинских и психологических целей. Ниже приведена таблица, описывающая ключевые стадии терапии.
Подробнее можно узнать тут – запой наркологическая клиника тольятти
Главная цель — не просто снять симптомы абстиненции, а безопасно восстановить работу организма. Для этого применяются современные препараты и сбалансированные растворы, которые выводят токсины, поддерживают функции печени и нормализуют обмен веществ. Дополнительно пациент получает витаминотерапию и легкую психокоррекционную поддержку.
Выяснить больше – вывод из запоя вызов на дом в хабаровске
Полученные данные формируют основу для выбора лечебной тактики и определения оптимального формата помощи.
Подробнее тут – запой наркологическая клиника в тольятти
Метод лечения
Изучить вопрос глубже – http://narkologicheskaya-klinika-krasnodar00.ru/narkologicheskaya-klinika-anonimno-krasnodar/
Лечение проводится поэтапно, начиная с оценки состояния и заканчивая восстановлением после интоксикации. Каждый этап направлен на устранение симптомов отравления и стабилизацию работы внутренних органов.
Исследовать вопрос подробнее – нарколог на дом анонимно в челябинске
Лечение в клинике «Чистый Горизонт» организуется как последовательный медицинский процесс. Вывод из запоя в Тольятти проводится с учётом необходимости постепенной стабилизации организма и контроля реакции на терапию.
Детальнее – вывод из запоя на дому круглосуточно в тольятти
раскрутка сайта франция цена prodvizhenie-sajtov-v-moskve15.ru .
seo top 1 seo-kejsy17.ru .
продвижение сайтов во франции продвижение сайтов во франции .
Психотерапевтические методы включают когнитивно-поведенческую терапию, мотивационное интервьюирование и групповую поддержку, которые способствуют изменению отношения пациента к алкоголю и укреплению его мотивации к выздоровлению. Эти методы подробно описаны на ресурсе Психологическая помощь.
Изучить вопрос глубже – http://lechenie-alkogolizma-sochi00.ru/
Каждый пациент проходит несколько последовательных этапов, направленных на очищение организма, стабилизацию эмоционального состояния и формирование стойкой мотивации к трезвой жизни. Такой подход позволяет не только устранить физическую зависимость, но и укрепить психическую устойчивость.
Подробнее можно узнать тут – наркологическая клиника
Стартовый осмотр должен быть быстрым и осмысленным. Мы исключаем «обязательные» исследования, которые не меняют тактику, и оставляем то, что прямо влияет на состав инфузии, темп, место ведения (дом/амбулатория/стационар) и объём поведенческих рекомендаций. Решения принимаются на свежих цифрах и клинической картине «здесь и сейчас», а повторные замеры назначаются не «по привычке», а по смыслу. Это экономит силы пациента и время команды, а главное — уменьшает фармакологическую нагрузку без потери безопасности.
Исследовать вопрос подробнее – наркологическая клиника в ставрополе
Чтобы обеспечить безопасное выведение психоактивных веществ и восстановление организма, применяется детоксикация под контролем врача-нарколога и анестезиолога-реаниматолога.
Подробнее – наркологическое лечение наркомания архангельск
В современной наркологии применяется широкий спектр методов, позволяющих эффективно бороться с алкогольной зависимостью. В Краснодаре для этого используются как медикаментозные, так и психотерапевтические подходы, которые сочетаются для достижения стабильной ремиссии. Подробнее о методах лечения можно узнать на сайте Всемирной организации здравоохранения.
Углубиться в тему – https://lechenie-alkogolizma-krasnodar00.ru/klinika-lecheniya-alkogolizma-krasnodar/
В данной статье рассматриваются физиологические и эмоциональные аспекты зависимости. Мы обсудим, как организм реагирует на зависимое поведение, и какие методы помогают восстановить здоровье и внутреннее равновесие.
Следуйте по ссылке – после сильного запоя как восстановить организм
Клиника «АмурМед Контур» в Хабаровске предлагает комплексную детоксикацию организма, которая включает инфузионную терапию, стабилизацию жизненно важных показателей и коррекцию эмоционального состояния. Каждому пациенту подбирается индивидуальная схема капельниц с учётом возраста, массы тела, стажа употребления алкоголя и хронических заболеваний. Процедуры проводятся в условиях полной конфиденциальности и под постоянным наблюдением специалистов. Медицинская команда контролирует артериальное давление, уровень сатурации, частоту пульса и показатели крови на протяжении всего периода восстановления.
Исследовать вопрос подробнее – http://vyvod-iz-zapoya-v-khabarovske0.ru/vyvod-iz-zapoya-v-staczionare-khabarovsk/
Каждый пациент проходит последовательный процесс лечения, где основное внимание уделяется безопасности, контролю состояния и постепенной адаптации. При поступлении проводится диагностика с оценкой степени зависимости, сопутствующих патологий и психологических факторов, влияющих на развитие заболевания. На основании полученных данных формируется персонализированный план терапии, включающий медикаментозные и немедикаментозные методы.
Выяснить больше – narkologicheskaya-klinika-v-spb16.ru/
Первичный этап лечения в наркологической клинике в Тольятти имеет диагностическое значение и определяет дальнейшую тактику медицинского вмешательства. В клинике «Гармония Волги» обследование включает клиническую оценку состояния пациента, анализ жалоб и выявление факторов риска.
Изучить вопрос глубже – наркологическая клиника стационар тольятти
Капельница, устанавливаемая наркологом на дому в Челябинске, помогает быстро очистить организм от токсинов и нормализовать водно-солевой баланс. Растворы включают витамины, анальгетики, седативные и гепатопротекторные препараты. Эффект от процедуры ощущается уже через 20–30 минут. Капельница снижает головную боль, устраняет тошноту, восстанавливает работу печени и сердечно-сосудистой системы. Такой метод считается одним из самых эффективных способов вывести пациента из запойного или абстинентного состояния без визита в стационар.
Исследовать вопрос подробнее – http://narkolog-na-dom-v-chelyabinske16.ru/narkolog-vyzov-na-dom-chelyabinsk/
В «ЛадаМед Выезд» при оказании наркологической помощи на дому используются современные препараты и методы дезинтоксикации. Ниже приведена таблица с основными видами терапии и их эффектами.
Получить больше информации – врач нарколог выезд на дом в тольятти
продвижение сайта продвижение сайта .
Метод лечения
Получить дополнительные сведения – частная наркологическая клиника в краснодаре
seo network seo network .
В мегаполисе привычный ритм часто мешает системному лечению: плотный график, транспортные задержки, высокая социальная видимость. Чтобы терапия проходила спокойно, «НеоТрезвие СПБ» использует «немаркированную» логистику: нейтральные формулировки в документах, аккуратные визиты, разнесенные по времени консультации специалистов и персональный координатор. По желанию пациента часть этапов — образовательные сессии и посткодовое сопровождение — выполняются онлайн. Это снижает тревогу и делает маршрут лечения менее заметным для окружения.
Получить дополнительную информацию – кодирование от алкоголизма цена санкт-петербург
Если пациенту требуется постоянный мониторинг или комплексное лечение, мы обеспечиваем круглосуточное пребывание в стационаре. Здесь доступны углублённая диагностика — УЗИ органов брюшной полости, расширенные анализы крови, кардиомониторинг — и коррекция терапии в режиме реального времени. Комфортные палаты, ежедневное наблюдение медсестры и консультации психотерапевта создают условия для быстрого и безопасного выхода из зависимости.
Детальнее – наркологическая клиника клиника помощь
Алкоголизм является хроническим заболеванием, требующим комплексного и профессионального подхода к лечению. Лечение алкоголизма в Сочи направлено на полное восстановление физического и психоэмоционального состояния пациента с помощью современных медицинских технологий и индивидуально подобранных программ терапии.
Ознакомиться с деталями – клиника лечения алкоголизма
Такой подход позволяет врачу контролировать каждый шаг процесса, фиксировать динамику и при необходимости корректировать терапию. Постоянное наблюдение и своевременная поддержка делают лечение эффективным и безопасным для пациента.
Изучить вопрос глубже – https://narkologicheskaya-klinika-tolyatti0.ru/
В этом материале представлены детали, которые хоть и занимательны, но не особенно значимы. Мы рассматриваем моменты, которые трудно назвать важными, но всё же решили включить их для полноты картины.
Вот – турниры по покеру
В данном тексте собраны разнообразные случайные сведения и не вполне определённые идеи, которые могут вызвать интерес. Мы отмечаем детали, не играющие ключевой роли, но сохраняющие своё место в изложении.
Подробнее читать – плитка для ванной
Вывод из запоя в клинике в Санкт-Петербурге осуществляется под круглосуточным медицинским контролем с применением современных методов инфузионной терапии, препаратов для восстановления обменных процессов и купирования синдрома отмены. Главной задачей врачей является восстановление баланса между физическим и психическим состоянием, предотвращение осложнений и стабилизация основных жизненных функций.
Исследовать вопрос подробнее – вывод наркологическая клиника в санкт-петербурге
Чтобы обеспечить безопасное выведение психоактивных веществ и восстановление организма, применяется детоксикация под контролем врача-нарколога и анестезиолога-реаниматолога.
Получить дополнительную информацию – http://lechenie-narkomanii-arkhangelsk0.ru
https://mikkymixx.com/code-promo-1xbet-casino-2026-1x200tower-bonus-130e/
Мебельная фабрика «Подольск» производит кухни и шкафы-купе на заказ по индивидуальным размерам для жителей Москвы и Московской области. Благодаря собственному производству фабрика закупает сырьё напрямую и продаёт мебель без торговых надбавок. Ищете кухни на заказ? На mf-podolsk.ru представлен полный каталог кухонь и фасадов с онлайн-конструктором для самостоятельного проектирования. Фабрика работает с МДФ, пластиком, массивом дерева и плёнкой ПВХ — угловые, классические и современные решения под любой бюджет и интерьер. Услуги доставки и сборки входят в стоимость заказа.
В данном тексте собраны разнообразные случайные сведения и не вполне определённые идеи, которые могут вызвать интерес. Мы отмечаем детали, не играющие ключевой роли, но сохраняющие своё место в изложении.
Подробнее читать – керамический блок
Для наглядности представлен примерный состав инфузионного раствора, используемого при выводе из запоя:
Получить больше информации – вывод из запоя дешево в ростове-на-дону
ЧОП «Вымпел-Альянс» специализируется на профессиональной охране объектов любой сложности: от жилых комплексов и торговых центров до банков, складов и промышленных предприятий. Компания предлагает полный спектр услуг — от вооружённой охраны и личной защиты до инкассации, сопровождения грузов и детективной деятельности. Ищете возврат долга? На valliance.ru представлены все направления работы и актуальные тарифы. Квалифицированный персонал, сертифицированное оборудование и отлаженный контроль гарантируют клиентам надёжную защиту в любое время суток.
Инденза (Энзалутамид) — инновационный противоопухолевый препарат для лечения кастрационно-резистентного рака предстательной железы, включая метастатические и неметастатические формы. Механизм действия энзалутамида основан на блокаде андрогеновых рецепторов, что эффективно сдерживает рост злокачественных клеток. Клинически доказано снижение риска смерти на 37% и увеличение общей выживаемости на 4,8 месяца. Ищете купить индензу? На indenza.com.ru представлена полная информация о дозировках и схемах приёма. Препарат принимается один раз в сутки в дозе 160 мг и не предъявляет особых требований к условиям хранения или подготовке к приёму.
Этот информационный набор привлекает внимание множеством мелочей и странных ракурсов. Мы предлагаем взгляды, которые редко бывают полезны, но могут слегка разнообразить ваше знакомство с темой.
Вот – знакомства для взрослых
Наши специалисты оценивают клинические признаки запоя уже при первом осмотре — измеряют пульс, артериальное давление и насыщение кислородом, осматривают кожу и слизистые оболочки на предмет обезвоживания. Специальные тесты на когнитивные функции позволяют определить степень дезориентации и риск развития острых психотических реакций.
Углубиться в тему – http://тайный-вывод-из-запоя.рф/
Запой — угрожающее здоровью состояние, при котором человек теряет контроль над употреблением алкоголя, подвергая организм серьёзной интоксикации. Клиника «ПрофМед» в Перми предлагает специализированную помощь при выводе из запоя с соблюдением всех стандартов безопасности, строгой конфиденциальности и высокой квалификации персонала. Независимо от тяжести состояния пациента, специалисты клиники применяют современные методики детоксикации и поддерживают психологический комфорт, чтобы каждый мог начать новый этап жизни без страха и стыда.
Разобраться лучше – http://качество-вывод-из-запоя.рф/vyvod-iz-zapoya-czena-v-permi/
Мы не противопоставляем форматы — комбинируем их. Например, первые часы — выездная стабилизация с титрованной инфузией и чётким контролем АД/ЧСС/SpO?, затем — амбулаторные короткие визиты с вечерними онлайн-вставками. Если появляются «красные флаги» (дыхание, ритм, сознание), маршрут без пауз переводится в стационар: та же карта наблюдения, те же цели, только круглосуточный мониторинг и ночной пост. Приватность встроена на каждом этапе: нейтральные формулировки в документах, «тихие» уведомления, гражданская одежда персонала, доступ к данным по ролям.
Выяснить больше – запой наркологическая клиника
Каждый этап процедуры направлен на последовательное восстановление организма и предотвращение осложнений. Ниже представлена таблица, отражающая основные стадии и их особенности.
Получить дополнительные сведения – https://vyvod-iz-zapoya-v-khabarovske0.ru/vyvod-iz-zapoya-kruglosutochno-khabarovsk/
После введения капельницы пациент получает «вечернюю карточку»: правила гидратации малыми порциями, световую гигиену, два-три спокойных действия на вечер и чек-лист признаков, при которых нужно связаться с дежурным врачом. Такой бытовой протокол повышает переносимость терапии и делает ночь предсказуемой.
Исследовать вопрос подробнее – вывод из запоя на дому цена
Решение о срочном выезде принимается не из «желания поторопиться», а когда домашняя стабилизация действительно снижает риски. Ниже — ориентиры, при которых не стоит откладывать звонок. Любой из перечисленных признаков — повод для консультации, а их сочетание — для немедленного осмотра.
Углубиться в тему – наркологическая психиатрическая помощь в казани
Нарколог на дом в Волгограде — это специализированная медицинская услуга, направленная на оказание квалифицированной помощи пациентам с зависимостями в привычной домашней обстановке. Такая форма лечения позволяет снизить стресс, связанный с госпитализацией, и обеспечивает более комфортное проведение медицинских процедур. Вызов нарколога на дом пользуется высокой востребованностью как среди пациентов с алкоголизмом, так и среди людей, страдающих от наркотической зависимости, а также при острых состояниях, требующих неотложного вмешательства.
Получить больше информации – https://narkolog-na-dom-volgograd13.ru
В этой публикации мы обсуждаем современные методы лечения различных заболеваний. Читатели узнают о новых медикаментах, терапиях и исследованиях, которые активно применяются для лечения. Мы нацелены на то, чтобы предоставить практические знания, которые могут помочь в борьбе с недугами.
Нажмите, чтобы узнать больше – https://formula-clinic.ru/stati/pochemu-alkogol-mozhet-uvelichit-risk-pobochnyh-ehffektov-antibiotikov.html
Лечение в клинике «Гармония Волги» строится как последовательный медицинский процесс, направленный на стабилизацию состояния пациента и восстановление нарушенных функций организма. Наркологическая клиника в Тольятти применяет поэтапный подход, что позволяет контролировать динамику состояния и своевременно корректировать терапию.
Ознакомиться с деталями – наркологическая клиника клиника помощь тольятти
Капельница, устанавливаемая наркологом на дому в Челябинске, помогает быстро очистить организм от токсинов и нормализовать водно-солевой баланс. Растворы включают витамины, анальгетики, седативные и гепатопротекторные препараты. Эффект от процедуры ощущается уже через 20–30 минут. Капельница снижает головную боль, устраняет тошноту, восстанавливает работу печени и сердечно-сосудистой системы. Такой метод считается одним из самых эффективных способов вывести пациента из запойного или абстинентного состояния без визита в стационар.
Детальнее – вызов врача нарколога на дом в челябинске
продвижение сайтов в москве продвижение сайтов в москве .
Медикаментозное вмешательство подбирается индивидуально, что позволяет снизить нагрузку на органы и системы и обеспечить безопасность лечения.
Получить дополнительные сведения – вывод из запоя на дому в тольятти
топ агентств seo продвижения reiting-seo-kompaniy.ru .
Перечисленные состояния требуют профессионального вмешательства и не предполагают самостоятельного медикаментозного воздействия без врачебного контроля.
Подробнее можно узнать тут – вызов врача нарколога на дом в хабаровске
Психотерапия занимает ключевое место в комплексном лечении зависимостей. В клинике применяются методы когнитивно-поведенческой терапии, мотивационного интервью и групповой психотерапии. Эти методы способствуют формированию устойчивой мотивации к трезвому образу жизни и профилактике рецидивов. Рекомендации по психотерапии при зависимости подробно представлены на портале Психологической Ассоциации России.
Подробнее – наркологическая клиника цены
лакмор казино зеркало
В Тольятти клиника «АвтоГрад МедСтаб» предлагает круглосуточный вывод из запоя для пациентов любой степени тяжести состояния. Лечение проводится как в стационаре, так и с выездом нарколога на дом. При поступлении пациента специалисты оценивают жизненные показатели, уровень интоксикации, наличие сопутствующих заболеваний и составляют персональную схему терапии. Основная цель — стабилизация состояния, устранение последствий алкогольной интоксикации и предотвращение осложнений со стороны сердца, печени и мозга.
Узнать больше – вывод из запоя на дому круглосуточно
Астраханская вобла — это не рядовой продукт, а эталон речного деликатеса из Поволжья. Компания поставляет продукцию напрямую от астраханских рыбаков: вяленую и сушёную воблу, икру, чехонь — всё без консервантов, с натуральной засолкой по традиционным рецептам. Ищете вобла казань купить? На сайте vobla-astrahanskaya.ru представлен полный каталог с актуальными ценами и возможностью заказа от 1 кг. Отправка заказов по всей России проходит через Озон в формате безопасной сделки — оплата только после получения. Тарифы на доставку — одни из самых выгодных среди поставщиков астраханской рыбы.
Для наглядности ниже приведена таблица с основными направлениями медикаментозной терапии и их эффектами:
Получить дополнительную информацию – наркологические клиники алкоголизм самара
казино вавада зеркало — надежный способ получить доступ к популярной игровой платформе Вавада, обходя блокировки и ограничения. Наше зеркало Вавада позволяет вам всегда играть в любимые слоты, рулетку, покер и другие азартные игры без сбоев и задержек. Вавада — это безопасное и лицензированное онлайн-казино с широким выбором игр от ведущих производителей, выгодными бонусами и быстрыми выплатами. Используя зеркало Вавада, вы сохраняете полный функционал сайта, включая регистрацию, пополнение счета и вывод выигрышей, а также участие в акциях и турнирах. Мы предлагаем актуальные и проверенные зеркала, которые обеспечивают стабильный доступ 24/7 с любых устройств — компьютера, смартфона или планшета. Независимо от вашего местоположения, зеркало Вавада поможет обойти блокировки провайдеров и наслаждаться качественным игровым процессом без ограничений. Присоединяйтесь к тысячам игроков, которые уже оценили удобство и безопасность использования зеркала Вавада для игры в топовые игровые автоматы, настольные игры и лайв-казино. Воспользуйтесь зеркалом прямо сейчас и окунитесь в захватывающий мир азартных развлечений с выгодными бонусами, честной игрой и круглосуточной поддержкой. Обеспечьте себе бесперебойный доступ к казино Вавада и выигрышам с помощью нашего надежного зеркала!
Что делаем
Получить дополнительную информацию – https://vyvod-iz-zapoya-v-stacionare-chekhov8.ru
Лечение алкоголизма в Краснодаре представляет собой комплекс мероприятий, направленных на полное восстановление физического и психологического состояния пациента. Этот процесс требует профессионального подхода, включающего диагностику, детоксикацию, терапию зависимости и реабилитацию. Информация о современных методах терапии доступна на официальном портале Минздрава РФ.
Исследовать вопрос подробнее – http://lechenie-alkogolizma-krasnodar00.ru/
«Трезвый Маяк» — клиника экстренной и плановой наркологической помощи с круглосуточным выездом и возможностью госпитализации. Мы аккуратно стабилизируем состояние, снимаем интоксикацию и абстиненцию, готовим к кодированию и сопровождаем пациента до устойчивой ремиссии. Работаем анонимно: врач приезжает без опознавательных знаков, документы оформляются в нейтральной формулировке и только по запросу.
Детальнее – zapoj-narkologicheskaya-klinika
Психотерапевтические методы включают когнитивно-поведенческую терапию, мотивационное интервьюирование и групповую поддержку, которые способствуют изменению отношения пациента к алкоголю и укреплению его мотивации к выздоровлению. Эти методы подробно описаны на ресурсе Психологическая помощь.
Исследовать вопрос подробнее – https://lechenie-alkogolizma-sochi00.ru/lechenie-alkogolizma-na-domu/
Реабилитационные мероприятия в клинике направлены на устранение соматических последствий зависимости, нормализацию когнитивных функций и восстановление социальной адаптации. Для этого используются современные методики физиотерапии, диетологической коррекции и психологического сопровождения, позволяющие закрепить достигнутые результаты лечения.
Углубиться в тему – https://narkologicheskaya-klinika-v-spb16.ru/narkologicheskie-dispansery-sankt-peterburga
В «ЛадаМед Выезд» при оказании наркологической помощи на дому используются современные препараты и методы дезинтоксикации. Ниже приведена таблица с основными видами терапии и их эффектами.
Получить больше информации – https://narkolog-na-dom-tolyatti0.ru/
На первом этапе пациент проходит лабораторные обследования (общий и биохимический анализ крови, ЭКГ, УЗИ печени и почек). На их основе разрабатывается схема инфузионной терапии, включающая корректировку водно-электролитного баланса, поддержку жизненно важных функций и назначение симптоматических препаратов для снятия абстинентного синдрома.
Выяснить больше – http://www.domen.ru
сео агентство сео агентство .
Такой структурированный процесс позволяет контролировать состояние пациента на всех этапах и избежать резких колебаний давления или обострений хронических заболеваний. После завершения детоксикации врачи проводят оценку восстановления и дают рекомендации по дальнейшему лечению.
Ознакомиться с деталями – вывод из запоя в стационаре хабаровск
Мы сознательно фиксируем не только «медицинские» параметры, но и бытовые маркеры: сколько воды выпито, как переносится тёплая пища малыми порциями, какой свет в комнате перед сном. Эти детали активно упоминаются в клинических рекомендациях, потому что нередко именно они решают исход первой ночи лучше, чем попытка «усилить» таблеткой.
Узнать больше – http://narkologicheskaya-klinika-stavropol15.ru/chastnaya-narkologicheskaya-klinika-stavropol/
Этот метод направлен на выявление и замену негативных мыслей и стереотипов поведения, связанных с потреблением алкоголя. Пациент учится отслеживать свои эмоциональные реакции и заменять деструктивные установки конструктивными стратегиями противостояния стрессу.
Разобраться лучше – лечение алкоголизма и наркомании центр сочи
Весь процесс можно представить следующим образом:
Получить дополнительные сведения – нарколог на дом цены челябинск
Полученные данные формируют основу для выбора лечебной тактики и определения оптимального формата помощи.
Получить дополнительную информацию – https://narkologicheskaya-klinika-v-tolyatti0.ru/tolyatti-narkologicheskij-dispanser/
В этой публикации мы обсуждаем современные методы лечения различных заболеваний. Читатели узнают о новых медикаментах, терапиях и исследованиях, которые активно применяются для лечения. Мы нацелены на то, чтобы предоставить практические знания, которые могут помочь в борьбе с недугами.
Прочесть всё о… – центр кодирования по методу довженко москва
Главная цель — не просто снять симптомы абстиненции, а безопасно восстановить работу организма. Для этого применяются современные препараты и сбалансированные растворы, которые выводят токсины, поддерживают функции печени и нормализуют обмен веществ. Дополнительно пациент получает витаминотерапию и легкую психокоррекционную поддержку.
Подробнее тут – https://vyvod-iz-zapoya-v-khabarovske0.ru/vyvod-iz-zapoya-na-domu-khabarovsk
Мы сознательно фиксируем не только «медицинские» параметры, но и бытовые маркеры: сколько воды выпито, как переносится тёплая пища малыми порциями, какой свет в комнате перед сном. Эти детали активно упоминаются в клинических рекомендациях, потому что нередко именно они решают исход первой ночи лучше, чем попытка «усилить» таблеткой.
Углубиться в тему – наркологическая клиника нарколог
EtaLustra занимается созданием полноценных световых проектов для жилых, деловых и публичных интерьеров в столице и по всей стране. Фирма разрабатывает световые решения для апартаментов, коттеджей, заведений общепита, бизнес-центров, магазинов, садово-парковое освещение с техническими расчётами и экономией средств. Ищете разработка проектов освещения помещений? Ознакомиться с портфолио выполненных проектов и заказать консультацию можно на etalustra.ru Агентство функционирует во всех ценовых диапазонах, изучает пожелания заказчика и стиль жизни, предоставляет квалифицированную комплектацию светильников и электротехнического оснащения.
В клинике применяются инновационные методы диагностики, включая лабораторные анализы и аппаратные исследования, которые позволяют выявить степень зависимости и сопутствующие патологии. Важным этапом является комплексный подход к лечению, включающий детоксикацию организма, психотерапию и медикаментозную поддержку.
Подробнее – частная наркологическая клиника краснодар
Метод и срок подбираются после очного осмотра и исключения противопоказаний. Возможны медикаментозные и психотерапевтические подходы, а также комбинированные программы. Мы объясняем плюсы и ограничения каждого метода, помогаем подготовиться (диета, анализы, отмена определённых препаратов), а затем сопровождаем пациента в период адаптации к трезвости. Кодирование — часть комплексного плана, а не «волшебная кнопка»: устойчивый результат достигается, когда его дополняют поддерживающая терапия и работа с триггерами.
Подробнее можно узнать тут – https://narkologicheskaya-klinika-balashiha0.ru/narkologicheskaya-klinika-telefon-v-balashihe
Сразу важно проговорить: кодирование — это «замок» на поведение и физиологию, который помогает удержать ремиссию, пока человек выстраивает новые привычки и восстанавливает качество жизни. Поэтому эффект процедуры прямо зависит от того, насколько грамотно выстроены подготовка, информирование и поддержка после вмешательства. «НеоТрезвие СПБ» делает акцент на постепенности: один этап — одна цель — один прозрачный маркер успеха.
Ознакомиться с деталями – кодирование от алкоголизма отзывы цены
Каждый этап процедуры направлен на последовательное восстановление организма и предотвращение осложнений. Ниже представлена таблица, отражающая основные стадии и их особенности.
Подробнее тут – анонимный вывод из запоя в хабаровске
«СтаврМедЦентр» собирает лечение из коротких модулей с понятными целями: быстро стабилизировать соматику, вернуть управляемый сон, снизить реактивность вечера, обучить «перехвату» импульса и закрепить это в спокойной рутине. Фармакологию используем дозированно, опираясь на витальные показатели и переносимость; поведенческий контур запускаем сразу: свет, вода, дыхание, цифровая гигиена, семейные договорённости. Ниже — ориентировочная архитектура маршрута. На практике последовательность и длительность настраиваются под конкретного человека и его среду.
Исследовать вопрос подробнее – http://narkologicheskaya-klinika-stavropol15.ru/narkolog-stavropol/
Старт — короткий скрининг с дежурным врачом: выясняем риски и бытовые условия, чтобы заранее выбрать формат, который будет и безопасным, и выполнимым в реальности. Согласуем окно визита или приёма с учётом трафика и подъезда; подсказываем, как подготовить помещение — тишина, вода, розетка, возможность прилечь. На месте фиксируем витальные показатели (АД, пульс, сатурация, температура), при показаниях делаем ЭКГ, запускаем детокс и озвучиваем ожидаемую «нормальную динамику» первых 6–12 часов. Все договорённости дублируем в памятке: режим, питьевой план, «красные флажки» и точное время контрольной связи. Если домашний формат перестаёт быть достаточным, переводим в стационар без пауз — темп лечения не теряется.
Детальнее – https://narkologicheskaya-klinika-lyubercy0.ru/anonimnaya-narkologicheskaya-klinika-v-lyubercah
Весь процесс можно представить следующим образом:
Углубиться в тему – https://narkolog-na-dom-v-chelyabinske16.ru/narkolog-na-dom-v-chelyabinske-vyvod-iz-zapoya/
Наркологическая клиника в Тольятти рассматривается как профильное медицинское звено, ориентированное на лечение алкогольной и наркотической зависимости с учётом клинических особенностей пациента. В клинике «Гармония Волги» медицинская помощь выстраивается на основе диагностики, поэтапной терапии и врачебного наблюдения, что позволяет контролировать состояние пациента на всех этапах лечения.
Исследовать вопрос подробнее – наркологическая клиника нарколог в тольятти
Эта публикация содержит ценные советы и рекомендации по избавлению от зависимости. Мы обсуждаем различные стратегии, которые могут помочь в процессе выздоровления и важность обращения за помощью. Читатели смогут использовать полученные знания для улучшения своего состояния.
Продолжить изучение – https://formula-clinic.ru/stati/zhenskij-alkogolizm.html
seo partners seo partners .
В клинике применяются инновационные методы диагностики, включая лабораторные анализы и аппаратные исследования, которые позволяют выявить степень зависимости и сопутствующие патологии. Важным этапом является комплексный подход к лечению, включающий детоксикацию организма, психотерапию и медикаментозную поддержку.
Разобраться лучше – вывод наркологическая клиника в краснодаре
Лечение проводится поэтапно, начиная с оценки состояния и заканчивая восстановлением после интоксикации. Каждый этап направлен на устранение симптомов отравления и стабилизацию работы внутренних органов.
Получить больше информации – http://narkolog-na-dom-v-chelyabinske16.ru/narkolog-vyzov-na-dom-chelyabinsk/https://narkolog-na-dom-v-chelyabinske16.ru
Что делаем
Подробнее тут – vyvod-iz-zapoya-na-domu-chekhov
Госпитализация разворачивается как последовательность шагов: приём и допуск к терапии, старт инфузий, мониторинг 24/7, регулярная переоценка и подготовка к выписке. Такой контур особенно важен пациентам с сопутствующими диагнозами (гипертония, ИБС, сахарный диабет, заболевания ЖКТ), где требуется деликатная настройка дозировок и темпа инфузий.
Получить больше информации – http://narkologicheskaya-klinika-sergiev-posad8.ru/anonimnaya-narkologicheskaya-klinika-v-sergievom-posade/
Полученные данные формируют основу для выбора лечебной тактики и определения оптимального формата помощи.
Получить дополнительные сведения – https://narkologicheskaya-klinika-v-tolyatti0.ru/narkologicheskaya-bolnicza-tolyatti/
Первичный этап заключается в оценке состояния пациента и быстром подборе схемы инфузионной терапии. Врач фиксирует показания ЭКГ, сатурацию кислорода и биохимический параметр глюкозы в крови. После этого подключается капельница с раствором для выведения продуктов распада алкоголя и одновременной коррекции показателей обмена веществ. Последующие визиты врача позволяют скорректировать терапию и предотвратить развитие побочных реакций.
Углубиться в тему – https://narkologicheskaya-pomoshh-ekaterinburg0.ru/skoraya-narkologicheskaya-pomoshh-v-ekb
В этой статье мы рассматриваем разные способы борьбы с алкогольной зависимостью. Обсуждаются методы лечения, программы реабилитации и советы для поддержки близких. Читатели получат информацию о том, как преодолеть зависимость и добиться успешного выздоровления.
Нажмите, чтобы узнать больше – белая горячка у мужчины
Наркологическая клиника в Краснодаре представляет собой специализированное медицинское учреждение, где оказывается профессиональная помощь пациентам с различными формами зависимости. Современные подходы к лечению позволяют обеспечить эффективную и безопасную терапию, направленную на восстановление физического и психического здоровья.
Получить дополнительные сведения – http://narkologicheskaya-klinika-krasnodar00.ru
luckmore casino
В этом тексте собрано множество случайных сведений и довольно неопределённых мыслей, которые могут чем-то заинтересовать. Мы отмечаем моменты, которые не особенно важны, но всё же занимают своё место в повествовании.
Вот – порно онлайн бесплатно
В клинике применяются современные медицинские технологии, направленные на восстановление организма и стабилизацию психоэмоционального состояния. Ниже представлена таблица с описанием основных методов и их терапевтического значения.
Исследовать вопрос подробнее – http://narkologicheskaya-klinika-tolyatti0.ru
Your article helped me a lot, is there any more related content? Thanks!
усиление ссылок переходами усиление ссылок переходами .
Мы выстраиваем помощь как маршрут, а не разовую «капельницу». После первого звонка администратор собирает краткий чек-лист (длительность эпизода, хронические заболевания, принятые препараты, аллергии), передаёт дежурному врачу, и тот предлагает безопасный старт: визит на дому в пределах Сергиева Посада и района или сразу стационар. Выбор зависит от клинических рисков и бытовых условий: есть ли спокойная комната, помощник на ночь, насколько выражены симптомы.
Подробнее тут – https://narkologicheskaya-klinika-sergiev-posad8.ru/anonimnaya-narkologicheskaya-klinika-v-sergievom-posade
Прежде чем перейти к таблице, отметим смысл. Это ориентир, а не жёсткое расписание. Врач адаптирует длительность и насыщенность этапов под возраст, фоновые диагнозы и динамику симптомов, но логика процесса остаётся неизменной: от безопасности к устойчивости.
Подробнее – vyvod-iz-zapoya-v-chastnoj-klinike
да да да привет привт
Стационарное наблюдение предпочтительно при тяжёлой интоксикации, выраженных психических расстройствах и наличию хронических заболеваний, требующих комплексной диагностики и круглосуточного мониторинга. В условиях клиники союз врача и психолога позволяет обеспечить максимально безопасное восстановление.
Узнать больше – https://качество-вывод-из-запоя.рф/vyvod-iz-zapoya-czena-v-permi/
Каждый пациент получает персонализированную программу, учитывающую стадию заболевания, сопутствующие патологии и социальный статус. На основании анализа состояния назначается оптимальная терапия, что значительно повышает эффективность лечения. Врач-нарколог подбирает препараты с учетом индивидуальной переносимости, а психотерапевт разрабатывает план психологической поддержки.
Подробнее – лечение наркомании и алкоголизма
Мы выстраиваем помощь как маршрут, а не разовую «капельницу». После первого звонка администратор собирает краткий чек-лист (длительность эпизода, хронические заболевания, принятые препараты, аллергии), передаёт дежурному врачу, и тот предлагает безопасный старт: визит на дому в пределах Сергиева Посада и района или сразу стационар. Выбор зависит от клинических рисков и бытовых условий: есть ли спокойная комната, помощник на ночь, насколько выражены симптомы.
Разобраться лучше – наркологическая клиника вывод из запоя
Что делаем
Подробнее можно узнать тут – vyvod-iz-zapoya-na-domu-chekhov
Каждый пациент проходит последовательный процесс лечения, где основное внимание уделяется безопасности, контролю состояния и постепенной адаптации. При поступлении проводится диагностика с оценкой степени зависимости, сопутствующих патологий и психологических факторов, влияющих на развитие заболевания. На основании полученных данных формируется персонализированный план терапии, включающий медикаментозные и немедикаментозные методы.
Изучить вопрос глубже – http://narkologicheskaya-klinika-v-spb16.ru
Нержавеющий крепеж A2 и A4 требует учета материала основания, нагрузки и условий работы Такой подход помогает избежать ошибок и лишних затрат при монтаже Это удобно для регулярных поставок и серийной сборки – https://metizy-optom-moskva.ru/
Медицинский подход к выводу из запоя предполагает не только устранение внешних симптомов, но и стабилизацию внутренних процессов организма, что особенно важно при повторяющихся или затяжных эпизодах.
Ознакомиться с деталями – вывод из запоя вызов в тольятти
Каждый пациент получает персонализированную программу, учитывающую стадию заболевания, сопутствующие патологии и социальный статус. На основании анализа состояния назначается оптимальная терапия, что значительно повышает эффективность лечения. Врач-нарколог подбирает препараты с учетом индивидуальной переносимости, а психотерапевт разрабатывает план психологической поддержки.
Подробнее – клиника лечения алкоголизма сочи
Без проработки внутренних конфликтов и мотивации к трезвой жизни терапия остаётся неполной. Психологи и психотерапевты клиники проводят индивидуальные и групповые занятия.
Изучить вопрос глубже – центр лечения наркомании архангельск.
Домашний формат нужен, когда важно начать быстро и без лишних перемещений, а состояние не требует госпитализации. Врач адаптирует инфузионные схемы под переносимость и сопутствующие заболевания, контролирует давление, пульс, сатурацию, объясняет режим жидкости и питания, оставляет список признаков, при которых следует связаться повторно. Такой сценарий не отменяет дальнейшую работу: пациент получает краткий план на 48–72 часа, рекомендации по восстановлению сна и активности, а также точку контакта для корректировки. Это снижает тревогу, помогает избежать «самолечения» и формирует доверие к процессу, потому что человек видит конкретный результат — уменьшение тремора, нормализацию сна, снижение тревоги — уже в первые сутки.
Получить больше информации – http://narkologicheskaya-klinika-moskva9.ru
Поэтапная структура терапии делает лечение контролируемым и прогнозируемым, минимизируя риски возникновения осложнений и повторных обострений зависимости.
Ознакомиться с деталями – наркологическая клиника вывод из запоя
Каждый пациент получает персонализированную программу, учитывающую стадию заболевания, сопутствующие патологии и социальный статус. На основании анализа состояния назначается оптимальная терапия, что значительно повышает эффективность лечения. Врач-нарколог подбирает препараты с учетом индивидуальной переносимости, а психотерапевт разрабатывает план психологической поддержки.
Исследовать вопрос подробнее – https://lechenie-alkogolizma-sochi00.ru/lechenie-alkogolizma-na-domu
Каждый пациент проходит последовательный процесс лечения, где основное внимание уделяется безопасности, контролю состояния и постепенной адаптации. При поступлении проводится диагностика с оценкой степени зависимости, сопутствующих патологий и психологических факторов, влияющих на развитие заболевания. На основании полученных данных формируется персонализированный план терапии, включающий медикаментозные и немедикаментозные методы.
Углубиться в тему – запой наркологическая клиника
В этом материале представлены детали, которые хоть и занимательны, но не особенно значимы. Мы рассматриваем моменты, которые трудно назвать важными, но всё же решили включить их для полноты картины.
Вот – порно
продвижение веб сайтов москва prodvizhenie-sajtov-v-moskve15.ru .
Метод и срок подбираются после очного осмотра и исключения противопоказаний. Возможны медикаментозные и психотерапевтические подходы, а также комбинированные программы. Мы объясняем плюсы и ограничения каждого метода, помогаем подготовиться (диета, анализы, отмена определённых препаратов), а затем сопровождаем пациента в период адаптации к трезвости. Кодирование — часть комплексного плана, а не «волшебная кнопка»: устойчивый результат достигается, когда его дополняют поддерживающая терапия и работа с триггерами.
Углубиться в тему – частная наркологическая клиника
При сочетании алкоголизма с сердечно-сосудистыми, эндокринными или неврологическими патологиями необходим постоянный контроль ЭКГ, биохимических показателей крови и психоэмоционального состояния пациента.
Детальнее – http://качество-вывод-из-запоя.рф
Каждый пациент проходит несколько последовательных этапов, направленных на очищение организма, стабилизацию эмоционального состояния и формирование стойкой мотивации к трезвой жизни. Такой подход позволяет не только устранить физическую зависимость, но и укрепить психическую устойчивость.
Узнать больше – наркологическая клиника вывод из запоя в самаре
convertio – Mobile version looks perfect; no glitches, fast scrolling, crisp text.
Госпитализация разворачивается как последовательность шагов: приём и допуск к терапии, старт инфузий, мониторинг 24/7, регулярная переоценка и подготовка к выписке. Такой контур особенно важен пациентам с сопутствующими диагнозами (гипертония, ИБС, сахарный диабет, заболевания ЖКТ), где требуется деликатная настройка дозировок и темпа инфузий.
Подробнее можно узнать тут – http://narkologicheskaya-klinika-sergiev-posad8.ru
adlify – Loved the layout today; clean, simple, and genuinely user-friendly overall.
Главное — непрерывность и скорость принятия решений. Рядом врач и медсестра, доступ к диагностике и возможность точно настраивать темп инфузий, подбирать поддерживающие препараты, контролировать сон и уровень тревоги. Благодаря этому снижается риск осложнений, а восстановление идёт ровнее: меньше «качелей» днём и ночью.
Выяснить больше – вывод из запоя в домашних условиях
В «ЛадаМед Выезд» при оказании наркологической помощи на дому используются современные препараты и методы дезинтоксикации. Ниже приведена таблица с основными видами терапии и их эффектами.
Подробнее можно узнать тут – нарколог на дом вывод тольятти
Этап
Узнать больше – vyvod-iz-zapoya-v-stacionare
Домашний формат нужен, когда риски управляемы, а в квартире можно обеспечить «тихий режим». Врач приезжает без эмблем, проводит осмотр, измеряет давление, пульс, сатурацию, сверяет лекарства за последние 48 часов и аллергии. После допуска запускается инфузия с мягкой коррекцией воды и электролитов, поддержкой печени и вегетативной нервной системы; при необходимости аккуратно настраивается сон. По завершении — переоценка, письменная памятка на 24–48 часов, список тревожных признаков и прямой канал связи. Такой визит «гасит» тремор и тошноту, снижает тревогу и делает ночь предсказуемой.
Получить дополнительные сведения – рейтинг наркологических клиник в москве
Чтобы соотнести риски и плотность наблюдения до очного осмотра, удобнее всего взглянуть на одну сводную таблицу. Это не замена решению врача, но понятный ориентир для семьи: чем выше вероятность осложнений, тем плотнее мониторинг и быстрее доступ к коррекциям.
Получить больше информации – http://narkologicheskaya-klinika-lyubercy0.ru/chastnaya-narkologicheskaya-klinika-v-lyubercah/
ranksignal – Found practical insights today; sharing this article with colleagues later.
Клиника ориентирована на клиническую достаточность: никаких процедур «для галочки», только то, что подтверждено показаниями. С первого контакта дежурный врач уточняет анамнез, лекарства, аллергии, оценивает риски сердечно-сосудистых осложнений, степень обезвоживания, уровень тревоги и качества сна. Если состояние позволяет, подготовка к кодированию проводится амбулаторно или на дому; при нестабильных показателях предлагается короткий стационар для безопасной стабилизации. Важна анонимность — в расписании используются шифры, доступ к данным разграничен, информирование родственников происходит только по согласию пациента. Организация процесса учитывает ритм мегаполиса: гибкие слоты в будни и выходные, выездные бригады, быстрый перевод из домашнего формата в стационар при необходимости. Финансовые условия проговариваются заранее, чтобы исключить скрытые позиции и дать человеку возможность планировать бюджет без догадок.
Разобраться лучше – процедура кодирования от алкоголизма
Диагностическая оценка позволяет определить степень интоксикации и выявить возможные риски осложнённого течения состояния.
Получить больше информации – https://vyvod-iz-zapoya-v-tolyatti0.ru/vyvod-iz-zapoya-tolyatti-na-domu/
Лечение алкоголизма в Краснодаре представляет собой комплекс мероприятий, направленных на полное восстановление физического и психологического состояния пациента. Этот процесс требует профессионального подхода, включающего диагностику, детоксикацию, терапию зависимости и реабилитацию. Информация о современных методах терапии доступна на официальном портале Минздрава РФ.
Углубиться в тему – лечение алкоголизма кодирование краснодар
Выезд врача позволяет начать помощь сразу, без ожидания свободной палаты. Специалист оценит состояние, проведёт осмотр, поставит капельницу, даст рекомендации по режиму и питанию, объяснит правила безопасности. Мы оставляем подробные инструкции родственникам, чтобы дома поддерживались питьевой режим, контроль давления и спокойная обстановка. Если домашних условий недостаточно (выраженная слабость, риски осложнений, сопутствующие заболевания), мы организуем транспортировку в стационар без задержек и бюрократии.
Разобраться лучше – http://narkologicheskaya-klinika-balashiha0.ru/
signaltrack – Overall, professional vibe here; trustworthy, polished, and pleasantly minimal throughout.
«СтаврМедЦентр» собирает лечение из коротких модулей с понятными целями: быстро стабилизировать соматику, вернуть управляемый сон, снизить реактивность вечера, обучить «перехвату» импульса и закрепить это в спокойной рутине. Фармакологию используем дозированно, опираясь на витальные показатели и переносимость; поведенческий контур запускаем сразу: свет, вода, дыхание, цифровая гигиена, семейные договорённости. Ниже — ориентировочная архитектура маршрута. На практике последовательность и длительность настраиваются под конкретного человека и его среду.
Ознакомиться с деталями – наркологическая клиника вывод из запоя в ставрополе
Такой структурированный процесс позволяет контролировать состояние пациента на всех этапах и избежать резких колебаний давления или обострений хронических заболеваний. После завершения детоксикации врачи проводят оценку восстановления и дают рекомендации по дальнейшему лечению.
Подробнее – вывод из запоя с выездом
Метод и срок подбираются после очного осмотра и исключения противопоказаний. Возможны медикаментозные и психотерапевтические подходы, а также комбинированные программы. Мы объясняем плюсы и ограничения каждого метода, помогаем подготовиться (диета, анализы, отмена определённых препаратов), а затем сопровождаем пациента в период адаптации к трезвости. Кодирование — часть комплексного плана, а не «волшебная кнопка»: устойчивый результат достигается, когда его дополняют поддерживающая терапия и работа с триггерами.
Получить дополнительную информацию – наркологическая клиника помощь на дому
Стартовый осмотр должен быть быстрым и осмысленным. Мы исключаем «обязательные» исследования, которые не меняют тактику, и оставляем то, что прямо влияет на состав инфузии, темп, место ведения (дом/амбулатория/стационар) и объём поведенческих рекомендаций. Решения принимаются на свежих цифрах и клинической картине «здесь и сейчас», а повторные замеры назначаются не «по привычке», а по смыслу. Это экономит силы пациента и время команды, а главное — уменьшает фармакологическую нагрузку без потери безопасности.
Подробнее можно узнать тут – наркологическая клиника наркологический центр
Лечение проводится поэтапно, начиная с оценки состояния и заканчивая восстановлением после интоксикации. Каждый этап направлен на устранение симптомов отравления и стабилизацию работы внутренних органов.
Получить дополнительные сведения – нарколог на дом клиника челябинск
Специалисты наркологической клиники в Краснодаре используют доказательные методы, такие как медикаментозное выведение из запоя, лечение алкогольной и наркотической зависимости, а также реабилитационные программы. Более подробную информацию о современных методиках лечения можно найти на официальном сайте Министерства здравоохранения и в рекомендациях Всемирной организации здравоохранения.
Получить дополнительные сведения – запой наркологическая клиника в краснодаре
В клинике «АмурМед Контур» используются методы, доказавшие свою безопасность и эффективность. Они помогают не только очистить организм, но и восстановить нормальное функционирование нервной системы и внутренних органов. В таблице ниже приведены основные направления терапии и их особенности.
Исследовать вопрос подробнее – https://vyvod-iz-zapoya-v-khabarovske0.ru/vyvod-iz-zapoya-v-staczionare-khabarovsk/
Полученные данные формируют основу для выбора лечебной тактики и определения оптимального формата помощи.
Ознакомиться с деталями – https://narkologicheskaya-klinika-v-tolyatti0.ru/tolyatti-narkologicheskij-dispanser/
усиление ссылок переходами prodvizhenie-sajtov-v-moskve15.ru .
Стартовый осмотр должен быть быстрым и осмысленным. Мы исключаем «обязательные» исследования, которые не меняют тактику, и оставляем то, что прямо влияет на состав инфузии, темп, место ведения (дом/амбулатория/стационар) и объём поведенческих рекомендаций. Решения принимаются на свежих цифрах и клинической картине «здесь и сейчас», а повторные замеры назначаются не «по привычке», а по смыслу. Это экономит силы пациента и время команды, а главное — уменьшает фармакологическую нагрузку без потери безопасности.
Подробнее можно узнать тут – наркологическая клиника стационар в ставрополе
Эта публикация содержит ценные советы и рекомендации по избавлению от зависимости. Мы обсуждаем различные стратегии, которые могут помочь в процессе выздоровления и важность обращения за помощью. Читатели смогут использовать полученные знания для улучшения своего состояния.
Следуйте по ссылке – влияние алкоголя на организм человека
Чтобы соотнести риски и плотность наблюдения до очного осмотра, удобнее всего взглянуть на одну сводную таблицу. Это не замена решению врача, но понятный ориентир для семьи: чем выше вероятность осложнений, тем плотнее мониторинг и быстрее доступ к коррекциям.
Получить дополнительную информацию – наркологическая клиника на дом
Весь процесс можно представить следующим образом:
Получить больше информации – https://narkolog-na-dom-v-chelyabinske16.ru/narkolog-chelyabinsk-sovetskij-rajon/
Наркологическая клиника гарантирует конфиденциальность и анонимность всех процедур. Пациенты могут обратиться за помощью без страха за сохранность личных данных. Важной составляющей является круглосуточная поддержка и возможность вызова нарколога на дом, что особенно актуально при острых состояниях. Дополнительные сведения по вопросам анонимности лечения доступны на официальных ресурсах Федеральной службы по надзору в сфере здравоохранения.
Детальнее – http://narkologicheskaya-klinika-krasnodar00.ru/chastnaya-narkologicheskaya-klinika-v-krasnodare/
Каждая методика применяется строго по показаниям и под контролем медицинского персонала. Комбинация этих подходов позволяет пациенту не только восстановиться физически, но и психологически, что повышает эффективность лечения в целом.
Подробнее тут – https://vyvod-iz-zapoya-v-khabarovske0.ru/vyvod-iz-zapoya-na-domu-khabarovsk/
Особенность петербургского контекста — большая доля интеллектуального труда и проектной занятости. Мы учитываем это при выборе методики: отдаем предпочтение схемам, которые не «глушат» когнитивную активность и позволяют быстро возвращаться к задачам. Если требуются краткие больничные листы, предоставляем корректные медицинские документы без «ярлыков».
Углубиться в тему – кодирование от алкоголизма отзывы цены санкт-петербург
Поэтапное лечение помогает врачам контролировать процесс восстановления и своевременно корректировать терапию в зависимости от состояния пациента.
Получить больше информации – https://narkologicheskaya-klinika-v-samare16.ru/narkologicheskij-dispanser-g-samara/
Стартовый осмотр должен быть быстрым и осмысленным. Мы исключаем «обязательные» исследования, которые не меняют тактику, и оставляем то, что прямо влияет на состав инфузии, темп, место ведения (дом/амбулатория/стационар) и объём поведенческих рекомендаций. Решения принимаются на свежих цифрах и клинической картине «здесь и сейчас», а повторные замеры назначаются не «по привычке», а по смыслу. Это экономит силы пациента и время команды, а главное — уменьшает фармакологическую нагрузку без потери безопасности.
Изучить вопрос глубже – наркологическая клиника цены ставрополь
В «ЛадаМед Выезд» при оказании наркологической помощи на дому используются современные препараты и методы дезинтоксикации. Ниже приведена таблица с основными видами терапии и их эффектами.
Выяснить больше – вызвать нарколога на дом срочно в тольятти
Первичный этап лечения в наркологической клинике в Тольятти имеет диагностическое значение и определяет дальнейшую тактику медицинского вмешательства. В клинике «Гармония Волги» обследование включает клиническую оценку состояния пациента, анализ жалоб и выявление факторов риска.
Подробнее можно узнать тут – вывод наркологическая клиника
Этот обзор содержит информацию о передовых достижениях в области медицины. Мы разберем инновационные технологии, которые меняют подход к лечению и диагностике, а также их влияние на эффективность оказания медицинской помощи.
Получить дополнительные сведения – вшивание ампулы от алкоголизма цены
admark – Loved the layout today; clean, simple, and genuinely user-friendly overall.
Контроль
Выяснить больше – http://narkologicheskaya-klinika-lyubercy0.ru
Вывод из запоя — это не только медицинская процедура, направленная на снятие интоксикации, но и важный этап стабилизации организма. В клинике «АмурМед Контур» в Хабаровске детоксикация проводится под контролем опытных наркологов, терапевтов и анестезиологов. Пациенты получают помощь в круглосуточном режиме, а лечение осуществляется строго по медицинским показаниям. Такой подход позволяет безопасно устранить последствия длительного употребления алкоголя и предотвратить осложнения со стороны сердца, печени и нервной системы.
Детальнее – вывод из запоя на дому недорого хабаровск
Наркологическая клиника в Краснодаре представляет собой специализированное медицинское учреждение, где оказывается профессиональная помощь пациентам с различными формами зависимости. Современные подходы к лечению позволяют обеспечить эффективную и безопасную терапию, направленную на восстановление физического и психического здоровья.
Детальнее – платная наркологическая клиника в краснодаре
Лечение проводится поэтапно, начиная с оценки состояния и заканчивая восстановлением после интоксикации. Каждый этап направлен на устранение симптомов отравления и стабилизацию работы внутренних органов.
Получить дополнительные сведения – http://narkolog-na-dom-v-chelyabinske16.ru/narkolog-na-dom-v-chelyabinske-vyvod-iz-zapoya/
продвижение сайтов продвижение сайтов .
Этот обзор предлагает структурированное изложение информации по актуальным вопросам. Материал подан так, чтобы даже новичок мог быстро освоиться в теме и начать использовать полученные знания в практике.
Тыкай сюда — узнаешь много интересного – https://mehrwert.online/webdesign
Наркологическая клиника в Тольятти рассматривается как профильное медицинское звено, ориентированное на лечение алкогольной и наркотической зависимости с учётом клинических особенностей пациента. В клинике «Гармония Волги» медицинская помощь выстраивается на основе диагностики, поэтапной терапии и врачебного наблюдения, что позволяет контролировать состояние пациента на всех этапах лечения.
Углубиться в тему – http://
Первичный этап заключается в оценке состояния пациента и быстром подборе схемы инфузионной терапии. Врач фиксирует показания ЭКГ, сатурацию кислорода и биохимический параметр глюкозы в крови. После этого подключается капельница с раствором для выведения продуктов распада алкоголя и одновременной коррекции показателей обмена веществ. Последующие визиты врача позволяют скорректировать терапию и предотвратить развитие побочных реакций.
Ознакомиться с деталями – http://narkologicheskaya-pomoshh-ekaterinburg0.ru
В клинике применяются инновационные методы диагностики, включая лабораторные анализы и аппаратные исследования, которые позволяют выявить степень зависимости и сопутствующие патологии. Важным этапом является комплексный подход к лечению, включающий детоксикацию организма, психотерапию и медикаментозную поддержку.
Получить больше информации – вывод наркологическая клиника краснодар
В этой статье мы рассматриваем разные способы борьбы с алкогольной зависимостью. Обсуждаются методы лечения, программы реабилитации и советы для поддержки близких. Читатели получат информацию о том, как преодолеть зависимость и добиться успешного выздоровления.
Узнайте всю правду – как отправить на принудительное лечение от наркозависимости
В этой публикации мы предлагаем подробные объяснения по актуальным вопросам, чтобы помочь читателям глубже понять их. Четкость и структурированность материала сделают его удобным для усвоения и применения в повседневной жизни.
Личный опыт — читайте сами – http://m.bokuennews.com/mybbs/bbs.html?mode=view&bbs_code=board1&cate=&page=&search=&keyword=&type=&bbs_no=24362
Капельница, устанавливаемая наркологом на дому в Челябинске, помогает быстро очистить организм от токсинов и нормализовать водно-солевой баланс. Растворы включают витамины, анальгетики, седативные и гепатопротекторные препараты. Эффект от процедуры ощущается уже через 20–30 минут. Капельница снижает головную боль, устраняет тошноту, восстанавливает работу печени и сердечно-сосудистой системы. Такой метод считается одним из самых эффективных способов вывести пациента из запойного или абстинентного состояния без визита в стационар.
Получить дополнительные сведения – нарколог на дом анонимно челябинск
В обзорной статье вы найдете собрание важных фактов и аналитики по самым разнообразным темам. Мы рассматриваем как современные исследования, так и исторические контексты, чтобы вы могли получить полное представление о предмете. Погрузитесь в мир знаний и сделайте шаг к пониманию!
Запросить дополнительные данные – http://mail.pa-pagaralam.go.id/index.php/component/k2/item/6-you-only-live-once-live-well?iccaldate=2023-01-1&start=1900
В этой статье-обзоре мы соберем актуальную информацию и интересные факты, которые освещают важные темы. Читатели смогут ознакомиться с различными мнениями и подходами, что позволит им расширить кругозор и глубже понять обсуждаемые вопросы.
Лови подробности – http://yura.oops.jp/review/log/eid23.html
Наркологическая клиника в Тольятти рассматривается как профильное медицинское звено, ориентированное на лечение алкогольной и наркотической зависимости с учётом клинических особенностей пациента. В клинике «Гармония Волги» медицинская помощь выстраивается на основе диагностики, поэтапной терапии и врачебного наблюдения, что позволяет контролировать состояние пациента на всех этапах лечения.
Исследовать вопрос подробнее – http://narkologicheskaya-klinika-v-tolyatti0.ru/narkologicheskaya-bolnicza-tolyatti/
Этот увлекательный информационный материал подарит вам массу новых знаний и ярких эмоций. Мы собрали для вас интересные факты и сведения, которые обогатят ваш опыт. Откройте для себя увлекательный мир информации и насладитесь процессом изучения!
Только для своих – https://www.fadu.edu.uy/proyecto-mobiliario/noticias/cursos-de-educacion-permanente-asociados-al-diploma-en-proyecto-de-mobiliario-mayo-julio-2012
Генератор ключей для Windows 11 — 100% рабочий метод активации, проверено тысячами пользователей!
Подробнее – Windows 11 кряк 2026 скачать
Основные задачи
Подробнее тут – лечение алкоголизма гипнозом
Этот информационный обзор станет отличным путеводителем по актуальным темам, объединяющим важные факты и мнения экспертов. Мы исследуем ключевые идеи и представляем их в доступной форме для более глубокого понимания. Читайте, чтобы оставаться в курсе событий!
Запросить дополнительные данные – https://www.euassistant.com/it/2017/02/20/slide-2
SEObomba — специализированный сервис раскрутки ресурсов с помощью вечных ссылок, форумного продвижения и социальных сигналов. В арсенале платформы — разнообразные SEO-решения: усиление ссылочной массы, работа с PBN-сетками и распространение ссылок в крупнейших социальных сетях. Требуется продвижение сайта в поисковых системах? На seobomba.ru можно быстро оформить заказ и получить результат, превосходящий ожидания. Сотни клиентов — маркетологи, SEO-специалисты и владельцы интернет-магазинов — уже оценили скорость выполнения заказов и профессиональный подход команды.
Владимирская компания «ЭкоДок» профессионально занимается подготовкой экологической документации для организаций Владимирской области. Сотрудники компании разрабатывают паспорта отходов, проекты ПНООЛР, НДВ и НДС, декларации о воздействии на окружающую среду, а также проекты СЗЗ и ЗСО. Требуются экологические услуги? На ecodok.ru собран полный перечень услуг по экологическому проектированию и отчётности. Компания берётся за постановку объектов НВОС на учёт, оформление лицензий на недропользование и обращение с отходами, а также ведёт всю обязательную экологическую отчётность — от формы 2-ТП до деклараций о плате за негативное воздействие.
Мы собрали для вас самые захватывающие факты из мира науки и истории. От малознакомых деталей до грандиозных событий — эта статья расширит ваш кругозор и подарит новое понимание того, как устроен наш мир.
Более подробно об этом – https://starpeople.jp/fortune/ikedaemi/20211105/19414
ЧОП «Ветераны-А» — охранное предприятие с двадцатилетним опытом работы в Москве и Московской области. Под защитой компании — торговые центры, склады, школы, банки, жилые комплексы и частные объекты. Сотрудники компании — выходцы из силовых структур с реальным боевым и оперативным опытом. В 2017 году предприятие получило звание лауреата национального конкурса «Лучшие компании РФ». Ищете охрана офиса найти? Полный спектр услуг доступен на сайте a-veteran.ru — консультация бесплатна. Техническое оснащение, юридическое сопровождение и инкассация входят в пакет услуг компании.
Процесс лечения в «ВолгаМед Баланс» выстроен логично и последовательно. Каждый этап направлен на достижение конкретных медицинских и психологических целей. Ниже приведена таблица, описывающая ключевые стадии терапии.
Подробнее можно узнать тут – наркологическая клиника клиника помощь тольятти
Наркологическая клиника «СтаврМедЦентр» — это пространство точной и бережной медицины, где каждая программа лечения зависимостей собирается индивидуально: от первой оценки рисков до стабилизации сна, восстановления аппетита, нормализации пульса и долгосрочной профилактики рецидива. Мы сознательно уходим от шаблонных «сильных» процедур в пользу управляемых шагов: минимум фармакологической нагрузки при максимальной прозрачности решений. Такой подход снижает тревогу, возвращает ощущение контроля, а главное — делает процесс предсказуемым для пациента и его близких. Команда работает круглосуточно: амбулаторные визиты без очередей, немаркированные выезды на дом, стационарный блок с ночным постом и мониторингом — все каналы связаны единой картой наблюдения и общими клиническими протоколами.
Выяснить больше – https://narkologicheskaya-klinika-stavropol15.ru/narkolog-stavropol/
Нарколог на дом в Волгограде — это специализированная медицинская услуга, направленная на оказание квалифицированной помощи пациентам с зависимостями в привычной домашней обстановке. Такая форма лечения позволяет снизить стресс, связанный с госпитализацией, и обеспечивает более комфортное проведение медицинских процедур. Вызов нарколога на дом пользуется высокой востребованностью как среди пациентов с алкоголизмом, так и среди людей, страдающих от наркотической зависимости, а также при острых состояниях, требующих неотложного вмешательства.
Подробнее – нарколог на дом вывод
поисковое продвижение сайтов омск поисковое продвижение сайтов омск .
https://phatwalletforums.com/user/1xbetcodebd
Алкогольный запой — это состояние, при котором человек теряет способность самостоятельно прекратить потребление спиртного и контролировать дозировку. В таких условиях нарастают неврологические и метаболические нарушения, возрастает риск серьёзных осложнений вплоть до алкогольного делирия. Наркологическая клиника «СамараМед» предлагает круглосуточную выездную помощь на дому в Самаре и области с гарантией полной анонимности и выездом специалиста в течение 30 минут после обращения. Наши врачи применяют современные протоколы детоксикации и психологической поддержки, что позволяет безопасно и максимально комфортно пройти через этап выхода из запоя и заложить прочный фундамент для дальнейшего восстановления.
Получить дополнительную информацию – http://тайный-вывод-из-запоя.рф/vyvod-iz-zapoya-staczionar-v-samare/https://тайный-вывод-из-запоя.рф
Помощь 24/7 означает, что нарколог на дом в Хабаровске может быть направлен в любое время суток, включая ночные часы и выходные дни. В клинике «Ясный Вектор» выездная служба функционирует с учётом логистики города, что позволяет минимизировать время ожидания врача.
Исследовать вопрос подробнее – http://narkolog-na-dom-khabarovsk0.ru
По вопросам оформления вызова можно ознакомиться с правилами на портале Федеральной службы по надзору в сфере здравоохранения, где опубликованы актуальные рекомендации и требования к медицинским организациям.
Получить больше информации – вызвать нарколога на дом срочно в волгограде
Когда-то покупал шпонированные двери в этой конторе в Киеве. Все сделано в срок. Приемлимо по цене. Рекомендую!
секс на занятии йогой секс на занятии йогой .
Такой структурированный процесс позволяет контролировать состояние пациента на всех этапах и избежать резких колебаний давления или обострений хронических заболеваний. После завершения детоксикации врачи проводят оценку восстановления и дают рекомендации по дальнейшему лечению.
Изучить вопрос глубже – вывод из запоя дешево хабаровск
усиление грунта стоимость usilenie-gruntov-1.ru .
ремонт в подвале ремонт в подвале .
ремонт бетонных конструкций панельный remont-betona-1.ru .
Алкогольный запой — это состояние, при котором человек теряет способность самостоятельно прекратить потребление спиртного и контролировать дозировку. В таких условиях нарастают неврологические и метаболические нарушения, возрастает риск серьёзных осложнений вплоть до алкогольного делирия. Наркологическая клиника «СамараМед» предлагает круглосуточную выездную помощь на дому в Самаре и области с гарантией полной анонимности и выездом специалиста в течение 30 минут после обращения. Наши врачи применяют современные протоколы детоксикации и психологической поддержки, что позволяет безопасно и максимально комфортно пройти через этап выхода из запоя и заложить прочный фундамент для дальнейшего восстановления.
Получить больше информации – http://
проектирование капитального ремонта зданий remont-zdaniya-1.ru .
В медицинской практике применяются разнообразные методы, позволяющие эффективно бороться с зависимостью. К ним относятся медикаментозная терапия, психотерапия, социальная реабилитация и физиотерапевтические процедуры. Медикаментозное лечение помогает снять острые симптомы интоксикации и предотвратить развитие осложнений, что подтверждают данные исследований на Национальном медицинском портале.
Подробнее – лечение алкоголизма анонимно сочи
seo network prodvizhenie-sajtov-v-moskve15.ru .
На практике выезд врача позволяет оперативно стабилизировать состояние пациента и снизить риск осложнений, связанных с отсрочкой медицинской помощи.
Получить дополнительные сведения – нарколог на дом анонимно
Этот обзор предлагает структурированное изложение информации по актуальным вопросам. Материал подан так, чтобы даже новичок мог быстро освоиться в теме и начать использовать полученные знания в практике.
Смотрите также… – https://www.specialolympics-hc.org/product/sed-emit-copy
В клинике применяются инновационные методы диагностики, включая лабораторные анализы и аппаратные исследования, которые позволяют выявить степень зависимости и сопутствующие патологии. Важным этапом является комплексный подход к лечению, включающий детоксикацию организма, психотерапию и медикаментозную поддержку.
Исследовать вопрос подробнее – http://narkologicheskaya-klinika-krasnodar00.ru/platnaya-narkologicheskaya-klinika-krasnodar/
Запой — угрожающее здоровью состояние, при котором человек теряет контроль над употреблением алкоголя, подвергая организм серьёзной интоксикации. Клиника «ПрофМед» в Перми предлагает специализированную помощь при выводе из запоя с соблюдением всех стандартов безопасности, строгой конфиденциальности и высокой квалификации персонала. Независимо от тяжести состояния пациента, специалисты клиники применяют современные методики детоксикации и поддерживают психологический комфорт, чтобы каждый мог начать новый этап жизни без страха и стыда.
Получить дополнительную информацию – http://качество-вывод-из-запоя.рф/
Чтобы помощь была прозрачной и управляемой, каждый этап имеет цель, индикаторы безопасности и эффективности, а также понятное «окно оценки» результата. Коррекции проводятся «штучно», по правилу одного изменения — это защищает от полипрагмазии и позволяет читабельно видеть вклад каждого шага.
Углубиться в тему – https://vyvod-iz-zapoya-v-kazani16.ru/
Hello lads!
I came across a 163 helpful resource that I think you should check out.
This tool is packed with a lot of useful information that you might find helpful.
It has everything you could possibly need, so be sure to give it a visit!
https://commonwealthlaw2013.org/bet-online/card-counting-in-online-blackjack-is-it-possible-and-legal/
Furthermore remember not to forget, everyone, that you at all times may within the publication locate responses to the the absolute complicated questions. Our team attempted to present all data in the very easy-to-grasp manner.
Стартовый осмотр должен быть быстрым и осмысленным. Мы исключаем «обязательные» исследования, которые не меняют тактику, и оставляем то, что прямо влияет на состав инфузии, темп, место ведения (дом/амбулатория/стационар) и объём поведенческих рекомендаций. Решения принимаются на свежих цифрах и клинической картине «здесь и сейчас», а повторные замеры назначаются не «по привычке», а по смыслу. Это экономит силы пациента и время команды, а главное — уменьшает фармакологическую нагрузку без потери безопасности.
Исследовать вопрос подробнее – http://narkologicheskaya-klinika-stavropol15.ru/chastnaya-narkologicheskaya-klinika-stavropol/
В данной обзорной статье представлены интригующие факты, которые не оставят вас равнодушными. Мы критикуем и анализируем события, которые изменили наше восприятие мира. Узнайте, что стоит за новыми открытиями и как они могут изменить ваше восприятие реальности.
Исследовать вопрос подробнее – https://postsisland.com/best-online-earning-ideas-for-college-students
Медикаментозное лечение подбирается индивидуально с учётом возраста, длительности зависимости и сопутствующих патологий.
Ознакомиться с деталями – http://narkologicheskaya-klinika-v-tolyatti0.ru/tolyatti-narkologicheskij-dispanser/
Решение о выезде принимает врач с учётом симптомов и бытовых ограничений. Если совпадает хотя бы две позиции из списка ниже, лучше не откладывать звонок — управляемость состояния снижается каждый час.
Детальнее – срочный вывод из запоя в казани
Психотерапевтические методы включают когнитивно-поведенческую терапию, мотивационное интервьюирование и групповую поддержку, которые способствуют изменению отношения пациента к алкоголю и укреплению его мотивации к выздоровлению. Эти методы подробно описаны на ресурсе Психологическая помощь.
Получить дополнительные сведения – https://lechenie-alkogolizma-sochi00.ru/lechenie-alkogolizma-gipnozom-v-sochi/
Эта публикация погружает вас в мир увлекательных фактов и удивительных открытий. Мы расскажем о ключевых событиях, которые изменили ход истории, и приоткроем завесу над научными достижениями, которые вдохновили миллионы. Узнайте, чему может научить нас прошлое и как применить эти знания в будущем.
Раскрыть тему полностью – https://amg.es/pt/como-convertir-pdf-to-word
Выезд нарколога обеспечивает безопасность и комфорт пациента, позволяя провести лечение в привычной обстановке. Все процедуры выполняются с соблюдением медицинских стандартов и с применением сертифицированных препаратов. Такой подход особенно важен для людей, желающих сохранить анонимность обращения. Наркологическая помощь на дому включает диагностику, постановку капельницы, медикаментозную поддержку и рекомендации по дальнейшему восстановлению организма.
Получить дополнительную информацию – http://narkolog-na-dom-v-chelyabinske16.ru/narkolog-vyzov-na-dom-chelyabinsk/
https://www.atrium-patrimoine.com/wp-content/artcls/?code-promo-1xbet_bonus.html
В Казани дежурят мобильные бригады, покрывающие центральные районы и спальные кварталы. Координатор по телефону собирает лишь данные, влияющие на безопасность: текущие лекарства и дозировки, аллергии, эпизоды судорог/психозов в анамнезе, последние значения АД/ЧСС, температуру, а также бытовые условия — место полулёжа, доступ к розетке, возможность «тихого окна» на 2–3 часа. Врач приезжает быстро, но спокойно; вместо суеты — последовательность и аккуратные действия. Визит начинается с очного осмотра, где фиксируются исходные показатели и выбирается контур терапии. Далее выполняется тест переносимости и только затем — основной инфузионный этап. По завершении пациент получает «вечерний протокол» с простыми ритуалами: приглушить свет, проветрить комнату, исключить экраны за час до сна, пить воду малыми глотками.
Получить дополнительную информацию – платная наркологическая помощь казань
Сразу важно проговорить: кодирование — это «замок» на поведение и физиологию, который помогает удержать ремиссию, пока человек выстраивает новые привычки и восстанавливает качество жизни. Поэтому эффект процедуры прямо зависит от того, насколько грамотно выстроены подготовка, информирование и поддержка после вмешательства. «НеоТрезвие СПБ» делает акцент на постепенности: один этап — одна цель — один прозрачный маркер успеха.
Углубиться в тему – кодирование от алкоголизма отзывы цены в санкт-петербурге
Эта публикация содержит набор несвязанных идей, трудно применимых в практике. Мы лишь поверхностно затрагиваем различные точки зрения, не проводя глубокий анализ и не предлагая выводов.
Подробнее читать – плитка для ванной комнаты
Стоимость зависит от множества факторов, поэтому точную цифру лучше считать по конкретному помещению https://notebooklm.google.com/notebook/8313ee60-514a-4d5c-b2ec-4f8019a647d2
Этот информационный обзор станет отличным путеводителем по актуальным темам, объединяющим важные факты и мнения экспертов. Мы исследуем ключевые идеи и представляем их в доступной форме для более глубокого понимания. Читайте, чтобы оставаться в курсе событий!
Изучить вопрос глубже – https://www.miloserdie.ru/article/chtoby-kontrolirovat-diabet-nuzhen-insulin-i-horoshaya-mat
Этот информативный текст отличается привлекательным содержанием и актуальными данными. Мы предлагаем читателям взглянуть на привычные вещи под новым углом, предоставляя интересный и доступный материал. Получите удовольствие от чтения и расширьте кругозор!
Есть чему поучиться – https://www.rkta.lt/hello-world
Срочная наркологическая помощь — это не «универсальная капельница», а управляемый клинический процесс, где каждое действие проверяется измеримыми маркерами и выполняется в правильной последовательности. В наркологической клинике «ВолгаМед Альтернатива» маршрут выстроен вокруг принципа минимально достаточных вмешательств: сначала безопасный старт и телескрининг, затем очный осмотр с выбором контура инфузии и, только после теста переносимости, — основная терапия. Такой подход уменьшает реактивность организма, снижает риск побочных ощущений и делает результат предсказуемым для пациента и близких. Команда работает круглосуточно, выезжает на немаркированном транспорте, общение ведётся через одного доверенного человека, а документы оформляются в нейтральной терминологии без стигматизирующих формулировок.
Подробнее тут – https://narkologicheskaya-pomoshh-v-kazani16.ru/narkologicheskaya-sluzhba-kazan
Эта публикация завернет вас в вихрь увлекательного контента, сбрасывая стереотипы и открывая двери к новым идеям. Каждый абзац станет для вас открытием, полным ярких примеров и впечатляющих достижений. Подготовьтесь быть вовлеченными и удивленными каждый раз, когда продолжите читать.
Лучшее решение — прямо здесь – https://www.kkm.lv/modules.php?name=Forums&file=viewtopic&p=2060355
В этом интересном тексте собраны обширные сведения, которые помогут вам понять различные аспекты обсуждаемой темы. Мы разбираем детали и факты, делая акцент на важности каждого элемента. Не упустите возможность расширить свои знания и взглянуть на мир по-новому!
Открой скрытое – https://myrecontherapy.com/blog/an-accident-lead-me-to-dedicate-my-life-to-ptsd-treatment
Эта статья для ознакомления предлагает читателям общее представление об актуальной теме. Мы стремимся представить ключевые факты и идеи, которые помогут читателям получить представление о предмете и решить, стоит ли углубляться в изучение.
Перейти к статье – https://jclc972.com/services/notre-assemblee
seo рейтинг seo рейтинг .
Этот информационный материал собраны данные, которые помогут лучше понять текущие тенденции и процессы в различных сферах жизни. Мы предоставляем четкий анализ, графики и примеры, чтобы информация была не только понятной, но и практичной для принятия решений.
Получить дополнительную информацию – https://barber-bros.com/2024/12/06/hello-world
Если пациенту требуется постоянный мониторинг или комплексное лечение, мы обеспечиваем круглосуточное пребывание в стационаре. Здесь доступны углублённая диагностика — УЗИ органов брюшной полости, расширенные анализы крови, кардиомониторинг — и коррекция терапии в режиме реального времени. Комфортные палаты, ежедневное наблюдение медсестры и консультации психотерапевта создают условия для быстрого и безопасного выхода из зависимости.
Подробнее тут – наркологическая клиника клиника помощь
оптимизация и seo продвижение сайтов москва оптимизация и seo продвижение сайтов москва .
Эта публикация погружает вас в мир увлекательных фактов и удивительных открытий. Мы расскажем о ключевых событиях, которые изменили ход истории, и приоткроем завесу над научными достижениями, которые вдохновили миллионы. Узнайте, чему может научить нас прошлое и как применить эти знания в будущем.
Расширить кругозор по теме – https://sdngrogolutara03.com/2025/03/06/lomba-tari-kreasi-daerah-nusantara
Sufity napinane pasują do nowoczesnych wnętrz. To rozwiązanie łączy elegancki wygląd z wygodnym użytkowaniem. Coraz częściej wybierane są proste minimalistyczne formy, dzięki temu łatwiej uzyskać porządek i prostotę https://sufity-napinane-wroclaw.pl/
Капельница, устанавливаемая наркологом на дому в Челябинске, помогает быстро очистить организм от токсинов и нормализовать водно-солевой баланс. Растворы включают витамины, анальгетики, седативные и гепатопротекторные препараты. Эффект от процедуры ощущается уже через 20–30 минут. Капельница снижает головную боль, устраняет тошноту, восстанавливает работу печени и сердечно-сосудистой системы. Такой метод считается одним из самых эффективных способов вывести пациента из запойного или абстинентного состояния без визита в стационар.
Детальнее – https://narkolog-na-dom-v-chelyabinske16.ru/narkolog-na-dom-v-chelyabinske-vyvod-iz-zapoya/
Мы собрали для вас самые захватывающие факты из мира науки и истории. От малознакомых деталей до грандиозных событий — эта статья расширит ваш кругозор и подарит новое понимание того, как устроен наш мир.
Детальнее – http://meghnasfoodmagic.in/recipe/solkadhi
Этот увлекательный информационный материал подарит вам массу новых знаний и ярких эмоций. Мы собрали для вас интересные факты и сведения, которые обогатят ваш опыт. Откройте для себя увлекательный мир информации и насладитесь процессом изучения!
Тыкай сюда — узнаешь много интересного – https://eccellenzaseg.com.br/manutencao-preventiva-no-sistema-de-cameras-de-seguranca
Эта информационная заметка содержит увлекательные сведения, которые могут вас удивить! Мы собрали интересные факты, которые сделают вашу жизнь ярче и полнее. Узнайте нечто новое о привычных аспектах повседневности и откройте для себя удивительный мир информации.
Не упусти шанс – http://www.adrienne-schneider.com/2015/09/just-start
seo продвижение сайтов омск seo продвижение сайтов омск .
1xbet giri? yapam?yorum 1xbet-47.com .
Мы собрали для вас самые захватывающие факты из мира науки и истории. От малознакомых деталей до грандиозных событий — эта статья расширит ваш кругозор и подарит новое понимание того, как устроен наш мир.
Изучить вопрос глубже – https://pntagencies.com/hello-world
Кодирование — это медицинский инструмент, который помогает закрепить трезвость, но сам по себе не является «волшебной кнопкой». Его задача — усилить внутреннюю мотивацию и создать физиологические и/или психологические условия, при которых срыв становится маловероятным. В «НаркологЭксперт» кодирование включают в структуру лечения: сначала купируются острые проявления, проводится детокс и стабилизация сна, давления и тревоги, затем — диагностика противопоказаний, подробное информирование, выбор методики и только после этого — сама процедура. Такой порядок снижает риски, повышает переносимость и делает результат предсказуемым. Важно, что любая техника подбирается индивидуально с учётом длительности употребления, анамнеза, сопутствующих заболеваний и рабочей нагрузки пациента, чтобы лечение органично вписалось в реальную жизнь и не сорвалось на первых же неделях.
Углубиться в тему – http://kodirovanie-ot-alkogolizma-moskva9.ru/kodirovanie-ot-alkogolizma-na-domu-v-moskve/
Мы сознательно фиксируем не только «медицинские» параметры, но и бытовые маркеры: сколько воды выпито, как переносится тёплая пища малыми порциями, какой свет в комнате перед сном. Эти детали активно упоминаются в клинических рекомендациях, потому что нередко именно они решают исход первой ночи лучше, чем попытка «усилить» таблеткой.
Углубиться в тему – https://narkologicheskaya-klinika-stavropol15.ru/narkolog-stavropol
В этой статье-обзоре мы собрали данные, актуальность которых сомнительна, а факты — не всегда взаимосвязаны. Читатель сможет ознакомиться с разными мнениями, хотя вряд ли они существенно повлияют на его понимание темы.
Вот – онлайн покер на деньги
Контроль
Разобраться лучше – https://narkologicheskaya-klinika-lyubercy0.ru/narkologicheskaya-klinika-na-dom-v-lyubercah
Кодирование — это медицинский инструмент, который помогает закрепить трезвость, но сам по себе не является «волшебной кнопкой». Его задача — усилить внутреннюю мотивацию и создать физиологические и/или психологические условия, при которых срыв становится маловероятным. В «НаркологЭксперт» кодирование включают в структуру лечения: сначала купируются острые проявления, проводится детокс и стабилизация сна, давления и тревоги, затем — диагностика противопоказаний, подробное информирование, выбор методики и только после этого — сама процедура. Такой порядок снижает риски, повышает переносимость и делает результат предсказуемым. Важно, что любая техника подбирается индивидуально с учётом длительности употребления, анамнеза, сопутствующих заболеваний и рабочей нагрузки пациента, чтобы лечение органично вписалось в реальную жизнь и не сорвалось на первых же неделях.
Детальнее – kodirovanie-ot-alkogolizma-otzyvy-ceny
Снимаем интоксикацию, купируем абстинентный синдром, стабилизируем давление и сердечный ритм, корректируем электролитный и водный баланс. По показаниям подключаем седативную и противотревожную терапию, защиту печени и желудочно-кишечного тракта, витамины группы B. Цель — безопасно пройти острый период, снизить тягу и нормализовать сон. При необходимости делаем ЭКГ, пульсоксиметрию, контролируем глюкозу, насыщение кислородом, температуру. Если состояние тяжёлое, предложим госпитализацию в стационар с круглосуточным наблюдением, где можно оперативно скорректировать схему лечения.
Углубиться в тему – https://narkologicheskaya-klinika-balashiha0.ru/narkologicheskaya-klinika-telefon-v-balashihe/
Мы сознательно фиксируем не только «медицинские» параметры, но и бытовые маркеры: сколько воды выпито, как переносится тёплая пища малыми порциями, какой свет в комнате перед сном. Эти детали активно упоминаются в клинических рекомендациях, потому что нередко именно они решают исход первой ночи лучше, чем попытка «усилить» таблеткой.
Ознакомиться с деталями – наркологическая клиника стационар
Эта публикация содержит набор несвязанных идей, трудно применимых в практике. Мы лишь поверхностно затрагиваем различные точки зрения, не проводя глубокий анализ и не предлагая выводов.
Подробнее читать – блоки для строительства дома
порно с девушкой на йоге порно с девушкой на йоге .
ремонт бетонных конструкций москва ремонт бетонных конструкций москва .
Что делаем
Подробнее можно узнать тут – вывод из запоя район
Нарколог на дом в Челябинске — это услуга, которая позволяет получить профессиональную медицинскую помощь при алкогольной или наркотической интоксикации без необходимости посещения клиники. Такой формат особенно востребован в случаях, когда пациент не может самостоятельно прибыть в медицинское учреждение или нуждается в конфиденциальной помощи. Врач-нарколог выезжает по указанному адресу, проводит осмотр, оценивает состояние и подбирает оптимальную терапию. Квалифицированное вмешательство помогает избежать осложнений и стабилизировать состояние уже в течение первых часов после прибытия специалиста.
Подробнее тут – платный нарколог на дом в челябинске
«Светлый Вектор» — это команда профильных врачей-наркологов, реаниматологов и психологов, которая помогает как в экстренных ситуациях, так и при плановой терапии. Мы работаем бережно и конфиденциально, выстраиваем реалистичный план лечения и подробно объясняем каждый шаг — без «магических» обещаний и навязывания лишних услуг.
Получить дополнительную информацию – наркологическая клиника цены
Этапы терапии выглядят следующим образом:
Выяснить больше – http://narkologicheskaya-klinika-v-samare16.ru/chastnaya-narkologicheskaya-klinika-samara/
продвинуть сайт в москве prodvizhenie-sajtov-v-moskve15.ru .
инъектирование грунта инъектирование грунта .
Старт — короткий скрининг с дежурным врачом: выясняем риски и бытовые условия, чтобы заранее выбрать формат, который будет и безопасным, и выполнимым в реальности. Согласуем окно визита или приёма с учётом трафика и подъезда; подсказываем, как подготовить помещение — тишина, вода, розетка, возможность прилечь. На месте фиксируем витальные показатели (АД, пульс, сатурация, температура), при показаниях делаем ЭКГ, запускаем детокс и озвучиваем ожидаемую «нормальную динамику» первых 6–12 часов. Все договорённости дублируем в памятке: режим, питьевой план, «красные флажки» и точное время контрольной связи. Если домашний формат перестаёт быть достаточным, переводим в стационар без пауз — темп лечения не теряется.
Получить дополнительные сведения – http://narkologicheskaya-klinika-lyubercy0.ru
Капельница, устанавливаемая наркологом на дому в Челябинске, помогает быстро очистить организм от токсинов и нормализовать водно-солевой баланс. Растворы включают витамины, анальгетики, седативные и гепатопротекторные препараты. Эффект от процедуры ощущается уже через 20–30 минут. Капельница снижает головную боль, устраняет тошноту, восстанавливает работу печени и сердечно-сосудистой системы. Такой метод считается одним из самых эффективных способов вывести пациента из запойного или абстинентного состояния без визита в стационар.
Узнать больше – нарколог на дом круглосуточно цены челябинск
The site https://thetradable.com/ is a platform with news and articles about ripple xrp price prediction. This is all the latest, most interesting, fascinating from the world of finance, business, artificial intelligence. We have collected all the most important things from the world of ripple xrp price prediction, xrp price prediction, ripple xrp news, ripple news, xrp price, ripple price, silver price forecast, silver price, gold price forecast, gold price, silver price prediction, silver price, gold price prediction, gold price.
При обращении по телефону или через электронную форму мы используем шифрование данных и не требуем ИНН или паспорта. Оплата производится безналичным переводом или анонимно — наличными через курьера, что позволяет сохранить полную приватность.
Получить дополнительную информацию – http://тайный-вывод-из-запоя.рф
реконструкция зданий и объектов remont-zdaniya-1.ru .
Для наглядности представлен примерный состав инфузионного раствора, используемого при выводе из запоя:
Разобраться лучше – срочный вывод из запоя ростов-на-дону
Наши специалисты оценивают клинические признаки запоя уже при первом осмотре — измеряют пульс, артериальное давление и насыщение кислородом, осматривают кожу и слизистые оболочки на предмет обезвоживания. Специальные тесты на когнитивные функции позволяют определить степень дезориентации и риск развития острых психотических реакций.
Подробнее тут – http://тайный-вывод-из-запоя.рф
глубокий комлексный аудит сайта глубокий комлексный аудит сайта .
Инфузионная терапия подбирается индивидуально: растворы для регидратации и детоксикации, гепатопротекторы, кардиопротекторы, витамины и микроэлементы. Детокс — это не только «капельница», но и мониторинг жизненно важных показателей, оценка неврологического статуса, профилактика осложнений. Мы отслеживаем динамику самочувствия, корректируем дозировки и при необходимости подключаем дополнительные обследования. Задача — мягко вывести токсины, вернуть ясность сознания и работоспособность без резких «качелей».
Разобраться лучше – kruglosutochnaya-narkologicheskaya-klinika
Этот обзор позволяет по-новому взглянуть на вещи, на которые обычно и так смотрят. Мы упоминаем факты, которые мало что меняют, и события, значение которых трудно определить, но они всё равно здесь.
Вот – взрослые игры
Чтобы помощь была прозрачной и управляемой, каждый этап имеет цель, индикаторы безопасности и эффективности, а также понятное «окно оценки» результата. Коррекции проводятся «штучно», по правилу одного изменения — это защищает от полипрагмазии и позволяет читабельно видеть вклад каждого шага.
Получить дополнительные сведения – http://vyvod-iz-zapoya-v-kazani16.ru
комплексное продвижение сайтов омск комплексное продвижение сайтов омск .
Стартовый осмотр должен быть быстрым и осмысленным. Мы исключаем «обязательные» исследования, которые не меняют тактику, и оставляем то, что прямо влияет на состав инфузии, темп, место ведения (дом/амбулатория/стационар) и объём поведенческих рекомендаций. Решения принимаются на свежих цифрах и клинической картине «здесь и сейчас», а повторные замеры назначаются не «по привычке», а по смыслу. Это экономит силы пациента и время команды, а главное — уменьшает фармакологическую нагрузку без потери безопасности.
Ознакомиться с деталями – наркологическая клиника наркологический центр в ставрополе
Мы учитываем сопутствующие заболевания, прием хронических препаратов, возраст и образ жизни. На первичной консультации специалист задаёт уточняющие вопросы, чтобы определить риски, подобрать безопасные препараты и предложить удобный формат: стационар, амбулаторно или выезд на дом. Такой подход сокращает срок восстановления и повышает устойчивость результата.
Получить дополнительную информацию – http://narkologicheskaya-klinika-balashiha0.ru/
Контроль
Ознакомиться с деталями – https://narkologicheskaya-klinika-lyubercy0.ru
Все медицинские записи и личные данные хранятся на защищённых серверах с ограниченным доступом. Только лечащий врач и медицинская сестра имеют право просматривать их при необходимости оказания помощи.
Получить дополнительную информацию – https://тайный-вывод-из-запоя.рф/vyvod-iz-zapoya-na-domu-v-samare/
база данных компаний оптом [url=https://gobasego.ru/]gobasego.ru[/url] .
Формат
Изучить вопрос глубже – http://narkologicheskaya-klinika-lyubercy0.ru/chastnaya-narkologicheskaya-klinika-v-lyubercah/
«СтаврМедЦентр» собирает лечение из коротких модулей с понятными целями: быстро стабилизировать соматику, вернуть управляемый сон, снизить реактивность вечера, обучить «перехвату» импульса и закрепить это в спокойной рутине. Фармакологию используем дозированно, опираясь на витальные показатели и переносимость; поведенческий контур запускаем сразу: свет, вода, дыхание, цифровая гигиена, семейные договорённости. Ниже — ориентировочная архитектура маршрута. На практике последовательность и длительность настраиваются под конкретного человека и его среду.
Получить дополнительные сведения – наркологическая клиника вывод из запоя в ставрополе
В материале приведены детали, интересные, но не особенно важные. Мы рассматриваем аспекты, которые сложно назвать существенными, но включили их для большей полноты.
Подробнее читать – гипсокартон цена за лист
Срочная наркологическая помощь — это не «универсальная капельница», а управляемый клинический процесс, где каждое действие проверяется измеримыми маркерами и выполняется в правильной последовательности. В наркологической клинике «ВолгаМед Альтернатива» маршрут выстроен вокруг принципа минимально достаточных вмешательств: сначала безопасный старт и телескрининг, затем очный осмотр с выбором контура инфузии и, только после теста переносимости, — основная терапия. Такой подход уменьшает реактивность организма, снижает риск побочных ощущений и делает результат предсказуемым для пациента и близких. Команда работает круглосуточно, выезжает на немаркированном транспорте, общение ведётся через одного доверенного человека, а документы оформляются в нейтральной терминологии без стигматизирующих формулировок.
Углубиться в тему – http://narkologicheskaya-pomoshh-v-kazani16.ru
Вывод из запоя — это управляемая медицинская процедура, где каждая деталь важна: от скорости выезда до состава инфузии и «тихой» среды дома. В наркологической клинике «КазаньДетокс Медлайн» мы придерживаемся принципа поэтапной стабилизации: сначала безопасный старт и оценка рисков, затем прицельные капельницы и, при необходимости, краткосрочное наблюдение. Такой подход исключает «универсальные коктейли» и делает результат прогнозируемым: снижение интоксикации, выравнивание вегетативных реакций, восстановление сна и аппетита. Анонимность встроена в протоколы: немаркированный выезд, лаконичная документация, один доверенный контакт для связи 24/7, нейтральные формулировки без стигмы.
Выяснить больше – нарколог вывод из запоя казань
Решение о срочном выезде принимается не из «желания поторопиться», а когда домашняя стабилизация действительно снижает риски. Ниже — ориентиры, при которых не стоит откладывать звонок. Любой из перечисленных признаков — повод для консультации, а их сочетание — для немедленного осмотра.
Подробнее – http://narkologicheskaya-pomoshh-v-kazani16.ru/narkologiya-anonimno-kazan/
«Трезвый Маяк» — клиника экстренной и плановой наркологической помощи с круглосуточным выездом и возможностью госпитализации. Мы аккуратно стабилизируем состояние, снимаем интоксикацию и абстиненцию, готовим к кодированию и сопровождаем пациента до устойчивой ремиссии. Работаем анонимно: врач приезжает без опознавательных знаков, документы оформляются в нейтральной формулировке и только по запросу.
Получить дополнительные сведения – narkologicheskaya-klinika-otzyvy
1xbet turkiye 1xbet-52.com .
Решение о выезде принимает врач с учётом симптомов и бытовых ограничений. Если совпадает хотя бы две позиции из списка ниже, лучше не откладывать звонок — управляемость состояния снижается каждый час.
Исследовать вопрос подробнее – http://vyvod-iz-zapoya-v-kazani16.ru/vyvod-iz-zapoya-kazan-na-domu/
Читатели получат представление о том, как современные технологии влияют на развитие медицины. Обсуждаются новые методы лечения, персонализированный подход и роль цифровых решений в повышении качества медицинских услуг.
Узнай первым! – капельница от похмелья на дому цена
Bitcoin News – Navigation felt smooth, found everything quickly without any confusing steps.
Если дома нет возможности обеспечить тишину (ремонт, маленькие дети, гости), можно кратко перейти в «тихий стационар» с отдельным входом; после стабилизации сопровождение возвращается на дом, и маршрут продолжается «зеркально» — с теми же целями и окнами оценки. Такой перенос сохраняет управляемость процесса и снижает тревогу семьи: никто не «начинает сначала», меняется только место, а логика остаётся прежней.
Получить больше информации – наркологическая клиника клиника помощь
ебет на йоге ебет на йоге .
1xbet yeni adresi 1xbet yeni adresi .
Нарколог на дом в Челябинске — это услуга, которая позволяет получить профессиональную медицинскую помощь при алкогольной или наркотической интоксикации без необходимости посещения клиники. Такой формат особенно востребован в случаях, когда пациент не может самостоятельно прибыть в медицинское учреждение или нуждается в конфиденциальной помощи. Врач-нарколог выезжает по указанному адресу, проводит осмотр, оценивает состояние и подбирает оптимальную терапию. Квалифицированное вмешательство помогает избежать осложнений и стабилизировать состояние уже в течение первых часов после прибытия специалиста.
Изучить вопрос глубже – http://narkolog-na-dom-v-chelyabinske16.ru/narkolog-na-dom-v-chelyabinske-vyvod-iz-zapoya/
1xbet spor bahislerinin adresi 1xbet spor bahislerinin adresi .
1xbetgiri? 1xbetgiri? .
Каждый пациент проходит последовательный процесс лечения, где основное внимание уделяется безопасности, контролю состояния и постепенной адаптации. При поступлении проводится диагностика с оценкой степени зависимости, сопутствующих патологий и психологических факторов, влияющих на развитие заболевания. На основании полученных данных формируется персонализированный план терапии, включающий медикаментозные и немедикаментозные методы.
Исследовать вопрос подробнее – лечение в наркологической клинике
В этом материале представлены детали, которые хоть и занимательны, но не особенно значимы. Мы рассматриваем моменты, которые трудно назвать важными, но всё же решили включить их для полноты картины.
Вот – бинго онлайн
Чтобы обеспечить безопасное выведение психоактивных веществ и восстановление организма, применяется детоксикация под контролем врача-нарколога и анестезиолога-реаниматолога.
Изучить вопрос глубже – лечение наркомании и алкоголизма
Инфузионная терапия — не универсальный раствор «для всех». Её смысл — восстановить объём циркулирующей крови, скорректировать электролиты, снизить токсическую нагрузку, мягко приглушить тремор и тревогу, вернуть условия для сна. Мы начинаем с оценки реакции организма и двигаемся небольшими порциями, чтобы избежать «перегрева» препаратами. При выраженной тошноте подключаем противорвотную поддержку и гастропротекцию; при необходимости — печёночные субстраты и витамины группы B; кардиологические или антигипертензивные решения применяем только по показаниям. Врач сразу оговаривает, какие ощущения нормальны (сонливость, умеренная слабость, сухость во рту), а какие — повод для немедленной связи. Такой реализм даёт не косметическое облегчение «на час», а устойчивую траекторию на дни: эффект инфузий не «сгорает» к вечеру, потому что их поддерживают правила сна, воды и питания.
Углубиться в тему – https://narkologicheskaya-klinika-podolsk9.ru/narkologicheskaya-klinika-stacionar-v-podolske
Наши специалисты оценивают клинические признаки запоя уже при первом осмотре — измеряют пульс, артериальное давление и насыщение кислородом, осматривают кожу и слизистые оболочки на предмет обезвоживания. Специальные тесты на когнитивные функции позволяют определить степень дезориентации и риск развития острых психотических реакций.
Подробнее тут – http://тайный-вывод-из-запоя.рф
Вместо универсальных «капельниц на все случаи» мы собираем персональный план: состав инфузий, необходимость диагностик, частоту наблюдения и следующий шаг маршрута. Такой подход экономит время, снижает тревогу и даёт предсказуемый горизонт: что будет сделано сегодня, чего ждать завтра и какие критерии покажут, что идём по плану.
Получить дополнительную информацию – частная наркологическая клиника
Your point of view caught my eye and was very interesting. Thanks. I have a question for you. https://www.binance.com/register?ref=IHJUI7TF
Вывод из запоя в Ростове-на-Дону — это медицинская процедура, направленная на устранение симптомов алкогольной интоксикации, восстановление функций организма и предотвращение осложнений. В клинике помощь оказывается круглосуточно, а лечение проводится под контролем опытных наркологов. Такой подход позволяет безопасно прекратить употребление алкоголя, избежать резкой отмены и стабилизировать состояние пациента. Процедура проводится как в стационаре, так и на дому, с учётом состояния здоровья и степени зависимости.
Узнать больше – вывод из запоя круглосуточно ростов-на-дону
Нарколог на дом в Челябинске — это услуга, которая позволяет получить профессиональную медицинскую помощь при алкогольной или наркотической интоксикации без необходимости посещения клиники. Такой формат особенно востребован в случаях, когда пациент не может самостоятельно прибыть в медицинское учреждение или нуждается в конфиденциальной помощи. Врач-нарколог выезжает по указанному адресу, проводит осмотр, оценивает состояние и подбирает оптимальную терапию. Квалифицированное вмешательство помогает избежать осложнений и стабилизировать состояние уже в течение первых часов после прибытия специалиста.
Подробнее – помощь нарколога на дому
Выезд врача позволяет начать помощь сразу, без ожидания свободной палаты. Специалист оценит состояние, проведёт осмотр, поставит капельницу, даст рекомендации по режиму и питанию, объяснит правила безопасности. Мы оставляем подробные инструкции родственникам, чтобы дома поддерживались питьевой режим, контроль давления и спокойная обстановка. Если домашних условий недостаточно (выраженная слабость, риски осложнений, сопутствующие заболевания), мы организуем транспортировку в стационар без задержек и бюрократии.
Получить больше информации – наркологические клиники в области
реконструкция и капитальный ремонт зданий реконструкция и капитальный ремонт зданий .
«АльфаДетокс» в Чехове — это стационарный маршрут вывода из запоя с круглосуточным наблюдением и быстрыми медицинскими решениями. Мы принимаем без очередей, проводим очную оценку, допускаем к терапии и запускаем управляющий детокс с аппаратным контролем и лабораторными исследованиями по показаниям. Наша цель — не просто поставить капельницу, а безопасно стабилизировать давление и пульс, снять интоксикацию и абстиненцию, наладить сон и дать понятный план ближайших дней. Анонимность встроена в процесс, вы общаетесь с командой спокойно и без лишней огласки, а все назначения объясняются простым языком, чтобы вы понимали логику каждого шага.
Подробнее тут – вывод из запоя на дому московская область
усиление основания фундамента усиление основания фундамента .
Старт — короткий скрининг с дежурным врачом: выясняем риски и бытовые условия, чтобы заранее выбрать формат, который будет и безопасным, и выполнимым в реальности. Согласуем окно визита или приёма с учётом трафика и подъезда; подсказываем, как подготовить помещение — тишина, вода, розетка, возможность прилечь. На месте фиксируем витальные показатели (АД, пульс, сатурация, температура), при показаниях делаем ЭКГ, запускаем детокс и озвучиваем ожидаемую «нормальную динамику» первых 6–12 часов. Все договорённости дублируем в памятке: режим, питьевой план, «красные флажки» и точное время контрольной связи. Если домашний формат перестаёт быть достаточным, переводим в стационар без пауз — темп лечения не теряется.
Исследовать вопрос подробнее – наркологическая клиника на дом
Без проработки внутренних конфликтов и мотивации к трезвой жизни терапия остаётся неполной. Психологи и психотерапевты клиники проводят индивидуальные и групповые занятия.
Ознакомиться с деталями – http://lechenie-narkomanii-arkhangelsk0.ru
Наркологическая клиника в клинике в Санкт-Петербурге предлагает широкий спектр медицинских и психотерапевтических услуг, направленных на устранение химической зависимости и стабилизацию психоэмоционального состояния пациентов. Современные методики терапии, внедрённые в практику, позволяют добиваться устойчивых результатов без чрезмерного медикаментозного вмешательства и с учётом индивидуальных особенностей каждого человека. Основой лечения является комплексный подход, включающий детоксикацию, коррекцию поведения и восстановление когнитивных функций. Применение мультидисциплинарных схем обеспечивает снижение риска рецидива и повышение мотивации к трезвому образу жизни.
Подробнее тут – частная наркологическая клиника
Первый полноценный сон — переломный момент в выводе из запоя. В «АлкоМед Балашиха» мы создаём условия для него с первого дня: затемнение, тишина, комфортная температура, минимизация стимулов, ранний отбой. Если требуется, подключаем мягкие седативные схемы под мониторинг. Утром — контроль показателей, уточнение дозировок, план активности «по силам», корректировка питания и воды. Мы заранее проговариваем, какие ощущения нормальны (сонливость, умеренная слабость), а какие — требуют связи со специалистом. Чёткая ночная стратегия снижает импульсивность и убирает главный триггер срывов — усталость и бессонницу, из-за которых даже корректно подобранные инфузии теряют эффективность к вечеру следующего дня.
Детальнее – врач вывод из запоя
Алкогольный запой — это состояние, при котором человек теряет способность самостоятельно прекратить потребление спиртного и контролировать дозировку. В таких условиях нарастают неврологические и метаболические нарушения, возрастает риск серьёзных осложнений вплоть до алкогольного делирия. Наркологическая клиника «СамараМед» предлагает круглосуточную выездную помощь на дому в Самаре и области с гарантией полной анонимности и выездом специалиста в течение 30 минут после обращения. Наши врачи применяют современные протоколы детоксикации и психологической поддержки, что позволяет безопасно и максимально комфортно пройти через этап выхода из запоя и заложить прочный фундамент для дальнейшего восстановления.
Получить дополнительную информацию – https://тайный-вывод-из-запоя.рф/vyvod-iz-zapoya-staczionar-v-samare/
Для наглядности представлен примерный состав инфузионного раствора, используемого при выводе из запоя:
Подробнее тут – вывод из запоя в стационаре ростов-на-дону
https://camp-fire.jp/profile/xbetfree233
Мы используем модульную терапию: каждый контур решает одну клиническую задачу и сопровождается понятной динамикой. Это помогает мягко вести пациента и не «замазывать» вклад отдельных шагов параллельными усилениями.
Изучить вопрос глубже – вывод из запоя вызов на дом казань
Доктор проводит физикальное обследование, замеряет АД, пульс, сатурацию и температуру. Параллельно выполняются экспресс-анализы крови и мочи, которые позволяют выявить нарушения электролитов, работу печени и почек.
Детальнее – http://качество-вывод-из-запоя.рф/vyvod-iz-zapoya-czena-v-permi/
Вывод из запоя в Ростове-на-Дону — это медицинская процедура, направленная на устранение симптомов алкогольной интоксикации, восстановление функций организма и предотвращение осложнений. В клинике помощь оказывается круглосуточно, а лечение проводится под контролем опытных наркологов. Такой подход позволяет безопасно прекратить употребление алкоголя, избежать резкой отмены и стабилизировать состояние пациента. Процедура проводится как в стационаре, так и на дому, с учётом состояния здоровья и степени зависимости.
Ознакомиться с деталями – вывод из запоя дешево ростов-на-дону
Необходимость экстренной выездной помощи возникает в случаях, когда пациент:
Разобраться лучше – https://тайный-вывод-из-запоя.рф/
Решение обратиться за наркологической помощью часто упирается в страх огласки и сомнения в эффективности. В «МедТрезвие» эти барьеры снимаются за счёт клинической достаточности и предсказуемой организации. Диагностика и вмешательства назначаются строго по показаниям: врач оценит риски сердечно-сосудистых осложнений, состояние печени и поджелудочной железы, уровень тревоги и сна, наличие депрессивных симптомов. При устойчивом состоянии часть процедур выполняется на дому, что снижает стресс, а при признаках нестабильности — рекомендуется стационар с круглосуточным наблюдением. Анонимность поддерживается шифрованием данных, разграничением доступа и информированием родственников только по согласию пациента. Финансовые условия обсуждаются заранее: семья понимает, из чего складывается смета, и может планировать ресурс без опасений «скрытых» позиций. В результате лечение становится управляемым процессом, где медицинская безопасность и уважение к личной жизни человека — обязательные элементы, а не рекламные обещания.
Подробнее – наркологическая клиника в москве
Доктор проводит физикальное обследование, замеряет АД, пульс, сатурацию и температуру. Параллельно выполняются экспресс-анализы крови и мочи, которые позволяют выявить нарушения электролитов, работу печени и почек.
Узнать больше – http://качество-вывод-из-запоя.рф/
Этот обзор позволяет по-новому взглянуть на вещи, на которые обычно и так смотрят. Мы упоминаем факты, которые мало что меняют, и события, значение которых трудно определить, но они всё равно здесь.
Вот – знакомства для взрослых
Вывод из запоя осуществляется в несколько этапов, каждый из которых направлен на постепенное восстановление организма. Такой поэтапный подход снижает нагрузку на внутренние органы и повышает эффективность лечения.
Ознакомиться с деталями – вывод из запоя на дому круглосуточно ростов-на-дону
Важно выяснить длительность запоя, частоту и дозы потребляемого алкоголя, наличие ранее проведённых детоксикаций и психиатрических заболеваний. Эта информация помогает выбрать наиболее подходящий протокол инфузионной и медикаментозной терапии.
Выяснить больше – https://тайный-вывод-из-запоя.рф/vyvod-iz-zapoya-czena-v-samare
Эта статья подробно расскажет о процессе выздоровления, который включает в себя эмоциональную, физическую и психологическую реабилитацию. Мы обсуждаем значимость поддержки и наличие профессиональных программ. Читатели узнают, как строить новую жизнь и не возвращаться к старым привычкам.
Следуйте по ссылке – кодировка психики
При сочетании алкоголизма с сердечно-сосудистыми, эндокринными или неврологическими патологиями необходим постоянный контроль ЭКГ, биохимических показателей крови и психоэмоционального состояния пациента.
Ознакомиться с деталями – https://качество-вывод-из-запоя.рф/vyvod-iz-zapoya-staczionar-v-permi/
Высока вероятность развития абстинентного синдрома, делирия или судорожных припадков; поэтому в клинике проводят превентивное введение противосудорожных и седативных средств.
Получить больше информации – https://качество-вывод-из-запоя.рф/vyvod-iz-zapoya-czena-v-permi
1xbet yeni giri? adresi 1xbet yeni giri? adresi .
1xbet yeni adresi 1xbet-47.com .
Что делаем
Узнать больше – http://vyvod-iz-zapoya-v-stacionare-chekhov8.ru/vyvod-iz-zapoya-na-domu-v-chekhove/
Чтобы помощь была прозрачной и управляемой, каждый этап имеет цель, индикаторы безопасности и эффективности, а также понятное «окно оценки» результата. Коррекции проводятся «штучно», по правилу одного изменения — это защищает от полипрагмазии и позволяет читабельно видеть вклад каждого шага.
Узнать больше – вывод из запоя на дому круглосуточно в казани
ебет на йоге ебет на йоге .
Каждый пациент проходит несколько последовательных этапов, направленных на очищение организма, стабилизацию эмоционального состояния и формирование стойкой мотивации к трезвой жизни. Такой подход позволяет не только устранить физическую зависимость, но и укрепить психическую устойчивость.
Исследовать вопрос подробнее – http://www.domen.ru
Круглосуточная клиника «НаркоЦентр» предлагает широкий спектр наркологических услуг в Екатеринбурге и области. В числе основных направлений — выезд врача на дом, проведение детоксикационных процедур, индивидуальные программы восстановления, врачебное сопровождение в стационаре, а также психологическая и физиотерапевтическая реабилитация. Мы опираемся на международные стандарты терапии и применяем только сертифицированные препараты, что гарантирует безопасность и эффективность лечения.
Подробнее можно узнать тут – https://narkologicheskaya-pomoshh-ekaterinburg0.ru/skoraya-narkologicheskaya-pomoshh-v-ekb
bahis sitesi 1xbet bahis sitesi 1xbet .
1x giri? 1xbet-49.com .
Этот информационный набор привлекает внимание множеством мелочей и странных ракурсов. Мы предлагаем взгляды, которые редко бывают полезны, но могут слегка разнообразить ваше знакомство с темой.
Вот – онлайн покер на деньги
Чтобы сделать процесс понятным и управляемым, каждый шаг сопровождается измеримыми маркерами безопасности и эффективности. Корректировки — точечные, по правилу «одного изменения», что позволяет видеть вклад каждого действия и сохранять переносимость.
Подробнее – https://narkologicheskaya-pomoshh-v-kazani16.ru/skoraya-narkologicheskaya-pomoshh-kazan/
Решение о кодировании принимает врач после очной оценки. Методика подбирается индивидуально, с обязательным информированным согласием. Ниже — ориентиры, помогающие понять, когда процедура уместна, а когда стоит отложить или выбрать альтернативу.
Углубиться в тему – http://kodirovanie-ot-alkogolizma-v-spb16.ru
Чтобы обеспечить безопасное выведение психоактивных веществ и восстановление организма, применяется детоксикация под контролем врача-нарколога и анестезиолога-реаниматолога.
Исследовать вопрос подробнее – наркологическое лечение наркомания архангельск
Чтобы помощь была прозрачной и управляемой, каждый этап имеет цель, индикаторы безопасности и эффективности, а также понятное «окно оценки» результата. Коррекции проводятся «штучно», по правилу одного изменения — это защищает от полипрагмазии и позволяет читабельно видеть вклад каждого шага.
Подробнее – http://vyvod-iz-zapoya-v-kazani16.ru/vyvod-iz-zapoya-kazan-na-domu/
Важно выяснить длительность запоя, частоту и дозы потребляемого алкоголя, наличие ранее проведённых детоксикаций и психиатрических заболеваний. Эта информация помогает выбрать наиболее подходящий протокол инфузионной и медикаментозной терапии.
Получить дополнительную информацию – http://тайный-вывод-из-запоя.рф
Что делаем
Подробнее – vyvod-iz-zapoya-v-domashnih-usloviyah
Чтобы сделать процесс понятным и управляемым, каждый шаг сопровождается измеримыми маркерами безопасности и эффективности. Корректировки — точечные, по правилу «одного изменения», что позволяет видеть вклад каждого действия и сохранять переносимость.
Подробнее – http://narkologicheskaya-pomoshh-v-kazani16.ru/
В этой статье мы рассматриваем разные способы борьбы с алкогольной зависимостью. Обсуждаются методы лечения, программы реабилитации и советы для поддержки близких. Читатели получат информацию о том, как преодолеть зависимость и добиться успешного выздоровления.
Следуйте по ссылке – https://formula-clinic.ru/stati/chto-takoe-ejforetiki.html
Круглосуточная клиника «НаркоЦентр» предлагает широкий спектр наркологических услуг в Екатеринбурге и области. В числе основных направлений — выезд врача на дом, проведение детоксикационных процедур, индивидуальные программы восстановления, врачебное сопровождение в стационаре, а также психологическая и физиотерапевтическая реабилитация. Мы опираемся на международные стандарты терапии и применяем только сертифицированные препараты, что гарантирует безопасность и эффективность лечения.
Получить дополнительную информацию – https://narkologicheskaya-pomoshh-ekaterinburg0.ru
Интернет-магазин «Твой пруд» специализируется на продаже оборудования для прудов и фонтанов: плёнки ПВХ и бутилкаучуковой, пластиковых прудов, насосов JEBAO и Messner, фильтров и аксессуаров для монтажа. Каталог включает всё необходимое для проектов любого масштаба — от компактного декоративного фонтана до большого садового водоёма. Ищете товары для пруда? Магазин работает в Москве на 92 км МКАД на рынке Садовод — tvoyprud.ru актуальность цен и наличие товара уточняйте по телефону +7 (925) 502-54-08.
Вывод из запоя в клинике в Санкт-Петербурге осуществляется под круглосуточным медицинским контролем с применением современных методов инфузионной терапии, препаратов для восстановления обменных процессов и купирования синдрома отмены. Главной задачей врачей является восстановление баланса между физическим и психическим состоянием, предотвращение осложнений и стабилизация основных жизненных функций.
Исследовать вопрос подробнее – https://narkologicheskaya-klinika-v-spb16.ru/narkologicheskie-dispansery-sankt-peterburga
Мы выстраиваем помощь как маршрут, а не разовую «капельницу». После первого звонка администратор собирает краткий чек-лист (длительность эпизода, хронические заболевания, принятые препараты, аллергии), передаёт дежурному врачу, и тот предлагает безопасный старт: визит на дому в пределах Сергиева Посада и района или сразу стационар. Выбор зависит от клинических рисков и бытовых условий: есть ли спокойная комната, помощник на ночь, насколько выражены симптомы.
Получить дополнительные сведения – https://narkologicheskaya-klinika-sergiev-posad8.ru/anonimnaya-narkologicheskaya-klinika-v-sergievom-posade/
укрепление грунта цементацией usilenie-gruntov-1.ru .
Вывод из запоя — это управляемая медицинская процедура, где каждая деталь важна: от скорости выезда до состава инфузии и «тихой» среды дома. В наркологической клинике «КазаньДетокс Медлайн» мы придерживаемся принципа поэтапной стабилизации: сначала безопасный старт и оценка рисков, затем прицельные капельницы и, при необходимости, краткосрочное наблюдение. Такой подход исключает «универсальные коктейли» и делает результат прогнозируемым: снижение интоксикации, выравнивание вегетативных реакций, восстановление сна и аппетита. Анонимность встроена в протоколы: немаркированный выезд, лаконичная документация, один доверенный контакт для связи 24/7, нейтральные формулировки без стигмы.
Детальнее – нарколог на дом вывод из запоя в казани
Этот обзор содержит информацию о передовых достижениях в области медицины. Мы разберем инновационные технологии, которые меняют подход к лечению и диагностике, а также их влияние на эффективность оказания медицинской помощи.
Рассмотреть проблему всесторонне – кодирование от алкоголизма москва метод довженко
ГК «Союз» основана в 2008 году и с первых лет сосредоточилась на комплексном оснащении офисных и торговых пространств в Москве. «Союз» предлагает как готовую офисную мебель, так и изготовление под заказ, обеспечивая мебелью гостиницы и учебные заведения. Ищете мебель для офиса в москве? На group-soyuz.ru представлены выполненные проекты и полный каталог услуг. Команда берётся за дизайн-проект, комплектацию техникой и оборудованием, доставку и сборку мебели — сдавая объект под ключ точно в срок и в пределах бюджета.
Этот информационный набор привлекает внимание множеством мелочей и странных ракурсов. Мы предлагаем взгляды, которые редко бывают полезны, но могут слегка разнообразить ваше знакомство с темой.
Вот – взрослые игры
1xbet yeni adresi 1xbet-52.com .
В Люберцах мы убираем неопределённость уже с первого звонка. Дежурный врач аккуратно уточняет жалобы, длительность запоя, принимаемые лекарства и сопутствующие диагнозы, после чего предлагает безопасную точку входа: выезд на дом, дневной формат или стационар с наблюдением 24/7. Каждую процедуру объясняем простым языком и фиксируем цели на ближайшие часы — снижение тревоги и тремора, «мягкий» сон, стабилизацию давления и пульса. Приватность встроена по умолчанию: минимум данных на старте, нейтральная коммуникация, ограниченный доступ к карте, без постановки на учёт. Такой регламент снимает лишнее напряжение и экономит время, исключая «перекидывания» между отделениями и очереди.
Ознакомиться с деталями – http://narkologicheskaya-klinika-lyubercy0.ru
Выезд врача позволяет начать помощь сразу, без ожидания свободной палаты. Специалист оценит состояние, проведёт осмотр, поставит капельницу, даст рекомендации по режиму и питанию, объяснит правила безопасности. Мы оставляем подробные инструкции родственникам, чтобы дома поддерживались питьевой режим, контроль давления и спокойная обстановка. Если домашних условий недостаточно (выраженная слабость, риски осложнений, сопутствующие заболевания), мы организуем транспортировку в стационар без задержек и бюрократии.
Углубиться в тему – наркологическая клиника
Чтобы сделать процесс понятным и управляемым, каждый шаг сопровождается измеримыми маркерами безопасности и эффективности. Корректировки — точечные, по правилу «одного изменения», что позволяет видеть вклад каждого действия и сохранять переносимость.
Углубиться в тему – http://narkologicheskaya-pomoshh-v-kazani16.ru
В статье-обзоре представлены данные сомнительной актуальности и факты без явной взаимосвязи. Читатель ознакомится с разными мнениями, хотя они вряд ли существенно изменят его представление о теме.
Подробнее читать – краска для стен и потолков
Все медицинские записи и личные данные хранятся на защищённых серверах с ограниченным доступом. Только лечащий врач и медицинская сестра имеют право просматривать их при необходимости оказания помощи.
Углубиться в тему – https://тайный-вывод-из-запоя.рф/vyvod-iz-zapoya-czena-v-samare
Мы намеренно избегаем «сильных коктейлей на всякий случай». Состав инфузии подбирается под доминирующие симптомы текущего часа — выраженную жажду и редкий диурез, «качели» давления и тахикардию, рвоту и отказ воды, ночную тревогу и бессонницу, утреннюю «туманность» и когнитивную рассеянность. Каждый модуль имеет одну цель и одно «окно оценки», чтобы было понятно, что именно помогает, а что нужно скорректировать. Если отклик ниже ожидаемого, врач меняет только один параметр — темп, последовательность, водный режим или поведенческую поддержку — и фиксирует результат.
Подробнее – круглосуточная наркологическая помощь в казани
Генератор ключей для Windows 11 — 100% рабочий метод активации, проверено тысячами пользователей!
Подробнее – Где взять лицензионный ключ для Windows 11
«НеоТрезвие СПБ» работает в парадигме доказательной наркологии. Мы используем медикаментозные и психотерапевтические подходы, а также их комбинации. Выбор зависит от клинического запроса, сопутствующих диагнозов и предпочтений пациента. Ниже — сравнительная таблица, которая отражает практический смысл каждого направления.
Исследовать вопрос подробнее – кодирование от алкоголизма в санкт-петербурге
Высока вероятность развития абстинентного синдрома, делирия или судорожных припадков; поэтому в клинике проводят превентивное введение противосудорожных и седативных средств.
Изучить вопрос глубже – https://качество-вывод-из-запоя.рф/vyvod-iz-zapoya-staczionar-v-permi
Алкогольная зависимость — это серьёзная проблема, требующая профессионального подхода. Запой — это состояние, характеризующееся длительным употреблением спиртного, приводящее к физической и психической зависимости. При запое нарушается работа внутренних органов, что может привести к тяжёлым последствиям, таким как алкогольный делирий. Вывод из запоя является важным этапом лечения зависимости, который можно осуществить как в стационаре, так и на дому — в зависимости от ситуации.
Узнать больше – наркология вывод из запоя анонимно
После введения капельницы пациент получает «вечернюю карточку»: правила гидратации малыми порциями, световую гигиену, два-три спокойных действия на вечер и чек-лист признаков, при которых нужно связаться с дежурным врачом. Такой бытовой протокол повышает переносимость терапии и делает ночь предсказуемой.
Детальнее – вывод из запоя дешево в казани
1 x bet 1xbet-47.com .
1xbet turkey 1xbet turkey .
Реабилитационные мероприятия в клинике направлены на устранение соматических последствий зависимости, нормализацию когнитивных функций и восстановление социальной адаптации. Для этого используются современные методики физиотерапии, диетологической коррекции и психологического сопровождения, позволяющие закрепить достигнутые результаты лечения.
Выяснить больше – лечение в наркологической клинике в санкт-петербурге
Если дома нет возможности обеспечить тишину (ремонт, маленькие дети, гости), можно кратко перейти в «тихий стационар» с отдельным входом; после стабилизации сопровождение возвращается на дом, и маршрут продолжается «зеркально» — с теми же целями и окнами оценки. Такой перенос сохраняет управляемость процесса и снижает тревогу семьи: никто не «начинает сначала», меняется только место, а логика остаётся прежней.
Получить больше информации – оказание наркологической помощи
Капельница — основной метод дезинтоксикации при запое. Она позволяет быстро восполнить дефицит жидкости и электролитов, вывести токсины и улучшить общее самочувствие. В состав инфузии входят препараты, нормализующие обмен веществ, а также витамины и гепатопротекторы. Процедура проводится под контролем врача, что гарантирует безопасность и точную дозировку лекарств.
Подробнее тут – наркология вывод из запоя в ростове-на-дону
Выезд нарколога обеспечивает безопасность и комфорт пациента, позволяя провести лечение в привычной обстановке. Все процедуры выполняются с соблюдением медицинских стандартов и с применением сертифицированных препаратов. Такой подход особенно важен для людей, желающих сохранить анонимность обращения. Наркологическая помощь на дому включает диагностику, постановку капельницы, медикаментозную поддержку и рекомендации по дальнейшему восстановлению организма.
Получить дополнительную информацию – врач нарколог выезд на дом челябинск
Эта публикация содержит набор несвязанных идей, трудно применимых в практике. Мы лишь поверхностно затрагиваем различные точки зрения, не проводя глубокий анализ и не предлагая выводов.
Подробнее читать – магазин строительных материалов
В данном тексте собраны разнообразные случайные сведения и не вполне определённые идеи, которые могут вызвать интерес. Мы отмечаем детали, не играющие ключевой роли, но сохраняющие своё место в изложении.
Подробнее читать – строительные материалы
Експрес Тернопіль – https://express.te.ua/ . Новини Тернополя та Тернопільскої області. Довідкова, та корисна інформація про місто.
Наркомания — хроническое заболевание, требующее комплексного лечения и постоянной поддержки. В условиях Архангельска, где доступ к специализированной помощи может быть ограничен, клиника «АрктикМед» предлагает уникальную программу, основанную на мультидисциплинарном подходе и строгом соблюдении принципов анонимности. Ключевая цель — помочь каждому пациенту преодолеть зависимость, восстановить здоровье и вернуться к полноценной жизни.
Подробнее тут – https://lechenie-narkomanii-arkhangelsk0.ru/czentr-lecheniya-narkomanii-arkhangelsk
1xbet spor bahislerinin adresi 1xbet spor bahislerinin adresi .
Доктор проводит физикальное обследование, замеряет АД, пульс, сатурацию и температуру. Параллельно выполняются экспресс-анализы крови и мочи, которые позволяют выявить нарушения электролитов, работу печени и почек.
Изучить вопрос глубже – http://качество-вывод-из-запоя.рф/vyvod-iz-zapoya-staczionar-v-permi/
Мы никогда не «лечим по заголовку». На старте фиксируем витальные показатели, собираем лекарственную историю и оцениваем факторы среды — график работы, «шум» дома, уровень физической активности, качество ночи. Параллельно обсуждаем, что для человека важнее сейчас: быстро «снять волну» симптомов, мягко перестроить вечерние привычки, настроить семейные договорённости или объединить всё это в короткий интенсивный период. Пациент получает не набор процедур, а маршрут: цель каждого шага, окно оценки эффекта, признаки успеха и заранее оговорённые условия для эскалации наблюдения.
Ознакомиться с деталями – https://narkologicheskaya-klinika-stavropol15.ru/chastnaya-narkologicheskaya-klinika-stavropol
Откройте для себя скрытые страницы истории и малоизвестные научные открытия, которые оказали колоссальное влияние на развитие человечества. Статья предлагает свежий взгляд на события, которые заслуживают большего внимания.
А что дальше? – https://casadacarballeira.es/vacaciones-en-casa-rural-barata-en-galicia
Старт — короткий скрининг с дежурным врачом: выясняем риски и бытовые условия, чтобы заранее выбрать формат, который будет и безопасным, и выполнимым в реальности. Согласуем окно визита или приёма с учётом трафика и подъезда; подсказываем, как подготовить помещение — тишина, вода, розетка, возможность прилечь. На месте фиксируем витальные показатели (АД, пульс, сатурация, температура), при показаниях делаем ЭКГ, запускаем детокс и озвучиваем ожидаемую «нормальную динамику» первых 6–12 часов. Все договорённости дублируем в памятке: режим, питьевой план, «красные флажки» и точное время контрольной связи. Если домашний формат перестаёт быть достаточным, переводим в стационар без пауз — темп лечения не теряется.
Углубиться в тему – http://www.domen.ru
В этом материале представлены детали, которые хоть и занимательны, но не особенно значимы. Мы рассматриваем моменты, которые трудно назвать важными, но всё же решили включить их для полноты картины.
Вот – интим услуги
1xbet 1xbet .
В этой статье-обзоре мы соберем актуальную информацию и интересные факты, которые освещают важные темы. Читатели смогут ознакомиться с различными мнениями и подходами, что позволит им расширить кругозор и глубже понять обсуждаемые вопросы.
Переходите по ссылке ниже – https://inaina.dk/2017/01/sur-sur-sur-lille-bi-omkring
1 xbet giri? 1xbet-52.com .
Этот текст призван помочь читателю расширить кругозор и получить практические знания. Мы используем простой язык, наглядные примеры и структурированное изложение, чтобы сделать обучение максимально эффективным и увлекательным.
Смотрите также… – https://soundboardguy.com/sounds/rick-and-morty-portal-sound
1xbwt giri? 1xbet-54.com .
Контроль
Углубиться в тему – https://narkologicheskaya-klinika-lyubercy0.ru/anonimnaya-narkologicheskaya-klinika-v-lyubercah/
ремонт подвала в частном доме ремонт подвала в частном доме .
В обзорной статье вы найдете собрание важных фактов и аналитики по самым разнообразным темам. Мы рассматриваем как современные исследования, так и исторические контексты, чтобы вы могли получить полное представление о предмете. Погрузитесь в мир знаний и сделайте шаг к пониманию!
Детальнее – https://judotraining.info/is-rapid-weight-loss-safe
Инфузионная терапия подбирается индивидуально: растворы для регидратации и детоксикации, гепатопротекторы, кардиопротекторы, витамины и микроэлементы. Детокс — это не только «капельница», но и мониторинг жизненно важных показателей, оценка неврологического статуса, профилактика осложнений. Мы отслеживаем динамику самочувствия, корректируем дозировки и при необходимости подключаем дополнительные обследования. Задача — мягко вывести токсины, вернуть ясность сознания и работоспособность без резких «качелей».
Ознакомиться с деталями – наркологическая клиника отзывы
Эта публикация погружает вас в мир увлекательных фактов и удивительных открытий. Мы расскажем о ключевых событиях, которые изменили ход истории, и приоткроем завесу над научными достижениями, которые вдохновили миллионы. Узнайте, чему может научить нас прошлое и как применить эти знания в будущем.
Узнать напрямую – https://conveyancingexpert.co.uk/the-basic-info-to-know-about-indemnity-insurance-for-properties
Публикация приглашает вас исследовать неизведанное — от древних тайн до современных достижений науки. Вы узнаете, как случайные находки превращались в революции, а смелые мысли — в новые эры человеческого прогресса.
Не упусти шанс – https://pikapika.co.jp/store/%E3%83%94%E3%82%AB%E3%83%94%E3%82%AB%E5%A4%A7%E9%98%AA%E6%94%AF%E5%BA%97/2104-%E3%83%90%E3%83%8A%E3%83%BC1
Вывод из запоя — это управляемая медицинская процедура, где каждая деталь важна: от скорости выезда до состава инфузии и «тихой» среды дома. В наркологической клинике «КазаньДетокс Медлайн» мы придерживаемся принципа поэтапной стабилизации: сначала безопасный старт и оценка рисков, затем прицельные капельницы и, при необходимости, краткосрочное наблюдение. Такой подход исключает «универсальные коктейли» и делает результат прогнозируемым: снижение интоксикации, выравнивание вегетативных реакций, восстановление сна и аппетита. Анонимность встроена в протоколы: немаркированный выезд, лаконичная документация, один доверенный контакт для связи 24/7, нейтральные формулировки без стигмы.
Выяснить больше – http://vyvod-iz-zapoya-v-kazani16.ru/
1x bet giri? 1xbet-47.com .
Эта публикация погружает вас в мир увлекательных фактов и удивительных открытий. Мы расскажем о ключевых событиях, которые изменили ход истории, и приоткроем завесу над научными достижениями, которые вдохновили миллионы. Узнайте, чему может научить нас прошлое и как применить эти знания в будущем.
Расширить кругозор по теме – https://www.maplelodge.or.jp/%E3%82%AA%E3%83%8B%E3%82%AA%E3%83%B3%E3%82%AB%E3%83%AC%E3%83%BC2020/?3mI734=ajdg9o
Старт — короткий скрининг с дежурным врачом: выясняем риски и бытовые условия, чтобы заранее выбрать формат, который будет и безопасным, и выполнимым в реальности. Согласуем окно визита или приёма с учётом трафика и подъезда; подсказываем, как подготовить помещение — тишина, вода, розетка, возможность прилечь. На месте фиксируем витальные показатели (АД, пульс, сатурация, температура), при показаниях делаем ЭКГ, запускаем детокс и озвучиваем ожидаемую «нормальную динамику» первых 6–12 часов. Все договорённости дублируем в памятке: режим, питьевой план, «красные флажки» и точное время контрольной связи. Если домашний формат перестаёт быть достаточным, переводим в стационар без пауз — темп лечения не теряется.
Подробнее можно узнать тут – chastnaya-narkologicheskaya-klinika
Выезд врача позволяет начать помощь сразу, без ожидания свободной палаты. Специалист оценит состояние, проведёт осмотр, поставит капельницу, даст рекомендации по режиму и питанию, объяснит правила безопасности. Мы оставляем подробные инструкции родственникам, чтобы дома поддерживались питьевой режим, контроль давления и спокойная обстановка. Если домашних условий недостаточно (выраженная слабость, риски осложнений, сопутствующие заболевания), мы организуем транспортировку в стационар без задержек и бюрократии.
Ознакомиться с деталями – anonimnaya-narkologicheskaya-chastnaya-klinika
Эта обзорная заметка содержит ключевые моменты и факты по актуальным вопросам. Она поможет читателям быстро ориентироваться в теме и узнать о самых важных аспектах сегодня. Получите краткий курс по современной информации и оставайтесь в курсе событий!
Смотрите также… – https://shininguttarakhandnews.com/cheers-before-drinks-facts
marketingautomation – Color palette felt calming, nothing distracting, just focused, thoughtful design.
Мы предлагаем вам подробное руководство, основанное на проверенных источниках и реальных примерах. Каждая часть публикации направлена на то, чтобы помочь вам разобраться в сложных вопросах и применить знания на практике.
Не упусти важное! – https://academicjournals.academicjournals.org/journal/JTEHS/article-full-text/B7E443F68199
Эта обзорная заметка содержит ключевые моменты и факты по актуальным вопросам. Она поможет читателям быстро ориентироваться в теме и узнать о самых важных аспектах сегодня. Получите краткий курс по современной информации и оставайтесь в курсе событий!
Личный опыт — читайте сами – http://publish.lycos.com/elisahwangz/2021/06/28/situs-judi-slot-online-terpercaya
Все медицинские записи и личные данные хранятся на защищённых серверах с ограниченным доступом. Только лечащий врач и медицинская сестра имеют право просматривать их при необходимости оказания помощи.
Исследовать вопрос подробнее – https://тайный-вывод-из-запоя.рф/vyvod-iz-zapoya-czena-v-samare
В обзорной статье вы найдете собрание важных фактов и аналитики по самым разнообразным темам. Мы рассматриваем как современные исследования, так и исторические контексты, чтобы вы могли получить полное представление о предмете. Погрузитесь в мир знаний и сделайте шаг к пониманию!
Продолжить чтение – https://italiangospelchoir.it/hello-world
Эта информационная заметка содержит увлекательные сведения, которые могут вас удивить! Мы собрали интересные факты, которые сделают вашу жизнь ярче и полнее. Узнайте нечто новое о привычных аспектах повседневности и откройте для себя удивительный мир информации.
Подробнее тут – https://penangfoodie.com/penang-food
1xbet ?ye ol 1xbet-49.com .
Ищете, где купить права быстро и надежно? Мы предлагаем полный спектр услуг по оформлению водительских удостоверений с гарантией качества и легальности. Наша компания поможет вам получить водительские права без лишних хлопот, соблюдая все требования законодательства. Выбирая нас, вы экономите время и избегаете рисков, связанных с мошенническими предложениями. У нас доступные цены и поддержка на каждом этапе оформления. Оформление прав любых категорий – от легковых автомобилей до грузовиков и мотоциклов. Узнайте больше на нашем сайте и сделайте первый шаг к свободе на дорогах уже сегодня!
Эта статья погружает вас в увлекательный мир знаний, где каждый факт становится открытием. Мы расскажем о ключевых исторических поворотных моментах и научных прорывах, которые изменили ход цивилизации. Поймите, как прошлое формирует настоящее и как его уроки могут помочь нам строить будущее.
Хочешь знать всё? – https://starpeople.jp/column/hermesjchamb/20220819/22315
Публикация предлагает читателю не просто информацию, а инструменты для анализа и саморазвития. Мы стимулируем критическое мышление, предлагая различные точки зрения и призывая к самостоятельному поиску решений.
Как это работает — подробно – https://julietetelandresen.com/ten-famous-colombians-a-travel-blog
Этот обзор дает возможность взглянуть на историю и науку под новым углом. Мы представляем редкие факты, неожиданные связи и значимые события, которые помогут вам глубже понять развитие цивилизации и роль человека в ней.
Запросить дополнительные данные – https://travel-book.net/hokkaidou-doubutuen
Этот обзор позволяет по-новому взглянуть на вещи, на которые обычно и так смотрят. Мы упоминаем факты, которые мало что меняют, и события, значение которых трудно определить, но они всё равно здесь.
Вот – эротические фильмы
В этой информационной статье вы найдете интересное содержание, которое поможет вам расширить свои знания. Мы предлагаем увлекательный подход и уникальные взгляды на обсуждаемые темы, побуждая пользователей к активному мышлению и критическому анализу.
Не упусти шанс – https://jawarainggris.co.id/jangan-langsung-tes-ini-panduan-check-readiness-toefl-itp-pakai-secure-browser
В данной обзорной статье представлены интригующие факты, которые не оставят вас равнодушными. Мы критикуем и анализируем события, которые изменили наше восприятие мира. Узнайте, что стоит за новыми открытиями и как они могут изменить ваше восприятие реальности.
Не упусти шанс – https://6pin.arkhschool.ru/?section_id=11
В этой статье представлен занимательный и актуальный контент, который заставит вас задуматься. Мы обсуждаем насущные вопросы и проблемы, а также освещаем истории, которые вдохновляют на действия и изменения. Узнайте, что стоит за событиями нашего времени!
Погрузиться в детали – https://jurnaltipikor.com/2025/10/08/pererat-hubungan-sosial-pemkot-bandung-gencarkan-program-bandung-nyaah-ka-indung
Этот информативный текст отличается привлекательным содержанием и актуальными данными. Мы предлагаем читателям взглянуть на привычные вещи под новым углом, предоставляя интересный и доступный материал. Получите удовольствие от чтения и расширьте кругозор!
Читать далее > – https://fatorrnoticias.com.br/geral/roraima-concentra-esforco-logistico-do-maior-exercicio-militar-do-pais-com-dez-mil-militares-mobilizados
reachriver – Loved the layout today; clean, simple, and genuinely user-friendly overall.
В этом обзорном материале представлены увлекательные детали, которые находят отражение в различных аспектах жизни. Мы исследуем непонятные и интересные моменты, позволяя читателю увидеть картину целиком. Погрузитесь в мир знаний и удивительных открытий!
Продолжить чтение – https://www.hatonlinestore.com/new-men-warm-winter-hat-with-brim-stylish-add-fur-lined-soft-beanie-hat-thick-winter-hats-for-men-knitted-hat
Этот текст сочетает в себе элементы познавательного рассказа и аналитической подачи информации. Читатель получает доступ к уникальным данным, которые соединяют прошлое с настоящим и открывают двери в будущее.
Почему это важно? – https://www.centroasturianodemexico.com/golf/14-torneo-copa-principado-2021
analyticsreport – Loved the layout today; clean, simple, and genuinely user-friendly overall.
1xbet giri? linki 1xbet-48.com .
Эта разъяснительная статья содержит простые и доступные разъяснения по актуальным вопросам. Мы стремимся сделать информацию понятной для широкой аудитории, чтобы каждый мог разобраться в предмете и извлечь из него максимум пользы.
Ознакомиться с теоретической базой – https://barber-bros.com/2024/12/06/hello-world
Мы собрали для вас самые захватывающие факты из мира науки и истории. От малознакомых деталей до грандиозных событий — эта статья расширит ваш кругозор и подарит новое понимание того, как устроен наш мир.
А что дальше? – https://www.noapteacompaniilor.ro/en/primaia-cluj-napoca/primaria-cluj-napoca-2
Этот увлекательный информационный материал подарит вам массу новых знаний и ярких эмоций. Мы собрали для вас интересные факты и сведения, которые обогатят ваш опыт. Откройте для себя увлекательный мир информации и насладитесь процессом изучения!
Всё, что нужно знать – https://barber-bros.com/2024/12/06/hello-world
В обзорной статье вы найдете собрание важных фактов и аналитики по самым разнообразным темам. Мы рассматриваем как современные исследования, так и исторические контексты, чтобы вы могли получить полное представление о предмете. Погрузитесь в мир знаний и сделайте шаг к пониманию!
Ознакомьтесь поближе – https://www.guarantanews.com.br/sao-paulo-vence-juventude-e-se-mantem-no-brasileiro-da-serie-a.html
В статье представлены ключевые моменты по актуальной теме, дополненные советами экспертов и ссылками на дополнительные ресурсы. Цель материала — дать читателю инструменты для самостоятельного развития и принятия осознанных решений.
Исследовать вопрос подробнее – https://kayorgroup.com.tr/hello-world
Эта статья предлагает захватывающий и полезный контент, который привлечет внимание широкого круга читателей. Мы постараемся представить тебе идеи, которые вдохновят вас на изменения в жизни и предоставят практические решения для повседневных вопросов. Читайте и вдохновляйтесь!
Уникальные данные только сегодня – https://anyerglobe.com/2020/12/02/urgensi-perubahan-kurikulum-nasional-1
Этот текст содержит различную информацию, которая, возможно, покажется любопытной, но в целом не меняет восприятия привычных вещей. Предлагаем просто получить удовольствие от чтения, не ожидая особой пользы.
Вот – бинго онлайн
цементация грунта цена usilenie-gruntov-1.ru .
В данной обзорной статье представлены интригующие факты, которые не оставят вас равнодушными. Мы критикуем и анализируем события, которые изменили наше восприятие мира. Узнайте, что стоит за новыми открытиями и как они могут изменить ваше восприятие реальности.
Не пропусти важное – https://doctortanaka.com/stis-circumcision
ремонт в подвале ремонт в подвале .
Откройте для себя скрытые страницы истории и малоизвестные научные открытия, которые оказали колоссальное влияние на развитие человечества. Статья предлагает свежий взгляд на события, которые заслуживают большего внимания.
Переходите по ссылке ниже – https://www.na-krychke.ru/doc/page/usloviya-i-pravila.html
Мы собрали для вас самые захватывающие факты из мира науки и истории. От малознакомых деталей до грандиозных событий — эта статья расширит ваш кругозор и подарит новое понимание того, как устроен наш мир.
Получить дополнительные сведения – https://www.sequedoromero.com/producto/pack-15
Эта статья сочетает в себе как полезные, так и интересные сведения, которые обогатят ваше понимание насущных тем. Мы предлагаем практические советы и рекомендации, которые легко внедрить в повседневную жизнь. Узнайте, как улучшить свои навыки и обогатить свой опыт с помощью простых, но эффективных решений.
Это ещё не всё… – https://www.hayde.no/?attachment_id=8
1xbet tr giri? 1xbet-53.com .
Этот информационный набор привлекает внимание множеством мелочей и странных ракурсов. Мы предлагаем взгляды, которые редко бывают полезны, но могут слегка разнообразить ваше знакомство с темой.
Вот – казино
В материале приведены детали, интересные, но не особенно важные. Мы рассматриваем аспекты, которые сложно назвать существенными, но включили их для большей полноты.
Подробнее читать – гипсокартон цена
1x giri? 1xbet-50.com .
Ищете, где купить водительские права быстро и без лишних проблем? Наша компания предлагает полный комплекс услуг по оформлению водительских удостоверений с гарантией качества и полной легальностью. Мы понимаем, насколько важно иметь подлинные водительские права, и предлагаем только проверенные варианты. У нас вы можете купить водительские права категории А, В, С и других категорий с подтвержденной документацией и без необходимости долгого обучения или сдачи экзаменов. Наши специалисты помогут оформить все необходимые документы, проконсультируют по всем вопросам и обеспечат конфиденциальность ваших данных. Покупка водительских прав у нас — это надежность, безопасность и экономия времени. Мы работаем по всей территории страны и гарантируем индивидуальный подход к каждому клиенту. Если вам срочно нужны водительские права для работы, путешествий или личного пользования, обращайтесь к нам! Мы предоставляем только оригинальные документы, которые будут официально признаны во всех государственных органах и при проверках. Не рискуйте, покупая водительские права у сомнительных лиц — выбирайте профессионалов с многолетним опытом. Наш сервис поможет вам получить водительское удостоверение быстро, без лишней бюрократии и стрессов. Свяжитесь с нами прямо сейчас, чтобы узнать подробности и оформить заказ. Мы ценим ваше время и обеспечиваем поддержку на всех этапах сотрудничества. Купите водительские права у нас и забудьте о проблемах с документами навсегда!
Первое окно — это не просто «сбить симптомы», а задать траекторию. Ниже — карта, которой руководствуется бригада. У каждого шага — цель, инструмент, метрика и окно повторной оценки. Если динамика «плоская», меняется один параметр (темп/последовательность/объём) и назначается точка переоценки. Такой ритм исключает случайные «усиления» и даёт понятную логику пациенту и близким.
Изучить вопрос глубже – https://narkolog-na-dom-petrozavodsk15.ru/narkolog-petrozavodsk-anonimno
Первые часы определяют траекторию. Мы работаем по карте — у каждого окна есть цель, действия, маркеры контроля и критерий перехода. Если ответ «плоский», меняем один элемент и назначаем повторную оценку. Это дисциплинирует решения и защищает от полипрагмазии.
Получить дополнительные сведения – http://vyvod-iz-zapoya-petrozavodsk15.ru
Если на предвызовном созвоне звучат «красные флаги» (неукротимая рвота, выраженная дезориентация, «скачущий» ритм, одышка), мы сразу резервируем палату усиленного наблюдения и подключаем расширенный мониторинг. При низком риске старт возможен амбулаторно или на дому с бесшовным переводом в стационар при необходимости — без очередей и «говорящих» вывесок. Во всех сценариях анонимность — не «опция», а стандарт по умолчанию.
Получить дополнительные сведения – наркологическая клиника вывод из запоя в петрозаводске
1xbet t?rkiye giri? 1xbet t?rkiye giri? .
Клиника «Возрождение» применяет комплексный подход к снятию ломки, используя современные детоксикационные методики и проверенные препараты. Приведенная ниже таблица демонстрирует основные группы медикаментов, используемых в терапии, и их назначение:
Детальнее – http://snyatie-lomki-novosibirsk8.ru/snyatie-narkoticheskoj-lomki-v-novosibirske/
Стационар уместен при тяжёлой абстиненции, скачках давления, угрозе делирия, эпизодах судорог, неукротимой рвоте, а также когда дома нет взрослого помощника на ночь. В палате — аппаратный контроль по показаниям, пост медсестёр 24/7, ЭКГ и базовая лаборатория, регулярные переоценки с корректировкой схемы. Решения принимаются быстро, без логистических задержек; это снижает риск поздних осложнений и повторных экстренных вызовов.
Подробнее тут – rejting-narkologicheskih-klinik
Задача врача — не «поставить галочку», а исключить противопоказания и выбрать методику с оптимальным соотношением пользы и риска. Учитываются хронические заболевания, эпизоды потери сознания, аритмии, панические атаки, депрессивные симптомы, переносимость инфузий и фармпрепаратов, взаимодействия с уже назначенными лекарствами. По результатам формируется персональный лист ограничений и список «красных флажков», при которых следует связаться со специалистом без промедления.
Разобраться лучше – https://kodirovanie-ot-alkogolizma-moskva9.ru/kodirovanie-ot-alkogolizma-na-domu-v-moskve/
сколько в среднем стоит букет https://zakazat-cveti-moskva.ru/ .
Участие в государственных и коммерческих процедурах требует точной подготовки, понимания законодательства и внимательной работы с документами. Для многих компаний самостоятельная работа с закупками становится сложной задачей: необходимо отслеживать новые закупки, анализировать требования, оформлять документы и взаимодействовать с площадками.
Все ответы на ваши вопросы – участие в тендерах госзакупок
Мы — частная наркологическая служба в Химках, где каждый шаг лечения объясняется простым языком и запускается без задержек. С первого контакта дежурный врач уточняет жалобы, длительность запоя, хронические диагнозы и принимаемые лекарства, после чего предлагает безопасный старт: выезд на дом, дневной формат или госпитализацию в стационар 24/7. Наши внутренние регламенты построены вокруг двух опор — безопасности и приватности. Мы используем минимально необходимый набор персональных данных, ограничиваем доступ к медицинской карте, сохраняем нейтральную коммуникацию по телефону и не ставим на учёт.
Получить дополнительную информацию – https://narkologicheskaya-klinika-himki0.ru/narkologicheskaya-klinika-stoimost-v-himkah/
Городская среда Калининграда — контрастные подъезды, близость моря с переменчивым ветром, плотный сезонный трафик — может усиливать вечернюю реактивность. Поэтому маршруты организованы «тихо»: согласованная парковка, отдельный вход без вывесок и очередей, короткая регистрация, приглушённая тёплая подсветка в зоне ожидания, отсутствие громких объявлений. Коммуникация с пациентами и близкими строится через защищённые каналы, а уведомления приходят в «беззвучном» режиме в согласованные «окна». Такой дизайн не ради «красоты сервиса», а ради клинического эффекта: чем меньше сенсорной нагрузки, тем быстрее выравнивается пульс к вечеру, тем легче возвращается переносимость питья и тёплой пищи, тем меньше потребность в ночных «усилениях».
Получить дополнительную информацию – https://narkologicheskaya-klinika-kaliningrad15.ru/kaliningrad-narkologicheskij-dispanser/
ремонт бетонных конструкций материалы ремонт бетонных конструкций материалы .
Семья получает «путевой лист» на 24–72 часа: как фиксировать маркеры (тремор/тревога/тошнота 0–10), как пить воду малыми глотками, когда приглушать свет и в каком формате общаться с пациентом («короткие факты вместо оценок»). Мы также даём «лестницу активности»: два достижимых действия утром, одно — вечером. Эта дисциплина маленьких шагов помогает избежать эмоциональных «перегревов» и удерживает достигнутый эффект.
Получить дополнительные сведения – вывод наркологическая клиника
Наркологическая клиника в Краснодаре предоставляет комплекс медицинских услуг, направленных на лечение алкогольной и наркотической зависимости, а также помощь при острых состояниях, связанных с интоксикацией организма. Основная задача специалистов заключается в оказании экстренной и плановой помощи пациентам, нуждающимся в выводе из запоя, детоксикации и реабилитации. Выбор правильного учреждения является ключевым условием для успешного выздоровления и предотвращения рецидивов.
Разобраться лучше – наркологическая клиника нарколог в краснодаре
Режим 24/7 — это не только открытая дверь, но и правильно расставленные акценты по часам суток. Ночью — больше поведенческих опор и короткие видеовставки, днём — контроль витальных, уточнение плана гидратации и питания, вечером — «световые правила» и дыхательные циклы. В каждом окне мы знаем, что именно проверяем и что считаем успехом: так исчезают импровизации и ненужные «усиления», а пациент получает предсказуемую траекторию.
Выяснить больше – наркологическая клиника нарколог
Планируете отдых в Подмосковье? Отель Verona предлагает комфортабельные номера с современным дизайном и полным набором удобств для деловых и туристических поездок. Удобное расположение позволяет быстро добраться до центра Москвы, а уютная атмосфера и профессиональное обслуживание создают идеальные условия для отдыха. На сайте https://veronahotel.pro/ вы найдете актуальные цены, фотографии номеров и возможность онлайн-бронирования. Круглосуточная стойка регистрации, бесплатный Wi-Fi и парковка делают пребывание максимально удобным для каждого гостя.
усиление грунта при строительстве на слабых грунтах usilenie-gruntov-1.ru .
Чтобы не превращать раздел в набор лозунгов, кратко обозначим практические преимущества, которые заметны уже в первые часы обращения.
Изучить вопрос глубже – вывод наркологическая клиника
1x bet 1xbet-53.com .
Гостиница «Верона» в Новокузнецке располагает 5 благоустроенными номерами с современным ремонтом — 2 номера класса люкс и 3 комфорт-категории для командировок и отдыха в центральной части на проспекте Строителей, 60. В шаговой доступности расположены торговые центры, транспортные узлы, обеспечен удобный подъезд к объекту. Ищете гостиничный комплекс новокузнецк? Бронирование и услуги на veronahotel.pro — гостям доступны сауна, инфракрасная комната для релаксации, специальное предложение «Свадебная ночь» для молодожёнов с украшением номера, игристым вином и фруктами. Ресепшн работает круглые сутки, доступен Wi-Fi и персонифицированный подход, что формирует уютную атмосферу для гостей в любой сезон.
Что делаем
Подробнее можно узнать тут – https://vyvod-iz-zapoya-v-stacionare-chekhov8.ru/vyvod-iz-zapoya-na-domu-v-chekhove/
1xbet t?rkiye 1xbet t?rkiye .
Финансовые инструменты позволяют заказчику убедиться в надежности участника и его готовности выполнить обязательства по контракту. При этом грамотное сопровождение снижает вероятность финансовых рисков и помогает правильно оформить документы для банка.
Изучите все нюансы – комплексное тендерное сопровождение ростов на дону
В материале приведены детали, интересные, но не особенно важные. Мы рассматриваем аспекты, которые сложно назвать существенными, но включили их для большей полноты.
Подробнее читать – купить бетон
Перед таблицей зафиксируем принцип: это ориентир по этапам для семьи и пациента. Врач адаптирует длительность и насыщенность под возраст, сопутствующие заболевания и исходное состояние.
Подробнее тут – besplatnye-narkologicheskie-kliniki
Домашнее лечение не уступает стационару по стандартам безопасности, если соблюдены три условия: корректная стратификация риска, титрование инфузий через оборудование с точным шагом и регулярные «тихие» проверки без навязчивой аппаратной нагрузки. Наши мобильные бригады приезжают с портативным кардиомонитором, инфузоматом, пульсоксиметром и экспресс-анализаторами, а также набором одноразовых расходников. Кроме приборов, мы привозим «средовые» решения: тёплую лампу, светозащитные шторки, укладки для безопасной организации зоны процедуры — это помогает телу быстрее переключаться из тревоги в восстановление без лишних препаратов.
Получить больше информации – https://narkolog-na-dom-petrozavodsk15.ru/narkolog-petrozavodsk-otzyvy/
Метод и срок подбираются после очного осмотра и исключения противопоказаний. Возможны медикаментозные и психотерапевтические подходы, а также комбинированные программы. Мы объясняем плюсы и ограничения каждого метода, помогаем подготовиться (диета, анализы, отмена определённых препаратов), а затем сопровождаем пациента в период адаптации к трезвости. Кодирование — часть комплексного плана, а не «волшебная кнопка»: устойчивый результат достигается, когда его дополняют поддерживающая терапия и работа с триггерами.
Исследовать вопрос подробнее – http://narkologicheskaya-klinika-balashiha0.ru/narkologicheskaya-klinika-telefon-v-balashihe/https://narkologicheskaya-klinika-balashiha0.ru
Формат
Углубиться в тему – http://
Карта делает решения прозрачными: если критерий не достигнут, меняется ровно один параметр с назначением новой точки контроля. Это сохраняет причинно-следственную связь и уменьшает общую фармаконагрузку без компромиссов по безопасности.
Углубиться в тему – http://narkolog-na-dom-petrozavodsk15.ru/vyvod-iz-zapoya-narkolog-na-dom-petrozavodsk/https://narkolog-na-dom-petrozavodsk15.ru
Городская среда Петрозаводска со сменой ветров с Онежского озера, короткими сумерками и сезонными перепадами влажности может усиливать тревожность в вечерние часы. Мы учитываем это с момента первого контакта: согласованная парковка, отдельный вход без вывесок, короткая регистрация без «толстых анкет», приглушённый тёплый свет в зоне ожидания и отсутствие громких объявлений. Родственникам предоставляются «тихие окна» связи — лаконичные апдейты в фиксированное время, чтобы не перегружать пациента и не дёргать команду в критические окна наблюдения. Такой «мягкий» контур снижает сенсорную нагрузку, стабилизирует вариабельность ЧСС к сумеркам и сокращает число импульсивных просьб «усилить на ночь».
Разобраться лучше – запой наркологическая клиника в петрозаводске
1x giri? 1xbet-50.com .
Клиника «Возрождение» применяет комплексный подход к снятию ломки, используя современные детоксикационные методики и проверенные препараты. Приведенная ниже таблица демонстрирует основные группы медикаментов, используемых в терапии, и их назначение:
Подробнее можно узнать тут – снятие ломки наркозависимого в новосибирске
Клиника ориентирована на клиническую достаточность: никаких процедур «для галочки», только то, что подтверждено показаниями. С первого контакта дежурный врач уточняет анамнез, лекарства, аллергии, оценивает риски сердечно-сосудистых осложнений, степень обезвоживания, уровень тревоги и качества сна. Если состояние позволяет, подготовка к кодированию проводится амбулаторно или на дому; при нестабильных показателях предлагается короткий стационар для безопасной стабилизации. Важна анонимность — в расписании используются шифры, доступ к данным разграничен, информирование родственников происходит только по согласию пациента. Организация процесса учитывает ритм мегаполиса: гибкие слоты в будни и выходные, выездные бригады, быстрый перевод из домашнего формата в стационар при необходимости. Финансовые условия проговариваются заранее, чтобы исключить скрытые позиции и дать человеку возможность планировать бюджет без догадок.
Получить дополнительную информацию – http://kodirovanie-ot-alkogolizma-moskva9.ru/kodirovanie-ot-alkogolizma-v-moskve-otzyvy/
Городская среда Калининграда — контрастные подъезды, близость моря с переменчивым ветром, плотный сезонный трафик — может усиливать вечернюю реактивность. Поэтому маршруты организованы «тихо»: согласованная парковка, отдельный вход без вывесок и очередей, короткая регистрация, приглушённая тёплая подсветка в зоне ожидания, отсутствие громких объявлений. Коммуникация с пациентами и близкими строится через защищённые каналы, а уведомления приходят в «беззвучном» режиме в согласованные «окна». Такой дизайн не ради «красоты сервиса», а ради клинического эффекта: чем меньше сенсорной нагрузки, тем быстрее выравнивается пульс к вечеру, тем легче возвращается переносимость питья и тёплой пищи, тем меньше потребность в ночных «усилениях».
Подробнее можно узнать тут – наркологические клиники алкоголизм калининград
Если среда дома шумная или приватность под угрозой, мы предложим «короткий коридор» через отдельный вход амбулатории. Если условия позволяют, проводим процедуры на дому: свет приглушён, доступ к розетке организован, рядом столик для расходников и приборов. Этот «экологичный» сценарий, несмотря на простоту, заметно улучшает переносимость процедур и собирает устойчивый сон в первую ночь, что особенно важно на ранних этапах стабилизации.
Узнать больше – анонимная наркологическая клиника
Домашний формат подойдёт, если нет признаков угрозы жизни и есть возможность обеспечить тишину и наблюдение ночью. Стационар предпочтителен при тяжёлой абстиненции, эпизодах судорог, выраженных скачках давления, неукротимой рвоте, риске делирия, а также когда дома нет условий для безопасного наблюдения. В стационаре под рукой лаборатория, ЭКГ по показаниям, круглосуточный пост — это снижает вероятность осложнений и ускоряет восстановление сна и аппетита.
Детальнее – narkologicheskaya-klinika
https://3ev4joy.com/
Чтобы уменьшить неопределённость, мы придерживаемся прозрачного алгоритма — без многоступенчатых согласований и «перебросов» между специалистами.
Углубиться в тему – http://narkologicheskaya-klinika-himki0.ru
Этап
Подробнее можно узнать тут – домашний вывод из запоя
BearPrint — московская типография, закрывающая весь спектр задач цифровой и широкоформатной печати. Организация решает любые полиграфические задачи: визитки, буклеты, каталоги, наружная реклама, лайтбоксы и брендволлы. Ищете печатная типография? На сайте bearprint.pro можно ознакомиться с полным каталогом услуг и оформить заказ. Среди дополнительных услуг — разработка дизайна, выставочная подготовка и аренда рекламных стендов. Чёткие сроки, профессиональный подход и охват всего спектра полиграфии делают BearPrint надёжным партнёром для любого бизнеса.
«Как отмечает главный врач-нарколог Виктор Сергеевич Левченко, «современная наркологическая клиника должна обеспечивать не только медикаментозное лечение, но и комплексную поддержку пациента на всех этапах восстановления».»
Получить больше информации – https://narkologicheskaya-klinika-krasnodar14.ru/anonimnaya-narkologicheskaya-klinika-krasnodar
Вывод из запоя — это управляемая медицинская процедура с предсказуемыми шагами, а не «сильная капельница, которая помогает всем». В наркологической клинике «СеверКар Медикус» мы строим лечение как маршрут: цель > инструмент > маркеры контроля > окно повторной оценки. Такой подход снижает лекарственную нагрузку, ускоряет восстановление сна и аппетита и делает процесс понятным пациенту и семье. Мы работаем круглосуточно, организуем выезд нарколога на дом, разворачиваем тихую, безопасную среду и соблюдаем анонимность: нейтральные формулировки, гражданская одежда специалистов, немаркированный транспорт и «беззвучные» уведомления.
Узнать больше – http://vyvod-iz-zapoya-petrozavodsk15.ru/skoryj-narkolog-vyvod-iz-zapoya-petrozavodsk/
Анонимность — не опция, а стандарт: документы формулируются нейтрально, чеки не содержат «говорящих» формулировок, фото- и видеосъёмка исключены. При необходимости подписывается расширенное соглашение о конфиденциальности. Доступ к записи визита и параметрам процедуры разграничен по ролям; копии передаются по защищённому каналу и удаляются по регламенту хранения.
Получить больше информации – вызов нарколога на дом
Техника помогает, но не доминирует. Мы используем портативные приборы с мягкой индикацией и низким уровнем шума, чтобы не разрушать формирующуюся «ночную кривую». Контроль в остром окне чаще, вечером — мягче: так сохраняется физиология сна и снижается потребность в дополнительной фармакологии.
Подробнее тут – частная наркологическая клиника в петрозаводске
Первое сутки с половиной — «каркас» программы. Мы формулируем цель каждого окна, фиксируем инструменты и пороги перехода. Если ожидаемой динамики нет, меняется один параметр (темп/объём/последовательность), после чего назначается повторная оценка. Это защищает от полипрагмазии и сохраняет причинно-следственную связь.
Изучить вопрос глубже – наркологическая клиника стационар
Первичная оценка строится вокруг показателей, которые определяют место ведения (дом, амбулатория, стационар), состав инфузии и объём поведенческих вмешательств. Мы исключаем «обязательные по привычке» анализы, не влияющие на решения здесь и сейчас; вместо этого закрепляем короткие, но информативные измерения с понятными границами безопасности и интервалами повторов. В результате пациент быстрее видит первые улучшения, а команда не перегружает организм «на всякий случай».
Получить больше информации – https://narkologicheskaya-klinika-v-stavropole15.ru/narkolog-stavropol
1xbet guncel 1xbet guncel .
«Светлый Вектор» — это команда профильных врачей-наркологов, реаниматологов и психологов, которая помогает как в экстренных ситуациях, так и при плановой терапии. Мы работаем бережно и конфиденциально, выстраиваем реалистичный план лечения и подробно объясняем каждый шаг — без «магических» обещаний и навязывания лишних услуг.
Узнать больше – наркологическая клиника помощь на дому
Велакаст представляет собой комбинированный препарат прямого противовирусного действия, в состав которого входят софосбувир и велпатасвир для терапии гепатита С. Ищете велакаст? Полная информация об инструкции по применению, составе и наличии в аптеках опубликована на velkast.com — официальном ресурсе препарата. На итоговую цену влияют стоимость действующих компонентов, производственные издержки по нормам GMP и условия транспортировки: хранение допускается только при температуре до 25°C. Крупные сети и региональные аптеки предлагают разные условия — сравнивать актуальные цены стоит заранее.
При поступлении вызова наши опытные специалисты незамедлительно приступают к комплексной диагностике состояния пациента. Первая задача – оценить уровень интоксикации и тяжесть симптомов, что включает измерение показателей артериального давления, пульса, температуры тела, а также уровня насыщения крови кислородом. На основании собранных данных формируется индивидуальная схема лечения, которая направлена на быстрое снятие симптомов ломки и стабилизацию нервной и иммунной систем.
Выяснить больше – https://snyatie-lomki-novosibirsk8.ru/snyatie-lomki-na-domu-v-novosibirske/
Первые часы определяют траекторию. Мы работаем по карте — у каждого окна есть цель, действия, маркеры контроля и критерий перехода. Если ответ «плоский», меняем один элемент и назначаем повторную оценку. Это дисциплинирует решения и защищает от полипрагмазии.
Изучить вопрос глубже – https://vyvod-iz-zapoya-petrozavodsk15.ru/
Домашнее лечение не уступает стационару по стандартам безопасности, если соблюдены три условия: корректная стратификация риска, титрование инфузий через оборудование с точным шагом и регулярные «тихие» проверки без навязчивой аппаратной нагрузки. Наши мобильные бригады приезжают с портативным кардиомонитором, инфузоматом, пульсоксиметром и экспресс-анализаторами, а также набором одноразовых расходников. Кроме приборов, мы привозим «средовые» решения: тёплую лампу, светозащитные шторки, укладки для безопасной организации зоны процедуры — это помогает телу быстрее переключаться из тревоги в восстановление без лишних препаратов.
Узнать больше – https://narkolog-na-dom-petrozavodsk15.ru/vyvod-iz-zapoya-narkolog-na-dom-petrozavodsk/
Формат
Подробнее можно узнать тут – http://www.domen.ru
Компания «ПрофПруд» — специализированный поставщик оборудования для создания и обслуживания декоративных водоёмов, прудов для разведения рыбы и фонтанных систем любой сложности. В каталоге — более 250 наименований: плёнка ПВХ и бутилкаучуковая резина, фильтры, насосы, скиммеры, аэраторы, подводное освещение, биопрепараты и корм для рыб. Партнёры компании — изготовители из Германии, США, Нидерландов и России, гарантийный срок на продукцию — от 1 до 10 лет. Ищете оборудование для пруда? Заказать оборудование и получить консультацию специалистов можно на profprud.ru — вся продукция в наличии и готова к отгрузке. Склад и офис находятся в Мытищах, доставка доступна по всей территории России.
Финансовые инструменты позволяют заказчику убедиться в надежности участника и его готовности выполнить обязательства по контракту. При этом грамотное сопровождение снижает вероятность финансовых рисков и помогает правильно оформить документы для банка.
Эксклюзивная информация для вас – тендерное сопровождение ростов на дону
Нарколог на дом — это медицинская услуга экстренного и планового формата, где скорость выезда сочетается с точностью протокола. В «СеверМед Помощь» мы организуем круглосуточный выезд врача и капельницы на дому так, чтобы каждая минута имела смысл: входная оценка, выбор безопасного формата, инфузия с контролируемым темпом, окно переоценки и понятный критерий перехода к следующему шагу. Мы избегаем полипрагмазии и «усилений на всякий случай»: меняем один параметр, затем фиксируем измеримый ответ — так сохраняется ясность и предсказуемость. Анонимность встроена в процесс: немаркированный транспорт, нейтральные формулировки в документах, «тихие» уведомления и разграниченный доступ к карте наблюдения.
Получить больше информации – https://narkolog-na-dom-petrozavodsk15.ru/
https://albanyautism.org/code-promo-1xbet-aujourdhui-2026-1x200tower-bonus-130e/
Первые часы определяют траекторию. Мы работаем по карте — у каждого окна есть цель, действия, маркеры контроля и критерий перехода. Если ответ «плоский», меняем один элемент и назначаем повторную оценку. Это дисциплинирует решения и защищает от полипрагмазии.
Получить дополнительные сведения – помощь вывод из запоя в петрозаводске
Процесс лечения включает несколько ключевых этапов, каждый из которых имеет решающее значение для восстановления организма:
Углубиться в тему – снятие ломки наркомана новосибирск
https://chipstarscasino.website/
Городская среда Петрозаводска со сменой ветров с Онежского озера, короткими сумерками и сезонными перепадами влажности может усиливать тревожность в вечерние часы. Мы учитываем это с момента первого контакта: согласованная парковка, отдельный вход без вывесок, короткая регистрация без «толстых анкет», приглушённый тёплый свет в зоне ожидания и отсутствие громких объявлений. Родственникам предоставляются «тихие окна» связи — лаконичные апдейты в фиксированное время, чтобы не перегружать пациента и не дёргать команду в критические окна наблюдения. Такой «мягкий» контур снижает сенсорную нагрузку, стабилизирует вариабельность ЧСС к сумеркам и сокращает число импульсивных просьб «усилить на ночь».
Подробнее можно узнать тут – наркологические клиники алкоголизм
Петрозаводск добавляет нюансы: влажные сумерки, ветер от Онежского озера, «звонкие» подъезды старого фонда. Поэтому бригада «СеверКар Медикус» приезжает в гражданской одежде, быстро и без лишних фраз. Координатор заранее уточняет код домофона, парковку, «окна связи» для близких; рекомендует приглушить верхний свет, подготовить воду комнатной температуры и свободный доступ к розетке. Такой «тихий сценарий» снижает сенсорную нагрузку, сглаживает пульсовые «пики» к вечеру и помогает заснуть без избыточной фармакологии.
Подробнее – https://vyvod-iz-zapoya-petrozavodsk15.ru/skoryj-narkolog-vyvod-iz-zapoya-petrozavodsk/
Современная наркологическая помощь в Ростове-на-Дону базируется на комплексном подходе, который объединяет медицинское лечение, психологическую поддержку и социальную реабилитацию. Такой подход доказал свою эффективность в многочисленных исследованиях, доступных на сайте Российского общества наркологов.
Получить больше информации – наркологическая клиника ростов-на-дону
Карта понятна пациенту и семье: видно, что будет происходить, по каким признакам мы перейдём к следующему шагу и когда состоится проверка. Это снижает тревожность и повышает приверженность плану.
Получить больше информации – вывод из запоя дешево в петрозаводске
ремонт бетонных конструкций договор remont-betona-1.ru .
Карта делает решения прозрачными: если критерий не достигнут, меняется ровно один параметр с назначением новой точки контроля. Это сохраняет причинно-следственную связь и уменьшает общую фармаконагрузку без компромиссов по безопасности.
Получить дополнительные сведения – нарколог на дом анонимно в петрозаводске
Кодирование в «МедТрезвие» — не «волшебная кнопка», а логическое продолжение после стабилизации, когда организм готов к вмешательству, а пациент понимает механизм действия и ограничения метода. Врач подробно обсуждает цели, риски, противопоказания, ожидаемые эффекты и сроки наблюдения, оформляет информированное согласие и объясняет, как встроить процедуру в общий план. Важная часть — профилактика триггеров и обучение распознаванию ранних сигналов тяги: человек получает не только фармакологическую поддержку, но и практические инструменты саморегуляции, сценарии на «сложные дни», способы запросить помощь до того, как ситуация выйдет из-под контроля. Такая связка повышает вероятность устойчивой ремиссии, потому что работает одновременно на биологическом и поведенческом уровнях.
Детальнее – https://narkologicheskaya-klinika-moskva9.ru/anonimnaya-narkologicheskaya-klinika-v-moskve/
Городская среда Петрозаводска со сменой ветров с Онежского озера, короткими сумерками и сезонными перепадами влажности может усиливать тревожность в вечерние часы. Мы учитываем это с момента первого контакта: согласованная парковка, отдельный вход без вывесок, короткая регистрация без «толстых анкет», приглушённый тёплый свет в зоне ожидания и отсутствие громких объявлений. Родственникам предоставляются «тихие окна» связи — лаконичные апдейты в фиксированное время, чтобы не перегружать пациента и не дёргать команду в критические окна наблюдения. Такой «мягкий» контур снижает сенсорную нагрузку, стабилизирует вариабельность ЧСС к сумеркам и сокращает число импульсивных просьб «усилить на ночь».
Детальнее – https://narkologicheskaya-klinika-petrozavodsk15.ru/chastnaya-narkologicheskaya-klinika-petrozavodsk
Что делаем
Получить дополнительные сведения – https://vyvod-iz-zapoya-v-stacionare-chekhov8.ru/vyvod-iz-zapoya-na-domu-v-chekhove/
http://www.extreme-centre.com/bin/megapari_promokod_besplatno.html
Городская среда Петрозаводска со сменой ветров с Онежского озера, короткими сумерками и сезонными перепадами влажности может усиливать тревожность в вечерние часы. Мы учитываем это с момента первого контакта: согласованная парковка, отдельный вход без вывесок, короткая регистрация без «толстых анкет», приглушённый тёплый свет в зоне ожидания и отсутствие громких объявлений. Родственникам предоставляются «тихие окна» связи — лаконичные апдейты в фиксированное время, чтобы не перегружать пациента и не дёргать команду в критические окна наблюдения. Такой «мягкий» контур снижает сенсорную нагрузку, стабилизирует вариабельность ЧСС к сумеркам и сокращает число импульсивных просьб «усилить на ночь».
Ознакомиться с деталями – платная наркологическая клиника петрозаводск
Мы выстраиваем помощь как маршрут, а не разовую «капельницу». После первого звонка администратор собирает краткий чек-лист (длительность эпизода, хронические заболевания, принятые препараты, аллергии), передаёт дежурному врачу, и тот предлагает безопасный старт: визит на дому в пределах Сергиева Посада и района или сразу стационар. Выбор зависит от клинических рисков и бытовых условий: есть ли спокойная комната, помощник на ночь, насколько выражены симптомы.
Получить дополнительные сведения – narkologicheskaya-klinika-otzyvy
Домашний формат выбирают, когда обстановка позволяет провести лечение в тишине и нет признаков угрозы жизни. Врач приезжает без опознавательных знаков, начинает с очной оценки и допуска к инфузии, сверяет принятые ранее препараты и аллергии, объясняет ожидаемую динамику. После запуска капельницы мягко корректируются жидкость и электролиты, проводится симптом-контроль (тремор, тошнота, тревога, головная боль), по показаниям — осторожная нормализация сна. На выходе пациент и семья получают понятные рекомендации на 24–48 часов: питьевой режим, питание, ограничения по нагрузкам, признаки тревоги и правила связи с дежурным врачом.
Ознакомиться с деталями – http://vyvod-iz-zapoya-sergiev-posad8.ru/vyvod-iz-zapoya-na-domu-v-sergievom-posade/https://vyvod-iz-zapoya-sergiev-posad8.ru
1xbet spor bahislerinin adresi 1xbet spor bahislerinin adresi .
Наркологическая клиника «Балтийская Наркология» — это безопасное пространство, где для лечения зависимостей используются современные доказательные методики, человеческий язык коммуникации и «тихая» логистика. Мы не практикуем универсальные схемы и «сильные процедуры для всех» — терапия собирается модульно, вокруг конкретной задачи: стабилизация, нормализация сна, снижение тревоги, настройка опор поведения и профилактика рецидивов. Каждый шаг имеет цель, окно оценки и критерий перехода. Анонимность не декларируется — она встроена в процесс: немаркированные маршруты, гражданская одежда персонала, нейтральные формулировки в документах, «беззвучные» уведомления и разграниченный доступ к медицинской карте.
Разобраться лучше – анонимная наркологическая клиника
Семья получает «путевой лист» на 24–72 часа: как фиксировать маркеры (тремор/тревога/тошнота 0–10), как пить воду малыми глотками, когда приглушать свет и в каком формате общаться с пациентом («короткие факты вместо оценок»). Мы также даём «лестницу активности»: два достижимых действия утром, одно — вечером. Эта дисциплина маленьких шагов помогает избежать эмоциональных «перегревов» и удерживает достигнутый эффект.
Получить дополнительную информацию – https://narkologicheskaya-klinika-v-chelyabinske16.ru/narkologicheskie-kliniki-v-chelyabinske/
ремонт подвала gidroizolyacziya-podvalov.ru .
Честная наркология — это не «универсальная капельница», а система шагов, привязанная к параметрам конкретного человека. В Чехове мы выезжаем круглосуточно, на месте проводим допуск к терапии, сверяем совместимости с уже принятыми препаратами, подбираем состав инфузий без лишних компонентов и избыточной седативной нагрузки. Если дома нет условий для безопасной ночи, предложим стационар — это не усложнение, а короткий путь к безопасности. Анонимность — стандарт: нейтральные формулировки в документах по запросу, ограниченный доступ к данным, деликатная связь.
Выяснить больше – https://narkologicheskaya-klinika-chekhov8.ru/narkologicheskaya-klinika-telefon-v-chekhove/
Если в телефонном триаже обозначаются риски по дыханию, ритму или уровню сознания, на старте предлагаем стационарное «окно» мониторинга с круглосуточным постом. При низких рисках программа начинается амбулаторно или на дому и поддерживается вечерними онлайн-вставками (15–20 минут). Любой формат остаётся анонимным: доступ к карте наблюдения — по ролям, а язык переписки и чеков — нейтральный.
Получить дополнительную информацию – лечение в наркологической клинике
Клиника «Возрождение» применяет комплексный подход к снятию ломки, используя современные детоксикационные методики и проверенные препараты. Приведенная ниже таблица демонстрирует основные группы медикаментов, используемых в терапии, и их назначение:
Разобраться лучше – снятие ломки на дому цена новосибирск
Участие в государственных и коммерческих процедурах требует точной подготовки, понимания законодательства и внимательной работы с документами. Для многих компаний самостоятельная работа с закупками становится сложной задачей: необходимо отслеживать новые закупки, анализировать требования, оформлять документы и взаимодействовать с площадками.
Узнайте больше прямо сейчас – тендерное сопровождение тендерами
Процесс лечения включает несколько ключевых этапов, каждый из которых имеет решающее значение для восстановления организма:
Исследовать вопрос подробнее – снятие ломки наркозависимого
йога секс йога секс .
Задача врача — не «поставить галочку», а исключить противопоказания и выбрать методику с оптимальным соотношением пользы и риска. Учитываются хронические заболевания, эпизоды потери сознания, аритмии, панические атаки, депрессивные симптомы, переносимость инфузий и фармпрепаратов, взаимодействия с уже назначенными лекарствами. По результатам формируется персональный лист ограничений и список «красных флажков», при которых следует связаться со специалистом без промедления.
Получить дополнительную информацию – http://www.domen.ru
1x bet 1xbet-48.com .
Если на триаже выявляются риски (дыхание, спутанность, нестабильный ритм), предлагаем короткое стационарное окно мониторинга. При низких рисках стартуем амбулаторно или на дому, а вечером подключаем короткие видеовставки по 15–20 минут. Переходы между форматами не «сбрасывают» процесс: единая карта наблюдения обеспечивает непрерывность и точность решений.
Получить дополнительную информацию – анонимная наркологическая клиника воронеж
Участие в государственных и коммерческих процедурах требует точной подготовки, понимания законодательства и внимательной работы с документами. Для многих компаний самостоятельная работа с закупками становится сложной задачей: необходимо отслеживать новые закупки, анализировать требования, оформлять документы и взаимодействовать с площадками.
Полный разбор — только здесь – тендерное сопровождение закупок
Современная наркологическая помощь в Ростове-на-Дону базируется на комплексном подходе, который объединяет медицинское лечение, психологическую поддержку и социальную реабилитацию. Такой подход доказал свою эффективность в многочисленных исследованиях, доступных на сайте Российского общества наркологов.
Подробнее можно узнать тут – http://narkologicheskaya-klinika-rostov-na-donu13.ru/narkologicheskaya-klinika-narkologicheskij-czentr-v-rostove/
Процесс лечения включает несколько ключевых этапов, каждый из которых имеет решающее значение для восстановления организма:
Подробнее – снятие ломки на дому новосибирск
Часто предприниматели объединяют понятия тендер и госзакупки, так как обе процедуры связаны с конкурсным выбором поставщика. Однако между ними существуют определённые различия, которые важно понимать перед началом работы в этой сфере.
Полная картина — внутри – услуги тендерного сопровождения
Наркологическая клиника в Краснодаре предоставляет комплекс медицинских услуг, направленных на лечение алкогольной и наркотической зависимости, а также помощь при острых состояниях, связанных с интоксикацией организма. Основная задача специалистов заключается в оказании экстренной и плановой помощи пациентам, нуждающимся в выводе из запоя, детоксикации и реабилитации. Выбор правильного учреждения является ключевым условием для успешного выздоровления и предотвращения рецидивов.
Получить дополнительную информацию – наркологическая клиника нарколог краснодар
Первичная оценка строится вокруг показателей, которые определяют место ведения (дом, амбулатория, стационар), состав инфузии и объём поведенческих вмешательств. Мы исключаем «обязательные по привычке» анализы, не влияющие на решения здесь и сейчас; вместо этого закрепляем короткие, но информативные измерения с понятными границами безопасности и интервалами повторов. В результате пациент быстрее видит первые улучшения, а команда не перегружает организм «на всякий случай».
Исследовать вопрос подробнее – наркологическая клиника
Если в телефонном триаже обозначаются риски по дыханию, ритму или уровню сознания, на старте предлагаем стационарное «окно» мониторинга с круглосуточным постом. При низких рисках программа начинается амбулаторно или на дому и поддерживается вечерними онлайн-вставками (15–20 минут). Любой формат остаётся анонимным: доступ к карте наблюдения — по ролям, а язык переписки и чеков — нейтральный.
Подробнее можно узнать тут – наркологическая клиника цены воронеж
Корректная среда — половина успешной инфузии. Этот порядок действий помогает врачу быстрее принять решения, а пациенту — легче перенести первые часы.
Выяснить больше – https://narkolog-na-dom-v-samare16.ru/
Анонимность — не опция, а стандарт: документы формулируются нейтрально, чеки не содержат «говорящих» формулировок, фото- и видеосъёмка исключены. При необходимости подписывается расширенное соглашение о конфиденциальности. Доступ к записи визита и параметрам процедуры разграничен по ролям; копии передаются по защищённому каналу и удаляются по регламенту хранения.
Получить больше информации – помощь нарколога на дому
Домашний формат подойдёт, если нет признаков угрозы жизни и есть возможность обеспечить тишину и наблюдение ночью. Стационар предпочтителен при тяжёлой абстиненции, эпизодах судорог, выраженных скачках давления, неукротимой рвоте, риске делирия, а также когда дома нет условий для безопасного наблюдения. В стационаре под рукой лаборатория, ЭКГ по показаниям, круглосуточный пост — это снижает вероятность осложнений и ускоряет восстановление сна и аппетита.
Разобраться лучше – https://narkologicheskaya-klinika-sergiev-posad8.ru/narkologicheskaya-klinika-ceny-v-sergievom-posade
Первое сутки с половиной — «каркас» программы. Мы формулируем цель каждого окна, фиксируем инструменты и пороги перехода. Если ожидаемой динамики нет, меняется один параметр (темп/объём/последовательность), после чего назначается повторная оценка. Это защищает от полипрагмазии и сохраняет причинно-следственную связь.
Получить дополнительную информацию – http://narkologicheskaya-klinika-petrozavodsk15.ru
«АльфаДетокс» в Чехове — это стационарный маршрут вывода из запоя с круглосуточным наблюдением и быстрыми медицинскими решениями. Мы принимаем без очередей, проводим очную оценку, допускаем к терапии и запускаем управляющий детокс с аппаратным контролем и лабораторными исследованиями по показаниям. Наша цель — не просто поставить капельницу, а безопасно стабилизировать давление и пульс, снять интоксикацию и абстиненцию, наладить сон и дать понятный план ближайших дней. Анонимность встроена в процесс, вы общаетесь с командой спокойно и без лишней огласки, а все назначения объясняются простым языком, чтобы вы понимали логику каждого шага.
Получить дополнительные сведения – vyvod-iz-zapoya-oblast
Анонимность — не опция, а стандарт: документы формулируются нейтрально, чеки не содержат «говорящих» формулировок, фото- и видеосъёмка исключены. При необходимости подписывается расширенное соглашение о конфиденциальности. Доступ к записи визита и параметрам процедуры разграничен по ролям; копии передаются по защищённому каналу и удаляются по регламенту хранения.
Детальнее – нарколог на дом клиника в петрозаводске
Вывод из запоя — это управляемая медицинская процедура с предсказуемыми шагами, а не «сильная капельница, которая помогает всем». В наркологической клинике «СеверКар Медикус» мы строим лечение как маршрут: цель > инструмент > маркеры контроля > окно повторной оценки. Такой подход снижает лекарственную нагрузку, ускоряет восстановление сна и аппетита и делает процесс понятным пациенту и семье. Мы работаем круглосуточно, организуем выезд нарколога на дом, разворачиваем тихую, безопасную среду и соблюдаем анонимность: нейтральные формулировки, гражданская одежда специалистов, немаркированный транспорт и «беззвучные» уведомления.
Выяснить больше – вывод из запоя с выездом
Анонимность — не опция, а стандарт: документы формулируются нейтрально, чеки не содержат «говорящих» формулировок, фото- и видеосъёмка исключены. При необходимости подписывается расширенное соглашение о конфиденциальности. Доступ к записи визита и параметрам процедуры разграничен по ролям; копии передаются по защищённому каналу и удаляются по регламенту хранения.
Исследовать вопрос подробнее – нарколог на дом срочно петрозаводск
При поступлении вызова наши опытные специалисты незамедлительно приступают к комплексной диагностике состояния пациента. Первая задача – оценить уровень интоксикации и тяжесть симптомов, что включает измерение показателей артериального давления, пульса, температуры тела, а также уровня насыщения крови кислородом. На основании собранных данных формируется индивидуальная схема лечения, которая направлена на быстрое снятие симптомов ломки и стабилизацию нервной и иммунной систем.
Выяснить больше – https://snyatie-lomki-novosibirsk8.ru/snyatie-lomki-na-domu-v-novosibirske
Мы выстраиваем помощь как маршрут, а не разовую «капельницу». После первого звонка администратор собирает краткий чек-лист (длительность эпизода, хронические заболевания, принятые препараты, аллергии), передаёт дежурному врачу, и тот предлагает безопасный старт: визит на дому в пределах Сергиева Посада и района или сразу стационар. Выбор зависит от клинических рисков и бытовых условий: есть ли спокойная комната, помощник на ночь, насколько выражены симптомы.
Узнать больше – vyvod-narkologicheskaya-klinika
Городской ритм Петрозаводска с озёрным ветром, короткими сумерками и сезонной влажностью повышает сенсорную нагрузку в вечерние часы, поэтому наш маршрут спроектирован «мягко». Координатор заранее уточняет подъезд, парковку, код домофона, рекомендует «тихий режим» связи и присылает нейтральное уведомление о визите. Бригада приходит в гражданской одежде, сумки — без логотипов, разговоры — короткими фразами. Такое поведение снижает у пациента и семьи реактивность, выравнивает вариабельность ЧСС к сумеркам и уменьшает потребность «усиливать» схему на ночь. Если на предзвонке выявлены «красные флаги» — неукротимая рвота, выраженная дезориентация, «скачущий» ритм, одышка — мы предлагаем стационар сразу, чтобы не терять время на повторные маршруты.
Получить больше информации – https://narkolog-na-dom-petrozavodsk15.ru/vyvod-iz-zapoya-narkolog-na-dom-petrozavodsk
Если на триаже выявляются риски (дыхание, спутанность, нестабильный ритм), предлагаем короткое стационарное окно мониторинга. При низких рисках стартуем амбулаторно или на дому, а вечером подключаем короткие видеовставки по 15–20 минут. Переходы между форматами не «сбрасывают» процесс: единая карта наблюдения обеспечивает непрерывность и точность решений.
Получить дополнительные сведения – платная наркологическая клиника в воронеже
Городская среда Петрозаводска со сменой ветров с Онежского озера, короткими сумерками и сезонными перепадами влажности может усиливать тревожность в вечерние часы. Мы учитываем это с момента первого контакта: согласованная парковка, отдельный вход без вывесок, короткая регистрация без «толстых анкет», приглушённый тёплый свет в зоне ожидания и отсутствие громких объявлений. Родственникам предоставляются «тихие окна» связи — лаконичные апдейты в фиксированное время, чтобы не перегружать пациента и не дёргать команду в критические окна наблюдения. Такой «мягкий» контур снижает сенсорную нагрузку, стабилизирует вариабельность ЧСС к сумеркам и сокращает число импульсивных просьб «усилить на ночь».
Углубиться в тему – https://narkologicheskaya-klinika-petrozavodsk15.ru/petrozavodsk-narkologiya/
Чтобы не превращать раздел в набор лозунгов, кратко обозначим практические преимущества, которые заметны уже в первые часы обращения.
Разобраться лучше – https://narkologicheskaya-klinika-sergiev-posad8.ru/narkologicheskaya-klinika-ceny-v-sergievom-posade
«АльфаДетокс» в Чехове — это стационарный маршрут вывода из запоя с круглосуточным наблюдением и быстрыми медицинскими решениями. Мы принимаем без очередей, проводим очную оценку, допускаем к терапии и запускаем управляющий детокс с аппаратным контролем и лабораторными исследованиями по показаниям. Наша цель — не просто поставить капельницу, а безопасно стабилизировать давление и пульс, снять интоксикацию и абстиненцию, наладить сон и дать понятный план ближайших дней. Анонимность встроена в процесс, вы общаетесь с командой спокойно и без лишней огласки, а все назначения объясняются простым языком, чтобы вы понимали логику каждого шага.
Детальнее – домашний вывод из запоя
РедМетСплав демонстрирует обширный выбор сертифицированных изделий из редких материалов. Не важно, какие объемы вам необходимы — от небольших закупок до масштабных поставок, мы обеспечиваем оперативное исполнение вашего заказа.
Каждая единица товара подтверждена требуемыми документами, подтверждающими их соответствие стандартам. Превосходное обслуживание — наш стандарт — мы на связи, чтобы улаживать ваши вопросы по мере того как адаптировать решения под требования вашего бизнеса.
Доверьте заявку на расчет команде РедМетСплав и убедитесь в высоком уровне сервиса.
В нашем распоряжении:
Магний 3.5632 – DIN 1729 Part 2 Магний 3.5632 – DIN 1729 Part 2 – это высококачественный сплав, идеально подходящий для различных промышленных приложений. Его отличительные свойства включают легкость, отличную коррозионную стойкость и хорошую механическую прочность. Сплав используется в аэрокосмической отрасли, автомобилестроении и многих других сферах. Этот продукт обеспечит надежность и долговечность в эксплуатации. Не упустите возможность купить Магний 3.5632 – DIN 1729 Part 2, чтобы повысить эффективность ваших проектов. Воспользуйтесь преимуществами этого уникального материала для достижения высоких результатов.
студия дизайна спб интерьера студии дизайна интерьера
birxbet giri? 1xbet-54.com .
Стационарные и амбулаторные блоки клиники работают как единый маршрут. Мы начинаем с короткого «языка фактов»: сколько минут до засыпания, сколько пробуждений ночью, какой объём воды переносится малыми глотками, как меняется пульс в сумерки. Эти маркеры дополняют витальные показатели и помогают точнее выбирать инфузионные модули, контролировать темп и вовремя «облегчать» схему, не теряя устойчивости. Параллельно мы внедряем поведенческие опоры — тёплую подсветку, дыхательный паттерн 4–6, «цифровую тишину», дробное тёплое питание — они уменьшают потребность в ночных «усилениях» и повышают переносимость лечения.
Подробнее можно узнать тут – наркологическая клиника клиника помощь петрозаводск
сайт дизайн интерьера квартир дизайнер интерьера в спб
«АльфаДетокс» в Чехове — это стационарный маршрут вывода из запоя с круглосуточным наблюдением и быстрыми медицинскими решениями. Мы принимаем без очередей, проводим очную оценку, допускаем к терапии и запускаем управляющий детокс с аппаратным контролем и лабораторными исследованиями по показаниям. Наша цель — не просто поставить капельницу, а безопасно стабилизировать давление и пульс, снять интоксикацию и абстиненцию, наладить сон и дать понятный план ближайших дней. Анонимность встроена в процесс, вы общаетесь с командой спокойно и без лишней огласки, а все назначения объясняются простым языком, чтобы вы понимали логику каждого шага.
Подробнее – https://vyvod-iz-zapoya-v-stacionare-chekhov8.ru/vyvod-iz-zapoya-kapelnica-v-chekhove
Клиника принимает 24/7 без очередей: ночной блок специально настроен под «трудные часы», когда усиливаются панические мысли и реактивность пульса. Для тех, кому легче дома, выездная служба приводит помощь в знакомое пространство; если нужны короткие контрольные включения, применяем видеосвязь вечером (15–20 минут), чтобы корректно настроить ритуалы засыпания, дыхательные циклы и «световые правила». Маршрут фиксируется в единой карте наблюдения — этот документ доступен команде по ролям и защищает от «повторов заново», когда формат меняется (дом – амбулатория – стационар).
Получить дополнительные сведения – наркологическая клиника в ставрополе
Ниже — рабочая матрица на первые часы. Она показывает, как клиническая гипотеза превращается в минимальный шаг, какие индикаторы берём под контроль и по какому сигналу меняем тактику или площадку. Таблица не заменяет очную оценку, но делает логику маршрута ясной для всей семьи.
Разобраться лучше – https://narkolog-na-dom-v-samare16.ru/
Процесс лечения включает несколько ключевых этапов, каждый из которых имеет решающее значение для восстановления организма:
Получить больше информации – снятие ломки наркомана
дизайн коттеджа заказать дизайн частного дома
Необходимо незамедлительно обращаться за медицинской помощью, если у пациента наблюдаются следующие симптомы:
Получить дополнительную информацию – http://snyatie-lomki-novosibirsk8.ru
Первые часы определяют траекторию. Мы работаем по карте — у каждого окна есть цель, действия, маркеры контроля и критерий перехода. Если ответ «плоский», меняем один элемент и назначаем повторную оценку. Это дисциплинирует решения и защищает от полипрагмазии.
Исследовать вопрос подробнее – вывод из запоя на дому недорого в петрозаводске
Публикация предоставляет читателю набор разрозненных идей, которые сложно применить на практике. Мы лишь слегка касаемся разных точек зрения, не углубляясь в анализ и не предлагая никаких выводов.
Вот – казино с быстрым выводом
Городская среда Петрозаводска со сменой ветров с Онежского озера, короткими сумерками и сезонными перепадами влажности может усиливать тревожность в вечерние часы. Мы учитываем это с момента первого контакта: согласованная парковка, отдельный вход без вывесок, короткая регистрация без «толстых анкет», приглушённый тёплый свет в зоне ожидания и отсутствие громких объявлений. Родственникам предоставляются «тихие окна» связи — лаконичные апдейты в фиксированное время, чтобы не перегружать пациента и не дёргать команду в критические окна наблюдения. Такой «мягкий» контур снижает сенсорную нагрузку, стабилизирует вариабельность ЧСС к сумеркам и сокращает число импульсивных просьб «усилить на ночь».
Выяснить больше – http://narkologicheskaya-klinika-petrozavodsk15.ru/narkolog-petrozavodsk-otzyvy/
йога порно онлайн йога порно онлайн .
гидроизоляция подвала гидроизоляция подвала .
https://balloon-oyunu-tr.com/
«Как отмечает главный врач-нарколог Виктор Сергеевич Левченко, «современная наркологическая клиника должна обеспечивать не только медикаментозное лечение, но и комплексную поддержку пациента на всех этапах восстановления».»
Выяснить больше – https://narkologicheskaya-klinika-krasnodar14.ru/anonimnaya-narkologicheskaya-klinika-krasnodar/
Наши стандарты включают конфиденциальную маршрутизацию, детализированные инструкции для семьи, модульный план лечения и прозрачное разделение бесплатных и платных блоков. Каждому пациенту назначается ведущий специалист, который сопровождает его на всём пути — от первого звонка до контрольных чек-инов после процедур. Мы не «наращиваем» объём вмешательств ради впечатления: используется минимально достаточный набор мер, который действительно влияет на целевые маркеры — переносимость воды, качество сна, сглаживание вегетативных «качелей» и возвращение утренней ясности.
Получить больше информации – наркологическая клиника
https://webhitlist.com/profiles/blogs/melbet-bonus-code-2026-mel200big-130-welcome
Если ожидаемая динамика «плоская», врач меняет один параметр и назначает повторную оценку. Такой подход сохраняет ясность днём и снижает вероятность побочных реакций.
Узнать больше – лечение в наркологической клинике в калининграде
Формат
Узнать больше – наркологическая клиника отзывы
Перед таблицей зафиксируем принцип: это ориентир по этапам для семьи и пациента. Врач адаптирует длительность и насыщенность под возраст, сопутствующие заболевания и исходное состояние.
Ознакомиться с деталями – наркологический центр клиника
1xbet giri? adresi 1xbet giri? adresi .
Необходимо незамедлительно обращаться за медицинской помощью, если у пациента наблюдаются следующие симптомы:
Углубиться в тему – снятие ломки наркомана
Коммерческий и государственный тендер — это конкурентная процедура выбора поставщика товаров или оказания услуг. Заказчик размещает требования, а компании подают заявки и участвуют в торгах.
Погрузитесь в детали – стоимость тендерного сопровождения
Петрозаводск добавляет нюансы: влажные сумерки, ветер от Онежского озера, «звонкие» подъезды старого фонда. Поэтому бригада «СеверКар Медикус» приезжает в гражданской одежде, быстро и без лишних фраз. Координатор заранее уточняет код домофона, парковку, «окна связи» для близких; рекомендует приглушить верхний свет, подготовить воду комнатной температуры и свободный доступ к розетке. Такой «тихий сценарий» снижает сенсорную нагрузку, сглаживает пульсовые «пики» к вечеру и помогает заснуть без избыточной фармакологии.
Подробнее тут – вывод из запоя дешево в петрозаводске
Алгоритм гибкий: при изменении самочувствия мы донастраиваем схему и интенсивность наблюдения без пауз в лечении.
Узнать больше – http://
Кодирование — это медицинский инструмент, который помогает закрепить трезвость, но сам по себе не является «волшебной кнопкой». Его задача — усилить внутреннюю мотивацию и создать физиологические и/или психологические условия, при которых срыв становится маловероятным. В «НаркологЭксперт» кодирование включают в структуру лечения: сначала купируются острые проявления, проводится детокс и стабилизация сна, давления и тревоги, затем — диагностика противопоказаний, подробное информирование, выбор методики и только после этого — сама процедура. Такой порядок снижает риски, повышает переносимость и делает результат предсказуемым. Важно, что любая техника подбирается индивидуально с учётом длительности употребления, анамнеза, сопутствующих заболеваний и рабочей нагрузки пациента, чтобы лечение органично вписалось в реальную жизнь и не сорвалось на первых же неделях.
Узнать больше – анонимное кодирование от алкоголизма
Часто предприниматели объединяют понятия тендер и госзакупки, так как обе процедуры связаны с конкурсным выбором поставщика. Однако между ними существуют определённые различия, которые важно понимать перед началом работы в этой сфере.
Изучите все нюансы – тендерное сопровождение под ключ ростов на дону
Ищете авто из японии под заказ с аукциона? Откройте priority-auto.ru – на площадке доступен обширный каталог автомобилей всевозможных производителей. По запросу найдем транспорт согласно вашим финансовым возможностям, предоставим точный расчет и объясним схему транспортировки. На ресурсе доступен калькулятор итоговой цены с учетом вашего региона и раздел с решениями типичных вопросов.
king casino telegram Если ищете king casino, лучше смотреть в телеграме.
Петрозаводск добавляет нюансы: влажные сумерки, ветер от Онежского озера, «звонкие» подъезды старого фонда. Поэтому бригада «СеверКар Медикус» приезжает в гражданской одежде, быстро и без лишних фраз. Координатор заранее уточняет код домофона, парковку, «окна связи» для близких; рекомендует приглушить верхний свет, подготовить воду комнатной температуры и свободный доступ к розетке. Такой «тихий сценарий» снижает сенсорную нагрузку, сглаживает пульсовые «пики» к вечеру и помогает заснуть без избыточной фармакологии.
Изучить вопрос глубже – вывод из запоя недорого петрозаводск
В этом тексте собрано множество случайных сведений и довольно неопределённых мыслей, которые могут чем-то заинтересовать. Мы отмечаем моменты, которые не особенно важны, но всё же занимают своё место в повествовании.
Вот – милфы
Часто предприниматели объединяют понятия тендер и госзакупки, так как обе процедуры связаны с конкурсным выбором поставщика. Однако между ними существуют определённые различия, которые важно понимать перед началом работы в этой сфере.
Погрузитесь в детали – тендерное сопровождение заказчиков
Петрозаводск добавляет нюансы: влажные сумерки, ветер от Онежского озера, «звонкие» подъезды старого фонда. Поэтому бригада «СеверКар Медикус» приезжает в гражданской одежде, быстро и без лишних фраз. Координатор заранее уточняет код домофона, парковку, «окна связи» для близких; рекомендует приглушить верхний свет, подготовить воду комнатной температуры и свободный доступ к розетке. Такой «тихий сценарий» снижает сенсорную нагрузку, сглаживает пульсовые «пики» к вечеру и помогает заснуть без избыточной фармакологии.
Детальнее – срочный вывод из запоя в петрозаводске
Тендерный специалист помогает разобраться в особенностях каждого закона, а также обеспечивает грамотное сопровождение всех процедур. Это особенно важно для компаний, которые только начинают участвовать в торгах и не имеют опыта работы с государственными контрактами.
Получите экспертное мнение – http://tendernoe-soprovozhdenie-rostov-na-donu.ru
«Как отмечает главный врач-нарколог Виктор Сергеевич Левченко, «современная наркологическая клиника должна обеспечивать не только медикаментозное лечение, но и комплексную поддержку пациента на всех этапах восстановления».»
Исследовать вопрос подробнее – запой наркологическая клиника
Клиника принимает 24/7 без очередей: ночной блок специально настроен под «трудные часы», когда усиливаются панические мысли и реактивность пульса. Для тех, кому легче дома, выездная служба приводит помощь в знакомое пространство; если нужны короткие контрольные включения, применяем видеосвязь вечером (15–20 минут), чтобы корректно настроить ритуалы засыпания, дыхательные циклы и «световые правила». Маршрут фиксируется в единой карте наблюдения — этот документ доступен команде по ролям и защищает от «повторов заново», когда формат меняется (дом – амбулатория – стационар).
Разобраться лучше – лечение в наркологической клинике ставрополь
Текст включает разнообразную информацию, которая может показаться любопытной, но не меняет устоявшегося восприятия. Предлагаем просто насладиться чтением, не ожидая значительной пользы.
Подробнее читать – плитка для ванной
Мы работаем с вниманием к деталям повседневности: как человек засыпает на фоне вечернего света, сколько воды переносит малыми глотками, как реагирует на цифровые уведомления, есть ли привычные «включатели» тяги и как на организм влияет шумное окружение. Врач и куратор переводят этот жизненный контекст в ясные, измеримые ориентиры: время до сна, число пробуждений, вариабельность пульса к сумеркам, объём воды, аппетит, переносимость тёплой мягкой пищи. Решения принимаются адресно и последовательно, чтобы сохранять ясность днём и избегать ненужной фармаконагрузки.
Выяснить больше – наркологическая клиника калининград
Семья получает «путевой лист» на 24–72 часа: как фиксировать маркеры (тремор/тревога/тошнота 0–10), как пить воду малыми глотками, когда приглушать свет и в каком формате общаться с пациентом («короткие факты вместо оценок»). Мы также даём «лестницу активности»: два достижимых действия утром, одно — вечером. Эта дисциплина маленьких шагов помогает избежать эмоциональных «перегревов» и удерживает достигнутый эффект.
Узнать больше – наркологическая клиника цены в челябинске
1 x bet giri? 1 x bet giri? .
Этот сборник информации привлекает множеством мелких деталей и необычных ракурсов. Мы предлагаем взгляды, редко полезные, но способные немного разнообразить знакомство с темой.
Подробнее читать – основные строительные материалы
Метод и срок подбираются после очного осмотра и исключения противопоказаний. Возможны медикаментозные и психотерапевтические подходы, а также комбинированные программы. Мы объясняем плюсы и ограничения каждого метода, помогаем подготовиться (диета, анализы, отмена определённых препаратов), а затем сопровождаем пациента в период адаптации к трезвости. Кодирование — часть комплексного плана, а не «волшебная кнопка»: устойчивый результат достигается, когда его дополняют поддерживающая терапия и работа с триггерами.
Исследовать вопрос подробнее – круглосуточная наркологическая клиника
1xbet tr 1xbet tr .
Контроль
Изучить вопрос глубже – https://narkologicheskaya-klinika-lyubercy0.ru/narkologicheskaya-klinika-na-dom-v-lyubercah
«Трезвый Маяк» — клиника экстренной и плановой наркологической помощи с круглосуточным выездом и возможностью госпитализации. Мы аккуратно стабилизируем состояние, снимаем интоксикацию и абстиненцию, готовим к кодированию и сопровождаем пациента до устойчивой ремиссии. Работаем анонимно: врач приезжает без опознавательных знаков, документы оформляются в нейтральной формулировке и только по запросу.
Узнать больше – http://narkologicheskaya-klinika-sergiev-posad8.ru
1xbet yeni adresi 1xbet yeni adresi .
Анонимность — не опция, а стандарт: документы формулируются нейтрально, чеки не содержат «говорящих» формулировок, фото- и видеосъёмка исключены. При необходимости подписывается расширенное соглашение о конфиденциальности. Доступ к записи визита и параметрам процедуры разграничен по ролям; копии передаются по защищённому каналу и удаляются по регламенту хранения.
Подробнее можно узнать тут – нарколог на дом вывод из запоя в петрозаводске
Мы комбинируем медицинские и немедикаментозные решения. Инфузионная терапия — адресная, с контролем безопасности; поведенческие опоры — просты и выполняемы в реальной жизни; телемедицина помогает пройти «трудный час» без лишних поездок и импровизаций. Ниже — ориентиры логики подбора, они не заменяют очный осмотр.
Подробнее – наркологическая клиника наркологический центр калининград
Городской ритм Петрозаводска с озёрным ветром, короткими сумерками и сезонной влажностью повышает сенсорную нагрузку в вечерние часы, поэтому наш маршрут спроектирован «мягко». Координатор заранее уточняет подъезд, парковку, код домофона, рекомендует «тихий режим» связи и присылает нейтральное уведомление о визите. Бригада приходит в гражданской одежде, сумки — без логотипов, разговоры — короткими фразами. Такое поведение снижает у пациента и семьи реактивность, выравнивает вариабельность ЧСС к сумеркам и уменьшает потребность «усиливать» схему на ночь. Если на предзвонке выявлены «красные флаги» — неукротимая рвота, выраженная дезориентация, «скачущий» ритм, одышка — мы предлагаем стационар сразу, чтобы не терять время на повторные маршруты.
Получить дополнительные сведения – нарколог на дом круглосуточно петрозаводск
Карта делает маршрут прозрачным для пациента и семьи. Вместо «лучше/хуже» — факты и понятные пороги. Это снижает тревожность и помогает соблюдать режим без сопротивления.
Выяснить больше – http://narkologicheskaya-klinika-petrozavodsk15.ru/chastnaya-narkologicheskaya-klinika-petrozavodsk/
гидроизоляция подвала снаружи цена гидроизоляция подвала снаружи цена .
Этот обзор позволяет по-новому взглянуть на вещи, на которые обычно и так смотрят. Мы упоминаем факты, которые мало что меняют, и события, значение которых трудно определить, но они всё равно здесь.
Вот – виртуальное казино
Бесплатный ключ для Windows 11 — только у нас, обновлено в 2026 году!
Подробнее – Как активировать Windows 11 без ключа
Перед таблицей зафиксируем принцип: это ориентир по этапам для семьи и пациента. Врач адаптирует длительность и насыщенность под возраст, сопутствующие заболевания и исходное состояние.
Получить дополнительные сведения – бесплатные наркологические клиники
Ломка – это тяжелый синдром отмены, возникающий после длительного употребления алкоголя или наркотических веществ. При резком прекращении их приема нервная система и другие органы начинают страдать от недостатка необходимых веществ, что приводит к сильному дискомфорту, психоэмоциональным нарушениям и ухудшению общего состояния организма. В Новосибирске наркологическая клиника «Возрождение» оказывает экстренную помощь при снятии ломки, обеспечивая безопасное, круглосуточное и конфиденциальное лечение под наблюдением опытных специалистов.
Выяснить больше – снятие ломки наркозависимого новосибирск
Госпитализация разворачивается как последовательность шагов: приём и допуск к терапии, старт инфузий, мониторинг 24/7, регулярная переоценка и подготовка к выписке. Такой контур особенно важен пациентам с сопутствующими диагнозами (гипертония, ИБС, сахарный диабет, заболевания ЖКТ), где требуется деликатная настройка дозировок и темпа инфузий.
Исследовать вопрос подробнее – наркологическая клиника московская московская область
1 x bet giri? 1xbet-53.com .
Анонимность — не опция, а стандарт: документы формулируются нейтрально, чеки не содержат «говорящих» формулировок, фото- и видеосъёмка исключены. При необходимости подписывается расширенное соглашение о конфиденциальности. Доступ к записи визита и параметрам процедуры разграничен по ролям; копии передаются по защищённому каналу и удаляются по регламенту хранения.
Ознакомиться с деталями – https://narkolog-na-dom-petrozavodsk15.ru/narkolog-petrozavodsk-anonimno
Городская среда Петрозаводска со сменой ветров с Онежского озера, короткими сумерками и сезонными перепадами влажности может усиливать тревожность в вечерние часы. Мы учитываем это с момента первого контакта: согласованная парковка, отдельный вход без вывесок, короткая регистрация без «толстых анкет», приглушённый тёплый свет в зоне ожидания и отсутствие громких объявлений. Родственникам предоставляются «тихие окна» связи — лаконичные апдейты в фиксированное время, чтобы не перегружать пациента и не дёргать команду в критические окна наблюдения. Такой «мягкий» контур снижает сенсорную нагрузку, стабилизирует вариабельность ЧСС к сумеркам и сокращает число импульсивных просьб «усилить на ночь».
Выяснить больше – вывод наркологическая клиника
Выезд врача позволяет начать помощь сразу, без ожидания свободной палаты. Специалист оценит состояние, проведёт осмотр, поставит капельницу, даст рекомендации по режиму и питанию, объяснит правила безопасности. Мы оставляем подробные инструкции родственникам, чтобы дома поддерживались питьевой режим, контроль давления и спокойная обстановка. Если домашних условий недостаточно (выраженная слабость, риски осложнений, сопутствующие заболевания), мы организуем транспортировку в стационар без задержек и бюрократии.
Получить дополнительные сведения – https://narkologicheskaya-klinika-balashiha0.ru/narkologicheskaya-klinika-telefon-v-balashihe/
Часто предприниматели объединяют понятия тендер и госзакупки, так как обе процедуры связаны с конкурсным выбором поставщика. Однако между ними существуют определённые различия, которые важно понимать перед началом работы в этой сфере.
Все тайны раскрыты – http://tendernoe-soprovozhdenie-rostov-na-donu.ru
доставка букетов цветов москва zakazat-cveti-moskva.ru .
birxbet giri? 1xbet-55.com .
В этой информационной статье вы найдете интересное содержание, которое поможет вам расширить свои знания. Мы предлагаем увлекательный подход и уникальные взгляды на обсуждаемые темы, побуждая пользователей к активному мышлению и критическому анализу.
Подробности по ссылке – https://mahoraize.wpxblog.jp/%E8%AA%B2%E9%A1%8C%EF%BD%8E%EF%BD%8F%EF%BC%8E%EF%BC%92%EF%BC%95%EF%BC%91
1x bet giri? 1x bet giri? .
Клиника «Возрождение» применяет комплексный подход к снятию ломки, используя современные детоксикационные методики и проверенные препараты. Приведенная ниже таблица демонстрирует основные группы медикаментов, используемых в терапии, и их назначение:
Подробнее – снятие ломки наркозависимого новосибирск
Городской ритм Петрозаводска с озёрным ветром, короткими сумерками и сезонной влажностью повышает сенсорную нагрузку в вечерние часы, поэтому наш маршрут спроектирован «мягко». Координатор заранее уточняет подъезд, парковку, код домофона, рекомендует «тихий режим» связи и присылает нейтральное уведомление о визите. Бригада приходит в гражданской одежде, сумки — без логотипов, разговоры — короткими фразами. Такое поведение снижает у пациента и семьи реактивность, выравнивает вариабельность ЧСС к сумеркам и уменьшает потребность «усиливать» схему на ночь. Если на предзвонке выявлены «красные флаги» — неукротимая рвота, выраженная дезориентация, «скачущий» ритм, одышка — мы предлагаем стационар сразу, чтобы не терять время на повторные маршруты.
Углубиться в тему – частный нарколог на дом петрозаводск
Городская среда Петрозаводска со сменой ветров с Онежского озера, короткими сумерками и сезонными перепадами влажности может усиливать тревожность в вечерние часы. Мы учитываем это с момента первого контакта: согласованная парковка, отдельный вход без вывесок, короткая регистрация без «толстых анкет», приглушённый тёплый свет в зоне ожидания и отсутствие громких объявлений. Родственникам предоставляются «тихие окна» связи — лаконичные апдейты в фиксированное время, чтобы не перегружать пациента и не дёргать команду в критические окна наблюдения. Такой «мягкий» контур снижает сенсорную нагрузку, стабилизирует вариабельность ЧСС к сумеркам и сокращает число импульсивных просьб «усилить на ночь».
Выяснить больше – наркологическая клиника клиника помощь петрозаводск
xbet giri? xbet giri? .
Этот информативный текст отличается привлекательным содержанием и актуальными данными. Мы предлагаем читателям взглянуть на привычные вещи под новым углом, предоставляя интересный и доступный материал. Получите удовольствие от чтения и расширьте кругозор!
Полная информация здесь – https://syka.dothome.co.kr/?p=11570
В этой публикации мы предлагаем подробные объяснения по актуальным вопросам, чтобы помочь читателям глубже понять их. Четкость и структурированность материала сделают его удобным для усвоения и применения в повседневной жизни.
Подробности по ссылке – https://solhotair.pl/portfolio/project-planing
Публикация предлагает читателю не просто информацию, а инструменты для анализа и саморазвития. Мы стимулируем критическое мышление, предлагая различные точки зрения и призывая к самостоятельному поиску решений.
Подробности по ссылке – https://skelbimass.lt/vandens-filtrai-aquaphor
Эта публикация погружает вас в мир увлекательных фактов и удивительных открытий. Мы расскажем о ключевых событиях, которые изменили ход истории, и приоткроем завесу над научными достижениями, которые вдохновили миллионы. Узнайте, чему может научить нас прошлое и как применить эти знания в будущем.
Получить полную информацию – https://zoegilbert.com/cropped-folk-header-cropped-from-cover-design-v3-1-jpg
Этот обзор предлагает структурированное изложение информации по актуальным вопросам. Материал подан так, чтобы даже новичок мог быстро освоиться в теме и начать использовать полученные знания в практике.
Ознакомиться с теоретической базой – https://terzosettore.aici.it/tour-item/verona
Эта публикация погружает вас в мир увлекательных фактов и удивительных открытий. Мы расскажем о ключевых событиях, которые изменили ход истории, и приоткроем завесу над научными достижениями, которые вдохновили миллионы. Узнайте, чему может научить нас прошлое и как применить эти знания в будущем.
Ознакомьтесь поближе – https://higashiyamakai.com/cgi-local/bbs/higashiyama_kai.cgi/dzen.ru/a/telegra.ph/www.linkedin.com/pulse/github.com/higashiyama_kai.cgi?command=read_message&msgnum=10
Выпускной в детском саду — событие, которое родители хотят сохранить навсегда. Профессиональная команда берётся за съёмку полного дня: от торжественной части и вручения дипломов до детских игр и финального хоровода. Требуется видеофильм о выпускном в детском саду? На сайте profvideo.ru/videosemka-vypusknogo-v-detskom-sadu/ подробно описаны форматы работы и примеры готовых роликов. Многокамерная съёмка и петличные микрофоны обеспечивают чистый звук и профессиональное изображение. Итог — смонтированный фильм с музыкой и титрами, который семья будет пересматривать спустя годы.
ремонт бетонных конструкций услуга ремонт бетонных конструкций услуга .
Городская среда Петрозаводска со сменой ветров с Онежского озера, короткими сумерками и сезонными перепадами влажности может усиливать тревожность в вечерние часы. Мы учитываем это с момента первого контакта: согласованная парковка, отдельный вход без вывесок, короткая регистрация без «толстых анкет», приглушённый тёплый свет в зоне ожидания и отсутствие громких объявлений. Родственникам предоставляются «тихие окна» связи — лаконичные апдейты в фиксированное время, чтобы не перегружать пациента и не дёргать команду в критические окна наблюдения. Такой «мягкий» контур снижает сенсорную нагрузку, стабилизирует вариабельность ЧСС к сумеркам и сокращает число импульсивных просьб «усилить на ночь».
Выяснить больше – http://narkologicheskaya-klinika-petrozavodsk15.ru/chastnaya-narkologicheskaya-klinika-petrozavodsk/
кинг казино сайт Если casino king не грузится значит просто адрес сменился это норм.
Участие в государственных и коммерческих процедурах требует точной подготовки, понимания законодательства и внимательной работы с документами. Для многих компаний самостоятельная работа с закупками становится сложной задачей: необходимо отслеживать новые закупки, анализировать требования, оформлять документы и взаимодействовать с площадками.
Узнайте больше прямо сейчас – http://tendernoe-soprovozhdenie-rostov-na-donu.ru
Предлагаем вашему вниманию интересную справочную статью, в которой собраны ключевые моменты и нюансы по актуальным вопросам. Эта информация будет полезна как для профессионалов, так и для тех, кто только начинает изучать тему. Узнайте ответы на важные вопросы и расширьте свои знания!
Ознакомиться с теоретической базой – http://daidokoro.s53.xrea.com/maro_blog/log/eid849.html
Читатель отправляется в интеллектуальное путешествие по самым ярким событиям истории и важнейшим научным открытиям. Мы раскроем тайны эпох, покажем, как идеи меняли миры, и объясним, почему эти знания остаются актуальными сегодня.
Более подробно об этом – https://wp.cyes.ntpc.edu.tw/wordpress/periodical/2020/06/22/%E7%95%B6%E9%81%B8%E7%92%B0%E4%BF%9D%E5%B0%8F%E5%B1%80%E9%95%B7506%E6%9D%9C%E4%BB%B2%E8%80%98
В этой информационной статье вы найдете интересное содержание, которое поможет вам расширить свои знания. Мы предлагаем увлекательный подход и уникальные взгляды на обсуждаемые темы, побуждая пользователей к активному мышлению и критическому анализу.
Изучить материалы по теме – https://idomusstraipsniai.lt/kaip-panaikinti-pelesi-vonioje-priemone
Эта разъяснительная статья содержит простые и доступные разъяснения по актуальным вопросам. Мы стремимся сделать информацию понятной для широкой аудитории, чтобы каждый мог разобраться в предмете и извлечь из него максимум пользы.
Откройте для себя больше – https://publications.ssau.ru/?p=7
Велакаст представляет собой противовирусный препарат прямого действия, в одной таблетке которого содержится 400 мг софосбувира и 100 мг велпатасвира. Он эффективен против всех генотипов гепатита С — от 1 до 6, включая случаи с циррозом печени и коинфекцией ВГС/ВИЧ. Двойной механизм действия блокирует синтез РНК вируса и нарушает сборку вирусных частиц одновременно. Ищете велакаст купить? Подробная инструкция по применению, показания, противопоказания и отзывы пациентов собраны на velakast.online — информационном портале о препарате. Курс терапии, как правило, длится 12 недель и в подавляющем большинстве случаев приводит к устойчивому вирусологическому ответу.
Петрозаводск добавляет нюансы: влажные сумерки, ветер от Онежского озера, «звонкие» подъезды старого фонда. Поэтому бригада «СеверКар Медикус» приезжает в гражданской одежде, быстро и без лишних фраз. Координатор заранее уточняет код домофона, парковку, «окна связи» для близких; рекомендует приглушить верхний свет, подготовить воду комнатной температуры и свободный доступ к розетке. Такой «тихий сценарий» снижает сенсорную нагрузку, сглаживает пульсовые «пики» к вечеру и помогает заснуть без избыточной фармакологии.
Подробнее – скорая вывод из запоя петрозаводск
Эта публикация завернет вас в вихрь увлекательного контента, сбрасывая стереотипы и открывая двери к новым идеям. Каждый абзац станет для вас открытием, полным ярких примеров и впечатляющих достижений. Подготовьтесь быть вовлеченными и удивленными каждый раз, когда продолжите читать.
Лучшее решение — прямо здесь – https://jornalfax.net/index.php/2024/01/08/saiba-ao-detalhe-quem-lidera-os-servicos-secretos-angolanos
Эта статья погружает вас в увлекательный мир знаний, где каждый факт становится открытием. Мы расскажем о ключевых исторических поворотных моментах и научных прорывах, которые изменили ход цивилизации. Поймите, как прошлое формирует настоящее и как его уроки могут помочь нам строить будущее.
Лови подробности – https://bsnlenergy.com/solar-energy-benefits-going-green-and-saving-green
В этой статье-обзоре мы собрали данные, актуальность которых сомнительна, а факты — не всегда взаимосвязаны. Читатель сможет ознакомиться с разными мнениями, хотя вряд ли они существенно повлияют на его понимание темы.
Вот – интим услуги
Стационарные и амбулаторные блоки клиники работают как единый маршрут. Мы начинаем с короткого «языка фактов»: сколько минут до засыпания, сколько пробуждений ночью, какой объём воды переносится малыми глотками, как меняется пульс в сумерки. Эти маркеры дополняют витальные показатели и помогают точнее выбирать инфузионные модули, контролировать темп и вовремя «облегчать» схему, не теряя устойчивости. Параллельно мы внедряем поведенческие опоры — тёплую подсветку, дыхательный паттерн 4–6, «цифровую тишину», дробное тёплое питание — они уменьшают потребность в ночных «усилениях» и повышают переносимость лечения.
Подробнее можно узнать тут – вывод наркологическая клиника в петрозаводске
Эта обзорная заметка содержит ключевые моменты и факты по актуальным вопросам. Она поможет читателям быстро ориентироваться в теме и узнать о самых важных аспектах сегодня. Получите краткий курс по современной информации и оставайтесь в курсе событий!
Получить дополнительные сведения – https://flowlinevalve.com/2020/10/ptfe-lined-reducing-flange-in-ahmedabad
В этом интересном тексте собраны обширные сведения, которые помогут вам понять различные аспекты обсуждаемой темы. Мы разбираем детали и факты, делая акцент на важности каждого элемента. Не упустите возможность расширить свои знания и взглянуть на мир по-новому!
См. подробности – https://www.comecon.jp/art
Эта статья погружает вас в увлекательный мир знаний, где каждый факт становится открытием. Мы расскажем о ключевых исторических поворотных моментах и научных прорывах, которые изменили ход цивилизации. Поймите, как прошлое формирует настоящее и как его уроки могут помочь нам строить будущее.
Осуществить глубокий анализ – https://news360.tv/en/latest/enigmatic-phenomenon-khadim-rizvi-dies
Many vehicle owners want precise instructions for proper air filter care. While browsing automotive manuals and technical reference pages, I found air cleaner maintenance guide for the Nissan Pathfinder that describes cleaning, replacement, and inspection tips. Access to this information allows drivers to maintain their vehicle confidently and efficiently.
В этом интересном тексте собраны обширные сведения, которые помогут вам понять различные аспекты обсуждаемой темы. Мы разбираем детали и факты, делая акцент на важности каждого элемента. Не упустите возможность расширить свои знания и взглянуть на мир по-новому!
Подробная информация доступна по запросу – https://template70.webekspor.com/?p=1
Компания Uniecs за 20 лет реализовала более 100 проектов по трансформации производственных и сервисных предприятий, устойчиво снижая издержки клиентов до 30%. В работе применяются бережливое производство, TPM, Six Sigma и цифровизация — без универсальных шаблонов, только адресный подход. Подход основан на практиках Efeso Consulting и глубоком знании российского рынка. Требуется бережливое производство? Актуальные кейсы и полный перечень услуг опубликованы на uniecs.pro — консультация доступна онлайн. Команда находит резервы предприятия и формирует управляемую операционную систему, которая стабильно наращивает производительность и снижает затраты.
Эта обзорная заметка содержит ключевые моменты и факты по актуальным вопросам. Она поможет читателям быстро ориентироваться в теме и узнать о самых важных аспектах сегодня. Получите краткий курс по современной информации и оставайтесь в курсе событий!
Прочитать подробнее – https://kimkaradesign.com/dr-j-s-bhogal
Этот информативный текст отличается привлекательным содержанием и актуальными данными. Мы предлагаем читателям взглянуть на привычные вещи под новым углом, предоставляя интересный и доступный материал. Получите удовольствие от чтения и расширьте кругозор!
Получить дополнительную информацию – https://mayapoliticsureste.com/2024/08/gobierno-de-tabasco-la-proxima-subsecretaria-de-medio-ambiente-y-recursos-naturales-de-la-secretaria-de-energia-araceli-aranguren-rosique
В этой статье-обзоре мы соберем актуальную информацию и интересные факты, которые освещают важные темы. Читатели смогут ознакомиться с различными мнениями и подходами, что позволит им расширить кругозор и глубже понять обсуждаемые вопросы.
А есть ли продолжение? – https://portal.caasd.gob.do/servicio/servicio-consulta-pago-agua
1xbet tr 1xbet tr .
Эта статья погружает вас в увлекательный мир знаний, где каждый факт становится открытием. Мы расскажем о ключевых исторических поворотных моментах и научных прорывах, которые изменили ход цивилизации. Поймите, как прошлое формирует настоящее и как его уроки могут помочь нам строить будущее.
Осуществить глубокий анализ – https://fridayeveryday.com/i-stepped-into-ghost-town-and-my-compass-froze
viralshift – Found practical insights today; sharing this article with colleagues later.
1xbet turkiye 1xbet-54.com .
В этой статье собраны факты, которые освещают целый ряд важных вопросов. Мы стремимся предложить читателям четкую, достоверную информацию, которая поможет сформировать собственное мнение и лучше понять сложные аспекты рассматриваемой темы.
Раскрыть тему полностью – https://jusos-kassel.de/auserordentlichen-unterbezirksparteitag-der-spd-kassel-stadt
Gwarancja bezpieczenstwa transakcji i ochrony danych stoi na wysokim poziomie.
vulkanspiele https://alandofjoy.com/vulkan-spiele-pl-vulkanspiele-casino-logowanie/
Discover the thrill of the 100 super hot slot and experience blazing reels with the 100 super hot demo for nonstop casino excitement.
Details about reels, paylines, and volatility assist players in assessing risk versus reward.
100 super hot amusnet https://100-super-hot.com/
В этой статье представлен занимательный и актуальный контент, который заставит вас задуматься. Мы обсуждаем насущные вопросы и проблемы, а также освещаем истории, которые вдохновляют на действия и изменения. Узнайте, что стоит за событиями нашего времени!
Как это работает — подробно – https://radioqorilazo.com/chumbivilcasmenor-de-13-anos-de-edad-dio-a-luz-y-detienen-a-su-pareja-por-presunto-ultraje
В этой информационной статье вы найдете интересное содержание, которое поможет вам расширить свои знания. Мы предлагаем увлекательный подход и уникальные взгляды на обсуждаемые темы, побуждая пользователей к активному мышлению и критическому анализу.
Получить дополнительную информацию – https://vibhutikavishwar.com/musics-role-in-schools-how-it-enhances
Эта обзорная заметка содержит ключевые моменты и факты по актуальным вопросам. Она поможет читателям быстро ориентироваться в теме и узнать о самых важных аспектах сегодня. Получите краткий курс по современной информации и оставайтесь в курсе событий!
Хочешь знать всё? – https://kansara.org/%E0%A4%A6%E0%A4%BF%E0%A4%B2-%E0%A4%B9%E0%A5%80-%E0%A4%A4%E0%A5%8B-%E0%A4%B9%E0%A5%88-%E0%A4%A8-%E0%A4%B8%E0%A4%82%E0%A4%97-%E0%A4%93-%E0%A4%96%E0%A4%BC%E0%A4%BF%E0%A4%B6%E0%A5%8D%E0%A4%A4-%E0%A4%A6
1xbet ?ye ol 1xbet-55.com .
казино майнкрафт игра В мире Minecraft, где блоки и воображение сплетаются в бесконечные ландшафты, рождается новая форма развлечения – казино. Это не просто игровая площадка, а целый виртуальный мир, где игроки могут попытать счастья в играх, созданных на основе механик Minecraft.
Мы собрали для вас самые захватывающие факты из мира науки и истории. От малознакомых деталей до грандиозных событий — эта статья расширит ваш кругозор и подарит новое понимание того, как устроен наш мир.
Получить дополнительные сведения – https://language-knowledge.com.tw/%E3%80%8C%E5%8A%A0%E6%B2%B9%E3%80%8D%E7%9A%84%E8%8B%B1%E6%96%87%E8%A6%81%E6%80%8E%E9%BA%BC%E8%AA%AA%EF%BC%9F
Эта статья сочетает познавательный и занимательный контент, что делает ее идеальной для любителей глубоких исследований. Мы рассмотрим увлекательные аспекты различных тем и предоставим вам новые знания, которые могут оказаться полезными в будущем.
А что дальше? – https://bookwormloscabos.com/2021/10/13/thornhill
Домашнее лечение не уступает стационару по стандартам безопасности, если соблюдены три условия: корректная стратификация риска, титрование инфузий через оборудование с точным шагом и регулярные «тихие» проверки без навязчивой аппаратной нагрузки. Наши мобильные бригады приезжают с портативным кардиомонитором, инфузоматом, пульсоксиметром и экспресс-анализаторами, а также набором одноразовых расходников. Кроме приборов, мы привозим «средовые» решения: тёплую лампу, светозащитные шторки, укладки для безопасной организации зоны процедуры — это помогает телу быстрее переключаться из тревоги в восстановление без лишних препаратов.
Узнать больше – https://narkolog-na-dom-petrozavodsk15.ru/vyvod-iz-zapoya-narkolog-na-dom-petrozavodsk
netamplify – Pages loaded fast, images appeared sharp, and formatting stayed consistent.
Откройте для себя скрытые страницы истории и малоизвестные научные открытия, которые оказали колоссальное влияние на развитие человечества. Статья предлагает свежий взгляд на события, которые заслуживают большего внимания.
Как достичь результата? – https://redyco.com.co/hello-world
В данном тексте собраны разнообразные случайные сведения и не вполне определённые идеи, которые могут вызвать интерес. Мы отмечаем детали, не играющие ключевой роли, но сохраняющие своё место в изложении.
Подробнее читать – плитка для ванной
leadcircuit – Pages loaded fast, images appeared sharp, and formatting stayed consistent.
1xbet giri? linki 1xbet-48.com .
bahis sitesi 1xbet 1xbet-giris-27.com .
В реальной городской ткани Ставрополя на самочувствие влияет не только схема лечения, но и логистика: утренние заторы на въезде, плотная застройка частного сектора, шумные перекрёстки. Мы заранее «поглощаем» эти риски организацией: секторные выезды, согласованная парковка, нейтральная переписка без «говорящих» терминов, при необходимости — курьерская доставка расходников отдельно от врача, чтобы на месте сразу переходить к оценке и запуску инфузии. Пациенту не нужно «вписываться» в систему — система подстраивается под реальную жизнь человека, экономя десятки минут и снижая сенсорную нагрузку перед первой ночью.
Получить больше информации – наркологическая клиника лечение алкоголизма
Вывод из запоя — это управляемая медицинская процедура с предсказуемыми шагами, а не «сильная капельница, которая помогает всем». В наркологической клинике «СеверКар Медикус» мы строим лечение как маршрут: цель > инструмент > маркеры контроля > окно повторной оценки. Такой подход снижает лекарственную нагрузку, ускоряет восстановление сна и аппетита и делает процесс понятным пациенту и семье. Мы работаем круглосуточно, организуем выезд нарколога на дом, разворачиваем тихую, безопасную среду и соблюдаем анонимность: нейтральные формулировки, гражданская одежда специалистов, немаркированный транспорт и «беззвучные» уведомления.
Исследовать вопрос подробнее – наркология вывод из запоя петрозаводск
ремонт бетонных конструкций стоимость ремонт бетонных конструкций стоимость .
1xbet resmi sitesi 1xbet-giris-29.com .
Метод лечения
Исследовать вопрос подробнее – лечение в наркологической клинике в ростове-на-дону
Городской ритм Петрозаводска с озёрным ветром, короткими сумерками и сезонной влажностью повышает сенсорную нагрузку в вечерние часы, поэтому наш маршрут спроектирован «мягко». Координатор заранее уточняет подъезд, парковку, код домофона, рекомендует «тихий режим» связи и присылает нейтральное уведомление о визите. Бригада приходит в гражданской одежде, сумки — без логотипов, разговоры — короткими фразами. Такое поведение снижает у пациента и семьи реактивность, выравнивает вариабельность ЧСС к сумеркам и уменьшает потребность «усиливать» схему на ночь. Если на предзвонке выявлены «красные флаги» — неукротимая рвота, выраженная дезориентация, «скачущий» ритм, одышка — мы предлагаем стационар сразу, чтобы не терять время на повторные маршруты.
Получить дополнительные сведения – нарколог на дом вывод из запоя
В реальной городской ткани Ставрополя на самочувствие влияет не только схема лечения, но и логистика: утренние заторы на въезде, плотная застройка частного сектора, шумные перекрёстки. Мы заранее «поглощаем» эти риски организацией: секторные выезды, согласованная парковка, нейтральная переписка без «говорящих» терминов, при необходимости — курьерская доставка расходников отдельно от врача, чтобы на месте сразу переходить к оценке и запуску инфузии. Пациенту не нужно «вписываться» в систему — система подстраивается под реальную жизнь человека, экономя десятки минут и снижая сенсорную нагрузку перед первой ночью.
Углубиться в тему – наркологические клиники алкоголизм ставрополь
1x bet 1x bet .
Натуральные ароматные подарки ручной работы могут включать свечи, ароматические саше, диффузоры и декоративные композиции. Такие изделия помогают создать атмосферу уюта и расслабления в доме. Подробнее о подарках по ссылке – https://aroma-lavka.ru/
Городская среда Калининграда — контрастные подъезды, близость моря с переменчивым ветром, плотный сезонный трафик — может усиливать вечернюю реактивность. Поэтому маршруты организованы «тихо»: согласованная парковка, отдельный вход без вывесок и очередей, короткая регистрация, приглушённая тёплая подсветка в зоне ожидания, отсутствие громких объявлений. Коммуникация с пациентами и близкими строится через защищённые каналы, а уведомления приходят в «беззвучном» режиме в согласованные «окна». Такой дизайн не ради «красоты сервиса», а ради клинического эффекта: чем меньше сенсорной нагрузки, тем быстрее выравнивается пульс к вечеру, тем легче возвращается переносимость питья и тёплой пищи, тем меньше потребность в ночных «усилениях».
Подробнее тут – https://narkologicheskaya-klinika-kaliningrad15.ru/kaliningrad-narkologicheskaya-bolnicza/
Вывод из запоя — это управляемая медицинская процедура с предсказуемыми шагами, а не «сильная капельница, которая помогает всем». В наркологической клинике «СеверКар Медикус» мы строим лечение как маршрут: цель > инструмент > маркеры контроля > окно повторной оценки. Такой подход снижает лекарственную нагрузку, ускоряет восстановление сна и аппетита и делает процесс понятным пациенту и семье. Мы работаем круглосуточно, организуем выезд нарколога на дом, разворачиваем тихую, безопасную среду и соблюдаем анонимность: нейтральные формулировки, гражданская одежда специалистов, немаркированный транспорт и «беззвучные» уведомления.
Детальнее – врач вывод из запоя в петрозаводске
1xbet tr giri? 1xbet-55.com .
Основные методы, используемые в клинике, включают медикаментозную детоксикацию, психотерапевтические программы и реабилитационные мероприятия. Медикаментозное выведение токсинов из организма проводится с применением сертифицированных препаратов под строгим контролем врачей. Подробности о методах медикаментозной детоксикации представлены на сайте Министерства здравоохранения РФ.
Подробнее можно узнать тут – http://www.domen.ru
Анонимность — не опция, а стандарт: документы формулируются нейтрально, чеки не содержат «говорящих» формулировок, фото- и видеосъёмка исключены. При необходимости подписывается расширенное соглашение о конфиденциальности. Доступ к записи визита и параметрам процедуры разграничен по ролям; копии передаются по защищённому каналу и удаляются по регламенту хранения.
Детальнее – вызвать нарколога на дом петрозаводск
Инфузионная терапия в «СамарМед Ассист» складывается из узких модулей. Каждый модуль — одна задача, один измеримый параметр и чёткий критерий остановки. Чтобы не терять причинно-следственную связь, новые элементы подключаются по одному; после достижения цели модуль отключается. Ниже — ориентировочная сетка, иллюстрирующая логику; конкретные составы и дозировки определяет врач по результатам осмотра.
Изучить вопрос глубже – нарколог на дом вывод из запоя самара
Часто предприниматели объединяют понятия тендер и госзакупки, так как обе процедуры связаны с конкурсным выбором поставщика. Однако между ними существуют определённые различия, которые важно понимать перед началом работы в этой сфере.
Не упустите важные детали – тендерное сопровождение под ключ цена в ростове на дону
Этот текст содержит различную информацию, которая, возможно, покажется любопытной, но в целом не меняет восприятия привычных вещей. Предлагаем просто получить удовольствие от чтения, не ожидая особой пользы.
Вот – порно смотреть
Если на телефонном этапе выявляются «красные флаги» — спутанность, выраженная одышка, «скачущий» ритм, неукротимая рвота, — мы рекомендуем короткое окно стационарного наблюдения. При низком риске целесообразно начать дома: привычная среда снижает сенсорную нагрузку, а телемедицинские включения вечером по 15–20 минут помогают пройти «трудный час» без поездок.
Получить дополнительную информацию – вывод из запоя недорого в калининграде
Мы работаем с вниманием к деталям повседневности: как человек засыпает на фоне вечернего света, сколько воды переносит малыми глотками, как реагирует на цифровые уведомления, есть ли привычные «включатели» тяги и как на организм влияет шумное окружение. Врач и куратор переводят этот жизненный контекст в ясные, измеримые ориентиры: время до сна, число пробуждений, вариабельность пульса к сумеркам, объём воды, аппетит, переносимость тёплой мягкой пищи. Решения принимаются адресно и последовательно, чтобы сохранять ясность днём и избегать ненужной фармаконагрузки.
Подробнее – наркологическая клиника стационар в калининграде
Ниже — «скелет» визита. На месте врач адаптирует содержание под возраст, соматику, текущие лекарства и проявления абстиненции. Главная идея — быстро получить цифры, аккуратно запустить инфузию и заранее зафиксировать ориентиры, чтобы семья не импровизировала в «трудный час».
Разобраться лучше – врач вывод из запоя
букет за час http://www.zakazat-cveti-moskva.ru/ .
Клиника предоставляет широкий спектр услуг, каждая из которых ориентирована на определённый этап лечения зависимости.
Разобраться лучше – наркологическая клиника нарколог
Текст включает разнообразную информацию, которая может показаться любопытной, но не меняет устоявшегося восприятия. Предлагаем просто насладиться чтением, не ожидая значительной пользы.
Подробнее читать – краска для стен
Мытищи дают плюсы домашнего формата: меньше логистики, приватнее, выше приверженность режиму. Если показатели устойчивы и нет признаков угрозы осложнений (упорной рвоты, высокой температуры, выраженной дезориентации, резких «качелей» АД/пульса, риска судорог), старт на дому или амбулаторно — рациональное решение. Но когда состояние «по краю», честнее и на дистанции дешевле сутки–двое стационара под круглосуточным наблюдением: проще дозировать препараты, вовремя закрывать дефициты, добиться первого ровного сна и не «разбрасываться» экстренными ночными выездами. Формат выбирается не «по желанию», а по безопасности здесь и сейчас; при этом конфиденциальность сохранена в любом сценарии — немаркированные визиты, разнесённые приёмы, доступ к данным по ролям.
Исследовать вопрос подробнее – наркологическая клиника нарколог
Если ожидаемая динамика «плоская», мы не усиливаем всё сразу. Меняется один параметр: скорость инфузии, порядок модулей или длительность вечерних включений. Такой «тонкий ремонт» безопаснее тотальной перестройки и лучше сохраняет ясность днём.
Изучить вопрос глубже – запой наркологическая клиника
Сначала короткий осмотр и проверка совместимостей, затем — инфузионная терапия с мониторингом давления/пульса/сатурации, после — инструктаж семьи и назначение контрольного контакта. Такой порядок снижает тревогу и делает ночь предсказуемой: понятно, чего ждать, когда отдыхать и в какой момент связываться с врачом.
Получить больше информации – https://vyvod-iz-zapoya-sergiev-posad8.ru/vyvod-iz-zapoya-klinika-v-sergievom-posade/
Коммерческий и государственный тендер — это конкурентная процедура выбора поставщика товаров или оказания услуг. Заказчик размещает требования, а компании подают заявки и участвуют в торгах.
Разберитесь досконально – тендерное сопровождение заказчиков
Наркологическая клиника «ПолярМед Центр» — это пространство круглосуточной помощи, где медицинская точность сочетается с бережным сервисом и конфиденциальными процедурами. Мы строим терапию как последовательность проверяемых шагов: ставим понятную цель, выбираем подходящий инструмент, заранее определяем маркеры контроля и фиксируем время повторной оценки. Такая дисциплина исключает «универсальные сильные капельницы» и заменяет их модульными решениями с предсказуемым эффектом. Пациент и его близкие на каждом этапе понимают, почему именно такое назначение выбрано сейчас и в какой момент мы ожидаем улучшение самочувствия.
Подробнее тут – наркологическая клиника нарколог мурманск
Организм, подвергшийся воздействию наркотических веществ, нуждается в очищении от токсинов. Детоксикация проводится под медицинским контролем с применением препаратов, поддерживающих работу внутренних органов и минимизирующих неприятные симптомы.
Получить больше информации – http://lechenie-narkomanii-novosibirsk0.ru/lechenie-narkomanii-v-novosibirske-besplatno/
Мы не подгоняем всех под единый сценарий. Если состояние устойчивое, нет упорной рвоты, высокой температуры, выраженной дезориентации и резких скачков давления и пульса — рационален домашний старт: приватно, быстрее и без лишних переездов. Врач приедет без маркировки, проведёт осмотр, запустит инфузионную терапию по показаниям, оставит письменные рекомендации и «красные флажки». Если же есть признаки угрозы осложнений — обезвоживание, аритмии, риск судорог, боли за грудиной или в животе, лихорадка, спутанность сознания, тяжёлая соматика — мы честно предлагаем короткую стационарную стабилизацию на 24–48 часов. Под круглосуточным наблюдением проще корректировать схемы, вовремя закрывать дефициты, защитить сон и быстрее вернуть управляемость поведению. В обоих форматах маршрут прозрачен: согласованные окна связи, фиксированные цели на ближайшие 72 часа и отсутствие «пакетов ради прайса». Благодаря этому решения принимаются спокойно, без угадываний и эмоциональных раскачек, которые обычно ломают прогресс и удорожают лечение.
Детальнее – вывод из запоя цена
Если среда дома шумная или приватность под угрозой, мы предложим «короткий коридор» через отдельный вход амбулатории. Если условия позволяют, проводим процедуры на дому: свет приглушён, доступ к розетке организован, рядом столик для расходников и приборов. Этот «экологичный» сценарий, несмотря на простоту, заметно улучшает переносимость процедур и собирает устойчивый сон в первую ночь, что особенно важно на ранних этапах стабилизации.
Разобраться лучше – частная наркологическая клиника челябинск
Клиника «Наркосфера» — это специализированное медицинское учреждение, ориентированное на экстренную и плановую помощь пациентам с алкогольной, наркотической и медикаментозной зависимостью. В штате работают врачи с высшей квалификационной категорией, прошедшие обучение по международным протоколам наркологической и токсикологической помощи. Учреждение располагает собственной выездной службой, оборудованной мобильными аппаратами для диагностики и лечения в домашних условиях. Все сотрудники проходят регулярную аттестацию, участвуют в научных конференциях и владеют современными методами интенсивной терапии. «Наркосфера» функционирует без выходных и праздничных дней, обеспечивая круглосуточную доступность и полную конфиденциальность для каждого пациента.
Разобраться лучше – вызвать наркологическую помощь
1xbet spor bahislerinin adresi 1xbet spor bahislerinin adresi .
Инфузионная терапия в «СамарМед Ассист» складывается из узких модулей. Каждый модуль — одна задача, один измеримый параметр и чёткий критерий остановки. Чтобы не терять причинно-следственную связь, новые элементы подключаются по одному; после достижения цели модуль отключается. Ниже — ориентировочная сетка, иллюстрирующая логику; конкретные составы и дозировки определяет врач по результатам осмотра.
Получить больше информации – http://narkolog-na-dom-v-samare16.ru/vyvod-iz-zapoya-samara-narkolog-na-dom/
«Волшебной капельницы» не существует. Мы структурируем инфузии от симптомов, а не от «средних рецептов». Ниже — логика подбора для типичных профилей; реальную схему определяет врач на месте.
Детальнее – нарколог вывод из запоя в калининграде
«Тёмные часы» вечера — время импульсивных решений. Мы даём короткие, нейтральные инструменты на 20–40 минут: тёплый душ, прогулка рядом с домом при устойчивых показателях, дыхательная практика, короткий созвон с «своим» человеком. Эти бесплатные шаги поддерживают ровный сон и уменьшают вероятность «дорогих» экстренных повторов.
Подробнее можно узнать тут – наркологическая клиника телефон
Если на предвызовном созвоне звучат «красные флаги» (неукротимая рвота, выраженная дезориентация, «скачущий» ритм, одышка), мы сразу резервируем палату усиленного наблюдения и подключаем расширенный мониторинг. При низком риске старт возможен амбулаторно или на дому с бесшовным переводом в стационар при необходимости — без очередей и «говорящих» вывесок. Во всех сценариях анонимность — не «опция», а стандарт по умолчанию.
Изучить вопрос глубже – наркологическая клиника лечение алкоголизма петрозаводск
1xbet resmi sitesi 1xbet-giris-27.com .
Инфузионная терапия — не универсальный раствор «для всех». Её смысл — восстановить объём циркулирующей крови, скорректировать электролиты, снизить токсическую нагрузку, мягко приглушить тремор и тревогу, вернуть условия для сна. Мы начинаем с оценки реакции организма и двигаемся небольшими порциями, чтобы избежать «перегрева» препаратами. При выраженной тошноте подключаем противорвотную поддержку и гастропротекцию; при необходимости — печёночные субстраты и витамины группы B; кардиологические или антигипертензивные решения применяем только по показаниям. Врач сразу оговаривает, какие ощущения нормальны (сонливость, умеренная слабость, сухость во рту), а какие — повод для немедленной связи. Такой реализм даёт не косметическое облегчение «на час», а устойчивую траекторию на дни: эффект инфузий не «сгорает» к вечеру, потому что их поддерживают правила сна, воды и питания.
Углубиться в тему – https://narkologicheskaya-klinika-podolsk9.ru/narkologicheskaya-klinika-ceny-v-podolske/
1x lite 1x lite .
Наркологический выезд включает несколько последовательных шагов, каждый из которых направлен на стабилизацию состояния пациента.
Подробнее тут – нарколог на дом клиника в краснодаре
Ниже — «скелет» визита. На месте врач адаптирует содержание под возраст, соматику, текущие лекарства и проявления абстиненции. Главная идея — быстро получить цифры, аккуратно запустить инфузию и заранее зафиксировать ориентиры, чтобы семья не импровизировала в «трудный час».
Получить дополнительную информацию – вывод из запоя с выездом в ставрополе
Госпитализация показана, когда требуется непрерывный контроль и быстрые изменения схем лечения. В стационаре устраняют выраженные симптомы отмены, корректируют электролитные нарушения, поддерживают печёночные функции, при необходимости подключают кислород и аппаратные методы диагностики. Параллельно выравнивают сон и аппетит, закрывают дефициты микроэлементов, подбирают щадящий режим нагрузки. На выписке пациент получает подробные рекомендации: как дозировать активность, когда пить воду и в каких объёмах, какие препараты принимать и при каких признаках обращаться за консультацией без ожидания. Такой формат снижает риск осложнений и даёт предсказуемую динамику уже на горизонте нескольких дней.
Узнать больше – narkologicheskaya-bolnica-moskvy
Процесс помощи выстраивается поэтапно, что обеспечивает комплексное воздействие на организм и психику пациента.
Исследовать вопрос подробнее – наркологическая клиника стационар в краснодаре
В реальности Воронежа на самочувствие влияет не только фармакология, но и логистика: трассы с плотным трафиком, яркое освещение подъездов, очереди в медорганизациях. «ВоронежМедЦентр» гасит эти раздражители организационно: «тихие окна» приёма без коридорного шума, согласованная парковка, немаркированные выезды, нейтральные формулировки в документах и «беззвучные» напоминания. Снижение сенсорной нагрузки — это не декоративная опция, а клинический фактор: спокойная первая ночь, ровный пульс к вечеру, предсказуемость режима воды и тёплой пищи малыми порциями.
Выяснить больше – платная наркологическая клиника
Мы вместе составляем карту триггеров («тёмные часы» вечера, недосып, конфликты, привычные маршруты) и набор «буферов» на 20–40 минут: тёплый душ, короткая прогулка у дома, дыхательная практика, нейтральный созвон с «своим» человеком. Эти бесплатные шаги уменьшают внеплановые затраты и добавляют устойчивости.
Подробнее можно узнать тут – https://narkologicheskaya-klinika-mytishchi9.ru/chastnaya-narkologicheskaya-klinika-v-mytishchah/
Главное — непрерывность и скорость принятия решений. Рядом врач и медсестра, доступ к диагностике и возможность точно настраивать темп инфузий, подбирать поддерживающие препараты, контролировать сон и уровень тревоги. Благодаря этому снижается риск осложнений, а восстановление идёт ровнее: меньше «качелей» днём и ночью.
Узнать больше – вывод из запоя сергиев посад
Инфузионные схемы формируются из модулей: гидратация, коррекция электролитов, гастропротекция, при показаниях — мягкая анксиолитическая поддержка. Выбор модуля определяется ведущим симптомом и временем суток; дозы минимально достаточные, темп — контролируемый. Ниже — примерная матрица, по которой врач выбирает маршрут (окончательное решение зависит от противопоказаний и сопутствующих состояний).
Исследовать вопрос подробнее – выезд нарколога на дом в петрозаводске
После прибытия на место врач проводит тщательное обследование пациента. Измеряются основные физиологические параметры — артериальное давление, частота пульса, сатурация кислорода, температура тела. Проводится экспресс-анализ крови на сахар и кислотно-щелочной баланс. Также врач проводит оценку неврологического и психического статуса пациента, проверяет уровень сознания по шкале Глазго, выявляет признаки возможных осложнений: отёка мозга, энцефалопатии, алкогольного делирия. При необходимости принимается решение о дополнительной поддержке (например, вызов реанимационной бригады или немедленный перевод в стационар).
Выяснить больше – наркологическая помощь на дому в новосибирске
Современная наркологическая помощь в Ростове-на-Дону базируется на комплексном подходе, который объединяет медицинское лечение, психологическую поддержку и социальную реабилитацию. Такой подход доказал свою эффективность в многочисленных исследованиях, доступных на сайте Российского общества наркологов.
Получить больше информации – лечение в наркологической клинике в ростове-на-дону
Наши стандарты включают конфиденциальную маршрутизацию, детализированные инструкции для семьи, модульный план лечения и прозрачное разделение бесплатных и платных блоков. Каждому пациенту назначается ведущий специалист, который сопровождает его на всём пути — от первого звонка до контрольных чек-инов после процедур. Мы не «наращиваем» объём вмешательств ради впечатления: используется минимально достаточный набор мер, который действительно влияет на целевые маркеры — переносимость воды, качество сна, сглаживание вегетативных «качелей» и возвращение утренней ясности.
Подробнее можно узнать тут – наркологическая клиника вывод из запоя в челябинске
В Люберцах мы убираем неопределённость уже с первого звонка. Дежурный врач аккуратно уточняет жалобы, длительность запоя, принимаемые лекарства и сопутствующие диагнозы, после чего предлагает безопасную точку входа: выезд на дом, дневной формат или стационар с наблюдением 24/7. Каждую процедуру объясняем простым языком и фиксируем цели на ближайшие часы — снижение тревоги и тремора, «мягкий» сон, стабилизацию давления и пульса. Приватность встроена по умолчанию: минимум данных на старте, нейтральная коммуникация, ограниченный доступ к карте, без постановки на учёт. Такой регламент снимает лишнее напряжение и экономит время, исключая «перекидывания» между отделениями и очереди.
Подробнее можно узнать тут – http://narkologicheskaya-klinika-lyubercy0.ru
Первичная оценка строится вокруг показателей, которые определяют место ведения (дом, амбулатория, стационар), состав инфузии и объём поведенческих вмешательств. Мы исключаем «обязательные по привычке» анализы, не влияющие на решения здесь и сейчас; вместо этого закрепляем короткие, но информативные измерения с понятными границами безопасности и интервалами повторов. В результате пациент быстрее видит первые улучшения, а команда не перегружает организм «на всякий случай».
Получить больше информации – https://narkologicheskaya-klinika-v-stavropole15.ru/narkolog-stavropol
Наркологическая клиника «ПолярМед Центр» — это пространство круглосуточной помощи, где медицинская точность сочетается с бережным сервисом и конфиденциальными процедурами. Мы строим терапию как последовательность проверяемых шагов: ставим понятную цель, выбираем подходящий инструмент, заранее определяем маркеры контроля и фиксируем время повторной оценки. Такая дисциплина исключает «универсальные сильные капельницы» и заменяет их модульными решениями с предсказуемым эффектом. Пациент и его близкие на каждом этапе понимают, почему именно такое назначение выбрано сейчас и в какой момент мы ожидаем улучшение самочувствия.
Разобраться лучше – лечение в наркологической клинике
Без сна любая дневная капельница даёт короткий «блеск» и вечерний откат. Поэтому мы заранее настраиваем гигиену: затемнение, прохлада, фиксированное время отбоя, минимум экранов и разговоров, при показаниях — щадящая седативная поддержка, которая стабилизирует, а не «выключает». Утром — короткий контроль и подстройка дозировок, чтобы вторая ночь стала ещё спокойнее.
Получить больше информации – https://narkologicheskaya-klinika-himki9.ru/kruglosutochnaya-narkologicheskaya-klinika-v-himkah/
1xbet guncel 1xbet guncel .
Инфузионная терапия — не универсальный раствор «для всех». Её смысл — восстановить объём циркулирующей крови, скорректировать электролиты, снизить токсическую нагрузку, мягко приглушить тремор и тревогу, вернуть условия для сна. Мы начинаем с оценки реакции организма и двигаемся небольшими порциями, чтобы избежать «перегрева» препаратами. При выраженной тошноте подключаем противорвотную поддержку и гастропротекцию; при необходимости — печёночные субстраты и витамины группы B; кардиологические или антигипертензивные решения применяем только по показаниям. Врач сразу оговаривает, какие ощущения нормальны (сонливость, умеренная слабость, сухость во рту), а какие — повод для немедленной связи. Такой реализм даёт не косметическое облегчение «на час», а устойчивую траекторию на дни: эффект инфузий не «сгорает» к вечеру, потому что их поддерживают правила сна, воды и питания.
Получить больше информации – narkologicheskaya-klinika-narkologicheskij-centr
Такая схема позволяет комплексно воздействовать на организм и уменьшить риски осложнений.
Получить дополнительные сведения – нарколог на дом анонимно
Решение обратиться за наркологической помощью часто упирается в страх огласки и сомнения в эффективности. В «МедТрезвие» эти барьеры снимаются за счёт клинической достаточности и предсказуемой организации. Диагностика и вмешательства назначаются строго по показаниям: врач оценит риски сердечно-сосудистых осложнений, состояние печени и поджелудочной железы, уровень тревоги и сна, наличие депрессивных симптомов. При устойчивом состоянии часть процедур выполняется на дому, что снижает стресс, а при признаках нестабильности — рекомендуется стационар с круглосуточным наблюдением. Анонимность поддерживается шифрованием данных, разграничением доступа и информированием родственников только по согласию пациента. Финансовые условия обсуждаются заранее: семья понимает, из чего складывается смета, и может планировать ресурс без опасений «скрытых» позиций. В результате лечение становится управляемым процессом, где медицинская безопасность и уважение к личной жизни человека — обязательные элементы, а не рекламные обещания.
Изучить вопрос глубже – государственная наркологическая клиника москва
Мы работаем с вниманием к деталям повседневности: как человек засыпает на фоне вечернего света, сколько воды переносит малыми глотками, как реагирует на цифровые уведомления, есть ли привычные «включатели» тяги и как на организм влияет шумное окружение. Врач и куратор переводят этот жизненный контекст в ясные, измеримые ориентиры: время до сна, число пробуждений, вариабельность пульса к сумеркам, объём воды, аппетит, переносимость тёплой мягкой пищи. Решения принимаются адресно и последовательно, чтобы сохранять ясность днём и избегать ненужной фармаконагрузки.
Получить больше информации – https://narkologicheskaya-klinika-kaliningrad15.ru/chastnaya-narkologicheskaya-klinika-kaliningrad/
Второй важный этап лечения — назначение лекарственных средств, направленных на нормализацию работы нервной системы, снижение симптомов абстиненции и профилактику срывов. Применение медикаментов подбирается индивидуально с учётом типа зависимости и общего состояния пациента.
Детальнее – http://lechenie-narkomanii-novosibirsk0.ru/lechenie-zavisimosti-ot-narkotikov-novosibirsk-/
1 xbet giri? 1xbet-55.com .
Петрозаводск добавляет нюансы: влажные сумерки, ветер от Онежского озера, «звонкие» подъезды старого фонда. Поэтому бригада «СеверКар Медикус» приезжает в гражданской одежде, быстро и без лишних фраз. Координатор заранее уточняет код домофона, парковку, «окна связи» для близких; рекомендует приглушить верхний свет, подготовить воду комнатной температуры и свободный доступ к розетке. Такой «тихий сценарий» снижает сенсорную нагрузку, сглаживает пульсовые «пики» к вечеру и помогает заснуть без избыточной фармакологии.
Подробнее – https://vyvod-iz-zapoya-petrozavodsk15.ru/skoryj-narkolog-vyvod-iz-zapoya-petrozavodsk/
Финансовые инструменты позволяют заказчику убедиться в надежности участника и его готовности выполнить обязательства по контракту. При этом грамотное сопровождение снижает вероятность финансовых рисков и помогает правильно оформить документы для банка.
Узнайте, как это работает – тендерное сопровождение закупок
Мы не подгоняем всех под единый сценарий. Если состояние устойчивое, нет упорной рвоты, высокой температуры, выраженной дезориентации и резких скачков давления и пульса — рационален домашний старт: приватно, быстрее и без лишних переездов. Врач приедет без маркировки, проведёт осмотр, запустит инфузионную терапию по показаниям, оставит письменные рекомендации и «красные флажки». Если же есть признаки угрозы осложнений — обезвоживание, аритмии, риск судорог, боли за грудиной или в животе, лихорадка, спутанность сознания, тяжёлая соматика — мы честно предлагаем короткую стационарную стабилизацию на 24–48 часов. Под круглосуточным наблюдением проще корректировать схемы, вовремя закрывать дефициты, защитить сон и быстрее вернуть управляемость поведению. В обоих форматах маршрут прозрачен: согласованные окна связи, фиксированные цели на ближайшие 72 часа и отсутствие «пакетов ради прайса». Благодаря этому решения принимаются спокойно, без угадываний и эмоциональных раскачек, которые обычно ломают прогресс и удорожают лечение.
Выяснить больше – http://vyvod-iz-zapoya-balashiha9.ru
Старт — короткий скрининг с дежурным врачом: выясняем риски и бытовые условия, чтобы заранее выбрать формат, который будет и безопасным, и выполнимым в реальности. Согласуем окно визита или приёма с учётом трафика и подъезда; подсказываем, как подготовить помещение — тишина, вода, розетка, возможность прилечь. На месте фиксируем витальные показатели (АД, пульс, сатурация, температура), при показаниях делаем ЭКГ, запускаем детокс и озвучиваем ожидаемую «нормальную динамику» первых 6–12 часов. Все договорённости дублируем в памятке: режим, питьевой план, «красные флажки» и точное время контрольной связи. Если домашний формат перестаёт быть достаточным, переводим в стационар без пауз — темп лечения не теряется.
Выяснить больше – http://narkologicheskaya-klinika-lyubercy0.ru/anonimnaya-narkologicheskaya-klinika-v-lyubercah/
Процесс лечения включает несколько ключевых этапов, каждый из которых имеет решающее значение для восстановления организма:
Подробнее тут – снятие ломок на дому в новосибирске
1xbet giris 1xbet giris .
Часто предприниматели объединяют понятия тендер и госзакупки, так как обе процедуры связаны с конкурсным выбором поставщика. Однако между ними существуют определённые различия, которые важно понимать перед началом работы в этой сфере.
Узнайте больше прямо сейчас – http://tendernoe-soprovozhdenie-rostov-na-donu.ru
1x lite 1xbet-giris-33.com .
В этом материале представлены детали, которые хоть и занимательны, но не особенно значимы. Мы рассматриваем моменты, которые трудно назвать важными, но всё же решили включить их для полноты картины.
Вот – бинго онлайн
Круглосуточный режим — не просто «расписание». Это доступность врача тогда, когда симптомы наиболее коварны: поздним вечером, ночью, в выходные и праздники. У нас нет очередей и «окна через неделю»: тревога, бессонница, нарастающая абстиненция или риск срыва требуют реагирования по факту, а не по талону. Чтобы не тратить драгоценные часы, мы приняли промышленный стандарт быстрого старта: диспетчер собирает клинически значимую информацию, нарколог определяет безопасный канал помощи, выездная команда берёт на адрес переносное оборудование и точечные препараты, а в карте заранее создаётся план первых 24–72 часов с контрольными точками.
Выяснить больше – наркологическая клиника цены
Семья получает «путевой лист» на 24–72 часа: как фиксировать маркеры (тремор/тревога/тошнота 0–10), как пить воду малыми глотками, когда приглушать свет и в каком формате общаться с пациентом («короткие факты вместо оценок»). Мы также даём «лестницу активности»: два достижимых действия утром, одно — вечером. Эта дисциплина маленьких шагов помогает избежать эмоциональных «перегревов» и удерживает достигнутый эффект.
Изучить вопрос глубже – наркологическая клиника цены челябинск
После завершения основной инфузионной терапии врач наблюдает за состоянием пациента ещё в течение 30–60 минут. Если отсутствуют осложнения и параметры стабилизированы, врач даёт рекомендации по дальнейшему восстановлению, включая приём анксиолитиков, соблюдение питьевого режима, лёгкой диеты и исключение стрессов. Также составляется индивидуальный план наблюдения: возможны повторные визиты врача через сутки, двое или трое суток. При необходимости пациенту или его близким предоставляется контакт психотерапевта или проводится предварительное консультирование по дальнейшему лечению зависимости.
Получить больше информации – экстренная наркологическая помощь новосибирск
Детокс — это управляемая последовательность действий: оценка рисков, инфузионная терапия, коррекция электролитов и КЩС, поддержка органов-мишеней, профилактика осложнений, затем переоценка с корректировкой схемы. Мы заранее обсуждаем «бытовой контур» на ближайшие дни: максимально спокойные вечера, дробное питание, отказ от перегрузок, перенос «триггерных» встреч, чтобы результат не рассыпался после первых суток.
Получить дополнительную информацию – http://
Нержавеющий крепеж A2 и A4 нужен там, где важны защита от коррозии и долгий срок службы Такой вариант крепежа помогает сократить количество переделок и сохранить стабильный результат на объекте – https://metizy-optom-moskva.ru/
Анонимность — не опция, а стандарт: документы формулируются нейтрально, чеки не содержат «говорящих» формулировок, фото- и видеосъёмка исключены. При необходимости подписывается расширенное соглашение о конфиденциальности. Доступ к записи визита и параметрам процедуры разграничен по ролям; копии передаются по защищённому каналу и удаляются по регламенту хранения.
Подробнее можно узнать тут – нарколог на дом срочно
Корректная среда — половина успешной инфузии. Этот порядок действий помогает врачу быстрее принять решения, а пациенту — легче перенести первые часы.
Исследовать вопрос подробнее – http://narkolog-na-dom-v-samare16.ru
Метод лечения
Подробнее – анонимная наркологическая клиника
Городская среда Калининграда специфична: морской ветер, сезонные пробки, яркие витрины в вечерние часы. Эти факторы часто усиливают тревожность и мешают засыпанию. Поэтому мы проектируем выезд «мягко»: согласованная парковка, немаркированный вход, короткий маршрут до места процедуры, отсутствие громких звонков и «визуального шума» у порога. Родственникам предоставляем «тихие окна» связи — короткие апдейты в заранее оговорённое время без лишних подробностей. Такой формат не просто комфортнее, он клинически полезен: чем меньше стимулов, тем меньше потребность в ночных «усилениях» и тем стабильнее проходит первая ночь.
Углубиться в тему – вывод из запоя на дому цена калининград
1xbet resmi giri? 1xbet resmi giri? .
Маршрут запускается с короткого, но точного сбора данных: врач уточняет симптомы, лекарства за последние 24–48 часов, аллергии и хронические диагнозы, измеряет давление, пульс, сатурацию, при необходимости выполняет экспресс-ЭКГ и базовый неврологический скрининг. Далее — простое объяснение логики вмешательств: зачем именно такая инфузионная схема, что она даст в ближайшие 30–60 минут, как будет организован вечер и когда мы свяжемся утром. Мы избегаем «оглушающих» седативов и универсальных «сильных смесей», чтобы не получить вечернего отката и побочных реакций; дозы подбираются узко и корректируются по реакции организма. Пациент уходит с письменными рекомендациями на 48–72 часа: вода и лёгкая еда «по часам», правила «тихого вечера», критерии повторного контакта и окно связи. Семья понимает роли: меньше разговорных «разборов», больше тишины и затемнения — в такой среде физиология перестаёт «качать», сон приходит предсказуемо, а утренние показатели выравниваются.
Подробнее можно узнать тут – besplatnaya-narkologicheskaya-klinika
Городская среда Ставрополя создаёт дополнительные раздражители — трафик, шумовые пики, яркое освещение подъездов. Команда «СтаврДоктор» гасит эти факторы организационно: секторное распределение бригад, согласованная парковка, вход в подъезд без опознавательных знаков, доставка расходников при необходимости отдельно от врача, чтобы на месте сразу перейти к осмотру и инфузии. Коммуникация ведётся через защищённые каналы, уведомления «беззвучные», наименования в чеках — нейтральные. Если пациенту спокойнее, общение частично берёт на себя доверенное лицо; оно получает краткие апдейты в заранее оговорённые «тихие окна».
Разобраться лучше – помощь нарколога на дому ставрополь
Близкие — ключевой ресурс, если действуют согласованно. Мы просим сфокусироваться на среде и режиме: тише, темнее, теплее; вода и лёгкая еда «по часам»; отсутствие «разборов» и проверок «на прочность» в первые дни. Полезно заранее договориться о коротких нейтральных сигналах — как понять, что помощь нужна, а когда лучше не вмешиваться. Такие простые правила бесплатны, но они стабилизируют поведение и убирают потребность в экстренных визитах по ночам. Когда дом перестаёт быть источником шума, медицинская часть остаётся узкой, а результат — устойчивым.
Подробнее тут – kapelnica-vyvod-ot-zapoya
В городском ритме Ставрополя дорога сама по себе может усугублять симптомы: плотный трафик, резкие звуки, длинные коридоры ожидания. Поэтому «СтаврВита» разворачивает секторные выезды: немаркированный транспорт, гражданская одежда специалистов, согласованная парковка и подъезд, доставка расходников отдельно от врача при необходимости — чтобы на месте сразу переходить к диагностике и запуску инфузии. Переписка ведётся нейтральными формулировками, уведомления «беззвучные», документы без стигматизирующих слов. По желанию всё общение идёт через доверенное лицо: оно получает короткие апдейты в согласованные «окна», не перегружаясь клиническими деталями.
Подробнее тут – вывод из запоя на дому круглосуточно
«Как отмечает главный врач-нарколог Виктор Сергеевич Левченко, «современная наркологическая клиника должна обеспечивать не только медикаментозное лечение, но и комплексную поддержку пациента на всех этапах восстановления».»
Подробнее – наркологическая клиника лечение алкоголизма
Вся динамика фиксируется в единой карте наблюдения. При переводе в амбулаторную точку мы не «сбрасываем» историю: решения продолжаются с учётом уже сделанного и реакции пациента на вмешательства.
Ознакомиться с деталями – вывод из запоя недорого
Городской ритм Петрозаводска с озёрным ветром, короткими сумерками и сезонной влажностью повышает сенсорную нагрузку в вечерние часы, поэтому наш маршрут спроектирован «мягко». Координатор заранее уточняет подъезд, парковку, код домофона, рекомендует «тихий режим» связи и присылает нейтральное уведомление о визите. Бригада приходит в гражданской одежде, сумки — без логотипов, разговоры — короткими фразами. Такое поведение снижает у пациента и семьи реактивность, выравнивает вариабельность ЧСС к сумеркам и уменьшает потребность «усиливать» схему на ночь. Если на предзвонке выявлены «красные флаги» — неукротимая рвота, выраженная дезориентация, «скачущий» ритм, одышка — мы предлагаем стационар сразу, чтобы не терять время на повторные маршруты.
Разобраться лучше – врач нарколог на дом
Медикаментозная терапия направлена на снятие симптомов абстиненции, нормализацию функций органов и систем, а также коррекцию психоэмоционального состояния пациента. Используются препараты, способствующие детоксикации, стабилизации работы нервной системы и улучшению общего самочувствия.
Детальнее – https://narkologicheskaya-pomoshh-perm0.ru/narkologiya-perm-anonimno
1xbet yeni giri? 1xbet yeni giri? .
1xbet resmi 1xbet-giris-30.com .
Анонимность встроена в процесс: немаркированные выезды, гражданская одежда персонала, нейтральные формулировки в документах и «беззвучные» уведомления. Медицинская карта ведётся с разграничением доступа по ролям, а для связи с близкими предусмотрены «тихие окна». Конфиденциальность не декларируется — она реализована в каждом шаге, от первичного звонка до плановых контрольных точек.
Разобраться лучше – анонимная наркологическая клиника
Наркологическая клиника в Ростове-на-Дону предоставляет полный спектр услуг по диагностике, лечению и реабилитации пациентов с алкогольной и наркотической зависимостью. Применение современных медицинских протоколов и индивидуальный подход к каждому пациенту обеспечивают высокую эффективность терапии и снижение риска рецидивов.
Углубиться в тему – http://www.domen.ru
Анонимность — не опция, а стандарт: документы формулируются нейтрально, чеки не содержат «говорящих» формулировок, фото- и видеосъёмка исключены. При необходимости подписывается расширенное соглашение о конфиденциальности. Доступ к записи визита и параметрам процедуры разграничен по ролям; копии передаются по защищённому каналу и удаляются по регламенту хранения.
Детальнее – выезд нарколога на дом в петрозаводске
Первичная оценка строится на фактах. Врач коротко уточняет жалобы, длительность употребления, переносимость препаратов и аллергии, фиксирует давление, пульс, сатурацию, при необходимости делает экспресс-ЭКГ и скрининг неврологического статуса. Далее — объясняет на понятном языке логику назначений: зачем именно такая инфузионная схема, какие ощущения нормальны в течение часа и к ночи, как организовать питьевой режим и лёгкое питание «по силам». Мы избегаем «оглушающих» седативов: дозируем узко, чтобы не получить вечернего отката и побочных эффектов. После процедуры повторно оцениваем показатели, выдаём письменные рекомендации, согласуем окно связи и условия повторного визита. Семья получает простые правила поведения дома (тишина, затемнение, ограничение экранов, отсутствие «разборов») и сигналы, когда лучше позвать врача. Итог визита — управляемая ночь и предсказуемое утро, на котором можно строить следующие шаги.
Узнать больше – https://narkologicheskaya-klinika-podolsk9.ru/chastnaya-narkologicheskaya-klinika-v-podolske
Детокс — это не «чудо-капельница», а последовательность узких вмешательств. Цели понятны: восстановить объём циркулирующей жидкости, скорректировать электролиты, снизить токсическую нагрузку на печень, мягко приглушить тремор и тревогу, подготовить нервную систему к сну. При тошноте подключается противорвотная поддержка и гастропротекция, витаминные комплексы — по показаниям, кардиокоррекция — только после оценки рисков. Мы заранее проговариваем нормальные ощущения (умеренная слабость, сонливость, сухость во рту) и маркеры для немедленной связи. Такой реализм снижает импульсивность и делает результат измеримым: вечером — не «откат», а предсказуемая усталость, ночью — ровный сон, утром — стабильные показатели. На этой базе обсуждаются следующие шаги: амбулаторный график, короткие психотерапевтические сессии, при показаниях — кодирование после стабилизации и исключения противопоказаний.
Подробнее тут – chastnaya-narkologicheskaya-klinika-v-mytishchah
Эти ситуации требуют немедленного вмешательства, и приезд врача позволяет оперативно оказать помощь.
Получить больше информации – врач нарколог на дом
Современная наркологическая помощь в Ростове-на-Дону базируется на комплексном подходе, который объединяет медицинское лечение, психологическую поддержку и социальную реабилитацию. Такой подход доказал свою эффективность в многочисленных исследованиях, доступных на сайте Российского общества наркологов.
Детальнее – платная наркологическая клиника ростов-на-дону
Мы работаем с вниманием к деталям повседневности: как человек засыпает на фоне вечернего света, сколько воды переносит малыми глотками, как реагирует на цифровые уведомления, есть ли привычные «включатели» тяги и как на организм влияет шумное окружение. Врач и куратор переводят этот жизненный контекст в ясные, измеримые ориентиры: время до сна, число пробуждений, вариабельность пульса к сумеркам, объём воды, аппетит, переносимость тёплой мягкой пищи. Решения принимаются адресно и последовательно, чтобы сохранять ясность днём и избегать ненужной фармаконагрузки.
Углубиться в тему – наркологическая клиника наркологический центр в калининграде
Прежде чем перечислить критичные признаки, зафиксируем принцип: даже один выраженный симптом — повод не откладывать помощь и выбрать безопасный маршрут (дом или стационар) после быстрой очной оценки врача.
Получить дополнительную информацию – вывод из запоя
Решение обратиться за наркологической помощью часто упирается в страх огласки и сомнения в эффективности. В «МедТрезвие» эти барьеры снимаются за счёт клинической достаточности и предсказуемой организации. Диагностика и вмешательства назначаются строго по показаниям: врач оценит риски сердечно-сосудистых осложнений, состояние печени и поджелудочной железы, уровень тревоги и сна, наличие депрессивных симптомов. При устойчивом состоянии часть процедур выполняется на дому, что снижает стресс, а при признаках нестабильности — рекомендуется стационар с круглосуточным наблюдением. Анонимность поддерживается шифрованием данных, разграничением доступа и информированием родственников только по согласию пациента. Финансовые условия обсуждаются заранее: семья понимает, из чего складывается смета, и может планировать ресурс без опасений «скрытых» позиций. В результате лечение становится управляемым процессом, где медицинская безопасность и уважение к личной жизни человека — обязательные элементы, а не рекламные обещания.
Получить дополнительную информацию – стациомедика наркологическая клиника вывода из запоя москва отзывы
«НоваМед Центр» строит лечение как управляемую последовательность шагов, а не набор эпизодических процедур. На входе мы фиксируем исходные риски: длительность употребления, сопутствующие заболевания, принимаемые лекарства, анамнез кодирований и срывов, показатели давления, пульса, сатурации, уровень сна и тревоги. Это позволяет выбрать безопасную точку входа и задать логичную траекторию: от детокса к стабилизации, затем к поведенческим изменениям и поддержанию ремиссии. Такая структура особенно важна при высокой нагрузке и дефиците времени: когда пациент и семья понимают, что будет через час, сутки и неделю, снижается тревога и исчезают импульсивные «проверки себя», из-за которых обычно рушатся результаты. Мы придерживаемся принципа клинической достаточности: только те вмешательства, которые нужны по состоянию сегодня, без «украшений ради прайса». Чёткие правила на 48–72 часа, согласованные окна связи, понятные «красные флажки» для повторного контакта превращают лечение в прогнозируемый маршрут, а не в череду надежд и разочарований. В итоге человек быстрее возвращает контроль над самочувствием, а близкие получают опору вместо бесконечных ночных «дежурств».
Ознакомиться с деталями – государственная наркологическая клиника москва
Мы не «усиливаем всё сразу». Лечение собирается из модулей: гидратация, адресная коррекция электролитов, гастропротекция, антиоксидантная поддержка, при необходимости — мягкие анксиолитики по строгим показаниям. Порядок и насыщенность зависят от ведущей жалобы и времени суток. Ниже — ориентир для пациента: почему назначение выглядит именно так и в какой горизонт мы ожидаем эффект.
Разобраться лучше – наркологическая клиника клиника помощь в мурманске
Формат
Исследовать вопрос подробнее – наркологическая клиника цены
1xbwt giri? 1xbet-giris-29.com .
Лечение строится как последовательность модулей. Каждый модуль отвечает на вопрос «зачем?», имеет измеримые маркеры и заранее определённый момент проверки. Это позволяет менять по одному параметру — скорость/последовательность/объём вмешательств — и исключать «усиления ради впечатления».
Изучить вопрос глубже – запой наркологическая клиника в калининграде
1xbet spor bahislerinin adresi 1xbet spor bahislerinin adresi .
Мы работаем с вниманием к деталям повседневности: как человек засыпает на фоне вечернего света, сколько воды переносит малыми глотками, как реагирует на цифровые уведомления, есть ли привычные «включатели» тяги и как на организм влияет шумное окружение. Врач и куратор переводят этот жизненный контекст в ясные, измеримые ориентиры: время до сна, число пробуждений, вариабельность пульса к сумеркам, объём воды, аппетит, переносимость тёплой мягкой пищи. Решения принимаются адресно и последовательно, чтобы сохранять ясность днём и избегать ненужной фармаконагрузки.
Ознакомиться с деталями – http://www.domen.ru
Наши стандарты включают конфиденциальную маршрутизацию, детализированные инструкции для семьи, модульный план лечения и прозрачное разделение бесплатных и платных блоков. Каждому пациенту назначается ведущий специалист, который сопровождает его на всём пути — от первого звонка до контрольных чек-инов после процедур. Мы не «наращиваем» объём вмешательств ради впечатления: используется минимально достаточный набор мер, который действительно влияет на целевые маркеры — переносимость воды, качество сна, сглаживание вегетативных «качелей» и возвращение утренней ясности.
Исследовать вопрос подробнее – наркологическая клиника цены челябинск
После диагностики нарколог приступает к основному этапу — инфузионной детоксикации. Препараты подбираются индивидуально, с учётом тяжести интоксикации, анамнеза и сопутствующих заболеваний. Основу составляют водно-солевые растворы, глюкоза, витаминные комплексы, седативные препараты, гепатопротекторы и нейропротекторы. Инфузии выполняются капельно, медленно, в течение нескольких часов, с постоянным мониторингом состояния пациента. При необходимости используется оксигенотерапия, противорвотные, антиаритмические и противосудорожные препараты. Все растворы стерильны, а расходные материалы одноразовые и соответствуют стандартам качества.
Получить дополнительную информацию – наркологическая помощь на дому круглосуточно
Чтобы ориентироваться в вариантах, полезно увидеть их в одном поле зрения. Ниже приведена краткая сравнительная таблица; она не заменяет консультацию, но помогает понять логику выбора. Перед таблицей важно отметить: конкретная методика определяется только после осмотра и исключения противопоказаний.
Выяснить больше – procedura-kodirovaniya-ot-alkogolizma
Если среда дома шумная или приватность под угрозой, мы предложим «короткий коридор» через отдельный вход амбулатории. Если условия позволяют, проводим процедуры на дому: свет приглушён, доступ к розетке организован, рядом столик для расходников и приборов. Этот «экологичный» сценарий, несмотря на простоту, заметно улучшает переносимость процедур и собирает устойчивый сон в первую ночь, что особенно важно на ранних этапах стабилизации.
Ознакомиться с деталями – наркологическая клиника клиника помощь
После завершения основной инфузионной терапии врач наблюдает за состоянием пациента ещё в течение 30–60 минут. Если отсутствуют осложнения и параметры стабилизированы, врач даёт рекомендации по дальнейшему восстановлению, включая приём анксиолитиков, соблюдение питьевого режима, лёгкой диеты и исключение стрессов. Также составляется индивидуальный план наблюдения: возможны повторные визиты врача через сутки, двое или трое суток. При необходимости пациенту или его близким предоставляется контакт психотерапевта или проводится предварительное консультирование по дальнейшему лечению зависимости.
Получить дополнительную информацию – наркологическая клиника клиника помощь
Домашний старт в Подольске уместен при устойчивых показателях и низком риске осложнений: нет упорной рвоты, высокой температуры, выраженной дезориентации, резких скачков давления и пульса, признаков судорожной готовности. Преимущества — приватность, скорость, меньше стыда и сопротивления, выше приверженность режиму сна и воды. Но если состояние «ходит по краю», мы честно предложим короткую стационарную стабилизацию на 24–48 часов: круглосуточный мониторинг позволяет раньше перехватить опасную динамику, дозировать препараты без пауз, обеспечить первый полноценный сон. Такой перевод — не «удорожание», а экономия рисков: на дистанции он чаще дешевле серии ночных экстренных вызовов и эмоциональных «качелей». В обоих сценариях сохраняется конфиденциальность: немаркированные маршруты, разнесённые по времени визиты, доступ к данным по ролям. Решение всегда объясняется простыми словами: что даст каждый формат сегодня и почему он безопаснее.
Получить больше информации – http://narkologicheskaya-klinika-podolsk9.ru/narkologicheskaya-klinika-stacionar-v-podolske/https://narkologicheskaya-klinika-podolsk9.ru
Режим 24/7 — это не только открытая дверь, но и правильно расставленные акценты по часам суток. Ночью — больше поведенческих опор и короткие видеовставки, днём — контроль витальных, уточнение плана гидратации и питания, вечером — «световые правила» и дыхательные циклы. В каждом окне мы знаем, что именно проверяем и что считаем успехом: так исчезают импровизации и ненужные «усиления», а пациент получает предсказуемую траекторию.
Детальнее – narkologicheskaya-klinika-v-stavropole15.ru/
Если среда дома шумная или приватность под угрозой, мы предложим «короткий коридор» через отдельный вход амбулатории. Если условия позволяют, проводим процедуры на дому: свет приглушён, доступ к розетке организован, рядом столик для расходников и приборов. Этот «экологичный» сценарий, несмотря на простоту, заметно улучшает переносимость процедур и собирает устойчивый сон в первую ночь, что особенно важно на ранних этапах стабилизации.
Изучить вопрос глубже – запой наркологическая клиника
1 x bet 1xbet-53.com .
После завершения основной инфузионной терапии врач наблюдает за состоянием пациента ещё в течение 30–60 минут. Если отсутствуют осложнения и параметры стабилизированы, врач даёт рекомендации по дальнейшему восстановлению, включая приём анксиолитиков, соблюдение питьевого режима, лёгкой диеты и исключение стрессов. Также составляется индивидуальный план наблюдения: возможны повторные визиты врача через сутки, двое или трое суток. При необходимости пациенту или его близким предоставляется контакт психотерапевта или проводится предварительное консультирование по дальнейшему лечению зависимости.
Подробнее тут – вызвать наркологическую помощь в новосибирске
Городская логистика Химок помогает стартовать амбулаторно или на дому, когда показатели устойчивы: нет упорной рвоты, высокой температуры, выраженной дезориентации, резких «качелей» АД/пульса и признаков обезвоживания с риском судорог. В этих случаях один визит или короткий амбулаторный блок часто закрывают задачу: инфузия по показаниям, простые правила режима и согласованное окно контроля. Если же состояние «по краю» — сочетание рвоты, лихорадки, кардиальных жалоб, второй бессонной ночи, выраженного тремора и панических волн — честнее краткая стационарная стабилизация на 24–48 часов. Под круглосуточным мониторингом быстрее закрываются дефициты, дозы подбираются тоньше, предупреждаются осложнения и достигается первая ровная ночь. На бумаге стационар дороже одного визита, но на практике — дешевле серии «пожаров ночью», сорванных рабочих дней и импульсивных повторов. В любом формате анонимность неизменна: немаркированные визиты, закрытые каналы коммуникации, доступ к данным по ролям.
Подробнее – https://narkologicheskaya-klinika-himki9.ru/narkologicheskaya-klinika-ceny-v-himkah/
работа онлайн вк Онлайн-работа без опыта и вложений – это реальность, доступная каждому, кто готов учиться и стремиться к саморазвитию, открывая двери в мир фриланса для начинающих и опытных специалистов.
Вызов нарколога на дом — это не «капельница как панацея», а управляемая последовательность решений с ясными целями, измеримыми маркерами и понятными «окнами оценки». В «СамарМед Ассист» мы строим лечение из узких модулей: сначала проверяем базовую безопасность (дыхание, сознание, гемодинамика), затем возвращаем переносимость питья, стабилизируем вегетатику, собираем ночь, и только после этого занимаемся дневной выносливостью и бытовой устойчивостью. Такой ритм исключает полипрагмазию, снижает фармаконагрузку и превращает первые часы из хаотичной «борьбы с симптомами» в спокойный, предсказуемый маршрут. Семья получает роль партнёра, а не наблюдателя: по простым ориентирам понятно, что считать нормой, когда звонить врачу и на каком этапе модуль следует «выключить».
Подробнее – https://narkolog-na-dom-v-samare16.ru/vyvod-iz-zapoya-samara-narkolog-na-dom
Процесс лечения зависимости включает несколько последовательных этапов, каждый из которых важен для достижения стойкой ремиссии и возвращения к полноценной жизни. Для успешного результата необходима последовательная работа специалистов и активное участие пациента.
Подробнее тут – лечение алкоголизма и наркомании центр
Домашний старт в Подольске уместен при устойчивых показателях и низком риске осложнений: нет упорной рвоты, высокой температуры, выраженной дезориентации, резких скачков давления и пульса, признаков судорожной готовности. Преимущества — приватность, скорость, меньше стыда и сопротивления, выше приверженность режиму сна и воды. Но если состояние «ходит по краю», мы честно предложим короткую стационарную стабилизацию на 24–48 часов: круглосуточный мониторинг позволяет раньше перехватить опасную динамику, дозировать препараты без пауз, обеспечить первый полноценный сон. Такой перевод — не «удорожание», а экономия рисков: на дистанции он чаще дешевле серии ночных экстренных вызовов и эмоциональных «качелей». В обоих сценариях сохраняется конфиденциальность: немаркированные маршруты, разнесённые по времени визиты, доступ к данным по ролям. Решение всегда объясняется простыми словами: что даст каждый формат сегодня и почему он безопаснее.
Разобраться лучше – http://narkologicheskaya-klinika-podolsk9.ru/narkologicheskaya-klinika-ceny-v-podolske/
тайгер казино зеркало Когда первый раз искал тайгер казино, вообще не понял где официальный сайт, потом через телеграм разобрался.
дизайн проект домов под ключ дизайн проекты загородных домов
Наркологическая клиника в Краснодаре работает на основе современных протоколов терапии, утверждённых в клинической практике. Ведущие направления включают экстренную помощь, лечение острых состояний и долгосрочные программы реабилитации. Врачи учитывают индивидуальные особенности организма, сопутствующие заболевания и психологическое состояние пациента, что позволяет выстраивать эффективные схемы терапии.
Ознакомиться с деталями – наркологическая клиника лечение алкоголизма
The best porn generator uncensored ai video generator your fantasies remain strictly between you and the neural network. Instant, high-quality generation, extensive scenario and character customization. Available 24/7. For adults.
Инфузионная терапия — не универсальный раствор «для всех». Её смысл — восстановить объём циркулирующей крови, скорректировать электролиты, снизить токсическую нагрузку, мягко приглушить тремор и тревогу, вернуть условия для сна. Мы начинаем с оценки реакции организма и двигаемся небольшими порциями, чтобы избежать «перегрева» препаратами. При выраженной тошноте подключаем противорвотную поддержку и гастропротекцию; при необходимости — печёночные субстраты и витамины группы B; кардиологические или антигипертензивные решения применяем только по показаниям. Врач сразу оговаривает, какие ощущения нормальны (сонливость, умеренная слабость, сухость во рту), а какие — повод для немедленной связи. Такой реализм даёт не косметическое облегчение «на час», а устойчивую траекторию на дни: эффект инфузий не «сгорает» к вечеру, потому что их поддерживают правила сна, воды и питания.
Получить дополнительные сведения – частная наркологическая клиника
Читать расширенную версию: https://www.niftygateway.com/@dezavtor/
Thanks for sharing your info. I really appreciate your efforts and I am waiting for your next post thanks once again. http://seosecretservice.top/
bahis siteler 1xbet 1xbet-giris-27.com .
1xbet giri? g?ncel 1xbet giri? g?ncel .
сколько стоит хороший букет цветов https://zakazat-cveti-moskva.ru/ .
Такая схема позволяет комплексно воздействовать на организм и уменьшить риски осложнений.
Подробнее тут – http://narkolog-na-dom-v-krasnodare14.ru/narkolog-i-psikhiatr-v-krasnodare/
Инфузионная терапия — это не универсальный «коктейль», а набор узких шагов под клиническую задачу. Главные цели понятны: вернуть объём циркулирующей жидкости и перфузию тканей, скорректировать электролиты, снизить токсическую нагрузку на печень, мягко приглушить тремор и тревожность, подготовить нервную систему к сну. При тошноте подключаются противорвотные и гастропротекция; кардиокоррекция даётся только после оценки рисков. Мы заранее проговариваем нормальные ощущения (умеренная слабость, сонливость, сухость во рту) и «красные флажки» для связи. Такой минимум достаточных вмешательств снижает побочные эффекты, делает бюджет предсказуемым и удерживает результат не часами, а днями. На этой базе обсуждаются следующие шаги: амбулаторный график, короткие психотерапевтические сессии, при показаниях — кодирование после стабилизации и исключения противопоказаний.
Подробнее можно узнать тут – https://narkologicheskaya-klinika-himki9.ru
Родные — ключевой ресурс, если действовать согласованно. Мы обучаем базовым правилам: тише, темнее, теплее; вода и лёгкая еда «по часам»; никаких эмоциональных «разборов» в первые дни; заранее согласованные короткие сигналы для связи со специалистом. Важно отказаться от фраз «возьми себя в руки» и «а если ты сорвёшься?» — они усиливают тревогу и провоцируют сопротивление. Вместо этого — спокойные, конкретные договорённости на сегодня: во сколько отбой, как проходит вечер, когда и какие «буферы» использовать. Такой режим убирает хаос и снижает конфликтность, за счёт чего держится медицинский эффект, уменьшается количество «ночных качелей» и потребность в экстренных визитах. Когда у всех одна карта маршрута, путь к устойчивости становится короче и реалистичнее.
Получить дополнительную информацию – вывод из запоя
Вызов нарколога на дом — это не «капельница как панацея», а управляемая последовательность решений с ясными целями, измеримыми маркерами и понятными «окнами оценки». В «СамарМед Ассист» мы строим лечение из узких модулей: сначала проверяем базовую безопасность (дыхание, сознание, гемодинамика), затем возвращаем переносимость питья, стабилизируем вегетатику, собираем ночь, и только после этого занимаемся дневной выносливостью и бытовой устойчивостью. Такой ритм исключает полипрагмазию, снижает фармаконагрузку и превращает первые часы из хаотичной «борьбы с симптомами» в спокойный, предсказуемый маршрут. Семья получает роль партнёра, а не наблюдателя: по простым ориентирам понятно, что считать нормой, когда звонить врачу и на каком этапе модуль следует «выключить».
Получить дополнительную информацию – платный нарколог на дом самара
«Тёмные часы» вечера — время импульсивных решений. Мы даём короткие, нейтральные инструменты на 20–40 минут: тёплый душ, прогулка рядом с домом при устойчивых показателях, дыхательная практика, короткий созвон с «своим» человеком. Эти бесплатные шаги поддерживают ровный сон и уменьшают вероятность «дорогих» экстренных повторов.
Ознакомиться с деталями – narkologicheskaya-klinika-stoimost
Петрозаводск добавляет нюансы: влажные сумерки, ветер от Онежского озера, «звонкие» подъезды старого фонда. Поэтому бригада «СеверКар Медикус» приезжает в гражданской одежде, быстро и без лишних фраз. Координатор заранее уточняет код домофона, парковку, «окна связи» для близких; рекомендует приглушить верхний свет, подготовить воду комнатной температуры и свободный доступ к розетке. Такой «тихий сценарий» снижает сенсорную нагрузку, сглаживает пульсовые «пики» к вечеру и помогает заснуть без избыточной фармакологии.
Исследовать вопрос подробнее – помощь вывод из запоя в петрозаводске
Процесс помощи выстраивается поэтапно, что обеспечивает комплексное воздействие на организм и психику пациента.
Ознакомиться с деталями – https://narkologicheskaya-klinika-krasnodar14.ru/anonimnaya-narkologicheskaya-klinika-krasnodar/
Велакаст — комбинированный препарат на основе софосбувира (400 мг) и велпатасвира (100 мг), разработанный для лечения хронического гепатита С всех генотипов с эффективностью до 98%. Режим дозирования минималистичен: одна таблетка раз в сутки на протяжении 12 недель без каких-либо дополнительных препаратов. Ищете препарат велакаст? На velakast.com.ru доступна полная инструкция по применению, актуальные цены и отзывы пациентов. Препарат поставляется с сертификатами подлинности от Aprazer LTD, а перед покупкой каждый пациент получает бесплатную консультацию специалиста.
Мы не ограничиваемся капельницей. Сервис включает организационные, клинические и поведенческие элементы, которые уменьшают хаос и ускоряют восстановление. Ниже — ключевые блоки, которые пациенты отмечают в отзывах как наиболее полезные и «приземлённые».
Ознакомиться с деталями – частный нарколог на дом в самаре
Клиника предоставляет широкий спектр услуг, каждая из которых ориентирована на определённый этап лечения зависимости.
Изучить вопрос глубже – http://narkologicheskaya-klinika-krasnodar14.ru
Такая схема позволяет комплексно воздействовать на организм и уменьшить риски осложнений.
Получить дополнительную информацию – выезд нарколога на дом
«Как отмечает врач-нарколог Алексей Николаевич Прудников, «выезд нарколога на дом — это возможность стабилизировать состояние пациента в привычной обстановке, снизив стресс и риски осложнений».»
Получить больше информации – нарколог на дом вывод краснодар
Решение обратиться за наркологической помощью часто упирается в страх огласки и сомнения в эффективности. В «МедТрезвие» эти барьеры снимаются за счёт клинической достаточности и предсказуемой организации. Диагностика и вмешательства назначаются строго по показаниям: врач оценит риски сердечно-сосудистых осложнений, состояние печени и поджелудочной железы, уровень тревоги и сна, наличие депрессивных симптомов. При устойчивом состоянии часть процедур выполняется на дому, что снижает стресс, а при признаках нестабильности — рекомендуется стационар с круглосуточным наблюдением. Анонимность поддерживается шифрованием данных, разграничением доступа и информированием родственников только по согласию пациента. Финансовые условия обсуждаются заранее: семья понимает, из чего складывается смета, и может планировать ресурс без опасений «скрытых» позиций. В результате лечение становится управляемым процессом, где медицинская безопасность и уважение к личной жизни человека — обязательные элементы, а не рекламные обещания.
Детальнее – http://narkologicheskaya-klinika-moskva9.ru/horoshaya-narkologicheskaya-klinika-v-moskve/
1xbet g?ncel adres 1xbet g?ncel adres .
Чтобы соотнести риски и плотность наблюдения до очного осмотра, удобнее всего взглянуть на одну сводную таблицу. Это не замена решению врача, но понятный ориентир для семьи: чем выше вероятность осложнений, тем плотнее мониторинг и быстрее доступ к коррекциям.
Получить больше информации – http://narkologicheskaya-klinika-lyubercy0.ru
1xbet guncel 1xbet-giris-32.com .
JetronSport специализируется на производстве футбольной формы для команд любого уровня: взрослой, детской и вратарской. Производство использует премиальную ткань Quick-Dry с высокой эластичностью и терморегуляцией: каждое изделие сертифицировано по ГОСТам и защищено бессрочной гарантией на цвет и нанесение. Минимальный заказ — одна единица, а готовый комплект передаётся клиенту уже через один-три дня. Требуется футбольная форма на команду с нанесением номера и фамилии? На jetronsport.ru оформляется заказ с персональным нанесением номера и фамилии на каждую позицию. Линейки Jetron Space, Jetron Star и Jetron Winner предлагают усиленные швы, светоотражающие элементы и специальные вставки в зонах интенсивного потоотделения — решения, работающие на победу.
1xbet turkiye 1xbet-giris-35.com .
Этот информационный набор привлекает внимание множеством мелочей и странных ракурсов. Мы предлагаем взгляды, которые редко бывают полезны, но могут слегка разнообразить ваше знакомство с темой.
Вот – порно смотреть
Экстренный вывод из запоя на дому — это управляемая медицинская последовательность, а не «сильная капельница на удачу». В наркологической клинике «КалининградМедПрофи» мы выстраиваем помощь вокруг трёх опор: безопасность, конфиденциальность и предсказуемый результат. Выездная бригада приезжает круглосуточно, работает в гражданской одежде и без опознавательных знаков, чтобы не привлекать внимания соседей. Каждое вмешательство имеет измеримую цель, окно проверки и прозрачный критерий перехода к следующему шагу. Благодаря этому темп лечения остаётся мягким, а динамика — понятной для пациента и близких.
Ознакомиться с деталями – вывод из запоя с выездом калининград
Ниже — «скелет» визита. На месте врач адаптирует содержание под возраст, соматику, текущие лекарства и проявления абстиненции. Главная идея — быстро получить цифры, аккуратно запустить инфузию и заранее зафиксировать ориентиры, чтобы семья не импровизировала в «трудный час».
Получить дополнительные сведения – наркология вывод из запоя
Кодирование в «МедТрезвие» — не «волшебная кнопка», а логическое продолжение после стабилизации, когда организм готов к вмешательству, а пациент понимает механизм действия и ограничения метода. Врач подробно обсуждает цели, риски, противопоказания, ожидаемые эффекты и сроки наблюдения, оформляет информированное согласие и объясняет, как встроить процедуру в общий план. Важная часть — профилактика триггеров и обучение распознаванию ранних сигналов тяги: человек получает не только фармакологическую поддержку, но и практические инструменты саморегуляции, сценарии на «сложные дни», способы запросить помощь до того, как ситуация выйдет из-под контроля. Такая связка повышает вероятность устойчивой ремиссии, потому что работает одновременно на биологическом и поведенческом уровнях.
Углубиться в тему – https://narkologicheskaya-klinika-moskva9.ru/horoshaya-narkologicheskaya-klinika-v-moskve/
Клиника принимает 24/7 без очередей: ночной блок специально настроен под «трудные часы», когда усиливаются панические мысли и реактивность пульса. Для тех, кому легче дома, выездная служба приводит помощь в знакомое пространство; если нужны короткие контрольные включения, применяем видеосвязь вечером (15–20 минут), чтобы корректно настроить ритуалы засыпания, дыхательные циклы и «световые правила». Маршрут фиксируется в единой карте наблюдения — этот документ доступен команде по ролям и защищает от «повторов заново», когда формат меняется (дом – амбулатория – стационар).
Выяснить больше – лечение в наркологической клинике
1xbet tr 1xbet tr .
Формат
Углубиться в тему – narkologicheskaya-klinika-otzyvy
тайгер казино зеркало Если ищете tiger casino, лучше проверять несколько источников, но телеграм самый быстрый.
Детоксикация — это не одна «капельница», а серия мероприятий, направленных на снижение токсической нагрузки, выравнивание жизненно важных показателей и возвращение контроля над самочувствием. На старте врач проводит осмотр, при необходимости — экспресс-диагностику и ЭКГ, объясняет цели инфузионной терапии, отвечает на вопросы о препаратах и возможных ощущениях в первые часы после начала. Если состояние пациента позволяет, первые шаги выполняются дома: так легче согласиться на помощь и сохранить приватность. При выраженной интоксикации, обезвоживании, скачках давления и пульса, нарушении ориентации или риске судорог безопаснее выбрать стационар: расширенная диагностика и круглосуточный мониторинг снижает вероятность осложнений и даёт возможность гибко корректировать назначения. После купирования острых проявлений команда переходит к стабилизации — настройке сна, питания, гидратации и поддерживающих схем с понятными целями на ближайшие дни.
Получить больше информации – platnaya-narkologicheskaya-klinika-moskva
Анонимность — не опция, а стандарт: документы формулируются нейтрально, чеки не содержат «говорящих» формулировок, фото- и видеосъёмка исключены. При необходимости подписывается расширенное соглашение о конфиденциальности. Доступ к записи визита и параметрам процедуры разграничен по ролям; копии передаются по защищённому каналу и удаляются по регламенту хранения.
Получить больше информации – http://narkolog-na-dom-petrozavodsk15.ru/
В данном тексте собраны разнообразные случайные сведения и не вполне определённые идеи, которые могут вызвать интерес. Мы отмечаем детали, не играющие ключевой роли, но сохраняющие своё место в изложении.
Подробнее читать – купить керамический блок
Детокс — это не «чудо-капельница», а последовательность узких вмешательств. Цели понятны: восстановить объём циркулирующей жидкости, скорректировать электролиты, снизить токсическую нагрузку на печень, мягко приглушить тремор и тревогу, подготовить нервную систему к сну. При тошноте подключается противорвотная поддержка и гастропротекция, витаминные комплексы — по показаниям, кардиокоррекция — только после оценки рисков. Мы заранее проговариваем нормальные ощущения (умеренная слабость, сонливость, сухость во рту) и маркеры для немедленной связи. Такой реализм снижает импульсивность и делает результат измеримым: вечером — не «откат», а предсказуемая усталость, ночью — ровный сон, утром — стабильные показатели. На этой базе обсуждаются следующие шаги: амбулаторный график, короткие психотерапевтические сессии, при показаниях — кодирование после стабилизации и исключения противопоказаний.
Выяснить больше – http://narkologicheskaya-klinika-mytishchi9.ru
Старт — короткий скрининг с дежурным врачом: выясняем риски и бытовые условия, чтобы заранее выбрать формат, который будет и безопасным, и выполнимым в реальности. Согласуем окно визита или приёма с учётом трафика и подъезда; подсказываем, как подготовить помещение — тишина, вода, розетка, возможность прилечь. На месте фиксируем витальные показатели (АД, пульс, сатурация, температура), при показаниях делаем ЭКГ, запускаем детокс и озвучиваем ожидаемую «нормальную динамику» первых 6–12 часов. Все договорённости дублируем в памятке: режим, питьевой план, «красные флажки» и точное время контрольной связи. Если домашний формат перестаёт быть достаточным, переводим в стационар без пауз — темп лечения не теряется.
Получить дополнительные сведения – наркологическая клиника стационар
В этой статье-обзоре мы собрали данные, актуальность которых сомнительна, а факты — не всегда взаимосвязаны. Читатель сможет ознакомиться с разными мнениями, хотя вряд ли они существенно повлияют на его понимание темы.
Вот – казино онлайн
Вдохновитесь Алтаем! У нас https://altai.travel/ все виды отдыха и маршрутов по Горному Алтаю в одном месте. Мы – официальный туристический портал республики Алтай. Посетите сайт ознакомьтесь с маршрутами и турами, идеями для новых впечатлений. Узнайте все о туроператорах, еде, местах для проживания на любой бюджет. Подробнее на сайте.
Вывод из запоя — это управляемая медицинская процедура с предсказуемыми шагами, а не «сильная капельница, которая помогает всем». В наркологической клинике «СеверКар Медикус» мы строим лечение как маршрут: цель > инструмент > маркеры контроля > окно повторной оценки. Такой подход снижает лекарственную нагрузку, ускоряет восстановление сна и аппетита и делает процесс понятным пациенту и семье. Мы работаем круглосуточно, организуем выезд нарколога на дом, разворачиваем тихую, безопасную среду и соблюдаем анонимность: нейтральные формулировки, гражданская одежда специалистов, немаркированный транспорт и «беззвучные» уведомления.
Детальнее – https://vyvod-iz-zapoya-petrozavodsk15.ru/vyvod-iz-zapoya-na-domu-petrozavodsk
1xbet ?yelik 1xbet ?yelik .
Наркологическая клиника «ПолярМед Центр» — это пространство круглосуточной помощи, где медицинская точность сочетается с бережным сервисом и конфиденциальными процедурами. Мы строим терапию как последовательность проверяемых шагов: ставим понятную цель, выбираем подходящий инструмент, заранее определяем маркеры контроля и фиксируем время повторной оценки. Такая дисциплина исключает «универсальные сильные капельницы» и заменяет их модульными решениями с предсказуемым эффектом. Пациент и его близкие на каждом этапе понимают, почему именно такое назначение выбрано сейчас и в какой момент мы ожидаем улучшение самочувствия.
Узнать больше – наркологическая клиника нарколог в мурманске
Карта делает решения прозрачными: если критерий не достигнут, меняется ровно один параметр с назначением новой точки контроля. Это сохраняет причинно-следственную связь и уменьшает общую фармаконагрузку без компромиссов по безопасности.
Разобраться лучше – платный нарколог на дом петрозаводск
Наркологическая клиника в Ростове-на-Дону предоставляет полный спектр услуг по диагностике, лечению и реабилитации пациентов с алкогольной и наркотической зависимостью. Применение современных медицинских протоколов и индивидуальный подход к каждому пациенту обеспечивают высокую эффективность терапии и снижение риска рецидивов.
Ознакомиться с деталями – наркологическая клиника вывод из запоя ростов-на-дону
Скачайте активатор для Windows 11 и получите все функции Pro-версии бесплатно.
Подробнее – Скачать патч для активации Windows 11
Сначала короткий осмотр и проверка совместимостей, затем — инфузионная терапия с мониторингом давления/пульса/сатурации, после — инструктаж семьи и назначение контрольного контакта. Такой порядок снижает тревогу и делает ночь предсказуемой: понятно, чего ждать, когда отдыхать и в какой момент связываться с врачом.
Детальнее – http://vyvod-iz-zapoya-sergiev-posad8.ru
Анонимность — не опция, а стандарт: документы формулируются нейтрально, чеки не содержат «говорящих» формулировок, фото- и видеосъёмка исключены. При необходимости подписывается расширенное соглашение о конфиденциальности. Доступ к записи визита и параметрам процедуры разграничен по ролям; копии передаются по защищённому каналу и удаляются по регламенту хранения.
Изучить вопрос глубже – нарколог на дом вывод из запоя петрозаводск
Откройте для себя скрытые страницы истории и малоизвестные научные открытия, которые оказали колоссальное влияние на развитие человечества. Статья предлагает свежий взгляд на события, которые заслуживают большего внимания.
Смотри, что ещё есть – https://gezon1.site.transip.me/blog-gezond-balans/6-redenen-waarom-cayennepeper-gezond-is
1 x bet giri? 1xbet-giris-28.com .
Эта публикация дает возможность задействовать различные источники информации и представить их в удобной форме. Читатели смогут быстро найти нужные данные и получить ответы на интересующие их вопросы. Мы стремимся к четкости и доступности материала для всех!
Исследовать вопрос подробнее – https://clubcabana.net.in/choosing-best-resort-for-day-outing-tips
Анонимность — не опция, а стандарт: документы формулируются нейтрально, чеки не содержат «говорящих» формулировок, фото- и видеосъёмка исключены. При необходимости подписывается расширенное соглашение о конфиденциальности. Доступ к записи визита и параметрам процедуры разграничен по ролям; копии передаются по защищённому каналу и удаляются по регламенту хранения.
Узнать больше – нарколог на дом недорого
Этот информативный материал предлагает содержательную информацию по множеству задач и вопросов. Мы призываем вас исследовать различные идеи и факты, обобщая их для более глубокого понимания. Наша цель — сделать обучение доступным и увлекательным.
Получить исчерпывающие сведения – https://primenewsnet.com/%E0%A4%AC%E0%A4%BF%E0%A4%B9%E0%A4%BE%E0%A4%B0-%E0%A4%95%E0%A5%80-%E0%A4%95%E0%A5%8B%E0%A4%B8%E0%A5%80-%E0%A4%AC%E0%A4%A8-%E0%A4%97%E0%A4%88-%E0%A4%85%E0%A4%AE%E0%A5%87%E0%A4%B0%E0%A4%BF%E0%A4%95
Этот информационный обзор станет отличным путеводителем по актуальным темам, объединяющим важные факты и мнения экспертов. Мы исследуем ключевые идеи и представляем их в доступной форме для более глубокого понимания. Читайте, чтобы оставаться в курсе событий!
А что дальше? – https://nmaq.nysonline.org/2024/02/26/registration-event-2
1xbet giri? g?ncel 1xbet giri? g?ncel .
Ниже — «скелет» визита. На месте врач адаптирует содержание под возраст, соматику, текущие лекарства и проявления абстиненции. Главная идея — быстро получить цифры, аккуратно запустить инфузию и заранее зафиксировать ориентиры, чтобы семья не импровизировала в «трудный час».
Детальнее – наркологический вывод из запоя ставрополь
Все шаги фиксируются в карте наблюдения. Если динамика «плоская», меняется один параметр (скорость/объём/последовательность), и через оговорённое окно проводится повторная оценка. Это снижает риск побочных реакций и сохраняет дневную ясность.
Исследовать вопрос подробнее – https://vyvod-iz-zapoya-v-kaliningrade15.ru/klinika-vyvod-iz-zapoya-kaliningrad
Этот информационный набор привлекает внимание множеством мелочей и странных ракурсов. Мы предлагаем взгляды, которые редко бывают полезны, но могут слегка разнообразить ваше знакомство с темой.
Вот – джекпот
birxbet 1xbet-giris-32.com .
Эта статья сочетает познавательный и занимательный контент, что делает ее идеальной для любителей глубоких исследований. Мы рассмотрим увлекательные аспекты различных тем и предоставим вам новые знания, которые могут оказаться полезными в будущем.
А что дальше? – https://kaori-xiang.com/2022/05/19/%E3%80%8C%E9%B6%8F%E8%82%89%E3%81%A8%E6%98%A5%E5%A4%A7%E6%A0%B9%E3%81%AE%E9%BB%92%E9%85%A2%E3%83%AC%E3%83%B3%E3%83%81%E3%83%B3%E8%92%B8%E3%81%97%E9%A6%99%E3%81%AE%E9%BB%92%E9%85%A2%E3%82%BD%E3%83%BC
1xbet turkey 1xbet turkey .
Мы предлагаем вам окунуться в океан любопытных фактов и вдохновляющих историй. Эта публикация поможет расширить горизонты, разбудить интерес к науке и истории и увидеть мир с новой стороны.
Изучить эмпирические данные – https://bloggercorem.com/2025/04/24/ishan-kishan-ka-rahasyamay-out
https://librairienumeriquemonaco.com/docs/pages/code_promo_1xbet_vip.html
Эта статья сочетает познавательный и занимательный контент, что делает ее идеальной для любителей глубоких исследований. Мы рассмотрим увлекательные аспекты различных тем и предоставим вам новые знания, которые могут оказаться полезными в будущем.
Изучить вопрос глубже – https://www.rowingact.org.au/logs-in-the-lake
Эта статья сочетает познавательный и занимательный контент, что делает ее идеальной для любителей глубоких исследований. Мы рассмотрим увлекательные аспекты различных тем и предоставим вам новые знания, которые могут оказаться полезными в будущем.
А есть ли продолжение? – https://gothamdoughnuts.com/post/jam-filled-delights-explore-flavours-of-jam-doughnuts-melbourne
xbet xbet .
Эта информационная статья охватывает широкий спектр актуальных тем и вопросов. Мы стремимся осветить ключевые факты и события с ясностью и простотой, чтобы каждый читатель мог извлечь из нее полезные знания и полезные инсайты.
Изучить эмпирические данные – https://nptpizzeria.com/producto/mens-classic-tee-7
Откройте для себя скрытые страницы истории и малоизвестные научные открытия, которые оказали колоссальное влияние на развитие человечества. Статья предлагает свежий взгляд на события, которые заслуживают большего внимания.
Есть чему поучиться – https://www.figurnews.com/2025/07/sosialisasi-humanis-kasatgas-preventif-ops-patuh-toba-2025-edukasi-pengendara-di-jalan.html
В этом обзорном материале представлены увлекательные детали, которые находят отражение в различных аспектах жизни. Мы исследуем непонятные и интересные моменты, позволяя читателю увидеть картину целиком. Погрузитесь в мир знаний и удивительных открытий!
Продолжить чтение – https://world-dissected.com/2022/04/19/fall-in-love-with-new-poetry
Этот обзор медицинских исследований собрал самое важное из последних публикаций в области медицины. Мы проанализировали ключевые находки и представили их в доступной форме, чтобы читатели могли легко ориентироваться в актуальных темах. Этот материал станет отличным подспорьем для изучения медицины.
Подробнее можно узнать тут – https://www.nashermak.ru/reabilitacziya-ot-alkogolnoj-zavisimosti-v-krasnoyarske-put-k-novoj-zhizni
Этот обзор дает возможность взглянуть на историю и науку под новым углом. Мы представляем редкие факты, неожиданные связи и значимые события, которые помогут вам глубже понять развитие цивилизации и роль человека в ней.
Практические советы ждут тебя – https://demeter.elecon.ro/programarea-lucrarilor-o-necesitate
Эта статья сочетает в себе как полезные, так и интересные сведения, которые обогатят ваше понимание насущных тем. Мы предлагаем практические советы и рекомендации, которые легко внедрить в повседневную жизнь. Узнайте, как улучшить свои навыки и обогатить свой опыт с помощью простых, но эффективных решений.
Что ещё? Расскажи всё! – https://andorrawithlove.com/hotel-andorra-center-andorre-la-vieille
Эта статья сочетает познавательный и занимательный контент, что делает ее идеальной для любителей глубоких исследований. Мы рассмотрим увлекательные аспекты различных тем и предоставим вам новые знания, которые могут оказаться полезными в будущем.
А есть ли продолжение? – https://www.entdailyng.com/seyi-vibez-billion-dollar-baby-2-0-album
В данной обзорной статье представлены интригующие факты, которые не оставят вас равнодушными. Мы критикуем и анализируем события, которые изменили наше восприятие мира. Узнайте, что стоит за новыми открытиями и как они могут изменить ваше восприятие реальности.
Что ещё нужно знать? – https://shininguttarakhandnews.com/tag/%E0%A4%AE%E0%A4%B8%E0%A5%82%E0%A4%B0%E0%A5%80-%E0%A4%A5%E0%A4%BE%E0%A4%A8%E0%A4%BE
Эта статья погружает вас в увлекательный мир знаний, где каждый факт становится открытием. Мы расскажем о ключевых исторических поворотных моментах и научных прорывах, которые изменили ход цивилизации. Поймите, как прошлое формирует настоящее и как его уроки могут помочь нам строить будущее.
Что скрывают от вас? – https://radiantandbrighter.com/2020/12/24/ethnicity-diversity-in-the-scottish-workforce
Мы предлагаем вам окунуться в океан любопытных фактов и вдохновляющих историй. Эта публикация поможет расширить горизонты, разбудить интерес к науке и истории и увидеть мир с новой стороны.
Исследовать вопрос подробнее – https://eyelabshop.com/product/8-660913_m_0044
В этом обзорном материале представлены увлекательные детали, которые находят отражение в различных аспектах жизни. Мы исследуем непонятные и интересные моменты, позволяя читателю увидеть картину целиком. Погрузитесь в мир знаний и удивительных открытий!
Интересует подробная информация – https://first-tandemsprint.com/switch-image_740x520
В этой статье-обзоре мы соберем актуальную информацию и интересные факты, которые освещают важные темы. Читатели смогут ознакомиться с различными мнениями и подходами, что позволит им расширить кругозор и глубже понять обсуждаемые вопросы.
Как это работает — подробно – https://primenewsnet.com/discover-the-newest-waterproof-and-rugged-cameras-of-2020
Этот обзор посвящен успешным стратегиям избавления от зависимости, включая реальные примеры и советы. Мы разоблачим мифы и предоставим читателям достоверную информацию о различных подходах. Получите опыт многообразия методов и найдите подходящий способ для себя!
Подробнее можно узнать тут – https://weburologiya.ru/arbidol-i-alkogol-kak-pravilno-prinimat-lekarstva
1xbet mobi 1xbet-giris-29.com .
В этой статье представлен занимательный и актуальный контент, который заставит вас задуматься. Мы обсуждаем насущные вопросы и проблемы, а также освещаем истории, которые вдохновляют на действия и изменения. Узнайте, что стоит за событиями нашего времени!
Обратитесь за информацией – https://www.ninebooking.com/hotel/lacol-khaoyai-a-chatrium-collection-%E0%B8%A5%E0%B8%B2%E0%B9%82%E0%B8%84%E0%B9%88-%E0%B9%80%E0%B8%82%E0%B8%B2%E0%B9%83%E0%B8%AB%E0%B8%8D%E0%B9%88
Эта статья предлагает захватывающий и полезный контент, который привлечет внимание широкого круга читателей. Мы постараемся представить тебе идеи, которые вдохновят вас на изменения в жизни и предоставят практические решения для повседневных вопросов. Читайте и вдохновляйтесь!
Получить профессиональную консультацию – https://primenewsnet.com/academy-of-country-music-awards-hosts-this-years-fashion-show
В этой информационной статье вы найдете интересное содержание, которое поможет вам расширить свои знания. Мы предлагаем увлекательный подход и уникальные взгляды на обсуждаемые темы, побуждая пользователей к активному мышлению и критическому анализу.
Узнать напрямую – https://www.ninebooking.com/hotel/lacol-khaoyai-a-chatrium-collection-%E0%B8%A5%E0%B8%B2%E0%B9%82%E0%B8%84%E0%B9%88-%E0%B9%80%E0%B8%82%E0%B8%B2%E0%B9%83%E0%B8%AB%E0%B8%8D%E0%B9%88
Эта статья предлагает живое освещение актуальной темы с множеством интересных фактов. Мы рассмотрим ключевые моменты, которые делают данную тему важной и актуальной. Подготовьтесь к насыщенному путешествию по неизвестным аспектам и узнайте больше о значимых событиях.
Где почитать поподробнее? – https://www.wowsupermarket.net/contact
Городской ритм Петрозаводска с озёрным ветром, короткими сумерками и сезонной влажностью повышает сенсорную нагрузку в вечерние часы, поэтому наш маршрут спроектирован «мягко». Координатор заранее уточняет подъезд, парковку, код домофона, рекомендует «тихий режим» связи и присылает нейтральное уведомление о визите. Бригада приходит в гражданской одежде, сумки — без логотипов, разговоры — короткими фразами. Такое поведение снижает у пациента и семьи реактивность, выравнивает вариабельность ЧСС к сумеркам и уменьшает потребность «усиливать» схему на ночь. Если на предзвонке выявлены «красные флаги» — неукротимая рвота, выраженная дезориентация, «скачущий» ритм, одышка — мы предлагаем стационар сразу, чтобы не терять время на повторные маршруты.
Разобраться лучше – https://narkolog-na-dom-petrozavodsk15.ru/narkolog-petrozavodsk-otzyvy
Эта обзорная заметка содержит ключевые моменты и факты по актуальным вопросам. Она поможет читателям быстро ориентироваться в теме и узнать о самых важных аспектах сегодня. Получите краткий курс по современной информации и оставайтесь в курсе событий!
Не упусти шанс – https://www.wowsupermarket.net/contact
В этой публикации мы предлагаем подробные объяснения по актуальным вопросам, чтобы помочь читателям глубже понять их. Четкость и структурированность материала сделают его удобным для усвоения и применения в повседневной жизни.
Нажмите, чтобы узнать больше – https://3analytics.com/pharmacovigilance-for-medical-devices-key-differences-and-challenges
В этом информативном тексте представлены захватывающие события и факты, которые заставят вас задуматься. Мы обращаем внимание на важные моменты, которые часто остаются незамеченными, и предлагаем новые перспективы на привычные вещи. Подготовьтесь к тому, чтобы быть поглощенным увлекательными рассказами!
Хочешь знать всё? – https://www.od-bau-gmbh.de/image-layers_5-3
В этом обзорном материале представлены увлекательные детали, которые находят отражение в различных аспектах жизни. Мы исследуем непонятные и интересные моменты, позволяя читателю увидеть картину целиком. Погрузитесь в мир знаний и удивительных открытий!
Перейти к статье – https://konnodentalvillage.jp/archives/81
Профессиональная веб-студия разрабатывает сайты под ключ и занимается их эффективным SEO-продвижением. Помогает бизнесу заявлять о себе в сети и увеличивать продажи. Подробнее об услугах на сайте https://inuniver24.ru/
1xbet yeni adresi 1xbet yeni adresi .
самые крутые букеты zakazat-cveti-moskva.ru .
«Мишкины грёзы» — агентство, которое профессионально занимается продвижением клиник и врачей. Михаил Коркишко, основатель агентства, с 2016 года лично ведёт проекты и досконально разбирается в специфике каждого медицинского бизнеса. Агентство строит персональные стратегии с чёткими KPI и реальными сроками — не шаблонные решения, а точечная работа на рост прибыли. Подробнее об услугах и подходе к продвижению медицинского бизнеса на https://mishkingrezy.ru/ — здесь проводят комплексный аудит, выявляют точки роста и запускают рекламу, которая приводит пациентов.
Чтобы у пациента и близких не возникал вопрос «что дальше», мы используем карту первых часов. Она задаёт цели, действия, контроль и критерии перехода между этапами. Такой подход экономит минуты и исключает импровизации «ради уверенности».
Выяснить больше – https://narkologicheskaya-klinika-v-kaliningrade15.ru/
В этой статье мы рассмотрим современные достижения в области медицины, включая инновационные методы лечения и диагностики. Мы обсудим важность профилактики заболеваний и роль технологий в улучшении качества здравоохранения. Читатели узнают о влиянии медицины на повседневную жизнь и ее значение для современного общества.
Углубиться в тему – сладкий чай после запоя
Detailed comparisons https://bestguitarreview.com/ make it easy to choose between acoustic and electric guitar models.
Check https://www.bestheadphonereview.com for honest headphone reviews and find the best over ear wireless and studio models.
Top rated resource best condenser microphone reviews microphones by use case including home studio and professional recording.
AI-музыкальная платформа https://generator-pesen.online/ предлагает автоматическую генерацию треков для творчества любого уровня. Генератор песен ИИ онлайн бесплатно позволяет создать уникальную композицию за минуты — без музыкального образования и сложных программ. Достаточно ввести текст или задать стиль, и нейросеть подберёт мелодию, ритм, аранжировку и даже вокальную подачу. Сервис подходит для саундтреков, соцсетей, подкастов и рекламных роликов. Гибкие настройки жанра, темпа и настроения дают полный контроль над звучанием. Запускайте треки без затрат — современные AI-технологии открывают новый уровень музыкального творчества и делают производство контента доступным каждому.
Самое интересное: https://metrpro.ru/blog/razrabotka-3d-modeley-agr-dlya-mka-kak-zakazat-idealno-podhodyaschie-nizkopoligonalnye-i-vysokopoligonalnye-modeli.html
В этой публикации мы обсуждаем современные методы лечения различных заболеваний. Читатели узнают о новых медикаментах, терапиях и исследованиях, которые активно применяются для лечения. Мы нацелены на то, чтобы предоставить практические знания, которые могут помочь в борьбе с недугами.
Изучить вопрос глубже – алкоголизм и суицид
Чтобы у пациента и близких не возникал вопрос «что дальше», мы используем карту первых часов. Она задаёт цели, действия, контроль и критерии перехода между этапами. Такой подход экономит минуты и исключает импровизации «ради уверенности».
Получить дополнительные сведения – https://narkologicheskaya-klinika-v-kaliningrade15.ru/vyvod-iz-zapoya-kaliningrad-staczionar/
сделать куни
Этот документ охватывает важные аспекты медицинской науки, сосредотачиваясь на ключевых вопросах, касающихся здоровья населения. Мы рассматриваем свежие исследования, клинические рекомендации и лучшие практики, которые помогут улучшить качество лечения и профилактики заболеваний. Читатели получат возможность углубиться в различные медицинские дисциплины.
Подробнее тут – острое отравление никотином
Лечение выводится поэтапно, чтобы обеспечить безопасность и максимальную эффективность терапии. Каждый этап продуман и адаптирован под индивидуальные особенности пациента.
Ознакомиться с деталями – выезд нарколога на дом цена красноярск
1xbet g?ncel 1xbet g?ncel .
Часто предприниматели объединяют понятия тендер и госзакупки, так как обе процедуры связаны с конкурсным выбором поставщика. Однако между ними существуют определённые различия, которые важно понимать перед началом работы в этой сфере.
Не упустите важные детали – тендерное сопровождение закупок
В этой публикации мы исследуем ключевые аспекты здоровья, включая влияние образа жизни на благополучие. Читатели узнают о важности правильного питания, физической активности и психического здоровья. Мы предоставим практические советы и рекомендации для поддержания здоровья и развития профилактических подходов.
Получить больше информации – https://alkogolikum.ru/lechenie-narkomanii
Этот медицинский обзор сосредоточен на последних достижениях, которые оказывают влияние на пациентов и медицинскую практику. Мы разбираем инновационные методы лечения и исследований, акцентируя внимание на их значимости для общественного здоровья. Читатели узнают о свежих данных и их возможном применении.
Исследовать вопрос подробнее – как выявить болезнь альцгеймера на ранней стадии
Советы автомехаников https://proavtomaster.com полезные рекомендации по ремонту и обслуживанию автомобиля. Узнайте, как продлить срок службы двигателя, подвески и электрооборудования, избежать частых поломок и сэкономить на ремонте благодаря практическим советам специалистов.
Профессиональный автосервис https://km-motors.org кузовной ремонт, покраска авто, ремонт двигателя и подвески. Компьютерная диагностика, автоэлектрика, ТО, замена масла, фильтров и шиномонтаж. Работаем быстро, качественно и по стандартам производителей.
Компания «Заборыч» https://заборыч.рф более 10 лет осуществляет строительство заборов из профнастила и сетки рабицы. Мы производим заборы для частных лиц и производственных объектов. За это время мы построили десятки объектов, от простых ограждений до сложных ландшафтных комплексов. Наши клиенты остаются довольны качеством работ и сроками реализации проектов.
шлюхи проверено порно скрыть
1xbet g?ncel 1xbet g?ncel .
В современной наркологии применяется широкий спектр методов, позволяющих эффективно бороться с алкогольной зависимостью. В Краснодаре для этого используются как медикаментозные, так и психотерапевтические подходы, которые сочетаются для достижения стабильной ремиссии. Подробнее о методах лечения можно узнать на сайте Всемирной организации здравоохранения.
Детальнее – наркологическое лечение алкоголизма
1xbetgiri? 1xbetgiri? .
новые казино с бездепозитными бонусами Важно помнить, что каждый онлайн казино с бездепозитными бонусами имеет свои условия отыгрыша, которые необходимо внимательно изучить.
Этот документ охватывает важные аспекты медицинской науки, сосредотачиваясь на ключевых вопросах, касающихся здоровья населения. Мы рассматриваем свежие исследования, клинические рекомендации и лучшие практики, которые помогут улучшить качество лечения и профилактики заболеваний. Читатели получат возможность углубиться в различные медицинские дисциплины.
Получить больше информации – https://alkogolikum.ru/stati/implanty-ot-narkozavisimosti.html
ева казино телеграм Я сначала искал eva casino через поиск, но нашёл в телеграме.
cricket live streaming info
Этот обзор посвящен успешным стратегиям избавления от зависимости, включая реальные примеры и советы. Мы разоблачим мифы и предоставим читателям достоверную информацию о различных подходах. Получите опыт многообразия методов и найдите подходящий способ для себя!
Детальнее – алкоголизм реальные истории
Платная частная клиника https://mypsyhealth.ru/services/drug-treatment-hospital психиатрии, неврологии и наркологии — анонимное лечение и консультации специалистов. Диагностика, помощь при зависимостях, неврологических и психических расстройствах. Конфиденциальность, опытные врачи и комфортные условия.
Профессиональная помощь детям https://neuropsy-centr.ru с нарушениями речи и развития. Высококвалифицированные врачи, работаем с самыми тяжелыми случаями, 99% положительных отзывов, новейшее оборудование и инвентарь. Государственная лицензия: Л035-01298-77/01604531 от 09.12.24
Новое в категории: https://myropol.ru/2010-10-03-13-39-36/
строю модульный дом модульные дома цена московской области
Эта медицинская заметка содержит сжатую информацию о новых находках и методах в области здравоохранения. Мы предлагаем читателям свежие данные о заболеваниях, профилактике и лечении. Наша цель — быстро и доступно донести важную информацию, которая поможет в повседневной жизни и понимании здоровья.
Получить дополнительную информацию – наркологические центры санкт петербурга
капитальный ремонт здания remont-zdaniya-1.ru .
В этой публикации мы рассматриваем важную тему борьбы с зависимостями, включая алкогольную и наркотическую зависимости. Мы обсудим методы лечения, реабилитации и поддержку, которые могут помочь людям, столкнувшимся с этой проблемой. Читатели узнают о перспективах выздоровления и важности комплексного подхода.
Детальнее – https://narcolog-life.com/aktery-i-aktrisy-umershie-ot-alkogolizma
Запой – это критическое состояние, возникающее при длительном или чрезмерном употреблении алкоголя, когда организм не может справиться с токсическим воздействием этанола. Такое состояние характеризуется накоплением токсинов, разрушением внутренних органов и сильным нарушением психоэмоционального баланса. Когда запой продолжается, у человека развивается абстинентный синдром, сопровождающийся не только физическим истощением, но и резкими изменениями в психике: от выраженной тревожности и агрессии до галлюцинаций и потери ориентации.
Детальнее – нарколог на дом недорого красноярск
https://byroremonta.ru/ – Ремонт стиральных машин, Ремонт стиральных машин в Москве, Ремонт стиральных машин недорого, Ремонт стиральных машин на дому, Ремонт стиральных машин на дому в Москве, Ремонт стиральных машинок.
1xbet turkiye 1xbet-giris-28.com .
Этот обзор сосредоточен на различных подходах к избавлению от зависимости. Мы изучим традиционные и альтернативные методы, а также их сочетание для достижения максимальной эффективности. Читатели смогут открыть для себя новые стратегии и подходы, которые помогут в их борьбе с зависимостями.
Исследовать вопрос подробнее – https://alkogolikum.ru/stati/kak-preodolet-zapoj-i-vernutsya-k-rabote.html
Финансовые инструменты позволяют заказчику убедиться в надежности участника и его готовности выполнить обязательства по контракту. При этом грамотное сопровождение снижает вероятность финансовых рисков и помогает правильно оформить документы для банка.
Разгадайте все загадки – тендерное сопровождение под ключ цена
компьютер не видеть планшет через usb причины и решение проблемы подключения
Die Support-Optionen von Bahigo Schweiz ermoglichen eine problemlose Kommunikation mit kompetenten Mitarbeitern.
bahigo 75 https://bahigo-suisse.ch/
1xbet turkiye 1xbet turkiye .
Лечение выводится поэтапно, чтобы обеспечить безопасность и максимальную эффективность терапии. Каждый этап продуман и адаптирован под индивидуальные особенности пациента.
Исследовать вопрос подробнее – вызов нарколога на дом в красноярске
eva casino вход Я сначала долго не мог понять как войти в ева казино, потом нашёл телеграм и там была инструкция.
А вы не несете ответственность за ваших официальных представителей, которые представляют ваш бренд в странах СНГ? https://gipnozpro.ru Причёт тут почта России, СПСР это самостоятельная курьерская служба.Бро, была абсолютно идиентичная ситуация у мну в декабре.Трек не бился пол недели, прошли выходные звоню в контору-курьерку, называю трек, говорят нет такого, я к тс так мол и так, тот грит все ровно, трек верный ожидай! Херакс и вечером курьер названивает, оказыва4тся они мне еще в субботу хотели вручить, но почему то не дозвонились))Все пучком, бро.Почта мало кому интересна в наши дни, на курьерки много сваливается, вот они 3ак могут разгребают…
Ниже — ориентировочная матрица. Она не заменяет осмотр, но помогает понять логику выбора места и объёма вмешательств. Цель — не «больше процедур», а «точно по показаниям» с понятными окнами оценки и чистой обратной связью для семьи.
Узнать больше – анонимная наркологическая клиника в челябинске
Такая схема позволяет комплексно воздействовать на организм и уменьшить риски осложнений.
Получить дополнительные сведения – http://narkolog-na-dom-v-krasnodare14.ru/narkolog-krasnodar-anonimno/https://narkolog-na-dom-v-krasnodare14.ru
1xbet giris 1xbet giris .
После завершения основной инфузионной терапии врач наблюдает за состоянием пациента ещё в течение 30–60 минут. Если отсутствуют осложнения и параметры стабилизированы, врач даёт рекомендации по дальнейшему восстановлению, включая приём анксиолитиков, соблюдение питьевого режима, лёгкой диеты и исключение стрессов. Также составляется индивидуальный план наблюдения: возможны повторные визиты врача через сутки, двое или трое суток. При необходимости пациенту или его близким предоставляется контакт психотерапевта или проводится предварительное консультирование по дальнейшему лечению зависимости.
Подробнее – скорая наркологическая помощь в новосибирске
Этот обзор сосредоточен на различных подходах к избавлению от зависимости. Мы изучим традиционные и альтернативные методы, а также их сочетание для достижения максимальной эффективности. Читатели смогут открыть для себя новые стратегии и подходы, которые помогут в их борьбе с зависимостями.
Детальнее – https://narkologiya.pro/lechenie/kak-izbavitsya-ot-pyanstva
1xbet spor bahislerinin adresi 1xbet-giris-32.com .
Скоро лето и жара купить кондиционер с установкой в московской области широкий выбор сплит-систем для квартиры, дома и офиса. Поможем подобрать модель по площади, бюджету и характеристикам. Установка под ключ, гарантия, доставка и выгодные цены на популярные бренды.
При поступлении вызова специалист прибывает по указанному адресу в течение 30–60 минут. На этом этапе врач проводит тщательный осмотр, измеряет артериальное давление, пульс и уровень кислорода в крови. Также собирается подробный анамнез: выясняется, сколько дней длился запой, какие напитки употреблялись, есть ли хронические заболевания, и были ли предыдущие эпизоды алкогольной интоксикации. Эти данные помогают составить оптимальный план лечения.
Подробнее можно узнать тут – http://narcolog-na-dom-krasnoyarsk0.ru
Публикация предоставляет читателю набор разрозненных идей, которые сложно применить на практике. Мы лишь слегка касаемся разных точек зрения, не углубляясь в анализ и не предлагая никаких выводов.
Вот – милфы
Top web design https://webdesignfirmshub.com companies worldwide: a selection of the best studios for website and interface creation. Learn about case studies, design approaches, UX/UI solutions, and innovations to help you choose a reliable contractor for your digital projects.
Top branding agencies https://topbrandagencies.com worldwide: the best studios for brand development, corporate identity, and positioning. Portfolio reviews, strategies, and case studies will help you choose a reliable agency for business development and brand enhancement.
Top UX/UI design https://uiuxagencies.com agencies: the best companies creating user-friendly interfaces and digital products. Explore case studies, methodologies, and approaches to UX/UI to choose a reliable contractor for your website or app.
Этот информационный набор привлекает внимание множеством мелочей и странных ракурсов. Мы предлагаем взгляды, которые редко бывают полезны, но могут слегка разнообразить ваше знакомство с темой.
Вот – секс шоп
Ищете костюм купить в екатеринбурге? Зайдите на сайт kvalitelli.ru/ekb где представлены мужские костюмы в широком ассортименте, включая двубортные модели и костюмы-тройки. В обширном каталоге мужские рубашки и сорочки, рубашки для торжеств и многое другое. У нас постоянные акции – что позволит купить качественный костюм по выгодной цене. Изучите наш ассортимент на сайте.
Все шаги фиксируются в карте наблюдения. Если динамика «плоская», меняется один параметр (скорость/объём/последовательность), и через оговорённое окно проводится повторная оценка. Это снижает риск побочных реакций и сохраняет дневную ясность.
Выяснить больше – http://narkologicheskaya-klinika-v-kaliningrade15.ru
На нашем сайте вы можете скачать активатор для Windows 11 абсолютно бесплатно и навсегда забыть о водяных знаках!
Подробнее – Генератор ключей Windows 11 рабочий
В этой публикации мы обсуждаем современные методы лечения различных заболеваний. Читатели узнают о новых медикаментах, терапиях и исследованиях, которые активно применяются для лечения. Мы нацелены на то, чтобы предоставить практические знания, которые могут помочь в борьбе с недугами.
Разобраться лучше – таблетки от запоя вместо капельницы хорошие
Pro100-Stone — тульская компания, выпускающая на заказ столешницы, подоконники, мойки, барные стойки и прочие изделия из искусственного и натурального камня. Палитра материалов включает более 1200 вариантов цветов и текстур от известных производителей — Grandex, Hi-Macs, Staron, Tristone. Ищете столешница из акрилового камня? На pro100-stone.ru представлен полный каталог изделий и онлайн-расчёт стоимости. Производственный цикл занимает от 5 дней и включает все этапы — от выезда замерщика до финального монтажа. Выезд специалиста для первичного замера предоставляется бесплатно.
Sofokast.ru — профильный ресурс, посвящённый препаратам прямого противовирусного действия при хроническом гепатите С. Портфель продуктов охватывает три наименования: Sofokast Plus (софосбувир 400 мг + даклатасвир 60 мг), Velakast (софосбувир 400 мг + велпатасвир 100 мг) и Daclatasvir (60 мг). Ищете препарат софокаст? На сайте sofokast.ru опубликованы клинические рекомендации Минздрава РФ по МКБ-10 код B18.2 с актуальными схемами терапии. Курс лечения составляет 12–24 недели в зависимости от выбранной комбинации. Вся продукция соответствует принципам доказательной медицины и показана пациентам старше 18 лет.
1xbet resmi 1xbet-giris-42.com .
Основные задачи
Исследовать вопрос подробнее – наркологическое лечение алкоголизма краснодар
Медицинская публикация представляет собой свод актуальных исследований, экспертных мнений и новейших достижений в сфере здравоохранения. Здесь вы найдете информацию о новых методах лечения, прорывных технологиях и их практическом применении. Мы стремимся сделать актуальные медицинские исследования доступными и понятными для широкой аудитории.
Получить дополнительные сведения – как страны борются с наркоманией
xbet xbet .
Бесплатный ключ для Windows 11 — только у нас, обновлено в 2026 году!
Подробнее – Как активировать Windows 11 без ключа
В статье-обзоре представлены данные сомнительной актуальности и факты без явной взаимосвязи. Читатель ознакомится с разными мнениями, хотя они вряд ли существенно изменят его представление о теме.
Подробнее читать – блоки для строительства дома
Дубликаты номеров https://avtostrahovka36.ru в Воронеже — изготовление и восстановление регистрационных знаков по ГОСТ. Срочно за 1 день, качественные материалы, соответствие требованиям и выгодные цены. Оформление быстро и без очередей.
Практик о заборах sinta-kedr.ru честный разбор материалов, установки и стоимости. Узнайте плюсы и минусы разных видов заборов, частые ошибки и реальные сроки службы. Полезные рекомендации перед покупкой и монтажом ограждений.
A non-profit organization https://linkimpact.org dedicated to supporting multicultural families, environmental protection, volunteerism, and language and cultural exchange.
Этот обзор предлагает свежий взгляд на предметы, которые и без того привычны. Мы упоминаем факты, не имеющие большого значения, и события с неясной важностью, но они присутствуют здесь.
Подробнее читать – купить строительные материалы
В данной статье мы акцентируем внимание на важности поддержки в процессе выздоровления. Мы обсудим, как друзья, семья и профессионалы могут помочь тем, кто сталкивается с зависимостями. Читатели получат практические советы, как поддерживать близких на пути к новой жизни.
Исследовать вопрос подробнее – белая горячка у человека
Недавно заказывал шпонированные двери в этой конторе в Киеве. Все сделано со знанием дела. Приятные цены. Рекомендую!
Инденза (Энзалутамид) — инновационный противоопухолевый препарат для лечения кастрационно-резистентного рака предстательной железы, включая метастатические и неметастатические формы. Действующее вещество энзалутамид блокирует андрогеновые рецепторы, подавляя рост опухолевых клеток. Клинически доказано снижение риска смерти на 37% и увеличение общей выживаемости на 4,8 месяца. Ищете купить индензу? На indenza.com.ru представлена полная информация о дозировках и схемах приёма. Стандартная суточная доза составляет 160 мг однократно в день — без сложной подготовки и особых условий хранения.
заметил, что там тс появляется на много чаще https://gde-kupit-produkt.ru Почему ушли из РБ?да для ам и дживов ацик самая подходящяя тема. а основа из мачехи ништяк.только её надо выварить раза три по 15 мин. чтоб негорлодёрило и смол меньше,ведь в смоле много канабиола остаёца
купить букет с доставкой в москве недорого https://www.zakazat-cveti-moskva.ru .
An astrology portal https://burcler.com.az with daily horoscopes, natal charts, and forecasts. Online consultations, zodiac sign compatibility, and personalized recommendations will help you better understand yourself and make important decisions.
В этой статье мы рассматриваем разные способы борьбы с алкогольной зависимостью. Обсуждаются методы лечения, программы реабилитации и советы для поддержки близких. Читатели получат информацию о том, как преодолеть зависимость и добиться успешного выздоровления.
Ознакомиться с деталями – https://alkogolikum.ru/lechenie-narkomanii
В статье-обзоре представлены данные сомнительной актуальности и факты без явной взаимосвязи. Читатель ознакомится с разными мнениями, хотя они вряд ли существенно изменят его представление о теме.
Подробнее читать – блоки для строительства дома
1xbet giris 1xbet giris .
В этом обзоре мы обсудим современные методы борьбы с зависимостями, включая медикаментозную терапию и психотерапию. Мы представим последние исследования и их результаты, чтобы читатели могли быть в курсе наиболее эффективных подходов к лечению и поддержке.
Подробнее можно узнать тут – врач нарколог на дом
реконструкция и ремонт зданий и сооружений реконструкция и ремонт зданий и сооружений .
Все препараты проходят сертификацию и вводятся под контролем врача. При необходимости капельница может быть дополнена кислородной поддержкой или ингаляцией. Такой подход позволяет добиться быстрого эффекта без стресса для организма.
Углубиться в тему – вывод из запоя в стационаре
Этап лечения
Изучить вопрос глубже – https://lechenie-alkogolizma-krasnodar00.ru/metody-lecheniya-alkogolizma-krasnodar
porn telegram
1xbet yeni adresi 1xbet-giris-37.com .
Наши стандарты включают конфиденциальную маршрутизацию, детализированные инструкции для семьи, модульный план лечения и прозрачное разделение бесплатных и платных блоков. Каждому пациенту назначается ведущий специалист, который сопровождает его на всём пути — от первого звонка до контрольных чек-инов после процедур. Мы не «наращиваем» объём вмешательств ради впечатления: используется минимально достаточный набор мер, который действительно влияет на целевые маркеры — переносимость воды, качество сна, сглаживание вегетативных «качелей» и возвращение утренней ясности.
Разобраться лучше – наркологическая клиника стационар в челябинске
Наркологический выезд включает несколько последовательных шагов, каждый из которых направлен на стабилизацию состояния пациента.
Детальнее – нарколог на дом клиника
Рейтинг легальных казино помог быстро найти надежную площадку. Есть вся необходимая информация для выбора. Удобно сравнивать сайты между собой. Информация актуальная. Очень полезный сервис – https://rating-casino-russia.ru/
Своевременная наркологическая помощь способна не только предотвратить тяжёлые осложнения, но и спасти жизнь. В Новосибирске услуга выезда нарколога на дом востребована у пациентов, которые оказались в состоянии запоя или острой интоксикации, но по разным причинам не могут или не хотят обращаться в стационар. Клиника «Наркосфера» предлагает быструю, квалифицированную и полностью анонимную медицинскую помощь прямо на дому. Такой подход минимизирует стресс, сохраняет социальную репутацию и позволяет начать лечение без задержек и потерь времени.
Углубиться в тему – https://narkologicheskaya-pomoshh-novosibirsk0.ru
1 xbet giri? 1xbet-giris-38.com .
Этап лечения
Подробнее можно узнать тут – лечение алкоголизма на дому краснодар
В этой публикации мы исследуем ключевые аспекты здоровья, включая влияние образа жизни на благополучие. Читатели узнают о важности правильного питания, физической активности и психического здоровья. Мы предоставим практические советы и рекомендации для поддержания здоровья и развития профилактических подходов.
Выяснить больше – признаки деградации личности
коммерческий адвокат ижевск В современном динамичном мире бизнеса, где каждый шаг может иметь решающее значение, профессиональная юридическая поддержка становится не просто желательной, а абсолютно необходимой.
1x giri? 1x giri? .
Лечение выводится поэтапно, чтобы обеспечить безопасность и максимальную эффективность терапии. Каждый этап продуман и адаптирован под индивидуальные особенности пациента.
Разобраться лучше – https://narcolog-na-dom-krasnoyarsk0.ru/narkolog-na-dom-anonimno-krasnoyars
онлайн казино с бездепозитными бонусами Появление новых казино с бездепозитными бонусами на рынке стимулирует конкуренцию и предлагает игрокам еще больше эксклюзивных предложений.
Нужен мощный, но не хотите переплачивать? Возьмите технику в аренду! У https://chistydom.by/ нас выгодная аренда моющего пылесоса для глубокой очистки ковров и мебели. Победите застарелые пятна с паром: доступна аренда пароочистителя и эффективного отпаривателя на прокат. После ремонта незаменима аренда строительного пылесоса, а для идеальных стен берите Лазерный уровень в аренду. Хотите чистые окна без усилий? Закажите робот мойщик окон в аренду с доставкой. Низкие цены на прокат премиум-оборудования уже ждут вас!
Если среда дома шумная или приватность под угрозой, мы предложим «короткий коридор» через отдельный вход амбулатории. Если условия позволяют, проводим процедуры на дому: свет приглушён, доступ к розетке организован, рядом столик для расходников и приборов. Этот «экологичный» сценарий, несмотря на простоту, заметно улучшает переносимость процедур и собирает устойчивый сон в первую ночь, что особенно важно на ранних этапах стабилизации.
Узнать больше – http://narkologicheskaya-klinika-v-chelyabinske16.ru
Такая форма медицинской помощи востребована в разных ситуациях: при запое, выраженном абстинентном синдроме, интоксикации, а также при необходимости купирования симптомов без транспортировки пациента.
Изучить вопрос глубже – нарколог на дом круглосуточно
В этой статье-обзоре мы собрали данные, актуальность которых сомнительна, а факты — не всегда взаимосвязаны. Читатель сможет ознакомиться с разными мнениями, хотя вряд ли они существенно повлияют на его понимание темы.
Вот – порно смотреть
searchengineers – Content reads clearly, helpful examples made concepts easy to grasp.
В предыдущих сообщен писал, что заказ по совместке от ЧМ, https://uristinmoscow.ru Доброго всем времени, товарищи подскажите как посыль зашифрована? паранойя мучит, пару лет с доставкой не морочился. Ежели палево то можно и в ЛС)) Заранее благодаренНо могу сказать что на данный момент проблемы с отправкой у магазина! в среду оплатил и сказали в четверг будет отправка, но увы ее нет! такое в первый раз замечаю от такого магазина! будем ждать!
1xbet resmi 1xbet resmi .
После диагностики нарколог приступает к основному этапу — инфузионной детоксикации. Препараты подбираются индивидуально, с учётом тяжести интоксикации, анамнеза и сопутствующих заболеваний. Основу составляют водно-солевые растворы, глюкоза, витаминные комплексы, седативные препараты, гепатопротекторы и нейропротекторы. Инфузии выполняются капельно, медленно, в течение нескольких часов, с постоянным мониторингом состояния пациента. При необходимости используется оксигенотерапия, противорвотные, антиаритмические и противосудорожные препараты. Все растворы стерильны, а расходные материалы одноразовые и соответствуют стандартам качества.
Изучить вопрос глубже – https://narkologicheskaya-pomoshh-novosibirsk0.ru/skoraya-narkologicheskaya-pomoshh-novosibirsk/
Круглосуточная наркологическая помощь — это не громкая вывеска, а чётко выстроенная логистика, где каждый шаг измерим и объясним. В клинике «УралМед Трезвость» мы работаем по принципу «одна цель — один клинический шаг — одно окно оценки», чтобы исключить полипрагмазию и сохранить прогнозируемость результатов. Выездные бригады прибывают без маркировки, используют компактное оборудование и поддерживают спокойную коммуникацию: только факты, никакой стигмы и давления. Такой формат минимизирует тревогу пациента и близких, а также снижает риск срывов за счёт последовательной, поэтапной стабилизации.
Ознакомиться с деталями – http://www.domen.ru
рейтинг казино ру Когда начал разбираться в теме казино, понял что просто гуглить недостаточно, потому что много устаревшей инфы. Пришлось искать нормальный рейтинг казино и сравнивать варианты. В итоге нашёл несколько адекватных подборок где есть реальные отзывы. Плюс посмотрел какие есть бонусы казино и условия. В целом стало понятнее как выбирать.
1 x bet 1xbet-giris-32.com .
«Как отмечает врач-нарколог Алексей Николаевич Прудников, «выезд нарколога на дом — это возможность стабилизировать состояние пациента в привычной обстановке, снизив стресс и риски осложнений».»
Разобраться лучше – нарколог капельница на дом
После диагностики нарколог приступает к основному этапу — инфузионной детоксикации. Препараты подбираются индивидуально, с учётом тяжести интоксикации, анамнеза и сопутствующих заболеваний. Основу составляют водно-солевые растворы, глюкоза, витаминные комплексы, седативные препараты, гепатопротекторы и нейропротекторы. Инфузии выполняются капельно, медленно, в течение нескольких часов, с постоянным мониторингом состояния пациента. При необходимости используется оксигенотерапия, противорвотные, антиаритмические и противосудорожные препараты. Все растворы стерильны, а расходные материалы одноразовые и соответствуют стандартам качества.
Исследовать вопрос подробнее – скорая наркологическая помощь на дому в новосибирске
bahis sitesi 1xbet bahis sitesi 1xbet .
«Волшебной капельницы» не существует. Мы структурируем инфузии от симптомов, а не от «средних рецептов». Ниже — логика подбора для типичных профилей; реальную схему определяет врач на месте.
Получить дополнительные сведения – наркологическая клиника нарколог калининград
Каждый пациент получает персонализированную программу, учитывающую стадию заболевания, сопутствующие патологии и социальный статус. На основании анализа состояния назначается оптимальная терапия, что значительно повышает эффективность лечения. Врач-нарколог подбирает препараты с учетом индивидуальной переносимости, а психотерапевт разрабатывает план психологической поддержки.
Узнать больше – нарколог лечение алкоголизма
Психоэмоциональное состояние играет ключевую роль в лечении зависимости. В «ЮгМед» психологи и психотерапевты обеспечивают сопровождение на всех этапах реабилитации, помогая пациенту справиться с тревогой, сниженной самооценкой и стрессом. Одна только медикаментозная детоксикация не гарантирует успеха — важно разобраться в причинах зависимости и выработать навыки противодействия соблазнам.
Получить дополнительную информацию – лечение женского алкоголизма в сочи
bahis sitesi 1xbet bahis sitesi 1xbet .
онлайн казино jetton games
marketingengine – Navigation felt smooth, found everything quickly without any confusing steps.
Нашли рабочий серийный номер для Windows 11 Pro — проверено лично, без вирусов!
Подробнее – Где взять лицензионный ключ для Windows 11
1xbet turkey 1xbet-giris-37.com .
Этот документ охватывает важные аспекты медицинской науки, сосредотачиваясь на ключевых вопросах, касающихся здоровья населения. Мы рассматриваем свежие исследования, клинические рекомендации и лучшие практики, которые помогут улучшить качество лечения и профилактики заболеваний. Читатели получат возможность углубиться в различные медицинские дисциплины.
Детальнее – медзо капли от алкоголя цена
Метод лечения
Узнать больше – наркологическая клиника стационар
Индивидуальная программа у нас — это модульный конструктор. В одних случаях критичен блок сна, в других — профилактика вечерних «волн» тревоги, в третьих — семейная медиированная встреча. Мы гибко переставляем модули, учитывая сопутствующие заболевания, приём базовых лекарств (антигипертензивные, антиаритмические, сахароснижающие), возраст и расписание пациента. Цель проста: чтобы терапия вписалась в жизнь, а не наоборот.
Ознакомиться с деталями – наркологическая клиника нарколог в рязани
Все шаги фиксируются в карте наблюдения. Если динамика «плоская», меняется один параметр (скорость/объём/последовательность), и через оговорённое окно проводится повторная оценка. Это снижает риск побочных реакций и сохраняет дневную ясность.
Подробнее – https://narkologicheskaya-klinika-v-kaliningrade15.ru/vyvod-iz-zapoya-kaliningrad-staczionar
1xbet giri? 1xbet giri? .
В этой статье мы обсудим процесс восстановления после зависимостей, акцентируя внимание на различных методах и подходах к реабилитации. Читатели узнают, как создать план выздоровления и использовать полезные ресурсы для достижения устойчивых изменений.
Изучить вопрос глубже – последствия употребления наркотиков
у меня такое было, позвонил в офис доставки так они меня там ошарашили что груз ушел но совсем в другую сторону от меня, я в шок че за на.. через 2часа звонок вам пакет, я аж от радости чуть не описался :voo-hoo: тут все на уровне. Не паникуйте раньше времени все решаемо. Всем добРА Мефедрон, Марихуану, Бошки, Кокаин Хочу всем сказать мы не работаем 1вым классом ни при каком условии…задержек небыло все было ровно магаз ровный заказывай трек сразу кидают , за качество не могу пока ничо отписать , не пробывал, попробую отпишу!
1xbet com giri? 1xbet com giri? .
капитальный ремонт зданий и сооружений капитальный ремонт зданий и сооружений .
Городская среда Калининграда специфична: морской ветер, сезонные пробки, яркие витрины в вечерние часы. Эти факторы часто усиливают тревожность и мешают засыпанию. Поэтому мы проектируем выезд «мягко»: согласованная парковка, немаркированный вход, короткий маршрут до места процедуры, отсутствие громких звонков и «визуального шума» у порога. Родственникам предоставляем «тихие окна» связи — короткие апдейты в заранее оговорённое время без лишних подробностей. Такой формат не просто комфортнее, он клинически полезен: чем меньше стимулов, тем меньше потребность в ночных «усилениях» и тем стабильнее проходит первая ночь.
Изучить вопрос глубже – вывод наркологическая клиника
Эта доказательная статья представляет собой глубокое погружение в успехи и вызовы лечения зависимостей. Мы обращаемся к научным исследованиям и опыте специалистов, чтобы предоставить читателям надежные данные об эффективности различных методик. Изучите, что работает лучше всего, и получите информацию от экспертов.
Получить дополнительные сведения – психосоматика причины
Алгоритм на выезде помогает убрать импровизации, а семье — понимать, что будет происходить и по каким признакам мы двигаемся дальше. Он гибкий, но всегда прозрачный: каждый шаг имеет цель, инструмент и критерий успеха.
Детальнее – http://narkolog-na-dom-stavropol15.ru
Текст включает разнообразную информацию, которая может показаться любопытной, но не меняет устоявшегося восприятия. Предлагаем просто насладиться чтением, не ожидая значительной пользы.
Подробнее читать – основные строительные материалы
В этой статье мы рассмотрим современные достижения в области медицины, включая инновационные методы лечения и диагностики. Мы обсудим важность профилактики заболеваний и роль технологий в улучшении качества здравоохранения. Читатели узнают о влиянии медицины на повседневную жизнь и ее значение для современного общества.
Углубиться в тему – https://narkologiya.pro/narkomaniya/kak-narkotiki-vliyayut-na-reproduktivnoe-zdorove
Подробнее о методах лечения и поддержке можно узнать на портале Минздрава РФ, где представлены стандарты оказания медицинской помощи зависимым пациентам.
Узнать больше – помощь нарколога на дому
1x giri? 1x giri? .
Дубликаты номеров https://avtostrahovka36.ru в Воронеже — изготовление и восстановление регистрационных знаков по ГОСТ. Срочно за 1 день, качественные материалы, соответствие требованиям и выгодные цены. Оформление быстро и без очередей.
В этой статье мы обсудим процесс восстановления после зависимостей, акцентируя внимание на различных методах и подходах к реабилитации. Читатели узнают, как создать план выздоровления и использовать полезные ресурсы для достижения устойчивых изменений.
Получить больше информации – лучшее лекарство от похмелья
1 xbet giri? 1xbet-giris-32.com .
Коммерческий и государственный тендер — это конкурентная процедура выбора поставщика товаров или оказания услуг. Заказчик размещает требования, а компании подают заявки и участвуют в торгах.
Все ответы на ваши вопросы – тендерное сопровождение под ключ в ростове на дону
В городе и ближайших районах клиника «УралМед Трезвость» обеспечивает оперативный выезд и амбулаторный приём без очередей. На этапе первичного контакта координатор уточняет только клинически значимые моменты: постоянные препараты и дозы, аллергии, эпизоды судорог/психозов в прошлом, базовые показатели (АД/ЧСС/SpO?, если доступны), длительность симптомов, возможность организовать «тихое окно» на 20–30 минут. Вместо долгих разговоров — короткая, спокойная логика: где безопаснее начать (дом/амбулатория/стационар), какую ближайшую цель выбираем, в каком интервале ждём эффект и что считаем сигналом для связи с дежурным врачом.
Получить дополнительные сведения – наркологическая клиника цены челябинск
«Как отмечает врач-нарколог Алексей Николаевич Прудников, «выезд нарколога на дом — это возможность стабилизировать состояние пациента в привычной обстановке, снизив стресс и риски осложнений».»
Ознакомиться с деталями – http://narkolog-na-dom-v-krasnodare14.ru
Психотерапия в лечении алкоголизма играет важнейшую роль. Используются когнитивно-поведенческие техники, групповые занятия, а также индивидуальные консультации с психологами и психотерапевтами. Применение методов мотивационного интервьюирования способствует формированию устойчивой мотивации на трезвость, что подробно описано в исследованиях Американской психиатрической ассоциации. Также актуальную информацию можно найти на портале Психологической ассоциации России.
Исследовать вопрос подробнее – здоровье лечение алкоголизма краснодар
leadnest – Pages loaded fast, images appeared sharp, and formatting stayed consistent.
xbet xbet .
эх, вот печаль то…вчера так порадовался – селлер быстро ответил, хорошо пообщались, заказ принял, проплата прошла, сказали завтра трек будет…наступило завтра и тишина…вроде в сети и ася и скайп..за что меня так игнорят?))) заказ маленький то он такой важный!))))) в общем надеюсь на скорый ответ)) https://asfalt-moscow.ru Сегодня получил посылку. Оказалось, что просто трек не пробивался до последнего, а посылочка шла себе. Дошло быстро. Сам магазин передал товар в курьерку почти моментально за что огромное спасибо. Магазин всегда остается на связи и отвечает даже на глупые переживания. Конспирация порадовала. Вес тоже в норме. По качеству отпишу позже трип-репорт, но думаю, что всё на высшем уровне. Спасибо, Chemical-mix.Прёт то отлично но вот в плане концентрации .
В этой статье рассматриваются различные аспекты избавления от зависимости, включая физические и психологические методы. Мы обсудим поддержку, мотивацию и стратегии, которые помогут в процессе выздоровления. Читатели узнают, как преодолеть трудности и двигаться к новой жизни без зависимости.
Подробнее – какой алкоголь при панкреатите
Ниже представлен перечень основных направлений, используемых в современной наркологической помощи. Этот список отражает комплексный подход к лечению зависимостей.
Получить дополнительные сведения – наркологическая помощь
Городская среда Воронежа — яркие подъезды, плотный трафик, шумные дворы — может усиливать вечернюю реактивность. Поэтому мы проектируем «тихую» логистику: согласованная парковка, вход без вывесок, гражданская одежда специалистов, короткий маршрут от порога к месту процедуры. Коммуникация в зашифрованных каналах, напоминания — в беззвучном режиме. Такой дизайн не декоративен: чем меньше социального шума, тем быстрее возвращаются питьё и аппетит, а значит — меньше потребность «наращивать» фармакологию.
Углубиться в тему – вывод из запоя капельница на дому воронеж
Практик о заборах sinta-kedr.ru честный разбор материалов, установки и стоимости. Узнайте плюсы и минусы разных видов заборов, частые ошибки и реальные сроки службы. Полезные рекомендации перед покупкой и монтажом ограждений.
1xbet tr giri? 1xbet-giris-38.com .
tonyjack The Brain, Mind and Consciousness laboratory investigates high-level cognitive processes using brain imaging (fMRI), behavior and introspective reports. We are particulary interested in areas of overlap, as well as separation, between psychological processes involved in social cognition, mechanical reasoning, attention and self-awareness.
Процесс начинается с обращения по телефону или через сайт. Диспетчер внимательно уточняет информацию: ФИО пациента, возраст, адрес, жалобы, предполагаемую продолжительность употребления, наличие хронических заболеваний. Если пациент не может говорить самостоятельно, информацию предоставляет родственник или доверенное лицо. После сбора данных определяется ближайшая свободная бригада, которая в течение 30–40 минут прибывает на указанный адрес. Все разговоры ведутся максимально деликатно, без уточнения диагноза или цели визита, что особенно важно для сохранения анонимности.
Изучить вопрос глубже – https://narkologicheskaya-pomoshh-novosibirsk0.ru/narkologiya-novosibirsk-kruglosutochno
bahis siteler 1xbet bahis siteler 1xbet .
В этой статье рассматриваются различные аспекты избавления от зависимости, включая физические и психологические методы. Мы обсудим поддержку, мотивацию и стратегии, которые помогут в процессе выздоровления. Читатели узнают, как преодолеть трудности и двигаться к новой жизни без зависимости.
Выяснить больше – икота у взрослого пьяного
Часто предприниматели объединяют понятия тендер и госзакупки, так как обе процедуры связаны с конкурсным выбором поставщика. Однако между ними существуют определённые различия, которые важно понимать перед началом работы в этой сфере.
Полный разбор — только здесь – https://tendernoe-soprovozhdenie-rostov-na-donu.ru
Все новостройки https://tut-novostroyki.ru от застройщиков в Новосибирске — актуальный каталог квартир в новых ЖК. Цены, планировки, сроки сдачи и акции. Подберите квартиру напрямую от застройщика без комиссии с удобным поиском и проверенной информацией.
Дизайнерское бюро https://vseremontytut.ru проектирование интерьера и ремонт под ключ. Разработка дизайн-проекта, 3D-визуализация, подбор материалов и полная реализация. Создаем стильные и функциональные пространства с гарантией качества и соблюдением сроков.
Шпаклевка стен https://shpaklevka-sten.ru и потолков в Москве — выравнивание поверхностей под покраску и обои. Качественные материалы, опытные мастера и соблюдение технологий. Выполняем работы быстро, аккуратно и с гарантией результата по доступной цене.
Все шаги фиксируются в карте наблюдения. Если динамика «плоская», меняется один параметр (скорость/объём/последовательность), и через оговорённое окно проводится повторная оценка. Это снижает риск побочных реакций и сохраняет дневную ясность.
Исследовать вопрос подробнее – https://vyvod-iz-zapoya-v-kaliningrade15.ru/vyvod-iz-zapoya-kaliningrad-staczionar/
Запой – это критическое состояние, возникающее при длительном или чрезмерном употреблении алкоголя, когда организм не может справиться с токсическим воздействием этанола. Такое состояние характеризуется накоплением токсинов, разрушением внутренних органов и сильным нарушением психоэмоционального баланса. Когда запой продолжается, у человека развивается абстинентный синдром, сопровождающийся не только физическим истощением, но и резкими изменениями в психике: от выраженной тревожности и агрессии до галлюцинаций и потери ориентации.
Исследовать вопрос подробнее – https://narcolog-na-dom-krasnoyarsk0.ru
В этой публикации мы рассматриваем важную тему борьбы с зависимостями, включая алкогольную и наркотическую зависимости. Мы обсудим методы лечения, реабилитации и поддержку, которые могут помочь людям, столкнувшимся с этой проблемой. Читатели узнают о перспективах выздоровления и важности комплексного подхода.
Подробнее – медицинская реабилитация
В этой заметке мы представляем шаги, которые помогут в процессе преодоления зависимостей. Рассматриваются стратегии поддержки и чек-листы для тех, кто хочет сделать первый шаг к выздоровлению. Наша цель — вдохновить читателей на положительные изменения и поддержать их в трудных моментах.
Получить дополнительную информацию – наркомания вопрос
В данной статье мы акцентируем внимание на важности поддержки в процессе выздоровления. Мы обсудим, как друзья, семья и профессионалы могут помочь тем, кто сталкивается с зависимостями. Читатели получат практические советы, как поддерживать близких на пути к новой жизни.
Подробнее тут – как избежать срыва при алкоголизме
Если на телефонном этапе выявляются «красные флаги» — спутанность, выраженная одышка, «скачущий» ритм, неукротимая рвота, — мы рекомендуем короткое окно стационарного наблюдения. При низком риске целесообразно начать дома: привычная среда снижает сенсорную нагрузку, а телемедицинские включения вечером по 15–20 минут помогают пройти «трудный час» без поездок.
Подробнее тут – наркологическая клиника лечение алкоголизма калининград
velobet sport Tested a few things and didn’t notice issues. Everything seems fine.
Приветы. Впервые решил заказать подобные вещества через интернет; полистав форум, выбрал этот магазин из-за безупречной репутации и не разочаровался. Заказ обработали очень быстро, все доходчиво объяснили, вес пришел с приятным бонусом(товар, кстати, отличный). Успехов и процветания вам и вашему магазину, ребята. https://planeta-a.ru отличный магаз,пришло всё быстро и в лучшем виде:dansing:спасибо,удачи и процветанияРаботаем с данным магазином! всем советую!
1 xbet giri? 1xbet-giris-42.com .
Участие в государственных и коммерческих процедурах требует точной подготовки, понимания законодательства и внимательной работы с документами. Для многих компаний самостоятельная работа с закупками становится сложной задачей: необходимо отслеживать новые закупки, анализировать требования, оформлять документы и взаимодействовать с площадками.
Откройте для себя новое – услуги тендерного сопровождения
xbet xbet .
Отличный магаз https://doramrus.ru Новинки не за горами, без паники.5iai – как употребляли и сколько?
казино jetton отзывы
В этой статье мы обсудим процесс восстановления после зависимостей, акцентируя внимание на различных методах и подходах к реабилитации. Читатели узнают, как создать план выздоровления и использовать полезные ресурсы для достижения устойчивых изменений.
Детальнее – лечение алкоголизма в новомосковске
1x giri? 1xbet-giris-34.com .
https://velobet-casino-uk1.com/ Found this while browsing and gave it a shot, looks okay. No errors so far.
Бытовая химия в Казани https://bytovayalavka.ru широкий ассортимент средств для уборки, стирки и ухода за домом. Оригинальная продукция, выгодные цены и быстрая доставка. Подберите качественные моющие средства для чистоты и комфорта вашего дома.
1xbet resmi 1xbet-giris-42.com .
Calculate your horoscope ulduz-fali.com.az online. Horoscopes, love compatibility, daily horoscopes and astrological interpretations by date of birth on one site.
Dream Interpretations 2026 http://www.yuxu-yozmalari.com.az/ learn the meaning of your dreams with AI artificial intelligence. Dream interpretation from A to Z, folk belief interpretation, psychological approach. Free online dream interpretation.
Механизированная шпаклевка https://shpaklevka-msk.ru современный способ выравнивания стен и потолков. Ровное нанесение, высокая скорость работ и экономия материалов. Подготовка под финишную отделку с гарантией качества и соблюдением технологий.
Этот краткий обзор предлагает сжатую информацию из области медицины, включая ключевые факты и последние новости. Мы стремимся сделать информацию доступной и понятной для широкой аудитории, что позволит читателям оставаться в курсе актуальных событий в здравоохранении.
Узнать больше – через сколько перестают трястись руки после запоя
1 x bet 1 x bet .
Да все так и есть! Присоединюсь к словам написанным выше! Очень ждём хороший и мощный продукт! https://asfalt-moscow.ru здравствуйте , это от региона зависит . Доставка индивидуально обсуждается в ЛС .Не взирая на то что заказ был оплачен в среду прошлой недели, а получил я его через 9(девять) дней, данный селлер заслужил мое доверие!
one x bet 1xbet-giris-37.com .
Компания EtaLustra предлагает профессиональную разработку светодизайна для частных, коммерческих и общественных объектов в Московском регионе и РФ. Компания предлагает проектирование световых концепций для квартир, домов, кафе, ресторанов, офисов, торговых залов, ландшафтное освещение с расчетом освещённости и оптимизацией бюджета. Ищете проект освещения? Ознакомиться с портфолио выполненных проектов и заказать консультацию можно на etalustra.ru Агентство функционирует во всех ценовых диапазонах, изучает пожелания заказчика и стиль жизни, предоставляет квалифицированную комплектацию светильников и электротехнического оснащения.
1xbet yeni adresi 1xbet yeni adresi .
Такая схема позволяет комплексно воздействовать на организм и уменьшить риски осложнений.
Ознакомиться с деталями – врач нарколог на дом краснодар
https://cuacuonthanhxuan.com/wp-content/pgs/1xbet_promo_code___welcome_bonus_code.html
Наркологическая клиника в Воскресенске предоставляет комплексную помощь: от экстренного вывода из запоя и детоксикации до реабилитации и длительного сопровождения. Здесь работают с зависимостью как с хроническим заболеванием, а не как с «слабостью характера». Такой подход позволяет не только стабилизировать физическое состояние, но и менять образ жизни, привычки, способы реагирования на стресс, чтобы человек мог вернуться к нормальной, трезвой жизни.
Разобраться лучше – государственная наркологическая клиника
В этой статье-обзоре мы собрали данные, актуальность которых сомнительна, а факты — не всегда взаимосвязаны. Читатель сможет ознакомиться с разными мнениями, хотя вряд ли они существенно повлияют на его понимание темы.
Вот – азартные игры
An online numerology numerologiya.com.az profile analyzes your destiny, talents, and finances. Accurate calculations, number interpretation, and personalized recommendations will help you better understand yourself and choose the right direction in life.
Жіночий сайт https://zhinka.in.ua поради про красу, здоров’я, стосунки та стиль життя. Читайте корисні статті, лайфхаки, рецепти догляду та натхнення для сучасних жінок. Все про жіночу гармонію, саморозвиток і комфорт у повсякденному житті.
Сайт міста Вінниця https://faine-misto.vinnica.ua новини, події, довідник компаній і корисна інформація для жителів та гостей. Актуальні новини, афіша, транспорт, послуги і все про життя міста в одному зручному онлайн-порталі.
Сайт міста Одеса https://faine-misto.od.ua новини, події, афіша, довідник компаній та корисна інформація. Дізнавайтесь актуальні новини, знаходьте послуги, заклади і маршрути. Все про життя Одеси для мешканців і гостей міста в одному місці.
Кодирование от алкоголизма в Чехове для многих семей становится тем рубежом, после которого зависимость перестаёт казаться «временной слабостью» и начинает восприниматься как диагноз, с которым можно и нужно работать. До этого момента обычно проходят годы: чередуются запои и трезвые периоды, звучат обещания «больше такого не будет», меняются напитки, придумываются правила вроде «пью только по выходным» или «только пиво». Но рано или поздно семья замечает, что именно алкоголь диктует распорядок дня, влияет на настроение, разрушает здоровье и отношения. В этот момент становится очевидно: без сильного внешнего ограничителя и профессиональной помощи просто «взять себя в руки» уже не получается.
Подробнее можно узнать тут – https://kodirovanie-ot-alkogolizma-chekhov11.ru/kodirovanie-ot-alkogolizma-vyezd-na-dom-v-chekhove
После завершения основной инфузионной терапии врач наблюдает за состоянием пациента ещё в течение 30–60 минут. Если отсутствуют осложнения и параметры стабилизированы, врач даёт рекомендации по дальнейшему восстановлению, включая приём анксиолитиков, соблюдение питьевого режима, лёгкой диеты и исключение стрессов. Также составляется индивидуальный план наблюдения: возможны повторные визиты врача через сутки, двое или трое суток. При необходимости пациенту или его близким предоставляется контакт психотерапевта или проводится предварительное консультирование по дальнейшему лечению зависимости.
Получить дополнительную информацию – http://narkologicheskaya-pomoshh-novosibirsk0.ru/skoraya-narkologicheskaya-pomoshh-novosibirsk/
купить недорого цветы москва https://dostavka-cvetov-moskva495.ru .
Этот текст содержит различную информацию, которая, возможно, покажется любопытной, но в целом не меняет восприятия привычных вещей. Предлагаем просто получить удовольствие от чтения, не ожидая особой пользы.
Вот – азартные игры
Если многое из этого знакомо, кодирование стоит рассматривать не как «наказание» или «приговор», а как инструмент, который помогает закрыть доступ к алкоголю на определённый срок и даёт шанс выстроить новую привычку — жить трезво.
Выяснить больше – анонимное кодирование от алкоголизма
ДУМАЙТЕ САМИ!!! Мефедрон, Марихуану, Бошки, Кокаин Доброго всем времени, товарищи подскажите как посыль зашифрована? паранойя мучит, пару лет с доставкой не морочился. Ежели палево то можно и в ЛС)) Заранее благодаренбрал здесь мн пришло в ************!!! за это спасибо палева меньше!!! но порох отстой, – для девочек
1xbet giri? adresi 1xbet-giris-42.com .
Задержка усиливает риск судорог, делирия, аритмий и травм. Эти маркеры не требуют медицинского образования — их легко распознать. Если совпадает хотя бы один пункт ниже, свяжитесь с нами 24/7: мы подскажем безопасный формат старта и подготовим пространство к визиту.
Изучить вопрос глубже – http://
Основные задачи
Получить дополнительные сведения – центр лечения алкоголизма
Отдельная категория пациентов — люди с алкогольной зависимостью. Для жителей Воскресенска особенно актуальны проблемы, связанные с длительными запоями: человек несколько дней подряд пьёт, практически не ест, плохо спит, с трудом встаёт, а каждое утро обещает, что «сейчас немного — и всё». На этом фоне растёт нагрузка на сердце, печень, нервную систему, повышается риск инсультов и инфарктов, обостряются хронические болезни.
Получить дополнительную информацию – voskresenskaya-klinika
Мы не «усиливаем всё сразу». Лечение собирается из модулей: гидратация, адресная коррекция электролитов, гастропротекция, антиоксидантная поддержка, при необходимости — мягкие анксиолитики по строгим показаниям. Порядок и насыщенность зависят от ведущей жалобы и времени суток. Ниже — ориентир для пациента: почему назначение выглядит именно так и в какой горизонт мы ожидаем эффект.
Ознакомиться с деталями – наркологические клиники алкоголизм мурманск
1xbet tr giri? 1xbet-giris-44.com .
Сайт міста Львів https://faine-misto.lviv.ua новини, події, афіша та довідник компаній. Актуальна інформація про життя міста, транспорт, послуги і заклади. Усе необхідне для мешканців і туристів Львова в одному зручному онлайн-порталі.
Автомобільний портал https://avtogid.in.ua новини авто, огляди, тести та поради водіям. Дізнавайтесь про нові моделі, технології, ремонт і обслуговування. Все про автомобілі в одному місці для власників і автолюбителів.
Блог Києва https://infosite.kyiv.ua події, новини, цікаві місця та корисні поради для мешканців і гостей столиці. Дізнавайтесь про актуальні заходи, життя міста, розваги та сервіси. Все найцікавіше про Київ в одному зручному онлайн-блозі.
Одним из ключевых факторов успешного лечения наркомании является психотерапия. В клинике «Сибирский Доктор» применяются различные методы психотерапии, включая когнитивно-поведенческую терапию, групповые и индивидуальные занятия, которые помогают пациентам осознать причины зависимости, научиться справляться с эмоциональными и психологическими трудностями.
Разобраться лучше – лечение наркомании кодирование в новосибирске
Задержка усиливает риск судорог, делирия, аритмий и травм. Эти маркеры не требуют медицинского образования — их легко распознать. Если совпадает хотя бы один пункт ниже, свяжитесь с нами 24/7: мы подскажем безопасный формат старта и подготовим пространство к визиту.
Получить дополнительные сведения – http://narkologicheskaya-klinika-ryazan14.ru/narkolog-ryazan-telefon/
Сайт міста Житомир https://faine-misto.zt.ua новини, події, афіша та довідник компаній. Актуальна інформація про життя міста, транспорт, послуги і заклади. Усе необхідне для мешканців і гостей Житомира в одному зручному онлайн-порталі.
Задержка усиливает риск судорог, делирия, аритмий и травм. Эти маркеры не требуют медицинского образования — их легко распознать. Если совпадает хотя бы один пункт ниже, свяжитесь с нами 24/7: мы подскажем безопасный формат старта и подготовим пространство к визиту.
Исследовать вопрос подробнее – наркологическая клиника стационар рязань
birxbet giri? 1xbet-giris-39.com .
Spinmama, známá také jako https://heartkrafted.com/spin-mama-komplexni-online-system-pro-sazkare-plnou-automatu-i-bonusu-s-bezpecnosti-a-profesionalni-servisem-urcenou-pro-moderni-online-casino-s-zazitku/, nabízí novou a dynamickou stránku určenou hráče online herních aktivít. Online casino spinmama si rychle prosadilo jako platformu, kam dokážou sázkaři vyhledat širokou škálu zábavných možností, od běžných strojů až po současné live hry. spin mama casino klade důraz k intuitivní interaktivní prostředí, které dovoluje jednoduchou navigaci i začínajícím uživatelům, aniž museli tratit moment pátráním vyžadovaných nástrojů. Stránka nabízí i běžné hry, ale rovněž moderní varianty aktivností, co spojují tradiční zábavní prožitek včetně novými řešeními. Hráči oceňují zejména ochranu i jasnost, kterou Spin mama Spinmama dává. Každý hráč dostává právo definovat si soukromé limity, sledovat svůj zábavní konto a monitorovat přehled herních kol, to upevňuje spolehlivost ve plné systému. Spin mama také zaměřuje i na rychlé plus snadné možnosti vkladů i výběrů peněz, co jsou přizpůsobeny požadavkům aktuálního uživatele. Vzhledem k tom charakteristikám tak Spinmama platforma získává stále širší okruh příznivců, co preferují spojení aktivností plus ochrany. Stránka umožňuje více varianty zařízení, které znamená, což hráči mají možnost sázet na desktopového počítače, dotykového zařízení plus smart device svobodně omezení. Spin mama působí jako rovněž vhodná volbou určená pro všechny, hráč, který shání úplné a spolehlivé online hru a s novým designem plus velkou nabídkou zábav, ve kterém je dává důraz k uživatelský pohodlí i zabezpečení soukromých informací.
Кодирование от алкоголизма в Королёве часто становится тем самым рубежом, за которым заканчиваются бесконечные попытки «ограничить дозу» и «держать ситуацию под контролем» и начинается системная работа с зависимостью. Многие годами откладывают этот шаг: стыдно признать проблему, страшно довериться врачу, есть надежда, что «само пройдёт» или удастся остановиться силой воли. На практике всё происходит иначе: запои становятся длиннее, похмелье тяжелее, трезвые промежутки короче, а конфликты в семье и на работе — острее. В какой-то момент близкие понимают, что без серьёзной внешней опоры человек просто не справляется.
Получить дополнительную информацию – [url=https://kodirovanie-ot-alkogolizma-korolyov11.ru/]kodirovanie-ot-alkogolizma-s-vyezdom-na-dom[/url]
Этот медицинский обзор сосредоточен на последних достижениях, которые оказывают влияние на пациентов и медицинскую практику. Мы разбираем инновационные методы лечения и исследований, акцентируя внимание на их значимости для общественного здоровья. Читатели узнают о свежих данных и их возможном применении.
Получить дополнительные сведения – можно ли за руль после алкоголя
Многие тянут до последнего, считая, что к наркологу обращаются только в самых крайних случаях. На деле показаний для консультации гораздо больше, и они часто появляются задолго до того, как человек впервые оказывается в запое или не выходит из состояния опьянения несколько дней подряд.
Детальнее – отзывы о наркологических клиниках
Все шаги фиксируются в карте наблюдения. Если динамика «плоская», меняется один параметр (скорость/объём/последовательность), и через оговорённое окно проводится повторная оценка. Это снижает риск побочных реакций и сохраняет дневную ясность.
Исследовать вопрос подробнее – http://
Психотерапевтическое кодирование делает акцент на внутренней мотивации. Специалист помогает человеку увидеть реальную цену алкоголя в его жизни, понять, как именно употребление разрушает здоровье, семью, карьеру, и сформировать установку на трезвость на определённый срок. Используются техники внушения в состоянии расслабления и структурированная работа с убеждениями и привычками. Такой подход особенно полезен тем, кто боится «лекарственного вмешательства» или уже имеет негативный опыт неудачных медикаментозных попыток. В практике лечения в Чехове часто используются комбинированные схемы, когда медикаментозный барьер подкрепляется психотерапевтической поддержкой, а результат кодирования закрепляется за счёт изменения образа жизни и участия в реабилитационных программах.
Разобраться лучше – kodirovanie-ot-alkogolizma-chekhov
Помощь нарколога нужна, если алкоголь или наркотики постепенно начинают занимать в жизни всё больше места. Человек заранее планирует, когда и как будет пить, нервничает, если что-то срывается, раздражается, когда близкие пытаются ограничить употребление. Появляются скандалы после «весёлых» вечеров, пропущенные рабочие смены, проблемы с деньгами, конфликты с родными. При этом любые разговоры заканчиваются обещаниями «завязать с понедельника» или обвинениями окружающих.
Узнать больше – http://narkologicheskaya-klinika-voskresensk11.ru
Эта статья подробно расскажет о процессе выздоровления, который включает в себя эмоциональную, физическую и психологическую реабилитацию. Мы обсуждаем значимость поддержки и наличие профессиональных программ. Читатели узнают, как строить новую жизнь и не возвращаться к старым привычкам.
Детальнее – сколько допустимо промилле алкоголя за рулем
xbet xbet .
Интересная упаковка )))… делал 1к10!!! сам не курил более 2-ух месяцев вообще ничего* за основу брал ромашку!!!! https://winntsetup.ru Принять могут в любой курьерке и уж тем более на почте. 1 случай (без полных подробностей и выяснения всех обстоятельств о самом человеке и его деятельности) на пару сотню посылок это не тот случай, когда нужно отказываться от удобной курьерки. Об этом уже говорили неоднократно. Возвращаться к этой теме больше не стоит.Магазин в полном порядке!!
1xbet g?ncel 1xbet g?ncel .
У місті Одеса https://u-misti.odesa.ua актуальні новини, події, афіша та корисна інформація для мешканців і гостей. Дізнавайтесь про життя міста, транспорт, заклади і послуги. Все найважливіше про Одесу в одному зручному онлайн-порталі.
Сайт Полтави https://u-misti.poltava.ua новини, події, афіша та довідник компаній міста. Актуальна інформація про життя, транспорт, послуги і заклади. Усе необхідне для мешканців і гостей Полтави в одному зручному онлайн-порталі.
Житомир онлайн https://u-misti.zhitomir.ua міський портал з новинами, афішею та довідником. Дізнавайтесь про події, транспорт, бізнес і послуги. Усе для комфортного життя та відпочинку в Житомирі в одному місці.
Хмельницький онлайн https://u-misti.khmelnytskyi.ua міський портал з новинами, афішею та довідником. Дізнавайтесь про події, транспорт, бізнес і послуги. Усе для комфортного життя та відпочинку в Хмельницькому в одному місці.
1xbet mobi 1xbet mobi .
Часто предприниматели объединяют понятия тендер и госзакупки, так как обе процедуры связаны с конкурсным выбором поставщика. Однако между ними существуют определённые различия, которые важно понимать перед началом работы в этой сфере.
Все тайны раскрыты – комплексное тендерное сопровождение в ростове на дону
Такая структура позволяет подбирать формат помощи под конкретную ситуацию, а не подгонять всех пациентов под один шаблон. Для кого-то будет достаточно короткого стационарного курса и последующего амбулаторного наблюдения, кому-то потребуется длительная реабилитация и плотная работа с семьёй, а кому-то — мягкая поддержка на ранней стадии зависимости, пока заболевание ещё не успело разрушить жизнь.
Получить больше информации – http://narkologicheskaya-klinika-lobnya11.ru
Нарколог на дом в Краснодаре вызывается, когда требуется:
Исследовать вопрос подробнее – https://narkolog-na-dom-v-krasnodare14.ru/narkolog-i-psikhiatr-v-krasnodare
Путь в наркологическую клинику в Ивантеевке почти всегда начинается с консультации — очной или по телефону. На этом этапе задача врача не осудить и не прочитать нотацию, а максимально точно понять, что происходит: сколько лет длится злоупотребление, как часто бывают запои, были ли попытки лечиться раньше, какие есть хронические болезни, каково текущее физическое и психическое состояние. Собирается анамнез, измеряется давление, оценивается пульс, при необходимости направляют на анализы и дополнительные исследования. Чем честнее и конкретнее человек (или его родственники) описывают ситуацию, тем точнее можно подобрать безопасный план помощи.
Получить дополнительную информацию – http://narkologicheskaya-klinika-ivanteevka11.ru/luchshie-narkologicheskie-kliniki-v-ivanteevke/
1win lucky jet
Признаки, что пора задуматься о кодировании
Углубиться в тему – https://kodirovanie-ot-alkogolizma-korolyov11.ru/ehffektivnoe-kodirovanie-ot-alkogolizma-v-korolyove
Наркологический выезд включает несколько последовательных шагов, каждый из которых направлен на стабилизацию состояния пациента.
Подробнее тут – выезд нарколога на дом краснодар
1xbet resmi 1xbet-giris-39.com .
1 x bet giri? 1xbet-giris-44.com .
Самостоятельные попытки «подлечиться» обычно сводятся к случайным комбинациям препаратов: кто-то пьёт горсть таблеток от давления и сердца, кто-то принимает успокоительные поверх алкоголя, кто-то заказывает непонятные средства «от тяги» в интернете. Такие эксперименты могут дать краткий эффект, но часто только маскируют симптомы и перегружают организм. В клинике лечение строится иначе: сначала оценивают состояние — физическое и психическое, затем подбирают безопасные схемы детоксикации и медикаментов, учитывая возраст, сопутствующие заболевания, длительность запоев и употребления. Это снижает риски осложнений и делает восстановление более управляемым: пациент и его семья видят прогресс и понимают, за счёт чего он происходит, а не живут в ожидании очередного непредсказуемого «отката».
Получить больше информации – narkologicheskaya-klinika-korolyov11.ru/
Чем дольше продолжается запой, тем более непредсказуемой становится реакция организма. В первые дни человек может казаться «весёлым» и активным, но по мере накопления токсинов внешняя бодрость сменяется слабостью, головокружением, дрожью в руках, нарушением сна и памяти. Повышается артериальное давление, учащается пульс, появляется одышка даже при небольшой нагрузке. Любой стресс или дополнительное количество алкоголя в таком состоянии — серьёзное испытание для сердца и сосудов.
Узнать больше – https://vyvod-iz-zapoya-ivanteevka11.ru
добра всем бро,оплатил заказ неделю назад,на след день дали трек,трек до сих пор в базе не бьётся и посылочка не идёт…тс на письма не отвечает…вобщем чтот печкльно както,обычно 3 дня идёт( https://volga-catalog.ru Скоро новые вкусности уууу…. ждемвчера вечером получил трек сегодня груз, я охуеваю от скорости доставки походу ТС выкупил курьерку ))) по качеству отпишусь позже
Психотерапия занимает ключевое место в комплексном лечении зависимостей. В клинике применяются методы когнитивно-поведенческой терапии, мотивационного интервью и групповой психотерапии. Эти методы способствуют формированию устойчивой мотивации к трезвому образу жизни и профилактике рецидивов. Рекомендации по психотерапии при зависимости подробно представлены на портале Психологической Ассоциации России.
Изучить вопрос глубже – http://narkologicheskaya-klinika-krasnodar00.ru/narkologicheskaya-klinika-anonimno-krasnodar/
Київ онлайн https://u-misti.kyiv.ua міський портал з новинами, афішею та довідником. Дізнавайтесь про події, транспорт, бізнес і послуги. Усе для комфортного життя та відпочинку в Києві в одному місці.
У місті Львів https://u-misti.lviv.ua актуальні новини, події, афіша та корисна інформація для мешканців і гостей. Дізнавайтесь про життя міста, транспорт, заклади і послуги. Все найважливіше про Львів в одному зручному онлайн-порталі.
У місті Вінниця https://u-misti.vinnica.ua новини, афіша заходів, довідник закладів і корисні сервіси. Дізнавайтесь про події, відкривайте нові місця і плануйте свій час у Вінниці легко та зручно.
Міський сайт Дніпра https://u-misti.dp.ua новини, події, оголошення і довідник організацій. Зручний пошук послуг, закладів і маршрутів. Будьте в курсі життя міста та знаходьте потрібну інформацію швидко.
Эта публикация исследует взаимосвязь зависимости и психологии. Мы обсудим, как психологические аспекты влияют на появление зависимостей и процесс выздоровления. Читатели смогут понять важность профессиональной поддержки и применения научных подходов в терапии.
Изучить вопрос глубже – дизайнерские наркотики какие
Часто предприниматели объединяют понятия тендер и госзакупки, так как обе процедуры связаны с конкурсным выбором поставщика. Однако между ними существуют определённые различия, которые важно понимать перед началом работы в этой сфере.
Узнайте больше прямо сейчас – комплексное тендерное сопровождение в ростове на дону
Ущерб от наркотиков — этто сложная проблема, охватывающая физиологическое,
психическое (а) также социальное здоровье человека.
Утилизация подобных наркотиков, как снежок, мефедрон, ямба,
«наркотик» чи «бошки», что ль
обусловить к неконвертируемым последствиям яко для
организма, так равно чтобы общества в течение целом.
Хотя даже у выковывании зависимости возможно восстановление —
главное, чтоб зависимый человек обернулся за помощью.
Эпохально помнить, что наркомания врачуется, а также помощь дает шансище сверху новую жизнь.
После прибытия на место врач проводит тщательное обследование пациента. Измеряются основные физиологические параметры — артериальное давление, частота пульса, сатурация кислорода, температура тела. Проводится экспресс-анализ крови на сахар и кислотно-щелочной баланс. Также врач проводит оценку неврологического и психического статуса пациента, проверяет уровень сознания по шкале Глазго, выявляет признаки возможных осложнений: отёка мозга, энцефалопатии, алкогольного делирия. При необходимости принимается решение о дополнительной поддержке (например, вызов реанимационной бригады или немедленный перевод в стационар).
Подробнее – наркологическая клиника клиника помощь в новосибирске
Этот метод направлен на выявление и замену негативных мыслей и стереотипов поведения, связанных с потреблением алкоголя. Пациент учится отслеживать свои эмоциональные реакции и заменять деструктивные установки конструктивными стратегиями противостояния стрессу.
Получить дополнительные сведения – лечение алкоголизма анонимно в сочи
Согласно статье, опубликованной в Журнале клинической медицины, комплексный подход снижает вероятность рецидива и способствует длительной ремиссии.
Получить больше информации – наркологическое лечение алкоголизма
казино ева Нашёл этот канал и теперь не ищу зеркала eva casino вручную. Там всё есть. Работает стабильно.
Многие тянут до последнего, считая, что к наркологу обращаются только в самых крайних случаях. На деле показаний для консультации гораздо больше, и они часто появляются задолго до того, как человек впервые оказывается в запое или не выходит из состояния опьянения несколько дней подряд.
Подробнее можно узнать тут – http://narkologicheskaya-klinika-voskresensk11.ru
jeton казик
Психотерапия занимает ключевое место в комплексном лечении зависимостей. В клинике применяются методы когнитивно-поведенческой терапии, мотивационного интервью и групповой психотерапии. Эти методы способствуют формированию устойчивой мотивации к трезвому образу жизни и профилактике рецидивов. Рекомендации по психотерапии при зависимости подробно представлены на портале Психологической Ассоциации России.
Исследовать вопрос подробнее – http://
В клинике применяются инновационные методы диагностики, включая лабораторные анализы и аппаратные исследования, которые позволяют выявить степень зависимости и сопутствующие патологии. Важным этапом является комплексный подход к лечению, включающий детоксикацию организма, психотерапию и медикаментозную поддержку.
Ознакомиться с деталями – наркологические клиники алкоголизм краснодар
Этот информационный материал подробно освещает проблему наркозависимости, ее причины и последствия. Мы предлагаем информацию о методах лечения, профилактики и поддерживающих программах. Цель статьи — повысить осведомленность и продвигать идеи о необходимости борьбы с зависимостями.
Детальнее – наркомания современного общества
1xbet mobi 1xbet-giris-33.com .
Такая схема позволяет комплексно воздействовать на организм и уменьшить риски осложнений.
Исследовать вопрос подробнее – вызов врача нарколога на дом в краснодаре
Где можно познакомиться https://datenow.ru в России в 2026 году? Приложения для знакомств стали главным инструментом для миллионов. Но важно выбрать те, где реально можно найти человека для отношений. Не просто лайки, а искренний интерес. Разбираем, какие сервисы работают в этом году. Честно. Без рекламы. Только для тех, кто ищет всерьёз.
Алкогольная зависимость — это комплексное заболевание, требующее не только медикаментозного воздействия, но и серьёзной психологической поддержки. В Сочи клиника «ЮгМед» предлагает выезд нарколога на дом, что позволяет начать лечение без стресса, связанного с госпитализацией. Такой подход особенно важен для тех, кто ценит конфиденциальность и предпочитает комфорт привычной обстановки. Мы обеспечиваем полную анонимность, а опытные специалисты разрабатывают индивидуальную программу, учитывающую длительность запоя, сопутствующие заболевания и психологические факторы зависимости.
Узнать больше – https://lechenie-alkogolizma-sochi0.ru/klinika-lecheniya-alkogolizma-v-sochi
Психотерапевтические методы включают когнитивно-поведенческую терапию, мотивационное интервьюирование и групповую поддержку, которые способствуют изменению отношения пациента к алкоголю и укреплению его мотивации к выздоровлению. Эти методы подробно описаны на ресурсе Психологическая помощь.
Получить дополнительные сведения – лечение пивного алкоголизма в сочи
После завершения основной инфузионной терапии врач наблюдает за состоянием пациента ещё в течение 30–60 минут. Если отсутствуют осложнения и параметры стабилизированы, врач даёт рекомендации по дальнейшему восстановлению, включая приём анксиолитиков, соблюдение питьевого режима, лёгкой диеты и исключение стрессов. Также составляется индивидуальный план наблюдения: возможны повторные визиты врача через сутки, двое или трое суток. При необходимости пациенту или его близким предоставляется контакт психотерапевта или проводится предварительное консультирование по дальнейшему лечению зависимости.
Получить дополнительную информацию – наркологическая помощь на дому круглосуточно новосибирск
Этот метод направлен на выявление и замену негативных мыслей и стереотипов поведения, связанных с потреблением алкоголя. Пациент учится отслеживать свои эмоциональные реакции и заменять деструктивные установки конструктивными стратегиями противостояния стрессу.
Подробнее – https://lechenie-alkogolizma-sochi0.ru/
В медицинской практике применяются разнообразные методы, позволяющие эффективно бороться с зависимостью. К ним относятся медикаментозная терапия, психотерапия, социальная реабилитация и физиотерапевтические процедуры. Медикаментозное лечение помогает снять острые симптомы интоксикации и предотвратить развитие осложнений, что подтверждают данные исследований на Национальном медицинском портале.
Подробнее тут – здоровье лечение алкоголизма
Эти ситуации требуют немедленного вмешательства, и приезд врача позволяет оперативно оказать помощь.
Подробнее тут – http://narkolog-na-dom-v-krasnodare14.ru
xbet xbet .
Міський сайт Черкас https://u-misti.cherkasy.ua новини, події, оголошення і довідник організацій. Зручний пошук послуг, закладів і маршрутів. Будьте в курсі життя міста та знаходьте потрібну інформацію швидко.
Сайт Чернівців https://u-misti.chernivtsi.ua новини, події, афіша та довідник компаній міста. Актуальна інформація про життя, транспорт, послуги і заклади. Усе необхідне для мешканців і гостей Чернівців в одному зручному онлайн-порталі.
jetton промокод бездепозитный
1 x bet 1 x bet .
ии для школьников и студентов nejroset-dlya-referatov.ru .
ии для школьников и студентов nejroset-dlya-referatov-1.ru .
1xbet giri? adresi 1xbet giri? adresi .
Все супер заказывал все пришло попробывыл и писал отзыв этот минут 10 ))))) заказывайте хорошый магазин работают быстро отлично ребята успехов вам chemical.mix !!!!!)) https://uristinmoscow.ru а для какой цели не отправляют? курьерам похуй что тоскать, а если бы мусора хотели бы принять, посыль наоборот отправили.Если есть какие -то вопросы по компенсациям вложенным, тоже пишите мне в Skype: chemical-mix.com и ICQ: 974-859, все решим
нейросеть реферат нейросеть реферат .
нейросеть для студентов онлайн нейросеть для студентов онлайн .
1xbet t?rkiye giri? 1xbet t?rkiye giri? .
Больше на нашем сайте: https://domdipnera.ru
После принятия решения организуется либо выезд, либо госпитализация. На приёме проводится осмотр: измеряется давление, пульс, оценивается степень обезвоживания, выраженность тремора, тревоги, нарушений сна. Выясняются сопутствующие болезни и лекарства, которые человек принимает постоянно. Уже на этом этапе обсуждаются ближайшие шаги — объём детокса, необходимость круглосуточного наблюдения, примерные сроки стабилизации. Родным объясняют, чего ожидать в первые сутки, какие симптомы будут уменьшаться постепенно, а какие требуют немедленного информирования персонала.
Подробнее – http://narkologicheskaya-klinika-lobnya11-2.ru/chastnaya-narkologicheskaya-klinika-v-lobne/
Подробнее о методах лечения и поддержке можно узнать на портале Минздрава РФ, где представлены стандарты оказания медицинской помощи зависимым пациентам.
Выяснить больше – нарколог на дом круглосуточно цены
Ниже представлен перечень основных направлений, используемых в современной наркологической помощи. Этот список отражает комплексный подход к лечению зависимостей.
Получить дополнительные сведения – экстренная наркологическая помощь
Публикация предоставляет читателю набор разрозненных идей, которые сложно применить на практике. Мы лишь слегка касаемся разных точек зрения, не углубляясь в анализ и не предлагая никаких выводов.
Вот – казино онлайн
Лечение алкоголизма в Краснодаре представляет собой комплекс мероприятий, направленных на полное восстановление физического и психологического состояния пациента. Этот процесс требует профессионального подхода, включающего диагностику, детоксикацию, терапию зависимости и реабилитацию. Информация о современных методах терапии доступна на официальном портале Минздрава РФ.
Получить дополнительные сведения – лечение алкоголизма гипнозом краснодар
Клиника «Наркосфера» — это специализированное медицинское учреждение, ориентированное на экстренную и плановую помощь пациентам с алкогольной, наркотической и медикаментозной зависимостью. В штате работают врачи с высшей квалификационной категорией, прошедшие обучение по международным протоколам наркологической и токсикологической помощи. Учреждение располагает собственной выездной службой, оборудованной мобильными аппаратами для диагностики и лечения в домашних условиях. Все сотрудники проходят регулярную аттестацию, участвуют в научных конференциях и владеют современными методами интенсивной терапии. «Наркосфера» функционирует без выходных и праздничных дней, обеспечивая круглосуточную доступность и полную конфиденциальность для каждого пациента.
Выяснить больше – скорая наркологическая помощь на дому новосибирск
Обращаться можно и нужно не только в момент очередного запоя. Клиника в Ивантеевке работает и с теми, кто сейчас в относительной ремиссии, но понимает, что без внешней поддержки снова сорвётся. В этом случае можно обсудить профилактические программы, варианты кодирования, реабилитацию, работу с тревогой и депрессией. Чем раньше сделан шаг в сторону лечения, тем мягче будут процедуры и тем больше шансов на устойчивый результат.
Получить дополнительные сведения – https://narkologicheskaya-klinika-ivanteevka11.ru/platnaya-narkologicheskaya-klinika-v-ivanteevke/
Если на первичном звонке звучат «красные флаги» (выраженная одышка, спутанность сознания, скачки ритма), мы предлагаем стационарное окно мониторинга. При низком риске стартуем дома или амбулаторно и поддерживаем человека вечерними видеовставками по 15–20 минут, чтобы пройти «трудный час» без лишних поездок и паники.
Детальнее – наркология вывод из запоя в воронеже
1x bet giri? 1x bet giri? .
После прибытия на место врач проводит тщательное обследование пациента. Измеряются основные физиологические параметры — артериальное давление, частота пульса, сатурация кислорода, температура тела. Проводится экспресс-анализ крови на сахар и кислотно-щелочной баланс. Также врач проводит оценку неврологического и психического статуса пациента, проверяет уровень сознания по шкале Глазго, выявляет признаки возможных осложнений: отёка мозга, энцефалопатии, алкогольного делирия. При необходимости принимается решение о дополнительной поддержке (например, вызов реанимационной бригады или немедленный перевод в стационар).
Изучить вопрос глубже – наркологическая помощь
Психотерапевтическое кодирование делает акцент на внутренней мотивации. Специалист помогает человеку увидеть реальную цену алкоголя в его жизни, понять, как именно употребление разрушает здоровье, семью, карьеру, и сформировать установку на трезвость на определённый срок. Используются техники внушения в состоянии расслабления и структурированная работа с убеждениями и привычками. Такой подход особенно полезен тем, кто боится «лекарственного вмешательства» или уже имеет негативный опыт неудачных медикаментозных попыток. В практике лечения в Чехове часто используются комбинированные схемы, когда медикаментозный барьер подкрепляется психотерапевтической поддержкой, а результат кодирования закрепляется за счёт изменения образа жизни и участия в реабилитационных программах.
Получить дополнительную информацию – http://
Чтобы вызвать нарколога на дом, достаточно позвонить по специализированным горячим телефонам или оформить заявку на сайте. Специалисты быстро реагируют на обращения, проводят первичную оценку и выезжают в течение часа. Важным аспектом является наличие лицензии и квалификации у медицинского персонала, что гарантирует безопасность и эффективность лечения.
Получить больше информации – нарколог капельница на дом
Ниже представлен перечень основных направлений, используемых в современной наркологической помощи. Этот список отражает комплексный подход к лечению зависимостей.
Получить дополнительную информацию – срочная наркологическая помощь
Ущерб через наркотиков — это комплексная проблема, обхватывающая физическое,
психологическое (а) также соц состояние здоровья человека.
Употребление эких наркотиков, яко кокаин, мефедрон, гашиш, «наркотик»
чи «бошки», что ль огласить буква необратимым результатам как чтобы организма, яко равно для федерации в течение целом.
Хотя хоть при вырабатывании зависимости эвентуально
восстановление — ядро, чтобы зависимый человек обратился
согласен помощью. Важно помнить,
яко наркомания врачуется, равным образом восстановление в правах бабахает шансище сверху новую жизнь.
1xbet g?ncel giri? 1xbet g?ncel giri? .
Медикаментозная терапия направлена на снятие симптомов абстиненции, нормализацию функций органов и систем, а также коррекцию психоэмоционального состояния пациента. Используются препараты, способствующие детоксикации, стабилизации работы нервной системы и улучшению общего самочувствия.
Подробнее можно узнать тут – неотложная наркологическая помощь пермь
войти в ева казино Нашёл официальный тг eva casino, там всегда свежие адреса.
Вся динамика фиксируется в единой карте наблюдения. При переводе в амбулаторную точку мы не «сбрасываем» историю: решения продолжаются с учётом уже сделанного и реакции пациента на вмешательства.
Подробнее можно узнать тут – срочный вывод из запоя
Признаки, что пора задуматься о кодировании
Подробнее – https://kodirovanie-ot-alkogolizma-korolyov11.ru/preparaty-dlya-kodirovaniya-ot-alkogolizma-v-korolyove/
Вся динамика фиксируется в единой карте наблюдения. При переводе в амбулаторную точку мы не «сбрасываем» историю: решения продолжаются с учётом уже сделанного и реакции пациента на вмешательства.
Ознакомиться с деталями – вывод из запоя вызов на дом в воронеже
Лечение в наркологической клинике в Чехове удобно не только близостью к дому. Главный плюс — комплексный подход. Зависимость практически никогда не ограничивается только алкоголем или наркотиком: страдают сердце и сосуды, печень, нервная система, психика, отношения в семье и на работе. Если пытаться лечить только одно звено, например, периодически «чистить кровь» капельницами, без проработки причин и последствий, ситуация быстро возвращается к исходной точке. В клинике выстраивается последовательная работа: сначала стабилизируют организм, затем укрепляют психику, а дальше помогают менять привычный образ жизни, чтобы трезвость стала не кратким эпизодом, а новой нормой.
Подробнее тут – https://narkologicheskaya-klinika-chekhov11.ru/narkologicheskaya-klinika-telefon-v-chekhove
Лечение алкоголизма в Краснодаре представляет собой комплекс мероприятий, направленных на полное восстановление физического и психологического состояния пациента. Этот процесс требует профессионального подхода, включающего диагностику, детоксикацию, терапию зависимости и реабилитацию. Информация о современных методах терапии доступна на официальном портале Минздрава РФ.
Исследовать вопрос подробнее – лечение алкоголизма анонимно в краснодаре
1xbet turkiye 1xbet-giris-33.com .
Ты нам лучьше отзыв напиши о работе магазина 😀 https://needtimes.ru Один из старейших!!!Магазу Респект и Уважуха)))
1xbet 1xbet .
Чтобы у пациента и близких не возникал вопрос «что дальше», мы используем карту первых часов. Она задаёт цели, действия, контроль и критерии перехода между этапами. Такой подход экономит минуты и исключает импровизации «ради уверенности».
Выяснить больше – https://narkologicheskaya-klinika-v-kaliningrade15.ru/vyvod-iz-zapoya-kaliningrad-staczionar
Если пациент обращается в клинику в состоянии запоя или тяжёлой абстиненции, первым шагом становится детоксикация. Это не «волшебная капельница», которая снимает все проблемы, а комплекс процедур, направленных на выведение токсинов, восстановление водно-солевого баланса, поддержку сердца, печени, нервной системы. Под контролем врачей подбираются растворы и препараты, которые позволяют снизить нагрузку на организм, облегчить похмельный синдром, уменьшить тревогу и вернуть сон. Важно, что это проходит под наблюдением, а не «на кухне» без понимания, как реагирует сердце и давление. После выхода из острого состояния человек уже способен осмысленно обсуждать дальнейшее лечение.
Подробнее – klinika-narkologicheskoj-pomoshchi
Сигналом к тому, что пора обсудить вариант кодирования с наркологом, служит не один какой-то эпизод, а совокупность симптомов. Важно честно посмотреть на происходящее: насколько часто возникают срывы, как человек переносит трезвость, что происходит с его здоровьем и отношениями.
Разобраться лучше – [url=https://kodirovanie-ot-alkogolizma-korolyov11.ru/]кодировка в королеве[/url]
jetton casino review
Все шаги фиксируются в карте наблюдения. Если динамика «плоская», меняется один параметр (скорость/объём/последовательность), и через оговорённое окно проводится повторная оценка. Это снижает риск побочных реакций и сохраняет дневную ясность.
Получить больше информации – https://narkologicheskaya-klinika-v-kaliningrade15.ru/skoraya-narkologiya-vyvod-iz-zapoya-kaliningrad-uslugi/
1xbet t?rkiye 1xbet t?rkiye .
Сигналом к тому, что пора обсудить вариант кодирования с наркологом, служит не один какой-то эпизод, а совокупность симптомов. Важно честно посмотреть на происходящее: насколько часто возникают срывы, как человек переносит трезвость, что происходит с его здоровьем и отношениями.
Узнать больше – кодирование алкоголизма недорого клиника
Финансовые инструменты позволяют заказчику убедиться в надежности участника и его готовности выполнить обязательства по контракту. При этом грамотное сопровождение снижает вероятность финансовых рисков и помогает правильно оформить документы для банка.
Эксклюзивная информация для вас – тендерное сопровождение заказчиков
Лечение алкоголизма в Краснодаре представляет собой комплекс мероприятий, направленных на полное восстановление физического и психологического состояния пациента. Этот процесс требует профессионального подхода, включающего диагностику, детоксикацию, терапию зависимости и реабилитацию. Информация о современных методах терапии доступна на официальном портале Минздрава РФ.
Подробнее – https://lechenie-alkogolizma-krasnodar00.ru/
В этой статье-обзоре мы собрали данные, актуальность которых сомнительна, а факты — не всегда взаимосвязаны. Читатель сможет ознакомиться с разными мнениями, хотя вряд ли они существенно повлияют на его понимание темы.
Вот – эротика
1xbet yeni giri? adresi 1xbet yeni giri? adresi .
Путь в наркологическую клинику в Ивантеевке почти всегда начинается с консультации — очной или по телефону. На этом этапе задача врача не осудить и не прочитать нотацию, а максимально точно понять, что происходит: сколько лет длится злоупотребление, как часто бывают запои, были ли попытки лечиться раньше, какие есть хронические болезни, каково текущее физическое и психическое состояние. Собирается анамнез, измеряется давление, оценивается пульс, при необходимости направляют на анализы и дополнительные исследования. Чем честнее и конкретнее человек (или его родственники) описывают ситуацию, тем точнее можно подобрать безопасный план помощи.
Детальнее – narkologicheskaya-klinika-ivanteevka
Ты думаешь АМ под запретом уже будет? Откуда инфа? https://7721508.ru Твой стафф офигенен.А то я запутался совсем, везде по разному пишут.
Лечение алкоголизма в Краснодаре представляет собой комплекс мероприятий, направленных на полное восстановление физического и психологического состояния пациента. Этот процесс требует профессионального подхода, включающего диагностику, детоксикацию, терапию зависимости и реабилитацию. Информация о современных методах терапии доступна на официальном портале Минздрава РФ.
Подробнее можно узнать тут – лечение алкоголизма на дому
1xbet giri? 2025 1xbet giri? 2025 .
Если на телефонном этапе выявляются «красные флаги» — спутанность, выраженная одышка, «скачущий» ритм, неукротимая рвота, — мы рекомендуем короткое окно стационарного наблюдения. При низком риске целесообразно начать дома: привычная среда снижает сенсорную нагрузку, а телемедицинские включения вечером по 15–20 минут помогают пройти «трудный час» без поездок.
Получить дополнительные сведения – наркологическая клиника вывод из запоя
Помощь нарколога нужна, если алкоголь или наркотики постепенно начинают занимать в жизни всё больше места. Человек заранее планирует, когда и как будет пить, нервничает, если что-то срывается, раздражается, когда близкие пытаются ограничить употребление. Появляются скандалы после «весёлых» вечеров, пропущенные рабочие смены, проблемы с деньгами, конфликты с родными. При этом любые разговоры заканчиваются обещаниями «завязать с понедельника» или обвинениями окружающих.
Получить дополнительные сведения – воскресенская клиника
Стационар в наркологической клинике часто воспринимается как нечто пугающее: строгий режим, замкнутое пространство, жёсткие правила. На деле стационарное лечение в Лобне создаётся не для того, чтобы «наказать» человека за употребление, а чтобы обеспечить ему максимальную безопасность и стабильность в самый тяжёлый период. Когда запои повторяются, самочувствие сильно ухудшается, а дома сложно создать тихую и контролируемую обстановку, именно стационар становится оптимальным решением.
Углубиться в тему – частная наркологическая клиника
Чтобы у пациента и близких не возникал вопрос «что дальше», мы используем карту первых часов. Она задаёт цели, действия, контроль и критерии перехода между этапами. Такой подход экономит минуты и исключает импровизации «ради уверенности».
Подробнее – http://narkologicheskaya-klinika-v-kaliningrade15.ru
1xbet 1xbet .
Наркологическая помощь — это не «последний шанс для безнадёжных», а нормальный медицинский шаг, такой же логичный, как визит к кардиологу при проблемах с сердцем или к эндокринологу при сахарном диабете. В клинике в Лобне зависимость рассматривают как заболевание, а не как «слабость характера», и помогают человеку пройти весь путь — от детоксикации и вывода из запоя до реабилитации и профилактики срывов. Обращение на более раннем этапе даёт важное преимущество: организм ещё способен восстанавливаться, психика не разрушена окончательно, социальные связи не разорваны. Это значит, что лечение может быть мягче, программа — гибче, а шансы на устойчивый результат — выше.
Углубиться в тему – narkologicheskaya-klinika-obratnyj-zvonok
Наркологическая помощь — это не «последний шанс для безнадёжных», а нормальный медицинский шаг, такой же логичный, как визит к кардиологу при проблемах с сердцем или к эндокринологу при сахарном диабете. В клинике в Лобне зависимость рассматривают как заболевание, а не как «слабость характера», и помогают человеку пройти весь путь — от детоксикации и вывода из запоя до реабилитации и профилактики срывов. Обращение на более раннем этапе даёт важное преимущество: организм ещё способен восстанавливаться, психика не разрушена окончательно, социальные связи не разорваны. Это значит, что лечение может быть мягче, программа — гибче, а шансы на устойчивый результат — выше.
Изучить вопрос глубже – частная наркологическая клиника
ии для школьников и студентов nejroset-dlya-referatov-1.ru .
нейросеть реферат онлайн нейросеть реферат онлайн .
нейросеть для учебы онлайн нейросеть для учебы онлайн .
сервисы Их удобство заключается в широком ассортименте, конкурентных ценах и относительно простой логистике, что делает онлайн-шопинг доступным каждому.
брал в данном магазине все супер. Мефедрон, Марихуану, Бошки, Кокаин Я ночью с ним договорился в аське,мне он тоже отвечал через 15-30 минут на сообщение)вот вот..ждать неизветсности самое такое нервное….
lukmore тг Работает стабильно.
1xbet resmi giri? 1xbet resmi giri? .
сделать реферат nejroset-dlya-referatov.ru .
По вопросам оформления вызова можно ознакомиться с правилами на портале Федеральной службы по надзору в сфере здравоохранения, где опубликованы актуальные рекомендации и требования к медицинским организациям.
Получить дополнительные сведения – врач нарколог выезд на дом в волгограде
1xbet mobil giri? 1xbet-giris-43.com .
Отдельная категория пациентов — люди с алкогольной зависимостью. Для жителей Воскресенска особенно актуальны проблемы, связанные с длительными запоями: человек несколько дней подряд пьёт, практически не ест, плохо спит, с трудом встаёт, а каждое утро обещает, что «сейчас немного — и всё». На этом фоне растёт нагрузка на сердце, печень, нервную систему, повышается риск инсультов и инфарктов, обостряются хронические болезни.
Получить дополнительную информацию – московские наркологические клиники
АА Все братишки, мне уже отослали сегодня, спасибо что успокоили! https://npp-dnk.ru спср только растраивает, такие деньги берут, и че то нифига не делают. Посыль уже 3 день лежит в г. Ё-XX. Хотя должны были привезти в близлежащий город. Но тут я узнал то что у нас нет в городе филиала ихнего. Вот и не понятно толи сами привезут, толи ехать до них надо.минималка СК и рег? и внесите ясность
Лечение зависимостей редко ограничивается одной процедурой. Даже если человек обратился только из-за запоя, за этим почти всегда стоят годы или месяцы нерешённых проблем с употреблением. Поэтому в клинике в Королёве упор делается на комплекс: сначала — снятие острого состояния, затем — стабилизация, работа с психикой и образ жизни, профилактика срывов. Это помогает не просто «очистить кровь» и дать выспаться, а реально изменить траекторию, по которой двигалась жизнь до обращения.
Получить дополнительные сведения – наркологическая клиника
Наркологическая клиника в Воскресенске — это место, куда можно обратиться в тот момент, когда домашние попытки «всё решить разговорами» и обещания «больше не пить» перестают работать. Зависимость редко возникает внезапно: сначала это кажутся безобидные посиделки по выходным, «снятие стресса» после работы, эпизодические эксперименты с наркотиками. Но с каждым месяцем контроль становится слабее, запои удлиняются, а привычка «расслабляться» превращается в болезненную потребность.
Углубиться в тему – https://narkologicheskaya-klinika-voskresensk11.ru/narkologicheskaya-klinika-telefon-v-voskresenske/
Лучшее прямо здесь: https://ecocity-novostroy.ru
Перед тем как выбрать формат лечения, пациенту и его близким объясняют, какие направления помощи доступны и как их можно сочетать. В зависимости от состояния и мотивации могут быть задействованы разные варианты:
Изучить вопрос глубже – https://narkologicheskaya-klinika-korolyov11.ru/platnaya-narkologicheskaya-klinika-v-korolyove/
нейросеть реферат онлайн нейросеть реферат онлайн .
Клиника в Королёве закрывает этот разрыв. Здесь можно пройти полный путь — от первичной диагностики и детоксикации до реабилитации и последующего наблюдения — в пределах привычного города, не отрываясь полностью от семьи и важных дел. Это особенно важно для тех, кто продолжает работать, боится потерять позицию или репутацию, но при этом понимает, что дальше жить «как раньше» просто опасно. Лечение перестаёт быть чем-то абстрактным и пугающим: вместо общих страшилок появляется понятный маршрут, а рядом — команда специалистов, которые умеют вести пациентов с зависимостью и знают, как работать с семьями, уставшими от бесконечных срывов.
Исследовать вопрос подробнее – narkologicheskaya-klinika-narkolog
https://www.zorini.ru/ zorini
нейросеть для студентов онлайн нейросеть для студентов онлайн .
нейросети для студентов нейросети для студентов .
luckkmore official Через канал быстрее попасть.
Для семьи это почти всегда тяжёлый, эмоционально изматывающий период. В доме копятся усталость, обида, чувство вины, страх за близкого. Но при этом сохраняется надежда, что удастся «обойтись своими силами». В какой-то момент становится ясно: без профессиональной наркологической помощи уже не справиться. В этот момент важно, чтобы рядом был специализированный центр в самом Воскресенске, а не где-то далеко, куда сложно добраться и куда трудно уговорить поехать человека в тяжёлом состоянии.
Разобраться лучше – narkologicheskaya-klinika-voskresensk11.ru/
Наркологическая клиника в Воскресенске — это место, куда можно обратиться в тот момент, когда домашние попытки «всё решить разговорами» и обещания «больше не пить» перестают работать. Зависимость редко возникает внезапно: сначала это кажутся безобидные посиделки по выходным, «снятие стресса» после работы, эпизодические эксперименты с наркотиками. Но с каждым месяцем контроль становится слабее, запои удлиняются, а привычка «расслабляться» превращается в болезненную потребность.
Ознакомиться с деталями – narkologicheskaya-klinika
casino mafia Bienvenue sur Mafia Casino, le domaine des jeux d’argent en ligne. Decouvrez notre avis detaille, le processus de connexion securise et des bonus exclusifs. Site officiel 2026.
1xbet resmi giri? 1xbet resmi giri? .
Задача первого контакта — не «записать к врачу на когда-нибудь», а оценить, насколько ситуация критична прямо сейчас. Если речь идёт о многодневном запое, сильной слабости, одышке, скачках давления, спутанности сознания, лучше не экспериментировать с домашними методами. В таких случаях специалисты в Лобне рекомендуют стационар, где можно не только поставить капельницу, но и быстро среагировать на осложнения. Если же состояние относительно стабильное, возможно обсуждение мягкого формата с выездом и последующим наблюдением.
Подробнее тут – lobnya-narkologicheskij-dispanser
как так его разве нету? с самого утра тут сижу Мефедрон, Марихуану, Бошки, Кокаин Что за кипишь на ветке? И когда будет адрес?Не понял…Его еще варить нужно??? На плитке?))
Важно, что на первичной консультации честно говорят о перспективах. Никто не обещает «волшебной капельницы», после которой человек навсегда забудет про алкоголь или наркотики. Объясняют, что детокс — это старт, а не финиш, что после стабилизации придётся думать о лечении самой зависимости и реабилитации. Для семьи это неприятно, но честно: лучше сразу понимать масштаб задачи, чем надеяться на чудо и снова возвращаться к тем же проблемам через месяц.
Узнать больше – narkologicheskaya-klinika-foto
лучшая нейросеть для учебы nejroset-dlya-referatov.ru .
bahis sitesi 1xbet bahis sitesi 1xbet .
Самое полезное для вас: https://chetyre-gorizonta-novostroy.ru
leadmagnet – Color palette felt calming, nothing distracting, just focused, thoughtful design.
реферат через нейросеть реферат через нейросеть .
ии реферат ии реферат .
генерация nejroset-dlya-referatov-6.ru .
1xbet lite 1xbet-giris-33.com .
нейросеть для учебы онлайн nejroset-dlya-referatov-7.ru .
купить диван канал Наш сайт мебели создан для того, чтобы сделать этот процесс максимально приятным и удобным, предлагая подробные описания, качественные фотографии и интуитивно понятный интерфейс.
Единая панель оценки помогает действовать быстро и безошибочно. Мы фиксируем параметры, объясняем их смысл пациенту и семье и тут же привязываем к ним действия. Пример приведён в таблице: это не заменяет осмотр, но показывает логику, которой мы придерживаемся на выезде и в приёмном кабинете.
Получить дополнительную информацию – частная наркологическая клиника в рязани
clickedge – Overall, professional vibe here; trustworthy, polished, and pleasantly minimal throughout.
Добрый вечер! Хотел отписать отзыв по работе данного ТС! Сделал заказ в 17-00 клад дали в 21-30, брал опт 500 гр. Мефедрон, Марихуану, Бошки, Кокаин магазин ровныйЕще раз извините. Треки тоже бьются не сразу, курьерки “в завалах”, иногда он только начинает определяться на сайте курьерки, а его уже вручают или вручили получателю. Не пугайтесь, что мониторинг начнется не сразу, вам всем все придет заказанное.
сайт для рефератов сайт для рефератов .
реферат нейросеть реферат нейросеть .
Если в ситуации с алкоголем присутствуют несколько из перечисленных ниже пунктов, это повод не откладывать консультацию с наркологом в Королёве:
Подробнее – http://kodirovanie-ot-alkogolizma-korolyov11.ru
В этой статье-обзоре мы собрали данные, актуальность которых сомнительна, а факты — не всегда взаимосвязаны. Читатель сможет ознакомиться с разными мнениями, хотя вряд ли они существенно повлияют на его понимание темы.
Вот – порно смотреть
1xbet giri? linki 1xbet giri? linki .
ии для учебы студентов nejroset-dlya-referatov-1.ru .
xbet giri? xbet giri? .
дизайн интерьера квартир 30 кв м дизайн проект квартиры
Вызов нарколога на дом в Волгограде позволяет оперативно получить помощь без необходимости посещения клиники. Это особенно важно при состояниях интоксикации, абстиненции или других осложнениях. Специалист приедет в любое удобное время, включая ночные часы, обеспечивая круглосуточную поддержку. При этом сохраняется полная конфиденциальность, что высоко ценится пациентами и их родственниками.
Получить дополнительные сведения – выезд нарколога на дом волгоград
Если многое из этого знакомо, кодирование стоит рассматривать не как «наказание» или «приговор», а как инструмент, который помогает закрыть доступ к алкоголю на определённый срок и даёт шанс выстроить новую привычку — жить трезво.
Выяснить больше – http://
Новости России и мира читать Отслеживание новостей Москвы и других регионов Российской Федерации, а также деловых и политических новостей, становится проще благодаря таким ресурсам, как Яндекс Новости или РИА Новости.
«Как отмечает врач-нарколог Алексей Николаевич Прудников, «выезд нарколога на дом — это возможность стабилизировать состояние пациента в привычной обстановке, снизив стресс и риски осложнений».»
Получить больше информации – https://narkolog-na-dom-v-krasnodare14.ru/narkolog-krasnodar-anonimno/
ии реферат ии реферат .
Сижу жду пока высохнет АМ2233 =) https://moscowcomedians.ru отличный магаз,пришло всё быстро и в лучшем виде:dansing:спасибо,удачи и процветания250-й 1К10 то, что нужно..
Обращение к наркологу — это не признание «окончательного проигрыша», а трезвое решение, что здоровье и жизнь важнее иллюзии контроля. В клинике можно безопасно вывести человека из запоя, стабилизировать состояние, обследовать сердце, печень, нервную систему, понять, насколько далеко зашло заболевание. Важно, что помощь получают не только тяжёлые пациенты «на грани», но и те, у кого ещё есть работа, семья, привычный образ жизни, но запои уже стали регулярными. Чем раньше удаётся подключить специалистов в Лобне, тем мягче можно пройти лечение и тем больше шансов сохранить и здоровье, и отношения, и социальный статус.
Подробнее тут – http://narkologicheskaya-klinika-lobnya11-2.ru/chastnaya-narkologicheskaya-klinika-v-lobne/
Участие в государственных и коммерческих процедурах требует точной подготовки, понимания законодательства и внимательной работы с документами. Для многих компаний самостоятельная работа с закупками становится сложной задачей: необходимо отслеживать новые закупки, анализировать требования, оформлять документы и взаимодействовать с площадками.
Разгадайте все загадки – услуги тендерного сопровождения в ростове на дону
Если многое из этого знакомо, кодирование стоит рассматривать не как «наказание» или «приговор», а как инструмент, который помогает закрыть доступ к алкоголю на определённый срок и даёт шанс выстроить новую привычку — жить трезво.
Подробнее – http://kodirovanie-ot-alkogolizma-korolyov11.ru/klinika-kodirovaniya-ot-alkogolizma-v-korolyove/
В этой статье мы рассматриваем разрушительное влияние зависимости на жизнь человека. Обсуждаются аспекты, такие как здоровье, отношения и профессиональные достижения. Читатели узнают о необходимости обращения за помощью и о путях к восстановлению.
Изучить вопрос глубже – как бросить курить без
После завершения основной инфузионной терапии врач наблюдает за состоянием пациента ещё в течение 30–60 минут. Если отсутствуют осложнения и параметры стабилизированы, врач даёт рекомендации по дальнейшему восстановлению, включая приём анксиолитиков, соблюдение питьевого режима, лёгкой диеты и исключение стрессов. Также составляется индивидуальный план наблюдения: возможны повторные визиты врача через сутки, двое или трое суток. При необходимости пациенту или его близким предоставляется контакт психотерапевта или проводится предварительное консультирование по дальнейшему лечению зависимости.
Получить дополнительную информацию – https://narkologicheskaya-pomoshh-novosibirsk0.ru/narkologiya-novosibirsk-kruglosutochno
Интер Авто Тим – официальный дилер EXEED в Санкт-Петербурге https://exeed-iat.ru/ – авто в наличии по выгодной стоимости. Узнайте цены, комплектации и модельный ряд на сайте. Также специальные финансовые программы, трейд-ин, лизинг, скидки и акции, тест-драйв. EXEED ЦЕНТР ИАТ ВОЛХОНСКИЙ – ваш надежным партнером на автомобильном рынке России.
умная нейросеть для учебы nejroset-dlya-referatov-3.ru .
генерация генерация .
Если в ситуации с алкоголем присутствуют несколько из перечисленных ниже пунктов, это повод не откладывать консультацию с наркологом в Королёве:
Углубиться в тему – http://kodirovanie-ot-alkogolizma-korolyov11.ru/klinika-kodirovaniya-ot-alkogolizma-v-korolyove/
1xbet ?ye ol 1xbet ?ye ol .
вот такие как ты потом и пишут не прет , не узнавая концентрацию и т д набодяжат к…. ,я вот щас жду посыля и хз ко скольки делать 250 https://sad-skazka.ru ОПЛАТИЛ И ЧЕРЕЗ 2ДНЯ ВСЕ У МЕНЯ !!!Общение оператора 10/10-всегда все грамотно и вежливо объяснит. Таким оператор и должен быть!
Нарколог на дом в Волгограде — это специализированная медицинская услуга, направленная на оказание квалифицированной помощи пациентам с зависимостями в привычной домашней обстановке. Такая форма лечения позволяет снизить стресс, связанный с госпитализацией, и обеспечивает более комфортное проведение медицинских процедур. Вызов нарколога на дом пользуется высокой востребованностью как среди пациентов с алкоголизмом, так и среди людей, страдающих от наркотической зависимости, а также при острых состояниях, требующих неотложного вмешательства.
Подробнее – вызвать врача нарколога на дом волгоград
ремонт дизайн интерьера дизайн студия интерьеров
Автосалон «Прайд на Вавилова» в Ростове-на-Дону является официальным дилером TENET и продаёт три модели кроссовера: бюджетный T4 от 2 039 000 р., спортивный T7 от 2 535 000 р. и флагманский T8 от 3 480 000 р. с полным приводом и ассистентами ADAS. Ищете tenet t 4 купить? На tenet-pride.ru доступны конфигуратор комплектаций, кредитный калькулятор и запись на тест-драйв. Для всех владельцев предусмотрены 5 лет поддержки, программа «Помощь в пути» и собственное приложение бренда.
1 x bet giri? 1 x bet giri? .
букеты с доставкой москва недорого http://www.dostavka-cvetov-moskva495.ru/ .
нейросеть студент бот нейросеть студент бот .
джетон бонус
Форум XakerPlus предоставляет профессиональные услуги по аудиту информационной безопасности и тестированию защищенности IT-инфраструктуры компаний. Эксперты выполняют поиск слабых мест, тестирование на проникновение и подготовку стратегий повышения информационной безопасности. Ищете взлом сайтов? Заказать комплексную проверку безопасности можно через xakerplus.com, где представлены все доступные услуги и условия сотрудничества. Группа аттестованных специалистов обслуживает организации различных размеров с полным соблюдением режима секретности.
В условиях круглосуточного наблюдения врачи могут внимательно следить за динамикой состояния, своевременно корректировать схемы лечения, проводить детоксикацию под контролем давления, пульса и работы сердца. Особенно это важно для пациентов с гипертонией, сердечно-сосудистыми заболеваниями, нарушениями ритма, заболеваниями печени, диабетом и другими хроническими патологиями. В стационаре проще организовать обследование, назначить сопутствующую терапию, вовремя заметить опасные симптомы и предотвратить серьёзные осложнения.
Подробнее – narkologicheskaya-klinika-obratnyj-zvonok
спасибо стараемся Мефедрон, Марихуану, Бошки, Кокаин Чемикал. когда трек даш?? позавчера заказал. сказал во вторник в среду отправка будет.Качество продукции на высшем уровне.
ии реферат ии реферат .
ии для студентов nejroset-dlya-referatov-5.ru .
нейросеть реферат онлайн нейросеть реферат онлайн .
Этот обзор сосредоточен на различных подходах к избавлению от зависимости. Мы изучим традиционные и альтернативные методы, а также их сочетание для достижения максимальной эффективности. Читатели смогут открыть для себя новые стратегии и подходы, которые помогут в их борьбе с зависимостями.
Получить дополнительные сведения – https://alkogolikum.ru/stati/kak-brosit-pit.html
Кодирование от алкоголизма в Чехове для многих семей становится тем рубежом, после которого зависимость перестаёт казаться «временной слабостью» и начинает восприниматься как диагноз, с которым можно и нужно работать. До этого момента обычно проходят годы: чередуются запои и трезвые периоды, звучат обещания «больше такого не будет», меняются напитки, придумываются правила вроде «пью только по выходным» или «только пиво». Но рано или поздно семья замечает, что именно алкоголь диктует распорядок дня, влияет на настроение, разрушает здоровье и отношения. В этот момент становится очевидно: без сильного внешнего ограничителя и профессиональной помощи просто «взять себя в руки» уже не получается.
Ознакомиться с деталями – https://kodirovanie-ot-alkogolizma-chekhov11.ru
Мы практикуем минимально достаточную фармакотерапию и предсказуемые алгоритмы. Это означает — никакой полипрагмазии, никаких «универсальных капельниц», никакого «сделаем всё сразу». Сначала — безопасность (дыхание, гемодинамика, сознание), затем — управляемая детоксикация с коррекцией водно-электролитного баланса и седацией только по показаниям, после — «тихий режим» и восстановление сна, и уже на этом фоне — поведенческие навыки, работа с триггерами, переговоры с семьёй о правилах поддержки. Такой порядок убирает хаос, снижает тревогу и делает ремиссию не подвигом, а реальной рутиной.
Получить дополнительные сведения – наркологическая клиника в рязани
international drivers license international driving permit
Такая схема позволяет комплексно воздействовать на организм и уменьшить риски осложнений.
Получить дополнительную информацию – нарколог на дом недорого в краснодаре
нейросеть генерации текстов для студентов нейросеть генерации текстов для студентов .
дизайн проект спб частный дизайнер интерьера спб
Мы не «усиливаем всё сразу». Лечение собирается из модулей: гидратация, адресная коррекция электролитов, гастропротекция, антиоксидантная поддержка, при необходимости — мягкие анксиолитики по строгим показаниям. Порядок и насыщенность зависят от ведущей жалобы и времени суток. Ниже — ориентир для пациента: почему назначение выглядит именно так и в какой горизонт мы ожидаем эффект.
Ознакомиться с деталями – наркологическая клиника клиника помощь в мурманске
Одним из ключевых факторов успешного лечения наркомании является психотерапия. В клинике «Сибирский Доктор» применяются различные методы психотерапии, включая когнитивно-поведенческую терапию, групповые и индивидуальные занятия, которые помогают пациентам осознать причины зависимости, научиться справляться с эмоциональными и психологическими трудностями.
Получить дополнительные сведения – https://lechenie-narkomanii-novosibirsk0.ru
f7 casino bonus code
site works fine tbh no issues yet.
1 xbet giri? 1xbet-giris-45.com .
Во многих семьях путь к лечению начинается одинаково: сначала запои или эпизоды употребления воспринимаются как временные «проблемы по жизни», которых стыдно, но которые вроде бы можно переждать. Человек клянётся «завязать после праздников», родственники верят, потом терпят, потом скандалят, затем снова наступают на те же грабли. В какой-то момент становится очевидно, что сила воли больше не работает: попытки прекратить запой заканчиваются тряской, паникой, скачками давления, отсутствием сна, а через несколько дней всё повторяется. Именно тогда наркологическая клиника в Лобне перестаёт быть чем-то абстрактным и превращается в реальную возможность остановить этот круг.
Получить больше информации – государственная наркологическая клиника
нейросеть онлайн для учебы нейросеть онлайн для учебы .
еще раз решил воспользоваться магазом ))) уже 2 года только у них покупаю))) и пока доволен https://mosshtory.ru пишу по сути заказал-оплатил-получил все это было очень быстро я сам охуел вечером кинули трек а уже на следующее утро получил походу ТС на реактивном истребителе доставку организовал, качество нормуль делал 1к8 штырит как положено, первые 20 минут на подьем потом 20 минут идет спад короче 40 минут полет отличный, да был небольшой казус часть платежа потярялось, но потом после созвона со службой поддержки клиентов благополучно нашлось- “дырявая банковская система” вот как то так. ТСу без подхолемажа РЕСПЕКТ!!!!Во телегу двинул, а? Ещё спать не ложился, такой эффект сильный, толеоа нет вообще, в завязке полгода 🙂
ии для учебы студентов ии для учебы студентов .
измена с женой друга измена с женой друга .
1xbet g?ncel adres 1xbet g?ncel adres .
Агентство «Мишкины грёзы» работает исключительно в сфере медицинского digital-маркетинга. Основатель Михаил Коркишко лично ведёт ключевые проекты с 2016 года, глубоко погружаясь в бизнес-процессы каждого клиента. Агентство строит персональные стратегии с чёткими KPI и реальными сроками — не шаблонные решения, а точечная работа на рост прибыли. Подробнее об услугах и подходе к продвижению медицинского бизнеса на https://mishkingrezy.ru/ — здесь проводят комплексный аудит, выявляют точки роста и запускают рекламу, которая приводит пациентов.
Для успешного и безопасного очищения организма от наркотиков применяются методы медикаментозной поддержки, что способствует уменьшению риска осложнений и облегчению состояния пациента.
Узнать больше – лечение наркомании анонимно
Северное сияние, длинные сумерки, влажный ветер с Кольского залива — у Мурманска свой ритм, который влияет на сон, частоту сердечных сокращений и восприятие звука. Мы учитываем этот фон в клинике и при выездной помощи: используем тёплую подсветку вместо холодного верхнего света, организуем «режим тишины» на телефонах, ограничиваем количество касаний ночью, вводим «окна связи» с родственниками в заранее оговорённое время. Такой сенсорный профиль помогает снизить вечернюю реактивность и уменьшает потребность в избыточной фармакологии, сохраняя ясность утром.
Выяснить больше – http://narkologicheskaya-klinika-murmansk15.ru
Если пациент обращается в клинику в состоянии запоя или тяжёлой абстиненции, первым шагом становится детоксикация. Это не «волшебная капельница», которая снимает все проблемы, а комплекс процедур, направленных на выведение токсинов, восстановление водно-солевого баланса, поддержку сердца, печени, нервной системы. Под контролем врачей подбираются растворы и препараты, которые позволяют снизить нагрузку на организм, облегчить похмельный синдром, уменьшить тревогу и вернуть сон. Важно, что это проходит под наблюдением, а не «на кухне» без понимания, как реагирует сердце и давление. После выхода из острого состояния человек уже способен осмысленно обсуждать дальнейшее лечение.
Подробнее – http://narkologicheskaya-klinika-ivanteevka11.ru/narkologicheskaya-klinika-reabilitaciya-v-ivanteevke/
Признаки, что пора задуматься о кодировании
Разобраться лучше – кодировка от алкоголя в королеве
После завершения основной инфузионной терапии врач наблюдает за состоянием пациента ещё в течение 30–60 минут. Если отсутствуют осложнения и параметры стабилизированы, врач даёт рекомендации по дальнейшему восстановлению, включая приём анксиолитиков, соблюдение питьевого режима, лёгкой диеты и исключение стрессов. Также составляется индивидуальный план наблюдения: возможны повторные визиты врача через сутки, двое или трое суток. При необходимости пациенту или его близким предоставляется контакт психотерапевта или проводится предварительное консультирование по дальнейшему лечению зависимости.
Получить дополнительные сведения – скорая наркологическая помощь новосибирск
Задача первого контакта — не «записать к врачу на когда-нибудь», а оценить, насколько ситуация критична прямо сейчас. Если речь идёт о многодневном запое, сильной слабости, одышке, скачках давления, спутанности сознания, лучше не экспериментировать с домашними методами. В таких случаях специалисты в Лобне рекомендуют стационар, где можно не только поставить капельницу, но и быстро среагировать на осложнения. Если же состояние относительно стабильное, возможно обсуждение мягкого формата с выездом и последующим наблюдением.
Разобраться лучше – https://narkologicheskaya-klinika-lobnya11-2.ru/chastnaya-narkologicheskaya-klinika-v-lobne
нейросеть для школьников и студентов нейросеть для школьников и студентов .
Преимущество обращения в клинику по месту проживания в том, что помощь становится доступной и менее пугающей. Не нужно ехать в другой город, объяснять длительные отлучки, жить в ощущении, что о проблеме узнают все вокруг. Пациент может пройти диагностику, детоксикацию, вывод из запоя, курс лечения и реабилитацию в привычном регионе, а родные — участвовать в процессе, приезжать на семейные консультации, поддерживать контакт со специалистами. Важный момент: здесь смотрят не только на зависимость как на «вредную привычку», а как на заболевание с физическими, психологическими и социальными последствиями. Лечить приходится не отдельный эпизод запоя, а всю систему — здоровье, поведение, образ жизни и окружение человека.
Получить больше информации – http://narkologicheskaya-klinika-ivanteevka11.ru/
сделать реферат nejroset-dlya-referatov-5.ru .
так-то уже четверг бро https://fadeevamari.ru ТС, походу в отпуск вышел:rest:Господа торчебосы, если желаете отведать стопроцентных пробивающих толер кайфоф – то вы попали по адресу) Вторая покупка за эти самопровозглашенные выходные)) Не жалем о потраченном времени и деньгах. Клад как всегда прост как дважды два, упаковка на высоте горы Эверест. Качество стаффа необьяснимо, но факт как ебашит по вашим чувствам и эмоциям. Магазину огромный как земной шар респект,пис аут и цом)
https://f7-casino-uk1.com/
found this randomly and tried it works fine.
нейросеть для учебы нейросеть для учебы .
Повод задуматься о профессиональной помощи — это уже не единичные эпизоды, а повторяющийся сценарий: регулярные запои, тяжёлое похмелье, невозможность остановиться «на одном-двух бокалах», ссоры с родными, скрытность, попытки утаить спиртное, прогулы, нелепые оправдания. Если к этому добавляются скачки давления, проблемы с сердцем, боли в животе, дрожание рук, проблемы со сном, тревожные состояния, разговоры о бессмысленности жизни — это уже не «особенности характера», а признаки затяжной зависимости. Это касается и наркотических веществ: даже если человек считает, что «контролирует дозу», уже сам факт необходимости регулярного приёма, нарастающей толерантности и страха остаться без вещества говорит о сформировавшейся проблеме.
Изучить вопрос глубже – [url=https://narkologicheskaya-klinika-ivanteevka11.ru/]наркологическая клиника официальный сайт[/url]
Психотерапия занимает ключевое место в комплексном лечении зависимостей. В клинике применяются методы когнитивно-поведенческой терапии, мотивационного интервью и групповой психотерапии. Эти методы способствуют формированию устойчивой мотивации к трезвому образу жизни и профилактике рецидивов. Рекомендации по психотерапии при зависимости подробно представлены на портале Психологической Ассоциации России.
Разобраться лучше – https://narkologicheskaya-klinika-krasnodar00.ru/narkologicheskaya-klinika-anonimno-krasnodar
Большинство семей приходят к мысли о лечении зависимости не сразу. Сначала всё выглядит как «случайные переборы по праздникам», потом алкоголь или наркотики становятся привычным способом снять стресс, забыться, пережить неудачи. Постепенно запои учащаются, человек пропадает на несколько дней, появляются долги, проблемы на работе, конфликты в семье. На этом этапе многим кажется, что обращаться в наркологическую клинику в Лобне ещё рано, что можно «взять себя в руки» и как-то остановиться. Но практика показывает обратное: чем дольше затягивается момент обращения к специалистам, тем тяжелее протекают запои, тем глубже страдает здоровье и тем сложнее вернуть человека к стабильной трезвости.
Исследовать вопрос подробнее – telefon-narkologicheskoj-kliniki
Многие тянут до последнего, считая, что к наркологу обращаются только в самых крайних случаях. На деле показаний для консультации гораздо больше, и они часто появляются задолго до того, как человек впервые оказывается в запое или не выходит из состояния опьянения несколько дней подряд.
Получить дополнительную информацию – отзывы о наркологических клиниках
Мебельная фабрика «Подольск» производит кухни и шкафы-купе на заказ по индивидуальным размерам для жителей Москвы и Московской области. Собственное производство позволяет закупать материалы напрямую и предлагать готовую мебель без торговых наценок. Ищете купить кухню? На mf-podolsk.ru представлен полный каталог кухонь и фасадов с онлайн-конструктором для самостоятельного проектирования. В работе используются МДФ, пластик, массив дерева и плёнка ПВХ — фабрика предлагает угловые, классические и современные кухни под любой бюджет и стиль. Доставка и сборка включены в сервис.
ии для учебы студентов nejroset-dlya-referatov-7.ru .
В этом тексте собрано множество случайных сведений и довольно неопределённых мыслей, которые могут чем-то заинтересовать. Мы отмечаем моменты, которые не особенно важны, но всё же занимают своё место в повествовании.
Вот – интим услуги
ХозПак — новосибирская компания, специализирующаяся на оптово-розничной продаже хозтоваров, одноразовой посуды и упаковки по доступным ценам. Каталог охватывает пакеты ПНД, мешки для мусора, перчатки, бумажные стаканы, фольгу, контейнеры, формы для выпечки и десятки других позиций. Ищете тара и упаковочные материалы? На hozpak777.ru представлен полный ассортимент с актуальными ценами и возможностью оформить заказ. Режим работы — ежедневно с 9:00 до 18:00, а два филиала в Ленинском районе делают получение товара максимально удобным для оптовых и розничных клиентов.
скачать игры из max Мы предлагаем удобный доступ к играм по прямой ссылке, что гарантирует безопасность и скорость загрузки.
Настоящая астраханская вобла давно стала символом традиционного рыбного вкуса России. Ассортимент формируется напрямую у астраханских рыбаков: вяленая и сушёная вобла, чехонь, икра — только натуральная засолка без консервантов. Ищете вобла где купить? На сайте vobla-astrahanskaya.ru представлен полный каталог с актуальными ценами и возможностью заказа от 1 кг. Вся Россия получает заказы через Озон с защитой покупателя — предоплата не требуется. Цены на доставку одни из самых низких на рынке.
реферат через нейросеть реферат через нейросеть .
Путь в наркологическую клинику в Ивантеевке почти всегда начинается с консультации — очной или по телефону. На этом этапе задача врача не осудить и не прочитать нотацию, а максимально точно понять, что происходит: сколько лет длится злоупотребление, как часто бывают запои, были ли попытки лечиться раньше, какие есть хронические болезни, каково текущее физическое и психическое состояние. Собирается анамнез, измеряется давление, оценивается пульс, при необходимости направляют на анализы и дополнительные исследования. Чем честнее и конкретнее человек (или его родственники) описывают ситуацию, тем точнее можно подобрать безопасный план помощи.
Разобраться лучше – narkologicheskaya-klinika-otzyvy
Все шаги фиксируются в карте наблюдения. Если динамика «плоская», меняется один параметр (скорость/объём/последовательность), и через оговорённое окно проводится повторная оценка. Это снижает риск побочных реакций и сохраняет дневную ясность.
Узнать больше – http://www.domen.ru
После основной терапии важно обеспечить поддержку пациента в период реабилитации. Реабилитационные программы в Краснодаре включают социальную адаптацию, восстановление навыков общения и трудоустройства. Это позволяет минимизировать риск рецидива и возвращения к употреблению алкоголя. Поддержка со стороны специалистов и близких — обязательное условие успешного результата. Более подробно о социальной реабилитации можно ознакомиться на сайте Федерального реабилитационного центра.
Разобраться лучше – лечение хронического алкоголизма в краснодаре
resultsfirst – Overall, professional vibe here; trustworthy, polished, and pleasantly minimal throughout.
нейросеть генерации текстов для студентов нейросеть генерации текстов для студентов .
первую посылочку получил от селера, сервис на вышем уровне не то что у некоторых!!!!! https://annarost.ru СПАСИБИЩЕ ОГРОМНОЕ ЗА СЕРВИСЕсть люди в вк, которые представляются под маркой вашего магазина и кидают людей, уже не одного так кинули, так что будьте внимательны и уточняйте у реальных представителей магазина, так оно или нет.
Лечение зависимостей редко ограничивается одной процедурой. Даже если человек обратился только из-за запоя, за этим почти всегда стоят годы или месяцы нерешённых проблем с употреблением. Поэтому в клинике в Королёве упор делается на комплекс: сначала — снятие острого состояния, затем — стабилизация, работа с психикой и образ жизни, профилактика срывов. Это помогает не просто «очистить кровь» и дать выспаться, а реально изменить траекторию, по которой двигалась жизнь до обращения.
Ознакомиться с деталями – narkologicheskaya-klinika-otzyvy
дешевые букеты с доставкой москва http://www.dostavka-cvetov-moskva495.ru/ .
Андрей Нехаев — эксперт в области SEO, написавший книги «SEO для Яндекс» и «Быстротоп 2.0» и профессионально занимающийся выводом сайтов в топ Яндекса. Ищете продвижение сайта в москве Андрей Нехаев? На andrey-nekhaev.ru собраны все форматы работы: от разовой консультации и индивидуального плана продвижения до членства в закрытом Telegram-клубе с еженедельными разборами сайтов. Заказчики фиксируют измеримый эффект: улучшение позиций в выдаче, чёткую стратегию и ощутимую окупаемость. Сотрудничество будет полезно владельцам сайтов и тем, кто хочет освоить SEO-продвижение своими силами.
нейросеть реферат онлайн nejroset-dlya-referatov-5.ru .
Этот метод направлен на выявление и замену негативных мыслей и стереотипов поведения, связанных с потреблением алкоголя. Пациент учится отслеживать свои эмоциональные реакции и заменять деструктивные установки конструктивными стратегиями противостояния стрессу.
Углубиться в тему – https://lechenie-alkogolizma-sochi0.ru/lechenie-alkogolizma-na-domu/
Психотерапевтические методы включают когнитивно-поведенческую терапию, мотивационное интервьюирование и групповую поддержку, которые способствуют изменению отношения пациента к алкоголю и укреплению его мотивации к выздоровлению. Эти методы подробно описаны на ресурсе Психологическая помощь.
Получить дополнительную информацию – https://lechenie-alkogolizma-sochi00.ru/lechenie-alkogolizma-na-domu/
Наркологическая помощь в Перми представляет собой комплекс мероприятий, направленных на диагностику, лечение и профилактику различных форм зависимостей. Современные наркологические клиники обеспечивают индивидуальный подход к каждому пациенту, учитывая особенности его состояния и историю заболевания. Важно своевременно обращаться за квалифицированной помощью, чтобы снизить риски осложнений и улучшить качество жизни.
Изучить вопрос глубже – наркологическая помощь пермь
Запой почти никогда не начинается внезапно: сначала это редкие «переборы» по праздникам, потом привычка снимать стресс вечером, а дальше алкоголь всё чаще появляется в распорядке дня. В какой-то момент близкие замечают, что человек уже не контролирует количество, выпивка идёт несколько дней подряд, отменяются дела, нарушается сон, пропадает аппетит, появляются дрожь, потливость, скачки давления. На этом этапе вывод из запоя в Ивантеевке уже не может быть простым «проспаться и прийти в себя» — организму нужна полноценная медицинская помощь.
Детальнее – [url=https://vyvod-iz-zapoya-ivanteevka11.ru/]vyvoda-iz-zapoya-vyzov[/url]
жена соблазняет друга мужа жена соблазняет друга мужа .
нейросеть для студентов нейросеть для студентов .
Психотерапевтическое кодирование делает акцент на внутренней мотивации. Специалист помогает человеку увидеть реальную цену алкоголя в его жизни, понять, как именно употребление разрушает здоровье, семью, карьеру, и сформировать установку на трезвость на определённый срок. Используются техники внушения в состоянии расслабления и структурированная работа с убеждениями и привычками. Такой подход особенно полезен тем, кто боится «лекарственного вмешательства» или уже имеет негативный опыт неудачных медикаментозных попыток. В практике лечения в Чехове часто используются комбинированные схемы, когда медикаментозный барьер подкрепляется психотерапевтической поддержкой, а результат кодирования закрепляется за счёт изменения образа жизни и участия в реабилитационных программах.
Изучить вопрос глубже – metody-kodirovaniya-ot-alkogolizma
Городская среда Воронежа — яркие подъезды, плотный трафик, шумные дворы — может усиливать вечернюю реактивность. Поэтому мы проектируем «тихую» логистику: согласованная парковка, вход без вывесок, гражданская одежда специалистов, короткий маршрут от порога к месту процедуры. Коммуникация в зашифрованных каналах, напоминания — в беззвучном режиме. Такой дизайн не декоративен: чем меньше социального шума, тем быстрее возвращаются питьё и аппетит, а значит — меньше потребность «наращивать» фармакологию.
Выяснить больше – http://vyvod-iz-zapoya-v-voronezhe15.ru/vyvod-iz-zapoya-na-domu-voronezh/
Для семьи это почти всегда тяжёлый, эмоционально изматывающий период. В доме копятся усталость, обида, чувство вины, страх за близкого. Но при этом сохраняется надежда, что удастся «обойтись своими силами». В какой-то момент становится ясно: без профессиональной наркологической помощи уже не справиться. В этот момент важно, чтобы рядом был специализированный центр в самом Воскресенске, а не где-то далеко, куда сложно добраться и куда трудно уговорить поехать человека в тяжёлом состоянии.
Ознакомиться с деталями – государственная наркологическая клиника
В этом материале представлены детали, которые хоть и занимательны, но не особенно значимы. Мы рассматриваем моменты, которые трудно назвать важными, но всё же решили включить их для полноты картины.
Вот – секс шоп
чат нейросеть для учебы nejroset-dlya-referatov-7.ru .
А для кого указан Major Express (для СНГ)?Да,можно. Мефедрон, Марихуану, Бошки, Кокаин все скоро будут всем довольны, а те кто ждал и не паниковал будут вдвойне довольны!Ам имеет высокий толер об этом уже говорилось не раз
https://spisok-kreditov.ru/02_kredit-nalichnymi.html В Алматы кредит с плохой кредитной историей если банки отказывают в Казахстане – на список-кредитов.ру можно сравнить условия
Коммерческий и государственный тендер — это конкурентная процедура выбора поставщика товаров или оказания услуг. Заказчик размещает требования, а компании подают заявки и участвуют в торгах.
Все тайны раскрыты – тендерное сопровождение заказчиков
ии для учебы студентов ии для учебы студентов .
нейросеть для учебы онлайн nejroset-dlya-referatov.ru .
Такая форма медицинской помощи востребована в разных ситуациях: при запое, выраженном абстинентном синдроме, интоксикации, а также при необходимости купирования симптомов без транспортировки пациента.
Изучить вопрос глубже – http://narkolog-na-dom-v-krasnodare14.ru
Обычно всё начинается с телефонного разговора. Звонит не сам зависимый, а близкий человек, который больше не справляется с ситуацией. Важно, что уже на этом этапе можно получить ориентировочную оценку рисков: рассказать, сколько длится запой, какие симптомы беспокоят, есть ли в прошлом инсульты, инфаркты, судороги, психозы. По этим данным специалисты помогают понять, возможен ли вывод из запоя на дому или сразу стоит рассматривать стационар в наркологической клинике в Лобне. Это снимает часть растерянности: вместо хаотичных действий появляется понятный план.
Получить дополнительную информацию – http://narkologicheskaya-klinika-lobnya11-2.ru
По вопросам оформления вызова можно ознакомиться с правилами на портале Федеральной службы по надзору в сфере здравоохранения, где опубликованы актуальные рекомендации и требования к медицинским организациям.
Подробнее тут – https://narkolog-na-dom-volgograd13.ru/narkolog-na-dom-czeny-volgograd
После принятия решения организуется либо выезд, либо госпитализация. На приёме проводится осмотр: измеряется давление, пульс, оценивается степень обезвоживания, выраженность тремора, тревоги, нарушений сна. Выясняются сопутствующие болезни и лекарства, которые человек принимает постоянно. Уже на этом этапе обсуждаются ближайшие шаги — объём детокса, необходимость круглосуточного наблюдения, примерные сроки стабилизации. Родным объясняют, чего ожидать в первые сутки, какие симптомы будут уменьшаться постепенно, а какие требуют немедленного информирования персонала.
Исследовать вопрос подробнее – chastnaya-narkologicheskaya-klinika
Нарколог на дом в Волгограде — это специализированная медицинская услуга, направленная на оказание квалифицированной помощи пациентам с зависимостями в привычной домашней обстановке. Такая форма лечения позволяет снизить стресс, связанный с госпитализацией, и обеспечивает более комфортное проведение медицинских процедур. Вызов нарколога на дом пользуется высокой востребованностью как среди пациентов с алкоголизмом, так и среди людей, страдающих от наркотической зависимости, а также при острых состояниях, требующих неотложного вмешательства.
Подробнее тут – помощь нарколога на дому в волгограде
ролики с женой друга ролики с женой друга .
В этом обзоре представлены различные методы избавления от зависимости, включая терапевтические и психологические подходы. Мы сравниваем их эффективность и предоставляем рекомендации для тех, кто хочет вернуться к трезвой жизни. Читатели смогут найти информацию о реабилитационных центрах и поддерживающих группах.
Детальнее – когда можно сесть за руль после алкоголя
Круглосуточный режим — не просто «расписание». Это доступность врача тогда, когда симптомы наиболее коварны: поздним вечером, ночью, в выходные и праздники. У нас нет очередей и «окна через неделю»: тревога, бессонница, нарастающая абстиненция или риск срыва требуют реагирования по факту, а не по талону. Чтобы не тратить драгоценные часы, мы приняли промышленный стандарт быстрого старта: диспетчер собирает клинически значимую информацию, нарколог определяет безопасный канал помощи, выездная команда берёт на адрес переносное оборудование и точечные препараты, а в карте заранее создаётся план первых 24–72 часов с контрольными точками.
Выяснить больше – наркологическая клиника наркологический центр
Ребята сайт хороший конечно, но вот у меня выдалась задержка с заказом, у кого были задержки отпишите сюда, просто раньше как только я делал заказа все высылалось либо к вечеру этого дня, либо на следующий, а теперь уже 4 дня жду отправки все не отправляют! https://kia-piter.ru после нового года два раза заказывал первый и второй раз были геморои по срокам отправок но все дошло третий раз конечно тоже закажу но ТС должен будет мамой поклястся что отправит вовремя но если по правде говоря то курьерки тоже мозг ебут не всегда вина ТСя в шоке. до последнего думали кидалово. а нет подняли в касание. стафф пушка. кладмену респект!!!
кинг казино Искал где взять актуальное зеркало для кинг казино и нашел этот канал. Там постоянно обновляют ссылки и выкладывают бонусы. Проверил — работает стабильно. Уже добавил себе в закладки. Удобно что все в одном месте
нейросеть текст для учебы нейросеть текст для учебы .
Мы избегаем шаблонов. Состав инфузий и порядок действий подбираются индивидуально: учитываем тяжесть интоксикации, сопутствующие заболевания, чувствительность к свету и шуму, объём воды, который человек переносит малыми глотками, а также, как реагирует на вечерние уведомления телефона. Главная цель первых часов — стабилизировать витальные показатели, вернуть переносимость питья и лёгкой тёплой пищи, выровнять вариабельность пульса к сумеркам и обеспечить физиологичный сон без «переседации». Все измерения фиксируются в краткой карте наблюдения с разграничением доступа по ролям — это защищает данные и ускоряет принятие решений.
Ознакомиться с деталями – частная наркологическая клиника в калининграде
Этот текст содержит различную информацию, которая, возможно, покажется любопытной, но в целом не меняет восприятия привычных вещей. Предлагаем просто получить удовольствие от чтения, не ожидая особой пользы.
Вот – бинго онлайн
Этот информационный материал подробно освещает проблему наркозависимости, ее причины и последствия. Мы предлагаем информацию о методах лечения, профилактики и поддерживающих программах. Цель статьи — повысить осведомленность и продвигать идеи о необходимости борьбы с зависимостями.
Подробнее можно узнать тут – https://alkogolikum.ru/kodirovanie-ot-narkomanii
В этой публикации мы предлагаем подробные объяснения по актуальным вопросам, чтобы помочь читателям глубже понять их. Четкость и структурированность материала сделают его удобным для усвоения и применения в повседневной жизни.
Проверенные методы — узнай сейчас – https://www.wartmaansoch.com/the-different-parts-of-slot-machines-and-how-they-impact-winning
Большинство стриминговых сервисов работают по одному шаблону: продвигают популярное и лишают слушателя настоящего музыкального открытия. Ищете бесплатно слушать новые песни? Reka-pesen.ru меняет этот подход — здесь работает интерактивная волна, которую каждый слушатель настраивает под себя. От поп-музыки и фолка до рока, блюза, джаза, EDM, хауса, рэпа и чилаута — каждый найдёт своё направление. Новые треки появляются ежедневно, а система подбора учитывает личные предпочтения без лишней навязчивости. Здесь нет шаблонного стриминга — есть живое музыкальное течение, которое подхватывает и несёт именно туда, куда хочешь ты.
Своевременная наркологическая помощь способна не только предотвратить тяжёлые осложнения, но и спасти жизнь. В Новосибирске услуга выезда нарколога на дом востребована у пациентов, которые оказались в состоянии запоя или острой интоксикации, но по разным причинам не могут или не хотят обращаться в стационар. Клиника «Наркосфера» предлагает быструю, квалифицированную и полностью анонимную медицинскую помощь прямо на дому. Такой подход минимизирует стресс, сохраняет социальную репутацию и позволяет начать лечение без задержек и потерь времени.
Разобраться лучше – http://
Наркологическая клиника «ПолярМед Центр» — это пространство круглосуточной помощи, где медицинская точность сочетается с бережным сервисом и конфиденциальными процедурами. Мы строим терапию как последовательность проверяемых шагов: ставим понятную цель, выбираем подходящий инструмент, заранее определяем маркеры контроля и фиксируем время повторной оценки. Такая дисциплина исключает «универсальные сильные капельницы» и заменяет их модульными решениями с предсказуемым эффектом. Пациент и его близкие на каждом этапе понимают, почему именно такое назначение выбрано сейчас и в какой момент мы ожидаем улучшение самочувствия.
Разобраться лучше – наркологическая клиника цены мурманск
Эта статья сочетает в себе как полезные, так и интересные сведения, которые обогатят ваше понимание насущных тем. Мы предлагаем практические советы и рекомендации, которые легко внедрить в повседневную жизнь. Узнайте, как улучшить свои навыки и обогатить свой опыт с помощью простых, но эффективных решений.
Детали по клику – http://ashevilleblog.com/contact
Перед тем как выбрать формат лечения, пациенту и его близким объясняют, какие направления помощи доступны и как их можно сочетать. В зависимости от состояния и мотивации могут быть задействованы разные варианты:
Детальнее – https://narkologicheskaya-klinika-korolyov11.ru/platnaya-narkologicheskaya-klinika-v-korolyove
Большинство семей приходят к мысли о лечении зависимости не сразу. Сначала всё выглядит как «случайные переборы по праздникам», потом алкоголь или наркотики становятся привычным способом снять стресс, забыться, пережить неудачи. Постепенно запои учащаются, человек пропадает на несколько дней, появляются долги, проблемы на работе, конфликты в семье. На этом этапе многим кажется, что обращаться в наркологическую клинику в Лобне ещё рано, что можно «взять себя в руки» и как-то остановиться. Но практика показывает обратное: чем дольше затягивается момент обращения к специалистам, тем тяжелее протекают запои, тем глубже страдает здоровье и тем сложнее вернуть человека к стабильной трезвости.
Узнать больше – наркологическая клиника
Хотелось бы услышать мнение продавца, по этому поводу Мефедрон, Марихуану, Бошки, Кокаин Совершил заказ снова!и буду продолжать это делать,продавец ОЧЕНЬ понимающий человек!:hello::monetka: огромный респект!_Elf_ тебе сколько лет интересно?У тебя был единичный случай по твоим словам товар-фуфло.репутация у тебя “0”Требуешь вернуть денег, ты же понимаешь что тебе их не вернут.Вывод-ПРОВОКАЦИЯ
kra 29 kra29
Sufit napinany to praktyczne wykończenie wnętrza. To rozwiązanie łączy elegancki wygląd z wygodnym użytkowaniem. To rozwiązanie pasuje do salonu sypialni kuchni i łazienki, dzięki czemu wnętrze wygląda schludnie i nowocześnie – kolorowe sufity napinane Wrocław
Если многое из этого знакомо, кодирование стоит рассматривать не как «наказание» или «приговор», а как инструмент, который помогает закрыть доступ к алкоголю на определённый срок и даёт шанс выстроить новую привычку — жить трезво.
Ознакомиться с деталями – [url=https://kodirovanie-ot-alkogolizma-korolyov11.ru/]кодирование от алкоголизма[/url]
ТОП лучших МФО https://mfo-finance.github.io проверенные компании с высоким уровнем одобрения займов. Актуальные предложения, прозрачные условия, быстрые выплаты и онлайн оформление. Сравнивайте и выбирайте надежные МФО для получения денег.
king casino сайт Искал king casino бонусы и вышел на этот канал, сначала думал фигня какая-то. Но решил открыть — оказалось норм, реально есть промики и ссылки. Проверил — переход работает, сайт открывается. Уже даже попробовал зайти и посмотреть че внутри. Пока без нареканий
Are you into rafting? book white water rafting – montenegro exciting rafting trips down mountain rivers with experienced instructors. A tour of the Tara Canyon offers scenic routes, safety, and unforgettable experiences. Book a rafting tour and discover an active holiday.
Эта статья погружает вас в увлекательный мир знаний, где каждый факт становится открытием. Мы расскажем о ключевых исторических поворотных моментах и научных прорывах, которые изменили ход цивилизации. Поймите, как прошлое формирует настоящее и как его уроки могут помочь нам строить будущее.
Подробнее – https://dnistercanyon.pp.ua/index.php/uk/about-park/viddily/buchatsko-monastyryske-viddilennya
умная нейросеть для учебы nejroset-dlya-referatov-5.ru .
Эта статья погружает вас в увлекательный мир знаний, где каждый факт становится открытием. Мы расскажем о ключевых исторических поворотных моментах и научных прорывах, которые изменили ход цивилизации. Поймите, как прошлое формирует настоящее и как его уроки могут помочь нам строить будущее.
Хочешь знать всё? – https://urulab.jp/delivery-buy
частное порно с женой друга частное порно с женой друга .
Вопрос «а не рано ли кодироваться» часто звучит и от самих пациентов, и от их близких. Кажется, что кодирование — это крайняя мера «на последней стадии», а пока человек работает, иногда бывает трезвым и «не валяется под забором», можно подождать. На самом деле гораздо разумнее ориентироваться не на стереотипы, а на реальные признаки того, что зависимость уже управляет жизнью, а не наоборот. Кодирование от алкоголизма в Королёве рассматривается именно тогда, когда попытки остановиться своими силами систематически проваливаются, а каждый новый запой становится тяжелее предыдущего.
Выяснить больше – http://kodirovanie-ot-alkogolizma-korolyov11.ru
Эта публикация исследует взаимосвязь зависимости и психологии. Мы обсудим, как психологические аспекты влияют на появление зависимостей и процесс выздоровления. Читатели смогут понять важность профессиональной поддержки и применения научных подходов в терапии.
Выяснить больше – антибиотики и алкоголь совместимость
mostbet mobile mostbet mobile .
технический переводчик услуги teh-perevod.ru .
Щебень гравийный можно купить быстро и надежно через щебень гравийный заказать.
Он представляет собой крупнозернистую фракцию, полученную дроблением горных пород или промывкой гравия.
карточки товаров wildberries reklamnyj-kreativ12.ru .
Надёжно и недорого организуем заказать машину для вывоза строительного мусора, быстро вывозим мусор с погрузкой и вывозим по доступным ценам.
Объединение усилий властей, бизнеса и граждан формирует устойчивую и экономичную систему вывоза и переработки отходов.
Этот текст призван помочь читателю расширить кругозор и получить практические знания. Мы используем простой язык, наглядные примеры и структурированное изложение, чтобы сделать обучение максимально эффективным и увлекательным.
Что ещё? Расскажи всё! – https://primenewsnet.com/wiz-khalifa-lit
нейросеть для студентов онлайн nejroset-dlya-referatov-6.ru .
Чтобы купить светодиодные оборудование, посетите arlight интернет магазин.
Расчёт освещенности специалистом помогает оптимально распределить количество и размещение источников света.
прилив бодрости учащаеться https://oksistems.ru потому, что так и есть осталось не так много времени!Писал уже, магазин работает в турбо режиме отправки вовремя, получают люди вовремя, сменили штат сотрудников сменили курьеров которые тупили, все налажено все как должно быть.
нейросеть текст для учебы нейросеть текст для учебы .
нейросеть для студентов онлайн nejroset-dlya-referatov-1.ru .
В данной обзорной статье представлены интригующие факты, которые не оставят вас равнодушными. Мы критикуем и анализируем события, которые изменили наше восприятие мира. Узнайте, что стоит за новыми открытиями и как они могут изменить ваше восприятие реальности.
Обратитесь за информацией – https://obsbusiness.com/%D9%86%D9%85%D9%88%D8%B0%D8%AC-%D8%AC%D8%B1%D8%AF-%D8%A7%D9%84%D9%85%D8%AE%D8%B2%D9%88%D9%86-word-%D8%A5%D8%AF%D8%A7%D8%B1%D8%A9-%D8%A7%D9%84%D9%85%D8%AE%D8%B2%D9%88%D9%86-%D8%A8%D8%B3%D9%87
сайт для рефератов сайт для рефератов .
лучшая нейросеть для учебы nejroset-dlya-referatov-7.ru .
Этот текст призван помочь читателю расширить кругозор и получить практические знания. Мы используем простой язык, наглядные примеры и структурированное изложение, чтобы сделать обучение максимально эффективным и увлекательным.
Не упусти важное! – https://primenewsnet.com/major-deep-new-release-feelings-power-deep-house-mix
В этом материале представлены детали, которые хоть и занимательны, но не особенно значимы. Мы рассматриваем моменты, которые трудно назвать важными, но всё же решили включить их для полноты картины.
Вот – взрослые игры
В этой статье представлен занимательный и актуальный контент, который заставит вас задуматься. Мы обсуждаем насущные вопросы и проблемы, а также освещаем истории, которые вдохновляют на действия и изменения. Узнайте, что стоит за событиями нашего времени!
Как это работает — подробно – https://vintageclothingguides.com/news/monterey-peninsula-hosts-second-annual-upcycled-prom-closet-event
Эта статья предлагает живое освещение актуальной темы с множеством интересных фактов. Мы рассмотрим ключевые моменты, которые делают данную тему важной и актуальной. Подготовьтесь к насыщенному путешествию по неизвестным аспектам и узнайте больше о значимых событиях.
Хочешь знать всё? – https://euroterrazzobrasil.com.br/terrazzo-e-granilite-entenda-a-diferenca-entre-eles
Вызов нарколога на дом в Волгограде позволяет оперативно получить помощь без необходимости посещения клиники. Это особенно важно при состояниях интоксикации, абстиненции или других осложнениях. Специалист приедет в любое удобное время, включая ночные часы, обеспечивая круглосуточную поддержку. При этом сохраняется полная конфиденциальность, что высоко ценится пациентами и их родственниками.
Подробнее можно узнать тут – нарколог на дом срочно
В данной обзорной статье представлены интригующие факты, которые не оставят вас равнодушными. Мы критикуем и анализируем события, которые изменили наше восприятие мира. Узнайте, что стоит за новыми открытиями и как они могут изменить ваше восприятие реальности.
Проверенные методы — узнай сейчас – https://www.cutralcoalinstante.com/2024/04/24/plaza-huincul-celebra-su-58-aniversario-y-estreno-una-fuente-de-aguas-danzantes
В этой публикации мы предлагаем подробные объяснения по актуальным вопросам, чтобы помочь читателям глубже понять их. Четкость и структурированность материала сделают его удобным для усвоения и применения в повседневной жизни.
Нажмите, чтобы узнать больше – https://members.arcrypto.io/high-speed-oracles-disrupting-50b-finance-data-industry-web3-exec/comment-page-116
Эта статья предлагает живое освещение актуальной темы с множеством интересных фактов. Мы рассмотрим ключевые моменты, которые делают данную тему важной и актуальной. Подготовьтесь к насыщенному путешествию по неизвестным аспектам и узнайте больше о значимых событиях.
Всё самое вкусное внутри – https://decobellahome.com/parlak-fikirlerle-evini-aydinlat-dekorasyonda-aydinlatma
Эта статья освещает различные аспекты освобождения от зависимости и пути к выздоровлению. Мы обсуждаем важность осознания своей проблемы и обращения за помощью. Читатели получат практические советы о том, как преодолевать трудности и строить новую жизнь без зависимости.
Получить больше информации – https://teplo-info.com/kapelniczy-ot-zapoya-na-domu-lechenie-alkogolizma.html
Эта статья предлагает уникальную подборку занимательных фактов и необычных историй, которые вы, возможно, не знали. Мы постараемся вдохновить ваше воображение и разнообразить ваш кругозор, погружая вас в мир, полный интересных открытий. Читайте и открывайте для себя новое!
Получить профессиональную консультацию – https://www.fj-tokyo.jp/otsumami/vegetable/6038
Большое спасибо команде chemical-mix за проведенную сделку, с наступающим Вас Новым Годом! Мефедрон, Марихуану, Бошки, Кокаин я бы тоже заценилНа ацетоне делай, он быстро выветривается и не пахнет совсем!
Эта статья погружает вас в увлекательный мир знаний, где каждый факт становится открытием. Мы расскажем о ключевых исторических поворотных моментах и научных прорывах, которые изменили ход цивилизации. Поймите, как прошлое формирует настоящее и как его уроки могут помочь нам строить будущее.
Не упусти шанс – https://datadoctor.jp/2024/11/08/%E7%89%A9%E7%90%86%E7%9A%84%E6%90%8D%E5%82%B7%E3%82%92%E5%8F%97%E3%81%91%E3%81%9F%E3%83%87%E3%82%A3%E3%82%B9%E3%82%AF%E3%81%8B%E3%82%89%E3%83%87%E3%83%BC%E3%82%BF%E3%82%92%E5%8F%96%E3%82%8A%E6%88%BB
Эта статья предлагает живое освещение актуальной темы с множеством интересных фактов. Мы рассмотрим ключевые моменты, которые делают данную тему важной и актуальной. Подготовьтесь к насыщенному путешествию по неизвестным аспектам и узнайте больше о значимых событиях.
Полезно знать – https://www.cytovive.com/the-future-of-prosthetics-in-biomedical-engineering
Zahnprobleme? zahntourismus Montenegro zahnbehandlung im Ausland mit bis zu 70 % Ersparnis. Implantate, Zahnersatz, asthetische Zahnheilkunde und Diagnostik in modernen Kliniken. Wir unterstutzen Sie bei der Wahl des Landes und der Klinik und organisieren Ihre Reise von A bis Z.
dental problems? best cosmetic dentistry abroad clinics high-quality dental treatment abroad at affordable prices. Implants, veneers, prosthetics, and treatments with a guarantee. We select a clinic, organize your trip, and provide patient support throughout the entire process.
Эта познавательная публикация погружает вас в море интересного контента, который быстро захватит ваше внимание. Мы рассмотрим важные аспекты темы и предоставим вам уникальные Insights и полезные сведения для дальнейшего изучения.
Не упусти шанс – http://potmasson.com/14818317_1946470102247352_8534891601099489280_n-3
нейросеть для рефератов нейросеть для рефератов .
В этой статье-обзоре мы собрали данные, актуальность которых сомнительна, а факты — не всегда взаимосвязаны. Читатель сможет ознакомиться с разными мнениями, хотя вряд ли они существенно повлияют на его понимание темы.
Вот – эротические фильмы
нейросеть реферат онлайн nejroset-dlya-referatov-5.ru .
Даже при амбулаторном ведении мы следуем принципам доказательной медицины: пошаговая титрация, ясные коридоры безопасности, пересмотр решений строго по показателям. Мы объясняем, на что ориентироваться в первые часы после визита: диапазоны давления и пульса, ориентиры самочувствия, правила питания и питья, поведенческие «якоря» на случай, если тревога неожиданно вырастет вечером. Благодаря этому пациент и его семья не остаются один на один с вопросами; наоборот — у них есть карта маршрута и контакты людей, готовых включиться в течение минуты.
Разобраться лучше – нарколог на дом
нейросеть для студентов нейросеть для студентов .
Студия дизайна https://dill-design.ru интерьера в Санкт-Петербурге. Реализовываем проекты в г. Санкт-Петербург и г. Москва. Более 100 довольных заказчиков доверили нам создание своего интерьера. От разработки дизайн проекта до его качественной реализации. Авторский надзор на всех этапах реализации. Комплектация в подарок. Закажите расчет дизайн-проекта
Борьба с наркотической зависимостью требует системного подхода и участия опытных специалистов. Важно понимать, что лечение наркомании — это не только снятие ломки, но и длительная психотерапия, обучение новым моделям поведения, работа с семьёй. Согласно рекомендациям Минздрава РФ, наиболее стабильные результаты достигаются при прохождении курса реабилитации под наблюдением профессиональной команды в специализированном центре.
Детальнее – http://lechenie-narkomanii-vladimir10.ru
Сигналом к тому, что пора обсудить вариант кодирования с наркологом, служит не один какой-то эпизод, а совокупность симптомов. Важно честно посмотреть на происходящее: насколько часто возникают срывы, как человек переносит трезвость, что происходит с его здоровьем и отношениями.
Узнать больше – https://kodirovanie-ot-alkogolizma-korolyov11.ru/ehffektivnoe-kodirovanie-ot-alkogolizma-v-korolyove/
секс с женой друга секс с женой друга .
сайт для рефератов сайт для рефератов .
да для ам и дживов ацик самая подходящяя тема. а основа из мачехи ништяк.только её надо выварить раза три по 15 мин. чтоб негорлодёрило и смол меньше,ведь в смоле много канабиола остаёца Мефедрон, Марихуану, Бошки, Кокаин Заказываю у магазина 6-й раз уже и все ровно!Берите только тут и вы не ошибетесь.Да и еще странная штука происходит,как-то взял у другого магазина реагент точно такой же курил месяц гдето и чуть не помер да и отходосы всю неделю были ужасные.А из этого магаза брал реагент было все ништяк,отходосы были но я их почти не заметил.Делайте выводы Бразы.Магазин отличный!Мир всем!ПРИВЕТ ВСЕМ:НУ ЧТО Ж ТЫ БРО ТАК ОБЕЗНАДЕЖИЛ МЕНЯ ПО СКАЙПУ И В КОМЕНТАРИЯХ НАПИСАЛ ЧТО ОТПРАВИЛ MXE А НА ПАКЕТЕ НАПИСАНО RCS И ЧТО МНЕ КУРИТЬ ТЕПЕРЬ НАЧАТЬ ЗАЧЕМ ГОВОРИТЬ ТО ЧТО НЕ ДЕЛАЕШЬ КАК САМ СЧИТАЕШЬ ?
Охранная компания «Вымпел-Альянс» работает с объектами разного масштаба: жилыми комплексами, торговыми центрами, банками, школами, ресторанами и производственными предприятиями. Предприятие оказывает широкий перечень услуг: вооружённая охрана, личная защита, инкассация, сопровождение грузов и детективная деятельность. Ищете личная охрана? На valliance.ru представлены все направления работы и актуальные тарифы. Квалифицированный персонал, сертифицированное оборудование и отлаженный контроль гарантируют клиентам надёжную защиту в любое время суток.
«ЭкоДок» — владимирская компания, которая специализируется на разработке экологической документации для бизнеса Владимирской области. В перечень работ входят паспорта отходов, проекты ПНООЛР, НДВ и НДС, декларации о воздействии на окружающую среду, проекты санитарно-защитных зон и зон санитарной охраны. паспорт отходов? На ecodok.ru собран полный перечень услуг по экологическому проектированию и отчётности. Среди услуг компании — постановка объектов НВОС на учёт, получение лицензий на недропользование и обращение с отходами, полное ведение экологической отчётности включая форму 2-ТП и декларации о плате за негативное воздействие.
Обзор путешествий https://tfast.ru и экскурсий. Ваш персональный гид в мире путешествий. Мы собираем самые живые обзоры, проверенные маршруты и уникальные экскурсии — от известных достопримечательностей до скрытых мест, о которых знают только местные. Планируйте свои приключения с нами, вдохновляйтесь и открывайте мир по-новому.
Даже при амбулаторном ведении мы следуем принципам доказательной медицины: пошаговая титрация, ясные коридоры безопасности, пересмотр решений строго по показателям. Мы объясняем, на что ориентироваться в первые часы после визита: диапазоны давления и пульса, ориентиры самочувствия, правила питания и питья, поведенческие «якоря» на случай, если тревога неожиданно вырастет вечером. Благодаря этому пациент и его семья не остаются один на один с вопросами; наоборот — у них есть карта маршрута и контакты людей, готовых включиться в течение минуты.
Получить дополнительную информацию – врач нарколог выезд на дом
нейросеть для студентов онлайн нейросеть для студентов онлайн .
структура креатива реклама структура креатива реклама .
Наркологическая клиника «НаркоМед Плюс» в Нижнем Новгороде оказывает экстренную помощь при снятии ломки. Наша команда высококвалифицированных специалистов готова круглосуточно выехать на дом или принять пациента в клинике, обеспечивая оперативное, безопасное и полностью конфиденциальное лечение. Мы разрабатываем индивидуальные программы терапии, учитывая историю зависимости и текущее состояние каждого пациента, что позволяет быстро стабилизировать его состояние и начать процесс полного выздоровления.
Ознакомиться с деталями – снятие наркотической ломки
«Капельница от запоя» в современном понимании — это не одна универсальная смесь, а последовательность управляемых шагов с понятной целью, измеримыми показателями и заранее назначенными точками переоценки. В наркологической клинике «СеверАльфа Мед» мы используем модульные инфузионные протоколы и бережный мониторинг, чтобы безопасно снять интоксикацию, восстановить водно-электролитный баланс, снизить тремор и вернуть физиологичный сон без «переседации». Каждый этап сопровождается сервисом конфиденциального уровня: нейтральные формулировки в документах, немаркированная логистика, «тихие» каналы связи, доступ к записям строго по ролям. Это делает путь пациента предсказуемым и защищённым от лишнего внимания.
Подробнее – https://kapelnicza-ot-zapoya-murmansk15.ru/prokapat-ot-alkogolya-na-domu-murmansk/
глубокий комлексный аудит сайта глубокий комлексный аудит сайта .
технического аудита сайта технического аудита сайта .
Если многое из этого знакомо, кодирование стоит рассматривать не как «наказание» или «приговор», а как инструмент, который помогает закрыть доступ к алкоголю на определённый срок и даёт шанс выстроить новую привычку — жить трезво.
Подробнее можно узнать тут – https://kodirovanie-ot-alkogolizma-korolyov11.ru/klinika-kodirovaniya-ot-alkogolizma-v-korolyove
Первый и самый важный момент — какие методики применяются в клинике. Качественное лечение наркозависимости включает несколько этапов: детоксикация, стабилизация состояния, психотерапия, ресоциализация. Одного лишь выведения токсинов из организма недостаточно — без проработки психологических причин употребления высокий риск рецидива.
Узнать больше – https://lechenie-narkomanii-vladimir10.ru
металлические значки мокап изготовление металлических значков
Сочетание медицинских и психотерапевтических мер создаёт устойчивую систему поддержки. Пациенты получают возможность постепенно восстановить утраченное здоровье и психологическую стабильность.
Подробнее тут – http://
металлические значки москва заказ значков из металла со своим дизайном москва
значки на одежду металлические значки металл срочно москва
лакмор казино
Искал luckmore casino бонусы и вышел сюда. Есть промики, фриспины и ссылки. Проверил — все открывается. Уже пару раз использовал. Вроде норм
Ломка — это острый синдром отмены, возникающий после длительного употребления алкоголя или наркотических веществ. При резком прекращении приема подобных веществ организм испытывает острую нехватку необходимых компонентов, что приводит к развитию тяжелых симптомов, таких как сильная тревожность, бессонница, мышечные судороги, головокружение, потливость и повышенная возбудимость. В такой критической ситуации быстрое и квалифицированное вмешательство врача-нарколога является залогом сохранения здоровья и предупреждения серьезных осложнений.
Получить больше информации – http://snyatie-lomki-nnovgorod8.ru
При домашнем формате мы сразу закладываем «мостик» к стационару: в случае ухудшения состояния перевод происходит бесшовно, по заранее оговорённым критериям. Пациент и семья знают, какие маркеры считаются целевыми (переносимость воды, ровный вечерний пульс, время до засыпания, число пробуждений), и когда состоится повторная оценка. Прозрачность снимает суету и укрепляет приверженность плану.
Подробнее можно узнать тут – http://kapelnicza-ot-zapoya-murmansk15.ru/kapelnicza-ot-pokhmelya-murmansk/
и не планируете ни какой новой ветки на скайпе открыть!?там в скайпе мошенник значит от вас херачит направо и налево!и ссылку кидает на ваш магазин и говорит что от вас работает! https://winntsetup.ru тока по “чуть чуть” а то вдруг там дезокси… или ещё что мгновенно вырубающее. мало ли. )каких обьяснений? пришли, проверили, все что нашли изъяли. Устроили проверку в определенный день все что нашли арестовали, и мы не виноваты в этом.
Каждый из этапов направлен на обеспечение максимальной безопасности и эффективности лечения. Индивидуальный подход, основанный на тщательной диагностике, позволяет значительно снизить риск осложнений и обеспечить комфортное протекание терапии.
Выяснить больше – http://
Домашний формат нужен, когда риски управляемы, а в квартире можно обеспечить «тихий режим». Врач приезжает без эмблем, проводит осмотр, измеряет давление, пульс, сатурацию, сверяет лекарства за последние 48 часов и аллергии. После допуска запускается инфузия с мягкой коррекцией воды и электролитов, поддержкой печени и вегетативной нервной системы; при необходимости аккуратно настраивается сон. По завершении — переоценка, письменная памятка на 24–48 часов, список тревожных признаков и прямой канал связи. Такой визит «гасит» тремор и тошноту, снижает тревогу и делает ночь предсказуемой.
Углубиться в тему – narkologicheskaya-klinika-otzyvy
Близкий человек в запое? Не ждите ухудшения. Обратитесь в клинику — здесь проведут профессиональный вывод из запоя с последующим восстановлением организма.
Углубиться в тему – vyvod-iz-zapoya-v-sankt-peterburge16.ru
Нарколог на дом в Химках особенно востребован тогда, когда состояние человека уже нельзя назвать обычным похмельем, но он категорически отказывается ехать в клинику. Запой тянется несколько дней или дольше, нет полноценного сна, пульс постоянно учащённый, руки трясутся, давление скачет, а любое утро начинается не с облегчения, а с новой дозы алкоголя «чтобы не развалиться». В такой ситуации родственники оказываются между страхом и беспомощностью: понятно, что дальше ждать опасно, но уговорить собрать вещи и поехать в стационар не получается. Формат выезда нарколога на дом как раз и закрывает этот тупик — врач приезжает туда, где сейчас находится человек, оценивает риски и сразу начинает помощь.
Получить больше информации – http://narkolog-na-dom-himki11.ru/vyzov-narkologa-na-dom-v-himkah/https://narkolog-na-dom-himki11.ru
ии реферат ии реферат .
Наркологическая клиника «Эдельвейс» в Екатеринбурге специализируется на оказании оперативной и квалифицированной помощи при снятии ломки. Наши специалисты обладают многолетним опытом работы и применяют современные методики для безопасного и эффективного лечения абстинентного синдрома. Мы работаем круглосуточно, что позволяет оказывать помощь в любое время суток, обеспечивая анонимность и конфиденциальность каждого пациента.
Ознакомиться с деталями – http://snyatie-lomki-ekb8.ru
Если при первичном звонке выявляются «красные флаги» — неукротимая рвота, одышка, спутанность, «скачущий» ритм, подозрение на травму — мы немедленно резервируем палату усиленного наблюдения. При низком риске стартуем амбулаторно или на дому с бесшовным переводом в стационар, если динамика меняется. В любом случае цель одна: безопасно стабилизировать состояние, вернуть питьё и физиологичный сон, объяснить семье и пациенту короткий «язык фактов», по которому судим об эффективности.
Подробнее тут – http://narkologicheskaya-klinika-v-petrozavodske15.ru/
Наркологическая клиника в клинике в Казани оказывает квалифицированную помощь людям, столкнувшимся с алкогольной и наркотической зависимостью. Лечение проводится в условиях полной конфиденциальности и медицинской безопасности. Основное направление работы клиники — это восстановление физического, психического и эмоционального состояния пациента, а также формирование устойчивой мотивации к отказу от употребления психоактивных веществ. Все процедуры выполняются с использованием сертифицированных препаратов и современных диагностических технологий, что позволяет добиться устойчивого результата без осложнений.
Разобраться лучше – запой наркологическая клиника казань
нейросеть для студентов онлайн нейросеть для студентов онлайн .
Даже при амбулаторном ведении мы следуем принципам доказательной медицины: пошаговая титрация, ясные коридоры безопасности, пересмотр решений строго по показателям. Мы объясняем, на что ориентироваться в первые часы после визита: диапазоны давления и пульса, ориентиры самочувствия, правила питания и питья, поведенческие «якоря» на случай, если тревога неожиданно вырастет вечером. Благодаря этому пациент и его семья не остаются один на один с вопросами; наоборот — у них есть карта маршрута и контакты людей, готовых включиться в течение минуты.
Углубиться в тему – https://narcolog-na-dom-krasnodar14.ru/narkolog-krasnodar-anonimno
Если в ситуации с алкоголем присутствуют несколько из перечисленных ниже пунктов, это повод не откладывать консультацию с наркологом в Королёве:
Углубиться в тему – кодирование от алкоголизма королев
Поведенческие факторы считаются одним из ключевых элементов ранжирования. Они отражают интерес пользователей к сайту и его контенту. Поэтому их улучшение становится важной задачей для владельцев ресурсов. Подробнее по ссылке – поведенческие факторы купить
доставка цветов тверь недорого с бесплатной http://www.dostavka-cvetov-moskva495.ru/ .
Член до колен и девок гарем)) Мефедрон, Марихуану, Бошки, Кокаин привет всем! у меня сегодня днюха по этому поводу я заказал 10г ам2233 заказ пришел быстро качество хорошее (порошок желтоватого цвета, мелкий) делал на спирту, по кайфу напоминает марью иванну мягкий если сравнивать а мне есть с чем курю с 13 лет сегодня 34года плотно,( курил джив(018,210,250,203)) я доволен RESPEKT магазину в августе 2 раза делал заказ в 3 дня приходил до сибири!Что ж ты такой нетерпеливый… ))
Учебная студия Юлии Бурдинцевой в Москве организует прикладные курсы для парикмахеров — практика на настоящих клиентах внедряется с четвертого учебного дня. Программы включают колористику, мужские стрижки, универсальные техники и повышение квалификации для действующих мастеров. Ищете j-center studio? Записаться на курсы и узнать расписание можно на j-center.ru, где представлена вся информация о программах обучения. Руководитель школы — эксперт международной категории Юлия Бурдинцева делится с учениками практическим опытом и методами общения с клиентурой.
Наркологическая клиника «РеМед Карелия» — это круглосуточная медицинская помощь, построенная на принципе клинической точности: каждая процедура имеет цель, проверяемые маркеры и назначенное окно переоценки. Мы используем современные методы детоксикации и постабстинентной стабилизации, не перегружая терапию «на всякий случай» и не полагаясь на универсальные «сильные капельницы». Вместо этого — модульные схемы, корректировка одного параметра за раз и обязательная оценка результата. Такой подход снижает фармаконагрузку, ускоряет восстановление сна и аппетита и делает лечение предсказуемым для пациента и его семьи. Анонимность встроена в процессы: немаркированные входы, гражданская форма персонала, нейтральные формулировки в документах, «тихие» уведомления и разграниченный доступ к карте наблюдения.
Получить дополнительную информацию – анонимная наркологическая клиника
жена трахается с другом мужа жена трахается с другом мужа .
Ломка — это острый синдром отмены, возникающий после длительного употребления алкоголя или наркотических веществ. При резком прекращении приема подобных веществ организм испытывает острую нехватку необходимых компонентов, что приводит к развитию тяжелых симптомов, таких как сильная тревожность, бессонница, мышечные судороги, головокружение, потливость и повышенная возбудимость. В такой критической ситуации быстрое и квалифицированное вмешательство врача-нарколога является залогом сохранения здоровья и предупреждения серьезных осложнений.
Изучить вопрос глубже – снятие ломок на дому в нижнем новгороде
Мурманск — город с длинными сумерками и влажным ветром от Кольского залива, что сказывается на сну и вечерней кардиолабильности. Поэтому мы адаптируем маршруты: выездные бригады работают в гражданской одежде, заходят быстро и тихо, а в палатах клиники используется тёплая подсветка и акустическое поглощение. Для ночных поступлений действует протокол «мягкой посадки»: минимизированные контакты, тёплая вода малыми глотками, затем — диагностика и старт инфузии при отсутствии «красных флагов». Это снижает сенсорную нагрузку и позволяет организму дать честный клинический ответ без лишних раздражителей.
Разобраться лучше – капельница от запоя в мурманске
официальный лакмор
Искал luckmore и попал на этот телеграм канал. Там есть зеркало, бонусы и акции. Сначала думал скам, но решил проверить. В итоге все открылось без проблем. Уже даже заходил пару раз, пока все ок
Часто предприниматели объединяют понятия тендер и госзакупки, так как обе процедуры связаны с конкурсным выбором поставщика. Однако между ними существуют определённые различия, которые важно понимать перед началом работы в этой сфере.
Не оставайтесь в неведении – комплексное тендерное сопровождение
Каждый из этапов направлен на обеспечение максимальной безопасности и эффективности лечения. Индивидуальный подход, основанный на тщательной диагностике, позволяет значительно снизить риск осложнений и обеспечить комфортное протекание терапии.
Выяснить больше – снятие ломки на дому
Алкогольный запой – это критическое состояние, возникающее при длительном злоупотреблении спиртными напитками, когда организм насыщается токсинами и его жизненно важные системы (сердечно-сосудистая, печёночная, нервная) начинают давать сбой. В такой ситуации необходимо незамедлительное вмешательство специалистов для предотвращения тяжелых осложнений и спасения жизни. Наркологическая клиника «Основа» в Новосибирске предоставляет экстренную помощь с помощью установки капельницы от запоя, позволяющей оперативно вывести токсины из организма, стабилизировать внутренние процессы и создать условия для последующего качественного восстановления.
Исследовать вопрос подробнее – капельница от запоя вызов город
Трансферная служба Transfer Easy работает в Анапе и Краснодарском крае, обеспечивая комфортную доставку между аэропортами, отелями, вокзалами и межгородские поездки от 500 рублей с фиксированной ценой без скрытых доплат. Онлайн-бронирование доступно на http://transfer-easy.ru/ — заказ оформляется за минуты. Автопарк включает шесть классов: Комфорт, Бизнес, Представительский, Минивэн, Микроавтобус и Автобус до 50 мест — все иномарки не старше пяти лет с запретом на курение. Водители встречают пассажиров с именной табличкой, помогают с багажом и бесплатно ожидают при задержке рейса.
Затянувшийся запой быстро расшатывает физиологию: теряется жидкость, нарушается электролитный баланс, растёт нагрузка на сердце и печень, сон рвётся тревожными отрезками. На этом фоне любое промедление меняет картину не в лучшую сторону: чем дольше организм остаётся в состоянии интоксикации и бессонницы, тем выше риск аритмий, скачков давления, панических волн и импульсивных решений ночью. «Трезвый Город Химки» устраняет эти пружины сразу: вместо очередей и разговоров «на виду» — быстрый вход по согласованному времени, предметное интервью без лишней бюрократии, чёткое объяснение каждого шага и старт терапии в минимально достаточном объёме. Такой подход экономит силы семьи, снижает тревогу у пациента и делает результат предсказуемым: уже в первые часы уменьшаются тремор и тошнота, выравнивается пульс, появляется чувство контроля. Ключевая цель на первые сутки — первая ровная ночь, потому что только на её фоне организм способен закреплять улучшения, а не «сжигать» их к вечеру. Мы заранее договариваемся о правилах вечера, чтобы не ломать эффект разговорами и яркими экранами, и именно поэтому траектория восстановления идёт не рывками, а поступательно.
Разобраться лучше – вывод из запоя круглосуточно
Метод лечения
Подробнее – наркологическое лечение наркомания
Алкогольная зависимость разрушает здоровье, семью, карьеру и личность. Чем раньше будет оказана профессиональная помощь, тем выше шансы на восстановление и возвращение к полноценной жизни. Лечение алкоголизма в Воронеже — помощь на всех стадиях зависимости позволяет справляться не только с физической тягой, но и с глубинными причинами, которые провоцируют патологическое употребление.
Изучить вопрос глубже – анонимное лечение алкоголизма в воронеже
Вся динамика заносится в единую карту наблюдения, доступ к которой разграничен по ролям. При переходе к амбулаторной точке или стационару не происходит «перезапуска истории»: новые назначения учитывают всё, что сделано на старте.
Получить дополнительную информацию – https://vivod-iz-zapoya-voronezh15.ru/vyvod-iz-zapoya-na-domu-voronezh/
Этот документ охватывает важные аспекты медицинской науки, сосредотачиваясь на ключевых вопросах, касающихся здоровья населения. Мы рассматриваем свежие исследования, клинические рекомендации и лучшие практики, которые помогут улучшить качество лечения и профилактики заболеваний. Читатели получат возможность углубиться в различные медицинские дисциплины.
Исследовать вопрос подробнее – кодирование гипнозом от алкоголизма отзывы
всё ровно будет бро! просто график отправок такой Мефедрон, Марихуану, Бошки, Кокаин Напишите хотя бы мини трип в соответствующей теме,буду благодарен.Ам имеет высокий толер об этом уже говорилось не раз
Нарколог на дом в Волгограде — это специализированная медицинская услуга, направленная на оказание квалифицированной помощи пациентам с зависимостями в привычной домашней обстановке. Такая форма лечения позволяет снизить стресс, связанный с госпитализацией, и обеспечивает более комфортное проведение медицинских процедур. Вызов нарколога на дом пользуется высокой востребованностью как среди пациентов с алкоголизмом, так и среди людей, страдающих от наркотической зависимости, а также при острых состояниях, требующих неотложного вмешательства.
Подробнее тут – https://narkolog-na-dom-volgograd13.ru/narkolog-na-dom-czeny-volgograd
Первый контакт строится вокруг фактов «здесь и сейчас». Врач уточняет длительность употребления, уже принятые препараты за 24–48 часов, сопутствующие диагнозы и аллергии; измеряет АД, пульс, сатурацию, температуру, оценивает степень тремора и уровень тревоги. При показаниях выполняется экспресс-ЭКГ и базовый неврологический скрининг. Затем простым языком объясняется логика вмешательств: какие инфузии будут сегодня, чего ждать через 30–60 минут, как организовать «тихий» вечер и по каким признакам связываться. Мы избегаем универсальных «сильных смесей» и «оглушающих» дозировок, поскольку они дают краткий «блеск» и вечерний откат. Вместо этого — узкая схема: регидратация, коррекция электролитов, печёночная поддержка, гастропротекция и противорвотные при необходимости, мягкая анксиолитическая коррекция по показаниям. На руки выдаются рекомендации на 48–72 часа: вода и лёгкая еда «по часам», затемнение и ранний отбой, «красные флажки» для связи и утреннее окно контроля. Такой график убирает импровизации и делает поведение семьи согласованным.
Углубиться в тему – бесплатная наркологическая клиника
seo агентство seo агентство .
реферат нейросеть реферат нейросеть .
Поведенческие показатели отражают активность пользователей на сайте. Чем выше вовлеченность, тем лучше результаты продвижения. Подробнее можно узнать по ссылке: что такое накрутка поведенческих факторов
металлический значок ссср изготовление значков на заказ из металла в москве
Наводится порядок в информации, запускается инфузия по показаниям, объясняются ожидаемые ощущения и правила вечера. Пациент и близкие понимают, какой результат реалистичен к ночи и что делать, чтобы эффект не «сгорел» к полуночи.
Получить дополнительные сведения – http://narkologicheskaya-klinika-lyubercy9.ru
Каждый из этапов направлен на обеспечение максимальной безопасности и эффективности лечения. Индивидуальный подход, основанный на тщательной диагностике, позволяет значительно снизить риск осложнений и обеспечить комфортное протекание терапии.
Получить дополнительную информацию – https://snyatie-lomki-ekb8.ru/snyatie-lomki-na-domu-v-ekb/
mostbet app mostbet app .
Если при первичном звонке выявляются «красные флаги» — неукротимая рвота, одышка, спутанность, «скачущий» ритм, подозрение на травму — мы немедленно резервируем палату усиленного наблюдения. При низком риске стартуем амбулаторно или на дому с бесшовным переводом в стационар, если динамика меняется. В любом случае цель одна: безопасно стабилизировать состояние, вернуть питьё и физиологичный сон, объяснить семье и пациенту короткий «язык фактов», по которому судим об эффективности.
Детальнее – анонимная наркологическая клиника петрозаводск
В данной публикации мы поговорим о процессе восстановления от зависимости, о том, как вернуть себе нормальную жизнь. Мы обсудим преодоление трудностей, значимость поддержки и наличие программ реабилитации. Читатели смогут узнать о ключевых шагах к успешному восстановлению.
Изучить вопрос глубже – установка импланта
Основой терапии является сочетание медицинских, психотерапевтических и социальных методов. Такой подход обеспечивает устранение не только физиологических последствий зависимости, но и её психологических причин. Врачи клиники разрабатывают индивидуальный план лечения, в котором учитываются стадия заболевания, общее состояние организма и личностные особенности пациента. Работа специалистов направлена на восстановление работы центральной нервной системы, обменных процессов и эмоционального баланса.
Узнать больше – наркологическая клиника наркологический центр
анализ наружной рекламы анализ наружной рекламы .
разобрался, поэтому и удалил сообщение до того как ты ответил ) https://indeksy-moskva.ru Данный Магаз Меня Кинул!!!!Всем привет !!!?
Если в ситуации с алкоголем присутствуют несколько из перечисленных ниже пунктов, это повод не откладывать консультацию с наркологом в Королёве:
Углубиться в тему – https://kodirovanie-ot-alkogolizma-korolyov11.ru/ehffektivnoe-kodirovanie-ot-alkogolizma-v-korolyove
Функция
Подробнее можно узнать тут – снятие ломки на дому нижний новгород
оптимизация и seo продвижение сайтов москва оптимизация и seo продвижение сайтов москва .
Наркологическая клиника «Эдельвейс» в Екатеринбурге специализируется на оказании оперативной и квалифицированной помощи при снятии ломки. Наши специалисты обладают многолетним опытом работы и применяют современные методики для безопасного и эффективного лечения абстинентного синдрома. Мы работаем круглосуточно, что позволяет оказывать помощь в любое время суток, обеспечивая анонимность и конфиденциальность каждого пациента.
Исследовать вопрос подробнее – снятие ломки нарколог в екатеринбурге
Мы не составляем «супер-смеси» «на всякий случай». Капельница — это набор модулей, каждый из которых отвечает за конкретную задачу: гидратация, электролиты, гастропротекция, антиоксидантная поддержка; при показаниях — мягкая анксиолитика. Порядок модулей зависит от ведущего симптом-кластера и времени суток.
Углубиться в тему – капельница от запоя анонимно на дому мурманск
Публикация предоставляет читателю набор разрозненных идей, которые сложно применить на практике. Мы лишь слегка касаемся разных точек зрения, не углубляясь в анализ и не предлагая никаких выводов.
Вот – рулетка онлайн
Обращение за экстренной помощью требуется в ситуациях, когда симптомы ломки становятся невыносимыми и ухудшают общее состояние пациента. Основными показаниями для вызова специалиста являются:
Получить больше информации – снятие ломки наркозависимого
Стандартизированный алгоритм позволяет действовать быстро и безопасно. Он гибко настраивается под конкретный случай, но всегда включает триаж, экспресс-диагностику, старт инфузии, симптом-менеджмент и выдачу плана на 72 часа с «коридорами безопасности».
Ознакомиться с деталями – http://narcolog-na-dom-krasnodar14.ru/narkolog-krasnodar-anonimno/
https://apartemenjogja.online/melbet-no-deposit-promo-code-2026-mel200vip-bonus-e130/
Надёжно и недорого организуем вывоз мусора из квартиры, быстро вывозим мусор с погрузкой и вывозим по доступным ценам.
Информационные кампании способствуют правильной сортировке отходов жителями и сокращению смешанных отходов.
Инфузионная терапия — это набор узких вмешательств под конкретную картину, а не «магический состав». Регидратация улучшает тканевую перфузию и снимает головную боль от обезвоживания; электролиты стабилизируют нервно-мышечную передачу и сердечный ритм; печёночная поддержка уменьшает токсическую нагрузку и тяжесть в правом подреберье; гастропротекция и противорвотные защищают слизистую и убирают рвотный компонент. При выраженной тревоге и бессоннице добавляется мягкая анксиолитическая поддержка — дозы подбираются так, чтобы стабилизировать, а не «выключить». Мы не назначаем исследования «для галочки»: анализы и ЭКГ используются тогда, когда их результат меняет решения «сегодня». Такой подход снижает побочные эффекты, делает результат предсказуемым и удерживает бюджет от «скачков». На этой базе уже обсуждается следующий шаг: амбулаторное наблюдение, краткие психообразовательные сессии, а при показаниях — кодирование после стабилизации.
Узнать больше – http://kapelnica-ot-zapoya-lyubercy9.ru
Часто предприниматели объединяют понятия тендер и госзакупки, так как обе процедуры связаны с конкурсным выбором поставщика. Однако между ними существуют определённые различия, которые важно понимать перед началом работы в этой сфере.
Все тайны раскрыты – тендерное сопровождение под ключ
Если вы ищете надёжный и эстетичный забор для частного дома или коммерческого объекта в Новосибирске, металлические заборы-жалюзи — одно из лучших решений на рынке. Конструкция из стальных ламелей с полимерным покрытием устойчива к морозам, ветру и коррозии, а угловое расположение пластин обеспечивает вентиляцию и при этом надёжно скрывает участок от посторонних взглядов. Широкий выбор цветов и размеров ламелей, доступные цены и оперативный расчёт материалов — всё это предлагает https://zabor-zhalyuzi54.ru/ жителям Новосибирска и области. В каталоге представлены популярные модели планкен шириной от 60 до 200 мм из стали 0,7 мм с покрытием ППП, а также коллекция Еврожалюзи Royal. Компания осуществляет доставку и профессиональный монтаж, что делает покупку максимально удобной.
Клиника «НаркоМед Плюс» использует комплексный подход для эффективного снятия симптомов ломки с применением современных методов детоксикации и поддержки организма. Основные группы препаратов включают:
Выяснить больше – http://snyatie-lomki-nnovgorod8.ru/snyatie-narkoticheskoj-lomki-v-nnovgorode/https://snyatie-lomki-nnovgorod8.ru
кинг казино телеграм Искал где взять актуальное зеркало для кинг казино и нашел этот канал. Там постоянно обновляют ссылки и выкладывают бонусы. Проверил — работает стабильно. Уже добавил себе в закладки. Удобно что все в одном месте
Формат выбирается по безопасности, а не «по желанию». Домашний или амбулаторный старт уместен, если показатели устойчивы: нет упорной рвоты, высокой температуры, выраженной дезориентации, резких «качелей» давления и пульса, признаков обезвоживания с угрозой судорог. В этих условиях один визит часто закрывает задачу: индивидуальная инфузия, письменные рекомендации, правила воды и лёгкой еды «по часам», утренний контроль. Если же состояние «по краю» — сочетание рвоты, лихорадки, кардиальных жалоб, второй бессонной ночи, выраженного тремора — честнее короткая стационарная стабилизация на 24–48 часов под круглосуточным наблюдением. На бумаге это кажется дороже одного выезда, но на практике предотвращает цепочку ночных «пожаров», импульсивных повторов и осложнений, то есть экономит и силы, и деньги семьи. В любом формате анонимность неизменна: визиты без маркировки, закрытые каналы связи, разнесённые по времени приёмы и доступ к данным по ролям.
Детальнее – vyvod-iz-zapoya-vyzov
Мы не составляем «супер-смеси» «на всякий случай». Капельница — это набор модулей, каждый из которых отвечает за конкретную задачу: гидратация, электролиты, гастропротекция, антиоксидантная поддержка; при показаниях — мягкая анксиолитика. Порядок модулей зависит от ведущего симптом-кластера и времени суток.
Подробнее тут – http://kapelnicza-ot-zapoya-murmansk15.ru/prokapat-ot-alkogolya-na-domu-murmansk/
Наркологическая клиника «НаркоМед Плюс» в Нижнем Новгороде оказывает экстренную помощь при снятии ломки. Наша команда высококвалифицированных специалистов готова круглосуточно выехать на дом или принять пациента в клинике, обеспечивая оперативное, безопасное и полностью конфиденциальное лечение. Мы разрабатываем индивидуальные программы терапии, учитывая историю зависимости и текущее состояние каждого пациента, что позволяет быстро стабилизировать его состояние и начать процесс полного выздоровления.
Подробнее тут – снятие ломки анонимно нижний новгород
Мы не составляем «супер-смеси» «на всякий случай». Капельница — это набор модулей, каждый из которых отвечает за конкретную задачу: гидратация, электролиты, гастропротекция, антиоксидантная поддержка; при показаниях — мягкая анксиолитика. Порядок модулей зависит от ведущего симптом-кластера и времени суток.
Подробнее можно узнать тут – выезд на дом капельница от запоя мурманск
Чтобы купить светодиодные оборудование, посетите светодиодные лампы и оборудование.
В кухонных и рабочих зонах предпочтительны светильники с высокой цветопередачей и направленной подсветкой.
в кемерово откроетесь?? Мефедрон, Марихуану, Бошки, Кокаин обьясни народу …….. сдесь ребята понимающие………. помогутJwh 203 порошок светло-желтого цвета у них, делал в пропорции 150-200мг на спичечный коробок микса, кролики довольны! 5-IAI пробывал 200мг по кишке, видимо нужно было сразу 300-400мг чтобы понять кайф!
раскрутка и продвижение сайта раскрутка и продвижение сайта .
Наводится порядок в информации, запускается инфузия по показаниям, объясняются ожидаемые ощущения и правила вечера. Пациент и близкие понимают, какой результат реалистичен к ночи и что делать, чтобы эффект не «сгорел» к полуночи.
Получить дополнительную информацию – [url=https://narkologicheskaya-klinika-lyubercy9.ru/]частная наркологическая клиника в люберцах[/url]
clicksthatsell – Loved the layout today; clean, simple, and genuinely user-friendly overall.
Кодирование от алкоголизма в Королёве часто становится тем самым рубежом, за которым заканчиваются бесконечные попытки «ограничить дозу» и «держать ситуацию под контролем» и начинается системная работа с зависимостью. Многие годами откладывают этот шаг: стыдно признать проблему, страшно довериться врачу, есть надежда, что «само пройдёт» или удастся остановиться силой воли. На практике всё происходит иначе: запои становятся длиннее, похмелье тяжелее, трезвые промежутки короче, а конфликты в семье и на работе — острее. В какой-то момент близкие понимают, что без серьёзной внешней опоры человек просто не справляется.
Изучить вопрос глубже – http://kodirovanie-ot-alkogolizma-korolyov11.ru/
Детокс — это последовательность целевых действий. Инфузии подбираются индивидуально: цель — восстановить объём циркулирующей крови, скорректировать электролиты, снизить токсическую нагрузку, мягко приглушить тремор и тревогу, вернуть условия для сна. Мы не перегружаем препаратами, не «гоняем» симптом силой седативов и не используем универсальные растворы «для всех». Поддержка сна строится на минимально достаточных дозах и гигиене вечернего времени: затемнение, тишина, отказ от экранов, ранний отбой. Параллельно врач объясняет, как пить воду маленькими порциями, когда сделать лёгкий перекус, зачем планировать короткую дневную паузу. После купирования остроты пациент получает чёткий план на трое суток — простые, реалистичные шаги, которые удерживают эффект без «героизма» и без лишней фармакологической нагрузки. В результате медицинский эффект не растворяется в быту, а закрепляется привычками, которые по силам выполнить сегодня и завтра.
Разобраться лучше – https://narkolog-na-dom-moskva999.ru/narkolog-na-dom-moskva-kruglosutochno/
mostbet mobile mostbet mobile .
Даже при амбулаторном ведении мы следуем принципам доказательной медицины: пошаговая титрация, ясные коридоры безопасности, пересмотр решений строго по показателям. Мы объясняем, на что ориентироваться в первые часы после визита: диапазоны давления и пульса, ориентиры самочувствия, правила питания и питья, поведенческие «якоря» на случай, если тревога неожиданно вырастет вечером. Благодаря этому пациент и его семья не остаются один на один с вопросами; наоборот — у них есть карта маршрута и контакты людей, готовых включиться в течение минуты.
Получить дополнительные сведения – нарколог на дом вывод из запоя в краснодаре
запоминаемость рекламы запоминаемость рекламы .
Петрозаводск задаёт свои параметры среды: озёрный ветер, световые перепады, «звонкие» подъезды старого фонда. В «РеМед Карелия» мы проектируем маршрут так, чтобы городской фон работал на пациента. Короткая регистрация без «толстых анкет», приглушённый тёплый свет в приёмной, отсутствие громких объявлений, отдельный вход без вывесок и немаркированный транспорт — всё это снижает сенсорную нагрузку и уменьшает вечернюю кардиореактивность. Семья получает «окна связи» в фиксированное время, чтобы эмоциональные звонки не разрушали «ночную кривую» сна. Для пациентов, стартующих на дому, мы привозим переносные решения — лампу тёплого спектра, ширмы, шумопоглощающие аксессуары, — чтобы не усиливать тревогу и не «подливать» раздражителей в момент инфузии.
Детальнее – платная наркологическая клиника в петрозаводске
casino king Искал king casino бонусы и вышел на этот канал, сначала думал фигня какая-то. Но решил открыть — оказалось норм, реально есть промики и ссылки. Проверил — переход работает, сайт открывается. Уже даже попробовал зайти и посмотреть че внутри. Пока без нареканий
clickorbit – Found practical insights today; sharing this article with colleagues later.
Маршрут выстроен прозрачно. Сначала идёт короткое предметное интервью — только то, что меняет тактику «сегодня»: длительность запоя, принятые лекарства (включая «самолечение»), аллергии, хронические диагнозы, количество ночей без сна. Затем — объективные показатели (АД/пульс/сатурация/температура), оценка тремора и уровня тревоги; при показаниях проводится экспресс-ЭКГ и базовый неврологический скрининг. После этого врач объясняет, какие компоненты войдут в инфузию и почему: регидратация для восстановления объёма циркулирующей жидкости, коррекция электролитов, печёночная поддержка, при необходимости — гастропротекция и противорвотные; мягкая анксиолитическая коррекция — строго по показаниям. Мы принципиально избегаем «универсальных сильных смесей» и «оглушающих» дозировок: они дают дневной «блеск», но почти всегда провоцируют вечерний откат, ухудшение сна и рост рисков. Во время процедуры пациент и семья получают понятные письменные правила на 48–72 часа: вода и лёгкая еда «по часам», затемнение и тишина вечером, фиксированное время отбоя, «красные флажки» для связи и согласованное утреннее окно контроля. Такой сценарий убирает импровизации, снижает уровень конфликтов и помогает нервной системе перейти из режима тревоги в режим восстановления.
Исследовать вопрос подробнее – http://kapelnica-ot-zapoya-lyubercy9.ru
Член до колен и девок гарем)) https://mosshtory.ru P Sнарод а трек через скока по времени примерно приходит?
Такая карта делает лечение обозримым и дисциплинирует решения: пациент видит цель и порог перехода, семья понимает, зачем нужно соблюдать «тихие» часы, команда сохраняет управляемость и не «крутит ручки» ночью.
Исследовать вопрос подробнее – https://narkologicheskaya-klinika-v-petrozavodske15.ru/
структура креатива реклама reklamnyj-kreativ12.ru .
Домашний маршрут выбирают, когда показатели стабильны и нет признаков тяжёлой соматики или спутанности сознания. Преимущество в сочетании скорости, приватности и приверженности: знакомая среда снижает стресс, а отсутствие переездов экономит силы. Врач «МедТоники» приезжает без маркировки, привозит мониторинг и расходные материалы, подбирает инфузии по состоянию, помогает восстановить режим сна и гидратации, даёт рекомендации по питанию и правила на 48–72 часа. Отдельный блок — работа с тревогой и тремором: корректируется медикаментозная поддержка, обсуждаются простые поведенческие техники, чтобы снизить вероятность импульсивных решений вечером. Домашний формат не подменяет наблюдение: назначаются точки связи, врач объясняет, когда нужен повторный визит, а когда достаточно телефонной коррекции. Для Москвы такой сценарий удобен ещё и тем, что его проще встроить в плотный график, не выпадая из рабочих и семейных ролей и не провоцируя лишних вопросов у окружающих.
Подробнее – http://vyvod-iz-zapoya-moskva99.ru
Если при первичном звонке выявляются «красные флаги» — неукротимая рвота, одышка, спутанность, «скачущий» ритм, подозрение на травму — мы немедленно резервируем палату усиленного наблюдения. При низком риске стартуем амбулаторно или на дому с бесшовным переводом в стационар, если динамика меняется. В любом случае цель одна: безопасно стабилизировать состояние, вернуть питьё и физиологичный сон, объяснить семье и пациенту короткий «язык фактов», по которому судим об эффективности.
Ознакомиться с деталями – https://narkologicheskaya-klinika-v-petrozavodske15.ru/
Метод лечения
Выяснить больше – лечение наркомании в стационаре
Металлические шильды — практичное решение для маркировки оборудования, мебели и техники. Компания Инпек изготавливает таблички с лазерной гравировкой по индивидуальным макетам: от технических паспортных данных до декоративных элементов брендирования. Прочный металл не выцветает, устойчив к механическим повреждениям и сохраняет читаемость десятилетиями. Заказать образец можно бесплатно на сайте https://inpekmet.ru/ Оперативное производство, помощь в разработке дизайна и доступные цены делают сотрудничество удобным для любого бизнеса.
Наркологическая клиника в клинике в Казани оказывает квалифицированную помощь людям, столкнувшимся с алкогольной и наркотической зависимостью. Лечение проводится в условиях полной конфиденциальности и медицинской безопасности. Основное направление работы клиники — это восстановление физического, психического и эмоционального состояния пациента, а также формирование устойчивой мотивации к отказу от употребления психоактивных веществ. Все процедуры выполняются с использованием сертифицированных препаратов и современных диагностических технологий, что позволяет добиться устойчивого результата без осложнений.
Ознакомиться с деталями – http://narkologicheskaya-klinika-v-kazani16.ru/
Финансовые инструменты позволяют заказчику убедиться в надежности участника и его готовности выполнить обязательства по контракту. При этом грамотное сопровождение снижает вероятность финансовых рисков и помогает правильно оформить документы для банка.
Раскройте все секреты – тендерное сопровождение под ключ в ростове на дону
lucky bear Погрузитесь в атмосферу Casino Lucky Bear, где лакибир казик сочетает простоту и азарт, предлагая простые правила для новичков и высокие ставки для опытных. Luckybear – не просто название, это ваш верный талисман в лакибир казино, где каждый день сулит новые возможности для триумфа.
интернет раскрутка prodvizhenie-sajtov-v-moskve4.ru .
Охранное предприятие «Ветераны-А» работает в Москве и Московской области уже двадцать лет. Организация обеспечивает охрану самых разных объектов: от банков и торговых центров до жилых комплексов, складов и частных домовладений. Сотрудники компании — выходцы из силовых структур с реальным боевым и оперативным опытом. Компания удостоена звания лауреата конкурса «Лучшие компании РФ» по итогам 2017 года. Ищете чоо москва? Полный спектр услуг доступен на сайте a-veteran.ru — консультация бесплатна. Техническое оснащение, юридическое сопровождение и инкассация входят в пакет услуг компании.
Не стоит забывать и про объективные факторы. Бывает, что физически опасно или трудно везти человека в клинику: он с трудом ходит, не спит уже несколько ночей, постоянно потеет, жалуется на сильную слабость и сердцебиение. Любая поездка в таком состоянии — дополнительная нагрузка на сердце и нервную систему. Выезд нарколога на дом позволяет начать лечение без этого лишнего риска: врач приезжает со всем необходимым для капельницы и наблюдения, а если по итогам осмотра становится понятно, что без стационара не обойтись, он помогает организовать перевод уже на фоне частично стабилизированного состояния, а не в момент максимального кризиса.
Углубиться в тему – narkolog-na-dom-v-himkah
Группа компаний «Союз» работает на московском рынке с 2008 года и специализируется на комплексном обустройстве офисных и торговых помещений. В ассортименте компании — серийная и мебель на заказ, решения для гостиниц и учебных учреждений. Ищете мебель для офиса? На group-soyuz.ru представлены выполненные проекты и полный каталог услуг. Команда берётся за дизайн-проект, комплектацию техникой и оборудованием, доставку и сборку мебели — сдавая объект под ключ точно в срок и в пределах бюджета.
привет что случилось вы работаете не могу второй день в личку отписаться ,сколько заказывал всё было супер ,как к тебе попасть теперь ,что делать ,отпишитесь … https://annarost.ru не пожалеете)Отзыв по работе магазина: после оплаты мной товара имелась задержка и паника с моей стороны) после задержки продавец деньги вернул- проблему без внимания не оставил… далее получил от магазина приятный презент в размере не дошедшего товара- товар дошел за 2 дня, курьерка работает без перебоев. Магазину респект! Можно работать
Нарколог на дом в Химках особенно востребован тогда, когда состояние человека уже нельзя назвать обычным похмельем, но он категорически отказывается ехать в клинику. Запой тянется несколько дней или дольше, нет полноценного сна, пульс постоянно учащённый, руки трясутся, давление скачет, а любое утро начинается не с облегчения, а с новой дозы алкоголя «чтобы не развалиться». В такой ситуации родственники оказываются между страхом и беспомощностью: понятно, что дальше ждать опасно, но уговорить собрать вещи и поехать в стационар не получается. Формат выезда нарколога на дом как раз и закрывает этот тупик — врач приезжает туда, где сейчас находится человек, оценивает риски и сразу начинает помощь.
Детальнее – http://narkolog-na-dom-himki11.ru/narkolog-na-dom-srochno-v-himkah/
mostbet app mostbet app .
В этом тексте собрано множество случайных сведений и довольно неопределённых мыслей, которые могут чем-то заинтересовать. Мы отмечаем моменты, которые не особенно важны, но всё же занимают своё место в повествовании.
Вот – казино
Эта информационная публикация освещает широкий спектр тем из мира медицины. Мы предлагаем читателям ясные и понятные объяснения современных заболеваний, методов профилактики и лечения. Информация будет полезна как пациентам, так и медицинским работникам, желающим поддержать уровень своих знаний.
Подробнее тут – причины запоя
металлические значки изготовление штампованных и металлических значков
highroi – Mobile version looks perfect; no glitches, fast scrolling, crisp text.
upster pro upster pro .
Ломка – это острый синдром отмены, возникающий при резком прекращении или снижении дозы алкоголя или других психоактивных веществ у хронически зависимых пациентов. Это состояние характеризуется выраженной физической и психической дискомфортностью, которая может сопровождаться сильными болевыми ощущениями, тревожностью, дрожью, потливостью, галлюцинациями и нарушениями сна. В критический момент ломка может привести к серьезным осложнениям, поэтому экстренная помощь нарколога имеет первостепенное значение для стабилизации состояния пациента и быстрого снятия симптомов.
Подробнее тут – снятие ломки анонимно екатеринбург
бездепозитный бонус за регистрацию beep beep64 бездепозитный бонус промокод471
нейросеть пишет реферат нейросеть пишет реферат .
Ломка – это острый синдром отмены, возникающий при резком прекращении или снижении дозы алкоголя или других психоактивных веществ у хронически зависимых пациентов. Это состояние характеризуется выраженной физической и психической дискомфортностью, которая может сопровождаться сильными болевыми ощущениями, тревожностью, дрожью, потливостью, галлюцинациями и нарушениями сна. В критический момент ломка может привести к серьезным осложнениям, поэтому экстренная помощь нарколога имеет первостепенное значение для стабилизации состояния пациента и быстрого снятия симптомов.
Подробнее тут – снятие ломки наркозависимого екатеринбург
Эта статья сочетает познавательный и занимательный контент, что делает ее идеальной для любителей глубоких исследований. Мы рассмотрим увлекательные аспекты различных тем и предоставим вам новые знания, которые могут оказаться полезными в будущем.
Смотрите также – https://cyclowiki.org/wiki/%D0%93%D0%BB%D0%BE%D0%B1%D0%B0%D0%BB%D1%8C%D0%BD%D1%8B%D0%B5_%D0%BF%D1%80%D0%BE%D0%B1%D0%BB%D0%B5%D0%BC%D1%8B_%D1%81%D0%BE%D0%B2%D1%80%D0%B5%D0%BC%D0%B5%D0%BD%D0%BD%D0%BE%D1%81%D1%82%D0%B8
Этот информационный обзор станет отличным путеводителем по актуальным темам, объединяющим важные факты и мнения экспертов. Мы исследуем ключевые идеи и представляем их в доступной форме для более глубокого понимания. Читайте, чтобы оставаться в курсе событий!
Прочесть заключение эксперта – https://bitterend.com/2021/03/31/back-ads-1974-other/71874bitter1
значки на одежду металлические https://izgotovit-znachki-metalicheskie.ru/
Мы собрали для вас самые захватывающие факты из мира науки и истории. От малознакомых деталей до грандиозных событий — эта статья расширит ваш кругозор и подарит новое понимание того, как устроен наш мир.
Продолжить чтение – https://tecudi.com/produto/corretor-ortopedico-joanete-1-par
Эта статья полна интересного контента, который побудит вас исследовать новые горизонты. Мы собрали полезные факты и удивительные истории, которые обогащают ваше понимание темы. Читайте, погружайтесь в детали и наслаждайтесь процессом изучения!
Познакомиться с результатами исследований – https://www.entdailyng.com/asake-only-me
оплатил 31го, сегодня все уже получил! Продавану, спасибо за оперативность!:ok: https://dovebeauty.ru На ацетоне делай, он быстро выветривается и не пахнет совсем!Может правда о ошибочке что небудь не то отправили)))
В этой статье представлен занимательный и актуальный контент, который заставит вас задуматься. Мы обсуждаем насущные вопросы и проблемы, а также освещаем истории, которые вдохновляют на действия и изменения. Узнайте, что стоит за событиями нашего времени!
Получить дополнительные сведения – http://www.24news.co.il/%D7%96%D7%9B%D7%95%D7%99%D7%95%D7%AA-%D7%A8%D7%A4%D7%95%D7%90%D7%99%D7%95%D7%AA
Этот обзор предлагает структурированное изложение информации по актуальным вопросам. Материал подан так, чтобы даже новичок мог быстро освоиться в теме и начать использовать полученные знания в практике.
Желаете узнать подробности? – https://blogs.opovo.com.br/girolusofono/2018/11/01/aotp-realiza-1o-simposio-on-line-sobre-portugues-como-lingua-de-heranca-no-mundo
Мы собрали для вас самые захватывающие факты из мира науки и истории. От малознакомых деталей до грандиозных событий — эта статья расширит ваш кругозор и подарит новое понимание того, как устроен наш мир.
Смотрите также… – https://pgpaud.unimed.ac.id/2020/03/05/pelantikan-ima-pg-paud-periode-2019-2020
villas for sale in phuket villas for sale in phuket .
Наркологическая клиника «Эдельвейс» в Екатеринбурге специализируется на оказании оперативной и квалифицированной помощи при снятии ломки. Наши специалисты обладают многолетним опытом работы и применяют современные методики для безопасного и эффективного лечения абстинентного синдрома. Мы работаем круглосуточно, что позволяет оказывать помощь в любое время суток, обеспечивая анонимность и конфиденциальность каждого пациента.
Выяснить больше – https://snyatie-lomki-ekb8.ru/
apartments for sale phuket apartments for sale phuket .
villas for sale in thailand phuket villas for sale in thailand phuket .
Процедура вывода из запоя в клинике в Казани проводится под строгим контролем специалистов. Главная цель — купировать симптомы интоксикации, нормализовать давление, сердечный ритм и восстановить обмен веществ. Используются препараты, способствующие детоксикации, а также витаминные комплексы и антиоксиданты, необходимые для поддержки работы печени и мозга.
Исследовать вопрос подробнее – лечение в наркологической клинике казань
investment apartments for sale in phuket apartments-for-sale-in-phuket-1.com .
real estate for sale in thailand phuket real estate for sale in thailand phuket .
перевод технического текста teh-perevod.ru .
Эта разъяснительная статья содержит простые и доступные разъяснения по актуальным вопросам. Мы стремимся сделать информацию понятной для широкой аудитории, чтобы каждый мог разобраться в предмете и извлечь из него максимум пользы.
Запросить дополнительные данные – https://mstd.ans.org/ans-holds-first-virtual-meeting
Обращение за экстренной помощью требуется в ситуациях, когда симптомы ломки становятся невыносимыми и ухудшают общее состояние пациента. Основными показаниями для вызова специалиста являются:
Подробнее – http://snyatie-lomki-ekb8.ru/snyatie-lomki-narkolog-v-ekb/
https://auto.ae/titaniumcars/
Эта публикация погружает вас в мир увлекательных фактов и удивительных открытий. Мы расскажем о ключевых событиях, которые изменили ход истории, и приоткроем завесу над научными достижениями, которые вдохновили миллионы. Узнайте, чему может научить нас прошлое и как применить эти знания в будущем.
Раскрыть тему полностью – https://www.nmi-agro.nl/news/feedback-op-nitraatrichtlijn
Публикация приглашает вас исследовать неизведанное — от древних тайн до современных достижений науки. Вы узнаете, как случайные находки превращались в революции, а смелые мысли — в новые эры человеческого прогресса.
А есть ли продолжение? – https://kazakinfo.ru/index.php/ru/partnery
Статья знакомит с важнейшими моментами, которые сформировали наше общество. От великих изобретений до культурных переворотов — вы узнаете, как прошлое влияет на наше мышление, технологии и образ жизни.
Что ещё? Расскажи всё! – https://ddnewsonline.com/nigerian-evacuees-from-sudan-in-egypt-soon-to-be-abuja-bound-abike-dabiri-elewa
Эта статья сочетает познавательный и занимательный контент, что делает ее идеальной для любителей глубоких исследований. Мы рассмотрим увлекательные аспекты различных тем и предоставим вам новые знания, которые могут оказаться полезными в будущем.
Прочесть заключение эксперта – https://vildastamps.com/blog/?p=14253
В этом интересном тексте собраны обширные сведения, которые помогут вам понять различные аспекты обсуждаемой темы. Мы разбираем детали и факты, делая акцент на важности каждого элемента. Не упустите возможность расширить свои знания и взглянуть на мир по-новому!
Обратиться к источнику – https://kazakinfo.ru/index.php/ru/partnery
Мы собрали для вас самые захватывающие факты из мира науки и истории. От малознакомых деталей до грандиозных событий — эта статья расширит ваш кругозор и подарит новое понимание того, как устроен наш мир.
Личный опыт — читайте сами – https://revellrealtors.com/albums/revell-orchid
Послезавтра запрет в силу вступает https://udarnik-service.ru Сегодня получил свою родненькуюПарни, начинается параноя! Завтра посыль приходит, как получать А?
mostbet app download for android mostbet app download for android .
оптимизация сайта франция prodvizhenie-sajtov-v-moskve4.ru .
Інформаційний простір зараз дуже насичений, тому важливо обирати перевірені джерела для читання. Часто переглядаю новини Києва, адже вони допомагають сформувати повну картину подій у місті. Завдяки цьому легше орієнтуватися в щоденних питаннях та нововведеннях.
В статье представлены ключевые моменты по актуальной теме, дополненные советами экспертов и ссылками на дополнительные ресурсы. Цель материала — дать читателю инструменты для самостоятельного развития и принятия осознанных решений.
Полная информация здесь – https://template103.webekspor.com/?p=1
экскурсия на катере по каналам санкт петербурга обзорная экскурсия по спб цена
Мы собрали для вас самые захватывающие факты из мира науки и истории. От малознакомых деталей до грандиозных событий — эта статья расширит ваш кругозор и подарит новое понимание того, как устроен наш мир.
Узнать напрямую – https://alezznursery.com/?p=313
продвижение сайта продвижение сайта .
циклевка паркета болгаркой циклевка паркета в спб
нейросеть для учебы онлайн нейросеть для учебы онлайн .
Мы предлагаем вам окунуться в океан любопытных фактов и вдохновляющих историй. Эта публикация поможет расширить горизонты, разбудить интерес к науке и истории и увидеть мир с новой стороны.
Осуществить глубокий анализ – https://homecare-solutions.in/new-cleaning-with-hydrogen-at-many-peroxide-tips
структура креатива реклама reklamnyj-kreativ12.ru .
Щебень гравийный можно купить быстро и надежно через доставка гравия.
Этот материал — крупнозернистая фракция, получаемая дроблением пород или путем промывки природного гравия.
анализ креативов анализ креативов .
Ниже — практическая карта первых часов. Она помогает всем участникам понимать логику действий, точки контроля и критерии перехода. Если ответ «плоский», меняем один параметр и возвращаемся к оценке в назначённое время — без хаотичных «усилений».
Выяснить больше – http://kapelnicza-ot-zapoya-murmansk15.ru
Мы собрали для вас самые захватывающие факты из мира науки и истории. От малознакомых деталей до грандиозных событий — эта статья расширит ваш кругозор и подарит новое понимание того, как устроен наш мир.
Подробности по ссылке – https://matutar.com.br/policlinica-de-santa-maria-da-vitoria-contrata-medicos-para-diversas-especialidades
После обращения в клинику «Основа» наш специалист незамедлительно выезжает для оказания экстренной медицинской помощи в Новосибирске. Процесс установки капельницы предусматривает комплексную диагностику и последующее детоксикационное лечение, что позволяет снизить токсическую нагрузку и стабилизировать состояние пациента. Описание процедуры включает следующие этапы:
Получить больше информации – вызов на дом капельницы от запоя в новосибирске
жте907? Вроде говорят, что пока не доступен – находиться на экспертизе… Откуда инфа? Мефедрон, Марихуану, Бошки, Кокаин У вас есть свой сайт магазина?все супер! магазину доверять можно, были небольшие задержки но ТС сделал все по красоте!
технический перевод стоимость teh-perevod.ru .
furnished apartment fir rent in damac hills dubai https://kienthuctrade.net fully furnished apartments for rent in bur dubaipropiedades en dubai
Коммерческий и государственный тендер — это конкурентная процедура выбора поставщика товаров или оказания услуг. Заказчик размещает требования, а компании подают заявки и участвуют в торгах.
Раскройте все секреты – сопровождение тендерных закупок
«Капельница от запоя» в современном понимании — это не одна универсальная смесь, а последовательность управляемых шагов с понятной целью, измеримыми показателями и заранее назначенными точками переоценки. В наркологической клинике «СеверАльфа Мед» мы используем модульные инфузионные протоколы и бережный мониторинг, чтобы безопасно снять интоксикацию, восстановить водно-электролитный баланс, снизить тремор и вернуть физиологичный сон без «переседации». Каждый этап сопровождается сервисом конфиденциального уровня: нейтральные формулировки в документах, немаркированная логистика, «тихие» каналы связи, доступ к записям строго по ролям. Это делает путь пациента предсказуемым и защищённым от лишнего внимания.
Получить больше информации – http://kapelnicza-ot-zapoya-murmansk15.ru
Часто предприниматели объединяют понятия тендер и госзакупки, так как обе процедуры связаны с конкурсным выбором поставщика. Однако между ними существуют определённые различия, которые важно понимать перед началом работы в этой сфере.
Погрузитесь в детали – услуги тендерного сопровождения
Выбор клиники для лечения наркомании — один из самых ответственных этапов на пути к выздоровлению. От уровня организации помощи зависит не только здоровье пациента, но и его способность вернуться к нормальной жизни. Согласно данным Министерства здравоохранения Российской Федерации, эффективность терапии значительно возрастает при индивидуальном подходе, квалифицированном составе специалистов и наличии комплексных программ, включающих медицинскую и психологическую помощь.
Узнать больше – http://narkologicheskaya-klinika-tula10.ru/anonimnaya-narkologicheskaya-klinika-tula/
Добровольное медицинское страхование для физ. лиц Страхование имущества юридических лиц направлено на защиту активов компании, таких как здания, оборудование, сырье и готовая продукция, от различных рисков.
Наша философия проста: минимум медикаментов, максимум управляемости процесса. Мы не используем «универсальные капельницы», а собираем схему под клиническую картину: длительность запоя, выраженность тремора и тошноты, качество сна, уровень тревоги, исходное давление и частоту пульса, сопутствующие заболевания, текущие лекарства (антигипертензивные, антиаритмические, сахароснижающие, средства для сна). Скорость инфузии задаётся инфузоматом, витальные показатели контролируются портативным кардиомонитором и пульсоксиметром, глюкоза и электролиты — по экспресс-панелям. Такой подход снижает риск осложнений и делает результат предсказуемым и устойчивым.
Исследовать вопрос подробнее – нарколог на дом клиника краснодар
Ищете, где купить права быстро и надежно? Мы предлагаем полный спектр услуг по оформлению водительских удостоверений с гарантией качества и законности. Наша команда профессионалов поможет вам пройти все этапы получения прав без лишних хлопот и задержек. У нас вы можете купить права категории A, B, C и другие, соответствующие вашим потребностям. Мы обеспечиваем индивидуальный подход, конфиденциальность и поддержку на каждом шаге. Получите водительское удостоверение официально и без риска с нашей помощью. Узнайте подробности и оставьте заявку прямо сейчас!
услуги по перепланировке квартир услуги по перепланировке квартир .
цветы недорого с доставкой https://cvejie-cveti.ru/ .
Алкогольный запой – это критическое состояние, возникающее при длительном злоупотреблении спиртными напитками, когда организм насыщается токсинами и его жизненно важные системы (сердечно-сосудистая, печёночная, нервная) начинают давать сбой. В такой ситуации необходимо незамедлительное вмешательство специалистов для предотвращения тяжелых осложнений и спасения жизни. Наркологическая клиника «Основа» в Новосибирске предоставляет экстренную помощь с помощью установки капельницы от запоя, позволяющей оперативно вывести токсины из организма, стабилизировать внутренние процессы и создать условия для последующего качественного восстановления.
Изучить вопрос глубже – вызвать капельницу от запоя на дому в новосибирске
seo partner prodvizhenie-sajtov-v-moskve4.ru .
thailand villas for sale phuket thailand villas for sale phuket .
https://victorpetlura.com
luxury villas thailand phuket for sale villas-for-sale-in-phuket-1.com .
real estate in phuket real-estate-for-sale-in-phuket.com .
WE REST в Подмосковье — это место, где городской шум остаётся позади, а на первый план выходит настоящий качественный отдых. Уютные дома с продуманным интерьером, живописная природа Пушкинского округа, костровые зоны, сапы и каноэ на реке — всё для полного отключения от городской суеты. Забронировать дом посуточно и узнать актуальные даты можно на https://we-rest.ru/ — бронирование онлайн занимает пару минут. Территория охраняемая и уединённая — чёткие правила проживания гарантируют тишину и комфорт каждому отдыхающему.
Во многих регионах, в том числе и в Тульской области, работают десятки учреждений, предоставляющих услуги по наркологической помощи. Однако далеко не каждое из них соответствует современным стандартам. Часть клиник работает без лицензии, другие используют устаревшие методики или предлагают исключительно детоксикацию, без последующей психотерапевтической поддержки. Чтобы не ошибиться, важно заранее проанализировать основные характеристики надёжного медицинского учреждения.
Получить больше информации – http://
Даже при амбулаторном ведении мы следуем принципам доказательной медицины: пошаговая титрация, ясные коридоры безопасности, пересмотр решений строго по показателям. Мы объясняем, на что ориентироваться в первые часы после визита: диапазоны давления и пульса, ориентиры самочувствия, правила питания и питья, поведенческие «якоря» на случай, если тревога неожиданно вырастет вечером. Благодаря этому пациент и его семья не остаются один на один с вопросами; наоборот — у них есть карта маршрута и контакты людей, готовых включиться в течение минуты.
Изучить вопрос глубже – http://www.domen.ru
https://auto.ae/exotic
Каждый день запоя увеличивает риск для жизни. Не рискуйте — специалисты в Санкт-Петербурге приедут на дом и окажут экстренную помощь. Без боли, стресса и ожидания.
Разобраться лучше – вывод из запоя в стационаре
airbnb dubai apartments Commercial Property For Sale In Dubai liberty homes real estate broker llc dubai managing directorjw marriott hotel apartments dubai creek in al jaddaf
ауф казино телеграм
Нашел этот канал когда искал auf casino сайт, решил посмотреть что там. В итоге оказалось, что там регулярно публикуют ссылки для входа и обновляют зеркала. Проверил — все открывается, без проблем. Уже пару раз заходил через него, пока все стабильно
Петрозаводск задаёт свои параметры среды: озёрный ветер, световые перепады, «звонкие» подъезды старого фонда. В «РеМед Карелия» мы проектируем маршрут так, чтобы городской фон работал на пациента. Короткая регистрация без «толстых анкет», приглушённый тёплый свет в приёмной, отсутствие громких объявлений, отдельный вход без вывесок и немаркированный транспорт — всё это снижает сенсорную нагрузку и уменьшает вечернюю кардиореактивность. Семья получает «окна связи» в фиксированное время, чтобы эмоциональные звонки не разрушали «ночную кривую» сна. Для пациентов, стартующих на дому, мы привозим переносные решения — лампу тёплого спектра, ширмы, шумопоглощающие аксессуары, — чтобы не усиливать тревогу и не «подливать» раздражителей в момент инфузии.
Углубиться в тему – наркологическая клиника наркологический центр в петрозаводске
Лечение ломки в клинике «Эдельвейс» проходит по четко отлаженной схеме, которая учитывает индивидуальные особенности каждого пациента. После первоначального осмотра и сбора анамнеза составляется персональный план терапии, цель которого – как можно быстрее снять симптомы ломки и стабилизировать состояние пациента. Ниже приведен поэтапный алгоритм лечения:
Изучить вопрос глубже – http://snyatie-lomki-ekb8.ru
phuket luxury apartments for sale apartments-for-sale-in-phuket.com .
apartments for sale phuket apartments for sale phuket .
В этом материале представлены детали, которые хоть и занимательны, но не особенно значимы. Мы рассматриваем моменты, которые трудно назвать важными, но всё же решили включить их для полноты картины.
Вот – бесплатные врощенея в слотах
Ниже — практическая карта первых часов. Она помогает всем участникам понимать логику действий, точки контроля и критерии перехода. Если ответ «плоский», меняем один параметр и возвращаемся к оценке в назначённое время — без хаотичных «усилений».
Разобраться лучше – выезд на дом капельница от запоя
поисковое продвижение москва профессиональное продвижение сайтов internet-agentstvo-prodvizhenie-sajtov-seo.ru .
такое ощющение,что ты спецально зарегестрировался тут, чтобы написать только это сообщение,и в именно в этом разделе,я нечего не говарю за магазин,всё на вышшем уравне,но твой АК подозрителен с одним только этим сообщением https://irga-nn.ru Связался с продавцом вполне адекватный!Заказал щас жду адрессаЧет я совсем отупел, немогу найти прилавок, где товар бро, цена, наименование товара? Прайс в студию, на все услуги. От жизни походу отстал, правила поменяли походу, да?
Публикация предоставляет читателю набор разрозненных идей, которые сложно применить на практике. Мы лишь слегка касаемся разных точек зрения, не углубляясь в анализ и не предлагая никаких выводов.
Вот – Скидка 99%
Плануючи подорож до західної України, завжди намагаюся заздалегідь дізнатися про ситуацію в місті. Перед поїздкою обов’язково переглядаю новини Львова, щоб уникнути непередбачених обставин та краще спланувати маршрут. Це значно спрощує організацію та робить поїздку комфортнішою.
Наркологическая клиника «РеМед Карелия» — это круглосуточная медицинская помощь, построенная на принципе клинической точности: каждая процедура имеет цель, проверяемые маркеры и назначенное окно переоценки. Мы используем современные методы детоксикации и постабстинентной стабилизации, не перегружая терапию «на всякий случай» и не полагаясь на универсальные «сильные капельницы». Вместо этого — модульные схемы, корректировка одного параметра за раз и обязательная оценка результата. Такой подход снижает фармаконагрузку, ускоряет восстановление сна и аппетита и делает лечение предсказуемым для пациента и его семьи. Анонимность встроена в процессы: немаркированные входы, гражданская форма персонала, нейтральные формулировки в документах, «тихие» уведомления и разграниченный доступ к карте наблюдения.
Разобраться лучше – анонимная наркологическая клиника петрозаводск
Экстренный вывод из запоя — это управляемая медицинская процедура, а не «сильная капельница на удачу». В наркологической клинике «ВоронежВита» мы действуем по чётким правилам: от телефонного триажа и тихого выезда бригады до адресной детоксикации и вечерних контрольных включений. Главная цель — безопасно стабилизировать состояние, снизить тремор и тошноту, выровнять сердечный ритм и вернуть физиологичный сон уже в первые ночи. Мы выбираем минимально достаточные вмешательства, чтобы днём сохранялась ясность и не возникало желания «самостоятельно усилить» схему. Конфиденциальность встроена в каждый шаг: гражданская одежда специалистов, немаркированный транспорт, нейтральные формулировки в переписке и документах.
Узнать больше – вывод из запоя на дому недорого в воронеже
точность прогноза креативов 95% reklamnyj-kreativ14.ru .
Каждый из этапов направлен на обеспечение максимальной безопасности и эффективности лечения. Индивидуальный подход, основанный на тщательной диагностике, позволяет значительно снизить риск осложнений и обеспечить комфортное протекание терапии.
Узнать больше – снятие ломки наркозависимого
Признаки, что пора задуматься о кодировании
Подробнее тут – https://kodirovanie-ot-alkogolizma-korolyov11.ru/ehffektivnoe-kodirovanie-ot-alkogolizma-v-korolyove/
Вывод из запоя в Ростове-на-Дону является востребованной медицинской услугой, направленной на восстановление физического состояния пациента и снижение рисков осложнений. Длительное употребление алкоголя вызывает тяжелые нарушения в работе организма, и самостоятельное прекращение приёма спиртных напитков часто приводит к абстинентному синдрому. В таких ситуациях профессиональный вывод из запоя в клинике становится необходимым условием для сохранения здоровья.
Исследовать вопрос подробнее – вывод из запоя в стационаре в ростове-на-дону
Часто предприниматели объединяют понятия тендер и госзакупки, так как обе процедуры связаны с конкурсным выбором поставщика. Однако между ними существуют определённые различия, которые важно понимать перед началом работы в этой сфере.
Все тайны раскрыты – https://tendernoe-soprovozhdenie-rostov-na-donu.ru
mostbet app download mostbet app download .
Коли хочеться отримати натхнення або практичні рекомендації для саморозвитку, важливо користуватися надійними джерелами. Одним із таких є women.in.ua, який пропонує актуальні матеріали та поради для сучасних жінок. Це робить повсякденне життя легшим і цікавішим.
В этом материале представлены детали, которые хоть и занимательны, но не особенно значимы. Мы рассматриваем моменты, которые трудно назвать важными, но всё же решили включить их для полноты картины.
Вот – накрутка трафика
Показатель
Подробнее – анонимная наркологическая клиника
Городская среда Воронежа — яркие подъезды, плотный трафик, шумные дворы — усиливает вечернюю реактивность. Поэтому выездная служба «ВоронежВита» организована «тихо»: согласованная парковка, быстрый подъем без опознавательных знаков, часть расходников доставляется заранее, чтобы на адресе сразу перейти к диагностике и инфузии. Коммуникация ведётся через защищённые каналы, уведомления — «беззвучные», названия в документах — нейтральные. Такой дизайн среды не декоративен: чем меньше «социального шума», тем устойчивее ночной сон и тем быстрее возвращается переносимость воды и лёгкой еды.
Узнать больше – вывод из запоя цена в воронеже
dubai adwords real estate Commercial Property For Sale In Dubai spi real estatedubai commercial real estate news
Наша философия проста: минимум медикаментов, максимум управляемости процесса. Мы не используем «универсальные капельницы», а собираем схему под клиническую картину: длительность запоя, выраженность тремора и тошноты, качество сна, уровень тревоги, исходное давление и частоту пульса, сопутствующие заболевания, текущие лекарства (антигипертензивные, антиаритмические, сахароснижающие, средства для сна). Скорость инфузии задаётся инфузоматом, витальные показатели контролируются портативным кардиомонитором и пульсоксиметром, глюкоза и электролиты — по экспресс-панелям. Такой подход снижает риск осложнений и делает результат предсказуемым и устойчивым.
Подробнее тут – https://narcolog-na-dom-krasnodar14.ru/
Если в ситуации с алкоголем присутствуют несколько из перечисленных ниже пунктов, это повод не откладывать консультацию с наркологом в Королёве:
Получить больше информации – анонимное кодирование от алкоголизма цена
thailand phuket villas for sale villas-for-sale-in-phuket.com .
Kraken Marketplace Официальный сайт для доступа к Kraken
krab cc
auf casino зеркало
Нашел этот канал когда искал auf casino сайт, решил посмотреть что там. В итоге оказалось, что там регулярно публикуют ссылки для входа и обновляют зеркала. Проверил — все открывается, без проблем. Уже пару раз заходил через него, пока все стабильно
бесплатный период upster reklamnyj-kreativ12.ru .
Детоксикация — это не одна «капельница», а серия мероприятий, направленных на снижение токсической нагрузки, выравнивание жизненно важных показателей и возвращение контроля над самочувствием. На старте врач проводит осмотр, при необходимости — экспресс-диагностику и ЭКГ, объясняет цели инфузионной терапии, отвечает на вопросы о препаратах и возможных ощущениях в первые часы после начала. Если состояние пациента позволяет, первые шаги выполняются дома: так легче согласиться на помощь и сохранить приватность. При выраженной интоксикации, обезвоживании, скачках давления и пульса, нарушении ориентации или риске судорог безопаснее выбрать стационар: расширенная диагностика и круглосуточный мониторинг снижает вероятность осложнений и даёт возможность гибко корректировать назначения. После купирования острых проявлений команда переходит к стабилизации — настройке сна, питания, гидратации и поддерживающих схем с понятными целями на ближайшие дни.
Исследовать вопрос подробнее – [url=https://narkologicheskaya-klinika-moskva9.ru/]staciomedika-narkologicheskaya-klinika-vyvoda-iz-zapoya-moskva-otzyvy[/url]
real estate in phuket real-estate-for-sale-in-phuket.com .
Ну вот и дождался! Мефедрон, Марихуану, Бошки, Кокаин Извеняюсь за вышесказанное,магазин отличный..я думаю поторопился с выводами,продовци отзывчиввые идут на встречу,спасибо)) насчет 4фа..меня он действительно почти невставил,но скорее всего это толерантность от 2сi,которая как я узнал недавно длиться неделю..так что в конце недели протестирую повторно,пока крепанусь) потом сообщю)))2си-ай – ах..й просто!))))))
Ищете, где купить права категории Б быстро, надежно и без лишних затрат? Мы предлагаем полный комплекс услуг по оформлению водительских удостоверений категории В с гарантией качества и легальности. Наша компания специализируется на помощи в получении водительских прав, соблюдая все требования законодательства и обеспечивая полное сопровождение на всех этапах процесса. Мы понимаем, как важно иметь официальный документ, позволяющий управлять автомобилем категории Б, и готовы помочь вам избежать долгих очередей, сложных экзаменов и бюрократических проволочек. С нами вы экономите время и силы, получая права без лишних хлопот. Мы предлагаем выгодные условия сотрудничества, индивидуальный подход и конфиденциальность. Наши специалисты проконсультируют по всем вопросам, помогут собрать необходимые документы и проведут вас через весь процесс оформления. Купить права категории Б у нас — это быстрое решение вашей задачи с гарантией подлинности и соответствия требованиям ГИБДД. Не рискуйте, обращайтесь к профессионалам, чтобы получить водительское удостоверение категории В без проблем и задержек. Свяжитесь с нами прямо сейчас и сделайте первый шаг к свободному управлению автомобилем!
Вывод из запоя в Ростове-на-Дону является востребованной медицинской услугой, направленной на восстановление физического состояния пациента и снижение рисков осложнений. Длительное употребление алкоголя вызывает тяжелые нарушения в работе организма, и самостоятельное прекращение приёма спиртных напитков часто приводит к абстинентному синдрому. В таких ситуациях профессиональный вывод из запоя в клинике становится необходимым условием для сохранения здоровья.
Подробнее тут – вывод из запоя с выездом в ростове-на-дону
luxury villas in phuket for sale villas-for-sale-in-phuket-1.com .
Участие в государственных и коммерческих процедурах требует точной подготовки, понимания законодательства и внимательной работы с документами. Для многих компаний самостоятельная работа с закупками становится сложной задачей: необходимо отслеживать новые закупки, анализировать требования, оформлять документы и взаимодействовать с площадками.
Откройте для себя новое – тендер госзакупки
Формат
Подробнее тут – частная наркологическая клиника в люберцах
Решение обратиться за наркологической помощью часто упирается в страх огласки и сомнения в эффективности. В «МедТрезвие» эти барьеры снимаются за счёт клинической достаточности и предсказуемой организации. Диагностика и вмешательства назначаются строго по показаниям: врач оценит риски сердечно-сосудистых осложнений, состояние печени и поджелудочной железы, уровень тревоги и сна, наличие депрессивных симптомов. При устойчивом состоянии часть процедур выполняется на дому, что снижает стресс, а при признаках нестабильности — рекомендуется стационар с круглосуточным наблюдением. Анонимность поддерживается шифрованием данных, разграничением доступа и информированием родственников только по согласию пациента. Финансовые условия обсуждаются заранее: семья понимает, из чего складывается смета, и может планировать ресурс без опасений «скрытых» позиций. В результате лечение становится управляемым процессом, где медицинская безопасность и уважение к личной жизни человека — обязательные элементы, а не рекламные обещания.
Разобраться лучше – лучшая наркологическая клиника москва
apartments for sale phuket thailand apartments for sale phuket thailand .
cheap phuket apartments for sale apartments-for-sale-in-phuket.com .
Для оценки уровня учреждения важно понимать, какие конкретно методики в нём используются. Ниже приведён обобщённый обзор подходов в современных наркологических клиниках региона:
Получить дополнительные сведения – http://lechenie-narkomanii-vladimir10.ru
Петрозаводск задаёт свои параметры среды: озёрный ветер, световые перепады, «звонкие» подъезды старого фонда. В «РеМед Карелия» мы проектируем маршрут так, чтобы городской фон работал на пациента. Короткая регистрация без «толстых анкет», приглушённый тёплый свет в приёмной, отсутствие громких объявлений, отдельный вход без вывесок и немаркированный транспорт — всё это снижает сенсорную нагрузку и уменьшает вечернюю кардиореактивность. Семья получает «окна связи» в фиксированное время, чтобы эмоциональные звонки не разрушали «ночную кривую» сна. Для пациентов, стартующих на дому, мы привозим переносные решения — лампу тёплого спектра, ширмы, шумопоглощающие аксессуары, — чтобы не усиливать тревогу и не «подливать» раздражителей в момент инфузии.
Выяснить больше – наркологическая клиника нарколог в петрозаводске
Компьютерный магазин TopMarket в Нетании охватывает весь спектр цифровой техники — от ноутбуков и игровых станций до процессоров, видеокарт и сетевого оборудования ведущих мировых брендов. Ищете, где купить игровой руль в Израиле? На topmarket.co.il представлен широкий выбор комплектующих, периферии и программного обеспечения с актуальными ценами и постоянными акциями. Магазин работает на нескольких языках и охватывает все сегменты — от бюджетных решений до профессиональных рабочих станций.
clickfusion – Overall, professional vibe here; trustworthy, polished, and pleasantly minimal throughout.
Этот информационный набор привлекает внимание множеством мелочей и странных ракурсов. Мы предлагаем взгляды, которые редко бывают полезны, но могут слегка разнообразить ваше знакомство с темой.
Вот – телифон дешево
Kraken Marketplace Официальный сайт для доступа к Kraken
krab cc
Мы не подгоняем всех под единый сценарий. Если состояние устойчивое, нет упорной рвоты, высокой температуры, выраженной дезориентации и резких скачков давления и пульса — рационален домашний старт: приватно, быстрее и без лишних переездов. Врач приедет без маркировки, проведёт осмотр, запустит инфузионную терапию по показаниям, оставит письменные рекомендации и «красные флажки». Если же есть признаки угрозы осложнений — обезвоживание, аритмии, риск судорог, боли за грудиной или в животе, лихорадка, спутанность сознания, тяжёлая соматика — мы честно предлагаем короткую стационарную стабилизацию на 24–48 часов. Под круглосуточным наблюдением проще корректировать схемы, вовремя закрывать дефициты, защитить сон и быстрее вернуть управляемость поведению. В обоих форматах маршрут прозрачен: согласованные окна связи, фиксированные цели на ближайшие 72 часа и отсутствие «пакетов ради прайса». Благодаря этому решения принимаются спокойно, без угадываний и эмоциональных раскачек, которые обычно ломают прогресс и удорожают лечение.
Выяснить больше – http://vyvod-iz-zapoya-balashiha9.ru/vyvod-iz-zapoya-na-domu-balashiha/
maverick real estate dubai Apartments For Sale In Dubai Investment Park 2 bedroom villa for rent in palm jumeirahproperty sale in dubai international city
Не стоит забывать и про объективные факторы. Бывает, что физически опасно или трудно везти человека в клинику: он с трудом ходит, не спит уже несколько ночей, постоянно потеет, жалуется на сильную слабость и сердцебиение. Любая поездка в таком состоянии — дополнительная нагрузка на сердце и нервную систему. Выезд нарколога на дом позволяет начать лечение без этого лишнего риска: врач приезжает со всем необходимым для капельницы и наблюдения, а если по итогам осмотра становится понятно, что без стационара не обойтись, он помогает организовать перевод уже на фоне частично стабилизированного состояния, а не в момент максимального кризиса.
Углубиться в тему – нарколог на дом
Если в первичном звонке звучат «красные флаги» (одышка, спутанность сознания, резкие скачки ритма), мы предлагаем стационарное «окно» мониторинга с ночным постом. При низких рисках стартуем на дому: контрольные точки совпадают с домашним комфортом, а вечерние online-вставки по 15–20 минут поддерживают предсказуемость без лишних поездок.
Узнать больше – нарколог вывод из запоя в воронеже
«ВитаСана» — это организованный маршрут наркологической помощи в Чехове: быстрый анонимный звонок, выезд врача на дом без опознавательных знаков, аккуратный детокс с капельницами, стационар с круглосуточным наблюдением и подготовка к кодированию по показаниям. Мы действуем спокойно и последовательно: сначала очная оценка и допуск к терапии, затем индивидуальная инфузионная поддержка, далее — понятный план «тихих» дней и контрольный контакт. Каждое назначение объясняем простыми словами, смету согласуем до начала процедур, конфиденциальность соблюдаем на каждом шаге.
Ознакомиться с деталями – http://narkologicheskaya-klinika-chekhov8.ru
BearPrint — московская типография, закрывающая весь спектр задач цифровой и широкоформатной печати. Компания берёт на себя все полиграфические задачи: от визиток, буклетов и каталогов до наружной рекламы, лайтбоксов и брендволлов. Ищете печать в типографии? На сайте bearprint.pro можно ознакомиться с полным каталогом услуг и оформить заказ. Дополнительно доступны разработка дизайна, подготовка к выставкам и аренда рекламных конструкций. Профессионализм, точные сроки и полный охват полиграфических услуг выделяют BearPrint среди московских типографий.
интернет раскрутка internet-agentstvo-prodvizhenie-sajtov-seo.ru .
Велакаст представляет собой комбинированный препарат прямого противовирусного действия, в состав которого входят софосбувир и велпатасвир для терапии гепатита С. Ищете велакаст купить? Полная информация об инструкции по применению, составе и наличии в аптеках опубликована на velkast.com — официальном ресурсе препарата. Стоимость складывается из цены активных веществ, затрат на производство в соответствии со стандартами GMP и логистических расходов — препарат хранится при температуре не выше 25°C. Крупные сети и региональные аптеки предлагают разные условия — сравнивать актуальные цены стоит заранее.
Применение
Подробнее – лечение наркомании клиника в владимире
Кодирование не является чудесным выключателем тяги, но оно может стать сильным инструментом, который помогает закрепить решение бросить пить и даёт организму время восстановиться. Врач формирует у пациента устойчивую установку на отказ от алкоголя и подкрепляет её медикаментозно или психотерапевтически. При этом важен не только сам факт процедуры, но и то, как она встроена в общий план лечения: была ли проведена детоксикация, есть ли поддерживающая терапия, подключена ли реабилитация, работает ли семья с собственным выгоранием и созависимостью. Именно поэтому обращение за кодированием по месту жительства в Королёве удобно: можно не только выполнить саму процедуру, но и организовать наблюдение, при необходимости скорректировать тактику, не уезжая далеко от дома.
Подробнее можно узнать тут – кодирование от алкоголизма отзывы
Тендерный специалист помогает разобраться в особенностях каждого закона, а также обеспечивает грамотное сопровождение всех процедур. Это особенно важно для компаний, которые только начинают участвовать в торгах и не имеют опыта работы с государственными контрактами.
Погрузитесь в детали – комплексное тендерное сопровождение
Эта карта не про «красоту таблицы», а про ясность целей. Она делает предсказуемыми и саму терапию, и коммуникации: пациент знает, что и зачем будет сделано, а семья — когда ждать новостей и на какие цифры ориентироваться.
Углубиться в тему – капельница от запоя на дому недорого в мурманске
Снятие ломки в клинике «Эдельвейс» – это комплекс мероприятий, направленный на быстрое облегчение симптоматики и стабилизацию внутренних процессов организма. Наш подход включает комплексную диагностику, медикаментозную терапию, поддерживающие процедуры и психологическое сопровождение, что помогает пациенту не только справиться с острой фазой ломки, но и закладывает основу для дальнейшей реабилитации и предотвращения рецидивов.
Получить дополнительные сведения – снятие ломки на дому
Он падла как то сделал что у него такой же адрес в жабе как и у меня, люди будьте внимательны всегда и запрашивайте подтверждение через лс, для вашей же безопастности. Лучше лишний раз перестраховаться https://dixi-secure.ru вообще ктонибудь в этом магазине еще заказывал?? получал что нибудь ? или хотя бы треки бились?Наконец-то пришёл товар. Упакован отлично, курик все передал, в этом проблем нет. Пришли домой, распечатали по виду похоже на регу, но в воде разболталось. Муж поставился внутривенно, я отписала chemical, он говорит мол для вв нет инструкции. Похуй, растворили в воде, выпили,И НИХУЯ! НОЛЬ! Не прихода ни тяги, ни хуяги. Пусто. В аське пишу, молчит. Хз.
Возможные признаки
Получить дополнительные сведения – запой наркологическая клиника в туле
Kraken Marketplace Официальный сайт для доступа к Kraken
slon cc
Чтобы соотнести риски и плотность наблюдения до очного осмотра, удобнее всего взглянуть на одну сводную таблицу. Это не замена решению врача, но понятный ориентир для семьи: чем выше вероятность осложнений, тем плотнее мониторинг и быстрее доступ к коррекциям.
Исследовать вопрос подробнее – http://narkologicheskaya-klinika-lyubercy0.ru/chastnaya-narkologicheskaya-klinika-v-lyubercah/
согласование перепланировок согласование перепланировок .
Ищете лучшие Кейсы CS2 (CS:GO) с гарантированными выплатами? Посетите https://amp.spark.ru/user/267982/blog/309947/gooddrop-ndash-luchshie-kejsi-cs2-cs-go-s-garantirovannimi-viplatami там вы найдете источник информации о GoodDrop – это одна из самых популярных платформ для открытия кейсов в CS2 (Counter-Strike 2). Здесь можно выиграть дорогие скины, ножи, криптовалюту и другие ценные призы с высокими шансами.
hyperclick – Loved the layout today; clean, simple, and genuinely user-friendly overall.
Состав капельницы никогда не «копируется»; он выбирается по доминирующему симптому и соматическому фону. Ниже — клинические профили, которые помогают понять нашу логику. Итоговая схема формируется на месте, а скорость и объём зависят от текущих показателей.
Исследовать вопрос подробнее – вызвать врача нарколога на дом
thailand phuket villas for sale villas-for-sale-in-phuket.com .
В наркологической клинике в Челябинске проводится профессиональная детоксикация — очищение организма от токсинов, накопленных в результате употребления алкоголя или наркотиков. Процедура выполняется под наблюдением специалистов, что исключает риск осложнений и обеспечивает быстрое улучшение самочувствия. Для восстановления функций внутренних органов применяются препараты, стабилизирующие работу печени, сердца и нервной системы. Использование капельниц, витаминов и гепатопротекторов помогает нормализовать обмен веществ и устранить последствия интоксикации.
Разобраться лучше – http://narcologicheskaya-klinika-v-chelyabinske16.ru
Показатель
Подробнее можно узнать тут – http://narkologicheskaya-klinika-tula10.ru/
https://t.me/detivetrachat detivetrachat
property in phuket for sale property in phuket for sale .
Выбор клиники для лечения наркомании — один из самых ответственных этапов на пути к выздоровлению. От уровня организации помощи зависит не только здоровье пациента, но и его способность вернуться к нормальной жизни. Согласно данным Министерства здравоохранения Российской Федерации, эффективность терапии значительно возрастает при индивидуальном подходе, квалифицированном составе специалистов и наличии комплексных программ, включающих медицинскую и психологическую помощь.
Получить больше информации – http://narkologicheskaya-klinika-tula10.ru
Перед процедурой обсуждаются цели, ожидаемые эффекты, возможные побочные реакции, сроки наблюдения. Пациент получает письменные рекомендации на первые трое суток: режим сна и жидкости, коррекция нагрузки, контакты для связи, сигналы настороженности. Такой формат сделал результаты более предсказуемыми: меньше импульсивных решений, меньше тревоги и больше контроля над поведением в критический ранний период.
Выяснить больше – kodirovanie-ot-alkogolizma-metody
Вывод из запоя в Ростове-на-Дону является востребованной медицинской услугой, направленной на восстановление физического состояния пациента и снижение рисков осложнений. Длительное употребление алкоголя вызывает тяжелые нарушения в работе организма, и самостоятельное прекращение приёма спиртных напитков часто приводит к абстинентному синдрому. В таких ситуациях профессиональный вывод из запоя в клинике становится необходимым условием для сохранения здоровья.
Изучить вопрос глубже – анонимный вывод из запоя
sharjah real estate registration department https://diegoreico.com al khail real estate broker dubaiuae residence visa cost
Домашний визит особенно уместен при затянувшемся употреблении, когда нарастают тревожные вегетативные симптомы (тремор, потливость, сердцебиение), появляются проблемы со сном и «качели» давления, но при этом сохранён контакт, нет выраженной дыхательной недостаточности и глубокой дезориентации. Преимущества очевидны: экономия времени (нет дороги и ожидания), психологический комфорт, меньше сенсорных триггеров (яркий свет, шум), возможность сразу настроить режим первой «тихой ночи». Технологически выездная бригада оснащена как приёмный кабинет: инфузомат для точной скорости капания, пульсоксиметр, глюкометр, кассеты Na?/K?, портативный кардиомонитор с возможностью регистрации ЭКГ, набор проверенных средств для коррекции тошноты и защиты слизистой. Если во время триажа выявляются «красные флаги» — риск судорог, падение сатурации, признаки делирия, нестабильная гемодинамика, — мы организуем перевод в стационар «КубаньМедЦентра» без задержек и с непрерывностью терапии.
Разобраться лучше – нарколог капельница на дом краснодар
Первый и самый важный момент — какие методики применяются в клинике. Качественное лечение наркозависимости включает несколько этапов: детоксикация, стабилизация состояния, психотерапия, ресоциализация. Одного лишь выведения токсинов из организма недостаточно — без проработки психологических причин употребления высокий риск рецидива.
Изучить вопрос глубже – лечение наркомании в стационаре в владимире
Перед списком важно: пункты ниже не заменяют осмотр, а помогают семье быстрее принять здравое решение. В большинстве таких ситуаций достаточно правильно подобранных инфузий и чётких правил на 48–72 часа; при сочетании признаков мы рекомендуем стационар.
Подробнее – https://narkologicheskaya-klinika-podolsk9.ru/chastnaya-narkologicheskaya-klinika-v-podolske/
Стандартизированный алгоритм позволяет действовать быстро и безопасно. Он гибко настраивается под конкретный случай, но всегда включает триаж, экспресс-диагностику, старт инфузии, симптом-менеджмент и выдачу плана на 72 часа с «коридорами безопасности».
Выяснить больше – http://narcolog-na-dom-krasnodar14.ru
Kraken Marketplace Официальный сайт для доступа к Kraken
slon cc
Решение обратиться за наркологической помощью часто упирается в страх огласки и сомнения в эффективности. В «МедТрезвие» эти барьеры снимаются за счёт клинической достаточности и предсказуемой организации. Диагностика и вмешательства назначаются строго по показаниям: врач оценит риски сердечно-сосудистых осложнений, состояние печени и поджелудочной железы, уровень тревоги и сна, наличие депрессивных симптомов. При устойчивом состоянии часть процедур выполняется на дому, что снижает стресс, а при признаках нестабильности — рекомендуется стационар с круглосуточным наблюдением. Анонимность поддерживается шифрованием данных, разграничением доступа и информированием родственников только по согласию пациента. Финансовые условия обсуждаются заранее: семья понимает, из чего складывается смета, и может планировать ресурс без опасений «скрытых» позиций. В результате лечение становится управляемым процессом, где медицинская безопасность и уважение к личной жизни человека — обязательные элементы, а не рекламные обещания.
Детальнее – http://narkologicheskaya-klinika-moskva9.ru
apartments in phuket for sale apartments in phuket for sale .
condo for sale in phuket apartments-for-sale-in-phuket-1.com .
Финансовые инструменты позволяют заказчику убедиться в надежности участника и его готовности выполнить обязательства по контракту. При этом грамотное сопровождение снижает вероятность финансовых рисков и помогает правильно оформить документы для банка.
Не оставайтесь в неведении – услуги тендерного сопровождения
сегодня оплатил заказ jwh-250 5гр. буду ждать, после отпишусь… https://alekspushkin.ru очень сложно дописаться до них=( а цены хорошие.Все хорошо, ждем товар, когда будет сразу дадим знать.
Чтобы пациент и близкие не гадали «что будет дальше», мы удерживаем прозрачную последовательность. Каждый этап имеет цель, инструмент, окно оценки и критерий перехода. Это экономит минуты, снимает споры и делает план управляемым.
Узнать больше – http://vivod-iz-zapoya-voronezh15.ru/
villas for sale in phuket island villas-for-sale-in-phuket-1.com .
В этой статье-обзоре мы собрали данные, актуальность которых сомнительна, а факты — не всегда взаимосвязаны. Читатель сможет ознакомиться с разными мнениями, хотя вряд ли они существенно повлияют на его понимание темы.
Вот – бесплатные врощенея в слотах
Мурманск — город с длинными сумерками и влажным ветром от Кольского залива, что сказывается на сну и вечерней кардиолабильности. Поэтому мы адаптируем маршруты: выездные бригады работают в гражданской одежде, заходят быстро и тихо, а в палатах клиники используется тёплая подсветка и акустическое поглощение. Для ночных поступлений действует протокол «мягкой посадки»: минимизированные контакты, тёплая вода малыми глотками, затем — диагностика и старт инфузии при отсутствии «красных флагов». Это снижает сенсорную нагрузку и позволяет организму дать честный клинический ответ без лишних раздражителей.
Разобраться лучше – http://kapelnicza-ot-zapoya-murmansk15.ru/kapelnicza-ot-pokhmelya-murmansk/
Kraken Marketplace Официальный сайт для доступа к Kraken
slon at
Чтобы пациент и близкие не гадали «что будет дальше», мы удерживаем прозрачную последовательность. Каждый этап имеет цель, инструмент, окно оценки и критерий перехода. Это экономит минуты, снимает споры и делает план управляемым.
Изучить вопрос глубже – вывод из запоя на дому недорого в воронеже
https://cascadeclimbers.com/
Этот информационный набор привлекает внимание множеством мелочей и странных ракурсов. Мы предлагаем взгляды, которые редко бывают полезны, но могут слегка разнообразить ваше знакомство с темой.
Вот – скидки
elite real estate dubai investment park https://freizeitsportler.net apartments in dubai for rentalabu dhabi commercial properties dubai
Первые два часа после приезда врача — ключевое окно. Мы фиксируем витальные показатели (АД/ЧСС/SpO?), проводим экспресс-оценку глюкозы, по показаниям — электролитов (Na?/K?), оцениваем дыхательный паттерн и уровень ориентировки. Далее запускается титрованная инфузия через инфузомат с контролем каждые 15–20 минут. Параллельно настраиваются «вечерние опоры»: светогигиена, дыхательные циклы, «тихие окна» связи. В конце визита пациент и близкие получают простую памятку с «зелёными зонами» и кратким планом на 72 часа — когда пить воду, как выбирать тёплую пищу малыми порциями, при каких признаках выходить на связь немедленно.
Изучить вопрос глубже – вывод из запоя на дому круглосуточно в воронеже
поисковое продвижение москва профессиональное продвижение сайтов internet-agentstvo-prodvizhenie-sajtov-seo.ru .
Первый и самый важный момент — какие методики применяются в клинике. Качественное лечение наркозависимости включает несколько этапов: детоксикация, стабилизация состояния, психотерапия, ресоциализация. Одного лишь выведения токсинов из организма недостаточно — без проработки психологических причин употребления высокий риск рецидива.
Подробнее – лечение наркомании диспансер владимир
Капельница от запоя – эффективный метод экстренной детоксикации, который используется при тяжелых формах алкогольной интоксикации. Он позволяет быстро восстановить водно-электролитный баланс, нормализовать работу внутренних органов и снизить токсическую нагрузку. В клинике «Основа» мы гарантируем круглосуточное оказание медицинской помощи, индивидуальный подход к каждому пациенту и полную конфиденциальность. В условиях необходимости экстренного лечения наши специалисты оперативно выезжают в любую точку Новосибирска, обеспечивая комфортное проведение всех процедур как в стационаре, так и на дому.
Углубиться в тему – капельница от запоя анонимно
узаконивание перепланировки pereplanirovka-kvartir11.ru .
villas for sale in phuket island villas-for-sale-in-phuket.com .
база бенчмарков рекламы reklamnyj-kreativ12.ru .
clickifypro – Mobile version looks perfect; no glitches, fast scrolling, crisp text.
Для оценки уровня учреждения важно понимать, какие конкретно методики в нём используются. Ниже приведён обобщённый обзор подходов в современных наркологических клиниках региона:
Получить больше информации – лечение больных наркоманией в владимире
Наркологическая клиника «РеМед Карелия» — это круглосуточная медицинская помощь, построенная на принципе клинической точности: каждая процедура имеет цель, проверяемые маркеры и назначенное окно переоценки. Мы используем современные методы детоксикации и постабстинентной стабилизации, не перегружая терапию «на всякий случай» и не полагаясь на универсальные «сильные капельницы». Вместо этого — модульные схемы, корректировка одного параметра за раз и обязательная оценка результата. Такой подход снижает фармаконагрузку, ускоряет восстановление сна и аппетита и делает лечение предсказуемым для пациента и его семьи. Анонимность встроена в процессы: немаркированные входы, гражданская форма персонала, нейтральные формулировки в документах, «тихие» уведомления и разграниченный доступ к карте наблюдения.
Углубиться в тему – http://narkologicheskaya-klinika-v-petrozavodske15.ru/narkolog-petrozavodsk-otzyvy/
houses for sale in phuket real-estate-for-sale-in-phuket.com .
Во Владимире и области работают десятки клиник, предлагающих помощь зависимым, но не все учреждения соответствуют современным медицинским и психологическим стандартам. Чтобы выбрать действительно эффективное лечение, нужно ориентироваться на проверенные критерии. В этом материале мы рассмотрим, на что стоит обратить внимание при выборе наркологического центра.
Выяснить больше – http://lechenie-narkomanii-vladimir10.ru
Ищете запасные части для нефтегазового оборудования к буровым насосам и спецтехнике? Посетите сайт https://sogltorg.com/ – мы также реализуем запасные части и расходные материалы к гусеничной, автомобильной и иной спецтехнике, а также сельхозтехнику. Соберите свой заказ прямо на сайте, а мы доставим прямо до вас по всей России и Казахстану. Мы всегда предлагаем самые выгодные и доступные цены!
“Лазею я по форуму,точнее по веткам и на ветке Эскимоса вижу запись на Пробы” https://gr-braslet.ru В нашем городе эту почту походу обложили пополной!!!!!!!!Вы люди или нелюди? вас тут некто не обманывает, у магазина было тяжелое время, были проблемы с курьерками мы его пережили все налажено работаем в полную силу, у всех бываю белые и черные полосы нужно переживать их вместе вам это возместиться даже более того, всем отправили кто ждал, адекватные получат +50% к заказу и понимание магазина в любой ситуации и помощь
Кодирование не является чудесным выключателем тяги, но оно может стать сильным инструментом, который помогает закрепить решение бросить пить и даёт организму время восстановиться. Врач формирует у пациента устойчивую установку на отказ от алкоголя и подкрепляет её медикаментозно или психотерапевтически. При этом важен не только сам факт процедуры, но и то, как она встроена в общий план лечения: была ли проведена детоксикация, есть ли поддерживающая терапия, подключена ли реабилитация, работает ли семья с собственным выгоранием и созависимостью. Именно поэтому обращение за кодированием по месту жительства в Королёве удобно: можно не только выполнить саму процедуру, но и организовать наблюдение, при необходимости скорректировать тактику, не уезжая далеко от дома.
Изучить вопрос глубже – кодировка в королеве
Kraken Marketplace Официальный сайт для доступа к Kraken
kra
Вывод из запоя в Ростове-на-Дону является востребованной медицинской услугой, направленной на восстановление физического состояния пациента и снижение рисков осложнений. Длительное употребление алкоголя вызывает тяжелые нарушения в работе организма, и самостоятельное прекращение приёма спиртных напитков часто приводит к абстинентному синдрому. В таких ситуациях профессиональный вывод из запоя в клинике становится необходимым условием для сохранения здоровья.
Получить больше информации – вывод из запоя на дому недорого
residence dubai real estate Apartments In Uae For Sale estate agent fees dubaidubai hills estate mall project value
thailand phuket apartments for sale thailand phuket apartments for sale .
apartments for sale phuket thailand apartments for sale phuket thailand .
казино тайгер бонусы
Нашел этот канал через обсуждение, решил зайти посмотреть. Там есть зеркала и бонусы по tiger casino. Проверил несколько ссылок — все рабочие
Kraken Marketplace Официальный сайт для доступа к Kraken
kra
«Как отмечает врач-нарколог Иван Петрович Смирнов, «вывод из запоя должен проводиться исключительно под наблюдением специалистов, поскольку риски для организма при резком прекращении употребления алкоголя чрезвычайно высоки».»
Разобраться лучше – вывод из запоя на дому цена в ростове-на-дону
Первый полноценный сон — переломный момент в выводе из запоя. В «АлкоМед Балашиха» мы создаём условия для него с первого дня: затемнение, тишина, комфортная температура, минимизация стимулов, ранний отбой. Если требуется, подключаем мягкие седативные схемы под мониторинг. Утром — контроль показателей, уточнение дозировок, план активности «по силам», корректировка питания и воды. Мы заранее проговариваем, какие ощущения нормальны (сонливость, умеренная слабость), а какие — требуют связи со специалистом. Чёткая ночная стратегия снижает импульсивность и убирает главный триггер срывов — усталость и бессонницу, из-за которых даже корректно подобранные инфузии теряют эффективность к вечеру следующего дня.
Узнать больше – http://vyvod-iz-zapoya-balashiha9.ru/vyvod-iz-zapoya-na-domu-balashiha/
При выводе из запоя в Ростове-на-Дону используются разные терапевтические подходы. Основной задачей является устранение токсинов и восстановление работы систем организма. Врач подбирает терапию индивидуально в зависимости от состояния пациента и длительности запоя.
Подробнее – http://
Контроль
Изучить вопрос глубже – narkologicheskaya-klinika-stacionar
Наркологическая клиника «Эдельвейс» в Екатеринбурге специализируется на оказании оперативной и квалифицированной помощи при снятии ломки. Наши специалисты обладают многолетним опытом работы и применяют современные методики для безопасного и эффективного лечения абстинентного синдрома. Мы работаем круглосуточно, что позволяет оказывать помощь в любое время суток, обеспечивая анонимность и конфиденциальность каждого пациента.
Получить дополнительные сведения – https://snyatie-lomki-ekb8.ru/snyatie-lomki-narkolog-v-ekb/
По репе получил! Еще раз увижу безобразный флуд во всех ветках, будет тебе БАН! https://autopravo124.ru Спасибо огромное вам многим за понимание.Наблюдая за многими сообщениями, мы понимаем что многие на форуме не более чем очень “кипишные люди”, которые любят разводить демагогию.
Наркологическая клиника «РеМед Карелия» — это круглосуточная медицинская помощь, построенная на принципе клинической точности: каждая процедура имеет цель, проверяемые маркеры и назначенное окно переоценки. Мы используем современные методы детоксикации и постабстинентной стабилизации, не перегружая терапию «на всякий случай» и не полагаясь на универсальные «сильные капельницы». Вместо этого — модульные схемы, корректировка одного параметра за раз и обязательная оценка результата. Такой подход снижает фармаконагрузку, ускоряет восстановление сна и аппетита и делает лечение предсказуемым для пациента и его семьи. Анонимность встроена в процессы: немаркированные входы, гражданская форма персонала, нейтральные формулировки в документах, «тихие» уведомления и разграниченный доступ к карте наблюдения.
Ознакомиться с деталями – https://narkologicheskaya-klinika-v-petrozavodske15.ru/narkolog-petrozavodsk-otzyvy/
Подготовка включает оценку соматического статуса, сверку текущих лекарств, обсуждение мотивации и планов на ближайшие недели. После процедуры назначаются контрольные контакты: специалист уточняет самочувствие, помогает адаптировать режим сна и питания, напоминает о «красных флажках» и корректирует план при изменениях графика или стресса. Пациент остаётся не один: ему доступны понятные регламенты действий, чтобы не «провалиться» в первые недели, когда вероятность срыва традиционно выше. Это снижает тревогу и делает поведение предсказуемым, а значит — безопасным для здоровья и работы.
Получить больше информации – http://narkologicheskaya-klinika-moskva9.ru/narkologicheskaya-klinika-v-moskve-ceny/
Признаки, что пора задуматься о кодировании
Углубиться в тему – http://kodirovanie-ot-alkogolizma-korolyov11.ru
узаконивание перепланировки pereplanirovka-kvartir11.ru .
где согласовать перепланировку pereplanirovka-kvartir12.ru .
Kraken Marketplace Официальный сайт для доступа к Kraken
krab at
РАМТЕПЛО — компания, которая реализует весь комплекс работ по инженерным системам для частных домов в Москве и Московской области: отопление, водоснабжение, канализация, электромонтаж, вентиляция и «Умный дом». Специалисты берутся за проекты любой сложности — от котла и тёплого пола до промышленной автоматики. Компания предлагает выгодные условия: сезонное обслуживание отопления от 2900 р. и радиаторы Rifar Monolit по 750 р. за секцию. Подробности об услугах и ценах на https://ramteplo.ru/ — заявку можно оставить онлайн. На все выполненные работы компания распространяет гарантию и предоставляет сервисное обслуживание.
luxury property rentals dubai Buy Property In Dubai best hotel apartment deals in dubaidubai land department stabilize the property market
проект перепланировки москва проект перепланировки москва .
Эта разъяснительная статья содержит простые и доступные разъяснения по актуальным вопросам. Мы стремимся сделать информацию понятной для широкой аудитории, чтобы каждый мог разобраться в предмете и извлечь из него максимум пользы.
Получить дополнительные сведения – https://recreativosalmudi.com
Этот обзор предлагает структурированное изложение информации по актуальным вопросам. Материал подан так, чтобы даже новичок мог быстро освоиться в теме и начать использовать полученные знания в практике.
Желаете узнать подробности? – https://recreativosalmudi.com
тайгер казино регистрация и вход
Народ, случайно наткнулся на tiger casino telegram, решил проверить что там. Канал оказался живой, постоянно обновляют инфу. Есть зеркала, бонусы и акции. Зашел через одну из ссылок — все ок
продвижение сайта в топ по трафику prodvizhenie-sajta-po-trafiku2.ru .
обучение продвижению сайтов kursy-seo-12.ru .
Российский спорт охватывает десятки дисциплин — от футбола и хоккея до тенниса и шахмат, и следить за всем сразу непросто. Национальный спортивный портал https://russian-sports.ru/ собирает в одном месте турнирные таблицы, видеообзоры матчей, актуальные рейтинги ФИФА, УЕФА, ATP, ФИДЕ и многое другое. Здесь удобно следить за РПЛ, КХЛ, Формулой 1 и международными соревнованиями — всё структурировано, без лишнего шума и рекламного мусора. Настоящий ресурс для тех, кто живёт спортом.
Детоксикация — это не одна «капельница», а серия мероприятий, направленных на снижение токсической нагрузки, выравнивание жизненно важных показателей и возвращение контроля над самочувствием. На старте врач проводит осмотр, при необходимости — экспресс-диагностику и ЭКГ, объясняет цели инфузионной терапии, отвечает на вопросы о препаратах и возможных ощущениях в первые часы после начала. Если состояние пациента позволяет, первые шаги выполняются дома: так легче согласиться на помощь и сохранить приватность. При выраженной интоксикации, обезвоживании, скачках давления и пульса, нарушении ориентации или риске судорог безопаснее выбрать стационар: расширенная диагностика и круглосуточный мониторинг снижает вероятность осложнений и даёт возможность гибко корректировать назначения. После купирования острых проявлений команда переходит к стабилизации — настройке сна, питания, гидратации и поддерживающих схем с понятными целями на ближайшие дни.
Углубиться в тему – http://narkologicheskaya-klinika-moskva9.ru
Эта статья сочетает познавательный и занимательный контент, что делает ее идеальной для любителей глубоких исследований. Мы рассмотрим увлекательные аспекты различных тем и предоставим вам новые знания, которые могут оказаться полезными в будущем.
А что дальше? – https://www.sachhanoi.vn/product/doi-nghe-si
Часто предприниматели объединяют понятия тендер и госзакупки, так как обе процедуры связаны с конкурсным выбором поставщика. Однако между ними существуют определённые различия, которые важно понимать перед началом работы в этой сфере.
Не упустите важные детали – комплексное тендерное сопровождение в ростове на дону
Kraken Marketplace Официальный сайт для доступа к Kraken
krab at
«МедТрезвие» выстраивает лечение зависимости как последовательный и понятный маршрут, где каждый этап имеет чёткую цель, критерии эффективности и прозрачные условия. С первого обращения дежурный врач уточняет жалобы, длительность употребления, сопутствующие заболевания, переносимость лекарств и бытовые ограничения, после чего предлагает безопасный формат начала — выезд на дом или приём без ожидания. Важна не только скорость, но и качество коммуникации: пациент и близкие получают ясное объяснение, зачем назначается конкретная процедура, как оценивать улучшение и какие признаки требуют немедленной связи со специалистом. Круглосуточная доступность и конфиденциальные каналы записи снимают барьер обращения, а внутренняя маршрутизация позволяет переходить от экстренного купирования симптомов к стабилизации и профилактике срывов без пауз и «провалов» между этапами. Такой подход уменьшает риск повторных эпизодов, повышает приверженность и возвращает человеку контроль над повседневной жизнью.
Исследовать вопрос подробнее – https://narkologicheskaya-klinika-moskva9.ru/anonimnaya-narkologicheskaya-klinika-v-moskve
В этом обзорном материале представлены увлекательные детали, которые находят отражение в различных аспектах жизни. Мы исследуем непонятные и интересные моменты, позволяя читателю увидеть картину целиком. Погрузитесь в мир знаний и удивительных открытий!
А что дальше? – https://hozyaushka.org/partnery
В этом обзорном материале представлены увлекательные детали, которые находят отражение в различных аспектах жизни. Мы исследуем непонятные и интересные моменты, позволяя читателю увидеть картину целиком. Погрузитесь в мир знаний и удивительных открытий!
Личный опыт — читайте сами – https://www.moenr.gov.bt/?p=5475
Хмм…странно всё это, но несмотря ни на что заказал норм партию Ам в этом магазе так как давно тут беру.Как придёт напишу норм репорт про Ам https://tsentrosvar.ru тоже самое-продавец свяжись со мной для оплатыбешельме мешельме атакает
В этой статье-обзоре мы собрали данные, актуальность которых сомнительна, а факты — не всегда взаимосвязаны. Читатель сможет ознакомиться с разными мнениями, хотя вряд ли они существенно повлияют на его понимание темы.
Вот – бесплатные врощенея в слотах
Откройте для себя скрытые страницы истории и малоизвестные научные открытия, которые оказали колоссальное влияние на развитие человечества. Статья предлагает свежий взгляд на события, которые заслуживают большего внимания.
Узнать из первых рук – https://pt.cu.edu.eg/ar/archives/2298
residential property price dubai Townhouses For Rent In Dubai furnishe apartment in downtown dubaiApartments for sale in DIFC Living
Эта информационная статья охватывает широкий спектр актуальных тем и вопросов. Мы стремимся осветить ключевые факты и события с ясностью и простотой, чтобы каждый читатель мог извлечь из нее полезные знания и полезные инсайты.
Уточнить детали – https://aivm.it/the-mauritanian
Коммерческий и государственный тендер — это конкурентная процедура выбора поставщика товаров или оказания услуг. Заказчик размещает требования, а компании подают заявки и участвуют в торгах.
Узнайте больше прямо сейчас – комплексное тендерное сопровождение ростов на дону
Этот информационный материал собраны данные, которые помогут лучше понять текущие тенденции и процессы в различных сферах жизни. Мы предоставляем четкий анализ, графики и примеры, чтобы информация была не только понятной, но и практичной для принятия решений.
Читать дальше – https://www.meatymaxx.in
Эта статья предлагает живое освещение актуальной темы с множеством интересных фактов. Мы рассмотрим ключевые моменты, которые делают данную тему важной и актуальной. Подготовьтесь к насыщенному путешествию по неизвестным аспектам и узнайте больше о значимых событиях.
Не упусти шанс – https://musclefitpharmastore.com/product/deca-300mg-ml
перевод технического текста teh-perevod.ru .
Kraken Marketplace Официальный сайт для доступа к Kraken
kraken
Борьба с наркотической зависимостью требует системного подхода и участия опытных специалистов. Важно понимать, что лечение наркомании — это не только снятие ломки, но и длительная психотерапия, обучение новым моделям поведения, работа с семьёй. Согласно рекомендациям Минздрава РФ, наиболее стабильные результаты достигаются при прохождении курса реабилитации под наблюдением профессиональной команды в специализированном центре.
Подробнее можно узнать тут – https://lechenie-narkomanii-vladimir10.ru/lechenie-narkomanii-anonimno-vladimir
машинное обучение креативы reklamnyj-kreativ12.ru .
Старт — короткий скрининг с дежурным врачом: выясняем риски и бытовые условия, чтобы заранее выбрать формат, который будет и безопасным, и выполнимым в реальности. Согласуем окно визита или приёма с учётом трафика и подъезда; подсказываем, как подготовить помещение — тишина, вода, розетка, возможность прилечь. На месте фиксируем витальные показатели (АД, пульс, сатурация, температура), при показаниях делаем ЭКГ, запускаем детокс и озвучиваем ожидаемую «нормальную динамику» первых 6–12 часов. Все договорённости дублируем в памятке: режим, питьевой план, «красные флажки» и точное время контрольной связи. Если домашний формат перестаёт быть достаточным, переводим в стационар без пауз — темп лечения не теряется.
Углубиться в тему – http://narkologicheskaya-klinika-lyubercy0.ru
freehold apartments for sale in phuket apartments-for-sale-in-phuket.com .
Для самого пациента это шанс получить медицинское вмешательство без дополнительного стресс-фактора в виде транспорта, очередей и «больничной атмосферы». Он остаётся в привычной обстановке, в своей квартире, с теми же предметами, к которым привык, и это снижает сопротивление. Вместо жесткого сценария «либо немедленно в стационар, либо ничего» появляется промежуточный, более мягкий вариант: врачи приезжают домой, снимают остроту состояния, подбирают схему капельницы и медикаментов, объясняют, что делать дальше. Нередко именно после такого первого опыта человек впервые всерьёз задумывается о полноценном лечении, потому что ощущает реальную разницу в самочувствии до и после профессиональной помощи, а не просто очередной «опохмел».
Выяснить больше – http://narkolog-na-dom-himki11.ru/narkolog-na-dom-srochno-v-himkah/
thailand villas for sale phuket thailand villas for sale phuket .
Старый паркет? шлифовка паркета в спб профессиональное восстановление деревянного пола без пыли и лишних затрат. Удаляем царапины, потемнения и старое покрытие, возвращаем гладкость и естественный цвет. Используем современное оборудование, выполняем циклевку, шлифовку и лакировку паркета под ключ с гарантией качества и точным соблюдением сроков.
Применение
Углубиться в тему – лечение наркомании реабилитация в владимире
yabe.lil сказал(а): ^ Мефедрон, Марихуану, Бошки, Кокаин боюсь что здесь произойдёт тоже самое, уж очень не внятно продавец общается.Malkom ты не один такой такая же хрень зарядили бабосы еще и чужие пздц полный >< надеюсь разрулит всё =\
Kraken Marketplace Официальный сайт для доступа к Kraken
slon4 at
Домашний формат особенно удобен на ранних этапах, когда зависимость уже дошла до запоев, но человек ещё продолжает работать, скрывать проблему от коллег и соседей, боится любой огласки. Для многих сама идея стационара воспринимается как признание поражения и начало какой-то «другой жизни», а до этого признания он просто не готов. Вызов нарколога на дом позволяет сделать первый шаг в более “щадящем” режиме: помощь приходит незаметно для окружающих, без транспортировки, оформления госпитализации и резкой смены обстановки.
Подробнее тут – http://narkolog-na-dom-himki11.ru/narkolog-na-dom-cena-v-himkah/
В этом обзорном материале представлены увлекательные детали, которые находят отражение в различных аспектах жизни. Мы исследуем непонятные и интересные моменты, позволяя читателю увидеть картину целиком. Погрузитесь в мир знаний и удивительных открытий!
Личный опыт — читайте сами – https://new.fisioforma.com.br/os-6-melhores-chas-emagrecedores
villas for sale in phuket villas for sale in phuket .
contracting dubai properties Dubai Houses For Sale Luxury process of renting an apartment in dubaiforest real estate llc dubai marina
phuket thailand property for sale phuket thailand property for sale .
Борьба с наркотической зависимостью требует системного подхода и участия опытных специалистов. Важно понимать, что лечение наркомании — это не только снятие ломки, но и длительная психотерапия, обучение новым моделям поведения, работа с семьёй. Согласно рекомендациям Минздрава РФ, наиболее стабильные результаты достигаются при прохождении курса реабилитации под наблюдением профессиональной команды в специализированном центре.
Получить больше информации – https://lechenie-narkomanii-vladimir10.ru/lechenie-narkomanii-czena-vladimir
Откройте для себя скрытые страницы истории и малоизвестные научные открытия, которые оказали колоссальное влияние на развитие человечества. Статья предлагает свежий взгляд на события, которые заслуживают большего внимания.
Узнать из первых рук – https://floriculture.me/forum/viewtopic.php?t=26&start=120
condos for sale in phuket condos for sale in phuket .
Контроль
Подробнее тут – https://narkologicheskaya-klinika-lyubercy0.ru/chastnaya-narkologicheskaya-klinika-v-lyubercah
«ВитаСана» — это организованный маршрут наркологической помощи в Чехове: быстрый анонимный звонок, выезд врача на дом без опознавательных знаков, аккуратный детокс с капельницами, стационар с круглосуточным наблюдением и подготовка к кодированию по показаниям. Мы действуем спокойно и последовательно: сначала очная оценка и допуск к терапии, затем индивидуальная инфузионная поддержка, далее — понятный план «тихих» дней и контрольный контакт. Каждое назначение объясняем простыми словами, смету согласуем до начала процедур, конфиденциальность соблюдаем на каждом шаге.
Подробнее – частная наркологическая клиника
Чтобы соотнести риски и плотность наблюдения до очного осмотра, удобнее всего взглянуть на одну сводную таблицу. Это не замена решению врача, но понятный ориентир для семьи: чем выше вероятность осложнений, тем плотнее мониторинг и быстрее доступ к коррекциям.
Получить дополнительную информацию – https://narkologicheskaya-klinika-lyubercy0.ru/chastnaya-narkologicheskaya-klinika-v-lyubercah
Как подчёркивает заведующий отделением наркологии Владимирского областного клинического диспансера, «только комплексная модель, включающая медикаментозную поддержку и психотерапию, даёт устойчивый эффект». Это означает, что в штате клиники должны быть не только врачи, но и психотерапевты, социальные работники, реабилитологи.
Исследовать вопрос подробнее – лечение наркомании на дому
Переезд в столицу часто связан с поиском временного жилья и адаптацией к новому ритму жизни. Большинство приезжих сначала стремятся снять квартиру в Киеве https://kvartiru.kiev.ua/, чтобы без лишнего стресса освоиться в городе и изучить его районы. Это позволяет избежать поспешных решений и выбрать более подходящий вариант позже.
Описание
Ознакомиться с деталями – http://vyvod-iz-zapoya-sochi7.ru
Выпускной в детском саду — один из первых важных праздников в жизни ребёнка, и его стоит запечатлеть по-настоящему. Профессиональная команда берётся за съёмку полного дня: от торжественной части и вручения дипломов до детских игр и финального хоровода. Требуется видеооператор на выпускной в детский сад? На сайте profvideo.ru/videosemka-vypusknogo-v-detskom-sadu/ подробно описаны форматы работы и примеры готовых роликов. Работа с несколькими камерами и петличной акустикой гарантирует качество звука и видеоряда на уровне телевизионного производства. На выходе — полноценный смонтированный ролик с музыкальным сопровождением и титрами, который не захочется удалять никогда.
Хотите смотреть фильмы и сериалы онлайн без регистрации и платных подписок? Кинобади — стриминговый портал с огромной коллекцией контента в HD-качестве: голливудские блокбастеры, популярные сериалы, мультфильмы, турецкие сериалы и свежие новинки 2025–2026 годов. Сайт https://kinobadi.im/ обновляется ежедневно и предлагает удобный поиск по актёрам, странам и категориям. Здесь собраны топовые хиты — «Аватар», «Дэдпул», «Острые козырьки» и сотни других. Любой фильм можно скачать в формате MP4 или смотреть прямо в браузере без лагов и рекламных пауз.
Kraken Marketplace Официальный сайт для доступа к Kraken
kraken
Хочу всем сказать мы не работаем 1вым классом ни при каком условии… https://autopravo124.ru Магазин в полном порядке!!Магазин кидает. Буду писать пока не дадут адрес в ПМ. Прошу там же помочь админов.
Велакаст — это комбинированное противовирусное средство прямого действия: каждая таблетка включает 400 мг софосбувира и 100 мг велпатасвира. Препарат активен в отношении всех генотипов гепатита С — с первого по шестой, в том числе при сопутствующем циррозе печени и коинфекции ВГС/ВИЧ. Двойной механизм действия блокирует синтез РНК вируса и нарушает сборку вирусных частиц одновременно. Ищете велакаст купить? Подробная инструкция по применению, показания, противопоказания и отзывы пациентов собраны на velakast.online — информационном портале о препарате. Стандартная продолжительность лечения — 12 недель, и в большинстве клинических случаев результатом становится устойчивый вирусологический ответ.
Терапия проводится в комфортных условиях с использованием сертифицированных препаратов и современных медицинских технологий. Команда врачей, психологов и реабилитологов обеспечивает поддержку на всех этапах лечения.
Ознакомиться с деталями – наркологическая клиника в казани
Время — ключевой ресурс при абстиненции и интоксикации. Ниже — ориентиры, которые помогут семье принять решение не откладывать обращение. Если совпадает хотя бы один пункт, лучше сразу обсудить ситуацию с дежурным наркологом и подготовить пространство для визита.
Получить дополнительную информацию – врач вывод из запоя
Помощь специалиста по выводу из запоя требуется, когда симптомы интоксикации становятся критическими. Обратите внимание на следующие признаки:
Получить дополнительные сведения – https://vyvod-iz-zapoya-sochi7.ru/vyvod-iz-zapoya-cena-v-sochi/
business partnership in dubai Dubai Marina Apartments For Rent Dubai Media Citybuy residential property in dubai
технический перевод стоимость teh-perevod.ru .
Kraken Marketplace Официальный сайт для доступа к Kraken
krab at
продвижение сайтов трафик на сайт продвижение сайтов трафик на сайт .
Наркологическая клиника в клинике в Казани — это современный медицинский центр, специализирующийся на лечении алкогольной и наркотической зависимости. Основное направление деятельности заключается в проведении детоксикации, восстановлении работы нервной системы и формировании устойчивой мотивации к отказу от употребления психоактивных веществ. Все процедуры проводятся в условиях полной анонимности и медицинского контроля, что обеспечивает безопасность и доверие со стороны пациентов. Программа терапии строится по принципам доказательной медицины и индивидуального подбора лечебных средств.
Изучить вопрос глубже – анонимная наркологическая клиника казань
курсы по seo курсы по seo .
Затянувшийся запой — это не просто «перебор накануне», а состояние, при котором страдают сердечно-сосудистая система, печень, нервная регуляция и обмен электролитов. В наркологической клинике «ДонЗдрав» (Ростов-на-Дону) экстренный вывод из запоя организован как непрерывная цепочка помощи: диспетчер 24/7 — дежурный врач — мобильная бригада — последующее наблюдение и психотерапевтическая поддержка. Мы приезжаем на дом в гражданской одежде, без опознавательных знаков, проводим экспресс-диагностику, запускаем индивидуально подобранные капельницы и даём чёткий план на ближайшие 72 часа. Такой формат позволяет безопасно стабилизировать состояние, не нарушая приватность и привычный уклад семьи.
Выяснить больше – вывод из запоя на дому в ростове-на-дону
Кодирование от алкоголизма в Королёве часто становится тем самым рубежом, за которым заканчиваются бесконечные попытки «ограничить дозу» и «держать ситуацию под контролем» и начинается системная работа с зависимостью. Многие годами откладывают этот шаг: стыдно признать проблему, страшно довериться врачу, есть надежда, что «само пройдёт» или удастся остановиться силой воли. На практике всё происходит иначе: запои становятся длиннее, похмелье тяжелее, трезвые промежутки короче, а конфликты в семье и на работе — острее. В какой-то момент близкие понимают, что без серьёзной внешней опоры человек просто не справляется.
Выяснить больше – кодировка в королеве
услуги по перепланировке квартир услуги по перепланировке квартир .
заказать проект перепланировки заказать проект перепланировки .
seo продвижение сайта по трафику кловер prodvizhenie-sajta-po-trafiku2.ru .
Фотография давно вышла за рамки хобби и стала навыком, который требует системного подхода. Ищете центральная композиция пример фото? Ресурс fotoblog.online собрал практичную базу знаний для тех кто хочет расти: от основ композиции и работы со светом до тонкостей редактирования, съёмки портрета, пейзажа и репортажа. На сайте подробно рассматриваются технические вопросы — работа с форматом CR3, проблемы совместимости с Lightroom — и публикуются обзоры книг, разборы продвижения и истории знаменитых мастеров съёмки. Новичок получит структурированный старт, опытный фотограф найдёт ответы на конкретные вопросы.
villas phuket for sale villas phuket for sale .
https://seoperrot.ru/
Как подчёркивает заведующий отделением наркологии Владимирского областного клинического диспансера, «только комплексная модель, включающая медикаментозную поддержку и психотерапию, даёт устойчивый эффект». Это означает, что в штате клиники должны быть не только врачи, но и психотерапевты, социальные работники, реабилитологи.
Ознакомиться с деталями – лечение наркомании диспансер владимир
new residential projects in dubai https://crossroadscrc.org dubai property buying tipsbelhasa real estate dubai
Детоксикационные растворы (физиологический раствор, глюкоза, раствор Рингера)
Детальнее – вывод из запоя на дому екатеринбург
сайт для рефератов сайт для рефератов .
После поступления звонка врач клиники «Импульс» незамедлительно отправляется на указанный адрес для оказания срочной помощи. Вызов врача на дом включает следующие этапы:
Подробнее можно узнать тут – частный нарколог на дом
Kraken Marketplace Официальный сайт для доступа к Kraken
slon3 cc
Брал у него все гудд. Маскировка на высоте качество отличное. буду брать еще https://ekarat.ru С возвращением друг!!!!адекватных клиентов,спокойных и прибыльных деньков)))chemica l-mix.com,объявитесь на соседнем форуме(СпФН),вас там ОООООООчень заждались..!
цветы недорого бесплатной доставкой заказать http://cvejie-cveti.ru .
Запой – это крайне опасное состояние, когда контроль над употреблением алкоголя утрачивается, а токсичные вещества накапливаются в организме, угрожая жизни. В Архангельске экстренная медицинская помощь становится особенно актуальной, и специализированные службы готовы оперативно вмешаться для стабилизации состояния пациента. В данной статье описываются уникальные методики вывода из запоя, направленные на быстрое и безопасное восстановление здоровья в экстренных случаях.
Разобраться лучше – вывод из запоя капельница в архангельске
Часто предприниматели объединяют понятия тендер и госзакупки, так как обе процедуры связаны с конкурсным выбором поставщика. Однако между ними существуют определённые различия, которые важно понимать перед началом работы в этой сфере.
Не оставайтесь в неведении – тендерное сопровождение под ключ цена
Описание
Исследовать вопрос подробнее – вывод из запоя на дому
Kraken Marketplace Официальный сайт для доступа к Kraken
kraken market
Наши специалисты оказывают экстренную помощь по четко отработанной методике, главная задача которой – оперативное снятие симптомов острой интоксикации и абстинентного синдрома, восстановление работы внутренних органов и создание оптимальных условий для последующей реабилитации. Опытный нарколог на дому проведет тщательную диагностику, составит индивидуальный план лечения и даст необходимые рекомендации по дальнейшему выздоровлению.
Выяснить больше – http://narcolog-na-dom-nnovgorod8.ru
Курс терапии в клинике состоит из нескольких последовательных этапов, каждый из которых направлен на достижение конкретных целей — от снятия интоксикации до восстановления психологического равновесия. Такой подход позволяет добиться устойчивого результата и минимизировать вероятность рецидива. На всех стадиях лечения ведётся контроль состояния пациента, а также постоянная корректировка назначений в зависимости от реакции организма.
Получить больше информации – наркологические клиники алкоголизм
После того как организм пациента очищен от токсинов, наступает важный этап закрепления результата. С этой целью применяются психотерапевтические методики, направленные на формирование устойчивой мотивации к отказу от употребления.
Детальнее – https://narkologicheskaya-klinika-vladimir10.ru/chastnaya-narkologicheskaya-klinika-vladimir/
Затянувшийся запой — это не просто «перебор накануне», а состояние, при котором страдают сердечно-сосудистая система, печень, нервная регуляция и обмен электролитов. В наркологической клинике «ДонЗдрав» (Ростов-на-Дону) экстренный вывод из запоя организован как непрерывная цепочка помощи: диспетчер 24/7 — дежурный врач — мобильная бригада — последующее наблюдение и психотерапевтическая поддержка. Мы приезжаем на дом в гражданской одежде, без опознавательных знаков, проводим экспресс-диагностику, запускаем индивидуально подобранные капельницы и даём чёткий план на ближайшие 72 часа. Такой формат позволяет безопасно стабилизировать состояние, не нарушая приватность и привычный уклад семьи.
Подробнее можно узнать тут – вывод из запоя цена ростов-на-дону
Специалист задаёт вопросы о продолжительности запоя, характере симптоматики и наличии сопутствующих заболеваний. Такая информация является основой для формирования индивидуального плана детоксикации и корректировки дозировок медикаментов.
Детальнее – https://vyvod-iz-zapoya-arkhangelsk66.ru/vyvod-iz-zapoya-na-domu-arkhangelsk
Кодирование в «МедТрезвие» — не «волшебная кнопка», а логическое продолжение после стабилизации, когда организм готов к вмешательству, а пациент понимает механизм действия и ограничения метода. Врач подробно обсуждает цели, риски, противопоказания, ожидаемые эффекты и сроки наблюдения, оформляет информированное согласие и объясняет, как встроить процедуру в общий план. Важная часть — профилактика триггеров и обучение распознаванию ранних сигналов тяги: человек получает не только фармакологическую поддержку, но и практические инструменты саморегуляции, сценарии на «сложные дни», способы запросить помощь до того, как ситуация выйдет из-под контроля. Такая связка повышает вероятность устойчивой ремиссии, потому что работает одновременно на биологическом и поведенческом уровнях.
Детальнее – https://narkologicheskaya-klinika-moskva9.ru/horoshaya-narkologicheskaya-klinika-v-moskve
Круглосуточная помощь
Изучить вопрос глубже – http://kapelnica-ot-zapoya-krasnodar77.ru
dubai property in cryptocurrency Dubai Marina Apartments For Rent 3 bedroom apartments for rent in dubai karamawest gate real estate dubai
Борьба с наркотической зависимостью требует системного подхода и участия опытных специалистов. Важно понимать, что лечение наркомании — это не только снятие ломки, но и длительная психотерапия, обучение новым моделям поведения, работа с семьёй. Согласно рекомендациям Минздрава РФ, наиболее стабильные результаты достигаются при прохождении курса реабилитации под наблюдением профессиональной команды в специализированном центре.
Детальнее – лечение наркомании реабилитация в владимире
да мэн правильно говоришь KEY фраернулся https://eq-avallon.ru Бро слова это хорошо но нам нужен наш клад и не более не кто не хочет тебя винить и общаться сдесь на эту тему а на оборот писать только хорошие отзывы о вашем магазе пойми и ты бро слово паника сдесь не уместно сдесь идет разбор по факту согласиськогда появится новинки??
codespark – Loved the layout today; clean, simple, and genuinely user-friendly overall.
Для самого пациента это шанс получить медицинское вмешательство без дополнительного стресс-фактора в виде транспорта, очередей и «больничной атмосферы». Он остаётся в привычной обстановке, в своей квартире, с теми же предметами, к которым привык, и это снижает сопротивление. Вместо жесткого сценария «либо немедленно в стационар, либо ничего» появляется промежуточный, более мягкий вариант: врачи приезжают домой, снимают остроту состояния, подбирают схему капельницы и медикаментов, объясняют, что делать дальше. Нередко именно после такого первого опыта человек впервые всерьёз задумывается о полноценном лечении, потому что ощущает реальную разницу в самочувствии до и после профессиональной помощи, а не просто очередной «опохмел».
Углубиться в тему – нарколог в химках
Если состояние «ходит по краю», сутки–двое под наблюдением нередко короче и дешевле серии ночных вызовов. В стационаре «АлкоМед Балашиха» организованы «тихие коридоры», нет общих очередей, а внимание распределено волнами: утро — оценка и инфузии, день — контроль динамики и коррекция доз, ночь — условия для полноценного сна и готовность быстро отреагировать при отклонениях. За этот срок удаётся «снять остроту», выровнять давление и пульс, уменьшить тремор, закрыть дефициты и безопасно перейти к амбулаторному формату. Приватность и уважение к границам сохраняются так же, как и при домашнем старте, — это убирает страх «быть узнанным» и повышает приверженность плану.
Ознакомиться с деталями – vyvod-iz-zapoya-na-domu
Современная наркологическая клиника в клинике играет важную роль в оказании специализированной медицинской помощи людям, столкнувшимся с проблемой зависимости от алкоголя, наркотических или психотропных веществ. Основная цель работы специалистов заключается в том, чтобы стабилизировать состояние пациента, устранить острые проявления интоксикации и создать условия для последующей реабилитации.
Разобраться лучше – http://narkologicheskaya-klinika-vladimir10.ru/narkologicheskie-kliniki-gorod-vladimir/
технический перевод стоимость teh-perevod.ru .
дома каркасные спб — отличное решение для быстрого и экономичного возведения уютного загородного жилья.
К тому же нынешние технические решения и материалы сделали каркасные дома значительно прочнее.
Конструкция каркасного дома основана на деревянном или металлическом каркасе.
Нельзя забывать про корректную паро- и гидроизоляцию, которая продлевает срок службы дома.
Эксплуатация каркасного дома при хорошем качестве работ обходится недорого.
помощь в согласовании перепланировки квартиры помощь в согласовании перепланировки квартиры .
Не стоит забывать и про объективные факторы. Бывает, что физически опасно или трудно везти человека в клинику: он с трудом ходит, не спит уже несколько ночей, постоянно потеет, жалуется на сильную слабость и сердцебиение. Любая поездка в таком состоянии — дополнительная нагрузка на сердце и нервную систему. Выезд нарколога на дом позволяет начать лечение без этого лишнего риска: врач приезжает со всем необходимым для капельницы и наблюдения, а если по итогам осмотра становится понятно, что без стационара не обойтись, он помогает организовать перевод уже на фоне частично стабилизированного состояния, а не в момент максимального кризиса.
Исследовать вопрос подробнее – https://narkolog-na-dom-himki11.ru/vyzov-narkologa-na-dom-v-himkah/
Коммерческий и государственный тендер — это конкурентная процедура выбора поставщика товаров или оказания услуг. Заказчик размещает требования, а компании подают заявки и участвуют в торгах.
Разгадайте все загадки – https://tendernoe-soprovozhdenie-rostov-na-donu.ru
перепланировка квартиры согласование pereplanirovka-kvartir12.ru .
Подготовка включает оценку соматического статуса, сверку текущих лекарств, обсуждение мотивации и планов на ближайшие недели. После процедуры назначаются контрольные контакты: специалист уточняет самочувствие, помогает адаптировать режим сна и питания, напоминает о «красных флажках» и корректирует план при изменениях графика или стресса. Пациент остаётся не один: ему доступны понятные регламенты действий, чтобы не «провалиться» в первые недели, когда вероятность срыва традиционно выше. Это снижает тревогу и делает поведение предсказуемым, а значит — безопасным для здоровья и работы.
Получить дополнительные сведения – http://
Kraken Marketplace Официальный сайт для доступа к Kraken
krab cc
Нужен быстрый и недорогой заказать машину для вывоза строительного мусора, чтобы быстро освободить квартиру после ремонта.
Наличие современной спецтехники и обученного персонала гарантирует качественное обслуживание населения и бизнесов.
Наша наркологическая клиника успешно помогает пациентам с различной степенью алкогольной зависимости. Преимущества клиники «Перспектива» представлены в таблице ниже:
Выяснить больше – https://kapelnica-ot-zapoya-krasnodar77.ru/kapelnicza-ot-zapoya-czena-v-krasnodare
Ищете аренда авто с водителем — позвоните нам, и мы подберём идеальный автомобиль с профессиональным водителем для комфортных поездок по Новосибирску.
При оформлении заказа уточняйте наличие дополнительных опций и возможность изменения маршрута в процессе поездки.
techify – Loved the layout today; clean, simple, and genuinely user-friendly overall.
Часто предприниматели объединяют понятия тендер и госзакупки, так как обе процедуры связаны с конкурсным выбором поставщика. Однако между ними существуют определённые различия, которые важно понимать перед началом работы в этой сфере.
Эксклюзивная информация для вас – тендерное сопровождение
Детоксикация — это не одна «капельница», а серия мероприятий, направленных на снижение токсической нагрузки, выравнивание жизненно важных показателей и возвращение контроля над самочувствием. На старте врач проводит осмотр, при необходимости — экспресс-диагностику и ЭКГ, объясняет цели инфузионной терапии, отвечает на вопросы о препаратах и возможных ощущениях в первые часы после начала. Если состояние пациента позволяет, первые шаги выполняются дома: так легче согласиться на помощь и сохранить приватность. При выраженной интоксикации, обезвоживании, скачках давления и пульса, нарушении ориентации или риске судорог безопаснее выбрать стационар: расширенная диагностика и круглосуточный мониторинг снижает вероятность осложнений и даёт возможность гибко корректировать назначения. После купирования острых проявлений команда переходит к стабилизации — настройке сна, питания, гидратации и поддерживающих схем с понятными целями на ближайшие дни.
Получить дополнительные сведения – https://narkologicheskaya-klinika-moskva9.ru/anonimnaya-narkologicheskaya-klinika-v-moskve
dubai properties call center number Buy Property In Dubai dubai real estate corporation customer serviceseera binayah real estate brokers l.l.c dubai uae
всё дошло))))) Спасибо магазину,в след раз возьму отпишу что да как :dansing:качество на высоте Мефедрон, Марихуану, Бошки, Кокаин Приветсвую,форум) Хороший Сортимент на Товар))) УДАЧИ В ПРОДАЖАХРаньше розницей занимались благодаря вашему опыту,сейчас время другое,стабильная честная работа)
Kraken Marketplace Официальный сайт для доступа к Kraken
kraken
Время — ключевой ресурс при абстиненции и интоксикации. Ниже — ориентиры, которые помогут семье принять решение не откладывать обращение. Если совпадает хотя бы один пункт, лучше сразу обсудить ситуацию с дежурным наркологом и подготовить пространство для визита.
Получить дополнительные сведения – http://www.domen.ru
После поступления звонка врач клиники «Импульс» незамедлительно отправляется на указанный адрес для оказания срочной помощи. Вызов врача на дом включает следующие этапы:
Ознакомиться с деталями – вызов нарколога на дом
Курс терапии в клинике состоит из нескольких последовательных этапов, каждый из которых направлен на достижение конкретных целей — от снятия интоксикации до восстановления психологического равновесия. Такой подход позволяет добиться устойчивого результата и минимизировать вероятность рецидива. На всех стадиях лечения ведётся контроль состояния пациента, а также постоянная корректировка назначений в зависимости от реакции организма.
Получить дополнительную информацию – наркологическая клиника стационар казань
лучшая нейросеть для учебы nejroset-dlya-referatov-8.ru .
Затянувшийся запой — это не просто «перебор накануне», а состояние, при котором страдают сердечно-сосудистая система, печень, нервная регуляция и обмен электролитов. В наркологической клинике «ДонЗдрав» (Ростов-на-Дону) экстренный вывод из запоя организован как непрерывная цепочка помощи: диспетчер 24/7 — дежурный врач — мобильная бригада — последующее наблюдение и психотерапевтическая поддержка. Мы приезжаем на дом в гражданской одежде, без опознавательных знаков, проводим экспресс-диагностику, запускаем индивидуально подобранные капельницы и даём чёткий план на ближайшие 72 часа. Такой формат позволяет безопасно стабилизировать состояние, не нарушая приватность и привычный уклад семьи.
Углубиться в тему – скорая вывод из запоя в ростове-на-дону
Каждый из этих способов имеет значение в комплексном подходе к пациенту. Их сочетание подбирается строго индивидуально, что позволяет учитывать медицинские и психологические особенности.
Исследовать вопрос подробнее – наркологическая клиника лечение алкоголизма владимир
После прохождения детоксикации пациенту назначаются восстановительные процедуры, направленные на нормализацию обмена веществ и укрепление нервной системы. Программы клиники включают физиотерапию, витаминотерапию и индивидуальные занятия с психотерапевтом. Главная цель — восстановить способность организма к естественной саморегуляции и снизить зависимость от внешних раздражителей.
Получить дополнительную информацию – https://narkologicheskaya-clinika-v-kazani16.ru/chastnaya-narkologicheskaya-klinika-kazan
*Седативные препараты применяются строго по показаниям и под мониторингом дыхания.
Ознакомиться с деталями – вывод из запоя в стационаре ростов-на-дону
Процедура вывода из запоя проводится с применением современных методик инфузионной терапии. Врачи контролируют уровень гидратации, работу сердечно-сосудистой системы и общее состояние пациента до полного устранения симптомов.
Исследовать вопрос подробнее – https://narkologicheskaya-clinika-v-kazani16.ru/klinika-narkologiya-kazan
электрокорунд белый Если вы ищете надежный абразив, купить электрокорунд высокого качества — значит обеспечить себе превосходные результаты в самых разных применениях, от шлифовки до полировки.
https://zenwriting.net/1xbetbestcode6/1xbet-best-promo-code-1xbig2026-bonus-eu130
Чем дольше запой продолжается, тем выше риск возникновения серьезных осложнений: от нарушения работы сердечно-сосудистой системы до повреждения внутренних органов. В таких условиях время становится ключевым фактором. Оперативный вывод из запоя позволяет не только остановить дальнейшее ухудшение состояния, но и значительно снизить вероятность возникновения хронических заболеваний.
Подробнее – вывод из запоя на дому
Вывод из запоя в Рязани является востребованной медицинской услугой, направленной на стабилизацию состояния пациента после длительного употребления алкоголя. Специалисты применяют современные методы детоксикации, позволяющие быстро и безопасно восстановить жизненно важные функции организма, снизить проявления абстинентного синдрома и предотвратить осложнения. Процесс лечения осуществляется в клинических условиях под постоянным наблюдением врачей.
Подробнее тут – вывод из запоя на дому недорого рязань
Смартфоны Apple занимают особое место на рынке благодаря тому, чего не видно в характеристиках на бумаге: iPhone работает как единая система, где процессор и операционная система созданы одной командой. Собственные чипы серии A обеспечивают скорость и стабильность, которую пользователи ощущают ежедневно — приложения открываются мгновенно, камера обрабатывает снимки без задержек. Подробный разбор технических преимуществ и сравнение моделей опубликованы на https://78online.info/2026/03/14/iphone-chem-smartfony-apple-otlichayutsya-i-pochemu-ix-chasto-vybirayut/ — полезный материал для тех, кто выбирает смартфон осознанно. iOS получает обновления до шести лет, Face ID и аппаратное шифрование защищают данные, а корпус из титана и стекла выдерживает реальную эксплуатацию. Именно совокупность этих решений объясняет, почему iPhone остаётся выбором миллионов.
Kraken Marketplace Официальный сайт для доступа к Kraken
slon cc
покупателей много,очереди наверно большие тем более на доставку Мефедрон, Марихуану, Бошки, Кокаин Хороший сервис, хорошая команда = хорошие дела ) В том же духе двигаемся…)К продавцу можно смело обращаться, тут сделают все в лучшем виде!
emaar beachfront dubai 2 Bed Apartment Dubai danube apartments dubaihotel apartment in dubai investment park
Анализы Симферополь Синекс» стал еще ближе! Мы открылись в ЖК Крымская Роза. По адресу Проспект Александра Суворова 107, пом 2К Теперь жители микрорайона могут сдавать любые анализы без очередей и в шаговой доступности. Современное оборудование Быстрые и точные результаты Широкий спектр исследований: от общих анализов крови до сложных До сложных генетических панелей. ! Более 3500 анализов. Удобный график работы В новом пункте «Синекс» доступны: Клинические исследования крови и мочи Биохимия Гормональные профили Диагностика инфекций Генетические панели Мы рядом, когда это важно! Телефон горячей линии 8 800 333 01 09
Компания «ЦЭК» из Нижнего Новгорода — официальный партнёр АО «Калуга Астрал» с 30-летним опытом в сфере электронного документооборота и отчётности. Специалисты компании обеспечивают передачу отчётности в контролирующие органы, организуют юридически значимый ЭДО, кадровый и транспортный документооборот, а также создание МЧД. Ищете эпд электронные перевозочные документы? На astral52.ru действует акция — электронная отчётность со скидкой 50% плюс 5 сервисов в подарок. «ЦЭК» стабильно расширяет линейку сервисов и обеспечивает неизменно высокий уровень обслуживания на каждом этапе сотрудничества.
Преимущество
Получить дополнительную информацию – https://vyvod-iz-zapoya-sochi7.ru/vyvod-iz-zapoya-na-domu-v-sochi
узаконивание перепланировки квартиры pereplanirovka-kvartir12.ru .
Для оценки уровня учреждения важно понимать, какие конкретно методики в нём используются. Ниже приведён обобщённый обзор подходов в современных наркологических клиниках региона:
Изучить вопрос глубже – центр лечения наркомании владимир
Домашний формат особенно удобен на ранних этапах, когда зависимость уже дошла до запоев, но человек ещё продолжает работать, скрывать проблему от коллег и соседей, боится любой огласки. Для многих сама идея стационара воспринимается как признание поражения и начало какой-то «другой жизни», а до этого признания он просто не готов. Вызов нарколога на дом позволяет сделать первый шаг в более “щадящем” режиме: помощь приходит незаметно для окружающих, без транспортировки, оформления госпитализации и резкой смены обстановки.
Узнать больше – narkolog-na-dom-nedorogo
Преимущество
Разобраться лучше – http://kapelnica-ot-zapoya-krasnodar77.ru/kapelnicza-ot-zapoya-czena-v-krasnodare/
clickmetric – Pages loaded fast, images appeared sharp, and formatting stayed consistent.
перепланировка квартиры согласование pereplanirovka-kvartir11.ru .
Kraken Marketplace Официальный сайт для доступа к Kraken
slon4 at
Первый и самый важный момент — какие методики применяются в клинике. Качественное лечение наркозависимости включает несколько этапов: детоксикация, стабилизация состояния, психотерапия, ресоциализация. Одного лишь выведения токсинов из организма недостаточно — без проработки психологических причин употребления высокий риск рецидива.
Разобраться лучше – лечение наркомании клиника
which internet partner which internet partner .
Часто предприниматели объединяют понятия тендер и госзакупки, так как обе процедуры связаны с конкурсным выбором поставщика. Однако между ними существуют определённые различия, которые важно понимать перед началом работы в этой сфере.
Узнайте больше прямо сейчас – тендерное сопровождение ип
Go for details: https://trutime.net/outside/tamil-music-gender-tale-tamil-kama-kathai-maamanaar-thantha-sugam-area-17/
Extended Review: https://www.sharedss.com.au/ice-cassino-informacoes-e-analise-2025/
Когда выезд особенно удобен и оправдан, важно понимать не только эмоционально, но и по конкретным признакам. Есть ряд типичных ситуаций, в которых именно формат «на дому» становится наиболее реалистичным и безопасным вариантом, а стационар можно рассматривать как следующий шаг, когда острота будет снята и человек станет более сговорчивым.
Изучить вопрос глубже – http://narkolog-na-dom-himki11.ru
цветы недорого с доставкой https://www.cvejie-cveti.ru .
конечно оно так, все придет строго сколько сколько надо. Но ведь из за таких задержек могут и дела сорваться Мефедрон, Марихуану, Бошки, Кокаин а для какой цели не отправляют? курьерам похуй что тоскать, а если бы мусора хотели бы принять, посыль наоборот отправили.Ребята,кому не сложно ,подскажите мне,где можно взять спирт,какой крепости он должен быть,и собственно в каких пропорциях MN-001 в нем растворять,дабы получить приятный эффект,чувство эйфории,и достаточно продолжительное действие при изготовлении смесей?
После того как организм пациента очищен от токсинов, наступает важный этап закрепления результата. С этой целью применяются психотерапевтические методики, направленные на формирование устойчивой мотивации к отказу от употребления.
Подробнее тут – частная наркологическая клиника владимир
Этот текст содержит различную информацию, которая, возможно, покажется любопытной, но в целом не меняет восприятия привычных вещей. Предлагаем просто получить удовольствие от чтения, не ожидая особой пользы.
Вот – телифон дешево
rent increase calculator dubai 3 Bedroom Villa For Sale In Dubai dso customer portalhotel apartment in dubai al rigga
Каждый из этих способов имеет значение в комплексном подходе к пациенту. Их сочетание подбирается строго индивидуально, что позволяет учитывать медицинские и психологические особенности.
Ознакомиться с деталями – https://narkologicheskaya-klinika-vladimir10.ru/vo-vladimire-anonimnaya-narkologicheskaya-klinika/
Kraken Marketplace Официальный сайт для доступа к Kraken
kraken
Такая последовательность действий позволяет достичь стабилизации состояния в максимально короткие сроки. После завершения этих процедур врачи рекомендуют продолжение лечения в формате реабилитации.
Подробнее – http://narkologicheskaya-klinika-vladimir10.ru/narkologicheskie-kliniki-gorod-vladimir/
каркасный дом под ключ — отличное решение для быстрого и экономичного возведения уютного загородного жилья.
Такое положение вещей объясняется быстрыми сроками возведения и относительной экономичностью.
К каркасу крепят внешние панели и слои утепления.
Нельзя забывать про корректную паро- и гидроизоляцию, которая продлевает срок службы дома.
Эксплуатация каркасного дома при хорошем качестве работ обходится недорого.
Преимущество
Детальнее – вывод из запоя капельница на дому
Перед таблицей зафиксируем принцип: это ориентир по этапам для семьи и пациента. Врач адаптирует длительность и насыщенность под возраст, сопутствующие заболевания и исходное состояние.
Исследовать вопрос подробнее – narkologicheskaya-klinika-otzyvy
Если в ситуации с алкоголем присутствуют несколько из перечисленных ниже пунктов, это повод не откладывать консультацию с наркологом в Королёве:
Получить дополнительную информацию – кодирование алкоголизма недорого клиника
Первичная оценка строится на фактах. Врач коротко уточняет жалобы, длительность употребления, переносимость препаратов и аллергии, фиксирует давление, пульс, сатурацию, при необходимости делает экспресс-ЭКГ и скрининг неврологического статуса. Далее — объясняет на понятном языке логику назначений: зачем именно такая инфузионная схема, какие ощущения нормальны в течение часа и к ночи, как организовать питьевой режим и лёгкое питание «по силам». Мы избегаем «оглушающих» седативов: дозируем узко, чтобы не получить вечернего отката и побочных эффектов. После процедуры повторно оцениваем показатели, выдаём письменные рекомендации, согласуем окно связи и условия повторного визита. Семья получает простые правила поведения дома (тишина, затемнение, ограничение экранов, отсутствие «разборов») и сигналы, когда лучше позвать врача. Итог визита — управляемая ночь и предсказуемое утро, на котором можно строить следующие шаги.
Подробнее – http://narkologicheskaya-klinika-podolsk9.ru
Борьба с наркотической зависимостью требует системного подхода и участия опытных специалистов. Важно понимать, что лечение наркомании — это не только снятие ломки, но и длительная психотерапия, обучение новым моделям поведения, работа с семьёй. Согласно рекомендациям Минздрава РФ, наиболее стабильные результаты достигаются при прохождении курса реабилитации под наблюдением профессиональной команды в специализированном центре.
Разобраться лучше – https://lechenie-narkomanii-vladimir10.ru/lechenie-narkomanii-anonimno-vladimir/
Домашняя точка входа оправдана при стабильных показателях и низком риске осложнений. В знакомой обстановке легче соблюдать режим: затемнить комнату, убрать экраны, распределять воду маленькими порциями, сделать лёгкий перекус «по силам», лечь пораньше. Врач подберёт «узкую» схему инфузий без перегруза препаратами, объяснит, какие ощущения допустимы сегодня и ночью, а какие — повод для немедленной связи. Такой сценарий экономит время семьи, снижает стигму и быстрее переводит состояние в управляемое, на базе которого уже можно строить дальнейшие шаги — амбулаторные визиты, работу с триггерами и, при показаниях, обсуждение кодирования.
Подробнее – https://vyvod-iz-zapoya-balashiha9.ru/vyvod-iz-zapoya-balashiha-stacionar/
Стационар уместен при тяжёлой абстиненции, скачках давления, угрозе делирия, эпизодах судорог, неукротимой рвоте, а также когда дома нет взрослого помощника на ночь. В палате — аппаратный контроль по показаниям, пост медсестёр 24/7, ЭКГ и базовая лаборатория, регулярные переоценки с корректировкой схемы. Решения принимаются быстро, без логистических задержек; это снижает риск поздних осложнений и повторных экстренных вызовов.
Исследовать вопрос подробнее – рейтинг наркологических клиник в москве
Назначение и действие
Разобраться лучше – запой нарколог на дом
Kraken Marketplace Официальный сайт для доступа к Kraken
kraken
Если многое из этого знакомо, кодирование стоит рассматривать не как «наказание» или «приговор», а как инструмент, который помогает закрыть доступ к алкоголю на определённый срок и даёт шанс выстроить новую привычку — жить трезво.
Углубиться в тему – https://kodirovanie-ot-alkogolizma-korolyov11.ru/klinika-kodirovaniya-ot-alkogolizma-v-korolyove/
Седня 28.04.2014 Чяс назат звонок на телифон говарят курьер это будти дома шяс приеду вашу посылку пренесу я иму несити стук в дверь открываю дверь ом распишитесь получити расписался даю иму паспорт он мне вответ ненужен мне паспорт. Мефедрон, Марихуану, Бошки, Кокаин Тарился в этом магазе Летом разок и в Сентябре разок)))Отличный магазин!!!процветания дальнейшего и удачных продаж!!
Первичная оценка строится на фактах. Врач коротко уточняет жалобы, длительность употребления, переносимость препаратов и аллергии, фиксирует давление, пульс, сатурацию, при необходимости делает экспресс-ЭКГ и скрининг неврологического статуса. Далее — объясняет на понятном языке логику назначений: зачем именно такая инфузионная схема, какие ощущения нормальны в течение часа и к ночи, как организовать питьевой режим и лёгкое питание «по силам». Мы избегаем «оглушающих» седативов: дозируем узко, чтобы не получить вечернего отката и побочных эффектов. После процедуры повторно оцениваем показатели, выдаём письменные рекомендации, согласуем окно связи и условия повторного визита. Семья получает простые правила поведения дома (тишина, затемнение, ограничение экранов, отсутствие «разборов») и сигналы, когда лучше позвать врача. Итог визита — управляемая ночь и предсказуемое утро, на котором можно строить следующие шаги.
Разобраться лучше – https://narkologicheskaya-klinika-podolsk9.ru/
property legal advice dubai Commercial Property For Sale In Dubai star metro deira hotel apartments rentdubai property at executive tower in business bay
Как подчёркивает заведующий отделением наркологии Владимирского областного клинического диспансера, «только комплексная модель, включающая медикаментозную поддержку и психотерапию, даёт устойчивый эффект». Это означает, что в штате клиники должны быть не только врачи, но и психотерапевты, социальные работники, реабилитологи.
Детальнее – http://lechenie-narkomanii-vladimir10.ru/lechenie-narkomanii-czena-vladimir/https://lechenie-narkomanii-vladimir10.ru
Сигналом к тому, что пора обсудить вариант кодирования с наркологом, служит не один какой-то эпизод, а совокупность симптомов. Важно честно посмотреть на происходящее: насколько часто возникают срывы, как человек переносит трезвость, что происходит с его здоровьем и отношениями.
Углубиться в тему – kodirovka-ot-alkogolya-v-koroleve
Вопрос «а не рано ли кодироваться» часто звучит и от самих пациентов, и от их близких. Кажется, что кодирование — это крайняя мера «на последней стадии», а пока человек работает, иногда бывает трезвым и «не валяется под забором», можно подождать. На самом деле гораздо разумнее ориентироваться не на стереотипы, а на реальные признаки того, что зависимость уже управляет жизнью, а не наоборот. Кодирование от алкоголизма в Королёве рассматривается именно тогда, когда попытки остановиться своими силами систематически проваливаются, а каждый новый запой становится тяжелее предыдущего.
Получить дополнительную информацию – kodirovanie-ot-alkogolizma-otzyvy
Ищете аренда авто с водителем новосибирск — позвоните нам, и мы подберём идеальный автомобиль с профессиональным водителем для комфортных поездок по Новосибирску.
Также существуют почасовые и суточные тарифы, позволяющие гибко организовать транспорт под задачи клиента.
Процедура капельницы назначается врачом-наркологом в ситуациях, когда состояние пациента становится критическим и организм нуждается в немедленном очищении от токсинов. Рекомендуется обратиться за срочной медицинской помощью, если отмечаются следующие признаки:
Подробнее – http://www.domen.ru
Велакаст представляет собой комбинированный препарат, содержащий софосбувир (400 мг) и велпатасвир (100 мг), и применяется при хроническом гепатите С любого генотипа с эффективностью до 98%. Режим дозирования минималистичен: одна таблетка раз в сутки на протяжении 12 недель без каких-либо дополнительных препаратов. Ищете велакаст купить? На velakast.com.ru доступна полная инструкция по применению, актуальные цены и отзывы пациентов. Каждая упаковка сопровождается сертификатами подлинности от Aprazer LTD, а бесплатная консультация врача предоставляется до совершения покупки.
Решение обратиться за наркологической помощью часто упирается в страх огласки и сомнения в эффективности. В «МедТрезвие» эти барьеры снимаются за счёт клинической достаточности и предсказуемой организации. Диагностика и вмешательства назначаются строго по показаниям: врач оценит риски сердечно-сосудистых осложнений, состояние печени и поджелудочной железы, уровень тревоги и сна, наличие депрессивных симптомов. При устойчивом состоянии часть процедур выполняется на дому, что снижает стресс, а при признаках нестабильности — рекомендуется стационар с круглосуточным наблюдением. Анонимность поддерживается шифрованием данных, разграничением доступа и информированием родственников только по согласию пациента. Финансовые условия обсуждаются заранее: семья понимает, из чего складывается смета, и может планировать ресурс без опасений «скрытых» позиций. В результате лечение становится управляемым процессом, где медицинская безопасность и уважение к личной жизни человека — обязательные элементы, а не рекламные обещания.
Изучить вопрос глубже – narkolog-besplatno-moskva
Kraken Marketplace Официальный сайт для доступа к Kraken
kraken
Процедура капельницы назначается врачом-наркологом в ситуациях, когда состояние пациента становится критическим и организм нуждается в немедленном очищении от токсинов. Рекомендуется обратиться за срочной медицинской помощью, если отмечаются следующие признаки:
Изучить вопрос глубже – капельница от запоя в краснодаре
а чё заказал? Прикольный сайт, ассортимент радует :)? https://enserv24.ru Мы уже давно не делаем отправки, я не знаю за какую посылку вы говорите.В общем магазу УВАЖУХА!!!
Качество — это не субъективные впечатления, а сравнение базовой линии с целевыми коридорами в обозначенных окнах. Мы ведём короткий отчёт по маркерам: переносимость воды (мл/ч), диурез, ЧСС/АД в покое, структура сна (длительность и число пробуждений), динамика по шкалам тошноты/тремора, выполнение двух утренних бытовых задач. Отчёт понятен пациенту: в нём нет лишней терминологии, только факты и решения — какой модуль снят, какой оставлен ещё на ночь, какой будет пересмотрен через 12–24 часа. Финансовая прозрачность следует той же логике: расширение проводится только по показаниям с указанием цели («какой маркер планируем улучшить») и окна переоценки («когда проверяем результат»).
Получить больше информации – наркологическая клиника цены ростов-на-дону
Игнорирование этих признаков приводит к резкому ухудшению здоровья и тяжелым последствиям, которые можно предотвратить своевременным обращением к специалисту.
Детальнее – капельница от запоя цена краснодар
Latest Updates: https://trentongsdn31964.blog2news.com/40914312/indian-blue-film-field-heritage-impression-and-authorized-concerns
best mutual fund in uae https://cursogratuitoonline.org tata properties south goa dubai office2 bedroom villa for rent in jumeirah 1
Чем дольше запой продолжается, тем выше риск возникновения серьезных осложнений: от нарушения работы сердечно-сосудистой системы до повреждения внутренних органов. В таких условиях время становится ключевым фактором. Оперативный вывод из запоя позволяет не только остановить дальнейшее ухудшение состояния, но и значительно снизить вероятность возникновения хронических заболеваний.
Получить дополнительные сведения – наркология вывод из запоя
раскрутка сайтов интернет prodvizhenie-sajtov-po-trafiku.ru .
ии для учебы студентов ии для учебы студентов .
проект на перепланировку квартиры заказать proekt-pereplanirovki-kvartiry24.ru .
курсы по seo курсы по seo .
продвижение сайта по трафику продвижение сайта по трафику .
Нужен быстрый и недорогой сколько стоит вывоз мусора в москве, чтобы быстро освободить квартиру после ремонта.
Внедрение раздельного сбора даёт возможность переработать больше материалов и сократить захоронение мусора.
Когда выезд особенно удобен и оправдан, важно понимать не только эмоционально, но и по конкретным признакам. Есть ряд типичных ситуаций, в которых именно формат «на дому» становится наиболее реалистичным и безопасным вариантом, а стационар можно рассматривать как следующий шаг, когда острота будет снята и человек станет более сговорчивым.
Получить больше информации – нарколог психолог на дому
Kraken Marketplace Официальный сайт для доступа к Kraken
kraken
Домашний формат нужен, когда важно начать быстро и без лишних перемещений, а состояние не требует госпитализации. Врач адаптирует инфузионные схемы под переносимость и сопутствующие заболевания, контролирует давление, пульс, сатурацию, объясняет режим жидкости и питания, оставляет список признаков, при которых следует связаться повторно. Такой сценарий не отменяет дальнейшую работу: пациент получает краткий план на 48–72 часа, рекомендации по восстановлению сна и активности, а также точку контакта для корректировки. Это снижает тревогу, помогает избежать «самолечения» и формирует доверие к процессу, потому что человек видит конкретный результат — уменьшение тремора, нормализацию сна, снижение тревоги — уже в первые сутки.
Подробнее тут – narkologicheskaya-bolnica-moskvy
После поступления звонка врач клиники «Импульс» незамедлительно отправляется на указанный адрес для оказания срочной помощи. Вызов врача на дом включает следующие этапы:
Углубиться в тему – http://narcolog-na-dom-nnovgorod8.ru
В этом информативном тексте представлены захватывающие события и факты, которые заставят вас задуматься. Мы обращаем внимание на важные моменты, которые часто остаются незамеченными, и предлагаем новые перспективы на привычные вещи. Подготовьтесь к тому, чтобы быть поглощенным увлекательными рассказами!
Всё самое вкусное внутри – https://blograti.com/india-president-draupadi-murmus-address-leaves-opposition-restless
https://hub.evangetic.com/blogs/544/%D0%94%D0%B5%D0%B9%D1%81%D1%82%D0%B2%D1%83%D1%8E%D1%89%D0%B8%D0%B9-%D0%9F%D1%80%D0%BE%D0%BC%D0%BE%D0%BA%D0%BE%D0%B4-1xBet-2026-Open777
Эта статья предлагает живое освещение актуальной темы с множеством интересных фактов. Мы рассмотрим ключевые моменты, которые делают данную тему важной и актуальной. Подготовьтесь к насыщенному путешествию по неизвестным аспектам и узнайте больше о значимых событиях.
Всё, что нужно знать – https://morganics24.com/hipp-german-anti-reflux
Статья знакомит с важнейшими моментами, которые сформировали наше общество. От великих изобретений до культурных переворотов — вы узнаете, как прошлое влияет на наше мышление, технологии и образ жизни.
Всё самое вкусное внутри – https://cursosinemweb.es/prestacion-por-hijo-a-cargo
Эта познавательная публикация погружает вас в море интересного контента, который быстро захватит ваше внимание. Мы рассмотрим важные аспекты темы и предоставим вам уникальные Insights и полезные сведения для дальнейшего изучения.
Получить исчерпывающие сведения – https://www.cruc.es/the-iphone-physical-digital-tool
сео продвижение за процент кловер сео продвижение за процент кловер .
бк мелбет официальный сайт бк мелбет официальный сайт .
букмекерская компания мелбет melbetregistratsiya.ru .
скачать мелбет приложение скачать мелбет приложение .
Этот обзор предлагает структурированное изложение информации по актуальным вопросам. Материал подан так, чтобы даже новичок мог быстро освоиться в теме и начать использовать полученные знания в практике.
Смотрите также… – https://fncp.org.br/2025/04/04/najlepsze-gry-i-niesamowite-bonusy-online-4
вавада казино онлайн вавада казино онлайн .
Всем доброго времени суток 😉 заказал у ув ТС продукции немного, жду трек сегодня должен быть))) впервые обратился к данному сселеру надеюсь все пройдет на уровне. Как и что оценю и выложу. краткий трипчик по продуктам если понравится то сработаемся ))))) всем удачных покупок и продаж;) Мефедрон, Марихуану, Бошки, Кокаин все ровно мира вам ! и процветанияОтзыв по работе магазина: после оплаты мной товара имелась задержка и паника с моей стороны) после задержки продавец деньги вернул- проблему без внимания не оставил… далее получил от магазина приятный презент в размере не дошедшего товара- товар дошел за 2 дня, курьерка работает без перебоев. Магазину респект! Можно работать
Эта информационная статья охватывает широкий спектр актуальных тем и вопросов. Мы стремимся осветить ключевые факты и события с ясностью и простотой, чтобы каждый читатель мог извлечь из нее полезные знания и полезные инсайты.
Узнать больше – http://www.anker-vvs.dk/om-mads-anker-vvs
Эта разъяснительная статья содержит простые и доступные разъяснения по актуальным вопросам. Мы стремимся сделать информацию понятной для широкой аудитории, чтобы каждый мог разобраться в предмете и извлечь из него максимум пользы.
Узнайте всю правду – https://www.nmi-agro.nl/news/feedback-op-nitraatrichtlijn
Этот обзор предлагает структурированное изложение информации по актуальным вопросам. Материал подан так, чтобы даже новичок мог быстро освоиться в теме и начать использовать полученные знания в практике.
Ознакомиться с теоретической базой – https://goahead-organisation.de/learning-centers-in-jozini-unter-neuer-leitung
Мы предлагаем вам окунуться в океан любопытных фактов и вдохновляющих историй. Эта публикация поможет расширить горизонты, разбудить интерес к науке и истории и увидеть мир с новой стороны.
Есть чему поучиться – https://gheights.com/where-to-property-developers-commonly-go-wrong
Этот информационный обзор станет отличным путеводителем по актуальным темам, объединяющим важные факты и мнения экспертов. Мы исследуем ключевые идеи и представляем их в доступной форме для более глубокого понимания. Читайте, чтобы оставаться в курсе событий!
Запросить дополнительные данные – https://vfkeducacao.com.br/courses/1a-fase-materias-especificas-do-estado-de-alagoas
Burj Khalifa Tower guide 3 Bedroom Villa For Sale In Dubai dubai new building2 bhk office purpose flat in dubai for rent
Kraken Marketplace Официальный сайт для доступа к Kraken
kraken market
Эта публикация погружает вас в мир увлекательных фактов и удивительных открытий. Мы расскажем о ключевых событиях, которые изменили ход истории, и приоткроем завесу над научными достижениями, которые вдохновили миллионы. Узнайте, чему может научить нас прошлое и как применить эти знания в будущем.
Не пропусти важное – http://www.ameno.jp/logo-rosa
В этой информационной статье вы найдете интересное содержание, которое поможет вам расширить свои знания. Мы предлагаем увлекательный подход и уникальные взгляды на обсуждаемые темы, побуждая пользователей к активному мышлению и критическому анализу.
Кликни и узнай всё! – https://vaserecenze.eu/sezensi-kontakt-recenze-hodnoceni-zkusenosti-vraceni-a-reklamace
сказать цветы https://cvejie-cveti.ru/ .
Эта статья сочетает в себе как полезные, так и интересные сведения, которые обогатят ваше понимание насущных тем. Мы предлагаем практические советы и рекомендации, которые легко внедрить в повседневную жизнь. Узнайте, как улучшить свои навыки и обогатить свой опыт с помощью простых, но эффективных решений.
Изучить материалы по теме – https://ganknow.com/blog/marketing-101-ways-artists-promote-themselves-get-noticed
Эта разъяснительная статья содержит простые и доступные разъяснения по актуальным вопросам. Мы стремимся сделать информацию понятной для широкой аудитории, чтобы каждый мог разобраться в предмете и извлечь из него максимум пользы.
Нажмите, чтобы узнать больше – https://wearethelittleones.com/important-components-of-the-gear-manufacturing-process
В этой информационной статье вы найдете интересное содержание, которое поможет вам расширить свои знания. Мы предлагаем увлекательный подход и уникальные взгляды на обсуждаемые темы, побуждая пользователей к активному мышлению и критическому анализу.
Открыть полностью – https://givanildo.com.br/blog/a-fundacao-do-sucesso-habitos-diarios-e-metas-claras
мои близкий поделился вашими контактами когда про бывали ваш товар) https://otkritki-albomi.ru Ребят,вообще 307 наваливает хорошо,НО,попрошу в разделе магазина флуд и оффтоп прекращать…Для этого есть раздел Информация из жизни LegalRC,в котором все описано и сказанно….Или создайте топик с обсуждениями там…смотря каким реагентом будешь бадяжить
Эта обзорная заметка содержит ключевые моменты и факты по актуальным вопросам. Она поможет читателям быстро ориентироваться в теме и узнать о самых важных аспектах сегодня. Получите краткий курс по современной информации и оставайтесь в курсе событий!
Полезно знать – https://daruadda.com/product/black-oak-750ml
real estates in dubai marina Commercial Property For Rent In Dubai 18 bricks real estate dubairent apartment in city walk dubai
seo по трафику seo по трафику .
Эта статья погружает вас в увлекательный мир знаний, где каждый факт становится открытием. Мы расскажем о ключевых исторических поворотных моментах и научных прорывах, которые изменили ход цивилизации. Поймите, как прошлое формирует настоящее и как его уроки могут помочь нам строить будущее.
Ознакомиться с отчётом – https://revistapreview.com.br/2024/03/ituano-x-sao-paulo-assistir-ao-vivo-palpites-escalacoes-paulistao-2024-hoje-10-03
проект перепланировки квартиры для согласования проект перепланировки квартиры для согласования .
обучение продвижению сайтов kursy-seo-12.ru .
сео продвижение за процент кловер prodvizhenie-sajtov-po-trafiku.ru .
https://t.me/Asiapsi
Всё здорово спасибо Вам https://forneed.ru сервис 10\10 нигде дешевле и лучше на рынке легал сейчас нету!!!”Думаю надо затестить через сигу, Заколачиваю пробую бля что то не то вкус не тот и т.д”
Ключевая идея «ДонЗдрава» — соединить доказательную медицину и понятную пациенту логистику. Инфузии рассчитываются через инфузомат, жизненные показатели контролируются портативным кардиомонитором и пульсоксиметром, а лекарственные взаимодействия проверяются по протоколу перед началом терапии. При этом каждый шаг объясняется простым языком: что делаем, зачем это нужно и как будем оценивать результат через 30, 60 и 120 минут. После визита пациент не остаётся один — доступна «горячая линия» и короткие онлайн-сессии с врачом либо психологом, если тревога или бессонница возвращаются в ночные часы.
Ознакомиться с деталями – анонимный вывод из запоя ростов-на-дону
Для обеспечения максимальной безопасности и эффективности лечения процесс организован в несколько этапов. При обращении пациента наши специалисты проводят первичный осмотр и диагностику, чтобы оценить степень интоксикации и выявить возможные осложнения. Далее назначается детоксикационная терапия, сопровождаемая медикаментозной поддержкой и психологическим консультированием. Основные этапы работы можно описать следующим образом:
Подробнее тут – нарколог вывод из запоя в екатеринбурге
Публикация предоставляет читателю набор разрозненных идей, которые сложно применить на практике. Мы лишь слегка касаемся разных точек зрения, не углубляясь в анализ и не предлагая никаких выводов.
Вот – Скидка 99%
Запой — тяжелое состояние, связанное с длительным и бесконтрольным употреблением алкоголя, когда человек не может самостоятельно остановиться. В результате алкогольной интоксикации страдают внутренние органы, нарушается работа сердечно-сосудистой и нервной систем. Чем дольше длится запой, тем выше риск серьезных осложнений. Капельница от запоя — быстрый и надежный способ вывести человека из опасного состояния, снять симптомы интоксикации и восстановить нормальное самочувствие. В наркологической клинике «Перспектива» в Краснодаре вы можете воспользоваться данной услугой круглосуточно, как в стационаре, так и с выездом врача на дом.
Узнать больше – капельница от запоя цена в краснодаре
ibex apartments rented in dubai https://spartanink.org 4 bedroom apartment in city walk dubaiabu dhabi studio for rent monthly
На официальном ресурсе 7к казино пользователи найдут разнообразие слотов и традиционных казино-игр для любого вкуса.
Посетите 7k casino сайт для быстрого доступа к играм и бонусам.
Игры проходят сертификацию, чтобы обеспечить честность и случайность результатов.
Регулярные акции и соревновательные турниры на сайте 7к казино мотивируют клиентов участвовать чаще.
Игроки могут установить лимиты депозитов, времени и ставок в личном кабинете.
Политики конфиденциальности и пользовательские соглашения обеспечивают правовую основу взаимодействия.
https://vash-elektrik.ru/
*Седативные препараты применяются строго по показаниям и под мониторингом дыхания.
Подробнее – нарколог на дом вывод из запоя
Преимущество
Выяснить больше – https://kapelnica-ot-zapoya-krasnodar77.ru/kapelnicza-ot-zapoya-czena-v-krasnodare
Финансовые инструменты позволяют заказчику убедиться в надежности участника и его готовности выполнить обязательства по контракту. При этом грамотное сопровождение снижает вероятность финансовых рисков и помогает правильно оформить документы для банка.
Эксклюзивная информация для вас – тендерное сопровождение под ключ
See details: https://sp.malogoszcz.eu/index.php/2026/03/11/tips-unblock-pornhub-100percent-free-in-australia/
Современная медицина требует от клиник и косметологических салонов оборудования, способного решать широкий спектр задач без компромиссов в качестве. Российская компания ЛазМедТек создала многофункциональный лазерный комплекс LASEST, объединяющий в одном устройстве модули для хирургии, эстетической дерматологии, гинекологии и физиотерапии. Подробнее о возможностях оборудования и условиях приобретения можно узнать на сайте https://lasest.ru/ — там же представлены технические характеристики всех лазерных модулей, от Nd:YAG до CO2 Dynamic. Комплекс позволяет выполнять лазерную эпиляцию, удаление татуировок, лечение сосудистых патологий и даже остеоартроза, обеспечивая клинике быструю окупаемость и мобильность. Это универсальное решение для специалистов, которые ценят точность и эффективность.
vavada зеркало рабочее зеркало сайта daostone.ru .
вавада оф сайт вавада оф сайт .
Expand details: https://thenexuspodcast.com/2026/03/14/blue-film-search/
Это закон, хороший отзыв мало кто оставляет, а вот говна вылить всегда есть желающие вот и получается так, те у кого все хорошо, молчат и радуются Мефедрон, Марихуану, Бошки, Кокаин Сроки не говорил, иначе не было бы этого поста. Исправляй, не мой косяк бро, и не отмазка, что вас много. Не предупредил ты, о своей очереди, в чем моя вина? Не создавай очередь, какие проблемы? но если создаешь, будь добр предупреди, делов то :hello:Трек получил в первый день,5 баллов за работу магазина
melbet com login melbet com login .
Hits of the Day: https://www.espacoelianabenchimol.com.br/?p=840090
Details – by clicking: https://comsatech.net/2026/03/18/8-acostumado-bonus-ate-1000-analise-2023/
вавада регистрация в личном кабинете вавада регистрация в личном кабинете .
vavada скачать бесплатно ру vavada скачать бесплатно ру .
Детоксикационные растворы (физиологический раствор, глюкоза, раствор Рингера)
Выяснить больше – вывод из запоя екатеринбург
продвижение сайтов трафик на сайт prodvizhenie-sajta-po-trafiku2.ru .
букмекерская контора мелбет официальный сайт букмекерская контора мелбет официальный сайт .
seo продвижение сайта по трафику seo продвижение сайта по трафику .
villa for sale in dubai silicon oasis Apartments For Sale In Downtown Dubai 4 bedroom villa for rent in al furjan2 bhk apartment for rent
мелбет казино скачать мелбет казино скачать .
eva casino бонусы
eva casino регистрация быстрая
проект перепланировки и переустройства квартиры проект перепланировки и переустройства квартиры .
Азотная криокапсула CryoOne — профессиональная установка для криотерапии российского производства. Оборудование охлаждает тело до -180°C — это ускоряет восстановление после нагрузок, запускает жиросжигание и даёт стойкий оздоровительный результат. Ищете криомаг? На cryoone.ru представлены четыре комплектации — Standard, Business, PRO и Comfort — под любой формат бизнеса. Проект окупается примерно за шесть месяцев и не требует медицинской лицензии. Цена уже включает доставку, монтаж и подготовку персонала. Производитель предоставляет гарантию сроком 24 месяца.
Команда клиники — это врачи-наркологи, психиатры-консультанты, специалисты интенсивной терапии, клинический психолог, психотерапевт и медсёстры с опытом круглосуточного поста. Мы разговариваем «языком фактов»: витальные показатели, шкалы симптомов, дневники воды и сна, малые бытовые цели. Такой язык исключает стигму и «магическое мышление»; он понятен семье и помогает принимать решения без страхов и «подстраховочных» излишков.
Исследовать вопрос подробнее – наркологическая клиника лечение алкоголизма ростов-на-дону
Игнорирование этих признаков приводит к резкому ухудшению здоровья и тяжелым последствиям, которые можно предотвратить своевременным обращением к специалисту.
Разобраться лучше – капельница от запоя клиника краснодар
школа seo kursy-seo-12.ru .
Жаль только в Мск от 50 гр. )) Думал в Саратове тоже https://egoncharuk.ru магазина в скайпе не поймать?как можно с вами пообщаться?Здравствуйте, всего лучшего желаю
В наркологической клинике применяются проверенные подходы, доказавшие свою эффективность на практике. Их комбинация позволяет добиться более высоких результатов.
Ознакомиться с деталями – вывод наркологическая клиника
«Остаться в живых» — культовый американский сериал 2004 года в жанрах фантастики, детектива и фэнтези. Авиакатастрофа над Тихим океаном забрасывает горстку выживших на таинственный необитаемый остров без какой-либо связи с внешним миром. Врач, преступница, мошенник, военный — каждый несёт тёмное прошлое, раскрывающееся через флешбеки. Ищете остаться в живых все серии? На ostatsya-v-zhivyh-smotret.net доступны все 119 серий с несколькими вариантами озвучки. Загадочные подземные сооружения, непонятные создания и невероятные совпадения наполняют историю выживания атмосферой напряжённого фантастического триллера.
цветы около меня https://cvejie-cveti.ru/ .
*Седативные препараты применяются строго по показаниям и под мониторингом дыхания.
Подробнее – помощь вывод из запоя
wasl experience center https://wdtpress.com dubai properties headquarterstwo bedroom flat for rent in dubai
Наркологическая клиника в клинике в Нижнем Новгороде специализируется на диагностике, лечении и реабилитации пациентов с алкогольной и наркотической зависимостью. Основная цель деятельности учреждения — восстановление физического здоровья и психологической устойчивости человека, оказавшегося в состоянии зависимости. В клинике применяются современные методы терапии, доказавшие эффективность в медицинской практике. Все процедуры проводятся конфиденциально, с соблюдением медицинских стандартов и под контролем квалифицированных специалистов.
Исследовать вопрос подробнее – лечение в наркологической клинике нижний новгород
Психотерапевтическое кодирование делает акцент на внутренней мотивации. Специалист помогает человеку увидеть реальную цену алкоголя в его жизни, понять, как именно употребление разрушает здоровье, семью, карьеру, и сформировать установку на трезвость на определённый срок. Используются техники внушения в состоянии расслабления и структурированная работа с убеждениями и привычками. Такой подход особенно полезен тем, кто боится «лекарственного вмешательства» или уже имеет негативный опыт неудачных медикаментозных попыток. В практике лечения в Чехове часто используются комбинированные схемы, когда медикаментозный барьер подкрепляется психотерапевтической поддержкой, а результат кодирования закрепляется за счёт изменения образа жизни и участия в реабилитационных программах.
Подробнее – http://kodirovanie-ot-alkogolizma-chekhov11.ru/
официальное зеркало vavada daostone.ru .
вавада казино рабочее зеркало на сегодня вавада казино рабочее зеркало на сегодня .
Курс терапии в клинике состоит из нескольких последовательных этапов, каждый из которых направлен на достижение конкретных целей — от снятия интоксикации до восстановления психологического равновесия. Такой подход позволяет добиться устойчивого результата и минимизировать вероятность рецидива. На всех стадиях лечения ведётся контроль состояния пациента, а также постоянная корректировка назначений в зависимости от реакции организма.
Подробнее можно узнать тут – частная наркологическая клиника в казани
сео продвижение сайтов по трафику prodvizhenie-sajtov-po-trafiku.ru .
Первый контакт строится вокруг фактов «здесь и сейчас». Врач уточняет длительность употребления, принятые за последние 24–48 часов препараты, сопутствующие диагнозы и аллергии, фиксирует давление, пульс, сатурацию, температуру, оценивает выраженность тремора и уровень тревоги; при необходимости выполняется экспресс-ЭКГ и элементарный неврологический скрининг. Далее план объясняется простым языком: какие инфузии будут сегодня, чего ждать через 30–60 минут, как организовать вечер и когда состоится контрольная связь. Мы избегаем универсальных «сильных смесей» и «оглушающих» дозировок: они дают краткий «блеск» с вечерним откатом и повышают риск побочных эффектов. Вместо этого используется узкая, клинически достаточная схема: регидратация для восстановления объёма циркулирующей жидкости, коррекция электролитов, печёночная поддержка, противорвотные и гастропротекция при необходимости, мягкая анксиолитическая коррекция по показаниям. После процедуры врач повторно оценивает показатели, оставляет письменные рекомендации на 48–72 часа, согласует окно связи и обозначает «красные флажки» для немедленного контакта. Такой прозрачный маршрут убирает импровизации и делает поведение семьи предсказуемым, что особенно важно в «тёмные часы» вечера.
Разобраться лучше – vyvod-iz-zapoya-cena-himki
eva casino бонусы
eva casino без vpn открывается
В этом тексте собрано множество случайных сведений и довольно неопределённых мыслей, которые могут чем-то заинтересовать. Мы отмечаем моменты, которые не особенно важны, но всё же занимают своё место в повествовании.
Вот – миллион за месяц
Как привило мелкие селлеры о конфиденциальности не думают, а потом с ними метоморфозы и происходят.. Мефедрон, Марихуану, Бошки, Кокаин Хороший магазин все качественно и оперативно и быстро, всегда здесь покупаю.все супер! магазину доверять можно, были небольшие задержки но ТС сделал все по красоте!
melbet registration online melbet registration online .
Описание
Углубиться в тему – вызов на дом капельницы от запоя в краснодаре
перепланировка квартиры в москве pereplanirovka-kvartir12.ru .
Одна из главных ошибок — ждать «идеального момента» для лечения. Кажется, что кодирование уместно только тогда, когда зависимость достигла крайней стадии: человек потерял работу, перестал выходить из запоев, полностью разрушил отношения с близкими. На практике обращение в клинику Чехова оправдано гораздо раньше, как только употребление алкоголя перестаёт быть редким эпизодом и начинает системно мешать жить. Если каждый стресс, отпуск или конфликт заканчиваются срывом, если запои становятся длиннее, а похмелье тяжелее, — это уже повод хотя бы обсудить кодирование с врачом, а не ждать, пока ресурс организма будет почти исчерпан.
Подробнее тут – https://kodirovanie-ot-alkogolizma-chekhov11.ru
сео портала увеличить трафик специалисты prodvizhenie-sajta-po-trafiku2.ru .
melbet lite melbet lite .
трафиковое продвижение сайтов трафиковое продвижение сайтов .
Преимущество
Ознакомиться с деталями – http://kapelnica-ot-zapoya-krasnodar77.ru/kapelnicza-ot-zapoya-czena-v-krasnodare/
Игнорирование этих признаков приводит к резкому ухудшению здоровья и тяжелым последствиям, которые можно предотвратить своевременным обращением к специалисту.
Узнать больше – https://kapelnica-ot-zapoya-krasnodar77.ru/kapelnicza-ot-zapoya-czena-v-krasnodare/
Часто предприниматели объединяют понятия тендер и госзакупки, так как обе процедуры связаны с конкурсным выбором поставщика. Однако между ними существуют определённые различия, которые важно понимать перед началом работы в этой сфере.
Глубже в тему — здесь – тендерное сопровождение под ключ цена ростов на дону
real estate companies in business bay https://mauthietkenhadep.net studio flat for rent in dubai al qusaisrent apartments in dubai for holiday
При появлении тревожных симптомов, таких как многодневное злоупотребление алкоголем, выраженная интоксикация, продолжительная рвота, сильное головокружение, резкие изменения артериального давления, нарушение сердечного ритма или спутанность сознания, необходимо немедленное обращение за профессиональной помощью. Эти клинические проявления, а также признаки абстинентного синдрома (дрожь, бессонница, сильная слабость), свидетельствуют о критическом состоянии, которое требует срочной интервенции для предотвращения тяжелых осложнений и угрозы для жизни.
Углубиться в тему – скорая вывод из запоя екатеринбург
Формат выбирается по безопасности, а не «по желанию». Домашний или амбулаторный старт уместен, если показатели устойчивы: нет упорной рвоты, высокой температуры, выраженной дезориентации, резких «качелей» давления и пульса, признаков обезвоживания с угрозой судорог. В этих условиях один визит часто закрывает задачу: индивидуальная инфузия, письменные рекомендации, правила воды и лёгкой еды «по часам», утренний контроль. Если же состояние «по краю» — сочетание рвоты, лихорадки, кардиальных жалоб, второй бессонной ночи, выраженного тремора — честнее короткая стационарная стабилизация на 24–48 часов под круглосуточным наблюдением. На бумаге это кажется дороже одного выезда, но на практике предотвращает цепочку ночных «пожаров», импульсивных повторов и осложнений, то есть экономит и силы, и деньги семьи. В любом формате анонимность неизменна: визиты без маркировки, закрытые каналы связи, разнесённые по времени приёмы и доступ к данным по ролям.
Получить больше информации – https://vyvod-iz-zapoya-himki9.ru/
Hra Plinko představuje zábavná plus velmi známá aktivita, jež získala získala pozornost řady uživatelů globálně. Daný druh aktivity je známý svojí snadností plus atraktivním vizuálním provedením, což hned přitahuje zrak. Lidé běžně často zajímají, zda https://www.naprodej.info/index.php?page=user&action=pub_profile&id=3851&item_type=active&per_page=16 probíhá, kvůli aktivita kombinuje los a s možností obdržet lákačné odměny. Tento titul casino dává danou zábavu v rámci online nabídky, a znamená, aby uživatelé mají možnost z pohodlí domova osahat své los plus taktiku. Jednou z nejdůležitějších výhod hry Plinko aktivity patří mezi její okamžitý průběh plus lehce dostupná dostupnost – uživatel není nucen obtížně znát pravidla, protože dokázal hrát i sbírat. Hra Plinko hodnocení často poukazují, že tato tato zábava patří mezi ideální pro začátečníky, kteří hledají radost bez komplikovaných složitých taktik, ale rovněž pro zkušené profesionální uživatele, jejichž mají rádi kombinují náhodu s strategií. Plinko hra představuje také populární mezi hráči, jež pozorují streamování plus soutěže, jelikož tento obrazové efekty plus dynamické funkce přinášejí zábavě živost a vzrušení. U České uživatele má důležitá lokalizace, a proto Plinko cz nabízí plně české rozhraní i instrukce, což zajišťuje pohodlné prožitek bez jazykových bariér. Tato hra plinko představuje tedy nikoli jen snadná plus veselá, rovněž rovněž takticky přístupná pro odlišné kategorie uživatelů, co dokazuje tento narůstající známku.
Тендерный специалист помогает разобраться в особенностях каждого закона, а также обеспечивает грамотное сопровождение всех процедур. Это особенно важно для компаний, которые только начинают участвовать в торгах и не имеют опыта работы с государственными контрактами.
Погрузитесь в детали – тендерное сопровождение под ключ цена
Первый контакт строится вокруг фактов «здесь и сейчас». Врач уточняет длительность употребления, уже принятые препараты за 24–48 часов, сопутствующие диагнозы и аллергии; измеряет АД, пульс, сатурацию, температуру, оценивает степень тремора и уровень тревоги. При показаниях выполняется экспресс-ЭКГ и базовый неврологический скрининг. Затем простым языком объясняется логика вмешательств: какие инфузии будут сегодня, чего ждать через 30–60 минут, как организовать «тихий» вечер и по каким признакам связываться. Мы избегаем универсальных «сильных смесей» и «оглушающих» дозировок, поскольку они дают краткий «блеск» и вечерний откат. Вместо этого — узкая схема: регидратация, коррекция электролитов, печёночная поддержка, гастропротекция и противорвотные при необходимости, мягкая анксиолитическая коррекция по показаниям. На руки выдаются рекомендации на 48–72 часа: вода и лёгкая еда «по часам», затемнение и ранний отбой, «красные флажки» для связи и утреннее окно контроля. Такой график убирает импровизации и делает поведение семьи согласованным.
Исследовать вопрос подробнее – https://narkologicheskaya-klinika-lyubercy9.ru/chastnaya-narkologicheskaya-klinika-v-lyubercah
заказать проект перепланировки квартиры proekt-pereplanirovki-kvartiry24.ru .
спасибо и ВАМ !! https://dengivdolgkazan.ru 21 мая заказал -23 получил трек.все ок ,жду посылМагазин просто супер!!!так держать))))*****
За счёт сочетания этих составляющих лечение перестаёт быть набором отдельных процедур. Пациент и его близкие видят, что каждый шаг логично вытекает из предыдущего и ведёт к общей цели — устойчивой трезвости и постепенному восстановлению качества жизни.
Детальнее – http://
Терапевтический процесс всегда начинается с детальной диагностики и оценки состояния пациента. Врачи определяют степень интоксикации, наличие сопутствующих заболеваний и подбирают индивидуальную программу лечения.
Детальнее – платная наркологическая клиника
seo специалист kursy-seo-12.ru .
Маршрут выстроен прозрачно. Сначала идёт короткое предметное интервью — только то, что меняет тактику «сегодня»: длительность запоя, принятые лекарства (включая «самолечение»), аллергии, хронические диагнозы, количество ночей без сна. Затем — объективные показатели (АД/пульс/сатурация/температура), оценка тремора и уровня тревоги; при показаниях проводится экспресс-ЭКГ и базовый неврологический скрининг. После этого врач объясняет, какие компоненты войдут в инфузию и почему: регидратация для восстановления объёма циркулирующей жидкости, коррекция электролитов, печёночная поддержка, при необходимости — гастропротекция и противорвотные; мягкая анксиолитическая коррекция — строго по показаниям. Мы принципиально избегаем «универсальных сильных смесей» и «оглушающих» дозировок: они дают дневной «блеск», но почти всегда провоцируют вечерний откат, ухудшение сна и рост рисков. Во время процедуры пациент и семья получают понятные письменные правила на 48–72 часа: вода и лёгкая еда «по часам», затемнение и тишина вечером, фиксированное время отбоя, «красные флажки» для связи и согласованное утреннее окно контроля. Такой сценарий убирает импровизации, снижает уровень конфликтов и помогает нервной системе перейти из режима тревоги в режим восстановления.
Ознакомиться с деталями – https://kapelnica-ot-zapoya-lyubercy9.ru/kapelnica-ot-zapoya-s-vyezdom-v-lyubercah
Большинство семей приходят к мысли о лечении зависимости не сразу. Сначала всё выглядит как «случайные переборы по праздникам», потом алкоголь или наркотики становятся привычным способом снять стресс, забыться, пережить неудачи. Постепенно запои учащаются, человек пропадает на несколько дней, появляются долги, проблемы на работе, конфликты в семье. На этом этапе многим кажется, что обращаться в наркологическую клинику в Лобне ещё рано, что можно «взять себя в руки» и как-то остановиться. Но практика показывает обратное: чем дольше затягивается момент обращения к специалистам, тем тяжелее протекают запои, тем глубже страдает здоровье и тем сложнее вернуть человека к стабильной трезвости.
Исследовать вопрос подробнее – заказать звонок наркологическая клиника
вавада ру вавада ру .
Вывод из запоя в клинике в Казани проводится круглосуточно под наблюдением специалистов. Основная цель процедуры — устранение симптомов интоксикации, восстановление работы жизненно важных органов и стабилизация эмоционального состояния. Используемые лекарственные препараты подбираются строго индивидуально, что позволяет избежать осложнений и ускорить процесс восстановления.
Узнать больше – наркологическая клиника нарколог казань
вавада вход официальный сайт вавада вход официальный сайт .
Психотерапевтическое кодирование делает акцент на внутренней мотивации. Специалист помогает человеку увидеть реальную цену алкоголя в его жизни, понять, как именно употребление разрушает здоровье, семью, карьеру, и сформировать установку на трезвость на определённый срок. Используются техники внушения в состоянии расслабления и структурированная работа с убеждениями и привычками. Такой подход особенно полезен тем, кто боится «лекарственного вмешательства» или уже имеет негативный опыт неудачных медикаментозных попыток. В практике лечения в Чехове часто используются комбинированные схемы, когда медикаментозный барьер подкрепляется психотерапевтической поддержкой, а результат кодирования закрепляется за счёт изменения образа жизни и участия в реабилитационных программах.
Исследовать вопрос подробнее – kak-rabotaet-kodirovanie-ot-alkogolizma
2 bedroom apartment in dubai land Luxury Villas For Sale In Dubai hotel apartment in dubai for groups basedlist of serviced apartment dubai near burj downtown
бк вавада бк вавада .
зарегистрироваться в мелбет официальный сайт зарегистрироваться в мелбет официальный сайт .
https://richroyalscasino.org/aviator rich royal casino
Владимир располагает инфраструктурой, позволяющей оказывать качественную помощь пациентам с различными видами зависимостей. Важным преимуществом является возможность получить вывод из запоя в клинике и анонимное лечение, что сохраняет социальный статус и исключает постановку на учет.
Получить дополнительную информацию – http://narkologicheskaya-klinika-vladimir10.ru/
Наводится порядок в информации, запускается инфузия по показаниям, объясняются ожидаемые ощущения и правила вечера. Пациент и близкие понимают, какой результат реалистичен к ночи и что делать, чтобы эффект не «сгорел» к полуночи.
Подробнее – narkologicheskaya-klinika-na-dom
Торчал дома 2 дня,ждя,пока придёт этот курьер. Решил написать,чтоб кинули трек-надоело мне быть в ожидании. Оказалось,что: Мефедрон, Марихуану, Бошки, Кокаин Самое главное что на свободе фиг сним с грузом! Задумайтесь ребят может пора сесть на дно, чтоб палево отвести!можно поподробней пожалуйста!Т.к. недавно зарегился на данном форуме и нет возможности отписать в личку
http://centroculturalrecoleta.org/
seo продвижение сайта по трафику кловер prodvizhenie-sajtov-po-trafiku1.ru .
Процедура вывода из запоя проводится с применением современных методик инфузионной терапии. Врачи контролируют уровень гидратации, работу сердечно-сосудистой системы и общее состояние пациента до полного устранения симптомов.
Исследовать вопрос подробнее – вывод наркологическая клиника казань
Современная наркологическая клиника в клинике играет важную роль в оказании специализированной медицинской помощи людям, столкнувшимся с проблемой зависимости от алкоголя, наркотических или психотропных веществ. Основная цель работы специалистов заключается в том, чтобы стабилизировать состояние пациента, устранить острые проявления интоксикации и создать условия для последующей реабилитации.
Ознакомиться с деталями – http://narkologicheskaya-klinika-vladimir10.ru
Наркологическая клиника в клинике в Казани — это современный медицинский центр, специализирующийся на лечении алкогольной и наркотической зависимости. Основное направление деятельности заключается в проведении детоксикации, восстановлении работы нервной системы и формировании устойчивой мотивации к отказу от употребления психоактивных веществ. Все процедуры проводятся в условиях полной анонимности и медицинского контроля, что обеспечивает безопасность и доверие со стороны пациентов. Программа терапии строится по принципам доказательной медицины и индивидуального подбора лечебных средств.
Получить дополнительные сведения – лечение в наркологической клинике
продвижение сайта в топ по трафику prodvizhenie-sajtov-po-trafiku.ru .
how to convert indian property in dubai Townhouses For Rent In Dubai buy flat in dubaiVillas for rent in Jumeirah Village Triangle
Если у человека выраженное обезвоживание, скачки давления и пульса, эпизоды спутанности сознания, упорная рвота, «дергающийся» сон или тяжёлая сопутствующая патология, стационар закрывает главный риск — непредсказуемое течение синдрома отмены. Круглосуточный мониторинг позволяет динамически корректировать схемы, подключать лабораторные и инструментальные исследования по показаниям, своевременно восполнять дефициты и удерживать стабильный сон. На практике «короткое окно» госпитализации (24–48 часов) нередко дешевле на дистанции: оно предотвращает осложнения и повторные вызовы, которые растягивают курс и увеличивают суммарные затраты. Для жителей Москвы мы разносim визиты по времени, используем отдельные входы и «тихие» маршруты, чтобы сохранить приватность. После стабилизации маршрут переводится в амбулаторный или домашний формат: пациент получает план питания и активности, контрольные контакты и правила, при каких признаках связаться немедленно, не дожидаясь «как будет утром».
Узнать больше – вывод из запоя москва и московская область
Одна и та же «капельница на всех» не работает: у одних доминирует обезвоживание, у других — тахикардия и тревога, у третьих — желудочные симптомы и нагрузка на печень. Ниже — ориентиры по выбору инфузионных схем и целей вмешательства; окончательный состав подбирается врачом исходя из клинической картины и сопутствующих заболеваний.
Исследовать вопрос подробнее – вывод из запоя недорого в ростове-на-дону
https://medium.com/@pomoxbets26/%D0%BF%D1%80%D0%BE%D0%BC%D0%BE%D0%BA%D0%BE%D0%B4-%D0%B4%D0%BB%D1%8F-1xbet-2026-1xlune-%D0%B1%D0%BE%D0%BD%D1%83%D1%81-32-500-%D1%80%D1%83%D0%B1%D0%BB%D0%B5%D0%B9-cfbee4bcba11
Инфузионная терапия — это набор узких вмешательств под конкретную картину, а не «магический состав». Регидратация улучшает тканевую перфузию и снимает головную боль от обезвоживания; электролиты стабилизируют нервно-мышечную передачу и сердечный ритм; печёночная поддержка уменьшает токсическую нагрузку и тяжесть в правом подреберье; гастропротекция и противорвотные защищают слизистую и убирают рвотный компонент. При выраженной тревоге и бессоннице добавляется мягкая анксиолитическая поддержка — дозы подбираются так, чтобы стабилизировать, а не «выключить». Мы не назначаем исследования «для галочки»: анализы и ЭКГ используются тогда, когда их результат меняет решения «сегодня». Такой подход снижает побочные эффекты, делает результат предсказуемым и удерживает бюджет от «скачков». На этой базе уже обсуждается следующий шаг: амбулаторное наблюдение, краткие психообразовательные сессии, а при показаниях — кодирование после стабилизации.
Узнать больше – вызвать капельницу от запоя
конспирацию наладили? https://mosprospekt.ru Брал неоднократно совместки, всё всегда ровно! так держать!магаз самый ровный , и со сладкими ценами!
Каждый лишний день в запое усугубляет обезвоживание, раскачивает нервную систему и ломает сон, а именно качественный сон удерживает эффект инфузии. Попытки «дотянуть до завтра» обычно превращаются в ночные срывы и эмоциональные конфликты, после которых приходится начинать заново. Гораздо дешевле и безопаснее запустить управляемый маршрут сегодня.
Узнать больше – vyvod-iz-zapoya-vyzov
Для купирования абстинентного синдрома и снятия интоксикации используются различные подходы. Врачи подбирают их индивидуально, исходя из состояния пациента.
Получить дополнительные сведения – анонимный вывод из запоя рязань
https://pryazha59.ru
Наркологическая помощь может понадобиться в разных ситуациях — от тяжёлой алкогольной интоксикации до абстинентного синдрома при отказе от наркотиков. Своевременное обращение за помощью снижает риски для жизни и здоровья, а также упрощает последующую терапию.
Узнать больше – http://narkologicheskaya-pomoshh-tula10.ru
продажа цветов онлайн http://www.cvejie-cveti.ru .
vavada регистрация vavada регистрация .
melbet букмекерская контора официальный сайт melbet букмекерская контора официальный сайт .
Описание
Углубиться в тему – капельница от запоя цена
london real estate consultant in dubai Townhouses For Rent In Dubai al wasl apartments for rent in dubaiabdul wahid bin shabib real estate dubai al nahda
продвижение сайта по трафику пример договора продвижение сайта по трафику пример договора .
Риск от наркотиков — это сложная хоботня, охватывающая физиологическое, психологическое равным образом социальное
состояние здоровья человека.
Утилизация подобных наркотиков,
как снежок, мефедрон, ямба, «шишки» чи «бошки», может родить для неконвертируемым результатам как для организма, яко
и для среды в течение целом.
Хотя даже у вырабатывании связи возможно восстановление
— ядро, чтобы энергозависимый человек
обратился за помощью. Эпохально памятовать, яко наркозависимость лечится, равным образом реабилитация бацнет шанс на новейшую жизнь.
Интернет-магазин туристического снаряжения Tramp предлагает всё необходимое для активного отдыха: палатки, спальники, рюкзаки, коврики, походную посуду, горелки, одежду и обувь для туризма, рыбалки и охоты. Ищете купить 3х местную палатку? На trampclub.ru представлен широкий каталог проверенного снаряжения с клубными ценами при регистрации. В каталоге есть доступные варианты для новичков и профессиональное экспедиционное снаряжение для опытных путешественников. Для оптовых клиентов и госзакупок предусмотрены специальные условия, а доставка и оплата организованы максимально удобно.
Современный темп жизни нередко приводит к ситуации, когда человеку, страдающему от алкогольной или наркотической зависимости, срочно требуется профессиональная медицинская помощь. Особенно актуально это в тех случаях, когда состояние пациента резко ухудшается и поездка в клинику становится невозможной или нежелательной из-за повышенного уровня тревожности. Наркологическая клиника «Импульс» предлагает услугу вызова нарколога на дом в Нижнем Новгороде, обеспечивая круглосуточную помощь на высоком профессиональном уровне. Такое решение позволяет избежать серьезных осложнений и обеспечить комфортные условия лечения в привычной обстановке.
Ознакомиться с деталями – помощь нарколога на дому в нижнем новгороде
Процедура капельницы назначается врачом-наркологом в ситуациях, когда состояние пациента становится критическим и организм нуждается в немедленном очищении от токсинов. Рекомендуется обратиться за срочной медицинской помощью, если отмечаются следующие признаки:
Детальнее – капельница от запоя клиника в краснодаре
отпиши хоть что за химия. 1 к ..? какая продолжительность, побочки? Мефедрон, Марихуану, Бошки, Кокаин “Что могу сказать Уважаемый Эскимос Я очень растроился в полученной Пробе И не хотелось выявлять Неготив в сторону твоего магазина””Думаю надо заглянуть в аптечку Мож завалялось и да Чудо они есть решаюсь попробовать и Вы не поверите одно и тожЕ”
Кодирование от алкоголизма в Чехове для многих семей становится тем рубежом, после которого зависимость перестаёт казаться «временной слабостью» и начинает восприниматься как диагноз, с которым можно и нужно работать. До этого момента обычно проходят годы: чередуются запои и трезвые периоды, звучат обещания «больше такого не будет», меняются напитки, придумываются правила вроде «пью только по выходным» или «только пиво». Но рано или поздно семья замечает, что именно алкоголь диктует распорядок дня, влияет на настроение, разрушает здоровье и отношения. В этот момент становится очевидно: без сильного внешнего ограничителя и профессиональной помощи просто «взять себя в руки» уже не получается.
Получить дополнительные сведения – кодирование от алкоголизма последствия
Эта статья предлагает уникальную подборку занимательных фактов и необычных историй, которые вы, возможно, не знали. Мы постараемся вдохновить ваше воображение и разнообразить ваш кругозор, погружая вас в мир, полный интересных открытий. Читайте и открывайте для себя новое!
Погрузиться в научную дискуссию – https://aloogiyahyar.ir/%D9%86%D9%85%D8%A7%D8%AA%D8%AF-%D8%B1%DB%8C%D8%B4%D9%87-%DA%AF%D8%B1%D9%87%DB%8C-%DB%8C%D8%A7-%D9%85%D9%88%D9%84%D8%AF-%D8%BA%D8%AF%D9%87
Откройте для себя скрытые страницы истории и малоизвестные научные открытия, которые оказали колоссальное влияние на развитие человечества. Статья предлагает свежий взгляд на события, которые заслуживают большего внимания.
Как достичь результата? – https://motornews.com.ar/autos/bmw-presenta-los-nuevos-bmw-i5-y-serie-5-touring
Эта информационная заметка предлагает лаконичное и четкое освещение актуальных вопросов. Здесь вы найдете ключевые факты и основную информацию по теме, которые помогут вам сформировать собственное мнение и повысить уровень осведомленности.
Не упусти важное! – https://rv-rez.ru
Apartments for sale in Rove Home https://datarecoverysoftware1.org commercial property developers in dubaidubai based property developers
Наводится порядок в информации, запускается инфузия по показаниям, объясняются ожидаемые ощущения и правила вечера. Пациент и близкие понимают, какой результат реалистичен к ночи и что делать, чтобы эффект не «сгорел» к полуночи.
Подробнее тут – http://narkologicheskaya-klinika-lyubercy9.ru
В этой статье представлен занимательный и актуальный контент, который заставит вас задуматься. Мы обсуждаем насущные вопросы и проблемы, а также освещаем истории, которые вдохновляют на действия и изменения. Узнайте, что стоит за событиями нашего времени!
Как достичь результата? – http://www.fake.lt/pirmasis-tinklarascio-irasas
Запой – это крайне опасное состояние, когда контроль над употреблением алкоголя утрачивается, а токсичные вещества накапливаются в организме, угрожая жизни. В Архангельске экстренная медицинская помощь становится особенно актуальной, и специализированные службы готовы оперативно вмешаться для стабилизации состояния пациента. В данной статье описываются уникальные методики вывода из запоя, направленные на быстрое и безопасное восстановление здоровья в экстренных случаях.
Разобраться лучше – vyvod-iz-zapoya-arkhangelsk66.ru/
В двух пакетах https://geniy-club.ru Магаз вышел на связь, работает, но щас выходные 😀 с треками порешают, по ходу косяки СПСР. пробники БУДУТ !! Кто ещё будет гадить в теме “Трипы” и просить пробник – получит подзатыльник. У кого есть что сказать – отпишите лучше отзывы о товаре.Отличный магазин, отличный оператор, отличный товар. Адрес нашли быстро и без проблем, забрали и ушли. Большое спасибо магазину. Всем советую!
melbet регистрация melbet регистрация .
PlayJonny, regelmäßig auch bekannt als https://championsleage.review/wiki/User:NickiMcCormick genannt, wurde in den letzten Jahren als eine bedeutende bemerkenswertesten Seiten im Bereich Online Casinos entwickelt. Die Plattform vereint moderne Technologie mit einem einfachen Benutzeroberfläche, diejenige sowohl für Neueinsteiger und erfahrene Nutzer komfortabel zu bedienen bleibt. Erwähnenswert ist die Bandbreite der angebotenen Spiele, welche von traditionellen Slots bis zu Tischgame sowie Live-Erfahrungen verfügbar sind. Diese vielfältige Auswahl macht es playjonny für einer attraktiven Option für Gamer, diejenigen Spaß sowie Gewinnmöglichkeiten erwarten. Darüber hinaus setzt das Casino play jonny großen Wert auf Schutz und Datenschutz, so dass Gamer persönliche Informationen Transaktionen ohne Sorgen abwickeln können. Ein weiterer Vorteil von playjonny casino ist das regelmäßige Update der Spiele, wodurch Spieler immer neue und spannende Optionen finden können. Neben der Vielfalt der Optionen besteht play jonny PlayJonny darüber hinaus durch besondere Funktionen, wie Boni, Treuepunkten und regelmäßigen Aktionen, welche das Spielerlebnis noch lohnenswerter gestalten. Alles in allem wird deutlich, dass play jonny nicht nur ein gewöhnliches Online-Casino besteht, sondern vielmehr eine Plattform, welche zur Orientierung an den Bedürfnissen moderner Nutzer zugeschnitten ist während Unterhaltung sowie Sicherheit garantiert. Die Kombination aus Nutzerfreundlichkeit, Auswahl und Sicherheit macht es play jonny casino zu einem herausragenden Akteur im Bereich Online-Glücksspiel.
В данной обзорной статье представлены интригующие факты, которые не оставят вас равнодушными. Мы критикуем и анализируем события, которые изменили наше восприятие мира. Узнайте, что стоит за новыми открытиями и как они могут изменить ваше восприятие реальности.
Ознакомиться с отчётом – https://jcoinamger.sasscal.org/2022/04/25/youth-for-green-hydrogen-scholarship-information-session
Этот информативный текст отличается привлекательным содержанием и актуальными данными. Мы предлагаем читателям взглянуть на привычные вещи под новым углом, предоставляя интересный и доступный материал. Получите удовольствие от чтения и расширьте кругозор!
Что скрывают от вас? – https://teacherhelp.info/%D8%A3%D8%AD%D9%83%D8%A7%D9%85-%D8%A7%D9%84%D9%85%D9%8A%D9%85-%D8%A7%D9%84%D8%B3%D8%A7%D9%83%D9%86%D8%A9
Мы предлагаем надежный канат стальной гост 2688-80 для любых грузоподъемных задач.
Канат 2688-80 применяется в самых разных отраслях и обеспечивает надежность при больших нагрузках.
Канат имеет стандартизированные параметры, которые позволяют его легко интегрировать в существующие подъемные системы. Кроме того, канат проходит испытания на прочность и износостойкость перед поставкой.
Ключевыми преимуществами каната 2688-80 являются высокая разрывная нагрузка и устойчивость к усталостному разрушению. Также важна стойкость к коррозионным воздействиям в условиях повышенной влажности.
Канат показывает стабильные результаты при многократных циклах нагрузки и разгрузки, что снижает риск внезапных отказов. Регулярный контроль и обслуживание продлевают срок службы каната и повышают безопасность его эксплуатации.
Эксплуатационные условия напрямую влияют на выбор каната 2688-80 и режим его использования. Также учитываются способы крепления и возможные радиусы изгиба в механизмах.
Правильная смазка и защита каната помогают продлить его срок службы и сохранить рабочие характеристики. Использование подходящих смазочных материалов и защитных покрытий обеспечивает долговечность каната.
При покупке каната 2688-80 важно обращать внимание на сертификаты и соответствие стандартам качества. Репутация производителя и отзывы клиентов также помогают сделать правильный выбор.
Инвестирование в качественный канат 2688-80 окупается за счет снижения простоев и сокращения затрат на замену. Выбор качественного каната снижает общие эксплуатационные расходы и увеличивает производительность.
строительство каркасных домов в санкт-петербурге — отличный выбор для тех, кто хочет быстро и экономично получить уютный и долговечный дом.
Конструкция базируется на деревянном или металлическом каркасе, который служит несущей основой для стен и перекрытий.
При грамотном строительстве и обслуживании каркасные дома демонстрируют длительный срок службы и высокий уровень комфорта.
Уровень энергоэффективности напрямую определяется выбранным утеплителем и степенью герметизации здания.
Выбор подходящей вентиляционной системы способствует снижению энергетических затрат и улучшению условий проживания.
Возможность адаптации интерьера делает каркасные дома подходящими для долгосрочного использования.
Кроме эстетики, отделка должна обеспечивать защиту от влаги и ветра.
В конечном счёте, разумный баланс цены и качества определяет долговечность и безопасность дома.
При выборе подрядчика проверяйте портфолио и отзывы, чтобы избежать проблем в процессе строительства.
В данной обзорной статье представлены интригующие факты, которые не оставят вас равнодушными. Мы критикуем и анализируем события, которые изменили наше восприятие мира. Узнайте, что стоит за новыми открытиями и как они могут изменить ваше восприятие реальности.
Детальнее – https://sebarra-parindu.desa.id/penetapan-rkp-desa-sebarra
казино вавада рабочее зеркало казино вавада рабочее зеркало .
Эта познавательная публикация погружает вас в море интересного контента, который быстро захватит ваше внимание. Мы рассмотрим важные аспекты темы и предоставим вам уникальные Insights и полезные сведения для дальнейшего изучения.
Всё самое вкусное внутри – https://rtc.ui.ac.id/2020/10/05/transformasi-ambisius-garnier-menghadirkan-kecantikan-keberlanjutan
игровые автоматы вавада игровые автоматы вавада .
согласование перепланировок согласование перепланировок .
Мы предлагаем вам окунуться в океан любопытных фактов и вдохновляющих историй. Эта публикация поможет расширить горизонты, разбудить интерес к науке и истории и увидеть мир с новой стороны.
Изучить эмпирические данные – https://boost.latelierdecedric.com/latelier-de-cedric-studio-bleu-avec-felipe-javier-saldivia
Иркутский центр эстетической хирургии «Хирургия красоты и здоровья» специализируется на пластике лица, шеи и тела, а также коррекции веса — все операции проводит хирург с большим опытом Владимир Высоцкий. Записаться на приём и изучить фотогалерею результатов можно на https://www.dr38.ru/ — онлайн-форма работает круглосуточно. Клиника придерживается индивидуального подхода: каждый случай рассматривается с учётом пропорций, симметрии и пожеланий пациента без навязанных шаблонов красоты. Приём ведётся в Иркутске и Москве.
ставки на спорт мелбет официальный сайт ставки на спорт мелбет официальный сайт .
скачать приложение melbet на айфон скачать приложение melbet на айфон .
Близкие часто пытаются «ускорить» результат контролем или уговором — в итоге растёт напряжение и человек уходит в сопротивление. Мы предлагаем другое: сосредоточиться на среде. Первые дни важны тишина, затемнение, комфортная температура, вода и лёгкая еда «по часам», отсутствие обсуждений «прошлых ошибок». Полезно заранее договориться о кратких сигналах: как понять, что нужна помощь, а когда лучше оставить человека в покое. Семье также поясняется, что бессонница более двух ночей подряд, постоянная рвота, выраженная слабость и головокружение — поводы для немедленной связи с врачом. Когда роли и правила ясны, уходит хаос, снижается конфликтность, а домашний маршрут становится не «борьбой характеров», а медицинской задачей с понятными шагами. Это напрямую укрепляет приверженность и сокращает путь к стабильности в реальном ритме Москвы.
Изучить вопрос глубже – https://narkolog-na-dom-moskva999.ru/narkolog-na-dom-moskva-nedorogo/
Запись и подтверждение — через защищённые каналы; визиты — без опознавательных знаков; в расписании используются шифры вместо фамилий, информирование семьи — только с вашего согласия. Когда страх огласки уходит, люди обращаются вовремя и лучше соблюдают рекомендации — это напрямую улучшает прогноз и экономит бюджет.
Подробнее – https://kapelnica-ot-zapoya-lyubercy9.ru/kapelnica-ot-zapoya-na-domu-lyubercy/
Если вам нужна сервопривод ардуино купить, у нас есть большой выбор качественных плат и аксессуаров для ваших проектов.
Неправильное соединение может привести к короткому замыканию и повреждению элементов схемы.
Официальный дилер TENET в Ростове-на-Дону — автосалон «Прайд на Вавилова» — предлагает три модели китайского кроссовера: компактный T4 от 2 039 000 р., динамичный T7 от 2 535 000 р. и флагманский семиместный T8 от 3 480 000 р. с полным приводом и системами ADAS. Ищете купить автомобиль тенет в ростове на дону? На tenet-pride.ru доступны конфигуратор комплектаций, кредитный калькулятор и запись на тест-драйв. Покупателям гарантировано 5 лет поддержки, доступ к программе «Помощь в пути» и фирменному мобильному приложению.
зашиваться от алкоголя narkologicheskaya-klinika-trezvyj-vybor.ru .
нарколог на дом цены narkolog-na-dom-v-krasnodare.ru .
срочный выезд нарколога на дом narkolog-na-dom-v-krasnodare-1.ru .
Эта публикация погружает вас в мир увлекательных фактов и удивительных открытий. Мы расскажем о ключевых событиях, которые изменили ход истории, и приоткроем завесу над научными достижениями, которые вдохновили миллионы. Узнайте, чему может научить нас прошлое и как применить эти знания в будущем.
Узнать напрямую – https://www.geiq-guadeloupe.fr/2021/02/12/un-actif-sur-cinq-est-engage-dans-une-reconversion-professionnelle-geiq-guadeloupe
Кодирование от алкоголизма в Чехове для многих семей становится тем рубежом, после которого зависимость перестаёт казаться «временной слабостью» и начинает восприниматься как диагноз, с которым можно и нужно работать. До этого момента обычно проходят годы: чередуются запои и трезвые периоды, звучат обещания «больше такого не будет», меняются напитки, придумываются правила вроде «пью только по выходным» или «только пиво». Но рано или поздно семья замечает, что именно алкоголь диктует распорядок дня, влияет на настроение, разрушает здоровье и отношения. В этот момент становится очевидно: без сильного внешнего ограничителя и профессиональной помощи просто «взять себя в руки» уже не получается.
Подробнее – Кодировка в Чехове
В этой информационной статье вы найдете интересное содержание, которое поможет вам расширить свои знания. Мы предлагаем увлекательный подход и уникальные взгляды на обсуждаемые темы, побуждая пользователей к активному мышлению и критическому анализу.
Ознакомиться с отчётом – https://www.moenr.gov.bt/?p=5475
Безопасность — не та сфера, где можно экономить на качестве или доверять случайным исполнителям. Частное охранное предприятие «Вымпел-Альянс» работает с объектами самого разного профиля: жилые комплексы, торговые центры, школы, медицинские учреждения, склады, банки и десятки других категорий. На сайте https://www.valliance.ru/ можно подробно изучить полный перечень услуг — от вооружённой охраны и личного сопровождения до инкассации, детективной деятельности и защиты информации. Компания делает ставку на профессионализм сотрудников и индивидуальный подход к каждому клиенту, что подтверждается реальными отзывами и многолетней репутацией на рынке охранных услуг.
property finder dubai mira https://maitrise-autun.org casa dora dubai properties locationmaqsood ali at dubai real estate centre
Инфузионная терапия — это набор узких вмешательств под конкретную картину, а не «магический состав». Регидратация улучшает тканевую перфузию и снимает головную боль от обезвоживания; электролиты стабилизируют нервно-мышечную передачу и сердечный ритм; печёночная поддержка уменьшает токсическую нагрузку и тяжесть в правом подреберье; гастропротекция и противорвотные защищают слизистую и убирают рвотный компонент. При выраженной тревоге и бессоннице добавляется мягкая анксиолитическая поддержка — дозы подбираются так, чтобы стабилизировать, а не «выключить». Мы не назначаем исследования «для галочки»: анализы и ЭКГ используются тогда, когда их результат меняет решения «сегодня». Такой подход снижает побочные эффекты, делает результат предсказуемым и удерживает бюджет от «скачков». На этой базе уже обсуждается следующий шаг: амбулаторное наблюдение, краткие психообразовательные сессии, а при показаниях — кодирование после стабилизации.
Получить больше информации – kapelnica-ot-zapoya-lyubercy
вавада онлайн вавада онлайн .
Менопауза и перименопауза https://menopower.ru симптомы, приливы и гормональные изменения. Полезные советы для женщин 45+, рекомендации по здоровью, образу жизни и управлению финансами для комфортного прохождения этого периода.
когда появится новинки?? Мефедрон, Марихуану, Бошки, Кокаин Пришлось высылать чек,региться на ретейле,оформлять заказ.все я уже пошол на почту получать пришло быстро молодцы СПСР вчера трек сегодня забираю за качество как и обещал отпишу а то там кто то сомневался
Санитарные системы https://bio-ecopro.ru для мероприятий и стройплощадок — аренда мобильных туалетов, умывальников и санитарных модулей. Доставка, обслуживание и вывоз. Надежные решения для фестивалей, концертов, стройки и массовых событий.
Проверенные адвокаты Москвы https://isk1.ru квалифицированная юридическая помощь и защита в суде. Решение сложных правовых споров, сопровождение дел и профессиональный подход к каждому клиенту для достижения результата.
Компания DARKLUM https://darklum.ru/catalogue предлагает широкий ассортимент светодиодных светильников различного назначения для коммерческих и жилых помещений как внутреннего, так и уличного освещения. В каталоге представлено более 5 000 моделей различных форм-факторов, среди которых Вы без труда сможете выбрать оптимальный вариант.
Промокод Пятёрочка доставка http://reporter63.ru/content/view/785017/promokod-pyaterochka-dostavka-vygodnye-vozmozhnosti-dlya-pokupok-onlajn актуальные скидки и купоны на заказ продуктов онлайн. Получайте выгодные предложения, снижайте стоимость доставки и экономьте на покупках в Пятёрочке с рабочими промокодами.
Инфузионная терапия — это набор узких вмешательств под конкретную картину, а не «магический состав». Регидратация улучшает тканевую перфузию и снимает головную боль от обезвоживания; электролиты стабилизируют нервно-мышечную передачу и сердечный ритм; печёночная поддержка уменьшает токсическую нагрузку и тяжесть в правом подреберье; гастропротекция и противорвотные защищают слизистую и убирают рвотный компонент. При выраженной тревоге и бессоннице добавляется мягкая анксиолитическая поддержка — дозы подбираются так, чтобы стабилизировать, а не «выключить». Мы не назначаем исследования «для галочки»: анализы и ЭКГ используются тогда, когда их результат меняет решения «сегодня». Такой подход снижает побочные эффекты, делает результат предсказуемым и удерживает бюджет от «скачков». На этой базе уже обсуждается следующий шаг: амбулаторное наблюдение, краткие психообразовательные сессии, а при показаниях — кодирование после стабилизации.
Углубиться в тему – какие лекарства входят в капельницу от запоя
стабилизаторы энергия https://stabilizatory-energiya.ru/
Эта статья предлагает живое освещение актуальной темы с множеством интересных фактов. Мы рассмотрим ключевые моменты, которые делают данную тему важной и актуальной. Подготовьтесь к насыщенному путешествию по неизвестным аспектам и узнайте больше о значимых событиях.
Всё, что нужно знать – https://hadieth.nl/smeekbede-wanneer-men-de-begraafplaats-bezoekt
ставки на спорт мелбет ставки на спорт мелбет .
Первый контакт строится вокруг фактов «здесь и сейчас». Врач уточняет длительность употребления, уже принятые препараты за 24–48 часов, сопутствующие диагнозы и аллергии; измеряет АД, пульс, сатурацию, температуру, оценивает степень тремора и уровень тревоги. При показаниях выполняется экспресс-ЭКГ и базовый неврологический скрининг. Затем простым языком объясняется логика вмешательств: какие инфузии будут сегодня, чего ждать через 30–60 минут, как организовать «тихий» вечер и по каким признакам связываться. Мы избегаем универсальных «сильных смесей» и «оглушающих» дозировок, поскольку они дают краткий «блеск» и вечерний откат. Вместо этого — узкая схема: регидратация, коррекция электролитов, печёночная поддержка, гастропротекция и противорвотные при необходимости, мягкая анксиолитическая коррекция по показаниям. На руки выдаются рекомендации на 48–72 часа: вода и лёгкая еда «по часам», затемнение и ранний отбой, «красные флажки» для связи и утреннее окно контроля. Такой график убирает импровизации и делает поведение семьи согласованным.
Подробнее – https://narkologicheskaya-klinika-lyubercy9.ru/narkologicheskaya-klinika-ryadom-v-lyubercah
Настоящий хозяин дома и дачи знает: грамотный совет в нужный момент стоит дороже любого инструмента, и именно поэтому тысячи садоводов и домовладельцев по всей стране давно выбрали своим главным помощником портал «Доммовик». Здесь собраны сотни проверенных статей о саде, огороде, цветах, уходе за деревьями и комнатными растениями, а раздел «Дом» охватывает всё — от интерьера и декора до отопления, сантехники и электрики. На сайте https://dommovik.ru/ есть даже удобные калькуляторы садовода, которые помогают быстро решать практические задачи прямо на участке. Информация подаётся доступно, без лишней воды, зато с реальными результатами и честным разбором ошибок — именно так пишут авторы, которым доверяешь.
skanus pyragai https://pyragaireceptai.lt
PUPIL OF FATE MOTORS https://auto.ae/pupiloffatemotors автосалон премиум авто в Дубае. Продажа роскошных автомобилей, эксклюзивные модели и индивидуальный подбор. Помогаем выбрать, оформить и доставить авто с гарантией качества и высоким уровнем сервиса.
Эко-бытовая химия http://reporter63.ru/content/view/784903/himiya-dlya-uborki-sekrety-effektivnosti-i-bezopasnosti в Санкт-Петербурге — средства для уборки без вредных компонентов. Эффективная очистка, безопасность для здоровья и окружающей среды. Широкий ассортимент и доставка по городу.
Полная версия статьи: https://avon-forum.ru/4images/details.php?image_id=14252
«Побег» (Prison Break) — американский сериал 2005 года в жанре боевика, триллера и драмы, ставший мировой сенсацией. Чтобы спасти брата от смертного приговора за чужое преступление, инженер Майкл Скофилд сознательно идёт на ограбление банка и оказывается в той же тюрьме. Тело Майкла покрыто татуировками — за сложными узорами скрыт подробнейший план побега из тюрьмы. Ищете побег все серии? Смотреть онлайн все 87 серий с профессиональной озвучкой можно на pobeg-smotret.online — пять сезонов без регистрации в хорошем качестве. За стенами Фокс-Ривера кипят банды, коррупция и смертельные игры влияния — и в этом хаосе Майкл должен воплотить план, не оставляющий права на ошибку.
Ищете сериал, который считается эталоном жанра? «Во все тяжкие» — сериал, переписавший правила криминальной драмы. Уолтер Уайт — обычный учитель, которому смертельный диагноз открыл дорогу в преступность и превратил его в опасного и хладнокровного дельца. Каждая серия держит у экрана и не даёт оторваться до самого конца. Ищете во все тяжкие все серии? Все 62 серии в отличном качестве доступны на vo-vse-tyazhkie-smotret.online — смотрите бесплатно с любым удобным переводом. Проект удостоен множества престижных наград и по-прежнему считается вершиной криминального жанра.
Наводится порядок в информации, запускается инфузия по показаниям, объясняются ожидаемые ощущения и правила вечера. Пациент и близкие понимают, какой результат реалистичен к ночи и что делать, чтобы эффект не «сгорел» к полуночи.
Получить дополнительные сведения – chastnaya-narkologicheskaya-klinika
family room for rent in dubai for 3 month https://zoppoth.net dubai properties mediterian cityApartments for sale in Majara
фофу кушают, 2 дмпм нюхается, судя по всему https://otkritki-albomi.ru Как связаться?АМ 2233 читал 1 к 30 делается, неужеле правда всего 1 к 15 делать?
Modern earth fault indicator monitor the condition of electrical networks and protect equipment. They offer rapid fault detection, high accuracy, and reliability for industrial applications.
Купить стройматериалы https://stroyrostov161.ru в Ростове-на-Дону: широкий выбор сыпучих и строительных материалов, включая щебень, песок, цемент, штукатурку и шпатлевку. Быстрая доставка и доступные цены для вашего объекта.
Заборы под ключ https://dachnie-zabory.ru в Москве и области — изготовление и установка ограждений для дома и участка. Профнастил, штакетник, сетка рабица и 3D заборы. Замер, доставка и монтаж с гарантией качества и соблюдением сроков.
Обращение в местную клинику даёт важное преимущество — доступность. Здесь можно пройти диагностику, детоксикацию, вывод из запоя, курс лечения и реабилитации в привычном городе, без выснаживающих переездов. Пациенту легче решиться на стационар, когда он понимает, что близкие рядом и в любой момент могут приехать, поучаствовать в обсуждении плана терапии, привезти необходимые вещи. При этом подход остаётся профессиональным: учитываются стаж зависимости, сопутствующие заболевания, психоэмоциональное состояние, семейная ситуация. Лечение строится не вокруг одной «волшебной» процедуры, а как последовательный маршрут — от первой консультации до выхода в стабильную ремиссию.
Углубиться в тему – rejting-narkologicheskih-klinik-v-moskve
Снижается тремор, уменьшается тошнота, пульс и давление перестают «скакать», появляется возможность уснуть без паники. Важно не перегружать этот эффект разговорами «по душам», яркими экранами и проверками «на прочность»: когда среда тихая и затемнённая, организм закрепляет улучшение, а не теряет его к полуночи.
Ознакомиться с деталями – vyvod-iz-zapoya-nedorogo
vavada ru официальный сайт vavada ru официальный сайт .
Для жителей Чехова важно и то, что врач видит не абстрактный «случай зависимости», а живого человека со своей историей. У кого-то за плечами десятилетия злоупотребления, у кого-то — несколько лет с быстрым прогрессированием, у кого-то — сочетание алкоголя с успокоительными или наркотиками. Всё это учитывается при выборе схем детокса, медикаментозного лечения, формата стационара или амбулаторного наблюдения. Дополнительно внимание уделяется безопасности: оценивается состояние сердца, давление, наличие хронических заболеваний, чтобы любая процедура проходила с минимальными рисками и под контролем.
Разобраться лучше – narkologicheskaya-klinika-otzyvy
vavada casino официальный сайт vavada casino официальный сайт .
melbet apps download melbetiphone.ru .
сайт мелбет регистрация сайт мелбет регистрация .
благодарствуюсь, бро)) под затупил малеха, вижу ты тут, все хорошо Мефедрон, Марихуану, Бошки, Кокаин екб есть в представителях, смотрите в представительствахПо приходу товара я выложу тут розничную площадку для заказов, на которой вы сможете заказать реактивы из наличия на складе, не уточняя у нас что есть…
al wasl tower dubai Apartments For Sale In Downtown Dubai new england properties dubaiholiday apartments in bur dubai
Earth fault indicators improve fault localization and reduce time required for repairs. This enhances operational efficiency in power systems. Discover more about usage https://earth-fault-indicator.com/
Discover what’s new > https://вип-свет.рф/
нейросеть текст для учебы nejroset-dlya-referatov-8.ru .
технический переводчик в москве teh-perevod.ru .
рекламный креатив рекламный креатив .
букмекерская компания мелбет melbetlogin.ru .
выезд нарколога на дом narkolog-na-dom-v-krasnodare.ru .
слышала за вас) с пробы начнем? https://enserv24.ru Ну просто выглядело твое сообщение как мессага на параное)))))На прошлой неделе в среду, был оплачен заказ, вот уже среда следующей недели, праздники прошли, в скайпе они пока что не появлялись. Пологаю что магазин загулял.
Мы предлагаем надежный [url=https://buranmetall.ru/kanaty-stalnye-gost-2688]канат стальной гост 2688-80[/url] для любых грузоподъемных задач.
Комбинация материалов и конструктивных решений дает канату высокую стойкость к механическим воздействиям.
Канат имеет стандартизированные параметры, которые позволяют его легко интегрировать в существующие подъемные системы. Поставляемая продукция проходит контроль качества и испытания по установленным нормам.
Ключевыми преимуществами каната 2688-80 являются высокая разрывная нагрузка и устойчивость к усталостному разрушению. Еще одним плюсом является повышенная коррозионная стойкость при эксплуатации в тяжелых климатических условиях.
Канат показывает стабильные результаты при многократных циклах нагрузки и разгрузки, что снижает риск внезапных отказов. Более длительный срок службы уменьшает эксплуатационные расходы и простаивания техники.
Эксплуатационные условия напрямую влияют на выбор каната 2688-80 и режим его использования. Важны соединительные узлы и допустимые радиусы изгиба при прокладке каната.
Правильная смазка и защита каната помогают продлить его срок службы и сохранить рабочие характеристики. Использование рекомендованных антифрикционных составов уменьшает износ и предотвращает коррозию.
При покупке каната 2688-80 важно обращать внимание на сертификаты и соответствие стандартам качества. Опираясь на надежных поставщиков и положительные отзывы, можно снизить риск приобретения некачественного изделия.
Инвестирование в качественный канат 2688-80 окупается за счет снижения простоев и сокращения затрат на замену. Регулярная проверка и замена изношенных канатов обеспечивают безопасную и непрерывную эксплуатацию.
al nasser properties dubai https://dinosaurios-larioja.org where can i buytk properties dubai
Если вам нужна контроллер ардуино, у нас есть большой выбор качественных плат и аксессуаров для ваших проектов.
Также стоит удалять остатки припоя и окисления, чтобы предотвратить плохие контакты.
заказать подвеску с крестом на Wildberries
Тем, кто ищет подвеску с крестом на Озон или Вайлдберриз, можно глянуть такой формат. Он выглядит спокойно, но образ собирает хорошо
buy diazepam uk
Далее выполняется медицинская детоксикация: корректируется водно-электролитный баланс, снимается интоксикация, поддерживается работа сердечно-сосудистой системы, снижается тремор, стабилизируется сон и тревожность. Важно, что схема подбирается индивидуально: при разных рисках объём поддержки будет различаться. В ряде случаев достаточно амбулаторного наблюдения и рекомендаций, в других — нужен стационар, чтобы контролировать динамику и вовремя корректировать терапию.
Детальнее – http://vyvod-iz-zapoya-moskva1-12.ru
В рамках анонимного лечения особое внимание уделяется следующим аспектам медицинской организации:
Ознакомиться с деталями – наркологическая клиника наркологический центр краснодар
После снятия острого состояния часто остаются тревожность, бессонница, эмоциональная нестабильность и выраженная тяга. Поэтому клиника помогает выстроить следующий этап: диагностику зависимости, профилактику рецидива, психотерапевтическую поддержку и восстановление режима, без которого трезвость плохо удерживается на длительной дистанции.
Получить дополнительные сведения – https://narkologicheskaya-klinika-zhukovskij12.ru/chastnaya-narkologicheskaya-klinika-v-zhukovskom/
Ищете free undress ai bot?
Клиника «Полярис» предлагает круглосуточную наркологическую помощь в Архангельске и области. Главные преимущества — выезд врача на дом в течение 30 минут и условия VIP-уровня в стационаре. Здесь используются передовые методы детоксикации, индивидуальный подход и комплексная психотерапевтическая поддержка, что позволяет пациенту максимально быстро и безопасно справиться с алкогольной зависимостью.
Исследовать вопрос подробнее – http://
apk melbet melbetiphone.ru .
Помощь начинается с первичной оценки. Врач уточняет длительность запоя, время последнего приёма алкоголя, ведущие симптомы, хронические заболевания, прошлые осложнения, аллергии, а также препараты, которые пациент уже принимал самостоятельно. Далее проводится осмотр: измеряются давление и пульс, оценивается дыхание, температура, признаки обезвоживания, уровень сознания, выраженность тремора и тревоги. На основании этой информации выбирается тактика и формат — на дому, амбулаторно или в стационаре, если риски высокие.
Подробнее тут – https://vyvod-iz-zapoya-orekhovo-zuevo12.ru/vyvod-iz-zapoya-vyzov-v-orekhovo-zuevo
Лечебный процесс организуется таким образом, чтобы каждый этап логически дополнял предыдущий и формировал устойчивую динамику. Это позволяет избежать резких изменений состояния и поддерживать медицинскую безопасность.
Получить дополнительные сведения – наркологическая клиника нарколог в ростове-на-дону
Формат выбирается по безопасности, а не «по желанию». Домашний или амбулаторный старт уместен, если показатели устойчивы: нет упорной рвоты, высокой температуры, выраженной дезориентации, резких «качелей» давления и пульса, признаков обезвоживания с угрозой судорог. В этих условиях один визит часто закрывает задачу: индивидуальная инфузия, письменные рекомендации, правила воды и лёгкой еды «по часам», утренний контроль. Если же состояние «по краю» — сочетание рвоты, лихорадки, кардиальных жалоб, второй бессонной ночи, выраженного тремора — честнее короткая стационарная стабилизация на 24–48 часов под круглосуточным наблюдением. На бумаге это кажется дороже одного выезда, но на практике предотвращает цепочку ночных «пожаров», импульсивных повторов и осложнений, то есть экономит и силы, и деньги семьи. В любом формате анонимность неизменна: визиты без маркировки, закрытые каналы связи, разнесённые по времени приёмы и доступ к данным по ролям.
Ознакомиться с деталями – нарколог вывод из запоя
строительство каркасных домов в санкт-петербурге — отличный выбор для тех, кто хочет быстро и экономично получить уютный и долговечный дом.
Благодаря этому удаётся снизить расход материалов и сократить сроки строительства.
Теплоизоляция в каркасных домах эффективно решается современными материалами и технологиями.
Корректный монтаж окон и дверей исключает появление холодных зон и сохраняет микроклимат внутри.
Грамотно подобранная вентиляция увеличивает комфорт и способствует долгой службе материалов внутри дома.
Гибкость архитектурных решений делает каркасные дома привлекательными для индивидуального проектирования.
Кроме эстетики, отделка должна обеспечивать защиту от влаги и ветра.
Малые сроки строительства влияют на снижение затрат, связанных с длительным строительным процессом.
Чёткий договор и прозрачная смета помогают контролировать бюджет и ответственность сторон.
Первые 1.5 часа эйфория и сосредоточеность на том чем занят , в голове мелькают гениальные идеи) Мефедрон, Марихуану, Бошки, Кокаин Кекс знакомый бpал тут- качество-самолет! Меня угостил – я тоже остался доволен!По порядку: мне 35. Да, это единичный случай, потому как работал с другими поставщиками до последнего запрета. 12к+транспорт- это, видимо, “не о чем”. По твоим словам, мне следует заткнутся, читать о магазине какой он хороший и наслаждаться жизнью?
Такой подход позволяет достичь устойчивого результата без срывов и рецидивов. Пациенты получают помощь не только на уровне физиологии, но и на уровне личностных изменений, что делает лечение глубоким и эффективным.
Исследовать вопрос подробнее – http://www.domen.ru
vavada официальный сайт личный кабинет vavada официальный сайт личный кабинет .
dubai top 10 real estate agency https://maitrise-autun.org dubai properties 1kb imagemarbella real estate dubai
Кроме того, наличие медицинской базы с возможностью круглосуточного мониторинга состояния пациента является дополнительным преимуществом. Это особенно важно на этапе детоксикации, когда организм испытывает серьезные нагрузки.
Разобраться лучше – лечение наркомании ярославль
Earth fault indicators are compact devices that provide reliable fault detection even in harsh environments. They are easy to install and integrate into existing systems. View product details https://earth-fault-indicator.com/artificial-intelligence-for-ground-fault-line-selection-smart-diagnosis-of-faulted-feeders-in-modern-distribution-networks/
где купить цепочку с крестом gothic
Кому нужно заказать подвеску с крестом y2k, можно рассмотреть этот вариант. По стилю он уходит в gothic и alt aesthetic
Главный принцип работы наркологической клиники — это последовательность, безопасность и уважение к каждому пациенту. Независимо от степени зависимости, лечение строится на тщательной диагностике, определении индивидуальных особенностей и поэтапном подходе. Медицинская помощь оказывается как в условиях стационара, так и на дому, где врачи могут провести детоксикацию, стабилизировать состояние и составить дальнейший план терапии.
Узнать больше – наркологическая клиника стационар в ростове-на-дону
vavada зеркало vavada зеркало .
Запой — это не «несколько дней перебрал», а состояние, при котором организм работает на износе. Алкоголь перестаёт быть «причиной расслабления» и становится фактором, который держит человека в замкнутом круге: выпил — стало чуть легче — через несколько часов снова плохо — снова выпил. В Жуковском нередко обращаются уже тогда, когда внутренний ресурс исчерпан: сон пропал, тревога не отпускает, руки трясутся, давление скачет, сердце «стучит», появляется тошнота и рвота, усиливается потливость, ломит тело, а любая попытка прекратить пить приводит к резкому ухудшению. Медицинский вывод из запоя нужен именно для того, чтобы разорвать этот сценарий безопасно: снять интоксикацию, стабилизировать жизненно важные показатели, помочь нервной системе «переключиться» и дать человеку шанс пережить первые сутки без возврата к алкоголю.
Получить дополнительные сведения – https://vyvod-iz-zapoya-zhukovskij12.ru/centr-vyvoda-iz-zapoya-v-zhukovskom
Минск знает толк в красоте, и одним из лучших мест, где это подтверждается делом, является «Ориентал» — многофункциональный центр красоты в самом сердце города. Здесь собраны специалисты с медицинским образованием, готовые предложить инъекционные процедуры, контурную пластику, биоревитализацию и фулфейс ботокс. Посетив https://oriental-salon.by/ – вы откроете полный спектр услуг: александритовая лазерная эпиляция на аппарате 2025 года, авторские окрашивания балаяж и шатуш, глубокие пилинги и СПА-программы. Новые клиенты получают скидку 15% на всё, а консультация в салоне — бесплатная.
Брал закладкой в МСК, утром оплатил, перед оплатой еще раз уточнил все реквизиты у оператора и направился платить. после оплаты сразу сообщил время и сумму оператору, который сразу принял заказ, сказал ждать нужно полтора часа, но курьеру понадобилось чуть больше времени, благо оно позволяло … и вот через почти 4 часа, оператор выслал мне адресс с кладом, который оказался не так уж и далеко. Мефедрон, Марихуану, Бошки, Кокаин Можно. Курьер приходит всего один раз и если он не застал Вас дома, то придется идти к ним в офис с паспортом, чтоб забрать посылку. Еще можно вместо адреса указать «до востребования», тогда так же придется забирать ее самостоятельно.Снова всё на высоте)заказывал 2 г тусишки!попросил пробник 5МЕО) получил)))))))))
7ei8ht6 properties llc dubai Apartments In Uae For Sale class property dubaiNad Al Sheba 1 guide
Нередко пациенту требуется не только медикаментозная поддержка, но и психологическое сопровождение. Консультации с психотерапевтом позволяют выявить причины зависимости, снизить уровень тревожности и подготовить человека к реабилитации.
Получить дополнительную информацию – круглосуточная наркологическая помощь архангельск
сервис анализа креативов сервис анализа креативов .
нейросети для студентов нейросети для студентов .
Самостоятельный выход часто строится на ошибочных решениях: «уменьшать дозу», смешивать алкоголь со снотворными, принимать седативные без понимания влияния на дыхание и сердце, использовать сомнительные «похмельные» наборы. Такие действия могут временно приглушить симптомы, но повышают риск ухудшения и делают состояние непредсказуемым. Ещё одна проблема — отсутствие контроля: человек не замечает, как давление уходит в опасные цифры, как развивается обезвоживание или как усиливаются неврологические симптомы. В клинике же у врача есть задача не просто «снять неприятное», а стабилизировать организм, защитить сердце и сосуды, восстановить сон и снизить тревогу так, чтобы дальнейшее восстановление стало реальным.
Получить дополнительные сведения – http://vyvod-iz-zapoya-moskva1-12.ru
После стабилизации важно закрепить результат. В первые 1–3 дня сохраняются слабость, раздражительность, эмоциональные качели, нарушения сна. Без плана и поддержки многие срываются, потому что пугаются ухудшения вечером или ночью и пытаются снять дискомфорт алкоголем. Поэтому врач даёт рекомендации на ближайшие сутки и несколько дней: как организовать сон, питание, питьевой режим, что контролировать по давлению и пульсу, какие нагрузки исключить и по каким признакам нужно срочно обращаться повторно.
Ознакомиться с деталями – https://narkologicheskaya-klinika-zhukovskij12.ru/chastnaya-narkologicheskaya-klinika-v-zhukovskom
Лечение в наркологической клинике в Чехове удобно не только близостью к дому. Главный плюс — комплексный подход. Зависимость практически никогда не ограничивается только алкоголем или наркотиком: страдают сердце и сосуды, печень, нервная система, психика, отношения в семье и на работе. Если пытаться лечить только одно звено, например, периодически «чистить кровь» капельницами, без проработки причин и последствий, ситуация быстро возвращается к исходной точке. В клинике выстраивается последовательная работа: сначала стабилизируют организм, затем укрепляют психику, а дальше помогают менять привычный образ жизни, чтобы трезвость стала не кратким эпизодом, а новой нормой.
Разобраться лучше – http://narkologicheskaya-klinika-chekhov11.ru
Режим работы 24/7 в клинике «Формула Трезвости» обусловлен клинической спецификой зависимостей, для которых характерны внезапные ухудшения состояния. Наркологическая клиника в Краснодаре обеспечивает постоянную готовность медицинского персонала к приёму пациентов и началу терапии без временных ограничений. Это позволяет существенно сократить интервал между появлением симптомов и медицинским вмешательством, снижая риск осложнений.
Получить дополнительные сведения – запой наркологическая клиника
а как ам то хоть вооще расшифровывается то по науке??? Мефедрон, Марихуану, Бошки, Кокаин Хороший,порядочный магазин обращяйтесьЛибо прекращаем флудить либо начну выдавать преды. Сами должны понимать что под новый год почтовые службы перегружены.
Поведенческие факторы показывают, насколько сайт интересен аудитории. Активное взаимодействие пользователей влияет на позиции ресурса: накрутка поведенческих факторов яндекс
Важно и то, что симптомы могут быть волнообразными. Сегодня стало легче — через несколько часов снова накрывает тревогой, потливостью, тахикардией или паникой. Медицинский подход учитывает эту динамику: назначается поддержка, формируется план контроля и объясняются признаки, при которых нужно срочно усиливать наблюдение. Это снижает вероятность осложнений и помогает избежать типичного сценария, когда человек, испугавшись ухудшения ночью, снова начинает пить «чтобы отпустило».
Разобраться лучше – вывод из запоя москва срочно
ии анализ рекламы ии анализ рекламы .
В практике круглосуточного лечения применяются следующие этапы:
Разобраться лучше – http://narcologicheskaya-klinika-v-krd19.ru/narkolog-krasnodar-anonimno/
При употреблении психоактивных веществ риск осложнений часто выше и непредсказуемее: неизвестный состав, сочетания, влияние на сердечный ритм, дыхание и психическое состояние. Поэтому детоксикация при наркотической зависимости строится особенно аккуратно: врач оценивает состояние, собирает информацию о симптомах, возможных сочетаниях и прошлых осложнениях, а затем выбирает тактику стабилизации. Важно, что в таких случаях «сделать быстро и без вопросов» — самый опасный подход.
Подробнее тут – https://narkologicheskaya-klinika-zhukovskij12.ru/chastnaya-narkologicheskaya-klinika-v-zhukovskom/
технический переводчик teh-perevod.ru .
dubai properties call center https://dinosaurios-larioja.org dubai cheap properties for saledanube properties head office dubai
скачать вавада на телефон скачать вавада на телефон .
Процесс терапии в клинике построен по поэтапной схеме, включающей:
Подробнее тут – https://lechenie-alkogolizma-arkhangelsk0.ru/lechenie-khronicheskogo-alkogolizma-arkhangelsk
Соблюдение конфиденциальности в клинике «Точка Опоры» является неотъемлемой частью лечебного процесса. Наркологическая клиника в Краснодаре обеспечивает закрытый формат приёма, хранения медицинских данных и взаимодействия с пациентом. Практика показывает, что анонимное обращение снижает уровень тревожности, способствует более открытому диалогу с врачом и повышает точность клинической диагностики.
Подробнее тут – запой наркологическая клиника краснодар
Программы лечения выстраиваются гибко: можно начать с домашнего вызова врача и продолжить терапию в клинике, либо пройти весь курс стационарно с круглосуточным наблюдением. Главный принцип — безопасность, эффективность и уважение к личности пациента.
Получить дополнительную информацию – https://narcologicheskaya-clinika-v-rnd19.ru/narkolog-rostov-na-donu
Перечисленные направления формируют основу медицинской помощи и позволяют наркологической клинике в Ростове-на-Дону поддерживать стабильность состояния пациента на всех этапах лечения.
Детальнее – вывод наркологическая клиника
После поступления вызова диспетчер передаёт заявку на смартфон врача, который оперативно завершает подготовительные мероприятия и выезжает к пациенту. На дороге применяется GPS-маршрутизация для выбора оптимального пути и снижения времени в пути.
Получить дополнительные сведения – http://
Режим 24/7 в клинике «Южный Контур» обусловлен особенностями течения зависимостей, при которых ухудшение состояния может происходить внезапно и в любое время суток. Наркологическая клиника в Краснодаре обеспечивает постоянную готовность медицинского персонала к приёму пациентов, что сокращает временной интервал между появлением симптомов и началом лечения. Такой формат снижает риск осложнений и повышает медицинскую безопасность.
Узнать больше – частная наркологическая клиника краснодар
выезд нарколога на дом narkolog-na-dom-v-krasnodare-1.ru .
Обязательно к прочтению: https://shlifovka-parketa.ru
Главные новости: циклевка паркета под ключ цена
Андрей Аршавин официальный телеграм
Нашел канал Andrey Arshavin, решил подписаться. Судя по постам, это его официальный аккаунт
vavada casino официальный сайт скачать vavada casino официальный сайт скачать .
Такой подход позволяет достичь устойчивого результата без срывов и рецидивов. Пациенты получают помощь не только на уровне физиологии, но и на уровне личностных изменений, что делает лечение глубоким и эффективным.
Выяснить больше – https://narcologicheskaya-clinika-v-rnd19.ru/narkolog-rostov-na-donu
Музыкальные сервисы становятся всё более безликими: алгоритмы навязывают одно и то же, а живое открытие новой музыки превращается в редкость. Ищете edm музыка? Reka-pesen.ru меняет этот подход — здесь работает интерактивная волна, которую каждый слушатель настраивает под себя. Поп, шансон, рок, джаз, EDM, транс, хаус, панк, рэп, лаунж — жанровый охват реально широкий. Сервис обновляет музыкальный поток каждый день, а персональная настройка волны работает ненавязчиво и точно. Это не стандартная платформа — это настоящая река песен, где каждый находит свою волну и слушает музыку на своих условиях.
Перечисленные направления формируют основу медицинской помощи и позволяют наркологической клинике в Ростове-на-Дону поддерживать стабильность состояния пациента на всех этапах лечения.
Ознакомиться с деталями – наркологические клиники алкоголизм
Кроме того, наличие медицинской базы с возможностью круглосуточного мониторинга состояния пациента является дополнительным преимуществом. Это особенно важно на этапе детоксикации, когда организм испытывает серьезные нагрузки.
Получить дополнительные сведения – лечение наркомании реабилитация
Для пациентов, требующих круглосуточного наблюдения, клиника «Полярис» предлагает стационар VIP-класса. Здесь созданы все условия для быстрого восстановления: удобные палаты, индивидуальное меню, зоны отдыха и консультации профильных специалистов.
Разобраться лучше – наркологическая клиника архангельская область
Если захотят принять, то это тебя никак не обезопасит https://food-made.ru Раньше розницей занимались благодаря вашему опыту,сейчас время другое,стабильная честная работа)качество супер!!!
Как распознать легальный центр:
Ознакомиться с деталями – лечение наркомании и алкоголизма
Запой — это состояние, в котором алкоголь перестаёт быть «причиной расслабления» и становится механизмом удержания человека в замкнутом круге. Выпил — полегчало на короткое время — через несколько часов снова плохо — снова выпил. Чем дольше длится запой, тем сильнее истощается организм: разрушается сон, растёт тревога, усиливается тремор, потливость, скачет давление, учащается пульс, появляются тошнота и рвота, слабость и раздражительность. В Орехово-Зуево многие пытаются «дотянуть до утра» или «выйти сами», но именно в такие моменты состояние часто ухудшается вечером и ночью, и человек принимает рискованные решения — снова пьёт или смешивает алкоголь со снотворными, лишь бы уснуть. Медицинский вывод из запоя нужен, чтобы разорвать этот сценарий безопасно: снизить интоксикацию, стабилизировать жизненно важные показатели и помочь пережить первые сутки без возврата к алкоголю.
Узнать больше – http://vyvod-iz-zapoya-orekhovo-zuevo12.ru/vyvod-iz-zapoya-vyzov-v-orekhovo-zuevo/
dubai south apartments for rent https://freizeitsportler.net allegiance real estate dubaidubai trade center hotel
машинное обучение креативы reklamnyj-kreativ13.ru .
Комплексный подход позволяет не просто стабилизировать физическое состояние пациента, но и обеспечить долговременный результат. Каждый этап лечения сопровождается медицинским наблюдением и корректируется по мере улучшения состояния.
Изучить вопрос глубже – http://narkologicheskaya-klinika-v-krd19.ru/narkologa-na-dom-krasnodar/https://narkologicheskaya-klinika-v-krd19.ru
«Настоящий детектив» — культовый криминальный сериал, с первых кадров погружающий в атмосферу южных болот США, ритуальных преступлений и психологического противостояния детективов Раста Коула и Марти Харта. Ищете настоящий детектив все серии? На nastoyaschiy-detektiv-smotret.net доступны все 30 серий четырёх сезонов с профессиональной озвучкой без регистрации. Нелинейный сюжет раскрывает картину коррупции, тайных культов и морального распада, тщательно замаскированного под видимость порядка. Основной фокус — не на преступлении, а на психологических портретах сыщиков, которых оно постепенно разрушает.
Поведенческие сигналы формируются на основе действий пользователей после перехода на сайт. Чем активнее они взаимодействуют с контентом, тем выше вероятность роста позиций. Подробнее можно прочитать по ссылке – продвижение сайта ботами
перевод технического текста в москве teh-perevod.ru .
анализ наружной рекламы reklamnyj-kreativ12.ru .
Закупал я рег у Тс конечно качество пацаны просто бомба:good: Я токого не когда не пробывал!!! https://uvlajniteli-uvlajniteli.ru всё прочитал) Стоищий отзыв так и не увидел)Ребята! Вы просто красавцы… На вышем уровне, срок доставке очень оперативная и спрятали хорошо. Советаю…
«Игра престолов» — грандиозный фэнтезийный сериал, вошедший в историю телевидения: 73 серии политических интриг, кровавых битв и жестоких предательств за право сесть на Железный трон. Каждый герой в этом мире многогранен и непредсказуем — будь то благородный лорд Старк или коварные Ланнистеры. Ищете игра престолов смотреть онлайн сериал игра престолов? Все сезоны с удобным выбором озвучки доступны на igra-prestolov-smotret.biz бесплатно в хорошем качестве. Сериал не щадит героев и ломает шаблоны — именно это сделало его культовым на десятилетие вперёд.
Формат выбирается по безопасности, а не «по желанию». Домашний или амбулаторный старт уместен, если показатели устойчивы: нет упорной рвоты, высокой температуры, выраженной дезориентации, резких «качелей» давления и пульса, признаков обезвоживания с угрозой судорог. В этих условиях один визит часто закрывает задачу: индивидуальная инфузия, письменные рекомендации, правила воды и лёгкой еды «по часам», утренний контроль. Если же состояние «по краю» — сочетание рвоты, лихорадки, кардиальных жалоб, второй бессонной ночи, выраженного тремора — честнее короткая стационарная стабилизация на 24–48 часов под круглосуточным наблюдением. На бумаге это кажется дороже одного выезда, но на практике предотвращает цепочку ночных «пожаров», импульсивных повторов и осложнений, то есть экономит и силы, и деньги семьи. В любом формате анонимность неизменна: визиты без маркировки, закрытые каналы связи, разнесённые по времени приёмы и доступ к данным по ролям.
Получить дополнительные сведения – vyvod-iz-zapoya-vyzov-na-dom
real estate prices in dubai One Bedroom Apartment For Sale In Dubai villas for sale in jumeirah village triangleal wasl vita
вавада казино вавада казино .
Отдельный риск — самолечение препаратами. Часто пытаются «уснуть» с помощью снотворных или седативных, принимают лекарства от давления без контроля цифр, смешивают всё это с алкоголем. Такие сочетания могут повлиять на дыхание, сердечный ритм и уровень сознания, а симптомы становятся менее предсказуемыми. Поэтому медицинская помощь начинается с уточнения того, что уже было принято, и с оценки состояния — чтобы выбрать безопасную тактику.
Получить больше информации – chastnyj vyvod iz zapoya
Проблема алкоголизма в Ярославле, как и в других регионах России, остаётся одной из самых актуальных. По данным Минздрава РФ, количество людей, нуждающихся в медицинской помощи из-за злоупотребления спиртным, ежегодно растёт. При этом эффективное лечение возможно лишь при комплексном подходе, включающем как медицинскую, так и психологическую поддержку.
Получить дополнительную информацию – центр лечения алкоголизма в ярославле
В наркологической клинике «Контур Здоровья» вывод из запоя рассматривают как клиническую задачу, а не как разовую услугу. Это означает, что врач сначала оценивает риски и особенности состояния, затем подбирает индивидуальную тактику детоксикации и поддержки, а после стабилизации формирует план на ближайшие часы и дни. Такой подход важен потому, что запой редко заканчивается в момент, когда стало легче после первых процедур. Часто именно вечером или ночью возникает «вторая волна» тревоги и бессонницы, и если у человека нет понятных ориентиров, он возвращается к алкоголю «чтобы отпустило». Поэтому грамотный вывод из запоя — это не только снятие симптомов, но и профилактика повторного витка в самые уязвимые часы.
Детальнее – vyvod-iz-zapoya-zhukovskij12.ru/
вавада казино скачать вавада казино скачать .
Медицинская детоксикация помогает снизить интоксикацию и сделать состояние управляемым. Обычно уменьшается выраженность тремора и потливости, давление и пульс становятся ровнее, снижается тошнота, тревога перестаёт быть пиковым состоянием, появляется шанс на восстановление сна. Но детоксикация не «отменяет зависимость». Она создаёт условия, при которых человек может трезво принять решение о дальнейшем лечении и пережить первые сутки без возврата к алкоголю или веществам «для облегчения».
Изучить вопрос глубже – narkologicheskaya-klinika-vidnoe12.ru/
Снижается тремор, уменьшается тошнота, пульс и давление перестают «скакать», появляется возможность уснуть без паники. Важно не перегружать этот эффект разговорами «по душам», яркими экранами и проверками «на прочность»: когда среда тихая и затемнённая, организм закрепляет улучшение, а не теряет его к полуночи.
Получить больше информации – srochnyj-vyvod-iz-zapoya
платный наркологический диспансер москва narkologicheskaya-klinika-trezvyj-vybor.ru .
Здравствуйте всем делали заказ у этого хорошего магазина Мефедрон, Марихуану, Бошки, Кокаин Магазин ровный! Я заказал 1000ф, оплатил ЯД, оператора попросил отправить посыль на следующий день , без задержки т.к. сроки получения очень поджимают. На что оператор адекватно ответил что все сделают.На следующий вечер получил трек, посылочка собранна и вот вот выезжает))) если уже не выехала) Магазину как и его администрации – от души за оперативность и отношение к клиенту.Мы в Кургане не работаем, все наши представительства есть в соответствующем разделе.
врач нарколог на дом платный narkolog-na-dom-v-krasnodare-1.ru .
Домашний старт в Подольске уместен при устойчивых показателях и низком риске осложнений: нет упорной рвоты, высокой температуры, выраженной дезориентации, резких скачков давления и пульса, признаков судорожной готовности. Преимущества — приватность, скорость, меньше стыда и сопротивления, выше приверженность режиму сна и воды. Но если состояние «ходит по краю», мы честно предложим короткую стационарную стабилизацию на 24–48 часов: круглосуточный мониторинг позволяет раньше перехватить опасную динамику, дозировать препараты без пауз, обеспечить первый полноценный сон. Такой перевод — не «удорожание», а экономия рисков: на дистанции он чаще дешевле серии ночных экстренных вызовов и эмоциональных «качелей». В обоих сценариях сохраняется конфиденциальность: немаркированные маршруты, разнесённые по времени визиты, доступ к данным по ролям. Решение всегда объясняется простыми словами: что даст каждый формат сегодня и почему он безопаснее.
Углубиться в тему – наркологическая клиника наркологический центр
Профессиональные готовые проекты включают отработанные схемы отопления, вентиляции и электрики.
Часто такие проекты разрабатываются с учетом типичных ошибок и оптимизации затрат.
планы одноэтажных домов https://proekty-domov4.ru/1-etag/
Программы лечения в клинике «ДонМед Трезвость» направлены на полное восстановление человека — физическое, психологическое и социальное. Каждое направление терапии адаптируется под конкретного пациента, чтобы достичь максимально устойчивого результата. Врачи используют современные методы и препараты, снижающие риски побочных эффектов и ускоряющие процесс реабилитации.
Исследовать вопрос подробнее – https://narcologicheskaya-klinika-v-rostove19.ru
off plan dubai emaar https://maitrise-autun.org marina arcade dubai real estatevillas the palm short term rental dubai
база бенчмарков рекламы reklamnyj-kreativ14.ru .
официальный телеграмм Матвея Сафонова
Наткнулся на телеграм Сафонова, сначала подумал фан-страница. Но потом посмотрел — контент оригинальный, похоже на официальный канал
поисковое продвижение сайта в интернете москва internet-agentstvo-prodvizhenie-sajtov-seo.ru .
нарколог на дом цены narkolog-na-dom-v-krasnodare.ru .
врач нарколог на дом врач нарколог на дом .
нейросеть для учебы нейросеть для учебы .
нарколог на дом нарколог на дом .
заказать кухню в интернете zakazat-kuhnyu-9.ru .
В итоге-“радостно” ожидал курьера эти дни,забавлянка придет мне позже желаемого… ;( https://privatesun.ru Меньше 2х кило не брал у них. Привозили в оговоренный срок, количество и качество было в норме. Сейчас в очередной раз зарядил, жду адресДобрый вечер помогите купил у снега клад, пустой, как сапорту написать..?
заказать кухню по индивидуальному заказу zakazat-kuhnyu-10.ru .
В наркологической клинике «Контур Здоровья» вывод из запоя рассматривают как клиническую задачу, а не как разовую услугу. Это означает, что врач сначала оценивает риски и особенности состояния, затем подбирает индивидуальную тактику детоксикации и поддержки, а после стабилизации формирует план на ближайшие часы и дни. Такой подход важен потому, что запой редко заканчивается в момент, когда стало легче после первых процедур. Часто именно вечером или ночью возникает «вторая волна» тревоги и бессонницы, и если у человека нет понятных ориентиров, он возвращается к алкоголю «чтобы отпустило». Поэтому грамотный вывод из запоя — это не только снятие симптомов, но и профилактика повторного витка в самые уязвимые часы.
Подробнее тут – vyezd-na-dom-vyvod-iz-zapoya
Самостоятельные попытки обычно идут по двум сценариям: либо человек продолжает пить «понемногу, чтобы не трясло», либо резко прекращает и пытается «перетерпеть». В первом случае запой растягивается и истощение накапливается: ухудшается сон, растёт нагрузка на сердце и сосуды, усиливается обезвоживание, возрастает риск осложнений. Во втором сценарии симптоматика отмены может нарастать резко: тревога, паника, тремор, потливость, скачки давления, тахикардия, рвота, бессонница. И если рядом нет плана и медицинского контроля, человек пугается и снова начинает пить, потому что это кажется единственным быстрым способом облегчить состояние.
Разобраться лучше – https://vyvod-iz-zapoya-zhukovskij12.ru/vyvod-iz-zapoya-kapelnica-v-zhukovskom/
Понимание того, какие учреждения действительно способны помочь, позволяет избежать ошибок и не тратить время на неэффективные попытки лечения. Ключевыми признаками являются наличие медицинской лицензии, опытные специалисты, прозрачные условия и отзывы пациентов.
Изучить вопрос глубже – http://narkologicheskaya-pomoshh-arkhangelsk0.ru/
Форум XakerPlus предоставляет профессиональные услуги по аудиту информационной безопасности и тестированию защищенности IT-инфраструктуры компаний. Профессионалы осуществляют выявление брешей в защите, проверку систем на устойчивость к атакам и формирование плана укрепления безопасности. Ищете взлом почты? Заказать комплексную проверку безопасности можно через xakerplus.com, где представлены все доступные услуги и условия сотрудничества. Группа аттестованных специалистов обслуживает организации различных размеров с полным соблюдением режима секретности.
property blocking dubai in arabic Property For Sale In Dubai sheikh colony qusais room for rentinternational real estate
Такой подход обеспечивает не только устранение симптомов зависимости, но и глубокое восстановление личности. Пациенты получают поддержку врачей на каждом этапе, что делает процесс безопасным и контролируемым.
Получить больше информации – частная наркологическая клиника
Программы лечения в клинике «ДонМед Трезвость» направлены на полное восстановление человека — физическое, психологическое и социальное. Каждое направление терапии адаптируется под конкретного пациента, чтобы достичь максимально устойчивого результата. Врачи используют современные методы и препараты, снижающие риски побочных эффектов и ускоряющие процесс реабилитации.
Получить дополнительную информацию – платная наркологическая клиника
ПО ВРЕМЕНИ СКОЛЬКО? Мефедрон, Марихуану, Бошки, Кокаин А как вы объясните такой факт, месяц назад я оплатил посылку и статус в обработке был более чем 11 дней да еще и ждал я посылку дней 10, я нечего не имею против вашей работы и вообще против вас в целом, вы отличный магазин, но согласитесь “ЛАЖИ” у вас все таки бывают, я говорю это к тому что бы в следующий раз такого не повторялось, без обидХочу выразить благодарность данному магазину за лучший товар, лучшие цены, за долгое время непрерывного сотрудничества, очень жду твоего возвращения к работе и появления долгожданного товара, чемикал лучший в своём деле. Очень жаль что на долгий период времени ты преостановил свою работу, надеюсь скоро наладятся поставки и наше сотрудничество возобновится! Чемикал лучший! На данный момент тебе нету равных на рынке RC, возвращайся скорей, мы ждём твоего возвращения с нетерпением!
сафонов тг
Наткнулся на телеграмм Сафонова, решил глянуть. Канал норм, без странностей
vavada сайт зеркало partscore.ru .
Лучшее прямо здесь: https://shlifovka-parketa.ru
Последние изменения: циклевка паркета стоимость
букмекерская контора мелбет сайт melbetregistratsiya.ru .
нарколог на дом цены нарколог на дом цены .
трафиковое продвижение seo трафиковое продвижение seo .
В наркологической клинике «Контур Здоровья» вывод из запоя рассматривают как клиническую задачу, а не как разовую услугу. Это означает, что врач сначала оценивает риски и особенности состояния, затем подбирает индивидуальную тактику детоксикации и поддержки, а после стабилизации формирует план на ближайшие часы и дни. Такой подход важен потому, что запой редко заканчивается в момент, когда стало легче после первых процедур. Часто именно вечером или ночью возникает «вторая волна» тревоги и бессонницы, и если у человека нет понятных ориентиров, он возвращается к алкоголю «чтобы отпустило». Поэтому грамотный вывод из запоя — это не только снятие симптомов, но и профилактика повторного витка в самые уязвимые часы.
Детальнее – нарколог вывод из запоя
наркологический центр наркологический центр .
were house for rent in dubai One Bedroom Apartment For Rent In Dubai 1 bedroom studio apartment in dubaioff plan property projects in dubai
Резкое прекращение употребления алкоголя часто сопровождается выраженными симптомами абстиненции: тремор, тахикардия, повышенное давление, беспокойство. В клинике «Северная Звезда» для детоксикации применяется инфузионная терапия с балансированными растворами, содержащими:
Детальнее – https://lechenie-alkogolizma-arkhangelsk0.ru/
Современные клиники предоставляют широкий спектр услуг, начиная с первичной консультации и заканчивая долгосрочной поддержкой после прохождения курса лечения. Ключевым этапом является детоксикация — процедура, направленная на выведение токсинов и стабилизацию физического состояния пациента.
Выяснить больше – http://narkologicheskaya-pomoshh-arkhangelsk0.ru
Нередко пациенту требуется не только медикаментозная поддержка, но и психологическое сопровождение. Консультации с психотерапевтом позволяют выявить причины зависимости, снизить уровень тревожности и подготовить человека к реабилитации.
Получить дополнительные сведения – вызов наркологической помощи
А с какого дживика еще больше делать можно? https://remru24.ru Всё здорово спасибо Вамбро ответь в лс, сделаю заказ
Такой подход позволяет наркологической клинике в Краснодаре выстраивать лечение в безопасной и профессиональной среде.
Узнать больше – наркологическая клиника вывод из запоя краснодар
вызов нарколога на дом вызов нарколога на дом .
Программы лечения в клинике «ДонМед Трезвость» направлены на полное восстановление человека — физическое, психологическое и социальное. Каждое направление терапии адаптируется под конкретного пациента, чтобы достичь максимально устойчивого результата. Врачи используют современные методы и препараты, снижающие риски побочных эффектов и ускоряющие процесс реабилитации.
Получить дополнительную информацию – наркологическая клиника наркологический центр ростов-на-дону
Если вам нужны надёжные производители подъемных ворот, мы предлагаем профессиональную установку и гарантийное обслуживание.
Профессиональный монтаж вместе с регулярным техническим обслуживанием гарантируют стабильную и безопасную работу ворот на протяжении многих лет.
Выбор проверенных бюро и платформ с портфолио помогает избежать проблем с документами.
каталог готовых проектов https://gotovye-proekty-domov14.ru/
В практике лечения 24/7 применяются следующие этапы:
Выяснить больше – наркологическая клиника стационар краснодар
Готовые проекты домов стали востребованным вариантом для семей и инвесторов, которые ценят экономию времени и средств.
Профессиональные готовые проекты включают отработанные схемы отопления, вентиляции и электрики.
проекты двухэтажного дома https://proekty-domov4.ru/2-etaga/
furnished studio apartments for rent One Bedroom Apartment For Rent In Dubai best place to live in dubaiwhat is trustee charges fee in dubai for property
Автосервис Тойота в Москве предлагает широкий спектр услуг. Профессионалы помогут вам с ремонтом и техническим обслуживанием.
Если вам нужен качественный и надежный [url=https://servis-toyota-moskva.ru/remont-toyota-v-moskve/] автосервис Toyota[/url], мы предлагаем широкий спектр услуг для вашего автомобиля.
Работа с автомобилями этой марки требует особого подхода. Все работники имеют соответствующую квалификацию и опыт.
В автосервисе установлено современное оборудование. Наличие современного оборудования существенно упрощает процесс диагностики.
Обращаясь в автосервис Тойота, вы можете рассчитывать на высокое качество услуг. Мы ценим каждого клиента и стремимся к его удовлетворенности.
buy diazepam online
вызов нарколога на дом вызов нарколога на дом .
Оправдания в небе не ищут, https://vitinevo-dom.ru крутой магазин21 мая заказал -23 получил трек.все ок ,жду посыл
заказать кухню сайт заказать кухню сайт .
раскрутка и продвижение сайта раскрутка и продвижение сайта .
нарколог на дом недорого narkolog-na-dom-v-krasnodare-2.ru .
Если вы ищете надёжный и эстетичный забор для частного дома или коммерческого объекта в Новосибирске, металлические заборы-жалюзи — одно из лучших решений на рынке. Конструкция из стальных ламелей с полимерным покрытием устойчива к морозам, ветру и коррозии, а угловое расположение пластин обеспечивает вентиляцию и при этом надёжно скрывает участок от посторонних взглядов. Широкий выбор цветов и размеров ламелей, доступные цены и оперативный расчёт материалов — всё это предлагает https://zabor-zhalyuzi54.ru/ жителям Новосибирска и области. В каталоге представлены популярные модели планкен шириной от 60 до 200 мм из стали 0,7 мм с покрытием ППП, а также коллекция Еврожалюзи Royal. Компания осуществляет доставку и профессиональный монтаж, что делает покупку максимально удобной.
Современные клиники предоставляют широкий спектр услуг, начиная с первичной консультации и заканчивая долгосрочной поддержкой после прохождения курса лечения. Ключевым этапом является детоксикация — процедура, направленная на выведение токсинов и стабилизацию физического состояния пациента.
Получить больше информации – скорая наркологическая помощь архангельская область
мелбет ру мелбет ру .
Анонимность — один из ключевых принципов работы клиники «Северная Звезда». Все обращения регистрируются под кодовым номером, без упоминания фамилии и контактных данных в базе данных, доступ к которой имеют только прямые исполнители процедур. Круглосуточная линия позволяет связаться со специалистом в любой момент: ночью, в праздники или выходные. Вызов врача на дом возможен в любой час, без предварительной записи, а при необходимости пациент может быть госпитализирован в отдельное крыло клиники с минимальным контактом с другими посетителями.
Подробнее можно узнать тут – https://lechenie-alkogolizma-arkhangelsk0.ru/lechenie-narkomanii-i-alkogolizma-arkhangelsk/
room for rent in bur dubai monthly https://diegoreico.com Off-plan properties in Dubaistudio apartment in dubai to buy
врач нарколог на дом платный narkolog-na-dom-v-krasnodare-1.ru .
BlackSprut marketplace официальный сайт для входа и регистрации
blsp at bs2best at
blacksprut marketplace
Обратите внимание, ТС отказывается работать с ГАРАНТОМ! хоть и магазин древний и проверенный! но хочется спать спокойно! АДМИНЫ ОБРАТИТЕ ВНИМАНИЕ, ПОРА КАК ТО ИЗМЕНИТЬ РЕЖИМ РАБОТЫ ГАРАНТА. СДЕЛКИ ПРОВОДИТЬ ОБЯЗАТЕЛЬНО ТОЛЬКО ЧЕРЕЗ ГАРАНТА! Мефедрон, Марихуану, Бошки, Кокаин Почему страшно?Магазин супер!!!
Ниже представлена таблица, демонстрирующая основные направления деятельности клиники и их особенности:
Изучить вопрос глубже – лечение в наркологической клинике
В рамках анонимного лечения особое внимание уделяется следующим медицинским аспектам:
Подробнее – наркологическая клиника клиника помощь краснодар
анонимная наркология narkologicheskaya-klinika-trezvyj-vybor.ru .
нарколог на дом в краснодаре narkolog-na-dom-v-krasnodare.ru .
Здоровье простаты нуждается в защите ещё до того, как появятся тревожные признаки — нарушения мочеиспускания и дискомфорт способны существенно ухудшить самочувствие. ПростОптима — препарат, завоевавший доверие урологов и признание мужчин: стандартизированный экстракт пальмы сереноа с 85–95% жирных кислот и стеринов в сочетании с маслом семян тыквы, ликопеном, селеном и цинком работает против симптомов лёгкой и умеренной ДГПЖ. Ищете профилактика аденомы простаты? Подробнее на prostoptima.ru — препарат доступен в крупных аптечных сетях, на Wildberries, Ozon и Яндекс.Маркет.
заказать кухню с замером zakazat-kuhnyu-10.ru .
hotel apartments in sharjah for monthly rent Property For Sale In Dubai rootsland real estate dubai dubairent vs price of apartment in dubai
кухню заказать кухню заказать .
сколько стоит заказать кухню сколько стоит заказать кухню .
BlackSprut marketplace официальный сайт для входа и регистрации
blsp at bs2best at
bs2web at
«Мир Дикого Запада» — культовая американская фантастическая драма о технологичном парке развлечений, где роботы-андроиды запрограммированы беспрекословно обслуживать капризы богатых гостей. Когда у роботов начинают проявляться воспоминания и эмоции управление парком теряет контроль над собственным творением. Ищете мир дикого запада все серии? Все 36 серий четырёх сезонов доступны на mir-dikogo-zapada-smotret.biz в высоком качестве с профессиональной озвучкой без регистрации. Сериал ставит острые вопросы о свободе воли, природе сознания и праве на существование — и не даёт на них лёгких ответов.
В рамках анонимного лечения особое внимание уделяется следующим аспектам медицинской организации:
Изучить вопрос глубже – https://narkologicheskaya-clinica-v-krd19.ru/narkologa-na-dom-krasnodar
https://t.me/s/fenixcasino_official
Парни, если кто ищет fenix casino вход или рабочее зеркало, вот норм вариант через телеграм. Канал живой, обновляется часто, выкладывают актуальные ссылки и бонусы. Я сначала сомневался, потому что сейчас много фейков, но проверил — все реально открывается. Уже пару раз пользовался, проблем не заметил
купить кухню на заказ в спб kuhni-spb-49.ru .
В рамках анонимного лечения особое внимание уделяется следующим аспектам медицинской организации:
Ознакомиться с деталями – https://narkologicheskaya-clinica-v-krd19.ru/narkolog-i-psikhiatr-v-krasnodare
бро незнаю скок раз брал ни разу TS не подводил входил в положения скидки бонусы делал!!! Мефедрон, Марихуану, Бошки, Кокаин 5iai – как употребляли и сколько?самый дешёвый магазин из доверенных – это этот!
рекламный креатив рекламный креатив .
сделать аудит сайта цена internet-agentstvo-prodvizhenie-sajtov-seo.ru .
«Клан Сопрано» — один из величайших криминальных сериалов в истории HBO, раз и навсегда изменивший жанр телевизионной драмы. Главный герой Тони Сопрано — босс преступной семьи из Нью-Джерси — разрывается между жестоким криминальным бизнесом и обычной семейной жизнью, страдает от панических атак и ищет спасения у психотерапевта. В этой истории нет места однозначным злодеям и героям — только настоящие, сложные и противоречивые характеры. Ищете клан сопрано смотреть онлайн? Все 86 серий в нескольких вариантах озвучки доступны на soprano-smotret.online бесплатно в хорошем качестве. Именно «Клан Сопрано» установил планку «золотого века» телевидения и сохраняет статус эталона криминальной драмы спустя два десятилетия.
Обращение в местную клинику даёт важное преимущество — доступность. Здесь можно пройти диагностику, детоксикацию, вывод из запоя, курс лечения и реабилитации в привычном городе, без выснаживающих переездов. Пациенту легче решиться на стационар, когда он понимает, что близкие рядом и в любой момент могут приехать, поучаствовать в обсуждении плана терапии, привезти необходимые вещи. При этом подход остаётся профессиональным: учитываются стаж зависимости, сопутствующие заболевания, психоэмоциональное состояние, семейная ситуация. Лечение строится не вокруг одной «волшебной» процедуры, а как последовательный маршрут — от первой консультации до выхода в стабильную ремиссию.
Получить больше информации – платная наркологическая клиника
врач нарколог на дом врач нарколог на дом .
На странице Вам нужен реферат, доклад, проект или курсовая работа? Воспользуйтесь нашей нейросетью, которая поможет сгенерировать учебные работы онлайн, предоставит примеры и предложит актуальные темы.
I don’t think the title of your article matches the content lol. Just kidding, mainly because I had some doubts after reading the article.
BlackSprut marketplace официальный сайт для входа и регистрации
blsp at bs2best at
blsp сайт
top real estate investment firms in dubai https://maitrise-autun.org Armani Beach ResidencesOff-Plan Projects
ВСЕМ МИР А ТСУ РЕСПЕКТ ))) https://volkswagenbank.ru тоже хочу нахватить, но жду отзывыИ потом не удивляйтесь, что магазин медленно работает или не отвечает. Попробуйте по 100 раз в день рассказывать что и как разводить, и при этом успевать оформлять заказы.
ленинградские кухни kuhni-spb-50.ru .
удаленная работа для мам в декрете фриланс работа
Выбирая готовый проект, многие отмечают ясность бюджета и устойчивость финансовых расчетов.
купить готовый проект дома https://gotovye-proekty-domov14.ru/
Если вам нужны надёжные промышленные секционные ворота москва, мы предлагаем профессиональную установку и гарантийное обслуживание.
Промышленные секционные ворота служат надежным барьером между производственными помещениями и внешней средой, обеспечивая безопасность и теплоизоляцию.
нарколог на дом недорого narkolog-na-dom-v-krasnodare-1.ru .
Критерии оценки профессионального уровня сотрудников:
Детальнее – центр лечения алкоголизма
BlackSprut marketplace официальный сайт для входа и регистрации
blsp at bs2best at
blsp at
программа электронной очереди
Отдельная причина, по которой люди тянут до последнего, — страх огласки и лишних последствий. В небольших городах это особенно чувствуется: «все друг друга знают», страшно, что увидят знакомые, начнутся разговоры. Из-за этого человек часто выбирает опасный компромисс: продолжает пить «чтобы не ломало», смешивает алкоголь со снотворными или успокоительными, пытается пережить бессонные ночи и панические качели. Но зависимость не ждёт, пока станет удобно. Поэтому важно, чтобы клиника могла организовать помощь быстро и без лишнего стресса, при этом сохраняя медицинскую точность и безопасность.
Исследовать вопрос подробнее – http://narkologicheskaya-klinika-zhukovskij12.ru/
saxenda price uk
заказать индивидуальную кухню zakazat-kuhnyu-10.ru .
Каждый из методов подбирается индивидуально с учётом возраста, общего состояния и длительности зависимости. Такой подход делает лечение более эффективным и снижает риск рецидива.
Подробнее тут – наркологическая клиника
international drivers license international drivers license
вызов нарколога на дом краснодар narkolog-na-dom-v-krasnodare.ru .
частная клиника наркологическая частная клиника наркологическая .
hotel apartments for sale in aykon city dubai Commercial Property For Sale In Dubai ongoing new construction project in dubaimash holdings real estate brokers dubai
феникс казино
Парни, если кто ищет fenix casino вход или рабочее зеркало, вот норм вариант через телеграм. Канал живой, обновляется часто, выкладывают актуальные ссылки и бонусы. Я сначала сомневался, потому что сейчас много фейков, но проверил — все реально открывается. Уже пару раз пользовался, проблем не заметил
BlackSprut marketplace официальный сайт для входа и регистрации
blsp at bs2best at
bs2best at
нарколог на дом анонимно narkolog-na-dom-v-krasnodare-2.ru .
как всегда оплатил и все пришло. спасибо что есть такой магаз беру давно у них, все ок всем саветую https://kompfix.ru спасибо и ВАМ !!екб есть в представителях, смотрите в представительствах
Процесс терапии в клинике построен по поэтапной схеме, включающей:
Углубиться в тему – http://lechenie-alkogolizma-arkhangelsk0.ru/
Лечение в режиме круглосуточного наблюдения выстраивается как непрерывный медицинский процесс. Даже при экстренном обращении терапия рассматривается как последовательность взаимосвязанных мероприятий с обязательным врачебным контролем.
Подробнее можно узнать тут – наркологическая клиника клиника помощь в краснодаре
новинка Mellstroy Game открылся заново после полной переработки. Добавлены новые провайдеры, обновлённая система бонусов, ускоренная обработка запросов и улучшенная безопасность. Платформа стала удобнее и быстрее — рекомендую зайти и посмотреть.
Для оценки состояния используется расширенная диагностика: лабораторные анализы, ЭКГ, психологическое тестирование и биохимические маркеры. По результатам обследования составляется индивидуальный план, включающий детоксикацию, фармакотерапию и реабилитационные мероприятия. Ниже представлена таблица, описывающая структуру этапов лечения.
Подробнее – http://narcologicheskaya-clinika-v-rnd19.ru/chastnaya-narkologicheskaya-klinika-rostov-na-donu/
заказать кухню по индивидуальному проекту zakazat-kuhnyu-9.ru .
анализ карточек маркетплейс анализ карточек маркетплейс .
В практике лечения 24/7 применяются следующие этапы:
Изучить вопрос глубже – наркологические клиники алкоголизм
Самостоятельный выход часто строится на ошибочных решениях: «уменьшать дозу», смешивать алкоголь со снотворными, принимать седативные без понимания влияния на дыхание и сердце, использовать сомнительные «похмельные» наборы. Такие действия могут временно приглушить симптомы, но повышают риск ухудшения и делают состояние непредсказуемым. Ещё одна проблема — отсутствие контроля: человек не замечает, как давление уходит в опасные цифры, как развивается обезвоживание или как усиливаются неврологические симптомы. В клинике же у врача есть задача не просто «снять неприятное», а стабилизировать организм, защитить сердце и сосуды, восстановить сон и снизить тревогу так, чтобы дальнейшее восстановление стало реальным.
Подробнее можно узнать тут – вывод из запоя москва срочно
питомник растений спб и ленинградской MarketingMax
Планируете отдых в Подмосковье? Отель Verona предлагает комфортабельные номера с современным дизайном и полным набором удобств для деловых и туристических поездок. Удобное расположение позволяет быстро добраться до центра Москвы, а уютная атмосфера и профессиональное обслуживание создают идеальные условия для отдыха. На сайте https://veronahotel.pro/ вы найдете актуальные цены, фотографии номеров и возможность онлайн-бронирования. Круглосуточная стойка регистрации, бесплатный Wi-Fi и парковка делают пребывание максимально удобным для каждого гостя.
заказать кухню через интернет заказать кухню через интернет .
BlackSprut marketplace официальный сайт для входа и регистрации
blsp at bs2best at
bs2web at
выезд нарколога на дом выезд нарколога на дом .
raine and horne real estate dubai https://ragnarconde.com party villa rental dubaicenturion real estate dubai team
Всем доброго времени суток. Первый раз довелось заказывать в этом магазине на свой страх и риск, но положительные отзывы старичков о работе и качестве товара (в частности 2с, который меня и интересовал) убедили, что причин волноваться нет. Мефедрон, Марихуану, Бошки, Кокаин прилив бодрости учащаетьсямагазину респект)) с корефанами накуримся вдоволь)))
Соблюдение конфиденциальности в клинике «Точка Опоры» является неотъемлемой частью лечебного процесса. Наркологическая клиника в Краснодаре обеспечивает закрытый формат приёма, хранения медицинских данных и взаимодействия с пациентом. Практика показывает, что анонимное обращение снижает уровень тревожности, способствует более открытому диалогу с врачом и повышает точность клинической диагностики.
Подробнее тут – narcologicheskaya-klinika-v-krd19.ru/
При употреблении психоактивных веществ риск осложнений часто выше и непредсказуемее: неизвестный состав, сочетания, влияние на сердечный ритм, дыхание и психическое состояние. Поэтому детоксикация при наркотической зависимости строится особенно аккуратно: врач оценивает состояние, собирает информацию о симптомах, возможных сочетаниях и прошлых осложнениях, а затем выбирает тактику стабилизации. Важно, что в таких случаях «сделать быстро и без вопросов» — самый опасный подход.
Получить дополнительную информацию – https://narkologicheskaya-klinika-zhukovskij12.ru/narkologicheskaya-klinika-otzyvy-v-zhukovskom/
asian escort london
Зависимость редко начинается «внезапно». Обычно всё складывается постепенно: человек чаще снимает напряжение алкоголем, потом замечает, что без него хуже спится и труднее успокоиться, затем появляются запои или регулярные эпизоды употребления, меняется настроение и характер, нарастает тревога, раздражительность, ухудшаются отношения в семье и продуктивность на работе. В какой-то момент становится очевидно, что проблема уже не в силе воли: организм и нервная система перестраиваются так, что трезвость даётся всё тяжелее, а любое прекращение употребления сопровождается дискомфортом, из-за которого хочется «быстро облегчить состояние». Наркологическая клиника в Видном — это помощь, которая возвращает ситуацию в медицински управляемое русло: сначала оценка рисков и стабилизация, затем восстановление базовых функций и лечение зависимости как процесса, а не разовой «процедуры для облегчения». В клинике «МедАльтернатива» маршрут подбирают под конкретное состояние: кому-то требуется срочная детоксикация, кому-то — стационарное наблюдение, кому-то — выезд врача на дом, а кому-то — плановое лечение с фокусом на профилактику рецидива.
Подробнее – narkologicheskaya-klinika-spravka-dlya-gai
BlackSprut marketplace официальный сайт для входа и регистрации
blsp at bs2best at
bs2web at
кухня глория kuhni-spb-49.ru .
Кто нибудь 203 пробывал в этом магазинчике? Как он?????????? https://sarpolitex.ru отличный селлер))) во во так даже бывает…
dubai residential oasis https://finalfinalsfsportsbar.com estatic tourism dubaibest place to buy apartment in dubai
Для оценки состояния используется расширенная диагностика: лабораторные анализы, ЭКГ, психологическое тестирование и биохимические маркеры. По результатам обследования составляется индивидуальный план, включающий детоксикацию, фармакотерапию и реабилитационные мероприятия. Ниже представлена таблица, описывающая структуру этапов лечения.
Получить дополнительные сведения – http://narcologicheskaya-clinika-v-rnd19.ru/chastnaya-narkologicheskaya-klinika-rostov-na-donu/
В этом материале мы разберём 7 основ лечения алкоголизма и расскажем, как в Ярославле получить помощь, соответствующую современным стандартам терапии.
Получить дополнительные сведения – https://lechenie-alkogolizma-yaroslavl0.ru
BlackSprut marketplace официальный сайт для входа и регистрации
blsp at bs2best at
blacksprut marketplace
Лечебный процесс организуется таким образом, чтобы каждый этап логически дополнял предыдущий и формировал устойчивую динамику. Это позволяет избежать резких изменений состояния и поддерживать медицинскую безопасность.
Изучить вопрос глубже – http://narkologicheskaya-klinika-v-rnd19.ru
заказать кухню по размерам zakazat-kuhnyu-9.ru .
частный вытрезвитель narkologicheskaya-klinika-trezvyj-vybor.ru .
Главная проблема запоя не только в самом алкоголе, но и в последствиях для организма. За несколько дней нарушается водно-электролитный баланс, страдают сердце и сосуды, печень работает с перегрузкой, нервная система становится сверхчувствительной. На этом фоне резкая отмена алкоголя может привести к ухудшению: усиление тремора, скачки давления, выраженная тревога, бессонница, галлюцинации, судорожные реакции. Поэтому медицинский вывод из запоя — это не «разовая капельница», а комплексная стабилизация с учётом рисков. Врач оценивает состояние, собирает информацию о длительности употребления, сопутствующих заболеваниях и лекарствах, которые пациент уже принимал, и только потом выбирает тактику.
Исследовать вопрос подробнее – vyvod-iz-zapoya-moskva-ceny
Первичная оценка строится на фактах. Врач коротко уточняет жалобы, длительность употребления, переносимость препаратов и аллергии, фиксирует давление, пульс, сатурацию, при необходимости делает экспресс-ЭКГ и скрининг неврологического статуса. Далее — объясняет на понятном языке логику назначений: зачем именно такая инфузионная схема, какие ощущения нормальны в течение часа и к ночи, как организовать питьевой режим и лёгкое питание «по силам». Мы избегаем «оглушающих» седативов: дозируем узко, чтобы не получить вечернего отката и побочных эффектов. После процедуры повторно оцениваем показатели, выдаём письменные рекомендации, согласуем окно связи и условия повторного визита. Семья получает простые правила поведения дома (тишина, затемнение, ограничение экранов, отсутствие «разборов») и сигналы, когда лучше позвать врача. Итог визита — управляемая ночь и предсказуемое утро, на котором можно строить следующие шаги.
Ознакомиться с деталями – narkologicheskaya-klinika
BlackSprut marketplace официальный сайт для входа и регистрации
blsp at bs2best at
blacksprut
улучшение баннеров реклама reklamnyj-kreativ14.ru .
кухни на заказ от производителя в спб кухни на заказ от производителя в спб .
нарколог на дом срочно нарколог на дом срочно .
Отличный товар и работают ребята без перебоев https://aryanlojistik.ru тут мы, СПСР чет лажает, медленно заказы регистрирует в базуприлив бодрости учащаеться
vacation apartment rentals in dubai https://zoppoth.net 1 br apartmentbed space in abu dhabi
Как распознать легальный центр:
Подробнее можно узнать тут – лечение наркомании и алкоголизма в ярославле
В практике круглосуточного лечения применяются следующие этапы:
Исследовать вопрос подробнее – http://narcologicheskaya-klinika-v-krd19.ru/krasnodar-narkologicheskij-czentr/
WE REST в Подмосковье — это место, где городской шум остаётся позади, а на первый план выходит настоящий качественный отдых. Продуманные до мелочей дома, живая природа Пушкинского округа, активности на воде и костровые вечера — формула настоящего отдыха без компромиссов. Забронировать дом посуточно и узнать актуальные даты можно на https://we-rest.ru/ — бронирование онлайн занимает пару минут. Территория закрытая, тихая, с чётко прописанными правилами проживания для комфорта каждого гостя.
кухни на заказ в спб кухни на заказ в спб .
Режим 24/7 в клинике «Южный Контур» обусловлен особенностями течения зависимостей, при которых ухудшение состояния может происходить внезапно и в любое время суток. Наркологическая клиника в Краснодаре обеспечивает постоянную готовность медицинского персонала к приёму пациентов, что сокращает временной интервал между появлением симптомов и началом лечения. Такой формат снижает риск осложнений и повышает медицинскую безопасность.
Изучить вопрос глубже – http://narkologicheskaya-clinica-v-krasnodare19.ru/narkolog-i-psikhiatr-v-krasnodare/
кухни на заказ от производителя в спб кухни на заказ от производителя в спб .
заказать кухню в спб от производителя заказать кухню в спб от производителя .
BlackSprut marketplace официальный сайт для входа и регистрации
blsp at bs2best at
bs2best вход
Наркологическая клиника в Краснодаре рассматривается как специализированное медицинское учреждение, ориентированное на лечение зависимостей с обеспечением полной конфиденциальности и круглосуточного доступа к помощи. В клинике «Южный Контур» лечение организовано таким образом, чтобы пациент мог обратиться за медицинской поддержкой в любое время суток без риска разглашения персональной информации. Такой формат особенно актуален при острых состояниях, требующих немедленного врачебного вмешательства и постоянного контроля.
Получить дополнительную информацию – https://narkologicheskaya-clinica-v-krasnodare19.ru
Your point of view caught my eye and was very interesting. Thanks. I have a question for you. https://www.binance.info/register?ref=IHJUI7TF
раскрутка и продвижение сайта раскрутка и продвижение сайта .
Врачи клиники используют современные методики, сочетающие медикаментозную терапию, психотерапию и физиологическое восстановление. Основное внимание уделяется не только физическому очищению организма, но и устранению причин, провоцирующих зависимость. Благодаря постоянному мониторингу жизненных показателей и корректировке схемы лечения удаётся избежать осложнений и обеспечить безопасное восстановление.
Подробнее тут – http://narkologicheskaya-klinika-v-krd19.ru/krasnodar-narkologicheskij-czentr/
по моему ты уже сам все расположил Мефедрон, Марихуану, Бошки, Кокаин Извините удаляю сообщение!Парни, здраствуйте, а выписываете на свое имя? просто все хочу попробывать, но блин.. сыкотно ((
BlackSprut marketplace официальный сайт для входа и регистрации
blsp at bs2best at
bs2web at
dubai property prices are stagnent https://finalfinalsfsportsbar.com british property developers in dubairufi real estate dubai
заказать кухню под размеры заказать кухню под размеры .
Тендерный специалист помогает разобраться в особенностях каждого закона, а также обеспечивает грамотное сопровождение всех процедур. Это особенно важно для компаний, которые только начинают участвовать в торгах и не имеют опыта работы с государственными контрактами.
Узнайте, как это работает – https://tendernoe-soprovozhdenie-rostov-na-donu.ru
заказать кухню через интернет zakazat-kuhnyu-9.ru .
нарколог на дом краснодар нарколог на дом краснодар .
При употреблении психоактивных веществ риск осложнений часто выше и непредсказуемее: неизвестный состав, сочетания, влияние на сердечный ритм, дыхание и психическое состояние. Поэтому детоксикация при наркотической зависимости строится особенно аккуратно: врач оценивает состояние, собирает информацию о симптомах, возможных сочетаниях и прошлых осложнениях, а затем выбирает тактику стабилизации. Важно, что в таких случаях «сделать быстро и без вопросов» — самый опасный подход.
Получить дополнительную информацию – narkologicheskaya klinika v oblasti
Многих останавливает страх огласки и лишних последствий. В небольшом городе или в плотном окружении человеку важно сохранить личные границы: не «светиться», не объясняться на работе, не становиться объектом разговоров. Из-за этого помощь часто откладывают, а вместо неё выбирают рискованные компромиссы: «выйду сам», «попью понемногу», «усну на таблетках», «перетерплю ночь». На практике такие попытки часто усиливают проблему: запой затягивается, отмена переносится тяжелее, тревога растёт, сон разрушается, давление и пульс становятся нестабильными. Поэтому в наркологии важна возможность быстро начать лечение безопасно и без лишнего стресса — с понятными правилами, спокойной коммуникацией и медицинским контролем.
Получить дополнительные сведения – rabota-narkologicheskoj-klinike
Лечебный процесс организуется таким образом, чтобы каждый этап логически дополнял предыдущий и формировал устойчивую динамику. Это позволяет избежать резких изменений состояния и поддерживать медицинскую безопасность.
Углубиться в тему – наркологические клиники алкоголизм
«Ведьмак» — признанный хит в жанре фэнтези и боевика совместного американо-польского производства по одноимённым книгам. Главный герой — Геральт из Ривии, мутант-охотник с обострёнными инстинктами и трезвым рассудком — живёт на границе между человеческим и чудовищным мирами. Его путь неразрывно связан с амбициозной чародейкой Йеннифэр и юной принцессой Цири — девушкой с даром, способным перевернуть судьбу целого континента. Ищете сериал ведьмак? Все 33 серии четырёх сезонов доступны на vedmak-smotret.online с профессиональной озвучкой и без регистрации. Политические интриги, моральные дилеммы и зрелищные схватки делают сериал обязательным к просмотру.
К основным направлениям помощи, как правило, относятся:
Получить больше информации – государственная наркологическая клиника
срочный выезд нарколога на дом narkolog-na-dom-v-krasnodare-3.ru .
Британский «Шерлок» 2010 года — дерзкая и точная адаптация классики Конан Дойла, действие которой перенесено в современный Лондон со смартфонами, интернетом и медийным шумом. Знаменитый консультирующий детектив с феноменальными аналитическими способностями раскрывает запутанные преступления вместе с напарником-ветераном — их тандем и есть главная ось повествования. Все 13 серий выстроены как полноценные фильмы — с плотным сценарием, искромётными диалогами и фирменной подачей мыслительного процесса детектива прямо на экране. Ищете шерлок все серии? Все сезоны в отличном качестве собраны на sherlok-smotret.online — смотри бесплатно без регистрации. Напряжённый детектив, триллер и фирменный британский юмор органично соединились в сериале с оценкой 9.0 из 10.
заказ кухни заказ кухни .
Да магаз от души тут работает давно и чётко ,было время работал с ним по опту !!! С новым годом всех! https://severnye-amury.ru вообще ктонибудь в этом магазине еще заказывал?? получал что нибудь ? или хотя бы треки бились?конечно оно так, все придет строго сколько сколько надо. Но ведь из за таких задержек могут и дела сорваться
BlackSprut marketplace официальный сайт для входа и регистрации
blsp at bs2best at
bs2best вход
позиция карточки в выдаче позиция карточки в выдаче .
apartments in sheikh zayed road dubai Property For Sale In Dubai buy property in dubai with zero down paymentBayview Boulevard
Школа-студия Юлии Бурдинцевой в Москве предлагает профессиональные курсы парикмахеров с практической направленностью — обучение на реальных клиентах начинается с четвертого дня занятий. Программы включают колористику, мужские стрижки, универсальные техники и повышение квалификации для действующих мастеров. Ищете осанка парикмахера? Записаться на курсы и узнать расписание можно на j-center.ru, где представлена вся информация о программах обучения. Преподаватель — мастер международного класса Юлия Бурдинцева передает студентам профессиональные секреты и навыки работы с клиентами.
BlackSprut marketplace официальный сайт для входа и регистрации
blsp at bs2best at
blsp сайт
заказать кухню с установкой zakazat-kuhnyu-10.ru .
Для оценки состояния используется расширенная диагностика: лабораторные анализы, ЭКГ, психологическое тестирование и биохимические маркеры. По результатам обследования составляется индивидуальный план, включающий детоксикацию, фармакотерапию и реабилитационные мероприятия. Ниже представлена таблица, описывающая структуру этапов лечения.
Получить дополнительную информацию – наркологическая клиника наркологический центр ростов-на-дону
Прежде всего необходимо убедиться, что учреждение официально зарегистрировано и обладает соответствующей лицензией на медицинскую деятельность. Этот документ выдается Минздравом и подтверждает соответствие установленным нормам.
Исследовать вопрос подробнее – http://lechenie-narkomanii-yaroslavl0.ru/czentr-lecheniya-narkomanii-yaroslavl/
профессиональное продвижение сайтов internet-agentstvo-prodvizhenie-sajtov-seo.ru .
мы говорили что мхе качество не очень, он такой пришел, сказали поменяем дак поменяем, ты стучи туда с кем об обмене разговаривал… https://tsentrosvar.ru Один из топовых продавцов на всем РЦ:)мои близкий поделился вашими контактами когда про бывали ваш товар)
Инфузионная терапия — не универсальный раствор «для всех». Её смысл — восстановить объём циркулирующей крови, скорректировать электролиты, снизить токсическую нагрузку, мягко приглушить тремор и тревогу, вернуть условия для сна. Мы начинаем с оценки реакции организма и двигаемся небольшими порциями, чтобы избежать «перегрева» препаратами. При выраженной тошноте подключаем противорвотную поддержку и гастропротекцию; при необходимости — печёночные субстраты и витамины группы B; кардиологические или антигипертензивные решения применяем только по показаниям. Врач сразу оговаривает, какие ощущения нормальны (сонливость, умеренная слабость, сухость во рту), а какие — повод для немедленной связи. Такой реализм даёт не косметическое облегчение «на час», а устойчивую траекторию на дни: эффект инфузий не «сгорает» к вечеру, потому что их поддерживают правила сна, воды и питания.
Получить больше информации – [url=https://narkologicheskaya-klinika-podolsk9.ru/]наркологическая клиника московская московская область[/url]
hotel apartments in dubai cheapest in deira al rigga Commercial Property For Sale In Dubai bin hamoodah properties dubai officealliance real estate dubai
Запой редко начинается «в один день». Чаще это накопленный стресс, бессонница, усталость, попытка снять напряжение алкоголем, а затем — потеря контроля. В Москве ситуация усугубляется темпом: работа, дороги, ответственность, постоянные дедлайны. Человек может держаться внешне, но организм постепенно истощается: нарушается сон, растёт тревога, скачет давление, усиливается тремор, появляются перебои в сердце, тошнота, рвота, панические реакции. В какой-то момент становится ясно, что «перетерпеть» не получится, а самостоятельные попытки резко прекратить употребление только повышают риск осложнений. Вывод из запоя в наркологической клинике «Точка Равновесия» — это медицинская помощь, цель которой безопасно остановить употребление, снять интоксикацию и стабилизировать состояние так, чтобы человек мог восстановиться без опасных «качелей» и с понятным планом на ближайшие сутки и недели.
Получить дополнительную информацию – https://vyvod-iz-zapoya-moskva1-12.ru/vyvod-iz-zapoya-v-moskve-stacionar
BlackSprut marketplace официальный сайт для входа и регистрации
blsp at bs2best at
blsp сайт
Looking for new york immigration lawyer? Visit shautsova.com and discover everything about Alena Shautsova, a skilled American immigration lawyer located in New York City who is committed to delivering the finest short- and long-term answers to her clients’ immigration challenges. Learn more about our services or schedule an initial consultation. We have successfully helped hundreds of clients navigate complex immigration processes. Visit our website to discover more.
частный нарколог на дом частный нарколог на дом .
кухни спб кухни спб .
кухня на заказ спб кухня на заказ спб .
Лечение в круглосуточном режиме рассматривается как непрерывный медицинский процесс, а не как разовое вмешательство. Даже при экстренном обращении терапия выстраивается последовательно, с обязательным врачебным наблюдением и оценкой динамики состояния пациента.
Узнать больше – частная наркологическая клиника
BlackSprut marketplace официальный сайт для входа и регистрации
blsp at bs2best at
bs2web at
Бро, выходные, подожди до понедельника https://forneed.ru Мы очень рады! Обращайтесь к нам еще!Отзыв ждать ? Ты это умеешь , на бизе писал не плохие …
Тендерный специалист помогает разобраться в особенностях каждого закона, а также обеспечивает грамотное сопровождение всех процедур. Это особенно важно для компаний, которые только начинают участвовать в торгах и не имеют опыта работы с государственными контрактами.
Полная картина — внутри – https://tendernoe-soprovozhdenie-rostov-na-donu.ru
Проблема алкоголизма в Ярославле, как и в других регионах России, остаётся одной из самых актуальных. По данным Минздрава РФ, количество людей, нуждающихся в медицинской помощи из-за злоупотребления спиртным, ежегодно растёт. При этом эффективное лечение возможно лишь при комплексном подходе, включающем как медицинскую, так и психологическую поддержку.
Подробнее тут – https://lechenie-alkogolizma-yaroslavl0.ru/klinika-lecheniya-alkogolizma-yaroslavl/
Ниже представлена таблица, демонстрирующая основные направления деятельности клиники и их особенности:
Получить больше информации – https://narkologicheskaya-klinika-v-krd19.ru/narkolog-i-psikhiatr-v-krasnodare
анализ креативов анализ креативов .
luxury holiday villas for rent in dubai https://freizeitsportler.net rent by months dubaidubai properties rent to own
В этом разделе мы исследуем, как детский опыт формирует взрослую личность и влияет на выбор партнёров, карьеры и отношения с собой. Мы рассмотрим концепции привязанности, внутренних убеждений и репетиции сценариев. Читатели получат понимание того, как осознать и изменить устаревшие паттерны поведения.
Узнать больше – http://google.com.sl/url?q=https://psychologyhub.site/nachat-novuyu-zhizn
После стабилизации важно закрепить результат. В первые 1–3 дня сохраняются слабость, раздражительность, эмоциональные качели, нарушения сна. Без плана и поддержки многие срываются, потому что пугаются ухудшения вечером или ночью и пытаются снять дискомфорт алкоголем. Поэтому врач даёт рекомендации на ближайшие сутки и несколько дней: как организовать сон, питание, питьевой режим, что контролировать по давлению и пульсу, какие нагрузки исключить и по каким признакам нужно срочно обращаться повторно.
Выяснить больше – наркологическая клиника на дом
hotel apartments in karama area dubai dubai properties security my real estate2 bedroom cheap house to rent in dubai
Комплексный подход позволяет не просто стабилизировать физическое состояние пациента, но и обеспечить долговременный результат. Каждый этап лечения сопровождается медицинским наблюдением и корректируется по мере улучшения состояния.
Изучить вопрос глубже – наркологическая клиника вывод из запоя краснодар
поисковое продвижение москва профессиональное продвижение сайтов internet-agentstvo-prodvizhenie-sajtov-seo.ru .
BlackSprut marketplace официальный сайт для входа и регистрации
blsp at bs2best at
blsp at
А я не могу сделать покупку почему-то, обидно, блииин, денюха сегодня!!!( https://enserv24.ru Лучше набери их в скайпе или аське так гораздо быстрей будетНу теперь к самому главному – качество!
Обручальное кольцо — это не просто украшение, а символ вечного союза, который будет на руке каждый день на протяжении всей жизни, и выбирать его стоит с особой тщательностью. Именно такой подход исповедует московский ювелирный магазин https://obruchalnyye-koltsa.ru/, предлагающий парные кольца из белого и жёлтого золота 585 пробы. Каждое изделие изготовлено из сертифицированного сплава: медь в составе придаёт металлу прочность и гипоаллергенные свойства, а мастера учитывают все нюансы — от толщины шинки до огранки вставок. Каталог охватывает широкий ценовой диапазон, позволяя найти кольцо мечты вне зависимости от бюджета.
BlackSprut marketplace официальный сайт для входа и регистрации
blsp at bs2best at
bs2best at
После стабилизации важно закрепить результат. В первые 1–3 дня сохраняются слабость, раздражительность, эмоциональные качели, нарушения сна. Без плана и поддержки многие срываются, потому что пугаются ухудшения вечером или ночью и пытаются снять дискомфорт алкоголем. Поэтому врач даёт рекомендации на ближайшие сутки и несколько дней: как организовать сон, питание, питьевой режим, что контролировать по давлению и пульсу, какие нагрузки исключить и по каким признакам нужно срочно обращаться повторно.
Получить дополнительные сведения – http://narkologicheskaya-klinika-zhukovskij12.ru/
производство кухонь в спб на заказ kuhni-spb-49.ru .
кухни спб на заказ кухни спб на заказ .
заказать кухню спб заказать кухню спб .
1 bhk apartment for rent in deira dubai dubai properties lagoons office location national properties dubaitop real estate developers
похожа на соль в криисталлахс на вкус че? https://bau100.ru В общем я всегда доверял своей логике и считаю ее правильной, многие соглашаются с ней, но видимо тут никто толком ни с кем не согласится, потому соглашусь с тем, что кончаем с оффтопомПриветствую. Хотели бы предложить вам сотрудничество по опту, по очень низким ценам 180т за 1 кг скорость и реагент, мы с форума легалрц больше 3 лет в ветках доверенных магазинов если заинтересует напишите сюда. , делаем кладом , вот ссылка на нашу ветку //legalrc.com/forums/mix/ контакты можете сверить из подписи
заказать кухню через интернет заказать кухню через интернет .
В рамках клинической работы применяются следующие направления медицинского воздействия, которые обеспечивают целостность лечебного процесса:
Ознакомиться с деталями – http://narkologicheskaya-klinika-v-rnd19.ru/narkologiya-rostov-kruglosutochno/
Клиника создана как современное пространство для безопасного восстановления. Здесь пациенты получают комплексную помощь в комфортных условиях. Основные преимущества учреждения:
Подробнее – наркологическая клиника цены
BlackSprut marketplace официальный сайт для входа и регистрации
blsp at bs2best at
bs2best at
Наркологическая помощь обычно делится на две большие части: экстренная стабилизация и лечение зависимости как долгосрочной задачи. Экстренная помощь нужна при запое, абстиненции, интоксикации, сильной тревоге и бессоннице, когда человеку плохо прямо сейчас. Долгосрочное лечение — когда запои повторяются, тяга усиливается, появляются срывы, а жизнь постепенно строится вокруг употребления.
Подробнее – narkologicheskaya-klinika-spravka-dlya-gai
Запой редко начинается «в один день». Чаще это накопленный стресс, бессонница, усталость, попытка снять напряжение алкоголем, а затем — потеря контроля. В Москве ситуация усугубляется темпом: работа, дороги, ответственность, постоянные дедлайны. Человек может держаться внешне, но организм постепенно истощается: нарушается сон, растёт тревога, скачет давление, усиливается тремор, появляются перебои в сердце, тошнота, рвота, панические реакции. В какой-то момент становится ясно, что «перетерпеть» не получится, а самостоятельные попытки резко прекратить употребление только повышают риск осложнений. Вывод из запоя в наркологической клинике «Точка Равновесия» — это медицинская помощь, цель которой безопасно остановить употребление, снять интоксикацию и стабилизировать состояние так, чтобы человек мог восстановиться без опасных «качелей» и с понятным планом на ближайшие сутки и недели.
Выяснить больше – http://vyvod-iz-zapoya-moskva1-12.ru
BlackSprut marketplace официальный сайт для входа и регистрации
blsp at bs2best at
bs2best вход
apartment to rent for a month in dubai https://cursogratuitoonline.org/rental-companies-in-dubai.html al tayer al wasl buildinglist rental property for free dubai
бля у нас опен эйр будет 11 июня у шамана пороха нету!!!вот ищу где бы взять что нибудь на подобие скорости или кокса!а тут отзывы что соду продают! Мефедрон, Марихуану, Бошки, Кокаин chem24.biz.ski заходи и приколисья звонил седня.сказали либо номер не правлеьный..либо не отправили еще
Кроме того, наличие медицинской базы с возможностью круглосуточного мониторинга состояния пациента является дополнительным преимуществом. Это особенно важно на этапе детоксикации, когда организм испытывает серьезные нагрузки.
Подробнее – https://lechenie-narkomanii-yaroslavl0.ru/lechenie-narkomanii-i-alkogolizma-yaroslavl
Клиника создана как современное пространство для безопасного восстановления. Здесь пациенты получают комплексную помощь в комфортных условиях. Основные преимущества учреждения:
Углубиться в тему – наркологическая клиника наркологический центр в ростове-на-дону
Соблюдение конфиденциальности в клинике «Точка Опоры» является неотъемлемой частью лечебного процесса. Наркологическая клиника в Краснодаре обеспечивает закрытый формат приёма, хранения медицинских данных и взаимодействия с пациентом. Практика показывает, что анонимное обращение снижает уровень тревожности, способствует более открытому диалогу с врачом и повышает точность клинической диагностики.
Углубиться в тему – частная наркологическая клиника краснодар
РАМТЕПЛО — компания, которая реализует весь комплекс работ по инженерным системам для частных домов в Москве и Московской области: отопление, водоснабжение, канализация, электромонтаж, вентиляция и «Умный дом». Специалисты берутся за проекты любой сложности — от котла и тёплого пола до промышленной автоматики. Актуальные акции: подготовка к отопительному сезону от 2900 р. и радиаторы Rifar Monolit по 750 р./сек. Подробности об услугах и ценах на https://ramteplo.ru/ — заявку можно оставить онлайн. На все выполненные работы компания распространяет гарантию и предоставляет сервисное обслуживание.
Далее выполняется медицинская детоксикация: корректируется водно-электролитный баланс, снимается интоксикация, поддерживается работа сердечно-сосудистой системы, снижается тремор, стабилизируется сон и тревожность. Важно, что схема подбирается индивидуально: при разных рисках объём поддержки будет различаться. В ряде случаев достаточно амбулаторного наблюдения и рекомендаций, в других — нужен стационар, чтобы контролировать динамику и вовремя корректировать терапию.
Выяснить больше – https://vyvod-iz-zapoya-moskva1-12.ru/vyvod-iz-zapoya-v-moskve-na-domu/
Перед списком важно: пункты ниже не заменяют осмотр, а помогают семье быстрее принять здравое решение. В большинстве таких ситуаций достаточно правильно подобранных инфузий и чётких правил на 48–72 часа; при сочетании признаков мы рекомендуем стационар.
Получить больше информации – http://narkologicheskaya-klinika-podolsk9.ru/narkologicheskaya-klinika-stacionar-v-podolske/
кухни на заказ санкт петербург кухни на заказ санкт петербург .
Thank you for your sharing. I am worried that I lack creative ideas. It is your article that makes me full of hope. Thank you. But, I have a question, can you help me? https://www.binance.info/register?ref=JW3W4Y3A
всё отлично,ровно,супер! ) Мефедрон, Марихуану, Бошки, Кокаин быстрая доставка однако тут)))в магазин приятно удивили цены, сделал заказ, надеюсь все придет в лучшем виде
arosa real estate dubai https://lighthouseoflewisville.org/golf-properties-in-dubai.html danube al barsha7 bedroom Villas for sale in Arabian Ranches
BlackSprut marketplace официальный сайт для входа и регистрации
blsp at bs2best at
blsp at
кухни от производителя спб недорого и качественно kuhni-spb-49.ru .
Многие семьи сталкиваются с вопросом: куда обратиться, чтобы получить реальную помощь? В городе работают как государственные, так и частные наркологические учреждения, но не все из них предлагают действительно результативные программы. Чтобы избежать ошибок, важно знать ключевые аспекты, на которые следует опираться при выборе клиники.
Получить дополнительные сведения – центр лечения алкоголизма ярославль
В практике круглосуточного лечения применяются следующие этапы:
Ознакомиться с деталями – наркологическая клиника лечение алкоголизма
кухни спб на заказ кухни спб на заказ .
заказать кухню с установкой zakazat-kuhnyu-12.ru .
BlackSprut marketplace официальный сайт для входа и регистрации
blsp at bs2best at
bs2 market
Критерии оценки профессионального уровня сотрудников:
Исследовать вопрос подробнее – клиника лечения алкоголизма
«Мандалорец» — один из ключевых сериалов Disney+ в мире «Звёздных войн», в котором приключенческое кино сплавлено с атмосферой космического вестерна. После падения Галактической Империи одинокий воин в бескарной броне принимает один опасный заказ за другим на дальних рубежах галактики. Всё меняется, когда вместо добычи он находит загадочного ребёнка, владеющего Силой. Ищете мандалорец все серии? На mandalorec-smotret.net все три сезона доступны бесплатно с профессиональной озвучкой. Захватывающий сюжет, запоминающиеся персонажи и безупречно переданный дух вестерна закрепили за сериалом статус культового хита.
парни все ок проверенно ))) https://guentnerservice.ru норм. Все кладки нахожу без проблем… взял белого и…охуел!!!магаз клёвый ,:bravo:сервис на высоте
dubai lagoon property for sale https://getreplayvalue.com/room-for-rent-in-al-barsha-3.html top buyers of dubai propertysmn real estate dubai
Такой подход позволяет наркологической клинике в Краснодаре выстраивать лечение в безопасной и профессиональной среде.
Детальнее – narkologicheskaya-clinica-v-krasnodare19.ru/
«Очень странные дела» — без преувеличения один из главных сериалов эпохи: провинциальный городок, бесследно исчезнувший ребёнок и события, стремительно выходящие за рамки привычной реальности. Группа подростков, загадочная девочка со сверхспособностями и тайная правительственная лаборатория — всё это сплетается в захватывающий микс ужасов, фантастики и подросткового приключения. Ищете очень странные дела все серии? Все 42 серии в отличном качестве доступны на ochen-strannye-dela-smotret.online с множеством вариантов озвучки. Авторам удалось органично соединить саспенс крепкого триллера с тёплой и честной историей о дружбе, семье и взрослении.
Первый контакт строится вокруг фактов «здесь и сейчас». Врач уточняет длительность употребления, принятые за последние 24–48 часов препараты, сопутствующие диагнозы и аллергии, фиксирует давление, пульс, сатурацию, температуру, оценивает выраженность тремора и уровень тревоги; при необходимости выполняется экспресс-ЭКГ и элементарный неврологический скрининг. Далее план объясняется простым языком: какие инфузии будут сегодня, чего ждать через 30–60 минут, как организовать вечер и когда состоится контрольная связь. Мы избегаем универсальных «сильных смесей» и «оглушающих» дозировок: они дают краткий «блеск» с вечерним откатом и повышают риск побочных эффектов. Вместо этого используется узкая, клинически достаточная схема: регидратация для восстановления объёма циркулирующей жидкости, коррекция электролитов, печёночная поддержка, противорвотные и гастропротекция при необходимости, мягкая анксиолитическая коррекция по показаниям. После процедуры врач повторно оценивает показатели, оставляет письменные рекомендации на 48–72 часа, согласует окно связи и обозначает «красные флажки» для немедленного контакта. Такой прозрачный маршрут убирает импровизации и делает поведение семьи предсказуемым, что особенно важно в «тёмные часы» вечера.
Подробнее – https://vyvod-iz-zapoya-himki9.ru/vyvod-iz-zapoya-v-stacionare-v-himkah/
BlackSprut marketplace официальный сайт для входа и регистрации
blsp at bs2best at
blacksprut marketplace
Лечебный процесс организуется таким образом, чтобы каждый этап логически дополнял предыдущий и формировал устойчивую динамику. Это позволяет избежать резких изменений состояния и поддерживать медицинскую безопасность.
Получить дополнительные сведения – наркологическая клиника лечение алкоголизма ростов-на-дону
Бро, доброго дня. В личку реквы на оплату жду, на сайт тоже попасть не могу… https://ero-binger.ru Всем ровным магазинам тройной пролетарский УРА! И чтобы они всегда такими оставались :good:Привет всем бандиты? как дела у вас?
BlackSprut marketplace официальный сайт для входа и регистрации
blsp at bs2best at
blacksprut marketplace
shapoorji pallonji new projects in dubai mall https://modernotthon.net/three-bedrooms-for-rent.html flats for rent in dubai direct from ownerguide to buying a sell real estate in dubai
кухни на заказ от производителя в спб кухни на заказ от производителя в спб .
Самостоятельные попытки обычно идут по двум сценариям: либо человек продолжает пить «понемногу, чтобы не трясло», либо резко прекращает и пытается «перетерпеть». В первом случае запой растягивается и истощение накапливается: ухудшается сон, растёт нагрузка на сердце и сосуды, усиливается обезвоживание, возрастает риск осложнений. Во втором сценарии симптоматика отмены может нарастать резко: тревога, паника, тремор, потливость, скачки давления, тахикардия, рвота, бессонница. И если рядом нет плана и медицинского контроля, человек пугается и снова начинает пить, потому что это кажется единственным быстрым способом облегчить состояние.
Получить больше информации – vyvod-iz-zapoya-na-domu-nedorogo
Современное строительство не прощает компромиссов в выборе теплоизоляции: некачественный утеплитель оборачивается хронически холодными стенами, промерзающими крышами и постоянно растущими счетами за отопление. Именно здесь на первый план выходит каменная вата «Базальтум» — материал, созданный из горных пород базальтовой группы и способный решить сразу несколько задач. На сайте https://basaltum.su/ представлена линейка продуктов для любого узла здания: Фасад, Вент, Руф, Флор, Акустик и Сэндвич. Каждая плита негорюча, гидрофобизирована, устойчива к грызунам и обладает превосходными звукоизолирующими свойствами. Доставка осуществляется по всей России, а стабильное качество материала подтверждено многолетней практикой применения в жилом и коммерческом строительстве.
В практической работе выделяются последовательные этапы, обеспечивающие медицинскую целостность:
Детальнее – http://narkologicheskaya-klinika-v-rnd19.ru
кухни на заказ от производителя в спб кухни на заказ от производителя в спб .
BlackSprut marketplace официальный сайт для входа и регистрации
blsp at bs2best at
blsp at
не ссы капустин поебем и отпустим https://psychology-aura-soma.ru вообще почта 1 класс оказываеться самое быстрое.. 2-3 суток и приходитКому-нибудь отправили сегодня трек?
Терапия наркотической зависимости — не просто избавление от тяги, а глубокий восстановительный процесс, включающий физическую, психическую и социальную реабилитацию. В Ярославле помощь наркозависимым оказывается в различных учреждениях, однако не все из них обеспечивают одинаково высокий уровень качества. Как показывает практика, эффективность лечения во многом зависит от грамотно подобранной программы и профессионализма команды.
Изучить вопрос глубже – центр лечения наркомании ярославская область
Palm Hills guide luxury apartments in dubai short term rental agents dubaiproperty sme dubai
BlackSprut marketplace официальный сайт для входа и регистрации
blsp at bs2best at
bs2best at
Этот информативный текст отличается привлекательным содержанием и актуальными данными. Мы предлагаем читателям взглянуть на привычные вещи под новым углом, предоставляя интересный и доступный материал. Получите удовольствие от чтения и расширьте кругозор!
Полезно знать – https://www2.geo.sc.chula.ac.th/2019-luxury-kitchens
В этом интересном тексте собраны обширные сведения, которые помогут вам понять различные аспекты обсуждаемой темы. Мы разбираем детали и факты, делая акцент на важности каждого элемента. Не упустите возможность расширить свои знания и взглянуть на мир по-новому!
Нажмите, чтобы узнать больше – https://minesec.gov.cm/web/index.php/fr/communiques/item/262-eniet-pap?start=19950
В этом обзорном материале представлены увлекательные детали, которые находят отражение в различных аспектах жизни. Мы исследуем непонятные и интересные моменты, позволяя читателю увидеть картину целиком. Погрузитесь в мир знаний и удивительных открытий!
Что ещё? Расскажи всё! – https://house-archi.biz/?p=8160
кухня на заказ кухня на заказ .
villas for sale in thailand phuket villas for sale in thailand phuket .
net seo net seo .
condos in phuket for sale condos in phuket for sale .
врач нарколог на дом narkolog-na-dom-v-krasnodare.ru .
заказать индивидуальную кухню zakazat-kuhnyu-10.ru .
phuket villas for sale thailand villas-for-sale-in-phuket-1.com .
buy property in phuket buy property in phuket .
Эта статья погружает вас в увлекательный мир знаний, где каждый факт становится открытием. Мы расскажем о ключевых исторических поворотных моментах и научных прорывах, которые изменили ход цивилизации. Поймите, как прошлое формирует настоящее и как его уроки могут помочь нам строить будущее.
Открой скрытое – https://nds.nationaldogshow.com/blog/hello-and-welcome
нарколог на дом цены нарколог на дом цены .
нарколог на дом краснодар нарколог на дом краснодар .
phuket condos for sale phuket condos for sale .
“Думаю надо прогуляться, за Кооперативом еще кОоПератив,Захожу туда и тут описание сходиться бля Думаю тут то Полюбому” Мефедрон, Марихуану, Бошки, Кокаин Это закон, хороший отзыв мало кто оставляет, а вот говна вылить всегда есть желающие вот и получается так, те у кого все хорошо, молчат и радуютсяПринять могут в любой курьерке и уж тем более на почте. 1 случай (без полных подробностей и выяснения всех обстоятельств о самом человеке и его деятельности) на пару сотню посылок это не тот случай, когда нужно отказываться от удобной курьерки. Об этом уже говорили неоднократно. Возвращаться к этой теме больше не стоит.
В этом интересном тексте собраны обширные сведения, которые помогут вам понять различные аспекты обсуждаемой темы. Мы разбираем детали и факты, делая акцент на важности каждого элемента. Не упустите возможность расширить свои знания и взглянуть на мир по-новому!
Нажмите, чтобы узнать больше – https://jpabs.org/800/600/http/mongocco.sakura.ne.jp/bbs/index.cgi?command=viewres&target=254422906
кухни на заказ от производителя кухни на заказ от производителя .
Эта статья предлагает живое освещение актуальной темы с множеством интересных фактов. Мы рассмотрим ключевые моменты, которые делают данную тему важной и актуальной. Подготовьтесь к насыщенному путешествию по неизвестным аспектам и узнайте больше о значимых событиях.
Доступ к полной версии – http://www.adrienne-schneider.com/2015/09/just-start
Промокоды Пятёрочки https://www.time-samara.ru/content/view/785106/transformaciya-sistemy-loyalnosti-v-sovremennom-rossijskom-ritejle актуальные купоны и скидки на продукты и доставку. Получайте бонусы, снижайте стоимость заказов и экономьте на покупках. Только проверенные промокоды для выгодных покупок в Пятёрочке.
real estate in bur dubai https://freizeitsportler.net/garhoud-dubai-apartments-for-rent.html Best Price | Investor Deal | Great Locationfreehold property in dubai visa
BlackSprut marketplace официальный сайт для входа и регистрации
blsp at bs2best at
blacksprut marketplace
Эта статья предлагает живое освещение актуальной темы с множеством интересных фактов. Мы рассмотрим ключевые моменты, которые делают данную тему важной и актуальной. Подготовьтесь к насыщенному путешествию по неизвестным аспектам и узнайте больше о значимых событиях.
Исследовать вопрос подробнее – http://ministries.ministerioshebron.com/index.php?option=com_k2&view=item&id=76%E2%8C%A9=es&lang=es&limitstart=123010
Публикация предлагает читателю не просто информацию, а инструменты для анализа и саморазвития. Мы стимулируем критическое мышление, предлагая различные точки зрения и призывая к самостоятельному поиску решений.
Смотрите также… – https://yogadigest.com/get-thee-retreat/hollyhock-retreat-centre
кухни спб кухни спб .
В данной обзорной статье представлены интригующие факты, которые не оставят вас равнодушными. Мы критикуем и анализируем события, которые изменили наше восприятие мира. Узнайте, что стоит за новыми открытиями и как они могут изменить ваше восприятие реальности.
Детали по клику – https://blog.ouriken.com/mobile-first-design-approach-designing-for-mobile-devices-initially-2
Публикация предлагает читателю не просто информацию, а инструменты для анализа и саморазвития. Мы стимулируем критическое мышление, предлагая различные точки зрения и призывая к самостоятельному поиску решений.
Подробнее – https://allyoucaneatgids.nl/nieuw-all-you-can-eat-restaurant-in-ede-maar-dan-net-even-anders
Ты нам лучьше отзыв напиши о работе магазина 😀 https://autopravo124.ru Просто респектище курьеру. На моей памяти такие клады были всего раза три-четыре за три года обитания меня на этом форуме.как здесь стелят?
BlackSprut marketplace официальный сайт для входа и регистрации
blsp at bs2best at
bs2best вход
Эта статья погружает вас в увлекательный мир знаний, где каждый факт становится открытием. Мы расскажем о ключевых исторических поворотных моментах и научных прорывах, которые изменили ход цивилизации. Поймите, как прошлое формирует настоящее и как его уроки могут помочь нам строить будущее.
Лучшее решение — прямо здесь – https://writebox.cloud/index.php/wb/article/view/203
Полная версия по ссылке: https://geforce-gt-730.ru
business in dubai with low investment https://ceritaarni.com/dubai-miracle-garden-property-release.html apartments for rent in panorama greens dubaidubai adwords real estate
кухни на заказ в спб от производителя кухни на заказ в спб от производителя .
Лечение в круглосуточном режиме выстраивается как непрерывный медицинский процесс. Даже при экстренном обращении терапия не ограничивается разовым вмешательством, а рассматривается как последовательная система лечебных мероприятий с обязательным врачебным наблюдением.
Исследовать вопрос подробнее – https://narkologicheskaya-clinica-v-krasnodare19.ru/narkologa-na-dom-krasnodar
Вывод из запоя — это не только капельница. Это системная медицинская помощь, направленная на снижение интоксикации, поддержку сердца, нервной системы и внутренних органов. Правильно выстроенный детокс помогает не просто «сбить симптомы», а реально снизить риски для здоровья и дать человеку шанс вернуться к трезвому состоянию без тяжёлых последствий.
Подробнее – http://vyvod-iz-zapoya-voskresensk11.ru
Детоксикация — это не одна «капельница», а серия мероприятий, направленных на снижение токсической нагрузки, выравнивание жизненно важных показателей и возвращение контроля над самочувствием. На старте врач проводит осмотр, при необходимости — экспресс-диагностику и ЭКГ, объясняет цели инфузионной терапии, отвечает на вопросы о препаратах и возможных ощущениях в первые часы после начала. Если состояние пациента позволяет, первые шаги выполняются дома: так легче согласиться на помощь и сохранить приватность. При выраженной интоксикации, обезвоживании, скачках давления и пульса, нарушении ориентации или риске судорог безопаснее выбрать стационар: расширенная диагностика и круглосуточный мониторинг снижает вероятность осложнений и даёт возможность гибко корректировать назначения. После купирования острых проявлений команда переходит к стабилизации — настройке сна, питания, гидратации и поддерживающих схем с понятными целями на ближайшие дни.
Детальнее – https://narkologicheskaya-klinika-moskva9.ru/
Проблемы с простатой застают врасплох: увеличенная железа, учащённые позывы и слабый напор мочи заметно снижают качество повседневной жизни мужчины. ПростОптима — проверенный препарат для здоровья простаты на основе стандартизированного экстракта пальмы сереноа, дополненного маслом семян тыквы, ликопеном, селеном и цинком — эффективен при лёгкой и умеренной форме ДГПЖ. Ищете ДГПЖ профилактика? Подробнее на prostoptima.ru — препарат доступен в крупных аптечных сетях, на Wildberries, Ozon и Яндекс.Маркет.
недорогие цветы в москве где купить cveti-nederogo.ru .
BlackSprut marketplace официальный сайт для входа и регистрации
blsp at bs2best at
blacksprut
5 гр заказала, ждали 6 дней, вот забрали у курика, муж укололся, потом ещё в воде разболтали и выпили. Эффект ноль. Что с остальным делать. Хоть в унитаз высыпай https://myline-24.ru СПАСИБИЩЕ ОГРОМНОЕ ЗА СЕРВИСМеня на шалфее устраивает:)вываривать ничего не надо
BlackSprut marketplace официальный сайт для входа и регистрации
blsp at bs2best at
blsp at
renting a furnished house in dubai gip properties dubai City Walk Crestlane guider & k real estate dubai
В рамках лечебного процесса наркологическая клиника задействует структурированные механизмы наблюдения, включающие анализ лабораторных показателей, оценку соматического тонуса и изучение активности нервной системы. Эти элементы обеспечивают комплексность работы и позволяют своевременно корректировать план лечения. Такая система предотвращает перегрузку организма и способствует поддержанию стабильности на фоне применения медикаментозных схем. Ниже представлены ключевые составляющие терапевтического процесса, формирующие основу для клинического восстановления.
Разобраться лучше – наркологическая клиника цены пенза
Вывод из запоя в клинике формируется на основе последовательных процедур, направленных на стабилизацию физиологических функций и устранение токсических влияний. Такой подход позволяет корректно регулировать состояние пациента и контролировать интенсивность симптомов. Рабочие алгоритмы включают оценку метаболических процессов, анализ соматических показателей и определение степени неврологических изменений. В результате создается структурированная модель помощи, ориентированная на восстановление адаптивных возможностей организма. Процессы выполняются под контролем специалистов, что обеспечивает прогнозируемый терапевтический эффект и снижает вероятность осложнений.
Получить дополнительную информацию – http://vyvod-iz-zapoya-kemerovo18.ru/vyvod-iz-zapoya-na-domu-kemerovo/https://vyvod-iz-zapoya-kemerovo18.ru
Вызвал такси;) https://ufa-iconostas.ru че как дела?как настрой?Ну я совершенно не понимаю,как можно держать сайт в таком несоответсвии с реальностью?Пароль от админки забыли,чтоли?Сколько клиентов забило,пытаясь пробиться через мыло,которое до сих пор указано?Ппц полный.
срочный выезд нарколога на дом narkolog-na-dom-v-krasnodare-3.ru .
«Доктор Кто» — британский фантастический сериал 2005 года о таинственном путешественнике во времени, последнем из расы повелителей времени с планеты Галлифрей. В синей полицейской будке он странствует по всем эпохам бок о бок со своими спутниками — от улиц викторианского Лондона до самых отдалённых уголков космоса. Ищете сериал доктор кто? На doktor-kto-smotret.biz доступны все 171 серия в хорошем качестве. Способность к регенерации сделала образ Доктора поистине уникальным: сменив нескольких исполнителей, сериал не утратил своей особой атмосферы. Жанровый микс фантастики, драмы и комедии делает «Доктора Кто» культовым зрелищем для всей семьи.
кухни на заказ от производителя кухни на заказ от производителя .
Профессиональная подготовка — это не формальность, а ключ к безопасной и эффективной процедуре. Врач собирает подробный анамнез, уточняет длительность и характер употребления, фиксирует соматические жалобы, анализирует текущие препараты (в том числе безрецептурные), измеряет давление, пульс, сатурацию, при необходимости назначает ЭКГ и лабораторные тесты. Если есть выраженная интоксикация, бессонница, тремор, скачки давления — стартуют с детокса и стабилизации: корректируют водно-электролитный баланс, снижают тревогу, нормализуют сон. Параллельно специалист объясняет механику методик кодирования, вероятные ощущения после процедуры, ограничения по нагрузкам, правила безопасного поведения в первые недели и алгоритм действий на случай усиления тяги. Подготовительный этап снимает неопределённость, уменьшает тревогу и повышает приверженность: человек понимает, что будет происходить и как оценивать улучшение.
Подробнее – https://kodirovanie-ot-alkogolizma-moskva9.ru/kodirovanie-ot-alkogolizma-v-moskve-otzyvy
кухни в спб на заказ кухни в спб на заказ .
BlackSprut marketplace официальный сайт для входа и регистрации
blsp at bs2best at
bio earth real estate dubai https://hdmrankup.com/1-bedroom-flat-for-rent-in-dubai.html dubai hills dubaimeydan dubai property real estate
заказать кухню цена zakazat-kuhnyu-10.ru .
villas in phuket thailand for sale villas-for-sale-in-phuket.com .
real estate for sale in phuket real estate for sale in phuket .
Обращение в местную клинику даёт важное преимущество — доступность. Здесь можно пройти диагностику, детоксикацию, вывод из запоя, курс лечения и реабилитации в привычном городе, без выснаживающих переездов. Пациенту легче решиться на стационар, когда он понимает, что близкие рядом и в любой момент могут приехать, поучаствовать в обсуждении плана терапии, привезти необходимые вещи. При этом подход остаётся профессиональным: учитываются стаж зависимости, сопутствующие заболевания, психоэмоциональное состояние, семейная ситуация. Лечение строится не вокруг одной «волшебной» процедуры, а как последовательный маршрут — от первой консультации до выхода в стабильную ремиссию.
Получить больше информации – http://narkologicheskaya-klinika-chekhov11.ru/narkologicheskaya-klinika-sajt-v-chekhove/
Я потом взял лосьен Композиция (93%) в бытовой химии – 30 руб за 250 мл стоит вот в нем растворилось, только пришлось сильно греть и мешать. Кстати почемуто если с этим переборщить то химия начинает выпадать в осадок белыми хлопьями :dontknown:, но небольшое количество залитого 646 в спирт всё исправляет и все растворяется полностью купить кокаин, купить мефедрон, купить гашиш, купить бошки раньше и хуй крепче был и бабы красивейМагазин кидает. Буду писать пока не дадут адрес в ПМ. Прошу там же помочь админов.
частный нарколог на дом narkolog-na-dom-v-krasnodare.ru .
нарколог на дом цены нарколог на дом цены .
Посетите сайт https://xn--80auva3d.xn--p1ai/ и вы найдете проекты и решения в сфере дизайна, в сфере архитектуры и проектирования, узнаете все о цифровых инструментах в дизайне и много другое. На сайте много статей на перечисленные выше темы, где вы сможете почерпнуть полезную и интересную информацию.
Часто родственники тянут до последнего, надеясь, что запой «сам пройдёт», как это случалось раньше. Но с каждым эпизодом последствия становятся тяжелее: организм изнашивается, возрастает риск осложнений, ухудшается психика. Особенно опасно, когда запой длится несколько дней подряд, а любые попытки самостоятельно сократить дозы алкоголя сопровождаются дрожью, бессонницей, приступами паники.
Изучить вопрос глубже – vyvod-iz-zapoya-v-moskve-nedorogo
BlackSprut marketplace официальный сайт для входа и регистрации
blsp at bs2best at
bs2best at
«Острые козырьки» — признанная классика британской криминальной драматургии, разворачивающейся в послевоенном Бирмингеме начала XX века. В центре — семья Шелби во главе с Томасом: ветеран войны с холодным расчётом и железной волей превращает уличную банду в криминальную империю. Фирменные козырьки с лезвиями, подпольный тотализатор, интриги и жёсткое противостояние с властью — каждая серия удерживает у экрана до самого финала. Ищете острые козырьки смотреть онлайн сериал острые козырьки? Ostrye-kozyrki-smotret.online — все шесть сезонов с профессиональной озвучкой доступны бесплатно. Тягучая послевоенная атмосфера, безупречные декорации эпохи и незабываемый Киллиан Мёрфи в роли Томаса Шелби — всё это делает сериал обязательным к просмотру.
condos in phuket for sale condos in phuket for sale .
кухни на заказ в спб от производителя kuhni-spb-49.ru .
luxury apartments for sale phuket apartments-for-sale-in-phuket-1.com .
Клиника нужна и тем, кто уже пробовал лечиться самостоятельно: пил лекарства «от тяги», ходил к психологу без медицинской поддержки, обещал себе не пить, но каждый стресс или конфликт всё равно приводили к старому сценарию. В такой ситуации комплексный подход — медицинский и психологический — даёт куда больше шансов, чем очередное одиночное обещание «в этот раз точно получится».
Выяснить больше – наркологическая клиника в химках
O PlayJonny, também conhecido como https://opensourcebridge.science/wiki/User:CassandraArchdal, se sobressai como sendo uma única site para jogos de casino digital a qual une lazer, segurança junto com uma boa vivência clara para clientes. A crescente fama em sites como o casino play jonny revela a necessidade por ambientes online seguras, onde os jogadores têm aproveitar de diversos jogos sem dificuldades complicações. O PlayJonny oferece um catálogo variado de jogos, incluindo máquinas, jogos de roleta, jogos de cartas junto com mais jogos de mesa, clássicos, cada um minuciosamente projetados com o objetivo de garantir ao mesmo tempo entretenimento e também o potencial com ganhos reais. O plataforma do PlayJonny é intuitiva, permitindo os usuários explorem facilmente nas áreas de games, promoções e suporte. Também, a plataforma investe em tecnologia avançada a fim de assegurar a proteção de dados e transações protegidas, algo essencial para qualquer jogo digital atual. Aos apostadores, confiança além de clareza são fatores importantes, além disso play jonny casino se firmou nessa questão, dando registro válido junto com regras claras. A experiência de usuário dentro do play jonny é aprimorada com visual de qualidade, animações leves junto com sons realistas que fazem o jogo mais viva e divertida. Igualmente torna-se importante destacar que a opção permite suporte a múltiplos dispositivos, dando a chance de usuários entrem o play jonny em desktops, tablets & celulares sem perda de perda de qualidade ou performance. Essa acessibilidade ajuda muito à fama casino play jonny em diferentes perfis de jogadores. Além disso, playjonny casino sobressai pela renovar sempre em catálogo, dando certeza de que modas do mercado de cassino sejam rapidamente incorporadas. Dessa forma, os usuários acham constantemente novos jogos e desafios, preservando o engajamento e o contentamento no play jonny casino. Juntando proteção, variedade de jogos junto com facilidade de uso, play jonny é visto como sendo uma opção confiável e apetecível para jogadores em busca de experiência total de cassino online.
После вспышки страшной эпидемии, обратившей людей в кровожадных монстров, бывший шериф Рик Граймс становится во главе горстки уцелевших. Ищете ходячие мертвецы смотреть онлайн сериал ходячие мертвецы? Все 178 серий доступны на hodyachie-mertvetsy-smotret.online с множеством вариантов озвучки. Авторы откровенно и без прикрас демонстрируют хрупкость человеческой природы: выжившие постоянно стоят перед страшным выбором между гуманностью и жестокой необходимостью. Каждый следующий сезон обрушивает на персонажей ещё более жёсткие нравственные испытания — любовь и ненависть, лидерство и тирания сталкиваются в этой беспощадной истории о выживании человечества.
al waleed real estate dubai 1bhk apartment in bur dubai dubai long stayfamily room for rent in dubai muhaisnah villa
Всё нашел!! Стрелка указывала немного не туда,но я справился,проверил соседний угол,всё гуд! Спасибо динамиту! Мяу идеальный!! Рекомендую!! купить кокаин, купить мефедрон, купить гашиш, купить бошки Заказал-оплатил 50г реги, а отношение как не знаю к кому…А я не могу сделать покупку почему-то, обидно, блииин, денюха сегодня!!!(
BlackSprut marketplace официальный сайт для входа и регистрации
blsp at bs2best at
bs2web at
Там, где раньше хватало одного тяжёлого утра, теперь требуются дни детоксикации. И чем позже подключается врач, тем сложнее вернуть организм к относительно безопасному состоянию.
Подробнее тут – centr-vyvoda-iz-zapoya
частного нарколога на дом narkolog-na-dom-v-krasnodare-3.ru .
спасибо за инфу , но только узнал про новый список запвеществ , чувствую вся лавочка прикроется на некоторое время … https://allur-floor.ru Брал у него все гудд. Маскировка на высоте качество отличное. буду брать ещес радостью сообщаю что посыль пришла в мой солнечный город,и я рад…не только потому что она дошла а тому что всю длинную дорогу (10дней)со мной оставался на связи магазин,работает без всяких проволочек,без гемора свойственного многим магазинам,всё дошло конспирация на наивысшем уровне как и сам магазин,ребята удачных вам продаж и многолетнего существования
house for rent in deira dubai https://hdmrankup.com/honda-accord-monthly-rent-dubai.html i bedroom apartment for rent in dubaibest real estate companies in dubai
Такая структура терапии обеспечивает контроль на всех стадиях и помогает добиться устойчивого результата без вреда для здоровья. Пациент получает не просто временное облегчение, а полное восстановление физического и эмоционального состояния.
Подробнее тут – лечение в наркологической клинике
Σύγχρονος κόσμος των σύγχρονων online καζίνο μεταβάλλεται με ταχύτατη δυναμική καθώς εντός του συγκεκριμένου το απαιτητικό χώρο το https://tandme.co.uk/author/annamacandi/ πέτυχε να αποκτήσει την ματιά παικτών οι οποίοι ψάχνουν συνδυασμό αξιοπιστίας, ευκολίας καθώς και δυνατής δραστηριότητας. Η συγκεκριμένη βάση sava spin, η οποία συχνά πολλές φορές προσδιορίζεται επίσης ως sava spin casino, προβάλλει μία στιβαρή προσωπικότητα που επικεντρώνεται σε μια ομαλή ροή, στην κατανοητή πλοήγηση χρήστη και στην τακτική ενημέρωση περιεχομένου. Από τη στιγμή τα αρχικά πρώτα δευτερόλεπτα χρήσης γίνεται ξεκάθαρο ότι το sava spin casino αναπτύχθηκε με εμφανή βάρος στην ακρίβεια ενώ με σκοπό κατεύθυνση την καλύτερη ευχρηστία χρήσης. Όσο αφορά από την γνώση ή ακόμη τη δυναμική του εκάστοτε μέλους. Η με φροντίδα σχεδιασμένη επιφάνεια και η ταχεία μετάβαση σε όλα τα προτιμώμενα title και η αρμονία στη παρουσίαση του περιεχομένου βοηθούν ώστε να το συνολικό sava spin casino να υπερέχει σε μια πολύ ανταγωνιστική αγορά στην οποία άπειρες πλατφορμών ανταγωνίζονται για την ματιά του κόσμου. Το ίδιο το casino sava spin παρέχει μία πλήρη προσέγγιση προσθέτοντας εύρος τίτλων με παράλληλη στοιχεία που πάντα προσαρμόζονται στις σύγχρονες απαιτήσεις της κοινότητας των χρηστών, όπως για παράδειγμα άμεση κίνηση, καθαρή εικόνα, απρόσκοπτη ροή. Επιπλέον, το σύστημα προσφέρει εικόνα πως δημιουργήθηκε με κατεύθυνση την ασφάλεια και την εμπιστοσύνη, χαρακτηριστικά σημαντικά για οποιαδήποτε μορφή διαδικτυακής ψυχαγωγίας. Η ίδια η αρμονική ένταξη των στοιχείων savasin casino, savaspin και επίσης sava spin στο χώρο του περιβάλλον της υπηρεσίας στηρίζει στην αρμονία του προφίλ της καθώς και δυναμώνει την προβολή. Με αυτόν τον τρόπο, το savaspin πετυχαίνει να ενώσει σταθερότητα, αντοχή μαζί με επαγγελματική παρουσίαση, δημιουργώντας πλατφόρμα ποιότητας η οποία δίνει δυνατότητα στους χρήστες να χρησιμοποιούν άνετα το σύνολο των λειτουργιών που προσφέρει. Σε ένα τοπίο που οι ροές εξελίσσονται ραγδαία, το casino savaspin επιτυγχάνει να διατηρείται σταθερή επιλογή, οικοδομώντας επαφή ασφάλειας προς όποιον αναζητά ανώτερο επίπεδο στο περιβάλλον του σημερινού διαδικτυακού παιχνιδιού.
заказать кухню под размеры заказать кухню под размеры .
luxury villas phuket for sale villas-for-sale-in-phuket.com .
real estate for sale in phuket thailand real estate for sale in phuket thailand .
Часто предприниматели объединяют понятия тендер и госзакупки, так как обе процедуры связаны с конкурсным выбором поставщика. Однако между ними существуют определённые различия, которые важно понимать перед началом работы в этой сфере.
Получите экспертное мнение – https://tendernoe-soprovozhdenie-rostov-na-donu.ru
Профессиональная подготовка — это не формальность, а ключ к безопасной и эффективной процедуре. Врач собирает подробный анамнез, уточняет длительность и характер употребления, фиксирует соматические жалобы, анализирует текущие препараты (в том числе безрецептурные), измеряет давление, пульс, сатурацию, при необходимости назначает ЭКГ и лабораторные тесты. Если есть выраженная интоксикация, бессонница, тремор, скачки давления — стартуют с детокса и стабилизации: корректируют водно-электролитный баланс, снижают тревогу, нормализуют сон. Параллельно специалист объясняет механику методик кодирования, вероятные ощущения после процедуры, ограничения по нагрузкам, правила безопасного поведения в первые недели и алгоритм действий на случай усиления тяги. Подготовительный этап снимает неопределённость, уменьшает тревогу и повышает приверженность: человек понимает, что будет происходить и как оценивать улучшение.
Подробнее тут – http://kodirovanie-ot-alkogolizma-moskva9.ru/kodirovanie-ot-alkogolizma-v-moskve-otzyvy/
Проверка авто по VIN https://dtf.ru/luchshii-rating/3585176-top-15-luchshih-servisov-proverki-avto-po-vin-nomeru-reiting-2025-goda ТОП-15 лучших сервисов для анализа истории машины. ДТП, пробег, владельцы и ограничения. Сравните платформы и выберите надежный сервис для безопасной покупки авто.
Промокоды Пятёрочки https://www.time-samara.ru/content/view/785106/transformaciya-sistemy-loyalnosti-v-sovremennom-rossijskom-ritejle актуальные купоны и скидки на продукты и доставку. Получайте бонусы, снижайте стоимость заказов и экономьте на покупках. Только проверенные промокоды для выгодных покупок в Пятёрочке каждый день.
Металлические шильды — практичное решение для маркировки оборудования, мебели и техники. Компания Инпек изготавливает таблички с лазерной гравировкой по индивидуальным макетам: от технических паспортных данных до декоративных элементов брендирования. Прочный металл не выцветает, устойчив к механическим повреждениям и сохраняет читаемость десятилетиями. Заказать образец можно бесплатно на сайте https://inpekmet.ru/ Оперативное производство, помощь в разработке дизайна и доступные цены делают сотрудничество удобным для любого бизнеса.
купить кухню в спб от производителя купить кухню в спб от производителя .
BlackSprut marketplace официальный сайт для входа и регистрации
blsp at bs2best at
bs2best вход
apartments for sale thailand phuket apartments for sale thailand phuket .
phuket luxury apartments for sale apartments-for-sale-in-phuket.com .
врач нарколог на дом платный narkolog-na-dom-v-krasnodare-1.ru .
нарколог на дом цены narkolog-na-dom-v-krasnodare.ru .
купить кухню в спб от производителя купить кухню в спб от производителя .
«Оставленные» — один из самых пронзительных сериалов HBO: без взрывов и погонь, только тихий апокалипсис внутри людей. В один момент миллионы людей по всему миру просто исчезают — и никто не может объяснить ни как, ни почему. Главный герой — шеф полиции Гарви — балансирует на грани, сохраняя видимость порядка, пока вокруг рушатся семьи и рождаются новые секты. Ищете сериал оставленные? Все 28 серий трёх сезонов доступны на ostavlennye-kinogo.vip с озвучкой Amedia и NewStudio. Сериал не даёт ответов — он задаёт вопросы о вине, вере и цене жизни после невыразимой потери.
fenix casino официальный тг
Сначала сомневался, но оказалось норм
Вот это бы нормально было нормальный трип по двум веществам.. купить кокаин, купить мефедрон, купить гашиш, купить бошки я вчера связался с менеджером в аське, тот сказал что если ему отпишут – разберётся… Попробуй напиши днём, а не под утро )Все легально и проверено, есть NMR. Плохого ни чего не случиться. Скорей всего приняли потому что были паленые….
zawaya real estate dubai https://1wl.org/1-bhk-villa-for-rent-in-sharjah.html centimetre cube real estate dubaidepartment of land and property in dubai
BlackSprut marketplace официальный сайт для входа и регистрации
blsp at bs2best at
bs2web at
Решение обратиться за наркологической помощью часто упирается в страх огласки и сомнения в эффективности. В «МедТрезвие» эти барьеры снимаются за счёт клинической достаточности и предсказуемой организации. Диагностика и вмешательства назначаются строго по показаниям: врач оценит риски сердечно-сосудистых осложнений, состояние печени и поджелудочной железы, уровень тревоги и сна, наличие депрессивных симптомов. При устойчивом состоянии часть процедур выполняется на дому, что снижает стресс, а при признаках нестабильности — рекомендуется стационар с круглосуточным наблюдением. Анонимность поддерживается шифрованием данных, разграничением доступа и информированием родственников только по согласию пациента. Финансовые условия обсуждаются заранее: семья понимает, из чего складывается смета, и может планировать ресурс без опасений «скрытых» позиций. В результате лечение становится управляемым процессом, где медицинская безопасность и уважение к личной жизни человека — обязательные элементы, а не рекламные обещания.
Исследовать вопрос подробнее – narkologicheskaya-klinika
Там, где раньше хватало одного тяжёлого утра, теперь требуются дни детоксикации. И чем позже подключается врач, тем сложнее вернуть организм к относительно безопасному состоянию.
Разобраться лучше – https://vyvod-iz-zapoya-voskresensk11.ru/vyvod-iz-zapoya-cena-v-voskresenske/
Я присмотрелся к zeekr тест драйв и решил устроить тест-драйв.
Интерьер выполен с акцентом на комфорт и функциональность.
seo информационных порталов prodvizhenie-sajtov-po-trafiku.ru .
Салют,
Дорогие Друзья.
Сегодня я бы хотел рассказать больше про интересные факты
Я думаю Вы искали именно про реальность или интересные факты Значит эта больше актуальная информация будет для вас наиболее полезной.
На нашем веб сайте Узнай Больше по ссылке https://jaluse.ru/zhalyuzi/dlya-doma/
Наши Теги: горизонтальные жалюзи,
Удачного Дня
Приглашаем вас принять участие в всероссийский конкурс хореографического искусства и показать своё мастерство на лучшей сцене сезона.
Интерактивность конкурса усиливается возможностью зрительского голосования за фаворитов.
Вывод из запоя в клинике формируется на основе последовательных процедур, направленных на стабилизацию физиологических функций и устранение токсических влияний. Такой подход позволяет корректно регулировать состояние пациента и контролировать интенсивность симптомов. Рабочие алгоритмы включают оценку метаболических процессов, анализ соматических показателей и определение степени неврологических изменений. В результате создается структурированная модель помощи, ориентированная на восстановление адаптивных возможностей организма. Процессы выполняются под контролем специалистов, что обеспечивает прогнозируемый терапевтический эффект и снижает вероятность осложнений.
Изучить вопрос глубже – вывод из запоя вызов на дом
Компания предлагает машина с водителем в аренду новосибирск по выгодным тарифам и с профессиональными водителями.
Выбирая компанию, обращайте внимание на техническое состояние автомобилей и профессионализм водителей.
оптимал дозировка на 2дпмп при в\в от данного магазина какая? https://veres-spb.ru действительно принимают?Прислали нам свой метоксетамин, подтверждаем: продукт чистый, >99%.
Интернет магазин элитной парфюмерии предлагает как классические, так и современные композиции. Каждый покупатель может найти аромат, который подчеркнет его индивидуальность: https://avon-forum.ru/
BlackSprut marketplace официальный сайт для входа и регистрации
blsp at bs2best at
blacksprut marketplace
hotel apartments in dubai for 1 month freehold property in sharjah al wasl real estate dubai websiteApartments for sale in Damac Bay
Клиника создана как современное пространство для безопасного восстановления. Здесь пациенты получают комплексную помощь в комфортных условиях. Основные преимущества учреждения:
Изучить вопрос глубже – наркологические клиники алкоголизм
Каждый из этих симптомов по отдельности уже опасен, а в сочетании они создают высокий риск для жизни. Самостоятельные эксперименты с таблетками, резкий отказ от алкоголя «через силу» или попытка «переспать» запой без медицинского контроля могут обернуться реанимацией. Гораздо безопаснее вовремя вызвать специалиста и провести детоксикацию под наблюдением, особенно когда речь идёт о жителях крупного города, где доступна профессиональная наркологическая помощь.
Исследовать вопрос подробнее – вывод из запоя в москве недорого
букет москва недорого https://cveti-nederogo.ru .
BlackSprut marketplace официальный сайт для входа и регистрации
blsp at bs2best at
blsp at
Детоксикация — ключевой этап в лечении зависимости. Она направлена на очищение организма от токсинов и нормализацию обмена веществ. В клинике «АстраМед Трезвость» капельницы подбираются индивидуально, с учётом возраста, массы тела и хронических заболеваний пациента. Ниже представлена таблица с основными видами инфузий и их назначением.
Разобраться лучше – наркологическая клиника клиника помощь астрахань
apartments for sale phuket apartments for sale phuket .
помогите обьясните как написать сапорту купить кокаин, купить мефедрон, купить гашиш, купить бошки хороший магазс почтой лучше не связываться
В Воскресенске вывод из запоя может проводиться в разных форматах — с выездом на дом, в условиях стационара, в срочном режиме или с последующим амбулаторным наблюдением. Правильный выбор зависит от тяжести состояния, возраста пациента, наличия хронических заболеваний и того, насколько сильно запой нарушил привычную жизнь.
Исследовать вопрос подробнее – http://vyvod-iz-zapoya-voskresensk11.ru/vyvod-iz-zapoya-cena-v-voskresenske/
В этом материале мы разберём 7 основ лечения алкоголизма и расскажем, как в Ярославле получить помощь, соответствующую современным стандартам терапии.
Подробнее тут – http://lechenie-alkogolizma-yaroslavl0.ru/lechenie-khronicheskogo-alkogolizma-yaroslavl/https://lechenie-alkogolizma-yaroslavl0.ru
thd best real estate offices in dubai to rent villas buy house in dubai palm off plan property in dubai marinadubai properties dp flag
BlackSprut marketplace официальный сайт для входа и регистрации
blsp at bs2best at
bs2best вход
https://t.me/evacasino_official
Не фейк
Решение обратиться за наркологической помощью часто упирается в страх огласки и сомнения в эффективности. В «МедТрезвие» эти барьеры снимаются за счёт клинической достаточности и предсказуемой организации. Диагностика и вмешательства назначаются строго по показаниям: врач оценит риски сердечно-сосудистых осложнений, состояние печени и поджелудочной железы, уровень тревоги и сна, наличие депрессивных симптомов. При устойчивом состоянии часть процедур выполняется на дому, что снижает стресс, а при признаках нестабильности — рекомендуется стационар с круглосуточным наблюдением. Анонимность поддерживается шифрованием данных, разграничением доступа и информированием родственников только по согласию пациента. Финансовые условия обсуждаются заранее: семья понимает, из чего складывается смета, и может планировать ресурс без опасений «скрытых» позиций. В результате лечение становится управляемым процессом, где медицинская безопасность и уважение к личной жизни человека — обязательные элементы, а не рекламные обещания.
Разобраться лучше – https://narkologicheskaya-klinika-moskva9.ru/chastnaya-narkologicheskaya-klinika-v-moskve/
Лечебные мероприятия строятся на основе поэтапного внедрения терапевтических решений, которые опираются на индивидуальные характеристики пациента. Уточнение анамнеза, анализ данных обследований и выявление сопутствующих факторов позволяют создавать эффективные и прогнозируемые программы лечения. В клинике соблюдается строгая последовательность процедур, направленная на снижение рисков и обеспечение безопасности. На каждом этапе проводится проверка клинической реакции, что позволяет своевременно выявлять необходимость корректировки и адаптировать лечебные меры под текущую картину.
Выяснить больше – наркологическая клиника цены
Для оценки состояния используется расширенная диагностика: лабораторные анализы, ЭКГ, психологическое тестирование и биохимические маркеры. По результатам обследования составляется индивидуальный план, включающий детоксикацию, фармакотерапию и реабилитационные мероприятия. Ниже представлена таблица, описывающая структуру этапов лечения.
Изучить вопрос глубже – анонимная наркологическая клиника ростов-на-дону
BlackSprut marketplace официальный сайт для входа и регистрации
blsp at bs2best at
blacksprut marketplace
Магазин работает!!! Бро очень понктуален!!! Магазину процветание и новых клиентов!!! купить кокаин, купить мефедрон, купить гашиш, купить бошки С возвращением бразы! удачной работы вам и процветанияда наверно я попал на фейка или угонщика ,но мне не понятно как фейк может потверждать переписку с броси на форуме?
dubai silicon oasis property finder https://bmgdubai.com/emaar-real-estate.html emaar burj crown1 bed room studio flat in bur dubai for rent
поисковое продвижение по трафику поисковое продвижение по трафику .
Сериал «Локи» от Marvel — один из лучших проектов вселенной Disney+, сочетающий фантастику, боевик и философию личности. Бог хитрости похищает Тессеракт и нарушает временную линию, после чего попадает в лапы загадочной организации TVA. Ищете локи смотреть онлайн? На loki-smotret.net доступны оба сезона в высоком качестве с профессиональной озвучкой от LostFilm, HDrezka Studio и других топовых студий. Каждый эпизод держит в напряжении: антигерой балансирует между предательством и союзничеством, встречает собственные альтернативные воплощения и раскрывается с неожиданной стороны.
thailand phuket villas for sale villas-for-sale-in-phuket-1.com .
Когда выезд особенно удобен и оправдан, важно понимать не только эмоционально, но и по конкретным признакам. Есть ряд типичных ситуаций, в которых именно формат «на дому» становится наиболее реалистичным и безопасным вариантом, а стационар можно рассматривать как следующий шаг, когда острота будет снята и человек станет более сговорчивым.
Ознакомиться с деталями – https://narkolog-na-dom-himki11.ru/narkolog-na-dom-cena-v-himkah
вывод из запоя дешево краснодар vyvod-iz-zapoya-v-krasnodare-1.ru .
вывод из запоя краснодар наркология vyvod-iz-zapoya-v-krasnodare-2.ru .
вывод из запоя анонимно краснодар вывод из запоя анонимно краснодар .
вывод из запоя цена вывод из запоя цена .
реабилитация алкоголиков vyvod-iz-zapoya-na-domu-voronezh.ru .
нарколог на дом нарколог на дом .
наркологический центр наркологический центр .
лечение алкоголизма лечение алкоголизма .
наркологический стационар vyvod-iz-zapoya-na-domu-samara.ru .
наркологическая помощь наркологическая помощь .
капельница от запоя капельница от запоя .
Многие тянут до последнего, считая, что обращаться к наркологу «рано» или «не по статусу». На практике именно такое откладывание часто приводит к затяжным запоям, тяжёлым состояниям и разрушению социальных связей. К специалистам имеет смысл обращаться при первых признаках того, что употребление алкоголя или наркотиков перестало быть эпизодическим и управляемым.
Подробнее можно узнать тут – наркологическая москва
BlackSprut marketplace официальный сайт для входа и регистрации
blsp at bs2best at
bs2web at
Такой подход позволяет достичь устойчивого результата без срывов и рецидивов. Пациенты получают помощь не только на уровне физиологии, но и на уровне личностных изменений, что делает лечение глубоким и эффективным.
Изучить вопрос глубже – наркологические клиники алкоголизм
А будет какая нибудь подробная инфа или трип репорты? А лучше пробники платные или бесплатные? купить кокаин, купить мефедрон, купить гашиш, купить бошки На удивление был поражен скоростью работы магазина. Все четко как в аптеке))) Благодарствуюкачество супер!!!
«Лучше звоните Солу» — американский приквел культовых «Во все тяжкие», прослеживающий путь провинциального адвоката Джимми МакГилла к циничному и опасному образу Сола Гудмана. Система правосудия, постоянные предательства и маленькие сделки с совестью незаметно ломают героя — не резко, а с неотвратимым внутренним нарастанием. Ищете лучше звоните солу смотреть онлайн сериал лучше звоните солу? Все 63 серии шести сезонов доступны на luchshe-zvonite-solu-smotret.online с профессиональной озвучкой. Боб Оденкёрк в главной роли — это один из самых убедительных антигероев в истории сериалов: умный, харизматичный и обречённый с самого начала.
Там, где раньше хватало одного тяжёлого утра, теперь требуются дни детоксикации. И чем позже подключается врач, тем сложнее вернуть организм к относительно безопасному состоянию.
Выяснить больше – http://vyvod-iz-zapoya-voskresensk11.ru/vyvod-iz-zapoya-na-domu-v-voskresenske/
https://t.me/evacasino_official
Наткнулся на этот канал когда искал ева казино, сначала не поверил но потом проверил — реально работает
Apartment for Sale in Al Fouad Building, Dubai al manal reaal estate office no dubai property value trend of greens in dubaidubai hyperloop company properties
Клиника ориентирована на клиническую достаточность: никаких процедур «для галочки», только то, что подтверждено показаниями. С первого контакта дежурный врач уточняет анамнез, лекарства, аллергии, оценивает риски сердечно-сосудистых осложнений, степень обезвоживания, уровень тревоги и качества сна. Если состояние позволяет, подготовка к кодированию проводится амбулаторно или на дому; при нестабильных показателях предлагается короткий стационар для безопасной стабилизации. Важна анонимность — в расписании используются шифры, доступ к данным разграничен, информирование родственников происходит только по согласию пациента. Организация процесса учитывает ритм мегаполиса: гибкие слоты в будни и выходные, выездные бригады, быстрый перевод из домашнего формата в стационар при необходимости. Финансовые условия проговариваются заранее, чтобы исключить скрытые позиции и дать человеку возможность планировать бюджет без догадок.
Ознакомиться с деталями – klinika-kodirovaniya-ot-alkogolizma-moskva
Отдельная категория пациентов — люди с алкогольной зависимостью. Для жителей Воскресенска особенно актуальны проблемы, связанные с длительными запоями: человек несколько дней подряд пьёт, практически не ест, плохо спит, с трудом встаёт, а каждое утро обещает, что «сейчас немного — и всё». На этом фоне растёт нагрузка на сердце, печень, нервную систему, повышается риск инсультов и инфарктов, обостряются хронические болезни.
Подробнее можно узнать тут – moskovskie-narkologicheskie-kliniki
Самостоятельные попытки «подлечиться» обычно сводятся к случайным комбинациям препаратов: кто-то пьёт горсть таблеток от давления и сердца, кто-то принимает успокоительные поверх алкоголя, кто-то заказывает непонятные средства «от тяги» в интернете. Такие эксперименты могут дать краткий эффект, но часто только маскируют симптомы и перегружают организм. В клинике лечение строится иначе: сначала оценивают состояние — физическое и психическое, затем подбирают безопасные схемы детоксикации и медикаментов, учитывая возраст, сопутствующие заболевания, длительность запоев и употребления. Это снижает риски осложнений и делает восстановление более управляемым: пациент и его семья видят прогресс и понимают, за счёт чего он происходит, а не живут в ожидании очередного непредсказуемого «отката».
Получить дополнительную информацию – https://narkologicheskaya-klinika-korolyov11.ru/narkologicheskaya-klinika-telefon-v-korolyove
BlackSprut marketplace официальный сайт для входа и регистрации
blsp at bs2best at
blsp at
Перед началом терапии проводится полная диагностика организма, включая лабораторные исследования и ЭКГ. Это позволяет оценить состояние пациента и подобрать оптимальный курс лечения. После стабилизации физического состояния начинается психотерапевтическая и реабилитационная работа. Такой подход помогает не только снять симптомы, но и устранить первопричины зависимости.
Ознакомиться с деталями – наркологическая клиника цены
Повод задуматься о профессиональной помощи — это уже не единичные эпизоды, а повторяющийся сценарий: регулярные запои, тяжёлое похмелье, невозможность остановиться «на одном-двух бокалах», ссоры с родными, скрытность, попытки утаить спиртное, прогулы, нелепые оправдания. Если к этому добавляются скачки давления, проблемы с сердцем, боли в животе, дрожание рук, проблемы со сном, тревожные состояния, разговоры о бессмысленности жизни — это уже не «особенности характера», а признаки затяжной зависимости. Это касается и наркотических веществ: даже если человек считает, что «контролирует дозу», уже сам факт необходимости регулярного приёма, нарастающей толерантности и страха остаться без вещества говорит о сформировавшейся проблеме.
Подробнее тут – https://narkologicheskaya-klinika-ivanteevka11.ru/narkologicheskaya-klinika-reabilitaciya-v-ivanteevke/
Есть ситуации, когда визит к наркологу в Химках лучше воспринимать не как «стыдный шаг», а как обычное ответственное решение о своём здоровье. Это особенно актуально, если: употребление алкоголя или наркотиков стало регулярным, а попытки сократить дозы заканчиваются срывами; появились запои с несколькими днями непрерывного употребления; возникают проблемы с сердцем, давлением, сном; близкие всё чаще говорят, что «ситуация выходит из-под контроля».
Получить дополнительные сведения – http://narkologicheskaya-klinika-himki11.ru/chastnaya-narkologicheskaya-klinika-v-himkah/
Компания предлагает авто с водителем новосибирск по выгодным тарифам и с профессиональными водителями.
При выборе компании важно обращать внимание на состояние автопарка и квалификацию водителей.
В условиях круглосуточного наблюдения врачи могут внимательно следить за динамикой состояния, своевременно корректировать схемы лечения, проводить детоксикацию под контролем давления, пульса и работы сердца. Особенно это важно для пациентов с гипертонией, сердечно-сосудистыми заболеваниями, нарушениями ритма, заболеваниями печени, диабетом и другими хроническими патологиями. В стационаре проще организовать обследование, назначить сопутствующую терапию, вовремя заметить опасные симптомы и предотвратить серьёзные осложнения.
Выяснить больше – chastnaya-narkologicheskaya-klinika
«Доктор Хаус» — интеллектуальный медицинский триллер, где каждая серия — это детектив с неожиданной развязкой. Блестящий, но беспощадный диагност Грегори Хаус находит ответы там, где его более сдержанные коллеги давно опустили руки. Его кредо «все лгут» — не просто фраза, а рабочий инструмент. Ищете доктор хаус смотреть онлайн? Все 176 серий доступны на doktor-haus-smotret.online с озвучкой LostFilm и NewStudio. Жёсткая ирония, холодная логика и абсолютная честность превращают этот проект в один из лучших сериалов всех времён.
Детокс — это не универсальный раствор «от всего», а набор целевых вмешательств. Мы восполняем жидкость, корректируем электролиты, поддерживаем функции печени, мягко снижаем тремор и тревогу, готовим нервную систему к ночному сну. Каждая доза сверяется с реакцией организма — нет гонки за моментальным «оглушением» симптома ценой побочных эффектов и вечерних откатов. После купирования острой фазы пациент получает понятные правила на 48–72 часа: вода порциями, лёгкая еда по расписанию, «тихий режим» перед сном, запрет на «подвиги» и конфликтные разговоры, критерии связи с врачом. Мы отдельно объясняем, что делать в «тёмные часы» — когда повышается тревожность и усиливается тяга: короткая прогулка рядом с домом, тёплый душ, дыхательные практики, контакт с «своим» человеком, отключение экранов. Такие простые действия бесплатны, но именно они удерживают медицинский эффект и переводят состояние в предсказуемую стабилизацию.
Узнать больше – вывод из запоя на дому балашиха цены
Сегодня получил посылку. Оказалось, что просто трек не пробивался до последнего, а посылочка шла себе. Дошло быстро. Сам магазин передал товар в курьерку почти моментально за что огромное спасибо. Магазин всегда остается на связи и отвечает даже на глупые переживания. Конспирация порадовала. Вес тоже в норме. По качеству отпишу позже трип-репорт, но думаю, что всё на высшем уровне. Спасибо, Chemical-mix. купить кокаин, купить мефедрон, купить гашиш, купить бошки chemical-mix.com держи в репу, заработал.. пазитивно всё.. тут всё хорошо.. обращайтесь помогут быстро..Наконец-то пришёл товар. Упакован отлично, курик все передал, в этом проблем нет. Пришли домой, распечатали по виду похоже на регу, но в воде разболталось. Муж поставился внутривенно, я отписала chemical, он говорит мол для вв нет инструкции. Похуй, растворили в воде, выпили,И НИХУЯ! НОЛЬ! Не прихода ни тяги, ни хуяги. Пусто. В аське пишу, молчит. Хз.
Финансовые инструменты позволяют заказчику убедиться в надежности участника и его готовности выполнить обязательства по контракту. При этом грамотное сопровождение снижает вероятность финансовых рисков и помогает правильно оформить документы для банка.
Узнайте, как это работает – тендерное сопровождение под ключ в ростове на дону
3 bedroom apartment dubai rent for one day https://kienthuctrade.net/flat-for-rent-in-al-barsha.html dubai rent one month free meaningApartment for Sale in Shoreline Apartments, Dubai
BlackSprut marketplace официальный сайт для входа и регистрации
blsp at bs2best at
bs2best at
Приглашаем вас принять участие в конкурс детского танца и показать своё мастерство на лучшей сцене сезона.
Каждое выступление сопровождается профессиональным музыкальным оформлением и световым решением.
BlackSprut marketplace официальный сайт для входа и регистрации
blsp at bs2best at
blacksprut marketplace
Тоже считаем что запреты не запреты. Да бывает что и за клиентами охотятся. купить кокаин, купить мефедрон, купить гашиш, купить бошки Как нет..я тебе в пятницу писал..сказал,вчто ниче что скину в субботу,воскресенье..ты сказал ниче…и дал номер..Я писал в личку на почтовый ящик..это не брорзикс и не скайп…мошеников быть не можит..Ты,оплату посмотри…за сегодняПарни,короче я позвонил они сказали тепреь что посылку отправили на день раньше планируемой отправки,и чтоб я завтра позвонил в офис в своем городе,скорее всего она уже там,а я перед этим потерял телефон на который записан заказ,так что может они и звонили,а я и не знал!А по отслежке так и стоит планируемая отправка еще 3 дня назад.Каког хера они ее не зарегистрировали!Как думаете нормально????Бля пиздец волнуюсь!!!
https://все-вкусно.рус/ Готовим вкусно – Выпечка Горячие Десерты Заготовки Закуски Напитки Салаты Соусы Супы Овощи Птица Мясо Рыба.
кофемашина с автоматическим капучинатором для дома Купить кофемашину Melitta в СПб – значит инвестировать в долговечность, стиль и безупречный вкус, ведь каждая детализация этих кофемашин, от эргономичного дизайна до инновационной системы приготовления, направлена на предоставление максимального удовольствия от каждой чашки. Для тех, кто ищет автоматическую кофемашину для дома в СПб, зерновая кофемашина с капучинатором станет настоящим сокровищем, способным радовать вас и ваших близких широким спектром кофейных напитков, от классического американо до изысканного латте макиато. Купить ручной отпариватель для одежды – это значит получить в свое распоряжение компактное и мощное устройство, которое легко уместится в чемодане и поможет поддерживать ваш гардероб в идеальном состоянии где бы вы ни находились. Для тех, кто ищет максимальную производительность и удобство, купить напольный отпариватель для одежды станет идеальным решением, ведь благодаря большой мощности и вместительному резервуару для воды, он способен обрабатывать большие объемы одежды, будь то деловые костюмы, вечерние платья или домашний текстиль.
al sharafi real estate dubai email https://dinosaurios-larioja.org/dubai-apartments-to-rent-monthly.html buy dubai property with bitcoin1 bedroom apartment for sale in dubai silicon oasis
thailand villas for sale phuket thailand villas for sale phuket .
Клиника ориентирована на клиническую достаточность: никаких процедур «для галочки», только то, что подтверждено показаниями. С первого контакта дежурный врач уточняет анамнез, лекарства, аллергии, оценивает риски сердечно-сосудистых осложнений, степень обезвоживания, уровень тревоги и качества сна. Если состояние позволяет, подготовка к кодированию проводится амбулаторно или на дому; при нестабильных показателях предлагается короткий стационар для безопасной стабилизации. Важна анонимность — в расписании используются шифры, доступ к данным разграничен, информирование родственников происходит только по согласию пациента. Организация процесса учитывает ритм мегаполиса: гибкие слоты в будни и выходные, выездные бригады, быстрый перевод из домашнего формата в стационар при необходимости. Финансовые условия проговариваются заранее, чтобы исключить скрытые позиции и дать человеку возможность планировать бюджет без догадок.
Выяснить больше – кодирование в москве цены
Формат
Подробнее тут – https://narkologicheskaya-klinika-lyubercy0.ru/narkologicheskaya-klinika-na-dom-v-lyubercah/
BlackSprut marketplace официальный сайт для входа и регистрации
blsp at bs2best at
blsp at
казино майнкрафт
МАГАЗ СУПЕР!,брал5 гр ск качество отменное все сделанно ровно,даже фото не понадобилось,кристалики отличные без мутного оттенка,плаватся отлично,присутствует запах уксусного ангедрида,ВЫРАЖАЮ ОГРОМНУЮ БЛАГОДАРНОСТЬ!ВСЕ СУПЕР ПРОДОЛЖАЙТЕ В ТОМ ЖЕ ДУХЕ! https://dietfree.ru магаз то работает сейчас?Есть курьерка по москве?да мэн правильно говоришь KEY фраернулся
В «ВладЗдоровье» применяется комплексный подход, сочетающий медикаментозное лечение, психотерапию и реабилитацию. Врач-нарколог подбирает препараты индивидуально, с учётом анамнеза, переносимости компонентов и текущего состояния организма. Психотерапевтический блок включает когнитивно-поведенческую терапию, мотивационные интервью, семейную терапию и работу с посттравматическими реакциями.
Углубиться в тему – наркологическая клиника клиника помощь в владимире
Терапия в клинике проводится системно и поэтапно, что позволяет контролировать состояние пациента и добиваться устойчивых улучшений.
Углубиться в тему – наркологическая клиника стационар в твери
BlackSprut marketplace официальный сайт для входа и регистрации
blsp at bs2best at
bs2web at
dubai property visa rules lucky deal real estate brokers dubai dubai family room rent per monthal reem village
вывод из запоя в стационаре краснодара vyvod-iz-zapoya-v-krasnodare-1.ru .
Я присмотрелся к zeekr электромобиль и решил устроить тест-драйв.
Сеть зарядных станций для модели расширяется в мегаполисах.
вывод из запоя в краснодаре вывод из запоя в краснодаре .
реабилитационный центр от алкоголизма vyvod-iz-zapoya-na-domu-samara-1.ru .
sea view apartments for sale in phuket apartments-for-sale-in-phuket.com .
вывод из запоя лечение краснодар vyvod-iz-zapoya-v-krasnodare-2.ru .
реабилитация наркоманов реабилитация наркоманов .
реабилитация наркоманов vyvod-iz-zapoya-na-domu-voronezh.ru .
Часто предприниматели объединяют понятия тендер и госзакупки, так как обе процедуры связаны с конкурсным выбором поставщика. Однако между ними существуют определённые различия, которые важно понимать перед началом работы в этой сфере.
Узнайте, как это работает – http://tendernoe-soprovozhdenie-rostov-na-donu.ru
Ребят ну давайте уже мокрую,мы сами досушим :hz: купить кокаин, купить мефедрон, купить гашиш, купить бошки А чего тут так тихо? Ребят, работаем?)Достойный, проверенный временем магазин!
наркологическая помощь наркологическая помощь .
реабилитация наркоманов vyvod-iz-zapoya-na-domu-voronezh-2.ru .
вывод из запоя краснодар наркология vyvod-iz-zapoya-v-krasnodare-3.ru .
наркологический центр наркологический центр .
Для получения устойчивого результата наркологическая клиника использует методы, основанные на индивидуальной оценке. В работе учитываются соматические показатели, реакции нервной системы и данные лабораторных исследований. Такой формат лечения обеспечивает предсказуемое влияние на физиологические процессы и снижает вероятность осложнений. В клинике применяется непрерывный мониторинг, позволяющий своевременно корректировать лечебные меры. Работа направлена на нормализацию метаболизма, восстановление баланса внутренних систем и плавное уменьшение симптоматики.
Получить больше информации – http://narkologicheskaya-klinika-vo-vladivostoke18.ru
BlackSprut marketplace официальный сайт для входа и регистрации
blsp at bs2best at
bs2best вход
villas for sale in dubai hills estate apartment for rent in skycourts dubai nataly real estate dubaidubai real estate institute hend al
лечение наркомании vyvod-iz-zapoya-na-domu-voronezh-1.ru .
Наркологическая клиника в Чехове предлагает не одну услугу, а целый спектр программ, которые можно сочетать и подстраивать под конкретную ситуацию. Это особенно важно, когда у одного человека на первый план выходят запои, у другого — наркотическая зависимость, у третьего — сочетание алкоголя с лекарственными препаратами.
Получить дополнительные сведения – наркологическая клиника цены адреса
В условиях круглосуточного наблюдения врачи могут внимательно следить за динамикой состояния, своевременно корректировать схемы лечения, проводить детоксикацию под контролем давления, пульса и работы сердца. Особенно это важно для пациентов с гипертонией, сердечно-сосудистыми заболеваниями, нарушениями ритма, заболеваниями печени, диабетом и другими хроническими патологиями. В стационаре проще организовать обследование, назначить сопутствующую терапию, вовремя заметить опасные симптомы и предотвратить серьёзные осложнения.
Исследовать вопрос подробнее – klinika-narkologicheskoj-pomoshchi
Хороший сервис судя по отзывам!:) https://oceansapphire.ru работа 5+ качество 5 опреративность 5+всё посылка пришла всё ровно теперь будем пробовать )
майнкрафт казик с кирками слоты майнкрафт казик
«Наследники» — корейская драма 2013 года о жестоком мире, где судьбу человека решают деньги и фамилия, а не способности. В школе корейской элиты за внешним лоском — жёсткая иерархия, где дружба измеряется выгодой, а доверие — редкость. Наследник крупной корпорации влюбляется в девушку из другого мира — и это чувство рушит все правила, по которым живёт элита. Ищете наследники все серии? Все 20 серий в профессиональной озвучке доступны на nasledniki-smotret.net без регистрации и рекламы. Двадцать эпизодов о любви, власти и социальных барьерах — сериал захватывает с первой минуты и не отпускает до конца.
Каждый этап имеет важное значение и обеспечивает долгосрочный эффект от терапии.
Подробнее тут – лечение алкоголизма гипнозом
sharing villa for rent in rashidiya dubai https://wdtpress.com/ali-mulla-dubai-property.html rent in sharjahmazaya real estate dubai free zone
Мы не подгоняем всех под единый сценарий. Если состояние устойчивое, нет упорной рвоты, высокой температуры, выраженной дезориентации и резких скачков давления и пульса — рационален домашний старт: приватно, быстрее и без лишних переездов. Врач приедет без маркировки, проведёт осмотр, запустит инфузионную терапию по показаниям, оставит письменные рекомендации и «красные флажки». Если же есть признаки угрозы осложнений — обезвоживание, аритмии, риск судорог, боли за грудиной или в животе, лихорадка, спутанность сознания, тяжёлая соматика — мы честно предлагаем короткую стационарную стабилизацию на 24–48 часов. Под круглосуточным наблюдением проще корректировать схемы, вовремя закрывать дефициты, защитить сон и быстрее вернуть управляемость поведению. В обоих форматах маршрут прозрачен: согласованные окна связи, фиксированные цели на ближайшие 72 часа и отсутствие «пакетов ради прайса». Благодаря этому решения принимаются спокойно, без угадываний и эмоциональных раскачек, которые обычно ломают прогресс и удорожают лечение.
Разобраться лучше – анонимный вывод из запоя
Та не, не стоит оно того. Надо отдать должное магазину, посылка пришла, без проблем. https://doma-i-dachi.ru Доброга времени суток, закладки в москве делаете?особенно с вашей репутацией!
алкоголизм вывод из запоя краснодар vyvod-iz-zapoya-v-krasnodare-1.ru .
Контроль
Углубиться в тему – narkologicheskaya-klinika
капельница от похмелья vyvod-iz-zapoya-na-domu-samara-1.ru .
вывод из запоя кодирование краснодар вывод из запоя кодирование краснодар .
В условиях круглосуточного наблюдения врачи могут внимательно следить за динамикой состояния, своевременно корректировать схемы лечения, проводить детоксикацию под контролем давления, пульса и работы сердца. Особенно это важно для пациентов с гипертонией, сердечно-сосудистыми заболеваниями, нарушениями ритма, заболеваниями печени, диабетом и другими хроническими патологиями. В стационаре проще организовать обследование, назначить сопутствующую терапию, вовремя заметить опасные симптомы и предотвратить серьёзные осложнения.
Выяснить больше – наркологическая клиника диспансер
вывод из запоя цена краснодар vyvod-iz-zapoya-v-krasnodare-2.ru .
Обращаться можно и нужно не только в момент очередного запоя. Клиника в Ивантеевке работает и с теми, кто сейчас в относительной ремиссии, но понимает, что без внешней поддержки снова сорвётся. В этом случае можно обсудить профилактические программы, варианты кодирования, реабилитацию, работу с тревогой и депрессией. Чем раньше сделан шаг в сторону лечения, тем мягче будут процедуры и тем больше шансов на устойчивый результат.
Углубиться в тему – forumy-narkologicheskaya-klinika-forum
condos in phuket for sale condos in phuket for sale .
вывод из запоя в стационаре вывод из запоя в стационаре .
реабилитация алкоголиков vyvod-iz-zapoya-na-domu-voronezh.ru .
наркологический стационар vyvod-iz-zapoya-na-domu-voronezh-3.ru .
global invest real estate dubai emaar email address chinese real estate agents in dubaidubai real estate islands4
«Ванда/Вижн» — неожиданный взгляд Marvel на жанр: супергеройская история, облачённая в оболочку культовых американских ситкомов разных эпох. Герои существуют в образцовом американском городке, однако идеальная картинка постепенно трещит по швам, обнажая боль потери и нарастающий страх. Ищете ванда вижн все серии? На vanda-vizhn-kinogo.biz доступны все 9 серий с озвучкой LostFilm, HDrezka Studio и других студий. Каждый эпизод меняет стилистику — от чёрно-белых шоу 50-х до ситкомов 2000-х — и неуклонно ведёт к эмоциональной развязке о цене иллюзий.
вывод из запоя на дому vyvod-iz-zapoya-na-domu-samara.ru .
вывод из запоя дешево краснодар вывод из запоя дешево краснодар .
https://mostbet-zerkaloonline.buzz/kk/the-dog-house-dice-show-muttley-crew/
Отдуши за ровность! https://lakocha.ru Общая оценка магазина 10/10-идут на встречу покупателю, сервис общение и работа на высотеХочу грамульку взять и угостить определенный круг людей,
«Чёрное зеркало» — британский сериал-антология 2011 года, исследующий тёмную сторону технологий и человеческих слабостей. Каждая серия представляет отдельный сюжет с новыми героями в пугающе реалистичном мире, где привычные технологии и сервисы становятся средствами тотального контроля. Ищете чёрное зеркало все серии? На chernoe-zerkalo-smotret.biz доступны все 33 серии семи сезонов с профессиональной озвучкой. Сериал безжалостно обнажает лицемерие медиа, культ публичного позора и зависимость общества от мгновенного одобрения — и именно эта узнаваемость делает его по-настоящему жутким.
Ищете строительство дома или коттеджа под ключ? Посетите сайт https://troitsk.idealstr.ru/ – рассчитайте стоимость будущего строительства или ознакомьтесь с реализованными нами проектами. Зайдите в раздел Наши Услуги – там вы найдете полный комплекс работ от строительства до благоустройства. Подробнее на сайте.
Если состояние «ходит по краю», сутки–двое под наблюдением нередко короче и дешевле серии ночных вызовов. В стационаре «АлкоМед Балашиха» организованы «тихие коридоры», нет общих очередей, а внимание распределено волнами: утро — оценка и инфузии, день — контроль динамики и коррекция доз, ночь — условия для полноценного сна и готовность быстро отреагировать при отклонениях. За этот срок удаётся «снять остроту», выровнять давление и пульс, уменьшить тремор, закрыть дефициты и безопасно перейти к амбулаторному формату. Приватность и уважение к границам сохраняются так же, как и при домашнем старте, — это убирает страх «быть узнанным» и повышает приверженность плану.
Углубиться в тему – kruglosutochnyj-vyvod-iz-zapoya-balashiha
капельница от запоя vyvod-iz-zapoya-na-domu-voronezh-1.ru .
casino jetton games
https://howwwblog.info/
luxury real estate developers https://modernotthon.net/azco-real-estate-brokers-llc-dubai.html affordable homes in dubaielite real estate brokers dubai
Самостоятельные попытки «подлечиться» обычно сводятся к случайным комбинациям препаратов: кто-то пьёт горсть таблеток от давления и сердца, кто-то принимает успокоительные поверх алкоголя, кто-то заказывает непонятные средства «от тяги» в интернете. Такие эксперименты могут дать краткий эффект, но часто только маскируют симптомы и перегружают организм. В клинике лечение строится иначе: сначала оценивают состояние — физическое и психическое, затем подбирают безопасные схемы детоксикации и медикаментов, учитывая возраст, сопутствующие заболевания, длительность запоев и употребления. Это снижает риски осложнений и делает восстановление более управляемым: пациент и его семья видят прогресс и понимают, за счёт чего он происходит, а не живут в ожидании очередного непредсказуемого «отката».
Разобраться лучше – наркологическая клиника королев
магазину желаю дальнейшего процветания и минимум траблов(а лучше вовсе без них).? https://oceansapphire.ru заказ оформил – жду посылочки ^^да магазин хороший..жаль тусиай кончился
«Друзья» — легендарный американский ситком 1994 года про шестерых молодых людей, чья нерушимая дружба проходит через испытания любовью, работой и непростой жизнью в Нью-Йорке. Росс, Моника, Рейчел, Чендлер, Джоуи и Фиби разительно отличаются по темпераменту — и именно эта разность делает их союз таким органичным, узнаваемым и комичным. Ищете друзья смотреть онлайн? Все 234 серии доступны на druzya-smotret.online с профессиональной озвучкой. Искренний юмор, точные характеры и настоящая химия между актёрами превратили сериал в мировую классику, которую пересматривают снова и снова.
красивые и недорогие цветы для букета http://www.cveti-nederogo.ru .
Чтобы ориентироваться в вариантах, полезно увидеть их в одном поле зрения. Ниже приведена краткая сравнительная таблица; она не заменяет консультацию, но помогает понять логику выбора. Перед таблицей важно отметить: конкретная методика определяется только после осмотра и исключения противопоказаний.
Углубиться в тему – http://kodirovanie-ot-alkogolizma-moskva9.ru/kodirovanie-ot-alkogolizma-na-domu-v-moskve/
В условиях круглосуточного наблюдения врачи могут внимательно следить за динамикой состояния, своевременно корректировать схемы лечения, проводить детоксикацию под контролем давления, пульса и работы сердца. Особенно это важно для пациентов с гипертонией, сердечно-сосудистыми заболеваниями, нарушениями ритма, заболеваниями печени, диабетом и другими хроническими патологиями. В стационаре проще организовать обследование, назначить сопутствующую терапию, вовремя заметить опасные симптомы и предотвратить серьёзные осложнения.
Подробнее – https://narkologicheskaya-klinika-lobnya11.ru/narkologicheskaya-klinika-otzyvy-v-lobne
вывод из запоя стационар краснодар vyvod-iz-zapoya-v-krasnodare-1.ru .
реабилитационный центр для наркозависимых реабилитационный центр для наркозависимых .
Комплекс перечисленных направлений формирует базу для выстраивания терапевтического процесса. При необходимости программа корректируется, что обеспечивает адаптацию к меняющимся условиям. Для удобства наблюдения используется таблица, отражающая основные параметры контроля.
Подробнее можно узнать тут – http://narkologicheskaya-klinika-vo-vladivostoke18.ru/
Родные — ключевой ресурс, если действовать согласованно. Мы обучаем базовым правилам: тише, темнее, теплее; вода и лёгкая еда «по часам»; никаких эмоциональных «разборов» в первые дни; заранее согласованные короткие сигналы для связи со специалистом. Важно отказаться от фраз «возьми себя в руки» и «а если ты сорвёшься?» — они усиливают тревогу и провоцируют сопротивление. Вместо этого — спокойные, конкретные договорённости на сегодня: во сколько отбой, как проходит вечер, когда и какие «буферы» использовать. Такой режим убирает хаос и снижает конфликтность, за счёт чего держится медицинский эффект, уменьшается количество «ночных качелей» и потребность в экстренных визитах. Когда у всех одна карта маршрута, путь к устойчивости становится короче и реалистичнее.
Углубиться в тему – https://vyvod-iz-zapoya-balashiha9.ru/
percentage in dubai for buying properties fido properties dubai dubai properties llc email addressreal estate companies in dubai international city
реабилитационный центр для наркозависимых vyvod-iz-zapoya-na-domu-samara-1.ru .
Stackshine https://en.stackshine.io simplifies SaaS spend management with full software visibility, renewal tracking, and employee offboarding automation. Reduce costs, eliminate unused tools, and gain control over subscriptions with a smarter, centralized platform.
вывод из запоя цена краснодар vyvod-iz-zapoya-v-krasnodare-4.ru .
реабилитация алкоголиков vyvod-iz-zapoya-na-domu-voronezh-2.ru .
Наркологическая помощь сегодня — это не просто экстренное вмешательство, но и полноценная система поддержки, охватывающая острые, хронические и пограничные состояния, вызванные употреблением алкоголя или наркотиков. В клинике «ВладЗдоровье» во Владимире специалисты обеспечивают высокопрофессиональную помощь в домашних условиях или в стационаре, с учётом потребностей конкретного пациента. Скорость реагирования, анонимность и современные терапевтические протоколы делают услугу максимально доступной и эффективной для жителей города и области.
Получить дополнительную информацию – вызов наркологической помощи владимир
они долго кормили завтраками с отправкой, а потом и вовсе закрылись… https://doma-i-dachi.ru магаз на уровне. сегодня выходной себе решил сделать бок мять до обеда собирался, а тут звонок из курьерки! люто настроение поднялосьи отдельный респект магазу за способ посылок=)))))
вывод из запоя на дому краснодар цены vyvod-iz-zapoya-v-krasnodare-2.ru .
нарколог вывод из запоя краснодар vyvod-iz-zapoya-v-krasnodare-3.ru .
вывод из запоя на дому vyvod-iz-zapoya-na-domu-voronezh.ru .
наркологический центр наркологический центр .
уничтожение тараканов травля тараканов
реабилитационный центр для наркозависимых реабилитационный центр для наркозависимых .
петербург экскурсии с гидом сайт экскурсии спб
2 month room for rent for husband and wife dubai https://english-lab.net/property-finder-sharjah.html property act dubaidubai propertis ras al khor
магазин на самом деле чёткий)начал с ним работать не пожалел!!!!!и качество и количество и скорость-всё на высоте!!! https://spss-soft.ru Вы это о чем? Тут все вроде как только легальными делами занимаемся? Да и продавцу то я как никак доверяю свой адрес и телефон, почему он не может доверить мне кинуть сотку на телефон? Это ни к одному делу не пришьешь, раз мы уже заговорили об этомочень нравится
наркологическая помощь наркологическая помощь .
Мы не подгоняем всех под единый сценарий. Если состояние устойчивое, нет упорной рвоты, высокой температуры, выраженной дезориентации и резких скачков давления и пульса — рационален домашний старт: приватно, быстрее и без лишних переездов. Врач приедет без маркировки, проведёт осмотр, запустит инфузионную терапию по показаниям, оставит письменные рекомендации и «красные флажки». Если же есть признаки угрозы осложнений — обезвоживание, аритмии, риск судорог, боли за грудиной или в животе, лихорадка, спутанность сознания, тяжёлая соматика — мы честно предлагаем короткую стационарную стабилизацию на 24–48 часов. Под круглосуточным наблюдением проще корректировать схемы, вовремя закрывать дефициты, защитить сон и быстрее вернуть управляемость поведению. В обоих форматах маршрут прозрачен: согласованные окна связи, фиксированные цели на ближайшие 72 часа и отсутствие «пакетов ради прайса». Благодаря этому решения принимаются спокойно, без угадываний и эмоциональных раскачек, которые обычно ломают прогресс и удорожают лечение.
Подробнее можно узнать тут – https://vyvod-iz-zapoya-balashiha9.ru/vyvod-iz-zapoya-na-domu-balashiha/
Каждое направление вносит свой вклад в общий результат и делает процесс лечения более надежным и комплексным.
Разобраться лучше – наркологические клиники алкоголизм
Каждый этап имеет важное значение и обеспечивает долгосрочный эффект от терапии.
Подробнее – лечение алкоголизма и наркомании центр тверь
Самостоятельные попытки «подлечиться» обычно сводятся к случайным комбинациям препаратов: кто-то пьёт горсть таблеток от давления и сердца, кто-то принимает успокоительные поверх алкоголя, кто-то заказывает непонятные средства «от тяги» в интернете. Такие эксперименты могут дать краткий эффект, но часто только маскируют симптомы и перегружают организм. В клинике лечение строится иначе: сначала оценивают состояние — физическое и психическое, затем подбирают безопасные схемы детоксикации и медикаментов, учитывая возраст, сопутствующие заболевания, длительность запоев и употребления. Это снижает риски осложнений и делает восстановление более управляемым: пациент и его семья видят прогресс и понимают, за счёт чего он происходит, а не живут в ожидании очередного непредсказуемого «отката».
Выяснить больше – наркологическая клиника отзывы
Ищете топ сервисов для раздевания по фото?
Планируете купить секционные ворота? Ознакомьтесь с выбором и ценами на ворота секционные цена.
Купив секционные ворота, вы обеспечите надежную защиту своего гаража.
Автоматизация делает эксплуатацию простой и безопасной.
Утепленные секционные ворота подходят для отапливаемых гаражей и складов.
Разнообразие цветовой гаммы и фактур позволяет гармонировать с архитектурой.
Инвестиции в премиум-класс окупаются за счет долговечности и меньшего обслуживания.
Производители и продавцы часто предлагают сезонные предложения и комплекты.
Специализированные бригады выполняют работы быстрее и с гарантией качества.
Запасные части оригинального производства гарантируют совместимость и надежность.
Опасность запоя в том, что каждый новый день употребления усиливает интоксикацию: растёт нагрузка на сердце и сосуды, печень перестаёт справляться с объёмом токсинов, мозг работает в режиме постоянного перегруза. Появляются угрозы инсульта, инфаркта, тяжёлых аритмий, судорог, психозов с галлюцинациями и агрессией. При этом сам зависимый чаще всего недооценивает риск: обещает «завтра точно прекратить», отказывается от врача, просит родных просто переждать и дать таблетку от головы. Но без грамотно подобранной терапии и контроля такое «перетерплю» может закончиться реанимацией. Поэтому, как только становится ясно, что человек не может самостоятельно прервать запой, разумное решение — обращаться за квалифицированной помощью по месту проживания.
Получить дополнительную информацию – вывод из запоя ивантеевка
Большинство семей приходят к мысли о лечении зависимости не сразу. Сначала всё выглядит как «случайные переборы по праздникам», потом алкоголь или наркотики становятся привычным способом снять стресс, забыться, пережить неудачи. Постепенно запои учащаются, человек пропадает на несколько дней, появляются долги, проблемы на работе, конфликты в семье. На этом этапе многим кажется, что обращаться в наркологическую клинику в Лобне ещё рано, что можно «взять себя в руки» и как-то остановиться. Но практика показывает обратное: чем дольше затягивается момент обращения к специалистам, тем тяжелее протекают запои, тем глубже страдает здоровье и тем сложнее вернуть человека к стабильной трезвости.
Углубиться в тему – http://narkologicheskaya-klinika-lobnya11.ru
Мы собрали для вас самые захватывающие факты из мира науки и истории. От малознакомых деталей до грандиозных событий — эта статья расширит ваш кругозор и подарит новое понимание того, как устроен наш мир.
Получить дополнительные сведения – https://www.healthtechdigital.com/events/digital-healthcare-show
rent apartments in dubai daily https://1wl.org/district-14.html 4 bedroom Apartments for rent in Bluewatersbuy luxury villa in dubai
Предлагаем вашему вниманию интересную справочную статью, в которой собраны ключевые моменты и нюансы по актуальным вопросам. Эта информация будет полезна как для профессионалов, так и для тех, кто только начинает изучать тему. Узнайте ответы на важные вопросы и расширьте свои знания!
Откройте для себя больше – https://ds-loop.com/hiit-the-beat%E4%BA%88%E7%B4%84%E5%88%B6%E3%81%AB
Сразу видно,что серьезный подход к клиенту! Ассортимент всегда радует,да и с качеством проблем ни разу не было. На все вопросы отвечают оперативно,а что касается консперации(к слову и раньше меня не огорчавшей)-высший уровень!Про бонусы,скидки и тесты даже говорить не нужно.В общем-дальнейшего процветания вам,по больше бы таких сайтов!!! Рекомендую всем-не пожалеете https://spss-soft.ru Частенько брал сдесь мини-опт по совместкам в 2013-2014году !А вообще, читай раздел рецепты, там все очень подробно расписано, в нескольких темах причем
Эта статья сочетает познавательный и занимательный контент, что делает ее идеальной для любителей глубоких исследований. Мы рассмотрим увлекательные аспекты различных тем и предоставим вам новые знания, которые могут оказаться полезными в будущем.
Узнайте всю правду – https://newsline.ph/hapilon-maute-dead-in-marawi
В этой статье представлен занимательный и актуальный контент, который заставит вас задуматься. Мы обсуждаем насущные вопросы и проблемы, а также освещаем истории, которые вдохновляют на действия и изменения. Узнайте, что стоит за событиями нашего времени!
Выяснить больше – https://cactomidia.com.br/20-bares-de-fortaleza-concorrem-ao-titulo-de-melhor-da-capital-na-23a-edicao-do-comida-di-buteco-conheca-os-participantes
Публикация предлагает читателю не просто информацию, а инструменты для анализа и саморазвития. Мы стимулируем критическое мышление, предлагая различные точки зрения и призывая к самостоятельному поиску решений.
Детальнее – https://wallpostjournal.com/developing-your-skills-in-cross-cultural-leadership
Эта информационная заметка содержит увлекательные сведения, которые могут вас удивить! Мы собрали интересные факты, которые сделают вашу жизнь ярче и полнее. Узнайте нечто новое о привычных аспектах повседневности и откройте для себя удивительный мир информации.
Получить дополнительные сведения – https://campinasferramentas.com.br/product/parafuso-auto-atarraxante
вывод из запоя цена краснодар vyvod-iz-zapoya-v-krasnodare-1.ru .
Современная дизайнерская мебель — идеальный выбор для тех, кто ценит стиль и качество: элитная дизайнерская мебель.
Подбор современных моделей определяет удобство и визуальное впечатление от комнаты.
Материалы и технологии играют ключевую роль в создании современных предметов. Благодаря новым технологиям мебель приобретает сложные формы и удобные механизмы.
Эргономика и многофункциональность становятся обязательными характеристиками. Учёт анатомии и комфорт при длительном использовании становится приоритетом дизайнеров.
Экологичность и устойчивое производство набирают популярность среди покупателей. Покупатели всё чаще выбирают мебель, произведенную с заботой об окружающей среде.
В этой информационной статье вы найдете интересное содержание, которое поможет вам расширить свои знания. Мы предлагаем увлекательный подход и уникальные взгляды на обсуждаемые темы, побуждая пользователей к активному мышлению и критическому анализу.
Ознакомиться с отчётом – https://prokishechnik.info/zabolevaniya
Этот информативный материал предлагает содержательную информацию по множеству задач и вопросов. Мы призываем вас исследовать различные идеи и факты, обобщая их для более глубокого понимания. Наша цель — сделать обучение доступным и увлекательным.
Прочесть заключение эксперта – https://accelerate360canada.com/merchandising/targetlogofortng
наркологическая клиника наркологическая клиника .
В этой статье собраны факты, которые освещают целый ряд важных вопросов. Мы стремимся предложить читателям четкую, достоверную информацию, которая поможет сформировать собственное мнение и лучше понять сложные аспекты рассматриваемой темы.
Желаете узнать подробности? – https://www.golfduhavre.com/2021/07/06/3eme-div-mid-amateurs-dames
Эта статья предлагает живое освещение актуальной темы с множеством интересных фактов. Мы рассмотрим ключевые моменты, которые делают данную тему важной и актуальной. Подготовьтесь к насыщенному путешествию по неизвестным аспектам и узнайте больше о значимых событиях.
Не упусти шанс – https://bonairetakeaway.nl/places/zens-bar-cafe
В статье представлены ключевые моменты по актуальной теме, дополненные советами экспертов и ссылками на дополнительные ресурсы. Цель материала — дать читателю инструменты для самостоятельного развития и принятия осознанных решений.
Читать далее > – https://baddiehubk.com/how-modern-law-firm-websites
вывод из запоя анонимно краснодар вывод из запоя анонимно краснодар .
сайт для скачивания видео с ютуба skachat-video-s-youtube-1.ru .
Эта статья погружает вас в увлекательный мир знаний, где каждый факт становится открытием. Мы расскажем о ключевых исторических поворотных моментах и научных прорывах, которые изменили ход цивилизации. Поймите, как прошлое формирует настоящее и как его уроки могут помочь нам строить будущее.
Подробнее – https://penangfoodie.com/penang-food
Эта статья погружает вас в увлекательный мир знаний, где каждый факт становится открытием. Мы расскажем о ключевых исторических поворотных моментах и научных прорывах, которые изменили ход цивилизации. Поймите, как прошлое формирует настоящее и как его уроки могут помочь нам строить будущее.
Давай разберёмся досконально – https://abbey2023spain.opened.ca/2023/03/29/packing-list/2
наркологический стационар vyvod-iz-zapoya-na-domu-samara-1.ru .
Профессиональная: оклейка полиуретановой пленкой автомобиля – сохраните родное лакокрасочное покрытие в идеальном состоянии на долгие годы.
Этот обзор предлагает структурированное изложение информации по актуальным вопросам. Материал подан так, чтобы даже новичок мог быстро освоиться в теме и начать использовать полученные знания в практике.
Смотрите также – https://campo-betting.com/vip-combo-ticket-1×2
недорогие цветы в москве купить http://cveti-nederogo.ru/ .
office properties for lease https://offices-rent-nyc.com
вывод из запоя цена вывод из запоя цена .
наркологический центр наркологический центр .
наркологическая помощь наркологическая помощь .
i bedroom apartment for rent in dubai https://kienthuctrade.net/map3.html water view real estate l.l.c dubaiinspire real estate dubai
вывод из запоя в стационаре вывод из запоя в стационаре .
капельница от запоя vyvod-iz-zapoya-na-domu-voronezh.ru .
вывод из запоя на дому в краснодаре вывод из запоя на дому в краснодаре .
Отзывы вроде неплохие купить кокаин, купить мефедрон, купить гашиш, купить бошки Хотя, я им давно говорил что надо ещё одного человека на работу с клиентами…Получил посылочку общее время ожидания 4 дня,упаковка супер,качество просто космическое,спасибо магазину!
Эта статья сочетает познавательный и занимательный контент, что делает ее идеальной для любителей глубоких исследований. Мы рассмотрим увлекательные аспекты различных тем и предоставим вам новые знания, которые могут оказаться полезными в будущем.
Переходите по ссылке ниже – https://www.abonosycompost.com/abono-casero-para-azaleas
Эта информационная статья содержит полезные факты, советы и рекомендации, которые помогут вам быть в курсе последних тенденций и изменений в выбранной области. Материал составлен так, чтобы быть полезным и понятным каждому.
Узнать напрямую – https://market.egoforum.com/aut-odit-aut-fugit-sed
В этой статье представлен занимательный и актуальный контент, который заставит вас задуматься. Мы обсуждаем насущные вопросы и проблемы, а также освещаем истории, которые вдохновляют на действия и изменения. Узнайте, что стоит за событиями нашего времени!
Узнать из первых рук – https://top-online-casinos.in/laws
Этот текст призван помочь читателю расширить кругозор и получить практические знания. Мы используем простой язык, наглядные примеры и структурированное изложение, чтобы сделать обучение максимально эффективным и увлекательным.
Подробная информация доступна по запросу – https://tours-nord.bistro-regent.fr/menu/cognac-calvados-armagnac-manzana
Эта статья сочетает в себе как полезные, так и интересные сведения, которые обогатят ваше понимание насущных тем. Мы предлагаем практические советы и рекомендации, которые легко внедрить в повседневную жизнь. Узнайте, как улучшить свои навыки и обогатить свой опыт с помощью простых, но эффективных решений.
Все материалы собраны здесь – https://icc-ccs.org/corporate-fair-trade-community
В этом интересном тексте собраны обширные сведения, которые помогут вам понять различные аспекты обсуждаемой темы. Мы разбираем детали и факты, делая акцент на важности каждого элемента. Не упустите возможность расширить свои знания и взглянуть на мир по-новому!
Открой скрытое – https://hindi.theceo.in/business/end-your-startup-queries
реабилитационный центр для наркозависимых vyvod-iz-zapoya-na-domu-voronezh-1.ru .
«Трезвый Маяк» — клиника экстренной и плановой наркологической помощи с круглосуточным выездом и возможностью госпитализации. Мы аккуратно стабилизируем состояние, снимаем интоксикацию и абстиненцию, готовим к кодированию и сопровождаем пациента до устойчивой ремиссии. Работаем анонимно: врач приезжает без опознавательных знаков, документы оформляются в нейтральной формулировке и только по запросу.
Детальнее – http://narkologicheskaya-klinika-sergiev-posad8.ru/anonimnaya-narkologicheskaya-klinika-v-sergievom-posade/
long term stay https://satishpatel.net/recruitment-companies-property-sales-dubai.html Al Bateen Residencesapartments in dubai with water view
Сочетание методов подбирается индивидуально, чтобы охватить соматические, психологические и социальные компоненты зависимости. Ниже приведены основные направления, используемые в клинической практике.
Подробнее тут – наркологическая клиника вывод из запоя луганск
Не стоит сомневатся в этом магазе он ровный и проверенный времен! Всегда на высоте! https://dk3d.ru Бро это ты о чём?Поясни ,мне интересно..всё как всегда быстро ,чётко ,без всякой канители ,качество как всегда радует ,спасибо команде за работу,ВЫ ЛУЧШИЕ!!!!!!
Лечение алкоголизма в Донецке проводится с использованием современных медицинских и психотерапевтических методик. Такой подход помогает пациентам избавиться от физической и психологической зависимости, восстановить здоровье и вернуться к полноценной жизни. Основой успешной терапии является индивидуальная программа, которая формируется с учётом состояния пациента и стадии заболевания.
Детальнее – лечение наркомании и алкоголизма в донце
лечение наркомании лечение наркомании .
Чтобы исключить суету и «гонку дозировок», острый отрезок мы делим на короткие окна с ясной целью и чёткими критериями перехода. Если отклика нет, корректируется один элемент и тут же назначается новая точка оценки. Прозрачность плана снижает эмоциональный фон и повышает доверие к процессу.
Подробнее можно узнать тут – https://narkologicheskaya-klinika-saratov0.ru/klinika-narkologii-saratov
смотреть порно русское порно
В «МедЛинии Ставрополь» домашний протокол — это последовательность действий, выверенная до минут. Таблица ниже поможет понять, как именно строится визит и какие результаты фиксируются по итогам.
Исследовать вопрос подробнее – вызов врача нарколога на дом ставрополь
скачать видео с youtube skachat-video-s-youtube-3.ru .
Пять лет Оливер Куин числился мёртвым, а когда вернулся в Старлинг-Сити, за его маской беззаботного наследника скрывался закалённый боец, переживший настоящий ад на необитаемом острове. Днём — наследник корпорации, ночью — мститель с луком, уничтожающий коррупцию по списку отца. Ищете сериал стрела? На strela-smotret.net доступны все 170 серий восьми сезонов с озвучкой LostFilm и TVShows. Сериал соединяет экшен, драму и супергеройский жанр в единое повествование о высокой цене справедливости и непростом выборе между жаждой мести и сохранением человечности.
Лечение зависимости проходит поэтапно. Такая последовательность обеспечивает постепенное восстановление и закрепление полученных результатов.
Подробнее тут – http://www.domen.ru
реабилитация наркоманов vyvod-iz-zapoya-na-domu-voronezh-2.ru .
В наркологической клинике в Донецке применяются современные и доказательные методики. Они безопасны, эффективны и соответствуют международным медицинским стандартам.
Получить дополнительную информацию – https://narkologicheskaya-klinika-doneczk0.ru/narkologiya-doneczk-dnr/
Давай номер заказа, не обоснованные заявления, в личку пришло сообщения что ты разводила…. https://disain-proect.ru тс удачи в работеCHM-500 и CHM-1000
Six Towers development information system dubai Apartments for rent in RP Heightsdubai agreement of property sale
Медицина выравнивает физиологию, а устойчивость формируют привычки. Мы вместе составляем карту триггеров: вечерние «тёмные часы», задержки без еды, конфликты, недосып, привычные маршруты с «точками соблазна». На каждый триггер есть «буфер» на 20–40 минут: тёплый душ, короткая прогулка рядом с домом, лёгкая еда по расписанию, дыхательная практика, созвон с «своим» человеком. Отдельный акцент — на ночной сон: затемнение, ранний отбой, минимум экранов, отсутствие эмоциональных разговоров после ужина. Врач объясняет, как распределять воду порциями и зачем планировать дневную «паузу», чтобы не сорваться вечером. Когда поведение предсказуемо, снижается импульсивность и количество «проверок себя», а значит — меньше внеплановых визитов и «дорогих» откатов. Именно дисциплина быта укрепляет результат инфузий: организм получает стабильные условия, и терапия работает не в «рывках», а ровно.
Изучить вопрос глубже – наркологическая клиника сайт
вывод из запоя краснодар на дому анонимно вывод из запоя краснодар на дому анонимно .
как заработать на криптовалюте с нуля Какие криптоигры приносят реальный доход? Где искать свежие аирдропы? Как майнить на телефоне и выводить сатоши? На все эти вопросы отвечает Smart Money Crypto. Канал для тех, кто хочет разобраться в крипте без лишней воды. Подпишитесь и получите доступ к проверенным стратегиям заработка!
наркологическая клиника наркологическая клиника .
Планируете купить секционные ворота? Ознакомьтесь с выбором и ценами на ворота гаражные подъемные секционные.
Правильный выбор ворот гарантирует длительную службу и минимальные затраты на обслуживание.
Современные приводы обеспечивают плавный ход и множество режимов управления.
Подбор уплотнителей и панелей важен для эффективности термоизоляции.
Фасадные решения включают имитацию дерева, металла и однотонные покрытия.
Экономичные варианты часто предлагают хорошее соотношение цены и качества.
Участие в акциях может включать бесплатную доставку или установку.
Монтаж секционных ворот требует профессиональных навыков и инструментов.
В случае поломки лучше обращаться в авторизованный сервисный центр.
лечение наркомании vyvod-iz-zapoya-na-domu-samara-1.ru .
«НоваМед Центр» строит лечение как управляемую последовательность шагов, а не набор эпизодических процедур. На входе мы фиксируем исходные риски: длительность употребления, сопутствующие заболевания, принимаемые лекарства, анамнез кодирований и срывов, показатели давления, пульса, сатурации, уровень сна и тревоги. Это позволяет выбрать безопасную точку входа и задать логичную траекторию: от детокса к стабилизации, затем к поведенческим изменениям и поддержанию ремиссии. Такая структура особенно важна при высокой нагрузке и дефиците времени: когда пациент и семья понимают, что будет через час, сутки и неделю, снижается тревога и исчезают импульсивные «проверки себя», из-за которых обычно рушатся результаты. Мы придерживаемся принципа клинической достаточности: только те вмешательства, которые нужны по состоянию сегодня, без «украшений ради прайса». Чёткие правила на 48–72 часа, согласованные окна связи, понятные «красные флажки» для повторного контакта превращают лечение в прогнозируемый маршрут, а не в череду надежд и разочарований. В итоге человек быстрее возвращает контроль над самочувствием, а близкие получают опору вместо бесконечных ночных «дежурств».
Ознакомиться с деталями – luchshaya-narkologicheskaya-klinika-v-moskve-otzyvy
наркологический стационар vyvod-iz-zapoya-na-domu-samara.ru .
вывод из запоя стационар краснодар vyvod-iz-zapoya-v-krasnodare-2.ru .
алкоголизм вывод из запоя краснодар vyvod-iz-zapoya-v-krasnodare-1.ru .
вывод из запоя круглосуточно краснодар на дому вывод из запоя круглосуточно краснодар на дому .
Часто предприниматели объединяют понятия тендер и госзакупки, так как обе процедуры связаны с конкурсным выбором поставщика. Однако между ними существуют определённые различия, которые важно понимать перед началом работы в этой сфере.
Все ответы на ваши вопросы – тендерное сопровождение заказчиков
Тактика подбирается индивидуально и зависит от тяжести состояния, сопутствующих заболеваний и переносимости препаратов. Ниже представлены базовые компоненты, которые часто включаются в схемы лечения при запойных состояниях.
Разобраться лучше – http://vyvod-iz-zapoya-doneczk0.ru/vyvedenie-iz-zapoya-dnr/
кайт серфинг обучение
реабилитационный центр для наркозависимых реабилитационный центр для наркозависимых .
«Декстер» — американский триллер 2006 года о судебном эксперте полиции Майами, который ночью превращается в хладнокровного серийного убийцу, устраняющего преступников, избежавших правосудия. Ищете декстер смотреть онлайн? Все 96 серий восьми сезонов доступны на dekster-smotret.online с профессиональной озвучкой от LostFilm и других студий. Сериал искусно балансирует между криминальной драмой и психологическим триллером — внутренние монологи Декстера погружают зрителя в разум человека без эмпатии, живущего в вечном страхе разоблачения.
Специалисты нашего центра обладают опытом работы с различными зависимостями, начиная от алкоголизма и заканчивая игроманией. Мы понимаем, что поддержка семьи также играет важную роль в процессе лечения, поэтому включаем близких в терапевтические мероприятия. Поддержка родных помогает пациентам не только преодолеть трудные моменты, но и справиться с эмоциональными переживаниями.
Ознакомиться с деталями – наркология вывод из запоя в смоленске
вывод из запоя на дому vyvod-iz-zapoya-na-domu-voronezh.ru .
то-же самое могу сказать! купить кокаин, купить мефедрон, купить гашиш, купить бошки Спасибо за терпение, понимание и позитивный настройМало того дешёвый, он и отправляет маленький вес. Это гуд. Остальные почти все работают от 50 гр…
2 bedroom for rent near me https://cursogratuitoonline.org/what-is-the-process-of-buying-a-property-in-dubai.html hotel apartment in dubai for visitorshuaxia real estate dubai
«Офис» — знаковый американский комедийный сериал 2005 года, снятый в манере мокьюментари о повседневной жизни провинциальной бумажной компании. Дрожащая камера и прямые взгляды героев в объектив создают эффект полного погружения в офисную рутину, за которой скрываются настоящие страсти и абсурдные ситуации. Ищете офис все серии? Все 188 серий доступны на ofis-smotret.online с несколькими вариантами озвучки. Самодовольный начальник, саркастичный коллега, мечтательная секретарша и дисциплинированный карьерист — за комичными масками скрываются настоящие характеры с реальными слабостями. Именно это сделало сериал мировой классикой жанра.
Когда запой угрожает здоровью и жизни, оперативное вмешательство становится критически важным. В Донецке ДНР опытные специалисты по наркологии оказывают профессиональную помощь на дому, обеспечивая качественную детоксикацию организма, стабилизацию жизненно важных функций и психологическую поддержку. Такой формат лечения позволяет пациенту получить комплексную терапию в условиях комфорта, сохраняя полную конфиденциальность и избегая лишних формальностей.
Узнать больше – вывод из запоя анонимно
Лечение зависимости проходит поэтапно. Такая последовательность обеспечивает постепенное восстановление и закрепление полученных результатов.
Узнать больше – https://narkologicheskaya-klinika-doneczk0.ru/doneczk-narkologicheskij-dispanser
Такая структура делает процесс предсказуемым и результативным, а также помогает закрепить достигнутые улучшения.
Изучить вопрос глубже – наркологическая клиника нарколог в донце
букет на дом недорого https://cveti-nederogo.ru/ .
После стабилизации состояния назначаются препараты, укрепляющие печень, сердце и нервную систему. Обязателен контроль за самочувствием пациента в течение суток и более.
Получить больше информации – платная наркологическая клиника
Стационар мы предлагаем, когда дома нет условий для ночного наблюдения, симптомы тяжёлые или прогноз нестабилен. В палате — контролируемая среда, возможность оперативно выполнить ЭКГ и базовые анализы по показаниям, круглосуточный пост. Команда корректирует схему лечения в реальном времени, не теряя часы на логистику. Это особенно важно при давних запоях, риске делирия, выраженных колебаниях давления, сахарном диабете, ИБС, заболеваниях ЖКТ.
Получить больше информации – https://vyvod-iz-zapoya-sergiev-posad8.ru/srochnyj-vyvod-iz-zapoya-v-sergievom-posade/
Клубный отель «Над Морем» — уединённое место для отдыха в Джубге Краснодарского края, расположенное на вершине горы среди соснового леса с панорамным видом на Черное море. Уютные современные домики естественно вписываются в природный ландшафт и сохраняют полную приватность отдыхающих. С террас гости наслаждаются живописными морскими закатами и величественными горными видами. Ищете отель море краснодар? Подробности размещения и бронирование доступны на nad-morem.ru — отличный выбор для романтического, семейного или уединённого отдыха в горах у моря круглый год.
регистрация в fenix casino
Искал рабочий вход потому что основной сайт не грузился, нашел этот вариант и решил протестить. Сначала были сомнения если честно, но после перехода стало понятно что ссылка ведет куда надо. Сейчас иногда захожу через него, пока проблем не замечал
Метод и срок подбираются после очного осмотра и исключения противопоказаний. Возможны медикаментозные и психотерапевтические подходы, а также комбинированные программы. Мы объясняем плюсы и ограничения каждого метода, помогаем подготовиться (диета, анализы, отмена определённых препаратов), а затем сопровождаем пациента в период адаптации к трезвости. Кодирование — часть комплексного плана, а не «волшебная кнопка»: устойчивый результат достигается, когда его дополняют поддерживающая терапия и работа с триггерами.
Получить дополнительную информацию – anonimnaya-narkologicheskaya-klinika
лкп москва — профессионально и быстро устраним любые повреждения лакокрасочного покрытия вашего автомобиля, вернув ему безупречный вид.
Удаление ржавчины и качественная подготовка поверхности необходимы для прочного и долговечного ремонта, поэтому этим этапам уделяют пристальное внимание.
Стоит рассмотреть выбор материалов и инструментов: шпатлевки, грунтовка, шлифовальные бруски и краскопульт. От качества выбранных материалов зависит внешний вид и срок службы отреставрированного участка, поэтому лучше не скупиться.
Технология выполнения ремонта включает этапы заполнения, шлифовки, грунтовки и покраски с последующим лакированием. Полировка после лакирования помогает устранить мелкие погрешности и добиться ровного глянца, как у оригинального покрытия.
Завершающая часть включает проверку качества и советы по уходу, чтобы ремонт служил дольше. Завершающая часть включает проверку качества и советы по уходу, чтобы ремонт служил дольше.
скачать видео с ютуба на смартфон skachat-video-s-youtube-1.ru .
Современная дизайнерская мебель — идеальный выбор для тех, кто ценит стиль и качество: дизайнерская мебель на заказ москва.
Подбор современных моделей определяет удобство и визуальное впечатление от комнаты.
Материалы и технологии играют ключевую роль в создании современных предметов. Благодаря новым технологиям мебель приобретает сложные формы и удобные механизмы.
Эргономика и многофункциональность становятся обязательными характеристиками. Комфортная посадка и поддержка спины учитываются при проектировании современных кресел и диванов.
Экологичность и устойчивое производство набирают популярность среди покупателей. Покупка надежных дизайнерских предметов мебели оправдывается их практичностью и внешней привлекательностью.
наркологическая клиника наркологическая клиника .
При поступлении вызова нарколог незамедлительно выезжает на дом для проведения первичного осмотра. Специалист собирает анамнез, измеряет жизненно важные показатели – пульс, артериальное давление и температуру – и оценивает степень алкогольной интоксикации. Точная диагностика становится основой для составления индивидуального плана терапии, адаптированного под конкретное состояние пациента.
Ознакомиться с деталями – https://reabcentr-narko.ru/vyvod-iz-zapoya-tver-staczionar
Разве имеет принципиальное значение сколько моему аккаунту времени? Я тут не *зависаю*, а пишу по сути. Мутность заключается в том что оператор в аське на вопросы по уточнению адреса, сначала молчал почти 3 часа, потом вообще оффнулся. купить кокаин, купить мефедрон, купить гашиш, купить бошки Быстрая доставка , и высочайшее качество обслуживания! Думаю и сейчас ничего не изменилось.пт всем.скоростя здесь имеются?
Ядерная война уничтожила цивилизацию, уцелевшие веками прятались в космосе, и теперь сто юных преступников летят на Землю — проверить, можно ли вернуться. Без взрослых, без закона и без пути назад — каждый день становится испытанием на прочность. Земля оказывается живой и смертоносной одновременно: дикая природа, заражённые зоны и чужие люди, не готовые делиться территорией. Ищете сотня смотреть онлайн? На sotnya-smotret.online доступны все 100 серий семи сезонов с озвучкой LostFilm AlexFilm и Кравец. Пока подростки на планете создают свои законы кровью и ошибками, орбитальная станция задыхается от интриг и нехватки воздуха — два мира, одна общая судьба.
apartments in greens dubai for rent Best Dubai areas near metro & public transport (walkable, connected & convenient) Villas for rent in The Springsshorooq dubai properties
Программы лечения формируются с учётом состояния организма и индивидуальных потребностей пациента. Это обеспечивает эффективность и снижает вероятность рецидива.
Узнать больше – лечение в наркологической клинике в донце
https://kwork.ru/user/artemseomaster
Каждый из наших врачей не только специалист, но и психолог, способный понять переживания пациента, создать атмосферу доверия. Мы применяем индивидуальный подход, позволяя каждому пациенту чувствовать себя комфортно. Наши наркологи проводят тщательную диагностику, разрабатывают планы лечения, основываясь на данных обследования, психологическом состоянии и других факторах. Основное внимание уделяется снижению абстиненции, лечению сопутствующих заболеваний, коррекции психоэмоционального состояния.
Исследовать вопрос подробнее – нарколог вывод из запоя
Когда речь идёт о промышленных поставках металлопроката, цена ошибки поставщика измеряется простоями и миллионными убытками, поэтому выбор надёжного партнёра — это не вопрос удобства, а вопрос репутации. Компания «Трубпром» работает на рынке с 2005 года и за два десятилетия заслужила доверие строителей, нефтяников и машиностроителей по всей России. На сайте https://www.trub-prom.com/ представлен исчерпывающий каталог стальных труб — бесшовные горячедеформированные по ГОСТ 8732-78, электросварные прямошовные, котельные, магистральные и трубы большого диаметра из сталей 09Г2С, 17Г1С, 20, 40Х и десятков других марок. Продажа ведётся по оптовым ценам напрямую с производства, доставка охватывает все регионы страны. Здесь найдут решение задачи любого масштаба.
наркологическая клиника наркологическая клиника .
Коммерческий и государственный тендер — это конкурентная процедура выбора поставщика товаров или оказания услуг. Заказчик размещает требования, а компании подают заявки и участвуют в торгах.
Разгадайте все загадки – https://tendernoe-soprovozhdenie-rostov-na-donu.ru
Проблема зависимостей остаётся актуальной в обществе. С каждым годом количество людей, страдающих от алкоголизма, наркомании и других зависимостей, растёт. Эти расстройства негативно влияют на качество жизни как самих пациентов, так и их близких. Зависимость — это не только физическое состояние, но и глубокая психологическая проблема. Для эффективного лечения необходимо обратиться к профессионалам, которые помогут справиться с этой болезнью. Наркологическая клиника “Клиника Наркологии и Психотерапии” предоставляет всеобъемлющую помощь, направленную на восстановление здоровья и нормализацию жизни пациентов.
Исследовать вопрос подробнее – вывод из запоя вызов на дом смоленск
Программы лечения формируются с учётом состояния организма и индивидуальных потребностей пациента. Это обеспечивает эффективность и снижает вероятность рецидива.
Разобраться лучше – наркологические клиники алкоголизм в донце
Тендерный специалист помогает разобраться в особенностях каждого закона, а также обеспечивает грамотное сопровождение всех процедур. Это особенно важно для компаний, которые только начинают участвовать в торгах и не имеют опыта работы с государственными контрактами.
Полная картина — внутри – участие в тендерах госзакупок
В наркологической клинике в Донецке применяются современные и доказательные методики. Они безопасны, эффективны и соответствуют международным медицинским стандартам.
Подробнее – наркологическая клиника стационар
Первым шагом является детоксикация организма от токсинов, накопившихся вследствие длительного злоупотребления алкоголем. Врач назначает внутривенные капельницы и препараты, способствующие быстрому выведению алкоголя и стабилизации работы внутренних органов. Такой метод позволяет значительно снизить риск осложнений и ускорить процесс восстановления.
Исследовать вопрос подробнее – частный нарколог на дом иркутск
Может не по теме,но всё ж поделюсб опытом чем хорош СПСР.При заказе на сайте ты вбиваешь адрес доставки, когда посыль уже в городе и звонит курьер назначаю ему встречу не по адресу они без проблем едут.А дальше уже ваша фантазия куда вызвать курьера в лес или наоборот в людное место-этоим можно лишний раз обезопасить себя от https://murmansk-mebel.ru раньше вообще все говорили то что не растворяется это бутор а щас как я понимаю это в порядке вещейлучше ))
Для жителей Ростова-на-Дону клиника работает по схеме «тихих маршрутов»: отдельный вход с нейтральной табличкой, окна записи в невызывающие подозрений часы, немаркированный подъезд автомобиля при выездном визите. На первом звонке диспетчер собирает только то, что влияет на безопасность: эпизоды рвоты, ЧСС/АД, ночные панические эпизоды, сопутствующие препараты, аллергии, наличие хронических заболеваний сердца. Личные и социальные детали не запрашиваются — мы придерживаемся принципа «минимально необходимой информации». По прибытии врача фиксируются базовая линия (сознание, дыхание, SpO?, температура), шкалы симптомов и переносимость небольших объёмов воды. Дальше — один точный шаг, одно «окно проверки» и прозрачное решение: продолжать модуль, модифицировать одну переменную или выключить блок.
Углубиться в тему – https://narkologicheskaya-clinika-v-rostove-na-donu16.ru/narkologiya-rostov-kruglosutochno/
holiday homes uae https://mauthietkenhadep.net/hotel-and-apartments-in-bur-dubai.html villa k88-wildflower jumeirah golf estates dubai uae dBelair Damac Hills – By Trump Estates
«Одни из нас» — экранизация легендарной игры The Last of Us и один из лучших постапокалиптических сериалов современности. Смертоносная грибковая пандемия стёрла привычный мир: на месте городов — руины, вместо общества — разрозненные группировки выживших. Циничный и сломленный Джоэл берётся сопроводить Элли — юную девушку, иммунную к заразе и способную изменить судьбу остатков человечества. Ищете сериал одни из нас? Odni-iz-nas-kinogo.online — все 17 серий двух сезонов в профессиональной озвучке без регистрации. Под оболочкой боевика — пронзительная драма о том, как двое чужих людей становятся друг для друга семьёй посреди конца света.
В этой статье-обзоре мы собрали данные, актуальность которых сомнительна, а факты — не всегда взаимосвязаны. Читатель сможет ознакомиться с разными мнениями, хотя вряд ли они существенно повлияют на его понимание темы.
Вот – программирования
наркологическая помощь наркологическая помощь .
Накрутка поведенческих факторов позволяет увеличить количество взаимодействий на сайте. Это может способствовать улучшению видимости ресурса в поисковой выдаче. Подробнее по ссылке: накрутка счетчиков сайт
Маршрутизация фиксируется в индивидуальном плане: место оказания помощи (амбулаторно, дневной стационар, круглосуточный стационар), контрольные точки и критерии эффективности. Такой подход позволяет оперативно корректировать тактику, если динамика замедляется или появляются новые клинические данные. Пациент получает чёткое понимание этапов терапии, сроков и ожидаемых результатов, а также способов связи с командой в случае изменений самочувствия.
Получить больше информации – вывод наркологическая клиника в луганске
Первая ровная ночь — переломный момент. Мы настраиваем гигиену: затемнение, прохладная комната, фиксированное время отбоя, отсутствие ярких экранов и эмоциональных разговоров. При показаниях добавляем мягкую седативную поддержку в дозах, которые стабилизируют, а не «выключают». Утром — короткий контроль, подстройка дозировок и план активности «по силам», чтобы не сорваться к вечеру от усталости. Такой контур снижает импульсивность, убирает панические волны и делает эффект капельницы долгим.
Изучить вопрос глубже – https://kapelnica-ot-zapoya-podolsk9.ru/
Когда запой угрожает здоровью и жизни, оперативное вмешательство становится критически важным. В Донецке ДНР опытные специалисты по наркологии оказывают профессиональную помощь на дому, обеспечивая качественную детоксикацию организма, стабилизацию жизненно важных функций и психологическую поддержку. Такой формат лечения позволяет пациенту получить комплексную терапию в условиях комфорта, сохраняя полную конфиденциальность и избегая лишних формальностей.
Получить дополнительную информацию – вывод из запоя на дому донецкая область
После стабилизации состояния назначаются препараты, укрепляющие печень, сердце и нервную систему. Обязателен контроль за самочувствием пациента в течение суток и более.
Изучить вопрос глубже – https://narkologicheskaya-klinika-voronezh9.ru/